


Front Cover
1
WARNING: READ BEFORE USING YOUR PLAYSTATION®2
COMPUTER ENTERTAINMENT SYSTEM.
A very small percentage of individuals may experience epileptic seizures
when exposed to certain light patterns or flashing lights. Exposure to certain
patterns or backgrounds on a television screen or while playing video
games, including games played on the PlayStation 2 console, may induce
an epileptic seizure in these individuals. Certain conditions may induce
previously undetected epileptic symptoms even in persons who have no
history of prior seizures or epilepsy. If you, or anyone in your family, has an
epileptic condition, consult your physician prior to playing. If you experience
any of the following symptoms while playing a video game – dizziness,
altered vision, eye or muscle twitches, loss of awareness, disorientation,
any involuntary movement, or convulsions – IMMEDIATELY discontinue use
and consult your physician before resuming play.
WARNING TO OWNERS OF PROJECTION TELEVISIONS:
Do not connect your PlayStation 2 console to a projection TV without first
consulting the user manual for your projection TV, unless it is of the LCD
type. Otherwise, it may permanently damage your TV screen.
USE OF UNAUTHORIZED PRODUCT:
The use of software or peripherials not authorized by Sony Computer
Entertainment America may damage your console and/or invalidate your
warranty. Only official or licensed peripherals should be used in the
controller ports or memory card slots.
HANDLING YOUR PLAYSTATION 2 FORMAT DISC:
• This disc is intended for use only with PlayStation 2 consoles
with the NTSC U/C designation.
• Do not bend it, crush it or submerge it in liquids.
• Do not leave it in direct sunlight or near a radiator or other source of heat.
• Be sure to take an occasional rest break during extended play.
• Keep this compact disc clean. Always hold the disc by the edges and
keep it in its protective case when not in use. Clean the disc with a lint free, soft, dry cloth, wiping in straight lines from center to outer edge.
Never use solvents or abrasive cleaners.
GETTING STARTED . . . . . . . . . . . . . 2
CONTROLLER . . . . . . . . . . . . . . . . . 3
GAME START . . . . . . . . . . . . . . . . . . 5
MAIN MENU . . . . . . . . . . . . . . . . . . . 7
HEADS UP DISPLAY . . . . . . . . . . . . 8
BASIC OPERATION . . . . . . . . . . . . .13
SCRAMBLE . . . . . . . . . . . . . . . . . . . .19
ARCADE MODE . . . . . . . . . . . . . . . .22
TRAINING . . . . . . . . . . . . . . . . . . . . . 23
AERO MEET 2002 . . . . . . . . . . . . . .27
FREE FLIGHT . . . . . . . . . . . . . . . . . .29
VS BATTLE . . . . . . . . . . . . . . . . . . . . 32
SUB MENU . . . . . . . . . . . . . . . . . . . .34
FAQ . . . . . . . . . . . . . . . . . . . . . . . . . .41
APPENDIX . . . . . . . . . . . . . . . . . . . .43
CONTENTS
CONTENTS
Thank you for purchasing AERO ELITE™. Please note that this software is
designed only for use with the PlayStation®2 computer entertainment system. Be
sure to read this instruction manual thoroughly before you start playing AERO
ELITE™. Also note that this instruction manual cannot be re-issued, therefore
please keep it in a safe place.
2
GETTING STARTED
3
CONTROLLER
Set up your PlayStation®2 computer entertainment system according to
the instructions in its Instruction Manual. Make sure the MAIN POWER
switch (located on the back of the console) is turned on. Press the RESET
button. When the power indicator lights up, press the open button and the
disc tray will open. Place the AERO ELITE™ disc on the disc tray with the
label side facing up. Press the open button again and the disc tray will
close. Attach game controllers and other peripherals, as appropriate.
Follow on-screen instructions and refer to this manual for information on
using the software.
This game can be played by 1 or 2 players using the DUALSHOCK®2
analog controller. In 2 player VS BATTLE mode, connect the controller to
controller port 1 first. The key assignments for the DUALSHOCK®2 analog
controller can be configured from OPTIONS:KEY CONFIG (see p.38). All
explanations assume default configuration.
MEMORY CARD slot 1
MEMORY CARD slot 2
USB connector
S400 i.LINK connector
controller port 1
controller port 2
disc tray
RESET button
(OPEN) button
button
button
button
button
directional
buttons
left analog stick
(L3 button
when pushed down)
SELECT button
ANALOG mode button
START button
right analog stick
(R3 button
when pushed down)
L2 button
L1 button
R2 button
R1 button
Directional buttons : Select menu item
A button : Enter Selection
S button : Enter Selection
D button : Cancel
F button : Skip
START : Start/Enter Selection
SELECT : Not used
AERO ELITE™ supports MEMORY CARD slots 1 and 2. Refer to p.6 in
this manual for details on loading and saving games. Insertion or removal
of the memory card (8MB) (for PlayStation®2) after switching on the
console may cause data to be overwritten or lost. At least 81KB or more of
free space is required to save game data in this game.
Memory Card (8MB) (for PlayStation®2)
DUALSHOCK®2 Analog Controller Configurations
Menu Controls
5
GAME START
There are two difficulty levels you can select
when you begin this game. Each difficulty level
is comprised of a number of settings that can
later be customized in OPTIONS (see p.36).
The difficulty levels are as follows.
Difficulty Settings
STANDARD
ADVANCED
Flight mode that emphasizes piloting. Allows flight
without stalls or G force effects. Ideal for beginners.
Flight mode with an emphasis on realism. Enables
players to maximize aircraft engine functions. Suited for
higher level players.
4
CONTROLLER
Directional buttons C : Airbrakes
V : Landing Gear
Z : Landing Gear Brake
A button : Throttle Up
S button : Throttle Down
D button : Fire Weapon/Take Photograph/Fuel Dump
F button : Pilot View/Select Target
Q button : Rudder Left
E button : Rudder Right
W button : Select Weapon
R button : Issue Command to Wingman
Left analog stick C : Lower nose (descend)
V : Raise nose (climb)
ZX : Left/Right Roll
Right analog stick : Adjust View
START button : Pause Menu
SELECT button : Switch View
When difficulty is set to STANDARD, Weapon Select and Landing Gear
Brake functions are performed automatically. Control settings can be
customized in OPTIONS:KEY CONFIG (see p.38).
Pressing Throttle Up after engine output has been set at maximum will
engage the afterburners.
When the MAIN POWER is switched on, the controllers will be
calibrated automatically. Avoid pressing keys or moving the sticks at this
stage to prevent malfunction.
2 player games will require a second controller (sold separately).
This game does not support controllers other than the DUALSHOCK®2
analog controller.
This game supports the vibration function present on the
DUALSHOCK®2 analog controller. This can be set ON/OFF in
OPTIONS (see p.36).
Flight Controls
1. From the Title Screen press the START
button to show the Game Select Menu. The
first time you play you will need to select
NEW GAME.
2. Select the Difficulty level.
3. Enter your call sign (name).
4. Select OK from the Call Sign
Confirmation Screen, and the MAIN
MENU will be displayed.
When Playing for the First Time
At the beginning of a new game you will need
to choose the name that you will be referred to
as (call sign). The maximum length of your call
sign is eight characters. It may be comprised of
capital letters, numbers and punctuation marks.
Name Entry
7
MAIN MENU
6
After you have selected a difficulty level and entered your call sign, the
MAIN MENU will be displayed. Here you can select from 5 items in the
Main-Mode and 4 in the Sub-Menu. The different flying modes include flight
training, practice missions and 2 player challenges and are selected from
the Main-Mode. To customize settings or watch replays, you should select
from the Sub-Menu. Abrief description of each item is detailed below.
ARCADE MODE
page 22
Make a sortie and challenge missions in sequence. ARCADE MODE
games cannot be saved.
TRAINING
page 23
Aim to become an ace pilot and take up the challenge of pilot training.
AERO MEET 2002
page 27
Enter a competition and test your aviation skills.
FREE FLIGHT
page 29
Choose an aircraft, location, position and objective and fly without further
instructions.
VS BATTLE
page 32
2-player battle in split screen mode. VS BATTLE requires a second
DUALSHOCK®2 analog controller.
GAME START
System Data
Replay Data
81KB
75-773KB (varies depending on data)
Weapons Data more than 75KB
DATA TYPE
MINIMUM SPACEREQUIRED
Select CONTINUE to return to the game
in progress.
Select LOAD GAME from the Game Select
Menu to continue playing a game previously
saved. The LOAD GAME item is only displayed
when saved data has been detected.
Starting Previously Saved Games
MAIN MODE
ALERT HANGAR
page 34
A hangar that dispatches fighters for scramble attacks at short notice. Due
to the urgent nature of scramble missions, aircraft settings should be
configured here in advance. This item becomes available as you progress
through the game.
REPLAY ROOM
page 34
View or edit replays and manage replay data.
DAT ABANK
page 35
Check player flight history and change your emblem.
OPTIONS
page 36
Change game environment settings and manage game data.
SUB MENU
To save game data, select OPTIONS:
SAVE/LOAD (see p.40). The settings will be
saved into a system data file.
A memory card (8MB) (for PlayStation®2) is
required to save game data.
Saving Game Data
Memory Requirements
98
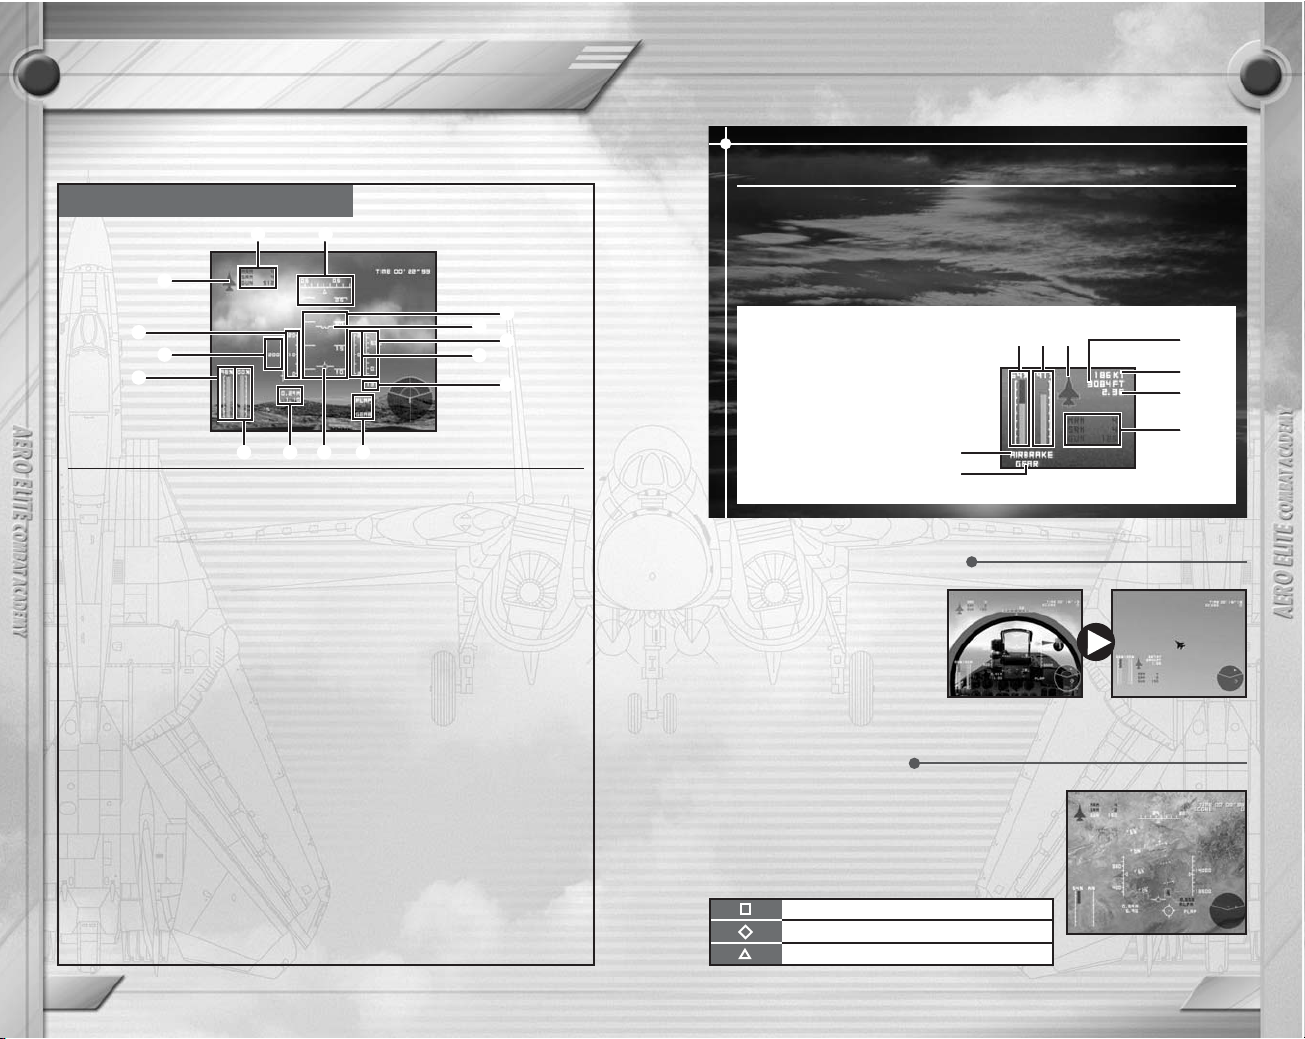
HEADS UP DISPLAY
HEADS UP DISPLAY
Airborne Target
Terrestrial Target
Shoot Cue (missile launch possible)
The HUD instrument panel displays essential information about the aircraft’s
state and position, and should be referred to frequently to ensure smooth flight.
Fixed Wing Aircraft HUD
1 Weapons: Weapons installed and
quantity remaining. When a camera
is installed, CMR and the shots
remaining will be displayed.
2 Damage Indicator: Shows status
and location of areas damaged.
Green = no damage.
Yellow = light damage.
Red = heavy damage
3 AOA gauge: Angle Of Attack.
Indicates the angle of the aircraft’s
axis compared to its traveling
direction. This is displayed when the
landing gear is extended.
4 Airspeed Indicator: Displays the
axial airspeed as measured in knots.
5 Fuel gauge: Decreases as the
aircraft is used. The rate that it
decreases is related to the way the
aircraft is flown.
6 Tachometer: Measured in
percentage. 60% is idling speed.
A/B is displayed when afterburners
are engaged.
7
Heading scale: Displays the current
bearing. 36 is due north, 09 is due east,
18 is due south and 27 is due west.
8 Pitch Scale: Shows the aircraft’s
angle with the earth.
9 Whiskey Mark: Indicates the axis of
the aircraft.
0 Velocity Vector: Shows the forward
vector of the aircraft.
q Altimeter: Measures current altitude
by external air pressure and
indicated in feet.
w Flaps (Automatic): Increases lift at
lower speeds. Displayed when
engaged.
Airbrakes: Reduces speed during
flight. Displayed when engaged.
Landing gear: Displayed when
engaged.
e Terrain Clearance: Shows distance
from land when less than 1500 feet
and landing gear is engaged.
r Statoscope: Shows rate of climb/
descent indicated in thousands of
feet per minute. Displayed when
landing gear is extended.
t Mach Speed
G: Acceleration (see p.17)
1 7
2
3
8
q
5
4
6 t w
9
0
r
e
When an enemy aircraft is
close by but out of view, its
position is indicated onscreen
by a red or yellow target arrow.
Holding down the
F button will
show the target as seen from
the cockpit.
Pilot View/T ar get View
Enemies that have been locked on to by the
radar will be displayed in a Container. When
more than one target has been locked on to,
the one presently selected will be displayed in a
larger Container.
Target Container
Simple HUD
During replay, or when the HUD has been set to SIMPLE in
OPTIONS:VIEW (see p.38), a simplified HUD will be displayed at all
times (cockpit and outside HUD are set separately). The simplified
display shows only the most essential instruments in the bottom left
hand corner of the screen.
1 Fuel gauge
2 Tachometer
3 Damage
4 Airspeed (knots)
5 Altimeter (feet)
6 G
7 Weapons
8 Airbrake
9 Landing gear
1 2 3
8
9
7
5
4
6
SHOOT
ALERT
Selected weapon can be fired.
Enemy missiles locked on.
MISSILE Enemy missiles launched.
GUN Enemy machine guns fired.
OVER SPEED Flying too fast. Engine output reduces.
OVER AREA Outside permitted airspace.
RELEASE Bomb released.
STALLWARNING
Aircraft likely to stall.
Warning Indicator
Warning Indicator
1110
HEADS UP DISPLAY
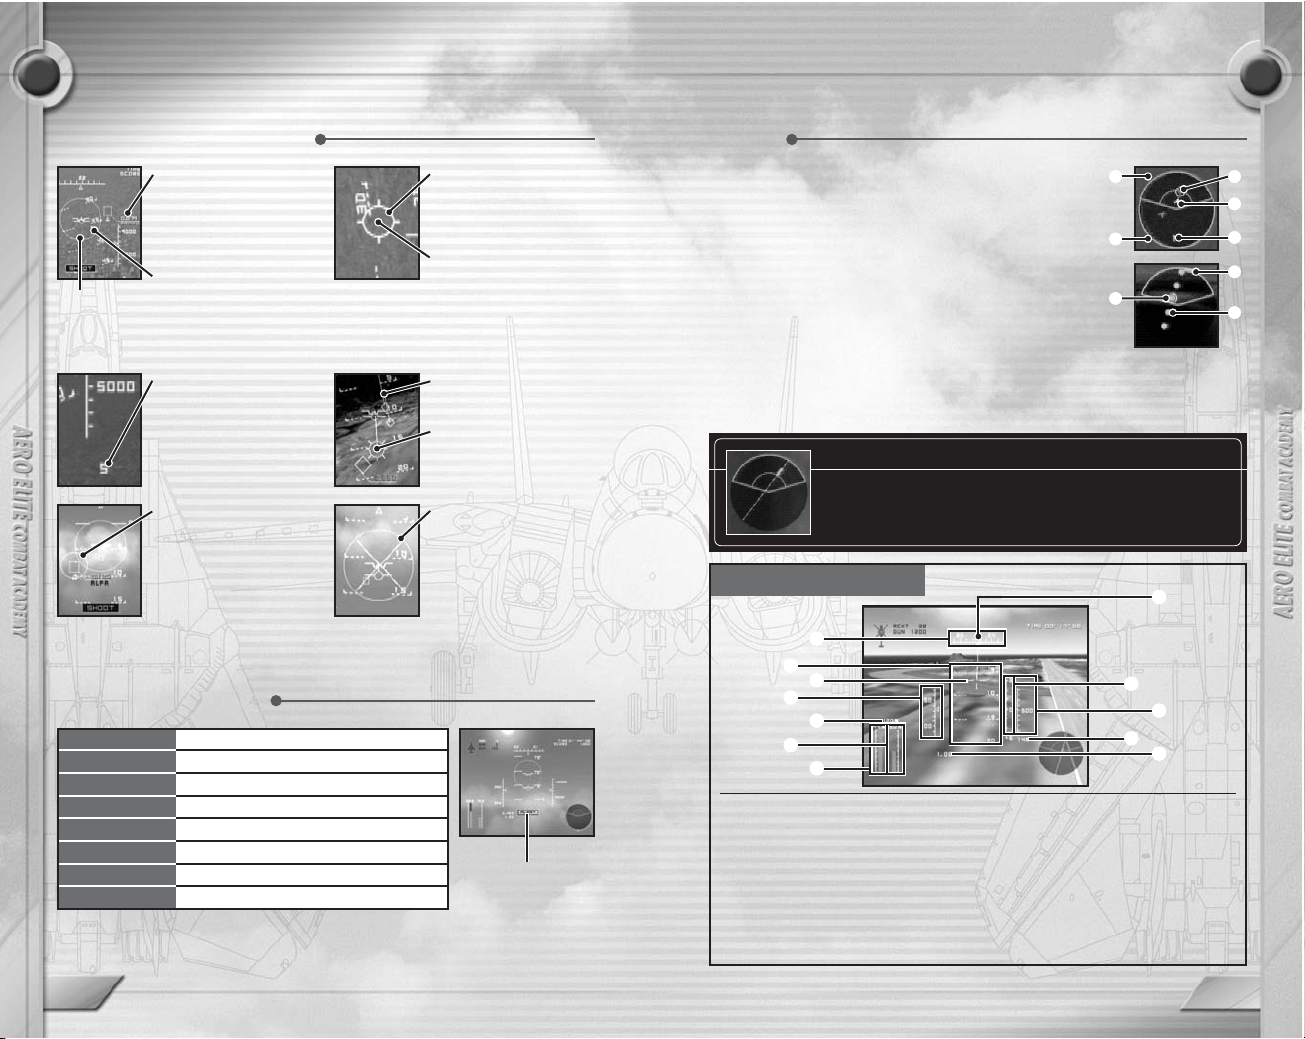
1 Target Outside Range indicator.
Blue/Purple: Friendly aircraft.
Green: Landmark (terrestrial targets).
2 Shows when enemies are outside the radar operating range.
3 White Circle: Displayed when target can be seen from
Pilot View (see p.9).
4 White: Missile
5 Yellow/Red: Airborne Target
Green dot: Balloon/Terrestrial Target
The area spanning 30 degrees behind your aircraft is a radar blind spot. Rear
targets at altitudes higher than your own aircraft will be displayed as normal
.
Purple is also used to represent enemy aircraft in ARCADE MODE only.
HEADS UP DISPLAY
Target Distance
Displayed using color
and number.
Red: Within gun range
White: Outside gun range
Steering Dot
Target’s projected position.
When inside the Steering
Circle, MRM missiles stand
a greater chance of hitting.
Steering
Circle
Reticle
The round gun sight
displayed when using the
machine gun.
Peeper
The center point of the
reticle and projected
impact point. Fire when
lined up with targets.
Reach Count
Estimated time before a
launched MRM missile
reaches its target.
Seeker
SRM Missile tracking
point. Locks on when it
overlaps a target. The
color changes from orange
to yellow when the target
is within missile range.
Terrestrial T arget
indicator bar
Impact Point
Projected point of impact.
Release the bomb when
this overlaps the target.
Weapons Disable
Displayed at certain roll
angles and G levels to
indicate that weapons
cannot be fired.
Refer to p.16 for weapons details.
Display During Attack Radar
1
2
3
3
4
5
1
5
Returning to base
When in range of the runway or aircraft carrier, a
symbol and approach path will be displayed. This is
not shown when enemy aircraft are within range.
Rotary Wing HUD
1 Heading Scale
2 Pitch Scale: Displays the forward
and backward tilt of the aircraft.
3 Velocity Vector
4 Axis Symbol
5 Airspeed Indicator
6 Altimeter
7 Statoscope
8 G: Acceleration (See p.17).
9 Collective Indicator: In NORMAL
this will read 50% with the throttle
released.
0 Fuel Gauge
q Engine Torque Meter: Condition of
rotor torque in relation to engine torque.
w Terrain Clearance.
1
2
3
5
4
7
w
8
q
0
9
6
13
BASIC OPERATION
12
A rate of 400-450 knots is appropriate when turning a fighter. Attempting this at
higher speeds will cause the aircraft to stall and may result in a black out (see
p.17). Maintaining control of the aircraft will become impossible.
Speed decreases while ascending and turning, and increases while descending.
Careful adjustments to the throttle are necessary to maintain consistent speed.
HEADS UP DISPLAY
Nozzle Angle Display
Changing the nozzle angle on the VTOL capable AV-8B
aircraft also changes the direction of thrust. On the HUD,
the nozzle angle and nozzle control mode are displayed.
0
45
Directly rear
Diagonally below and to the rear
90 Directly below
ANGLE
DIRECTION OF THRUST
Take-off Thrust Indicator
With the C-1, thrust can be temporarily increased to assist
takeoff (Takeoff Thrust). The letters T.O are displayed
above the tachometer to confirm this setting.
Cargo Door Open Indicator
When transporting machinery or carrying airdrop
containers, the Cargo Door Open Indicator will flash while
the doors are open.
The following information is only displayed on aircraft with the appropriate
functions.
Special Function Display
Learn how to control a fixed wing craft. For fuller details and an
opportunity to practice basic aviation techniques and a variety of
maneuvers, aim to complete the TRAINING as detailed on p.23.
Fixed Wing Craft Basic Operation
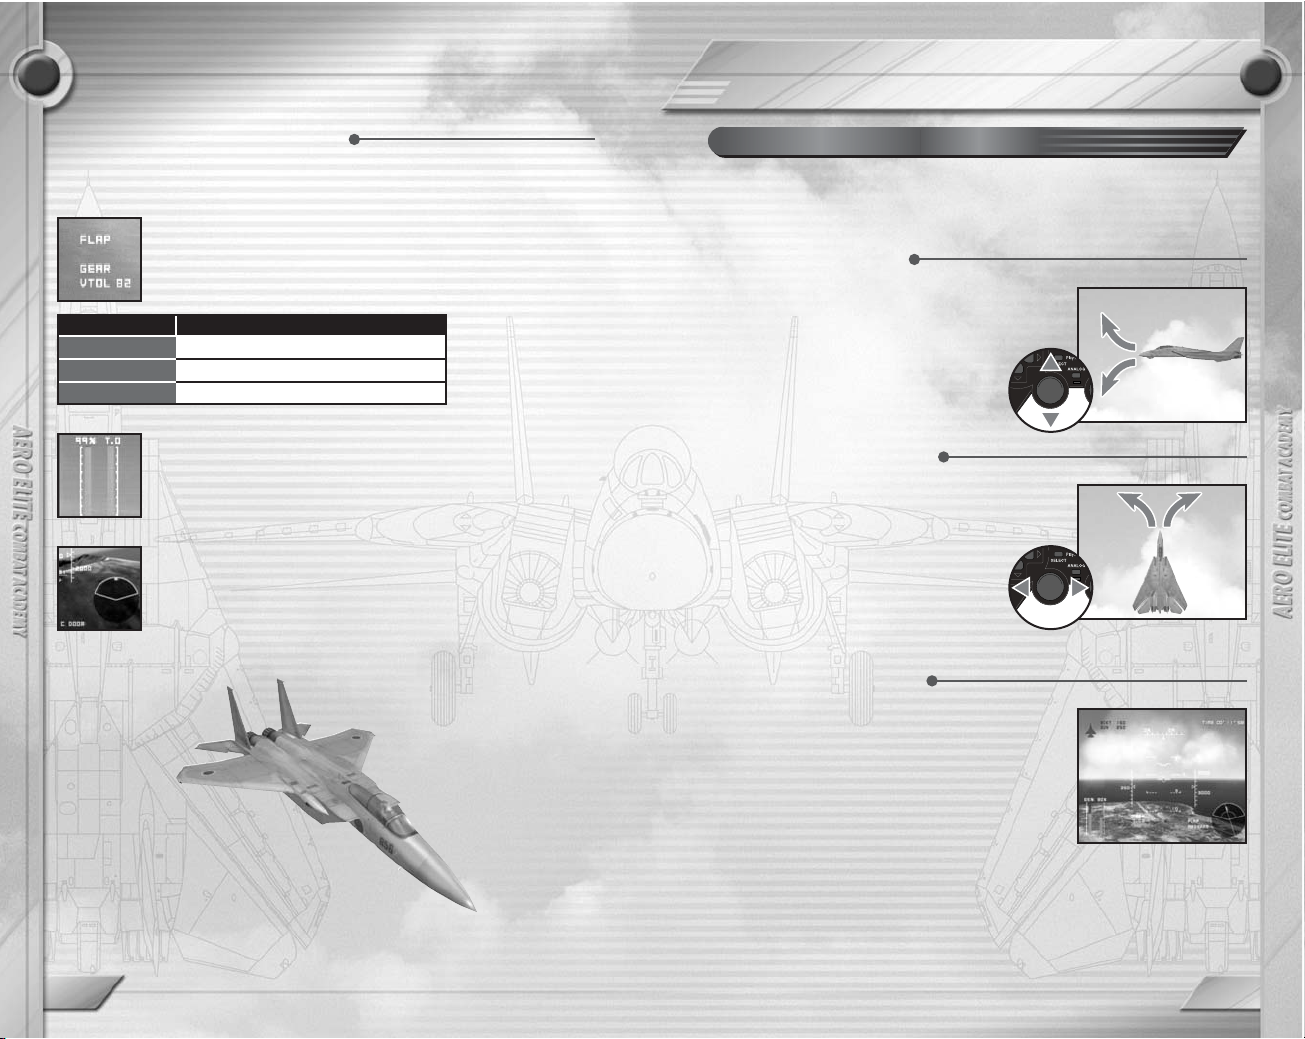
The aircraft’s pitch is controlled by the left
analog stick VC. Pulling the stick backwards
(
V) will raise the nose, and pushing the stick
forward (C) will lower it.
Controlling Pitch
The left analog stick also controls steering. Drop
the stick in the direction you wish to turn and bank
the aircraft 30-45 degrees. Center the stick when
at the necessary angle. Pulling back gently
on the stick will cause the aircraft to turn
naturally. Minor adjustments to course can
be performed with the rudder by pressing
the
Q and E buttons, which is also used
to control direction when taxiing.
Changing Direction
Speed is measured in knots (nautical miles per
hour). Press the A button to increase engine
output and raise the speed. When the output is
at 100%, press the
A button to engage the
afterburners if present. Press the S button to
reduce engine output and lower speed. The
airbrakes should also be employed when
landing by pressing the directional button
C.
Controlling Speed

1514
BASIC OPERATION
While hovering (holding one
position and altitude), pulling the
left analog stick ZXwill allow
lateral horizontal flight.
BASIC OPERATION
For the first time in this series, helicopter piloting and training can be
performed allowing you to advance your skills to a new level. Control of a
helicopter is very different to that of a fixed wing aircraft so careful training
is imperative.
Rotary Wing Craft (Helicopter) Control
To perform vertical take-off and landing maneuvers, the jet nozzles must
be switched to VTOL Mode.
VTOL Mode: Vertical Take-Off and Landing possible.
STOL Mode: Short Take-Off possible.
Special Aircraft Controls:VTOL/STOL
Adjustments to altitude are made by raising or
lowering the collective. To takeoff or climb, press
the A button to sharpen the rotor blade angle and
increase output and lift. To descend, press the S
button to reduce the output from the main rotor.
Whether in climb or descent, watch the
statoscope carefully as you adjust the collective.
Adjusting Altitude
To increase speed,
lean the aircraft at a
stronger angle in the
direction you are
heading using the left
analog stick. To reduce
speed, lean in the
opposite direction. Pay
close attention to the
airspeed indicator.
Adjusting Speed
In order to turn left or right during
horizontal flight, pull the left analog
stick in the direction you wish to
turn. Careful adjustments to pitch,
roll and the main rotor output is
necessary to maintain consistent
altitude, speed and turn. Sudden
dramatic adjustments will cause
flight to become unstable, so
sensitive control is essential.
Changing direction
To rotate the aircraft horizontally you will need
to adjust the power output from the tail rotor.
Press the
Q and E buttons to rotate the
aircraft left or right. Horizontal turning has a
proportionate effect on the power output from
the main rotor, so take care not to turn too
quickly. Turning can also affect the pitch angle
of the aircraft making flight unstable, so make
careful adjustments to the cyclic to keep it level.
Hovering T urn
When piloting a helicopter, forward thrust is
produced by adjusting the cyclic to lower the
pitch of the aircraft. Likewise, raising the pitch will
create reverse thrust. The cyclic is
controlled using the left analog stick. Push
the left analog stick forwards (
C) to lower
the nose and the craft will start to advance.
Advance/Retreat

16
BASIC OPERATION
BLACK OUT
RED OUT
Caused during an excessive +G count (7G or over).
Breath becomes short and vision impaired.
Caused during an excessive –G count (–1.5G or below).
Vision becomes red.
BLACK/RED OUT can be set ON/OFF in OPTIONS:FLIGHT SETTINGS
(see p.37).
Black Out
BASIC OPERATION
During Flight
While Landed
Directional button V (landing gear) sets to VTOL mode.
Directional button V switches between VTOL and STOLmodes.
VTOL is not possible with certain weapons installations.
GUN
SRM
Machine Gun
Infra-red guided
air-to-air missile.
MRM
Radar-guided
missile
DISPLAY WEAPON TYPE
Close range rapid fire weapon.
Self-targeting short-range missile.
Can lock on when positioned
behind the enemy.
Radar-guided medium-range
missile. Type varies according to
aircraft.
DESCRIPTION
AGM Air-to-ground missile Directionally-fired missile.
BOMB Bomb
Bomb released onto terrestrial
targets.
RCKT Rocket
Can be launched at both airborne
and terrestrial targets.
This game makes available a wide variety of weapons. Different
situations require different tactical solutions so choose your weapons
installations carefully.
Weapons and Customization
When the G level is too extreme, it can cause
problems for both the pilot and the aircraft.
Horizontal flight gives a reading of 1G, and
horizontal flight upside down gives a reading
of –1G. High speed flight, rapid changes in
direction and increasing or decreasing of
altitude causes G to increase with the
following consequences.
G (Acceleration) and Flight Problems
After choosing an aircraft in the SELECT
FIGHTER screen, appropriate weapon sets are
displayed for selection. Sets available will vary
depending on the aircraft. Use the directional
buttons to select the weapon set required and the
S button to confirm. Heavy weapons have an
adverse effect on the aircraft’s performance and
maneuverability, which is particularly noticeable
when turning. Avoid carrying more weaponry than
is necessary for the given situation.
Customizing Weapons
Depending on the mode, press the SELECT button to customize the weapons
array (see p.21).
Observe the movement of enemy aircraft and the paths of bullets to evade
machine gun fire. With SRM missiles, the lock-on can be cancelled by
changing your angle of flight relative to the enemy aircraft. Flying at high
speed and altitude can cause missiles to lose the trail. The release of chaff
or flares followed by a sudden change in direction is also a highly effective
evasive maneuver.
Depending on the type of missile launched, chaff and flares used to distract the
missile targeting are released automatically.
Evading Machine Gun Fire and Missiles
17

19
SCRAMBLE
When the required level has been reached in TRAINING (see p.25), you
will acquire the qualification to be mobilized for scramble missions.
A scramble is an urgent deployment of fighters to engage enemy aircraft in
response to an invasion of airspace. Missions cannot be selected from the
menu, but can arise during a game at any time without warning. When a
scramble is mobilized, you must takeoff immediately in the aircraft you have
prepared in the alert hangar. Different missions require different tactics, so
choose your craft carefully. In the event that a mission requires a different
aircraft with special features, this will be prepared ready on the airfield.
GO/CANCEL
FLIGHT
On receiving the call to scramble, you will immediately
be mobilized from the alert hangar. The controller will
issue instructions en route.
REPLAY
Watch a replay of the flight. See p.28 for playback controls.
DEBRIEFING
Receive points according to your performance.
ALERTHANGAR
Return to the alert hangar on completion of the mission.
When a scramble is mobilized, you must attack within a
set time. You can choose to refuse missions but this will
adversely affect your piloting career.
BASIC OPERATION
3 o’clock
6 o’clock
To the right of
your aircraft
Behind your
aircraft
9 o’clock
To the left of your
aircraft
12 o’clock
Directly in front of
your aircraft
The Clock Code is used to inform you of the location of enemies. Position
is described in terms of the numbers on a clock.
Clock Code
When the mission instructions have been carried
out, MISSION COMPLETE will be displayed and
you can then return to base. Successful
completion of the mission is dependent on your
returning to base safely, so take care when
landing. Selecting RETURN TO BASE in the
PAUSE menu lets you skip the return procedure
and the aircraft will land automatically. Some
missions may not require a return to base.
Completing Scramble Missions
Scramble Mission Gameflow
PAUSE Menu
Pressing the START button during flight brings up the PAUSE menu.
CANCEL
STOP
Return to the game
Cancel the flight
RESTART Restart the flight from the beginning
HUD Switch the HUD display ON/OFF
RADAR Switch the radar display ON/OFF
COCKPIT Switch the cockpit display ON/OFF
TARGET Switch the target direction display ON/OFF
BGM Change the background music during flight
Certain items on the PAUSE menu vary depending on the mode.
18

2120
Approach the aircraft from behind, and then maintain pursuit. Try to fire
bursts around the target so they can be seen from the enemy’s cockpit.
Take extra care not to hit the target.
SCRAMBLESCRAMBLE
Setting the Frequency of Missions
The frequency of missions and the time on the GO/CANCEL screen
can be set in OPTIONS:GAME SETTINGS (see p.36).
Follow the directions of the controller closely. Ignoring or acting against
instructions will be penalized and the mission will be unsuccessful.
Missions
If an unknown aircraft invades airspace, it may
be necessary to take photographs. The first
step is to approach the target aircraft. In
ADVANCED mode you will also need to select
between weapons and camera. You have a
total of three exposures with no refills, so use
exposures sparingly. A higher rating is achieved
if photographs are close up and from a variety
of angles. Control the camera angle with the
right analog stick and use the
D button to
operate the shutter.
Photos can only be taken from Cockpit/Behind/
Front views.
Photography
Fire shots near the aircraft that have invaded
your airspace. Because these are for warning
purposes only, care must be taken to ensure
that the shots do not reach the enemy target.
Position yourself within .1nm of the enemy
target and fire a burst of machine gun rounds at
an angle no greater than 10 degrees from the
target. In ADVANCED mode you will need to
select GUN using the
W button.
Warning Shots
Customizing Settings
Pressing SELECT in the WEAPON SELECT screen allows you to
make customized weapon installations. Use the left analog stick ZX
to highlight a section of aircraft and CVto allocate weapons. Details
of the installation can be saved for later selection.
Saved weapons data requires a minimum of 75KB. Details on installing
weapons can be found on p.16.
PROCEDURE

22 23
ARCADE MODE TRAINING
Aim to become an ace pilot and take up the challenge of pilot training. It’s
vital that you become accustomed to basic piloting techniques before
attempting more challenging missions.
The course is broken down into 9 Stages. Once you have met the
requirements of each Stage you can progress to the next. Each Stage
contains a series of Steps that allows you to gradually progress and
expand your skills. Training requires patience and repetition, so try to
master each step before moving on to the next.
Training Stages
Select an aircraft, make a sortie and challenge missions in sequence.
This is a good place to start for those that wish to get airborne and experience
the thrills of scramble missions as quickly a possible. Choices of aircraft,
weapons and missions are limited, so for a greater challenge aim to complete
the TRAINING (see p.23) and work through the more advanced flight modes.
NG
SCORE
If you fail to clear a round in the specified time, or your
aircraft is destroyed, the status will be NG and you will return
to the start of the round. After three NGs the game will end.
Increases with each enemy destroyed. Atime score is
also awarded based on the time remaining at the end of
each round.
HUD
The standard Heads Up Display. See p.8 for a
detailed explanation.
In ARCADE MODE only, missiles and machine gun rounds are unlimited.
Fighters available in ARCADE MODE cannot be piloted in the regular game
modes until unlocked.
ARCADE MODE games cannot be saved and restarted partway through.
Game Screen
Tries Remaining
HUD
Time Remaining
Score
Game Concepts
You will be presented with a series of mission stages that allow a brief
introduction to the game concepts. As with SCRAMBLE missions (see
p.19), you will be briefed en route by the controller at each stage.
ARCADE MODE Gameflow
STAGESELECT
BRIEFING Receive detailed instructions on the different elements
of the Step.
FLIGHT Fly in accordance with the instructions given.
REPLAY Watch a replay of the flight. See p.25 for
playback controls.
DEBRIEFING Receive marks for each element in the Step. If your
marks are too low and you don’t pass, pay especially
close attention to your altitude and speed at this stage.
FLIGHT LOG See your best scores for each Step.
Choose the Stage and Step of training you wish
to undertake.
TRAINING Gameflow
PRIMARY
FINISH
CVACM VTOL
COMBAT ROTARY WING F
ROTARY WING BBASIC

2524
TRAINING
1 Pause.
2 Fast Forward (hold down).
3 Return to the beginning.
4 Change music. Rotates the background
music to the next item in sequence. When
selected, replay will return to the start.
5 Change angle of view. Pauses replay and
displays a list of the different viewing angles
available. Use the directional buttons to select a view and press the S
button to enter.
6 Switch flight path display on/off. When set to on, the flight path can be
referred to when evaluating your piloting skills.
7 Switch between Icon & HUD display/Cinema View. Removes the icons
and HUD and you can then switch between full screen and wide screen
cinema mode by pressing the S button. Pressing the D button will
return you to the full display.
8 Change aircraft display. Moves the focus point of the replay to that of an
accompanying aircraft or enemy target.
9 Restart game. Returns you to the game at the point where the button is
pressed. When returning to the game, scores and hit counts are
returned to zero. Regardless of performance, you will not be able to
clear steps using this method. Not available in every stage.
0 Exit replay mode
TRAINING
The starting position and flight conditions are explained first. In the case of
Take-Off Training, the aircraft is positioned on the runway at a standstill.
With Steps that begin mid-flight, details of the altitude, airspeed and
bearing will be outlined.
In the earlier stages, a diagram of the controller
will be displayed together with an explanation
of controls. At this time, instruments that must
be monitored carefully will also be highlighted.
During the training, keep a close eye on the
instruments in accordance with instructions.
All explanations have assumed use of the DUALSHOCK®2 analog
controller and a difficulty level of NORMAL.
Scores start at 100 and points are deducted for each mistake made. 60
points are required to pass each Step.
Scoring
First select the Stage and Step of the training
you wish to undertake. On your first attempt
you will only be able to select TAKE-OFF in the
PRIMARY piloting stage, but as you progress,
more advanced stages will become available.
Stage Select
This is your opportunity to take control of the
aircraft and attempt to fly in accordance with
instructions. During flight, your instructor will
remind you of the directions and warn you if you
begin to deviate. In the event that your aircraft
crashes, or your flight differs substantially from
instructions, the training will end. Remember
also that each Step has a time limit.
Flight
Here you can watch an instant replay of your flight. This is a very useful
reference for checking your flight techniques. There are a variety of replay
controls to help you make the most of this facility. Use the directional
buttons to select and the
S button to enter.
Replay
Pay close attention to the instructions given by
your captain who will explain each element of
the step. While listening to the explanation,
pressing the
F button will fast-forward to the
next instruction. You can listen to the
explanation as many times as you like, so
make sure you understand fully before
attempting the drill.
Briefing
1 2
6
4
8
5
9
3
7
0

27
AERO MEET 2002
26
Once you have developed your skills in TRAINING (see p.23), the AERO
MEET 2002 competition mode will help you gain real mission experience.
The contest is broken down into 4 main categories. As with TRAINING,
each category contains a series of missions, and by fulfilling the conditions
of each while attaining the required amount of points you can progress to
the next.
AIR TO AIR
SURFACE
Air-To-Air Combat
Air-To-Surface Combat
MANEUVER Aerial Maneuver
RECON Aerial Reconnaissance
TRAINING
Points are awarded according to the accuracy
in which the exercise was carried out. All details
of the exercise are very carefully checked.
Where altitude and speed vary from that
specified, points will be deducted. Press the
F
button to fast forward to the next checkpoint.
Use this information to find your weak points
and improve them in subsequent practices.
Debriefing
Controls During Debriefing
On the DUALSHOCK®2 analog controller, press the E button to
zoom in, and the Q button to zoom out. The camera angle can be
rotated around the aircraft using the left analog stick. This can be
useful when evaluating your aviation skills.
Check your score and flight time. 5 course
records are stored for each step. Score higher
than 60 to clear the Step and progress onto the
next. Please remember that 60 points is the
minimum required to pass, and that to become
a skilled pilot you will need to practice each
Step honing your techniques and aiming for a
perfect score. As your skill advances, you will
be awarded qualifications to fly different kinds
of aircraft through more advanced drills.
Flight Log
MISSION SELECT
BRIEFING
Listen to an explanation of the mission.
SELECTFIGHTER
Choose the aircraft to use. Selections may be limited
depending on the category.
SELECTWEAPON
Choose the weapons you wish to have fitted. Selections
may be limited depending on category and aircraft.
DEBRIEFING
Receive points according to performance.
FLIGHT
Fly in accordance with instructions.
REPLAY
Watch a replay of the flight. See p.25 for
playback controls.
FLIGHT LOG
Check the record of your best scores.
Choose the category and mission to attempt.
AERO MEET 2002 Gameflow

29
FREE FLIGHT
28
In FREE FLIGHT mode, aircraft, location, objective and other options can
be freely selected.
SOLO FLIGHT
AIR ATTACK
Player flies alone.
Anti-aircraft combat.
SURFACE ATTACK
Anti-surface/anti-aircraft attacks.
RANDOM MISSION
Settings chosen at random.
Settings vary depending on category and location.
To end your flight, select STOP in the PAUSE menu (see p.18).
AERO MEET 2002
This is a dogfight between fighters. Down as
many aircraft as possible within the given time
limit. As each fighter is downed, another will
appear and 10 seconds will be added to the
time limit.
AIR TO AIR
This is an aerial support and precision bombing
mission. Destroy all the targets on land and at
sea in the shortest time possible.
SURFACE
This is a tactical reconnaissance mission.
Approach landed aircraft to take photographs.
Only one exposure is available. See p.20 for
details on photography.
RECON
This is a test of maneuverability. The category
includes aerial attack elements where balloons
marked on a map must be destroyed, and midair pursuit elements where rings deployed by
the target aircraft must be passed through
within the given time limit.
MANEUVER
Breakdown of Each Category
SELECTCATEGORY
SELECT MAP
Choose the flight location. Time and weather
conditions can also be selected.
SELECTFIGHTER
Choose the aircraft to pilot.
SELECTWEAPONS
Choose the weapons array. In scenarios where
there are no enemies, weapons can be installed but
not used.
SELECT POSITION
Choose your position at the start of the flight, as well
as the position of enemy fighters. Where possible
you can also choose to start from a landed position.
SELECTWINGMAN
Choose accompanying wingman (Choices increase
as the game progresses).
SELECT ENEMY
Choose the type, number, weaponry and skill of
enemy fighters.
FLIGHT
Fly in accordance with selections.
REPLAY
Watch a replay of the flight. See p.25 for
playback controls.
FLIGHT LOG
See your best scores for each category.
Choose the flight category.
FREE FLIGHT Gameflow

3130
FREE FLIGHT
The wingman is a strong pilot that accompanies the player during
missions. Wingmen can attack enemy targets on your behalf and keep you
informed of the enemy’s movements. As you progress through the game,
your choice of wingmen will increase and you will be able to select
between different characters and levels of ability.
NON
ATTACK
No instructions.
Instruction to attack the enemy.
COVER Instruction to assist player.
TACTICS
Instruction to act as decoy to attract the
enemy’s attention.
FREE FLIGHT
CHARACTER
LEVEL
Affects their performance while flying.
Affects the speed of maneuver.
Enjoy free solo flight without enemy fighters or
targets. This is an excellent opportunity to practice
the more basic flying skills you learned in TRAINING
(see p.23). Location, time, weather conditions and
position at start can also be selected.
SOLO FLIGHT
The wingman replaces the controller in keeping you informed of the
enemy’s movements. Enemy altitude is referred to by level. 1=1,000 feet,
10=10,000 feet etc.
Wingman Navigation
A number of commands can be given to the wingman. Press the R
button until the desired command is displayed. In some circumstances, a
wingman may refuse commands.
Commanding the Wingman
Engage in air-to-air combat. Depending on your
progress in the game, you may be able to choose a
wingman. When selecting the enemy you can choose
from a range of fighters, weapons and skill levels.
AIR ATTACK
Attack enemy targets both on land and at sea.
Targets will vary depending on the location. The type
and number of enemies can also be specified.
SURFACE ATTACK
All settings are decided at random, including the
player aircraft. This option is convenient for those
wishing to fly immediately.
RANDOM MISSION
Breakdown of Each Flight Mode Accompanying Aircraft
Enemy Select

3332
VS BATTLE
VS BATTLE
When the battle is won, or the time reaches its limit, the game will end.
Selecting YES to Retry will start a new game with the same selections.
In VS BATTLE mode, the screen is split allowing
battle between two players. Players can select
between NORMAL and RANDOM modes.
VS BATTLE Gameflow
SELECTMODE
SELECT MAP
Selected by Player 1. The location is above sea.
Choose between noon and evening.
SELECTFIGHTER
Choose the aircraft you will pilot. Aweaponless
fighter may also be selected.
SELECTWEAPONS
Install a weapons array. Weapons available will vary
depending on the fighter.
SELECTTIME LIMIT
Player 1 selects the time limit from 3 minutes
to unlimited.
SELECTWINGMAN
Select the wingman that will be accompanying you.
Available wingmen will increase as the game
progresses.
SELECT POSITION
Player 1 selects the starting position of both players
in relation to one other.
FLIGHT
Compete in accordance with selections.
REPLAY
Watch a replay of the flight. See p.25 for
playback controls.
FLIGHT LOG
See the number of wins for each player.
Choose the VS BATTLE mode. Options below have
assumed NORMAL mode.
Allows the location, aircraft and other settings
to be made before commencing.
NORMAL
All selections are made at random. This mode
is ideal if you wish to begin quickly.
RANDOM
Breakdown of Modes
Ending VS BA TTLE
VS BATTLE can only be selected when a second DUALSHOCK®2
analog controller has been connected.
The following options from SELECT FIGHTER to
SELECT WINGMAN are made by Player 1 first and
Player 2 second.

3534
SUB MENU
SUB MENU
In the Sub Menu you can change various game
settings, watch replays, and manage game
files. The following items can be selected from
the Sub Menu.
The alert hangar houses aircraft that can
emergency launch on standby in response to
an invasion of airspace. This option becomes
available as you progress through the game.
When a scramble is called, there is no time to
select weapons installations, so be sure to arm
the fighters in advance to respond to any
breach of airspace.
ALERT HANGAR
Shows a replay of the most recent flight.
Controls during playback are outlined on p.25.
Any changes made to viewing angle or
background music are automatically stored.
If no flights have been made or replay details
cannot be found, this option will not be available.
REPLAY ROOM
In the Databank you can check player details,
select a personal emblem to apply to your
aircraft, see a glossary of terms and details of
available aircraft.
DATABANK
Select a fighter with good braking, or one that you are
familiar and comfortable with. Bear in mind that
installed weaponry will affect flight performance. Try
to make a selection suitable for any given emergency.
FIGHTER SELECT
Read replay data from a memory card (8MB) (for
PlayStation®2).
LOAD REPLAY DATA
Check the high scores from previous scramble
missions.
SCORE
Store replay data on a memory card (8MB) (for
PlayStation®2). Replay data requires a minimum
of 75KB.
SAVE REPLAY DATA
Use this option to view your total score, total time
and kill ratio. Press the
S button to switch between
TOTAL DATA and FIGHTER DATA.
PERSONAL DATA
Replay the model flights from TRAINING (see p.23).
Select Category and Step with the directional buttons
and the
S button to select. Available videos will
increase as the game progresses.
TRAINING VIDEO
Select an emblem to put on your aircraft. As the game
progresses, more emblems will become available.
SELECT EMBLEM

3736
SUB MENU
NORMAL
FLIGHT MODE
(FIXED W)
FLIGHT MODE
(ROTARY W)
Set flight characteristics of fixed wing craft.
STANDARD flight mode emphasizes piloting allowing
flight without stalls or G force effects. PRO enables
players to maximize engine functions.
Set flight characteristics of rotary wing craft. to
STANDARD or PRO.
BLACK OUT/
RED OUT
When set to OFF, black outs/red outs do not occur
even when experiencing extreme Gs.
AUTO LANDING
GEAR BRAKE
ON sets landing gear brakes to automatic when
engines are at minimum output during touchdown.
AUTO RUDDER
ON automatically cancels out effects of propeller
torque when flying a Reciprocal craft.
WEAPON
SELECTION
Set weapon selection to AUTO or MANUAL.
TARGET SELECTION Set target selection to AUTO or MANUAL.
With the exception of the radar, velocity vector and gun sights etc., the aspect
ratio of the HUD and menus will be stretched horizontally when set to WIDE.
SUB MENU
DEFCON
SCRAMBLE LIMIT
Set the alert frequency. The smaller the number, the
more frequent the alerts.
Set the scramble alert time limit.
VIBRATION Switch the vibration function ON/OFF.
SCREEN
Set the aspect ratio display to NORMAL (4:3) for standard
televisions or WIDE (16:9) for wide-screen televisions.
SUBTITLES Switch subtitles during flight ON/OFF.
FILTER
Switch the filter to reduce flickering on screen
ON/OFF
.
See an explanation of the terms and acronyms that
appear in this game. Use the directional buttons CV
and the S button to select.
GLOSSARY
Make changes to the gameplay environment. Use
the directional buttons CV to select and ZXto
make changes.
GAME SETTINGS
See an overview and technical details of the aircraft
available. Use the directional buttons and the S button
to select. Pressing the F button while in the AIRCRAFT
DET AILS screen will display the aircraft only. In this
view, use the left analog stick to change the camera
angle and the
Q and E buttons to zoom.
AIRCRAFT DETAILS
In OPTIONS you can change settings for play
environment, controllers, display, sound and
others, as well as manage system data.
OPTIONS
Change settings relating to aircraft control. Basic
settings are made at the beginning of a game by
selecting STANDARD/ADVANCED.
FLIGHT SETTINGS
Selecting WIDE while connected to a widescreen television set allows a
much greater range of vision. This is especially useful when seeking targets.
SCREEN:WIDE
WIDE

3938
SUB MENU
CUSTOMIZE VIEW
COCKPIT HUD
Set the default cockpit view.
Set the HUD type during Cockpit View to STANDARD/
SIMPLE/OFF .
OUTSIDE HUD
Set the HUD type during Outside View to STANDARD/
SIMPLE/OFF .
COCKPIT ON displays the interior of the cockpit.
RADAR ON displays the radar.
TARGETARROW
ON displays the guiding arrow for targets outside the
main view.
COCKPIT
BEHIND
View from the cockpit.
View showing rear of craft.
FRONT View from further to the rear.
CUSTOM 1 to 9 can be set using the directional
buttons
ZX. In ADVANCED mode, 1 to 3 are
already set as follows.
LEFT
BACK
View on the left side of the craft.
View on the rear of the craft.
RIGHT View on the right side of the craft.
More than 30 different views can be selected.
Pressing SELECT button during flight will rotate the views available.
COCKPIT
FRONT
BEHIND
SUB MENU
CONTROL TYPE
RESPONSE
In STANDARD, moving the left analog stick down
raises the nose. In REVERSE, moving the left analog
stick down lowers the nose.
Set the control stick to STIFF/STANDARD/
SENSITIVE. In SENSITIVE the stick will feel the
most responsive.
CUSTOMIZE
CONTROLS
Switch the DUALSHOCK®2 analog controller to left
handed mode, or configure each button separately.
CALIBRATE Calibrate a joystick.
BUTTON TYPE
CUSTOMIZE ALL
Set the control stick to TYPE A for standard
operation or TYPE B for right-handed operation.
Configure each key individually.
Use this to configure the controller settings. Sensitivity
of the control stick (left analog stick) and the functions
assigned to each button can be changed. Find the
settings that suit your gameplay best.
KEY CONFIG
In View, you can make changes to perspectives and
cockpit views during flight. The HUD can be set to
STANDARD/SIMPLE/OFF.
VIEW
Adjust the settings of background music, volume,
and sound effects during gameplay.
SOUND
CUSTOMIZE CONTROLS
CALIBRATE
When using a joystick, you can calibrate the sensitivity and play of the control
stick. If SENSITIVITY is set to HIGH, small stick movements will have a
greater effect on the aircraft. If PLAY is set to HIGH, then a greater movement
of the stick is required before the aircraft responds. These settings are made
individually for the stick, rudder and throttle. Please note that this game does
not support controllers other than the DUALSHOCK®2 analog controller. Use
of any other peripheral is neither condoned nor recommended.
CUSTOMIZE VIEW
This item allows you to change the view from the
aircraft. Select and press the
S button to set the
default view for subsequent flights.

41
F.A.Q.
40
Q1 Is it possible to evade missiles?
A1 Yes. The way to evade them will vary depending on the missile type.
a) In the case of air-to-air short-range missiles (SRM), it is the target’s exhaust
heat that they home in on. To evade this kind of missile you will need to use
a flare. Aflare is a heat source released from the aircraft that burns at a high
temperature and distracts the heat sensors in the missile. Performing a
Barrel Roll maneuver immediately following release is very effective. If there
is a heat source greater than the flare nearby, the effect of distraction will be
lost, so use of afterburners should be avoided.
b) Medium Range Missiles (MRM) are guided by semi-active radars. Using
wave emissions, they are able to track the location of aircraft, so evasion is
best performed with chaff. Chaff are small particles of material such as
aluminum foil that reflect radar waves and distract the targeting system.
Many missiles once launched however cannot be successfully evaded, so
aim to keep out of enemies’ flight paths and prevent the missiles from
locking on.
In this game, flares and chaff are automatically selected and released to counter
incoming missiles. Try to time the release with an evasive maneuver.
Q2 My missile didn’t hit the enemy. Why?
A2 The most likely reasons are:
a) The steering circle of missiles is limited, so depending on the angle they’re
launched from they may overshoot the target. By positioning the aircraft so
the steering dot is inside the steering circle, you can greatly improve the
chances of a successful hit.
b) Missiles only have a few seconds of thrust after which they coast towards the
target. If the target is too far, it may be out of the missile range.
Q3 Why can’t I select weapons during flight?
A3 From OPTIONS:FLIGHT SETTINGS (see p.37) set WEAPON SELECTION to
MANUAL. You can then switch weapons using the
W button.
Q4 The AV-8B is very difficult to control. How do I fly it?
A4 First, practice the VTOL stage of TRAINING. When turning, make careful
adjustments to keep the craft level. When maneuvering at high altitudes, try not
to lose height. If too many weapons are installed, it may not be possible to take
off vertically. In this case it is advisable that you change the weapons
installation. The aircraft can be made much easier to land by setting COCKPIT
to OFF in the OPTIONS:VIEW menu (see p.38).
Q5 How do you hold the helicopter level when hovering?
A5 When hovering (holding one position and altitude), you will need to pay
attention to the following.
a) Airspeed: Make sure this is at zero. As the display only shows forwards and
reverse airspeeds, it will continue to show zero if the aircraft is moving
sideways, so take care.
b) Lean: Carefully adjust the cyclic to keep the aircraft level using the left
SUB MENU
Manage data files. System data requires a minimum
of 81KB.
SAVE/LOAD
AUDIO SETTINGS
BGM VOLUME
Switch between STEREO and MONO.
Adjust the volume of the background music.
SOUND FX VOLUME Adjust the volume of the sound effects.
DIALOG VOLUME Adjust the volume of the Dialog.
LISTEN TO BGM Listen to the background music from the game.
View the opening movie. As the game progresses,
more movies will become available. Press START
button to finish playback.
MOVIES
Q1
A1
Q2
A2
Q3
A3
Q4
A4
Q5
A5

43
APPENDIX
42
This is just a small selection of over 60 aircraft available in this game. Aim
to become an ace pilot and fly them all!
F.A.Q.
analog stick. In the case of the AH-64D, the rotor shaft is angled slightly
forwards, so raise the pitch a little above zero to maintain position. If the
pitch is kept level, the aircraft will not move.
Until you’re accustomed to operating the helicopter, set FLIGHT (ROT ARY W)
to STAND ARD in OPTIONS:FLIGHT SETTINGS.
Q6 Why aren’t aircraft that have been enabled appearing in aircraft selection?
A6 Depending on the mode and location, aircraft selection may be limited. See the
DAT ABANK (p.35) to confirm the aircraft available for use. Always save game
data after new aircraft are enabled, or you will not be able to use them after you
restart the game.
Q7 I can’t hit the balloons even though they’re straight ahead of me. What am I
doing wrong?
A7 Even when the target is straight ahead, you will not be able to attack if the
reticle or container is not being displayed. Pay close attention to the following:
a) When WEAPON SELECTION is set to MANUAL in OPTIONS:FLIGHT
SETTINGS, you will have to choose appropriate weapons depending on the
location of targets.
b) When more than one target is locked on to, you will need to select the
correct one using the
F button. The presently selected target will be
displayed inside a larger Container.
c) Weapons cannot be fired unless the target is within firing range.
d) Certain factors such as the flight condition of your own aircraft and the flight
angle of the target may prevent weapons from being fired. Try adjusting your
altitude, speed, angle and G levels.
Q8 When I lower the throttle, why does the aircraft sometimes start to fly backwards?
A8 Some aircraft such as the C-1, TND and US-1 have a function known as a
Thrust Reverser. This is particularly useful for reducing speed prior to landing,
and can be used for reverse flight. In this game, thrust reversers are controlled
by pressing the
S button when engine output is at zero
When the thrust reverser is in use, the engine output display will flash.
Q9 Why can’t I take off after landing on some surfaces?
A9 Taking off from surfaces other than a dedicated runway may not be possible
due to the weight of the aircraft causing the wheels to partially sink.
Q
10
Why does the helicopter continue to tilt and move by itself while hovering?
A
10
To counter the torque produced by having a single main rotor, the tail rotor
produces thrust in the opposite direction. It’s because of this rear rotor that the
aircraft tends to naturally lean. While hovering, make careful adjustments to the
tilt to keep it balanced.
Q6
A6
Q8
A8
Q7
A7
Q9
A9
Q10
A10
Classification
Beginner's reciprocal training craft.
Breadth extreme
10m
Length extreme
8m
Height extreme
3m
Vehicle weight
1121kg
Maximum speed
200 kts
Arms
None
Crew
2
A beginner's reciprocal training craft for the Japan Air Self-Defense Force.
Designed to heighten the functions of its predecessor, the T-34, its engine has been
fortified, fuel tanks added, and its electronics modernized. This is the starting point
for those training to be pilots in the JASDF.
T-3
Classification
Twin-engine jet fighter.
Breadth extreme
19.54m (Sweepback 20 degrees)
Length extreme
19.10m
Height extreme
4.88m
Vehicle weight
18951kg
Maximum speed
Mach 2.39
Arms
M61A1 20mm Vulcan x 1
Crew
2
The main carrier fighter of the US Navy. Its primary mission is armada air defense. Its combination of
fortified fire control radar and long-range air-to-air missiles provide long-range multi-functional attack
capabilities. Its computer-controlled retractable swing-wings provide superior combat functionality. The B
class engine has been replaced for improved output and was formerly called the APlus class.
F-14B
Classification
Intermediate jet-training craft.
Breadth extreme
9.9m
Length extreme
13.00m
Height extreme
4.60m
Vehicle weight
3920kg
Maximum speed
Mach 0.9
Arms
None
Crew
2
An intermediate training craft developed in Japan. Ease of piloting and balance come from
superior flight design. The engine was also developed in Japan and attention was given to quiet
operation as it was envisioned to operate from urban air force bases. It is used in JASDF basic
training, as a pilot training craft, and also currently used by aerobatic troupe “Blue Impulse”.
T-4

44
APPENDIX
An air base island
to the east.
F-16 Fighting Falcon and F-104 Starfighter are Trademarks of Lockheed Martin
Corporation used under license to Sega Corporation.
Classification
Supersonic jet training craft.
Breadth extreme
7.88m
Length extreme
17.85m
Height extreme
4.45m
Vehicle weight
6622kg
Maximum speed
Mach 1.6
Arms
M61A1 20mm Vulcan x 1
Crew
2
The first advanced supersonic jet training craft developed in Japan. It can fire
machine-guns and missiles, as it is used in for training by JASDF. It has adopted main
wings with large sweepback with an emphasis on supersonic flight and is not well
suited to low-altitude, low speed flight. It was the prototype for the support F-1 fighter.
T-2
Classification
Single-engine jet V/STOL attacker.
Breadth extreme
9.25m
Length extreme
14.55m
Height extreme
3.55m
Vehicle weight
6470kg
Maximum speed
Mach 0.98
Arms
GAU-12 25mm machine-gun x 1
Crew
1
AV/STOL attack aircraft based prototype developed and realized in Great Britain. It has vertical
and short-distance take-off and landing by changing the exhaust direction of its jet engines, a
structure that has enabled an aerial maneuver called VIFF. The B class was refurbished in order to
overcome the small payload and short aerial distance, now both have high functionality.
AV-8B
East Island
Mountain air base
on the lake.
Lake
An aircraft carrier
on the ocean.
A/CFT CR-CV
A European city
where historical
buildings remain.
Known as the
“foggy capital”.
City
*THIS LIMITED WARRANTY IS VALID FOR SEGA PRODUCTS FOR PLAY ON PLAYSTATION®2
COMPUTER ENTERTAINMENT SYSTEM MANUFACTURED FOR SALE IN AND PURCHASED AND
OPERATED IN THE UNITED STATES AND CANADA, ONLY!
Limited Warranty
Sega of America, Inc. warrants to the original consumer purchaser that the PlayStation 2
Game Disc shall be free from defects in material and workmanship for a period of 90-days
from the date of purchase. If a defect covered by this limited warranty occurs during this
90-day warranty period, the defective PlayStation 2 Game Disc or component will be
replaced free of charge. This limited warranty does not apply if the defects have been
caused by negligence, accident, unreasonable use, modification, tampering or any other
causes not related to defective materials or workmanship. Please retain the original or a
photocopy of your dated sales receipt to establish the date of purchase for in-warranty
replacement. For replacement, return the Game Disc, with its original packaging and
receipt, to the retailer from which the software was originally purchased. In the event that
you cannot obtain a replacement from the retailer, please contact Sega to obtain support.
Obtaining technical support/service
To receive additional support, including troubleshooting assistance, please contact Sega at:
• web site . . . . . . . . . . . . . . http://www.sega.com
• e-mail . . . . . . . . . . . . . . . support@sega.com
• telephone . . . . . . . . . . . . . 1-716-650-6702
LIMITATIONS ON WARRANTY
ANY APPLICABLE IMPLIED WARRANTIES, INCLUDING WARRANTIES OF MERCHANTABILITY AND
FITNESS FOR A PARTICULAR PURPOSE, ARE HEREBY LIMITED TO 90-DAYS FROM THE DATE OF
PURCHASE AND ARE SUBJECT TO THE CONDITIONS SET FORTH HEREIN. IN NO EVENT SHALL
SEGA OF AMERICA, INC. BE LIABLE FOR CONSEQUENTIAL OR INCIDENTAL DAMAGES
RESULTING FROM THE BREACH OF ANY EXPRESS OR IMPLIED WARRANTIES. THE PROVISIONS
OF THIS LIMITED WARRANTY ARE VALID IN THE UNITED STATES ONLY. SOME STATES DO NOT
ALLOW LIMITATIONS ON HOW LONG AN IMPLIED WARRANTY LASTS, OR EXCLUSION OF
CONSEQUENTIAL OR INCIDENTAL DAMAGES, SO THE ABOVE LIMITATION OR EXCLUSION MAY
NOT APPLY TO YOU. THIS WARRANTY PROVIDES YOU WITH SPECIFIC LEGAL RIGHTS. YOU
MAY HAVE OTHER RIGHTS WHICH VARY FROM STATE TO STATE.
Sega is registered in the U.S. Patent and Trademark Office. SEGA and AERO ELITE: COMBAT
ACADEMY are registered trademarks or trademarks of SEGA CORPORATION or its affiliate.
Original Game ©SEGA-AM2. ©SEGA-AM2/SEGA, 2002, 2003. F-16 Fighting Falcon and F-104
Starfighter are Trademarks of Lockheed Martin Corporation used under license to Sega
Corporation. All Rights Reserved. This game licensed for use with the PlayStation 2 console
only. Copying and/or transmission of this game is strictly prohibited. Unauthorized rental or
public performance of this game is a violation of applicable laws. The ratings icon is a
trademark of the Interactive Digital Software Association. Sega of America, Inc., 650 Townsend
Street, Suite 650, San Francisco, CA 94103. All Rights Reserved. www.sega.com. Programmed
in Japan. Made and printed in the USA.

Outside Cover
 Loading...