

Page 1

d
C
WMP-Series
Plastic-Bodied Magmeter
Instructions
3 inch
2 inch 1 inch
o
m
e
i
p
f
PROUDLY
MADE
IN THE
USA
i
t
r
e
C
ISO
9001:2008
a
n
y
Page 2

GENERAL INFORMATION
General Information
General Information ...................................................................................................................................................Page 2
Features ...........................................................................................................................................................................Page 3
Specications ................................................................................................................................................................Page 3
Dimensions ....................................................................................................................................................................Page 4
Flow Range .....................................................................................................................................................................Page 4
Installation
Piping Conditions ........................................................................................................................................................Page 5
End Connections ..........................................................................................................................................................Page 5
Positioning......................................................................................................................................................................Page 5
Straight Pipe Recommendations ...........................................................................................................................Page 6
Full Pipe Recommendations ....................................................................................................................................Page 6
Connections and Operation
Electrical Connections ................................................................................................................................................Page 7
Cable Connections ......................................................................................................................................................Page 7
Grounding ......................................................................................................................................................................Page 7
Operation ........................................................................................................................................................................Page 7
Maintenance and Troubleshooting
Maintenance ..................................................................................................................................................................Back
Troubleshooting ...........................................................................................................................................................Back
WMP-SERIES INSTRUCTIONS
The WMP-Series meters are full-bore, plastic-bodied
electromagnetic ow meters designed for ow and usage
monitoring applications in 1, 2, and 3 inch pipe. The
polypropylene ow tube offers corrosion resistance to
a wide range of chemicals. It’s light weight and easy to
install or remove from the pipe for inspection.
With no moving parts, the magmeter permits unobstructed
ow, minimizing ow disturbances and hence, straight
pipe requirements. The WMP-Series can be used in piping
congurations where there is little space between the
meter and an elbow or valve. The WMP-Series meters are
resistant to wear from sand and debris found in ground
or surface water. Since there are no bearings or propeller
to wear out, downtime, maintenance, and repair costs are
kept to a minimum. Because there are no mechanical parts
in the ow stream, the meter tolerates high ows without
damage.
The hinged, opaque polyethylene cover protects from dust
and UV rays, while permitting easy access to the LCD ow
rate and total display. The electronics housing is made of
rugged powder-coated diecast aluminum. It can be tted
with cross-drilled screws and seal wire for tamper-evidence.
Flow rate and total can be displayed in a variety of units,
customer-selected and factory-set.
The WMP101 is externally powered via a 5-pin connector
and the power cable also provides pulse output for use with
a variety of Seametrics and other displays and controls for
remote reading, data logging, pulse-to-analog conversion,
and telemetry applications.
The WMP104 is a battery-operated unit for use when pulse
output is not required. The standard batteries are user
replaceable with an approximate 1–2 year life depending on
usage. An extended battery life option offers an estimated
2–4 year life depending on usage.
In the event of DC power loss, or when changing the
battery, the WMP is designed to retain the internal settings
and ow total.
Seametrics • 253.872.0284 Page 2 seametrics.com
Page 3
GENERAL INFORMATION
WMP-SERIES INSTRUCTIONS
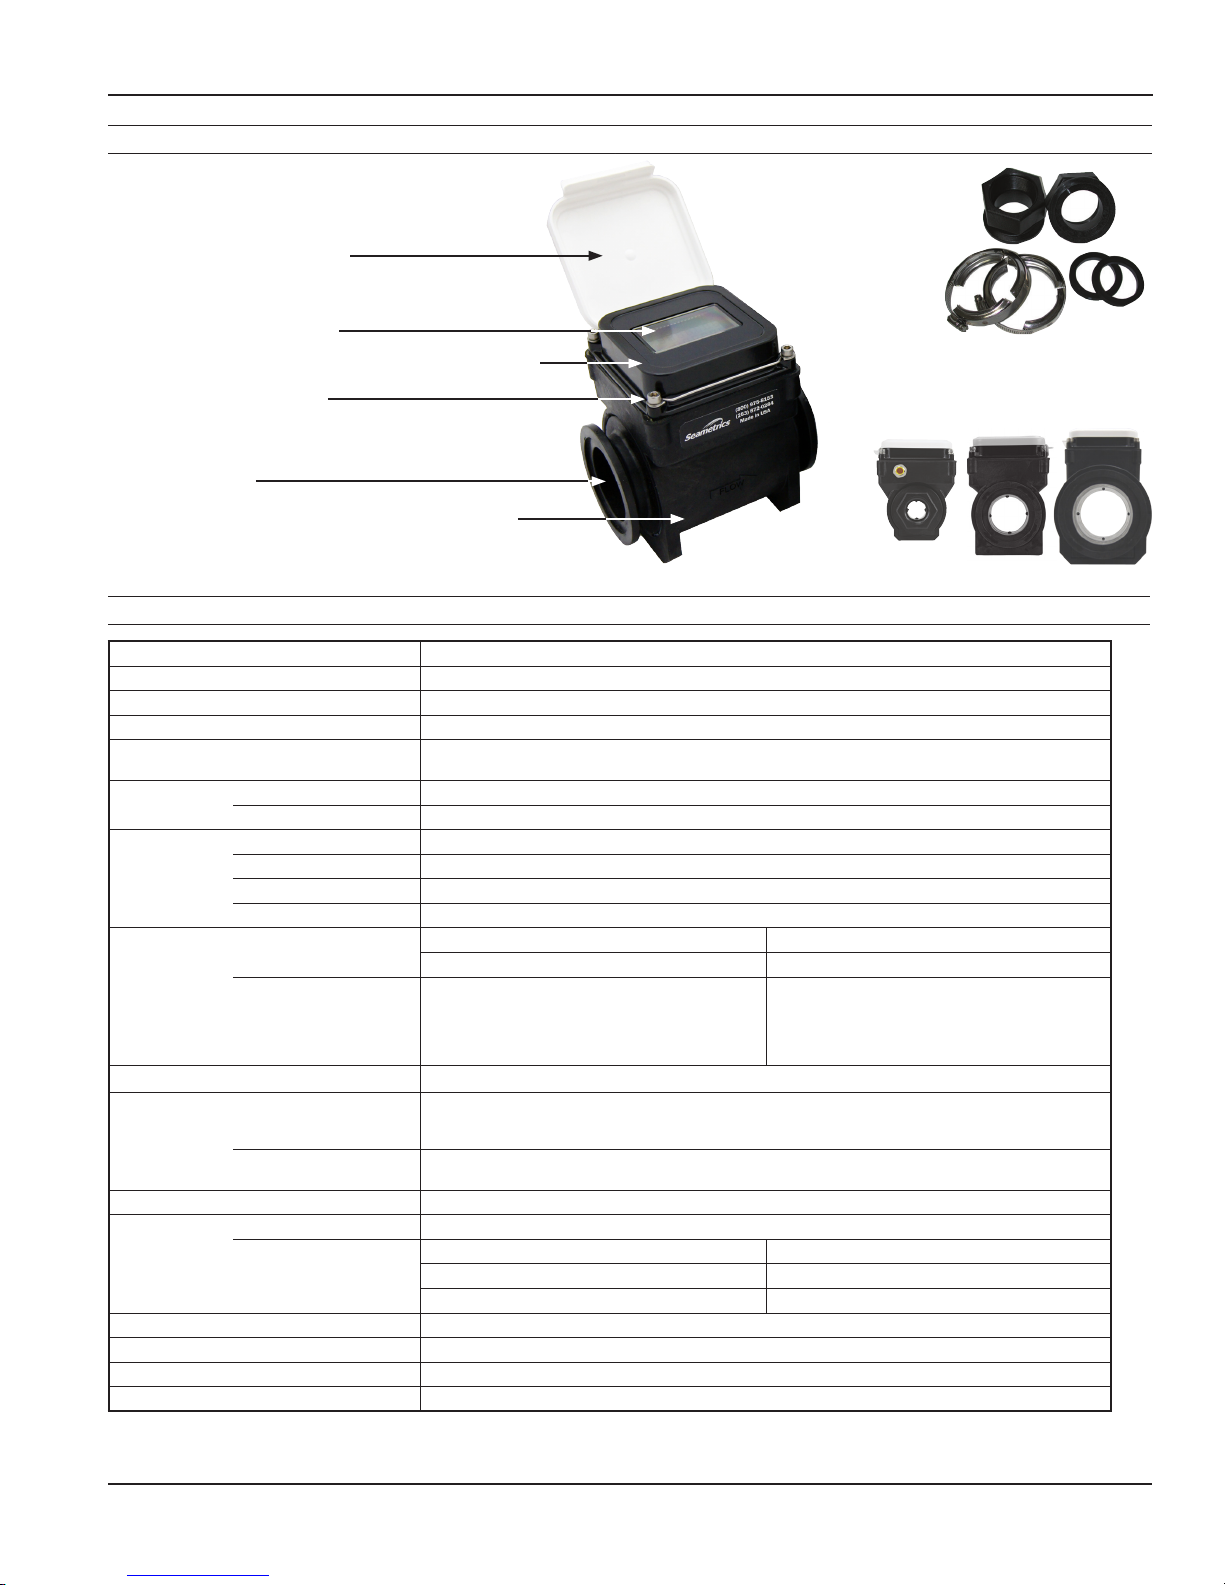
Features
Polyethylene protective cover
LCD rate and total indicator
Powder-coated diecast aluminum electronics housing
Seametrics Fitting Kit
Cross-drilled screws (2) for
tamper-evidence
316SS electrodes
Corrosion-resistant glass-lled polypropylene body
Lightweight for easy handling
Unobstructed Flow
Specications*
Pipe Size 1, 2, or 3 inch full port
Fittings 1 inch NPTF, 2 or 3 inch ange clamps with 2 or 3 inch NPTF tting kit
Pressure 150 psi or 10.3 bar working pressure @ 70˚ F
Operating Temperature Range Operating: 10˚ to 130˚ F (-12˚ to 54˚ C), Non-operating: -40˚ to 176˚ F (-40˚ to 80˚ C)
Accuracy ±1% of reading (between 10% and 100% of maximum ow)
Flow Range Minimum 1”: 2.3 gpm (0.145 l/s) 2”: 6 gpm (0.38 l/s) 3”: 14 gpm (0.88 l/s)
Maximum 1”: 110 gpm (6.94 l/s) 2”: 300 gpm (18.9 l/s) 3”: 670 gpm (42.3 l/s)
Materials Body Glass-lled polypropylene
Electrodes 316 stainless steel
Electronics Housing Power-coated diecast aluminum
Display Cover Polyethylene
Display Rate Total
Digits 6 8
Units Gallons/Minute, Million Gallons/Day,
Security Cross-drilled screws and tamper-evident seal (optional)
Power WMP101 10–30 Vdc @ 60 mA maximum (15 mA average)
WMP104 6 - AA alkaline cells, replaceable. Estimated life is 1 year depending on usage (standard)
Pulse Output Signal (WMP101 only) Current sinking pulse, opto-isolated, 32 Vdc maximum @ 10mA maximum
Pulse Rate Low Frequency (-PxU) 1 unit/pulse out, pulse width of 10 ms, depending on unit selection
(WMP101 only)
Empty Pipe Detection Hardware/software, conductivity based
Conductivity >20 microSiemens/cm
Environmental NEMA 4X standard
Electrical Connection (WMP101 only) 5-pin male circular connector, mates to industry standard cable
*Specications subject to change • Please consult our website for current data (seametrics.com).
High Frequency (-HF) 1” 2” 3” Pulse width 1.1 ms, min–max frequency, 3–150 Hz
Pulse/Gal 80 30 13
Pulse/Liter 21.14 7.93 3.44
±3% of reading (between cutoff and 10% of maximum ow)
Cubic Feet/Second,
Cubic Feet/Minute, Liters/Second, Liters/Minute,
Million Liters/Day, Cubic Meters/Minute,
Cubic Meters/Hour
Note: Using an unregulated power supply >18 Vdc may damage the meter due to AC line input voltage
uctuation.
2 - C lithium batteries, replaceable. Estimated life is 2–4 years depending on usage (extended battery life opt)
Acre-Feet, Acre-Inch, Gallons, Gallons x 1000,
Cubic Feet, Liters, Megaliters, Cubic Meters,
Cubic Meters x 1000
for 2 & 3 inch model
Seametrics • 253.872.0284 Page 3 seametrics.com
Page 4

4.625”
10.75”
4.40”
3.00”
7.30”
7.30”
2.625”
GENERAL INFORMATION
Dimensions
Dimensions shown without the Seametrics WMP Fitting Kit.
WMP-SERIES INSTRUCTIONS
4.3”
1.00”
5.50”
4.55”
8.8”
5.38”
4.625”
3.25”
2.00”
5.50”
2 Inch1 Inch
9.50”
3 Inch
6.03”
1.63”
2.03”
Flow Range
1” 2” 3”
Gal/Min Liter/Sec Gal/Min Liter/Sec Gal/Min Liter/Sec
Minimum 2.3 0.145 6 0.38 14 0.88
Maximum 110 6.94 300 18.9 670 42.3
Seametrics • 253.872.0284 Page 4 seametrics.com
Page 5

INSTALLATION
WMP-SERIES INSTRUCTIONS
Piping Conditions
It is highly recommended that the meter be installed with
a length of straight pipe at least two times the diameter
upstream and one diameters downstream. Some piping
conditions require more than this. See next page for
recommendations.
Step 1
Position gasket
at either end
Step 2
Place adapter
against gasket,
open screw clamps
to clear anges
End Connections
The meter comes with Banjo™ union-type ange
connections for ease in servicing the meter. To connect
these to piping ends, a variety of kits are available from any
Banjo dealer or from Seametrics.
Follow the diagrams below to make the connections.
Step 3
Place screw-clamps
over both adapter
and meter anges
and tighten screws
NOTE: Above installation instructions are for WMP101/104-200 (2”) and WMP101/104-300 (3”) only.
The WMP101/104-100 (1”) is provided with integrated NPT female threaded ends.
Positioning
This is an all position meter which can be installed either vertically or horizontally, register up, down, or angled. However,
entrained air or solids may make some positions preferable to others.
WMP
Intermittent air
bubbles pass over
electrode
Possible
sediment
build-up
Not ideal:
Air bubbles and sediment on the
electrodes can affect accuracy
Recommended:
May prevent sediment
or bubble problems
WMP
Electrode moved
from top by
rotating meter
Intermittent air
bubbles
miss electrode
Electrodes free
from sediment
build-up
Seametrics • 253.872.0284 Page 5 seametrics.com
Page 6

INSTALLATION
Straight Pipe Recommendations (X = pipe diameter)
WMP-SERIES INSTRUCTIONS
Reduced Pipe
2X
Elbows
2X
Full Pipe Recommendations
Possible Problem
1X
1X
Expanded Pipe
Swirling Flow: Partially Open
Buttery Valve
Better Installation
5X
5X
1X
1X
Allows air pockets to form at sensor
Possible Problem
Better Installation
Post-valve cavitation can create air pocket
Possible Problem Better Installation
Air can be trapped
Ensures full pipe
Keeps pipe full at sensor
Allows air to bleed off
Seametrics • 253.872.0284 Page 6 seametrics.com
Page 7

CONNECTIONS and OPERATION
Electrical Connections
WMP-SERIES INSTRUCTIONS
WMP104. The WMP104 is battery-powered, totally self-
contained, and does not require any electrical connections
(there is no output on the WMP104 model).
Cable Connections
Gray: Pin 5 = Ground
Black: Pin 4 = (–) Power
Blue: Pin 3 = (+) Pulse
White: Pin 2 = (–) Pulse
Brown: Pin 1 = (+) Power
Shield Drain Wire
WMP101. A connector is provided on the outside of the
WMP101. To connect to the meter, plug the cable in and
hand tighten the retaining threads. Follow the diagram
to make connections. If you are using the pulse output,
connect power rst and determine that the meter is
working properly by observing the display. Then connect
the pulse output.
Grounding
Grounding (WMP101). For best performance, especially
in chemically noisy environments, the gray ground wire
and the bare drain wire should be connected together and
to a good earth ground as close to the meter as possible.
Metal pipe and ttings in contact with the uid should
also be bonded to the same earth ground with corrosion-
resistant connections.
Seametrics • 253.872.0284 Page 7 seametrics.com
Operation
Display. The display reads ow rate and accumulated total,
in the units for which it was ordered. The top line is the
total, the bottom line is the rate, and indicators give the
units (ac-ft, GPM for instance.) Empty or partially full pipe
is automatically detected and is indicated by a reading of
“ – EP – “.
Battery. The standard batteries are user replaceable
with an approximate 1–2 year life depending on usage.
An extended battery life option offers an estimated 2–4
year life depending on usage. On the battery-powered
WMP104 there is a low-battery indicator (“low bat”) when
the battery voltage drops below a certain point. Batteries
should be changed within four weeks of the appearance of
this indicator.
Page 8

MAINTENANCE and TROUBLESHOOTING
Maintenance
WMP-SERIES INSTRUCTIONS
There are no user-serviceable parts in the WMP-Series
meters except the batteries in the WMP104.
Battery Replacement. When the “low bat” indicator
appears, the batteries should be changed. Either six AA
alkaline cells are required, or two C lithium cells with
integrated wiring harness, depending on power option
ordered with meter.
To change the batteries, rst remove the four screws which
hold the top cover in place. Be careful not to lose the
washers. Move the top cover to one side and remove the
foam retainer which covers the battery tray or pack.
Warning!
Use Extreme Caution not to pinch wiring
or other assembly parts under the
housing seal—this may cause an ingress
of water, voiding the product warranty.
• For units with AA alkaline batteries, remove the old
bat teries from the battery tray and replace them
with fresh ones, taking care to fol low the polarity
indicators in the battery tray.
• For units with the optional C lithium batteries,
carefully unplug each of the two battery wiring
harness connectors. Slip the batteries out from
under the elastic retainer, and replace them with
the new batteries. Reconnect each of the two wiring
harness connectors. The connectors are indexed for
correct installation.
Replace the foam retainer, and then put the top cover
back in place. Replace the four screws and washers, and
then tighten them securely using cross-pattern to evenly
compress the gasket.
Environmental and Safety Note
Take care to dispose of all batteries in
accordance with Federal, State, and Local
regulations.
Troubleshooting
Problem Probable Causes Things to try…
Blank Display (WMP101) No power to unit Check power supply; check wiring
Blank Display (WMP104) Batteries dead or misinstalled Check polarity; replace batteries
Reading “-EP-” Empty or partly lled pipe or
Rearrange piping to ensure full pipe
excessive air pockets or foaming
Flow but no ow rate reading Heavily coated electrodes Remove meter and wipe electrodes
Seametrics • 19026 72nd Avenue South • Kent, Washington 98032 • USA
(P) 253.872.0284 • (F) 253.872.0285 • 1.800.975.8153 • seametrics.com
LT-65650290r1.2 20161006
10/6/16
 Loading...