


Precision Flow Measurement
Orange (R) Remote B: pn4
R
Black (R) -Remote Pwr: pn2
Wiring
An ON
I
CON Brand
Electrical
Quick Start Guide
AC Power w/Pulse (A1X/A2X)
for: iMAG 4700r / AG3000r
Remote Meter: Unscrew the user access lid and remove it.
Remove the 5 pin screw connector from its socket. Install the
wires through the cable port into the 5 pin screw connector in
their respective locations. Plug the 5 pin screw connector into its
socket. Refer to the complete manual for further details.
User access lid Front panel—do
Red (R) +Remote Pwr: pn1
Blue (R) Remote A: pn5
not open
C1 = power/output cable
AC = AC power cable
R = remote cable
Remote Meter Remote Display
Remote Display: Remove the 3 screws holding the display
assembly and remove it from the meter. Remove the 15 pin
screw connector from its bag. Install the wires through the
cable ports into the 15 pin screw connector in their respective
locations. Plug the 15 pin screw connector into its socket. Be
sure all pins align properly and that the connector has not
slipped to one side. Refer to the complete manual for further
details.
Orange (R) Remote B: pn11
Blue (R) Remote A: pn12
Black (Internal): pn14
Red (Internal): pn15
R
Black (Line)
White (Neutral)
Green (Ground)
Black (R) -Remote Pwr: pn10
Red (R) +Remote Pwr: pn9
Green (C1) Pulse+: pn2
White (C1) Pulse-: pn1
C1
AC
Remove plug & o-ring. Insert
cable gland/strain relief. Feed
cable through cable gland.
Refer to the Mechanical Quick Start Guide or the complete instruction manual for details on mechanical installation.
WARNING: Improper sealing of glands or cables will invalidate any warranty.
Be sure all pins align
properly and that the
connector has not slipped to
one side.
Clamp cable with strain relief
clips. Attach drain wire lug to
bracket post.
Plug the backup
battery cable into the
back of the display
assembly.
WARNING: BACKUP BATTERIES
ARE NOT INTENDED AS A
PRIMARY POWER SOURCE
CRITICAL!
Torque cable gland sealing
nut to 22 in-lbs.
253.872.0284 seametrics.com
Menu System
1.2345678
TAP
TAP
Electrical Quick Start Guide
AC Power w/Pulse (A1X/A2X)
for: iMAG 4700r/ AG3000r
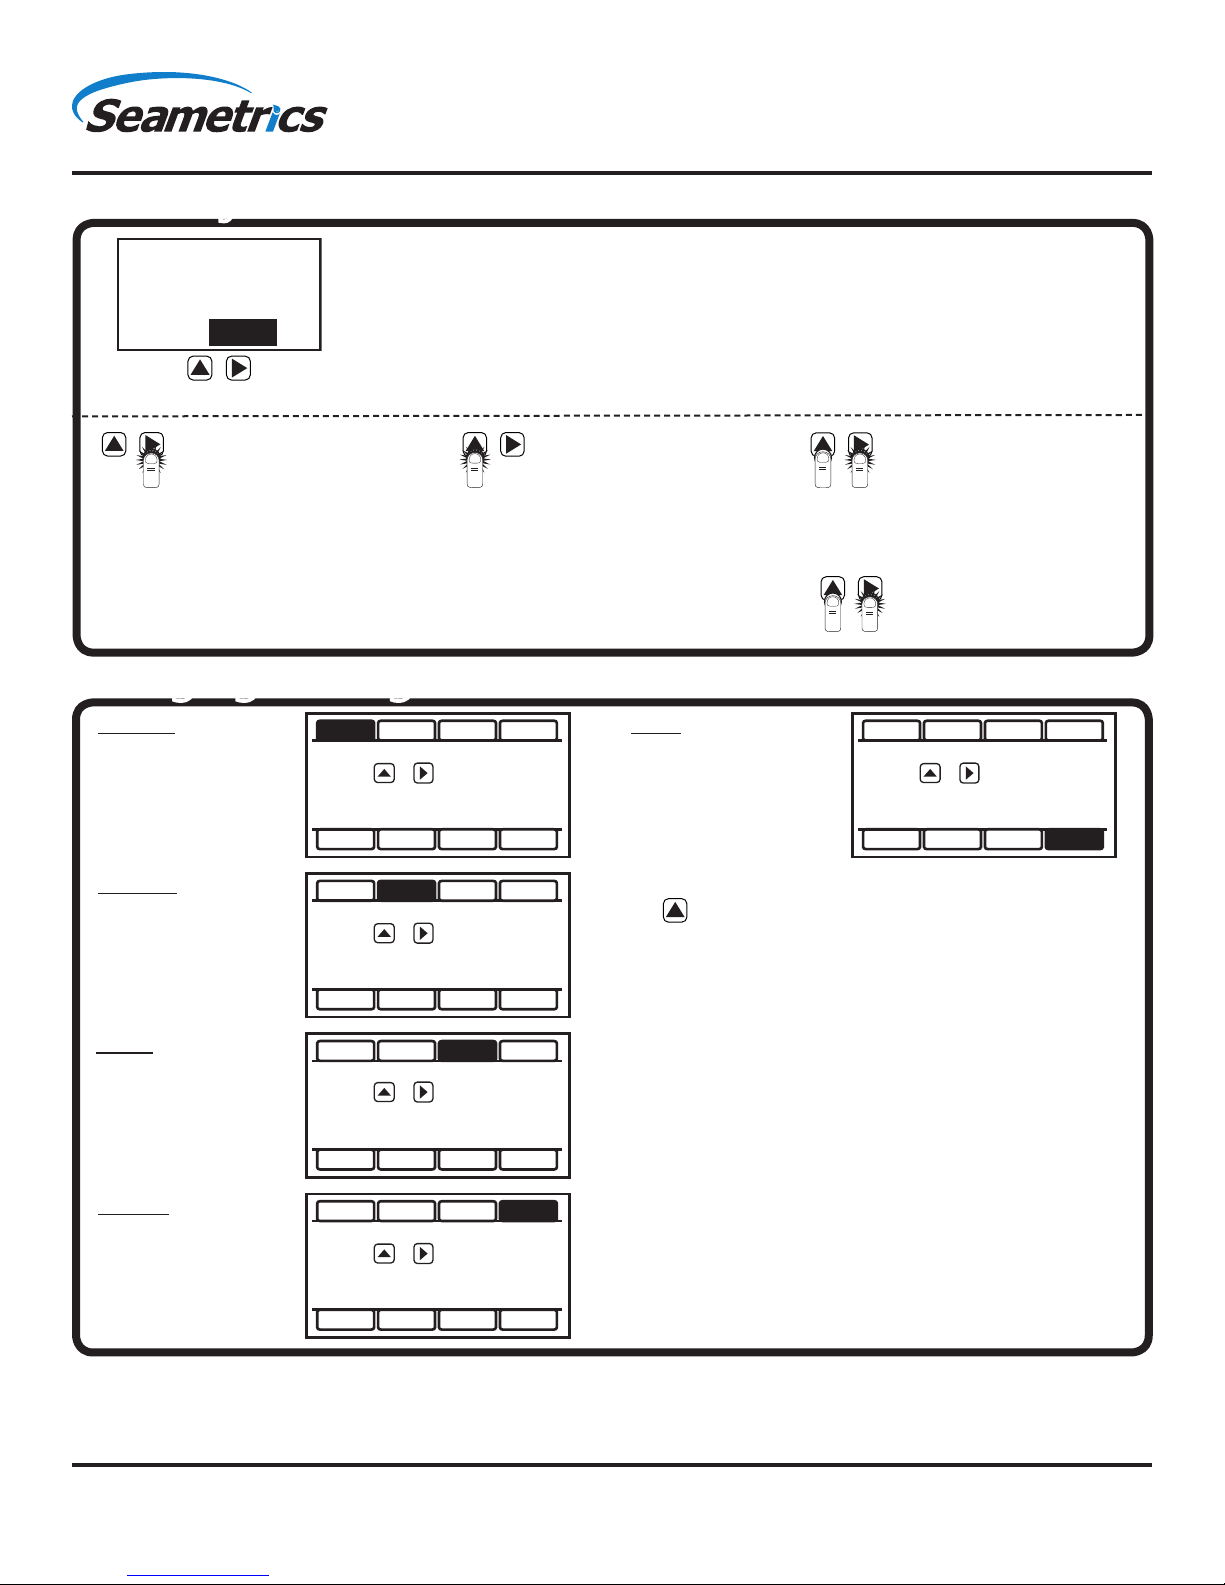
The HOME Screen displays ow volume, direction of the ow total and ow RATE
along with status conditions such as Empty Pipe. Two buttons below the LCD
display are used to access menu screens for viewing and changing meter setup
parameters.
100
FWD TOTAL
TOTAL
CU FT
X1000
RATE
GPM
These two buttons are light sensors which can detect when a nger is covering
them. Only three button touch actions are needed to control navigation
through the menus, settings changes and back to the home screen.
HORIZONTAL SCROLLING:
Tap right-hand button to
scroll horizontally through
SELECT: Tap left-hand button
to change a highlighted item
within a tab dialog.
menu tabs or move
horizontally within a tab
dialog when applicable.
All menu screens consist of two rows of tabs surrounding a dialog box that lets
you view and change setup parameters. To enter the Menu System perform the
hold and tap sequence.
Changing Settings
T UNIT
View or change TOTAL
volume units
T UNIT R UNIT SET P DAMP
TOTAL = GALLONS
PRESS + TO SET TOTAL
UNITS FOR DISPLAY
SET 4 SET 20 SET F EXIT
EXIT
Return to HOME
SCREEN or enter
SUBMENU
ENTER/EXIT: Hold left
button while tapping right
+
HOLD TAP
button once to enter or exit
a tab dialog or to navigate
between the HOME and
other menu screens.
+
HOLD TAP
T UNIT R UNIT SET P DAMP
PRESS + EXIT MENU
AND RETURN TO FLOW
DISPLAY
SET 4 SET 20 SET F EXIT
R UNIT
View or change ow
RATE units
Set P
View or change pulse
output scaling
DAMP
View or change # of
seconds for rolling
average.
(0=1 second,
1=2 seconds, etc.)
T UNIT R UNIT SET P DAMP
FLOW RATE = GALLONS/MIN
PRESS + TO SET RATE
UNITS FOR DISPLAY
SET 4 SET 20 SET F EXIT
T UNIT R UNIT SET P DAMP
00001.0 GALLONS
PRESS + TO SET
GALLONS TOTALIZED PER
PULSE SENT OUT PULSE1
SET 4 SET 20 SET F EXIT
T UNIT R UNIT SET P DAMP
DAMPING = 1
PRESS + TO SET
DAMPING VALUE
SET 4 SET 20 SET F EXIT
The EXIT tab in the MAIN MENU has a second function. If you
tap ve times, you will be redirected to a SUBMENU screen
from which you can access additional options.
INFO: Meter model, serial number, rmware version
Seametrics • 19026 72nd Avenue South • Kent, Washington 98032 • USA
(P) 253.872.0284 • (F) 253.872.0285 • 1.800.975.8153 • seametrics.com
LT-14296r2.0 20180515
5/15/18
 Loading...