

Page 1

Continuous Band Sealer Instruction Manual
Distributed By:
Version 3.5
Last Updated: December 11, 2019
Sealer Sales | www.sealersales.com | Tel: 818-718-8818 | E-mail: contact@sealersales.com
Page 2

Copyright © 2014 by Stephanie Hwang
All rights reserved. No part of this publication may be reproduced, distributed, or transmitted in any form or by any means, including photocopying,
recording, or other electronic or mechanical methods, without the prior written permission of the publisher, except in the case of brief quotations embodied in
critical reviews and certain other noncommercial uses permitted by copyright law. For permission requests, write to the publisher, addressed “Attention:
Permissions Coordinator,” at the address below.
Sealer Sales, Inc.
8820 Baird Avenue
Northridge, Ca 91324
www.sealersales.com
Printed in the United States of America
Page 3

General Information
E Q U I P M E N T I N F O R M A T I O N
Model #
Serial #
Purchase Date:
Reference # (found on packing slip)
Owner:
Thank you for purchasing our continuous band sealer.
This owner’s manual contains information relating to your band sealer machine. The manual will
provide you with basic information concerning both operation and maintenance of your new machine.
Please read it carefully as failure to do so may result in bodily injury and/or damage to the equipment.
Please fill in the information below. You will find the information on the machine identification plate.
You will need this information when ordering replacement parts or making technical inquiries.
No part of this manual may be duplicated, reproduced, stored in a retrieval system, translated, transcribed, or
transmitted in any form without the express prior written permission of Sealer Sales.
ii
Page 4

Page 5

Table of Contents
Safety Instructions ........................................................................................... 1
Introduction ...................................................................................................... 3
Installation ......................................................................................................... 8
Operating your Band Sealer .......................................................................... 10
Maintenance .................................................................................................... 23
FRM-1120C Parts Diagram .......................................................................... 26
FRS-1120W Parts Diagram ........................................................................... 39
Troubleshooting ............................................................................................. 48
Spare Parts List ............................................................................................... 54
Quality Control Testing ................................................................................. 55
Page 6

F R M - 1 1 2 0 C I N S T R U C T I O N M A N U A L
Safety Instructions
WARNING!
Below are general safety precautions and warnings that should be
understood prior to setting up or operating your equipment. Read and fully understand all instructions and
warnings prior to using this unit. Your safety is most important! Failure to comply with procedures may
result in serious injury or property damage. Remember:
responsibility.
Unsafe practices or unauthorized modifications could result in accidents or property damage. Failure to follow these
safety rules and take necessary precautions can result in serious injury as well as damage to equipment.
Never operate or service your band sealer until you have read this manual completely and understand it
fully.
Plug the band sealer into a standard 120 Volt, 60Hz wall outlet or surge protector. We highly suggest using a
surge protector. Some special order units are 220 Volt, 50Hz. Make adjustments as necessary.
Do not use the band sealer if the power cord, plug or any other parts are damaged. Be sure not to allow the
power cord to drape into your work area. Check that all parts are operating properly and perform the
intended functions. Check for all other conditions that may affect the operation.
Reduce risk of unintentional starting. Make sure the power switch is in the "OFF" position before attaching
to the power source.
Always disconnect sealer from power source before servicing, changing accessories or cleaning the unit.
Your personal safety is your
To provide protection against the risk of electrical shock, the power connection must be properly grounded
at all times.
Do not leave the sealer unattended when in use. Disconnect the sealer from the power source before
leaving the work area.
Band sealer is used solely for sealing thermoplastic materials. Using the machine for any other purpose can
cause damage to the machine and operator.
Always operate machine on a flat stable surface.
While operating machinery, wear close-fitting clothing and tie back long hair to prevent any external items
from getting caught in the machine. Do not wear jewelry when operating the band sealer.
1
Page 7

F R M - 1 1 2 0 C I N S T R U C T I O N M A N U A L
2
While machine is operating do not touch the heating and/or
cooling blocks. Blocks will be extremely hot and may burn your hands.
While machine is in operation, do not place fingers, tools, or other foreign objects on or into
the machine. Do not touch any moving parts while machine is operating. Fingers may get caught in
between the gears /pinch points and cause significant injury.
Thermoplastic bags and material are hand fed into the machine. Place bag on the guide and carefully feed
the bag through the band sealer. Fingers may be placed on the guide but do not allow fingers to touch any
of the moving parts on the band sealer.
Use emergency stop to turn off machine should material/bags get jammed into the machine. Carefully pull
material out of the band sealer. Do NOT use fingers to touch any part of the machine.
The band sealer is not water resistant or water proof. Spraying down the machine will damage machine or
cause electrical shock. Do not submerge the band sealer into water or liquid.
Do not operate band sealer in a corrosive or humid environment.
Always keep the machine clean, lubricated and in good working condition. Follow any maintenance and
lubrication procedures outlined in this manual. Make sure unit is disconnected from power source before
cleaning.
NEVER use any accessories or parts from other manufacturers. Machine should not be altered or modified
using parts that are not genuine authorized parts. Doing so will VOID YOUR WARRANTY.
Never leave the band sealer unattended. Be safe, disconnect the band sealer from power source before
leaving work area.
Close supervision is necessary when any appliance is near children or persons with reduced physical, sensory
or mental capabilities or lack of experience and knowledge . This sealer is NOT to be used by children or
by persons with reduced physical, sensory or mental capabilities or lack of experience and knowledge.
DO NOT use the band sealer outdoors.
DO NOT use the band sealer while under the influence of drugs, medications or alcohol.
SAVE THESE INSTRUCTIONS - REFER TO THEM OFTEN AND USE THEM TO INSTRUCT OTHERS.
Page 8

F R M - 1 1 2 0 C I N S T R U C T I O N M A N U A L
3
Introduction
Our band sealers are equipped with electronic temperature controllers and variable speed conveyors to
seal all types of thermoplastic materials (PP, PE, stand up pouches, gusseted bags, moisture barrier bags,
etc.). Seals are created using PTFE bands which maintain high seal quality and produce consistently
strong, clean seals on all heat sealable bags. Because bags are placed on a conveyor system, the width of
the bag does not matter. These versatile machines offer several adjustments which allow them to be used
for a wide range of applications. These machines are used extensively in the food, medical, chemical,
cosmetic, and electronic industries.
The FRM-1120C band sealer adopts dry ink coding designed to print date and lot codes at the seal line.
Ink dries instantly upon contact with packaging materials and produces clear and legible characters. For
FRM-1120C, the standard font size is 18PT which allows for two-line printing. An optional 10.5PT font
size which allows for three-line printing can be purchased separately. Please ask your distributor for more
information.
The FRS-1120W band sealer adopts hot stamp printing to print date and lot codes at the seal line. Hot
stamp printing is similar to an analog printing press. Color ribbon printing provides a stronger adhesion
print than dry ink coding and works best for humid environments.
The FRM-1120C / FRS-1120W are stand alone units with casters providing easy mobility for the band
sealer. In addition, the sealer is equipped with a tilting mechanism which allows the conveyor to tilt up
to 30 degrees, ideal for packaging liquids and grains.
Features of our Band Sealer
Your band sealer is equipped with a wide range of standard features and capabilities.
Simple to use – minimal operator training
Fast warm up time
Unit feeds right to left
Rust inhibiting stainless steel construction
Equipped with bag entry guide for easy bag feeding and straight seals
Industrial grade safety emergency stop switch
10amp protection power surge breaker
Equipped with photo sensor for optimal printing precision
Dry ink coder for printing characters at the seal line (FRM-1120C)
Hot stamp printing coder for printing characters at the seal line (FRS-1120W)
Wide seal (8mm) to assure airtight seal
PTFE sealing belts
Extended forced-air cooling system with extra wide cooling bars and 6 heat transfer orifices
One pair of brass sealing bars
Sealing method – constant heat
Adjustable 2-way pulley system for optimal stability and embossing clarity
Page 9

F R M - 1 1 2 0 C I N S T R U C T I O N M A N U A L
4
FRM-1120C
FRS-1120W
Dry Ink Coding
Hot Stamp Printing
Power
110V/60Hz
Motor Power
100W
Sealing Speed
0-394 inches/minutes
Sealing Width
8mm
Temperature Range
0-300˚C (572˚F)
Conveyor Size
43” x 8”
Max Conveyor Load
16.5lbs
Printing Heating Power
40 x 2 (W)
50 x 2 (W)
Character Size
3x5x7mm / 18PT – 2 lines
2x3x7mm / 10.5PT – 3 lines
(additional option available)
2x4x15mm
Printing Colors
Black, Blue, Green, Red,
White, Yellow
Black, Blue, Red, White
Dimensions
43” x 24” x 41”
Weight
187lbs (n.w.) / 275lbs (g.w.)
Basic
Principles
FRM-1120C is easy to
use. To seal, adjust
temperature and place
bag on conveyor
Knurled pressure rolls with variable pressure adjustment
PID digital temperature controller 0-300˚C (572˚F) with dual alphanumeric displays (target & current
temperature)
Motorized rubber conveyor with speed control
Capable of speeds up to 394 inches/minute
How Does the Band Sealer Work?
Our band sealers are comprised of a stainless steel frame, speed adjusting
mechanism, sealing temperature control system and transmission system. Turning
on the heat for the band sealer will cause a rapid rise in the temperature of the
heating blocks. Required temperature and speed can be adjusted via the
temperature controller and speed adjusting device. Plastic material to be sealed is
placed on the guide and conveyor. Conveyor will then take the material between the two heating blocks
to fuse the material together. Material will then pass through the cooling blocks to allow the material to
congeal. Finally, a photoelectric sensor will direct the dry ink coder to print a clear and legible print at the
seal line.
The motor drives the sealing belts, drive belts and conveyor simultaneously.
Specifications
Page 10

F R M - 1 1 2 0 C I N S T R U C T I O N M A N U A L
5
Band Sealer Diagram
Figure 1. FRM-1120C (1) Pedestal, (2) Lock Handle, (3) Slide Block for Bracket, (4) Guide Belt, (5) Conveyor Belt, (6) Conveyor Table, (7) Silicone Wheel, (8)
Guiding Wheel (small), (9) Printing Wheel, (10) Solid Ink Roller, (11) Ink Roller Heat Block, (12) Housing Case (13) Embossing Wheel (14) Control Panel (15)
Driving Wheel, (16) Cooling Block, (17) Adjusting Knob, (18) Pressing Wheel, (19) Heating Block, (20) Sealing Belt, (21) Driven Wheel, (22) Cam Shaft, (23)
Guide, (24) Work Table, (25) Adjusting Knob for Conveyor, (26) Lifting Hand Wheel of Conveyor Table, (27) Lifting Hand Wheel of Complete Unit, (28) Casters
Figure 2. FRS-1120W Band Sealer (29) Hot Stamp Imprinter
Page 11
F R M - 1 1 2 0 C I N S T R U C T I O N M A N U A L
6
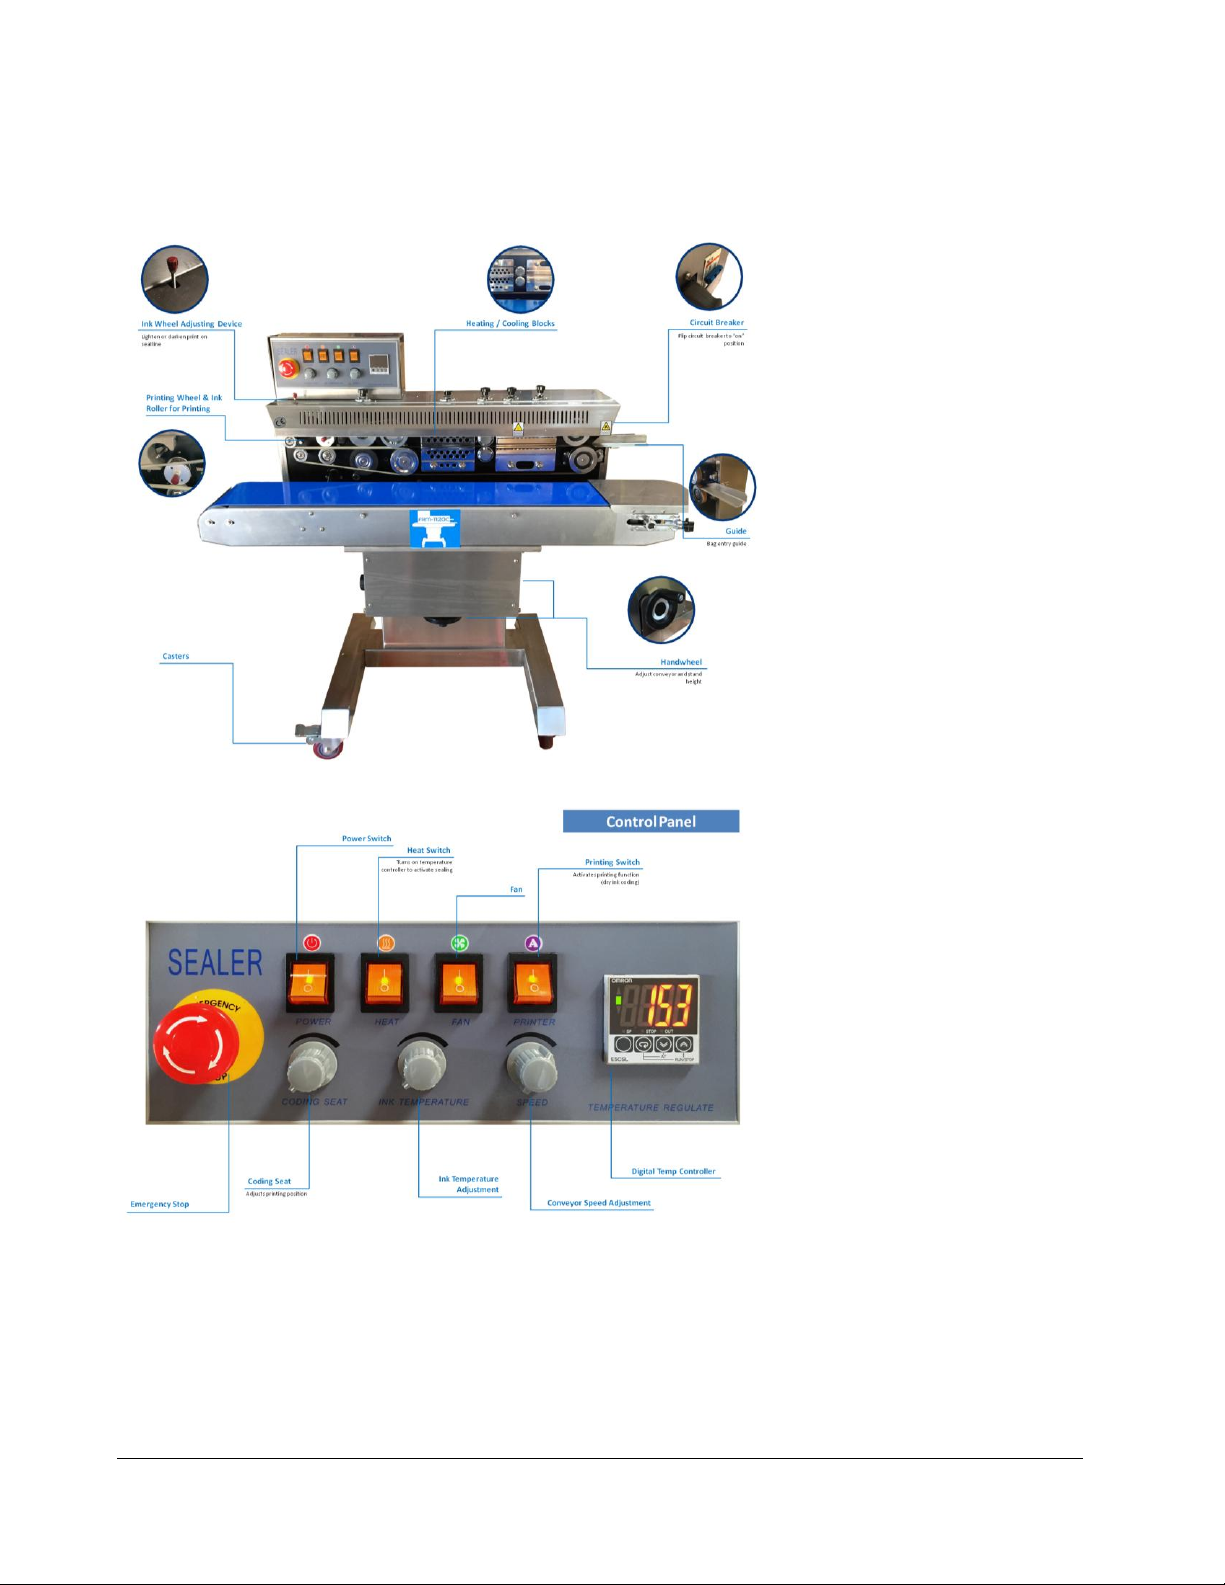
Getting to Know your Band Sealer
Page 12

F R M - 1 1 2 0 C I N S T R U C T I O N M A N U A L
7
Electrical Circuit Diagram
Figure 3. Electrical Circuit Diagram. (QF1) High Rupture Switch, (SB1) Emergency Stop Switch, (K1) Switch/Power, (K2) Switch/Heat, (K3) Switch/Fan,
(K4) Switch/Printer, (K5) Switch/Aerating-Vacuum (W1) Speed-Regulating Potentiometer; (W2) Coding Position Potentiometer, (W3) Temperature-Regulating
Potentiometer; (HE1) Heating Element of Sealing, (R3/R4) Heating Element of Ink Roller; (MD), Speed adjusting Motor; (M) Aerating/Vacuum, (FAN) Fan,
(TC1) Transformer, (YC1) Electromagnetic Clutch, (YC2) Electromagnetic Brake, (SQ1) Groove Sensor, (SQ2) Photoelectric Sensor, (THC1) Temperature
Controller, (ST1) Thermocouple, (AP1) Speed Adjusting PC Board, (AP2) Main Control PC Board, (PCB1) Temperature Adjusting PC Board
Page 13

F R M - 1 1 2 0 C I N S T R U C T I O N M A N U A L
8
Installation
Important
Read this manual carefully, and make it available to everyone connected with the supervision, maintenance,
or operation of this machine. Additional copies are available at your request. (Contact your distributor for
this information.) Be very careful when operating, adjusting, or servicing this equipment. If in doubt, stop
and obtain qualified help before proceeding.
Installation
Place the band sealer in the desired location with the required electrical power source available. (See power
requirements.) Make certain that proper electrical wiring is provided to guard against low voltage. If the
voltage is too low, the equipment will not function properly.
Finding the proper location is a most important function of the initial set-up. One must take several factors
into consideration:
Adequate power source
Relationship to source of product
Relationship to band sealer
Relationship to any conveyors necessary to transport finished product
Convenience of operator
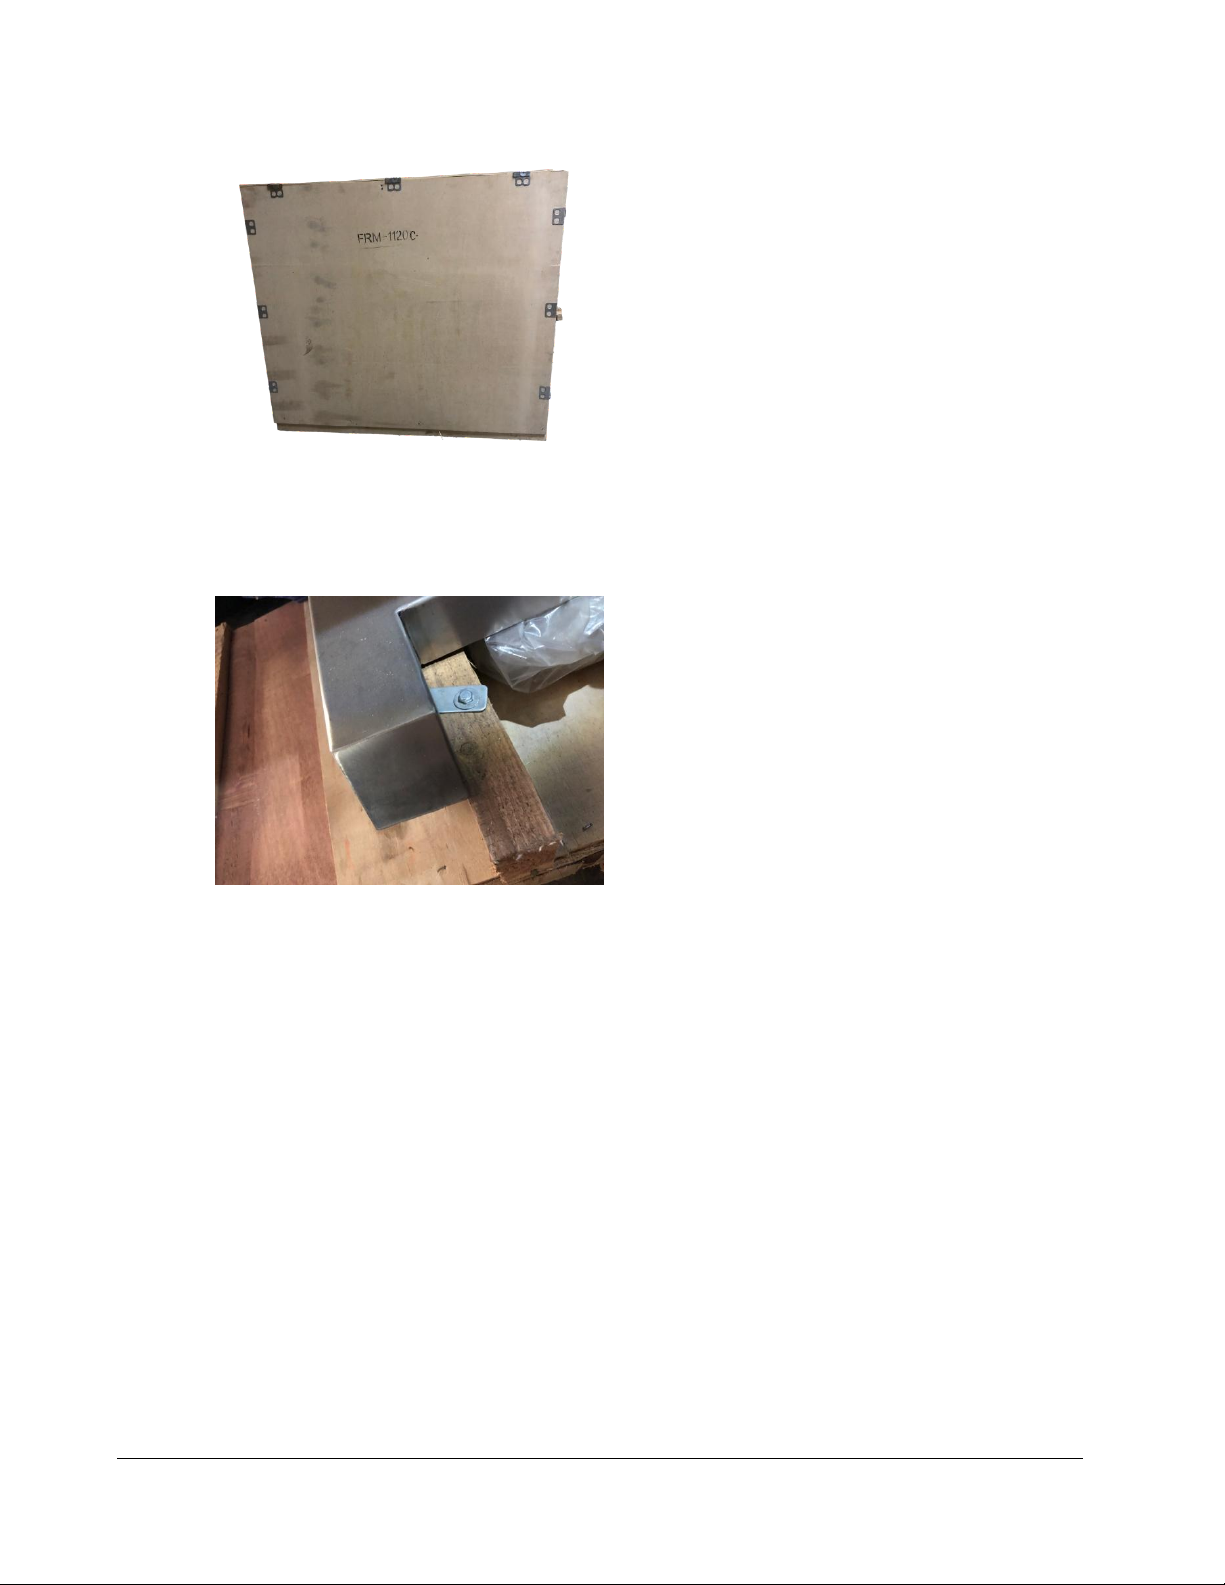
1. Your new HL-M1120LD band sealer comes packaged in a heavy duty crate to protect it. If your
machine does not arrive in this condition, write on shipping paperwork that outside of box is
damaged. Concealed damage may have occurred.
2. Remove the nails.
Page 14
F R M - 1 1 2 0 C I N S T R U C T I O N M A N U A L
9
Figure 4. FRM-1120C Crate
Figure 5. Bolts locking FRM-1120C to crate.
3. Remove the protective plastic covering the machine.
4. Remove bolts holding machine to crate.
5. Carefully check the contents against the spare parts list in the toolbox (see Spare Parts List on page
Error! Bookmark not defined.). Once you have determined that all of the parts have arrived in
good order set up can proceed. If any parts are missing or appear to be damaged, please notify your
distributor or Sealer Sales AND your freight company at once.
Page 15
F R M - 1 1 2 0 C I N S T R U C T I O N M A N U A L
10
Operating your Band Sealer
Operation Set-up
1. Our machines are equipped with a three-prong grounded plug. Make sure the plug is well-
connected in the socket to ensure safe operation.
2. Make sure the circuit breaker is in the “ON” position. (Levers pointing up)
3. First time operation. Allow the machine to pre-heat by running at a low temperature for a few
minutes. This would apply if the machine has not been in operation for a long time. The
machine can sometimes be damp from storage or shipment and running at a low temperature
will dry out any residual moisture.
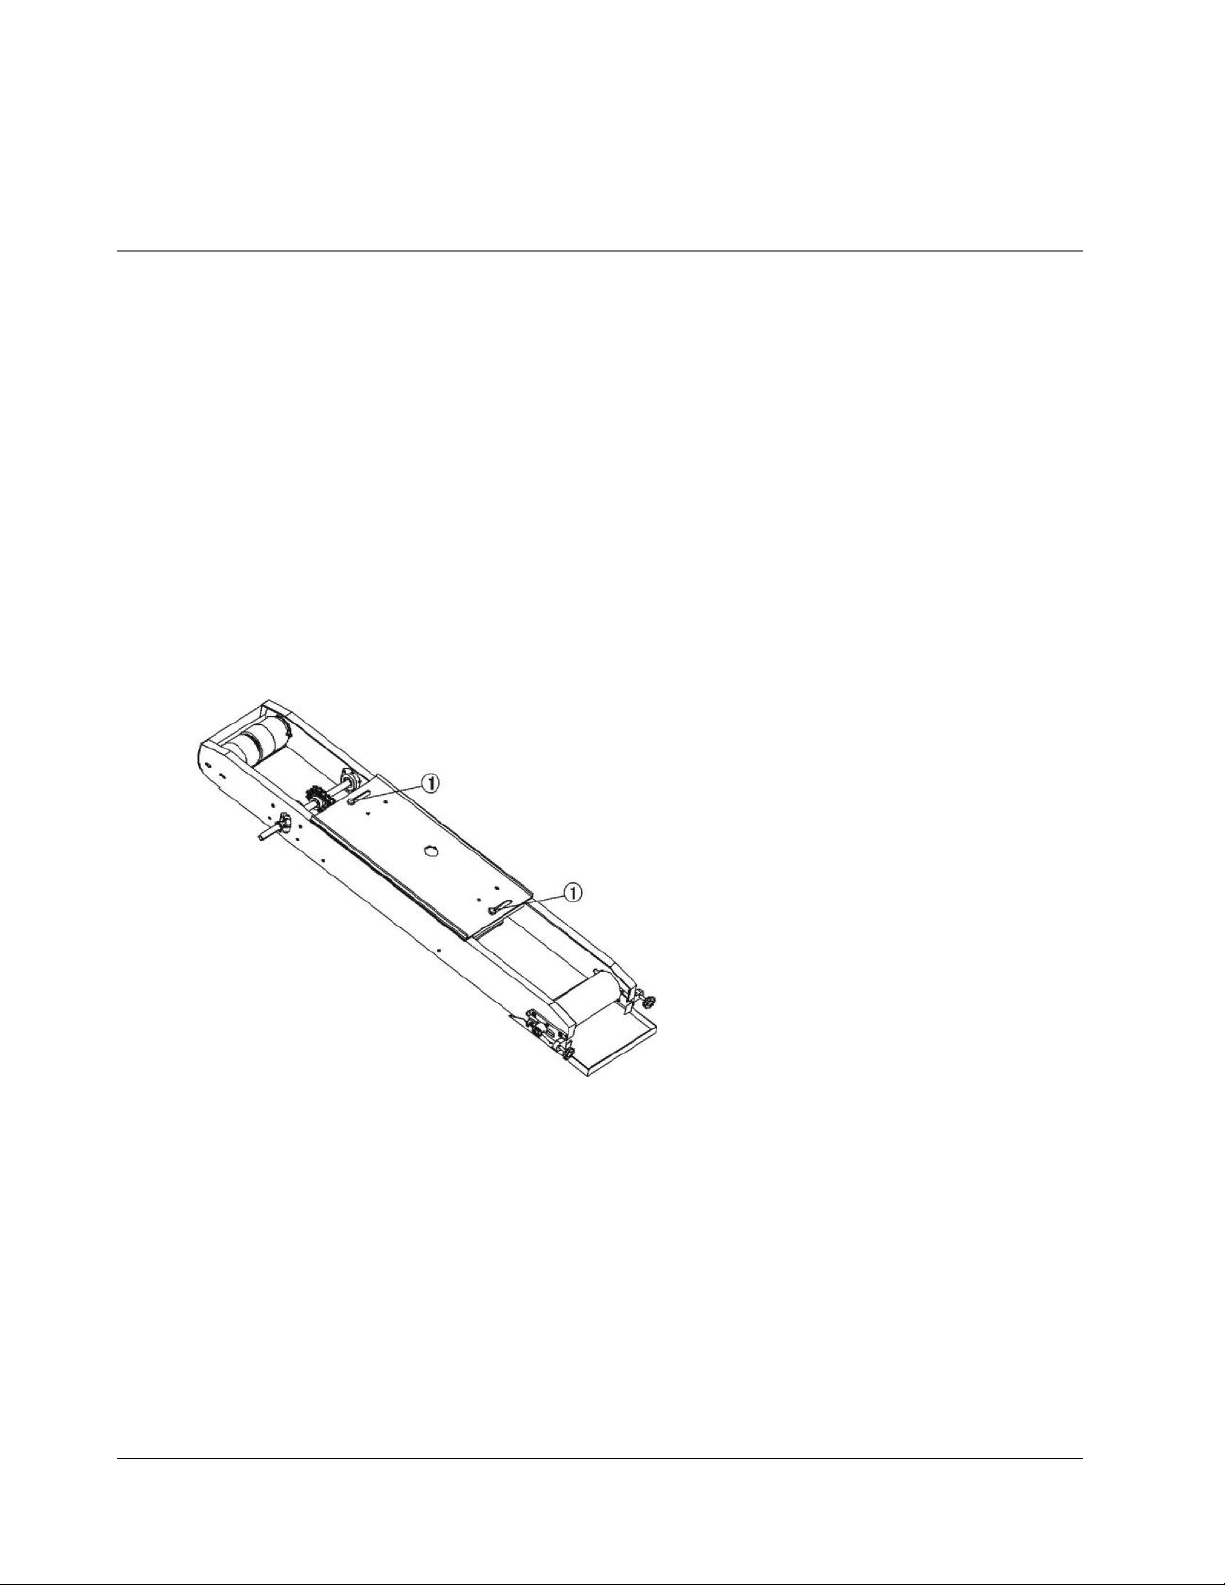
4. Adjust the conveyor position forwards or backwards. Loosen the two screws at the bottom of
the conveyor table. Move out the conveyor table to the suitable position, then fasten the screws.
Refer to Figure 6.
Figure 6.
5. Adjust the guide to adjust seal width and position of seal line on your material.
Page 16
F R M - 1 1 2 0 C I N S T R U C T I O N M A N U A L
11
Operation
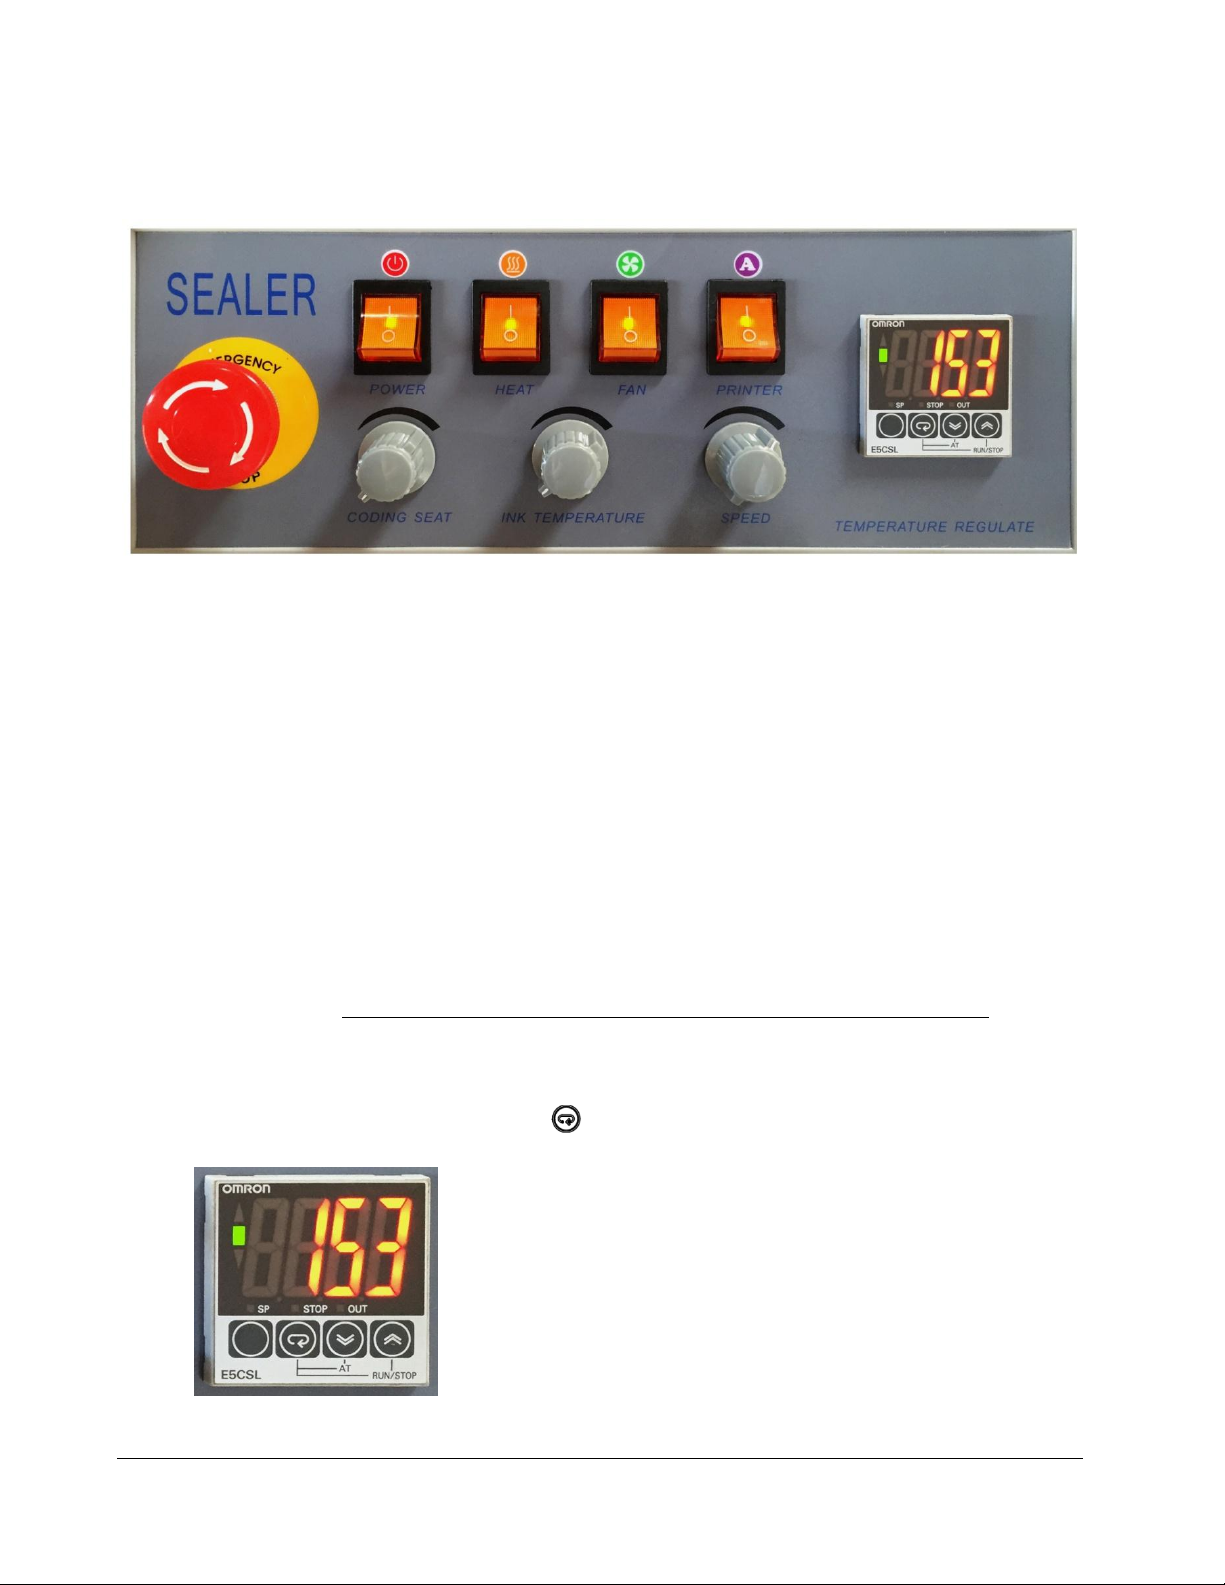
Figure 7. Control Panel of FRM-1120C
1. Our machines are equipped with a three-prong grounded plug. Make sure the plug is well-
connected in the socket to ensure safe operation.
2. Make sure the circuit breaker is in the “ON” position. (Levers pointing up)
3. Turn Power, Heat (Seal), Fan, and Printer switches to the “On” position. Belts and conveyor
will begin to move simultaneously.
4. Adjust the conveyor speed.
5. Adjust the temperature controller to the temperature desired to seal your material. Temperature
settings will vary based on bag material and thickness. If you are unsure what temperature setting
to use, we recommend starting at a low temperature (150ºC) and gradually increase to a
temperature that will seal your material. We highly discourage sealing material at a temperature
above 200ºC. Please note: Temperature will be in Celsius, not Fahrenheit. The
temperature controller cannot be displayed in Fahrenheit.
The PV value is the actual temperature and the SV value is the desired temperature setting. The
SV value can be viewed by pressing the button.
Figure 8. FRM-1120C Temperature Controller
Page 17
F R M - 1 1 2 0 C I N S T R U C T I O N M A N U A L
12
a. To set the temperature, press the button. The SV temperature will be displayed.
The SP light will be on to show the SV temperature.
b. Press the and button to change temperature setting.
c. Press the button to save the temperature settings.
d. Wait until the PV temperature matches the SV temperature which should take
approximately 5-10 minutes.
e. Check our YouTube channel (https://www.youtube.com/user/sealersales) for a video
demo.
f. Please note: Temperature will be in Celsius, not Fahrenheit. Do not attempt to make
additional adjustments to the temperature controller besides the temperature. The
temperature controller CANNOT be displayed in Fahrenheit and is ALWAYS in Celsius.
Please do not set the temperature controller above 200ºC. Please contact your local
distributor if you need assistance.
6. Adjust the pressure knob (Figure 34 , Item #71) on your band sealer depending on the
thickness of your bag material.
7. Place material on the guide (Figure 36, Item #28) and allow the band sealer to pull your
material through. Make sure your material is flat on the guide. While the material is moving
through the band sealer, do not push or pull the material as this will cause irregular sealing.
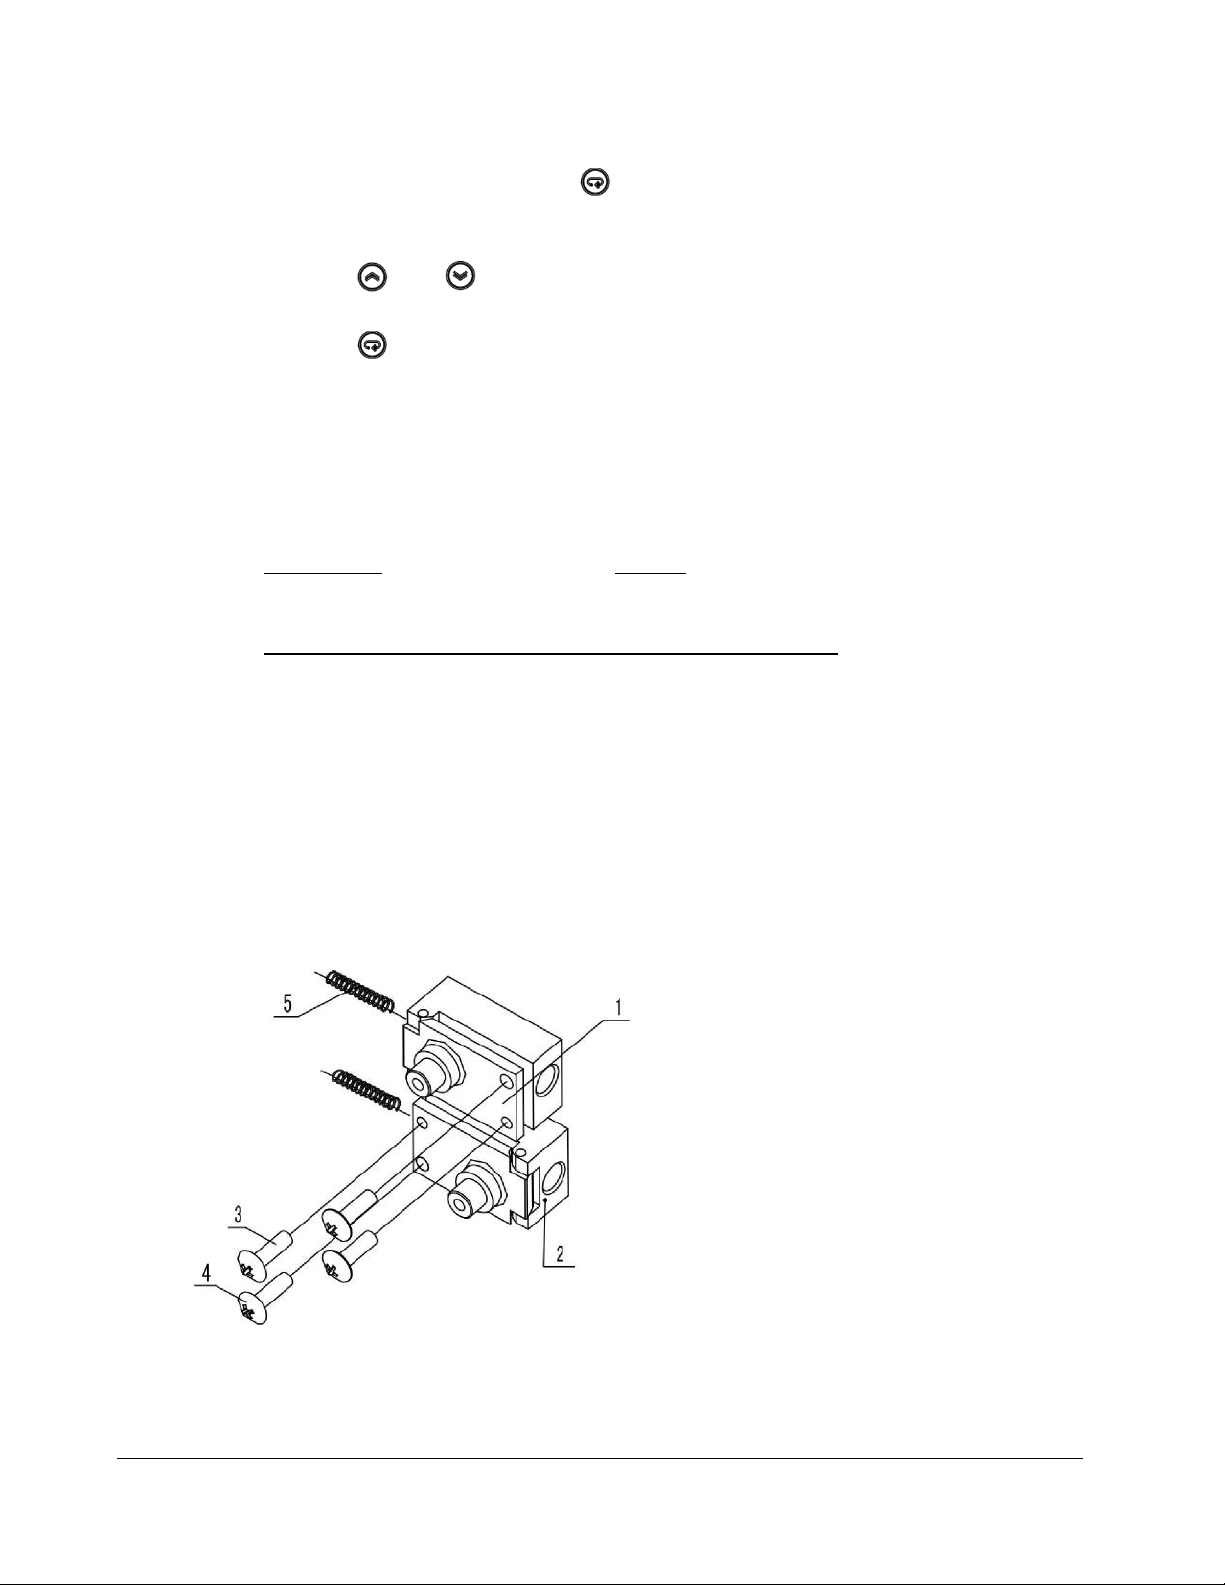
8. If the sealing belt is running off the guide wheels, make adjustments to the screws that are found
on the driven wheel seat (Figure 9, Item #1 & 2)
Figure 9. (1) Driven Wheel Seat (Adjusting Block), (2) Driven Wheel Seat (Adjusting Block), (3)/(4) Adjusting Screws, (5) Springs
Page 18

F R M - 1 1 2 0 C I N S T R U C T I O N M A N U A L
13
9. Emergency Stop – Press the emergency stop to turn off the machine. In order to restart the
machine, you must release the emergency stop by turning the knob 120˚ clockwise.
10. To shut down, turn off the heater switch and allow the temperature of the machine to drop
before turning off the power and fan switches. Following this shut down procedure will significantly
prolong the life of machine and sealing belts.
Sealing Optimization
1. Sealing performance can be adjusted with the sealing temperature and sealing speed. The higher
the speed the less exposure the material to heating blocks and therefore a higher temperature will
be required to seal the material.
2. Try a variety of different sealing temperatures and conveyor speeds to get the optimal seal for
your material.
Page 19
F R M - 1 1 2 0 C I N S T R U C T I O N M A N U A L
14
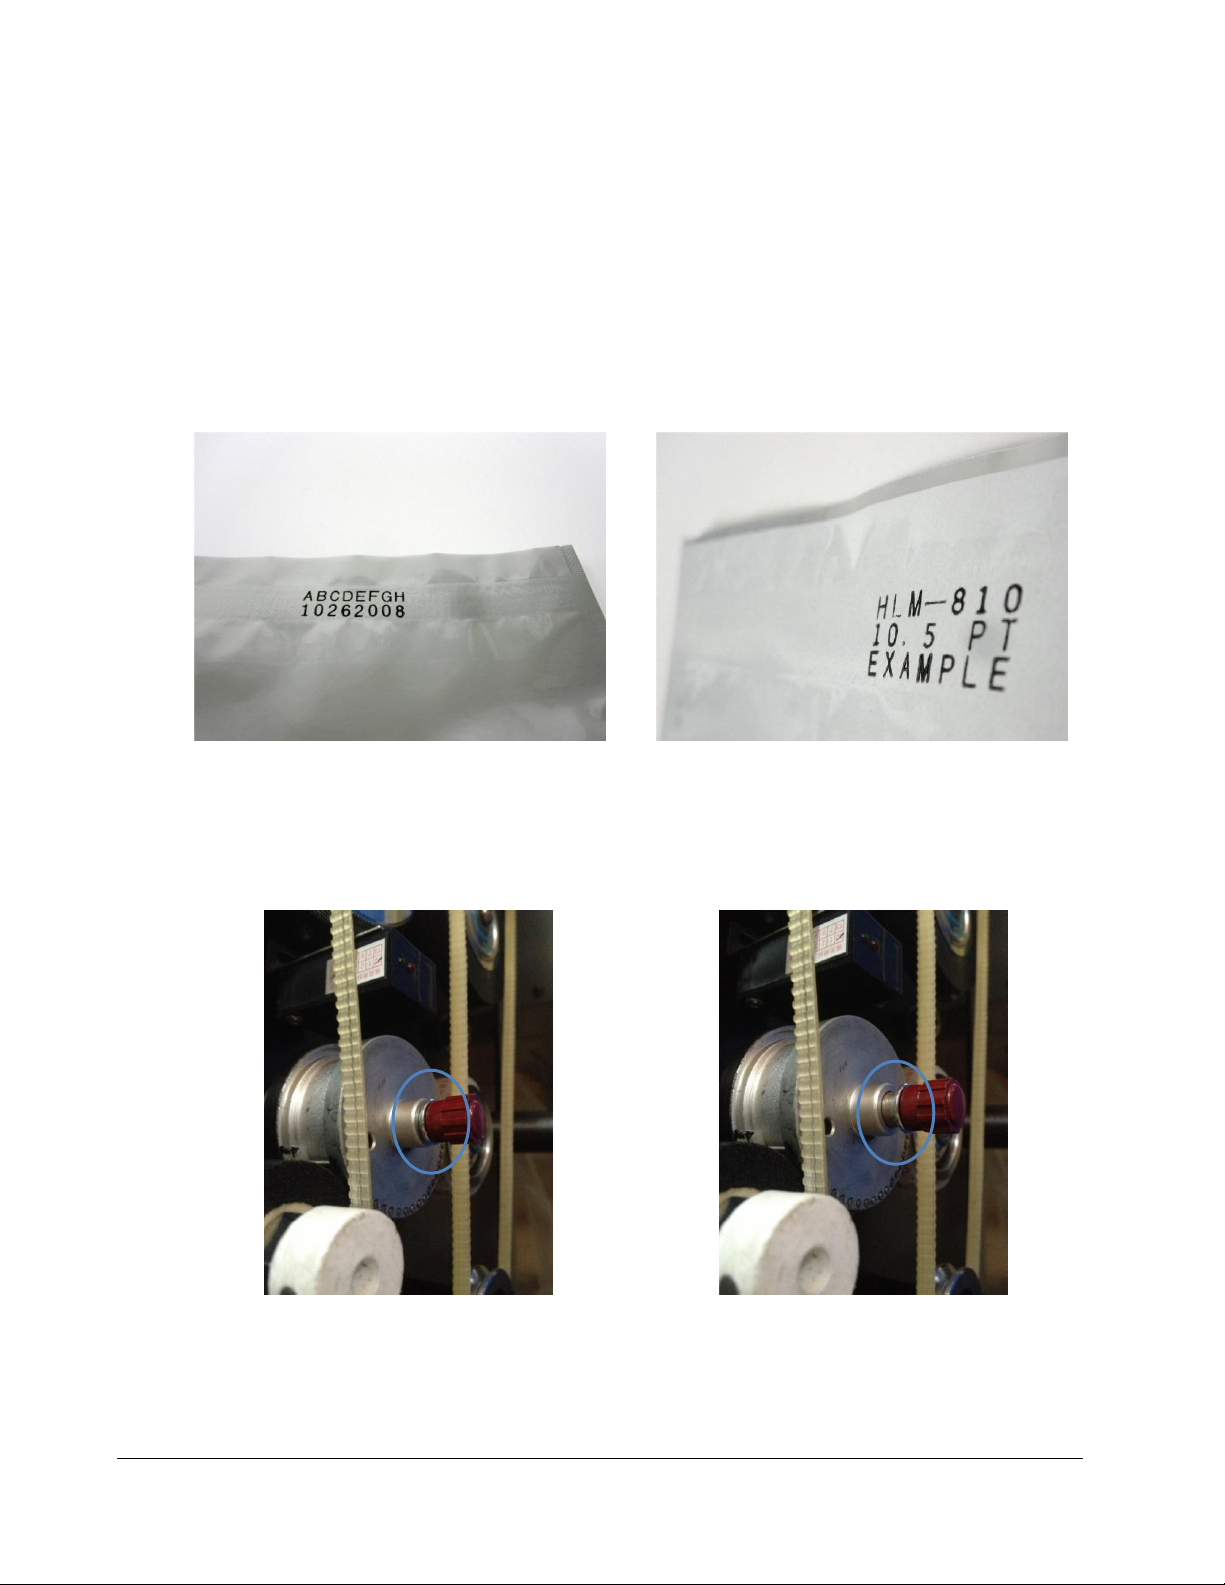
Figure 10. Standard font size - 18PT
Figure 11. Optional 10.5PT font size available for purchase
Figure 12. Locked Handle Position
Figure 13. Unlocked Handle Position
Printing Operation - FRM-1120C
FRM-1120C is equipped with a dry ink coding feature capable of printing characters at the seal line. Ink
dries instantly upon contact with packaging materials and produces clear and legible letters/numbers.
Standard font size is 18PT which allows for two-line printing up to 20 characters per line. Optional print
wheel which allows for 40 characters per line is available to be purchased separately. In addition, we also
carry 10.5PT font size which allows for three-line printing can also be purchased separately. Ask your
distributor for more details. Check our YouTube channel (https://www.youtube.com/user/sealersales) for
a video demo.
1. Removing Print Wheel. To remove the printing wheel from the base, push the red handle in and
turn clockwise until you feel the handle unlock. (See Figure 12 and Figure 13 for locked and
unlocked positions). You may need to turn the wheel a few times until the red handle unlocks and
pops out of its locked position.
Page 20

F R M - 1 1 2 0 C I N S T R U C T I O N M A N U A L
15
Figure 14. Place characters from right to left.
Figure 15. Place silicone pin to lock characters in place.
Figure 16. Ensure two holes and pins line up with the base
Figure 17. Ensure two holes and pins line up with the base
2. Installing Types/Characters on Print Wheel. Place selected characters in the grooves of the
printing wheel. Be sure to insert the characters from right to left to ensure actual imprint prints
correctly on your packaging material. Once completed, insert the silicone pin at the top of the
printing wheel to hold the characters in place.
3. Installing the Print Wheel. To insert the spring-loaded print wheel into the print wheel base,
ensure that the pin on the printing wheel is aligned with the notch of the print wheel base. Gently
insert the print wheel into the base. Lock the print wheel by pushing the red handle in until you
feel the handle lock into place.
Page 21

F R M - 1 1 2 0 C I N S T R U C T I O N M A N U A L
16
Figure 18. Remove metal wring found on the ink roller holder
Figure 19. Ink roller installed on ink roller holder
Figure 20. Correct Ink Roller Position
Figure 21. Incorrect Ink Roller Position
4. Install Ink Roller into the Ink Roller Holder. Remove the metal ring found on the ink roller
holder using an allen wrench. Place the ink roller onto the ink roller holder and place the metal
ring back on the ink roller holder to hold the ink roller in place. Please note that for 30mm wide
ink rollers, the metal ring will not be used.
5. Insert Ink Roller in the Ink Wheel Heating Block. When inserting the ink roller, ensure the
ink roller lines up with the type on the printing wheel. If the ink roller is pushed in too far, the
printing wheel will not print correctly. Note: Do not allow the ink roller to heat continuously when machine
is not in use as heating block may melt the ink roller.
Test the ink roller position relative to the printing wheel. Place your finger under the
photoelectric sensor. The sensor light will turn green and allow the printing wheel to rotate.
6. Make Adjustments to Ink Wheel Adjusting Device. As the print wheel rotates, check that
the printing wheel makes contact with the ink roller. Make adjustments using the ink wheel
adjusting device (Figure 22, Item #5) if necessary. Turning the adjusting screw clockwise will
move the ink roller away from the print wheel and turning the adjusting screw counterclockwise
will move the ink roller closer to the print wheel.
Page 22

F R M - 1 1 2 0 C I N S T R U C T I O N M A N U A L
17
Figure 22. (1) Ink Roller, (2) Ink Roller Heating Block, (3) Swing Pole, (4) Adjusting Strut, (5) Ink Wheel Adjusting Device
7. Make Adjustments Between Printing Wheel and Silicone Wheel. The typesets/characters
on the printwheel should only touch the silicone wheel during the printing process. The
characters should not touch the silicone wheel at any other time. If the band sealer is used to seal
relatively thicker materials, the screw (Figure 23, Item #4) should be loosened. Rotate the
eccentric sleeve (Figure 23, Item #3) to ensure the characters/typesets slightly tough the silicone
wheel's surface. Refasten the screw after making adjustments.
Figure 23. (1) Printing Wheel, (2) Silicone Wheel, (3) Eccentric Sleeve, (4) Screw
8. Setting Printing Temperature. We recommend setting the ink temperature on the higher end.
Allow 5-10 minutes for the ink heating block and ink roller to reach the correct temperature.
Note: If band sealer is not in use right away, do not leave ink roller in the unit while temperature is on. This may
result in the ink roller melting and producing messy print.
9. Adjust Printing Position. The coding seat knob determines printing position on your material.
For example, if you want to print on the left side of your bag, turn the coding seat to its lowest
Page 23

F R M - 1 1 2 0 C I N S T R U C T I O N M A N U A L
18
setting (or counterclockwise). If you want to print on the right side of the bag, turn the coding
seat to a higher setting (or clockwise).
Printing Optimization
1. Print quality will be determined by the degree of ink melting, distance between the ink roller and
printing wheel and distance between the silicone wheel and printing wheel.
2. Over time, decrease the gap between the ink roller and printing wheel.
3. A newer ink roller will require a lower temperature vs. an older ink roller. Make adjustments to
ink temperature as necessary.
4. Ensure there is adequate pressure on the silicone wheel (Part #BS-57A) by the printing wheel.
We suggest using factory default settings before making any adjustments. Adjustments may be
needed based on material thickness.
5. If the printing wheel rotates and there is no thermoplastic material running through the band
sealer, excess ink will rub off on the silicone wheel. Clean the silicone wheel with a shop cloth
and silicone spray to remove any excess ink.
6. Remove the ink roller from unit until sealer is ready for use. If ink roller is left in the
machine while not in use, this may result in melting of the ink roller and messy print. To
clean, wipe down belts, silicone wheel, and other parts with silicone spray and cloth.
Page 24

F R M - 1 1 2 0 C I N S T R U C T I O N M A N U A L
19
Figure 24. Type Example - FRS-1120W
Figure 25. FRS-1120W Control Panel
Each number dial turn moves the print
approximately 1” – 1½” to the right
Each number dial turn moves the
print approximately 1/8” to the right
Printing Operation - FRS-1120W
FRS-112W is equipped with a hot stamp ribbon printer. The printer works much like an analog printing
press. Types are loaded into the imprinter then heated. An inked printing ribbon sits between the type and
material to be printed. The heated type presses onto the ribbon, melting the ink onto the material. A spring
biased dancer assembly having a idler roller maintains a tension on the inked print ribbon as the inked print
ribbon is transferred from a supply reel to a rewind reel. To change the code of the hot stamp, types can be
easily replaced.
1. Determining the correct position for printing on your bag will require some trial and error.
Adjust the Speed, Coarse Tuning, and Fine Tuning knobs to determine the optimal printing
location on your bag.
2. To install the hot stamp ribbon, web the imprinter per diagram below (Figure 26). Be sure that
the dull side (pigment) of the tape faces away from printing head and toward the base of the
imprinter. To web the ribbon through the ribbon press wheel, pull the handle upwards to release
the ribbon press wheel. Lock the ribbon to the collect wheel by using a piece of scotch tape to
adhere the ribbon to the collect wheel.
Page 25

F R M - 1 1 2 0 C I N S T R U C T I O N M A N U A L
20
Figure 26. Ribbon Webbing Guide
3. Insert the printing head/type holder in the printing block. To lock the printing head, press the
handle on the printing head inward and turn clockwise about 90 degrees. When locked, you
should not be able to pull the printing head out of the printing block.
4. If temperature is left on while imprinter is not in use, we suggest turning the ribbon collect wheel
a few turns so that ribbon exposed to the heat of the printing block is moved into the ribbon
collect wheel. This will prevent ribbon breakage.
Imprinter Adjustments
Best results in hot stamp imprinting depends on correct temperature, pressure, and stroke speed. Different
materials may require adjusting any of these, as follows:
1. Temperature Adjustment. Turn the temperature knob to the appropriate temperature for the
material to be printed. Turning the knob clockwise will cause the temperature to rise and turning
the temperature counterclockwise will cause the temperature to lower. Wait approximately 15-20
minutes for imprinter to reach set temperature.
2. Pressure Adjustment. Normal printing pressures vary with the printing material. Pressure
should be kept just high enough to obtain good results. Too much pressure causes excessive
wear on type and silicone rubber pad. If pressure is too high, the ribbon may break and printed
materials may be melted through. If pressure is too low, the printed characters will be illegible.
The connection pole can be adjusted up or down to accommodate different types of material
and varying degrees of print darkness. To adjust the length of the connection pole, release either
of the two nuts located on the connection pole. Turning the nuts clockwise will cause the
Page 26

F R M - 1 1 2 0 C I N S T R U C T I O N M A N U A L
21
Figure 27. To adjust the length of the connection pole, release either of the two nuts located on the connection pole. Turning the nuts clockwise will
cause the connection pole to lengthen. Turning the nuts counterclockwise will cause the connection pole to shorten.
Figure 28. Ribbon Step Distance Adjustment. Loosen the butterfly-shaped nut found on the bolt. Moving the bolt upwards will reduce the step distance
and moving the bolt downwards will increase the step distance.
Adjust either of the two nuts located on the connection
pole.
Loosen butterfly-shaped nut and adjust the bolt up or
down.
connection pole to lengthen. Turning the nuts counterclockwise will cause the connection pole
to shorten.
3. Ribbon Step Distance Adjustment. The step distance is the amount of tape pulled through
by each printing stroke. If the step distance is higher, more ribbon will be consumed during
print. This distance is controlled by the bolt located at the back of the machine. Loosen the
butterfly-shaped nut found on the bolt. Moving the bolt upwards will reduce the step distance
and moving the bolt downwards will increase the step distance. Once the optimal step distance
is acquired, tighten the butterfly-shaped nut. The tape should advance just enough to present a
new surface on each impression.
Changing Type
Typesets are easily changed but
extremely hot when taken out of the imprinter.
280-58) to release the typesets. Insert new types into the printing head/typeset holder and tighten set screw
to ensure types do not fall out when inserted into the printing block. Additional types may be ordered as
needed. Please ask your distributor for more details.
please use caution as the printing head/typeset holder will be
Using an allen wrench, loosen the set screws (Part# HP-
Page 27

F R M - 1 1 2 0 C I N S T R U C T I O N M A N U A L
22
Figure 29. Printing Head / Typeset Holder with typesets
Page 28

F R M - 1 1 2 0 C I N S T R U C T I O N M A N U A L
23
Maintenance
The following maintenance procedures should be followed to ensure the longevity of your FRM-1120C
band sealer.
Inspection and Cleaning
1. Inspect your machine daily.
2. Check if there is any foreign matter or dirt adhering to the band sealer.
3. To clean your band sealer, wipe down your sealer with silicone spray and a shop cloth. Do not
apply silicone directly to your sealer. Definitely DO NOT wash down your machine with water.
Sealing and Drive Belts
1. Check and replace the belts as necessary. Both the sealing and drive belts are consumable items.
Replace sealing belts when there are burn marks or if the belts become hard and brittle. Replace
drive belts when the belts break or become badly cracked.
2. To change out the belts, make sure the machine is turned off.
3. Remove the safety cover.
4. Remove the two drive belts.
5. To remove the sealing belts, push on the adjustment blocks (Figure 34, Item #28/34) and the
sealing belts should easily slip off.
6. Put new sealing and/or drive belts back on the machine. Test the machine, making adjustments
as necessary.
7. Replace the safety cover.
8. Check our YouTube channel (https://www.youtube.com/user/sealersales) for a video demo.
Page 29

F R M - 1 1 2 0 C I N S T R U C T I O N M A N U A L
24
Cap on turbocase
Turbocase Maintenance
1. Remove dust and clean motor at regular intervals. Avoid contact with alcohol, gasoline and
benzene chemicals.
2. The turbocase should be oiled monthly with 50g 20# oil by:
a. Remove the back cover.
b. Locate the turbocase and unscrew the cap. Replenish any depleted gear oil with 50g 20#
oil.
3. The motor brush (Part #BS-29A) is designed to be used 2,500 hours continuously. Replace
carbon brush at regular intervals.
Figure 30. Turbocase cap
Page 30

F R M - 1 1 2 0 C I N S T R U C T I O N M A N U A L
25
Figure 31. Remove Ink Temperature Knob
Figure 32. Remove Washer Holding Ink Temperature Potentiometer
Figure 33. Unplug Ink Temperature Potentiometer w/ PC Board and Replace with a New Ink Temperature Potentiometer w/ PC Board
Printing Maintenance
FRM-1120C band sealers are equipped with an ink temperature potentiometer which is attached to a PC
Board. This part controls the temperature that is transmitted to both the ink heating block as well as the
printing wheel. The part is located behind the ink temperature knob. (Figure 40, Item #12) You should
change the ink temperature potentiometer w/ PC Board when both ink heating block and printing wheel
on your band sealer are not achieving optimal heat temperatures.
1. Turn off and unplug your band sealer.
2. Remove ink temperature knob from potentiometer and remove the washer that holds the ink
temperature potentiometer on the panel.
3. Remove the band sealer display panel. There should be six screws to remove.
4. Unplug the ink temperature potentiometer and plug in a new ink temperature potentiometer.
Make sure the part is plugged in properly and tight.
Page 31

F R M - 1 1 2 0 C I N S T R U C T I O N M A N U A L
26
FRM-1120C Parts Diagram
To order spare parts, please use diagram and part #s below:
Figure 34 – Spare Parts Diagram Overview
Figure 36 – Heating / Cooling Blocks and Dry Ink Coding
Figure 38 – Conveyor Table
Figure 40 – Controller Box
Figure 43 – Sealer Rack
Error! Reference source not found. – Sealer Rack II
Page 32

F R M - 1 1 2 0 C I N S T R U C T I O N M A N U A L
27
Figure 34. FRM-1120C Spare Parts Diagram Overview
Page 33

F R M - 1 1 2 0 C I N S T R U C T I O N M A N U A L
28
Item Part # Quantity Description Reference Comments
1 1
bottom board
106042
2 FRM-1120C-6A-2 2
small pulley shaft
106002
3 FRM-1120C-6A 2
small pulley
106003
Includes #3-5
4 FRM-1120C-6A 2
bearing (626)
GB/T276-1994
Includes #3-5
5 FRM-1120C-6A 2
circlip for hole
GB/T893.1-1986
Includes #3-5
6 Washer-M5x16 2
flat washer
GB/97.1-2002
7 Screw-M4x8 2
screw
GB/T818-2000
M4x8
8 FRM-1120C-26 1
guiding belt (678×4.5×3.5) (65°)
910803
9 FRM-1120C-26 1
guiding belt (678×4.5×3.5) (65°)
910803
10 1
embossing wheel shaft
106006
11 FRM-1120C-3A 1
bearing (6201)
GB/T276-1994
Includes #11-13
12 FRM-1120C-3A 1
embossing wheel
106007
Includes #11-13
13 FRM-1120C-3A 1
circlip for hole
GB/T893.1-1986
Includes #11-13
14 Washer-M5x16 1
flat washer
GB/T97.1-2002
M5x16
15 Screw-M4x8 1
screw
GB/T818-2000
M4x8
16 1
silicone wheel shaft
106011
17 FRM-1120C-2 1
silicone wheel assembly
106010
18 1
silicone wheel cover
19 FRM-1120C-6 2
driving wheel
106012
20 Washer-M5x28 2
flat washer
M5x28
21 Screw-M4x8 2
screw
GB/T818-2000
22 FRM-1120C-21-22-26 1
upper pressing wheel shaft
106023
Includes #22-25
23 FRM-1120C-21-22-26 2
bearing (16002)
GB/T276-1994
Includes #22-25
24 FRM-1120C-21-22-26 2
circlip for shaft
GB/T894.1-1986
Includes #22-25
25 FRM-1120C-21-22-26 2
pressing wheel
106025
Includes #22-25
26 FRM-1120C-21-22-26 2
circlip for hole
GB/T893.1-1986
27 FRM-1120C-21-27 1
lower pressing wheel shaft
106024
Includes #23-27
28 FRM-1120C-13 1
upper driven wheel seat (adjusting block)
106026
29 FRM-1120C-12a 2
driven wheel shaft
106030
30 FRM-1120C-12 2
driven wheel
106029
Includes #30-32
31 FRM-1120C-12 2
bearing (6005)
GB/T276-1991
Includes #30-32
32 FRM-1120C-12 2
circlip for hole
GB/T893.1-1986
Includes #30-32
33 Washer-M5x28 2
washer
M5x28
34 FRM-1120C-13 1
lower driven wheel seat (adjusting block)
106026
35 Screw-M4x8 4
screw
GB/T818-2000
36 FRM-1120C-13-36 2
cam shaft
11511011104
37 2
cam shaft seat
106033
Figure 35. FRM-120C Spare Parts Diagram Overview
Page 34

F R M - 1 1 2 0 C I N S T R U C T I O N M A N U A L
29
Item Part # Quantity Description Reference Comments
38 FRM-1120C-13-38 2 cam 11511011106
39 Screw-M4x8 2 screw GB/T818-2000
40 FRM-1120C-13-40 2 pressing plate for adjusting block 11511011107
41 FRM-1120C-13-41 4 spacing ring of pressing plate 11511011108
42 Screw-M4x8 4 screw GB/T818-2000
43 WasherM5x16 4 flat washer GB/T97.1-2002
44 Screw-M4x8 4 screw GB/T818-2000
45 FRM-1120C-13A 2 spring
46 1 spring seat 106034
47 Washer-M5x16 2 flat washer GB/97.1-2002
48 2 hexagonal nut GB/T41-2000
49 FRM-1120C-28-49 2 single slide block seat 106004
50 Washer-M5x16 8 flat washer GB/97.1-2002
51 Screw-M4x8 8 screw GB/T818-2000
52 FRM-1120C-6-50-56 3 circlip for hole GB/T893.1-1986 Includes #52-56
53 FRM-1120C-6-50-56 2 driving wheel shaft 106013 Includes #52-56
54 FRM-1120C-6-50-56 6 bearing (6201) GB/T276-1994 Includes #52-56
55 FRM-1120C-6-50-56 2 spacing ring of bearing 106009 Includes #52-56
56 FRM-1120C-6-50-56 3 bearing seat 106008 Includes #52-56
57 Screw-M4x8 9 screw GB/T818-2000
58 FRM-1120C-35B 5 gear 106014
59 FRM-1120C-29 1 motor 110V/100W
BS-29A 2 motor brush
Not shown
60 FRM-1120C-30 1 worm-gear case assembly 106084 determine gen 1.0 or 2.0
61 FRM-1120C-30-61 1 driving sprocket
62 Circlip-T894.1-1986 3 circlip for shaft GB/T894.1-1986
63 1 bearing seat for connecting shaft 105013
64 1 connecting shaft
65 FRM-1120C-28-65 2 slide block 106005
66 FRM-1120C-28-66 2 spring seat for slide block 106038
67 5 socket cap screw GB/T70.1-2000
68 BS-35-68 1 medium gear 106040
69 1 bearing (6101) GB/T276-1994
70 1 medium gear shaft 106041
71
FRM-1120C-28A, 28B,
or 28C
2 adjusting knob
A = 65mm, B = 77mm,
C = 92mm
72
FRM-1120C-28A, 28B,
or 28C
2 adjusting screw for slide block 106036
A = 65mm, B = 77mm,
C = 92mm
73 2 spring for slide block
74
FRM-1120C-28A, 28B,
or 28C
2
adjusting double-screw bolt for
slide block
106037
A = 65mm, B = 77mm,
C = 92mm
75 FRM-1120C-28D 2 adjusting seat for slide block 106035
Page 35

F R M - 1 1 2 0 C I N S T R U C T I O N M A N U A L
30
Page 36

F R M - 1 1 2 0 C I N S T R U C T I O N M A N U A L
31
Figure 36. FRM-1120C Heating / Cooling Blocks and Dry Ink Coding
Page 37

F R M - 1 1 2 0 C I N S T R U C T I O N M A N U A L
32
Item # Part # Quantity Description Reference Comments
1 1 bottom board 106042
2 BS-46 1 ink roller shaft 105036
3 BS-62E-FRM 1 swing pole of ink roll er 201007
4 FRM-1120C-47 1 heating block of ink roller 201002
5 BS-48C 1 heating pipe 110v/40w 921301
6 1 printing wheel shaft 106071
7 BS-48-7 1 spring of holding latch on printing wheel
8 BS-48-8 1 cov er for printing wheel shaft 201015
9 BS-48B 1 printi ng wheel 201013
10 BS-48A 1 printing wheel cover 201014 Includes #10, #11
11 BS-48A 1 holding latch for printing wheel 201016 Includes #10, #11
12 1 printing-silicone wheel shaft 201010
13 BS-57A 1 sili cone ring 910107
14 BS-57 1 circl ip for hole GB/T893.1-1986 Includes #14-17
15 BS-57 1 core of sil icone wheel 201011 I ncludes #14-17
16 BS-57 1 beari ng GB/T276-1994 Includes #14-17
17 BS-57 1 eccentric sleeve 201012 Includes #14-17
18 FRM-1120C-8-18 1 upper cooling block shaft 11511010502
19 FRM-1120C-8 2 upper cooling block 11511010503 /11511010601 Includes #19, #23, sold as pair
20 7 flat washer GB/97.1-2002
21 7 cap nut GB/923-1988
22 FRM-1120C-8-22 1 l ower cooling block shaft 11511010602
23 FRM-1120C-8 1 lower cooli ng block 11511010503 /11511010601 I ncludes #19, #23, sold as pair
24 FRM-1120C-9-24 2 upper heating block shaft 11511010902
25 FRM-1120C-9A-SS 1 upper heating block 11511010901 / 11511011002 Includes #25, #27, sold as pair
26 FRM-1120C-9-26 2 lower heating block shaft 11511011001
27 FRM-1120C-9A-SS 1 lower heating block 11511010901 / 11511011002 Includes #25, #27, sold as pair
28 FRM-1120C-44 1 feed opening 101035
29 1 wind catcher 106058
30 FRM-1120C-32 1 fan
31 BS-64B 1 support for brush 106073
32 BS-64A 1 carbon brush holder 920423
33 BS-64C 2 pressing plate of brush 201009
BS-64 2 carbon brush
34 BS-65 1 groove sensor
35 BS-139-FRM-1120C 1 electromagnetic clutch assembly A10501
36 BS-54B 1 middle pulley 105032
37 BS-54B-35 1 middle pulley shaft 105035
38 BS-54C-34 1 ink roller shaft pulley 105041
39 BS-54C 1 seat for ink roller swing pole shaft 201006
Figure 37. FRM-1120C Heating / Cooling Blocks and Dry Ink Coding
Page 38

F R M - 1 1 2 0 C I N S T R U C T I O N M A N U A L
33
Figure 38. FRM-1120C Conveyor Table
Page 39

F R M - 1 1 2 0 C I N S T R U C T I O N M A N U A L
34
Item # Part # Quantity Description Reference Comments
1 1 conveyor table
2 FRM-1120C-41 1 adjusting shaft Includes #2-5,#12-13
3 FRM-1120C-41 1 connecting ball Includes #2-5,#12-13
4 FRM-1120C-41 1 connecting sleeve Includes #2-5,#12-13
5 FRM-1120C-41 1 base plate for middle shaft 106025 Includes #2-5,#12-13
6 FRM-1120C-37 2 bearing (6201) GB/T276-1994 Includes #6-8, #10-11
7 FRM-1120C-37 2 bearing seat 106085 Includes #6-8, #10-11
8 FRM-1120C-37 2 front roller of conveyor table 106047 Includes #6-8, #10-11
9 1 outfeed plate 106090
10 FRM-1120C-37 2 sprocket of conveyor table 106089 Includes #6-8, #10-11
11 FRM-1120C-37 1 front shaft of conveyor table 106044 Includes #6-8, #10-11
12 FRM-1120C-41 1 middle shaft of conveyor table 106045 Includes #2-5,#12-13
13 FRM-1120C-41 2 bearing seat of conveyor table middle shaft 101003 Includes #2-5,#12-13
14 2 middle roller of conveyor table
15 2 middle roller shaft of conveyor table
16 4 bearing seat
17 4 bearing sleeve
18 FRM-1120C-36 1 rear roller of conveyor table 106048 Includes #18-20
19 FRM-1120C-36 1 rear shaft of conveyor table 106046 Includes #18-20
20 FRM-1120C-36 2 bearing (6201) GB/T276-1994 Includes #18-20
21 2 adjusting seat of conveyor table 106086
22 FRM-1120C-16 2 adjusting loop of conveyor table 106051 Includes #22-24
23 FRM-1120C-16 Includes #22-24
24 FRM-1120C-16 Includes #22-24
25 FRM-1120C-15 1 working table
Figure 39. FRM-1120C Conveyor Table
Page 40

F R M - 1 1 2 0 C I N S T R U C T I O N M A N U A L
35
Figure 40. FRM-1120C Controller Box
Page 41

F R M - 1 1 2 0 C I N S T R U C T I O N M A N U A L
36
Item # Part # Quantity Description Comments
1 1
rear cover of electric cabinet
2 BS-45B 1
PF113A relay holder
3 FRM-1120C-56 1
20 pin socket
4 BS-22A 1
emergency stop
5 BS-52C 1
main control PCB
6 BS-52A 1
speed regulating PCB
7 BS-66A 1
transformer BK-10/220-13.5V
8 BS-45A 1
PF083 relay holder
9 1
control panel
10 BS-22 1
control switch
specify large or small
11 TMC-XMTE-1000-2 1
temperature controller
determine version by taking temp controller out
TMC-XMTE -1000-2-O 1
temperature controller
determine version by taking temp controller out
TMC-E5CSL-QTC-FRM-1120 1
temperature controller
12 BS-25A 1
knob
13 BS-51 1
coding potentiometer 1.0M
14 BS-50A 1 ink temperature potenti ometer wih pc board
BS-25 1 potenti ometer 100K
15 BS-51 1 coding potentiometer 1.0M
19 R-JQX-13F 1
Relay
R-JG3NA 1
Relay
20 BS-74A 1
Seat for relay
Figure 41. FRM-1120C Controller Box
Figure 42. Controller Box
Page 42

F R M - 1 1 2 0 C I N S T R U C T I O N M A N U A L
37
Figure 43. FRM-1120C Sealer Rack
Page 43

F R M - 1 1 2 0 C I N S T R U C T I O N M A N U A L
38
Item # Part # Quantity Description Reference Comments
1 1
pedestal
2 4
caster
3 1
bearing seat of lifting screw rod
106064
4 1
bearing (6201) GB/T276-1994
5 1
bevel gear
106061
6 1
lifting slide block
7 4
lock handle
106063
8 1
bevel gear seat
106062
9 1
handle bevel gear
106060
10 1
bearing (6201) GB/T276-1994
11 1
lifting nut
106067
12 1
lifting screw rod
106065
13 1
rear cover of pedestal
14 1
rear cover of bracket
15 1
bracket
16 1
upper cover of bracket
17 FRM-1120C-20-17 1
connecting plate of bracket slide block
11511050009
18 FRM-1120C-20-18 1
connecting plate of conveyor table
11511050010
19 1
support plate of bracket
20 1
bearing (6201) GB/T276-1994
21 1
bearing seat for lifting screw rod
106064
22 1
bracket
23 1
screw rod of bracket
106066
24 1
lifting nut for bracket
106067
25 FRM-1120C-90 1
handwheel QB8251.2-98
26 1
slide block of bracket
27 1
stay bar for bracket
28 1
front cover of bracket
Figure 44. FRM-1120C Sealer Rack
Page 44

F R M - 1 1 2 0 C I N S T R U C T I O N M A N U A L
39
FRS-1120W Parts Diagram
To order spare parts, please use diagram and part #s below:
Figure 45. FRS-1120W Spare Parts Overview Diagram
Figure 47. FRS-1120W Heating / Cooling Blocks Parts Diagram
Figure 49. FRS-1120W Motor and Gears Parts Diagram
Figure 51. FRS-1120W Conveyor Parts Diagram
Figure 53. FRS-1120W Control Box Diagram
Figure 55. FRS-1120W Sealer Rack Parts Diagram
Page 45

F R M - 1 1 2 0 C I N S T R U C T I O N M A N U A L
40
Figure 45. FRS-1120W Spare Parts Overview Diagram
Page 46

F R M - 1 1 2 0 C I N S T R U C T I O N M A N U A L
41
Item Part # Quantity Description Reference Comments
1 FRM-1120C-28a, b or c 5 Adjusting Assembly for FRM-1120C, FRS-1120W 11511010203
2 FRM-1120C-28a, b or c 5 Adjusting Assembly for FRM-1120C, FRS-1120W 11511010204
3 FRM-1120C-28a, b or c 3 Adjusting Assembly for FRM-1120C, FRS-1120W 11511010205. 65
4 FRM-1120C-28a 5 Adjusting Assembly for FRM-1120C, FRS-1120W - 65mm 9100411120625
Includes #1-4
5 FRM-1120C-28c 1 Adjusting Assembly for FRM-1120C, FRS-1120W - 92mm 11511010205.92
Includes #1-3, 5
6 FRM-1120C-28b 1 Adjusting Assembly for FRM-1120C, FRS-1120W - 78mm 11511010205.78
Includes #1-3, 6
7 FRM-1120C-6-56 3 Bearing Seat 11511010303
8 3 E-clip 12mm 9746036400012
9 Bearing_6201Z 7 Bearing 6201 Z (12 x 32 x 10) 9105200602011
10 FRM-1120C-6-55 3 Spacing Ring of Bearing 11511010304
11 4 E-Cl ip 32mm 9746016400032
12 FRM-1120C-6-53 2 Driving Wheel Shaft 11511010402
13 FRM-1120C-6 2 Driving Wheel, Big 11511010401
14 Washer-M5x28 2 Washer M5 x 28 x 2 11511010403
15 1 Rubber Wheel Shaft 11511010302
16 FRM-1120C-2 1 Rubber Wheel 11511010301
17 CBS -880-2-33 1 Sil icone Wheel Cover 11111030018
18 FRM-1120C-3A-10 1 Emboss ing Wheel Shaft 11511010201
19 FRM-1120C-3A 1 Embossing Wheel, Meshed 11511010202
20 FRM-1120C-40A 1 Drive Shaft Connector, Gimbel Assembly A115110107
21 FRS-1120W-HP-241G 1 Imprinter for FRS-1120W A21312105
FRS-1120W-48A 1 Print Head for FRS-1120W
22 FRS-1120W-6B 2 Small Pulley Shaft 11513010101
23 2 Driving Wheel, Small 11311030001
24 Bearing_6062Z 2 Bearing 606-ZZ (17 x 6 x 6) 9105200600062
25 Circlip-17mm 2 E-Clip 17mm 9746016400017
26 FRS-1120W-26 2 Drive Belt (#830mm) 9425100020830
Figure 46. FRS-1120W Spare Parts Overview Parts List
Page 47

F R M - 1 1 2 0 C I N S T R U C T I O N M A N U A L
42
Figure 47. FRS-1120W Heating / Cooling Blocks Parts Diagram
Page 48

F R M - 1 1 2 0 C I N S T R U C T I O N M A N U A L
43
Item # Part # Quantity Description Reference Comments
1 2 Cam Shaft Seat 11511011105
2 FRM-1120C-13-36 2 Cam Shaft 11511011104
3 FRM-1120C-13-41 8 Spacing Ring of Pres sing Pl ate 11511011108
4 FRM-1120C-13 2 Adjustment Block Assembly 11511011111 Includes #4, 5
5 FRM-1120C-13 2 Adjustment Block Assembly 11511011112 Includes #4, 5
6 2 Driven Wheel Shaft 11511011102
7 FRM-1120C-12 2 Bearing 6005-2RS (25 x 47x x12) 9105200601052 Includes #7-9
8 FRM-1120C-12 2 Driven Wheel 11511011101 Includes #7-9
9 2 E-Clip 47mm 9746016400047 Includes #7-9
10 Washer-M5x28 2 Washer M5 x 28 x 2 11511010403
11 BS-9B 2 Heater sold as a pair
12 FRM-1120C-9-26 2 Lower Heating Block Shaft 11511011001
13 FRM-1120C-9A-SS 1 Heating Block 11511011002 Includes #13, 15 - sold as a set
14 FRM-1120C-9-24 2 Upper Heating Block Shaft 11511010902
15 FRM-1120C-9A-SS 1 Heating Block 11511010901 Includes #13, 15 - sold as a set
16 FRM-1120C-10 2 Sealing Belt (#1120mm) 9430113112015
17 FRM-1120C-34 1 Thermocouple 9241100021000
18 FRM-1120 C-21-27 1 Lower Pressing Wheel Shaft 11511010801 Includes #18-22
19 2 E-Clip 32mm 9746016400032 Includes #18-22
20 2 Pressing Wheel 9105200601022 Includes #18-22
21 2 E-Clip 15mm 9746036400015
22 2 Bearing 6002 ZZ (15 x 32 x 9) 11511010702
23 FRM-1120C-21-22-26 1 Upper Pressing Wheel Shaft 11511010701 Includes #18-21, 23
24 FRM-1120C-8-22 2 Lower Cooling Block Shaft 11511010602
25 FRM-1120C-8-SS 1 Cooling Block 11511010601 Includes #25, 27 - sold as set
26 FRM-1120C-8-18 1 Upper Cooling Block Shaft 11511010502
27 FRM-1120C-8-SS 1 Cooling Block 11511010503 Includes #25, 27 - sold as set
Figure 48. FRS-1120W Heating / Cooling Blocks Parts List
Page 49

F R M - 1 1 2 0 C I N S T R U C T I O N M A N U A L
44
Item # Part # Quantity Description Reference Comments
1 HL-M810-40C 1 Connecting Shaft Bearing Seat 11311030026 Includes #1, 2, 3
2 HL-M810-40C 2 E-Clip 28mm 9746016400028 Includes #1, 2, 3
3 HL-M810-40C 3 Bearing 6001 ZZ (12 x 28 x 8) 9105200601012 Includes #1, 2, 3
4 1 E-Clip 12mm 9746036400012
5 FRM-1120C-35b Wheel Gear (with out groove) 11511010305
FRM-1120C-35c Wheel Gear (with groove) 11511010305C
6 1 Wheel Shaft 11511011202
7 FRM-1120C-35-68 1 Medium Gear 11511011201
8 5 Slide Spring Seat 11511010207
9 FRM01129C-28-66 5 Spring Seat for Slide Block 11511010208
10 1 Slide Block Seat 11511010209A
11 FRM-1120C-29 1 Motor
FRM-1120C-30 Turbocase
12 FRM-1120C-28-49 4 Slide Block Seat 11511010209
13 1 Bottom Plate 11513011303
14 BS-33A 1 Connection Station (4P) 9201401110002
15 FRM-1120C-32 1 Fan 11511020011 Includes #15, 16
16 FRM-1120C-32 1 Fan 9230121000765 Includes #15, 16
17 FRM-1120C-13-46 1 Adjusting Block Seat 11511011110
18 FRM-1120C-13-40 2 Adjusting Pressing Plate 11511011107
19 FRM-1120C-13-38 2 Cam / Protruding Wheel 11511011106
Figure 49. FRS-1120W Motor and Gears Parts Diagram
Figure 50. FRS-1120W Motor and Gear Parts List
Page 50

F R M - 1 1 2 0 C I N S T R U C T I O N M A N U A L
45
Item # Part # Quantity Description Reference Comments
1 FRM-1120C-15 1 Working Table 11511030002
2 FRM-1120LD-16 2 Adjusting Knob 9100402140632 Includes #2, 3, 4
3 FRM-1120LD-16 2 Adjusting Screw 11511030403. 01 Includes #2, 3, 4
4 FRM-1120LD-16 2 Adjusting Loop 11511030403 Includes #2, 3, 4
5 FRM-1120LD-16-15 2 Adjusting Seat 11511030404
6 FRM-1120C-36 6 Bearing 6201-2RS 9105200602012 Includes #6-9
7 FRM-1120C-36 2 E-Clip 12mm 9746036400012 Includes #6-9
8 FRM-1120C-36 1 Conveyor Roller Shaft, Right 11511030402 Includes #6-9
9 FRM-1120C-36 1 Conveyor Roller, Right 11511030401 Includes #6-9
10 1 Conveyor Belt 2080 x 175 x 2 9422112208173
11 2 Intermediate Roller Shaft A115110304
12 1 Conveyor 11513030001
13 FRM-1120C-41 2 Middle Post 11111010014 Includes #6, #13-16
14 FRM-1120C-41 2 Gear 11511030104 Includes #6, #13-16
15 FRM-1120C-41 1 Shaft 11511030201 Includes #6, #13-16
16 FRM-1120C-41 1 Conveyor Middle Post with Gear 11511030203 Includes #6, #13-16
17 FRM-1120C-37 2 Front Roller Bearing 11511030102 Includes #6, #17-19
18 FRM-1120C-37 2 Conveyor Roller, Left 11511030103 Includes #6, #17-19
19 FRM-1120C-37 1 Shaft 11511030101 Includes #6, #17-19
20 1 Chain (06B-1 x 69L) 9104101106069
21 FRM-1120C-1-9 1 Outfeed Plate 11511030003
Figure 51. FRS-1120W Conveyor Parts Diagram
Figure 52. FRS-1120W Conveyor Parts List
Page 51

F R M - 1 1 2 0 C I N S T R U C T I O N M A N U A L
46
Item # Part # Quantity Description Reference Comments
1 BS-22A_G 1 Emergency Stop, Green / Green 9212232220640
BS-22A_O 1 Emergency Stop, Orange / Green
2 BS-25A 4 Knob 9210200100004
3 TMC-E5CSL-QTC 1 Temperature Controller 9241131305325
4 1 Font Panel Plate 9160103115412
5 BS-22-LARGE 4 Switch, Large 9212240130395
6 BS-25A 1 Speed Potentiometer 9300112520100
7 Relay-JG3NA 1 Relay JG3NA-2255B 9215301102252
8 FRM-1010-31 1 Speed PC Board 9310121115015
9 1 Guard 11513020005
10 1 Body 11513020001
11 FRM-1120C-44 1 Sealing Width Adjusting Guide 11511020101
12 BS-14 1 Socket for Power Cord 9201111031002
13 BS-27 1 Circuit Breaker 9212711602005
14 1 Back Cover 11513020004
15 2 Door Latch 1151102001381
Figure 53. FRS-1120W Control Box Diagram
Figure 54. FRS-1120W Control Box Parts List
Page 52

F R M - 1 1 2 0 C I N S T R U C T I O N M A N U A L
47
Item Part # Quantity Description Reference Comments
1 1 Conveyor Connecting Plate 11511050010
Compatible with FRM-1120C
2 1 Backet Slider Connecting Plate 11511050009
Compatible with FRM-1120C
3 BS-5_Gen2.0 6 Pressure Adjusting Knob 9450101111004
Includes #3, 4
4 BS-5_Gen2.0 6 Pressure Adjusting Knob 9450101111003
Includes #3, 4
5 1 Bracket Front Cover 11511050002
Compatible with FRM-1120C
6 2 Side Bracket 11511050003
Compatible with FRM-1120C
7 1 Mid Bracket Slider 11511050004
Compatible with FRM-1120C
8 1 Bracket Support 11511050008
Compatible with FRM-1120C
9 2 Upper Bracket Shafts 11511050001
Compatible with FRM-1120C
10 2 Lower Bracket Shafts 11511050001-D2
Compatible with FRM-1120C
11 Bearing_60 02Z 3 Bearing 6002 ZZ (15 x 32 x 9) 9105200601022
12 2 Lifting Bracket Bearing Housing 11511040007
Compatible with FRM-1120C
13 1 Lifting Bracket Shaft 11511050006
Compatible with FRM-1120C
14 2 Lifting Bracket Nut 11511040004
15 FRM-1120C-90 2 Handwheel 9100303112100
16 1 Top Bracket Cover 11511050011
Compatible with FRM-1120C
17 1 Back Bracket Cover 11511050012
Compatible with FRM-1120C
18 1 Base 11511040001
Compatible with FRM-1120C
19 4 Caster Support 11510000099
20 FRM-1120C-92B 2 Cas ters With Brake 9400102410403
21 FRM-1120C-92A 2 Casters Without Brake 9400102400403
22 1 Handle Bevel Gear 11511040009
Compatible with FRM-1120C
23 1 E-clip 32mm 9746016400032
24 1 E-clip 15mm 9746036400015
25 1 Bev el Gear 1151140005
Compatible with FRM-1120C
26 1 Base Back Cover 11511040006
Compatible with FRM-1120C
27 1 Lifting Slider 11511040002
Compatible with FRM-1120C
28 1 Lifting Slider Shaft 11511040003
Compatible with FRM-1120C
29 1 Bev el Gear 11511040008
Figure 55. FRS-1120W Sealer Rack Parts Diagram
Figure 56. FRS-1120W Sealer Rack Parts List
Page 53

F R M - 1 1 2 0 C I N S T R U C T I O N M A N U A L
48
Troubleshooting
Unable to Set Temperature Controller
If operator is unable to set the temperature or is finding the temperature settings inaccurate, we suggest
resetting the temperature controller to the default settings. Please follow the following steps:
Hold the for at least three seconds.
Press the or key at the display for the parameter for which the setting is to be changed.
The parameter setting display will appear. Use the or key to change the setting.
Example: Changing the Input Type from 0 to 1 is below:
Enter to move on to the next parameter display.
To save the settings, hold again for more than three seconds. The temperature controller will
automatically restart and save the settings.
Please note: This temperature controller can only be set to Celsius. If you try and change
the temperature unit to F, the temperature controller will not function properly.
Page 54

F R M - 1 1 2 0 C I N S T R U C T I O N M A N U A L
49
Figure 57. Default Setting Parameters
Figure 58. Parameter Displays
Printing Wheel Adjustments
Problem: Print wheel on the band sealer rotates more than once.
Possible Cause: Electromagnetic clutch on the back of the unit and groove sensor are not aligned properly.
The flat panel of the electromagnetic clutch signals the grove sensor to stop the print wheel rotation.
1. We suggest the following steps:
2. Loosen the nut as shown in Figure 59. This will allow the carbon brush holder and grove sensor
some movement.
3. Push the groove sensor closer to the electromagnetic clutch
4. Re-tighten the nut
Page 55

F R M - 1 1 2 0 C I N S T R U C T I O N M A N U A L
50
Figure 59. Incorrect position of groove sensor and electromagnetic clutch
Figure 60. Correct position of groove sensor and electromagnetic clutch
Loosen Nut in
order to move the
groove sensor
closer to
electromagnetic
clutch
Electromagnetic Clutch
Groove Sensor
Page 56

F R M - 1 1 2 0 C I N S T R U C T I O N M A N U A L
51
Problem Possible Causes Solution
Sealing belt is off tracking.
Driving wheel shaft is not parallel to
driven wheel shaft
Adjust two adjusting screws on the adjusting block
seat (Part# FRM-1120C-13)
Sealing belts are tearing
1. Too much tension on sealing belt
2. Sealing belt is off tracking
3. Creases on the sealing belt
4. Residual film or other debris
attached to the sealing belt
1. Adjust the vertical adjusting screw on driven
wheel seal to decrease tension on sealing belt
2. see above
3. When installing belt, make sure no creases are
found on belt
4. Clean surface of belt with cloth
Seal is crumpled and film sticks to
sealing belts
1. Temperature is too high
2. Guide belt is not correctly in place
3. Plastic melted on the sealing belt
1. Reduce temperature
2. Adjust guide belt
3. Clean or replace sealing belt
If any plastic melts on the sealing belt, your bags
will stick to the melted plastic
Embossing is not clear
1. Embossing roller is worn out
2. Pressure spring on embossing
roller needs to be tightened
1. Replace embossing roller
2. Adjust the embossing roller spring (Part# FRM1120C-28B)
Material will not pass through
sealing blocks
Clearance between heating blocks or
cooling blocks may be too small
Adjust the clearance between blocks by adjusting
the springs and stopping flakes found above the
blocks
Conveyor belt is off tracking
Driving roller shaft is not parallel to
the driven roller shaft
Adjust using the conveyor belt adjustment (Part#
FRM-1120C-16)
Conveyor and sealing belt are not
moving at same speed
Not enough tension on conveyor belt
1. Tighten the chain of driving roller shaft (front
shaft) and middle shaft. (Parts # FRM-1120C-37
and FRM-1120C-41)
2. Tighten the conveyor belt
Temperature doesn't rise or cannot
be controlled
1. Heat switch is damaged
2. Heater (BS-9B) is damaged
3. Temperature Controller
4. Coupling
Replace:
1. Heat switch (BS-22-Large)
2. Heater (BS-9B)
3. Temperature Controller
4. Thermocouple (FR-1120C-34)
Page 57

F R M - 1 1 2 0 C I N S T R U C T I O N M A N U A L
52
Problem Possible Causes Solution
Printing wheel does not rotate
1. Sensor is blocked
2. Sensor is not clean and eye is
blocked by dust
1. Make sure sensor is not blocked
2. Clean sensor
3. Replace PCB (BS-52C)
Printing wheel does not stop
rotating
1. Sensor (groove) is damaged or
dirty
2. Photoelectric sensor is damaged
or dirty
3. Main control PC Board is damaged
1. Replace or correct position of the groove
sensor or clean its surface (BS-65)
2. Replace or clean photoelectric sensor (BS-60)
3. Repalce PC Board (BS-52C)
No heat on the ink heating block
1. Heating element in heating block
is damaged
2. Heating PCB is damaged
3. Potentiometer w/ PC Board (BS50A) is damaged
4. Carbon brush is not in place
5. Carbon brush is damaged
1. Replace element (BS-48C) in heating block
2. Replace PCB (BS-50A)
3. Replace potentiometer with PC Board (BS-50A)
4. Adjust and tighten nut on carbon brush seat
5. Replace carbon brush
Temperature of heating block for
ink roller cannot be regulated
Relay for temperature control PCB is
damaged
Check and replace temperature control PCB (BS50A)
Printing position cannot be
regulated
1. Tighten screw on printing wheel
2. Coding seat potentiometer may be
damaged
1. Tighten screw on printing wheel.
2. Replace coding seat potentiomter (BS-51)
Motor runs at a high speed and
cannot be regulated
Speed controller has malfunctioned Replace the speed controller (BS-52A)
Power, heater, and or fan switches
do not light up
1. No AC Voltage
2. Open Fuse
3. Lamp is damaged
Check power source / power cord
Connect the power
Replace the fuse
Replace the lamp
Page 58

F R M - 1 1 2 0 C I N S T R U C T I O N M A N U A L
53
Problem Possible Causes Solution
Machine does not run
1. Board for speed regulation is
abnormal
2. Doesn't connect well
3. Brushes in the motor are too short
because of friction
1. Replace the speed board (BS-52A)
2. Tighten the connecting screws
3. Replace motor brushes (BS-29A)
If the temperature controller works and the power
lamp illuminates but the motor does not move,
start off by checking the motor and turbocase
connection. Remove the back of the machine and
you will see bushing where the motor connects to
the gear box. Ensure the bushing is not broken.
There is also a set screw that connects the bushing
to the gear box / motor shafts. Ensure that these
are tight so that when the motor turns, the
turbocase turns as well.
If the turbocase is noisy before it stopped
working, the gear box could be broken inside.
Lack of oil could cause this.
If the lamp illuminates and the motor does not
turn, the motor speed controller may need to be
replaced.
Page 59

F R M - 1 1 2 0 C I N S T R U C T I O N M A N U A L
54
Spare Parts List
Included with your band sealer are the following parts. Please note that spare parts included with your
band sealer are subject to change without notice.
Typeset Box which includes numbers (0-9), Letters – EXP, MFD, silicone pins (Part# BS-59),
tweezers, and allen wrench
Power Cord (Part# PWC-CBS)
PTFE Sealing Belts (Part# FRM-1120C-10)
Drive Belts (Part# FRM-1120C-26)
Speed Adjusting PC Board (Part# BS-52A)
Central Circuit PC Board (Part# BS-52C)
Ink Temperature Potentiometer with Heat PC Board (Part# BS-50A)
O-Rings (Part#s BS-53 and BS-54)
Silicone Ring (Part#BS-57A)
Ink Roller Holder (Part# BS-58)
Ink Rollers, 15mm (Part# IT-IR-15-BLK)
Groove (Trough) Sensor (BS#BS-65)
Carbon Brush for Printer (BS#64)
Philips Screwdriver
Flat Screwdriver
Allen Wrench (3mm and 5mm)
Wrench
Page 60

F R M - 1 1 2 0 C I N S T R U C T I O N M A N U A L
55
Steps
Description
Inspect all wiring on the unit, nothing is loosely attached.
Make sure all wires are connected correctly.
Make sure all connections are tight and properly mounted. (Ex: PC Board, Relay)
Check parts to ensure they are in proper working order (ex: wheels, belts, knobs, etc)
CBS-880 only - Attach the conveyor to the body via the drive shaft (Part #40). Detach
after testing.
Turn on machine - start, seal, fan, printer
Check all knobs to make sure they start and end in the correct position
Make adjustments as necessary if there is any unusual noise. Noise should be under
80db.
Check fan - There should be air coming out of the cooling blocks
Check motor - motor brushes should be held in tightly
Check conveyor belt to make sure the belt is running smoothly and evenly
Run machine for at least 20 minutes - after the seal temperature has been reached, seal
bag sample to ensure good quality seal
Band Sealers w/ Printing Option:
Printing - make sure ink heating block, ink printing wheel are at optimal heat
temperature
Sensor and Coding Seat - test the sensor and coding seat are working properly; make
adjustments as necessary
Clean machine
Enter serial # of the unit in the manual
Repackage sealer w/ QC form, sealed bag / printed sample and manual.
Quality Control Testing
Our band sealers are manufactured in a facility which is certified in accordance with ISO 9001:2008. In
addition, we quality test all of our band sealers in our facility following a rigorous and exacting standards to
ensure that the product you purchased is a high quality reliable machine.
Date:
Technician:
Page 61

 Loading...