


Continuous Band Sealer Instruction Manual
Distributed By:
Version 2.6
Last Updated: 2/13/2019

Copyright © 2013 by Stephanie Hwang
All rights reserved. No part of this publication may be reproduced, distributed, or transmitted in any form or by any means, including photocopying, recording, or other electronic or mechanical methods, without the prior written permission of the publisher, except in the case of brief quotations embodied in critical reviews and certain other noncommercial uses permitted by copyright law. For permission requests, write to the publisher, addressed “Attention: Permissions Coordinator,” at the address below.
Sealer Sales, Inc. 8820 Baird Avenue Northridge, Ca 91324 www.sealersales.com
Printed in the United States of America

General Information
Thank you for purchasing our CBS-880 continuous band sealer.
This owner’s manual contains information relating to your band sealer machine. The manual will provide you with basic information concerning both operation and maintenance of your new machine. Please read it carefully as failure to do so may result in bodily injury and/or damage to the equipment.
Please fill in the information below. You will find the information on the machine identification plate. You will need this information when ordering replacement parts or making technical inquiries.
No part of this manual may be duplicated, reproduced, stored in a retrieval system, translated, transcribed, or transmitted in any form without the express prior written permission of Sealer Sales.
C B S - 8 8 0 E Q U I P M E N T I N F O R M A T I O N
Model #
Serial #
Purchase Date:
Reference # (found on packing slip)
Owner:
ii

Table of Contents |
|
Safety Instructions ........................................................................................... |
1 |
Introduction...................................................................................................... |
3 |
Operating your Band Sealer............................................................................ |
8 |
Vertical Configuration Set-up....................................................................... |
15 |
Maintenance.................................................................................................... |
20 |
Parts Diagram ................................................................................................. |
22 |
Troubleshooting............................................................................................. |
37 |
Spare Parts List............................................................................................... |
39 |
Quality Control Testing................................................................................. |
40 |

C B S - 8 8 0 I N S T R U C T I O N M A N U A L
Safety Instructions
 WARNING! Below are general safety precautions and warnings that should be understood prior to setting up or operating your equipment. Read and fully understand all instructions and warnings prior to using this unit. Your safety is most important! Failure to comply with procedures may result in serious injury or property damage. Remember: Your personal safety is your responsibility.
Unsafe practices or unauthorized modifications could result in accidents or property damage. Failure to follow these safety rules and take necessary precautions can result in serious injury as well as damage to equipment.
Never operate or service your band sealer until you have read this manual completely and understand it fully.
Plug the band sealer into a standard 120 Volt, 60Hz wall outlet or surge protector. We highly suggest using a surge protector. Some special order units are 220 Volt, 50Hz. Make adjustments as necessary.
Do not use the band sealer if the power cord, plug or any other parts are damaged. Be sure not to allow the power cord to drape into your work area. Check that all parts are operating properly and perform the intended functions. Check for all other conditions that may affect the operation.
Reduce risk of unintentional starting. Make sure the power switch is in the "OFF" position before attaching to the power source.
Always disconnect sealer from power source before servicing, changing accessories or cleaning the unit.
To provide protection against the risk of electrical shock, the power connection must be properly grounded at all times.
Do not leave the sealer unattended when in use. Disconnect the sealer from the power source before leaving the work area.
Band sealer is used solely for sealing thermoplastic materials. Using the machine for any other purpose can cause damage to the machine and operator. Do NOT use the machine for any other purpose other than to seal thermoplastic materials. Doing so may result in damage to the machine and injury to the operator.
Always operate machine on a flat stable surface.
While operating machinery, wear close-fitting clothing and tie back long hair to prevent any external items from getting caught in the machine. Do not wear jewelry when operating the band sealer.
1

C B S - 8 8 0 I N S T R U C T I O N M A N U A L
While machine is operating do not touch the heating and/or cooling blocks. Blocks will be extremely hot and may burn your hands.
 While machine is in operation, do not place fingers, tools, or other foreign objects on or into the machine. Do not touch any moving parts while machine is operating. Fingers may get caught in between the gears /pinch points and cause significant injury.
Thermoplastic bags and material are hand fed into the machine. Place bag on the guide and carefully feed the bag through the band sealer. Fingers may be placed on the guide but do not allow fingers to touch any of the moving parts on the band sealer.
Use emergency stop to turn off machine should material/bags get jammed into the machine. Carefully pull material out of the band sealer. Do NOT use fingers to touch any part of the machine.
The band sealer is not water resistant or water proof. Spraying down the machine will damage machine or cause electrical shock. Do not submerge the band sealer into water or liquid.
Do not operate band sealer in a corrosive or humid environment.
Always keep the machine clean, lubricated and in good working condition. Follow any maintenance and lubrication procedures outlined in this manual. Make sure unit is disconnected from power source before cleaning
NEVER use any accessories or parts from other manufacturers. Machine should not be altered or modified using parts that are not genuine authorized parts. Doing so will VOID YOUR WARRANTY.
Never leave the band sealer unattended. Be safe, disconnect the band sealer from power source before leaving work area.
Close supervision is necessary when any appliance is near children or persons with reduced physical, sensory or mental capabilities or lack of experience and knowledge . This sealer is NOT to be used by children or by persons with reduced physical, sensory or mental capabilities or lack of experience and knowledge.
DO NOT use the band sealer outdoors.
DO NOT use the band sealer while under the influence of drugs, medications or alcohol.
SAVE THESE INSTRUCTIONS - REFER TO THEM OFTEN AND USE THEM TO INSTRUCT OTHERS.
2

C B S - 8 8 0 I N S T R U C T I O N M A N U A L
Introduction
CBS-880 is equipped with an electronic temperature controller and variable speed conveyor to seal all types of thermoplastic materials (PP, PE, stand up pouches, gusseted bags, moisture barrier bags, etc.). Seals are created using PTFE bands which maintain high seal quality and produce consistently strong, clean seals on all heat sealable bags. Because bags are placed on a conveyor system, the width of the bag does not matter. These versatile machines offer several adjustments which allow them to be used for a wide range of applications. These machines are used extensively in the food/produce, medical, chemical, cosmetic, and electronic industries. The CBS-880 band sealer will significantly increase efficiency of packaging your products.
There are two configurations for the CBS-880 band sealer. The horizontal configuration (CBS-880I) is primarily used for sealing dry materials and when you can lay flat your pouch. The vertical configuration (CBS-880II) typically seals small solid products (ex: powders, grains, coffee) and liquids. In addition, sealing using the vertical configuration also works best with stand up pouches.
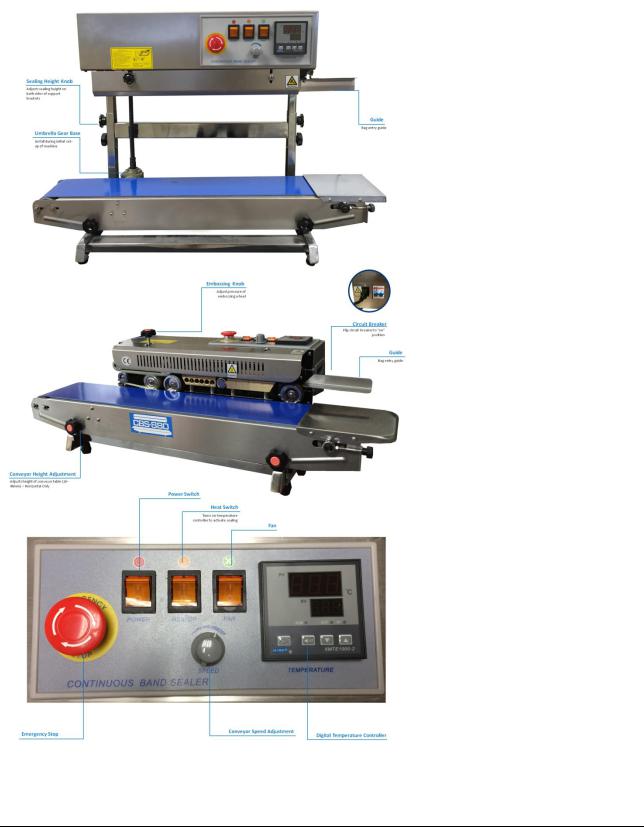
Features of the CBS-880 Band Sealer
Your band sealer is equipped with a wide range of standard features and capabilities.
Simple to use – minimal operator training
Rust inhibiting stainless steel construction
Unit feeds right to left
Equipped with electronic adjustable speed control
Equipped with bag entry guide for easy bag feeding and straight seals
Control panel includes industrial grade safety emergency stop switch
10amp protection power surge breaker
Wide seal (8mm) to assure airtight seal / Optional 15mm width sealer model available
PTFE sealing belts
Extended forced-air cooling system with extra wide cooling bars and 6 heat transfer orifices
One pair of brass sealing bars
Sealing method – constant heat
Adjustable 2-way pulley system for optimal stability and embossing clarity
Knurled pressure rolls with variable pressure adjustment
Fast warm up time
PID digital temperature controller 0-300˚C (572˚F) with dual alphanumeric displays (target & current temp)
Motorized rubber conveyor with speed control
Capable of speeds up to 472 inches/minute
Optional pressure embossing printing coder
3

C B S - 8 8 0 I N S T R U C T I O N M A N U A L
How Does the CBS-880 Work?
CBS-880 is comprised of a stainless steel frame, speed adjusting mechanism, sealing temperature control system and transmission system. Turning on the heat for the band sealer will cause a rapid rise in the temperature of the heating blocks. Required
temperature and speed can be adjusted via the temperature controller and speed adjusting device. Plastic material to be sealed is placed on the guide and conveyor. Conveyor will then take the material between the two heating blocks to fuse the material together. Material will then pass through the cooling blocks to allow the material to congeal. Finally, material will then pass through the embossing wheel for a meshed seal line.
The motor drives the sealing belts, drive belts and conveyor simultaneously.
Specifications
|
|
CBS-880I (Horizontal) |
|
|
CBS-880II (Vertical) |
|
|
|
|
|
|
||
Power |
|
110V/60Hz |
|
|||
Motor Power |
|
50W |
|
|
||
Sealing Speed |
|
0-472 inches/minutes |
|
|||
Sealing Width |
|
8mm (Optional 15mm width available) |
|
|||
Temperature Range |
|
0-300˚C (572˚F) |
|
|||
Conveyor Size |
|
38” x 7” |
|
|
||
Max Conveyor Load |
|
6.6lbs |
|
|
||
Min/Max Height of Bag (Vertical Only) |
|
N/A |
|
6” / 12” |
|
|
Character Size |
|
3x4x9mm / 18PT |
|
|||
Embossing (Optional Feature) |
|
1 line embossing (2 lines available) |
|
|||
|
|
3 sections w/ 15 characters/line |
|
|||
Dimensions |
|
33” x 17” x 13” |
|
33” x 17” x 22” |
|
|
Weight |
|
60lbs |
|
66lbs |
|
|
CBS-880 Diagram
Figure 1. Horizontal Band Sealer (1) Guide, (2) Driven Wheel Seat (Adjusting Block), (3) Driven Wheel, (4) Control Panel, (5) Heating Block, (6) Holding Plate, (7) Pinch Roller, (8) Cooling Block, (9) Driving Wheel, (10) Embossing Roller, (11) Silicone Wheel, (12) Guiding Wheel, (13) Conveyor Belt, (14) Conveyor Table, (15) Fastening Knob for Elevating Table, (16) Transverse Tightening Knob for Conveyor Table, (17) Conveyor Support
4

C B S - 8 8 0 I N S T R U C T I O N M A N U A L
Figure 2. Vertical Band Sealer (1) Conveyor Table, (2) Driving Roller, (3) Conveyor Belt, (4) Fixed Bracket, (5) Slip Bracket, (6) Safety Cover, (7) Adjusting Knob for Embossing Roller, (8) Housing, (9) Circuit Breaker, (10) Control Panel, (11) Feed Opening, (12) Fastening Knob, (13) Worktable, (14) Adjusting Knob for Conveyor Belt, (15) Tightening Nut, (16) Transverse Tightening Knob for Conveyor Table, (17) Conveyor Support, (18) Vertical Shaft, (19) Gimbel Assembly, (20) Umbrella Gear Shaft
Figure 3. Horizontal Band Sealer with Stand. Optional stand available for CBS-880. Please ask your distributor.
5
C B S - 8 8 0 I N S T R U C T I O N M A N U A L
Getting to Know your Band Sealer
6
C B S - 8 8 0 I N S T R U C T I O N M A N U A L
Electrical Circuit Diagram
Figure 4. Electrical Circuit Diagram. (QF1) Breaker, (SB1) Switch/Emergency Stop, (K1) Switch/On-Off, (K2) Switch/Seal, (K3) Switch/Fan, (MD) DC Motor, (FAN) Axial-Flow Fan, (THC1) Temperature Controller, (ST1) Thermocouple, (HE1) Heating Element, (W1) Potentiometer, (AP1) Speed-Regulating PCB
7

C B S - 8 8 0 I N S T R U C T I O N M A N U A L
Operating Your Band Sealer
Important
Read this manual carefully, and make it available to everyone connected with the supervision, maintenance, or production of this machine. Additional copies are available at your request. (Contact your distributor for this information.) Be very careful when operating, adjusting, or servicing this equipment. If in doubt, stop and obtain qualified help before proceeding.
Installation
Place the band sealer in the desired location with the required electrical power source available. (See power requirements.) Make certain that proper electrical wiring is provided to guard against low voltage. If the voltage is too low, the equipment will not function properly.
Finding the proper location is a most important function of the initial set-up. One must take several factors into consideration:
Adequate power source
Relationship to source of product
Relationship to band sealer
Relationship to any conveyors necessary to remove finished product
Convenience of operator
Initial Set-up
If you have not already done so, please unpack your machine, carefully checking the contents against the spare parts list (See Spare Parts List on page 39). Once you have determined that all of the parts have arrived in good order set up can proceed. If any parts are missing or appear to be damaged, please notify your distributor or Sealer Sales AND your freight company at once.
To prevent damage to the band sealer, the band sealer body and conveyor are shipped disconnected. Please follow these simple steps to connect the drive shaft (Figure 34, Item #17) on the band sealer body with the conveyor middle post (Figure 40, Items #5, 14-18) on the band sealer conveyor. Please disregard if you purchased the CBS-880II vertical band sealer and follow the vertical configuration set up instructions.
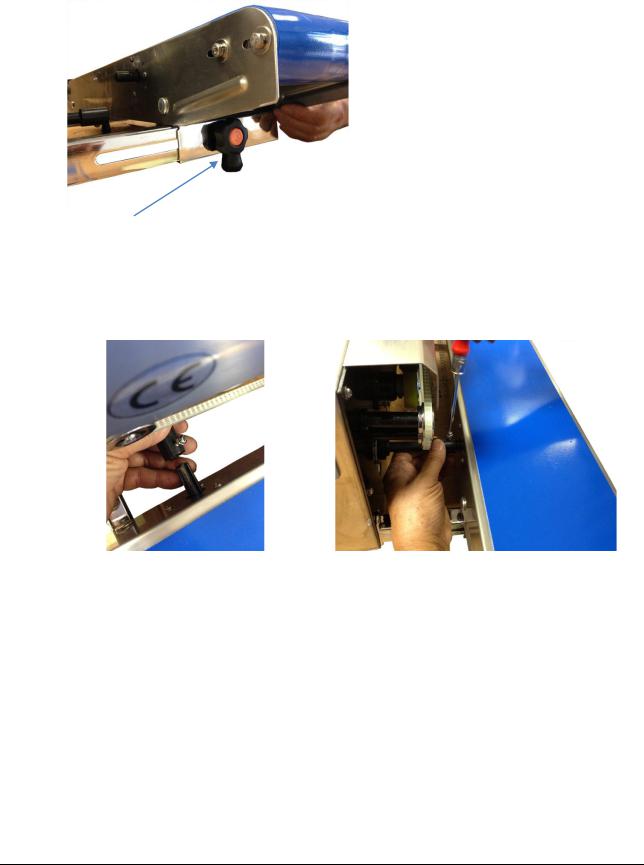
1. Loosen the knobs for the conveyor table to move the conveyor table forward.
8
C B S - 8 8 0 I N S T R U C T I O N M A N U A L
Figure 5. Two flower shaped knobs are found under conveyor.
2.Loosen the screw on the drive shaft and insert the conveyor middle post (found on the conveyor table) to the drive shaft. Be sure the groove on the conveyor middle post lines up along the screw on the drive shaft. Move the conveyor belt as needed to allow the conveyor middle post to meet with the drive shaft. Once the conveyor middle post is in place, tighten the screw on the drive shaft to lock the conveyor middle post in place.
Figure 6. Insert the conveyor middle post in drive shaft. Make sure |
Figure 7. Tighten the screw on the drive shaft to lock the conveyor middle post |
grooves are aligned. |
in place. |
3.Tighten the round nut (Figure 34, Item #18) along the drive shaft as well as the knobs and in front of the band sealer (Figure 40, Item #12)
Operation Set-up
1.Our machines are equipped with a three-prong grounded plug. Make sure the plug is wellconnected in the socket to ensure safe operation.
2.Make sure the circuit breaker is in the “ON” position. (Levers pointing up)
3.First time operation. Allow the machine to pre-heat by running at a low temperature for a few minutes. This would apply if the machine has not been in operation for a long time. The machine can sometimes be damp from storage or shipment and running at a low temperature will dry out any residual moisture.
9
C B S - 8 8 0 I N S T R U C T I O N M A N U A L
4.Adjust the conveyor position forwards or backwards. Refer to Figure 8 for knob adjustments. For vertical configuration only, adjust the height of the band sealer appropriate for your bag to be sealed.
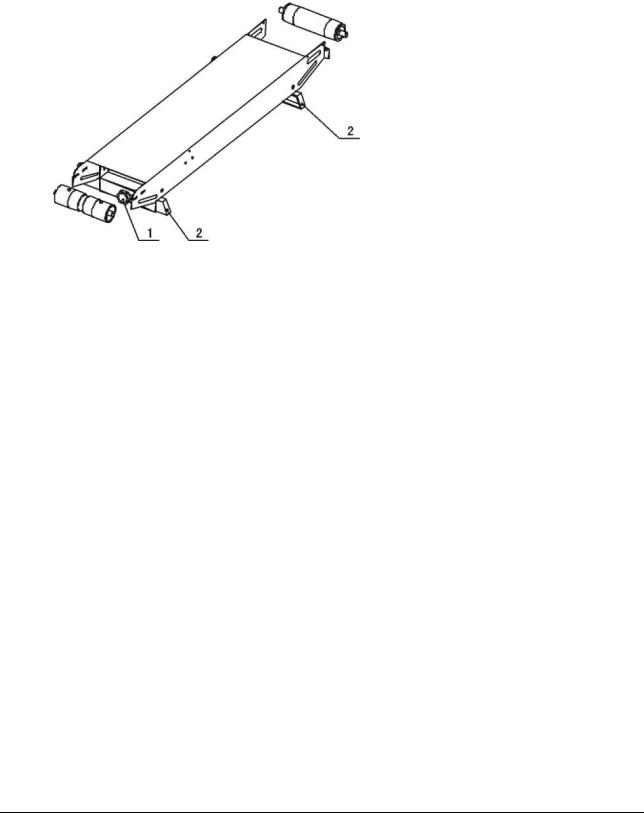
Figure 8. (1) Adjusting Knob, (2) Foot Rest
5. Adjust the guide to adjust seal width and position of seal line on your material.
10
 Loading...