


IMPORTANT
Since CD circuitry may cause interference to other radio tuners nearby, switch this unit off when
not in use or move it away from the affected radio tuner.
NOTE :
This digital apparatus does not exceed the Class A/Class B (whichever is applicable) limits for
radio noise emissions from digital apparatus as set out in the Radio Interference Regulations of
Industry Canada. These limits are designed to provide reasonable protection against harmful
interference in a residential installation. This equipment generates uses and can radiate radio
frequency energy and if not installed and used in accordance with the instruction, may cause
harmful interference to radio communications. However, there is no guarantee that interference
will not occur in a particular installation. If this equipment does cause harmful interference to radio
or television, which can be determined by turning the equipment off and the user is encouraged to
try to correct the interference by one or more of the following measures:
• Reorient or relocate the receiving antenna.
• Increase the separation between the equipment and receiver.
• Connect the equipment into an outlet on a circuit different from that to which the receiver is
connected.
• Consult the dealer or an experienced radio / TV technician for help.
SAFETY
WARNING :
TO REDUCE THE RISK OF FIRE OR ELECTRIC SHOCK, DO NOT EXPOSE THIS APPLIANCE
TO RAIN OR MOISTURE. DANGEROUS HIGH VOLTAGES ARE PRESENT INSIDE THE
ENCLOSURE. DO NOT OPEN THE CABINET . REFER SERVICING TO QUALIFIED PERSONNEL
ONLY.
Mains plug is used as the disconnected device and it shall remain readily
operable. To be completely disconnected the power input, the mains plug of the
apparatus shall be disconnected from the mains completely. The mains plug
should not be obstructed OR should be easily accessed during intended use.
“The apparatus shall not be exposed to dripping or splashing and that no objects
filled with liquids, such as vases, shall be placed on the apparatus.”
– no naked flame sources such as lighted candles should be placed on the apparatus;
– attention should be drawn to the environmental aspects of battery disposal;
– the use of apparatus in moderate climates.
LASER :
This Digital Video Disc Player employs a Laser System.
To ensure proper use of this product, please read this owner’s manual carefully and retain for
future reference. Should the unit require maintenance, contact an qualified service personnel.
Use of controls, adjustments or the performance of procedures other than those specified may
result in hazardous radiation exposure.
To prevent direct exposure to laser beam, do not try to open the enclosure.
Visible and invisible laser radiation when open and interlocks defeated.
GB–1

DO NOT ST ARE INTO BEAM
LASER
Type Semiconductor laser GaAIAs
Wave length 650nm
Output Power 7mW
Beam divergence 60 degree
SAFETY
GB–2

SAFETY
CAUTION :
PLEASE READ AND OBSERVE ALL W ARNINGS AND INSTRUCTIONS GIVEN IN
THIS OWNER’S MANUAL AND THOSE MARKED ON THE UNIT. KEEP THESE
INSTRUCTIONS. RETAIN THIS BOOKLET FOR FUTURE REFERENCE.
This set has been designed and manufactured to assure personal safety. Improper use can result
in electric shock or fire hazard. The safeguards incorporated in this unit will protect you if you
observe the following procedures for installation, use and servicing. This unit does not contain
any parts that can be repaired by the user.
DO NOT REMOVE THE CABINET COVER, OR YOU MA Y BE EXPOSED TO DANGEROUS
VOLTAGE. REFER SERVICING TO QUALIFIED SERVICE PERSONNEL ONLY.
1. Read these instructions
After unpacking this product, read the owner manual carefully.
2. Keep these instructions
Retain this booklet for future reference.
3. Heed all warnings.
4. Follow all the operating and other instructions.
5. Do not use this apparatus near water.
6. Clean only with a damp cloth.
7. Do not block any of the ventilation openings. Install in accordance with the manufacturers
instructions.
8. Do not install near any heat sources such as radiators, heat registers, stoves, or other
apparatus (including amplifiers) that produce heat.
9. Protect the power cord from being walked on or pinched particularly at plugs, convenience
receptacles, and the point where they exit from the apparatus.
10. Only use attachments/accessories specified by the manufacturer.
11. Use only with a cart, stand, tripod, bracket, or table specified by the manufacturer, or sold
with the apparatus. When a cart is used, use caution when moving the cart/apparatus
combination to avoid injury from tip-over.
12. Unplug this apparatus during lightning storms or when unused for long periods of time.
13. Refer all servicing to qualified service personnel. Servicing is required when the apparatus
has been damaged in any way, such as when the power-supply cord or plug is damaged,
liquid has been spilled or objects have fallen into the apparatus, the apparatus has been
exposed to rain or moisture, does not operate normally, or has been dropped.
14. Disc Tray
Keep your fingers well clear of the disc tray as it is closing. It may cause serious personal
injury.
15. Burden
Do not place a heavy object on, or step on the product. The object may fall, causing serious
personal injury and serious damage to the product.
GB–3

SAFETY
16. Disc
Do not use a cracked, deformed, or repaired disc. These discs are easily broken and may
cause serious personal injury and product malfunction.
17. Damage Requiring Service
Unplug this product from the wall refer servicing to qualified service personnel under the
following conditions:
a.) When the power-supply cord or plug is damaged.
b.) If liquid has been spilled, or objects have fallen into the product.
c. ) If the product has been exposed to rain or water.
d.) If the product does not operate normally by following the operating instructions. Adjust only
those controls that are covered by the operating instructions. Improper adjustment of other
controls may result in damage and will often require extensive work by a qualified technician
to restore the product to its normal operation.
e.) If the product has been dropped or damaged in any way.
f. ) When the product exhibits a distinct change in performance - this indicates a need for
service.
18. Servicing
Do not attempt to service this product yourself as opening or removing covers may expose
you to dangerous voltage or other hazards. Refer all servicing to qualified service personnel.
19. Replacement Parts
When replacement parts are required, be sure the service technician has used replacement
parts specified by the manufacturer or have the same characteristics as the original part.
Unauthorized substitutions may result in fire, electric shock, or other hazards.
20. Safety Check
Upon completion of any service or repairs to this product, ask the service technician to
perform safety checks to determine that the product is in proper operating condition.
Remark :
Power Indication
1. The mains plug is used as the disconnect device and it shall remain readily
operable to be completed disconnect the power input, disconnected from
the mains.
2. Since the mains plug is used as disconnect.
Device and the stand-by indicator would light-up to indicate power on. If the
stand-by indicator turns off (no color), the apparatus is completely
disconnected from the mains.
Notes : See Marking on Bottom / Rear Cabinet
PLAYER ZONES
For the purpose of distribution of DVD Discs, the world has been separated into 6 zones. The
zone your player is intended for is indicated on the “Zone Label”. This should be the same as the
label on discs available in your region. If you have any difficulties in playing a disc, make sure that
the disc is for the same zone as your player.
GB–4
INSTALLATION
This product incorporates copyright protection technology that is protected by method claims of certain
U.S.
patents and other intellectual property rights owned by Macrovision Corporation and other rights
owners.
Use of this copyright protection technology must be authorized by Macrovision Corporation,and
is
intended for home and other limited viewing uses only unless otherwise authorized by Macrovision
Corporation.
Reverse engineering or disassembly is prohibited
.
Apparatus Claims of U.S. Patent Nos.4,631,603;
4,819,098;
4,907,093;5,315,448;and 6,516,132
licensed
for limited viewing uses only.
Consumers should note that not all high definition televison sets are fully compatible with this product and
may
cause artifacts to be displayed in the picture. In case of 525 or 625 progressive scan picture problems,
it
is recommended that the user switch the connection to the standard definition output. If there are
questions
regarding our TV set compatibility with this model 525p and 625p DVD player, please contact
our
customer service center.
Manufactured under license from Dolby Laboratories.
Dolby and
the double-D symbol are trademarks of
Dolby
Laboratories.
Install your DVD player on a stable flat surface. The unit should be situated with enough space
around it so that proper heat ventilation is assured. Allow 20 cm clearance from the rear and the
top of the unit, and 10 cm from each side.
Caution :
Do not install this equipment in confined space with poor ventilation.
This product incorporates copyright protection technology that is protected by method claims of certain
U.S. patents and other intellectual property rights owned by Macrovision Corporation and other rights
owners. Use of this copyright protection technology must be authorized by Macrovision Corporation,and
is intended for home and other limited viewing uses only unless otherwise authorized by Macrovision
Corporation. Reverse engineering or disassembly is prohibited
.
Apparatus Claims of U.S. Patent Nos.4,631,603;
4,819,098; 4,907,093;5,315,448;and 6,516,132
licensed for limited viewing uses only.
Consumers should note that not all high definition televison sets are fully compatible with this product and
may cause artifacts to be displayed in the picture. In case of 525 or 625 progressive scan picture problems,
it is recommended that the user switch the connection to the standard definition output. If there are
questions regarding our TV set compatibility with this model 525p and 625p DVD player, please contact
our customer service center.
Manufactured under license from Dolby Laboratories.
Dolby and the double-D symbol are trademarks of
Dolby Laboratories.
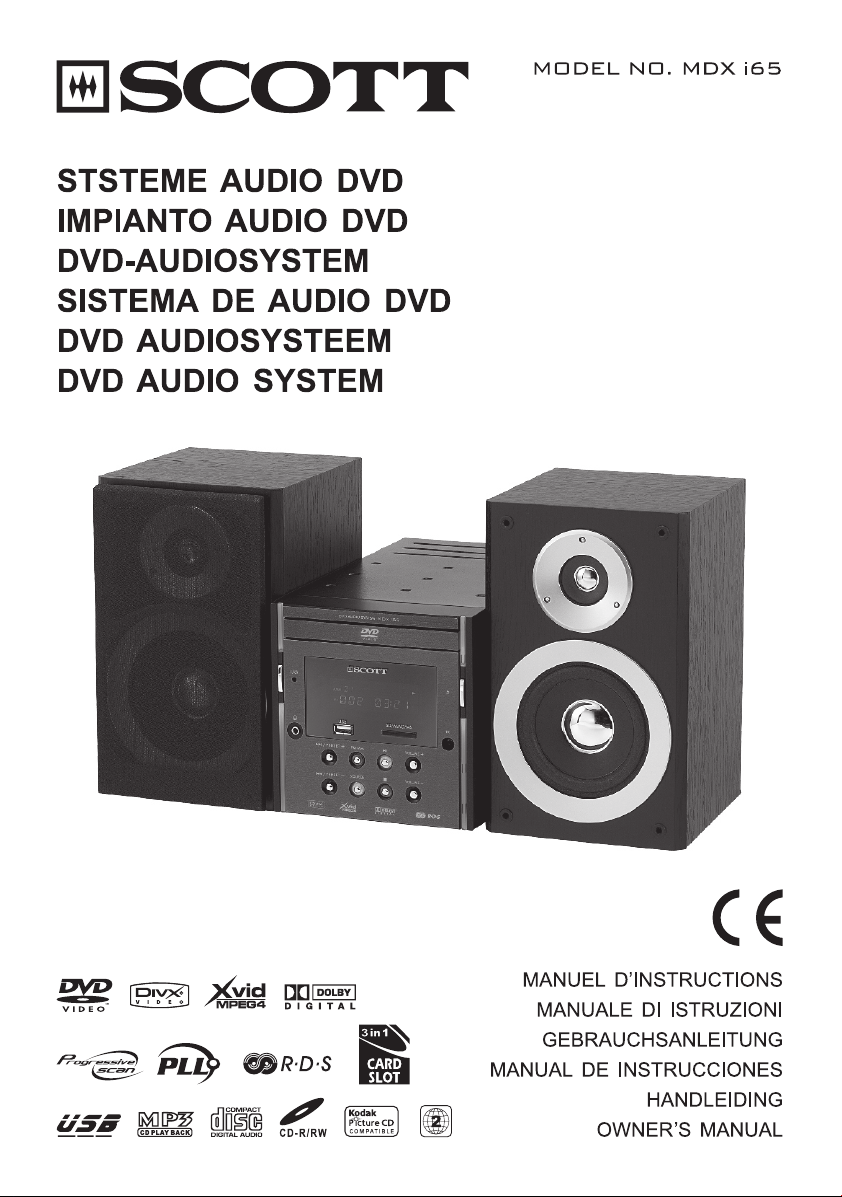
CONNECTIONS
1) Connecting to TV
Only the component cable and the audio cable need be connected if your TV has COMPONENT
input as this will give a higher quality picture. Otherwise use the SCART or Video input of the TV.
COMPONENT CABLE CONNECTING
GB–5
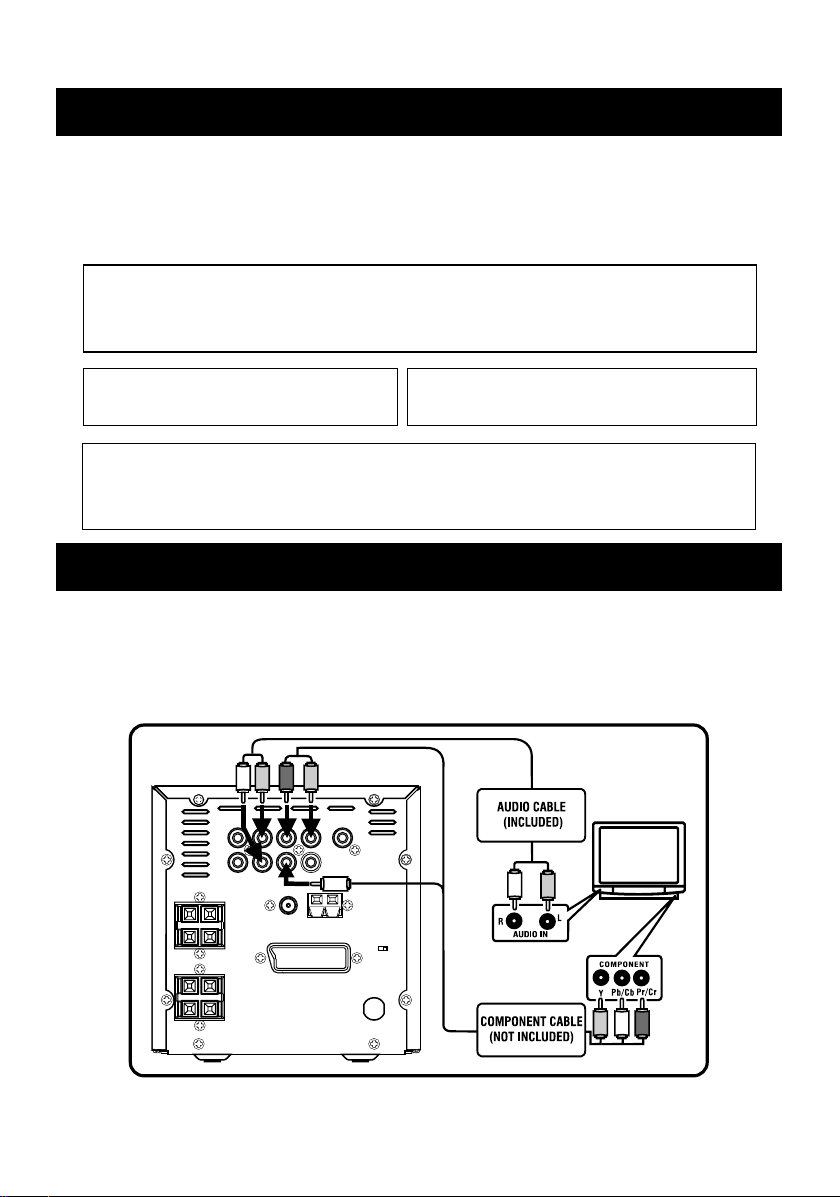
CONNECTIONS
SCART CABLE CONNECTING
VIDEO CABLE CONNECTING
GB–6
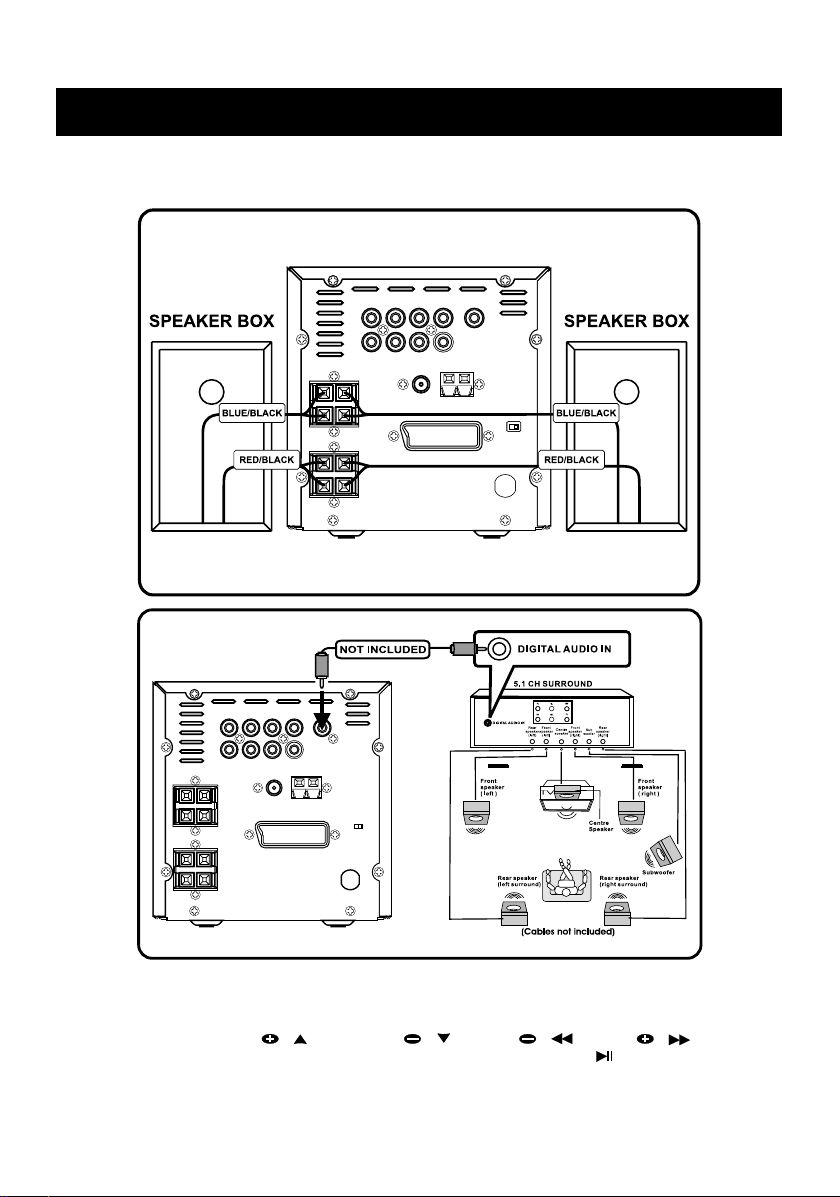
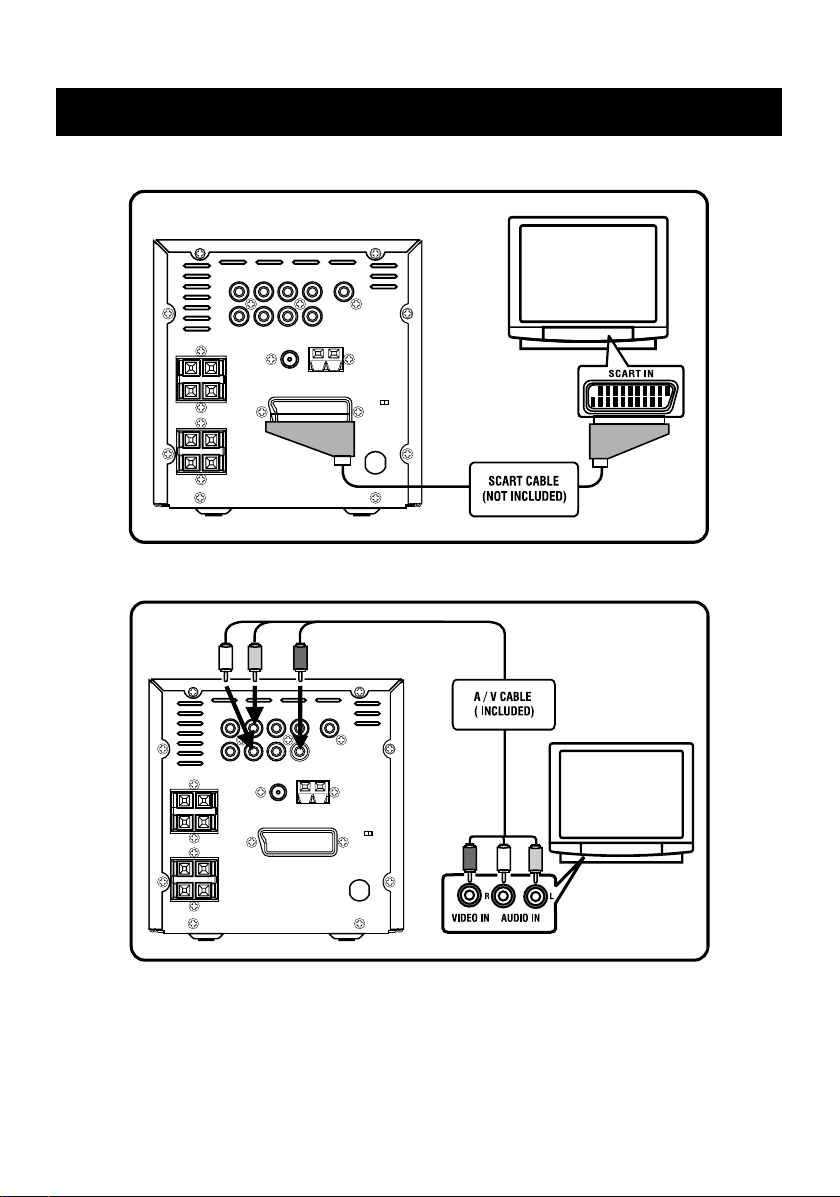
CONNECTIONS
2) Connecting to the standard speaker boxes
CONNECTING TO SPEAKER BOXES
Notes:
To enjoy the SURROUND SOUND with the above connection, you need to set the
corresponding preference in setup menu. Press SETUP key on the remote control to access
menu, then press PRESET / or PRESET / , or TUN / or TUN / key to
select AUDIO OUT and the ANALOG, SPDIF/RAW or SPDIF/PCM, press / ENTER key to
confirm your setting. To exit setup menu, press SETUP key once.
GB–7
CONNECTIONS
3) Connecting to AM and FM antenna
A.) Adjusting the position of the FM antenna
While listening to an FM program, extend the antenna and move it in various directions until the
clearest signal is received. Then secure the antenna with push pins in the position with the least
distortion.
B.) Adjusting the position of the AM antenna
Connect the AM antenna wire to antenna marked “ ” with the white wire.
Connect the AM antenna wire to antenna marked “ ” with the black wire.
While listening to an AM program, set the antenna in the direction and position where you receive
the clearest sound. Position it as far away as possible from the unit, TVs, speaker cables and
power cords (main leads).
GB–8
MAIN UNIT
1. – Turns the system on or standby. Remember to remove the power of the system, if you
are not going to use the system for a period of time.
2. FM/AM – Selects TUNER as input source, switches the DVD Micro System on from standby
with TUNER selects as the input source. Switches between the FM and AM frequency bands.
3. SOURCE – Switches the DVD Micro System on from standby with DISC, USB, CARD, AUX IN
select as the input source.
Switches among the DISC, USB, CARD , AUX IN as input source.
4. – To open or close the disc tray.
5. PLAY/PAUSE – In DISC , USB or CARD mode: starts disc playback; pauses playback.
6. STOP - Ends DISC , USB or CARD playback.
7. VOLUME – – Adjusts Volume down.
8. VOLUME + – Adjusts Volume up.
9. / PRESET – – In Disc playback mode, press to skip backward to the other track/chapter; In
Tuner mode, press briefly to select a preset station down. Press and hold down to start the
station search mode backwards.
10. / PRESET + – In Disc playback mode, press to skip forward to the other track/chapter; In
Tuner mode, press briefly to select a preset station up. Press and hold down to start the
station search mode forwards.
11. IR – Infrared sensor for remote control.
12. – Headphones jack for connecting a stereo head phone set with a jack plug (no including).
The loudspeakers are switched off automatically.
13. USB – USB connector.
14. CARD – CARD connector.
GB–9
REMOTE CONTROLS
6
7
8
11
13
12
23
16
24
27
28
31
21
33
34
37
38
41
42
5
1
2
3
4
9
10
14
15
18
25
20
17
26
19
29
30
32
35
36
39
40
43
44
22
1. – Turns the system on or standby. Remember to remove the power, if you are not going to
use the system for a long time.
2. OPEN / CLOSE – To open / close the disc tray.
3. DVD – Selects Disc mode from other source modes; In Standby mode, turns the system on at
Disc mode directly.
4. TUNER – Selects Tuner AM, FM band from other source modes; In Standby mode, turns the
system on at turn AM or FM band directly.
5. AUX – Selects AUX mode from other source modes; In Standby mode, turns the system on at
AUX mode directly.
6. USB – Selects USB mode from other source modes; In Standby mode, turns the system on at
USB mode directly.
7. CARD – Selects CARD mode from other source modes; In Standby mode, turns the system on
at CARD mode directly.
8. DIGITS (0~9) – Numerical buttons for various inputs. In DISC, USB, CARD mode, selects
tracks or files directly. In TUNER mode, selects preset station position directly.
9. +10 – If the number of track of files is over 10, press >>+10 << to set ten digit, then
press numerical key to select primacy number.
GB–10

REMOTE CONTROLS
10. PROG – In Disc, USB, CARD mode, enters or exits the function for track memory (PROGRAM).
In tuner mode, opens the function for storing radio stations in preset channel positions
confirms your setting.
11. OSD/INFO – Press briefly to view the current state for title No, chapter No, elapsing time (on
top TV screen). Press twice to exit the state menu (if CD disc) or view angle/subtitle state are
on or off (if DVD disc). Press thrice to exit the state menu (if DVD disc). Press and hold down
more than two seconds to enter DIMMER mode for VFD display. In FM mode, press the key to
display RDS information.
12. CLOCK – Press the CLOCK key to display current time briefly, press and hold down more
than 2 seconds to enter the clock setting.
13. TIMER – Press the TIMER key to switch the timer ON or OFF, press and hold down to enter
the timer setting mode.
14. SLEEP – Press the SLEEP key to view sleep time if the sleep time is set; press and hold down
more than 2 seconds to enter the sleep time setting mode.
15. SETUP – Calls up the set-up menu of the DVD Micro System on the television screen when
the system is switched to DISC, USB or CARD mode.
16. TUN / – Moves the cursor left in the set-up menu (on the TV screen). In DISC, USB,
CARD playback mode, press and hold down to starts reverse in search; In TUNER mode,
switches the frequency down; In CLOCK setting mode, selects the hour or minute for
adjustment.
17. TUN / – Moves the cursor right in the set-up menu (on the TV screen). In DISC, USB,
CARD playback mode, press and hold down to starts fast forward in search; In TUNER mode,
switches the frequency up; In CLOCK setting mode, selects the hour or minute for adjustment.
18. PRESET / – Moves the cursor up in the set-up menu or MP3, MPEG 4 filelist (on the TV
screen). In TUNER mode, switches forward through the preset stations step by step. In
CLOCK or TIMER setting mode, adjusts the values such as hour, minute, volume source.
19. PRESET / – Moves the cursor up in the set-up menu or MP3, MPEG 4 filelist (on the TV
screen). In TUNER mode, switches backward through the preset stations step by step. In
CLOCK or TIMER setting mode, adjusts the values such as hour, minute, volume source.
20. / ENTER – Activates the selected setting and confirms the entry in the set-up menu. In DISC,
USB or CARD mode, starts disc playback, pause playback.
21. – During playback, press once briefly interrupt playback (resume). Press twice to end
playback (stop).
22. VOLUME / – Adjust the volume up and down.
23. TITLE – Calls up the DVD setting according to the track of a DVD.
24. SUBTITLE – For selecting and displaying subtitles of the DVD during playback according to
the DVD prerequisites. Select to change subtitles during DivX playback.
25. MENU – Calls up the DVD settings according to the menu of the DVD.
26. AUDIO – Press briefly to choose the audio language you prefer according to the DVD
prerequisites.
27. STEP – Switches to freeze frame forwards during DVD/ MPEG 4 and VCD/S-VCD playback,
switches through freeze frames step by step.
28. SLOW – Press each time briefly to switch to play in slow motion among 1/2,1/3,1/4,1/5, 1/6,
1/7.
29. NEXT / – In DISC, USB or CARD mode, press to skip forward the other track /chapter
30. PREV / – In DISC, USB or CARD mode, press to skip forward the other track /chapter.
GB–11

REMOTE CONTROLS
31. GOTO – In DVD mode, press to select the desired title or chapter; In CD, VCD disc mode,
press to the desired starting point for playback (If VCD disc, PBC must be set as off).
32. REPEAT – In CD, MP3, WMA, SVCD and VCD disc mode, repeatedly selects the disc repeat
modes: REPEAT (repeat the current track), REPEAT ALB (album repeat) for MP3 and WMA
disc; REPEAT ALL (repeat all tracks of disc) ; Repeat off (remark: For VCD20 or SVCD, it is
available when PBC is set as off mode); In DVD disc mode, repeatedly selects the playback
mode, RPT CHP (repeat current chapter), RPT TITLE (repeat current title).
33. BOOKMARK/PBC - Switches the PBC (Play Back Control) function on and off in VCD/S-VCD
mode. Calls up the menu for setting bookmark in DVD mode.
34. INTRO – In CD/VCD/SVCD disc, press briefly to select chapter /track for playback in intro
order.
35. RDS/A-B – In DISC , USB or CARD mode, marks a section, which is then constantly
repeated.In FM mode, press the key to select the type of program that they broadcast.
36. RAND – In DISC, USB or CARD mode, playback track/chapter in random order.
37. P-SCAN – In DISC, USB or CARD mode, switches the output format of the picture of signal
among INTERLACE-YUV , TV-RGB, P-SCAN YPBPR.
38. ST/MONO – In VCD/SVCD disc, selects channel of audio output; Switches between STEREO
and MONO.
39. ANGLE – Selects the DVD setting appropriately during playback of various camera angles for
certain scenes of passages on the DVD.
40. ZOOM – You press ZOOM button to enlarge or zoom out the video image during play DVD/
VCD and JPEG Picture disc.
41. MUTE – Press MUTE button to reduce sound to an inaudible level, and “ MUTING ” will be
displayed on screen. Press the button again to resume, and “ MUTING ” has gone off.
42. DEMO – Press briefly to activate the DEMO function ON and OFF in standby mode.
43. BASS – Press briefly to switch the BBS (Bass Boost) function among BASS 1, BASS 2 or
BASS OFF.
44. EQ – Selects a different sound effect among FLAT, CLASSIC, ROCK, JAZZ and POP.
GB–12

BASIC SETUP
SCREEN SAVER
PASSWORD
TV SYSTEM
DYNAMIC RANGE
LINE OUT
RF REMOD
ANGLE SWITCH
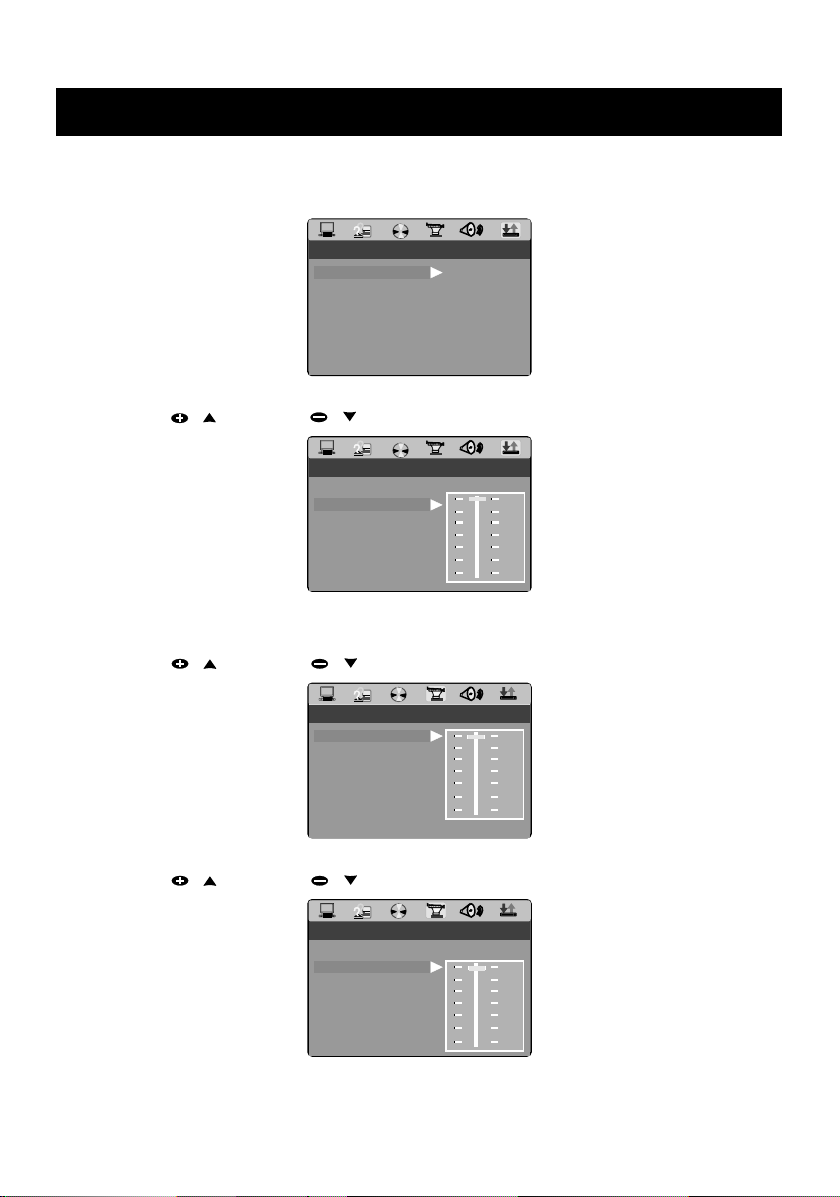
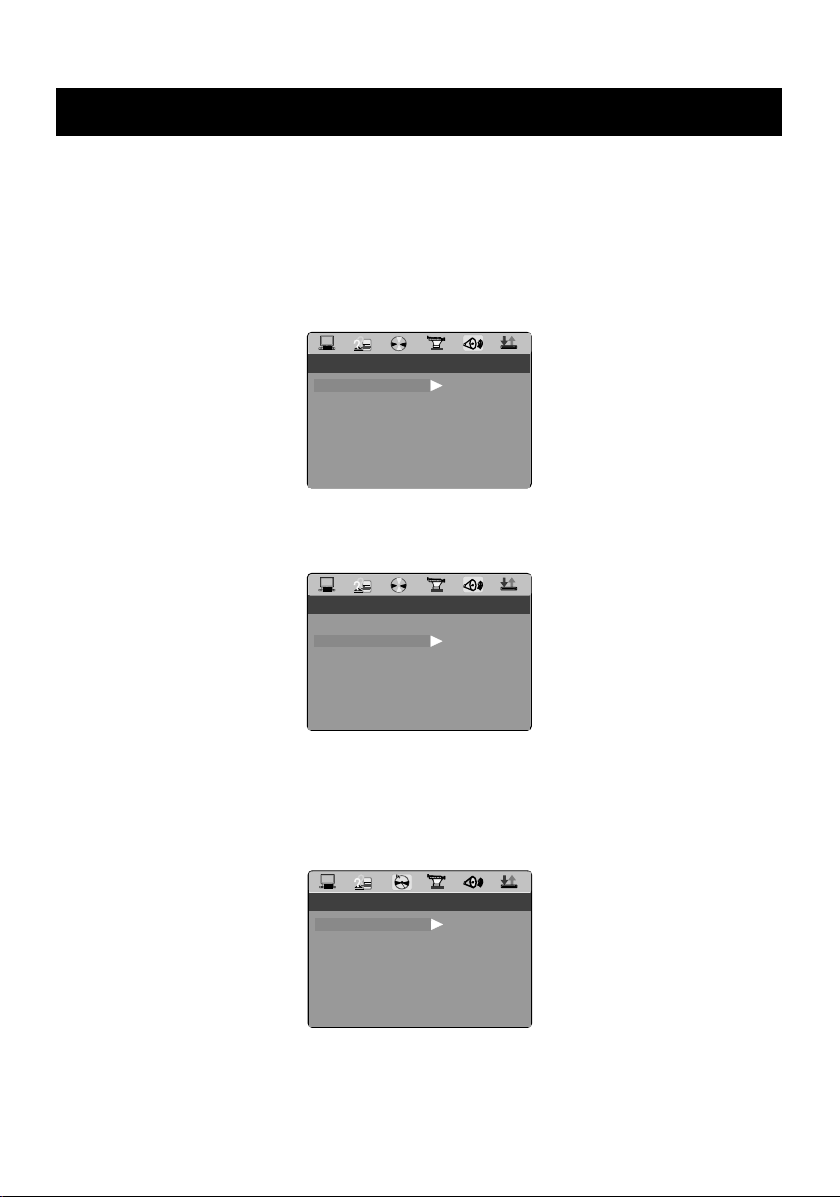
1. General Steps of Setup Menu
a.) In DISC, USB or CARD mode, press the SETUP key on the remote control , the main setup
menu appears as below. When the main menu displayed, the DVD system will auto pause.
SYSTEM SETUP
TV SYSTEM
SCREEN SAVER
VIDEO
TV TYPE
PASSWORD
RATING
DEFAULT
EXIT SETUP
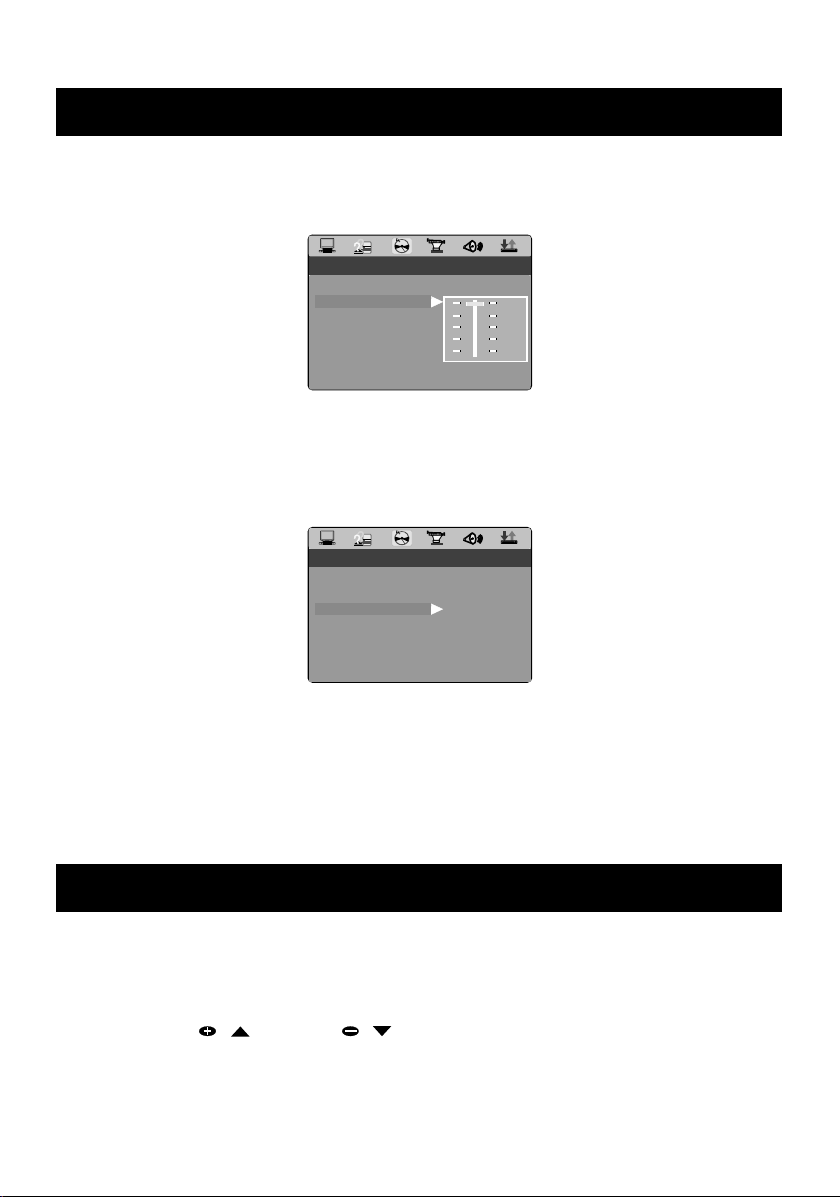
b.) Press TUN / and TUN / key to highlight the icon of the desired page, then press
PRESET / or TUN / key to activate that page; For example, if you want to setup the
audio page, press TUN / key to highlight the audio icon, the audio page will be displayed
on the screen.
AUDIO SETUP
OP MODE
DYNAMIC RANGE
DUAL MONO
EXIT SETUP
c.) Press PRESET / key to highlight the desired option. Press / ENTER or TUN /
key to select, the choices of that option appear on the right; For example, press PRESET /
key to highlight the BRIGHTNESS option, then press / ENTER key to select, the
brightness choices appear on the right.
LINE OUT
RF REMOD
VIDEO SETUP
BRIGHTNESS
CONTRAST
HUE
SATURATION
SHARPNESS
ANGLE SWITCH
EXIT SETUP
12
10
8
6
4
2
0
d.) Press PRESET / key to highlight the Exit Setup option, then press / ENTER key or
SETUP key again to exit Setup Menu.
GB–13

BASIC SETUP
SCREEN SAVER
TV SYSTEM
2. Setup Items Introduction
SYSTEM SETUP
• TV SYSTEM
According to the Color System of the TV, you can choose the TV System.
–NTSC : Choose this settings if your DVD player is connected to a NTSC TV.
– PAL : Choose this settings if your DVD player is connected to a PAL TV.
–PAL-M : Choose this settings if your DVD player is connected to a PAL M TV.
–AUTO : Choose this settings if your DVD player is connected to a multi-system TV.
SYSTEM SETUP
TV SYSTEM NTSC
SCREEN SAVER
VIDEO
TV TYPE
PASSWORD
RATING
DEFAULT
EXIT SETUP
• SCREEN SAVER
If the screen saver is on, when your DVD player is in Stop, Open, or No Disc state, or there is a
frame frozen for more than 3 minutes, the screen saver will be displayed. This feature can
protect the screen from damage.
– ON : Choose this setting to activate the screen saver.
– OFF : Choose this setting to cancel the screen saver
SYSTEM SETUP
TV SYSTEM
SCREEN SAVER
VIDEO
TV TYPE
PASSWORD
RATING
DEFAULT
EXIT SETUP
• VIDEO
– INTERLACE-YUV : Choose this setting if your DVD player is connected to a TV with Y, Cb, Cr
video cables.
– TV-RGB : Choose this setting if your DVD player is connected to a TV with an SCART cable.
– P-SCAN : Choose this setting if your DVD player is connected to a progressive scan TV with Y,
Pb, Pr video cables.
PAL
PAL M
AUTO
ON
OFF
GB–14

BASIC SETUP
TV SYSTEM
SCREEN SAVER
TV SYSTEM
SYSTEM SETUP
TV SYSTEM
SCREEN SAVER
VIDEO
TV TYPE
PASSWORD
RATING
DEFAULT
EXIT SETUP
Notes :
– If composite Video is connected to your TV, the submenu INTERLACE-YUV must be selected.
– If the component cable (Y, Pb/Cb, Pr/Cr) is connected to your TV for interlace TV or progressive
scan TV, the submenu P- SCAN YPBPR must be selected.
Remark : The mechanism switch need to move to the YUV position on the back
panel.
– If the scart cable is connected to your TV, the submenu TV-RGB must be selected.
Remark : The mechanism switch need to move to the RGB position on the back
panel.
• TV TYPE
– 16 : 9 (Wide Screen): Choose this setting if your DVD player is connected to a wide screen TV.
If you choose this setting and you don’t have a wide screen TV, the images on the screen may
appear distorted due to vertical compression.
– 4 : 3 LB (Letter Box): Choosing this setting if your DVD player is connected to a normal ratio TV.
You’ll see the movies in their original aspect ratio (height-to-width ratio). You’ll see the entire
frame of the movie, but it will take up a smaller portion of the screen vertically. The movie might
appear with black bars at the top and bottom of the screen.
–4 : 3 PS (Pan & Scan): Choosing this setting if your DVD player is connected to a normal ratio
TV. You can fill the movie to the entire screen of your TV. This might mean that parts of the
picture (the left and right edges) won’t be seen.
INTERLACE-YUV
TV-RGB
P-SCAN YPBPR
SYSTEM SETUP
TV SYSTEM
SCREEN SAVER
VIDEO
TV TYPE
PASSWORD
RATING
DEFAULT
EXIT SETUP
4:3PS
4:3LB
16:9
Notes :
The image display ratio is related to the recorded disc format. Some disc can not display
images in the aspect ratio you choose.
If you play a disc recorded in 4:3 format on a wide screen TV, black bars will appear on the
left and right side of the screen.
You must adjust the screen setting depending on the type of the television you have.
GB–15

BASIC SETUP
TV SYSTEM
TV SYSTEM
1 G
• PASSWORD
The password option is initialized locked, and you cannot set the ratings limit or change the
password. In order for the Ratings feature work, the password mode must be turned on. If you
want to set the ratings limit, you will need to enter the default password, which is 00000, then
press
password, then be prompted for a new. Enter a 5-digit number (this is your password).
• RATING
Press PRESET / or PRESET / key to RATING option , you can setup the parental rating
when password is unlock. The following settings are available 1 to 8.
Notes:
–1 G : Suitable for all ages.
–2 : Level 2.
– 3 PG : Only with parental guidance.
– 4 PG13 : Not suitable for children under 13 age, from 13 to 18 only under parental guidance.
–5 : Level 5
– 6 R : May contain violence or sex scene, can only be viewed under 18 under with parental
– 7 NC-17 : Only for adults, not for those under 17.
– 8 : Only for adults.
If the password option is locked, your can’t set the rating limit, the rating limit doesn’t work when
the password option unlocked.
/ ENTER key to confirm. To change the password, you will be prompted for the old
SYSTEM SETUP
TV SYSTEM
SCREEN SAVER
VIDEO
TV TYPE
PASSWORD
RATING
DEFAULT
EXIT SETUP
SYSTEM SETUP
TV SYSTEM
SCREEN SAVER
VIDEO
TV TYPE
PASSWORD
RATING
DEFAULT
EXIT SETUP
1G
2
3PG
4 PG13
5
6R
7 NC-17
8
guidance.
GB–16

BASIC SETUP
TV SYSTEM
AUDIO LANG
SUBTITLE LANG
MENU LANG
OSD LANGUAGE
SUBTITLE LANG
MENU LANG
• DEFAULT
Choose this option to resume all the setup options to default settings.
SYSTEM SETUP
TV SYSTEM
SCREEN SAVER
VIDEO
TV TYPE
PASSWORD
RATING
DEFAULT
EXIT SETUP
LANGUAGE SETUP
• OSD LANGUAGE
Highlight the OSD LANGUAGE option, and press PRESET / or PRESET / key to choose
the OSD language you prefer. Press / ENTER key to confirm, and it will display OSD in that
language; There are 7 optional OSD languages: English, German, Spanish, French and Portuguese, Italian or Swedish.
LANGUAGE SETUP
OSD LANGUAGE ENGLISH
AUDIO LANG
SUBTITLE LANG
MENU LANG
EXIT SETUP
• AUDIO LANG
Highlight the AUDIO LANG option, and press PRESET / or PRESET / key to choose the
audio language you prefer. Press / ENTER key to confirm. If the disc you are playing has that
language available, it will output audio in that language; There are 8 optional audio languages:
Chinese, English, Japan, French, Spanish, Portuguese, Latin and German.
RESTORE
GERMAN
SPANISH
FRENCH
PORTUGUESE
ITALIAN
SWEDISH
LANGUAGE SETUP
OSD LANGUAGE
AUDIO LANG
SUBTITLE LANG
MENU LANG
EXIT SETUP
GB–17
CHINESE
ENGLISH
JAPAN
FRENCH
SPANISH
PORTUGUESE
LATIN
GERMAN
BASIC SETUP
MENU LANG
EXIT SETUP
OSD LANGUAGE
AUDIO LANG
EXIT SETUP
OSD LANGUAGE
AUDIO LANG
SUBTITLE LANG
• SUBTITLE LANG
Highlight the SUBTITLE LANG option, and press PRESET
the subtitle language you prefer. Press / ENTER key to confirm. If the disc you are playing has
that language available, it will displays subtitles in that language; There are 7 optional audio
languages: Chinese, English, Japan, French, Spanish, Portuguese and German.
LANGUAGE SETUP
OSD LANGUAGE
AUDIO LANG
SUBTITLE LANG
MENU LANG
EXIT SETUP
• MENU LANG
Highlight the MENU LANG option, and press PRESET / or PRESET / key to choose the
menu language you prefer. Press / ENTER key to confirm. If the disc you are playing has that
language available, it will displays menu in that language; There are 8 optional menu languages :
Chinese, English, Japan, French, Spanish, Portuguese ,German or Latin.
LANGUAGE SETUP
OSD LANGUAGE
AUDIO LANG
SUBTITLE LANG
MENU LANG
EXIT SETUP
/ or PRESET / key to choose
CHINESE
ENGLISH
JAPAN
FRENCH
SPANISH
PORTUGUESE
GERMAN
OFF
CHINESE
ENGLISH
JAPAN
FRENCH
SPANISH
PORTUGUESE
GERMAN
LATIN
DIGITAL SETUP
• AUDIO OUT
Highlight the AUDIO OUT option, and press PRESET / or PRESET / key to choose the
audio output mode you prefer. Press / ENTER key to confirm; There are 3 optional audio output
modes: SPDI / OFF , SPDIF / RAW , and SPDIF / PCM.
–SPDIF / OFF : From the Coaxial Output jack and the Optical Output jack, no signal is output.
– SPDIF / RAW : Choose this setting if your DVD player is connected to a power amplifier with a
coaxial cable or an optical cable; When playing a disc recorded with Dolby Digital, DTS and
MPEG audio formats, the corresponding digital signals will be output from the Coaxial Output
jack or Optical Output jack. This player’s digital output jacks are designed for a connection to a
Dolby Digital, DTS, or MPEG receiver or decoder.
GB–18
BASIC SETUP
AUDIO OUT
ANGLE SWITCH
ANGLE SWITCH
–SPDIF / PCM: Choose this setting if your DVD player is connected to a 2-channel digital stereo
amplifier; When playing a disc recorded with Dolby Digital and MPEG audio formats, audio signals
will be modulated into a 2-channel PCM signal, and it will be output from the Coaxial Output jack
or Optical Output jack.
DIGITAL SETUP
AUDIO OUT
KEY
EXIT SETUP
SPDIF/OFF
SPDIF/RAW
SPDIF/PCM
• KEY
Press PRESET / or PRESET / key to move the scroll and adjust the key.
DIGITAL SETUP
AUDIO OUT
KEY
EXIT SETUP
#
+4
+2
0
-2
-4
b
VIDEO SETUP
• BRIGHTNESS
Press PRESET / or PRESET / key to move the scroll and adjust the brightness.
VIDEO SETUP
BRIGHTNESS
CONTRAST
HUE
SATURATION
SHARPNESS
ANGLE SWITCH
EXIT SETUP
12
10
8
6
4
2
0
• CONTRAST
Press PRESET / or PRESET / key to move the scroll and adjust the contrast.
VIDEO SETUP
BRIGHTNESS
CONTRAST
HUE
SATURATION
SHARPNESS
ANGLE SWITCH
EXIT SETUP
GB–19
12
10
8
6
4
2
0

BASIC SETUP
CONTRAST
ANGLE SWITCH
CONTRAST
ANGLE SWITCH
CONTRAST
ANGLE SWITCH
CONTRAST
• HUE
Press PRESET
• SATURATION
Press PRESET / or PRESET / key to move the scroll and adjust the saturation.
• SHARPNESS
Press PRESET / or PRESET / key to move the scroll and adjust the sharpness.
/ or PRESET / key to move the scroll and adjust the hue.
VIDEO SETUP
BRIGHTNESS
CONTRAST
HUE
SATURATION
SHARPNESS
ANGLE SWITCH
EXIT SETUP
VIDEO SETUP
BRIGHTNESS
CONTRAST
HUE
SATURATION
SHARPNESS
ANGLE SWITCH
EXIT SETUP
VIDEO SETUP
BRIGHTNESS
CONTRAST
HUE
SATURATION
SHARPNESS
ANGLE SWITCH
EXIT SETUP
+6
+4
+2
0
-2
-4
-6
12
10
8
6
4
2
0
8
6
4
2
0
• ANGLE SWITCH
Press PRESET / or PRESET / key to select on or off angle switch.
VIDEO SETUP
BRIGHTNESS
CONTRAST
HUE
SATURATION
SHARPNESS
ANGLE SWITCH
EXIT SETUP
GB–20
ON
OFF
BASIC SETUP
BASS MODE
LT / RT
ALL LG SPK
ALL SM SPK
MIXED SPK
DYNAMIC RANGE
LINE OUT
RF REMOD
SPEAKER SETUP
• DOWNMIX
–LT / RT : Choose this setting, it will be sound like in a movie theatre if the original movie the disc
was recorded from was encoded in the Pro Logic Dolby Digital format.
– STEREO : Choose this setting, when 5.1-channel sound playing, two channels of signals will be
output from the left and right soundtrack; when 2-channel sound playing, stereo signal will be
output.
– VSS : Choose this setting, when a disc recorded with 5.1-channel sound format playing, the
fictitious surround soundtracks effect will be heard from the main soundtrack.
SPEAKER SETUP
DOWNMIX
BASS MODE
EXIT SETUP
• BASS MODE
There are three settings in this option: ALL LG SPK, ALL SM SPK, MIXED SPK.
You can adjust speaker volume in this option
SPEAKER SETUP
DOWNMIX
BASS MODE
EXIT SETUP
LT / R T
STEREO
VSS
ALL LG SPK
ALL SM SPK
MIXED SPK
AUDIO SETUP
• OP MODE
–LINE OUT : Choose this setting to line out the input signal. It will be more suitable for playing in the
night time, for the output volume is low.
–RF REMOD : It will be more suitable to choose this setting for playing in the day time, for the
output volume is high.
AUDIO SETUP
OP MODE
DYNAMIC RANGE
DUAL MONO
EXIT SETUP
GB–21
LINE OUT
RF REMOD
BASIC SETUP
DYNAMIC RANGE
MONO L
MONO R
MIX MONO
• DYNAMIC RANGE
When “LINE OUT” is selected, choose this setting to adjust the line out ratio and get different
effect. If adjusting to FULL, the audio signal peak value will be the minimum; while adjusting to
OFF , maximum.
AUDIO SETUP
OP MODE
DYNAMIC RANGE
DUAL MONO
EXIT SETUP
Note :
This option will be validated when the DOWNMIX OFF.
• DUAL MONO (LEFT + RIGHT)
Choose this option to setup the L and R mono output mode; There are four modes in this option :
STEREO, MONO L, MONO R, and MIX MONO; It is mainly used in karaoke mode.
AUDIO SETUP
OP MODE
DYNAMIC RANGE
DUAL MONO
EXIT SETUP
STEREO
MONO L
MONO R
MIX MONO
FULL
6/8
4/8
2/8
OFF
REFERENCE :
– To protect your DVD player, the interval between two consecutive Power button operations
must be above 30 seconds.
– No using for a period of time, please pull out the plug from the electronic outlet.
– The player should be operated only on condition that the type of power supply corresponds to
the marking label. Otherwise, it doesn’t work or even be damaged.
– The player may not be compatible with some encrypted discs.
– If the player stops playback by accident, please power it on again.
CLOCK / TIMER
Clock Setting
In standby or any source mode
1. Press and hold CLOCK key on the remote control for more than 2 seconds to enter into the
clock setting mode, the “ SYNC ON ” or “ SYNC OFF ” will show on the display.
2. Press PRESET / or PRESET / to select ON or OFF for the SYNC.
– “ SYNC ON ” active RTC function of RDS, the time will update automatically when received the
correct signal.
GB–22

CLOCK / TIMER
3. Press / ENTER key on the remote control to confirm the selection, then CLK 24 or CLK 12
will show on the display.
4. Press PRESET / or PRESET / to select the hour format, the “ 24 ” or “ 12 ” is
flashing.
5. Press / ENTER key on the remote control to confirm the selection, the hour indication will
start flashing.
6. Press PRESET / or PRESET / key to set the hour.
7. Press / ENTER key on the remote control to confirm the setting.
8. Repeat step 6 and step 7 for minute setting. The clock will begin working after setting
above.
Notes:
The clock will be erased when the power cord is disconnected or if a power failure occurs.
During clock setting if no button is pressed within 5 seconds, the system will exit clock
setting mode automatically.
If the RDS time synchronization is activated on the system , the SYNC ON will be set. The system
time is automatically updated by this RDS function.
Timer Setting
The system can switch on to DISC, USB or CARD mode automatically at a preset time, serving as
an alarm to wake you up.
IMPORTANT!
Before setting the timer, ensure that the clock is set correctly. The timer can only be
activated from standby mode.
1. Press and hold TIMER key on the remote control for more than 2 seconds to start timer
setting mode.
The wake up source will appear on the display (for example: DISC or USB).
2. Press PRESET / or PRESET / on the remote control to select the source for timer.
3. Press / ENTER on the remote control to confirm the setting.
4. Repeat step 2 and step 3 to set volume, the timer shut on or off.
Activating the Timer
Press TIMER key on remote control to turn the timer on or off. The TIMER icon will appear on the
display if the timer is ready.
Notes:
– The function of timer-off will not be activated if the starting and stopping time are the same.
– If the selected source DISC is not available when preset timer is reached, TUNER will be
selected automatically.
– During timer setting, if no button is pressed within 10 seconds, the system will exit timer setting
mode automatically.
GB–23
CLOCK / TIMER
Sleep Timer Setting
If the sleep timer is activated, the system will switch to standby mode after the selected time has
expired.
1. Press and hold down SLEEP key for more than 2 seconds to start sleep timer setting. “ SLEEP
OFF ” will be displayed.
2. Press PRESET / or PRESET / to set the sleep timer as follows:
SLEEP OFF 120 MIN 110 MIN 100 MIN 90 MIN 80 MIN
3. When you reach the desired time, stop pressing PRESET / or PRESET / key, and
10 MIN
press / ENTER key to confirm your selection. “ SLEEP ” icon will appear on the display,
except for “ SLEEP OFF ” mode.
50 MIN40 MIN30 MIN20 MIN
60 MIN
While SLEEP mode is activated, you can check the remaining time
Press SLEEP key on the remote control to view the remain time.
Press and hold down SLEEP key for more than 2 seconds.
–“ XXXMIN ” will be displayed. “ XXX ” is the remaining time in minute.
To change the preset sleep timer
– Press and hold down again during sleep time checking.
To deactivate the Sleep Timer
–Press PRESET / or PRESET / repeatedly during sleep time checking until “ SLEEP
OFF ” is displayed, or press STANDBY/ON.
70 MIN
TUNER
T uning to radio st ations
1. Press FM / AM on main unit or TUNER on remote control to select Tuner FM or AM band.
2. Press and hold TUN / or TUN / key to search stations automatically, once a
station is found, the search will automatically stop.
3. Keep pressing the TUN / or TUN / key on remote control, the tuning will stop
whenever you release the button.
–To tune to a weak station, briefly press TUN / or TUN / key repeatedly until the
display shows the desired frequency or when the best reception has been obtained.
Storing preset stations
You can store up to 20 stations for FM and 20 for AM in the memory. When a preset radio station
is selected, the preset number appears on the display.
Manual programming
1. Press FM / AM on main unit or TUNER on remote control to select the desired waveband: AM
or FM.
2. Press TUN / or TUN / key to the desired frequency.
3. Press PROG key on remote control to active the preset number for storing.
4. If you wish to store the radio station to another preset number, press PRESET / or
PRESET / to select the desired preset number.
GB–24

TUNER
5. Press PROG or / ENTER on remote control to store the radio station.
–“ STORED ” will scroll through briefly.
–Repeat step 1 to 5 to store other preset radio stations.
Note:
During programming, if no button is pressed within 5 seconds, the system will exit program
mode automatically.
Mono / Stereo (FM band)
–Press ST/MONO key repeatedly on remote control to select mono or stereo sound.
–When STEREO mode is selected, the icon STEREO appears on the display.
T uning to a RDS station (FM only)
In Tuner FM mode, press TUN / or TUN / key to turn the RDS station (RDS light turns
on). Press and hold down / PRESET – or / PRESET + key on the main unit or TUN /
or TUN / key on the remote control to access preset RDS station.
Search by program type (PTY)
1. In Tuner FM mode, press RDS/A-B key on the remote control .
2. When “ NONE ” and “ FIND ” are displayed , press PRESET / or PRESET / key on
the remote control to select a desired program type from NEWS / AFFAIRS / INFO / SPORTS /
EDUCATE / DRAMA / CUL TURE / SCIENCE / V ARIED / POP M / ROCK M / EASY M / LIGHT M /
CLASSICS / OTHERS / WEATHER / FINANCE / CHILDREN / SOCIRL / RELIGION / PHONE M /
TRAVEL / LEISURE / JAZZ / COUNTRY / NATION M / OLDIES / FOLK M / DOCUMENT / TEST /
ALARM
3. Within 3 seconds, press / ENTER key on the remote control to search for a station
broadcasting for programming type you prefer.
Display RDS station information
Press OSD/INFO key on the remote control to display station information:
1. RDS name.
2. Radio text.
3. RDS type (PTY).
4. RDS time
5. PI code.
CD / DVD / VCD / MP3-CD
Adjusting the TV system
Before viewing the Video Disc DVD or VCD, ensure that the set is switched to corresponding PAL
or NTSC system of your TV set. If your TV set is a Multi-System TV, we suggest that it is set at
AUTO mode.
– To change the video format output of your player system, in disc stop mode, press SETUP key
to enter SETUP menu, press PRESET / or PRESET / and / ENTER to select
SYSTEM SETUP, and then use the same method to select TV SYSTEM and the final one PAL-M or
NTSC. Press SETUP key again to exit the setup menu.
GB–25

CD / DVD / VCD / MP3-CD
Loading a disc
1. Press SOURCE button on the main or DVD on remote control to select disc mode.
2. Press OPEN / CLOSE on the main unit or on remote control, the disc tray slides out.
3. Load a disc with the label side facing up.
4. Press OPEN / CLOSE to close the disc tray. “ CLOSE ” .... “ READING ” will scroll through the
display until a corresponding disc type is displayed. The system will play the disc from
memory track automatically.
Playing a DVD disc
1. Press / ENTER to start playback in disc stop mode.
2. To interrupt playback, press / ENTER again during disc playback.
3. Skip forward, or skip backward a chapter by pressing NEXT / or PREV / key , each
press will jump to the beginning of the next or previous chapter.
4. Press and hold TUN / or TUN / key to search a passage fast forward or reverse.
There are 4 modes for speed selecting (x2, x4, x8, x20).
5. During fast forward or backward, press / ENTER key, the disc will resume normal
playback.
6. In stop or playback mode, press GOTO key and press TUN / or TUN / key to
move the cursor to title or chapter position, then enter the desired title or chapter number by
number key, finally press / ENTER key to confirm your selection.
7. In disc playback mode, each press SLOW key to play slow motion forward for one step. You
can play slow motion continuously by pressing the key repeatedly.
8. Press button on remote control for once, the player will go resume stop mode. In this
condition, press / ENTER key the film will be resumed to playback from the stop point. If
button is pressed again in resume stop mode, the player will go stop mode. When / ENTER
is pressed the disc will start from the beginning of the disc.
Discs DivX which cannot be played with this player
–DVD-ROM
–DVD-RAM
–CDV
DivX Files
CD-R and CD-RW disc containing video files in DivX format, only stereo audio output will have.
As for CD-R DivX discs, please follow all the recommendations for CD-R above, along with the
comments below:
– DivX filenames should not exceed 12 characters, and should end with the “.avi ” extension.
General name format: “ Title. avi ”. When composing your title ensure that you use 8 characters
or less, have no spaces in the name, and avoid the use of special characters including (. , / , \ ,
= , + ).
–Please burn the DivX with the DivX file (eg. GREAT MOVIE.avi ) and the subtitle (MUST in same
file name, eg. GREAT MOVIE. sub ) in same folder. When the movie is playing, the subtitle can be
shown.
GB–26

CD / DVD / VCD / MP3-CD
Important:
The above recommendations cannot be taken as a guarantee that the DVD player will play
DivX recordings, or as an assurance of video quality. You should note that certain
technologies and methods for DivX file recording on CD-Rs prevent optional playback of these
files on your DVD player (i.e. In some cases, inability of the player to read the file, or playback
the file normally).
Depending on the conditions of the recording equipment or the CD-R/RW, DVD+R/RW or DVDR/RW disc itself, some discs can not be played on the unit.
Playing a VCD disc
1. Press / ENTER key to start playback in disc stop mode.
2. To interrupt playback, press / ENTER key again during disc playback.
3. Skip forward, or skip backward a chapter by pressing NEXT / or PREV / key, each
press will jump to the beginning of the next or previous chapter.
4. Press and hold TUN / or TUN / key to search a passage fast forward or
reverse. There are 4 modes for speed selecting (x2, x4, x8, x20).
5. During fast forward or backward, press / ENTER key the disc will resume normal playback.
6. In disc playback mode, each press STEP key to play slow motion forward for one step. You
can play slow motion continuously by pressing the key repeatedly.
7. Press on remote control key briefly to stop playback.
Notes:
– In “ PBC ON ” mode, the disc menu will be shown on TV screen before starting playback and
pressing the / ENTER key . During the disc menu is displayed, you could use number keys to
select the desired chapter for playback directly.
–To toggle “ PBC ON ” or “ PBC OFF ”, press PBC / BOOKMARK on the remote control.
Playing a CD disc
1. Press / ENTER key to start playback in disc stop mode. The playtime will be shown on the
display.
2. To interrupt playback, press / ENTER again during disc playback.
3. To stop playback, press key to stop.
Selecting a desired track/passage
– Skip forward, or skip backward a track by pressing NEXT / or PREV / key , each press
will jump to the beginning of the next or previous chapter. Or use number key, and press /
ENTER key to select a desired track directly.
– Press and hold TUN / or TUN / to search a passage fast forward or reverse. There
are 4 modes for speed selecting (2X, 4X, 8X, 20X).
– During fast forward or backward, press / ENTER key the disc will resume normal playback.
Note:
– If a CD-G disc is played, some pictures from the disc will be displayed on the TV as a Slide
Show for watching.
GB–27

CD / DVD / VCD / MP3-CD
Playing an MP3 or WMA Music CD
–Load an MP-3 CD format music disc on the disc tray.
–“ CLOSE ”....“ READING ” will scroll through the display.
–The system will play the MP-3/WMA CD from track 1 of album 1 automatically.
– On the TV screen, the disc menu is displayed.
Selecting a desired album and a desired track
1. In stop mode, press TUN / key, the number of album will be blinking on VFD display;
Then press PRESET / or PRESET / to set desired album and press / ENTER key
to confirm the selection. Press / ENTER key to start playback from the first track of the
current album.
2. Press TUN / or TUN / key repeatedly to select a desired track from the current
3. Press and hold TUN / or TUN / key to search a passage fast forward or
reverse. There are 4 modes for speed selecting (X2, X4, X6, X8).
4. Press button to stop playback.
Or use with TV set to select a desired Album and a desired track.
1. In stop mode, press the PRESET / or PRESET / , or TUN / or TUN / key
to select an album list (see TV screen).
2. Press / ENTER key to confirm the desired album.
3. Press PRESET / or PRESET / to select a desired track and press / ENTER key
to start playback from the current album.
For JPEG Picture CD playback
After a JPEG picture file is detected by the system, the track NO. and “JPEG” will be shown on the
VFD display, and the picture of the current track will show on TV screen.
1. Press TUN / or TUN / key repeatedly to select a desired track from the current
album.
2. Press PRESET / or PRESET / , or TUN / or TUN / key to rotate the
picture from the current position.
3. Press ZOOM key to enter zoom mode, there are 6 modes of zoom X2, X3, X4 , X1/2, X1/3, X1/
4, during zoom mode, use PRESET / or PRESET / , or TUN / or TUN /
key to pan up or down, left or right.
4. Press button to stop playback.
Notes:
– To ensure good system performance, wait until the disc tray completely reads the disc before
proceeding.
– For MP-3 CD, the disc reading time may exceed 10 seconds due to the large number of songs
compiled into one disc.
Programming Tracks
Total 16 tracks / chapter can be stored in the memory for CD-DA, VCD, JPEG picture CD, MP3 or
WMA CD, DVD.
1. In DISC, USB or CARD mode, press PROG key to on the remote control to enter program
setting mode. PROG will be light up and PROGRAM on VFD display.
GB–28

CD / DVD / VCD / MP3-CD
2. By navigation on TV screen, move the cursors to item NO of memory using PRESET / or
PRESET / , or TUN / or TUN / key, press 0-9 number key on remote control
to enter desired title NO. on T column, then press TUN / or TUN / key to move the
cursors to C column, then press 0-9 number to enter desired chapter NO. when disc is DVD,
MP3-CD/WMA-CD. (If disc is CD, press 0-9 key on the remote control set desired track NO.
directly.)
3. Move the cursor to PLAY column using PRESET / or PRESET / ,TUN / or TUN
/ key according to navigation on TV screen, then press / ENTER key to implement
program playback.
4. If need to reset the title NO. or chapter NO., move the cursor to the CLEAR column, then press
/ ENTER key to confirm the clear order.
5. To exit program mode, press PROG key again in the program mode.
Notes:
– “T” represents title and “ C ” represents chapter.
–The programming is cleared automatically as soon as the CD compartment is opened.
DVD BOOKMARK
1. This function is as a bookmark to resume the film playback from the beginning of your mark.
Also it can be erased. There are 5 bookmarks that can be used.
2. To set a bookmark, press BOOKMARK / PBC key on the remote control, a navigation info
( MARK _ _ _ _ _ TT.....) will display on TV top screen, then according to navigation move the
cursor to mark NO. position using TUN / or TUN / key ,and then press PROG key
to set the starting pointing of film that is the beginning you want to resume to playback. When
a book mark is set, the mark NO. on TV screen will turn as 1- 5 number.
3. To resume playback from the film marked, during playback mode press PBC/BOOKMARK, and
then press TUN / or TUN / key to select the bookmark NO. (1-5 ), and then press
/ ENTER key to begin the marked film playback.
4. Press OPEN / CLOSE key to eject the disk, the bookmark record will be clear.
Sound Features
–Press EQ key on remote control to toggle the effects among FLAT, CLASSIC, ROCK, JAZZ and
POP. Press BASS key on remote control to turn BASS 1, BASS 2 or OFF.
–Press MUTE key on the remote control to silence sound.
GB–29

USB PLAYBACK
Insert the USB Storage Device into the USB slot, Press SOURCE button on main unit or USB key
on remote control to enter USB mode, and the player will auto search the directories saved MP3 /
JPEG files. After searching, it will auto go to the first directory of saved MP3 files if the device
containing both MP3 and jpeg files. If the device containing single type of files, it will auto go to the
first directory and play the first song in the directory (“01:” is highlighted on TV screen.) Press
PRESET / or PRESET / , or TUN / or TUN / key to enter the Directory
Region and highlight the desired directory, then the first track under it starts playback; Also you
can press PRESET / or PRESET / , or TUN / or TUN / key to enter the File
Region and select the file you want to play.
Notes:
1. Press TUN / and TUN / keys, you can activate Directory Region, File Region and
File Switch Region separately.
2. In File Switch Region, you can press TUN / or TUN / key to switch the highlight,
then press / ENTER key to confirm your selection; the “ ” bottom is for music files
playback,
“ ”, bottom is for picture files for playback and “ ” button is for video files playback, if a
disc with MP3 and JPEG files but without any Video files is loaded, the color of the letter “ ”
and “ ” will appear to white and “ ” black. If a MP3 file playing, “ ” turns red.
3. To the device with WMA, MP3 and JPEG files, when playing a JPEG picture, press the stop
button to return to JPEG list.
4. You can press the Numeric buttons to select the file you wan you want to play. For example,
if you desire the 15th track in current list, press the “10+” button once, then press “ 5 ”, the
th
15
track starts playback.
5. When a picture playing , press PRESET / or PRESET / , or TUN / or TUN /
key to change the display angle:
PRESET / : flip vertical
PRESET / : flip horizontal
TUN / : rotate 90 counter-clockwise
TUN / : rotate 90 clockwise
6. When playing JPEG or BMP pictures, press the PROG key to choose the pictures switched
mode. There are 17 switch modes; Press PROG key repeatedly to activate the function and
choose the required switch mode: WIPE TOP, WIPE BOTT OM, WIPE LEFT , WIPE RIGHT,
DIAGONAL WIPE LEFT TO P , DIAGONAL WIPE RIGHT TOP, DIAGONAL WIPE LEFT BOTTOM,
DIAGONAL WIPE RIGHT BOTTOM, EXTEND FROM CENTER H, EXTEND FROM CENTER V ,
COMPRESS TO CENTER H, COMPRESS TO CENTER V , WINDOW H, WINDOW V , WIPE FROM
EDGE TO CENTER, RANDOM, NONE.
7. When a picture playing, press key, the screen displays small pictures. Up to 6 small pictures
are displayed per screen. To view the next 6 pictures, press NEXT / key to go for ward
and PREV / key to go to the previous page. You can also select and play a picture in full
screen by press that number on the remote control.
This feature does not work in program slide show mode.
8. The micro system support USB HOST 1.1 .during WMA, MP3 program playback).
Caution:
Do not plug in or unplug the USB storage device when playing. Press STOP button or power
off when plug in or unplug the USB storage device.
GB–30

CARD PLAYBACK
The player can support 3 in 1 card (SD/MMC/MS card) playback. Insert the card SD/MMC/MS)
Storage Device into the card slot, then press SOURCE button on main unit or CARD key on remote
control to enter CARD mode, and the player will auto search the directories saved MP3 / JPEG
files. After searching, it will auto go to the first directory saved MP3 files if the device containing
both MP3 and jpeg files. If the device containing single type of files, it will auto go to the first
directory and play the first song in the directory (“ 01: ” is highlighted on TV screen.) Press
PRESET / or PRESET / , or TUN / or TUN / key to enter the Directory
Region and highlight the desired directory, then the first track under it starts playback; Also you
can press PRESET / or PRESET / , or TUN / or TUN / key to enter the File
Region and select the file you want to play.
Notes:
1. Press TUN / and TUN / keys, you can activate Directory Region, File Region and
File Switch Region separately.
2. In File Switch Region, you can press TUN / or TUN / key to switch the highlight,
then press / ENTER key to confirm your selection; the “ ” bottom is for music files
playback, “ ”, bottom is for picture files for playback and “ ” button is for video files
playback, if a disc with MP3 and JPEG files but without any Video files is loaded, the color of
the letter “ ” and “ ” will appear to white and “ ” black. If a MP3 file playing, “ ” turns
red.
3. To the device with WMA, MP3 and JPEG files, when playing a JPEG picture, press the stop
button to return to JPEG list.
4. You can press the Numeric buttons to select the file you want to play. For example, if you
desire the 15th track in current list, press the “ 10+ ” button once, then press “ 5 ”, the 15
track starts playback.
5. When a picture playing , press PRESET / or PRESET / , or TUN / or TUN /
key to change the display angle:
PRESET / : flip vertical
PRESET / : flip horizontal
TUN / : rotate 90 counter-clockwise
TUN / : rotate 90 clockwise
6. The micro system support SD, MS, MMC card.
Caution:
Do not plug in or unplug the SD / MMC / MS card when playing. Press STOP button or power
off when you change the card.
th
GB–31

PROBLEMS
If it appears that your DVD-Video player is faulty, first examine with this checklist. It may be that
something simple has been overlooked.
Under no circumstances should you try to repair the player yourself. Only qualified
service personnel can remove the cover or service this player.
NO POWER
• Check if power plug is properly connected.
• Check if there is power at the AC outlet by plugging in another appliance.
NO PICTURE
• Check if the TV is switched on.
• Select the correct AV input on the TV.
• Check the video connection.
• Check channel selector is set to AV on the TV
(See your TV manual for instructions).
DISTORTED PICTURE
• Check the disc for fingerprints and clean with soft cloth, wiping from centre to edge.
• Sometimes a small amount of picture distortion may appear.
This is not a malfunction.
COMPLETEL Y DISTORTED PICTURE
• The disc is not formatted to the TV-set used (PAL/NTSC).
NO COLOR IN PICTURE
• The disc is not formatted to the TV-set used (PAL/NTSC).
• Ensure DVD Player is not connected through VCR.
DISC CAN’T BE PLA YED
• Ensure the disc is label side up.
• Clean the disc.
• Check if the disc is defective by trying another disc.
NO SOUND
• Check audio connections.
• If using a HiFi amplifier, try another sound source.
NO RETURN TO START -UP SCREEN WHEN DISC IS REMOVED
• Check to see if the program requires another disc to be loaded.
• Reset by unplugging the player from the power supply, then connect the power supply again.
THE PLA YER DOES NOT RESPOND TO THE REMOTE CONTROL
• Aim the remote control directly at the sensor on the front of the player.
• Avoid all obstacles which may interfere with the signal path.
• Inspect or replace the batteries.
NO AUDIO AT DIGIT AL OUTPUT
• Check the digital connections.
• Check the Digital Out menu to make sure that the digital output is correctly set.
• Check if the audio format of the selected audio language matches your receiver capabilities.
GB–32
PROBLEMS
BUTTONS DO NOT WORK
• Unplug the player from power outlet and reconnect after a few seconds.
YOU HAVE FORGOTTEN THE P ASSWORD
• In DISC, USB or CARD mode, press SETUP key on the remote control to access the setup menu,
move the highlight to the password option, then enter the number key 7,6,4,1,8, press
/ ENTER key to confirm. The password option will be unlocked.
THE DISC IS STUCK INSIDE THE PLA YER
• In case the disc is stuck inside the tray, please disconnect the power first, wait for at least 2
minutes, then plug the unit back in (Do Not Power On The Unit) and press disc tray open button.
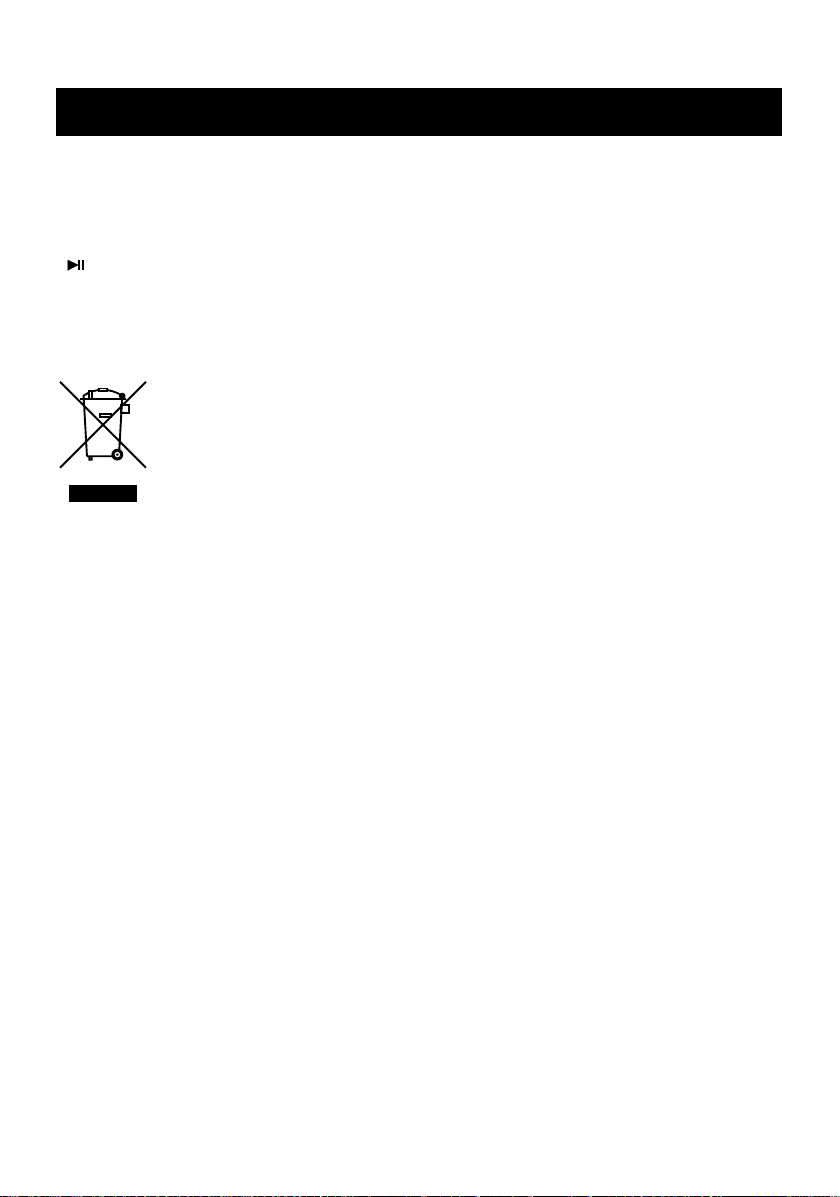
INFORMATION FOR USERS APPLICABLE IN EUROPEAN UNION COUNTRIES
This symbol on the product or on its packaging means that your electrical and
electronic equipment should be disposed at the end of life separately from your
household wastes.
There are separate collection systems for recycling in EU.
For more information, please contact the local authority or the dealer where you
purchased the product.
GB–33
 Loading...