

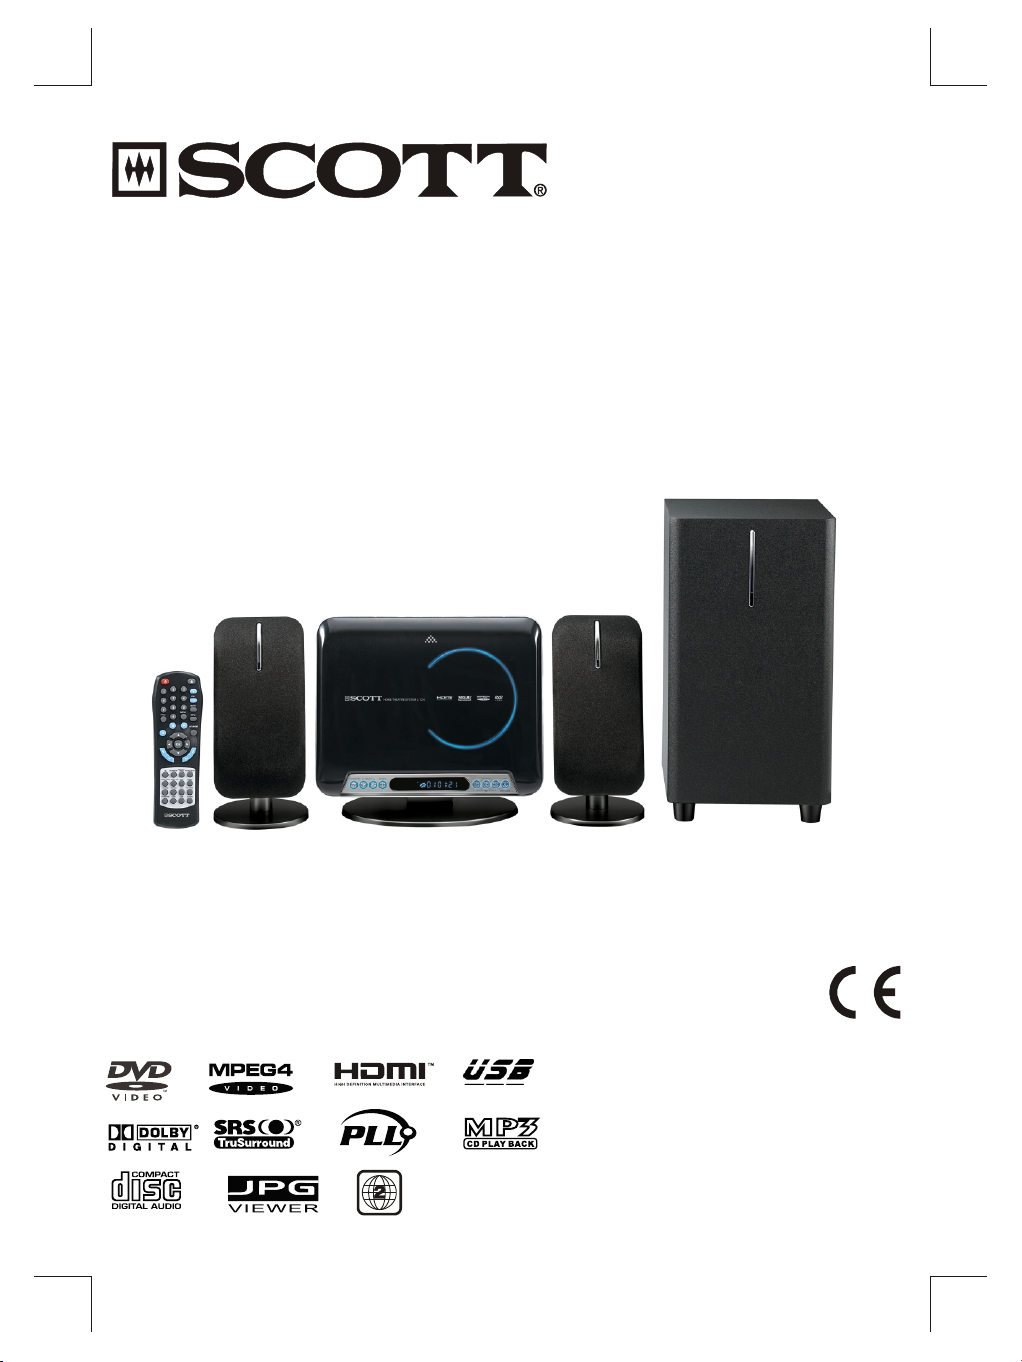
HOME CINEMA 2.1 CH
HOME CINEMA 2.1 CH
HEIMKINO 2.1 CH
HOME CINEMA 2.1 CH
HOME CINEMA 2.1 KANAALS
HOME THEATRE 2.1 CH
MODEL NO. MDX 100 SW
MANUEL D’INSTRUCTIONS
MANUALE DI ISTRUZIONI
GEBRAUCHSANLEITUNG
MANUAL DE INSTRUCCIONES
HANDLEIDING
OWNER’S MANUAL
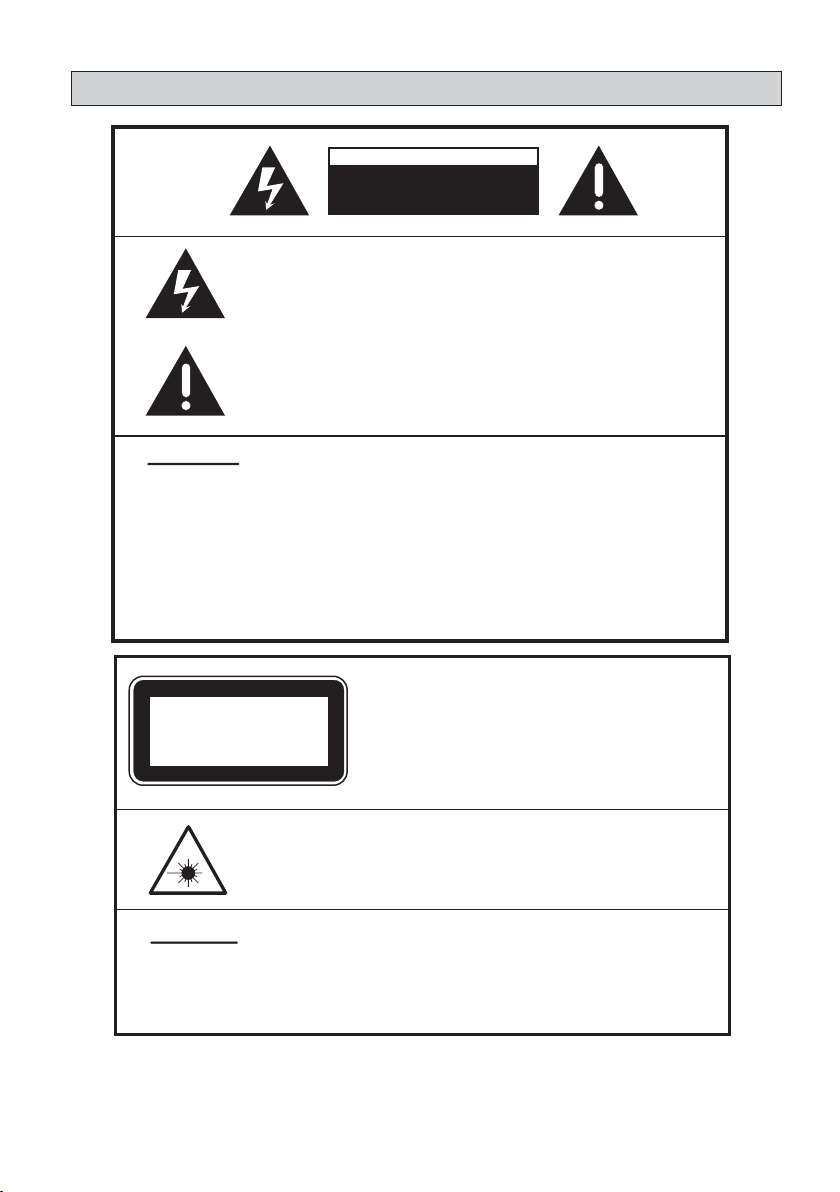
SAFETY
WARNINGS:
CAUTION
RISK OF ELECTRIC SHOCK
DO NOT OPEN
WARNING: SHOCK HAZARD-
DO NOT OPEN
The lightning flash with arrowhead symbol, within an equilateral
triangle, is intended to alert user to the presence of uninsulated
"dangerous voltage" within the products enclosure that may be
of sufficient magnitude to constitute a risk of electric shock to
persons.
The exclamation point within an equilateral triangle is intended
to alert the user to the presence of important operating and
maintenance (servicing) instruction in the literature accompanying
the appliance.
To reduce the risk of fire or electric shock, do not expose this appliance
to rain or moisture.
DO NOT REMOVE COVER or OPEN CASING.
Dangerous high voltages are present inside the enclosure. Do not open
the casing. Refer servicing to qualified personnel only.
Use of controls or adjustments or performance of procedures other
than those specified may result in hazardous radiation exposure.
LASER:
CLASS 1
LASER PRODUCT
INVISIBLE LASER RADIATION WHEN OPEN OR INTERLOCK
FAILED OR DEFEATED.
Type: Dual semiconductor laser GaAIAs
Wavelength: 650nm and 780nm
Output Power: 7mW
Beam Divergence: 60 degrees
WARNINGS:
DO NOT STARE INTO BEAM. Avoid direct exposure to laser beam.
To prevent direct exposure to laser beam, do not try to open the
enclosure.
To ensure proper use of this product, please read this owner’s manual carefully and keep for future reference.
Should the unit require maintenance, contact an authorized service location.
GB - 1

IMPORTANT SAFETY INSTRUCTIONS
CAUTION: RETAIN THIS BOOKLET FOR FUTURE REFERENCE.
This set has been designed and manufactured to assure personal safety. Improper use can result in electric shock
or fire hazard. The safeguards incorporated in this unit will protect you if you observe the following procedures for
installation, use and servicing. This unit does not contain any parts that can be repaired by the user.
• Read these instructions.
• Keep these instructions.
• Heed all warnings.
• Follow all instructions.
• Do not use this device near water.
• Clean only with dry cloth.
• Do not block any ventilation openings. Install in
accordance with the manufacturer’s instructions.
• Do not install near any heat sources such as
radiators, heat registers, stoves, or other devices
(including amplifiers) that produce heat.
• Protect the power cord from being walked on or
pinched. Pay particular attention to the plug and
connections.
• Only use accessories specified by the
manufacturer.
• Unplug this device during lightning storms or when
unused for long periods of time.
• Use only with a cart, stand, tripod, bracket or
table specified by the manufacturer, or sold with
the device. When a cart is used, use caution
when moving the cart/device combination to avoid
injury from tip-over.
• The apparatus shall not be exposed to dripping or
splashing and that no objects filled with liquids,
such as vases, shall be placed on the device.
• Motorized door
Be careful that your fingers do not get trapped
when opening and closing the motorized door.
Ensure that there is enough room for the motorized
door to open in the location where you place the
appliance.
• Burden
Do not place a heavy object on the product. The
object may fall, causing serious personal injury
and serious damage to the product.
• Disc
Do not use a cracked, deformed, or damaged
disc. These discs are easily broken and may cause
serious personal injury and product malfunction.
• The main plug of apparatus should not be
obstructed OR should be easily accessed during
intended use.
• To completely disconnect the power input, the
mains plug of apparatus must be disconnected
from the mains.
• Do not expose the battery to excessive heat such
• Damage Requiring Service
Unplug this product from the wall outlet and refer
servicing to qualified service personnel under the
following conditions:
a) When the power-supply cord or plug is damaged.
b) If liquid has been spilled, or objects have fallen
into the product.
c) If the product has been exposed to rain or water.
d) If the product does not operate normally by
following the operating instructions. Adjust only
those controls that are covered by the operating
instructions. Improper adjustment of other controls
may result in damage and will often require
extensive work by a qualified technician to restore
the product to its normal operation.
e) If the product has been dropped or damaged in
any way.
f) When the product exhibits a distinct change in
performance - this indicates a need for service.
• Servicing
Do not attempt to service this product yourself
as opening or removing covers may expose you
to dangerous voltage or other hazards. Refer all
servicing to qualified service personnel.
• Replacement Parts
When replacement parts are required, be sure the
service technician has used replacement parts
specified by the manufacturer or have the same
characteristics as the original part. Unauthorized
substitutions may result in fire, electric shock, or
other hazards.
• Safety Check
Upon completion of any service or repairs to this
product, ask the service technician to perform
safety checks to determine that the product is in
proper operating condition.
• It complies with CE requirements.
GB - 2

CONTENTS
SAFETY -------------------------------------------------------------------------------------------------------------------------------------1
IMPORTANT SAFETY INSTRUCTIONS---------------------------------------------------------------------------------------------------2
PACKAGE ----------------------------------------------------------------------------------------------------------------3
INSTALLATION---------------------------------------------------------------------------------------------------------------------------------4
REMOTE CONTROL----------------------------------------------------------------------------------------------------------------------------5
FRONT /SIDE P ANEL,DISPLA Y & BACK PANEL-----------------------------------------------------------------------------------6
MAIN UNIT PREPARATION------------------------------------------------------------------------------------------------------------7
CONNECTIONS--------------------------------------------------------------------------------------------------------------------------------9
SPEAKER PLACEMENT------------------------------------------------------------------------------------------------------------------13
GETTING STAR TED & BASIC SETUP------------------------------------------------------------------------------------------------ 14
PLAYING DVD / CD / VCD DISC----------------------------------------------------------------------------------------------------19
ADVANCED PLA YBACK FUNCTION--------------------------------------------------------------------------------------------------------21
PLAYING MP3 / JPEG / WMA / MPEG 4 FILES----------------------------------------------------------------------------------------25
AUDIO CD RIPPING (ENCODING IN MP3 FORMA T)---------------------------------------------------------------------------26
LISTENING TO THE RADIO-------------------------------------------------------------------------------------------------------------------27
OTHER OPERATIONS AND FUNCTIONS-----------------------------------------------------------------------------------------------28
PLAYABLE DISCS / FILES------------------------------------------------------------------------------------------------------------------29
TROUBLESHOOTING GUIDE-----------------------------------------------------------------------------------------------------------------31
TECHNICAL SPECIFICATIONS------------------------------------------------------------------------------------------------------------32
TEMPLA TE FOR MAIN UNIT W ALL MOUNTING----------------------------------------------------------------------------------33
This product incorporates copyright protection technology that is protected by method claims of certain U.S.
patents and other intellectual property rights owned by Macrovision Corporation and other rights owners. Use of
this copyright protection technology must be authorized by Macrovision Corporation, and is intended for home and
other limited viewing uses only unless otherwise authorized by Macrovision Corporation. Reverse engineering or
disassembly is prohibited.
U.S. Patent Nos. 4,631,603; 4,819,098; 4,907,093; 5,315,448; and 6,516,132.
PACKAGE
Examine the contents of the box for your DVD Micro Theatre System. It includes the following:
• DVD Micro Theatre System with power cord
• Detachable Stand
• Remote Control with 2xAAA Batteries
• AV Cable
• DIN SCART Cable
• FM antenna and AM antenna
• Subwoofer
• 2x Front speakers
• 2x Front speaker stands
• Instruction Book
GB - 3
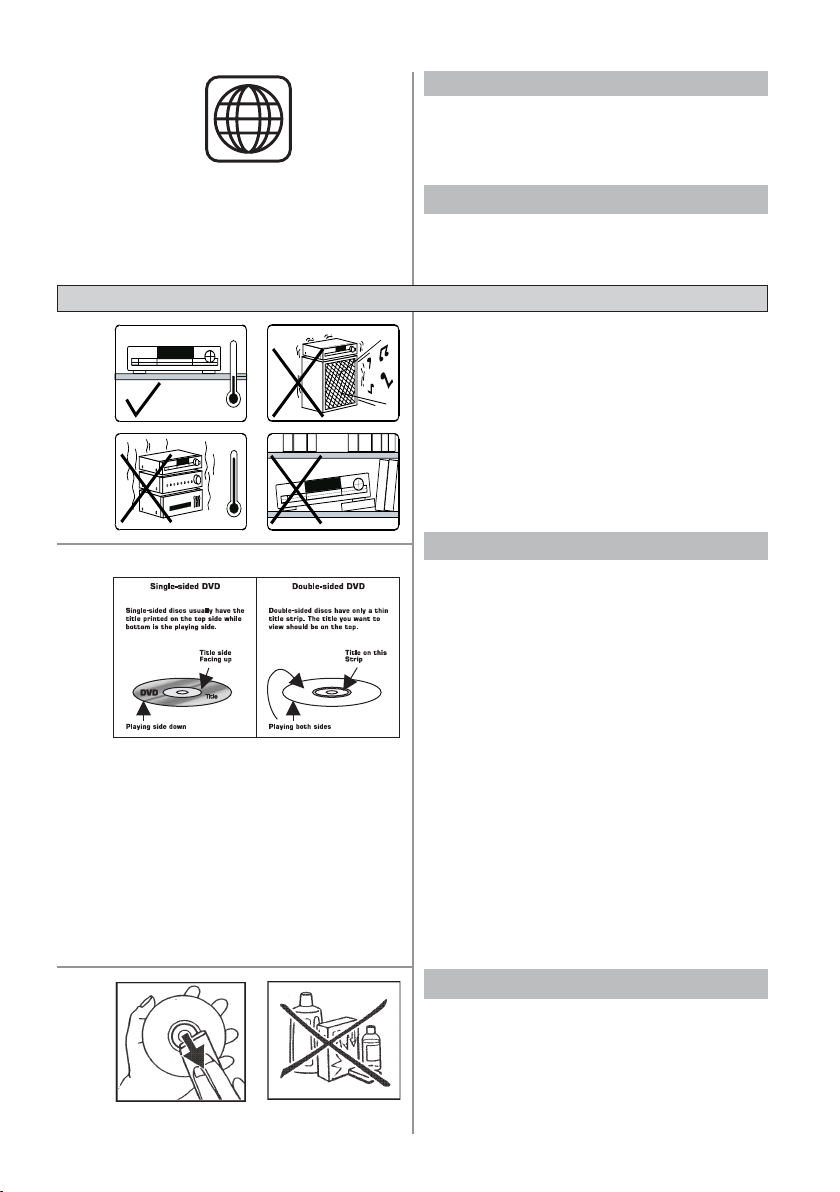
INSTALLATION
2
Region 2
Player Zones
For the purpose of distribution of DVD discs, the world has been separated
into 6 zones. The zone this unit is intended for is indicated on the Zone
Label. This should be the same as the label on discs available in your
region. If you have any difficulties in playing a disc, make sure that the
disc is for the same zone as your unit.
Anti-Copy Disc Protection
Some DVD discs have anti-copying devices. It is impossible to copy
these discs.
• Install your unit on a stable flat surface. There must be
sufficient room in front of the unit for the drawer to be opened
and the unit should be positioned so that it can face to the
remote control.
• Do not expose your unit to extremes of temperature or
humidity.
• Avoid standing it on a hot surface such as on top of other hot
running equipment and ensure that there is adequate
ventilation to the unit.
Caution:
Do not install this equipment in a confined space such as a book
case or similar unit!
DVD Discs
There are several types of DVD Disc:
Single-sided discs play for approximate 2 Hours
Single-sided two-layer discs play for approximate 4 Hours
Double-sided discs play for approximate 4 Hours
Double-sided discs with double-layer on both sides play for
approximately 8 Hours
DVD discs have Titles and Chapters:
* There can be several Titles on one disc and each Title can
contain several Chapters. Titles and Chapters are numbered,
e.g. Title 1, Title 2, Chapter 1 and etc.
* Usually Title one will show the disc publisher and studio
logos. The next Title will be the film. Other Titles contain
trailers for other films, production notes, or alternative
endings for the film. There are many possibilities with Digital
Versatile Disc.
* Chapters within the main Title allow you to search quickly for
a specific point on the disc. Many discs have a Chapter Menu
sometimes called Scene Index or Scene Menu that displays
the first shot from each Chapter, which allows you to select a
shot and play the disc from that point onwards.
DVD discs can be PAL or NTSC. This player can play both types (if the
player zone is correct).
DVD discs allow up to 8 Languages and 32 subtitles on a single disc.
The language and subtitle can be changed, and the whole disc or just
part of it can be played and viewed from different angles ( if the video is
shot at different camera angles).
Cleaning Disc
Picture freezing & sound skipping or repeating can occur if the disc
inside the player is dirty.
• When a disc becomes dirty, clean it with a cleaning cloth.
Wipe the disc from the center out.
• Do not wipe in a circular motion. Circular scratches can
cause picture distortion or render the disc unplayable.
Caution: Do not use solvents, commercially available cleaners, or
antistatic spray to clean discs.
GB - 4
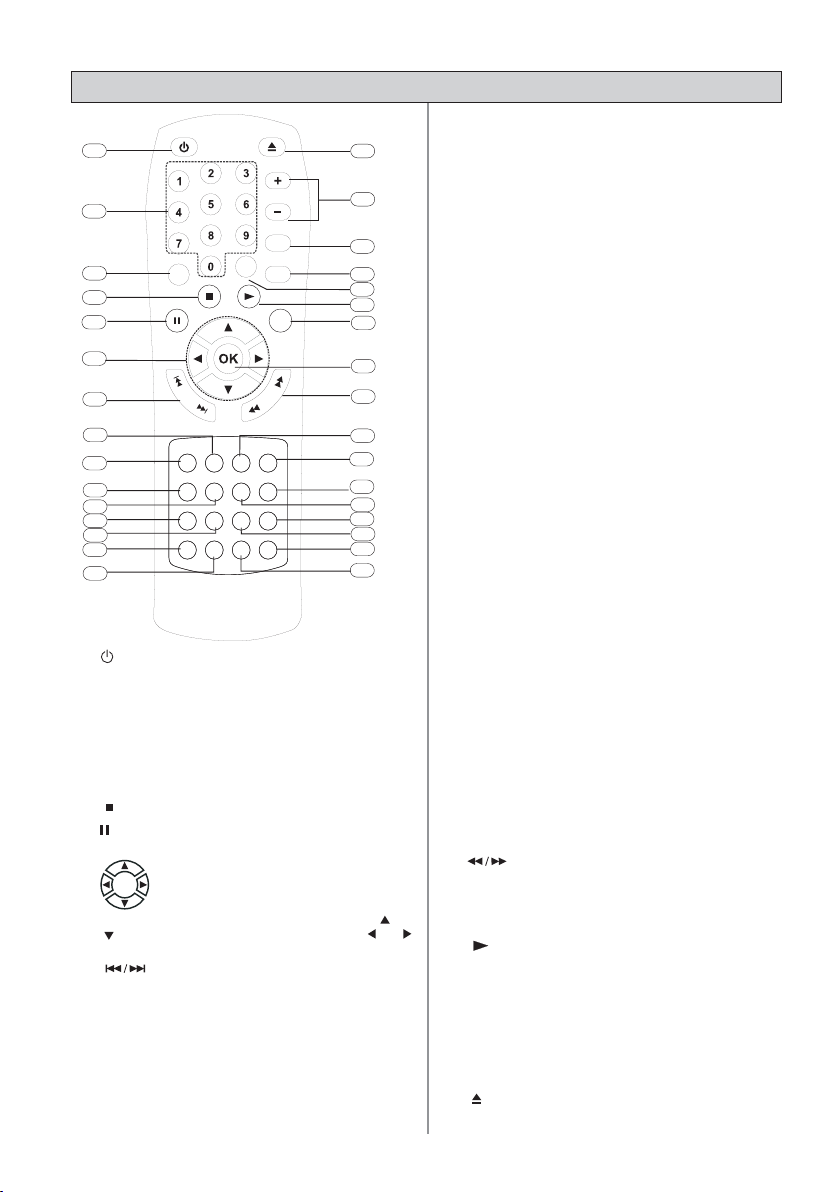
REMOTE CONTROL
1
2
3
4
5
27
6
7
10
13
16
17
18
19
21
20
22
24
23
25
28
26
30
31
32
15
14
8
9
29
11
12
11. ANGLE / PBC 1) Press to select different viewing
angles (if available on disc). 2) Press to turn PBC
ON or OFF on a VCD/SVCD disc.
12. SOURCE Press to select a mode in the following
order: “DVD”, “AU1 “(Aux in jack) and “AU2”
(Scart input), “FM” or” MW” input.
13. RIPPING (encoding in MP3 format) Press to
convert CD audio files into MP3 digital files and
save them on a USB flash drive.
14. SURROUND Press to select switch surround
sound effect between ON or OFF .
15. SLEEP Press to activate a sleep timer to go into
standby mode automatically.
16. TONE Press to select an EQ mode from the
following: “FLAT”, “ROCK”, “POP”,
“CLASSIC ”, and “JAZZ”.
17. EX BASS
18. A-B Press to set a point-to-point repeat playback
19. PLAYMODE Press to select different play modes:
20. GOTO Press to display the search Menu to search
21. DIMMER Press to adjust the brightness of the
1. STANDBY/ON Press to switch between On
and standby mode.
2. 0 - 9 (number keys) DVD mode: Press to
enter title, chapter, track and time search
22. AUDIO / FM ST 1) DVD mode - Press to select
selections.Tuner mode : Press to enter a preset
station.
3. TITLE Press to display the title menu if available
on DVD disc.
4.
Stop Press to stop playback.
5.
Pause Press to pause playback and advance
frame by frame for DVD/VCD discs.
6. Navigation
- 1) Cursor function.
- 2) Press to flip or rotate a picture on
the TV. - 3) Tuner mode: Press
to change the radio frequency. Press or
to change the radio Channel.
7. Press to skip backward/forward to the
previous/next chapter for DVD or track for CD/
VCD.
8. BOOKMARK Press to display Bookmark menu.
9. HD Press to change the HDMI output resolution.
10. ZOOM / CLEAR 1) Press to select different zoom
ratios during playback. 2) Press to clear the
information you have entered.
23. SUBTITLE/SPEED 1) Press to select a different
24.
25. OK Press to confirm the selection.
26. SETUP / EXIT Press to enter or exit the System
or
27.
28. MENU 1) DVD mode - Press to enter the disc
29. INFO Press to display current playback information
30. MUTE Press to mute or restore the sound output
31. - VOL + Press to increase or decrease the volume.
32.
disc tray motorized door.
GB - 5
(EXTRA BASS) Press to turn EX BASS to
Soft Bass, Balance Bass, or Powerful Bass.
or to clear repeat mode.
program, random and repeat.
for a specific title, chapter, track or time on a
disc.
display, the buttons and the backlighting on the
motorized door in the following order:
“ON”,”DIM” ,”OFF”. (Even if you select
“OFF”, the display always lights up slightly so
that you can easily use the appliance).
different languages for DVD (If available on the
disc).
For VCD discs, this option also enables you
to select one of these audio modes : ( “Stereo”,
“Mono L”, “Mono R”) . 2) Tuner FM mode Press this button to select Mono or Stereo.
subtitle language. 2) Press to change the speed of
encoding MP3 files for CD Ripping.
Press to fast search backward or forward.
Setup menu.
Play Press to start playback.
menu. 2) PBC ON mode - Press to view a VCD
disc menu.
from the speakers.
OPEN/CLOSE Press to open or close the
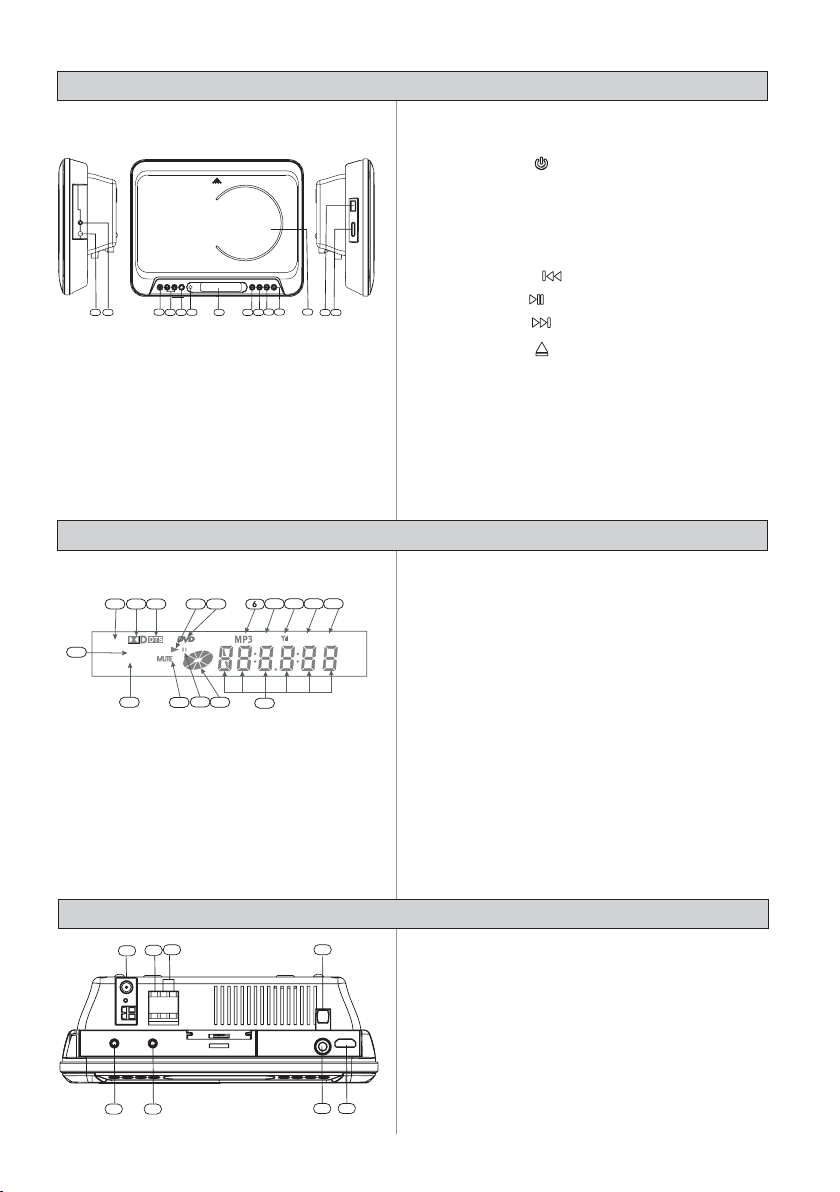
FRONT/SIDE PANEL
FM
MW
SLEEP
ST.
KHZ
MHZ
Right side left side
10
11
6
4
5
2
1
3
7
12
9
8
14
13
DISPLAY
8
7
10
1
2
3
11
12
54
14
15
13
9
16
1. PHONES Jack
2. AUX IN Jack
3. STANDBY/ON
Button
4. VOLUME Button
5. SOURCE Button
6. Infra-Red Receiver Window
7. VFD Display
8. SKIP Backward
9. PLAY/PAUSE
10. SKIP Forward
11. OPEN/CLOSE
12.
Disc tray motorized door
Button
Button
Button
Button / STOP Button
13. USB Port
14. DIMMER:
Use this button to adjust the brightness of
the display, the buttons and the backlighting on the
motorized door in the following order “ON”, “DIM”
or “OFF”. (Even if you select “OFF”, the display
always lights up slightly so that you can easily use
the appliance)
1. SLEEP Timer Indicator
2. Dolby Digital Indicator
3. DTS Indicator
4. Disc Indicator
5. DVD Disc Indicator
6. MP3 Indicator
Lights up during MP3 Playback
7. FM stereo Indicator
8. Radio signal indicator
9. KHz indicator for MW Frequency
10. MHz indicator for FM Frequency
11. MW mode Indicator
12. FM mode Indicator
13. Mute Status Indicator
14. Pause Indicator
15. Disc Play Status
16. Digit Display
BACK PANEL
2
3
4
6
5
1
1. Power Cord
2. Front speakers output terminal
3. Subwoofer output terminal
4. FM and AM Antenna Terminal
5. Digital coaxial output
6. Video and Audio output
8
7
7. DIN SCART cable output
8. HDMI output
GB - 6
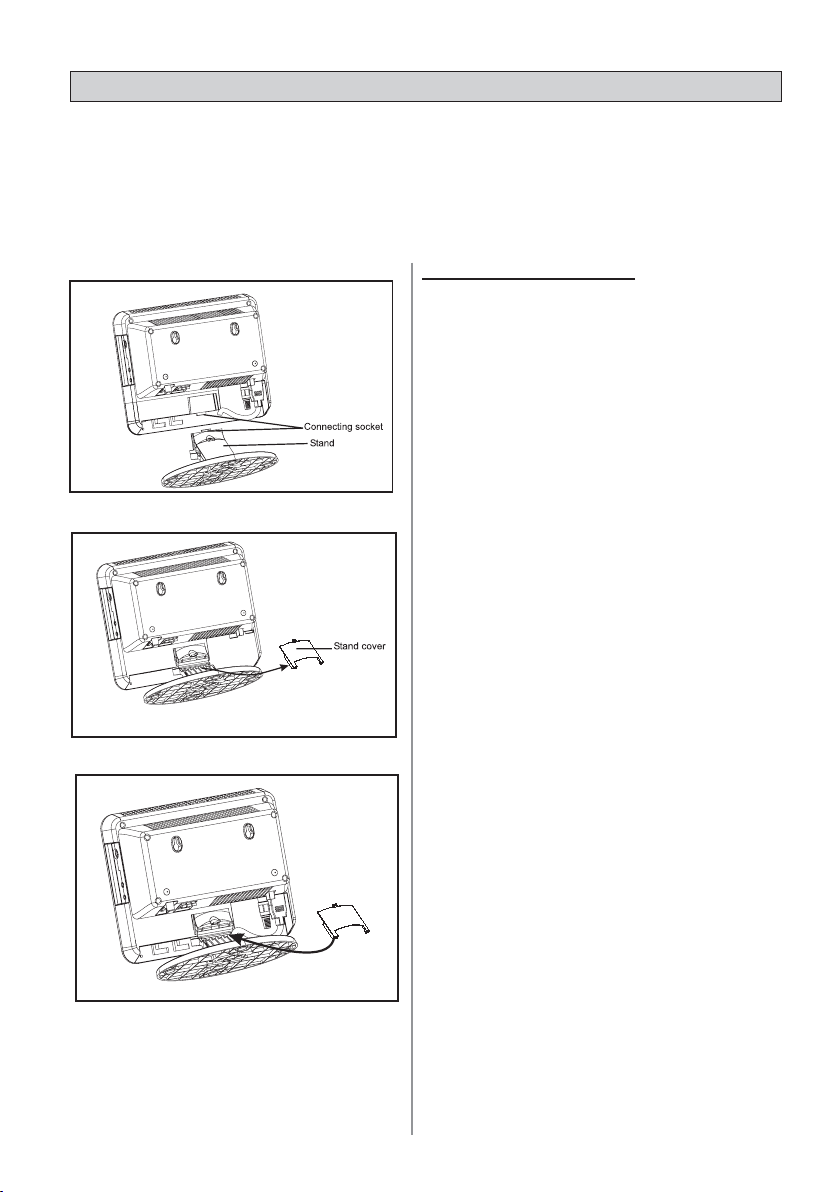
MAIN UNIT PREP ARA TION
Installation methods
Make sure to unplug the AC power cord before installing the main unit.
The ergonomic feature incorporated into the design of your vertical HomeTheatre System is that it can be mounted
either on its stand or on the wall.
Notes:
• When attaching or removing the stand, place the main unit on a cushion or soft cloth to avoid damage.
• Remove the only specified screws otherwise a malfunction may occur. Be careful not to lose the removed
screws.
Mounting on the stand
With both hands, guide the main unit along the sides
of connecting socket until it is firmly connected to
the stand.
The design of the stand can help you tightly fit the
connection cables.
1. To remove the stand cover, simply press the clip on
its top side, then pull out towards you.
2. Connect the main unit to the television. For more
detailed information, please refer to the next chapter-
--CONNECTIONS.
3. After placing the cables correctly, replace the stand
cover on your DVD stand.
GB - 7

MAIN UNIT PREP ARA TION
3/16”(5mm)
Min. 7/8”(22mm)
1/8”(3.2mm)
3/8”(9mm)
Mounting on the wall
Preparation:
• Remove the stand from the main unit:
Grip the top of the main unit with one hand and grip
the stand with another hand, slowly but firmly pull
the main unit off its stand.
•
Use appropriate screws (not supplied). See the
illustration on the left for size and type of screws.
Wall surface
Wall surface
100mm
7/32”(5.5mm)
Wall mounting screw
Min. 21/32”(16.5mm)
Template for main unit
1. Please first cut out the template on the last page of
the user’s manual.
Fix the template on the wall where you want to hang
the appliance and drive two screw holes into the wall
with a distance of 100mm in between, then remove
the template.
2. Drive the appropriate screws into the holes and
tighten them, making sure that you leave 5.5 mm
between the screw head and the wall. Ensure that
the wall and the screws can support a weight of 1.25
kg.
3. Hook the main unit on the screw heads and make
sure it is secure.
CAUTION:
Handle the appliance carefully when mounting it on the
wall.
• Mounting screws are not supplied. Use appropriate
ones.
• Check the two mounting screws are properly fixed
to the wall and that the main unit is firmly attached
• Select a good location. In the wrong location,
accidents may occur or the main unit may get
damaged.
• Avoid placing above a bed, sofa, water tank, sink or
in a hallway.
GB - 8
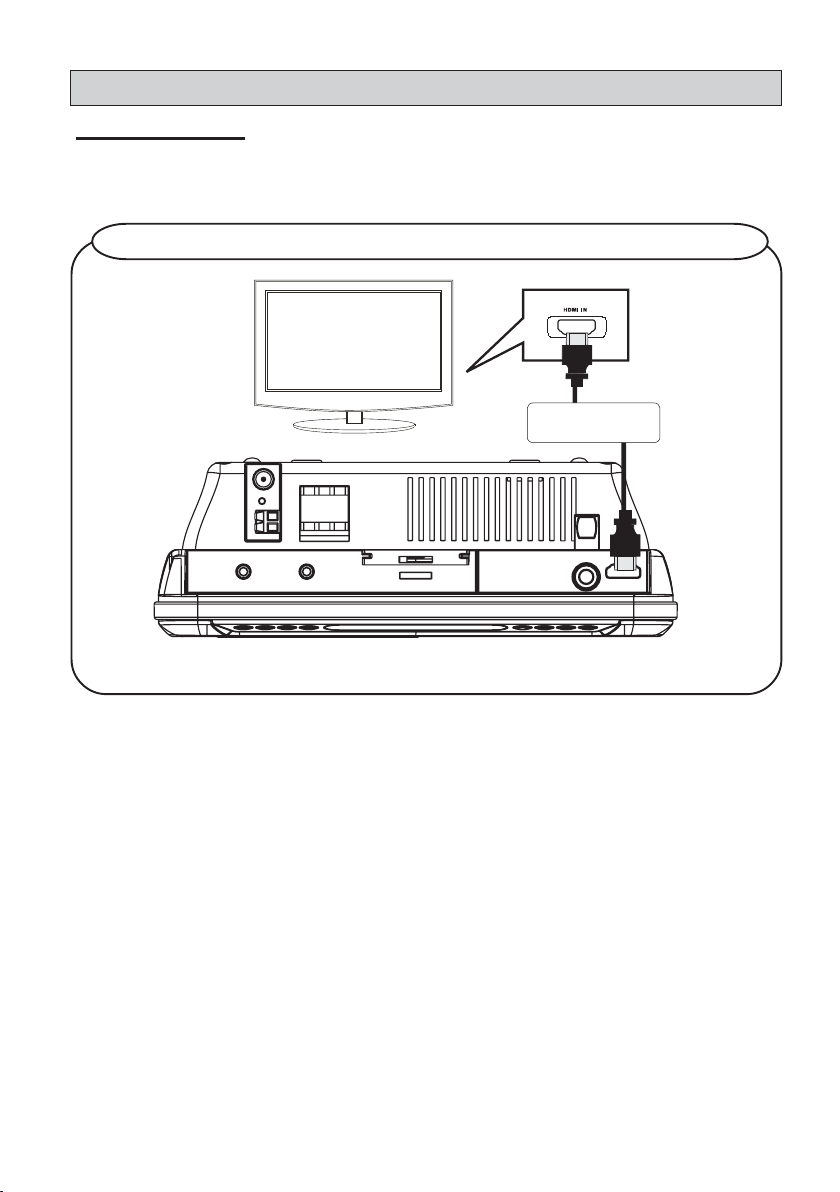
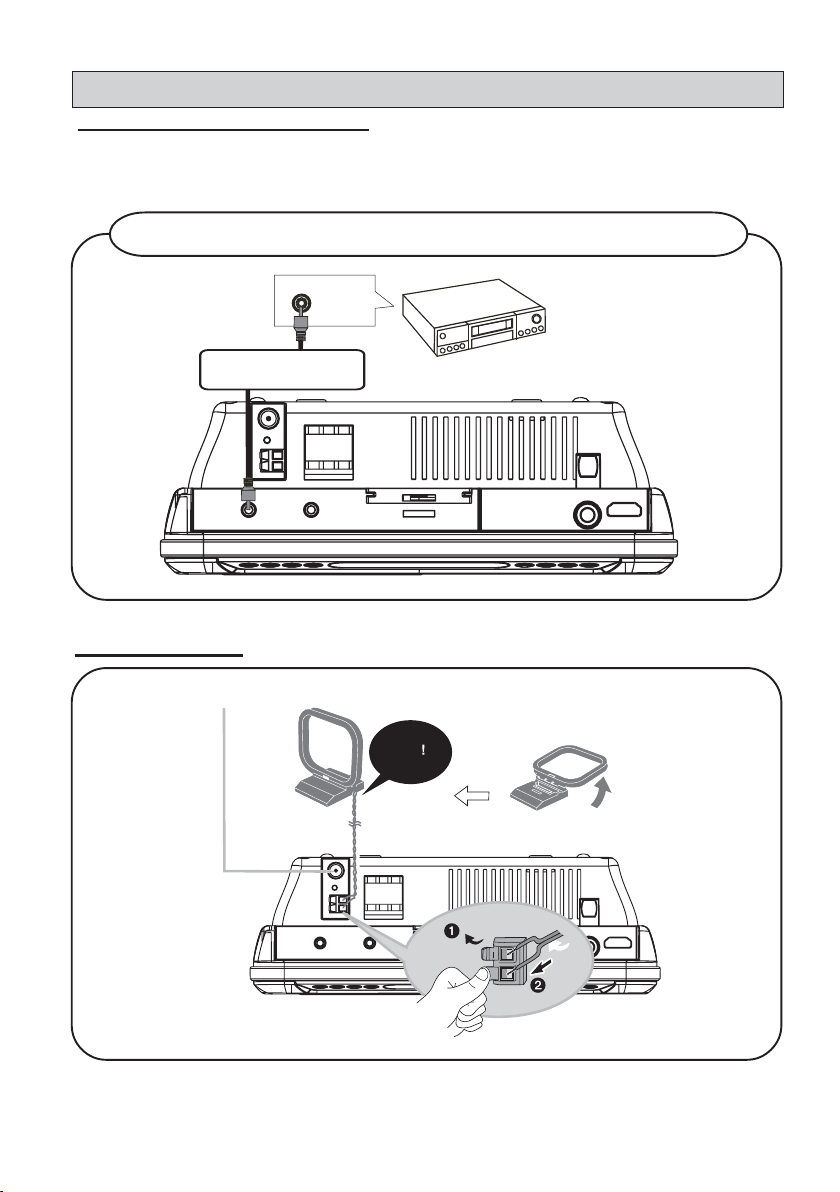
CONNECTIONS
Connecting to TV
The way in which the Main unit is connected and the kinds of cables used can make a noticeable difference in picture
and sound quality. Before selecting one of the options, please make sure that any other equipment has the required
input/output connections. Use any of the options below:
For best picture quality, use a HDMI cable (not included)
HDMI CABLE
(Not Included)
Bottom side
What is HDMI (High Definition Multimedia Interface)?
This device transmits a digital video signal without the process of converting to an analog signal. You can get
sharper digital picture by connecting to your TV to the unit using an HDMI connection cable.
HDMI was developed to provide HDCP technology (High Definition Contents Protection). HDCP is used to protect
digital content transmitted and received.
Because HDMI is an evolving technology, it is possible that some devices may not operate properly with the DVD
Home Theatre System.
HDMI, the HDMI logo and High-Definition Multimedia Interface are trademarks or registered trademarks of HDMI
licensing LLC.
Notes:
Please make sure you have a HDMI TV and set the TV’s source to the HDMI (Refer to TV owner’s manual)
• Connect the HDMI cable to the HDMI output on the appliance.
• Once connected, press HD to select the resolution (480P/576P, 720P, 1080i, 1080P) for the HDMI output.
The resolution can only be changed according to the TV’s and Monitor’s resolution capabilities.
• If there is noise or lines on the screen, please check the HDMI cable.
• If you do not want to connect your TV with a HDMI cable, please refer to the TV Connections shown on the
next page.
GB - 9
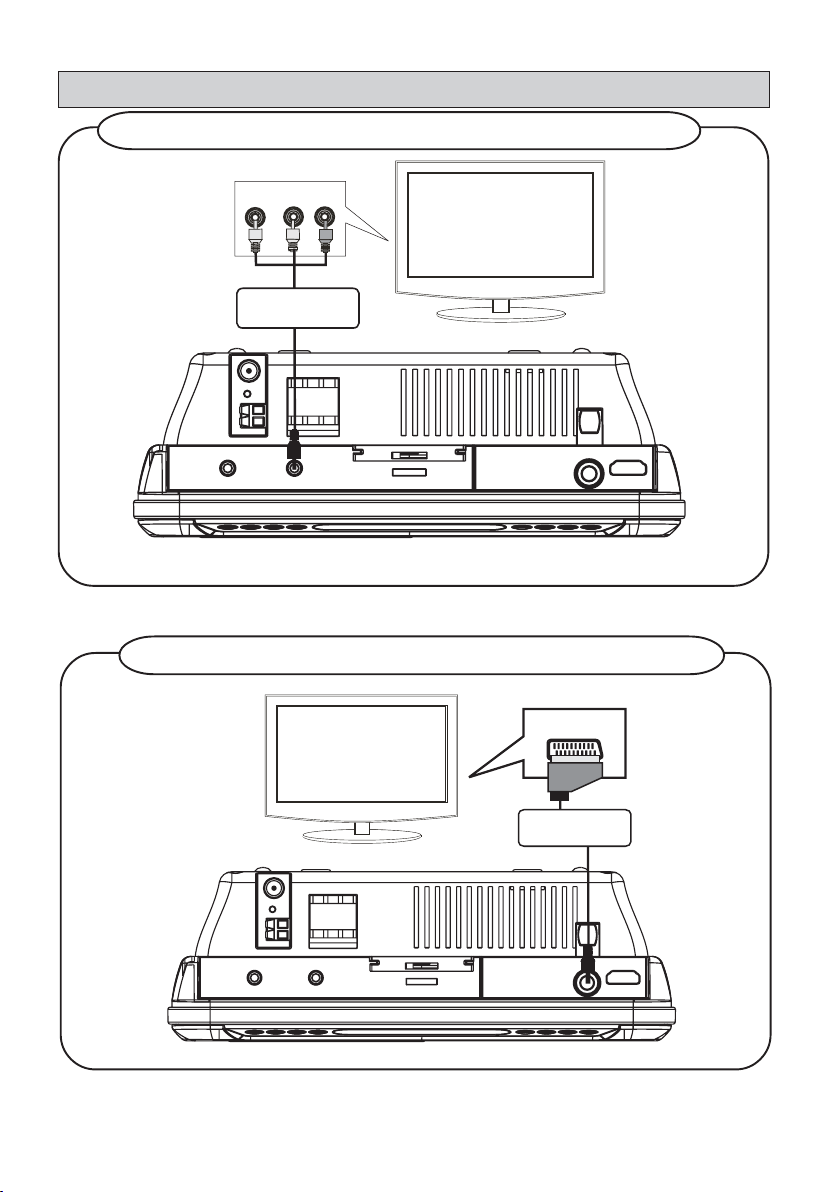
CONNECTIONS
Yellow
White
Red
For good picture and sound quality, use supplied AV CABLE
AUDIO IN
LR
VIDEO IN
AV CABLE
(Included)
1. Connect the yellow output jack on the AV cable to the video input jack on the TV.
2. Connect the white and red output jacks on the AV cable (white/red) to the audio input jacks (L/R) on the TV .
Use a DIN SCART cable (included)
SCART IN
DIN SCART CABLE
(included)
1. In DVD mode, the DIN SCART cable socket only transmits the video signal to the TV (not the audio signal).
The sound comes from your Home Theatre System’s speakers.
2. In AUX 2 mode (SCART input), the sound coming from the external appliance (from the TV for example) is
produced by the Home Theatre System’s speakers.
GB - 10
CONNECTIONS
Connecting to 5.1 CH Receiver
When connecting to a 5.1 CH receiver, do not connect the L-R Audio sockets to the TV. If the L-R connections are
made, the TV volume must be set to zero.
Using a Coaxial Audio Cable, connect the Coaxial Out socket (3.5mm jack) at the back of the player to the Digital
Coaxial Audio In socket of the 5.1 Ch receiver.
For best sound quality, use a COAXIAL AUDIO CABLE (not included)
COAXIAL IN
Coaxial Audio Cable
(not included)
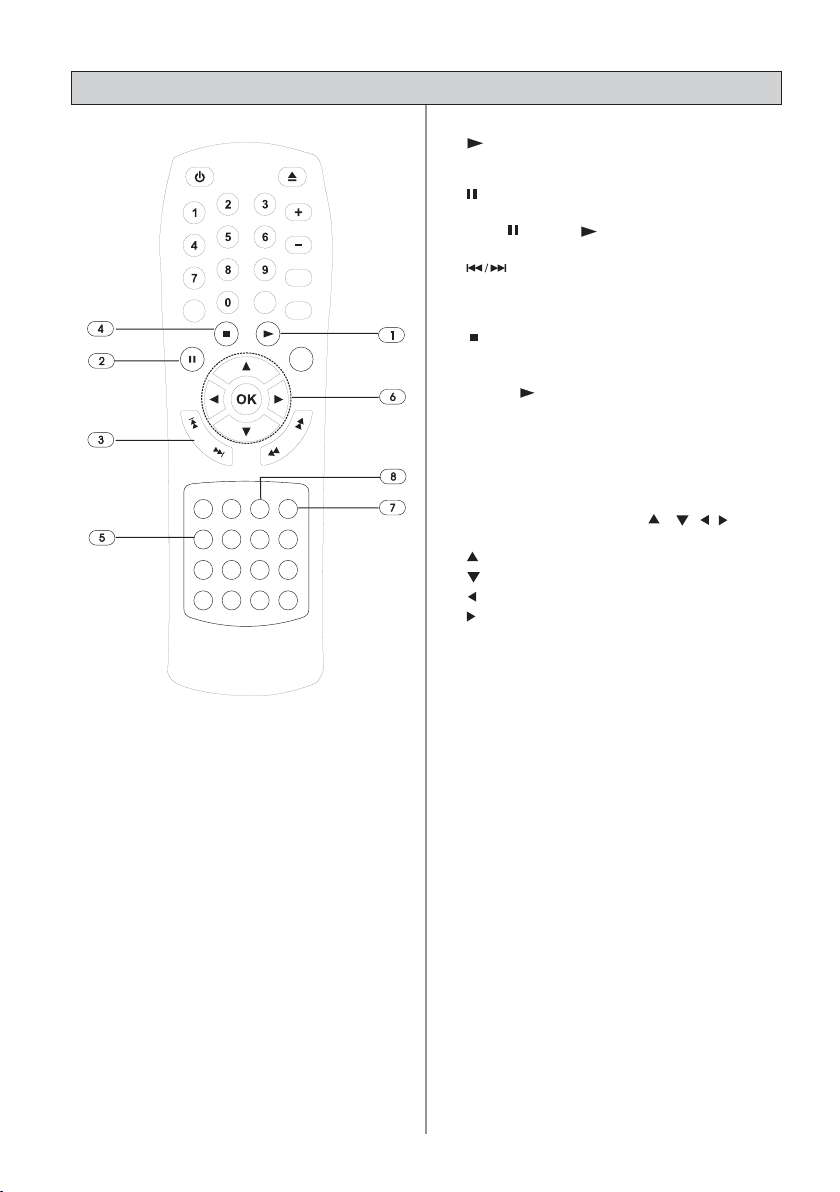
Radio connection
AM antenna
ClicK
FM indoor antenna
AM antenna connection - Stand the antenna up on its base. Place the antenna where reception is best. Keep the
antenna cable away from other wires and cables.
FM antenna connection - Affix the end of the FM antenna where reception is best.
GB - 11

CONNECTIONS
AUX
Audio in connection
3.5mm plug
You can use your Home Theatre System to amplify the sound of an external music device. In order to do this,
connect the AUX IN jack of this unit to the Headphone output of your music device using an AUX IN CABLE (not
included). Then press SOURCE on the remote control or the front panel to select AUX 1.
Speaker Connection
Before Connecting
This DVD Home Theatre System is designed to reproduce optimum sound quality when the supplied speakers are
used. If you wish to connect other speakers to the system instead of the supplied speakers, they should be 4 ohms
impedance for the speakers and 8 ohms impedance for subwoofer.
Ensure that the polarities are correct when connecting the speakers (colored wire for matching colored terminal clip).
To prevent damage to circuits, never short-circuit the speaker output terminals.
SUBWOOFER
Front right speaker
Front left speaker
GB - 12

Press the speaker terminal clip down & insert the wire of speaker, then release the clip.
TV
Notes:
• Do not remove an excessive amount of insulation on the wire , in order to avoid the stripped portions of the
wires from touching each other. The optimal length for the stripped part should be around 1/3 inch (or 1cm).
• Do not push the stripped part too far into the speaker terminals.
• Do not connect more than one speaker to any one pair of speaker terminals.
• Do not connect speakers with an impedance lower than the speakers supplied.
Insert the speaker stand into the speaker in the way shown below.
You can place the speakers in a vertical or horizontal direction according to your preference.
SPEAKER PLACEMENT
The placement of the speakers plays an important role in the reproduction of surround sound effect.
Particular attention should be taken when designing the speaker layout. For the best surround effects, all speakers
should be installed.
Front
Subwoofer
speaker
Subwoofer
Front
speaker
( left )
Sound Reproduction
Angle
1) Place the front left and right speakers to the left hand side and right hand side of your TV.
speaker
( right )
Front
( left )
DIM L
2) The subwoofer can be installed for powerful bass sounds when it is placed on the floor. Place the subwoofer
on the floor near the TV.
3) All speakers should approximately be at the same distance from your listening position and must face you.
GB - 13
Front
spea ker
( right )
DIM R

GETTING STARTED
Powering the unit
1. Finish the connections for the DVD HomeTheatre System as shown in the previous section.
2. Insert 2pcs AAA batteries (supplied), with correct polarities marked in the battery compartment, in the remote
control.
3. Connect the Power cord to AC mains outlet and press
control to turn on the unit.
4. Turn on the TV and set to the correct video-in source.
5. To go to the standby mode, press the
Micro Home Theatre is not to be used for a long time, please disconnect the power cord.
Notes:
• The effective distance for remote control operation is about 5 metres.
• Replace the batteries when the remote control operating distance starts to reduce.
• If the remote control is not to be used for a long time, remove the batteries to avoid
damage caused by battery leakage.
STANDBY/ON button on the remote control or on the unit. If the DVD
STANDBY/ON button on the unit or on the remote
Inserting a disc
1. Press the OPEN/CLOSE button on the remote or the button on the front panel
to open the disc tray motorized door.
2. Insert a disc, press
the remote control to close the disk tray motorized door.
The unit will start reading the disc and playing it. Before the movie starts to play, a
menu will be displayed.
Inserting a USB device( in DVD mode )
OPEN/CLOSE button on the front panel or the button on
When there is no disc in the disc tray:
• Insert a USB device in the USB port on the unit. The player will automatically play the files contained in the
USB device.
When there is a disc in the disc tray:
• When the disc is playing, insert the USB device in the USB port on the unit, the DISC/USB selection menu
will pop up on the screen, you can press / to select DISC or USB and press OK to confirm.
• To play the disc, please stop the USB device playing first, then press SETUP/EXIT to access the SETUP
menu, select the SOURCE option and then select DISC.
Notes:
• Please ensure the USB device has been inserted.
• This unit cannot support NTFS format. If the device does not work on it, please check the device file system
and format it with FAT or FAT32.
Although you can watch a movie immediately, to get the best from this unit, you are suggested to proceed for the
Basic Setup first.
BASIC SETUP
Press the STANDBY/ON button to turn on the unit and
press SETUP/EXIT button to enter SYSTEM SETUP menu.
Basic Operation
1. Press or to navigate to one of these menus:
• SYSTEM SETUP • LANGUAGE SETUP
• VIDEO SETUP • AUDIO SETUP
2. Press
3. Press
4. Repeat steps 1 to 3 to change any settings.
5. Press SETUP/EXIT button to exit setup.
For details, refer to the corresponding chapters in the
GB - 14
or to select different settings under the
menu. Press
to confirm the new setting.
following section.
or OK to active the setting.
or to select a new setting, then press OK

1. SYSTEM SETUP
SYSTEM SETUP
SCREEN SAVER ON
PASSWORD OFF
RATING
SOURCE
EXIT SETUP
SYSTEM SETUP
SCREEN SAVER
PASSWORD ----
RATING
SOURCE
EXIT SETUP
SYSTEM SETUP
SCREEN SAVER 1 KID SAFE
PASSWORD 2 G
RATING
SOURCE 4 PG-13
EXIT SETUP
3PG
5 PG-R
6R
7 NC-17
8 ADULT
1.1 SCREEN SAVER
Use this setting to turn the screen saver option on or off.
If you turn the screen saver on, the screen saver image
appears when you leave the player in Pause or Stop mode
more than 3 minutes. It can protect the television screen
from being damaged.
On: To turn screen saver on.
Off: To turn screen saver off.
1.2 PASSWORD & RA TING
Many DVD movie discs contain Motion Picture Association
rating codes. This DVD Player will recognize the codes on
these discs, providing a method to prevent children from
viewing films which are not suitable or are objectionable.
1 (Kid safe): Suitable for all audiences
2 (G): Suitable for general audiences
3 (PG): Parental guidance suggested
4 (PG-13): Parental guidance suggested, unsuitable for
children under 13
5 (PG-R): Parental guidance recommended - very brief
mature language or situations
6 (R): Restricted - violence, adult language and situations
unsuitable for young viewers
7 (NC 17): Adult theme or content, not suitable for children
under 17
8 ( Adult): Adult themes, language and nudity. Select this
level of control to switch off parental control.
1. Press
or to highlight Rating, then press .
Select a parent control level and press OK.
2. Press
or to select Password and press . Use
the number keys (0-9) to enter the four-digit password
and press OK to confirm. The system is locked
again, which means that the parental control function
is switched on.
3. In SYSTEM SETUP menu, press
Password and press
. Use the number keys (0-9)
or to highlight
to enter the four-digit password and press OK to
confirm. The system is unlocked, which means that
you can adjust the setup for parental control.
If a mistake is made before pressing OK, press the CLEAR
button and enter the 4-digit password again.
DVD discs that are rated above the selected level will not
play.
To change the password, first enter the old password, then
enter the new password.
Indicates Parental lock is NOT active.
The Parental lock is active.
Notes:
• The rating levels are only functional when the parental
lock is active.
• The rating levels can only be changed when the
parental lock is not active.
• If you forget the password, enter 76418 while the
player is in NO DISC mode. The password will be
cancelled.
GB - 15

SYSTEM SETUP
SCREEN SAVER
PASSWORD
RATING
SOURCE
EXIT SETUP
LANGUAGE SETUP
OSD LANGUAGE
AUDIO LANG
SUBTITLE LANG
DISC MENU
EXIT SETUP
DISC
USB
1.3 SOURCE
Select the available input source between Disc and USB.
The unit can read MP3, JPEG, MPEG 4, WMA file formats
in the USB.
2. LANGUAGE SETUP
You can select different languages for the Setup menu.
Y ou can also select the different languages for the audio,
subtitle, and disc menu recorded on the DVD.
2.1 OSD LANGUAGE
Selects the on screen display language.
2.2 AUDIO LANG
Selects the audio language.
2.3 SUBTITLE LANG
Selects the subtitle displayed on the TV screen.
2.4 DISC MENU
Selects the disc menu language.
GB - 16

VIDEO SETUP
TV SYSTEM
TV TYPE
HDMI OUTPUT AUTO
EXIT SETUP
VIDEO SETUP
TV SYSTEM
TV TYPE
HDMI OUTPUT 4:3 LB
EXIT SETUP
NTSC
PAL
4:3 PS
16:9
3. VIDEO SETUP
3.1 TV SYSTEM
This player supports different TV output, including NTSC
and PAL system. The setting of the unit can be changed
to match the TV.
NTSC: Select this if your television supports the NTSC
color system used in North America.
PAL: Select this if your television supports the P AL color
system used in Europe and Asia.
AUTO: Select this to automatically switch to PAL or
NTSC output according to the disc inserted.
Note: If the disc’s color system is different to the TV
system selected, the video from the HDMI output will
become flickering. You should select the AUTO to adjust
it.
3.2 TV TYPE
4:3 PS Select this format if the unit is connected to a
normal TV . The left and right edges of wide-screen images
are cut so that the image can be displayed in full screen.
4:3 LB Select this when the unit is connected to a normal
TV . Wide-screen images are shown on screen, with black
bands on the top and bottom.
16:9 Select this when the unit is connected to a widescreen TV .
Notes:
• Some discs may not be able to play according to
your selection, due to the format that has been
recorded onto a DVD disc.
• A disc recorded in 4:3 mode will only play in 4:3.
• The TV TYPE should correspond to the TV.
VIDEO SETUP
TV SYSTEM
TV TYPE
HDMI OUTPUT
EXIT SETUP
480P/576P
720P
1080 I
1080P
3.3 HDMI OUTPUT
This function allows the user to select screen resolution
for HDMI output.
Note:
• If your TV or monitor does not support HDCP, a
blue screen without picture appears when playing
the DVD discs which are protected by copyright.
• The HDMI output options depend on TV System
(PAL/NTSC) selected.
• See your TV owner’s manual for more information
on how to select TV’s Video Input source.
• Please make sure your HD TV supports the high
resolution selected.
• You can also easily change the resolution by
pressing the HD button on the remote control
repeatedly.
GB - 17

AUDIO SETUP
FRONT LEFT
0 dB
VOLUME SETUP
DYNAMIC RANGE
DIGITAL OUTPUT
VOCAL MODE
EXIT SETUP
0dB
4. AUDIO SETUP
4.1 VOLUME SETUP
•
Once you select the Volume Setup and press OK,
you will hear the calibrating sound from each
speaker for a few seconds as follows: Front Left > Front Right -> Subwoofer. If the sound is either
too quiet or too loud, adjust the volume control
until the sound is more clear. Let the calibrating
sound cycle through all the speakers at least once.
• If the calibrating sound level from all speakers is
approximately the same, no further adjustment is
necessary.
• If any speaker sound level appears unbalance to
the rest, you can increase or decrease the speaker
sound level by pressing
is highlighted.
• When you have completed the level adjustments,
press OK to exit the Volume Setup and return to
the previous menu.
Note: We recommend to set Volume = 30 before entering
this Volume Setup to further calibrating any unbalance
speaker level output.
or when that speaker
AUDIO SETUP
VOLUME SETUP
DYNAMIC RANGE
DIGITAL OUTPUT
VOCAL MODE
EXIT SETUP
AUDIO SETUP
VOLUME SETUP
DYNAMIC RANGE
DIGITAL OUTPUT
VOCAL MODE
EXIT SETUP
AUDIO SETUP
VOLUME SETUP
DYNAMIC RANGE
DIGITAL OUTPUT
VOCAL MODE
EXIT SETUP
ON
OFF
SPDIF/RAW
SPDIF/PCM
STEREO
MONO L
MONO R
VOCAL ALL
4.2 DYNAMIC RANGE
Reduces large variations in volume for night-time listening
and avoid loud sound such as explosion.
On: Loud sounds such as explosions are tuned down
sightly.
Off: The unit plays back at the recording level on the
disc.
4.3 DIGITAL OUTPUT
If an amplifier is connected to the unit’s “COAXIAL”
socket, the following settings can be selected
SPDIF/RAW: Dolby Digital signals are fed unaltered to
the digital output. Generally, this setting is used with a
5.1 channel receiver.
SPDIF/PCM: Dolby Digital and MPEG 2 multi-channel
signals are converted to PCM (Pulse Code Modulation).
This setting is suitable for amplifiers or receivers without
digital multi-channel sound decoders.
4.4 VOCAL MODE
Selects among STEREO, MONO L, MONO R and VOCAL
ALL as the desired vocal sound effect when playing
Karaoke discs.
Note: This function is not available for some karaoke
discs.
GB - 18

PLA YING DVD / CD / V CD DISC
1
2
3
4
5
6
7
10
8
9
11
12
1. (Open / Close)
• Press to open the motorized door.
Note: Load the disc on the disc tray with disc label facing
forward.
• Press this button again to close the disk tray door. The unit
will start playback automatically.
(Play)
2.
• Press to start playback.
3.
(Pause / Frame-by-Frame Advance)
The image can be frozen and advance frame by frame.
• For CD, press
directly press to resume the normal playback.
• For DVD / VCD, press
again to go to STEP mode. Each press of the button will
advance the frame in STEP mode.
Press to resume the normal playback.
to pause the playback. Press again or
to pause the playback. Press
4.
• Press
(Backward / Forward Search, Slow Motion)
to search backward or forward. Press to
resume the normal playback.
Each time the
or button is pressed, the speed of
backward / forward search changes at speed: x2, x4, x8,
x20.
• In PAUSE mode, press
or to start forward/backword
slow motion play at speed: 1/2, 1/4, 1/8, 1/16, 1/32. Press
to resume normal playback.
Note: Slow motion is not applicable to CD playback.
5.
(Skip Forward/Backward)
When a disc is playing, a chapter/track can be skipped
backward/forward.
• Press the
button to skip to the beginning of the previous
chapter or track.
• Press the
button to skip to the beginning of the next
chapter or track.
• For audio CD discs, use the numeric buttons (0 - 9 on the
remote control only) to directly jump to a track number.
6. (Stop)
• Press once to stop the current playback instantly and
enter the Resume Play mode.
Press again to resume playback from the point where
the disc was stopped.
• Press twice to stop playback completely. It is now
impossible to resume playback from the place where
playback was stopped.
Press again to start playback from the beginning of the
disc.
7. MENU
• Press to display the Disc Menu.
Notes:
This button has no function during playback of a CD.
For VCD, this function is only available at PBC ON mode.
8. TITLE
• Press to display the title menu if available on disc (DVD
only).
GB - 19

9. ZOOM
• When a disc is playing, press the ZOOM/CLEAR button.
• While an image is magnified, use the
• To return to the original normal view, press the ZOOM/
10. ANGLE/PBC
ANGLE (To change the Viewing Angle on a DVD disc)
Different viewing angles can be selected when playing a DVD
video disc that contains scenes recorded from multiple angles.
• Press ANGLE/PBC repeatedly to select different viewing
PBC (VCD/SVCD)
• When a VCD/SVCD is playing, press ANGLE/PBC
• If PBC ON is selected, the disc menu (if available) will
11. AUDIO (To select the Audio Languages available on
During playback, different audio languages can be selected.
• When a disc is playing, press AUDIO to show the current
• Press repeatedly to select the desired audio language.
:[12CH]
Note:
• For VCD, audio output (STEREO,Mono L, Mono R) can be
Picture size can be magnified or reduced during playback.
Each time the ZOOM/CLEAR button is pressed, the ZOOM
settings will be changed as follows :
ZOOM 2 --> ZOOM 3 --> ZOOM 4 --> ZOOM 3/4
--> ZOOM 2/3 --> ZOOM 1/2 --> ZOOM : OFF
, , and keys
to shift the image for viewing.
CLEAR key until the message ZOOM : OFF is shown. The
screen will return to normal.
angles if available on the disc.
repeatedly to switch between PBC ON and OFF.
appear on the TV. Use the numeric keys (0-9) to select the
options in the menu.
the disc)
audio language.
selected.
: [ 3 ENGLISH ]
12. SUBTITLE (To select the Subtitle Languages available
on the disc)
During playback, you can change the subtitle language or disable
the subtitle function.
• While a disc is playing, press SUBTITLE/SPEED to show
the current subtitle playback language.
• Press repeatedly to select the desired subtitle language.
Notes:
• This function can only be used for discs on which different
subtitle languages have been recorded.
• The number of languages recorded may be different depending
on the disc.
GB - 20

ADV ANCED PLA YBACK FUNCTION
1. INFO function
While the disc is playing, press INFO to display playback
information available, depending on the disc.
For DVD:
• Press INFO once to display the playback information
and playing time of current chapter.
• Press INFO twice to check the remaining time of current
chapter.
• Press INFO three times to check the playing time of
current title.
• Press INFO four times to check the remaining time of
OFF
current title.
• Press INFO five times to further display more playback
information: audio language and output mode, subtitle
and angle.
For CD/VCD:
• Press INFO once to display the playback information
and playing time of current track.
• Press INFO twice to check the remaining time of current
track.
• Press INFO three times to check the playing time of
current disc.
• Press INFO four times to check the remaining time of
current disc.
1.1 TT (Title Info)
• Displays the Title Number being played and the Total
Number of Titles recorded on the disc.
1.2 CH (Chapter Info)
• Displays the Chapter Number being played and the
Total Number of Chapters recorded on the disc.
1.3 Elapsed time
• Displays the elapsed time from the beginning of the
title/chapter/disc/track being played.
Note: If there is a “-” displaying in the front the time, then the
time will be the remaining time of current title/chapter/track.
1.4 Audio
• Displays the audio language and audio output mode
currently selected.
1.5 Subtitle
• Displays the subtitle language currently selected.
1.6 Angle
• Displays the viewing angle currently selected.
When a disc without multi-angle is played,
displayed.
1.7 TRK (Track Info)
• Displays the Track Number being played and the Total
Number of Tracks recorded on the disc.
1.8 Unmute Icon
• When the sound is unmuted, the icon will be displayed.
1.9 Repeat Mode
• Displays current repeat mode.
Note: After checking the settings, press INFO again to make
the information disappear.
DVD
1/2ENG
CD
VCD
Disc format
TT
Disc format
Track
TRK
Disc format
TRK
Track
Title
7/36
Audio
2/2
2/2
CH
Totaltitle
Current title
5.1CH
Totaltrack
Current track
Totaltrack
Current track
Chapter
Unmute
Unmute
PBC
Current chapter
Totalchapter
1/41
1/4
---
PBC status
00:03:12
Elapsed time
Subtitle
ENG
Angle
Repeat Mode
00:03:12
Elapsed time
Repeat Mode
00:03:12
Elapsed time
OFF is
GB - 21

2. GOTO function
This function allows you to select any point on the disc
and to start playback from this point.
DVD:
DVD
CD:
CD
TT
TRK
07/36
Current Title
02/16
CH
Total Title
Current Track
Total track
Current Chapter
Total Chapter
1/41
00:03:12
Time
00:03:12
Time
2.1 Selecting a Specific Title/Chapter for DVD or
Track for CD/VCD
Any specific Title/Chapter/Track can be selected to start
playback by directly selecting the Title/Chapter for DVD
or Track number for CD/VCD.
• Press GOTO.
• Press or to highlight the Title / Chapter / Track
field and press the corresponding numeric key 0 -
9.
• Press OK to confirm. The unit will then start
playback from the selected position.
Note: Press ZOOM/CLEAR to reset the highlighted Title
/ Chapter / Track.
2.2 Locating a Specific Time
A specific time can be selected by directly entering the
time (hours, minutes, seconds).
• Press GOTO.
• Press
or to highlight time.
• Using the numeric keys 0 - 9, directly key in the
time when playback should start.
- The first two digits are for the hours.
- The next two digits are for the minutes.
- The last two digits are for the seconds.
• After entering the time, press OK to confirm. The
unit will then start playback from the selected time.
Notes:
• Some discs may not allow use of this function.
• Some scenes may not be located precisely as
specified.
• This method for accessing a specific location is
available only within the current title of the DVD
disc or current track of the CD disc.
• For VCD, it works at PBC OFF mode only .
• Press ZOOM/CLEAR to reset the highlighted time.
PLAY MODE
MODE
REPEAT
PLAY MODE
MODE
REPEAT
OFF
OFF
PROG
OFF
3. Programming Playback
Contents of the disc can be played in a selected order .
• Press the PLAYMODE button.
• When MODE is highlighted, use
PROG mode. Then press OK to confirm.
Note:
During VCD/SVCD playback, the function is only available
when PBC is OFF.
GB - 22
or to select

Chapter
Title
3.1 DVD Programming
• Enter the title numbers in
01). Use
or to highlight chapter and enter the
chapter numbers in
• Use
, , or to move to another entry.
--
(2 digit format, e.g.
--
.
• Repeat the above steps for more inputs.
• Press
or highlight PLAY on the screen and press
OK to start the programmed playback.
PLAY MODE
MODE
REPEAT
PLAY MODE
MODE CD INTRO
REPEAT OFF
RANDOM
OFF
3.2 CD/VCD/SVCD Programming
--
• Enter the track numbers in
.
• Refer to DVD Programming for program operation.
3.3 Clear the Programs
• Highlight the current input on the screen and press
ZOOM/CLEAR to delete the program.
Note:
• Highlight CLEAR on the PROG screen and press
OK to delete all programs.
4. Random playback
Chapters in a DVD and tracks in a CD/VCD can be
played in random order.
• Press the PLAYMODE button.
• When MODE is highlighted, use
or to select
RANDOM mode. Then press OK to confirm.
Note:
• For VCD, it works at PBC OFF mode only .
5. CD INTRO
For CD only ,you can select CD INTRO to play each
track by 10 seconds.
• Press the PLAYMODE button.
• When MODE is highlighted, use
or to select
CD INTRO mode. Then press OK to confirm.
6. Repeat playback
A specific title, chapter or track can be played repeatedly .
Note: During VCD / SVCD playback, repeat playback is
only available when PBC is OFF .
PLAY MODE
MODE
REPEAT
OFF
REP ALL
6.1 Repeating a Title/Chapter/Track/All disc
• Press the PLAYMODE button, then use
select the REPEAT option.
• Use
or button to select the repeat mode and
press OK to confirm.
For DVD Disc : OFF> REP ALL> Chapter > Title
For CD /VCD/SVCD Disc: OFF> REP 1 > REP All
For MP3 / JPEG Disc : OFF>REP DIR>REP 1>REP All
GB - 23
or to

REPEAT A-
REPEAT A-B
A-B CANCEL
PBC: [ ON ]
PBC: [ OFF ]
PBC: [ OFF ]
6.2 Repeating a Specific Section
A-B repeat playback allows a specific section to be
repeated.
• While the disc is playing, press A-B button to set
the beginning of the section (point A) to be played
repeatedly.
• Press A-B button again to set the end of the section
(point B) to be played repeatedly.
• The unit will then immediately begin replaying the
selection ( A to B) repeatedly.
• Press A-B button again to clear the programmed
repeat playback and return to normal playback.
Note:
• The A-B repeat function can only be used within
the same title or track. If points A and B are defined
in different titles or tracks, A-B repeat is cancelled.
7. VCD/SVCD playback control
• While a VCD / SVCD is playing, press ANGLE/
PBC repeatedly to switch between PBC (Playback
Control) ON and OFF.
• If PBC ON is selected, the Disc Menu (if available)
will appear on the TV . Use
(0-9) to select an option.
• If PBC OFF is selected, the unit will skip the disc
menu and start playback directly.
• Press MENU to return to Disc Menu with PBC ON
mode.
or Numeric keys
MARK ------------ T1 C1 00:03:21
MARK 123--------- TRK2 00:00:20
8. Bookmark
The Bookmark feature allows a point to be marked for
playback.
8.1 Creating a Bookmark
• During DVD / CD / VCD playback, press
BOOKMARK to access the bookmark menu.
• Press OK to add the first bookmark, then use the
/ buttons to move the cursor and press OK to
add additional bookmarks.
8.2 Recalling a Bookmark
• During playback, press BOOKMARK to access
the bookmark menu.
• Use
Note:
• For VCDs, this function works in PBC OFF mode
GB - 24
or button to highlight the desired bookmark
and press to play from the bookmark point.
Press ZOOM/CLEAR to delete the highlighted
bookmark.
only.
PLAYING MP3 / JPEG / WMA / MPEG 4 FILES
1. (Play)
• Press to start playback.
2. (Pause)
• Press to pause the playback.
• Press
again or to resume normal playback.
3.
• Press to skip a track or picture forwards or
4.
• Press to stop playback and display the Selection
Note: Press
5. ZOOM
• Press to zoom into the picture when playing JPEG
6. Flipping and rotating still picture (JPEG)
• Press the navigation keys(
7. Audio ( MPEG 4)
• During playback, press AUDIO/FM ST to show the
• Press repeatedly to select the desired audio
8. Subtitle ( MPEG 4)
• The unit only can support the MPEG4 files with
• To use the subtitle function:
1). Download or create the subtitle file with specified
2). Name the MPEG 4 movie and subtitle file with the
3). Insert the disc or USB device and select the MPEG4
(Skip)
backwards.
(Stop)
Menu (For JPEG and movie files).
to play from the beginning.
or MPEG 4 files.
, , , , ) to flip
the still picture on the TV.
: flip the picture vertically.
: flip the picture horizontally.
: rotate the picture 900 counter-clockwise.
: rotate the picture 900 clockwise.
current playback audio language.
language.
external subtitle.
format, e.g. Subrip (*.srt), MicroDVD (*.sub), SAMI
Captioning (*.smi), SubViewer 2.0 (*.sub).
same characters (e.g. abc.avi & abc.srt). Burn
them on to a CD disc or copy them into the USB
device.
file to play, then press SUBTITLE to turn subtitle
on or off.
GB - 25

01 . BITRATE
02 . FOLDER TEST
03 . FOLDER 1
04 . ADD CHARAK
05 . ALPHANUYER
06 . NUMERIC
07 . FOLDER 2
08 . FOLDER 3
09 . FOLDER 4
10 . FOLDER 5
01 . BITRATE_03
BITRATE_04
02 .
BITRATE_05
03 .
BITRATE_06
04 .
BITRATE_07
05 .
BITRATE_08
06 .
BITRATE_09
07 .
08 . BITRATE_10
09 . BITRATE_11
10 . BITRATE_12
Selection Menu
The Selection Menu will appear when MP3/ WMA/JPEG/MPEG 4 files
are read.
All folders will appear on the left side menu and numbered in
ascending order. When one of the folders is highlighted, all the
contents of the folder will be displayed on the right side.
Music/Picture/Movie files can be selected individually for desired
playback. Use the navigation keys to highlight the Music/Picture/
Movie icon at the bottom of Selection Menu and press OK to confirm.
Then select the files and press OK or to start playback.
[MUSIC] --- MP3 / WMA Files
The unit will play the MP3 / WMA file currently selected. It will then
play all the files in the subfolders contained within its folder. After
that, the unit will play the remaining folders on the disc.
Music
Movie
Picture
[PICTURE] --- JPEG Files
Press PLAY , the unit will start the slideshow from the JPEG file
currently selected. Then you can zoom or rotate the displayed
pictures. You can also select a folder and display all the files in that
folder. Select the folder of your choice and press the button.
[MOVIE] --- MPEG 4 Files
The unit will start to play the whole file currently selected.
Notes:
• WMA, MP3, JPEG and MPEG 4 files cannot be played
simultaneously.
• The highlighted icon at the bottom of the menu indicates what
kind of file is playing.
AA
UDIO CD RIPPING (ENCODING IN MP3 FORMAUDIO CD RIPPING (ENCODING IN MP3 FORMA
A
UDIO CD RIPPING (ENCODING IN MP3 FORMA
AA
UDIO CD RIPPING (ENCODING IN MP3 FORMAUDIO CD RIPPING (ENCODING IN MP3 FORMA
T)T)
T)
T)T)
1. Insert the USB device without write protection to the USB port.
2. When the USB device has been recognized, if necessary, press the
button to stop playback of files already
present, and insert the CD disc you want to record, then select the track from which you would like to start encoding
(the unit will encode this track and record it on the USB device, and will do the same for the following tracks until the
last one). Then press the RIPPING button. Once the “USB Ready” is displayed on the screen, the unit will start to
encode the CD files.
• The unit starts to encode the MP3 files on the USB device. The message “CD RIPPING TRACK 1/XX%” is
displayed. The unit plays and encodes all tracks on the CD one by one automatically until the last track is
played and encoded.
• To stop CD Ripping, press STOP. The MP3 files will be saved in the USB flash drive.
• T o speed up CD Ripping, press SUBTITLE/SPEED to double the speed of encoding MP3 files. The “Recorder
2X” flashes a moment and processing of Ripping will then display without audio output. Press it again to
return to the normal speed, and “Normal” flashes a moment and then the unit will read the tracks again
during the ripping process.
• Once all tracks on the CD disc have been played, CD Ripping stops and files are saved on the USB device
and “STOP” is displayed.
Notes:
• When other play mode is set on, press RIPPING to stop the other play mode and start CD Ripping.
• When the CD Ripping function is on, the PAUSE and INFO buttons will still be available.
• The CD Ripping speed is 128Kb/ps.
• In “Recorder 2X” mode, there is no audio output. The appliance encodes the current file at double speed,
then returns to normal mode for the next file.
• The files that are created are saved in a file called “Ripping”.
• If “USB ERROR” appears during CD ripping, or the MP3 files cannot be read after ripping, please format the
USB device with FAT or FAT 32 and then start the ripping again.
GB - 26

LISTENING TO THE RADIO
FM
MHZ
FM
MHZ
FM
FM
FM
Important: Make sure the FM and AM antennas are connected
correctly.
You can program up to 20 FM and 20 AM radio stations for easy
recall.
To search a radio station
1. Press the
2. Press the SOURCE button repeatedly until the Tuner Mode
is selected.Press again to switch between MW andFM bands
ifnecessary.
3. Tune to the radio station by one of the following methods :
• Manual Tuning --- Press
control until the desired frequency is reached.
• Automatic Tuning--- Press and hold / on the remote
control for more than one second to activate the AUTO
SCAN function. Then release the button. It will stop on any
radio station found. Repeat this process until it stops at the
desired station.
To save a radio station
1. When the desired radio station is tuned. Press and hold OK
until the frequency flashes on the display.
2. Press / or use the remote control numeric keys 0 - 9 to
select the channel number that you want the unit to memorize.
3. Press OK again to store into channel number. The word
SAVEd is displayed during the saving operation. The radio
station is memorized to that channel number.
STANDBY/ON button to turn on the unit.
/ repeatedly on the remote
4. Repeat the above steps to save up to 20 FM and 20 AM
radio channels.
Note: When you tune to a weak FM station manually, press AUDIO/
FM ST on the remote control to switch from Stereo mode to Mono
mode to reduce the background
noise.
To recall a memorized radio channel
. Press / on the remote control or / on the front
panel to recall a memorized radio channel.
GB - 27

OTHER FUNCTIONS
• All operation messages will appear on both the TV screen and the VFD display on the front panel.
Sleep
This feature allows you to select a time for the system
to switch to the Standby mode automatically.
Setting the Sleep Timer
1. Press SLEEP on the remote control repeatedly to
select one of the sleep timer options below in the
following order:
• SLEEP 15 (automatic stop after 15 minutes)
• SLEEP 30
• SLEEP 60
• SLEEP 90
• SLEEP 120
• SLEEP OFF
2. The ‘SLEEP’ icon will appear when the desired
Sleep time is set on.
Checking remaining Sleep Time
When the Sleep timer is switched on, you can check the
remaining time before the unit switches to Standby mode.
Press SLEEP once, the remaining time will be displayed.
Cancelling the Sleep Timer
To switch off the Sleep Timer, press SLEEP repeatedly
until “SLEEP OFF” is displayed.
Headphones Jack
Connect a set of stereo headphones to the jack on
the unit for private listening without disturbing others.
The speakers are automatically disconnected when
headphones are in use.
Note:
• This unit offer various sound output modes, but it
switches automatically to stereo mode when
headphones are connected.
• When using the headphones,always set the
volume to a low level before putting the
headphones on. Then put the headphones on and
gradually increase the volume to a comfortable
listening level.
Tone and T reble/Bass Control
EQ Modes
In total there are 5 EQ modes available. Press TONE
repeatedly on the remote control for different EQ modes
CLASSIC,FLAT, ROCK, POP and JAZZ.
EX Bass Control
In total there are three EX BASS modes available: Press
EX BASS repeatedly on the remote control for different
BASS effects: SOFT BASS, BALANCE BASS and
POWERFUL BASS.
GB - 28

PLAYABLE DISCS/FILES
2
While improvement have been made to ensure that your disc player is compatible with the largest number of discs
possible, it cannot be guaranteed that you will be able to play discs which might not be compliant with audio CD
standards. For writable and rewritable discs, compatibility with this player depends on the disc writer, the software
and the disc used.
DVD-Video
Digital video discs -12 cm and 8 cm, single or double
sided, single or dual layer. DVDs are high density optical
discs on which high quality picture and audio are recorded.
PLA YER ZONE:
The zone this player can play is “2”, that is marked on
the DVD disc label.
DVD-/+R, DVD-/+RW discs
Most DVD-R and DVD+R (one recording only), DVDRW and DVD+RW discs (rewritable) are compatible with
this player, but this depends on the DVD writer and discs
used.
Video CD(VCD)
VCD stands for Video Compact Disc on which contains
video associated with still images, audio tracks and
interactive menus.
Audio CDs
Audio CDs (8 and 12 cm).
CD-R & CD-RW
Most CD-R (one recording only) and CD-RW discs
(rewritable). CD-Rs written during a multi session recording
can also be played, provided that the session has ended
before the disc is played (depending on the burning
software). However, depending on the CD writer, software
and disc used, you may find that not all discs will play
successfully. When playing a CD-R disc, it is completely
normal for the unit to take up to 20 seconds to recognize
the disc before starting to play. If the disc is not recognized
after a period of 20 seconds, remove the disc, and then
insert it again.
• Irrespective of the actual recording capacity of
the CD-R, do not use its full capacity.
• CD-Rs should be preferably used instead of CDRWs (rewritable CDs) as, in certain cases, CDRW playback may be impossible.
• Use reliable, good-quality CD burning software.
• Close all other applications on the computer to
ensure reliable CD-R disc recording.
MP3 Files
CD-R, CD-RW, DVD-R, DVD+R, DVD-RW and
DVD+RW discs and USB devices containing audio files
in MP3 format are compatible with this player. As for
CD-R MP3 discs, please follow all the recommendations
for CD-R above, along with the comments below:
• Your MP3 files should be ISO 9660 or JOLIET
format. ISO 9660 format and Joliet MP3 or WMA
files are compatible with Microsoft’s DOS and
Windows, and with Apple’s Mac. These two formats
are the most widely used.
• When naming your MP3 files do not exceed 8
characters, and place “.mp3” as the file extension.
General name format of: Title.mp3. When
composing your title, make sure that you have no
spaces in the name, and avoid the use of special
characters including: (.,/,\,=,+).
• Use a compression transfer rate of at least 128
Kbps when recording MP3 files. Sound quality with
MP3 files basically depends on the rate of
compression you choose. Getting audio CD quality
sound requires a sampling rate of at least 128
Kbps and up to 160 Kbps. The use of higher rates,
like 192 Kbps or more, rarely give better sound
quality. Conversely , files with decompression rates
below 128 Kbps are not of high enough quality.
• Do not try recording copyright protected MP3 files.
Certain files are encrypted and code protected to
prevent illegal copying. These files are of the
following types: Windows MediaTM (registered trade
mark of Microsoft Inc) and SDMITM (registered
trade mark of The SDMI Foundation). You cannot
copy such files.
Important: The above recommendations cannot be taken
as a guarantee that the DVD home theatre system will
play MP3 recordings, or as an assurance of sound quality.
You should note that certain technologies and methods
for MP3 file recording on CD-Rs prevent optimal playback
of these files on your DVD player (degraded sound quality
and in some cases, inability of the player to read the
files).
GB - 29

PLAYABLE DISCS/FILES
WMA Files
CD-R, CD-RW, DVD-R, DVD+R, DVD-RW and
DVD+RW discs and USB devices containing WMA files
are compatible with this player. Windows Media Audio
(WMA) is another compressed audio file format that is
similar to MP3. WMA files can also be grouped in folders
or albums as MP3 files.
• When naming your WMA files do not exceed 8
characters, and place “.wma” as the file extension.
General name format of: Title.wma. When
composing your title, make sure that you do not
use spaces or special characters including: (.,/
,\,=,+) in the name.
• Use a compression transfer rate of at least 64Kbps
when recording WMA files. Sound quality with
WMA files basically depends on the rate of
compression you choose. Getting audio CD quality
sound requires a sampling rate, that is conversion
to WMA format, of at least 64Kbps and up to
192Kbps are not of high enough quality.
Conversely, files with compression rates over
192Kbps will not be of any higher quality.
• Supported formats: WMA 7.0, WMA 8.0, WMA
9.0.
JPEG Files
CD-Rs, CD-RW, DVD-R, DVD+R, DVD-R, DVD-RW
and DVD+RW and USB devices containing JPEG files
are compatible with this player. JPEG is a compressed
image file format. Your player can play JPEG files with
a resolution of up to five million (5 mega) pixels. However,
there is no perceptible improvement in the quality of
pictures displayed on your TV screen beyond 400,000
pixels.
Certain JPEG files, including progressive JPEG files,
cannot be read by this player.
MPEG 4 Files
CD-R, CD-RW, DVD-R, DVD+R, DVD-RW and DVD+RW
discs and USB devices containing video files in MPEG 4
format with stereo audio output only are compatible with
this player.
As for CD-R MPEG 4 discs, please follow all the
recommendations for CD-R above, along with the
comments below:
• When naming your MPEG 4 files do not exceed 8
characters, and place “.avi” as the file extension.
General name format of: Title.avi. When
composing your title, make sure that you have no
spaces in the name, and avoid the use of special
characters including: (.,/,\,=,+).
Important: The above recommendations cannot be taken
as a guarantee that the DVD player will play MPEG 4
recordings, or as an assurance of sound quality. You
should note that certain technologies and methods for
MPEG 4 file recording on CD-Rs prevent optimal playback
of these files on your DVD player (degraded sound quality
and in some cases, inability of the player to read the
files).
Depending on the conditions of the recording equipment
or the CD-R/RW, DVD+R/RW or DVD-R RW disc itself,
some discs can not be played on the unit.
Note:
• Some external hard disks may not be supported.
(particularly if they do not have a separate power
supply and if they are not in FA T32 format). Detecting
and scanning the hard disk may sometimes take a
few minutes.
Note: Display time will vary according to the file size
and number of pixels of JPEG files.
GB - 30

TROUBLESHOOTING GUIDE
If it appears that the unit is faulty, first consult this checklist. It may be that something simple has been overlooked.
Note: Under no circumstances should you try to repair the unit yourself as this will void the warranty. Only qualified
service personnel can remove the cover or service this unit.
NO POWER
• Check that the player is switched on.
• Check if the power cord is properly connected.
NO PICTURE
• Check if the TV is switched on.
• Check if the correct AV input is selected on the TV
(refer to the TV manual for more details).
• Check the video connection between the player
and TV .
NO PICTURE AT HDMI OUTPUT .
• Check if the TV HDMI input is selected.
• Check if the HDMI resolution selected corresponds
to resolution of your HD TV.
• Check if your HD TV supports HDCP.
BAD QUALITY PICTURE
• Check the disc for fingerprints and clean with soft
cloth, wiping from the center to the edge.
• A small amount of picture distortion may sometimes
appear-this is not a malfunction.
• Check if the disc format is compatible with the TV
(PAL/NTSC).
NO COLOR IN PICTURE
• Check if the disc format is compatible with the TV
(PAL/NTSC).
• Check that DVD player is not connected through
VCR.
PICTURE INTERFERENCE
• Relocate the unit further away from possible
interference or emission source (e.g. radio, power
amplifier, radiator etc.).
NOT RETURNED TO STA R T-UP SCREEN WHEN
DISC IS REMOVED
• Check to see if the program requires another disc
to be loaded.
• Reset by unplugging the player from the power,
then connect the power again.
RADIO CHANNEL RECEPTION IS POOR
• Check that the antenna is connected correctly.
• Adjust the antenna location and position to obtain
the best signal reception.
• Tune to the correct radio channel frequency.
• Place the antenna further away from any equipment
that may be causing the noise or interference.
THE PLAYER DOES NOT RESPOND T O THE
REMOTE CONTROL
• Aim the remote control directly at the sensor on
the front of the player.
• Avoid all obstacles which may interfere with the
transmission path.
• Inspect and/or replace the batteries.
NO SOUND FROM THE SPEAKERS
• Check speaker cable connections.
• Check if the volume control is NOT at minimum
setting.
• Check if it is NOT muted by the remote control.
• Check if the disc is defective by trying another
disc
NO SOUND
• Check audio connections.
• If using a Hi-Fi amplifier, try another sound source.
• Clean the disc.
• Check if the disc is defective by trying another
disc.
NO AUDIO AT DIGITA L OUTPUT
• Check the digital connections.
• Check the AUDIO SETUP menu to make sure that
the digital output is correctly set.
• Check if the audio format selected is compatible
with the player.
NO AUDIO AT HDMI OUTPUT
• Check if the SPDIF/PCM is selected in the HDMI
AUDIO settings.
• Check if the DTS digital out is selected as audio
output if DTS is played.
DISC CANNOT BE PLAYED
• Ensure disc is placed properly into the disc tray.
YOU HAVE FORGOTTEN THE P ASSWORD
• Under DVD mode with NO DISC in the unit, press
“76418” on Remote Control to clear the password.
RESTORE THE FA CTOR Y DEF AUL T SETTINGS
• Under DVD mode with NO DISC in the unit, press
“76419” on Remote Control to reset the DVD micro
home theatre to the default settings. The unit will
switch to standby mode automatically.
IMPROPER FUNCTIONING
• The normal function of the product may be disturbed
by external interference. Just reset the product by
disconnecting and reconnecting the power cord.
GB - 31

TECHNICAL SPECIFICA TIONS
Power supply AC 230V ~ 50 Hz
Power Consumption 85 Watts
Speaker output port / impedance 2x 15 Watts/4 ohm
Subwoofer output port / impedance 30 Watts/8 ohm
Discs and files supported DVD-Video, DVD+R/RW DVD-R/RW,
TV system PAL/NTSC
Video out Composite video 1.0 Vp-p 75 ohm
Audio out Analog audio out 2. 0V (RMS) / 10K ohm load
Frequency Response 20Hz -20KHz +/ 3dB
Tuner FM MW
Frequency Range 87.5-108MHz 531-1620KHz
S/N Ratio 50dB 43dB
Stereo separation 28dB /
Output Terminals Audio/Video (composite) Output x 1
USB Port Type 1.1
Maximum Capacity supported by the USB Port 2G
Dimension Player:
Speaker: (left / right) 96 (L) X 55 (W) X 228 (H) mm
Subwoofer: 170 (L) X 180 (W) X 322 (H) mm
Weight (full package) Approx 6,2 Kg
CD-DA, CD-R/RW, MP3, JPEG, VCD2.0,
Full compatibility with MPEG 4, Xvid (.avi)
Output jack for the DIN Scart cable x 1
Audio Output (left, right, subwoofer) x 1
Coaxial Output x 1
HDMI output x 1
Some external hard disks may not be supported
(particularly if they do not have a separate power supply
and if they are not in FAT32 format). Detecting and
scanning the hard disk may sometimes take a few
minutes.
240 (L) X 82 (W) X 228 (H) mm
If at any time in the future you should need to dispose of this product, please note that waste
electrical products should not be disposed of with household waste. Please recycle where
facilities exist. Check with your Local Authority or retailer for recycling advice. (Waste
Electrical and Electronic Equipment Directive)
GB - 32

TEMPLATE FOR MAIN UNIT WALL MOUNTING
Cut along dotted line
Template
Screw hole
Screw hole
100mm
The distance between the two screws
1. After cutting down the template along dashed line, fix it on the wall where you want to hang.
2. Drive two screws into the wall with the drawing hole on the template.
Caution: Avoid fixing template askew.
GB-33
 Loading...