

Page 1

SCOTT 2011
BIKE OWNERS
MANUAL
SCOTT SPORTS SA | 17 RTE DU CROCHET | 1762 GIVISIEZ | SWITZERLAND
© 2009 SCOTT SPORTS SA, ALL RIGHTS RESERVED | SCOTT-SPORTS.COM
D
GAMBLER
Page 2
CONTENT
Gambler Concept P. 004
Geometry/Technical Data Gambler P. 005
Adjustment of head angle P. 007
The Gambler should be adjusted exactly to the current
rider for reaching maximum safety and fun while riding.
GAMBLER
All adjustments should be done at the local Scott dealer
or following to this manual.
2 different headtube inserts P. 008
3 different rear travel options P. 009
GAMBLER
Recommended Tools for the Shock Set-Up P. 009
Basic Set-Up of the Gambler Rear Suspension P. 010
Adjustment of Seatpost-Height P. 012
IDS Drop Out System P. 013
Front Fork Set-Up/Change of Front Fork P. 014
Pivot Maintenance P. 014
Warranty P. 016
ENG LISH
2 2011 SCOTT BIKE OWNERS MANUAL
3
Page 3
GAMBLER CONCEPT
Gambler is the result of 2 years of research and development searching for one of the
most versatile and durable FR and DH bikes available on the market, but still easy in
set-up and maintenance.
Scott’s focus was to combine solid construction with optimized kinematics. This
respecting the demands of riders concerning geometry, suspension characteristics,
low center of gravity and stiffness.
Gambler was designed for riders looking for a dual suspended FR bike or a race
oriented DH bike offering rear wheel travel between 190 and 230 mm.
GAMBLER
Scott does not see frame, rear shock and kinematics as single components which are
assembled together on a bike, but as a concept with all these components working
together and offering an outrageous function by matching perfectly.
The Gambler Concept is based on a new designed multi-pivot technology.
In combination with the linear coil-over shock characteristics the kinematics
guarantees a progressive suspension, adapted to smooth riding (beginning of travel)
as well as extreme jumps (end of travel).
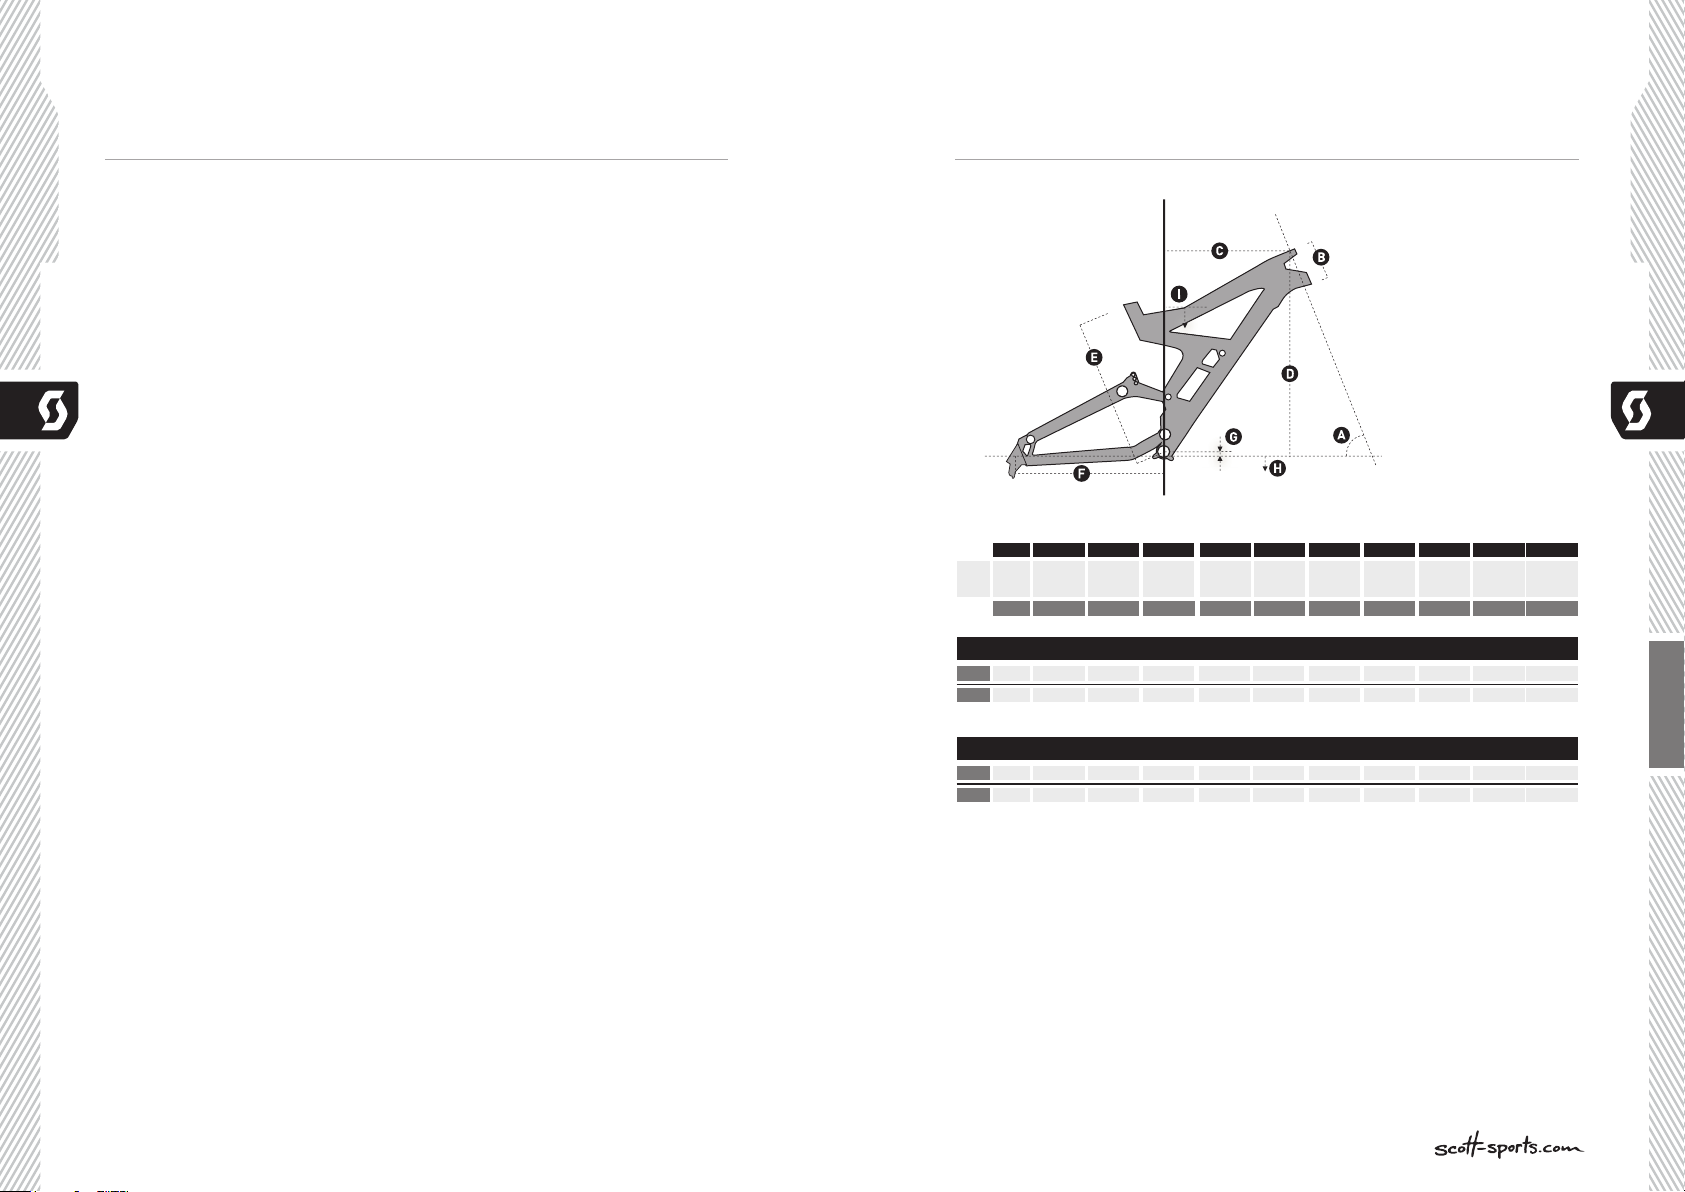
GEOMETRY DATA GAMBLER
GAMBLER
A
Size
Head
angle
°
GAMBLER FR
66.0°
short
long
66.0°
GAMBLER DH
64.0°
short
long
64.0°
Head tube
length
mm
inches
115
4.5
115
4.5
115
4.5
115
4.5
CB D
Stack
Reach Stem
mm
inches
mm
375
14.7
586
410
165.1
586
375
14.7
586
410
165.1
586
inches
23.1
23.1
23.1
23.1
E
BB center
to top of
seattube
mm
inches
424
16.7
424
16.7
424
16.7
424
16.7
Chainstay
length
430
430
440
440
inches
16.9
16.9
17.3
17.3
BB
offset
mm
25251.0
25251.0
GF
inches
1.0
1.0
mm
370
370
370
370
H
BB
height
inches
14.6
14.6
14.6
14.6
I
Standover
height
mm
inches
790
31.1
790
31.1
790
31.1
790
31.1
Wheel
mm
1135
1170
1135
1170
base
inches
44.7
46.1
44.7
46.1
length
mmmm
40
40
ENG LISH
50
50
4 2011 SCOTT BI KE OWNERS MANUAL
5
Page 4

TECHNICAL DATA GAMBLER ADJUSTMENT OF HEAD ANGLE
Travel 190 / 210 / 230mm
Suspension Ratio 2.5 / 2.75 / 3.0
Piston stroke 76mm
Shock length (Eye to Eye) 241mm
Hardware Mainframe 22,2mm x 8mm
Hardware Swingarm 40mm x 8mm
Seatpost diameter 34,9mm
GAMBLER
Headset 1 1/8“ or 1.5”, depending on headtube insert
Fork travel 180 - 200mm
Fork length 568mm
BB housing 83mm
Chainguide system ISCG / ISCG05 tab
Rear Hub Width 150mm
Bearings 2 x 61901 (24 x 12 x T6)
6 x 61902 (28 x 15 x T7)
On Gambler you can adjust the headangle within a few minutes for a better handling
depending on your riding style and track condition/style.
Howtoadjusttheheadangle:
You need
- a 4mm Allen key bit for a tighening torque key
- a 56mm wrench (attached to this bike)
1. Loose the three screws on the head of the headtube with a 4mm allen key but
do not remove them completely. These screws hold the insert in Place.
Please note that it is not necessary to disassemble the fork or any other
components.
2. Turn the insert with the 56mm wrench which is attached to your bike/frameset.
The slot of the insert should always be in line with the slot of the headtube clamp.
The resulting angle is engraved in the insert for both options.
GAMBLER
ENG LISH
6 2011 SCOTT B IKE OWNERS MAN UAL
3. IMPORTANT:
Please make sure that there is no gap
between the collar on the downside of
the insert and the head tube clamp on
the frame.
4. tighten the 3 screws with
5Nm/44in-lbs
7
Page 5

2 DIFFERENT HEADTUBE INSERTS
3 DIFFERENT REAR TRAVEL OPTIONS
On Gambler you have 2 options for the headset diameter (1 1/8” and 1.5”).
You can order the headtube inserts via your local Scott dealer with:
210127 Headtube Insert Gambler 1 1/8” 1size
210128 Headtube Insert Gambler 1.5” 1size
For removing/assemblying them please contact your local Scott dealer as you might
need some special tools for the headset dis-/assembly as well as a tightening torque
key to fix the inserts in the headtube section.
GAMBLER
Important:
Itisveryimportanttofollowthetighteningtorqueindicationsshownontheparts.
On Gambler you have 3 options for the rear travel as shown on the drawing below:
RECOMMENDED TOOLS FOR THE SET-UP
GAMBLER
ENG LISH
8 2011 SCOT T BIKE OWNERS MANUAL
Please read this manual and the manual of the rear shock manufacturer carefully
before you start the set-up procedure.
In addition we strongly recommend using a tightening torque key with a 6mm allen
key insert.
9
Page 6

SET-UP GAMBLER BASIC SET-UP OF REBOUND
The Set-Up of the rear shock can be easy done within a few minutes.
Please take this time to avoid dangerous riding performance and to get the best out of
your Gambler.
Please make sure that the coil spring on the shock matches to your riding weight
(including your riding gear).
We recommend following coil springs:
Weight
GAMBLER
(kg)
50 - 60
60 - 70
70 - 80
80 - 90
190mm
reartravel
250 x 3.25
300 x 3.25
350 x 3.25
400 x 3.25
210mm
reartravel
300 x 3.25
350 x 3.25
400 x 3.25
450 x 3.25
reartravel
350 x 3.25
400 x 3.25
450 x 3.25
500 x 3.25
For fine tuning the SAG and the corresponding eye-to-eye distance of the shock bolts
you can tighten or release the pretension of the coil spring but please respect the
maximum and minimum spring indications of the shock manufacturer.
The eye-to-eye distance between the shock bolts should be in basic set up 212mm
(40% SAG).
For further details on the shock set-up please follow the indications of the rear shock
manufacturer attached to this bike.
230mm
“Rebound” describes the speed the shock comes back to its original length after
absorbing an obstacle.
By using the red rebound screw you can adjust the rebound step by step.
Please refer to the following instruction:
Ride your bike off a pavement (remain in the saddle) and check how many times it
bounces.
- if it bounces 1-2 times, the set up is good.
- If it bounces more than 3 times the rebound is too fast.
Turn the screw 1-2 “clicks” clockwise
- If it does not bounce the rebound is too slow.
Turn the screw 1-2 “clicks” counter clockwise.
IMPORTANT
After a dismantlement of the rear shock, both fixing bolts should be tightened with
a tightening torque of 35Nm/308in-lbs.
If this is not done correctly the rear shock can be damaged.
IMPORTANT
Note that you have to mount the rear shock always as shown underneath.
Mounting the rear shock in a different position can cause severe damages to the frame,
the linkage levers and the rear shock.
GAMBLER
ENG LISH
10 2011 SCOTT BIKE OWNERS MANUAL
11
Page 7

SET-UP OF OTHER SHOCK MODELS IDS DROP OUT SYSTEM
Scott strongly recommends using only the originally specified shock with the
Gambler bike, as we have chosen carefully both parts for a perfect matching
combination.
If you want to use a different rear shock model than the one originally on the bike,
please make sure that the shock will not in any position hit the frame and cause a
damage to the frame.
Please follow the instruction below:
GAMBLER
Please make sure that the rear shock or its accessory parts do not touch the frame
when mounting or suspending.
For doing so release the air/remove the coil, install the shock and compress the shock
completely.
If the shock touches the frame while doing so, do not use this shock in order to avoid
damage to frame, swingarm or shock
ADJUSTMENT OF SEATPOST-HEIGHT
IMPORTANT:
Theseatposthastobeinsertedintotheseattubeataminimumof80mm.
Neveruseanotherseatpostdiameterthan34.9mmortrytouseashim/reducer
betweenseatpostandframe.
When lowering down the seatpost, please make sure that it will not hit the shock
below while riding! This could result in serious damage on bike parts and result in
a dangerous riding condition.
The Gambler offers the possibility not only to change drop out hanger in case of
damage, you also can choose between different 3 different drop outs of the Scott IDS
(Interchangeable Drop-Out System):
Inline you will find on Gambler FR
following drop out:
Another Option is SRAM-Maxle System for 12mm/150mm through axle hubs
(same length as your FR dropout), available at your local authorized Scott dealer:
Inline on Gambler DH you will find
following drop out
(10mm longer as FR drop out):
GAMBLER
ENG LISH
12 2011 SCOTT BIKE OWNERS MANUAL
13
Page 8

FRONT FORK SET-UP/
CHANGE OF FRONT FORK
For the set up of the front fork please use the fork specific manual attached to the bike.
We recommend using front forks with a travel between 180 and 200 mm (568mm fork
length), as this will not influence the geometry and alter handling of the bike.
NOTES
GAMBLER
PIVOT MAINTENANCE
The pivots and bearings on SCOTT Gambler are extremely easy to maintain.
An external treatment with a grease spray after every bike wash is all you have to do.
We do not recommend heavy grease sprays since these will leave a film on the parts
which is difficult to remove. We recommend the same for the chain also.
If you have to change the bearings you can order them included in a service kit (Scott
article number: 210126) at your local SCOTT dealer or buy them with international parts
number as shown above in the specs list in a hardware store.
Incaseofachangeofthebearingsoroftherearswingarmyoushouldcontactyour
localSCOTTdealerasyouneedaspecialtoolkitfordisassemblyandassembly.
GAMBLER
ENG LISH
14 2011 SCOTT BIKE OWNERS MANUAL
15
Page 9

WARRANTY
Model
Year
Size
GAMBLER
Frame
Date of purchase
WARRANTY
SCOTT bikes are made using the most innovative production and quality methods. They
are equipped with best components of well known parts suppliers.
Doing so SCOTT warrants its frames and swingarms for five years (subject to compliance
with maintenance ranges, see below) and SCOTT forks (provided it is a fork of SCOTT)
for two years for defects in material and/or workmanship in case of purchase of
completely assembled bikes.
This warranty of 5 years for the frames shall only be granted in case once a year a
maintenance service has been effected according to maintenance requirements as set
forth in this manual by an authorised SCOTT dealer.
The authorised SCOTT dealer shall confirm the effected annual maintenance service by
stamp and signature.
In case such an annual maintenance service has not been effected the warranty of
5 years for the frame shall be reduced to 3 years.
Costs for maintenance and service have to be born by the owner of the SCOTT bike.
On Gambler, Voltage Fr and Volt-X the warranty period is limited to 2 years.
The warranty period starts at the day of purchase. This warranty is limited to the first
buyer, what means the first person who uses the bike and only with the use it was made
for. Furthermore, this warranty is limited to purchases via authorized SCOTT-dealers
The warranty is solely granted in case of purchase of a completely assembled bike to the
explicit exclusion of purchases of not completely assembled bikes.
In case of a warranty claim the decision to repair or to replace the defective part is up
to SCOTT. Non defective parts will only be replaced at the guarantee’s own expense.
Fair wear and tear is not covered by the warranty.
A complete list of all parts of wear and tear can be found in the next chapter of this
manual.
In addition, you will find at the end of this manual a protocol for the handing over of the
bike which will remain in copy at the SCOTT dealer after acceptance and signature of
the consumer.
It is obligatory to show this protocol of handing over together with the defective part
in case of a warranty claim given that it provides evidence of purchase. Otherwise no
warranty is granted.
In principle, this warranty is granted worldwide. Claims must be made through an
authorized dealer, for information regarding the nearest dealer, write or call this
company or the national SCOTT distributor.
Normal wear, accident, neglect, abuse, improper assembly, improper maintenance by
other than an authorized dealer or use of parts or devices not consistent with the use
originally intended for the bicycle as sold are not covered by this warranty.
Hereby SCOTT grants a voluntarily manufacturer’s warranty. Additional entitlements
according to national warrant of merchantability are reserved.
GAMBLER
ENG LISH
16 2011 SCOTT BIKE OWNERS MAN UAL
17
 Loading...