

Page 1
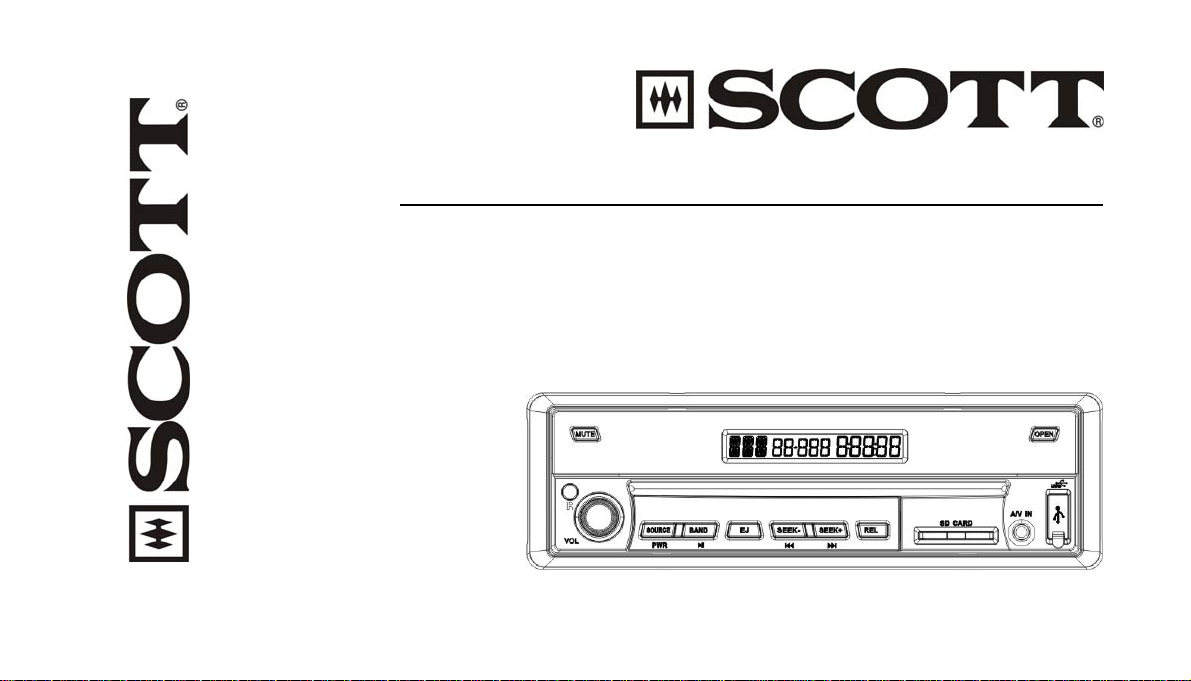
DRXI900T
RDS CAR RADIO DVD/MP4/VCD CD/MP3/USB/SD PLAYER
AM/FM STEREO
RDS FUNCTION (AF/TP/TA/PTY)
30 STATION MEMORY
MOTORIZED INDASH MONITOR
MUSIC POWER 160 WATTS
USER MANUAL AND INSTALLATION INSTRUCTIONS
Page 2

CONTENTS
1. ACCESSORIES………………………………………………..………………………………………………………………….GB-2
2. SAFETY PRECAUTIONS……………………………………………………………………………………………………….GB-3
3. INSTALL THE UNIT…………………………………………………………………………………………………………….GB-6
4. MAINTENANCE…………………………………………………………………………………………………………………GB-11
5. DESCRIPTION OF FUNCTIONS………………………………………………………………………………………………GB-12
6. REMOTE CONTROL……………………………………………………………………………………………………………GB-14
7. COMMON OPERATIONS………………………………………………………………………………………………………GB-15
8. TUNER…………………………………………………………………………………………………………………………….GB-19
9. MP3 PLAYBACK IN DISC/USB/SD/MMC…………………………………………………………………………………….GB-24
10. VCD/CD……………………………………………………………………………….……………………………………..…...GB-26
11. MP4………………………..........……………………….………………………………………………………………………..GB-31
12. DVD……………………………………………………………………………………………………………………………….GB-36
13. A/V IN CONNECTION..…………………..…………………………………………………………………………………….GB-46
14. MAIN MENU…………………………………………………………………………………………………………………….GB-47
15. SPECIFICATIONS………………………………………………………………………………………………………………GB-54
16. SIMPLE TROUBLESHOOTING GUIDE……………………………………………………………………………………..GB-56
GB-1
Page 3
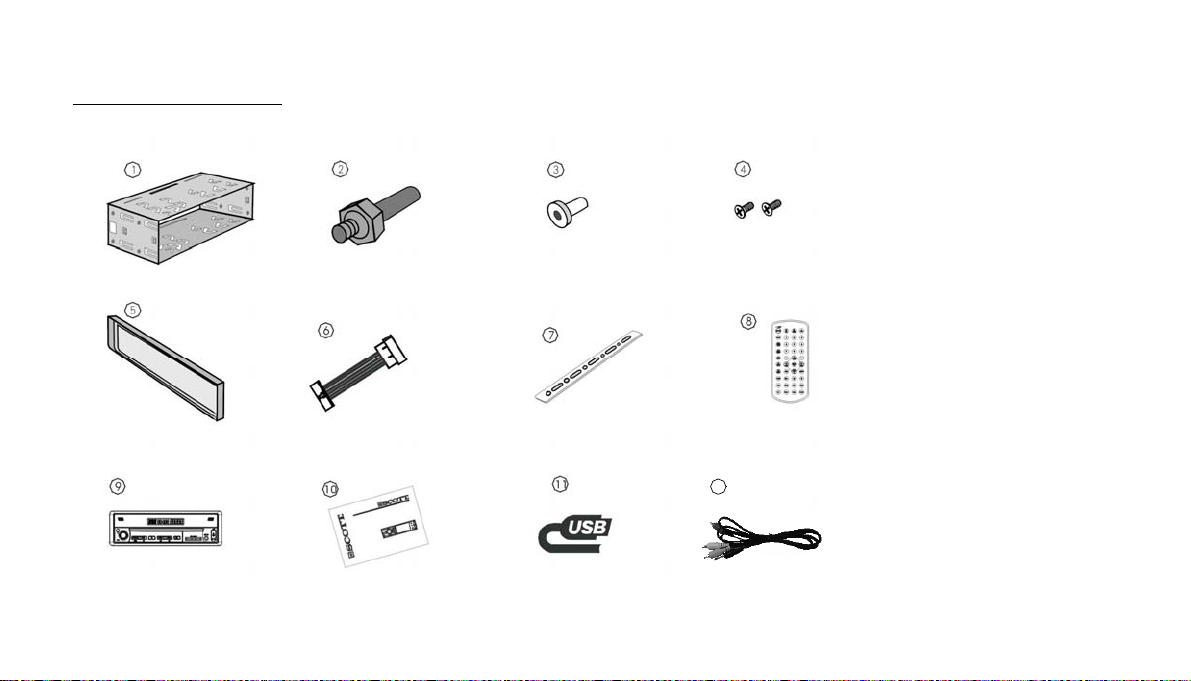
1. ACCESSORIES
(
g
y
p
Mounting Sleeve x1
Mounting Bracket
Half Sleeve) X1
Rear Mounting Bolt x1 Harness Rubber x1
Removable Trim Rin
equipped on the unit
Small Metal Stri
X1
X1
M4x3 &M5x5
4 Screws Each
Washer X1 Nut X1
Outer Trim Frame x 1
Rubber X1
Removable control User manual x 1
ISO Wire connector
ISO Wire connector Steel Bar x 1
Remote Control X1
Removable control
Release ke
User manual X1
USB cable x 1
X2
USB cableX1
Protective case X1
Remote Control x 1
12
A/V cable x 1
GB-2
Page 4

2. SAFETY PRECAUTIONS
1. Be sure to connect the color-coded leads according to the diagram. Incorrect connections may cause the unit to malfunction or
damage the vehicle’s electrical system.
2. Be sure to connect the speaker leads to the speaker terminal using the correct polarity. Never connect the left and right channel
speaker cables to each other or to a metal part of the vehicle.
3. Make sure all the connections are correct before turning on your unit.
4. When replacing the fuse(s), the replacement must be of the same amperage as shown on the fuse holder.
5. Do not block vents or radiator panels. Blocking them will cause heat to build up inside and may result in fire.
6. Do not use the unit for too long after the car has stopped in order to avoid using up the electric energy of the car battery.
7. Keep the unit away from direct sunlight.
8. Do not expose the unit to extreme temperatures, and avoid humidity and direct sunlight. Ensure that that the temperature inside
the vehicle is between –10°C and +60°C.
9. Be careful of the unit’s magnetic field. Do no put the credit cards, cassettes or watches around the unit, or they may break or lose
some information.
10. In order to avoid interference, stay away from the unit when using a mobile phone.
11. Do not expose the remote control to high temperatures or direct sunlight as this may cause it to malfunction.
GB-3
Page 5
About this manual
This unit features a number of sophisticated functions ensuring superior operation. All the functions have been designed for the easiest
possible use, but many are not self-explanatory. This manual will help you understand the functions and operations of the unit. This manual
mainly explains remote control operation. However, in addition to those functions related to DVD/VCD/CD/MP3/MP4 operation that can
only be operated by the remote control, there are also functions that can be operated by the buttons on the main unit.
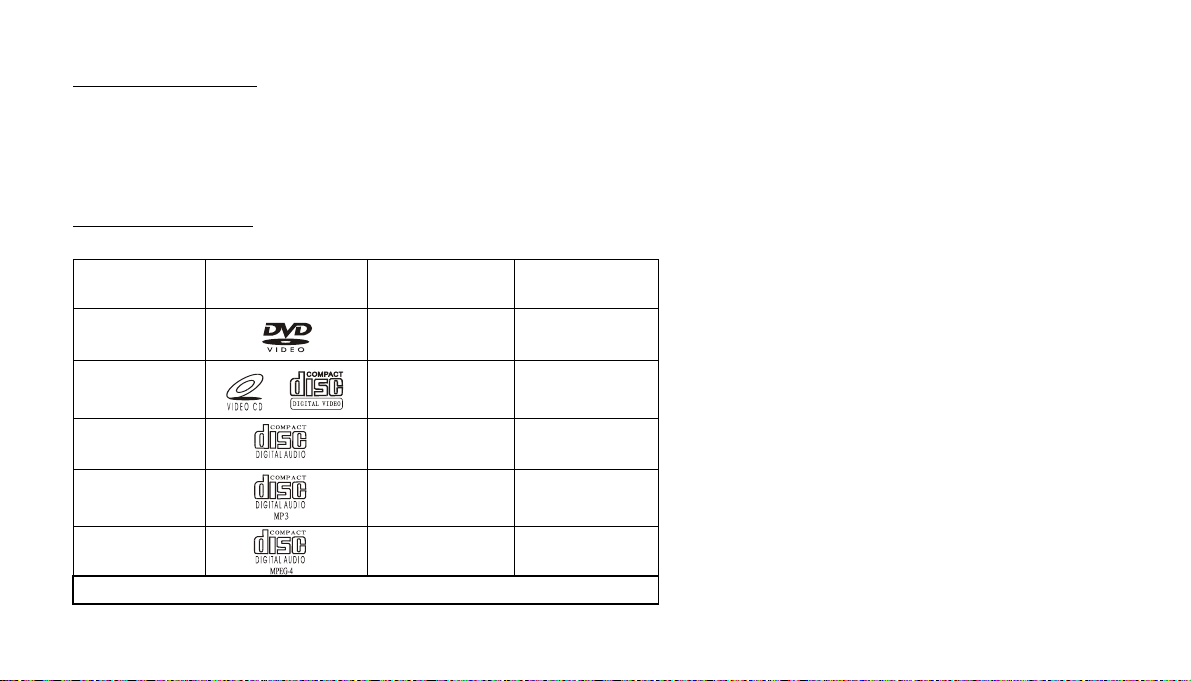
PRECAUTIONS
This unit can play the following discs and formats only:
Type of disc Label on the disc
DVD
VCD
Recorded material
Sound and Video
Sound and Video
Size of disc
CD
MP3
MP4
NOTE: The unit is compatible with VCD1.0/2.0/3.0 version and DVD disc.
Sound only
Sound only
Sound and Video
12cm
12 cm
12 cm
12 cm
12 cm
GB-4
Page 6
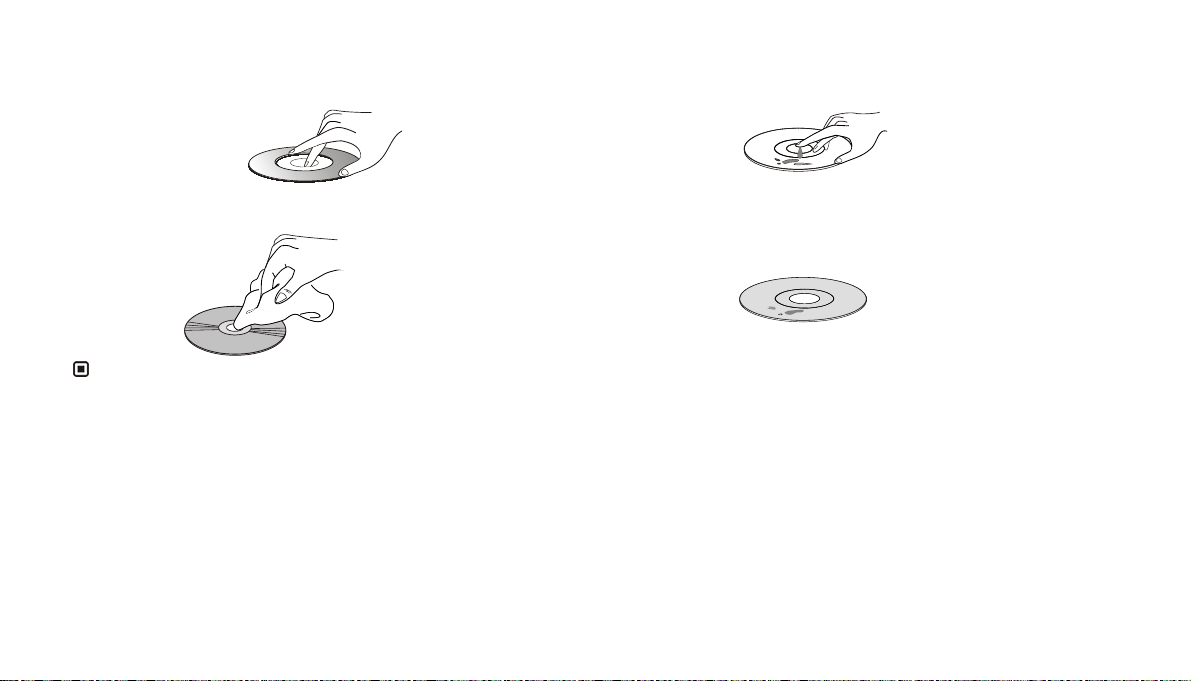
- Handle the disc by its edge to keep the disc clean, and do
not touch the surface.
- Clean the discs with a cleaning cloth. Wipe each disc from
the center outwards. (As shown in the picture)
- Do not place stickers on your CDs or write on them.
- Do not use CDs with labels or stickers attached, which may
leave a sticky residue when they begin to peel off. (As
shown in the picture)
Note:
* Besides playing the discs above, the unit also can use other sources.
GB-5
Page 7
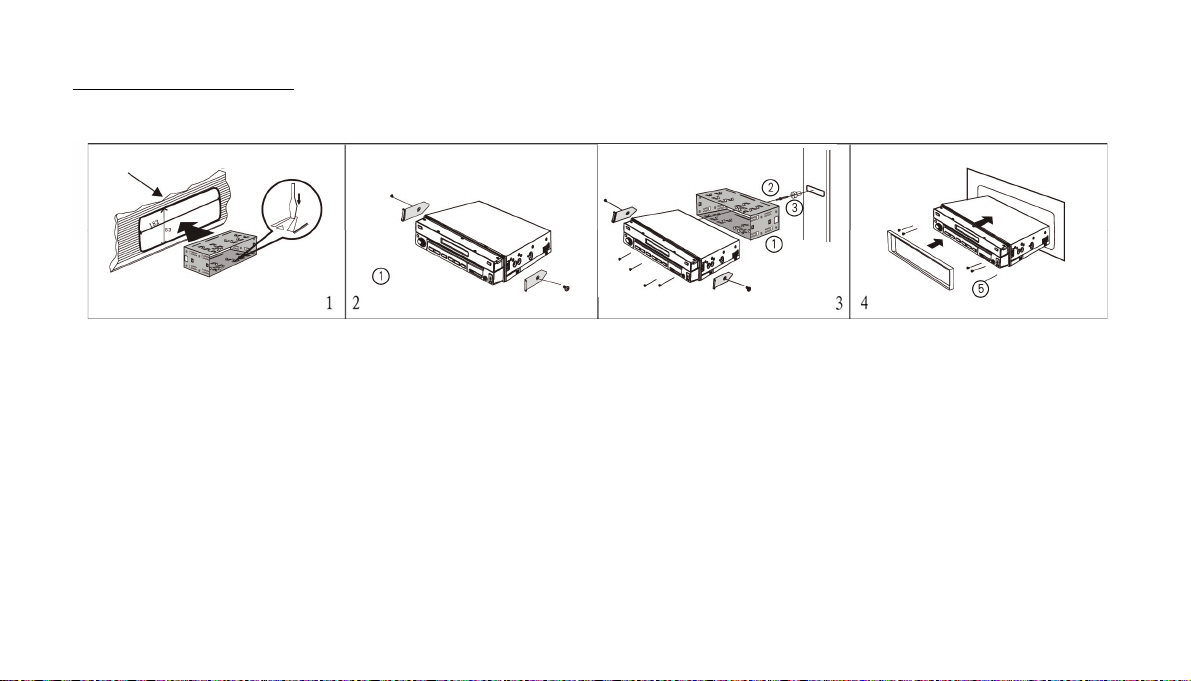
3. Install the Unit
Installation Method :DIN Front-Mount
dashboard
To support the unit
Fire Wall
Install Outer Trim Frame
Installation Method
1. Put the mounting sleeve into place by folding down the claws (cf. fig. 1).
2. Mount the two metal holding plates (cf. fig.2) on the sides of the unit using the M5x5 screws.
3. Make the electrical connections and place the unit into its mounting sleeve. Attach the two parts together permanently using the
M2x2 screws (cf. fig.3). If necessary, use the metal assembly bar, rear mounting bolt with its screw guider.
4. Install the outer trim frame (cf. fig.4).
GB-6
Page 8
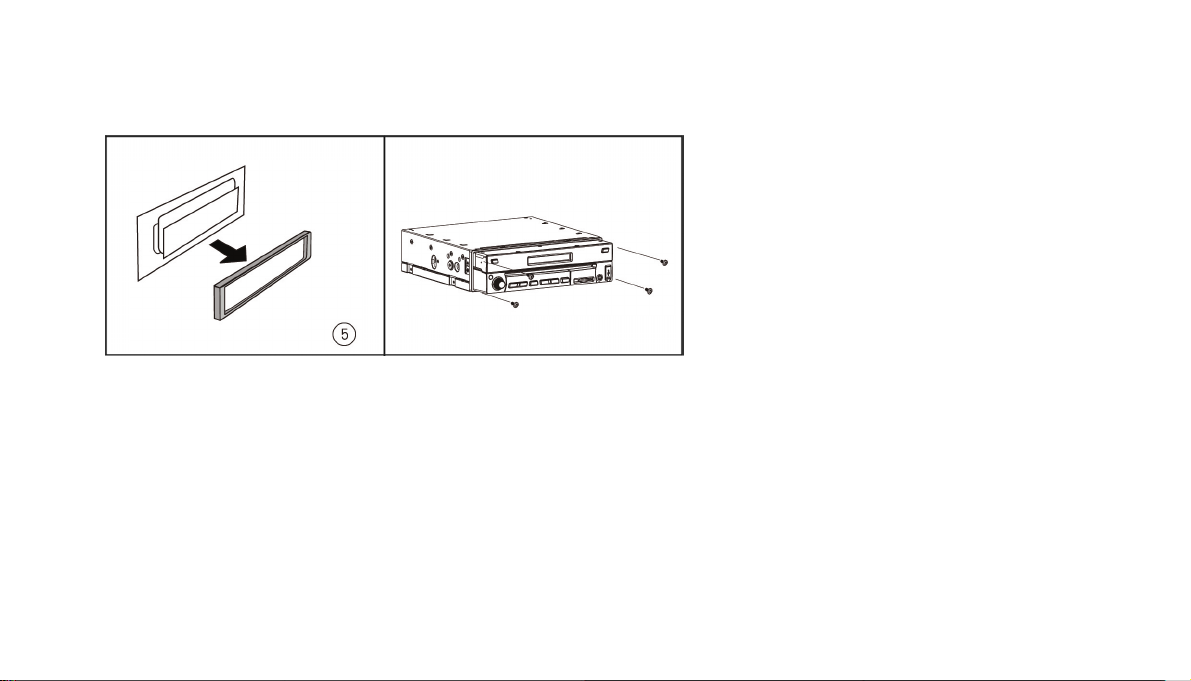
Detach the Unit
Proceed in the reverse order
1. Remove the outer trim frame out .
to installation.
Proceed in the reverse order to installation.
2. Unscrew the 4 screws, pull the head
unit
GB-7
Page 9

Installation The Front Panel
Installing the front panel
Put notch (A) (shown as picture) onto shaft (B). And then slightly press into the right side.
Removing the front panel
Press REL button in the right side, to release the front panel.
GB-8
Page 10

t
Wiring Connection
Rear Audio Out
Front Audio Ou
Video Out 2
Video Out 1
(Grey line with yellow plug)
(Grey line with yellow plug)
Reversing Signal
Ignition Key
Memory Back-up12V
Negative Ground
Rear L
Speaker
Front L
Speaker
Orange
Red
Yellow
Black
Green/Black
Green
White/Black
White
Choke
Box
(Light Grey line with
red & white plugs)
(Dark Grey line with
red & white plugs)
Subwoofer
Reverse Video
Input
Brown
Blue
Violet/Black
Violet
Grey/Black
Grey
(Brown line with
brown plug)
(Brown line with
yellow plug)
Antenna
Hand brake
To power
Antenna
Rear R
Speaker
Front R
Speaker
Antenna Receptacle
Output Plug (Male)
Output Socket (Female)
Screw Hole
Wire Clip
Fan Window
Note:
* The brown wire is connected to the handbrake signal; for
safety, the programs and MP3 navigation menu can be seen
on the monitor after the handbrake is activated, but the
menu and RCA output do not have this constraint.
* If you do not want to use this function, connect it to the
negative pole.
GB-9
Page 11

Many vehicles are pre-fitted with ISO connectors behind the dashboard, including all the electrical cabling for a car radio. In such cases, the
connections fitted to the vehicle can be directly plugged into the car radio connectors. Should your car not be pre-fitted with these connectors,
we strongly advise you to obtain the ISO wiring loom fitted with the male connector for connection to your car radio either from a specialist
shop or from the car dealer for your vehicle. Once obtained, you will only need to connect your loudspeakers and the power supply to the ISO
connector, following the connection instructions below.
Speaker Connector
Power Supply Connector
Power Supply Connector
1.Battery (yellow)
2.Ground (black)
3.Power +12 volt (red)
4.Electrical Antenna (blue)
Speaker Connector
6.Rear right speaker + (violet)
7.Rear right speaker - (violet/black)
8.Fornt right speaker + (grey)
9.Fornt right speaker – (grey/black)
10.Front left speaker + (white)
11.Front left speaker – (white/black)
12.Rear left speaker + (green)
13.Rear left speaker – (green/black)
1) Make sure your car battery is a 12 volt (6 filter caps) negative ground
system (if not, a converter will be necessary).
2) Before starting wiring connections, di sconnect the power supply by
removing the fuse from the fuse holder.
3) Connect the Power wire to one of the extra terminal of the car.
4) Connect the black Ground wire to a metal part of the car. It is
important to make good contact.
5) Make other wiring connections as shown.
6) Connect the battery of the car.
7) Replace the fuse holder of the unit.
NOTE: INCORRECT WIRING OR OPERATION
WILL VOID THE WARRANTY OF THIS UNIT.
GB-10
Page 12
4. Maintenance
Replacing the Fuse
Make sure the amperage matches the specified value when replacing the fuses. If the fuse is blown, check the power connection and replace
with a new one. If the same problem occurs, there must be a malfunction. In such cases, please consult the nearest repairs center.
Warning:
Never use the fuse with a rated amperage over the one specified, otherwise you risk damaging the unit.
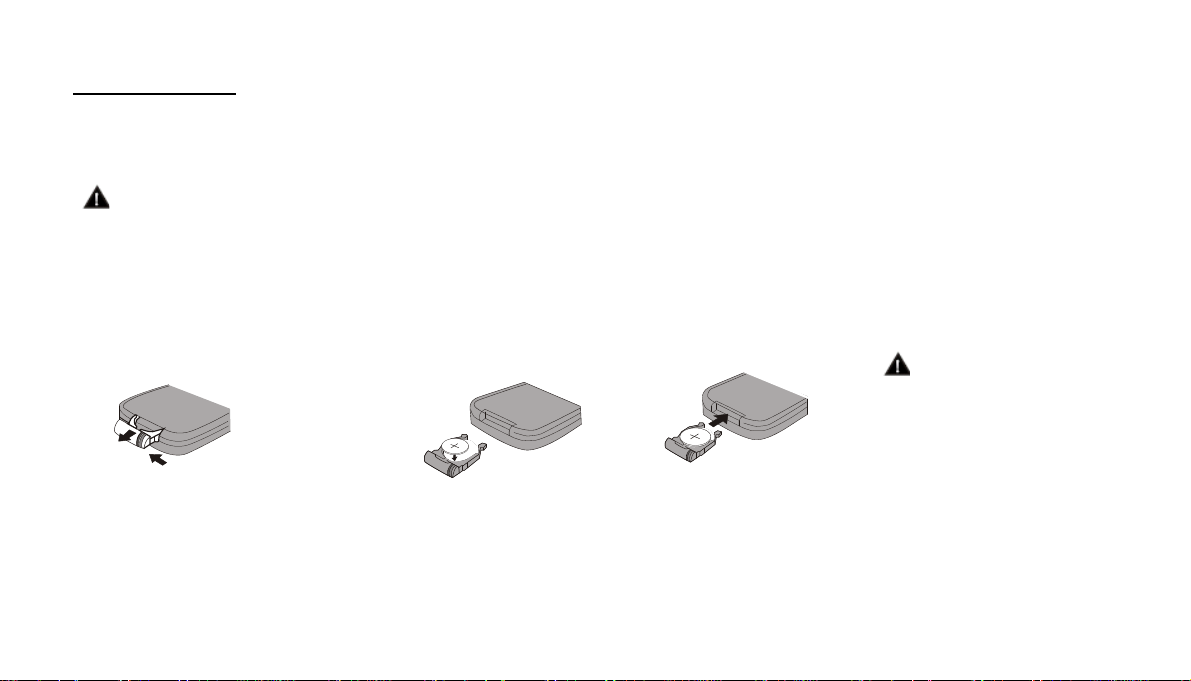
Replacing the Battery
When the operation range of the remote control becomes short or if it no longer works, replace the lithium battery with a new button cell
(CR2025). Make sure the battery polarities match before replacing it.
Gently pull out the battery holder
whilst pressing the side
Put the button-typebattery with
the + facing
upward into
the battery
holder.
Insert the battery holder into the
remote control.
Warning:
Improper handling of the battery may
lead to explosion. Do not charge,
disassemble or throw the battery into
a fire.
Precautions on Using Lithium Batteries
Always keep the lithium battery out of the reach of children. If it is swallowed, see a doctor immediately. In order to ensure optimum
performance, clean the battery with a dry cloth.
Make sure that the polarities are correct when loading the battery. To prevent short circuits, do not use metal tweezers to insert the batter y.
GB-11
Page 13

5. Description of functions
Description of the screen
Description of the unit (with front
panel)
Description of the unit (without
front panel)
GB-12
Page 14

(1) SOURCE/PWR Briefly press to turn on the unit, select radio mode or playback mode. Hold and press it to turn the unit off.
(2) EJ Button Press it to eject a disc.
(3) BAND/ (band selector/play/pause) Button During radio mode, press it to select the bands; During playback mode, press it to pause or resume play.
(4) [SEEK-/
(5) (ANGLE+) Button Adjust the monitor backwards
(6) (ANGLE-) Button Adjust the monitor forwards
(7) VOL+/ VOL-/SEL
(8) REMOTE Infrared Sensor
(9) RESET Button
(10) A/V IN
(11) MENU Button
Briefly press to set DVD menu during playback mode; hold and press it to set the main menu.
(12) USB Port
(13) (Back Space) Button
(14) Disc Loading Slot
(15) OPEN Button
(16) MUTE Button
(17) LCD Screen
(18) REL Button press to release the front panel
(19) SD Card Slot
(20) Anti-theft led indicator It blinks when the front panel is removed.
]/[SEEK+/ ]([Search station backward/Previous track]/[Search station forward/Next Track])
GB-13
Page 15

6. Remote Control
1 SOURCE/PWR
2 GOTO (playing time/track)
3 BAND/TITLE
4 AMS/MENU (automatic memorization of stations / menu)
5 LOC/SUB –T (local / subtitles)
6 ST/AUDIO (mono or stereo / language or channel selector)
7 PTY/ANGLE
8 OSD (On Screen Display)
9 ZOOM to increase the picture size
10 Slow Forward/Backward
11 P/N ( system adjusting)
12 Mute
13 PROG (Program play)
14 VOL+/VOL-/SEL
15 RPT(Repeat Playing)
16 RDM (Play Tracks at Random)
17 Pause/Play
18 Stop Play
19 SETUP
20 (F.R/F.F)
21 (Previous/Next Track/Chapter)
22 CLEAR
23 Number Buttons (0~9)
24 (Eject Button)
25 TA/LOUD (traffic alarm/ loudness)
26 AF/EQ (alternative frequency/equalizer button)
27 (Left/Right/Up/Down ENTER)
GB-14
Page 16

7. Common Operations
1. Reset the Unit
When operating the unit for the first time or after replacing the car battery, you must reset it.
Press the RESET button (9) on the main unit with a pointed object, (such as a ballpoint pen) to reset it.
Note:
* When errors occur on the display, you can press R ESET button to resolve the problem, The clock setting and any memorized functions will be erased.
* Only the RESET button on the main unit can be used to reset the unit.
2. Turning the Unit On/Standby
Press the PWR button (1) on the remote control to turn on the unit at last source. Press it again to select the source: DISC, USB,
SD/MMC, AUX or RADIO. The unit will automatically start playback when a disc is inserted. Press and hold this button to turn the unit
in standby mode.
Note:
* Pressing the PWR button on the main unit will perform the same function.
3. Volume Control
Press the VOL+ button (14) on the remote control to increase the sound level and press the VOL- button (14) to lower the sound level.
Note:
* The volume can also be adjusted by rotating the VO L+/- button (7) on the main unit.
GB-15
Page 17
4. Setting the Sound
Repeatedly press the SEL button (14) to select the desired mode, in the following order:
VOLUME BALAN FAD
TREBL BASS
After selecting the desired mode, use the VOL buttons (14) on the remote control adjust the settings.
Note:
* The VOL+/- button (7) can also be used to adjust the volume of the main unit.
5. Selecting an EQ Setting
While listening to pop, classical or rock music, you can select the corresponding preset modes to adjust the sound quality by using EQ
button (26).
Press and hold the EQ button (26) to choose the following modes in turn:
POP
CLASSIC
EQ
OFF ROCK
The default setting is OFF.
Note:
* This function is operated by using the remote control only.
6. Turning Loudness On/Off
Hold down the LOUD button (25) on the remote control to activate the loudness function. You can press this button to increase the low
frequency, which can improve sensitivity for your ears. Keep pressing it again to switch off this function.
Note:
* This function is operated by using the remote control only.
GB-16
Page 18
7. Eject a Disc
Press the EJ button (2) on the main unit to eject a disc.
Note:
* Pressing the button on the remote control performs the same operation..
8. Open the Monitor
Press the OPEN button (15) on the main unit to open the monitor. Press it again and the monitor will return to initial status.
Note:
* The unit will continue playing after the monitor returns into the dashboar d..
9. Angle Setting
Press the (5) and (6) buttons to adjust the position of the monitor. Press the button to adjust the monitor backwards and
press the button to adjust it forwards.
Note:
* Please use theses buttons when adjusting t he monitor, other wise you ri sk damagi ng it. Only the and buttons on the main unit can be used to
10. Mute Function
adjust the position of the monitor.
Press the MUTE button (12) to shut off the sound output. The button appears on the LCD. Press it again to resume
previous volume level.
Note:
* Pressing MUTE (16) on the main unit also performs the same function.
GB-17
Page 19

11. Clear
If you make a mistake when entering your selection, press the CLEAR button (22) on the remote control to clear it.
Note:
* This function can only be carried out with the remote control.
12. Mode Selector
Repeatedly press the SOURCE button (1) on the remote control to select the different modes available.
Note:
* Briefly pressing the SOURCE (1)button on the main unit performs the sa m e function.
13. Menu Setup Button
During DVD Menu Setup/ Main menu mode, briefly press SETUP button (19) to turn on or turn off DVD Menu, press and hold it to turn
on or turn off Main Menu Setup. Use the direction buttons (27) to select an option, then press ENTER (27) to confirm.
Note:
* Pressing MENU button (11) on the main unit can also turn on the DVD menu Setup and Main menu. Press it again to enter a
sub-menu and press
14. Remote Infrared Sensor:
button (13) to return to the previous menu.
The remote infrared sensor (8) on the main unit receives the remote control signal.
15. Eject a Disc Compulsively
During playback, if a disc cannot be played normally or cannot eject, briefly press the SOURCE button to switch to radio mode, hold
down the EJ button (2) on the main unit for 3 seconds and the disc will be forced to eject.
GB-18
Page 20

8. Tuner
1. Listening to the radio
2
1
FM1 CH:1 87.50MHz
4
10
87.50M 87.50M
90.00M
7
6
1/Band Indicator
3
11
Shows which band the radio is tuned to.
2/Preset Number Indicator
Shows what preset has been selected.
3/Frequency Indicator
Shows which frequency the radio is tuned to.
4/SEEK+/SEEK-
Briefly press to tune by the presettable range, hold and press to tune
5
108.00M
106.00M98.00M
9
8
automatically.
5/VOL+/VOL-
To increase or decrease the volume.
6/BAND
To select the bands.
7/AMS
Briefly press to scan the current station, hold and press to tune
automatically.
8/MENU
Press this button to set the main menu.
9/SRC
Press this button to select the signal source.
10/The 6 stations of the current band.
Briefly press to select station, hold and press to save the current station to
one of the 6 stations.
11/RDS
Press it to enter RDS SETUP.
GB-19
Page 21

2. Band Selector
In radio mode, repeatedly pre ss the BAND b utton (3 ) to se lect ban ds i n the foll owin g or de r:
FM1 FM2 FM3
MW2(AM) MW1(AM)
Note:
* The BND button on the main unit (3) and the monitor (6) perform the same function.
3. Manual/Automatic Tuning
Manual Tuning: Press the or button (20) on the remote control continuously to increase or decrease the frequency and search for
a station. Automatic Tuning: Press and hold down the or button (20) for more than 3 seconds to automatically search for lower
or higher frequencies.
Note:
* The SEEK+
4. DX/LOC Selector
In radio mode, press the LOC button (5) o n the remo te cont rol to selec t the rece ption of local sta tio ns.“LOC ON” appears on the
display a short moment and only local sta tions a re ava ila ble. Press thi s button again to switch off this func tion . ”LOC OFF” ap pear s a
short moment and both distan t an d l ocal sta tions c an be recei ved .
and SEEK- buttons on the main unit or the monitor (4) performs the same function.
Note:
* The function can only be carried out with the remote control.
* The function is invalid in AM tuning.
5. Selecting the Stored Station
In radio mode, press the
or button (27) to select the next or previous stored station.
Note:
* The function can only be carried out with the remote control.
GB-20
Page 22

6. MONO/STEREO Selector
In radio mode, press the ST button (6) on the remote control to select MONO or STEREO mode. When stereo mode is selected, the
letters “ST” appear. Press the ST button to go to MONO mode.
Note:
* This function can only be carried out wit h the remote control.
* Switch to the MONO mode to improve the list ening quality when the signal i s weak.
* It is only valid in FM tuning.
7. Scanning/Memorizing Stations Automatically
In radio mode, press the AMS button (4) on the remote control to listen to each sta tion th at is store d in the me mory for 5 second s.
Press the corresponding number buttons or the AMS button when you hear the desired station. The radio will stop the scan at this
station.
Press and hold down the AMS button (4) for more than 2 seconds to activate the aut omatic memory storing function. The radio
automatically selects a stati on sto red und er the 6 preset n umbe rs (num ber butt ons 1 to 6) .
Note:
* The unit can memorize up to 6 station s for eac h band.
* The AMS button (7) on the monit or perfo rms the sam e func tion.
8. Using the Number Buttons
In radio mode, use the number buttons to selec t the store d stati ons.
The number Buttons (from 1 to 6) can help you store your favorite station. Follow the steps below:
1. When listening to a station, hold down any one of the number buttons (from 1 to 6) until the num ber appears on the LCD, which i ndicates that station is
already stored under the corres pondi ng num ber but ton.
2. Press the AMS button (4) to search for stati ons aut omatically, and store them under the 6 pres et num bers.
3. When listening to a station that is stored under a preset num ber, press another number button (1 t o 6) for m ore than 2 second s to store the station under that
number button.
Note:
* The button on the monitor performs the same function.
GB-21
Page 23
9. On Screen Display
In radio mode, briefly pre s s the OSD butt on ( 8) t o di splay th e RDS setup. Hold and press it to display the edition informatio n.
Note:
* This function can only be carried out with the remote control .
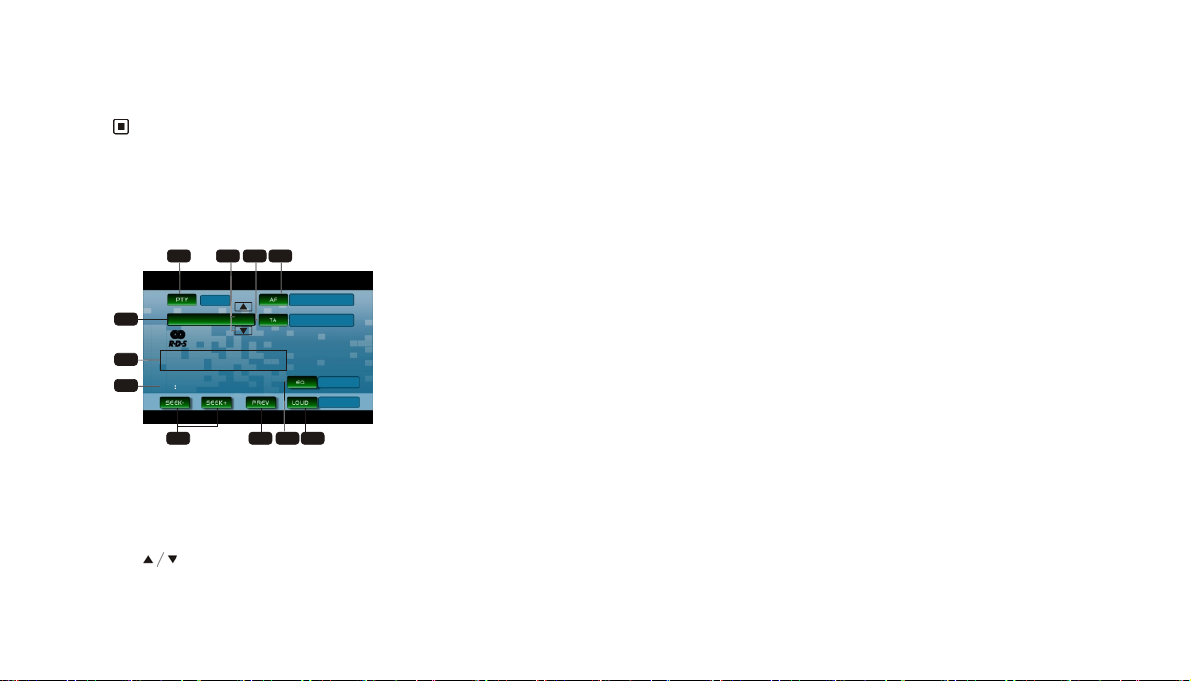
10. RDS Setup
5. When the PTY function is on, use the / butt ons to scroll through t he
different types of program. Once you have chosen one, press the name of
the type of program chosen to launch the search.
6. Displays the radio text for RDS stations.
7. PS (station name)
Displays the station name thanks to RDS information.
8. SEEK+/SEEK-
Press here to tune automatically
9. PREV (previous)
Press here to return to the previous screen.
10. EQ (equalizer)
Press here to choose an equalizer preset.
11. LOUD (Loudness)
Press here to switch the loudness functi on on/o ff.
1234
ON
NONE
5
6
PS
7
8
OFF
OFF
9
11
10
1. AF
Press it to activate AF function.
2. TA
Press it to activate TA function.
3.
Press it to select PTY code.
4. PTY
POP
ON
Press it to activate PTY function.
GB-22
Page 24

11. Alternative Frequencies
Briefly press the AF button (26) to switch the AF function on/off. With this function, the radio searches for the best alternative
frequency available for the current station.
Note:
* The AF on the monitor (1) performs the same function.
12 . Traffic Alarm
Briefly press the TA button (25) to activate the traffic alarm function. When AF is on, “TA” is displayed on the LCD. If there is no TA
information, the mode will search for a TA station automatically.
The “TA” display is green, a station is broadcasting traffic information, if not, it is yellow. When traffic information is broadcast, the
volume will be adjusted to the preset TA level automatically When in other modes (such as DVD, AUX), if traffic information is
broadcast, the mode will change to radio mode automatically. It will return to the current mode after the TA is over.
Note:
* The TA button on the monitor perform the same function.
* When TA is off, the letters “TA” or “TP” are not displayed on the LCD.
13. Program Type
Briefly press the PTY button (7) to activate the PTY function.
When this function is on, “PTY ON” appears on the monitor. Press the and buttons to select the program type, and then press
the name of the program chosen to launch the search. The monitor displays “PTY SEARCH”.
If the PTY function is off, “PTY OFF” appears on the monitor and the search is stopped.
Note:
* The PTY button on the monitor (4) also performs the same function.
GB-23
Page 25
9. MP3 PLAYBACK IN DISC/USB/SD/MMC
1. Playing MP3 files in DISC/USB/SD/MMC
When the unit is on, insert DISC/USB/SD/MMC with MP3 files into the corresponding slot. The unit will automatically switch to this
source and start playback. If more than one source are inserted, press the SOURCE button to select the desired source. If it contains
folders, press the
ENTER button. Then select the desired file using the or buttons.
button during playback and use the or buttons (21) to select the required folder. Then confirm using the
Note:
* You can eject an MP3 CD by pressing the EJ button on the main unit or the button on the remote control or the button on the monitor.
* After inserting USB(with the supplied USB cable if necessary) or SD/MMC, you must wait for about 20 seconds to eject the disc.
2. Quick track selection
When playing MP3 files, press the or button (21) on the remote control to go to the next or previous track.
Note:
* The and button on the main unit or the or button on the monitor perform the same function.
3. Repeat Playing
When playing MP3 files, press the RPT button (15) on the remote control to play the current track on repeat. Press it this button again to
cancel.
Note:
* Only the remote control can be used to operate repeat play.
4. Number Buttons
Press one the number buttons (23) to select a track.
Note:
* This function can only be operated using the remote control.
* If you make a mistake, press CLEAR (22) to clear.
GB-24
Page 26
5. Stop Playing
When playing MP3 files, press the butto n (18) to stop playback.
Note:
* The button on the monitor performs the same function.
6. Selecting an MP3 Track
In MP3 mode, first press the GOTO button (2) on the remote control and “---” will be displayed. Then press number buttons to enter
the desired MP3 track number. Press the GOTO button twice to go to a specific section of the file. “--:-- ” will be displayed. Now enter
the desired play back time. If you make a mistake, press the CLEAR button (22) to clear.
Note:
* Y ou can only select a file using its number and playback time by using the remote control.
7. Pause Playback
When playing MP3 files, press the button (17) to switch between play and stop.
Note:
* The button on the monitor (this button is displayed after you have touched the screen) or on the main unit performs the same operation .
8. Skip backward/forward/F.F/F.REW the playback
Press the
or button (20) on the remote control to perform fast rewind or fast forward.
2 X 4 X 8 X 16 X
Note:
The and buttons on the monitor perform the same function.
*
GB-25
Page 27

9. On Screen Display
Hold down the OSD button (8) to display the current mode.
Note:
*
This function can only be carried out with remote contr ol.
Note
1. Some external hard disks may not be supported. Hard disks that have built-in power supply should be favored.
2. Some models of USB storage devices or MP3 players may not be played.
3.The quality and speed for reading JPEG photos depend on the resolution and compression ratio of the photos. Some JPEG photos may not be played due to
the disc quality and the formats.
4. Some DVD+R/RW, DVD-R/RW, CD-R/RW disc may not be played
due to the quality on burning conditions.
10. VCD/CD
1. Playing a VCD/CD
Insert a VCD/CD disc into th e slot and the unit will au tomatic ally switch to DISC mode. If a disc is loaded, press the button to start playback.
Note:
* To eject a disc, press the EJ button on the main unit, the button on the remote control or the by button on the monitor (after you have touched
the screen)
GB-26
Page 28
2. Quick track selection
During VCD/CD playback, first press the
track. Press the
button (21) to play the next track.
button to return to the begin ning of th e curr ent track . Press this bu tton ag ain to pla y the prev ious
Note:
*
The and buttons on the main unit or the and buttons on the monitor perform the same function.
3. Repeat Play
During VCD/CD playback , press the RPT button (15) on the remote control to perform repeat play. Press this button again to cancel this
function.
Note:
* This function can only be operated by using the remote control.
4. Playing Tracks at Random
During VCD/CD playback, press the RDM button (16) on the remote control to play any track in the folder at random.
Press this button again to return to normal play.
Note:
* This function can only be operated by using the remote control.
5. Number Buttons
Use the number buttons (23) to select a track to play.
Note:
* This function can only be operated by using the remote control.
* If you make a mistake, press the CLEAR button (22) to clear.
GB-27
Page 29
6. Stop Play
During VCD/CD playback, first press the button (18) to stop playback. Press thebutton (27) or the button (17) on the remote
control to resume play. Press the button again to stop playback.
Note:
* The button on the monitor performs the same function.
7. Pause Playback
During VCD/CD playback, press the button (17) to switch between play and stop.
Note:
* The button on the monitor or on the main unit performs the same function.
8. Skip backward/forward/F.F/F.REW playback
Press the or button (20) on the remote control to perform fast rewind or fast forward.
2 X 4 X 8 X 16 X
Note:
* Press the and buttons on the monitor perform the same function.
GB-28
Page 30
9. System Switch
In VCD mode, Press the P/N button (11) on the remote control to switch to PAL or NTSC or AUTO.
Note:
* This function can only be carried out with remote control.
10. Slow motion playback
In VCD mode, press the
button (10) to play slow forward or slow backward. The following speeds are available:
1/4 1/2
1/8
1/16
Note:
* This function can only be carried out with remote control.
11. Increase the size of the picture
In VCD mode, Press the ZOOM button (9) to increase the picture size. Press this button repeatedly to change the zoom size.
2X 3X 4X
No Change
Note:
* This function can only be carried out with the remote control.
* To move the picture during zooming, press
,,,
, button (27) on the remote control.
GB-29
Page 31

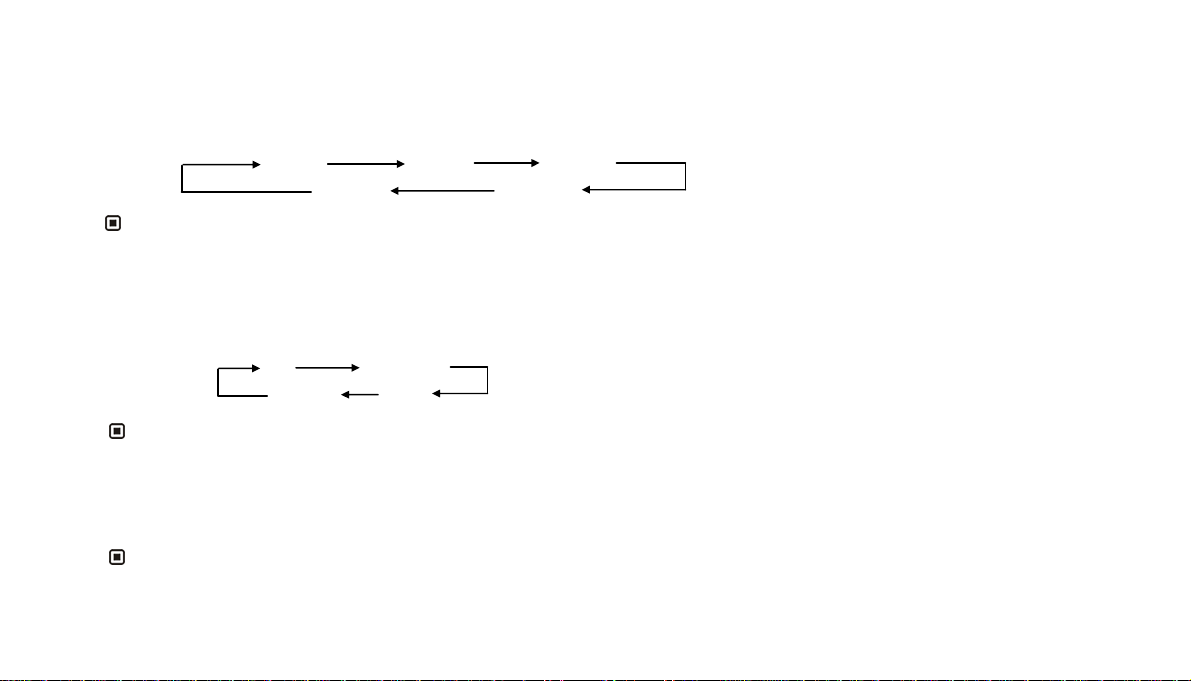
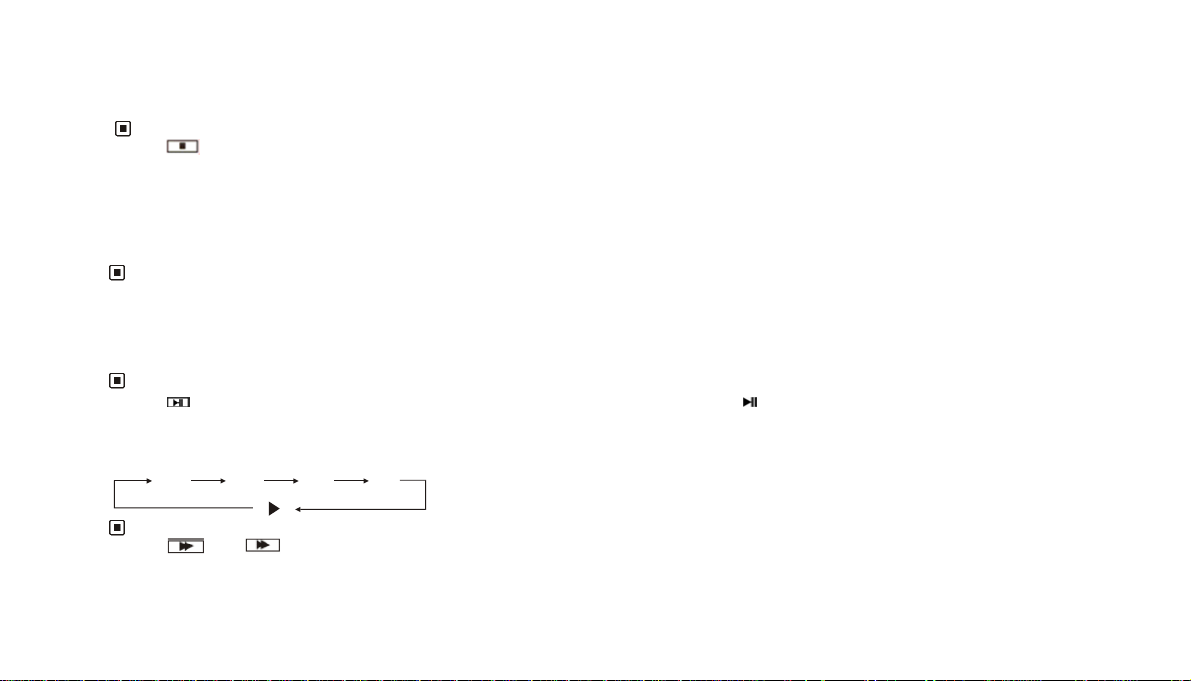
12. On Screen Display
In VCD/CD mode, briefly press the OSD button (8) and the display shows:
Single elapsed time
OFF
Hold down the OSD button (8) to display the setup information.
Total
remain time
Single remain time
Total
elapsed time
Note:
* This function can only be operated by using the remote control.
13. Setting the Playback Time
In CD mode, first press the GOTO button (2), and “:--:--” is displayed. Enter the desired playback time using the number buttons (you
can access the whole disc). If you press the GOTO button twice, this function is applied to the track being played (so you cannot enter a
playback time higher than that of the current track).
In VCD stop mode, proceed in the same manner as in CD mode. If you press GOTO button third times, you can enter the track number.
In VCD mode, press the GOTO button (2) to assess information on the track number, length of track, repeat etc. Use the and buttons
(27) to select an option and press ENTER to confirm. Then use the number keys (23) to adjust the option.
Note:
* This function can only be carried out with the remote control.
14. Selecting an audio mode
In VCD mode, press the AUDIO button (6) repeatedly to select an audio mode in the following order:
Stereo
Mono Right
Mono Left
GB-30
Page 32

Note:
* This function can only be carried out with remote control.
15. PBC Selector
In VCD (PBC off) mode, press the TITLE button (3). PBC playback starts and the menu of the entire disc appears on the LCD. Then you
can select the desired track by using button (27) or (23). When a track is playing, you can press the MENU button (3) to return to the
menu, if you want to stop the track and select another. To cancel the PBC function, press the TITLE button (3) again.
Note:
* PBC playback is only compatible with discs which are version 2.0 or above.
16. Programmed Playback
In VCD(PBC off)//CD mode, press the PROG button (13) and the program menu will be displayed. Press the number buttons to select
the track number. Move the cursor to EXIT and press ENTER to exit the programmed playback. Move the cursor to and press ENTER
to go to the previous page; move the cursor to and press ENTER to go to the next page. During this process, press (18) or press
PROG (13) to cancel the programmed playback.
Note:
• The function is only valid on remote control.
• To input the single digit track number, “01”, “02”,….”09” must be entered, instead of “1”, “2”, …..”9”.
11.MP4/DIVX
1. Playing an MP4/DIVX file
Basic operations refer to “Playing MP3 files in DISC/USB/SD/MMC”.
GB-31
Page 33

2. Number Buttons
You can select any track directly by using the number buttons (23). The track will play automatically.
Note:
* This function can only be operated by using the remote control.
3. Stop playback
During MP4 (AVI, MPEG4) playback, first press the button (18) to pause play. Then press (17) to play from the beginning of the
disc. In stop mode press the
button to resume play.
Note:
* The button on the monitor performs the same function (this button is displayed after you have touched the screen).
4. Pause Playback
During MP4 (AVI, MPEG4) playback, press the button (17) to stop playback. Press it again to resume normal playback.
Note:
* The button on the monitor or on the main unit performs the same function (this button is displayed after you have touched the screen).
5. Repeat Playing
During MP4 (AVI, MPEG4) playback, press the RPT button (15) on the remote control to repeat the current track. Press the button again
to cancel this function.
Note:
* This function can only be operated by using the remote control.
GB-32
Page 34

6. On Screen Display
Press the OSD button (8) and the display will show the following information:
Single
elapsed time
Single
remain time
OFF
Hold down the OSD button (8) to display the setup information.
Note:
* This function can only be operated by using the remote control.
7. Setting for a specific section on a file
During MP4 (AVI, MPEG4) playback, firstly press GOTO button (2), and the monitor will show: “---“. Press the desired track using the
number buttons, then press ENTER. Press the GOTO button twice, and the monitor shows: “-:--:--“. Enter the desired time, then press
ENTER.
Note:
* This function can only be operated by using the remote control.
8. Slow motion playback
Same operation as playing VCD.
GB-33
Page 35
9. Quick track selection
During MP4(AVI, MPEG4) playback, first press the button (21) to return to the beginning of the current track. Press the button again
to play the previous track. Press the button (21) to move to the next track.
Note:
* The and buttons on the main unit and the and buttons on the main unit or monitor performs the same function.
10. Skip backward/forward/F.F/F.REW the playback
Press the or button (20) on the remote control to perform fast rewind or fast forward.
2 X 4 X 8 X 16 X
Note:
* The and on the monitor perform the same function.
11. Playing Tracks at Random
During MP4 (AVI, MPEG4) playback, pressing RDM button (16) on the remote control to play any track at random. Press it again to
cancel this function.
Note:
* This function can only be operated by using the remote control.
12. Increase the size of the picture
Same operation as playing VCD
GB-34
Page 36
13. Changing audio language (Multi-audio)
With the MP4 (AVI,MPEG4) file has multi-audio recordings, you can press AUDIO (6) to switch between language/ audio output during
playback as follows:
Note:
* This function is operated by using the remote control.
* This function only operates with disc featuring multi-audio recordings.
* The number in the“ ”symbol on a packaging indicates the number of recorded languages/audio output.
2
14. Changing the subtitle language (Multi-subtitle)
With MP4 (AVI,MPEG4) files has multi-subtitle recordings, you can press SUB-T (5) to switch between subtitle languages during
playback as follows:
Subtitles 1——Subtitles 2——Subtitles OFF
Note:
* This function is operated by using the remote control.
* This function only operates with disc featuring multi-subtitle recordings.
* The number in the symbol on a disc packaging indicates the number of recorded subtitle languages.
2
GB-35
Page 37
12. DVD
1. Playing a DVD
Insert a DVD disc into the slot (14). The unit will automatically switch to this source.
Note:
* You can eject a DVD by pressing the EJ button on the main unit or the button on the remote control or the button on the monitor.
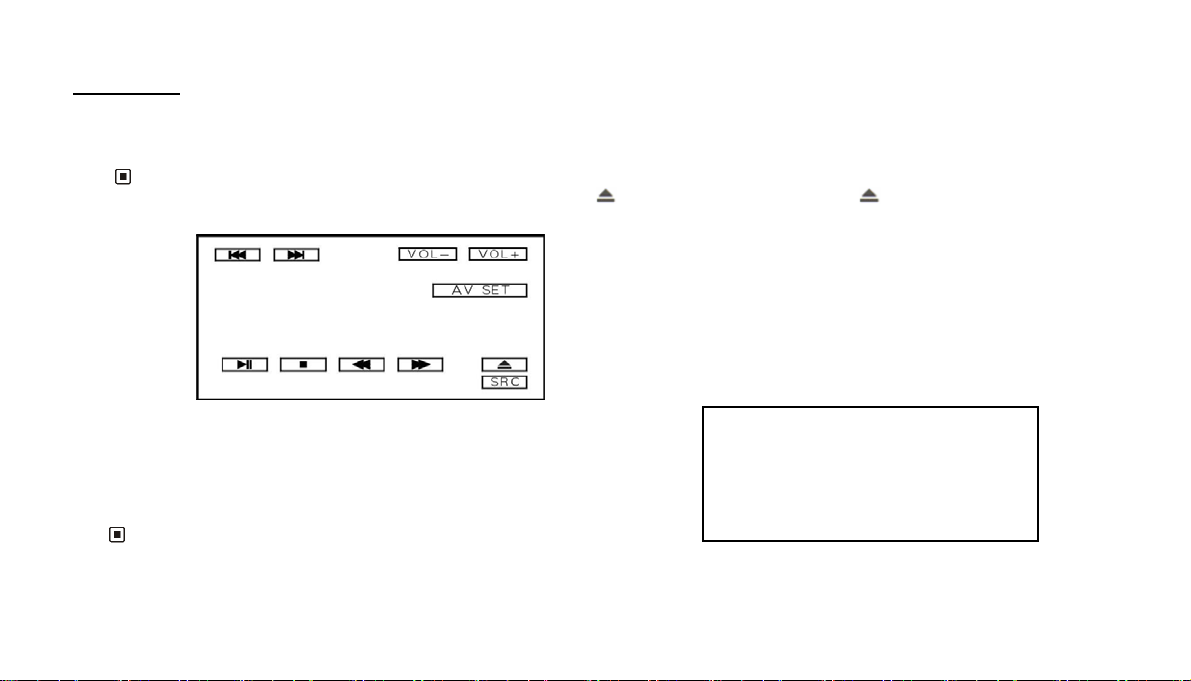
When you touch the monitor, the monitor will display the following menu:
2. DVD SETUP
During DVD playback, press AV SET to access the following menu:
AUDIO ADJUST: V o lume, Balance, Fad, Bass & Treble.
VIDEO ADJUST: Contrast, Color, Tint, Bright
Note:
* To access the VIDEO ADJUST menu, a DVD should be inserted and be playing.
AUDIO ADJUST
VIDEO ADJUST
BACK
GB-36
Page 38
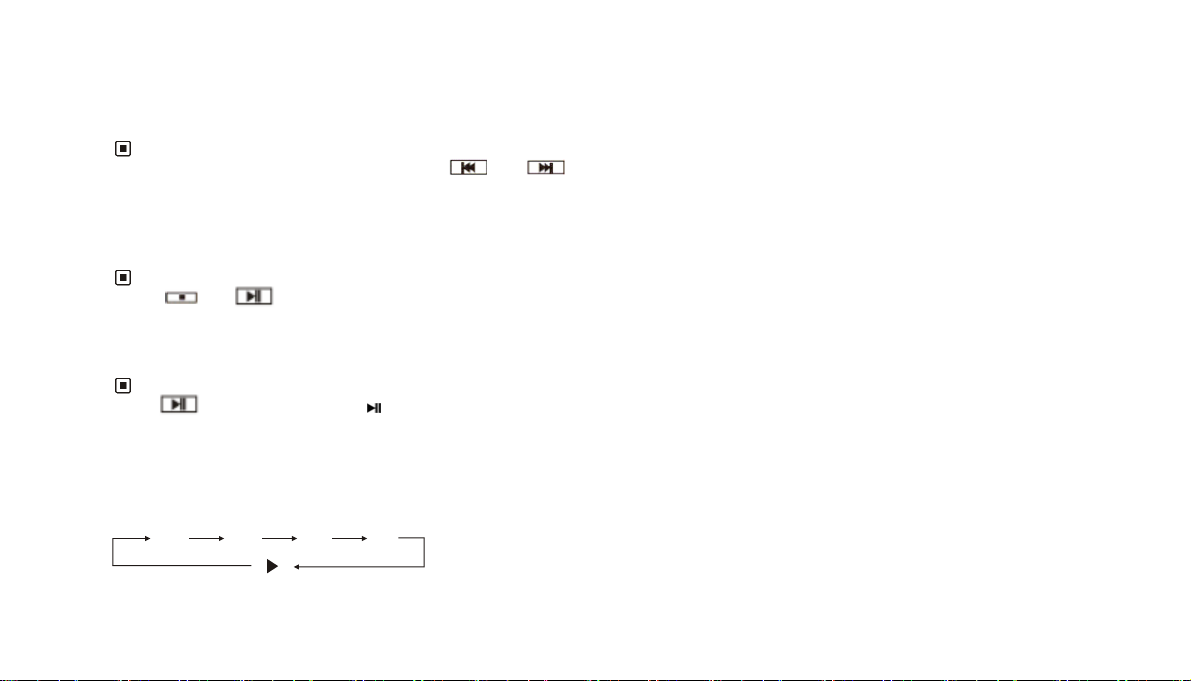
3. Quick track selection
During DVD playback, press the button (21) to return to the beginning of the current chapter. Press this button again to play previous
chapter. Press the button to go to the next chapter.
Note:
* The and buttons on the main unit and the and buttons on the button on the main unit or monitor perform the same function.
4. Stop playback
During DVD playback, first press the button (18) on the remote control to stop play. Then press the ENTER button (27) or
thebutton (17) on the remote control to resume play. Press the button (18) again to stop playback completely.
Note:
* The and buttons on the monitor perform the same function.
5. Pause Playback
During DVD playback, press the button to pause or resume play. In stop mode, press this button to resume playback
Note:
* The button on the monitor or on the main unit performs the same function.
6. Skip backward/forward/F.F/F.REW the playback
Press the or button on the remote control to perform fast rewind or fast forward. Press repeatedly to change speed in the following
order:
2 X 4 X 8 X 16 X
GB-37
Page 39

Note:
* The and buttons on the monitor perform the same function.
7. Number Buttons
Use the number buttons (23) to select a chapter directly.
Note:
* This function can only be carried out with remote control.
* If you make a mistake, press the CLEAR button (22) to clear.
8. Repeat Playing
During DVD playback, press the RPT button (15) on the remote control to select a repeat mode from:
Chapter
Off
Title
Note:
* This function can only be carried out with remote control.
9. System Switch
During playback mode, Press the P/N button on the remote control to set the TV system to PAL, NTSC or AUTO.
Note:
* This function can also be operated by selecting the DVD menu setup.
GB-38
Page 40

10. Slow motion playback
In DVD mode, press the
1/2
1/4
16
1
/
button (10) to play forward or backward in slow motion. The following speeds are available:
1/8
8
1
/
1/4
1/16
1/2
Note:
* This function can only be carried out with the remote control.
11. Increase the size of the picture
In DVD mode, Press the ZOOM button (9) to increase the picture size. Press this button repeatedly to change the size of zoom in the
following order:
2X 3X 4X
No Change
Note:
* This function can only be carried out with the remote control.
* To move the picture during zooming, press
12. On Screen Display
In DVD mode, briefly press the OSD button (8) to display the following information:
Title elapsed time
OFF
chapter
remain time
Title remain time
Chapter
elapsed time
,,,
, button (27) on the remote control.
GB-39
Page 41

Hold down the OSD button (8) to display the current setup.
Note:
* This function can only be operated by using the remote control.
13. DVD Options
In DVD mode, press GOTO button (2) on the remote control to set the playing time and the following options will be displ ayed:
title/chapter/sound/captions/angle/title time/chapter time/repeat playing/time. Use the and buttons to select the options, press
ENTER to confirm. Then press the number buttons (23) or and buttons (27) to set the current status.
Note:
* This function is operated by using the remote control.
14. Changing the viewing angle (Multi-angle)
With DVDs featuring multi-angle (scenes shot from multiple angles) recordings, press the ANGLE button to switch between viewing
angles during playback.
The viewing angle changes in the following order: ANGLE 1 – ANGLE 2 – ANGLE 3
Note:
* This function is operated by using the remote control.
* This function is only available with DVDs featuring multi-angle recordings.
* The“
* The ANGLE button does not function during fast forward/fast rewind or pause.
”symbol on a DVD packaging indicates that it features multi-angle scenes. The number in the symbol indicates the number of angles
from which scenes were shot.
33
GB-40
Page 42

15. Changing audio language (Multi-audio)
DVDs can provide audio playback with different languages. With DVDs featuring multi-audio recordings, you can press the AUDIO
button (6) to switch between language and audio systems during playback.
Note:
* This function is operated by using the remote control.
* This function only operates with DVDs featuring multi-audio recordings.
* The number in the“ ”symbol on a DVD packaging indicates the number of recorded languages/audio outputs.
2
16. Changing the subtitle language (Multi-subtitle)
With DVDs featuring multi-subtitle recordings, press the SUB-T button (5) to switch between subtitle languages during playback.
Note:
* This function is operated by using the remote control.
* This function only operates with DVDs featuring multi-subtitle recordings.
* The number in the symbol on a DVD packaging indicates the number of recorded subtitle languages.
2
17. Using the menus
In DVD mode, press the MENU button (4) to return to the root menu. Press the TITLE (3) button on the remote control to display the
DVD player title menu. You can press the direction buttons (27) or the number buttons (23) to select the chapter.
Note:
* This function is operated by using the remote control.
GB-41
Page 43
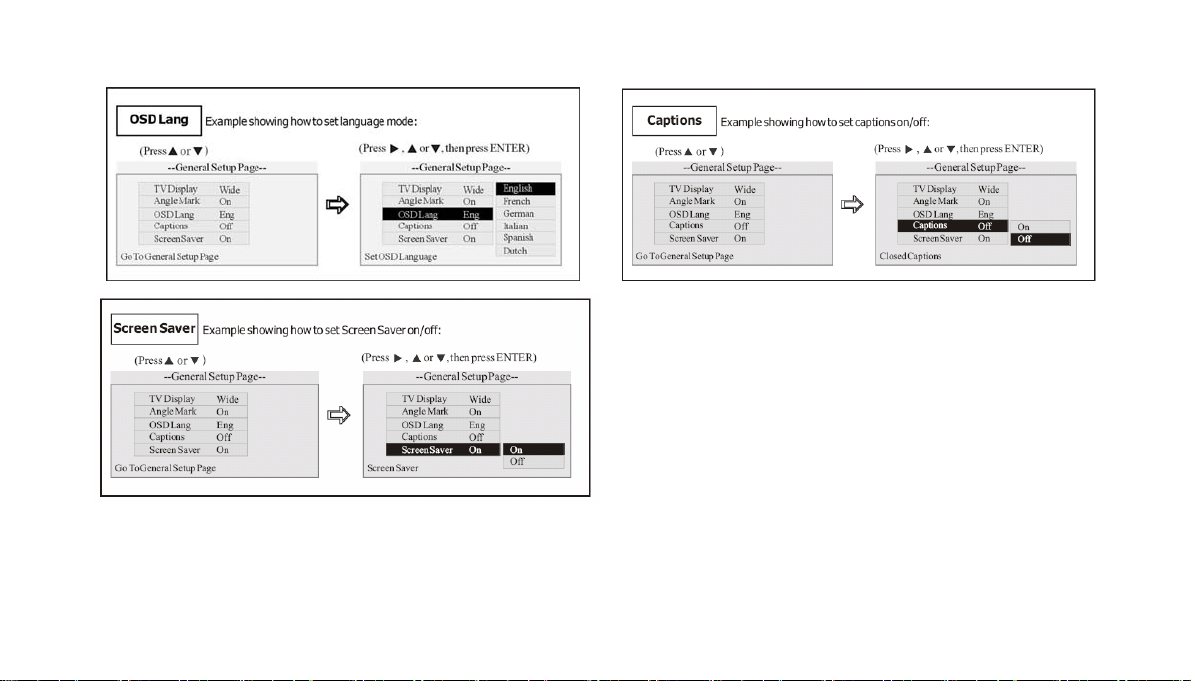
18. DVD SETUP MENU
Briefly press the SET UP button (19) on remote control or the MENU button (11) on the main unit to display the DVD player setup menu.
Use the /// buttons on the remote control (20 and 21) to select the desired option, and press the ENTER button (27) on the
remote control to confirm your choice. Press the
button (13) to exit the sub menu. µ
Note:
* you can select your preferred options. These options will be chosen if they are available on a disc. If the disc does not have the preferred option then
the default setting will be used.
* Regarding the DVD setup menu, please refer to the following pages for more details.
* Some functions vary depending on the types of models or disc formats.
* Press the SETUP button (19) on the remote control or the MENU button (11) on the main unit to exit the menu setup.
GB-42
Page 44
GB-43
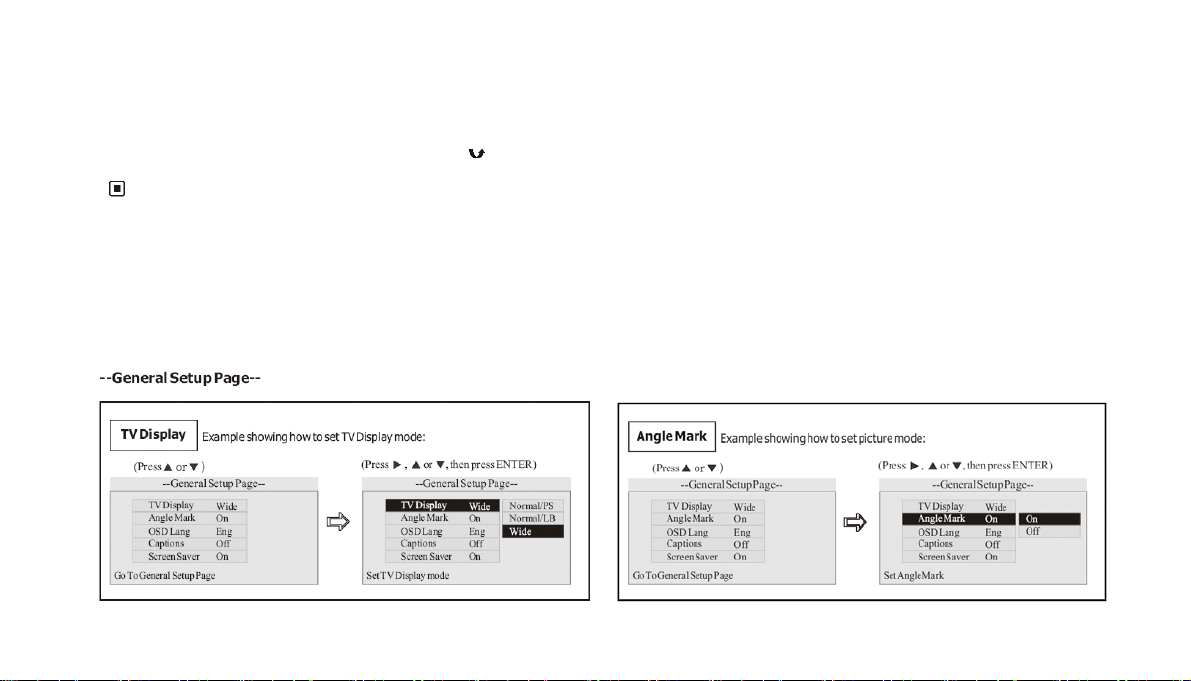
Page 45
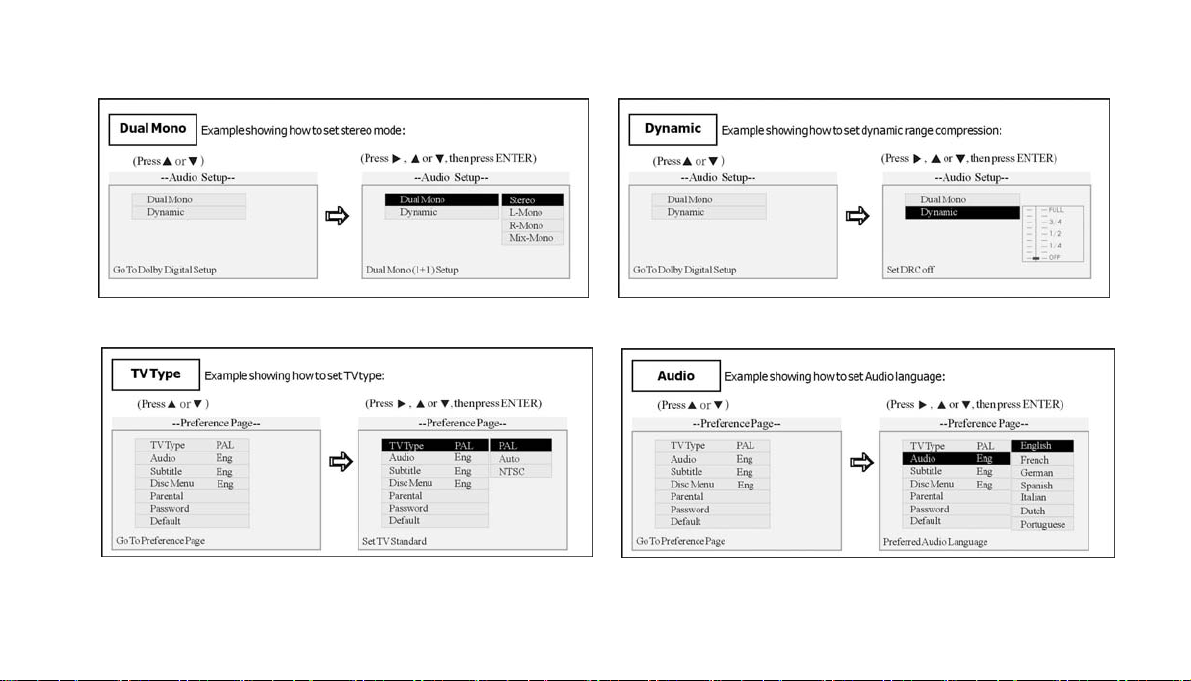
--- Audio Setup ---
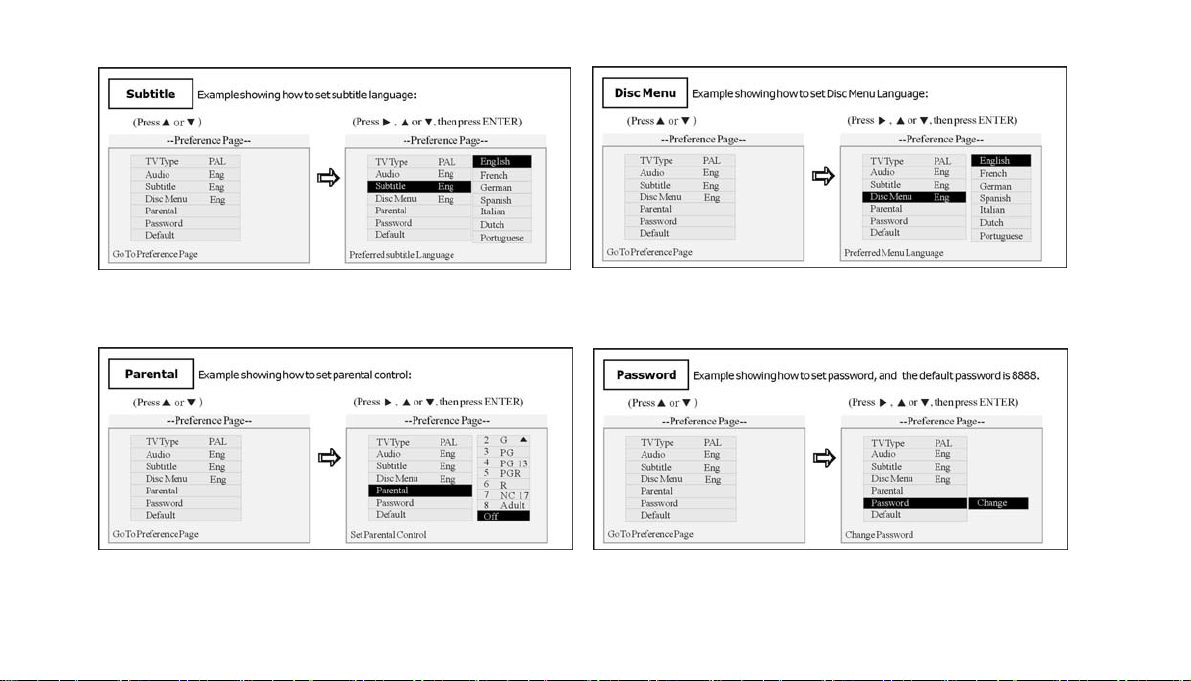
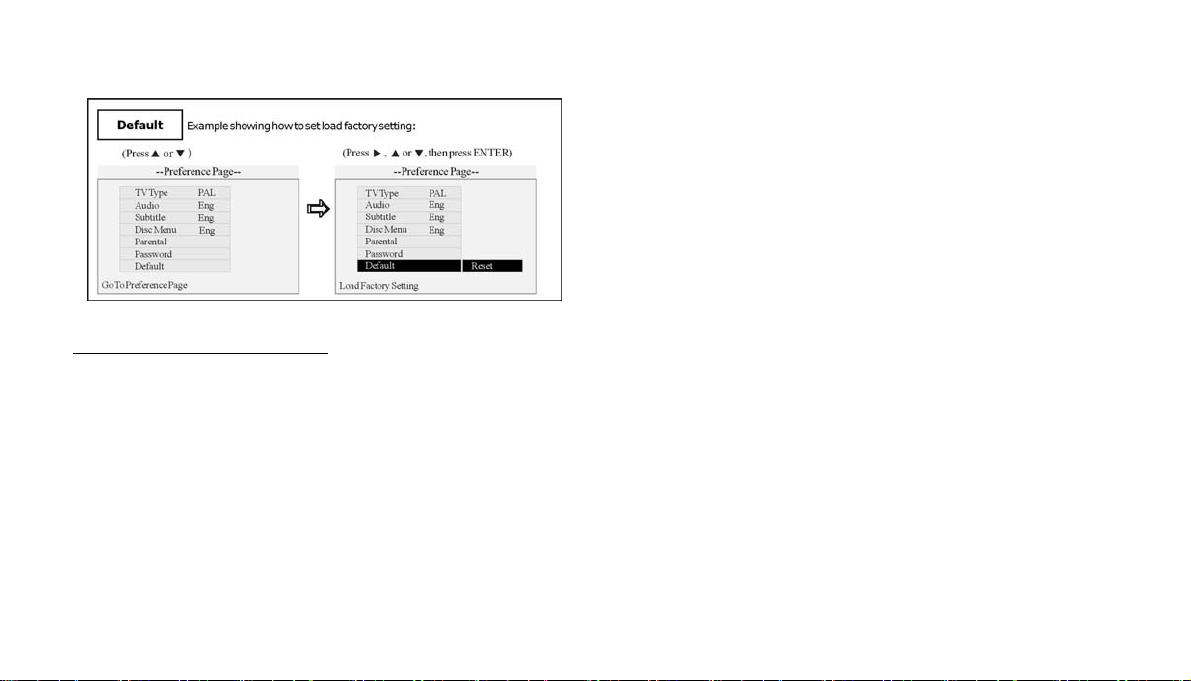
--- Preference page ---
GB15
GB-44
Page 46
--- Password Setup page ---
GB-45
Page 47
13. A/V IN Connection
1. Connect an external A/V device in the A/V IN jack by the supplied A/V cable on the front of the main unit.
2. Press the SOURCE/PWR button (1) on the remote control to select the source: AUX.
3. Operate the external A/V device to select and playback the file.
4. Adjust the volume controls on both the external A/V device and this unit to desired volume level.
GB-46
Page 48

14. Main Menu
1. Set up Main Menu
When the unit is on at radio mode, the monitor will display the menu as follows:
FM1 CH:1 87.50MHz
87.50M 87.50M
90.00M
Hold down the SETUP button (19) on the remote control or the
MENU button on the main unit (11) or the monitor to display the
following menu:
108.00M
106.00M98.00M
This menu includes AUDIO, VIDEO, SOURCE,
SYSTEM, EXIT. Press them on the monitor to set the
desired status.
GB-47
Page 49
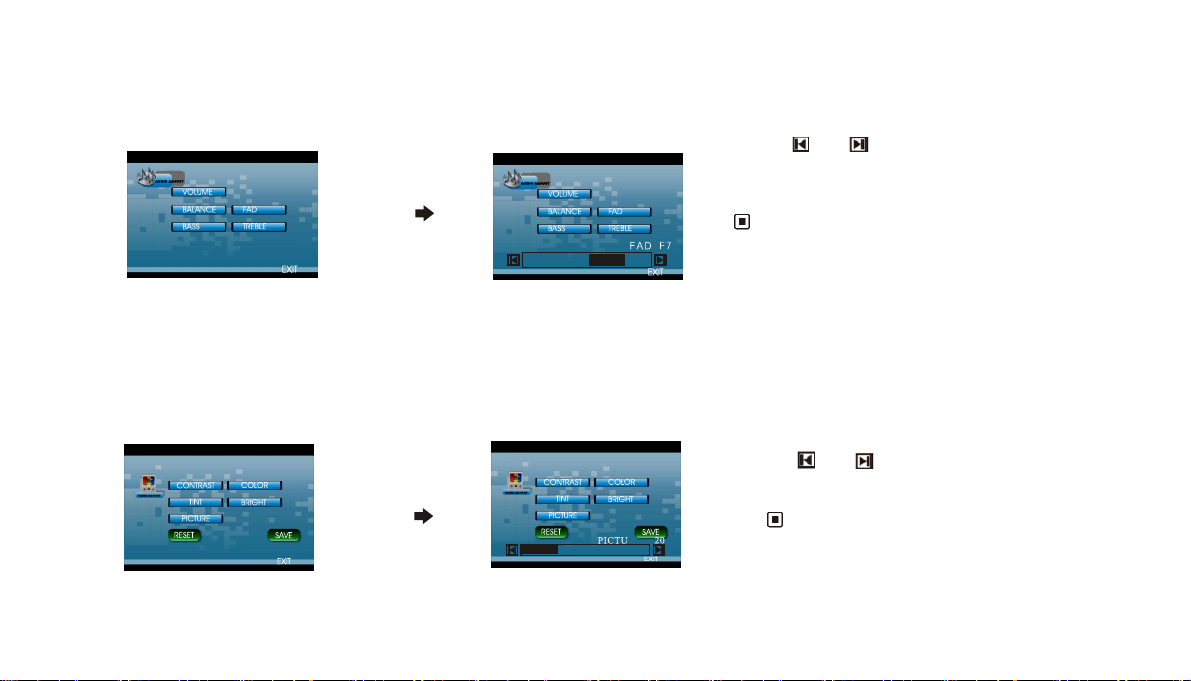
2. Audio Adjust
t
After selecting “AUDIO”, the following sub-menu will appear:
Select the desired settings: “VOLUME”, “BALANCE”, “FAD” (fade) “BASS” or “TREBLE”,
For example, press “FAD” and the setting menu will appear as above:
3. Video Adjust
After selecting “VIDEO”, the following sub-menu will appear:
In this menu you can select the following options: CONTRAST, COLOR, TINT, BRIGHT,
PICTURE, EXIT.
Picture Adjus
GB-48
Press and to adjust the desired FAD level,
press “EXIT” to exit this menu.
Note:
* Proceed in the same way to adjust the other options.
Press “PICTURE” in this menu, and the following menu
will appear:
Press
save the setup and EXIT to exit this menu.
and to adjust the size, then press SAVE to
Note:
* Proceed in the same way to adjust the other options.
Page 50
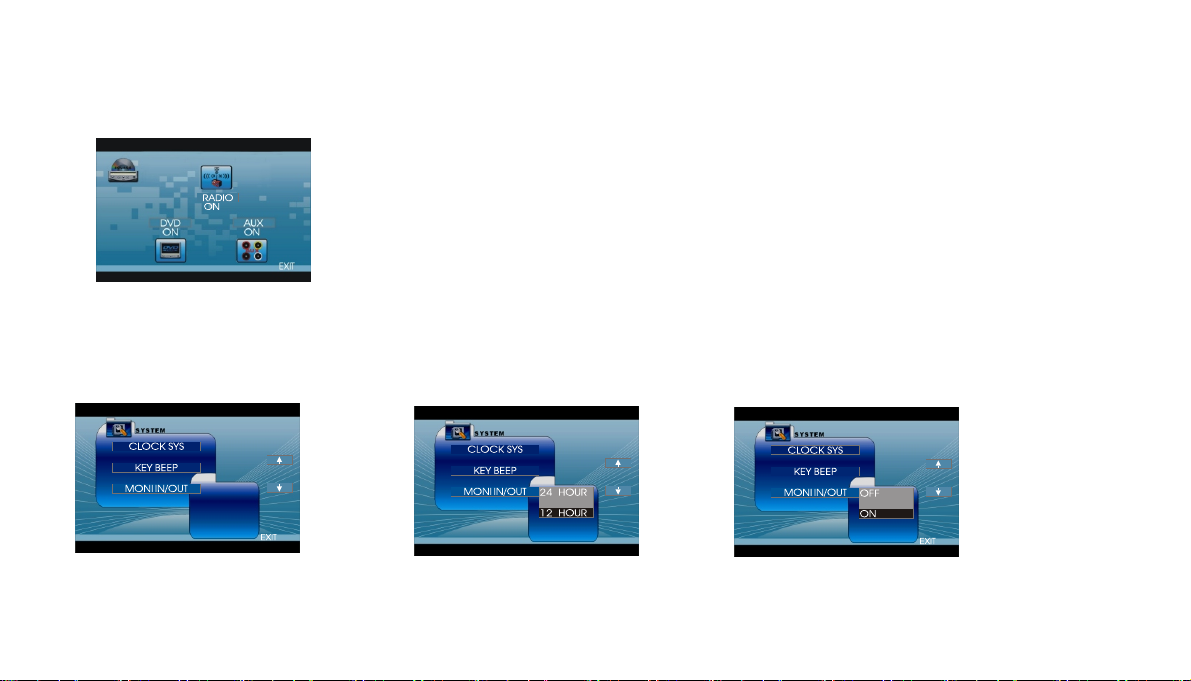
4.Source Adjust
After selecting “SOURCE” in the main menu, the following sub-menu will appear:
5.System Adjust
After selecting “SYSTEM”, the following sub-menu
will appear.
You can adjust RADIO, DVD, AUX to ON or OFF, press the corresponding option.
If one source is set OFF, that function will not work. For example, if the option chosen for the
RADIO is “OFF”, the unit will no longer receive radio stations. However it is not possible to
switch off the source currently being used.
Clock System Clock System Key Beep Key Beep
EXIT
In this menu you can adjust CLOCK SYSTEM,
KEY BEEP, MONITOR IN/OUT, etc.
Press “CLOCK SYS” on the monitor
to set 12 HOUR or 24 HOUR display.
GB-49
Press “KEY BEEP”and select ON or OFF, the default
setting is ON, which means when you press the
keys, they make a sound.
Page 51

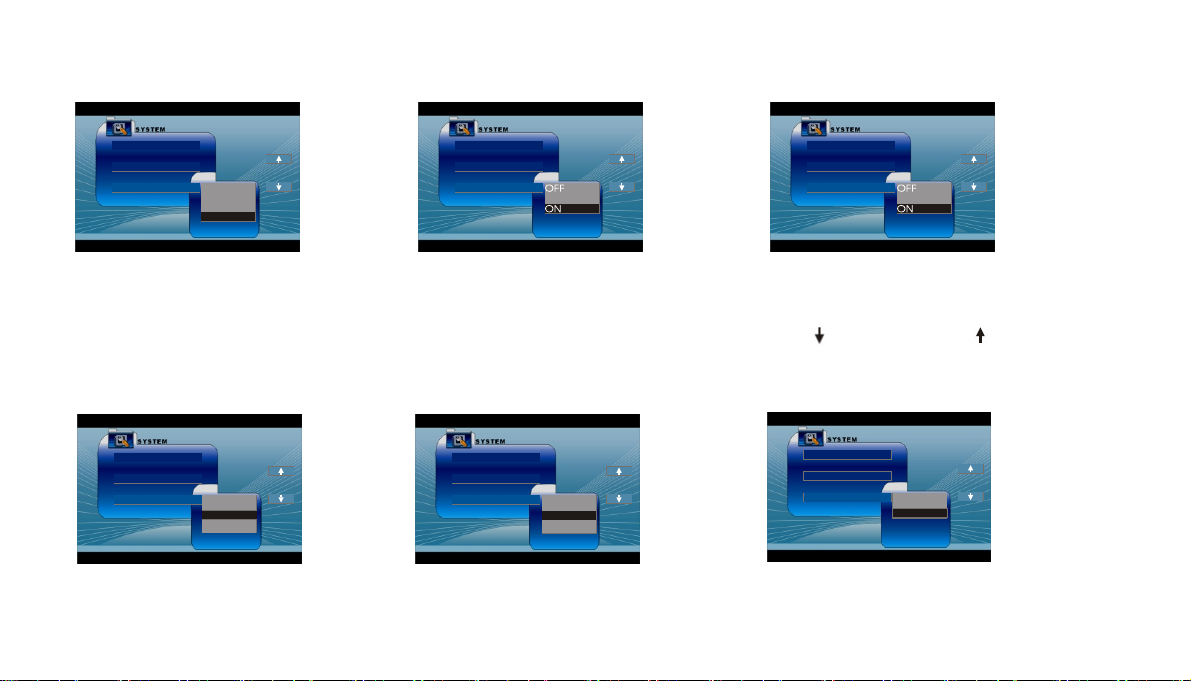
Monitor IN/OUT Next Setup Reverse Pola
In this menu you can adjust “MONITOR IN/OUT”,
and select MANUAL or AUTO. The default
setting is “AUTO”, which means
the monitor will goes into or out of
the dashboard automatically.
Subwoofer
Press to display the next menu,
press to display the previous menu.
AMS Fullup
This option allows you to set the radio according to the
type of reversing signals from the reversing sensor (if a
reversing camera is connected). Select “BATTERY” if
your vehicle emits a positive signal when you change to
reverse. Choose “GROUND” if your vehicle emits a
negative signal when you go into reverse.
Press to display the menu follows,
press to display the previous one.
In this menu you can adjust MONITOR FLEX,
press it in the monitor and select MANUAL
or AUTO, the default setting is AUTO, it means
the monitor will flex automatically.
Press “AMS FULLUP”. When the function is on,
no new station is allowed if no preset is free.
(when the user launches an AMS search). When
you select “OFF”: current preset stations are
erased when the user launches a new AMS search.
GB-50
To set the above options, proceed as before.
Page 52
Local Area Local Goto FREQ
r
LOCAL AREA
You can select EUROPE or USA to search
the stations quickly according to your
geographical area. You can also select FM
ONLY to receive FM stations only.
GOTO FREQ
LOCAL
EUROPE
U.S.A
FM ONLY
EXIT
LOCAL AREA
LOCAL
GOTO FREQ
EXIT
Select ON to search for strong local stations.
Select OFF to receive more distant stations or
stations with a weaker signal.
LOCAL AREA
LOCAL
GOTO FREQ
If ON is selected, you can use the GOTO button on the
remote control to select a station frequency directly
in radio mode.
Press to display the next or previous options.
RT Scroll TA Vo lume REGION
RT SCROLL
TA VOLUME
REGION
SLOW
NORMAL
FAST
EXIT
To select the sc
among the following options: SLOW,
NORMAL, FAST. The default setting is
NORMAL.
olling speed, for information
RT SCROLL
TA VOLUME
REGION
LOW
NORMAL
HIGH
EXIT
To select your desired volume, LOW, NORMAL,
HIGH. The default setting is NORMAL
GB-51
RT SCROLL
TA VOLUME
REGION
Select REG ON to automatically search for the regional code
for the current station even if there is a national broadcast of
this station. Select “REG OFF” to ignore the regional code of
the current radio station and listen to the national broadcast of
this station.
REG OFF
REG ON
EXIT
EXIT
Page 53
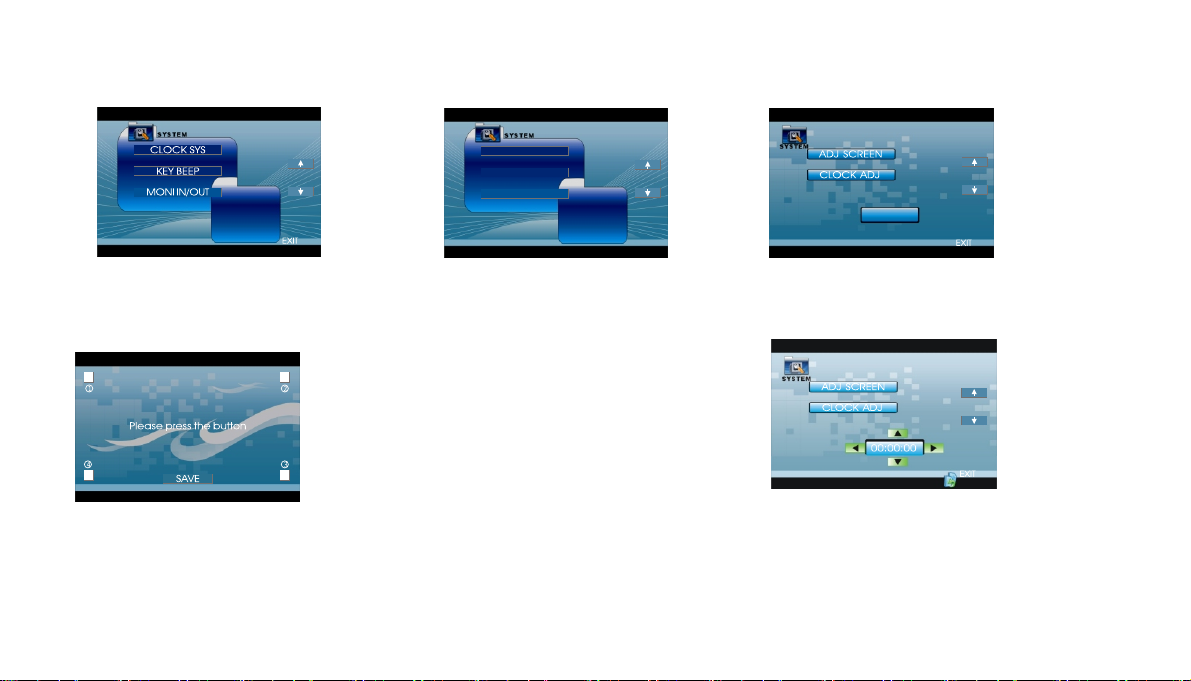
RT SCROLL
TA VOLUME
REGION
EXIT
Adjust Screen
(Picture 1) (Picture 2)
Press ADJ SCREEN to display the above menu, A square appears in the
top left corner and the sentence “ please press the button” appears. Press the square b utton in corner ①,
and the square will move to corner ②. Press the square again and it will move to corner③,
Press this square, and then the square in corner④, then press SAVE.
Press Ç in picture 1 or press Èin picture 2 to
enter the following menu:
Clock Adjust
Press CLOCK ADJ on the monitor to
adjust the clock. The buttons allow you to select
the digits for hours, minutes or seconds. The
buttons allow you to increase or decrease the selected
digit.
GB-52
Page 54
t
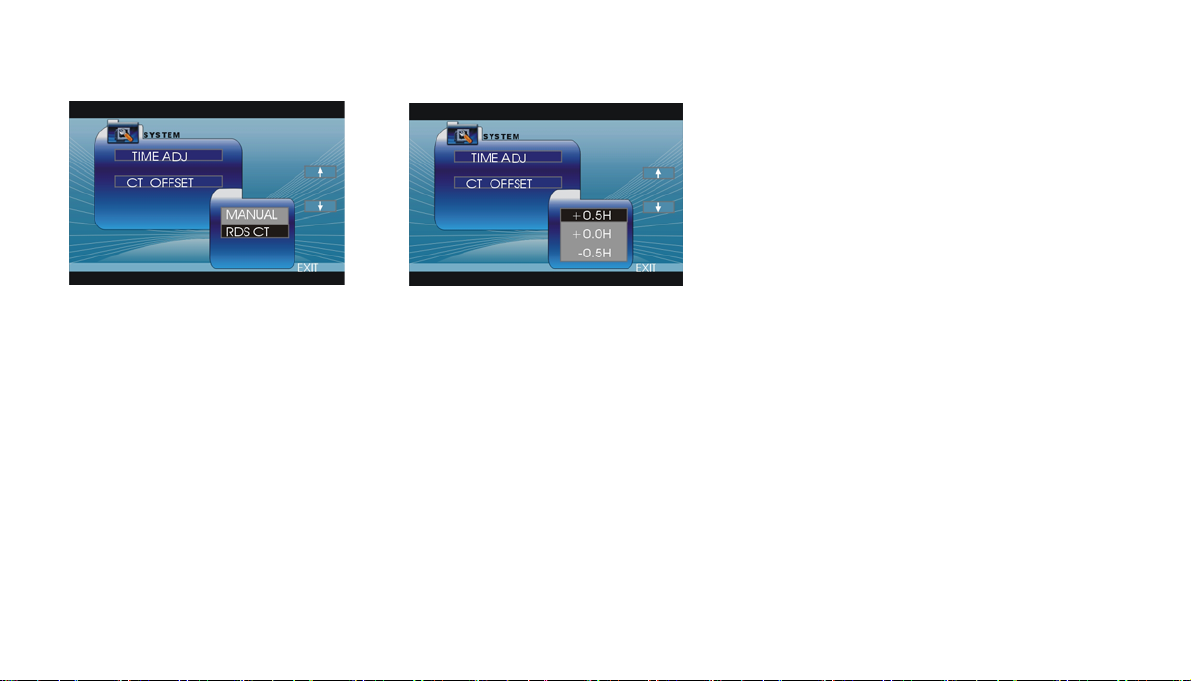
RDS Time Adjustmen
The option ‘TIME ADJ” allows you to
choose the RDS clock adjustment mode.
Select “MANUAL” to adjust the clock
manually or “RDS CT” to adjust it
automatically.
Offset Time Setting
The option “CT OFFSET” allows you to
introduce a time difference in order to
adjust the clock to daylight saving time,
actual time or winter time.
Each time you select “+0.5H”, the clock
will go forward by 30 minutes. Select
“-0.5H” to set the clock back 30 minutes.
This allows you to select a time that is
different from local time or RDS time.
Select “+0.0H” in order not to introduce a
time difference.
GB-53
Page 55

15.Specifications
FM S
General
Power Requirement
Load Impedance 4Ω
Max . Power Output 40W x 4
RMS output power 25W x 4
Tone Controls ±10 dB
Dimensions Approx.160x178 x 50mm (D/W/H)
TFT Sizes 7.0 ” diagonal (16: 9)
Angle between 30~100
folded and unfolded
Weight Approx.2.6kg
Resolution 1440 x 234
View angle 120(Horizontal), 100(Vertical)
150: 1
Contrast ratio 400
Brightness (cd/m2)
14.4V DC
(11-16V allowable)
Bass 100Hz
Treble 10KHz
ection
Tuning Range 87.5-108(MHz)(Europe)
IF Range
Usable Sensitivity
Sig n a l - t o - n o i se R a t i o
Stereo Separation
Frequency Response
10.7MHz
10dBuV
(-30dB)
50dB
30dB (1KHz)
20Hz-10KHz
AM Tuner Section
Frequency Range 522-1620(kHz)(Europe)
IF Range 450KHz
Usable Sensitivity 32dBuV
(-20dB)
GB-54
Page 56

D
VD/VCD/CD Player Section
VCD Signal System AUTO/PAL/NTSC
Compatible disc/file
Frequency Response 20Hz to 20KHz
Signal-to-noise Ratio 60dB
Separation 55dB(1KHz)
Distortion
USB/CARD Section
USB port type 2.0
USB port handling capacity 2 GB
CARD slot type
CARD handling capacity
DVD+R/RW, DVD-R/RW,
Xvid, CD-DA, CD-R/RW, MP3,
JPEG, VCD2.0
1%
SD/MMC
2 GB
Output Terminals
Video output x2
Rear/Front Wire out 2V
Subwoofer x1 0.8V
Reverse Video Input x1 1V
To Antenna x1
N
ote:
* Due to continuous pr
subject to change without prior notice.
oduct improvements, specifications and design are
1V
GB-55
Page 57

16.Simple Troubleshooting Guide
The following checklist can help you solve the problems which you may encounter when using the unit. Before consulting it, check the
connections and follow the instructions in the user manual.
Problem
No power.
Some errors occur in the LCD or it does not work when buttons
are pressed.
Unable to receive stations. • Check whether the antenna is inserted and properly connected, if not,
Poor quality of radio station.
Cause/Solution
• Check whether the fuses are blown (unit and car), if so, replace with
equivalent fuses.
• Press the RESET button.
insert the antenna or connect it properly.
• Check the antenna is fully extended; if broken, replace the antenna with
a new one. Check whether the antenna plug on the car is properly
connected to the radio connector.
• The antenna is not properly grounded.
Discs cannot be loaded.
Sound skips.
No video images.
Poor quality images.
Note:
* If any of the problem cannot be solved using the checklist, consult your nearest retailer. Never try to disassemble the unit.
• A disc is already loaded in the mechanism.
• The disc is dirty or damaged.
• Check that the brown cable is properly connected (connection to the
braking signal).
• The color system is not set properly. Set the color system correctly.
GB-56
Page 58
If at any time in the future you should need to dispose of this product please note that electrical products should not be disposed of with
household waste. Please recycle where facilities exist. Check with your Local Authority or retailer for recycling advice. (Waste Electrical and
Electronic Equipment Directive)
GB-57
 Loading...