

Page 1
www.scot t-sport s.com
BIKE OWNER’S MANUAL 2015
All right s reserved © 2014 SC OTT Sports SA
SCOTT Spo rts SA | 17 Route du Cro chet | 1762 Givisiez | Sw itzerland
Distrib ution: SSG (Europ e) Distrib ution Center SA
P.E.D Zon e C1, Rue Du Kiel l 60 | 6790 Aubang e | Belgium
V4.3/19012015
SCOTT
BMX
Page 2
02
BMX | BIKE OWN ER’S M ANUAL 201 5 BIKE OWN ER’S M ANUAL 20 15 | BMX
03
www.scot t-sport s.com
ENGLISH
ENGLISH
Congratulations on your purchase of a new S COTT bicycle!
We are confident that the bicycle will exceed your expectations
for value, performa nce, and ride quality. Each frame set a nd
component has been carefully selected and designed to enhance
your riding experience. W hether you are a beginne r cyclist, or
a seasoned pro, SCOT T bicycles will provide endless hours of
two‑whe eled fun.
We strongly r ecommend you take th e time to re ad this manual
and familiarize you rself with your new bi cycle.
If you have purchased a bi ke for your child, please take the time
to ensure they understand the safety information contained in
this manual.
Bicycle Safety . . . . . . . . . . . . . . . . . . . . . . . . . . . . . . . . . . . . . . . . . . . . .04
Saddle Height. . . . . . . . . . . . . . . . . . . . . . . . . . . . . . . . . . . . . . . . . . . . . 05
Chain Tension . . . . . . . . . . . . . . . . . . . . . . . . . . . . . . . . . . . . . . . . . . . . . 05
Brakes . . . . . . . . . . . . . . . . . . . . . . . . . . . . . . . . . . . . . . . . . . . . . . . . . 06
Tires and Rims . . . . . . . . . . . . . . . . . . . . . . . . . . . . . . . . . . . . . . . . . . . . 09
Wheels . . . . . . . . . . . . . . . . . . . . . . . . . . . . . . . . . . . . . . . . . . . . . . . . . .10
Maintenance and Care . . . . . . . . . . . . . . . . . . . . . . . . . . . . . . . . . . . . . . . . 13
Bicycle Care . . . . . . . . . . . . . . . . . . . . . . . . . . . . . . . . . . . . . . . . . . . . . . .15
Tightening Torques for SCOTT Bikes . . . . . . . . . . . . . . . . . . . . . . . . . . . . . . . 16
Troubleshooting . . . . . . . . . . . . . . . . . . . . . . . . . . . . . . . . . . . . . . . . . . . . 17
Warranty. . . . . . . . . . . . . . . . . . . . . . . . . . . . . . . . . . . . . . . . . . . . . . . . .18
Parts of Wear and Tear . . . . . . . . . . . . . . . . . . . . . . . . . . . . . . . . . . . . . . . 20
SCOTT Service Plan . . . . . . . . . . . . . . . . . . . . . . . . . . . . . . . . . . . . . . . . . 22
CONTENTS
Page 3
04
BMX | BIKE OWN ER’S M ANUAL 201 5 BIKE OWN ER’S M ANUAL 20 15 | BMX
05
A
ENGLISH
ENGLISH
BICYCLE SAFETY
IMPORTANT!
If you purchased th is bicycle f or a minor, it is essential that a respons ible adult
thorou ghly reads and explains the safety instruc tions in t his man ual to the minor.
Please ensure your SCOTT bike is completely asse mbled by your authorized SC OTT
dealer. This ensures that your bike is correctly set up to optimize safet y, performa nce
and fun while riding.
It is impor tant to understand the basics of an d exercise commo n sense when cycling.
Cycling is a dynamic sport that requires awareness of and reaction to various situations
and surroundings. Like any sport, cycling involves risks of injur y and damage. By
choosing to ride a bicycle, you assume the responsibility for those risks.
IMPORTANT!
Please us e your bike on ly for the p urpose i t was mad e fo r.
For instance, a road racing bike should not be used as a substitute for a mo untain bike in
off road terrain. Nor should a Trekking bike be used for down hill racing o r road racing.
If you have any questions regarding your new SC OTT bicycle, please contact your
authorized dealer.
Ride Frequently!
1. Obey all tra ffic laws .
Use proper signals when turning.
Never tow yourself b ehind another vehicle.
Do not weave or race in traffic.
2. Watch out f or parked cars.
A car door can open or a c ar can pull o ut into traffic at any time.
3. Always ensu re you are highly visible.
Wear bright colo rs, install reflectors properly and use lights at night.
4. Always wear a helmet.
Ensure the helmet meets or exceeds national safety standards.
5. Ensure that your bicycle is in good working condi tion before every ride.
Check your brakes, tires, components, etc.
6. Ensure that the bike is the rig ht size.
The rider sh ould be abl e to reach the bra ke levers pro pe rly.
7. Never have two people on a bicycle designed for one.
Except speci ally design ed and prop erly installed child c arriers.
8. Mount loads securely.
Never mount anything that interferes with b rakes or vision.
SADDLE HEIGHT
Comfortable riding depends on the position and height of the saddle . You can adjust
the saddle height by:
1. Straddle the saddle. Place the ball of your foot on th e pedal nearest to the grou nd.
Make sure the cranks are vertical.
2. If the heel of your foot points down about 30 degrees, the saddle h eight is correc t.
CAUTION!
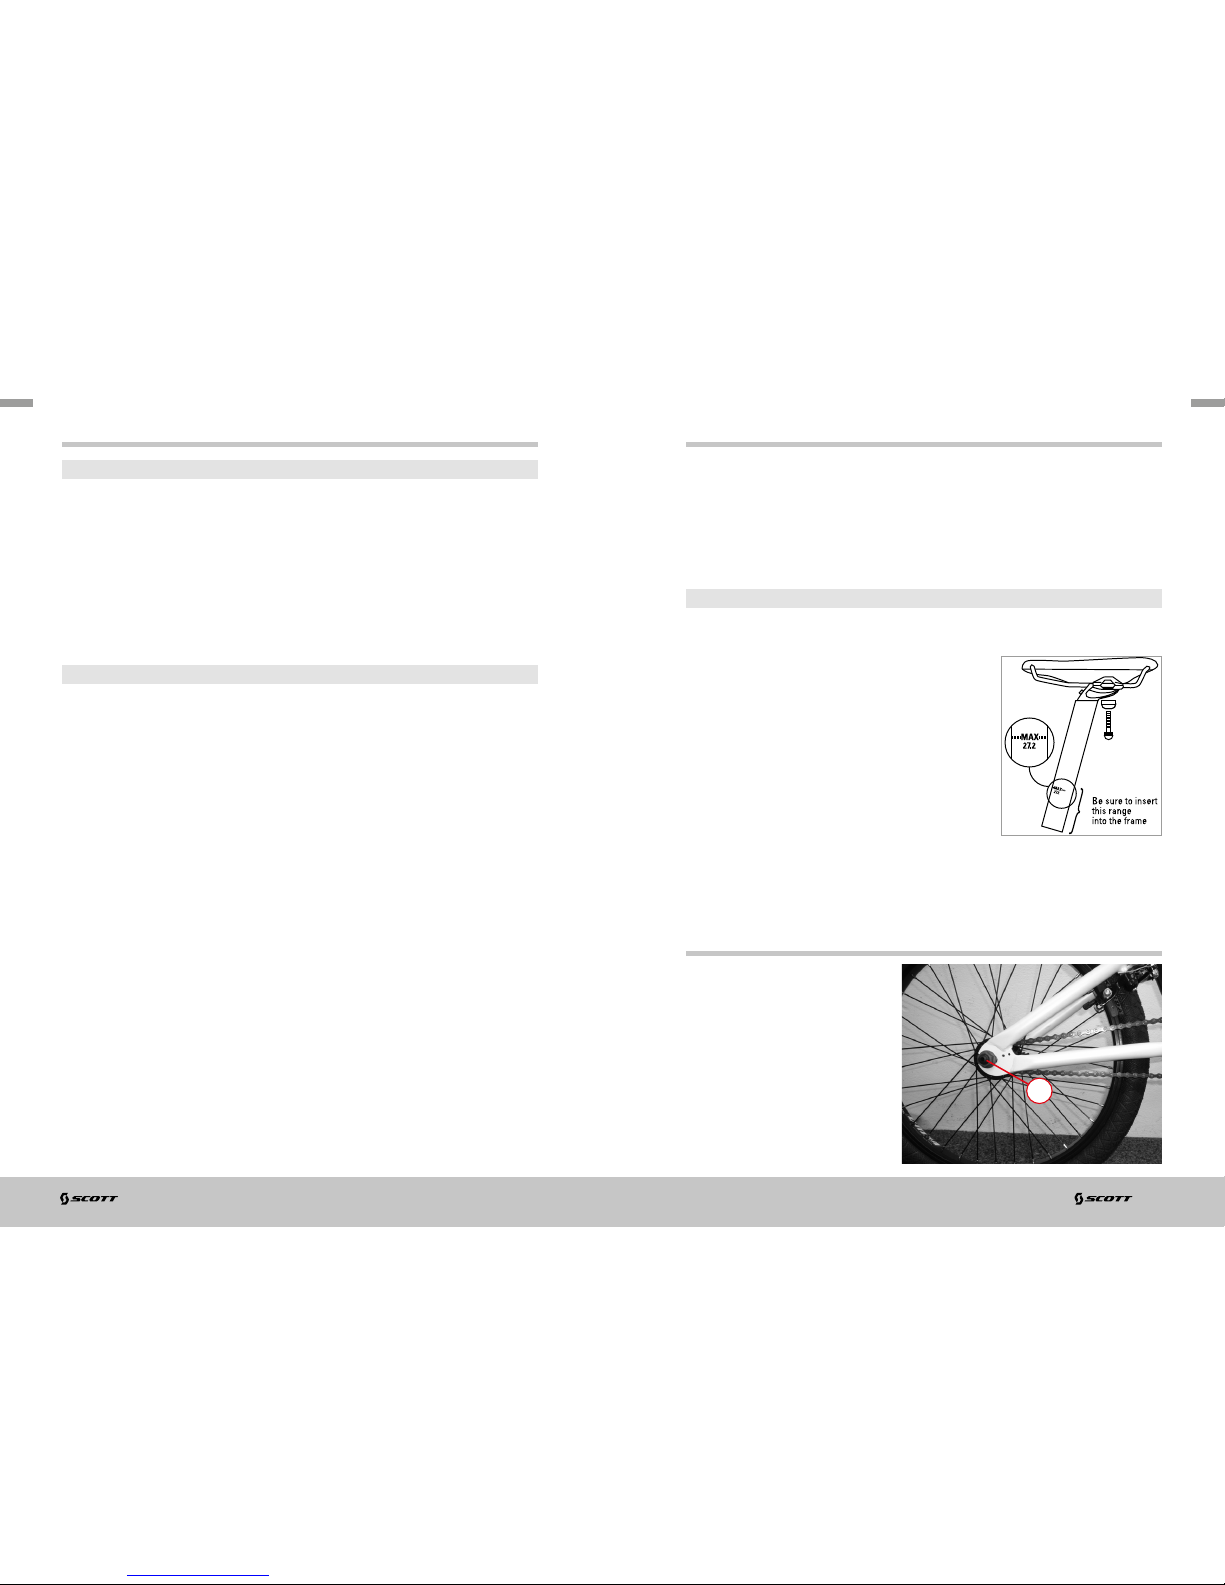
Ensure that the limit marking on your seat post is inside th e seat tube. If it is not
possible to rea ch the correc t seat height, you will nee d a larger size.
Ensure that the seatpost marking is inse rted into the
frame. If you need to chan ge the inclination of the
saddle or th e horizontal position, en sure you do not
exceed the max. tightening torque.
Screws with M5 sho uld be tighten ed with 6 Nm, a nd
M8 with 20 Nm.
Ensure the saddle is installed corre ctly with the seat
post before ever y ride.
Please note that SCOT T is not responsible for
damages c aused by neg lecting th e tightening torques
on the seat clamp fixing screws.
CHAIN TENSION
If the chain needs to be tensioned
again, release nut A on b oth sides
and pull the re ar wheel straight
backward u ntil the tension is ok.
Retighten nut A on both sides.
Please note the tightening torque in
the Tightenin g Torques table at the
end of this manual.
Page 4
06
BMX | BIKE OWN ER’S M ANUAL 201 5 BIKE OWN ER’S M ANUAL 20 15 | BMX
07
A B
A B
+
=3-4mm
2
2
1
1
A
B
C
1 mm 1 mm
12
1 1
2 2
BC
B+C=2 mm
ENGLISH
ENGLISH
BRAKES
GENERAL BRAKE ADJUSTMENT
You r SCOTT bike is f itted with a reliable and well‑functioning braking system,
provided the brakes are correctly adjusted. Check by measuring th e distance
between the brake shoes a nd the rim: it sh ould be 1. 5 to 2 mm.
Cable connecti on and adjustment of the (D ual Pivot) b rake
1. Put the quick release lever in
the closed position.
2. Adjust the brake shoe
clearance (as shown in the
illustration) and secure the
cable with the pinch bolt nut.
Cable bolt tightening
torque 6 ‑8 Nm
HOW TO CHANGE BRAKE PADS
1. Loosen the security screw with a 2 mm alle n key.
2. Push the used brake pad out of the aluminum brake shoe.
3. Push the new brake pad into the brake sh oe, according to the arrow showing the
mounting direction.
4. Tighten the security screw to approximately 1 .5 Nm .
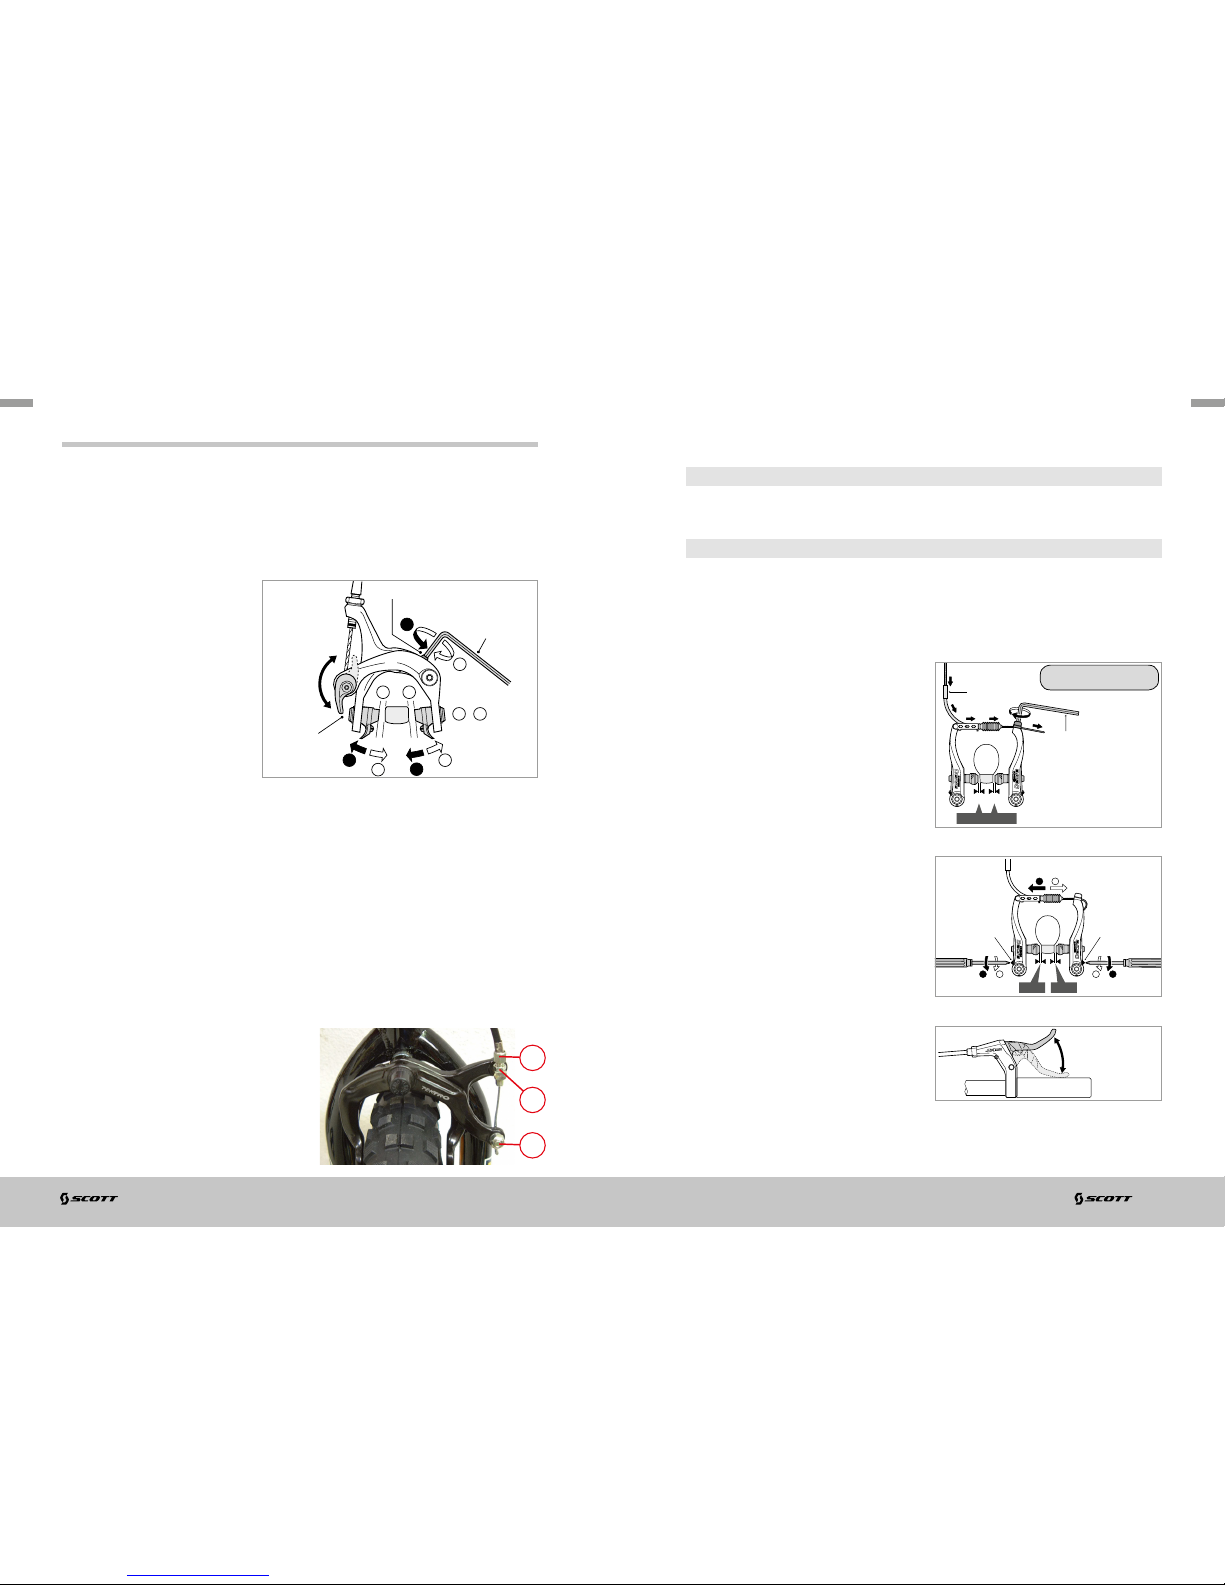
CALIPER BRAKE
Release counter nut A and tu rn adjustm ent screw B counter clockwise until the
distance between brake pads and rims is approx. 2m m on each side. Tighten
counter nut A.
‑ If the adjustme nt screw B is relea sed
already to the limit, then release cabl e
clamping screw C and turn ad justment
screw clockwise to its origin al position .
‑ Close the caliper brake with your h and
to the rim, adjust the brake c able and
tighten clamp ing screw C. Please note
the Tightenin g Torques table at the end
of this manual.
quick release
lever
centering adjustment bolt
3mm alle nkey
closed
open
‑ Finally make the fine tuning with adjustme nt screw B as mentioned above. The
wheel nee ds to spin free without touching the brake pa ds. Fix counter nut A.
IMPORTANT!
Make sure that the brake works pe rfect ly.
IMPORTANT!
Under wet con ditions the brake performance can decrease which will result in a
prolongation of the braking distance.
5mm allen key
tightening torque :
6‑8 Nm (52‑69 in. lbs.)
inner cable lead
Spring tension
adjustment screw
Spring tension
adjustment screw
Depress lever
about 10 times
V‑BRAKE
1. While holding the sh oe agains t the rim,
tighten the sho e fixing nut .
2. Pass the inner cable through the inner
cable lea d, and af ter setting so that the
total of the clearances between the lef t
and right shoes and the rim is 2 mm
tighten the cable fixing bolt.
3. Adjust the dista nce with the spring
tension adjustment screws.
4. Depress lever about 1 0 times
Page 5

08
BMX | BIKE OWN ER’S M ANUAL 201 5 BIKE OWN ER’S M ANUAL 20 15 | BMX
09
ENGLISH
ENGLISH
Replacement of the brake pads/cartridge shoe
Make sure to us e the correc t brake pad and brake shoe for each side. Those fo r the
left side are diffe rent from those for the right side. Slide the n ew pad into the s hoe
and make sure that the di rection is correct and that the security pi n holes concord.
Insertion of shoe fixing pin is ver y critical to keep shoe properly fixed in place
Remove the sho e fixing pin
Remove the sho e by sliding it a long the groove of the shoe h older
shoe fixing pin
shoe
for the left
same at front and rear
front
shoe
shoe holder shoe holder
shoe
front
same at front and rear
for the rig ht
shoe
insertion
direction
shoe fixing pin shoe fixing pin
TIRES AND RIMS
Tires should always be inflated within the man ufacture r’s recommendations . They are
rated from 40 to 80 lbs. (check your t ir es).
Higher pre ssure for smo other roads or heavy riders .
Lower pressure for more shock a bsorption on rougher terrains.
For example:
INFLATE TO MIN. 3.5 (5 0PSI) - MA X. 6.0 BAR (85PSI)
RIM AND WEAR OF THE RIM
If the brake system has brake pads, please be aware that the rim will become worn
through the action of braking.
When riding in wet and muddy terrain, for example, th e rim is quickly worn out.
The appea rance of small cracks or deformation of th e brake surface on the rim when
increasing the tire pressu re indicates i ncreased wear of the rim. I f this occurs , the rim
should be replaced imm ediately at an authorized dealer.
SCOTT bikes that are fu lly equipp ed (lights , mudgua rd, carri er) have a
wea r‑out‑indic ato r.
Please follow the instruc tions of the rim manufac turer shown in the manual o r on the
rim itself.
Page 6

10
BMX | BIKE OWN ER’S M ANUAL 201 5 BIKE OWN ER’S M ANUAL 20 15 | BMX
11
ENGLISH
ENGLISH
WHEELS
Bicycle wheels are desig ned to be removable for easier transportation an d for
repair of a tire pu ncture. In most cases, the whee l axles are inserted into slots, called
“dropouts” in the fork and f rame, but some suspe nsion mountain bikes use what is
called a “ through axl e” wheel mounting sys tem.
If you have a mountain bike equipp ed with through axle front o r rear wheels, make
sure tha t your deal er has given you the man ufact urer’s instru ctions, and follow
those when installing or re moving a th rough axle wheel. If you don’ t know what a
throug h axle is, a sk your d eal er.
Hex nuts or hex key bolts which are
threaded on to or into the hub axle
(bolt‑on wheel, fig . 10)
Your bicycle may be equipped with a dif ferent securing method for the front wheel
than for the rea r wheel. D iscuss the wh eel securing method fo r your bicycle with
your dealer.
It is very im porta nt that you unders tand th e type of wheel securing method on
your bicycle, that you know how to secu re the wheels corre ctly, and that you know
how to apply the correct clamp ing force t hat safely secures the wheel. Ask you r
dealer to i nstruct you in corre ct wheel r emoval and installation , and ask h im to
give you any available manufact urer’s instructions.
FRONT WHEEL SECONDARY RETENTION DEVICES
Most bicycles have front forks which utilize a secondary wh eel retention d evice
to keep the wheel from disengaging if the q uick release is incorrectly adjusted.
Secondary retention devices are not a substitute for corre ct quick release
adjustme nt. Secondary retention devices fall into two basic categories:
1. The clip‑on typ e is a part whi ch the manufacturer a dds to the front wheel hub or
front fork.
2. The integral type is molde d, cast or machined into the outer faces of the front fo rk
dropouts.
Ask your dealer to explain the particular secondary retention device on your bike.
WARNING!
Do not remove or dis able the secondary retention device . As its name implies , it
serves as a ba ck‑up for a critical adjustm ent. If the quick release is not adjusted
correctly, the secondary retention device can reduce the risk of the wheel
disengaging from the fork. Removin g or disabling the secon dary retention device
may also void the warranty.
Failure to properly adjust the q uick release mechanism can cause the wheel to
wobble or disengage, which could cause you to loose co ntrol and fall, resulting i n
serious injury or death.
FIXING A FLAT TIRE
Bike tires are fit ted with tubes .
Remove the whee l from the bike and deflate it. U nhook the ti re from one sid e of the
rim using tire tools. Do not screwdrivers .
Remove the tube from the tire casing, repair or replace it . Install th e new or repaired
tire. Fill the tube lightly with air in order to let it ta ke its shape. Put the valve stem
through the hole, and fit the inside tire. Put the tire be ad in the rim starting at the
valve and finishing at the op posite end, working on both sides. Push the valve stem
into the tire and pull it back down to seat. Make sure the tube is not pin ched und er
the tire bead . Inflate with hand or foot‑pump.
Close the brake’s quick relea se system carefully.
USE OF A BICYCLE HAULER
SCOTT bikes are not intended to be used with haulers (load‑h aulers , kids‑haulers,
Trailer bik es) .
Please note that SCOT T will not take any war ranty or res ponsibility when using
a hau ler.
There are too ma ny different haulers a nd hauler fixation systems on the market
to give a detailed table of system s that might fit without technical problems or
endangering the passengers.
Page 7

12
BMX | BIKE OWN ER’S M ANUAL 201 5 BIKE OWN ER’S M ANUAL 20 15 | BMX
13
ENGLISH
ENGLISH
USE OF A BABY SEAT
SCOTT bikes such as Racing Conce pt, Racing , Endurance, Progressive, Road,
Roadster and Kids Series are not intended to be used with baby seats .
Please note that SCOT T will not take any war ranty or res ponsibility when using a
baby seat on bikes mentioned above.
There are too ma ny different baby seat and b aby seat fixation systems on the m arket
to give a detailed table of system s that might fit without technical problems or
endangering the passengers.
ASSIGNMENT OF BRAKE LEVERS TO FRONT AND REAR BRAKE
In general SCOTT bikes are d elivered an d preassem bled with the right lever
matching the rear brake and th e left lever matching the front brake.
Due to nationa l laws this may have been changed by your SCOT T dealer to fulfil the
national laws.
Please ask you r dealer to explain to you the assignment of the brakes and brake
levers when ha nding over the bike.
MAXIMUM WEIGHT AND LOAD OF SCOTT BIKES
SCOTT mountain bikes are intended for a maximum rid er weight of 11 0 kgs, the
overall weight of bike including rider should not exceed 11 9‑128kgs (depe nding on
bike weight).
SCOTT trekking bikes are intended for a maximum rid er weight of 11 0 kgs, the
overall weight of bike including rider and a maximum load of 25kgs shou ld not
exceed 143‑15 0kgs (depending on bike weight).
SCOTT road bikes are intended for a maximum rider weight of 110 kgs, the overall
weight of bike including rider should not exceed 117‑120kgs (depen ding on bike
weig ht).
SCOTT kids bikes are intended for a maximum load of 50 kgs including rider
and load.
Please always follow th e inform ation of t he compo nent sup pliers r egardi ng the
maximum rider weight.
USE OF SCOTT BIKES IN PUBLIC TRAFFIC
Please follow the national l aws concerning the use of equ ipped and non‑equipped
bikes in public traffic . For example , reflector s and light systems.
MAINTENANCE AND CARE
MAINTENANCE SCHEDULE
Please be aware that you must follow the list of maximum tightening torques for
screws at the end of th is ch ap ter.
CHECK BEFORE EVERY RIDE:
‑ All bolts and nuts, espe cially the qu ick releases of the wheels for proper f it. If they
are loose tighte n them according to the maximum tightening torque.
‑ Stem and handle bar for visib le damage and replace them if neces sary. Ensure
that the bolts are tightened evenly when closing the front c ap accordin g to the
tightening torq ue recomme nded by the pro ducer of the parts.
‑ Braking system s.
‑ Air p ressure of the tires according to the recommendation of the producer.
‑ Light systems and bell.
‑ Handlebar g rips to be fixed to the h andlebar.
‑ All parts of the re ar suspension system in cluding mounting bolts .
‑ The front suspe nsion fork on perfec t functio n and play in the b ushings.
CHECK ADDITIONALLY EVERY MONTH
‑ Front and rear derailleur for perfect f unction a nd grease th em. Readjust the
system and cle an it if necessary.
‑ The play of the headset. Readjust it if necessary.
‑ Brake and shif ting cables on perfect wear and leakage on hydraulic systems.
Grease the c ables if necessary.
Page 8

14
BMX | BIKE OWN ER’S M ANUAL 201 5 BIKE OWN ER’S M ANUAL 20 15 | BMX
15
ENGLISH
ENGLISH
CHECK WHEN NECESSARY OR AT LEAST ONCE A YEAR AT YOUR
LOCAL DEALER
‑ Chain wear and tension (on bikes equipped with internal gear hu bs). Readjust if
necessary, clean and grease the chain.
‑ Bot tom bracket cartridge for play, replace it if ne cessary.
‑ Pedal bearin gs for play, replace th em if necessary.
‑ Front and rear derailleur for perfect f unction a nd grease th em. Readjust the
system and cle an it if necessary.
‑ Stem and handle bar for visib le damage and replace them if neces sary. Ensure
that the bolts are tightened evenly when closing the front c ap, according to the
tightening torq ue recomme nded by the pro ducer of the parts.
‑ Complete brake sys tem on perfect func tion and rea djust and grease it if necessary.
Replace worn o ut or defec tive parts . Replace leaking hydraulic pipelin es at once .
‑ Rims and tension of spokes. If n ecessar y true them.
‑ Air p ressure of the tires according to the recommendation of the producer.
‑ Overall condition of the tires.
‑ Light systems and b ell.
‑ Handlebar g rips to be fixed to the h andl eba r.
‑ All parts of the re ar suspension system in cluding mounting bolts.
‑ The front suspe nsion fork on perfec t functio n and play in the b ushings.
‑ Frame and fork on perfect co ndition, replace if damaged.
SPARE PARTS FOR YOUR SCOTT BIKE
When buyin g spare par ts we strongly recommend visiting your lo cal SCOTT dealer
as they will be best equipped with the knowledge, advice and specific part s that are
correct for your bike.
By doing so you can avoid using wron g or incorrectly installed parts that could
damage your bike or cause p ersonal injuries . This is extrem ely impor tant on parts of
the brake system , the tire and air tube.
Please only use origina l spare par ts as only these can gua rantee optimum function
and safety while riding . Please note that SCOT T is not responsible for damages
caused by not u sing origin al spare parts.
Never use adapter solutions on parts such as brakes , seat/seatpost, stem/handlebar!
BICYCLE CARE
We recommend periodical care in order to keep your bike functioni ng well and in
good condition.
Doing so maintains the value of the bike and helps to prevent corrosion or othe r
damages.
‑ Cle an using a sof t brush, water and sof t towel. Do not use a high pressure cleaner,
otherwise bearings , colors or d ecals may be come damaged
‑ Do not use aggressive cleaning substances
‑ Rep air any damage to the paint immediately
‑ Gre ase or oil all m etal parts especially during winter use
Please use biodegrad able bicycle cleaner s and degreasers which are available f rom
your local S COTT dealer.
Page 9

16
BMX | BIKE OWN ER’S M ANUAL 201 5 BIKE OWN ER’S M ANUAL 20 15 | BMX
17
ENGLISH
ENGLISH
TIGHTENING TORQUES FOR SCOTT BIKES
PART MOUNTING BOLT MAX. TO RQUE
Rear Deraille ur ‑ Mounting bolt
‑ Cable f ixing bolt
‑ Pulley screws
7.8 ‑9.8 Nm
3.9‑5. 9 Nm
2.9‑3. 9 Nm
Front Deraill eur ‑ Clamp
‑ Cable f ixing bolt
4.9‑6 .8 Nm
4.9‑6 .8 Nm
Rapidfire lever ‑ Clamp mounting bolt 4.9‑6 .8 Nm
STI ‑ Clamp mounting bolt 4.9‑6. 8 Nm
Brake lever ‑ Clamp mounting bolt 4.9‑6. 8 Nm
Freewheel hub ‑ Freewheel body
‑ Cassette fixing nut
35‑49 N m
30‑49 N m
Crankset ‑ Square type
‑ Spline type
‑ Chainring screws
35‑45 N m
35‑50 N m
7.8 ‑10.7 Nm
BB‑Cartridge 50 ‑70 Nm
Pedals 40 Nm
Stem Mounting bo lts
‑ M5
‑ M6
5.6‑7. 8 Nm
9.8‑13. 7 Nm
Seatpost‑seatclamp ‑ M4
‑ M5
‑ M6
2.8‑3.9 Nm
5.6‑7. 8 Nm
9.8‑13. 7 Nm
V‑Br ake ‑ Frame mounting bolts
‑ Cable f ixing bolt
‑ Brake pad b olts
5‑6.8 Nm
5.8‑7. 8 Nm
5‑6.8 Nm
Calipe r Disc brake ‑ Magura
‑ Shimano
‑ Formula
‑ Hayes
6 Nm
6‑8 Nm
9 Nm
12 Nm
Disc mounting bolts ‑ Magura
‑ Shimano
‑ Formula
‑ Hayes
4 Nm
2‑4 Nm
6.2 Nm
5 Nm
TROUBLESHOOTING
TROUBLE REASON SOLUTION
Fork Shakes Headset Loose Tighten an d Lock
Chain Pops Out
‑ Derailleurs Not Adjuste d
‑ Chainwheel Bent
‑ Adjust Acco rding to Manual
‑ Fix or Change
Bearings Squeak or Crack
‑ Bottom Bra cket
‑ Pedals Need Grease
‑ Hubs Nee d Grease
‑ Replacement
‑ Dismount, Clean, Grease
‑ Dismount, Clean, Grease
Bearin gs Are Loose
‑ Bottom Bra cket
‑ Pedals
‑ Hubs
‑ Replacement
‑ Tighten and Lock
‑ Tighten and Lock
Handlebar Cracks, Shakes Stem Or Han dlebar Bolts Are
Loose or Turn
Tighten All B olts and Nuts
Seat Post Turns o r Slides
‑ Quick Rel ease is Loose
‑ Seat Post D iameter Too Thin
‑ Retighten and Lock
‑ Check Diameter
Front Derailleur Rattles
‑ Bottom B racket Loose
‑ Not Adjuste d
‑ Chainwheel Bent
‑ Tighten B ottom Bracket
‑ Adjust
‑ Fix or Change
Suspen sion Fork is Lo ose Contac t Your Local Dea ler
Rear Susp ension is Loose C ontact Your Lo cal Deal er
Page 10

18
BMX | BIKE OWN ER’S M ANUAL 201 5 BIKE OWN ER’S M ANUAL 20 15 | BMX
19
SCOTT Bikes
Gambler, Voltage FR, Volt-X
5
ENGLISH
ENGLISH
How Do You Make a Clai m Under This Limit ed Warranty?
To make a claim under this limited warra nty, you must notif y SCOT T of the claimed defect
within the warra nty perio d and timely return the Prod uct to SCOT T at your expe nse for
inspection. Please contact you r authorized S COTT dealer, call SCOTT’s customer service
or the national SCOTT distributor (dealer locator : www.scot t‑sports .com). All returne d
Products must be acco mpanied by proof of purchase (receipt) from an authorized
SCOTT dealer or th is limited warranty will not a pply. In case of replacement or refund ,
returned Pro duct becomes the property of S CO TT.
A protocol for the handing over of the Product (which you will find at the end of the
manual) will remain in copy at th e SCOT T dealer af ter acceptance and signature of
the consume r. It is obligatory to show this protocol of h anding over tog ether with the
defective part in case of a wa rranty cla im given that it provides evidence of purchase or
this limited warranty will not apply.
How Do State L aws Affect Your Rights Under Th is Limited Warranty ?
This limited warranty gives you specific legal rights, and you may also have other right s,
which vary f rom state to state.
Recommendation
We strongly recommend that you use only autho rized SCOT T dealers for yearly
maintenance services and for repairs, as improper or incorrectly performed maintenance
or repairs voids this limited wa rranty. Cost s for maintenance service have to be borne by
the consumer.
What is Covered?
This warrant y covers defec ts in materia ls and workm anship at the time of transfe r of risks
in frames , swingarm s and forks (provided it is a fork of SCOTT) on S COTT branded bikes
sold completely assembled by SCOTT or an authorized SCOTT dealer (“Product”).
How Long Does Coverage Last?
This voluntary manuf acturer ’s warranty is limited to five years for frames a nd swingar ms,
respectively two years for forks, from th e date of purchase of the Product and is limited
to the first purchaser of the Product. Transfer of the Produ ct from the f irst purch aser to
another pe rson terminates this limited warranty.
The limited warranty of five yea rs for the fra mes and swingarms sha ll only be gra nted
in case once a year a maintena nce service has been effected a ccording to maintenance
requirements as set for th in the man ual. The ef fected annual maintenance service shall
be confirmed by stamp an d signature. In case such an annual m aintenance service has
not been ef fected the warranty of f ive years for the frame shall b e reduced to three years.
Costs for ma intenance a nd service have to be borne by the own er of the Product. On
Gambler, Voltage Fr and Volt‑X the warranty perio d is limited to two years.
Repaired or replaced Products a re covered for the remainder of th e original warranty
period and subject to the conditions o utlined in th e original warranty, to the extent
permitted by law.
Hereby SCOTT grants a worldwide volunt arily manufacturer’s warranty. To the extent
permitted by law and unless a shorter duration is stip ulated by law, any warranties
implied by law are limited in duration to maximum five, respec tively two years, from the
date of purchase of the Produc t and are limited to the first purchaser of th e Product.
What Will SCOTT Do?
SCOTT will replace by similar kind and quality or repair any defective Product, or will
refund your purchase price (as evidenced by your tendered receipt of purchase of the
Product), at SCOTT ’s option. You must p ay charges in co nnectio n with replacement of
any non‑defective par ts. In su ch a case, you will be alerted to the advisability of replacing
non‑defective par ts, so you ca n pre‑auth orize the costs .
What Does This Limited Warranty Not Cover?
This limited warranty does not cover defec ts which did not exist before the transfer of
risks. This limited warra nty does not cover Products used in rental operations. This limited
warranty does not cover purchases of not completely ass embled bi kes. This lim ited
warranty does not cover any defect caused by “wear and tear” (a complete list of all parts
of “wear and tear” can be found in the manual), accident, neglect, improper handling,
abuse, misuse, an act of God, improper assembly, non‑compliance with recommended
maintenance and care procedures, improper or incorrectly performed maintenance or
repairs pe rformed by someone oth er than an authorized SC OTT dealer, use of parts or
devices not consistent with the Product, and alteration of the Product. All Products come
with a manual; p lease carefully follow th e instructions located there or af fixed elsewhere
to the Product. To the extent permitted by law, conseque ntial and incidental damages are
not recoverable under this limited warranty.
WARRANTY WARRANTY
Page 11

20
BMX | BIKE OWN ER’S M ANUAL 201 5 BIKE OWN ER’S M ANUAL 20 15 | BMX
21
ENGLISH
ENGLISH
PARTS OF WEAR AND TEAR
PARTS OF WEAR AND TEAR ARE EXCLUDED FROM AN Y WARRANT Y.
CHAIN
The chain is subject to wear and tear due to its use. The exte nd of the wear an d tear
depends on the mainten ance and conditions the bike is subjec ted to (amount of
kilometers, rain, di rt, salt, etc .).
Cleaning a nd greasin g will help to prolong the life of the chain but it is th e
responsibility of the owne r to replace the chain when reaching the wear limit.
SPROCKETS, CHAINRINGS AND PULLEYS
The sprockets, chainrings and pu lleys are subje ct to wear and tea r due to their use.
The extend of the wear and tear depends on the maintenance and conditions the
bike is subjec ted to (amount of kilom eters, rain, dirt, salt, etc.).
Cleaning a nd greasin g will help to prolong the life of the sprockets, chainrings and
pulleys, but it is the respon sibility of th e owner to replace them when re aching the ir
wear limit.
SHIFTING AND BRAKE CABLES
All cables must be checked regularly and chan ged if necessary. Cables may need to
be change d more regularly if the bike is of ten left o utside or exp osed to weather.
BRAKE PADS
All brake pads, whether they are rim‑b rakes, disc‑brakes or internal brakes , are
subject to wea r and tear due to their use.
The extend of the wear and tear depends on the maintenance and conditions the
bike is subjec ted to (amount of kilom eters, rain, dirt, salt, etc.).
Check your brake pads regularly and re place them if necessary.
RIMS
When using rim brakes, n ot only are the brake pads subject to wear an d tear, but also
the rim. So regularly check the rims , e.g. when inflating the tires.
If you see small cracks or deformation in the brake surface of the rim while inflating
the tires, then replace the rim immediately.
Rims with wear‑out indicators e nable the bike user to easily check the con dition of
the rim. Refe r to the sticker on th e rim.
TIRES
The tires are subject to wear and tear due to their use. The extend of the wear and
tear depen ds on the maintenance and conditions the bike is subje cted to and is
influenced by the owner's riding style.
Aggressive braking will reduce the lifetime of the tire dramat ic all y.
In addition , check the a ir pressure re gularly and inflate the tire according to the
pressure reco mmende d by the produce r of the tire which is imprinted on the sidewall
of the tire.
LIGHT SYSTEMS AND REFLECTORS
A well functi oning light system is incre dibly impo rtant for your riding safety in
public traf fic. Before every ride check your front and tail lights and the condition of
the reflectors. Light bulbs are subject to wear and tear and we recommend taking
replacements with you in case of failure.
HANDLEBAR GRIPS
Handleb ar grips are subject to wear and tear due to their use and should be replaced
immediately if they no longer fit to the handlebar or b ecome loose.
HANDLEBAR, STEM AND SEAT POST
The handlebar, stem and seat post are subject to high dynamic forces while riding.
Please che ck these par ts regularly for visible cracks or d amage and replace the m if
necessary.
In addition , we recomme nd a periodical repla cement (every two years) of these parts
if you ride often and hard.
Page 12

22
BMX | BIKE OWN ER’S M ANUAL 201 5 BIKE OWN ER’S M ANUAL 20 15 | BMX
23
ENGLISH
ENGLISH
SCOTT SERVICE PLAN SCOTT SERVICE PLAN
Model ..............................................................................
Yea r ................................................................................
Size ................................................................................
Frame ..............................................................................
Date of purchase ...................................................................
Annual service to be done
‑ Check of shock mounts incl. lubricating the bushings
‑ Check of swingarm pivot incl. axle and mounts
‑ Check of rear sho ck according to the enclose d shock manual
‑ Check of hubs, bottom bracket and headset
‑ Check of all screws of th e bike
‑ Check of handle bar, stem, saddle rails and seat post
‑ Check if brakepads and rims are worn out
‑ Check of disc brake according to enclosed ser vice manual
‑ Check of suspension fork according to encl osed service manual
‑ Check of shifters and derailleurs incl. cables.
Date of Ser vice: Dealer’s Signature:
Page 13

24
BMX | BIKE OWN ER’S M ANUAL 201 5 BIKE OWN ER’S M ANUAL 20 15 | BMX
25
ENGLISH
ENGLISH
SCOTT SERVICE PLAN SCOTT SERVICE PLAN
Model ..............................................................................
Yea r ................................................................................
Size ................................................................................
Frame ..............................................................................
Date of purchase ...................................................................
Annual service to be done
‑ Check of shock mounts incl. lubricating the bushings
‑ Check of swingarm pivot incl. axle and mounts
‑ Check of rear sho ck according to the enclose d shock manual
‑ Check of hubs, bottom bracket and headset
‑ Check of all screws of th e bike
‑ Check of handle bar, stem, saddle rails and seat post
‑ Check if brakepads and rims are worn out
‑ Check of disc brake according to enclosed ser vice manual
‑ Check of suspension fork according to encl osed service manual
‑ Check of shifters and derailleurs incl. cables.
Date of Ser vice: Dealer’s Signature:
Model ..............................................................................
Yea r ................................................................................
Size ................................................................................
Frame ..............................................................................
Date of purchase ...................................................................
Annual service to be done
‑ Check of shock mounts incl. lubricating the bushings
‑ Check of swingarm pivot incl. axle and mounts
‑ Check of rear sho ck according to the enclose d shock manual
‑ Check of hubs, bottom bracket and headset
‑ Check of all screws of th e bike
‑ Check of handle bar, stem, saddle rails and seat post
‑ Check if brakepads and rims are worn out
‑ Check of disc brake according to enclosed ser vice manual
‑ Check of suspension fork according to encl osed service manual
‑ Check of shifters and derailleurs incl. cables.
Date of Ser vice: Dealer’s Signature:
 Loading...