

Page 1

CME855A & CME1000A
INTRODUCTION
This manual is intended as a reference for the
installation of a Scotsman ice maker models
CME855 and the CME1000.
TABLE OF CONTENTS
SPECIFICATIONS . . . . . . . . . . . . . . . . . . . . . . . . . . . . . . . . . . . . . . . . . page 2
UTILITY CONNECTION LOCATIONS . . . . . . . . . . . . . . . . . . . . . . . . . . . . . . . page 3
FOR THE INSTALLER: Environmental Limitations . . . . . . . . . . . . . . . . . . . . . . . . page 4
FOR THE INSTALLER: Machine & Bin Assembly . . . . . . . . . . . . . . . . . . . . . . . . . page 5
STACKING TWO UNITS . . . . . . . . . . . . . . . . . . . . . . . . . . . . . . . . . . . . . . page 6
FOR THE PLUMBER . . . . . . . . . . . . . . . . . . . . . . . . . . . . . . . . . . . . . . . . page 7
FOR THE ELECTRICIAN: Electrical Connections . . . . . . . . . . . . . . . . . . . . . . . . page 8
FOR THE INSTALLER: Final Check List . . . . . . . . . . . . . . . . . . . . . . . . . . . . . . page 9
INITIAL START UP . . . . . . . . . . . . . . . . . . . . . . . . . . . . . . . . . . . . . . . . . page 10
ADJUSTMENT OF THE TIMER & SWITCH ASSEMBLY . . . . . . . . . . . . . . . . . . . . . page 12
REFRIGERATION SYSTEM OPERATION . . . . . . . . . . . . . . . . . . . . . . . . . . . . page 13
WATER SYSTEM OPERATION . . . . . . . . . . . . . . . . . . . . . . . . . . . . . . . . . . page 14
COMPONENT DESCRIPTION . . . . . . . . . . . . . . . . . . . . . . . . . . . . . . . . . . . page 15
SERVICE SPECIFICATIONS: CME855A . . . . . . . . . . . . . . . . . . . . . . . . . . . . . page 17
SERVICE SPECIFICATIONS: CME1000A . . . . . . . . . . . . . . . . . . . . . . . . . . . . . page 18
CLEANING . . . . . . . . . . . . . . . . . . . . . . . . . . . . . . . . . . . . . . . . . . . . . page 19
SERVICE DIAGNOSIS . . . . . . . . . . . . . . . . . . . . . . . . . . . . . . . . . . . . . . . page 21
REMOVAL AND REPLACEMENT . . . . . . . . . . . . . . . . . . . . . . . . . . . . . . . . . page 23
REFRIGERATION SERVICE . . . . . . . . . . . . . . . . . . . . . . . . . . . . . . . . . . . . page 25
LIQUID CHARGING . . . . . . . . . . . . . . . . . . . . . . . . . . . . . . . . . . . . . . . . page 26
A Service Parts List and the Wiring
Diagrams are located in the center of this
manual, printed on yellow paper.
October, 1994
Page 1
Page 2
SPECIFICATIONS
CME855A & CME1000A
Page 2
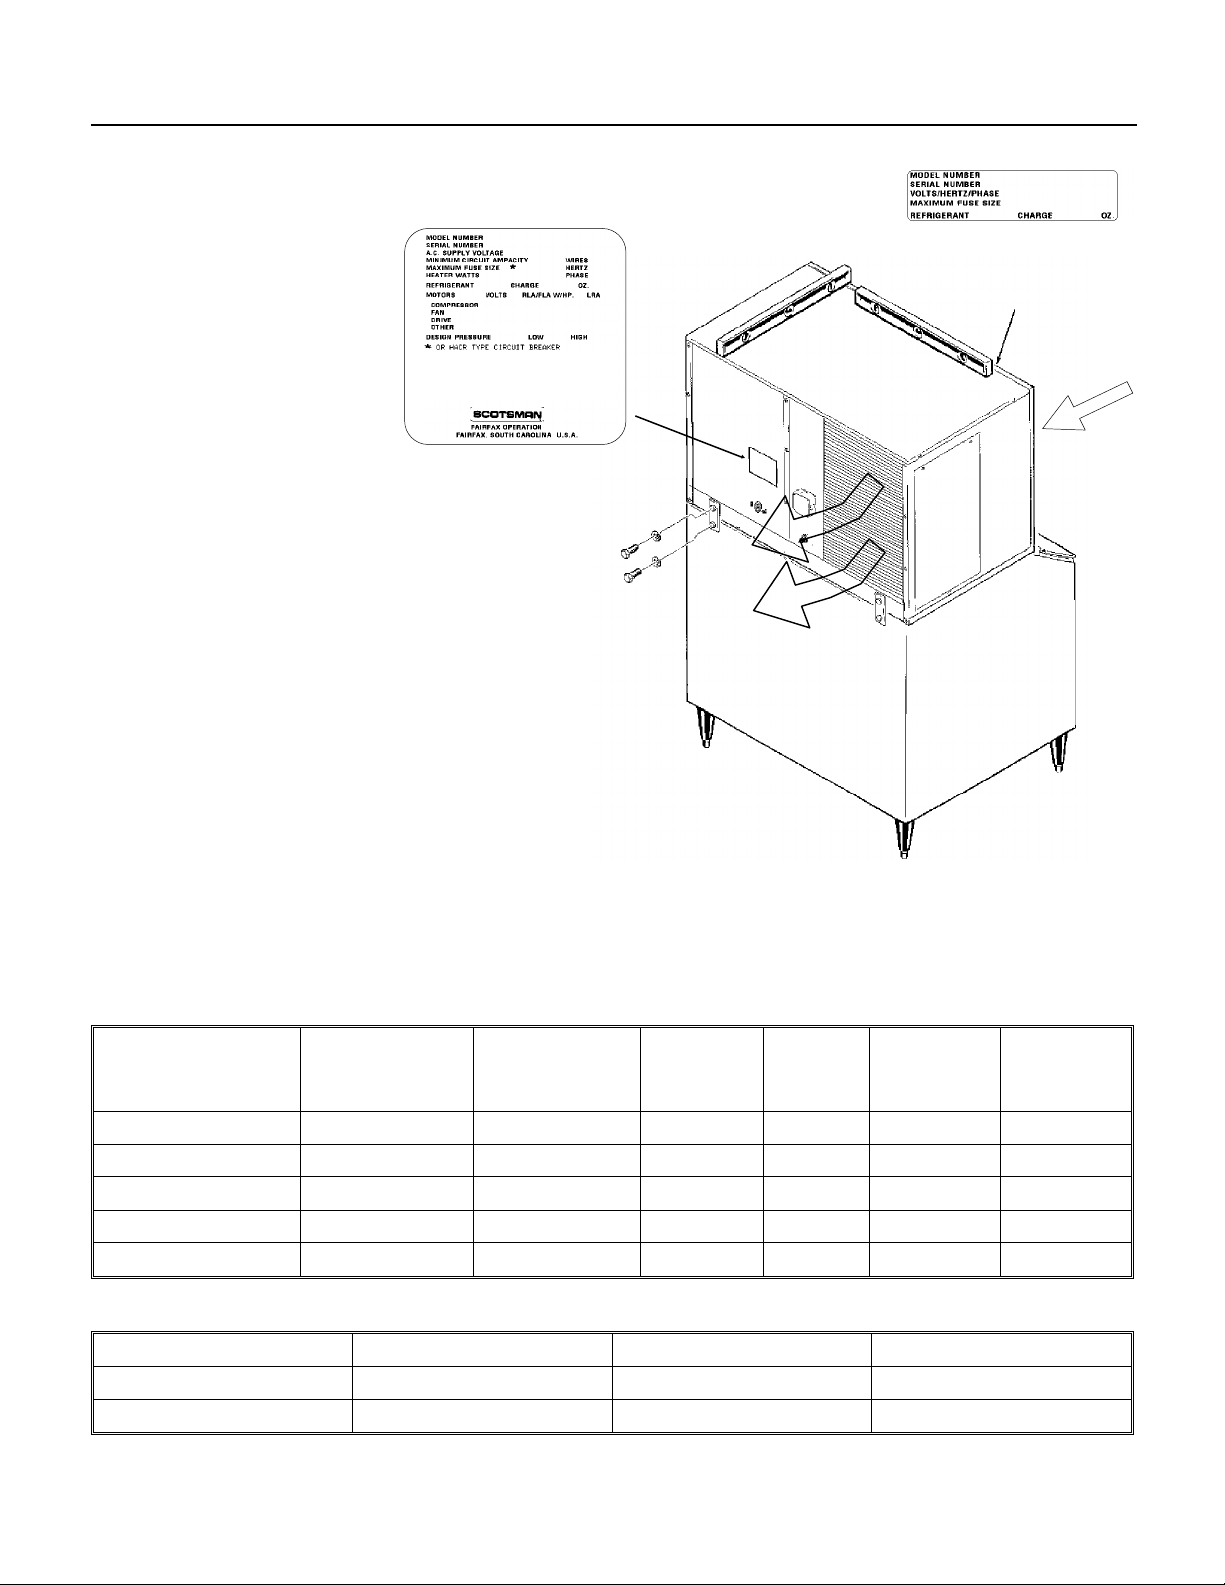
Always refer to the nameplate, located on the back
of the cabinet, for the:
••model number,
••serial number,
••basic electrical
requirements,
••minimum circuit ampacity,
••maximum fuse size,
••and refrigerant charge.
Serial Number
Plate Behind
Front Panel
A serial number plate with the model number,
serial number and refrigerant charge is located
behind the front panel, near the control box.
The unit comes from the factory with the correct
refrigerant charge. The refrigerant charge
information is for recharging, should that be
necessary.
All utility connections are made at the back of the
ice maker.
Before beginning installation, be sure that all of the
components necessary for complete assembly of
the ice system are available, and are the correct
components with regard to model, voltage, and
finish.
The CME855 or CME1000 will fit Scotsman bin
BH800 without needing a bin top. Other bins will
require a bin top.
Model Number Dimensions
W" x D" x H"
CME855AE-32A 42 x 24 x 27 208-230/60/1 R-404A 15.9 20 36 ounces
CME855AE-6A 42 x 24 x 27 230/50/1 R-404A 36 ounces
CME1000AE-32A 42 x 24 x 27 208-230/60/1 R-404A 19.9 20 42 ounces
CME1000AE-3A 42 x 24 x 27 208-230/60/3 R-404A 13.8 15 42 ounces
CME1000AE-6A 42 x 24 x 27 230/50/1 R-404A 42 ounces
* The system charge is in the machine. This number is for recharging purposes only. If the nameplate has a
different value, go by the nameplate. ** Or HACR type circuit breakers.
Basic Electrical Refrigerant
Type
Air Out
Min.
Circ.
Amps
Max.
Fuse** Size
Refrigerant
Charge*
Air In
Air Temperature Water Temperature Voltage
Minimum 50
Maximum 100
0
F. 400 F. -5%
0
F. 1000 F. +10%
December, 1994
Page 3
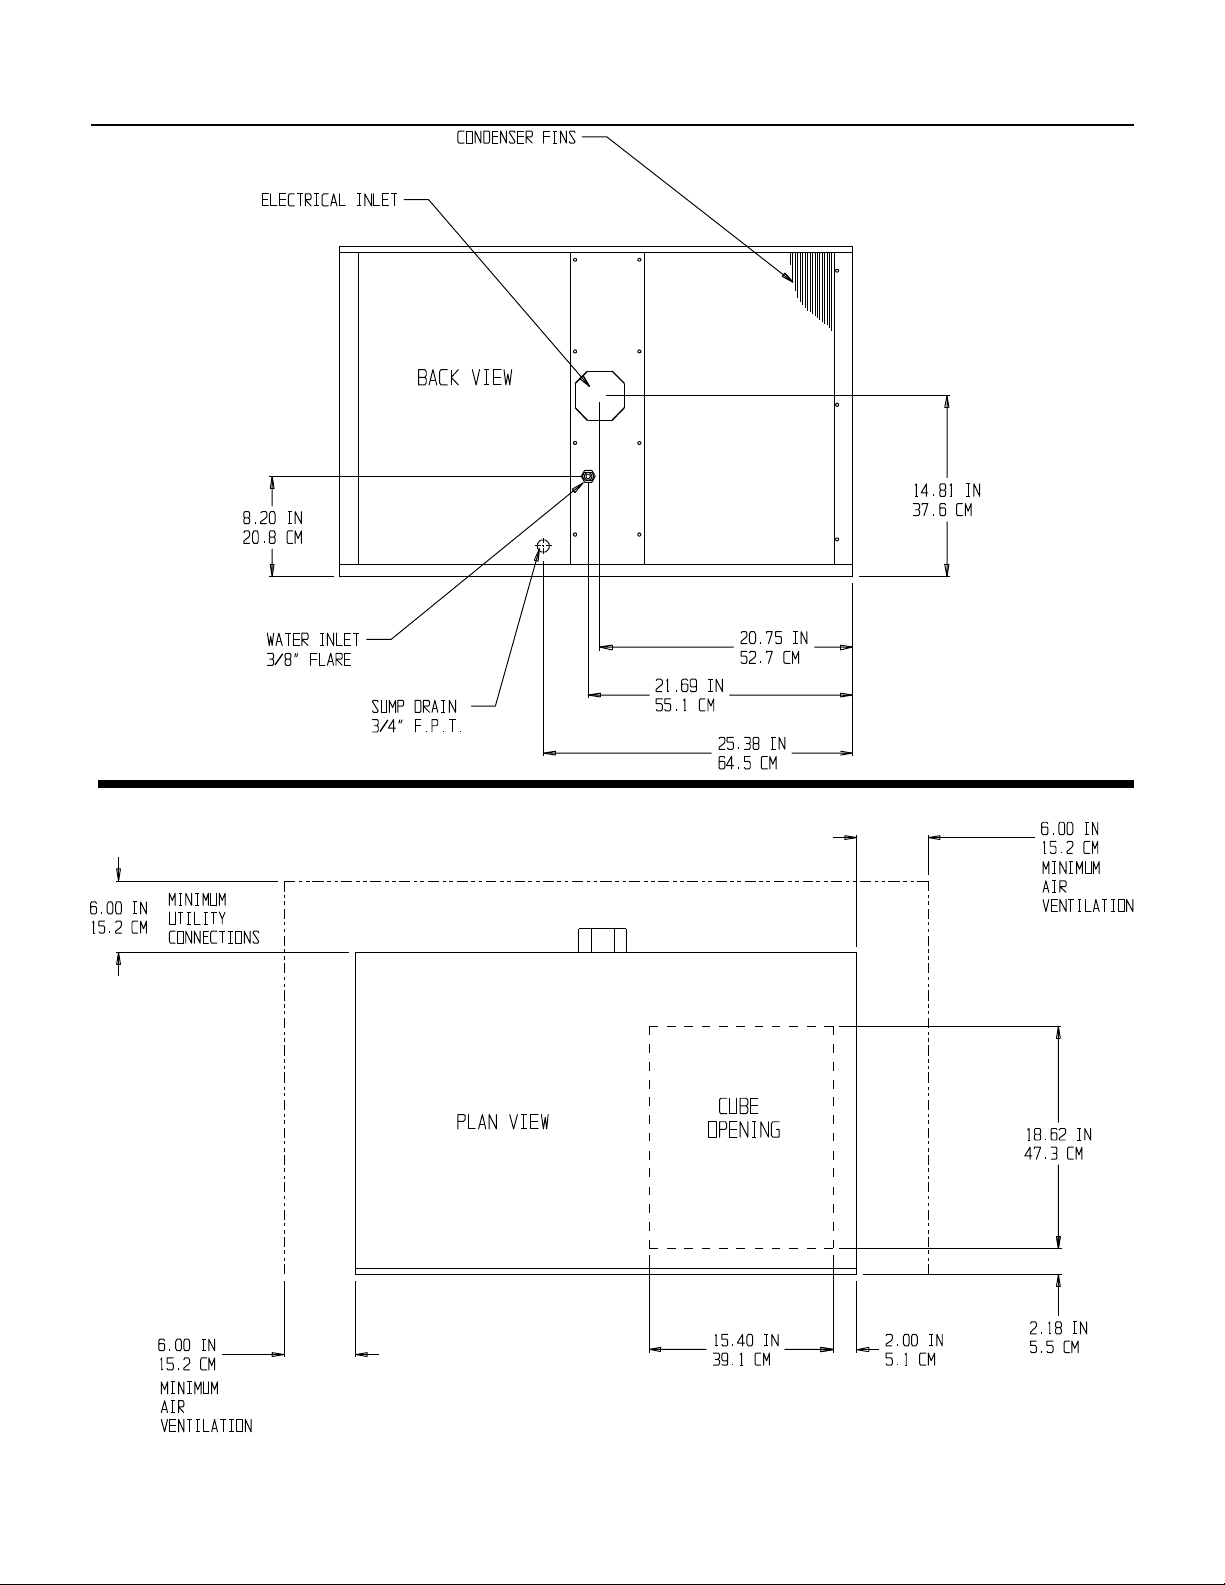
UTILITY CONNECTION LOCATIONS
CME855A & CME1000A
Page 3
October, 1994
Page 4

FOR THE INSTALLER: Environmental Limitations
CME855A & CME1000A
Page 4
Installation Limitations
The ice making portion of this ice system is
designed to be installed indoors, in a controlled
environment.
Minimum Maximum
Air Temp 50
Water Temp 40
Water Pressure 20 PSI 80 PSI
Voltage 197 253
Operating the ice machine outside of the above
limitations, or outdoors, is potentially damaging to
the machine; also it is misuse of the machine,
which may void the warranty.
Scotsman Ice Systems are designed and
manufactured with the highest regard for safety
and performance. They meet or exceed the
standards of UL, NSF, and CUL.
Scotsman assumes no liability or responsibility of
any kind for products manufactured by Scotsman
that have been altered in any way, including the
use of any part and/or other components not
specifically approved by Scotsman.
0
F. 1000F.
0
F. 1000F.
Water Limitations
An ice machine is a food manufacturing plant; it
takes a raw material, water, and turns it into a food
product, ice. The purity of the water is very
important in obtaining pure ice and in maximizing
product life. These general recommendations
should help keep the ice maker clean:
1. Filter the water used to produce ice. Water filters
vary greatly in ability and function. Install one that
filters out suspended solids to a dimension of 5
microns or smaller. The finer the filter the better,
but finer filters will clog sooner than course ones. It
may be necessary to add a course filter ahead of
the fine filter to prolong filter life.
2. Check with a water treatment specialist for a
water test, and recommendations regarding filters
and treatment.
Service Limitations
Some space on the sides, the back and the top
should be allowed for service and utility
connections.
Scotsman reserves the right to make design
changes and/or improvements at any time.
Specifications and design are subject to change
without notice.
December, 1994
Page 5
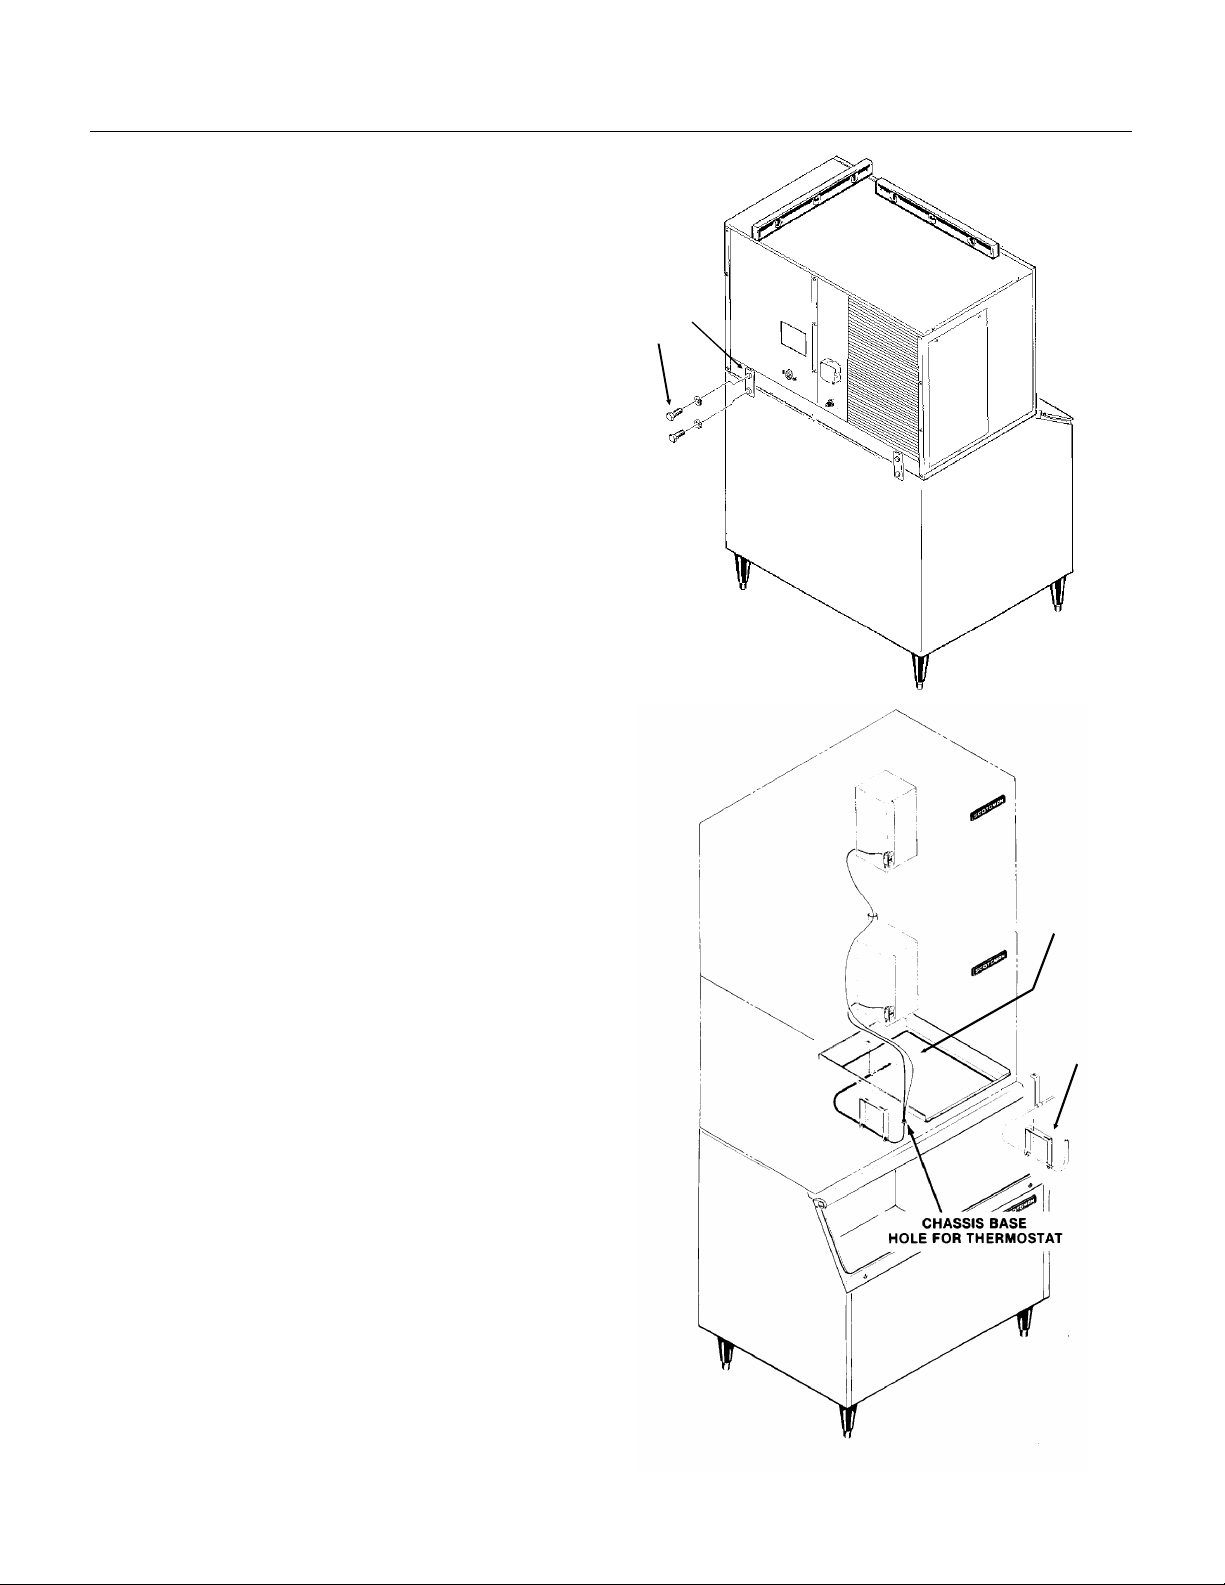
Bin
Thermostat
Bracket
C ME 855A & CME1000A
FOR THE INSTALLER: Machine & Bin Assembly
Storage Bin:
Afte r u ncrat i ng the ice stor age bin , attach th e l egs
to th e bin:
1. Use a portion of the carton as a cushion, and tip
the stora ge bin on its back.
2. Scr ew the le g s i nto th e th r eade d ho l e s in the
bottom of the bin.
3. Turn th e leg levele rs all th e way in to p rep are
the bin and ice machine for lev eling.
4. Return the bin to th e uprigh t posit ion.
Ice Maker:
1. Arrange for proper ele ctric , wa ter and drain .
See instructio ns for th e plu mbe r and for the
electrician.
2. Position the ice st ora ge bin in the sele ct ed
INDOOR locat ion .
3. Level the bin , in bo th the fron t to rear an d side
to side directions.
4. Inspect the bin top mounting gasket which
should be flat, with no wrinkles, to pro vide a good
water seal whe n the cuber is installed on top of
the bin .
Fasten
Machine To
Bin
5. Install the modular cuber on top of the bin using
care to be sure a good se al is made betwee n th e
two cabinets, use of a mechanical lift is
recommended . Alig n the holes in the botto m back
of the cabinet to mate with the two mounting straps
on the top rear of the bin.
6. Use bolts and strap s found in the hard ware
package to se cure the ice mach ine to the ice
storage bin. When alignment and leveling are
completed, tigh ten th e bolts to secu re the
mounting straps.
7. Install the bin thermo sta t bra cke t. The bracket
is shipped in a cardb oa rd con ta ine r located in front
of the freezing compartment.
Mount the brac ket to the bo tt om of the ic e machine
with the plastic tube inserted up thru the ice
machine base from below. Se cure the brac ket to
the ice machine base using 3 thumbs crews from
the hardware packa ge.
Uncoil the bin thermost at cap tub e and insert it int o
the plastic tubing of the bracket to the end of the
meta l tubin g.
Bin
Thermostat
Capillary Tube
March 1995
Page 5
Page 6
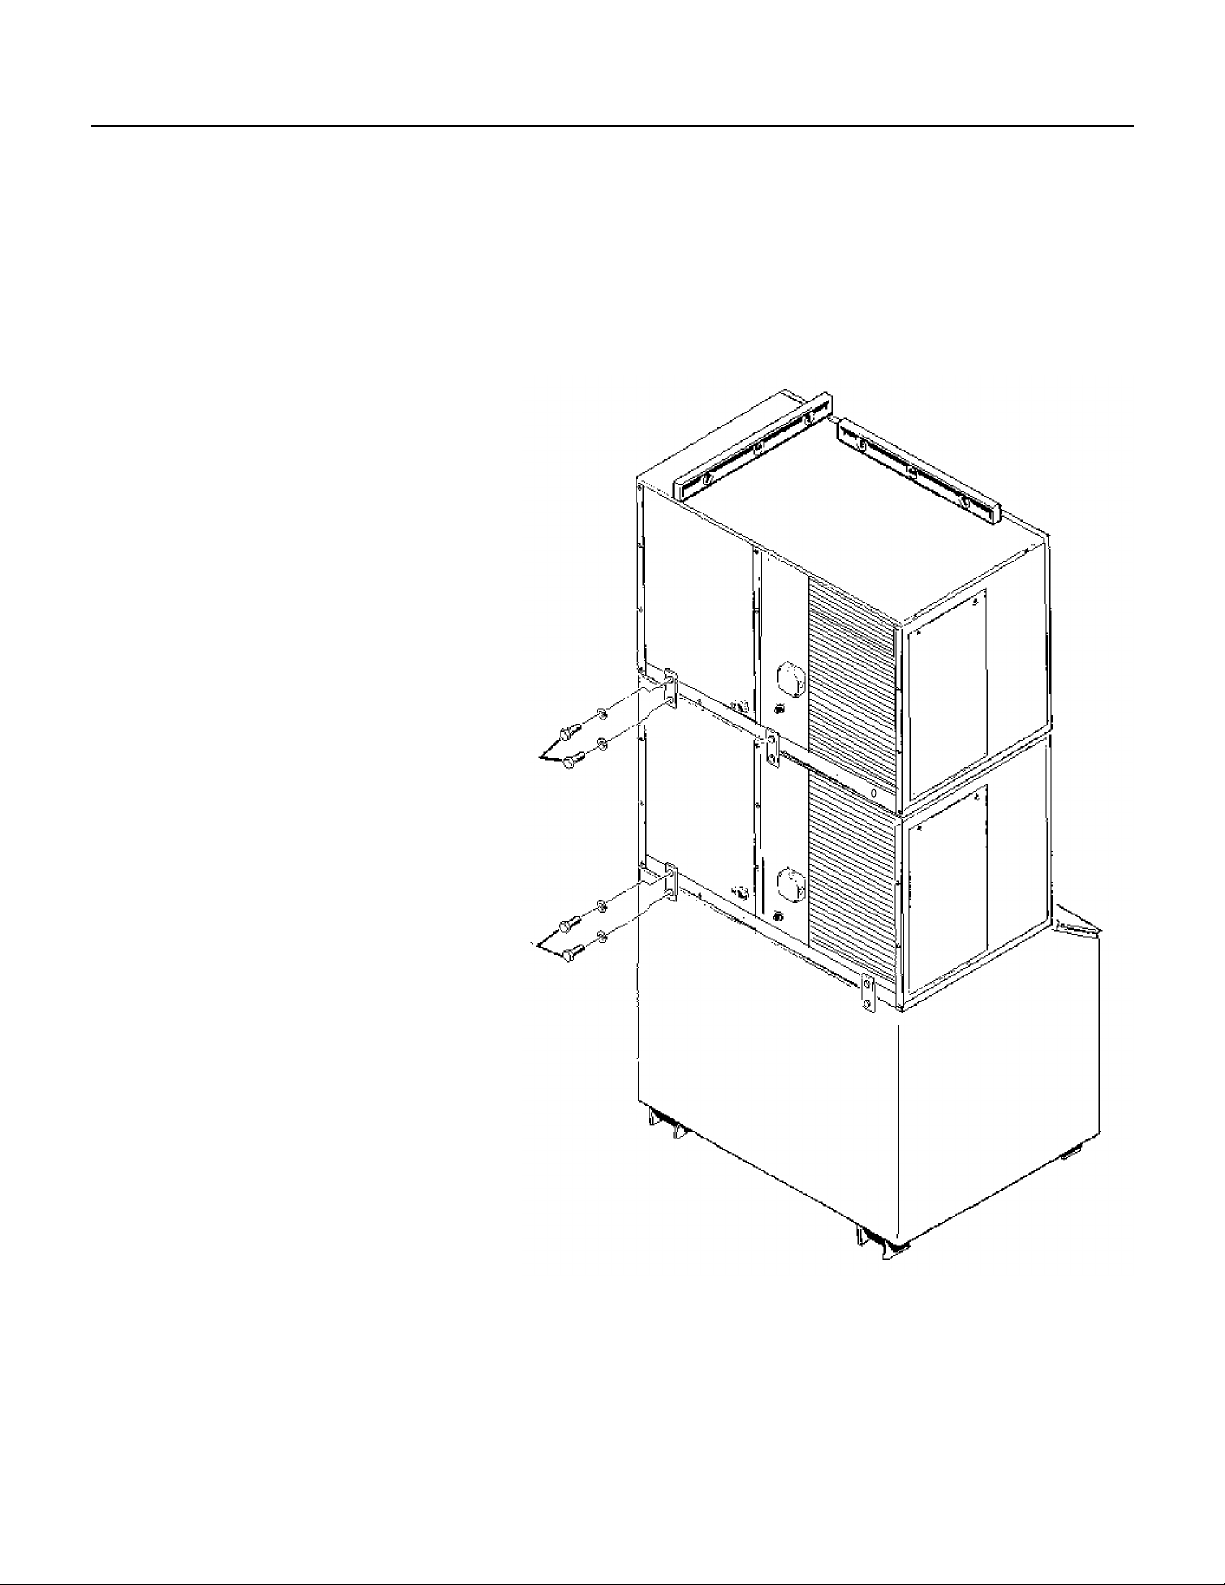
STACKING TWO UNITS
CME855A & CME1000A
Page 6
To stack a 42" wide CME cuber onto a CME855A,
CME1000A, CM855 or CM1000 cuber:
A Heavy Duty Leg Kit is Recommended.
1. Remove the top panel from the lower unit.
2. Add a bead of food grade sealant (such as
Scotsman part number 19-0529-01) to the top
edges of the lower unit’s freezing compartment.
3. Lift the top unit onto the bottom machine (a
mechanical lift is recommended).
4. Align the two machine’s cabinets, and using the
bolts and straps from the hardware package,
fasten the two units together at the back.
Note: When placing a new unit on a CM855 or
CM1000, the outboard (right side viewed from the
back) threaded holes should be used.
5. Route the bin thermostat capillary tube from the
upper machine into the lower machine and into the
bin thermostat bracket, next to the capillary tube
from the lower machine.
FROM
HARDWARE
PACKAGE
FROM
HARDWARE
PACKAGE
STACKING TWO CME 42" AIR COOLED
December, 1994
Page 7
FOR THE PLUMBER
CME855A & CME1000A
Page 7
Water Supply
The recommended water supply line is a 3/8-inch
O.D. tubing with a minimum operating pressure of
20 PSIG and a maximum of 80 PSIG.
A separate water inlet is required for the
condenser water supply.
Connect to cold water supply line with standard
plumbing fittings, with shut off valve installed in an
accessible place between the water supply and
the cuber. In some cases a plumber will be
required.
CONFORM TO ALL LOCAL CODES
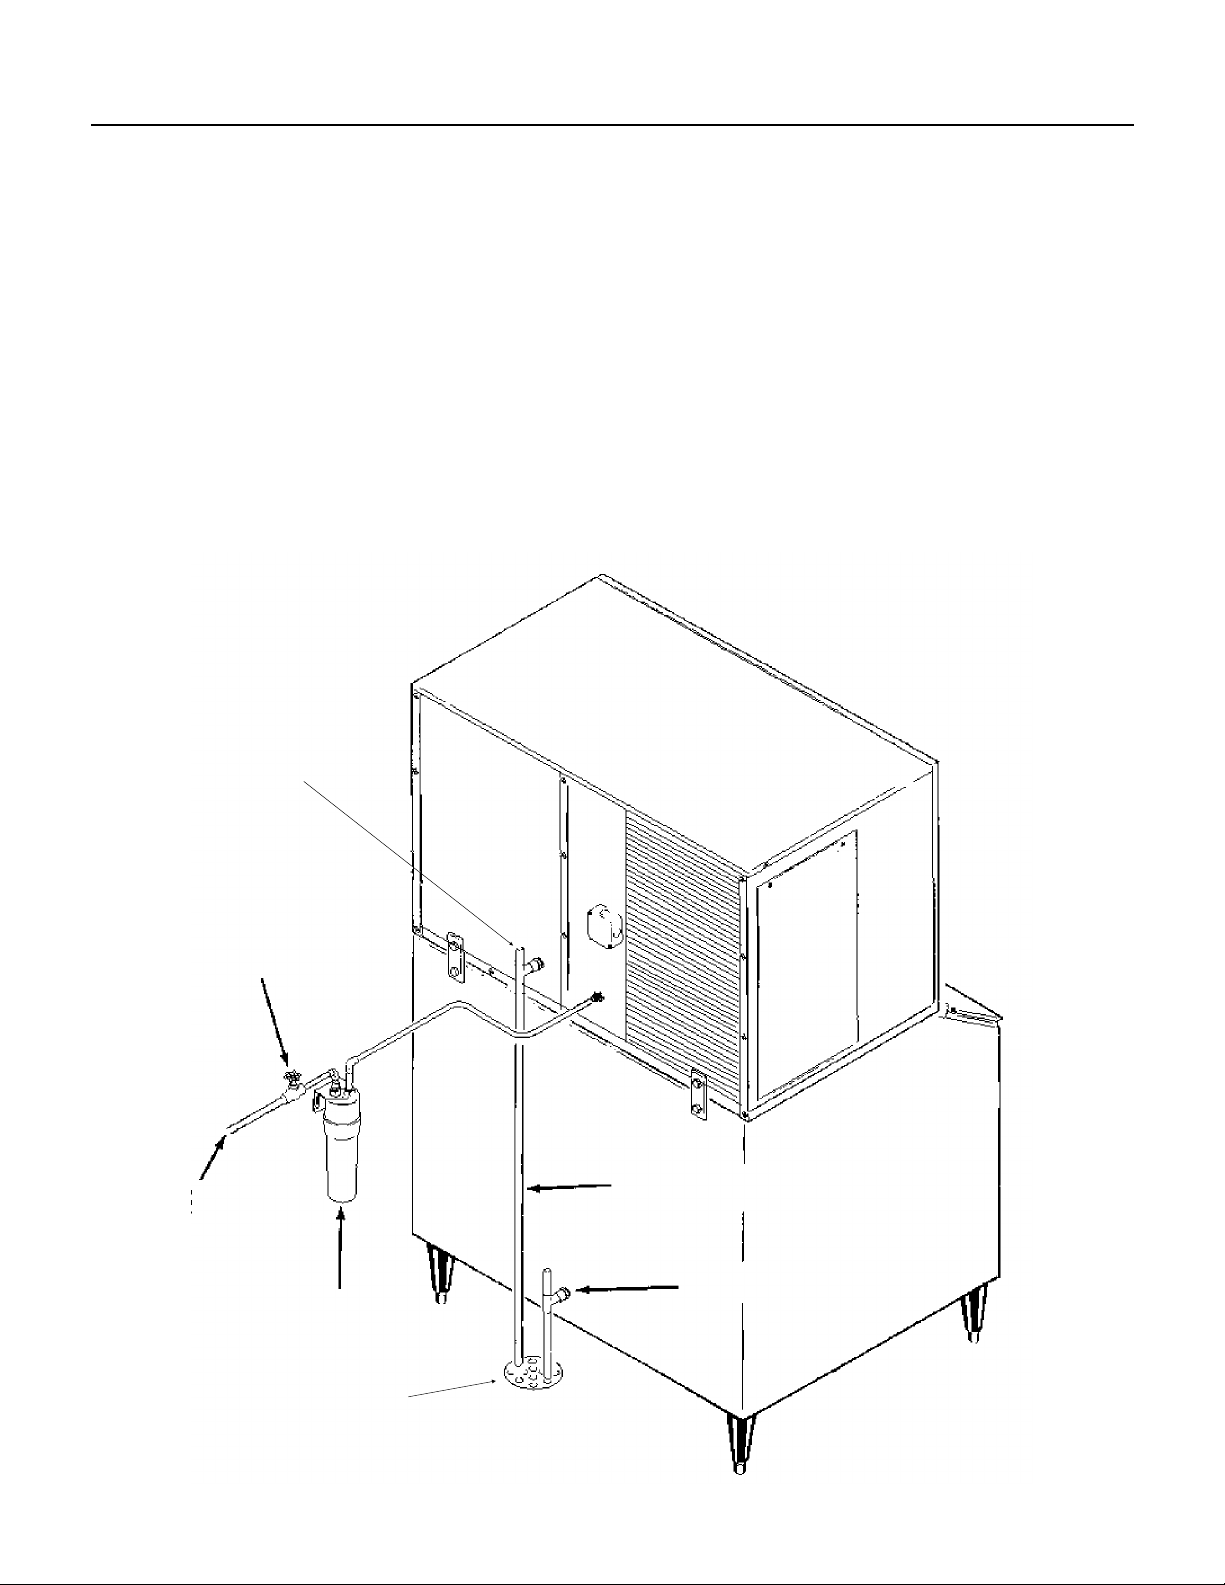
Drain Connections:
Connections: All drains are gravity type and must
have a minimum of 1/4 - inch fall per foot of
horizontal run. The drains to be installed must
conform with the local plumbing codes. Install a
vertical open vent on the ice machine reservoir
drain. The ideal drain receptacle is a trapped and
vented floor drain. The storage bin drain should be
insulated.
PLUMBING CONNECTIONS
RESERVOIR
DRAIN VENT
HAND SHUT OFF
HAND SHUT
OFF VALVE
VALVE
RESERVOIR DRAIN
BIN DRAIN VENT
POSITION OF
FILTER
FLOOR DRAIN
October, 1994
Page 8
CME855A & CME1000A
FOR THE ELECTRICIAN: El ect ric al Connect ions
See the NAMEPLATE for curre nt requ ireme nts to
determine wire size to be used for electric al
hookup. The cuber requires a solid chassis to
chassis earth groun d wire. See Wiring Diag ram.
Be certain the cuber is connected to its own
electrical circuit and individ ually fus ed. Voltage
variation should no t exceed ten perce nt of the
nameplate rat ing , even under sta rtin g cond itio ns.
Low voltages can cause erratic ope rat ion and may
be responsible for seriou s dama ge to the ice
maker.
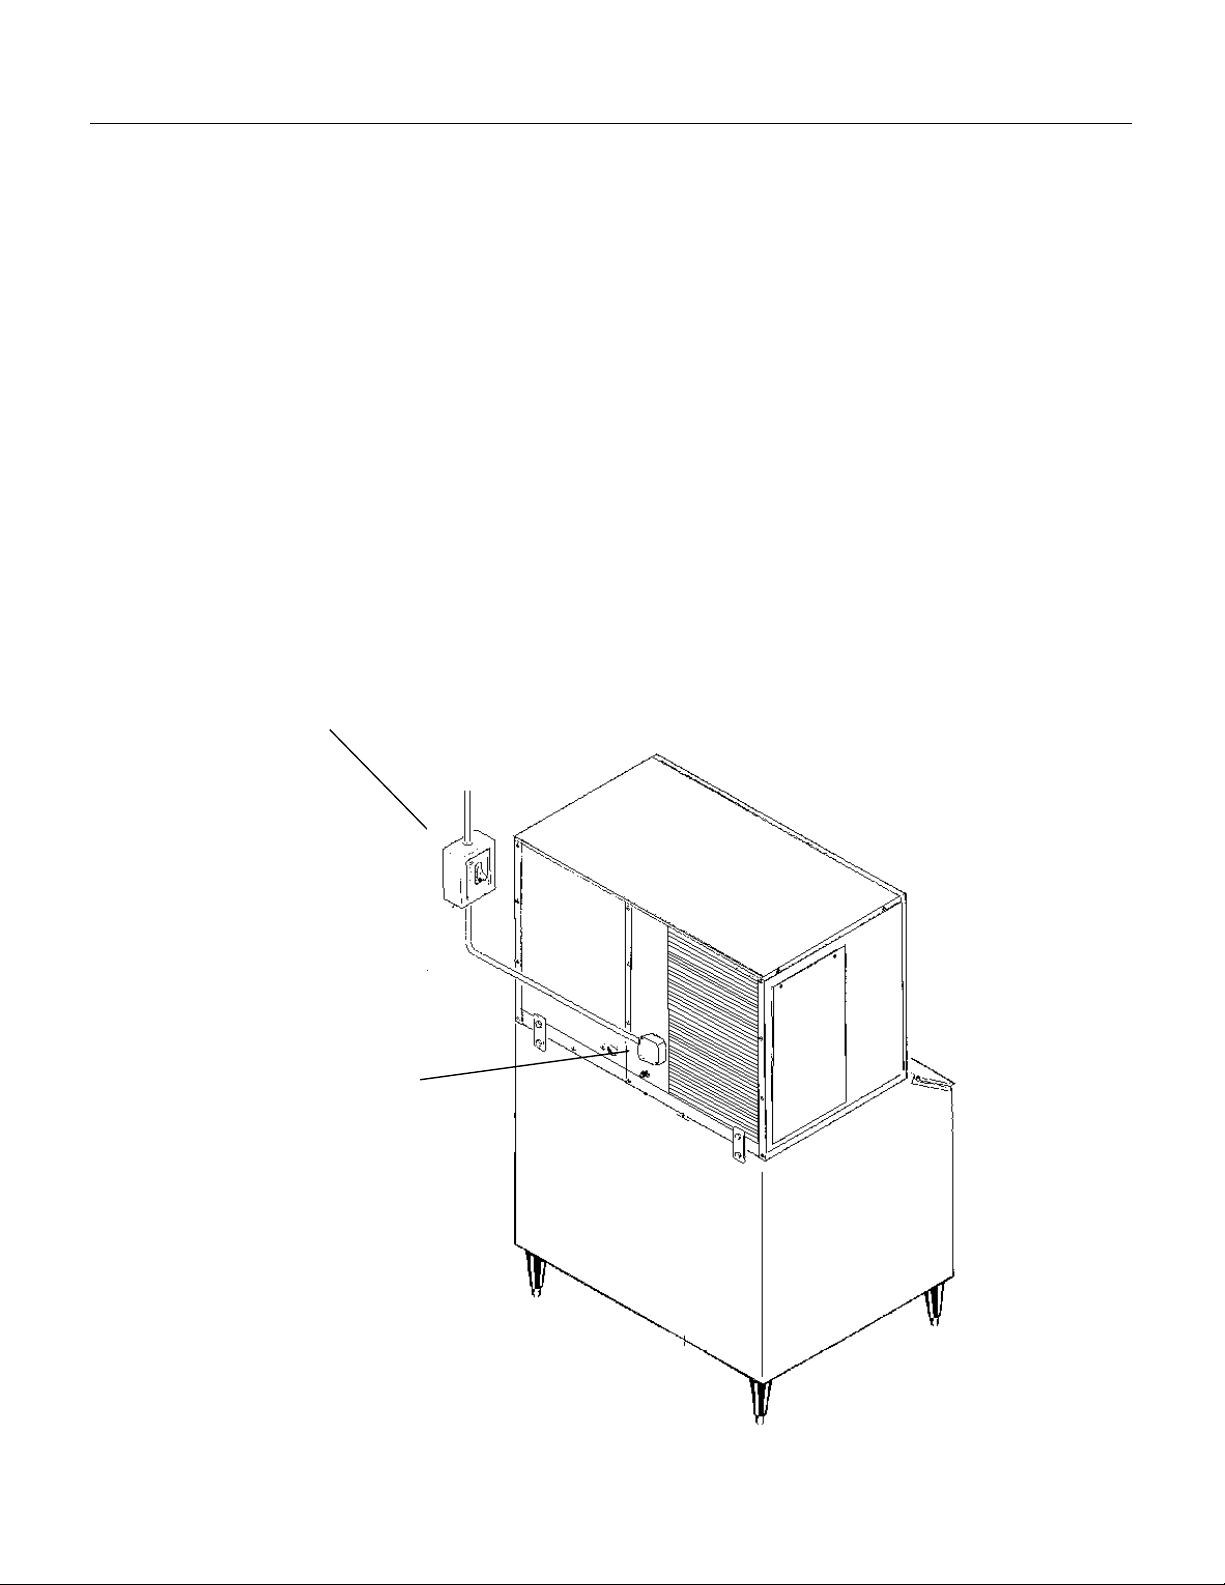
Electrical conn ection s are made at the rear of the
ice maker, inside the junction box.
FUSES or HACR
CIRCUIT BREAKERS
All external wiring shoul d conform to the
national, sta te and loc al electr ic al code
requirements. Usually an electrica l per mit and
services of a licensed electrici an wi ll be
required.
ELECTRICAL JUNCTION BOX
Cuber Electrical Conn ectio ns
January 1997
Page 8
Page 9

FOR THE INSTALLER: Final Check List
CME855A & CME1000A
Page 9
1. Is the ice maker cabinet in a room where
ambient temperatures are within the minimum and
maximum temperatures specified?
2. Is there clearance at the left side of the cabinet
and at the back and top for service and utility
connections?
3. Has water supply pressure been checked to
insure a minimum of 20 PSIG and a maximum of
80 PSIG operating pressure?
4. Is the cabinet level?
5. Check that any shipping material has been
removed from inside the cabinet.
6. Have all electrical and piping connections been
made?
7. Are the Master and
Compressor switches on OFF?
8. Has power been connected
to the ice maker?
9. Is the water supply line shut
off valve installed?
Power?
Final Check List
10. Check all refrigerant lines
and conduit lines, to guard
against vibration or rubbing
and possible failure.
11. Have the bin and cabinet
been wiped clean and
sanitized?
12. Has the Customer
Evaluation and Warranty
Registration form been properly
filled out? Check for correct
model and serial numbers from
Serial nameplate, then mail the
completed form to SCOTSMAN.
13. Has the owner been given
the name and telephone
number of the authorized
SCOTSMAN Service Agency
serving him?
Secure?
Supply?
Cabinet
Water
Filter?
Reservoir
Drain?
Bin Drain?
October, 1994
Page 10

INITIAL START UP
CME855A & CME1000A
Page 10
Ice Maker:
1. Remove screws and front panel.
2. Remove two screws and the control box cover.
3. Remove the evaporator cover.
4. Locate two toggle switches on the front of the
control box. Check that the Master ON/OFF switch
and the Compressor ON-OFF switch are in the
OFF position.
5. OPEN the water supply line shut off valve.
6. Inside the control box is the shaft of the timer
and the switch assembly. Rotate the shaft of the
timer and switch assembly clockwise to where the
actuator arm on the microswitch drops off outer
cam into cam slot. See Timer Cam Positions.
7. Move the Master ON/OFF switch to the ON
position.
TIMER CAM POSITIONS
ACTUATOR
CAM &
SHAFT
MICROSWITCH
8. Observe water fill cycle: Water pump operates
and water inlet solenoid valve OPENS, incoming
water flows from the valve through the tubing, the
reservoir fills and excess water drains out the
reservoir drain. At the end of the harvest cycle, the
water inlet solenoid valve will close and the water
fill cycle is complete. If the reservoir is not full,
advance the shaft of the timer clockwise into a new
harvest cycle; this opens the water valve again.
9. Check that the water cascades down over each
cube mold and into the reservoir.
10. When the reservoir is full, move the
compressor ON-OFF switch, to the ON position.
11. Check operation of the freezing cycle: The
compressor is operating. The ice making process
begins; feeling the metal parts of the evaporator
plate reveals cold temperature, very shortly ice
begins to form. Tubing will become frosted at the
top of the evaporator plate. After the first cycle,
freezing time will range between 10 and 17
minutes.
In moderate temperatures, CME855 average
complete cycle time is about 15 minutes, and
CME1000 average complete cycle time is about
12 minutes.
12. Check CUBE SIZE
FREEZE
PORTION
HARVEST
PORTION
The dimensions of the cubes are fixed by the size
and shape of the molds on the evaporator plate,
except that the thickness of the cube MAY need to
be adjusted at start up. There is only one size of
cube that is correct; adjusting the cube size control
to that size of cube will allow the ice maker to
produce ice at its most efficient size. The correct
size cubes will be fully formed at the edges; will
harvest off of the evaporators beginning with
individual cubes at the top of the evaporator, then
vertical strips for the balance; and will appear
similar to the illustration for ‘‘Correct Size Cube’’.
December, 1994
Page 11

INITIAL START UP
CME855A & CME1000A
Page 11
Adjust for the correct size if needed:
To produce SMALLER sized ice cubes:
Locate cube size control knob in the front of the
control box. Rotate this knob one eighth of a turn
counter clockwise. Observe size of the ice cubes
in the next ice cube harvest and adjust again if
needed, until the correct ice cube is achieved.
To produce LARGER ice cubes:
Locate cube size control on the front of the control
box. Rotate the knob one eighth of a turn
clockwise. Observe size of ice cubes in the next
cube harvest and adjust again if needed, until
correct the ice cube size is achieved.
13. Check Harvest Time. The machine must
harvest all cubes before returning to a freeze cycle.
Increase the harvest time if there is less than 15
seconds of harvest time after the last cube has
fallen into the bin.
Decrease the harvest time if there is much more
than 15 seconds of harvest time after the last cube
has fallen into the bin. Note: Harvest time is
dependent upon the water and air temperatures at
the ice machine. Do not adjust harvest time too
short, as this will cause a freeze up.
See the next page for detailed harvest time
adjustment instructions.
CUBES (ACTUAL SIZE)
TOO
THICK
1
⁄
"
1
4
CORRECT
SIZE
CUBE
Note: Optimum performance will be achieved when
the ice machine is adjusted to produce this size and
shape of cube. The typical batch weight at this
1
1
⁄
"
4
setting is between 8.25 and 9 pounds.
14. Check BIN THERMOSTAT
With the ice maker in the harvest cycle, hold ice
against the metal tube of the bin thermostat
bracket. The ice machine will shut off only at the
end of the harvest cycle.
Remove the ice and within a few minutes the ice
machine should restart.
15. Replace all panels, the machine is ready for
automatic operation.
16. Fill out and mail in the Customer Evaluation
and Warranty Registration Form.
Explain to the user the specifications, operation
and maintenance requirements of the ice machine.
Inform the user of the name and telephone
number of the local service contact.
TOO
THIN
October, 1994
Page 12

ADJUSTMENT OF THE TIMER & SWITCH ASSEMBLY
CME855A & CME1000A
Page 12
One complete revolution of the cam on the timer
represents eight minutes. If left as factory set, the
timed freeze cycle will be 5 minutes 15 seconds,
and the harvest cycle will be 2 minutes 45
seconds. Rotating the shaft of the timer cam
Clockwise will put the ice machine into the freeze
or harvest cycle.
ACTUATOR
TIMER CAM POSITIONS
MICROSWITCH
WARNING
Disconnect electrical power supply to ice maker
whenever adjustment procedures are performed.
To adjust the timer & switch assembly:
1. Remove front panel.
2. Remove control box cover.
A. To start the HARVEST CYCLE: Slowly rotate
the shaft of the timer and switch assembly,
clockwise until the actuator arm on the
microswitch initiates the harvest cycle. An audible
click can be heard, but in a noisy area, look at
the cam and switch to observe the event
B. To start the FREEZING CYCLE: Slowly rotate
the shaft of the timer and switch assembly
clockwise until the actuator arm on the
microswitch initiates the freezing cycle.
C. To adjust the length of the harvest cycle:
1. Loosen the adjustment screw on the cam and
rotate the shaft of the cam to move the cam. More
of a gap between the high and low portions will
yield more harvest time.
2. Tighten the set screw.
CAM &
SHAFT
HARVEST
PORTION
FREEZE
PORTION
TIMER ADJUSTMENT
MICROSWITCH
SHAFT OF
CAM
3. Replace the control box cover and front panel.
It is important that the length of the harvest cycle
allow enough time for all the ice cubes to fall from
the evaporator. Too short of a time will cause the
evaporator to freeze up and stop ejecting ice into
the bin. Too much time wastes ice making
capacity, energy and water. Adjustment of the
harvest cycle may require an adjustment of the
cube size control.
SET SCREW
December, 1994
Page 13

REFRIGERATION SYSTEM OPERATION
CME855A & CME1000A
Page 13
Suction
Line
Condenser
Hot Gas Valve
Hot
Gas
Line
Compressor
Drier
Refrigeration System Schematic
FREEZE CYCLE
The compressor forces the refrigerant into the
discharge tube. The refrigerant, now a very hot,
high pressure gas flows to the condenser. At the
condenser the refrigerant’s heat is transferred to
the air blowing thru the condenser. The refrigerant
changes from a gas to a liquid.
After the condenser, the now liquid refrigerant
flows thru the thermostatic expansion valve. The
thermostatic expansion valve liquid refrigerant thru
the refrigerant distributor and into the three
evaporators.
Inside the evaporators, the liquid refrigerant rapidly
expands, because it has moved from a high
pressure zone to one of much lower pressure. The
heat from the water going over the evaporators
keeps the refrigerant expanding, and the
refrigerant absorbs this heat. This causes the
evaporators and the water going over them to
loose heat.
Evaporators
Thermostatic
Expansion Valve
HARVEST CYCLE
The only change between freeze and harvest is
that a valve opens a path between the discharge
line and the evaporator inlet. This valve is called
the Hot Gas Valve. It allows hot discharge
refrigerant gas to flow directly from the compressor
to the evaporator inlet, warming the evaporators
and causing the ice cubes to release.
The refrigerant then flows into the suction line and
back to the compressor.
October, 1994
Page 14

WATER SYSTEM OPERATION
CME855A & CME1000A
Page 14
Evaporators
WATER SYSTEM SCHEMATIC
Drain
Inlet Water Valve
A fixed charge of water is brought into the reservoir
during the harvest cycle.
Water Manifold and
Distributors
Reservoir
Water Pump
A water pump, running continuously, forces the
water to the top of the evaporators, where it is
distributed through manifolds, and then cascades
down the evaporator surface by gravity.
As it flows across the refrigerated evaporators,
some of the water will be chilled enough to change
form, turn to ice and stay frozen to the evaporator.
Most of the water returns to the reservoir, to be
sucked back into the pump and re-pumped over
the evaporators.
Water is forced over the evaporators during the
freeze cycle to be changed into ice, and during the
harvest cycle to assist the release of the ice.
December, 1994
Page 15

COMPONENT DESCRIPTION
CME855A & CME1000A
Page 15
Compressor Contactor
The compressor contactor carries the compressor
line current. The compressor contactor coil has
power whenever the ice machine is making or
harvesting ice.
Cube Size Control
This reverse acting (closes on temperature fall)
thermostat determines how long the freezing cycle
will be. The cube size control closes it’s contacts
when the evaporator & suction line cools to the set
temperature. When the cube size control closes, it
connects power to the timer motor. A variation in
heat load (either ambient air or incoming water
temperature) will affect the efficiency of the
refrigeration system, and that will vary the length of
time it takes the evaporators to cool to the
temperature at which the cube size control is set to
close, which, in turn, will affect the overall cycle
time. See CUBE SIZE ADJUSTMENT BEFORE
attempting to adjust the control.
Relay
Hot Gas Solenoid Valve
The hot gas solenoid valve opens only during the
harvest cycle. When it opens, it diverts the hot
discharge gases so that they flow directly into the
evaporator plates, by-passing the condenser and
thermostatic expansion valve. The hot gases warm
the evaporators, releasing the ice cubes from the
ice cube molds. The hot gas solenoid valve is
installed in a branch of the discharge line, and
when the timer switches the ice machine into the
harvest cycle, the energized solenoid coil lifts the
valve stem within the valve body, allowing the hot
discharge gas to be diverted to the evaporators.
High Temperature Cut Out
This temperature sensor is located next to the hot
gas valve, on the outlet side.
Cut Out is 140
During normal operation, it does not affect the ice
machine, but it will shut the machine off if the hot
gas line overheats. It is an automatic reset.
o
F., Cut In is 110oF.
The multi-function, three pole, double throw, relay
plugs into a socket on the printed circuit board in
the control box. When the relay coil has power, the
machine is in a freeze cycle, and when power is
removed from the coil, the machine will be in the
harvest cycle.
The relay also by-passes the bin control during the
harvest and freeze cycles, preventing the ice
maker from shutting off in the middle of a cycle.
The bypass action allows only complete freeze
and harvest cycles; the only time that the ice
maker can shut off on bin control is as the end of
the harvest cycle.
Timer - Timer & Switch Assembly
The timer begins to turn when activated by the
cube size control. The outer surface, or large
diameter lobe of the timer cam, determines the
length of time for finish freezing of the ice cubes,
while the inner surface, or small diameter lobe,
determines length of the harvest cycle. The
single-pole, double throw microswitch on the timer
controls the power to the plug in relay coil, making
it either the freezing or harvest cycle. The
microswitch is actuated by the cams connected to
the timer motor. The timer cam can be adjusted to
vary the defrost time, as required. One complete
rotation of the cam will take eight minutes.
October, 1994
Page 16

COMPONENT DESCRIPTION
CME855A & CME1000A
Page 16
Electric Water Inlet Valve
The water inlet solenoid valve fills the reservoir
assembly with water. Excess water overflows out
the overflow standpipe located at the back of the
reservoir. This action fills and rinses the reservoir
during each harvest cycle. The flow rate is .75
g.p.m.
Water Distribution System
The water distribution system evenly supplies
water to all cells of the evaporator plates. The
water pump pumps water from the reservoir up the
vertical tygon tube to the tee. From there water is
channeled through the water manifold to the water
distributors, above each evaporator plate, and
from six holes within each distributor, water flows
to the cells of each side of the evaporator plates.
Gravity flow returns the unfrozen excess portion of
water to the reservoir for recirculation.
Reservoir
The reservoir, located below the evaporators,
stores the inlet water charge, and collects the
water that flows over the evaporator plates. Most
ice will be falling into the bin below the center
evaporator.
High Pressure Cut Out
This is a manual reset control that shuts down the
ice maker, should the discharge pressure ever
reach 450 PSIG.
WATER
DISTRIBUTION
SYSTEM
WATER
PUMP
EVAPORATOR
RESERVOIR
ELECTRIC WATER VALVE
December, 1994
Page 17

SERVICE SPECIFICATIONS: CME855A
CME855A & CME1000A
Page 17
When servicing a machine, it’s helpful to compare
that unit’s operating characteristics to those of a
new, clean, normally operating machine. What
follows is that type of information:
Numbers = Cabinet Air Temp/Water Temp.
70/50 90/70
Typical Cycle Time 14 - 15 minutes 17 - 18 minutes
Harvest Time (2
standard)
Typical Freeze Cycle Low Side
Pressure (end of cycle)
Typical Freeze Cycle Discharge
Pressure (end of cycle)
Typical Harvest Cycle Low Side
Pressure (peak)
Typical Harvest Cycle Discharge
Pressure (min)
2
⁄
minute
3
2
2
⁄
minutes
3
26 PSIG 32-32 PSIG
195 PSIG 255 PSIG
84 PSIG 107 PSIG
140 PSIG 180 PSIG
2 minutes
Typical Batch Weight
•• 8.25 - 9 lb.
Refrigerant Charge
•• 36 ounces of R-404A.
Hi Pressure Cut Out Point
•• 450 PSIG
Hi Temperature Cut Out Point
o
•• 140
F.
Typical Compressor Amp Draw
•• at 90/70: 5 min. into freeze: 9.9, in harvest 10.8
•• at 70/50: 5 min. into freeze: 8.9, in harvest 8.3
Compressor:
•• CS14K6E
Water Inlet Valve Flow Rate:
•• .75 g.p.m.
Cube Size Thermostat:
•• Cut in adjustable between 0
o
F. and 24oF.
Bin Thermostat:
••CI= 38.5
••CO= 33.5
o
F. to 43.5oF.
o
F. to 38.5oF.
Thermostatic Expansion Valve
••Not adjustable
October, 1994
Page 18

SERVICE SPECIFICATIONS: CME1000A
CME855A & CME1000A
Page 18
When servicing a machine, it’s helpful to compare
that unit’s operating characteristics to those of a
new, clean, normally operating machine. What
follows is that type of information:
Numbers = Cabinet Air Temp/Water Temp.
70/50 90/70
Typical Cycle Time 11 - 12 minutes 13 - 14 minutes
Harvest Time (2
standard)
Typical Freeze Cycle Low Side
Pressure (end of cycle)
Typical Freeze Cycle Discharge
Pressure (end of cycle)
Typical Harvest Cycle Low Side
Pressure (peak)
Typical Harvest Cycle Discharge
Pressure (min)
2
⁄
minute
3
2
2
⁄
minutes
3
25 PSIG 25 PSIG
190 PSIG 240 PSIG
84 PSIG 94 PSIG
155 PSIG 190 PSIG
2 minutes
Typical Batch Weight
•• 8.25 - 9 lb.
Refrigerant Charge
•• 42 ounces of R-404A.
Hi Pressure Cut Out Point
•• 450 PSIG
Hi Temperature Cut Out Point
o
•• 140
F.
Typical Compressor Amp Draw
•• 90/70: 5 min. into freeze - 11.5, harvest -13.3
•• 70/50: 5 min. into freeze - 10.7, harvest -11.8
Compressor:
•• CS18K6E
Water Inlet Valve Flow Rate:
•• .75 g.p.m.
Cube Size Thermostat:
•• Cut in adjustable between 0
o
F. and 24oF.
Bin Thermostat:
••CI= 38.5
••CO= 33.5
o
F. to 43.5oF.
o
F. to 38.5oF.
Thermostatic Expansion Valve
••Not adjustable
December, 1994
Page 19

CLEANING
CME855A & CME1000A
Page 19
A Scotsman Ice System represents a sizable investment of time and money in any company’s business. In
order to receive the best return for that investment, it MUST receive periodic maintenance.
Maintenance and Cleaning should be scheduled at a
minimum of twice per year.
CLEANING: ICE MAKER
1. Remove front panel.
2. Switch the Wash/Off/Ice switch to OFF.
3. Remove the front liner.
4. Remove and discard all ice from the storage bin.
5. Locate the reservoir drain and drain the
reservoir. If the reservoir doesn’t drain completely,
disconnect the pump hose attached to the water
distributors and place the end of the hose in a
bucket. Switch the Wash/Off/Ice switch to Wash,
and allow the pump to discharge the rest of the
water. Reattach the hose to the water distributors.
6. Mix 8 ounces of Scotsman Ice Machine Cleaner
with 1 gallon of warm (95
pour into the reservoir until full.
0
F. - 1150F.) water and
Scotsman Ice Machine
Cleaner contains acids.
These compounds may
cause burns.
If swallowed, DO NOT
induce vomiting. Give
large amounts of water
or milk. Call Physician
immediately. In case of
external contact, flush
with water.
KEEP OUT OF THE
REACH OF CHILDREN.
13. Replace the front panel
14. Check the next batch of cubes to make sure all
of the acid taste is gone.
CAUTION
DO NOT use ice produced from the cleaning
solution. Be sure none remains in the bin.
15. Remove and discard all ice from the storage
bin, pour hot water into the storage bin to melt the
cubes and also clean out the bin drain.
16. The unit is now ready for continued automatic
operation.
7. Switch the Wash/Off/Ice switch to ‘‘wash’’. Let
the unit operate for 30 minutes, then switch the
unit off.
8. Drain the reservoir again (repeat step 5)
9. Switch the machine to ‘‘wash’’ and continue to
add fresh water to flush residual cleaner from the
system. Switch the Wash/Off/Ice switch off.
10. Sanitize the ice maker and bin, see ‘‘Sanitize
Water System’’.
11. Replace the front liner.
12. Switch the Wash/Off/Ice switch back on.
October, 1994
Page 20

CLEANING
CME855A & CME1000A
Page 20
SANITIZE WATER SYSTEM
1. Remove and discard all ice from the bin.
2. Remove front panel.
3. Drain the reservoir
4. Prepare 2 gallons of an approved sanitizer
solution in accordance with the instructions on the
package, or use the following instructions for use
of household bleach, if it meets local codes:
Mix a sanitizing solution of 1 ounce of household
bleach to 2 gallons of water.
5. Pour 1 gallon of the sanitizer into the ice maker
reservoir.
6. Move the Wash/Off/Switch switch to ‘‘Wash’’,
and allow the solution to circulate for a MINIMUM
of 5 minutes.
7. Move the Wash/Off/Switch switch to ‘‘Off’’.
8. Remove the drain plug and drain the reservoir.
9. Using a clean sponge and the remainder of the
sanitizer solution, wipe the interior of the
evaporator cover and the inside of the storage bin,
taking care to wipe all surfaces that are normally in
contact with ice.
SANITIZE ICE STORAGE BIN
This procedure is to be done monthly
1. Remove and discard all ice from the bin.
2. Switch the ice maker off.
2. Prepare 2 gallons of an approved sanitizer
solution in accordance with the instructions on the
package, or use the following instructions for use
of household bleach, if it meets local codes: Mix a
sanitizing solution of 1 ounce of household bleach
to 2 gallons of water.
3. Using clean rubber gloves and a clean cloth,
wipe all interior surfaces of the ice machine and
ice storage bin with the sanitizing solution.
Immerse any small parts in the sanitizing solution
and wash the parts, flushing the solution
thoroughly in, over and through all parts and
surfaces of the parts being cleaned.
4. Allow to air dry.
5. Switch the ice machine back on.
10. Replace the evaporator cover. Replace the
front panel.
11. Move the master switch to ON.
December, 1994
Page 21

SERVICE DIAGNOSIS
CME855A & CME1000A
Page 21
SYMPTOM POSSIBLE CAUSE PROBABLE CORRECTION
No ice, machine does not run 1. No electrical power 1. Restore power
2. Circuit breaker tripped or fuse
blown
3. High pressure control open. 3. Reset HPC, check fan motor
4. Bin Thermostat holding
machine off
5. High temp. cut out open 5. Hot gas valve leaks thru,
6. Timer switch open 6. Replace timer
7. Master switch open 7. Check or replace switch.
8. Circuit board open 8. Replace circuit board.
No ice, compressor does not run,
rest of ice machine does.
No ice, no water over evaporators 1. Water pump does not pump 1. Check/replace water pump
No ice, everything runs 1. Too much heat load 1. Check for slow leak thru of
Low ice production 1. Too much heat load. 1. Check condenser air inlet
1. Open contactor coil 1. Replace contactor
2. Thermostatic Expansion valve
clogged or does not open.
2. No water in reservoir 2. Check/replace water inlet valve.
2. Low on refrigerant 2. Check pressures, if low
3. Suction pressure too high 3. Defective compressor - replace
2. Compressor inefficient. 2. Replace compressor
3. Non condensable gasses in
refrigeration system.
2. Reset breaker or replace fuse,
check for electrical fault.
for proper operation, and
condenser coil for dirt.
4. Check bin thermostat.
replace hot gas valve
2. Check/replace TXV.
water inlet valve.
find/repair leak; weigh in charge.
temperature. Check water
temperature.
3. Check head pressure, if very
high, and no other reason is
suspected, replace refrigerant
charge.
October, 1994
Page 22

SERVICE DIAGNOSIS
CME855A & CME1000A
Page 22
SYMPTOM POSSIBLE CAUSE PROBABLE CORRECTION
Low ice production 4. High head pressure, a result of
a dirty condenser
5. Hot gas valve leaks thru 5. Replace hot gas valve
6. High discharge pressure 6. If possible, reduce condenser
No ice falling in bin, unit frozen up 1. Cube size control will not close 1. Check temp. of suction line,
2. Timer motor open 2. Replace timer
3. Plug in relay contacts open 3. Replace relay
4. Not enough time during the
harvest cycle to drop all ice
5. Cube size wrong 5. Adjust cube size
6. Hot gas valve restricted. 6. Replace hot gas valve.
7. Not enough water to help
harvest.
8. Head pressure too low 8. Check water reg./pressure
Ice maker stuck in harvest cycle 1. Relay coil open 1. Replace relay
2. Timer stuck in harvest cycle 2. Check for power to timer
3. Timer microswitch N.O.
contacts will not close.
Ice is mal-formed 1. Shortage of water 1. Check for restriction of water
2. Evaporator water passages
restricted.
3. Cube size set wrong 3. Adjust cube size control
Water overflows from reservoir
into bin.
1. Restricted sump drain 1. Repair drain
2. Inlet water valve lets in too
much water
4. Clean water circuit of
condenser
water inlet temperature.
cube size control will not close if
temp. too high. If temp. low
enough, replace cube size control
4. Adjust timer for more harvest
time
7. Check for restriction of water
supply.
control valve. Check for low
refrigerant charge.
motor, if power replace timer, if
no power to timer motor, replace
relay.
3. Replace timer.
supply. Check for leak.
2. Clean ice maker.
2. Replace valve
December, 1994
Page 23

REMOVAL AND REPLACEMENT
CME855A & CME1000A
Page 23
Disconnect electrical
power before beginning.
Cube Size Control
To remove the cube size control:
1. Remove front panel.
2. Remove cover from control box.
3. Trace capillary tube, from the cube size control
to the refrigerant suction line.
4. Remove the coiled capillary tube bulb from the
tube well on the suction line.
5. Remove electrical leads from the cube size
control.
6. Remove screws and the cube size control. To
replace the cube size control, reverse the removal
procedure. Be certain to re-insulate the cube size
control bulb.
Water Distributor Tubes And Manifold Tubes
To remove the water distributor tube and manifold
tube:
Inlet Water Solenoid Valve Assembly
To remove the inlet water solenoid valve assembly:
1. Shut OFF water supply to machine.
ELECTRICAL CORD
CONNECTION
INLET
FITTING
OUTLET
SOLENOID
VALVE
1. Pull out to unsnap catches and remove the front
panel.
2. Remove the evaporator cover.
3. Slide the water distributor tube to the front about
1/8-inch along the top of the evaporator plate, until
the water distributor tube can be unsnapped from
the flexible notch and lifted upward to the right
side.
4. Unsnap and disconnect water distributor tubes
from the water manifold section. To replace the
water distributor tubes and manifold tubes, reverse
the removal procedure.
BE SURE the notches in the water manifold tubes
properly engage the alignment keys in the tee. BE
SURE the water distributor tube is securely
fastened at the notch at both sides of the
evaporator plate.
Check identical attachment for the left water
distributor tube and notch; also, that the
distributor/manifold connections at the top center
of each evaporator plate is snug against the top of
the plate.
REMOVAL OF THE INLET WATER VALVE
2. Loosen and remove outlet water line from the
inlet water solenoid valve assembly.
3. Remove screws and pull the water solenoid
valve out to gain access.
4. Pull electrical cord connection from solenoid coil
terminals.
4. Remove inlet water fitting from the water
solenoid valve. To replace the inlet water valve
assembly, reverse the removal procedures.
October, 1994
Page 24

REMOVAL AND REPLACEMENT
CME855A & CME1000A
Page 24
Disconnect electrical
power before beginning.
Water Pump
1. Remove front panel.
2. Remove evaporator cover.
3. Unplug water pump electrical connection.
4. Remove thumb screw retaining pump to cross
brace.
5. Pull pump partially out of reservoir and remove
discharge hose.
ELECTRICAL
CONNECTION
Hot Gas Valve
1. Remove the side service panel, and top panel if
possible.
2. Discharge and recover the refrigerant from the
system.
3. Remove the electrical connections from the coil
of the valve
4. Cut out or unsweat the valve at the tubing
connections, remove the valve from the ice maker.
5. Install the new valve, wrap it in wet cloths or
other efficient heat sink material.
6. Sweat the tubing connections to the valve.
7. Connect the electrical wires to the terminals of
the valve coil.
8. Weigh in the nameplate charge.
9. Replace all panels removed for service.
10. Reconnect electrical power.
Thermostatic Expansion Valve
DISCHARGE
HOSE
PUMP
REMOVAL OF THE WATER PUMP
6. Reverse to reassemble.
7. Replace all panels.
8. Reconnect electrical power.
1. Remove the side service panel, and top panel if
possible.
2. Discharge and recover the refrigerant from the
system.
3. Locate the TXV sensing bulb on the suction line,
unwrap the insulation and remove the bulb from
the clamp.
4. Cut out or unsweat the old TXV from the tubing
connections.
5. Wrap the new TXV body in wet cloths or other
efficient heat sink material.
6. Sweat in the new valve. Do not overheat.
7. Re-attach the TXV bulb to the suction line in the
same place as the original. Be certain to
re-insulate.
8. Install a new HFC type drier.
9. Evacuate to at least 200 microns.
10. Weigh in the nameplate charge.
11. Replace all panels removed for service.
12. Reconnect electrical power, and restart
machine.
December, 1994
Page 25

REFRIGERATION SERVICE
CME855A & CME1000A
Page 25
This ice machine uses R-404A refrigerant and polyolester oil. Do NOT
use mineral oil in this refrigeration system.
••R-404A is a "Near Azeotrope" so liquid charging is required: See the
next page.
••When the system is serviced, a special liquid line drier is required. It is
included with replacement compressors.
••HP62 is not compatible with mineral oil, so these ice machines use
Polyolester oil. Polyolester oil absorbs water very easily. When one of
these refrigeration systems is opened for service, it must be re-sealed
as soon as possible (15 minutes maximum).
••Special leak detection equipment is required to locate small refrigerant
leaks. Usually a leak detector capable of detecting a Halongenated
refrigerant or HFC-134a will work. Check with the leak detector
manufacturer if in doubt.
Access Valves: To use the access valves:
••Remove the cap from the stem, use a 3/16" allen wrench to check
that the valve is CLOSED. The remove the core cap.
••Close the valve and replace the caps when the job is finished.
The valve must be closed and the caps must be on or the valve
will leak.
General Information:
Work on the refrigeration system should only be done when it is certain
that the system needs repair.
••Refrain from checking refrigeration pressures without reason.
Visual inspection of the water system, observation of the ice
formation, amp draw, voltage, and other techniques will lead to proper
diagnosis.
••If gauges must be used, don’t always check the high side pressure. If
the condenser is clean and seems to be operating correctly, it most
likely is.
••If gauges must be used, use very short hoses to minimize refrigerant
discharged into the air.
••Refrigerant should not be added except as a way to determine the
proper operation of the product. If the system was low on refrigerant,
there is a leak, and it must be found and repaired.
••This system has a critical charge, it must be recharged with the
correct amount of refrigerant as listed on the nameplate of the ice
machine, or performance will suffer.
••Anytime the refrigeration system has been opened, the dryer should
be replaced. Note: Only a HFC type dryer can be used.
••When brazing the tubing connections to components such as the
TXV, the component must be protected by heat sink material.
Recover, reclaim or recycle refrigerant . The method chosen is up to
the service company. Any refrigerant placed into a Scotsman ice machine
must meet ARI spec 700-88. Reclaim programs are available through
most refrigerant wholesalers.
Pressure-Temperature Chart for HP62
VAPOR VAPOR
TEMP. PRES. TEMP. PRESS.
(DEG F) (PSIG) DEG F) (PSIG)
-20 17 70 146
-18 18 72 150
-16 20 74 155
-14 21 76 161
-12 23 78 166
-10 24 80 171
-8 26 82 177
-6 28 84 182
-4 29 86 188
-2 31 88 194
0 33 90 200
2 35 92 206
4 37 94 212
6 39 96 219
8 41 98 225
10 43 100 232
12 46 102 239
14 48 104 246
16 50 106 253
18 53 108 260
20 55 110 268
22 58 112 275
24 60 114 283
26 63 116 291
28 66 118 299
30 69 120 307
32 72 122 316
34 75 124 324
36 78 126 333
38 81 128 342
40 85 130 351
42 88 132 360
44 91 134 370
46 95 136 379
48 99 138 389
50 102 140 399
52 106 142 409
54 110 144 420
56 114 146 430
58 118 148 441
60 123 150 452
62 127 152 464
64 132 154 475
66 136 156 487
68 141 158 499
October, 1994
Page 26

LIQUID CHARGING
CME855A & CME1000A
Page 26
Instructions for R-404A
In preparation for charging, the low side hose
should have a sight glass, and/or a restrictor
device (such as a "Charge Faster") installed in it
for metering liquid into the low side of the system.
1. After a thorough evacuation to at least 200
microns, shut off the manifold valves and switch
off the vacuum pump.
2. Place a drum of R-404A onto an electronic
scale.
3. Attach the charging hose to the drum.
4. Open the valve on the drum and purge the
charging hose.
5. Zero out the scale.
6. Shut the low side access valve at the ice
machine.
7. Open the discharge manifold valve full open.
8. Watch the scale, when the correct charge is
shown, shut the manifold valve.
Note: If all of the charge will not "go in" the
discharge side:
A. Shut the discharge access valve at the ice
machine.
B. Switch the machine on.
C. Open the low side access valve at the ice
machine.
D. Open the low side manifold valve and observe
the sight glass to be certain that only gas is
flowing into the system.
E. When the proper charge is indicated on the
scale, shut off the manifold valve(s).
9. Shut off the valve on the refrigerant drum.
10. Re-open the manifold valves until all liquid has
flowed out of the hoses.
11. Shut the low side access valve on the ice
machine.
12. Remove hoses from ice machine and replace
all caps.
Hose Connection Schematic for Liquid Charging
Allen
Wrench
Torque Stem to
6-8 ft. lb..
Torque Stem Cap to
8-12 ft. lb..
Torque
Core Cap to
7-12 ft. lb..
Access Valves
Note: There are no valve
cores in this valve.
December, 1994
 Loading...