

STATim 2000/5000 G4
CASSETTE AUTOCLAVE
• Setting Up and Using Your Web Portal
• Paramétrage et utilisation de votre portail Web
• Einrichtung und Verwendung Ihres Web-Portals
• Impostazione e uso del Vostro portale web
• Conguración y uso de su portal web
™
95-112505 Rev. 4.0 Copyright 2011 SciCan Ltd . All rights reserved.

Setting up and using your STATIM G4 web portal
Connecting to a Network ............................................................. 7
Connecting to a Wireless Network ............................................... 8
Reserving an IP Address for Your STATIM .................................. 9
Setting Up your Contacts Page ................................................. 10
Setting Up your LAN Page .......................................................... 10
Setting Up your Email ................................................................ 11
Setting Up Email Notications ................................................... 11
Setting Up Time Zone and Internet Synchronizations ............... 12
Setting Up your Password ......................................................... 12
Setting Up Backups ................................................................... 13
Using Tests ................................................................................ 13
Using the Status Page ................................................................ 14
Using the Archives Page ............................................................ 14
Emailing Cycle Information ......................................................... 15
Retrieving Cycle Information Using your STATim Web Portal ... 15
STATim Cassette Autoclave and STATim are registered trademarks, and
Your Infection Control Specialist logos are trademarks of SciCan Ltd. All other
trademarks referred to in this manual are the property of their respective owners.
For all service and repair inquiries:
In Canada 1-800-870-7777
United States: 1-800-572-1211
Germany:
International: (416) 446-4500
Email: techservice.ca@scican.com
Manufactured by:
SciCan
1440 Don Mills Road,
Toronto ON M3B 3P9
CANADA
Phone: (416) 445-1600
Fax: (416) 445-2727
Toll free: 1-800-667-7733
+49 (0)7561 98343 - 0
EU Representative
SciCan GmbH
Wangener Strasse 78
88299 Leutkirch
GERMANY
Tel.: +49 (0)7561 98343 - 0
Fax: +49 (0)7561 98343 - 699
SciCan Inc.
701 Technology Drive
Canonsburg, PA 15317
USA
Phone: +1 724 820 1600
Fax: +1 724 820 1479
Toll free: 1-800-572-1211
SciCan Medtech
Alpenstrasse 16
CH-6300 ZUG
SWITZERLAND
Phone: +41 (0) 41 727 7027
Fax: +41 (0) 41 727 7029

Paramétrage et Utilisation de Votre Portail Web
Connexion à un réseau .............................................................. 17
Connexion de votre STATIM G4 à un réseau sans l ................ 18
Réservation d’une adresse IP pour votre STATIM ..................... 19
Paramétrage de votre page de CONTACTS .............................. 20
Paramétrage de votre page LAN ................................................ 20
Paramétrage de votre e-mail STATIM ......................................... 21
Paramétrage du lieu de réception de vos NOTIFICATIONS d’e-mail ...... 21
Paramétrage de la zone horaire et de la synchronisation Internet .... 22
Paramétrage de votre MOT DE PASSE ..................................... 22
Paramétrer une sauvegarde ....................................................... 23
Utilisation de TESTS ................................................................... 23
Utilisation de la page STATUT ................................................... 24
Utilisation de la page ARCHIVES ............................................... 24
Envoi d’un e-mail sur les informations de cycle ......................... 25
Retrouver les informations de cycle en utilisant votre portail
Web STATIM .............................................................................. 25
STATim Cassette Autoclave et STATIM sont des marques déposées
et le logo Your Infection Control Specialist est une marque commerciale
de SciCan Ltd. Toutes les autres marques commerciales mentionnées
dans ce manuel appartiennent à leurs propriétaires respectifs
Pour toute demande de maintenance et
de réparation :
Canada : 1-800-870-7777
Etats Unis : 1-800-572-1211
Allemagne :
International : (416) 446-4500
Email : techservice.ca@scican.com
Fabriqué par :
SciCan
1440 Don Mills Road,
Toronto ON M3B 3P9
CANADA
Téléphone : (416) 445-1600
Fax : (416) 445-2727
Appel gratuit : 1-800-667-7733
+49 (0)7561 98343 - 0
.
Représentation pour l’UE
SciCan GmbH
Wangener Strasse 78
88299 Leutkirch
GERMANY
Tél : +49 (0)7561 98343 - 0
Fax : +49 (0)7561 98343 - 699
SciCan Inc.
701 Technology Drive
Canonsburg, PA 15317
USA
Téléphone : +1 724 820 1600
Fax : +1 724 820 1479
Appel gratuit : 1-800-572-1211
SciCan Medtech
Alpenstrasse 16
CH-6300 ZUG
SWITZERLAND
Téléphone : +41 (0) 41 727 7027
Fax : +41 (0) 41 727 7029

Einrichtung und Verwendung Ihres STATIM-G4-Web-Portals
Netzwerkverbindung .................................................................. 27
Anschluss Ihres STATIM G4 an ein Wireless-Netzwerk ............. 28
Reservieren einer IP-Adresse für Ihren STATIM ......................... 29
Einrichten Ihrer KONTAKTE-Seite .............................................. 30
Einrichten Ihrer LAN-Seite ........................................................... 30
Einrichten der E-Mail-Adresse Ihres STATIM ............................. 31
Einrichten von Personen für E-Mail-Benachrichtigungen .......... 31
Einrichten von Zeitzone und Internet-Synchronisierungen ........ 32
Einrichten Ihres Passwortes ....................................................... 32
Einrichten eines Backups ........................................................... 33
Verwenden von TESTS ............................................................... 33
Verwenden der STATUS-Seite ................................................... 34
Verwenden der ARCHIV-Seite .................................................... 34
Verschicken von Zyklusinformationen per E-Mail ...................... 35
Abrufen von Zyklusinformationen über Ihr STATIM-Web-Portal .... 35
STATim Cassette Autoclave und STATim sind eingetragene Handelsmarken.
Your Infection Control Specialist” sind Handelsmarken von SciCan
Die Logos
“
Ltd. Sämtliche weitere im vorliegenden Handbuch erwähnte Handelsmarken
sind Eigentum ihrer jeweiligen Besitzer.
Kundendienst und Reparaturen:
Kanada: 1-800-870-7777
Vereinigte Staaten: 1-800-572-1211
Deutschland:
International: (416) 446-4500
E-Mail: techservice.ca@scican.com
Hergestellt von:
+49 (0)7561 98343 - 0
SciCan
1440 Don Mills Road,
Toronto ON M3B 3P9
CANADA
Telefon: (416) 445-1600
Fax: (416) 445-2727
Gebührenfrei: 1-800-667-7733
EU-Vertretung
SciCan GmbH
Wangener Straße 78
88299 Leutkirch
DEUTSCHLAND
Telefon: +49 (0)7561 98343 - 0
Fax: +49 (0)7561 98343 - 699
SciCan Inc.
701 Technology Drive
Canonsburg, PA 15317
USA
Telefon: +1 724 820 1600
Fax: +1 724 820 1479
Gebührenfrei: 1-800-572-1211
SciCan Medtech
Alpenstraße 16
CH-6300 ZUG
SWITZERLAND
Telefon: +41 (0) 41 727 7027
Fax: +41 (0) 41 727 7029

Impostazione e Uso del Vostro Portale Web
Come connettersi a una Rete .................................................... 37
Come connettere lo STATIM G4 a una rete wireless ................ 38
Come riservare un indirizzo IP per il vostro STATIM ................... 39
Come impostare la pagina dei Vostri CONTATTI ........................ 40
Come impostare la pagina della Vostra LAN .............................. 40
Come impostare le E-mail sul Vostro STATIM ........................... 41
Come impostare gli utenti che riceveranno NOTIFICHE di e-mail ...... 41
Come impostare il Fuso orario e la Sincronizzazione Internet .. 42
Come impostare la Vostra PASSWORD .................................... 42
Come impostare una COPIA DI SICUREZZA (BACKUP) ........... 43
Come usare TEST ....................................................................... 43
Come usare la pagina degli STATI .............................................. 44
Come usare la pagina degli ARCHIVI ........................................ 44
Come inviare per e-mail informazioni su un ciclo ....................... 45
Come recuperare informazioni su un ciclo usando il portale web del
Vostro STATIM ............................................................................ 45
STATIM Cassette Autoclave e STATim sono marchi registrati e i logo Infection
Control Specialist sono marchi della SciCan Ltd. Tutti gli altri marchi riportati in
questo manuale sono proprietà dei loro rispettivi titolari.
Per tutte le richieste di assistenza e di riparazioni:
In Canada 1-800-870-7777
Stati Uniti: 1-800-572-1211
Germania:
Internazionale: (416) 446-4500
E-mail: techservice.ca@scican.com
Fabbricato da:
SciCan
1440 Don Mills Road,
Toronto ON M3B 3P9
CANADÁ
Telefono: (416) 445-1600
Fax: (416) 445-2727
Senza addebito:
+49 (0)7561 98343 - 0
1-800-667-7733
Rappresentante EU
SciCan GmbH
Wangener Strasse 78
88299 Leutkirch
GERMANIA
Telefono: +49 (0)7561 98343 - 0
Fax: +49 (0)7561 98343 - 699
SciCan Inc.
701 Technology Drive
Canonsburg, PA 15317
USA
Telefono: +1 724 820 1600
Fax: +1 724 820 1479
Senza addebito: 1-800-572-1211
SciCan Medtech
Alpenstrasse 16
CH-6300 ZUG
SVIZZERA
Telefono: +41 (0) 41 727 7027
Fax: +41 (0) 41 727 7029

Configuración y Uso de Su Portal Web
Conexión a una red .................................................................... 47
Conexión de su STATIM G4 a una red inalámbrica .................. 48
Reserva de una diricción IP para su STATIM ............................. 49
Conguración de su página de contactos ................................. 50
Conguración de su página de LAN .......................................... 50
Conguración de su correo electrónico de STATIM .................. 51
Configuración de quién recibirá NOTIFICACIONES de correo electrónico .. 51
Conguración de huso horario y sincronizaciones por Internet ... 52
Conguración de su CONTRASEÑA ......................................... 52
Conguración de una COPIA DE SEGURIDAD ........................... 53
Uso de PRUEBAS ...................................................................... 53
Uso de la página de ESTADO ................................................... 54
Uso de la página de ARCHIVOS ................................................ 54
Mensajes de correo electrónico con información del ciclo ....... 55
Recuperación de la información del ciclo mediante el uso de su
portal web STATIM ..................................................................... 55
STATim Cassette Autoclave y STATim son marcas registradas, y los logotipos
de Your Infection Control Specialist son marcas comerciales de SciCan Ltd.
Todas las demás marcas mencionadas en este manual son propiedad de sus
respectivos dueños.
Para cualquier consulta relacionada con tareas de
servicio técnico y reparaciones:
En Canadá 1-800-870-7777
Estados Unidos: 1-800-572-1211
Alemania:
International: (416) 446-4500
Correo electrónico: techservice.ca@scican.com
Fabricado por:
+49 (0)7561 98343 - 0
SciCan
1440 Don Mills Road,
Toronto ON M3B 3P9
CANADÁ
Teléfono: (416) 445-1600
Fax: (416) 445-2727
Número de teléfono gratuito: 1-800-667-7733
Representante en la UE
SciCan GmbH
Wangener Strasse 78
88299 Leutkirch
ALEMANIA
Teléfono: +49 (0)7561 98343 - 0
Fax: +49 (0)7561 98343 - 699
SciCan Inc.
701 Technology Drive
Canonsburg, PA 15317
USA
Teléfono: +1 724 820 1600
Fax: +1 724 820 1479
Número de teléfono gratuito: 1-800-572-1211
SciCan Medtech
Alpenstrasse 16
CH-6300 ZUG
SUIZA
Teléfono: +41 (0) 41 727 7027
Fax: +41 (0) 41 727 7029
Setting up and using your STATIM G4 web portal
This web portal is a direct connection to the STATim on your network. It is protected by
your rewall and not accessible to outside users. It provides real-time cycle information
and archived sterilization records unique to this unit. From here, you can print reports,
set up email notication and search cycle histories. To set up your web portal follow
these instructions.
Connecting to a Network
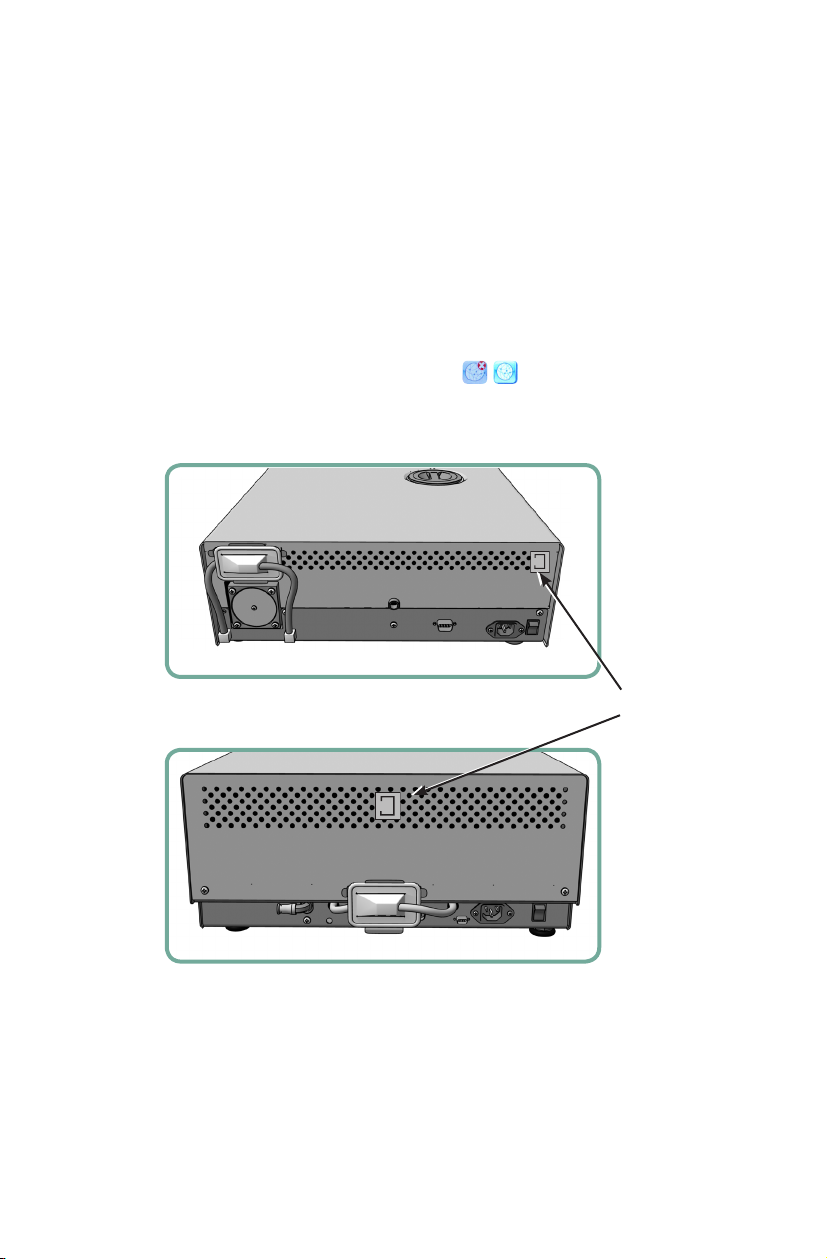
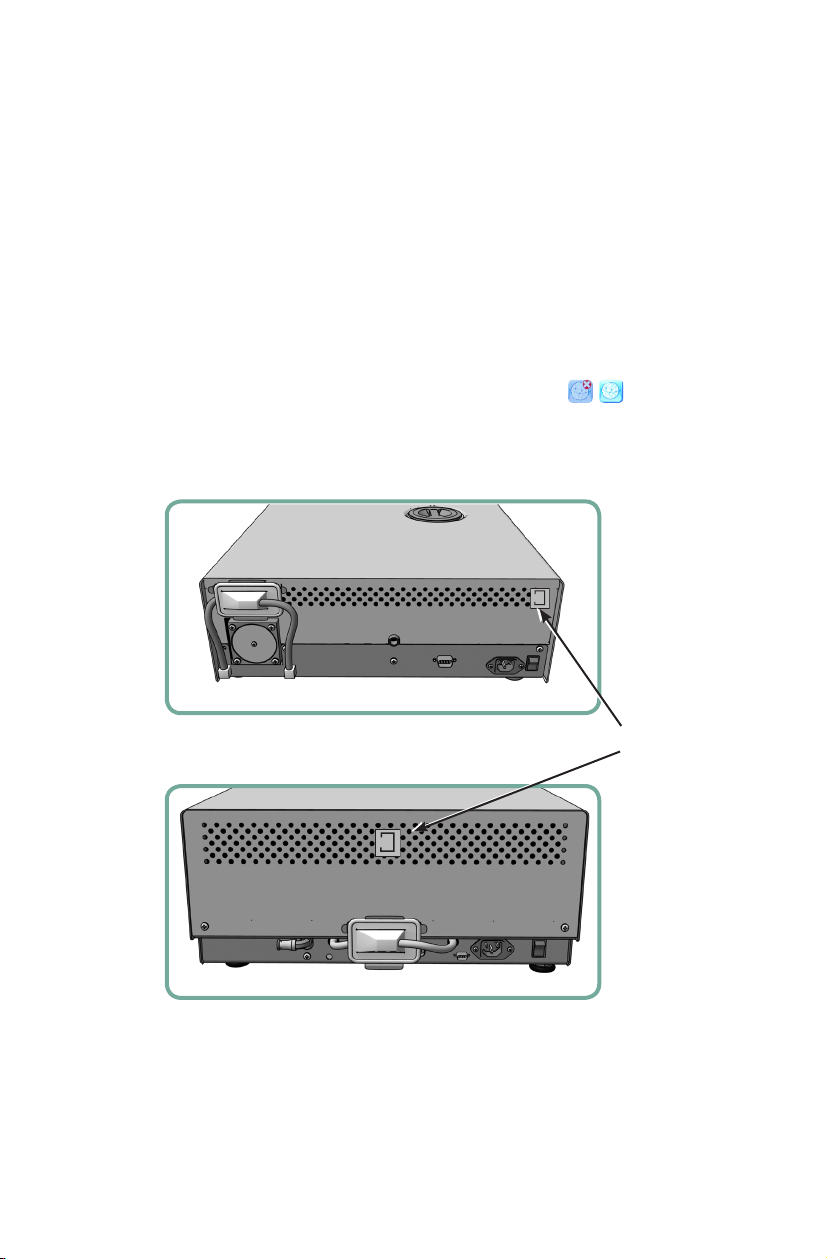
The STATim G4 has a 10/100Base-T Ethernet port located at the back of the unit.
To connect your STATim to a network using a router, follow these steps:
1. Connect your network cable to the Ethernet port at the back of the unit (see next
section for location of port). If your ofce uses a router, the router should automatically
assign the unit an IP address. You will know the IP address has been assigned when
the red X over the Network icon disappears.
NOTE: In some circumstances, for example, where you do not have a router and when
using Windows Network Sharing, you may have to assign a dedicated or ‘static’
IP address. To assign a static IP address, contact your local network administrator.
2000 G4
5000 G4
Ethernet
Port
Page 7
Setting up and using your STATIM G4 web portal
MAC: xx:xx:xx:xx:xx:xx
DHCP
Link: On
Bind: dhcp
IP: xxx.xxx.xxx.xxx
MASK: xxx.xxx.xxx.xxx
GATE: xxx.xxx.xxx.xxx
DNS1: xxx.xxx.xxx.xxx
mm/dd/yyyy hh:mm:ss
SELECT A CYCLE
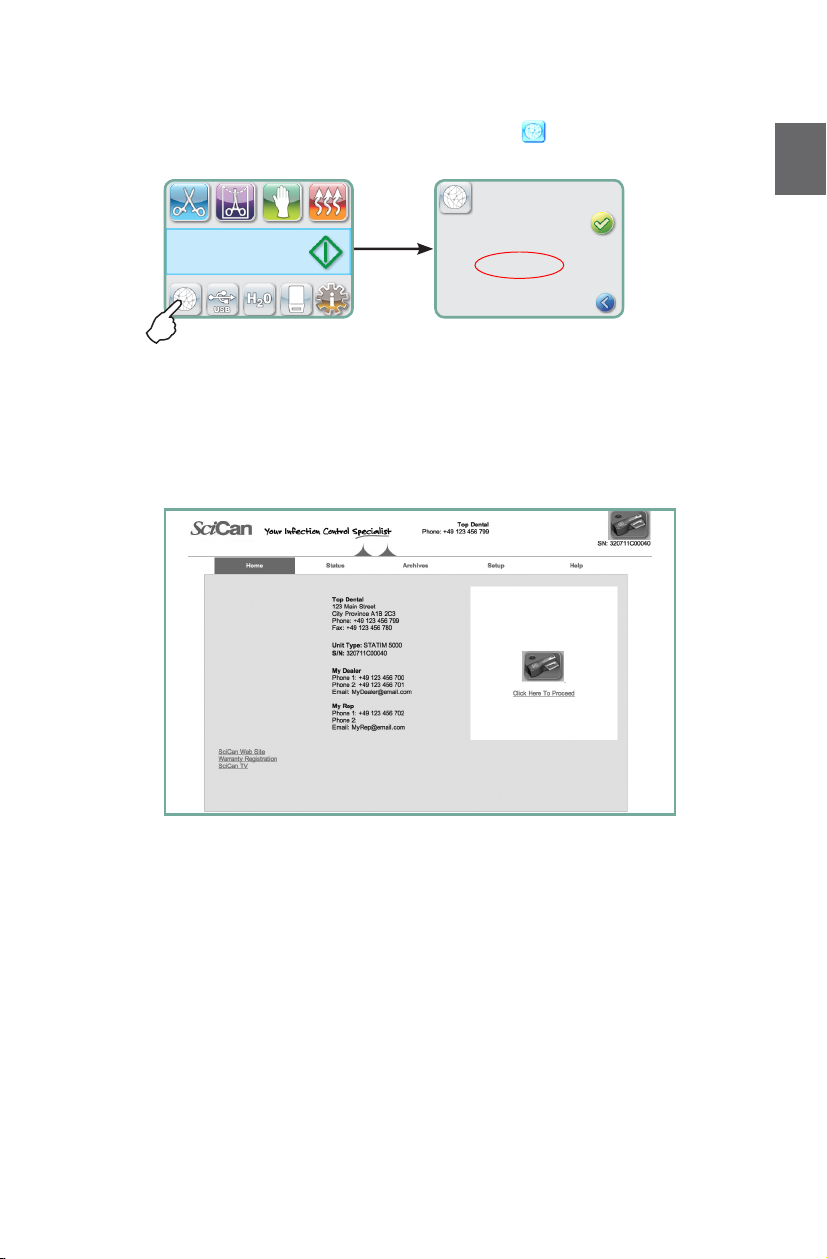
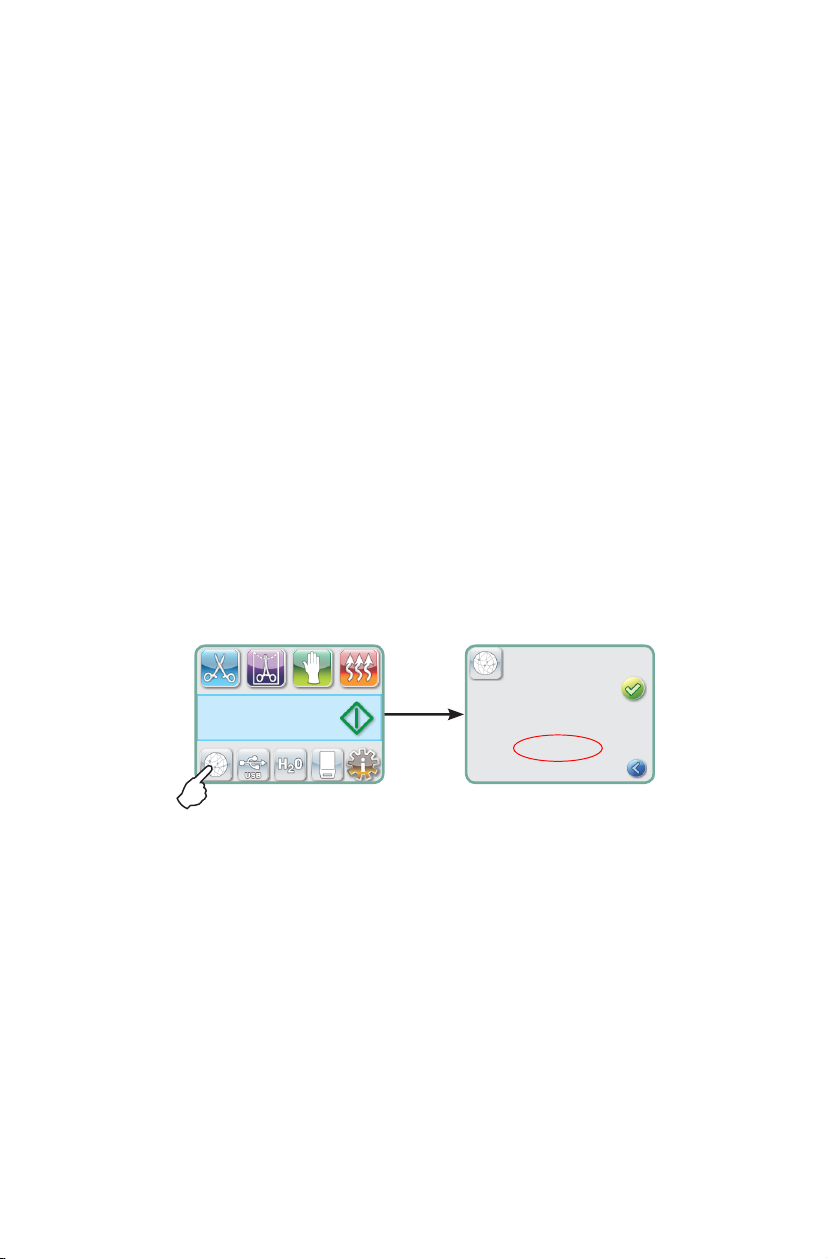
2. From the main screen, press the NETWORKING icon . The Networking screen
displays information about your STATim’s connectivity, including its IP address.
3. Type the IP address displayed on the touchscreen into your computer’s browser to
access your unit’s web portal. You will know that an IP address has been assigned
when the red X over the Network icon disappears. When the Network icon is active (for
example when sending email) it will turn green.
NOTE: Connection time will vary depending on your network speed, and making an initial
connection may take longer.
EN
Connecting your STATIM G4 to a wireless network
The STATim G4 can be congured for wireless use by connecting the Ethernet port to an
external wireless bridge / access point. SciCan currently recommends the use of the D-Link
DAP-1522 Xtreme N
®
Duo Wireless Bridge. Contact your network administrator to learn
more about setting up a wireless bridge.
Page 8
®
Setting up and using your STATIM G4 web portal
MAC: xx:xx:xx:xx:xx:xx
DHCP
Link: On
Bind: dhcp
IP: xxx.xxx.xxx.xxx
MASK: xxx.xxx.xxx.xxx
GATE: xxx.xxx.xxx.xxx
DNS1: xxx.xxx.xxx.xxx
mm/dd/yyyy hh:mm:ss
SELECT A CYCLE
Reserving an IP Address for Your STATIM
When your STATim is connected to a router on your network, it is assigned a unique
IP address.
NOTE: Accessing this screen will vary for each router, please consult your
router’s User Manual or contact your network administrator for more detailed
instructions. SciCan currently recommends D-Link DIR-615 Wireless N router.
If the connection between your
STATim or router was restarted, etc), then the re-established connection may be
a different IP address. This may result in invalid links from any previously saved
bookmarks or other saved connections. In order to set a ‘permanent’ IP address,
follow these steps to establish a ‘DHCP/IP/Address Reservation’:
NOTE: Each manufacturer may use different nomenclature, this settings may be
called one of the following:
• DHCP Reservation,
• IP Reservation, or
• Address Reservation.
IMPORTANT: Please contact your network administrator for more detailed
instructions.
1. On the
STATim unit LCD, select the network information button and write down
the numbers found for the GATE (Router Local IP).
STATim and the router is lost (ie. facility lost power,
2. Use this GATE address in any web browser to access your router settings.
NOTE: You will need your network password to change the settings.
3. Use the ‘DHCP/IP/Address Reservation’ function to assign a ‘permanent’ IP
address to your
STATim. You will have to select the appropriate device to apply
this setting, your unit’s default name will be: ‘statim_###’
Page 9
Setting up and using your STATIM G4 web portal
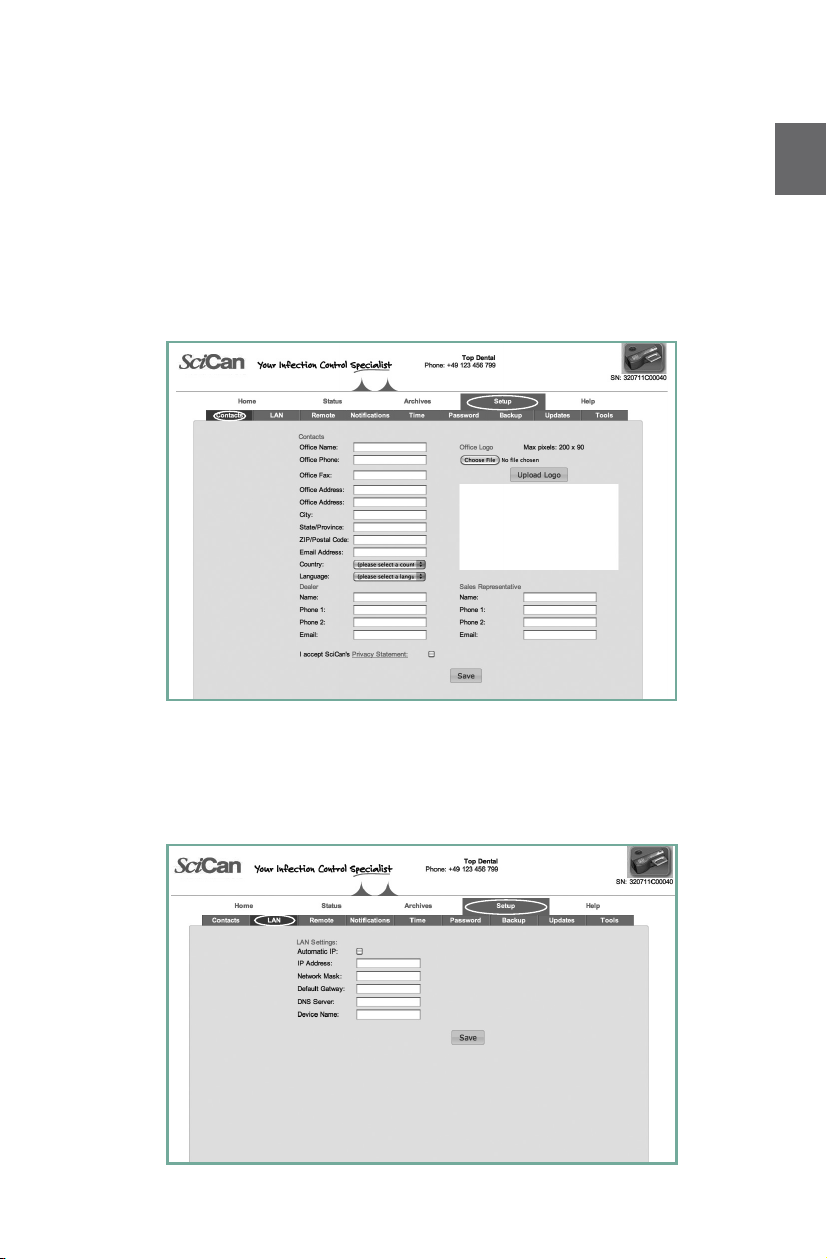
Setting up your CONTACTS page
1. Click on the SETUP page and go to the CONTACTS tab.
2. Here you will be prompted to provide a user name and password. For both
the user name and password, the default is “scican”. Use it to enter and then
you can customize it using the PASSWORD tab.
3. The information you use to ll the elds on the CONTACTS page, such as your ofce name,
address and uploaded logo, is then used to customize your
NOTE: Please read and review SciCan’s privacy statement. Refer to SciCan’s website if you cannot
access the statement through the Web Portal. To accept the statement, check the box - your
STATim cannot send any emails if the box is unchecked.
STATim
’s home page and print outs.
EN
Setting up your LAN page
1. From the SETUP page, use the LAN tab to check your network settings.
2. If you have a router in your ofce, keep the Automatic IP box checked. This will
populate the elds for correct network settings automatically.
3. If you want to assign different values to these elds, uncheck the box, populate the
elds and click Save to preserve the changes.
Page 10
Setting up and using your STATIM G4 web portal
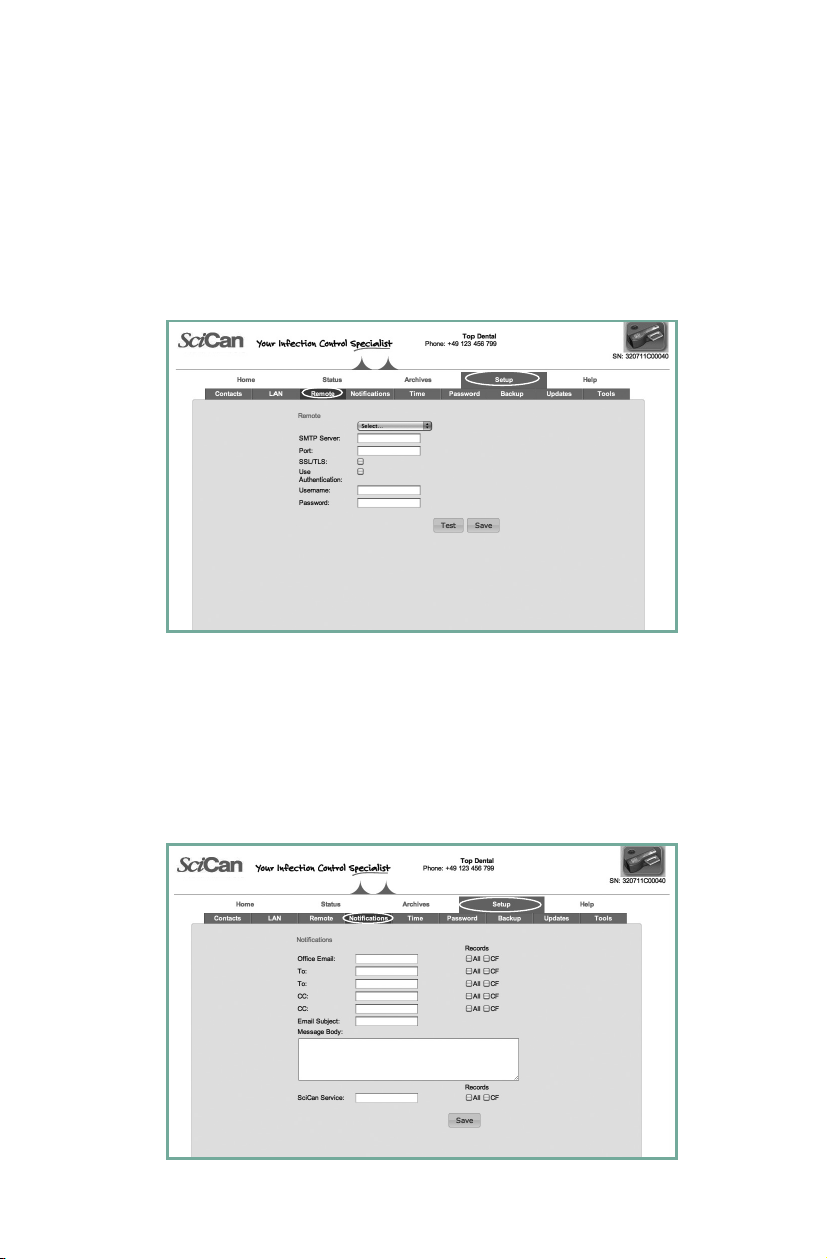
Setting up your STATIM’s email
1. From the SETUP page, use the REMOTE tab to assign your unit an email address.
2. Your STATim must use an email account set up either with your Internet service
provider or with a web-based email service. Populate the email account elds on this
page with your provider’s information if you are working with an email address from
your Internet service provider. To use one of the STATim web portal’s preset email
servers (choose from gmail, gmx mail, Yahoo and MSN mail), you must create an
account for your STATim (e.g. drsmithstatim@gmail.com).
3. Click the Test button to verify your settings.
Setting up who will receive email NOTIFICATIONS
1. From the SETUP page, use the NOTIFICATIONS tab to enter the email addresses and
specify which records will be sent. Choose from either ‘All’ cycle information including
cycle faults or ‘CF’ for cycle faults only.
2. The message box lets you add details to identify the unit, such as its location.
3. Uncheck the box if you do not want SciCan Technical Service to automatically receive
your unit’s cycle fault emails.
NOTE: If you are not receiving emails from your unit, check your spam lter to be certain
your STATim has been identied as an accepted email source.
Page 11

Setting up and using your STATIM G4 web portal
Setting the TIME zone and Internet synchronization
1. From the SETUP page, use the TIME tab to set the time and according to your time
zone and check the box if you want your unit to synchronize automatically with
dedicated Internet time servers. It will then automatically reset its clock whenever it
connects to the network.
NOTE: It will override any manual changes you may have made to time settings directly
on the unit.
Setting up your PASSWORD
Set a new user name and password to keep unauthorized users from changing the
congurations you have made on your web portal as well as in the Contacts
information your STATim uses to generate forms.
2. From the SETUP page, go to the PASSWORD tab. Note that both the default user
name and password is ‘scican’.
EN
Page 12
Setting up and using your STATIM G4 web portal
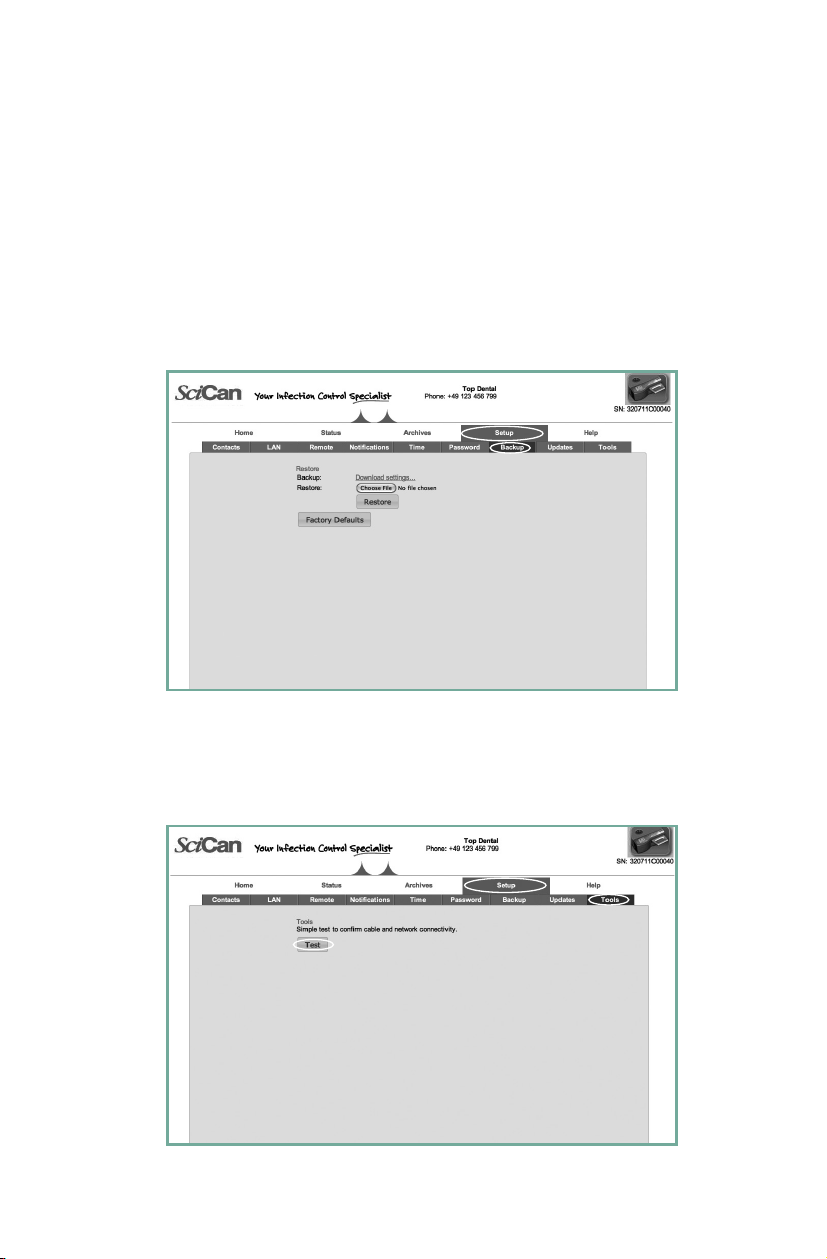
Setting up a BACKUP
1. From the SETUP page, use the BACKUP tab to back up all the congurable changes
and Contacts information you have made on your STATim’s web portal by storing a le
on your ofce computer.
NOTE: For security reasons, your email password will not be saved.
2. Click download settings to automatically store all settings in a le on your computer
(TIP: Use the Save As function on your computer to choose a specic location,
otherwise it will load the le in a default location preset by your browser).
3. To restore settings, click Choose le and browse for the le on your computer, select it
and click Restore.
Using TESTS
1. From the SETUP page, click on the TOOLS tab.
2. From here you can run a simple pass or fail test to check your network connectivity.
The results will conrm whether you are accessing the Internet, accessing a router
and whether your unit has a proper IP address.
Page 13
Setting up and using your STATIM G4 web portal
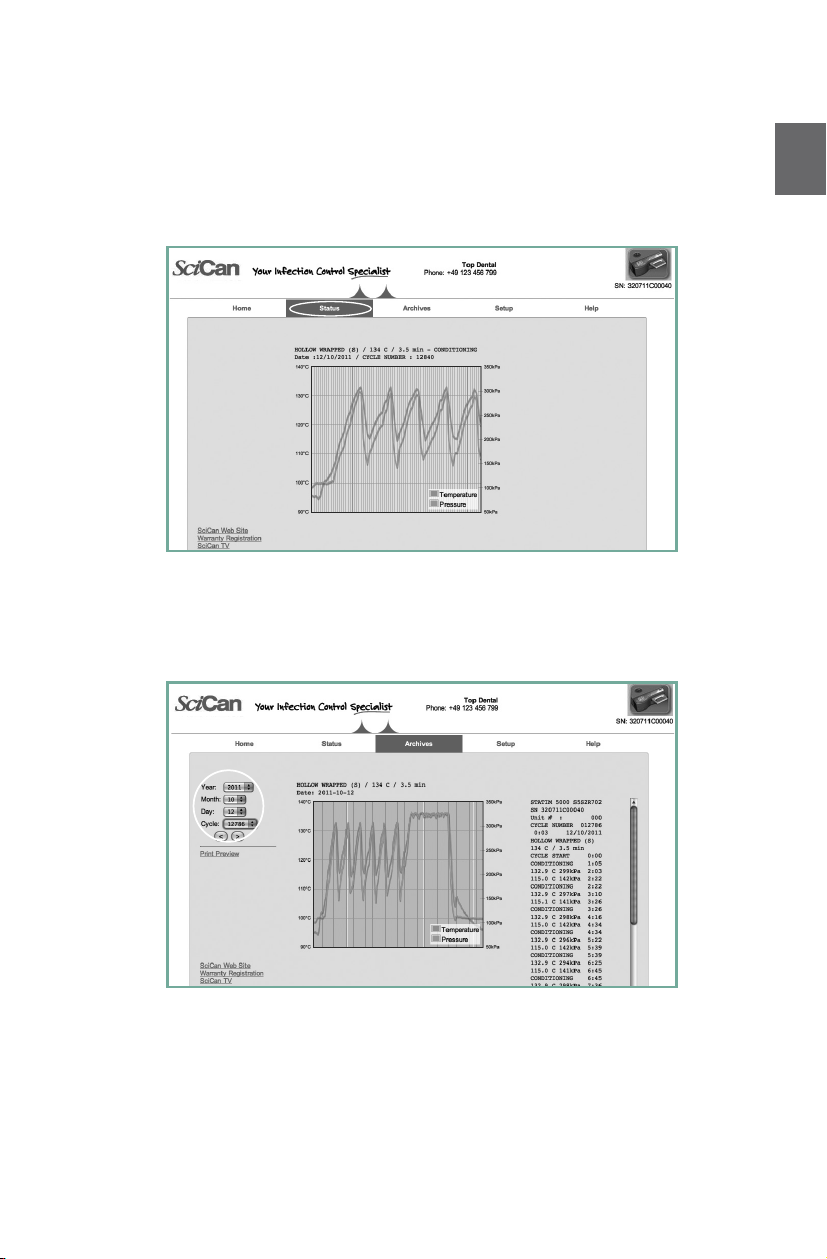
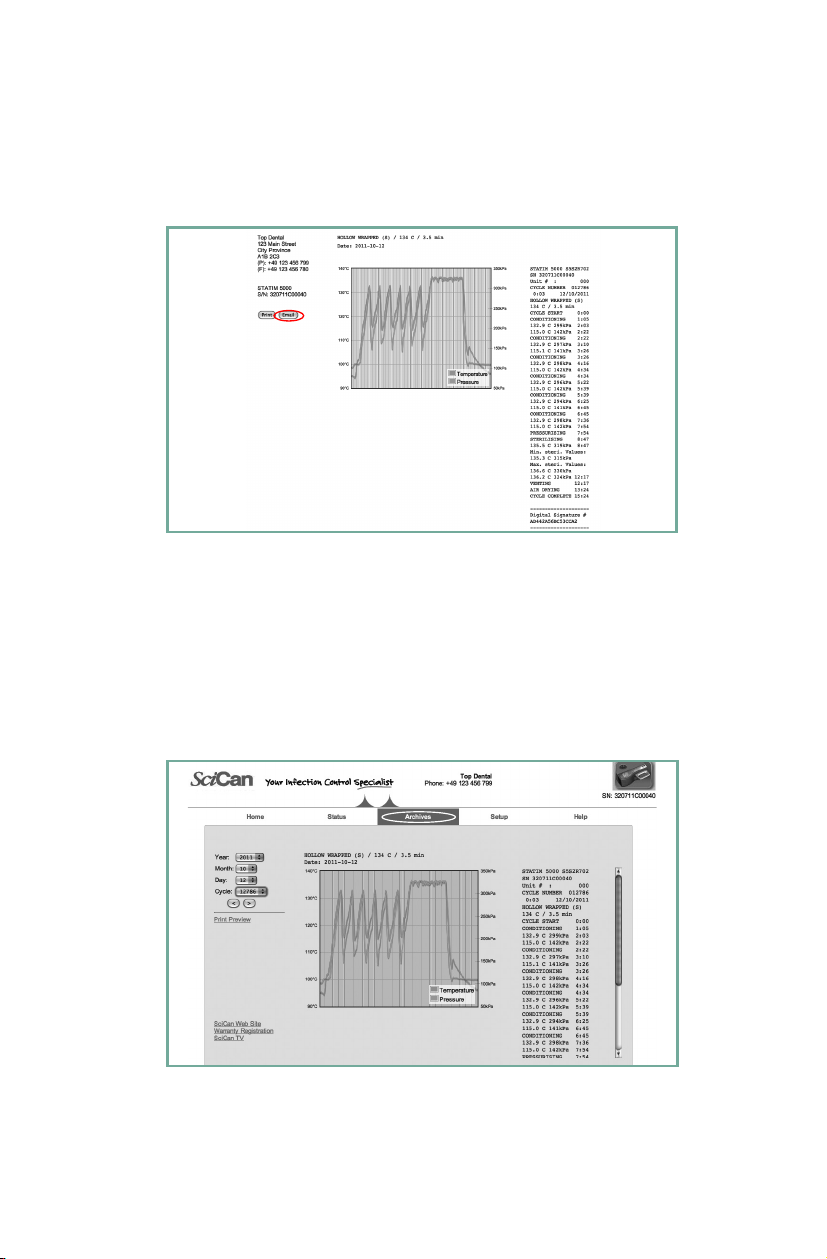
Using the STATUS page
From the Status page, you can see exactly what your STATim is doing. When your unit is in
operation, a graph depicting the different stages of the current cycle will display in real time.
Upon completion or after a forced stop, you can print the cycle graph on a form that includes
your organization’s information and logo.
Using the ARCHIVES page
From the Archives page, you can access cycle information stored in your STATim’s internal
Data logger. Fill in the year, month and day elds to browse through the cycles completed
on that date. To print, select the print preview button and then click Print.
EN
Page 14
Setting up and using your STATIM G4 web portal
Emailing cycle information
Send the cycle information you accessed in the ARCHIVES by selecting the print preview
button and clicking on EMAIL. It will send both a text le and PDF version of the cycle
information to any of the email addresses you have preset in the NOTIFICATIONS page.
The STATim G4 has an internal Datalogger capable of storing all cycle data on every
cycle, whether successful or incomplete, for the lifetime of the unit. You can access this
information through the touchscreen, through the web portal, using a USB storage device or
by attaching a printer.
Retrieving Cycle Information using your STATIM Web Portal
1. From your home page, click on the ARCHIVES page.
2. From the ARCHIVES page, you can access cycle information stored in your STATim’s
internal Datalogger. Fill in the year, month and day elds to browse through the cycles
completed on that date. To print, select the print preview button and then click Print.
Page 15

Setting up and using your STATIM G4 web portal
Fill in the following information for your own reference.
IP Address:
GATE:
Unit Type:
Serial #:
_____________________________________________________________
__________________________________________________________________
______________________________________________________________
________________________________________________________________
EN
Page 16
Paramétrage et Utilisation de Votre Portail Web
Le portail Web est la connexion directe vers STATIM sur votre réseau. Il est protégé par
votre pare-feu et inaccessible aux utilisateurs extérieurs. Il vous permet de retrouver en
temps réel toutes vos informations sur les cycles d’utilisation et d’archiver les paramètres
de stérilisation propres à votre appareil. A partir de ce portail, vous pouvez imprimer des
rapports, créer des notications par e-mail et effectuer des recherches dans l’historique
des cycles. Pour créer votre portail Web, il vous suft de suivre les instructions fournies.
Connexion à un réseau
Le STATIM G4 dispose d’un port Ethernet 10/100Base-T situé au dos de l’appareil. Pour
connecter votre STATIM au réseau à l’aide d’un routeur, suivez nos instructions pas à pas :
1. Connectez votre câble réseau au port Ethernet situé au dos de l’appareil (voir la position
exacte du port ci-dessous). Si votre cabinet utilise un routeur, le routeur assignera
automatiquement une adresse IP à l’appareil. Vous saurez que l’adresse IP a été
assignée lorsque le X rouge qui se trouve sur l’icône de réseau disparaîtra.
NOTE : Dans certaines circonstances, si, par exemple, vous ne disposez pas d’un
routeur, ou si vous utilisez le partage de réseau Windows Network Sharing, il vous faudra
peut-être assigner une adresse IP dédiée ou ‘statique’. Pour ce faire, contactez votre
administrateur réseau.
2000 G4
5000 G4
Port
Ethernet
Page 17
 Loading...