


STATIM 2000S/5000S
C A S S E T T E A U T O C L A V E ™
• Operator’s Manual
• Benutzerhandbuch
• Manuel de l’utilisateu
• Manuale per l’operatore
• Manual del Operador
STAT 2000S/5000S Operator’s Manual 95-108430 Rev 7.0.
CopyrightIM 2009 SciCan. All rights reserved.

Table of Contents
1.Introduction . . . . . . . . . . . . . . . . . . . . . . . 3
2.Important Information . . . . . . . . . . . . . . . 4
2.1 Disclaimers
2.2 Statim 2000S — Unit Overview
2.3 Statim 5000S — Unit Overview
3.Installation . . . . . . . . . . . . . . . . . . . . . . . . 7
3.1 Environmental Considerations
3.2 Unit Placement
3.3 Connecting the Waste Bottle
3.4 Filling the Reservoir
3.5 Priming the Statim Pump
3.6 Setting the Time and Date
3.7 Language Selection
3.8 Assigning Unit Identifier Number
3.9 Shipping the Unit
4.Instructions for Use . . . . . . . . . . . . . . . 11
4.1 Statim 2000S — Cassette
4.2 Statim 5000S — Cassette
4.3 Statim 5000S — STAT-DRI Plates
4.4 Preparing and Loading Instruments
4.5 Instrument Weight Table
4.6 Selecting a Cycle
4.7 Running a Cycle
4.8 Stopping a Cycle
STATIM Cassette Autoclave and Statim are registered trademarks and |
|
STAT-DRI and DriTec logos are trademarks of SciCan Ltd. All other trademarks |
|
referred to in this manual are the property of their respective owners. |
|
For all service and repair inquiries: |
|
In Canada |
1-800-870-7777 |
United States: |
1-800-572-1211 |
Germany: |
+49 (0) 821 56 74 56-0 |
International: |
(416) 446-4500 |
Email: |
techservice.ca@scican.com |
|
|
Manufactured by: |
|
SciCan |
|
1440 Don Mills Road, |
|
Toronto ON M3B 3P9 |
|
CANADA |
|
Phone: |
(416) 445-1600 |
Fax: |
(416) 445-2727 |
Toll free: |
1-800-667-7733 |
|
|
5.Maintenance . . . . . . . . . . . . . . . . . . . . . 20
5.1 Cleaning the Cassette
5.2 Cleaning the Water Reservoir Filter
5.3 Cleaning the Reservoir
5.4 Cleaning the Exterior Surfaces
5.5 Changing the Statim 2000S Air Filter
5.6 Changing the Bacteria Retentive Air Filters
5.7 Replacing the Cassette Seal
5.8 Maintaining Fluid Levels
5.9 Reading Water Quality
5.10 Preventative Maintenance Schedule
6.The Communication Port . . . . . . . . . . . 25
6.1 The RS232 Communication Port
6.2 Installing the Statim Data Logger
6.3 Installing Paper on the Internal Printer
6.4 Removing Internal Printer Paper Jams
6.5 Internal Printer Output Overview
7.Troubleshooting . . . . . . . . . . . . . . . . . . 35
8.Spare Parts List . . . . . . . . . . . . . . . . . . 39
9.Warranty . . . . . . . . . . . . . . . . . . . . . . . . 40
10.Test Protocol . . . . . . . . . . . . . . . . . . . 41
10.1 Type Test
11.Specifications . . . . . . . . . . . . . . . . . . . 43
11.1 Statim 2000S — Specifications
11.2 Statim 5000S — Specifications
EU Representative
SciCan GmbH
Kurzes Geländ 10
D-86156 Augsburg
GERMANY
Phone: +49 (0) 821 56 74 56-0
Fax: +49 (0) 821 56 74 56-99
SciCan Inc.
701 Technology Drive
Canonsburg, PA 15317
USA
Phone: +1 724 820 1600
Fax: +1 724 820 1479
Toll free: 1-888-632-6031
SciCan Medtech
Alpenstrasse
166300 Zug
SWITZERLAND
Phone: +41 (0) 41 727 7027
Fax: +41 (0) 41 727 702
Page 2

1. Introduction
Statim 5000S |
Statim 2000S |
Congratulations on your selection of the STATIM® Cassette Autoclave. We are confident that you have purchased the finest equipment of its type. The Statim is a compact, counter-top unit that features a number of sterilizing cycles designed to meet your needs and suitability for steam sterilization. The Statim “S” Cassette Autoclaves are fully compliant with EN13060.
The details of installing, operating and servicing your Statim are all contained within this operator’s manual. To ensure years of safe, trouble-free service please read these instructions before operating this unit and keep them for future reference. Operational, maintenance and replacement instructions should be followed for the product to perform as designed. Contents of this manual are subject to change without notice to reflect changes and improvements to the Statim product.
The Statim is suitable for the sterilization of dental and medical instruments designed
to withstand steam sterilization. The Statim has not been designed to sterilize liquids, cloth loads, biomedical waste or materials not compatible with steam sterilization.
The processing of such loads may result in incomplete sterilization and / or damage to the autoclave. For more information about instrument suitability for steam sterilization, consult the manufacturers’ reprocessing instructions.
Page 3

2. Important Information
2.1 Disclaimers
Use only steam-process distilled water in your Statim. Deionized, demineralized, or specially filtered water should not be used. Never use tap water.
Do not permit any person other than certified personnel to supply parts for, service or maintain your Statim. SciCan shall not be liable for incidental, special or consequential damages caused by any maintenance or services performed on the Statim by a third party, or for the use of equipment or parts manufactured by a third party, including lost profits, any commercial loss, economic loss, or loss arising from personal injury.
Never remove the cover of the unit and never insert objects through holes or openings in the cabinetry. Doing so may damage the unit and / or pose a hazard to the operator.
All elements of this book are common to both Statim 2000S and Statim 5000S except when noted.
IMPORTANT:
Follow local guidelines governing verification of the sterilization procedure.
Drying Performance
The Statim 2000S and 5000S have been designed to provide a complete sterilization solution for your unwrapped and wrapped instrument needs: rapid sterilization balanced with rapid drying, by using the SciCan Dri-Tec Drying Technology.
The Statim 2000S uses convection heat to dry instruments by utilizing the remaining heat in the system after the sterilization phase. Heat is captured and released in the cassette to rapidly dry a properly loaded Statim cassette.
The Statim 5000S uses heat generated by the sterilization phase which is absorbed by the drying plates. The heat is transferred from drying plates directly to the load resulting in accelerated, rapid drying of a properly loaded Statim cassette.
Please refer to this operator’s manual for instructions on the proper arrangement of instruments in the cassette and the use of Stat-Dri plates (Statim 5000S). By carefully following these directions on how to properly load the cassette chamber, rapid drying of the load will be achieved.
Page 4
2. |
Important Information Con’t. |
|
|
|
|
|
|
|
||||
|
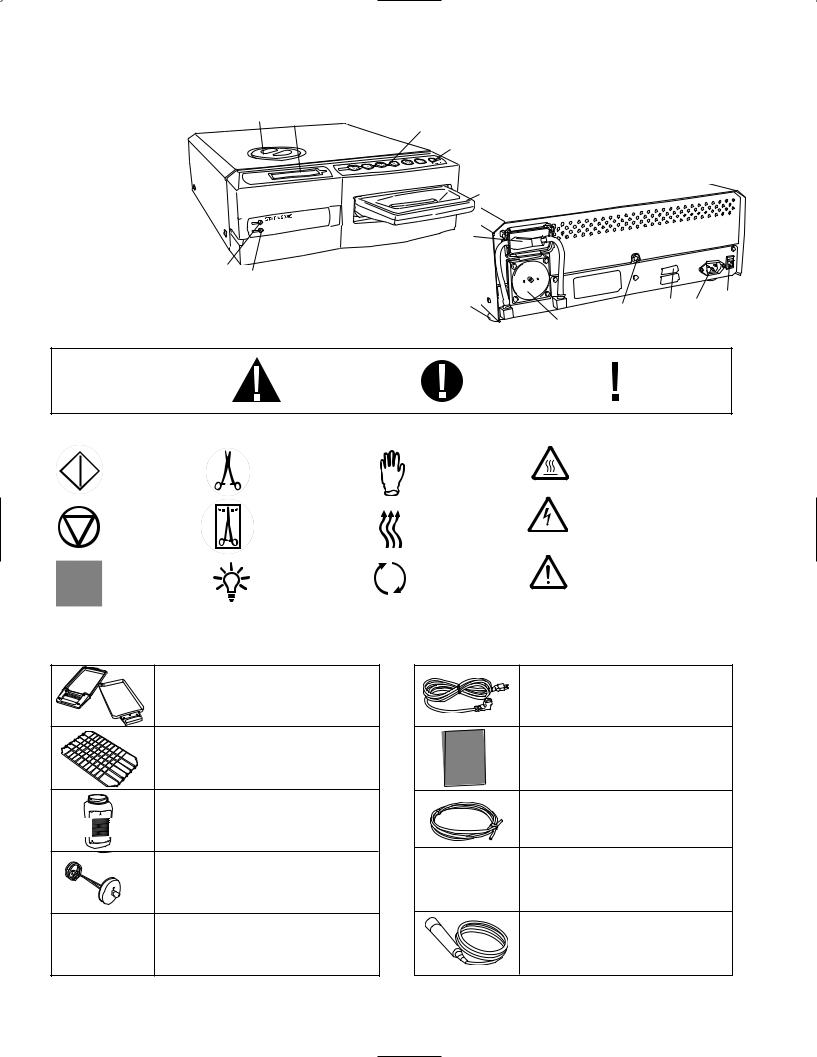
2.2 Statim 2000S — Unit overview |
|
|
|
|
|
|
|||||
■ level indicator |
|
■ |
|
4 |
|
|
|
|
|
Figure 1 |
||
1 |
|
|
3 |
■ |
|
|
|
|
|
|||
|
|
|
|
|
|
|
|
|
|
|
||
■ keypad |
|
|
|
|
|
2 |
1 |
|
|
|
|
|
|
|
|
|
■ |
|
|
|
|
||||
2 |
|
|
|
|
|
■ |
|
|
|
|
||
■ reservoir cap/ |
|
|
|
|
|
|
|
|
|
|
||
3 |
|
|
|
|
|
|
|
|
|
|
|
|
|
|
|
|
|
|
|
|
|
|
|
|
|
■ |
water filter |
|
|
|
|
|
|
|
12 |
|
|
|
LCD |
|
|
|
|
|
|
|
|
|
|
||
|
|
|
|
|
|
|
■ |
|
|
|
||
4 |
|
|
|
|
|
|
|
|
|
|
|
|
■ |
power indicator |
|
|
|
|
|
|
|
|
|
|
|
5 |
|
|
|
|
|
|
|
13 |
|
|
|
|
■ active indicator |
|
|
|
|
|
|
|
|
|
|
||
6 |
|
|
|
|
|
|
|
■ |
|
|
|
|
■ power switch |
|
|
|
|
|
|
|
|
|
|
||
7 |
|
■ |
5 |
|
|
|
|
|
|
|
|
|
■ power cable port |
|
|
|
|
|
|
|
|
|
|||
8 |
|
6 |
■ |
|
|
|
|
|
|
|
|
|
■ leveler feet |
|
|
|
|
|
|
|
|
|
|
||
9 |
|
|
|
|
|
|
|
|
|
|
|
7 |
|
|
|
|
|
|
|
|
9 |
|
|
14 8 |
|
■ exhaust tube port |
■ cassette |
■ biological filter |
|
11 |
■ |
■ |
||||||
|
■ |
■ ■ |
|
|||||||||
10 |
|
12 |
|
|
13 |
|
|
■ |
10 |
|
||
■ compressor |
■ |
RS232 port |
|
|
|
|
|
|
||||
11 |
|
14 |
|
|
|
|
|
|
|
|
|
|
|
The following symbols |
|
|
|
A potential hazard |
|
|
|
A situation which |
|
Important |
|
|
appear in the margins |
|
|
|
|
|
|
may lead to a |
|
|
||
|
|
|
|
to the operator. |
|
|
|
|
information |
|
||
|
of this book. |
|
|
|
|
|
|
mechanical failure. |
|
|
||
|
|
|
|
|
|
|
|
|
|
|
||
The following symbols appear on the unit: UNWRAPPED cycles
WRAPPED cycles
Power Indicator LED
RUBBER /
PLASTIC cycles
Air dry only.
Active Indicator LED
Caution: Hot Surface and/or Hot Steam
Caution: Risk of electrical shock. Disconnect supply before servicing
Caution: Refer to manual for details
When you receive your Statim 2000S packing carton, the items listed below will be included.
If any of the items are missing, contact your dealer immediately so the situation can be corrected.
Cassette Tray and Lid
Unwrapped Instrument
Rack
Waste Bottle
Bottle Lid Fitting
Tube Mounting Hardware
Power Cord
Operator’s Manual
Exhaust Tube
Stat-Dri
P.C.D. + 20 SciCan
Sterilization Emulators
Page 5

2. |
Important Information Con’t. |
|
|
|
||||
■ |
2.3 Statim 5000S — Unit overview |
|
|
|
||||
level indicator |
|
3 |
|
|
|
|
|
|
1 |
|
|
■ |
|
|
|
|
|
■ keypad |
|
4 |
|
|
|
|
||
|
|
■ |
|
|
|
|
||
2 |
|
|
|
2 |
|
|
|
|
|
|
|
|
|
|
|
||
■ |
reservoir cap/ |
|
|
|
|
|
|
|
|
|
|
■ |
|
|
|
||
3 |
|
|
|
|
1 |
|
|
|
4 |
water filter |
|
|
|
|
|
|
|
|
|
|
|
■ |
|
|
||
|
|
|
|
|
|
|
|
|
■ LCD |
|
|
|
|
|
|
|
|
■ |
power indicator |
|
|
|
|
|
|
|
5 |
active indicator |
|
|
|
|
|
|
|
■ |
|
|
|
|
|
|
|
|
6 |
power switch |
|
|
|
|
|
|
|
■ |
|
|
|
|
|
|
|
|
7 |
power cable port |
|
|
|
|
|
|
|
■ |
|
|
|
|
|
|
|
|
8 |
|
|
|
|
|
|
|
|
■ leveler feet |
6 |
|
|
|
|
|
|
|
9 |
|
■ |
|
12 |
13 |
|
|
|
|
|
|
5 |
■ |
|
|
|
|
■ exhaust tube port |
|
■ |
|
|
|
■ |
||
10 |
|
|
■ |
|
|
9 |
|
10 |
|
|
|
|
■ |
|
|||
■ biological filter |
|
|
|
|
|
|
|
|
11 |
|
|
|
|
■ cassette |
■ |
RS232 port |
|
■ optional internal printer (not on all models) |
||||||||
12 |
|
|
|
|
13 |
|
14 |
|
Figure 2
■11 ■14 ■8 ■7
(not on all models)
|
|
|
|
|
|
|
The following symbols |
|
A potential hazard |
|
A situation which |
|
Important |
appear in the margins |
|
|
may lead to a |
|
||
|
to the operator. |
|
|
information |
||
of this book. |
|
|
mechanical failure. |
|
||
|
|
|||||
|
|
|
|
|
The following symbols appear on the unit: UNWRAPPED cycles
WRAPPED cycles
Power
Indicator LED
When you receive your Statim 5000S packing carton, the items listed below will be included. If any of the items are missing, contact your dealer immediately so the situation can be corrected.
Cassette Tray and Lid
Unwrapped
Instrument Rack
Waste Bottle
Bottle Lid Fitting
Tube Mounting Hardware
RUBBER /
PLASTIC cycles
Air dry only.
Active Indicator LED
Caution: Hot Surface and/or Hot Steam
Caution: Risk of electrical shock. Disconnect supply before servicing
Caution: Refer to manual for details
Drying Enhancement Plates
Power Cord
Operator’s Manual
Exhaust Tube
Stat-Dri
P.C.D. + 20 SciCan
Sterilization Emulators
Page 6

3. Installation
3.1 Environmental Considerations
There are several factors that may affect the performance of your Statim.
Please review these factors, and select a suitable location in which to install the unit.
• Temperature and Humidity
Avoid installing your Statim in direct sunlight or close to a heat source (e.g. vents or radiators). The recommended operating temperatures are 15-25˚C with humidity of 25-70%.
• Spacing
The vents and openings on the Statim should remain uncovered and unobstructed. Leave a minimum of 50 mm between the top, sides and back of the unit and any
wall or partition.
• Venting
The Statim should be operated in a clean, dust free environment.
• Work Surface
The Statim should be placed on a flat, level, water-resistant surface.
Never install and operate the unit on a sloped surface.
• Electromagnetic Environment
The Statim has been tested and meets applicable standards for electromagnetic emissions. While the unit does not emit any radiation, it may itself be affected by other equipment which does. We recommend that the unit be kept away from potential sources of interference.
• Electrical Requirements
Use properly grounded and fused power sources with the same voltage rating as indicated on the label at the back of your Statim. Avoid multiple outlet receptacles. If using a surge suppressor power bar, plug in one Statim only.
3.2 Unit Placement
When placing the unit on a counter top, ensure the following:
• |
1 |
|
The level indicator bubble ■ on the front panel should be |
||
|
balanced in the front right quadrant of the target. |
This will |
|
ensure that the unit drains properly. Adjusting the three lev- |
|
|
eler feet will help you move the bubble if necessary. |
|
• The unit should be stable and all four feet should be secure- |
||
|
ly in contact with the counter surface. |
|
|
This will prevent the unit from moving freely. |
1 |
|
|
|
|
|
■ |
|
|
Figure 3 |
Page 7
3. Installation Con’t.
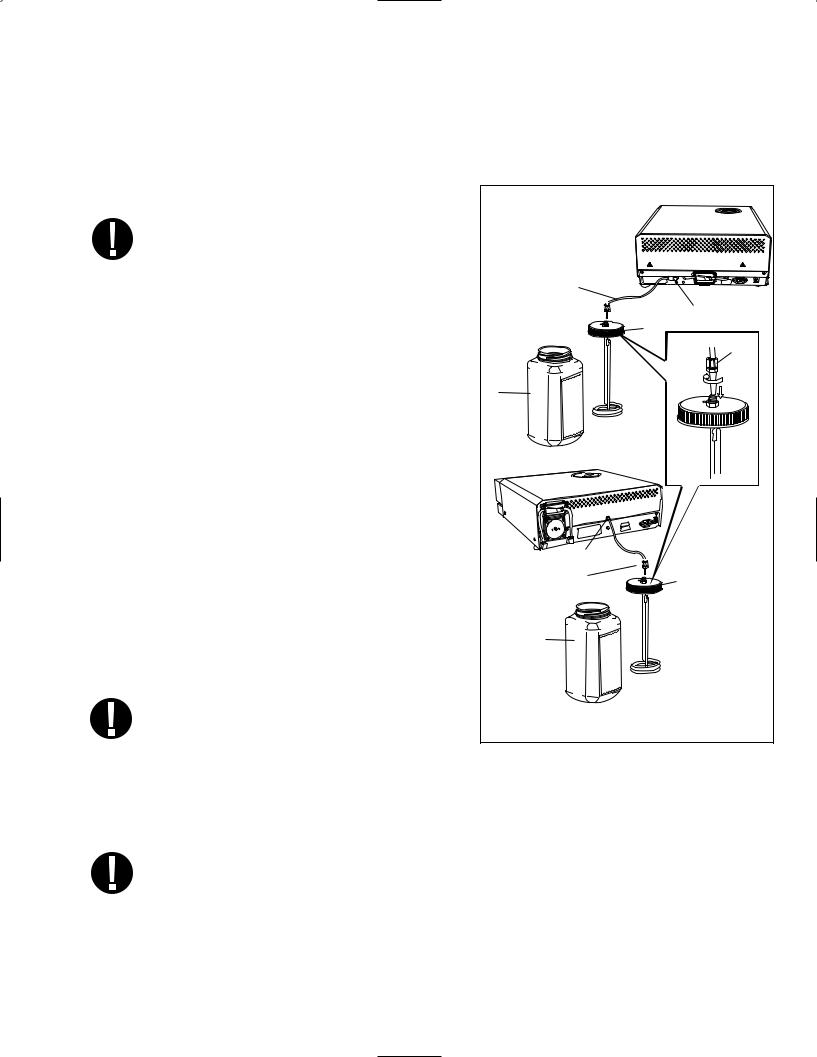
3.3 Connecting the Waste Bottle
2 |
|
|
|
|
|
The waste bottle ■ is used to collect the wastewater after it has been converted |
|
||||
to steam and then drained from the cassette. To connect the waste bottle to the |
|
||||
Statim, follow these steps (see figure 4): |
|
|
|
|
|
3 |
|
4 |
|
5000S |
|
1. Insert the exhaust ■ tube into the fitting |
■ |
|
|
|
|
on the back of the unit and connect tightly. |
|
|
|
|
|
2. Cut the tube to length and slide the waste |
|
|
|
|
|
5 |
|
|
|
3 |
|
|
|
|
■ |
|
|
bottle fitting ■ into place. |
|
|
|
|
|
|
|
|
|
|
4 |
3. Place the free end of the tube into the hole in |
|
|
■ |
||
|
6 |
|
|||
|
|
|
|
|
|
the lid of the waste bottle and hand-tighten |
|
■ |
|
||
|
|
5 |
|||
the fitting. Do not coil the exhaust tube. |
|
|
|
|
|
|
|
|
|
■ |
|
|
|
6 |
2 |
|
|
4. Unscrew the lid and copper condenser coil ■ |
|
|
|||
assembly from the waste bottle. The lid and |
■ |
|
|
||
coil should come out together. |
|
|
|
|
|
5. Fill the waste bottle with water to the MIN line |
|
|
|
||
and replace the lid and copper condenser |
|
|
|
|
|
assembly. Empty the waste bottle often to |
|
|
|
|
|
avoid unpleasant odors and discoloration of |
|
|
|
||
the contents. (A low-level disinfectant, pre- |
|
2000S |
4 |
|
|
|
|
|
|
||
pared according to the manufacturer’s |
|
|
■ |
|
|
|
|
|
|
|
|
|
|
|
|
3 |
|
instructions, may be added to the waste |
|
|
|
■ |
6 |
|
|
|
|
|
■ |
bottle to remedy this situation). As a mini- |
|
|
|
|
|
mum, empty the waste bottle each time |
|
|
|
|
|
you refill the reservoir. |
|
|
2 |
|
|
|
|
■ |
|
|
|
6. Place the waste bottle near the unit. Store |
|
|
|
||
the bottle below the unit. The tube can be |
|
|
|
|
|
routed through a hole, (8 mm in diameter) |
|
Figure 4 |
|
|
|
in the counter-top and secured with the |
|
|
|
|
|
|
|
|
|
|
|
provided nylon clamps. |
|
|
|
|
|
3.4 Filling the Statim Reservoir
When filling the reservoir, ensure you only use steam processed distilled water containing less than 5 ppm total dissolved solids (having conductivity of less than 10 µS / cm). The impurities and additives in other water sources will cause an error reading on the LCD. If you have a water conductivity meter (available from SciCan, order number 01-103139S) check each new water container before filling the reservoir. To fill the reservoir, follow these steps (see figure 5):
Page 8

3. Installation Con’t.
1. |
2 |
|
Remove the reservoir cap ■ |
2 |
|
|
|
■ |
2. |
Pour steam-process distilled water into |
|
|
the reservoir until almost full (a maxi- |
|
|
mum of 4L). Use a funnel to avoid |
|
|
spillage. |
|
3. |
Replace and secure the cap. |
|
Figure 5
1. Move the unit to the edge of the work surface. The front leveler feet should be approximately 12 mm from the edge.
2. Lift the front left corner of the unit upward and remove the drain tube ■3 from the clip located on the underside of the unit.
3. Pull the drain tube outward so the free end can be positioned over a water container. 4. Fill the reservoir with steam-process distilled water.
5. |
4 |
|
|
|
Remove the plug ■ from the end of the drain tube and allow water to drain from the |
||||
|
tube into a container for 30 seconds. When the water flows in a steady stream, replace |
|||
|
the stopper. |
|
|
|
|
|
|
4 |
|
6. |
Lift the front left corner of the unit upward and reinsert |
|
■ |
|
|
|
|||
|
the tube into the clip on the underside of the unit. |
|
3 |
|
|
Push the excess length of tubing back into the space |
|
■ |
|
|
|
|
||
|
provided. |
|
|
|
Make sure the plug in the drain tube is secured. |
Figure 6 |
|||
|
|
|||
3.6 Setting the Time and Date |
|
|
||
To set the time and date, follow these steps and watch the blinking cursor on the LCD: |
||||
1. |
Power the Statim OFF. |
|
|
|
2. |
Press and hold the UNWRAPPED cycle button. |
14:23 |
11/15/2006 |
|
HH:MM |
DD/MM/YYYY |
|||
|
|
|||
3. |
While pressing the UNWRAPPED cycle button, |
Display when setting the Date / Time |
||
|
power the Statim ON. The LCD display reads: |
|||
|
|
|
||
4.Use the cycle buttons to select and change the selected field’s value. To increase a field’s value, press the UNWRAPPED cycle button. Hold the button down to increase the value.
5.To decrease the value, press the WRAPPED cycle button.
Page 9

3. Installation Con’t.
6. |
To select the next field, press the RUBBER AND PLASTICS cycle button. |
||||
7. |
To save changes and return to the regular operating mode, press the STOP button. |
||||
8. |
To quit without making changes, power the Statim OFF. |
|
|
||
3.7 Language Selection |
|
|
|
|
|
The messages displayed on the LCD can be changed to a number of different languages. To |
|||||
change the current language selections, follow these steps: |
|
|
|||
1. |
Turn the power switch at the back of the unit OFF. |
|
|
||
2. |
Press and hold the WRAPPED cycle button. |
|
|
|
|
|
|
ENGLISH |
|
||
|
|
|
|
|
|
3. |
While depressing the WRAPPED |
|
|
|
|
|
cycle button, turn the power switch at |
|
|
|
|
|
Display when scrolling through languages |
||||
|
the back of the unit to ON. |
||||
|
|
|
|
|
|
4. |
Press the UNWRAPPED cycle button to scroll to the next language selection. |
||||
5. |
Press the WRAPPED cycle button to scroll to the previous language. |
||||
6. |
When the desired language is displayed, press the STOP button to save the selection |
||||
|
and return to the regular operating mode. |
|
|
|
|
3.8 Assigning Unit Identifier Number |
|
|
|
|
|
|
|
STATIM 2000 S2S2R601 |
|||
1. |
Power the Statim OFF. |
|
|
||
|
|
#323 |
|
||
2. |
Press and hold the RUBBER / PLASTIC cycle button. |
|
|||
Display when assigning unit number |
|||||
3. |
While pressing the RUBBER / PLASTIC cycle button, power the Statim ON. |
||||
4. |
Using the cycle buttons, select a maximum of 3 digits to be used as the unit’s identifier. The |
||||
|
UNWRAPPED button will increase the selected value and the WRAPPED cycle button will |
||||
|
decrease it. Use the RUBBER / PLASTIC to move to the next digit. |
||||
5. |
To save changes and return to the regular operating mode, press the STOP button. |
||||
3.9 Shipping the Unit |
|
|
|
|
|
Before you move the unit, you will need to drain the reservoir. To do so, follow these steps: |
|||||
1. |
Place a water container below the unit. |
|
|
|
|
2. |
Using the drain tube (see section 3.5 Priming the Pump, Figure 6) empty the contents of |
||||
|
the reservoir into the water container. |
|
|
|
|
3. |
Remove any remaining water from the reservoir with a non-linting, absorbant towel. |
||||
4. |
Screw-in the three leveler feet found underneath the unit. |
|
|
||
5. |
Repack the unit in the original packing materials and include all accessories originally |
||||
|
included with the unit. |
|
|
|
|
6. |
Specify heated and insured shipping. |
|
|
|
|
Page 10
4. Instructions For Use
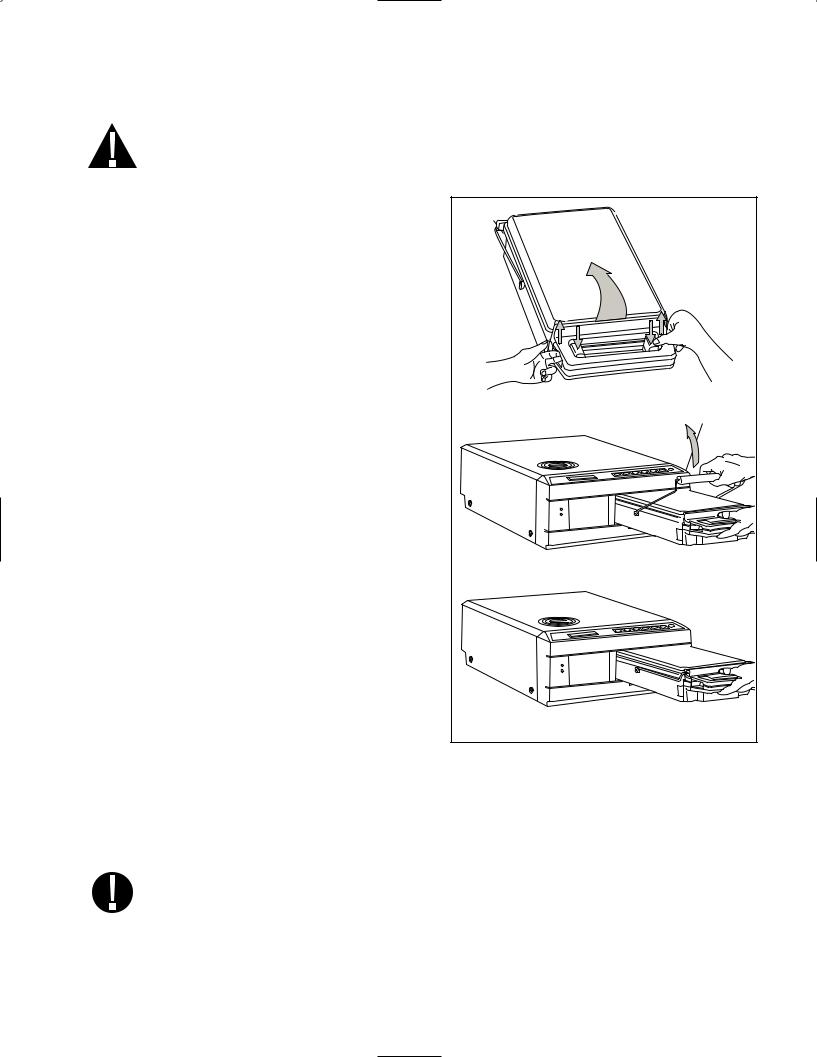
4.1 Statim 2000S — Using the Cassette |
|
|
|
When removing the cassette after a cycle, exercise caution as the metal areas will be hot |
|||
and the cassette may contain hot steam. |
|
|
|
• |
To open the cassette: |
|
|
1. |
Hold the cassette handle with your thumbs facing inward on the cassette latch. |
|
|
2. |
Push downward on the cassette latch. |
cassette latch |
|
|
|
|
|
3. |
Raise the cassette lid upwards and disengage the |
|
|
|
hinge. |
|
|
4. |
Rest the lid on its outer surface. |
|
|
• |
To close the cassette: |
|
Figure 7 |
1. |
Align the hinge tab on the cassette lid with |
|
|
|
|
||
|
the hinge slot on the rear of the bottom tray. |
|
|
2. |
As you begin to close the lid, the hinge tab and slot will engage. |
|
|
• Inserting the cassette into the Statim 2000S:
1. Place the end of the cassette into the unit.
2. Gently push inward until you hear a “click” sound.
Never push the cassette into the Statim with force as the interior components could be damaged.
• Removing the cassette:
1. Grasp the handle with two hands and pull away from the unit.
2. Pull the cassette clear of the unit and set down on a firm surface.
|
• |
Disengaging the cassette |
|
|
When not in use, the cassette should be disengaged. To disengage the cassette, grasp the |
||
|
handle and pull the cassette out until there is a 15 mm to 20 mm (1/2 |
to 3 /4") gap between |
|
|
the front of the Statim 2000S and the cassette handle. |
|
|
|
|
||
|
• |
STAT-DRI |
|
Treatment of the interior surfaces of the cassette with the Stat-Dri drying agent, provided with your unit, will enhance the drying process. (Replacement bottles are available from SciCan, order number 2OZPLUS, 8OZPLUST, 32OZPLUS).
Page. 11
4. Instructions For Use Con’t.
4.2 Statim 5000S — Using the Cassette |
|
|||
When removing the cassette after a cycle, exercise caution as the metal areas will be hot |
||||
and the cassette may contain hot steam. |
|
|
||
• |
To open the cassette: |
|
|
|
1. |
|
1 |
|
|
Push the carry handle ■ into the |
1 |
|
||
|
open position. |
|
■ |
|
|
|
|
|
|
2. |
Put your hands on either side of the cas- |
|
|
|
|
sette handle. |
|
|
|
3. |
Insert your forefingers in the slots and |
|
|
|
|
place your thumbs on the thumb pads. |
|
|
|
4. |
Press down with your thumbs and |
|
|
|
|
pull up with your forefingers until |
|
|
|
|
the lid opens. |
|
|
1 |
|
|
|
|
■ |
5. |
Raise the cassette lid and disengage |
|
|
|
|
from the tray. Rest the lid on its |
|
|
|
|
outer surface. |
|
|
|
• |
To close the cassette: |
|
|
|
1. |
Align the hinge tab on the lid with the |
|
|
|
|
hinge slot on the tray. |
|
|
|
2.As you begin to close the lid, the hinge tab and slot will engage.
3. Place the carry handle into the closed position.
• Inserting the cassette into the Statim 5000S:
1. Hold the cassette handle in one hand and the carry handle in the other as shown in Figure 8.
2.Place the end of the cassette into the unit and drop the carry handle into its closed position.
3.Gently push the cassette inward until you hear a click sound.
Never push the cassette into the Statim with force as the interior components could be damaged.
Page 12
4. Instructions For Use Con’t.
• Removing the cassette:
1. Grasp the cassette handle with one hand and pull out from the unit.
2. As the cassette emerges from the unit, grasp the carry handle with your free hand and lift it upwards.
3. Pull the cassette clear from the unit and set down on a firm surface.
• Disengaging the cassette
When not in use, the cassette should be disengaged. To disengage the cassette, grasp the handle and pull the cassette out until there is a 15 mm to 20 mm (1/2 to 3 /4") gap between the front of the Statim 5000S and the cassette handle.
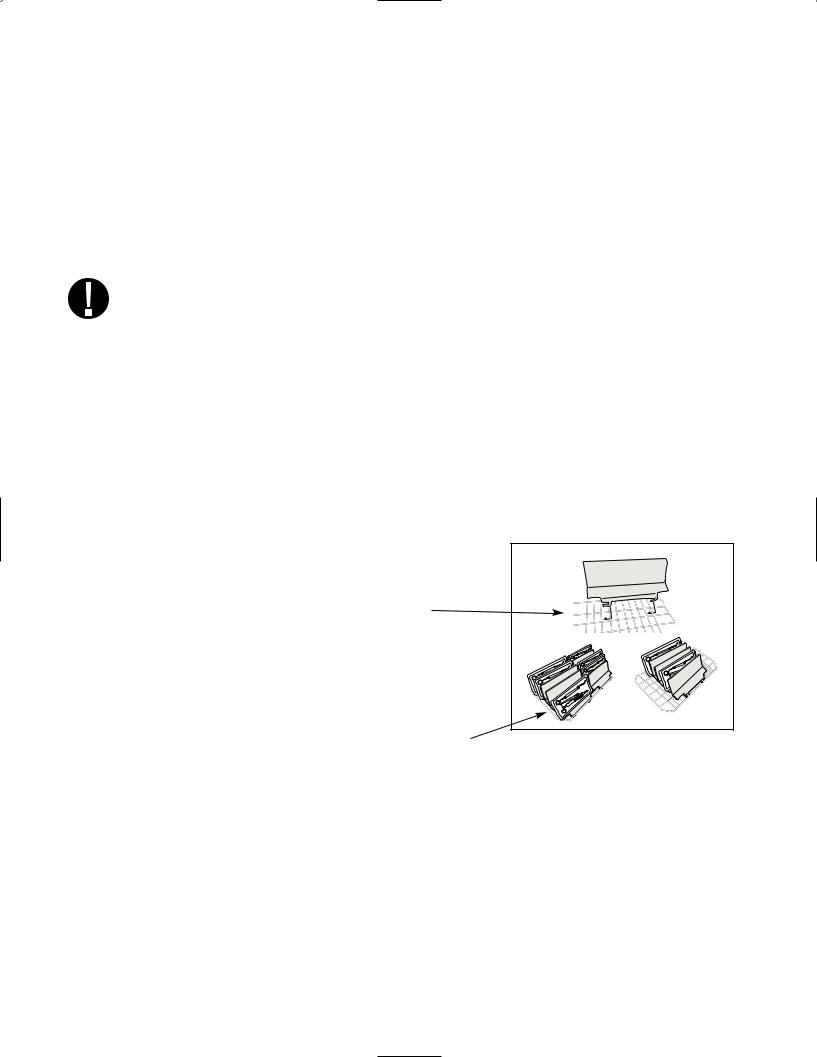
4.3 Statim 5000S — STAT-DRI Plates
The Statim 5000S cassette uses STAT-DRI plates to enhance the drying process
for wrapped instruments. The adjustable plates are designed for the unwrapped instruments rack and eliminate the need for a separate wrapped instrument rack.
Up to ten plates can be arranged along the length of the rack. Each unit is shipped with five STAT-DRI plates. Additional plates may be ordered from SciCan (SciCan part number 01-103935).
To install and adjust a STAT-DRI plate, follow these steps:
1.Hold a plate over the desired position, tilted slightly forward with the tabs down.
2.Insert the tabs between the mesh of the unwrapped instrument rack.
3. Each tab has an elongated slot. Slide the plate until the wire is at the end of each slot.
4. Release the plate to the resting position.
5. Prepare and load instruments for sterilization.
4.4 Preparing and Loading Instruments
Before loading any instruments into the Statim, consult the manufacturer’s reprocessing instructions.
• Clean Instruments
Clean and rinse all instruments before loading them into the cassette. Disinfectant residues and solid debris may inhibit sterilization and damage the instruments, the cassette, and the Statim. Lubricated instruments must be wiped thoroughly and any excess lubricant should be removed before loading.
Page 13

4. Instructions For Use Con’t.
• Unwrapped Instruments
Arrange unwrapped instruments on the instrument rack in the tray so that they
do not touch one another. This ensures that steam reaches all surfaces and will promote drying.
Instruments must not be stacked or piled in the cassettes, as this will impede the sterilization process.
• Wrapped Instruments (single wraps)
Place the instruments into single layer autoclave bags according to the manufacturer’s instructions. Orient the instrument rack in the cassette to ensure that wrapped instruments rest approximately 6 mm / 0.25" above the cassette base. Place the wrapped instruments on the rack and arrange them to avoid overlap. Ensure that all wrapped loads are dry before handling and /or storage to maintain sterility.
The use of cloth wraps in the Statim is not recommended.
SciCan recommends the use of paper / paper and plastic / paper autoclave bags manufactured in accordance to EN 868. Loosely pack instruments in the bags to allow steam penetration to all instrument surfaces.
The wrapped instrument rack for the Statim 5000S is designed to hold a maximum of
12 autoclave bags. Care must be taken to ensure that the combined weight of the loaded bags does not exceed 1.5 kg (3.3 lbs).
The unwrapped instrument rack fitted with a maximum of 10 Stat-Dri plates will hold 10 autoclave bags.
• Rubber and Plastic Instruments
The following materials can be sterilized in the Statim:
nylon, polycarbonate (Lexan™), polypropylene, PTFE (Teflon™), acetal (Delrin™), polysulfone (Udel™), polyetherimide (Ultem™), silicone rubber, and polyester.
When loading rubber and plastic instruments in the tray, leave a space between the instruments and the cassette walls. This ensures that steam reaches all surfaces, and will promote drying.
The following materials cannot be sterilized in the Statim:
polyethylene, ABS, styrene, cellulosics, PVC, Acrylic (Plexiglas™), PPO (Noryl™), latex, neoprene, and similar materials.
Use of these materials may lead to instrument or equipment damage. If you are unsure of your instrument’s material or construction, do not load into your Statim until you have checked with the instrument manufacturer.
Page 14

4. Instructions For Use Con’t.
• All Instruments
The Statim is NOT intended for sterilizing textiles, liquids or biomedical waste. Instruments will remain sterile after a successful cycle until the cassette is disengaged from the unit. Unwrapped instruments, once exposed to ambient or external conditions, cannot be maintained in a sterile state. If sterile storage is desired, wrap the instruments to be sterilized in autoclave bags, according to the instrument manufacturer’s instructions. Then allow the wrapped cycle to run until the air-dry phase is complete.
Best Practice: Allow instruments (wrapped or unwrapped) to dry completely prior to handling. Wrapped or pouched instruments must not touch each other to promote drying and enable effective sterilization.
SciCan recommends the final user carefully choose the most appropriate sterilization cycle according to the recommendations of their leading infection control authorities and local regulatory guidelines / recommendations.
• Routine Monitoring
Chemical process indicators suitable for steam sterilizers should be included in or on each package or load being sterilized. In addition, the weekly use of biological indicators, which allow you to ascertain whether the instruments have been exposed
to sterilization conditions, is recommended.
4.5 Instrument Weight Guide
|
Instrument |
Typical Instrument Weight |
Scissors |
|
30 g / 0.96 oz |
Dental scalers |
20 g / 0.64 oz |
|
Forceps |
|
15 g / 0.48 oz |
Dental handpiece |
40 to 60 g / 1.29 to 1.92 oz |
|
Wrapped instrument rack |
260 g / 8.35 oz |
|
Unwrapped instrument rack |
225 g / 7.23 oz |
|
Suction cannula |
10 g / 0.32 oz |
|
Plastic mouth mirror |
8 g / 0.25 oz |
|
Impression tray |
15 to 45 g / 0.48 to 1.45 oz |
|
Plastic x-ray positioning ring |
20 g / 0.64 oz |
|
NOTE: The above weights are to be used as reference only. For exact weights of your instruments, consult the manufacturer’s specifications.
Page 15
4. Instructions For Use Con’t.
4.6 Selecting a Cycle
The Statim 2000S and 5000S have seven sterilization cycles, each designed to sterilize using the parameters specified. Each cycle can be selected by pressing the UNWRAPPED, WRAPPED or RUBBER / PLASTIC cycle buttons.
The types of instruments, sterilization requirements and a graph depicting each cycle characteristics are described over the following pages.
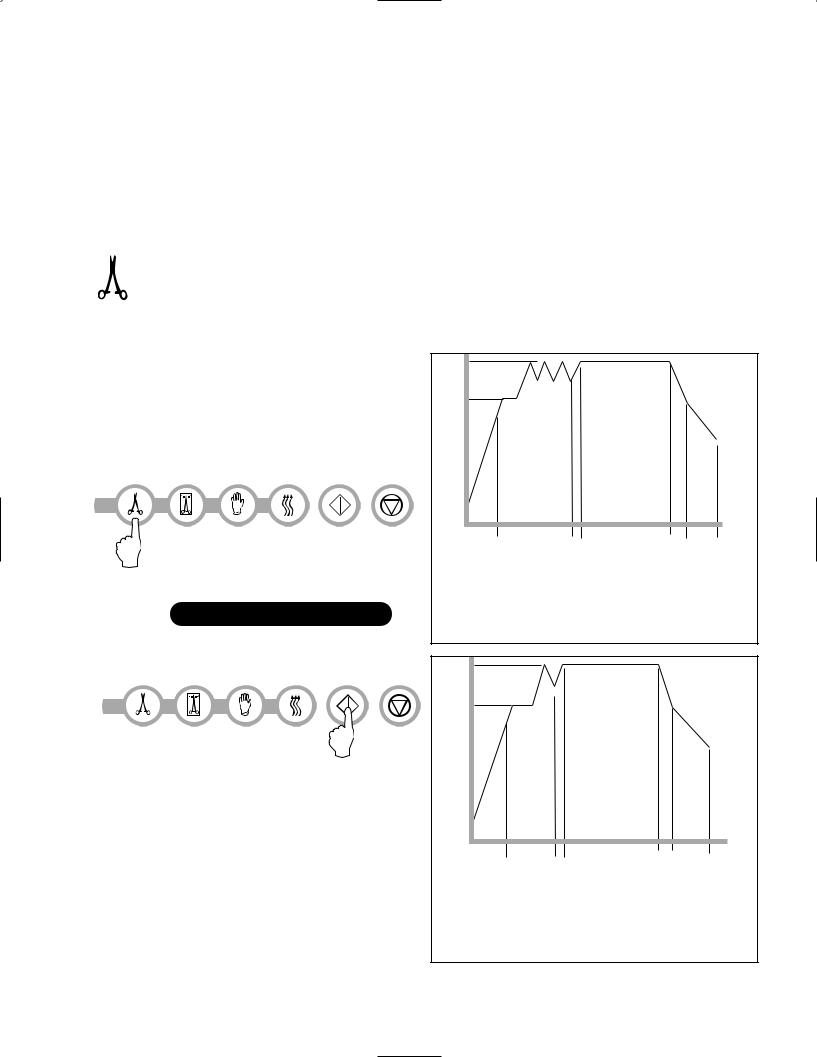
1. Unwrapped Cycles
The Statim 2000S and 5000S feature two 134˚C type S and one 134˚C type N UNWRAPPED sterilization cycles. At the end of the cycle’s sterilization phase, air drying will commence for one hour.
Air-drying can be interrupted at any time by pressing the STOP button.
To select one of these cycles: Press the UNWRAPPED
cycle button to scroll through the available cycles.
HOLLOW UNWRAPPED (S) 134˚C / 3.5 min |
|
|
|
3.5 min / 18 min |
|
|
|
A |
B |
C |
D |
E |
F |
|
A 100˚C / 101 kPa |
|
D |
Sterilizing |
|
|
HOLLOW UNWRAPPED (S) 134˚C / 18 min |
B |
3 purges (Conditioning) |
|
134˚C / 304 kPa - |
||
|
|
peak at 133˚C / 295 kPa |
|
138˚C / 341 kPa |
||
SOLID UNWRAPPED (N) 134˚C / 3.5 min |
C |
Pressurizing |
|
F |
Air Drying |
|
|
|
vent to 115˚C / 169 kPa |
E |
Venting |
|
|
Once the desired cycle has been |
|
|
(Type S) |
|
|
|
|
|
|
|
|
selected, press the START button. |
|
|
|
|
|
The unit memory remembers the last |
|
|
|
|
|
cycle run and then displays this first when |
|
|
|
|
|
the unit is powered on. |
|
|
|
|
|
A |
B |
C |
D |
E |
F |
|
|
|
3.5 min |
|
|
A 100˚C / 101 kPa |
D |
Sterilizing |
|
B |
1 purge (Conditioning) |
|
134˚C / 304 kPa - |
|
138˚C / 341 kPa |
||
|
peak at 133˚C / 295 kPa |
|
|
|
E |
Venting |
|
|
vent to 115˚C / 169 kPa |
||
C |
Pressurizing |
F |
Air Drying |
|
(Type N) |
|
|
Page 16
4. Instructions For Use Con’t.
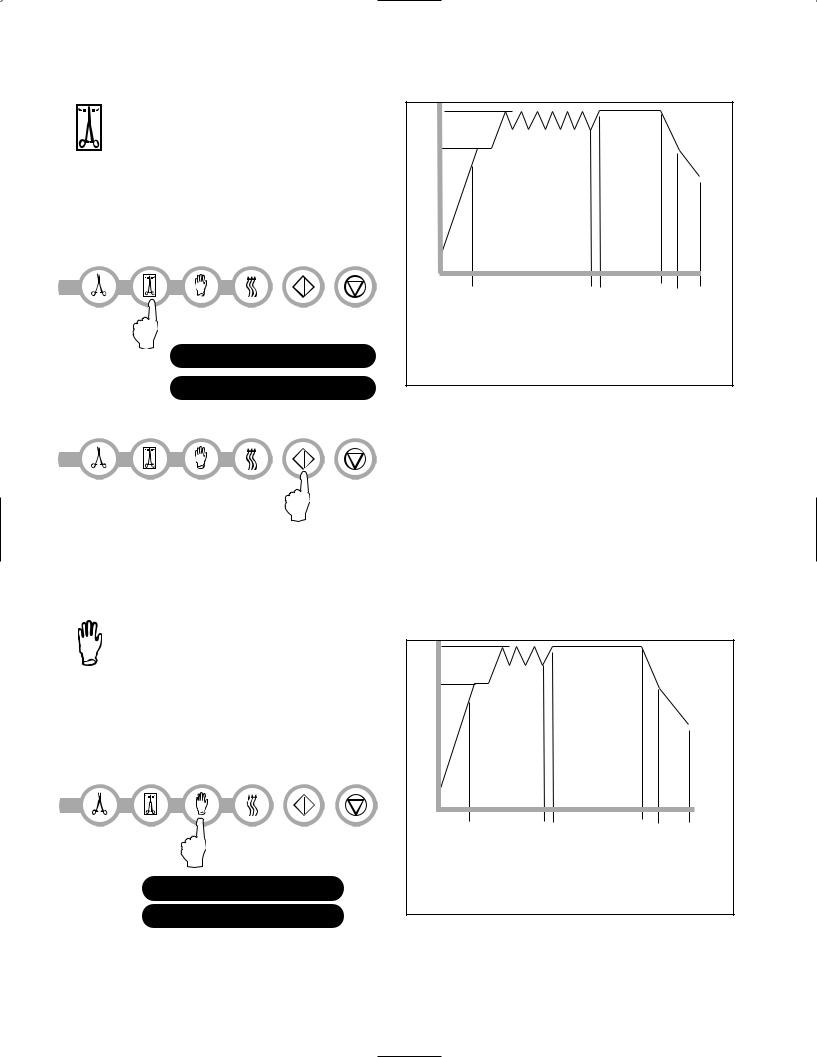
2. Hollow Wrapped Cycles
The Statim 2000S and 5000S feature two WRAPPED 134˚C type S sterilization cycles.
To select one of these S Cycles: Press the WRAPPED button to scroll through the available cycles.
HOLLOW WRAPPED (S) 134˚C / 3.5 min HOLLOW WRAPPED (S) 134˚C / 18 min
A |
B |
C |
D |
E |
F |
|
|
3.5 min / |
|
|
|
|
|
18 min |
|
|
|
A 100˚C / 101 kPa |
D |
Sterilizing |
|
||
B |
6 purges (Conditioning) |
|
134˚C / 304 kPa - |
||
|
138˚C / 341 kPa |
||||
|
peak at 133˚C / 295 kPa |
|
|||
|
E |
Venting |
|
|
|
|
vent to 115˚C / 169 kPa |
|
|
||
C |
Pressurizing |
F |
Air Drying |
|
|
Once the desired cycle has been selected, press the START button.
The unit remembers the last cycle run and then displays this first when the unit is powered on.
A Process Challenge Device (PCD) is available for validation of HOLLOW WRAPPED (S) 134˚C/3.5 min cycle.
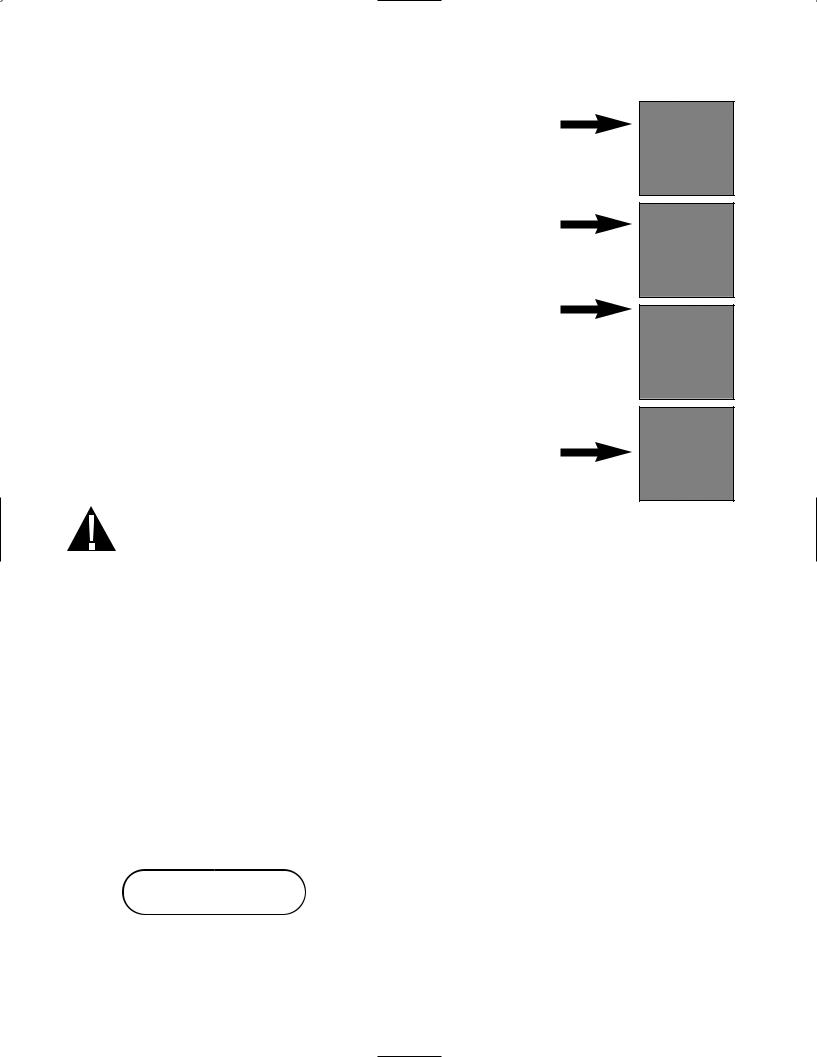
3. Rubber and Plastics Cycle
The Statim 2000S and 5000S feature two 121˚C type S sterilization cycles.
To select one of these S Cycles: Press the RUBBER / PLASTIC button to scroll through the available cycles.
RUBBER / PLASTIC (S) 121˚C / 15 min
RUBBER / PLASTIC (S) 121˚C / 30 min
A |
B |
C |
D |
E |
F |
|
|
|
15 min / 30 min |
|
|
A 100˚C / 101 kPa |
D |
Sterilizing |
|
B |
3 purges (Conditioning) |
|
121˚C / 205 kPa - |
|
124˚C / 225 kPa |
||
|
peak at 120˚C / 199 kPa |
|
|
|
E |
Venting |
|
|
vent to 110˚C / 143 kPa |
||
C |
Pressurizing |
F |
Air Drying |
Page 17

4. Instructions For Use Con’t.
Once the desired cycle has been selected, press the START button.
The unit remembers the last cycle run and then displays this first when the unit is powered on.
4. Air Dry Only Cycle
This is not a sterilization cycle.
The Air Dry Only Cycle starts automatically after each sterilizing cycle and runs for 60 minutes.
Air drying may be interrupted by pressing the STOP button. To ensure that the contents of the cassette are dry, the cycle should run for the full 60 minutes. Dryness is important for unwrapped instruments for corrosion prevention. For wrapped instruments, a dry wrap is required to maintain sterility.
If the STOP button is pressed during the air drying stage of the sterilization cycle, and the cassette has not been removed from the autoclave, the Air Dry Only cycle may be used to promote further drying. If the cassette has been removed from the autoclave, it may NOT be reinserted for the Air Dry Only cycle. If the cassette contains wrapped instruments and the wraps are not dry when the cassette is opened, the instruments must be handled in an aseptic manner for immediate use or resterilized.
To start, press the Air Dry Only Cycle button, then press the START button.
When started independently, this cycle will run for 1 hour.
Page 18

4. Instructions For Use Con’t.
4.7 Running a Cycle
To operate each cycle, follow these steps and watch the LCD . 1. Turn the power switch ON
at the back of the unit to . The LCD display reads:
2.Press the appropriate cycle button on the keypad to scroll through the available cycles
The display will read either: |
|
|
|
|
|
|
|
|
|
|
HOLLOW UNWRAPPED |
or |
HOLLOW WRAPPED (S) |
or |
|
(S) 134˚C / 3.5 min |
134˚C / 3.5 min |
||
|
|
|
||
|
|
|
|
|
|
HOLLOW UNWRAPPED |
|
HOLLOW WRAPPED (S) |
|
|
(S) 134˚C / 18 min |
|
134˚C / 18 min |
|
SOLID UNWRAPPED (N) 134˚C / 3.5 min
As the button is released the display reads:
Cycle you selected
PRESS START

RUBBER / PLASTIC (S) 121˚C / 15 min
RUBBER / PLASTIC (S) 121˚C / 30 min
The unit’s cycle counter is displayed at the start, after the start button is depressed.
Cycle you selected CYCLE NUMBER 000000
The amber indicator light comes on. To indicate that the cycle is in progress, the following messages are displayed as the cycle runs.
Cycle you selected WARMING UP
PRESSURIZING 125˚C 232 kPa
As the cycle is running, various sounds will be heard.
This is the normal functioning of the unit.
STERILIZING |
|
136.8˚C 330 kPa 3:29 |
VENTING |
|
|
|
108˚C 134 kPa |
Page 19

4. Instructions For Use Con’t.
The buzzing noise during the air drying stage is the compressor operating. The air drying phase of the cycle may be interrupted at any time by pressing the STOP button. The display will read:
PLEASE WAIT
CYCLE COMPLETE
When the automatic 60-minute air drying stage is finished the display reads:
REMOVE CASSETTE
CYCLE COMPLETE
If a sterilization cycle is successful the reminder tone sounds and the amber light flashes until the STOP button is pressed or the cassette is removed from the unit.
4.8 Stopping a Cycle
To stop a cycle press the STOP button. If the STOP button is pushed, the cassette is removed, or the unit detects a problem while operating, the cycle will stop and the amber active light will flash. Once a cycle has been stopped, the STOP button must be pressed before another cycle can be started. The display reads any of the following messages:
CYCLE FAULT xxx NOT STERILE or
CASSETTE REMOVED
NOT STERILE
If the display shows the message, CYCLE FAULT or NOT STERILE, the cassette contents are not sterile! See section 7. Troubleshooting for more information.
If the air drying stage of the cycle is interrupted, do not store wrapped instruments that were in the cassette unless they are dry.
Page 20
5. Maintenance
5.1 Cleaning the Cassette
Keeping the Statim cassette clean is good clinical practice and assists in the function of the unit. SciCan recommends that the interior surface be cleaned at least once a week. Use dishwashing soap or a mild detergent that does not contain chlorine. Scrub the inside of the cassette with a cleaning pad designed for use with Teflon™ coated surfaces. After scouring, rinse thoroughly with water to remove all traces of the detergent. Cleaning the inside of your cassette is very important if you regularly sterilize lubricated instruments. Coating the entire inside surface with STAT-DRI drying agent induces water to form an even coat on the inside surface, without beading. The water in contact with the hot cassette surfaces also evaporates much more efficiently. Spotting is minimized and instruments dry much better. STATDRI should be applied every 10 cycles, and after every cassette cleaning.
5.2 Cleaning the Water Reservoir Filter
This water reservoir filter should be cleaned at least once a week or when required. The filter can easily be removed and cleaned by placing the filter upside down under running water to wash away the particles until clean, and then placed back into the reservoir opening. If a replacement water reservoir filter is required, order part number 01-109300S.
5.3 Cleaning the Reservoir
Check the reservoir for dirt or particles. The reservoir may be cleaned by draining followed by cleaning and rinsing with steam process distilled water ONLY. Use of chemicals or cleaning agents is not reccommended and could cause the unit damage.
5.4 Cleaning the Exterior Surfaces
Use a soft cloth moistened with soap and water to clean all exterior surfaces. Do not use harsh cleaning chemicals or disinfectants.
5.5 Changing the Statim 2000S Air Filter |
|
|
|
||
The filter should be replaced every six months in order to maintain an adequate supply of |
|||||
clean air during the air drying cycle. |
|
|
|
|
|
To change the filter, follow these steps: |
|
|
|
2000S |
|
1. |
Turn the power switch at the back of the unit OFF. |
|
|
|
|
2. |
Remove and discard the old foam air filter |
4 |
|
|
|
■ . |
|
|
|
||
3. |
4 |
|
|
|
|
Install the new filter ■ (SciCan part no. 01-100207S). |
|
|
|
||
4. |
2 |
|
|
|
|
Secure the filter plate ■ to the back of the compressor |
|
4 |
|
||
|
1 |
|
|
|
|
|
|
|
■ |
|
|
|
using the screw ■ retained during |
|
|
2 |
|
|
the disassembly procedure. |
|
|
|
|
|
|
|
■ |
|
|
|
|
|
1 |
|
|
|
|
|
■ |
|
Figure 10 |
|
|
|
|
|
|
Page 21

5. Maintenance
5.6 Changing the Bacteria Retentive Air Filters
The filters should be replaced every six months or after 500 cycles to maintain an adequate supply of clean air during the air drying cycle.
To change the bacteria retentive air filter on the Statim 2000S and 5000S, follow these steps:
1. Power the Statim OFF.
2. |
|
|
1 |
|
|
|
|
|
Disconnect tube A ■ from the bacteria |
|
|
2 |
|
2000S |
|||
|
|
2 |
|
|
|
|
||
|
|
|
|
|
■ |
3 |
|
|
|
retentive filter |
■ |
3and remove the filter from |
|
|
|
|
|
|
|
|
|
|
■ |
|
||
|
the filter bracket |
■ . As you remove the filter |
|
|
|
|
|
|
|
from the bracket, note the orientation of the |
|
|
|
1 |
|
||
|
arrow mark on the filter. |
|
|
■ |
|
|||
|
|
|
|
|
|
|||
3. When the filter is free of the bracket, carefully discon- |
|
|
|
|
|
|||
|
4 |
|
|
|
|
|
|
|
|
nect tube B ■ from the filter. |
|
4 |
|
|
|
||
|
|
|
|
|
■ |
|
|
Figure 11 |
4. Before installing the replacement |
|
|
|
|
||||
|
|
|
|
|
||||
|
|
|
2 |
|
|
|
|
|
|
bacteria retentive filter ■ (SciCan order |
|
|
|
|
5000S |
||
|
no. 01-102119S) check that the arrow mark |
|
|
|
|
|||
|
on the filter matches the direction |
|
|
|
|
|
||
|
of the arrow on the bracket. Push the left |
|
|
|
|
|
||
|
|
|
4 |
|
2 |
|
|
|
|
hand filter fitting into tube B ■ . |
|
|
1 |
|
|||
|
|
|
|
|
■ |
|
|
|
|
|
|
|
|
|
■ |
|
|
5. Gently press the replacement filter into |
|
|
|
|
|
|||
|
the filter bracket |
3 |
4 |
|
3 |
|
Figure 12 |
|
|
■ . The arrow mark of |
|
|
|||||
|
the filter should be facing out and pointing to |
■ |
|
■ |
|
|||
|
|
|
|
|
|
|||
|
the left. |
|
|
|
|
|
|
|
6. |
|
|
1 |
|
|
|
|
|
Re-connect tube A ■ to the right hand filter fitting. |
|
|
|
|
|
|||
5.7 Replacing the Cassette Seal
To ensure optimum performance of your Statim cassette autoclave, change the
cassette seal every 500 cycles or every six months, whichever comes first. Replacement seals are available from SciCan (order number 01-100028S for Statim 2000S and 01101649S for Statim 5000S).
To change the cassette seal, follow these steps:
Place the cassette lid and the new seal on a clean work surface. Examine the position of the old seal in the cassette lid and arrange the new seal in the same orientation, next to the lid.
Page 22
5. Maintenance con’t.
Remove the old seal and discard. Clean any residue out of the seal channel and flush out the channel with distilled water.
Lubricate the new seal with the liquid seal lubricant provided. |
|
Insert the rounded edge of the seal under the round lip of |
|
the lid. Align the holes in the new seal with the holes in the lid. |
|
NOTE: At every corner and at the holes in the lid, two square nibs |
|
should be visible. The nibs should fit flush with the lid’s outer surface. |
|
Ensure the seal is completely inserted. Feel around |
|
the periphery to ensure the seal is securely in place. |
|
NOTE: During a cycle, steam may appear between the lid |
|
and the tray. If this persists, remove the cassette and check |
|
that the seal is correctly installed. |
|
|
Figure 13 |
Be careful. The metal parts will be hot, and the cassette may contain hot steam. |
|
5.8 Maintaining Fluid Levels
Use only steam-process distilled water containing less than 5 ppm total dissolved
solids (having conductivity of less than 10 µS / cm) in the Statim. To fill the reservoir, remove the cap from the top of the unit and fill the reservoir. We recommend using
a funnel to minimize spills. Each time you refill the reservoir, empty the waste bottle
and refill with water to the MIN line. Empty the waste bottle often to avoid unpleasant odors and discoloration of the contents. (A low-level chlorine-free disinfectant,
prepared according to the manufacturer’s instructions, may be added to the waste bottle to remedy this situation).
5.9 Reading Water Quality |
|
||
1. |
Power up unit while pressing the STOP button to access the User Setup menu. |
||
2. |
Using the UNWRAPPED and WRAPPED buttons, scroll to Water Quality and select it by |
||
|
pressing the RUBBER AND PLASTIC button. |
|
|
|
>Water Quality |
CD=conductivity |
XX= micro S. value |
|
CD=XXuS / yyy / z.z ppm |
yyy= engineering value |
z.z= parts per million value |
|
l |
||
Page 23

5. Maintenance con’t.
Daily
Weekly
Every 6 months
5.10 Preventative Maintenance Schedule
To ensure trouble-free performance, both the operator and the dealer must follow
a preventative maintenance schedule. NOTE: Please refer to your National, Regional, State or Safety laws for any additional reoccurring user testing that may be required.
The schedules below describe the necessary actions.
|
|
|
Operator |
|
|
Water Reservoir |
• Replace water as needed. |
|
• For opthalmic use, drain at the end of every workday, leave empty, and refill at the start |
|
of the next workday. |
|
|
Waste Bottle |
• Empty the waste bottle every time you refill the water reservoir. |
|
• Fill the bottle with water, up to the MIN line marking. |
Cassette |
• Wash the interior of the cassette with dishwashing soap or a mild detergent that does not |
|
contain chlorine. |
|
• Scrub the inside with a cleaning pad designed for use with Teflon™-coated surfaces. |
|
• After removing all traces of the detergent, treat interior surfaces of the cassette with |
|
the STAT-DRI™ Plus drying agent to enhance the drying process. Order more STAT- |
|
DRI™ Plus from SciCan quoting 2OZPLUS, 8OZPLUST, or 32OZPLUS. |
|
|
Biological and/or |
• Check the filter for dirt and moisture. Replace if dirty. Call for service if wet. |
Air Filter |
|
|
|
Water Filter |
• Check the water reservoir filter every week and clean if necessary. Replace only if necessary. |
Cassette Seal |
• Replace every 500 cycles or six months (whichever is first), or whenever necessary. |
|
|
Biological and/or |
• Replace every 500 cycles or six months (whichever is first). |
Air Filter |
|
|
|
Once a year
|
|
|
Technician |
|
|
Cassette |
• Check the tray, lid and seal for damage. Replace if necessary. |
|
|
Biological Filter |
• Inspect the biological filter for moisture. |
|
|
Solenoid Valve |
• Inspect the valve and clean if dirty. Replace the plunger if defective. |
|
|
Pump |
• Clean the filters, replace if dirty. |
|
|
Check Valve |
• Remove the exhaust tube from the back of the unit during the air drying phase. Check for |
|
air coming from the fitting. |
|
• Remove the air compressor tube from the check valve inlet while running a cycle. Make |
|
sure no steam is leaking from the valve. Replace if there are any leaks. |
|
|
Water Reservoir |
• Check the reservoir for dirt. Clean and rinse with steam process distilled water if necessary. |
|
|
Calibration |
• Calibrate the unit. |
|
|
Page 24

6. The Communication Port |
|
|
|
6.1 The RS232 Communication Port |
|
|
|
All Statim units that do not have an internal |
|
Printer |
|
printer will have an RS232 communication |
|
||
|
|
||
port that will allow you to connect to an external |
|
|
|
printer or to a SciCan Data Logger. For printing, |
|
|
|
you will need to purchase a recommended printer |
|
|
|
(see list below) from your local computer or electron- |
|
OR |
|
ics store. For data storage, you can |
|
|
|
|
|
|
|
purchase SciCan’s USB Data Logger to record |
|
|
|
and store cycle information onto a mass storage |
|
|
|
device (MSD) such as a USB Flash Drive or SD |
|
Data |
|
memory card. |
|
|
Logger |
Printer Model |
End Of Line |
Serial Port |
Printer user ° |
|
CR/LF |
Bitrate |
character |
Epson |
|
|
|
TM-U220D (C31C515603) |
CR/LF |
9600 |
248 [0xF8] |
Citizen |
|
|
|
IDP-3110-40 RF 120B |
CR |
9600 |
N/A |
Star Micro |
|
|
|
SP212FD42-120 |
CR |
9600 |
210 [0xd2] |
Star Micro |
|
|
|
SP216FD41-120 |
CR/LF |
9600 |
210 [0xd2] |
Star Micro |
|
|
|
SP512MD42-R |
CR/LF |
9600 |
210 [0xd2] |
SciCan Data Logger |
End Of Line |
Serial Port |
Printer user ° |
|
CR/LF |
Bitrate |
character |
For Mass Storage Device* |
N/A |
9600 |
32 [0xd2] |
*Due to a variety of software programs/viewers that can be used to view the data files stored on a mass storage device such as a USB memory stick, we recommend the above settings.
For your Statim to communicate to a specific device, you must enable this function through the User Setup menu. Follow the instructions in section 6.2 Installing the
SciCan Data Logger below to enable communication to either an external printer or the SciCan Data Logger.
Page 25

6. The Communication Port con’t.
6.2 Installing the SciCan Data Logger
SciCan’s USB Data Logger can record and store cycle information onto a mass storage device (MSD) such as a USB Flash Drive or SD memory card.
These instructions are for units with a 9-pin communication (RS232) port located at the back of the unit.
Follow the steps below before connecting the Data Logger.
User Mode
Time/Date Setup
Language Setup
Unit ID Setup
Water Quality
Last Printout
RS232
End Of Line CR/LF Serial Port Bitrate Printer user ° char Save and Exit
Exit
User Setup Menu
To install the SciCan Data logger, access the user setup menu by powering up the unit while pressing the STOP button.
Follow the instructions below to complete installation steps.
STEP 1
Selecting the USB Flash/MSD Option
RS232 |
USB/Flash MSD |
1.Power up unit while pressing the STOP button to access the User Setup menu.
2.Using the UNWRAPPED and WRAPPED buttons, scroll to RS232 and select it by pressing the RUBBER AND PLASTIC button.
3.From the RS232 menu, use the UNWRAPPED and WRAPPED buttons to scroll down to the USB/FLASH MSD option and press the RUBBER AND PLASTIC button to select and return to the User Setup menu.
Page 26

6. The Communication Port con’t.
Setting the Serial Port Bitrate to 9600
Serial Port Bitrate |
9600 |
1.From the User Setup menu, use the UNWRAPPED and WRAPPED buttons to scroll to the Serial Port Bitrate menu and select it using the RUBBER AND PLASTIC button.
2.From the Serial Port Bitrate menu, use the UNWRAPPED and WRAPPED buttons to scroll down to 9600 and press the RUBBER AND PLASTIC button to select and return to the User Setup menu.
Setting the Printer user Character; (example: 134°C)
Printer user ° char |
32 [0x20] |
1.From the User Setup menu, use the UNWRAPPED and WRAPPED buttons to scroll to the Printer user ° char menu and select it using the RUBBER AND PLASTIC button.
2.From the Printer user ° char menu, using the UNWRAPPED button to increase the displayed value by one, and the WRAPPED button to increase that value by ten, enter the value 32 [0x20] and press the RUBBER AND PLASTIC button to accept and return to the User Setup menu.
Save and Exit
 Save and Exit
A Save and Exit must be performed after the above settings are completed. If this is not done, the information will revert to its prior settings.
1.From the User Setup menu, use the UNWRAPPED and WRAPPED buttons to scroll to Save and Exit.
2.Select it by pressing the RUBBER AND PLASTIC button.
The LCD will display time and date information and a sequence of messages:
HH:MM DD/MM/YYYY
“MSD NOT DETECTED”/”INSERT MSD/FLASH”/”SELECT A CYCLE”
Page 27

6. The Communication Port con’t.
Step 2
Selecting the Time and Date
 Time/Date
  HH:MM DD/MM/YYYY
Note: If the time and date were set according to section 3.6, this does not have to be performed again.
1. Power up unit while pressing the STOP button to access the User Setup menu.
2. Using UNWRAPPED and WRAPPED buttons, scroll to Time/Date Setup and press the RUBBER AND PLASTIC button to select it.
3. From the Time/Date Setup menu, set the time and date using the UNWRAPPED and WRAPPED buttons to change the displayed values and the RUBBER AND PLASTIC button to select. Press the STOP button when completed.
Step 3
Setting Unit ID
|
|
|
|
|
|
|
|
Unit ID |
|
|
|
001 |
|
|
|
|
|
|
||
|
|
|
|
|
|
|
Note: If the unit ID |
was set according to section 3.8, this does not have to be |
|||||
|
performed again. |
|||||
1. |
Power up unit while pressing the STOP button to access the User Setup menu. |
|||||
2. |
Using the UNWRAPPED and WRAPPED buttons, scroll to the Unit ID Setup and press |
|||||
|
the RUBBER AND PLASTIC button to select it. |
|||||
3. |
From the Setup Unit ID menu, use the UNWRAPPED and WRAPPED buttons to change |
|||||
|
the displayed values and the RUBBER AND PLASTIC button to select and move to the |
|||||
|
next digit. Press the STOP button when completed. |
|||||
Step 4 |
|
||
Connecting the SciCan Data Logger |
|
||
1. |
Ensure that both the Statim unit and the SciCan Data Logger are off. |
||
2. |
Connect the SciCan Data Logger to the Statim unit by using the serial cable. |
||
3. |
Power up the SciCan Data Logger |
|
|
HH:MM DD/MM/YYYY |
|||
4. |
Power up the Statim unit. |
||
“MSD NOT DETECTED”/”INSERT |
|||
5. |
The LCD will display the following |
||
MSD/FLASH”/”SELECT A CYCLE” |
|||
|
sequence of messages: |
|
|
|
|
||
6. |
Insert USB Flash Drive or SD memory card |
HH:MM DD/MM/YYYY |
|
7. |
After a few seconds the LCD will display |
USB/FLASH DETECTED/SAFELY |
|
|
the following sequence of messages: |
REMOVE MSD/SELECT A CYCLE |
|
|
|
||
|
|
|
|
Page 28

6. The Communication Port con’t.
6.3 Installing Paper on the Internal Printer
Use only paper approved for use with the optional internal printer on the Statim 5000S. The use of any other paper will damage the printer and will void the warranty. Thermal paper is available from SciCan (SciCan order no. 01-101657S).
Do not operate the printer without paper. If you run out of thermal paper, or if you do not wish to use the printer, turn it OFF.
Never pull the paper backwards through the printer. This will damage the printer mechanism.
To install the paper into the printer, follow these steps:
1.Power the Statim 5000S ON.
2.Open the printer door ■1 by pushing on the top half of the door.
3.Power the printer ON.
4.Unroll some paper from the thermal paper roll ■3 and trim the corners using the paper cutting template included with each box.
5.Move the paper roll arm ■4 into the loading position. Place the paper roll ■3 on the arm so the paper strip feeds from the top of the roll and then carefully insert
it into the paper feed slot ■5 until it stops.
If the paper does not feed from the top, the heat sensitive side of the paper will not be in contact with the print head and the printer will not print.
6.With one hand, continue to gently feed the paper strip into the paper feed slot. With the other hand, press the paper advance button until the paper feeds by itself.
Keep the paper straight when feeding it into the printer or it may jam. Do not force the paper into the slot! If the paper will not feed into the slot, pre-cut the end of the roll again and reload the paper.
Page 29

6.The Communication Port con’t.
7.Continue to press the paper advance button ■6 until the paper feeds through the paper exit slot on the front of the printer. Then, move the paper roll ■3 and arm into the operating position and close the printer door ■1 . The printer is now ready to operate.
When you see a red line on one side of the paper, it is time to replace the roll.
If a paper jam occurs, and the paper cannot be removed by pressing the paper advance button ■6 , do not pull the paper backwards through the printer.
Never put a utensil or tool into the paper exit slot. For full instructions on how to remove paper jams, see section 6.4 Removing Internal Printer Paper Jams.
To replace the paper roll ■3 steps:
1.With scissors, cut the paper between the roll and the paper feed slot ■5 .
2.Remove the roll from the arm and discard the unused portion.
3.Press the paper advance button ■6 to feed
the paper that remains in the printer out of the slot at the front of the printer.
4.Install the new thermal paper roll by following the instructions described in this section.
■5 ■2
■4 ■3 ■1
■4
■6
Figure 15.1
■5 ■2
■6
■3 Figure 15.2
Page 30
 Loading...