

Page 1
HYDRIM® L110w G4
INSTRUMENT WASHER
Operator’s Manual
Manuel de l’utilisateur
HYDRIM L110w G4 Operator’s Manual 95-113645 CA ML R2 Copyright 2013 SciCan Ltd. All rights reserved.
Page 2

Table of Contents
1. Introduction ......................1
2. Important Information ..............2
3. Disclaimers ......................3
4. Installation Instructions.............4
5. Instructions for Use ...............9
5.1 Instrument Reprocessing
Recommendations ..................9
5.2 Cycle Description Chart .............10
5.3 Hints and tips for best cleaning results . 11
5.4 Recommended load congurations ....12
5.5 Baskets and Accessories............14
5.6 Touchscreen Overview .............15
5.7 Set up menu overview ..............16
5.8 - 5.22 Setup menu options ...........17
5.23 Connecting to a network ............22
5.24 Connecting to a wireless network .....22
5.25 Activating the HYDRIM L110w G4.....23
5.26 Interrupting / aborting a cycle ........24
5.27 Additional user
and setup menu functions ...........25
5.28 Opening the Door in
Case of Power Failure ..............26
5.29 Storing and Retrieving
Cycle Information ..................27
5.30 Printer / Data Logger Setup ..........29
6. Care and Maintenance ...........30
6.1 Replacing the HIP™
Cleaning Solution .................30
6.2 Relling the Water Softener
Salt Reservoir...................... 32
6.3 Cleaning the HYDRIM L110w G4 .....32
6.4 Filter and Wash Arm Maintenance ....33
6.5 Preparing the unit for shipping .......33
6.6 Annual maintenance ...............34
7. Troubleshooting .................36
8. Specications ..................38
9. Serial Number Plate .............38
10. Warranty ......................39
HYDRIM and STATIM are registered trademarks of SciCan Ltd. BRAVO,
HIP, and SysTM are a trademarks of SciCan Ltd. All other trademarks referred
to in this manual are the property of their respective owners.
For all service and repair inquiries:
In Canada 1-800-870-7777
United States: 1-800-572-1211
Germany:
International: (416) 446-4500
Email: techservice.ca@scican.com
Manufactured by:
+49 (0)7561 98343 - 0
SciCan Ltd.
1440 Don Mills Road,
Toronto ON M3B 3P9
CANADA
Phone: (416) 445-1600
Fax: (416) 445-2727
Toll free: 1-800-667-7733
EU Representative
SciCan GmbH
Wangener Strasse 78
88299 Leutkirch GERMANY
Tel.: +49 (0)7561 98343 - 0
Fax: +49 (0)7561 98343 - 699
SciCan Inc.
701 Technology Drive
Canonsburg, PA 15317 USA
Phone: +1 724 820 1600
Fax: +1 724 820 1479
Toll free: 1-800-572-1211
SciCan Medtech
Alpenstrasse 16
CH-6300 ZUG SWITZERLAND
Phone: +41 (0) 41 727 7027
Fax: +41 (0) 41 727 7029
Page 3

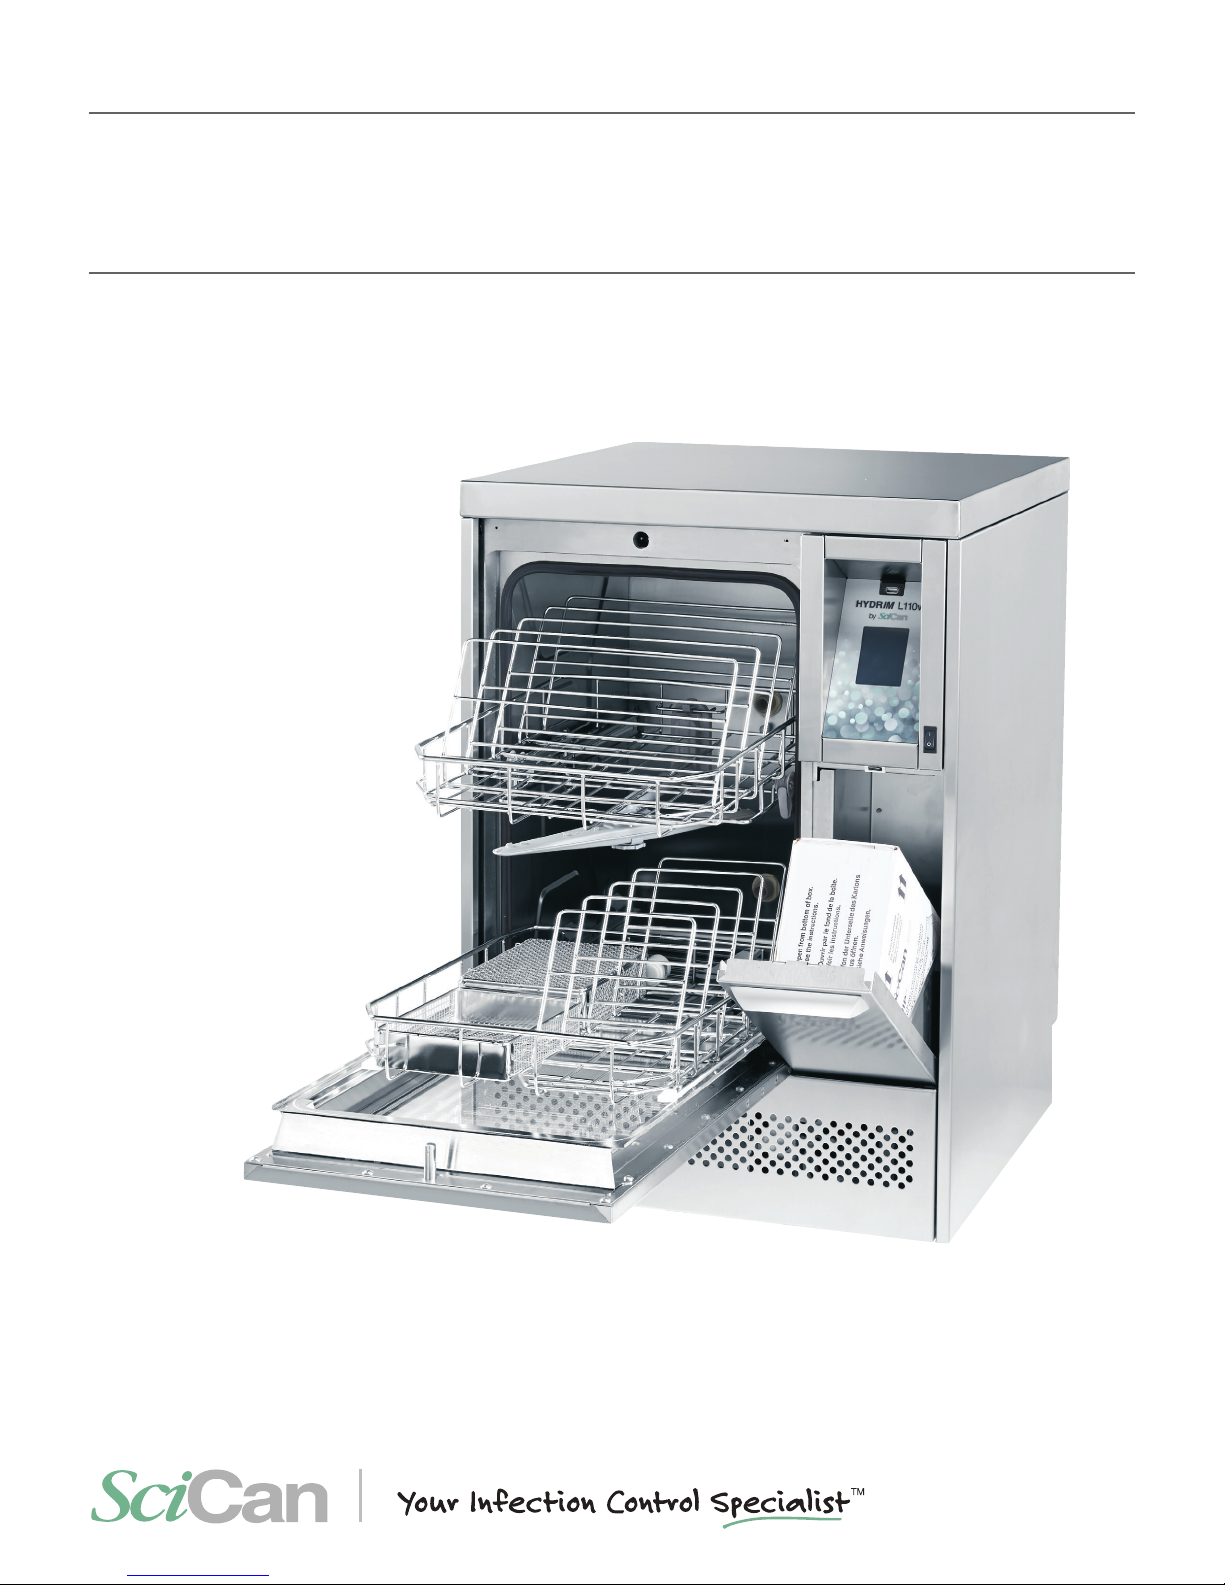
1. Introduction
Thank you for selecting the HYDRIM L110w G4 instrument washer. The HYDRIM
complements the STATIM® and BRAVO™ autoclaves by quickly and hygienically
preparing soiled instruments for sterilization. To ensure years of safe, trouble-free service,
carefully review this Operator’s Manual before operating the unit. The HYDRIM L110w G4
is suitable only for the applications listed in this manual. Using the HYDRIM for other
purposes may be dangerous. The manufacturer cannot be held responsible for damage
caused by improper use.
Operational, maintenance and replacement instructions must be followed for the product
to perform as designed. All trademarks referred to in this manual are the property of their
respective owners. Contents of this manual are subject to change without notice to reect
changes and improvements to the HYDRIM product.
The HYDRIM L110w G4 should only be installed and serviced by a qualied contractor
as it is an Installation Category 2 device. Before connecting the unit, the installer should
check that the voltage and frequency of the electrical supply correspond with the details
in the installation instructions. The unit must only be plugged into a grounded outlet.
Please note that this unit is completely isolated from the electrical supply only when it is
unplugged or the circuit breaker is turned OFF. This must be done before any repair work
is carried out.
The HYDRIM L110w G4 uses HIP™ Cleaning Solution exclusively. The unit will not
perform as described if other detergents / cleaning products are used. Other detergents /
cleaning products may damage the unit, the instruments, cause excessive foaming, and
void the warranty. Do not use solvents in this unit. Do not allow small children or
unauthorized personnel access to this unit or its controls.
1
Page 4

2. Important Information
The following symbols appear in this book.
Caution, there is a potential hazard to the operator.
This situation may lead to a mechanical failure.
This is important information.
2
Page 5

3. Disclaimers
Do not permit any person other than authorized personnel to supply parts for service or
maintenance for your HYDRIM. SciCan is not liable for incidental, special or consequential
damages caused by any maintenance or services performed on the HYDRIM by unauthorized
personnel, or for the use of equipment or parts manufactured by a third party, including lost prots,
any commercial loss, economic loss, or loss arising from personal injury.
Never remove any unit panels and never insert objects through holes or openings in the cabinetry.
Doing so may damage the unit and/or pose a hazard to the operator.
If the unit is used in a manner other than that specied, the protection provided by the equipment
may be impaired.
Cleaning solutions may irritate. Avoid contact with eyes, skin and mouth.
Never sit, stand or lean on the open door. The unit may tip forward causing injury.
Always turn the unit OFF before adding softener salt, adding solutions or performing routine
maintenance to the unit.
The owner shall not allow any personnel other than the trained and authorized personnel
to operate the unit.
SciCan recommends leaving the unit turned ON at all times, in particular over times when no staff
is in the ofce or when no water shut-off mechanism is installed. Leaving the unit turned ON will
activate the drain pump if water is leaking into the chamber as a result of any faulty circumstance.
For further information or questions about the HYDRIM L110w G4, contact your authorized dealer.
3
Page 6
4. Installation Instructions
To open the wash chamber door, plug in the unit,
turn it on and press the unlock symbol.
Alternatively, remove the screw in the kickplate
and pull the ring. See section 5.28.
Tools and supplies required for installation:
• Slot screwdriver
• Channel locks
Specications:
Voltage: 208 – 240 V
Frequency: 60 Hz
Rated load: 2.5 kW
Circuit
breaker: 15 A
per phase
Height: 850 mm / 33.5”
Width: 598 mm / 23.54”
Depth: 600 mm / 23.75”
Depth with
door open: 1200 mm / 47”
Weight: 80 kg / 176 lbs
Max. Running Noise: 78 dBA
Utility Hook-ups
Installation:
Installation should be undertaken by a
SciCan approved technician. The use of
an unapproved installer may invalidate
the warranty.
If the HYDRIM is installed in a Sterilization
Center, the manufacturer of the Sterilization
Center should allow a 10mm / 1/2” space
at the top, back and both sides of the HYDRIM.
This will facilitate installation, and service
access to the HYDRIM.
Do not move the HYDRIM into place by
maneuvering the open wash chamber door.
This may cause to door to become misaligned
and leak.
During installation, all consumables should
have been added to the machine as appropriate.
It is important that this be done before starting
the machine.
For safety reasons, do not install
the HYDRIM without the top cover.
Hose / Length / Max. Distance Water Shut-off
Cord Diameter Distance from Pressure valve
inlet / drain
Hot Inlet 1.9 m / 6 ft. 1.5 m / 5 ft. 1-10 bar / Yes
3/4” 14.5-145 psi
Cold Inlet 1.9 m / 6 ft. 1.5 m / 5 ft. 1-10 bar / Yes
3/4” 14.5-145 psi
R/O Inlet 1.9 m / 6 ft. 1.5 m / 5 ft. 1-10 bar / Yes
3/4” 14.5-145 psi
Drain 1.5 m / 5 ft. — — —
3/4”
Electrical 1.8 m — — —
AWG 14-3
Levelling the HYDRIM:
The unit is standing on three supports: rollers (wheels) at the
back and two legs at the front.
1. Remove the front kickplate. Push the HYDRIM
into place while lifting the strap at the front to allow the unit
to roll on the rollers.
2. Adjust the front legs as required until the
HYDRIM is level.
3. The rear two legs are used only if the oor is uneven or
cannot provide support to the rollers.
4. Tuck the strap under the machine before
replacing the kickplate, so as not to interfere
with the exhaust air vents.
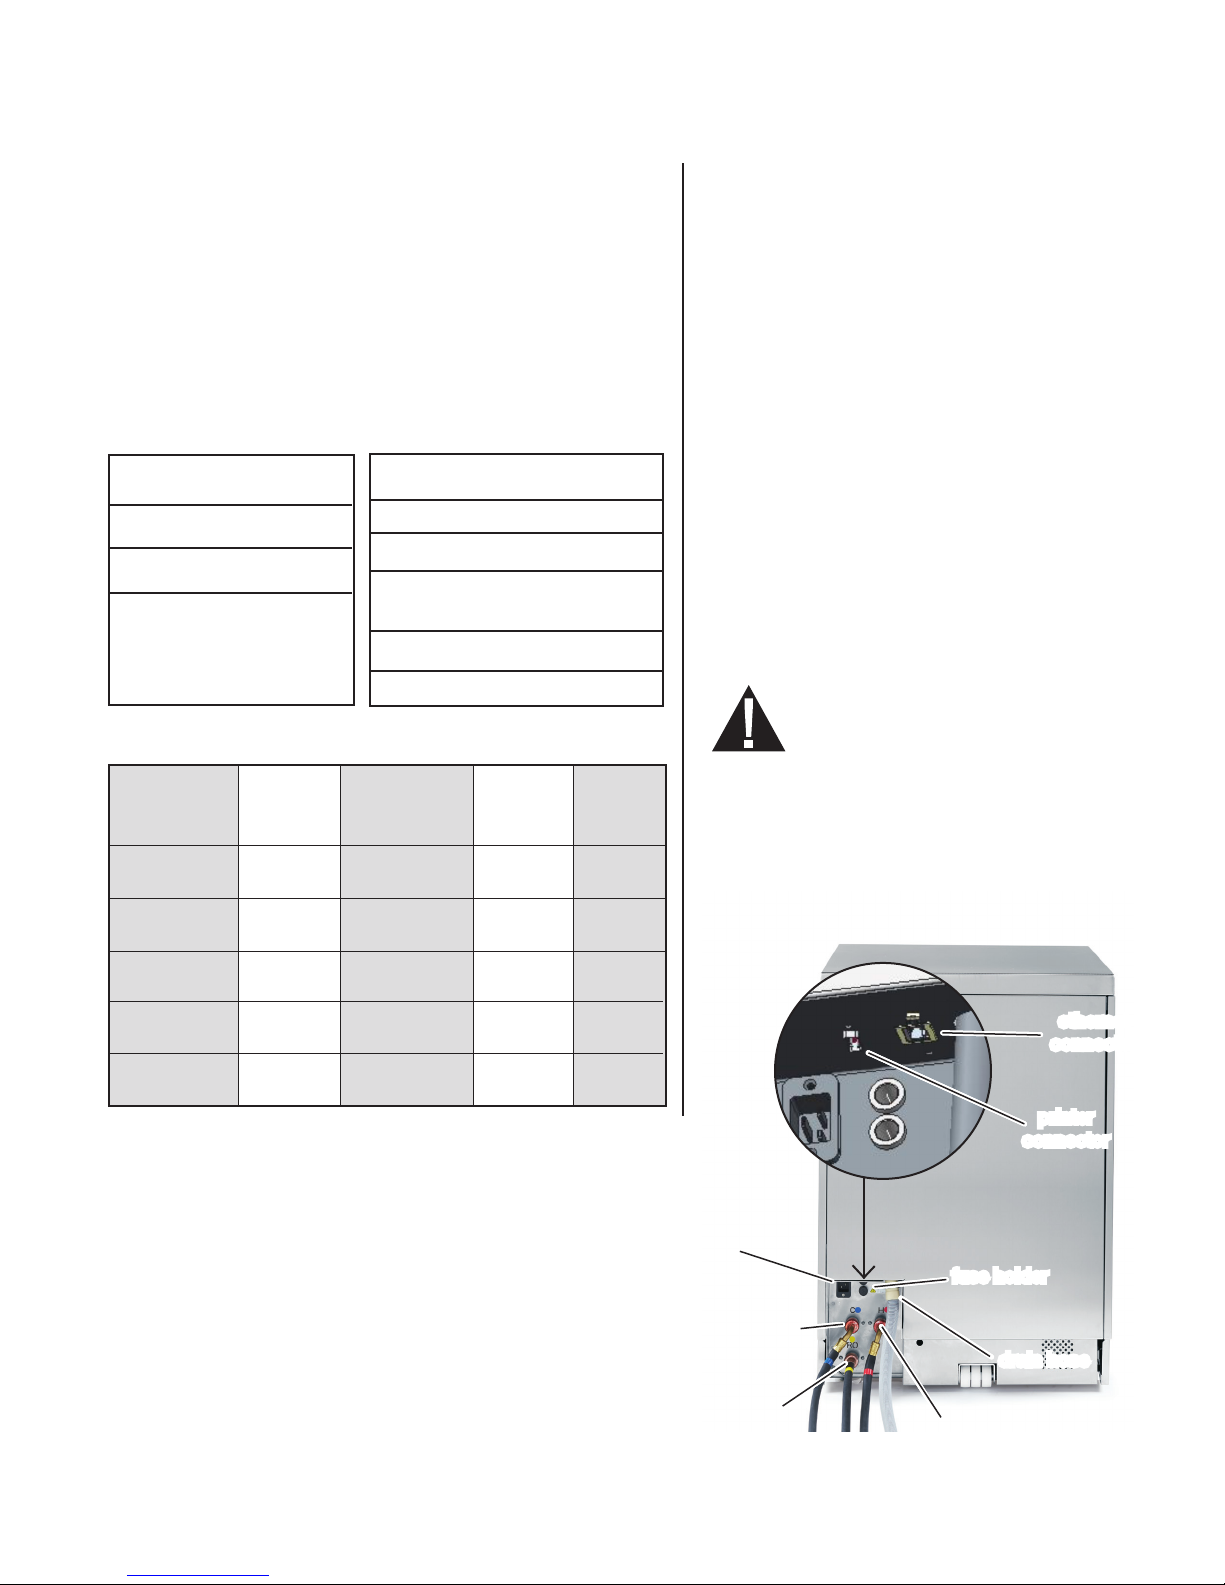
Rear of Unit
power
connector
cold water
inlet hose
RO water
inlet hose
ethernet
connector
printer
connector
fuse holder
drain hose
hot water
inlet hose
4
Page 7

4. Installation Instructions
Connecting the water inlet hoses:
Connect the hot and cold water inlet hoses to the hot and cold water supply.
Drain requirements:
Connect the drain hose to the drain outlet. The drain hose can be attached to existing drain
lines using a 3.5 cm / 1.5” or larger standpipe / P-trap combination. If the hose is connected
directly to the drain line, ttings and adapters should not reduce water ow. The drain hose
should be attached to the main drain at a point no more than 1 metre /3 ft. above the base of
the HYDRIM. A oor drain is acceptable (check local codes).
Electrical requirements:
Connect the electrical cord to the power supply. The HYDRIM must have a dedicated circuit
equipped with a 15A fuse. The outlet must be grounded.
Additional Information:
• The HYDRIM unit is heavy. Use a forklift or dolly and exercise caution when moving it.
• The HYDRIM should be serviced on site.
• The HYDRIM is equipped with an air gap / anti-suction device to prevent backow of dirty
water into the water supply. No other air gap device is necessary.
• If you need to extend the water inlet and drain hoses, ensure that you use commercial grade
plumbing hose.
• The maximum length of the drain hose is 3.3 m / 13 ft.
Installing the water softener salt:
Unscrew the salt container lid and pour 1 litre / 1 quart of water into
the water softener. Add 1 kg / 2.2 lbs of water softening salt in the
same manner. Screw the salt container cap on tightly.
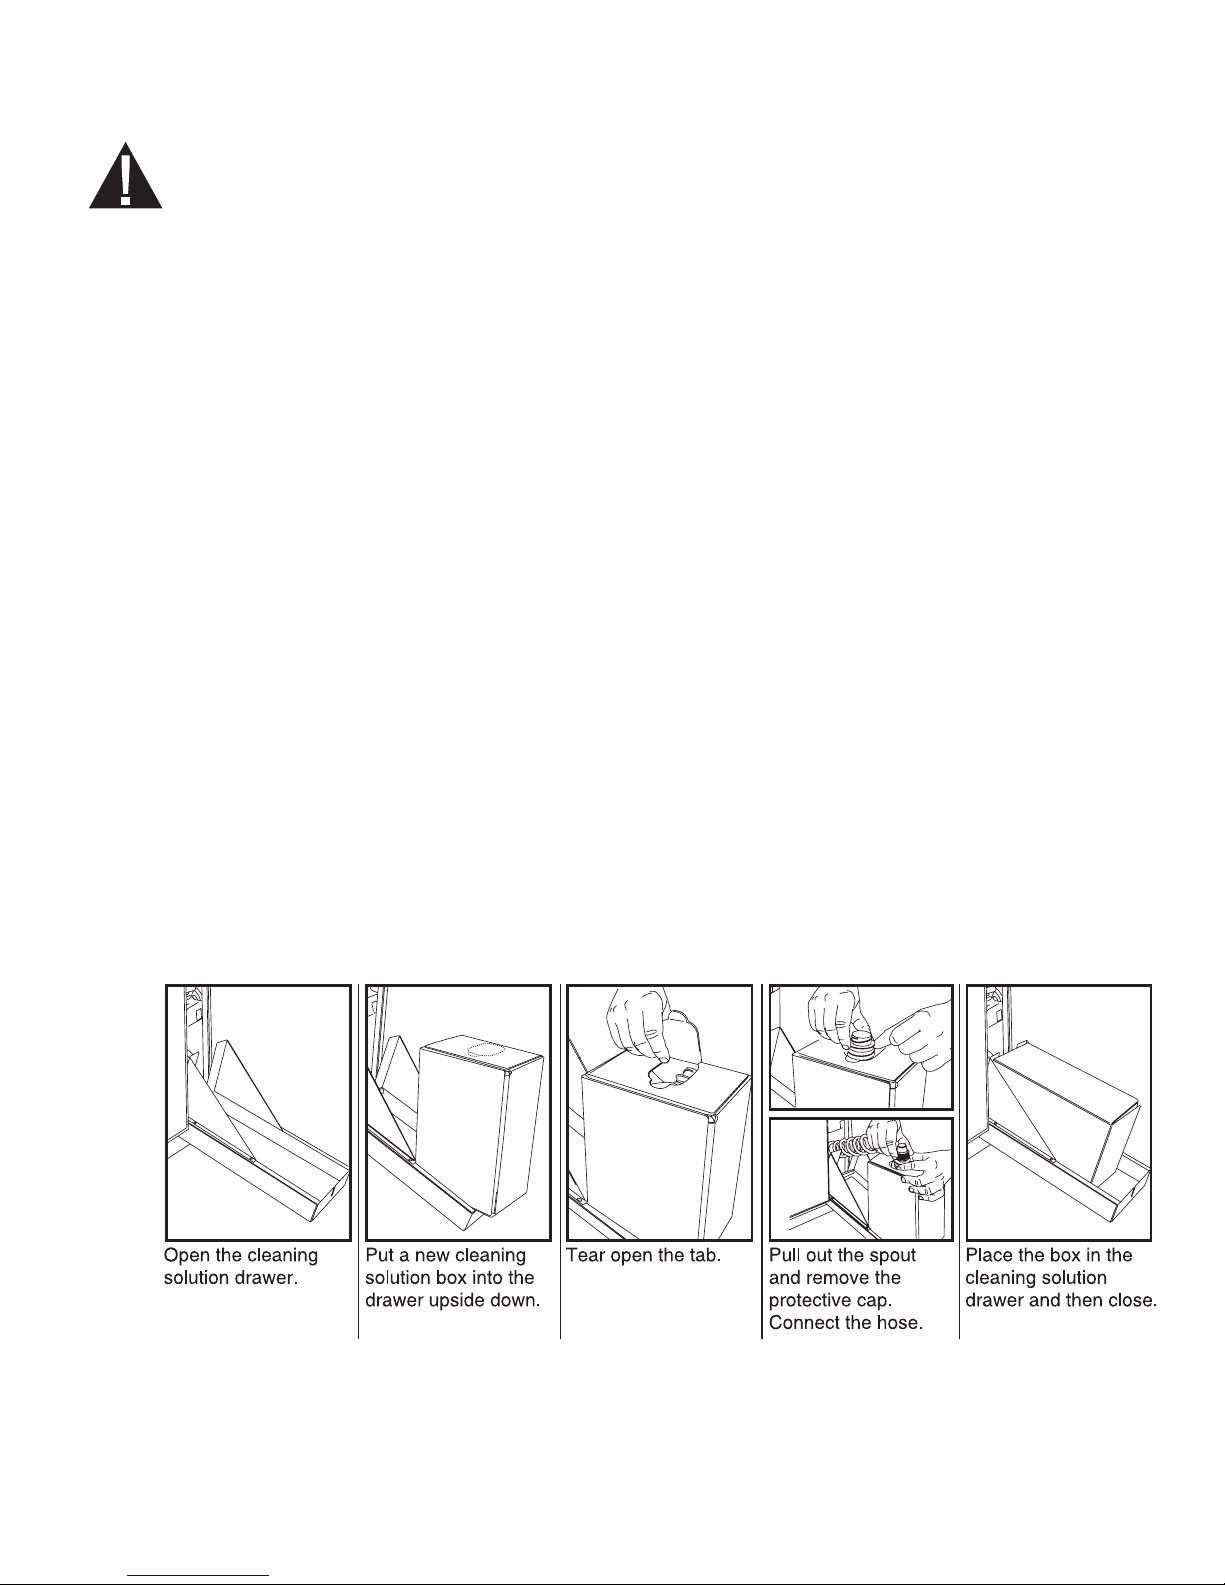
Handling and installing the HIP™ cleaning solution
The HIP™ cleaning solution is used in dilute form as a detergent for the cleaning
of surgical instruments in the HYDRIM range of washers and washer disinfectors. It is a
colourless and almost odourless liquid which is completely soluble in water.
The pH range of the concentrated solution is between 9.3 to 9.8 and the solution is
therefore alkaline. It is therefore advised that certain precautionary measures are observed
when handling and during the loading of the solution into the machine, and when removing
and disposing of the empty box.
5
Page 8
4. Installation Instructions
Recommended precautionary measures with regard to safe handling of HIP™ cleaning solution.
• Always wear undamaged gloves made of natural or butyl rubber, nitrile, or neoprene
(Surgical gloves are ideal).
• Always wear eye protection.
• Protect exposed skin on arms.
• If solution is spilled on clothing, remove the item of clothing and wash affected skin
with plenty of water, in accordance with the Material Safety Data Sheet requirements.
• Use good industrial hygiene practices in handling this material. When handling,
do not eat or drink.
• After handling the product, remove and dispose of gloves and wash hands prior to
removing eye protection.
• Do not use the personal protective equipment you use for clinical activities to handle
HIP™ products.
• Always ensure that personal protective equipment, if contaminated with HIP™
cleaning solution, is cleaned, or disposed of as appropriate.
For comprehensive data on HIP™ cleaning solution, please visit SciCan.com to
view or download a PDF of the Material Safety Data Sheet.
To install the HIP™ cleaning solution box, follow these steps:
salt container
Installing Cleaning Solution:
Install HIP™ Cleaning Solution as follows:
Technician Installation Test: Turn on the shut-off valves. Run a cycle, checking for leaks in
the plumbing connections.
6
Page 9

4. Installation Instructions
Water quality
The quality of the water being used in the HYDRIM to clean the instruments is very critical
to achieving satisfactory cleaning results and to protecting the instruments and the internal
parts of the unit from deterioration.
Drinking water typically contains many dissolved solids. The amount of dissolved solids
greatly depends on the local natural geological conditions and they can cause stains, spots
and corrosion on instruments and on the internal parts of the HYDRIM. Among others, Iron,
Manganese, Chloride, and Calcium Carbonate (CaCO
that affect the cleaning results when using a washer.
Iron and Manganese can cause orange and brown or black stains on the instruments and
on the internal parts of the HYDRIM. Chloride is usually responsible for causing stains,
spotting, pitting and scaling. If the instruments or the inner parts of the HYDRIM L110w G4,
such as the chamber, show any of these spots or stains, a water test may be required to
determine the cause. The installation of a water treatment system may be required to
reduce the amount of dissolved solids in the water and to improve the cleaning
performance of the HYDRIM.
) are the dominant dissolved solids
3
Calcium Carbonate is the principle cause of water hardness and leaves white spots or
scales. The HYDRIM is equipped with a built-in water softening system that must be
adjusted according to the local water hardness. Please see the next section of this manual
for recommended regeneration settings.
Before using the HYDRIM, SciCan recommends testing the water and recording
the results for water hardness, pH value, and water conductivity for future reference.
IMPORTANT: The HYDRIM's water softening system reduces the water hardness by
taking out Calcium Carbonate. If your water testing results show that your water hardness
is outside the unit's range of adjustment, or if other dissolved solids in the water cause
stains or deposits on the instruments or chamber, an external water treatment system may
be required.
7
Page 10

4. Installation Instructions
Testing water quality
Water Hardness Conversion and salt regeneration levels
The HYDRIM L110w G4 is equipped with
a built-in water softening system that must
be adjusted according to the local water
hardness. To read local water hardness,
proceed as follows:
1. The water test kit included with your
HYDRIM contains three water
hardness test strips in bags. Take a
water sample from the location where
the machine will be installed.
2. Open one of the bags, remove the
test strip and dip it into the water.
3. Compare the color of the strip with
the chart on the back of the bag
Determine the water hardness according
to the chart on the water test kit envelope.
4. Power the unit on and select the
Settings key from the main menu.
5. Go to the Setup Menu and select
“Set Regeneration”.
6. Using the up and down arrows, set the
water softener regeneration level
according to the water hardness table
in this section. If your water hardness
falls between two settings, select the
higher setting.
7. Unscrew the water softener container
lid from the bottom right of the chamber
and pour at least 1.0 litres (0.26 gal) of water
into the water softener container. Then fill the
salt container to the top (maximum 1 kg/
2.2 lbs.) with salt. Close by screwing the lid
°dH
1 1.0 18
2 2.1 36
3 3.1 54
Very Soft
4 4.2 71
Necessary
5 5.2 89
5.6 5.8 100
Typically
External Treatment
6 6.3 107
6.2 6.4 110
(values from 18-143)
7 7.3 125
No Treatment
8 8.3 143
8.4 8.8 150
9 9.4 161
10 10.4 178
10.1 10.5 180
11 11.5 196
11.2 11.7 200
11.8 12.3 210
12 12.5 214
13 13.6 232
14 14.6 250*
15 15.6 268
16 16.7 286
16.8 17.5 300
17 17.7 303
18 18.8 321
19 19.8 339
19.6 20.5 350
20 20.9 357
20.2 21.0 360
(values from 150-535)
21 21.9 375
May Require External Treatment
22 22.9 393
22.4 23.4 400
23 24.0 411
24 25.0 428
25 26.1 446
25.2 26.3 450
26 27.1 464
27 28.2 482
28 29.2 500
28.6 29.8 510
29 30.2 518
30 31. 3 535
≥30.3 ≥31.6
Required
(values >535)
tightly back into place and run a complete
cycle with no instruments. An improper seal can lead to corrosion.
US
GPG
PPM
(mg CaCO3 / Litre)
≥540
Regen.
1
2
3
4
5
6
7
8
Additional
Water
Treatment
Required
*Please note: The water test strip is only accurate up to 250 ppm. If the reading on the test strip exceeds
250 ppm and/or if the location in which the HYDRIM is installed has known water quality problems, having
a more detailed and accurate water test done by a test lab is strongly recommended.
8
Page 11

5. Instructions for Use
5.1 Instrument Reprocessing Recommendations
The HYDRIM L110w G4 is designed to clean general dental and medical instruments.
Terminal sterilization MUST follow processing in the HYDRIM L110w G4.
Prior to placing instruments in the HYDRIM, consult the instrument manufacturer’s reprocessing
instructions.
Examples of medical and dental instruments suitable for cleaning in the HYDRIM L110w G4
include:
• Stainless steel scalers, spatulas and hemostats.
• Stainless steel retractors, needle holders, skin hooks, tissue forceps, scissors, curettes, and
other stainless steel instruments free of deep cavities.
For best results, instruments processed in the HYDRIM L110w G4 should
have the following properties:
• Heat resistance to a temperature of up to 70°C / 158°F
• Corrosion resistance in the presence of heat and alkalinity.
Burs, microkeratomes, phaco tubing, beroptics and electrical equipment should not be processed
in the HYDRIM.
Nickel-plated instruments, or instruments containing aluminum or colour anodized aluminum
as well as single use instruments are not suited for processing in the HYDRIM.
HIP™ (HYDRIM Cleaning Solution with Instrument Protection) has been carefully formulated to
provide outstanding material compatibility with a wide range of metals and coatings. However,
some manufacturers’ instruments or instrument coatings may not be compatible.
Please consult the instrument manufacturer for their recommended cleaning procedures.
In general, it is not recommended to process carbon steel and chrome plated instruments
in the HYDRIM.
All hinged instruments should be placed in open position in open baskets or in the hinged
instrument rack (SciCan part number 01-110409S) in P3 Heavy-Duty cycle.
When processing small or light objects in the HYDRIM use the basket with lid (SciCan part number
01-109966S).
Only the outer surfaces of dental handpieces can be cleaned in the HYDRIM L110w G4 with
the handpiece holder (9 handpieces, PN 01-113113S or 21 Handpieces, PN 01-113112S).
Set-able materials, such as cements, amalgam, and composites need to be removed from the
instruments after use at chairside. The HYDRIM will not be able to clean them off the instruments.
.
9
Page 12

5. Instructions for Use
5.2 Cycle Description Chart
Cycle Prewash Wash
P0 – Machine
Cleaning Cycle
No initial draining.
<30ºC/86°F
(cold)
3 minutes
P1 – Rinse and
Hold Cycle*
Use to prevent
soil from drying on
instruments when they
will not be washed
within one hour.
<30ºC/86°F
(cold)
3 minutes
P2 – Regular
Cycle
Use for moderately
soiled loose
instruments.
N/A
N/A N/A
N/A N/A
50ºC/122°F
5-15 minutes
(default 5
minutes)
Intermediate
Rinse
<60ºC/140°F
1 minute
Rinse Dry
<30ºC (cold)
2 minutes
60ºC/140°F
1 minute
60ºC/140°F***
1-10 minutes
(default 1 minute)
N/A
N/A
1-20
minutes
(default 10
minutes)
Total Time**
w/o Drying
7
minutes
17
minutes
25
minutes
Water
Consumption
16 L
4.23 Gal
16 L
4.23 Gal
24L
6.34 Gal
P3 – Heavy Duty
Cycle
Use for heavily soiled
instruments and
cassettes.
* This is not a wash cycle. Always run a wash cycle following the rinse & hold cycle.
** Cycle times depend on the temperature and pressure of incoming water.
*** Rinse times are adjustable up to 10 minutes by an authorized technician.
<30ºC/86°F
(cold)
3 minutes
50ºC/122°F
5-15 minutes
(default 9
minutes)
<60ºC/140°F
1 minute
60ºC/140°F
1 minute
1-20 minutes
(default 10
minutes)
34
minutes
32L
8.45 Gal
10
Page 13

5. Instructions for Use
5.3 Hints and tips for best cleaning results
Remove all cement, composite material and amalgam from instruments at chairside prior to
processing in the Hydrim.
• Use only accessories, such as baskets, cassettes, trolleys and racks to hold instruments
that are designed for the HYDRIM L110w G4.
• Use accessories for their intended purpose only. For example, do not place hinged
instruments in cassettes. Use the hinged instrument rack instead.
• Disassemble instruments if possible.
• Do not overlap instruments. Each instrument must be kept separate.
• All instruments must be placed in the instrument washer in such a way as to allow good
rinsing of all surfaces. Any surface that is shielded from water and detergent cannot
be cleaned.
• Open hinged instruments widely when placed in baskets or hinged instrument rack
(PN 01-110409S). Closed hinged instruments cannot be cleaned.
• Place suction tubes in the rack for vertical instruments and ensure that water can flow
unrestricted in and out of the tubes. Do not place suction tubes horizontally in a basket
or in a cassette. For instruments containing lumens, such as dental handpieces, only the
external surfaces are cleaned.
• Place trays and other concave shaped items at an angle to ensure water can run off
surfaces easily.
• Do not overload the HYDRIM.
• Verify the Hydrim setup:
– Ensure that the washer spray arms are free of any blockage and can rotate freely.
– Ensure that the mesh filters in the chamber drain are free from debris.
• To achieve best cleaning results, instruments should be processed in the HYDRIM as
soon as possible. If immediate cleaning is not possible, it is recommended to process
the instruments using the P1 Rinse and Hold program immediately after use on
the patient.
• Visually inspect instruments for cleanliness and integrity (corrosion, material changes)
after cleaning and repair or replace instruments if necessary.
• If process enforced is activated, the operator must confirm that the instruments are
visually clean after a complete cycle is finished.
11
Page 14
5. Instructions for Use
5.4 Recommended load congurations
The intended purpose of the L110w G4 washer is a clinical general instrument washer,
predominantly aimed at the general dental and medical markets. There will be many
combinations of instruments that can be processed in the L110w G4 unit depending on:
• Size of practice
• Types of procedures undertaken at any one time
• Specialization of practice
• Instrument management protocols
It is difcult to illustrate all the possible combinations av ailable, so below we have given
examples of the most common typical basket loadings, the recommended loading
of general instruments, and the worst case loading, for which the unit has been type
tested and validated.
Handle all instruments with care to prevent personal injuries through punctures for
example. Follow local health and safety regulations for preventing accidents, bodily
harm and personal injuries.
Observe the instrument manufacturer’s recommendations for cleaning and care.
When loading the unit, arrange loose instruments so that they do not touch one
another. Instruments with concave surfaces or cavities should be placed so that water
can drain freely.
Sample loading:
Example 1 – solid straight & hinged instruments
Example 2 – solid straight instruments
12
Page 15
5. Instructions for Use
Example 3 – hinged instruments, solid instruments and open hollow instruments
For example:
Scalers, curettes,
dental elevators,
single part mirrors,
suction tubes etc.
Example 4 – small & disassembled instruments
For example: Two piece mirrors, scalpel knife handles, etc.
Example 5 – instrument sets in cassettes – full load
For example:
Rongeurs, forceps,
scissors etc.
For example: Bone fi les, pluggers, curettes, excavators, etc.
Example 6 – instrument sets in cassettes – half load
For example: Bone fi les, pluggers, curettes, excavators, etc.
Example 7 – instrument trays
13
Page 16
5. Instructions for Use
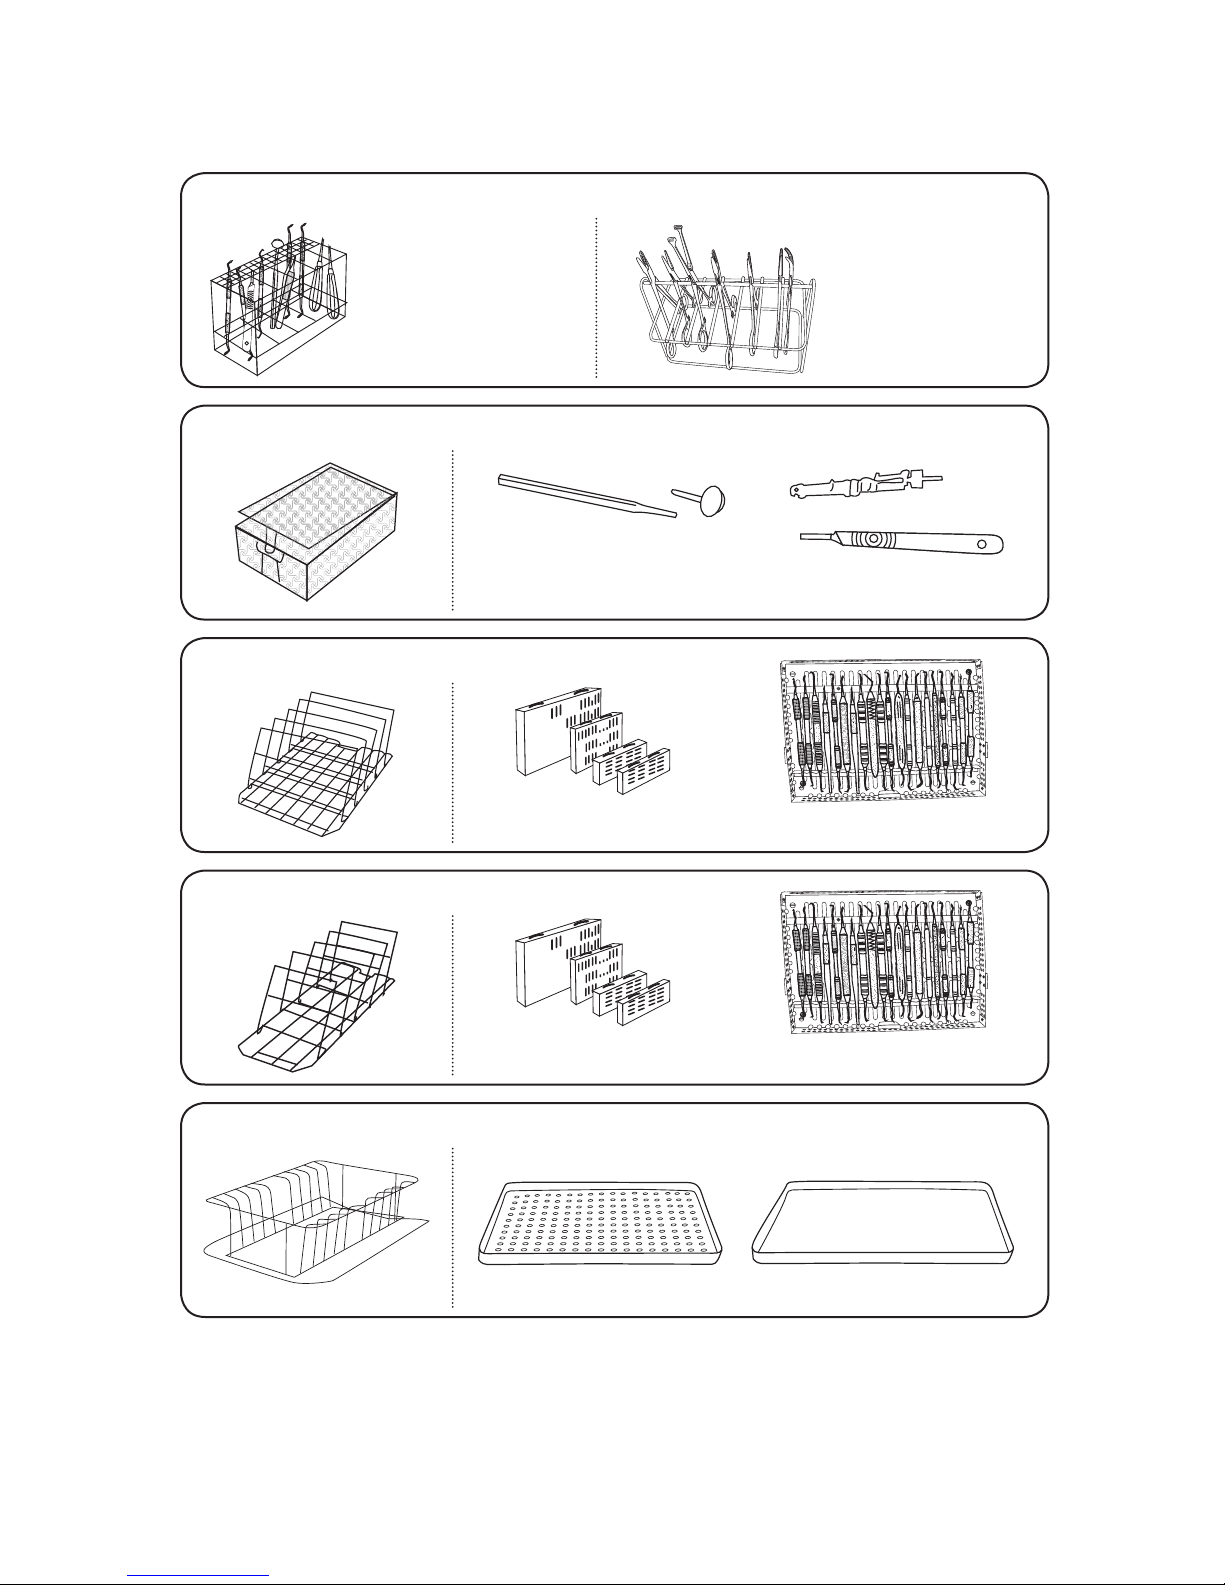
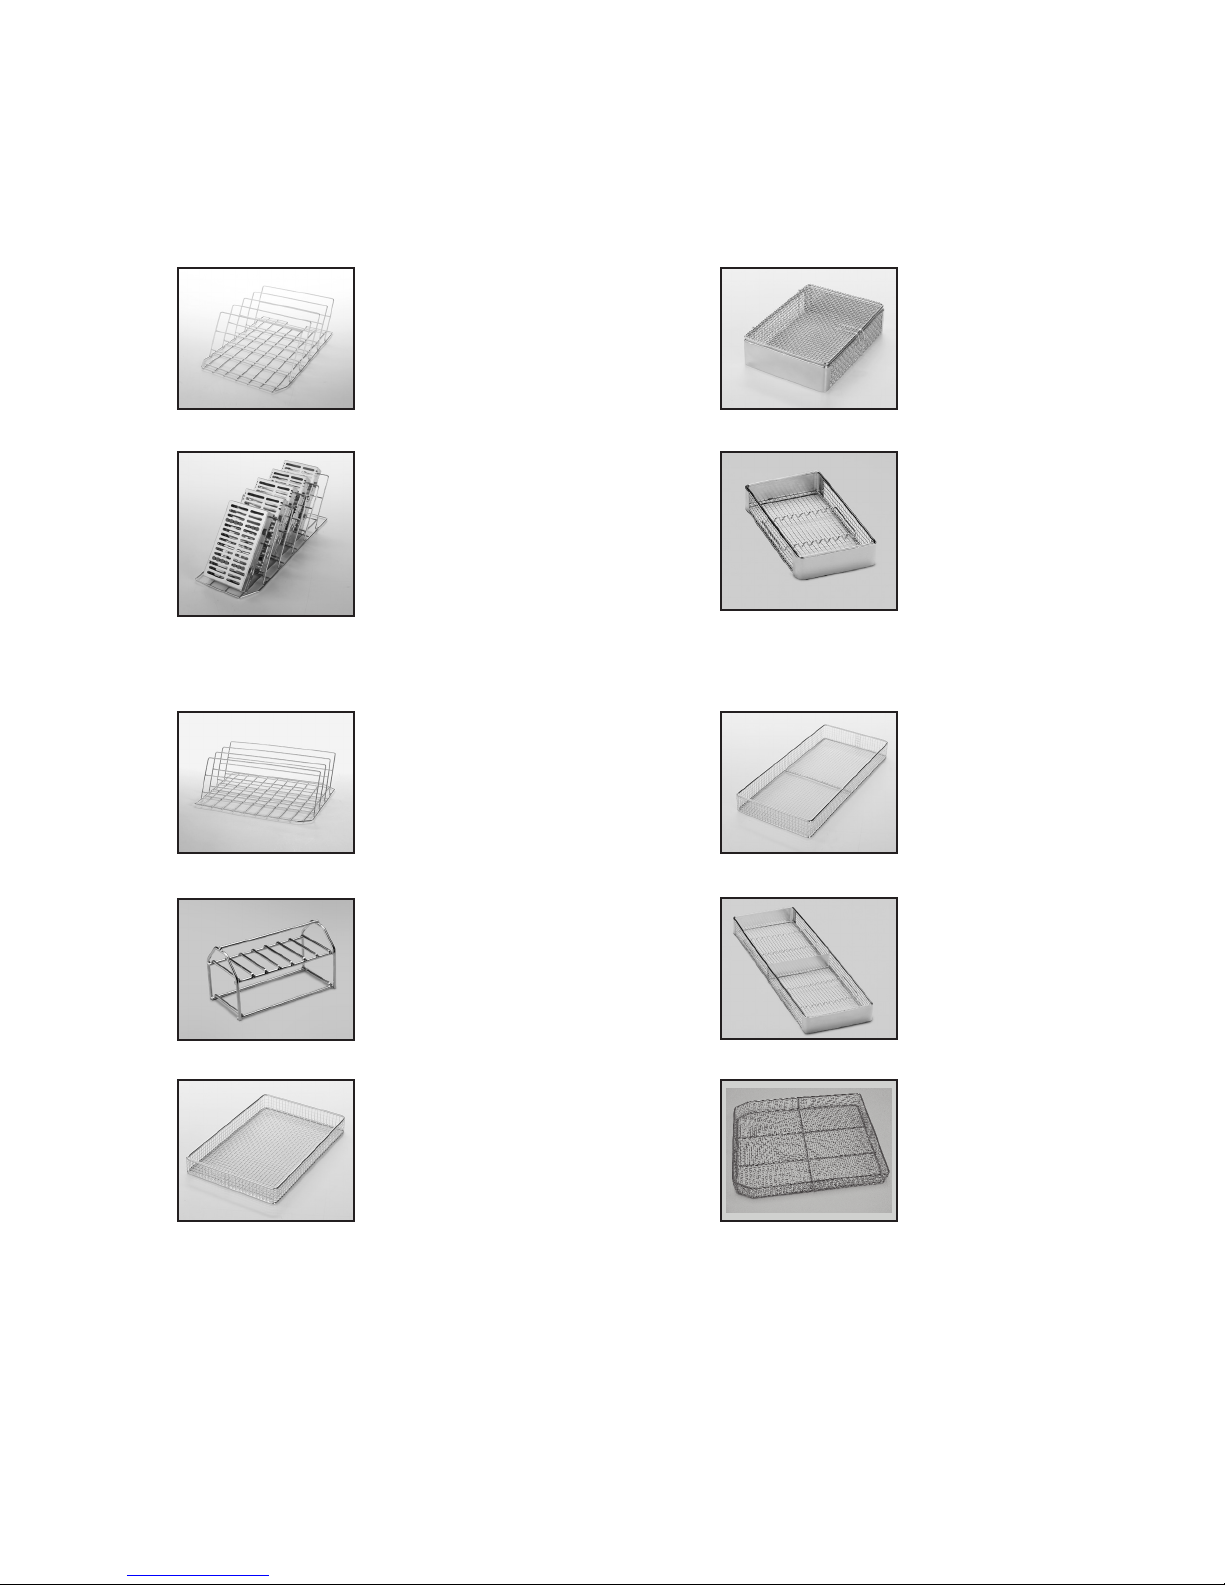
5.5 Baskets and Accessories
The following are included with the HYDRIM:
Rack for ve 8” x11”
cassettes, for upper
or lower trolley. Full size (1/1).
Part-number
01-109963S
Rack for ve medium
size cassettes, for upper
or lower trolley. Half-size (1/2).
Part-number
01-109964S
The following are optional:
Rack for four 11” x 14”
cassettes, for upper
or lower trolley. Full size (1/1).
Part-number
01-109965S
Basket with lid.
Quarter size (1/4).
Part-number
01-109966S
Hygiene basket for
loose instruments.
Quarter size (1/4).
Part-number
01-109967S
STATIM 5000 basket.
Part-number
01-107241
Hinged instrument rack.
Part-number
01-110409S
STATIM 2000 basket.
Part-number
01-107240
Long Basket.
Part-number
01-108232
Full Size Basket.
Part-number
01-111598
14
Page 17
5. Instructions for Use
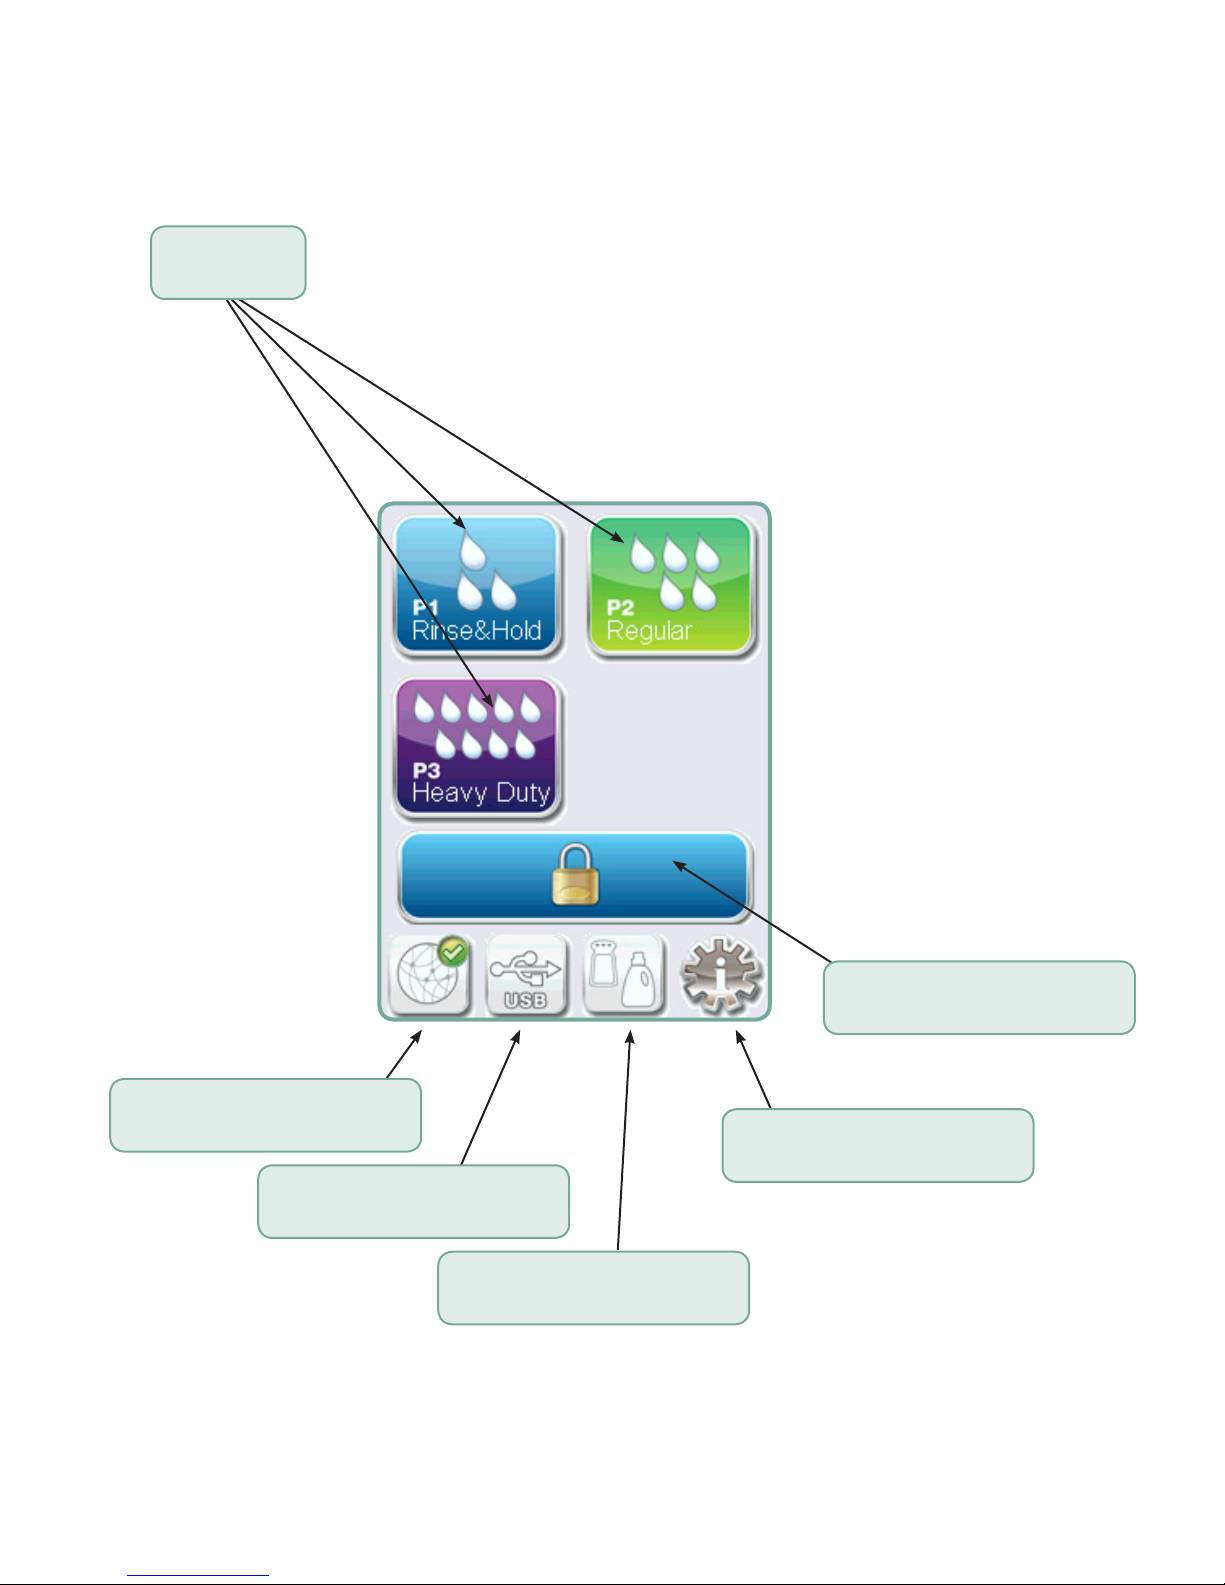
5.6 Touchscreen overview
Programs
Network connectivity
(green when active)
USB status
(green when active)
Unlock door
Settings
Water softener,
detergent level,
and door status
15
Page 18
5. Instructions for Use
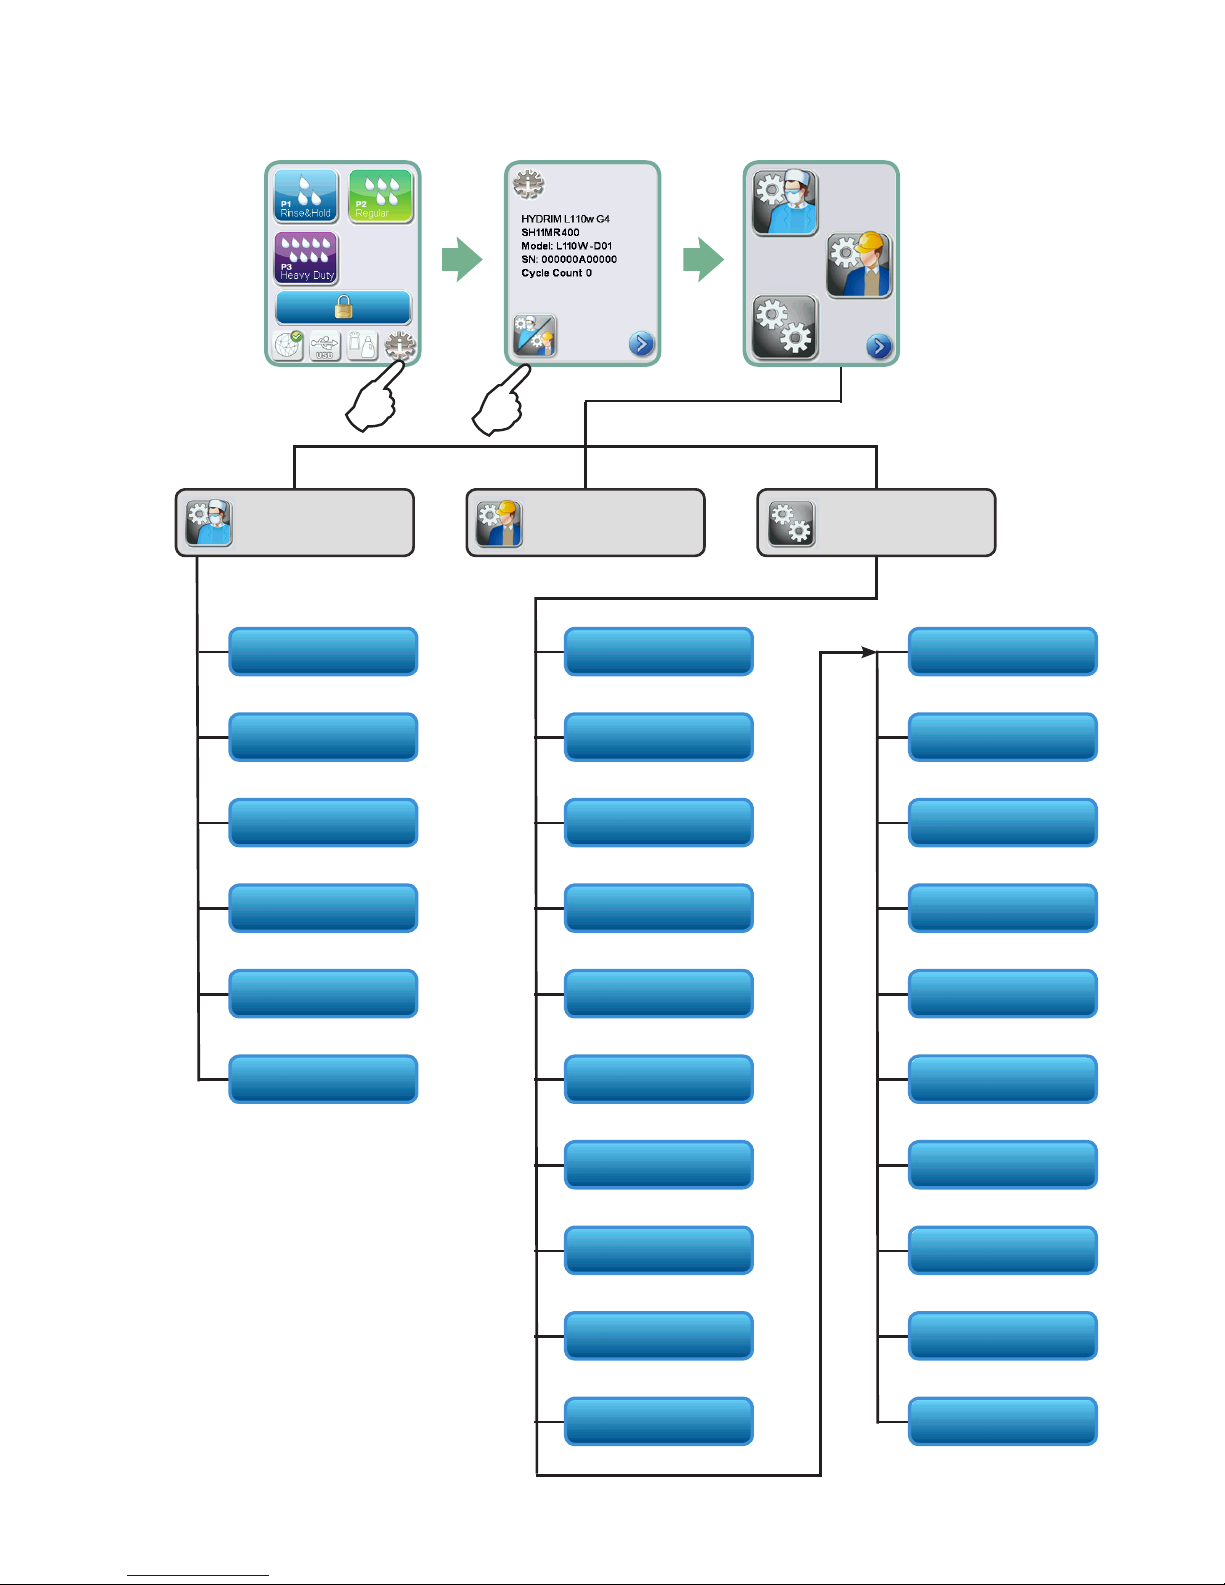
5.7 Set up menu overview
User Technician Setup
Cleaning
Set Drying Time
Set Wash Time
Cycle Count
Process Enforced
User
Country
Date/Time
Unit No.
Network Setup
Screen Saver
Temperature C/F
Baud RateLanguage
Set EOL CR/LF
Set Regeneration
LCD Contrast
Theme
Remote Screen
Instructions
Set Button Beep
Beep Volume
Set Printer
16
Instructions Delay
Remote Access
Prepare for Shipping
Page 19
5. Instructions for Use
5.8 Setting the language
The messages displayed by your HYDRIM can be presented in a number of different
languages. To change the current language, follow these steps:
1.
2. Scroll to
Language
and select.
3. From the LANGUAGE screen, press to scroll through the list of languages.
When you have found the desired language, press
to the Setup menu.
to save your selection and return
5.9 Setting the country
1.
2. Scroll to
3. Using the keypad, type the name of the country and press
to save and return to the Setup menu.
Country
and select.
EN
to select. Press
5.10 Setting the time
1.
2. Scroll to
Date / Time
and select TIME.
3. From the TIME screen, use the keypad to set the time. Press
to return to the Setup menu.
NOTE: If the HYDRIM is connected to a network, it is important to also enter the correct
Time Zone. Enter the Time submenu, select Time Zone and scroll and select your local
time zone.
EN
to save and
4. To change your unit to display 12-hour time format (24-hour time format is the default
setting), go to the Setup menu and use
toggle to 12. Press
to save and return to the Setup menu.
5. To activate daylight savings time (DST), go to the Setup menu and use
to DST ON/OFF and select. Use
to save and return to the Setup menu. If connected to the network, the time will
automatically adjust to DST.
to toggle DST ON or OFF and press the
to scroll to TIME 12/24, select it and
to scroll
17
Page 20
5. Instructions for Use
5.11 Setting the date
1.
2. Scroll to
Date / Time
3. From the DATE screen, use the keypad to set the date. Press
to return to the Setup menu.
and select DATE.
EN
to save and
4. To change the format in which the date appears, return to the Setup menu and use
to scroll to DATE FORMAT. Select it, and follow the prompts to have
the date displayed in the desired format. Press
the Setup menu.
to save and return to
5.12 Assigning unit identi er number
1.
2. Scroll to
Unit No
and select.
3. Using the keypad, select a maximum of 3 digits to be used as the unit’s identifi er
number. Press
to save and to return to the Setup menu.
EN
5.13 Adjusting the screensaver delay
To change the length of time before the screensaver is activated, follow these steps:
1.
2. Scroll to
Screensaver
and select.
3. Use to scroll through your time options. When you have found the amount of
time you require, press it. Press
to save and return to the Setup menu.
5.14 Adjusting the temperature display
1.
2. Scroll to
3. Use to choose between having information displayed in degrees Celsius or
Fahrenheit. Press
Temperature C/F
to save and return to the Setup menu.
and select.
18
Page 21
5. Instructions for Use
5.15 Turning the button sound ON or OFF
The HYDRIM is preset to beep when a button is pressed. If you would like to turn the button
sound off, follow these steps:
NOTE: Turning OFF the button sound does NOT turn off other alarms and cycle notifi cation
beeps.
1.
2. Scroll to
Beep ON/OFF
and select.
3. Use to scroll through your ON or OFF options and select it by pressing it.
Press
to save and move back to the Setup menu.
5.16 Adjusting the button beep volume
If you would like to adjust the beep volume, follow these steps:
1.
2. Scroll to
Beep Volume
and select.
3. Use to scroll through the volume settings. Select the one you want by
pressing it. Press
to save and move back to the Setup menu.
5.17 Adjusting the salt regeneration
Salt regeneration should be set according to the local water hardness. See section 4
Testing Water Quality for instructions on determining correct settings. To set salt
regeneration, follow these steps:
1.
2. Scroll to
Set Regeneration
3. Use to change the value. The default setting is 1. Press to save and return
to the Setup menu.
and select.
19
Page 22

5. Instructions for Use
5.18 Adjusting the screen contrast
The touchscreen is calibrated for the lighting condition of most sterilization centers. Should
you need to adjust the contrast for your offi ce, follow these steps:
1.
2. Scroll to
LCD Contrast
and select.
3. Use to scroll through your contrast options. When you have found the contrast
you require, press it. Press
to save and return to the Setup menu.
5.19 Changing the touchscreen display themes
The touchscreen themes (i.e. icons and background colours) can be changed to one of the
preset options. To change themes follow these steps:
1.
2. Scroll to
3. In the
As you scroll, each theme will display on the touchscreen. Press
theme and return to the Setup menu.
Theme
Change Theme
and select.
screen, use to scroll through your available options.
to select your
5.20 Creating a User Name
Up to four unique User Names can be created. To assign a User Name follow these steps:
1.
2. Scroll to
3. To assign a user name, select
a name (up to 12 characters) and press
User
and select.
User Name
to save.
EN
and use the alphabetic keypad to enter
20
Page 23
5. Instructions for Use
5.21 Creating a User PIN
From the User PIN screen, you can assign up to four PINs. To assign a PIN, follow these
steps:
1.
2. Scroll to
3. To assign a user PIN, select
a number (up to 4 digits) and select
screen.
User
and select.
User PIN
and use the numeric keypad to enter
to save and to move to the confi rmation
EN
5. If all of the information presented in the confi rmation screen is correct, press OK
to be returned to the User PIN screen. To make a correction, select the User PIN you
want to change and repeat the process described above.
5.22 Setting up process enforced usage
When process enforced usage is activated, users are required to enter a PIN at the end of
a cycle. For process enforced usage to function, User IDs and PINs must fi rst be assigned.
To set up User ID and PINs, refer to sections 5.19 and 5.20 on creating a user name and
PIN. To activate process enforced usage, follow these steps:
1.
2. Scroll to
Process Enforced
3. Use to toggle process enforced function ON or OFF. Press
to save your selection and return to the Setup menu.
NOTE: Any user can stop a cycle even
with process enforced usage ON.
However, the cycle data will record
that an unauthorized user has stopped
the cycle.
and select.
21
Page 24
5. Instructions for Use
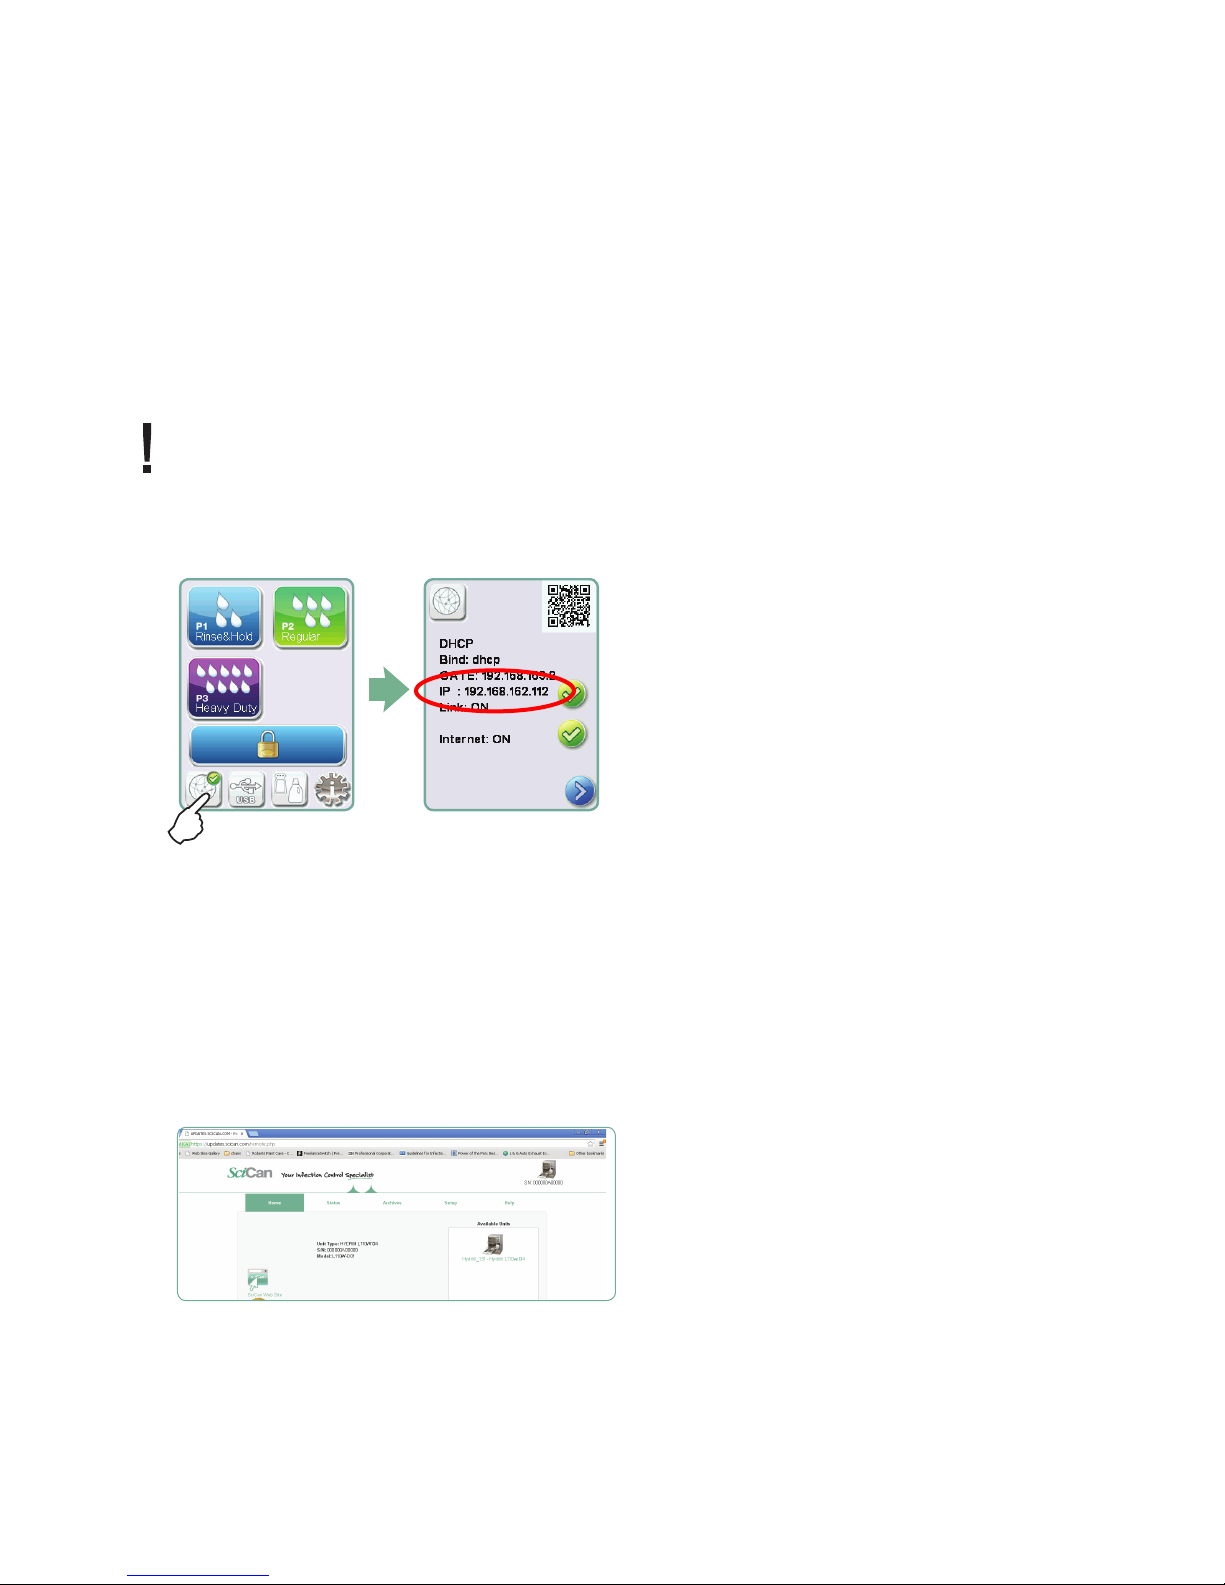
5.23 Connecting to a network
The HYDRIM L110w G4 has a 10/100Base-T Ethernet port located at the back of the unit.
To connect your HYDRIM to a network using a router, follow these steps:
1. Connect your network cable to the Ethernet port at the back of the unit. If your offi ce
uses a router, the router should automatically assign the unit an IP address. A red X on the
network icon means the unit is not connected. A yellow check mark means the unit has
an IP address but is not connected to the Internet and cannot send emails. A green check
mark means the Internet connection is set up properly and the unit can send out emails.
NOTE: In some circumstances, where you do not have a router, for example when using
Windows Network Sharing, you may have to assign a dedicated or ‘static’ IP address.
To assign a static IP address, contact your local network administrator.
2. From the main screen, press the Network icon. The Network screen displays information
about your HYDRIM’s connectivity, including its IP address.
3. Type the IP address displayed on the touchscreen into the browser of any web enabled
device to access your unit’s web portal. When the Network icon is active (for example when
sending email) it will turn green.
NOTE: Use QR code if connecting to a mobile device.
NOTE: Connection time will vary depending on your network speed, and making an initial
connection can take longer.
In Canada and USA you can call our network support line at 1-800-635-5179 for additonal networking support.
5.24 Connecting to a wireless network
The HYDRIM can be confi gured for wireless use by connecting the Ethernet port to an
external wireless bridge / access point. SciCan currently recommends the use of the
®
D-Link
to learn more about setting up a wireless bridge.
DAP-1522 Xtreme N® Duo Wireless Bridge. Contact your network administrator
22
Page 25
5. Instructions for Use
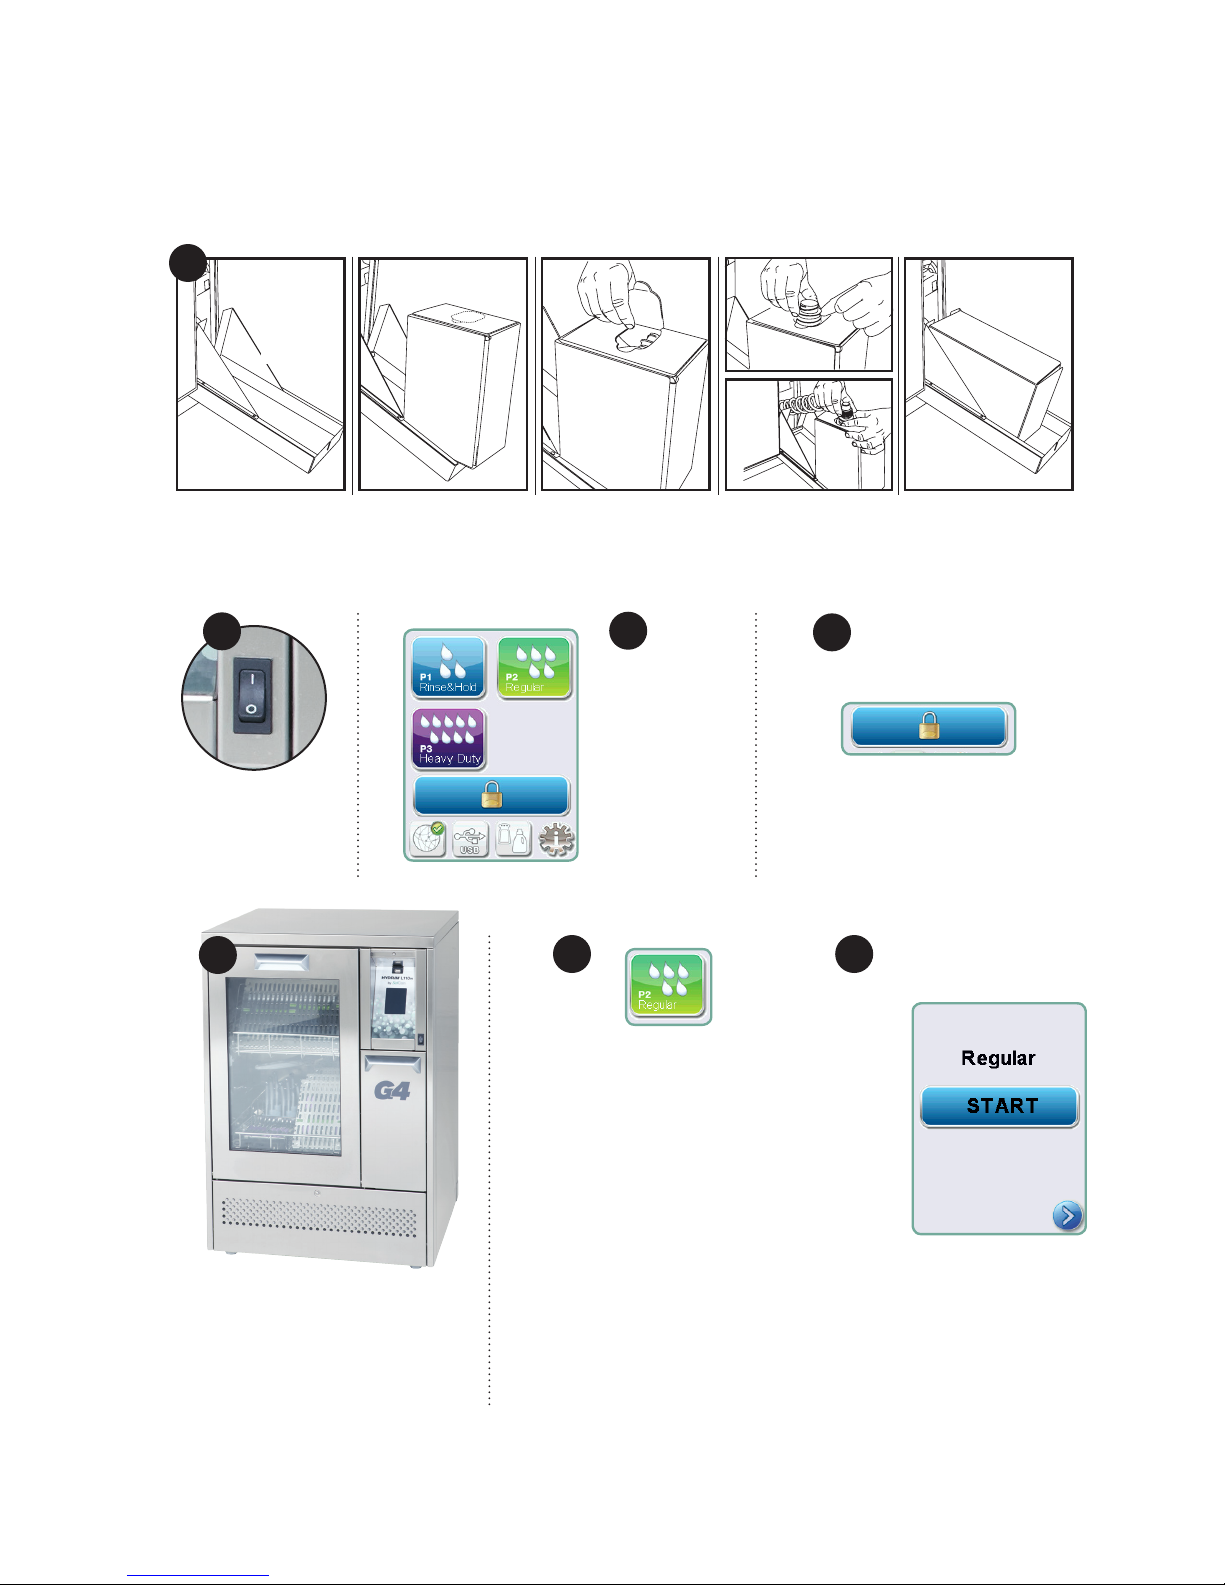
5.25 Activating the HYDRIM L110w G4
Prior to activating the washer, check that the water supply is on and follow these steps:
1
Open the chemical door and ensure that a box of HIP™ Cleaning Solution has
been installed.
2
Turn the
unit on.
5
3
Touch
the screen
to begin.
4
Press to unlock door.
6 7
Select the
desired cycle.
(
Use a heavy duty
cycle for cassettes,
hinged instruments
or heavily soiled
instruments.)
Press START.
Load instruments into
the baskets or cassettes,
place them in the machine
and close the door.
23
Page 26

5. Instructions for Use
7. The cycle will begin.
8
The cycle will start by draining the unit. The bar on the screen
indicates the progression of the cycle. The stage within the cycle
is shown beneath the bar (e.g. Filling, Rinsing). The estimated time
remaining (in minutes) is always displayed. Please note that the
time will increase or decrease depending on the projected cycle
completion.
8. The cycle is complete.
9
When the cycle is complete, the program name and “Cycle
Complete” is displayed, and the unit beeps three times. Press “OK”
to open the door. Use gloves to unload the instruments. After all
cycles, exercise caution as the instruments, trolley, baskets and
cassettes may be hot. Inspect the instruments for debris prior to
packaging / sterilizing.
5.26 Interrupting / aborting a cycle
The door of the HYDRIM is locked during the cycle. If the STOP
button is pressed, the cycle is aborted and cannot be re-started.
The message “Draining. Please wait” will appear. The unit will drain.
Then the message “Instruments not processed” will appear. Press
OK. Open the door by pressing
instruments. Exercise caution as instruments, trolley, baskets and
cassettes may be hot. The cycle must be repeated to ensure that
instruments are properly processed.
NOTE: If the drying phase of the cycle is interrupted, the critical parts of the cycle are
complete and the message displaying the program name and “Cycle Complete. Drying
interrupted” will appear.
. Use gloves if handling the
24
Page 27

5. Instructions for Use
5.27 Additional user and setup menu functions
To access the user or setup menus, follow these steps:
This cycle is used to periodically remove hardwater deposits from
the chamber walls and racks. Pour 1.0 litres (0.26 gal) of vinegar into
the chamber before starting the cycle. Touch “cleaning.” A cleaning
cycle, similar to a normal wash cycle, will run. Failure to clean
chamber can promote corrosion.
The drying times for P2 and P3 can be set independently. Touch
the cycle for which you want to set the drying time. Use the up and
down arrows to select the desired drying time. Touch “default” if you
wish to return to the factory default. Use the back arrow to return to
the previous screen.
OR
Chamber cleaning
Set drying time
Set wash time
The wash time for P2 and P3 can be set independently. P2 and P3
cycles can be adjusted from 5 to 15 minutes. Touch the cycle for
which you want to set the wash time. Use the up and down arrows
to select the desired wash time. Touch “default” if you wish to return
to the factory default. Use the back arrow to return to the previous
screen.
Cycle count
This allows the user to see how many cycles have been run on
the HYDRIM. Touch cycle count and the number of cycles
(completed and aborted) will be displayed. This cannot be reset.
Touch the back arrow to return to the previous menu.
Instructions
Users can access a database of pictorial instructions on how to
perform routine maintenance such as installing the cleaning solution.
25
Page 28

5. Instructions for Use
5.28 Opening the Door in Case of Power Failure
If there is a power failure, remove the kickplate of the HYDRIM. Remove the screw
with a screwdriver and lift the kickplate up and toward you. Locate the ring and pull
it to open the door. Exercise caution! There may be uid remaining in the unit and
the instruments may be hot. Instruments that have not completed the cycle should
not be used and should be reprocessed. When replacing the kickplate, ensure that
the grounding wire is attached.
Ring
Kickplate
Grounding wire
Screw
26
Page 29

5. Instructions for Use –
5.29 Storing and Retrieving Cycle Information
The HYDRIM L110w G4 has an internal Data Logger capable of storing all the data
on every cycle, whether successful or incomplete, for the lifetime of the unit. You can
access this information through the touchscreen, through the web portal or by using a
USB storage device.
Retrieving cycle information using the touchscreen
1. From the main menu, press the USB icon.
2. The unit will record up to the last ve successful cycles and the last ve incomplete
cycles.
If you select a cycle from the list, it will display cycle information in a format similar
to how it would be printed.
3. Use the arrow keys to scroll through and read.
NOTE: Regardless of whether you have a USB storage device attached to the
unit or not, you can always see the last ve successful cycles and the last ve
incomplete cycles.
Use the HYDRIM L110w G4 web portal to access all the cycle information stored
on your Hydrim from your computer. To connect your HYDRIM see section 5.23
Connecting to a Network.
27
Page 30

5. Instructions for Use –
Retrieving cycle information using the USB data back up
The USB storage device can be used to transfer cycle information stored in the unit to
a computer. Best practice suggests this should be done once a week. To transfer data
using the USB port, follow these steps:
1. Plug the USB storage device into the USB port.
2. The HYDRIM keeps track of what data has already been transferred to the USB
storage device and will automatically load only new data. Data stored in the internal
memory of the HYDRIM can be copied once only. Access to previously transferred
information can be made from the web portal.
3. When the activity light on your USB storage device stops blinking or the USB icon
on the LCD turns from a ashing green to a solid grey, remove the USB storage
device and transfer the information to your computer.
NOTE: If you select the USB storage device icon from the main menu, you will only be
able to view the last ve complete cycles and the last ve incomplete cycles. To view all
the cycles stored on the USB storage device, you must use your computer.
NOTE: If you lose your USB storage device and would like to transfer your unit’s cycle
history to a new device, follow these steps:
1. Plug the new USB storage device into the USB port.
2. Select the USB icon.
3. From the cycle information screen, select the USB icon again.
4. Select Copy and the unit will copy all cycle information to the USB storage device.
28
Page 31

5. Instructions for Use –
5.30 Printer / Data Logger Setup
The HYDRIM L110w G4 has an RS-232 port at the back, and can be used with
an external printer or the SciCan Data Logger. The printers in the chart below
have been tested with the HYDRIM. To add or change a printer or SciCan Data
Logger, follow these steps:
Turn off the HYDRIM and the printer or Data Logger before connecting these
devices to the unit.
1. With the printer or Data
Logger connected, turn on
the HYDRIM and press the i
to move to the Menu screen.
2. In the Setup Menu, select
Printer Selection.
3. Select Serial Printer if
connecting a printer, or USB
Flash/MSD if connecting the
SciCan Data Logger. Press
the back arrow to return to
the Setup Menu.
4. In the Setup Menu, select
Baud rate.
5. Select the rate required
(refer to chart below for
recommended Baud rates).
Use the back arrow to return
to the Start screen.
Printer Model
Epson
TM-U220D (C31C515603)
Citizen
IDP-3110-40 RF 230B
Star Micro
SP212FD42-230
Star Micro
SP216FD42-230
Star Micro
SP512MD42-R
SciCan Data Logger
For Mass Storage Device 9600
Serial Port
Baud Rate
9600
9600
9600
9600
9600
Serial Port
Baud Rate
6. Ensure that the date and time have been set (see Setup Menu – Date / Time)
7. Now the HYDRIM will write its cycle information to the device chosen.
29
Page 32

6. Care and Maintenance
6.1 Replacing the HIP™ Cleaning Solution
The HYDRIM L110w G4 uses a 3.8L / 1 gallon container of HIP™ Cleaning Solution
(Part number CS-HIPL). Use only the recommended cleaning solution and read the
MSDS before inserting into the unit.
HIP™ cleaning solution is used in dilute form as a detergent for the cleaning of surgical
instruments in the HYDRIM washer. It is a colourless and almost odourless liquid that is
completely soluble in water. Some precautions must be taken to safely handle this
chemical. For more information, see Chapter 4 Handling and Installing the HIP™
cleaning solution.
NOTE: To avoid spillage, replace the solution container only when the message appears
and be sure to wear gloves.
When a red X appears on the water softener/detergent icon. Press on the icon to
determine if the problem is with the water softener or cleaning solution level. If the
cleaning solution must be replaced, a red X will appear next to it.
To order additional HIP™ Cleaning Solution, contact your local dealer. When the message
“no detergent” appears on the screen, the cleaning solution container is empty and is in
need of changing. To avoid spillage, replace the solution container only when the message
appears and be sure to wear gloves.
NOTE: Each cleaning solution container will last approximately 30 cycles,
depending on which cycles are used.
To replace the cleaning solution container, follow these steps:
1. Turn the power switch OFF.
2. Open the cleaning solution door.
3. Disconnect the cleaning solution connector. Remove any dried chemical by
immersing the connector in a cup of water.
4. Remove the empty cleaning solution container and discard or recycle.
30
Page 33

6. Care and Maintenance
5. Connect new container and insert into the cleaning solution compartment.
Follow the instructions printed on each cleaning solution container.
6. Close the door.
7. Turn the power switch ON
To prime the cleaning solution dosing pump, press the water softener/detergent icon
on the main screen. In the water softener/detergent screen, press the red X next to
“Detergent”. The unit will prime the dosing system and a green check mark will appear in
place of the red X when it is ready for use.
NOTE: The system can also be primed by simply starting a cycle and selecting “Detergent
Replaced”, when prompted.
31
Page 34

6. Care and Maintenance
6.2 Relling the Water Softening Salt Reservoir
When a red X appears on the detergent and water
softener level indicator, press on the icon to determine if the problem lies with the water softener or
cleaning solution level. If the water softener must be
relled, follow these steps:
To ll the salt reservoir, follow these steps:
1. Unscrew the salt container lid.
2. Fill the salt container to the top
(maximum 1 kg / 2.2 lbs.)
3. Screw the salt container lid on tightly.
4. Run a complete cycle, with no instruments.
salt container
6.3 Cleaning the HYDRIM L110w G4
To clean outer surfaces and the decal covering the touchscreen, use a soft cloth
moistened with soap and water or a surface disinfectant. Do not use harsh cleaning
chemicals.
32
Page 35

6. Care and Maintenance
6.4 Filter and Wash Arm Maintenance
Filter Maintenance:
Inspect the lter in the bottom of the
chamber daily for debris and clean if
necessary. To clean, remove the lter,
rinse under a tap and replace. Ensure
that the lter is rmly locked into position
when replaced.
Wash arms
Wash Arm Maintenance:
If the wash arms are not turning
easily, remove them, rinse under a tap
and reassemble. To remove the upper
or middle arm, unscrew the collar
counterclockwise. To remove the lower
arm unscrew the collar clockwise.
Filter
6.5 Preparing the unit for shipping
If preparing the unit for transport or storage, waste water should be removed from the
sump. Waste water in the unit may contain biological contaminants. From the Setup menu,
select the Prepare for Shipping function.
Use a mechanical means or absorbent material to siphon the contents from the sump.
Wear disposable rubber gloves. Dispose of absorbent material according to biological
waste disposal regulations.
33
Page 36

6. Care and Maintenance
6.6 Annual maintenance
If the message “Preventative Maintenance Required. Call for Service” appears, the annual
maintenance is required. To continue using the HYDRIM, press OK. Call for service as
soon as possible. The annual maintenance should be done after 365 days have elapsed
since the initial installation or since the last service call was performed.
When Who What Tests
Daily tests and checks
By the user
• door lock check
• wash arm rotation check
• door seal check
• load carrier check
• check and clean chamber filters
• visual examination of each load for residual soil.
Annually
Bi-Annually
By a
SciCan-approved
technician
By a
SciCan-approved
technician
• Annual maintenance schedule
as outlined in the service manual
• Re-validation if required by local regulations.
To ensure that the ongoing efcacy of the machine is assured, SciCan recommends that
the following periodic testing protocols are observed.
IMPORTANT NOTES:
• This document outlines the minimum requirements to ensure that the equipment
performs to specication. In some regions, local/national guidance documents may
require additional testing. Please contact your dealer or local medical authorities
for details.
• Installation, commissioning, annual servicing MUST be undertaken by SciCan
approved technicians. Failure to maintain this equipment may invalidate the results of
the following testing regime.
34
Page 37

6. Care and Maintenance
Tests to be performed by the user:
Door lock check
This test is to ensure that the door cannot be opened while a cycle is running or a cycle
will not start with the door open. To check that these features are working correctly,
attempt to open the door using the handle immediately after a cycle has started. Caution
– DO NOT attempt this when the wash arms are rotating and/or the water is above
ambient temperature. The door should not open. When you attempt to start a cycle with
the door open, the cycle should not start. If the unit fails this test, stop using it immediately
and call your dealer for technical service.
Wash arm rotation check
Run a P1 cycle and check that wash arms are rotating. If wash arms are not rotating,
remove, visually check and clean as described in Section 6.4.
Door seal check
Visually check the door seal for debris or wear. If the seal is worn or damaged, call your
dealer for technical service.
Load carrier check
Visually check load carriers (trolleys) for wear and tear, damage and that the runners
move freely over their full range.
Chamber lter check
Remove, visually check and clean as described in section 6.4.
Load check
Visually inspect each load for residual soil. Washers are designed to ensure that the
surfaces of instruments are free from debris that may compromise the sterilization process.
A visual check of the instruments processed in each load should be undertaken prior to
sterilization to ensure that no residual debris is present on the instrument.
If debris is still apparent, the instrument should not be considered clean and should be
reprocessed through the HYDRIM again prior to sterilization.
Note: Some set-able materials such as cements, amalgam, and composites, if set on
the instrument will not be removed in a HYDRIM. If these materials are noticed on the
instrument then abrasive removal may be required.
35
Page 38

7. Troubleshooting
Possible Causes and SolutionsProblem
Instruments are
not clean
Touchscreen /
Unit does not come on
The wash arms
do not rotate
The door cannot be
opened
Operating cycles appear
to be taking too long
to complete
• Do not overload cassettes or instrument baskets.
• Do not load too many cassettes into the HYDRIM.
• Use the Heavy Duty cycle for cassettes and hinged
instruments.
• Check lters and wash arms for debris.
• Ensure that the power button is turned ON.
• Ensure that the plug is properly inserted into the wall
socket.
• Check if a fuse or circuit is blown – call service
for assistance.
• Remove the wash arms, clean and reinstall them.
• The cycle is not complete.
• The cycle was aborted and the unit has not
completed draining yet.
• The water is not hot enough. Check that the incoming
hot water temperature is in the recommended range.
• Check that the hot and cold hoses are not reversed.
“No detergent” message
• Check for a kink in chemical tubing.
comes on when there is still
chemical left in the container
Drying Performance is
• Increase the drying time (user menu).
inadequate
NOTE: Fuses should NOT be replaced by the operator. Call an authorized service technician for assistance.
36
Page 39

7. Troubleshooting
Error Messages
CF1 Water Heating
failure
CF2 Chamber
Filling Failure
CF3 Chamber
temper ature
reading failure
CF4 Draining
failure
CF9 Software or
PCB Failure
Cause
The water does not reach the
required temperature in the
specied time
The water does not ll the
chamber within the specied time.
Faulty sensor.
Water cannot drain
from the unit.
Cycle length is more than
3hr 30 min.
SolutionError
Call for service.
Check that the water hoses
are not kinked. Open the
water shut-off valves.
Call for service.
Check that the drain hose
is not kinked. Check that the
lter in the bottom of the
chamber is not obstructed.
Call for service.
CF14 Water
Temperature too high
CF19 Pressure
Sensor
CF21 No detergent
CF28 No water
pressure
Water in prewash stage too hot.
Pressure sensor is stuck.
Flow switch did not detect detergent
during wash phase.
Not enough water during cycle.
Check water connections
at back of unit.
Call for service.
Replace detergent box
if empty.
If the problem persists,
call for service.
Check water hoses are not
kinked. Open water shut-off
valves.
Check for leaks.
Call for service.
37
Page 40

8. Specications
Height, freestanding: 850 mm / 33.5”
Width: 598 mm / 23.54”
Depth: 600 mm / 23.75”
Depth with door open: 1200 mm / 47”
Weight: 80 kg / 176 lbs.
Maximum Running Noise: 78 dB(A)
Hot and cold water connections: 3/4”
Inlet water pressure: 1-10 bar
Incoming hot water temperature: 50-70°C / 122-158°F
Drain: 3/4”
Water softener: 1 kg / 2.2 lbs salt capacity
Filling System: 5.5L / 1.5 gallon safety maximum
Drying System: Heater 1 kW
Electrical Connection: 208-240 V 60 Hz 15 A
Equipment pollution degree: Pollution Degree 2
Equipment installation category: Installation category II
Maximum relative humidity: 80% for temp up to 31°C / 88°F
Operating temperature range: +5°C to 40°C / 41-104°F
Max. altitude: 2000m / 6561.7 ft.
Mains supply: + / -10% of nominal
9. Serial Number Plate
When ordering supplies, spare parts or requesting service, please ensure that
the information contained on the serial number plate is available (Model number,
serial number etc.).
50% for temp up to 40°C / 104°F
The serial number plate is located at the bottom left on the rear panel of
the HYDRIM L110w G4 unit. A small label is located on the left hand side of
the chemical door.
38
Page 41

10. Warranty
Limited Warranty
For a period of one year, SciCan guarantees that the HYDRIM L110w G 4,
when manufactured in new and unused condition, will not fail during normal
service due to defects in material and workmanship that are not due to apparent
abuse, misuse, or accident. In the event of failure due to such defects during
this period of time, the exclusive remedies shall be repair or replacement, at
SciCan’s option and without charge, of any defective part(s), provided SciCan
is notified in writing within thirty(30) days of the date of such a failure and further
provided that the defective part(s) are returned to SciCan prepaid.
This warranty shall be considered to be validated, if the product is accompanied
by the original purchase invoice from the authorized SciCan dealer, and
such invoice identifies the item by serial number and clearly states the date
of purchase. No other validation is acceptable. After one year, all SciCan’s
warranties and other duties with respect to the quality of the product shall
be conclusively presumed to have been satisfied, all liability therefore shall
terminate, and no action or breach for any such warranty or duty may thereafter
be commenced against SciCan.
Any express warranty not provided hereon and any implied warranty or
representation as to performance, and any remedy for breach of contract which,
but for this provision, might arise by implication, operation of law, custom of
trade or course of dealing, including any implied warranty of merchantability or of
fitness for particular purpose with respect to all and any products manufactured
by SciCan is excluded and disclaimed by SciCan.
To register your product warranty with SciCan, go to Scican.com, click on
the appropriate country, and then click on the Register Your Warranty tab.
39
Page 42

Table des matières
1. Introduction ......................1
2. Informations importantes ...........2
3. Avertissements ...................3
4. Instructions d’installation ............4
5. Mode d’emploi ....................9
5.1 Recommandations pour le retraitement
des instruments ....................9
5.2 Tableau descriptif des cycles ........10
5.3 Conseils pour de meilleurs résultats
de nettoyage .....................11
5.4 Configurations recommandées pour
le chargement ....................12
5.5 Paniers et accessoires..............14
5.6 Aperçu de l’écran tactile ............15
5.7 Aperçu du menu Configuration .......16
5.8 - 5.22 Options du menu Configuration ..17
5.23 Connexion à un réseau .............22
5.24 Connexion à un réseau sans fil .......22
5.25 Mise en marche
du HYDRIM L110w G4 .............23
5.26 Interrompre/annuler un cycle.........24
5.27 Fonctions supplémentaires des menus
Utilisateur et Configuration ..........25
5.28 Ouvrir la porte lors d’une panne
de courant .......................26
5.29 Enregistrer et récupérer
les informations de cycles ...........27
5.30 Configuration de l’imprimante et
de l’enregistreur de données.........29
6. Entretien et maintenance .........30
6.1 Remplacer le contenant de solution
nettoyante HIP
6.2 Remplissage du réservoir de sel
adoucisseur d’eau ..................32
6.3 Nettoyage du HYDRIM L110w G4 ....32
6.4 Entretien du filtre et du bras
de lavage........................33
6.5 Préparation de l’appareil
pour l’expédier ...................33
6.6 Entretien annuel ..................34
MC
.................30
7. Dépannage .....................36
8. Spécifications ..................38
9. Plaque du numéro de série .......38
10. Garantie ......................39
HYDRIM et STATIM sont des marques déposées de SciCan ltée.
BRAVO, HIP, et Sys
Toute autre marque dont il est fait mention dans le présent manuel appartient
à son propriétaire respectif..
Pour toute demande de renseignements relatifs
à l’entretien et à la réparation, composer :
Au Canada : 1-800-870-7777
Aux États-Unis : 1-800-572-1211
En Allemagne:
International : (416) 446-4500
Courriel : techservice.ca@scican.com
Fabriqué par :
TM
sont des marques de commerce de SciCan ltée.
+49 (0)7561 98343 - 0
SciCan
1440 Don Mills Road,
Toronto ON M3B 3P9
CANADA
Tél. : (416) 445-1600
Téléc. : (416) 445-2727
Sans frais : 1-800-667-7733
Représentant UE
SciCan GmbH
Wangener Strasse 78
88299 Leutkirch ALLEMAGNE
Tél.: +49 (0)7561 98343 - 0
Téléc. : +49 (0)7561 98343 - 699
SciCan Inc.
701 Technology Drive
Canonsburg, PA 15317 USA
Tél. : +1 724 820 1600
Téléc. : +1 724 820 1479
Sans frais : 1-800-572-1211
SciCan Medtech
Alpenstrasse 16
CH-6300 ZOUG SUISSE
Tél. : +41 (0) 41 727 7027
Téléc. : +41 (0) 41 727 7029
Page 43

1. Introduction
Merci d’avoir choisi le lave-instruments HYDRIM L110w G4. Le HYDRIM est un appareil
complémentaire aux autoclaves STATIMMD et BRAVOMC; il permet de préparer de façon
salubre les instruments souillés pour la stérilisation. . Afin d’assurer un fonctionnement
sécuritaire et sans problème de l’appareil à long terme, veuillez lire attentivement le
présent manuel de l’utilisateur avant de mettre l’appareil en marche. Le HYDRIM L110w
G4 ne doit être utilisé qu’aux fins mentionnées dans ce manuel. L’utilisation du HYDRIM
à toute autre fin peut être dangereuse. Le fabricant ne peut être tenu responsable des
dommages causés par une utilisation inappropriée.
Les instructions d’utilisation, d’entretien et de remplacement doivent être suivies
scrupuleusement pour que ce produit exécute les fonctions pour lesquelles il a été conçu.
Toute marque dont il est fait mention dans le présent manuel appartient à son propriétaire
respectif. Le contenu du présent manuel peut être modifié sans préavis afin de refléter les
modifications et améliorations apportées au produit HYDRIM.
Le HYDRIM L110w G4 devrait être installé et entretenu uniquement par un sous-traitant
qualifié, puisqu’il s’agit d’un dispositif de catégorie d’installation 2. Avant de brancher
l’appareil, l’installateur doit s’assurer que la tension et la fréquence de l’alimentation
électrique correspondent bien aux spécifications mentionnées dans les instructions
d’installation. L’appareil ne doit être branché que dans une prise mise à la terre. Veuillez
noter que cet appareil n’est complètement isolé de l’alimentation électrique que lorsqu’il
est débranché ou que le disjoncteur est fermé. Vous devez l’isoler complètement avant
d’effectuer toute réparation.
Le HYDRIM L110w G4 utilise exclusivement la solution de nettoyage HIPMC. L’appareil
ne donnera pas les résultats escomptés si vous utilisez d’autres détergents ou produits
nettoyants. L’utilisation de détergents ou de produits nettoyants autres que la solution
HIPMC pourrait endommager l’appareil ou les instruments, causer une mousse excessive et annuler la garantie. N’utilisez aucun solvant dans cet appareil. Ne permettez pas
l’accès à cet appareil ou à ses commandes à des enfants ou à du personnel non autorisé.
1
Page 44

2. Informations importantes
Les symboles suivants sont utilisés dans ce manuel.
Attention, danger potentiel pour l’utilisateur.
Cette situation pourrait entraîner une défaillance mécanique.
Information importante.
2
Page 45

3. Avertissements
Permettre exclusivement à du personnel autorisé de fournir les pièces, d’entretenir ou de réparer
le HYDRIM. SciCan n’est pas responsable des dommages accessoires, spéciaux ou indirects
causés par des travaux de maintenance ou de réparation effectués sur le HYDRIM par du personnel non autorisé ou par l’utilisation d’équipements ou de pièces fabriqués par une tierce partie, y
compris le manque à gagner, le préjudice commercial, la perte économique ou toute perte causée
par des blessures.
Ne jamais enlever les panneaux de l’appareil et ne jamais insérer d’objets dans les trous ou les
ouvertures du boîtier.
Cela pourrait endommager l’appareil et présenter un risque pour l’utilisateur.
Une utilisation autre que celle spécifiée dans le présent manuel pourrait entraîner une diminution
du niveau de protection offert par l’équipement.
Les solutions nettoyantes peuvent être irritantes. Éviter tout contact avec les yeux, la peau et la
bouche.
Ne jamais s’asseoir, se tenir ou s’appuyer sur la porte lorsque celle-ci est ouverte. L’appareil
pourrait basculer vers l’avant et pourrait causer des blessures.
Toujours éteindre l’appareil avant d’ajouter du sel adoucisseur, des solutions ou d’effectuer
l’entretien régulier de l’appareil.
Le propriétaire de l’appareil doit interdire l’utilisation de l’appareil à toute personne non autorisée
ni formée.
SciCan recommande de laisser l’appareil allumé en tout temps, particulièrement lorsqu’aucune
personne n’est présente dans le cabinet ou qu’aucun mécanisme d’arrêt d’alimentation en eau
n’est installé. En laissant l’appareil allumé, la pompe de vidange s’activera s’il y a fuite d’eau dans
la chambre à la suite d’une quelconque défaillance.
Pour de plus amples renseignements ou en cas de questions à propos du HYDRIM L110w G4,
communiquez avec votre détaillant autorisé.
3
Page 46

4. Instructions d’installation
Pour ouvrir la porte de la chambre de lavage,
brancher l’appareil, le mettre en marche et
appuyer sur le symbole de déverrouillage.
En cas de panne de courant, retirer la vis
de la plaque de protection et tirer sur l’anneau.
Consulter la section 5.28.
Outils et accessoires requis pour l’installation :
• Tournevis à lame plate
• Pinces multiprises
Spécifications :
Tension : 208 à 240 V
Fréquence : 60 Hz
Charge nominale : 2.5 kW
Disjoncteur 15 A
phase: par phase
Hauteur : 850 mm (33,5 po)
Largeur: 598 mm (23,54 po)”
Profondeur: 600 mm (23,75 po)
Profondeur avec la porte
ouverte : 1200 mm (47 po)
Poids: 80 kg (176 lb)
Bruit maximal de fonctionnement : 78 dBA
Utility Hook-ups
Installation :
L’installation devrait être effectuée par un technicien approuvé par SciCan. L’installation faite par
un installeur non approuvé peut annuler la garantie
de l’appareil.
Si le HYDRIM est installé dans un Stéri-Centre, le
fabricant de ce dernier doit prévoir un espace de
10 mm (½ po) au-dessus, à l’arrière et de chaque
côté de l’appareil. Ceci afin de faciliter l’installation
et l’entretien du HYDRIM.
Ne pas empoigner la porte de la chambre de
lavage pour déplacer le HYDRIM. Cela pourrait
désaligner la porte et causer des fuites.
Lors de l’installation, il est essentiel d’ajouter tous
les consommables requis dans l’appareil. Il est
important que cette étape soit effectuée avant
de mettre l’appareil en marche.
Pour des raisons de sécurité, ne pas
installer le HYDRIM sans son panneau
supérieur
Tuyau/ Longueur /
Cordon Diamètre
Entrée d’eau
chaude 3/4 po (14,5-145 psi)
Entrée d’eau
froide 3/4 po (14,5-145 psi)
Entrée OI 1,9 m (6 pi) 1,5 m (5 pi) 1-10 bars Oui
3/4 po (14,5-145 psi)
Vidange 1,5 m (5 pi) — — —
3/4 po
Électrique 1,8 m — — —
AWG 14-3
1,9 m (6 pi) 1,5 m (5 pi) 1-10 bars Oui
1,9 m (6 pi) 1,5 m (5 pi) 1-10 bars Oui
Distance maximale
Distance à partir
de l’entrée/du drain
Pression Valve
d’eau d’arrêt
Mise au niveau du HYDRIM :
L’appareil est en appui sur trois supports : roulettes (roues) à
l’arrière et deux pattes à l’avant.
1. Retirer la plaque de protection à l’avant. Placer le
HYDRIM à l’endroit convenu en soulevant la courroie à
l’avant pour permettre de déplacer l’appareil à l’aide de
ses roulettes.
2. Ajuster les pattes avant au besoin afin de mettre
le HYDRIM au niveau.
3. Utiliser les deux pattes arrière uniquement si le plancher est
inégal ou ne peut fournir suffisamment de soutien aux roulettes.
4. Placer la courroie sous la machine avant de remettre en
place la plaque de protection, de sorte à ne pas interférer avec les conduits d’évacuation d’air.
4
Arrière de l’appareil
Prise
d’alimentation
Tuyau
de vidange
Tuyau d’eau OI
Tuyau d’eau chaude
Port
Ethernet
Connecteur
d’imprimante
Porte-fusible
Tuyau d’eau froide
Page 47

4. Instructions d’installation
Raccordement des tuyaux d’alimentation en eau :
Raccorder les tuyaux d’alimentation en eau chaude et froide à l’alimentation d’eau chaude
et d’eau froide.
Exigences concernant la vidange :
Raccorder le tuyau de vidange à la sortie du drain. Le tuyau de vidange peut être fixé aux
conduites de drain existantes à l’aide d’une combinaison colonne d’alimentation/siphon P
de 3,5 cm (1,5 po) ou plus. Si le tuyau est directement relié à la conduite de drain, les raccords et adaptateurs ne devraient pas réduire le débit d’eau. Le tuyau de vidange doit être
fixé au drain principal à un point ne dépassant pas 1 mètre (3 pi) au-dessus de la base du
HYDRIM. Un drain de plancher est acceptable (vérifier les codes locaux).
Spécifications électriques :
Brancher le cordon électrique à l’alimentation électrique. Le HYDRIM doit posséder
un circuit dédié doté d’un fusible 15A. La prise doit être mise à la terre.
Informations supplémentaires :
• L’appareil HYDRIM est lourd. Utiliser une fourche d’élévation ou un chariot et faire preuve
de prudence en le déplaçant.
• L’entretien et la réparation du HYDRIM devraient se faire sur place.
• Le HYDRIM est doté d’un dispositif de coupure anti-retour et anti-aspiration afin de prévenir
le retour d’eaux usées dans l’alimentation d’eau. Aucun autre dispositif de coupure
anti-retour n’est nécessaire.
• S’il est nécessaire d’allonger les tuyaux d’alimentation en eau et
de vidange, s’assurer d’utiliser des tuyaux de plomberie
de catégorie commerciale.
• La longueur maximale du tuyau de vidange est de 3,3 m (13 pi).
Mise en place du sel adoucisseur d’eau :
Dévisser le couvercle du réservoir de sel et verser 1 litre (1 pinte)
d’eau dans le réservoir. Ajouter 1 kg (2,2 lb) de sel adoucisseur d’eau de la même façon.
Revisser solidement le couvercle du réservoir de sel.
Manipulation et mise en place de la solution nettoyante HIP
La solution nettoyante HIPMC est utilisée, dans une forme diluée, comme détergent pour le
nettoyage des instruments chirurgicaux pour la gamme de lave-instruments et de laveursdésinfecteurs d’instruments HYDRIM. Il s’agit d’un liquide incolore et presque inodore
complètement soluble dans l’eau.
Le pH de la solution concentrée varie entre 9,3 et 9,8, ce qui en fait une solution alcaline.
Par conséquent, certaines mesures de sécurité devraient être observées au cours de la
manipulation et de la mise en place de la solution dans l’appareil, ainsi que lors du retrait et
de l’élimination du contenant vide.
MC
5
Page 48

4. Instructions d’installation
Mesures de sécurité recommandées pour manipuler la solution nettoyante HIPMC.
1. Toujours porter des gants, non endommagés, en caoutchouc naturel ou en butylcaou-
tchouc, en nitrile, ou en néoprène (les gants chirurgicaux sont idéals).
2. Toujours porter un dispositif de protection oculaire.
3. Protéger la peau exposée des bras.
4. Si la solution est renversée sur les vêtements, enlever le ou les vêtements souillés
et rincer abondamment la peau touchée avec de l’eau.
5. Utiliser les bonnes pratiques d’hygiène industrielle lors de la manipulation de cette
substance.
6. Ne pas boire ni manger tout en manipulant cette substance.
7. Après avoir terminé de manipuler la substance, enlever et jeter les gants et se laver
les mains avant de retirer la protection oculaire.
8. Ne pas utiliser l’équipement de protection individuelle qui sert habituellement pour vos
MC
activités cliniques pour manipuler les produits HIP
.
9. Toujours s’assurer que l’équipement de protection individuelle, si contaminé avec
MC
la solution nettoyante HIP
Pour obtenir toutes les données sur la solution nettoyante HIP
de visualiser ou de télécharger la fiche signalétique en format PDF.
Pour installer le contenant de solution nettoyante HIP
, a été nettoyé correctement ou jeté selon le cas.
MC
, visiter SciCan.com afin
salt container
MC
, suivre ces étapes:
Mise en place de la solution nettoyante :
Mettre la solution nettoyante HIPMC en place comme suit :
Ouvrir le tiroir destiné
à la solution nettoyante.
Insérer un nouveau
contenant de solution
nettoyante dans le tiroir
en le mettant à l’envers.
Test d’installation effectué par un technicien : Ouvrir les valves d’arrêt. Mettre un cycle
en marche et vérifier s’il y a des fuites au niveau des raccords de plomberie.
Retirer la partie
détachable.
6
Tirer sur la buse et
enlever le bouchon
de protection. Raccorder
le tuyau.
Placer le contenant
de solution nettoyante
dans le tiroir et refermer
le tiroir.
Page 49

4. Instructions d’installation
Qualité de l’eau
La qualité de l’eau utilisée par le HYDRIM pour nettoyer les instruments médicaux est
primordiale pour obtenir des résultats satisfaisants et pour protéger les instruments et les
pièces internes du HYDRIM contre la détérioration.
L’eau potable contient généralement des particules solides dissoutes dans l’eau. La
quantité de particules solides dissoutes dépend, entre autres, des conditions géographiques
naturelles de votre localité. Ces particules peuvent causer des taches, des souillures et
entraîner la corrosion des instruments et des pièces internes du HYDRIM. Parmi les particules solides dissoutes dans l’eau, le fer, le manganèse, le chlorure et le carbonate de calcium (CACO
Le fer et le manganèse peuvent créer des taches orange et brunes ou noires sur les instruments et sur les pièces internes du HYDRIM. Le chlorure est généralement responsable des
taches, des souillures, de la corrosion et du tartre. Si les instruments ou les pièces internes
du HYDRIM L110w G4, comme la chambre, présentent des signes de taches ou de souillures, un test d’eau pourrait être nécessaire afin d’en déterminer la cause. L’installation d’un
système de traitement d’eau pourrait être requise afin de réduire la quantité de particules
solides dissoutes dans l’eau et d’améliorer la performance du HYDRIM.
3) sont ceux qui affectent le plus les résultats de nettoyage d’un lave-instruments.
Le carbonate de calcium est la principale cause de dureté de l’eau et laisse des taches
blanches ou du tartre. Le HYDRIM est muni d’un système intégré pour adoucir l’eau;
celui-ci doit être réglé selon la dureté de l’eau locale. Consulter la prochaine section de ce
manuel concernant les réglages recommandés pour la régénération.
Avant d’utiliser le HYDRIM, SciCan recommande de tester l’eau et de consigner les
résultats concernant la dureté, le pH et la conductivité de l’eau pour référence ultérieure.
IMPORTANT : Le système adoucisseur d’eau du HYDRIM permet de réduire la valeur de la
dureté de l’eau en éliminant le carbonate de calcium. Si les résultats du test d’eau indiquent
que la valeur de la dureté de votre eau se situe au-delà des limites de réglage de l’appareil,
ou si d’autres particules solides dissoutes dans l’eau causent des taches ou des dépôts sur
les instruments ou dans la chambre, un système de traitement d’eau externe pourrait être
requis.
7
Page 50

4. Instructions d’installation
M2 Regeneration Levels
>540
>30.3 >31.6
Water hardness and salt regeneration levels
(mg Ca CO3/Litre)
>540
>
30.3>31.6
Addiil
W
t
t
t
i
d
*
Vérification de la qualité de l’eau
Le HYDRL110w G4 est muni d’un système
intégré pour adoucir l’eau; celui-ci doit être
réglé selon la dureté de l’eau locale. Pour
mesurer la dureté de l’eau locale, procéder
comme suit:
1. La trousse d’analyse d’eau fournie avec
votre HYDRcontient trois bandelettes
réactives pour la dureté de l’eau emballées
dans des sachets. Prélever un échantillon
d’eau à l’endroit où votre appareil sera installé.
2. Ouvrir l’un des sachets, retirer la bandelette
réactive et la tremper dans l’eau.
3. Comparer la couleur de la bandelette
au tableau situé à l’arrière du sachet.
Déterminer la valeur de la dureté de l’eau
en fonction du tableau situé sur la pochette
de la trousse d’analyse d’eau.
4. Allumer l’appareil et appuyer sur la touche
Réglages à partir du menu principal.
5. Aller au menu Configuration et sélectionner
Réglage de la régénération.
6. Au moyen des flèches verticales, régler
le niveau de régénération de l’adoucisseur
d’eau en fonction du tableau sur la dureté
de l’eau présenté dans cette même section.
Si la valeur de la dureté de votre eau se situe
entre deux valeurs de réglage, sélectionner
la plus élevée des deux.
7. Dévisser le couvercle du réservoir de
l’adoucisseur d’eau situé dans la partie
inférieure droite de la chambre et y verser
au moins 1 litre d’eau (0,26 gallon). Remplir
Conversion dureté de l’eau et niveaux de régénération
°dH
Very Soft
Typiquement
(valeurs de 18-143)
Aucun traitement nécessaire
10.1 10.5 180
11.2 11.7 200
11.8 12.3 210
16.8 17.5 300
19.6 20.5 350
(valeurs de 150-535)
20.2 21.0 360
Peut nécessiter un traitement externe
22.4 23.4 400
25.2 26.3 450
28.6 29.8 510
30.3 31.6
requis
>30.3 >31.6
(valeurs >535)
Traitement externe
US
GPG
1 1.0 18
2 2.1 36
3 3.1 54
4 4.2 71
5 5.2 89
5.6 5.8 100
6 6.3 107
6.2 6.4 110
7 7.3 125
8 8.3 143
8.4 8.8 150
9 9.4 161
10 10.4 178
11 11.5 196
12 12.5 214
13 13.6 232
14 14.6 250*
15 15.6 268
16 16.7 286
17 17.7 303
18 18.8 321
19 19.8 339
20 20.9 357
21 21.9 375
22 22.9 393
23 24.0 411
24 25.0 428
25 26.1 446
26 27.1 464
27 28.2 482
28 29.2 500
29 30.2 518
30 31. 3 535
PPM
(mg CaCO3 / Litre)
540
>540
ensuite le réservoir jusqu’en haut avec
le sel (maximum 1 kg/2,2 lb). Revisser solidement le couvercle et effectuer un cycle
complet sans instruments. L’utilisation d’un type de sel inapproprié peut entraîner
la corrosion.
Régén.
1
2
3
4
5
6
7
8
Traitement
supplémentaire
de l’eau
est requis
*À noter: La bandelette pour l’analyse de l’eau sera précise seulement si la valeur est de 250 ppm ou moins.
Si la valeur indiquée par la bandelette excède 250 ppm et/ou si des problèmes quant à la qualité de l’eau ont
été rencontrés auparavant à l’emplacement où le HYDRest installé, il est fortement recommandé qu’une
analyse de l’eau plus poussée et plus précise soit effectuée par un laboratoire d’essai.
8
Page 51

5. Mode d’emploi
5.1 Recommandations pour le retraitement des instruments
Le HYDRIM L110w G4 est conçu pour nettoyer les instruments médicaux et dentaires généraux.
La stérilisation terminale DOIT être effectuée après le processus de lavage dans le HYDRIM
L110w G4.
Avant de placer les instruments dans le HYDRIM, consulter les instructions de retraitement des
instruments du fabricant.
Exemples d’instruments médicaux et dentaires pouvant être nettoyés à l’aide du HYDRIM L110w :
Instruments à détartrer, spatules et pinces hémostatiques en acier inoxydable.
Écarteurs, porte-aiguilles, crochets à peau, pinces à plastie, ciseaux et curettes en acier
inoxydable, et autres instruments en acier inoxydable ne comportant aucune cavité profonde.
Pour de meilleurs résultats, les instruments traités dans le HYDRIM L110w G4 devraient présenter
les propriétés suivantes:
• Être résistants à des températures pouvant atteindre 70°C (158°F).
• Être résistants à la corrosion puisqu’ils seront soumis à la chaleur et à l’alcalinité.
Les fraises, les microkératomes, les tubulures pour phaco, les équipements à fibre optique et
électriques ne devraient pas être traités dans le HYDRIM.
Les instruments nickelés, ou les instruments contenant de l’aluminium ou en aluminium anodisé
coloré ainsi que les instruments à usage unique ne conviennent pas au processus de traitement
du HYDRIM.
La solution HIPMC (solution nettoyante avec protection pour instruments pour le HYDRIM ) a été
soigneusement formulée pour être compatible avec une grande variété de métaux et de
revêtements. Toutefois, les instruments de certains fabricants ou revêtements peuvent ne pas être
compatibles.
Communiquer avec le fabricant des instruments pour connaître les procédures de nettoyage
recommandées. De façon générale, il n’est pas recommandé de traiter les instruments en acier au
carbone et chromés dans le HYDRIM.
Tous les instruments à charnière devraient être placés en position ouverte dans des paniers ou
dans le support pour instruments à charnière (numéro de pièce SciCan: 01-110-409S) au cycle
haut rendement.
Pour traiter de petits objets ou des objets légers dans le HYDRIM, utiliser le panier à couvercle
(numéro de pièce SciCan: 01-109966S).
Seules les surfaces externes des pièces à main dentaires peuvent être nettoyées dans le HYDRIM
L110w G4 à l’aide du support pour pièces à main (9 pièces à mains, pièce n° 01-113113S; ou 21
pièces à main, pièce n° 01-113112S).
Certains matériaux qui durcissent, comme les ciments, les amalgames et les composites, doivent
être retirés des instruments après l’utilisation de ceux-ci. Le HYDRIM ne sera pas en mesure de
décoller ces matériaux des instruments.
9
Page 52

5. Mode d’emploi
5.2 Tableau descriptif des cycles
Cycle
P0 – Cycle
de nettoyage
de la machine
Aucune vidange
initiale.
P1 – Cycle
de rinçage et
de mise en
attente*
Utiliser pour empêcher
les salissures de
sécher sur les
instruments alors que
ceux-ci ne seront pas
lavés dans un délai
d’une heure.
P2 – Cycle
régulier
Utiliser pour
des instruments
modérément souillés
en vrac.
P3 – Cycle haut
rendement avec
désinfection
Utiliser pour les
instruments très
souillés
et les cassettes.
Prélavage
<30ºC/86°F
(eau froide)
3 minutes
<30ºC/86°F
(eau froide)
3 minutes
S.O.
<30ºC/86°F
(eau froide)
3 minutes
Lavage
S.O. S.O.
S.O. S.O.
50ºC/122°F
5-15
minutes
(5 minutes
par défaut)
50ºC/122°F
5-15 minute s
(9 minutes
par défaut)
Rinçage
immédiat
<60ºC/140°F
1 minute
<60ºC/140°F
1 minute
Rinçage Séchage
<30ºC (cold)
2 minutes
60ºC/140°F
1 minute
60ºC/140°F***
1-10 minutes
(1 minute
par défaut)
60ºC/140°F
1 minute
S.O.
S.O.
1-20
minutes
(10 minutes
par défaut)
1-20 minutes
(10 minutes
par défaut)
Durée totale**
Consommation
sans séchage
7
minutes
17
minutes
423 gallons
25
minutes
34
minutes
8,45 gallons
en eau
16 L
4,23
gallons
16 L
24L
6,34
gallons
32L
* Il ne s’agit pas d’un cycle de lavage. Toujours effectuer un cycle de lavage après le cycle de rinçage et de mise en attente.
** La durée des cycles varie selon la température et la pression de l’eau entrante.
***Le temps de rinçage est réglable et peut atteindre 10 minutes. Le réglage doit se faire par un technicien autorisé.
10
Page 53

5. Mode d’emploi
5.3 Conseils pour de meilleurs résultats de nettoyage
Remove all cement, composite material and amalgam from instruments at chairside prior to
processing in the HYDRIM.
• Enlever tout ciment, composite et amalgame des instruments au fauteuil avant de les
mettre dans le HYDRIM.
• Utiliser uniquement les accessoires conçus pour le HYDRIM L110w G4, comme les paniers, les cassettes, les chariots et les supports, pour charger les instruments.
• Utiliser les accessoires uniquement aux fins pour lesquels ils ont été conçus. Par exemple, ne pas mettre les instruments à charnière dans les cassettes. Utiliser plutôt le support pour instruments à charnière.
• Désassembler les instruments, lorsque possible.
• Disposer les instruments de façon à ce qu’ils ne se chevauchent pas. Chaque instrument doit être séparé des autres.
• Ouvrez bien en grand les instruments à charnière afin de les placer dans des paniers ou
supports (PN 01-110409S) pour lesquels ils sont prévus. Des instruments à charnière
fermés ne pourront pas être nettoyés.
• Les instruments à charnière devraient être placés en position ouverte dans des paniers.
Les instruments à charnière en position fermée ne seront pas bien nettoyés.
• Placer les tubes d’aspiration dans le support pour chargement vertical d’instruments et
s’assurer que l’eau puisse entrer et sortir librement des tubes. Ne pas placer les tubes
d’aspiration à l’horizontale dans un panier ou dans une cassette. Pour les instruments
comportant des lumières, comme les pièces à main dentaires, seules les surfaces
externes seront nettoyées.
• Placer les plateaux et autres articles à forme concave de biais pour que l’eau puisse
s’écouler facilement des surfaces.
• Ne pas surcharger le HYDRIM.
• Vérifier l’état du HYDRIM:
S’assurer que les bras de lavage ne sont pas bloqués et qu’ils peuvent tourner librement
–
S’assurer que les filtres grillagés dans le drain de la chambre ne sont pas obstrués par des débris
–
• Pour obtenir un meilleur nettoyage, les instruments devraient être traités dans le
HYDRIM le plus tôt possible après leur utilisation. Si un nettoyage immédiat est
impossible, il est recommandé de traiter les instruments en utilisant le cycle P1 Rinçage
et mise en attente immédiatement après l’utilisation de l’instrument.
• Inspecter visuellement les instruments pour vérifier leur propreté et leur intégrité
(corrosion, dégradation du matériau) après leur nettoyage et réparer ou remplacer
les instruments si nécessaire.
.
.
• Si le processus d’application forcée est activé, l’utilisateur doit confirmer que
les instruments sont visiblement propres après qu’un cycle complet ait été effectué.
11
Page 54

5. Mode d’emploi
5.4 Configurations recommandées pour le chargement
Le lave-instruments L110w G4 se veut un appareil général destiné aux cliniques, plus
particulièrement dans les marchés dentaire et médical. Plusieurs configurations de
chargement d’instruments peuvent être traitées dans l’appareil L110w G4, selon:
• La taille du cabinet
• Les différents types de procédures entrepris simultanément
• La spécialisation du cabinet
• Les protocoles de gestion des instruments
Il est difficile d’illustrer toutes les configurations possibles, mais quelques exemples des
configurations de chargement les plus courantes à l’aide de paniers sont présentés, ainsi
que la configuration de chargement recommandée pour les instruments généraux, et un
exemple de configuration à éviter. Toutes ces configurations ont été testées et validées.
Manipuler tous les instruments avec soin pour éviter de se blesser. Respecter
les procédures locales de santé et de sécurité pour prévenir les accidents et
les blessures.
Suivre les recommandations du fabricant des instruments concernant le nettoyage et l’entretien. Lors du chargement des instruments dans l’appareil, disposer les
instruments en vrac de sorte qu’ils ne se touchent pas les uns les autres.
Les instruments présentant des surfaces concaves ou des cavités devraient être
positionnés de façon à ce que l’eau puisse se drainer librement.
Exemples de chargement :
Exemple 1 – Instruments pleins droits et à charnière
Exemple 2 – Instruments pleins droits
12
Page 55

5. Mode d’emploi
Exemple 3 – Instruments à charnière, instruments pleins et instruments avec cavités
Par exemple :
Instruments à détartrer,
curettes, élévateurs
dentaires, miroirs
monopièces, tubes
d’aspiration, etc.
Exemple 4 – Petits instruments et instruments désassemblés
Par exemple: Miroirs démontables, manches de scalpels et de couteaux, etc.
Exemple 5 –
Instruments regroupés dans des cassettes – pleine capacité
Par exemple :
Pinces-gouges,
forceps, ciseaux, etc.
Par exemple: Limes à os, fouloirs, curettes, excavateurs, etc.
Exemple 6 –
Instruments regroupés dans des cassettes – mi-capacité
Par exemple: Limes à os, fouloirs, curettes, excavateurs, etc.
Exemple 7 – Plateaux à instruments
13
Page 56

5. Mode d’emploi
5.5 Paniers et accessoires
Voici une liste des éléments inclus avec le HYDRIM:
Support pour cinq cassettes
de 8 po x 11 po, pour le chariot
supérieur ou inférieur. Pleine
grandeur (1/1).
Numéro de pièce : 01-109963S
Support pour cinq cassettes
de taille moyenne, pour le
chariot supérieur ou inférieur.
Demi-format (1/2).
Numéro de pièce : 01-109964S
Les éléments suivants sont en option :
Support pour quatre cassettes
de 11 po x 14 po, pour le chariot
supérieur ou inférieur. Pleine
grandeur (1/1).
Numéro de pièce : 01-109965S
Panier avec couvercle.
Quart de format (1/4).
Numéro de pièce : 01-109966S
Panier d’hygiène
pour instruments en vrac.
Quart de format (1/4).
Numéro de pièce :
01-109967S
Panier STATIM 5000.
Numéro de pièce :
01-107241
Support pour instruments
à charnière.
Numéro de pièce : 01-110409S
Panier STATIM 2000.
Numéro de pièce : 01-107240
Panier long.
Numéro de pièce :
01-108232
Panier pleine grandeur.
Numéro de pièce :
01-111598
14
Page 57

5. Mode d’emploi
5.6 Aperçu de l’écran tactile
Programmes
Connectivité du réseau
(vert = actif)
Statut du port USB
(vert = actif)
Déverrouiller la porte
Réglages
des paramètres
Statut de l’adoucisseur
d’eau, du niveau de
détergent et de la porte
15
Page 58

5. Mode d’emploi
5.7 Aperçu du menu Configuration
Utilisateur Technicien
Nettoyage
Regl temps sech
Regl temp lav
Compt. Cycl
Processus forcees
Utilisateur
Selection langue
Pays
Date / Heure
Unit n°
Config. du réseau
Econ d’ecran
Configuration
Deb bauds
Set EOL CR/LF
Regler regenerat
Contraste ACL
Thèmes
Qualité ecran à distance
Température C/F
Regl bouton bip
Volume Bip
Reglez l’imprimante
16
Instruct.
Retard instructions
Accès à dist.
Prép. pour expédition
Page 59

5. Mode d’emploi
5.8 Sélection de la langue
Les messages affi chés sur votre HYDRIM peuvent être présentés en diverses langues.
Pour modifi er la langue actuelle, procéder comme suit :
1.
2. Faire défi ler jusqu’à
Selection langue
et sélectionner.
3. Une fois sur l’écran SELECTION LANGUE, appuyer sur pour faire défi ler la liste
des langues disponibles. Appuyer sur
revenir au menu Confi guration.
pour enregistrer la langue souhaitée et
5.9 Sélection du pays
1.
2. Faire défi ler jusqu’à
3. À l’aide du pavé numérique, inscrire le nom du pays et appuyer sur
sélectionner. Appuyer sur
Confi guration.
Pays
et sélectionner.
EN
pour
pour enregistrer la sélection et revenir au menu
5.10 Réglage de l’heure
1.
2. Faire défi ler jusqu’à
Date / Heure
et sélectionner HEURE.
3. Une fois sur l’écran HEURE, utiliser le pavé numérique pour régler l’heure. Appuyer sur
EN
pour enregistrer la sélection et sur pour revenir au menu Confi guration.
NOTE: Si le HYDRIM est connecté à un réseau, il est important de régler également le fuse-
au horaire. Entrer dans le sous-menu Heure, sélectionner Fuseau horaire, faire défi ler pour
sélectionner votre fuseau horaire.
4. Pour placer l’appareil en format 12 heures (le format 24 heures est réglé par défaut),
aller au menu Confi guration et utiliser
Effectuer la sélection et appuyer sur 12. Appuyer sur
et revenir au menu Confi guration.
5. Pour activer l’heure avancée (HA), aller dans le menu Confi guration, utiliser
pour accéder à l’activation/désactivation de l’heure avancée et effectuer la sélection.
Utiliser
enregistrer la sélection et revenir au menu Confi guration
pour activer ou désactiver l’heure avancée et appuyer sur
17
pour faire défi ler jusqu’à 12 h/24 h.
pour enregistrer la sélection
pour
Page 60

5. Mode d’emploi
5.11 Réglage de la date
1.
2. Faire défi ler jusqu’à
Date / Heure
et sélectionner DATE.
3. Une fois sur l’écran DATE, utiliser le pavé numérique pour régler la date. Appuyer sur
EN
pour sauvegarder et sur pour revenir au menu Confi guration.
4. Pour changer le format de présentation de la date, revenir au menu Confi guration et
utiliser
les fl èches pour obtenir le format de date désiré. Appuyer sur
la sélection et revenir au menu Confi guration.
pour accéder à Regl Format date. Le sélectionner et appuyer sur
pour enregistrer
5.12 Attribution d’un numéro d’identification de l’appareil
1.
2. Faire défi ler jusqu’à
Unit n°
et sélectionner.
3. À l’aide du pavé numérique, sélectionner un maximum de 3 chiffres qui serviront
de numéro d’identifi cation de l’appareil. Appuyer sur
et sur
pour revenir au menu Confi guration.
pour enregistrer la sélection
EN
5.13 Réglage de l’économiseur d’écran
Pour modifi er le délai d’activation de l’économiseur d’écran, procéder comme suit :
1.
2. Faire défi ler jusqu’à
Econ d’ecran
et sélectionner.
3. Utiliser pour faire défi ler les options de temps. Sélectionner le délai souhaité.
Appuyer sur
pour enregistrer la sélection et revenir au menu Confi guration.
5.14 Réglage du format d’affichage de la température
1.
2. Faire défi ler jusqu’à
3. Utiliser pour choisir l’affi chage en Celsius ou en Fahrenheit. Appuyer sur
pour enregistrer la sélection et revenir au menu Confi guration.
Température C/F
et sélectionner.
18
Page 61

5. Mode d’emploi
5.15 Activation/désactivation du signal sonore des touches
Le HYDRIM est confi guré par défaut pour émettre un son lorsqu’on appuie sur une touche.
Pour désactiver le signal sonore des touches, procéder comme suit :
NOTE: La désactivation du signal sonore des touches ne désactive pas les autres signaux
sonores d’alarme et de notifi cation de cycle.
1.
2. Faire défi ler jusqu’à
Regl bouton bip
et sélectionner.
3. Utiliser pour faire défi ler les options ACTIVÉ ou DÉSACTIVÉ. Sélectionner
l’option désirée. Appuyer sur
Confi guration.
pour enregistrer la sélection et revenir au menu
5.16 Réglage du volume du signal sonore des touches
Pour régler le volume des signaux sonores, procéder comme suit :
1.
2. Faire défi ler jusqu’à
Volume Bip
et sélectionner.
3. Utiliser pour faire défi ler les options de réglage du volume. Sélectionner l’option
désirée. Appuyer sur
pour enregistrer la sélection et revenir au menu Confi guration.
5.17 Réglage de la régénération de sel
Le réglage de la régénération de sel devrait se faire en fonction de la dureté de l’eau locale.
Consulter la section 4 – Vérifi cation de la qualité de l’eau pour les instructions visant à
déterminer les réglages nécessaires: Pour régler la régénération de sel, procéder comme
suit:
1.
2. Faire défi ler jusqu’à
3. Utiliser pour modifi er la valeur. La valeur par défaut est 1. Appuyer sur
pour enregistrer la sélection et revenir au menu Confi guration..
Regler regenerat
et sélectionner.
19
Page 62

5. Mode d’emploi
5.18 Réglage du contraste de l’écran
L’écran tactile est initialement calibré pour les conditions d’éclairage de la plupart des
centres de stérilisation. Pour régler le contraste de votre écran selon les conditions
d’éclairage de votre cabinet, procéder comme suit :
1.
2. Faire défi ler jusqu’à
Contraste ACL
et sélectionner.
3. Utiliser pour faire défi ler les options de contraste. Sélectionner le contraste
désiré. Appuyer sur
pour enregistrer la sélection et revenir au menu Confi guration.
5.19 Changement des thèmes d’affichage
Il est possible de modifi er les thèmes d’affi chage de l’écran tactile (icônes et couleurs de
l’arrière-plan) par l’une des options préréglées. Pour changer les thèmes, procéder comme
suit :
1.
2. Faire défi ler jusqu’à
3. Sur l’écran
Lors du défi lement, chaque thème apparaît à son tour sur l’écran tactile. Appuyer sur
pour choisir votre thème et retourner au menu Confi guration..
Changer de thèmes
Thèmes
et sélectionner
, utiliser pour faire défi ler les options disponibles.
5.20 Création d’un nom d’utilisateur
Un maximum de quatre noms d’utilisateur uniques peut être créé. Pour assigner un nom
d’utilisateur, procéder comme suit:
1.
2. Faire défi ler jusqu’à
3. Pour assigner un nom d’utilisateur, sélectionner
alphabétique pour entrer un nom (maximum de 12 caractères) et appuyer sur
enregistrer.
Utilisateur
et sélectionner.
Nom utilisateur
20
et utiliser le pavé
pour
EN
Page 63

5. Mode d’emploi
5.21 Création d’un NIP
À partir de l’écran NIP de l’utilisateur, il est possible d’attribuer jusqu’à quatre NIP. Pour
assigner un NIP, procéder comme suit:
1.
2. Faire défi ler jusqu’à
3. Pour assigner un NIP à un utilisateur, sélectionner
numérique pour entrer un code (4 chiffres maximum). Sélectionner ensuite
enregistrer et
Utilisateur
passer à l’écran de confi rmation.
et sélectionner.
PIN utilisateur
et utiliser le pavé
pour
EN
4. Si toutes les informations affi chées à l’écran de confi rmation sont correctes, appuyer
sur OK pour retourner à l’écran NIP de l’utilisateur. Pour effectuer une correction,
sélectionner le NIP de l’utilisateur à modifi er et répéter le processus indiqué ci-dessus.
5.22 Configuration du processus d’application forcée
Lorsque le processus d’application forcée est activé, les utilisateurs doivent entrer leur
NIP à la fi n du cycle. Pour activer la fonction de processus d’application forcée, il faut tout
d’abord attribuer les noms d’utilisateurs et les NIP. Pour confi gurer les noms d’utilisateurs
et les NIP, consulter les sections 5.19 et 5.20 portant sur la création d’un nom d’utilisateur
et d’un NIP. Pour activer la fonction de processus d’application forcée, procéder comme
suit :
1.
2. Faire défi ler jusqu’à
3. Utiliser pour activer ou désactiver le processus d’application forcée. Appuyer
sur
NOTE : N’importe quel utilisateur peut
arrêter un cycle même si le processus
d’application forcée est activé.
Cependant, l’arrêt du cycle par
un utilisateur non autorisé sera
enregistré dans les données du cycle.
pour enregistrer la sélection et revenir au menu Confi guration.
Processus forcees
et sélectionner.
21
Page 64

5. Mode d’emploi
5.23 Connecting to a network
Le HYDRIM L110w G4 dispose d’un port Ethernet 10/100 Base T situé à l’arrière de l’appareil.
Pour connecter votre HYDRIM à un réseau muni d’un routeur, procéder comme suit:
1. Brancher votre câble réseau au port Ethernet situé à l’arrière de l’appareil. Si votre
cabinet utilise un routeur, celui-ci devrait assigner automatiquement une adresse IP
à l’appareil. Un X rouge sur l’icône Réseau signifi e que l’appareil n’est pas connecté.
Un crochet jaune signifi e que l’appareil a une adresse IP, mais qu’il n’est pas connecté
à Internet et ne peut envoyer de courriels. Un crochet vert signifi e que la connexion Internet
fonctionne adéquatement et que l’appareil peut envoyer des courriels.
NOTE : Dans certains cas, lorsque vous n’utilisez pas de routeur (par exemple, si vous
utilisez plutôt Windows Network Sharing), vous pourriez avoir à assigner une adresse
IP dédiée ou « statique ». Pour assigner une adresse statique, communiquez avec votre
administrateur de réseau local.
2. À partir de l’écran principal, appuyer sur l’icône Réseau. La fenêtre Réseau affi che les
informations concernant la connectivité de votre HYDRIM, notamment l’adresse IP.
3. Inscrire l’adresse IP affi chée à l’écran dans un navigateur Internet pour accéder au
portail Web lié à votre appareil. Lorsque l’icône Réseau est active (par exemple lors de
l’envoi d’un courriel) il devient vert.
NOTE : Utiliser le code QR si connecté à un appareil mobile.
NOTE : Le temps de connexion peut varier en fonction de la vitesse de votre réseau;
la connexion initiale peut prendre plus de temps
Au Canada et aux États-Unis, vous pouvez communiquer avec notre ligne de soutien pour les réseaux au 1800635-5179 afi n d’obtenir de l’aide
5.24 Connexion à un réseau sans fil
Le HYDRIM peut être confi guré pour un réseau sans fi l en connectant le port Ethernet à un
®
pont externe/point d’accès. SciCan recommande l’utilisation du D-Link
®
Duo Wireless Bridge. Communiquez avec votre administrateur réseau pour en apprendre
N
davantage sur la confi guration d’une connexion sans fi l avec un pont.
22
DAP-1522 Xtreme
Page 65

5. Mode d’emploi
5.25 Mise en marche du HYDRIM L110w G4
Avant de mettre le lave-instruments en marche, s’assurer que l’alimentation d’eau est
ouverte et suivre les étapes suivantes :
1
Ouvrir la porte pour produits chimiques et s’assurer qu’un contenant de solution
nettoyante HIPMC a été installé.
2
Mettre l’appareil
en marche.
5
3
Toucher
l’écran pour
commencer.
4
Appuyer sur le bouton
de déverrouillage de
la porte.
6 7
Sélectionner le cycle désiré.
(Utiliser le cycle haut
rendement pour les cassettes,
les instruments à charnière ou
les instruments très souillés.)
Appuyer sur
DÉMARRER.
Charger les instruments
dans les paniers ou les
cassettes et les placer
dans l’appareil, puis fermer
la porte.
23
Page 66

5. Mode d’emploi
7. Le cycle se met en marche.
8
8. Le cycle est terminé.
9
Compt.
Cycle
Le cycle commencera par vidanger l’appareil. La barre à l’écran
indique la progression du cycle. La phase du cycle est indiquée sous
la barre (p. ex., Remplissage, Rinçage). Le temps restant estimé (en
minutes) est toujours affiché. À noter que la durée peut augmenter
ou diminuer selon l’achèvement prévu du cycle.
Lorsque le cycle est terminé, le nom du cycle et «Cycle terminé»
apparaissent à l’écran et l’appareil émet trois bips. Appuyer sur
«OK» pour ouvrir la porte. Utiliser des gants pour retirer les
instruments. Après tous les cycles, faire preuve de prudence, car
les instruments, le chariot, les paniers et les cassettes peuvent être
chauds. Vérifier s’il y a présence de débris sur les instruments avant
de les emballer/stériliser.
5.26 Interrompre/annuler un cycle
La porte du HYDRIM est verrouillée pendant le cycle. Si on appuie
sur le bouton «STOP», le cycle sera interrompu et ne pourra être
relancé. Le message «Evacuation – Attendez» apparaîtra. L’appareil
se vidangera. Ensuite, le message «Instruments non traités»
apparaîtra. Appuyer sur OK. Ouvrir la porte en appuyant sur .
Utiliser des gants pour manipuler les instruments. Faire attention,
car les instruments, le chariot, les paniers et les cassettes peuvent
être chauds. Le cycle doit être refait pour que les instruments
puissent être adéquatement traités.
NOTE : Si la phase de séchage d’un cycle est interrompue, les phases essentielles
du cycle étant terminées, un message indiquant le nom du cycle et «Cycle terminé.
Séchage interrompu» apparaîtra.
24
Page 67

5. Mode d’emploi
5.27 Fonctions supplémentaires des menus Utilisateur et Confi guration
Pour accéder aux menus Utilisateur et Confi guration, procéder comme suit :
OU
Nettoyage de la chambre
Ce cycle est utilisé pour enlever périodiquement les dépôts laissés par une eau dure sur les parois de la chambre et les supports.
Verser 1.0 litre (0,26 gallon) de vinaigre dans la chambre avant de
démarrer le cycle. Appuyer sur «Nettoyage ». Le cycle de nettoyage, similaire au cycle de lavage normal, se mettra en marche. Le
fait de ne pas nettoyer la chambre peut entraîner de la corrosion.
Réglage du temps de séchage
Le temps de séchage pour P2 et P3 peut être réglé de façon
indépendante. Appuyer sur le cycle pour lequel on souhaite régler le
temps de séchage. Utiliser les fl èches verticales pour sélectionner le
temps de séchage désiré. Appuyer sur «Par défaut » si l’on souhaite
remettre en fonction les valeurs par défaut préréglées de l’appareil.
Utiliser la fl èche vers la gauche pour revenir à l’écran précédent.
Réglage du temps de lavage
Le temps de lavage pour P2 et P3 peut être réglé de façon indépendante. Le temps pour les cycles P2 et P3 peut être réglé à une valeur se situant entre 5 et 15 minutes. Appuyer sur le cycle pour lequel
on souhaite régler le temps de lavage. Utiliser les fl èches verticales
pour sélectionner le temps de lavage désiré. Appuyer sur «Par
défaut » si l’on souhaite remettre en fonction les valeurs par défaut
préréglées de l’appareil. Utiliser la fl èche vers la gauche pour revenir
à l’écran précédent.
Compteur de cycles
Le compteur de cycle permet à l’utilisateur de savoir le nombre de
cycles effectués par le HYDRIM. Appuyer sur Compteur de cycles
et le nombre de cycles (terminés et interrompus) s’affi chera. Il ne
peut être remis à zéro. Utiliser la fl èche vers la gauche pour revenir à
l’écran précédent.
25
Page 68

5. Mode d’emploi
5.28 Ouvrir la porte lors d’une panne de courant
En cas de panne de courant, retirer la plaque de protection du HYDRIM. Retirer la vis
à l’aide d’un tournevis et soulever la plaque de protection vers le haut et vers vous.
Localiser l’anneau et tirer dessus pour ouvrir la porte. Faire attention! Il pourrait rester
des fluides dans l’appareil et les instruments pourraient être chauds. Les instruments
qui n’ont pas complété le cycle ne doivent pas être utilisés et doivent être traités de
nouveau. Lors de la remise en place de la plaque de protection, s’assurer que le fil de
mise à la terre est fixé.
Instructions
Les utilisateurs peuvent accéder à une base de données d’instructions
imagées sur la façon de réaliser l’entretien régulier, comme l’installation
de la solution nettoyante
Anneau
Fil de mise à la terre
Plaque de protection
Vis
26
Page 69

5. Mode d’emploi
5.29 Enregistrer et récupérer les informations de cycles
Le HYDRIM L110w G4 dispose d’un registre intégré capable d’enregistrer et de conserver toutes les données de chaque cycle, qu’il soit réussi ou inachevé, pendant toute
la durée de vie de l’appareil. Les informations sont accessibles par l’écran tactile, le
portail Web ou par l’utilisation d’une unité de stockage USB.
Récupérer les informations de cycles à l’aide de l’écran tactile
1. À partir du menu principal, appuyer sur l’icône USB.
2. L’appareil enregistrera les cinq derniers cycles réussis et les cinq derniers cycles
incomplets.
En sélectionnant un cycle dans la liste, l’information du cycle s’affichera dans un
format similaire à celui de l’impression.
3. Utiliser les flèches pour faire défiler et lire.
NOTE : Que l’on dispose d’une unité de stockage USB sur l’appareil ou non, les cinq
derniers cycles réussis et les cinq derniers cycles incomplets sont toujours visibles.
Utiliser le portail Web du HYDRIM L110w G4 pour accéder, à partir de votre ordinateur, aux informations de tous les cycles enregistrés sur le HYDRIM. Pour connecter
votre HYDRIM à votre réseau, consulter la section 5.23 Connexion à un réseau.
27
Page 70

5. Mode d’emploi
Récupérer les informations de cycles à l’aide de la sauvegarde sur clé USB
L’unité de stockage USB peut être utilisée pour transférer les informations de cycles
enregistrées sur l’appareil vers un ordinateur. Il est recommandé de le faire une fois
par semaine. Pour transférer les informations en utilisant le port USB, procéder comme
suit :
1. Insérer l’unité de stockage USB dans le port USB.
2. Le HYDRIM conserve la trace des données qui ont déjà été transmises vers l’unité
de stockage USB et charge donc automatiquement les nouvelles informations. Les
données stockées dans la mémoire interne du HYDRIM ne peuvent être copiées
qu’une seule fois. L’accès aux informations transférées antérieurement peut se faire
à partir du portail Web.
3. Lorsque le témoin d’activité sur votre unité de stockage USB arrête de clignoter ou
lorsque l’icône USB de l’écran tactile passe du vert clair au gris foncé, retirer l’unité
de stockage USB et transférer l’information sur votre ordinateur.
NOTE : Si l’unité d’enregistrement USB est sélectionnée à partir du menu principal,
seuls les cinq derniers cycles réussis et les cinq derniers cycles incomplets pourront
être visualisés. Pour visualiser tous les cycles copiés sur votre unité USB, vous devez
utiliser un ordinateur.
NOTE : Si vous perdez votre unité de stockage USB, mais que vous aimeriez transférer l’historique des cycles de votre appareil vers une nouvelle unité de stockage,
procéder comme suit :
1. Insérer la nouvelle unité de stockage USB dans le port USB.
2. Sélectionner l’icône USB.
3. À partir de l’écran d’informations sur les cycles, sélectionner l’icône USB à nouveau.
4. Sélectionner Copier et l’appareil copiera toutes les informations sur les cycles sur
l’unité de stockage USB.
28
Page 71

5. Mode d’emploi
5.30 Configuration de l’imprimante et de l’enregistreur de données
Le HYDRIM L110w G4 dispose d’un port RS-232 situé à l’arrière de l’appareil. Celui-ci
peut être utilisé pour y brancher une imprimante externe ou un enregistreur de données
SciCan. Les imprimantes mentionnées dans le tableau ci-dessous ont été testées avec
le HYDRIM. Pour ajouter ou changer une imprimante ou un enregistreur de données
SciCan, suivre ces étapes:
Éteindre le HYDRIM et l’imprimante ou l’enregistreur de données avant de connecter
l’un ou l’autre de ces appareils au HYDRIM
1. Une fois l’imprimante ou
l’enregistreur de données
connecté(e), allumer le
HYDRIM et appuyer sur i
pour aller sur l’écran Menu.
.
Modèle d’imprimante
Epson
TM-U220D (C31C515603)
Débit
en bauds
du port série
9600
2. Dans le menu Configuration,
choisir Sélectionner une
imprimante.
Citizen
IDP-3110-40 RF 230B
Star Micro
SP212FD42-230
3. Sélectionner Imprimante
série s’il s’agit d’une
Star Micro
SP216FD42-230
imprimante, ou USB
Flash/MSD s’il s’agit de
l’enregistreur de données
Star Micro
SP512MD42-R
SciCan. Appuyer sur la
flèche vers la gauche
pour revenir au menu
Enregistreur
de données SciCan
en bauds
du port série
Configuration.
4. Dans le menu Configuration,
For Mass Storage Device 9600
sélectionner Débit en bauds .
5. Sélectionner le débit
requis (consulter le tableau ci-dessous pour connaître les débits en bauds
recommandés). Utiliser la flèche vers la gauche pour revenir à l’écran
Démarrage .
9600
9600
9600
9600
Débit
6. S’assurer que la date et l’heure ont été réglées (voir dans menu Configuration
- Date/Heure)
7. Le HYDRIM est maintenant prêt à enregistrer/imprimer les informations des
cycles sur l’appareil sélectionné.
29
Page 72

6. Entretien et maintenance
6.1 Remplacer le contenant de solution nettoyante HIP
MC
The HYDRIM L110w G4 requiert un contenant de 3,8 L (1 gallon) de solution nettoyante
HIPMC (numéro de pièce CS-HIPL). Utiliser uniquement la solution nettoyante
recommandée et lire la fiche signalétique avant d’insérer le contenant dans l’appareil.
MC
La solution nettoyante HIP
est utilisée, dans une forme diluée, comme détergent pour
le nettoyage des instruments chirurgicaux dans le lave-instruments HYDRIM. Il s’agit
d’un liquide incolore et presque inodore complètement soluble dans l’eau. Certaines
précautions doivent être prises pour manipuler de façon sécuritaire ce produit chimique.
Pour plus d’informations, consulter la section 4 - Manipulation et installation de la solution nettoyante HIPMC.
NOTE : Pour éviter les renversements, remplacer le contenant de solution uniquement
lorsque le message apparaît à l’écran et s’assurer de porter des gants.
Lorsqu’un X rouge apparaît sur l’icône Adoucisseur/Détergent, appuyer sur l’icône pour
voir si le problème concerne le niveau d’adoucisseur d’eau ou de solution nettoyante.
Si le contenant de solution nettoyante doit être remplacé, un X rouge apparaîtra à côté
de Détergent.
Pour commander d’autres contenants de solution nettoyante HIPMC, communiquez avec
votre détaillant local. Le message «Aucun déterg. » apparaît à l’écran lorsque le
contenant de solution nettoyante est vide et qu’il doit être changé. Pour éviter les
renversements, remplacer le contenant de solution uniquement lorsque le message
apparaît à l’écran et s’assurer de porter des gants.
NOTE : Chaque contenant de solution nettoyante a une capacité d’environ 30 cycles,
selon les cycles utilisés.
Pour remplacer le contenant de solution nettoyante, suivre ces étapes :
1. Éteindre l’appareil.
2. Ouvrir le tiroir destiné à la solution nettoyante.
30
Page 73

6. Entretien et maintenance
3. Détacher le sac de solution nettoyante du raccord. Nettoyer le raccord de tout produit
chimique séché en l’immergeant dans une tasse d’eau.
4. Retirer le contenant de solution nettoyante vide et le jeter ou le recycler.
5. Raccorder le nouveau contenant et l’insérer dans le compartiment destiné à la solution
nettoyante. Suivre les instructions imprimées sur chaque contenant de solution
nettoyante.
6. Fermer la porte du compartiment.
7. Rallumer l’appareil.
Pour amorcer la pompe doseuse de solution nettoyante, appuyer sur l’icône Adoucisseur/
Détergent sur l’écran principal. Sur l’écran Adoucisseur/Détergent, appuyer sur le X
rouge à côté de « Détergent ». L’appareil amorcera le système de dosage et un crochet
vert apparaîtra, au lieu du X rouge, lorsqu’il sera prêt.
NOTE : Le système peut également être amorcé en démarrant simplement un cycle et en
sélectionnant «Détergent remplacé » lorsque demandé.
31
Page 74

6. Entretien et maintenance
6.2 Remplissage du réservoir de sel adoucisseur d’eau
Lorsqu’un X rouge apparaît sur l’indicateur de niveau
de détergent et d’adoucisseur d’eau, appuyer sur
l’icône pour voir si le problème concerne le niveau
d’adoucisseur d’eau ou de solution nettoyante.
Si l’adoucisseur d’eau requiert un remplissage,
procéder comme suit:
Pour remplir le réservoir de sel, suivre ces étapes:
1. Dévisser le couvercle du réservoir de sel.
2. Remplir le réservoir de sel jusqu’en haut
(maximum 1 kg/2,2 lb).
3. Revisser solidement le couvercle du réservoir
de sel.
4. Effectuer un cycle complet, sans instruments.
Réservoir de sel
6.3 Nettoyage du HYDRIM L110w G4
Pour nettoyer les surfaces externes de l’appareil et la décalcomanie couvrant l’écran
tactile, utiliser un chiffon doux humidifié avec de l’eau et du savon ou un désinfectant
de surface. Ne pas utiliser de produits de nettoyage chimiques corrosifs.
32
Page 75

6. Entretien et maintenance
6.4 Entretien du filtre et du bras de lavage
Entretien du filtre :
Inspecter quotidiennement le filtre de la
partie inférieure de la cuve pour détecter
tout débris et le nettoyer au besoin. Pour
nettoyer le filtre, le retirer, le rincer à l’eau
claire et le remettre en place. S’assurer
que le filtre est fermement positionné
après l’avoir remis en place.
Bras de lavage
Entretien du bras de lavage :
Si les bras de lavage ne tournent pas
aisément, les retirer, les rincer à l’eau
claire et les réassembler. Pour retirer
le bras de lavage supérieur ou central,
dévisser le collet dans le sens antihoraire. Pour retirer le bras de lavage inférieur,
dévisser le collet dans le sens horaire.
Filtre
6.5 Préparation de l’appareil pour l’expédier
La préparation pour le transport ou l’entreposage nécessite que l’appareil soit vidangé.
Les eaux usées se trouvant dans l’appareil peuvent contenir des contaminants
biologiques. À partir du menu Configuration, sélectionner la fonction «Préparation
pour l’expédition ».
À l’aide d’un moyen mécanique ou d’un matériau absorbant, retirer toute trace de liquide
se trouvant dans le bassin collecteur. Porter des gants de caoutchouc jetables. Éliminer
le matériau absorbant conformément à la réglementation sur l’élimination des déchets
biologiques
33
Page 76

6. Entretien et maintenance
6.6 Entretien annuel
Si le message «Entretien préventif requis. Appeler un technicien » apparaît, l’entretien
annuel doit être fait. Pour continuer à utiliser le HYDRIM, appuyer sur OK. Communiquer
avec le service technique dès que possible. L’entretien annuel devrait être fait 365 jours
après l’installation initiale ou après le dernier appel de service effectué.
Quand Qui Éléments visés par l’essai
Quotidiennement:
essais et vérifications
Par l’utilisateur
• Vérification du verrou de la porte
• Vérification de la rotation des bras de lavage
• Vérification du joint de la porte
• Vérification des chariots de chargement
• Inspection visuelle de chaque chargement
pour la présence de saleté résiduelle.
• Calendrier d’entretien annuel tel que défini
dans le manuel d’entretien.
• Revalidation si requise par la réglementation
locale.
Annuellement
Biannuellement
Par un technicien
approuvé par SciCan
Par un technicien
approuvé par SciCan
Pour assurer l’efficacité constante de l’appareil, SciCan recommande de respecter
les protocoles d’essais périodiques suivants.
NOTES IMPORTANTES:
• Ce document énonce les exigences minimales requises pour assurer que l’équipement
fonctionne selon les spécifications. Dans certaines régions, les documents directeurs
locaux/nationaux peuvent nécessiter des essais supplémentaires. Veuillez
communiquer avec votre distributeur ou les autorités médicales pour les détails.
• L’installation, la mise en service et l’entretien annuel DOIVENT être effectués par des
techniciens approuvés par SciCan. Le manquement à l’entretien de cet équipement
peut invalider les résultats du régime de tests suivant.
34
Page 77

6. Entretien et maintenance
Essais devant être faits par l’utilisateur :
Vérification du verrou de la porte
Ce test vise à assurer que la porte ne puisse être ouverte lorsqu’un cycle est en marche
ou qu’un cycle ne puisse démarrer lorsque la porte est ouverte. Pour vérifier que ces
éléments fonctionnent correctement, essayer d’ouvrir la porte en utilisant la poignée
immédiatement après le démarrage d’un cycle. Mise en garde – NE PAS essayer
d’ouvrir la porte lorsque les bras de lavage tournent et/ou que la température de
l’eau est supérieure à la température ambiante. La porte ne devrait pas s’ouvrir.
Lorsque l’on tente de démarrer un cycle alors que la porte est ouverte, le cycle ne devrait
pas
démarrer. Si l’appareil échoue à ce test, cesser immédiatement d’utiliser l’appareil et
appeler le service technique chez votre distributeur.
Vérification de la rotation des bras de lavage
Mettre en marche le cycle P1 et vérifier si les bras de lavage tournent. Si les bras de
lavage NE tournent PAS, les retirer, les inspecter visuellement et les nettoyer comme
décrit dans la section 6.4.
Vérification du joint de la porte
Vérifier visuellement si le joint de la porte présente des débris ou des signes d’usure.
Si le joint est usé ou endommagé, appeler le service technique chez votre distributeur.
Vérification du chariot de chargement
Vérifier visuellement si les chariots de chargement présentent des signes d’usure,
de dommages et que les roues tournent librement et totalement.
Vérification des filtres de la chambre
Retirer, inspecter visuellement et nettoyer les filtres comme décrit dans la section 6.4.
Vérification du chargement
Inspecter visuellement chaque chargement pour la présence de saleté résiduelle. Les
lave-instruments sont conçus pour que les surfaces des instruments soient débarrassées
des débris pouvant compromettre le processus de stérilisation. La vérification visuelle des
instruments traités dans chaque chargement devrait être faite avant la stérilisation pour
s’assurer qu’aucun débris résiduel n’est présent sur l’instrument.
Si des débris sont toujours présents, l’instrument ne devrait pas alors être considéré
comme nettoyé et devrait être traité à nouveau dans le HYDRIM avant la stérilisation.
NOTE: Certains matériaux qui durcissent, comme les ciments, les amalgames et les
composites, ne seront pas enlevés dans le HYDRIM s’ils sont collés aux instruments.
Si ces matériaux sont présents sur les instruments, un solvant abrasif pourrait alors être
requis.
35
Page 78

7. Dépannage
Causes et solutions possiblesProblème
Les instruments ne sont pas
propres
L’écran/l’appareil ne s’allume
pas
Les bras de lavage
ne tournent pas
La porte ne s’ouvre pas
Les cycles prennent trop
de temps à s’effectuer
• Ne pas surcharger les cassettes ou les paniers à instruments.
• Ne pas mettre trop de cassettes dans le HYDRIM.
• Utiliser le cycle haut rendement pour les cassettes et
les instruments à charnière.
• Vérifier qu’il n’y a pas de débris dans les filtres et au
niveau des bras de lavage.
• S’assurer que l’interrupteur est à «ON».
• S’assurer que la fiche du cordon électrique est
correctement insérée dans la prise murale.
• Vérifier si un fusible a sauté ou si le circuit est défectueux
- appeler le service technique pour assistance.
• Retirer les bras de lavage, les nettoyer et les réinstaller.
• Le cycle n’est pas terminé.
• Le cycle a été interrompu et l’appareil n’a pas encore
terminé de se vidanger.
• L’eau n’est pas assez chaude. S’assurer que la
température de l’eau chaude entrante se situe dans
les valeurs recommandées.
• S’assurer que les tuyaux d’eau chaude et d’eau froide
ne sont pas inversés.
Le message « Aucun déterg
» apparaît même s’il reste
• S’assurer que le tube d’alimentation du produit n’est
pas plié.
des produits chimiques dans
le réservoir
La performance de séchage
• Augmenter le temps de séchage (menu Utilisateur).
est inadéquate
NOTE : Les fusibles NE devraient PAS être remplacés par l’utilisateur. Appeler un technicien de service autorisé
pour assistance.
36
Page 79

7. Dépannage
Messages d’erreur
CF1 Défaillance
chauffage
CF2 Défaillance
remplissage chambre
CF3 Défaillance
lecture sonde de
température chambre
CF4 Échec
de la vidange
CF9 Défaillance
logicielle ou PCB
Cause
L’eau n’atteint pas la température
requise dans les temps spécifiés.
La chambre ne se remplit pas
d’eau dans le délai spécifié.
Capteur défectueux.
L’eau à l’intérieur de l’appareil
ne se vidange pas.
La durée d’un cycle est supérieure
à 3 h 30 min.
SolutionErreur
Appeler le service technique.
Vérifier que les tuyaux
d’entrée d’eau ne sont pas
pliés. Ouvrir les valves d’arrêt
d’alimentation en eau.
Appeler le service technique.
Vérifier que le tuyau de
vidange n’est pas plié.
S’assurer que le filtre de la
partie inférieure de la cuve
n’est pas obstrué.
Appeler le service technique.
CF14 Température
de l’eau trop élevée
CF19 Capteur
de pression
CF21 Aucun déterg.
CF28 Aucune
pression d’eau
L’eau est trop chaude pendant
la phase de prélavage.
Le capteur de pression est défaillant.
L’interrupteur de débit ne détecte
pas le détergent durant la phase
de lavage.
Il n’y a pas assez d’eau lors
d’un cycle.
Vérifier les raccords
d’entrée d’eau à l’arrière de
l’appareil.
Appeler le service technique.
Remplacer le contenant de
détergent s’il est vide.
Si le problème persiste,
appeler un technicien.
Vérifier que les tuyaux d’eau
ne sont pas pliés. Ouvrir les
valves d’arrêt d’alimentation
en eau.
Vérifier s’il y a des fuites.
Appeler le service technique.
37
Page 80

8. Spécifications
Hauteur, installation autoportante : 850 mm (33,5 po)
Largeur: 598 mm (23,54 po)
Profondeur: 600 mm (23,75 po)
Profondeur avec la porte ouverte: 1200 mm (47 po)
Poids: 80 kg (176 lb)
Bruit maximal de fonctionnement : 78 dBA
Raccords d’eau chaude et d’eau froide : ¾ po
Pression d’admission d’eau: 1-10 bars
Température de l’eau chaude entrante: 50 à 70°C (122 à 158°F)
Drain: ¾ po
Adoucisseur d’eau : capacité de 1 kg (2,2 lb) de sel
Système de remplissage : capacité maximale sécuritaire de 5,5 L (1,5 gallon)
Système de séchage : Réchauffeur 1 kW
Connexion électrique : 208-240 V 60 Hz 15 A
Degré de pollution de l’équipement: degré de pollution 2
Catégorie d’installation de l’équipement: Catégorie d’installation II
Humidité relative maximale: 80 % pour une température jusqu’à 31°C (88°F)
50 % pour une température jusqu’à 40°C (104°F)
Échelle de température de fonctionnement: +5à 40°C (41 à 104°F)
Altitude maximale: 2000m (6561,7 pi)
Alimentation secteur: +/-10% de la tension nominale
9. Plaque du numéro de série
Lorsque vous commandez des accessoires ou des pièces de rechange ou que vous
réclamez un service, assurez-vous d’avoir en main l’information apparaissant sur la
plaque du numéro de série (numéro de modèle, numéro de série, etc.).
La plaque du numéro de série se trouve dans la partie inférieure gauche du panneau
arrière du HYDRIM L110w G4. Vous verrez une petite étiquette du côté gauche de la
porte destinée au produit chimique.
38
Page 81

10. Warranty
Garantie limitée
Pendant une période d’un an, SciCan garantit que le HYDRIM L110 w G4,
fabriqué à l’état neuf et non utilisé, ne tombera pas en panne en service normal
en raison de défauts de matières premières et de main-d’œuvre qui ne soient
pas dus à un abus, une mauvaise utilisation ou un accident apparents. En cas
de panne due à de tels défauts durant cette période de temps, les mesures
correctives exclusives seront la réparation ou le remplacement, au choix de
SciCan et gratuitement, des pièces défectueuses, à condition que SciCan soit
informée par écrit dans un délai de trente (30) jours de la date de la panne et à
condition que les pièces défectueuses soient renvoyées à SciCan en port payé.
Cette garantie sera considérée comme validée si le produit est accompagné de
l’original de la facture d’achat établie par le détaillant SciCan autorisé et que
cette facture identifie l’article par son numéro de série et indique clairement la
date de l’achat. Aucune autre validation n’est acceptable. Après la période d’un
an, toutes les garanties et autres obligations de SciCan en ce qui concerne
la qualité du produit seront décisivement réputées satisfaites, toute obligation
sera par conséquent éteinte et aucune action pour inobservation de garantie ou
d’obligation ne pourra être intentée contre SciCan.
Toute garantie explicite non indiquée dans le présent document ainsi que toute
garantie implicite ou toute assertion relative aux performances, tout recours
pour rupture de contrat qui, sauf pour cette disposition, pourrait survenir par
implication, par effet d’une loi, par pratique commerciale courante ou par
rapports d’affaires, y compris toute garantie implicite de qualité marchande ou
de conformité à une utilisation particulière en ce qui concerne tous ou n’importe
lequel des produits fabriqués par SciCan, est exclue et déclinée par SciCan.
Pour enregistrer la garantie de votre produit chez SciCan, se rendre
sur Scican.com, cliquer sur le pays approprié, et cliquer sur le bouton
«Warranty Registration».
39
 Loading...