

Schwaiger HGA500 532 User Manual
HGA500 532
GEBRAUCHSANWEISUNG
INSTRUCTIONS
INSTRUCTIONS
DE SERVICE
ISTRUZIONI PER L‘USO
INSTRUCCIONES
INSTRUCTIES
3
1
1
2
5
4
3
6
Schwaiger GmbH
Würzburger Straße 17
7
90579 Langenzenn
Hotline: +49 (0) 9101 702-299
www.schwaiger.de
info@schwaiger.de
BDA_HGA500
BEDIENUNGSANLEITUNG HGA500 532
1. Einführung
Herzlichen Glückwunsch und vielen Dank für den Kauf eines Produkts aus der
SECURE-4-YOU Serie. Im Folgenden erhalten Sie nützliche Hinweise zur Handhabung dieses Produkts. Bitte lesen Sie sich daher die Bedienungsanleitung vollständig und sorgfältig durch.
Allgemeine Sicherheits- & Wartungshinweise
• Dieses Produkt ist für den privaten, nicht gewerblichen Haushaltsgebrauch vorgesehen.
• Bei diesem Produkt handelt es sich um ein elektronisches Produkt, welches nicht in Kinderhände
gehört! Bewahren Sie es deshalb außerhalb der Reichweite von Kindern auf.
• Schützen Sie das Produkt vor Feuchtigkeit, Wasser, Regen, Schnee oder Sprühregen und verwenden Sie das Produkt nur in trockenen Umgebungen, wenn nicht speziell hierauf hingewiesen wird.
• Lassen Sie das Produkt nicht fallen und setzen Sie es keinen starken Erschütterungen aus.
• Führen Sie keine Objekte in die Anschlüsse oder Öffnungen des Produkts ein.
• Zerlegen Sie das Produkt nicht in seine Einzelteile. Das Gerät enthält keine vom Benutzer zu
wartenden Teile. Der unsachgemäße Zusammenbau kann zu elektrischen Schlägen oder Fehlfunktionen führen.
• Reinigen Sie dieses Produkt nur mit einem fusselfreien, maximal leicht feuchtem Tuch und verwenden Sie keine aggressiven Reiniger. Achten Sie hierbei besonders darauf, dass kein Wasser
(keine Flüssig-/ Feuchtigkeit) in das Produkt gelangt.
2. Verpackungsinhalt
• Außensirene
• Montagematerial (Montageschablone, Dübel & Schrauben)
• Bedienungsanleitung & Sicherheitshinweise
Zusätzlich benötigte Batterien: 4x 1,5V LR20 (D)
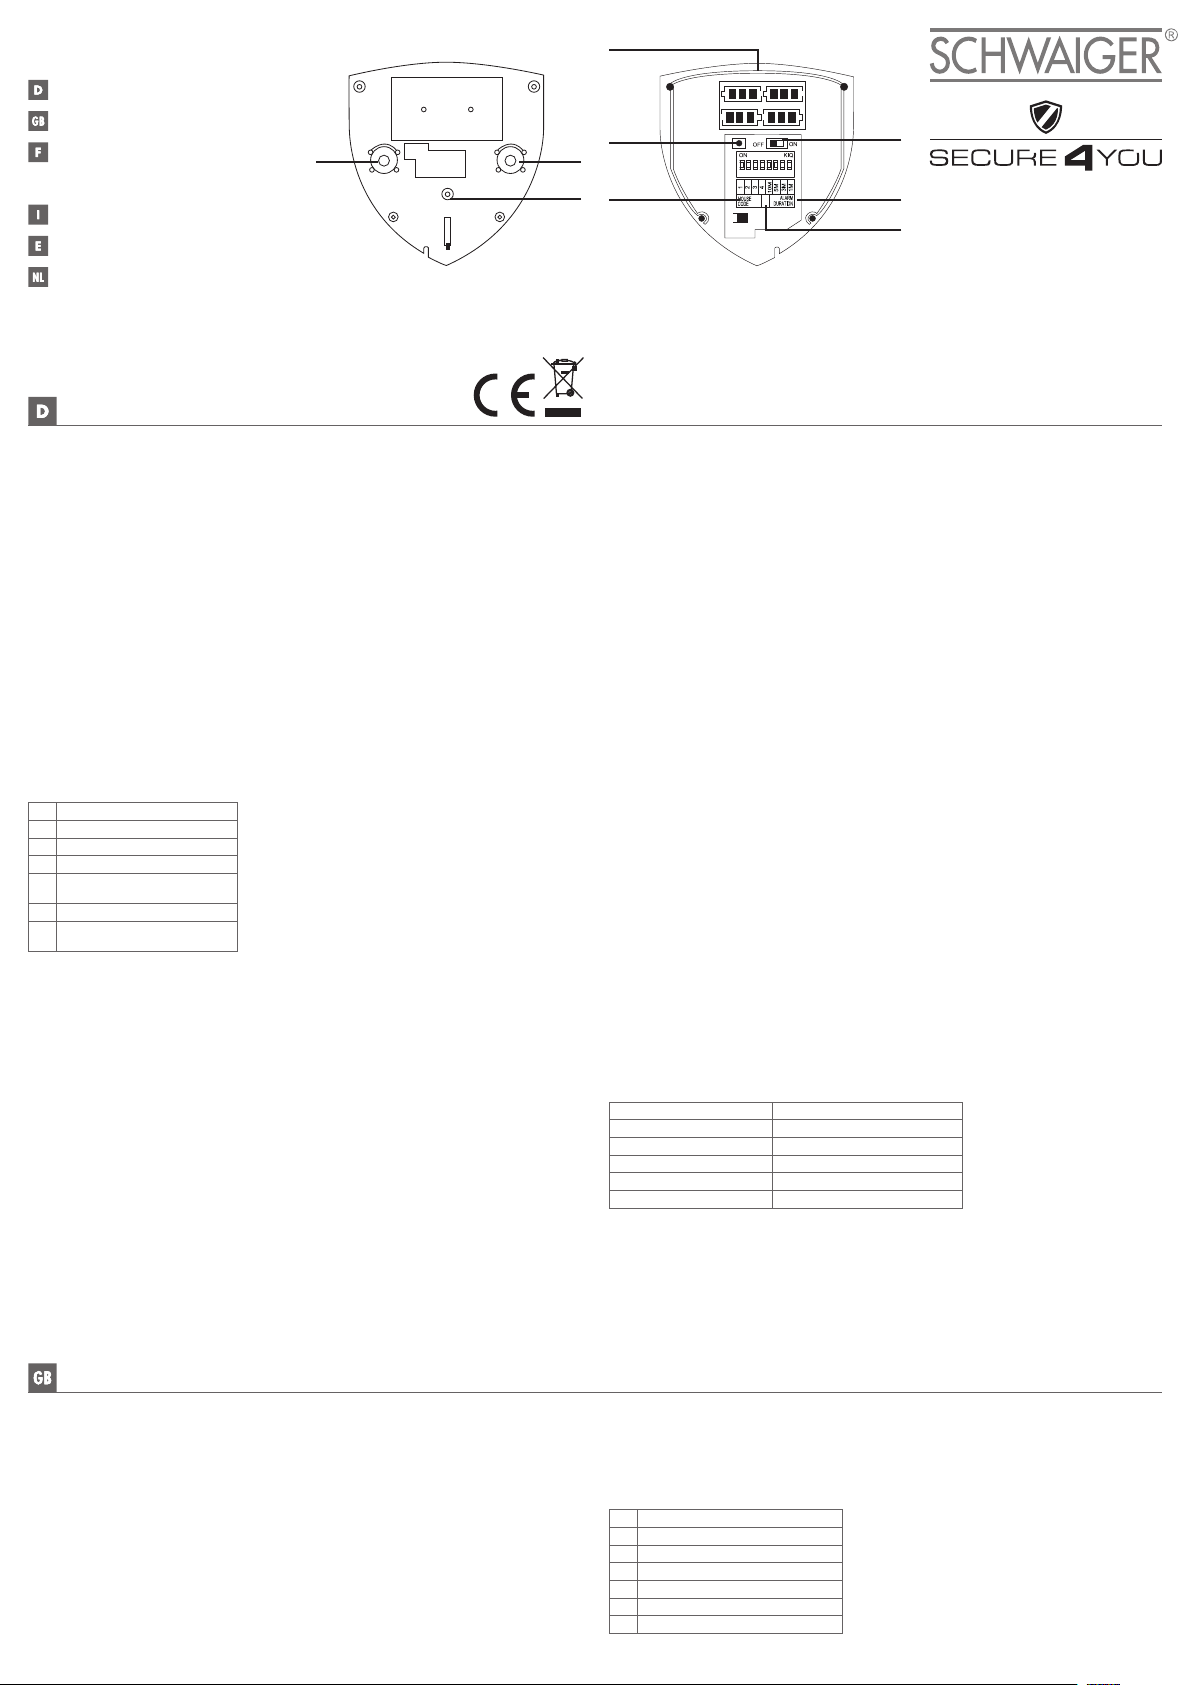
Die Sirene im Detail 3. Bestimmungsgemäßer Gebrauch
1 Sireneneinheit
2 Sabotageschalter
3 POWER-Taste
4 LEARN-Taste
5 Schiebeschalter
Haus-Sicherheits-Code
6 Schiebeschalter Alarmdauer
7 Schiebeschalter
Einschaltverzögerung
erkennt löst diese einen Alarm aus. Das Gehäuse der Außensirene besteht aus einem robusten
Kunststoff und ist witterungsbeständig sowie durch einen Manipulationsschalter geschützt.
Bei diesem Produkt handelt es sich um ein Ergänzungsprodukt für das Schwaiger „Green Guard“ System. Es
arbeitet nur in Verbindung mit einer Zentraleinheit
(z.B. HG1000 oder HG2000) und kann nicht einzeln verwendet werden.
Das Schwaiger „Green Guard“ System dient der Absicherung und Überwachung Ihres Grundstücks/ Zuhauses.
Mithilfe von unterschiedlichen Sensoren können einzelne Bereiche des Gebäudes wie z.B. der Eingangsbereich
überwacht oder abgesichert werden. Das komplette System wird über die Zentraleinheit gesteuert, welche per
Funk mit den unterschiedlichen Sensoren kommuniziert.
Sobald die Zentraleinheit einen Verstoß über die Sensoren
4. Inbetriebnahme
Montagehinweise zur Außensirene
• Dieses Produkt kann sowohl im Innen- als auch im Außenbereich montiert werden.
• Dieses Produkt ist speziell für die Montage an der Wand entwickelt worden.
• Bringen Sie das Produkt gut sichtbar in nicht direkt erreichbarer Höhe an.
• Achten Sie darauf das die Feder des Sabotageschalters, auf der Rückseite der Sirene,
vollständig eingedrückt ist (Klickgeräusch beim einrasten).
• Prüfen Sie vor der Installation die Eignung des Montageorts und überprüfen Sie das Montagematerial. Vergewissern Sie sich, dass keine elektrischen, Wasser-, Gas- oder sonstigen Leitungen an der Montagestelle vorhanden sind.
• Abhängig von Ihrem Montageort kann für die Montage zusätzliches/anderes Montagezubehör
benötigt werden.
Einlegen der Batterien
1) Entfernen Sie die Schraube der Frontabdeckung (an der unteren Spitze der Sirene) mithilfe
eines Kreuzschlitzschraubenziehers und nehmen Sie anschließend die Frontabdeckung ab.
2) Legen Sie 4x D Batterien (polrichtig) entsprechend der Prägung im Batteriefach ein.
3) Nun können Sie entweder die Frontabdeckung wieder montieren oder das Produkt mit Hilfe
der Funk-Fernbedienung entsprechend anlernen.
Anlernen mithilfe der Funk-Fernbedienung
1. Schieben sie den ON/OFF Schalter im Inneren der Sirene auf die Position ON.
(Alle Status LEDs leuchten auf)
2. Drücken Sie die Taste LEARN im inneren der Sirene.
3. Drücken Sie die Taste DISARM lange auf einer der Fernbedienungen, welche bereits in das
Hautsystem eingelernt wurde. Die Alarmsirene bestätigt einen erfolgreichen Verbindungsaufbau zusätzlich mit einem Piepton.
USER MANUAL HGA500 532
HERSTELLERINFORMATION
Sehr geehrter Kunde,
sollten Sie technischen Rat benötigen und Ihr Fach-
händler konnte Ihnen nicht weiterhelfen kontaktieren
Sie bitte unseren technischen Support.
Geschäftszeiten:
Montag bis Freitag: 08:00 - 17:00 Uhr
4. Die Alarmsirene bestätigt zusätzlich die Verbindung zwischen Fernbedienung und Alarmsirene
mit einem weiteren kurzen Piepton sowie einem kurzen Aufleuchten der LEDs.
5. Sollten mehrere Fernbedienungen vorhanden sein, wiederholen Sie diesen Vorgang mit jeder
einzelnen.
6. Nun Ist die Alarmsirene für die anschließende Montage bereit.
MANUFACTURER INFORMATION
Dear Customer,
should you require technical advice and
your retailer could not help please contact
our technical support.
Business hours:
Monday to Friday: 08:00 - 17:00
5. Betrieb
Wichtig!
Drücken Sie immer die Tasten ARM und DISARM gleichzeitig für zwei Sekunden auf einer
der Fernbedienungen, um den Sicherheitsschalter und damit auch die Alarmsirene zu aktivieren/
deaktivieren oder um Einstellung oder den Batteriewechsel vorzunehmen.
Ablauf:
• Drücken Sie die Tasten ARM und DISARM für zwei Sekunden auf einer der Fernbedienungen,
um den Sicherheitsschalter und damit auch die Alarmsirene zu aktivieren.
• Die blauen Status-LEDs erlöschen und rote Status-LED zeigt den aktiven Zustand der
• Alarmsirene an.
• Die Alarmsirene prüft nun ob ein Funksignal von der Zentraleinheit vorhanden ist und zeigt dies
durch einen kurzen Piepton an.
6. Grundfunktionen
Haus-Sicherheits-Code einstellen
Stellen Sie den Haus-Sicherheits-Code Schalter so ein, dass dieser mit dem Hause-Sicherheits-Code der Zentraleinheit übereinstimmen.
Ein-/Ausgangsverzögerung
Die Ein-/Ausgangsverzögerungszeit beträgt in der Standardeinstellung 5 Sekunden. Diese kann
mit Hilfe des Schiebeschalter alternativ auf 30 Sekunden eingestellt werden.
Sabotageschalter
Dieses Produkt verfügt über einen Sabotageschalter. Dieser verhindert bei Gewalteinwirkung oder
Entfernen der Sirene einen Ausfall dieser. Hierbei wird sofort ein lauter Alarm ausgelöst.
Einstellen der Alarmdauer
Die Alarmdauer kann über Schiebeschalter im inneren des Produktes eingestellt werden.
Zur Auswahl stehen hier: 1 Minute, 3 Minute, 5 Minuten.
Wichtig! Es muss einer dieser 3 Zeiten ausgewählt sein!
Funktionstest
Überprüfen Sie regelmäßig die ordnungsgemäße Funktion der Sirene.
Gehen Sie hierfür wie folgt vor:
1. Lösen Sie einen Alarm mit der PANIC Tastenkombination auf der Fernbedienung aus.
2. Nun Löst die Zentrale sowie die Außensirene einen lauten Alarm aus.
3. Wichtig! Dieser Alarm kann nur über die Tasten DISARM auf der Fernbedienung oder durch
Eingabe des 4-stelligen PIN Codes über die Zentraleinheit deaktiviert werden.
Vorsicht! Gefahr von Hörschädigungen
Lauter Alarmton! Setzen Sie Ihr Gehör diesem Ton nicht über einen längeren Zeitraum aus, da
sonst schwere Gehörschäden die Folge sein können! Aktivieren Sie den Alarm nicht in direkter
Nähe Ihrer Ohren!
Bedenken Sie zusätzlich den Alarm tagsüber und nicht nachts auszuprobieren, um Nachbarn nicht
unnötig zu belästigen!
7. Technische Daten
Stromversorgung 4x 1,5 V LR20 (D) – 6,0 V
Betriebsfrequenz 868,35 MHz (+/- 0,5 MHz)
Funkreichweite Max. 250 m (Freifläche)
Haus-Sicherheits-Code Über 4 poligen Jumper
Alarmdauer 1, 3, 5 Minuten
Montageort Außenbereich (Wasserfest)
Haftungsausschluss
Die Schwaiger GmbH übernimmt keinerlei Haftung und
Gewährleistung für Schäden die
aus unsachgemäßer Installation
oder Montage sowie unsachgemäßem Gebrauch des Produkts
oder einer Nichtbeachtung der
Sicherheitshinweise resultieren.
Entsorgung
Elektrische und elektronische Geräte sowie Batterien dürfen nicht mit dem Hausmüll entsorgt werden. Der Verbraucher ist gesetzlich verpflichtet, elektrische und elektronische Geräte sowie Batterien am Ende ihrer Lebensdauer an den dafür eingerichteten, öffentlichen Sammelstellen oder an
die Verkaufsstelle zurückzugeben. Einzelheiten dazu regelt das jeweilige Landesrecht. Das Symbol
auf dem Produkt, der Bedienungsanleitung bzw. der Verpackung weist auf diese Bestimmung hin.
EG Konformitätserklärung
Hiermit erklärt die Schwaiger GmbH, dass dieses Produkt den grundlegenden Anforderungen und
anderen relevanten Bestimmungen der Richtlinie 1999/5/EG entspricht. Die Konformitätserklärung finden Sie unter www.schwaiger.de/downloads. Dieses Produkt wurde gemäß der europäischen R&TTE-Richtlinie 1999/5/EC konzipiert, getestet und gefertigt.
1. Introduction
Thank you and congratulations on buying this product from the SECURE-4-YOU series. In the
following you will find useful information about using this product. Please read all the operating
instructions carefully.
General safety & maintenance instructions
• This product is intended for private, non-commercial household use.
• This product is an electronic product, and is not meant to be handled by children! Please keep
it out of the reach of children.
• Protect the product from dampness, water, rain, snow or drizzle. Only use this product in dry
environments, unless specifically indicated.
• Do not drop the product or expose it to strong vibrations.
• Do not insert any object into any openings or connections on the product.
• Do not disassemble the product. The device contains no parts that can be serviced by the user.
Incorrect assembly may result in electric shock or malfunction.
• Clean this product with a slightly damp, lintfree cloth. Do not use any aggressive cleaning
agents. Make sure no water gets into the product when it is being cleaned.
2. Contents of packaging
• Outdoor siren
• Mounting material (mounting template, dowels and screws)
• Operating instructions and safety instructions
Batteries that are additionally required: 4 x 1.5V LR20 (D)
The sirens in detail 3. Proper use
1 Siren unit
2 Sabotage switch
3 POWER button
4 LEARN button
5 Slide switch house security code
6 Slide switch alarm duration
7 Slide switch switch-on delay
This product is a supplementary product for the
Schwaiger “Green Guard” system. It only works
in connection with a central unit (e.g. HG1000 or
HG2000) and cannot be used individually.
The Schwaiger “Green Guard” system is used for
the securing and monitoring of your property / home.
With the help of different sensors, individual areas of
the building, such as, for example, the entrance zone,
can be monitored or secured. The entire system is
controlled via the central unit, which communicates
with the various sensors by radio.
USER MANUAL HGA500 532
As soon as the central unit recognises a breach through the sensors, this triggers an alarm.
The housing of the outdoor siren consists of a robust plastic and is weather-resistant as well as
protected by a manipulation switch.
4. Commissioning
Assembly instructions for the outdoor siren
• This product can be installed both in indoor and outdoor areas.
• This product is specially designed for mounting on the wall.
• Place the product where it is easily visible and at a height that is not directly reachable.
• Ensure that the spring of the sabotage switch, on the rear side of the siren, is com-
pletely pressed in (clicking noise when snapping in).
• Before installation, check the suitability of the place of assembly and also check the mounting
material. Ensure that no electrical, water, gas or other connections are present at the mounting
location.
• Depending on your mounting location, additional/other mounting accessories may be required
for mounting.
Inserting the batteries
1) Remove the screws of the front cover (on the lower tip of the siren) using a Phillips screw-
driver and then remove the front cover.
2) Place 4 x D batteries (with the correct polarity) accordingly into the battery compartment.
3) Now you can either mount the front cover again or correspondingly addition the product using
the radio remote control system.
Addition with the help of the radio remote control system
1. Push the ON/OFF switch in the interior of the sirens to the ON position.
(All status LEDs light up)
2. Press the LEARN button in the interior of the siren.
3. Press the DISARM button for a long time on one of the remote controls, which was already
added to the main system. The alarm siren additionally confirms the successful establishment
of a connection with a beep.
4. The alarm siren additionally confirms the connection between the remote control and alarm
siren with a further short beep and also the LEDs light up briefly as well.
5. If several remote controls are present, repeat this procedure with each one.
6. Now the alarm siren is ready for the subsequent mounting.
5. Operation
Important:
Always press the ARM and DISARM buttons at the same time for two seconds on one of the
remote controls, in order to activate/deactivate the safety switch and thereby also the alarm siren
or to set or to complete the battery change.
Process:
• Press the ARM and DISARM buttons for two seconds on one of the remote controls, in order
to activate the safety switch and thereby also the alarm siren.
• The blue status LEDs go out and red status LED shows the active state of the alarm siren.
• The alarm siren now checks whether a radio signal from the central unit is present and shows
this through a short beep.
6. Basic functions
Setting house security code
Set the house security code switch so that this agrees with the house security code of the central unit.
Switching on/off delay
The on/off delay time in the standard settings is 5 seconds. This can alternatively be set to 30
seconds with the help of the slide switch.
Sabotage switch
This product has a sabotage switch. If force is used or the sirens are removed, this prevents the
failure of these. In this case a loud alarm is set off immediately.
Setting the alarm duration
The duration of the alarm can be set through the slide switch in the interior of the product.
The options for selection here are: 1 minute, 3 minutes, 5 minutes.
Important: One of these three times must be selected.
Functional test
Regularly check the proper functioning of the sirens.
For this, proceed as follows:
1. Set off an alarm with the PANIC combination of buttons on the remote control.
2. Now the centre as well as the outer siren, set off a loud alarm.
3. Important: This alarm can only be deactivated via the DISARM button on the remote control
or by inputting the 4-digit PIN code via the central unit.
Caution! Risk of hearing loss
Loud alarm tone. Do not expose your hearing to this tone over a longer period of time, because
otherwise, severe hearing loss could be the consequence. Do not activate the alarm when it is
very near to your ears.
In addition, always remember to check the alarm in the day and not at night, so that you do not
unnecessarily disturb your neighbours.
7. Technical data
Disclaimer
Schwaiger GmbH gives no guarantees and assumes no liability whatsover for damages arising
from improper installation or assembly as well as from the improper use of the product or a
Power supply 4 x 1.5 V LR20 (D) – 6.0 V
Operating frequency 868.35 MHz (+/- 0.5 MHz)
Radio range Max. 250 m (open space)
House security code Via 4-polar jumper
Alarm duration 1, 3, 5 minutes
Place of assembly Outdoor area (waterproof)
teries at the end of their service life to the designated public collection points or to return them to
the original point of sale. Particulars relating to this are regulated by the respective national law.
The symbol on the product, the operating instructions, or the packaging refers to these provisions.
failure to comply with the safety
instructions.
Disposal
Electrical and electronic devices including batteries must
not be disposed of with household waste. The user is legally
obliged to return electric and
electronic devices including bat-
EC Declaration of Conformity
Schwaiger GmbH hereby declares that this product conforms to the basic requirements and other relevant regulations of the Directive 1999/5/EC. The declaration of conformity is at www.
schwaiger.de/downloads. This product was designed, tested and manufactured in accordance with
the European R&TTE Directive 1999/5/EC.
MODE D’EMPLOI HGA500 532
1. Introduction
Félicitations et merci beaucoup d’avoir acheté un produit de la série SECURE-4-YOU. Ci-dessous,
vous trouverez des conseils utiles sur la manipulation du produit. Lisez donc les instructions d’utilisation attentivement.
Conditions générales d’utilisation et de sécurité
• Ce produit est destiné à un usage privé, non commercial.
• Ceci est un appareil électronique et ne doit pas être manipulé par des enfants! Veillez donc à le
tenir hors de portée des enfants.
• Protéger le produit de l’humidité, de l’eau, de la pluie, de la neige ou de la bruine. Utilisation
uniquement dans un endroit sec même en l’absence d’indications spécifiques.
• Ne pas faire tomber le produit, ne pas l’exposer à des chocs violents.
• Ne pas insérer d’objets dans les ports et les ouvertures du produit.
• Ne pas démonter le produit. Le dispositif ne contient aucune pièce réparable par l’utilisateur. Un
montage incorrect peut provoquer un choc électrique ou un dysfonctionnement.
• Ne nettoyer le produit qu’avec un chiffon non pelucheux, très légèrement humide. Ne pas utiliser
de nettoyants abrasifs. S’assurer particulièrement que de l’eau ne pénètre pas dans l’appareil.
2. Contenu de l‘emballage
• Alarme extérieure
• Matériel d‘installation (gabarit de montage, chevilles et vis)
• Mode d‘emploi et instructions de sécurité
Piles additionnelles nécessaires : 4x 1,5V LR20 (D)
La sirène en détail 3. Utilisation prévue
1 Unité alarme
2 Interrupteur antisabotage
3 Bouton POWER
4 Bouton LEARN
5 Interrupteur à coulisse code
sécurité maison
6 Interrupteur à coulisse de la
durée d‘alarme
7 Interrupteur à coulisse du
retard d‘activation
4. Mise en service
Instructions de montage pour l‘alarme extérieure
• Ce produit peut aussi bien être monté à l‘intérieur qu‘en extérieur.
• Ce produit est spécialement conçu pour être monté contre un mur.
• Positionnez le produit de manière à ce qu‘il soit bien visible et à une hauteur qui ne soit pas
directement accessible.
• Vérifiez que le ressort de l‘interrupteur antisabotage à l‘arrière de la sirène est complètement comprimé (on entend un clic quand on le comprime).
• Assurez-vous avant l‘installation que le lieu de montage est adéquat et vérifiez le matériel de
montage. Assurez-vous qu‘il n‘y a aucun conduit électrique, d‘eau, de gaz ou autre à l‘emplacement du montage.
• Selon votre lieu de montage il est possible que des accessoires de montage différents ou supplémentaires s‘avèrent nécessaires.
Introduction des piles
1) Retirez les vis du couvercle avant (sur le bord inférieur de la sirène) avec un tournevis cruci-
forme puis retirez le couvercle avant.
2) Insérez 4 piles D (en respectant les polarités) en suivant le dessin en relief fourni dans le
compartiment à pile.
3) Vous pouvez maintenant soit remonter le couvercle avant ou procéder à l‘intégration du
produit avec la télécommande.
Intégration à l‘aide de la télécommande
1. Appuyez sur l‘interrupteur ON/OFF à l‘intérieur de la Sirène pour le mettre en position ON.
(Tous les LED d‘état s’allument)
2. Appuyez sur la touche LEARN à l‘intérieur de la sirène.
Ce produit est un produit complémentaire du système
«Green Guard» de Schwaiger. Il ne fonctionne
qu‘en liaison avec une unité centrale (par ex.
HG1000 ou HG2000) et ne peut être utilisé seul.
Le système „Green Guard“ de Schwaiger sert à protéger et à surveiller votre propriété/maison. À l‘aide de
divers capteurs, des zones individuelles du bâtiment,
par exemple la zone d‘entrée, peuvent être surveillées
ou protégées. Le système complet est commandé par
l‘unité centrale, qui communique avec les différents
capteurs par radio. Dès que l‘unité centrale détecte
une infraction à l‘aide des capteurs, elle déclenche une
alarme. Le boîtier de la sirène extérieure est fabriqué
avec un plastique robuste, il résiste aux intempéries et
comprend une protection anti manipulation.
3. Appuyez sur la touche DISARM pendant un long moment sur l‘une des télécommandes
déjà intégrées dans le système principal. L‘alarme confirme que l‘intégration a réussi avec un
bip bref.
4. L‘alarme confirme de plus la connexion entre la télécommande et l‘alarme sonore par un bip
bref supplémentaire et aussi en faisant clignoter brièvement les LED.
Dans le cas de plusieurs télécommandes présentes, répétez cette procédure pour chacune d‘elles.
5.
6. L‘alarme sonore est maintenant prête à être montée.
5. Fonctionnement
Important !
Appuyez toujours sur les boutons ARM et DISARM simultanément pendant deux secondes sur
l‘une des télécommandes, afin d‘activer/désactiver l‘interrupteur de sécurité et ainsi aussi l‘alarme
sonore ou pour le paramétrage ou pour remplacer la pile.
Processus :
• Appuyez sur les boutons ARM et DISARM simultanément pendant deux secondes sur l‘une
des télécommandes, afin d‘activer l‘interrupteur de sécurité et ainsi aussi l‘alarme sonore.
• Les LED d‘état bleus s‘éteignent et les LED d‘état rouge indiquent que l‘alarme sonore est activée.
• La sirène d‘alarme vérifie maintenant s‘il y a un signal radio émis par l‘unité centrale et indique
cet état par un bref bip.
6. Fonctions de base
Paramétrage du code sécurité maison
Paramétrez l‘interrupteur du code sécurité maison de manière à ce que celui-ci s‘accorde avec le
code sécurité maison de l‘unité centrale.
Retard entrée/sortie
En configuration standard le retard est de 5 secondes. Il peut être aussi réglé sur 30 secondes
avec l‘interrupteur à coulisse.
Interrupteur antisabotage
Ce produit dispose d‘une protection antisabotage. Il l‘empêche de tomber en panne en cas d‘utilisation de la force ou si les sirènes sont enlevées. Dans ce cas une alarme sonore se déclenche
immédiatement.
Réglage de la durée d‘alarme
La durée de l‘alarme peut être réglée avec l‘interrupteur à coulisse qui se trouve à l‘intérieur du
produit. Les options de sélections ici sont les suivantes : 1 minute, 3 minutes, 5 minutes.
Important ! Il faut qu‘une de ces 3 durées soit sélectionnée !
Test de fonctionnement
Vérifiez régulièrement que la sirène fonctionne bien.
Pour cela, procédez comme suit :
1. Déclenchez une alarme avec la combinaison de boutons PANIC sur la télécommande.
2. La centrale ainsi que la sirène extérieure déclenchent maintenant une alarme sonore.
3. Important ! Cette alarme ne peut être désactivée qu‘avec les boutons DISARM sur la
télécommande ou bien en saisissant le code PIN à quatre chiffres sur l‘unité centrale.
Attention ! Risque de lésions auditives
Alarme sonore fort ! N‘exposez pas votre ouïe à ce son pendant un temps prolongé, sinon vous
encourez le risque de dommages auditifs graves ! N‘activez pas l‘alarme à proximité immédiate de
vos oreilles ! N‘oubliez pas non plus de tester l‘alarme pendant la journée et pas pendant la nuit
pour éviter de gêner vos voisins inutilement !
7. Données techniques
Alimentation électrique 4x 1,5 V LR20 (D) – 6,0 V
Fréquence de fonctionnement 868,35 MHz (+/- 0,5 MHz)
Portée signal radio Max. 250 m (sans obstacles)
Code sécurité maison sur cavalier à 4 broches
Durée de l'alarme 1, 3, 5 minutes
Lieu de montage Zone extérieur (étanche)
Exclusion de responsabilité
Schwaiger GmbH décline toute responsabilité et garantie pour les dommages résultants d’une
mauvaise installation ou assemblage tout comme une mauvaise utilisation du produit ou du
non-respect des consignes de sécurité.
 Loading...