

Page 1

Bedienungsanleitung
POWERED BY
Page 2

INHALT
1. EINFÜHRUNG
Deutsch
1. EINFÜHRUNG ....................................................... 3
2. BATTERIE AUFLADEN ................................................4
3. MONTAGEANLEITUNG ...............................................5
3.1 AUSBAU DES VORHANDENEN AKUSTIKKRAGENS ............................5
3.2 ANSCHLUSS DES ANTENNEN KABELS ....................................... 5
3.3 EINBAU DES SRCSYSTEM™ PRO ........................................... 6
3.4 POSITIONIEREN DER LAUTSPRECHER ...................................... 6
3.5 POSITIONIEREN DES MIKROFONS ......................................... 7
3.6 AUSBAU DES SRCSYSTEM™ PRO AUS DEM HELM ............................ 7
3.7 AUFSETZEN UND ABNEHMEN DES HELMS .................................. 7
3.8 REINIGEN DES SRCSYSTEM™ HEADSETS ................................... 8
4. ANPASSUNG UND EINSTELLUNGEN ....................................8
5. ERSTE SCHRITTE ....................................................9
5.1 ALLGEMEINE FUNKTIONEN ................................................ 9
5.2 LEDANZEIGE AM GERÄT .................................................9
5.3 AUDIOQUELLEN UND RANGORDNUNG. . . . . . . . . . . . . . . . . . . . . . . . . . . . . . . . . . . . . . 9
5.4 SPRACHSTEUERUNG .................................................... 10
5.5 SPRACHVERBINDUNG VOX EINSTELLUNGEN .............................. 10
6. INTERKOM ........................................................11
6.1 „1+8” INTERKOM ....................................................... 11
6.2 INTERKOM MIT KANAL A/B .............................................. 12
6.3 CLICKTOLINK CTL INTERKOM. . . . . . . . . . . . . . . . . . . . . . . . . . . . . . . . . . . . . . . . . . . 14
6.4 BESETZTSIGNAL .......................................................14
6.5 EMPFANG VON INTERKOMANRUFEN ...................................... 14
7. KOPPELN UND NUTZEN VON GERÄTEN: HANDY, GPS NAVI UND
MP3- PLAYER ......................................................15
7.1 KOPPELUNG BLUETOOTHKANÄLE 1 UND 2 ................................ 15
7.2 ANRUFE TÄTIGEN UND EMPFANGEN ....................................... 16
7.3 MUSIK HÖREN ÜBER A2DP ............................................... 16
7.4 MUSIK TEILEN .......................................................... 16
8. UKW-RADIO .......................................................17
8.1 RADIOSENDERSUCHE .................................................... 17
8.2 AUTOMATISCHE RADIOSENDERSUCHE .................................... 17
9. FEHLERBEHEBUNG ................................................17
10. KUNDENDIENST ...................................................18
11. MITTEILUNGEN ...................................................18
Dies ist Version 1.0 der Bedienungsanleitung. Unter www.schuberth.com/leadmin/
downloads/SRC/SRC-Sys tem_Manual-1.pdf nden Sie stets die jeweils aktuelle Version
(Updates) in verschiedenen Sprachen, inkl. Erklärungen der neusten Funktionen und Features Ihres
SRC-Sy stem™ Headset s.
Bitte p rüfen Sie je tzt und auc h in Zukunf t, ob Sie die akt uellste Ver sion haben und l aden Sie stet s die
neueste Version in Ihrer bevorzugten Sprache herunter.
Herzlichen Glückwunsch und vielen Dank, dass Sie sich für das SRC-System™ PRO
Bluetooth® Kommunikations- und Unterhaltungssystem für Schuberth-Helme
entschieden haben. Diese Gebrauchsanleitung wird Ihnen beim Einstellen,
Gebrauch und Betrieb Ihres
SRC-System™ PRO bietet unter anderem folgende Funktionen:
Das
SRC-System™ PRO behilich sein.
KOMMUNIKATIONSOPTIONEN
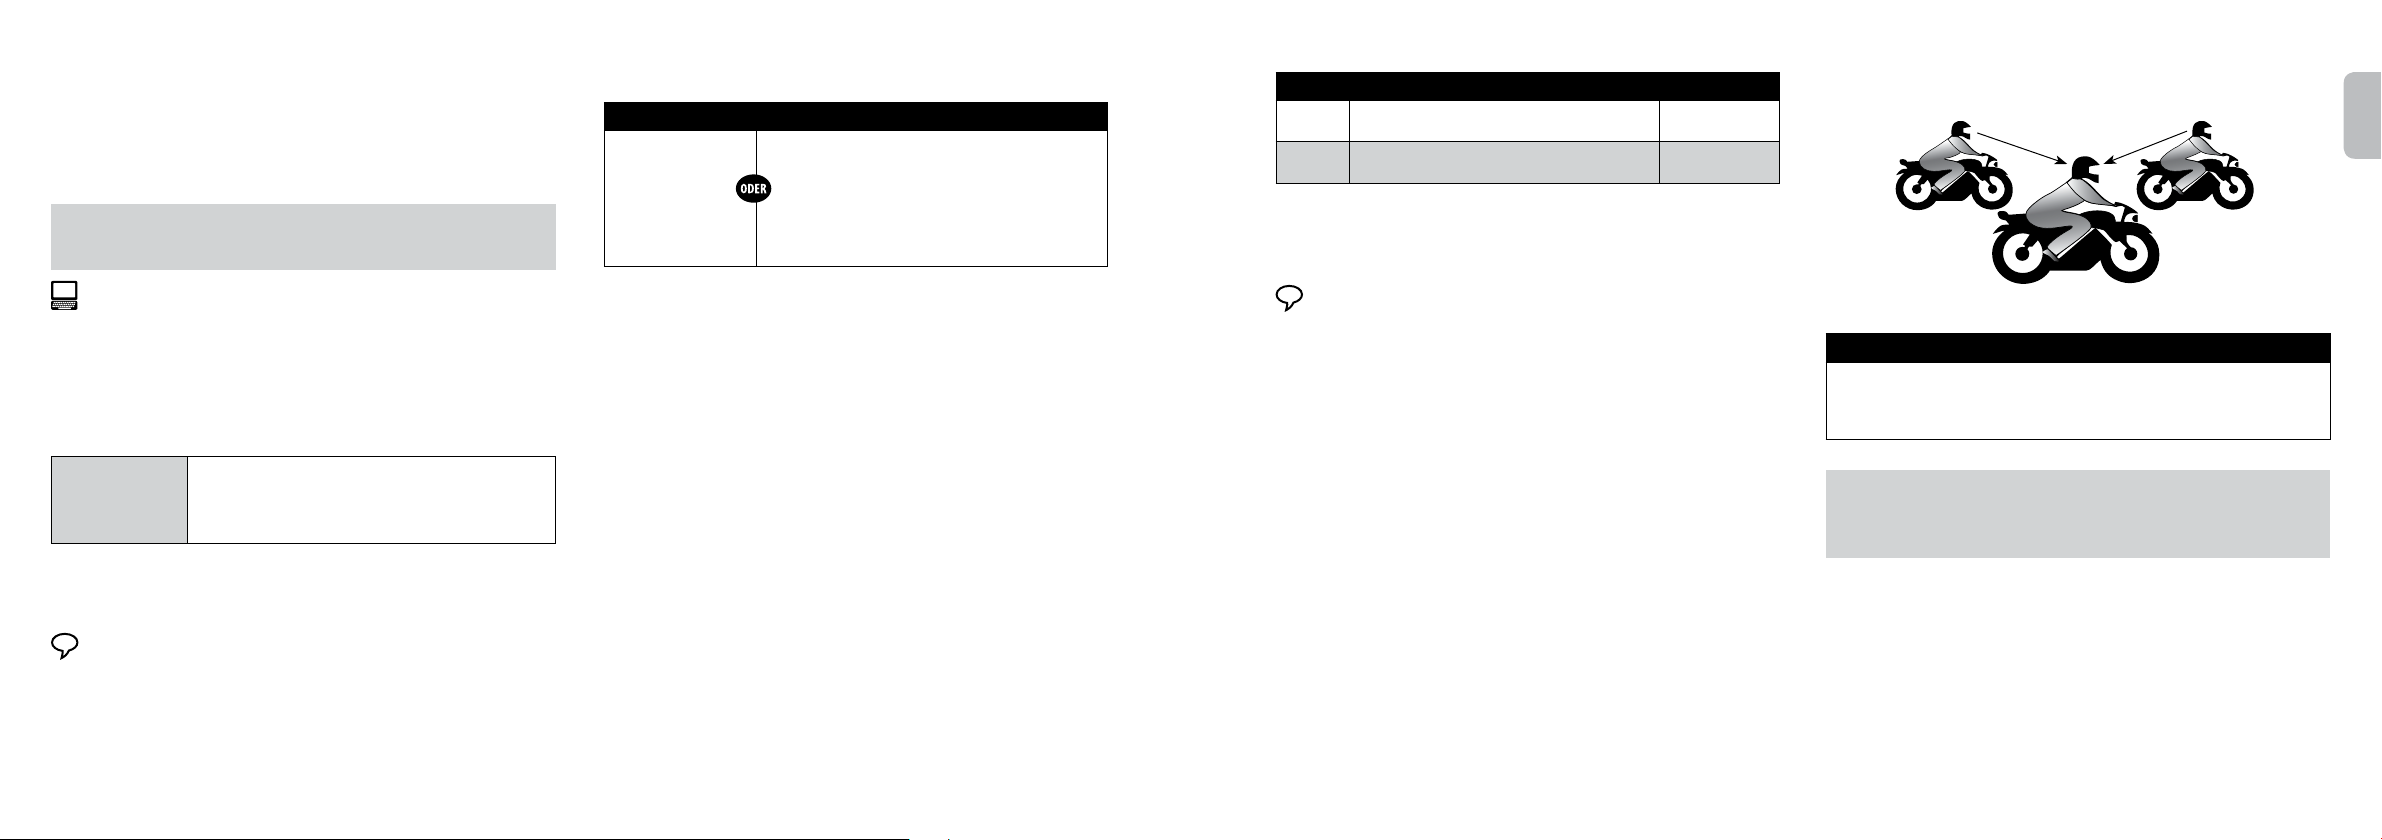
• 2, 3 o der 4-Fahrer-Konferenzmodus für einen Bereich von bis zu 1 km*
• Click-to-Link® Kommunikation: Für spontane Verbindungen zu anderen
Motorradfahrern in der Nähe
• „1+8” Interkom-Pendeln mit 8 zusätzlichen Teilnehmern
MULTI-GERÄTEANSCHLUSS
• Bluetooth Handy / GPS Navi Gerät
• Drahtlose A2DP/ MP3 Verbindung für Stereoempfang
ENTERTAINMENT-OPTIONEN
• D rahtloses Musik-Streaming über Geräte mit Bluetooth Stereo A2DP und
AVRCP-Prolen
• Eingebautes UKW-Radio mit 6 Senderspeichern und automatischem Sendersuchlauf
©
Cardo Community
• Software-Ak tualisierungen und Funktionserweiterungen
• Online-Einrichten von Interkom Freundelisten über die „1+8” Funktion
• Die Einstellungen anpassen
SPITZENTECHNOLOGIE
➤ Sprachsteuerung und VOX-Technologie:
• Sprachbefehligte Aufnahme und Annahme von Handygesprächen
• Sprachbefehligte Annahme von Interkomanrufen
➤ AGC Technologie (Automat ic Gain Control) sorgt f ür automatische
Lautstärkenanpassung gemäss Umgebungsgeräusche und Fahrgeschwindigkeit
( auch manuell justierbar). Der AGC-Empndlichkeitsgrad kann auch individuell
eingestellt werden.
➤ VOX Technologie und Sprachsteuerung für sichere und freihändige Bedienung
von Schlüsselfunktionen. Der VOX-Empndlichkeitsgrad kann auch individuell
eingestellt werden.
➤ PLC Technologie (Packet Los s Concealment) für digit ale Überbrückung vo n Audio-
Datenverlust in Echtzeit in schwierigem Gelände.
➤ Software-Aktualisierungen über jeden PC / Mac
(Mindestanforderung: Windows® XP / Mac OS X 10.7).
➤ Statusansagen informieren Sie per Audiosignal mit wem o der mit welchem Gerät
Sie jeweils verbunden sind.
➤ Volume-per- Mode: Ihre jeweils per Audioquelle gewählte Lautstärke wird
automatisch gespeichert und entsprechend angewandt.
Wir wünschen Ihnen viel Freude mit Ihrem SRC-System™ PRO und sind
auch weiterhin stets für Sie verfügbar. Schreiben Sie uns einfach an:
Kundenservice@schuberth.com. Gerne nehmen wir Ihre Fragen, Vor schläge
oder Kommentare entgegen.
* Bei schwierigen Umgebungsbedingungen (dichter Wald, eng bebautes Terrain, dichter Verkehr us w.)
verringert sich die Interkom-Reichweite entsprechend. Mit zunehmend verbe sserten Bedingungen,
vergrös sert sich di e Reichweite er neut.
2
| SRCS Pro SRCS Pro |
3
Page 3
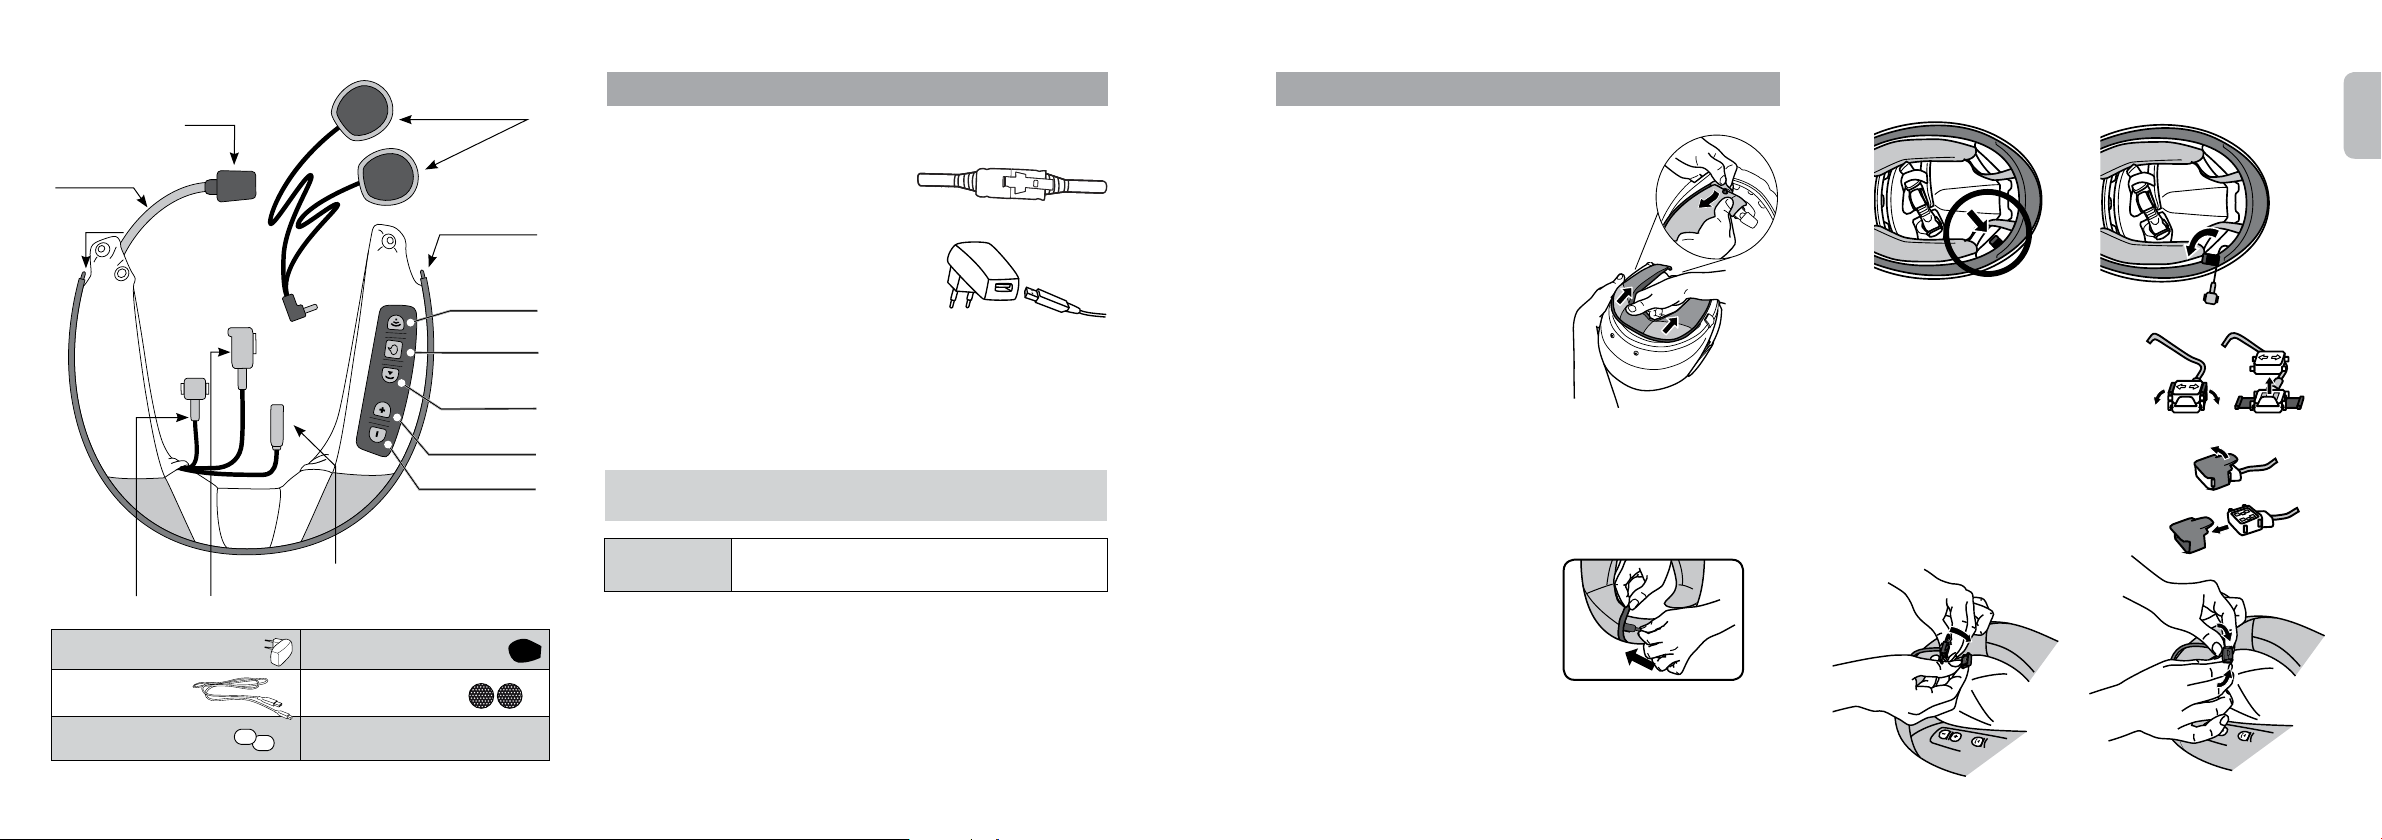
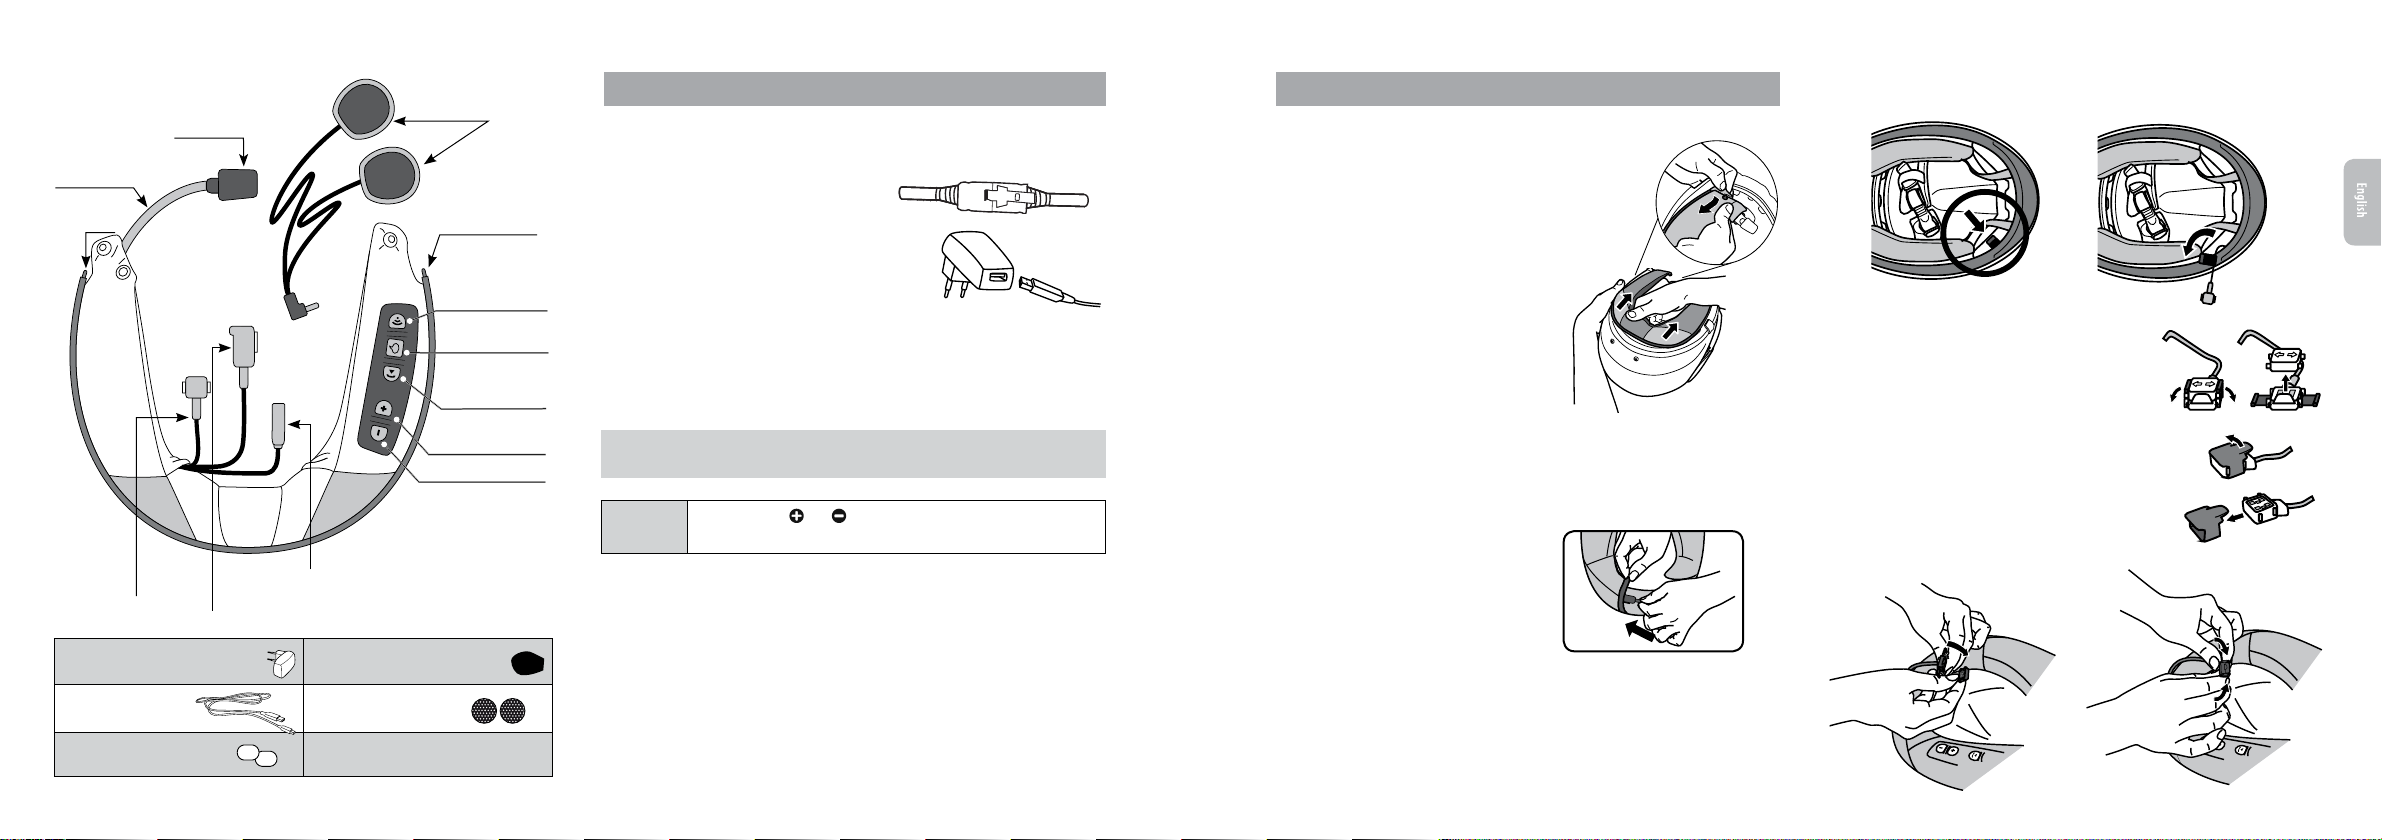
Schwanenhals
wird sichtbar
Antennenanschluss
herausziehen
Pin
Antennen-
anschluss
Ladegerät
Mikrofon
USB Ladebuchse
•Buchse für Ladekabel
• zum Anschluss an einen PC/MAC
Windschutz für Mikrofon
Lautsprecher anschluss
Zwei
Lautsprecher
Pin
Interkom
Sprachsteuerung
• EIN/AUS
Handy / Musik
Lautstärke +
Lautstärke –
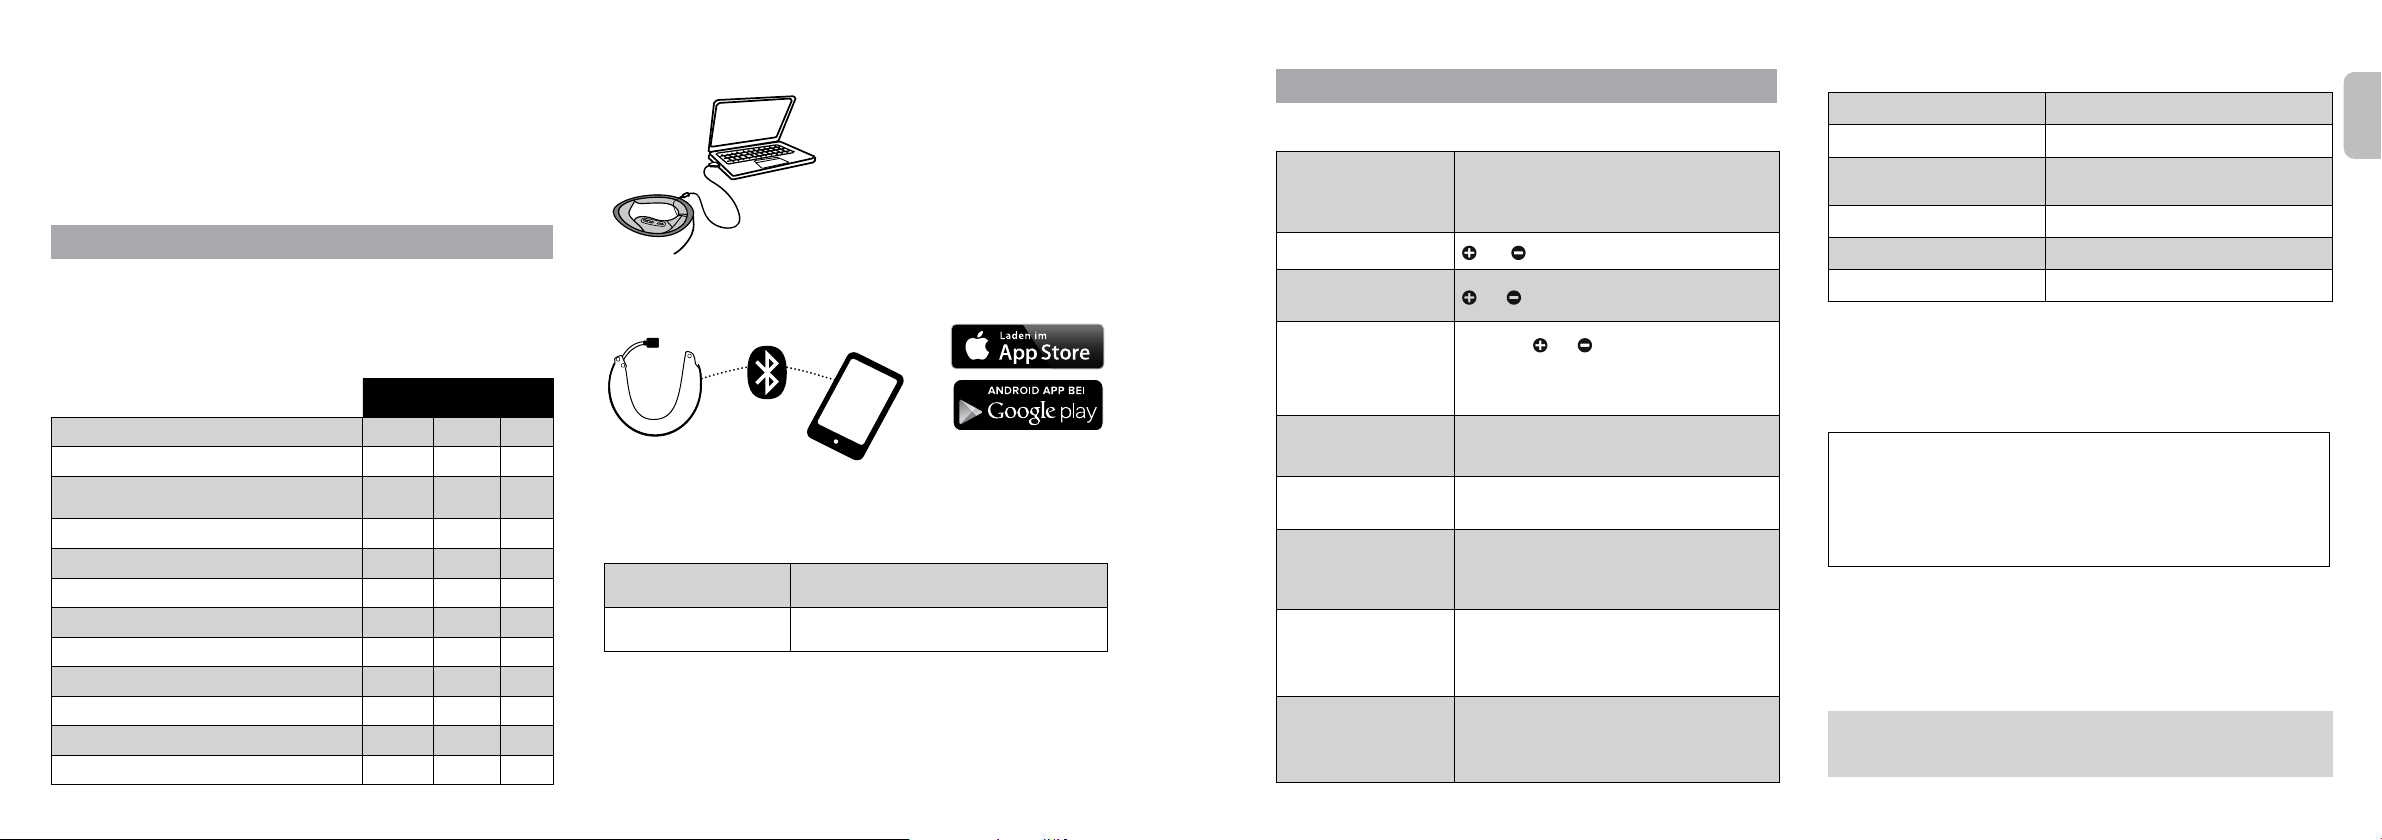
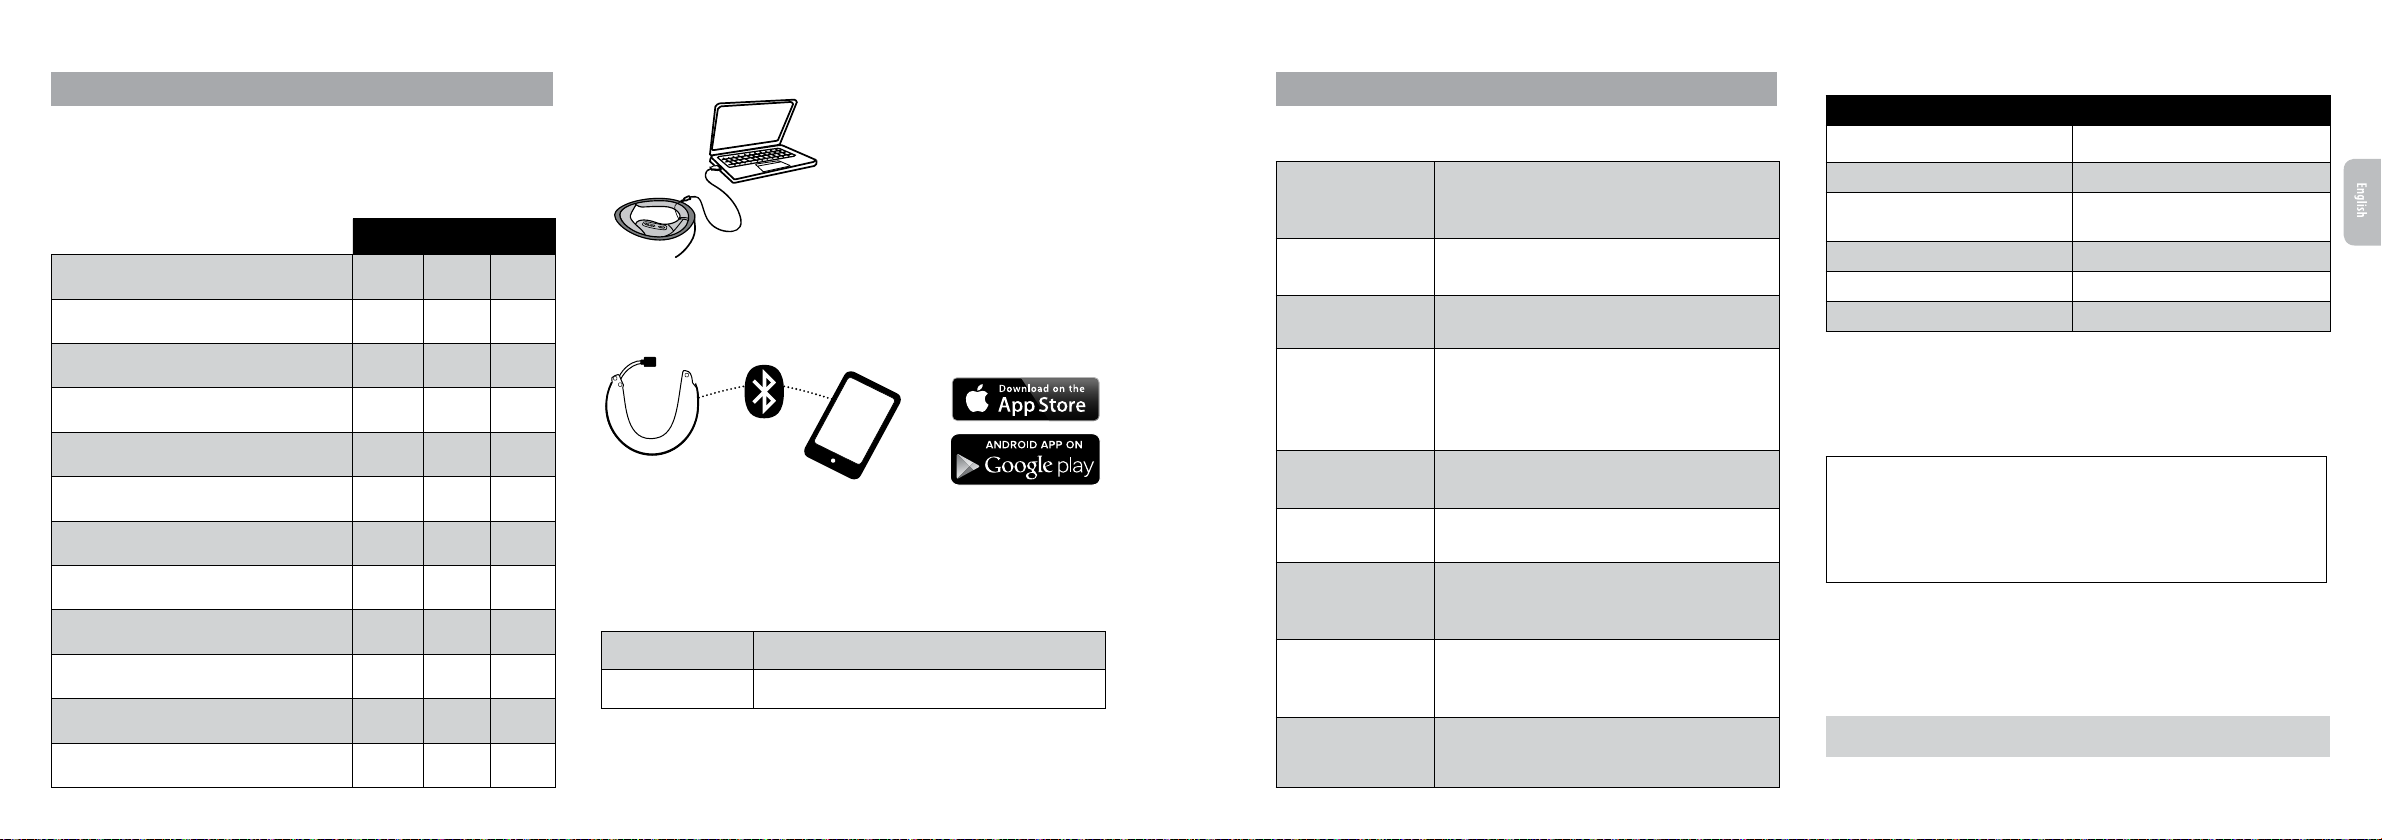
2. BATTERIE AUFLADEN
Bitte beachten Sie: Ihr SRC-System™ PRO muss vor der ersten
Inbetriebnahme mindestens 4 Stunden lang aufgeladen werden.
1. Heben Sie die Kappe an.
2. Das USB Kabel in die L adebuchse einste cken.
3. USB-Steckerende (and eres Ende des USB-Kab els) a n einem freien USB-Por t am
3. MONTAGEANLEITUNG
3.1 AUSBAU DES VORHANDENEN AKUSTIKKRAGENS
Entfernen Sie zuerst den bestehenden
Akustikkragen vom Helm wie folgt:
1. Önen Sie beide Druckknöpfe.
1. Ziehen Sie den Antennenanschluss (welcher durch einen roten Anhänger
gekennzeichnet ist) aus dem hinteren Bereich des Helms heraus.
Deutsch
Computer oder am Wandladegerät einstecken.
4. Während des L adevorgangs leuchte t die LED rot
und erlischt nach Beendigung des Ladevorgangs.
Das USB Verbindungskabel hat zwei
Verwendungszwecke:
1. Zum Au aden Ihres Headset s über eine Steckdose od er über einen USB
Anschluss Ihres PC´s
2.
Zum Herunterladen von Software-Updates über einen PC / Mac (s. Absatz 4
für weitere Informationen).
Um ein Eindringen von Feuchtig keit zu verhindern, sollten Sie die
Ladebuchse stets fest mit der Kappe verschließen.
2. Lösen Sie den Akustikkragen beginnend von
hinten aus der Fixierung.
3. Ziehen Sie die Pins am vorderen Bereich des
Akustikkragens aus den Önungen heraus.
3.2 ANSCHLUSS DES ANTENNEN KABELS
Ihr SRC-System™ PRO verfügt über ein Antennenkabel, welches mit dem
eingebauten Antennenanschluss im Schuberth- Helm verbunden werden muss.
Antennenanhänger
2. Bewegen Sie die beiden Verschlüsse für die
Schutzkappe des Antennenanschlus ses am Headset
nach unten und entfernen Sie anschließend die
Schutzkappe.
3. Ent fernen Sie die Schut zabdeckung vom
Antennenanschluss des Helms.
4. Verbinden Sie beide Antennenanschlüsse
miteinander und verriegeln Sie diese mit Hilfe der
Verschlüsse.
A. B.
A.
B.
Batteriekontrolle Im Standby, + und - 5 Sek. lang betätige n
• BLAU = voll • LILA = halbvoll • ROT = fast leer
Stellen
Sie sicher, dass die Schut zkappe des
USB-Anschlusses korrekt befestigt ist und
verstauen Sie diesen anschließend in der
dafür vorgesehenen Tasche im Nackenbereich
des SRC-System™ PRO
.
USB Verbindungskabel
Klettpolste r
4
| SRCS Pro SRCS Pro |
Lautsprecher Unterlage
Bedienungsanleitung und Sticker
5
Page 4
5. Verstauen Sie die verbundenen Anschlüsse in der
Pin
dafür vorgesehenen Tasche im Nackenbereich.
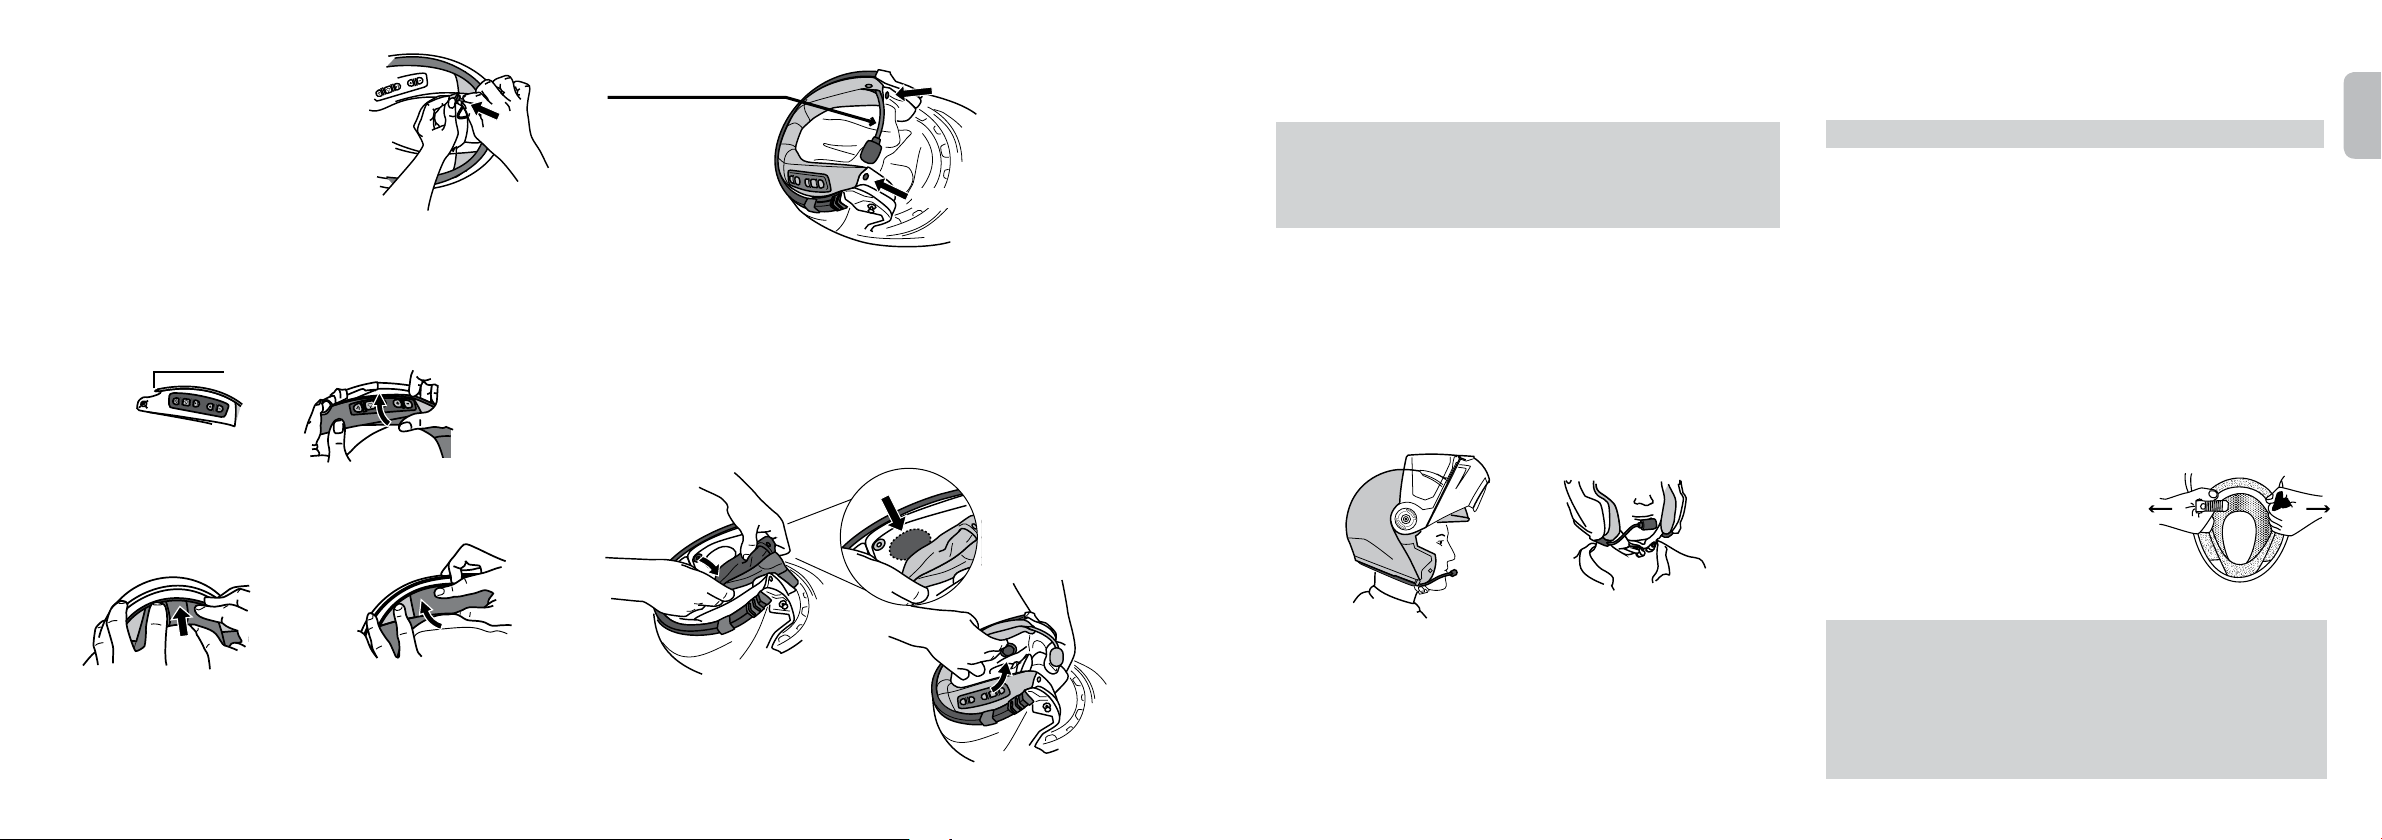
3.3 EINBAU DES SRCSYSTEM™ PRO
1. Stel len Sie sicher, dass sich die Lau tsprecher und das Mik rofon im Innern des
Helms benden.
2. Stecken Sie den am
SRC-System™ PRO
vorhandenen Stift in die dafür
vorgesehene runde Önung unter der Helmunterkante des Helms und
schließen Sie den Druckknopf.
3. Wiederholen Sie den vorigen Schritt für die gegenüberliegende Seite.
4. S chieben Sie das
SRC-System™ PRO beginnend vom hinteren Bereich
schrittweise in den Führungsspalt der Helmunterkante.
5. Prüfen Sie den korrekten Sitz des Schwanenhals-Mikrofons im Helm.
Schwanenhals-Mikrofon
Druckknopf
Druckknopf
3.4 POSITIONIEREN DER LAUTSPRECHER
Um eine optimale Audioleistung zu erzielen, sollten beide Lautsprecher
möglichst nah an den Ohren positionier t sein.
FÜHREN SIE FOLGENDE S CHRITTE AUF BEIDEN SEITEN DURCH:
1. Lösen Sie die Wangenpolster durch Herausziehen des jeweils hinteren Pins aus den
rot markierten Steckvorrichtungen.
2. Positionieren Sie die Klettpolster in den dafür vorgesehenen Ausschnitten an der EPSSchale. Platzieren Sie anschließend die Lautsprecher passig auf den Klettpolstern.
3. Knöpfen Sie die Wangenpolster mit Hilfe der Pins an die rot mark ierten Steckvorrichtungen an.
Die
zusätzlichen Lautsprecherunterlagen können verwendet werden, um die
Lautsprecher Ihren persönlichen Wünschen entsprechend näher am Ohr zu
positionieren und somit eine optimale Lautstärke zu gewährleisten.
Platzieren
Sie die Unterlagen direkt auf den Klettpolstern und a nschließend die
Lautsprecher direkt auf den Unterlagen.
3.5 POSITIONIEREN DES MIKROFONS
Um das schwenkbare Kinnteil des Helms auch über dem Schwanenhals-Mik rofon
leicht schließen zu können, sollten Sie zuerst das dreieckige Anti-Noise-Pad
ablösen.
Danach verfahren Sie wie folgt:
1. Justieren Sie den Schwanenhals, wie auf der Abbildung dargestellt.
2. Ziehen Sie das Mikrofon bis auf Berührungsnähe an den Mund heran, wobei die
ache Mikrofonseite fast auf den Lippen auiegt.
3. Schwenken Sie dann das Kinnteil bis zum Einrasten herunter.
4. Bei gesc hlo ssenem K innteil und oenem Visier justieren Sie erneut mit der
Hand die Mikr ofonposition, inde m Sie es nun nach vorne drüc ken, so dass
es gegenüb er des Mundes auf der Inne nseite des Kinnteils si tzt. Die obigen
Schritte können am besten mit beiden Händen vollzogen werden. Führen Sie
diese Schritte niemals beim Fahren durch.
3.6 AUSBAU DES SRCSYSTEM™ PRO AUS DEM HELM
1. Lö sen Sie beide Lautsp recher vom Klettp olster am Helm.
WICHTIG: Ziehen
2. Lösen Sie die Steckverbindung zwischen Antenne und
3. Lösen Sie das
Sie niemals am Antennenanschluss
SRC-System™ PRO
durch behutsames Ziehen aus der Fixierung.
.
SRC-System™ PRO
.
Beginnen Sie dabei im vorderen Helmbereich.
4. Ziehen Sie die Stifte an den vorderen Enden des Akustikkragens aus den
Önungen heraus.
5. Önen Sie beide Druckknöpfe.
3.7 AUFSETZEN UND ABNEHMEN DES HELMS
Die elektronischen Komponenten Ihres Headsets sind innerhalb des
SRC-System™ PRO Akustikkragens sicher untergebracht. Um das Aufsetzen bzw.
Abnehmen Ihres Helms möglichst einfach zu vollziehen, empfehlen wir wie folgt
vorzugehen
1. Greifen und ziehen Sie kräftig beide Kinnriemen auseinander, um so eine
möglichst weite Helmönung zu erzielen.
2. Während Sie die Riemen auseinanderziehen,
ziehen Sie den Helm über Ihren Kopf, beginnend
vom Hinterkopf her.
3. Zum Abnehmen des Helms ziehen Sie die
Kinnriemen erneut auseinander und ziehen Sie
dann den Helm nach oben ab.
HINWEIS:
Ihr SRC-System™ PRO
Bauteile enthä lt, kann es vorkommen, dass Sie da s Aufsetzen bzw. Abnehmen d es
Helms mit eingebautem
Durch
das regelmäßi ge Auf- und Absetzen des Helms , wird der Akustikkragen des
SRC-System™ PRO
wurde für höchs ten Komfort entwickelt. D a
SRC-System™ PRO
mit der Zeit exibler.
anders als gewohnt wahrnehmen.
dieses umfangreiche
Deutsch
6
| SRCS Pro SRCS Pro |
7
Page 5
3.8 REINIGEN DES SRCSYSTEM™ HEADSETS
Zum Reinigen des Akustikkragens schließen Sie zuerst die USB-Kappe des
SRC-System™ PRO
. Benutzen Sie danach beim Reinigen ein nur leicht und
lauwarm angefeuchtetes Tuch und vermeiden Sie es, den Akus tikkragen in Wasser
oder andere Flüssigkeiten zu tauchen. Mikrofon und Lautsprecher sollten nicht in
Kontakt mit Flüssigkeiten kommen.
4. ANPASSUNG UND EINSTELLUNGEN
Holen Sie das Meis te aus Ihrem SRC-System™ PRO heraus, indem Sie Einstellungen
ändern und Ihre Gerät nach eigenen Wünschen persönlich anpassen.
Es stehen drei Optionen zur Änderung der Einstellungen zur Verfügung: über die
Cardo Community auf einem PC / Mac, über die Cardo SmartSet App, oder über die
Menü Einstellungen am Gerät.
Cardo
Buddy-Namen für 1+8 Interkom einstellen
Freunde zur Buddy Liste hinzufügen
Den neuesten Software Aktualisierung
herunterladen
6 UKW-Radiosender einstellen
Die Hot-Dial-Nummer einrichten
Die A2DP / Interkom Audio-Priorität ändern
Die Sprache der Spracherkennung ändern
Akustische Statusansagen deaktivieren
Die AGC-Sensibilität der Lautsprecher ändern
Den VOX Betriebsmodus ändern
Die VOX-Sensibilität f ür das Mik rofon ändern
Click-to-Link aktivieren/deaktivieren
Community
SmartSet
App
Menu
CARDO COMMUNITY PLATTFORM
http://communit y.cardosys tems.com
Mindestanforderung: Windows® XP™ / Mac OS X 10.7
CARDO SMARTSET APP
Cardo
SmartSet
App
EINSTELLUNGENMENÜ
Das Menü ist in verschiedenen Sprachen verfügbar.
Gehen Sie in das Menü
Verlassen Sie das Menü
Im Standby,
2 Sekunden lang betätigen
µ
2 Sek. lang b etätigen
µ
Besuchen Sie
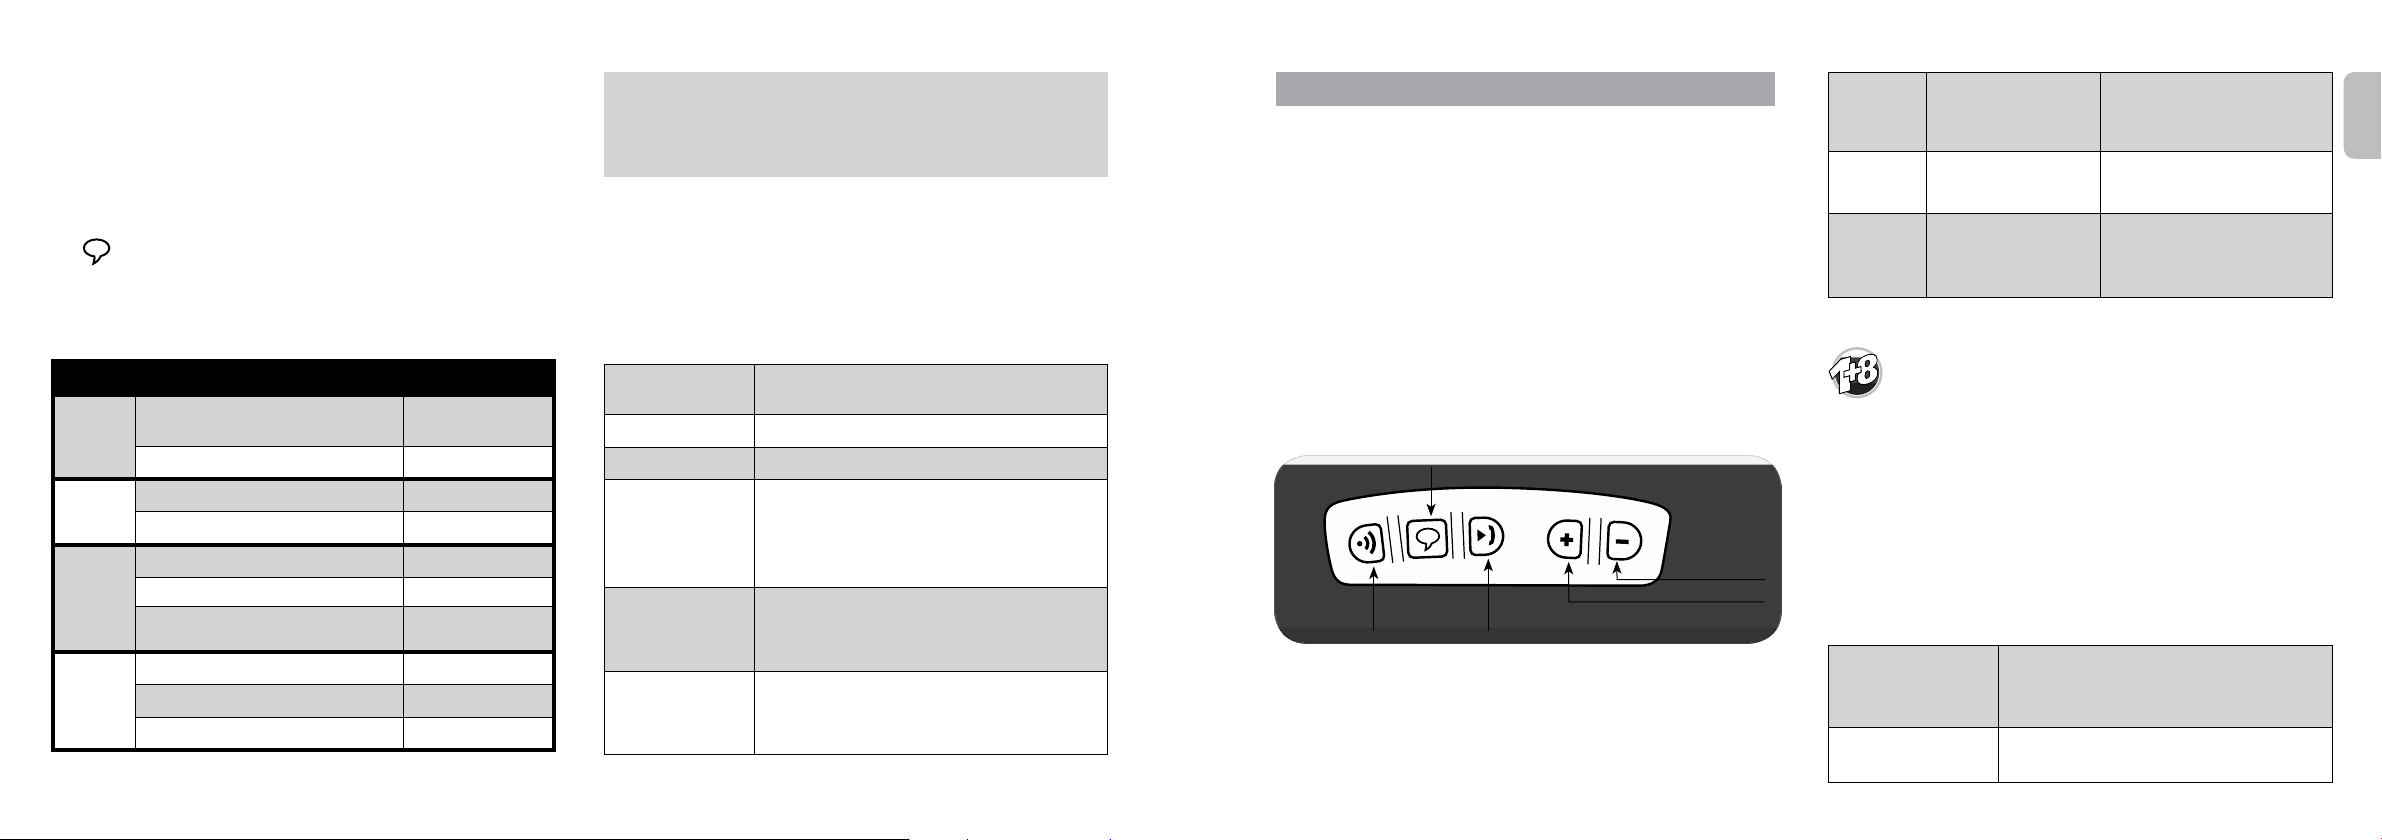
5. ERSTE SCHRITTE
5.1 ALLGEMEINE FUNKTIONEN
Gerät EIN/AUS
Lautstärke Auf/Ab
Lautsprecher
stummschalten
Akku Ladeanzeige
Einstellungenmenü
„Buddy“ Namen hören
Auist en der
gekoppelten Geräte
Vox Aktiv ieren /
Deaktivieren
(Nur für Interkom/
Sprachbefehl)
Gesprochene
Statusmeldungen
Aktivieren / Deaktivieren
s 2 Sek. lang b etätigen
• AN: 3 x blaues B linken + Aufsteige nder Ton
• AUS: 3 rotes Bli nken + Absteigender Ton
Im Standby
· Blaue LED = Akk u ist voll
· Violet te LED = Akku ist halb le er
· Rote LED = Akk u ist fast leer
Im Standby
Anweisungen folgen
Im Standby
Im Standby
Anwesenhe it von „1+8 “ Buddies ersch eint 2 Sek. lang
eine violette LED
Im Standby
AN:
AUS:
µ
bzw. antippen
und gleic hzeitig antippen
, und 5 S ek. lang betätig en
, µ 2 Sek. lang b etätigen und dann d en
, s und v antippen
, s und v 2 Sek. lang b etätigen. Bei
, + und - 2 Sek. lang b etätigen
2 Sek. lang es blaues Blinken
2 Sek. langes rotes Blinken
und s 2 Sek. lang b etätigen
5.2 LEDANZEIGE AM GERÄT
Kein LED SRC-System™ PRO ausgeschaltet
Eine BLAUE LED a lle 3 Sek. Im Standby - Kei ne Audioquelle ak tiv
Zwei BLAUE LED s alle 3 Sek. Aktiv, d.h. An ruf, Musik oder ander e Audioquelle
Eine ROTE LED al le 3 Sek. Im Standby – Ak ku ist schwach
Zwei ROTE LEDs a lle 3 Sek. Aktiv – Akku is t schwach
Konsta nt ROTE LED Akku wird g eladen / USB angesch lossen
ist aktiv
5.3 AUDIOQUELLEN UND RANGORDNUNG
Wenn zwei angeschlossene Quellen gleichzeitig Audio wiedergeben, bestimmt Ihr
SRC-System™ PRO automatisch die Prioritäten, d.h. welcher Audio- Quelle Vorr ang
gegeben wird.
Höhere Priorität
Niedrigere Priorität
1. Handy Audio oder GPS Navi Gerät*
2. Interkom
3. A2DP (Stereo Bluetooth) Audio
4. UKW Radio (eingebaut)
*GPS Navi Anweisu ngen von Smartphone A pps
werden wie A2D P Audio priorisiert
• Eingehende Handyanrufe unterbrechen laufende Interkomgespräche
• Eingehende Interkomanrufe unterbrechen A2DP Musikempfang
• Interkomgespräche und Click-to-Link Anrufe haben dieselbe Priorität. Laufende
Interkomgespräche werden durch eingehende Click-to-Link Anfragen nicht
unterbrochen, und umgekehrt.
Die Priorität vom A2DP A udio kann so festgelegt werde n, dass sie dem Interkom-Audi o
übergeordnet ist - Siehe Abschnit t 4..
Deutsch
8
| SRCS Pro SRCS Pro |
9
Page 6
5.4 SPRACHSTEUERUNG
Sie können eine Reihe der Funktionen Ihres SRC-System™ PRO über Sprachsterung
betreiben und wie eine Freisprecheinrichtung nutzen.
Die Sprachs teuerung ist werks eitig für Englisch aus gelegt. Weitere Sprach en, wie etwa Deutsc h,
können über die Cardo Community, die Cardo Smar tSet App oder über das Einstellungen-Menü
ausgewählt werden.
Im folgenden sind Funktionen, die über Sprachsteuerung verfügbar sind, mit
-Symbol markiert.
dem
1. Im Standby Modus,
antippen oder einfach ein Wor t laut und deutlich
s
sprechen, um VOX zu aktivieren
2. Sprachbef ehl aus folgender Tabelle:
Status Gewünschte Aktion Ihr Sprachbefehl:
Buddynamen rufen,
z.B. „Frit z Lang“
„Rufe Interkom“
„Musik AN“
„Radio AN“
„Radio AUS“
„Sender vorwärts”
„Sender rückwärts”
„Musik vorwärts”
„Musik rückwärts”
„Musi k AUS“
UKW
„1+8 “׃ Interkomanruf
Interkom An ruf mit Biker
Start A 2DP
UKW einschalten
UKW auss chalten
Zum nächsten voreingestellten Sender
Zum vorherigen voreingestellten Sender
Musik vorwärts
Musik rückwärts
Stop / Pause A2D P
Standby /
UKW / A2DP
Standby
A2DP
*s. Absch nitt 6.1 für weite re Details.
„A“
oder
„B“
Die Sprachsteuerungsleistung kann je nach Umgebungsbedingungen wie
Fahrtgeschwindigkeit, Helmtyp und Fahrgerä uschen variieren.
Für optimale Leis tung der Sprachsteuerungsfu nktion empfehlen wi r vor allem,
windbeding te Einüsse durch Nutzung der g rossen Mikrofonschaumkap pe und durch
Schließen des Visiers zu verringern.
5.5 SPRACHVERBINDUNG VOX EINSTELLUNGEN
Das SRC-System™ PRO bietet VOX Technologie für sichere und freihändige
Bedienung von Schlüsselfunktionen.
Sie können VOX so einstellen, dass ent weder ein Interkomanruf begonnen oder
die Sprachbefehl-Funktion aktivier t wird.
VOX Aktivieren
Anrufannahme Beli ebiges Wort laut au ssprechen (z.B. „ Hallo“)
Anrufablehnung 15 Sek. lang schweig en
VOX-Empndlichkeit
(Voreinstellung:
Mittelstar k)
VOX Betriebsmodus
VOX Aktiv ieren /
Deaktivieren (Nur fü r
Interkom/Sprachbefehl)
Spreche n Sie ein beliebiges Wor t laut in das Mikro fon (z.B.
„Hallo“)
Siehe Abs. 4 zur Anpassung der Einstellungen.
Hoch: Wählen Sie diese Einstellung, wenn es schwierig ist,
VOX zu aktivieren
Niedrig: Wählen Sie diese Eins tellung, wenn es zu einfach
ist, VOX zu aktivieren
VOX kann eingestellt werden, die Sp rachbefehl-Funktion
(Voreinstellung) zu aktivieren, oder einen Interkomanruf zu
beginnen – Siehe Abs. 4 zur Anpassung der Einstellungen
und - gleichze itig 2 Sek. lang bet ätigen
+
An: 2 Sek. lan ges blaues Blinken
Aus: 2 Sek. langes rotes Blinken
6. INTERKOM
Mit Ihrem SRC-Sy stem™ PRO können Sie Bike-zu-Bike Interkom-Kommunikation
in einer Reichweite von bis zu 1 km betreiben (Voll-Duplex). Die Reichweite ist
allerdings geländeabhängig und bedarf des Sichtkontaktes.
Um mit weiteren Motorradfahreren via Interkom zu kommunizieren, müssen
die Geräte vorab gekoppelt werden (Pairing). Der Koppelungsprozess muss
grundsätzlich nur einmal vollzogen werden. Danach erkennen sich die Geräte
gegenseitig, sobald sie sich in Reichweite benden.
Interkom-Kompatibilität
Sie können
und von Headsets der Cardo scala rider Reihe betreiben. Für weitere Informationen,
siehe www.cardosystems.com/SRC.
Interkom-Kommunikation kann alternativ über folgende Interkom-Optionen
betrieben werden:
SRC-System™ PRO als Interkom mit Nutzern von a nderen SRCS-Gerä ten
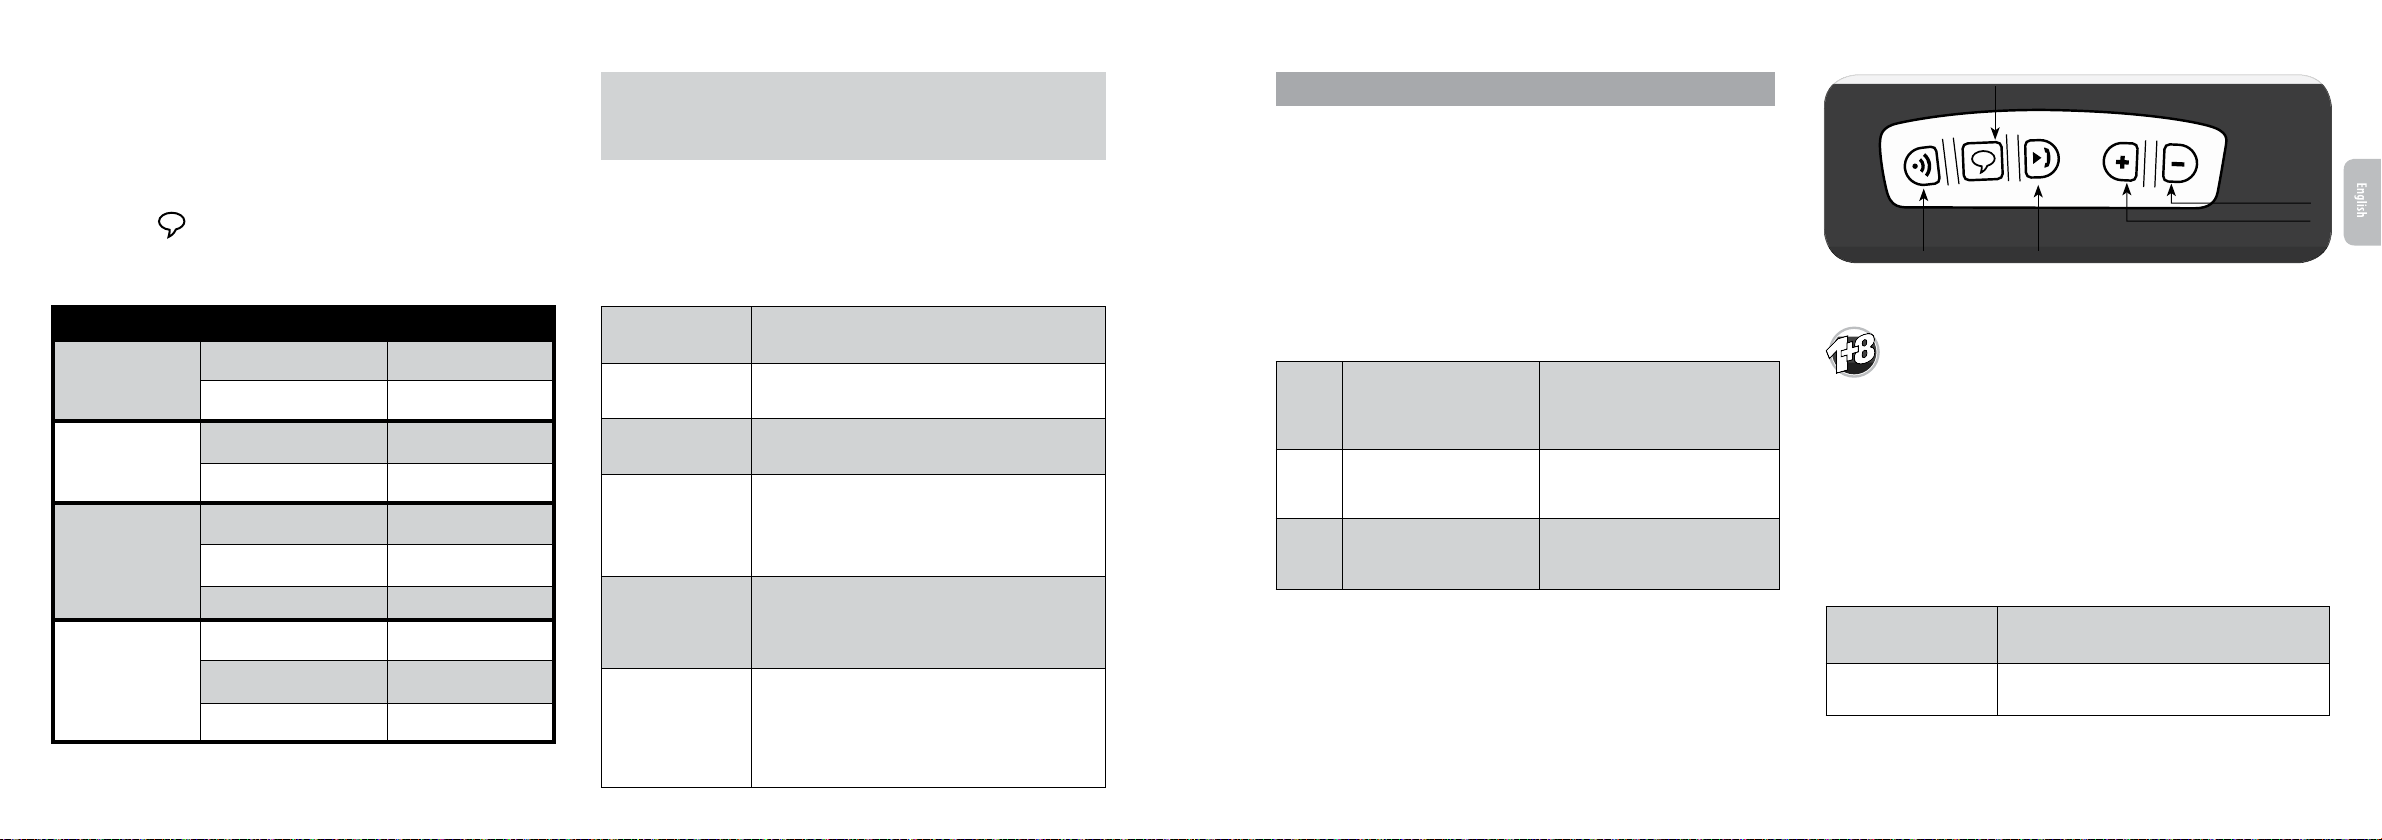
Sprachsteuerung
Lautstär ke –
Lautstär ke +
Interkom
Handy / Musik
SRCS Pro Tastenanordnung
s. Abs. 6.1
s. Abs. 6.2
s. Abs. 6.3
„1+ 8” Interkom (Kopplun g
nur mit SRCS P RO, scala rider
PACKTALK, G9/G9x und ca rdo
SHO-1 Modellen)
Interkom mi t Kanal A/B
(gekoppel t mit allen
scala rid er Modell en)
Click-to-Link
(mit kompatiblen Modelle)
2-Wege Interkomgespräche in einer
Gruppe vo n bis zu acht weiteren „1+8 ”
Teilnehmern
Interkom Konferenzgespräche
(2-Wege, 3-Wege und 4-Weg e)
1-zu-1 spont ane Interkom-gespräche
mit unbek annten Fahrern in der
Nähe, mit den en Ihr Gerät noch nic ht
gekoppelt wurde
6.1 „1+8” INTERKOM
Koppelung mit bis zu 8 anderen Geräten („1 +8” Teilnehmer) und
Verbindungsaufbau mit einzelnen Teilnehmern durch einfaches
Aussprechen der Teilnehmernamen.
6.1a BUDDYNAMEN KONFIGURIEREN
Vor Benutzung des „1+8“-Interkom sollten Sie Ihrem Gerät einen Buddy-Namen
zuweisen, über den andere „1+8“-Teilnehmer Sie anrufen können.
Wenn Sie Ihren Buddy-Namen ändern, müssen Sie erneut mit Ihren
„1+8“-Freunden koppeln, damit ihre Geräte Ihren Buddy-Namen registrieren
können.
Besuchen Sie die Cardo Community, um Ihren Buddy-Namen zu kongurieren (siehe
Abschnitt 4). Bis Sie einen Buddy-Namen kongurieren, wird Ihr Gerät mit seiner
generischen „1+8“-Bezeichnung, „SRC S PRO“, erkannt.
Ihren Buddy-Namen
hören
Hören Si e die Liste
gekoppelter Buddys
Im Standby
gewählter Buddy Namen wird abgespielt und kann über
Ihre Lautsprecher gehört werden.
Im Standby
und v gleichzeitig antippen. Ihr
s
2 Sek. lang be tätigen
v
Deutsch
10
| SRCS Pro SRCS Pro |
11
Page 7
6.1b KOPPELUNG MIT EINEM „1+8” TEILNEHMER
1. Im Standby, drücken Sie 5 Sek. lang auf
, um in den „1+8” Kopplungsmodus
s
überzugehen.
2. Im zweiten Gerät „1+8” Kopplung-Modus eingeben.
3. Bei erfolgreicher Kopplung erscheinen kurz die violetten Leuchtanzeigen.
Wenn ein SRC-Syste m™ PRO d ie maximal mögliche Anza hl von „1+8“ Interkomteilnehmern
erreicht hat (also acht „Budd ies“), dann ersetz t die Ankoppelung eines weiteren Teilnehmers
denjenigen in der Liste, mit dem Sie länger als alle anderen keinen Interkomkontakt hatten.
Koppelung Online – Cardo Community®
Auf der Cardo Community (community.cardosystems.com) nden Sie Ihre
Freunde und können sie in Ihre „1 +8” Freundeliste au fnehmen.
6.1c GERÄTEKOPPELUNGSANZEIGE
Um in einer Gruppe von „1 +8” Interkom Buddies schnell festzustellen, welche
Geräte miteinander als Buddies gekoppelt sind, müssen sich alle Teilnehmer in
einem maximalen Radius von bis zu 20 m benden.
GERÄTE
KOPPELUNGS
ANZEIGE
Im Standby s und v 2 Sek. lang be tätigen.
Sobald „1+8“-Buddie s in Reichweite sind, le uchten die LEDs an
beiden Ge räten 2 Sek. lang viol ett auf.
6.1d GERÄTEKOPPELUNGSANZEIGE
Es gibt zwei Möglichkeiten, einen Interkomanruf mit „1+8” Interkomteilnehmer
zu starten.
OPTION 1: INTERKOMANRUF PER SPRACHBEFEHL
VOX
Laut ein beliebiges Wort ins Mikrofon sprechen, um den Interkom-Kanal zu
önen. Sobald Sie den Sprachbefehl-Signalton hören, rufen Sie bitte laut den
„Buddy-Namen” eines „1+8” Teilnehmers, wie etwa „Hans Mustermann”.
OPTION 2: MANUELLER MODUS
☛
Namen rufen Namen aus der „Buddyliste“ wählen
2 Sek. lang b etätigen.
s
antippen
s
und namen
des „1+8“
Buddy‘s lau t
rufen.
Das Abspielen aller gekoppelten „1+8“ Buddyliste anhören.
Beim Erreichen des gewünschten Namens
oder ein beliebiges Wort laut rufen.
Zum Beend en des Abspielens de r Buddyliste, 2 Sek . lang
betätigen.
s
antippen,
s
INTERKOMZUTELEFON
Ist ein “1+8” Buddy außer halb der Reichweite, können Sie die “Inter kom-zu-
Telefon”-Funktion über die Cardo Community einrichten, um in Kontakt zu bleiben.
Ihre Interkomanr ufe werden dann auf Ihr Handy umgeleitet.
6.2 INTERKOM MIT KANAL A/B
Mehrparteien-Konferenzgespräche über Kanäle „A“ und „B“ aufnehmen.
Dieser Modus eignet sich für 2, 3 oder 4-Wege-Anrufe.
6.2a KOPPELUNG MIT KANAL A/B
Die Koppelung au f einem Kanal löscht ggf. auf diesem Kanal gekoppelte Geräte
und ersetzt sie mit dem neu gekoppelten Gerät.
1. Achten Sie darauf, dass sich alle Geräte im Standby benden.
2. Drücken Sie
5 Sekunden lan g, bis die LED durch schnelle s Blinken den Interkom-
v
Koppelungmodus anzeigt (siehe nachstehende Tab elle für Kanalkopp elung).
3. Greifen Sie mithilfe der jeweiligen Bedienungsanleitung auf den InterkomKoppelungsmo dus des zweiten Gerätes zu. Beide Geräte benden sich dann im
Interkom-Koppelungsmodus.
4. Nach einigen Sekunden leuchten beide Geräte 2 Sekunden lang auf und zeigen
an, dass sie jetzt miteinander gekoppelt, verbunden und einsatzbereit sind.
5. Falls der Koppelungsprozess nicht innerhalb von 2 Minuten abgeschlossen ist,
schaltet das
SRC-System™ PRO automatisch wieder in den Standby-Modus um.
KANAL KOPPELUNGSMODUS LED ANZEIGE
Schnelle s rotes
Blinksignal
Schnelle s blaues
Blinksignal
Im Standby,
„A”
koppelt automatisch.
Im Standby,
„B”
zu blinken beginnt, tippen Sie zweimal auf
5 Sek. lang be tätigen. Kanal „ A”
v
5 Sek. lang be tätigen. Wenn die LED
v
v
6.2B KANAL A/B ANRUFEN
Es gibt zwe i Möglichkeiten, einen Interko manruf mit Kanäle A und B tät igen.
OPTION 1: Interkomanruf per Sprachbefehl (VOX)
Laut ein beliebiges Wort ins Mikrofon sprechen, um den Interkom-kanal zu önen.
Sobald Sie den Sprachbefehl-Signalton hören, sagen Sie laut „Rufe Interkom”. Dieser
Befehl startet einen Interkomanruf mit „A“ und/oder „B“ (je nach Anwesenheit).
Ein VOX Interkomanruf über Kanal „A“ oder „B“ endet automatisch nach
30 Sekunden Stille.
OPTION 2: Manueller Modus
☛
Verwenden Sie diese Option zwecks Interkomanruf an:
• ”FAHRER A” –
• ”FAHRER B” –
Um einen Anruf zu beenden,
antippen
v
zweimal antippen
v
antippen.
v
Wenn Sie sich bereit s in einem Interkomgespräch mit Fahrer „A“ oder „B“
benden, können Sie einen anderen Fahrer („A“ oder „B“) hinzufügen, indem
zweimal bet ätigen. Andere Fahrer können sich auf gleiche Weise in das
Sie
v
Interkomgespräche einklinken.
3-WEGE INTERKOM
Über Kanal „ A”
Fahrer 2
Fahrer 1
Über Kanal „ B”
Fahrer 3
KOPPELN
Hier ist Fah rer “1” an Fahrer “2” und Fah rer “3” gekoppelt.
1. Fahrer 1 koppelt an Fah rer 2 über Kanal „A” (siehe 6.2a).
2. Fahrer 1 koppelt an Fahrer 3 über Kanal „B” (siehe 6.2a).
Einschränkungen des 3-Wege -Konferenzmodus
Während einer 3-Wege Interkom Telefonkonferenz mit zwei anderen Teilnehmern ist
Fahrer 1 nicht in de r Lage, Handy-Anrufe oder GPS -Navigationanweisu ngen zu erhalten,
solange der Anruf im Gange ist.
Deutsch
12
| SRCS Pro SRCS Pro |
13
Page 8
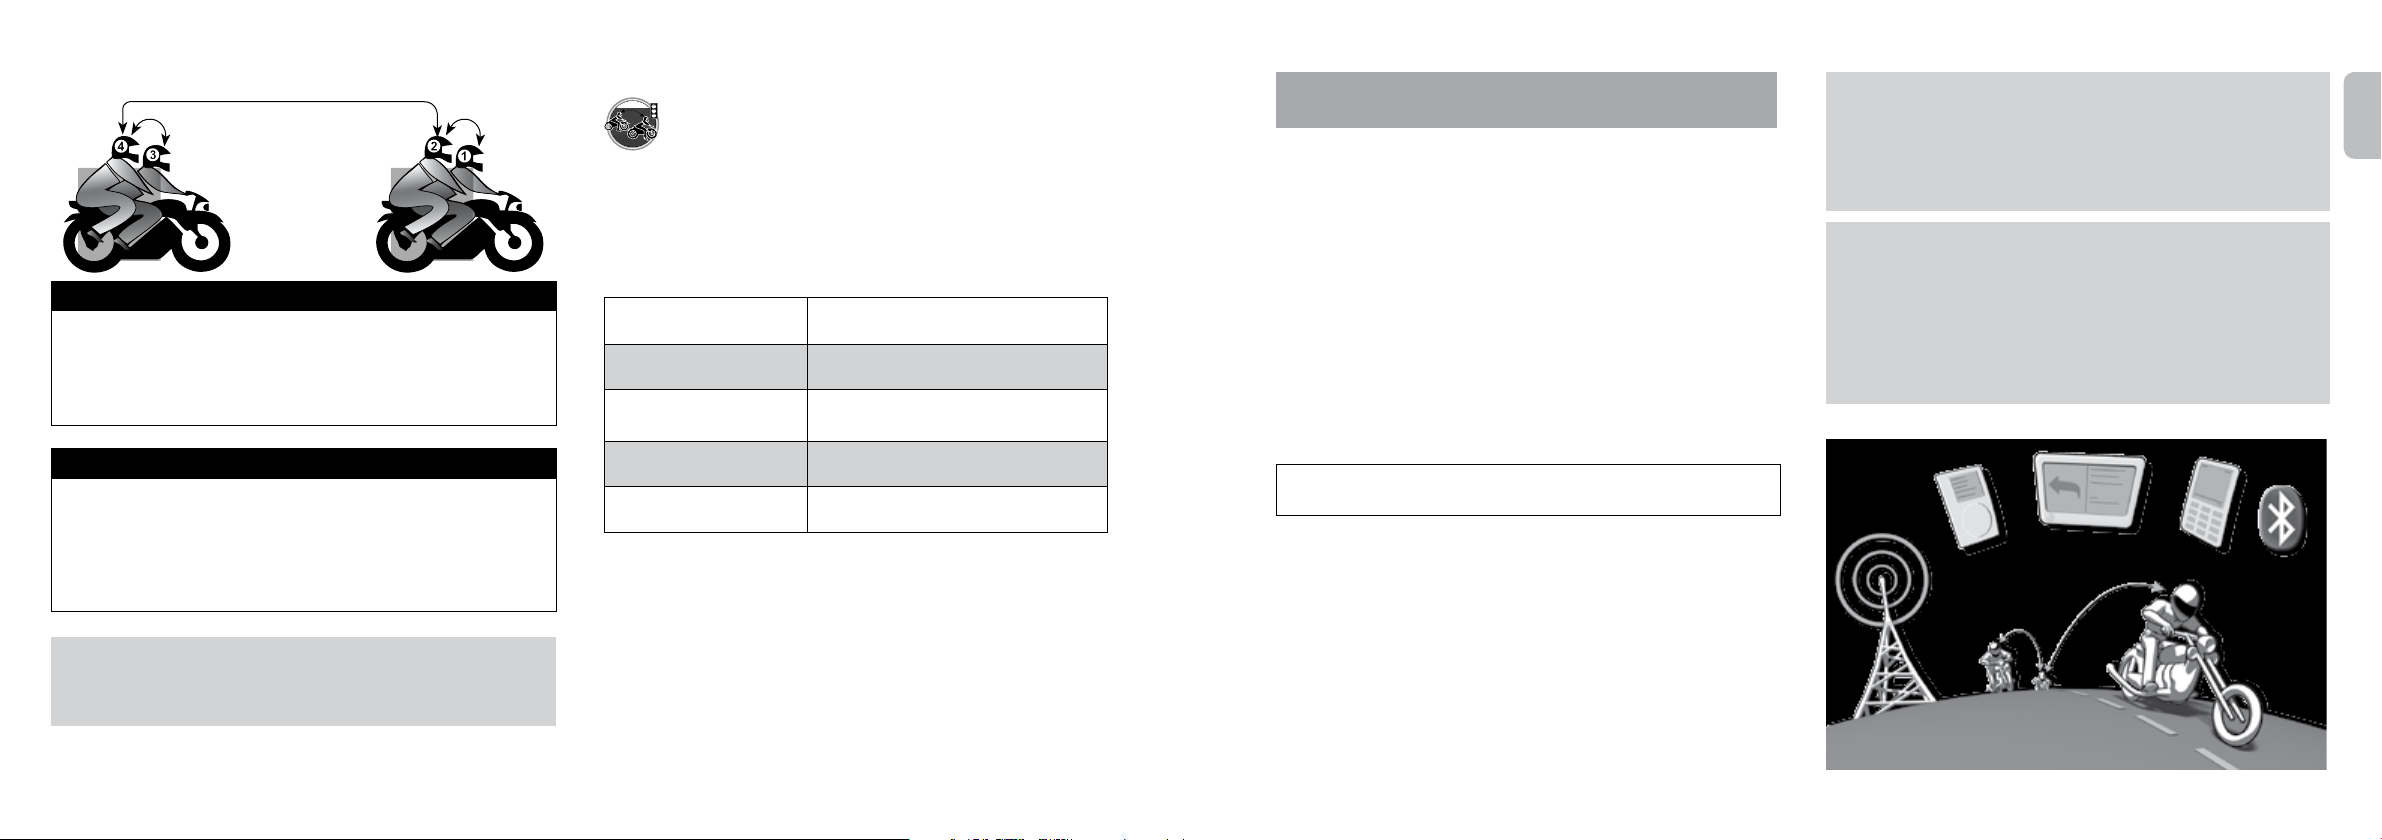
4-WEGE INTERKOM
KOPPELUNG
1. Fahrer 1 an Beifahrer 2 mit Kanal „ A” koppeln (siehe 6.2a).
2. Fahrer 3 an Beifahrer 4 mit Kanal „A” koppe ln (siehe 6.2a).
3. Beifahrer 2 an Beifahrer 4 mit Kanal „B” koppeln (siehe 6.2a).
In dieser Konguration können zwei Teilnehmer (2 und 4) zwei BluetoothVerbindungen nutzen.
ANRUFEN
1. Alle vier Geräte sind im Standby.
2. Beifahrer 2 betätigt zweimal
, um einen Interkomanruf mit Beifahrer
v
4 einzuleiten. Warten Sie, bis auf beiden Einheiten Audio zu hören ist.
3. Fahrer 1 betätigt
4. Fahrer 3 betätigt
, um ein Gespräc h mit Beifahrer 2 einzuleiten.
v
, um ein Gespräc h mit Beifahrer 4 einzuleiten.
v
EINSCHRÄNKUNGEN DE 4WEGEKONFERENZ MODUS
Während einer 4-Wege Interkom- Kommunikation können die beiden Fahrer, die gleichzeitig zwei
aktive Verbindungen aufrecht erhalten, keine Handy-Anrufe oder GPS-Navigationsanweisungen
entgegennehmen.
6.3 CLICKTOLINK CTL INTERKOM
Click-to-Link ist die spontane, sozusagen „gesellschaftsorientierte”
Eigenschaft Ihres
SRC-System™ PRO.
Verwenden Sie Click-to-Link, um spontan und ohne vorheriges Koppeln
1-zu-1 Interkomanrufe mit anderen Motorradfahren in unmittelbarer Nähe zu
starten. Gebrauchen Sie Click-to-Link praktisch als privaten Bike-to-Bike-Kanal,
den Sie unterwegs mit anderen Motorradfahren, denen Sie zufällig begegnen,
einrichten können.
Click-to-Link kann ausgeschaltet werden, wodurch jeder Versuch von anderen
Nutzern unterbunden wird, Click-to-Link-Anrufe zu Ihnen zu tätigen.
CTL Anruf aufnehmen
(Suche dauer t ca. 10 Sek.)
CTL Gespräch beenden oder
CTL Anruf annullieren
CTL Anruf annnehmen
CTL Anruf ablehnen
CTL Aktivieren / Deaktivieren
(werksseitig aktiviert)
dreimal antippen
v
antippen
v
Beim CTL Klingelton:
antippen oder sagen Sie laut ein b eliebiges Wort
v
Beim CTL Klingelton schweigen, bis der Klingelton
erlischt oder
Siehe Abs. 4 zur Anpassung der Einstellungen
2 Sek. lang b etätigen
v
Wenn Sie im Umfeld von anderen Nutzern erneut CTL initiieren, wird das Gespräch
zufallsbedingt mit einem dieser Nutzer und nicht zwangsläug mit Ihrem
vorherigen Gesprächspartner aufgebaut.
6.4 BESETZTSIGNAL
Ein Besetztzeichen ertönt, wenn versucht wird, einen Interkom anruf zu einem
anderen Gerät zu tätigen, auf dem gerade ein Mobilfunk- oder Interkomgespräch
geführt wird.
6.5 EMPFANG VON INTERKOMANRUFEN
Wenn ein anderer gekoppelter Nutzer versucht, Sie via Interkom anzurufen, wird
der Anruf praktisch unmittelbar durchgestellt.
7. KOPPELN UND NUTZEN VON GERÄTEN:
HANDY, GPS NAVI UND MP3-PLAYER
Um Ihr SRC-System™ PRO mit einem Bluetooth-Gerät zu verbinden, mü ssen Sie es
erst koppeln. Wenn sie gekoppelt sind, werden sie sic h immer erkennen, wenn sie sich
in Reichweite be nden (10 Meter).
SRC-System™ PRO hat zwei Bluetooth-Kanäle für die Verbindung zu
Ihr
Mobiltelefonen, GPS-Geräten und Musikplayern über A2DP.
7.1 KOPPELUNG BLUETOOTHKANÄLE 1 UND 2
1. Stellen Sie sicher, dass Bluetooth auf Ihrem Handy/GPS-Gerät/MP3-Player
aktiviert ist.
2. Stellen Sie sicher, dass
3. Um Bluetooth-Kanal 1 zu koppeln – Drücken Sie
lang, bis abwechs elnd die ROTE und BLAUE LED schnell zu blinken beginnen.
Um Bluetooth-Kanal 2 zu koppeln – Drücken Sie - mindestens 5 Sek.
lang, bis abwechs elnd die ROTE und BLAUE LED schnell zu blinken beginnen.
Um mit einem GPS-Gerät zu kopp eln, wenn die LEDs schnell zu blinken
4. Suchen Sie nach Bluetooth-Geräten mit Ihrem Handy/GPS-Gerät/MP3-Player,
indem Sie der Anleitung des Geräts folgen.
5. Nach ein paar Sekunden wird das Gerät „SRCS PRO“ auisten. Wählen Sie es
aus.
6. Wenn Sie nach einer PIN oder einem Kennwort gefragt werden, geben Sie 0000
(vier Nullen) ein .
7. Das Gerät wird bestätigen, dass die Koppelung erfolgreich war und die LED
beginnt langsam, BLAU zu blinken.
8. Falls der Koppelungsprozess nicht innerhalb von 2 Minuten abgeschlossen ist,
schaltet das SRC S Pro automatisch wieder in den Standby-Modus um.
SRC-System™ PRO im Standby-Modus ist.
mindestens 5 Sek.
+
beginnen, drücken Sie
+
.
WICHTIG!
• Wenn Sie zwei unterschiedliche Mobiltelefone direkt mit Ihrem SRC-System™ PRO
gekoppel t haben, müssen Sie ei nes davon als Standard gerät für Anruf e wählen.
• Wenn Ihr GPS -Gerät das unter stützt, kön nen Sie das zweite Mo biltelefon dire kt mit dem
GPS-G erät koppeln und da nn das GPS-Ger ät mit Ihrem SRC-System™ PRO koppeln und auf
diese Weise b eide Mobiltele fone und das GPS -Gerät mit Ihre m SRC-Syste m™ PRO verbind en.
HINWEISE:
• Nicht alle Bluetooth-Mobiltelefone können Bluetooth-Stereomusik übertragen
(A2DP), selbst wenn das Telefon eine MP3-Player-Funktion hat. Ziehen Sie die
Bedienungsanleitung Ihres Mobiltelefons zu Rate, um nähere Informationen zu
erhalten.
• Nicht alle Bluetooth-GPS-Geräte ermöglichen Verbindungen zu Bluetooth-Audioquellen.
Ziehen Sie Ihre GPS-Bedienungsanleitung zu Rate, um nähere Informationen zu erhalten.
• Nach der Kop pelung müssen Sie m öglicherweis e
drücken, um zu verbinden.
µ
Integriertes
UKW Radio
MP3-Player
1 km Reichweite
(geländeabhängig)
Navigationsgerät
Handy und
A2DP Verbindung
Deutsch
14
| SRCS Pro SRCS Pro |
15
Page 9
7.2 ANRUFE TÄTIGEN UND EMPFANGEN
antippen oder beliebiges Wort laut aussprechen, um Anruf
Anrufannahme
Anrufablehnung
Anruf beenden
Sprachwahl*
Wahlwieder holung*
Kurzwahl
Legen Sie e in
Standar d-Handy
fest
Zuschaltung des
festgelegten
Telefons
INTERKOM-KONFERENZMODUS
Kanal „ A“ zum
laufenden Gespräch
hinzuf ügen bzw.
ausklinken
Kanal „B “ zum
laufenden Gespräch
hinzuf ügen bzw.
ausklinken
* nicht mö glich bei lauf enden Handy Ge sprächen
† Um die Hot-Dial-Funktion zu nutzen, müssen Sie die Telefonnummer zuerst über die Cardo
Community kongurieren
‡ Wenn Sie z wei Mobiltel efone direk t an Ihr SRC-System™ PRO an geschloss en haben, müss en Sie
* †
‡
eines davon als Standard gerät für ausgehende Anrufe festlegen.
µ
über VOX anzunehmen
Bleiben Si e 15 S ek. lang ruhig oder
antippen
µ
2 Sek. lang b etätigen und die Anw eisungen des Handy s
+
befolgen
2 Sek. lang b etätigen
-
dreimal antippen
µ
Während eines Telefongesprächs + 5 Sek. lang b etätigen
Im Standby,
Während de s Gesprächs
Während de s Gesprächs zwei mal
5 Sek. lang b etätigen
µ
antippen
v
2 Sek. lang b etätigen
µ
antippen
v
7.3 MUSIK HÖREN ÜBER A2DP
(nur bei AVRCP-kompatiblen Bluetooth Audioquellen verfügbar)
Wiedergabe
Pause/St opp
Nächst er Track
Vorheriger Track *
ß
Song suc hen
Suche stoppen
*Bei einigen Handys evtl. diese Aktion wiederholen
Im Standby, µ antippen
ß
2 Sekunden lang betätigen
ß µ
Bei laufe nder Musik, µ antippen
ß
Bei laufe nder Musik, µ zweimal antippen
Betäti gen Sie bei laufende r Musik 5 Sek. lang auf
oben) oder
eines jeden Songs wiedergegeben.
Um die Suche b eim aktuellen St ück zu stoppen, r ufen Sie ein beli ebiges
Wort laut in d as Mikrofon, od er
(sucht nach unten). Es werden die ersten Sekunden
-
2 Sekunden lang betätigen
+
(sucht nach
+
ZWISCHEN A2DP AUDIOQUELLEN UMSCHALTEN
1. Musikwiedergabe vom aktuellen Gerät beenden.
2. Wiedergabe am anderen Gerät starten.
7.4 MUSIK TEILEN
Die Musik-Teilen-Funktion Ihres SRC-System™ PRO funktioniert auf
eine Entfe rnung von 10 Metern, ist also bes onders geeignet fü r die
Verwendung bei Fahrer und Beifahrer.
Musik teilen funktioniert nur mit A2DP (Bluetooth Stereo) dies
aktiviert die Audioquellen. Damit der Reisepartner Ihre Musik hören kann, muss
Ihre Einheit (Absender) mit der Einheit des Beifahrers (Empf änger) über Kanal A
koppeln, wobei die Empfängereinheit im Standby Modus ist.
(Absend er) Start/Stop
Musik-Teilen
(Empfänger)
Stop Musik-Teilen:
:
Während A2DP Musikwiedergabe, + für 2 Seku nden
betätigen
Betätigen Sie
2 Sekunden lang
+
Anrufe/ Interkom Telefonate und GPS Audio Navigation werden die
Musikwiedergabe abbrechen.
Musik-Teilen überträgt keine Gespräche und kann nicht für Interkomanrufe genutzt werden
8. UKW-RADIO
Ihr SRC-System™ PRO enthält ein eingebautes UKW-Radio mit sechs
speicherbaren Sendern und RDS (Radio Data System). RDS ermöglicht die
automatische Umschaltung zu der stärksten Frequenz des UKW-Senders, den Sie
gerade hören, wenn das Signal zu schwach wird.
Radio einschalten
Radio ausschalten
Nächsten voreingestellten
Sender
ß
Vorherige Sender
RDS AN/AUS (werksseitig:
ß
ß
ß
8.1 RADIOSENDERSUCHE
Die voreingestellten Sender können über die Cardo Communit y-Plattform, die
Cardo SmartSet App oder direkt über
1. Schalten Sie das Radio ein.
2. Wählen Sie den Speicherplatz, den Sie belegen wollen (Nummer 1-6), indem
drücken, bis der gewünschte Speicherplatz aufgerufen ist.
Sie
µ
3. Wählen Sie einen UKW-Sender, den Sie speichern wollen, indem Sie die Suche
oder den Durchlauf verwenden.
Suchen und Speichern
(nächsten UKW-
Radiosender nden)
Durchlauf und
Speichern
Im Standby, µ zweimal antippen
µ 2 Sek. lang bet ätigen
Wenn das Radio A N ist, µ antippen
Wenn das Radio A N ist, µ zweimal antippen
aus)
Wenn das Radio A N ist,
und - 2 Sek. lang b etätigen
+
SRC-System™ PRO gespeichert werden.
Drücken Si e
Drücken Si e
UKW-Sender gefunden haben, um ihn zu speichern.
Drücken Si e
Um den Durch lauf bei diesem S ender zu stopp en, drücken Sie
Drücken Si e
Sender gefunden wurde, um ihn zu speichern
Um den Durch lauf fortzu führen: Warten Sie b is der nächste
Sender gefunden ist
oder - 2 Sek. lang.
+
innerhalb vo n 20 Sek., nachdem Sie de n
µ
5 Sek. lang.
+
innerhal b von 20 Sek., nachdem de r UKW-
µ
+
8.2 AUTOMATISCHE RADIOSENDERSUCHE
Diese Funktion erzeugt automatisch eine temporäre Liste von 6 Radiosendern.
1. Wenn das Radio AN ist,
- 5 Sek. lang bet ätigen.
2. Das Radio wird aufwärts (höhere Frequenz) vom aktuellen Sender suchen und
die nächsten gefundenen 6 UKW-Sender temporär abspeichern.
3. Nach Wunsch wiederholen, um die nächsten 6 UKW-Sender temporär zu
speichern.
Diese 6 temporären Sender sind nicht permanent gespeichert und ersetzen nicht die vorher
gespeicherten Sender auf den Senderplätzen.
Beim Ausschal ten des SRC-Sys tem™ PRO werden die temporären Sender gelöscht
und die UKW-Senderplätze wiederhergestellt.
9. FEHLERBEHEBUNG
Neustart
Koppelung
zurücksetzen
(alle gekoppe lten
Geräte löschen)
Wenn Ihr SRCS Pr o nicht mehr reagier t, starten Si e das Gerät neu,
indem Sie es a us- und dann wieder ei nschalten – s 2 Sek. lang
betätigen
1. Im Standby,
blinkt.
2.
2 Sek. lang b etätigen, bis die LE D fünfmal LILA bli nkt.
µ
5 Sek. lang b etätigen, bis die L ED ROT/BLAU
+
Deutsch
16
| SRCS Pro SRCS Pro |
17
Page 10

10. KUNDENDIENST
Weitere Informationen erhalten Sie auf unserer Website
www.schuberth.com
Für technische Unterstützung wenden Sie sich bitte an Ihren
SCHUBERTH Fachhähandler, oder kontaktieren Sie uns unter
Kundenservice@schuberth.com
Unsere Rufnummer 0391 8106-555
International: +49 391-8106-555
Für die neuesten Informationen über Softwareaktualisierungen,
besuchen Sie bitte unsere Internetseite unter
www.schuberth.com/de/motorcycle/service/src-systemtm.html und
registrieren Sie Ihr Gerät online.
WICHTIG: ÖFFNEN DES SRC-SYSTEM™ PRO REIßVERSCHLUSSES
ANNULLIERT GEWÄHRLEISTUNGSRECHTE
Die elektronischen Bauteile Ihres Gerätes sind unter einem versiegelten
Reisverschluss verstaut. Bitte önen Sie den Reisverschluss unter
keinen Umständen. Bei Zuwiderhandlung entfallen etwaige
Gewährleistungsangprüche sowie etwaige
sonstige Ersatzansprüche.
11. MITTEILUNGEN
Während des Führens eines Fahrzeuges ist Ihre vollständige und ungeteilte Aufmerksamkeit erforderlich.
Sie haben sicherzustellen, dass Sie alle erforderlichen Vorsichtsmassnahmen treen, um auch
während der Benutzung des Gerätes zu jeder Zeit den gegebenen Situationen des Verkehrs und den
Witterungsbedingungen einschließlich des Zustands der Straße angemessen Rechnung tragen zu können.
Bevor Sie einen Anruf tätigen oder annehmen, sollten Sie ihr Fahrzeug am Straßenrand anhalten. Alle
Veröentlichungen, Anzeigen, Bekanntmachungen oder ähnliche Mitteilungen, die sich darauf beziehen,
dass das Gerät während der Fahrt verwendet werden kann, betreen lediglich dessen technische
Möglichkeiten und sind nicht als entsprechende Auorderung zu verstehen.
Sie haben zu klären und zu beachten, ob die Benutzung des Geräts - abhängig vom lokalen Einsatzgebiet -
einen Verstoß gegen Gesetze oder Vorschriften darstellen könnte. Jegliche Benutzung des Geräts erfolgt
insoweit ausschließlich auf eigenes Risiko und in einer Verantwor tung.
Zu den Grundanforderungen der sicheren Nutzung gehört unter anderem, dass Sie körperlich dazu in der
Lage sind, das Gerät zu benutzen und das Sie nicht unter einer Krankheit leiden bzw. Einschränkungen
unterliegen, die Ihre Fähigkeit zur sicheren Nutzung des Gerätes und der Teilnahme am Verkehr
beeinträchtigen könnten. Des Weiteren müssen Sie für das Fahrzeug über eine gültige Fahrerlaubnis
verfügen. Unter keinen Umständen dürfen vor oder während der Nutzung des Gerätes Alkohol oder
bewusstseinsverändernde Drogen, die Ihr
FCC-Erklärung
15.21
Sie werden hiermit darauf hingewiesen, dass alle seitens des Herstellers nicht ausdrücklich genehmigten
Änderungen oder Modizierungen an diesem Gerät die Berechtigung des Nutzers zum Betrieb dieses
Gerätes ungültig machen können.
15.105(b)
Dieses Gerät wurde geprüft und es wurde festgestellt, dass es die Anforderungen von Teil 15 der FCCVorschriften für ein digitales Gerät der Klasse B erfüllt. Diese Beschränkungen dienen zum angemessenen
Schutz gegen schädliche Interferenzen, bei Anschluss an eine stationäre Anlage. Dieses Gerät erzeugt
Hochfrequenzenergie und könnte diese ausstrahlen. Wird es nicht gemäß den Anweisungen installiert
und verwendet, kann es schädliche Interferenzen im Funkverkehr verursachen. Es kann jedoch nicht
gewährleistet werden, dass bei einer Einrichtung keine Interferenzen auftreten. Falls dieses Gerät
schädliche Interferenzen bei Funk- oder TV-Empfang verursacht, die durch Ein- und Ausschalten des
Gerätes festgestellt werden können, kann der Nutzer versuchen die Inter ferenzen durch eine der
folgenden Maßnahmen zu korrigieren:
• Die Empfangsantenne verstellen oder neu positionieren.
• Den Abstand zwischen Gerät und Empfänger erhöhen.
• Das Gerät an einen anderen Stromkreislauf, unabhängig vom Stromkreislauf des Empfängers, anschließen.
• Den Händler oder einen erfahrenen Radio-/TV-Techniker zu Rate ziehen.
Der Betrieb des Gerätes unterliegt den folgenden zwei Bedingungen:
1) Dieses Gerät darf keine schädlichen Interferenzen verursachen und
2) dieses Gerät muss jede empfangene Interferenz entgegennehmen, einschließlich solcher
Interferenzen, die einen unerwünschten Betrieb verursachen könnten.
FCC-Erklärung zur HF-Strahlenbelastung
Dieses Gerät erfüllt die Bedingungen der FCC RF Radiation Exposure Limits auch unter unkontrollierbaren
Umweltbedingungen. Endnutzer müssen die spezischen Betriebsanweisungen befolgen, um die
Bedingungen entsprechend einzuhalten. Dieser Sender darf nicht in der Nähe von oder zusammen mit
anderen Antennen oder Sendern angebracht werden.
e Aufmerksamkeit beeinträchtigen könnten, konsumiert werden.
CE-Mitteilung
Das SRC-System™ Headset (das “Produkt” oder das „Gerät“) entspricht den folgenden wesentlichen
Anforderungen der EG-Richtlinie ⁄/EC (hier “R&TTE-Richtlinie” genannt): Artikel 3.1a, 3.1.b und
3.2. Das Produkt wurde in Übereinstimmung mit dem Anhang II zur oben genannten Richtlinie
hergestellt.
Konformitätserklärung
Das SRC-System™ Headset ist im Einklang mit und entspricht den Richtlinien der Bluetooth
Spezikation 3.0 und hat alle Tests zur Interfunktionsfähigkeit, die in der Bluetooth
festgelegt sind, bestanden. Die Interfunktionsfähigkeit zwischen dem Gerät und anderen Bluetooth
fähigen Produkten ist jedoch nicht gewährleistet.
Betriebstemperatur: Das Produkt ist für Umgebungstemperaturen zwischen -20 ° und 55 °C
ausgelegt.
AC/DC Adapter: Zum Auaden das beiliegende Ladegerät bzw. einen zertizier ten AC/DC
Steckadapter, der die folgenden Kriterien erfüllt, benutzen:
Eingangsspannung: 100-240 V, 50 / 60 Hz, 0.2 A maximum
Ausgangsspannung: 5 DV DC, 1 A maximum.
Gesundheitsspezische Warnhinweise:
Gehörverlust
Audiogeräte können Gehörverlust verursachen. Gehen Sie mit Bedacht vor, und vermeiden Sie
übermäßige Lautstärken.
HF-Funksignale
Die meisten elektronischen Geräte sind gegenüber HF-Signalen abgeschirmt. Bestimmte
elektronische Geräte sind jedoch nicht gegen HFSignale aus Ihrem Kommunikationsgerät abgeschirmt.
Schrittmacher
Um potenzielle Störungen des Schrittmachers zu vermeiden, empehlt der Herstellerverband für
medizinische Geräte, zwischen Mobiltelefonen und einem Schrittmacher einen Abstand von ca. 16 cm
einzuhalten. Vergewissern Sie sich, dass die Funktion etwaiger medizinischer Geräte unbeeinträchtigt ist.
Hörhilfen
Manche Geräte verursachen Störungen von Hörhilfen. Lassen Sie sich bitte bei derartigen Störungen
vom Hersteller Ihrer Hörhilfe über Alternativen beraten.
Sonstige medizinische Geräte
Falls Sie ein persönliches medizinisches Gerät anderer Art benutzen, lassen Sie sich bitte vom
Gerätehersteller und/oder Ihrem Arzt beraten, um festzustellen, ob dieses Gerät gegenüber HF-
Energie angemessen abgeschirmt ist. Ihr Arzt kann Ihnen möglicherweise zu dieser
Information verhelfen.
®
®
Spezikation
VERZICHTSERKLÄRUNG UND HAFTUNGSFREISTELLUNG
(nicht für Länder der Europäischen Union)
Mit der Inbetriebnahme des SRC-System™ Headsets (nachstehend auch das “Gerät” genannt) verzichten
Sie auf wesentliche Rechte, einschließlich des Klagerechts. Bitte lesen Sie vor Inbetriebnahme des Geräts
sorgfältig den folgenden Abschnitt. Falls Sie nicht alle Bedingungen dieser Vereinbarung akzeptieren, sollten
Sie das Produkt sofort zurückgeben. Wir werden Ihnen in solchem Falle den vollen Kaufpreis zurückerstatten.
Falls Sie das Gerät jedoch in Betrieb nehmen, sind Sie an diese Vereinbarung gebunden und verzichten
®
-
u. a. auch auf jegliches Klagerecht. Während des Fahrens auf einem Motorrad, Motorroller, Cruiser, Moped,
Geländefahrzeug, Quad oder jeglichem anderen Fahrzeug, ob auf der Strasse, im Wasser oder in der Luft
(nachstehend “Fahrzeug” genannt) ist Ihre vollständige und ungeteilte Aufmerksamkeit erforderlich.
Die Schuberth GmbH und Cardo Systems, Inc., deren Management, Direktoren, Tochtergesellschaften,
Muttergesellschaft, Ver treter, B evollmächtigte, Auftragnehmer, Sponsoren, Mitarbeiter, Lieferanten
und Wiederverkäufer (nachstehend “Firma” genannt), weisen Sie ausdrücklich darauf hin, dass Sie alle
erforderlichen Vorsichtsmassnahmen treen müssen und sich während der Benutzung des Gerätes
einschließlich aller Modelle des Gerätes, ungeachtet deren Handels- oder Markennamen, zu jeder Zeit des
Verkehrs, den Witterungsbedingungen und dem Zustand der Strasse bewusst sein müssen. Bevor Sie einen
Anruf tätigen oder annehmen,sollten Sie Ihr Fahrzeug am Straßenrand anhalten. Alle Veröentlichungen,
Anzeigen, Bekanntmachungen oder ähnliche Mitteilungen, die sich darauf beziehen, dass das Gerät
während der Fahrt verwendet werden kann, betreen lediglich dessen technische Möglichkeiten
und sind nicht als Auorderung gedacht, das Gerät im direkten Straßenverkehr zu benutzen. Mit dem
Kauf des Gerätes und dem Verzicht auf Rückerstattung des Kaufpreises (siehe unten), stellen Sie die
Firma unwiderruich von allen Haftungsansprüchen, Verlusten, Forderungen und anderen Ansprüchen
jeglicher Art (einschließlich der Anwaltskosten) im Zusammenhang mit der Ver wendung des Geräts frei
und verpichten sich die Firma nicht für irgendwelche Körperverletzungen, Schäden oder Tod, sowie
für Warenverluste und –Schäden an Fahrzeugen, einschließlich Ihres eigenen Fahrzeugs, oder jeglichen
anderen Schäden an Sie oder an Dritten, ungeachtet der Umstände oder Bedingungen zu belangen
und die Firma in jedem Falle schadlos zu halten. Sie akzeptieren hiermit auch, dass die Firma keinerlei
Verantwortung für körperliche Schäden irgendwelcher Art, unabhängig von Gründen, Zuständen oder
Umständen, einschließlich eines Funktionsfehlers des Gerätes trägt. Alle Risiken die mit dem Betrieb des
Gerätes einhergehen, liegen ausschließlich und vollständig beim Benutzer des Gerätes, ungeachtet dessen,
ob das Gerät vom ursprünglichen Käufer oder Dritten benutzt wird. Die Firma setzt Sie hiermit davon in
Kenntnis, dass dieses Gerät außerdem einen Verstoß gegen örtliche, Bundes-, Staats- oder nationale Gesetze
oder Vorschriften darstellen könnte und dass jegliche Benutzung des Geräts ausschließlich auf eigenes Risiko
und eigene Verantwortung erfolgt.
1. Sie, Ihre Erben, Rechtsvertreter, Nachfolger oder Abtretungsempfänger verzichten hiermit
freiwillig und auf ewig auf jegliche Ansprüche, Forderungen, gerichtliche Schritte und
Haftungsansprüche, die direkt oder indirekt durch die Nutzung des Gerätes entstehen könnten,
ungeachtet der Umstände und UNABHÄNGIG DAVON, OB DIES DURCH FAHRLÄSSIGKEIT ODER
ANDERWEITIG UMSTÄNDE VERURSACHT WURDEN und diese Schäden Ihnen zu einem späteren
Deutsch
18
| SRCS Pro SRCS Pro |
19
Page 11

Zeitpunkt als Ergebnis der Nutzung dieses Gerätes zugefügt werden könnten, und Sie entlasten,
entbinden und halten die Firma davon schadlos, soweit dies gesetzlich zugelassen ist.
2. Sie verstehen und übernehmen das Risiko, dass mit der Nutzung des Gerätes verbunden ist,
einschließlich des Risikos fahrlässiger Handlungen oder Unterlassungen seitens Dritter.
3. Sie bestätigen, dass Sie körperlich dazu in der Lage sind, das Gerät zu benutzen und das Sie nicht
unter einer Krankheit leiden bzw. Einschränkungen unterliegen, die Ihre Fähigkeit zur sicheren
Nutzung des Gerätes beeinträchtigen könnten. Sie bestätigen, dass Sie mindestens achtzehn (18)
Jahre alt sind und dass Sie hinsichtlich der Risiken, die mit der Nutzung des Gerätes verbunden sind,
informiert wurden. Sie stimmen weiterhin zu, dass Sie vor oder während der Nutzung des Gerätes
weder Alkohol noch irgendwelche bewusstseinsverändernden Drogen zu sich nehmen werden die
Ihre Aufmerksamkeit beeinträchtigen könnten.
4. Sie bestätigen unsere Warnungen verstanden zu haben, dass: (a) bei der Nutzung des Geräts im
Straßenverkehr Risiken und Gefahren bestehen, einschließlich aber nicht nur in Bezug auf Verletzungen oder
Krankheiten, Zerrungen, Brüche, Teil- und/oder Totallähmung, Tod, oder andere Leiden, die zu ernsthaften
Behinderungen führen könnten; (b) diese Risiken und Gefahren durch die Fahrlässigkeit des Herstellers
oder dessen Vertreter oder Dritten verursacht sein könnten, die an der Konstruktion oder Herstellung dieses
Geräts beteiligt waren; (c) diese Risiken durch vorhersehbare oder unvorhersehbare Ursachen hervorgerufen
werden könnten. Sie übernehmen hiermit alle Risiken und Gefahren sowie alle Verantwortung für alle
Verluste und/oder Schäden, unabhängig davon ob sie ausschließlich oder teilweise durch die Fahrlässigkeit
oder das Verhalten anderer, einschließlich seitens der Firma verursacht wurden.
5. Sie bestätigen, dass Sie diese Haftungsfreistellung gelesen haben, ihre Bedingungen vollständig
verstehen und dass Sie mit dem Verzicht auf Rückgabe des Gerätes gegen Rückerstattung des
Kaufpreises auch auf jegliche Forderungen verzichten.
EINGESCHRÄNKTE GARANTIE
JE NACH DEN RECHTLICHEN VORAUSSETZUNGEN IHRES LANDES WIRD FÜR IHR PRODUKT EINE ZWEIJÄHRIGE
EINGESCHRÄNKTE PRODUKTGARANTIE AB KAUFDATUM ÜBERNOMMEN. BITTE BEWAHREN SIE DIE
EINZELHANDELSQUITTUNG UND IHRE REGISTRIERUNGSDATEN ALS KAUFNACHWEIS AUF.
GARANTIEVERZICHT
SCHUBERTH ÜBERNIMMT WEDER AUSDRÜCKLICHE NOCH STILLSCHWEIGENDE GARANTIEN HINSICHTLICH
DES BEIGEFÜGTEN GERÄTES, EINSCHLIESSLICH JEGLICHEN IMPLIZITEN GARANTIEN HINSICHTLICH DER
EIGNUNG FÜR EINEN BESTIMMTEN ZWECK ODER SONSTIGE ABSICHTEN DES KÄUFERS. DAS GERÄT SAMT
ZUBEHÖR WERDEN AUF EINER “AS IS”-BASIS (D. H. OHNE MÄNGEL GEWÄHR), UND AUF “AS AVAILABLE”BASIS ANGEBOTEN AUSSCHLIESSLICH JEGLICHER GARANTIEN, DIE ÜBER DIE IN DER BEILIEGENDEN
GEBRAUCHSANLEITUNG ERWÄHNTEN GARANTIEN HINAUSGEHEN.
HAFTUNGSBESCHRÄNKUNG
SCHUBERTH IST IN KEINEM FALL FÜR IRGENDWELCHE BESONDEREN, INDIREKTEN ODER FOLGESCHÄDEN
MIT STRAFCHARAKTER ODER IRGENDWELCHE ANDEREN SCHÄDEN DIE AUS DER VERWENDUNG DES
GERÄTES ENTSTEHEN HAFTBAR, UNGEACHTET OB ES SICH UM EINEN VERTRAGSBRUCH, EIN DELIKT
(EINSCHLIESSLICH FAHRLÄSSIGKEIT), PRODUKTHAFTUNG ODER EINEN ANDEREN UMSTAND HANDELT,
AUCH WENN AUF DIE MÖGLICHKEIT DIESER SCHÄDEN HINGEWIESEN WURDE. HIERMIT BESTÄTIGEN UND
STIMMEN SIE ZU, DASS ES SICH BEI DEN VORHER ERWÄHNTEN BESCHRÄNKUNGEN UM GRUNDLEGENDE
BESTANDTEILE DIESER VEREINBARUNG HANDELT UND DASS DAS GERÄT IHNEN OHNE DIESE
BESCHRÄNKUNGEN NICHT ZUR VERFÜGUNG GESTELLT WÜRDE.
RÜCKERSTATTUNG DES KAUFPREISES
FALLS SIE MIT DIESEN BEDINGUNGEN NICHT UNEINGESCHRÄNKT EINVERSTANDEN SIND, BITTEN WIR SIE, DASS
GERÄT AN die Firma MIT VOLLER KAUFPREISRÜCKERSTATTUNG ZURÜCKZUGEBEN, VORAUSGESETZT, DASS SIE
DIESES INNERHALB VON 7 ARBEITSTAGEN NACH ERWERB DES GERÄTES TUN (Kaufbeleg erforderlich) UND
DAS GERÄT SOWIE ALLE ZUBEHÖRTEILE UNVERSEHRT SIND. BEZIEHEN SIE SICH BEI DER RÜCKGABE AUF DIESE
BESTIMMUNGEN. BEI NICHT-RÜCKGABE INNERHALB DES VORGENANNTEN ZEITR AUMS BEFINDEN SIE SICH
AUSDRÜCKLICH IN UNEINGESCHRÄNKTER ZUSTIMMUNG MIT ALLEN OBEN ANGEFÜHRTEN BEDINGUNGEN UND
VERZICHTEN AUF ALLE ZUKÜNFTIGEN ANSPRÜCHE UND FORDERUNGEN GEGENÜBER SCHUBERTH.
www.schuberth.com
20
| SRCS Pro
Page 12

User Manual
POWERED BY
Page 13

CONTENTS
1. INTRODUCTION
1. INTRODUCTION ....................................................23
2. CHARGING THE BATTERY ............................................24
3. INSTALLATION .....................................................25
3.1 REMOVING THE EXISTING ACOUSTIC COLLAR ...............................25
3.2 CONNECTING THE ANTENNA CABLE .......................................25
3.3 ATTACHING THE SRCSYSTEM™ PRO .......................................26
3.4 POSITIONING THE SPEAKERS ............................................26
3.5 POSITIONING THE MICROPHONE ......................................... 27
3.6 REMOVING THE SRCSYSTEM™ FROM YOUR HELMET ........................ 27
3.7 WEARING AND REMOVING THE HELMET ...................................27
3.8 CLEANING THE SRCSYSTEM™ ACOUSTIC COLLAR ........................... 27
4. CUSTOMIZATION AND SETTINGS .....................................28
5. GETTING STARTED .................................................29
5.1 GENERAL FUNCTIONS ................................................... 29
5.2 STAT US LIGHTS ......................................................... 29
5.3 AUDIO SOURCES AND PRIORITIES .........................................29
5.4 VOICE COMMAND ....................................................... 30
5.5 VOICE CONNECT VOX ..................................................30
6. INTERCOM ........................................................31
6.1 “1+8” INTERCOM TOGGLING .............................................31
6.2 INTERCOM WITH CHANNELS “A” AND “B” ..................................32
6.3 CLICKTOLINK CTL INTERCOM ........................................... 34
6.4 BUSY SIGNAL .......................................................... 34
6.5 RECEIVING INTERCOM CALLS. . . . . . . . . . . . . . . . . . . . . . . . . . . . . . . . . . . . . . . . . . . . . 34
7. PAIRING AND USING A MOBILE PHONE, GPS OR MP3 PLAYER ............35
7.1 PAIRING BLUETOOTH CHANNELS 1 AND 2 .................................. 35
7.2 MAKING AND RECEIVING PHONE CALLS ...................................36
7.3 LISTENING TO MUSIC VIA A2DP ........................................... 36
8. FM RADIO .........................................................37
8.1 RADIO TUNING .........................................................37
8.2 AUTOMATIC RADIO TUNING .............................................. 37
9. TROUBLESHOOTING ...............................................37
10. SUPPORT ........................................................38
11. N OTI CES .........................................................38
IMPORTANT:
This is version 1.0 of the User Ma nual. Please note, that our manu al is periodically
updated on the Card o website to include the very lates t features and functio ns of your new
SRC-System™ PRO.
Please visit
to check if the manua l you are holding is the most up dated version and to downlo ad the
manual in your p referred language.
www.schuberth.com/leadmin/downloads/SRC/SRC-System_ Manual-1.pdf
Thank you for choosing the SRC-System™ PRO Bluetooth® communication and
entertainment system for Schuberth helmets. This manual w ill help you set up,
congure and op erate it.
Among others, the SRC-System™ PRO oers the following features:
INTERCOM OPTIONS
• Intercom Conference mode bet ween 2, 3 or 4 riders at a range of up to 1 k m*
• Click-to-Link® Intercom: For spontaneous connection with other riders nearby
• “1+8” Intercom Toggling with 8 additional buddies
MULTIPLE DEVICE CONNECTIVITY
• Bluetooth Mobile phones / GPS device
• Wireless MP3 connectivity via A2DP
ADVANCED TECHNOLOGY
➤ Voice Command and VOX technology:
• Make / Receive mobile calls by voice command
• Make intercom calls by voice command
➤ AGC technology (Automatic Gain Control), allowing the automatic volume
adjustment according to ambient noise and riding speed. You can also control
the volume level manually. AGC sensitivit y levels can be customized to suit
your personal preferences
➤ VOX technology and Voice Command for safe and hands-free operation of
key functions. VOX sensitiv ity levels can be customized to suit your personal
preferences
➤ PLC software (Packet Loss Concealment) for real-time compensation of audio
losses in challenging environments.
ENTERTAINMENT OPTIONS
• Wireless music streaming via devices supporting Bluetooth Stereo A 2DP and
AVRCP proles.
• Built-in FM Radio with 6 station presets and automatic tuning
CARDO COMMUNITY®
• Download software upgrades, enhancements and new features
• Set up your “1+8” Intercom buddies
• Customize your s ettings
➤ S oftware updates v ia the Cardo Community on PC/Mac
➤ Cardo SmartSet App for set tings customization on-the-go
➤ Spoken status announcements, so that you always know to whom or to what
device you are connected
➤ Volume Per Mode: Volume is set and saved at dierent levels of your choice
for each audio s ource
We wish you a great experience with your SRC-System™ PRO and encourage you
to contact us at service@schuberth.com with any questions, suggestions or
comments you may have.
* Under tough environmental conditions (dense fore st, narrow buildings, heavy trac), intercom range
will be re duced. Once con ditions imp rove, the range w ill increase a gain.
22
| SRCS Pro SRCS Pro |
23
Page 14
Flexible Boom
Antenna connector
pulled out
Pin
Microphone
2 Speakers
Intercom
Voice Command
• On / O
Music and Mobile
2. CHARGING THE BATTERY
3. INSTALLATION
1. Pu ll out the antenna connec tor (marked with a red tag) wh ich is tucked inside
the back ri m of the helmet.
Make sure that your SRC-System™ PRO is fully charged for at least 4 hours
before initial use.
1. Open the cover protecting the Charging Jack.
2. Insert the USB cable into the Charging Jack.
Pin
3. Ins ert the other end of the USB cable into the wall
charger or a computer’s USB port.
4. While charging, the red LED turns on. When
charging is complete, the red LED will turn o.
Your wall charger and USB adaptor cable ser ve two purposes:
1. Charging your headset from any A/C wall socket or from a USB port on your
computer (charging time from computer takes longer)
2. Downloading soft ware upgrades from any PC / Mac (see section 4 for details).
3.1 REMOVING THE EXISTING ACOUSTIC COLLAR
First, remove the exist ing Acoustic Collar from
your helmet as follows:
1. Open both snap but tons.
2. Pull out the Acoustic Collar from the rear at
its bended center.
3. Release the collar ’s pins f rom their
corresponding indentations inside the
helmet’s rim.
Antenna tag visible
2. On the SRC co llar open the two fas teners on the
antenna conne ctor and remove the pr otective
plastic cover.
A. B.
Antenna
Connector
Wall charger p lug
USB adapter c able
Velcro® pads
24
| SRCS Pro SRCS Pro |
Speaker Connector
USB Connector
• Charging Jack
• Soft ware Download Por t
Microphone sponge
Speaker pads
User Manual, stickers
Volume Up
Volume Down
The cover protectin g the micro USB Connector should be ke pt tightly closed at all times to
prevent moisture f rom entering the device.
Battery
Check
In Standby, press
• BLUE = Full • PURPLE = Half • RED = Almost emp ty
and for 5 seconds.
3.2 CONNECTING THE ANTENNA CABLE
You r SRC-System™ PRO has an antenna cable which must be connec ted to the
built-in antenna cable connector in the Schuberth helmet.
Make
sure to close the cover of the USB
connector, and then tu ck it away into the USB
connector pocket
.
3. On the helmet r emove the rubber prote ctor from
the antenna connector.
4. Align th e two connector hea ds and snap the two
fastene rs back into place to lock t he connector in
a closed po sition.
A.
B.
25
Page 15

5. T he antenna connector c an now be safely stowe d
Pin
away inside the a ntenna connector po cket on the
center of the S RC-Syst em™
PRO
.
3.3 ATTACHING THE SRCSYSTEM™ PRO
1. Ma ke s ure to place the speaker cord s inside the helmet, and th en secure the
SRC-System™ PRO into place.
2. Slide and ins ert the pin located a t the edge of the control p anel into its
corresp onding indentation o n the helmet and close the s nap button.
3. Ins ert the other pin on the opposite side of the Acoustic Collar into place and
close the second snap but ton.
4. Push and inser t the Acoustic Collar star ting from the center area to the back of
the helmet area. Do the same for the remaining parts to se cure the Acoustic
Collar into place.
5. Make sure that both snap buttons remain fastened, and that the
microphone boom is located on the inner side of your helmet (between the
PRO
SRC-System™
and the inner padding of the helmet).
Microphone Boom
Snap Button
Snap Button
3.4 POSITIONING THE SPEAKERS
For best audio results, make sure that both of your speakers are placed as closely
as possible just opposite your ears.
PRO
The following applies to both sides of the SRC-System™
1. O pen the rear red but ton located under th e interior lining that cov ers the cheek
pads (the but ton is held by a black ring). Li ft the lining slight ly.
2. Attach t he corresponding o val Velcro pads to the speaker-s haped indentation s on
the EPS (expan ded polystyr ene) and position the spea kers on the Velcro pads.
:
3. Close the re d button, making sure i t is still inside its bla ck holding ring.
Optional sp eaker pads are provided to boos t the speaker volume if neede d by bringing the
speakers close r to your ears.
To use, simply place the spea ker pad between the Velcro pad in t he helmet indentation an d
the speaker.
3.5 POSITIONING THE MICROPHONE
To assure smooth c losing (ip-down) of the he lmet’s chin sectio n, rst remove its
triangula r Anti-Noise Pad and pro ceed as follows:
1. Bend the exi ble microphone boom a s shown in the image.
2. Press the mi crophone towards the c enter of your mouth.
3. Flip-dow n and close the chin sec tion of your helmet. You may ne ed to use both
hands to clos e the chin section p roperly.
4. While the chi n section is close d and the visor is open, ins ert your hand into the
opening of t he visor and push the micr ophone away, towards the center o f the
chin sec tion directly op posite your mouth.
3.6 REMOVING THE SRCSYSTEM™ FROM YOUR HELMET
1. De tach both speakers f rom the Velcro on the helme t.
IMPORTANT:
2. Pull out the An tenna connector fr om its pocket and car efully disconnec t it.
3. Carefull y lift and push the Acou stic Collar’s arch from t he center.
Make sure not to pull o n the Antenna connector
.
4. Release the Ac oustic Collar’s pins fro m their correspondi ng indentations insid e
the helmet’s rim.
5. Open both snap b uttons.
3.7 WEARING AND REMOVING THE HELMET
The electronic components of SRC-System™
PRO
are safely embedded inside
an Acoustic Collar. To avoid discomfort while you put on your helmet or while
removing it, we recommend that you proceed as follows:
1. Expand the helmet opening by rmly holding the chin straps and pulling them
forcefully apart.
2. While pullin g the straps apart , slide the helmet
over your head.
3. To remove the helmet, p roceed along the sam e
lines by rs t pulling the straps a part and then
pushing the entire helmet upwards.
You r
SRC-Sy stem™ PRO
contains an entire el ectronic kit within, it w ill have a slight a bulge. Theref ore, putting
your SRC equipp ed helmet on or taking it o ma y feel dierent than what you a re used
to with a standard Acous tic Collar. Remember: The more you pu ll the helmet straps apar t
when puttin g on your helmet or taking i t o, the smoother the process will be, a llowing
the Acoustic Collar to so ften.
Collar is designe d for maximum comfort. H owever, since it
3.8 CLEANING THE SRCSYSTEM™ ACOUSTIC COLLAR
To clean the SRC-System™
PRO
Acoustic Collar, rs t make sure the USB connector
is tightly closed. Use only a slightly damp cloth. Avoid soaking the Acoustic Collar
with water or any other uid. Never submerge it and refrain from letting water
come in contac t with the speakers or the microphone. Allow t he unit to dry at
room temperature.
26
| SRCS Pro SRCS Pro |
27
Page 16
4. CUSTOMIZATION AND SETTINGS
Get the mos t out of your SRC-System™
customizing your unit according to your own personal preferences.
There are t hree ways to c hange the settings: v ia the Cardo Com munity on a PC / Mac,
the Smart Set App or from the Se ttings Menu on your devic e.
Set your Bu ddy name for 1+8 Intercom
Add frien ds to your Buddy list
Download the latest rmware upgrade
Set your Hot-Dial number
Set the 6 FM rad io presets
Change the Voice Recognition language
Disable Spoken Status Announcements
Change A2DP / I ntercom audio prio rity
Change AGC se nsitivity for t he speakers
Change VOX Operation Mode
Change VOX sen sitivity for t he microphone
Disable Click-to-Link
PRO
by changing the settings and
Cardo
Community
SmartSet
App
Settings
Menu
CARDO COMMUNITY WEB PLATFORM
Visit http://community.cardosystems.com
CARDO SMARTSET APP
Cardo
SmartSet
App
SETTINGS MENU
The Settings menu is built in to your SRC-System™
several languages.
Enter Menu
Exit Menu
In Standby, press µ for 2 seconds
Press µ for 2 seconds
Minimum Requirements:
Windows ® XP™ / Mac OS X 10.7
PRO
and is available in
5. GETTING STARTED
5.1 GENERAL FUNCTIONS
Press
s
Power ON / OFF
Volume
Mute / Unmu te
Battery level indicator
Enter Set tings Menu
Hear Your Bud dy
Name
Paired Device
Indication
Enable / D isable VOX
(For Interco m / Voice
command calls only)
Enable / D isable
Spoken St atus
Announcements
• ON: 3 BLUE ashes + a scending tone
• OFF: 3 RED ashe s + descending tone
Tap
or - to adjus t and set volu me of curre nt audio
+
source
and - simultaneously
Tap
+
In Standby, pres s
• Blue LED = Full c harge
• Purple LED = H alf charge
• Red LED = Almo st empty
In Standby, pres s
instructions
In Standby, tap
In Standby, pres s
If “1+8” Buddies a re within range, pur ple LEDs ash for
2 seconds
In Standby, pres s
• Enabled
• Disabled: Red ash fo r 2 seconds
Press
µ
for 2 secon ds
and - f or 5 second s
+
for 2 secon ds and follow the spo ken
µ
and v simultaneously
s
and v for 2 secon ds
s
and - for 2 secon ds
+
:
Blue ash fo r 2 seconds
and s for 2 secon ds
5.2 STATUS LIGHTS
Main unit LED indication Status
None SRC-System™ PRO is OFF
1 BLUE ash ever y 3 seconds Sta ndby mode – No act ive audio
2 BLUE ashes e very 3 seconds
1 RED ash eve ry 3 seconds Standby m ode – Battery i s low
2 RED ashe s every 3 second s Active mode – Battery is l ow
Solid RED USB connec ted / Charging
Active mode – Call in progres s / music or
other audi o source is ON
5.3 AUDIO SOURCES AND PRIORITIES
If two connected audio sources try to play audio simult aneously, the
SRC-System™ PRO automatically determines which to play through the speakers
based on the priority of the connec ted devices.
Higher Priority
Lower Priority
1. Mobile Phone or GPS instructions
2. Intercom
3. A2DP (Stereo Bluetooth) audio
4. FM Radio (Built-in)
*GPS instruc tions from Smartphon e GPS Apps are
prioritized like A2DP audio
*
• Incoming mobile phone calls interrupt ongoing intercom calls
• Incoming intercom calls will interrupt ongoing A2DP music
• Click-to-Link, Intercom and “1+8” calls have the same pr iority:
Click-to-Link requests w ill not interrupt any typ e of Intercom call in progres s, and
vice-vers a
A2DP audio prio rity can be congured to be hi gher than Intercom. See sec tion 4 to adjust settin gs.
English
28
| SRCS Pro SRCS Pro |
29
Page 17
5.4 VOICE COMMAND
The SRC-System™
PRO
allows you to per form key actions hands-free by simply
using your voice.
The default Voice Command language is English. Other languages are also
available (see section 4 to adjust settings).
Throughout this manual, features which are available via Voice Command are
marked with the
1. With no call in progress, tap
icon.
s
or speak any word lou dly to activate VOX
2. Speak a Voice Command from the table below:
Current Mode Desired Action Say this
<<Buddy Name>>*
“Call Intercom”
“Music ON”
“Radio ON”
“Radio OFF”
“Next Station”
“Previous Station”
“Music OFF”
Standby / FM / A2D P
Standby
FM Radi o
“1+8” Interco m Call*
Interco m call with A or B
Start A 2DP
Turn on FM
Turn o FM
Next Sta tion Preset
Previo us Station Prese t
Stop / Pause A 2DP
:
Voice Command perf ormance may vary based on envi ronmental conditions incl uding
driving speed, he lmet type and ambie nt noise.
For improved per formance of the Voice Command feat ure, minimize wind impac t on the
microphone by usi ng the large microphone sp onge and closing the visor.
5.5 VOICE CONNECT VOX
The SRC-System™
PRO
oers VOX technology for safe and hands-free operation
of some key functions.
You can set VOX to either st art an intercom call or ac tivate the Voice Command.
VOX Activation Speak any wor d loudly into the micr ophone
Answer a c all Speak any word l oudly into the micro phone
Reject a call Remain sile nt for about 15 seconds
VOX Sensitivity
(Default: Medium)
VOX Opera tion Mode
See sec tion 4 to adjust s ettings.
High: Us e this setti ng if it is dicult t o activate VOX
Low: Use this s etting if it is to o easy to activ ate VOX
VOX can be set to a ctivate the Voice Com mand (default) or to
star t an Intercom Call. See s ection 4 to adjus t settings.
6. INTERCOM
The SRC-System™
up to 1 km / 1,100 yards (subject to terrain and within line of sight).
To chat with someon e via Intercom, rst pair your SRC-System™
unit. Pairing is a one-time process. Once paired, the units should automatically
recognize each other whenever in range.
Intercom Compatibility
You r SRC-System™
Intercom range with other models is limited to the distance of the device with
the shorter range. For more info please visit www.cardosystems.com/SRC.
Intercom communication is possible using one of the three Intercom modes:
Section
6.1
Section
6.2
Section
6.3
PRO
allows full duplex intercom communication at a range of
PRO
is compatible with all Cardo intercom produc ts.
“1+8” Intercom Toggling
(betwe en SRCS PRO, scala ride r
PACKTALK, G9/G9x and ca rdo
SH O-1)
Intercom with Channels “A”
and “B”
(with other scala rider models)
Click-to-Link
(with compatible models)
PRO
to the second
2-way Intercom c onversations wi thin a
group of up to e ight other “1+8” Buddies
Intercom Conferencing (2-way, 3-way
and 4-way) usi ng Channels “A” and “B”
1-on-1 spontaneous intercom
convers ations with ran dom riders near y ou
who are not al ready paired to yo ur SRCS Pro
Voice Command
Volume Down
Volume Up
Intercom
Music and Mo bile
Button layout
6.1 “1+8” INTERCOM TOGGLING
Pair with up to 8 other devices (“1+8” Buddies) and connect with them
one at a time by saying their name.
6.1a CONFIGURING YOUR BUDDY NAME
Before using “1+8” Intercom, you should assign your device a Buddy Name, so
that other “1+8” participants c an call you by this name.
If you change your B uddy Name, you must pair again w ith your “1+ 8” Buddies for
their device to r eceive your new Buddy Name.
Visit the Cardo Community to congure your Buddy Name (see Section 4). Until
you congure a Buddy Name, your unit will be known by it s generic “1+8” Buddy
name, “SRCS PRO”.
Hear Your Bud dy Name
In Standby, tap
You will hear your B uddy name through t he speakers.
and v simultaneously.
s
English
A2DP Music
*see Sec tion 6.1 for detai ls
30
| SRCS Pro SRCS Pro |
Nex t Trac k
Previous Track “Previous Track ”
“N ext Track”
Enable/Disable VOX
(For Intercom/Voice
Command only)
In Standby, pres s
• Enable: Blue ash for 2 seco nds
• Disable: Red ash for 2 seco nds
and - simultaneously for 2 seconds
+
Play Paire d Buddy List
In Standby, pres s
for 2 secon ds
v
31
Page 18
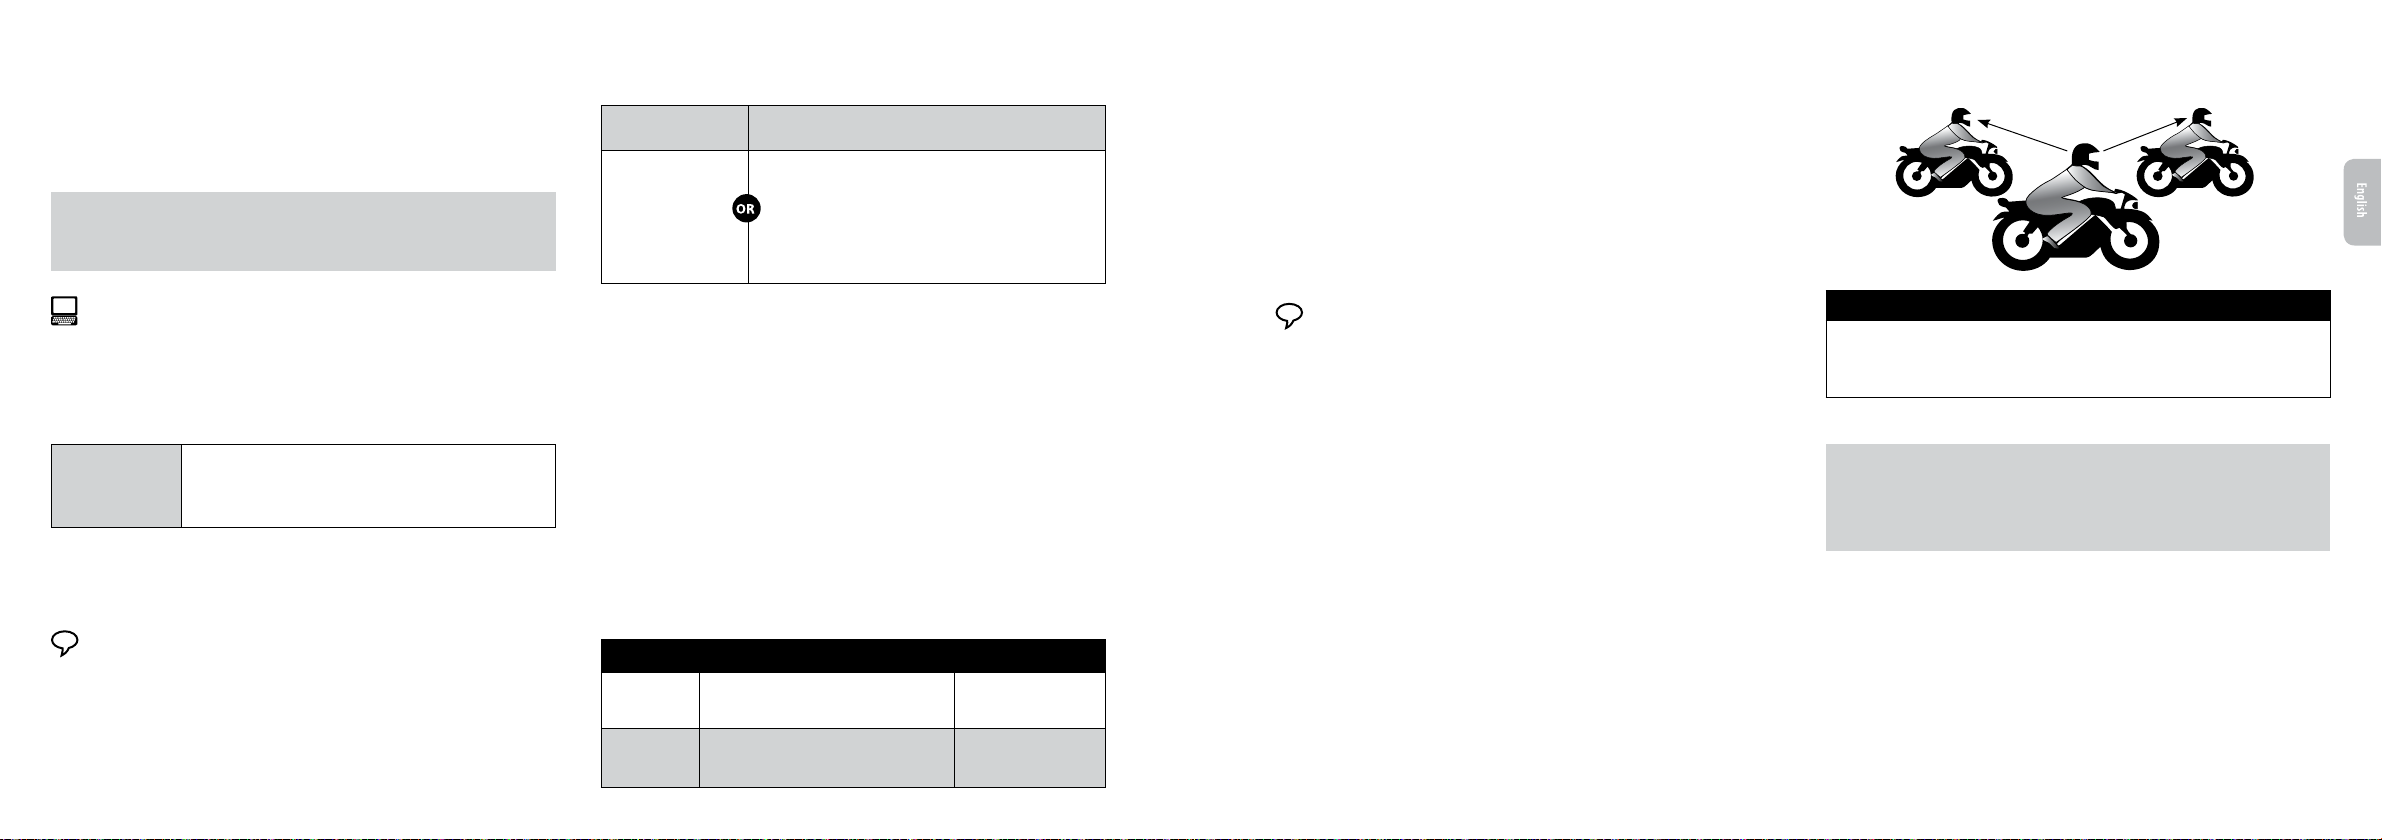
6.1b PAIRING WITH A “1+8” INTERCOM BUDDY
1. In Standby, press
for 5 seconds to enter pairing mode.
s
2. Enter “1+8” intercom pairing mode on the second unit. After a few seconds the
units should recognize each other.
3. If pairing was succe ssful, a purple light appears for 2 seconds.
If your SRC-System™ PRO already has a full list of 8 p aired “1+8” Intercom Buddies,
pairing ano ther buddy will replace the bu ddy that you have not spoken to for th e longest
time.
Pairing Online – Cardo Community®
You can also nd your fr iends and add them to your “1+8” Buddy list via the
Cardo Community (see section 3).
6.1c PAIRED DEVICE INDICATION
You can see which units within a range of 20m are your “1+8” Intercom Buddies.
Paired Device
Indication
In Standby, pres s
If “1+8” Buddies a re within range, the L EDs on both units wi ll
turn PURPLE f or 2 seconds
and v for 2 secon ds
s
6.1d CALLING “1+8” INTERCOM BUDDIES
There are two ways to star t an intercom call with “1+8” buddies.
OPTION 1: Voice Connec t VOX
Speak any word loudly into the microphone. When you hear the Voice Command
tone, say the name of a ”1+8” Intercom Buddy i.e. “John Smith”
OPTION 2: MANUAL MODE
☛
SAY THE NAME
Tap
and say
s
the name of th e
“1+8” Buddy
CHOOSE THE NAME
(from your Buddy List):
Press
for 2 secon ds. Hear the names of a ll pre-
s
paired “1+8” buddies.
When you hear t he name of the Buddy yo u wish to call,
tap
or say any word l oudly into the micr ophone.
s
To cancel Budd y List playback: Pr ess
for 2 seconds.
s
INTERCOMTOPHONE
If a “1+8” Buddy is not in range, or moves out of range, you have the option to
set up the “Intercom-to-Phone” feature via the Cardo Community, to remain in
contact by diverting Intercom calls automatically to your mobile phones.
6.2 INTERCOM WITH CHANNELS “A” AND “B”
Start multi-party conversations using Intercom Channels “A” and “B”. This mode
is suitable for 2, 3 or 4-way calls.
6.2a PAIRING INTERCOM CHANNELS “A” AND “B”
Pairing a Channe l will replace any existin g paired device on that Chann el with the
newly paired device.
1. Check that all unit s are in Standby.
2. Press
for 5 seconds until the LED begins ashing rapidly, indicating it is in
v
Intercom Pairing mode (see table below for channel pairing).
CHANNEL PAIRING METHOD LED INDICATORS
“A”
In Standby, pres s
“A” pairs automatically.
for 5 secon ds. Channel
v
Rapid RED ashing
3. Enter Intercom Pairing mode on the second unit follow ing its user manual.
Both units w ill now be in Intercom Pairing mode.
4. After a few s econds, both units will sh ow a solid LED for 2 seconds, ind icating that
they are paire d and ready to use.
5. I f Pairing is not completed wi thin two minutes, the unit s will return to Standby
mode.
6.2b CALLING INTERCOM CHANNELS “A” AND “B”
There are t wo ways to start an interco m call with Channels “A” a nd “B”
OPTION 1: Voice Connect VOX
Speak any word loudly into the microphone. When you hear the Voice Command
tone, say “Call Intercom” to start an intercom call with “A” and/or “B” (subject to
who is present)
VOX Intercom call with only “A” or “B” will end automatic ally after 30 seconds of
silence.
OPTION 2: Manual Mode
☛
Use this to start an Intercom c all with either:
• Channel “A”: Tap
• Channel “B”: Double-tap
v
v
To end a call tap v.
If you are already in an Intercom call with “A” or “B”, tap
twice to add a third
v
rider (“A” or “B”).
THREEWAY INTERCOM
Use Channel “A”
Use Channel “B”
Rider 2
Rider 1
Rider 3
Pairing
Rider “1” is paired to Rider “2” and also to Rider “3”.
1. Rider 1 pairs to Rider 2 using Channel “A” (see 6.2a).
2. Rider 1 pairs to Rider 3 using Channel “B” (see 6.2a).
IMPORTANT
During a 3-Way Intercom Conf erence call with 2 other parti cipants, Rider 1 will n ot be
able to receive mobil e phone calls or GPS navigatio n instructions as long as th e call is in
progress.
: Three-Way Conference Mode Considerations
English
“B”
32
| SRCS Pro SRCS Pro |
In Standby, pres s
When LED beg ins ashing , tap v twice.
for 5 seconds.
v
Rapid BLUE ashing
33
Page 19

FOURWAY INTERCOM
Pairing
1. Pair Rider 1 to Passenger 2 using Channel “A” (see 6.2a).
2. Pair Ride r 3 to Passenger 4 using Channel “A” (see 6.2a).
3. Pair Passenger 2 to Passenger 4 using Channel “B” (see 6.2a).
In this conguration the two passenger s (numbered 2 and 4) are each using
two Bluetooth connections:
Calling
1. Make sure all four unit s are in Standby.
2. Passenger 2 should double-tap
to call Passenger 4.
v
Wait until audio is heard on both unit s.
3. Rider 1 should tap
4. Rider 3 should tap
IMPORTANT: Four-Way Confer ence Mode Considerations
During a 4-Way Intercom call, the two passengers who maintain two active connections will not be
able to receive mobile phone calls or GPS instructions as long as the conference call is in progress.
to call Passenger 2.
v
to call Passenger 4.
v
6.3 CLICKTOLINK CTL INTERCOM
Click-to-Link is a spontaneous, “so cial” feature of your SRC-System™ PRO.
You can instantly initiate 1-on-1 intercom calls with other riders near
you, without being paired. Think of it as a private channel that you can
set up on-the -go with other rider s that you see along the way.
Click-to-Link can be disabled eectively blocking any attempt by a third part y to
send a CTL request to you.
Start a CTL c all re quest
(search las ts up to 10 sec.)
End a CTL call /
Cancel a CTL call request
Accept a CTL call
Rejec t a CTL call
Enable / D isable CTL
(Enabled by default)
Tap
three times
v
Tap
v
When hearing the CTL ringtone:
Tap
or say any word l oudly to answer by VOX
v
While hearing the CTL ringtone:
Remain silent until the ring tone stops or press
two seconds
Via the Settings Menu, Cardo Community and the
Cardo Smartset App
v
for
If other riders are nearby, your next Click-to-Link call may randomly connect to
any of them.
6.4 BUSY SIGNAL
When attemp ting to establish an Interco m call with another unit tha t is already
busy, a “busy ” signal will be heard. The SRC-System™ Pro is busy w hile on a phone
call, intercom c all with Channels “A” and “ B”, “1+8 ” intercom c all or CTL call.
6.5 RECEIVING INTERCOM CALLS
If a paired unit tries calling you via Intercom, the call will begin almost instantly.
7. PAIRING AND USING A MOBILE PHONE,
GPS OR MP3 PLAYER
To connect your SRC-System™ PRO to a Bluetooth device you must rst pair
them. Once paired, they will automatically recognize each other whenever they
are within range (10m / 33ft).
Your unit has two Bluetooth channels for connec tion to mobile phones, GPS
devices and music players with A 2DP.
7.1 PAIRING BLUETOOTH CHANNELS 1 AND 2
1. Make sure Bluetooth is enabled on your phone/GPS/MP3 player.
2. Check the unit is in Standby (single BLUE ash every 3 seconds).
3. To pair Bluetooth Channel 1 – press
RED and BLUE LEDs begin rapidly alternating.
To pair Bluetooth Channel 2 – press - for at least 5 seconds until the
RED and BLUE LEDs begin rapidly alternating.
To pair a GPS, when LEDs begin rapidly alternating, tap +.
4. S earch for Bluetooth devices on your phone/GPS/MP3 player by following the
device’s instructions.
5. Af ter a few seconds the device w ill list “SRCS PRO”. Select it.
6. If prompted for a PIN or Passkey, enter 000 0 (four zeros).
7. The device will conrm that pairing has succeeded and the LED will b egin
ashing Blue, once every 3 seconds.
8. If pairing is n ot completed within 2 minut es, the unit will return to Sta ndby mode.
IMPORTANT!
• If you have pai red 2 dierent mob ile phones direc tly to your SRC-System™ PRO, you
will need t o set one as default f or making calls.
• If your GPS s upports it, yo u can pair the secon d mobile phone dire ctly to the GPS and
then pair t he GPS to your SRC-System™ PRO, and so connect bot h mobile phones and
the GPS to you r SRC-System™ PRO.
for at least 5 seconds until the
+
NOTES:
• Not all Bluetooth mobil e phones can broad cast Bluetooth Stereo music (A2D P), ev en if
the phone ha s an MP3 player funct ion. Consult your mob ile phone’s User Manual fo r
more information.
• Not all Bluetooth GPS dev ices allow connec tion to Bluetooth audio devices. Consult your
GPS User Man ual for more infor mation.
• After p airing, you may need to t ap
MP3 player
Up to 1 km Bike-to-Bike
Built-in
FM radio
Intercom Range*
to connect.
µ
GPS
Mobile phone
& A2DP connectivity
English
34
| SRCS Pro SRCS Pro |
35
Page 20
7.2 MAKING AND RECEIVING PHONE CALLS
Tap
Answer a c all
Reject a call
End a call
Voice Dial* ( if supporte d
by mobile phone)
Redial*
Hot Dial*†
Set default mobile‡
Change default mobile
INTERCOM CONFERENCE MODE
Add/Remove Channel “A”
to/fro m a call
Add/Remove Channel “B”
to/fro m a call
* This featu re is not availab le during mobi le calls.
† Befor e using Hot-Dia l, congure you r Hot-Dial numb er via the Cardo Commu nity or the Car do
Smartset App.
‡ If 2 mobil e phones are pa ired direc tly to your unit , set one to use as de fault for ou tgoing calls .
or speak any wo rd loudly to ans wer by VOX
µ
Remain sile nt for 15 seconds, or p ress
Tap
µ
Press
for 2 secon ds and follow the pro mpt from the
mobile
Press
for 2 secon ds
Tap
three times
µ
While on a pho ne call, press f or 5 seconds
In Standby, pres s
Tap
while on a pho ne call
v
Double-tap
for 5 secon ds
µ
while on a pho ne call
v
for 2 secon ds
µ
7.3 LISTENING TO MUSIC VIA A2DP
Available only on AVRCP compatible Bluetooth audio sources
Play
ß
Pause/St op
Next Track
Previo us Track*
Music Scan
Stop Scan
*With som e phones you may ne ed to repeat th is action
ß
ß
ß
In Standby, tap
Press µ for 2 secon ds
With music O N, tap
With music ON, double-tap
With music O N, press
5 sec. The rst few second s of each track will p lay.
To stop the sca n on the current tr ack, say any word lou dly
into the mic rophone or tap
µ
µ
µ
(scans up) or - (scans dow n) for
+
µ
SWITCHING BETWEEN A2DP AUDIO SOURCES
If a Music Player is paired, the SRC-System™ PRO will use it as the default A2DP
audio source.
1. Stop the music playback f rom the current device.
2. Start music playback from the other device.
7.4 MUSIC SHARING
Rider and pass enger can listen to the same music (within a range of
10m / 33 ft)
Music Sharing wor ks only with A2DP (Bluetooth stereo) enable d
devices. To share your music with your riding partner, your SRC-System™ PRO
unit [SENDER] needs to be paired to the other unit [RECEIVER] on CHANNEL A and
the RECEIVER must be in Standby mode.
[SENDER] Star t/Stop
sharing your music
[RECEIVER] Stop m usic
sharing
Phone/Intercom calls and GPS audio navigation will override music playback.
Music Sharing do es not transmit voice audio an d cannot be used as an Intercom call.
During A 2DP music playback, p ress
Press
for 2 seconds
+
for 2 seconds
+
8. FM RADIO
You r SRC-System™ PRO includes a built-in FM radio with a 6 Preset
memory and RDS (Radio Data System).
RDS allows the radio to automatically retune to the strongest
frequenc y available for the FM station you are listening to when the
signal becomes too weak.
Turn on Radio
Turn o Radio
Next Sta tion
Previo us Station ßWith radio ON, double-tap
RDS ON/OFF
(Default: O)
8.1 RADIO TUNING
Preset st ations can be saved via the Cardo Community, the Cardo Smar tset App or
directly on your unit.
1. Turn on the Radio.
2. Selec t a Preset number you wish to s et (Preset 1 – 6) by tapping
preset is heard.
3. Find an FM station to s ave using Seek or Scan.
Seek up/dow n and Save
(Find the next FM station)
Scan an d Save:
(Automatic ally scans up for
a st ation)
ß
ß
ß
In standb y, d ouble-tap
Press µ for 2 secon ds
With radi o ON, tap
µ
µ
µ
With Radi o ON, press
and - simultaneously for 2 seconds
+
µ
Choose a pr eset by tapping
Press + or - for 2 secon ds
Tap µ within 20 s econds to save to cur rent preset
With Radi o ON, press
To stop search, t ap
within 20 s econds to save to cur rent preset
Tap
µ
To continue sc an, wait for the nex t station to b e found.
+
+
µ
for 5 seco nds
until the desired
8.2 AUTOMATIC RADIO TUNING
This feature m akes nding new statio ns fast and easy by auto matically creating a
temporar y list of 6 radio stat ions.
1. With the radio on, press
for 5 seconds.
-
2. The radio will search upwards (higher frequency) from the current station and
store the next 6 FM stations it discovers.
3. If desired, repeat to store the next 6 FM stations.
These 6 temporar y stations cannot be saved and do n ot replace the FM Presets you may
have saved.
Turning o the unit will clear the temporary stations and res tore the FM Presets.
9. TROUBLESHOOTING
Reboot
Reset Pairing
(Deletes a ll
paired devices)
If your SRC-System™ PRO stops respo nding, reset i t by turning it o
and then on ag ain (press
1. I n Standby, press
2. Press
for 2 secon ds until LED ashes 5 ti mes in PURPLE.
µ
for 2 seco nds).
s
for 5 sec s until LED ashes RED/B LUE.
+
English
36
| SRCS Pro SRCS Pro |
37
Page 21

10. SUPPORT
For additional information please visit our website at
www.schuberth.com
For technic al support pleas e contact us at:
service@schuberth.com
Phone: +49 -391-8106-555
For the lates t information on Sof tware upgrad es please visit our webs ite at
www.schuberth.com/en/motorcycle/service/src-systemtm.html and
register on-line.
IMPORTANT:
OPENING ACOUSTIC COLLAR ZIPPER VOIDS WARRANTY!
The electronic components inside the Acoustic Collar of the SRC-System™ are
closed by a sealed zipper. Please do not tamper with or open the zipp er as this
will void your war ranty.
11. NOTICES
Your complete and undivided attention is required while driving the vehicle. You must ensure that you take all the
necessary precautionary measures to be able to adequately take into account the current trac situation and weather
conditions including the state of the road at all times, including when you are using the device. B efore making or
accepting a call you should pull over to the side of the road and stop. Any publications, advertisements, announcements
or other similar communications, which imply that you can use the device on the move, merely refer to its technical
capabilities and are not to be understood as an encouragement to engage in such activity. You must establish whether
use of the device might represent a violation of any laws or regulations applic able in the location of use and adhere to
the relevant rules. In this respect, any use of the device is exclusively at the user’s own risk and responsibility. The basic
requirements for safe use include that you must be physically capable of using the device and not suer from any illness
or restrictions that might impair your capability to use the device safely and ride on the road. Furthermore, you must hold
a valid driving licence for the vehicle. Under no circumstances may you consume alcohol or mind altering drugs, which
might impair your alertness, before or during use of the device.
Federal Communications Commission (FCC)
Statement 15.21
You are cautioned that changes or modications not expressly approved by the part responsible for compliance could
void the user’s authority to operate the equipment.
FCC Statement
This equipment complies with Part 15 of the FCC Rules. Operation is subject to the following two
conditions:
(1) This device may not cause harmful interference, and
(2) This device must accept any interference received, including interference that may cause undesired operation.
15.105(b)
This equipment has been tested and found to comply with the limits for a Class B digital device, pursuant to part 15 of
the FCC rules. These limits are designed to provide reasonable protection against harmful interference in a residential
installation. This equipment generates, uses and can radiate radio frequency energy and, if not installed and used
in accordance with the instructions, may cause harmful interference to radio communications. However, there is no
guarantee that interference will not occur in a particular installation. If this equipment does cause harmful interference to
radio or television reception, which can be determined by turning the equipment o and on, the user is encouraged to try
to correct the interference by one or more of the following measures:
• Reorient or relocate the receiving antenna.
• Increase the separation between the equipment and receiver.
• Connect the equipment into an outlet on a circuit dierent from that to which the receiver is connected.
• Consult the dealer or an experienced radio/TV technician for help.
FCC/IC RF Radiation Exposure Statement:
This equipment complies with FCC/IC radiation exposure limits set forth for an uncontrolled environment. End users
must follow the specic operating instructions for satisfying RF exposure compliance. The antenna used for this
transmitter must not transmit simultaneously with any other antenna or transmitter, except in accordance with
FCC/IC multi-transmitter product procedures.
Instructions concerning human exposure to radio frequency electromagnetic elds - to comply with FCC Section
1.310 for human exposure to radio frequency electromagnetic elds, a distance of at least 20 mm between the
equipment and all persons should be maintained during the operation of the equipment.
This equipment complies with the RSS-102 exemption from routine RF exposure evaluation for use in an
uncontrolled environment.
Industry Canada (IC)
This device complies with Industry Canada licence-exempt RSS standard(s). Operation is subject to the following
two conditions: (1) this device may not cause interference, and (2) this device must accept any interference,
including interference that may cause undesired operation of the device.
European CE Notice
The SRC-System™ heads et (the “Produ ct”) is in c onformit y with the foll owing essent ial requirem ents of
Council D irective 199 9/5/EC (referre d to as R&TTE Direc tive): Artic les 3.1a, 3.1.b and 3. 2. The Produc t is
manufa ctured in acc ordance with A nnex II of the abo ve directi ve.
Declaration of Conformity (DOC)
The SRC-System™ PRO is compliant with and adopts the Bluetooth
all interoperability tests that are specied in the Bluetooth
device and other Bluetooth
HEALTH WARNINGS:
Hearing Loss
Audio devices can cause hearing loss. Employ care and avoid exposure to excessive volume levels that may
damage or impair hearing or lead to hearing loss. Permanent hearing loss may occur if Products are used at high
volume for prolonged periods of time.
RF Signals
Most electronic equipment is shielded from RF signals. However, certain elec tronic equipment may not be
shielded against the RF signals emanating from your wireless equipment.
Pacemakers
The Health Industry Manufacturers Association recommends that a minimum separation of about six inches
(or 16 cm) to be maintained between a mobile phone or wireless device and a pacemaker to avoid potential
interference with the pacemaker. Be sure not to inter fere with the functionality of personal medical devices.
Hearing Aids
Some devices may interfere with certain hearing aids. In the event of such interference, you should consult your
hearing aid manufacturer to discuss alternatives.
Other Medical Devices
If you use any other personal medical device, consult the manufacturer of your device and/ or your physician to
determine if it is adequately shielded from interference caused by external RF energy. Your physician may be able
to assist you in obtaining this information.
®
-enabled products is not guaranteed.
®
Specication 3.0 and has successfully passed
®
specication. However, interoperability between the
Battery
Batteries are warranted only if its capacity falls below 50% of rated capacity or if the battery develops leakage.
IMPORTANT: Do not store your Product without charging it from time to time for periods in excess of six months, as
this may cause irreversible damage to the capacity of your battery. Your warranty will not cover such events.
CAUTION: Risk of explosion if battery is replaced by an incorrect type. Dispose of used batteries according to the
instructions.
AC/DC Adapters: When charging from a wall outlet, use the charger provided or another certied plug-in
AC/DC adapter that meets the following criteria:
Input: 100-240 V, 50 / 60 Hz, 0.2 A maximum, O utput: 5 DV DC, 1 A maximum.
Operating temperature: The SRC-System™ PRO is designed to work in temperatures between -20° and 55° C.
Charging temperature: Battery charging temperature limits: 0° - 40°C (32°-104°F)
Product Weight: (50-59): 192g (6.77 oz), (60-65): 202g (7.12 oz)
WAIVER AND GENERAL RELEASE
(not for countries of the European Union)
BY USING THE SRC-SYSTEM™ YOU WILL WAIVE SUBSTANTIAL LEGAL RIGHTS INCLUDING THE RIGHT TO SUE. PLEASE
READ THE FOLLOWING CAREFULLY BEFORE USING THE DEVICE. IF YOU DO NOT ACCEPT ALL TERMS OF THIS AGREEMENT,
YOU SHOULD IMMEDIATELY RETURN THE PRODUCT FOR A FULL REFUND. BY USING THE HEADSET YOU AGREE TO BE
BOUND TO THIS AGREEMENT AND FORFEIT THE RIGHT TO SUE.
Using a communication device while riding a motorcycle, scooter, moped, ATV, quad-bike or any other vehicle or
equipment, whether on land, water or air (jointly referred to as “Vehicle”) requires your complete and undivided
attention. Schuberth GmbH. and Cardo Systems, Inc., including their respective Ocers, Directors, Aliates, Parent
Company, Representatives, Agents, Contractors, Sponsors, Employees, Suppliers and Resellers (jointly referred to as
the “Company ”) strongly advises you to take all necessar y precautions and remain alert to the trac, weather and
road conditions if you choose to use the SRC System (the “Device”) , including all derivative models irrespective of
its commercial name or branding, and stop your Vehicle on the roadside prior to initiating or receiving calls. Any
publications, advertisements, announcements or similar notes that refer to using the Device while riding a Vehicle
are solely intended to address its technical capabilities and should not be misconstrued as if encouraging users to
operate the Device while actively involved in trac.
By way of purchasing this Device and not returning it for a full refund (see below), you are irrevocably releasing,
indemnifying from any liability, loss, claim and expense (including attorneys fees) and holding the Company
harmless for any bodily injuries, harm or death as well as losses or damages in goods, to any Vehicles including your
own, or to any property or asset that belong to you or to third parties, any of which may result from using the Device
under any circumstances or conditions and irrespective of jurisdiction. the Company will not be responsible for any
physical damages, irrespective of reasons, conditions or circumstances, including malfunctioning of the Device, and all
risks associated with operating it rest solely and entirely with the user of this Device, irrespective of whether the Device is
used by the original purchaser or any third party.
The Company hereby noties you that using this Device may also be in contravention to local, federal, state or
38
| SRCS Pro SRCS Pro |
39
Page 22

national laws or regulations, and that any use of the Device is entirely at your sole risk and responsibility.
1. You, your heirs, legal representatives, successors or assigns, hereby voluntarily and forever release, discharge,
indemnify and hold harmless the Company from any and all litigation, claims, debts, demands, ac tions and
liability which may arise, directly or indirectly, from using
the Device for any distress, pain, suering, discomfort, loss, injury, death, damages to or in respect to any person
or property however caused, WHETHER ARISING FROM THE NEGLIGENCE OR OTHERWISE, and which may hereafter
accrue to you on some future date as a result of said use, to the fullest ex tent permitted by law.
2. You fully understand and assume the risks in using the Device, including risk of negligent acts or omissions by
others.
3. You conrm that you are physically capable to use the Device and that you have no medical conditions or needs
that may infringe upon your abilities to do so in a safe manner. You conrm that you are at least eighteen (18)
years of age and that you have been advised of the risks
associated with the use of the Device. You further conrm that you will not consume any alcohol that may aect
your alertness or any mind-altering substance, and will not carry, use or consume these substances before or
during the use of the Device.
4. You fully acknowledge our warnings and understand that:
(a) risks and dangers exist in using the Device while in trac, including but not limited to injury or illness, strains,
fractures, partial and/or total paralysis, death or other ailments that could cause serious disability;
(b) these risks and dangers may be caused by the negligence of the manufacturers or its agents or any third party
involved in designing or manufacturing the Device;
(c) these risks and dangers may arise from foreseeable or unforeseeable causes. You hereby assume all risks
and dangers and all responsibility for any losses and/ or damages, whether caused in whole or in part by the
negligence or other conduct of others, including the Company.
5. You conrm that you have read this release of liability and fully understand its terms and that you have given up
substantial rights by not returning the Device for a full refund (see refund option below).
LIMITED WARRANTY
SUBJECT TO THE APPLICABLE LAWS AND REGULATIONS IN YOUR JURISDICTION, YOUR PRODUCT IS COVERED BY A
TWO-YEAR LIMITED PRODUCT WARRANTY FROM THE DATE OF ORIGINAL PURCHASE. PLEASE RETAIN THE RETAIL SALES
RECEIPT AND YOUR REGISTRATION DATA FOR PROOF OF PURCHASE.
DISCLAIMER OF WARRANTY
THE COMPANY DISCLAIMS ALL EXPRESS AND IMPLIED WARRANTIES WITH REGARD TO THE ENCLOSED DEVICE,
INCLUDING WITHOUT LIMITATION ANY IMPLIED WARRANTIES OF MERCHANTABILIT Y, FITNESS FOR A PARTICULAR
PURPOSE, AND NON-INFRINGEMENT. THE DE VICE AND ITS ACCESSORIES ARE PROVIDED “AS IS” AND “AS AVAILABLE”
WITHOUT WARRANTY OF ANY KIND BEYOND THOSE ASSUMED IN THE ENCLOSED MANUAL.
LIMITATION OF LIABILITY
IN NO EVENT SHALL THE COMPANY BE LIABLE FOR ANY SPECIAL, INDIREC T, PUNITIVE, INCIDENTAL, EXEMPLARY OR
CONSEQUENTIAL DAMAGES, OR ANY DAMAGES WHATSOEVER RESULTING FROM THE USE OF THE DEVICE, WHETHER
BASED ON BREACH OF CONTRACT, TORT (INCLUDING NEGLIGENCE), PRODUCT LIABILITY OR OTHERWISE, EVEN IF
ADVISED OF THE POSSIBILITY OF SUCH DAMAGES. YOU ACKNOWLEDGE AND AGREE THAT THE LIMITATIONS SET FORTH
ABOVE ARE FUNDAMENTAL ELEMENTS OF THIS AGREEMENT AND THE DEVICE WOULD NOT BE PROVIDED TO YOU
ABSENT SUCH LIMITATIONS. SOME STATE STATUTES MIGHT APPLY REGARDING LIMITATION OF LIABILITY.
RETURN FOR FULL REFUND
IF YOU ARE UNWILLING TO ACCEPT AND AGREE TO THE ABOVE CONDITIONS, YOU MAY RETURN THIS DEVICE TO THE
RESELLER OR TO THE COMPANY FOR A FULL REFUND, PROVIDED THAT YOU DO SO NO LATER THAN 7 B USINESS DAYS
FOLLOWING THE PURCHASE OF THE DEVICE (proof of purchase required) AND SUBJECT TO THE WRAPPING BEING
INTACT. WHEN DOING SO, PLEASE REFER TO THIS SECTION. BY NOT RETURNING THE DEVICE FOR REFUND WITHIN THE
PERIOD PROVIDED, YOU ARE EXPLICITLY IN AGREEMENT WITH THE ABOVE, AND RENOUNCE ALL RIGHTS TO FUTURE
CLAIMS AND DEMANDS AGAINST THE COMPANY AS DEFINED ABOVE.
www.schuberth.com
40
| SRCS Pro
Page 23

Guide d’Utilisation
POWERED BY
Page 24

SOMMAIRE
1. INTRODUCTION
1. INTRODUCTION ....................................................43
2. CHARGEMENT DE LA BATTERIE ......................................44
3. INSTALLATION .....................................................45
3.1 RETIRER LE COL ACOUSTIQUE EXISTANT ................................... 45
3.2 CONNECTER LE CÂBLE D’ANTENNE ........................................ 45
3.3 FIXER LE SRCSYSTEM™ PRO .............................................46
3.5 POSITIONNEMENT DU MICROPHONE ..................................... 47
3.6 RETIRER LE SRCSYSTEM™ PRO DE VOTRE CASQUE. . . . . . . . . . . . . . . . . . . . . . . . . . 47
3.7 METTRE ET RETIRER LE C ASQUE ......................................... 47
3.8 NETTOYER LE SRCSYSTEM™ PRO ......................................... 47
4. PERSONNALISATION ET REGLAGES ...................................48
5. DÉMARRAGE ........................................................................49
5.1 FONCTIONS GÉNÉRALES ................................................. 49
5.2 ASPECTS DES VOYANTS DE L’UNITÉ PRINCIPALE ............................ 49
5.3 SOURCES AUDIO ET PRIORITÉS ........................................... 49
5.4 COMMANDE VOCALE .................................................... 50
5.5 PARAMÈTRES DE CONNEXION VOCALE VOX .............................. 50
6. INTERCOM ........................................................51
6.1 INTERCOM EN ALTERNANCE 1+8 ....................................... 51
6.2 INTERCOM AVEC DES CANAUX A ET B ................................. 52
6.3 INTERCOM CLICKTOLINK CTL ...........................................54
6.4 SIGNAL OCCUPÉ ........................................................ 54
6.5 RECEVOIR DES APPELS INTERCOM ........................................54
7. CONNEXION AU TELEPHONE MOBILE, GPS OU LECTEUR MP3 .............55
7.1 PAIRER LES CANAUX BLUETOOTH 1 ET 2 ................................... 55
7.2 PASSER ET RECEVOIR DES APPELS TELEPHONIQUES ........................ 56
7.3 MUSIQUE EN STRE AMING PAR A2DP ......................................56
7.4 PARTAGE DE MUSIQUE MUSIC SHARING .................................. 56
8. RADIO FM .........................................................57
8.1 RÉGLAGE DE LA RADIO .................................................. 57
8.2 RÉGLAGE AUTOMATIQUE DE LA RADIO ....................................57
9. DEPANNAGE ......................................................57
10. ASSISTANCE ......................................................58
11. N OTI CES .........................................................58
IMPORTANT:
Ceci est la version 1.0 du Gui de d’Utilisation. Veuill ez prendre en compte que notre
manuel est régu lièrement mis à jour sur le si te internet de Cardo pour vous four nir les
fonctionn alités et fonctions le s plus récentes de votre nouveau SRC-System™ PRO.
Veuillez visiter la pa ge
Manual-1.pd f
pour télécharg er le manuel dans votre langu e préférée.
www.schuberth.com/leadmin/downloads/SRC/SRC-System_
pour vérier si le m anuel que vous possédez est l a version la plus à jour et
Merci d’avoir choisi le système de communication et de divertissement Bluetooth®
de
SRC-System™ PRO pour casques Schuberth.
Ce manuel va vous aider à installer, congurer et faire fonctionner le
SRC-System™ PRO.
Entre autres, le
SRC-System™ PRO ore les fonctionnalités suivantes:
OPTIONS D’INTERCOM :
• Le mode confér ence intercom entre 2, 3 ou 4 motar ds jusqu’à une portée d e 1 km*
• Intercom Click-to-Link®: Pour des connexions spontanées avec d ’autres motards
à proximité
• Intercom « 1+8 » permet de communiquer en alternance avec 8 amis
supplémentaires
CONNECTIVITE A DE MULTIPLES PERIPHERIQUES :
• Téléphone port able Bluetooth / GPS
• Connectivité sans l A2DP / MP3 pour la musique stéréo
OPTIONS DE DIVERTISSEMENT
• L a musique en streaming sans l via des dispositifs stéréo Bluetooth A2DP et
AVRC P
• Radio FM intég rée avec 6 stations prér églées et réglage auto matique
Cardo Community®
• Téléchargez les mises à jour des logiciels, les nouvelles fonc tionnalités et
personnalisez les paramètres
• D éterminez vos amis d’intercom « 1+8 »
TECHNOLOGIE DE POINTE
➤ Commande vocale e t la technologie VOX:
• Passer / recevoir des appels mobiles par commande vocale
• Passer des appels intercom par commande vocale
AUTRES FONCTIONNALITÉS SPÉCIALES :
➤ La technologie AGC (Automatic Gain Control) permet le réglage automatique
du volume en fonc tion du bruit ambiant et de la vitesse de conduite. Vous
pouvez également contrôler manuellement le volume. Les niveaux de
sensibilité AGC peuvent être per sonnalisés pour s’adapter à vos préférences.
➤ La technologie VOX et la commande vocale pour un contrôle mains libres et
une commande en toute sécurité de certaines fonctions clés. Les niveaux de
sensibilité VOX peu vent être personnalisés en fonction de vos préférences
personnelles.
➤ La technologie PLC (Packet Loss Concealment) pour compenser les pertes
audio dans les environnements diciles.
➤ Un logiciel performant qu’il es t possible de mettre à jour
(Conguration minimale requise: Windows® XP / Mac OS X 10.7)
➤ Des indications vocales de statut pour que vous sachiez à tout moment à qui
ou à quel dispositif vous êtes connecté.
➤ Le mode volume : Le volume est ré glé et sauvegardé à diérents niveaux pour
chaque fonction audio.
Nous vous souh aitons d’excellents moments avec vo tre
encourageo ns à nous écrire à
Service@schuberth.com
SRC-System™ PRO
pour toutes vo s questions,
et vous
suggestions ou commentaires.
* Sous des conditions environnementales diciles (une f orêt dense, de s immeubles étroits, une
circulation chargée), la por tée intercom sera réduite. Une fois que les conditions redeviennent bonnes,
la port ée augmente de no uveau.
Français
42
| SRCS Pro SRCS Pro |
43
Page 25

Microphone
Connecteur
d'antenne sorti
Bras exible
Cheville
Connecteur
d’antenne
Prise de chargeur mural
Câble d’adaptateur USB
Velcros autocollants
Connecteur USB
• Prise de chargement
• Port de téléchargement
du logiciel
Bonnette pour microphone
Bandes d’écouteur
Guide d’utilisation
Connecteur
d’écouteurs
Deux écouteurs
Intercom
Commande Vocale
• Marche / Arrêt
Musique
et Mobile
Volume –
Volume +
2. CHARGEMENT DE LA BATTERIE
Veillez à char ger votre SRC-System™ PRO pendant au moins 4 heures
avant la première utilisation.
1. Ouvrez la langue tte de couverture pr otégeant la prise de charge.
2. Insérez le c âble USB dans la prise de charge.
Pin
3. I nsérez l’autre extrém ité du câble USB dans le
chargeur mur al ou dans le port USB d’un ordinateu r.
4. Pendant le charge ment, le voyant Rouge s’allume.
Une fois le char gement terminé, le voyant Rouge
s’é tei nt.
Le chargeur mural et le câble d’adaptateur USB ont deux fonctions :
1. Charger l’unité de contr ôle à partir de toute pris e murale ou port USB
d’ordinateur (demande un chargement plus long)
2. Télécharger les mis es à jour du logiciel à par tir d’un PC/Mac
(voir sectio n 4 pour plus de détails).
La languet te de couverture protégeant le con necteur de chargement do it rester
hermétiquement fermée pour empêcher l’humidité de pénétrer dans l’appareil.
Contrôle de
la batterie
En veille, app uyez sur
• BLEU = Pleine • VIOLET = A moitié p leine • ROUGE = Vide
et - pendant 5 secs .
+
3. INSTALLATION
3.1 RETIRER LE COL ACOUSTIQUE EXISTANT
Tout d’abord, retirez le Col Acoustique e xistant
de votre casque comme suit :
1. Détachez les deux boutons-pression.
2. S oulevez et poussez l’arc du protè ge-nuque
à partir de son centre.
3. R etirez les chevilles du p rotège-nuque de leur
orice à l’in térieur du rebord du casq ue.
3.2 CONNECTER LE CÂBLE D’ANTENNE
Votr e SRC-Syste m™ PRO disp ose d’un câble d’antenne qui doit êt re raccordé au
câble d’antenne intégré dans le casque Schuberth.
Refermez le cou vercle du connecteur USB, puis
rangez-le dans l a poche prévue à cet eet.
2. Sur le col du SRC-System™ PRO, ouvrez le s deux
attach es sur le connecteur d ’ant enne et retirez le
couvercle de protection en plastique.
3. Sur le casque, r etirez la protect ion en caoutchouc
de la prise d ’ante nne.
4. Aligne z les deux têtes du connec teur et remettez
les deux at taches en place pour ver rouiller le
connec teur en position ferm ée.
A. B.
A.
B.
Français
1. Tirez s ur le connecteur d’antenn e (qu e vous reconnaitrez gr âce à son étiquette
rouge) qui est r eplié à l’intérieur de la j ante arrière du casqu e.
5. L e connecteur d’antenne pe ut, sans danger, se
ranger à l’i ntérieur de la poche du con necteur
d’antenne au centr e du SRC-System™ PRO.
Etiquette de l'antenne
44
| SRCS Pro SRCS Pro |
45
Page 26

3.3 FIXER LE SRCSYSTEM™ PRO
Pin
1. Veille z à placer les cordons des é couteurs à l’intéri eur du casque, puis met tez le
SRC-Sy stem™ PRO en place.
2. Faites glisser l a cheville située à l’ext rémité du panneau de contr ôle pour
l’insére r dans son orice sur le ca sque et fermez le bou ton-pression.
3. Ins érez l’autre cheville de l’autre côté du protège-nuque et fermez le second
bouton-pression.
4. Poussez et insérez le protège-nuque en partant du centre jusqu’à l’arrière du
casque. Faites de même pour les autres parties pour assurer la bonne mise en
place du protège-nuque.
5. Assurez-vous que les deux boutons-pression sont bien fer més et que le
microphone exible es t bien placé à l’intérieur de votre casque (entre le
PRO
SRC-System™
et le rembourrage à l’intérieur du casque).
Microphone exible
Bouton-pression
Bouton-pression
3.4 POSITIONNER LES ÉCOUTEURS
Pour de meilleurs résultats audio, assurez-vous que vos deux écouteurs sont
placés aussi pr ès que possible et juste en f ace de vos oreilles.
PRO
Ce qui suit s’applique aux de ux côtés du SRC-System™
1. Ouvr ez le bouton rouge situ é à l’a rrière, sous le revêtem ent intérieur qui couvr e
les joues (l e bouton est maintenu pa r un anneau noir). Soulevez légèr ement le
revêtement.
2. Fixe z les bandes Velcro oval es correspondan tes au renfoncement d es écouteurs sur
l’EPS (surp lus de polysty rène) et positionnez l es écouteurs sur le s bandes velcro.
3. Fermez le bo uton rouge, en vous assura nt
qu’il est to ujours à l’intérie ur de sa bague de
maintien noire.
:
Des bandes d ’é couteurs en option sont prévu es pour augmenter le volu me des
écouteurs si nécessa ire, en rapprochant les écouteu rs de vos oreilles. Pour les uti liser,
il sut de placer la ba nde de l’écouteur entre la bande Velcro da ns le renfoncement
du casque et l’écouteur.
3.5 POSITIONNEMENT DU MICROPHONE
Pour assurer l a fermeture corre cte de la mentonnière, veui llez tout d’abord
supprime r son anti-bruit tr iangulaire et procéde z comme suit :
1. To urnez le micr ophone e xible, comme indiqué dans l’image.
2. Rapproc hez le microphone du cen tre de votre bouche.
3. Abaissez e t fermez la mentonnièr e de votre casque. Il se peu t que vous deviez
utiliser vo s deux mains pour la ferme r correctement.
4. Alors que la m entonnière est ferm ée et que la visière est o uverte, insérez votr e
main dans l’ouver ture de la visière et pou ssez le microphone ve rs le centre de la
mentonnièr e, juste en face de votre bou che.
3.6 RETIRER LE SRCSYSTEM™ PRO DE VOTRE CASQUE
1. Dé tachez les deux éco uteurs du velcro sur le c asque.
IMPORTANT : Veillez à ne pas tirer sur le co nnecteur d’antenne.
2. Tirez sur le c onnecteur d’antenne de s a poche et déconnec tez-le soigneusem ent.
3. Soulevez et p oussez l’arc du col de la zone avan t du casque pour retir er
délicatem ent le SRC-System™ PRO du casque.
4. Retirez le s chevilles de leur ori ce à l’intérieur du reb ord du casque.
5. Détachez l es deux boutons-pre ssion.
3.7 METTRE ET RETIRER LE CASQUE
Les composantes électroniques du SRC-System™ PRO sont intégrées de façon
sûre à l’intérieur du protège -nuque. Pour éviter un cert ain inconfort lorsque vous
mettez ou retirer votre casque, nous vous recommandons de procéder comme
suit :
1. Elargir l’ouverture du casque en tenant fermement les sangles et en les tirant
fort de chaque côté.
2. Tout en tirant les sangles de chaque côté, faites
glisser le casque sur votre tête, en commençant
par le cou puis ver s l’avant.
3. Pour enlever le casque, procédez de la même
façon en commençant par tirer les sangles de
chaque côté et en poussant ver s le haut, pour
faire suivre le casque entier.
Votre micro-casqu e SRC-System™ PRO est conçu pour un confor t maximum. Toutefois,
étant donné qu’i l contient un kit électro nique, il provoque donc un lé ger renement. Par
conséquent, enle r ou enlever votre casque muni du SRC pe ut être diérent de ce à quoi
vous êtes habitu é avec un micro-casque stand ard.
Rappelez-vo us : plus vous tirez sur les sangl es du casque de chaque côté lorsq ue vous
mettez ou e nlevez le casque, permetta nt ainsi de limiter la rigidi té du protège-nuque, plus
le processus sera facile.
3.8 NETTOYER LE SRCSYSTEM™ PRO
Tout d’abord, pour net toyer le SRC-System™ PRO, fermez hermétiquement
le connecteur micro USB. Utilisez seulement un chion légèrement humide e t
tiède. Évitez de tremper le protège-nuque dans de l’eau ou tout autre liquide. Ne
submergez jamais et évitez de laisser de l’eau entrer en contact avec le s écouteurs
ou le microphone. Laisser sécher à température ambiante.
Français
46
| SRCS Pro SRCS Pro |
47
Page 27

4. PERSONNALISATION ET REGLAGES
Protez au mieu x de votre scala rider en mod iant les paramètres e t en
personna lisant votre appareil en fo nction de vos préfére nces. Il existe trois fa çons
de modier le s paramètres : Via la Cardo Community sur un PC / Mac, v ia l’App
Cardo SmartSet ou à par tir du menu de ré glages de votre a ppareil.
Indiquez votre nom d'ami pour une communic ation
Intercom 1+8
Ajouter de s amis à votre liste d'am is
Télécharge z la dernière mise à j our du rmware
Déniss ez les 6 statio ns de radio FM prérég lées
Indiquez votre numéro favori
Changer la p riorité audio A 2DP / Intercom
Changer la langue de reconnaissance vocale
Désactivez les statut s d’annonce s parlés
Changez la s ensibilité AGC pou r les écouteur s
Changez le mode de fonctionnement VOX
Changez la s ensibilité VOX pour l e microphone
Activer / D ésactive r la fonction Click-to-Link
Cardo
Community
App
SmartSet
Menu
CARDO COMMUNITY
http://community.cardos ystems.com
Conguration minimale requise:
Windows ® XP™ / Mac OS X 10.7
CARDO SMARTSET
Cardo
SmartSet
App
MENU DE RÉGLAGES
Le menu est disp onible en plusieurs langues, dont le franç ais.
Entrer dans le Menu
Quitter le Menu
En veille, app uyez sur
Suivez les i nstruction s audio.
Appuyez su r
µ
pendant 2 se cs.
µ
pendant 2 se cs
Visitez
5. DÉMARRAGE
5.1 FONCTIONS GÉNÉRALES
Marche / A rrêt
Volume
Mode Silence
Indicateur du niveau
de batte rie
Menu de Réglages
Écoutez votre surnom
Indication d’appareil
pairé
Active r / Désactiver l a
fonct ion VOX
(Pour Intercom/
Commande Vocale
seulement)
Active r / Désactiver
les annonces vocales
Appuyez su r
• Marche : 3 LE Ds BLEUES + tonalité c roissante
• Arrêt : 3 LED s ROUGES + tonalité dé croissante
Appuyez su r
cours
Appuyez simultanément sur
En veille, app uyez sur
• LED Bleue = Ba tterie pleine
• LED Violet te = Batterie à mo itié vide
• LED Rouge = Ba tterie presqu e vide
En ve ille, a ppuyez sur
instructions vocales
En veille, app uyez sur
En veille, app uyez sur
Si l’un de vos cont acts “1+8” est à prox imité, la lumière
violet te s’allumera pendan t 2 secs
En veille, appuyez simultanément sur
• Acti vée: LED Bleue pendant 2 s ecs
• Désactivée: LED Rouge pend ant 2 secs
Appuye z sur
pendant 2 se cs
s
ou - pour régl er le volume de l’audio en
+
et
+
-
et-
pendant 5 se cs
+
pendant 2 se cs et suivez le s
µ
et
s
v
et v pendant 2 se cs
s
et- pendant 2 se cs
+
et spendant 2 se cs
µ
5.2 ASPECTS DES VOYANTS DE L’UNITÉ PRINCIPALE
Aucun Le SRC-System™ PRO est ét eint
1 LED BLEUE toutes l es 3 secs
2 LEDs BLEUES tou tes les 3 secs
1 LED ROUGE tout es les 3 secs Mode Veille – La batteri e est faible
2 LED ROUGES tou tes les 3 secs Mode A ctif – La batte rie est faible
Un rouge continu En ch arge / USB connecté
Mode Veille
Pas de sourc e audio active
Mode Act if – Appel en cours / m usique ou
autre sou rce audio en MARCHE
5.3 SOURCES AUDIO ET PRIORITÉS
Si deux sources audio connec tées essayent de lire des c hiers audio
simultanément, le
SRC-System™ PRO
détermine automatiquement quelle
source audio lire à travers les é couteurs selon la priorité des périphériques
connectés.
Priorité élevée
Faible priorité
Il est possible d e prioriser les sources aud io A2DP pour qu’elles soient p lus élevées que l’ Intercom –
Voir la section 4 po ur ajuster les réglage s.
1. Téléphone mobile ou instructions du GPS*
2. Intercom
3. Source audio A2DP (Stéréo Bluetooth)
4. Radio FM (intégrée)
*Les instruc tions GPS à partir des app lications
d’un Smart phone sont en priorité 3
• Les appels mobiles entrants interrompent un appel intercom
• Les appels intercom entrants interrompent l’audio A2DP
• Les communications Intercom et Click-to-Link ont la même priorité. Les
demandes de Click-to-Link n’interrompront aucune communication intercom en
cours et vice-versa.
Français
48
| SRCS Pro SRCS Pro |
49
Page 28

5.4 COMMANDE VOCALE
Le
SRC-System™ PRO
vous permet d ’ee ctuer certaine s actions en vous ser vant de
votre voix. En u tilisant la reconnaissan ce vocale avancée, vous pouvez tot alement
contrôler le
SRC-System™ PRO
vocalement.
La langue par dé faut est l’anglais. D’autres langues peuvent être sélectionnées,
dont le franç ais (voir la section 4).
Tout au long de ce manuel, les fonctionnalités disponibles via la commande
vocale sont signalées par l’icône
1. Quand aucun appel n’est en cour s, appuyez rapidement sur
.
ou dîtes
s
n’importe quel mot à voix haute pour activer le VOX
2. Choisissez une des commandes vocales du tableau suivant :
Mode
actuel
Mode Veill e /
FM / A2DP
Mode Veille
FM
A2DP
*Voir Sec tion 6.1 pour plus de d étails
Action Dîtes ceci
Communication Intercom
« 1+8 »*
Communication Intercom
avec A / B
Démarrer A2DP “Activez la musique”
Allumer FM “Activez la radio”
Éteindre FM “Éteindre la radio”
Prochaine station préréglée “Prochaine station”
Station précédente préréglée “Station précédente”
Piste suivante “Piste suivante”
Piste précédente “Piste précédente”
Arrêt / Pau se A2DP “Éteindre la musique”
Le nom d’un ami « 1+8 »*
“Appel Inte rcom”
:
Les performa nces de la commande vocale peuve nt varier en fonction des co nditions
environneme ntales, notamment la vitesse de con duite, le type de casque et le bru it
ambiant
5.5 PARAMÈTRES DE CONNEXION VOCALE VOX
Le
SRC-System™ PRO
est doté de la tec hnologie VOX pour le contrôle mains
libres et la commande en toute sécurité de cer taines fonctions clés.
Vous pouvez congurer la fonction VOX pour commencer un appel intercom ou
pour activer la fonction de Commande Vocale.
Active r la fonction
VOX
Répond re à un appel
Refuser un appel Restez silencieux pendant 15 sec s.
Sensibilité VOX
(Normale par défaut)
VOX Mode
Activer / Désacti ver
le VOX
(Pour Intercom/Commande
Vocale seulement)
Prononcez distinctivement un mot dans le microphone (par
exemple «allô»)
Prononcez distinctivement un mot dans le microphone (par
exemple «allô»)
Voir la sect ion 4 pour ajuster le s réglages.
Haut : Chois issez cette opt ion si vous avez des di cultés à
active r la fonction VOX
Bas : Choisi ssez cette opti on si la fonction VOX e st trop facile
à activer
La fonc tion VOX peut être con gurée pour act iver la
Commande Vocale (par défaut) ou pou r commencer un
Appel Intercom – voir la sec tion 4 pour ajuster l es réglages
En veille, app uyez sur + et - pendant 2 se cs
•
Activé:
LED BLEUE pend ant 2 secs
•
Désac tivé:
LED ROUGE pen dant 2 secs
6. INTERCOM
Le
SRC-System™ PRO
à-moto sur une portée allant jusqu’à 1 km (dépendant du terrain).
Pour discuter ave c quelqu’un via l’Intercom, comme ncez par faire un pairage
avec la seconde u nité. Le pairage ne se fait qu’une seu le fois. Une fois réalisé, le
SRC-System™ PRO
qu’elle est à port ée.
Compatibilité intercom
SRC-System™ PRO
Votr e
les appels intercom. La por tée intercom est limitée à la distance de l’appareil
fonctionnant avec la plus courte por tée.
Pour obtenir plus d’informations, veuillez vous rendre sur la page
www.cardosystems.com/SRC.
La communication est possible en utilisant un des 3 modes intercom :
Intercom “1+8”
Section
6.1
Section
6.2
Section
6.3
communication en alternance
(pairage uniquement avec des
modèles SR CS PRO, scala rider
PACKTALK, G9/G9x et car do SHO-1)
Interco m avec des canaux
«A» et «B»
(pairage a vec tous les modèle s
de scala ri der)
Click-to-Link
(avec les modèles compatibles)
permet une communication intercom full duplex de moto-
reconnaît automatiquement la deuxième unité chaque fois
est compatible avec les modèles scala rider pour
Des conver sations interco m avec deux
interloc uteurs au sein d’un gr oupe de
huit autr es amis « 1+8 »
Le mode conf érence intercom ent re 2,
3 ou 4 interlo cuteurs (par Ca nal
et
« B »
)
Des conver sations spont anées avec un
autre mot ard se trouvan t à proximité et qui
n’a pas eec tué de pairage au p réalable.
« A »
Commande Vocale
Volume –
Volume +
Français
Intercom
Musique
et Mobile
Dispositio n des boutons
6.1 INTERCOM EN ALTERNANCE 1+8
Faîtes le pairage ave c jusqu’à 8 autres amis « 1+8 » et communiquez
avec un ami à la fois en pr ononçant son nom.
6.1a CONFIGUREZ VOTRE SURNOM
Avant d’utiliser l’Intercom « 1+8 », il est fortement recommandé d’attribuer un
surnom à votre appareil pour permett re à vos amis « 1+8 » de vous appeler via
ce nom.
Si vous changez vo tre surnom, vous devez impér ativement eectu er le pairage de
nouveau avec vos ami s « 1+8 » pour q ue leur unités captent votre n ouveau surnom.
Visitez la Cardo Community pour at tribuer un nom à votre appa reil (vo ir section 4).
Jusqu’à ce que vo us attribuiez un sur nom, il sera reconnu par son n om général :
« SRCS PRO ».
Écoutez vo tre
surnom
Écoutez la l iste de
vos amis « 1+8 »
En veille, appuyez simultanément sur
Vous entendr ez le surnom attr ibué dans les écout eurs.
En veille, app uyez sur
pendant 2 se cs
v
s
et v .
50
| SRCS Pro SRCS Pro |
51
Page 29

6.1b PAIRAGE AVEC UN AMI 1+8
1. En veille, appuyez
pendant 5 secondes pour entrer en mode de pairage.
s
2. Entrez en mode de pairage « 1+8 » sur la deuxième unité.
3. Si le pairage es t réussi, une lumière viole tte apparaît pen dant 2 secondes.
Si votre SRCS Pro a déjà une lis te complète d’amis « 1+8 » pairés, le pairage avec u n autre
ami remplacera celu i avec qui vous n’avez pas parlé penda nt le plus long laps de temps
Pairage en ligne – Cardo Community®
Vous pouvez aussi trouver vos amis et les rajouter à votre liste « 1+8 » via la Cardo
Community : http://community.cardosystems.com
6.1c INDICATION D’APPAREIL PAIRÉ
Vériez rapidement quelles unités dans un rayon de 20 m sont vos amis «1+8».
Indication
d’appareil
pairé
En veille, app uyez sur
Si l’un de vos cont acts Interc om “1+8” est à proximité, la l umière violet te
s’allumera su r les deux unités p endant 2 seconde s.
et v pendant 2 secondes.
s
6.1d PASSER DES APPELS AUX AMIS 1+8
Il existe deu x façons de commencer un appel intercom avec les amis “1+8”.
OPTION 1: Connexion Voc ale VOX
Dîtes n’imp orte quel mot à voix haute dans le microphone. Quand vous entendez
la tonalité de la Commande Vocale, dîtes le surnom d’un ami «1+8», par exemple
« Jean Martin ».
OPTION 2: Mode Manuel
☛
DITES LE NOM CHOISISSEZ LE NOM (dans votre liste de contacts)
Appuyez su r
prononcez
le nom d’un ami
“1+ 8”.
Appuyez su r
Le SRCS Pro én once le surnom de ch aque ami «1+8» pré-pairé.
et
s
Sélec tionnez la per sonne que vous voul ez appeler en app uyant
sur
s
Pour annule r la lecture de la lis te: Appuyez sur
pendant 2 secondes.
pendant 2 secondes.
s
ou en prono nçant n’impor te quel mot à voix hau te.
s
INTERCOMAUTELEPHONE
Si un ami intercom « 1+8 » n’est pas à por tée, ou se déplace hors de votre
portée, vous avez la possibilité de mettre en place la fonc tion « de l’Intercom-autéléphone » via la Cardo Community, an de rester en contact en détournant les
appels Intercom sur vos téléphones mobiles.
6.2 INTERCOM AVEC DES CANAUX A ET B
Lancez une conversation multiple en utilisant les canaux A et B sur votre
SRC-System™ PRO
. Ce mode est possible entre 2, 3 ou 4 interlocuteurs.
6.2a PAIRAGE DES CANAUX INTERCOM A ET B
La sélec tion d’un canal déjà en ser vice remplacera l’appareil p airé existant sur ce c anal
par l’appareil nouvellement pairé.
1. Vériez que les deux unités sont en mode veille.
2. Appuyez sur
pendant 5 sec s jusqu’à ce que la LED commence à clignoter
v
rapidement, indiquant que l’unité est en mode de pairage (voir le tableau
ci-dessous).
CANAL PAIR AGE LED
En veille, app uyez sur
«A»
paire automatiquement.
En veille, app uyez sur
«B»
commence à c lignoter, appuyez 2 foi s sur
pendant 5 se cs. Le canal «A» se
v
pendant 5 s ecs. Lorsq ue la LED
v
v
.
Clignotement
rapide ROUGE
Clignotement
rapide BLEU
3. Ent rez dans le mode de pairage Intercom sur la deuxième unité selon son
manuel d’utilisation. Les deux unités sont maintenant en mode Pair age.
4. Aprè s quelque s s ecs, les deux unités montrent une lumière continue, indiquant
qu’ils sont pa irés et prêts à l’emploi.
5. Si l e pairage n’est pas terminé dans les 2 mi nutes qui suivent, le SRCS Pro se
remett ra en mode veille.
6.2b PASSER DES APPELS AUX CANAUX «A» ET «B»
Il existe deu x façons de commencer un app el intercom avec les canaux «A» et «B»:
OPTION 1: Connexion Voc ale VOX
Dîtes n’imp orte quel mot à voix haute dans le microphone. Quand vous entendez
la tonalité de la Commande Vocale, dîtes “Appel Intercom” pour lancer un
appel intercom avec Motard A et /ou Motard B si les deux s ont présents.
Un appel par VOX uniquement vers Motard A ou Motard B se couper a
automatiquement après 30 secondes de silence.
OPTION 2: Mode Manuel
☛
Utilisez ceci pour commencer un appel Intercom avec soit :
• « MOTARD A » - Pression rapide sur
• « MOTARD B » - Double pression rapide sur
v
v
Pour mettre n à un appel, appuyez de nouveau sur v.
Si vous êtes déjà en train de passer un appel intercom avec Motard A ou B, vous
pouvez ajouter un autre Motard (A ou B) en appuyant deux fois sur
v
- ou un
autre motard peut se joindre à la communicat ion de la même façon.
INTERCOM TRIDIRECTIONNEL
Canal «A»
Motard 2
Motard 1
Canal «B»
Motard 3
Pairage
Motard «1» est pairé à Motard « 2» ainsi qu’à Motard «3».
1. 1 paire son appareil à 2 utilisant le Canal «A» (voir 6.2a).
2. 1 paire son appareil à 3 utilisant le Canal «B» (voir 6.2a).
Pendant une confé rence intercom à 3 interlocuteurs, Mo tard 1 ne pourra pas recevoir des
appels mobi les ou les instructions d e navigation du GPS tant que la confé rence durera.
Français
52
| SRCS Pro SRCS Pro |
53
Page 30

INTERCOM QUADRIDIRECTIONNEL
Pairage
1. 1 paire son appareil à 2 utilisant le Canal «A» (voir 6.2a)
2. 3 paire son appareil à 4 utilisant le Canal «A» (voir 6.2a).
3. 2 paire son appareil à 4 utilisant le Canal «B» (voir 6.2a).
Dans cette conguration les deux passagers (numérotés 2 et 4) utilisent
chacun deux connexions Bluetooth.
Pendant un appe l intercom à 4 interlocuteurs , les 2 passagers qui ma intiennent deux conne xions actives
simultanéme nt ne pourront pas recevoir de s appels mobiles ou l es instructions de nav igation du GPS tant que
la conférence durera.
Eectuer un appel
1. Veriez que les 4 unités sont en mode veille.
2. 2 doit appuyer deu x fois sur
pour appeler 4.
v
Attendre jus qu’à entendre un son dans les deu x unités.
3. 1 doit appuyer sur
4. 3 doit appuyer sur
pour appeler 2.
v
pour appeler 4.
v
6.3 INTERCOM CLICKTOLINK CTL
Click-to-Link est une fonction « sociale » et spontanée de votre
SRC-System™ PRO
. Utilisez-le pour engager instantanément des
appels intercom avec d’autres motards à proximité s ans passer par un
processus de pairage au préalable. Voyez-le comme un canal privé avec d’autres
motards que vous rencontrez sur la route.
La fonction Click-to-Link peut être désactivé e, bloquant toute tentative d’un tier s
de vous envoyer une demande de C TL.
Lancer u n appel CTL
Terminer / Annuler
un appel C TL
Accepte r un appel
CTL
Rejeter u n appel CTL
Activer/Désactiver
la fonc tion CTL
Appuyez t rois fois sur
Appuyez su r
Quand vous e ntendez la sonneri e CTL :
• Appuyez su rv ou
• Prononc ez n’importe que l mot à haute voix pour ré pondre via
la fonct ion VOX
Quand vous e ntendez la sonner ie CTL, restez silencieux jusqu’à
l’arrêt de la s onnerie ou appuye z sur
Voir la sect ion 4 pour ajuster le s réglages
v
v
pendant 2 se cs
v
A la n d’un appel CTL, si d ’autres motards sont à proximité, le prochain appel CTL
que vous tentez peut vous connec ter avec un autre motard que vot re connexion
initiale.
6.4 SIGNAL OCCUPÉ
Lorsque vous tentez d’établir un appel intercom avec un autre appareil qui est
déjà occupé, une tonalité “occupée” se fera entendre. Le
SRC-System™ PRO
est
en mode « occupé » durant un appel téléphonique, un appel intercom avec les
Canaux «A» et «B», un appel intercom «1+8» ou un appel Click-to-Link.
7. CONNEXION AU TELEPHONE MOBILE,
GPS OU LECTEUR MP3
Pour connec ter votre
d’abord les pairer. Une fois pairés, ils se reconnaîtront automatiquement une fois
à proximité (à 10 m).
Votre unité dispose de deux canaux Bluetooth pour la connexion à des téléphones
mobiles, à des appareils GPS et à des lecteurs de musique avec A2DP.
7.1 PAIRER LES CANAUX BLUETOOTH 1 ET 2
1. Assurez-vous que le Blue tooth es t activé sur votre téléphone / GPS / lecteur
MP3.
2. Véri ez que le
3. Pour pairer le Canal Bluetooth 1 – appuyez sur
que les LEDS ROUGE et BLEU clignotent rapidement et alternativement.
Pour pairer le Canal Bluetooth 2 – appuyez sur - pendant 5 sec s jusqu’à ce
que les LEDS ROUGE et BLEU clignotent rapidement et alternativement.
Pour pairer un GPS, quand les LEDs commencent à clignoter rapidement,
4. Recherchez les dispositi fs Bluetooth sur votre téléphone / GPS / lec teur MP3 en
suivant les instructions de l’appareil.
5. Après quelqu es secs, l’appareil ach era «SRCS PRO». Sélectionnez-le.
6. Si vous êtes invité à entrer un code PIN ou co de, entrez 0000 (quatre zéros).
7. L’app areil conrmera que le pairage a réussi et la LED commencera à clignoter
lentement en BLEU.
8. Si le pairage n’est pas ter miné dans les 2 minutes qui suivent, le SRCS Pro se
remettra en mode Veille.
SRC-System™ PRO
SRC-System™ PRO
appuyez sur
à un périphérique Bluetooth, vous devez
est bien en mode veille.
pendant 5 sec s jusqu’à ce
+
.
+
IMPORTANT!
• Si vous avez p airé 2 diérents té léphones mobile s directement s ur votre
SRC-System™ PRO, v ous devrez en déni r un par défaut pou r passer des appel s.
• Si votre G PS le permet, vou s pouvez pairer l e deuxième télép hone mobile dire ctement sur
le GPS, puis p airer le GPS à votre SRC-System™ PRO, et ainsi connecter les téléphones
porta bles et le GPS à votr e SRC-Syste m™ PRO.
NOTES:
• Les télép hones portab les Bluetooth ne sont pas tous apte s à diuser de la musi que
stéréo Bluetooth (A2DP), mêm e si le téléphone disp ose d’une foncti on lecteur MP3.
Consultez l e Guide de l’utilisat eur de votre télépho ne portable pou r plus d’inform ations.
• Les appar eils GPS Bluetooth ne permettent pas tous la connexion à des périphériques
audio Bluetooth. Consulte z votre manuel d’util isation GPS pour pl us d’informati ons.
• Après le p airage, vous pour rez avoir besoin d ’appuyer sur
SRC-System™ PRO.
GPS
Radio FM
intégrée
Lecteur MP3
Portée Intercom de Motard-à-Motard
jusqu’à 1 km. *
pour connecter le
µ
Téléphone mobile et
connectivité A2DP Connexion
Français
6.5 RECEVOIR DES APPELS INTERCOM
Si une autre unité pairée essaye de vous appeler via l’Intercom, l’appel
commencera presque instantanément.
54
| SRCS Pro SRCS Pro |
55
Page 31

7.2 PASSER ET RECEVOIR DES APPELS TELEPHONIQUES
Répond re à un appel
Refuser un appel
Mettr e n à un appel
Appel pa r
Commande vocale*
Rappel*
Numéro Favori*
Etabli r le téléphone
par défaut‡
Commutation du
téléphone défaut
MODE CONFÉRENCE INTERCOM
Ajouter/Supprimer
Canal « A»
pour/d’un appe l
Ajouter/Supprimer
Canal «B»
pour/d’un appe l
* Pas disponible pendant les appels mobiles
† Congurez préalablement le numéro via la Cardo Community
‡ Si vous av ez 2 téléphone s portable s pairés dire ctement sur v otre SRC-System™ PRO, vous d evrez
en déni r un des deux pour u ne utilisat ion par défau t pour les appe ls sortant s.
Appuyez su r
répondre via VOX
Gardez le si lence pendant 15 second es, ou appuyez sur
pendant 2 se condes
Appuyez su r
Appuyez su r +
de votre téléphone portable
Appuyez su r
†
Appuyez t rois fois sur
Lors d’un ap pel téléphonique, a ppuyez sur
5 seconde s
En mode veill e, appuyez sur
Pression rapide sur
Double pression rapide sur
ou pronon cez un mot très for t pour
µ
µ
pendant 2 se condes et sui vez les instru ctions
pendant 2 se condes
-
µ
pendant
+
pendant 5 se condes
µ
pendant un a ppel.
v
pendant un a ppel.
v
µ
7.3 MUSIQUE EN STREAMING PAR A2DP
Fonctions disponibles uniquement avec sources AVRCP
Lecture
ß
Pause/Arrêt
Piste suivante
Piste pr écédente*
Scan Musique
Arrête r le scan
*Avec certai ns téléphone s, vous devrez r épéter cet te action
ß
ß
En veille, app uyez sur
Appuyez su r µ pendant 2 se condes
Pendant la lec ture de musique, a ppuyez sur
Pendant la lec ture de musique, a ppuyez deux fois su r
ß
Pendant la lec ture de musique, a ppuyez sur
amont) ou sur
premières secondes de chaque piste audio seront jouées.
Pour arrê ter le scan sur la pis te actuelle, pr ononcez un mot for t
dans le micr ophone ou appuye z sur
µ
(scan en aval) p endant 5 secondes. Les
-
µ
µ
+
µ
(scan en
INTERVERTIR LES SOURCES AUDIO A2DP
1. Arrêtez la lec ture de la musique de l’appareil en cours.
2. Lancez la lec ture de la musique depuis l’autre appareil.
7.4 PARTAGE DE MUSIQUE MUSIC SHARING
La fonction de partage de musique de votre
SRC-System™ PRO fonctionne à une portée de 10 mèt res, il est donc
particulièrement adapté pour une utilisation pilote-passager.
Le partage de musique ne fonctionne qu’avec des appareils
compatibles avec l’A2DP (Bluetooth stéréo). An de partager de la musique avec
votre partenaire de route, vot re SRC-System™ PRO [ÉMETTEUR] doivent être
pairés à l’autre [RÉCEPTEUR] par canal A, et le récepteur doit être en mode veille.
[ÉMETTEUR]
Partagez votre musique
[RÉCEPTEUR]
Pour se déconnecter
Pendant la le cture de musique, a ppuyez sur
pendant 2 se condes
Appuyez su r
+ pendant 2 se condes
+
Les appels téléphoniques / Intercom et les indications audio de navigation GPS
remplaceront la lecture de musique.
Le partage de musi que (Music Sharing) ne transmet pas d ’audio vocale et ne peut pas
être utilisé pou r appels intercom.
8. RADIO FM
Votr e SRC-System™ PRO comprend une radio FM intégrée avec une
mémoire de 6 st ations et RDS (Radio Data Sys tem).
Le RDS recherche automatiquement la meilleure fréquence disponible pour la
station FM que vo us écoutez lorsque le si gnal devient trop faible.
Allumez la radio
Eteigne z la radio
Prochaine station
préréglée
Station p réréglée
précédente
RDS Activé/Désactivé
(Par défaut: Désactivé)
ß
ß
ß
ß
8.1 RÉGLAGE DE LA RADIO
Les stations préréglées peuvent être enregistrées via la Cardo Community, via
l’A pp Cardo Smart Set ou directement depuis votre SRC-System™ PRO:
1. Allumez la radio et sélectionnez le numéro de la s tation préenregist rée que
vous voulez régler (de 1 à 6) en appuyant sur le bouton
numéro désiré.
2. Trouvez une stat ion FM à mémoriser en utilis ant les méthodes Cher cher ou Scanner.
Cherch er et
Mémoriser
(Trouvez la pr ochaine
stat ion FM)
Scanner et Mémoriser
(Scannez à t ravers les
stat ions FM)
En mode veill e, appuyez deux fois s ur
Appuyez su r µ pendant 2 se condes
Avec la radio al lumée, appuyez sur
Avec la radio al lumée, appuyez deu x fois sur
Avec la radio al lumée, appuyer sur
pendant 2 se condes
Appuyez su r
Appuyez su r
statio n FM pour la sauvegard er.
Appuyez su r
Pour arrê ter le scan sur cet te station : pres sion rapide sur
Appuyez su r
statio n FM pour la sauvegard er.
Pour contin uer de scanner : Atte ndez que la prochai ne
statio n soit trouvée.
+
ou - pendant 2 secondes.
dans les 20 se cs après avoir tro uvé la
µ
pendant 5 se condes.
+
dans les 20 se condes après avoir t rouvé la
µ
µ
µ
et -
+
jusqu’à entendre le
µ
µ
+
.
8.2 RÉGLAGE AUTOMATIQUE DE LA RADIO
Cette fonc tion permet de trou ver de nouvelles station s rapidement et facileme nt en
créant automatiquement une liste provisoire de 6 stations de radio temporaires.
1. Avec la radio allumée, appu yer sur
pendant 5 secondes.
2. La radio co mmencera à scanner en amon t (fréquence plus haute) par rapp ort à la
station ac tuelle et à enregis trer les 6 prochaines s tations FM qu’il découv rira comme
stations temporaires.
3. Si vous le désirez, répétez pour le s 6 prochaines stations.
Ces 6 stations tempora ires ne peuvent pas être enregis trées et ne remplacent pas les
stations FM préréglé es que vous avez déjà sauvegardé es.
Eteindre votre SRC-System™ PRO eacera les stations trouvées par réglage
automatique et restaurera les stations FM préréglé es.
9. DEPANNAGE
Redémarrez Si votre SRC-System™ PRO cesse de répo ndre, réinitialis ez-le en
Réinitialiser le
Pairage
(Supprime t ous les
appareils pairés)
l’éteignant pu is en le rallumant (appuye z sur
1. E n veille, appuyez sur
LED clignote en ROUGE/BLEU.
2. Appuye z sur
clignote 5 fois en VIOLET.
µ
pendant 5 se condes jusqu’à c e que la
+
pendant 2 se condes jusqu’à c e que la LED
pendant 2 se cs).
s
Français
56
| SRCS Pro SRCS Pro |
57
Page 32

10. ASSISTANCE
Pour de plus ample s informations, visitez notre site Web :
www.schuberth.com
Pour une assist ance technique, contacte z-nous à l’adresse suivante :
service@schuberth.com
Téléphone : +49-391-8106-555
Pour obtenir les d ernières informati ons sur les mises à jour du logic iel, visitez notre
site Web à l’adresse:
www.schuberth.com/fr/motorcycle/service/src-systemtm.html et
inscrive z-vous en ligne.
IMPORTANT:
OUVRIR LA FERMETURE DU MICRO-CASQUE ANNULE LA GARANTIE
Les composants électroniques à l ’intérieur du micro-casque du SRC-System™
sont protégés par une fermeture étanche. Veuillez ne pas toucher ou
ouvrir la fermeture sinon la garantie ne pourra plus être valable.
11. NOTICES
Pendant que vous conduisez un véhicule, votre attention totale et absolue est requise. Vous devez prendre
toutes les mesures nécessaires pour analyser convenablement le trac et les conditions météorologiques,
ainsi que l’état de la route en tout temps, y compris lorsque vous utilisez l’appareil. Avant de passer ou
d’accepter un appel, vous devez vous ranger sur le côté de la route. Toutes les publications, annonces
ou autres communications similaires, impliquant que vous pouvez utiliser l’appareil en mouvement, se
réfèrent uniquement aux capacités techniques de l’appareil et ne doivent pas être comprises comme un
encouragement à s’adonner à une telle activité.
Vous devez déterminer si l’utilisation de l’appareil pourrait représenter une violation des lois ou des
règlements en vigueur dans le lieu d’utilisation et respecter les lois pertinentes. À cet égard, toute utilisation
du dispositif est exclusivement aux risques et périls de l’utilisateur et à son entière responsabilité.
Les exigences de base pour une utilisation sûre impliquent que vous devez être physiquement capable
d’utiliser l’appareil et que vous ne sourez d’aucune maladie ou restrictions qui pourraient nuire à votre
capacité à utiliser l’appareil en toute sécurité et rouler sur la route. De plus, vous devez détenir un permis
de conduire valide pour le véhicule. En aucun cas vous ne pourrez consommer de l’alcool ou des drogues
psychotropes qui pourraient nuire à votre vigilance, avant ou pendant l’utilisation de l’appareil.
NOTICE DE LA FEDERAL COMMUNICATIONS COMMISSION FCC
15.21
Nous vous avertissons que les changements ou modications apportés à cette unité, non expressément
approuvés par la partie responsable de la conformité, pourraient annuler le droit accordé à l ’utilisateur
d’exploiter cet équipement.
15.105B
Cet équipement a été testé et jugé conforme aux limites s’appliquant à un appareil numérique de Classe
B, conformément à la Partie 15 des réglementations de la FCC. Ces limites ont été élaborées pour orir une
protection raisonnable contre les interférences nuisibles dans une installation résidentielle.
Cet équipement génère, utilise et peut émettre de l’énergie de fréquence radio et, s’il n’est pas installé et
utilisé conformément aux instructions du fabricant, peut provoquer des interférences dangereuses pour les
communications radio. Toutefois, rien ne garantit l’absence d’interférences dans une installation par ticulière.
Si cet équipement provoque des interférences nuisibles au niveau de la réception radio ou télévision, ce qui
peut être déterminé par la mise hors, puis sous tension de l’équipement, vous êtes invité à essayer de corriger
les interférences en prenant les mesures suivantes :
• Réorientez ou déplacez l’antenne réceptrice.
• Augmentez la distance qui sépare l’équipement et le récepteur.
• Branchez l’équipement à une prise d’un circuit diérent de celui auquel est branché le récepteur.
• Consultez le revendeur ou un technicien radio/télévision expérimenté pour obtenir de l’aide.
SON FONCTIONNEMENT EST SOUMIS AUX DEUX CONDITIONS SUIVANTES :
1) cet appareil ne peut pas causer d’interférence et
2) cet appareil doit accepter toutes les interférences, y compris celles susceptibles de perturber son
fonctionnement.
ENONCÉ FCC SUR L’EXPOSITION AUX RADIATIONS RF :
Cet équipement est conforme aux limites FCC d’exposition aux radiations, avancées ci-après, pour un
environnement incontrôlé. Les utilisateurs suivront les instructions d’exploitation spéciques pour répondre
aux exigences de conformité sur l’exposition aux RF. Cet émetteur ne cohabitera pas ou ne s’exploitera pas
en conjonction avec tout autre antenne ou émetteur. L’antenne utilisée pour ce transmetteur ne doit pas
transmettre simultanément avec une autre antenne ou un autre émetteur, sauf en conformité avec les
procédures de FCC pour produits multi-émetteurs.
NOTICE DE LA IC INDUSTRIE CANADA
Cet appareil est conforme avec Industrie Canada RSS standard exempts de licence(s). Son utilisation est
soumise aux deux conditions suivantes:
(1) cet appareil ne peut pas provoquer d’inter férences et
(2) cet appareil doit accepter toute interférence, y compris les interférences qui peuvent provoquer un
fonctionnement indésirable du dispositif.
DÉCLARATION D’EXPOSITION AUX RADIATIONS :
Cet équipement est conforme avec le RSS-102 exemption d’exposition aux rayonnements IC établies pour un
environnement non contrôlé.
NOTICE EUROPÉENNE CE
Le SRC-System™ PRO (le «Produit») conforme aux requêtes essentielles de la directive ⁄/EC du conseil
(référencée en tant que directive R&TTE ) : Articles 3.1a, 3.1.b et 3.2. Le produit est fabriqué en conformité
avec l’Annexe II de la directive susmentionnée.
DÉCLARATION DE CONFORMITÉ DOC
Le produit conforme et adopte la norme Bluetooth® Specication 3.0 et a réussi tous les tests
d’interopérabilité dénis dans les spécications Bluetooth®.
Cependant une interopérabilité entre le périphérique et d’autres produits équipés de la fonctionnalité
Bluetooth®, n’est pas garantie.
AVERTISSEMENTS POUR LA SANTÉ:
Perte d’audition
Les appareils audio peuvent causer une perte auditive. Utilisez-les prudemment et évitez l’exposition à
des niveaux de volume qui peuvent endommager ou nuire à l’audition ou mener à la perte de l’audition.
Une perte auditive permanente peut se produire si les produits sont utilisés à un volume élevé pendant de
longues périodes.
Les niveaux de volume doivent être maintenus à des niveaux raisonnables et non pas à leur maximum pour
éviter toute atteinte du bruit ambiant.
Les signaux RF
La plupart des équipements électroniques sont protégés des signaux RF. Toutefois, certains équipements
peuvent ne pas être protégés contre les signaux RF émanant de votre équipement sans l.
Stimulateurs cardiaques (pacemakers): L’Association des Fournisseurs de l’Industrie de la Santé
recommande une distance minimale d’environ six pouces (ou 16 cm) maintenue entre un téléphone
mobile ou un dispositif sans l et un stimulateur cardiaque pour éviter toute interférence possible avec le
stimulateur cardiaque.
Veillez à ne pas interférer avec les fonctionnalités des appareils médicaux personnels.
Prothèses auditives: Certains appareils peuvent interférer avec certaines prothèses auditives. Dans le
cas de telles interférences, vous devriez consulter le fabricant de votre appareil auditif pour discuter des
alternatives.
Autres appareils médicaux: Si vous utilisez tout autre appareil médical personnel, consultez le
fabricant de votre appareil et / ou votre médecin an de déterminer s’il est correctement protégé contre
les interférences provoquées par l’énergie RF externe. Votre médecin pourra vous aider à obtenir ces
informations.
Température de fonctionnement:
Le produit a été conçu pour fonctionner à des températures comprises entre -20 et 55 °C.
Adaptateurs AC/DC: Lors du chargement d‘une prise murale, utilisez le chargeur fourni ou un autre
adaptateur AC/DC certié qui répond aux critères suivants:
Entrée: 100-240 V, ⁄ Hz, 0,2 A au maximum S ortie: 5 DV DC, 1 A au maximum.
COPYRIGHT
Le contenu de ce manuel d’utilisation, y compris tous les textes, les illustrations et les dessins sont la
propriété intellectuelle exclusive de Cardo Systems, Inc (la «Société») et sont protégés par les lois de
copyright. Ils ne font pas partie du domaine public. Toute reproduction, partielle ou totale, toute traduction
et/ou diusion, sans l’autorisation écrite préalable de la Société sont strictement interdites. Tous les droits
non expressément accordés sont réservés.
RENONCIATION ET REMISE GENERALE NON VALABLE POUR LES PAYS DE L’UNION EUROPÉENNE
En utilisant le Produit, vous renoncez à certains droits légaux substantiels, y compris au droit d’intenter
des poursuites. Veuillez lire attentivement ce qui suit avant d’utiliser cet appareil. Si vous n’acceptez
pas tous les termes de cet accord, retournez immédiatement le produit qui vous sera intégralement
remboursé. En utilisant ce Produit, vous acceptez d’être lié à cet accord et renoncez à tout droit d’intenter
des poursuites.L’usage d’un dispositif de communication tout en conduisant une moto, un scooter, un
cyclomoteur, un véhicule tout-terrain ou tout autre véhicule ou équipement que ce soit sur terre, en mer
ou dans les airs (référencés conjointement en tant que « Véhicule ») requiert une attention complète
et unique. Schuberth GmbH et Cardo Systems, Inc., y compris ses cadres, sa direction, ses aliés, sa
société mère, ses représentants, agents, contractants, sponsors, employés, fournisseurs et revendeurs
(répertoriés conjointement en tant que la « Société » ou « l’Entreprise ») vous recommande vivement
de prendre toutes les précautions nécessaires et de rester attentif à la circulation, aux conditions
atmosphériques et routières, si vous choisissez d’utiliser le Produit (ci-après appelé le « dispositif »), y
compris tous les modèles dérivés, indépendamment de leur marque commerciale, et d’arrêter votre
véhicule sur le bord de la route avant d’initier ou de recevoir un appel. Toute publication, publicité,
annonce ou note similaire se référant à l’usage du dispositif en conduisant un véhicule ne répertorie
que les capacités techniques du périphérique et ne sera pas considérée comme un encouragement des
utilisateurs à manipuler l’appareil en étant impliqué activement dans le trac. En achetant cet appareil et
en ne le retournant pas pour remboursement (voir ci-dessous), vous renoncez de façon irrévocable à toute
indemnisation quant à la responsabilité, perte, réclamation et frais (y compris les honoraires d ’avocat) et
ne tenez pas l’Entreprise pour responsable de toutes lésions corporelles, dommages ou décès, ainsi que
des pertes ou endommagements de biens, pour tout véhicule dont le vôtre, ou à l’un quelconque des
biens ou des actifs qui appartiennent à vous ou à des tiers, de tout ce qui peut résulter de l’utilisation du
périphérique, en toute circonstance et indépendamment des conditions ou de la juridiction. l’Entreprise
ne pourra être tenue responsable d’aucun préjudice physique, qu’elle qu’en soit la raison, les conditions
ou circonstances, y compris un mauvais fonctionnement du dispositif et tous les risques liés à l’utilisation
restent sous l’entière responsabilité de l’utilisateur de ce dispositif, que celui-ci soit l’acquéreur original ou
toute autre partie. l’Entreprise, par la présente, vous notie que l’usage de ce dispositif pourrait se trouver
en infraction avec les lois ou règlementations locales, fédérales, étatiques ou nationales et que tout usage
de ce périphérique reste à vos risques et périls et sous votre responsabilité.
1. Vous, vos héritiers, représentants légaux, successeurs ou ayants droits déchargez volontairement, par
la présente et indéniment, l’Entreprise de toute indemnité et ne tiendrez pas responsable la société
pour tout litige, réclamation, dette, demande, action et responsabilité pouvant surgir directement
ou indirectement de l’usage du dispositif, pour toute perdition, douleur, sourance, inconfort, perte,
blessure, décès, dommage, à l’égard de toute personne ou de ses biens quelle qu’en soit la cause,
QU’ILS DECOULENT D’UNE NÉGLIGENCE OU AUTRE, et qui pourraient se retourner contre vous à une
Français
58
| SRCS Pro SRCS Pro |
59
Page 33

date ultérieure, à la suite de cette utilisation, dans la mesure permise par la loi.
2. Vous avez entièrement compris et assumez les risques liés à l’usage de ce dispositif, y compris ceux
associés à des actes de négligence ou omissions eectuées par des tiers.
3. Vous conrmez être à même physiquement d’utiliser le dispositif et vous n’avez aucune condition
ou nécessité médicale susceptible d’empiéter sur vos capacités à employer cet appareil de manière
sécurisée. Vous conrmez être âgé d’au moins dix-huit ans (18) et avoir été avisé des risques liés
à l’usage de ce dispositif. Vous conrmez également que vous ne consommerez pas de boissons
alcoolisées ou de substances psychotropes qui pourraient aecter votre vigilance et que vous ne
transporterez pas, n’utiliserez pas ou ne consommerez pas de telles substances avant et lors de
l’utilisation de ce dispositif.
4. Vous conrmez tous nos avertissements et comprenez que : (a) des risques et dangers existent lors
de l’usage du dispositif au sein du trac, y compris mais sans s’y limiter, des blessures ou maladies,
déformations, fractures, paralysie partielle ou totale, décès ou autres pouvant entraîner une invalidité
sérieuse ; (b) ces risques et dangers sont susceptibles d’être causés par une négligence des fabricants
ou de leurs agents ou par toute autre partie impliquée dans la conception ou la fabrication du
dispositif ; (c) ces risques et dangers pourraient être provoqués par des causes prévisibles ou non. Vous
assumez par la présente tous les risques et dangers, ainsi que toute responsabilité pour toute per te et/
ou endommagement qu’ils aient été provoqués par négligence ou par la conduite de tiers, y compris
la société.
5 Vous conrmez avoir lu cet énoncé de responsabilité et compris ses termes et renoncé à tout droit
substantiel vu que vous n’avez pas retourné le dispositif pour remboursement (consultez l’option de
remboursement ci-dessous).
GARANTIE LIMITÉE
SOUS RÉSERVE DES LOIS ET RÈGLEMENTS APPLICABLES DANS VOTRE JURIDICTION, VOTRE PRODUIT EST
COUVERT PAR UNE GARANTIE LIMITÉE POUR DEUX ANNÉES SUIVANT LA DATE ORIGINALE DE L’ACHAT. VEUILLEZ
CONSERVER LE REÇU ET VOS DONNÉES D’INSCRIPTION COMME PREUVE D’ACHAT.
DÉNÉGATION DE GARANTIE
L’ENTREPRISE N’OFFRE AUCUNE GARANTIE EXPRESSE OU TACITE, CONCERNANT LE DISPOSITIF CI-JOINT,
INCLUANT SANS LIMITATION, TOUTE GARANTIE TENANT A SA VALEUR MARCHANDE, TOUTE GARANTIE
IMPLICITE D’ADEQUATION A UN USAGE SPECIFIQUE, D’ABSENCE DE CONTREFACON ET DE DEFAUT DE
FABRICATION.
LE DISPOSITIF ET SES ACCESSOIRES SONT LIVRES TELS QUELS, EN FONCTION DE LEUR DISPONIBILITE SANS
GARANTIE DE TOUTE SORTE.
LIMITE DE RESPONSABILITÉ
L’ENTREPRISE NE POURRA ETRE TENU RESPONSABLE DE TOUT DOMMAGE SPECIAL, INDIRECT, PUNITIF,
INCIDENTIEL, CONSEQUENT, EXEMPLAIRE OU D’AUCUN DOMMAGE SURVENU SUITE A L’USAGE DU DISPOSITIF,
QUI’IL SOIT BASE SUR UNE RUPTURE DE CONTRAT, UN DELI (Y COMPRIS LA NEGLIGENCE), LA RESPONSABILITE
VIS-À-VIS DU PRODUIT OU AUTRE, MEME SI ELLE A ETE AVISEE DE LA POSSIBILITE DE TELS DOMMAGES.
VOUS ACCEPTEZ QUE LES LIMITATIONS DEFINIES CI-DESSUS CONSTITUENT DES ELEMENTS FONDAMENTAUX
DE CET ACCORD ET LE DISPOSITIF NE VOUS SER A PAS LIVRE SANS DE TELLES LIMITATIONS. CERTAINES LOIS
ETATIQUES POURRAIENT S’APPLIQUER EN CE QUI CONCERNE LA LIMITATION DE RESPONSABILITE .
RETOUR POUR REMBOURSEMENT
AU CAS OU VOUS N’ACCEPTERIEZ PAS LES CONDITIONS SUSMENTIONNEES, VOUS AVEZ LA POSSIBILITE DE
RETOURNER CE DISPOSITIF CHEZ A L’ENTREPRISE QUI VOUS REMBOURSERA INTEGRALEMENT, PARTANT
DU FAIT QUE VOUS L’AYEZ RETOURNE DANS LES 7 JOURS OUVRABLES SUIVANT SON ACQUISITION (preuve
de l’achat requise) ET QUE L’EMBALLAGE SOIT INTACT. POUR RETOURNER CE DISPOSITIF, VEUILLEZ VOUS
REFERER A CETTE SECTION.
EN NE RETOURNANT PAS LE DISPOSITIF DANS LA PERIODE SUSMENTIONNEE, VOUS CONFIRMEZ VOTRE
ACCORD AVEC CE QUI PRECEDE ET RENONCEZ A TOUT DROIT DE RECLAMATION OU DEMANDE FUTURE
CONTRE L’ENTREPRISE , COMME DEFINI CI-DESSUS.
www.schuberth.com
60
| SRCS Pro
Page 34

Manuale per l’Utente
POWERED BY
Page 35

INDICE
1. INTRODUZIONE
1. INTRODUZIONE ....................................................63
2. CARICA DELLA BATTERIA ...........................................64
3. INSTALLAZIONE ...................................................65
3.1 RIMOZIONE DEL COLLARE ACUSTICO ESISTENTE ............................65
3.2 COLLEGAMENTO DEL CAVO DELL’ANTENNA ................................ 65
3.3 ATTACC ARE L’SRCSYSTEM™ PRO ......................................... 66
3.4 POSIZIONAMENTO DEGLI ALTOPARLANT ..................................66
3.5 POSIZIONAMENTO DEL MICROFONO ......................................67
3.6 RIMOZIONE DI SRCSYSTEM™ PRO DAL CA SCO ............................. 67
3.7 COME INDOSSARE E TOGLIERE IL CASCO ................................... 67
3.8 PULIZIA DEL CUSCINO POSTERIORE ....................................... 67
4. PERSONALIZZAZIONE E IMPOSTAZIONI ...............................68
5. COME INIZIARE ....................................................69
5.1 FUNZIONI GENERALI ....................................................69
5.2 LUCI INDICANTI LO STATO ...............................................69
5.3 FONTI AUDIO E PRIORITÀ ................................................69
5.4 COMANDO VOCALE. . . . . . . . . . . . . . . . . . . . . . . . . . . . . . . . . . . . . . . . . . . . . . . . . . . . . . 70
5.5 COLLEGAMENTO VOCALE VOX .......................................... 70
6. INTERFONO .......................................................71
6.1 INTERFONO “1+8” ......................................................71
6.2 INTERFONO CON CANALE “A” E “B” ....................................... 72
6.3 INTERFONO CLICKTOLINK CTL .......................................... 74
6.4 SEGNALE DI O CCUPATO .................................................. 74
6.5 RICEVERE CHIAMATE INTERFONO ......................................... 74
7. ABBINAMENTO E USO DI TELEFONO CELLULARE, GPS O LETTORE MP3 ....75
7.1 ABBINAMENTO DEI CANALI BLUETOOTH 1 E 2 .............................. 75
7.2 FARE E RICEVERE TELEFONATE ........................................... 76
7.3 A SCOLTARE LA MUSICA PER MEZZO DI A2DP ............................... 76
7.4 CONDIVISIONE DI MUSICA ...............................................76
8. RADIO FM .........................................................77
8.1 SINTONIZZAZIONE DELLA RADIO .........................................77
8.2 SINTONIZZAZIONE AUTOMATICA DELLA RADIO ............................ 77
9. SOLUZIONI DI PROBLEMI ...........................................78
10. ASSISTENZA .....................................................78
11. AVVIS I ..........................................................78
IMPORTANTE:
Questa è la versio ne 1.0 del Manuale per l’Utente. Si p rega di notare che il nostro manua le
è aggiornato p eriodicamente nel sito web di Card o in modo che comprenda le ul timissime
caratteristic he e funzioni del nuovo SRC-System™ PRO.
Vedere
www.schuberth.com/leadmin/downloads/SRC/SRC-System_ Manual-1.pdf
per controllare se l a versione del manuale che s i ha a disposizione è la più aggi ornata e
per scaricare il manuale nella lingua preferita.
Grazie per aver scelto il sistema di comunicazione e intrattenimento Bluetooth®
SRC-System™ PRO per caschi Schuberth. Questo manuale aiuta a impostare,
congurare e u tilizzare il SRC-System™ PRO.
Le caratteristich e principali di SRC-System™ PRO comprendono:
OPZIONI DI INTERFONO:
• Modalità di conferenza interfono fra 2, 3, o 4 motociclisti su un ragg io massimo
di 1 km*.
• Interfono Click-to-Li nk® per collegamento spontaneo con altri m otociclisti nelle
vicinanze.
• Interfo no”1+8” con altri 8 compag ni (uno alla volta).
CONNETTIVITÀ CON PIÙ DISPOSITIVI:
• Telefono cellulare Bluetooth/dispositivo GPS
• Connetti vità wireless con MP3 via A2DP
OPZIONI DI INTRATTENIMENTO:
• Streaming wire less di musica per mezzo di dispositi vi che supportano i p roli
Bluetooth stereo A2DP e AVRCP.
• Radio FM incorporata con 6 st azioni predenite e sintonizzazione automat ica.
CARDO COMMUNITY®:
• Download di aggiornament i software, miglio ramenti e nuove caratteristiche
• Impos tazione dei compagni per interfono “1+8”
• Personalizzazione delle impostazioni del SRC-System™ PRO
TECNOLOGIA AVANZATA
➤
Comando Vocale e tecnologia VOX:
•
Fare/ricevere tele fonate con il cellulare per mez zo di comando vocale
• Fare chiamate interfono per mezzo di comando vocale
➤
Tecnologia AGC (Automat ic Gain Control – controllo au tomatico del volume),
che consente di regolare automaticamente il volume a seconda del rumore
circostante e della veloci tà di guida. È anche possibi le controllare manualmente
il livello del volume. I livelli di sensibilità AGC possono essere personali zzati per
adattarli alle preferenze pers onali
.
➤ Te cnologia VOX e Comando Vocale, che consente di attivare funzioni chiave in
modo sicuro e s enza utilizzare le mani. I livelli di sensibilità VOX possono essere
personalizzati per adat tarli alle preferenze personali.
➤ Software PLC (Compensazione della Perdita di Pacchet ti): per compensazione
in tempo reale de lla perdita di dati audio in ambienti problematici.
➤ Aggiornamenti avanzati del sof tware per mezzo di PC / Mac
(Requisito minimo: Windows® XP/Mac OS X 10.7)
➤ Informazioni voc ali relative allo stato di ut ilizzo, in modo che sia possi bile
sapere in qualsiasi momento co n chi e con quale dispositivo si è co llegati.
➤ Volume per Modalità: Il volum e è impostato e salvato a live lli diversi per ogni
funzione audio.
Vi auguriamo u na piacevole esperienza con il SRC-System™ PRO e vi incoraggiamo
a scriverci a
____________________________________
* In condizioni ambientali dicili (foresta tta, edici stretti, forte traco) il raggio di interfono sarà
inferiore. Quando le condizioni migliorano, il raggio aumenterà nuovamente.
Service@schuberth.com per ogni domanda, consiglio o commento.
Italiano
62
| SRCS Pro SRCS Pro |
63
Page 36

visibile
Connettore dell’antenna
estratto
Braccetto
Flessibile
Puntina
Connettore
Antenna
Microfono
Connettore USB
• Attacco per la ricarica
• Porta per scaricare il
software
Volume +
Volume -
Connettore altoparlanti
Due
altoparlanti
Puntina
Interfono
Comando Vocale
• Accendere / Spegnere
Musica/Cellulare
2. CARICA DELLA BATTERIA
Accertar si che l’auricolare sia completamente, carico lasciandolo in carica per
almeno quattro ore prima dell’uso iniziale.
1. Aprire il coperchio di che protegge la presa per la ricarica.
2. Inserire il cavo USB nella Presa per la r icarica .
3. Ins erire l’altra estremità del cavo USB nel
caricabatterie a muro o nella porta USB di un
computer.
4. Durante la ricarica la luce ros sa si accende. Quando
la carica è completa la luce rossa si spegne.
Il caricabatteria a muro e il cavo per adat tatore USB servono per:
1. ricaricare l ’auricolare da qualsiasi presa CA a muro o da qualsiasi por ta USB del
computer ( in que sto caso il tempo di ricar ica sarà più lungo)
2. scarica re gli aggiornamenti del s oftware da quals iasi PC / Mac (vedere paragrafo 4).
Il coperch io che protegge l’Att acco per la Ricaric a deve essere tenuto s empre ben
Controllo della
batteri a
chiuso per evitare che l’umidità entri nell’apparecchio
In Standby, premere
• BLU = Piena • VIOLA = Metà • ROSSO = Quasi vuota
e per 5 seco ndi.
3. INSTALLAZIONE
3.1 RIMOZIONE DEL COLLARE ACUSTICO ESISTENTE
Innanzitut to, rimuovere il collare acus tico
esistente dal casco procedendo come segue:
1. Aprire entrambi i bottoni automatici.
2. S ollevare il cuscino posteriore dal retro nella
sua parte centrale curvata.
3. Liberare le puntine del cuscino posteriore
dalle loro rispettive intaccature all’interno
del bordo del casco.
3.2 COLLEGAMENTO DEL CAVO DELL’ANTENNA
Il sistema SRC-System™ PRO ha un cavo per l’antenna che deve essere collegato
al connettore per il cavo dell ’antenna integrato nel c asco Schuberth.
Accertarsi di chi udere il coperchio del
connettore USB, e poi met terlo nella tasca per
connettore USB.
1. E strarre il connet tore dell’antenna (segnato c on un’et ichetta rossa) ch e si trova
dentro al bo rdo posteriore del c asco.
Etichetta dell’antenna
2. Sul collar e SRC aprire i due fermagl i che
si trovano sul c onnettore dell’antenn a e
A. B.
rimuovere il coperchio protettivo di plastica.
3. Sul casco ri muovere il protettor e di gomma dal
connettore dell’antenna.
4. Allinear e le due testine del conne ttore e
richiude re con uno scatto i due f ermagli nella
loro posiz ione per bloccare il con nettore in
A.
B.
posizione chiusa.
Italiano
Presa del caricabatteria a muro
Cavo per adat tatore USB
Cuscine tti di Velcro
64
| SRCS Pro SRCS Pro |
Spugnette per il microfono
Cuscinetti per auricolare
Manuale per l’Utente, adesivi
65
Page 37

5. Ad esso è possibile inla re il connettore dell ’an tenna
Puntina
in modo sicu ro nella tasca per conne ttore
dell’antenna al centro dell’
SRC-System™ PRO
.
3.3 ATTACCARE L’SRCSYSTEM™ PRO
1. Acce rtarsi di sistema re i cavi dell’auricolare ne l casco, e poi ssare al suo p osto
l’
SRC-System™ PRO
2. Fare scorrer e e inserire la puntina ch e si trova all’estremità del p annello di
controllo n ella sua intaccatura co rrispondente sul ca sco e chiudere il bott one
automatico.
.
3. Ins erire al suo posto l’altra puntina sul lato oppos to del cuscino posteriore e
chiudere il secondo bot tone automatico.
4. Premere e inserire il cuscino posteriore cominciando dalla zona centrale nella
parte posteriore del casco. Fare la stess a cosa con le parti rimanenti per ssare
il cuscino posteriore al suo posto.
5. Accer tarsi che entrambi i bottoni automatici rimangano chiusi e che il braccio
del microfono si trovi nel lato interno del casco (fra lo SRC-System™ PRO e il
rivestimento interno del casco).
Braccio del Microfono
Bottone automatico
Bottone automatico
3.4 POSIZIONAMENTO DEGLI ALTOPARLANT
Per ottenere i risultati audio migliori, accertarsi che entrambi gli altoparlanti
siano collocati più vicini possibile, di fronte alle orecchie.
Quanto se gue è valido per ent rambi i lati del
1. Ap rire il pulsante ross o posteriore ubica to sotto il rivesti mento interno che
copre i guanc iali (il pulsante è tenuto da un an ello nero). Sollevare legger mente
il rivestimento.
2. Attacc are i cuscinett i di Velcro ovali corrispo ndenti agli incavi a fo rma di auricolare
sull’EPS (p olistirene espans o) e sistemare gli auricolar i sui cuscinett i di Velcro.
SRC-System™ PRO
:
3. Chiudere il pu lsante rosso, accert andosi che sia ancora all ’interno del suo anello
nero di custodia.
Sono forniti cusc inetti opzionali pe r l’auricolare che consentono di aum entare il
volume dell’auricolare, se necessario, avvicinando gli auricolari alle orecchie
Per
usarli, semplicemente mettere il cuscinetto dell’auricolare fra il cuscinetto di
Velcro nell’incavo del casco e l’auricolare
.
.
3.5 POSIZIONAMENTO DEL MICROFONO
Per assicur are una chiusura scor revole (ip-down) della p arte del mento del ca sco,
rimuovere p rima il suo Cuscinet to Anti-Rumore tr iangolare e proceder e come segue:
1. Piegare il braccio essibile del microfono come indicato nell ’immagine.
2. Premere il mi crofono verso il cent ro della bocca.
3. Abbassar e e chiudere il laccio per il m ento del casco. Può esse re necessario
usare entr ambe le mani per chiuder e bene il laccio del mento.
4. Con la parte d el mento chiusa e la visie ra aperta, inseri re la mano nell’apertura
della visier a e spingere via il microf ono, verso il centro della p arte del mento
dirett amente di fronte alla bo cca.
3.6 RIMOZIONE DI SRC-SYSTEM™ PRO DAL CASCO
1. Sta ccare i due auricolari da l Vel cro sul casco.
IMPORTANTE: Accertarsi di non tirare i l connettore dell’antenna.
2. Estra rre il connettore de ll’a ntenna dalla sua tasca e st accarlo con attenz ione.
3. Sollevare e pr emere l’arco del collare dalla p arte anteriore del c asco per rimuo
vere con attenzione l’
4. Liberare l e puntine del cuscino p osteriore dalle loro r ispettive intacc ature
all’inter no del bordo del casco.
5. Aprire entr ambi i bottoni automa tici.
SRC-System™ PRO
dal casco.
3.7 COME INDOSSARE E TOGLIERE IL CASCO
Le componenti elettroniche del SRC-System™ PRO sono integr ate in modo
sicuro all’interno del cuscino posteriore. Per evitare una sensazione di scomodità
quando si indossa il casco o lo si toglie, raccomandiamo di procedere come segue:
1. All argare l’apertura del c asco tenendo fermam ente le cinghie per il mento e
separand ole con forza.
2. Mentre si se parano le cinghie, fare s civolare il casco sopra la te sta, cominciando dal c ollo in avanti.
3. Per togliere il c asco, procedere in mod o simile
prima separando le cinghie e poi spingendo tutto
il casco ver so l’alto.
Il cuscino posteriore SRC-System™ PRO è progettato pe r il Massimo comfort.
Tuttavia, poichè cont iene in esso un intero kit elet tronico, può essere un po’ gon o. Di
conseguenza,la sensa zione indossando il casco at trezzato con SRC o togliendo lo può
essere diversa da q uella cui si è abituati con un cusci no posteriore standard.
Ricordare: più si sep arano le cinghie del casco quand o si indossa il casco o lo si toglie, più
scorrevole sarà il proce sso, consentendo la riduzione del la rigidità del cuscino posteri ore.
3.8 PULIZIA DEL CUSCINO POSTERIORE
Per pulire il cuscino posteriore, prima chiudere bene il micro connettore USB
dello SRC-System™ PRO. Usare solo un panno leggermente umido e tiepido.
Evitare di inzuppare il cuscino posteriore con acqua o qualsiasi altro liquido. Non
immergerlo mai e evitare che l’acqua venga a contat to con gli altoparlanti o il
microfono. Lasciare asciugare l’unità a temperatura ambiente.
-
Italiano
66
| SRCS Pro SRCS Pro |
67
Page 38

4. PERSONALIZZAZIONE E IMPOSTAZIONI
Ricevi il massim o dal tuo SRC-System™ PRO modicando le impostazioni e
personali zzando l’unità secon do le tue preferenze per sonali.
Ci sono tre mo di di cambiare le imposta zioni: per mezzo della Cardo Community su
un PC / Mac, dell ’app Cardo Smar tSet o dal menu di impost azioni sul tuo dispositivo.
Imposta il tuo nome di compagno per interfono 1+8
Aggiungi amici al tuo elenco di compagni
Scarica l’ultimo upgrade di rmware
Impost a le 6 stazioni radi o FM predenite
Imposta il tuo numero di emergenza
Modic a la priorità audi o A2DP / Interfono
Modifica la lingua di riconoscimento vocale
Disat tiva gli annunci voc ali di stato
Modif ica la sensibilit à AGC per gli altoparla nti
Modifica la modalità di azionamento VOX
Modica la sensibilità VOX per il microfono
Abilita / disabilita Click-to-Link
CARDO COMMUNITY
Cardo
Community
http://communit y.cardosys tems.com
Windows ® XP™ / Mac OS X 10.7
App
SmartSet
Requisito minimo
Menu
Vede re
CARDO SMARTSET
Cardo
SmartSet
App
MENU DELLE IMPOSTAZIONI
Il menu è disponibile in più lingue. La lingua default è l’inglese.
Entrare nel Menu
Chiudere il Menu
:
In Standby, prem ere
Premere
per 2 secon di
µ
per 2 secon di
µ
5. COME INIZIARE
5.1 FUNZIONI GENERALI
Accendere / Spegnere
Volume
Interrompere /
ripristinare il suono
Indica tore del livell o
della batteria
Menu Vocale
Ascolt are il nome
assegnato
Indicazione di
dispositivo abbinato
Abilitazione /
Disabilitazione di VOX
(Solo per Inte rfono /
Comando viva voce)
Abilitazione /
Disabilitazione di annunci
di stato vo cali
Premere
• Accende re: 3 brevi lampeg gi blu + tono cresc ente
• Spegn ere: 3 brevi lampe ggi rossi + tono de crescente
Premere
della sorg ente audio attual e
Premere contemporaneamente
In Standby, prem ere
• BLU = batter ia completament e carica
• VIOLA = ba tteria caric a per metà
• ROSSO = bat teria quasi scari ca
In Standby, prem ere
vocali
In Standby, premere contemporaneamente
In Standby, prem ere
Se compag ni “1+8 ” sono nelle vicina nze, le luci viola si
accenderanno per 2 secondi
In Standby, prem ere
• Abilitazione: Una luce blu per 2 s ec.
• Disabilitazione: Una luce ross a per 2 sec.
Premere
per 2 sec.
s
o - per regol are e impostare il vo lume
+
e
+
-
e -
per 5 sec.
+
per 2 sec. e s eguire le istru zioni
µ
e v
per 2 sec.
s
e - per 2 sec.
+
e
s
per 2 secon di
µ
s
e
v
5.2 LUCI INDICANTI LO STATO
Nessuna Il SRC-System™ PRO è spento
1 luce blu o gni 3 sec. Stan dby - Non ci sono fonti a udio attive
2 luci blu o gni 3 sec.
1 luce ros sa ogni 3 sec. Standby–L a batteria è deb ole
2 luci ros se ogni 3 sec. Attivo –La batteri a è debole
Rosso stabile Ricarica in cor so / USB collegato
Attivo –È in corso una chia mata / la musica o un’altra
fonte audi o è ACCESA
5.3 FONTI AUDIO E PRIORITÀ
Se due fonti au dio collegate provano a ri produrre audio contem pora neamente, il
SRC-System™ PRO
stabilisc e automaticamente quale f onte audio riprodur re negli
altoparlanti in base alla priorità dei disposit ivi collegati.
Priorità maggiore
Priorità minore
1. Telefono cellulare o istruzioni GPS*
2. Interfono
3. Audio A2DP (Bluetooth stereo)
4. Radio FM (integrata)
*Istruzion i GPS da Applicazio ni GPS di Smartph one hanno la stessa p riorità
come Audio A2DP
• Chiamate telefono interromperanno chiamate interfono in corso
• Chiamate interf ono interr omperanno l ’audio A2DP
• Chiamate inte rfono e Click-to-Link hanno la stessa p riorità: Richies te Click-to-Link
non interrompono nessun tipo di chiamata interfono in corso, e viceversa.
È possibile cong urare la priorità dell’audio A2DP in m odo che sia più alta della prio rità
dell’audio dell’interfono (vedere sezione 4).
Italiano
68
| SRCS Pro SRCS Pro |
69
Page 39

5.4 COMANDO VOCALE
Il SRC-System™ PRO consente di eseguire alcune azioni semplicemente usando
la voce. Usando l’I denticazione Vocale avan zata, è possibile contro llare il
SRC-System™ PRO senza usare ass olutamente le mani.
La lingua default del Comando Vocale è l’inglese. È possibile selezionare altre lingue.
Vedere sezione 4 per modicare le impostazioni.
In questo manuale, le caratteristiche disponibili per mezzo del Comando Vocale
sono contrassegnate con l’icona
1. Quando non è in corso una chiamata premere
.
o pronunciare a voce alta una
s
parola qualsiasi per attivare VOX.
2. Pronunciare un comando vocale dalla tabella sot tostante:
Modalità Azione desiderata Pronunciare la frase
Standby /
FM/A 2DP
Standby
Radi o FM
Musica
A2DP
* Vedere sezione 6.1 per ulteriori informazioni
Chiamata interfono “1+8” << Nome del compag no>>*
Chiamata i n interfono con A / B “Chiama interfono”
Avvia re A2DP “Accendi la Musica”
Accendere FM “Accendi la Radio”
Spegnere FM “Spe gni la Radio”
Prossima stazione preselezionata “Prossima stazione”
Stazione precedente preselezionata “Stazione precedente”
Pista successiva “Pista successiva"
Pista precedente “Pista precedente”
Spegner e / Pausa A2DP “Spegni la Musica”
Le prestazioni de l comando vocale possono cambi are secondo le condizioni am bientali,
compresa la veloci tà di guida, il tipo di casco e il rumo re circostante.
Per prestazioni migliori della caratteristica di comando vocale, ridurre al minimo l’impatto
del vento sul microfo no usando la spugnetta gra nde per il microfono e chiud endo la visiera.
5.5 COLLEGAMENTO VOCALE VOX
Il SRC-System™ PRO ore la tecnologia VOX per un azionamento sicuro e con
mani libere di alcune funzioni chiave.
È possibile impostare VOX in modo che avvii una chiamata inter fono o attivi il
Comando Viva Voce.
Attiva zione di VOX
Rispos ta a una
telefonata
Riuto di una
telefonata
Sensibilità VOX
(Default: Medio)
Modalità di
azionamento di
VOX
Abilitazione /
Disabilitazione di
VOX
(Solo per Inte rfono /
Comando viva voce)
Pronunci are una parola qualsi asi a voce alta nel micr ofono
(es. “Pronto“)
Pronunci are una parola qualsi asi a voce alta nel micr ofono
(es. “Pronto“)
Rimanere in silenzio per 15 se condi
Vedere sezione 4 per modicare le impostazioni.
Alto
:
Scegliere questa impostazione se è dicile attivare VOX
:
Scegliere questa impostazione se è troppo facile
Basso
attivare VOX
VOX può esser e impostato in mod o che attivi il comando
viva voce (default) o avvii una chiamata interfono –
vedere sezione 4 per modicare le impostazioni.
In Standby pr emere
per 2 secon di
• Abilitazione: Una luce blu per 2 s econdi
• Disabilitazione: Una luce ross a per 2 secondi
e - contemporaneamente
+
6. INTERFONO
Il SRC-System™ PRO consente di comunicare in full duplex a una distan za
massima di 1 km (secondo il terreno e in linea visuale).
Per parlare con l’interfono, abbinare prima il SRC-System™ PRO all’altro
dispositivo. L’abbinamento è un processo che deve ess ere eseguito una sola volta.
Una volta abbinate, le unità si riconosceranno automaticamente fra loro quando
si trovano entro il raggio.
Compatibilità di interfono
Il SRC-System™ PRO è compatibile con tutti i modelli scala rider per chiamate
interfono. Il raggio di interfono con altri modelli è limitato alla distanza del
dispositivo con il raggio inferiore.
Per ulteriori informazioni, vedere ww w.cardosystems.com/SRC.
È possibile comunicare in interfono us ando una delle tre modalità di interfono:
Sezione
6.1
Sezione
6.2
Sezione
6.3
Interfono “1+8”
(solo fra SR CS PRO, scala
rider PACKTALK, G9/G9 x
e cardo SHO -1 )
Interfono con Canale
A e B (tutti i mo delli
scala rider)
Click-to-Link (modelli
compatibili)
Conversazioni interfono bi-direzionali
all’inte rno di un gruppo di un m assimo di
altri 8 com pagni “1+8”.
Conferenza interfono (bi-direzionale, tridirezionale, quadri-direzionale) usando i
Canali “A” e “B”
Conversazioni interfono spontanee a due con altri
motocic listi casua li che si trovano n elle vicinanz e e
non sono già a bbinati per il p roprio SRCS P ro
Comando Vocale
Volume –
Volume +
Interfono
Musica/Cellulare
Layout dei pu lsanti
6.1 INTERFONO “1+8”
Abbinamento con un massimo di altri 8 dispositi vi (compagni “1+8”) e
collegamento con uno alla volta pronunciando il suo nome.
6.1a CONFIGURAZIONE DEL PROPRIO “NOME DI COMPAGNO”
Prima di usare l’interfono “1+8”, assegnare al proprio dispositivo un nome di
compagno, in modo che gli altri partecipanti a “1+8” possano chiamare usando
questo nome.
Se si modica il proprio nome di compagno, è necessario abbinarsi di nuovo con i
propri compagni di “1+8” anchè i loro dispositivi ricevano il nuovo nome.
Visitare la Cardo Communit y per congurare il proprio nome di compagno
(vedere sezione 4). Fin quando non è congurato un nome di compagno, l’unità
sarà conosciuta con il suo nome generico “SRCS Pro”.
Sentir e il proprio nom e di
compagno
Ascolt are l’elenco dei
compagni abbinati
In Standby, prem ere
Si sentir à il nome assegnato ne gli auricolari.
In Standby, prem ere
e v insieme.
s
per 2 secon di.
v
Italiano
70
| SRCS Pro SRCS Pro |
71
Page 40

6.1b ABBINAMENTO A UN COMPAGNO DI INTERFONO “1+8”
1. In Standby, premere
per 5 secondi p er entrare in modalità di abbinamento.
s
2. Entrare in modalità di abbinamento “1+8” sulla seconda uni tà.
3. Se l’abbinamento è riuscito, appare una luce viola per 2 secondi.
Se la lista è già piena co n 8 Compagni Interfono “1+8” abbina ti, abbinando un ulteri ore
compagno si sosti tuirà il compagno con il qua le non si ha parlato più a lung o.
ABBINAMENTO ONLINE CARDO COMMUNITY
È possibile tr ovare i propri amici e aggiungerli alla propr ia lista di compagni “1+8”
per mezzo di Cardo Community http://community.cardosystems.com.
6.1C INDICAZIONE DI DISPOSITIVI ABBINATI
È possibile ve dere quali unità che si trov ano a una distanza massim a di 20m sono i
propri compagni di interfono “1+8”.
Indicazione
di dispositivi
abbinati
In Standby, prem ere
Se i compag ni di “1+ 8” si trovano a una dis tanza inferio re di quella
massima, i LED d elle due unità diven teranno VIOLA pe r 2 secondi.
s
e
v
per 2 secon di.
6.1d FARE CHIAMATE INTERFONO “1+8”
Ci sono due modi di cominciare una chiamata inter fono con compagni “1+8”:
OPZIONE 1: COLLEGAMENTO VOCALE VOX
Pronunciare una parola qualsiasi a voce alta nel mic rofono per aprire il canale di
interfono. Quando si sente il suono di Comando Vocale, dire il soprannome del
compagno di interfono “1+8”, per esempio “Mario Rossi”.
OPZIONE 2: COLLEGAMENTO MANUALE
☛
DIRE IL NOME S CEGLIERE IL NOME (dalla propri a lista di compagni):
Premere
e dire il nome
del compagno
“1+ 8”.
s
a. Premere
b. Il SRC-System™ PRO riproduce il no me di ogni compagno d i
interfono “1+8” abbinato.
c. Quan do si sente il nome de l compagno che si de sidera chiamar e,
premere
Per annullar e la riproduzio ne della lista, pr emere
per 2 secon di.
s
o pronunc iare a voce alta una pa rola nel microf ono.
s
per 2 secon di.
s
DAINTERFONOATELEFONO
Se un compagno “1+8” non è a una distanza inferiore a quella massima, o si
sposta al di f uori della distanza massima, è possibile impostare la caratteristica
“Da-Inter fono-a-Telefono” per mezzo della Cardo Community, per rimanere in
contatto deviando automaticamente chiamate interfono ai telefoni cellulari.
6.2 INTERFONO CON CANALE “A” E “B”
Iniziare conver sazioni con più utenti usando i canale “A” e “B”.
Questa modalità è adatta per conversazioni conferenze bi-, tri- e quadri-direzionali.
6.2a ABBINAMENTO CON CANALE “A” E “B”
Abbinare un Canale sostituirà qualsiasi dispositivo abbinato esistente su quel
canale con il nuovo dispositivo abbinato.
1. Controllare che tu tte le unità siano in Stand by.
2. Premere
per 5 secondi nchè il LED comincia a lampeg giare rapidamente,
v
indicando c he è in modalità di Abbiname nto Interfono (vedere ta bella sottostante
per abbinamento di canale).
3. Entrare nella m odalità di abbinamento in terfono sulla secon da unità seguendo
le istruz ioni del suo manuale per l’utente. A desso entr ambe l e uni tà sa ranno in
modalità abbinamento interfono.
4. D opo pochi secondi, entr ambe le unità visualizze ranno una luce stabile per due
secondi, cos a che indica che adesso s ono abbinati, collegati e pro nti per l’uso.
5. Se il procedimento di abbinamento non viene comple tato entro 2 minuti, il
SRC-System™ PRO torna in modalità Standby.
CANALE METODO DI ABBINA MENTO INDICATORI LED
In Standby, prem ere
“A”
“A” si abbina automat icamente.
In Standby, prem ere
“B”
il LED cominc ia a lampeggiare, pre mere due
volte v.
per 5 secon di. Il canale
v
per 5 secon di. Quando
v
ROSSO che lam peggia
velocemente
BLU che lampe ggia
velocemente
6.2b FARE CHIAMATE INTERFONO CON CANALE “A” E “B”
Ci sono due mod i di cominciare una chiamata i nterfono con “A” e “B”:
OPZIONE 1: COLLEGAMENTO VOCALE (VOX )
Pronunciare u na parola qualsiasi a voce alta n el microfono. Quando si se nte il suono
di Comando Vocale, dir e “ Chiama interfono” p er fare una chiamata inter fono con “A”
e/o “ B”
La chiamata i nterfono VOX con “A” e/o “B” nisce automaticame nte dopo
30 secondi di sil enzio.
OPZIONE 2: Collegamento manuale
☛
Usare questa opzione per cominciare una chiamata interfono con:
• Canale “A” – premere
v
• Canale “B” – premere due volte v
Per nire una chiamata, premere
v
.
Se è già in cors o una chiamata interf ono con “A“ o “B”, è possibile ag giungere un altro
motociclis ta (A o B) premendo due volte
, oppure un alt ro motociclista può u nirsi
v
alla chiamata in terfono allo stess o modo.
INTERFONO TRI-DIREZIONALE
Usa Canale “A”
Usa Canale “B ”
Motociclista 2
Motociclista 1
Abbinamento
Il Motociclista “1” è abbinat o al “2” e anche al “3”
1. Il Motociclista 1 abbi na al 2 usando il Canale “A ” (vedere 6.2a.)
2. Il Motociclist a 1 ab bina al 3 usando il Ca nale “B” (vedere 6.2a.)
Motociclista 3
Durante una chia mata di conferenza interfono t ri-direzionale con a ltri 2 partecipanti, il
Motociclista 1 non p otrà ricevere telefonate con il cellul are o istruzioni di navigaz ione GPS
mentre l’audio- conferenza è in corso.
Italiano
72
| SRCS Pro SRCS Pro |
73
Page 41

INTERFONO QUADRI-DIREZIONALE
Abbinamento
1. Abbinare 1 al 2 usando il C anale “A” (vedere 6.2a.)
2. Abbinare 3 al 4 usand o il Canale “A” (vedere 6.2a.)
3. Abbinare 2 al 4 usando i l Canale “B” (vedere 6.2a.)
In questa congurazione i due passeggeri (contrassegnati con i numeri 2 e 4) usa no
ognuno due c ollegamenti Bluetooth.
Durante una chiamata inter fono quadri-direzionale, i due passeggeri che mantengono
due collegame nti attivi non potranno ri cevere telefonate con il cellulare o is truzioni di
navigazione GPS m entre l’audio-conferenza è i n corso.
Chiamata
1. Accertar si che tutte le qua ttro unità siano i n Standby.
2. N. 2 deve pr emere due volte
si sente il suo no in entrambe le uni tà.
3. N. 1 deve preme re
4. N. 3 deve prem ere
v
v
per cominc iare una chiamata co n 4. At tendere nchè
v
per cominc iare una chiamata co n 2.
per cominc iare una chiamata co n 4.
6.3 INTERFONO CLICKTOLINK CTL
Click-to-Link costituisce la na tura “sociale” spontane a del SRC-System™.
Usare Click-to-Link per cominciare immediatamente chiamate in
interfo no a due con altri moto ciclisti che s i trovano nelle vic inanze senza
che i disposit ivi di questi u tenti siano già abbin ati.
Si può consider arlo come un canale priva to fra motociclet te che può essere impos tato
“al volo” con altri mot ociclisti che si vedon o nelle vicinanze lungo la st rada.
Click-to-Link può essere disabilitato, blocc ando qualsiasi tentativo di ter zi di
inviare al dispositivo una richiesta Click-to-Link.
Inviare una richiesta di chiamata
“C TL” (la ri cerca dura no a 10 sec)
Terminare una chiamata/
Annulllare una richiesta “CTL”
Accettare una chiamata “CTL”
Riutare una chiamata “CTL”
Abilitazione / Disabilitazione di
“C TL” (Default: Abilitato)
Premere t re volte
Premere
Quando si se nte il suono “C TL”:
• Premere v o
• Pronu nciare una parol a qualsiasi a voce alt a per
rispondere usando VOX
Quando si se nte il suono “C TL”, rimanere in
silenzio nchè smette di suonare o premere v
per 2 secon di
Vedere sezione 4 per modicare le impostazioni.
v
v
Se ci sono altri motociclisti nelle vicinanze, la chiamata C TL successiva che si
prova a fare può collegare con un utente diverso da quello del collegamento
precedente.
6.4 SEGNALE DI OCCUPATO
Quando si prova a i nstaurare una chiamat a interfono con un altr o dispositivo che è già
occupato, si sent irà un segnale di occup ato. Il SRC-S yst em™ P RO è occ upato con una
telefonata, una chiamata con Canale “A” e “B”, una chiamata “1+8” o una chiamata
Click-to-Link.
6.5 RICEVERE CHIAMATE INTERFONO
S e un dispositivo abbinato prova a chiamare usando l’intefono, la chiamata
inizierà quasi immediatamente.
7. ABBINAMENTO E USO DI TELEFONO
CELLULARE, GPS O LETTORE MP3
Per collegare il SRC-System™ PRO a un dispositivo Bluetooth è prima necessario
abbinarli. Quando sono abbinati, si riconosceranno a vicenda automaticamente
quando sono a una distanza inferiore di quella massima (10m).
Il SRC-System™ PRO ha due canali Bluetooth per collegamento con telefoni
cellulari, dispositivi GPS e lettori di musica con A2DP.
7.1 ABBINAMENTO DEI CANALI BLUETOOTH 1 E 2
1. Accertarsi che Bluetooth sia abili tato sul telefono / GPS / let tore MP3.
2. Controllare che il SRC-System™ PRO sia in Standby.
3. Per abbinare il canale Bluetooth 1 – premere
LED ROSSO e BLU cominciano a alternarsi.
Per abbinare il canale Bluetooth 2 – premere - per almeno 5 sec. nchè i
LED ROSSO e BLU cominciano a alternarsi.
Per abbinare un GPS, quando i LED cominciano a alternarsi
rapidamente, premere
4. Cercare i dispositivi Bluetooth sul telefono cellulare / GPS / lettore MP3
seguendo le istruzioni del dispositivo.
5. Dopo alcuni secondi il dispositivo elencherà “SRCS PRO”. Selezionarlo.
6. Se viene richiesto un PIN o chiave di accesso, digitare 0000 (quattro zeri).
7. Il dispositivo confermerà che l’abbinamento è s tato completato con success o e
il LED comincerà a lampeggiare lentamente con una luce BLU una volta ogni
3 secondi.
8. Se il procedimento di abbinamento non verrà completato entro 2 minuti, il
SRC-System™ PRO tornerà in modalit à di Standby.
per almeno 5 sec. nchè i
+
.
+
IMPORTANTE!
• Se si abbin ano 2 telefoni cellul ari diversi dire ttamente al SRC-System™ PRO , sarà
necessario impostarne uno come default per fare telefonate.
• Se il dispo sitivo GPS lo suppo rta, è possibile a bbinare il second o telefono cellular e
diret tamente al GPS e poi abb inare il GPS al SRCS Pro, e in q uesto modo colle gare al
SRC-System™ PRO entrambi i telefo ni cellulari e il GPS.
NOTE:
• Non tut ti i telefoni cellu lari Bluetooth possono trasm ettere musica Ste reo Bluetooth
(A2DP), anche se il te lefono ha una fun zione di lettore M P3. Consultare il Manual e per
l’Utente del telefono cellulare per ulteriori informazioni.
• Non tut ti i dispositivi G PS Bluetooth consentono un collegamento con dispositivi audio
Bluetooth. Consultare il Manuale per l ’Utente del GPS per ulteriori informazioni.
• Dopo avere e seguito l’abbinam ento, è possibile sia ne cessario preme re
il SRC-System™ PRO .
Radio FM
Integrata
Lettore MP3
Raggio di interfono fra
motociclette no
a 1 km
GPS
Connettività
con telefono cellulare o A2DP
per colleg are
µ
Italiano
74
| SRCS Pro SRCS Pro |
75
Page 42

7.2 FARE E RICEVERE TELEFONATE
Risposta a una telefonata
Riuto di una telefonata
Fine di una t elefonata
Composizione Vocale*
(se suppor tato dal telefon o)
Richiamo*
Numero pre-impostato
(Cal do) *†
Impost are il telefon o
‡
default
Cambiare telefono default
MODALITÀ DI CONFERENZA INTERFONO
Aggiungere/Rimuovere l’unità
Canale “A“ alla/dalla telefonata
Aggiungere/Rimuovere l’unità
Canale “B“ alla/dalla telefonata
* Ques ta caratt eristica no n è disponibil e durante chia mate con il telef ono cellulare
† Prim a di utilizza re la caratt eristica de l numero pre- impostat o, congurare il n umero per mez zo
dalla Cardo Community.
‡
Per abbin are 2 telefoni c ellulari dire ttamente co n il SRC-System™ PRO, sarà n ecessario i mpostare
uno di questi come default per chiamate in uscita.
Premere
qualsiasi per rispondere usando VOX
Rimanere in silenzio per 15 se condi, o premere
per 2 secon di
Premere
Premere
cellulare
Premere
Premere tre volte
Nel cors o di una telefonata , premere + per 5 secon di
In Standby, prem ere
Premere
Premere du e volte
o pronunc iare a alta voce una par ola
µ
µ
per 2 secon di e seguire le istr uzioni del
+
per 2 secon di
-
µ
per 5 sec.
µ
nel cors o di una telefonata
v
nel cors o di una telefonata
v
µ
7.3 ASCOLTARE LA MUSICA PER MEZZO DI A2DP
Funzioni disponi bili solo su fonti audio B luetooth compatibili AVRCP
Play
ß
Pausa /Stop
Pista successiva
Pista pr ecedente*
Scansione di
Musica
Interruzione della
scansione
* Con alcuni telefoni può essere necessario ripetere questa azione
In Standby, prem ere
Premere µ per 2 secon di
ß
Con la music a in corso, premere
ß
Con la music a in corso, premere du e volte
µ
µ
ß
Con la music a in corso, premere
(scansio ne verso il basso) per 5 s ec. Saranno ripr odotti i primi
secondi d i ogni traccia audi o.
Per arres tare la scansione s ulla traccia att uale, pronunciare a
alta voce ne l microfono una pa rola qualsiasi o preme re
(scansio ne verso l’alto) o -
+
µ
µ
PASSAGGIO FRA FONTI AUDIO A2DP
Se è abbinato un lettore di musica, il SRC-System™ PRO lo userà come la fonte
audio A2DP default.
1. Fermare la riproduzione di musica dal dispositivo attuale.
2. Cominciare la riproduzione di musica dall’altro dispositivo.
7.4 CONDIVISIONE DI MUSICA
La carat teristica di condivisione di musica del SRC-System™ PRO
[INVIANTE] Inizio/arresto della
condivisione della musica
[RICEVENTE] Arresto di
condivisione della musica
:
:
Durante la r iproduzione de lla musica A2DP,
premere
Premere
per 2 secon di
+
per 2 secon di
+
Telefonate/chiamate interfono e istruzioni di navigazione dal dispositivo GPS hanno la
precedenz a rispetto alla ripr oduzione della musica.
La condivisione de lla musica non trasmette il suon o della voce e non può essere usata
per chiamate in interfono.
8. RADIO FM
Il SRC-System™ PRO è equipaggiato con una radio FM integrata
con una memoria di 6 stazioni preimpostate e RDS (Radio Data
System). RDS consente di risintonizzarsi automaticamente sulla
frequenza più forte disponibile per la stazione FM che si sta
ascoltando quando il segnale diventa troppo debole.
Accendere la radio
Spegne re la radio
Stazione successiva
Stazione precedente
RDS Acceso/Spento
(Default: Spento)
ß
ß
In Standby, prem ere due volte
Premere µ per 2 secon di
Con la radio ac cesa, premere
ß
Con la radio ac cesa, premere due vo lte
ß
Con la radio ac cesa, premere
contemporaneamente per 2 secondi
µ
+
µ
µ
e -
2. Trovare una stazione FM da salvare usando Cercare o Sc andire:
Cercare e salvare
(Trovare la st azione
FM successiva)
Scandire e salvare
(Scansione di
stazioni)
Premere
Premere
preimpostata.
Premere
Per interrompere la scansione, premere
Premere µ entro 20 sec ondi per salvarl a come stazione
preimpostata.
Per continu are la scansione, at tendere che trovi l a stazione
successiva.
o - per 2 secon di.
+
entro 20 se condi per salvar la come stazion e
µ
+ per 5 secon di.
.
+
8.2 SINTONIZZAZIONE AUTOMATICA DELLA RADIO
Questa caratteristica consente di trovare nuove stazioni r adio velocemente e
facilmente creando automaticamente una lista temporanea di 6 stazioni radio.
1. Con la radio accesa, premere
per 5 secondi.
-
2. L a radio cercherà verso l’alto (frequenza più alta) dalla stazione attuale e
memorizzerà le 6 stazioni FM successive che trova come st azioni temporanee.
3. Se si desidera, ripetere per memorizzare le 6 stazioni FM successive come
stazioni temporanee.
Queste 6 stazioni tempora nee non possono essere salvate e non sostituiscono le Stazioni
Radio preimpostate che possono essere state salvate.
Spegnendo il SRC-System™ PRO le stazioni temporanee saranno cancellate e le
stazioni FM preimpostate saranno ripristinate.
English
Italiano
funziona a una distanza massima di 10m e di conse guenza è
particolarmente adat ta per uso fra il guidatore e il passeggero.
La condivisione della musica funziona solo con fonti audio abilitate A2DP (stereo
Bluetooth). Per condividere la musica con il compagno di motociclet ta, l’unità
SRC-System™ PRO [INVIANTE] deve essere abbinata con l’altra unità [RICEVENTE]
sul CANALE A e il RICE VENTE deve essere in modalità di standby.
8.1 SINTONIZZAZIONE DELLA RADIO
Le stazioni preimpost ate possono essere salvate attraver so la Cardo Communit y,
l’a pp Cardo Smartset o diret tamente sull’unità:
1. Accendere la radio e selezionare il numero della stazione che si desidera
impostare (1-6) premendo il pulsante
nchè si sente la stazione desiderata.
µ
76
| SRCS Pro SRCS Pro |
77
Page 43

9. SOLUZIONI DI PROBLEMI
Riavviare
Azzerare
l’abbinamento
(Cancella tut ti i
dispositivi abbinati)
Se il SRC-System™ PRO smette di rispondere, azzerarlo
spegnendolo e poi riaccendendolo (premere s
1. I n Standby, premere
per 5 secon di nchè il LED
+
per 2 secon di).
lampeggia con una luce ROSSA/BLU.
2. Premere
per 2 secon di nchè il LED lampeg gia 5 volte
µ
con una luce VI OLA.
10. ASSISTENZA
Per ulteriori informazioni visitare il nostro sito web:
www.schuberth.com
Per assistenza tecnica contattarci a:
Service@schuberth.com
Telefono: +49-391-8106 -555
Per vedere le info rmazioni più recen ti sugli aggiornamen ti di Softwa re visitare il nost ro
sito web su www.schuberth.com/it/motorc ycle/service/src-systemtm.html
e registrarsi online
IMPORTANTE:
NEL CASO LA CERNIERA DEL CUSCINO POSTERIORE
VENGA APERTA, LA GARANZIA SARÀ NULLA!
Le componenti elettroniche all’interno del Cuscino Posteriore dello
SRC-System™ sono chiuse da una cerniera sigillata. Non manomettere o
aprire la cerniera poichè questo annulla la garanzia.
11. AVVISI
Durante la guida di un veicolo è necessaria un’attenzione piena e completa. Devi accertar ti di prendere
tutte le misure precauzionali per poter tenere nella dovuta considerazione la situazione corrente del traco,
le condizioni del tempo e lo stato della strada in ogni momento, e così anche quando usi il dispositivo.
Prima di fare o accettare una chiamata devi accostarti al lato della strada e fermarti. Tutte le pubblicazioni,
pubblicità, annunci o altre comunicazioni simili, che indicano che è possibile usare il dispositivo mentre si è in
movimento, si riferiscono solo alle sue capacità tecniche e non devono essere considerati un incoraggiamento
a intraprendere questa attività.
È necessario controllare se l’uso del dispositivo può costituire una violazione di una legge o disposizione
applicabile nel luogo in cui viene usato il dispositivo stesso e attenersi alle leggi rilevanti. A questo
proposito, qualsiasi uso del dispositivo è a rischio esclusivo dell’utente e sotto la sua responsabilità. Un
uso sicuro richiede di attenersi a alcuni requisiti basilari, fra i quali il fatto che devi essere sicamente in
grado di usare il dispositivo e non sorire di nessuna malattia o restrizione che possano compromettere la
tua capacità di usare il dispositivo in modo sicuro e viaggiare sulla strada. Inoltre, devi essere in possesso
di una patente di guida valida per il veicolo. Non puoi mai e in nessun c aso consumare alcool o sostanze
psicoattive, che possono compromettere la tua prontezza di riessi, prima o durante l’uso del dispositivo.
Dichiarazione della Commissione Federale per le Comunicazioni (FCC)
15.21
Siete avvertiti che cambiamenti o modiche non approvate espressamente dalla parte responsabile per la
conformità possono annullare il permesso dell’utente a azionare l’attrezzatura.
15.105(b)
Questa attrezzatura è stata controllata e trovata conforme alle limitazioni per un apparecchio digitale
di Classe B, conformemente alla parte 15 delle norme FCC. Queste limitazioni sono progettate per
fornire una protezione ragionevole contro inter ferenze dannose in un’installazione residenziale. Questo
apparecchio genera, usa o può irradiare energia di frequenza radio e, se non installata e usata in
conformità a queste istruzioni, può causare interferenze dannose alle comunicazioni radio. Tuttavia,
non c’è garanzia che non ci siano interferenze in un’installazione particolare. Se quest’attrezzatura
causa interferenze dannose a ricezione radio o televisiva, cosa che può essere stabilita spegnendo e
riaccendendo l’attrezzatura, l’utente è incoraggiato a provare a correggere l’interferenza usando una o più
delle seguenti misure:
• Orientare nuovamente o collocare in un altro posto l’antenna ricevente.
• Aumentare la distanza fra l’attrezzatura e il ricevitore.
• Collegare l’attrezzatura a un attacco su un circuito diverso da quello cui è collegato il ricevitore.
• Consultare il rivenditore o un tecnico radio / TV esperto per aiuto.
Il funzionamento è soggetto alle due condizioni seguenti:
(1) questo apparecchio non può causare interferenze e
(2) questo apparecchio deve accettare ogni interferenza ricevuta, comprese inter ferenze che
possono causare un funzionamento indesiderato dell’apparecchio.
Dichiarazione FCC di Esposizione a Radiazione RF
Questa attrezzatura è conforme ai limiti per l’esposizione a radiazione della FCC indicati per un ambiente
non controllato. Gli utenti nali devono seguire le istruzioni operative speciche per la soddisfazione
della conformità all’esposizione RF. Questa trasmittente non deve essere ubicata insieme o azionata
congiuntamente a nessun’altra antenna o trasmittente.
Avviso CE Europeo
L’auricolare SRC-System™ (il “Prodotto”) è conforme con i seguenti requisiti essenziali della Direttiva
Comunitaria ⁄/EC (cui ci si riferisce come la Direttiva R&TTE): Articoli 3.1a, 3.1.b e 3.2. Il Prodotto è
costruito in conformità all’Allegato II della direttiva summenzionata.
Dichiarazione di Conformità (DOC)
L’auricolare SRC-System™ è conforme con e adotta le Specicazioni 3.0 di Bluetooth
con successo tutti i test di interoperabilità specicati nella specicazione Bluetooth
l’interoperabilità fra l’apparecchio e altri prodotti abilitati Bluetooth
Temperatura di funzionamento: Il Prodotto è progettato per funzionare a temperature
comprese tra -20° e 55° C.
Adattatori CA/CC Quando si ricarica da una presa a muro, usare il caricabatterie fornito o un altro
adattatore CA/CC certicato che soddisfa i criteri seguenti:
Entrata: 100-240 V, ⁄ Hz, 0.2 A massimo Uscita: 5 DV DC, 1 A massimo.
AVVISI IN MATERIA DI SALUTE:
Perdita di Udito
I dispositivi audio possono causare la perdita dell’udito. Usare attenzione e evitare di essere esposti a
livelli di emissione di volume che danneggino o indeboliscano l’udito o portino alla perdita dell’udito.
Nel caso i Prodotti siano usati a un alto volume per periodi di tempo prolungati questo può causare una
perdita permanente dell’udito.
Segnali RF
La maggior parte dell’attrezzatura elettronica è schermata contro segnali RF. Tuttavia, è possibile che
una determinata attrezzatura elettronica non sia schermata contro i segnali RF emessi dalla vostra
attrezzatura wireless.
Pacemaker
L’Associazione dei Costruttori di Apparecchi Medicali raccomanda di mantenere una distanza minima
di circa sei pollici (16 cm) fra un telefono cellulare o un dispositivo wireless e un pacemaker per
evitare possibili interferenze con il pacemaker. Assicuratevi di non interferire con la funzionalità di
apparecchiature mediche personali.
Apparecchi acustici
Alcuni dispositivi possono interferire con determinati dispositivi acustici. Nel caso di un’inter ferenza di
questo tipo, consultate il fabbricante dell’apparecchio acustico e discutete di alternative.
®
non è garantita.
®
e ha superato
®
. Tuttavia,
Altri dispositivi medici
Se usate altre apparecchiature mediche personali, consultate il fabbricante dell’apparecchiatura e/o il
medico per determinare se sono schermate in modo adeguato contro inter ferenze causate da energia RF
esterna. Il medico può essere in grado di aiutare a ottenere queste informazioni.
Deroga e Rinuncia Generale a Diritti
(non per Paesi dell’Unione Europea)
Usando lo SRC-System™ rinunciate a diritti legali sostanziali compreso il diritto di far causa. Si prega di
leggere con attenzione quanto segue prima di usare l’apparecchio. Se non accettate tutti i termini di
questo accordo, dovete restituire il prodotto immediatamente per il rimborso dell’intero importo. Usando
l’auricolare accettate di essere limitato da questo accordo e di perdere il diritto di fare causa. L’uso di
un’apparecchio per la comunicazione andando in motocicletta, motoretta, ciclomotore, ATV, quadriciclo
o qualunque altro veicolo o attrezzatura, per via di terra, acqua o aria (cui si farà riferimento come a
“Veicolo”) richiede la vostra attenzione totale priva di interferenze. Cardo Systems, Inc., compresi i suoi
Funzionari, Dirigenti, Soci, Società-Madre, Rappresentanti, Agenti, Appaltatori, Sponsor, Impiegati,
Fornitori e Rivenditori (cui si farà riferimento come “Azienda”) vi consiglia caldamente di prendere
tutte le cautele necessarie e rimenere vigile al traco, al tempo e alle condizioni stradali se scegliete
di usare l’auricolare SRC-System™, compresi tutti i modelli derivanti indipendentemente dal loro nome
commerciale o dalla marca (l’”Apparecchio”), e di fermare il vostro Veicolo al lato della strada prima
di fare una telefonata o accettarne una. Tutte le pubblicazioni, pubblicità, annunci o note simili che
si riferiscono all’uso dell’Apparecchio guidando un Veicolo intendono solo riferirsi alle sue capacità
tecniche e non devono essere fraintese e capite come se incoraggiassero gli utenti a usare l’Apparecchio
mentre si trovano in mezzo al traco. Acquistando questo Apparecchio e non restituendolo per un
rimborso completo (vedere più sotto), rinunciate in modo irrevocabile a ogni responsabilità, perdita,
ivendicazione e spese (comprese spese per avvocati) e ritenete l’azienda non responsabile per qualsiasi
ferita corporea, danno o morte come anche per perdite o danni a merce, a qualunque Veicolo compreso il
vostro, o a qualsiasi proprietà o bene che appartenga a voi o a terzi, che risultino dall’uso dell’Apparecchio
sotto qualsiasi circostanza o condizione e indipendentemente dalla giurisdizione. L’azienda non sarà
responsabile per nessun danno sico, indipendentemente dalle ragioni, condizioni o circostanze,
compreso cattivo funzionamento dell’Apparecchio, e tutti i rischi connessi con il suo azionamento sono
solo ed esclusivamente a carico dell’utente di questo Apparecchio, indipendentemente dal fatto che l’
Apparecchio sia usato dall’acquirente originario o da terzi. L’azienda vi avverte in questa sede che l’uso
dell’Apparecchio può essere in contravvenzione a leggi o regolamenti locali, federali, statali o nazionali, e
che ogni uso dell’Apparecchio è interamente a vostro esclusivo rischio e responsabilità.
1. Voi, i vostri eredi, rappresentanti legali, successori o cessionari, in questa sede, volontariamente e
per sempre liberate, esentate, indenizzate, e ritenete l’azienda esente da ogni causa, rivendicazione,
debito, richiesta, azione e responsabilità che possa insorgere, direttamente o indirettamente, dall’uso
dell’Apparecchio, per ogni disagio, dolore, soerenza, scomodità, perdita, ferita, morte, danni a o
in riferimento a qualsiasi persona o proprietà comunque causata, SIA CHE DERIVI DA NEGLIGENZA
Italiano
78
| SRCS Pro SRCS Pro |
79
Page 44

CHE DA ALTRO, e che possono derivarvi in futuro come risultato di tale uso, no all’estremo limite
permesso dalla legge.
2. Capite completamente e vi assumete i rischi dell’uso dell’Apparecchio, compreso il rischio di atti di
negligenza o di omissione da parte di terzi.
3. Confermate di essere sicamente in grado di usare l’Apparecchio e di non avere problemi medici o
necessità che possono inuire negativamente sulla capacità di farlo in modo sicuro. Confermate di
avere almeno diciotto (18) anni e di essere stati avvertiti dei rischi connessi con l’uso dall’Apparecchio.
Confermate inoltre che non consumerete alcool che possa inuire negativamente sulla prontezza
di riessi o nessuna sostanza che altera la mente, e non trasporterete, userete o consumerete tali
sostanze prima o durante l’uso dell’Apparecchio.
4. Riconoscete completamente i nostri avvertimenti e capite che: (a) esistono rischi e pericoli se si usa
l’Apparecchio in mezzo al traco, compreso ma non limitato a ferite o malattia, storte, fratture, paralisi
parziali e/o totali, morte o altre malattie che possano causare serie invalidità; (b) questi rischi e pericoli
possono essere causati dalla negligenza del fabbricante o dei suoi agenti o da terzi coinvolti nella
progettazione o fabbricazione dell’Apparecchio; (c) questi rischi e pericoli possono derivare da cause
prevedibili o non prevedibili. Voi vi assumete tutti i rischi e pericoli e tutte le responsabilità per tutte le perdite
e/o danni, causate in parte o totalmente dalla negligenza o da altra condotta di altri, compresa la Compagnia.
5. Confermate di aver letto questa rinuncia a responsabilità e capite completamente i suoi termini e che
avete rinunciato a diritti sostanziali non restituendo l’Apparecchio per un rimborso completo (vedere
opzione di rimborso più sotto).
GARANZIA LIMITATA
SUBORDINATAMENTE ALLE LEGGI E AI REGOLAMENTI APPLICABILI NELLA VOSTRA GIURISDIZIONE, IL
VOSTRO PRODOTTO È COPERTO DA UNA GARANZIA LIMITATA DEL PRODOTTO PER DUE ANNI DALLA DATA
DELL’ACQUISTO ORIGINALE. CONSERVATE LA RICEVUTA DELLA VENDITA AL MINUTO E I DATI DI REGISTRAZIONE
COME PROVA D’ACQUISTO.
RINUNCIA A GARANZIA
L’AZIENDA RINNEGA OGNI GARANZIA ESPLICITA E IMPLICITA RIGUARDO ALL’APPARECCHIO ANNESSO,
COMPRESO E SENZA LIMITAZIONE QUALSIASI GARANZIA IMPLICITA DI VENDIBILITÀ, IDONEITÀ A UNO
SCOPO PARTICOLARE, E NON-INFR AZIONE. L’APPARECCHIO E I SUOI ACCESSORI SONO FORNITI “COME SONO”
E “COME DISPONIBILI” SENZA GARANZIA DI NESSUN TIPO AL DI LÀ DI QUELLE ASSUNTE NEL MANUALE
INCLUSO.
LIMITAZIONE DI RESPONSABILITÀ
L’AZIENDA NON SARÀ RESPONSABILE IN NESSUN CASO PER NESSUN DANNO SPECIALE, INDIRETTO,
PUNITIVO, INCIDENTALE, ESEMPLARE O CONSEGUENTE, O NESSUN DANNO CHE RISULTI DALL’USO
DELL’APPARECCHIO, SIA SE SI BASA SU VIOLA ZIONE DEL CONTRATTO, ATTO ILLECITO (COMPRESA
NEGLIGENZA), RESPONSABILITÀ PER IL PRODOTTO O ALTRO, ANCHE SE AVVERTITO DELL A POSSIBILITÀ DI
TALI DANNI. VOI RICONOSCETE E ACCETTATE CHE LE LIMITAZIONI INDIC ATE PIÙ SOPRA SONO ELEMENTI
FONDAMENTALI DI QUESTO ACCORDO E L’APPARECCHIO NON VI SAREBBE FORNITO PRIVO DI TALI
LIMITAZIONI. GLI STATUTI DI ALCUNI STATI POSSONO ESSERE APPLIC ABILI PER QUANTO RIGUARDA LA
LIMITAZIONE DI RESPONSABILITÀ.
RESTITUZIONE PER RIMBORSO COMPLETO
SE NON DESIDERATE ACCETTARE E ACCONSENTIRE ALLE CONDIZIONI DI CUI SOPRA, POTETE
RESTITUIRE QUESTO APPARECCHIO ALL’AZIENDA PER UN RIMBORSO COMPLETO, A PATTO CHE LO FACCIATE
ENTRO 7 GIORNI LAVORATIVI DALL’ACQUISTO DELL’APPARECCHIO (è necessaria la prova di acquisto)
E CHE LA CONFEZIONE SIA INTATTA. QUANDO AGITE IN QUESTO SENSO, FATE RIFERIMENTO A QUESTO
PARAGRAFO. NON RESTITUENDO L’APPARECCHIO PER RIMBORSO ENTRO IL PERIODO INDICATO, ACCETTATE
IMPLICITAMENTE QUANTO SOPR A, E RINUNCIATE A TUTTI I DIRITTI A PRETESE E RIVENDICAZIONI FUTURE
CONTRO L’AZIENDA COME SOPRA DEFINITO.
www.schuberth.com
80
| SRCS Pro
Page 45

Guia de Usario
POWERED BY
Page 46

CONTENIDOS
1. INTRODUCCIÓN
1. INTRODUCCIÓN ....................................................83
2. CARGA DE BATERÍA ................................................84
3. INSTAL ACIÓN ......................................................85
3.1 RETIRANDO EL COLLAR ACÚSTICO EXISTENTE .............................. 85
3.2 CONECTANDO EL CABLE DE LA ANTENA ................................... 85
3.3 FIJANDO EL SRCSYS TEM™ PRO ........................................... 86
3.4 POSICIONANDO LOS PARLANTES ......................................... 86
3.5 POSICIONANDO EL MICRÓFONO ..........................................87
3.6 RETIRANDO EL SRCSYSTEM™ PRO DE SU CASCO ...........................87
3.7 COLOCANDO Y RETIRANDO EL CA SCO ..................................... 87
3.8 LIMPIANDO EL ACOLCHADO PARA LA NUCA ............................... 87
4. PERSONALIZACIÓN Y CONFIGURACIONES .............................88
5. PRIMEROS PASOS ..................................................89
5.1 FUNCIONES GENERALES ................................................. 89
5.2 LUCES DE ESTADO ...................................................... 89
5.3 FUENTES DE AUDIO Y PRIORIDADES ...................................... 89
5.4 COMANDO DE VOZ ...................................................... 90
5.5 CONEXIÓN DE VOZ VOX ................................................90
6. INTERCOMUNICADOR ..............................................91
6.1 MODO DE ALTERNACIÓN “1+8” .......................................... 91
6.2 INTERCOMUNICADOR CON CANALES “A” Y “B” ............................ 92
6.3 CLICKTOLINK CTL ..................................................... 94
6.4 SEÑAL DE OCUPADO. . . . . . . . . . . . . . . . . . . . . . . . . . . . . . . . . . . . . . . . . . . . . . . . . . . . . 94
6.5 RECEPCIÓN DE LLAMADAS DE INTERCOMUNICADOR ........................94
7. EMPARE JAMIENTO Y USO DE TELÉFONO MÓVIL, GPS O
REPRODUCTOR DE MP3 .............................................94
7.1 EMPAREJAMIENTO DE CANALES BLUETOOTH 1 Y 2 ..........................94
7.2 EJECUCIÓN Y RECEPCIÓN DE LLAMADAS DE TELÉFONO ...................... 95
7.3 E SCUCHAR MÚSICA A TRAVES DE A2DP. . . . . . . . . . . . . . . . . . . . . . . . . . . . . . . . . . . . 96
7.4 COMPARTIR MÚSICA MUSIC SHARING ................................... 96
8. RADIO FM .........................................................96
8.1 SINTONIZACIÓN DE L A RADIO ............................................ 96
8.2 SINTONIZACIÓN AUTOMÁTICA DE LA RADIO ............................... 97
9. SOLUCIÓN DE PROBLEMAS .........................................97
10. APOYO ..........................................................97
11. AVIS OS ..........................................................98
IMPORTANTE:
Esta e s la versión 1.0 del G uia de Usario . Por favor tenga e n cuenta, que n uestro man ual se
actua liza perió dicamente e n el sitio web con e l n de incluir l as últimas ca racterí sticas, as í
como también las nuevas opciones y f unciones de su nuevo SR C-System™ PRO. Por favor
ingres e a www.schuberth.com/leadmin/downloads/SRC/SRC-System_Manual-1.pdf
para com probar si el ma nual que uste d tiene ahora e s la versión má s actualiz ada, y desca rgue
desde el sitio web la versión del manual en su idioma preferido.
.
Gracias por e legir el sistema de comunic ación y entretenimiento SRC-System™ PRO
Bluetooth® para cascos de Schuberth. E ste manual le ayudará a instalar,
congurar y operar el
SRC-System™ PRO ofrece las siguientes características claves:
El
SRC-System™ PRO.
OPCIONES DEL INTERCOMUNICADOR:
• Intercomunicador en modo de conferencia ent re 2, 3 o 4 moto ciclistas a una
distancia de hasta 1 km*
• Intercomunicador Click-to-Link®: Para conexiones espontáneas con otros
motociclistas cercanos
• Intercomunicador “1+8” que alterna con 8 compañeros adicionales
CONECTIVIDAD CON MÚLTIPLES DISPOSITIVOS
• Teléfono Móvil con Bluetooth/dispositivo GPS
• Conectividad inalámbrica con MP3 vía A2DP
OPCIONES DE ENTRETENIMIENTO
• Transmisión de música inalámbrica a t ravés de dispositivos que soportan los
perles de Bluetooth Estéreo A2DP y AVRCP
• Radio FM Integrada con 6 estaciones programadas y sintoniz ación automática
CARDO COMMUNITY®
• Descarga de actualizaciones del software y nuevas características
• Conguración de compañeros en el Intercomunicador “1+8”
• Personalización de sus conguraciones del
SRC-System™ PRO
TECNOLOGÍA AVANZADA
➤ Comando de Voz y Tecnología VOX:
• Realiza / Recibe llamadas móvile s mediante comandos de voz
• Realiza llamadas del intercomunicador por comandos de voz
➤ Tecnología AGC (Control Automático del Volumen), permite el ajuste
automático del volumen según el ruido ambient al y la velocidad de
conducción. También puede controlar manualmente el nivel del Volumen.
Los niveles de sensibilidad del AGC pueden ser per sonalizados para
adaptarlos a sus preferencias personales.
➤ Tecnología VOX y Comando de Voz para la operación segura y sin manos
de funciones claves. Los niveles de sensibilidad de VOX pueden ser
personalizados para adaptarlos a sus preferencias personales.
➤ Software de PLC (Encubrimiento de Pérdida de Paquetes) para compensac ión
en tiempo real de las pérdidas de audio en entornos difíciles.
➤ Actualizacione s avanzadas de software vía PC/Mac
(Requisitos mínimos: Windows® XP / Mac OS X 10.7).
➤ Anuncios de estado hablados, de modo que siempre sab rá a quién o a qué
dispositivo está conectado.
➤ Vo lumen Por Modo: Fijación y almacenamiento de diferentes niveles de
volumen para c ada fuente de audio.
Le deseamos un a agradable experienc ia con su
SRC-System™ PRO y le ani mamos
para que nos es criba a Service@schuberth.com, con cualquier pregunta,
inquietud o comentario que pueda tener.
_______________________
* El alcance del intercomunicador se reduce en condiciones ambientales difíciles (bosques densos,
edici os estrech os, tráco pe sado). Al mejorar la s condicione s, el alcance v uelve a ampliar se.
Español
82
| SRCS Pro SRCS Pro |
83
Page 47

visible
Conector de la
antena extraído
Soporte Flexible
Patita de
contacto
Conector antena
Micrófono
Conector USB
• Entradas para conexión de carga
•Puerto de Descarga del Software
Conector Parlantes
Dos Parlantes
Intercomunicador
Comando de Voz
• Encender / Apagar
Subir Volumen
Bajar Volumen
Patita de contacto
Música / Móvil
2. CARGA DE BATERÍA
3. INSTALACIÓN
1. E xtraiga el conec tor de la antena (marcado con un a etiqueta roja), que está
guardado de ntro del borde de la par te posterior del ca sco.
Asegúrese de que el SRC-System™ PRO esté totalmente c argado durante por lo
menos cuatro horas antes del uso inicial.
1. Levante la cubierta, que protege la entrada para conexión de carga.
2. Inserte el cable USB dentro de la entrada de
conexión de c arga.
3. Ins erte el otro extremo del cable USB, dentro del cargador de pared o el puerto
USB del ordenador.
4. Durante la carga, s e enciende la luz Roja. Una vez
esté totalmente cargado, la luz Roja se apagará.
Su cargador de p ared y adaptador de Cable USB si rve
para dos propósitos:
1. Carga su kit manos libres desde cualquier enchu fe de pared A/C o desde
cualquier puerto de USB de su computador (la carga tarda más tiempo)
2. Descarga actualizaciones de software desde cualquier computador PC / Mac
(para más detalles, obser ve la sección 4).
La lengua d e cubierta que pr otege el micro cone ctor USB debe mante nerse bien
cerrada en todo momento, para impedir la entrada de hume dad.
Vericación
de la Batería
En modo de espera, presione
• AZUL = Llen a • PÚRPURA = Medio ll ena • ROJA = Casi vac ía
y - por 5 segundos.
+
3.1 RETIRANDO EL COLLAR ACÚSTICO EXISTENTE
Primero, retire el Collar Acústico existente de
su casco, de la siguiente manera:
1. Abra ambos botone s de presión.
2. Levante y empuje del centro, el arco del
acolchado par a la nuca.
3. Libere las patit as de contacto del acolchado
para la nuca, de su margen correspondiente
dentro del borde del casco.
3.2 CONECTANDO EL CABLE DE LA ANTENA
Su SRC-System™ PRO tiene una cable de la antena, que debe ser conec tado al
conector del cable de la antena integrada, en el casco Schub erth.
Asegúrese de cerrar la cubierta del conector
Etiqueta de la antena
2.
En el collar SRC, ab ra los dos broches del
conect or de la antena y retire la cubi erta plástica
protectora.
3. En el casco, retire el protec tor de goma del
conector de la antena
.
4. Alinie las d os cabezas del cone ctor y ajuste los
dos broch es de nuevo en su lugar, para asegu rar
el conec tor en una posición cerr ada.
A. B.
A. B.
A.
Español
B.
del USB, y luego guá rdela dentro del bolsi llo
del conec tor USB
.
Cargador de Pared
Adaptador de Ca ble USB
Almohadillas Velcro
84
| SRCS Pro SRCS Pro |
Esponja para e l Micrófon
Almohadillas para los Pa rlantes
Guía de Usuario, Ca lcomanías
o
85
Page 48

5. El conec tor de la antena ahora pued e
Patita de
contacto
guardars e en forma segura, dent ro del
bolsillo del c onector de la antena, en el
centro del
SRC-System™ PRO
.
3.3 FIJANDO EL SRCSYSTEM™ PRO
1. A segúrese de coloc ar los cables de los altavo ces dentro del casco, y lu ego asegure el
SRC-System™ PRO
en su lugar.
2. Deslice e in serte la patita de co ntacto localiz ada en el borde del pane l de control
dentro de su ma rgen correspondi ente en el casco y cierr e el botón de presión.
3. Ins erte la otra patita de contacto dentro de su lugar en el lado opuesto del
acolchado par a la nuca y cierre el segundo b otón de presión.
4. Empuje e inser te el acolchado para la nuca, empezando des de la zona del
centro a la par te posterior de la zona del casco. Haga lo mismo con las demás
partes para jar en su lugar el acolchado para la nuca.
5. Cierre ambos botones de presión y asegúrese de que el sopor te exible
del micrófono esté localizado en la par te interior de su casco (entre el
SRC-System™ PRO y el acolchado interno del casco).
Soporte Flexible
del Micrófono
Botón de Presión
Botón de Presión
3.4 POSICIONANDO LOS PARLANTES
Para obtener los mejores resultados de audio, asegúrese de que ambos parlantes
están colocados lo más cerca posible, jus to en frente de sus oídos.
Lo siguiente se aplica a ambos lados del acolchado para la nuca del
SRC-System™ PRO:
1. A bra el botón rojo de la par te de atrás, locali zado debajo del reve stimiento interior,
que cubre la al mohadilla de la mejilla (el botón e stá sujeto por un aro n egro).
2. Fije las almohadillas de Velcro ovaladas, correspondientes a las hendiduras
conforma das de los altavoces, en el EP S (poli estireno e xpandido), y coloque los
altavoces s obre las almohadillas de Velc ro.
3. Cierre el bo tón rojo, asegurándos e de que esté todavía dentr o su aro negro que
lo sujeta.
Las almohad illas opcionales para l os parlantes, se proporcion an para aumentar el
volumen de los pa rlantes, si es necesario, poni endo los parlantes más cerca a sus oídos .
Para utilizarlas, sim plemente coloque las alm ohadillas de los parlan tes entre las
almohadi llas de Velcro, dentro de la hendidu ra del casco y el parlante.
3.5 POSICIONANDO EL MICRÓFONO
Para asegu rar un buen cierre de la se cción de la barbilla del c asco (girar hacia
abajo), por favor re tire primero la almohad illa triangular anti-r uido y proceda de
la siguiente manera:
1. Doble el sopo rte exible del mic rófono como se muest ra en la imagen.
2. Presione e l micrófono hacia el cent ro de su boca.
3. Gire hacia aba jo y cierre la sección de l a barbilla de su casco. Es p osible que
necesite us ar ambas manos para cer rar la sección de la barb illa correctame nte.
4. Mientra s esta cerrada la se cción de la barbilla y la vis era se encuentra abi erta, in
troduzc a su mano dentro de la aber tura de la visera y emp uje el micrófono af uera,
hacia el cent ro de la sección de la barb illa, directamen te al frente de su boca.
3.6 RETIRANDO EL SRCSYSTEM™ PRO DE SU CASCO
1. De spegue los altavoces d el Ve lcro en el casco.
IMPORTANTE:
Asegúrese de no ja lar del conector de la antena
.
2. Extr aiga el conector de l a antena de su bolsillo y cuid adosamente descon éctelo
3. Levante y empuj e el arco del collar, desde la par te delantera de la zona del ca sco,
para reti rar con cuidado el SR C-Syste m™ PRO del casco.
4. Libere las p atitas de contacto d el acolchado para la nuc a, de su margen corres
-
pondiente dentro del borde del casco.
5. Abra ambos bo tones de presión.
3.7 COLOCANDO Y RETIRANDO EL CASCO
Los component es electrónicos del SRC-System™ PRO están inte grados en forma
segura dent ro del acolchado para la nuc a. Para evitar molestia s mientras se coloca
el casco o cuan do lo retira, le recomendam os que proceda de la siguiente ma nera:
1. Am plíe la apertura del c asco abriéndolo y suje tando las correas de la b arbilla y
jale de ellas con f uerza para sepa rarlas.
2. Mientras j ala las correas apart adamente, deslice el casco po r encima de su cabeza, co menzando desde el c uello hacia adelante.
3. Para retir ar el casco, proceda sig uiendo las
mismas línea s, en primer lugar jale las co rreas
apart adamente y luego empuje to do el casco hacia arr iba.
Su acolchado para la n uca SRC-Syste m™ PRO está diseñado para el máximo confort. Sin
embargo, puesto q ue contiene dentro de él un ki t de electrónica comple to, podría abultar un
poco. Por lo tanto, al pone rse su casco equipado SRC o al quitá rselo, puede sentirlo dif erente a
lo que usted está acostu mbrado con un acolchado para la n uca convencional.
Recuerde: Cuánto más ja le apartadamente de la s correas al ponerse o quita rse el casco, más
suave será el proceso, perm itiendo que la rigide z del acolchado para la nuca dism inuya.
Español
-
3.8 LIMPIANDO EL ACOLCHADO PARA LA NUCA
Para limpiar el Acol chado para la nuca, prime ro cierre hermétic amente el micro
conecto r USB del SRC-Syst em™ PRO. Utilice únicamente un paño ligeramente
húmedo y tibi o. Evite remojar el Acolchado par a la nuca con agua o con cualquie r otro
líquido. Nunca l o moje y no permita que el agua e ntre en contacto con lo s parlantes o
el micrófono. Deje que la unidad se seque a una temperatura ambiente.
86
| SRCS Pro SRCS Pro |
87
Page 49

4. PERSONALIZACIÓN Y CONFIGURACIONES
Aproveche al má ximo su unidad SRC-System™ PRO cambiando sus conguraciones
y personalizándola según sus pre ferencias individuales.
Existen t res maneras de cambiar las conguraciones: a través de Card o
Community en un PC / Mac, por la Aplicación Cardo Smar tSet, o desde el Menú de
Conguración en su aparato.
Congurar su Nombre de Compañero para
Intercomunicación 1+8
Agregar ami gos a su lista de Compa ñeros
Descar gar la última actu alización de rmw are
Preprog ramar las 6 estaci ones de radio FM
Congurar su número de Llamado Inmediato
Cambiar la prioridad de audio A2DP / Intercomunicador
Cambiar el i dioma para el Recon ocimiento de Voz
Desactivar los Anuncios de Estado Hablados
Cambiar la s ensibilidad de AGC de lo s altavoces
Cambiar el M odo de Operación VOX
Cambiar la sensibilidad de VOX del micróf ono
Activar/desactivar Click-to-Link
Cardo
Community
Apli.
SmartSet
Menú de
Config.
CARDO COMMUNITY
CARDO SMARTSET
Cardo
SmartSet
App
MENÚ DE CONFIGURACIÓN
El menú está disponible en varios idiomas.
Entrar al Menú
Salir del Menú
En Modo de E spera, presione
Presione
por 2 segun dos
µ
http://communit y.cardosys tems.com
Requisitos mínimos:
Windows ® XP™ / Mac OS X 10.7
por 2 segun dos
µ
Visite a
5. PRIMEROS PASOS
5.1 FUNCIONES GENERALES
Encender / Apagar
Volumen
Enmudecer/
desenmudecer
Indica dor del Nivel de
la Batería
Menú de
Conguración
Oír su Nom bre de
Compañero
Indica ción de
Dispositivos
Emparejados
Activar / Desactivar
VOX (Sólo para ll amadas
por Intercomunicador/
Comando de Voz)
Activar / Desactivar
Anuncios Hablados de
Estado
Presione
• Encender : 3 destellos AZUL ES + tono ascendente
• Apagar: 3 d estellos ROJOS + tono d escendente
Pulse
+
audio activa
Pulse simultáneamente
En Modo de Es pera, presione
• AZUL = Totalmen te cargada
• PÚRPURA = Me dio descargada
• ROJA = Casi des cargada
En Modo de Es pera, presione
instrucciones habladas
En Modo de E spera, pulse
En Modo de Es pera, presione
Si hay Compañe ros “1+8” dentro del alca nce del sistema,
una luz púr pura parpadear á por 2 seg.
En modo de es pera, presione
•
Activar:
•
Desactivar:
Presione
por 2 segun dos
s
o
-
para ajus tar y jar el volumen de la f uente de
y
+
-
y
-
por 5 seg.
+
por 2 seg. y si ga las
µ
y
s
v
y v por 2 seg.
s
y - por 2 seg.
Destell o AZUL por 2 segundo s
Destell o ROJO por 2 segundos
y s por 2 segun dos
µ
+
5.2 LUCES DE ESTADO
Indicación en LED Estado
Ningún Destello SRC-System™ PRO está Apagado
1 destel lo AZUL cada 3 seg. Modo de E spera - No hay audio ac tivo
2 destel los AZULES cada 3 s eg.
1 destel lo ROJO cada 3 seg. Modo de E spera – Batería baj a
2 destel los ROJOS cada 3 se g. Mod o Activo – Batería b aja
Luz ROJA ja Cargand o / USB conectado
Modo Act ivo – Llamada en cur so / música u
otra fue nte de audio está E ncendida
5.3 FUENTES DE AUDIO Y PRIORIDADES
Si dos fuentes de audio conec tadas intentan reproducir audio al mismo t iempo, el
SRC-System™ PRO determinará automátic amente la fuente de audio a reproducir
a través de los alt avoces, basándose en la prioridad de los dispositivos conectados.
Mayor Prioridad
Menor prioridad
El audio A2DP pu ede recibir una pr ioridad más alta q ue la del audio de
Intercomu nicador (ve la sección 4)
1. Teléfono móvil o instrucciones del GPS*
2. Intercomunicador
3. Fuente de audio A2DP (Estéreo Bluetooth)
4. Radio FM (Integrada)
*Las instrucciones de GPS desde Aplicaciones GPS para
Teléfonos Inteligentes se priorizan como audio A2DP
• Las llamadas de teléfono interrumpen a las del intercomunicador
• Las llamadas del intercomunicador interrumpen el audio A2DP
• L as llamadas del Intercomunicador son de igual prioridad. Una solicitud de
Click-to-Link no puede interrumpir ningún tipo de llamada del Intercomunicador
en curso, y viceversa.
Español
88
| SRCS Pro SRCS Pro |
89
Page 50

5.4 COMANDO DE VOZ
El SRC-System™ PRO le permite realizar ciertas acciones simplemente con su
voz. Utilizando el Reconocimiento de Voz Avanzado, usted puede controlar el
SRC-System™ PRO sin usar sus manos.
El idioma prec ongurado para el Comand o de Voz es el inglés. Usted puede s eleccionar
otro idioma (inc luyendo el español). Vea la sección 4 p ara ajustar las congur aciones.
A lo largo de este manual, las carac terísticas que están disponibl es a través del
Comando de Voz se señalan m arcadas con el icono
1. Mi entras no hayan llamadas en cur so, pulse
s
.
o pronuncie en voz alta cualquier
palabra par a activar el VOX.
2. Pronuncie un Comando de Voz de la siguiente tabla:
Modo actual Acción Deseada Diga esto:
Modo de
Espera/FM/
A2DP
Modo de
Espera
Radi o FM
A2DP
*vea la se cción 6.1 para más de talles
Llamada del intercomunicador “1+8”*
Llamada del i ntercomunicado r con A o B
Activa r el Música A2DP
Encender la FM
Apagar la FM
Estación Preprogramada Siguiente
Estación Preprogramada Anterior
Pista Siguiente
Pista Anterior
Música A2D P- Detener / Pausar
<< Nombre del
Compañero>>*
“Llamar intercom”
“Encender la Música”
“Encender la Radio”
“Apagar la Radio”
“Próxima estación”
“Estación anterior”
“Pista siguiente”
“Pista anterior”
“Apagar la Música”
El funcion amiento del Coma ndo de Voz puede varia r según las condici ones
ambien tales, incluyen do la velocidad de co nducción, el tipo d e casco y el ruido
ambiental.
Para mejora r el funcionami ento de la caracte rística del Comand o de Voz, reduzca
al mínim o el impacto del v iento en el micrófo no utilizando l a esponja grand e del
micrófon o y cerrando la visera.
5.5 CONEXIÓN DE VOZ VOX
El SRC-System™ PRO ofrece la tecnología VOX para la operación segura y sin
manos de algunas funciones claves.
Usted puede c ongurar a VOX para iniciar una llama da del intercomunicador o
activar e l Comando de Voz.
Activ ar VOX
Contestar una
llamada
Rechazar una
llamada
Sensibilidad de
VOX
(Por defecto: Media)
Modo de Operación
de VOX
Activar /
Desactivar VOX
(Sólo para llamadas
por Intercomunicador)
Pronunci e cualquier palabr a en voz alta hablando ha cia el
micrófono (por ejemplo, “Hola“)
Pronunci e cualquier palabr a en voz alta hablando ha cia el
micrófono (por ejemplo, “Hola“)
Manténgase en silencio por 15 s egundos
Vea la sección 4 para ajus tar las conguraciones.
:
Elija est a conguració n si es difícil ac tivar a VOX
Alta
:
Elija est a congur ación si e s muy fác il acti var a VOX
Baja
VOX puede ser c ongurado para ac tivar el Comando d e Vo z (por
defecto) o para iniciar una Llamada de Intercomunicador – vea
la secció n 4.
En Modo de Espera, pulse simultáneamente
• Activar: Destello A ZUL por 2 segundos
:
• Desactivar
Destell o ROJO por 2 segundos
y - por 2 segun dos
+
6. INTERCOMUNICADOR
El SRC-System™ PRO permite la comunicación por intercomunicador a dúplex
completo con un alcance de hasta 1 km (dependiendo del terreno y dentro de
línea de vista).
Para conversar a través del Intercomunicador, primero debe emparejar el
SRC-System™ PRO al segundo dispositivo. El emparejamiento e s un proceso que
se realiza una s ola vez. Una vez emparejados, el
automáticamente a la segunda unidad siempre que estén dentro de la distancia
de alcance.
Compatibilidad del Intercomunicador
SRC-System™ PRO es compatible con todos los modelos del intercomunicador
Su
scala rider. El alc ance del intercomunicador co n otros modelos se limit a a la
distancia d el dispositivo con el alcan ce más corto. Para más infor mación, visite a
www.cardosystems.com/SRC.
La comunicación del Intercomunicador es posible usando uno de los tres modos
del intercomunicador:
Sección
6.1
Sección
6.2
Sección
6.3
Modo de Alt ernación “1+8”
(sólo entr e SRCS PRO, scala rider
PACKTALK, G9/G9x y card o SHO-1)
Intercomunicador con
Canale s “A” y “ B” (emparejado
con otros m odelos scala rid er)
Click-to-Link
(con modelos compatibles)
SRC-System™ PRO reconocerá
Conversaciones por Intercomunicador
de 2 vías dent ro de un grupo de has ta
ocho Compañeros “1+8” adicionales
Conferencia por Intercomunicador
(de 2, 3 y 4 vías) usando l os
Canales “A” y “B”
Conversa ciones espontá neas de 1 a 1
por intercomunicador con cualesquier
motocic listas cercano s a usted que no
están ya e mparejados a su SRCS P ro
Comando de Voz
Bajar Volumen
Subir Volumen
Intercomunicador
Música / Móvil
Disposició n del botón
6.1 MODO DE ALTERNACIÓN “1+8”
Empareje hasta con otro s 8 dispositivos (Compañeros “1+8”) y con éctese
con ellos uno por u no pronunciando su nombr e.
6.1a CONFIGURACION DE SU NOMBRE DE ‘COMPAÑERO’
Antes de utiliz ar el Intercomunicador “1+8” uste d debe asignar un Nombre de
Compañero a su ap arato, para que los otros par ticipantes en el “1+8” puedan lla marle
por este nom bre.
Si cambia su Nomb re de Compañero, debe empare jarse nuevamente con sus Com pa
ñeros “1+8” para que las uni dades de ellos reciban su n uevo Nombre de Compañero.
Visite la Cardo Community para congu rar su Nombre (ver la Sección 4).
Hasta que congure un Nombre de Compañero, su unidad será conocida por su
nombre genérico, “SRCS PRO”.
Oír su Nom bre de
Compañero
Oír la Lis ta de
Compañeros
Emparejados
En Modo de E spera, presion e
a su aparato.
En Modo de Es pera, presione
y v para oír el n ombre asignado
s
por 2 segun dos.
v
Español
-
90
| SRCS Pro SRCS Pro |
91
Page 51

6.1b EMPAREJAR CON UN COMPAÑERO “1+8”
1. En Modo de Espera, presione
por 5 segundos para entrar al modo de
s
Emparejamiento “1+8”.
2. Entre al modo de Emparejamiento “1+8” en la segunda unidad.
3. Si el proceso de emp arejamiento tuvo éxito, una luz púrpura aparecerá durante
2 segundos.
Si su SRC-System™ PRO tiene ya una lista l lena de 8 compañe ros empareja dos, al
emparejarse con otro compañero éste reemplazará al compañero con el cual no ha
hablado por más tiempo.
Emparejamiento En Línea – Cardo Community®
Puede encont rar a sus amigos y agregarlos a s u Lista de Compañeros “1+8” a través
del sitio web de Cardo Community en http://community.cardosystems.com
6.1c INDICACIÓN DE DISPOSTIVOS EMPAREJADOS
Usted puede ver qué unidades son sus Compañeros de Intercomunic ador “1+8”
dentro de un alc ance de hasta 20 m.
Indicación de
Dispositivos
Emparejados
En Modo de Es pera, presione
Si hay Compañe ros “1+8” dentro del alc ance, los LED de ambas
unidades s e volverán PÚRPUR A por 2 seg.
s
y v
por 2 seg.
6.1d LLAMAR A UN COMPAÑERO “1+8”
Hay dos maneras de iniciar una llamada de intercomunicador con un Compañero
“1+8 ”:
OPCIÓN 1: CONEXIÓN DE VOZ VOX
Pronuncie en voz alta cualquier palabra en el micrófono. Cuando escuche el tono del
Comando de Voz, diga el nombre del Compañero ”1+8” – por ejemplo, “Juan Lopez”.
OPCIÓN 2: MODO MANUAL
☛
DIGA EL NOMBRE ELIJA EL NOMBRE (de su Li sta de Compañeros)
Pulse
por 2 segun dos. Escuche la li sta de compañero s
s
y
Pulse
s
pronunc ie el
nombre de l
Compañero “1+8”.
empareja dos. Al oír el nombre d el Compañero al que de sea
llamar, pulse
dirección al micrófono.
Para cance lar la reproducc ión de la Lista de Com pañeros, pres ione
por 2 segun dos.
s
o pronuncie cualquier palabra en voz alta en
s
DE INTERCOMUNICADOR A TELÉFONO
Si un Compañero “1+8” está, o sale, fuera de alcance, usted t iene la opción
de congurar la f unción “De Intercomunicador a Teléfono” a través de Cardo
Community para mantenerse en contac to desviando automáticamente las
llamadas de Intercomunicador a sus teléfonos móviles.
6.2 INTERCOMUNIC ADOR CON CANALES “A” Y “B”
Inicie conversaciones con múltiples participantes usando los Canales de Intercomunicador “A” y “B”. Este modo es adecuado para las llamadas de 2, 3 o 4 vías.
6.2a EMPAREJAR LOS CANALES
“A” Y “B”
El emparejamiento de un Canal sustituirá a cualquier dispositivo emparejado
existente en ese Canal por el dispositivo recientemente emparejado.
1. Verique que todas las unidades están en Modo de Espera.
2. Presione
por 5 segundos hasta que el LED empiece a parpadear rápidam ente,
v
indicando que está en modo de Emparejamiento de Intercomunicador (vea la
tabla de abajo para el emparejamiento de canale s).
CANAL MODO DE EMPAREJAMIENTO INDICADORES LED
En Modo de E spera, presione
“A”
Canal “A” se emparej a automáticament e.
En Modo de E spera, presion e
“B”
el LED empie ce a parpadear, pulse
por 5 segun dos. El
v
por 5 segun dos. Cuando
v
dos veces.
v
Luz ROJA parp adea
rápido
Luz AZUL pa rpadea
rápido
3. Entre al modo de Emparejamiento de Intercomunicador en la segunda unidad
siguiendo su man ual de uso. Ambas unidades es tarán ahora en modo de
Emparejamiento de Intercomunicador.
4. Dentro de unos pocos segundos, ambas unidades presentarán una luz sólida
por 2 segundos, indicando que están ahora emparejadas y listas para usar.
5. Si el proceso de emparejamiento no se completa en 2 minutos, las unidade s
retornarán al Modo de Espera.
6.2b LLAMAR A LOS CANALES “A” Y “B”
Hay dos maneras de iniciar una llamada con los Canales “A” y “B”:
OPCIÓN 1: CONEXIÓN DE VOZ VOX
Pronuncie en voz alta cualquier palabra en el micrófono. Al oír el tono del
Comando de Voz, diga “Llamar Intercom” para iniciar una llamada con “A” y/o “B”
(dependiendo de quién está presente).
La llamada de Intercomunicador por VOX sólo con “A” o “B” terminará
automáticamente tras 30 segundos de silencio.
OPCIÓN 2: MODO MANUAL
☛
Haga esto para iniciar una llamada con:
• Canal “A” – Pulse
v
• Canal “B” – Pulse v dos veces
Para terminar una llamada pulse
v
.
Si ya se encuentra en una llamada de Intercomunicador con “A” o “B”, usted puede
agregar a otro motociclista (“A” o “B”) pulsando
dos veces, o el otro motociclista
v
puede unirse a la llamada de intercomunicador en la misma forma.
INTERCOMUNICADOR DE 3 VÍAS
Utilic e el Canal “A”
Utilice el Canal “B”
Conductor 2 Conductor 3
Conductor 1
EMPAREJAMIENTO
El Conductor “1”e stá emparejado co n “2” y también con “3”.
1. El Conductor 1 se empa reja al 2 por el Canal “A” (ver 6.2a).
2. El Conduc tor 1 se em pareja al 3 por el Canal “B” (ver 6 .2a).
IMPORTANTE: Consideraciones del Modo Conferencia
Durante un a Conferencia por I ntercomunicad or a 3 o 4 Vías, los motocicli stas que
usan los dos ca nales del inte rcomunicador “A” y “B” no p odrán recibir ll amadas
telefón icas o instruccione s de GPS mientras la lla mada esté en cur so.
INTERCOMUNICADOR DE 4 VÍAS
EMPAREJAMIENTO
1. Empareje el Conductor 1 al Pasajero 2 por el Canal “A” (ver 6.2a).
2. Empareje el Conductor 3 al Pasajero 4 por el C anal “A” (ver 6.2a).
3. Empareje el Pasajero 2 al Pasajero 4 por el C anal “B” (ver 6.2a).
En esta con guración, cada uno de los do s pasajeros (números 2 y 4) usa dos
conexiones Bluetooth.
Español
92
| SRCS Pro SRCS Pro |
93
Page 52

LLAMAMIENTO
1. Verique que todas las unidades están en Modo de Espera.
2. El Pasajero 2 debe pulsar dos vece s
para llamar al Pasajero 4.
v
Espere hasta que se escuche el audio en ambas unidades.
3. El Conductor 1 debe pulsar
4. El Conductor 3 debe pulsar
, para llamar al Pasajero 2.
v
para llamar al Pasajero 4.
v
6.3 CLICKTOLINK CTL
Click-to-Link es una caract erística espontán ea y “s ocial” de su
6.4 SEÑAL DE OCUPADO
Cuando intente es tablecer una llamada por i ntercomunicador con otr o dispositivo que
ya está oc upado, se escuchará una s eñal de “ocupado”. El
SRC-System™ PRO está
ocupado mientras está en una llamada de teléfono, llamada de intercomunicador con
los Canales “A” y “ B”, llamada de inte rcomunicador “1+8” o llamada de Click-to-Link.
6.5 RECEPCIÓN DE LLAMADAS DE INTERCOMUNICADOR
Si una unidad emparejada intenta llamarle por Intercomunicador, la llamada
empezará casi instantáneamente.
SRC-System™ PRO.
Usted puede iniciar instantáneamente llamadas de 1 a 1 por
intercomunicador con otros motociclistas cercanos, sin estar emparejados. Piense
en ello como un canal privado de moto a moto que usted puede congurar en la
marcha con otros motociclis tas que ve en el camino.
La carac terística de CTL pue de ser desactivada, bloqueando cualquier intento de
conexión po r parte de otros usuar ios.
Iniciar una solicitud de CTL
(la búsque da puede durar ha sta 10 seg.)
Terminar una llamada CTL/
Cancelar una solicitud de CTL
Aceptar una llamada deCTL
Rechazar una llamada de CTL
Activar / Desactivar CTL
(Por Defec to: Activado)
Pulse tre s veces
Pulse
v
Cuando esc uche el tono de llamada d e CTL :
• Pulse
v
• Pronunc ie en voz alta cualqui er palabra para
responder por el VOX
Cuando esc uche el tono de llama da de CTL ,
manténgase en silencio hasta que se detenga el
tono de llama da o presione
Vea la sección 4 p ara ajustar las con guraciones
v
o
por 2 segund os
v
Si hay otros motoc iclistas alrededor, su próxima llamada CTL puede conectarse
con cualquiera de ellos al azar.
94
| SRCS Pro SRCS Pro |
7. EMPAREJAMIENTO Y USO DE TELÉFONO
MÓVIL, GPS O REPRODUCTOR DE MP3
Para conec tar su SRC-System™ PRO a un dispositivo Bluetooth, primero debe
emparejarlos. Una vez emparejados, ellos se reconocerán automáticamente
siempre que es tén dentro de la distancia de alcance (10 m).
SRC-System™ PRO tiene dos canales Bluetooth par a conectarse a telé fonos
Su
móviles, disp ositivos GPS y reproduc tores de música con A2DP.
7.1 EMPAREJAMIENTO DE CANALES BLUETOOTH 1 Y 2
1. Asegúrese que el Bluetooth está activado en su teléf ono/GPS/reproductor MP3.
2. Veri que que el
3. Para emparejar el Canal Bluetooth 1 – presione
LUCES ROJA y AZUL comiencen a alternar rápidamente.
Para emparejar el Canal Bluetooth 2 – presione - por 5 seg, has ta que las
LUCES ROJA y AZUL comiencen a alternar rápidamente.
4. Haga una búsqueda de dispositivos Bluetooth en su teléfono/GPS/reproductor
MP3 siguiendo las instrucciones del dispositivo.
SRC-System™ PRO está en Modo de Espera.
por 5 seg, has ta que las
+
Para emparejar un GPS, pulse +
cuando las LUCES comiencen a alternar rápidamente.
5. Tras unos segundos, “SRCS PRO” aparecerá en el dispositivo. Selecciónelo.
6. Si se le solicita un PIN o Contraseña, ingrese 0000 (cuatro ceros).
7. El dispositivo conrmará que el emparejamiento tuvo éxito y la luz AZUL
comenzará a p arpadear cada 3 segundos.
8. Si el proceso de emparejamiento no se completa en 2 minutos, el
SRC-System™ PRO retornará al Modo de Espera.
• Si ha empar ejado a 2 teléfonos mó viles diferente s directament e a su SRC-System™ PRO,
tendrá que c ongurar que uno sir va por defec to para realizar ll amadas.
• Si su GPS lo pe rmite, puede empar ejar el segundo telé fono móvil direc tamente al GPS y
luego emp arejar el GPS a su SRC-System™ PRO, y así conectar lo s dos teléfonos móv iles
y el GPS a su SRC-System™ PRO.
• No todos lo s teléfonos móvil es con Bluetooth pueden emitir m úsica en Estére o
Bluetooth (A2DP), incluso si el t eléfono dispone d e una función de Rep roductor MP3.
Consulte el M anual del Usuario de su te léfono móvil par a más información .
• No todas las u nidades de GPS con Bluetooth per miten la conexión a di spositivos de
audio con Bluetooth. Consul te el Manual del Usuari o de su GPS para más info rmación.
• Despué s del emparejamien to, es posible que tenga q ue pulsar
GPS
Reproductor
de MP3
Intercomunicador Moto- Moto
Hasta 1 km de Alcance*
Radio FM
incorporada
Teléfono Móvil
& Conectividad A2DP
para conectarse.
µ
7.2 EJECUCIÓN Y RECEPCIÓN DE LLAMADAS DE TELÉFONO
o diga en voz alt a cualquier palabr a para
Pulse
Contestar una llamada
Rechazar una llamada
Terminar una llamada
Marcac ión por Voz*
(si el teléfo no la soporta)
Rellamada*
Llamado Inmediato*
Congurar teléfono
preestablecido
Cambia r el teléfono
preestablecido
MODO DE CONFERENCIA POR INTERCOMUNICADOR
Agrega r/Retirar el Can al “A”
a/ de una l lamada
Agregar/Retirar el Canal “B”
a/ de una l lamada
* Est a caracter ística no es tá disponib le durante las ll amadas de móvil .
† Antes d e usar el Llamad o Inmediato, co ngure su númer o de Llamado Inm ediato a través d e Cardo
Community o la aplicación Cardo SmartSet (ver la sección4).
‡ Si tien e 2 teléfonos m óviles empar ejados direc tamente a su SRC-Sys tem™ PRO, tendrá que
congur ar que uno de ell os sea usado po r defecto p ara las llamad as saliente s.
†
‡
µ
responder por VOX
Manténgase en silencio por 15 s egundos,
o presion e µ por 2 segun dos
Pulse
µ
por 2 segun dos y siga los avisos en e l móvil
Pulse
+
Presione
Pulse µ tres veces
Estan do en una llamada de teléf ono,
presione + por 5 segun dos
En Modo de Es pera, presione
Estan do en una llamada de teléf ono,
pulse
Estan do en una llamada de teléf ono,
pulse
por 2 segun dos
-
v
dos veces seguidas
v
por 5 segun dos
µ
Español
95
Page 53

7.3 ESCUCHAR MÚSICA A TRAVES DE A2DP
Disponib les en fuente s de audio con Blu etooth compa tibles con AVRCP
Reproducir
Pausar/Detener
Pista siguiente
Pista anterior*
Escaneo de Música
Suspensión de
Escaneo
*En algunos t eléfonos es p osible que ten ga que repetir e sta acción
ß
ßPresione
ß
ß
En Modo de E spera, pulse
µ
por 2 segun dos
Estan do la música ENCENDI DA, pulse
Estan do la música ENCENDI DA, pulse µ
Estan do la música ENCENDIDA, p ulse
o
(escaneo para abajo) por 5 segundos. Se reproducirán
-
los prime ros segundos de c ada pista de audio.
Para detener el escaneo en la pista actual, pronuncie cualquier
palabra en v oz alta hacia el micró fono o pulse
µ
µ
dos veces
(escaneo para arr iba)
+
µ
ALTERNACIÓN ENTRE FUENTES DE AUDIO A2DP
Si se ha emparejado a un Reproduc tor de Música, el
SRC-System™ PRO lo usará
como fuente de audio A2DP por defecto.
1. Detenga la reproducción de la música del dispositivo actual.
2. Comience la reproducción de la músic a desde el otro dispositi vo.
7.4 COMPARTIR MÚSICA MUSIC SHARING
La carac terística de comp artir música de su SRC-System™ PRO funciona
dentro de un alc ance de 10m, por lo que es part icularmente adecuad o
para el uso del conductor-pasajero.
El uso compar tido de música funciona sólo con dispositivos A2DP habilitados
Bluetooth estéreo). Con el n de compar tir su música con su compañer o de
(
viaje, su unidad [EMISOR] necesita ser emparejada a la otra unidad [RECEPTOR] en
el CANAL A y el RECEPTOR debe estar en modo de espera.
[EMISOR] Inic iar/Detener el u so
compartido de su música:
[RECEPTOR] De tener el uso
compartido de la música
:
Durante la r eproducción de la m úsica A2DP,
presione
Presione
por 2 segun dos
+
por 2 segun dos
+
Las llamadas de teléfono/intercomunicador y audio del GPS, interrumpirán la
reproducción de la música.
El uso compar tido de la música, n o transmite audio de v oz y no se puede utiliz ar
para las llamadas del intercomunicador.
8. RADIO FM
Su SRC-System™ PRO incluye una Radio FM integrada con una
memora de 6 estaciones preprogramadas y un RDS (Sistema Radial
de Datos).
RDS permite la r adio automáticamente sinto nizar de nuevo a la
frecuen cia más fuerte dispon ible, para la estación de FM que e stá escuchando,
cuando la primera señal sea demasiado débil.
Encender la Radio
Apagar l a Radio
Estac ión Siguient e
Estac ión Anterior
Encender/Apagar RDS
(Por Defec to: Apagado)
ß
ß
ß
ß
8.1 SINTONIZACIÓN DE LA RADIO
Las estaciones preprogramadas pueden ser almacenadas por medio de Cardo
Community, vía la aplicación Cardo Smar tSet o directamente desde su unidad:
1. Enci enda la rad io y seleccio ne el número de la preprogra mación (del 1 al 6) que
desea prog ramar, p ulsando el botón
2. Busque la estación de FM que desee almacenar usando las funciones de Buscar
o Explorar:
En Modo de E spera, pulse
Presione µ por 2 segun dos
Con la radio EN CENDIDA, pulse
Con la radio EN CENDIDA, pulse
Con la radio EN CENDIDA, presione
simultáneamente por 2 segundos.
, hasta que es cuche el número desead o.
µ
dos veces seguidas
µ
µ
dos veces seguidas
µ
y -
+
Buscar y Guardar
(Buscar la siguiente
est ación FM)
Explorar y Guardar
(Explo rar a través de
las esta ciones de FM)
Presione
Pulse
para guardarla como la Estación Preprogramada ac tual.
Presione
Para deten er la exploració n en esta estaci ón, pulse
Pulse
para guardarla como la Estación Preprogramada ac tual.
Para conti nuar la exploraci ón, espere a que se enc uentre la
próxima estación.
o - por 2 segun dos.
+
dentro de 20 s egundos de local izada la estaci ón FM
µ
por 5 segun dos.
+
+
dentro de 20 s egundos de local izada la estaci ón FM
µ
.
8.2 SINTONIZACIÓN AUTOMÁTICA DE LA RADIO
Para encontrar nuevas estaciones de manera rápida, la sintonización automática crea
una lista temp oral de 6 estacione s de radio.
1. Con la radio encendida, presione
por 5 segundos.
-
2. L a radio buscará hacia arriba (frecuencia más alta) des de la estación actual
y almacenará las siguientes 6 estaciones FM descubiertas como estaciones
temporales.
3. Si lo desea, repita para almacenar las siguientes 6 estaciones FM.
Estas 6 estaci ones temporale s no se pueden guar dar y no reempla zan a las
Estaciones FM Preprogra madas que haya gua rdado.
Al apagar su SRC-System™ PRO las estaciones temporales se borrarán y las
Estaciones FM Preprogramadas serán restauradas.
9. SOLUCIÓN DE PROBLEMAS
Reiniciar
Restablecer
Emparejamiento
(Elimine todos
los dispositivos
emparejados)
Si su SRC-System™ PRO deja de re sponder, reiníciel o
apagándolo y luego encendiéndolo de nuevo (Presione s por
2 segundo s).
1. En Modo de Es pera, presione
luz parp adee en ROJA/AZUL.
2. Presione
en PÚRPURA.
por 2 segun dos, hasta que la lu z parpadee 5 vece s
µ
por 5 segun dos, hasta que la
+
10. APOYO
Para recibir información adicional, visite nuestro sitio Web a
www.schuberth.com
Para sopor te técnico por favor contác tenos a:
Service@schuberth.com
Teléfono: + 49-391-8106-555
Para obtener toda la información más reciente sobre las actualizaciones
del Software, por favor visite nuestro sitio web www.schuberth.com/es/
motorcycle/servicios/sistema-srctm.html y regístrese en línea.
IMPORTANTE:
¡LA APERTUR A DE LA CREMALLERA DEL ACOLCHADO PARA LA
NUCA, ANULARÁ LA GARANTÍA!
Los componentes electrónicos dentro del Acolchado para la nuca del
SRC-System™ PRO están cerrados mediante una cremallera sellada. Por favor
no manipule ni abr a la cremallera ya que esto anulará la garantía.
Español
96
| SRCS Pro SRCS Pro |
97
Page 54

11. AVISOS
Al conducir un vehículo, es necesario que ponga la máxima atención. Debe asegurarse de tomar todas las
medidas de precaución necesarias, para ser capaz de tomar en cuenta adecuadamente, la situación actual
del tráco y las condiciones del clima, incluyendo el estado de la carretera en todo momento, incluso
cuando se utiliza el dispositivo. Antes de realizar o aceptar una llamada, debe hacerse a un lado de la
carretera y detenerse. Todas las publicaciones, publicidades, anuncios u otras comunicaciones similares,
que implican que puede utilizar el dispositivo en movimiento, solamente se reeren a sus capacidades
técnicas, y no deben interpretarse como un estímulo para participar en dicha actividad.
Debe establecer, si el uso del dispositivo podría representar una violación a alguna ley, o reglamento
aplicable, en el lugar de su uso y cumplir con las reglas pertinentes. En este sentido, cualquier uso del
dispositivo, es exclusivamente bajo el propio riesgo del usuario y responsabilidad.
Los requisitos básicos para un uso seguro, incluyen que usted debe ser físicamente capaz de utilizar el
dispositivo y no sufrir de ninguna enfermedad o limitación, que puedan afectar su capacidad de utilizar
el dispositivo de manera segura y conducir en la carretera. Por otra parte, debe tener una licencia de
conducción válida para el vehículo. Bajo ninguna circunstancia, puede consumir alcohol o drogas que
alteran la mente, lo que podría afectar su estado de alerta, antes o durante el uso del dispositivo.
Declaración de la Comisión Federal de Comunicaciones (FCC)
15.21
Los cambios o modicaciones a esta unidad que no hayan sido expresamente aprobados por la parte a
cargo del cumplimiento podrían anular la autoridad del usuario para operar al equipo.
15.105(b)
Este equipo ha sido evaluado y demostró cumplir con los límites para un dispositivo digital Clase B, de
acuerdo con la Parte 15 de las Reglas FCC. Estos límites están diseñados para proporcionar protección
razonable contra: interferencia dañina en una instalación residencial. Este equipo genera y puede irradiar
energía de radiofrecuencia y si no se lo instala y usa de acuerdo con las instrucciones, puede causar una
interferencia nociva a las comunicaciones de radio. Sin embargo, no hay garantías de que no se produzca
una interferencia en una instalación en particular. Si este equipo causa interferencia dañina a la recepción
de radio o televisión, lo que se determinará encendiendo o apagando el equipo, se recomienda al usuario
que trate de corregir la interferencia haciendo lo siguiente:
• Reoriente o reubique la antena receptora
• Aumente la separación entre equipo y receptor
• Conecte el equipo a una salida en un circuito distinto al que tiene conectado al receptor
• Consulte al distribuidor o a un técnico de radio y TV experimentado para recibir ayuda.
Su operación está sujeta a las dos condiciones siguientes:
1) este dispositivo no causará interferencia y
2) este dispositivo debe aceptar cualquier interferencia, incluida la interferencia que puede causar la
operación indeseada del dispositivo.
Declaración de la exposición a radiación RF FCC
Este equipo cumple con los límites de exposición a la radiación FCC establecidos para un ambiente no
controlado. Los usuarios nales deben seguir las instrucciones operativas especícas para cumplir con los
límites de exposición RF. Este transmisor no puede ser colocado ni operar conjuntamente con otra antena
o transmisor.
Aviso CE Europeo
El SRC-System™ PRO (el “producto”) cumple con los siguientes requisitos esenciales de la Directiva del
Consejo 1999/ 5/ EC (referida como la directiva R&TTE): Artículos 3.1.a, 3.1.b y 3.2. El producto se fabrica
de acuerdo con el anexo II de dicha directiva.
Declaración de conformidad (DOC)
El producto cumple y adopta la especicación 3.0 para Bluetooth
de interoperabilidad que se detallan en las especicaciones del Bluetooth
garantizar la interoperabilidad entre el equipo y otros productos con Bluetooth
®
y pasó con éxito todas las pruebas
®
. Sin embargo, no se puede
®
.
Temperatura de funcionamiento
El Producto ha sido diseñado para funcionar a temperaturas de entre -20 y 55 °C.
AC/DC adaptadores
Al cargar desde una toma de corriente, utilice el cargador suministrado u otro plug-in certicada
adaptador AC/DC que cumpla con los siguientes criterios:
Entrada: 100-240 V, 50 /60 Hz, 0,2 A máximo Salida: 5 DV DC, 1 A máximo.
ADVERTENCIAS PARA LA SALUD:
Pérdida de la Audición
Los dispositivos de audio pueden causar la pérdida de la audición. Prestar atención y evitar la exposición
a la salida de niveles de volumen que puedan dañar o deteriorar la audición o llevar a la pérdida de la
audición. La pérdida permanente de la audición puede ocurrir si los Productos son utilizados a un volumen
alto, durante periodos prologados de tiempo.
Señales de Radiación RF
La mayoría de los equipos electrónicos están protegidos contra las señales de radiación RF. Sin embargo,
algunos equipos electrónicos pueden no estar protegidos contra las señales de radiación RF, procedentes
de su equipo inalámbrico.
Marcapasos
La Asociación de Fabricantes de la Industria Médica recomienda que se mantenga una separación mínima
de 16 cm entre un teléfono móvil o un dispositivo inalámbrico y un marcapasos, para evitar la potencial
interferencia con el marcapasos. Asegúrese de no interferir con la funcionalidad de los dispositivos
médicos personales.
Aparatos Auditivos
Algunos dispositivos pueden interferir con ciertos aparatos auditivos. En el caso de tal interferencia, usted
deberá consultar al fabricante del aparato auditivo para analizar las alternativas.
Otros Dispositivos Médicos
Si usted utiliza cualquier otro dispositivo personal médico, consulte al fabricante de su dispositivo y/o
al médico para determinar si está adecuadamente protegido contra las interferencias causadas por la
energía externa de radiación RF. Su médico puede ayudarle a obtener esta información.
RENUNCIA DE RESPONSABILIDAD Y LIBERACIÓN GENERAL
(No para los países de la Unión Europea)
Al usar el producto, renuncia a derechos legales esenciales, incluido el derecho a presentar una demanda
judicial. Lea lo siguiente con todo cuidado antes de usar el equipo. Si no acepta todos los términos de este
acuerdo debe retornar el producto de inmediato para obtener el reembolso completo. Al usar el kit manos
libres acepta cumplir con este acuerdo y renuncia a su derecho a presentar una demanda judicial. El uso
de un dispositivo de comunicación mientras se conduce una motocicleta, motoneta, ATV, quad-bike o
cualquier otro vehículo o equipo, en tierra, agua o aire (conjuntamente mencionados como Vehículo)
requiere la atención completa e indivisible. Schuberth GmbH. y Cardo Systems, Inc., incluidos sus
funcionarios, directores, aliadas, compañía madre, representantes, agentes, contratistas, patrocinadores,
empleados, proveedores y revendedores (la compañía) le recomiendan tomar todas las precauciones
necesarias y mantenerse alerta al tráco, condiciones de la ruta y del clima, si decide usar el producto,
incluidos todos los modelos derivados, independientemente de su nombre o marca (el “dispositivo”) y
detenga su vehículo en la ruta antes de iniciar o recibir llamadas.
Todas las publicaciones, publicidad, anuncios o notas similares referidas al uso del dispositivo mientras
se conduce el vehículo sólo pretenden indicar las funcionalidades técnicas y no se interpretarán como
el aliento a los usuarios para que operen el equipo en medio del tráco. Al comprar este equipo y no
devolverlo para obtener el reembolso (ver abajo) está liberando a la compañía, compensando por
obligaciones, pérdidas, reclamos y gastos (incluidos los honorarios de abogados) por lesiones corporales,
daño o muerte y pérdidas o daños materiales a vehículos, incluido el suyo, o a activos o propiedades que
le pertenezcan o a terceros, que podrían deberse al uso del equipo en cualquier circunstancia o condición
e independientemente de la jurisdicción. La compañía no asumirá ninguna responsabilidad por daños
físicos, independientemente de las razones, condiciones o circ unstancias, incluida la falla en la operación
del dispositivo y los riesgos asociados con la operación son responsabilidad exclusiva del usuario del
dispositivo, independientemente de que el equipo sea usado por el comprador original o un tercero. La
compañía le notica que el uso de este equipo puede contravenir leyes o reglamentos locales, federales,
estatales o federales y que el uso es de su exclusivo riesgo y responsabilidad.
1. Usted, sus herederos, representantes legales, sucesores, voluntariamente liberan, compensan
y consideran a La compañía libre de cualquier acción legal, reclamo, deuda, demanda, acción y
responsabilidad que pueda surgir directa o indirectamente, por el uso del equipo por sufrimiento,
dolor, molestias, pérdida, lesión, muerte, daños a una persona o propiedad, SE DEBAN O NO A
NEGLIGENCIA, y que le puedan ser imputados a usted en el futuro como resultado de dicho uso, en la
medida permitida por la ley.
2. Entiende y asume los riesgos del uso del equipo, incluido el riesgo de actos u omisiones negligentes
por terceros.
3. Conrma que es físicamente capaz de usar el equipo y que no tiene problemas médicos o necesidades
que puedan afectar su capacidad de hacerlo en forma segura. Conrma que tiene dieciocho años por
lo menos y que se le informó de los riesgos asociados con el uso del equipo. También conrma que no
consumirá alcohol que pueda afectar su estado de alerta ni ninguna sustancia que pueda afectar la
mente y que no transportará, usará ni consumirá estas sustancias antes o durante el uso del equipo.
4. Reconoce todas las advertencias y entiende que: (a) hay riesgos relacionados con el uso del dispositivo
en el tránsito, incluyendo sin limitaciones, lesiones o enfermedad, esguinces, fracturas, parálisis total
o parcial, muerte u otras enfermedades que podrían resultar en discapacidad grave (b) estos riesgos
pueden deberse a negligencia de los fabricantes o sus agentes o terceros participantes en el diseño
o fabricación del equipo; (c) estos riesgos pueden deberse a causas inesperadas o impredecibles. Por
ende asume todos los riesgos y responsabilidad por pérdidas y/o daños, causados en todo o en parte
por negligencia o la conducta de otros, incluida la compañía.
5. Conrma que leyó esta declaración y entiende sus términos y que renunció a sus derechos al no
retornar el equipo para obtener reembolso (consulte la opción de reembolso)
GARANTÍA LIMITADA
SU PRODUCTO ESTÁ CUBIERTO POR UNA GARANTÍA LIMITADA DE PRODUCTO POR DOS AÑOS, DESDE LA
FECHA ORIGINAL DE LA COMPRA, SUJETO A LAS LEYES Y REGLAMENTOS APLIC ABLES EN SU JURISDICCIÓN.
POR FAVOR, GUARDE EL RECIBO DE VENTA AL POR MENOR Y SUS DATOS DE REGISTRO PARA LA
COMPROBACIÓN DE LA COMPRA.
RENUNCIA DE RESPONSABILIDAD
LA COMPAÑÍA RENUNCIA A TODAS LAS GARANTÍAS EXPRESAS E IMPLÍCITAS CON RESPECTO AL EQUIPO,
INCLUIDAS SIN LIMITACIONES, GARANTÍAS IMPLÍCITAS DE COMERCIABILIDAD, ADAPTACIÓN PARA UN FINE
ESPECÍFICO Y LA NO VIOLACIÓN DE LA LE Y. EL EQUIPO Y SUS ACCESORIOS SE PROPORCIONAN “COMO ESTÁ”
SIN GARANTÍAS FUERA DE LAS ASUMIDAS EN EL MANUAL ADJUNTO.
LIMITACIÓN DE RESPONSABILIDAD
EN NINGÚN CASO LA COMPAÑÍA SERÁ CONSIDERADO RESPONSABLE POR DAÑOS ESPECIALES, INDIRECTOS,
PUNITIVOS, INCIDENTALES, EJEMPLARES O CONSECUENCIALES O DAÑOS DE CUALQUIER TIPO DEBIDOS AL
USO DEL EQUIPO, YA SEA QUE SE BASEN EN VIOLACIÓN DE CONTRATO, AGRAVIO (INCLUIDA NEGLIGENCIA),
RESPONSABILIDAD DEL PRODUCTO, ETC. INCLUSO SI SE LE INFORMÓ DE LA POSIBILIDAD. RECONOCE Y
ACEPTA QUE LAS LIMITACIONES ESTABLECIDAS SON ELEMENTOS FUNDAMENTALES DEL ACUERDO Y EL
EQUIPO NO LE SERÁ PROPORCIONADO, SIN LAS LIMITACIONES. LOS ESTATUTOS DE ESTADO PUEDEN SER
VÁLIDOS CON RESPECTO A LA LIMITACIÓN DE RESPONSABILIDAD.
Español
98
| SRCS Pro SRCS Pro |
99
Page 55

DEVOLUCIÓN POR REEMBOLSO COMPLETO
SI NO DESEA ACEPTAR LAS CONDICIONES ANTERIORES PUEDE DEVOLVER ESTE EQUIPO A LA COMPAÑÍA
PARA OBTENER UN REEMBOLSO COMPLETO, SIEMPRE QUE NO LO HAGA MÁS TARDE DE 7 DÍAS HÁBILES
TRAS LA COMPRA DEL EQUIPO (se requiere prueba de compra) Y SUJETO A QUE EL EMPAQUE ESTÉ INTACTO.
AL HACERLO MENCIONE ESTA SECCIÓN. DE LO CONTRARIO ESTÁ EXPLÍCITAMENTE ACEPTANDO LO ANTERIOR
Y RENUNCIA A TODO DERECHO A FUTUROS RECLAMOS Y DEMANDAS CONTRA LA COMPAÑÍA COMO SE
INDICA ARRIBA.
www.schuberth.com
100
| SRCS Pro
Page 56

Handleiding
POWERED BY
Page 57

INHOUD
1. TER INTRODUCTIE
1. TER INTRODUCTIE .................................................103
2. OPLADEN VAN DE BATTERIJ ........................................104
3. INSTALLATIE .....................................................105
3.1 VERWIJDEREN VAN DE AKOESTISCHE KRAAG .............................10 5
3.2 AANSLUITEN VAN DE KABEL VOOR DE ANTENNE .......................... 105
3.3 AANSLUITEN VAN HET SRCSYSTEM™ PRO ............................... 106
3.4 HET PLAATSEN VAN DE SPE AKERS .......................................10 6
3.5 HET PLA ATSEN VAN DE MICROFOON .....................................107
3.6 HET VERWIJDEREN VAN DE SRCSYSTEMHEADSET VAN UW HELM .......... 107
3.7 HET OPEN AFDOEN VAN DE HELM ....................................... 107
3.8 HET REINIGEN VAN DE AKOESTISCHE KRAAG ..............................107
4. AANPASSEN EN INSTELLEN .........................................108
5. HET EERSTE BEGIN ................................................10 9
5.1 ALGEMENE FUNCTIES ..................................................10 9
5.2 LED VAN DE SRCSYSTEM™ PRO .........................................109
5.3 AUDIOBRONNEN EN PRIORITEITEN .....................................10 9
5.4 MOGELIJKHEDEN VOOR SPRAAKBESTURING .............................. 110
5.5 INSTELLINGEN VAN SPRAAKBESTURING VOX ...........................11 0
6. INTERCOM .......................................................111
6.1 “1+8”INTERCOMWISSELEN ............................................ 111
6.2 INTERCOM MET KANAAL A / B. . . . . . . . . . . . . . . . . . . . . . . . . . . . . . . . . . . . . . . . . . . 112
6.3 C LICKT OLI NKINTERCOM CTL .........................................11 4
6.4 DE INGESPREKSTOON .................................................. 11 4
6.5 AANNEMEN VAN INTERCOMGESPREKKEN ................................114
7. KOPPELEN EN GEBRUIK VAN DE MOBIELE TELEFOON, GPS OF MP3 ......114
7.1 BLUETOOTHKANALEN 1 EN 2 KOPPELEN .................................11 4
7.2 BELLEN EN GEBELD WORDEN VIA DE TELEFOON ........................... 115
7.3 LUISTEREN NAAR MUZIEK VIA A2DP ..................................... 115
8. FM-RADIO .......................................................116
8.1 INSTELLEN VAN DE RADIO .............................................. 116
8.2 AUTOMATISCH INSTELLEN VAN DE RADIO ................................ 117
9. PROBLEMEN OPLOSSEN ...........................................117
10. VRAGEN/HULP ...................................................117
11. BEPALINGEN ....................................................118
BELANGRIJK:
Dit is vers ie 1.0 van deze handleidin g. Let wel dat op de website o nze handleiding
periodiek wordt bijgewerkt zodat de laatste mogelijkheden erin verwerkt zijn als ook
de nieuws te snues en func ties van uw nieuwe SRC-System™ PRO-headset.
Bezoek nu a l www.schuberth.com/leadmin/downloads/SRC/SRC-System_
Manual-1.pdf om te z ien of de handleiding i n uw bezit de mees t recente is en
download d e versie van de handle iding op onze website i n de taal van uw keuze.
Bedankt dat u voor het SRC-System™ PRO-Bluetooth® communicatie- en
entertainmentsysteem voor Schuber th helmen kiest. Deze handleiding helpt u
bij het initiëren, congureren en bedienen van de SRC-System™ PRO.
De SRC-System™ PRO biedt u onder andere de volgende belangrijke
mogelijkheden:
MOGELIJKHEDEN INTERCOM
• intercomgroepsgesprek: gesprekken voeren tussen 2, 3 of 4 rijders tot op een afstand
van 1 km*
• Click-to-Link®-intercom: spontane verbindingen met willekeurige rijders
• “1+8”-intercomwisselen: cont act met 8 andere
rijders
VERBINDINGSMOGELIJKHEDEN
• Bluetooth mobiele telefoon / gps
• draadloos mp3 via A 2DP
ENTERTAINMENTMOGELIJKHEDEN
• draadloos live muziek via apparaten die Bluetooth-stere o-A2DP- en -AVRCP-
proelen ondersteunen.
• ingebouwde FM-radio met 6 voorkeurstations en automatische afstemming
CARDO-GEMEENSCHAP – Cardo Communit y®
• downloaden van software-upgrades, -verbeteringen en nieuwe mogelijkheden
• invoeren van uw “1+8”-gesprekpar tners
• uw SRC-System™ PRO instellingen aanpassen aan uw wensen
GEAVANCEERDE TECHNOLOGIE
➤ spraakbesturing en VOX-technologie:
• bellen met / aannemen van de mobiele telefoon d.m.v. spraakopdrachten
• b ellen met de intercom d.m.v. spraakopdrachten
➤ de AGC-technologie (Automatic Gain Control) zorgt voor het automatisch
aanpassen van de geluidssterkte van de speakers aan de rijsnelheid en
het omgevingslawaai. U kunt ook de geluidssterkte zelf regelen. De AGCdrempelwaarden kunt u aanpassen aan uw per soonlijke voorkeur.
➤ de VOX-technologie en de spraakbesturing geven een veilige handsfree bediening
van de belangr ijke functies. De VOX-gevo eligheid kunt u aanpass en aan uw
persoonlijke voorkeur.
➤ de PLC-sof tware (Packet Loss Concealment) compenseer t live het audioverlies
dat kan optreden onder zware omgevingsomstandigheden.
➤ geavanceerde sof tware-updates via computer
(Minimumvereiste: Windows® XP / Mac OS X 10.7)
➤ gesproken statusmeldingen zodat u steeds weet met wie of welk apparaat u
verbonden bent.
➤ geluidssterkte per onderdeel (Volume per Mode): vo or iedere audiobron wordt
een eigen ideale geluidssterkte bepaald en vastgelegd.
We wensen u een geweldige tijd met uw SRC-System™ PRO.
Schrijf ons beslist op Service@schuberth.com, wanneer u vragen, suggesties of
opmerkingen heeft.
* Onder zware terreinomstandigheden (dichte bossen of bebouwing of veel verkeer) is het
intercombereik beperkt. Als de omstandigheden zich verbeteren neemt ook het bereik weer toe.
102
| SRCS Pro SRCS Pro |
103
Page 58

is zichtbaar
de antennestekker
is hier tevoorschijn getrokken
2 speakers
2. OPLADEN VAN DE BATTERIJ
3. INSTALLATIE
1. Trek de an tennestekker (hij hee ft een rood label) te voorschijn. U vind de ze
weggesto pt in de achterrand van de h elm.
exibele
microfoonstaaf
pinnetje
antenne
ingang
stekker vo or de oplader
USB-verloopk abel
klittenbandple isters
Microfoon
de USB connector
• Ingang voor downloaden van software
• Ingang om te laden
schuimrubberen windbeschermer voor de
microfoo
kussentjes voor de speakers
handleiding
de ingang connector
n
intercom
spraakbesturing
• aan / uitzetten
mobiele-telefoon
harder
zachter
muziek /
pinnetje
Zorgt u er voor dat uw headset volle dig is opgeladen, wat ten minste vier uur zal
duren, voor dat u hem voor het eerst gebruik t.
1. Open het lipje dat de ingang voor het opladen afschermt.
2. Plug de USB-kabel in de ingang voor
het opladen.
3. P lug de andere kant van de USB-kab el in het
stopcont act of in de USB-ingang van ee n computer.
4. T ijdens het opladen gaat de rode led aan. Als het
opladen klaar is gaat de rode led weer uit.
Uw oplader met USB/audioapparatuur-kabel heef t twee functies:
1. het opladen van uw headset vanuit een stopcontact of via een USB-poort van
uw computer (via de pc duurt het langer)
2. het downloaden van sof tware-verbeteringen via een computer (zie sectie 4).
Het lipje dat d e oplaadingang moe t beschermen mo et te allen tijde goe d dicht worden
gehouden om te voorkomen dat vocht het apparaat binnendringt.
Batterijniveau
nagaan
Tijden s stand-by dru kt u 5 seconden op
• BLAUW = vol • PAARS = hal f vol • RO OD = bijna leeg
+
en -.
3.1 VERWIJDEREN VAN DE AKOESTISCHE KRAAG
Verwijder eerst als volgt de akoestisc he kraag
die aan uw helm zit :
1. Open beide drukknopen.
2. Ver wijder de akoestische k raag door het
midden van het gebogen stuk naar voren
te trekken.
3. Haal de pinnetjes van de akoestische
kraag uit hun respectievelijkegaatjes in de
helmrand.
3.2 AANSLUITEN VAN DE KABEL VOOR DE ANTENNE
Uw SRC-System™ PRO heeft een antennekabel die u moet verbinden met de
ingebouwde stekker voor de antennekabel in de Schuberth-helm.
Zorg er voor dat u de USB-ste kker afsluit
en dan wegbergt in de uitsparing voor
de USB-stekker.
het antennelabel
2. Open op d e SRC-kraag d e twee klemmetjes
aan de antenne stekker en verwijde r de plastic
afscherming.
3. Verwijd de ru bberen afscherm ing van de
antenne-contrastekker van de helm.
4. Sluit nu de s tekker en de contrast ekker op elkaar
aan en klik de t wee klemmetjes weer o p hun
plaats om de verbinding te vergrendelen.
A. B.
A.
B.
104
| SRCS Pro SRCS Pro |
105
Page 59

5. De verbinding kan nu veilig in de uitsp aring
pinnetje
voor de antennestekker in het midden van het
SRC-System™ PRO worden opgeborgen.
3.3 AANSLUITEN VAN HET SRCSYSTEM™ PRO
1. Let er op da t u de speakerkabels in de helm s topt, en leg dan het SRC-System™ PRO
op zijn plaats vast.
2. S chuif het pinnetje dat op de rand van het bedieningspaneel zit naar het
overeenkomstige gaatje in de helm, tot hij er in zit, en sluit de drukknop.
3. Breng het andere pinnetje aan de andere kant van de akoe stische kraag op zijn
plaats en doe de drukknoop daar dicht.
4. Duw nu het midden van de akoestische kraag op zijn plaats achterin de helm.
Doe hetzelfde met de overige delen om de akoestische kraag te bevestigen
waar hij hoor t.
5. Zorg er voor dat beide drukknopen dicht blijven en dat het microfo onzwanehals zich aan de binnenkant van uw helm bevindt (tussen de
SRC-System™ PRO-headset en de binnenbekleding van de helm).
microfoon-statief
drukknoop
drukknoop
3.4 HET PLAATSEN VAN DE SPEAKERS
OM HET BESTE GELUID TE KRIJGEN MOET U ER VOOR ZORGEN DAT BEIDE SPEAKERS
ZO DICHT MOGELIJK TEGENOVER UW OREN GEPLAATST WORDEN.
het volgende slaat op beide kanten van de SRC-System™ PRO:
1. Open de achterste rode knoop onder de binnenbekleding die de wangstukken
bedekt (de knoop wordt op zijn p laats gehouden door een z warte ring). Til de
bekleding een beetje op.
2. B evestig de bijbehorende ovale klittenbandkussentjes aan de speakervormige
uitsparing in het EPS (geëxpandeerde polystyreen, piepschuim) en plaats de
speakers op de klittenbandkussentjes.
3. Sluit nu de ro de knoop zo dat het zwar te “knoopsgat” he m op zijn plaats houdt.
Reserve speakerkussentjes zijn meegeleverd om het speakervolume desgewenst
te vergroten d oor de speaker s dichter bij uw ore n te brengen.
Dat
doet u doo r eenvoudigweg d e speakerkussen tjes tussen de
klitte nbandkussent jes in de uitspa ringen in de he lm en de speaker s te plaatsen
3.5 HET PLAATSEN VAN DE MICROFOON
Om te zorgen dat het kinstuk van de helm makkelijk sluit (naar beneden klapt) en
plaats het dr iehoekige stukje stof in het kindeel zoveel mogelijk naatr voren:
1. Buigt u de het buigz ame microfoon-statief tot het zit zoals in de afbeelding.
2. Duwt u de mic rofoon naar het midden van uw mond.
3. Klapt u het kinst uk van uw helm naar beneden en sluit het. Het zou kunnen dat
u beide handen no dig heeft om het kins tuk geheel te sluiten.
4. Met het kinst uk gesloten en het helmvizier open, steekt u uw hand door de
opening van het vizier en duw t u de de microfoon een klein beetje naar voren
en beneden, naar het midden van het kinstuk tegenover uw mond.
3.6 HET VERWIJDEREN VAN DE SRCSYSTEMHEADSET VAN UW HELM
1. Maak beide speakers los van het klit tenband in de helm.
BELANGRIJ K: Zorg ervoor dat u ni et aan de antenn everbinding tre kt.
2. Trek de antenneverbinding uit zijn uitsparing en maak hem voorzichtig los.
3. Til de boog van de akoestische k raag op en duw hem uit het centrum weg.
4. Haal de pinnetjes van de akoestische kraag uit hun respec tievelijke gaatjes in
de helmrand.
5. Open beide drukknopen.
3.7 HET OPEN AFDOEN VAN DE HELM
DE ELEKTRONISCHE ONDERD ELEN VAN DE SRC-SYSTEM™ PRO-HEADSE T ZIJN VEILIG
WEGGEWERK T IN DE AKOESTISCHE KRAAG. OM ONGE MAK BIJ HET OP- EN AFDOEN VAN
UW HELM TE VOORKOMEN, BEV ELEN WIJ DE VOLGENDE WERKWIJZE AAN:
1. Maak de helm-opening wijder door de kinriempjes voor onder de kin stevig
vast te houden en ze krachtig uit elkaar te trek ken.
2. Terwijl u de riepjes zijdelings trekt, laat u de helm
over uw nek glijden, te b eginnen bij de nek en
dan naar voren.
3. Bij het afdoen van de helm volgt u dezelfde
procedure door eerst de riempjes van elkaar weg
te trekken en dan de hele helm naar boven te duwen.
Uw SRC-Sys tem™ PRO-akoestische k raag is ontworpe n voor maximaa l comfort.
Maar, omdat h et een uitgebre id elektroni sch apparaat beva t, zal het onvermij delijk
enigsz ins bol staan. Die ntengevolge ka n het op- of afdoen va n uw helm met
een SRCS-ui trusting ander s voelen dan wat u ge wend bent met ee n doorsnee
akoestische kraag.
Onthoud: Ho e meer u de riempj es van de helm van el kaar wegtrekt wa nneer u uw
helm op- o f afdoet, des te soe peler zal het pro ces verlopen,wat ui teindelijk d e
stijfhe id van de akoesti sche kraag zal vermi nderen.
3.8 HET REINIGEN VAN DE AKOESTISCHE KRAAG
Bij het reinigen van de akoestische kraag, sluit u eerst heel precies de micro-USBingang van de SRC-System™ PRO-headset. Gebruik alleen een doekje dat een
beetje vochtig en lauw is. Voorkom dat de akoestische kraag doordrenkt raakt
met water of een andere vloeis tof. Dompel hem nooit onder en voorkom dat
water in contac t komt met de speakers of de microfoon. Laat het geheel drogen
op kamertemperatuur.
106
| SRCS Pro SRCS Pro |
107
Page 60

4. AANPASSEN EN INSTELLEN
Haal alles uit uw SRC-System™ PRO door hem in te stellen en aan te passen
naar uw eigen per soonlijke voorkeur. Er zijn drie manieren om de instellingen
te veranderen: via de Cardo Community website vanaf een PC / Mac , via de Cardo
SmartSet App, of op het instelmenu op uw SRC-System™ PRO.
Cardo
Leg uw roep naam vast voor de 1+8 Interc om
Vroeg vri enden toe aan uw lijst v an maatjes
Downloaden van de laatste software-upgrades
Instelle n van de 6 FM-radio voor keurzenders
Instellen van uw alarmnummer
Veranderen v an de audioprior iteit tussen de A2DP
en de intercom
Veranderen van de taal voor de sp raakherkenning
Uitzetten van de gesproken statusmededelingen
Veranderen van de AGC-speakervolumewaarden
Veranderen van de VOX-be schikbaarheid
Veranderen van de VOX-microf oongevoeligheid
Aan-/uitz etten van de Click-to-Link-mogelijkheid
Community
SmartSet
App
Instel menu
CARDO COMMUNITY
http://communit y.cardosys tems.com
Windows ® XP™ / Mac OS X 10.7
Bezoek
Minimumvereiste:
CARDO SMARTSET APP
Cardo
SmartSet
App
INSTELMENU
Het instelme nu, op uw SRC-Sys tem™ PRO, is be schikbaar in versch illende talen.
Begin me t het menu
Verlaat he t menu
Druk in st and-by 2 seconde n op
Druk 2 sec onden op
µ
µ
5. HET EERSTE BEGIN
5.1 ALGEMENE FUNCTIES
Druk 2 sec onden op
Aanzetten/ Uitzetten
Geluidssterkte
Uit- en aanzetten van
de speakers (mute)
Controleren
batterijniveau
Instellingenmenu
Uw oproepnaam
auisteren
Koppelingen
controleren
VOX aan-/ uitzetten
(alleen voor de intercom
en de spraakbesturing)
Gesproken
statusmeldingen
aan-/ uitzetten
• AAN:3 BLAUWE itsjes + opklimmend geluid
• UIT: 3 RODE itsjes + af dalend geluid
of - om de geluidssterkte van de audiobron waar u nu
Tik op
+
naar luist ert aan te passe n en vast te leggen
Tik tegelijkertijd op
Druk in st and-by 5 secon den op
• blauw led = vol
• paars le d = halfvo l
• rood led = bijna leeg
In stand -by drukt u 2 seco nden op
audio-instructies
Tik in sta nd-by tegelijker tijd op
Druk in st and-by 2 second en op
Als zich “1+8 ”- gesprekspartners binnen bereik bevinden, ziet u
2 seconde n een paars led- itsje.
Druk tege lijkertijd 2 se conden op
• aanzet ten: een blauw itsj e van 2 seconden
• uitzet ten: een rood it sje van 2 seconden
Druk tege lijkertijd 2 se conden op
+
s
en
-
en
+
-
en volgt u ver der de
µ
en
s
v
en
s
v
en
+
en
µ
-
s
5.2 LED VAN DE SRCSYSTEM™ PRO
Geen de SRC-System™ PRO staat UIT
Elke 3 seco nden
1 BLAUW its je
Elke 3 seco nden
2 BLAUWE itsjes
Elke 3 seco nden
1 ROOD itsje
Elke 3 seco nden
2 RODE itsjes
Ononderbroken ROOD de batt erij wordt opgelad en / de USB is aangesloten
in stand-by
geen ontvangst van audioactiviteit
in gebruik – er wordt een ge sprek gevoerd / muzi ek
of een ande re audiobron sta at AAN
in stand-by – de batter ij raakt leeg
in gebruik – de batteri j raakt leeg
5.3 AUDIOBRONNEN EN PRIORITEITEN
Als twee audiobronnen tegelijkertijd een geluidssignaal afgeven, dan bepaalt uw
SRC-System™ PRO automatisch welke van de twee u zult horen over de speakers,
volgens het prioriteitschema van de verbonden apparaten.
hogere prioriteit
lagere prioriteit
1. mobiele telefoon of gps-aanwijzingen*
2. intercom
3. stereo Bluetooth-audio via de A2DP
4. ingebouwde FM-radio
*gps-aanwijz ingen van de smartphon e gps apps
krijgen dezelfde prioriteit als A2DP-audi o
• een telefoontje onderbreek t een intercomgesprek
• een intercomgesprek onderbreekt de A2DP-audio
• Intercom en Click-to-Link-gesprekken hebben dezelfde prioriteit, dus: een Click-
to-Link-oproep onderbreekt niet een intercomgesprek en andersom
De A2DP-audio -prioriteit ku nt u instellen al s hoger dan de inte rcomprioriteit .
Zie sectie 4 to vo or het aanpasse n van de instellin gen.
108
| SRCS Pro SRCS Pro |
109
Page 61

5.4 MOGELIJKHEDEN VOOR SPRAAKBESTURING
Met de SRC-System™ PRO kunt u met louter u w stem bepaalde acties uitvoeren.
Als u zijn geavanceerde spraakherkenning gebruikt kunt u de SRC-System™ PRO
volledig handsfree bedienen.
De standaardtaal voor de spraakbesturing is Engels. Andere talen zijn ook
beschikbaar. Zie sectie 4 to voor het aanpassen van de instellingen.
In deze handleiding ziet u bij mogelijkheden die ook via spraakbesturing werken
pictogram.
het
1. Terwijl u niet in gesprek bent, tikt u even op
of zegt u luid een w illekeurig
s
woord om de VOX in te schakelen.
2. Zeg nu een van de spr aakopdrachten van de volgende tabel:
Tijdens Beoogde actie Zeg dit
STA ND BY /
FM / A2DP
Stand-by
FM-ra dio
A2DP
*zie de sectie 6.1 vo or bijzonderheden
een “1+8”-intercomgesprek
intercomgesprek met A / B
de A2DP sta rten
de radio aanzetten
de FM-radio uitzetten
volgende voorkeuzestation
vorige voorkeuzestation
volgende track
vorige track
de A2DP stop pen / onderbre ken
:
<<oproepnaam >>*
“Call Inte rcom”
“Music ON”
“Radio ON”
“Radio OFF”
“Next station”
“Previous station”
“Nex t track”
“Previou s track”
“Music OFF”
De mogel ijkheid voor spra akbesturing h angt af van de omsta ndigheden zoa ls
rijsnelheid, helmtype en omgevingslawaai.
Om de spraa kbesturing te verb eteren kunt u de inv loed van de wind op d e microfoon
door de gro te windbescherm er te gebruiken e n het vizier te sluite n.
5.5 INSTELLINGEN VAN SPRAAKBESTURING VOX
De SRC-System™ PRO biedt u VOX-technologie voor een veilige handsfree
bediening van sommige van de belangrijkste functies.
U kunt VOX zo instellen dat òf een intercomoproep automatish beantwo ord
wordt òf spraakbesturing geac tiveerd wordt.
De VOX aanzetten Z eg luid een willekeur ig woord in de micro foon (bv.
De telefoon aannemen Zeg luid een will ekeurig woord in de mic rofoon (bv.
Een gesprek weigeren Zeg 15 seconden niets
VOX-gevoeligheid (s taat
uit zichzelf op “gemiddeld” )
VOX-instelling U kunt VOX zo inste llen dat de spraakb esturing
VOX aan-/uitzet ten
(alleen voor de i ntercom en de
spraakbesturing)
“hallo“).
“hallo“).
Zie sec tie 4 voor het aanp assen van de inst ellingen
Kies hoog als het moeilijk is om VOX t e starten.
Kies laag als VOX te gemakkelijk s tart.
geactiveerd wordt (de uitgangsstand) of dat een
intercomg esprek begin t – zie sectie 4 to vo or het
aanpassen van de instellingen.
Druk i n sta nd-b y 2 seconde n op
• aan: een blauw it sje van 2 seconden
• uit: een rood i tsje van 2 seconde n
+
en
-
6. INTERCOM
De SRC-System™ PRO geeft u full- duplex communicat ie van motor tot motor, tot een
bereik van 1 km (af hankelijk van het terrein en z icht).
Om te chatten via de Intercom moet u eerst uw SRC-System™ PRO koppelen
met het twe ede apparaat. Dit koppelen hoeft u maar een keer te doen. Eenmaal
gekoppeld moeten de twee ap paraten elkaar automatisch herkennen als ze
binnen elkaars bereik komen.
Verbindingsmogelijkheden van de intercom
Met uw SRC-System™ PRO kunt u intercomgesprekken voeren met alle
scala rider-intercommodellen. Het intercombereik met andere modellen wordt
beperkt door de maximale afstand van het apparaat met het kleinste bereik.
Voor meer informatie, bezoek w ww.cardosystems.com/SRC.
U kunt op drie manieren intercomcontact leggen:
sectie
6.1
sectie
6.2
sectie
6.3
“1+8”-intercomwisselen (alleen
met SRCS PRO, scala rider PACKTALK,
G9/G9x en cardo SHO-1 modellen)
Interco m met kanaal
A/B (af te stemmen op alle
scala rider-modellen)
Click-to-Link
(met compatibele modellen)
tweewegintercomgesprekken in een
groep met t ot aan
8 andere “1+8”- gespr ekpartner s
intercomgroepsgesprekken
(2-weg, 3-weg en 4 -weg) via
“kanaal A” en “kanaal B”
1-op-1 spontane intercom-gesprekken
met willeke urige rijders d ie zich bij u
in de buur t bevinden en nog nie t zijn
gekoppel d met uw SRC-Sys tem™ PRO
spraakbesturing
zachter
harder
intercom
muziek /
mobiele-telefoon
de SRC-System™ PRO-knoppen
6.1 “1+8”INTERCOMWISSELEN
Koppel uw appa raat met 8 andere (van uw “1+8”-gesprekp artners) en
leg daarna cont act met steeds e en van hen door hun naam hardop ui t te
spreken.
6.1a UW OPROEPNAAM VASTLEGGEN
Nog voor gebr uik van de “1+8”-intercom moet u uw SRC-System™ PRO een
oproepnaam geven waarmee uw “1+8”-gespr ekpartners u kunnen oproepen.
Als u uw oproepnaam veranderd he eft moet u opnieuw me t uw
“1+8”- gesprekpartners koppelen, opdat zij uw nieuwe roepnaam kunnen
gebruiken.
Om uw roepnaam vast te leggen b ezoekt u de Cardo Community (zie hoofdstuk 4).
Tot u een oproepnaam vastlegt heeft uw SRC-System™ PRO de algemene
“1+8”- oproepnaam: “SRCS PRO”.
Uw oproepnaam horen
Luiste ren naar de
lijst va n gekoppelde
gesprekpartners
Tik in sta nd-by op
oproepnaam over de speakers.
Druk in st and-by 2 seconde n op
en v. Nu hoor t u de
s
v
110
| SRCS Pro SRCS Pro |
111
Page 62

6.1b KOPPELEN MET EEN “1+8” INTERCOMGESPREKSPARTNERS
1. Druk in stand-by 5 seconden op
om de “1+8”-koppelstand te beginnen.
s
2. Begin de “1+8”-koppelstand op het twe ede apparaat.
3. Als het koppelen gelukt is verschijnt er 2 sec. lang een paars lichtje.
Als uw SRC-System™ PRO al een volle lijs t van 8 gekoppel de “1+8”- gesprek partners hee ft en u koppe lt
nog een ge sprekspar tner, dan komt die i n plaats van he t gesprekspa rtner met wie u h et langste nie t
gesproken heeft.
On-line koppelen via Cardo Community®
Via http://community.cardosystems.com van de Cardo Community
website kunt u uw gesprekpartners vinden en anderen toevoegen aan uw
“1+8”- gesprekspartnerslijst.
6.1c KOPPELINGEN CONTROLEREN
U kunt zien welke apparaten op minder dan 20m afst and van uw
“1+8”-gesprekpartners zijn.
Koppeling
nagaan
Druk in st and-by 2 seconde n op
Als “1+8”-gespre kpartners b innen bereik zijn, wor den de leds van
beide app araten 2 seconden PAAR S.
s
en v.
6.1d BELLEN NAAR EEN “1+8” INTERCOMGESPREKSPARTNER
Er zijn twee manieren om een intercomgesprek te beginnen met een
“1+8”- gesprekspartner:
MOGELIJKHEID 1: SPRAAKGESTUURD (VOX)
Zeg een willekeurig woord luid in de microfoon. Wanneer u de
spraakbesturings toon hoort, zegt u de oproepnaam, bv. “Jantje de Boer ”.
MOGELIJKHEID 2: HANDMATIG
☛
ZEG DE NAAM KIES DE NAAM (van uw gespreksp artnerslijst)
en zeg de
Tik op
s
oproepnaam van uw
“1+8”-intercomge
sprekspartner.
Druk 2 sec onden op
een voor ee n de namen horen van alle g ekoppelde
“1+8”- intercomgesprekspartner.
Wanneer u de naa m hoort van uw ge sprekspar tner dat u wilt
OF
-
bellen, tik t u kort op
in de microfoon.
Om het af spelen van de lijs t van “1+8”-gesprekpa rtners af te
breken, dru kt u 2 seconden o p
. De SRC-System™ PRO laat u
s
of zegt u een wil lekeurig woord lu id
s
.
s
VAN DE INTERCOM NAAR DE TELEFOON
Als een “1+8” gesprekspartner buiten bereik is, of raakt, dan kunt u toch in
contact blijven door via de Cardo Community gebr uik te maken van de “Intercom-
to-Pho ne”-mogelijkheid, waarbij intercomoproepen automatisch omgeleid
worden naar uw mobiele telefoon.
6.2 INTERCOM MET KANAAL A / B
U begint een ge sprek tussen meerdere partijen m et de intercomkanalen “A” en “B”.
Op deze manier kunt u 2-, 3- of 4-weggesprekken voeren.
6.2a KOPPELEN
INTERCOM KANAAL A EN B
Als u een kanaal koppelt, worden alle eerdere koppelingen op dat kanaal
vervangen door de nieuwe koppeling.
1. Ga na dat alle apparaten in s tand-by staan.
2. D ruk 5 seconden op
totdat de led snel begint te knipp eren, wat aangeeft
v
dat de intercomkoppeling nu kan plaatsvinden (zie de volgende tabel voor de
koppeling per kanaal).
KANAAL KOPPELMETHODE LED
Druk in st and-by 5 seconde n op
“A”
automatisch via “Kanaal A”.
Druk in st and-by 5 seconde n op
“B”
Als de led be gint te knipperen , tikt u twee keer o p v.
. U koppelt da n
v
.
v
snelle RODE
lichtitsjes
snelle BLAUWE
lichtitsjes
3. Maak het tweede apparaat ook gereed voor intercomkoppeling door zijn
handleiding te volgen. Beide apparaten zijn nu gereed om te koppelen.
4. Na een paar seconden ziet u 2 seconden een ononderbroken licht van beide
apparaten, wat aangeeft dat ze gekoppeld en klaar voor gebruik zijn.
5. Als het koppelen niet binnen 2 minuten af gerond is gaat de apparaten ter ug in
stand-by.
6.2b BELLEN NAAR KANAAL “A” EN “B”.
Er zijn twee manieren om een intercomgesprek te beginnen met “A” en “B”:
MOGELIJKHEID 1: SPRAAKGESTUURD VOX
Zeg een willekeu rig woord luid in de microf oon. Wanneer u de spraakbe sturingstoon
hoort, ze gt u “Call Intercom” voor een int ercom- gesprek met rij der A en/of B (afhan
kelijk van wie bes chikbaar is).
Een VOX-intercomgesprek met alleen rijder A of B wordt automatisch
afgebroken na 30 seconden stilte.
MOGELIJKHEID 2: HANDMATIG
☛
Gebruik deze mogelijkheid om een intercomgesprek te beginnen:
• òf met “kanaal A” – tik kor t op
• òf met “kanaal B” – tik twee keer op
v
v
Om gesprek te beëindigen, tik opnieuw op v.
Als u al met kanaal A of B b elt dan kunt u een andere rijder toevoegen aan het
gesprek (A of B) door t wee keer kort op
te drukken, of de andere motorrijder
v
kan volgens dezelfde procedure zichzelf bij het gesprek aansluiten.
BELANGRIJK: de gevolgen van het groepsgesprek
Tijdens e en 3- of 4-weginterco mgroepsgespre k kunnen de rijd ers, die zowel “ka naal
A” als “B” gebruiken, geen mobieletelefoongesprekken of gps-rijinstructies ontvangen
zolang al s het groepsgesp rek gaande is.
DRIEWEGINTERCOM
-
VIERWEGINTERCOM
Via “Kanaal A”
Via “Kanaal B”
rijder 2
rijder 1
rijder 3
KOPPELEN
Rijder 1 is gekoppeld met rijder 2 en ook met rijder 3.
1. Rijder 1 koppelt met rijder 2 via “k anaal A” (zie 6.2a)
2. Rijder 1 koppelt met rijder 3 via “kanaal B” (zie 6.2a)
KOPPELEN
1. Rijder 1 koppelt met passagier 2 via “kanaal A” (zie 6.2a)
2. Rijder 3 koppelt met pass agier 4 via “kanaal A” (zie 6.2a)
3. Passagier 2 koppelt met pa ssagier 4 via “kanaal B” (zie 6.2a)
In deze combinatie gebruiken de twee passagiers (2 en 4) elk twee
Bluetooth-verbindingen.
112
| SRCS Pro SRCS Pro |
113
Page 63

BELLEN
1. Ga na dat alle vier apparaten in stand-by staan.
2. P assagier 2 tikt t wee keer op
om contac t te leggen met passag ier 4. Wacht
v
tot ze elkaar hore n.
3. Rijder 1 tikt op
4. Rijder 3 tikt op
om contac t te leggen met passag ier 2.
v
om contac t te leggen met passag ier 4.
v
6.3 CLICKTOLINKINTERCOM CTL
Click-to-Link is een spontane, “sociale” mogelijkheid van uw
SRC-System™ PRO.
U kunt onmiddellijk 1-op-1-intercom gespreken beginnen met andere
rijders bij u in de buurt zonder dat zij al met u zijn gekoppeld. Zie het als een privé
van-motor-tot-motor-contact dat u onder het rijden kunt beginnen met andere
rijders die u onderweg ontmoet.
Click-to-Link kunt u uitzet ten wat elke poging door een de rde om u een Click-to-Link-
uitnodiging te sturen blokkeert.
Stuur een CTL-oproep
(het zoeken k an tot
10 seconden duren)
Gesprek beëindigen/
CTL-oproep intrekken
Gesprek aannemen
Oproep afwijzen
CTL aan-/uitzetten
(Staat standaard op aan)
Tik drie ke er op
Tik op
Als u een CTL-beltoon hoort:
Tik op v of zeg een wi llekeurig woord lui d om aan te
nemen met d e VOX
Als u een CTL-beltoon hoort:
Houdt u st il tot de beltoon sto pt of druk 2 seconde n op
Voorkeurzenders kunt u vastleggen via de Cardo
Community website, de Cardo Smartset App, of rechts treeks
op uw SRC-System™ PRO
v
v
v
Als er ook andere r ijders in de buurt zijn gaat uw volgende C TL-gesprek naar
willekeurig een van hen.
6.4 DE INGESPREKSTOON
Het opbellen v ia de intercom van een apparaat dat al in gesprek is, ge eft een
ingesprektoon. De SRC-System™ PRO kan in gesprek zijn ge durende een
telefoongesprek of een intercomgesprek met “kanaal A” en “kanaal B”, een
“1+8”- of een Click-to-Link-gesprek.
6.5 AANNEMEN VAN INTERCOMGESPREKKEN
Als een apparaat met wie u gekoppeld bent contact met u probeert te leggen via
de intercom dan begint het contact bijna onmiddellijk.
7. KOPPELEN EN GEBRUIK VAN DE
MOBIELE TELEFOON, GPS OF MP3
Voor contact tussen uw SRC-System™ PRO en een Bluetooth-apparaat moet
u ze eerst koppelen. Als u dat eenmaal gedaan heeft, herkennen ze elkaar
automatisch zodra ze binnen elkaars bereik komen (10m).
Uw SRC-System™ PRO heeft twee Bluetooth-kanalen voor verbinding met
mobiele telefoons, gps en audiospelers met A2DP.
7.1 BLUETOOTHKANALEN 1 EN 2 KOPPELEN
1. Ga na of Blue tooth aan staat op uw telefoon/gps/mp3-speler.
2. K ijk of de SRC-System™ PRO op stand-by staat.
3. Om via kanaal 1 te koppelen druk t u 5 seconden op
BLAUWE leds snel en om beurten beginnen te knipperen.
Om via kanaal 2 te koppelen drukt u 5 seconden op - tot de RODE en
BLAUWE leds snel en om beurten beginnen te knipperen.
Om een gps te koppelen tikt u op + als de leds snel om beurten beginnen
te knipperen.
4. Zo ek volgens de instructies van uw telefoon/gps/mp3-speler naar
Bluetooth-apparaten.
5. Na een paar seconden ziet u “SRCS PRO” vermeld. Kies dat.
tot de RODE en
+
6. Als u gevraagd wordt naar een (pin)code, voer dan 0000 (vier nullen) in.
7. Het apparaat bevestigt als de afstemming gelukt is en de led begint dan
langzaam in BLAUW te knipperen.
8. Als het koppelen niet binnen 2 minuten klaar is gaat de SRC-System™ PRO
terug in stand-by.
BELANGRIJK!
• Als u 2 versc hillende mobiele t elefoons rech tstreeks me t uw SRC-Syste m™ PRO hee ft
gekoppel d, moet u aangeven welke au tomatisch uw eer ste keus is om te bellen .
• Als uw gps de ze mogelijkheid he eft, kunt u de t weede mobiele tel efoon rechts treeks
met uw gps kop pelen en deze gps dan we er met uw SRC-System™ PRO, e n zo verbindt
u beide mob iele telefoons en d e gps met uw SRC-System™ PRO.
LET OP:
• Niet alle Bluetooth mobiele telefoons kunnen Bluetooth stereomuziek (A2DP)
weergeve n, zelfs niet als de tel efoon een mp3-spe ler mogelijkheid h eeft. Raadpl eeg de
handleiding van uw mobiele telefoon voor meer informatie.
• Niet elke Bluetooth gps we rkt samen met Bluetooth audi o-apparaten. R aadpleeg de
handleiding van uw gps voor meer informatie.
• Na de koppe ling kan het zijn dat u even o p
te brengen.
mp3-speler
tot op 1 km bike-to-bike
ingebouwde
FM-radio
intercombereik
moet tik ken om de verbinding to s tand
µ
gps navigatiesysteem
mobiele telefoon &
A2DP-speler
7.2 BELLEN EN GEBELD WORDEN VIA DE TELEFOON
Tik op
of zeg hardo p een willekeurig
De telefoon aannemen
Een gesprek weigeren
Een gesprek beëindigen
Spraakgestuurd opbellen* (als uw
telefoon deze mogelijkheid heeft)
Opnieuw bellen (redial)*
Snelkeu ze*
Een telef oon opgeven al s favoriet
De ander e telefoon favor iet maken
INTERCOMGROEPSGESPREKKEN MAKEN
kanaal “A” toevoegen aan/
verwijderen van een gesprek
kanaal “B” toevoegen aan/
verwijderen van een gesprek
* Deze mogelijkheid is niet beschikbaar tijdens gesprekken over de mobiele telefoon
† Cong ureer uw snelk euzetoest v ia de Cardo Comm unity of de Car do SmartSe t App
‡ Als u 2 ver schillend e telefoons re chtstre eks met uw SRC-Syste m™ PRO heeft ge koppeld, moe t u
aangeve n welke standaa rd uw voorkeur h eeft om mee t e bellen
†
‡
µ
woord om me t VOX op te nemen
Zeg 15 seconde n niets of druk 2 se conden op
Tik op
µ
µ
+
en volg de
+
-
µ
v
v
Druk 2 sec onden op
opdrachten van uw mobiele telefoon
Druk 2 sec onden op
Tik 3 keer op
Tijdens een telefoongesprek drukt u
5 seconde n op
Druk in st and-by 5 seconde n op
Tik tijde ns een gesprek kor t op
Tik 2 keer tij dens een gesprek op
µ
114
| SRCS Pro SRCS Pro |
115
Page 64

7.3 LUISTEREN NAAR MUZIEK VIA A2DP
Alleen beschikbaar voor Bluetooth audiob ronnen met AVRCP-mogelijkheden
Afspelen
ß
Pauze /stop
Volgend nummer
Vorig nummer*
Muziekscan
Stop scan nen
*bij sommige telefoons kan het zijn dat u deze actie moet herhalen
Tik in sta nd-by op
Druk 2 sec onden op
ß
Terwijl de muziek klinkt, tikt u op
ß
Terwijl de mu ziek klinkt, ti kt u twee keer op
ß
Terwijl de mu ziek klinkt, d rukt u 5 sec. op
(lager sc annen). U hoort dan de ee rste paar seco nden van elk numme r
Wilt u het scannen laten stoppen op het huidige nummer, zeg dan luid
een willeke urig woord in de mi crofoon of tik t u op
µ
µ
µ
µ
(hoger sc annen) of op -
+
µ
SCHAKELEN TUSSEN A2DP-AUDIOBRONNEN
Als een muziekspeler gekoppeld heeft, beschouw t de SRC-System™ PRO hem als
uw standaard A2DP-audiobron.
1. Stop eerst het apparaat waar u naar luistert.
2. Pas daarna start u het andere apparaat.
7.4 SAMEN NAAR MUZIEK LUISTEREN MUSIC SHARING
Uw SRC-System™ PRO geeft u de mogelijkheid om s amen naar
muziek te luisteren als u maximaal 10 m bij elkaar vandaan bent, dus
het is bij uitstek geschikt tussen bestuurder en passagier.
Samen naar dezelfde muziek luisteren kan alleen met audio bronnen met A2DP
(Bluetooth stereo). Om ook uw meder ijder naar uw muziek te laten luisteren,
moet uw SRC-System™ PRO [DE ZENDER] via “kanaal A” afgestemd worden op
diens SRC-System™ PRO [DE ONTVANGER] en DE ONTVANGER moet op stand-by
staan.
[DE ZENDER] Star ten/Stoppen m et naar
uw muziek te laten luis teren
[DE ONTVANGER] Sto ppen met naar de
muziek v an uw partner t e luisteren
:
Tijdens het afspelen van muziek A2DP,
druk 2 seco nden op
Druk 2 sec onden op
:
+
+
Gesprekken via de telefoon of intercom en audio navigatie-aanwijzigingen van
de gps schuiven het afspelen van muziek ter zijde.
U kunt niet v ia de mogelijkh eid om samen muzi ek te beluistere n met elkaar
praten of intercomgesprekken voeren.
8. FM-RADIO
Uw SRC-System™ PRO heeft een ingebouwde FM-radio met 6 in te
µ
µ
µ
en -.
+
stellen voorkeurstations en RDS (Radio Data System).
De RDS maakt dat uw radio automatisch naar de zender met de sterkste
frequentie van het FM-st ation waar u naar luistert gaat, als de oorspronkelijke
zender te zwak wordt.
Radio aanzetten
Radio uitzetten
Volgende
voorkeuzestation
Vorige
voorkeuzestation
RDS AAN/UI T
(standaard: UIT)
ß
Tik in sta nd-by twee keer op
ß
Druk 2 sec onden op
Terwijl de ra dio AAN staat, tik t u op
ß
Terwijl de ra dio AAN staat, t ikt u twee kee r op
ß
Terwijl de ra dio AAN staat, dr uk 2 seconden op
µ
8.1 INSTELLEN VAN DE RADIO
De voorkeur stations kunt u vast leggen via de Cardo Community, de Cardo SmartSet App
of rechts treeks vanaf uw SRC-System™ PRO:
1. Zet de radio aan.
2. S electeer de voorkeuzetoets die u wenst te programmeren (Preset 1 tot 6)
door op
te tikken tot u de gewenste toets hoort.
µ
3. Gebruik de zoek- of de scanfunc tie om een FM-station te vinden dat u wilt
vastleggen.
Zoeken en
vastleggen:
(vind het
volgende
FM-station)
Scannen en
vastleggen:
het langslopen
van de
FM-stations
Druk 2 sec onden op
zoekt een radiostation met een hogere frequentie
•
+
zoekt een radiostation met een lagere frequentie
•
-
Tik binnen 2 0 seconden kort op
voo rkeur.
Druk 5 sec onden op
dat een paar s econden.
Om het sca nnen te onderbreke n en op dit station te b lijven, tikt u
op
.
+
Tik binnen 2 0 seconden kort op
voo rkeur.
Om verder te g aan met scannen wac ht u eenvoudig even tot u he t
dan volgende station hoort.
of -.
+
om het vas t te leggen als deze
µ
. Wanneer er ee n station gevonde n is, hoort u
+
om het vas t te leggen als deze
µ
8.2 AUTOMATISCH INSTELLEN VAN DE RADIO
Deze mogelijkheid maakt het vinden van nieuwe stations sneller en makkelijker
door automatisch een lijst van 6 tijdelijke radiostations te creëren.
1. Terwijl de radio aan st aat, drukt u 5 seconden op
-
.
2. D e radio gaat dan in de hogere fre quenties zoeken vanaf het huidige station en
slaat de volgende 6 s tations tijdelijk op.
3. De sgewenst kunt u dit herhalen vanaf stap 1. om de volgende 6 FM-stations als
tijdelijk op te slaan.
Deze 6 tijd elijke station s kunt u niet vastleg gen en nemen noo it de plaats in va n
FM-voorkeuzestations als u die al heeft opgeslagen.
Als u uw SRC-System™ PRO uitzet vervallen de tijdelijke radiostations en komen
de FM-voorkeuzestations weer tevoorschijn.
9. PROBLEMEN OPLOSSEN
Herstarte n
Alle koppelingen
wissen
(dit wist alle
afstemmingen met
andere apparaten)
Als uw SRC-System™ PRO niet meer reageert, kunt u hem
opnieuw af regelen door he m uit en dan weer aan te zet ten
(druk 2 secon den op
1. D ruk in stand-by 5 s econden op
knippert.
2. Druk 2 se conden op
laat zien.
)
s
tot de led ROO D/BLAUW
+
tot de led 5 kee r een PAARS itsje
µ
10. VRAGEN/HULP
Voor meer informatie, kijk op onze website:
www.schuberth.com
Voor technische ondersteuning kunt u schr ijven naar:
Service@schuberth.com
telnr. : +49-391-8106-555
Be zoekt u a.u.b. onze website ww w.schuberth.com/en/motorcyc le/service/
src-systemtm.html en schrijft u zich online in voor de nieuwste informatie over
Software-verbeteringen
116
| SRCS Pro SRCS Pro |
117
Page 65

BELANGRIJK:
DOOR HE T OPENEN VAN DE RITSS LUITING VAN DE AKOESTI SCH
KRAAG , VERVALT DE GARANTIE!
De elektr onische onderdelen van de -headset in de akoestische kraag zijn
afgesloten door een verzegelde ritssluiting. Wilt u niet tornen aan die
ritssluiting of hem openen want dat maakt uw garantie ongeldig.
11.
BEPALINGEN
Het bes turen van een vo ertuig ver eist uw volled ige en onverdee lde aandacht . U moet er voor zor gen
dat u alle no odzakelijke v oorzorgsma atregelen n eemt waardoo r u te allen tijde ku nt inspelen op
de huidige verkeers-, weersgesteldheid en de st aat van he t wegdek, ook wanneer u ons product
gebrui kt. Voor u opbel t of aanneemt di ent u aan de kant va n de weg te stoppe n. Alle public aties,
advertenties, aankondigingen of ander, soor tgelijk verkoopmater iaal die suggereren dat u het
produc t tijdens het b esturen ku nt gebruiken, s laan louter en al leen op de techn ische mogel ijkheden
en moeten niet uitgelegd worden als een aanmoediging om het product dusdanig te gebruiken.
U moet nag aan of de lokale we t of andere plaa tselijke voo rschrif ten u toestaa n om het produc t te
gebrui ken en u moet zich d aaraan houde n. Wat dat betref t is elk gebru ik van het prod uct exclusi ef
voor risi co en verantw oording van de e igenaar.
De basis voorwaar den voor veilig g ebruik zijn o.a . dat u lichameli jk in staat moe t zijn het prod uct te
gebrui ken en dat u niet lij dt aan een ziek te of last hebt va n een beperki ng die uw mogel ijkheid tot
veilig ge bruik van het pr oduct en dee lname aan het ver keer zou kunne n verhindere n. Verder moet
u in het bez it zijn van een ge ldig rijbew ijs voor het voe rtuig. In gee n geval mag u voor o f tijdens het
gebruik van het product alcohol of medicatie gebruiken die de rijvaardigheid beïnvloeden.
Reguleringen van de federale communicatiecommissie (in de VS)
15. 21
We manen u tot voor zichtigheid dat verander ingen of aanpassingen die niet nadrukkelijk
goedgekeurd zijn door de partij die verantwoordelijk is voor de naleving, de gebruiker zijn
toestemming om het product te gebruiken teniet zouden kunnen doen.
15.105(b)
Dit prod uct is getes t en bevonden te v allen binnen de g renswaard en gesteld aan e en klasse B
digitaal apparaat, conform deel 15 van de FCC-voorschriften. Deze grenswaarden zijn opgesteld om
redelijke bescherming te verstrekken tegen storing van huiselijke installaties. Dit product produceert,
118
| SRCS Pro SRCS Pro |
verwerkt en kan energie op radiosignalen afgeven en indien niet geïnstalleerd en gebr uikt volgens
de instructies hinderlijke interferentie (storing) veroorzaken bij de radioontvangst. Echter kan er niet
gegara ndeerd worde n dat interfe rentie niet z al plaatsvi nden voor een sp ecieke ins tallatie. Ind ien dit
product daadwerkelijk hinderlijke storing veroorzaakt in radio- of televisieontvangst, wat vas tgesteld
kan worde n door het appa raat aan en uit te d oen, probeer t u dan de inter ferentie te n eutraliser en
door een van de volgende maatregelen:
• hero riënteer of ver plaats de ant enne
• vergr oot de afst and tussen he t product en de o ntvanger
• sluit h et produc t aan op een stopc ontact dat o nder een ander e zekering valt d an die waar de
ontvanger op is aangesloten.
• raadpleeg de importeur of een ervaren radio/tv-specialist.
Aan het functioneren worden de volgende 2 voorwaarden gesteld:
1) dit apparaat mag geen interferentie veroorzaken en
2) het app araat moet te gen elke vorm van s toring kunn en, inclusie f storing die e en ongewenste
werkin g van het appara at kan veroor zaken.
FCC-regulering voor radiofrequentieafgifte
Dit product voldoet aan de FCC-uitzendnormen die uitgevaardigd zijn voor buiten laboratoria.
Eindgeb ruikers moe ten de speci eke instruc ties volgen t ot naleving van d e voorschr iften voor d e
sterkte van de radiofrequentieafgifte. De zender mag niet bij een andere antenne of zender worden
geplaatst of er mee samenwerken.
De Europese CE regulering
De SRC-System™-hea dset (het “pro duct”) vo ldoet aan de vol gende essen tiële eisen va n Europese
richtl ijn 1999/5/EC (genaam de de R&TTE-reg ulering), art ikelen 3.1a, 3.1b e n 3.2. Het produ ct is
gefab riceerd volg ens aanhangse l 2 bij bovensta ande richtli jn.
Verklaring van het voldoen aan de standaard
(DOC - Declaration of Conformity)
De SRC-System™-hea dset voldoe t aan en gebruik t de Bluetoot h
succes al le testen door staan van we derzijdse o perabilitei t die vermeld s taan in deze Blu etooth
specicatie. Evenwel wordt interoperabiliteit tussen het product en andere Bluetooth
gegarandeerd.
Temperatuur bij gebruik
De Produ ct is ontwor pen voor gebr uik in een omge ving met een tem peratuur tu ssen -20 en 55 °C.
®
class 3.0 -specic tatie en hee ft met
®
-apparaten niet
®
-
Wisselstroom opladers
Gebrui k voor het oplad en via het stop contact de m eegeleverd e oplader of een a ndere
kwaliteitsoplader die voldoet aan de volgende criteria:
in: 100-240 V, 50/60 Hz, 0. 2 amp max, uit: 5 DV D C, 1 amp max.
GEZONDHEIDSWAARSCHUWINGEN:
Gehoorbeschadiging
Audioapparatuur kan beschadiging van het gehoor veroorzaken. Wees t u voor zichtig en vermijdt
u blootstelling aan geluidsvolumes die uw gehoor zullen schaden of verslechteren of leiden
tot gehoorbeschadiging. Permanente gehoorbeschadiging kan optreden wanneer producten
gedurende langere tijd op een hoog volume gebruik t worden.
Radiofrequentiesignalen
De meeste elektronische apparatuur is afgeschermd tegen radiofrequentiesignalen, maar sommige
elektronische apparatuur zou onafgeschermd kunnen zijn tegen radiofrequentiesignalen die uw
draadloze apparatuur afgeeft.
Pacemakers
De Amerikaanse ondernemersorganisatie van gezondheidsproducten (HIMA) beveelt een
minimal e afstand va n 16 cm aan tussen ee n mobiele tele foon of ander d raadloos app araat en
een pace maker, om een mogel ijke storing va n de pacemaker te vo orkomen. Zor g er voor dat u
persoonlijke medische apparatuur niet verstoort.
Hoorapparaten
Sommig e apparaten ku nnen de werkin g van bepaalde h oorappara ten verstore n. Neemt u in zo’n
geval con tact op met de f abrikant va n uw hoorappa raat om te zien wel ke alternatie ven er zijn.
Andere medische apparaten
Als u enig an der persoon lijk medisc h apparaat geb ruikt, raa dpleegt u dan de f abrikant va n uw
appara at en/of uw dokte r om vast te stell en of het adequ aat afgesche rmd is van inter ferentie
door energie van radiofrequenties van buiten. Wellicht kan uw dokter u van dienst zijn bij het
verkrijgen van deze informatie.
VERKLARING VAN AFSTAND EN ONTHEFFING
(niet voor landen van de Europese Unie)
Met het in g ebruik nem en van de SRC-System™-hea dset doet u af stand va n belangrij ke rechten in clusief
het rech t om naar de rec hter te stap pen. Lees als tublief t het volgen de zeer zorg vuldig voor dat u het
appara at te gaan gebr uiken. Indie n u niet akkoor d gaat met alle o nderdelen v an deze overe enkomst,
dient u onmiddellijk het product te retourneren waarbij u de volledige aankoopprijs terug ontvangt.
Door de he adset in geb ruik te nemen b evestigt u d at deze overe enkomst bin dend is en zie t u af van de
mogelijkheid om een rechtszaak aan te spannen. He t gebruik van een communicatiemiddel tijdens
het beri jden van een m otoret s, scooter, bro mmer, quad of een a nder voer-, vaar- of v liegtuig o f
appara at, te land, te wat er of in de lucht (ve rder aange duid als “ver voermidd el”) verei st uw volled ige en
onderverdeelde aandacht. Schuberth GmbH en Cardo Systems, Inc., met inbegrip van de bestuursleden,
directeuren, partners, het moederbedrijf, vertegenwoordigers, agenten, onderaannemers, sponsors,
werknemers, leveranciers en wederverkopers (verder aangeduid als “het bedrijf”) raadt u ten sterkste
aan om alle b enodigde vo orzorgsm aatregel en te nemen en ale rt te blijve n op de verkeer s-, weers- en
wegomstandigheden indien u ervoor kiest om gebruik te maken van de SRC-System™-headset, inclusief
alle afgeleide modellen, ongeacht hun commerciële benaming of merk (verder aangeduid als “het
appara at”) en om u w vervoerm iddel te sto ppen voorda t u gaat opbell en of een gesp rek gaat aanne men.
Alle publicaties, advertenties, bekendmakingen of dergelijke berichten die het gebruik van het apparaat
tijdens het zich verplaatsen te berde brengen, zijn alleen bedoeld om de technische mogelijkheden
te bespreken en moeten niet ver keerd uitgelegd worden alsof zij de gebruikers aanmoedigen om
het appa raat te gebr uiken tijden s deelname a an het verkee r. Door dit appa raat aan te sc haen en het
niet te retourneren onder volledige restitutie (zie hieronder) verleent u het bedrijf kwijtschelding en
schadeloosstelling van elke verantwoordelijkheid, verlies, eisen en alle kosten (inclusief advocatenkosten)
en besch ouwt u het b edrijf on schuldig aa n welke licham elijke ver wonding, le tsel of over lijden dan oo k,
evenals aan schade of beschadiging van goederen, van elk vervoermiddel, inclusief uw eigen, of van
enige eigendom of activa van uzelf of e en derde partij, elk mogelijk voor tkomend uit het gebruik van het
apparaat onder welke omstandigheden of condities dan ook en ongeacht de juridische aansprakelijkheid.
Het bedrijf zal niet verantwoordelijk worden gehouden voor welke materiële schade ook, ongeachte de
oorza ak, condit ies en omst andighed en, inclusi ef een defe ct aan het ap paraat, en a lle inbegre pen risico ’s
verbonden aan het gebruik van het apparaat worden uitsluitend en alleen gedragen door de gebruiker van
het apparaat, ongeacht of het apparaat gebruikt wordt do or de oorspronkelijke koper of door enige derde
parti j. Het bedr ijf stelt u bi j deze erva n op de hoogte d at het gebru ik van dit app araat een sc hending ka n
zijn van lo kale, regio nale of natio nale wette n of voorsc hrifte n, en dat elk geb ruik van het a pparaat vol ledig
voor uw eigen risico en ver antwoordelijkheid is.
1. Bij deze doen u, uw erfgenamen, wettelijke vertegenwoordigers, opvolgers of rechtverkrijgenden,
vrijwi llig en voor al tijd, afs tand van en on theen het b edrijf, en ho uden haar vo or onaanspr akelijk en
onschuldig ten aanzien van enig en alle procesvoering, claims, schuld, eisen, acties of aansprakelijkheid
welke, dire ct of indi rect, zou k unnen voor komen uit het g ebruik van h et appara at, betre ende welke
nood, pij n, lijden, ong emak, verl ies, lets el, overlijd en of schade da n ook, aan of te n opzichte va n wie dan
ook of welk b ezit ook, d oor welke oor zaak ook , HETZIJ AL S GEVOLG VAN NALATIGHE ID OF ANDERSZ INS,
en waar u late r in de toekoms t juridis ch recht toe z ou kunnen ver werven a ls gevolg van b ovengenoe md
gebrui k, zo ver als de we t maar mogeli jk maakt.
2. U be grijpt volk omen en neem t voor uw reken ing de risico ’s bij gebruik va n het appara at, met inbe grip
van het risico door nalatigheid of veronachtzaming door anderen.
3. U bevestigt d at u lichamel ijk in staat b ent om dit app araat te gebr uiken en dat u ge en medisc he
afwijkingen of gebreken heeft welke u zouden kunnen hinderen in het veilig gebruik. U bevestigt
dat u ten min ste 18 jaar oud ben t en dat u op de hoo gte bent ges teld van de ri sico’s verbon den aan
119
Page 66

het gebr uik van dit ap paraat. Verd er bevesti gt u dat u geen al cohol tot u zul t nemen die uw a lerthei d zou
kunnen geinvloeden of welke middelen die de rijvaardigheid beïnvloeden ook, en dat u deze producten
niet bij u zult hebben. gebruiken of nuttigen voor of gedurende het gebruik van het apparaat.
4. U er kent onze waar schuwin gen volled ig en begrij pt dat: (a) er risic o’s en gevaren be staan bij ge bruik van
het appa raat in het ver keer, inclusi ef, maar niet b eperkt to t, letsel o f ziekte, ove rbelasti ng, frac turen,
gedeeltelijke en/of gehele verlammingen, dood, of andere niet-genoemde kwalen die kunnen resulteren in
ernstige invaliditeit; (b) deze risico’s en gevaren zouden veroorzaak kunnen worden door achteloosheid van
de fabrikant, zijn vertegenwoordigers of een derde partij betrokken bij he t ontwerpen of de productie van
het appa raat; (c) deze ri sico’s en gevare n zouden voor t kunnen ko men uit te ver wachten of o nverwach tse
oorza ken. Hierbi j neemt u alle ri sico’s, gevare n en verant woordelij kheid op u om he t even welke sch ade en/
of beschadiging, zowel die geheel als die gedeeltelijk veroorzaakt door nalatigheid of ander gedrag van
anderen, inclusief het bedrijf.
5. U bev estigt dat u d it docume nt van afst and van veran twoorde lijkheid h eeft gel ezen en dat u het i n al
zijn onde rdelen voll edig begr ijpt en dat u wez enlijke rec hten heef t opgegeve n door het app araat niet t e
retourneren voor volledige restitutie (zie onderstaande terugbetalingsmogelijkheid).
BEPERKING VAN DE GARANTIE
NOG AFGEZIEN VAN DE DESBETREFFENDE WETTEN EN REGULERINGEN IN UW RECHTSGEBIED VALT
UW PRODUC T ONDER EEN BEPERK TE TWEEJA ARSPRODUCTG ARANTIE VANAF DE DAG VAN DE
OORSPRO NKELIJKE AAN SCHAF. BEWAART U A.U.B. DE A ANKOOPBON EN UW RE GISTRATIEGEGE VENS
ALS BEWI JS VAN AANKOOP.
GARANTIEBEPERKING
HET BEDRIJF VERWERPT ALLE UITDRUKKELIJKE EN INDIRECTE GARANTIES BETREFFENDE BIJGAAND
APPARAAT, MET INBEGRIP VAN ON BEPERKTE GARANTIE VAN VERKOOPBAARHEID, GESCHIKTHEID VOOR
EEN BEPAALD D OEL EN ONTSTOOR D ZIJN VAN HET APPARAAT. HET APPAR AAT EN ZIJN ACCESSOIR ES
WORDEN GEL EVERD IN DE TOESTAND WA ARIN U HEM AANTR EFT EN ZOALS HIJ LE VERBAAR IS, ZONDE R
ENIGE GARANTIE BUITEN DIE DIE VERMELD STAAT IN DE MEEGELEVERDE GEBRUIKSAANWIJZING.
BEPERKING VAN AANSPRAKELIJKHEID
IN GEEN GEVAL Z AL HET BEDRIJF A ANSPRAKELIJ K GEHOUDEN WORDE N VOOR BUITENGEWO NE,
INDIRECTE, STRAFRECHTELIJKE, BIJKOMENDE, SMARTENGELDELIJKE OF BIJKOMENDE SCHADECL AIMS,
OF ENIGE SCH ADE HOE DAN OOK VOOR TVLOEIEND UIT H ET GEBRUIK VAN HET APPAR AAT, ONGEACHT OF
HET NOU VOO RTKOMT UIT CONTR ACTBREUK, EEN ON RECHTMATIGE DAAD (IN CLUSIEF NALATIGHEI D),
AANSPRAKELIJKHEID VOOR HET APPARAAT OF ANDERSZINS, ZELFS WANNEER U GEÏNFORMEERD
BENT OVER DE MO GELIJKHEID OP Z ULKE SCHADE. U RK ENT EN ACCEPTEERT DAT DE BEPE RKINGEN DIE
HIERBOVEN UITEENGEZET ZIJN FUNDAMENTELE ELEMENTEN ZIJN IN DEZE OVEREENKOMST EN DAT HET
APPARAAT NIET A AN U VERSTREK T ZOU ZIJN IN ONTS TENTENIS VAN DEZE BEP ERKINGEN. IN SOM MIGE
STATEN KUNNEN WETTEN GELDEN DIE EEN BEPERKING VAN DE AANSPRAKELIJKHEID REGULEREN.
RETOURNEREN VOOR VOLLEDIGE TERUGBETALING
INDIEN U BOVENSTAANDE BEPALINGEN NIET WILT ACCEP TEREN OF ERMEE AKKOORD WILT GAAN,
KUNT U HET AP PARAAT RETOURNERE N AAN HET BEDRIJ F VOOR EEN VOLLEDIG E TERUGGAVE VAN HET
AANKOOPB EDRAG, OP VOORWA ARDE DAT U DIT DOET BINNE N 7 WERKDAGEN NA AANS CHAF VAN HET
APPARAAT (een aan koopbewijs i s vereist) EN DAT DE VERPAKK ING INTACT IS. MOCHT U DI T GAAN DOEN,
RAADPL EEGT U DAN WAT HIER GESCHRE VEN STAAT. ALS U HET APPARAAT NIE T TERUGBRENGT O M
UW GELD TERU G TE KRIJGEN BINNE N DE AANGEGEVE N PERIODE, GAAT U DAAR MEE AKKOORD ME T HET
BOVENSTAAN DE EN DOET U AFSTAND VAN ALL E RECHTEN TOT TOEKOMS TIGE CLAIMS EN EI SEN TEGEN
HET BEDRIJF ZOALS HIERBOVEN GEDEFINIEERD.
www.schuberth.com
© 2015 SCHUBERTH G mbH
The Bluetooth® word mark a nd logos are own ed by the Bluetooth® SIG, Inc. and a ny use of such mar ks is under lice nse.
Other t rademarks a nd trade name s are those of the ir respect ive owners.
120
| SRCS Pro
MAN00179 - SRCS BOO K J 003
 Loading...