

Page 1

G E B R A U C H S A N L E I T U N G
P O W E R E D B Y
QG SRC 207 - MAN00015.indd 1 2/1/11 11:38 AM
Page 2

INHALT
1. EINLEITUNG . . . . . . . . . . . . . . . . . . . . . . . . . . . . . . . . . . . . . . . . . . . . . . . . . . . . . . . . . . . . . . 3
2. INHALT DER VERPACKUNGSBOX . . . . . . . . . . . . . . . . . . . . . . . . . . . . . . . . . . . . . . . . . . 4
3. AUFLADEN DES SRCSYSTEM™ HEADSETS . . . . . . . . . . . . . . . . . . . . . . . . . . . . . 4
4. BASISEINSTELLUNGEN UND KONFIGURATIONEN . . . . . . . . . . . . . . . . . . . . . . . 5
4.1 HAUPTFUNKTIONEN . . . . . . . . . . . . . . . . . . . . . . . . . . . . . . . . . . . . . . . . . . . . . . 5
4.2 GESPROCHENE STATUSANZEIGE . . . . . . . . . . . . . . . . . . . . . . . . . . . . . . . . . 5
4.3 AUDIOQUELLEN UND PRIORITÄTEN . . . . . . . . . . . . . . . . . . . . . . . . . . . . . . 5
4.4 SOFTWARE AK TUALISIERUNG . . . . . . . . . . . . . . . . . . . . . . . . . . . . . . . . . . . . 6
4.5 RÜCKSETZUNG DES HEADSETS „RESET“ . . . . . . . . . . . . . . . . . . . . . . . . 6
5. ERSTKONFIGURATION . . . . . . . . . . . . . . . . . . . . . . . . . . . . . . . . . . . . . . . . . . . . . . . . . . . 6
5.1 EINBAU DES SRCSYSTEM™ HEADSETS . . . . . . . . . . . . . . . . . . . . . . . . . . 6
5.2 POSITIONIEREN DER LAUTSPRECHER . . . . . . . . . . . . . . . . . . . . . . . . . . . . 7
5.3 POSITIONIEREN DES MIKROFONS . . . . . . . . . . . . . . . . . . . . . . . . . . . . . . . . 7
5.4 AUSBAU DES SRCSYSTEM™ HEADSETS AUS DEM HELM . . . . . . . . 7
5.5 TRAGEN UND ABNEHMEN DES HELMS . . . . . . . . . . . . . . . . . . . . . . . . . . . 7
5.6 REINIGEN DES SRCSYSTEM™ HEADSETS . . . . . . . . . . . . . . . . . . . . . . . . 8
6. VERBINDEN VON BLUETO OTH FÄHIGEN HANDYS,
NAVIGATIONSGERÄTEN ODER MP3 A2DP GERÄTEN . . . . . . . . . . . . . . . . . . . 8
6.1 HANDY . . . . . . . . . . . . . . . . . . . . . . . . . . . . . . . . . . . . . . . . . . . . . . . . . . . . . . . . . . . 9
6.2 NAVIGATIONSGERÄT . . . . . . . . . . . . . . . . . . . . . . . . . . . . . . . . . . . . . . . . . . . . . 9
6.3 MP3MUSIK DRAHTLOSE OPTION A2DP . . . . . . . . . . . . . . . . . . . . . . . 10
7.: EINGEBAUTES UKW RADIO UND EXTERNER MP3PLAYER MIT
KABEL VERBUNDEN . . . . . . . . . . . . . . . . . . . . . . . . . . . . . . . . . . . . . . . . . . . . . . . . . . . . 11
7.1 UKW RADIO . . . . . . . . . . . . . . . . . . . . . . . . . . . . . . . . . . . . . . . . . . . . . . . . . . . . . . . 11
7.2 ANSCHLUSS VON MP3PLAYERN BZW. ANDEREN
EXTERNEN AUDIOQUELLEN VIA K ABELVERBINDUNG
NICHT ÜBER BLUETOOTH®. . . . . . . . . . . . . . . . . . . . . . . . . . . . . . . . . . . . . . 12
8. BEDIENEN DES HANDYS . . . . . . . . . . . . . . . . . . . . . . . . . . . . . . . . . . . . . . . . . . . . . . . . 12
9. INTERKOMBETRIEB GEGENSPRECHANLAGE . . . . . . . . . . . . . . . . . . . . . . . . . . . 13
9.1 EINLEITUNG . . . . . . . . . . . . . . . . . . . . . . . . . . . . . . . . . . . . . . . . . . . . . . . . . . . . . . 13
9.2 INTERKOM KOMPATIBILITÄT . . . . . . . . . . . . . . . . . . . . . . . . . . . . . . . . . . . . . . 13
9.3 VOR INBETRIEBNAHME DES INTERKOMS . . . . . . . . . . . . . . . . . . . . . . . . . 13
9.4 VERWENDUNG DER INTERKOMFUNK TION MIT
ANDEREN SRCSYSTEM™ HEADSETS . . . . . . . . . . . . . . . . . . . . . . . . . . 14
9.4a. ZWEIWEG INTERKOM KOPPLUNGSOPTIONEN
ZWISCHEN ZWEI TEILNEHMERN SPRACHVERBINDUNG . . . . 14
9.4b. DREI WEG INTERKOM . . . . . . . . . . . . . . . . . . . . . . . . . . . . . . . . . . . . . . 14
9.5 ANNAHME VON INTERKOMANRUFEN . . . . . . . . . . . . . . . . . . . . . . . . . . . 15
9.6 AUFNAHME VON INTERKOMANRUFEN . . . . . . . . . . . . . . . . . . . . . . . . . . 15
9.7 SPRACHBEFEHLMODUS VOX . . . . . . . . . . . . . . . . . . . . . . . . . . . . . . . . . . . 16
9.8 RESET: ANNULLIEREN / RÜCKSETZEN DES KOPPELNS
WIEDERHERSTELLUNG DER WERKSEINSTELLUNG . . . . . . . . . . . . . 16
9.9 WICHTIGE ANMERKUNGEN . . . . . . . . . . . . . . . . . . . . . . . . . . . . . . . . . . . . . . . 16
9.10 STÖRUNGSBEHEBUNG DES INTERKOMSYSTEMS . . . . . . . . . . . . . . . 16
10. CLICKTOLINK . . . . . . . . . . . . . . . . . . . . . . . . . . . . . . . . . . . . . . . . . . . . . . . . . . . . . . . . . . . 17
11. KUNDENSERVICE . . . . . . . . . . . . . . . . . . . . . . . . . . . . . . . . . . . . . . . . . . . . . . . . . . . . . . . . 18
12. HINWEISE . . . . . . . . . . . . . . . . . . . . . . . . . . . . . . . . . . . . . . . . . . . . . . . . . . . . . . . . . . . . . . . 19
WICHTIG: Dies ist Version 2.0 der Gebrauchsanleitung. Unter www.schuberth.com/
leadmin/downloads/SRC/SRC-System_Manual-1.pdf nden Sie stets die jeweils
aktuelle Version (Updates) in verschiedenen Sprachen, inkl. Erklärungen der neusten
Funktionen und Features Ihres SRC-System™ Headsets.
Bitte prüfen Sie jetzt und auch in Zukunft, ob Sie die aktuellste Version haben und
laden Sie stets die neueste Version in Ihrer bevorzugten Sprache herunter.
2
QG SRC 207 - MAN00015.indd 2 2/1/11 11:38 AM
Page 3

1. EINLEITUNG
Herzlichen Glückwunsch und vielen Dank, dass Sie sich für das
Schuberth Rider Communication-System™ (SRC-System™) Bluetooth®
Headset für Motorradhelme entschieden haben.
Diese Gebrauchsanleitung soll Ihnen bei der Nutzung des Headsets behilich sein. Vor Inbetriebnahme machen Sie sich bitte mit den Bluetooth®
Funktionen ihres Handys und/oder ihres Navigationsgerätes vertraut.
Die Box des SRC-System™ enthält eine Headseteinheit. Wenn diese
mit einem weiteren SRC-System™ gekoppelt wird, können die
Einheiten als Interkom mit einer Reichweite von bis zu 300 Meter
verwendet werden (Reichweite ist gelände- und verkehrsabhängig).
IHR SRCSYSTEM™ KANN WIE FOLGT VERWENDET WERDEN :
1. Als Bluetooth® Headset für Handy-Kommunikation (unterstützt Bluetooth®
Headset, Handsfree* und A2DP Profile mit bis zu 10 Meter Reichweite)
2. Als Bluetooth® Stereoheadset für kabellosen Musikempfang (unterstützt
die Bluetooth® A2DP und AVRCP Profile und ist kompatibel mit einer gro-
ßen Auswahl von MP3-Playern, Adaptern und anderen Audiogeräten)
3. Als 2-Weg bzw. 3-Weg Bike-to-Bike Interkom für Voll Duplex** Konferenzgespräche mit bis zu zwei anderen SRC-System™ Headsets
mit bis zu 300 Meter Reichweite (geländeabhängig)
4. Als Fahrer-zu-Sozius-Interkom
Click-to-Link für spontane Interkom-Kommunikation mit
5.
SRC-System™
5. Als Bluetooth® Headset zum Empfang von Navigationsanweisungen
und Audiostreaming von kompatiblen Navigationsgeräten.
6. Als Stereo-Headset zum UKW Radioempfang (eingebautes Modul)
7. Als Stereo-Headset zum Musikempfang über kabelverbundene
Audiogeräte (wie z.B. MP3-Player ohne Bluetooth®, iPods®)
- Geräten in unmittelbarer Umgebung
WEITERE SPEZIALFUNKTIONEN :
AGC Technologie (Automatic Gain Control) ausgerüstet, einer
➤
automatischen Lautstärkenanpassung an Umweltlärm und Fahrtgeschwindigkeit. Die Lautstärke kann allerdings auch jederzeit
manuell eingestellt werden.
➤
VOX Technologie für sichere und freihändige Bedienung von Schlüs-
selfunktionen (Sprachwahl, Anrufe empfangen, Anrufe abweisen).
➤ PLC Technologie (Packet Loss Concealment) für digitale Überbrü-
ckung von Audio-Datenverlust in Echtzeit. PLC optimisiert die
Klangqualität in besonders lauten Umgebungen.
➤ Software Aktualisierungen über jeden Rechner mit Windows® XP™,
Vista™ bzw. Windows® 7™ Plattform, um stets die neusten Features und Verbesserungen für Ihr SRC-System™ herunterzuladen.
➤ Statusansagen, um stets zu wissen mit wem, oder mit welchem
Gerät Sie gerade verbunden sind.
Wir wünschen Ihnen viel Freude mit Ihrem SRC-System™ und sind
bei Fragen und Anregungen gerne für Sie da. Schreiben Sie uns
einfach an: Kundenservice@schuberth.com
F-J. Görges Erwin Van Hoof
Leiter Vertrieb Vice President
SCHUBERTH GmbH Int. Sales Manager
Unter www.schuberth.com/src-tutorial/de nden Sie eine interak-
tive Anwendung, die Ihnen alle Funktionen des SRC-System™ erklärt.
Alle Funktionen können Sie dort auch selbstständig ausprobieren.
____________________
* Bei Handys, die das Bluetooth® Han dsfree Prol nicht unterstützen, sind bestimmte
Funktionen evt. nicht verfügbar
**” Voll Duplex” ermöglicht gleichzeitiges Hören und Sprechen mit Ihrem Gesprächs-
partner, d.h. Kommunikation wie bei Handys und nicht wie bei Walkie-Talkies.
Deu tsch
3
QG SRC 207 - MAN00015.indd 3 2/1/11 11:38 AM
Page 4

2. INHALT DER VERPACKUNGSBOX
SRC-System™ für C3 Helme*
SchwanenhalsMikrofon
Stift
Mikrofon
Zwei Lautsprecher
Ladegerät
USB Verbindungskabel
Klettpolster
MP3-Verbindungskabel
Windschutz für Mikrofon
Stift
Gebrauchsanleitung und Sticker
Ladebuchsenkappe
Kabel der USB
Ladebuchse
SRC-System™ für C2 / Concept Helme
Mikrofon
Zwei
Lautsprecher
Ladebuchsenkappe
USB
4
SchwanenhalsMikrofon
Stift
USB
Kabel der USB
Ladebuchse
• Verbinde mit Biker B
• UKW Radio Taste
Lautstärke Auf / Vorwärts Taste
Lautstärke Ab / Rückwärts Taste
Stift
• UKW Radio Taste
Kanal A Taste
•Verbinde mit Biker A
• MP3-Taste
Handy Taste
Kanal B Taste
Kanal A Taste
•Verbinde mit Biker A
• MP3-Taste
Handy Taste
Kanal B Taste
• Verbinde mit Biker B
Lautstärke Auf / Vorwärts Taste
Lautstärke Ab / Rückwärts Taste
* Das Gerät ist
in verschiedenen
Größen erhältlich
WICHTIG:
Um ein Eindringen von Feuchtigkeit zu verhindern,
sollten Sie die Ladebuchse stets fest mit der Kappe
verschließen.
3. AUFLADEN DES SRC-SYSTEM™ HEADSETS
Bitte beachten Sie: Ihr Headset muss vor der
ersten Inbetriebnahme mindestens 4
Stunden lang aufgeladen werden.
Verbinden Sie das USB Kabel mit dem Ladegerät und der Ladebuchse des Headsets. Während des Ladevorgangs erscheint die
Leuchtanzeige (LED) in Rot und erlischt, wenn der Ladevorgang
abgeschlossen ist.
Ihr Ladegerät und das USB Verbindungskabel haben zwei
Verwendungszwecke:
1. Zum Laden Ihres Headsets über eine Steckdose oder über einen
USB Anschluss Ihres PC´s
2. Zum Herunterladen von Software Upgrades über einen PC mit
Windows® XP™, Vista™ oder Windows® 7 Betriebssystemen
(s. Absatz 4.4 für weitere Informationen).
QG SRC 207 - MAN00015.indd 4 2/1/11 11:38 AM
Page 5

4. BASISEINSTELLUNGEN UND
KONFIGURATIONEN
4.1 HAUPTFUNKTIONEN
Gewünschtes
Ergebnis
Einschalten
des Headsets
Ausschalten
des Headsets
Lautstärke
erhöhen
Lautstärke
verringern
Stummschalten
Akku
Ladeanzeige
4.2 GESPROCHENE STATUSANZEIGE
Ihr SRC-System™ Headset ermöglicht die Übertragung verschiedener Statusanzeigen. Unter anderem wird Ihr Verbindungsstatus
angesagt, so dass Sie wissen, ob Sie sich im Handy- oder InterkomModus benden. Außerdem bestätigt es den Wechsel Ihres jeweiligen Betriebsmodus.
Nötige
Schritte
Betätigen und halten Sie die Handy-Taste mindestens
vier Sekunden lang
LED Signal : leuchtet 3x blau auf
Audiosignal : ansteigender Ton
Betätigen und halten Sie die Handy-Taste mindestens 3
Sekunden lang
LED Signal : leuchtet 3x rot auf
Audiosignal : absteigender Ton
Betätigen Sie die Lautstärke Auf Taste (bei aktivem Audio
Signal)
Betätigen Sie die Lautstärke Ab Taste (bei aktivem Audio
Signal)
Betätigen Sie kurz und gleichzeitig die Lautstärke Auf
und Lautstärke Ab Tasten (bei aktivem Audio Signal).
Betätigen Sie die Lautstärke Auf Taste mindestens drei
Sekunden lang:
- Blaues Licht = Akku ist voll
- Blau/rotes Licht = Akku ist halb leer
- Rotes Licht = Akku ist fast leer
Diese Option ist werksseitig eingeschaltet und kann, wie unten
beschrieben, deaktiviert werden.
Im Sprachmenü kann eine von fünf Sprachen ausgewählt werden.
Önen des Sprachmenüs : Betätigen und halten Sie gleichzeitig
etwa drei Sekunden lang die Kanal “A”- und Kanal “B”-Taste, während
sich das Headset im Standby-Modus bendet. Nach Aktivierung des
Sprachmenüs folgen Sie bitte den Anweisungen in Englisch oder
wählen Sie Ihre bevorzugte Sprache.
Zum Ein- bzw. Ausschalten der gesprochenen Statusanzeigen
betätigen und halten Sie die Lautstärke Ab Taste mindestens sechs
Sekunden lang.
EIN: LED Anzeige: Blau + Signalton: Ein kurzes Piepen
AUS: LED Anzeige: Rot + Signalton: Zweimaliges kurzes Piepen
4.3 AUDIOQUELLEN UND PRIORITÄTEN
Die verschiedenen Audioquellen, die mit dem SRC-System™ verbunden sind, werden priorisiert, d.h. eine höher priorisierte Quelle
wird immer eine niedrig priorisierte Quelle deaktivieren. Beispiele:
Ein eingehender Handyanruf wird z.B. ein in diesem Augenblick
geführtes Interkomgespräch unterbrechen. Ein eingehender
Interkomanruf wird Übertragungen vom eingebauten UKW Radio
unterbrechen.
Hohe Priorität
Niedrige Priorität
1. Handy oder GPS Navi Gerät (gerätespezisch)
2. Interkom / Click-to-Link
3. A2DP Audioquelle
4. UKW Radio (eingebaut)
5. AUX-Buchse (für kabelverbundene Geräte wie
z.B. MP3-Player)
Deu tsch
5
QG SRC 207 - MAN00015.indd 5 2/1/11 11:38 AM
Page 6

4.4 SOFTWARE AKTUALISIERUNG
Druck-
knopf
SchwanenhalsMikrofon
In Zukunft werden Sie auch Software Aktualisierungen herunterladen
können, um Ihr SRC-System™ stets mit der aktuellsten Softwarever-
sion auf den neuesten Stand zu bringen. Unter
anderem werden zukünftige Software Upgrades
weitere Statusanzeigen und Funktionen für Ihr Headset ermöglichen.
Um stets die neueste Version zu sichern, registrieren Sie sich bitte online
unter www.schuberth.com/src-register/de und halten Sie hierfür
die Seriennummer Ihres Gerätes bereit. Zur Installation von Software
Upgrades verwenden Sie bitte das USB Kabel, das in der Verpackungsbox enthalten ist.
Bitte beachten Sie, dass Software Upgrades vorläug nur für PC´s mit
Windows® XP™, Vista™ oder Windows® 7 Betriebssystem verfügbar sind.
4.5 ZURÜCKSETZEN DES HEADSETS „RESET“
Falls Ihr Headset trotz wiederholter Versuche nicht reagiert, können Sie
eine Rücksetzung veranlassen, indem Sie es einfach zehn Sekunden lang
über die Steckdose auaden und dann erneut anschalten. Danach sollte
das Gerät wieder normal funktionieren.
5. ERSTKONFIGURATION
5. Schieben Sie den aus dem SRCS-Helmkragen herausragenden Stift
am Rande des Bedienungspanels in die gegenüberliegende runde
Öffnung und schließen Sie den Druckknopf.
Stift
6. Wiederholen Sie diesen Schritt auf der gegenüberliegenden Seite des
Helms einschl. des Fixierens des Druckknopfes.
7. Schieben Sie den SRCS-Helmkragen jetzt, beginnend von der Mitte der
hufeneisenförmigen Rundung, in die dafür vorgesehene Kufe auf der
Helmrückseite und fahren auf diese Weise fort, um den Restteil des
Kragens in die Kufe zu drücken.
5.1 EINBAU DES SRCSYSTEM™ HEADSETS
Lösen Sie zunächst den originalen Akustikkragen wie folgt vom
Helm ab:
1. Öffnen Sie beide Druckknöpfe.
2. Heben Sie den Akustikkragen von der Mitte der Bogenkrümmung
her ab
8. Achten Sie darauf, dass beide Druckknöpfe auch jetzt fest verschlossen
sind und dass auch das Schwanenhals-Mikrofon an der Innenseite Ihres
Helms ruht (zwischen dem SRC-System™ und der Helmpolsterung)
Schwanenhals-Mikrofon
Druckknopf
3. Ziehen Sie die Stifte an den Enden des Akustikkragens aus den
Öffnungen heraus.
4. Nach Abziehen des Akustikkragens achten Sie beim Anbringen des
SRC-System™ darauf, die Lautsprecher in die dafür vorgesehenen
QG SRC 207 - MAN00015.indd 6 2/1/11 11:38 AM
Rundungen unter der Helmfütterung einzulegen.
6
C3-Helm C2/Concept-He lm
Page 7

9. Verschließen Sie die USB-Ladebuchse mit dessen Kappe und schieben
Sie diese dann in die gegenüberliegende, taschenförmige Öffnung an
der Rundung des SRCS Helmkragens.
5.2 POSITIONIEREN DER LAUTSPRECHER
Um eine hervorragende Audioleistung zu erzielen, sollten beide
Lautsprecher möglichst nahe an den Ohren positioniert sein.
C2 und Concept Helme
Wenn Sie eine SRC-System™ Version für C2 und
Concept Helme erworben haben, positionieren
Sie die Lautsprecher gegenüber den Ohren und
machen Sie sie mittels der beigefügten Klettbänder am Helmfutter fest.
C3 Helme
Hinweis: Sie können die Lautsprecher zwar - wie oben bei C2 und Concept
Helmen beschrieben - anbringen, wir empfehlen jedoch nachfolgende
Vorgehensweise
Folgende Beschreibung betrit beide Seiten des
Akkustikkragens:
1. Öffnen Sie die Druckknöpfe auf beiden Seiten des Akkustikkragens
(dieselben Knöpfe, die Sie vorher geschlossen haben).
2. Öffnen Sie die beiden roten Knöpfe am unterem Teil der Fütterung
über den Wangenpolstern und heben Sie
diese ein wenig an, so dass ein Teil des
Helmschalenschaumstoffes freigelegt wird.
(Der rückwärtige rote Knopf wird auch von
einer Öse umschlossen).
3. An der freigelegten Stelle ist nun eine Mulde
mit den gleichen Konturen wie das Klettband erkennbar. Machen
Sie dort die Lautsprecher mittels der Klettbänder fest.
4. Schließen Sie die roten Druckknöpfe und stellen Sie sicher, dass der
rückwärtige Knopf auch weiterhin von seiner Öse umschlossen ist.
5. Schließen Sie nun die Druckknöpfe an beiden Seiten des Akkustikkragens und stellen Sie sicher, dass sie fest verschlossen sind.
5.3 POSITIONIEREN DES MIKROFONS
Um das schwenkbare Kinnteil des Helms auch über dem Schwanenhals-Mikrofon leicht schließen zu können, sollten Sie
zuerst das dreieckige Anti-Noise-Pad ablösen.
Danach verfahren Sie bitte wie folgt:
1. Justieren Sie den Schwanenhals, wie auf der
Abbildung dargestellt.
Kinnteil
Visier
2. Ziehen Sie das Mikrofon bis auf Berührungsnähe an den Mund heran, wobei die flache
Mikrofonseite fast auf den Lippen aufliegt.
3. Schwenken Sie dann das Kinnteil bis zum
Einrasten herunter.
4. Bei geschlossenem Kinnteil und offenem
Visier justieren Sie erneut mit der Hand die
Mikrofonposition, indem Sie es nun nach vorne drücken, so dass es
gegenüber des Mundes auf der Innenseite des Kinnteils ruht.
Die obigen Schritte können am besten mit beiden Händen vollzogen werden. Führen Sie diese Schritte niemals beim Fahren durch.
5.4 AUSBAU DES SRCSYSTEM™ HEADSETS AUS DEM HELM
1. Öffnen Sie beide Druckknöpfe.
2. Heben Sie den Akustikkragen von der Mitte der Bogenkrümmung
her ab.
3. Ziehen Sie die Stifte an den Enden des Akustikkragens aus den
Öffnungen heraus.
5.5 TRAGEN UND ABNEHMEN DES HELMS
Die elektronischen Komponenten Ihres Headsets sind innerhalb des
SRC-System™ Akustikkragens sicher untergebracht. Um das Aufset-
Deu tsch
7
QG SRC 207 - MAN00015.indd 7 2/1/11 11:38 AM
Page 8

zen bzw. Abnehmen Ihres Helms möglichst reibungslos zu vollziehen,
empfehlen wir wie folgt vorzugehen
1. Greifen und ziehen Sie kräftig beide Kinnriemen auseinander, um
so eine möglichst weite Helmöffnung zu erzielen.
2. Während Sie die Riemen auseinanderziehen, ziehen Sie den Helm über Ihren
Kopf, beginnend vom Genick - d.h. vom
Hinterkopf her - nach vorne.
3. Zum Abnehmen des Helms spreizen
Sie die Kinnriemen erneut und ziehen Sie dann den Helm nach
oben ab.
HINWEIS:
Ihr SRC‑System™ wurde für höchsten Komfort entwickelt. Da es jedoch
sehr umfangreiche, elektronische Bauteile enthält, ist der hufeisenförmige
SRCS-Helmkragen recht aufgefüllt. Aus diesem Grunde kann es sein, dass
Sie das Aufsetzen bzw. Abnehmen des mit dem SRC‑System™ aufgerüsteten Akustikkragens evtl. anders als gewohnt wahrnehmen.
Bitte beachten: Wenn Sie die Helmönung routinemäßig durch Auseinanderziehen der Riemen beim Aufsetzen bzw. Abnehmen er weitern,
werden Sie den Prozess zunehmend reibungsloser vollziehen. Im Laufe der
Zeit werden Sie dabei auch die Rigidität (Steigkeit) des Akustikkragens
reduzieren.
5.6 REINIGEN DES SRCSYSTEM™ HEADSETS
Zum Reinigen des Kragens schließen Sie zuerst die USB Kappe des
SRC-System™. Benutzen Sie danach beim Reinigen nur ein sehr
leicht und lauwarm angefeuchtetes Tuch und vermeiden Sie es,
das Nackenband in Wasser oder andere Flüssigkeiten zu tauchen.
Mikrofon und Lautsprecher sollten nicht in Kontakt mit Flüssigkeiten kommen.
6. VERBINDEN VON BLUETOOTH® FÄHIGEN
HANDYS, NAVIGATIONSGERÄTEN ODER
MP3- (A2DP) GERÄTEN
Multiple Device Connectivity («MDC») mit Bluetooth® fähigen Geräten.
Dank MDC Technologie können der SRC-System™ folgende parallele
Verbindungen aufgebaut werden:
➤ Interkom mit bis zu zwei anderen SRC-System™ Geräten
➤ Handy / GPS Navi Gerät
➤ A2DP fähiger MP3 Player oder A2DP Adapter
MP3-
Player
Integrier tes
UKW Radio
Hinweis: Wenn Sie gleichzeitig ein Handy und ein Navigationsgerät nutzen wollen, muss Ihr Handy mit dem Navigationsgerät und nicht mit dem
SRC‑System™ gekoppelt werden.
Navigation sgerät
300 m Reichweite
(geländeabhä ngig)
Handy und
A2DP Verbindun g
* Bitte lesen Sie auch die unter Absatz 9.4b angeführten Einschränkungen.
8
QG SRC 207 - MAN00015.indd 8 2/1/11 11:38 AM
Page 9

6.1 HANDY
Um ihr Handy mit dem SRC-System™ zu verwenden, muss es zuvor
mit dem Handy gekoppelt werden.
Hinweis: Falls Sie neben dem Handy auch ein Navigationsgerät nutzen,
sollten Sie Ihr Handy statt mit dem SRC‑System™ direkt mit dem Navigationsgerät koppeln. In solchem Falle überspringen Sie den folgenden
Abschnitt und gehen Sie stattdessen direkt zu Abschnitt 6.2.
Koppeln (Pairing) muss prinzipiell nur einmal vollzogen werden.
Nachdem ein Headset mit einem bestimmten Handy gekoppelt
ist, können sich die Geräte automatisch erkennen, sobald sie sich in
Reichweite benden.
Sobald die Verbindung zwischen Handy und Headset unterbrochen
wurde, betätigen Sie die Handy-Taste, um die Verbindung wieder
herzustellen.
Koppeln des Headsets mit einem Handy:
1. Schalten Sie Ihr Handy und SRC-System™ ein und stellen Sie sicher,
dass die Bluetooth®-Funktion Ihres Handys aktiviert ist
2. Halten Sie die Handy-Taste des Headsets mindestens sechs Sekunden lang gedrückt, bis die roten und blauen Leuchtanzeigen (LED)
abwechselnd rasch blinken. Jetzt ist das Gerät im Pairing-Modus,
d.h. zum Kopplungsprozess bereit.
3. Suchen Sie gemäß der Anleitung Ihres Handys auf Ihrem HandyDisplay nach Bluetooth®-Geräten.
4. Nach wenigen Sekunden führt Ihr Handy das „SRCS” (samt Kennzeichnung der Software Version) als erkanntes Gerät auf. Wählen
und bestätigen Sie dieses. Folgen Sie dann den Handy-Anleitungen, um das Koppeln (Pairing) zu vollziehen.
5. Geben Sie bei der Eingabeaufforderung 0000 (vier Nullen) als PIN
bzw. Passwort ein.
6. Sobald Ihr Handy bestätigt, dass das Pairing erfolgreich war, beginnt das Headset langsam blau zu blinken.
Hinweis: Falls das Koppeln nicht innerhalb von zwei Minuten abgeschlossen
ist, schaltet sich das Headset automatisch wieder in den Standby-Modus.
Hinweis: Nicht alle Bluetooth® Handys können auch Bluetooth® Stereo-
Musik (A2DP) übertragen, selbst wenn das Handy über einen eingebauten
MP3-Player verfügt. Schauen Sie diesbezüglich in die Gebrauchsanleitung
Ihres Handys. In Verbindung mit einigen Handytypen ist es evtl. erforderlich,
dass Sie - auch nachdem das Koppeln durchgeführt wurde - die Handy-Taste
des SRC‑System™ betätigen müssen, um die Verbindung zwischen Handy
und Headset herzustellen. Ihr SRC‑System™ wird sich automatisch mit
jenem Handy verbinden, mit dem es zuletzt verbunden war.
6.2 NAVIGATIONSGERÄT
In Verbindung mit einem Navigationsgerät können Sie über Ihr
SRC-System™ Headset Navigationsanweisungen und Audio
empfangen.
Zur Verbindungsherstellung zwischen einem Bluetooth® fähigen
Navigationsgerät und Ihrem SRC-System™ müssen diese zuerst
gekoppelt werden
Hinweis: Nicht alle Bluetooth® fähigen Navigationsgeräte erlauben Verbindungen zu Bluetooth® Headsets. Unter anderem müssen diese Navigationsgeräte das Bluetooth® «Handsfree» Gateway Protokoll unterstützen. Bitte
schauen Sie dazu in die Bedienungsanleitung Ihres Navigationsgeräts.
.
Koppeln des Headsets mit einem Navigationsgerät:
1. Bei eingeschaltetem Zustand halten Sie die Lautstärke Auf Taste
des Headsets mindestens sechs Sekunden gedrückt, bis die roten
und blauen LEDs gleichzeitig rasch blinken.
2. Suchen Sie auf dem Navigationsgerät nach Bluetooth® Headsets
und folgen Sie dabei den Anweisungen.
3. Nach einigen Sekunden führt Ihr Navigationsgerät das „SRCS”
(samt Kennzeichnung der Software Version) als erkanntes Gerät
Deu tsch
9
QG SRC 207 - MAN00015.indd 9 2/1/11 11:38 AM
Page 10

auf. Wählen und bestätigen Sie dieses. Folgen Sie den Navigations-
Anleitungen, um das Koppeln (Pairing) zu vollenden.
4. Wenn Ihr Navigationsgerät zur Eingabe einer PIN oder eines Passworts auffordert, geben Sie 0000 (vier Nullen) ein.
5. Ihr Navigationsgerät bestätigt nun durch langsames blaues Blinken,
dass der Kopplungsvorgang (das Pairing) erfolgreich durchgeführt
wurde.
Falls Sie ein Bluetooth®-Handy dazu verwenden möchten, Anrufe
über Ihr Headset zu tätigen und entgegenzunehmen, müssen Sie
nun Ihr Handy mit dem Navigationsgerät koppeln. Folgen Sie bitte
den Gebrauchsanleitungen Ihres Navigationsgeräts bzw. Handys.
HINWEIS:
• Falls das Koppeln nicht innerhalb von zwei Minuten abgeschlossen ist,
schaltet sich das Headset automatisch wieder in den Standby Modus.
• Die Proritäten für ihr Headset sind so eingerichtet, dass eingehende Interkomgespräche eine Navigations-Sprachanweisung nicht unterbrechen.
In diesem Fall wird der Anrufer über Interkom ein Besetzt-Signal hören.
Sie hören gleichzeitig z wei Pieptöne, um zu verdeutlichen, dass ein
Interkomteilnehmer versucht, Sie zu erreichen (s. Absatz 4.3 für weitere
Informationen zu den Audio-Prioritäten der gekoppelten Geräte.)
6.3 MP3STEREOMUSIK DRAHTLOSE OPTION A2DP
Ihr Headset ist empfangsbereit für kabellose Stereomusik von A2DP
Quellen (z.B. MP3) und Smartphones, die die Bluetooth® Protokolle
A2DP und AVRCP unterstützen. Nutzung eines Bluetooth® Gerätes mit
AVRCP ermöglicht Ihnen den Betrieb der wichtigsten A2DP Funktio-
nen direkt vom Headset.
Hinweis: Das SRC‑System™ Headset kann über das beigefügte Kabel auch
Audiosignale von MP3-Playern und Audioquellen ohne Bluetooth® Prol
empfangen (s. Absatz 7.2)
Auch bei Musikempfang über Ihre A2DP Quelle bleiben Sie für einge-
hende Handy- und Interkomanrufe erreichbar. Bei eingehendem Anruf
werden auch Radio- bzw. MP3-Empfang automatisch stummgeschal-
10
tet, es wird dem eingehenden Anruf Vorrang gegeben. Beachten Sie
bitte, dass bestimmte Geräte nach Stummschaltung den Radio- bzw.
MP3-Empfang nicht automatisch wieder aufnehmen. In solchen Fällen
muss dieser manuell reaktiviert werden.
VORBEREITEN DES MP3-PLAYERS FÜR BLUETOOTH® STEREO
A2DP ÜBERTRAGUNGEN.
Um über einen Bluetooth® Stereo (A2DP) fähigen MP3-Player oder Adapter Musik zu hören, muss dieser zuerst mit dem Headset gekoppelt
werden.
KOPPELN DES HEADSETS MIT EINEM MP3-PLAYER ODER
ADAPTER
Hinweis: Falls Sie eine A2DP Quelle nutzen, die in Ihrem Handy eingebaut
ist, muss die Kopplung mit dem Headset wie in Absatz 6.1 beschrieben
vollzogen werden.
1. Schalten Sie Ihren MP3-Player oder Adapter ein und stellen Sie
sicher, dass die Bluetooth® Funktion aktiviert ist.
2. Bei eingeschaltetem Headset betätigen und halten Sie die Handy-
Taste mindestens sechs Sekunden, bis die roten und blauen
Leuchtsignale schnell abwechselnd blinken.
3. Suchen Sie mit ihrem MP3-Player nach dem Bluetooth® Headset
und folgen Sie dabei der Gebrauchanleitung Ihres Gerätes.
Hinweis: Zur Nutzung eines Bluetooth® Adapters schauen Sie bitte in die
Gebrauchsanleitung des Adapters.
4. Nach einigen Sekunden wird Ihr MP3-Player „SRCS” (samt Kenn-
zeichnung der Software Version) als gefundenes Gerät auflisten.
Wählen Sie dieses und folgen Sie der Gebrauchanleitung des MP3-
Players, um das Koppeln durchzuführen.
5. Wenn Ihr MP3-Player eine PIN oder ein Passwort verlangt, geben
Sie 0000 (vier Nullen) ein.
QG SRC 207 - MAN00015.indd 10 2/1/11 11:38 AM
Page 11

6. Wenn das Koppeln abgeschlossen ist, wird Ihr MP3-Player ihnen
dieses ggf. bestätigen und die LED des Headsets wird gleichmäßig
blau blinken.
Hinweis: Wenn das Koppeln der Geräte nicht innerhalb von zwei Minuten
abgeschlossen ist, wird das Headset in den Standby Modus zurückschalten.
Betrieb Ihrer A2DP Quelle direkt vom Headset
Play Betätigen und halten Sie die M P3-Taste im Laufe von 3 Sek.
Pause / Stop* Betätigen und halten Sie die M P3-Taste im Laufe von 3 Sek.
Vorwärts Betätigen und halten Sie die L autstärke Auf-Taste im
Rückwärts** Betätigen und halten Sie die L autstärke Ab-Taste im Laufe
* Unterschiedlich je nach Handymodell
** Bei einigen Handys muss dieser Schritt ev t. wiederholt werden
Laufe von 3 Sek.
von 3 Sek.
7. EINGEBAUTES UKW RADIO UND EXTERNER
MP3-PLAYER (MIT KABELVERBINDUNG)
7.1 UKWRADIO
Ihr SRC-System™ ist mit einem UKW Stereo Radiomodul ausgerüstet.
Dank der RDS Funktion und auch um Ihnen das Justieren von Radiofrequenzen bei schneller Fahrt zu ersparen, wählt Ihr Headset stets automatisch das stärkste Signal, das für den UKW-Sender Ihrer Wahl verfügbar ist.
Radio einschalten Im Standby-Modus betätigen Sie die Kanal “B”
Radio ausschalten Während des Radioempfangs betätigen Sie die
Zum nächsten
programmierten
Sender wechseln
Taste für 3 Sekunden.
Kanal “B” Taste für 3 Sekunden.
Während des Radioempfangs betätigen Sie kurz
die Kanal “B” Taste, um zwischen den sechs vorprogrammierten Sendern zu navigieren.
Einleiten eines
Interkom-Gesprächs
Einleiten von
Sprachwahl über
Handy
Einleiten von Wahlwiederholung über
Handy
RDS EIn/Aus Während des Radioempfangs betätigen Sie die
RDS An / Aus (bei laufendem Radioempfang gleichzeitig 3 Sek. lang betätigen)
• Radio Ein / Aus (3 Sekunden gedrückt halten)
• Zwischen gespeicherten Sendern pendeln (kurz betätigen)
Während des Radioempfangs beginnen Sie einfach laut zu sprechen.
Während des Radioempfangs betätigen Sie die
Handy-Taste und sprechen Sie laut den Namen
der Person, die Sie anrufen möchten. Für diese
Funktion muss das Handy die Sprachwahl Funktion unterstüzen.
Während des Radioempfangs betätigen Sie zwei
Mal kurz die Handy-Taste
Lautstärketasten (Auf/Ab) gleichzeitig im Laufe von
3 Sekunden.
Suchen und Speichern von Radiosendern
Ihr UKW-Radio kann bis zu sechs Sender speichern.
1. Betätigen Sie während des Radioempfangs die Lautstärketasten
(Auf oder Ab) für 3 Sek. bis Sie den nächsten Radiosender hören.
Beim Betätigen der Lautstärketasten (Auf/Ab) wird jeweils eine
höhere bzw. niedrigere Frequenz gesucht.
2. Wenn ein Sender gefunden ist, wird der Suchvorgang beendet und
der gewählte Sender kann empfangen werden.
Deu tsch
11
QG SRC 207 - MAN00015.indd 11 2/1/11 11:38 AM
Page 12

3. Um die Suche fortzusetzen, betätigen Sie eine der beiden Lautstärke-Tasten für 3 Sekunden.
4. Zum Speichern des Senders lesen Sie sich bitte den folgenden Abschnitt durch. Sie können einen gewählten Sender auch weiterhin
hören, ohne ihn zu speichern.
Sender speichern
1. Wählen Sie einen der sechs möglichen Sender, indem Sie die Kanal
„B“ Taste betätigen, bis Sie den gewünschten Sender ausfindig ge-
macht haben, den Sie anstelle eines bereits gespeicherten Senders
speichern möchten.
2. Suchen Sie auf dieselbe Weise nach einem zweiten Sender.
3. Betätigen Sie die Kanal “B” Taste innerhalb von 20 Sekunden
nach Wahl des gewünschten nächsten Senders, um diesen zu
speichern und fahren Sie auf diese Weise bis zum sechsten
Speicherplatz fort.
4. Wenn Sie einen gefundenen Sender nicht speichern, wird das
Radio den Suchmodus verlassen, ohne den aktuellen Sender zu
speichern. Sie können diesen Sender jedoch auch ungespeichert
weiterhin empfangen. Betätigen der Kanal “B” Taste führt in diesem Fall zum Wechseln auf den nächst gespeicherten Sender.
Sie können bis zu sechs Sender speichern.
7.2 ANSCHLUSS VON MP3PLAYERN BZW. ANDEREN
EXTERNEN AUDIOQUELLEN VIA KABELVERBINDUNG
NICHT ÜBER BLUETOOTH®
Nutzen Sie die AUX Buchse, um eine Kabelverbindung herzustellen
Ihr SRC-System™ Headset verfügt über eine AUX-Buchse zum An-
schluss von Geräten, die nicht über Bluetooth® verfügen. Diese Geräte
werden über das beigefügte Mini-USB Kabel verbunden.
1. Stellen Sie sicher, dass sich das Headset im Standby-Modus befindet und die blaue LED gleichmäßig blinkt.
2. Geben Sie das MP3-Kabel in die Kopfhörerbuchse ihres MP3
Players bzw. Audio Gerätes und das
andere Ende in die AUX Buchse des
SRC-Systems™.
3. Bedienen Sie den MP3-Player über die eigenen Steuertasten (FF /
REW / PLAY / PAUSE).
Die Lautstärke kann über den MP3-Player oder über die Lautstärke-
Tasten am Headset reguliert werden.
Jede andere Audioverbindung wird den MP3-Player automatisch
stumm stellen. Das Audiosignal wird erst dann aufgenommen,
wenn sich das Headset erneut im Standby Modus befindet.
Hinweis: Während des Betriebs des MP3-Players ist die VOX Funktion nicht
verfügbar.
8. BEDIENEN DES HANDYS
Handyanrufe aufnehmen und empfangen
GRUNDFUNK TIONE N
Anrufe
empfangen
Anrufe abweisen Schweigen Sie beim Klingelton, bis dieser verstummt
Gespräch
beenden
Sprachwahl Betätigen Sie während des Standby-Modus die
Wahlwiederholung
Bei Klingelton betätigen Sie die Handy-Taste oder
sprechen Sie laut ein beliebiges Wort aus
oder betätigen Sie die Handy-Taste für 3 Sek
Betätigen Sie während des Gesprächs kurz die
Handy-Taste oder überlassen Sie das Auegen
Ihrem Gesprächspartner
Handy-Taste und sprechen Sie laut den Namen der
Person aus, die Sie anrufen wollen. Diese Funktion
wird nur von Handys unterstüzt, die über das
Sprachbefehl Prol verfügen
Betätigen Sie während des Standby Modus zwei
Mal die Handy Taste
12
QG SRC 207 - MAN00015.indd 12 2/1/11 11:38 AM
Page 13

ERWEITERTE FUN KTION EN FÜR 3WEG KOMMUNIKATION
Hinzufügen bzw.
Abtrennen des Kanal “A” Headsets
vom laufenden
Handygespräch
Hinzufügen bzw.
Abtrennen des Kanal “B” Headsets
vom laufenden
Handygespräch
Betätigen Sie während eines Handygesprächs die
Kanal “A” Taste
Betätigen Sie während eines Handygesprächs die
Kanal “B” Taste
Während laufender Handygespräche werden eingehende Interkom-
Anrufe automatisch abgewiesen. Nach Beenden des Handygesprächs ist
das Headset wieder aufnahmebereit für eingehende Interkom Anrufe.
Leuchtanzeigen (LEDs)
LED ANZE IGE S TATUS
Keine Headset ist ausgeschaltet
Ein blaues Blinken
alle 3 Sekunden
Zwei blaue Blinker
alle 3 Sekunden
Ein rotes Blinken alle
3 Sekunden
Zwei rote Blinker alle
3 Sekunden
Permanent rot Akku wird geladen
Standby – Kein Gespräch
Handygespräch, Radio oder MP3-Player aktiv
Standby – Geringe Akkuladung
Geringe Akkuladung während eines Handyanrufs
oder beim Hören von Radio oder MP3-Player
9. INTERKOMBETRIEB
(GEGENSPRECHANLAGE)
9.1 EINLEITUNG
Ihr SRC-System™ ermöglicht Voll-Duplex Interkombetrieb mit anderen SRCS Nutzern in einer Reichweite von bis zu 300 Meter (geländeund verkehrsbedingt)
Um eine oder zwei Interkom Verbindungen herzustellen, sollten Sie
zuerst Ihr SRC-System™ mit den anderen Headsets koppeln.
Das Koppeln (“Pairing”) muss prinzipiell nur ein Mal durchgeführt werden. Nach Abschluss des Prozesses bleiben die Headsets gekoppelt
und erkennen einander automatisch, sobald sie in Reichweite sind.
Ihr Headset verfügt über zwei Interkom-Kanäle für Headset-zu-Headset-Verbindungen. Daher kann Ihr SRC-System™ simultan mit bis zu
zwei anderen Headsets kommunizieren.
9.2 INTERKOM KOMPATIBILITÄT
Sie können Ihr SRC-System™ als Interkom mit Nutzern von anderen
SRCS Geräten und von Headsets der Cardo scala rider Reihe betreiben.
9.3 VOR INBETRIEBNAHME DES INTERKOMS
Ihr SRC-Systemֳ™ Headset verfügt über zwei Tasten, die zur Verbindungsaufnahme mit zwei anderen Headsets dienen. Diese anderen
Headsets werden hier als KANAL “A” und KANAL “B“ bezeichnet.
Vor Beginn des Bike-zu-Bike Interkombetriebs mit einem oder zwei
anderen Geräten müssen alle teilnehmenden Headsets miteinander
gekoppelt werden.
Kanal «A» Taste
Kanal «B» Taste
Deu tsch
13
QG SRC 207 - MAN00015.indd 13 2/1/11 11:38 AM
Page 14

9.4 VERWENDUNG DER INTERKOMFUNKTION MIT
ANDEREN SRCSYSTEM™ HEADSETS
INTERKOMKANAL
KANAL “A” KANAL “A” - TASTE Schnelles Blinken der
KANAL “B” KANAL “B” - TASTE Schnelles Blinken der
KOPPLUNGS- /
VERBINDUNGS- TASTE
KOPPLUNGSMODUS
LED-ANZEIGE
ROTEN LED
BLAUEN LED
9.4a ZWEI-WEG INTERKOM KOPPLUNGSOPTIONEN ZWISCHEN
ZWEI TEILNEHMERN
Verwendung von zwei SRC-System™ Headsets
1. Schalten Sie beide Headsets EIN, indem Sie deren jeweilige HandyTaste so lange gedrückt halten, bis die blauen Leuchtanzeigen
(LED) dreimal kurz blinken.
2. Stellen Sie sicher, dass beide Headsets jetzt langsam blau blinken.
3. Wählen Sie einen verfügbaren Kanal, den Sie zum Koppeln der
Headsets benutzen wollen (KANAL “A” oder KANAL “B”).
HINWEIS: Die Wahl eines bereits belegten Kanals wird ein dor t gekoppeltes Headset mit dem jeweils neu gekoppelten Headset ersetzen.
4. Halten Sie die gewünschte Kanaltaste (“A” oder “B”) auf Ihrem Gerät
mindestens sechs Sekunden gedrückt, bis die BLAUE oder ROTE
LED des Headsets schnell blinkt. Dadurch wird angezeigt, dass der
Interkom-Kopplungsmodus in Gang ist. (s. obige Tabelle)
5. Wiederholen Sie Schritt 3-4 für das zweite SRC-System™ Headset.
6. Innerhalb weniger Sekunden leuchten beide Headsets zwei Sekun-
den konstant. Dadurch wird angezeigt, dass beide Headsets jetzt
miteinander gekoppelt, verbunden und einsatzbereit sind.
HINWEIS: Falls der Kopplungsprozess nicht innerhalb von zwei Minuten
abgeschlossen ist, schaltet das Headset automatisch wieder in den
Bereitschaftsmodus.
Aufnahme von Interkom-Anrufen
Es gibt zwei Möglichkeiten, einen Interkom-Anruf mit Ihrem gekoppelten
Headset zu initiieren, während das Headset im Bereitschaftsmodus ist:
SPRACHVERBINDUNG:
Beginnen Sie laut zu sprechen
Sobald Sie laut zu sprechen beginnen,
wird ein Interkom-Gespräch mit dem
anderen gekoppelten Headset hergestellt.
Das Interkom-Gespräch wird aufrechterhalten, bis alle Teilnehmer 30 Sekunden
schweigen.
VERBINDUNG ÜBER DIE
KANAL-TASTE:
Betätigen Sie einmal kurz
die gewünschte KANALTaste, um das andere Headset
zu einem Interkom-Gespräch
hinzuzufügen oder zu
entfernen.
9.4b. DREI WEG INTERKOM
Das SRC-System™ ermöglicht einen Interkom Konferenzmodus
zwischen drei Bikern
Über Kanal “B ”Über Kanal “A”
Erstes SRC-System™
Biker “A”
Zweites SRC-System™ Biker “B”
Drittes SRC-Sys-
tem™ Biker “C”
In dieser Konguration ist Fahrer “B” sowohl mit Fahrer “A” als auch
mit Fahrer “C” gekoppelt und dient daher als Verbindungsbrücke, die
den Konferenzmodus ermöglicht.
WICHTIG: Da Fahrer “B” zwei Bluetooth® Verbindungen beansprucht, wird
er von seinem Handy bzw. Navigationsgerät getrennt, bis das Konferenzgespräch beendet ist. Nach Beendigung des Konferenzmodus wird Fahrer “B”
automatisch wieder mit seinem Handy bzw. Navigationsgerät verbunden.
Fahrer “A” und “C“ bleiben mit ihren Handys bzw. Navigationsgeräten während des Konferenzgespräch verbunden.
14
QG SRC 207 - MAN00015.indd 14 2/1/11 11:38 AM
Page 15

Einrichtung und Konguration der Drei-Weg
Interkom-Verbindung
INTERKOMKANAL
KANAL “A” KANAL “A” - TASTE Schnelles Blinken der
KANAL “B” KANAL “B” - TASTE Schnelles Blinken der
KOPPLUNGS- /
VERBINDUNGS- TASTE
KOPPLUNGSMODUS
LED-ANZEIGE
ROTEN LED
BLAUEN LED
9.5 ANNAHME VON INTERKOMANRUFEN
Sobald ein anderes gekoppeltes Headset versucht, Sie über Interkom
anzurufen, wird das Gespräch sofort aufgebaut.
HINWEIS: Der werkseitige Prioritätsmodus des Headsets verhindert
Unterbrechungen von bereits begonnenen Handygesprächen oder Navigationsanweisungen durch eingehende Interkom-Anrufe. Bei laufenden
Gesprächen oder Navigationsanweisungen hört der Interkom-Anrufer ein
Besetzt-Zeichen und Sie einen doppelten Piepston (siehe Abschnitt 4.3 für
Details zu den Prioritätseinstellungen von gekoppelten Geräten).
Deu tsch
KOPPLUNGSOPTIONEN ZWISCHEN DREI TEILNEHMERN
Zum Koppeln von drei SRC-System™-Headsets wiederholen Sie ein-
fach mit einem dritten SRC-System™ Headset den in Abschnitt 9.4a
dargestellten Prozess (allerdings über einen anderen Kanal).
Beispiel:
1. Koppeln Sie Ihr SRC-System™ mit dem zweiten SRC-System™,
wie in Abschnitt 9.4a beschrieben (mittels KANAL “A”).
2. Koppeln Sie Ihr SRC-System™ mit dem dritten SRC-System™,
wie in Abschnitt 9.4a beschrieben (mittels KANAL “B”).
Aufnahme von Interkom-Anrufen
Es gibt zwei Möglichkeiten, einen Interkom-Anruf mit Ihren gekoppelten
Headsets zu initiieren, während das Headset im Bereitschaftsmodus ist:
SPRACHVERBINDUNG:
Beginnen Sie laut zu sprechen
Sobald Sie laut zu sprechen
beginnen, wird ein Interkom-Gespräch mit beiden
gekoppelten Headsets K ANAL
“A” und KANAL “B” aufgebaut
(falls beide gekoppelt und
verfügbar sind).
QG SRC 207 - MAN00015.indd 15 2/1/11 11:38 AM
VERBINDUNG ÜBER DIE
KANAL-TASTE:
Betätigen Sie einmal kurz die KANAL
“A” –Taste, um das KANAL “A” -Headset
zu einem Interkom-Anruf hinzuzufügen
oder zu entfernen.
Betätigen Sie einmal kurz die KANAL
“B” –Taste, um das KANAL “B” –Headset
zu einem Interkom-Anruf hinzuzufügen
oder zu entfernen.
9.6 AUFNAHME VON INTERKOMANRUFEN
Kopplungsprozess (Pairing) erfolgreich abgeschlossen? Dann fahren Sie
jetzt mit diesem Abschnitt fort. Falls nicht, bitte erst obige Tabelle einsehen
und Kopplungspräferenz wählen und durchführen.
Es gibt zwei Möglichkeiten einen Interkom -Anruf mit Headsets aufzunehmen, die mit Ihrem SRC-System™ gekoppelt sind (stellen Sie sicher, dass Sie
im Bereitschaftsmodus sind) :
SPRACHVERBINDUNG:
Vorzugsweise für relative kurze
Gespräche, da hier der Kanal nach 30
Sekunden Stille in den Bereitschaftsmodus umschaltet.
Beginnen Sie laut zu sprechen
Sobald Sie laut sprechen, wird automatisch ein Interkom-Gespräch mit
beiden gekoppelten Headsets, KANAL
«A» und KANAL «B», aufgebaut (falls
beide gekoppelt und verfügbar sind).
Das Interkom-Gespräch wird auf-
rechterhalten, bis alle Teilnehmer 30
Sekunden lang schweigen (gilt für
2-Wege Kommunikation).
HINWEIS: Während das Interkom in Betrieb ist, sind die Wiederwahl und
Sprachsteuerungsfunktionen nicht verfügbar.
VERBINDUNG ÜBER DIE
KANAL-TASTE:
Vorzugsweise für längere Gespräche, da hier der Kanal oen und
aktiv bleibt.
Betätigen Sie einmal kurz die
KANAL «A» –Taste, um das KANAL
«A» -Headset zu einem Interkom-
Gespräch hinzuzufügen oder zu
entfernen.
Betätigen Sie einmal kurz die
KANAL «B» –Taste, um das KANAL
«B» -Headset zu einem InterkomAnruf hinzuzufügen oder zu
entfernen.
15
Page 16

9.7 SPRACHBEFEHLMODUS VOX
Das SRC-System™ bietet auch VOX Technologie für sichere und freihän-
dige Bedienung von Schlüsselfunktionen.
Um eingehende Anrufe anzunehmen, sprechen Sie nur laut ein be-
stimmtes Wort aus (z.B. „Hallo”).
Um einen eingehenden Anruf abzulehnen, verhalten Sie sich lediglich
etwa 10 Sekunden still.
Um einen eingehenden Interkom Anruf abzuweisen, bleiben Sie bitte
etwa 30 Sekunden still.
EIN- / AUSSCHALTEN VOX: Während das Gerät im Bereitschaftsmodus
ist, halten Sie die Tasten „Lautstärke Auf“ und „Lautstärke Ab“ gleichzeitig
drei Sekunden gedrückt, bis Sie einen Piepston hören. Werkseitig ist die
Funktion „Sprachverbindung“ aktiviert.
HINWEIS: Das Ein-/Ausschalten der Funktion Sprachverbindung hat nur
Auswirkungen auf die Interkom-Funktionen
9.8 RESET: ANNULLIEREN / RÜCKSETZEN DES KOPPELNS
WIEDERHERSTELLUNG DER WERKSEINSTELLUNG
Dieser Abschnitt ist erst nach Abschluss des Kopplungsprozesses
relevant.
Sie können jederzeit alle gekoppelten Geräte abkoppeln. Verfahren
Sie dazu wie folgt:
1. Bei eingeschaltetem SRC-System™ halten Sie die Handy-Taste
mindestens sechs Sekunden gedrückt, bis die rote und blaue LEDs
(Leuchtanzeigen) abwechselnd blinken.
2. Halten Sie die Taste „Lautstärke Auf“ drei Sekunden gedrückt.
3. Nun blinken die roten und blauen LEDs fünf Mal und das Headset
schaltet sich aus. Damit ist der erfolgreiche Abschluss des Rücksetzens (Resetting) bestätigt.
9.9 WICHTIGE ANMERKUNGEN
a. Besetzt-Status
Wenn Sie über das Headset ein Interkom-Gespräch mit einem Teilnehmer beginnen möchten, der bereits ein Telefonat oder InterkomGespräch führt oder Navigationsanweisungen hört, werden Sie als
Besetztzeichen einen doppelten Piepston hören.
b. Automatische Interkom-Wiederverbindung
Falls das SRC-System™ und ein anderes gekoppeltes Headset außer
Reichweite geraten und voneinander getrennt werden, wird sich das
SRC-System™ automatisch wieder mit dem anderen Headset verbinden
(vorausgesetzt, sie sind wieder innerhalb der Reichweite).
Im Bereitschaftsmodus (Standby) können Sie das Interkom-Gespräch
erneut manuell aufnehmen. Betätigen Sie lediglich die KANAL “A” oder
KANAL “B”-Taste, um eine getrennte Verbindung wieder herzustellen.
c. Einschränkungen beim Konferenzmodus
Im Interkom-Konferenzmodus zwischen Ihnen und zwei weiteren
Teilnehmern (Drei-Wege Interkom) dient einer der Teilnehmer als
Verbindungsbrücke mit und kann daher im Laufe des Konferenzmodus weder Handy-Anrufe noch GPS-Nachrichten empfangen (siehe
Details in Abschnitt 9.4b)
9.10 STÖRUNGSBEHEBUNG DES INTERKOMSYSTEMS
Stellen Sie zuerst sicher, dass sich Ihr Mikrofon direkt in der Mitte vor
Ihrem Mund bendet. Beachten Sie auch folgendes: Da das SRC-Sys-
tem™ zur Nutzung in besonders lauter Umgebung entwickelt wurde,
sollten Sie die Interkom-Funktion auch in entsprechend lauter Umge-
bung testen, wie etwa in der Nähe eines Motorrads im Leerlauf und
nicht im Haus. Vergewissern Sie sich auch, dass die Headsets korrekt
miteinander gekoppelt wurden. Lesen Sie hierzu die Anweisungen in
den entsprechenden Kongurations-Abschnitten.
16
QG SRC 207 - MAN00015.indd 16 2/1/11 11:38 AM
Page 17

10. CLICKTOLINK
Click-to-Link ist die „spontane“ Charakterseite Ihres SRC-System™, mit
der Sie ohne jegliche Vorbereitungen Interkomkontakt aufnehmen
können. Click-to-Link ermöglicht spontanes Initiieren von InterkomGesprächen mit anderen SRC-System™-Nutzern in unmittelbarer
Umgebung ohne vorheriges Durchlaufen des Kopplungsvorgangs.
Sie erhalten sozusagen einen eigenen Kanal von Motorrad zu Motor-
rad, über den Sie unterwegs an der Ampel oder während der Fahrt
mit anderen SRC-System™ Nutzern spontan kommunizieren können.
Die Funktion Click-to-Link kann jederzeit ausgeschaltet werden, um
die Möglichkeit spontaner Verbindungen mit anderen SRC-System™-
Nutzern zu unterbinden.
NUTZUNG DER CLICK-TO-LINK-FUNKTION
Click-to-Link-Funktion aktivieren/deaktivieren: Die Funktion kann
über das Menü für die Anpassung der Einstellungen ein- bzw. ausgeschaltet werden (siehe Abschnitt 4.2). Die Funktion ist werkseitig nicht aktiv.
AUDIOQUELLEN UND PRIORITÄTEN
Die verschiedenen Audioquellen, die mit dem SRC-System™ ver-
bunden sind, werden priorisiert, d. h. eine höher angesetzte Quelle
deaktiviert grundsätzlich eine niedrige Quelle.
So werden beispielsweise aktuell laufende Click-to-Link-Anrufe durch
eingehende Handyanrufe und Navi-Anweisungen unterbrochen,
während sich ein im Gang befindlicher Radioempfang wiederum
von eingehenden Click-to-Link-Anrufen unterbrochen wird usw.
Die Funktion Click-to-Link lässt Anrufe und Interkomgespräche
zwischen Quellen mit gleicher Priorität zu: Während eine der Quellen
verwendet wird, kann die andere nicht unterbrechen. Daher können
aktuell laufende Interkomgespräche nicht durch Click-to-Link unterbrochen werden und umgekehrt.
Hohe Priorität
Niedrige Priorität
IC (Interkom) Rufton: Wenn Sie ein Click-to-Link-Gespräch führen,
und Fahrer „A“ bzw. Fahrer „B“ versucht, mit Ihnen ein IC-Gespräch zu
führen, hören Sie einen Signalton, während der andere Teilnehmer
ein Besetzt-Signal hört.
Wenn Ihre Click-to-Link-Verbindung aus irgendeinem Grund unter-
brochen wird und andere SRC-System™-Benutzer in der Nähe sind,
können neue SRC-System™-Verbindungen zu anderen Teilnehmern
als demjenigen hergestellt werden, zu dem die ursprüngliche Verbindung bestanden hat.
1. Handy oder GPS Navi Gerät
2. Interkom / Click-to-Link
3. A2DP Audioquelle
4. UKW Radio (eingebaut)
5. Aux-Buchse (für kabelgebundene Geräte wie
z.B. MP3 Player)
Deu tsch
17
QG SRC 207 - MAN00015.indd 17 2/1/11 11:38 AM
Page 18

Allgemeine Funktionen
Kategorie Gewünschtes
Click-to-Link-Anrufe
tätigen
Click-to-Link-Anrufe
entgegennehmen
Bei
Click-to-Link- Anrufen
* Das SRC‑System™ sucht 10 Sekunden la ng nach einem anderen SRC‑System™
Gerät, bei dem die Click-to-Link-Funktion ak tiviert wurde. Gerät. Dab ei blinkt es
rot und lässt einen Signalton erklingen .\
HINWEIS: Durch Click-to-Link-Verbindungen werden keine bestehenden Intercom-Kopplungen zwischen Fahrer A und Fahrer B ersetzt oder
geändert. Die Funktion Click-to-Link nutzt einen separaten Kanal für die
Verbindung zu Ihrem Click-to-Link-Gesprächspartner.
Ergebnis
Click-to-Link-Anruf
starten*
Click-to-Link-Anruf
ablehnen
Click-to-Link-Anruf
ablehnen
Click-to-Link-Anruf
ablehnen
Click-to-LinkGespräch beenden
Erforderlicher
Bedienvorgang
Taste „A“ zwei Mal betätigen
Taste „A“ betätigen
Beim Ertönen des Ruftons
Taste „A“ betätigen oder laut
sprechen, um per VOX zu
antworten
Bei Ertönen des Ruftons
10 Sekunden oder bis zum
Ende der Ruftons still
bleiben
Taste „A“ betätigen
11. KUNDENSERVICE
Weitere Informationen erhalten Sie auf unserer Website
www.schuberth.com
Für technische Unterstützung wenden Sie sich bitte an Ihren
SCHUBERTH Fachhähandler, oder kontaktieren Sie uns unter
Kundenservice@schuberth.com
Unsere Rufnummer 0391 8106-555
International: +49 391-8106-555
Für die neuesten Informationen über Software Aktualisierung, be-
suchen Sie bitte unsere Webseite unter www.schuberth.com/de/
produkte/service/src-systemtm.html und registrieren Sie Ihr Gerät
online.
WICHTIG:
ÖFFNEN DES SRC‑System™ REISSVERSCHLUSSES
ANNULLIERT GARANTIE
Die elektronischen Bauteile Ihres Gerätes sind unter einem versiegelten
Reisverschluss verstaut. Bitte öffnen Sie den Reisverschluss unter keinen
Umständen. Bei Zuwiderhandlung erlischt automatisch die Garantie.
18
QG SRC 207 - MAN00015.indd 18 2/1/11 11:38 AM
Page 19

12. HINWEISE
FCC-Erklärung
15.21
Sie werden hiermit darauf hingewiesen, dass alle seitens des Herstellers nicht
ausdrücklich genehmigten Änderungen oder Modizierungen an diesem Gerät die
Berechtigung des Nutzers zum Betrieb dieses Gerätes ungültig machen können.
15.105(b)
Dieses Gerät wurde geprüft und es wurde festgestellt, dass es die Anforderungen
von Teil 15 der FCC-Vorschriften für ein digitales Gerät der Klasse B erfüllt. Diese Beschränkungen dienen zum angemessenen Schutz gegen schädliche Inter ferenzen,
bei Anschluss an eine stationäre Anlage. Dieses Gerät erzeugt Hochfrequenzenergie und könnte diese ausstrahlen. Wird es nicht gemäß den Anweisungen installiert
und verwendet, kann es schädliche Interferenzen im Funkverkehr verursachen.
Es kann jedoch nicht gewährleistet werden, dass bei einer Einrichtung keine
Interferenzen auf treten. Falls dieses Gerät schädliche Interferenzen bei Funk- oder
TV-Empfang verursacht, die durch Ein- und Ausschalten des Gerätes festgestellt
werden können, kann der Nutzer versuchen die Interferenzen durch eine der
folgenden Maßnahmen zu korrigieren:
• Die Empfangsantenne verstellen oder neu positionieren.
• Den Abstand zwischen Gerät und Empfänger erhöhen.
• Das Gerät an einen anderen Stromkreislauf, unabhängig vom Stromkreislauf des
Empfängers, anschließen.
• Den Händler oder einen erfahrenen Radio-/TV-Techniker zu Rate ziehen.
Der Betrieb des Gerätes unterliegt den folgenden zwei Bedingungen:
1) Dieses Gerät darf keine schädlichen Interferenzen verursachen und
2) dieses Gerät muss jede empfangene Interferenz entgegennehmen, einschließlich
solcher Interferenzen, die einen unerwünschten Betrieb verursachen könnten.
FCC-Erklärung z ur HF-Str ahlenbe lastung:
Dieses Gerät erfüllt die Bedingungen der FCC RF Radiation Exposure Limits auch
unter unkontrollierbaren Umweltbedingungen. Endnutzer müssen die spezischen
Betriebsanweisungen befolgen, um die Bedingungen entsprechend einzuhalten.
Dieser Sender darf nicht in der Nähe von oder zusammen mit anderen Antennen
oder Sendern angebracht werden.
CE-M itteilung
Das SRC-System™ Headset (das “Produkt ” oder das „Gerät“) entspricht den folgen-
den wesentlichen Anforderungen der EG-Richtlinie 1999/5/EC (hier “R&TTE-Richt-
linie” genannt): Artikel 3.1a, 3.1.b und 3.2. Das Produkt wurde in Übereinstimmung
mit dem Anhang II zur oben genannten Richtlinie hergestellt.
Konfo rmitäts erkläru ng
Das SRC-System™ Headset ist im Einklang mit und entspricht den Richtlinien der
Bluetooth® Spezikation 2.1 und hat alle Tests zur Interfunktionsfähigkeit, die in der
Bluetooth® Spezikation festgelegt sind, bestanden. Die Interfunktionsfähigkeit
zwischen dem Gerät und anderen Bl uetooth®-fähigen Produkten ist jedoch nicht
gewährleistet.
VER ZICHTSE RKLÄRUN G UND HAF TUNGSFRE ISTELLUNG
(nicht für L änder de r Europäische n Union)
Mit der Inbetriebnahme des SRC-System™ Headsets (nachstehend auch das “Gerät”
genannt) verzichten Sie auf wesentliche Rechte, einschließlich des Klagerechts. Bit-
te lesen Sie vor Inbetriebnahme des Geräts sorgfältig den folgenden Abschnitt. Falls
Sie nicht alle Bedingungen dieser Vereinbarung akzeptieren, sollten Sie das Produkt
sofort zurückgeben. Wir werden Ihnen in solchem Falle den vollen Kaufpreis
zurückerstatten. Falls Sie das Gerät jedoch in Betrieb nehmen, sind Sie an diese Vereinbarung gebunden und verzichten u. a. auch auf jegliches Klagerecht. Während
des Fahrens auf einem Motorrad, Motorroller, Cruiser, Moped, Geländefahrzeug,
Quad oder jeglichem anderen Fahrzeug, ob auf der Strasse, im Wasser oder in
der Luft (nachstehend “Fahrzeug” genannt) ist Ihre vollständige und ungeteilte
Aufmerk samkeit erforderlich. Die Schuberth GmbH und Cardo Systems, Inc., deren
Management, Direktoren, Tochtergesellschaf ten, Muttergesellschaft, Ver treter,
Bevollmächtigte, Auftragnehmer, Sponsoren, Mitarbeiter, Lieferanten und Wiederverkäufer (nachstehend “Firma” genannt), weisen Sie ausdrücklich darauf hin, dass
Sie alle erforderlichen Vorsichtsmassnahmen treen müssen und sich während der
Benutzung des Gerätes einschließlich aller Modelle des Gerätes, ungeachtet deren
Handels- oder Markennamen, zu jeder Zeit des Verkehrs, den Witterungsbedingungen und dem Zustand der Strasse bewusst sein müssen. Bevor Sie einen Anruf
tätigen oder annehmen, sollten Sie Ihr Fahrzeug am Straßenrand anhalten. Alle
Veröentlichungen, Anzeigen, Bekanntmachungen oder ähnliche Mitteilungen, die
sich darauf beziehen, dass das Gerät während der Fahrt verwendet werden kann,
betreen lediglich dessen technische Möglichkeiten und sind nicht als Auorderung gedacht, das Gerät im direkten Straßenverkehr zu benutzen. Mit dem Kauf des
Gerätes und dem Verzicht auf Rückerstattung des Kaufpreises (siehe unten), stellen
Sie die Firma unwiderruich von allen Haf tungsansprüchen, Verlusten, Forderungen und anderen Ansprüchen jeglicher Art (einschließlich der Anwaltskosten) im
Zusammenhang mit der Verwendung des Geräts frei und verpichten sich die Firma
Deu tsch
19
QG SRC 207 - MAN00015.indd 19 2/1/11 11:38 AM
Page 20

nicht für irgendwelche Körperverletzungen, Schäden oder Tod, sowie für Warenverluste und –Schäden an Fahrzeugen, einschließlich Ihres eigenen Fahrzeugs, oder
jeglichen anderen Schäden an Sie oder an Dritten, ungeachtet der Umstände oder
Bedingungen zu belangen und die Firma in jedem Falle schadlos zu halten. Sie
akzeptieren hiermit auch, dass die Firma keinerlei Verantwor tung für körperliche
Schäden irgendwelcher Art, unabhängig von Gründen, Zuständen oder Umständen, einschließlich eines Funktionsfehlers des Gerätes trägt. Alle Risiken die mit
dem Betrieb des Gerätes einhergehen, liegen ausschließlich und vollständig beim
Benutzer des Gerätes, ungeachtet dessen, ob das Gerät vom ursprünglichen Käufer
oder Drit ten benutzt wird. Die Firma setzt Sie hiermit davon in Kenntnis, dass dieses
Gerät außerdem einen Verstoß gegen örtliche, Bundes-, Staats- oder nationale Gesetze oder Vorschrif ten darstellen könnte und dass jegliche Benutzung des Geräts
ausschließlich auf eigenes Risiko und eigene Verantwortung er folgt.
1. Sie, Ihre Erben, Rechtsvertreter, Nachfolger oder Abtretungsempfänger verzichten
hiermit freiwillig und auf ewig auf jegliche Ansprüche, Forderungen, gerichtliche
Schritte und Haftungsansprüche, die direkt oder indirekt durch die Nutzung des
Gerätes entstehen könnten, ungeachtet der Umstände und UNABHÄNGIG DAVON,
OB DIES DURCH FAHRLÄSSIGKEIT ODER ANDERWEITIG UMSTÄNDE VERURSACHT
WURDEN und diese Schäden Ihnen zu einem späteren Zeitpunkt als Ergebnis der
Nutzung dieses Gerätes zugefügt werden könnten, und Sie entlasten, entbinden
und halten die Firma davon schadlos, soweit dies gesetzlich zugelassen ist.
2. Sie verstehen und übernehmen das Risiko, dass mit der Nutzung des Gerätes
verbunden ist, einschließlich des Risikos fahrlässiger Handlungen oder Unterlassungen seitens Dritter.
3. Sie bestätigen, dass Sie körperlich dazu in der Lage sind, das Gerät zu benut zen
und das Sie nicht unter einer Krankheit leiden bzw. Einschränkungen unterliegen,
die Ihre Fähigkeit zur sicheren Nutzung des Gerätes beeinträchtigen könnten.
Sie bestätigen, dass Sie mindestens achtzehn (18) Jahre alt sind und dass Sie hinsichtlich der Risiken, die mit der Nutzung des Gerätes verbunden sind, informiert
wurden. Sie stimmen weiterhin zu, dass Sie vor oder während der Nutzung des
Gerätes weder Alkohol noch irgendwelche bewusstseinsverändernden Drogen
zu sich nehmen werden die Ihre Aufmerk samkeit beeinträchtigen könnten.
4. Sie bestätigen unsere Warnungen verstanden zu haben, dass: (a) bei der Nutzung
des Geräts im Straßenverkehr Risiken und Gefahren bestehen, einschließlich
aber nicht nur in Bezug auf Verletzungen oder Krankheiten, Zerrungen, Brüche,
Teil- und/oder Totallähmung, Tod, oder andere Leiden, die zu ernsthaften Behinderungen führen könnten; (b) diese Risiken und Gefahren durch die Fahrlässigkeit des Herstellers oder dessen Ver treter oder Dritten verursacht sein könnten,
die an der Konstruktion oder Herstellung dieses Geräts beteiligt waren; (c) diese
Risiken durch vorhersehbare oder unvorhersehbare Ursachen hervorgerufen
werden könnten. Sie übernehmen hiermit alle Risiken und Gefahren sowie alle
Verantwor tung für alle Verluste und/oder Schäden, unabhängig davon ob sie
ausschließlich oder teilweise durch die Fahrlässigkeit oder das Verhalten anderer,
einschließlich seitens der Firma verursacht wurden.
5. Sie bestätigen, dass Sie diese Haftungsfreistellung gelesen haben, ihre Bedingungen
vollständig verstehen und dass Sie mit dem Verzicht auf Rückgabe des Gerätes
gegen Rückerstattung des Kaufpreises auch auf jegliche Forderungen verzichten.
Garantieverzi cht
Die Firma ÜBERNIMMT WEDER AUSDRÜCKLICHE NOCH STILLSCHWEIGENDE GARANTIEN HINSICHTLICH DES BEIGEFÜGTEN GERÄTES, EINSCHLIESSLICH JEGLICHEN IMPLIZITEN GARANTIEN HINSICHTLICH DER EIGNUNG FÜR EINEN BESTIMMTEN ZWECK ODER
SONSTIGE ABSICHTEN DES KÄUFERS. DAS GERÄT SAMT ZUBEHÖR WERDEN AUF EINER
“AS IS”-BASIS (D. H. OHNE MÄNGEL GEWÄHR), UND AUF “AS AVAILABLE”-BASIS ANGE-
BOTEN AUSSCHLIESSLICH JEGLICHER GARANTIEN, DIE ÜBER DIE IN DER BEILIEGENDEN
GEBRAUCHSANLEITUNG ERWÄHNTEN GARANTIEN HINAUSGEHEN.
Haftungsbeschrän kung
Die Firma IST IN KEINEM FALL FÜR IRGENDWELCHE BESONDEREN, INDIREKTEN
ODER FOLGESCHÄDEN MIT STRAFCHARAK TER ODER IRGENDWELCHE ANDEREN
SCHÄDEN DIE AUS DER VERWENDUNG DES GERÄTES ENTSTEHEN HAFTBAR, UN-
GEACHTET OB ES SICH UM EINEN VERTRAGSBRUCH, EIN DELIKT (EINSCHLIESSLICH
FAHRLÄSSIGKEIT), PRODUKTHAF TUNG ODER EINEN ANDEREN UMSTAND HANDELT,
AUCH WENN AUF DIE MÖGLICHKEIT DIESER SCHÄDEN HINGEWIESEN WURDE. HIER-
MIT BESTÄTIGEN UND STIMMEN SIE ZU, DASS ES SICH BEI DEN VORHER ERWÄHNTEN
BESCHRÄNKUNGEN UM GRUNDLEGENDE BESTANDTEILE DIESER VEREINBARUNG
HANDELT UND DASS DAS GERÄT IHNEN OHNE DIESE BESCHRÄNKUNGEN NICHT
ZUR VERFÜGUNG GESTELLT WÜRDE.
RÜCK ERSTATTUNG DES K AUFPREIS ES
FALLS S IE MIT DIESEN BEDI NGUNGEN NICHT UNE INGESCHRÄN KT EINV ER-
STANDE N SIND, BI TTEN WIR SIE , DASS GER ÄT AN di e Firma MI T VOLLER
KAUFPREI SRÜCKER STATTUN G ZURÜCK ZUGEBEN , VORAUSG ESETZT, DASS
SIE D IESES IN NERHALB VON 7 AR BEITSTAGE N NACH ERWE RB DES GE RÄTES
TUN (K aufbeleg er forderl ich) UND DAS GER ÄT SOWI E ALLE ZUBEHÖR TEI-
LE UNVERS EHRT SIN D. BEZIE HEN SIE SICH BEI DER RÜCKG ABE AUF DI ESE
BEST IMMUNGE N. BEI NICHT-R ÜCKGABE INNER HALB DES VO RGENANN TEN
ZEIT RAUMS BEFINDEN SIE SICH AUSDR ÜCKLICH I N UNEING ESCHRÄNK-
TER ZUSTIM MUNG MIT ALLEN OBEN ANGE FÜHRTEN BEDINGUNGEN UND
VER ZICHTEN AUF ALLE ZUKÜ NFTIGEN ANSPRÜCHE UND FORDE RUNGEN
GEGE NÜBER der Firma .
www.schuberth.com
20
QG SRC 207 - MAN00015.indd 20 2/1/11 11:38 AM
Page 21

U S E R M A N U A L
P O W E R E D B Y
QG SRC 207 - MAN00015.indd 21 2/1/11 11:38 AM
Page 22

TABLE OF CONTENTS
1. INTRODUCTION . . . . . . . . . . . . . . . . . . . . . . . . . . . . . . . . . . . . . . . . . . . . . . . . . . . . . . . . . 23
2. CONTENTS OF THE RETAIL BOX . . . . . . . . . . . . . . . . . . . . . . . . . . . . . . . . . . . . . . . . . 24
3. CHARGING THE HEADSET . . . . . . . . . . . . . . . . . . . . . . . . . . . . . . . . . . . . . . . . . . . . . . . 24
4. BASIC SETUP AND CONFIGURATION . . . . . . . . . . . . . . . . . . . . . . . . . . . . . . . . . . . . . 25
4.1 GENERAL FUNCTIONS . . . . . . . . . . . . . . . . . . . . . . . . . . . . . . . . . . . . . . . . . . . . . 25
4.2 SPOKEN STATUS ANNOUNCEMENTS . . . . . . . . . . . . . . . . . . . . . . . . . . . . . . 25
4.3 AUDIO SOURCES AND PRIORITIES . . . . . . . . . . . . . . . . . . . . . . . . . . . . . . . . . 25
4.4 SOFTWARE UPGRADE OPTION . . . . . . . . . . . . . . . . . . . . . . . . . . . . . . . . . . . . 25
4.5 RESETTING YOUR HEADSET . . . . . . . . . . . . . . . . . . . . . . . . . . . . . . . . . . . . . . . 26
5. GETTING STARTED . . . . . . . . . . . . . . . . . . . . . . . . . . . . . . . . . . . . . . . . . . . . . . . . . . . . . . . 26
5.1 REPLACING THE EXISTING ACOUSTIC COLLAR WITH THE
SRC-SYSTEM . . . . . . . . . . . . . . . . . . . . . . . . . . . . . . . . . . . . . . . . . . . . . . . . . . . . . . 26
5.2 POSITIONING THE SPEAKERS . . . . . . . . . . . . . . . . . . . . . . . . . . . . . . . . . . . . . . 26
5.3 POSITIONING THE MICROPHONE . . . . . . . . . . . . . . . . . . . . . . . . . . . . . . . . . . 27
5.4 REMOVING THE SRC-SYSTEM FROM YOUR HELMET . . . . . . . . . . . . . . . . 27
5.5 WEARING AND REMOVING THE HELMET . . . . . . . . . . . . . . . . . . . . . . . . . . 27
5.6 CLEANING THE ACOUSTIC COLLAR . . . . . . . . . . . . . . . . . . . . . . . . . . . . . . . 27
6. CONNECTING BLUETOOTH® ENABLED MOBILE PHONES, GPS OR
MP3 (A2DP) DEVICES . . . . . . . . . . . . . . . . . . . . . . . . . . . . . . . . . . . . . . . . . . . . . . . . . . . . 28
6.1 MOBILE PHONE . . . . . . . . . . . . . . . . . . . . . . . . . . . . . . . . . . . . . . . . . . . . . . . . . . 28
6.2 GPS DEVICE . . . . . . . . . . . . . . . . . . . . . . . . . . . . . . . . . . . . . . . . . . . . . . . . . . . . . . 29
6.3 MP3 MUSIC WIRELESS OPTION A2DP . . . . . . . . . . . . . . . . . . . . . . . . 29
7. BUILTIN FM RADIO AND EXTERNAL MP3 PLAYER CABLE OPTION . . . . . 30
7.1 FM RADIO . . . . . . . . . . . . . . . . . . . . . . . . . . . . . . . . . . . . . . . . . . . . . . . . . . . . . . . . . 30
7.2 CABLE CONNECTING YOUR MP3 PLAYER OR OTHER
EXTERNAL AUDIO SOURCES . . . . . . . . . . . . . . . . . . . . . . . . . . . . . . . . . . . . . . 31
8. USING THE MOBILE PHONE . . . . . . . . . . . . . . . . . . . . . . . . . . . . . . . . . . . . . . . . . . . . . . 32
9. USING THE INTERCOM . . . . . . . . . . . . . . . . . . . . . . . . . . . . . . . . . . . . . . . . . . . . . . . . . . . 32
9.1 INTRODUCTION . . . . . . . . . . . . . . . . . . . . . . . . . . . . . . . . . . . . . . . . . . . . . . . . . . 32
9.2 INTERCOM COMPATIBILITY . . . . . . . . . . . . . . . . . . . . . . . . . . . . . . . . . . . . . . . 32
9.3 BEFORE STARTING THE INTERCOM . . . . . . . . . . . . . . . . . . . . . . . . . . . . . . . 33
9.4 USING YOUR SRCSYSTEM FOR INTERCOM WITH OTHER
SRCSYSTEM HEADSE TS . . . . . . . . . . . . . . . . . . . . . . . . . . . . . . . . . . . . . . . . . 33
9.4a. TWOWAY INTERCOM . . . . . . . . . . . . . . . . . . . . . . . . . . . . . . . . . . . . . . 33
9.4b. THREEWAY INTERCOM . . . . . . . . . . . . . . . . . . . . . . . . . . . . . . . . . . . . 33
9.5 RECEIVING INTERCOM CALLS. . . . . . . . . . . . . . . . . . . . . . . . . . . . . . . . . . . . . 34
9.6 INITIATE INTERCOM CALLS . . . . . . . . . . . . . . . . . . . . . . . . . . . . . . . . . . . . . . . 34
9.7 VOICE CONNECT FEATURE VOX . . . . . . . . . . . . . . . . . . . . . . . . . . . . . . . . . 35
9.8 RESET PAIRING RESTORING THE ORIGINAL DEFAULT
CONFIGURATION . . . . . . . . . . . . . . . . . . . . . . . . . . . . . . . . . . . . . . . . . . . . . . . 35
9.9 NOTEWORTHY ISSUES . . . . . . . . . . . . . . . . . . . . . . . . . . . . . . . . . . . . . . . . . . . 35
9.10 TROUBLESHOOTING THE INTERCOM . . . . . . . . . . . . . . . . . . . . . . . . . . . . 35
10. CLICKTOL INK . . . . . . . . . . . . . . . . . . . . . . . . . . . . . . . . . . . . . . . . . . . . . . . . . . . . . . . . . . . 36
11. SUPPORT . . . . . . . . . . . . . . . . . . . . . . . . . . . . . . . . . . . . . . . . . . . . . . . . . . . . . . . . . . . . . . . 37
12. NOTICES . . . . . . . . . . . . . . . . . . . . . . . . . . . . . . . . . . . . . . . . . . . . . . . . . . . . . . . . . . . . . . . . 37
IMPORTANT: This is version 2.0 of the User Manual. Please note, that our
manual is updated periodically on our website in order to include the
very latest features as well the new options and functions of your new
SRC‑System. Please visit www.schuberth.com/leadmin/downloads/
SRC/SRC‑System_Manual‑1.pdf to check now if the manual you are
holding is the most updated version and download the website manual
version in your preferred language.
22
QG SRC 207 - MAN00015.indd 22 2/1/11 11:38 AM
Page 23

1. INTRODUCTION
Congratulations and thank you for choosing the Schuberth Rider
Communication-System™ (SRC-System™) Headset for motorcycle
helmets.
This manual will help you operate the headset, but you should rst
familiarize yourself with the Bluetooth® functionality of your mobile
phone and/or GPS device before using the SRC-System™.
The SRC-System™ retail box contains one headset unit. When paired
with another SRC-System™, the headsets can be used as an Intercom at a range of up to 300 m/ 1,000 ft (subject to terrain).
YOUR SRCSYSTEM OFFERS THE FOLLOWING CONNECTIVITY
OPTIONS:
1. Mobile phone communication (supporting Bluetooth® Handsfree*
and A2DP and AVRCP proles at a 10 m / 33 ft. range)
2. Wireless music-streaming (supporting the Bluetooth® Stereo A2DP
prole and compatible with a variety of MP3 Players, adapters and
other audio devices)
3. 2-way or 3-Way Bike-to-Bike Intercom for conference calls with
other SRC-System™ headsets (up to 300 m / 1,000 ft) in Full
Duplex** mode.
4. Driver-to-Passenger Intercom
5. Click-to-Link for spontaneous intercom communication with any
nearby SRC-System™
6. GPS Navigation instructions and Streaming Audio from compatible
Bluetooth® devices
7. Built-in FM Radio
8. as a stereo headset for listening to cable-connected audio devices,
(such as non-Bluetooth® MP3 Players and iPods®)
ADDITIONAL SPECIAL FEATURES:
➤AGC technology (Automatic Gain Control), allowing your
SRC-System™ to automatically increase or reduce its volume
according to ambient noise and driving speed. You can also
control the volume level manually.
➤VOX technology for safe and handsfree operation of some key func-
tions (Voice Dial, answer call, reject call).
➤PLC software (Packet Loss Concealment) for real-time compensa-
tion of audio losses in challenging environments.
➤Advanced software which you should update while in standby
mode, via any PC running Windows® XP™, Vista™ or Windows 7™.
➤Spoken status instructions, so that you always know to whom or what
device you are connected to at any given time.
We wish you a great riding experience and remain available for any inquiries you may have. Just write us at Kundenservice@schuberth.com
F-J. Görges Erwin Van Hoof
Director of Sales Vice President
SCHUBERTH GmbH Int. Sales Manager
Visit www.schuberth.com/src-tutorial/en to experience an interactive
demonstration of the SRC-System functions.
_______________________
* Mobile phones that do not support the Bluetooth® Han dsfree prole may prevent
you from using certain advanced features
** “Full Duplex” lets you to speak and hear the other party simultaneously, similar to
mobile or landline phone conversations and unlike walkie-talkie communications
Eng lish
23
QG SRC 207 - MAN00015.indd 23 2/1/11 11:38 AM
Page 24

2. CONTENTS OF THE RETAIL BOX
SRC-System™ for C3 helmets*
Flexible Boom
Pin
Microphone
2 Speakers
Wall charger plug
USB adapter cable
Velcro® pads
MP3 cable
Microphone sponges
Pin
User Manual, stickers
USB
Connector
Cover
USB Connector
SRC-System™ for C2 / Concept helmets
Microphone
Flexible
Boom
2 Speakers
Pin
USB Connector
Cover
Pin
USB
Connector
Volume Down / Rewind Button
Channel A Button
• Connect to Rider A
• Mp3 Button
Mobile Phone
Button
Channel B Button
• Connect to Rider B
• FM Radio Button
Volume Up / Forward Button
Channel A Button
• Connect to Rider A
• MP3 Button
Mobile Phone Button
Channel B Button
• Connect to Rider B
• FM Radio Button
Volume Up / Forward
Button
Volume Down / Rewind
Button
*The product is
oered in
IMPORTANT:
The cover lid protecting the micro USB Connector should be kept tightly
closed at all times to prevent moisture from entering the device.
3. CHARGING THE HEADSET
Make sure that your headset is fully charged for at least four
hours before initial use.
Insert the USB cable to the wall charger and
insert the other end of the cable to the
headset’s micro USB Connector. While charging,
the Red Light turns on. When charging is
complete, the Red Light will turn o.
Your wall charger and USB adaptor cable
serve two purposes:
1. Charging your headset from
any A/C wall socket or from a USB port on your computer
(charging time from computer takes longer)
2. Downloading software upgrades from any PC running
Windows® XP™, Vista™ or Windows 7™. (see section 4.4 for
details).
dierent sizes
24
QG SRC 207 - MAN00015.indd 24 2/1/11 11:38 AM
Page 25

4. BASIC SETUP AND CONFIGURATION
4.1 GENERAL FUNCTIONS
DESIRED RESULT REQUIRED ACTION
Turn on the headset
Turn o the headset
Increase the volume of
the current audio source
Decrease the volume of
the current audio source
Mute Simultaneously tap Volume Up and Volume
Batter y Level Indicator While on standby, press and hold the Volume
4.2 SPOKEN STATUS ANNOUNCEMENTS
Your SRC-System™ headset oers various audio status messages
sent through your speakers. Among others, it will announce your
connection state, e.g. whether you are in mobile phone or on
intercom mode, it will conrm changes of such modes and more. By
default the feature is ON, and can be disabled as outlined below.
The Voice menu can be set at any one of the available language
options.
Entering the Voice Menu: Press and hold the CHANNEL “A” button
and CHANNEL “B” button simultaneously for 3 seconds while the
Press and hold the Mobile Button
four seconds
LED indication: Three blue ashes.
Audio feedback: Ascending tone (low-high).
Press and hold the Mobile Button
three seconds
LED indication: Three red ashes.
Audio feedback: Descending tone (high-low).
Tap the Volume Up Button (sets and saves the
volume per source)
Tap the Volume Down Button (sets and saves
the volume per source)
Down while any audio is on
Up Button for 3 seconds
Blue light = Battery is fully charged
Red/blue light = Battery is half full
Red light = Battery is almost empty
for at least
for at least
headset is on standby. Now, follow the voice instructions in English
or choose your preferred language.
Disable/Enable status announcements: While on standby, press
and hold the Volume Down Button for 6 seconds.
LED ON: indication: Solid blue + Audio feedback: One short beep
LED OFF: indication: Solid red + Audio feedback: Two short beeps
4.3 AUDIO SOURCES AND PRIORITIES
The dierent audio sources connected to the SRC-System™ are
prioritized as shown below, i.e. the higher priority source will always
override and interrupt the lower one.
For example, incoming mobile phone calls will interrupt ongoing
Intercom calls, while incoming intercom calls will interrupt the audio
from the built-in FM Radio etc.
Higher Priority
Lower Priority
1. Mobile phone audio or GPS instructions
(device specic)
2. Intercom / Click-to-Link
3. A2DP audio source
4. FM Radio (built-in)
5. Auxiliary Line-In Port (for corded connection
e.g. MP3 players).
4.4 SOFTWARE UPGRADE OPTION
In the future you will be able to install Software upgrades and program
patches to keep the software of your SRC-System™ up-to-date. Among
others, future Software upgrades will include
additional status announcements and other valuable functions. To ensure that you don’t miss out on the latest versions,
please register online at www.schuberth.com/src-register/en and
have your serial number ready. To download upgrades, please use the
USB cable included in the SRC-System™’s retail package.
Upgrades are only available for Windows® based computers with
XP™, Vista™ or Windows 7™ operating systems.
Eng lish
25
QG SRC 207 - MAN00015.indd 25 2/1/11 11:38 AM
Page 26

Microphone Boom
Snap
Button
Snap
Button
Microphone
Boom
26
4.5 RESETTING YOUR HEADSET
If your SRC-System™ fails to respond despite repeated attempts,
you can reset your headset by charging it. After approximately 10
seconds, remove the headset from the charger and turn it on again. It
should now respond as expected.
5. GETTING STARTED
5.1 REPLACING THE EXISTING ACOUSTIC COLLAR WITH THE
SRCSYSTEM
First, remove the existing Acoustic Collar from your helmet as follows:
1. Open both snap buttons.
2. Pull out the Acoustic Collar from the rear at its bended center.
3. Release the collar’s pins from their corresponding indentations
inside the helmets rim.
4. Now proceed and replace the existing collar with the new
SRC-System™ Acoustic Collar. As you secure the SRC-System™
into place, be sure to have the speaker cords inside the helmet.
5. Slide and insert the pin located at the edge of the control panel into it’s
corresponding indentation on the helmet and close the snap button.
Pin
6. Insert the other pin on the opposite side of the Acoustic Collar into
place and close the second snap button.
7. Push and insert the Acoustic Collar starting from the center area to
the back of the helmet area. Do the same for the remaining parts
to secure the Acoustic Collar into place.
8. Make sure that both snap buttons remain fastened, and that the
microphone boom is located on the inner side of your helmet
(between the SRC-System™ and the inner padding of the helmet).
C3 helmet C2/Concept helm et
9. Make sure to close the cover of the USB connector, and then tuck
it away into the folds of the Acoustic Collar (into the back of the
Acoustic Collar on the control panel side).
5.2 POSITIONING THE SPEAKERS
For best audio results, make sure that both of your speakers are placed
as closely as possible just opposite your ears.
C2 & Concept helmets:
If you have purchased an SRC-System™ version
that ts C2 and Concept helmets, simply attach
the speakers opposite your ears onto the internal
lining by using the supplied Velcro pads.
C3 helmet:
Note: While you can attach the speakers in the same manner as e xplained
above (for C2 and concept helmets), we recommend that you use the
following procedure.
The following applies to both sides of the C3 Acoustic Collar:
1. Release the snap buttons on both sides of the Acoustic Collar (the
same buttons that you just fastened earlier).
QG SRC 207 - MAN00015.indd 26 2/1/11 11:38 AM
Page 27

2. Open the two red buttons located at the bottom part of the
interior lining that cover the cheek pads (the
button on the back is held by a black ring).
Lift the lining slightly.
3. Attach the corresponding Velcro pad to the
identically shaped depression on the EPS (expanded polystyrene) and position the speaker
on the Velcro pad.
4. Close the two red buttons. Make sure the red button is still inside
its black holding ring.
5. Now, close the snap buttons of the Acoustic Collar on both sides
and make sure they are securely fastened.
5.3 POSITIONING THE MICROPHONE
To assure smooth closing (ip-down) of the helmet’s chin section, please
remove rst its triangular Anti-Noise Pad and proceed as follows:
1. Bend the exible microphone boom as shown in the image.
2. Press the microphone towards the center of your mouth with its
large surface facing you (not the narrow one).
3. Flip-down and close the chin section of your helmet. You may
need to use both of your hands to close the chin section properly.
4. While the chin section is closed and the visor is open, insert your hand
into the opening of the visor and push the microphone away, towards
the center of the chin section directly opposite of your mouth.
Chin
Section
Visor
5.4 REMOVING THE SRCSYSTEM™ FROM YOUR HELMET
1. Open both snap buttons.
2. Lift and push the Acoustic Collar’s arch from the center.
3. Release the Acoustic Collar’s pins from their corresponding indentations inside the helmet’s rim.
5.5 WEARING AND REMOVING THE HELMET
The electronic components of SRC-System™ are safely embedded
inside the Acoustic Collar. To avoid discomfort while you put on your helmet or while removing it, we recommend that you proceed as follows:
1. Expand the helmet opening by rmly holding the chin straps and
pulling them forcefully apart.
2. While pulling the straps apart, slide the
helmet over your head, beginning from
the neck forward.
3. To remove the helmet, proceed along the
same lines by rst pulling the straps apart
and then pushing the entire helmet upwards.
NOTE: Your SRC‑System™ Acoustic Collar is designed for maximum
comfort. However, since it contains an entire electronic kit within, it will
somewhat bulge a bit. Therefore, putting your SRC equipped helmet on or
taking it o may feel dierent than what you are used to with a standard
Acoustic Collar. Remember: The more you pull the helmet straps apart
when putting on your helmet or taking it o, the smoother the process will
be, allowing the stiness of the Acoustic Collar to decrease.
5.6 CLEANING THE ACOUSTIC COLLAR
To clean the Acoustic Collar, rst close tightly the micro USB connector of the SRC-System™. Use only a slightly damp and lukewarm cloth.
Avoid soaking the Acoustic Collar with water or any other uid. Never
submerge it and refrain from letting water come in contact with the
speakers or the microphone. Allow the unit to dry at room temperature.
Eng lish
27
QG SRC 207 - MAN00015.indd 27 2/1/11 11:38 AM
Page 28

6. CONNECTING BLUETOOTH ENABLED MOBILE
Up to 300 m / 1,000 ft.
Bike-to-B ike
Intercom Range*
Mobile pho ne
& A2DP connec tivity
Built-in
FM radio
GPS
MP3
player
PHONES, GPS OR MP3 (A2DP) DEVICES
Multiple Device Connectivity (“MDC”) with Bluetooth®
compatible Devices
Thanks to MDC technology the SRC-System™ oers parallel connec-
tivity as follows*:
➤ Intercom with up to two other SRC-System™ headsets
➤ Bluetooth enabled Mobile Phone / GPS device
➤ A2DP enabled MP3 Player or A2DP Adapter
GPS
Built-in
FM radio
MP3
player
Up to 300 m / 1,000 ft.
Bike-to-B ike
Intercom Range*
NOTE: If you plan to use your mobile phone while using a Bluetooth® GPS
device, then you should pair your mobile phone to the GPS and not to the
SRC‑System™ headset.
* see restrictions under 9.4 b
Mobile pho ne
& A2DP connec tivity
6.1 MOBILE PHONE
To use your Bluetooth® mobile phone with the SRC-System™, you
must rst pair the two devices.
NOTE: If you plan to use a GPS device in parallel with your mobile phone, then you
should pair your mobile phone to the GPS device and not to the SRC‑System™. In
such case, skip this section and proceed directly with section 6.2.
Pairing is a one time process. Once the headset is paired to a
specic mobile phone, they will remain paired and automatically
recognize each other whenever they are within range.
If the connection between the phone and headset is lost, tap the
Mobile Button on your headset to reconnect the devices.
PAIRING THE HEADSET TO A BLUETOOTH MOBILE PHONE:
1. Turn on your phone and make sure its Bluetooth® function is activated.
Turn on your headset by pressing the Mobile Phone Button for at least
three seconds resulting in three blue ashes.
2. With the SRC-System™ turned ON, press and hold the Mobile
Button for at least six seconds until the Red and Blue Lights begin
rapidly alternating.
3. Search for Bluetooth® devices on your phone by following the phone’s
instructions. Consult your phone’s User Manual for more information.
4. After a few seconds the phone will list “SRCS” (incl. its software
version) as a discovered device. Select it and follow your phone’s
instructions to accept the pairing.
5. When prompted, enter 0000 (four zeros) as your PIN or passkey.
6. Your phone will conrm that pairing has succeeded and the headset
will begin ashing slowly in Blue.
NOTE: Not all Bluetooth® mobile phones can broadcast Bluetooth®
Stereo music (A2DP), even if the phone has an MP3 player application.
Consult your mobile phone’s User Manual for more information.
With some mobile phones, you may need to tap the Mobile Button to connect the headset to the phone after pairing is complete. The SRC‑System™
will automatically connect to the last phone connected to the headset.
QG SRC 207 - MAN00015.indd 28 2/1/11 11:38 AM
28
Page 29

NOTE: If the pairing process is not completed within two minutes the
headset will return to Standby mode.
6.2 GPS DEVICE
To use a Bluetooth® enabled GPS device with the SRC-System™, you
must rst pair the two devices. This will allow your GPS to transmit
navigation instructions and audio to the speakers of your headset.
NOTE: Not all Bluetooth® enabled GPS devices allow connections to
Bluetooth® headsets. Among others, any such GPS unit must be compatible
with the Bluetooth® “Handsfree” gateway protocol. Please consult your GPS
device’s User Manual for more information.
PAIRING THE HEADSET TO A GPS DEVICE:
1. Turn on your GPS and turn on your headset.
2. With the SRC-System™ turned ON, press and hold the Volume Up
Button for at least six seconds until the Red and Blue Lights begin
ashing simultaneously.
3. Search for Bluetooth® headsets on your GPS device by following the
device’s instructions. Consult your GPS device’s User Manual for
more information.
After a few seconds the GPS will list “SRCS” (incl. its software version)
as a discovered device. Select it and follow your GPS’s instructions to
accept the pairing.
4. If your GPS device prompts for a PIN or Passkey enter 0000 (four
zeros).
5. Your GPS device will conrm that pairing has succeeded. Your
SRC-System™ will begin ashing slowly in Blue.
6. If you wish to use a Bluetooth® mobile phone to make and receive calls
through the headset, you should pair your mobile phone to your GPS
device by following the instructions in your GPS manual.
NOTE: If the pairing process is not completed within two minutes the
headset will return to Standby mode.
NOTE: The priority schedule of your SRC‑System™ has been set in a way to
avoid incoming intercom calls to interrupt GPS instructions in progress. In such
case the intercom caller will hear a busy signal and you will hear two beeps, indicating that an intercom caller is trying to page you. (see section 4.3 for details
on audio priorities of paired devices).
6.3 MP3 MUSIC WIRELESS OPTION A2DP
Your headset is designed to receive wireless stereo music from A2DP
sources and mobile phones that support the Bluetooth® A2DP and
AVRCP proles (mostly 3rd generation devices).
Using a Bluetooth® device that supports the AVRCP prole will allow you
to operate all major A2DP source functions directly from your headset.
NOTE: The SRC‑System™ can also receive audio via the enclosed cable
from non-Bluetooth® MP3 Players or audio sources as described in
section 7.2
While listening to music from an A2DP source, you will not miss any
mobile or intercom calls, as the headset will automatically stop the
music giving preference to the incoming call. However, after you terminate your call, some MP3 sources may not automatically continue
but require manual re-activation.
SETTING UP YOUR MP3 PLAYER FOR BLUETOOTH STEREO A2DP
TRANSMISSION
To use a Bluetooth® Stereo (A2DP) enabled MP3 Player or Adapter to
listen to stereo music, you must rst pair the device to your headset.
NOTE: When pairing two Bluetooth® audio devices to the SRC-System™,
please follow instructions below. Bluetooth® Stereo device pairing will
vary depending on the combination of Bluetooth® devices you are using.
PAIRING THE HEADSET TO AN MP3 PLAYER OR ADAPTER
NOTE: If your A2DP source is integrated inside your Mobile Phone, then
you should pair it with your headset as described in section 6.1 above
Eng lish
29
QG SRC 207 - MAN00015.indd 29 2/1/11 11:38 AM
Page 30

1. Turn on your MP3 Player or Adapter, and make sure that its Bluetooth®
function is activated.
2. With the SRC-System™ headset turned ON, press and hold the
Mobile Button for at least six seconds until the Red and Blue Lights
begin alternating rapidly:
3. Search for Bluetooth® headsets on your MP3 Player by following the
device’s instructions.
NOTE: For use of a Bluetooth® adapter, follow the device’s instructions.
4. After a few seconds the MP3 Player will list “SRCS” (incl. its software
version) as a discovered device. Select it and follow your MP3
Player’s instructions to accept the pairing.
5. If your MP3 player prompts for a PIN or Passkey enter 0000 (four zeros).
6. Once pairing is complete, your MP3 Player or Adapter may conrm
that pairing has succeeded, and the headset will begin ashing
slowly in Blue.
NOTE: If the Pairing process is not completed within two minutes the
headset will return to Standby mode.
7. BUILT-IN FM RADIO AND EXTERNAL MP3
PLAYER (CABLE OPTION)
7.1 FM RADIO
The SRC-System™ is equipped with an FM stereo radio receiver and
RDS (Radio Data System) technology.
Turn on the radio While in Standby mode, press and hold the CHAN-
Turn o the radio While listening to the Radio, press and hold the
Switch to next
preset station
Start Intercom call While listening to the Radio, start talking loudly
Initiate Voice Dial
from your Mobile
Phone
NEL “B” button for 3 seconds
CHANNEL “B” button for 3 seconds
While listening to the Radio, tap the CHANNEL “B”
button to cycle through the 6 Preset FM Stations
While listening to the Radio, tap the Mobile Button
and pronounce loudly the name of the person you
wish to call. This feature is supported only by mobile
phones that include the Voice Dial feature
Operating your A2DP source from your headset
Play press and hold the MP3 Button for 3 seconds
Pause / Stop* press and hold the MP3 Button for 3 seconds
Forward press and hold the Volume Up Button for 3 seconds
Rewind** press and hold the Volume Down Button for 3 seconds
* Varies depending on your mobile phone
** With some phones you may need to repeat this action once more
30
QG SRC 207 - MAN00015.indd 30 2/1/11 11:38 AM
Initiate Redial from
your Mobile Phone
RDS ON/OFF
(Default: OFF)
While listening to the Radio, tap the Mobile Button
twice
While the Radio is on, press and hold Volume Up and
Volume Down Buttons simultaneously for 3 seconds
Thanks to the RDS feature, your headset will automatically select the
strongest signal available for the FM station you wish to listen to, no
matter where you are riding. This allows you to leave your hands on
the handlebars at all times with no need to adjust the radio station
frequency while you are in motion.
Page 31

RDS ON/OFF (press simultaneously 3 seconds while Radio is on)
• FM Radio ON / OFF (press 3 sec.)
• Switch among pre-saved stations (tap briey)
Searching for and setting new stations
1. While the Radio is on, press and hold the Volume Up or Volume
Down Button for three seconds or until you hear the next station
on your headset.
• Pressing Volume Up will search upwards (higher frequency).
• Pressing Volume Down will search downwards (lower
frequency).
2. Once a station is found, searching stops and you can hear the station.
3. To continue searching, press the Volume Up or Volume Down Button again for three seconds.
4. To save this station, refer to the following section. You may still
continue to listen to the current unsaved station.
Saving a selected station
1. Select the station number from one to six that you wish to set by
tapping the CHANNEL “B” button until the desired station is found.
2. Search for a new station as described in the section above.
3. Tap the CHANNEL “B” button within 20 seconds of nding the station to save the current station.
4. To save another station, tap the CHANNEL “B” button again to
reach next station number.
5. If you don’t save the station, the Radio will exit search mode without saving the current station. You can still continue to listen to the
current unsaved station. Tapping the CHANNEL “B” Button in this
case will move to the next saved station.
You can store up to six stations.
7.2 CABLE CONNECTING YOUR MP3 PLAYER OR OTHER
EXTERNAL AUDIO SOURCES
Using the auxiliary line-in port for cable connectivity
Your headset allows you to connect non-Bluetooth® audio sources,
such as MP3 players to the headset by using the enclosed cable.
1. Make sure the headset is on Standby mode, ashing slowly in Blue.
2. Connect the MP3 cable to your MP3 player/audio source’s
headset jack and insert the other
end of the cable into the micro USB
Connector.
3. Operate the MP3 Player device by using its own buttons as usual
(FF / REW / PLAY / PAUSE).
Volume can be adjusted through the MP3 Player or the Volume
Buttons of the headset.
Any other audio connection will automatically mute the MP3 Player. The
audio signal will return only when headset is once again in Standby
mode.
NOTE: While listening to your MP3 player, the VOX feature is disabled
Eng lish
31
QG SRC 207 - MAN00015.indd 31 2/1/11 11:38 AM
Page 32

8. USING THE MOBILE PHONE
INITIATING AND RECEIVING MOBILE PHONE CALLS
BASIC FUNCTIONS
Answer a call Tap the Mobile Button or speak loudly any word of
Reject a call Remain silent for 15 seconds, or press and hold the
Terminate a call Tap the Mobile Button during a call, or let the other
Voice Dial During Standby, tap the Mobile Button and pro-
Redial During Standby, tap the Mobile Button twice
ADVANCED FUNCTIONS FOR 3WAY COMMUNICATION:
Add/Remove
CHANNEL “A”
headset to/from
phone call
Add/Remove
CHANNEL “B”
headset to/from
phone call
When the headset is on an active phone call, any Intercom call
request will be automatically rejected.
Once the phone call is terminated, you can initiate and accept Intercom calls.
your choice
Mobile Button for 3 seconds during an incoming call
party terminate the call
nounce loudly the name of the person you wish to
call. This feature is supported only by mobile phones
that include the Voice Dial feature
Tap the CHANNEL “A” button while on a phone call
Tap the CHANNEL “B” button while on a phone
call
STATUS LIGHTS
LED Indication Status
None Headset is o
1 blue ash every 3 seconds Standby – No call is in progress
2 blue ashes every 3 seconds Audio active
1 red ash every 3 seconds Standby - Battery is low
2 red ashes every 3 seconds Low battery while audio active
Solid red Charging
9. USING THE INTERCOM
9.1 INTRODUCTION
Your SRC-System™ allows you to connect to other bikers using
SRC headsets within a range of up to 300 meters / 1,000 ft. (subject
to terrain and other conditions). To set up one or two Intercom
Bluetooth® connections, you must rst pair your SRC-System™
headset with the other headsets.
Pairing is a one time process. Once completed, the headsets will
remain paired and automatically recognize each other whenever
they are within range.
Your headset has two Intercom channels available for headset-to-headset connections. Therefore, your SRC-System™ can communicate simul-
taneously in conference mode with up to two other SRC headsets.
9.2 INTERCOM COMPATIBILITY
You can use your SRC-System™ headset to conduct Intercom
communications with any other SRC-System™ headset and with
the Cardo scala rider headsets. For further details please visit
www.cardosystems.com/SRC.
32
QG SRC 207 - MAN00015.indd 32 2/1/11 11:38 AM
Page 33

9.3 BEFORE STARTING THE INTERCOM
Your SRC-System™ headset has two buttons designated for quick con-
nection to two other headsets. These other headsets are referred to as
CHANNEL “A” and CHANNEL “B”.
Channel “A“ Button
Channel “B“ Button
Before you can begin using the intercom for Bike-to-Bike communication with one or two other headsets, all units must rst be paired.
9.4 USING THE SRC-SYSTEM™ FOR INTERCOM WITH OTHER
SRC-SYSTEM™ HEADSETS
INTERCOM
CHANNEL
CHANNEL “A” CHANNEL “A” BUTTON Rapid RED ashing
CHANNEL “B” CHANNEL “B” BUTTON Rapid BLUE ashing
PAIRING / CONNECTION
BUTTON
PAIRING MODE LED
INDICATORS
9.4a. TWO-WAY INTERCOM PAIRING OPTIONS BETWEEN TWO
PARTICIPANTS
Using two SRC-System™ headsets
1.While both headsets are turned OFF, turn them ON by pressing and
holding the Mobile Buttons until the Blue Lights ash three times.
2. Make sure that both headsets are now ashing slowly in Blue.
3. Choose an available CHANNEL you wish to use to pair the headset
(CHANNEL “A” or CHANNEL “B”).
NOTE: Selecting a CHANNEL that is already in use will override the paired
headset on that CHANNEL with the newly paired headset.
4. On the SRC-System™ headset, press and hold the assigned
CHANNEL BUTTON (“A” or “B”) for at least six seconds until the
headset’s BLUE or RED Light begins ashing rapidly, indicating it is
in Intercom Pairing mode. (See Intercom Channel Table for Pairing
LED indication for each CHANNEL).
5. Repeat Step 3-4 for the second SRC-System™.
6. Within a few seconds, both headsets will show a solid light for two
seconds, indicating that the two headsets are now paired, connected and ready for use.
NOTE: If the Pairing process is not completed within two minutes the
headset will return to Standby mode.
Initiate Intercom calls
There are two ways to start an Intercom call with your paired headset
while the headset is in Standby mode:
VOICE CONNECT:
Start talking loudly
Once you start talking loudly, an Intercom call will
be established with the other paired headset.
The Intercom call will stay on until all participants
remain silent for 30 seconds.
CHANNEL BUTTON
CONNECT:
Tap the chosen
CHANNEL Button once
to add or remove the
other headset from an
Intercom call.
9.4b. THREE-WAY INTERCOM
The SRC-System™ oers three-way intercom conference connectivity as follows:
Eng lish
33
QG SRC 207 - MAN00015.indd 33 2/1/11 11:38 AM
Page 34

Use Channel “B ”Use Channel “A”
First SRC-System™
Rider “A”
Second SRC-System™
Rider “B”
Third SRC-System™
Rider “C”
In this conguration Rider “B” is paired to Rider “A” and to Rider “C”.
IMPORTANT: Since Rider “B” uses two Bluetooth® connections during the
conference mode, Rider “B” will be disconnected from the mobile phone or GPS
device until the conference mode is terminated. Upon termination, Rider “B” will
automatically re-connect to his mobile phone or GPS. Rider “A” and “C” remain
connected to their mobile phones or GPS devices during the 3-way intercom call.
Set-up and conguration of three-way intercom connectivity
INTERCOM
CHANNEL
CHANNEL “A” CHANNEL “A” BUTTON Rapid RED ashing
CHANNEL “B” CHANNEL “B” BUTTON Rapid BLUE ashing
PAIRING / CONNEC-
TION BUTTON
PAIRING MODE LED
INDICATORS
PAIRING OPTIONS BETWEEN THREE PARTICIPANTS
Pairing three SRC-System™ headsets is achieved by simply repeating
the procedure in the above section 9.4a with a third SRC-System™
headset (in a dierent CHANNEL).
1. Pair your SRC-System™ with the second SRC-System™ as
described in section 9.4a (Using CHANNEL “A”).
2. Pair your SRC-System™ with the third SRC-System™ as
described in section 9.4a (Using CHANNEL “B”)
Initiate Intercom calls
There are two ways to start an Intercom call with your paired headsets
while the headset is in Standby mode:
VOICE CONNECT:
Start talking loudly
Once you start talking loudly, an
Intercom call will be established
with both paired headsets,
CHANNEL “A” and CHANNEL “B”
(if both are available).
CHANNEL BUTTON CONNECT:
Single tap the CHANNEL “A” Button
to add or remove the CHANNEL “A”
headset from an Intercom call.
Single tap the CHANNEL “B” Button
to add or remove the CHANNEL “B”
headset from an intercom call.
9.5 RECEIVING INTERCOM CALLS
Once another paired headset tries calling you via intercom, the call
will begin almost instantly.
NOTE: The headsets preset priority modes have been set in a way to avoid incoming intercom calls from interrupting mobile phone calls and GPS instructions in progress. In such case the intercom caller will hear a busy signal and
you will hear two beeps, indicating that an intercom caller is trying to page
you. (see section 4.3 for details on audio priorities of paired devices).
9.6 INITIATE INTERCOM CALLS
There are two ways to start an Intercom call with headsets that are paired to
your SRC-System™ (make sure you are in Standby mode):
VOICE CONNECT:
Preferred for relatively brief conversations
as it takes the channel into standby mode
after 30 seconds of silence
Start talking loudly
Once you start talking loudly, an
Intercom call will be established with
both paired headsets, CHANNEL “A” and
CHANNEL “B” (if both are available).
The Intercom call will stay on until all
participants remain silent for 30 seconds.
(Applicable for 2-way communication)
CHANNEL BUTTON
CONNECT:
Preferred for extended conversations as it leaves the channel
open and active
Single tap the CHANNEL “A”
Button to add or remove the
CHANNEL “A” headset from an
Intercom call.
Single tap the CHANNEL “B”
Button to add or remove the
CHANNEL “B” headset from an
intercom call.
34
QG SRC 207 - MAN00015.indd 34 2/1/11 11:38 AM
Page 35

NOTE: While the Intercom is on, the Redial and Voice Dial functions will be
disabled.
9.7 VOICE CONNECT FEATURE VOX
The SRC-System™ also oers VOX technology for safe and hands-
free operation of some key functions.
For incoming calls, just pronounce loudly any word (e.g. “hello”).
To reject an incoming call, you need only to remain silent for about
15 seconds.
To reject an intercom call remain silent for 30 seconds.
ENABLE/DISABLE VOX: While on standby press and hold the Vol-
ume Up and Volume Down Buttons simultaneously for three seconds
until you hear a beep. The default status is Voice Connect enabled.
NOTE: The Enable/Disable Voice Connect feature aects only the Intercom
functionalit y.
9.8 RESET PAIRING RESTORING THE ORIGINAL DEFAULT
CONFIGURATION
This section is only relevant once you have completed a pairing process
You can delete all of your paired devices at any time as follows:
1. With the SRC-System™ headset turned ON, press and hold the
Mobile Button for at least six seconds until the Red and Blue Lights
begin rapidly alternating.
2. Press and hold the Volume Up Button for three seconds.
3. The Red and Blue Lights will ash ve times simultaneously and
then the headset will turn o, conrming that Reset was successfully completed.
9.9 NOTEWORTHY ISSUES
a. Busy Status (When using a SRC-System™ headset)
When attempting an Intercom call with a headset that is already on
a Phone/ GPS/ Intercom call, you will hear two beeps indicating the
other headset is busy.
b. Automatic Reconnection of the Intercom
If the SRC-System™ and another paired headset go out of range and
disconnect from each other, the SRC-System™ will immediately try
to reconnect to the other headset.
You can manually reconnect the intercom call while the headset is
in Standby mode by pressing the CHANNEL “A” or the CHANNEL “B”
Button to connect to the respective lost connection.
c. Conference Mode Limitations
Whenever you enter the Intercom Conference mode among three
participants (including yourself), the participants who maintain
simultaneously two active connections will not be able to receive
mobile phone calls or GPS messages as long as the conference call is
in progress (see details in sections 9.4 b).
9.10 TROUBLESHOOTING THE INTERCOM
First, make sure your microphone is located properly in front of the
center of your mouth.
The SRC-System™ is designed for use in loud environments.
Therefore, you should test the Intercom functionality only in a noisy
environment, such as next to an idling motorcycle and not indoors.
Please also verify that the headsets were paired together properly by
following the instructions in the relevant Setup sections.
Eng lish
35
QG SRC 207 - MAN00015.indd 35 2/1/11 11:38 AM
Page 36

10. CLICKTOLINK
Click-to-Link is the spontaneous “social” nature of your SRC-System™.
This unique feature will enable you to instantly initiate one-to-one
intercom calls with other SRC-System™ users in the near vicinity without
going through a pairing process in advance. Think of it as a private biketo-bike channel that you can set up on-the-y with other SRC-System™
users that you spot next to a trac light or along the road.
The Click-to-Link feature can of course be disabled at any time, blocking
any attempt by other users to establish a spontaneous link.
USING CLICKTOLINK
Disable/Enable Click-to-Link: The feature can be turned on or o
via the Settings Customization Menu (see Section 4.2). By default,
this feature is DISABLED.
AUDIO SOURCES AND PRIORITIES
The dierent audio sources connected to the SRC-System™ are
prioritized as shown below, i.e. the higher priority source will always
override and interrupt the lower one.
For example, incoming mobile phone calls and GPS navigation instructions will interrupt ongoing Click-to-Link calls, while incoming Click-to-Link
calls will interrupt the audio from the built-in FM Radio etc.
Click-to-Link established calls and Intercom calls have the same priority:
If one is in use, the other is unable to interrupt. Therefore, a Click-to-Link
request cannot interrupt an Intercom call in progress, and vice-versa.
Higher Priority
Lower Priority
1. Mobile Phone audio or GPS instructions (device
specic)
2. Intercom / Click-to-Link (same priority level)
3. A2DP audio source
4. FM Radio (built-in)
5. Auxiliary Line-In Port (for corded connection
e.g. MP3 players).
IC (Intercom) Request Tone: If you are on a Click-to-Link call and
Rider A or Rider B try to connect to you for an IC Call, you will hear an
IC Request Tone while the other party will hear a rejection beep.
If your Click-to-Link connection is dropped for any reason and other
Click-to-Link-enabled units are nearby, new Click-to-Link connections
may link up with users other than your initial connection.
General Functions
Categor y Desired result Required Action
Making
Click-to-Link
calls
Receiving
Click-to-Link
calls
During
Click-to-Link
calls
* The SRC‑System™ searches for another Click-to-Link enab led unit for up to
10 seconds, while beeping and ashing red.
NOTE: Click-to-Link connections will not replace or change your current Rider
A and Rider B intercom pairings. Click-to-Link uses a separate temporary
channel to connect to a Click-to-Link conversation partner.
Start a Click-to-Link call
request*
Cancel a Click-to -Link call Tap Channel “A” Button
Accept a Click-to-Link call When you hear the ringtone,
Reject a Click-to-Link call When hearing the ring tone,
End a Click-to-Link call Tap Channel “A” Button
Double tap Channel “A” Button
tap Channel “A” Button or speak
loudly to answer by VOX
remain silent for 10 seconds or
until the ring tone subsides
36
QG SRC 207 - MAN00015.indd 36 2/1/11 11:38 AM
Page 37

11. SUPPORT
12. NOTICES
For additional information please visit our website at
www.schuberth.com
For technical support please contact us at:
Kundenservice@schuberth.com
Phone: +49-391-8106-555
For the latest information on Software upgrades please visit our
website at www.schuberth.com/en/products/service/
src-systemtm.html and register on-line.
IMPORTANT:
OPENING ACOUSTIC COLLAR ZIPPER VOIDS WARRANTY!
The electronic components inside the Acoustic Collar of the
SRC-System™ are closed by a sealed zipper. Please do not tamper
with or open the zipper as this will void your warranty.
Federal Communications Commission (FCC) / Industry Canada (IC)
Statement
15.21
You are cautioned that changes or modications not expressly approved by
the part responsible for compliance could void the user’s authority to operate the equipment.
15.105(b)
This equipment has been tested and found to comply with the limits for a
Class B digital device, pursuant to part 15 of the FCC / IC rules. These limits
are designed to provide reasonable protection against harmful interference
in a residential installation. This equipment generates, uses and can radiate
radio frequency energy and, if not installed and used in accordance with
the instructions, may cause harmful interference to radio communications.
However, there is no guarantee that interference will not occur in a particular
installation. If this equipment does cause harmful interference to radio or
television reception, which can be determined by turning the equipment o
and on, the user is encouraged to try to correct the interference by one or
more of the following measures:
• Reorient or relocate the receiving antenna.
• Increase the separation between the equipment and receiver.
• Connect the equipment into an outlet on a circuit dierent from that to
which the receiver is connected.
• Consult the dealer or an experienced radio/TV technician for help.
Operation is subject to the following two conditions:
1) this device may not cause interference and
2) this device must accept any interference, including interference that may
cause undesired operation of the device.
Eng lish
37
QG SRC 207 - MAN00015.indd 37 2/1/11 11:38 AM
Page 38

FCC/IC RF Radiation Exposure Statement:
This equipment complies with FCC/IC radiation exposure limits set forth for an
uncontrolled environment. End users must follow the specic operating instructions for satisfying RF exposure compliance. The antenna used for this transmitter
must not transmit simultaneously with any other antenna or transmitter, except
in accordance with FCC/IC multi-transmitter product procedures.
European CE Notice
The SRC-System™ headset (the “Product”) is in conformity with the following
essential requirements of Council Directive 1999/5/EC (referred to as R&TTE
Directive): Articles 3.1a, 3.1.b and 3.2. The Product is manufactured in accor-
dance with Annex II of the above directive.
Declaration of Conformity (DOC)
The SRC-System™ headset is compliant with and adopts the Bluetooth® Speci-
cation 2.1 and has successfully passed all interoperability tests that are specied in the Bluetooth® specication. However, interoperability between the
device and other Bluetooth®-enabled products is not guaranteed.
WAIVE R AND GEN ERAL RELEASE
(not f or countr ies of the Euro pean Union)
By using the SRC-System™ you will waive substantial legal rights including the
right to sue.
Please read the following carefully before using the device. If you do not accept
all terms of this agreement, you should immediately return the product for a
full refund. By using the headset you agree to be bound to this agreement and
forfeit the right to sue.
Using a communication device while riding a motorcycle, scooter, moped, ATV, quadbike or any other vehicle or equipment, whether on land, water or air (jointly referred
to as “Vehicle”) requires your complete and undivided attention. Schuberth GmbH.
and Cardo Systems, Inc., including their respective Ocers, Directors, Aliates, Parent
Company, Representatives, Agents, Contractors, Sponsors, Employees, Suppliers and
Resellers (jointly referred to as the “Company”) strongly advises you to take all necessary
precautions and remain alert to the trac, weather and road conditions if you choose
to use the SRC System (the “Device”) , including all derivative models irrespective of its
38
commercial name or branding, and stop your Vehicle on the roadside prior to initiating
or receiving calls. Any publications, advertisements, announcements or similar notes
that refer to using the Device while riding a Vehicle are solely intended to address its
technical capabilities and should not be misconstrued as if encouraging users to oper-
ate the Device while actively involved in trac.
By way of purchasing this Device and not returning it for a full refund (see below),
you are irrevocably releasing, indemnifying from any liability, loss, claim and expense
(including attorneys fees) and holding the Company harmless for any bodily injuries,
harm or death as well as losses or damages in goods, to any Vehicles including your
own, or to any property or asset that belong to you or to third parties, any of which may
result from using the Device under any circumstances or conditions and irrespective of
jurisdiction. the Company will not be responsible for any physical damages, irrespective
of reasons, conditions or circumstances, including malfunctioning of the Device, and
all risks associated with operating it rest solely and entirely with the user of this Device,
irrespective of whether the Device is used by the original purchaser or any third party.
The Company hereby noties you that using this Device may also be in contravention
to local, federal, state or national laws or regulations, and that any use of the Device is
entirely at your sole risk and responsibility.
1. You, your heirs, legal representatives, successors or assigns, hereby voluntarily and
forever release, discharge, indemnif y and hold harmless the Company from any and
all litigation, claims, debts, demands, actions and liability which may arise, directly
or indirectly, from using the Device for any distress, pain, suering, discomfort, loss,
injury, death, damages to or in respect to any person or property however caused,
WHETHER ARISING FROM THE NEGLIGENCE OR OTHERWISE, and which may hereaf ter
accrue to you on some future date as a result of said use, to the fullest extent permitted by law.
2. You fully understand and assume the risks in using the Device, including risk of negli-
gent acts or omissions by others.
3. You conrm that you are physically capable to use the Device and that you have no
medical conditions or needs that may infringe upon your abilities to do so in a safe
manner. You conrm that you are at least eighteen (18) years of age and that you
have been advised of the risk s associated with the use of the Device. You further
conrm that you will not consume any alcohol that may aect your alertness or any
mind-altering substance, and will not carry, use or consume these substances before
or during the use of the Device.
4. You fully acknowledge our warnings and understand that: (a) risks and dangers ex-
ist in using the Device while in trac, including but not limited to injury or illness,
strains, fractures, partial and/or total paralysis, death or other ailments that could
QG SRC 207 - MAN00015.indd 38 2/1/11 11:38 AM
Page 39

cause serious disability; (b) these risks and dangers may be caused by the negligence
of the manufacturers or its agents or any third party involved in designing or manufacturing the Device; (c) these risks and dangers may arise from foreseeable or unforeseeable causes. You hereby assume all risks and dangers and all responsibility for
any losses and/ or damages, whether caused in whole or in part by the negligence or
other conduct of others, including the Company.
5. You conrm that you have read this release of liability and fully understand its terms
and that you have given up substantial rights by not returning the Device for a full
refund (see refund option below).
Disclaimer of Warrant y
THE COMPANY DISCLAIMS ALL EXPRESS AND IMPLIED WARRANTIES WITH REGARD TO
THE ENCLOSED DEVICE, INCLUDING WITHOUT LIMITATION ANY IMPLIED WARRANTIES OF
MERCHANTABILITY, FITNESS FOR A PARTICULAR PURPOSE, AND NON-INFRINGEMENT. THE
DEVICE AND ITS ACCESSORIES ARE PROVIDED “AS IS” AND “AS AVAILABLE” WITHOUT WARRANTY OF ANY KIND BEYOND THOSE ASSUMED IN THE ENCLOSED MANUAL.
Limitation of Liability
IN NO EVENT SHALL THE COMPANY BE LIABLE FOR ANY SPECIAL, INDIRECT, PUNITIVE,
INCIDENTAL, EXEMPLARY OR CONSEQUENTIAL DAMAGES, OR ANY DAMAGES WHATSOEVER RESULTING FROM THE USE OF THE DEVICE, WHETHER BASED ON BREACH OF
CONTRACT, TORT (INCLUDING NEGLIGENCE), PRODUCT LIABILITY OR OTHERWISE, EVEN
IF ADVISED OF THE POSSIBILITY OF SUCH DAMAGES.
YOU ACKNOWLEDGE AND AGREE THAT THE LIMITATIONS SET FORTH ABOVE ARE
FUNDAMENTAL ELEMENTS OF THIS AGREEMENT AND THE DEVICE WOULD NOT BE
PROVIDED TO YOU ABSENT SUCH LIMITATIONS. SOME STATE STATUTES MIGHT APPLY
REGARDING LIMITATION OF LIABILITY.
RETURN FOR FULL REFUND
IF YOU ARE UNWILLING TO ACCEPT AND AGREE TO THE ABOVE CONDITIONS,
YOU MAY RETURN THIS DEVICE TO THE RESELLER OR TO THE COMPANY FOR A
FULL REFUND, PROVIDED THAT YOU DO SO NO L ATER THAN 7 BUSINESS DAYS
FOLLOWING THE PURCHASE OF THE DEVI CE (proof of purchase required) AND
SUBJECT TO THE WRAPPING BEING INTACT. WHEN DOING SO, PLEASE REFER
TO THIS SECTION. BY NOT RETURNI NG THE DEVICE FOR REFUND WITHIN THE
PERIOD PROVIDED, YOU ARE EXPLICITLY IN AGREEMENT WITH THE ABOVE, AND
RENOUN CE ALL RIGHTS TO FUTURE CLAIMS AND DEMANDS AGAINST THE COMPANY AS DEFINED ABOVE.
www.schuberth.com
Eng lish
39
QG SRC 207 - MAN00015.indd 39 2/1/11 11:38 AM
Page 40

40
QG SRC 207 - MAN00015.indd 40 2/1/11 11:38 AM
Page 41

G U I D E D ’ U T I L I S A T I O N
P O W E R E D B Y
QG SRC 207 - MAN00015.indd 41 2/1/11 11:38 AM
Page 42

SOMMAIRE
1. INTRODUCTION . . . . . . . . . . . . . . . . . . . . . . . . . . . . . . . . . . . . . . . . . . . . . . . . . . . . . . . . . 43
2 CONTENU DU COFFRET . . . . . . . . . . . . . . . . . . . . . . . . . . . . . . . . . . . . . . . . . . . . . . . . . . . 44
3. CHARGEMENT DU KIT MAINS LIBRES . . . . . . . . . . . . . . . . . . . . . . . . . . . . . . . . . . . . . 44
4. INSTALLATION ET CONFIGURATION DE BASE . . . . . . . . . . . . . . . . . . . . . . . . . . . . . 45
4.1 FONCTIONNALITÉS GÉNÉRALES . . . . . . . . . . . . . . . . . . . . . . . . . . . . . . . . . . . 45
4.2 INDICATIONS VOCALES DE STATUT . . . . . . . . . . . . . . . . . . . . . . . . . . . . . . . . 45
4.3 SOURCES AUDIO ET PRIORITÉS . . . . . . . . . . . . . . . . . . . . . . . . . . . . . . . . . . . . 45
4.4 OPTION DE MISE A JOUR DU LOGICIEL . . . . . . . . . . . . . . . . . . . . . . . . . . . . 45
4.5 REINITIALISER VOTRE KIT MAINS LIBRES . . . . . . . . . . . . . . . . . . . . . . . . . . . . 46
5. DEMARRAGE . . . . . . . . . . . . . . . . . . . . . . . . . . . . . . . . . . . . . . . . . . . . . . . . . . . . . . . . . . . . 46
5.1 REMPLACER LE PROTEGE-NUQUE EXISTANT AVEC LE
SRC-SYSTEM : . . . . . . . . . . . . . . . . . . . . . . . . . . . . . . . . . . . . . . . . . . . . . . . . . . 46
5.2 POSITIONNER LES ECOUTEURS . . . . . . . . . . . . . . . . . . . . . . . . . . . . . . . . . . . . 46
5.3 POSITIONNEMENT DU MICROPHONE . . . . . . . . . . . . . . . . . . . . . . . . . . . . . 47
5.4. RETIRER LE SRC-SYSTEM DE VOTRE CASQUE . . . . . . . . . . . . . . . . . . . . . . . 47
5.5 MET TRE ET RETIRER LE CASQUE . . . . . . . . . . . . . . . . . . . . . . . . . . . . . . . . . . 47
5.6 NET TOYER LE PROTÈGE-NUQUE . . . . . . . . . . . . . . . . . . . . . . . . . . . . . . . . . . . 48
6. CONNEXION DE TÉLÉPHONES MOBILES BLUETOOTH, GPS ou MP3
(A2DP) . . . . . . . . . . . . . . . . . . . . . . . . . . . . . . . . . . . . . . . . . . . . . . . . . . . . . . . . . . . . . . . . . . 48
6.1 TÉLÉPHONE MOBILE . . . . . . . . . . . . . . . . . . . . . . . . . . . . . . . . . . . . . . . . . . . . . 48
6.2 GPS . . . . . . . . . . . . . . . . . . . . . . . . . . . . . . . . . . . . . . . . . . . . . . . . . . . . . . . . . . . . . . 49
6.3 MUSIQUE MP3 (option sans l – A2DP) . . . . . . . . . . . . . . . . . . . . . . . . . . . 49
7. RADIO FM INTÉGRÉE ET LECTEUR EXTERNE MP3 (OPTION FILAIRE) . . . . . . . 50
7.1 RADIO FM . . . . . . . . . . . . . . . . . . . . . . . . . . . . . . . . . . . . . . . . . . . . . . . . . . . . . . . . . 50
7.2 CONNEXION PAR CÂBLE DE VOTRE MP3 OU AUTRE
SOURCE AUDIO . . . . . . . . . . . . . . . . . . . . . . . . . . . . . . . . . . . . . . . . . . . . . . . . . . 52
8. UTILISATION DU TÉLÉPHONE MOBILE . . . . . . . . . . . . . . . . . . . . . . . . . . . . . . . . . . . . 52
9. UTILISATION DE L’INTERCOM . . . . . . . . . . . . . . . . . . . . . . . . . . . . . . . . . . . . . . . . . . . . 53
9.1 INTRODUCTION . . . . . . . . . . . . . . . . . . . . . . . . . . . . . . . . . . . . . . . . . . . . . . . . . . 53
9.2 COMPATIBILITE INTERCOM . . . . . . . . . . . . . . . . . . . . . . . . . . . . . . . . . . . . . . . . 53
9.3 AVANT D’UTILISER L’INTERCOM . . . . . . . . . . . . . . . . . . . . . . . . . . . . . . . . . . . 53
9.4 UTILISATION DU SRCSYSTEM™ EN MODE INTERCOM
AVEC DEUX AUTRES KITS SRCSYSTEM™ . . . . . . . . . . . . . . . . . . . . . . . . . 53
9.4a INTERCOM BIDIRECTIONNEL. . . . . . . . . . . . . . . . . . . . . . . . . . . . . . . . 53
9.4b INTERCOM TRIDIRECTIONNEL . . . . . . . . . . . . . . . . . . . . . . . . . . . . . . 54
9.5 RECEVOIR DES APPELS EN MODE INTERCOM . . . . . . . . . . . . . . . . . . . . 55
9.6 LANCER DES APPELS EN MODE INTERCOM . . . . . . . . . . . . . . . . . . . . . . . 55
9.7 FONCTIONNALITÉ CONNEXION VOCALE VOX . . . . . . . . . . . . . . . . . . 55
9.8 RÉINITIALISER ER LA CONNEXION RESTAURER LES
PARAMÈTRES ORIGINAUX PAR DEFAUT . . . . . . . . . . . . . . . . . . . . . . . . . 56
9.9 BON À SAVOIR . . . . . . . . . . . . . . . . . . . . . . . . . . . . . . . . . . . . . . . . . . . . . . . . . . . 56
9.10 DÉPANNAGE DE L’INTERCOM . . . . . . . . . . . . . . . . . . . . . . . . . . . . . . . . . . . . 56
10. CLICK-TO-LINK . . . . . . . . . . . . . . . . . . . . . . . . . . . . . . . . . . . . . . . . . . . . . . . . . . . . . . . . . . . 56
11. ASSISTANCE . . . . . . . . . . . . . . . . . . . . . . . . . . . . . . . . . . . . . . . . . . . . . . . . . . . . . . . . . . . . . 58
12. AVIS . . . . . . . . . . . . . . . . . . . . . . . . . . . . . . . . . . . . . . . . . . . . . . . . . . . . . . . . . . . . . . . . . . . . . 58
IMPORTANT: Il s’agit de la version 2.0 du Manuel d’Utilisateur. Veuillez noter que
notre guide est mis à jour régulièrement sur notre site an d’y inclure les toutes
dernières fonctionnalités et les nouvelles options et fonctions de votre nouveau
kit mains libres SRC-System™. Veuillez vous rendre à l’adresse ww w.schuberth.
com/le admin/downloads/SRC/SRC-Syst em_Manual -1.p df pour vérier dès
maintenant si le manuel que vous avez est la version la plus actuelle et téléchargez le manuel du site dans votre langue préférée.
42
QG SRC 207 - MAN00015.indd 42 2/1/11 11:38 AM
Page 43

1. INTRODUCTION
Merci d’avoir choisi le SRC-System™ Bluetooth® pour casques de moto.
Ce guide vous indiquera le fonctionnement du kit mains libres mais
il est conseillé de vous familiariser tout d’abord avec la fonctionnalité
Bluetooth® de votre téléphone mobile et/ou GPS avant d’utiliser le
SRC-System™.
Le coret du SRC-System™ contient un kit mains libres. Couplé à un
autre SRC-System™, il peut fonctionner comme intercom avec une
portée maximum de 300 mètres (en fonction du terrain).
VOTRE SRC-SYSTEM PEUT ETRE UTILISE COMME SUIT :
1. en tant que Bluetooth® pour la communication mobile (prenant en
charge les prols Bluetooth®, Mains libres* et A2DP avec une portée
de 10 m.)
2. en tant que Bluetooth® pour la lecture audio en transit sans fil
(prenant en charge le Profils A2DP et AVRCP, compatibles avec
une variété de lecteurs MP3, adaptateurs et autres périphériques audio)
3. en tant qu’intercom bidirectionnel ou tridirectionnel de moto à
moto pour des appels en mode conférence avec un maximum
de deux autres kits mains libres SRC-System™ (jusqu’à 300 m de
portée entre deux SRC-System™ et en Full Duplex**)
4. en tant qu’intercom entre le pilote et son passager
5 Click-to-Link pour les communications intercom spontanées avec
n’importe quelle unité SRC-System™ à proximité
6. en tant qu’unité de réception des instructions de navigation GPS
et pour lecture audio en transit à partir de dispositifs Bluetooth®
compatibles
7. en tant que radio FM intégrée
8. en tant qu’unité d’écoute pour des dispositifs audio connectés
par câble (tels que lecteurs MP3, iPods® non Bluetooth®)
AUTRES FONCTIONNALITÉS SPÉCIALES :
➤La technologie AGC (Automatic Gain Control), permettant à votre
SRC-System™ d’augmenter ou de réduire automatiquement son
volume en fonction du bruit ambiant et de la vitesse de conduite.
Vous pouvez également contrôler manuellement le volume.
➤La technologie VOX pour le contrôle mains libres et la commande
en toute sécurité de certaines fonctions clés. (Appel vocal, Répondre, Refuser un appel)
➤La technologie PLC (Packet Loss Concealment) pour compenser les
pertes d’audio dans les environnements difficiles.
➤Le SRC-System™ possède un logiciel sophistiqué qu’il est possible de
mettre à jour sur n’importe quel PC fonctionnant sous Windows® XP™,
Vista™ ou Windows® 7.
➤Le SRC-System™ vous donne des indications vocales de statut. Ainsi,
vous savez à tout moment à qui ou à quel dispositif vous êtes connecté.
Nous vous souhaitons d’excellents moments avec votre
SRC-System™ et sommes à votre disposition pour toute question.
Vous pouvez nous écrire à Kundenservice@schuberth.com
F-J. Görges Erwin Van Hoof
Directeur des Ventes Vice President
SCHUBERTH GmbH Int. Sales Manager
Visitez le site www.schuberth.com/src-tutorial/fr pour découvrir une
démonstration interactive des fonctionnalités du SRC-System
______ ____ __________
* Certaines fonctionnalités avancées ne seront peut-être pas disponibles avec les
téléphones mobiles ne prenant pas en charge le prol Bluetooth® Mains libres
** “Full Duplex” vous permet de parler et d’écouter simultanément.
Fra nçai s
43
QG SRC 207 - MAN00015.indd 43 2/1/11 11:38 AM
Page 44

2. CONTENU DU COFFRET
SRC-System™ pour casques C3*
Bras exible
Cheville
Connecteur USB
SRC-System™ pour C2 / Concept casques
Microphone
Deux
écouteurs
Bras exible
Cheville
Protection du
Connecteur USB
Couvercle de
Protection du
Connecteur USB
Couvercle de
Microphone
Deux écouteurs
Connecteur
USB
Cheville
Bouton Canal A
• Connexion au Motard A
• Bouton MP3
Bouton Téléphone
mobile
Bouton Canal B
• Connexion au Motard B
• Bouton Radio FM
Volume fort / Bouton Avance
Volume faible / Bouton Retour
Cheville
Bouton Canal B
• Connexion au Motard B
• Bouton Radio FM
Volume fort / Bouton Avance
Volume faible / Bouton Retour
diérentes tailles
Bouton Canal A
• Connexion au Motard A
• Bouton MP3
Bouton Téléphone mobile
* Le produit est
proposé sous
Prise de chargeur mural
Câble d’adaptateur USB
Velcros autocollants
Câble MP3
Bonnettes pour microphone
Guide d’utilisation
IMPORTANT:
La languette de couver ture protégeant le connecteur de chargement doit
rester hermétiquement fermée pour empêcher l’humidité de pénétrer
dans l’appareil.
3. CHARGEMENT DU KIT MAINS LIBRES
Veillez à charger l’unité de contrôle pendant au moins 4 heures
avant la première utilisation.
Insérez le câble USB dans le chargeur mural et
insérez l’autre extrémité du câble dans le kit.
Pendant le chargement, le voyant rouge s’allume.
Une fois le chargement terminé, le voyant rouge s’éteint.
Le chargeur mural et le câble d’adaptateur USB ont deux fonctions :
1. Charger l’unité de contrôle à partir
de toute prise murale ou port USB
d’ordinateur (demande un chargement plus long)
2. Télécharger les mises à jour du logiciel à partir de tout
ordinateur fonctionnant sous Windows® XP™, Vista™ ou
Windows® 7 (voir section 4.4 pour plus de détails).
44
QG SRC 207 - MAN00015.indd 44 2/1/11 11:38 AM
Page 45

4. INSTALLATION ET CONFIGURATION DE BASE
4.1 FONCTIONNALITÉS GÉNÉRALES
RÉSULTAT
ESCOMPTE :
Allumer
l’unité de
contrôle
Eteindre
l’unité de
contrôle
Augmenter /
Diminuer le
volume de la
source audio
en cours
Mode Silence Appuyez brièvement et simultanément sur les Boutons
Indicateur du
niveau des
piles
4.2 INDICATIONS VOCALES DE STATUT
Votre SRC-System™ vous indiquera son statut par des messages au-
dio : connexion à un téléphone mobile ou mode intercom, conrmation du changement de mode, etc. Cette fonction est en mode ON
par défaut et peut être désactivée comme indiqué ci-dessous.
Le menu vocal est disponible en plusieurs langues.
Pour entrer dans le menu vocal : Lorsque le kit mains libres est en
mode Veille appuyez simultanément sur les touches CANAL “A” et “B”
ACTION
REQUISE :
Appuyez sur le bouton Mobile pendant au moins 4
secondes. Voyant : trois clignotements Bleus.
Retour audio : Son ascendant (faible-élevé).
Appuyez sur le bouton Mobile pendant au moins 3
secondes. Voyant : trois clignotements rouges.
Retour audio : Son descendant (élevé-faible).
Appuyez rapidement sur le Bouton Volume for t ou faible
(mémorise le volume par source)
Volume fort et faible pendant qu’un dispositif audio est
en marche
Appuyez sur le bouton Volume fort pendant au moins 3
secondes
Voyant Bleu = Batterie pleine
Voyant Rouge/Bleu = Batterie à moitié vide
Voyant Rouge= Batterie pratiquement vide
pendant 3 secondes. Une fois dans le système, suivez les instructions
vocales en anglais ou choisissez une autre langue.
Pour activer/désactiver les indications vocales de statut :
Appuyez et maintenez le bouton Volume faible pendant 6 secondes.
ON: Voyant : Bleu continu + retour audio: Un bip
OFF: Voyant : Rouge continu + retour audio: deux bips
4.3 SOURCES AUDIO ET PRIORITÉS
Les diérentes sources audio connectées le sont dans l’ordre de priorité
indiqué ci-dessous. Ce même ordre détermine la source prioritaire. Par
exemple, un appel mobile entrant interrompra une communication en
mode intercom qui interrompra toujours la radio FM intégrée, etc.
Priorité élevée
Faible priorité
1. Son audio du téléphone mobile ou instructions
GPS (dispositifs spéciaux)
2. Intercom / Click-to-Link
3. Source audio A2DP
4. Radio FM (intégrée)
5. Port entrée de ligne (pour une connexion laire
pour les lecteurs MP3 par exemple).
4.4 OPTION DE MISE A JOUR DU LOGICIEL
Vous pourrez à l’avenir installer des mises à jour et des correcteurs
pour que votre logiciel SRC-System™ soit des plus à jour. Les mises à
jour ultérieures comprendront d’autres indications vocales de statut et d’autres fonctionnalités très appréciables. Pour veiller à posséder la dernière version,
inscrivez-vous en ligne sur : www.schuberth.com/src-register/fr en
prenant soin d’avoir votre numéro de série. Pour télécharger des mises
à jour, utilisez le câble USB fourni dans le coret du SRC-System™.
Les mises à jour ne sont disponibles que pour les ordinateurs fonctionnant sous Windows® avec XP™, Vista™ ou Windows® 7.
Fra nçai s
45
QG SRC 207 - MAN00015.indd 45 2/1/11 11:38 AM
Page 46
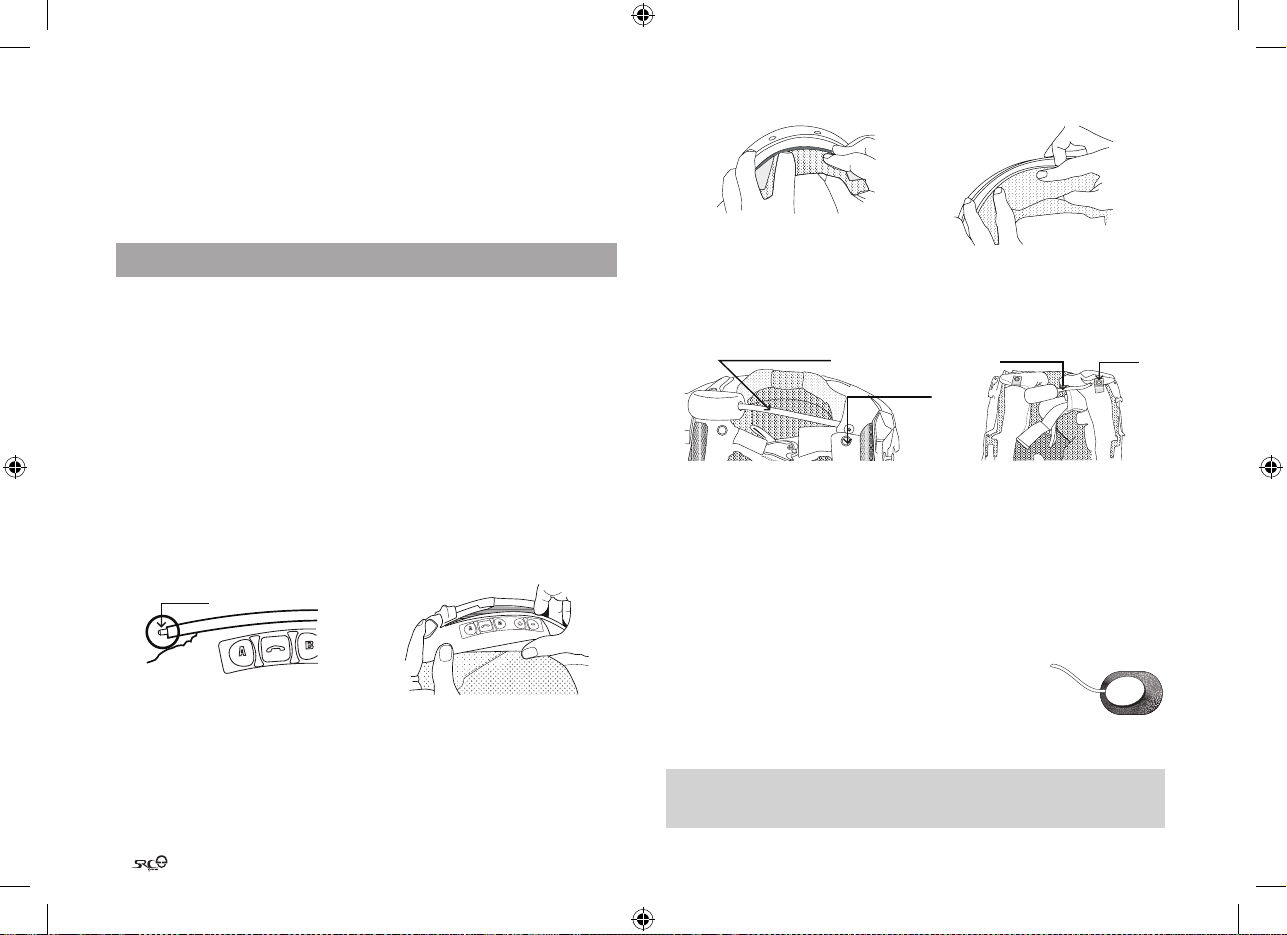
4.5 REINITIALISER VOTRE KIT MAINS LIBRES
Si votre kit mains libres ne répond pas malgré plusieurs tentatives , vous
pouvez le réinitialiser en le chargeant. Après environ 10 secondes, enlevez le kit mains libres du chargeur et rallumez-le.
Votre casque doit maintenant fonctionner correctement.
5. DEMARRAGE
5.1 REMPLACER LE PROTEGENUQUE EXISTANT AVEC LE
SRCSYSTEM
Tout d’abord, retirer le protège-nuque existant de votre casque
comme suit :
1. Détachez les deux boutons-pression.
2. Soulevez et poussez l’arc du protège-nuque à partir de son centre.
3. Retirez les chevilles du protège-nuque de leur orice à l’intérieur du
rebord du casque.
4. Maintenant, remplacez le protège-nuque existant avec le nouveau pro-
tège-nuque SRC-System™. Lorsque vous placez le SRC-system, assurez-
vous de disposer les cordons des écouteurs à l’intérieur du casque.
5. Faites glisser la cheville située à l’extrémité du panneau de contrôle pour
l’insérer dans son orice sur le casque et fermez le bouton-pression.
Cheville
6. Insérez l’autre cheville de l’autre côté du protège-nuque et fermez le
second bouton-pression
7. Poussez et insérez le protège-nuque en partant du centre jusqu’à
l’arrière du casque. Faites de même pour les autres parties pour assurer
la bonne mise en place du protège-nuque.
8. Assurez-vous que les deux boutons-pression sont bien fermés et que
le microphone exible est bien placé à l’intérieur de votre casque
(entre le SRC-System™ et le rembourrage à l’intérieur du casque).
Microphone exible
Bouton-
pression
C 3 casque C2/Concept casque s
Microphone
exible
Bouton-
pression
9. Assurez-vous de bien fermer le couvercle de protection du
connecteur USB et disposez le connecteur micro USB dans les plis
du protège-nuque (juste derrière le panneau de contrôle).
5.2 POSITIONNER LES ECOUTEURS
Pour de meilleurs résultats audio, assurez-vous que vos deux écouteurs
sont placés aussi près que possible et juste en face de vos oreilles.
Casques C2 & Concept :
Pour le Casque C2 & Concept, il sut de xer les
écouteurs à côté de vos oreilles sur la doublure interne
en utilisant le Velcro fourni.
Casque C3 :
NOTE : Même si vous pouvez at tacher les écouteurs de la manière décrite
ci-dessus (pour les casques C2 et concept), nous vous recommandons de
suivre la procédure suivante.
46
QG SRC 207 - MAN00015.indd 46 2/1/11 11:38 AM
Page 47
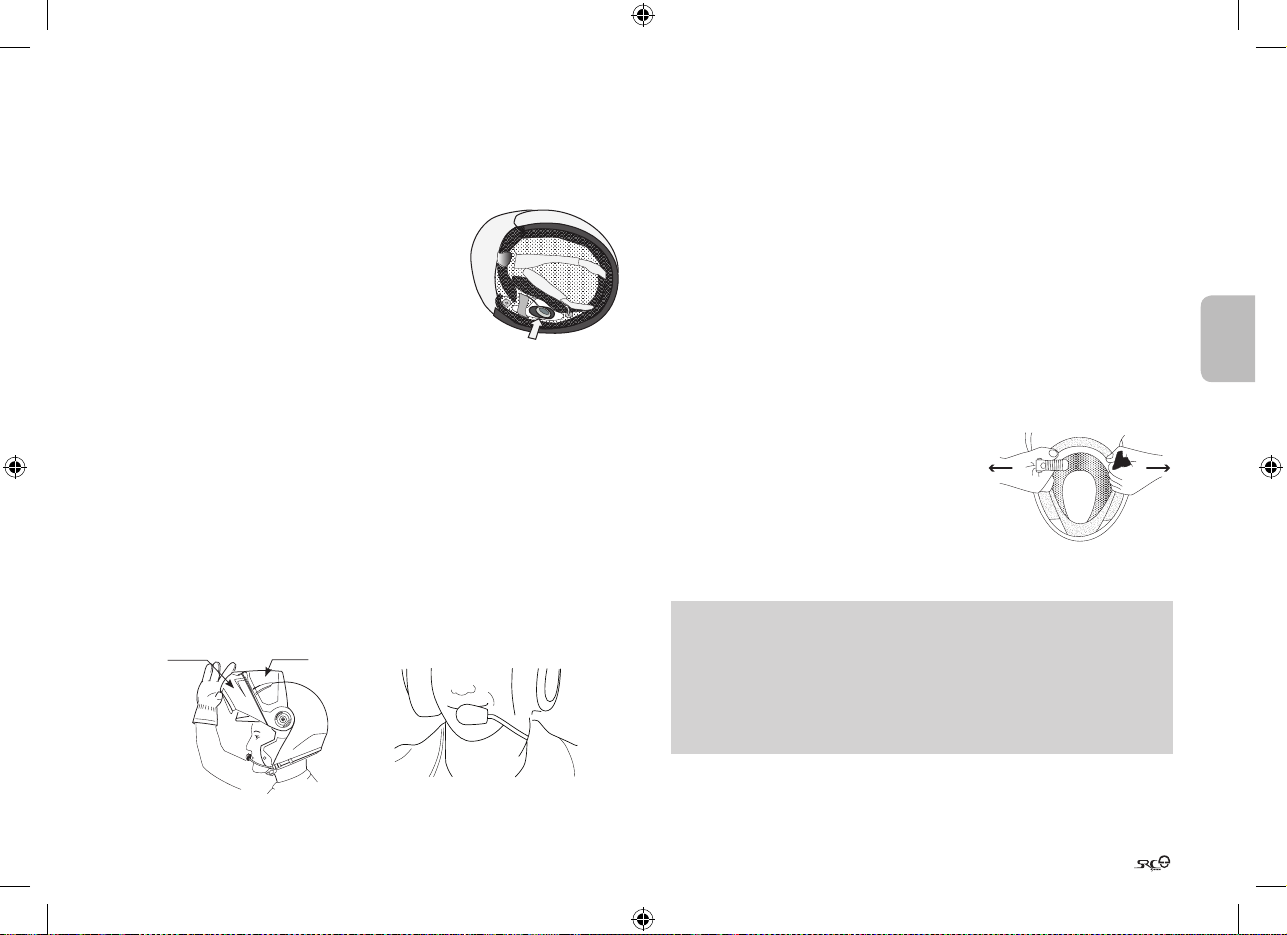
Ce qui suit s’applique aux deux côtés du casque C3 :
1. Détachez les boutons-pression des deux côtés du protège-nuque
(les mêmes boutons que vous venez d’attacher plus tôt).
2. Détachez les deux boutons rouges situés en bas du rembourrage
intérieur des joues. Soulevez légèrement la
doublure.
3. Attachez la bande Velcro sur la forme identique
se trouvant sur l’EPS (polystyrène expansé) et
xez l’écouteur à la bande Velcro.
4. Fermez les deux boutons rouges. Assurez-vous
que le bouton rouge est toujours à l’intérieur de
l’anneau noir qui le maintient.
5. Maintenant, fermez les boutons-pression du protège-nuque des deux
côtés et assurez-vous qu’ils sont solidement xés.
5.3 POSITIONNEMENT DU MICROPHONE
Pour assurer la fermeture en douceur de la partie du kit mains libres
placée sous le menton, veuillez tout d’abord supprimer son anti-bruit
triangulaire et procédez comme suit :
1. Tournez le microphone exible, comme indiqué dans l’image.
2. Rapprochez le microphone du centre de votre bouche avec sa
partie la plus large tournée vers vous (et non l’étroite).
3. Abaissez et fermez la mentonnière de votre casque. Il se peut que
vous deviez utiliser vos deux mains pour la fermer correctement.
Section du
menton
Visière
4. Alors que la mentonnière est fermée et que la visière est ouverte, insérez votre main dans l’ouverture de la visière et poussez le microphone
vers le centre de la mentonnière, juste en face de votre bouche.
5.4 RETIRER LE SRCSYSTEM DE VOTRE CASQUE
1. Détachez les deux boutons-pression.
2. Soulevez et poussez l’arc du protège-nuque à partir de son centre.
3. Retirez les chevilles du protège-nuque de leur orice à l’intérieur du
rebord du casque.
5.5 METTRE ET RETIRER LE CASQUE
Les composantes électroniques du SRC-System™ sont intégrées de fa-
çon sûre à l’intérieur du protège-nuque. Pour éviter un certain inconfort
lorsque vous mettez ou retirer votre casque, nous vous recommandons
de procéder comme suit :
1. Elargir l’ouverture du casque en tenant fermement les sangles et en
les tirant fort de chaque côté.
2. Tout en tirant les sangles de chaque côté,
faites glisser le casque sur votre tête, en
commençant par le cou puis vers l’avant.
3. Pour enlever le casque, procédez de la
même façon en commençant par tirer
les sangles de chaque côté et en poussant vers le haut, pour faire
suivre le casque entier.
NOTE: Votre micro-casque SRC‑System™ est conçu pour un confort maximum. Toutefois, étant donné qu’il contient un kit électronique, il provoque
donc un léger renement. Par conséquent, enler ou enlever votre casque
muni du SRC peut être diérent de ce à quoi vous êtes habitué avec un
micro-casque standard.
Rappelez-vous : plus vous tirez sur les sangles du casque de chaque côté
lorsque vous mettez ou enlevez le casque, permettant ainsi de limiter la
rigidité du protège-nuque, plus le processus sera facile.
Fra nçai s
47
QG SRC 207 - MAN00015.indd 47 2/1/11 11:38 AM
Page 48
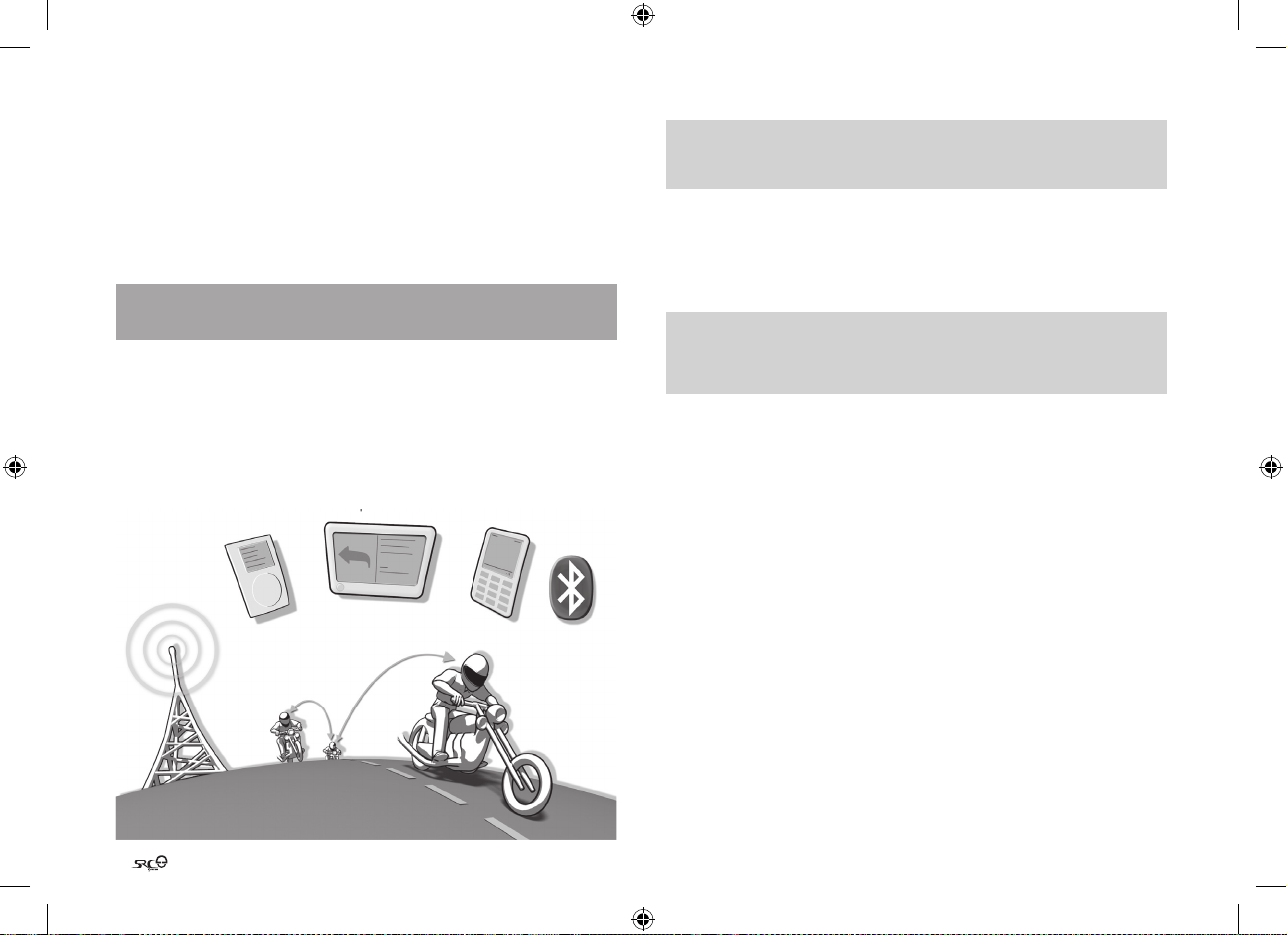
5.6 NETTOYER LE PROTÈGENUQUE
Tout d’abord, pour nettoyer le protège-nuque, fermez hermétiquement
le connecteur micro USB du SRC-System™. Utilisez seulement un chion
légèrement humide et tiède. Évitez de tremper le protège-nuque dans
de l’eau ou tout autre liquide. Ne submergez jamais et évitez de laisser
de l’eau entrer en contact avec les écouteurs ou le microphone. Laisser
sécher l’appareil à température ambiante.
6. CONNEXION DE TéLéPHONES MOBILES
BLUETOOTH, GPS OU MP3 (A2DP)
Technologie “MDC” (Multiple Device Connectivity ) avec des
dispositifs compatibles Bluetooth®
La technologie MDC permet le SRC-System™ d’avoir une connecti-
vité parallèle comme suit*:
➤ Intercom avec un ou deux autres kits SRC-System™
➤ Téléphone mobile compatible Bluetooth / GPS
➤ Lecteur MP3 avec A2DP ou adaptateur A2DP
Radio FM
intégrée
Lecteur
MP3
Portée Intercom de
Motard-à-Mo tard
jusqu’à 300 m. *
GPS
Téléphone
mobile et con nectivité
A2DP Connex ion
NOTE: Si vous prévoyez d’utiliser votre téléphone mobile en même temps
qu’ un appareil GPS Bluetooth®, vous devez connecter votre téléphone
mobile au GPS et non le kit mains libres SRC‑System™.
* voir restrictions section 9.4b
6.1 TÉLÉPHONE MOBILE
Pour utiliser votre téléphone mobile avec le SRC-System™, il faut
tout d’abord procéder à la connexion du kit et du téléphone mobile.
REMARQUE: Si vous prévoyez d’utiliser un appareil GPS en parallèle avec
votre téléphone mobile, alors vous devez connector votre téléphone mobile à l’appareil GPS et non au SRC‑System™. Dans ce cas, ignorez cette
section et passez directement à la section 6.2
La connexion ne se fait qu’une seule fois et une fois réalisée, les deux
dispositifs se reconnaîtront quand ils seront à portée l’un de l’autre.
S’il n’y a plus de connexion entre le téléphone et le kit, appuyez sur le
bouton Mobile pour connecter à nouveaux les dispositifs.
CONNEXION DU KIT MAINS LIBRES A UN TÉLÉPHONE MOBILE:
1. Allumez votre téléphone et vériez que la fonction Bluetooth® est
activée. Mettez le casque sous tension en appuyant sur la touche
Mobile pendant au moins 3 secondes, jusqu’à l’apparition de 3
clignotement bleus.
2. Un fois le SRC-System™ allumé, appuyez sur le bouton Mobile et
maintenez-le enfoncé pendant au moins 6 secondes, jusqu’à ce que
les lumières Rouge et Bleue clignotent rapidement et alternativement.
3. Recherchez les dispositifs Bluetooth® dans votre téléphone en suivant les instructions du téléphone. Consultez le Guide de l’utilisateur de votre téléphone pour de plus amples informations.
4. Après quelques secondes, le téléphone répertoriera le «SRCS» (y
compris sa version de logiciels) en tant que nouveau périphérique.
Sélectionnez-le et suivez les instructions de votre téléphone pour
accepter la connexion.
48
QG SRC 207 - MAN00015.indd 48 2/1/11 11:38 AM
Page 49

5. Lorsque vous y serez invité, entrez 0000 (quatre zéros) en tant que
PIN code d’entrée.
6. Votre téléphone conrmera que la connexion a réussi et la lumière
Bleue du module se mettra à clignoter lentement.
NOTE: Tous les téléphones mobiles Bluetooth® ne peuvent pas diuser de
la musique en stéréo (A2DP), même si le téléphone possède une application de lecteur MP3. Consultez le guide d’utilisateur de votre téléphone
mobile pour de plus amples informations
Avec certains téléphones mobiles, vous devrez peut-être une fois la
connexion terminée, appuyer sur le bouton Mobile pour connecter le
kit au téléphone. Le SRC‑System™ se connectera automatiquement au
dernier téléphone connecté au kit mains libres.
NOTE: Si le processus de connexion n’est pas terminé dans les deux minutes qui suivent, le module reviendra en mode Veille.
6.2 GPS
Pour utiliser un GPS Bluetooth® avec le SRC-System™, il faut tout
d’abord eectuer une connexion. Ainsi, votre GPS pourra transmettre
des instructions de navigation et les données audio aux écouteurs de
votre kit SRC-System™.
NOTE: Tous les GPS Bluetooth® ne se connectent pas aux kits Bluetooth®.
Il faut, entre autres, que le GPS soit compatible avec le protocole Blue-
tooth® “Handsfree”. Consultez le guide d’utilisateur de votre GPS pour de
plus amples informations.
CONNEXION DU KIT MAINS LIBRES ET A UN GPS :
1. Allumez votre dispositif GPS.
2. Le SRC-System™ étant allumé, appuyez sur le bouton Volume
fort et maintenez-le enfoncé jusqu’à ce que les lumières Rouge et
Bleue clignotent rapidement et simultanément.
3. Recherchez les kits Bluetooth® dans votre dispositif GPS en
suivant les instructions du périphérique. Consultez le Guide
de l’utilisateur de votre périphérique GPS pour de plus amples
informations.
Après quelques secondes, le GPS répertoriera le «SRCS» (y compris sa
version de logiciels) en tant que nouveau périphérique. Sélectionnezle et suivez les instructions du GPS pour accepter la connexion.
4. Si votre dispositif GPS vous demande un code PIN ou autre, entrez
0000 (quatre zéros).
5. Votre dispositif GPS conrmera que la connexion a réussi. La
lumière Bleue du module se mettra à clignoter.
6. Si vous voulez utiliser un téléphone mobile Bluetooth® pour
eectuer et recevoir des appels avec le kit mains libres, vous devez
connector votre téléphone mobile à votre GPS en suivant les
instructions indiquées dans le manuel du GPS.
NOTE:
• Si le processus de connexion n’est pas terminé dans les deux minutes qui
suivent, le module reviendra en mode Veille.
• L’ordre de priorité du kit mains libres est ainsi fait pour que les appels
en mode intercom n’interrompent pas les instructions GPS en cours.
L’appelant entendra une tonalité « occupé » et vous entendrez deux bips
(voir section 4.3 pour de plus amples détails sur les priorités audio et la
connexion de dispositifs).
6.3 MUSIQUE MP3 OPTION SANS FIL A2DP
Votre kit mains libres est conçu pour recevoir de la musique à partir
de sources stéréo sans l A2DP et les téléphones mobiles prenant
en charge les prols Bluetooth® A2DP et AVRCP (pour la plupart, des
dispositifs 3éme génération).
L’utilisation d’un périphérique Bluetooth® qui supporte le prol AVRCP
vous permettra d’exploiter toutes les fonctions principales de sources
A2DP directement de votre kit mains libres.
Fra nçai s
49
QG SRC 207 - MAN00015.indd 49 2/1/11 11:38 AM
Page 50

NOTE: Le SRC‑System™ peut également recevoir des données audio
de dispositifs MP3 ou sources audio non Bluetooth® via le câble fourni
comme indiqué dans la section 7.2.
Tout en écoutant de la musique provenant d’une source A2DP, vous
ne manquerez aucun appel de mobile ou intercom. En eet, le kit
mains libres arrête automatiquement la musique en donnant la
priorité à l’appel entrant. Toutefois, après avoir mis n à votre appel,
certaines sources MP3 pourront ne pas reprendre automatiquement
et donc imposer une nouvelle activation.
RÉGLAGE DU MP3 POUR UNE TRANSMISSION BLUETOOTH
STÉRÉO A2DP
Pour utiliser un lecteur MP3 ou un adaptateur Bluetooth® Stéréo
(A2DP), il vous faut tout d’abord eectuer une connexion entre le
dispositif et le kit.
CONNEXION DU KIT A UN LECTEUR OU ADAPTATEUR MP3
Note: Si votre source A2DP est intégrée à votre téléphone mobile, il faut la
connexion avec votre kit comme indiqué dans la section 6.1 ci-dessus.
5. Si votre MP3 vous demande un code PIN ou outre, entrez 0000
(quatre zéros).
6. La connexion une fois réalisée, votre MP3 ou Adaptateur vous conrmera qu’elle a réussi. La lumière bleue du kit se mettra à clignoter.
NOTE: Si le processus de connexion n’est pas terminé dans les deux minutes qui suivent, le module reviendra en mode Veille.
Utilisation de votre source A2DP à partir de votre kit mains libres
Lecture Appuyez et maintenez le bouton MP3 pendant 3 secondes
Pause / Stop * Appuyez et maintenez le bouton MP3 pendant 3 secondes
Avance Appuyez et maintenez le bouton Volume Fort pendant 3
Retour** Appuyez et maintenez le bouton Volume Faible pendant
* Varie selon le modèle de votre téléphone mobile
** Avec certains téléphones, vous pourriez avoir besoin de répéter l’opération
une fois de plus
secondes
3 secondes
1. Allumez votre MP3 ou Adaptateur et, le cas échéant, veillez à ce
que sa fonction Bluetooth® soit activée.
7. RADIO FM INTéGRéE ET LECTEUR EXTERNE
MP3 (OPTION FILAIRE)
2. Le SRC-System™ étant allumé, appuyez sur le bouton Mobile
pendant au moins six secondes jusqu’à ce que les voyants Bleu et
Rouge commencent à alterner:
3. Pour rechercher les dispositifs Bluetooth® sur votre MP3, procédez
comme suit :
NOTE: Pour utiliser un adaptateur Bluetooth®, suivez les instructions de
l’appareil.
4. Après quelques secondes, le MP3 répertoriera le «SRCS» (y compris sa
version de logiciels) en tant que nouveau périphérique. Sélectionnezle et suivez les instructions du MP3 pour accepter la connexion.
50
QG SRC 207 - MAN00015.indd 50 2/1/11 11:38 AM
7.1 RADIO FM
Le SRC-System™ est équipé d’un récepteur radio FM haute qualité et
d’une technologie RDS (Radio Data System).
Allumer la radio En mode Veille, appuyez sur le bouton CANAL “B”
Eteindre la radio La radio étant allumée, appuyez sur le bouton
Passer à la prochaine station
présélectionnée
pendant 3 secondes
CANAL “B” pendant 3 secondes
La radio étant allumée, appuyez sur le bouton
CANAL “B” pour passer d’une station FM à l’autre
(6 stations présélectionnées)
Page 51

Lancer un appel en
mode intercom
Lancer un appel vocal
à partir de votre Téléphone mobile
Recomposer un numéro à partir de votre
téléphone mobile
RDS ON/OFF (Défaut:
OFF)
La radio étant allumée, parlez à voix haute
La radio étant allumée, appuyez sur le bouton
Mobile et prononcez à haute voix le nom de
la personne à appeler. Cette fonctionnalité est
possible sur les téléphones mobiles qui prennent
en charge les commandes vocales.
La radio étant allumée, appuyez deux fois sur le
bouton Mobile
Quand la radio est allumée, appuyez sur les boutons Volume fort et faible simultanément pendant
3 secondes.
Grâce à la fonctionnalité RDS, votre casque sélectionnera automatiquement la meilleure fréquence disponible pour la station FM
désirée, peu importe où vous vous trouvez.
Ceci vous permet de ne jamais lâcher le guidon pour régler la radio.
ON/OFF RDS (appuyer simultanément pendant 3 secondes pendant
que la radio est en marche)
• ON/OFF Radio FM (appuyer pendant 3 secondes)
• Pour naviguer entre les stations pré-sélectionnées
(appuyer brièvement)
ON/OFF
FM Radio
(press 3 sec.)
Chercher et mémoriser de nouvelles stations
1. Lorsque la radio est allumée, appuyez sur les Boutons Volume Fort
ou Faible pendant 3 secondes ou jusqu’à ce que vous entendiez la
station suivante.
• En appuyant sur le bouton Volume Fort une recherche en
amont s’eectuera (fréquence plus élevée).
• En appuyant sur le bouton Volume Faible, une recherche en
aval s’eectuera (fréquence plus basse).
2. Une fois la station trouvée, la recherche s’arrête et vous pouvez
l’écouter.
3. Pour poursuivre la recherche, appuyez sur les boutons Volume Fort
ou Faible pendant 3 secondes.
4. Pour mémoriser cette station, reportez-vous à la section suivante. Il
est possible de continuer à écouter une station non mémorisée.
Mémoriser une station
1. Sélectionnez le numéro de station, de un à six, que vous souhaitez mémoriser en appuyant sur le bouton CANAL “B” jusqu’à ce que vous ayez
trouvé la station qui convient.
2. Pour savoir comment chercher une nouvelle station, reportez-vous
au paragraphe ci-dessus.
3. Appuyez sur le bouton CANAL “B” durant les 20 secondes nécessaires à la localisation de la nouvelle station pour mémoriser la
station en cours.
4. Pour mémoriser une autre station, appuyez à nouveau sur le Bouton CANAL “B” pour passer à la prochaine station.
5. Si vous ne la mémorisez pas, la radio quittera le mode Recherche
mais vous pourrez néanmoins continuer à écouter cette station.
Appuyez à nouveau appuyant sur le bouton CANAL “B” pour
passer à la prochaine station mémorisée.
La radio FM est équipée d’une capacité de mémoire de six stations.
Fra nçai s
51
QG SRC 207 - MAN00015.indd 51 2/1/11 11:38 AM
Page 52

7.2 CONNEXION PAR CÂBLE DE VOTRE MP3 OU AUTRE
SOURCE AUDIO
Utilisation du port auxiliaire entrée de ligne pour la connexion par
câble
Votre SRC-System™ possède une prise auxiliaire qui vous permet de
vous connecter à des sources audio non Bluetooth® tels que lecteurs
MP3 via le câble fourni.
1. Veillez à ce que le kit mains libres soit en mode Veille et que le
voyant Bleu clignote lentement.
2. Connectez le câble du MP3 à la prise de votre lecteur MP3 /source
audio et insérez l’autre extrémité du
câble dans la prise auxiliaire.
3. Utilisez les boutons du lecteur MP3
comme à l’ordinaire (FF/REW/ PLAY/PAUSE).
Vous pouvez régler le Volume à partir du MP3 ou du kit mains libres.
Toute autre connexion audio mettra automatiquement le MP3 en
sourdine. Le signal audio ne reprendra que quand le kit mains libres
sera à nouveau en mode Veille.
NOTE: Lorsque vous écoutez votre lec teur MP3, le dispositif VOX est
indisponible.
8. UTILISATION DU TéLéPHONE MOBILE
LANCER ET RECEVOIR DES APPELS AVEC LE TÉLÉPHONE MOBILE
FONCTIONS DE BASE
Répondre Appuyez sur le bouton Mobile ou prononcez à voix
Refuser un appel Restez silencieux pendant 15 secondes, OU appuyez
Mettre n à un
appel
haute le mot de votre choix
le bouton Mobile pendant 3 secondes
Appuyez sur le bouton Mobile pendant un appel, ou
laissez votre interlocuteur mettre n à l’appel.
Lancer un appel
par commande
vocale
Bis En mode Veille, appuyez deux fois sur le bouton Mobile
FONCTIONS AVANCÉES POUR LES COMMUNICATIONS À
3 INTERLOCUTEURS
Ajouter/Supprimer une
connexion
CANAL “A” à/d’une
conversation
téléphonique
Ajouter/Supprimer une
connexion
CANAL “B” à/d’une
conversation
téléphonique
En mode Veille, appuyez sur le bouton Mobile et prononcez à haute voix le nom de la personne à appeler. Cette
fonctionnalité n’est disponible qu’avec les téléphones
mobiles prenant en charge les commandes vocales.
Appuyez sur le bouton CANAL “A” pendant un appel
Appuyez sur le bouton CANAL “B” pendant un appel
Lorsque le kit mains libres est en mode appel téléphonique, tout
appel en mode intercom sera automatiquement rejeté.
L’appel une fois terminé, vous pouvez lancer et accepter des appels
en mode Intercom.
ÉTAT DU VOYANT LUMINEUX
INDICATEUR LUMINEUX ÉTAT
Aucun Le kit est éteint
1 clignotement Bleu toutes
les 3 secondes
2 clignotements Bleus
toutes les 3 secondes
1 clignotement Rouge
toutes les 3 secondes
En veille - Aucun appel en cours
Appel en cours/ Radio FM ou lecteur MP3 en
mode ON
En veille - Batterie faible
52
QG SRC 207 - MAN00015.indd 52 2/1/11 11:38 AM
Page 53

INDICATEUR LUMINEUX ÉTAT
2 clignotements Rouges
toutes les 3 secondes
Rouge Chargement
Batterie faible pendant un appel / lecture
MP3 ou radio FM
9. UTILISATION DE L’INTERCOM
Bouton Canal «A»
Bouton Canal «B»
9.1 INTRODUCTION
Votre SRC-System™ vous permet de vous connecter à d’autre
motards utilisant le kit mains libres SRC à une portée allant jusqu’à
300 mètres (selon le terrain et d’autres conditions). Pour établir
une ou deux connexions intercom Bluetooth®, il faut tout d’abord
procéder à la connexion du SRC-System™ avec les autres kits
mains libres.
La connexion ne se fait qu’une fois et une fois terminée, les kits se
reconnaîtront automatiquement lorsqu’ils seront à portée l’un de
l’autre.
Votre kit mains libres possède deux canaux intercom pour communiquer avec d’autres kits mains libres. Il peut donc communiquer avec
au maximum deux autres kits mains libres SRC.
9.2 COMPATIBILITE INTERCOM
Vous pouvez utiliser votre kit mains libres SRC-System™ pour
eectuer des communications Intercom avec n’importe quel autre
kit mains libres SRC-System™ et avec les kits mains libres Cardo
scala rider. Pour de plus amples informations, veuillez visiter le site
www.cardosystems.com/SRC.
9.3 AVANT D’UTILISER L’INTERCOM
Votre kit mains libres SRC-System™ possède deux boutons pour la
connexion rapide à deux autres kits mains libres, désignés CANAL
«A» et CANAL «B».
Avant de pouvoir utiliser l’intercom pour communiquer entre
plusieurs motos avec des kits SRC-System™, il faut tout d’abord
procéder à la connexion des kits.
9.4 UTILISATION DU SRCSYSTEM™ EN MODE INTERCOM AVEC
DEUX AUTRES KITS SRCSYSTEM™
CANAL INTERCOM BOUTON PAIRAGE/
CONNEXION
CANAL «A» BOUTON CANAL «A» Le voyant ROUGE
CANAL «B» BOUTON CANAL “B” Le voyant BLEU clignote
INDICATEURS DE
MODE DE PAIRAGE
clignote rapidement
rapidement
9.4a INTERCOM BIDIRECTIONNEL
OPTIONS DE CONNEXION ENTRE DEUX INTERLOCUTEURS
Avec deux kits SRC-System™
1. Si l’un des kits mains libres est en mode OFF, allumez-le en appuyant
sur le bouton Mobile jusqu’à ce que le voyant Bleu clignote 3 fois.
2. Assurez-vous que les deux kits mains libres clignotent lentement et
achent des voyants Bleus.
3. Sélectionnez le canal disponible à utiliser pour la connexion
(CANAL «A» ou CANAL «B»).
NOTE : La sélection d’un canal déjà utilisé connectera le nouveau dispositif
et annulera la connexion précédente.
Fra nçai s
53
QG SRC 207 - MAN00015.indd 53 2/1/11 11:38 AM
Page 54

4. Sur le kit mains libres SRC-System™, appuyez sur le Bouton
CANAL («A» ou «B») pendant au moins six secondes jusqu’à
ce que les voyants Bleu ou Rouge commencent à clignoter
rapidement indiquant la connexion intercom. (Voir le tableau
«CANAL INTERCOM» pour connaître les indicateurs LED pour
chaque canal)
5. Répétez les étapes 3-4 pour le deuxième kit SRC-System™.
6. Au bout de quelques secondes, les deux kits mains libres acheront un voyant Bleu pendant 2 secondes, indiquant qu’ils sont
connexion, connectés et prêts à être utilisés.
NOTE : Si le processus de connexion n’est pas terminé dans les deux minutes qui suivent, le kit mains libres reviendra en mode Veille.
Lancer des appels en mode intercom
Vous pouvez lancer un appel intercom depuis votre kit connecté en mode
Veille de deux façons :
CONNEXION VOCALE :
Parlez à voix haute
Dès ce moment, l’appel en mode intercom
sera établi avec l’autre kit mains libres
connecté.
L’intercom restera allumé jusqu’à ce que
les interlocuteurs observent un silence de
30 secondes.
CONNEXION AVEC LA
TOUCHE CANAL :
Appuyez une fois sur le bouton CANAL sélectionné pour
ajouter ou supprimer l’autre kit
mains libres d’une communication intercom.
9.4b INTERCOM TRIDIRECTIONNEL
Le SRC-System™ ore une connectivité tridirectionnelle en mode
intercom comme suit :
54
Utiliser le Canal “ B”Utiliser le Canal “A”
Premier kit mai ns
libres SRC-System™
Pilote “A”
Second kit mai ns libres
SRC-System™ Pilote “B”
Troisième kit mains
libres SRC-System™
Pilote “C”
Dans cette conguration motard «B» est pairé au motard «A» et au
motard «C».
IMPORTANT : Le motard «B» utilisant deux connexions Bluetooth® en
mode conférence, motard «B» sera déconnecté du téléphone mobile ou du
GPS jusqu’à la n de l’appel conférence. Dès la n de l’appel conférence,
le motard «B» sera automatiquement reconnecté à son téléphone mobile
ou au GPS. Les motards «A» et « C» resteront connectés à leurs téléphones
mobiles ou GPS durant l’appel intercom tridirectionnel.
Installation et conguration de la connectivité intercom
tridirectionnelle
CANAL
INTERCOM
CANAL «A» BOUTON CANAL «A» Le voyant ROUGE cli-
CANAL «B» BOUTON CANAL “B” Le voyant BLEU clignote
BOUTON PAIRAGE/
CONNEXION
INDICATEURS DE MODE
DE PAIRAGE
gnote rapidement
rapidement
OPTIONS DE CONNEXION ENTRE TROIS INTERLOCUTEURS
(entre des modèles SRC-System™ uniquement)
Pour connecter trois kits mains libres SRC-System™, il sut de
répéter la procédure de la section ci-dessus 9.4a avec un troisième kit
mains libres SRC-System™ (utiliser un canal diérent).
QG SRC 207 - MAN00015.indd 54 2/1/11 11:38 AM
Page 55

Exemple:
Pour connecter votre SRC-System™ avec deux autres kits
SRC-System™ :
1. Connectez votre SRC-System™ avec le second SRC-System™
tout comme décrit dans la section 9.4a – (utilisez CANAL «A»).
2. Connectez votre SRC-System™ avec le troisième
SRC-System™ tout comme décrit dans la section 9.4a –
(utilisez CANAL «B»).
Lancer des appels en mode intercom
Vous pouvez lancer un appel intercom depuis votre kit pairé en mode Veille
de deux façons :
CONNEXION VOCALE:
Parlez à voix haute
Dès ce moment, l’appel en
mode intercom sera établi
entre les kits mains libres
connectés, CANAL «A» et
CANAL «B» (s’ils sont tous
deux disponibles).
CONNEXION AVEC LA TOUCHE CANAL :
Appuyez une fois sur le bouton CANAL
«A» pour ajouter ou supprimer la connexion
CANAL «A» d’un appel en mode intercom.
Appuyez une fois sur le bouton CANAL
«B» pour ajouter ou supprimer la connexion
CANAL «B» d’un appel en mode intercom
9.6 LANCER DES APPELS EN MODE INTERCOM
Maintenant que vous avez terminé le processus de connexion, vous pouvez
commencer à utiliser l’intercom. Si vous ne l’avez pas encore fait, consultez
le tableau ci-dessus et procédez-y avant de poursuivre.
Vous pouvez lancer un appel intercom avec des kits connectés à votre
SRC-System™ de deux façons (assurez-vous d’être en mode Veille) :
CONNEXION VOCALE :
Pour des conversations relativement
brèves. Le canal passe en mode Veille
après 30 secondes de silence
Parlez à voix haute
Dès ce moment, l’appel en mode
intercom sera établi entre les kits
connectés, CANAL “A” et CANAL “B”
(s’ils sont tous deux disponibles).
L’intercom restera allumé jusqu’à ce
que les interlocuteurs observent un
silence de 30 secondes (applicables
pour une communication à 2 sens).
NOTE : Lorsque l’Intercom est en marche, les fonctions Rappel et Appel
Vocal sont indisponibles.
CONNEXION AVEC LE BOUTON DU
CANAL
Pour des conversations plus longues,
le canal reste ouvert et actif
Appuyez rapidement et une fois sur
le bouton CANAL «A» pour ajouter ou
supprimer le CANAL «A» d’un appel en
mode intercom.
Appuyez rapidement et une fois sur
le bouton CANAL «B» pour ajouter ou
supprimer le CANAL «B» d’un appel en
mode intercom
Fra nçai s
9.5 RECEVOIR DES APPELS EN MODE INTERCOM
Quand un kit mains libres connecté vous appelle en mode intercom,
l’appel commence presque immédiatement.
NOTE :
Les modes de priorité des kits ont été établis de façon à ce qu’un appel en
mode intercom n’interrompe pas un appel téléphonique et des instructions GPS. Dans ce cas, l’appelant entendra une tonalité « Occupé » et
vous deux bips (voir section 4.3 pour de plus amples détails sur les priorités
audio et la connexion de dispositifs).
9.7 FONCTIONNALITÉ CONNEXION VOCALE VOX
Le SRC-System™ est également doté de la technologie VOX pour le
contrôle mains libres et la commande en toute sécurité de certaines
fonctions clés.
Pour les appels entrants, il sut de prononcer haut et fort n’importe
quel mot (ex. : « allô »).
Pour rejeter un appel entrant, il sut de rester silencieux pendant
une quinzaine de secondes.
Pour rejeter un appel entrant, restez silencieux pendant 30 secondes.
Activer/Désactiver : En mode Veille, Appuyez sur les Boutons
Volume fort et Volume faible simultanément pendant 3 secondes
jusqu’au bip. Le statut par défaut est Connexion vocale.
55
QG SRC 207 - MAN00015.indd 55 2/1/11 11:38 AM
Page 56

NOTE : La fonctionnalité Ac tiver/Désactiver la conne xion Vocale ne
concerne que la fonction intercom.
9.8 RÉINITIALISER LA CONNEXION RESTAURER LES
PARAMÈTRES ORIGINAUX PAR DEFAUT
Cette section n’est pertinente qu’après avoir terminé la connexion.
Pour supprimer les dispositifs connectés à tout moment, procédez
comme suit :
1. Le SRC-System™ étant allumé, appuyez sur le bouton Mobile
pendant au moins six secondes jusqu’à ce que les lumières Rouge
et Bleu alternent rapidement.
2. Appuyez sur le bouton Volume fort pendant 3 secondes.
3. Les voyants Rouge et Bleu clignoteront 5 fois puis le kit s’éteindra,
conrmant que la réinitialisation a réussi.
9.9 BON À SAVOIR
a. Statut Occupé (En utilisant un kit mains libres SRC-System™ )
En tentant d’entrer en communication en mode intercom avec un kit
déjà en communication téléphonique/GPS/intercom, vous entendrez
deux bips indiquant que l’autre kit mains libres est occupé
b. Reconnexion automatique de l’intercom
Si le SRC-System™ et un autre kit couplé se trouvent être hors de portée
et sont déconnectés, le SRC-System™ tentera immédiatement de se
reconnecter à l’autre kit.
Il est possible de reconnecter manuellement l’appel intercom tandis
que le kit mains libres est en mode Veille en appuyant sur le bouton
CANAL «A» ou CANAL «B» pour rétablir la connexion.
c. Limites du mode Conférence
En mode conférence intercom avec 3 interlocuteurs (dont vous-même),
les interlocuteurs qui ont deux connexions actives simultanées ne pour-
ront pas recevoir des appels téléphoniques ou des messages GPS tant
que dure l’appel conférence (voir détails dans les section 9.4b)
9.10 DÉPANNAGE DE L’INTERCOM
Tout d’abord, assurez-vous que votre microphone est bien en face de
votre bouche.
Le SRC-System™ est conçu pour être utilisé dans des milieux bruyants. Il
faut donc le tester en extérieur, par exemple, près d’une moto au régime
ralenti par exemple et non en intérieur. Vériez aussi que la connexion a
été réalisée correctement. Pour cela, reportez-vous aux instructions des
sections correspondantes.
10. CLICKTOLINK
Click-to-Link est le caractère spontané «social» de votre SRC-System™.
Cette caractéristique unique vous permettra de passer instantanément
des appels intercom avec d’autres utilisateurs SRC-System™ dans les
environs sans passer par un processus de pairage préalable. Voyez-le
comme un canal privé de motard-à-motard que vous pouvez congurer
sur la route avec d’autres utilisateurs SRC-System™ une fois que vous
êtes arrêté à un feu ou le long de la route.
La fonction Click-to-Link peut bien sûr être désactivée à tout moment,
bloquant toute tentative par les autres utilisateurs SRC-System™
d’établir un lien spontané.
UTILISATION DE CLICK-TO-LINK
Activer / Désactiver Click-to-Link : Cette fonction peut être activée
ou désactivée via le menu vocal (voir la section 4.2). Par défaut, cette
fonction est désactivée.
SOURCES AUDIO ET PRIORITÉS
Les diérentes sources audio connectées au SRC-System™ sont
hiérarchisées comme indiqué ci-dessous, c’est à dire que la source
de plus grande priorité sera toujours en premier et interrompra la
priorité inférieure.
56
QG SRC 207 - MAN00015.indd 56 2/1/11 11:38 AM
Page 57

Par exemple, les appels entrants de téléphone mobile et les instructions de navigation GPS interrompront les appels Click-to-Link, tandis
que les appels entrants Click-to-Link interrompront la connexion
audio de la Radio FM etc.
Les appels par Click-to-Link et les appels Intercom ont la même priorité : Si l’un est en cours d’utilisation, l’autre ne sera pas en mesure de
vous interrompre. Par conséquent, une requête Click-to-Link ne peut
pas interrompre un appel Intercom en cours, et vice-versa.
Priorité élevée
Faible priorité
1. Son audio du téléphone mobile ou instructions
GPS (dispositifs spéciaux)
2. Intercom / Click-to-Link
3. Source audio A2DP
4. Radio FM (intégrée)
5. Port entrée de ligne (pour une connexion laire
pour les lecteurs MP3 par exemple).
Tonalité de Demande IC (Intercom) : Si vous êtes en plein appel
Click-to-Link et le Motard A ou le Motard B essaie de vous contacter
via un appel IC, vous entendrez une Tonalité de Demande IC tandis
que l’autre entendra un bip de rejet.
Si votre connexion Click-to-Link a été interrompue pour une raison
quelconque et que d’autres utilisateurs SRC-System™ sont à proxi-
mité, de nouvelles connexions Click-to-Link peuvent être établies avec
d’autres utilisateurs que celui de votre première connexion.
Fonctions générales
Catégorie Résultat Désiré Action Requise
Passer des appels
Click-to-Link
Recevoir des appels
Click-to-Link
Pendant les appels
Click-to-Link
* Le SRC‑System™ recherche un autre SRC‑System™ permettant la fonction
Click-to-Link pendant un maximum de 10 secondes, en émettant un bip et
en clignotant en rouge
NOTE : Les connexions Click-to-Link ne remplaceront ou ne modieront
pas vos pairages Intercom actuels avec les Motards A et B. Click-to-Link
utilise un canal séparé temporaire pour se connecter à votre interlocuteur
Click-to-Link.
Démarrer une requête
d’appel Click-to -Link*
Annuler un appel
Click-to-Link
Accepter un appel
Click-to-Link
Rejeter un appel
Click-to-Link
Mettre n à un appel
Click-to-Link
Double cliquez sur le
bouton Canal «A»
Appuyez sur le Bouton
Canal «A»
Lorsque vous entendez la
sonnerie, appuyez sur le
bouton Canal «A» ou parlez fort pour ré-pondre
par VOX
Lorsque vous entendez
la sonnerie, conservez
le silence pendant 10
secondes ou jusqu’à la n
de la sonnerie
Appuyez sur le Bouton
Canal «A»
Fra nçai s
57
QG SRC 207 - MAN00015.indd 57 2/1/11 11:38 AM
Page 58

11. ASSISTANCE
12. AVIS
Pour de plus amples informations, visitez notre site Web :
www.schuberth.com
Pour une assistance technique, contactez-nous à l’adresse suivante :
support@src-systems.com
Téléphone : +49-391-8106-555
Pour obtenir les dernières informations sur les mises à jour du logiciel,
visitez notre site Web à l’adresse: www.schuberth.com/fr/produits/
service/src-systemtm.html et inscrivez-vous en ligne.
IMPORTANT:
OUVRIR LA FERMETURE DU MICRO‑CASQUE ANNULE LA GARANTIE
Les composants électroniques à l’intérieur du micro-casque du
SRC-System™ sont protégés par une fermeture étanche. Veuillez
ne pas toucher ou ouvrir la fermeture ou la garantie ne pourra
plus être valable..
Not ice de la Fe deral Communications Co mmissi on (FCC)
15.21
Nous vous avertissons que les changements ou modications apportés à cette unité,
non expressément approuvés par la partie responsable de la conformité, pourraient
annuler le droit accordé à l’utilisateur d’exploiter cet équipement.
15.105(b)
Cet équipement a été testé et jugé conforme aux limites s’appliquant à un appareil
numérique de Classe B, conformément à la Partie 15 des réglementations de la FCC. Ces
limites ont été élaborées pour orir une protection raisonnable contre les interférences
nuisibles dans une installation résidentielle.
Cet équipement génère, utilise et peut émettre de l’énergie de fréquence radio et,
s’il n’est pas installé et utilisé conformément aux instructions du fabricant, peut
provoquer des interférences dangereuses pour les communications radio. Toute fois, rien ne garantit l’absence d’inter férences dans une installation par ticulière.
Si cet équipement provoque des interférences nuisibles au niveau de la réception
radio ou télévision, ce qui peut être déterminé par la mise hors, puis sous tension de
l’équipement, vous êtes invité à essayer de corriger les interférences en prenant les
mesures suivantes :
• Ré oriente z ou déplacez l’antenne réceptri ce.
• Aug mentez la dista nce qui sépare l ’équipement et l e récepteur.
• Branch ez l’équ ipement à une prise d’un circ uit dif férent de celui auquel est
branché le récepteur.
• Consult ez le re vendeur ou un te chnicie n radio/tél évision expéri menté p our
obte nir de l ’aide.
Son fonct ionnem ent es t soumis au x deux conditions su ivantes :
1) cet appa reil ne peut pas cau ser d’i nterfé rence et
2) cet appareil doit accep ter toutes l es inter férences, y compri s celles suscep tibles d e pert urber s on fonc tionne ment.
Eno ncé FCC sur l’exp osition aux radia tions RF :
Cet équipement est conforme aux limites FCC d’exposit ion aux radiations, éno ncées ci- après, pour un environn ement incontrôlé. Les utilisateurs suiv ront les
inst ructions d ’exploi tation spécif iques p our rép ondre aux exigences de confor-
58
QG SRC 207 - MAN00015.indd 58 2/1/11 11:38 AM
Page 59

mité sur l’exposition aux RF. Cet émetteur ne co habiter a pas ou ne s’exp loitera
pas en co njonct ion avec tout autre antenne ou émetteur.
Not ice de la IC - Industrie Ca nada
15.21
Nous vous avertissons que les changements ou modications apportés à cette unité,
non expressément approuvés par la partie responsable de la conformité, pourraient
annuler le droit accordé à l’utilisateur d’exploiter cet équipement.
15.105(b)
Cet équipement a été testé et jugé conforme aux limites s’appliquant à un appareil
numérique de Classe B, conformément à la Partie 15 des réglementations de la IC. Ces
limites ont été élaborées pour orir une protection raisonnable contre les interférences
nuisibles dans une installation résidentielle.
Cet équipement génère, utilise et peut émettre de l’énergie de fréquence radio et, s’il
n’est pas installé et utilisé conformément aux instructions du fabricant, peut provoquer
des interférences dangereuses pour les communications radio. Toutefois, rien ne
garantit l’absence d’interférences dans une installation particulière. Si cet équipement
provoque des interférences nuisibles au niveau de la réception radio ou télévision, ce
qui peut être déterminé par la mise hors, puis sous tension de l’équipement, vous êtes
invité à essayer de corriger les interférences en prenant les mesures suivantes :
• Ré oriente z ou déplacez l’antenne réceptri ce.
• Aug mentez la dista nce qui sépare l ’équipement et l e récepteur.
• Branch ez l’équ ipement à une prise d’un circ uit dif férent de celui auquel est
branché le récepteur.
• Consult ez le re vendeur ou un te chnicie n radio/tél évision expéri menté p our
obte nir de l ’aide.
Son fonct ionnem ent es t soumis au x deux conditions su ivantes :
1) cet appa reil ne peut pas cau ser d’i nterfé rence et
2) cet appareil doit accep ter toutes l es inter férences, y compri s celles suscep tibles d e pert urber s on fonc tionne ment.
Eno ncé IC sur l ’exposition au x radi ations RF :
Cet équipement est conforme aux limites IC d’exposition aux radiations, énoncées
ci-après, pour un environnement incontrôlé. Les utilisateurs suivront les instructions
d’exploitation spéciques pour répondre aux exigences de conformité sur l’exposition
aux RF. Cet émetteur ne cohabitera pas ou ne s’exploitera pas en conjonction avec tout
autre antenne ou émetteur.
Not ice européenne CE
Le kit mains libres SRC-System™ (le “Prod uit”) est conform e aux re quêtes
essentielle s de la d irective 199 9/5/EC du cons eil (réf érencée en tant que
dire ctive R&TT E ) : Ar ticles 3.1a, 3.1.b et 3.2. Le produ it est fabr iqué en
conf ormité avec l’Annexe II de la d irective susme ntionné e.
Déc larati on de c onform ité (DO C)
L’écouteur SRC-System™ est conforme et adopte la norme Bluetooth
a réussi tous les tests d’interopérabilité dénis dans les spécications Bluetooth
Cependant une intero pérabi lité ent re le périp hérique et d’aut res pro duits
équipés de l a fonction nalité Blue tooth
®
, n’es t pas ga rantie.
®
Specication 2.1 et
®
.
REN ONCIATI ON ET R EMISE GENER ALE
(Non val able p our les pay s de l’ Union E uropé enne)
En utilisant le SRCSystem™, vous renoncez à certains droits l égaux substan-
tiels, y compris au droit d’int enter des poursu ites. Veuillez lire attentivement
ce qui suit avant d’utiliser cet appareil. Si vous n’acceptez pas tous les termes
de cet accord, retou rnez immédiatement le pro duit qui vous sera intégrale ment remboursé. E n utilisant cet écouteur SRC-System, vous acceptez d ’être
lié à cet accord et reno ncez à tout droit d’intenter des poursuites.
L’usage d’un dispositif de communication tout en conduisant une moto, un scooter, un
cyclomoteur, un véhicule tout-terrain ou tout autre véhicule ou équipement que ce soit
sur terre, en mer ou dans les airs (référencés conjointement en tant que « Véhicule »)
requiert une attention complète et unique. Schuberth GmbH et Cardo Systems, Inc., y
compris ses cadres, sa direction, ses aliés, sa société mère, ses représentants, agents,
contractants, sponsors, employés, fournisseurs et revendeurs (répertoriés conjointement
en tant que la « Société » ou « l’Entreprise ») vous recommande vivement de prendre
toutes les précautions nécessaires et de rester attentif à la circulation, aux conditions
atmosphériques et routières, si vous choisissez d’utiliser l’écouteur SRC-System™ (ci-après
appelé le « dispositif »), y compris tous les modèles dérivés, indépendamment de leur
marque commerciale, et d’arrêter votre véhicule sur le bord de la route avant d’initier
ou de recevoir un appel. Toute publication, publicité, annonce ou note similaire se
référant à l’usage du dispositif en conduisant un véhicule ne répertorie que les capacités
techniques du périphérique et ne sera pas considérée comme un encouragement des
utilisateurs à manipuler l’appareil en étant impliqué activement dans le trac.
En achetant cet appareil et en ne le retournant pas pour remboursement (voir
ci-dessous), vous renoncez de façon irrévocable à toute indemnisation quant à la
responsabilité, per te, réclamation et frais (y compris les honoraires d’avocat) et ne
tenez pas l’Entreprise pour responsable de toutes lésions corporelles, dommages
ou décès, ainsi que des per tes ou endommagements de biens, pour tout véhicule
Fra nçai s
59
QG SRC 207 - MAN00015.indd 59 2/1/11 11:38 AM
Page 60

dont le vôtre, ou à l’un quelconque des biens ou des actifs qui appartiennent à vous
ou à des tiers, de tout ce qui peut résulter de l’utilisation du périphérique, en toute
circonstance et indépendamment des conditions ou de la juridiction.
l’Entrepris e ne pourra êtr e tenue resp onsabl e d’aucun préjudice p hysique,
qu’el le qu’en soit la raison, les conditio ns ou circonstan ces, y compr is un mauvais fon ctionn ement du dis positif et tous les risq ues liés à l ’utilisa tion restent
sous l’entière responsab ilité de l’utilisateur de ce d ispositif, q ue celui-c i soit
l’acq uéreur original ou toute autre p artie.
l’Entrepris e, par l a présente, vous notifie que l’usage de ce dispositif pourrait
se trouver en inf raction avec les lois o u règle mentations locales, fédér ales,
étatiques ou nat ionales et que tout usage de ce p ériphé rique reste à vos ris ques
et p érils et sous votre r esponsabilité.
1. Vous, vos héritiers, représentants légaux, successeurs ou ayants droits déchargez
volontairement, par la présente et indéniment, l’Entreprise de toute indemnité
et ne tiendrez pas responsable la société pour tout litige, réclamation, dette,
demande, action et responsabilité pouvant surgir directement ou indirectement
de l’usage du dispositif, pour toute perdition, douleur, sourance, inconfort,
perte, blessure, décès, dommage, à l ’égard de toute personne ou de ses biens
quelle qu’en soit la cause, QU’ILS DECOULENT D’UNE NÉGLIGENCE OU AUTRE, et
qui pourraient se retourner contre vous à une date ultérieure, à la suite de cette
utilisation, dans la mesure permise par la loi.
2. Vous avez entièrement compris et assumez les risques liés à l’usage de ce dispositif, y
compris ceux associés à des actes de négligence ou omissions eectuées par des tiers.
3. Vous conrmez être à même physiquement d’utiliser le dispositif et vous n’avez
aucune condition ou nécessité médicale susceptible d’empiéter sur vos capacités
à employer cet appareil de manière sécurisée. Vous conrmez être âgé d’au
moins dix-huit ans (18) et avoir été avisé des risques liés à l’usage de ce dispositif.
Vous conrmez également que vous ne consommerez pas de boissons alcoolisées ou de substances psychotropes qui pourraient aecter votre vigilance et
que vous ne transporterez pas, n’utiliserez pas ou ne consommerez pas de telles
substances avant et lors de l’utilisation de ce dispositif.
4. Vous confi rmez tous nos avertissements et comprenez que : (a) des risques et
dang ers existe nt lors de l ’usage d u dispositif au sein du traf ic, y co mpris mais
sans s’y limi ter, des blessures ou maladie s, défo rmations, frac tures, par alysie
par tielle ou total e, décès ou autres pouvant e ntraîner un e invali dité sérieuse ;
(b) ces risques et dangers sont suscep tibles d’êtr e causés par une négligence
des fabricants ou de leurs a gents o u par to ute autre pa rtie impli quée dans
la co nception ou la f abrication du d ispositif ; (c) ce s risques et dan gers pourraient ê tre provoqués par des ca uses prévisibles ou non .
Vous assumez par la présente tous les risques et dangers, ainsi que toute responsabilité pour toute perte et/ou endommagement qu’ils aient été provoqués par
négligence ou par la conduite de tiers, y compris la société.
5. Vous conrmez avoir lu cet énoncé de responsabilité et compris ses termes et renoncé
à tout droit substantiel vu que vous n’avez pas retourné le dispositif pour remboursement (consultez l’option de remboursement ci-dessous).
Dénégation de garantie
L’ENTREPRISE N’OFFRE AUCUNE GARANTIE EXPRESSE OU TACITE, CONCERNANT LE
DISPOSITIF CI-JOINT, INCLUANT SANS LIMITATION, TOUTE GARANTIE TENANT A SA
VALEUR MARCHANDE, TOUTE GARANTIE IMPLICITE D’ADEQUATION A UN USAGE
SPECIFIQUE, D’ABSENCE DE CONTREFACON ET DE DEFAUT DE FABRICATION.
LE DISPOSITIF ET SES ACCESSOIRES SONT LIVRES TELS QUELS, EN FONCTION DE LEUR
DISPONIBILITE SANS GARANTIE DE TOUTE SORTE.
Limite de responsa bilité
L’ENTREPRISE NE POURRA ETRE TENU RESPONSABLE DE TOUT DOMMAGE SPECIAL, INDIRECT, PUNITIF, INCIDENTIEL, CONSEQUENT, EXEMPLAIRE OU D’AUCUN DOMMAGE SURVENU SUITE A L’USAGE DU DISPOSITIF, QUI’IL SOIT BASE SUR UNE RUPTURE DE CONTRAT, UN
DELI (Y COMPRIS LA NEGLIGENCE), LA RESPONSABILITE VIS-À-VIS DU PRODUIT OU AUTRE,
MEME SI ELLE A ETE AVISEE DE LA POSSIBILITE DE TELS DOMMAGES.
VOUS ACCEPTEZ QUE LES LIMITATIONS DEFINIES CI-DESSUS CONSTITUENT DES
ELEMENTS FONDAMENTAUX DE CET ACCORD ET LE DISPOSITIF NE VOUS SERA PAS
LIVRE SANS DE TELLES LIMITATIONS. CERTAINES LOIS ETATIQUES POURRAIENT
S’APPLIQUER EN CE QUI CONCERNE LA LIMITATION DE RESPONSABILITE.
RETOUR POUR REMBOURSEM ENT
AU CAS OU VOUS N’ACCEPTERIE Z PAS LES CONDITIONS SUSM ENTIONNEES ,
VOUS AVEZ LA POSSIBILITE DE RETOUR NER CE DISPOSITI F CHEZ A L’ENTREPRISE QUI VOUS REMBO URSERA INTEGRALEME NT, PARTANT DU FAIT QUE
VOUS L’AYEZ RETOUR NE DANS LES 7 JOURS OUV RABLES SUIVANT SON ACQUISITION (p reuve de l’achat requise) ET QUE L’EMBALLAGE SOIT INTACT. POUR
RETOUR NER CE DISPOSITI F, VEUILLEZ VOUS REFERER A CETTE SECTION .
EN NE RETO URNANT PAS LE DISPOSITIF DANS LA PERIODE SUSMENTIONNEE,
VOUS CONFIR MEZ VOTRE ACCORD AVEC CE QUI PR ECEDE ET RENON CEZ A
TOUT DROI T DE RECLAMATION OU DE MANDE FUTURE CONTRE L’ENTREPRISE,
COMME DEFINI CI- DESSUS.
ww w.schuber th.com
60
QG SRC 207 - MAN00015.indd 60 2/1/11 11:38 AM
Page 61
G U I D A P E R L ’ U T E N T E
P O W E R E D B Y
QG SRC 207 - MAN00015.indd 61 2/1/11 11:38 AM
Page 62

INDICE
1. INTRODUZIONE . . . . . . . . . . . . . . . . . . . . . . . . . . . . . . . . . . . . . . . . . . . . . . . . . . . . . . . . . 63
2. CONTENUTO DELLA CONFEZIONE . . . . . . . . . . . . . . . . . . . . . . . . . . . . . . . . . . . . . . . 64
3. RICARICA DELL’AURICOLARE . . . . . . . . . . . . . . . . . . . . . . . . . . . . . . . . . . . . . . . . . . . . . 64
4. IMPOSTAZIONE E CONFIGURAZIONE BASILARI . . . . . . . . . . . . . . . . . . . . . . . . . . . 65
4.1 FUNZIONI GENERALI . . . . . . . . . . . . . . . . . . . . . . . . . . . . . . . . . . . . . . . . . . . . . . 65
4.2 ISTRUZIONI VOCALI SULLO STATO . . . . . . . . . . . . . . . . . . . . . . . . . . . . . . . . . 65
4.3 FONTI AUDIO E PRIORITÀ . . . . . . . . . . . . . . . . . . . . . . . . . . . . . . . . . . . . . . . . 65
4.4 OPZIONE DI AGGIORNAMENTO DI SOFT WARE . . . . . . . . . . . . . . . . . . . . 66
4.5 COME RESETTARE L’AURICOLARE . . . . . . . . . . . . . . . . . . . . . . . . . . . . . . . . . . 66
5. OPERAZIONI PRELIMINARI . . . . . . . . . . . . . . . . . . . . . . . . . . . . . . . . . . . . . . . . . . . . . . . 66
5.1 SOSTITUZIONE DEL CUSCINO POSTERIORE ESISTENTE
CON LO SRCSYSTEM . . . . . . . . . . . . . . . . . . . . . . . . . . . . . . . . . . . . . . . . . . . 66
5.2 POSIZIONAMENTO DEGLI ALTOPARLANTI . . . . . . . . . . . . . . . . . . . . . . . . 67
5.3 POSIZIONAMENTO DEGLI DEL MICROFONO . . . . . . . . . . . . . . . . . . . . . 67
5.4 RIMOZIONE DI SRCSYSTEM DAL CASCO . . . . . . . . . . . . . . . . . . . . . . . 67
5.5 COME INDOSSARE E TOGLIERE IL CASCO . . . . . . . . . . . . . . . . . . . . . . . . 67
5.6 PULIZIA DEL CUSCINO POSTERIORE . . . . . . . . . . . . . . . . . . . . . . . . . . . . . . 68
6. COLLEGAMENTO CON TELEFONI CELLULARI ABILITATI
BLUETOOTH, GPS o MP3 (A2DP) . . . . . . . . . . . . . . . . . . . . . . . . . . . . . . . . . . . . . . . . 68
6.1 TELEFONI CELLULARI . . . . . . . . . . . . . . . . . . . . . . . . . . . . . . . . . . . . . . . . . . . . . 69
6.2 DISPOSITIVO GPS . . . . . . . . . . . . . . . . . . . . . . . . . . . . . . . . . . . . . . . . . . . . . . . . 69
6.3 MUSICA VIA MP3 (OPZIONE WIRELESS-A2DP) . . . . . . . . . . . . . . . . . . . . . 70
7. RADIO FM INCORPORATA E LETTORE MP3 ESTERNO (OPZIONE VIA CAVO) . . .71
7.1 RADIO FM . . . . . . . . . . . . . . . . . . . . . . . . . . . . . . . . . . . . . . . . . . . . . . . . . . . . . . . . 71
7.2 COLLEGAMENTO VIA CAVO DEL LET TORE MP3 O ALTRE
FONTI DI AUDIO ESTERNE. . . . . . . . . . . . . . . . . . . . . . . . . . . . . . . . . . . . . . . . 72
8. USO DEL TELEFONO CELLULARE . . . . . . . . . . . . . . . . . . . . . . . . . . . . . . . . . . . . . . . . 72
9. USO DELL’INTERFONO . . . . . . . . . . . . . . . . . . . . . . . . . . . . . . . . . . . . . . . . . . . . . . . . . . . 73
9.1 INTRODUZIONE . . . . . . . . . . . . . . . . . . . . . . . . . . . . . . . . . . . . . . . . . . . . . . . . . 73
9.2 COMPATIBILITÀ DI INTERFONO . . . . . . . . . . . . . . . . . . . . . . . . . . . . . . . . . . 73
9.3 PRIMA DI AVVIARE L’INTERFONO . . . . . . . . . . . . . . . . . . . . . . . . . . . . . . . . . 73
9.4 USO DEL SRCSYSTEM™ NELLA FUNZIONE INTERFONO
CON ALTRI AURICOLARI SRCSYSTEM™ . . . . . . . . . . . . . . . . . . . . . . . . . . 74
9.4a. INTERFONO A DUE VIE . . . . . . . . . . . . . . . . . . . . . . . . . . . . . . . . . . . . . 74
9.4b. INTERFONO A TRE VIE . . . . . . . . . . . . . . . . . . . . . . . . . . . . . . . . . . . . . 74
9.5 RICEZIONE DI CHIAMATE CON INTERFONO . . . . . . . . . . . . . . . . . . . . . . 75
9.6 AVVIO DI CHIAMATE CON INTERFONO . . . . . . . . . . . . . . . . . . . . . . . . . . 75
9.7 COLLEGAMENTO VIVA VOCE VOX . . . . . . . . . . . . . . . . . . . . . . . . . . . . . . 76
9.8 CANCELLARE L’ABBINAMENTO RIPRISTINO DELLA
CONFIGURAZIONE ORIGINALE PREDEFINITA . . . . . . . . . . . . . . . . . . . 76
9.9 INFORMAZIONI UTILI . . . . . . . . . . . . . . . . . . . . . . . . . . . . . . . . . . . . . . . . . . . . . 76
9.10 RISOLUZIONE DI PROBLEMI CON L’INTERFONO . . . . . . . . . . . . . . . . . 76
10. CLICK-TO-LINK . . . . . . . . . . . . . . . . . . . . . . . . . . . . . . . . . . . . . . . . . . . . . . . . . . . . . . . . . . . 77
11. ASSISTENZA . . . . . . . . . . . . . . . . . . . . . . . . . . . . . . . . . . . . . . . . . . . . . . . . . . . . . . . . . . . . 78
12. AVVISI . . . . . . . . . . . . . . . . . . . . . . . . . . . . . . . . . . . . . . . . . . . . . . . . . . . . . . . . . . . . . . . . . . 78
IMPORTANTE: Questa è la versione 2.0 del Manuale per l’Utente. Notare che il
nostro manuale viene aggiornato periodicamente nel sito web in modo che comprenda le ultimissime caratteristiche oltre alle nuove opzioni e funzioni del nuovo
auricolare SRC-System™. Vedere www.schuberth.com/leadmin/downloads/
SRC/SRC-System_Manual -1.pdf per controllare adesso se la versione del manuale
a propria disposizione è la più aggiornata e scaricare la versione web del manuale
nella lingua preferita.
62
QG SRC 207 - MAN00015.indd 62 2/1/11 11:38 AM
Page 63

1. INTRODUZIONE
Congratulazioni e grazie per aver scelto l’Auricolare Schuberth Rider
Communication-System™ (SRC™-System™) Bluetooth® per caschi moto.
Questo manuale vi aiuterà a mettere in funzione l’auricolare. Tuttavia,
prima di usare lo SRC-System™ , occorre familiarizzare con la funzionalità Bluetooth® del telefono cellulare e/o del dispositivo GPS.
La confezione dello SRC-System™ contiene un’unità di auricolare.
Quando questa viene abbinata ad un altro SRC-System™, i due auri-
colari possono venire usati come Interfono entro un raggio di 300 m
(a seconda del terreno).
LO SRC-SYSTEM PUÒ ESSERE USATO COME SEGUE
1. Come auricolare Bluetooth® per comunicazioni con telefono cellu-
lare (supporta il prolo Bluetooth® Auricolare, Mani Libere * e A2DP
entro un raggio di 10 m);
2. Come auricolare stereo Bluetooth® per ascoltare musica wireless
in streaming (supporta i proli Bluetooth® A2DP e AVRCP ed è
compatibile con una vasta gamma di Lettori MP3, adattatori e altri
apparecchi audio);
3. Come interfono a 2 vie o 3 vie fra motociclette per audioconferenze con
altri auricolari SRC-System™ (no a 300 m) in modalità Full Duplex**
4. Come interfono fra Guidatore e Passeggero;
5. Funzionalità Click-to-Link per comunicazione interfono spontanea con
qualsiasi unità
SRC-System™
6. Come auricolare Bluetooth® per ricevere istruzioni di navigazione
GPS e Audio Streaming da dispositivi Bluetooth® compatibili;
7. Come auricolare stereo per ascoltare la radio FM integrata;
8. Come auricolare stereo per ascoltare apparecchi audio collegati via
cavo (come lettori MP3 non-Bluetooth®, iPods®);
vicina
ULTERIORI CARATTERISTICHE SPECIALI :
➤Tecnologia AGC (Automatic Gain Control – Controllo Automatico
del Volume), che consente a SRC-System™ di aumentare o
diminuire automaticamente il volume a seconda della velocità e
del rumore circostante . È anche possibile controllare manualmente
il livello del volume.
➤Tecnologia VOX, che consente di attivare alcune funzioni chiave in
modo sicuro e senza utilizzare le mani. (Composizione del Numero
Viva Voce, risposta a telefonata, Riuto di telefonata)
➤Tecnologia PLC (Compensazione della Perdita di Pacchetti): Compen-
sazione in tempo reale della perdita di audio in ambienti problematici.
➤Software avanzato che può essere aggiornato attraverso qualsiasi
PC fornito di Windows® XP™, Vista™ o Windows® 7.
➤SRC-System™ fornisce informazioni vocali relative allo stato di
utilizzo, in modo che sia possibile in qualsiasi momento sapere con
chi e con quale dispositivo si è collegati.
Vi auguriamo una piacevole guida e rimaniamo a disposizione per
ogni domanda: potete contattarci scrivendo a
Kundenservice@schuberth.com
F-J. Görges Erwin Van Hoof
Direttore delle Vendite Vice President
SCHUBERTH GmbH Int. Sales Manager
Andare su www.schuberth.com/src-tutorial/it per provare una
dimostrazoine interattiva delle funzioni dello SRC-System
____ ____ _____________________
* Telefoni cellulari che non supportano il prolo Blue tooth® Mani libere possono
non consentire di utilizzare alcune caratteristiche avanz ate.
** “Full Duplex” consente di parlare e ascoltare contemporaneamente.
Ita lian o
63
QG SRC 207 - MAN00015.indd 63 2/1/11 11:38 AM
Page 64

2. CONTENUTO DELLA CONFEZIONE
SRC-System™ per caschi C3
Braccetto Flessibile
Puntina
Connettore USB
SRC-System™ per caschi C2 / Concept
Microfono
Due
Braccetto
Flessibile
Puntina
altoparlanti
Coperchio del
Connettore USB
Coperchio del
Connettore
USB
*
Microfono
Due altoparlanti
Connettore
USB
Puntina
• Per collegamento con il
• Pulsante per Radio FM
Pulsante per Alzare il Volume / Avanzare (FWD)
Pulsante per Abbassare il Volume /
Riavvolgere (REW)
Puntina
Pulsante CANALE A
• Per collegamento con il
Motociclista A
• Pulsante per MP3
Pulsante per Telefono
Cellulare
Pulsante CANALE B
Motociclista B
Pulsante CANALE A
• Per collegamento con il
Motociclista A
• Pulsante per MP3
Pulsante per Telefono Cellulare
Pulsante CANALE B
• Per collegamento con il
Motociclista B
• Pulsante per Radio FM
Pulsante per Alzare il Volume /
Avanzare (FWD)
Pulsante per Abbassare il Volume /
Riavvolgere (REW)
Il prodott o viene
*
oerto in dim ensioni
diverse
Presa del caricabatteria a muro
Cavo per adattatore USB
Cuscinetti di Velcro
Cavo MP3
Spugnette per il microfono
Guida per l’Utente, adesivi
IM PO RTANT E:
Il coperchio che protegge l ’Attacco per la Ricarica deve essere tenuto
sempre ben chiuso per evitare che l’umidità entri nell’apparecchio
3. RICARICA DELL’AURICOLARE
Accertarsi che l’auricolare sia completamente,
carico lasciandolo in carica per almeno quattro ore
prima dell’uso iniziale.
Inserire il cavo USB nel caricabatteria a muro e
inserire l’altra estremità del cavo nel
connetore Micro USB dell’auricolare.
Durante la ricarica la Luce Rossa si
accende; quando l’auricolare è completamente carico la Luce Rossa si
spegne.
Il caricabatteria a muro e il cavo per adattatore USB servono per:
1. ricaricare l’auricolare da qualsiasi presa CA a muro o da qualsiasi porta
USB del computer ( in questo caso il tempo di ricarica sarà più lungo)
2. scaricare gli aggiornamenti del software da qualsiasi computer che
utilizzi Windows® XP™, Vista™ o Windows® 7 (vedere paragrafo 4.4
per ulteriori informazioni).
64
QG SRC 207 - MAN00015.indd 64 2/1/11 11:38 AM
Page 65

4. IMPOSTAZIONE E CONFIGURAZIONE
BASILARI
4.1 FUNZIONI GENERALI
RISULTATO DESIDERATO: AZIONE
Accendere
l’auricolare
Spegnere
l’auricolare
Alzare/Abbassare
il volume della
corrente sorgente
audio
Muto
Indicatore del
Livello della
Batteria
4.2 ISTRUZIONI VOCALI SULLO STATO
L’auricolare SRC-System™ fornisce tramite gli auricolari diversi
messaggi sonori relativi allo stato di utilizzo: fra gli altri segnalerà lo
stato del collegamento, indicando ad esempio se si è in modalità di
telefono cellulare o di interfono, confermerà la modica di queste
modalità e altro ancora. Questa caratteristica è attivata di default e
può essere disabilitata come indicato sotto.
NECESSARIA:
Premere il Pulsante del Cellulare per almeno
quattro secondi
Indicazione luminosa: tre lampeggi blu.
Feedback sonoro: Tono crescente (da basso ad alto).
Premere il Pulsante del Cellulare per almeno tre
secondi
Indicazione luminosa: tre lampeggi rossi.
Feedback sonoro: Tono decrescente (da alto a
basso).
Premere il Pulsante per Alzare o Abbassare il
Volume (impostare e memorizzare il Volume per
fonte)
Premere contemporaneamente i Pulsanti per
Alzare e per Abbassare il Volume quando il suono
è presente
In Standby premere e tenere premuto per 3
secondi il Pulsante per Alzare il Volume:
Luce blu = batteria completamente carica
Luce rossa/blu = batteria carica per metà
Luce rossa = batteria quasi scarica
Il menu vocale può essere impostato in una delle lingue
disponibili.
Come entrare nel Menu Vocale: Premere e tenere premuti
contemporaneamente il Pulsante di CANALE “A” e CANALE “B” per
3 secondi mentre l’auricolare è in standby. Dopo essere entrati nel
sistema, seguire le istruzioni vocali in Inglese o scegliere la lingua
preferita.
Per Disabilitare/Abilitare le informazioni sullo stato: In
Standby premere e tenere premuto il Pulsante per Abbassare il
Volume per 6 secondi.
ACCESO - Indicatore luminoso: Blu stabile; Feedback sonoro: Un
suono corto
SPENTO - Indicatore luminoso: Rosso stabile; Feedback sonoro: Due
suoni corti
4.3 FONTI AUDIO E PRIORITÀ
La priorità delle diverse fonti audio collegate al SRC-System™ è denita come indicato qui di seguito: questo signica che la fonte con
priorità maggiore avrà sempre la precedenza e interromperà quella
con priorità minore.
Per esempio, telefonate in entrata interromperanno chiamate inter-
fono in corso, mentre chiamate interfono interromperanno l’audio
proveniente dalla Radio FM incorporata, ecc.
Priorità maggiore
Priorità minore
1. Audio dal telefono cellulare o istruzioni GPS
(secondo il dispositivo)
2. Interfono / Click-to- Link
3. Fonte audio A2DP
4. Radio FM (integrata)
5. Porta Ausiliare per Linea in Entrata (per collegamento via cavo come nel caso dei lettori MP3).
Ita lian o
65
QG SRC 207 - MAN00015.indd 65 2/1/11 11:38 AM
Page 66
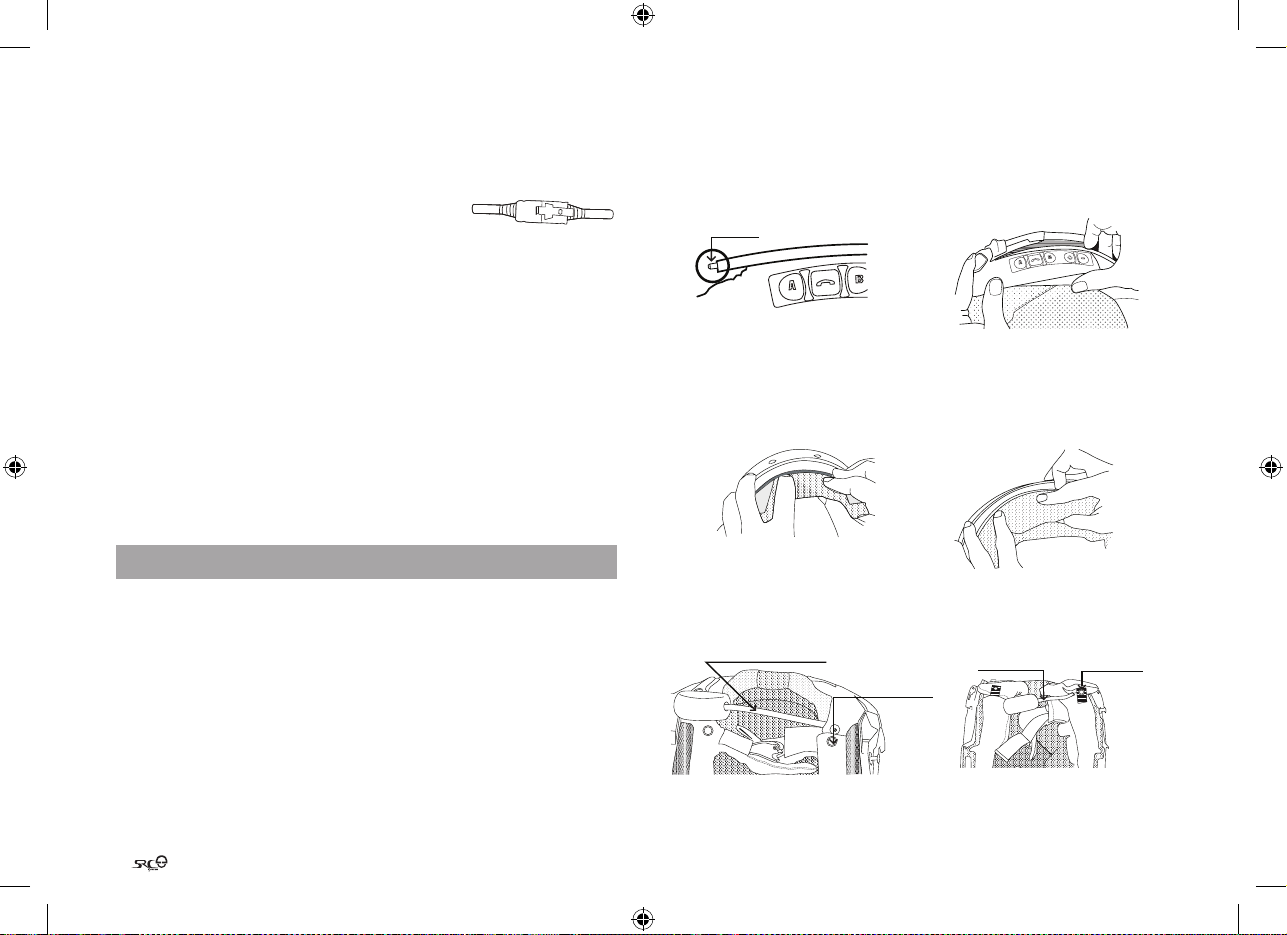
Bottone
automatico
Braccio del
Microfono
4.4 OPZIONE DI AGGIORNAMENTO DI SOFTWARE
In futuro, per mantenere il software del SRC-System™ aggiornato, sarà
possibile installare aggiornamenti di Software e patch di programmi. Gli
aggiornamenti futuri del Software comprenderanno ulteriori segnalazioni relative allo stato e
altre importanti funzioni.
Per assicurarsi di non perdere le versioni più aggiornate, suggeriamo
di registrarsi online su www.schuberth.com/src-register/it tenendo
pronto il proprio numero di serie. Per scaricare gli aggiornamenti utilizzare il cavo USB incluso nella confezione di SRC-System™.
Fino a nuova indicazione gli aggiornamenti saranno disponibili solo per
computer che utilizzano Windows® con sistemi operativi
Vista™ o Windows® 7
.
Windows® XP™,
4.5 COME RESETTARE L’AURICOLARE
Se l’auricolare non riesce a rispondere nonostante ripetute prove, è
possibile resettare l’auricolare caricandolo. Dopo circa 10 secondi, si
può rimuovere l’auricolare dal caricabatterie e riaccenderlo.
Adesso l’auricolare dovrebbe rispondere correttamente.
5. OPERAZIONI PRELIMINARI
5.1 SOSTITUZIONE DEL CUSCINO POSTERIORE ESISTENTE
CON LO SRCSYSTEM
Innanzitutto, rimuovere il cuscino posteriore esistente dal casco
come segue:
1. Aprire entrambi i bottoni automatici.
2. Sollevare il cuscino posteriore dal retro nella sua parte centrale
curvata
3. Liberare le puntine del cuscino posteriore dalle loro rispettive
intaccature all’interno del bordo del casco.
4. Adesso continuare sostituendo il cuscino posteriore esistente
con il nuovo cuscino posteriore SRC-System™. Quando si ssa lo
66
SRC-System™ al suo posto, è necessario assicurarsi che i li dell’al-
toparlante si trovino all’interno del casco.
5. Fare scorrere e inserire la puntina che si trova all’estremità del pannello di controllo nella sua intaccatura corrispondente sul casco e
chiudere il bottone automatico.
Puntina
6. Inserire al suo posto l’altra puntina sul lato opposto del cuscino
posteriore e chiudere il secondo bottone automatico.
7. Premere e inserire il cuscino posteriore cominciando dalla zona cen-
trale nella parte posteriore del casco. Fare la stessa cosa con le parti
rimanenti per ssare il cuscino posteriore al suo posto
.
8. Accertarsi che entrambi i bottoni automatici rimangano chiusi e
che il braccio del microfono si trovi nel lato interno del casco (fra lo
SRC-System™ e il rivestimento interno del casco).
Braccio del Microfono
Bottone
automatico
Casco C3 Casco C2/Concept
QG SRC 207 - MAN00015.indd 66 2/1/11 11:38 AM
Page 67

9. Accertarsi di chiudere il coperchio del connettore USB e poi metterlo
al sicuro nelle pieghe del cuscino posteriore (nella parte posteriore
del cuscino posteriore sul lato del pannello di controllo).
5.2 POSIZIONAMENTO DEGLI ALTOPARLANTI
Per ottenere i risultati audio migliori, accertarsi che entrambi gli altoparlanti siano collocati più vicini possibile, di fronte alle orecchie.
Caschi C2 & Concept:
Per i caschi C2 e Concept, semplicemente attaccare
gli altoparlanti di fronte alle orecchie sul riverstimento interno usando i cuscinetti di Velcro forniti.
Casco C3:
Nota: Anche se è possibile attaccare gli altoparlanti nello stesso modo
descritto nel paragrafo precedente (per caschi C2 e concept), raccomandiamo di usare la procedura seguente.
Quanto segue è valido per entrambi i lati del cuscino posteriore
per C3:
1. Aprire i bottoni automatici sui due lati del collare acustico (gli stessi
bottoni che sono stati chiusi poco prima).
2. Aprire i due bottoni rossi nella parte inferiore del rivestimento interno che copre i guanciali (il pulsante sul lato posteriore è tenuto da
un anello nero). Sollevare leggermente il rivestimento.
3. Attaccare il cuscinetto di Velcro corrispondente nell’incavo della
stessa forma sul EPS (polistirolo espanso) e
ssare l’altoparlante al cuscinetto di Velcro.
4. Chiudere i due bottoni rossi. Accertarsi che il
bottone rosso sia ancora all’interno del suo
anello nero.
5. Adesso, chiudere i bottoni automatici del collare
acustico su entrambi i lati e accertarsi che siano chiusi bene.
5.3 POSIZIONAMENTO DEL MICROFONO
Per assicurare una chiusura scorrevole (ip-down) della parte del
mento del casco, rimuovere prima il suo Cuscinetto Anti-Rumore
triangolare e procedere come segue:
1. Piegare il braccio essibile del microfono come indicato nell’immagine.
2. Premere il microfono verso il centro della bocca con la sua supercie più grande rivolta verso la persona (non quella stretta).
3. Abbassare e chiudere il laccio per il mento del casco. Può essere necessario usare entrambe le mani per chiudere bene il laccio del mento.
4. Con la parte del mento chiusa e la visiera aperta, inserire la mano
nell’apertura della visiera e spingere via il microfono, verso il centro
della parte del mento direttamente di fronte alla bocca.
Parte del
Mento
Visiera
5.4 RIMOZIONE DI SRCSYSTEM DAL CASCO
1. Aprire entrambi i bottoni automatici.
2. Sollevare e spingere l’arco del cuscino posteriore dal centro
3. Liberare le puntine del cuscino posteriore dalle loro rispettive
intaccature all’interno del bordo del casco.
5.5 COME INDOSSARE E TOGLIERE IL CASCO
Le componenti elettroniche del SRC System sono integrate in modo
sicuro all’interno del cuscino posteriore. Per evitare una sensazione di
scomodità quando si indossa il casco o lo si toglie, raccomandiamo di
procedere come segue:
Ita lian o
67
QG SRC 207 - MAN00015.indd 67 2/1/11 11:38 AM
Page 68

1. Allargare l’apertura del casco tenendo fermamente le cinghie per il
mento e separandole con forza.
2. Mentre si separano le cinghie, fare scivolare il casco sopra la testa, cominciando dal
collo in avanti.
3. Per togliere il casco, procedere in modo
simile prima separando le cinghie e poi
spingendo tutto il casco verso l’alto.
NOTA: Il cuscino posteriore SRC‑System™ è progettato per il Massimo
comfort. Tuttavia, poichè contiene in esso un intero kit elettronico, può
essere un po’ gono. Di conseguenza,la sensazione indossando il casco
attrezzato con SRC o togliendolo può essere diversa da quella cui si è
abituati con un cuscino posteriore standard.
Ricordare: più si separano le cinghie del casco quando si indossa il casco o
lo si toglie, più scorrevole sarà il processo, consentendo la riduzione della
rigidità del cuscino posteriore.
5.6 PULIZIA DEL CUSCINO POSTERIORE
Per pulire il cuscino posteriore, prima chiudere bene il micro connettore USB dello SRC-System™. Usare solo un panno leggermente
umido e tiepido. Evitare di inzuppare il cuscino posteriore con acqua
o qualsiasi altro liquido. Non immergerlo mai e evitare che l’acqua
venga a contatto con gli altoparlanti o il microfono. Lasciare asciugare l’unità a temperatura ambiente.
6. COLLEGAMENTO CON TELEFONI CELLULARI
ABILITATI BLUETOOTH, GPS O MP3 (A2DP)
FUNZIONE DI CONNETTIVITÀ CON DISPOSITIVI MULTIPLI MULTIPLE
DEVICE CONNECTIVITY “MDC” COLLEGAMENTO CON DISPOSITIVI
COMPATIBILI BLUETOOTH®
Grazie alla tecnologia MDC il SRC-System™ ore connettività
parallela come segue:
➤ Un massimo di altri due auricolari SRC-System™
➤ Un GPS/telefono cellulare (direttamente o per mezzo di un
dispositivo GPS) abilitato Bluetooth
➤ Adattatore o Lettore MP3 abilitato A2DP
Radio FM
Integrata
Lettore
MP3
Raggio di interf ono
fra motociclet te no
a 300 m
GPS
Connettiv ità
con telefono ce llulare
o A2DP
NOTA: Se si intende usare il telefono cellulare mentre si usa un dispositivo
GPS Bluetooth®, abbinare il telefono cellulare al GPS e non all’auricolare
SRC‑System™.
* vedere le restrizioni nel paragrafo 9.4b
68
QG SRC 207 - MAN00015.indd 68 2/1/11 11:38 AM
Page 69

6.1 TELEFONI CELLULARI
Per usare il telefono cellulare Bluetooth® con lo SRC-System™, occor-
re prima di tutto abbinare i due dispositivi.
NOTA: Se si intende usare un dispositivo GPS parallelamente al telefono
cellulare, è necessario abbinare il telefono cellulare al dispositivo GPS e
non allo SRC‑System™. In tal caso, saltare questo paragrafo e procedere
direttamente al paragrafo 6.2.
L’abbinamento è un procedimento che deve essere eseguito una
sola volta. Quando l’auricolare è abbinato con un telefono cellulare
specico, essi rimarranno abbinati e si riconosceranno l’un l’altro ogni
volta che saranno uno alla portata dell’altro.
Se il collegamento fra il telefono e l’auricolare viene perso, premere il
Pulsante Cellulare sull’auricolare per ricollegare gli apparecchi.
ABBINAMENTO DELL’AURICOLARE A UN TELEFONO CELLULARE
BLUETOOTH:
1. Accendere il telefono cellulare e accertarsi che la funzione Blueto-
oth® sia attiva. Accendere l’auricolare premendo il Pulsante Cellulare per almeno tre secondi; appariranno tre lampeggi blu.
2. Con l’auricolare SRC-System™ ACCESO, premere e tenere premuto
il Pulsante Cellulare per almeno sei secondi nchè le Luci Rossa e
Blu cominciano a lampeggiare alternate rapidamente.
3. Cercare gli apparecchi Bluetooth® sul telefono seguendo le istruzio-
ni di quest’ultimo. Per ulteriori informazioni consultare il Manuale
dell’Utente del telefono.
4. Dopo alcuni secondi il Telefono elencherà “SRCS” (compresa la
sua versione software) come un dispositivo rilevato. Selezionarlo e
seguire le istruzioni del Telefono per accettare l’abbinamento.
5. Quando richiesto inserire 0000 (quattro zeri) come PIN o password.
6. Il telefono confermerà che l’abbinamento è andato a buon ne e
l’auricolare comincerà a lampeggiare lentamente in Blu.
NOTA: Non tutti i telefoni Bluetooth® possono trasmettere musica Stereo
Bluetooth® (A2DP), anche se il telefono ha un’applicazione per let tore
MP3. Consultare il Manuale per l’Utente del proprio telefono cellulare per
ulteriori informazioni.
Con alcuni telefoni cellulari, può essere necessario premere il Pulsante
Cellulare per collegare l ’auricolare al telefono dopo aver completato
l’abbinamento. SRC-System™ si collegherà automaticamente con l’ultimo
telefono collegato all ’auricolare
NOTA: Se il procedimento di Abbinamento non verrà completato entro
due minuti, l’auricolare tornerà in modalità di Standby.
6.2 DISPOSITIVO GPS
Per utilizzare un dispositivo GPS abilitato Bluetooth® con SRC-System™, è prima di tutto necessario abbinarli: ciò consente al GPS
di trasmettere istruzioni per navigazione e indicazioni audio agli
altoparlanti dell’auricolare SRC-System™.
NOTA: Non tutti i dispositivi GPS abilitati Bluetooth® consentono un
collegamento con auricolari Bluetooth®. Fra le altre cose, qualsiasi
unità GPS di questo tipo deve essere compatibile con il protocollo
di gateway “Mani Libere” Bluetooth®. Per ulteriori informazioni
consultare il Manuale per l’Utente del dispositivo GPS.
ABBINAMENTO DELL’AURICOLARE CON UN APPARECCHIO GPS:
1. Accendere il dispositivo GPS e accendere l’auricolare.
2. Con l’auricolare SRC-System™ ACCESO, premere e tenere
premuto il Pulsante per Alzare il Volume per almeno sei secondi
finchè le luci Rossa e Blu iniziano a lampeggiare contemporaneamente.
3. Cercare gli auricolari Bluetooth® sul dispositivo GPS seguendo le
istruzioni di quest’ultimo. Per ulteriori informazioni consultare il
Manuale per l’Utente del dispositivo GPS. Dopo alcuni secondi
il GPS elencherà “SRCS” (compresa la versione software) come
Ita lian o
69
QG SRC 207 - MAN00015.indd 69 2/1/11 11:38 AM
Page 70

dispositivo rilevato. Selezionarlo e seguire le istruzioni del GPS per
accettare l’abbinamento.
4. Se il dispositivo GPS richiede un PIN o una password inserire 0000
(quattro zeri).
5. Il dispositivo GPS confermerà che l’abbinamento è andato a buon ne
e la luce Blu dello SRC-System™ inizierà a lampeggiare lentamente.
6. Se si desidera usare un telefono cellulare Bluetooth® per fare e
ricevere telefonate attraverso l’auricolare, è necessario abbinare
il telefono cellulare con il dispositivo GPS seguendo le istruzioni
riportate nel manuale del GPS.
NOTA:
• Se il procedimento di Abbinamento non verrà completato entro due
minuti, l’auricolare tornerà in modalità di Standby.
• Il programma per le priorità dello SRC‑System™ è stato impostato in
modo da evitare che chiamate in interfono in arrivo interrompano istruzioni GPS in corso. In questo caso, chi ha chiamato via interfono sentirà un
segnale di occupato e chi riceve la chiamata sentirà due bip, cosa che indica che qualcuno sta cercando di chiamare via interfono. (vedere paragrafo
4.3 per informazioni sulle priorità audio dei dispositivi abbinati).
6.3 MUSICA CON MP3 OPZIONE WIRELESSA2DP
L’auricolare è progettato per ricevere musica stereo wireless da fonti
A2DP e da telefoni cellulari che supportano i proli Bluetooth® A2DP e
AVRCP (la maggior parte dei dispositivi della terza generazione).
Usando un dispositivo Bluetooth® che supporta il prolo AVRCP sarà
possibile azionare tutte le funzioni principali della fonte A2DP diretta-
mente dall’auricolare.
NOTA: Lo SRC‑System™ può ricevere audio da Lettori MP3 non-Bluetooth® o da
fonti audio anche per mezzo del cavo incluso come descritto nel paragrafo 7.2.
Mentre si ascolta musica da una fonte A2DP, non occorre preoccu-
parsi di perdere una telefonata o una chiamata via interfono, poichè
l’auricolare interrompe automaticamente la musica e dà la preceden-
za alla chiamata in arrivo. Tuttavia, quando si termina la chiamata, è
possibile che alcune fonti MP3 non continuino automaticamente
bensì richiedano di essere riattivate manualmente.
IMPOSTAZIONE DEL LETTORE MP3 PER TRASMISSIONE A2DP
STEREO BLUETOOTH
Per usare un Adattatore o Lettore MP3 abilitato Bluetooth® Stereo
(A2DP) per ascoltare musica stereo, è prima necessario abbinare il
dispositivo all’auricolare.
NOTA: Quando si abbina due dispositivi audio Bluetooth® allo SRC-System™,
seguire le istruzioni seguenti. L’abbinamento del dispositivo Stereo Bluetooth®
può variare secondo la combinazione di dispositivi Bluetooth® usati.
ABBINAMENTO DELL’AURICOLARE A UN ADATTATORE O
LETTORE MP3
Nota: Se la fonte A2DP è integrata nel telefono cellulare, è necessario abbinarla all’auricolare come descritto più sopra nel paragrafo 6.1.
1. Accendere l’Adattatore o il Lettore MP3 e accertarsi che la sua
funzione Bluetooth® sia attiva.
2. Con l’auricolare SRC-System™ ACCESO, premere e tenere premuto
il Pulsante Cellulare per almeno sei secondi nchè le luci Rossa e
Blu cominciano ad alternarsi rapidamente.:
3. Cercare gli auricolari Bluetooth® sul Lettore MP3 seguendo le istru-
zioni del dispositivo.
NOTA: Se si usa un adattatore Bluetooth®, seguire le istruzioni del
dispositivo
4. Dopo alcuni secondi il Lettore MP3 elencherà “SRCS” (compresa la
sua versione software) come un dispositivo rilevato. Selezionarlo e
seguire le istruzioni del Lettore MP3 per accettare l’abbinamento.
70
QG SRC 207 - MAN00015.indd 70 2/1/11 11:38 AM
Page 71

5. Se il lettore MP3 richiede un PIN o una password inserire 0000
(quattro zeri).
6. Quando l’abbinamento è completato, il Lettore MP3 o l’Adattatore
possono confermare che è stato eseguito con successo, e la luce
Blu dell’auricolare inizierà a lampeggiare lentamente.
NOTA: Se il procedimento di Abbinamento non verrà completato entro
due minuti l’auricolare torna in modalità Standby.
Azionamento della fonte A2DP dall’auricolare
Play premere e tenere premuto il Pulsante MP3 per 3 secondi
Pause/Stop* premere e tenere premuto il Pulsante MP3 per 3 secondi
Forward Premere e tenere premuto il Pulsante per Alzare il Volume
Rewind** Premere e tenere premuto il Pulsante per Abbassare il
* Varia secondo il modello del telefono cellulare
** Con alcuni telefoni può essere necessario ripetere nuovamente questa operazione
per 3 secondi
Volume per 3 secondi
7. RADIO FM INTEGRATA E LETTORE MP3
ESTERNO (OPZIONE VIA CAVO)
7.1 RADIO FM
Lo SRC-System™ è equipaggiato con un ricevitore di radio stereo FM
e di tecnologia RDS (Radio Data System).
Accendere la
Radio
Spegnere la
Radio
Passare alla stazione predenita
successiva
Mentre è in modalità di Standby, premere e tenere
premuto il Pulsante CANALE „B“ per 3 secondi
Mentre si ascolta la Radio, premere e tenere premuto
il Pulsante CANALE „B“ per 3 secondi
Mentre si ascolta la Radio, premere il Pulsante CANALE
„B“ per passare fra le 6 Stazioni FM Predenite
Iniziare una
di chiamata in
interfono
Inziare la
Composizione
del Numero Viva
Voce dal Telefono
Cellulare
Ricomposizione
dell’Ultimo Numero dal Telefono
Cellulare
RDS ACCESO/
SPENTO (Predenito: SPENTO)
Mentre si ascolta la Radio, cominciare a parlare a
voce alta
Mentre si ascolta la Radio, premere il Pulsante Cellulare
e pronunciare ad alta voce il nome della persona che si
desidera chiamare. Questa caratteristica è supportata
solo da telefoni cellulari che sono dotati della funzione
Composizione del numero Viva Voce
Mentre si ascolta la Radio, premere brevemente il
Pulsante Cellulare due volte
Mentre la Radio è accesa, premere e tenere premuti
contemporaneamente i Pulsanti per Alzare e
Abbassare il Volume per 3 secondi
Grazie alla funzione RDS, l’auricolare selezionerà automaticamente il
segnale più forte disponibile per la stazione FM che si desidera ascoltare, indipendentemente dal luogo nel quale si sta viaggiando.
Questo consente di lasciare sempre le mani sul manubrio senza bisogno
di regolare la frequenza della stazione radio mentre si è in movimento.
RDS ACCESO/SPENTO (premere contemporaneamente
per 3 secondi mentre la radio è accesa)
• ACCENDERE/SPEGNERE la Radio FM (premere per 3 secondi)
• Passare fra stazioni salvate (premere brevemente)
Ita lian o
71
QG SRC 207 - MAN00015.indd 71 2/1/11 11:38 AM
Page 72

Ricerca e impostazione di stazioni nuove
1.Mentre la Radio è accesa, premere e tenere premuti il Pulsante per
Alzare o Abbassare il Volume per tre secondi o nchè si sente la
stazione successiva nell’auricolare.
• Premendo il Pulsante per Alzare il Volume verranno cercate
stazioni verso l’alto (frequenza più alta).
• Premendo il Pulsante per Abbassare il Volume verranno cercate
stazioni verso il basso (frequenza più bassa).
2. Una volta trovata la stazione, la ricerca è interrotta ed è possible sentirla.
3. Per continuare la ricerca, premere nuovamente il Pulsante per
Alzare o Abbassare il Volume per tre secondi.
4. Per salvare la stazione, vedere il paragrafo seguente. E’ possibile
continuare ad ascoltare una stazione anche se non è stata salvata.
Salvare una stazione selezionata
1. Selezionare il numero della stazione fra uno e sei che si desidera
impostare premendo il pulsante CANALE “B” no a quando si trova
la stazione desiderata.
2. Cercare una nuova stazione come descritto nel paragrafo precedente.
3. Per salvare la stazione attuale, premere il pulsante CANALE “B”
entro 20 secondi da quando la si è trovata.
4. Per salvare un’altra stazione, premere di nuovo il pulsante CANALE
“B” per raggiungere il numero della stazione successiva.
5. Se non si salva la stazione, la Radio esce dalla modalità di ricerca
senza salvare la stazione attuale. È possibile continuare ad ascoltare la stazione non salvata.
In questo caso, premendo brevemente il Pulsante CANALE “B” si
passa alla successiva stazione salvata
.
È possibile memorizzare un massimo di sei stazioni.
7.2 COLLEGAMENTO VIA CAVO DEL LETTORE MP3 O ALTRE
FONTI DI AUDIO ESTERNE.
Uso della porta di entrata ausiliare per connettività via cavo
L’auricolare consente di collegare fonti audio non-Bluetooth®, come
lettori MP3, all’auricolare usando il cavo incluso.
1. Accertarsi che l’auricolare sia in modalità di Standby, con la luce blu
che lampeggia lentamente.
2. Collegare il cavo dell’MP3 alla presa dell’auricolare per il lettore MP3
/fonte audio e inserire l’altra estremità
del cavo nel connettore Micro USB.
3. Azionare il Lettore MP3 usando i suoi
Pulsanti come di consueto (FF/REW/ PLAY/PAUSE).
Il volume può essere regolato attraverso il lettore MP3 o i Pulsanti del
Volume dell’auricolare.
Qualsiasi altro collegamento audio interromperà automaticamente
il suono proveniente dal Lettore MP3. Il segnale audio tornerà solo
quando l’auricolare sarà di nuovo in modalità Standby.
NOTA: Quando si ascolta il lettore MP3, la caratteristica VOX non è abilitata.
8. USO DEL TELEFONO CELLULARE
FARE E RICEVERE TELEFONATE CON IL TELEFONO CELLULARE
FUNZIONI BASILARI
Risposta a una
telefonata
Riuto di una
telefonata
Fine di una
telefonata
Premere il Pulsante Cellulare o pronunciare a alta voce
una parola di propria scelta
Rimanere in silenzio per 15 secondi, o premere e tenere
premuto il Pulsante Cellulare per 3 secondi mentre è in
arrivo una telefonata
Premere il Pulsante Cellulare durante una telefonata,
o lasciare che l’altra parte termini la telefonata.
72
QG SRC 207 - MAN00015.indd 72 2/1/11 11:38 AM
Page 73

Composizione del
Numero Viva Voce
Ricomposizione
del Numero
FUNZIONI AVANZATE PER COMUNICAZIONE A 3 VIE
Aggiungere/Rimuovere l’auricolare
CANALE „A“ alla/
dalla telefonata
Aggiungere/
Rimuovere l’auricolare CANALE
„B“ alla/dalla
telefonata
In modalità Standby, premere il Pulsante Cellulare e
pronunciare ad alta voce il nome della persona a cui
si desidera telefonare. Questa caratteristica è supportata solo da telefoni cellulari dotati della funzione di
Composizione del Numero Viva Voce
In Standby, premere il Pulsante Cellulare due volte
Premere il Pulsante CANALE „A“ nel corso di una
telefonata
Premere il Pulsante CANALE „B“ nel corso di una
telefonata
Mentre è in corso una telefonata tramite l’auricolare, qualsiasi richiesta di chiamata interfono sarà riutata automaticamente.
Quando la telefonata nisce, è invece possibile eettuare e accettare
chiamate in interfono.
LUCI INDICATRICI DI STATO:
Indicazione LED: Stato:
Nessuna L’auricolare è spento
1 lampeggio blu ogni 3
secondi
2 lampeggi blu ogni 3
secondi
1 lampeggio rosso ogni 3
secondi
2 lampeggi rossi ogni 3
secondi
Rosso stabile Ricarica in corso
Standby - Non è in corso una chiamata
L’audio è attivo
Standby - La batteria è debole
La batteria è debole e l’audio è attivo
9. USO DELL’INTERFONO
9.1 INTRODUZIONE
Lo SRC-System™ consente di collegarsi con altri motociclisti usando au-
ricolari SRC in un raggio no a 300 metri (secondo il terreno e altri fattori).
Per impostare uno o due collegamenti Interfono Bluetooth®, è prima ne-
cessario abbinare il proprio auricolare SRC-System™ con gli altri auricolari.
Il processo di abbinamento deve essere eseguito una sola volta e quando completato, gli auricolari rimarranno abbinati e si riconosceranno l’un
l’altro automaticamente quando sono uno alla portata dell’altro.
L’auricolare ha due canali di interfono disponibili per collegamento
fra auricolari. Di conseguenza, lo SRC-System™ può comunicare
contemporaneamente in modalità di audioconferenza con un massimo di altri due auricolari SRC-System™.
9.2 COMPATIBILITÀ DI INTERFONO
È possibile usare l’auricolare SRC-System™ per comunicazioni in
interfono con qualsiasi altro auricolare SRC-System™ e con gli
auricolari scala rider di Cardo. Per ulteriori informazioni vedere
www.cardosystems.com/SRC.
9.3 PRIMA DI AVVIARE L’INTERFONO
L’auricolare SRC-System™ ha due pulsanti destinati a un collegamento
veloce con altri due auricolari. Ci riferiamo a questi altri auricolari come
CANALE “A” e CANALE “B”.
Pulsante CANALE “A“
Pulsante CANALE “B“
Ita lian o
73
QG SRC 207 - MAN00015.indd 73 2/1/11 11:38 AM
Page 74

Prima di poter cominciare a usare l’interfono per comunicazioni fra
moto usando un altro o altri due auricolari, tutte le unità devono
innanzitutto essere abbinate.
9.4 USO DEL SRCSYSTEM™ NELLA FUNZIONE INTERFONO
CON ALTRI AURICOLARI SRCSYSTEM™
CANALE
INTERFONO
CANALE „A“ PULSANTE DI CANALE „A“ ROSSO che lampeggia
CANALE „B“ PULSANTE DI CANALE „B“ BLU che lampeggia
PULSANTE DI
ABBINAMENTO /
COLLEGAMENTO
INDICATORI LED
DI MODALITÀ DI
ABBINAMENTO
velocemente
velocemente
9.4a OPZIONI DI ABBINAMENTO PER INTERFONO A DUE VIE
FRA DUE PARTECIPANTI USANDO DUE AURICOLARI
SRCSYSTEM
1. Quando entrambi gli auricolari sono SPENTI, ACCENDERLI premendo e tenendo premuto il Pulsante Cellulare nchè le Luci Blu
lampeggiano tre volte.
2. Accertarsi che la luce blu di entrambi gli auricolari lampeggi adesso
lentamente.
3. Scegliere un CANALE disponibile che si desidera usare per abbinare
l’auricolare (CANALE “A” o CANALE “B”).
NOTA: Selezionando un CANALE già in uso l ’auricolare abbinato su quel
CANALE sarà sostituito con l’ultimo auricolare abbinato.
5. Ripetere i Passi 3-4 per il secondo auricolare SRC-System™.
6. Dopo pochi secondi, entrambi gli auricolari visualizzeranno una
luce stabile per due secondi, cosa che indica che i due auricolari
adesso sono abbinati, collegati e pronti per l’uso.
NOTA: Se il procedimento di Abbinamento non è viene completato entro
due minuti l’auricolare torna in modalità Standby.
Avvio di chiamate con Interfono
Ci sono due modi di iniziare una chiamata con Interfono con
l’auricolare abbinato mentre l’auricolare è modalità Standby:
COLLEGAMENTO VOCALE:
Iniziare a parlare a voce alta
Quando si comincia a parlare a voce
alta, verrà instaurata una chiamata con
interfono con l’altro auricolare abbinato.
La chiamata con interfono continuerà
nchè tutti coloro che vi partecipano
rimarranno in silenzio per 30 secondi.
COLLEGAMENTO USANDO IL
PULSANTE DI CANALE:
Premere una sola volta il
pulsante del CANALE scelto
per aggiungere o rimuovere
l’altro auricolare da una
chiamata con interfono .
9.4b INTERFONO A TRE VIE
Lo SRC-System™ consente anche di collegarsi via interfono a tre vie
come segue:
Usa Canale “B ”Usa Ca nale “A”
4. Sull’auricolare SRC-System™, poi premere e tenere premuto il PUL-
SANTE DEL CANALE scelto (“A” o “B”) per almeno sei secondi nchè
la luce BLU o ROSSA dell’auricolare inizia a lampeggiare rapidamente, cosa che indica che è in modalità di Abbinamento di Interfono.
(Vedere la tabella del canale di Interfono per l’indicazione LED di
Abbinamento per ogni CANALE)
74
QG SRC 207 - MAN00015.indd 74 2/1/11 11:38 AM
Primo auricola re
SRC-System™ -
Motociclista A
Secondo aurico lare SRC-Sys-
tem™ - Motociclista B
Terzo auricolare
SRC-System™ Motociclista C
Page 75

In questa congurazione il Motociclista “B” è abbinato con il Motociclista “A” e con il Motociclista “C”.
IMPORTANTE: Poichè il Motociclista “B” usa due collegamenti Bluetooth®
in modalità di conferenza, il Motociclista “B” sarà scollegato dal telefono
cellulare o dal dispositivo GPS no alla ne della comunicazione in
modalità di audioconferenza. Al termine, il Motociclista “B” si ricollegherà
automaticamente al suo telefono cellulare o GPS. Il Motociclista “A” e “C”
rimangono collegati ai loro telefoni cellulari o ai dispositivi GPS durante la
chiamata con interfono o tre vie.
Impostazione e congurazione della connettività interfono a
tre vie
CANALE DI
INTERFONO
CANALE „A“ PULSANTE DI CANALE „A“
CANALE „B“ PULSANTE DI CANALE „B“
PULSANTE DI
ABBINAMENTO /
COLLEGAMENTO
INDICATORI LED
DELLA MODALITÀ DI
ABBINAMENTO
ROSSO che lampeggia
velocemente
BLU che lampeggia
velocemente
Avvio di chiamate con Interfono
Ci sono due modi di iniziare una chiamata con Interfono con gli
auricolari abbinati mentre l’auricolare è modalità Standby:
COLLEGAMENTO VOCALE:
Iniziare a parlare a voce alta
Quando si comincia a parlare a voce alta,
verrà instaurata una chiamata con interfono
con entrambi gli altri auricolari abbinati:
CANALE “A” e CANALE “B” (se entrambi sono
disponibili).
COLLEGAMENTO USANDO IL
PULSANTE DI CANALE:
Premere una sola volta
il pulsante del CANALE
scelto per aggiungere o
rimuovere l’altro auricolare da
una chiamata con interfono .
9.5 RICEZIONE DI CHIAMATE CON INTERFONO
Quando un altro auricolare abbinato prova a avviare una chiamata
usando l’interfono, la chiamata comincerà quasi immediatamente.
NOTA: Le modalità di priorità predenite degli auricolari sono state impostate
in modo da evitare che chiamate con interfono in arrivo interrompano telefonate e istruzioni GPS in corso. In tal caso chi ha chiamato in interfono sentirà
un segnale di occupato e chi riceve la chiamata sentirà due bip, cosa che indica
che qualcuno sta cercando di chiamare via interfono. (vedere paragrafo 4.3 per
informazioni sulle priorità audio degli apparecchi abbinati).
Ita lian o
OPZIONI DI ABBINAMENTO FRA TRE PARTECIPANTI
L’abbinamento di tre auricolari SRC-System™ è eseguito semplice-
mente ripetendo la procedura descritta nel paragrafo precedente 9.4a
con un terzo auricolare SRC-System™ (usando un altro CANALE).
1. Abbinare il proprio SRC-System™ con il secondo SRC-System™
come descritto nel paragrafo 9.4 (Usando il CANALE “A”).
2. Abbinare il proprio SRC-System™ con il terzo SRC-System™
come descritto nel paragrafo 9.4 (Usando il CANALE “B”)
QG SRC 207 - MAN00015.indd 75 2/1/11 11:38 AM
9.6 AVVIO DI CHIAMATE CON INTERFONO
Ci sono due modi per avviare una chiamata con Interfono con auricolari che sono
abbinati al proprio SRC-System™ (assicurarsi di essere in modalità Standby):
COLLEGAMENTO VOCALE:
Da preferire per conversazioni relativamente
brevi poichè il canale viene messo in modalità
di standby dopo 30 secondi di silenzio
Iniziare a parlare a voce alta
Quando si comincia a parlare a voce alta, viene
instaurata una chiamata con interfono con
entrambi gli auricolari abbinati, CANALE „A“ e
CANALE „B“ (se sono entrambi disponibili).
La chiamata con interfono rimarrà aperta nchè
tutti i partecipanti non rimangono in silenzio
per 30 secondi. (applicabile per comunicazione
a 2 vie)
COLLEGAMENTO
USANDO IL PULSANTE
“CANALE”:
Da preferire per
conversazioni lunghe
poichè lascia il canale
aperto e attivo
Premere una sola
volta il pulsante del
CANALE scelto per
aggiungere o rimuovere
l’altro auricolare da una
chiamata con interfono .
75
Page 76

NOTA: Quando l’interfono è acceso, le funzioni di Ricomposizione del
Numero e Composizione Vocale del Numero sono disabilitate.
9.7 COLLEGAMENTO VIVA VOCE VOX
SRC-System™ è inoltre fornito di tecnologia VOX, che consente di attivare alcune funzioni chiave in modo sicuro e senza utilizzare le mani.
Per accettare chiamate in entrata occorre semplicemente pronunciare a
voce alta una parola qualsiasi (ad esempio “ciao”).
Per riutare una telefonata in entrata, basta rimanere in silenzio per circa
15 secondi.
Per riutare una chiamata interfono rimanere in silenzio per 30 secondi.
ABILITARE/DISABILITARE VOX: In standby, premere e tenere premuti
contemporaneamente i Pulsanti per Alzare il Volume e per Abbassare
il Volume per tre secondi nchè si sente un bip. Lo stato di default è di
Collegamento Viva Voce abilitato.
NOTA: l’abilitare/disabilitare la caratteristica di Collegamento Viva Voce
inuisce solo sulla funzionalità di Interfono.
9.8 CANCELLARE L’ABBINAMENTO RIPRISTINO DELLA
CONFIGURAZIONE ORIGINALE PREDEFINITA
Questo paragrafo è rilevante solo dopo aver completato un processo di
abbinamento
Si può cancellare l’abbinamento dei dispositivi in qualsiasi momento
come segue:
1. Con l’auricolare SRC-System™ ACCESO, premere e tenere premuto
il Pulsante Cellulare per almeno sei secondi nchè le Luci Rossa e
Blu cominciano a alternarsi rapidamente.
2. Premere e tenere premuto il pulsante per Alzare il Volume per tre
secondi.
3. Le Luci Rossa e Blu lampeggeranno cinque volte contemporaneamente e poi l’auricolare si spegnerà, confermando che l’abbinamento è stato cancellato con successo.
9.9 INFORMAZIONI UTILI
a. Stato di Occupato (Quando si usa un auricolare SRC-System™)
Quando si prova a fare una chiamata interfono con un auricolare
nel quale è già in corso una telefonata/ una chiamata via Interfono / GPS, si sentiranno due bip che indicano che l’altro auricolare
è occupato.
b. Ricollegamento Automatico dell’Interfono
Se lo SRC-System™ e un altro auricolare abbinato escono dal raggio
massimo e il collegamento fra loro si interrompe, lo SRC-System™
proverà immediatamente a ricollegarsi all’altro auricolare.
Si può ricollegare manualmente la chiamata con interfono mentre
l’auricolare è in modalità Standby premendo il pulsante CANALE “A” o
CANALE “B” per collegarsi alla rispettiva chiamata interrotta.
c. Limitazioni della Modalità di Conferenza
Quando si entra in modalità di Conferenza in Interfono fra tre
partecipanti (compresi se stessi), i partecipanti che mantengono
contemporaneamente due collegamenti attivi non potranno ricevere
telefonate o messaggi GPS nchè è in corso l’audioconferenza (vedere informazioni nel paragrafo 9.4b).
9.10 RISOLUZIONE DI PROBLEMI CON L’INTERFONO
Prima di tutto, assicurarsi che il microfono si trovi nella sua posizione
corretta al centro della bocca.
Lo SRC-System™ è progettato per essere usato in ambienti rumorosi.
Di conseguenza, la funzionalità di Interfono deve essere controllata
solo in un ambiente rumoroso, come ad esempio vicino a una moto
accesa e non all’interno di una casa. Accertarsi anche che gli auricolari siano stati abbinati uno con l’altro in modo corretto seguendo le
istruzioni riportate nei paragra di Impostazione rilevanti.
76
QG SRC 207 - MAN00015.indd 76 2/1/11 11:38 AM
Page 77

10. CLICKTOLINK
Click-to-Link costituisce la natura “sociale” spontanea dello SRC-System™.
Questa caratteristica unica consentirà di cominciare immediatamente
chiamate in interfono a due con altri utenti SRC-System™ che si trovano
nelle vicinanze senza dovere eseguire prima un processo di abbinamento. Si può considerarlo come un canale privato fra motociclisti che può
essere impostato “al volo” con altri utenti di SRC-System™ che si incon-
trano vicino a un semaforo o per la strada. Ovviamente la caratteristica
Click-to-Link può essere disabilitata in qualsiasi momento, bloccando
qualsiasi tentativo di stabilire un collegamento spontaneo da parte di
altri utenti di SRC-System™.
USO DI CLICK-TO-LINK
Disabilitare/Abilitare Click-to-Link: La caratteristica può essere accesa e
spenta per mezzo del Menu di Personalizzazione delle Impostazioni
(vedere paragrafo 4.2). Come default, questa carattetistica è DISABILITATA.
FONTI AUDIO E PRIORITÀ
Le diverse fonti audio collegate al SRC-System™ hanno le priorità
sotto elencate, cioè la fonte con priorità più elevata sostituirà sempre e
interromperà la più bassa.
Per esempio, telefonate in entrata con il cellulare e istruzioni di navigazione GPS interromperanno chiamate Click-to-Link in corso, mentre
chiamate Click-to-Link in entrata interromperanno l’audio dalla Radio FM
incorporata, ecc.
Chiamate Click-to-Link instaurate e chiamate interfono hanno la
stessa priorità: se una è in uso, l’altra non può interromperla. Di
conseguenza, una richiesta Click-to-Link non può interrompere una
chiamata interfono in corso, e viceversa.
NOTA: I collegam enti Click-to -Link non sostituiscono o modifi cano
gli abbi namenti interfono co rrenti co n Motociclis ta A o Motoci clista
B. Click-to- Link usa un canal e tempo raneo se parato p er collegarsi al
comp agno della conver sazione Click-to -Link.
Priorità maggiore
Priorità minore
1. Audio dal telefono cellulare o istruzioni GPS
(secondo il dispositivo)
2. Interfono / Click-to- Link
3. Fonte audio A2DP
4. Radio FM (integrata)
5. Porta Ausiliare per Linea in Entrata (per collegamento via cavo come nel caso dei lettori MP3).
Suono di Richiesta di Interfono: Se è in corso una chiamata
Click-to-Link e il Motociclista A o il Motociclista B provano a collegarsi per una chiamata Interfono, si sentirà un Suono di Richiesta di
Interfono mentre l’altra parte sentirà un suono di riuto.
Se il collegamento Click-to-Link è interrotto per qualsiasi motivo e altri
utenti SRC-System™ sono nelle vicinanze, possono essere instau-
rati nuovi collegamenti Click-to-Link con utenti diversi da quello del
collegamento iniziale.
Funzioni Generali
Categoria Risultato desiderato Azione Necessaria
Eseguire chiamate
Click-to-Link
Ricevere chiamate
Click-to-Link
Durante chiamate
Click-to-Link
* Il SRC‑System™ cerca un altro SRC‑System™ abilitato Click-to-Link per un
massimo di 10 secondi, emettendo bip e lampeggiando con una luce rossa.
Inizio di una richiesta di
chiamata Click-to -Link *
Annullare una chiamata
Click-to-Link
Accettare una chiamata
Click-to-Link
Riuto di chiamata
Click-to-Link
Fine di una chiamata
Click-to-Link
Premere due volte sul
Pulsante Canale “A”
Premere sul Pulsante
Canale“A”
Quando si sente il suono,
premere il Pulsante Canale
“A” o parlare a voce alta per
rispondere usando VOX
Quando si sente il suono,
rimanere in silenzio per
10 secondi o nchè cessa
il suono
Premere il Pulsante
Canale “A”
Ita lian o
77
QG SRC 207 - MAN00015.indd 77 2/1/11 11:38 AM
Page 78

11. ASSISTENZA
Per ulteriori informazioni visitare il nostro sito web:
www.schuberth.com
Per assistenza tecnica contattarci a:
Kundenservice@schuberth.com
Telefono: +49-391-8106-555
Per vedere le informazioni più recenti sugli aggiornamenti di Software
visitare il nostro sito web su www.schuberth.com/it/prodotti/service/
src-systemtm.html e registrarsi online
IMPORTANTE:
NEL CASO LA CERNIERA DEL CUSCINO POSTERIORE VENGA
APERTA, LA GARANZIA SARÀ NULLA!
Le componenti elettroniche all’interno del Cuscino Posteriore
dello SRC-System™ sono chiuse da una cerniera sigillata. Non
manomettere o aprire la cerniera poichè questo annulla la garanzia.
12. AVVISI
Dichiarazione della Commissione Federale per le Comunicazioni (FCC)
15.21
Siete avvertiti che cambiamenti o modifiche non approvate espressamente dalla
par te responsab ile per la confor mità può annullare il permesso dell’utente a azionare l’attrezzatura.
15.105(b)
Questa attrezzatura è stata controllata e trovata conforme alle limitazioni per un
apparecchio digitale di Classe B, conformemente alla parte 15 delle norme FCC. Queste
limitazioni sono proget tate per fornire una protezione ragionevole contro interferen-
ze dannose in un’installazione residenziale. Questo apparecchio genera, usa o può
irradiare energia di frequenza radio e, se non installata e usata in conformità a queste
istruzioni, può causare inter ferenze dannose alle comunicazioni radio. Tuttavia, non c’è
garanzia che non ci siano interferenze in un’installazione par ticolare. Se quest’attrezzatura causa interferenze dannose a ricezione radio o televisiva, cosa che può essere
stabilita spegnendo e riaccendendo l’attrezzatura, l’utente è incoraggiato a provare a
correggere l’interferenza usando una o più delle seguenti misure:
• Orientare nuovamente o collocare in un altro posto l’antenna ricevente.
• Aumentare la distanz a fra l’attrezzatura e il ricevitore.
• Collegare l’attrezzatura a un attacco su un circui to diverso da quello c ui è collegato
il ricevitore.
• Consultare il rivenditore o un tecnico r adio / T V esperto per aiuto.
Il funzionamento è soggetto alle due condizioni seguenti:
(1) questo appare cchio non può causare interferenze e
(2) questo apparecchio deve accettare ogni interferenza ricevuta, comprese interferen-
ze che possono causare un funzionamento indesiderato dell’apparecchio.
Dichiarazione FCC di Esposizione a Radiazione RF
Questa attrezzatura è conforme ai limiti per l’esposizione a radiazione della FCC
indicati per un ambiente non controllato. Gli utenti finali devono seguire le istru-
zioni op erative specifiche per la soddisfazione della conformità all’esp osizion e RF.
Questa trasmittente non deve essere ubicata insieme o azionata congiuntamente a
nessun’alt ra antenna o trasmittente.
Avviso CE Europeo
L’auricolare SRC-System™ (il “Prodotto”) è conforme con i se guenti requisiti essenzia-
li della Direttiva Comunitaria 1999/5/EC (cui ci si riferisce come la Diret tiva R&T TE):
Articoli 3.1a, 3.1.b e 3. 2. Il Prodotto è costruito in conformit à all’Alle gato II della
direttiva summenzionata.
Dichiarazione di Conformità (DOC)
L’auricolare SRC-System™ è conforme con e adotta le Specificazioni 2.0 di B luetoot h
e ha superato con successo tutti i test di interoperab ilità sp ecificati n ella specifica-
®
78
QG SRC 207 - MAN00015.indd 78 2/1/11 11:38 AM
Page 79

zione Bl uetooth®. Tuttavia , l’interoperabilità fra l’appare cchio e altri prodotti abilitati
®
Blue tooth
non è garantita.
Deroga e Rinuncia Generale a Diritti (non per Paesi dell’Unione Europea)
Usando lo SRC-System™ rinunciate a diritti legali sostanziali compreso il dirit to di far
caus a. Si prega di leggere con attenzione quanto se gue prima di usare l’apparecchio. Se non accet tate tutti i termini di questo accordo, dovete restituire il prodotto
imme diatamente per il rimborso de ll’intero imp orto. Usando l’auricolare accettate
di essere limitato da questo accordo e di perdere il diritto di fare causa.
L’uso di un’apparecchio per la comunicazione andando in motocicletta, motoretta,
ciclomotore, ATV, quadriciclo o qualunque altro veicolo o attrezzatura, per via di terra,
acqua o aria (cui si farà riferimento come a “ Veicolo”) richiede la vostra attenzione
totale priva di interferenze. Cardo Systems, Inc., compresi i suoi Funzionari, Dirigenti,
Soci, Società-Madre, Rappresentanti, Agenti, Appaltatori, Sponsor, Impiegati, Fornitori e
Rivenditori (cui si farà riferimento come “Azienda”) vi consiglia caldamente di prendere
tutte le cautele necessarie e rimenere vigile al traco, al tempo e alle condizioni stradali
se scegliete di usare l’auricolare SRC-System™, compresi tutti i modelli derivanti indipendentemente dal loro nome commerciale o dalla marca (l’”Apparecchio”), e di fermare il
vostro Veicolo al lato della strada prima di fare una telefonata o accettarne una. Tutte
le pubblicazioni, pubblicità, annunci o note simili che si riferiscono all’uso dell’Apparecchio guidando un Veicolo intendono solo riferirsi alle sue capacità tecniche e non
devono essere fraintese e capite come se incoraggiassero gli utenti a usare l’Apparecchio mentre si trovano in mezzo al traco.
Acquistando questo Apparecchio e non restituendolo per un rimborso completo
(vedere più sotto), rinunciate in modo irrevocabile a ogni responsabilità, perdita, rivendicazione e spese (comprese spese per avvocati) e ritenete l’azienda non responsabile
per qualsiasi ferita corporea, danno o morte come anche per perdite o danni a merce, a
qualunque Veicolo compreso il vostro, o a qualsiasi proprietà o bene che appar tenga a
voi o a terzi, che risultino dall’uso dell’Apparecchio sotto qualsiasi circostanza o condizione e indipendentemente dalla giurisdizione. L’azienda non sarà responsabile per nessun danno sico, indipendentemente dalle ragioni, condizioni o circostanze, compreso
cattivo funzionamento dell’Apparecchio, e tutti i rischi connessi con il suo azionamento
sono solo ed esclusivamente a carico dell’utente di questo Apparecchio, indipendentemente dal fatto che l’ Apparecchio sia usato dall’acquirente originario o da terzi.
L’azienda vi avverte in questa sede che l’uso dell’Apparecchio può essere in contravvenzione a leggi o regolamenti locali, federali, statali o nazionali, e che ogni uso dell’Apparecchio è
interamente a vostro esclusivo rischio e responsabilità.
1. Voi, i vostri eredi, rappresentanti legali, successori o cessionari, in questa sede, volontariamente e per sempre liberano, esentano, indenizzano, e ritengono l’azienda esente da
ogni causa, rivendicazione, debito, richiesta, azione e responsabilità che possa insorgere,
direttamente o indirettamente, dall’uso dell’Apparecchio, per ogni disagio, dolore, soerenza, scomodità, perdita, ferita, morte, danni a o in riferimento a qualsiasi persona o proprietà comunque causata, SIA CHE DERIVI DA NEGLIGENZA CHE DA ALTRO, e che possono
derivarvi in futuro come risultato di tale uso, no all’estremo limite permesso dalla legge.
2. Capite completamente e vi assumete i rischi dell’uso dell’Apparecchio, compreso il
rischio di atti di negligenza o di omissione da parte di terzi.
3. Confermate di essere sicamente in grado di usare l’Apparecchio e di non avere
problemi medici o necessità che possono inuire negativamente sulla capacità di
farlo in modo sicuro. Confermate di avere almeno diciotto (18) anni e di essere stati
avvertiti dei rischi connessi con l’uso dall’Apparecchio. Confermate inoltre che non
consumerete alcool che possa inuire negativamente sulla prontezza di riessi o
nessuna sostanza che altera la mente, e non trasporterete, userete o consumerete
tali sostanze prima o durante l’uso dell’Apparecchio.
4. Riconoscete completamente i nostri avvertimenti e capite che: (a) esistono rischi
e pericoli se si usa l’Apparecchio in mez zo al traco, compreso ma non limitato a
ferite o malattia, storte, fratture, paralisi parziali e/o totali, morte o altre malattie che
possano causare serie invalidità; (b) questi rischi e pericoli possono essere causati
dalla negligenza del fabbricante o dei suoi agenti o da terzi coinvolti nella progettazione o fabbricazione dell’Apparecchio; (c) questi rischi e pericoli possono derivare
da cause prevedibili o non prevedibili. Voi vi assumete tutti i rischi e pericoli e tutte
le responsabilità per tutte le perdite e/o danni, causate in parte o totalmente dalla
negligenza o da altra condotta di altri, compresa la Compagnia.
5. Confermate di aver let to questa rinuncia a responsabilità e capite completamente i
suoi termini e che avete rinunciato a diritti sostanziali non restituendo l’Apparecchio
per un rimborso completo (vedere opzione di rimborso più sotto).
Rinuncia a Garanzia
L’AZIENDA RINNEGA OGNI GARANZIA ESPLICITA E IMPLICITA RIGUARDO ALL’APPARECCHIO ANNESSO, COMPRESO E SENZA LIMITAZIONE QUALSIA SI GARANZIA
IMPLICITA DI VENDIBILITÀ, IDONEITÀ A UNO SCOPO PARTICOLARE, E NONINFRAZIONE. L’APPARECCHIO E I SUOI ACCESSORI SONO FORNITI “COME SONO”
E “COME DISPONIBILI” SENZA GARANZIA DI NESSUN TIPO AL DI LÀ DI QUELLE
ASSUNTE NE L MANUALE INCLUSO.
Limitazione di Responsabilità
L’AZIENDA NON SARÀ RESPONSABILE IN NESSUN CASO PER NESSUN DANNO
SPECIALE, INDIRETTO, PUNITIVO, INCIDENTALE, ESEMPLARE O CONSEGUENTE,
O NESSUN DANNO CHE RISULTI DALL’USO DELL’APPARECCHIO, SIA SE SI BASA
SU VIOLAZIONE DEL CONTRATTO, ATTO ILLECITO (COMPRESA NEGLIGENZA),
RESPONSABILITÀ PER IL PRODOTTO O ALTRO, ANCHE SE AVVERTITO DELLA
POSSIBILITÀ DI TALI DANNI. VOI RICONOSCETE E ACCETTATE CHE LE LIMITAZIONI
INDICATE PIÙ SOPRA SONO E LEMENTI FONDAMENTALI DI QUESTO ACCORDO
E L’APPARECCHIO NON VI SAREBBE FOR NITO PRIVO DI TALI LIMITAZIONI. GLI
STATUTI DI ALCUNI STATI POSSONO ESSERE APPLICABILI PER QUANTO RIGUARDA
LA LIMITAZI ONE DI RESPONSABILITÀ.
RESTITUZIONE PER RIMBORSO COMPLETO
SE NON DESIDERATE ACCETTARE E ACCONSENTIRE ALLE CONDIZIONI DI CUI
SOPRA, POTETE RESTITUIRE QUESTO APPARECCHIO ALL’AZIENDA PER UN
RIMBORSO COMPLETO, A PATTO CHE LO FACCIATE ENTRO 7 GIORNI LAVORATIVI
DALL’ACQUISTO DELL’APPARECCHIO (è necessaria la prova di acquisto) E CHE LA
CONFEZIONE SIA INTATTA. QUANDO AGITE IN QUESTO SENSO, FATE RIFERIMEN -
TO A QUESTO PARAGR AFO. NON RESTITUENDO L’APPARECCHIO PER RIMBORSO
ENTRO IL PERIODO INDICATO, ACCETTATE IMPLICITAMENTE QUANTO SOPRA, E
RINUNCIATE A TUTTI I DIR ITTI A PRETESE E RIVENDIC AZIONI FUTURE CONTRO
L’AZIENDA COME SOPRA DEFINITO.
www.schuberth.com
Ita lian o
79
QG SRC 207 - MAN00015.indd 79 2/1/11 11:38 AM
Page 80

80
QG SRC 207 - MAN00015.indd 80 2/1/11 11:38 AM
Page 81

H A N D L E I D I N G
P O W E R E D B Y
QG SRC 207 - MAN00015.indd 81 2/1/11 11:39 AM
Page 82

INHOUDSOPGAVE
1. INTRODUCTIE . . . . . . . . . . . . . . . . . . . . . . . . . . . . . . . . . . . . . . . . . . . . . . . . . . . . . . . . . . . 83
2. INHOUD VAN DE VERPAKKING . . . . . . . . . . . . . . . . . . . . . . . . . . . . . . . . . . . . . . . . . 84
3. HET OPLADEN VAN DE HEADSET . . . . . . . . . . . . . . . . . . . . . . . . . . . . . . . . . . . . . . . 84
4. BASISMOGELIJKHEDEN EN -INSTELLINGEN . . . . . . . . . . . . . . . . . . . . . . . . . . . . . . 85
4.1 ALGEMENE FUNCTIES . . . . . . . . . . . . . . . . . . . . . . . . . . . . . . . . . . . . . . . . . . . . 85
4.2 GESPROKEN STATUSMELDINGEN . . . . . . . . . . . . . . . . . . . . . . . . . . . . . . . . . 85
4.3 AUDIOBRONNEN EN PRIORITEITEN . . . . . . . . . . . . . . . . . . . . . . . . . . . . . . . 85
4.4 DE MOGELIJKHEID OM DE SOFTWARE UP-TO-DATE TE BRENGEN . 86
4.5 HET OPNIEUW OPSTARTEN VAN UW HEADSET . . . . . . . . . . . . . . . . . . . 86
5. HET EERSTE BEGIN . . . . . . . . . . . . . . . . . . . . . . . . . . . . . . . . . . . . . . . . . . . . . . . . . . . . . . 86
5.1 VERVANG DE BESTAANDE AKOESTISCHE KRAAG DOOR DIE
VAN DE SRC-SYSTEM-HEADSET . . . . . . . . . . . . . . . . . . . . . . . . . . . . . . . . . . 86
5.2 HET PLAATSEN VAN DE SPEAKERS . . . . . . . . . . . . . . . . . . . . . . . . . . . . . . . . 87
5.3 HET PLAATSEN VAN DE MICROFOON . . . . . . . . . . . . . . . . . . . . . . . . . . . . . 87
5.4 HET VERWIJDEREN VAN DE SRC-SYSTEM-HEADSET
VAN UW HELM . . . . . . . . . . . . . . . . . . . . . . . . . . . . . . . . . . . . . . . . . . . . . . . . . . 87
5.5 HET OP-EN AFDOEN VAN DE HELM . . . . . . . . . . . . . . . . . . . . . . . . . . . . . . . 87
5.6 HET REINIGEN VAN DE AKOESTISCHE KRAAG . . . . . . . . . . . . . . . . . . . . . 88
6. HET VERBINDEN VAN MOBIELE TELEFOONS, GPS NAVIGATIESYSTEMEN
OF MP3- (A2DP-) SPELERS MET BLUETOOTH MOGELIJKHEDEN . . . . . . . . . . 88
6.1 DE MOBIELE TELEFOON . . . . . . . . . . . . . . . . . . . . . . . . . . . . . . . . . . . . . . . . 89
6.2 HET GPS NAVIGATIESYSTEEM . . . . . . . . . . . . . . . . . . . . . . . . . . . . . . . . . . . 89
6.3 DE MP3-SPELER (ALS DRAADLOZE MOGELIJKHEID)) . . . . . . . . . . . . . 90
7. DE INGEBOUWDE FM-RADIO EN EXTERNE MP3-SPELER
(ALS INPLUGBARE MOGELIJKHEID) . . . . . . . . . . . . . . . . . . . . . . . . . . . . . . . . . . . . . 91
7.1 DE FM-RADIO . . . . . . . . . . . . . . . . . . . . . . . . . . . . . . . . . . . . . . . . . . . . . . . . . . . . 91
7.2 HET INPLUGGEN VAN UW MP3-SPELER OF ANDERE EXTERNE
GELUIDSBRONNEN . . . . . . . . . . . . . . . . . . . . . . . . . . . . . . . . . . . . . . . . . . . . . . 92
8. HET GEBRUIK VAN UW MOBIELE TELEFOON . . . . . . . . . . . . . . . . . . . . . . . . . . . . . 93
9.HET GEBRUIK VAN DE INTERCOM . . . . . . . . . . . . . . . . . . . . . . . . . . . . . . . . . . . . . . . . 93
9.1 INTRODUCTIE . . . . . . . . . . . . . . . . . . . . . . . . . . . . . . . . . . . . . . . . . . . . . . . . . . . 93
9.2
INTERCOM COMPATIBILITEIT . . . . . . . . . . . . . . . . . . . . . . . . . . . . . . . . . . 94
9.3 VOOR U BEGINT MET DE INTERCOM TE GEBRUIKEN . . . . . . . . . . . . . . . 94
9.4 HET GEBRUIK VAN DE SRC-SYSTEMHEADSET VOOR INTERCOM MET
ANDERE SRC-SYSTEMHEADSETS
. . . . . . . . . . . . . . . . . . . . . . . . . . . . . . . 94
9.4a. DE TWEEWEGINTERCOM . . . . . . . . . . . . . . . . . . . . . . . . . . . . . . . . . . . 94
9.4b. DE DRIEWEGINTERCOM . . . . . . . . . . . . . . . . . . . . . . . . . . . . . . . . . . . . 95
9.5 HET ONTVANGEN VAN INTERCOMGESPREKKEN . . . . . . . . . . . . . . . . . . 96
9.6 HET AANGAAN VAN INTERCOMGESPREKKEN . . . . . . . . . . . . . . . . . . . 96
9.7 HET SPRAAKGESTUURD CONTACTMAKEN (VOX . . . . . . . . . . . . . . . . . 96
9.8 HET ONGEDAANMAKEN VAN DE AFSTEMMING HET
TERUGBRENGEN NAAR DE OORSPRONKELIJKE
UITGANGSSTAND . . . . . . . . . . . . . . . . . . . . . . . . . . . . . . . . . . . . . . . . . . . . . . 97
9.9 WETENSWAARDIGHEDEN . . . . . . . . . . . . . . . . . . . . . . . . . . . . . . . . . . . . . . . 97
9.10 HET OPLOSSEN VAN PROBLEMEN MET DE INTERCOM . . . . . . . . . 97
10. CLICK-TO-LINK . . . . . . . . . . . . . . . . . . . . . . . . . . . . . . . . . . . . . . . . . . . . . . . . . . . . . . . . . . . 97
11. VRAGEN/HULP . . . . . . . . . . . . . . . . . . . . . . . . . . . . . . . . . . . . . . . . . . . . . . . . . . . . . . . . 99
12. BEPALINGEN . . . . . . . . . . . . . . . . . . . . . . . . . . . . . . . . . . . . . . . . . . . . . . . . . . . . . . . . . . 99
BELANGRIJK: Dit is versie 2.0 van deze handleiding. Let wel dat op de website onze
handleiding periodiek wordt bijgewerkt zodat de laatste mogelijkheden erin verwerkt zijn
als ook de nieuwste snues en functies van uw nieuwe SRC-System™-headset. Bezoek
nu al www.schuberth.com/leadmin/downloads/SRC/SRC-System_Manual-1.pdf om
te zien of de handleiding in uw bezit de meest recente is en download de versie van de
handleiding op onze website in de taal van uw keuze.
82
QG SRC 207 - MAN00015.indd 82 2/1/11 11:39 AM
Page 83

1. INTRODUCTIE
Gefeliciteerd met uw aankoop van de Schuberth RIder
Communication-System SRC-System™ (SRC™-System™ ) Bluetooth®
headset voor motorrijders.
Deze handleiding legt u het gebruik van de headset uit. Maak u zich
echter voor ingebruikname van de SRC-System™-headset eerst bekend
met de Bluetooth®-mogelijkheden van uw mobiele telefoon en/of uw gps
navigatiesysteem. De SRC-System™-headset doos bevat één headset.
Afhankelijk van de omgevingsomstandigheden kunt u, wanneer de headset
eenmaal gekoppeld is met (afgestemd is op) een andere SRC-System™-
headset, hem gebruiken als intercom met een maximaal bereik van 300m.
DE GEBRUIKSMOGELIJKHEDEN VAN UW SRC-SYSTEM:
1. als een Bluetooth®-headset voor mobiele telefoongesprekken (werkt
met Bluetooth®-headsets, Handsfree-* en A2DP-proelen tot een bereik
van 10 meter.)
2. als een Bluetooth®-stereoheadset voor draadloos (wireless), “life”
(streaming) naar muziek luisteren (werkt met de Bluetooth®-A2DP- en
-AVRCP-proelen, geschikt voor een uiteenlopende reeks aan mp3spelers, Bluetooth®-adapters en andere audioapparatuur)
3. als een bike-to-bike-intercom voor gesprekken en drieweggesprekken
(conference calls) met tot twee andere SRC-System™-headset (met een
maximaal bereik van 300 m tussen elke twee SRC-System™-headsets en in
full duplex**)
4. als een intercom tussen bestuurder en passagier (werkt ook nog met
eerdere SRC-System™-headset-versies)
5. Click-to-Link: spontaan intercomcontact met elk SRC-System™-apparaat in
de buurt
6. als een Bluetooth®-headset voor ontvangst van aanwijzingen van een gps
navigatiesysteem en streaming-audio van Bluetooth®-apparaten
7. als een stereoheadset voor het luisteren naar de ingebouwde FM-radio
8. als een stereoheadset voor het luisteren naar inplugbare audioapparatuur, (zoals mp3-spelers en iPods® die niet voldoen aan de Bluetooth®normen)
BIJKOMENDE SPECIALE MOGELIJKHEDEN:
➤AGC-technologie (Automatic Gain Control), die uw SRC-System™ in
staat stelt om automatisch de geluidssterkte te verhogen of verlagen
gelet op het omgevingslawaai en de rijsnelheid. U kunt het volume
ook handmatig bijstellen.
➤VOX-technologie voor het veilig en handsfree uitvoeren van sommige
belangrijke functies (spraakgestuurd opbellen [voice dial], aannemen en
niet aannemen van gesprekken).
➤ PLC-technologie (Packet Loss Concealment) die maakt dat signaal-
verlies door zware terreingesteldheden live wordt gecompenseerd
➤De SRC-System™ bevat geavanceerde software die u kunt up-to-
date brengen via elke computer met een
Windows 7™
besturingssysteem.
Windows® XP™, Vista™ of
➤De SRC-System™ biedt u gesproken statusinstructies, zodat u te allen
tijde weet met welk apparaat u verbonden bent.
We wensen u een geweldige SRC-System™-ervaring en houden ons
beschikbaar voor uw mogelijke nadere vragen. Voelt u zich vooral vrij om
te schrijven naar Kundenservice@schuberth.com
F-J. Görges Erwin Van Hoof
hoofd acquisitie Vice President
SCHUBERTH GmbH Int. Sales Manager
Bezoek www.schuberth.com/src-tutorial/en voor een interactieve demonstratie van de SRC-System-headset-functies.
_________________________
* Als u een mobiele telefoon gebruikt die niet werkt met het Bluetooth®-Handsfree-
proel kan dat het gebruik van zekere geavanceerde functies verhinderen
** In “full duplex” betekent dat u tegelijkertijd kunt spreken en de ander kunt horen,
net als bij gesprekken via de mobiele of vaste telefoon en in tegenstelling tot
walkie-talkie-gesprekken
Net herl ands
83
QG SRC 207 - MAN00015.indd 83 2/1/11 11:39 AM
Page 84
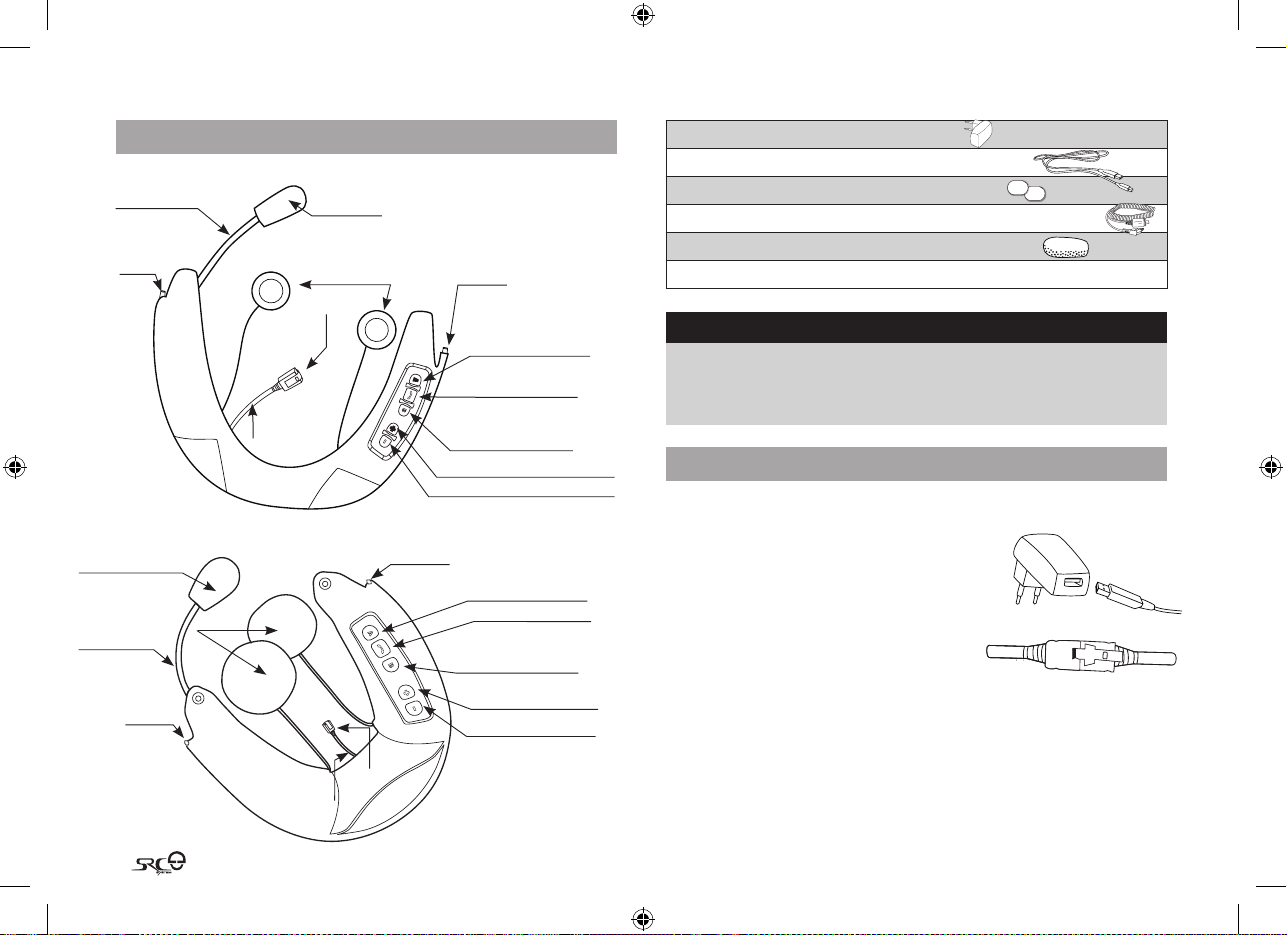
2. INHOUD VAN DE VERPAKKING
SRC-System™ voor de C3-helm*
buigzaam sta tief
pinnetje
microfoo n
twee spea kers
pinnetje
stekker voor de oplader
USB-verloopkabel
klittenbandpleisters
MP3-kabel
schuimrubberen windbeschermer voor de microfoon
Gebruiksaanwijzing
lipje voor de
USB-ingang
de USB -ingang
SRC-System™ voor de C2/Concept-helm
lawaai-n eutraliserende micro foon
twee
buigzaam
statief
84
pinnetje
speakers
lipje voor de
USB-ingang
• verbindt met de FM-radio
knop voor l uider / vooruitspo elen
knop voor za chter / terugspoele n
pinnetje
• verbindt met de FM-radio
de USB
-ingang
knop voor kanaal A
• verbindt met motorrijder A
• verbindt met de mp3-speler
knop voor d e
mobiele te lefoon
knop voor kanaal B
• verbindt met motorrijder B
knop voor kanaal A
• verbindt met motorrijder A
• verbindt met de mp3-speler
knop voor d e mobiele telefoo n
knop voor kanaal B
• verbindt met motorrijder B
knop voor l uider /
vooruitsp oelen
knop voor za chter /
terugspoe len
* dit product wordt
in verschillende
maten geleverd
BELANGRIJK:
Het lipje dat de oplaadingang moet beschermen moet te allen tijde
goed dicht worden gehouden om te voorkomen dat vocht het apparaat
binnendringt.
3. HET OPLADEN VAN DE HEADSET
Zorgt u er voor dat uw headset volledig is opgeladen, wat ten minste vier uur zal duren, voor dat u hem voor het eerst gebruikt.
Plug de USB-kabel in de oplader en plug het
andere eind van de kabel in de oplaadingang van
de headset. Tijdens het opladen gaat het rode
licht aan. Wanneer het opladen klaar is gaat het
rode licht uit.
Uw oplader met USB/audioapparatuur-kabel
heeft twee functies:
1. het opladen van uw headset vanuit een stopcontact of via
een USB-poort van uw computer (via de pc duurt het langer)
2. het downloaden van software-verbeteringen via een
computer met een Windows® XP™, Vista™ of Windows
7™-besturingssysteem (zie sectie 4.4 voor details).
QG SRC 207 - MAN00015.indd 84 2/1/11 11:39 AM
Page 85

4. BASISMOGELIJKHEDEN EN -INSTELLINGEN
4.1 ALGEMENE FUNCTIES
GEWENSTE RESULTAAT: BENODIGDE ACTIE:
aanzetten van de
headset
uitdoen van de headset Houd de knop voor mobiel bellen voor ten
harder / zachter
zetten van de huidige
audiobron
microfoon uitdoen
(mute)
gebruik van de
batterijoplaad-indicatie
4.2 GESPROKEN STATUSMELDINGEN
Uw SRC-System™ headset biedt verscheidene audio-statusmeldingen via uw speakers. Onder andere zal hij u de toestand van de
verbindingen melden, bv. of hij in de mobiele-telefoonstand of de
intercomstand staat, hij zal onder meer veranderingen in deze stand
Houd de knop voor mobiel bellen voor ten
minste vier seconden ingedrukt
het indicatielampje geeft drie blauwe itsjes.
audio-reactie: oplopende toon (van laag naar
hoog).
minste drie seconden ingedrukt
het indicatielampje geeft drie rode itsjes.
audio-reactie: neergaande toon (van hoog naar
hoog).
tik op de knop voor harder of zachter (dit
bepaalt de geluidssterk te per bron en bewaart
die in het geheugen)
druk kort tegelijkertijd op de knoppen voor
luider en zachter zetten, terwijl er een audiofunctie aanstaat
Druk op de knop voor luider en houd hem
langer dan 3 seconden ingedrukt:
- blauw licht = de batterij is volledig opgeladen
- rood/blauw licht = de batterij is haleeg
- rood licht = de batterij is bijna leeg
bevestigen. Uit zichzelf staat deze mogelijkheid AAN en kan worden
uitgezet zoals hieronder beschreven.
Het keuzemenu dat u hoort kunt u instellen op een van de vele
beschikbare talen.
Toegang tot het Keuzemenu: Druk gedurende 3 seconden gelijktijdig op de knoppen van “kanaal A” en “kanaal B” terwijl de headset
aan staat maar inactief is (op stand-by). Nadat u het apparaat aanzet
volgt u de Engelse instructies die u hoort of kiest u uw voorkeurstaal.
Het aan- en uitzetten van statusmeldingen: Druk op de knop
voor zachter en houd hem langer dan 6 seconden ingedrukt.
AAN: indicatielampje: ononderbroken blauw + audio-reactie: een
korte pieptoon
UIT: indicatielampje: ononderbroken rood + audio-reactie: twee korte
pieptonen
4.3 AUDIOBRONNEN EN PRIORITEITEN
De verschillende audiobronnen die verbonden zijn met uw
SRC-System™-headset hebben een prioriteit zoals hieronder afgebeeld, d.w.z. dat de bron met de hogere prioriteit altijd degene met
de lagere zal verdringen of onderbreken.
Zo zal bijvoorbeeld het overgaan van de mobiele telefoon een aan
de gang zijnd intercomgesprek onderbreken, terwijl een oproep tot
een intercomgesprek het geluid van de ingebouwde FM-radio zal
onderbreken, enz.
hogere prioriteit
lagere prioriteit
1. de mobiele telefoon of gps-aanwijzingen
(soort-afhankelijk)
2. de intercom / Click-to-Liink
3. de A2DP-audiobron
4. de FM-radio (ingebouwd)
5. de extra ingang (voor het inpluggen van bv.
een mp3-speler).
Net herl ands
85
QG SRC 207 - MAN00015.indd 85 2/1/11 11:39 AM
Page 86

4.4 DE MOGELIJKHEID OM DE SOFTWARE UPTODATE TE
BRENGEN
In de toekomst kunt u Software- en programmaverbeteringen installeren zodat de
software van up-to-date blijft.
Zo zullen toekomstige Software-verbeteringen onder andere bestaan
uit verdere statusmeldingen en andere waardevolle functies. Schrijft u
zich a.u.b. in op onze website at www.schuberth.com/src-register/en
en heb daarbij het serienummer van uw SRC-System™-headset bij de
hand, opdat u de allerlaatste versies niet zult missen. Voor het downloaden van verbeteringen gebruikt u de USB-kabel die in u aantrof bij uw
SRC-System™-headset .
Let wel, tot nadere aankondiging zijn deze verbeteringen alleen
beschikbaar voor computers die draaien op Windows® XP™, Vista™ of
Windows 7™ besturingssysteem.
4.5 HET OPNIEUW OPSTARTEN VAN UW HEADSET
Als uw headset niet reageert terwijl u het een paar keer geprobeerd heeft, kunt u hem opnieuw opstarten door hem ongeveer
10 seconden op te laden. Daarna kunt u de headset van de oplader
ontkoppelen en hem weer aan zetten. Uw headset behoort nu naar
verwachting te reageren.
4. Vervang nu vervolgens de bestaande akoestische kraag door de nieu-
we SRC-System™-akoestische kraag. Wanneer u de SRC-System™-
headset bevestigt waar hij hoort, zorgt u er dan voor dat de speakerdraden aan de binnenkant van de helm komen.
5. Schuif het pinnetje dat op de rand van het bedieningspaneel zit
naar het overeenkomstige gaatje in de helm, tot hij er in zit, en
sluit de drukknop.
Pinnetje
6. Breng het andere pinnetje aan de andere kant van de akoestische
kraag op zijn plaats en doe de drukknoop daar dicht
7. Duw nu het midden van de akoestische kraag op zijn plaats
achterin de helm. Doe hetzelfde met de overige delen om de
akoestische kraag te bevestigen waar hij hoort.
5. HET EERSTE BEGIN
5.1 VERVANG DE BESTAANDE AKOESTISCHE KRAAG DOOR
DIE VAN DE SRC-SYSTEM-HEADSET
Verwijder eerst de bestaande akoestische kraag als volgt van uw
helm:
1. Open beide drukknopen.
2. Verwijder de akoestische kraag door het midden van het gebogen
stuk naar voren te trekken.
3. Haal de pinnetjes van de akoestische kraag uit hun respectievelijke
gaatjes in de helmrand.
86
QG SRC 207 - MAN00015.indd 86 2/1/11 11:39 AM
8. Zorg er voor dat beide drukknopen dicht blijven en dat het microfoon-zwanehals zich aan de binnenkant van uw helm bevindt (tussen
de SRC-System™-headset en de binnenbekleding van de helm).
microfoon -statief
drukknoo p
C3-h elm C2/Con cept-helmen
microfoon -statief drukknoop
Page 87

9. Vergeet niet om het lipje van de USB-ingang dicht te doen en hem
dan in te stoppen in de plooien van de akoestische kraag (in de
achterkant van de akoestische kraag aan de kant van het bedieningspaneel).
5.2 HET PLAATSEN VAN DE SPEAKERS
Om het beste geluid te krijgen moet u er voor zorgen dat beide
speakers zo dicht mogelijk tegenover uw oren geplaatst worden.
de C2-en de Concept-helmen:
Bij de C2- en de Concept-helmen hecht u eenvoudig de speakers
tegenover uw oren aan de binnenbekleding
door gebruik te maken van de meegeleverde
klittenbandkussentjes.
de C3-helmen:
Let op: Hoewel u de speakers op dezelfde manier kunt vastmaken als hierboven uitgelegd (voor de C2- en Concept-helmen), bevelen we speciaal de
volgende procedure aan.
het volgende slaat op beide kanten van de C3-helm:
1. Open de drukknopen aan beide kanten van de akoestische kraag
(dezelfde drukknopen die u net nog gesloten had).
2. Open de twee rode knopen aan de onderkant van de binnenbekleding die over de “wangkussentjes” ligt. Til de bekleding een beetje op.
3. Hecht de klittenbandpleister aan de bodem van de uitsparing met
dezelfde vorm in het EPS (witte, geëxpandeerde polystyreen) en klit daarna de speaker aan
de klittenbandpleister.
4. Sluit de twee rode knopen. Let er op dat de
rode knoop nog steeds in het oog van de
zwarte tong zit.
5. Sluit nu de drukknopen aan beide kanten van de akoestische kraag
en vergewis u ervan dat ze goed vastzitten.
5.3 HET PLAATSEN VAN DE MICROFOON
Om te zorgen dat het kinstuk van de helm makkelijk sluit (naar beneden klapt) en plaats het driehoekige stukje stof in het kindeel zoveel
mogelijk naatr voren:
1. buigt u de het buigzame microfoon-statief tot
het zit zoals in de afbeelding.
2. duwt u de microfoon naar het midden van uw mond met zijn
grootste (en niet het smalle) oppervlak naar u toe.
3. klapt u het kinstuk van uw helm naar be-
kinstuk
helmvizier
neden en sluit het. Het zou kunnen dat u
beide handen nodig heeft om het kinstuk
geheel te sluiten.
4. met het kinstuk gesloten en het helmvizier
open, steekt u uw hand door de opening
van het vizier en duwt u de de microfoon
een klein beetje naar voren en beneden,
naar het midden van het kinstuk tegenover uw mond.
5.4 HET VERWIJDEREN VAN DE SRC-SYSTEM-HEADSET VAN
UW HELM
1. Open beide drukknopen.
2. Til de boog van de akoestische kraag op en duw hem uit het
centrum weg.
3. Haal de pinnetjes van de akoestische kraag uit hun respectievelijke
gaatjes in de helmrand.
5.5 HET OPEN AFDOEN VAN DE HELM
De elektronische onderdelen van de SRC-System™-headset zijn veilig
weggewerkt in de akoestische kraag. Om ongemak bij het op- en afdoen
van uw helm te voorkomen, bevelen wij de volgende werkwijze aan:
Net herl ands
87
QG SRC 207 - MAN00015.indd 87 2/1/11 11:39 AM
Page 88

1. Maak de helm-opening wijder door de kinriempjes voor onder de
kin stevig vast te houden en ze krachtig
uit elkaar te trekken.
2. Terwijl u de riepjes zijdelings trekt, laat u
de helm over uw nek glijden, te beginnen
bij de nek en dan naar voren.
3. Bij het afdoen van de helm volgt u dezelfde procedure door eerst de riempjes van elkaar weg te trekken
en dan de hele helm naar boven te duwen.
6. HET VERBINDEN VAN MOBIELE TELEFOONS,
GPS NAVIGATIESYSTEMEN OF MP3- (A2DP-)
SPELERS MET BLUETOOTH MOGELIJKHEDEN
Het tegelijkertijd kunnen verbinden van meerdere apparaten
(Multiple Device Connectivity, MDC) die Bluetooth®
mogelijkheden hebben
LET OP: Uw SRC-System™-akoestische kraag is ontworpen voor maximaal
comfort. Maar, omdat het een uitgebreid elektronisch apparaat bevat,
zal het onvermijdelijk enigszins bol staan. Dientengevolge kan het op- of
afdoen van uw helm met een SRCS-uitrusting anders voelen dan wat u gewend bent met een doorsnee akoestische kraag.
Onthoud: Hoe meer u de riempjes van de helm van elkaar wegtrekt wanneer u uw helm op- of afdoet, des te soepeler zal het proces verlopen,wat
uiteindelijk de stijfheid van de akoestische kraag zal verminderen
ingebouwd e
FM-radio
mp3speler
gps navigati esysteem
tot op 300m bi ke-to-bike
intercombere ik
mobiele tel efoon &
A2DP-spel er
5.6 HET REINIGEN VAN DE AKOESTISCHE KRAAG
Bij het reinigen van de akoestische kraag, sluit u eerst heel precies
de micro-USB-ingang van de SRC-System™-headset. Gebruik alleen een doekje dat een beetje vochtig en lauw is. Voorkom dat
de akoestische kraag doordrenkt raakt met water of een andere
vloeistof. Dompel hem nooit onder en voorkom dat water in contact
komt met de speakers of de microfoon. Laat het geheel drogen op
kamertemperatuur.
88
QG SRC 207 - MAN00015.indd 88 2/1/11 11:39 AM
Dankzij de MDC-technologie biedt elke SRC-System™ de mogelijkheid
om naast elkaar met de volgende apparaten te communiceren:
➤ maximaal twee andere SRC-System™-en
➤ een mobiele telefoon / gps navigatiesysteem
➤ een A2DP mp3-speler of adapter*
* zie voor voorbehouden: sectie 9.4 b
LET OP: Als u van plan bent om uw mobiele telefoon te gebruiken terwijl u ook
een Bluetooth®-gps apparaat gebruikt, dan dient u uw mobiele telefoon af te
stemmen op de gps en niet op de SRC-System™-headset.
Page 89

6.1 DE MOBIELE TELEFOON
Om uw mobiele telefoon met de SRC-System™-headset te kunnen gebruiken, dient u eerst uw headset af te stemmen (koppelen,
pairing) op uw mobiele telefoon.
LET OP: Als u van plan bent om een gps apparaat parallel aan uw mobiele
telefoon te gebruiken, dan dient u uw mobiele telefoon af te stemmen
op de gps en niet op de SRC‑System™-headset. In zo’n geval slaat u dit
gedeelte over en gaat u verder onder 6.2.
Dit afstemmen hoeft maar een maal gedaan te worden. Als de headset eenmaal is afgestemd op een specieke mobiele telefoon, blijven
ze gekoppeld en herkennen ze elkaar automatisch zodra ze binnen
elkaars bereik komen. Als de verbinding tussen de telefoon en de
headset verbroken is geraakt, herstelt u de verbinding met een tikje
op de knop voor mobiel bellen.
HET AFSTEMMEN VAN DE HEADSET OP EEN MOBIELE TELEFOON:
1. Zet uw mobiele telefoon aan en zorg ervoor dat de Bluetooth®
functie is ingeschakeld. Zet uw headset aan door langer dan drie
seconden op de knop voor de mobiele telefoon te drukken en dan
krijgt u drie blauwe itsjes.
2. Terwijl de SRC-System™-headset AAN staat drukt u op de knop
voor mobiel bellen en houdt u die ingedrukt voor ten minste zes
seconden tot er snel-afwisselend een rood en een blauw controlelampje gaan branden.
3. Zoek nu op uw mobiele telefoon naar Bluetooth®-apparaten door de
aanwijzigingen op uw mobiele telefoon te volgen. Raadpleeg de
handleiding van uw mobiele telefoon voor meer informatie.
4. Na enkele seconden zal uw mobiele telefoon de “
SRCS” (inclusief
software-versie) waarnemen en vermelden. Selecteer deze en volg
de instructies van uw mobiele telefoon om hem elektronisch to koppelen (pairing).
5. Als er op een gegeven moment wordt gevraagd naar een pincode
of toegangscode, vul dan 0000 (vier maal nul) in.
6. Uw mobiele telefoon zal hierna bevestigen dat de koppeling (afstemming) succesvol is verlopen. Het indicatielicht begint nu langzaam
blauw te knipperen. Wanneer de afstemming (het koppelingsproces)
niet binnen twee minuten wordt afgerond, zal de headset terugkeren
naar stand-by, de sluimerstand.
LET OP:
• Niet alle Bluetooth®-mobiele telefoons kunnen Bluetooth®-stereomuziek (A2DP)
doorgeven, zelfs al heeft de telefoon een aansluiting voor een mp3-speler. Raadpleeg de gebruiksaanwijzing van uw mobiele telefoon voor verdere informatie.
Met sommige mobiele telefoons kan het zijn dat men een tikje op de knop voor
mobiel bellen moet geven om de headset met de telefoon te verbinden nadat het
afstemmen (koppelen, pairing) voltooid is. De SRC-System™-headset zal zich dan
automatisch verbinden met de laatste telefoon die met de headset verbonden was.
• Wanneer de afstemming (het koppelingsproces) niet binnen twee minuten
wordt afgerond, zal de headset terugkeren naar stand-by, de sluimerstand.
6.2 HET GPS NAVIGATIESYSTEEM
Om een Bluetooth®-gps navigatiesysteem samen met de
SRC-System™
-headset te kunnen gebruiken, dient u eerst de twee op
elkaar af te stemmen (koppelen, pairing). Dit stelt uw gps in staat om
navigatie-instructies en geluid door te geven aan de speakers van uw
SRC-System™-headset.
LET OP: Niet alle Bluetooth®-gps navigatiesystemen kan men verbinden
met Bluetooth®-headsets. Een van de voor waarden is dat zo’n gps werkt
met het Bluetooth® “Handsfree” gateway protocol. Raadpleegt u a.u.b. de
handleiding van uw gps voor meer informatie.
HET AFSTEMMEN VAN DE HEADSET OP EEN GPS:
1. Schakel uw gps navigatiesysteem in.
Net herl ands
89
QG SRC 207 - MAN00015.indd 89 2/1/11 11:39 AM
Page 90

2. Terwijl de SRC-System™-headset AAN staat drukt u op de knop
voor luider en die houdt u ten minste 6 seconden ingedrukt tot
er gelijktijdig rode en blauwe lichtitsjes uit de controlelampjes
komen.
3. Zoek nu op uw gps navigatiesysteem naar Bluetooth®-headsets
zoals uitgelegd in de gps handleiding. Raadpleeg de handleiding
van uw navigatiesysteem voor meer informatie. Na enkele seconden zal uw navigatiesysteem de “SRCS” (inclusief software-versie)
aangeven als het gevonden apparaat. Selecteer deze en volg de
instructies op het scherm van uw gps navigatiesysteem over hoe
de elektronische koppeling te realiseren.
4. Als er op een gegeven moment wordt gevraagd naar een pincode of
toegangscode, vul dan 0000 (vier maal nul) in.
5. Uw gps navigatiesysteem zal bevestigen dat de elektronische afstemming (pairing, koppeling) gelukt is. Bovendien zal het blauwe
lampje van de headset dan langzaam beginnen te knipperen.
6. Als u een Bluetooth®-mobiele telefoon wilt gebruiken om op te bellen en gesprekken te ontvangen via uw headset, dan dient u uw
mobiele telefoon op uw gps navigatiesysteem af te stemmen (pair,
koppelen) door het opvolgen van de instructies van de handleiding van uw gps navigatiesysteem.
LET OP: Wanneer de afstemming (het koppelingsproces) niet binnen twee
minuten wordt afgerond, zal de headset terugkeren naar stand-by, de
sluimerstand.
LET OP: De prioriteiten in uw headset zijn zo afgesteld dat intercomoproepen geen gps-aanwijzigingen onderbreken. In zo’n geval zal degene
die tracht u te bereiken een ingesprekstoon horen en u hoort twee piepjes
ten teken van het feit dat iemand u probeert via de intercom te bereiken. (zie sectie 4.3 voor details over audio-prioriteiten van ingeplugde
apparaten).
6.3 DE MP3SPELER ALS DRAADLOZE MOGELIJKHEID
A2DP
Uw headset is zo ontworpen dat hij draadloos stereomuziek kan ontvangen van A2DP-bronnen en van mobiele telefoons die werken met
de Bluetooth®-A2DP- en -AVRCP-proelen (voornamelijk 3de-generatie
apparaten.
Als u een Bluetooth®-apparaat dat werkt met het AVRCP-proel gebruikt,
kunt u uw A2DP-bron rechtsreeks vanaf uw headset bedienen.
LET OP: De SRC-System™-headset kan ook audiosignalen ont-
vangen van mp3-spelers en andere audiobronnen die niet volgens de
Bluetooth®-normen werken via de bijgesloten kabel zoals beschreven is
in sectie 7.2.
Tijdens het luisteren naar muziek van een A2DP-bron zult u geen
telefoongesprekken of intercom-oproepen mislopen, omdat de
headset automatisch de muziek zal onderbreken en voorrang zal
geven aan dat u gebeld wordt. Sommige A2DP-bronnen gaan echter,
nadat u uw gesprek beëindigd heeft, niet automatisch weer door
met de muziek maar moeten dan met de hand opnieuw geactiveerd
worden.
HET INSTELLEN VAN UW MP3-SPELER VOOR BLUETOOTH
STEREO-A2DP-WEERGAVE
Om stereomuziek via een mp3-speler met Bluetooth® stereo (A2DP)-
mogelijkheid of via een Bluetooth®-adapter te kunnen beluisteren moet u
dat apparaat eerste op uw headset afstemmen (koppelen, pairing).
HET AFSTEMMEN VAN DE HEADSET OP EEN MP3-SPELER OF
BLUETOOTH-ADAPTER
Let op: Als uw A2DP-bron geïntegreerd is in uw mobiele telefoon, dan dient u
hem af te stemmen op uw headset zoals hierboven beschreven in sectie 6.1.
1. Zet uw mp3-speler / Bluetooth®-adapter aan en waar van toepassing zorg ervoor dat zijn Bluetooth®-functie geactiveerd is.
90
QG SRC 207 - MAN00015.indd 90 2/1/11 11:39 AM
Page 91

2. Als de SRC-System™-headset AAN staat drukt u ten minste zes
seconden op de knop voor mobiel bellen tot er snel-afwisselend
een rood en een blauw controlelampje gaan branden.
3. Zoek naar Bluetooth®-headsets op uw mp3-speler door het volgen
van de instructies van het apparaat
LET OP: Als u een Bluetooth®-adapter gebruikt, volg dan de instructies
van dat apparaat.
4. Na een paar seconden zal de mp3-speler “SRCS” (inclusief softwareversie) laten zien als een gevonden apparaat. Daar volgt u dan de
instructies van uw mp3-speler om de afstemming te accepteren.
5. Als er op een gegeven moment wordt gevraagd naar een pincode of
toegangscode, vul dan 0000 (vier maal nul) in.
6. Als eenmaal de elektronische afstemming gelukt is, kan het zijn dat
uw mp3-speler of adapter dat bevestigt en bovendien zal het blauwe
controlelampje van de headset dan langzaam beginnen te knipperen.
LET OP: Wanneer de afstemming (het koppelingsproces) niet binnen twee
minuten wordt afgerond, zal de headset terugkeren naar stand-by, de
sluimerstand.
Het bedienen van uw A2DP-bron vanaf uw headset
afspelen druk 3 seconden op de MP3-speler-knop
pauze/stop* druk 3 seconden op de MP3-speler-knop
vooruitspoelen druk 3 seconden op de knop voor luider
terugspoelen ** druk 3 seconden op de knop voor zachter
* dit hangt af van het type mobiele telefoon dat u heeft
** met sommige telefoons kan het nodig zijn om deze handeling tweemaal
te verrichten
7. DE INGEBOUWDE FM-RADIO EN
EXTERNE MP3-SPELER (ALS INPLUGBARE
MOGELIJKHEID)
7.1 DE FMRADIO
De SRC-System™ is uitgerust met een top-kwaliteitsradio voor FM-
stereo en met RDS- (Radio Data System) technologie.
de radio aanzetten terwijl de headset in de sluimerstand staat, drukt u
de radio uitzetten terwijl u naar de radio luistert, drukt u 3 seconden
naar het volgende
voorgeprogrammeerde station gaan
een intercomgesprek beginnen
spraakgestuurd
bellen (voice dial)
met uw mobiele
telefoon
opnieuw bellen
(redail) met uw
mobiele telefoon
RDS AAN/UIT (staat
van zichzelf op UIT)
Dankzij de RDS zal uw headset automatisch het sterkst beschikbare
signaal opzoeken van de FM-zender waar u naar wilt luisteren, ongeacht waar u rijdt. Dit stelt u in staat om uw handen voordurend aan
het stuur te houden want u hoeft onder het rijden niet de frequentie
van de radiozender aan te passen.
3 seconden op de knop voor “KANAAL B”
lang op de knop voor “KANAAL B”
korte druk op de knop voor “KANAAL B” om één
voor één langs de 6 FM-voorkeurzenders te gaan
terwijl u naar de radio luistert, begint u luid te
praten
in de sluimerstand (stand-by) tikt u op de knop
voor mobiel bellen en zeg luid de naam van de
persoon die u wilt bellen. Dit zal alleen werken
bij mobiele telefoons welke de mogelijkheid van
spraakgestuurd opbellen hebben
korte druk twee keer op de knop voor mobiel bellen terwijl u naar de radio luistert
houd de knoppen voor luider en zachter tegelijkertijd 3 seconden ingedrukt terwijl de radio aanstaat
Net herl ands
91
QG SRC 207 - MAN00015.indd 91 2/1/11 11:39 AM
Page 92

Het opsporen en programmeren van nieuwe zenders
RDS AAN/UIT (druk 3 seconden op beide terwijl de radio aan staat)
• FM Radio AAN/UIT (druk 3 sec.)
• ga de voorgeprogrammeerde stations langs (steeds kort tikje)
2. Zoek vervolgens naar een nieuw station zoals beschreven in de
sectie hiervoor.
3. Sla het station waarop u bent aangeland op door binnen 20
second na het vinden van het station een korte druk op de knop
voor “KANAAL B” te geven.
4. Om een volgende zender op te slaan tikt u nu weer op de knop
voor “kanaal B” tot u bij de volgende zender van uw keuze komt.
5. Indien u het station niet opslaat, houdt de radio op met zenders te
zoeken zonder de gevonden zender op te slaan, waar u wel nog
naar kunt blijven luisteren. In dat geval zal een korte druk op de
kop voor “KANAAL B” u leiden naar de volgende voorkeurzender.
De FM-radio is uitgerust met een totale geheugencapaciteit van zes
zenders.
1. Terwijl de radio aan staat, drukt u zo’n drie seconden op de knop
voor luider of voor zachter of tot u het volgende station op uw
headset hoort.
• Door te drukken op de knop voor luider (hoger volume) gaat
hij zoeken naar een zender op een hogere frequentie.
• Door te drukken op de knop voor zachter (lager volume) gaat hij
zoeken naar een zender op een lagere frequentie.
2. Zodra er een station is gevonden stopt het opsporen en kunt u het
station beluisteren.
3. Om verder te zoeken drukt u weer zo’n drie seconden op de knop
voor luider of voor zachter
4. Voor instructies hoe een station op te kunnen slaan als voorkeurzender, zie de volgende sectie.
Als u bij een zender aangekomen besluit om die niet op te slaan als
voorkeurzender, kunt u er wel naar blijven luisteren.
Het opslaan van een bepaal station
1. Om een voorkeurzender te programmeren (1 – 6) gaat u eerst naar
het station dat u wilt vervangen door op de knop voor “kanaal B”
te tikken tot u het beoogde station gevonden heeft.
92
QG SRC 207 - MAN00015.indd 92 2/1/11 11:39 AM
7.2 HET INPLUGGEN VAN UW MP3SPELER OF ANDERE
EXTERNE GELUIDSBRONNEN
Het gebruik van de extra ingang voor het inpluggen van apparaten
Uw SRC-System™ headset heeft een extra ingang waarmee u
audiobronnen, zoals mp3-spelers die niet volgens het Bluetooth®
protocol werken toch kunt inpluggen in de headset, door gebruik
te maken van de bijgeleverde kabel.
1. Om te beginnen moet de headset in de sluimerstand (stand-by)
staan, wat u kunt zien aan de infrequente blauwe itsjes.
2. Stop de MP3-kabel in de plugingang van uw mp3-speler/audio-
bron en het andere eind van de kabel in
de extra plugingang.
3. U bedient de mp3-speler gewoonweg door middel van zijn eigen
toetsen (FF/REW/ PLAY/PAUSE). De geluidssterkte kan worden
geregeld via de mp3-speler of de knoppen voor luider en zachter
van de headset. Activering van elke andere audioverbinding zal
automatisch de mp3-speler onderbreken (mute). Het audiosignaal
komt daarna pas weer terug zodra de headset weer in de sluimerstand (stand-by) staat.
Page 93

LET OP: Terwijl u naar uw mp3-speler luistert, is de VOX-mogelijkheid
geblokkeerd
8. HET GEBRUIK VAN UW MOBIELE TELEFOON
HET OPBELLEN MET EN AANNEMEN VAN DE DE MOBIELE
TELEFOON
BASISFUNCTIES
het aannemen van een
gesprek
het gesprek niet aannemen (reject)
het gesprek
beëindigen
spraakgestuurd bellen
(voice dial)
nummerherhaling
(redial)
DE GEAVANCEERDE FUNCTIES VOOR EEN DRIEWEGCONTACT:
voeg toe/verwijder de “KANAAL A”
headset aan/van het
telefoongesprek
voeg toe/verwijder de KANAAL “B”
headset aan/van het
telefoongesprek
korte druk op de knop voor mobiel bellen of
zeg luid een willekeurig woord
zeg 15 seconden niets of druk 3 seconden lang
op de knop voor mobiel bellen
korte druk op de knop voor mobiel bellen of
laat de andere partij ophangen
korte druk in de sluimerstand (stand-by) op de
knop voor mobiel bellen en zeg luid de naam
van de persoon die u wilt bellen. Dit zal alleen
werken bij mobiele telefoons welke de mogelijkheid van spraakgestuurd opbellen hebben
korte druk twee maal op de knop voor mobiel
bellen
Korte druk gedurende een telefoongesprek op
de knop voor “KANAAL A”
Korte druk gedurende een telefoongesprek op
de knop voor “KANAAL B”
Terwijl er over de telefoon gesproken wordt zal de headset oproepen
tot intercomgesprekken automatisch afwijzen.
Zodra het telefoongesprek beëindigd is kunt u intercomgesprekken
aangaan en aannemen.
CONTROLELAMPJES
led-activiteit: betekenis
geen in sluimerstand (stand-by) - er is geen gesprek
elke 3 seconden 1
blauw itsje
elke 3 seconden 2
blauwe itsjes
elke 3 seconden 1
rood itsje
elke 3 seconden 2
rode itsjes
ononderbroken rood de headset wordt opgeladen
gaande
stand-by – er wordt niet getelefoneerd
er is een gesprek gaande of de FM-radio of mp3speler staat AAN
de batterij begint leeg te raken – sluimerstand
(stand-by)
de batterij begint leeg te raken – tijdens een gesprek of dat de mp3-speler of FM-radio AAN staat
9. HET GEBRUIK VAN DE INTERCOM
9.1 INTRODUCTIE
Uw SRC-System™-headset stelt u in staat om contact te leggen met
andere motorrijders die SRC-headsets gebruiken binnen een straal
van 300 meter. Teneinde een of twee Bluetooth®-intercomcontacten
op te kunnen zetten, dient u eerst uw SRC-System™-headset elektronisch te koppelen met de andere headsets.
Dit afstemmen (koppelen, pairing) hoeft maar een maal gedaan te worden en als dat klaar is blijven de headsets op elkaar afgestemd en herkennen ze elkaar automatisch zodra ze binnen elkaars bereik komen.
Net herl ands
93
QG SRC 207 - MAN00015.indd 93 2/1/11 11:39 AM
Page 94
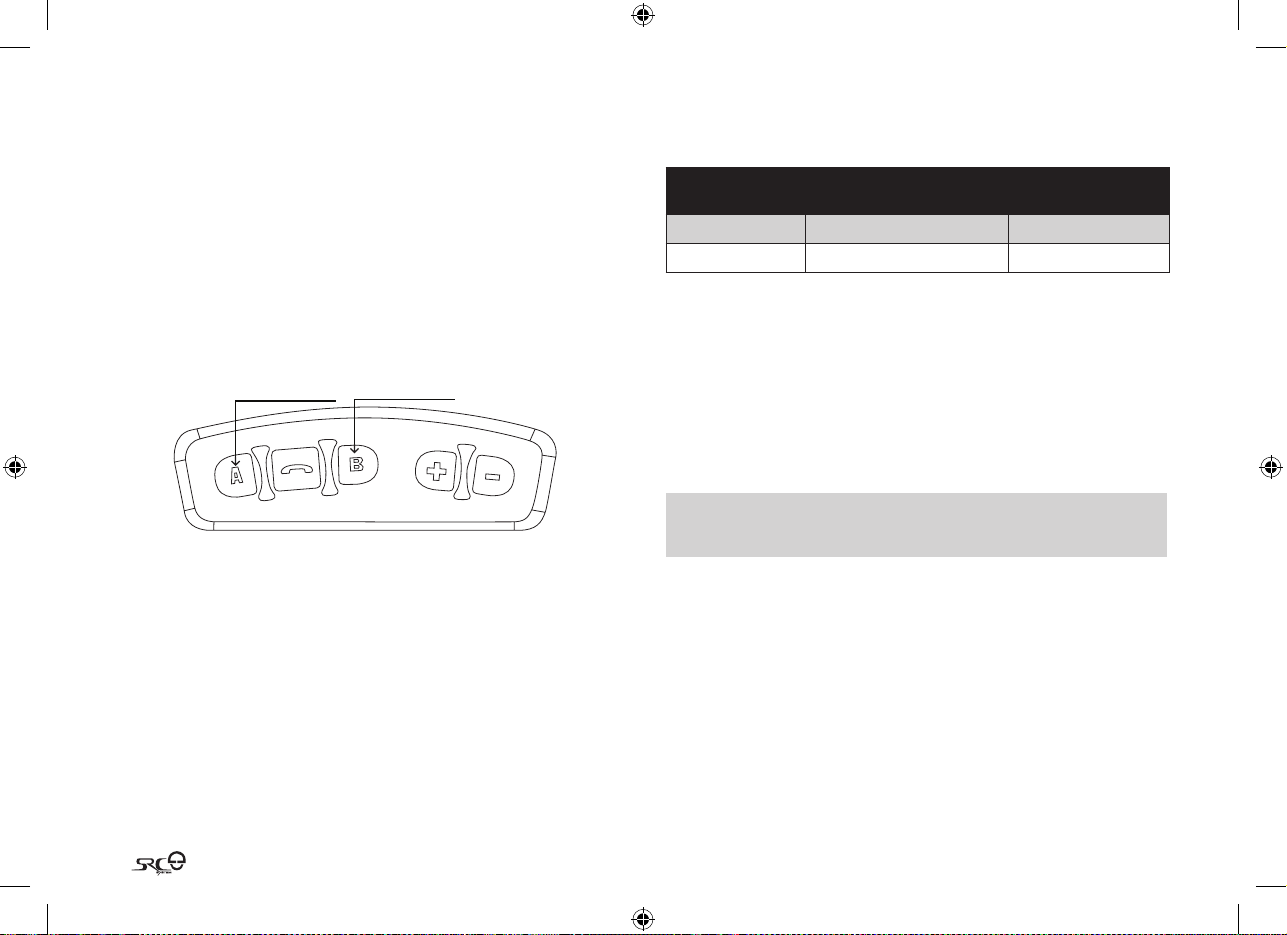
Uw headset heeft de beschikking over twee intercomkanalen
voor verbindingen van headset tot headset. Daarmee kan uw
SRC-System™-headset tegelijk in verbinding staan met maximaal
twee andere SRC-headsets.
9.2 INTERCOM COMPATIBILITEIT
U kunt met uw SRC-System™-headset intercomverbindingen leggen met alle andere SRC-System™-headsets en met de Cardo
scala rider-headsets. Voor nadere details kunt u terecht op
www.cardosystems.com/SRC.
9.3 VOOR U DE INTERCOM BEGINT TE GEBRUIKEN
de knop voor "kanaal A" de knop voor "kanaal B"
Uw SRC-System™-headset heeft twee knoppen die dienen tot snel
contactmaken met twee andere headsets. Deze andere headsets noemen we hier “KANAAL A” en KANAAL B.”
Voordat u het intercomcontact kunt leggen van motorrijder tot motorrijder met een of twee andere headsets, moeten eerst alle apparaten gekoppeld worden.
9.4 HET GEBRUIK VAN DE SRCSYSTEMHEADSET VOOR
INTERCOM MET ANDERE SRCSYSTEMHEADSETS
INTERCOMKANAAL
“KANAAL A” DE KNOP VOOR “KANAAL A” Snel ROOD itslicht
“KANAAL B” DE KNOP VOOR “KANAAL B” Snel BLAUW itslicht
KNOP VOOR AFSTEMMEN/
VERBINDEN
LED-INDICATIELAMPJES
9.4a. DE TWEEWEGINTERCOM
Het gebruik van twee SRC-System™-headsets
1. Als een van beide headset UIT staat, zet hem AAN door de knop
voor mobiel in te drukken tot het blauwe lampje drie maal itst.
2. Gaat u even na of van beide headsets nu het blauwe lampje lang-
zaam aan- en uitgaat.
3. Kies een beschikbaar KANAAL (“KANAAL A” of “KANAAL B”) dat u
wenst to gebruiken om de headset af te stemmen (koppelen, pairing).
LET OP: Als u een KANAAL kiest dat al in gebruik is dan zal de nieuwe
afstemming de eerdere afstemming op dat KANAAL ongedaan maken ten
behoeve van de nieuw-afgestemde headset.
4. Neem de SRC-System™-headset ter hand, houd de knop voor
het KANAAL (“A” of “B”) ten minste zes seconden ingedrukt tot het
blauwe of het rode lichtje van de headset snel begint te knipperen,
wat laat zien dat hij in de afstemstand staat. (Zie de TABEL voor
welke kleur led-indicatie hoort bij welk INTERCOMKANAAL.)
5. Herhaal stappen 3 en 4 voor de tweede SRC-System™-headset.
6. Binnen een paar seconden, zullen beide headsets twee seconden lang
een ononderbroken licht laten zien, wat aangeeft dat de twee headsets nu op elkaar afgestemd zijn, verbonden en klaar voor gebruik.
94
QG SRC 207 - MAN00015.indd 94 2/1/11 11:39 AM
Page 95

LET OP: Wanneer de afstemming (het koppelingsproces) niet binnen twee
minuten wordt afgerond, zal de headset terugkeren naar standby, de
sluimerstand.
Het contactleggen via de intercom
Er zijn twee manieren om een intercomgesprek te beginnen met headsets die afgestemd zijn op uw SRC-System™-headset (vergewis u ervan
dat uw SRC-System™-headset in de sluimerstand [stand-by] staat):
SPRAAKGESTUURD CONTACT MAKEN:
Begin luid te praten
Zodra u luid begint te praten zal er een
intercomcontact worden gelegd met de
andere afgestemde headset.
Het intercomcontact zal voortduren totdat
alle deelnemers 30 seconden niets zeggen.
CONTACT LEGGEN D.M.V.
DE KANAALKNOP:
Korte druk even de
knop voor het gekozen
KANAAL aan om het andere
headset toe te voegen of
te verwijderen van een
intercomgesprek.
9.4b. DE DRIEWEGINTERCOM
De SRC-System™-headset biedt als volgt de mogelijkheid tot
driewegintercomgebruik:
eerste SRC-System™-
motor A
tweede SRC-System™-motor B
Via “Kannal B ”Via “Kannal A”
derde SRC-System™-
motor C
In deze opzet is motorrijder “B” afgestemd op motorrijder “A” en op
motorrijder C.
VAN BELANG: Aangezien motorrijder “B” gedurende het groepscontact
(conference mode) twee Bluetooth®-verbindingen gebruikt, zal motorrijder “B” niet gebruik kunnen maken van zijn mobiele telefoon of gps
navigatiesysteem totdat het groepsgesprek beëindigd is. Onmiddellijk na
deze beëindiging zal motorrijder “B” automatisch weer in contact komen
met zijn mobiele telefoon of gps navigatiesysteem. Motorrijder “A” en “C”
blijven gedurende het gehele 3-wegintercomgesprek verbonden met hun
mobiele telefoons en gps navigatiesystemen.
Het opzetten en congureren van de mogelijkheid van de
driewegintercom
INTERCOMKANAAL
“KANAAL A” DE KNOP VOOR “KANAAL A” Snel ROOD itslicht
“KANAAL B” DE KNOP VOOR “KANAAL B” Snel BLAUW itslicht
PAIRING / CONNECTION
BUTTON
LED-INDICATIELAMPJES
AFSTEMMINGSMOGELIJKHEDEN (PAIRING) TUSSEN DRIE DEELNEMERS (alleen tussen SRC-System™-modellen)
Pairing, Het afstemmen van drie SRC-System™-headsets wordt bereikt door eenvoudigweg nogmaals de procedure in bovenstaande
sectie DE TWEEWEGINTERCOM uit te voeren met een derde afgestemde SRC-System™-headset (op het andere KANAAL).
Voor het afstemmen van uw SRC-System™ met nog twee andere
SRC-System™-headsets:
1. Stem uw SRC-System™-headset af op de tweede
SRC-System™-headset als met een T WEEWEGINTERCOM –
(gebruik “KANAAL A”).
2. Stem uw SRC-System™-headset af op de derde
SRC-System™-headset als met een T WEEWEGINTERCOM –
(gebruik “KANAAL B”)
Net herl ands
95
QG SRC 207 - MAN00015.indd 95 2/1/11 11:39 AM
Page 96

Het contactleggen via de intercom
9.6 HET AANGAAN VAN INTERCOMGESPREKKEN
Er zijn twee manieren om een intercomgesprek te beginnen met headsets
die afgestemd zijn op uw SRC-System™-headset terwijl uw SRC-System™-
headset in de sluimerstand (stand-by) staat:
SPRAAKGESTUURD CONTACT
LEGGEN:
Begin luid te praten
Zodra u luid begint te praten
zal er een intercomcontact
worden gelegd met met beide
afgestemde headsets, “KANAAL
A” en “KANAAL B” (indien beide
beschikbaar zijn).
CONTACT MAKEN D.M.V. DE
KANAALKNOP:
Korte druk even de knop voor
“KANAAL A” aan en dat voegt de
“KANAAL A”-headset toe of verwijdert
hem van een intercomgesprek.
Korte druk even de knop voor
“KANAAL B” aan en dat voegt de
“KANAAL B”-headset toe of verwijdert
hem van een intercomgesprek..
9.5 HET ONTVANGEN VAN INTERCOMGESPREKKEN
Zodra een op uw headset afgestemde headset u via de intercom probeert te bereiken, zal de verbinding vrijwel onmiddellijk beginnen.
LET OP: De voorgeprogrammeerde prioriteitsinstellingen van de headset
zijn zo gekozen dat voorkomen wordt dat binnenkomende intercomoproepen mobiele-telefoongesprekken en gps navigatiesysteem-instructies
onderbreken. In zo’n geval zal degene die via de intercom tracht u te
bereiken een ingesprekstoon horen en u hoort twee piepjes ten teken van
het feit dat iemand u probeert via de intercom te bereiken. (zie sectie 4.3
voor details over audio-prioriteiten van afgestemde apparaten).
Nu dat u het afstemmingsproces (koppeling, pairing) voltooid heeft kunt
u beginnen met de intercom te gebruiken. Mocht u dat nog niet gedaan
hebben, raadpleegt u dan a.u.b. de tabel hierboven en voltooi de afstemming naar uw voorkeur, nog voordat u verder gaat met deze sectie.
Er zijn twee manieren om een intercomgesprek te beginnen met headsets
die afgestemd zijn op uw SRC-System™-headset (vergewis u ervan dat uw
SRC-System™-headset in de sluimerstand [stand-by] staat):
SPRAAKGESTUURD CONTACT LEGGEN:
Dit heeft de voorkeur bij relatief korte gesprekken want na 30 sec. stilte gaat het kanaal op
stand-by
Begin luid te praten
Zodra u luid begint te praten zal er een
intercomcontact worden gelegd met met
beide afgestemde headsets, “KANAAL A” en
“KANAAL B” (indien beide beschikbaar zijn),
en aanblijven tot alle deelnemers 30 seconde
niets zeggen.
(dit is voor tweeweg-gesprekken)
LET OP: Terwijl de intercom in gebruik is werken opnieuw (redial) en
spraakgestuurd opbellen niet.
CONTACT MAKEN D.M.V.
DE KANAALKNOP:
Dit heeft de voorkeur bij
uitgebreide gesprekken want
het laat het kanaal open
en actief
Tik even de knop voor
het gekozen KANAAL
aan om de andere
SRC-System™ toe te
voegen of te verwijderen
van een intercomgesprek.
9.7 HET SPRAAKGESTUURD CONTACTMAKEN VOX
De SRC-System™-headset biedt VOX-technologie voor het veilig en
handsfree gebruik van een aantal belangrijke functies – spraakgestuurd bellen (voice dial), beantwoorden en weigering gesprekken.
Als u gebeld wordt hoeft u alleen een willekeurig woord luid uit te
spreken (bv. “hallo”).
Om niet aan te nemen hoeft u alleen maar ongeveer 15 seconden
niets te zeggen.
Om een intercomoproep niet aan te nemen zwijgt u 30 seconden.
96
QG SRC 207 - MAN00015.indd 96 2/1/11 11:39 AM
Page 97

VOX AAN-/UITZETTEN: Druk drie seconden tegelijkertijd op de
knoppen voor luider en zachter tot u een piepje hoort.
Van zichzelf staat de mogelijkheid om spraakgestuurd contact te
leggen op aan.
LET OP: Het kunnen aan-/uitzetten van de mogelijkheid om spraakgestuurd contact te leggen werkt alleen voor de intercomfunctie.
9.8 HET ONGEDAANMAKEN VAN DE AFSTEMMING
HET TERUGBRENGEN NAAR DE OORSPRONKELIJKE
UITGANGSSTAND
Deze sectie is alleen relevant als u al een keer het afstemmingsproces
(pairing) doorlopen heeft. U kunt te allen tijde als volgt alle afstemmingen
van de headset verwijderen:
1. Terwijl de SRC-System™-headset AAN staat, drukt u ten minste zes
seconden op de knop voor mobiel tot de rode en blauwe lampjes
elkaar snel beginnen af te wisselen.
2. Druk nu op de knop voor luider en houd die drie seconden ingedrukt.
3. De rode en blauwe lampjes moeten nu vijf korte itsjes afgeven en
dan schakelt de headset zichzelf uit, ter bevestiging van het feit dat
de ongedaanmaking (reset) succesvol verlopen is.
9.9 WETENSWAARDIGHEDEN
a. Ingesprekstoon (Bij gebruik van een SRC-System™-headset)
Wanneer u een intercomgesprek tracht te beginnen met een headset
die al gebruikt wordt voor een telefoon-/gps-/intercomverbinding,
zult u twee piepjes horen ten teken van het feit dat de andere headset al ingebruik is.
b. Het automatisch herstel van de intercomverbinding
Indien de SRC-System™-headset en een tweede, erop afgestemde headset hun bereik te buiten gaan en de verbinding tussen
hen verloren gaat, zal de SRC-System™-headset onmiddellijk
proberen de verbinding met de andere headset herstellen. U kunt
met de hand de intercomverbinding herstellen terwijl de headset
in de sluimerstand (stand-by) staat door de knop voor “KANAAL A”
of “KANAAL B” in te drukken om u te verbinden met de respectievelijke verloren gegane verbinding.
c. Grenzen aan een groepsgesprek (conference calls)
Als u een groepsgesprek begint met drie deelnemers (uzelf meegerekend), zullen de deelnemers die tegelijkertijd twee actieve verbindingen onderhouden niet instaat zijn om mobiele-telefoongesprekken
of gps-boodschappen te ontvangen voor zo lang het groepsgesprek
voortduurt (zie voor details sectie 9.4b).
9.10 HET OPLOSSEN VAN PROBLEMEN MET DE INTERCOM
Vergewis u er allereerst van dat uw microfoon zich bevindt waar hij
moet zitten, voor het midden van uw mond.
De SRC-System™-headset is ontworpen voor gebruik in luidruchtige omgevingen. Daarom dient u de intercomfunctie alleen in een
lawaaierige omgeving te testen, zoals naast een stationair draaiende motorets en niet binnenshuis. Gaat u alstublieft ook na of de
headsets juist op elkaar zijn afgestemd (gekoppeld, paired) door de
instructies te volgen in de relevante secties.
10. CLICK-TO-LINK
Click-to-Link (tikcontact) is de spontane, “gezellige” kant van uw
SRC-System™. Dezer unieke mogelijkheid stelt u in staat om
onmiddellijk één op één intercomgesprekken aan te gaan met
andere SRC-System™-gebruikers die zich in de buurt bevinden
zonder dat het nodig is om vooraf het koppelingsproces te
doorlopen. U kunt het beschouwen als een privé gesprekskanaal van
motorrijder tot motorrijder dat u zonder te stoppen kunt openen met
andere SRC-System™-gebruikers die u in de buurt opmerkt, bij een
verkeerslicht of langs de weg. De mogelijkheid van Click-to-Link kan
natuurlijk te allen tijde uitgezet worden, waardoor u ook pogingen
Net herl ands
97
QG SRC 207 - MAN00015.indd 97 2/1/11 11:39 AM
Page 98

van andere SRC-System™-gebruikers om spontaan contact met u op
te nemen blokkeert.
HET GEBRUIK VAN CLICK-TO-LINK
Het aan en uit zetten van Click-to-Link: deze mogelijkheid kan
aan of uit gezet worden via het menu voor het aanpassen van de
instellingen (zie sectie 4.2). Van zichzelf staat deze mogelijkheid UIT.
AUDIOBRONNEN EN -PRIORITEITEN
De verschillende audiobronnen die verbonden zijn met uw
SRC-System™ hebben de onderstaande prioriteiten, zodat de bron met
een hogere prioriteit altijd de bron met een lagere prioriteit verdringt en
onderbreekt.
Bij voorbeeld: mobiele-telefoonoproepen en gps-instructies
onderbreken gesprekken die via Click-to-Link tot stand kwamen,
terwijl uitnodigingen voor Click-to-Link-gesprekken het geluid van de
ingebouwde FM-radio onderbreken, enz.
Gesprekken die tot stand kwamen door Click-to-Link en
intercomcontacten hebben dezelfde prioriteit. Als het ene soort
gesprek gevoerd wordt kan het andere soort dat niet onderbreken.
Dus een poging om u via Click-to-Link te spreken te krijgen kan niet
een intercomgesprek onderbreken en vice versa.
hogere prioriteit
lagere prioriteit
1. de mobiele telefoon of gps-aanwijzingen
(soort-afhankelijk)
2. de intercom/Click-to-Link
3. de A2DP-audiobron
4. de FM-radio (ingebouwd)
5. de extra ingang (voor het inpluggen van bv.
een mp3-speler).
Een toon voor een verzoek tot intercomcontact: als bestuurder A of
bestuurder B contact met u zoekt voor een intercomgesprek terwijl u
bezig bent met een Click-to-Link-gesprek, hoort u een toon voor een
verzoek tot intercomcontact terwijl de partij die contact zoekt een
toon ter afwijzing hoort.
Als om welke reden ook het gebeurt dat uw Click-to-Link-verbinding
wegvalt en er zijn nog andere SRC-System™-gebruikers in de buurt, dan
kan het gebeuren dat een hernieuwde Click-to-Link-poging u verbindt
met andere gebruikers dan degene met wie u eerst contact had.
Algemene functies
soort wat u wilt bereiken wat u er voor moet doe
het contact
leggen voor
en verbreken
van een
Click-to-Linkgesprek
het al dan niet
aannemen van
een Click-to-
Link-gesprek
tijdens
Click-to-Linkgesprekken
*Wanneer de SRC-System™ maximaal 10 seconden een andere
SRC-System™ met Click-to-Link-mogelijkheden zoekt, geeft hij piepsignalen
en rode lichtitsen af.
het proberen om contact te
leggen via Click-to-Link*
het beëindigen van een
Click-to-Link-gesprek
het aannemen van een
Click-to-Link-gesprek
het niet aannemen van een
Click-to-Link-gesprek
het beëindigen van een
Click-to-Link-gesprek
tik twee keer op de knop
voor "KANAAL A”
tik op de knop voor
"KANAAL A”
als u de beltoon hoort tikt
op de knop voor "KANAAL
A” of spreekt u luid om
contact te leggen via VOX
als u de beltoon hoort
zegt u 10 seconden lang
niets of tot de beltoon
ophoudt
tik op de knop voor
"KANAAL A”
98
QG SRC 207 - MAN00015.indd 98 2/1/11 11:39 AM
Page 99

LET OP: Click-to-Link-verbindingen vervangen of veranderen niet
uw bestaande intercomafstemmingen met bestuurder A en bestuurder B. Om contact te maken met uw Click-to-Link-gesprekspartner
maakt Click-to-Link gebruik van een eigen, tijdelijk kanaal.
11. VRAGEN/HULP
Voor meer informatie, kijk op onze website:
www.schuberth.com
Voor technische ondersteuning kunt u schrijven naar:
Kundenservice@schuberth.com
telnr. : +49-391-8106-555
Be zoekt u a.u.b. onze website www.schuberth.com/en/products/
service/src-systemtm.html en schrijft u zich online in voor de nieuwste
informatie over Software-verbeteringen
DOOR HET OPENEN VAN DE RITSSLUITING VAN DE AKOESTISCH
De elektronische onderdelen van de -headset in de akoestische kraag zijn af-
gesloten door een verzegelde ritssluiting. Wilt u niet tornen aan die ritssluiting
of hem openen want dat maakt uw garantie ongeldig.
BELANGRIJK:
KRAAG, VERVALT DE GARANTIE!
12. BEPALINGEN
Reguleringen van de federale communicatiecommissie (in de VS)
15.21
We manen u tot voorzichtigheid dat veranderingen of aanpassingen die niet nadrukkelijk
goedgekeurd zijn door de partij die verantwoordelijk is voor de naleving, de gebruiker
zijn toestemming om het product te gebruiken teniet zouden kunnen doen.
15.105(b)
Dit product is getest en bevonden te vallen binnen de grenswaarden gesteld aan een
klasse B digitaal apparaat, conform deel 15 van de FCC-voorschriften. Deze grenswaarden zijn opgesteld om redelijke bescherming te verstrekken tegen storing van huiselijke
installaties. Dit product produceert, ver werkt en kan energie op radiosignalen afgeven
en indien niet geïnstalleerd en gebruikt volgens de instructies hinderlijke interferentie
(storing) veroorzaken bij de radio-ontvangst. Echter kan er niet gegarandeerd worden
dat interferentie niet zal plaatsvinden voor een specieke installatie.
Indien dit product daadwerkelijk hinderlijke storing veroorzaakt in radio- of televisieontvangst, wat vastgesteld kan worden door het apparaat aan en uit te doen, probeert u dan
de interferentie te neutraliseren door een van de volgende maatregelen:
• heroriënteer of verplaats de antenne
• vergroot de afstand tussen het product en de ontvanger
• sluit het product aan op een stopcontact dat onder een andere zekering valt dan die
waar de ontvanger op is aangesloten.
• raadpleeg de importeur of een ervaren radio/tv-specialist.
Aan het func tioneren worden de volgende 2 voorwaarden gesteld:
1. dit apparaat mag geen interferentie veroorzaken en
2. het apparaat moet tegen elke vorm van storing kunnen, inclusief storing die een ongewenste werking van het apparaat kan veroorzaken.
FCC-regulering voor radiofrequentieafgifte:
Dit product voldoet aan de FCC-uit zendnormen die uitgevaardigd zijn voor buiten laboratoria. Eindgebruikers moeten de specieke instructies volgen tot naleving van de
voorschriften voor de sterkte van de radiofrequentieafgifte. De zender mag niet bij een
andere antenne of zender worden geplaatst of er mee samenwerken.
Net herl ands
99
QG SRC 207 - MAN00015.indd 99 2/1/11 11:39 AM
Page 100

De Europese CE regulering
De SRC-System™-headset (het “product”) voldoet aan de volgende essentiële eisen van
Europese richtlijn 1999/5/EC (genaamde de R&TTE-regulering), artikelen 3.1a, 3.1b en 3.2.
Het product is gefabriceerd volgens aanhangsel 2 bij bovenstaande richtlijn.
Verklaring van het voldoen aan de standaard (DOC - Declaration of Conformity)
De SRC-System™-headset voldoet aan en gebruikt de Bluetooth® class 1.2-specictatie
en heeft met succes alle testen doorstaan van wederzijdse operabiliteit die vermeld
staan in deze Bluetooth®-specicatie. Evenwel wordt interoperabiliteit tussen het product
en andere Blueto oth®-apparaten niet gegarandeerd.
VERKL ARING VAN AFSTAND EN ONTHEFFING
(niet voor landen van de Europese Unie)
Met het in gebruik nemen van de SRC-System™-headset doet u afstand van belangrijke
rechten inclusief het recht om naar de rechter te stappen. Lees alstublieft het volgende
zeer zorgvuldig voordat u het apparaat te gaan gebruiken. Indien u niet akkoord gaat met
alle onderdelen van deze overeenkomst, dient u onmiddellijk het product te retourneren
waarbij u de volledige aankoopprijs terug ont vangt. Door de headset in gebruik te nemen bevestigt u dat deze overeenkomst bindend is en ziet u af van de mogelijkheid om
een rechtszaak aan te spannen.
Het gebruik van een communicatiemiddel tijdens het berijden van een motorets, scooter,
brommer, quad of een ander voer-, vaar- of vliegtuig of apparaat, te land, te water of in de lucht
(verder aangeduid als “vervoermiddel”) vereist uw volledige en onderverdeelde aandacht.
Schuberth GmbH en Cardo Systems, Inc., met inbegrip van de bestuursleden, directeuren, partners, het moederbedrijf, vertegenwoordigers, agenten, onderaannemers, spon sors, werknemers, leveranciers en wederverkopers (verder aangeduid als “het bedrijf”)
raadt u ten sterkste aan om alle benodigde voorzorgsmaatregelen te nemen en alert te
blijven op de verkeers-, weers- en wegomstandigheden
indien u ervoor kiest om gebruik te maken van de SRC-System™-headset, inclusief alle
afgeleide modellen, ongeacht hun commerciële benaming of merk (verder aangeduid
als “het apparaat”) en om uw vervoermiddel te stoppen voordat u gaat opbellen of een
gesprek gaat aannemen. Alle publicaties, advertenties, bekendmakingen of dergelijke
berichten die het gebruik van het apparaat tijdens het zich verplaatsen te berde brengen, zijn alleen bedoeld om de technische mogelijkheden te bespreken en moeten niet
verkeerd uitgelegd worden alsof zij de gebruikers aanmoedigen om het apparaat te gebruiken tijdens deelname aan het verkeer.
Door dit apparaat aan te schaen en het niet te retourneren onder volledige restitutie
(zie hieronder) verleent u het bedrijf kwijtschelding en schadeloosstelling van elke verantwoordelijkheid, verlies, eisen en alle kosten (inclusief advocatenkosten) en beschouw t
u het bedrijf onschuldig aan welke lichamelijke verwonding, letsel of overlijden dan ook ,
evenals aan schade of beschadiging van goederen, van elk vervoermiddel, inclusief uw
eigen, of van enige eigendom of activa van uzelf of een derde partij, elk mogelijk voortkomend uit het gebruik van het apparaat onder welke omstandigheden of condities dan
ook en ongeacht de juridische aansprakelijkheid.
Het bedrijf zal niet verantwoordelijk worden gehouden voor welke materiële schade
ook, ongeachte de oorzaak, condities en omstandigheden, inclusief een defect aan het
apparaat, en alle inbegrepen risico’s verbonden aan het gebruik van het apparaat worden uitsluitend en alleen gedragen door de gebruiker van het apparaat, ongeacht of
het apparaat gebruikt wordt door de oorspronkelijke koper of door enige derde partij.
Het bedrijf stelt u bij deze ervan op de hoogte dat het gebruik van dit apparaat een
schending kan zijn van lokale, regionale of nationale wetten of voorschrif ten, en dat
elk gebruik van het apparaat volledig voor uw eigen risico en verantwoordelijkheid is.
1. Bij deze doen u, uw erfgenamen, wettelijke vertegenwoordigers, opvolgers of rechtverkrijgenden, vrijwillig en voor altijd, afstand van en ontheen het bedrijf, en houden haar
voor onaansprakelijk en onschuldig ten aanzien van enig en alle procesvoering, claims,
schuld, eisen, acties of aansprakelijkheid welke, direct of indirect, zou kunnen voorkomen uit het gebruik van het apparaat, betreende welke nood, pijn, lijden, ongemak,
verlies, letsel, overlijden of schade dan ook, aan of ten opzichte van wie dan ook of welk
bezit ook, door welke oorzaak ook, HETZIJ ALS GEVOLG VAN NALATIGHEID OF ANDERSZINS, en waar u later in de toekomst juridisch recht toe zou kunnen verwerven als gevolg
van bovengenoemd gebruik, zo ver als de wet maar mogelijk maakt.
2. U b egrijpt volkomen en neemt voor uw rekening de risico’s bij gebruik van het
apparaat, met inbegrip van het risico do or nalatigheid of veronachtzaming door
anderen.
3. U bevestigt dat u lichamelijk in staat bent om dit apparaat te gebruiken en dat u geen
medische af wijkingen of gebreken heef t welke u zouden kunnen hinderen in het veilig gebruik. U bevestigt dat u ten minste 18 jaar oud bent en dat u op de hoogte bent
gesteld van de risico’s verbonden aan het gebruik van dit apparaat. Verder bevestigt u
dat u geen alcohol tot u zult nemen die uw alertheid zou kunnen geinvloeden of welke middelen die de rijvaardigheid beïnvloeden ook, en dat u deze producten niet bij u
zult hebben. gebruiken of nuttigen voor of gedurende het gebruik van het apparaat.
100
QG SRC 207 - MAN00015.indd 100 2/1/11 11:39 AM
 Loading...