

Page 1
U S E R M A N U A L
P O W E R E D B Y
Page 2

22
TABLE OF CONTENTS
1. IN TRODUC TION . . . . . . . . . . . . . . . . . . . . . . . . . . . . . . . . . . . . . . . . . . . . . . . . . . . . . . . . . 23
2. CON TENTS OF THE R ETAIL BO X . . . . . . . . . . . . . . . . . . . . . . . . . . . . . . . . . . . . . . . . . . . .24
3. CH ARGING THE HE ADSET . . . . . . . . . . . . . . . . . . . . . . . . . . . . . . . . . . . . . . . . . . . . . . . . . 24
4. BA SIC SET UP AND C ONFIGU RATION . . . . . . . . . . . . . . . . . . . . . . . . . . . . . . . . . . . . . . . 25
4.1 BASI C FUNCT IONS . . . . . . . . . . . . . . . . . . . . . . . . . . . . . . . . . . . . . . . . . . . . . . . . .25
4.2 STATU S LIGHT S. . . . . . . . . . . . . . . . . . . . . . . . . . . . . . . . . . . . . . . . . . . . . . . . . . . . 25
4.3 SO FTWAR E UPGR ADES AN D SETT INGS . . . . . . . . . . . . . . . . . . . . . . . . . . . . . . . 25
4.4 SET TINGS CUSTOM IZATIO N . . . . . . . . . . . . . . . . . . . . . . . . . . . . . . . . . . . . . . . . . 25
4.5 VOI CE MENU . . . . . . . . . . . . . . . . . . . . . . . . . . . . . . . . . . . . . . . . . . . . . . . . . . . . . . 26
4.6 AUD IO SOUR CES AN D PRIOR ITIES . . . . . . . . . . . . . . . . . . . . . . . . . . . . . . . . . . . 26
4.7 RE SETTI NG YOUR HEADSE T . . . . . . . . . . . . . . . . . . . . . . . . . . . . . . . . . . . . . . . . . 26
5. GE TTING STARTE D . . . . . . . . . . . . . . . . . . . . . . . . . . . . . . . . . . . . . . . . . . . . . . . . . . . . . . . 26
5.1 REMOV ING THE EXIST ING ACOU STIC CO LLAR . . . . . . . . . . . . . . . . . . . . . . . . . 26
5.2 CON NECTI NG THE A NTENNA CABLE . . . . . . . . . . . . . . . . . . . . . . . . . . . . . . . . . .26
5.3 ATTAC HING TH E SRCSYSTE M™ . . . . . . . . . . . . . . . . . . . . . . . . . . . . . . . . . . . . . 27
5.4 POSI TIONI NG THE S PEAKE RS . . . . . . . . . . . . . . . . . . . . . . . . . . . . . . . . . . . . . . . 27
5.5 POS ITION ING THE MICROP HONE . . . . . . . . . . . . . . . . . . . . . . . . . . . . . . . . . . . . 28
5.6 REM OVING T HE SRCSYST EM™ FROM YOUR HE LMET . . . . . . . . . . . . . . . . . . .28
5.7 WEA RING AN D REMOV ING THE HELME T. . . . . . . . . . . . . . . . . . . . . . . . . . . . . . 28
5.8 CLE ANING THE SRCSYS TEM™ ACOU STIC CO LLAR . . . . . . . . . . . . . . . . . . . . . .28
6. CON NECT ING MOB ILE PHO NES, GP S AND MP3 PLAYER S . . . . . . . . . . . . . . . . . . . . . 29
6.1 MOBI LE PHON E . . . . . . . . . . . . . . . . . . . . . . . . . . . . . . . . . . . . . . . . . . . . . . . . . . .29
6.2 GP S DEVI CE . . . . . . . . . . . . . . . . . . . . . . . . . . . . . . . . . . . . . . . . . . . . . . . . . . . . . . 30
6.3 MP3 M USIC . . . . . . . . . . . . . . . . . . . . . . . . . . . . . . . . . . . . . . . . . . . . . . . . . . . . . . . 31
6.3a WI RELES S A2DP . . . . . . . . . . . . . . . . . . . . . . . . . . . . . . . . . . . . . . . . . . . . 31
6.3b CAB LECO NNEC TED
MP3 PLAYER VIA THE AUX . . . . . . . . . . . . . . . 31
7. BU ILTIN FM R ADIO . . . . . . . . . . . . . . . . . . . . . . . . . . . . . . . . . . . . . . . . . . . . . . . . . . . . . . 32
8. USI NG THE I NTERCO M . . . . . . . . . . . . . . . . . . . . . . . . . . . . . . . . . . . . . . . . . . . . . . . . . . . . 33
8.1 INTR ODUCT ION . . . . . . . . . . . . . . . . . . . . . . . . . . . . . . . . . . . . . . . . . . . . . . . . . . . 33
8.2 IN TERCOM COMPATIBI LITY . . . . . . . . . . . . . . . . . . . . . . . . . . . . . . . . . . . . . . . . . 33
8.3 BE FORE STA RTING T HE INT ERCOM . . . . . . . . . . . . . . . . . . . . . . . . . . . . . . . . . . . 33
8.4 US ING THE SRCSYSTE M™ FOR IN TERCOM WITH OT HER
SRCSYS TEM™ HE ADSETS . . . . . . . . . . . . . . . . . . . . . . . . . . . . . . . . . . . . . . . . . . . 34
8.4a. TWO WAY INTE RCOM . . . . . . . . . . . . . . . . . . . . . . . . . . . . . . . . . . . . . . 34
8.4b. TH REEWAY IN TERCOM . . . . . . . . . . . . . . . . . . . . . . . . . . . . . . . . . . . . . 34
8.5 MA KING IN TERCOM CALLS . . . . . . . . . . . . . . . . . . . . . . . . . . . . . . . . . . . . . . . . . 35
8.6 RE CEIVIN G INTER COM CAL LS . . . . . . . . . . . . . . . . . . . . . . . . . . . . . . . . . . . . . . . 35
8.7 VOI CE CONN ECT FE ATURE V OX . . . . . . . . . . . . . . . . . . . . . . . . . . . . . . . . . . . . 35
8.8 RE SET PAIR ING RE STORI NG DEFAU LT CONFIG URATIO N . . . . . . . . . . . . . . .35
8.9 NOT EWORT HY ISSU ES . . . . . . . . . . . . . . . . . . . . . . . . . . . . . . . . . . . . . . . . . . . . . 35
8.10 TROUB LESHO OTING T HE INT ERCOM . . . . . . . . . . . . . . . . . . . . . . . . . . . . . . . . 36
9. CLI CKTOLINK ® CTL . . . . . . . . . . . . . . . . . . . . . . . . . . . . . . . . . . . . . . . . . . . . . . . . . . . . 36
10. SUPP ORT . . . . . . . . . . . . . . . . . . . . . . . . . . . . . . . . . . . . . . . . . . . . . . . . . . . . . . . . . . . . . . 37
11. NOTIC ES . . . . . . . . . . . . . . . . . . . . . . . . . . . . . . . . . . . . . . . . . . . . . . . . . . . . . . . . . . . . . . . 37
IMP ORTANT: T his is version 1.0 o f the User Manual. P lease note, tha t our manual is upd ated
period ically on our we bsite in order t o include the ve ry latest fea tures as well th e new
option s and functi ons of your new SRC-System. P lease visit w ww.schuber th.com/
leadm in/downloads /SRC/SRC-System_M anual-1.pdf t o check now if th e
manual yo u are holding is t he most update d version and d ownload the web site manual ver sion
in your pr eferred lan guage.
Page 3

Englis h
23
1. INTRODUCTION
Congratula tions and thank you for choosing the Schuberth Rider CommunicationSystem™ (SRC-System™) Headset f or motorcycle helme ts.
This manual wi ll help you operate the head set, but you should rst familiarize
yoursel f with the Bluetooth® func tionality of your mobile phone and/or GPS
device bef ore using the SRC-System™.
The retail b ox contains one SRC-System™. When paired with another
SRC-System™, the units can be used for Intercom at a range of up to 700 m/
2,300 ft (su bject to terrain).
YOUR SRCSYS TEM OFFERS THE FOLLOW ING CONNECTIV ITY OPTIONS:
1. Mob ile phone communication (support ing Bluetooth® Handsfree* and A2DP
and AVRCP proles at a 10 m / 33 ft. range)
2. Wireless music-streamin g (suppor ting the Bluetooth® Stereo A2DP and AVRCP
proles and compatible wi th a variety of MP3 Player s, adapters and other
audio devices)
3. 2-way or 3-Way Bike-to-Bike Intercom for conference calls with oth er
SRC-System™ headsets (up to 700 m/ 2,300 ft) in Full Dup lex** mode
4. Dr iver-to-Passenger Intercom
5. Click-to-L ink® for spontaneou s intercom communicati on with any nearby
SRC-System™, scala rider G4 or G9
6. GPS Navigation instruc tions and Streaming Audio from compatible Bluetooth®
devices
7. Built-in FM Radio with 6 st ation presets and automatic tuning
8. As a stereo headset for lis tening to cable-connected audio devices, (such a s
non-Bluetoo th® MP3 Players and iPods®)
ADDITIONAL SPECIAL FEATURES:
➤AGC technolo gy (Automatic Gain Contro l), allowing th e automatic adjustment
of volume according to ambient no ise and driving speed. You can also control
the volume level manually. AGC sensitivity levels can be customize d to suit
your pers onal preferences.
➤VOX technolog y for safe and hands-f ree operation of som e key func tions
(Voice Dial, Answer Call, Reject Call). VOX sensitivit y levels can be customized
to suit your pe rsonal preferences.
➤PLC soft ware (Packet Loss Concealm ent) for real-time compensation of audi o
losses in challenging envir onments.
➤Advanced so ftware which yo u should update while in st andby mode, via any
PC running Windows® XP™, Vista™ or Win dows 7.
➤Spoken status announcements, so that you alw ays know to whom or what
device you are connected to a t any given time.
We wish you a great riding experience and remain avai lable for any inquiries you
may have. Just write us at Serv ice@schuber th.com
Nicole Prell
Head of Sal es and Marketing
SCHUBERTH GmbH
Visit ww w.sch uberth.com/sr c2-tutorial/en to experience an intera ctive
demonstration of the SRC-System™ func tions.
_______________________
* Mobile p hones that do no t support th e Bluetooth® Handsf ree prole may pr event you from
using cer tain advan ced features
** “F ull Duplex” l ets you to spea k and hear the othe r party sim ultaneous ly, similar to mobil e or
landlin e phone convers ations and un like walkie-t alkie commun ications
Page 4
24
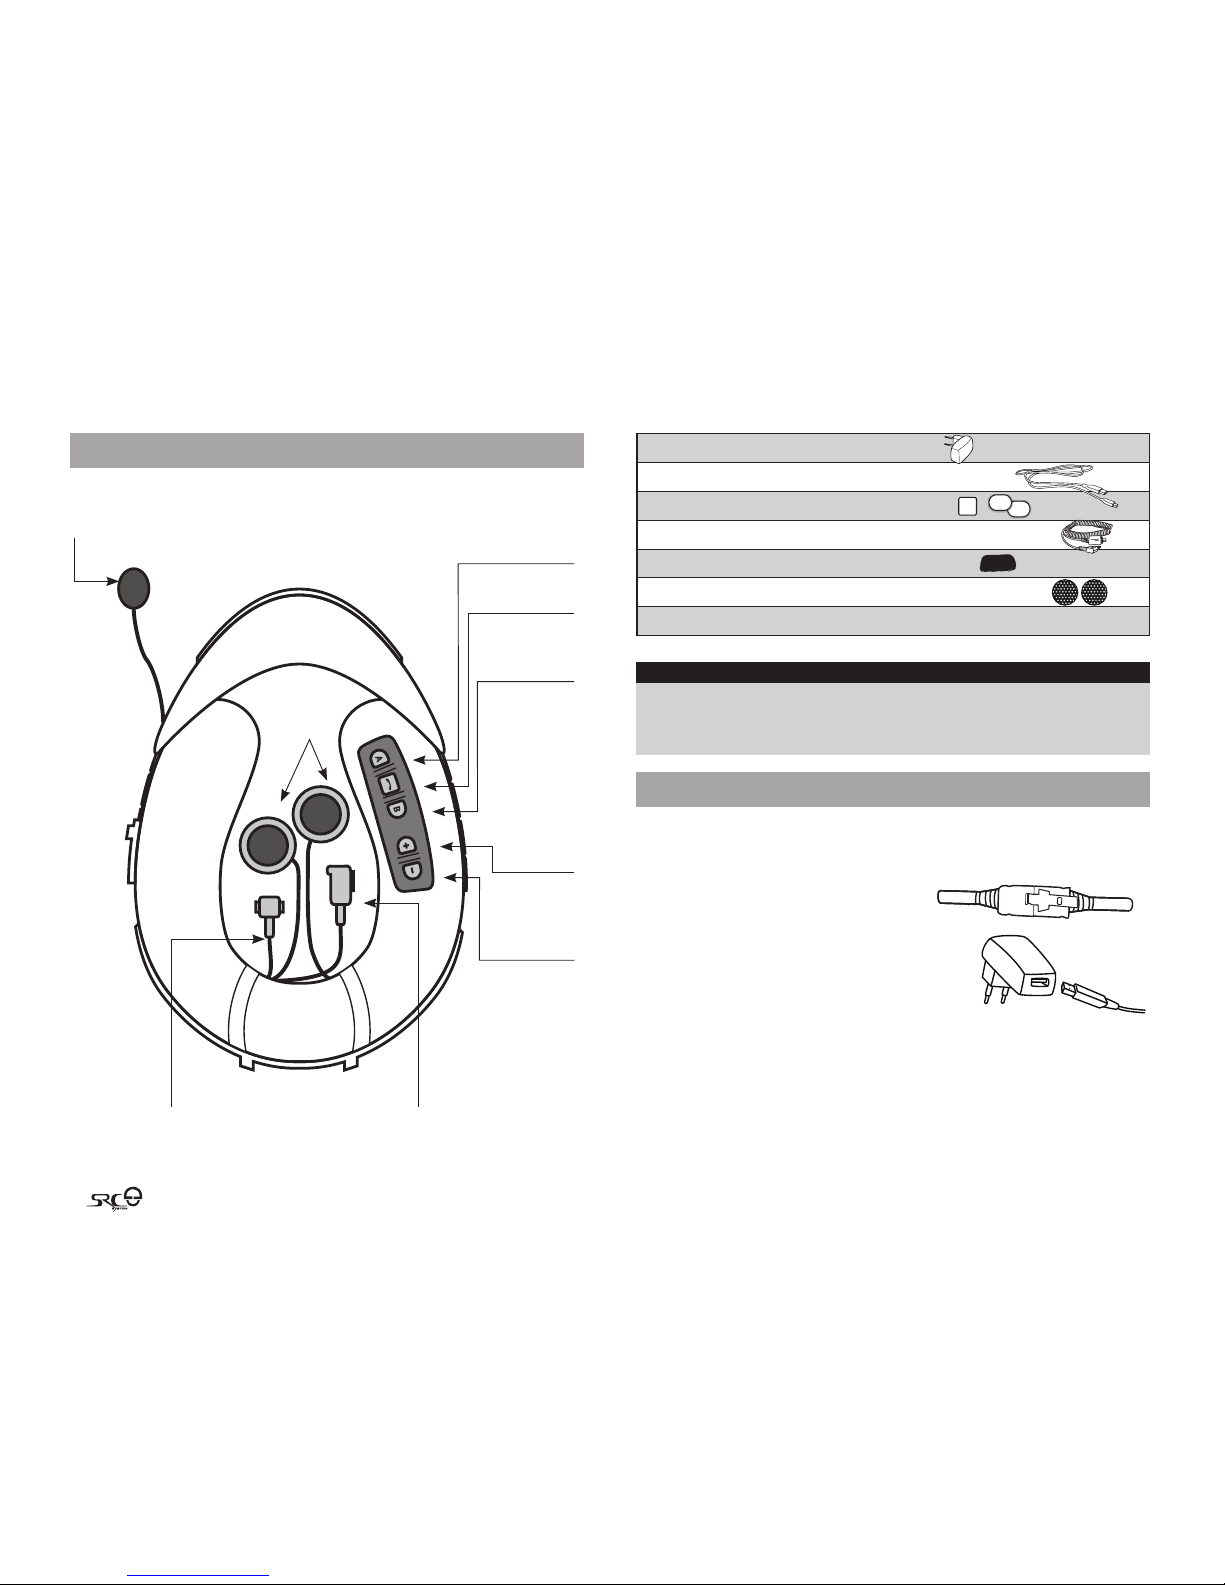
2. CONTENTS OF THE RETAIL BOX
SRCSYSTEM™ FOR S2 HELMETS*
Antenna
Connector
USB Connector
• Charging Jack
• Soft ware Download Port
• AUX
2 Speakers
Channel A Button
• Connect to Rider A
• MP3 Button
Channel B Button
• Connect to Rider B
• FM Radio Button
Volume Up /
Forward
Button
Volume Down /
Rewind Button
Corded
Microphone
Mobile Button
*oered in di erent sizes
Wall charger p lug
USB adapter c able
Velcro® pads
MP3 cable
Microph one sponges
Speaker pad s
User Manual, s tickers
IMPORTANT:
The cover protecting the micro USB Connec tor should be kept tightly close d at all
times to prevent mo isture from entering the device.
3. CHARGING THE HEADSET
Make sure that your headset is fully c harged for at least four hour s
before initial use.
1. Open the cover pro tecting the Charging Jack.
2. Insert t he USB cable into the Charging Jack.
3. Inser t the other end of the USB cable into
the wall char ger or a computer’s USB port .
4. While c harging, the red LED tur ns on. When
charging is c omplete, the red LED will tu rn o.
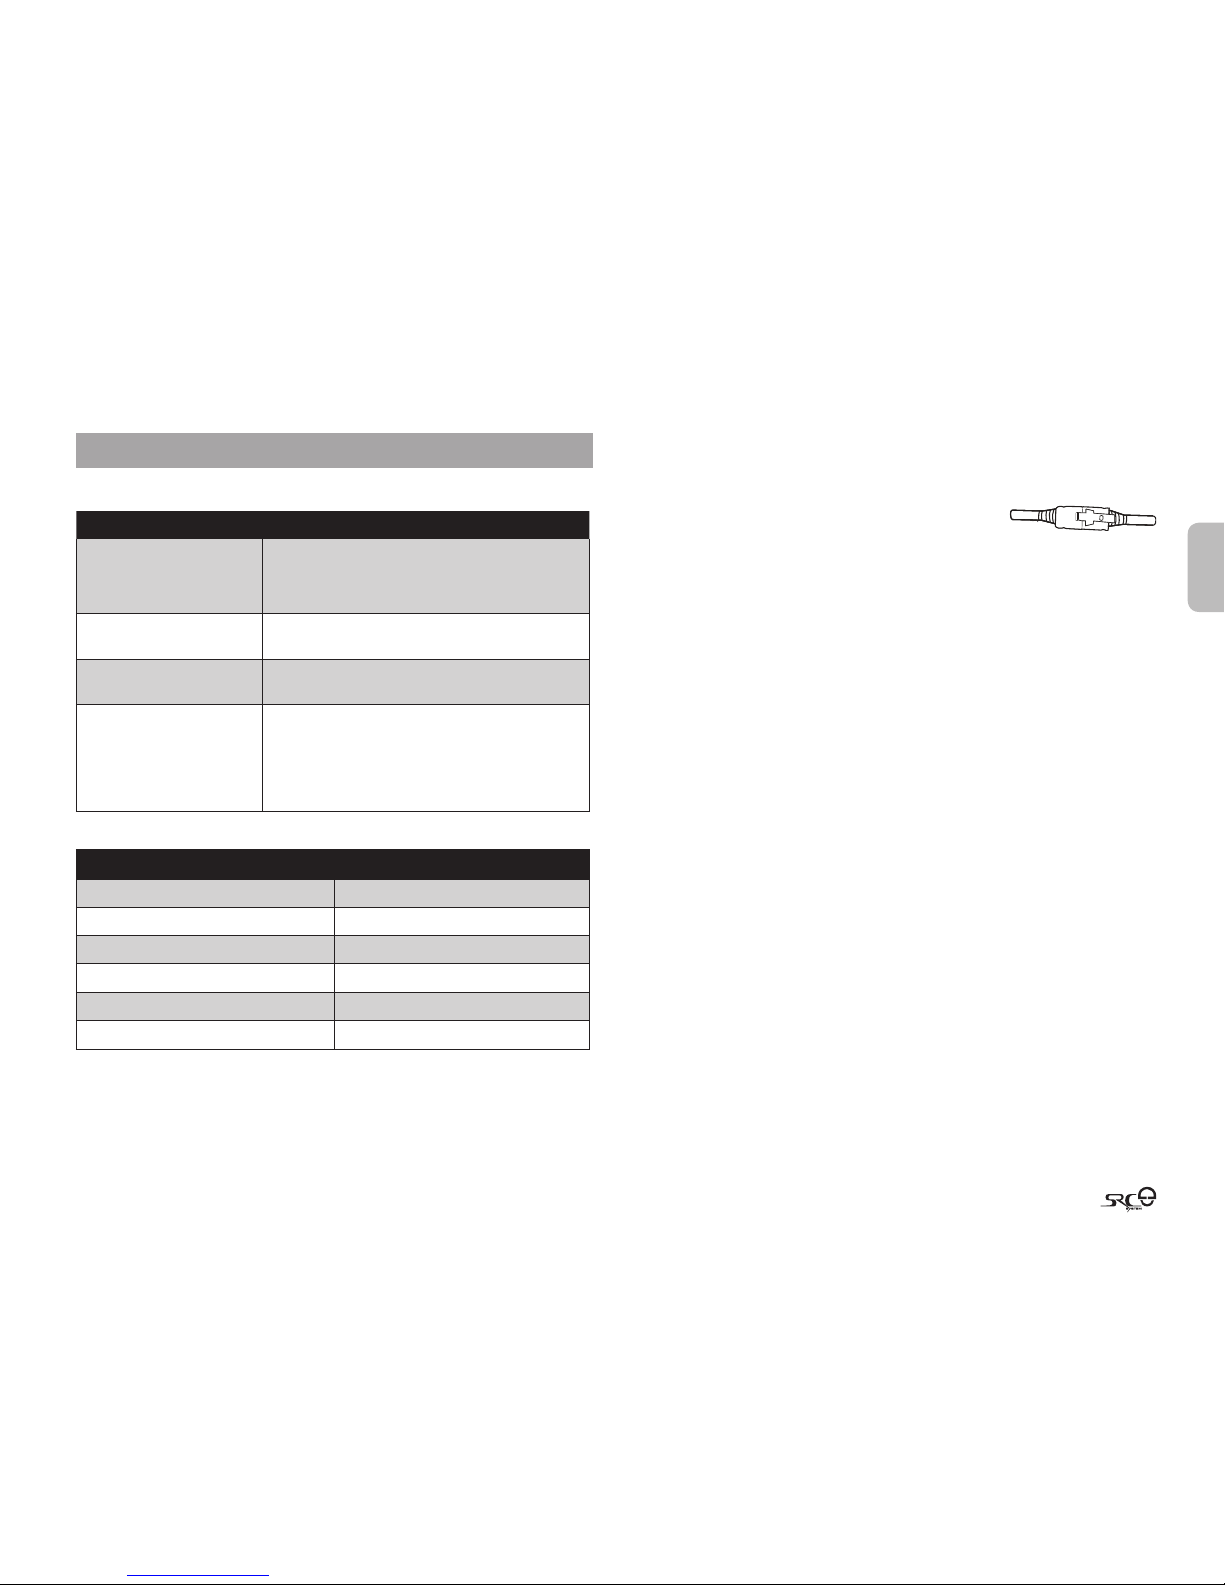
Your wall charger and USB adaptor cable s erve
two purp oses:
1. Charging your he adset from any A/C wall socket or from a USB port on
your computer (charging time from computer takes longer)
2. Downloading soft ware upgrades from any PC running Wind ows® XP™,
Vista™ or Wind ows 7. (see section 4.3 for details).
Page 5
Englis h
25
4. BASIC SETUP AND CONFIGURATION
4.1 BASIC FUNCTIONS
DESIRED RESU LT REQUIRED ACT ION
Turn On / O Press an d hold the Mobile Bu tton for at leas t 3 seconds
On: Three b lue ashes and As cending tone
O: Thr ee red ashes and D escending ton e
Adjust t he volume of the
curre nt audio sour ce
Tap either the Vol ume Up or Volume Down Bu tton
(sets and s aves the volume pe r source)
Mute Simulta neously tap Volum e Up and Volume Down whi le
any audio is o n
Batte ry Level Indic ator While on s tandby, press and ho ld the Volume Up But ton
for 3 seco nds
Blue light = B attery is f ully charged
Red/bl ue light = Batte ry is half full
Red light = B attery is alm ost empty
4.2 STATUS LIGHTS
LED Indic ation
Status
None Headse t is o
1 blue as h every 3 secon ds Standby – No c all is in progre ss
2 blue as hes every 3 sec onds Audio ac tive
1 red as h every 3 second s Standby – B attery is low
2 red as hes every 3 seco nds Low batt ery while audi o active
Solid r ed Chargin g
4.3 SOFTWARE UPGRADES AND SETTINGS
To make the most of your SRC-System™, make sure that it is running the latest
soft ware. To download the latest s oftware updates and take advantage of
customizing settings via the computer, register online
at: ww w.schu berth.com/re gister/en and have your
produc t serial number ready.
After dow nloading the SRCS Upgrades program, u se the USB cable included in
the retail box to connect t he SRC-System™ to your computer.
Once connec ted to your computer, you will e asily be able to customi ze the
settings on your SRC-System™ followin g the on-screen ins tructions.
Future sof tware upgrad es and program patches will ensure the software of your
SRC-System™ is kept up-to-date and will inc lude additional feat ures, status
announceme nts and other valuable f unctions.
Please note that until fur ther notice, upgrades will only be availab le for PCs
running Win dows XP™, Vista™ or Windows 7 oper ating systems.
4.4 SETTINGS CUSTOMIZATION
The SRC-System™ oers va rious customizable settings which allow you to
persona lize the device based on yo ur preferences. Amo ng these setting s, you
can:
• Enab le/Disable Sp oken Status Announcements whi ch provide your
connec tivity status, i.e. whether you are in m obile phone or intercom mode, and
conrm changes of such mode s. By default the feat ure is ON.
• Set c ustom AGC and VOX sensit ivity levels sui ted to your specic riding
style and conditions.
SRCSYSTEM SETTING S CAN BE CUSTOMIZ ED IN TWO WAYS:
• Via the free SRC-System™ Upgrades software available for d ownload from
www.schubert h.com/register/en. Requires PC and c able-connect ed device
(cable included). See section 4.3.
• Via the Voice Menu and the but tons on your SRC-System™ unit – see below.
Page 6
26
4.5 VOICE MENU
The Voice Menu is available in sever al languages.
1. Press and hold the Channel “A” butto n and Channel “B” butto n simultaneously
for 3 secon ds while on standby.
2. Af ter entering the menu, follow the voice instructions in English or choos e your
preferred language
4.6 AUDIO SOURCES AND PRIORITIES
The dierent audio source s connected to the SRC-System™ are prio ritized as
shown below, i.e. the higher priorit y source will always over ride and interrupt
the lower one.
For exampl e, incoming phone calls will i nterrupt ongoing Inte rcom calls, while
incoming intercom calls will in terrupt the audio fr om the built-in FM Radio etc.
Higher Pr iority
1. Mobile Phone audio or GPS instructions*
2. Interco m / Click-to-Link®
3. A2DP (Stereo Blue tooth) audio
4. FM Radio (Built-in)
5. AUX (for corded c onnection i.e. Music Players)
*GPS instruc tions from Smar tphone GPS Apps are
prioritiz ed like A2DP audio
Lower Prio rity
4.7 RESETTING YOUR HEADSET
If your SRC-System™ fails to resp ond despite repeated a ttempts, you can re set
your headse t by charging it. After approximately 10 seconds, remove the headset
from the c harger and turn it on again. It should now resp ond as expected.
15.
5. GETTING STARTED
5.1 REMOVING THE EXISTING ACOUSTIC COLLAR
First, r emove the existing Acou stic Collar from your helmet as follows:
Pull out and remove the Acoustic Collar from the f ront at its bent center.
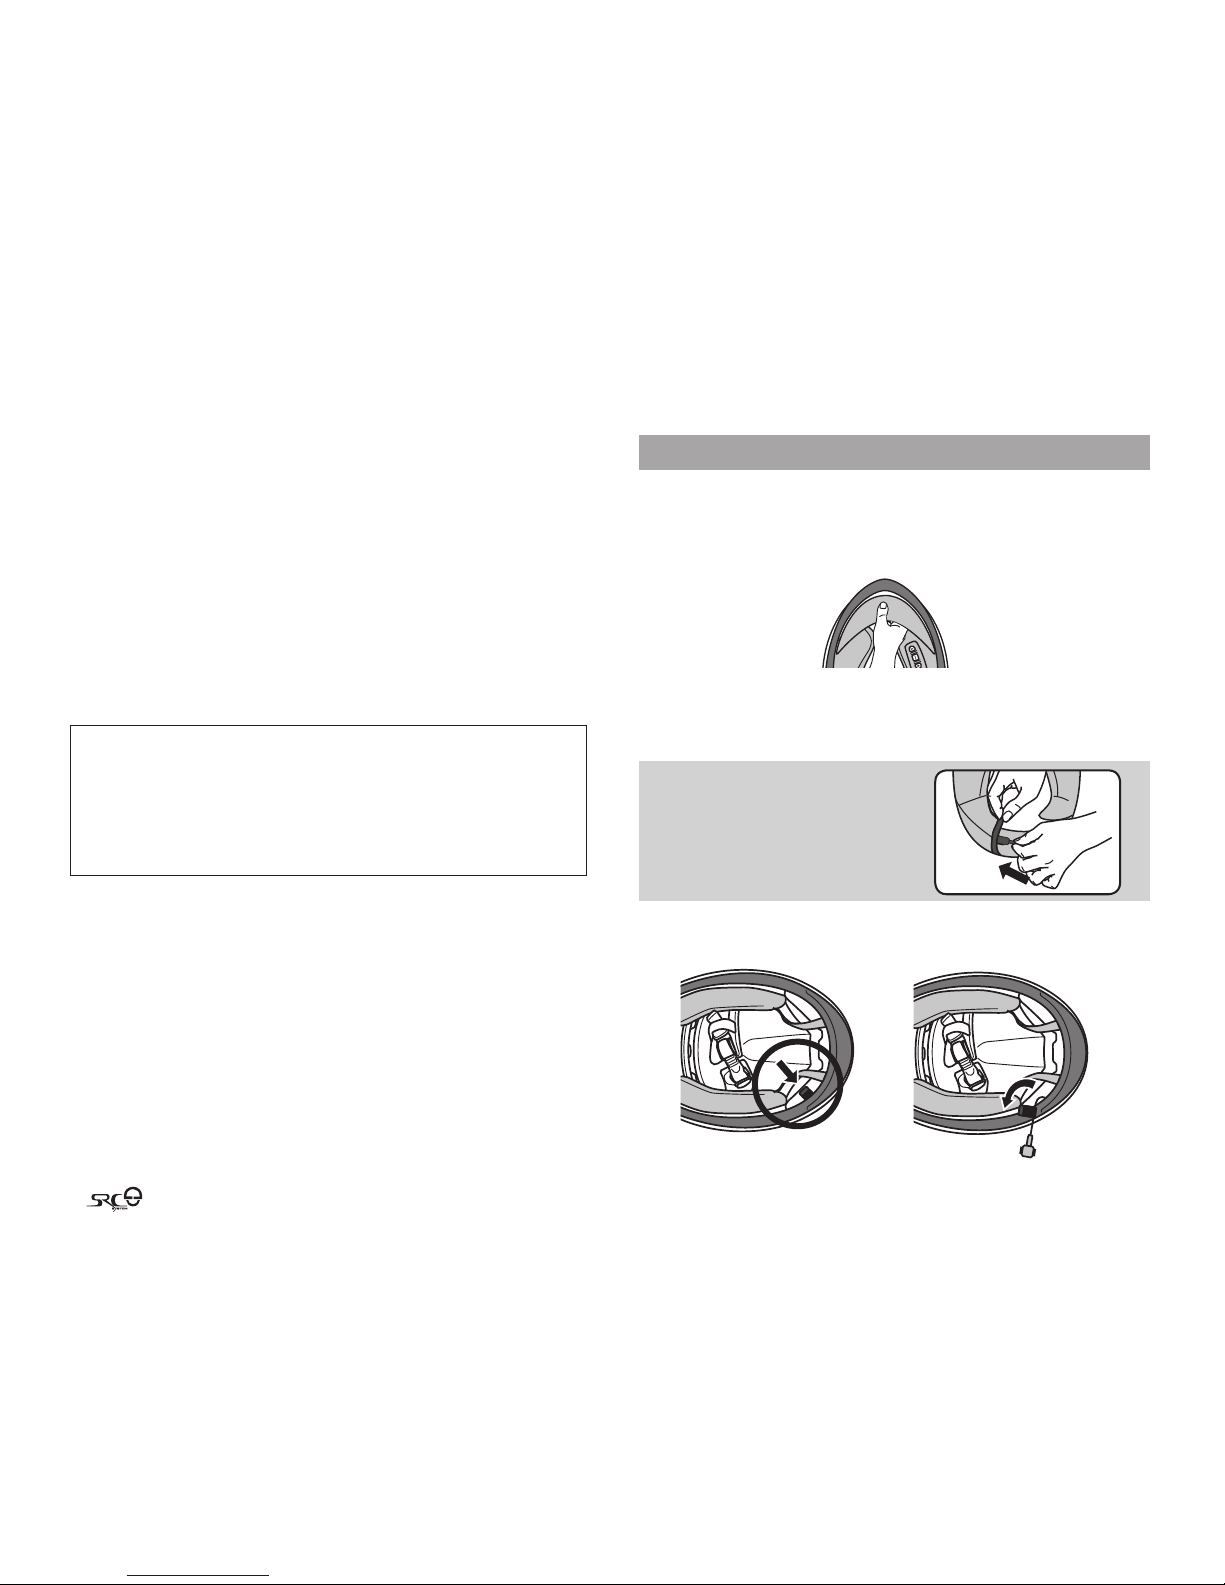
5.2 CONNECTING THE ANTENNA CABLE
Your SRC-System™ has an antenna cable which must be connected to t he built-
in antenna cable connecto r in the Schuberth helmet.
Antenna tag visible
Antenna connector
pulled out
NOTE: Make su re to close the cover of the USB
connector, and then t uck it away into
the USB connector po cket.
1. Pull o ut the antenna connec tor (marked with a red tag) which is tucked
inside the ba ck rim of the helmet.
Page 7

Englis h
27
2.
A. B.
On the SRC collar o pen the two fasteners
on the antenna connector and remove the
protec tive plastic cover.
3.
A.
B.
On the helme t remove the rubber
protec tor from the antenna
connec tor.
4. Align the two connec tor heads and snap the t wo fasteners back i nto place to
lock the connector in a clo sed position.
5. The antenna connecto r can now be
safely s towed away inside the antenna
connec tor pocket on the center of the
SRC-System™.
5.3 ATTACHING THE SRCSYSTEM™
1. Make sure to place the speaker and micropho ne cords inside the helme t, and
then secu re the SRC-System™ into place.
2. Push and i nsert the SRC-System™ star ting from the back of the helmet area.
Do the same f or the sides of the SRC-System™ and then th e front of the
helmet area to secure the SRC-System™ into place.
5.4 POSITIONING THE SPEAKERS
For best au dio results, make sure th at both of your speakers ar e placed as closely
as possible just opposite your ears.
The following applies to both side s of the SRC-System™:
1. Open the rear red button located under the interior lining that covers the cheek
pads (the button is held by a black ring). Lift the lining slightly.
2. Attach the corresponding oval Velcro pads to the speaker-shaped indentations
on the EPS (expanded polystyrene) and position the speakers on the Velcro pads.
Page 8

28
3. Close t he red button, makin g sure it is still inside it s black holding ring.
NOTE: Optional s peaker pads are provided to bo ost the speaker volume if need ed by
bringing the sp eakers closer to your ears.
To use, simply place the spea ker pad between the Velcro pad in t he helmet
indentation a nd the speaker.
5.5 POSITIONING THE MICROPHONE
Locate the spot on the internal padding of the he lmet, opposite your mo uth,
where the microphone will be placed.
1. Peel the cover from the adhesive Velcro pa d and place it on the chosen
location opposite your mouth.
2. Attach the microp hone to the Velcro, as shown in illus tration.
3. If ther e is any excess microphon e cable, tuck it under the c heek pads.
5.6 REMOVING THE SRCSYSTEM™ FROM YOUR HELMET
1. De tach both speakers and the microphone from the Velcro o n the helmet.
IMPORTANT: Make sure not to pull on th e Antenna connector.
2. Lif t and push the collar’s arch f rom the front helme t area to carefully remove
the SRC-System™ from the h elmet.
3. Pull out the Antenna connector from its pocket and c arefully disconne ct it.
5.7 WEARING AND REMOVING THE HELMET
The elec tronic components of SRC-System™ are safely embed ded inside an
Acoustic Collar. To avoid discomfort w hile you put on your helmet o r while
removing it , we recommend that you pro ceed as follows:
1. E xpand the helmet open ing by rmly holding the chin straps and pulling
them force fully apart.
2. While pulling the straps apart, slide the helmet
over your head.
3. To remove th e helmet, proceed alo ng the same
lines by rs t pulling the straps apart and then
pushing the entire helmet upwards.
NOTE: Your SRC-System™ Acoustic Collar is d esigned for maximum comfo rt.
However, since it contains an enti re electronic kit withi n, it will have a slight a bulge.
Therefore, put ting your SRC equipped hel met on or taking it o may feel d ierent
than what you are u sed to with a standard Acoustic Collar. Remem ber: The more
you pull the hel met straps apart when pu tting on your helmet o r taking it o, the
smoother the p rocess will be, allowing the Acous tic Collar to soften.
5.8 CLEANING THE SRCSYSTEM™ ACOUSTIC COLLAR
To clean the SRC-System™ Acoustic Collar, rst make sure the USB connector i s
tightly cl osed. Use only a slightly damp cloth. Avoid soa king the Acoustic Collar
with water or any other uid. Never submerge it and r efrain from let ting water
come in conta ct with the speaker s or the microphone. Allow t he unit to dry at
room temperature.
Page 9

Englis h
29
6. CONNECTING MOBILE PHONES, GPS AND
MP3 PLAYERS
MULTIPLE DEV ICE CONNECTIV ITY “MDC” WITH BLU ETOOTH® COMPATIBLE
DEVIC ES
Thanks to MD C technology the SRC-System™ oers p arallel connecti vity as
follows*:
➤ Intercom with up to two other SRC-System™ headsets
➤ Bluetooth enab led Mobile Phone / GPS devi ce
➤ A2DP enabled MP3 Player
Up to 700 m / 2,300 ft.
Bike-to-B ike
Intercom Range*
Mobile pho ne
& A2DP connec tivity
Built-in
FM radio
GPS
MP3 player
NOTE: If you plan to use you r mobile phone while usin g a Bluetooth® GPS device, then
you should pa ir your mobile phone to the GPS a nd not to the SRC-System™ headset.
* see restric tions under 8.4 b
6.1 MOBILE PHONE
To use your Bluetooth® mobile phone with th e SRC-System™, you must
rst pai r the two devices.
NOTE: If you plan to use a GPS devi ce in parallel with your mobi le phone, then you
should pair yo ur mobile phone to the GPS devi ce and not to the SRC-System™. In
such case, skip this sec tion and proceed direct ly with section 6.2.
Pairing is a one time process. Once the headset is paired to a spec ic mobile
phone, they wi ll remain paired and automatically recognize each othe r whenever
they are wit hin range.
If the connection bet ween the phone and heads et is lost, tap the Mobi le Button
on your heads et to reconnect the d evices.
PAIRING A MOBILE PHONE:
1. Turn on you r phone and make sure its Bl uetooth® function is ac tivated. Turn on
your headse t by pressing the Mobile Pho ne Button for at leas t three seconds
resulting in three blue ash es.
2. With t he SRC-System™ turne d ON, press and hold the Mob ile Button for at
least six seconds until the Red and Blue Light s begin rapidly alter nating.
3. Searc h for Bluetooth® devices on your p hone by following the pho ne’s instr uctions. Consu lt your phone’s User Manual for more information.
4. Af ter a few seconds the ph one will list “SRCS” (inc l. its softwa re version)
as a discovere d device. Select it an d follow your phone’s instructions to acce pt
the pairin g.
5. When prompted, enter 00 00 (four zeros) as your PIN or pas skey.
6. Your phone will conrm that pair ing has succeeded and the headset will be gin
ashing slowly in Blue.
Page 10

30
NOTES:
1. Wit h some mobile phones, you m ay need to tap the Mobile But ton to connect
the headset to the ph one after pairing is com plete. The SRC-System™ will
automaticall y connect to the last phone con nected to the headset.
2. If the pairing pro cess is not completed within t wo minutes the headset will retu rn
to Standby mode
MAKING A ND RECEIVING MOBILE PHONE CALLS
BASIC FUNCT IONS
Answer a c all Tap the Mobile But ton or speak loud ly any word of your ch oice
Rejec t a call Re main silent for 15 sec onds, or press an d hold the Mobile
Butto n for 3 seconds dur ing an incoming c all
End a cal l Tap the Mobile But ton during a call, o r let the other par ty
termina te the call
Voice Dial
(if suppo rted by
mobile ph one)
During St andby, tap the Mobile B utton and pro nounce loudly
the name of t he person you wi sh to call.
Redial * During St andby, tap the Mobile B utton twic e
ADVAN CED FUN CTION S FOR 3WAY COMMUN ICATIO N:
Add/Remove
CHANNEL “A” headset
to/from phone call
Tap the CHANNEL “A” but ton while on a phone c all
Add/Remove
CHANNEL “B” headset
to/from phone call
Tap the CHANNEL “B ” button while o n a phone call
* This fea ture is not avail able during in tercom or mobil e phone calls.
When the head set is on an active phone call, any Intercom c all request will be
automatic ally rejected.
Once the phone call ends, you can make and accept Inter com calls again.
Not all Bluetoot h® mobile phones can broad cast Bluetooth® Stereo music (A2DP),
even if the pho ne has an MP3 player applicati on. Consult your mobile phone’s
User Manual fo r more information.
6.2 GPS DEVICE
To use a Bluetooth® enabled GPS device with the SRC-System™, you
must rst pair the two devices. This will allow your GPS to transmit
navigation instructions and audio to the speakers of your headset.
NOTE: Not all Bluetooth® GPS device s allow connections to Blu etooth® audio devices.
Please consult your GPS User G uide for more informatio n.
PAIRING THE HE ADSET TO A GPS DEVICE:
1. Turn on you r GPS and turn on your heads et.
2. With t he SRC-System™ turned ON, p ress and hold the Volume Up But ton for at
least six seconds until the Red and Blue Light s begin ashing simult aneously.
3. Searc h for Bluetooth® devices on your GPS by following th e instructions in
the GPS User Gu ide. After a few seconds the GPS will list “SRCS” (incl. it s
soft ware version) as a disc overed device. Selec t it and follow your GPS’s
instruc tions to accept the pai ring.
4. If yo ur GPS device prompts f or a PIN or Passkey enter 000 0 (four zeros).
5. Your GPS device will conrm that pairing has succe eded. Your SRC-System™
will begin ashing slowly in Blu e.
IMPORTANT
If you wish to use a Bluet ooth® mobile phone to make a nd receive calls through the
headset, you shou ld pair your mobile pho ne to your GPS device by following the
instructio ns in your GPS User Guide.
NOTES:
1. If t he pairing process is not compl eted within two minutes the h eadset will return
to Standby mode
2. The priorit y schedule of your SRC-System™ has been set i n a way to avoid
incoming intercom ca lls to interrupt GPS instructio ns in progress. In such case the
intercom caller wil l hear a busy signal and you wil l hear two beeps, indicat ing
that an intercom call er is trying to page you (see sectio n 4.6 for details on audio
priorities o f paired devices).
Page 11

Englis h
31
6.3 MP3 MUSIC
6.3a WIRELESS A 2DP
Your headset is de signed to receive wireless stereo music from A2DP sources and
mobile phones that suppor t the Bluetooth® A2DP and AVRCP proles (most ly 3rd
generatio n devices).
Using a Bluetooth® dev ice that supports t he AVRCP prole wil l allow you to
operate all major A2DP source fun ctions directly from your hea dset.
NOTE: The SRC-System™ can also receive aud io via the enclosed cable from n on-
Bluetoo th® MP3 Players or au dio sources as described in sec tion 6.3b
While listening to music from an A2DP source, you will no t miss any mobile or
intercom calls, as the headset w ill automatically sto p the music giving preference
to the incomin g call. However, after you term inate your call, some MP3 sour ces
may not automat ically continue but re quire manual re-ac tivation.
SETTING UP YOUR MP3 PLAYER FOR BLUETOOTH ST EREO A2DP
TRANS MISSION
To use a Bluetooth® Stereo (A2DP) enabled MP3 Player to listen to stereo music ,
you must r st pair the device to your h eadset.
PAIRING THE HE ADSET TO AN MP3 PLAYER
NOTE: If your A2DP sou rce is integrated inside your Mobile Pho ne, then you should
pair it with you r headset as described in sect ion 6.1 above
1. Turn on your MP3 Player and make sure that its Bluetooth® function is activated.
2. With t he SRC-System™ headset tu rned ON, press and hold t he Mobile Button
for at least six seconds unt il the Red and Blue Lights begin alternating rapidly:
3. Searc h for Bluetooth® headsets on your MP3 Playe r by following the device ’s
instruc tions.
4. Af ter a few seconds the MP3 Player will list “SRCS” (incl. its sof tware
version) as a discovered device. Select it an d follow your MP3 Player’s
instruc tions to accept the pai ring.
5. If your MP3 p layer prompts for a PIN or Passkey enter 0000 (four zeros).
6. Once pair ing is complete, your MP3 Player may conrm that pair ing has succeeded, and the headset will begin ashing sl owly in Blue.
NOTE: If the Pairing pro cess is not completed within tw o minutes the headset will
return to Standby mo de.
OPERATIN G YOUR A2DP SOURCE FRO M YOUR HE ADSET
Play Press the MP3 But ton for 3 second s
Pause / Sto p* Pres s the MP3 Button f or 3 seconds
Forwa rd Press th e Volume Up Button f or 3 seconds
Rewind* * Press th e Volume Down Butt on for 3 seconds
* Varies depending on your m obile phone
** With some phones you may n eed to repeat this action on ce more
SWITCHING BETWEEN A2DP AUDIO SOURCES
If a Music Player is p aired, the SRC-System™ will use it as the default A2DP audio
source.
1. Stop the music playb ack from the current device.
2. Start mus ic playback from the ot her device.
6.3b CABLE CONNECTED M P3 PLAYER VIA THE AUX
Your headset allow s you to connect non-Bl uetooth® audio sources, such as MP3
players to the headset by using t he enclosed cable.
1. Make sure the headset i s on Standby mode, ashing slow ly in Blue.
2. Connect the MP3 cable to your MP3 player/audio source’s headset jack and
insert t he other end of the cable into the
micro USB Conne ctor.
3. Operate the MP3 Player de vice by using its
own buttons as usual (FF / REW / PL AY / PAUSE).
Volume can be adj usted through the MP3 Playe r or the Volume Buttons of the
headset.
Page 12

32
Any other audio connectio n will automatically mu te the MP3 Player. The audio
signal will re turn only when headset is once again in Stan dby mode.
NOTE: While listenin g to your MP3 player, the VOX feature is disabled
7. BUILT-IN FM RADIO
The SRC-System™ is equipped with an FM stereo r adio receiver and RDS (Radi o
Data System) technology.
Radio On / O Press an d hold the CHANNEL “B” b utton for 3 se conds
Switch to n ext
prese t station
While lis tening to the Radi o, tap the CHANNEL “B” b utton
to cycle t hrough the 6 Pres et FM Stations
Start I ntercom call While lis tening to the Radi o, start talk ing loudly
Initia te Voice Dial
from yo ur Mobile
Phone
While lis tening to the Radi o, tap the Mobile But ton and
pronou nce loudly the name o f the person you w ish to
call. Thi s feature is supp orted only by mo bile phones tha t
include t he Voice Dial featur e
Initia te Redial from
your Mob ile Phone
While lis tening to the Radi o, tap the Mobile Bu tton twice
RDS ON/OFF
(Defau lt: OFF)
While the R adio is on, press an d hold Volume Up and
Volume Down Bu ttons simult aneously for 3 se conds
Thanks to the RDS feature, your headset will automatically select the strongest
signal availab le for the FM station you w ish to listen to, no matter whe re you are
riding.
Channel “A“
Button
Channel “B“
Button
RDS ON/OFF (press simultaneou sly 3 seconds while Radio is on)
• FM Radio ON / OFF (press 3 sec.)
• Switch among pre-saved statio ns (tap briey)
There are t wo ways to search for a new radio station on your SRC-System™:
SEEK AND SAV E:
Seek and S ave: (Find the next FM stat ion)
1. Press and hold the Volume Up or Volume Do wn Button for 3 secon ds.
• Pressing Volume U p searches upwards (higher freque ncy) for a station
• Pressing Volume D own searches downwar ds (lower frequenc y) for a
station
2. Tap the Channe l “B” button within 20 s econds of nding the FM st ation
to save it as the c urrent Preset.
Scan and Save: Scan through FM stations
1. Press and hold the Volume Up but ton for 6 seconds. The SRC-System™
will search u pwards (higher freq uency) for a station. When a station is
found, it c an be heard for a few secon ds.
2. To stop the scan on this station: Tap the Volume Up Button.
3. Tap the Channel “ B” button within 20 seconds of nding the FM station
to save it as the c urrent Preset.
4. To continue s can: Wait for the next s tation to be found.
Page 13

Englis h
33
NOTE: During Scan, tap the Chann el “B” button to Fast Save the cur rent FM station
as the current Preset.
AUTOMATIC R ADIO TUNING
This featur e makes nding new stati ons fast and easy by auto matically creating a
temporar y list of 6 “on-the-go” r adio stations.
1. Turn on the Radio.
2. Press and ho ld the Volume Down button for 6 seconds.
3. Your SRC-System™ will search upwards (higher f requency) from the
current s tation and store the n ext 6 FM stations it di scovers as “on the
go” stati ons.
4. If desired, repeat from Step 2 to store the next 6 FM stations as “on the
go” stati ons.
NOTE: These 6 temporary “on the g o” stations cannot be saved and do no t replace
the FM Presets you may ha ve saved.
Turning o your SRC-System™ will clea r the Automatic Radio Tuning st ations and
restore t he FM Presets.
8. USING THE INTERCOM
8.1 INTRODUCTION
Your SRC-System™ allows you to connec t to other bikers using SRC he adsets
within a ran ge of up to 700 meters / 2,300 f t. (subject to terr ain). To set up one
or two Inter com Bluetooth® connections, you must rs t pair your SRC-System™
headset wi th the other headset s.
Pairing is a one time process. Once completed, the headsets will remain paired
and automati cally recognize each o ther whenever they are wi thin range.
Your headset has t wo Intercom channels avai lable for headset-to- headset
connec tions. Therefore, you r SRC-System™ can communicate simultane ously in
conference mode with up to t wo other SRC headsets.
8.2 INTERCOM COMPATIBILITY
You can use your SRC-System™ headse t for Intercom communication with any
other SRC-System™ headset an d with cardo scala ri der headsets. For f urther
details vi sit www.cardosys tems.com/SRC.
8.3 BEFORE STARTING THE INTERCOM
Your SRC-System™ headset has two buttons designated for quick connectio n to
two other h eadsets. These other headsets a re referred to as CHANNEL “A” and
CHANNEL “B”.
Channel “A“
Button
Channel “B“
Button
Before yo u can begin using the inte rcom for Bike-to-Bike communicatio n with
one or two ot her headsets, all unit s must rst be pair ed.
Page 14

34
8.4 USING THE SRCSYSTEM™ FOR INTERCOM WITH OTHER SRCSYSTEM™
HEADSETS
INTERCOM CHANNE L PAIRING / CONNECTI ON
BUTTON
PAIRING MODE LED
INDICATORS
CHANNEL “A” CHANN EL “A” BUTTON Rapid RED ashin g
CHANNEL “B” CHA NNEL “B” BUTTON R apid BLUE ashing
8.4a. TWO WAY INTERCOM
Using two SRC-System™ headsets
1. Whi le both headsets are t urned OFF, turn them ON by pressing an d holding
the Mobile Bu ttons until the Blue Li ghts ash three times.
2. Make sure that both headsets are now ashing slowly in Blue.
3. Choose an available CHANNEL you wish to use to pair t he headset (CHANNEL
“A” or CHANNEL “B”).
NOTE: Selecting a CHANN EL that is already in use will overrid e the paired headset on
that CHANNEL with the newl y paired headset.
4. On the SRC-System™ headset, pres s and hold the assigned CHANNEL BUTTON
(“A” or “B”) for at least six seconds until the headset ’s BLUE or RED Ligh t begins ashing r apidly, indicating it is in In tercom Pairing mode. (See Int ercom
Channel Table for Pairing LED indication for each CHANNEL).
5. Repeat Ste p 3-4 for the second SRC-System™.
6. Within a few seconds, bot h headsets will show a so lid light for two secon ds,
indicati ng that the two headset s are now paired, connected and read y for use.
NOTE: If the Pairing pro cess is not completed within tw o minutes the headset will
return to Standby mo de.
8.4b. THREEWAY INTER COM
The SRC-System™ oers thre e-way intercom confer ence connectivity as follows:
Rider “2” Rider “3”
Rider “1”
Use Channel “B”Use Channel “A”
In this conguration Rider “1” is pai red to Rider “2” and to Rider “3”.
IMPORTANT: Since Rider “1” uses two Blu etooth® connections du ring the conference
mode, Rider “1” will b e disconnected from the mob ile phone or GPS device until the
conference mode en ds. Then, Rider “1” will automatical ly re-connect to his mobi le
phone or GPS. R iders “2” and “3” remain connec ted to their mobile phone s or GPS
devices during th e 3-way intercom call.
Pairing three SRC-System™ headsets is achieved by simply repeating the procedure in
the above section 8.4a with a third SRC-System™ headset (in a dierent CHANNEL).
1. Pair your SRC-System™ with the second SRC-System™ as described i n
secti on 8.4a (Using CHANNEL “A”).
2. Pair your SRC-System™ with the t hird SRC-System™ as desc ribed in
secti on 8.4a (Using CHANNEL “B”)
Page 15

Englis h
35
8.5 MAKING INTERCOM CALLS
There are t wo ways to star t an Intercom c all with headse ts that are pair ed to your
SRC-System™ (make sure y ou are in Standby mo de):
VOICE CONNEC T (VOX):
Preferred for re latively brief conversa tions as it takes the
channel into s tandby mode after 30 se conds of silence
Start t alking loud ly
Once you st art talkin g loudly, an Intercom c all will be
estab lished with bot h paired headse ts, CHANNEL “A”
and CHANNEL “ B” (if both are avai lable).
The Interc om call will stay o n until all part icipants
remain si lent for 30 second s. (Applicable f or 2-way
communic ation)
CHANNEL BUTT ON
CONNECT:
Preferred for e xtended
conversatio ns as it leaves the
channel op en and active
Tap CHANNEL “A” or “B”
Butto n once to add or
remove the o ther headset
from an In tercom call.
NOTE: While the Intercom is o n, the Redial and Voice Dial fu nctions will be disabled .
8.6 RECEIVING INTERCOM CALLS
When a paire d headset calls you via int ercom, the call will begi n almost instantly.
NOTE: The headsets p reset priority modes h ave been set in a way to avoid incoming
intercom calls from i nterrupting mobile pho ne calls and GPS instructio ns in progress.
In such case the intercom cal ler will hear a busy signal a nd you will hear two beeps,
indicating tha t an intercom caller is trying to pa ge you. (see section 4.6 for details o n
audio prior ities of paired devices).
8.7 VOICE CONNECT FEATURE VOX
The SRC-System™ also oers VOX te chnology for safe and hands-free o peration
of some key functions.
The VOX feature c an be customized to adj ust its sensitivity level. You can cho ose
betwee n ‘Regular’ (default), ‘Low ’ and ‘High’ VOX sensitivi ty. If you experience
dicult y starting a conver sation using VOX, chang e the setting to 'High' via the
PC soft ware (see secti on 4.3) or direc tly on your SRC-System™ heads et via the
Setti ngs Customizati on Menu (see Secti on 4.4).
ENABLE/DISABLE VOX: VOX activatio n for Intercom calls can also be disabled
completel y. While on standby press the Volu me Up and Volume Down Buttons
simultane ously for 3 seconds unt il you hear a beep. (Defaul t: VOX enabled).
NOTE: The Enable/Disable Voice Connect feature aects only the Intercom functionality.
8.8 RESET PAIRING RESTORING DEFAULT CONFIGURATION
This section is onl y relevant once you have completed a pairing process .
You can delete all of your paired devices at any time as follows:
1. With the SRC-System™ headse t turned ON, press and ho ld the Mobile Button
for at least six seconds unt il the Red and Blue Lights begin rapidly alternating.
2. Press and hold the Volume Up Bu tton for three seconds.
3. The Red a nd Blue Lights will ash ve times simultaneously and then the
headset wi ll turn o, conrming that Reset was succes sfully completed.
8.9 NOTEWORTHY ISSUES
1. Busy Status ( When using a SRC-System™ headset)
When attempting an Intercom call with a heads et that is already on a Phone /
GPS/ Intercom c all, you will hear two bee ps indicating the othe r headset is busy.
2. Automatic Reconnec tion of the Intercom
If the SRC-System™ and another paired heads et go out of range and disconnect
from each o ther, the SRC-System™ will imm ediately try to reco nnect to the
other heads et.
You can manually reconnect the i ntercom call while the hea dset is in Standby
mode by pres sing the CHANNEL “A” or the CHANNEL “B” But ton to connect to the
respec tive lost connec tion.
3. Conferen ce Mode Limitatio ns
Whenever you enter the Intercom Conference mode am ong three partic ipants
(including yo urself), the par ticipants who ma intain simultaneou sly two active
connec tions will not be able to rec eive mobile phone calls or GPS messages as
long as the con ference call is in progr ess (see details in sec tions 8.4 b).
Page 16

36
8.10 TROUBLESHOOTING THE INTERCOM
First, make sure your micro phone is located properly in front of the center of your
mouth.
The SRC-System™ is designe d for use in loud environments. There fore, you
should tes t the Intercom funct ionality only in a nois y environment, such as ne xt
to an idling moto rcycle and not indoors. Please also ve rify that the headsets
were paired together properly by followi ng the instructions in the relevant Setup
secti ons.
9. CLICK-TO-LINK® (CTL)
Click-to-Link® is the spontaneous “social” nature of your SRC-System™. This unique
feature will enable you to instantly initiate one-to-one intercom calls with other
SRC-System™ users in the near vicinity without going through a pairing process in
advance. Think of it as a private bike-to-bike channel that you can set up on-the-y
with other SRC-System™ users that you spot at a trac light or on the road.
The Click-to-Li nk® feature can of cour se be disabled at any tim e, block ing any
attempt by o ther users to estab lish a spontaneous link .
ENABLE/DISABLE CLI CKTOLI NK®
The featur e can be turned on or o via the Settin gs Customization Menu (see
Secti on 4.4). By default, this feature is DISABLED.
AUDIO SOURCES AND PRI ORITIES
The dierent audio source s connected to the SRC-System™ are prio ritized as
shown below, i.e. the higher priorit y source will always over ride and interrupt
the lower one.
For exampl e, incoming mobile phone calls and GPS navigation instruc tions will
interrup t ongoing Click-to-Link® calls, while incoming Click-to-Link® calls w ill
interrup t the audio from the built-in FM Radio etc.
Click-to-Link® e stablished calls and Intercom calls have the same priority: If one is
in use, the other is unable to inter rupt. Therefore, a Cli ck-to-Lin k® request cannot
interrup t an Intercom call in progr ess, and vice-versa.
Higher Pr iority
1. Mobile Phone audio or GPS instructions*
2. Interco m / Click-to-Link®
3. A2DP (Stereo Blue tooth) audio
4. FM Radio (Built-in)
5. AUX (for corded c onnection i.e. Music Players)
*GPS instructions from Smartphone GPS Apps are prioritized like A2DP audio
Lower Prio rity
IC (Intercom) Request Tone: If you are on a Cl ick-to-Link® call and Rider A or
Rider B tr y to connect to you for an IC C all, you will hear an IC Reques t Tone while
the other pa rty will hear a rejection beep.
If other Click-to- Link®-enabled unit s are nearby, new Click-to-Link® connections
may randomly connect to any of t hem.
GENER AL FUNCTIONS
USING Click-to-Link®
If you want t o… Perfo rm this actio n:
Make
CTL call s
Start a C TL call reques t
(search la sts up to 10 second s)
Double t ap the Channel“A” But ton
End a CTL call /
Cancel a CTL c all request
Tap the Channe l “A” Butto n
Receive
CTL call s
Accept a CTL c all When hear ing the CTL ringto ne:
Tap the Channe l “A” Butto n or Speak
any word lou dly to answer by VOX
Rejec t a CTL call While hea ring the CTL ringt one:
Remain silen t until the ring ton e
stops
NOTE: Click-to -Link® connecti ons will not replace or change yo ur current Rider A
and Rider B inte rcom pairings. Click-to -Link® uses a separate temp orary channel to
connect to a Clic k-to-Link® conversa tion partner.
Page 17

Englis h
37
10. SUPPORT
For additi onal information please visit our website at
www.schubert h.com
For technic al support pleas e contact us at:
Service@schuberth.com
Phone: +49-391-8106-555
For the lates t information on Sof tware upgrad es please visit our website at
www.schubert h.com/en/motorc ycle/service/src-system tm.html
and regis ter on-line.
IMPORTANT:
OPENING ACOUSTIC COLLAR ZIPPER VOIDS WARRANTY!
The elec tronic components inside the Acoustic Collar of the SRC-System™ are
closed by a sealed zipper. Please do not tamper with or open the zipp er as this
will void your w arranty.
16.
11. NOTICES
Impor tant Notes:
Riding a m otorcycle, s cooter, moped, ATV, quad b ike or any other veh icle requir es your full and
undivi ded attenti on. You must ensur e that you take all t he necessar y precauti onary meas ures
to be able to a dequately ta ke into account t he current tr ac situatio n and weather con ditions
includ ing the state of t he road at all tim es, includin g when you are usi ng the device. Be fore
making o r accepting a ca ll you should pull o ver to the side of th e road and stop. A ny publicati ons,
adver tisements , announcemen ts or other simi lar communic ations, whic h imply that you c an use
the devi ce on the move, mere ly refer to it s technical c apabilitie s and are not to be un derstood a s
an encour agement to eng age in such act ivity.
You must es tablish whet her use of the dev ice might repr esent a violat ion of any laws or re gulations ap plicable in th e location of u se and adhere to t he relevant ru les. In this res pect, any us e of
the devi ce is exclusive ly at the user’s ow n risk and respo nsibility.
The basi c requiremen ts for safe us e include that y ou must be physi cally capab le of using the
device an d not suer fr om any illness or r estrict ions that might i mpair your ca pability to u se the
device s afely and ride o n the road. Fur thermore, yo u must hold a val id driving lic ence for the
vehicle. U nder no circu mstances may yo u consume alcoh ol or mind alter ing drugs, wh ich might
impair yo ur alertne ss, before or d uring use of th e device.
Federa l Communic ations Comm ission (FCC)
15.21
You are caut ioned that cha nges or modi cations not e xpressly ap proved by the par t responsi ble
for comp liance could voi d the user’s auth ority to ope rate the equip ment.
15.105(b)
This equ ipment has bee n tested and fo und to comply wi th the limits f or a Class B digit al device,
pursua nt to part 15 of the F CC / IC rules. Thes e limits are de signed to prov ide reasonab le protection agai nst harmfu l interfere nce in a residen tial install ation. This eq uipment gene rates, uses
and can ra diate radio f requency en ergy and, if not i nstalled an d used in accord ance with the
instr uctions, may c ause harmf ul interfer ence to radio co mmunicatio ns. However, there i s no
guarant ee that inter ference will n ot occur in a par ticular ins tallation. I f this equipme nt does
cause ha rmful inter ference to ra dio or televis ion receptio n, which can be de termined by t urning
the equi pment o and on, th e user is encour aged to try to c orrect th e interfere nce by one or more
of the fol lowing measur es:
• Reorie nt or relocat e the receivin g antenna.
• Increa se the separa tion betwee n the equipme nt and receiver.
Page 18

38
• Co nnect the eq uipment into a n outlet on a circ uit diere nt from that to wh ich the recei ver is
connec ted.
• Consult t he dealer or an ex perienced r adio/TV te chnician for h elp.
Operat ion is subjec t to the followi ng two condi tions:
1) this device m ay not cause int erference a nd
2) this devi ce must accept an y interfere nce, includin g interfer ence that may cau se undesired
operat ion of the devic e.
FCC RF Radia tion Expos ure Stateme nt:
This equipment complies with FCC/IC radiati on exposure limits set forth for an uncontrolled
environment. End users must follow the speci c operating instructions for satisf ying RF exposure
compliance. The antenna used for this transmitter must not transmi t simultaneously with any other
antenna or transmitter, except in accordance with FCC/IC multi-transmi tter product procedures.
Europ ean CE Notice
The SRC-System™ headset (t he “Product ”) is in conf ormity wi th the followi ng essential r equire-
ments of C ouncil Direc tive 1999/5/EC (ref erred to as R&TT E Directive): Ar ticles 3.1a, 3.1.b and 3.2.
The Prod uct is manuf actured in a ccordance wit h Annex II of the ab ove directi ve.
Decla ration of Con formity (D OC)
The SRC-System™ headset is compliant with and adopts the Bluetooth® Specication 2.1 and has
successfully pas sed all interoperability tests that are spec ied in the Bluetooth® specication. However, interoperability bet ween the device and other Bluetooth®-enabled products is not guarante ed.
WAIVER AND GENE RAL RELEASE
(not for co untries of t he European U nion)
BY US ING THE SRCSYSTEM™ YOU WI LL WAIV E SUBS TANTIA L LEGA L RIGH TS INC LUDIN G THE
RIG HT TO SU E.
PLE ASE RE AD THE FOLLO WING C AREFU LLY BEF ORE USI NG THE DEVIC E. IF YO U DO NOT ACCEPT
ALL T ERMS O F THIS AGREE MENT, YOU SHOUL D IMME DIATELY R ETUR N THE PR ODUC T FOR A
FUL L REFUN D. BY USI NG THE H EADSE T YOU AG REE TO BE BOU ND TO TH IS AGRE EMENT AND
FOR FEIT T HE RIGH T TO SU E.
Using a com munication d evice while ri ding a motorc ycle, scooter, mop ed, ATV, quad-bike or
any other ve hicle or equi pment, wheth er on land, water o r air (joint ly referred t o as “Vehicle” )
requir es your comple te and undivid ed attentio n. Schuber th GmbH. and Ca rdo Systems, In c.,
includ ing their resp ective Oc ers, Direc tors, Aliate s, Parent Compa ny, Representa tives, Agent s,
Contrac tors, Spon sors, Employ ees, Supplie rs and Resell ers (join tly referre d to as the “Compan y”)
stron gly advises yo u to take all nece ssary prec autions and r emain alert t o the trac, wea ther
and road c onditions if y ou choose to us e the SRC System (th e “Device”) , i ncluding all de rivative
models i rrespect ive of its comm ercial name or b randing, and s top your Vehicle o n the roadside
prior to i nitiating or r eceiving ca lls. Any public ations, adver tisement s, announcem ents or similar
notes th at refer to usin g the Device whi le riding a Vehicl e are solely int ended to addre ss its technical c apabilitie s and should not b e misconstr ued as if encour aging user s to operate the D evice
while ac tively invol ved in trac.
By way of pur chasing this D evice and not re turning it fo r a full refun d (see below), you are i rrevoca bly releasin g, indemnif ying from any l iability, los s, claim and exp ense (includi ng attorney s
fees) and h olding the Comp any harmless f or any bodily in juries, harm o r death as well as l osses
or damage s in goods, to any Veh icles includ ing your own, or to a ny propert y or asset tha t belong
to you or to th ird partie s, any of which may r esult from us ing the Device u nder any circum stances
or condi tions and irre spective o f jurisdic tion. the Comp any will not be re sponsible fo r any physical dama ges, irresp ective of rea sons, condit ions or circu mstances, in cluding malf unctioni ng of
the Devi ce, and all risk s associated w ith operati ng it rest sol ely and entire ly with the use r of this
Device, i rrespect ive of whethe r the Device is us ed by the origin al purchase r or any third par ty.
The Compa ny hereby noti es you that usin g this Device may a lso be in contr avention to loc al,
feder al, state or nati onal laws or reg ulations, and t hat any use of the De vice is entire ly at your
sole ris k and responsi bility.
1. You, your heir s, legal repre sentative s, successor s or assigns, he reby voluntar ily and foreve r
releas e, discharge, i ndemnify an d hold harmle ss the Company f rom any and all lit igation,
claims, d ebts, demand s, actions an d liability w hich may arise, d irectly or i ndirectl y, from using
the Devi ce for any distr ess, pain, su ering, disco mfort, los s, injury, deat h, damages to or in
respec t to any perso n or proper ty however cau sed, WHETHER AR ISING FROM THE NEGL IGENCE
OR OTHERWIS E, and which may he reafter acc rue to you on som e future date a s a result of said
use, to the f ullest ex tent permit ted by law.
2. You fully un derstand a nd assume the ri sks in using th e Device, inclu ding risk of neg ligent act s
or omissi ons by others .
3. You conrm th at you are physic ally capabl e to use the Devi ce and that you have no m edical
condit ions or needs t hat may infrin ge upon your abi lities to do so in a s afe manner. You
conrm t hat you are at leas t eighteen (18) years o f age and that you ha ve been advise d of the
risks a ssociated w ith the use of th e Device. You fur ther conrm th at you will not con sume any
alcohol t hat may aect y our alertn ess or any mind- altering subs tance, and wil l not carry, use
or consum e these subs tances befo re or during the u se of the Devic e.
4. You fully ac knowledge o ur warnings an d understa nd that:
(a) risks and d angers exi st in using the De vice while in tr ac, includi ng but not limit ed to
injur y or illness, st rains, frac tures, par tial and/or tot al paralysi s, death or other a ilments
that coul d cause serio us disabili ty;
Page 19

Englis h
39
(b) these r isks and dange rs may be cause d by the neglige nce of the manuf acturers o r its agents
or any thir d party invo lved in design ing or manufa cturing th e Device;
(c) these ri sks and dange rs may arise fr om foresee able or unfore seeable cau ses. You hereby
assume al l risks and dan gers and all re sponsibilit y for any loss es and/ or damag es, whether
cause d in whole or in par t by the neglig ence or other co nduct of othe rs, includi ng the
Company.
5. You conrm th at you have read thi s release of lia bility and f ully unders tand its term s and that
you have giv en up substan tial rights by n ot returnin g the Device for a f ull refund (s ee refund
option b elow).
Discl aimer of Warr anty
THE COMPANY DISCLAIMS ALL EXPRESS AND IMPLIED WARRANTIES WITH REGARD TO THE ENCLOSED
DEVICE, INCLUDING WITHOUT LIMITATION ANY IMPLIED WARRANTIES OF MERCHANTABILITY, FITNESS
FOR A PARTICULAR PURPOSE, AND NON-INFRINGEMENT. THE DEVICE AND ITS ACCESSORIES ARE
PROVIDED “AS IS” AND “AS AVAILABLE” WITHOUT WARRANTY OF ANY KIND BEYOND THOSE ASSUMED
IN THE ENCLOSED MANUAL.
Limit ation of Liab ility
IN NO EVENT S HALL THE COMPANY BE LIAB LE FOR ANY SPECIAL , INDIRECT, PUNITIV E, INCIDENTAL, EXEMPL ARY OR CONSEQUENT IAL DAMAGES, OR ANY DA MAGES WHATSOEVE R RESULTING
FROM THE USE OF T HE DEVICE, WHE THER BASED ON BRE ACH OF CONTRACT, TOR T (INCLUDING
NEGLIGEN CE), PRODUCT LIA BILITY OR OTHER WISE, EVEN IF ADVISE D OF THE POSSIBILIT Y OF SUCH
DAMAGES.
YOU ACKNOWLE DGE AND AGREE THAT THE LIM ITATIONS SET FORTH ABOV E ARE FUNDAMENTAL
ELEMENT S OF THIS AGREEMENT AN D THE DEVICE WOUL D NOT BE PROVIDED TO YOU ABS ENT SUCH
LIMITATIONS. SOM E STATE STATUTES M IGHT APPLY REGARDING L IMITATION OF LIABILIT Y.
RETURN FOR FULL R EFUND
IF YOU ARE UNWI LLING TO ACCEPT AND AGREE T O THE ABOVE CONDITI ONS, YOU MAY RETURN THIS
DEVICE TO T HE RESELLER OR TO TH E COMPANY FOR A FULL REFUN D, PROVIDED THAT YOU DO SO
NO LATER THAN 7 B USINESS DAYS FOLLOWING TH E PURCHASE OF THE DE VICE (proof o f purchase
requir ed) AND SUBJEC T TO THE WRAPPING BEI NG INTACT. WHEN DOING SO, PLE ASE REFER TO THIS
SECTIO N. BY NOT RETURNIN G THE DEVICE FOR R EFUND WITHIN THE PER IOD PROVIDED, YOU ARE
EXPLIC ITLY IN AGREEMENT WITH TH E ABOVE, AND RENOU NCE ALL RIGHTS TO FUT URE CLAIMS AND
DEMANDS AG AINST THE COMPANY AS D EFINED ABOVE.
www.s chubert h.com
Page 20

40
 Loading...