

Page 1

MANUAL
R2
BASIC
Page 2

BASIC
R2
THANK YOU FOR PLACING YOUR TRUST,
In our decades of experience in the development and manufacture of
motorcycle helmets. We’re delighted that you have chosen the SCHUBERTH
R2 BASIC. Each and every R2 BASIC that leaves our factory has been made
with exquisite craftsmanship using state-of-the-art manufacturing techniques.
The R2 BASIC features outstanding aeroacoustics and advanced ergonomics.
Perfected in a wind tunnel, the aerodynamics ensure stable helmet
performance at all times. Naturally, the R2 BASIC possesses the tried and
tested SCHUBERTH helmet features you have come to expect when it
comes to safety, comfort and designed. All these features, the stringent
quality requirements we place on the materials used, as well as our meticulous
craftsmanship, go together to make a quality product designed to meet
extremely high expectations in safety and reliability on the road – especially on
long journeys.
We hope you have plenty of fun with your SCHUBERTH R2 BASIC and a safe
and enjoyable trip at all times.
2
Page 3
A. HOW TO USE THIS MANUAL CORRECTLY
Please take time to read through this manual carefully so that your helmet
protects you properly when riding your motorcycle. In order to ensure that
you do not overlook any aspect of the manual that is relevant to your safety,
we recommend that you read it in the order in which it appears.
Please play particular attention to:
Caution: safety instructions
Note: advice
Advice: practical tips
Caution:
This helmet is not intended for use in the USA and Canada. The helmet has been inspected
and approved to the European ECE Standard and therefore does not conform to US and
Canadian regulations and requirements. It is only legal to use the helmet in countries in which
the European ECE Standard is valid. If you use the helmet in other countries, you will not in
the event of injury be entitled to make a claim for compensation before the US or Canadian
courts or the courts of other countries not bound by the ECE Standard.
Note:
We reserve the right to make changes that reect technical advances and
to do so without express notice.
EN
3
Page 4

B. CONTENTS
A. How to use the manual correctly 3
B. Contents 4
C. The helmet 6
1. Standard 6
2. ECE approval 6
3. Anatomy the helmet 7
4. Outer shell 7
5. Inner shell 7
6. Aerodynamics 8
7. Aeroacoustics 8
8. Wind deector 10
9. Retention system 10
10. Visor 11
11. Inner lining 18
12. Ventilation systems 22
13. Additional safety features 23
D. Putting on and taking o the helmet 24
1. Putting on the helmet 24
2. Taking o the helmet 24
E. Before every journey 25
1. Checking the helmet 25
2. Checking the chinstrap 25
3. Checking the face shield and sun visor 26
4
Page 5

F. For your safety 27
1. Safety advice concerning the helmet 27
2. Safety advice concerning the face shield / sun visor 28
3. Safety advice concerning modications / accessories 28
G. Care and maintenance 29
1. Outer shell 29
2. Face shield and sun visor 29
3. Inner lining 30
4. Ventilation 30
5. Locking system 31
6. Storing the helmet 31
H. Accessories and replacement parts 32
1. Accessories and replacement parts 32
2. Obtaining original SCHUBERTH parts 32
I. SCHUBERTH service 33
J. Warranty 33
K. How to contact us 34
EN
5
Page 6
C. THE HELMET
1. STANDARD
The R2 BASIC conforms to the ECE-R 22.05 standard. This testing norm
guarantees conformity to dened safety standards in respect of impact
absorption, visor, retention system and eld of vision. The certication applies to
all the countries of the European Union and all countries that recognize the ECE
standard. It also guarantees conformity with all insurance requirements that are
important in the event of a claim.
Please note that this R2 BASIC with ECE approval is not certied for the USA,
Canada or any other EU countries. It is only permitted for use in countries where
the ECE standard is valid.
Note:
The only SCHUBERTH helmets that it is legal to use in the USA, Canada
or other non-EU countries are those with the appropriate approval and
technical specications.
Further information and details of sales outlets for these helmets can be
found on the internet at:
WWW.SCHUBERTH.COM
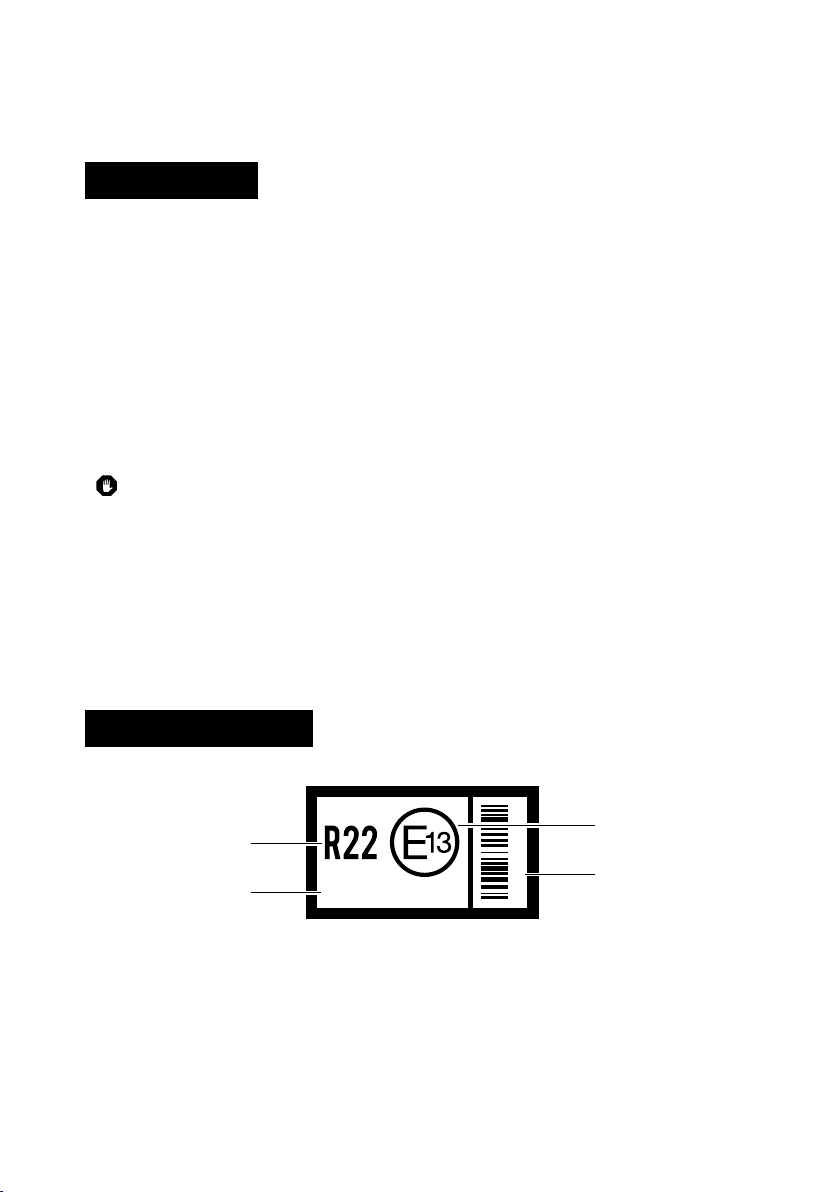
2. ECE APPROVAL
ECE test standard
Certication number
6
051234/P-1234
Certifying authority
Serial number
05123456
Page 7
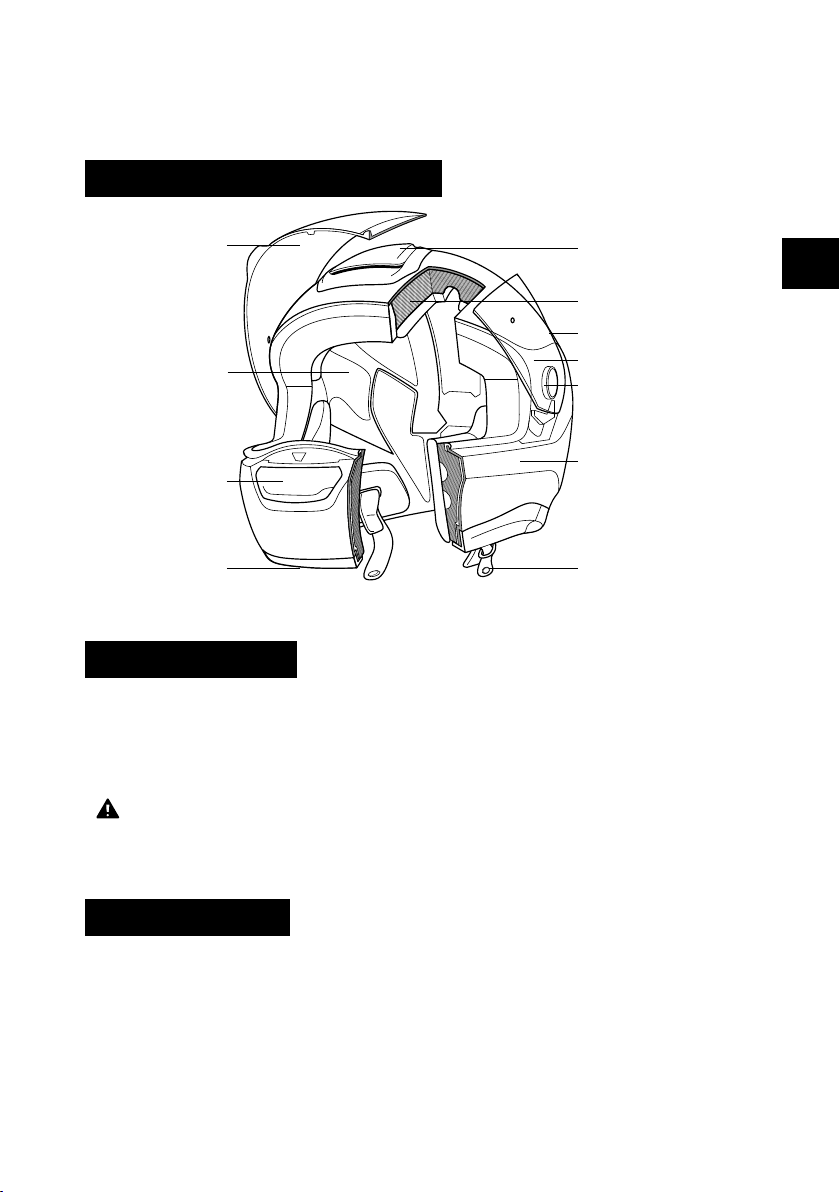
3. ANATOMY OF THE HELMET
Face shield
Inner lining
Face shield
ventilation/
Chin ventilation
Chin bar release
Head ventilation
Inner shell
Head outlet vent
Anti-fog lens
Visor mechanicsk
Outer shell
Chinstrap
(with double-Dfastening)
4. OUTER SHELL
The outer shell of the R2 BASIC helmet combines an aerodynamically optimal
shape with consistent protection. It consists of a special glass-bre reinforced
special duroplastic matrix developed by SCHUBERTH, which gives the helmet
the high level of strength needed for your protection.
Caution:
The safety helmet is designed to absorb the eects of only one impact.
The helmet must be replaced after a fall, accident or any other impact.
EN
5. INNER SHELL
For optimised impact absorption properties, the inner shell of the helmet
consists of several components. The complex multi-segment foam padding of
the main body provides better absorption and dissipation of impact forces and
gives you the highest level of safety.
7
Page 8

C. THE HELMET
6. AERODYNAMICS
Wind noise is low with the R2 BASIC, both for race-riding and during long
touring rides. The R2 BASIC produces practically no uplift even at speed.
Note:
Please note that the strong eddy currents that can occur as a result of
the fairing on faired motorcycles may have a signicant eect on the
aerodynamic characteristics of a helmet.
7. AEROACOUSTICS
Various features developed in SCHUBERTH’s wind tunnel make the helmet
agreeably quiet as far as aeroacoustics are concerned, while providing optimised
acoustic feedback when riding. This enhances concentration, especially at high
speeds.
Note:
Aeroacoustic values may vary according to the type of motorcycle, fairing
design, seat position and physical size of the rider.
Caution:
As a result of the aeroacoustic optimisation of the helmet (and the lower
wind noise inside the helmet that comes with it), your actual speed can
easily be underestimated. Please do not rely on your sense of hearing to
estimate your road speed – always check it using your speedometer.
8
Page 9

Note:
With faired motorcycles, strong eddy currents occur at the edges of
the wind shadow. These may signicantly reduce the aeroacoustic
performance of the helmet. The motorcycle fairing should be adjusted so
that the turbulence created does not strike the bottom surface of the
helmet.
aeroacousitcally non-critical area
aeroacoustically critical area
aeroacousitcally non-critical area
Turbulators
The patented turbulators on the top of the face shield also
optimise the aeroacoustic properties when riding and
prevent acoustic disturbances in the form of
whistling sounds that can be created by smooth
and straight edges.
EN
9
Page 10
C. THE HELMET
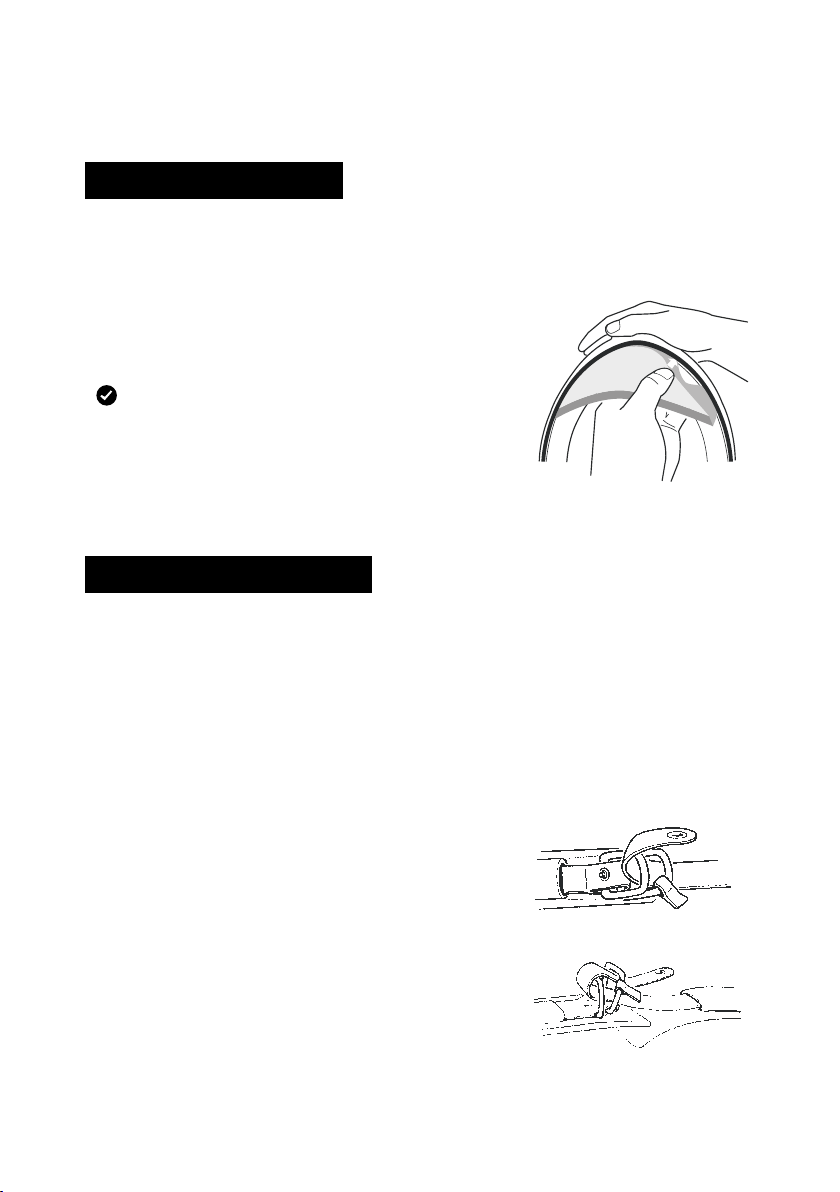
8. WIND DEFLECTOR
The wind deector prevents any unwanted airstream into the helmet. In
addition, the noise of driving in the helmet can be further reduced.
Start with one side and repeat the process on the
other side.
Advice:
The t of the bottom of the helmet is
extremely important in ensuring that the
helmet is as quiet as possible. If you have a
smaller collar size, we recommend that you
also wear a scarf.
9. RETENTION SYSTEM
The restraint system of the R2 BASIC consists of the chinstrap. For helmet
sizes up to and including 54/55, a neckband is also available in the neck area.
CHIN STRAP WITH DOUBLEDFASTENING
The double-D-fastener allows for an easy and precise adjustment of the chin
strap.
Closing the chin strap
1. Thread the end of the chin strap through
the double-D-fastener.
2. Pull the chin strap tight and feed the free
end back through the front ring.
10
Page 11
3. Pull the free end of the chin strap until it’s
tight and comfortable on your chin.
4. Take the free end of the chin strap reverse
and ax to the press stud.
Loosing and opening
Release the press stud and pull on the red lug of
the double-D-fastener, so that the chin strap is
loosened.
Thread the free end of the chin strap out of the
double-D-fastener.
Caution:
Never ride without a closed and adjusted chin strap, otherwise you risk
losing the helmet from your head.
10. VISOR
The visor is a fog-free double-lens visor. By xing the inner anti-fog lens using
eccentric pins, the two visor panes are pre-tensioned together and are thereby
sealed. An insulating air cushion is thus formed between the visor’s main plate
– i.e. the outer plate – and the inner plate, which prevents any fogging up of
the inner plate.
EN
COATING
The main visor has an anti-scratch coating.
Note:
The helmet should never be used to hold gloves or any other objects as
this may damage the scratch-sensitive anti-fog lens.
11
Page 12

C. THE HELMET
Note:
The helmet should never be used to hold gloves or any other objects as
this may damage the scratch-sensitive anti-fog lens.
Note:
The anti-fog lens may only be used in conjunction with the SCHUBERTH
main face shield that has been specially designed for this purpose. Other
face shields must not be tted.
OPENING THE FACE SHIELD
To open the face shield, use your thumb to push
the face shield up using one of the nger tabs
situated to the left and right of the face shield,
and move it to the desired position.
Face shield (including urban position)
The second position (urban position) locks in place more rmly, providing greater
resistance when the face shield is in this position. This makes it easier to lock
the face shield in the urban position, especially while riding.
• When you push the face shield open, it may well travel beyond the urban
position
• but it is easy to nd this position by moving it downwards again
12
Page 13

CLOSING THE FACE SHIELD
To close the face shield, grip the nger tabs at
top left and right and press the face shield down
with one movement until it audibly locks into
place.
REPLACING THE VISOR SHIELD
Changing the visor shield is easy to do without tools using the convenient
EasyChange visor mechanism. To replace the visor, it is helpful to place the
helmet on a at surface or on your lap while seated.
Removing the face shield
1. Move the face shield into the
uppermost locked position.
EN
2. Press the spring underneath the
face shield mechanism on one side
towards the face shield opening,
then do the same with the spring on
the other side.
13
Page 14

C. THE HELMET
3. Move the face shield upwards until it is released from the face shield
mechanism.
Fitting the face shield
1. Using both hands, guide the face
shields locking studs into the
respective recesses in the face
shield mechanism.
2. The face shield will then audibly lock into
place when you press it gently towards
the helmet with a simultaneous closing
movement.
3. Make sure that the face shield mechanism is
functioning properly by opening the face shield
once to its maximum extent.
14
Page 15

ANTIFOG LENS
Fitting
1. Lay the anti-fog lens in the face shield in such
a way that one side of it is already slotted into
the locking pin.
2. Now grasp the other side of the antifog lens by
its upper and lower transverse edges and use
your index nger to gently press the end of the
visor into a slight "S" shape. Now you can easily
guide the slot over the locking pin and release
the anti-fog lens into place.
3. The anti-fog lens should now be positioned in
the face shield with its lower edge parallel to
the lower edge of the face shield. If you need
to change the positioning of the anti-fog lens,
use the balls of your thumbs to gently bend the
face shield apart until the inner visor can be
adjusted as required.
4. Check all round the visor to make sure that the silicone seal ts tightly and
evenly against the face shield. Only if this is the case will the anti-misting
properties function properly.
EN
5. If you have not already done so, please remove the yellow protective lm.
15
Page 16

C. THE HELMET
If the anti-fog lens is not air-tight and the face shield mists up, either the visor
is not correctly in place or the pressure on the seal is inadequate. You can
regulate the pressure on the seal by adjusting the eccentric locking pins. To do
so, remove the anti-fog lens, then use a at object with no sharpedges to push
the locking pins out of the face shield carefully from the inside; then rotate
them by 180° and reinsert them. Fit the anti-fog lens and check the seal.
Removal
1. Before starting to remove the antifog lens, rst lay the face shield on a
soft, clean cloth so that its top edge is facing you.
2. To reduce the pretensioning of the
antifog lens slightly if necessary, use the
balls of your thumbs to carefully bend
the face shield suciently apart while
applying pressure with your thumbs to
release the anti-fog lens and move it
approx. 2-3 mm forward.
3. Now grip the back of the anti-fog lens with
your index and middle ngers and lift it
o the face shield. In this position you can
easily remove the anti-fog lens from the
locking pin with your thumb.
4. You can now remove the anti-fog lens
from the face shield.
Note:
To avoid scratching the face shield, never remove or t the anti-fog lens
unless the visor unit is clean and dry.
When tting the anti-fog lens, check that neither dust nor moisture are
able to get between the two plates.
16
Page 17

When removing or tting the anti-fog lens, it is always best to lay the face
shield unit on a clean, dry cloth.
Note:
Due to the high air pressure caused while riding with an open visor, we
generally recommend closing the visor to prevent dirt and moisture from
getting in.
Note:
Never press the locking pins out with your ngers as they may break.
Caution:
As a result of the double shield lens structure, there is a possibility of
greater light reection in the face shield, especially when riding at night. As
a rule, such light reection is regarded as uncritical due to the absence of
misting with this type of visor. However, if this light reection should cause
you diculties - because of particular sensitivity to it, for example – you
should refrain from using the anti-fog lens.
Caution:
If moisture is present in or has penetrated the airtight area between the
two plates, you should remove the anti-fog lens immediately in order to
prevent any interference with visibility. Do not re-t it until both plates are
completely dry (we recommend air-drying). If, after this, it is clear that
moisture is still getting in, please take the anti-fog lens to your retailer for
inspection.
EN
SAFETY NOTE
Before every ride, check the functionality of the visor to see whether it can
guarantee suciently good visibility. Impurities should be removed before each
ride. Inspect the visor for mechanical damage and cracks. Heavily scratched or
dull panes considerably impair vision and should be replaced before starting a
journey for safety reasons.
Caution:
Petrol, solvent and fuel vapours can cause cracking of the face shield.
Make sure that the face shield is never exposed to such vapours! Never
place the helmet on the tank of your bike.
17
Page 18

C. THE HELMET
11. INNER LINING
The replaceable inner lining of the R2 BASIC is washable and ensures both an
excellent t and improved ventilation of the helmet.
The high-comfort cheek pads ensure that the helmet ts comfortably around
the cheeks, and the headband pad provides an optimal t all around the head.
The head pad sits comfortably on the head without covering the ventilation
channels.
The interior is made of skin-friendly material at all points (especially those
with direct head contact). A soft, breathable, very good heat- and moisturetransporting ShinyTex® material as well as a special, antibacterial, odourreducing material is used.
REMOVING THE LINING
Removing the high-comfort cheek pads
1. Gently pull the comfort cheek pad out of its
xing.
18
Page 19

2. Loosen the sewn-in pins of the comfort
cheek pad from the red-marked connectors
on the helmet’s inner shell.
3. Proceed with the second comfort cheek
pad as explained in steps 1 and 2.
Removing head padding
1. Undo the buttons at the back of the head
padding.
EN
2. Undo the two buttons in the forehead area
and remove the head padding.
19
Page 20

C. THE HELMET
FITTING INNER LINING
Installing head padding
Using the red pins, attach the head padding to
the two connectors in the forehead area and
the one at the back of the helmet
Fitting the high-comfort cheek pads
1. Pull the chinstrap through the cheek
pads on each inner side.
20
Page 21

2. Fix the comfort cheek pads with the help of
the redmarked connectors.
3. Slide the retaining tab oft he comfort
cheek pad into the guide gap between the
helmet’s inner and outer shell. Start with the
lower part of the cheek pad.
4. Push the retaining tab into the guide gap
between the helmet’s inner and outer shell
with a light pressure directed towards the
helmet shell.
5. Proceed with the second comfort cheek
pad as explained in steps 1 to 4.
EN
Caution:
Never ride when parts of the inner lining
have been removed.
Caution:
Excessive heat (e.g. exhaust heat) can
cause damage to the inner lining!
Note:
To avoid damage to the inner lining and inner shell, do not hang the helmet
over the mirrors or handlebar grips.
21
Page 22

C. THE HELMET
12. VENTILATION SYSTEMS
VENTILATION DEVICE 1 FACE SHIELD SETTING
The R2 BASIC has a face shield that adjusts to several positions. Depending on
your road speed and the tendency of the face shield to mist up, open the face
shield suciently wide to stop it misting up but so that it still protects your eyes
from excessive draft.
Urban position
In its second locking position, the face shield is automatically in urban position.
Air entering through the bottom gap ows over the inside of the face shield and
escapes through the opening at the top.
VENTILATION DEVICE 2 INLET VENT IN CHIN AREA
(face shield ventilation)
The R2 BASIC features an air inlet in the chin
section for visor ventilation.
Air ows through the open air inlet regardless
of riding position. A deector ensures that
the visor is eectively ventilated even at low
speeds. By pressing on the lower or upper
part of the ventilation element, the air inlet is
opened or closed.
VENTILATION SYSTEM 3
HEAD VENTILATION
To ventilate the head, a large air vent with
adjustable ventilation system is located at the top
of the helmet shell. The air entering through this
vent is routed through channels to the top of the
head.
22
Page 23

In the helmet interior, the head padding system
allows airow to directly contact the surface of
the head, thereby providing faster dissipation
of inner heat. To regulate ventilation, a slider is
located on the air vent which is easy to operate
even with gloves on. Moving the slider back
opens the air vent completely.
VENTILATION DEVICE 4
INTERIOR AIR EXTRACTION
The R2 BASIC is equipped with an innovative air
extraction system. Fresh air owing in through
the head vent is directed via the air channels in
the inner shell to the back of the helmet. The
reduced pressure that prevails at the back of the
helmet ensures that the air is constantly sucked
out through the air vents and special netting
material tted to the neck pad, thus guaranteeing
a pleasant climate inside the helmet.
13. ADDITIONAL SAFETY FEATURES
EN
REFLECTIVE PANELS
Black reective patches in the neck pad and in the forehead area make
the motorcyclist more visible. With solid-colour helmets (no decals), the
SCHUBERTH logo on the back of the helmet is also made of reective lm.
Note:
Keep the reective safety areas clean.
Note:
When riding in France, local law requires that further reective safety
stickers be attached to the front, back and both sides of the helmet.
23
Page 24

D. PUTTING THE HELMET ON
AND TAKING IT OFF
Note:
Please note the information on the handling of the chin strap.
1. PUTTING THE HELMET ON AND TAKING IT OFF
1. Open the chinstrap.
2. Take hold of the lower ends of the chinstrap and pull these apart.
3. It will now be easy to put the helmet on.
4. Fasten the chinstrap.
5. Make sure the chinstrap passes under the chin and ts rmly.
2. TAKING OFF THE HELMET
1. Open the chinstrap.
2. Grasp the ends of the chinstrap and pull the chinstrap ends apart.
3. The helmet can now be removed easily from the head.
Advice:
To avoid scratching any objects on which you place the helmet when you
take it o, we recommend closing the chinstrap after you have taken the
helmet o.
24
Page 25

E. BEFORE EVERY JOURNEY
For your safety, check the following points before every journey:
1. CHECKING THE HELMET
Check the helmet regularly for damage. Small supercial scratches will not
impair the protective function of your helmet. In the case of more serious
damage (cracks, dents, aking and cracking paint, etc.), the helmet should no
longer be used.
2. CHECKING THE CHINSTRAP
CHECKING THE CHINSTRAP
1. Check that the chinstrap passes under your chin.
2. Slip your index nger under the chinstrap and pull.
If the chinstrap is loose under the chin, it is too long and needs to be
tightened.
If the chinstrap loosens when you pull it, it is not properly fastened. Undo
the chinstrap completely and try fastening it again. Repeat the test.
Note:
Repeat the test after each adjustment.
Caution:
Never ride with the chinstrap unfastened or incorrectly adjusted. The
chinstrap should t correctly and should not become loose when pulled.
The fastener is not correctly closed if the chinstrap becomes loose when
pulled.
EN
25
Page 26

E. BEFORE EVERY JOURNEY
3. CHECKING THE FACE SHIELD
Before each ride, please check the visor function provides a suciently good
view. Impurities should be removed before each ride.
Inspect the visor for mechanical damage and cracks. A heavily scratched visor
signicantly aects vision and should be replaced before starting the ride if
necessary.
Caution:
Never use tinted face shield or sun visor in conditions of poor visibility,
when riding at night or in a tunnel.
Caution:
Stop riding if visibility is poor.
26
Page 27

F. FOR YOUR SAFETY
1. SAFETY ADVICE CONCERNING THE HELMET
Motorcycling is associated with particular risks and dangers for the rider
and passenger. These risks and dangers can be reduced, but not eliminated
completely, by wearing a helmet. It is impossible to state precisely what the
protective eect of a helmet will be in the event of an accident. Safe riding
techniques, adapted to the particular road and weather conditions, are
essential for your safety.
To provide adequate protection, the helmet must t well and be securely
fastened.
Always fasten the chinstrap before setting o and check that the
fastening system and strap are correctly in position.
Never ride with the chinstrap unfastened or incorrectly adjusted. The
chinstrap must be correctly positioned and must not come loose when
pulled. The fastener is not correctly closed if the chinstrap becomes loose
when pulled.
The full protective function of a helmet can no longer be guaranteed
after an accident or impact. Like the crumple zone of a car, the impact
energy of a collision is absorbed by complete or partial destruction of the
structure of the outer and/or inner shell of the helmet. Because of the
way helmets are designed, this damage is rarely visible from the outside.
The safety helmet is designed to absorb only one impact. It is therefore
essential to replace the helmet after a fall, accident or other violent impact.
For safety reasons, the old helmet should be rendered unusable.
EN
The helmet safety mechanism described above can also cause small
cracks in the shell when the helmet is dropped from a small height (less
than 1 metre).
Any helmet that has been subjected to a violent impact should be
replaced.
No helmet provides absolute protection from all conceivable impacts. This
helmet has been specially developed for motorcycle riding and is unsuitable
for other purposes.
Examine the helmet for damage at regular intervals. Small scratches will
not impair the protective function of your helmet.
27
Page 28

F. FOR YOUR SAFETY
The helmet should be replaced after 5 to 7 years, depending on use and
care. Although the outer shell is in principle capable of a longer service life,
the occurrence of material fatigue and wear to other components, as well
as the overall action of the helmet and the unknown conditions in which
the helmet has been used, make it advisable for your own safety to replace
the helmet after this period of use.
Excessive heat (e.g. exhaust heat) can cause damage to the decoration,
the inner shell of the helmet and the interior lining.
Direct contact with motor fuel, thinners or solvents can destroy the
structure of the inner and outer shell. Make sure the helmet does not
come into contact with such substances, even for cleaning purposes.
2. SAFETY ADVICE CONCERNING THE FACE SHIELD
The protective lm used during shipping should be removed before use.
Never use a tinted face shield or sun visor in conditions of poor visibility, at
night or in a tunnel!
Benzene, solvent and fuel vapour can cause cracks in the face shield. Keep
the face shield away from such vapours and do not allow these kinds of
substances to come into direct contact with the face shield! Never place
the helmet on the tank of your motorcycle.
Make sure the face shield is always in perfect condition. Don’t ride when
visibility is poor!
3. SAFETY ADVICE CONCERNING MODIFICATIONS/
ACCESSORIES
Original components (in particular on the outer shell, inner shell and
restraint system) should not be altered or removed. The tting of additional
parts from other manufacturers that have not been recommended can
reduce the protective eect and renders the ECE certication and all
warranty and insurance claims invalid.
Use only original parts, replacement parts and accessories that
SCHUBERTH has expressly approved for your helmet!
28
Page 29

G. CARE AND MAINTENANCE
1. OUTER SHELL
To clean the helmet shell, you can use water, soap or one of the commonly
available motorcycle shampoos, cleaners, polishes, plastic cleaners or cleaning
uids. Using water and soap is usually sucient. Make sure when using the
other cleaning materials that these do not come into contact with the face
shield, since they can cause damage to the visor and its coating.
Note:
Never use motor fuel, thinners or solvents to clean the helmet. These
substances can cause serious damage to the helmet with no external
signs. The full safety function of the helmet can then no longer be
guaranteed.
2. FACE SHIELD
OUTER SURFACE OF THE FACE SHIELD
Use a soft cloth and a mild soap solution (< 20 °C) to remove dirt from the
outside of the face shield. To dry the face shield, use a lint-free cloth and apply
gentle pressure.
EN
ANTIFOG LENS
The inside surface of the face shield must only be cleaned with a soft cloth,
which may be slightly dampened if required (we recommend a mocrobre cloth).
Do not use any cleaning agents.
Note:
Only use tepid water (< 20 °C) for cleaning. Never on any account clean
the face shield or sun visor with petrol, solvent, a window or glass cleaner
or other cleaning agents containing alcohol.
Note:
The face shield should not be soaked in water even if it is very dirty on
the outside, as this will severely reduce the surface hardness and thus the
durability of the anti-fog/anti-scratch coating.
29
Page 30

G. CARE AND MAINTENANCE
Note:
The face shield should not be completely closed when not in use
(particularly during periods of storage), as the moisture contained on the
inside cannot escape if closed and will largely be absorbed by the anti-fog/
anti-scratch coating. This can lead to a reduction in the lifespan of the
coating. Ideally, position the face shield in the third locking setting above
the urban position.
Note:
Do not attach labels, tape or stickers to the visor.
3. INNER LINING
The inner lining of the R2 BASIC can be removed completely. The head and
cheek pads can be washed by hand using a mild soap solution (e.g. with highly
diluted standard mild detergent) at a maximum temperature of 30 °C. Allow the
lining to dry at room temperature and with good ventilation.
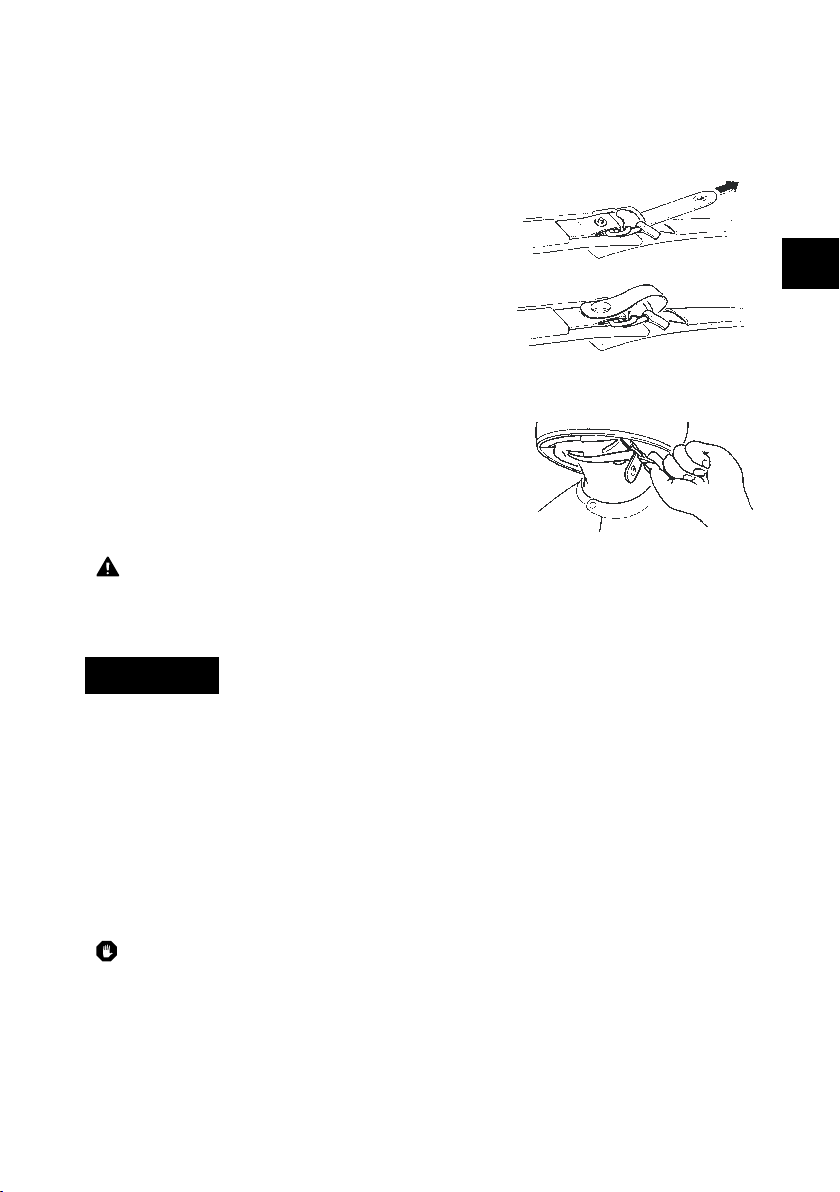
4. VENTILATION
VENTILATION COWL
When necessary, the head ventilation system’s air inlet cowl can be removed to
clean the ventilation mechanism.
1. To do this, press down hard on the ventilation
slider from behind and hold it lightly under the
front until it comes o the ventilation hood.
30
Page 31

2. After cleaning, guide the ventilation slider
into the corresponding guide. Then push
the slider backwards with a little pressure.
5. LOCKING SYSTEM
The metal components of the locking system do not require maintenance.
6. STORING THE HELMET
Store the helmet in a dry, well-ventilated and stable location. Always position the
helmet so that it cannot fall to the oor. Damage that occurs in this way is not
covered by the warranty.
Note:
Store the helmet out of the reach of children and animals.
EN
31
Page 32

H. ACCESSORIES AND SPARE PARTS
1. ACCESSORIES AND SPARE PARTS
An overview of all available accessories and spare parts can be found on the
Internet at WWW.SCHUBERTH.COM
We recommend that you only use original SCHUBERTH accessories and spare
parts for your SCHUBERTH helmet as they are specially adapted to your helmet
model.
Caution:
For safety reasons, all other parts of the helmet should be replaced by the
SCHUBERTH Repair Service only.
You can nd out more about the SC1 System from your specialist dealer and at
WWW.SCHUBERTH.COM
2. ORDERING ORIGINAL SCHUBERTH PARTS
Please contact your specialist dealer for original SCHUBERTH accessories and
replacements. To nd your nearest SCHUBERTH specialist dealer, please go to
WWW.SCHUBERTH.COM
32
Page 33

I. SCHUBERTH SERVICE
Please contact your dealer if necessary, or you can call our service centre
directly. Find your local dealer as well as the contact details for our service
centre on the SCHUBERTH website at WWW.SCHUBERTH.COM
J. WARRANTY
Please check your statutory warranty entitlement in your country.
You can also enjoy the benets of the “5 YEARS SCHUBERTH STANDARD
GUARANTEE”. Register your C4 on the internet at WWW.SCHUBERTH.COM
to enjoy the privileges of your extended guarantee.
Should there be a problem with your product, please contact your dealer directly
or through his service address or you can call our service centre directly. If you
return the product, please provide an accurate description of the fault. Please
enclose a copy of your receipt if you have not yet registered for the “5 YEARS
SCHUBERTH STANDARD GUARANTEE”.
You can register at any time.
EN
33
Page 34

K. HOW TO CONTACT US
HEADQUARTERS
Phone
+49 (0)391 8106-0
Address
SCHUBERTH GmbH
Stegelitzer Straße 12
39126 Magdeburg
Germany
Web
WWW.SCHUBERTH.COM
34
Page 35

EN
35
Page 36

Änderungen vorbehalten. Keine Gewährleistung auf Irrtümer und Druckfehler.
Subject to change. Not responsible for mistakes or printing errors.
WWW.SCHUBERTH.COM
 Loading...