

Page 1
MANUAL
R2
Page 2

Page 3

MANUAL
R2
2 – 36
37 – 70
71 – 105
106 – 140
141 – 175
DE
EN
FR
IT
ES
1 | 11.17
Page 4

R2
VIELEN DANK FÜR IHR VERTRAUEN,
in unsere jahrzehntelange Erfahrung bei der Entwicklung und Fertigung von
Motorradhelmen. Wir freuen uns, dass Sie sich für einen SCHUBERTH R2
entschieden haben. Jeder einzelne R2, der unser Werk verlässt, wurde in
aufwändiger Handarbeit unter Anwendung modernster Fertigungsmethoden
hergestellt. Der R2 verfügt über eine ausgezeichnete Aeroakustik und
fortschrittliche Ergonomie. Seine, im Windkanal perfektionierte, Aerodynamik
sorgt für ein jederzeit stabiles Verhalten des Helms. Selbstverständlich
verfügt der R2 über die bewährten Eigenschaften eines SCHUBERTH-Helms
in Bezug auf Sicherheit, Komfort und Design, die Sie erwarten dürfen. All
diese Eigenschaften, unser hoher Anspruch an die Qualität der verwendeten
Materialien und die Sorgfalt in der Verarbeitung, vereinen sich zu einem
Qualitätsprodukt, welches für höchste Anforderungen an Sicherheit und
Zuverlässigkeit im Straßenverkehr – insbesondere auf langen Fahrten –
ausgelegt ist.
Wir wünschen Ihnen viel Freude mit Ihrem SCHUBERTH R2 sowie allzeit gute
und sichere Fahrt.
Jan-Christian Becker Thomas Schulz
CEO SCHUBERTH GmbH Product Management SCHUBERTH GmbH
2
Page 5
A. DIE RICHTIGE BENUTZUNG
DER GEBRAUCHSANWEISUNG
Lesen Sie bitte diese Gebrauchsanweisung aufmerksam durch, damit Ihr Helm
Sie beim Motorradfahren richtig schützen kann.
Um keinen für Ihre Sicherheit relevanten Aspekt außer Acht zu lassen, empfehlen wir Ihnen, diese Gebrauchsanweisung in der vorgegebenen Reihenfolge zu
lesen.
Bitte achten Sie besonders auf:
Warnung: Sicherheitshinweise
Achtung: Hinweise
Tipp: Praktische Ratschläge
Warnung:
Dieser Helm ist nicht für den Gebrauch in den USA und Kanada bestimmt. Dieser Helm ist
nach der europäischen ECE-Norm gebaut, geprüft und zugelassen, er entspricht daher nicht
den US-amerikanischen und kanadischen Vorschriften und Anforderungen. Er darf nur in
Ländern eingesetzt werden, in denen die europäische ECE-Norm Gültigkeit besitzt. Der
Gebrauch in anderen Ländern berechtigt im Schadensfall nicht zur Geltendmachung von
Ersatzansprüchen vor US-amerikanischen oder kanadischen sowie vor Gerichten dritter
nicht ECE-normgebundener Länder.
Achtung:
Änderungen im Sinne des technischen Fortschritts behalten wir uns
vor – auch ohne ausdrückliche Ankündigung.
DE
3
Page 6

B. INHALT
A. Die richtige Benutzung der Gebrauchsanweisung 3
B. Inhalt
4
C. Der Helm 6
1. Norm 6
2. ECE-Zulassung 6
3. Anatomie des Helms 7
4. Außenschale 7
5. Innenschale 7
6. Aerodynamik 8
7. Aeroakustik 8
8. Windabweiser 10
9. Rückhaltesystem 10
10. Visier 12
11. Innenausstattung 18
12. Belüftungssysteme 22
13. Zusätzliche Sicherheitsausstattung 23
D. Auf- und Absetzen
24
1. Aufsetzen des Helms 24
2. Absetzen des Helms 24
E. Vor jeder Fahrt
25
1. Überprüfen des Helms 25
2. Überprüfen des Kinnriemens 25
3. Kontrolle des Visiers 26
4
Page 7

F. Für Ihre Sicherheit 27
1. Sicherheitshinweise Helm 27
2. Sicherheitshinweise Visier 28
3. Sicherheitshinweise Modikation/Zubehör 29
DE
G. Wartung und Pege
30
1. Außenschale 30
2. Visier 30
3. Innenausstattung 31
4. Belüftung 31
5. Verschluss-System 32
6. Aufbewahrung 32
H. Zubehör und Ersatzteile
33
1. Zubehör und Ersatzteile 33
2. Kommunikationssysteme 33
3. Bezug von SCHUBERTH Originalteilen 34
I. SCHUBERTH Service
35
J. Gewährleistung 35
K. Wie Sie uns erreichen
36
5
Page 8
C. DER HELM
1. NORM
Der R2 erfüllt die Norm ECE-R 22.05. Diese Prüfnorm gewährleistet die
Einhaltung von denierten Sicherheitsstandards hinsichtlich Stoßdämpfung,
Visier, Rückhaltesystem sowie Sichtfeld. Diese Zulassung gilt in Ländern der
europäischen Union und in allen anderen, die die ECE-Norm anerkennen und
sichert zum anderen die im Schadensfall wichtige Versicherungskonformität.
Bitte beachten Sie, dass dieser R2 mit ECE-Zulassung nicht für die USA, Kanada
oder möglicherweise andere Nicht-EU-Länder zugelassen ist. Er darf nur in
Ländern verwendet werden, für die die ECE-Norm Gültigkeit besitzt.
Achtung:
Für den Gebrauch in den USA, Kanada oder möglicherweise anderen
Nicht-EU-Ländern dürfen ausschließlich SCHUBERTH Helme eingesetzt
werden, die über die entsprechende Zulassung und technische Einstellung
verfügen. Weitere Informationen und die Bezugsquelle für diese Helme
nden Sie im Internet unter:
WWW.SCHUBERTH.COM
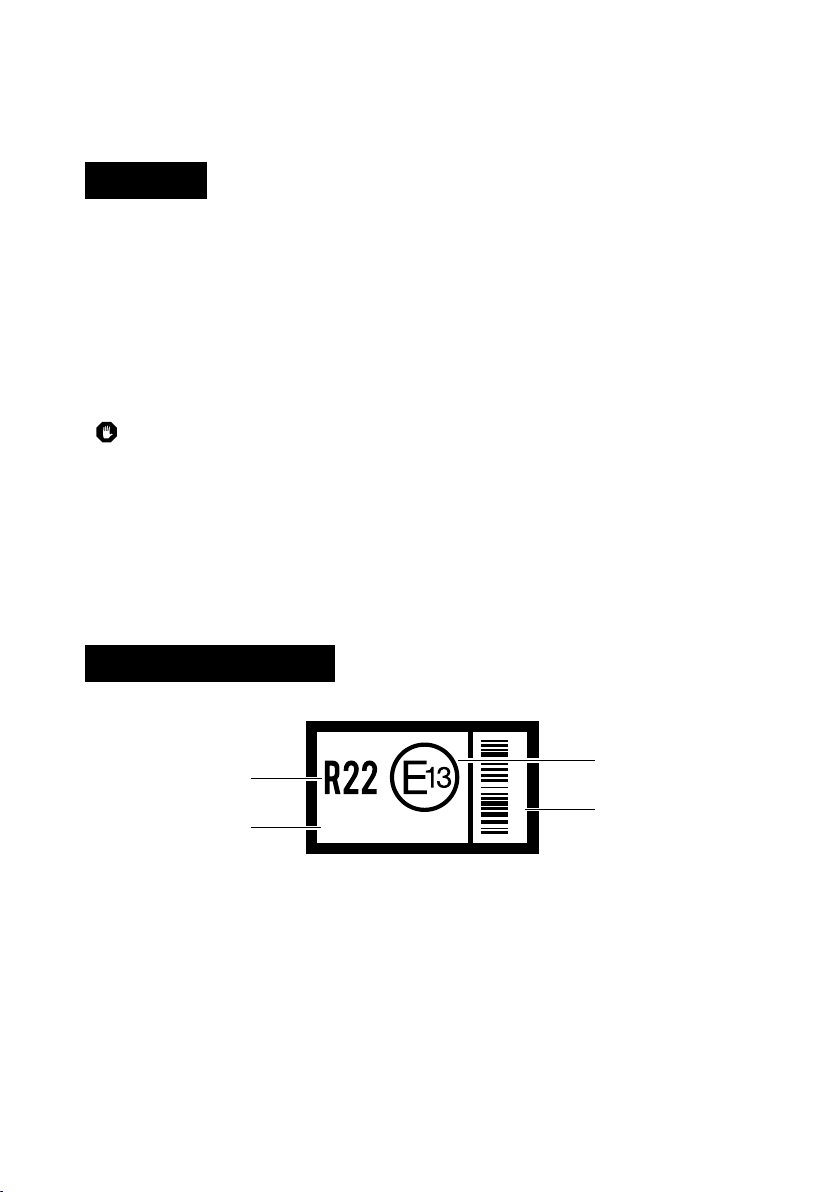
2. ECEZULASSUNG
ECE-Prüfnorm
Genehmigungsnummer
6
051234/P-1234
Zulassungsbehörde
Seriennummer
05123456
Page 9
3. ANATOMIE DES HELMS
DE
Visier
Integrierte
Antennen
Innenausstattung
Visierbelüftung/
Kinnbelüftung
Windabweiser
Kopfbelüftung
Innenschale
Kopfentlüftung
Antibeschlag-Scheibe
Visiermechanik
Außenschale
Kinnriemen mit
Doppel-D-Verschluss
4. AUSSENSCHALE
Die Helm-Außenschale des R2 verbindet eine aerodynamisch optimale Form mit
konsequentem Schutz. Sie besteht aus einer von SCHUBERTH entwickelten
glasfaserverstärkten, duroplastischen Spezial-Matrix, die dem Helm die für Ihren
Schutz notwendige, hohe Festigkeit verleiht.
Warnung:
Der Schutzhelm ist für die Absorption nur einer Schlag – oder
Stoßeinwirkung ausgelegt. Nach einem Sturz, Unfall oder nach einer
sonstigen Krafteinwirkung muss der Helm ausgetauscht werden.
5. INNENSCHALE
Die Helminnenschale ist zur Optimierung der Stoßdämpfungseigenschaften
mehrteilig aufgebaut. Durch eine komplexe Mehrzonen-Verschäumung des
Hauptkörpers wird eine bessere Kraftaufnahme und -verteilung erreicht und
Ihnen ein Höchstmaß an Sicherheit geboten.
7
Page 10

C. DER HELM
6. AERODYNAMIK
Der R2 liegt sowohl bei sportlicher Fahrweise als auch beim Touren und Cruisen
ruhig im Fahrtwind. Bei höheren Geschwindigkeiten entwickelt der R2 praktisch
keinen Auftrieb.
Achtung:
Bitte beachten Sie, dass bei verkleideten Motorrädern die durch die
Verkleidung auftretenden starken Luftverwirbelungen die aerodynamischen
Eigenschaften eines Helms erheblich verändern können.
7. AEROAKUSTIK
Verschiedene im SCHUBERTH Windkanal entwickelte Maßnahmen sorgen
für einen aeroakustisch angenehm leisen Helm bei gleichzeitig optimiertem
akustischen Feedback während des Fahrens. Hierdurch wird ein konzentrierteres
Fahren – insbesondere bei höheren Geschwindigkeiten – ermöglicht.
Achtung:
Aeroakustische Werte können in Abhängigkeit von Motorradtyp,
Verkleidung, Sitzhaltung und Körpergröße variieren.
Warnung:
Durch die aeroakustische Optimierung des Helms (und die damit
einhergehenden geringeren Windgeräusche im Helm) kann die tatsächliche
Geschwindigkeit leicht unterschätzt werden. Verlassen Sie sich bei der
Einschätzung der gefahrenen Geschwindigkeit nicht auf Ihr Gehör, sondern
kontrollieren Sie diese anhand Ihres Tachometers.
8
Page 11
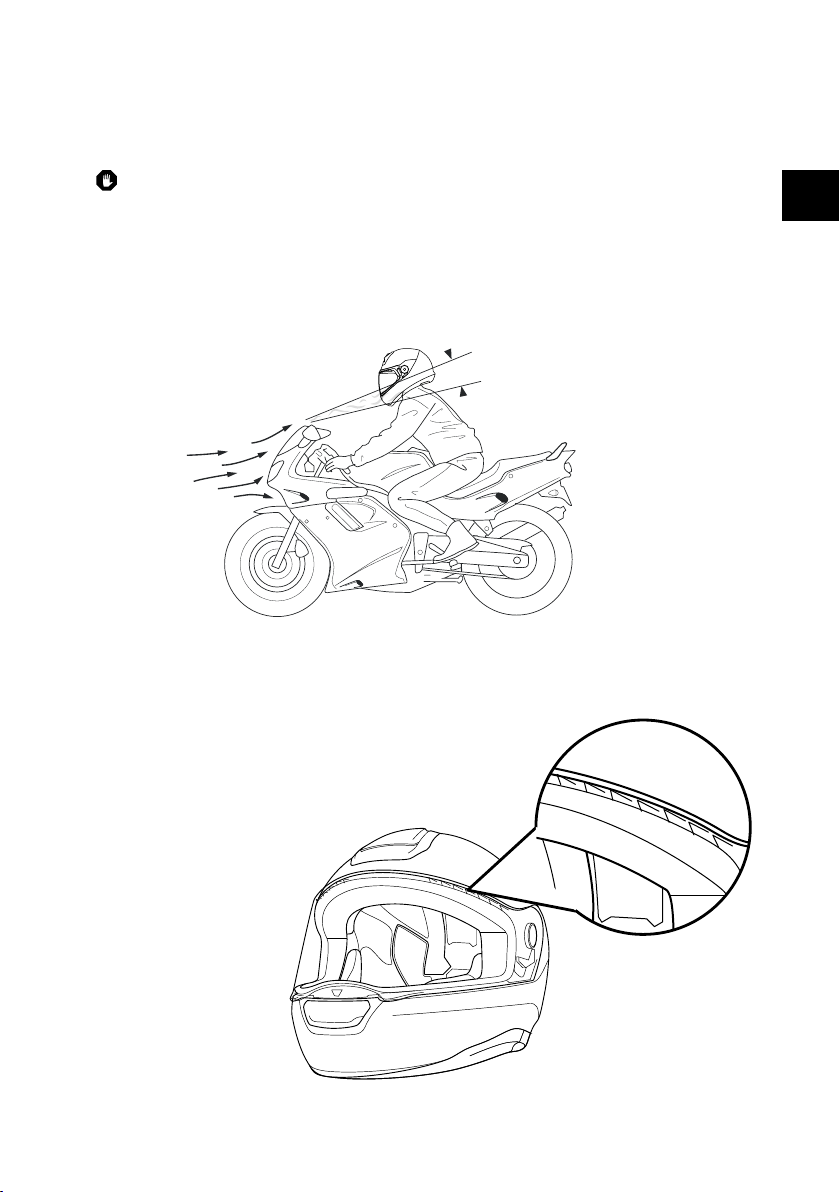
Achtung:
Bei verkleideten Motorrädern treten im Randbereich des erzeugten
Windschattens starke Luftverwirbelungen auf. Diese können die
aeroakustische Leistungsfähigkeit des Helms erheblich reduzieren. Die
Motorradverkleidung sollte so angepasst sein, dass die abgehende
Wirbelschicht nicht direkt auf die Helmunterseite trit.
aeroakustisch unkritischer Bereich
aeroakustisch kritischer Bereich
aeroakustisch unkritischer Bereich
Visierturbulatoren
Die an der Oberseite des Visiers bendlichen, patentierten
Turbulatoren optimieren zusätzlich die aeroakustischen
Eigenschaften bei Fahrten mit geönetem Visier und
verhindern akustische Störgeräusche in Form
von Pfeiftönen, die an glatten sowie geraden
Kanten entstehen können.
DE
9
Page 12

C. DER HELM
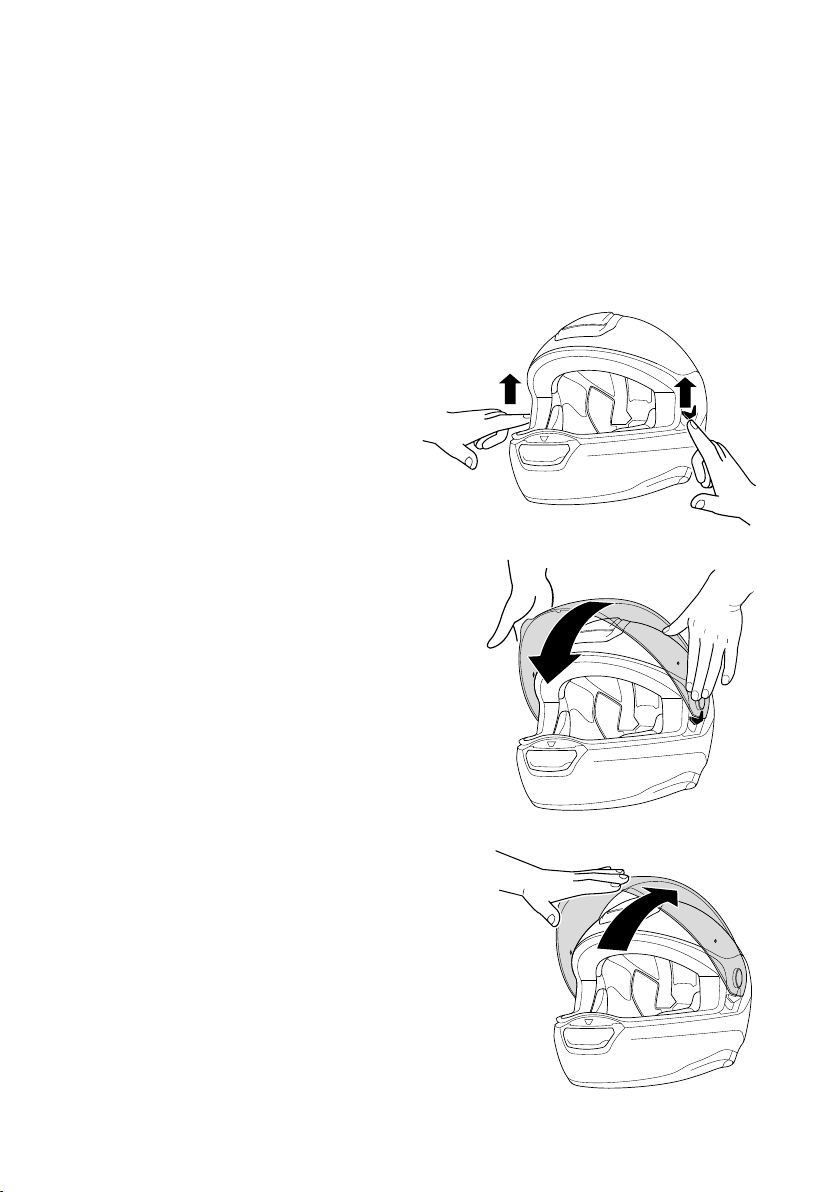
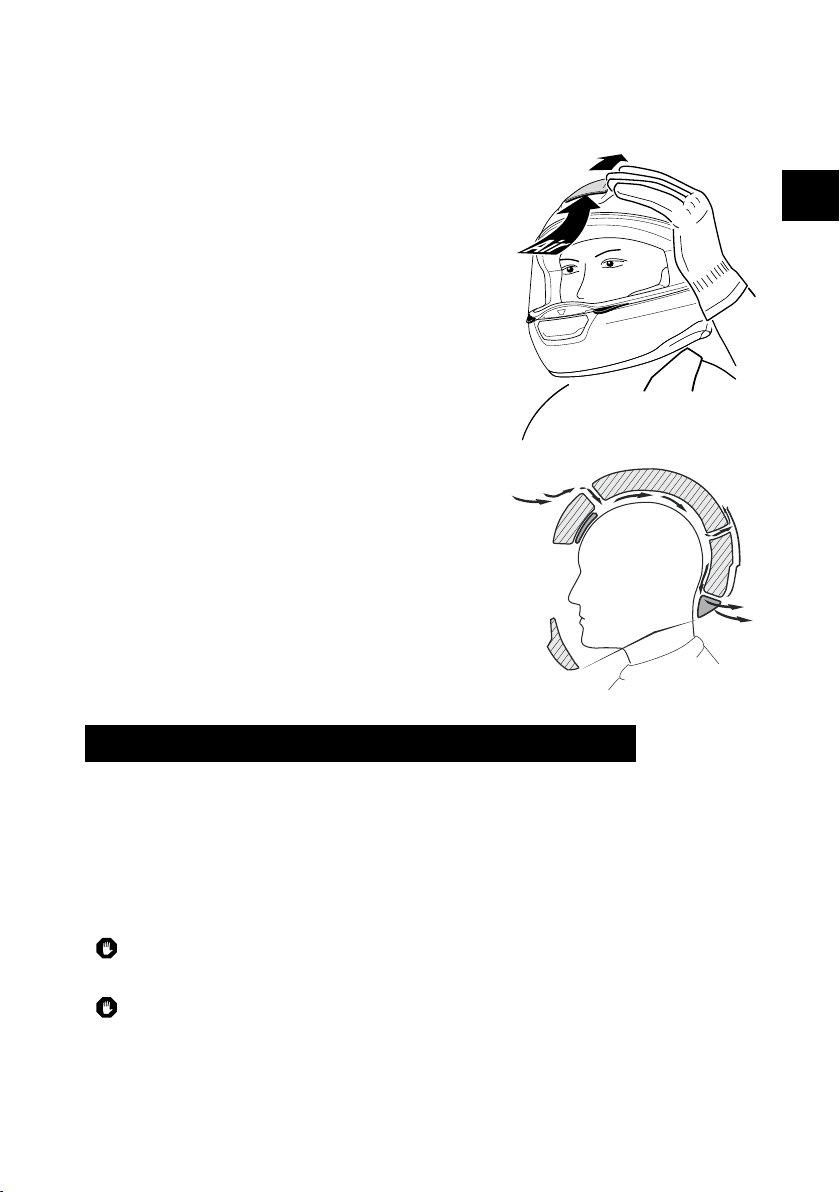
8. WINDABWEISER
Der Windabweiser verhindert ein unerwünschtes Einströmen von Fahrtwind in
den Helm. Zusätzlich lassen sich die Fahrgeräusche im Helm weiter reduzieren.
Beginnen Sie hierbei mit einer Seite und
wiederholen sie den Vorgang analog auf der
anderen Seite.
Tipp:
Um einen möglichst leisen Helm zu erhalten,
ist die Passform auf der Helmunterseite
extrem wichtig. Bei kleineren Kragenweiten
empehlt sich die zusätzliche Verwendung
eines Halstuches.
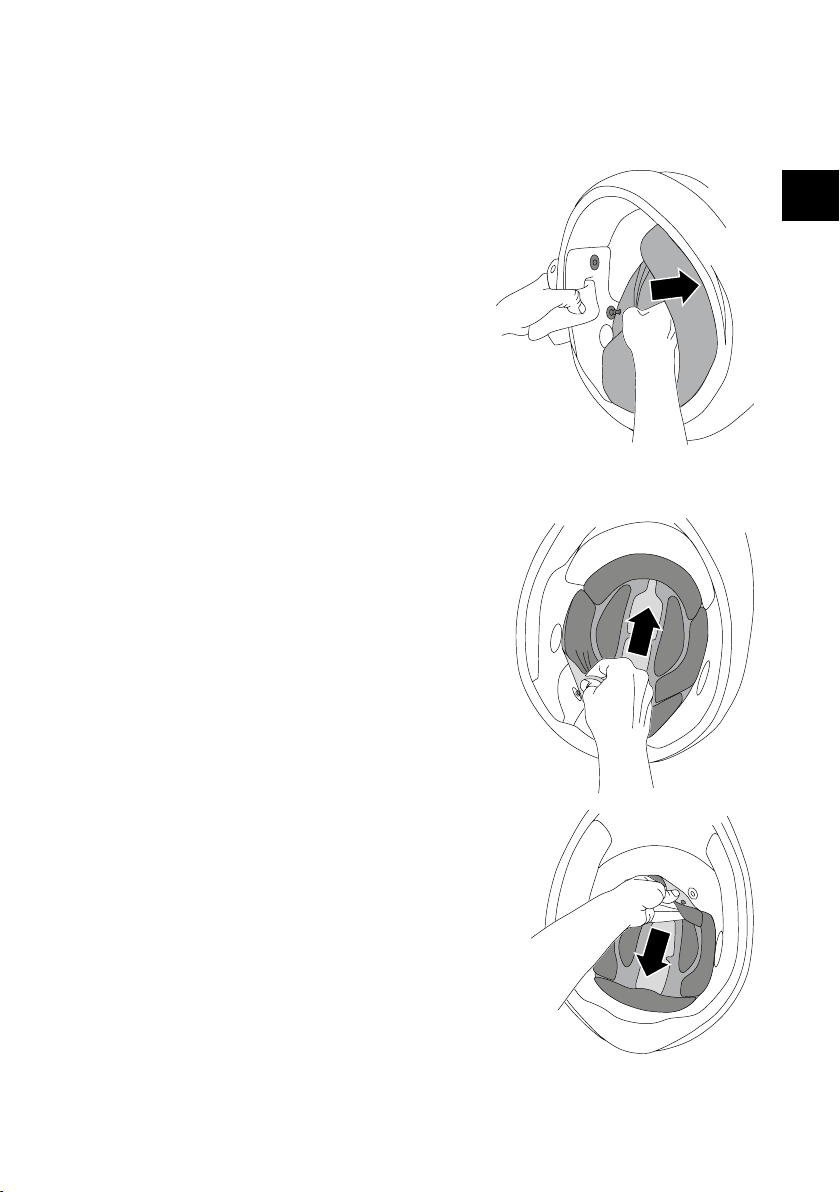
9. RÜCKHALTESYSTEM
Das Rückhaltesystem des R2 besteht aus dem Kinnriemen. Bei den Helmgrößen
bis einschließlich 54/55 ist zusätzlich ein Nackenband im Nackenbereich
vorhanden.
KINNRIEMEN MIT DOPPELDVERSCHLUSS
Ein Doppel-D-Verschluss ermöglicht ein einfaches und präzises Einstellen der
Kinnriemenlänge.
Schließen des Kinnriemens
1. Fädeln Sie das Kinnriemenende durch beide
Ringe des Doppel-D-Verschlusses.
2. Ziehen Sie den Kinnriemen stra und führen
Sie dann das freie Ende durch den vorderen
Ringe zurück.
10
Page 13
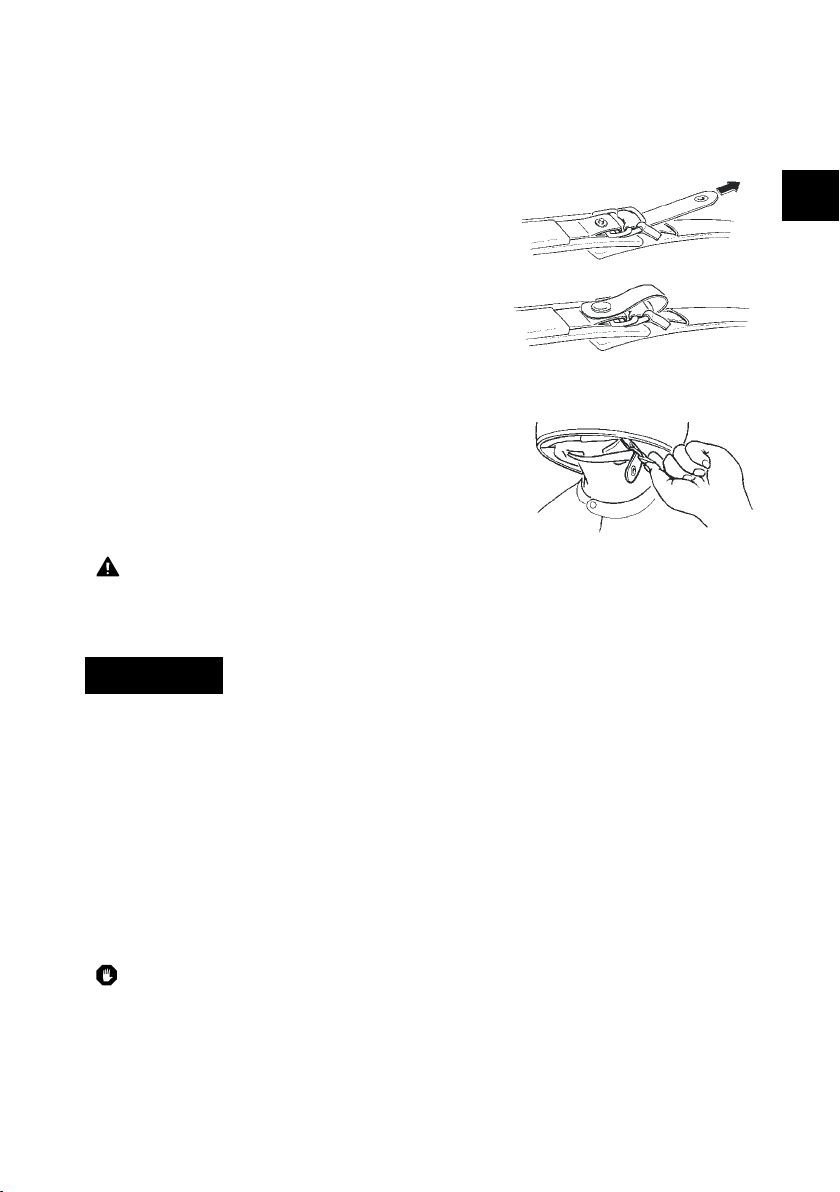
3. Ziehen Sie am freien Ende des Kinnriemens,
bis dieser stra und bequem anliegt.
4. Legen Sie das Kinnriemenende um und
befestigen Sie es mittels Druckknopf.
Lösen und Önen
Lösen Sie den Druckknopf und ziehen Sie an der
roten Fahne des Doppel-D-Verschluss so, dass
sich der Kinnriemen lockert.
Fädeln Sie den Kinnriemen aus dem Doppel-DVerschluss.
Warnung:
Fahren Sie niemals ohne geschlossenen und eingestellten Kinnriemen,
sonst riskieren Sie das Lösen des Helms vom Kopf.
10. VISIER
Das Visier ist ein beschlagfreies Doppelscheibenvisier. Durch die Befestigung
der inneren Antibeschlag-Scheibe mittels Pins werden die beiden
Visierscheiben zueinander vorgespannt und dadurch abgedichtet. Es entsteht
ein isolierendes Luftpolster zwischen der Haupt- bzw. Außenscheibe und der
Innenscheibe des Visiers, wodurch ein Beschlagen der Innenscheibe verhindert
wird.
DE
BESCHICHTUNG
Die Hauptscheibe ist anti-scratch beschichtet.
Achtung:
Um Beschädigungen an der kratzempndlichen Antibeschlag-Scheibe zu
vermeiden, sollten keine Handschuhe oder andere Gegenstände in den
Helm gesteckt werden.
11
Page 14
C. DER HELM
Achtung:
Die Antibeschlag-Scheibe ist im Auslieferzustand mit einer Schutzfolie
ausgestattet. Entfernen Sie diese Folie vor dem ersten Gebrauch des
Helms.
Achtung:
Die Antibeschlag-Scheibe darf nur in Verbindung mit speziell dafür
vorgesehenen SCHUBERTH Visierscheiben gefahren werden. Eine
Anbringung auf anderen Visieren ist nicht gestattet.
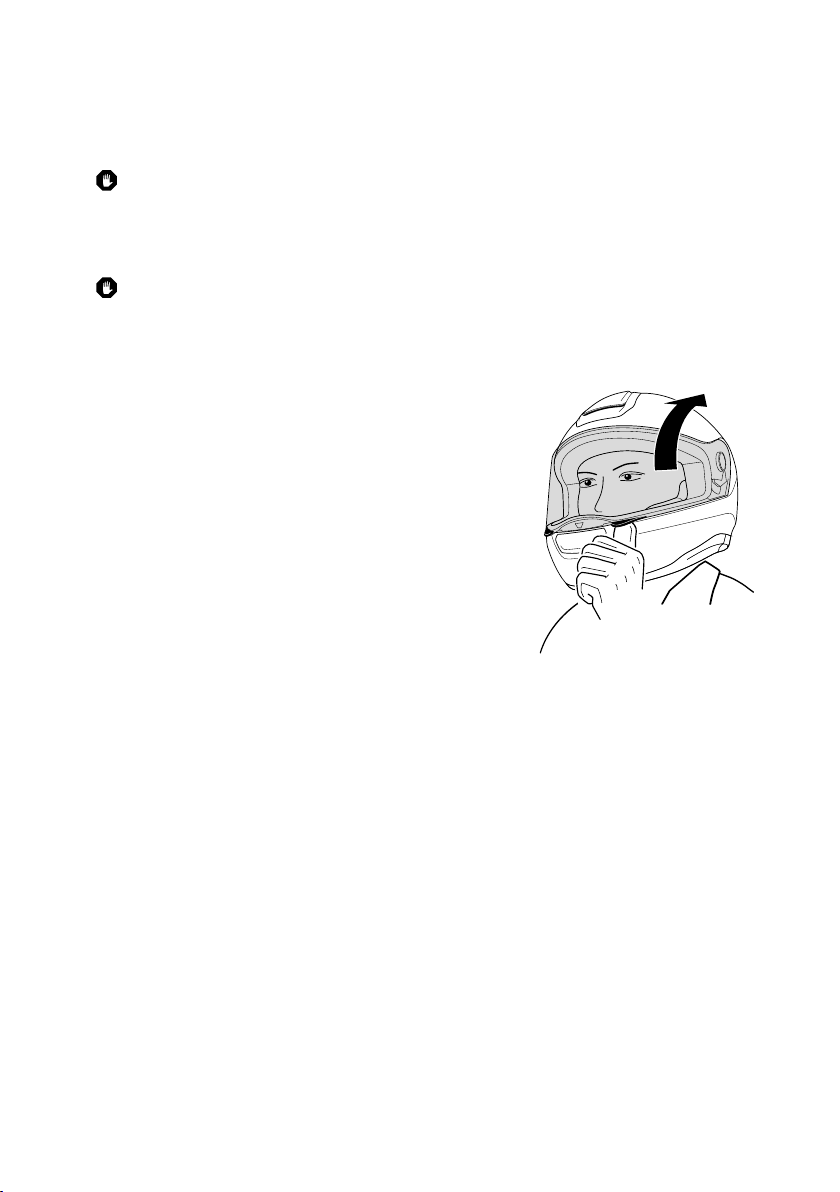
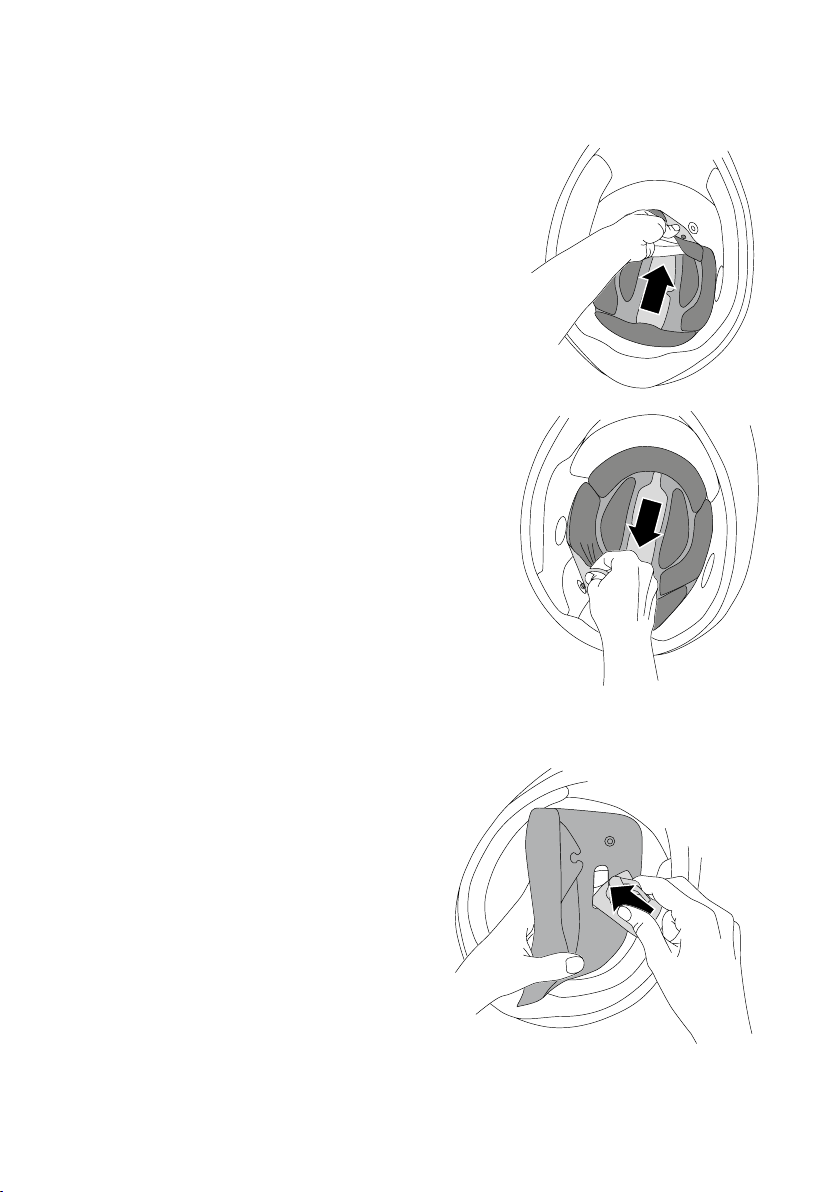
ÖFFNEN DES VISIERS
Das Visier wird geönet, indem Sie links oder
rechtsseitig mit dem Daumen unter eines der
am Visier angebrachten Fingertabs greifen und
die Visierscheibe mit Druck nach oben in die
gewünschte Position bringen.
Visierpositionen (mit Stadtstellung)
Das Visier arretiert in sieben verschiedenen Positionen. Die zweite Rastposition (Stadtstellung) ist etwas verstärkt, so dass das Visier an dieser Stelle einen
stärkeren Widerstand erfährt. Auf diese Weise wird das Arretieren des Visiers in
der Stadtstellung erleichtert, insbesondere während der Fahrt.
Önen Sie hierzu das Visier
· hierbei wird die Stadtstellung in der Regel zunächst übersprungen
· mit einer Abwärtsbewegung des Visiers kann diese dann einfach eingestellt
werden.
12
Page 15
SCHLIESSEN DES VISIERS
Das Visier wird geschlossen, indem Sie das linksund rechtsseitige Fingertab oben greifen und mit
einer Handbewegung nach unten drücken bis es
hörbar einrastet.
VISIERSCHEIBENWECHSEL
Der Visierscheibenwechsel ist mit der komfortablen EasyChange-Visiermechanik
schnell und ohne Hilfsmittel möglich. Zum Wechseln des Visiers ist es hilfreich,
den Helm auf einer geraden Fläche abzustellen oder ihn im Sitzen auf Ihren
Oberschenkeln abzulegen.
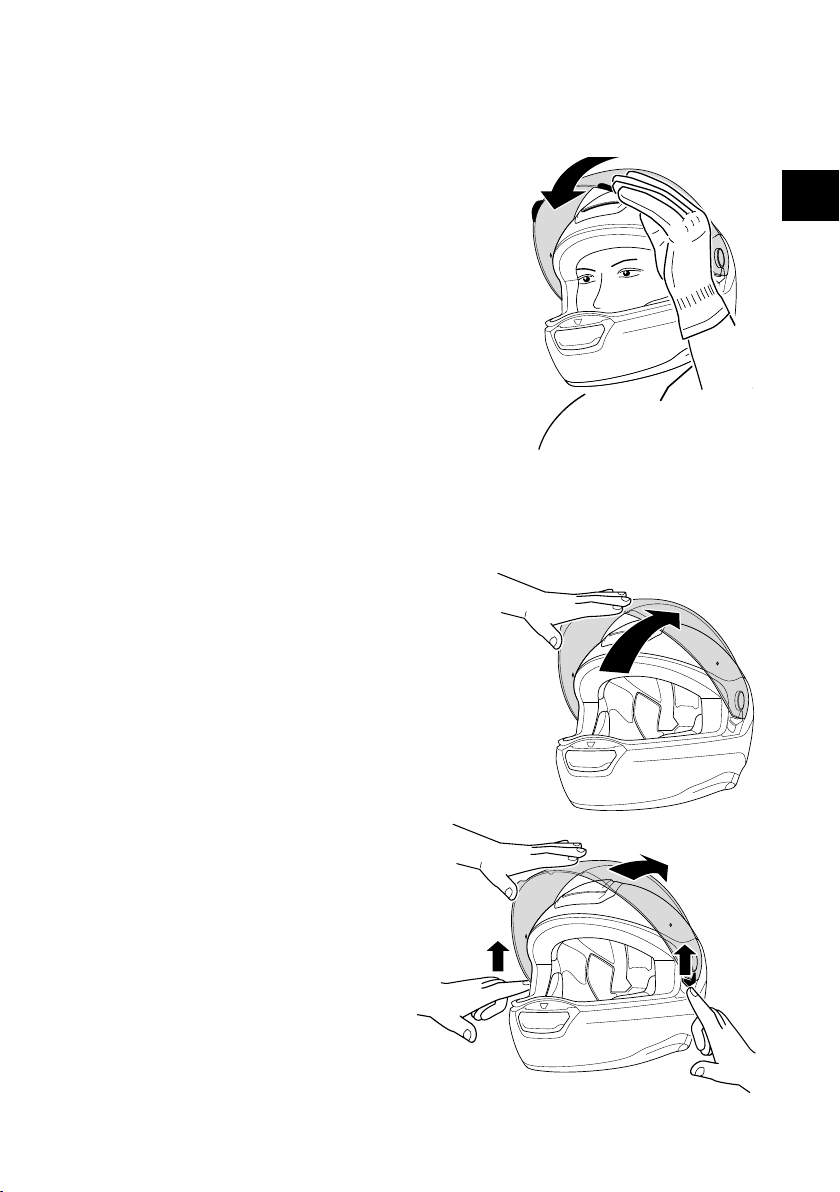
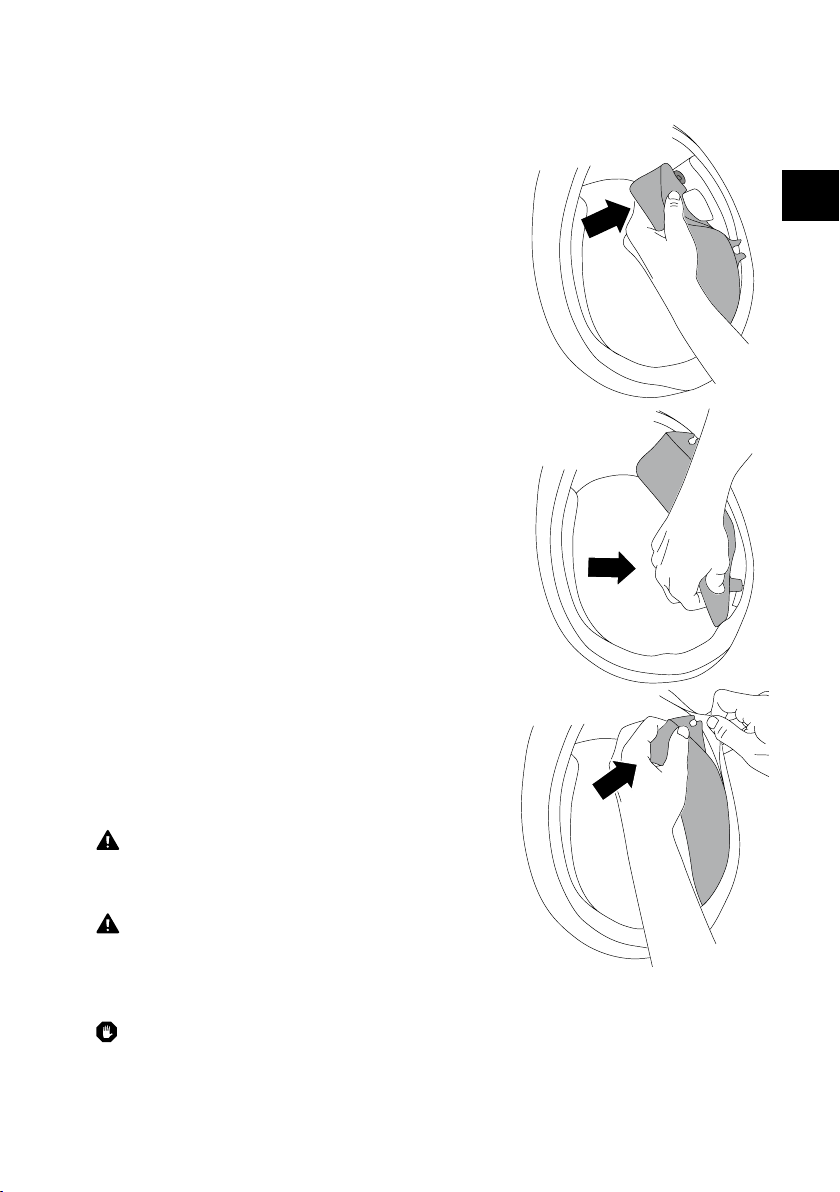
Visierscheiben-Ausbau
1. Bewegen Sie das Visier in
die oberste Raststellung.
DE
2. Betätigen Sie das Federelement
unterhalb der Visiermechanik in
Richtung Visierönung. Anschließend
das Federelement auf der anderen
Seite betätigen.
13
Page 16
C. DER HELM
3. Bewegen Sie das Visier so weit nach oben,
bis sich dieses aus der Visiermechanik löst.
Visierscheiben-Einbau
1. Führen Sie mit beiden Händen
die Rastzapfen des Visiers in die
dafür vorgesehene Aussparung in
der Visiermechanik.
2. Durch leichten, zum Helm
gerichteten Druck und gleichzeitiger
Schließbewegung, rastet das Visier
hörbar ein.
3. Überprüfen Sie die Funktion der
Visiermechanik, indem Sie das Visier einmal bis
zum Anschlag önen.
14
Page 17
ANTIBESCHLAGSCHEIBE
Einbau
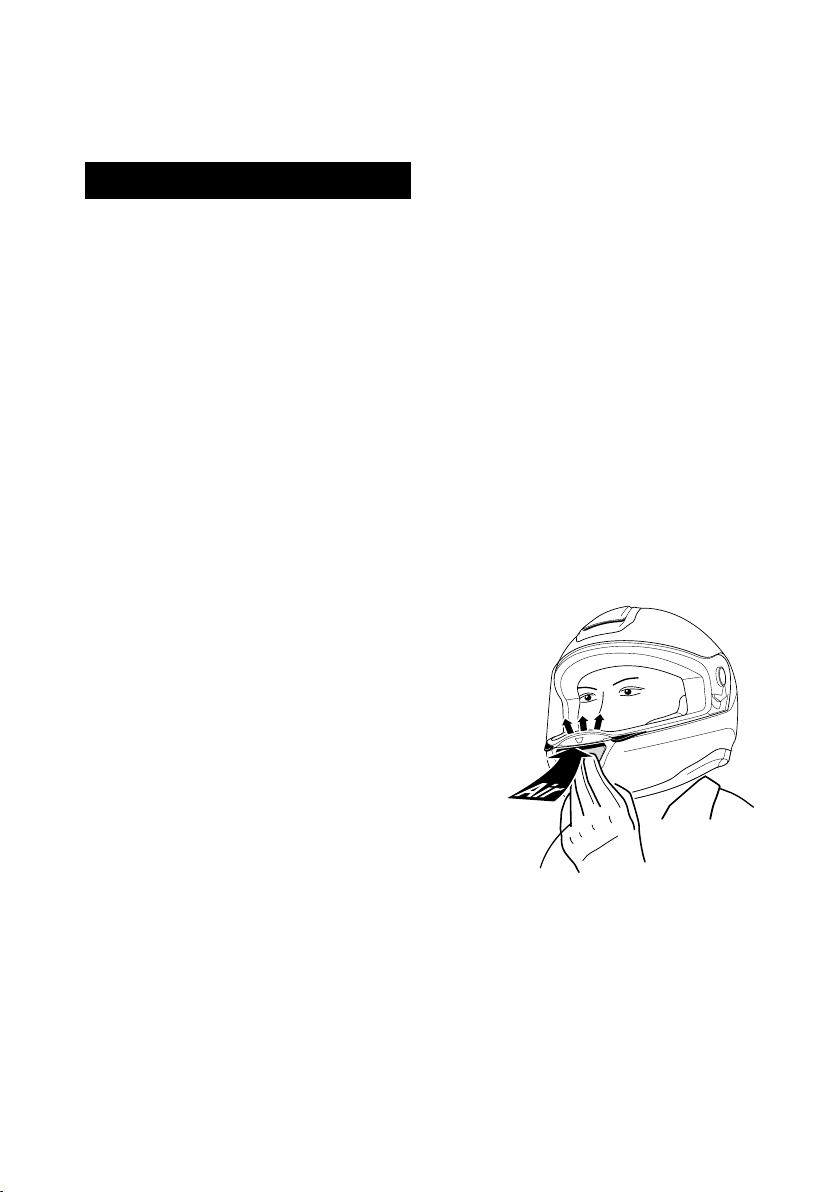
1. Legen Sie die Antibeschlag-Scheibe so in das
Hauptvisier ein, dass es auf einer Seite bereits
am Pin liegt.
2. Greifen Sie nun an der gegenüberliegenden
Seite die Antibeschlag-Scheibe an der oberen
und unteren Querkante und drücken Sie das
Ende der Innenscheibe mit dem Zeigenger
in eine leichte S-Form. Nun lässt sich die
Aussparung leicht über den Pin einführen und
Sie können die Antibeschlag-Scheibe loslassen.
3. Die Antibeschlag-Scheibe sollte nun im
Außenvisier auiegen, wobei die Unterkante der
Antibeschlag-Scheibe parallel zur Unterkante
des Hauptvisiers verlaufen sollte. Um bei
Bedarf die Lage der Antibeschlag-Scheibe
zu ändern, biegen Sie das Visier mit den
Handballen vorsichtig so weit auseinander, bis
sich die Antibeschlag-Scheibe entsprechend
verschieben lässt.
DE
4. Kontrollieren Sie rundherum das gleichmäßige Anliegen der AntibeschlagScheibe an der Visierscheibe. Nur so ist ein einwandfreies Antibeschlagverhalten gewährleistet.
5. Sofern noch nicht geschehen, entfernen Sie bitte die gelbe Schutzfolie.
15
Page 18
C. DER HELM
Sollte es zu Undichtigkeiten und damit zu einem Beschlagen des Visiers
kommen, ist die Antibeschlag-Scheibe nicht richtig platziert oder der Druck auf
die Dichtung zu gering. Der Druck auf die Dichtung kann durch Verdrehen der
beiden Pins reguliert werden. Dazu die Antibeschlag-Scheibe ausbauen, den
Pin von innen mit Hilfe eines achen aber nicht scharfkantigen Gegenstandes
vorsichtig aus der Außenscheibe herausdrücken, bis zu 180° drehen und
wieder einsetzen. Danach die Antibeschlag-Scheibe montieren und Dichtung
kontrollieren.
Ausbau
1. Legen Sie zur Demontage der Antibeschlag-Scheibe das Visier auf
einen weichen, sauberen Lappen. Die Oberkante des Visiers sollte Ihnen
zugewandt sein.
2. Um gegebenenfalls die Vorspannung
der Antibeschlag-Scheibe etwas zu
verringern, können Sie das Visier mit den
Handballen vorsichtig so weit auseinander
biegen, bis sich bei gleichzeitigem Druck
mit den Daumen die AntibeschlagScheibe löst und ca. 2-3 mm nach vorne
bewegt.
3. Greifen Sie nun mit Zeige- und Mittelnger
hinter die Antibeschlag-Scheibe und
heben diese von der Außenscheibe ab. In
dieser Stellung lässt sich die AntibeschlagScheibe nun leicht mit dem Daumen aus
dem Pin ziehen.
4. Danach lässt sich die AntibeschlagScheibe vom Visier entnehmen.
Hinweise:
Um ein Verkratzen des Visiers zu vermeiden, darf die AntibeschlagScheibe nur bei sauberem und trockenem Visier demontiert bzw. montiert
werden.
Achten Sie bei der Montage der Antibeschlag-Scheibe darauf, dass weder
Staub noch Feuchtigkeit zwischen die beiden Visierscheiben geraten.
16
Page 19

Als Unterlage zur Demontage bzw. Montage verwenden Sie am besten ein
weiches und sauberes Tuch.
Achtung:
Aufgrund der hohen Luftdrücke, die beim Fahren mit oenem Visier
wirken, empfehlen wir grundsätzlich während der Fahrt das Visier
zu schließen, um ein Eindringen von Schmutz bzw. Feuchtigkeit zu
vermeiden.
Achtung:
Drücken Sie den Pin nicht mit den Fingern heraus, da der Pin dabei
brechen könnte.
Warnung:
Bei Verwendung eines Doppelscheibenvisiers ist konstruktionsbedingt
damit zu rechnen, dass es zu vermehrten Lichteinspiegelungen im Visier
kommt (insbesondere bei Fahrten in der Dunkelheit). In der Regel werden
diese Lichtreexe aufgrund der Beschlagfreiheit dieses Visiertyps als
unkritisch betrachtet. Sollten Sie aber dennoch, z.B. aufgrund einer
höheren individuellen Sensibilität, Schwierigkeiten mit den Lichtreexen
haben, ist von einem weiteren Einsatz des Doppelscheibenvisiers
abzusehen.
Warnung:
Sollte sich Feuchtigkeit im luftdichten Bereich zwischen den beiden
Visierscheiben benden bzw. eindringen, ist die Antibeschlag-Scheibe,
um Sichtbehinderungen zu vermeiden, umgehend auszubauen. Bauen
Sie diese erst wieder ein, wenn beide Visierscheiben komplett getrocknet
sind (empfohlen: Lufttrocknung). Sollte danach erneut ein Eindringen von
Feuchtigkeit festgestellt werden, so legen Sie die Antibeschlag-Scheibe
Ihrem Händler zur Überprüfung vor.
DE
Sicherheitshinweise
Überprüfen Sie vor jeder Fahrt die Funktionsfähigkeit des Visiers und ob es
eine ausreichend gute Sicht gewährleisten kann. Verunreinigungen sollten
vor jeder Fahrt entfernt werden. Kontrollieren Sie das Visier auf mechanische
Schäden und Risse. Stark verkratzte oder matte Scheiben beeinträchtigen
die Sicht erheblich und sollten vor Antritt einer Fahrt aus Sicherheitsgründen
ausgetauscht werden.
17
Page 20
C. DER HELM
Warnung:
Benzin-, Lösungsmittel- und Treibstodämpfe können am Visier Risse
hervorrufen. Das Visier darf diesen Dämpfen nicht ausgesetzt werden!
Stellen Sie daher Ihren Helm auch nie auf den Tank Ihres Motorrades.
11. INNENAUSSTATTUNG
Die auswechselbare und waschbare Innenausstattung des R2 gewährleistet
neben einer hervorragenden Passform auch gleichzeitig eine bessere Be- und
Entlüftung des Helms.
Die Komfort-Wangenpolster sorgen für eine weiche Polsterung an den Wangen
und das Kopfpolster für eine gute Anlage rund um den Kopf. Das Kopfpolster
gewährleistet die bequeme Auage auf dem Kopf ohne die Lüftungskanäle zu
verdecken.
Die Innenausstattung besteht an allen Stellen (insbesondere jenen mit
direktem Kopfkontakt) aus hautfreundlichem Material. Dabei kommt ein
weiches, atmungsaktives, sehr gut wärme- und feuchtigkeitstransportierendes
ShinyTex® Material sowie ein spezieller, antibakteriell wirkender,
geruchsmindernder Sto zum Einsatz.
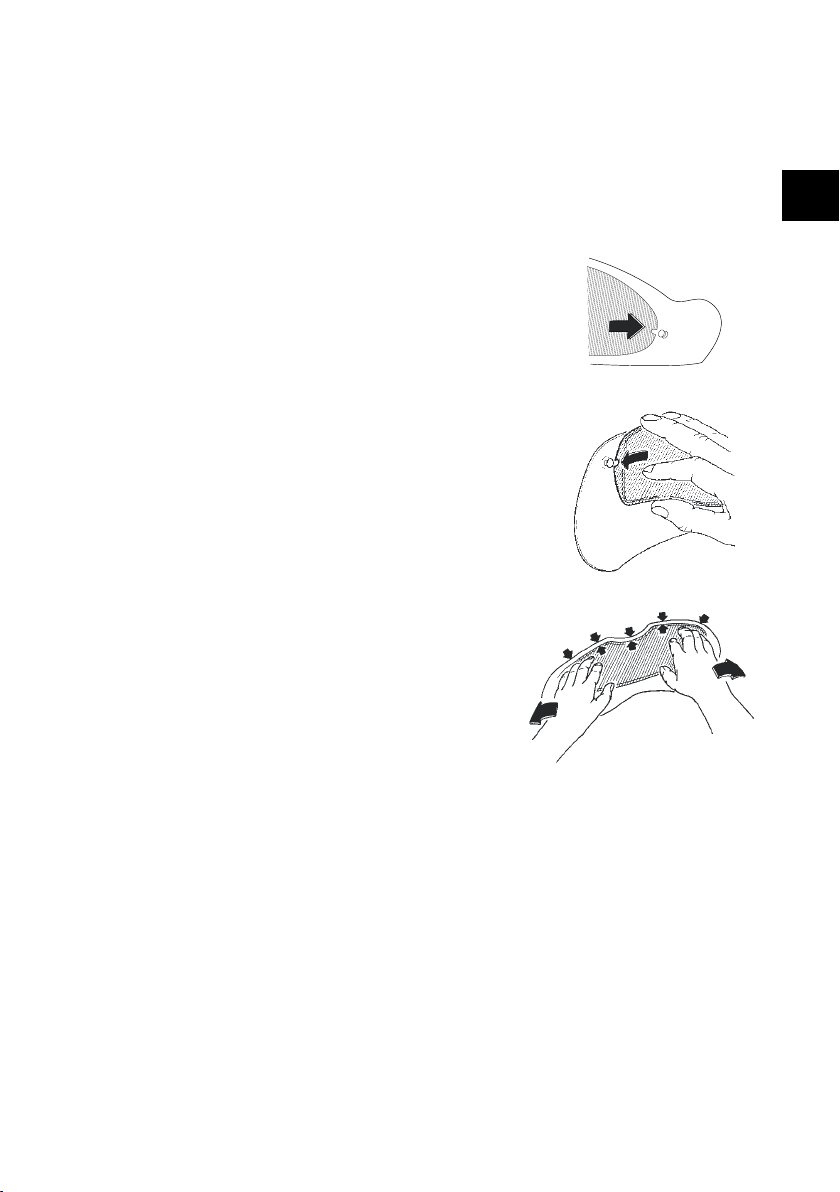
AUSBAU INNENAUSSTATTUNG
Ausbau Komfort-Wangenpolster
1. Ziehen Sie das Komfort-Wangenpolster
behutsam aus seiner Fixierung.
18
Page 21
2. Lösen Sie die eingenähten Pins des
Komfort-Wangenpolsters aus den
rotmarkierten Steckvorrichtungen an der
Helminnenschale.
3. Verfahren Sie mit dem zweiten KomfortWangenpolster wie in den Schritten 1. und
2. erläutert.
Ausbau Kopfpolster
1. Lösen Sie die hinteren Knöpfe des
Kopfpolsters.
DE
2. Lösen Sie die beiden Knöpfe im Stirnbereich
und entnehmen Sie das Kopfpolster.
19
Page 22
C. DER HELM
EINBAU INNENAUSSTATTUNG
Einbau Kopfpolster
Knöpfen Sie das Kopfpolster mit Hilfe der
roten Pins an beide Steckvorrichtungen im
Stirnbereich und die Steckvorrichtung im
hinteren Bereich.
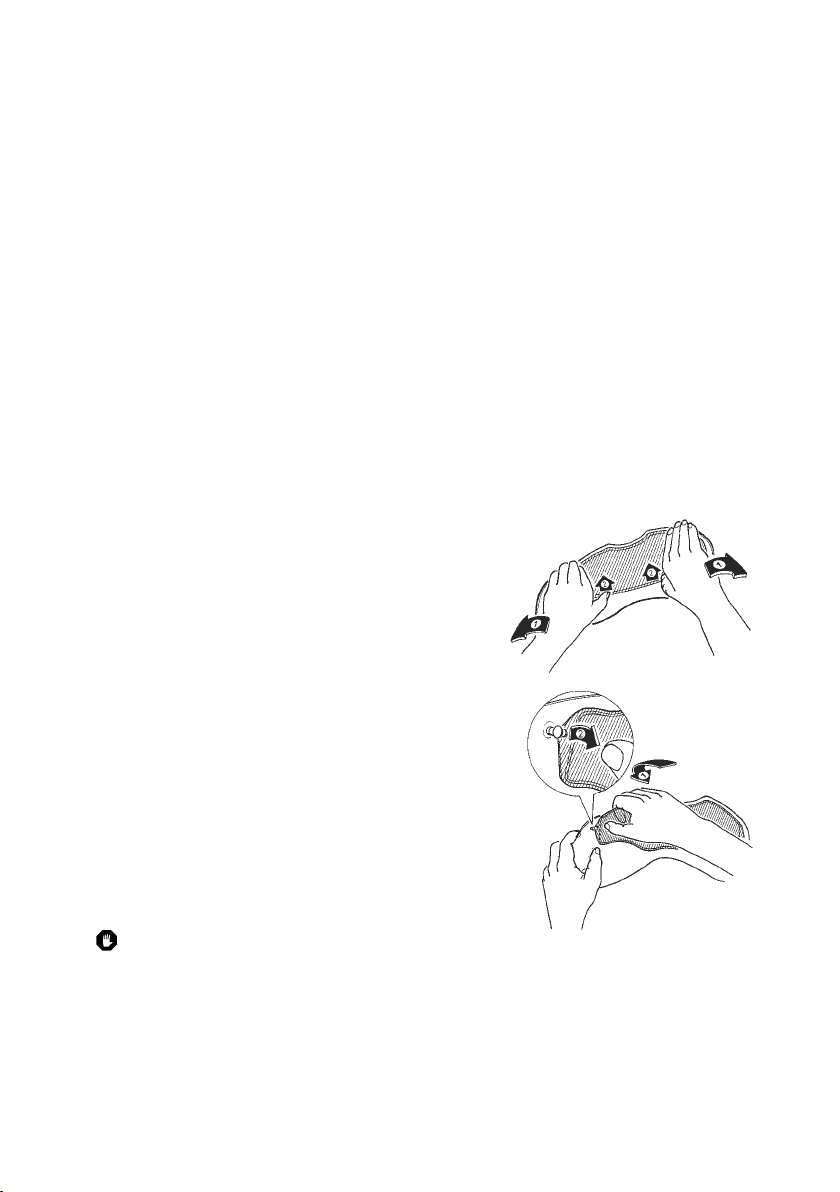
Einbau Komfort-Wangenpolster
1. Ziehen Sie den Kinnriemen durch die
Wangenpolster an jeder Innenseite.
20
Page 23
2. Fixieren Sie das Komfort-Wangenpolster mit
Hilfe der rotmarkierten Steckvorrichtungen.
3. Schieben Sie die Haltelasche des KomfortWangenpolsters in den Führungsspalt zwischen
Helminnen- und Außenschale. Beginnen Sie hierzu
mit dem unteren Teil des Wangenpolsters.
4. Schieben Sie die Haltelasche mit einem
leichten, zur Helmschale gerichteten Druck in
den Führungsspalt zwischen Helminnen- und
Außenschale.
5. Verfahren Sie mit den zweiten KomfortWangenpolster wie in den Schritten 1. bis 4.
Erläutert.
DE
Warnung:
Fahren Sie niemals, wenn Teile der
Innenausstattung entfernt sind.
Warnung:
Große Hitzeeinwirkungen (z.B. Auspuhitze)
können zu Beschädigungen der
Innenausstattung führen!
Achtung:
Um Schäden an der Innenausstattung und der Innenschale zu vermeiden,
den Helm nicht über Spiegel oder Lenkergri hängen.
21
Page 24
C. DER HELM
12. BELÜFTUNGSSYSTEME
BELÜFTUNG 1 VISIEREINSTELLUNG
Der R2 besitzt ein mehrstug verstellbares Visier. Önen Sie das Visier – in
Abhängigkeit von Geschwindigkeit und Beschlagneigung – so weit, dass es
nicht beschlägt und gleichzeitig Ihre Augen vor unangenehmen Luftzügen
geschützt sind.
Stadtstellung
In der zweiten Raststufe bendet sich das Visier automatisch in der
Stadtstellung. Die durch den unteren Spalt eindringende Luft strömt über die
Visierinnenseite und entweicht durch die Önung an der Oberkante.
BELÜFTUNG 2 BELÜFTUNGSEINLASS KINN
(Visierbelüftung)
Zur Belüftung des Visiers ist der R2 im
Kinnbereich mit einem Belüftungseinlass
ausgestattet. Unabhängig von der Sitzhaltung
strömt die Luft in den geöneten Lufteinlass.
Eine Umlenkung sorgt dafür, dass der Luftstrom
schon bei niedrigen Geschwindigkeiten die
Visierscheibe wirkungsvoll belüftet. Durch
Druck auf den unteren bzw. oberen Teil des
Belüftungselements wird der Lufteinlass
geönet bzw. geschlossen.
BELÜFTUNG 3 KOPFBELÜFTUNG
Zur Belüftung der Kopfoberäche bendet
sich an der Oberseite der Helmschale eine
große Lufteinlasshaube mit regelbarem
Belüftungssystem. Die durch diese Haube
eintretende Luft wird über Kanäle an die
Kopfoberseite geführt.
22
Page 25
Im Helminnenraum ermöglicht das Kopfpolstersystem den direkten Kontakt zwischen
einströmen der Luft und Kopfoberäche,
wodurch eine schnellere Ableitung der
Innenraumwärme erzielt wird. Zur Regulierung der
Belüftung bendet sich auf der Lufteinlasshaube
ein auch mit Handschuhen gut bedienbarer
Schieber. Durch Bewegen des Schiebers nach
hinten wird der Lufteinlass komplett geönet.
BELÜFTUNG 4 KOPFENTLÜFTUNG
Der R2 ist mit einem innovativen
Entlüftungssystem ausgestattet. Die über die
Stirnbelüftung einströmende Frischluft wird über
die Luftkanäle der Innenschale weit über den
Hinterkopf zur Helmrückseite geführt. Der auf
der Helmrückseite herrschende Unterdruck sorgt
für einen permanenten Abzug der Innenraumluft
durch die Luftauslässe und den im Nackenpolster
eingesetzten Spezial-Netzsto. Auf diese Weise
wird ein angenehmes Helmklima gewährleistet.
13. ZUSÄTZLICHE SICHERHEITSAUSSTATTUNG
DE
REFLEXBEREICHE
Schwarze Reex-Applikationen im Nackenpolster und im Stirnbereich bewirken
eine bessere Erkennbarkeit des Motorradfahrers. Bei einfarbigen Helmen (ohne
Dekor) ist außerdem das SCHUBERTH Logo auf der Rückseite des Helms aus
Reexfolie gefertigt.
Achtung:
Halten Sie die reektierenden Sicherheitsbereiche sauber.
Achtung:
Bei Einsatz des Helms in Frankreich sind weitere reektierende
Sicherheitsaufkleber verpichtend im Stirn- und Rückenbereich sowie links
und rechts am Helm anzubringen.
23
Page 26

D. AUF UND ABSETZEN
Achtung:
Beachten Sie die Ausführungen zur Handhabung des Kinnriemens.
1. AUFSETZEN DES HELMS
1. Önen Sie den Kinnriemen.
2. Fassen Sie die unteren Enden des Kinnriemens und ziehen Sie diese fest
auseinander.
3. Der Helm lässt sich nun leicht über den Kopf ziehen.
4. Schließen Sie den Kinnriemen.
5. Stellen Sie sicher, dass der Kinnriemen unter dem Kinn verläuft und fest
anliegt.
2. ABSETZEN DES HELMS
1. Önen Sie den Kinnriemen.
2. Ziehen Sie die Kinnriemenenden fest auseinander.
3. Der Helm lässt sich jetzt leicht vom Kopf ziehen.
Tipp:
Um Kratzer an anderen Gegenständen, auf denen der Helm abgelegt
werden könnte zu vermeiden, empfehlen wir, den Kinnriemen auch nach
dem Absetzen zu schließen.
24
Page 27

E. VOR JEDER FAHRT
Kontrollieren Sie zu Ihrer Sicherheit vor jeder Fahrt die folgenden Punkte:
1. ÜBERPRÜFEN DES HELMS
Kontrollieren Sie den Helm regelmäßig auf Schäden. Kleine, oberächliche
Kratzer beeinträchtigen die Schutzwirkung Ihres Helms nicht. Bei gravierenden
Schäden (Risse, Dellen, abgeplatzter und rissiger Lack, etc.) darf der Helm nicht
weiter eingesetzt werden.
2. ÜBERPRÜFEN DES KINNRIEMENS
MIT AUFGESETZTEM UND VERSCHLOSSENEM HELM
1. Prüfen Sie, ob der Kinnriemen unter Ihrem Kinn verläuft.
2. Greifen Sie mit Ihrem Zeigenger unter den Kinnriemen und ziehen Sie.
Liegt der Kinnriemen lose am Kinn, dann ist dieser zu lang eingestellt und
muss straer angezogen werden.
Falls der Kinnriemen nachgibt oder sich löst, ist er nicht richtig
geschlossen! Önen Sie den Kinnriemen komplett und schließen ihn
erneut. Wiederholen Sie die Prüfung.
Achtung:
Wiederholen Sie nach jeder Korrekturmaßnahme die Prüfung.
Warnung:
Nie ohne geschlossenen und richtig eingestellten Kinnriemen fahren! Der
Kinnriemen muss korrekt sitzen und darf unter Zug nicht nachgeben.
Nur wenn der Kinnriemen nicht nachgibt, ist der Verschluss richtig
geschlossen.
DE
25
Page 28

E. VOR JEDER FAHRT
3. KONTROLLE DES VISIERS
Überprüfen Sie bitte vor jeder Fahrt die Funktionsfähigkeit von dem Visier, ob
es eine ausreichend gute Sicht gewährleisten kann. Verunreinigungen sollten vor
jeder Fahrt entfernt werden.
Kontrollieren Sie das Visier auf mechanische Schäden und Risse. Eine stark
verkratzte Visierscheibe beeinträchtigt die Sicht erheblich und sollte bei Bedarf
vor Antritt der Fahrt ausgetauscht werden.
Warnung:
Benutzen Sie niemals getönte Visiere bei schlechten Sichtverhältnissen
sowie Nacht- und Tunnelfahrten.
Warnung:
Bei schlechter Sicht ist die Fahrt abzubrechen.
26
Page 29
F. FÜR IHRE SICHERHEIT
1. SICHERHEITSHINWEISE HELM
Beim Motorradfahren existieren spezielle Gesundheitsrisiken und -gefahren
für Fahrer und Beifahrer. Diese Risiken und Gefahren können durch
das Tragen eines Helms reduziert aber nicht ausgeschaltet werden.
Es sind keine denitiven Aussagen über die konkrete Schutzwirkung
eines Helms bei einem Unfall möglich. Eine sichere, den Straßen- und
Witterungsbedingungen angepasste Fahrweise ist die Grundvoraussetzung
für Ihre Sicherheit.
Um ausreichenden Schutz zu gewähren, muss der Helm gut passen und
sicher befestigt sein.
Schließen Sie vor jeder Fahrt den Kinnriemen und überprüfen Sie
Verschluss-System und Kinnriemen auf korrekten Sitz!
Fahren Sie nie mit geönetem oder nicht korrekt eingestelltem Kinnriemen!
Der Kinnriemen muss korrekt sitzen und darf unter Zug nicht nachgeben.
Nur wenn der Kinnriemen nicht nachgibt, ist der Verschluss richtig
geschlossen.
Nach einem Sturz bzw. Unfall oder nach Gewalteinwirkung auf den Helm
ist dessen volle Schutzwirkung nicht mehr gewährleistet! Die bei einer
Kollision einwirkende Energie wird – ähnlich der Knautschzone beim PKW
– durch völlige oder teilweise Strukturzerstörung der Helmaußen- bzw.
-innenschale absorbiert. Bedingt durch die Konstruktion des Helms sind
diese Schäden für den Betrachter häug nicht erkennbar. Der Schutzhelm
ist für die Absorption nur einer Stoßeinwirkung ausgelegt. Nach einem
Sturz, Unfall oder nach einer sonstigen Krafteinwirkung muss der Helm
daher grundsätzlich ausgetauscht werden. Aus Sicherheitsgründen ist der
alte Helm unbrauchbar zu machen.
DE
Der zuvor beschriebene Schutzmechanismus des Helms kann auch beim
Fallen des Helms aus einer Höhe (<1m) zu kleinen Rissen in der Helmschale
führen.
eder Helm, der einem heftigen Schlag ausgesetzt war, ist auszuwechseln!
Kein Helm bietet Schutz gegen alle denkbaren Stoßeinwirkungen.
Dieser Helm wurde speziell zum Motorradfahren entwickelt. Für andere
Verwendungszwecke ist er nicht geeignet.
27
Page 30
F. FÜR IHRE SICHERHEIT
Kontrollieren Sie den Helm regelmäßig auf Schäden. Kleine Kratzer
beeinträchtigen die Schutzwirkung Ihres Helms nicht.
Der Helm sollte je nach Beanspruchung und Pege nach 5–7 Jahren
ausgetauscht werden. Die Außenschale ist zwar prinzipiell für eine
darüber hinausgehende Nutzungsdauer geeignet, aufgrund von
Materialermüdungs- und Materialabnutzungserscheinungen anderer
Komponenten sowie des Gesamtwirkungssystems des Helms und
unbekannter Rahmenbedingungen während der Nutzung empfehlen wir zu
Ihrer eigenen Sicherheit den Austausch des Helms nach Ablauf des oben
genannten Zeitraums.
Große Hitzeeinwirkungen (z. B. durch Auspuhitze) können
zu Beschädigungen des Dekors, der Helminnenschale und der
Innenausstattung führen!
Das direkte Einwirken von Kraftstoen, Verdünnern und Lösungsmittel
kann zu Strukturzerstörungen der Helmaußen- und Helminnenschale
führen. Der Helm darf nicht mit derartigen Substanzen in Kontakt gebracht
werden! Auch nicht für Reinigungszwecke.
2. SICHERHEITSHINWEISE VISIER
Die während des Transports am Visier befestigte Schutzfolie ist vor
Gebrauch zu entfernen.
Benutzen Sie niemals getönte Visiere bei schlechten Sichtverhältnissen
sowie Nacht- oder Tunnelfahrten!
Benzin-, Lösungsmittel- und Treibstodämpfe können am Visier Risse
hervorrufen. Das Visier darf diesen Dämpfen nicht ausgesetzt werden oder
mit derartigen Substanzen in Kontakt kommen! Stellen Sie daher Ihren
Helm auch nie auf den Tank Ihres Motorrades.
Tragen Sie Sorge, dass das Visier immer in einem einwandfreien Zustand
ist. Bei schlechter Sicht ist die Fahrt abzubrechen!
28
Page 31

3. SICHERHEITSHINWEISE MODIFIKATION/ZUBEHÖR
Originalbestandteile (insbesondere an Außenschale, Innenschale und
Rückhaltesystem) dürfen weder verändert noch entfernt werden. Das
Anbringen fremder, nicht empfohlener Zusatzteile kann die Schutzwirkung
aufheben und bewirkt das Erlöschen der ECE-Zulassung sowie aller
Gewährleistungs- und Versicherungsansprüche.
Verwenden Sie nur Original-Zubehör und Ersatzteile sowie Zubehör, das
von SCHUBERTH für Ihren Helm ausdrücklich freigegeben ist!
DE
29
Page 32

G. WARTUNG UND PFLEGE
1. AUSSENSCHALE
Zur Reinigung und Pege der Helmaußenschale können Sie Wasser,
Seifenlauge, alle handelsüblichen Lackshampoos, Lackreiniger, -polituren und
Kunststopegemittel sowie Reinigungsbenzin verwenden. Die Reinigung
mit Wasser und Seifenlauge ist in der Regel ausreichend. Achten Sie beim
Einsatz der anderen Mittel darauf, dass diese nicht mit dem Visier in Berührung
kommen, da diese Schäden an Visier und Beschichtung hervorrufen können.
Achtung:
Verwenden Sie zur Reinigung keine Kfz-Kraftstoe, keine Verdünner
und Lösungsmittel. Diese Substanzen können zu schwerwiegenden
Beschädigungen des Helms ohne äußerlich sichtbare Anzeichen führen.
Die volle Schutzwirkung des Helms ist dann nicht mehr gegeben.
2. VISIER
VISIERAUSSENSEITE
Verwenden Sie einen weichen Lappen und eine milde Seifenlauge (< 20 °C)
zum Entfernen von Verunreinigungen auf der Visier-Außenseite. Zum Trocknen
des Visiers benutzen Sie ein fusselfreies Tuch mit geringer Druckausübung.
ANTIBESCHLAGSCHEIBE
Die Antibeschlag-Scheibe ist ausschließlich mit einem weichen, bei Bedarf leicht
angefeuchteten Tuch (empfohlen: Mikrofasertuch), zu reinigen. Hierbei keine
Reinigungsmittel verwenden.
Achtung:
Zur Reinigung nur lauwarmes Wasser (< 20 °C) verwenden. Reinigen
Sie die Visiere keinesfalls mit Benzin, Lösungsmitteln, Fenster- bzw.
Glasreinigern oder anderen alkoholhaltigen Reinigungsmitteln.
Achtung:
Das Visier darf auch bei starker Verschmutzung der Visieraußenseite nicht
im Wasserbad eingeweicht werden, da hierdurch die Oberächenhärte und
damit die Widerstandsfähigkeit der Anti-Scratch-Beschichtung extrem
reduziert wird.
30
Page 33

Achtung:
Das Visier darf während Nicht-Einsatzzeiten (insbesondere
Lagerungszeiten) nicht komplett geschlossen werden, da ansonsten
die im Innenraum enthaltene Feuchtigkeit nicht entweichen kann und in
verstärktem Maße von der Anti-Scratch- Beschichtung aufgenommen
wird. Dies kann zu einer Reduktion der Lebensdauer der Beschichtung
führen. Idealerweise positionieren Sie das Visier in der 3. Raststufe
oberhalb der Stadtstellung.
Achtung:
Bringen Sie keine Etiketten, Klebebänder oder Aufkleber an das Visier an.
3. INNENAUSSTATTUNG
Die Innenausstattung des R2 ist komplett herausnehmbar. Die Kopf und
Wangenpolster können mittels Handwäsche unter Verwendung einer milden
Seifenlauge (z. B. mit stark verdünntem, handelsüblichem Feinwaschmittel)
bei maximal 30 ° C gewaschen werden. Feuchte Innenausstattung bei
Raumtemperatur und guter Durchlüftung trocknen lassen.
4. BELÜFTUNG
BELÜFTUNGSHAUBE
DE
Bei Bedarf kann die Belüftungshaube der Kopfbelüftung entfernt und die
Belüftungsmechanik gereinigt werden.
1. Drücken Sie hierzu kräftig von hinten gegen
den Belüftungsschieber und fassen Sie vorne
leicht unter den Belüftungsschieber, bis sich
dieser von der Lüftungshaube löst.
31
Page 34

G. WARTUNG UND PFLEGE
2. Führen Sie den Belüftungsschieber nach
dem Reinigen in die entsprechende
Führung. Anschließend schieben Sie den
Schieber mit etwas Druck nach hinten.
5. VERSCHLUSSSYSTEM
Die Metallteile des Verschluss-Systems sind wartungsfrei.
6. AUFBEWAHRUNG
Bewahren Sie den Helm an einem trockenen, gut belüfteten und standsichern
Ort auf. Legen Sie den Helm immer so ab, dass er nicht auf den Boden fallen
kann. Beschädigungen, die auf diese Art entstehen, fallen nicht unter die
Gewährleistung.
Achtung:
Bewahren Sie den Helm für Kinder und Tiere unzugänglich auf.
32
Page 35

H. ZUBEHÖR UND ERSATZTEILE
1. ZUBEHÖR UND ERSATZTEILE
Eine Übersicht aller verfügbaren Zubehör- und Ersatzteile nden Sie im Internet
unter WWW.SCHUBERTH.COM
Wir empfehlen Ihnen für Ihren SCHUBERTH Helm ausschließlich die Verwendung
von SCHUBERTH Original Zubehör- und Ersatzteilen, da diese optimal auf Ihr
entsprechendes Helmmodell abgestimmt sind.
Warnung:
Der Austausch aller anderen Helmbestandteile darf aus Sicherheitsgründen
nur vom SCHUBERTH Reparaturservice durchgeführt werden.
2. KOMMUNIKATIONSSYSTEME
Warnung:
Der Einbau von Kommunikationssystemen (dazu gehören auch einfache
Head-Sets) in einen Helm stellt grundsätzlich eine Modikation des Helms
dar. Daher müssen die jeweiligen Kommunikationssysteme und Headsets
speziell für den Einbau in das jeweilige Helmmodell nach der europäischen
Helmnorm ECE-R 22.05 geprüft und zugelassen sein, ansonsten erlischt
die Zulassung und Versicherungskonformität des Helms mit dem Einbau.
Der Nachweis für eine ECE-R 22.05 gemäße Zulassung eines Helms
– in Verbindung mit einem speziellen Kommunikationssystem – ist nur
gültig, wenn er von einer oziellen Zulassungsbehörde der EU-Länder
beurkundet ist.
Andersartige Auskünfte dieser Institutionen (u.a. zur allgemeinen Eignung
von Kommunikationssystemen zur Verwendung in Motorradhelmen) oder
Auskünfte anderer Institutionen besitzen keinerlei Relevanz und der Helm
verliert seine Zulassung.
DE
33
Page 36

H. ZUBEHÖR UND ERSATZTEILE
Ihr R2 ist bereits mit einem vorinstalliertem Mikrofon und Kopfhörern für die
Verwendung mit dem SC1 System vorbereitet.
Die Kopfhörer benden sich hinter dem Wangenpolster und können bei Bedarf in
ihrer Position verändert werden.
Informationen rund um das SC1 System erhalten Sie bei Ihrem Fachhändler und
auf WWW.SCHUBERTH.COM
3. BEZUG VON SCHUBERTH ORIGINALTEILEN
SCHUBERTH Original Zubehör- und Ersatzteile erhalten Sie bei Ihrem
Fachhändler. Den SCHUBERTH Fachhändler in Ihrer Nähe nden Sie im Internet
unter WWW.SCHUBERTH.COM
34
Page 37

I. SCHUBERTH SERVICE
Bei Bedarf wenden Sie sich bitte an Ihren Fachhändler oder nehmen Sie direkt
Kontakt mit unserem Servicecenter auf. Den Fachhändler in Ihrer Nähe, sowie
die Kontaktdaten unseres Servicecenter nden Sie im Internet unter
WWW.SCHUBERTH.COM
J. GEWÄHRLEISTUNG
Bitte beachten Sie die länderspezische gesetzliche Gewährleistung.
Zusätzlich können Sie von den Vorteilen der „5 YEARS SCHUBERTH
STANDARD GUARANTEE“ protieren. Registrieren Sie hierfür Ihren R2 im
Internet unter WWW.SCHUBERTH.COM und genießen Sie die Vorzüge der
erweiterten Garantie.
Sollte es ein Problem mit Ihrem Produkt geben, wenden Sie sich bitte an Ihren
Fachhändler bzw. an dessen Serviceanschrift oder nehmen Sie direkt Kontakt
mit unserem Servicecenter auf. Bei Rücksendung bitten wir Sie, eine möglichst
genaue Fehlerbeschreibung beizufügen. Sofern Sie sich noch nicht für die „5
YEARS SCHUBERTH STANDARD GUARANTEE“ registriert haben, legen Sie
bitte eine Kopie des Kaufbelegs bei.
Eine Registrierung ist jederzeit möglich.
DE
35
Page 38

K. WIE SIE UNS ERREICHEN
FIRMENSITZ
Telefonzentrale
+49 (0)391 8106-0
Anschrift
SCHUBERTH GmbH
Stegelitzer Straße 12
39126 Magdeburg
Deutschland
Internet
WWW.SCHUBERTH.COM
36
Page 39

R2
THANK YOU FOR PLACING YOUR TRUST,
In our decades of experience in the development and manufacture of
motorcycle helmets. We’re delighted that you have chosen the SCHUBERTH
R2. Each and every R2 that leaves our factory has been made with exquisite
craftsmanship using state-of-the-art manufacturing techniques.
The R2 features outstanding aeroacoustics and advanced ergonomics.
Perfected in a wind tunnel, the aerodynamics ensure stable helmet performance
at all times. Naturally, the R2 possesses the tried and tested SCHUBERTH
helmet features you have come to expect when it comes to safety, comfort and
designed. All these features, the stringent quality requirements we place on the
materials used, as well as our meticulous craftsmanship, go together to make
a quality product designed to meet extremely high expectations in safety and
reliability on the road – especially on long journeys.
We hope you have plenty of fun with your SCHUBERTH R2 and a safe and
enjoyable trip at all times.
EN
Jan-Christian Becker Thomas Schulz
CEO SCHUBERTH GmbH Product Management SCHUBERTH GmbH
37
Page 40

A. HOW TO USE THIS MANUAL CORRECTLY
Please take time to read through this manual carefully so that your helmet
protects you properly when riding your motorcycle. In order to ensure that
you do not overlook any aspect of the manual that is relevant to your safety,
we recommend that you read it in the order in which it appears.
Please play particular attention to:
Caution: safety instructions
Note: advice
Advice: practical tips
Caution:
This helmet is not intended for use in the USA and Canada. The helmet has been inspected
and approved to the European ECE Standard and therefore does not conform to US and
Canadian regulations and requirements. It is only legal to use the helmet in countries in which
the European ECE Standard is valid. If you use the helmet in other countries, you will not in
the event of injury be entitled to make a claim for compensation before the US or Canadian
courts or the courts of other countries not bound by the ECE Standard.
Note:
We reserve the right to make changes that reect technical advances and
to do so without express notice.
38
Page 41

B. CONTENTS
A. How to use the manual correctly 38
B. Contents 39
C. The helmet 41
1. Standard 41
2. ECE approval 41
3. Anatomy the helmet 42
4. Outer shell 42
5. Inner shell 42
6. Aerodynamics 43
7. Aeroacoustics 43
8. Wind deector 45
9. Retention system 45
10. Visor 46
11. Inner lining 53
12. Ventilation systems 57
13. Additional safety features 58
D. Putting on and taking o the helmet 59
1. Putting on the helmet 59
2. Taking o the helmet 59
EN
E. Before every journey 60
1. Checking the helmet 60
2. Checking the chinstrap 60
3. Checking the face shield and sun visor 61
39
Page 42

B. CONTENTS
F. For your safety 62
1. Safety advice concerning the helmet 62
2. Safety advice concerning the face shield / sun visor 62
3. Safety advice concerning modications / accessories 63
G. Care and maintenance 64
1. Outer shell 64
2. Face shield and sun visor 64
3. Inner lining 65
4. Ventilation 65
5. Locking system 66
6. Storing the helmet 66
H. Accessories and replacement parts 67
1. Accessories and replacement parts 67
2. Communication systems 67
3. Obtaining original SCHUBERTH parts 68
I. SCHUBERTH service 69
J. Warranty 69
K. How to contact us 70
40
Page 43

C. THE HELMET
1. STANDARD
The R2 conforms to the ECE-R 22.05 standard. This testing norm guarantees
conformity to dened safety standards in respect of impact absorption, visor,
retention system and eld of vision. The certication applies to all the countries
of the European Union and all countries that recognize the ECE standard. It also
guarantees conformity with all insurance requirements that are important in the
event of a claim.
Please note that this R2 with ECE approval is not certied for the USA, Canada
or any other EU countries. It is only permitted for use in countries where the
ECE standard is valid.
Note:
The only SCHUBERTH helmets that it is legal to use in the USA, Canada
or other non-EU countries are those with the appropriate approval and
technical specications.
Further information and details of sales outlets for these helmets can be
found on the internet at:
WWW.SCHUBERTH.COM
EN
2. ECE APPROVAL
ECE test standard
Certication number
051234/P-1234
Certifying authority
Serial number
05123456
41
Page 44

C. THE HELMET
3. ANATOMY OF THE HELMET
Face shield
Integrated
antennas
Inner lining
Face shield
ventilation/
Chin ventilation
Chin bar release
Head ventilation
Inner shell
Head outlet vent
Anti-fog lens
Visor mechanicsk
Outer shell
Chinstrap
(with double-Dfastening)
4. OUTER SHELL
The outer shell of the R2 helmet combines an aerodynamically optimal shape
with consistent protection. It consists of a special glass-bre reinforced special
duroplastic matrix developed by SCHUBERTH, which gives the helmet the high
level of strength needed for your protection.
Caution:
The safety helmet is designed to absorb the eects of only one impact.
The helmet must be replaced after a fall, accident or any other impact.
5. INNER SHELL
For optimised impact absorption properties, the inner shell of the helmet
consists of several components. The complex multi-segment foam padding of
the main body provides better absorption and dissipation of impact forces and
gives you the highest level of safety.
42
Page 45

6. AERODYNAMICS
Wind noise is low with the R2, both for race-riding and during long touring rides.
The R2 produces practically no uplift even at speed.
Note:
Wind noise is low with the R2, both for race-riding and during long touring
rides. The R2 produces practically no uplift even at speed.
7. AEROACOUSTICS
Various features developed in SCHUBERTH’s wind tunnel make the helmet
agreeably quiet as far as aeroacoustics are concerned, while providing optimised
acoustic feedback when riding. This enhances concentration, especially at high
speeds.
Note:
Aeroacoustic values may vary according to the type of motorcycle, fairing
design, seat position and physical size of the rider.
Caution:
As a result of the aeroacoustic optimisation of the helmet (and the lower
wind noise inside the helmet that comes with it), your actual speed can
easily be underestimated. Please do not rely on your sense of hearing to
estimate your road speed – always check it using your speedometer.
EN
43
Page 46

C. THE HELMET
Note:
With faired motorcycles, strong eddy currents occur at the edges of
the wind shadow. These may signicantly reduce the aeroacoustic
performance of the helmet. The motorcycle fairing should be adjusted so
that the turbulence created does not strike the bottom surface of the
helmet.
aeroacousitcally non-critical area
aeroacoustically critical area
aeroacousitcally non-critical area
Turbulators
The patented turbulators on the top of the face shield also
optimise the aeroacoustic properties when riding and
prevent acoustic disturbances in the form of
whistling sounds that can be created by smooth
and straight edges.
44
Page 47

8. WIND DEFLECTOR
The wind deector prevents any unwanted airstream into the helmet. In
addition, the noise of driving in the helmet can be further reduced.
Start with one side and repeat the process on the
other side.
Advice:
The t of the bottom of the helmet is
extremely important in ensuring that the
helmet is as quiet as possible. If you have a
smaller collar size, we recommend that you
also wear a scarf.
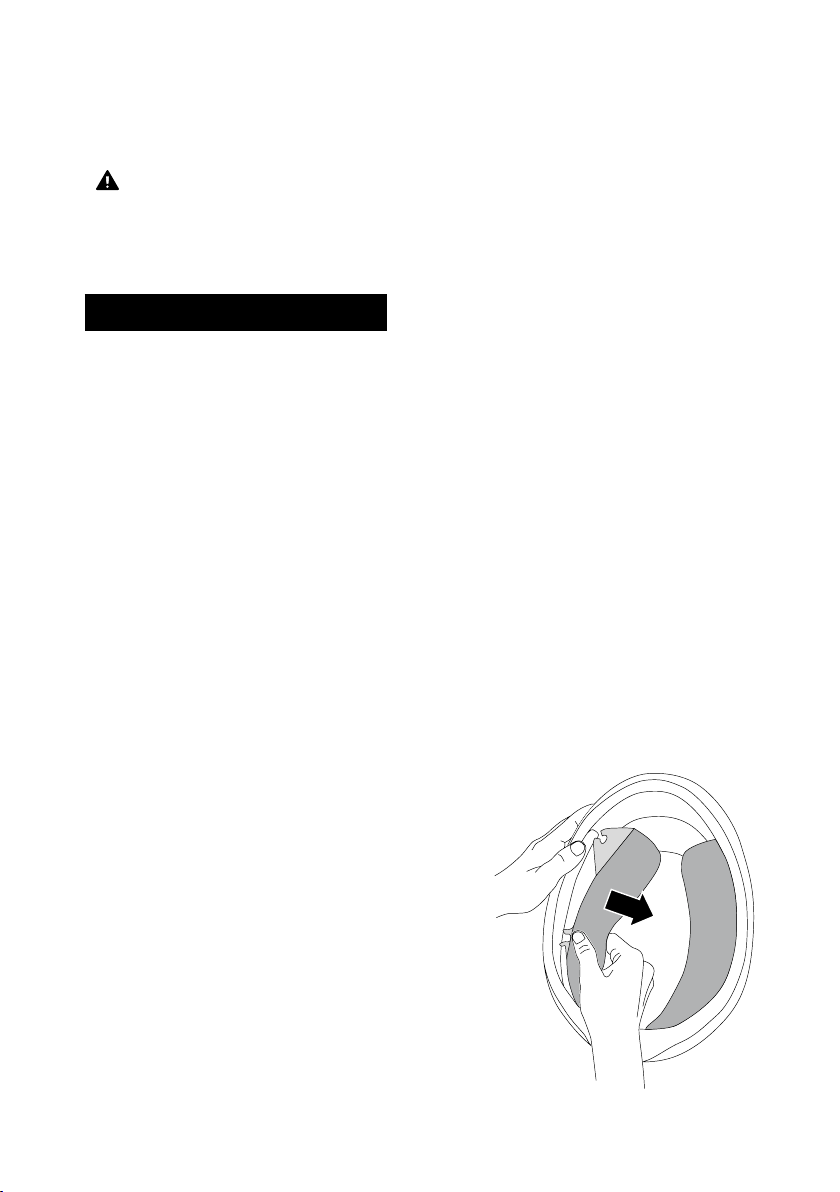
9. RETENTION SYSTEM
The restraint system of the R2 consists of the chinstrap. For helmet sizes up to
and including 54/55, a neckband is also available in the neck area.
CHIN STRAP WITH DOUBLEDFASTENING
The double-D-fastener allows for an easy and precise adjustment of the chin
strap.
EN
Closing the chin strap
1. Thread the end of the chin strap through
the double-D-fastener.
2. Pull the chin strap tight and feed the free
end back through the front ring.
45
Page 48

C. THE HELMET
3. Pull the free end of the chin strap until it’s
tight and comfortable on your chin.
4. Take the free end of the chin strap reverse
and ax to the press stud.
Loosing and opening
Release the press stud and pull on the red lug of
the double-D-fastener, so that the chin strap is
loosened.
Thread the free end of the chin strap out of the
double-D-fastener.
Caution:
Never ride without a closed and adjusted chin strap, otherwise you risk
losing the helmet from your head.
10. VISOR
The visor is a fog-free double-lens visor. By xing the inner anti-fog lens using
eccentric pins, the two visor panes are pre-tensioned together and are thereby
sealed. An insulating air cushion is thus formed between the visor’s main plate
– i.e. the outer plate – and the inner plate, which prevents any fogging up of
the inner plate.
COATING
The main visor has an anti-scratch coating.
Note:
The helmet should never be used to hold gloves or any other objects as
this may damage the scratch-sensitive anti-fog lens.
46
Page 49

Note:
The helmet should never be used to hold gloves or any other objects as
this may damage the scratch-sensitive anti-fog lens.
Note:
The anti-fog lens may only be used in conjunction with the SCHUBERTH
main face shield that has been specially designed for this purpose. Other
face shields must not be tted.
OPENING THE FACE SHIELD
To open the face shield, use your thumb to push
the face shield up using one of the nger tabs
situated to the left and right of the face shield,
and move it to the desired position.
Face shield (including urban position)
The face shield can be locked in any one of seven positions. The second position
(urban position) locks in place more rmly, providing greater resistance when
the face shield is in this position. This makes it easier to lock the face shield in
the urban position, especially while riding.
EN
• When you push the face shield open, it may well travel beyond the urban
position
• but it is easy to nd this position by moving it downwards again
47
Page 50

C. THE HELMET
CLOSING THE FACE SHIELD
To close the face shield, grip the nger tabs at
top left and right and press the face shield down
with one movement until it audibly locks into
place.
REPLACING THE VISOR SHIELD
Changing the visor shield is easy to do without tools using the convenient
EasyChange visor mechanism. To replace the visor, it is helpful to place the
helmet on a at surface or on your lap while seated.
Removing the face shield
1. Move the face shield into the
uppermost locked position.
2. Press the spring underneath the
face shield mechanism on one side
towards the face shield opening,
then do the same with the spring on
the other side.
48
Page 51

3. Move the face shield upwards until it is released from the face shield
mechanism.
Fitting the face shield
1. Using both hands, guide the face
shields locking studs into the
respective recesses in the face
shield mechanism.
2. The face shield will then audibly lock into
place when you press it gently towards
the helmet with a simultaneous closing
movement.
EN
3. Make sure that the face shield mechanism is
functioning properly by opening the face shield
once to its maximum extent.
49
Page 52

C. THE HELMET
ANTIFOG LENS
Fitting
1. Lay the anti-fog lens in the face shield in such
a way that one side of it is already slotted into
the locking pin.
2. Now grasp the other side of the antifog lens by
its upper and lower transverse edges and use
your index nger to gently press the end of the
visor into a slight "S" shape. Now you can easily
guide the slot over the locking pin and release
the anti-fog lens into place.
3. The anti-fog lens should now be positioned in
the face shield with its lower edge parallel to
the lower edge of the face shield. If you need
to change the positioning of the anti-fog lens,
use the balls of your thumbs to gently bend the
face shield apart until the inner visor can be
adjusted as required.
4. Check all round the visor to make sure that the silicone seal ts tightly and
evenly against the face shield. Only if this is the case will the anti-misting
properties function properly.
5. If you have not already done so, please remove the yellow protective lm.
50
Page 53

If the anti-fog lens is not air-tight and the face shield mists up, either the visor
is not correctly in place or the pressure on the seal is inadequate. You can
regulate the pressure on the seal by adjusting the eccentric locking pins. To do
so, remove the anti-fog lens, then use a at object with no sharpedges to push
the locking pins out of the face shield carefully from the inside; then rotate
them by 180° and reinsert them. Fit the anti-fog lens and check the seal.
Removal
1. Before starting to remove the antifog lens, rst lay the face shield on a
soft, clean cloth so that its top edge is facing you.
2. To reduce the pretensioning of the
antifog lens slightly if necessary, use the
balls of your thumbs to carefully bend
the face shield suciently apart while
applying pressure with your thumbs to
release the anti-fog lens and move it
approx. 2-3 mm forward.
3. Now grip the back of the anti-fog lens with
your index and middle ngers and lift it
o the face shield. In this position you can
easily remove the anti-fog lens from the
locking pin with your thumb.
EN
4. You can now remove the anti-fog lens
from the face shield.
Note:
To avoid scratching the face shield, never remove or t the anti-fog lens
unless the visor unit is clean and dry.
When tting the anti-fog lens, check that neither dust nor moisture are
able to get between the two plates.
51
Page 54

C. THE HELMET
When removing or tting the anti-fog lens, it is always best to lay the face
shield unit on a clean, dry cloth.
Note:
Due to the high air pressure caused while riding with an open visor, we
generally recommend closing the visor to prevent dirt and moisture from
getting in.
Note:
Never press the locking pins out with your ngers as they may break.
Caution:
As a result of the double shield lens structure, there is a possibility of
greater light reection in the face shield, especially when riding at night. As
a rule, such light reection is regarded as uncritical due to the absence of
misting with this type of visor. However, if this light reection should cause
you diculties - because of particular sensitivity to it, for example – you
should refrain from using the anti-fog lens.
Caution:
If moisture is present in or has penetrated the airtight area between the
two plates, you should remove the anti-fog lens immediately in order to
prevent any interference with visibility. Do not re-t it until both plates are
completely dry (we recommend air-drying). If, after this, it is clear that
moisture is still getting in, please take the anti-fog lens to your retailer for
inspection.
SAFETY NOTE
Before every ride, check the functionality of the visor to see whether it can
guarantee suciently good visibility. Impurities should be removed before each
ride. Inspect the visor for mechanical damage and cracks. Heavily scratched or
dull panes considerably impair vision and should be replaced before starting a
journey for safety reasons.
Caution:
Petrol, solvent and fuel vapours can cause cracking of the face shield.
Make sure that the face shield is never exposed to such vapours! Never
place the helmet on the tank of your bike.
52
Page 55

11. INNER LINING
The replaceable inner lining of the R2 is washable and ensures both an excellent
t and improved ventilation of the helmet.
The high-comfort cheek pads ensure that the helmet ts comfortably around
the cheeks, and the headband pad provides an optimal t all around the head.
The head pad sits comfortably on the head without covering the ventilation
channels.
The interior is made of skin-friendly material at all points (especially those
with direct head contact). A soft, breathable, very good heat- and moisturetransporting ShinyTex® material as well as a special, antibacterial, odourreducing material is used.
REMOVING THE LINING
Removing the high-comfort cheek pads
1. Gently pull the comfort cheek pad out of its
xing.
EN
53
Page 56

C. THE HELMET
2. Loosen the sewn-in pins of the comfort
cheek pad from the red-marked connectors
on the helmet’s inner shell.
3. Proceed with the second comfort cheek
pad as explained in steps 1 and 2.
Removing head padding
1. Undo the buttons at the back of the head
padding.
2. Undo the two buttons in the forehead area
and remove the head padding.
54
Page 57

FITTING INNER LINING
Installing head padding
Using the red pins, attach the head padding to
the two connectors in the forehead area and
the one at the back of the helmet
Fitting the high-comfort cheek pads
EN
1. Pull the chinstrap through the cheek
pads on each inner side.
55
Page 58

C. THE HELMET
2. Fix the comfort cheek pads with the help of
the redmarked connectors.
3. Slide the retaining tab oft he comfort
cheek pad into the guide gap between the
helmet’s inner and outer shell. Start with the
lower part of the cheek pad.
4. Push the retaining tab into the guide gap
between the helmet’s inner and outer shell
with a light pressure directed towards the
helmet shell.
5. Proceed with the second comfort cheek
pad as explained in steps 1 to 4.
Caution:
Never ride when parts of the inner lining
have been removed.
Caution:
Excessive heat (e.g. exhaust heat) can
cause damage to the inner lining!
Note:
To avoid damage to the inner lining and inner shell, do not hang the helmet
over the mirrors or handlebar grips.
56
Page 59

12. VENTILATION SYSTEMS
VENTILATION DEVICE 1 FACE SHIELD SETTING
The R2 has a face shield that adjusts to several positions. Depending on your
road speed and the tendency of the face shield to mist up, open the face shield
suciently wide to stop it misting up but so that it still protects your eyes from
excessive draft.
Urban position
In its second locking position, the face shield is automatically in urban position.
Air entering through the bottom gap ows over the inside of the face shield and
escapes through the opening at the top.
VENTILATION DEVICE 2 INLET VENT IN CHIN AREA
(face shield ventilation)
The R2 features an air inlet in the chin section
for visor ventilation.
Air ows through the open air inlet regardless
of riding position. A deector ensures that
the visor is eectively ventilated even at low
speeds. By pressing on the lower or upper
part of the ventilation element, the air inlet is
opened or closed.
EN
VENTILATION SYSTEM 3
HEAD VENTILATION
To ventilate the head, a large air vent with
adjustable ventilation system is located at the top
of the helmet shell. The air entering through this
vent is routed through channels to the top of the
head.
57
Page 60

C. THE HELMET
In the helmet interior, the head padding system
allows airow to directly contact the surface of
the head, thereby providing faster dissipation
of inner heat. To regulate ventilation, a slider is
located on the air vent which is easy to operate
even with gloves on. Moving the slider back
opens the air vent completely.
VENTILATION DEVICE 4
INTERIOR AIR EXTRACTION
The R2 is equipped with an innovative air
extraction system. Fresh air owing in through
the head vent is directed via the air channels in
the inner shell to the back of the helmet. The
reduced pressure that prevails at the back of the
helmet ensures that the air is constantly sucked
out through the air vents and special netting
material tted to the neck pad, thus guaranteeing
a pleasant climate inside the helmet.
13. ADDITIONAL SAFETY FEATURES
REFLECTIVE PANELS
Black reective patches in the neck pad and in the forehead area make
the motorcyclist more visible. With solid-colour helmets (no decals), the
SCHUBERTH logo on the back of the helmet is also made of reective lm.
Note:
Keep the reective safety areas clean.
Note:
When riding in France, local law requires that further reective safety
stickers be attached to the front, back and both sides of the helmet.
58
Page 61

D. PUTTING THE HELMET ON
AND TAKING IT OFF
Note:
Please note the information on the handling of the chin strap.
1. PUTTING THE HELMET ON AND TAKING IT OFF
1. Open the chinstrap.
2. Take hold of the lower ends of the chinstrap and pull these apart.
3. It will now be easy to put the helmet on.
4. Fasten the chinstrap.
5. Make sure the chinstrap passes under the chin and ts rmly.
2. TAKING OFF THE HELMET
1. Open the chinstrap.
2. Grasp the ends of the chinstrap and pull the chinstrap ends apart.
3. The helmet can now be removed easily from the head.
Advice:
To avoid scratching any objects on which you place the helmet when you
take it o, we recommend closing the chinstrap after you have taken the
helmet o.
EN
59
Page 62

E. BEFORE EVERY JOURNEY
For your safety, check the following points before every journey:
1. CHECKING THE HELMET
Check the helmet regularly for damage. Small supercial scratches will not
impair the protective function of your helmet. In the case of more serious
damage (cracks, dents, aking and cracking paint, etc.), the helmet should no
longer be used.
2. CHECKING THE CHINSTRAP
CHECKING THE CHINSTRAP
1. Check that the chinstrap passes under your chin.
2. Slip your index nger under the chinstrap and pull.
If the chinstrap is loose under the chin, it is too long and needs to be
tightened.
If the chinstrap loosens when you pull it, it is not properly fastened. Undo
the chinstrap completely and try fastening it again. Repeat the test.
Note:
Repeat the test after each adjustment.
Caution:
Never ride with the chinstrap unfastened or incorrectly adjusted. The
chinstrap should t correctly and should not become loose when pulled.
The fastener is not correctly closed if the chinstrap becomes loose when
pulled.
60
Page 63

3. CHECKING THE FACE SHIELD
Before each ride, please check the visor function provides a suciently good
view. Impurities should be removed before each ride.
Inspect the visor for mechanical damage and cracks. A heavily scratched visor
signicantly aects vision and should be replaced before starting the ride if
necessary.
Caution:
Never use tinted face shield or sun visor in conditions of poor visibility,
when riding at night or in a tunnel.
Caution:
Stop riding if visibility is poor.
EN
61
Page 64

F. FOR YOUR SAFETY
1. SAFETY ADVICE CONCERNING THE HELMET
Motorcycling is associated with particular risks and dangers for the rider
and passenger. These risks and dangers can be reduced, but not eliminated
completely, by wearing a helmet. It is impossible to state precisely what the
protective eect of a helmet will be in the event of an accident. Safe riding
techniques, adapted to the particular road and weather conditions, are
essential for your safety.
To provide adequate protection, the helmet must t well and be securely
fastened.
Always fasten the chinstrap before setting o and check that the
fastening system and strap are correctly in position.
Never ride with the chinstrap unfastened or incorrectly adjusted. The
chinstrap must be correctly positioned and must not come loose when
pulled. The fastener is not correctly closed if the chinstrap becomes loose
when pulled.
The full protective function of a helmet can no longer be guaranteed
after an accident or impact. Like the crumple zone of a car, the impact
energy of a collision is absorbed by complete or partial destruction of the
structure of the outer and/or inner shell of the helmet. Because of the
way helmets are designed, this damage is rarely visible from the outside.
The safety helmet is designed to absorb only one impact. It is therefore
essential to replace the helmet after a fall, accident or other violent impact.
For safety reasons, the old helmet should be rendered unusable.
The helmet safety mechanism described above can also cause small
cracks in the shell when the helmet is dropped from a small height (less
than 1 metre).
Any helmet that has been subjected to a violent impact should be
replaced.
No helmet provides absolute protection from all conceivable impacts. This
helmet has been specially developed for motorcycle riding and is unsuitable
for other purposes.
Examine the helmet for damage at regular intervals. Small scratches will
not impair the protective function of your helmet.
62
Page 65

The helmet should be replaced after 5 to 7 years, depending on use and
care. Although the outer shell is in principle capable of a longer service life,
the occurrence of material fatigue and wear to other components, as well
as the overall action of the helmet and the unknown conditions in which
the helmet has been used, make it advisable for your own safety to replace
the helmet after this period of use.
Excessive heat (e.g. exhaust heat) can cause damage to the decoration,
the inner shell of the helmet and the interior lining.
Direct contact with motor fuel, thinners or solvents can destroy the
structure of the inner and outer shell. Make sure the helmet does not
come into contact with such substances, even for cleaning purposes.
2. SAFETY ADVICE CONCERNING THE FACE SHIELD
The protective lm used during shipping should be removed before use.
Never use a tinted face shield or sun visor in conditions of poor visibility, at
night or in a tunnel!
Benzene, solvent and fuel vapour can cause cracks in the face shield. Keep
the face shield away from such vapours and do not allow these kinds of
substances to come into direct contact with the face shield! Never place
the helmet on the tank of your motorcycle.
Make sure the face shield is always in perfect condition. Don’t ride when
visibility is poor!
EN
3. SAFETY ADVICE CONCERNING MODIFICATIONS/
ACCESSORIES
Original components (in particular on the outer shell, inner shell and
restraint system) should not be altered or removed. The tting of additional
parts from other manufacturers that have not been recommended can
reduce the protective eect and renders the ECE certication and all
warranty and insurance claims invalid.
Use only original parts, replacement parts and accessories that
SCHUBERTH has expressly approved for your helmet!
63
Page 66

G. CARE AND MAINTENANCE
1. OUTER SHELL
To clean the helmet shell, you can use water, soap or one of the commonly
available motorcycle shampoos, cleaners, polishes, plastic cleaners or cleaning
uids. Using water and soap is usually sucient. Make sure when using the
other cleaning materials that these do not come into contact with the face
shield, since they can cause damage to the visor and its coating.
Note:
Never use motor fuel, thinners or solvents to clean the helmet. These
substances can cause serious damage to the helmet with no external
signs. The full safety function of the helmet can then no longer be
guaranteed.
2. FACE SHIELD
OUTER SURFACE OF THE FACE SHIELD
Use a soft cloth and a mild soap solution (< 20 °C) to remove dirt from the
outside of the face shield. To dry the face shield, use a lint-free cloth and apply
gentle pressure.
ANTIFOG LENS
The inside surface of the face shield must only be cleaned with a soft cloth,
which may be slightly dampened if required (we recommend a mocrobre cloth).
Do not use any cleaning agents.
Note:
Only use tepid water (< 20 °C) for cleaning. Never on any account clean
the face shield or sun visor with petrol, solvent, a window or glass cleaner
or other cleaning agents containing alcohol.
Note:
The face shield should not be soaked in water even if it is very dirty on
the outside, as this will severely reduce the surface hardness and thus the
durability of the anti-fog/anti-scratch coating.
64
Page 67

Note:
The face shield should not be completely closed when not in use
(particularly during periods of storage), as the moisture contained on the
inside cannot escape if closed and will largely be absorbed by the anti-fog/
anti-scratch coating. This can lead to a reduction in the lifespan of the
coating. Ideally, position the face shield in the third locking setting above
the urban position.
Note:
Do not attach labels, tape or stickers to the visor.
3. INNER LINING
The inner lining of the R2 can be removed completely. The head and cheek
pads can be washed by hand using a mild soap solution (e.g. with highly diluted
standard mild detergent) at a maximum temperature of 30 °C. Allow the lining
to dry at room temperature and with good ventilation.
4. VENTILATION
VENTILATION COWL
When necessary, the head ventilation system’s air inlet cowl can be removed to
clean the ventilation mechanism.
EN
1. To do this, press down hard on the ventilation
slider from behind and hold it lightly under the
front until it comes o the ventilation hood.
65
Page 68

G. CARE AND MAINTENANCE
2. After cleaning, guide the ventilation slider
into the corresponding guide. Then push
the slider backwards with a little pressure.
5. LOCKING SYSTEM
The metal components of the locking system do not require maintenance.
6. STORING THE HELMET
Store the helmet in a dry, well-ventilated and stable location. Always position the
helmet so that it cannot fall to the oor. Damage that occurs in this way is not
covered by the warranty.
Note:
Store the helmet out of the reach of children and animals.
66
Page 69

H. ACCESSORIES AND SPARE PARTS
1. ACCESSORIES AND SPARE PARTS
An overview of all available accessories and spare parts can be found on the
Internet at WWW.SCHUBERTH.COM
We recommend that you only use original SCHUBERTH accessories and spare
parts for your SCHUBERTH helmet as they are specially adapted to your helmet
model.
Caution:
For safety reasons, all other parts of the helmet should be replaced by the
SCHUBERTH Repair Service only.
2. COMMUNICATION SYSTEMS
Caution:
The installation of a communication system (including basic headsets)
constitutes a modication to the helmet. For this reason it is necessary
for any communication system and headset intended for installation into a
specic model of helmet to be tested and approved in line with the ECE-R
22.05 European helmet standard, otherwise the helmet’s approval and
compliance with insurance requirements become invalid on installation.
EN
Evidence of approval in line with ECE-R 22.05 in connection with a
specic communication system is only valid if certied by an ocial
regulatory oce of an EU member state. Any other form of information
from these or other institutions (e.g. on the general suitability of
communication systems for use in motorcycle helmets) is of no relevance
and the helmet will lose its approval.
67
Page 70

H. ACCESSORIES AND SPARE PARTS
Your R2 comes with pre-installed microphone and headset so that it is ready for
use with the SC1 System.
The headset speakers are behind the cheek padding and can be repositioned if
necessary.
You can nd out more about the SC1 System from your specialist dealer and at
WWW.SCHUBERTH.COM
3. ORDERING ORIGINAL SCHUBERTH PARTS
Please contact your specialist dealer for original SCHUBERTH accessories and
replacements. To nd your nearest SCHUBERTH specialist dealer, please go to
WWW.SCHUBERTH.COM
68
Page 71

I. SCHUBERTH SERVICE
Please contact your dealer if necessary, or you can call our service centre
directly. Find your local dealer as well as the contact details for our service
centre on the SCHUBERTH website at WWW.SCHUBERTH.COM
J. WARRANTY
Please check your statutory warranty entitlement in your country.
You can also enjoy the benets of the “5 YEARS SCHUBERTH STANDARD
GUARANTEE”. Register your C4 on the internet at WWW.SCHUBERTH.COM
to enjoy the privileges of your extended guarantee.
Should there be a problem with your product, please contact your dealer directly
or through his service address or you can call our service centre directly. If you
return the product, please provide an accurate description of the fault. Please
enclose a copy of your receipt if you have not yet registered for the “5 YEARS
SCHUBERTH STANDARD GUARANTEE”.
You can register at any time.
EN
69
Page 72

K. HOW TO CONTACT US
HEADQUARTERS
Phone
+49 (0)391 8106-0
Address
SCHUBERTH GmbH
Stegelitzer Straße 12
39126 Magdeburg
Germany
Web
WWW.SCHUBERTH.COM
70
Page 73

R2
MERCI BEAUCOUP POUR LA CONFIANCE,
que vous accordez à l'expérience que nous accumulons depuis des dizaines
d'années dans le développement et la fabrication de casques de moto. Nous
sommes heureux que votre choix se soit porté sur un casque SCHUBERTH
R2. Chaque R2 qui sort de notre usine est le résultat de longues heures de
travail manuel, combiné avec l'utilisation des méthodes de fabrication les plus
modernes.
Le casque R2 dispose d'une excellente aéro-acoustique et ore une ergonomie
perfectionnée. Son aérodynamique optimisée en souerie garantit la stabilité du
casque à tout moment. Naturellement, le casque R2 ore les caractéristiques
éprouvées d'un casque SCHUBERTH auxquelles vous pouvez légitimement
vous attendre en termes de sécurité, de confort et de design. Toutes ces
caractéristiques, la haute qualité des matériaux utilisés ainsi qu’un processus
de fabrication précis font de notre produit, un produit able et de qualité dont
l’objectif est d’assurer des conditions de sécurité routière élevées surtout pour
les longs trajets.
Nous vous souhaitons de grands moments de plaisir avec votre casque
SCHUBERTH R2. Bonne route, en toute sécurité!
FR
Jan-Christian Becker Thomas Schulz
CEO SCHUBERTH GmbH Product Management SCHUBERTH GmbH
71
Page 74

A. UTILISATION CORRECTE DU MANUAL
Veuillez lire attentivement ce manuel, an que votre casque vous protège convenablement lorsque vous faites de la moto.
Nous vous conseillons de lire ce manuel dans l’ordre prescrit, an de ne négliger
aucune remarque importante pour votre sécurité.
Veuillez observer plus particulièrement les points signalés comme suit :
Avertissement : consignes de sécurité
Attention : remarques
Conseil : conseils pratiques
Avertissement :
Ce casque n’est pas conçu pour être utilisé aux Etats-Unis ni au Canada. Il a été fabriqué,
contrôlé et homologué selon la norme européenne ECE. Par conséquent, il n’est pas
conforme aux prescriptions et exigences des Etats-Unis d’Amérique et du Canada. Il ne
peut être utilisé que dans les pays où la norme européenne ECE est applicable. En cas
d’utilisation du casque dans d‘autres pays, aucun droit de dommages-intérêts ne peut être
revendiqué devant les tribunaux des Etats-Unis d’Amérique ou du Canada ou de pays tiers
non assujettis à la norme ECE.
Attention :
Sous réserve de modications dues au progrès technique – éventuellement
sans avis préalable.
72
Page 75

B. SOMMAIRE
A. Utilisation correcte du manuel 72
B. Sommaire 73
C. Le casque 75
1. Norme 75
2. Homologation ECE 75
3. Anatomie du casque 76
4. Calotte 76
5. Coque intérieure 76
6. Aérodynamique 77
7. Aéro-acoustique 77
8. Coupe-vent 79
9. Système de retenue 79
10. Visière 80
11. Coie 87
12. Systèmes d’aération 91
13. Equipement de sécurité supplémentaire 92
D. Enler et retirer le casque 93
1. Enler le casque 93
2. Retirer le casque 93
FR
E. Avant de démarrer 94
1. Contrôle du casque 94
2. Contrôle de la jugulaire 94
3. Contrôle de la visière 95
73
Page 76

B. SOMMAIRE
F. Pour votre sécurité 96
1. Consignes de sécurité - casque 96
2. Consignes de sécurité - visière 97
3. Consignes de sécurité - modications / accessoires 98
G. Entretien et soin 99
1. Calotte 99
2. Visière 99
3. Coie 100
4. Système d'aération 100
5. Système de fermeture 101
6. Rangement 101
H. Accessoires et pièces de rechange 102
1. Accessoires et pièces de rechange 102
2. Systèmes de communication 102
3. Achat des pièces d’origine SCHUBERTH 103
I. Service clientèle SCHUBERTH 104
J. Garantie 104
K. Comment nous contacter 105
74
Page 77

C. LE CASQUE
1. NORME
Le casque R2 est conforme a la norme ECE-R 22.05. Cette norme de contrôle
garantit le respect de standards de sécurité dénis concernant l’amortissement
des chocs, la visière, le système de retenue et le champ visuel. L’homologation
vous garantit, d’une part, l’homologation pour les pays de l’Union Européenne et
tous les pays qui reconnaissent la norme ECE et, d’autre part, la conformité aux
exigences imposées par les compagnies d’assurance, ce qui est essentiel en cas
de sinistre.
Veuillez noter que le casque R2 homologue ECE est conçu spécialement selon la
norme ECE et qu’il n’est donc pas homologue pour les Etats-Unis ni le Canada. Il
ne peut être utilise que dans les pays pour lesquels la norme ECE est applicable.
Attention :
Seuls les casques SCHUBERTH homologues spécialement pour les
Etats-Unis et le Canada et possédant le réglage technique correspondant
peuvent être utilises dans ces pays. Vous trouverez d’autres informations
ainsi que le point de vente de ces casques sur Internet, a l’adresse
suivante :
WWW.SCHUBERTH.COM
FR
2. HOMOLAGATION ECE
Norme ECE
Numéro d’homologation
051234/P-1234
Autorités chargées
d l’homologation
05123456
Numéro de série
75
Page 78

C. LE CASQUE
3. ANATOMIE DES HELMS
Antennes
intégrées
Ventilation
de la visière /
Ventilation du
mentonnière
Winddeector
Visière
Coie
Ventilation de la tête
Coque intérieure
Aération de la tête
Visière anti-buèe
Mécanisme de la
visière
Calotte
Jugulaire avec
fermeture a boucle
double D
4. CALOTTE
La calotte du casque R2 associe une forme aérodynamique optimale et une
protection systématique. Elle se compose d’une matrice spécial duroplastique,
renforcée a la bre de verre et conçue spécialement par SCHUBERTH. Celle-ci
confère au casque une grande robustesse, indispensable pour votre sécurité.
Avertissement :
Le casque de protection est conçu pour l’absorption d’un seul choc. Tout
casque ayant subi une chute, un accident ou un choc violent devra être
remplacé.
5. COQUE INTERIEURE
An d’optimiser les caractéristiques d‘amortissement des chocs, la coque
intérieure du casque présente une structure en plusieurs parties. La mousse
complexe multizones du corps principal permet d’obtenir une meilleure
absorption et répartition des forces et ore un maximum de sécurité.
76
Page 79

6. AERODYNAMIQUE
Le casque R2 maintient une tenue stable, que votre conduite soit calme ou plus
sportive. Il n'y a pratiquement pas de secousses même à grande vitesse.
Attention :
Pour les motos carénées, notez que les forts tourbillons d’air qui
environnent la zone protégée du vent par le carénage, peuvent modier
considérablement les propriétés aérodynamiques du casque.
7. AEROACOUSTIQUE
Les diérentes mesures mises en place dans la souerie SCHUBERTH
permettent de proposer un casque agréable en matière d’aéro-acoustique,
avec des retours acoustiques optimisés lors des randonnées. Ces principes
permettent de conduire de manière concentrée, surtout en cas de vitesses
élevées.
Attention :
Les valeurs aéro-acoustiques peuvent varier en fonction du type de moto,
de carénage, de la position assise et de la taille du motard.
Avertissement :
En raison de l’optimisation aéro-acoustique du casque et de la réduction du
bruit du vent qui en résulte, le conducteur risque de sous-évaluer la vitesse
réelle.
FR
77
Page 80

C. LE CASQUE
Attention :
Pour les motos carénées, de forts tourbillons d’air environnent la
zone protégée du vent. Ceux-ci peuvent réduire considérablement les
performances aéro-acoustiques du casque. Veiller à ce que le carénage
ne dirige pas précisément la couche turbulente sur la partie inférieure du
casque.
Zone non critique d’un point
de vue aéro-acoustique
Zone critique d’un point de vue
aéro-acoustique
Zone non critique d’un point de vue
aéro-acoustique
Coussinets Antibruit
Les coussinets antibruit, brevetés, situés sur la partie
supérieure de la visière optimisent les caractéristiques
aéro-acoustiques lors des promenades eectuées
avec le casque ouvert et prévennent des bruits
désagréables comme les siements,
pouvant être créés au niveau
des angles droits et lisses.
78
Page 81

8. COUPEVENT
Le déecteur d’air empêche une arrivée indésirable de courant d’air dans le
casque. De plus, cela permet une réduction du bruit dans le casque.
Vous commencez par un côté et répétez même
processus de l’autre côté.
Conseil :
Pour disposer d’un casque très peu bruyant,
la forme de la partie inférieure joue un rôle
très important. Pour les cous plus petits,
nous conseillons d’utiliser un foulard.
9. SYSTEME DU RETENUE
Le système d’attache du R2 se compose de la jugulaire. Pour les tailles de
casque jusqu’à 54/55 compris, vous bénéciez d’une bande pour la nuque dans
la zone du cou.
JUGULAIRE AVEC FERMETURE A BOUCLE DOUBLE D
La fermeture a bouclé double D permet a chaque fermeture de la mentonnière
un réglage simple et précis de la longueur de la mentonnière.
FR
Fermeture de la jugulaire
1. Enlez l’extrémité de la jugulaire dans les
deux boucles de la fermeture double D.
2. Serrez bien la jugulaire puis passez
l’extrémité libre de la jugulaire dans le
premier anneau de la fermeture.
79
Page 82

C. LE CASQUE
3. Tirez sur l’extrémité libre de la jugulaire,
jusqu’à ce que la xation soit ferme et
confortable.
4. Repliez l’extrémité de la jugulaire et xez
celle-ci à l’aide du bouton pression.
Desserer et ouvrir
Relâchez le bouton pression et faites glisser la
languette rouge de la fermeture à boucle double
D, pour que la jugulaire se desserre.
Passez l’extrémité libre de la jugulaire hors de la
fermeture à boucle double D.
Avertissement :
Ne roulez jamais avec la jugulaire ouverte ou mal réglée. Sinon le casque
risqué de se détacher.
10. VISIÈRE
La visière est une visière anti-buée à double paroi. En raison de la xation de la
paroi intérieure anti-buée á l'aide d'éléments excentriques, les deux parois de
la visière sont précontraintes l'une contre l'autre et ainsi rendues étanches. On
obtient ainsi un coussin d’air isolant entre l’écran principal ou écran extérieur et
l’écran intérieur de la visière, ce qui empêche la formation de buée sur l’écran
intérieur.
REVÊTEMENT :
Visière principale anti rayures.
Attention :
Pour éviter d’endommager l’écran intérieur se rayant facilement, ne pas
mettre de gants ou autres objets dans le casque.
80
Page 83

Attention :
Lors de sa livraison, l’écran intérieur est muni d’un lm de protection.
Retirez ce lm avant la première utilisation du casque.
Attention :
Les visières Anti-Buèes ne doivent être utilisés qu’avec un écran principal
SCHUBERTH prévu à cet eet. Ils ne doivent pas être utilisés avec
d’autres visières. Ceci vaut explicitement pour les autres variantes de
visières.
OUVERTURE DE LA VISIÈRE
Pour ouvrir la visière, pousser le bouton de visière
gauche ou droit avec le pouce et relever la visière
jusqu'á la position souhaitée, en la poussant vers
le haut.
Positions de la visière (avec position ville)
La visière comporte sept crans d’ouverture. La deuxième position de crantage
(position ville) est légèrement plus ferme et une plus grande résistance se fait
sentir au niveau de cette position. Cela facilite le blocage de la visière sur la position ville – et plus particulièrement pendant les trajets.
Ouvrir la visière
FR
· Vous passerez généralement la position ville.
· Grâce au mouvement vers l'arrière, vous pouvez eectuer le réglage sans
aucune diculté.
81
Page 84

C. LE CASQUE
FERMETURE DE LA VISIERE
Pour fermer la visière, saisissez le bouton de
visière gauche ou droit et poussez-le vers le bas
jusqu’à ce qu’il se verrouille de manière audible.
REMPLACEMENT DE L’ECRAN
Le mécanisme de visière EasyChange permet de remplacer l’écran rapidement
et sans outil. Pour remplacer l’écran, posez le casque sur une surface plane ou
sur vos jambes si vous êtes en position assise.
Démontage des écrans
1. Mettez la visière en position supérieure.
2. Actionnez l’élément-ressort, situé
sous le mécanisme de visière, en
position Ouverture de la visière.
Ensuite, actionnez l’élément-ressort
se trouvant de l’autre côté.
82
Page 85

3. Relevez la visière jusqu’à ce qu’elle se
désolidarise du mécanisme de visière.
Montage des écrans
1. Avec les deux mains, insérez les
tenons de crantage de la visière
dans la découpe prévue à cet
eet dans le mécanisme de
visière.
2. Une légère pression sur la visière, en
direction du casque, et un mouvement
de fermeture simultané provoque le
verrouillage audible de la visière.
FR
3. Vériez que le mécanisme de visière
fonctionne correctement en ouvrant la visière
jusqu’à la butée.
83
Page 86

C. LE CASQUE
VISIÈRE ANTIBUÈE
Montage
1. Placez la visière anti-buèe dans la visière
principale. Pour cela, insérez la visière dans un
boulon de retenue de manière.
2. Saisissez alors l‘autre côté de la visière antibuèe en plaçant vos doigts sur les bords
horizontaux supérieur et inférieur et exercez
avec l’index une pression sur l’extrémité de
l’écran intérieur, qui formera un S. Ceci permet
d’introduire aisément la découpe sur le boulon
de retenue. Vous pouvez lâcher la visière antibuèe.
3. La visière anti-buèe doit reposer à l’intérieur
de la visière extérieure. Le bord inférieur de
la visière anti-buèe doit être parallèle au bord
inférieur de la visière principale. Si vous devez
modier la position de l’écran intérieur, appuyez
avec précaution sur la visière en utilisant la
paume de vos mains, jusqu’à ce que la visière
anti-buèe puisse être déplacée.
4. Contrôlez que le joint de la visière antibuèe repose de manière uniforme sur
l’écran extérieur. Ceci est la meilleure garantie pour empêcher la formation
de buée.
5. Si ce n’est pas encore fait, veuillez retirer le lm de protection jaune.
84
Page 87

Les défauts d’étanchéité, et par conséquent la formation de buée sur la visière,
indiquent que la visière anti-buèe intérieur n’est pas correctement en place ou
que la pression est trop faible sur le joint. Pour régler la pression sur le joint,
tournez les deux boulons excentriques de retenue. Pour cela, démontez la
visière anti-buèe. Retirez prudemment et par l’intérieur les boulons de retenue
de l’écran extérieur, en utilisant un objet plat, non coupant. Les tourner de 180°
et les remettre en place. Ensuite, monter la visière anti-buèe et contrôlez le
joint.
Démontage
1. Pour démonter la visière anti-buèe, merci de poser la visière sur un chion
doux et propre. Le bord supérieur de la visière devra être tourné vers
vous.
2. An de réduire, si nécessaire, la
prétension de la visière anti-buèe, vous
pouvez incliner délicatement la visière
de manière à ôter, à l’aide du pouce, la
visière anti-buèe de 2 à 3 mm environ et
la déplacer vers l’avant.
3. Avec l’index et le majeur, attrapez la
partie derrière la visière anti-buèe an
de la soulever de l’écran extérieur. Dans
cette position, vous pourrez retirer très
simplement du boulon de retenue la visière
anti-buèe avec votre pouce.
FR
4. Et vous pourrez enlever la visière antibuèe
de la visière.
Attention :
An d’éviter de rayer la visière, la visière anti-buèe doit toujours être propre
et sèche lorsque vous montez ou démontez l’écran intérieur.
Lors du montage de la visière anti-buèe, veillez à ce que l’espace compris
entre les deux écrans de visière soit exempt de poussière et d‘humidité.
Eectuez le montage et le démontage sur un chion doux et propre.
85
Page 88

C. LE CASQUE
Attention :
En raison des fortes pressions exercées par l'air lorsque vous roulez avec la
visière relevée, nous conseillons par principe d'abaisser la visière en roulant
pour éviter la pénétration d'impuretés ou d'humidité.
Attention :
Ne faites pas sortir les boulons de retenue par pression avec les doigts car
vous risquez de les casser.
Avertissement :
En raison de sa construction, une visière à double écran entraîne une
augmentation des reets dans la visière (surtout lors de la conduite dans
l‘obscurité). En règle générale, ces reets ne présentent pas de danger,
grâce à l’absence de buée sur ce type de visière. Cependant, si votre
sensibilité est telle que les reets vous gênent, nous vous conseillons de ne
plus utiliser la visière à double écran.
Avertissement :
Si l’humidité se trouve ou pénètre dans la zone étanche à l’air, comprise
entre les deux écrans de visière, la visière anti-buèe doit aussitôt être
démontée, car cela risquerait de compromettre la visibilité. Ne remontez
l’écran intérieur que si les deux écrans sont absolument secs (nous
recommandons un séchage à l’air libre). Si une pénétration d’humidité est
de nouveau constatée par la suite, remettez la visière anti-buèe à votre
revendeur pour vérication.
Consignes des sécurité
Vériez avant chaque trajet que la visière fonctionne correctement et si elle
permet d’avoir une visibilité susante. Les impuretés doivent être retirées
avant chaque trajet. Contrôlez que la visière ne présente pas de défaut
mécanique ou de ssure. Des vitres fortement rayées ou mattes restreignent
considérablement la visibilité et devraient être remplacées avant chaque trajet
pour des raisons de sécurité.
Avertissement :
Les vapeurs d’essence, de solvants et de carburant peuvent ssurer la
visière. Ne pas exposer la visière à de telles vapeurs ! Pour cette raison, ne
posez jamais votre casque sur le réservoir de votre moto..
86
Page 89

11. COIFFE
La coie interchangeable et lavable du casque R2 garantit non seulement une
excellente forme anatomique mais aussi une amélioration de la ventilation et de
l’aération du casque.
Les coussinets de joue confort assurent un rembourrage douillet sur les joues
et le bandeau de tête protège le tour de tête. Le coussinet de rembourrage de
crane repose bien sur la tête, sans recouvrir les canaux de ventilation.
L’équipement intérieur se compose à entièrement (en particulier aux endroits en
contact direct avec la tête) d’une matière hypoallergénique. Matière ShinyTex®
douce et respirable pour une bonne évacuation de la chaleur et de l'humidité,
tissu spécial respirable antibactérien réduisant les odeurs.
DÈMONTAGE DE LA COIFFE
Démontage du rembourrage confort
au niveau des joues
1. Retirez délicatement la protection des
joues de la xation.
FR
87
Page 90

C. LE CASQUE
2. Détachez des xations marquées
de rouge les broches cousues sur
la protection des joues de la partie
intérieure du casque.
3. Procédez avec la deuxième protection
des joues comme expliqué aux étapes 1
et 2.
Démontage du revêtement intérieur
1. Déboutonnez la partie arrière du
revêtement intérieur.
2. Déboutonnez les deux boutons
situés au niveau du front et retirer le
revêtement intérieur.
88
Page 91

MONTAGE DE LA COIFFE
Montage du revêtement intérieur
Attachez le revêtement intérieur sur les xations
au niveau du front et sur la partie postérieure à
l'aide des broches rouges.
Installation des coussinets de rembourrage
au niveau des joues
FR
1. Retirez la jugulaire au niveau des
protections des joues à chaque face
interne.
89
Page 92

C. LE CASQUE
2. Fixez la protection des joues à l'aide des
xations marquées de rouge.
3. Poussez la patte de maintien de la protection
des joues dans la fente de guidage entre la
coque intérieure et extérieure du casque.
Commencez avec la partie inférieure de la
protection des joues
4. Poussez la patte de maintien avec une légère
pression dirigée vers la coque du casque dans
la fente de guidage entre la coque intérieure
et extérieure du casque.
5. Procédez avec la deuxième protection des
joues comme expliqué aux étapes 1 à 4.
Avertissement :
Ne roulez jamais lorsque des pièces de la
coie sont défaites.
Avertissement :
Les chaleurs intenses (ex. Chaleur
d’échappement) risqueront d’endommager
la coie !
Attention :
Pour éviter d’endommager la coie et la coque intérieure, ne jamais
suspendre le casque aux rétroviseurs ou au niveau du guidon.
90
Page 93

12. SYSTEMES D’AERATION
VENTILATION 1 RÉGLAGE DE LA VISIÈRE
La visière du casque R2 est réglable en plusieurs paliers. En fonction de la
vitesse et de la formation de buée, ouvrez la visière de manière a ce qu’il
ne se forme plus de buée, tout en protégeant vos yeux des courants d’air
désagréables.
Position ville
Sur le deuxième cran, la visière est automatiquement en position ville. L’air
pénétrant dans le casque par la fente inférieure circule sur la face intérieure de
la visière et s’échappe par l’ouverture située sur le bord supérieur.
VENTILATION 2 ADMISSION D’AIR MENTONNIÈRE
(ventilation de la visière)
Le casque R2 est équipé d'une admission d'air
pour une aération de la visière.
L'air circule indépendamment de la position du
casque. Une déviation permet au courant d’air
de ventiler ecacement la vitre de la visière
même à faible vitesse. Ouvrez ou fermez
l'admission d'air en exerçant un mouvement de
pression sur la partie inférieure ou supérieure de
l'élément d’aération.
FR
VENTILATION 3 AÉRATION DE LA TÊTE
Pour l’aération de la surface de la tête se trouve,
sur la partie supérieure de la coque du casque,
un capot d’entrée d’air doté d’un système de
ventilation réglable. L’air pénétrant par ce capot
est conduit à la partie supérieure de la tête par
des canaux.
91
Page 94

C. LE CASQUE
Dans l’intérieur du casque, un système de
revêtement intérieur permet le contact direct
entre l’arrivée de l’air et la surface de la tête,
moyennant quoi la chaleur intérieure s’étend
plus rapidement. Pour réguler l’aération, une
commande facilement atteignable avec des gants
se trouve sur le capot d’entrée d’air. En déplaçant
cette commande vers l’arrière, l’entrée d’air est
complètement ouverte.
VENTILATION 4 AÉRATION DE LA TÊTE
Le casque R2 est équipe d’un système d’aération
permanent. L’air qui se trouve a l’intérieur du casque
et l’air arrivant par le système de ventilation de la
tête est conduit vers l’arrière du casque par les
canaux d’aération de la coie. La dépression existant
au niveau de la nuque assure en permanence
une extraction de l’air emmagasine a l’intérieur du
casque, Grâce au let spécial utilise dans le protègenuque. Ceci garantit une bonne aération du casque.
13. EQUIPEMENT DE SECURITE SUPPLEMENTAIRE
ZONES RÉFLÉCHISSANTES
Des stickers rééchissants noirs ont été appliqués sur la zone de la nuque et
du front pour une meilleure visibilité du motard. Sur les casques monochromes
(sans éléments décoratifs) le logo rééchissant SCHUBERTH apparaît
également à l'arrière du casque.
Attention :
Veillez à ce que les zones rééchissantes de sécurité soient toujours
propres.
Attention :
En cas d’utilisation du casque en France, il est obligatoire d’apposer des
autocollants de sécurité rééchissants supplémentaires sur la partie
frontale, la partie arrière et sur les côtés du casque.
92
Page 95

D. ENFILER ET RETIRER LE CASQUELE CASQUE
Attention :
Consultez les indications sur l'emploi de la mentonnière.
1. ENFILER LE CASQUE
1. Ouvrez la jugulaire.
2. Prenez et écartez les extrémités inférieures de la jugulaire.
3. Le casque peut maintenant être retiré aisément en le passant par-dessus
tête.
4. Fermez la jugulaire.
5. Assurez-vous que la jugulaire passe sous le menton et soit fermement
serrée.
2. RETIRER LE CASQUE
1. Ouvrez la jugulaire.
2. Prenez et écartez les extrémités de la jugulaire.
FR
3. Le casque peut maintenant être retiré facilement de la tête.
Conseil :
An d’éviter que le casque raye les objets sur lesquels il est posé, nous
recommandons de fermer la jugulaire après avoir ôté le casque.
93
Page 96

E. AVANT DE DEMARRER
An d’assurer votre sécurité, merci de contrôler les points suivants :
1. CONTROLE DU CASQUE
Contrôlez régulièrement le casque pour détecter toute défectuosité. Les
éraures supercielles ne portent pas atteinte à la sécurité. En cas de
dommages importants (ssures, bosses, peinture éclatée ou ssurée, etc.), ne
plus utiliser le casque.
2. CONTROLE DE LA JUGULAIRE
CASQUE ENFILÈ ET FERMÈ
1. Vériez que la jugulaire passe sous le menton.
2. Tirez sur la jugulaire avec votre index.
Si la jugulaire est lâche sous le menton, celle-ci est trop longue et doit être
resserrée.
Si la jugulaire se relâche ou s’ouvre, celle-ci n’est pas fermée correctement.
Ouvrez complètement la jugulaire puis refermez-la.
Répétez le contrôle.
Attention :
Répétez ce contrôle après toute modication.
Avertissement :
Ne roulez jamais avec la jugulaire ouverte ou mal réglée. La jugulaire doit
être mise en place correctement et ne doit pas être lâche lorsqu’on tire
dessus. L’attache est bien fermée, uniquement si la jugulaire n’est pas
lâche.
94
Page 97

3. CONTROLE DE LA VISIERE
Vériez avant chaque trajet que la visière fonctionne correctement et si elle
permet d’avoir une visibilité susante. Les impuretés doivent être retirées avant
chaque trajet.
Contrôlez que la visière ne présente pas de défaut mécanique ou de ssure. Une
vitre de visière fortement rayée altère considérablement la visibilité et devrait, au
besoin, être remplacée avant le trajet.
Avertissement :
Les écrans teintés ne conviennent pas pour la conduite de nuit et la
traversée de tunnels ou en cas de mauvaises conditions de visibilité.
Avertissement :
En cas de visibilité mauvaise, arrêtez immédiatement de conduire.
FR
95
Page 98

F. POUR VOTRE SECURITE
1. CONSIGNE DE SÉCURITÉ CASQUE
La moto présente des risques et dangers particuliers pour la santé du
conducteur et du passager. Le port du casque permet de réduire ces
risques et dangers mais il ne peut les supprimer. Il n’est pas possible de
prédire l’ecacité réelle de la protection du casque en cas d’accident. Une
conduite sûre et adaptée à la circulation, aux routes et à la météorologie
est une condition essentielle pour votre sécurité.
Pour assurer un niveau de sécurité susant, utilisez uniquement un casque
de la bonne taille, bien ajusté et xé.
Bouclez toujours la jugulaire avant de prendre la route et vériez que le
système de fermeture et la jugulaire soit bien en place.
Ne roulez jamais avec une jugulaire ouverte ou mal ajustée. La jugulaire doit
être mise en place correctement et ne pas être lâche lorsqu’on tire dessus.
L’attache est considérée comme bien fermée dès lors que la jugulaire n’est
pas lâche.
Suite à une chute, un accident ou un choc violent sur le casque, ce dernier
n’assure plus une protection parfaite ! L’énergie libérée en cas de collision
est absorbée par le casque. Ceci peut provoquer un endommagement
voire une destruction totale de la calotte ou de la coque intérieure –
eets comparables à la zone déformable d’une voiture. En raison de la
construction du casque, ces dommages ne sont généralement pas visibles
extérieurement. Le casque de protection est conçu pour absorber un seul
choc. Tout casque ayant subi une chute, un accident ou un choc violent
devra donc systématiquement être remplacé. Pour des raisons de sécurité,
le casque endommagé devra être rendu inutilisable.
Le mécanisme de protection du casque décrit ci-dessus peut également
provoquer des petites ssurations dans la calotte même si le casque est
tombé d’une faible hauteur (< 1 m).
Tout casque ayant subi un choc violent doit être remplacé !
Aucun casque n’assume une protection contre toutes sortes de chocs. Ce
casque a été conçu spécialement pour une utilisation à moto. Il ne peut
être utilisé à d’autres ns.
96
Page 99

Contrôlez régulièrement votre casque quant à la présence de dommages
éventuels. Les éraures supercielles ne portent pas atteinte à la sécurité.
Selon son utilisation et son entretien, un casque doit être remplacé après
5 ou 7 ans. Certes la calotte a une durée de vie supérieure mais en raison
de la fatigue et de l’usure d’autres composants et du système global
de fonctionnement du casque et de conditions spéciques méconnues
existant pendant l’utilisation, nous vous recommandons pour votre sécurité
de remplacer le casque après la période indiquée ci-dessus.
Une chaleur excessive (comme celle dégagée par un tuyau
d’échappement) peut endommager le décor, la coque intérieure et la
coie !
L’action directe de carburant, diluant et solvant peut détériorer la structure
de la calotte et de la coque intérieure du casque. Le casque ne doit
pas entrer en contact avec de telles substances, pas même pour son
nettoyage.
2. CONSIGNES DE SÉCURITÉ VISIÈRE
Le lm de protection placé sur la visière pour le transport doit être retiré
avant l'emploi.
N’utilisez jamais de visières teintées en cas de mauvaises conditions de
visibilité, ni pour la conduite de nuit ou la traversée de tunnels.
FR
Les vapeurs d’essence, de solvants et de carburant peuvent provoquer des
ssurations de la visière. La visière ne doit pas être exposée à ces vapeurs
ni entrer en contact avec de telles substances. Pour cette raison, ne posez
jamais votre casque sur le réservoir de votre moto.
Assurez-vous que la visière soit toujours en parfait état. Vous ne devez pas
continuer de rouler en cas de mauvaise visibilité.
97
Page 100

F. POUR VOTRE SECURITE
3. CONSIGNES DE SÉCURITÉ MODIFICATIONS /
ACCESSOIRES
Les éléments d'origine (en particulier sur la coque extérieure, la coque
intérieure et le système de retenue) ne doivent pas être modiés ni
supprimés. La pose d'accessoires étrangers non agréés peut réduire la
sécurité à néant et a pour eet d'annihiler l'homologation ECE, ainsi que les
droits à garantie et à assurance.
Utilisez uniquement des pièces et des accessoires d’origine ou des
accessoires expressément agréés par SCHUBERTH.
98
 Loading...