

Page 1

Manual
deutschenglishfrançaisitalianonederlandsespañol
116 - 171français
172 - 227italiano
228 - 283nederlands
284 - 339español
PT
PL
RU
SE
SI
TR
4 - 59deutsch
60 - 115english
346
347
348
349
350
351
DE
GB
FR
IT
NL
ES
340
CZ
341
DK
342
FI
GR
343
HU
344
NO
3/06.09.
345
Page 2

Kompliment!
Sie haben mit dem SCHUBERTH C3 eine ausgezeichnete Wahl
getroffen. Der C3 ist das Ergebnis modernster Entwicklungs- und
Fertigungsmethoden. Dieser Helm verbindet die Top Eigenschaften
eines Sporthelms in Puncto Aerodynamik und Aeroakustik
mit dem Komfort und der hohen Funktionalität eines Klapphelms.
Sie besitzen mit diesem Helm ein Qualitätsprodukt, welches für
höchste Anforderungen an Sicherheit und Leistungsvermögen im
Straßenverkehr – insbesondere auf langen Fahrten – ausgelegt ist
und Ihnen viel Freude bereiten wird.
Wir wünschen Ihnen eine sichere Fahrt.
F.- J . G ör ge s
Leiter Vertrieb
SCHUBERTH GmbH
DE
A. DIE RICHTIGE BENUTZUNG
DER GEBRAUCHSANWEISUNG
Lesen Sie bitte diese Gebrauchsanweisung aufmerksam durch, damit
Ihr Helm Sie beim Motorradfahren richtig schützen kann.
Um keinen für Ihre Sicherheit relevanten Aspekt außer Acht zu lassen,
empfehlen wir Ihnen, diese Gebrauchsanweisung in der vorgegebenen
Reihenfolge zu lesen.
Bitte achten Sie besonders auf:
Warnung: Sicherheitshinweise
Achtung: Hinweise
Tipp: Praktische Ratschläge
Warnung:
Dieser Helm ist nicht für den Gebrauch in den USA und Kanada bestimmt.
Dieser Helm ist nach der europäischen ECE-Norm gebaut, geprüft und zugelassen,
er entspricht daher nicht den US-amerikanischen und kanadischen Vorschriften
und Anforderungen. Er darf nur in Ländern eingesetzt werden, in denen die
europäische ECE-Norm Gültigkeit besitzt. Der Gebrauch in anderen Ländern
berechtigt im Schadensfall nicht zur Geltendmachung von Ersatzansprüchen
vor US-amerikanischen oder kanadischen sowie vor Gerichten drit ter nicht ECEnormgebundener Länder.
Caution:
This helmet is not intended for use in the USA and Canada. The helmet has
been inspected and approved to the European ECE Standard and therefore does
not conform to US and Canadian regulations and requirements. It is only legal to
use the helmet in countries in which the European ECE Standard is valid. If you
use the helmet in other countries, you will not in the event of injur y be entitled to
make a claim for compensation before the US or Canadian courts or the courts of
other countries not bound by the ECE Standard.
Avertissement:
Ce casque n’est pas conçu pour être utilisé aux Etats-Unis ni au Canada.
Il a été fabriqué, contrôlé et homologué selon la norme européenne ECE. Par
conséquent, il n’est pas conforme aux prescriptions et exigences des Etats-Unis
d’Amérique et du Canada. Il ne peut être utilisé que dans les pays où la norme
européenne ECE est applicable. En cas d’utilisation du casque dans d‘autres pays,
aucun droit de dommages-intérêts ne peut être revendiqué devant les tribunaux
des Etats-Unis d’Amérique ou du Canada ou de pays tiers non assujettis à la
norme ECE.
deutschenglish
françaisitalianonederlandsespañol
Achtung:
Änderungen im Sinne des technischen Fortschritts behalten wir
uns vor – auch ohne ausdrückliche Ankündigung.
4 5
Page 3

B. INHALT
A. Die richtige Benutzung der Gebrauchsanweisung.......... 5
B. Inhalt.................................................................................. 6
C. Die Wahl des passenden Helms..................................... 8
1. Bestimmen der Kopfgröße 8
2. Ermitteln der entsprechenden Helmgröße 9
3. Prüfen, ob die ermittelte Helmgröße passt 10
D. Der Helm......................................................................... 12
1. Norm 12
2. ECE-Zulassung 12
3. Anatomie des Helms 13
4. Außenschale 13
5. Innenschale 13
6. Aerodynamik 14
7. Aeroakustik 14
8. Kinnteil 17
9. Rückhaltesystem 19
®
10. Pinlock
Visier 21
11. Sonnenvisier 28
12. Innenausstattung 32
13. Belüftungssysteme 34
14. Zusätzliche Sicherheitsausstattung 37
E. Auf- und Absetzen.......................................................... 38
1. Aufsetzen des Helms 38
2. Absetzen des Helms 39
F. Vor jeder Fahrt............................................................... 40
1. Überprüfen des Helms 40
2. Überprüfen des Kinnriemens 40
3. Kontrolle von Visier und Sonnenvisier 41
G. Für Ihre Sicherheit......................................................... 42
1. Sicherheitshinweise Helm 42
2. Sicherheitshinweise Visier/Sonnenvisier 44
3. Sicherheitshinweise Modifi kation/Zubehör 44
H. Wartung und Pfl ege........................................................ 45
1. Außenschale 45
2. Kinnteil 45
3. Visiere und Sonnenvisier 46
4. Innenausstattung 49
5. Belüftung 50
6. Verschluss-System 51
7. Aufbewahrung 51
I. Zubehör und Ersatzteile................................................. 52
1. Teileübersicht 52
2. Kommunikationssysteme 53
3. Bezug von SCHUBERTH Originalteilen 54
J. SCHUBERTH Service...................................................... 55
1. Kunden-Hotline 55
2. Sonderanpassungen 55
3. Sicherheits-Check 56
4. Reparaturservice 56
5. Garantie 57
6. Blue Concept 58
7. SCHUBERTH im Internet 58
K. Wie Sie uns erreichen.................................................... 59
deutschenglish
françaisitalianonederlandsespañol
6 7
Page 4

C. DIE WAHL DES PASSENDEN HELMS
Die Wahl des passenden Helms ist eine wichtige Angelegenheit.
Nur ein passender Helm ist die Voraussetzung dafür, dass Sie im Falle
eines Sturzes oder Unfalls bestmöglich geschützt sind. Mit folgenden
Schritten ermitteln Sie den passenden Helm:
1. Schritt: Bestimmen der Kopfgröße
2. Schritt: Ermitteln der entsprechenden Helmgröße
3. Schritt: Prüfen, ob die ermittelte Helmgröße passt.
1. BESTIMMEN DER KOPFGRÖSSE
Ihre Kopfgröße bestimmen Sie, indem Sie ein fl exibles Maßband
(Schnei der maßband) etwa einen Fingerbreit (ca. 2 cm) über den
Augenb rauen so um den Kopf legen, dass Sie den größten Kopf umfang er fassen. Der gemessene Wert stellt Ihre Kopfgröße in cm
dar.
2. ERMITTELN DER ENTSPRECHENDEN HELMGRÖSSE
Den C3 liefern wir in sieben Doppel-Helmgrößen. Die für Ihre
Kopfgröße passende Helmgröße entnehmen Sie bitte der folgenden
Übersicht:
Kopfgröße
in cm
SCHUBERTH
Helmgrößen
Alpha
Helmgrößen
52 bis 53 52 / 53 XS
54 bis 55 54 / 55 S
56 bis 57 56 / 57 M
58 bis 59 58 / 59 L
60 bis 61 60 / 61 XL
62 bis 63 62 / 63 XXL
64 bis 65 64 / 65 XXXL
Falls die Kopfgrößenmessung einen Wert liefert, der zwischen zwei
Helmgrößen liegt (z. B. 57,5 cm), empfehlen wir, zuerst die kleinere
Größe zu probieren.
deutsch
8
9
Page 5

C. DIE WAHL DES PASSENDEN HELMS
3. PRÜFEN, OB DIE ERMITTELTE HELMGRÖSSE PASST
Überprüfen Sie bitte bei aufgesetztem Helm, verriegeltem Kinnteil
sowie geschlossenem und richtig eingestelltem Kinnriemen (wichtig:
Kinnriemen-Einstellung siehe Kapitel D.9. - Rückhaltesystem), ob Ihr
Helm die für Sie richtige Größe aufweist und korrekt sitzt.
1. Schritt: Prüfen Sie, ob alle Polster der Innenausstattung straff,
aber ohne zu drücken an Ihrem Kopf anliegen:
a) zentrales Kopfpolsterpad
b) Wangenpolster
c) Kopfbandpolsterung (insbesondere im Stirnbereich).
Sollten Sie einen störenden, wenn nicht sogar schmerzhaften Druck verspüren, probieren Sie die nächstgrößere
Helmgröße.
2. Schritt: Kontrollieren Sie, ob der Helm Ihnen ein ausreichend
großes peripheres Sichtfeld gewährt. Seitliche Einschränkungen der Sicht treten konstruktions bedingt
bei jedem Helm auf, sollten aber nicht als störend oder
wahrnehmungseinschränkend empfunden werden.
3. Schritt: Halten Sie den aufgesetzten Helm fest zwischen Ihren
Händen und bewegen Sie den Helm rauf und runter.
Versuchen Sie auch, den Helm zu drehen. Bei diesen
Bewegungen sollten Sie spüren, wie Ihre Kopf- und
Gesichtshaut bewegt wird. Lässt sich der Helm zu
einfach bewegen, dann ist der Helm zu groß! Probieren
Sie eine kleinere Größe.
4. Schritt: Greifen Sie den aufgesetzten Helm am Kinnteil und
versuchen Sie, ihn nach hinten vom Kopf zu ziehen.
Gelingt Ihnen das, dann ist der Helm zu groß oder
der Kinnriemen zu weit eingestellt (nicht fest genug
angezogen). Bitte benutzen Sie zu Ihrer eigenen
Sicherheit eine kleinere Größe bzw. stellen Sie den
Kinnriemen neu ein.
5. Schritt: Fassen Sie den Helm mit beiden Händen im hinteren
Bereich und versuchen Sie, den Helm nach vorne über
den Kopf zu drehen. Lässt sich der Helm so vom Kopf
ziehen, ist entweder der Kinnriemen zu weit eingestellt
(nicht fest genug angezogen) oder der Helm zu groß.
Stellen Sie den Kinnriemen neu ein bzw. wählen Sie eine
kleinere Helmgröße.
Wiederholen Sie die Prüfschritte so lange, bis Sie den für Sie
richtigen Helm bzw. die passende Helmgröße gefunden haben.
deutsch
10
Idealerweise überprüfen Sie Ihre Wahl bei einer Probefahrt.
Warnung:
Fahren Sie niemals mit einem Helm, der nicht richtig passt!
11
Page 6

D. DER HELM
1. NORM
Der C3 erfüllt die Norm ECE-R 22.05. Diese Prüfnorm gewähr leistet
die Einhaltung von defi nierten Sicherheitsstandards hinsichtlich
Stoß dämpfung, Durchdringungsfestigkeit, Seitensteifi gkeit, Rückhaltesystem sowie Sichtfeld. Die Zulassung garantiert Ihnen zum einen die
Zulassung für die Länder der europäischen Union und aller Länder,
die die ECE-Norm anerkennen und zum anderen die im Schadensfall
wichtige Versicherungskonformität.
Bitte beachten Sie, dass dieser C3 mit ECE-Zulassung speziell auf
die ECE-Norm eingestellt ist und daher insbesondere nicht für die
USA oder Kanada zugelassen ist. Er darf nur in Ländern verwendet
werden, für die die ECE-Norm Gültigkeit besitzt.
Achtung:
Für den Gebrauch in den USA oder Kanada dürfen ausschließlich SCHUBERTH Helme eingesetzt werden, die über die
entsprechende Zulassung und technische Einstellung verfügen.
Weitere Informationen und die Bezugsquelle für diese Helme
fi nden Sie im Internet unter:
www.schuberth.com/usa
www.schuberth.com/canada
2. ECE-ZULASSUNG
Genehmigungsnummer
12
ECE-Prüfnorm
059284/P-3523
35230001
Zulassungsbehörde
Seriennummer
3. ANATOMIE DES HELMS
Visier
Refl exaugen
Sonnenvisier
Innenausstattung
Kopfentlüftung
Visierbelüftung/
Kinnbelüftung
Öffungstaste
Kinnteil
Kopfbelüftung
Innenschale
®
Pinlock
-Visier
Visiermechanik
Außenschale
Rückhaltesystem
(mit Anti-Roll-Off System)
Bedienungselement
Sonnenvisier
Kinnriemen
mit Ratschenverschluss
4. AUSSENSCHALE
Die Helm-Außenschale des C3 verbindet eine aerodynamisch optimale
Form mit konsequentem Schutz. Sie besteht aus S.T.R.O.N.G.Fibre – einer von SCHUBERTH entwickelten glasfaserverstärkten,
duroplastischen Spezial-Matrix, die dem Helm die für Ihren Schutz
notwendige, hohe Festigkeit verleiht.
Warnung:
Der Schutzhelm ist für die Absorption nur einer Schlag – oder
Stoßeinwirkung ausgelegt. Nach einem Sturz, Unfall oder nach
einer sonstigen Krafteinwirkung muss der Helm ausgetauscht
werden.
5. INNENSCHALE
Die Helm-Innenschale ist zur Optimierung der Stoßdämpfungseigenschaften mehrteilig aufgebaut. Durch eine komplexe MehrzonenVerschäumung des Hauptkörpers wird eine bessere Kraftaufnahme
und -verteilung erreicht und Ihnen ein Höchstmaß an Sicherheit ge boten. Die großen Seitenteile sorgen für optimalen und angenehmen
Sitz des Helms.
13
deutsch
Page 7

D. DER HELM
6. AERODYNAMIK
Alle SCHUBERTH Motorrad- und Rennsporthelme werden im
SCHUBERTH eigenen Windkanal unter wissenschaftlich genau
defi nierten Bedingungen entwickelt und optimiert. Der C3 ist speziell
für die Touren- und Sporttourenfahrer-Sitzhaltung eingestellt und liegt
ruhig im Luftstrom. Auch bei höheren Geschwindigkeiten entwickelt
der C3 praktisch keinen Auftrieb. Weitere charakteristische Eigenschaften des C3 sind ein verbesserter Luftwiderstand und eine hohe
Richtungsstabilität. Bei unverkleideten Motorrädern wird zudem das
Buffeting* deutlich minimiert.
* Rütteln des umströmten Körpers im Luftstrom.
Achtung:
Bitte beachten Sie, dass die – bei verkleideten Motorrädern
im Randbereich des (durch die Verkleidung) erzeugten
Windschattens – auftretenden starken Luftverwirbelungen
die aerodynamischen Eigenschaften eines Helms erheblich
verändern können.
7. AEROAKUSTIK
Auf die aeroakustischen Eigenschaften haben wir beim C3
besonderen Wert gelegt, ohne Einschränkungen beim Tragekomfort in
Kauf zu nehmen. Verschiedene im SCHUBERTH Windkanal entwickelte
Maßnahmen (u. a. die spezielle Anpassung des Windabweisers
im Kinnbereich und die Formgebung des Akustikkragens) sowie
die Auswahl besonderer Materialien sorgen für Zugfreiheit und
einen leisen Helm**. Hierdurch wird ein entspannteres Fahren
– insbesondere auf längeren Strecken – und damit eine größere
Konzentrationsfähigkeit ermöglicht.
Ein leiser Helm zeichnet sich durch geringe Windgeräusche aus.
Windgeräusche entstehen durch turbulente Verwirbelung der Luft,
die den Helm umströmt, die Turbulenzstrukturen erzeugen lokale
Druckschwankungen, die im Helm als Rauschen wahrgenommen
werden (sogenannter Pseudoschall). Dieses Geräusch hört nur der
Helmträger. Ab ca. 100 km/h wird bei den meisten Motorrädern und
Helmen das Motorengeräusch von diesem Windgeräusch überdeckt.
** Aeroakustische Werte können in Abhängigkeit von Motorradtyp, Verkleidung,
Sitzhaltung und Körpergröße variieren.
Warnung:
Durch die aeroakustische Optimierung des Helms und die damit
einhergehenden geringeren Windgeräusche kann die tatsächliche
Geschwindigkeit leicht unterschätzt werden. Verlassen Sie sich
bei der Einschätzung der gefahrenen Geschwindigkeit nicht
auf Ihr Gehör, sondern kontrollieren Sie diese anhand Ihres
Tac hometers.
Achtung:
Bei verkleideten Motorrädern treten im Randbereich des
erzeugten Windschattens starke Luftverwirbelungen auf. Diese
können die aeroakustische Leistungsfähigkeit des Helms
erheblich reduzieren. Die Motorradverkleidung sollte so angepasst sein, dass die abgehende Wirbelschicht nicht direkt auf
die Helmunterseite trifft.
deutsch
14
15
Page 8

D. DER HELM
aeroakustisch unkritischer Bereich
Tipp:
Um einen möglichst leisen Helm zu erhalten, ist die
aeroakustisch kritischer Bereich
aeroakustisch unkritischer Bereich
Passform auf der Helmunterseite extrem wichtig. Sorgen
Sie für einen guten Helmabschluss, nutzen Sie hierzu die
Verstellmöglichkeiten, die Ihnen der justierbare Akustikkragen
bietet. Bei kleineren Kragenweiten empfi ehlt sich die zusätzliche
Verwendung eines Halstuches.
ANTI-NOISE-PAD (im Lieferumfang enthalten)
Mit Hilfe des mitgelieferten Anti-Noise-Pads lassen sich die
Fahrgeräusche im Helm weiter reduzieren.
1. Das Anti-Noise-Pad wird mit Hilfe
der Klettstreifen innenseitig am
Windabweiser befestigt.
8. KINNTEIL
Der C3 ist mit einem hochschwenkbaren Kinnteil ausgerüstet,
welches sich mit Hilfe des mittig am Kinnteil platzierten Bedienungselements leicht öffnen und schließen lässt. Der dazu nötige Bewegungsablauf ist ergonomisch optimiert.
Schloss-System
Das Kinnteil ist im geschlossenen Zustand links- und rechtsseitig mit
einem in Anlehnung an Türverriegelungen aus dem Automobilbau
– speziell entwickelten Schloss-System ausgerüstet. Zur Öffnung des
Kinnteils ist trotz der Verwendung von 2 Schlössern die Bedienung
mittels nur einer Taste nötig. Die Schlösser werden über einen
Bowdenzug simultan gesteuert. Das mechanisch optimierte System
reduziert die Bedienkraft der beiden Schlösser auf angenehme 16 N,
obwohl die sicherheitsrelevante Gesamtschließkraft ein Vielfaches
dessen beträgt.
deutsch
16
17
Page 9

D. DER HELM
Systembedienung
Das Kinnteil kann jederzeit unabhängig von der Stellung von Visier
oder Sonnenblende geöffnet bzw. geschlossen werden. Die harte
und sichere Endrastung sorgt dafür, dass das hochgeklappte Kinnteil
sicher in seiner Position gehalten wird.
Öffnen des Kinnteils
1. Das Kinnteil wird geöffnet, indem Sie
die mittig im Kinnbereich befi ndliche
rote Taste mit dem Daumen in
Pfeilrichtung bis zum Anschlag nach
vorne schieben.
2. Die Bowdenzugmechanik gibt beide
Schlösser frei und Sie können das
Kinnteil nach oben in die Endrastung
schwenken.
Achtung:
Die Kinnteilmechanik des C3 ist mit einem Sicherheitsfeature
ausgestattet, welches ein selbstständiges Öffnen des Kinnteils
bei einem eventuellen Sturz verhindert. Greifen Sie zum Öffnen
deshalb zusätzlich das Kinnteil mit einer Hand.
Schließen des Kinnteils
1. Das Kinnteil wird geschlossen,
indem Sie es mit einer Hand geführt
nach unten schwenken, bis beide
Schlösser deutlich hörbar einrasten.
Achtung:
Überprüfen Sie nach jedem Verschließen der Kinnklappe das
korrekte Einrasten der Schlösser indem Sie von unten gegen das
Kinnteil drücken.
Tipp:
Bei Verwendung des verstellbaren Zusatz-Windabweiser ist es
beim Schließen hilfreich, mit einem Finger unter das Kinnpolster
zu greifen, um das Kinnteil über das Kinn zu bewegen.
Warnung:
Fahren Sie nie mit hochgeschwenktem Kinnteil!
9. RÜCKHALTESYSTEM
Das Rückhaltesystem des C3 besteht aus einem Kinnriemen, der
zusätzlich mit Nackenbändern am hinteren Teil der Helmschale
gesichert ist (Anti-Roll-Off-System – siehe Kapitel D.14).
Kinnriemen mit Micro-Lock-Ratschenschloss
Der C3 wird mit einem Ratschenschloss
ausgeliefert. Dieses Verschluss-System
ermöglicht bei jedem Aufsetzen
des Helms ein einfaches und
auf Ihren Kopf abgestimmtes
Anlegen des Kinnriemens.
deutsch
18
19
Page 10

D. DER HELM
Einstellung des Kinnriemens
Die Länge des Kinnriemens wird variiert durch vermehrten
oder verringerten Durchzug des Kinnriemenbandes durch die
Metallschnalle. Stellen Sie die Länge des Kinnriemens
so ein, dass der Kinnriemen fest, aber noch bequem
unter dem Kinn anliegt und fi xieren Sie das
Kinnriemenende per Halterungsschlaufe
mit der Komfort-Kinnriemenunterlage.
Warnung:
Achten Sie bei der Einstellung darauf, dass der Helm bei
geschlossenem Kinnriemen nicht nach vorn vom Kopf gezogen
werden kann (siehe auch Kapitel C.3.).
Warnung:
Kontrollieren Sie die Einstellung der Kinnriemenlänge regelmäßig
(siehe Kapitel F.2. Überprüfen des Kinnriemens).
Öffnen und Schließen
Das Kinnriemenschloss wird geschlossen, indem Sie die Ratschenzunge stufenweise in das Schloss einschieben. Sollte der Kinnriemen
zu locker am Kinn anliegen, schieben Sie die Ratschenzunge eine
Stufe weiter in das Schloss.
Achten Sie beim Einstellen darauf, dass der Kinnriemen nicht störend,
jedoch aber straff am Kinn anliegt. Öffnen Sie den Kinnriemen,
indem Sie das rote Band am Ratschenschloss hochziehen und so den
Verschluss freigeben. Ziehen Sie anschließend die Ratschenzunge aus
dem Schloss.
20
Warnung:
Fahren Sie niemals, ohne dass der Kinnriemen richtig
geschlossen, passend eingestellt sowie auf seinen korrekten
Sitz überprüft wurde. Aufgrund eines falsch eingestellten oder
nicht richtig geschlossenen Kinnriemens kann sich, im Falle
eines Unfalls, der Helm vom Kopf lösen.
Warnung:
Eine geschlossene Komfort-Kinnriemenunterlage bietet keinen
Schutz. Der Kinnriemen muss stets komplett geschlossen sein.
Warnung:
Öffnen Sie niemals den Kinnriemen während der Fahrt.
10. PINLOCK® VISIER
Das Pinlock
®
Visier ist ein beschlagfreies Doppelscheibenvisier, bei
dem auf der Visier-Innenseite anstelle der standardmäßigen AntiFog-Beschichtung eine zweite Visierscheibe integriert wurde. Die
beiden Visierscheiben sind durch eine klare, fl exible Silikondichtung
voneinander getrennt und abgedichtet. Durch die Befestigung
der inneren Visierscheibe mittels exzentrischer Haltebolzen (Pins)
werden die beiden Visierscheiben zueinander vorgespannt und die
Silikondichtung dadurch abgedichtet. Es entsteht ein isolierendes
Luftpolster zwischen der Haupt- bzw. Außenscheibe und der
Innenscheibe des Visiers, wodurch ein Beschlagen der Innenscheibe
verhindert wird.
BESCHICHTUNG
Die Hauptscheibe ist beidseitig HighClear® anti-scratch beschichtet.
Die Pinlock® - Innenscheibe verfügt über eine beidseitige
Antifog-Beschichtung.
21
deutsch
Page 11

D. DER HELM
Achtung:
Um Beschädigungen an der kratzempfi ndlichen Innenscheibe zu
vermeiden, sollten keine Handschuhe oder andere Gegenstände
in den Helm gesteckt werden.
Achtung:
Die Innenscheibe ist im Auslieferzustand mit einer Schutzfolie
ausgestattet. Entfernen Sie diese Folie vor dem ersten
Gebrauch des Helms.
Achtung:
Die Pinlock® - Innenscheiben dürfen nur in Verbindung mit
speziell dafür vorgesehenen SCHUBERTH Hauptvisieren
gefahren werden. Eine Anbringung auf anderen Visieren ist nicht
gestattet. Letzteres gilt explizit auch für andere Visiervarianten.
Öffnen des Visiers
Das Visier wird geöffnet, indem Sie
links oder rechtsseitig mit dem Daumen
unter eines der am Visier angebrachten
Fingertabs greifen und die Visierscheibe
mit Druck nach oben in die gewünschte
Position bringen.
Visierrastung (mit Stadtstellung)
Das Visier arretiert in sieben verschiedenen Positionen. Die zweite
Rastposition (Stadt stellung) ist etwas verstärkt, so dass das Visier
an dieser Stelle einen stärkeren Widerstand erfährt. Auf diese Weise
wird das Arretieren des Visiers in der Stadtstellung erleichtert,
insbesondere während der Fahrt. Öffnen Sie hierzu das Visier
– hierbei wird die Stadtstellung in der Regel zunächst übersprungen
– mit einer Abwärts bewegung des Visiers kann diese dann einfach
eingestellt werden. Das Visier kann jederzeit unabhängig von der
Stellung des Sonnen visiers betätigt werden.
Schließen des Visiers
Das Visier wird geschlossen, indem
Sie das links- und rechtsseitige
Fingertab oben greifen und mit einer
Handbewegung nach unten drücken bis
es hörbar einrastet.
VISIERSCHEIBENWECHSEL
Der Visierscheibenwechsel ist mit der komfortablen EasyChangeVisiermechanik schnell und ohne Hilfsmittel möglich. Zum Wechseln
des Visiers ist es hilfreich, den Helm auf einer geraden Fläche
abzustellen oder ihn im Sitzen auf Ihren Oberschenkeln abzulegen.
Visierscheiben-Ausbau
1. Bewegen Sie das Visier in die
oberste Raststellung.
2. Betätigen Sie das Federelement
unterhalb der Visiermechanik in
Richtung Visieröffnung. Anschließend
das Federelement auf der anderen
Seite betätigen.
3. Bewegen Sie das Visier so weit
nach oben, bis sich dieses aus der
Visiermechanik löst.
deutsch
22
23
Page 12

D. DER HELM
Visierscheiben-Einbau
1. Führen Sie mit beiden Händen die
Rastzapfen des Visiers in die dafür
vorgesehene Aussparung in der
Visiermechanik.
2. Durch leichten, zum Helm gerichteten
Druck und gleichzeitiger Schließbewegung, rastet das Visier hörbar
ein.
3. Überprüfen Sie die Funktion der
Visiermechanik, indem Sie das Visier
einmal bis zum Anschlag öffnen.
INNENSCHEIBENWECHSEL
Innenscheiben-Ausbau
1. Legen Sie zur Demontage der Innenscheibe das Visier auf einen weichen,
sauberen Lappen. Die Oberkante des
Visiers sollte Ihnen zugewandt sein.
2. Um gegebenenfalls die Vorspannung
der Innen scheibe etwas zu verringern, können Sie das Visier mit
den Handballen vor sichtig so weit
auseinander biegen, bis sich bei
gleichzeitigem Druck mit den
Daumen die Innenscheibe löst und
ca. 2-3 mm nach vorne bewegt.
3. Greifen Sie nun mit Zeige- und
Mittelfi nger hinter die Innenscheibe
und heben diese von der
Außenscheibe ab. In dieser Stellung
lässt sich die Innen scheibe nun leicht
mit dem Daumen aus dem Haltebolzen ziehen.
4. Danach lässt sich die Innenscheibe
aus dem Visier entnehmen.
Innenscheiben-Einbau
1. Legen Sie die Innenscheibe so in das
Haupt visier ein, dass es auf einer Seite
bereits im Haltebolzen liegt und die
Silikon dichtung sich auf der dem Außenvisier zugewandten Seite befi ndet.
deutsch
24
25
Page 13

D. DER HELM
2. Greifen Sie nun an der gegenüberlie gen den Seite die Innenscheibe an
der oberen und unteren Querkante
und drücken Sie das Ende der
Innenscheibe mit dem Zeige fi n g e r
in eine leichte S-Form. Nun lässt
sich die Ausspa rung leicht über den
Haltebolzen einführen und Sie können
die Innenscheibe loslassen.
3. Die Innenscheibe sollte nun im
Außen visier aufl iegen, wobei die
Unterkante der Innen scheibe parallel
zur Unterkante des Haupt visiers
verlaufen sollte. Um bei Bedarf
die Lage der Innenscheibe zu
ändern, biegen Sie das Visier mit
den Handballen vor sich tig so weit
auseinander, bis sich die Innen scheibe entsprechend verschieben
lässt.
4. Kontrollieren Sie rundherum das gleichmäßige Anliegen der
Silikon dichtung an der Außen scheibe. Nur so ist ein einwandfreies
Antibeschlagverhalten gewährleistet.
5. Entfernen Sie gegebenenfalls die Schutzfolie der Innenscheibe.
Sollte es zu Undichtigkeiten und damit zu einem Beschlagen des
Visiers kommen, ist die Innenscheibe nicht richtig platziert oder der
Druck auf die Dichtung zu gering. Der Druck auf die Dichtung kann
durch Verdre hen der beiden exzentrischen Haltebolzen reguliert
werden. Dazu die Innenscheibe ausbauen, die Haltebolzen von innen
mit Hilfe eines fl achen aber nicht scharfkantigen Gegenstandes
vorsichtig aus der Außenscheibe herausdrücken, bis zu 180° drehen
und wieder einset zen. Danach die Innenscheibe montieren und
Dichtung kontrollieren.
Hinweise:
• Um ein Verkratzen des Visiers zu vermeiden, darf die Innen-
scheibe nur bei sauberem und trockenem Visier demontiert
bzw. montiert werden.
• Achten Sie bei der Montage der Innenscheibe darauf, dass
weder Staub noch Feuchtigkeit zwischen die beiden Visier -
scheiben geraten.
• Als Unterlage zur Demontage bzw. Montage verwenden Sie
am besten ein weiches und sauberes Tuch.
• Kontrollieren Sie regelmäßig das korrekte und gleichmäßige
Anliegen der Silikondichtung zwischen Außen- und
Innenscheibe.
Achtung:
Aufgrund der hohen Luftdrücke, die beim Fahren mit
offenem Visier auf die Silikondichtung wirken, empfehlen wir
grundsätzlich während der Fahrt das Visier zu schließen, um ein
Eindringen von Schmutz bzw. Feuchtigkeit zu vermeiden.
Achtung:
Drücken Sie die Haltebolzen nicht mit den Fingern heraus, da
die Haltebolzen dabei brechen könnten.
Warnung:
Bei Verwendung eines Doppelscheibenvisiers ist konstruktionsbedingt damit zu rechnen, dass es zu vermehrten Lichtein spiege lungen im Visier kommt (insbesondere bei Fahrten in der
Dunkel heit). In der Regel werden diese Lichtrefl exe aufgrund der
Be schlagfreiheit dieses Visiertyps als unkritisch betrachtet.
Sollten Sie aber dennoch, z.B. aufgrund einer höheren individuellen Sensibilität, Schwierigkeiten mit den Lichtrefl exen
haben, ist von einem weiteren Einsatz des Doppelscheibenvisiers abzusehen.
Warnung:
Sollte sich Feuchtigkeit im luftdichten Bereich zwischen den
beiden Visierscheiben befi nden bzw. eindringen, ist die Innen-
deutsch
26
27
Page 14

D. DER HELM
scheibe, um Sichtbehinderungen zu vermeiden, umgehend
auszubauen. Bauen Sie diese erst wieder ein, wenn beide Visierscheiben komplett getrocknet sind (empfohlen: Lufttrocknung).
Sollte danach erneut ein Eindringen von Feuchtigkeit festgestellt
werden, darf das Pinlock
®
- Visier nicht weiter eingesetzt werden
und muss ausgetauscht werden.
SICHERHEITSHINWEISE
Überprüfen Sie vor jeder Fahrt die Funktionsfähigkeit von Visier und
Sonnenvisiermechanik und ob das Visier bzw. Sonnenvisier eine
ausreichend gute Sicht gewährleisten. Verunreinigungen sollten vor
jeder Fahrt entfernt werden. Kontrollieren Sie Visier und Sonnenvisier
auf mechanische Schäden und Risse. Stark verkratzte oder matte
Scheiben beeinträchtigten die Sicht erheblich und sollten vor Antritt
einer Fahrt aus Sicherheitsgründen ausgetauscht werden.
Warnung:
Benzin-, Lösungsmittel- und Treibstoffdämpfe können am Visier
Risse hervorrufen. Das Visier darf diesen Dämpfen nicht ausgesetzt werden! Stellen Sie daher Ihren Helm auch nie auf den
Tank Ihres Motorrades.
11. SONNENVISIER
Scheibe
Das Sonnenvisier ist grau getönt und 3D-thermogeformt. Aufgrund
der Visierdicke von 1,5 mm kann das Sonnenvisier auch beim
Fahren mit hochgeschwenktem Visier noch Schutz gegen leichten
Steinschlag oder Insekten bieten. Zudem bietet es aufgrund
der UV-absorbierenden Eigenschaften des eingesetzten SpezialPolycarbonats einen wirksamen Schutz gegen schädliche
UV-Strahlung.
Beschichtung
Das Sonnenvisier verfügt über eine beidseitige Anti-Fog-Beschichtung
und ist kratzfest.
Bedienung
Die Bedienung des Sonnenvisiers
erfolgt über den linksseitig im
Kinnbereich platzierten Schieber,
der auch mit Handschuhen leicht zu
Bedienen ist. Durch Bewegung des
Schiebers nach hinten senkt sich das
Sonnenvisier, durch Bewegen nach vorne
verschwindet das Sonnenvisier in der
Helminnenschale.
Das Sonnenvisier kann unabhängig von
der Stellung des Visiers betätigt werden.
Achtung:
Das Sonnenvisier darf nur über den Schieber betätigt werden.
Warnung:
Fahren Sie niemals mit gesenktem Sonnenvisier bei Dunkelheit
oder schlechten Sichtverhältnissen. Vor Tunnelfahrten ist das
Sonnenvisier stets hochzuklappen.
Warnung:
Fahren ohne Visier oder mit geöffnetem Visier kann Schäden
der Augen und des Gesichts durch Steine, Staub, Insekten und
andere herumfl iegende Teile zur Folge haben. Ein abgesenktes
Sonnenvisier bietet zwar einen gewissen Schutz gegen leichten
Steinschlag oder Insekten, kann aber nicht alle Gefahren
vermeiden.
deutsch
28
29
Page 15

D. DER HELM
SONNENVISIERWECHSEL
Der Sonnenvisierwechsel ist ohne Hilfsmittel möglich.
Tipp:
Fassen Sie beim Ein- und Ausbau das Sonnenvisier mit einem
sauberen und weichen Tuch (empfohlen: Mikrofasertuch) an, um
Fingerspuren und Kratzer zu vermeiden.
Tipp:
Der Wechsel des Sonnenvisiers ist leichter möglich bei
geöffnetem und arretiertem Kinnteil. Zudem ist es hilfreich, den
Helm auf einer geraden Fläche abzustellen oder ihn im Sitzen auf
den Oberschenkeln abzulegen.
Achtung:
Vermeiden Sie beim Aus- und Einbau einen Kontakt zwischen
Sonnenvisier und Helmaußenschale.
Sonnenvisier-Ausbau
1. Kinnteil öffnen und arretieren.
2. Sonnenvisier nach unten schwenken.
3. Mittlere Schnappverbindung mit
Haltezapfen leicht nach außen biegen
bis sich das Sonnenvisier aus der
Halterung löst.
4. Wiederholen Sie den Schritt für die
andere Seite.
Tipp:
Die Sonnenvisieraufnahmen sollten bis zum Wiedereinbau in der
unteren Stellung verbleiben.
Sonnenvisier-Einbau
1. Sonnenvisier zwischen die Schnappverbindungen stecken und auf dem
Halte zapfen einrasten, anschließend
den Schritt für die andere Seite
durchführen.
2. Das Sonnenvisier zwischen
Helmaußen- und -innenschale
positionieren und per Bedienschieber
versenken.
3. Führen Sie zur Sicherheit eine
Funktionsüberprüfung des
Sonnenvisier-Bedienmechanismus
durch.
deutsch
30
31
Page 16

D. DER HELM
12. INNENAUSSTATTUNG
Die auswechselbare und waschbare Innenausstattung des C3
gewährleistet neben einer hervorragenden Passform auch gleichzeitig
eine bessere Be- und Entlüftung des Helms.
Die Komfort-Wangenpolster sorgen für eine weiche Polsterung an
den Wangen und das Kopfband-Polster für eine gute Anlage rund
um den Kopf. Das Kopfpad gewährleistet die bequeme Aufl age auf
dem Kopf ohne die Lüftungskanäle zu verdecken (siehe Kapitel D.13.
Belüftungssysteme - Kopfbelüftung).
Die Innenausstattung besteht an allen Stellen (insbesondere
denen mit direktem Kopfkontakt) aus hautfreundlichem Material.
Überwiegend kommt dabei ein weicher, atmungsaktiver sowie sehr
gut wärme- und feuchtigkeitstransportierender Coolmax®-Stoff
zum Einsatz. Die Kopfpads sind wiederum aus einem speziellen,
antibakteriell wirkenden und schweißabsorbierenden Stoff gefertigt.
Einbau Kopfband-Polster
Die Innenausstattung ist per Klettband und Klemmbefestigung an
der Innen schale fi xiert und kann durch behutsames Herausziehen
entnommen werden.
Zum Einbau dienen die stirnseitig eingenähte Kunststoffl eiste sowie
die im Nackenbereich befi ndlichen Laschen als Fixierungshilfe.
1. Schieben Sie die Kunststoffl eiste
stückweise unter die Aussparungen
der auf der Innenschale befestigten
Kunststoffl eiste.
32
2. Stecken Sie die Kunststoffl asche
mit runder Lochung über den am
hinteren Teil der Wangenpolster
eingenähten Pin und fi xieren Sie
diesen mit Hilfe der rot-markierten
Steckvorrichtung.
Achtung:
Beim Einlegen der Innenausstattung darauf achten, dass
sich die Belüftungsaussparungen des Kopfbandes über den
Lüftungskanälen im hinteren Teil des Helms befi nden und das
Kopfband mittig zwischen den beiden Lüftungskanälen verläuft.
Warnung:
Fahren Sie niemals, wenn Teile der Innenausstattung entfernt
sind.
Warnung:
Große Hitzeeinwirkungen (z. B. Auspuffhitze) können zu
Beschädigungen der Innenausstattung führen!
Achtung:
Um Schäden an der Innenausstattung und der Innenschale
zu vermeiden, den Helm nicht über Spiegel oder Lenkergriff
hängen.
Tipp:
Sollten Sie eine individuelle Anpassung der Komfortpolsterung
wünschen, sprechen Sie bitte mit Ihrem Händler oder direkt mit
der SCHUBERTH Kunden-Hotline unter +49 (0)391 8106-555.
Anpassungen des Helms können nur im Rahmen der gültigen
ECE-R 22 Norm und gegen Berechnung durchgeführt werden
(siehe auch Kapitel J.2. Sonderanpassungen).
deutsch
33
Page 17

D. DER HELM
13. BELÜFTUNGSSYSTEME
Belüftung 1 - Visiereinstellung
Der C3 besitzt ein mehrstufi g verstellbares Visier. Öffnen Sie das
Visier – in Abhängigkeit von Ge schwin digkeit und Beschlagneigung
– so weit, dass es nicht beschlägt und gleichzeitig Ihre Augen vor
unangenehmen Luftzügen geschützt sind.
Stadtstellung
In der zweiten Raststufe befi ndet sich das Visier automatisch in der
Stadtstellung. Die durch den unteren Spalt eindringende Luft strömt
über die Visierinnenseite und entweicht durch die Öffnung an der
Oberkante.
Belüftung 2 - Belüftungseinlass Kinn
(Visierbelüftung)
Zur Belüftung des Visiers ist der C3 im
Kinn bereich mit einem Belüftungseinlass
ausgestattet. Unab hängig von der Sitzhaltung strömen ca. 80-90 % der Luft
im mittleren Stromfaden exakt in den
geöffneten Lufteinlass.
Eine Umlenkung sorgt dafür, dass
der Luft strom schon bei niedrigen
Geschwindigkeiten die Visierscheibe
wirkungsvoll belüftet. Durch Druck
auf den unteren bzw. oberen Teil des
Belüftungs elements wird der Lufteinlass
geöffnet bzw. geschlossen.
Belüftung 3 - Kopfbelüftung
Zur Belüftung der Kopfoberfl äche befi ndet sich an der Oberseite der
Helm schale eine große Lufteinlasshaube mit 3 stufi g regelbarem
Belüftungs system. Die durch diese Haube eintretende Luft wird über
Kanäle an die Kopfoberseite geführt.
Ein neuartiges innovatives
Regenabzugsystem verringert bei
starkem Regen das Eindringen von
Wasser in den Helm auf ein Minimum.
Im Helminnenraum ermöglicht das
Kopfpolstersystem den direkten Kontakt
zwischen einströmen der Luft und
Kopfoberfl äche, wodurch eine schnellere
Ableitung der Innenraum wärme erzielt
wird. Zur Regulierung der Belüftung
befi ndet sich auf der Luftein lasshaube ein auch mit Handschuhen gut
bedienbarer Schieber. Durch Bewegen
des Schiebers nach hinten bis zum
ersten Einrasten ist die Teilbelüftung
aktiv, durch weiteres Bewegen nach
hinten wird der Lufteinlass komplett
geöffnet.
Sommer- und Winteranpassung
Die Belüftung des C3 kann den
Jahreszeiten, Witterungsbedingungen
oder persönlichen Belüftungsvorlieben
angepasst werden. Während im Sommer
die einströmende Luft möglichst
direkt auf den Kopf wirken und kühlen
sollte, kann im Herbst/ Winter durch
Abdeckung der Belüftungskanäle durch
das Kopfpad die einströmende, u. U. sehr
kalte Luft vermindert bzw. umgelenkt
werden. Dazu heben Sie den Mittelsteg
des Kopfpolsters leicht an und entfalten
die sich hinter dem im Stirnbereich des
Kopfpolsters befi ndliche Stoffl asche.
deutsch
34
35
Page 18

D. DER HELM
Belüftung 4 – Kopfentlüftung
Der C3 ist mit einem permanen ten
Entlüf tungs system ausgestattet. Die
im Innenraum befi ndliche bzw. über
die Belüftung einströmende Luft wird
über die Luftkanäle der Innenschale
zur Helmrückseite geführt. Der im
Nackenbereich herrschende Unterdruck
sorgt für einen permanenten Abzug
der Innenraumluft durch den im
Nackenpolster eingesetzten SpezialNetzstoff. Auf diese Weise wird ein
angenehmes Helmklima gewährleistet.
Belüftung 5 – O2-Minimalbelüftung
Durch die spezielle Formgebung im
oberen Bereich des Kinnbelüftungselements verfügt der Helm über eine
Minimalbelüftungsfunktion, die für eine
permanente Zufuhr von Frischluft sorgt.
Die auf diese Weise einströmende
Luftmenge ist so dosiert, dass sie
vom Helmträger praktisch nicht
wahrgenommen wird, aber bereits ab ca.
30 km/h (soweit sich der Helm während
der Fahrt komplett im Luftstrom
befi ndet) eine wirksame Frischluftzufuhr
gewährleistet. Hierdurch wird einer
Beschlagneigung der Visierscheibe und
einer C02-Überkonzentration – auch
bei komplett abgeschlossenem Helm
– entgegengewirkt.
14. ZUSÄTZLICHE SICHERHEITSAUSSTATTUNG
Anti-Roll-Off-System (A.R.O.S.)
Das speziell von SCHUBERTH entwickelte und auch in jedem
SCHUBERTH Motorradhelm als Sicherheitsaus rüstung enthaltene
Anti-Roll-Off-System bewirkt, dass bei geschlossenem und richtig
eingestelltem Kinnriemen
a) sich der Helm nicht von hinten vom
Kopf drehen kann,
b) aufgrund des geringeren
Neigungswinkels einem Kontakt
zwischen der Kinnpartie des Helms
und dem Kinn bzw. Hals des Fahrers
entgegenwirkt wird und
c) die unfallbedingten Folgen eines
Brustkorbkontakts des Helms
reduziert werden.
Refl exbereiche
Zur besseren Erkennbarkeit im Straßen verkehr – insbesondere bei
ungünstigen Sichtverhältnissen – befi nden sich links und rechts unter
der Visierscheibe 2 Refl exbereiche. Ergänzt mit den silberfarbenen
Refl exstoff-Applikationen in den hinteren Seitenbereichen des
Nackenpolsters bewirkt dies eine bessere Erkennbarkeit des
Motorradfahrers.
Achtung:
Halten Sie die refl ektierenden Sicherheitsbereiche sauber.
Achtung:
Bei Einsatz des Helms in Frankreich sind weitere refl ektierende
Sicherheitsaufkleber verpfl ichtend im Stirn- und Rückenbereich
sowie links und rechts am Helm anzubringen.
deutsch
36
37
Page 19

E. AUF- UND ABSETZEN
1. AUFSETZEN DES HELMS
Achtung:
Handhabung von Kinnriemen/Verschluss-System siehe Kapitel D.8.
1. Öffnen und arretieren Sie das Kinnteil. Achten Sie darauf, dass
das Sonnenvisier in der Helmschale versenkt ist.
2. Öffnen Sie den Kinnriemen und die Komfort-Kinnriemenunterlage.
3. Fassen Sie die unteren Enden des Kinnriemens und ziehen Sie
diese auseinander.
4. Der Helm lässt sich nun leicht über den Kopf ziehen.
5. Schließen Sie die Komfort-Kinnriemenunterlage (mittels des Klettverschlusses).
6. Schließen Sie den Kinnriemen, indem Sie die die Ratschenzunge
bis zum festen Sitz des Kinnriemens stufenweise in das Schloss
einführen.
7. Stellen Sie sicher, dass der Kinnriemen unter dem Kinn verläuft
und fest anliegt.
8. Schwenken Sie die Kinnklappe herunter, bis beide Schlösser
hörbar einrasten.
9. Überprüfen Sie mit einem Druck von unten auf das Kinnteil
dessen Verriegelung.
Achtung:
Überprüfen Sie den richtigen Sitz und die korrekte Länge des
Kinnriemens regelmäßig (siehe Kapitel F.2.).
Warnung:
Fahren Sie nie mit hochgeschwenktem Kinnteil !
2. ABSETZEN DES HELMS
1. Öffnen und arretieren Sie das Kinnteil. Achten Sie darauf, dass
das Sonnenvisier in der Helmschale versenkt ist.
2. Öffnen Sie den Kinnriemen indem Sie am roten Band des
Ratschenschlosses ziehen und so den Verschluss freigeben.
Ziehen Sie anschließend die Ratschenzunge aus dem Schloss.
3. Lösen Sie den Klettverschluss des Komfort-Kinnriemenpolster.
4. Fassen Sie nun die Kinnriemenenden und ziehen Sie diese
auseinander.
5. Der Helm lässt sich jetzt leicht vom Kopf ziehen.
6. Schließen Sie das Kinnteil.
Tipp:
Um Kratzer an anderen Gegenständen, auf denen der Helm
abgelegt werden könnte zu vermeiden, empfehlen wir, den
Kinnriemen auch nach dem Absetzen zu schließen.
deutsch
38
39
Page 20

F. VOR JEDER FAHRT
Kontrollieren Sie zu Ihrer Sicherheit vor jeder Fahrt die folgenden Punkte:
1. ÜBERPRÜFEN DES HELMS
Kontrollieren Sie den Helm regelmäßig auf Schäden. Kleine, oberfl ächliche Kratzer beeinträchtigen die Schutzwirkung Ihres Helms
nicht. Bei gravierenden Schäden (Risse, Dellen, abgeplatzter und
rissiger Lack, etc.) darf der Helm nicht weiter eingesetzt werden.
Bei Bedarf können Sie den C3 zu einer kostenlosen Überprüfung
an den SCHUBERTH Kundenservice einschicken (siehe Kapitel J.3.
Sicherheits-Check).
Achtung:
Falls sich Ihr Körpergewicht erheblich reduziert hat, müssen Sie
überprüfen, ob Ihr Helm noch die für Sie passende Helmgröße
hat (siehe Kapitel C.3.).
2. ÜBERPRÜFEN DES KINNRIEMENS
(mit aufgesetztem und verschlossenem Helm)
1. Prüfen Sie, ob der Kinnriemen unter Ihrem Kinn verläuft.
2. Greifen Sie mit Ihrem Zeigefi nger unter den Kinnriemen und
ziehen Sie.
- Liegt der Kinnriemen lose am Kinn, dann ist dieser zu lang
eingestellt und muss straffer angezogen werden.
- Falls der Kinnriemen nachgibt oder sich löst, ist er nicht
richtig geschlossen! Öffnen Sie den Kinnriemen komplett
und schließen ihn erneut. Wiederholen Sie die Prüfung.
3. Falls sich der Kinnriemen nicht so schließen lässt, dass er fest
unter dem Kinn anliegt, müssen Sie überprüfen, ob Ihr Helm noch
die für Sie passende Helmgröße hat (siehe Kapitel C.3.).
Achtung:
Wiederholen Sie nach jeder Korrekturmaßnahme die Prüfung.
Warnung:
Nie ohne geschlossenen und richtig eingestellten Kinnriemen
fahren! Der Kinnriemen muss korrekt sitzen und darf unter Zug
nicht nachgeben. Nur wenn der Kinnriemen nicht nachgibt, ist
der Verschluss richtig geschlossen.
3. KONTROLLE VON VISIER UND SONNENVISIER
Überprüfen Sie bitte vor jeder Fahrt die Funktionsfähigkeit von Visierund Sonnenvisiermechanik und, ob Visier bzw. Sonnenvisier eine
ausreichend gute Sicht gewährleisten. Verunreinigungen sollten vor
jeder Fahrt entfernt werden (siehe Pfl egehinweise - Kapitel H.2.).
Kontrollieren Sie Visier und Sonnenvisier auf mechanische Schäden
und Risse. Eine stark verkratzte Visierscheibe beeinträchtigt die Sicht
er heblich und sollte bei Bedarf vor Antritt der Fahrt ausgetauscht
werden.
Warnung:
Benutzen Sie niemals getönte Visiere bei schlechten
Sichtverhältnissen sowie Nacht- und Tunnelfahrten.
Warnung:
Verkratzte und/oder verschmutzte Visiere und Sonnenvisiere
beeinträchtigen die Sicht erheblich. Tauschen bzw. reinigen Sie
diese zu Ihrer eigenen Sicherheit unverzüglich.
Warnung:
Tragen Sie Sorge, dass das Visier bzw. Sonnenvisier immer in
einem einwandfreien Zustand ist. Beschädigte Visiere sind nicht
fahrtauglich und somit auszutauschen.
Warnung:
Bei schlechter Sicht ist die Fahrt abzubrechen.
deutsch
40
41
Page 21

G. FÜR IHRE SICHERHEIT
1. SICHERHEITSHINWEISE HELM
Fahren Sie niemals ohne Helm!
Beim Motorradfahren existieren spezielle Gesundheitsrisiken
und -gefahren für Fahrer und Beifahrer. Diese Risiken und
Gefahren können durch das Tragen eines Helms reduziert aber
nicht ausgeschaltet werden. Es sind keine defi nitiven Aussagen
über die konkrete Schutzwirkung eines Helms bei einem Unfall
mög lich. Eine sichere, den Straßen- und Witterungsbedingungen
ange passte Fahrweise ist die Grundvoraussetzung für Ihre
Sicherheit.
Benutzen Sie nur einen Helm, der richtig sitzt und passt!
Um ausreichenden Schutz zu gewähren, muss der Helm gut
passen und sicher befestigt sein.
Schließen Sie vor jeder Fahrt den Kinnriemen und überprüfen
Sie Verschluss-System und Kinnriemen auf korrekten Sitz!
Fahren Sie nie mit geöffnetem oder nicht korrekt eingestelltem
Kinnriemen! Der Kinnriemen muss korrekt sitzen und darf unter
Zug nicht nachgeben. Nur wenn der Kinnriemen nicht nachgibt,
ist der Verschluss richtig geschlossen.
Fahren Sie nie mit hochgeschwenktem Kinnteil!
Nach einem Sturz bzw. Unfall oder nach Gewalteinwirkung auf
den Helm ist dessen volle Schutzwirkung nicht mehr gewährleistet! Die bei einer Kollision einwirkende Energie wird – ähnlich
der Knautschzone beim PKW – durch völlige oder teilweise
Strukturzerstörung der Helmaußen- bzw. -innenschale absorbiert. Bedingt durch die Konstruktion des Helms sind diese
Schäden für den Betrachter häufi g nicht erkennbar. Der Schutzhelm ist für die Absorption nur einer Stoßeinwirkung ausgelegt. Nach einem Sturz, Unfall oder nach einer sonstigen Kraftein wirkung muss der Helm daher grundsätzlich ausge tauscht
werden. Aus Sicherheits gründen ist der alte Helm unbrauchbar
zu machen (siehe auch Kapitel J.6. Blue Concept). Bei Bedarf
können Sie den C3 zu einer kostenlosen Überprüfung an den
SCHUBERTH Kundenservice einschicken.
Der zuvor beschriebene Schutzmechanismus des Helms kann
auch beim Fallen des Helms aus einer Höhe (<1m) zu kleinen
Rissen in der Helmschale führen. Zu einer kostenlosen Überprüfung können Sie Ihren Helm gerne an unseren Kundenservice
einschicken.
Jeder Helm, der einem heftigen Schlag ausgesetzt war, ist
auszuwechseln!
Kein Helm bietet Schutz gegen alle denkbaren Stoßeinwirkungen. Dieser Helm wurde speziell zum Motorradfahren entwickelt.
Für andere Verwendungszwecke ist er nicht geeignet.
Kontrollieren Sie den Helm regelmäßig auf Schäden. Kleine
Kratzer beeinträchtigen die Schutzwirkung Ihres Helms nicht.
Der Helm sollte je nach Beanspruchung und Pfl ege nach
5-7 Jahren ausgetauscht werden. Die Außenschale ist zwar
prinzipiell für eine darüber hinausgehende Nutzungsdauer
geeignet, aufgrund von Materialermüdungs- und
Materialabnutzungs erscheinungen anderer Komponenten sowie
des Gesamtwirkungssystems des Helms und unbekannter
Rahmenbedingungen während der Nutzung empfehlen wir zu
Ihrer eigenen Sicherheit den Austausch des Helms nach Ablauf
des oben genannten Zeitraums.
Große Hitzeeinwirkungen (z. B. durch Auspuffhitze) können zu
Beschädigungen des Dekors, der Helminnenschale und der
Innenausstattung führen!
Das direkte Einwirken von Kraftstoffen, Verdünnern und Lösungs mittel kann zu Strukturzerstörungen der Helmaußen- und
Helm innen schale führen. Der Helm darf nicht mit derartigen
Substanzen in Kontakt gebracht werden! Auch nicht für
Reinigungszwecke.
deutsch
42
43
Page 22

H. WARTUNG UND PFLEGEG. FÜR IHRE SICHERHEIT
2. SICHERHEITSHINWEISE VISIER/SONNENVISIER
Die während des Transports mit Spezialklebepunkten am Visier
befestigte Schutzfolie ist vor Gebrauch zu entfernen.
Verkratzte und/oder verschmutzte Visiere und Sonnenvisiere
beeinträchtigen die Sicht – insbesondere bei Nacht oder
Gegenlicht – erheblich und erhöhen dadurch die Gefahr eines
Unfalls. Tauschen bzw. reinigen Sie diese zu Ihrer eigenen
Sicherheit unverzüglich.
Benutzen Sie niemals getönte Visiere bei schlechten
Sichtverhältnissen sowie Nacht- oder Tunnelfahrten!
Benzin-, Lösungsmittel- und Treibstoffdämpfe können am
Visier Risse hervorrufen. Das Visier darf diesen Dämpfen nicht
ausge setzt werden oder mit derartigen Substanzen in Kontakt
kommen! Stellen Sie daher Ihren Helm auch nie auf den Tank Ihres
Motorrades.
Tragen Sie Sorge, dass das Visier immer in einem einwandfreien
Zustand ist. Bei schlechter Sicht ist die Fahrt abzubrechen!
3. SICHERHEITSHINWEISE MODIFIKATION/ZUBEHÖR
Originalbestandteile (insbesondere an Außenschale, Innenschale und Rückhaltesystem) dürfen weder verändert noch
entfernt werden. Das Anbringen fremder, nicht empfohlener
Zusatzteile kann die Schutzwirkung aufheben und bewirkt
das Erlöschen der ECE-Zulassung sowie aller Garantie- und
Versicherungsansprüche.
Verwenden Sie nur Original-Zubehör und Ersatzteile sowie
Zubehör, das von SCHUBERTH für Ihren Helm ausdrücklich
freigegeben ist!
Tipp:
Bei Fragen zu den Sicherheitshinweisen wenden Sie sich bitte an
die SCHUBERTH Kunden-Hotline unter +49 (0)391 8106-555.
44
1. AUSSENSCHALE
Zur Reinigung und Pfl ege der Helmaußenschale können Sie Wasser,
Seifenlauge, alle handelsüblichen Lackshampoos, -reiniger, -polituren
und Kunststoffpfl egemittel sowie Reinigungsbenzin verwenden. Die
Reinigung mit Wasser und Seifenlauge ist in der Regel ausreichend.
Achten Sie beim Einsatz der anderen Mittel darauf, dass diese nicht
mit dem Visier in Berührung kommen, da diese Schäden an Visier und
Beschichtung hervorrufen können.
Achtung:
Verwenden Sie zur Reinigung keine Kfz-Kraftstoffe, keine
Verdünner und Lösungsmittel. Diese Substanzen können zu
schwerwiegenden Beschädigungen des Helms ohne äußerlich
sichtbare Anzeichen führen. Die volle Schutzwirkung des Helms
ist dann nicht mehr gegeben.
2. KINNTEIL
Bitte überprüfen Sie in regelmäßigen Abständen die Funktionsfähigkeit des Kinnteils, der beiden Schlösser.
Warnung:
An den Schlössern dürfen keine Veränderungen
vorgenommen werden. Insbesondere dürfen die Metallteile
des Kinnteilschlosses nicht geölt und nicht gefettet
werden. Reparaturen dürfen nur durch den SCHUBERTH
Reparaturservice ausgeführt werden.
45
deutsch
Page 23

H. WARTUNG UND PFLEGE
3. VISIERE UND SONNENVISIER
PINLOCK
®
VISIER
Visier-Außenseite
Verwenden Sie einen weichen Lappen und eine milde Seifenlauge
zum Entfernen von Verunreinigungen auf der Visier-Außenseite. Zum
Trocknen des Visiers benutzen Sie ein fusselfreies Tuch.
Visier-Innenseite
Die Visier-Innenseite ist ausschließlich mit einem weichen, bei Bedarf
leicht angefeuchteten Tuch (empfohlen: Mikrofasertuch), zu reinigen.
Hierbei keine Reinigungsmittel verwenden.
SONNENVISIER
Das Sonnenvisier ist ausschließlich mit einem weichen, bei Bedarf
leicht angefeuchteten Tuch (empfohlen: Mikrofasertuch), zu reinigen.
Hierbei keine Reinigungsmittel verwenden. Vermeiden Sie zum Schutz
der Anti-Fog-Beschichtung starkes Rubbeln und Reiben.
Für alle Visiere gilt:
Achtung:
Nach einer intensiven Reinigung, Regenfahrt oder langer Fahrt bei
kalter Witterung benötigt die beschlaghemmende Beschichtung
einige Zeit, um wieder vollständig aktiv zu werden. In dieser Zeit
kann die Beschichtung keine oder nur wenig durch den Atem
entstehende Feuchtigkeit aufnehmen.
Achtung:
Zur Reinigung nur lauwarmes Wasser verwenden. Reinigen Sie
die Visiere keinesfalls mit Benzin, Lösungsmitteln, Fenster- bzw.
Glasreinigern oder anderen alkoholhaltigen Reinigungs mitteln.
Achtung:
Vermeiden Sie zum Schutz der Anti-Fog-Beschichtung starkes
Rubbeln und Reiben.
Achtung:
Tragen Sie kein Anti-Fog-Gel, -Spray oder ähnliche Mittel auf die
aktive Anti-Fog-Beschichtung auf. Dies kann zu unerwünschten
Reaktionen bis hin zur irreparablen Beschädigung der
Beschichtung führen.
Achtung:
Die aktive Anti-Fog-Beschichtung unterliegt einem in
Abhängigkeit von Einsatzintensität und Umweltbedingungen
unterschiedlich schnellen Alterungsprozess. Zu Ihrer eigenen
Sicherheit empfehlen wir bei stark nachlassender Anti-FogWirkung einen Austausch von Visierscheibe bzw. Sonnenvisier.
Achtung:
Die aktive Anti-Fog-Beschichtung nimmt auch chemische
Substanzen, wie z. B. Lösungsmittel, auf und kann dadurch
beschädigt werden. Vermeiden Sie daher die Lagerung in der
Nähe von aggressiven Stoffen (z. B. Kraftstoffen).
Achtung:
Auch feuchte Brillenputztücher sind – trotz anders lautender
Empfehlung – oft nicht für die Reinigung der Visiere geeignet,
da sich die enthaltenen Substanzen nicht mit der Anti-Scratchund Anti-Fog-Beschichtung vertragen. Vermeiden Sie die
Anwendung dieser Tücher.
Achtung:
Das Visier darf auch bei starker Verschmutzung der Visieraußenseite nicht im Wasserbad eingeweicht werden, da hierdurch die
Oberfl ächenhärte und damit die Widerstandsfähigkeit der AntiFog-Beschichtung extrem reduziert wird.
deutsch
46
47
Page 24

H. WARTUNG UND PFLEGE
Achtung:
Das Visier darf während Nicht-Einsatzzeiten (insbesondere Lagerungszeiten) nicht komplett geschlossen werden, da ansonsten
die im Innenraum enthaltene Feuchtigkeit nicht entweichen kann
und in verstärktem Maße von der Anti-Fog-Beschichtung aufgenommen wird. Dies kann zu einer Reduktion der Lebensdauer
der Beschichtung führen. Idealerweise positionieren Sie das
Visier in der 3. Raststufe oberhalb der Stadtstellung.
Achtung:
Bringen Sie keine Etiketten, Klebebänder oder Aufkleber an
Visier oder Sonnenvisier an.
Tipp:
Ein nach längerer Nichtbenutzung des Helms bisweilen auftretender milchiger Belag (durch Reaktion der aktiven Anti-FogBeschichtung mit der Umgebung) lässt sich am leichtesten mit
einem trockenen Mikrofasertuch entfernen.
Tipp:
Hartnäckige Verschmutzungen der Visieraußenseite (z. B. eingetrocknete Insektenreste) lassen sich leicht entfernen, wenn
Sie das Visier im geschlossenen Zustand mit einem feuchtnassen Tuch bedecken und den Schmutz ca. 1/2 bis 1 Stunde
aufweichen.
Achtung:
Vermeiden Sie am Lagerort des Visiers unbedingt Temperaturen
über 60° C, da diese Beschädigungen am Visier hervorrufen.
4. INNENAUSSTATTUNG
Auswechselbare Teile der Innenausstattung
Die Kopf- und Wangenpolster können mittels Handwäsche unter
Verwendung einer milden Seifenlauge (z. B. mit stark verdünntem,
handelsüblichem Feinwaschmittel) bei maximal 30° C gewaschen
werden. Feuchte Innenausstattung bei Raumtemperatur und guter
Durchlüftung trocknen lassen. (Ausbau siehe Innenausstattung Kapitel D.12.)
Tipp:
Bei Bedarf (z. B. auf Reisen während Fahrpausen) kann das
Kopfband zum Trocknen über den Spiegel gehängt werden.
Nichtauswechselbare Stoffteile der Innenausstattung
Zur Reinigung der Innenausstattung eignet sich eine milde, handwarme Seifenlösung (z. B. aus stark verdünntem, handelsüblichem
Feinwaschmittel).
Tragen Sie die Seifenlösung mit Hilfe eines feuchten Schwammes
bzw. Tuches durch Tupfen oder leichtes Reiben vorsichtig auf.
Vermeiden Sie das Durchwässern der Innenausstattung. Nehmen Sie
dann die Seifenlauge mit Hilfe eines trockenen saugfähigen Tuches
durch Drücken auf die Polsterung wieder auf. Wiederholen Sie die
Schritte mit klarem Wasser.
Achten Sie beim Trocknen der Innenausstattung auf eine gute Durchlüftung des Helms.
TechSkin
Das TechSkin-Komfortmaterial reinigen Sie am besten regelmäßig mit
einem angefeuchteten, weichen Tuch.
deutsch
48
49
Page 25

H. WARTUNG UND PFLEGE
5. BELÜFTUNG
Belüftungshaube
Bei Bedarf kann die Belüftungshaube der Kopfbelüftung entfernt
werden und die Belüftungsmechanik gereinigt werden.
1. Lösen Sie hierzu das Bedienelement
durch einfaches Herausziehen nach
oben aus der Belüftungshaube.
2. Schieben Sie anschließend das fl ache
Ende des Bedienelements unter den
Rand hinter der Belüftungshaube und
lösen Sie die Belüftungshaube mit
einer Hebelbewegung nach oben.
3. Befestigen Sie die Belüftungshaube
nach dem Reinigen wieder durch
Einhaken im vorderen Bereich
an der Belüftungsmechanik und
anschließendem Andrücken an die
Helmschale bis zu einem deutlichen
"Klick"-Geräusch.
4. Zum Schluss das Bedienelement
durch die Belüftungshaube in die
Mechanik einstecken.
6. VERSCHLUSS-SYSTEM
Ratschenschloss
Die Metallteile des Verschluss-Systems sind wartungsfrei.
7. AU FB E WA HR UN G
Bewahren Sie den Helm im mitgelieferten Helmbeutel an einem
trockenen und geschützten Ort auf. Legen Sie den Helm immer so
ab, dass er nicht auf den Boden fallen kann. Beschädigungen, die auf
diese Art entstehen, fallen nicht unter die Garantieleistungen.
Achtung:
Bewahren Sie den Helm für Kinder und Tiere unzugänglich auf.
deutsch
50
51
Page 26

I. ZUBEHÖR UND ERSATZTEILE
1. TEILEÜBERSICHT
Windabweiser
Zur zusätzlichen Optimierung der Aeroakustik.
Helmtasche
Gepolsterte Helmtasche aus hochwertigen Materialien zum sicheren Transport und
Aufbewahrung Ihres Helms. Mit SCHUBERTH 3D- Logo.
Sonnenvisier 80% grau getönt
2 Größen: Gr. 52/53 - Gr. 58/59, Gr. 60/61 - Gr. 64/65
Visierscheibe Pinlock®
2 Größen: Gr. 52/53 - Gr. 58/59, Gr. 60/61 - Gr. 64/65
Ersatz-Innenscheibe Pinlock
®
2 Größen: Gr. 52/53 - Gr. 58/59, Gr. 60/61 - Gr. 64/65
Refl exaufkleber-Set
für den Einsatz des Helms in Frankreich
Innenausstattung (Kopfband-Polster)
7 Größen: Gr. 52/53, Gr. 54/55, Gr. 56/57, Gr. 58/59, Gr. 60/61,
Gr. 62/63, Gr. 64/65
Komfort-Wangenpolster-Set (2 Stück)
7 Größen: Gr. 52/53, Gr. 54/55, Gr. 56/57, Gr. 58/59, Gr. 60/61,
Gr. 62/63, Gr. 64/65
52
Achtung:
Beim Austausch der KomfortWangen polster ist unbedingt
darauf zu achten, dass das AntiRoll-Off-System ordnungsgemäß
mit dem Kinnriemen verbunden
ist. Dazu müssen einerseits die
Laschen an den freien Enden
der Nacken bänder – wie in der
nebenstehen den Zeichnung
dargestellt – die entsprechenden
Kinnriemenenden umschließen
und andererseits die
Nackenbänder nicht verdreht
oder verknotet sein.
Warnung:
Der Austausch aller anderen Helmbestandteile darf aus
Sicherheitsgründen nur vom SCHUBERTH Reparaturservice
durchgeführt werden.
2. KOMMUNIKATIONSSYSTEME
Warnung:
Der Einbau von Kommunikationssystemen (dazu gehören
auch einfache Head-Sets) in einen Helm stellt grundsätzlich
eine Modifi kation des Helms dar. Daher müssen die jeweiligen
Kommunikationssysteme und Headsets speziell für den Einbau
in das jeweilige Helmmodell nach der europäischen Helmnorm
ECE-R 22.05 geprüft und zugelassen sein, ansonsten erlischt
die Zulassung und Versicherungskonformität des Helms mit
dem Einbau. Der Nachweis für eine ECE-R 22.05 gemäße
deutsch
53
Page 27

J. SCHUBERTH SERVICEI. ZUBEHÖR UND ERSATZTEILE
Zulassung eines Helms – in Verbindung mit einem speziellen
Kommunikationssystem – ist nur gültig, wenn er von einer
offi ziellen Zulassungsbehörde der EU-Länder beurkundet ist.
Andersartige Auskünfte dieser Institutionen (u.a. zur allgemeinen
Eignung von Kommunikations systemen zur Verwendung in
Motorradhelmen) oder Auskünfte anderer Institutionen besitzen
keinerlei Relevanz und der Helm verliert seine Zulassung.
3. BEZUG VON SCHUBERTH ORIGINALTEILEN
SCHUBERTH Original-Ersatzteile und -Zubehör erhalten Sie bei Ihrem
Fachhändler. Den SCHUBERTH Fachhändler in Ihrer Nähe fi nden
Sie im Produktbereich “Motorrad” in der Rubrik “Händler” auf der
SCHUBERTH Website:
www.schuberth.com
Falls sich kein Fachhändler in Ihrer Nähe befi nden sollte, der Sie
mit den entsprechenden SCHUBERTH Ersatzteilen oder Zubehör
versorgen kann, können Sie auch direkt bei SCHUBERTH bestellen:
SCHUBERTH GMBH
Vertrieb Motorradhelme
Stegelitzer Str. 12
D-39126 Magdeburg
1. KUNDEN-HOTLINE
Bei Wünschen, Fragen, aber auch Problemen und Kritik steht Ihnen
unsere Kunden-Hotline zur Verfügung. Sie erreichen Ihren Ansprechpartner bei SCHUBERTH unter:
Telefon +49 (0)391 8106-555
Aktuelle Öffnungszeiten entnehmen Sie bitte der SCHUBERTH Website
www.schuberth.com im Bereich “Kundenservice”.
Falls Sie sich schriftlich an uns wenden wollen, verwenden Sie bitte
die folgende Anschrift:
SCHUBERTH GMBH
Kundenservice Motorradhelme
Stegelitzer Str. 12
D-39126 Magdeburg
2. SONDERANPASSUNGEN
Individuelle Änderungen der Innenausstattung (z.B. Größenanpassung
oder Änderung des Verschluss-Systems) können werkseitig im
Rahmen der aktuell gültigen ECE-Norm und gegen Berechnung
vor ge nommen werden. Auch in diesem Fall erreichen Sie Ihren
Ansprechpartner über unsere Kunden-Hotline.
Voraussetzung für die Annahme von Helmen für eine Sonderanpassung ist die Zusendung des Helms an SCHUBERTH frei Haus.
Bitte haben Sie Verständnis, dass Sonderanpassungen nicht im
Rahmen des normalen Reparaturservice möglich sind, sondern eine
längere Bearbeitungszeit in Anspruch nehmen.
deutsch
54
55
Page 28

J. SCHUBERTH SERVICE
3. SICHERHEITS-CHECK
Bei Bedarf können Sie den C3 zu einer kostenlosen Überprüfung
an den SCHUBERTH Kundenservice einschicken. Es entstehen nur
Porto- und Verpackungskosten. Auch in diesem Fall erreichen Sie
Ihren Ansprechpartner über unsere Kunden-Hotline. Voraussetzung
für die Annahme von Helmen für einen Sicherheits-Check ist die
Zusendung des Helms an SCHUBERTH frei Haus. Bitte geben Sie
in jedem Fall das Kaufdatum des Helms und den Grund für die
Einsendung mit an.
Bitte haben Sie Verständnis, dass Sicherheits-Checks nicht im
Rahmen des normalen Reparaturservice möglich sind, sondern
eine längere Bearbeitungszeit in Anspruch nehmen.
4. REPARATURSERVICE
Sie besitzen mit dem C3 ein SCHUBERTH Qualitätsprodukt,
welches nach den modernsten Entwicklungs- und Fertigungsmethoden konstruiert und gebaut wurde. Falls an Ihrem Helm
dennoch mal eine Reparatur notwendig sein sollte, wenden
Sie sich bitte an Ihren Händler, oder schicken Sie Ihren Helm
unter Angabe Ihrer Anschrift, Telefonnummer und E-Mail sowie
eindeutiger Fehlerangabe direkt an uns:
SCHUBERTH GMBH
Kundenservice Motorradhelme
Stegelitzer Str. 12
D-39126 Magdeburg
Bitte beachten Sie, dass im Reparatur-Zeitraum keine Sonderanpassun gen und darüber hinaus generell keine Lackierarbeiten durchgeführt werden können. Bitte berücksichtigen Sie die Dauer des
Versandwegs. Voraussetzung für die Annahme von Helmen für eine
Reparatur ist die Zusendung des Helms an SCHUBERTH frei Haus
(ausgenommen Garantiefälle).
Achtung:
Sofern ein Reparaturauftrag ohne eindeutige Fehlerangabe
erteilt worden ist, sind wir berechtigt, den Artikel zu
untersuchen und/oder die Ausführung des Auftrages bis
zu einer Rücksprache mit dem Kunden zurückzustellen.
Werden bei eindeutiger Fehler angabe während der Reparatur
weitere Mängel festgestellt, sind wir berechtigt, aber nicht
verpfl ichtet, diese ohne besonderen Auftrag zu beseitigen,
wenn dies zur Erhaltung der Funktions fähig keit notwendig
und im Verhältnis zu den Kosten des ursprünglichen
Reparaturauftrages geringfügig ist. Anderenfalls ist das
Einverständnis des Kunden erforderlich.
5. GARANTIE
SCHUBERTH garantiert bei bestimmungsgemäßem Gebrauch
für den Zeitraum von 2 Jahren für den Helm sowie von einem
Jahr für das Visier und das Sonnenvisier ab dem Kaufdatum
einen kostenlosen Ersatz bzw. Reparatur fehlerhafter Teile.
Alle Garantieleistungen werden über unseren Reparaturservice
abgewickelt.
Die Vorlage des Kaufbelegs ist die Voraussetzung für den Gewährleistungsanspruch. Bitte bewahren Sie die Originalrechnung
sorgsam auf. Bei Gewährleistungsansprüchen muss der
Originalbeleg (bzw. eine Kopie) dem Helm beigepackt sein. Ohne
Kaufbeleg besteht kein Gewährleistungsanspruch. Durch die
Gewährung von einwandfreiem Ersatz oder Reparatur wird die
ursprüngliche Gewährleistungszeit nicht verlängert.
Beanstandungen müssen uns unverzüglich, spätestens jedoch
innerhalb von 8 Tagen nach Kaufdatum schriftlich mitgeteilt
werden. Mängel, die auch bei sorgfältiger Prüfung innerhalb dieser
Frist nicht entdeckt werden können, sind uns unverzüglich nach
deren Entdeckung schriftlich mitzuteilen. Bitte vergessen Sie bei
Rücksendung nicht eine ausführliche Fehlerbeschreibung.
deutsch
56
57
Page 29

J. SCHUBERTH SERVICE
K. WIE SIE UNS ERREICHEN
Bereits getragene Ware wird nicht umgetauscht, sondern repariert.
Es liegt generell im Ermessen von SCHUBERTH, ob fehlerhafte Teile
repariert, ersetzt oder gutgeschrieben werden.
Gewährleistungsansprüche bestehen insbesondere nicht bei:
- unsachgemäßem Gebrauch und Überbeanspruchung des Produkts
- Veränderung des Produkts durch den Kunden
- Nichtbeachtung unserer Produktempfehlungen
- normaler Abnutzung
6. BLUE CONCEPT
“Blue Concept” steht bei SCHUBERTH für ökologische Ausrichtung
rund um den Helm. Dieses Verständnis erstreckt sich von der
Entwicklung über die Gestaltung der Produktionsprozesse bis zur
Rückführung der eingesetzten Materialien in den Rohstoffkreislauf.
Im Rahmen des “Blue Concept”-Systems nehmen wir daher jeden
gebrauchten SCHUBERTH Motorradhelm zurück, um die in ihm enthaltenen Materialien einem Recycling zuzuführen.
Bringen Sie Ihren gebrauchten Helm verpackt zu einem Händler, der
unserem “Blue Concept”-System angeschlossen ist, oder senden Sie
den Helm direkt zu uns.
7. SCHUBERTH IM INTERNET
Wenn Sie immer das Neueste über uns und unser Helmprogramm
wissen wollen, erreichen Sie uns über das Internet unter:
www.schuberth.com
Firmensitz
Telefonzentrale Anschrift
+49 (0)391 8106-0 SCHUBERTH GMBH
Stegelitzer Str. 12
D-39126 Magdeburg
Kunden-Hotline
Telefon Anschrift
+49 (0)391 8106-555 SCHUBERTH GMBH
Kundenservice Motorradhelme
Stegelitzer Str. 12
D-39126 Magdeburg
Reparaturservice
Telefon Anschrift
+49 (0)391 8106-555 SCHUBERTH GMBH
Kundenservice Motorradhelme
Stegelitzer Str. 12
D-39126 Magdeburg
Bestellung, Ersatzteile und Zubehör
Fax Anschrift
+49 (0)391 8106-228 SCHUBERTH GMBH
Vertrieb Motorradhelme
Stegelitzer Str. 12
D-39126 Magdeburg
Internet
www.schuberth.com
E-Mail
motorradhelme@schuberth.de
deutsch
58
59
Page 30

GB
Congratulations!
You have made an excellent choice with the SCHUBERTH C3. The
C3 is the result of the very latest development and production
methods, and combines the top characteristics of a sport helmet in
terms of aerodynamics and aeroacoustics with the comfort and high
functionality of a fl ip-up helmet.
You can take pleasure in knowing that you now own a quality helmet
that is designed to provide the very highest standards of safety and
performance on the road – even on long journeys – and give you a
great deal of pleasure at the same time.
A. THE RIGHT WAY TO USE THE MANUAL
Please take time to carefully read through this manual so that your
helmet can really protect you when you ride your motorcycle.
To ensure that you don’t miss any aspect that is relevant to your
safety, we recommend reading the manual in the order in which it is
written.
Pay particular attention to:
Caution: safety instructions
Note: advice
Tip: practical tips
deutschenglish
We wish you a safe ride.
Caution:
This helmet is not intended for use in the USA and Canada. The helmet has
been inspected and approved to the European ECE Standard and therefore does
not conform to US and Canadian regulations and requirements. It is only legal to
use the helmet in countries in which the European ECE Standard is valid. If you
use the helmet in other countries, you will not in the event of injur y be entitled to
F.- J . G ör ge s
Director of Sales
SCHUBERTH GMBH
make a claim for compensation before the US or Canadian courts or the courts of
other countries not bound by the ECE Standard.
Avertissement:
Ce casque n’est pas conçu pour être utilisé aux Etats-Unis ni au Canada.
Il a été fabriqué, contrôlé et homologué selon la norme européenne ECE. Par
conséquent, il n’est pas conforme aux prescriptions et exigences des Etats-Unis
d’Amérique et du Canada. Il ne peut être utilisé que dans les pays où la norme
européenne ECE est applicable. En cas d’utilisation du casque dans d‘autres pays,
aucun droit de dommages-intérêts ne peut être revendiqué devant les tribunaux
des Etats-Unis d’Amérique ou du Canada ou de pays tiers non assujettis à la
norme ECE.
Note:
We reserve the right to make changes for the purpose of
technical progress – even without express notice.
60 61
françaisitalianonederlandsespañol
Page 31

B. CONTENT
A. The right way to use the manual.................................... 61
B. Contents........................................................................... 62
C. Choosing a helmet that fi ts properly.............................. 64
1. Measuring your head size 64
2. Ascertaining the right helmet size 65
3. Checking that the helmet fi ts properly 66
D. The helmet....................................................................... 68
1. Standard 68
2. ECE-approval 68
3. Anatomy of the helmet 69
4. Outer shell 69
5. Inner shell 69
6. Aerodynamics 70
7. Aeroacoustics 70
8. Chin section 73
9. Retention system 75
®
10. Pinlock
Visor 77
11. Sun visor 84
12. Interior lining 88
13. Ventilation systems 90
14. Additional safety features 93
E. Putting on an taking off the helmet............................... 94
1. Putting on the helmet 94
2. Taking off the helmet 95
F. Before every journey...................................................... 96
1. Checking the helmet 96
2. Checking the chin-strap 96
3. Checking the visor and sun visor 97
G. For your safety............................................................... 98
1. Safety advice concerning the helmet 98
2. Safety advice concerning the visor / sun visor 100
3. Safety advice concerning modifi cations / accessories 100
H. Maintenance and care.................................................. 101
1. Outer shell 101
2. Chin section 101
3. Visor and sun visor 102
4. Interior lining 105
5. Ventilation 106
6. Locking system 107
7. Storing the helmet 107
I. Accessories and replacements parts........................... 108
1. Spare parts 108
2. Communication systems 110
J. SCHUBERTH Service..................................................... 111
1. Special adaptions 111
2. Repair service 111
3. Guarentee 112
4. Blue concept 113
5. SCHUBERTH on the internet 113
K. How to contact us......................................................... 114
deutschenglish
françaisitalianonederlandsespañol
62 63
Page 32

C. CHOOSING A HELMET THAT
FITS PROPERLY
Choosing the right helmet is very important. The helmet must fi t
properly to give you the best protection if you fall off or are involved
in an accident. Here’s how to choose a helmet that fi ts properly:
Step 1: Measure your head size
Step 2: Ascertain the right helmet size
Step 3: Check that the helmet fi ts properly.
1. MEASURING YOUR HEAD SIZE
Measure your head size by placing a fl exible measuring tape around
your head approximately one fi nger’s width (2 cm) above the
eyebrows. This will give you the greatest circumference of your head.
The measured value represents your head size in centimetres.
2. ASCERTAINING THE RIGHT HELMET SIZE
The C3 is available in seven double helmet sizes. Refer to the
following list for the helmet size that fi ts you:
Head size
in cm
SCHUBERTH
helmet sizes
Alpha
helmet sizes
52 to 53 52 / 53 XS
54 to 55 54 / 55 S
56 to 57 56 / 57 M
58 to 59 58 / 59 L
60 to 61 60 / 61 XL
62 to 63 62 / 63 XXL
64 to 65 64 / 65 XXXL
If your measured head size (e.g. 57.5 cm) is between two helmet
sizes, we recommend trying the smaller size fi rst.
english
64 65
Page 33

C. CHOOSING A HELMET THAT
FITS PROPERLY
3. CHECKING THAT THE HELMET FITS PROPERLY
With the helmet on and the chinstrap fastened and properly adjusted
(important: for chinstrap adjustment, see Section D.8. “Retention
system”), check whether the helmet is the right size for you and fi ts
properly.
Step 1: Check that all pads of the interior lining press fi rmly
against your head without being uncomfortable:
a) Top centre pads
b) Cheek pads
c) Headband padding (especially in forehead area).
If the pressure is uncomfortable or possibly even
painful, try the next size up.
Step 2: Check that the helmet gives you an adequate peripheral
fi eld of vision. Lateral limitation of vision is normal with any
helmet due to its design but it should not feel distracting
or unduly restrict your vision.
Step 3: Hold both sides of the helmet fi rmly with your hands and
move the helmet up and down. Try also to rotate the
helmet. You should be able to feel the helmet moving
your head and the surface of your face. If it is too easy to
move the helmet, it is too large! Try a smaller size.
Step 4: With the helmet on, take hold of the chin section of the
helmet and try removing the helmet from your head in a
backwards direction. If you can do that, the helmet is too
large or the chinstrap adjusted too loosely (not pulled tight
enough). For your own safety, use a smaller size or readjust the chinstrap as necessary.
english
Step 5: With the helmet on, hold the back of the helmet with both
hands and try tipping the helmet forwards over your head.
If you can remove the helmet this way, either the chinstrap
is adjusted too loosely (not pulled tight enough) or the
helmet is too large. Re-adjust the chinstrap or choose a
smaller helmet.
Repeat these steps until you have found the right helmet size that fi ts
properly.
Ideally, confi rm your choice by going for a test ride.
Caution:
Never ride with a helmet that doesn’t fi t properly!
66 67
Page 34

D. THE HELMET
1. STANDARD
The C3 conforms to the ECE-R 22.05 standard. This test standard
guarantees conformity to defi ned safety standards in respect of
impact absorption, penetration resistance, lateral rigidity, retention
system and fi eld of vision. The approval guarantees that you have
approval for all the countries of the European Union and all countries
which recognise the ECE standard. It also guarantees conformity for
insurance purposes in the event of a claim.
Please note that this C3 with ECE approval is specifi cally orientated
to the ECE standard and is therefore particularly not approved for the
USA or Canada. It is only legal to use it in countries where the ECE
standard is valid.
Note:
3. ANATOMY OF THE HELMET
Visor
Refl ective eyes
Sun visor
Interior lining
Head outlet vent
Visor vent/
chin vent
Release botton
for chin section
Head inlet vent
Inner shell
®
Pinlock
Visor
Visor mechanism
Outer shell
Retention system
(with Anti-Roll-Off System)
Operating slide for
sun visor
Chinstrap (with
ratchet fastener)
The only SCHUBERTH helmets legal for use in the USA or Canada
are those with appropriate approval and technical specifi catio.
Further information and sales outlets for these helmets can be
found on the Internet at:
www.schuberth.com/usa
www.schuberth.com/canada
2. ECE APPPROVAL
4. OUTER SHELL
The outer shell of the C3 combines an aerodynamically optimal
shape that is suitable for racing with thorough protection. It consists
of a special glass fi bre reinforced, duroplastic matrix developed by
Schuberth, which gives the helmet the high level of strength needed
for your protection.
Caution:
The safety helmet is designed to absorb the effect of only one
impact. The helmet must be replaced after a fall, accident or any
other impact.
ECE-test standard
Approval number
059284/P-3523
35230001
Approval authorithy
Serial number
5. INNER SHELL
For optimised impact absorption properties, the inner shell of the
helmet consists of several components. Complex multi-segment
foam padding of the main body makes for better absorption
and distribution of impact forces and gives you a high degree of
protection. The large side sections ensure the helmet provides
optimum fi t and the greatest comfort.
68 69
english
Page 35

D. THE HELMET
6. AERODYNAMICS
All SCHUBERTH motorcycle and racing helmets are developed and
optimised in SCHUBERTH’s own wind tunnel under scientifi c, precisely
defi ned conditions.
The C3 is specifi cally designed for a touring or sports-touring riding
posture and remains stable in the air current. Even when travelling at
high speeds, the C3 generates practically no upward lift. Other
characteristics of the C3 are improved air resistance and excellent
directional stability. In addition, the buffeting often experienced at
high speed on an unfaired motorcycle is signifi cantly reduced.
Note:
Please note that the strong eddy currents that can occur at
the edges of the wind shadow with faired motorcycles due to
the fairing can have a considerable effect on the aerodynamic
characteristics of a helmet.
7. AEROACOUSTICS
We have paid a lot of attention to improve the acoustic properties of
the C3 without a reduction of comfort. Various features developed
in SCHUBERTH’s wind tunnel (such as special adaptation of the wind
defl ector in the chin area and the shape of the acoustic collar) as well
as the choice of special materials eliminates draughts and makes
the helmet quieter*. This enables relaxed riding – especially on long
journeys – and enhances concentration.
A quiet helmet is characterised by low wind noise. Wind noise arises
through turbulent swirling of the air that fl ows around the helmet. The
turbulence generates local pressure fl uctuations, which are detected
inside the helmet as noise (so-called pseudo noise). Only the wearer
of the helmet hears this noise. With most motorcycles and helmets,
engine noise is covered up by this wind noise from around 100 kph
upwards.
* Acoustic values can vary depending on t ype of motorcycle, fairing design, riding
posture and body size.
Caution:
The actual road speed can be underestimated slightly as
a result of the acoustic optimisation of the helmet and the
accompanying low wind noise. I.e. don’t rely on your sense of
hearing to judge road speed – check your speedometer.
Note:
Please note that with faired motorcycles strong eddy currents
occur at the edges of the wind shadow. This can considerably
reduce the aero-acoustic performance of the helmet. The fairing
of the motorcycle should be adapted so that the departing
turbulence does not strike the bottom surface of the helmet.
english
70 71
Page 36
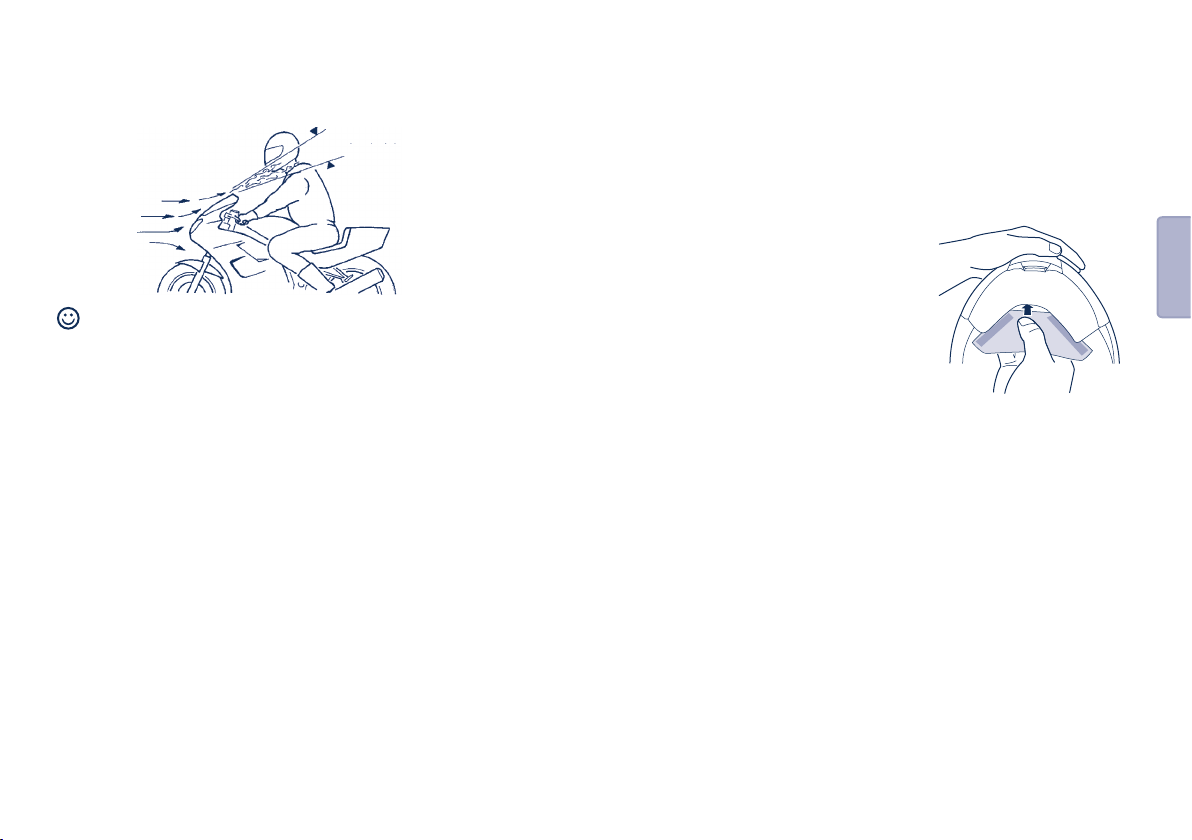
D. THE HELMET
Aeroacoustically non-critical area
Tip:
To ensure the helmet is as quiet as possible, how it fi ts at its
Aeroacoustically critical arrea
Aeroacoustically non-critical area
underside is extremely important. Make sure it is well sealed
off by using the adjustment options offered by the acoustic
collar. If you have a narrow neck, it is advisable to use a scarf
in addition.
ANTI-NOISE PAD (included)
The anti-noise pad helps further reduce noise in the helmet.
1. The anti-noise pad is fi xed in place
on the inside of the wind defl ector by
means of the Velcro strips.
english
8. CHIN SECTION
The C3 is equipped with a chin section that pivots up and can be
easily opened and closed by means of the operating element located
in the middle of the chin section. The movement of the section
required for this is optimised for convenient, smooth operation.
Lock system
The chin section is equipped with a specially developed lock system
on the left and the right side. The construction design of the lock
system is similar to the door lock systems used in car design. Despite
there being locks on both sides, the chin section opens with only one
button. The lock in the opposite side is simultaneously operated by
bowden cable. The mechanically optimised system reduces the force
need to operate the two locks to a comfortable 16 N, although the
safety-relevant overall locking force is many times this amount.
72 73
Page 37
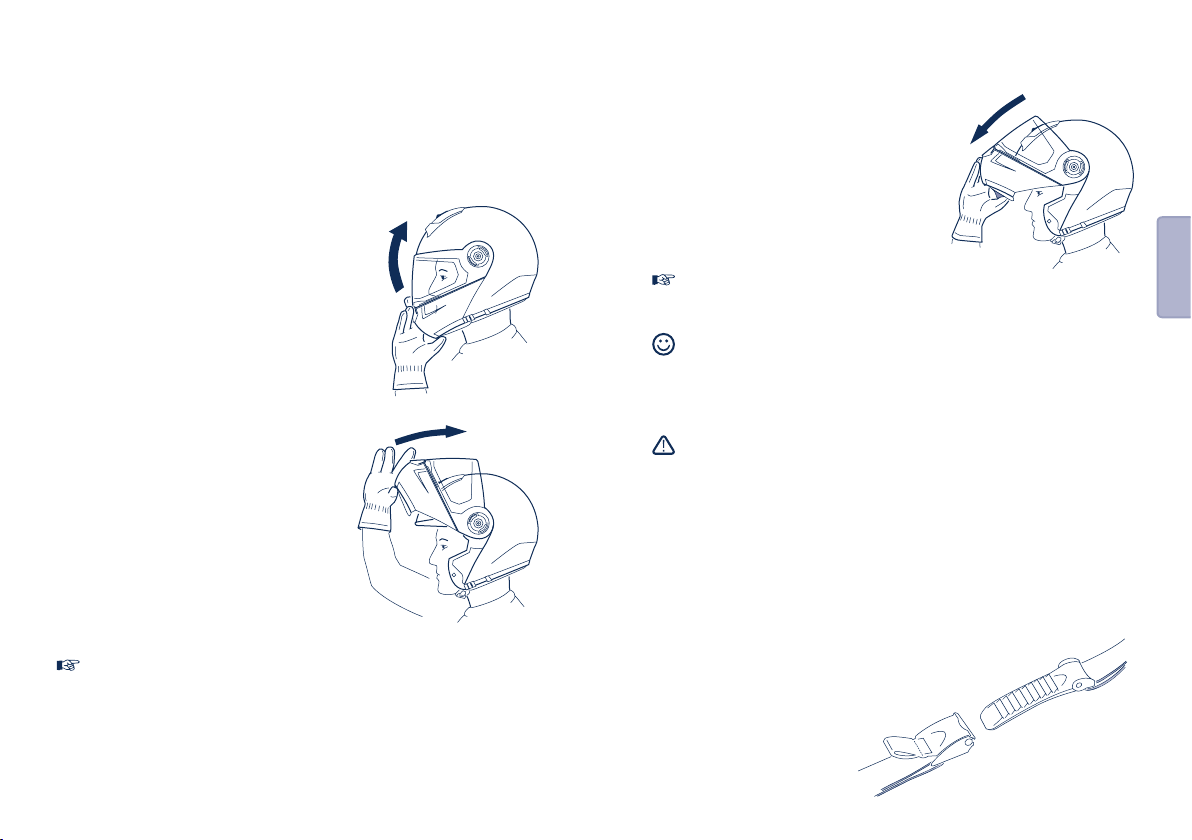
D. THE HELMET
Operation
The chin section can be opened at any time irrespective of the
position of the visor or sun visor. The stiff, positive engagement at the
end of travel ensures the chin section remains safely in place
when raised.
Opening the chin section
1. Open the chin section by sliding the
red button located in the middle
of the chin zone forwards in the
direction of the arrow as far as it will
go, using your thumb.
2. The Bowden cable mechanism will
then release both locks and you
can pivot the chin section up to its
uppermost locking position.
Important:
The C3’s chin section mechanism is equipped with a safety
feature which prevents the chin section from opening of its own
accord in the event of a fall, so when opening it you should also
grip the chin section with one hand.
Closing the chin section
1. To close the chin section, pivot it
down with one hand until both locks
audibly engage.
Important:
Each time you close the chin fl ap, check that the locks have
engaged properly by pressing the chin section upwards.
Tip:
When using the additional adjustable wind defl ector, locking the
chin section is easier if you grip the chin pad underneath with a
fi nger of your other hand to help you ease the chin section over
your chin.
Caution:
Never ride with the chin section raised!
9. RETENTION SYSTEM
The retention system of the C3 consists of a chin-strap that is
additionally secured with neck bands at the back of the helmet shell
(the anti-roll-off system, see section D.14.).
Chinstrap with Micro-Lock ratchet fastener
The C3 comes with a ratchet fastener.
This locking system is easy to use and
enables you to optimally adjust the
chinstrap to your head every
time you put on the helmet.
english
74 75
Page 38
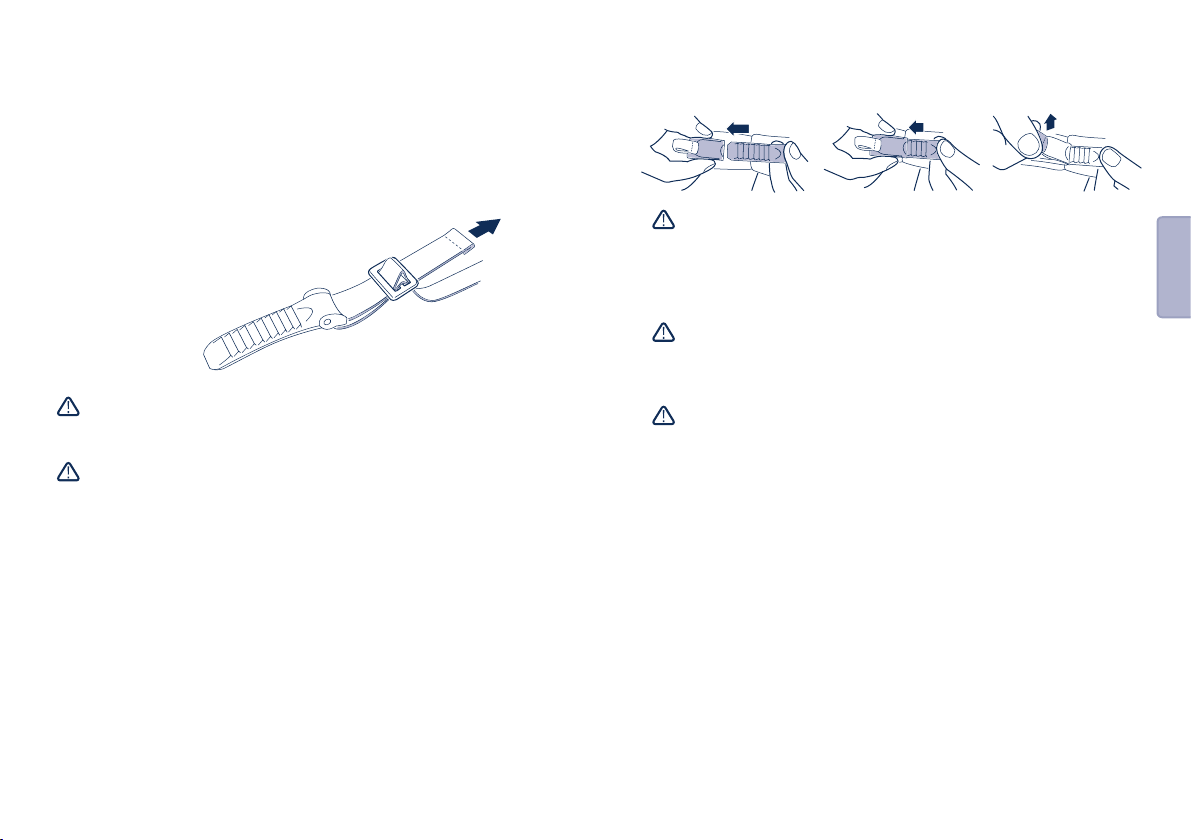
D. THE HELMET
Adjusting the chin-strap
You adjust the length of the chin-strap by increasing or
reducing the amount of strap pulled through the
metalbuckle. Adjust the length of the chin-strap
so that it fi ts fi rmly but comfortably
against your chin and fi x the end of
the strap using the retaining loop
with comfort pad.
Caution:
Never ride without making sure the chin-strap is correctly
fastened, adjusted to fi t and properly positioned.
If the chin-strap is not correctly adjusted or fastened, the
helmet could be displaced in the event of an accident.
Caution:
Closing only the comfort pad of the chin-strap will not ensure
adequate protection. Always make sure you fully close the
chin-strap system.
Caution:
When adjusting, make sure the helmet cannot be pulled off in a
forward direction with the chin-strap closed (see section C.3.).
Caution:
Never open the chin-strap while riding.
Caution:
Regularly check the adjustment of the chin-strap length
(see section F.2.).
10. PINLOCK® VISOR
The Pinlock
®
visor is a fog-free double-wall visor, the inside of which
has been given an integrated second visor plate rather than the
Opening and closing
To close the chinstrap fastener, slide the ratchet tongue step by step
into the locking buckle. If you fi nd that the chinstrap fi ts too loosely
around your chin, slide the ratchet tongue one step further into the
locking buckle.
When adjusting the chinstrap, make sure that it rests fi rmly but not
uncomfortably around your chin. To open the chinstrap, pull the red
ribbon on the ratchet fastener upwards to open the locking buckle.
Then draw the ratchet tongue out of the locking buckle.
conventional anti-fog coating. The two visor plates are separated
from each other and sealed by means of transparent, fl exible
silicone. The inner visor plate is fi xed in place by eccentric pins, so
the two visor plates are pretensioned towards each other and the
sealing effect of the silicone ensured. An insulating air cushion is thus
created between the visor’s main plate – in other words the outer
plate – and the inner plate, which prevents any fogging up of the inner
plate.
COATING
The outer plate has a HighClear® anti-scratch coating on both sides
while the outer and inner surfaces of the Pinlock® inner plate have an
anti-fog coating.
76 77
english
Page 39

D. THE HELMET
Important:
When not in use, the helmet should never be used to deposit
gloves or any other objects since the scratch-sensitive inner visor
shield could otherwise be damaged.
Important:
When new, the inner plate has a protective fi lm; this fi lm should
not be removed until the helmet is used for the fi rst time.
Important:
The Pinlock® inner visor shield may only be used in conjunction
with the SCHUBERTH main visor that has been specially designed
for this purpose. Do not on any account fi t the Pinlock® inner
visor to any other visor. This also expressly applies to other visor
variants.
Opening the visor
To open the visor, use your thumb to push
the visor up, using one of the fi nger tabs
situated to the left and right of the visor,
and move it to the desired position.
Visor lock (including city position)
The visor can be locked in any one of seven positions. The second
position (city position) locks more strongly. It is therefore easy to
feel the city position of the visor – especially while riding. When you
push the visor open, it may well travel beyond the city position, but
it is easy to fi nd this position by moving it downwards again. The
visor mechanism requires no additional lubrication. The visor can be
operated at any time irrespective of the position of the sun visor.
Closing the visor
To close the visor, grip the fi nger tabs
at top left and right and press the visor
down with a movement of the hand until
it audibly engages into place.
english
REPLACING THE VISOR SHIELD
Changing the visor screen is easy to do without tools with the
convenient EasyChange visor mechanism. To replace the visor, it is
helpful to place the helmet on a fl at surface or on your thighs while
seated.
Removing the visor
1. Slide the visor into the uppermost
lock-in position.
2. Press the spring element underneath
the visor mechanism towards the
visor opening, then do the same with
the spring element on the other side.
3. Move the visor upwards until it is
released from the visor mechanism.
78 79
Page 40

D. THE HELMET
Fitting the visor plate
1. Using both hands, guide the visor’s
locking studs into the respective
recess in the visor mechanism.
2. The visor will then audibly engage
into place when you press it
gently towards the helmet with a
simultaneous locking movement.
3. Make sure that the visor mechanism
is functioning properly by opening
the visor once to its maximum
extent.
CHANGING THE INNER VISOR SHIELD
Removing the inner visor shield
1. Before starting to remove the visor’s
inner shield, fi rst lay the visor on a soft,
clean piece of cloth so that its top edge
is facing you.
2. For the purposes of reducing the
pretensioning of the inner shield slightly
if necessary, you can use the balls of
your hands to carefully bend the visor
suffi ciently apart while at the same time
pressing with your thumbs so that the
inner shield becomes released and
moves approx. 2-3 mm forward.
3. Now grasp behind the inner shield with
your index and middle fi ngers and lift it
off the outer shield. In this position you
can now easily remove the inner shield
from the locking pin with your thumb.
4. You can now remove the inner shield
from the visor.
Fitting an inner visor shield
1. Lay the inner shield in the main visor in
such a way that one side of it is already
slotted into the locking pin and the
silicone sealing is on the side facing the
outer visor shield.
english
80 81
Page 41

D. THE HELMET
2. Now grasp the other side of the
inner visor shield by its upper and
lower transverse edges and use your
index fi nger to gently press the end
of the inner shield into a light ”S”
form. Now you can easily guide the
slot onto the locking pin and release
the inner shield.
3. The inner shield should now be
positioned in the main visor with
its lower edge parallel to the lower
edge of the main visor. If you need to
change the positioning of the inner
shield, use the balls of your hands to
gently bend the visor apart until the
inner shield can be shifted
accordingly.
4. Check right around the visor to make sure that the silicone seal
fi ts tightly and uniformly against the outer shield. It is only if it
does that the visor can be guaranteed to prevent misting.
5. If you have not done so already, remove the protective foil from
the inner visor shield.
Any lack of airtightness accordingly leading to misting of the visor
either means that the inner shield is incorrectly positioned or the
pressure on the seal is inadequate. You can regulate the pressure on
the seal by adjusting the eccentric locking pins. To do so, remove the
inner visor shield, then use a fl at but not sharp-edged object to
carefully press the locking pins out of the outer shield. Now adjust
these pins by rotating them by up to 180° and then reinsert them.
Then fi t the inner shield and check that the sealing is now airtight.
Please note:
• To avoid any scratching of the visor, never remove or fi t the
inner shield unless the visor unit is clean and dry.
• When fi tting the inner shield, be careful to ensure that neither
dust nor moisture are able to get into the space between the
two visor shields.
• When removing or fi tting the inner shield, it is always best to
lay the visor unit on a dry, clean piece of cloth.
• Check regularly to make sure that the fi t of the silicone seal
between the outer and inner visor shields is tight and even.
Please note:
In view of the high degrees of air pressure acting on the silicone
seal when travelling with an open visor, we recommend riding with
a closed visor at all times to prevent any dirt or moisture from
getting inside the helmet.
Please note:
Never press the locking pins out with your fi ngers since the
locking pins could otherwise break.
Caution:
Due to the double shield visor’s structure, there is a possibility of
greater light refl ection in the visor, especially when riding at night.
As a rule, such light refl ection is regarded as uncritical due to the
absence of misting with this type of visor. However, if this light
refl ection should nevertheless cause you diffi culties as result of
higher individual sensitivity, for example, you should refrain from
using the double visor anymore.
Caution:
In the event that any moisture might be present in or penetrate
the airtight zone between the two visor shields you should then
remove the inner shield immediately in order to prevent any
interference with visibility. Do not re-install it until both visor
shields are completely dry (we recommend air-drying). If you
english
82 83
Page 42

D. THE HELMET
should subsequently detect any renewed penetration of moisture,
the Pinlock® visor should on no account be used anymore and
must be replaced.
SAFETY ADVIVE
Check before each journey that the visor mechanism is functioning
correctly and that the visor will guarantee good visibility. Any dirt
should be removed before setting off. Check the visor and sunshield
for physical damage and cracks. Severely scratched or matt visor
shields will seriously impair visibility and should be replaced before
setting out on a journey.
Caution:
Petrol, solvent and propellant vapours can cause cracking of the
visor. Make sure the visor is not exposed to such vapours! On
account of that, you should never place the helmet on your bike’s
tank of you bike.
11. SUN VISOR
Shield
The sun visor shield has a grey tint and is heat formed in 3
dimensions. Due to the visor thickness of 1.5 mm, the sun visor still
gives protection from light impact from stones and insects when the
main visor is pivoted up. In addition, the UV-absorbing properties of
the special polycarbonate mean that the sun visor provides effective
protection against UV radiation.
Coating
The sun visor has an anti-fog coating on both sides and is scratchresistant.
Operation
Operate the sun visor by means of
the slide positioned on the left side in
the chin zone; this is easy to do, even
when wearing gloves. Moving the slide
towards the back lowers the visor,
moving it forwards retracts the visor
inside the inner helmet shell.
The sun visor can be operated irrespective
of the position of the main visor.
Note:
Only use the slide to operate the sun visor.
Caution:
Never ride in darkness or conditions of poor visibility with the sun
visor down. Always raise the sun visor before entering a tunnel.
Caution:
Riding without the visor or with an open visor can result in injury
to the eyes and face through stones, dust, insects and other
fl ying objects. The sun visor, when lowered, will provide a certain
amount of protection from light impact from stones or insects but
cannot protect from all hazards.
english
84 85
Page 43

D. THE HELMET
REPLACING THE SUN VISOR
The sun visor can be replaced without tools.
Tip:
To avoid fi ngerprints and scratches, use a soft, clean cloth
(we recommend a microfi bre cloth) to hold the sun visor when
removing or fi tting it.
Tip:
Changing the sun visor is easier when the chin section is open
and locked in place. It is also helpful if you place the helmet on a
fl at surface or on your thighs while seated.
Note:
Try to prevent the sun visor coming into contact with the helmet
inner shell when removing or fi tting it.
Removing the sun visor
1. Open and lock the chin section in
place.
2. Pivot the sun visor down.
3. Bend the middle snap connection
with locating pegs gently outwards
until the sun visor is released from
the visor holder.
4. Repeat this step for the other side.
Tip:
The sun visor holders should remain in the lower position until you
re-fi t the visor.
Fitting the sun visor
1. Put the sun visor between the snap
connections and fi t it onto the
retaining pegs on one side and then
on the other.
2. Position the sun visor between
helmet inner and outer shell and
retract it with the operating slide.
3. To be on the safe side, check
that the sun visor mechanism is
functioning correctly.
english
86 87
Page 44

D. THE HELMET
12. INTERIOR LINING
The exchangeable interior lining of the C3 is washable and ensures
both an excellent fi t as well as enhanced ventilation of the helmet.
The high-comfort cheek pads ensure that the helmet fi ts comfortably
around the cheeks and the headband pad makes for an optimal
fi t right around the head. The head pad sits comfortably on the
head without covering the ventilation channels (see Section D. 13,
Ventilation systems – Head ventilation).
All parts of the interior lining are made from materials that are
gentle on the skin (especially those that come into direct contact
with the head). The material predominantly used is Coolmax®, a
soft, breathable material that also transports warmth and moisture
very well. The head pads are produced from a special, antibacterial,
perspiration-absorbing material.
Removing and fi tting the headband padding
The interior lining is attached to the inner shell by means of Velcro
strips and clamp fi ttings, and can be removed by careful pulling it
out.
The plastic strip sewn into the front section and the clips in the neck
zone serve as fi xing aids when fi tting the headband padding.
1. Slide the plastic strip piece by piece
under the notches of the plastic strip
attached to the inner shell.
2. Put the plastic tongue with the
round holes over the pin sewn
into the rear section of the cheek
pad and fi x this into place using the
red-marked plug-in strip.
Important:
When inserting the interior lining, make sure that the headband’s
ventilation cut-outs are positioned over the ventilation channels
at the back of the helmet and that the headband runs centrally
between the two ventilation channels.
Caution:
Never ride with parts of the interior lining removed.
Caution:
Excessive heat (e.g. exhaust heat) can cause damage to the
interior lining!
Note:
To avoid damage to the interior lining and inner shell, do not hang
the helmet over the mirrors or handlebar grip.
Tip:
Should you require individual modifi cation of the comfort padding,
contact your authorised dealer. Adjustments to the helmet can
only be carried out within the bounds of the ECE-R 22 standard
and at a charge (see also Section J.2. “Special adaptions”).
english
88 89
Page 45

D. THE HELMET
13. VENTILATION SYSTEMS
Ventilation device 1 – visor setting
The C3 has a visor that adjusts to several positions. Depending on
your road speed and tendency of the visor to mist up, open the visor
suffi ciently wide to stop it misting up but so that it still protects your
eyes from excessive draft.
Urban position
The visor automatically goes into the urban position in the second
lock-in stage. Air entering through the bottom gap fl ows over the
inside of the visor and escapes through opening at the top.
Ventilation device 2 – inlet vent in
chin area (visor ventilation)
To ventilate the visor, the C3 is provided
with an inlet in the chin area. Irrespective
of riding posture, around 80-90% of the
central airstream fl ows directly into this
inlet. A defl ector ensures that the air
current ventilates the visor shield
effectively even at low road speeds.
You can open or close the inlet by
pushing the vent upwards or downwards.
Ventilation system 3 – head ventilation
There is a large air inlet cowl with
a three-stage adjustable ventilation
system on the top of the helmet shell for
ventilating the surface of your head. Air
entering the helmet via this inlet cowl is
directed via channels to the top of the
head. A new and innovative rain conduit
system prevents water from penetrating
into the helmet, even in heavy rain.
Inside the helmet, the head padding
system enables direct contact between
incoming air and the surface of the
head, thus making for quicker removal of
heat within the helmet. The ventilation is
adjusted by means of a slide on the air
inlet cowl that is easy to operate even
when wearing gloves. Moving the slide
backwards until the fi rst lock-in stage
produces partial ventilation, moving it
further back opens up the air inlet to the
full extent.
Summer and winter adjustment
The ventilation of the C3 can also be
adjusted to suit the seasons, weather
conditions or your personal preferences.
While it is preferable to have the air
current fl ow directly onto and cool your
head in summer, in autumn/winter you
can reduce the volume of or divert the
often very cold incoming air by covering
the ventilation channels by means of the
head pad. To do so, raise the middle
bar of the head pad slightly and fold out
the fabric fl ap located behind the front
section of the head pad.
english
90 91
Page 46

D. THE HELMET
Ventilation device 4 – interior air
extraction
The C3 is equipped with a constant air
extraction system.
Air inside the helmet or fl owing in
through the head vent is directed via the
air channels in the inner shell to the back
of the helmet.
The reduced pressure that prevails in
the neck area ensures that the air is
constantly sucked out through the
special netting material fi tted in the
neck pad, thus guaranteeing a pleasant
climate inside the helmet.
Ventilation device 5 – minimum level
of fresh air
The special shaping of the chin vent’s
upper zone provides the helmet with a
guaranteed minimum ventilation function
that ensures a constant supply of fresh
air. The air entering by these means is
regulated so that the rider barely notices
it, but so that it guarantees an effective
supply of fresh air from a speed as
low as 30 kph (provided the helmet
is fully in the air fl ow when travelling).
This function counteracts any build-up
of misting on the visor plate and any
excessive concentration of C02, even
when the helmet is fully closed.
14. ADDITIONAL SAFETY FEATURES
Anti-Roll-Off-System (A.R.O.S.)
The Anti-Roll-Off System specially developed by SCHUBERTH and
provided as a safety feature in every SCHUBERTH motorcycle helmet,
ensures – provided the chinstrap is closed and correctly adjusted
– that
a) the helmet cannot pivot off the head
from behind
b) due to the small angle of tilt, the risk
of contact between the chin section
of the helmet and the chin or neck of
the rider is minimised and
c) the consequences of the helmet
contacting the chest cavity as the
result of an accident are reduced.
Refl ective panels
Together with the silver refl ective applications located laterally at the
back of the neck pad, the two refl ective panels integrated into the
left and right zones under the visor plate help make the motorcycle
rider more noticeable on the road, especially in conditions of poor
visibility.
Note:
Keep the safety refl ective areas clean.
Note:
When riding in France, local law requires that further refl ective
safety stickers be attached at front and back as well as on both
sides of the helmet.
english
92 93
Page 47

E. PUTTING ON AND TAKING OFF THE
HELMET
1. PUTTING ON THE HELMET
Note:
See section D.9. for operation of the chin-strap / fastener system.
1. Open and lock the chin section. Make sure the sun visor is
retracted into the helmet shell.
2. Open the chinstrap and chinstrap comfort pad.
3. Take the lower ends of the chinstrap and pull these apart.
4. It will now be easy to put the helmet on.
5. Close the chinstrap comfort pad (with the Velcro fastener)
6. Fasten the chinstrap by pushing the ratchet tongue into the lock
so that you hear it engage properly.
7. Make sure the chinstrap passes under the chin and fi ts fi rmly.
8. Swing the chin section down until you hear both locks close and
the lock indicators in the chin section disappear.
9. Check that the chin section is securely locked by pressing it up
from below.
Note:
Regularly check that the chinstrap fi ts correctly and is adjusted
to the correct length (see section F.2.).
Caution:
Never ride with the chin section raised!
2. TAKING OFF THE HELMET
1. Open and lock the chin section. Make sure the sun visor is
retracted into the helmet shell.
2. Open the chinstrap by pulling the red strap on the ratchet
fastener and thus releasing the locking buckle. Having done this,
pull the ratchet tongue out of the locking buckle.
3. Undo the Velcro of the chinstrap comfort pad.
4. Grasp the ends of the chinstrap and pull the chinstrap ends apart.
5. The helmet can now be removed easily from the head.
6. Close the chin section.
Tip:
To avoid scratching any objects you might place the helmet on,
we recommend closing the chin-strap after you have taken the
helmet off.
english
94 95
Page 48

F. BEFORE EVERY JOURNEY
For your safety, check the following points before every journey:
1. CHECKING THE HELMET
Check the helmet regularly for damage. Small superfi cial scratches
will not impair the protective function of your helmet. In the case
of more serious damage (cracks, dents, fl aking and cracking paint,
etc.), the helmet should no longer be used.
Note:
If your body weight has dropped signifi cantly, you should check
that your helmet is still the right size for you (see Section C.3.).
2. CHECKING THE CHINSTRAP (with helmet on and fastened)
1. Check that the chinstrap passes under your chin.
2. Slip your index fi nger under the chinstrap and pull.
- If the chinstrap is loose under the chin, it is adjusted too long
and needs to be tightened.
- If pulling with your index fi nger loosens the chinstrap, it’s not
properly fastened! Completely undo the chinstrap and try
fastening it again. Repeat the test.
3. If you are unable to fasten the chinstrap so that it is fi rmly against
the chin, check that your helmet is still the right size for you (see
Section C.3.).
Note:
Repeat the test after each correction.
Caution:
Never ride with the chinstrap unfastened or incorrectly adjusted!
The chinstrap should fi t correctly and should not become loose
when pulled. The fastener is not correctly closed if the chinstrap
becomes loose when pulled.
3. CHECKING THE VISOR AND SUN VISOR
Before every journey, check that the mechanisms of the visor and sun
visor are working properly and that the visor or sun visor will provide
suffi ciently good visibility. Any dirt should be removed before riding
(for instructions on care, see Section H.2.).
Check the visor and sun visor for physical damage and cracks. A
heavily scratched visor will considerably impair your vision and should
be replaced before setting off on a journey.
Caution:
Never use tinted visors in conditions of poor visibility or when
riding at night or in a tunnel.
Caution:
A scratched and/or dirty visor will seriously impair visibility. For
your own safety, replace it or clean it immediately.
Caution:
Make sure the visor is always in perfect condition. A damaged
visor is not suitable for riding and needs to be replaced.
Caution:
Stop riding when visibility is poor.
english
96 97
Page 49

G. FOR YOUR SAFETY
1. SAFETY ADVICE CONCERNING THE HELMET
Never ride without a helmet!
Motorcycling is associated with particular risks and dangers
for the rider and passenger. These risks and dangers can be
reduced, but not eliminated completely, by wearing a helmet. It
is impossible to state precisely what the protective effect of a
helmet will be in the event of an accident. Safe riding techniques,
modifi ed for the particular road and weather conditions, are
essential for your safety.
Make sure your helmet is always correctly positioned and fi ts your
head.
To provide adequate protection, the helmet must fi t well and be
securely fastened.
Always fasten the chinstrap before setting off and check the
fastening system and strap for correct position!
Never ride with the chinstrap unfastened or incorrectly adjusted!
The chinstrap must be correctly positioned and must not come
loose when pulled. The fastener is not correctly closed if the
chinstrap becomes loose when pulled.
Never ride with the chin section raised!
The full protective function of a helmet can no longer be
guaranteed after an accident or impact to it! Like the crumple
zone of a car, the impact energy of a collision is absorbed by
complete or partial destruction of the structure of the outer
and/or inner shell of the helmet. Because of the way helmets
are designed, this damage is rarely visible to the observer.
The safety helmet is designed to absorb only one impact. It is
therefore essential to replace the helmet after a fall, accident or
other violent impact. For safety reasons, the old helmet should be
rendered unusable.
The helmet safety mechanism described above can also cause
small cracks in the shell when the helmet is dropped from a low
height (less than 1 metre).
Any helmet that has been subjected to a violent impact should be
replaced!
No helmet provides absolute protection from all conceivable
impacts. This helmet has been specially developed for motorcycle
riding and is unsuitable for other purposes.
Examine the helmet regularly for damage. Small scratches will not
impair the protective function of your helmet.
The helmet should be replaced after 5 to 7 years, depending on
use and care. Although the outer shell is in principle capable of a
longer service life, the occurrence of material fatigue and wear to
other components as well as the overall action of the helmet and
the unknown conditions in which the helmet has been used, make
it advisable for your own safety to replace the helmet after the
aforementioned period of use.
Excessive heat (e.g. exhaust heat) can cause damage to
graphics, the inner shell of the helmet and the interior lining!
Direct contact with motor fuel, thinners or solvents can destroy
the structure of the inner and outer shell. Make sure the helmet
does not come into contact with such substances, even for
cleaning purposes.
english
98 99
Page 50

H. MAINTENANCE AND CAREG. FOR YOUR SAFETY
2. SAFETY ADVICE CONCERNING THE VISOR / SUN VISOR
The protective fi lm fastened to the visor with special adhesive
dots to protect it from scratches in transit should be removed
before use.
A scratched and/or dirty visor or sun visor considerably impairs
visibility – especially at night or when riding into the sun – and
increases the risk of an accident. For your own safety, replace or
clean the visor immediately.
Never use a tinted visor in conditions of poor visibility or at night
or in a tunnel!
Benzene, solvent and fuel vapour can cause cracks on the visor.
Keep the visor away from such vapours and do not allow these
kinds of substances to come into direct contact with the visor!
For that reason, never place the helmet on the tank of your
motorcycle.
Make sure the visor is always in perfect condition. Don’t ride when
visibility is poor!
3. SAFETY ADVICE CONCERNING MODIFICATIONS /
ACCESSORIES
Original parts (especially on the outer shell, inner shell and
retention system) should not be modifi ed or removed. The
fi tting of non-genuine, non-recommended parts can partially
or completely counteract the protective function of the helmet
and invalidate the ECE approval together with all guarantee and
insurance rights.
Use only original parts, replacement parts and accessories that
SCHUBERTH has expressly approved for your helmet!
1. OUTER SHELL
To clean the helmet shell, you can use water, soapy water or one of
the commonly available motorcycle shampoos, cleaners, polishes
and plastic cleaners, or cleaning fl uid. The use of water and soapy
water is usually suffi cient. Make sure when using the other cleaning
materials that these do not come into contact with the visor, since
these can cause damage to the visor and coating.
Note:
Never use motor fuel, thinners or solvents to clean the helmet.
These substances can cause serious damage to the helmet with
no externally visible indication. The full safety function of the
helmet is then no longer guaranteed.
2. CHIN SECTION
Please check at regular intervals that the chin section, the two locks
and the lock indicators are working correctly.
Caution:
You should not make any modifi cations to the locks. In particular,
you should not oil or grease the metal components of the chin
section lock. Repairs may only be carried out by the SCHUBERTH
Repair Service.
english
100 101
Page 51

H. MAINTENANCE AND CARE
3. VISOR AND SUN VISOR
PINLOCK
®
VISOR
Outer surface of visor
Use a soft cloth and mild soapy water to remove dirt from the outside
of the visor. Use a lint-free cloth to dry the visor.
Inside surface of the visor
The inside surface of the visor should only be cleaned with a soft and,
if necessary, slightly damp cloth (we recommend a microfi bre cloth).
Do not use any cleaning agents for this.
SUN VISOR
The sun visor should only be cleaned with a soft and, if necessary,
slightly damp cloth (we recommend a microfi bre cloth). Do not use
any cleaning agents for this. To protect the anti-fog coating, avoid
vigorous rubbing.
Applicable to all visors:
Note:
After intensive cleaning, riding in the rain or long journeys in
cold weather, the anti-fog coating takes a little time to become
completely effective again. During this time, the coating is unable
to absorb much or any moisture from your breath. You can
accelerate recovery of the coating’s anti-fog property by placing
the helmet in a dry, well-ventilated place.
Note:
Use only lukewarm water for cleaning. Never on any account
clean the outer visor or sun visor with petrol, solvent or a window
or glass cleaner or other alcohol-containing cleaning agents.
Note:
To protect the anti-fog coating, avoid vigorous rubbing.
Note:
Never apply anti-fog gel, spray or similar substances to the active
anti-fog coating. This can cause undesirable reactions and even
irreparable damage to the coating.
Note:
The active anti-fog coating is subject to an ageing process,
the rate of which depends on the intensity of use and the
environmental conditions. For your own safety, we recommend
replacing the visor shield or sun visor if the anti-fog effect starts
to deteriorate signifi cantly.
Note:
The active anti-fog coating will also absorb chemical substances
such as solvents and can be damaged by them. Therefore, avoid
storing the visor in the vicinity of aggressive substances such as
motor fuels or solvents.
Note:
Even moist lens cloths are often unsuitable for cleaning the
visor – despite recommendations to the contrary – since the
substances they contain are incompatible with the anti-scratch
and anti-fog coating. Avoid using these cloths.
Note:
Do not soak the visor in water (i.e. to soften heavy dirt) as
this can signifi cantly reduce the surface hardness and thus the
resistance of the anti-fog coating.
english
102 103
Page 52

H. MAINTENANCE AND CARE
Note:
Avoid closing the visor fully when the helmet is not in use
(especially in storage) since any moisture inside the helmet
cannot escape and will be absorbed by the anti-fog coating to a
greater extent than normal. This can reduce the service life of
the coating. The best method is to lock the visor open in the 3rd
locking position above the town-riding position.
Note:
Never attach labels, adhesive tape or stickers to the visor or sun
visor.
Tip:
A milky coating that may occur after a long period of nonuse (through reaction of the active anti-fog coating with the
environment) is most easily removed with a dry microfi bre cloth.
Tip:
Stubborn dirt on the outer surface of the visor (e.g. dried-on
insect remains) can be easily removed by covering the closed
visor with a moist to wet cloth and allowing the dirt to soften for
around 1/2 to 1 hour.
Note:
The visor should not be stored in a place where the temperature
is above 60 °C since this will cause damage to the visor.
4. INTERIOR LINING
Replaceable parts of the interior lining
The head and cheek pads can be washed by hand using a mild soapy
solution (e.g. with strongly diluted standard mild detergent) at a
maximum temperature of 30 °C.
Tip:
If required (e.g. during a break in a journey), the headband can be
hung out to dry over the mirror.
Non-replaceable parts of the interior lining
Use a mild, lukewarm soap solution (e.g. any very diluted, normal
mild detergent can be used) to clean the interior lining.
Carefully apply the soap solution with a damp sponge or cloth by
dabbing or gentle rubbing. The inner padding should not be soaked
with water. Remove the soap solution from the padding by pressing a
dry, absorbent cloth on it. Repeat this process with clear water.
Afterwards, allow the interior padding to dry in a well-ventilated place.
TechSkin
It is best to clean the TechSkin comfort material with high-quality
leather-like surface structure regularly with a soft, moistened cloth.
english
104 105
Page 53
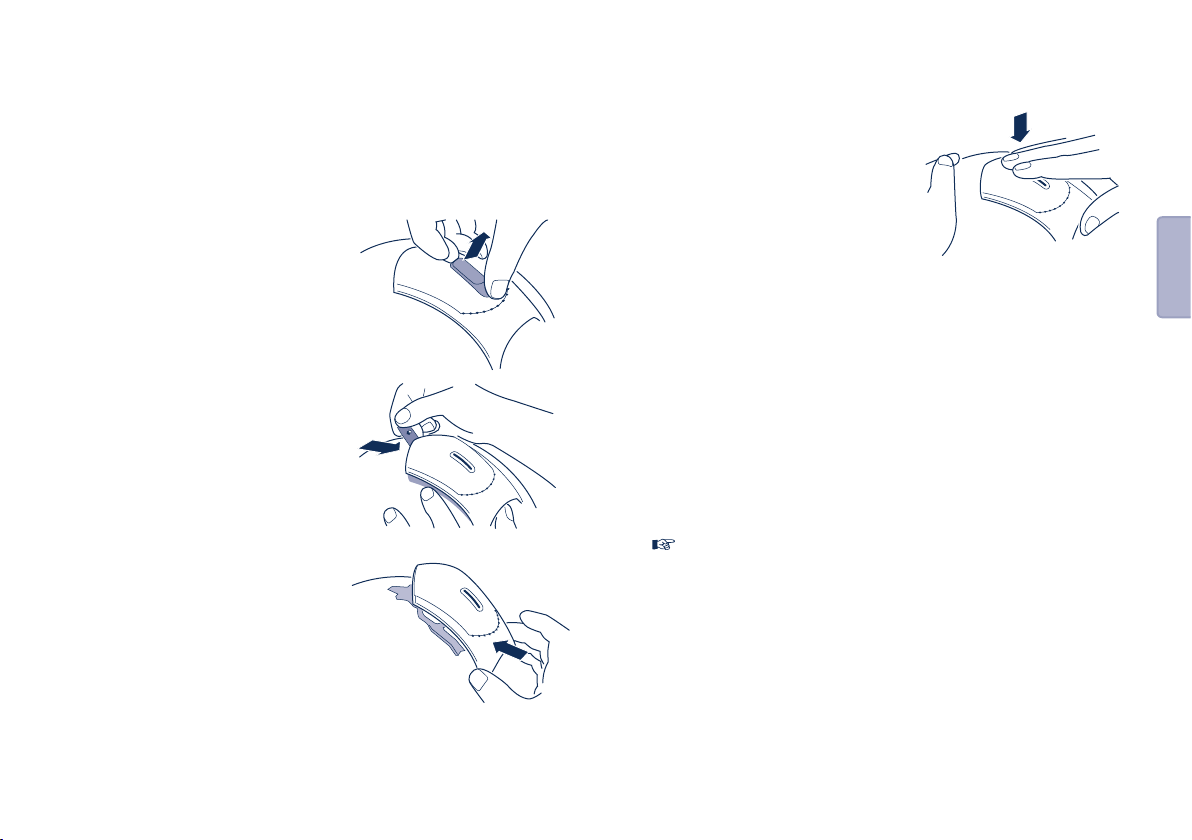
H. MAINTENANCE AND CARE
5. VENTILATION
Ventilation cowl
If necessary, the head ventilation system’s air inlet cowl can be
removed to enable cleaning of the ventilation mechanism.
1. To do this, fi rst remove the operating
element by simply taking it out
upwards from the ventilation cowl.
2. Having done that, slide the fl at end
of the operating element under the
edge behind the ventilation cowl
and remove the latter by levering it
upwards.
3. On completion of the cleaning, fi x
the ventilation cowl back in place
by hooking it into the front of the
ventilation mechanism and pressing
onto the helmet shell until you hear a
clearly audible “click”.
4. When this has been done, insert
the operating element through
the ventilation cowl and into the
ventilation mechanism.
english
6. LOCKING SYSTEM
Ratchet fastener
The lock system’s metal components require no maintenance.
7. STORING THE HELMET
When not in use, keep the helmet in the supplied helmet bag in a
dry, safe place. Always store the helmet so that there is no risk of it
falling onto the fl oor. Damage caused this way is not covered by the
guarantee.
Note:
Store the helmet out of reach of children and animals.
106 107
Page 54

I. ACCESSORIES AN REPLACEMENT
PARTS
1. SPARE PARTS
Wind defl ector
For additionally optimised aeroacoustics.
Helmet bag
Padded helmet bag made from high-quality materials for safe transport and storage of your
helmet. With 3-D Schuberth logo.
Sun visor 80% grey tinted
2 sizes: 52/53 - 58/59, 60/61 - 64/65
Visor shield Pinlock
®
2 sizes: 52/53 - 58/59, 60/61 - 64/65
Replacement inner shield Pinlock
®
2 sizes: 52/53 - 58/59, 60/61 - 64/65
Refl ective sticker set
for use in France
Interior lining (headband padding)
7 sizes: 52/53, 54/55, 56/57, 58/59, 60/61, 62/63, 64/65
Set of high-comfort cheek pads (2 items)
7 sizes: 52/53, 54/55, 56/57, 58/59, 60/61, 62/63, 64/65
Note:
When replacing the cheek pads,
the Anti-Roll-Off System must be
properly joined to the chinstrap.
For this purpose, the clips on the
free ends of the neckbands – as
shown in the illustration below
– must enclose the corresponding
ends of the chinstrap and the
neckbands must not be twisted or
knotted.
Caution:
For safety reasons, all other parts of the helmet should be
replaced by the SCHUBERTH Repair Service only.
english
108 109
Page 55

PARTS
J. SCHUBERTH SERVICEI. ACCESSORIES AN REPLACEMENT
2. COMMUNICATIONS SYSTEMS
Caution:
The installation of a communication system (including basic
headsets) constitutes a modifi cation of the helmet. For this reason
it is necessary for such a communication system and headset
destined for installation into a helmet model to be tested and
approved in line with the ECE-R 22.05 standard, otherwise the
helmet’s approval and insurance conformity become invalid on
installation of an unapproved system.
Substantiation of approval in line with ECE-R 22.05 in connection
with a special communication system is only valid if certifi ed
by an offi cial regulatory offi ce of an EU member state. Any
other form of information from these or other institutions (e.g.
on the general suitability of communication systems for use in
motorcycle helmets) is of no relevance and the helmet loses its
approval.
3. ORDERING ORIGINAL SCHUBERTH PARTS
SCHUBERTH original replacement parts and accessories can be
purchased from your authorised dealer. Please ask your SCHUBERTH
importer for details of the SCHUBERTH dealer closest to you. You can
fi nd the SCHUBERTH importer responsible for your country by going
to the “Motorcycle” section on our website and clicking on the link
“Worldwide Importer List”:
www.schuberth.com
1. SPECIAL ADAPTIONS
Individual modifi cations to the interior lining can be carried out at the
factory provided they conform to the current ECE standard and at a
charge. Please note that painting work cannot be carried out in the
SCHUBERTH customer service departement.
For us to accept orders for special modifi cations, the helmet must be
sent to SCHUBERTH carriage free.
We regret that special modifi cations cannot be carried out within the
regular repair service time frame but will take a longer period of time.
2. REPAIR SERVICE
With the C3, you own a SCHUBERTH quality product that has been
designed and manufactured using the latest development and
production methods. Should your helmet nevertheless require a
repair at some time, please contact your authorised dealer or send
the helmet directly to us, stating your address, telephone number
and e-mail as well as a clear description of the fault:
SCHUBERTH GMBH
Kundenservice Motorradhelme
(Customer Service, Motorcycle Helmets)
Stegelitzer Str. 12
39126 Magdeburg
Germany
For us to accept helmets for repair, the helmet must be sent to
SCHUBERTH carriage free (except for guarantee claims).
Note:
If we receive an order from a customer to carry out a repair
without a clear description of the fault, we are entitled to examine
the item and/or delay completion of the order until discussion
with the customer. If, even where a clear description of the
english
110 111
Page 56

J. SCHUBERTH SERVICE
original fault has been provided, we discover further faults in
the course of the repair, we are entitled, but not obliged, to
remedy these without a specifi c order if this is necessary to
reinstate the correct functioning of the helmet and the cost of
this is low in relation to the original repair job. Otherwise, we
will seek the agreement of the customer.
3. GUARANTEE
On the condition of proper use of the helmet, SCHUBERTH
guarantees replacement or repair of defective parts free of charge
from the date of purchase for a period of 2 years for the helmet
and 1 year for the visor and sun visor. All guarantee work is
undertaken via our repair service.
For guarantee claims, the sales receipt must be submitted.
Please keep the original invoice in a safe place. In the event of
a guarantee claim, the original sales receipt (or a copy) must
be enclosed with the helmet. Without the sales receipt, we
cannot satisfy any guarantee claims. The granting of a proper
replacement or repair does not extend the original guarantee
period.
Complaints must be notifi ed to us in writing as soon as possible,
but within 8 days of the purchase date at the latest. Defects that,
even with careful examination, are not discovered within this
period must be notifi ed to us in writing as soon as possible after
their discovery. Do not forget to provide a full description of the
fault when returning the helmet. A product that has already been
worn will not be exchanged but will be repaired. Whether defective
parts will be repaired, replaced or credited is at SCHUBERTH’s
discretion.
No guarantee rights exist specifi cally in the event of:
- improper use and excessive stressing of the product
- modifi cation of the product by the customer
- failure to follow our product recommendations
- normal wear and tear.
4. BLUE CONCEPT
At SCHUBERTH, “Blue Concept” refers to our environmental policy
relating to our helmets. This policy extends from development
through planning of production processes to the recycling of the
materials used. Under the Blue Concept system, we will therefore
take back any used SCHUBERTH motorcycle helmet in order to
return the materials used in its production to a recycling facility.
5. SCHUBERTH ON THE INTERNET
If you would like to get the latest news on the our company and our
range of helmets, you can visit us on the Internet at:
www.schuberth.com
english
112 113
Page 57

K. HOW TO CONTACT US
Headquarters
Address
SCHUBERTH GMBH
Stegelitzer Str. 12
39126 Magdeburg
Germany
Repair service
Fax Address
+49 391 8106-228 SCHUBERTH GMBH
Kundenservice Motorradhelme
(Customer Service, Motorcycle Helmets)
Stegelitzer Str. 12
39126 Magdeburg
Germany
Ordering, spare parts and accessories
Fax Address
+49 391 8106-228 SCHUBERTH GMBH
Vertrieb Motorradhelme
(Sales, Motocycle Helmets)
Stegelitzer Str. 12
39126 Magdeburg
Germany
Internet
www.schuberth.com
E-mail
motorcycle-helmets@schuberth.de
114 115
english
Page 58

Toutes nos félicitations...
FR
A. UTILISATION CORRECTE DU MANUAL
Veuillez lire attentivement ce manuel, afi n que votre casque vous
protège convenablement lorsque vous faites de la moto.
Nous vous conseillons de lire ce manuel dans l’ordre prescrit, afi n de
ne négliger aucune remarque importante pour votre sécurité.
deutschenglish
pour l’achat du casque SCHUBERTH C3. Vous pouvez être certain
d’avoir fait le bon choix. Issu de procédés de développement et de
fabrication ultramodernes, le C3 associe les excellentes propriétés
aérodynamiques et aéroacoustiques d’un casque de course au
confort et à la grande fonctionnalité d’un casque modulable.
Ce casque est un produit de qualité qui répond aux exigences les
plus sévères en matière de sécurité et de performances imposées
sur les routes, surtout lors de longs parcours. Il vous apportera une
grande satisfaction.
Nous vous souhaitons bonne route,
et ce en toute sécurité.
F.- J . G ör ge s
Directeur des Ventes
SCHUBERTH GMBH
Veuillez observer plus particulièrement les points signalés comme
suit :
Avertissement : consignes de sécurité
Attention : remarques
Conseil : conseils pratiques
Avertissement:
Ce casque n’est pas conçu pour être utilisé aux Etats-Unis ni au Canada.
Il a été fabriqué, contrôlé et homologué selon la norme européenne ECE. Par
conséquent, il n’est pas conforme aux prescriptions et exigences des Etats-Unis
d’Amérique et du Canada. Il ne peut être utilisé que dans les pays où la norme
européenne ECE est applicable. En cas d’utilisation du casque dans d’autres pays,
aucun droit de dommages-intérêts ne peut être revendiqué devant les tribunaux des
Etats-Unis d’Amérique ou du Canada ou de pays tiers non assujettis à la norme ECE.
Caution:
This helmet is not intended for use in the USA and Canada. The helmet has
been inspected and approved to the European ECE Standard and therefore does not
conform to US and Canadian regulations and requirements. It is only legal to use the
helmet in countries in which the European ECE Standard is valid. If you use the helmet
in other countries, you will not in the event of injury be entitled to make a claim for
compensation before the US or Canadian courts or the courts of other countries not
bound by the ECE Standard.
Attention :
Sous réserve de modifi cations dues au progrès technique
– éventuellement sans avis préalable.
françaisitalianonederlandsespañol
116 117
Page 59

B. SOMMAIRE
A. Utilisation correcte du manual..................................... 117
B. Sommaire...................................................................... 118
C. Choisir le bon casque................................................... 120
1. Mesurer le tour de tête 121
2. Déterminer la taille adéquate du casque 121
3. Vérifi er si la taille du casque choisie est la bonne 122
D. Le casque...................................................................... 124
1. Norme 124
2. Homologation ECE 124
3. Anatomie du casque 125
4. Calotte 125
5. Coque intérieure 125
6. Aérodynamique 126
7. Aéroacoustique 126
8. Mentonnière 129
9. Système de retenue 131
®
10. Visière Pinlock
134
11. Pare-soleil 140
12. Coiffe 144
13. Systèmes d’aération 146
14. Equipement de sécurité supplémentaire 149
E. Enfi ler et retirer le casque........................................... 150
1. Enfi ler le casque 150
2. Retirer le casque 151
F. Avant de démarrer........................................................ 152
1. Contrôle du casque 152
2. Contrôle de la jugulaire 152
3. Contrôle de la visière et du pare-soleil 153
G. Pour votre sécurité....................................................... 154
1. Consignes de sécurité - casque 154
2. Consignes de sécurité - visière / pare-soleil 156
3. Consignes de sécurité - modifi cations / accessoires 156
H. Entretien et soins.......................................................... 157
1. Calotte 157
2. Mentonnière 157
3. Visière et pare-soleil 158
4. Coiffe 161
5. Systèmes d’aération 162
6. Système de fermeture 163
7. Rangement 163
I. Accessoires et pièces de rechange............................. 164
1. Vue d’ensemble des pièces 164
2. Systèmes de communication 166
3. Achat des pièces originales SCHUBERTH 166
J. Service clientèle SCHUBERTH...................................... 167
1. Adaptation spéciales 167
2. Service réparations 167
3. Garantie 168
4. Blue Concept 169
5. SCHUBERTH sur Internet 169
K. Comment nous contacter............................................. 170
deutschenglish
françaisitalianonederlandsespañol
118 119
Page 60

C. CHOISIR LE BON CASQUE
Le choix du casque est d’une importance capitale. Seul un casque de
la bonne taille assure la meilleure protection possible en cas de chute
ou d’accident. Pour déterminer le casque qu’il vous faut, procédez
comme suit:
1ère étape : Mesurer le tour de tête
2ème étape : Déterminer la taille adéquate du casque
3ème étape : Vérifi er si la taille du casque choisie est la
bonne.
1. MESURER LE TOUR DE TETE
Mesurez votre tour de tête en plaçant un centimètre à ruban à
environ un doigt (env. 2 cm) au-dessus des sourcils, là où le tour de
tête est le plus grand.
Cette mesure représente votre tour de tête en cm.
2. DETERMINER LA TAILLE ADEQUATE DU CASQUE
Le casque C3 est livrable en sept tailles doubles. Vous trouverez la
taille du casque qui vous convient dans le tableau suivant :
Tour de tête
en cm
Tailles des
casques
SCHUBERTH
Tailles des
casques
alpha
52 à 53 52 / 53 XS
54 à 55 54 / 55 S
56 à 57 56 / 57 M
58 à 59 58 / 59 L
60 à 61 60 / 61 XL
62 à 63 62 / 63 XXL
64 à 65 64 / 65 XXXL
Si le tour de tête est compris entre deux tailles de casques (par ex.
57,5 cm), nous conseillons d’essayer la petite taille en premier.
français
120 121
Page 61

C. CHOISIR LE BON CASQUE
3. VERIFIER SI LA TAILLE DU CASQUE CHOISIE EST LA BONNE
Après avoir enfi lé le casque, fermé et réglé correctement la jugulaire,
vérifi ez si le casque a la bonne taille et s’il est bien en place
(important : pour ajuster la jugulaire, reportez-vous au chapitre
D.8. – système de retenue).
1ère étape : Assurez-vous que toutes les pièces de rembourrage de
la coiffe serrent un peu votre tête, sans pour autant faire
mal :
a) coussinets de rembourrage central du crâne
b) coussinets de joue
c) bandeau de rembourrage (en particulier pour le front).
Si le casque vous gêne ou vous fait mal, essayez la taille
supérieure.
2ème étape : Contrôlez si le casque vous laisse une visibilité
périphérique suffi samment grande. En raison de sa
construction, un casque limite toujours la visibilité sur
les côtés. Cependant, il ne doit pas gêner ou entraver la
visibilité.
3ème étape : Après avoir enfi lé votre casque, prenez-le fermement
entre les mains et faites des mouvements de va-et-vient
à la verticale. Essayez aussi de tourner le casque. Ces
mouvements doivent également faire mouvoir votre cuir
chevelu et la peau de votre visage. Si le casque bouge
trop facilement, il est trop grand. Essayez une taille plus
petite.
4ème étape : Prenez le casque se trouvant sur votre tête par la
mentonnière et essayez de le retirer en le passant
par-dessus tête vers l’arrière. Si vous pouvez quitter le
casque de cette manière, soit le casque est trop grand,
soit la jugulaire n’est pas assez serrée. Pour votre
sécurité, réglez de nouveau la jugulaire ou choisissez un
casque plus petit.
5ème étape : Prenez la partie arrière du casque des deux mains et
essayez de retirer le casque en le passant par-dessus
tête vers l’avant. Si vous pouvez quitter le casque de
cette manière, soit la jugulaire n’est pas assez serrée,
soit le casque est trop grand. Réglez de nouveau la
jugulaire ou choisissez un casque plus petit.
Répétez les étapes de vérifi cation jusqu’à ce que vous ayez trouvé le
bon casque ou la bonne taille de casque.
L’idéal est de vérifi er votre choix lors d’un parcours d’essai.
français
Avertissement :
Ne roulez jamais avec un casque de la mauvaise taille !
122 123
Page 62

D. LE CASQUE
1. NORME
Le casque C3 est conforme à la norme ECE-R 22.05. Cette norme
de contrôle garantit le respect de standards de sécurité défi nis
concernant l’amortissement des chocs, la résistance à la pénétration,
la rigidité latérale, le système de retenue et le champ visuel.
L’homologation vous garantit d’une part l’homologation pour les pays
de l’union européenne et tous les pays qui reconnaissent la norme
ECE et d’autre part la conformité aux exigences imposées par les
compagnies d’assurance, ce qui est essentiel en cas de sinistre.
Veuillez noter que le casque C3 homologué ECE est conçu
spécialement selon la norme ECE et qu’il n’est donc pas homologué
pour les Etats-Unis ni le Canada. Il ne peut être utilisé que dans les
pays pour lesquels la norme ECE est applicable.
3. ANATOMIE DU CASQUE
Visière
Yeux réfl échissants
Pare-soleil
Coiffe
Aération de la tête
Ventilation de la visière/
ventilation de la
mentonnière
Bouton d’ouverture
de la mentonnière
Ventilation de la tête
Coque intérieure
®
Pinlock
Visière
Mécanisme de la visière
Calotte
Système de retenue
(avec système anti-roll-off)
Curseur
pare-soleil
Jugulaire à crémaillère
Attention :
Seuls les casques SCHUBERTH homologués spécialement pour
les Etats-Unis et le Canada et possédant le réglage technique
correspondant peuvent être utilisés dans ces pays. Vous
trouverez d’autres informations ainsi que le point de vente de ces
casques sur Internet, à l’adresse suivante :
www.schuberth.com/usa
www.schuberth.com/canada
4. CALOTTE
La calotte du casque C3 associe une forme aérodynamique optimale
et une protection systématique. Elle se compose d’une matrice
spéciale duroplastique, renforcée à la fi bre de verre et conçue
spécialement par SCHUBERTH. Celle-ci confère au casque une
grande robustesse, indispensable pour votre sécurité.
Avertissement :
Le casque de protection est conçu pour l’absorption d’un seul
2. HOMOLOGATION ECE
Norme de contrôle ECE
Numéro d’homologation
059284/P-3523
35230001
Autorité ayant délivré
l’homologation
Numéro de série
choc. Tout casque ayant subi une chute, un accident ou un choc
violent devra être remplacé.
5. COQUE INTERIEURE
Afi n d’optimiser les caractéristiques d‘amortissement des chocs,
la coque intérieure du casque présente une structure en plusieurs
parties. La mousse complexe multizones du corps principal permet
d’obtenir une meilleure absorption et répartition des forces et offre
un maximum de sécurité. Ses côtés, largement dimensionnés,
garantissent un port irréprochable et agréable du casque.
124 125
français
Page 63

D. LE CASQUE
6. AÉRODYNAMIQUE
Tous les casques de courses et de moto SCHUBERTH sont étudiés et
optimisés dans la souffl erie de SCHUBERTH, dans des conditions
défi nies avec une précision scientifi que.
Le casque C3 est conçu spécialement pour une position assise du
conducteur lors de randonnées et de randonnées sportives en moto.
Il présente une grande stabilité dans le fl ux d’air, même à vitesse
élevée. Le casque C3 se caractérise également par une meilleure
résistance à l‘air, une grande stabilité d’orientation et une excellente
neutralité ascentionnelle et descentionnelle. En outre, sur les motos
non carénées, il minimise l’effet de “tremblement”*.
* Vibrations du casque dans le fl ux d’air.
Attention :
Pour les motos carénées, notez que les forts tourbillons
d’air qui environnent la zone protégée du vent par le
carénage, peuvent modifi er considérablement les propriétés
aérodynamiques du casque.
7. AÉROACOUSTIQUE
Nous avons accordé une importance particulière aux caractéristiques
aéroacoustiques du C3, sans toutefois devoir accepter de
restrictions du confort. Grâce à différents facteurs étudiés dans
la souffl erie de SCHUBERTH (entre autres l’adaptation spéciale du
défl ecteur de la mentonnière et la forme du col acoustique) et grâce
au choix de matériaux particuliers, le casque C3 est silencieux et
offre une excellente protection contre les courants d’air**. Ceci
permet une conduite plus détendue – en particulier sur les longs
parcours – et une meilleure concentration.
Un casque silencieux se caractérise par un faible bruit du vent. Le
bruit du vent est provoqué par un tourbillonnement turbulent de l’air
qui environne le casque. Les turbulences provoquent des fl uctuations
de pression locales qui se traduisent par le bruit dans le casque (ce
qu’on appelle le “pseudo-son”).
Seule la personne qui porte le casque entend ce bruit. Pour la plupart
des motos et des casques, le bruit du vent couvre le bruit du moteur
à partir de 100 km/h environ.
** Les valeurs aéroacoustiques peuvent varier en fonction du type de moto, de carénage,
de la position assise et de la taille du motard.
Avertissement :
En raison de l’optimisation aéroacoustique du casque et de la
réduction du bruit du vent qui en résulte, le conducteur risque
de sous-évaluer la vitesse réelle. N’essayez pas d’évaluer votre
vitesse à l’oreille, mais contrôlez celle-ci sur votre compteur.
Attention :
Pour les motos carénées, de forts tourbillons d’air
environnent la zone protégée du vent. Ceux-ci peuvent réduire
considérablement les performances aéroacoustiques du
casque. Veiller à ce que le carénage ne dirige pas précisément
la couche turbulente sur la partie inférieure du casque.
français
126 127
Page 64

D. LE CASQUE
Zone non critique pour
l’aéroacoustique
Conseil :
Si l’on souhaite un casque le plus silencieux possible, la forme
Zone critique pour
l’aéroacoustique
Zone non critique pour
l’aéroacoustique
intérieure de la face inférieure du casque est extrêmement
importante. Veillez à ce que le casque soit bien adapté à
votre morphologie. Utilisez les possibilités d‘ajustage du
col acoustique réglable. Si vous avez le cou fi n, nous vous
conseillons de porter un foulard en supplément.
COUSSINET ANTI-BRUIT (faisant partie de la livraison)
Le coussinet anti-bruit livré avec le casque permet de réduire
davantage les bruits environnants.
1. Fixez le coussinet anti-bruit à l’aide
des bandes velcro à l’intérieur du
défl ecteur.
français
8. MENTONNIERE
Le casque C3 est équipé d’une mentonnière relevable pouvant être
ouverte et fermée aisément à l’aide du curseur situé au centre de la
mentonnière. Les mouvements nécessaires sont optimisés d’un point
de vue ergonomique.
Système de verrouillage
Lorsqu’elle est fermée, la mentonnière est équipée de chaque côté
d’un système de verrouillage spécial, conçu sur le modèle des
verrouillages de portes dans la construction automobile. Bien que
la mentonnière soit munie de 2 verrous, il suffi t d’appuyer sur un
seul bouton pour l‘ouvrir. Le verrou du côté opposé est actionné
simultanément, grâce à un câble Bowden.
Le système mécanique optimisé réduit l’effort de fermeture des deux
verrous à 16 N, bien que la force totale de fermeture, essentielle à la
sécurité, soit beaucoup plus élevée.
128 129
Page 65
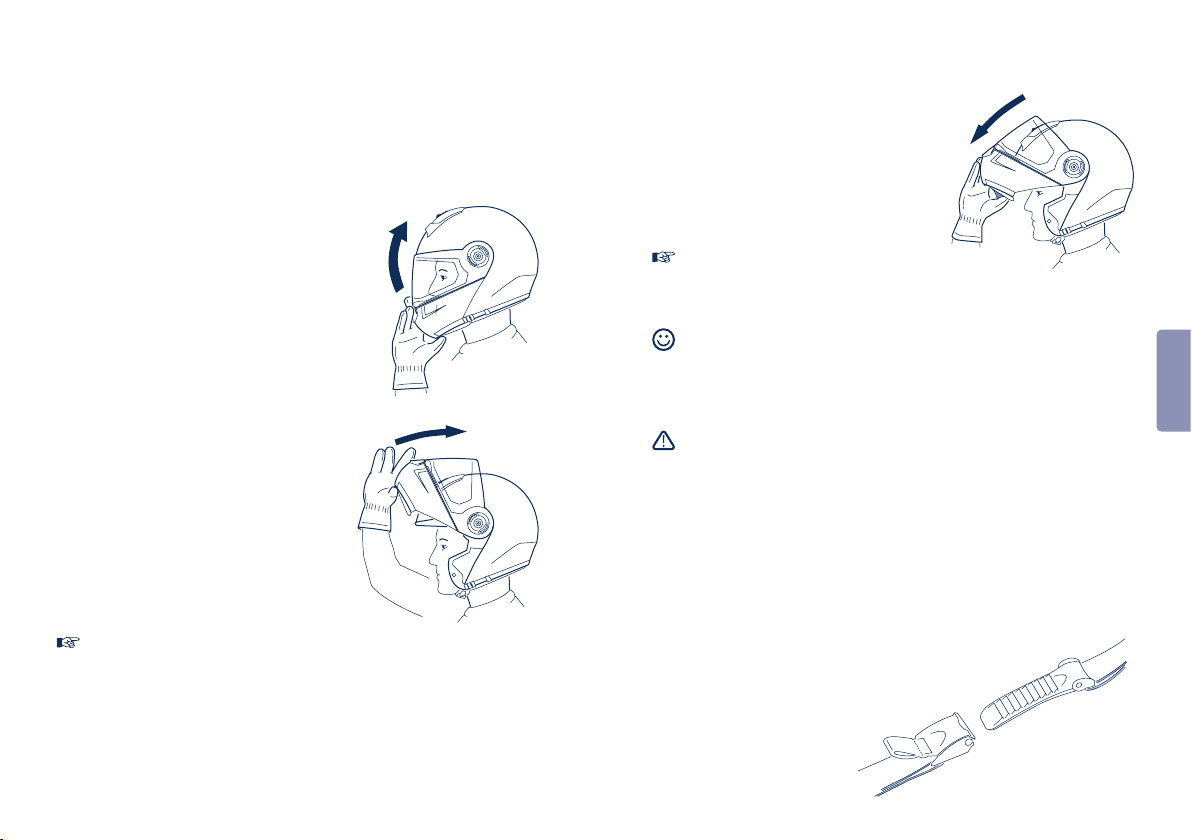
D. LE CASQUE
Maniement du système
La mentonnière peut être ouverte ou fermée à tout moment,
indépendamment de la position de la visière ou du pare-soleil. La
mentonnière est parfaitement maintenue en position haute par un
crantage terminal ferme et sûr.
Ouverture de la mentonnière
1. Pour ouvrir la mentonnière, poussez
le curseur rouge situé au centre de
la mentonnière avec le pouce en
direction de la fl èche, vers l’avant et
jusqu’à la butée.
2. Le mécanisme Bowden libère les
deux verrous et vous pouvez faire
basculer la mentonnière vers le
haut, dans la position de crantage
supérieure.
Attention :
Le mécanisme de la mentonnière du C3 est équipé d’un
dispositif de sécurité qui empêche l’ouverture automatique de
la mentonnière en cas de chute. C’est pourquoi vous devez
également saisir la mentonnière d’une main pour l’ouvrir.
Fermeture de la mentonnière
1. Pour fermer la mentonnière,
faites-la basculer vers le bas en
l’accompagnant d’une main, jusqu’à
ce que les deux verrous s’engagent
de manière audible.
Attention :
A chaque fois que vous fermez la mentonnière, vérifi ez que
les deux verrous soient correctement engagés en poussant la
mentonnière de bas en haut.
Conseil :
Pour fermer la mentonnière en cas d’utilisation du défl ecteur
réglable supplémentaire, nous conseillons de passer un doigt
sous le calotin amortisseur de mentonnière pour faire passer la
mentonnière sur le menton.
Avertissement :
Ne roulez jamais avec la mentonnière relevée !
9. SYSTEME DE RETENUE
Le système de retenue du casque C3 se compose d’une jugulaire
attachée à la partie arrière de la calotte à l’aide de bandes de nuque
(système anti-roll-off – voir chapitre D.14.).
Jugulaire à crémaillère micro-lock
Le casque C3 est livré avec une attache
à crémaillère. Ce système de fermeture
permet d’adapter aisément la
jugulaire à votre tête, à chaque
fois que vous enfi lez le
casque.
français
130 131
Page 66

D. LE CASQUE
Réglage de la jugulaire
La longueur de la jugulaire peut être réglée en tirant plus ou moins
sur la bande de la jugulaire, passée dans la boucle métallique.
Réglez la longueur de la jugulaire de manière à ce qu’elle
repose fermement sous le menton sans pour autant
faire mal. Fixez l’extrémité de la jugulaire avec
le rembourrage confort de la jugulaire
à l’aide de l’attache de fi xation.
Avertissement :
Lors du réglage veillez à ce que le casque ne puisse être retiré
en le passant par dessus tête vers l’avant lorsque la jugulaire est
fermée (voir chapitre C.3.).
Avertissement :
Contrôlez régulièrement le réglage de la longueur de la jugulaire
(voir chapitre F.2. -– Contrôle de la jugulaire).
Ouverture et fermeture
Pour fermer l’attache de la jugulaire, poussez la languette à
crémaillère cran par cran dans l’attache. Si la jugulaire est trop
lâche sous le menton, poussez la languette à crémaillère d’un cran
supplémentaire dans l’attache.
Lors du réglage, veillez à ce que la jugulaire soit tendue sur le
menton, sans toutefois gêner. Ouvrez la jugulaire en tirant le ruban
rouge de l’attache à crémaillère vers le haut, ce qui déverrouille le
système de fermeture. Ensuite, retirez la languette à crémaillère du
système de fermeture.
Avertissement :
Ne roulez jamais avec la jugulaire ouverte. Elle doit être réglée
convenablement et être bien ajustée. Si la jugulaire est mal
réglée ou pas fermée correctement, le casque risque d’être
éjecté en cas d’accident.
Avertissement :
Même s’il est fermé, le rembourrage confort de la jugulaire
n’offre pas une protection suffi sante. L’ensemble de la jugulaire
doit toujours être complètement fermé.
Avertissement :
N’ouvrez jamais la jugulaire pendant que vous roulez.
10. VISIERE PINLOCK
®
La visière Pinlock® est une visière à double écran anti-buée. La face
intérieure de la visière n’est pas équipée d‘un revêtement anti-buée
conventionnel mais d‘un deuxième écran. Les deux écrans sont
séparés et étanchés par un joint en silicone transparent et fl exible.
Grâce à la fi xation de l’écran intérieur par des boulons excentriques
de retenue („pins“), les deux écrans sont précontraints l’un par
rapport à l’autre et le joint de silicone devient étanche. On obtient
ainsi un coussin d’air isolant entre l’écran principal ou écran extérieur
et l’écran intérieur de la visière, ce qui empêche la formation de buée
sur l’écran intérieur.
REVETEMENT
L’écran principal de la visière dispose d‘un revêtement anti-rayures
HighClear® sur les deux faces. L’écran intérieur Pinlock® est équipé
d’un revêtement anti-buée sur les deux faces.
français
132 133
Page 67

D. LE CASQUE
Attention :
Pour éviter d’endommager l’écran intérieur se rayant facilement,
ne pas mettre de gants ou autres objets dans le casque.
Attention :
Lors de sa livraison, l’écran intérieur est muni d’un fi lm de
Fermeture de la visière
Pour fermer la visière, saisissez le
bouton de visière gauche ou droit et
poussez-le vers le bas jusqu’à ce qu’il se
verrouille de manière audible.
protection. Retirez ce fi lm avant la première utilisation du
casque.
Attention :
Les écrans intérieurs Pinlock® ne doivent être utilisés qu’avec un
écran principal SCHUBERTH prévu à cet effet. Ils ne doivent pas
être utilisés avec d’autres visières. Ceci vaut explicitement pour
les autres variantes de visières.
REMPLACEMENT DE L’ECRAN
Le mécanisme de visière EasyChange permet de remplacer l’écran
rapidement et sans outil. Pour remplacer l’écran, posez le casque sur
une surface plane ou sur vos jambes si vous êtes en position assise.
Ouverture de la visière
Pour ouvrir la visière, pousser le button
de visiére gauche ou droit avec le pouce
et relever la visiére jusqu'á la position
souhaitée, en la poussant vers le haut.
Démontage des écrans
1. Mettez la visière en position
supérieure.
2. Actionnez l’élément-ressort (situé
Crantage de la visière (avec position ville)
La visière comporte sept crans d‘ouverture. La deuxième position de
crantage (position ville) est légèrement plus ferme et une plus grande
résistance se fait sentir sur cette position. Cela facilite le blocage
sous le mécanisme de visière) en
position Ouverture de la visière.
Ensuite, actionnez l’élément-ressort
se trouvant de l’autre côté.
de la visière sur la position ville – en particulier en route. Pour cela,
ouvrez la visière; normalement, la position ville est escamotée dans
un premier temps. Elle est facile à régler en abaissant la visière.
Grâce à sa construction, le mécanisme de la visière ne nécessite
pas de graissage. La visière peut être articulée à tout moment,
indépendamment de la position du pare-soleil.
134 135
3. Relevez la visière jusqu’à ce qu’elle
se désolidarise du mécanisme de
visière.
français
Page 68
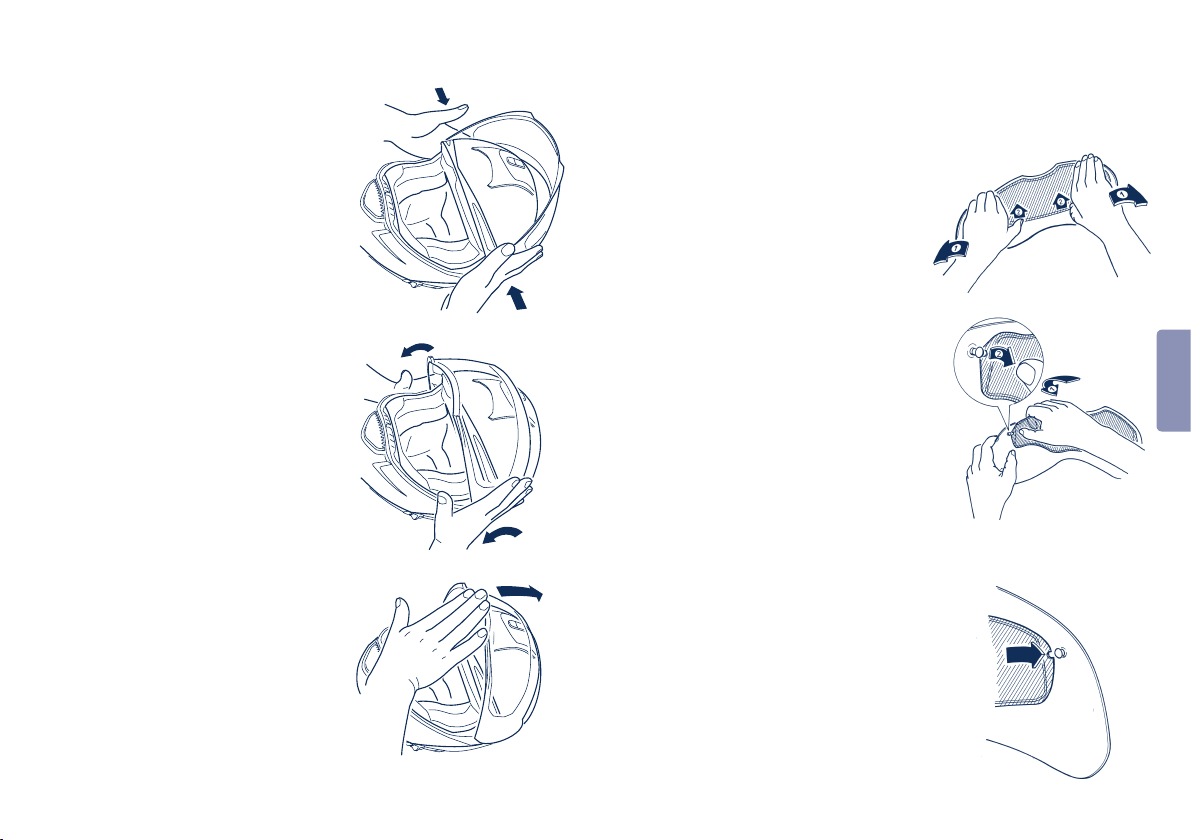
D. LE CASQUE
Montage des écrans
1. Avec les deux mains, insérez les
tenons de crantage de la visière dans
la découpe prévue à cet effet dans le
mécanisme de visière.
2. Une légère pression sur la visière,
en direction du casque, et un
mouvement de fermeture simultané
provoque le verrouillage audible de la
visière.
3. Vérifi ez que le mécanisme de visière
fonctionne correctement en ouvrant
la visière jusqu’à la butée.
REMPLACEMENT DE L’ECRAN INTERIEUR
Démontage de l’écran intérieur
1. Pour démonter l’écran intérieur, placez
la visière sur un chiffon doux et propre,
en orientant le bord supérieur de la
visière dans votre direction.
2. Afi n de réduire éventuellement la
précontrainte de l’écran intérieur,
vous pouvez appuyer prudemment sur
les deux extrémités de la visière avec la
paume de vos mains, jusqu’à ce que
l’écran intérieur se désolidarise sous la
pression des pouces et se déplace de
2-3 mm vers l’avant.
3. Placez l’index et le majeur derrière
l’écran intérieur et soulevez le par
rapport à l’écran extérieur. Dans cette
position, il est facile de faire sortir
l’écran intérieur des boulons de
retenue, avec les pouces.
4. L’écran intérieur peut alors être retiré
de la visière.
Montage de l’écran intérieur
1. Placez l’écran intérieur dans la
visière principale. Pour cela, insérer
l’écran dans un boulon de retenue
de manière à ce que le joint en
silicone se trouve sur la face
orientée vers la visière extérieure.
français
136 137
Page 69
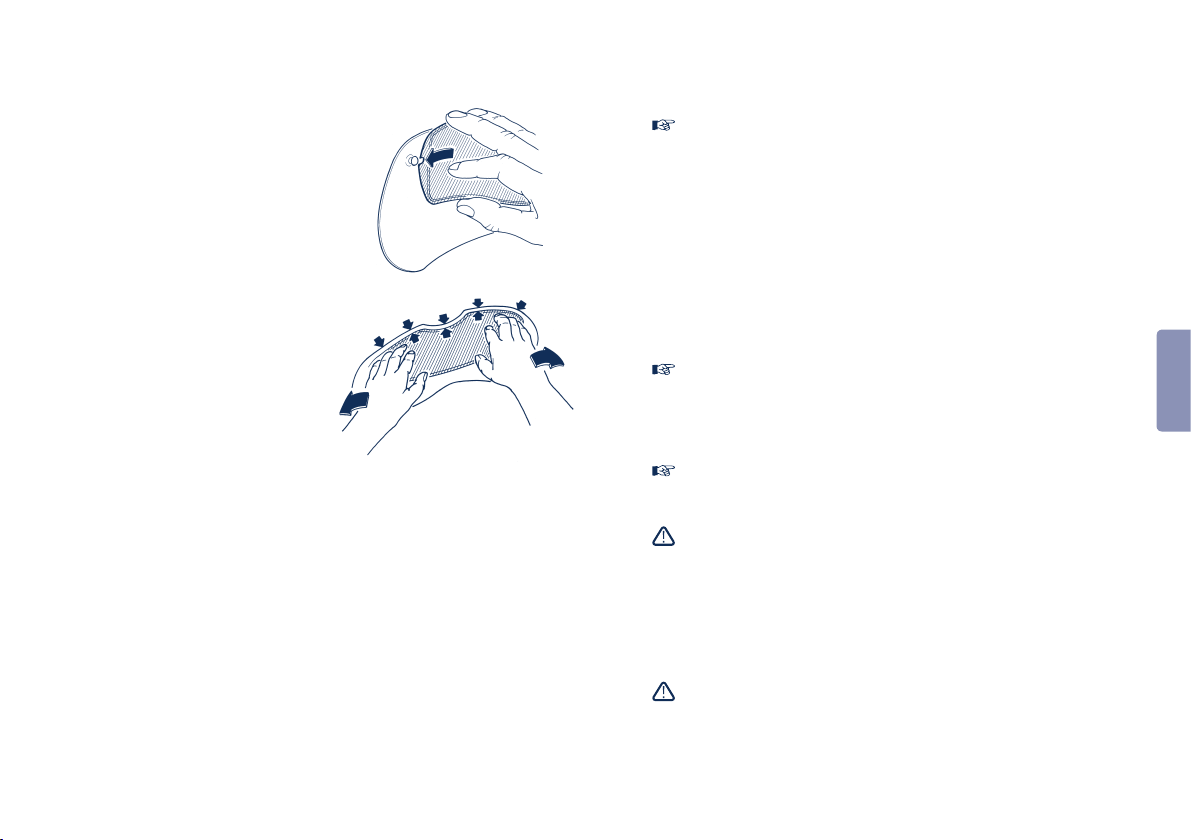
D. LE CASQUE
2. Saisissez alors l‘autre côté de
l’écran intérieur en plaçant vos
doigts sur les bords horizontaux
supérieur et inférieur et exercez
avec l’index une pression sur
l’extrémité de l’écran intérieur,
qui formera un S. Ceci permet
d’introduire aisément la découpe
sur le boulon de retenue. Vous
pouvez lâcher l’écran intérieur.
3. L’écran intérieur doit reposer à
l’intérieur de la visière extérieure.
Le bord inférieur de l’écran
intérieur doit être parallèle au
bord inférieur de la visière
principale. Si vous devez modifi er
la position de l’écran intérieur,
appuyez avec précaution sur la
visière en utilisant la paume de
vos mains, jusqu’à ce que l’écran
intérieur puisse être déplacé.
4. Contrôlez que le joint de silicone repose de manière uniforme sur
l’écran extérieur. Ceci est la meilleure garantie pour empêcher la
formation de buée.
5. Le cas échéant, retirez le fi lm de protection de l’écran intérieur.
Attention :
• Afi n d’éviter de rayer la visière, celle-ci doit toujours être
propre et sèche lorsque vous montez ou démontez l’écran
intérieur.
• Lors du montage de l’écran intérieur, veillez à ce que l’espace
compris entre les deux écrans de visière soit exempt de
poussière et d‘humidité.
• Effectuez le montage et le démontage sur un chiffon doux et
propre.
• Contrôlez régulièrement que le joint en silicone repose
correctement et uniformément entre l’écran intérieur et l’écran
extérieur.
Attention :
En raison des pressions d’air élevées, exercées sur le joint
en silicone lors d‘une conduite avec la visière ouverte, nous
recommandons de toujours fermer la visière pendant la conduite,
afi n d’éviter la pénétration de poussière ou d’humidité.
Attention :
Ne faites pas sortir les boulons de retenue par pression avec les
doigts car vous risquez de les casser.
Avertissement :
En raison de sa construction, une visière à double écran entraîne
une augmentation des refl ets dans la visière (en particulier lors de
la conduite dans l‘obscurité). En règle générale, ces refl ets ne
présentent pas de danger, grâce à l’absence de buée sur ce type
de visière. Cependant, si votre sensibilité est telle que les refl ets
Les défauts d’étanchéité, et par conséquent la formation de buée
sur la visière, indiquent que l’écran intérieur n’est pas correctement
en place ou que la pression est trop faible sur le joint. Pour régler
la pression sur le joint, tourner les deux boulons excentriques de
retenue. Pour cela, démonter l’écran intérieur. Retirer prudemment et
par l’intérieur les boulons de retenue de l’écran extérieur, en utilisant
un objet plat, non coupant. Les tourner de 180° et les remettre en
place. Ensuite, monter l’écran intérieur et contrôler le joint.
138 139
vous gênent, nous vous conseillons de ne plus utiliser la visière à
double écran.
Avertissement :
Si l’humidité se trouve ou pénètre dans la zone étanche à l’air,
comprise entre les deux écrans de visière, l’écran intérieur doit
aussitôt être démonté, car cela compromettrait la visibilité. Ne
remontez l’écran intérieur que si les deux écrans sont absolument
français
Page 70

D. LE CASQUE
secs (nous recommandons un séchage à l’air libre). En cas de
nouvelle pénétration d‘humidité, ne plus utiliser la visière Pinlock®
et la remplacer.
CONSIGNES DE SÉCURITÉ
Avant de démarrer, vérifi ez toujours que la visière et le pare-soleil
assurent une bonne visibilité ainsi que le bon fonctionnement de la
visière et de du mécanisme du pare-soleil et que le mécanisme de
la visière fonctionne correctement. Eliminez toujours les impuretés
avant de démarrer. Contrôlez que la visière et le pare-soleil ne
présentent pas de détériorations mécaniques ni de fi ssures. Une
visière fortement rayée ou mate gêne considérablement la visibilité.
Le cas échéant, elle doit être changée avant le départ.
Avertissement :
Les vapeurs d’essence, de solvants et de carburant peuvent
provoquer la fi ssuration de la visière. Ne pas exposer la visière à
de telles vapeurs ! Pour cette raison, ne posez jamais votre
casque sur le réservoir de votre moto.
11. PARE-SOLEIL
L’é cr an
L’écran est teinté gris et thermoformé en 3 dimensions. Grâce à
son épaisseur de 1,5 mm, le pare-soleil offre une protection contre
les petits gravillons ou les insectes, même si l’on conduit avec la
visière relevée. Fabriqué dans un polycarbonate spécial absorbant les
UV, il assure en outre une protection effi cace contre les rayons UV
nuisibles pour nos yeux.
Revêtement
Le pare-soleil dispose d‘un revêtement anti-buée sur les deux faces et
risque de se rayer.
Maniement
Un curseur situé à gauche de la
mentonnière permet d’actionner
aisément le pare-soleil, même avec des
gants. Si le curseur est poussé vers
l’arrière, le pare-soleil s’abaisse; s’il est
poussé vers l’avant, le pare-soleil est
escamoté dans la coque intérieure.
Le pare-soleil peut être actionné
indépendamment de la position de la
visière.
Attention :
Actionner le pare-soleil uniquement au moyen du curseur.
Avertissement :
Ne roulez jamais avec le pare-soleil abaissé dans l’obscurité ou en
cas de mauvaises conditions de visibilité. Lors de la traversée de
tunnels, relevez toujours le pare-soleil.
Avertissement :
En cas de conduite sans visière ou avec la visière ouverte, les
cailloux, la poussière, les insectes et autres particules volantes
risquent de vous blesser les yeux et le visage. Certes, l’utilisation
du pare-soleil offre une certaine protection contre les petits
gravillons ou les insectes mais elle ne supprime pas tous les
dangers.
français
140 141
Page 71
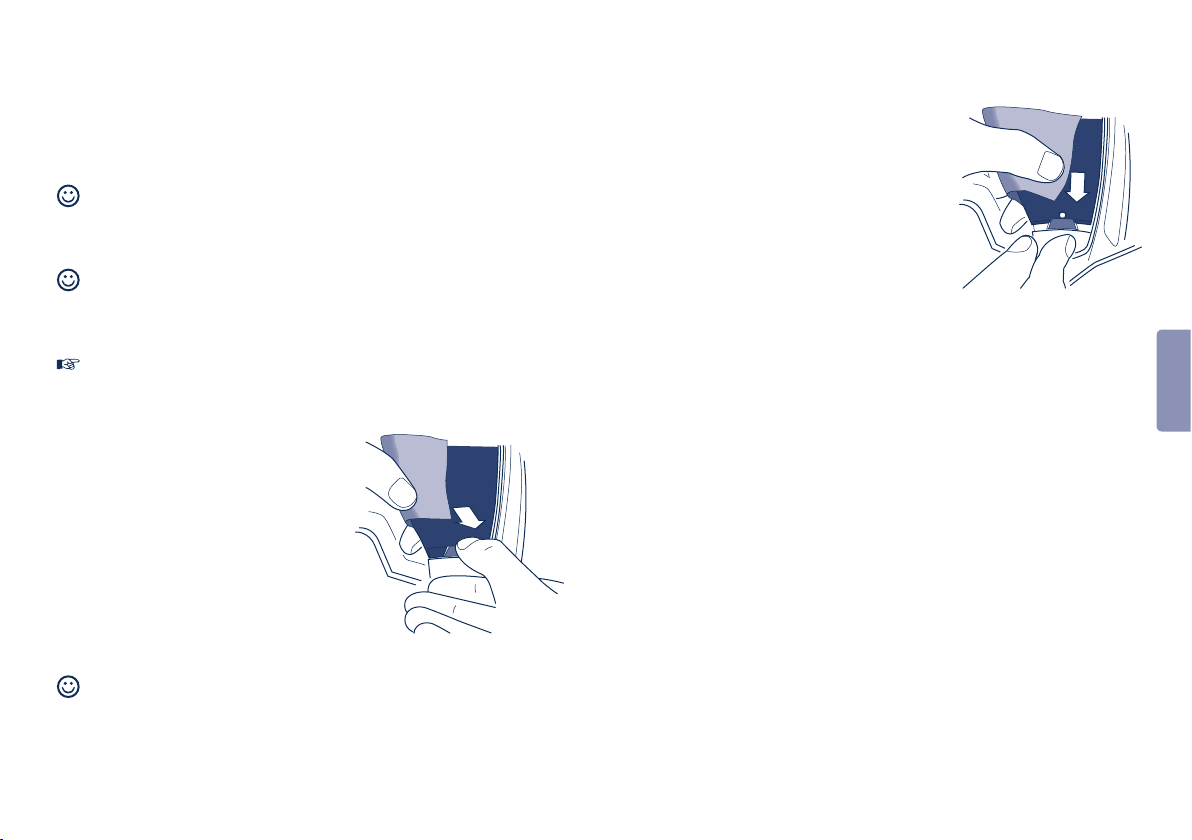
D. LE CASQUE
REMPLACEMENT DU PARE-SOLEIL
Le remplacement du pare-soleil est possible sans outils particuliers.
Conseil :
Lors de son montage et démontage, saisir le pare-soleil avec
un chiffon doux et propre (nous vous recommandons un chiffon
micro-fi bres), afi n d’éviter les rayures et les traces de doigts.
Conseil :
Pour faciliter le remplacement du pare-soleil, ouvrir et arrêter la
mentonnière. Posez le casque sur une surface plane ou sur vos
jambes si vous êtes en position assise
Attention :
Lors du montage et du démontage, évitez les contacts entre le
pare-soleil et la calotte.
Démontage du pare-soleil
1. Ouvrir et arrêter la mentonnière.
2. Pivoter le pare-soleil vers le bas.
3. Pousser légèrement le clip central
avec ses ergots de crantage vers
l’extérieur, jusqu’à ce que le paresoleil sorte de son support.
4. Répéter cette opération de l’autre
côté.
Conseil :
Laisser les logements du pare-soleil en position inférieure jusqu’au
remontage du pare-soleil.
Montage du pare-soleil
1. Insérer le pare-soleil entre les clips
et l’engager sur l’ergot de fi xation;
répéter l’opération de l’autre côté.
2. Positionner le pare-soleil entre la
calotte et la coque intérieure et
l’escamoter à l’aide du curseur.
3. Assurez-vous du bon fonctionnement
du mécanisme du pare-soleil.
français
142 143
Page 72
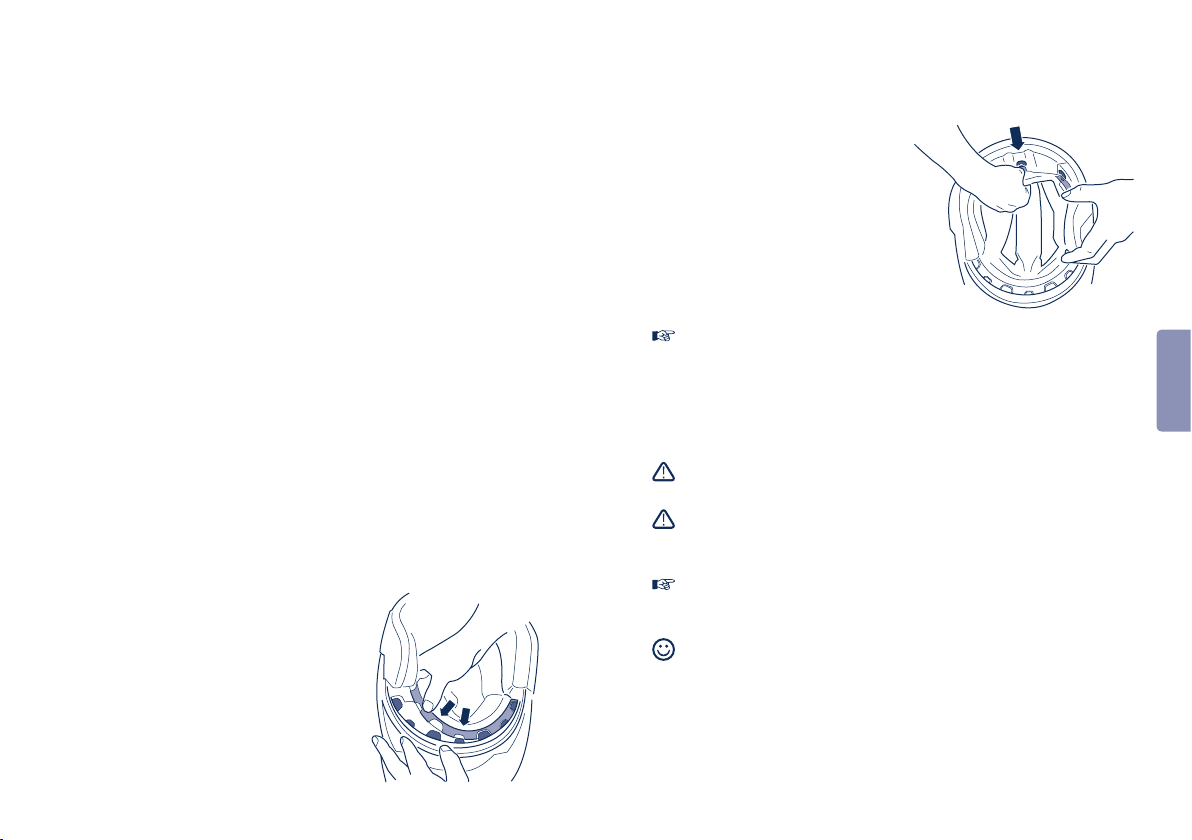
D. LE CASQUE
12. COIFFE
La coiffe interchangeable et lavable du casque C3 garantit non
seulement une excellente forme anatomique mais aussi une
amélioration de la ventilation et de l’aération du casque.
Les coussinets de joue confort assurent un rembourrage douillet sur
les joues et le bandeau de tête protège le tour de tête. Le coussinet
de rembourrage de crâne repose bien sur la tête, sans recouvrir
les canaux de ventilation (voir chapitre D.13. Systèmes d’aération
– Ventilation de la tête).
Tous les éléments de la coiffe (en particulier ceux qui sont en contact
direct avec la tête) sont fabriqués dans une matière bien tolérée par
la peau. On utilise principalement un tissu Coolmax® doux, respirant
et évacuant très bien la chaleur et l’humidité. Les coussinets
de rembourrage de crâne sont fabriqués dans un tissu spécial,
antibactérien et absorbant la transpiration.
Montage et démontage des bandeaux de tête
La coiffe est fi xée dans la coque intérieure par bande Velcro et pince
de fi xation. On peut l’ôter en tirant avec précaution.
L’élément en matière synthétique, cousu dans la partie frontale et les
languettes situées dans la nuque facilitent la fi xation lors du montage.
1. Poussez progressivement l’élément
en matière synthétique sous les
découpes de l’élément synthétique
fi xé sur la coque intérieure.
2. Placez la patte synthétique
perforée sur l’ergot cousu dans
la partie arrière des coussinets
de joue et fi xez celui-ci à l’aide du
dispositif de fi xation marqué de
rouge.
Attention :
Lors de la mise en place de la coiffe, veiller à ce que les
découpes de ventilation du tour de tête se trouvent au-dessus
des canaux de ventilation dans la partie arrière du casque et à
ce que le bandeau de tête soit centré entre les deux canaux de
ventilation.
Avertissement :
Ne roulez jamais avec une coiffe incomplète.
Avertissement :
Une chaleur excessive (comme celle dégagée par un tuyau
d’échappement) peut endommager la coiffe.
Attention :
Afi n d’éviter toute détérioration de la coiffe et de la coque intérieure,
ne pas suspendre le casque au rétroviseur ou au guidon.
Conseil :
Si vous souhaitez une adaptation individuelle du rembourrage
confort, veuillez vous adresser à votre revendeur. Les adaptations
spéciales du casque ne peuvent être réalisées qu’en conformité
avec la norme ECE-R 22 et contre facturation (voir également
chapitre J.1. Adaptations spéciales).
français
144 145
Page 73
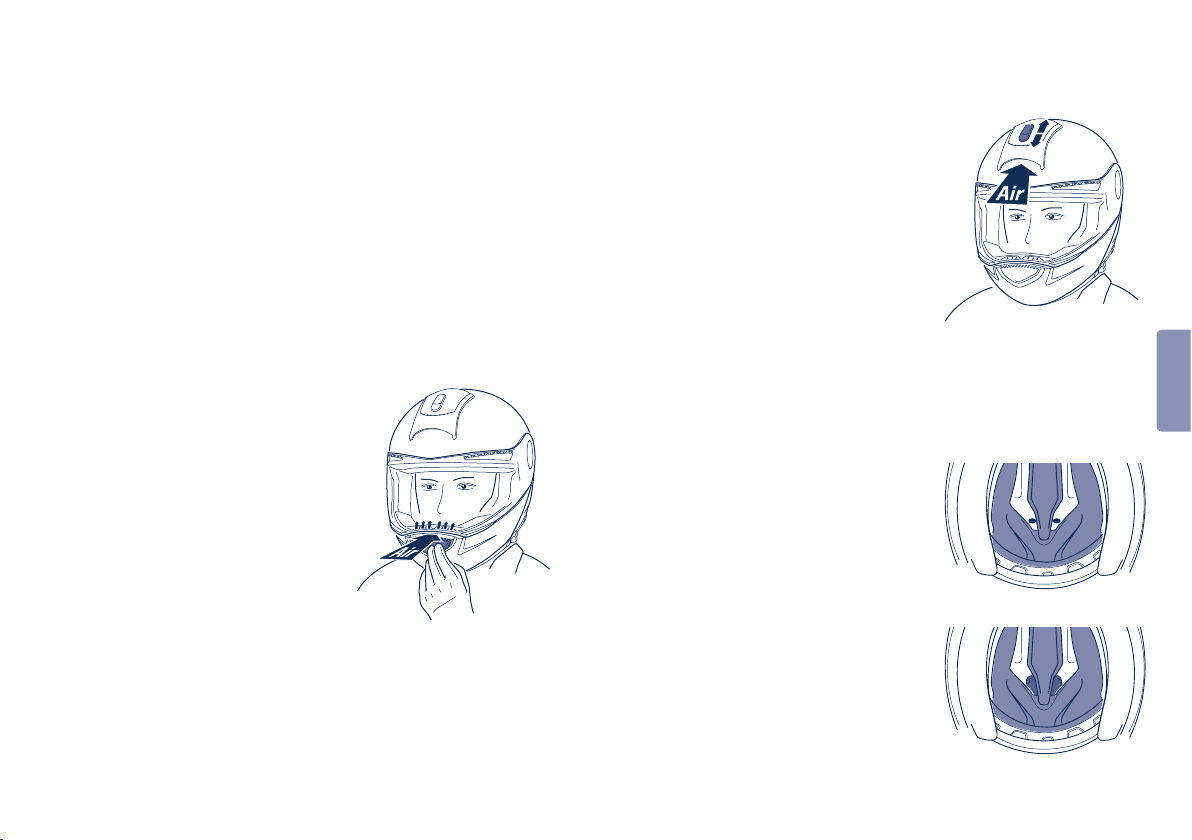
D. LE CASQUE
13. SYSTEMES D’AERATION
Ventilation 1 – réglage de la visière
La visière du casque C3 est réglable en plusieurs paliers. En fonction
de la vitesse et de la formation de buée, ouvrez la visière de manière
à ce qu’il ne se forme plus de buée, tout en protégeant vos yeux des
courants d’air désagréables.
Position ville
Sur le deuxième cran, la visière est automatiquement en position
ville. L’air pénétrant dans le casque par la fente inférieure circule sur
la face intérieure de la visière et s’échappe par l’ouverture située sur
le bord supérieur.
Ventilation 2 – admission d‘air
mentonnière
(ventilation de la visière)
Pour la ventilation de la visière,
le casque C3 est équipé d’une
admission d’air dans la mentonnière.
Indépendamment de la position adoptée
par le conducteur, environ 80 à 90 % du
fl ux d’air central pénètrent exactement
dans l’orifi ce d’admission ouvert. Grâce
à un défl ecteur, le fl ux d’air ventile la
visière de manière effi cace, même à
faible vitesse. Pour ouvrir ou fermer
l’admission d’air, pousser l’élément de
ventilation vers le haut ou vers le bas.
Ventilation 3 – aération de la tête
Dans la partie supérieure de la calotte, une grande prise d’air avec
système de ventilation réglable à 3 paliers assure la ventilation du
cuir chevelu. L’air pénétrant dans le casque par cette prise d’air est
véhiculé vers le crâne par l’intermédiaire de canaux. Un système
novateur d’évacuation d’eau de pluie empêche la pénétration d’eau
dans le casque, même en cas de forte pluie. A l’intérieur du casque,
le système de coussinets de
rembourrage du crâne permet le
contact direct entre l’air frais et le cuir
chevelu, ce qui accélère l’évacuation
de la chaleur emmagasinée à l’intérieur
du casque. Pour régler la ventilation,
la prise d’air est équipée d’un curseur
facile à manipuler, même avec des
gants. Pour actionner la ventilation
partielle, pousser le curseur vers
l’arrière, jusqu’à ce qu’il se verrouille
sur le premier cran. Pour ouvrir
complètement la prise d’air, pousser le
curseur vers l’arrière, jusqu’au deuxième
cran.
Adaptation été / hiver
La ventilation du casque C3 peut être
adaptée en fonction des saisons, des
intempéries ou des besoins d’aération
individuels. En été, il est souhaitable
que l’air frais soit dirigé directement
sur la tête et la rafraîchisse tandis
qu’en automne / hiver, il est possible
de réduire la quantité d’air parfois très
froid ou de dévier l’air en couvrant les
canaux de ventilation avec le coussinet
de rembourrage de crâne. Pour cela,
soulevez l’élément central du coussinet
de rembourrage du crâne et dépliez
la languette de tissu se trouvant dans
la partie frontale du coussinet de
rembourrage de crâne.
français
146 147
Page 74

D. LE CASQUE
Ventilation 4 – aération de la tête
Le casque C3 est équipé d’un système
d’aération permanent. L’air qui se trouve
à l’intérieur du casque et l’air arrivant
par le système de ventilation de la tête
est conduit vers l’arrière du casque
par les canaux d’aération de la coiffe.
La dépression existant au niveau
de la nuque assure en permanence
une extraction de l’air emmagasiné
à l’intérieur du casque, grâce au fi let
spécial utilisé dans le protège-nuque.
Ceci garantit une bonne aération du
casque.
Ventilation 5 – ventilation minimale
avec apport d’O2
Grâce à la forme spéciale de la partie
supérieure de l’élément de ventilation
de la mentonnière, le casque dispose
d’une ventilation minimale, qui assure
en permanence un apport d’air frais.
La quantité d’air frais est telle qu’elle
est à peine perçue par la personne qui
porte le casque, mais elle est effi cace
dès 30 km/h (dans la mesure où le
casque se trouve complètement dans
le fl ux d’air). Ceci empêche la formation
de buée sur l’écran de la visière et une
concentration excessive de CO2 dans le
casque – même lorsque le casque est
complètement fermé.
14. EQUIPEMENT DE SECURITE SUPPLEMENTAIRE
Système anti-roll-off (A.R.O.S.)
Le système anti-roll-off a été conçu spécialement par SCHUBERTH.
Cet équipement de sécurité est utilisé dans
tous les casques de moto SCHUBERTH. Lorsque la jugulaire
est fermée et réglée correctement, le système anti-roll-off
a) empêche que le casque ne puisse
se dégager de la tête par un
soulèvement de la partie arrière du
casque
b) empêche, grâce à un faible angle
d’inclinaison, le contact entre la
mentonnière du casque et le menton
ou le cou du conducteur
c) réduit les conséquences d’un contact
du casque avec la cage thoracique
en cas d’accident.
Zones réfl échissantes
Deux zones réfl échissantes situées à gauche et à droite sous l’écran
de visière permettent au motocycliste d’être mieux vu, en particulier
en cas de mauvaises conditions de visibilité. Cet effet est renforcé
par d’autres appliques de tissu réfl échissant argenté, sur les parties
arrière latérales du protège-nuque.
Attention :
Veillez à ce que les zones réfl échissantes de sécurité soient
toujours propres.
Attention :
En cas d’utilisation du casque en France, il est obligatoire
d’apposer des autocollants de sécurité réfl échissants
supplémentaires sur la partie frontale, la partie arrière et sur
les côtés du casque. Ces autocollants sont disponibles comme
pièces de rechange/accessoires.
français
148 149
Page 75

E. ENFILER ET RETIRER LE CASQUE
1. ENFILER LE CASQUE
Attention :
Utilisation de la jugulaire / du système de fermeture, voir
chapitre D.9.
1. Ouvrez et arrêtez la mentonnière. Veillez à ce que le pare-soleil
soit rentré dans la calotte.
2. Ouvrez la jugulaire et le rembourrage confort de la jugulaire.
3. Prenez et écartez les extrémités inférieures de la jugulaire.
4. Le casque peut maintenant être retiré aisément en le passant pardessus tête.
5. Fermez le rembourrage confort de la jugulaire (à l’aide de la
fermeture velcro).
6. Fermez la jugulaire en introduisant la languette à crémaillère de
l’attache dans la boucle jusqu’à ce qu’elle s’encliquète de manière
audible.
7. Assurez-vous que la jugulaire passe sous le menton et soit
fermement serrée.
8. Abaissez la mentonnière jusqu’à ce que les deux verrous se
ferment de manière audible et les indicateurs de verrouillage
disparaissent dans la mentonnière.
9. Vérifi ez que la mentonnière soit bien verrouillée en exerçant une
pression de bas en haut.
Attention :
Vérifi ez régulièrement si la jugulaire est bien ajustée et si elle a
la bonne longueur (voir chapitre F.2.).
Avertissement :
Ne roulez jamais avec la mentonnière relevée !
2. RETIRER LE CASQUE
1. Ouvrez et arrêtez la mentonnière. Veillez à ce que le pare-soleil
soit entièrement rentré dans la calotte.
2. Pour ouvrir la jugulaire, tirez sur le ruban rouge de l’attache
à crémaillère. Ensuite, sortez la languette à crémaillère de
l’attache.
3. Ouvrez la fermeture velcro du rembourrage confort de la
jugulaire.
4. Prenez et écartez les extrémités de la jugulaire.
5. Le casque peut maintenant être retiré facilement.
6. Fermez la mentonnière.
Conseil :
Afi n d’éviter que le casque raye les objets sur lesquels il est
posé, nous recommandons de fermer la jugulaire après avoir
ôté le casque.
français
150 151
Page 76

F. AVANT DE DEMARRER
Pour votre sécurité, contrôlez toujours les trois points suivants avant
de démarrer:
1. CONTROLE DU CASQUE
Contrôlez régulièrement le casque pour détecter toute défectuosité.
Les érafl ures superfi cielles ne portent pas atteinte à la sécurité. En
cas de dommages importants (fi ssures, bosses, peinture éclatée ou
fi ssurée, etc....), ne plus utiliser le casque.
Attention :
Si vous avez beaucoup maigri, vérifi ez si votre casque a toujours
la bonne taille (voir chapitre C.3.).
2. CONTROLE DE LA JUGULAIRE (casque enfi lé et fermé)
1. Vérifi ez que la jugulaire passe sous le menton.
2. Tirez sur la jugulaire avec votre index.
- Si la jugulaire est lâche sous le menton, celle-ci est trop longue
et doit être resserrée.
- Si la jugulaire se relâche ou s’ouvre, celle-ci n’est pas fermée
correctement. Ouvrez complètement la jugulaire puis
refermez-la. Répétez le contrôle.
3. Si la jugulaire ne peut pas être fermée en étant fermement serrée
sous le menton, vérifi ez si le casque est toujours de la bonne taille
pour vous (voir chapitre C.3.).
Attention :
Répétez ce contrôle après toute modifi cation.
Avertissement :
Ne roulez jamais avec la jugulaire ouverte ou mal réglée. La
jugulaire doit être mise en place correctement et ne doit pas être
lâche lorsqu’on tire dessus. L’attache est bien fermée, uniquement
si la jugulaire n’est pas lâche.
3. CONTROLE DE LA VISIERE ET DU PARE-SOLEIL
Avant de démarrer, vérifi ez toujours que la visière et le pare-soleil
assurent une bonne visibilité ainsi que le bon fonctionnement de la visière
et du mécanisme du pare-soleil. Eliminez toujours les impuretés avant
de démarrer (voir conseils d’entretien – chapitre H.2.). Contrôlez que la
visière et le pare-soleil ne présentent pas de détériorations mécaniques
ni de fi ssures. Une visière fortement rayée gêne considérablement la
visibilité. Le cas échéant, elle doit être changée avant le départ.
Avertissement :
Les écrans teintés ne conviennent pas pour la conduite de nuit et la
traversée de tunnels ou en cas de mauvaises conditions de visibilité.
Avertissement :
Une visière ou un pare-soleil rayé(e) et / ou encrassé(e) gêne
considérablement la visibilité. Pour votre sécurité, remplacez ou
nettoyez-la (le) immédiatement.
Avertissement :
Assurez-vous que la visière soit toujours en parfait état. Les visières
abimées ne conviennent pas à la circulation et doivent être remplacées.
français
152 153
Page 77

G. POUR VOTRE SÉCURITÉ
1. CONSIGNES DE SECURITE - CASQUE
Ne roulez jamais sans casque !
La moto présente des risques et dangers particuliers pour la
santé du conducteur et du passager. Le port du casque permet
de réduire ces risques et dangers mais il ne peut les supprimer.
Il n’est pas possible de prédire l’effi cacité réelle de la protection
du casque en cas d’accident. Une conduite sûre et adaptée à
la circulation, aux routes et à la météorologie est une condition
essentielle pour votre sécurité.
Utilisez uniquement un casque de la bonne taille et bien ajusté.
Pour assurer une protection suffi sante, le casque doit être bien
ajusté et solidement attaché.
Bouclez toujours la jugulaire avant de prendre la route et vérifi ez
que le système de fermeture et la jugulaire soient bien en place.
Ne roulez jamais avec une jugulaire ouverte ou mal ajustée. La
jugulaire doit être mise en place correctement et ne pas être
lâche lorsqu’on tire dessus. L’attache est bien fermée, uniquement
si la jugulaire n’est pas lâche.
Ne roulez jamais avec la mentonnière relevée !
Suite à une chute, un accident ou un choc violent sur le casque,
ce dernier n’assure plus une protection parfaite. L’énergie
libérée en cas de collision est absorbée par le casque. Ceci
peut provoquer un endommagement voire une destruction totale
de la calotte ou de la coque intérieure – effets comparables à
la zone déformable d’une voiture. En raison de la construction
du casque, ces dommages ne sont généralement pas visibles
extérieurement. Le casque de protection est conçu pour absorber
un seul choc. Tout casque ayant subi une chute, un accident
ou un choc violent devra donc systématiquement être remplacé.
Pour des raisons de sécurité, le casque endommagé sera rendu
inutilisable.
Le mécanisme de protection du casque décrit ci-dessus peut
également provoquer des petites fi ssurations dans la calotte
même si le casque est tombé d’une faible hauteur (< 1 m).
Tout casque ayant subi un choc violent doit être remplacé.
Aucun casque n’assume une protection contre toutes sortes de
chocs. Ce casque a été conçu spécialement pour une utilisation à
moto. Il ne peut être utilisé à d’autres fi ns.
Contrôlez régulièrement votre casque quant à la présence de
dommages éventuels. Les érafl ures superfi cielles ne portent pas
atteinte à la sécurité.
Selon son utilisation et son entretien, un casque doit être
remplacé après 5 ou 7 ans. Certes la calotte a une durée de
vie supérieure mais en raison de la fatigue et de l’usure d’autres
composants et du système global de fonctionnement du casque
et de conditions spécifi ques méconnues existant pendant
l’utilisation, nous vous recommandons pour votre sécurité de
remplacer le casque après la période indiquée ci-dessus.
Une chaleur excessive (comme celle dégagée par un tuyau
d’échappement) peut endommager le décor, la coque intérieure et
la coiffe.
L’action directe de carburant, diluant et solvant peut détériorer
la structure de la calotte et de la coque intérieure du casque. Le
casque ne doit pas entrer en contact avec de telles substances,
pas même pour son nettoyage.
français
154 155
Page 78

H. ENTRETIEN ES SOINSG. POUR VOTRE SÉCURITÉ
2. CONSIGNES DE SECURITE VISIERE / PARE-SOLEIL
Avant d’utiliser la visière, retirer la pellicule de protection fi xée à
la visière par des points de colle spéciale pour la protéger contre
les rayures pendant le transport.
Un écran ou un pare-soleil rayé et/ou sale gêne considérablement
la visibilité (en particulier la nuit et face aux phares de véhicules
arrivant en sens inverse). Ceci augmente le risque d’accident. Pour
votre sécurité, remplacez ou nettoyez-le immédiatement.
N’utilisez jamais de visières teintées en cas de mauvaises conditions
de visibilité, ni pour la conduite de nuit ou la traversée de tunnels.
Les vapeurs d’essence, de solvants et de carburant peuvent
provoquer des fi ssurations de la visière. La visière ne doit pas
être exposée à ces vapeurs ni entrer en contact avec de telles
substances. Pour cette raison, ne posez jamais votre casque sur
le réservoir de votre moto.
Assurez-vous que la visière soit toujours en parfait état. Vous ne
devez pas continuer de rouler en cas de mauvaise visibilité.
3. CONSIGNES DE SECURITE MODIFICATIONS / ACCESSOIRES
Ne jamais supprimer ou modifi er les composants d’origine (en
particulier sur la calotte, la coque intérieure et le système de retenue).
Le montage d’accessoires non recommandés par SCHUBERTH peut
compromettre la protection de votre tête et entraîner l’expiration de
l’homologation ECE et de tous les droits à garantie et assurance.
Utilisez uniquement des pièces et des accessoires d’origine ou
des accessoires expressément agréés par SCHUBERTH.
1. CALOTTE
Pour le nettoyage et l’entretien de la calotte, vous pouvez utiliser
de l’eau, de l’eau savonneuse, de la benzine, tous les shampooings,
produits de nettoyage et de polissage spéciaux pour peintures ainsi
que les produits d’entretien pour matières synthétiques vendus
dans le commerce. En règle générale, un nettoyage à l’eau et à l’eau
savonneuse est suffi sant. Si vous employez d’autres produits, veillez
à ce qu’ils n’entrent pas en contact avec la visière car ils peuvent
détériorer la visière et le revêtement.
Attention :
Pour le nettoyage, n’utilisez pas de supercarburant ni de diluant
ou solvant. Ces substances peuvent provoquer des détériorations
graves du casque sans que cela soit visible de l’extérieur. Dans
ce cas.
français
2. MENTONNIÈRE
Vérifi ez régulièrement le fonctionnement de la mentonnière, des deux
verrous et des indicateurs de verrouillage.
Avertissement :
Les verrous ne doivent subir aucune modifi cation. En particulier,
il est interdit de huiler ou de graisser les parties métalliques du
système de fermeture de la mentonnière. Les réparations doivent
être effectuées uniquement par le service de réparations de
SCHUBERTH.
156 157
Page 79

H. ENTRETIEN ES SOINS
3. VISIERE ET PARE-SOLEIL
®
PINLOCK
VISIERE
Ecran extérieur de la visière
Pour éliminer les impuretés sur l‘écran extérieur de la visière, utilisez
un chiffon doux et de l’eau savonneuse non agressive. Pour essuyer
la visière, utilisez un chiffon qui ne peluche pas.
Face intérieure de la visière
Pour nettoyer la face intérieure de la visière, utilisez uniquement un
chiffon doux, légèrement humide si nécessaire (nous recommandons
un chiffon micro-fi bres). N’utilisez pas de produits d’entretien.
PARE-SOLEIL
Pour éliminer les impuretés sur le pare-soleil, utilisez un chiffon doux
et de l’eau savonneuse non agressive. Pour essuyer la visière, utilisez
un chiffon qui ne peluche pas. Evitez de gratter ou de frotter trop
fortement, pour protéger le revêtement anti-buée.
Veuillez observer ces consignes pour toutes les visières :
Attention :
Après un nettoyage intensif, un parcours sous la pluie ou une
conduite prolongée par temps froid, le revêtement anti-buée
tarde un peu à retrouver toute son effi cacité. Pendant ce laps de
temps, il n’absorbera qu’à peine ou pas du tout l’humidité générée
par la respiration. Ranger le casque dans un endroit sec et aéré
pour accélérer le processus de réactivation du revêtement.
Attention :
Afi n de préserver le revêtement anti-buée, évitez de gratter ou de
frotter fortement.
Attention :
Pour nettoyer la visière, utiliser uniquement de l’eau tiède. Ne
nettoyez jamais la visière ni le pare-soleil avec de la benzine, un
solvant ou un produit de nettoyage pour le verre ou les vitres ni
un produit de nettoyage à base d’alcool.
Attention :
N’appliquez pas de gel ou de spray anti-buée ou un produit
similaire sur le revêtement actif anti-buée. Ceci peut provoquer
des réactions indésirables, voire une détérioration irréparable du
revêtement.
Attention :
Le revêtement actif anti-buée est soumis à un processus de
vieillissement plus ou moins rapide, en fonction des conditions
et de l’intensité de son utilisation. Si le revêtement anti-buée ne
fonctionne plus correctement, nous vous recommandons pour
votre sécurité de remplacer l’écran de la visière et le pare-soleil.
Attention :
Le revêtement actif anti-buée absorbe également des substances
chimiques telles que les solvants, ce qui peut le détériorer. Pour
cette raison, évitez de ranger la visière à proximité de substances
agressives (carburants par exemple).
Attention :
Malgré qu’elles soient recommandées, les serviettes imprégnées
pour nettoyer les lunettes ne conviennent souvent pas au
nettoyage de la visière, étant donné que les substances qu’elles
contiennent ne sont pas compatibles avec le revêtement anti-
rayures et anti-buée. Evitez d’utiliser ces serviettes.
Attention :
Même en cas de fort encrassement de la face extérieure de la
visière, ne pas tremper la visière dans l’eau car ceci réduirait très
fortement la dureté de la surface et la résistance du revêtement
anti-buée.
français
158 159
Page 80

H. ENTRETIEN ES SOINS
Attention :
En cas de non-utilisation (en particulier pendant une période
prolongée), la visière ne doit pas être complètement fermée, car
sinon, l’humidité présente à l’intérieur du casque ne peut pas
s’évacuer et le revêtement anti-buée doit absorber une quantité
considérable d’humidité. Ceci peut raccourcir la durée de vie du
revêtement. Nous vous recommandons de bloquer la visière au
3ème cran au-dessus de la position ville.
Attention :
Ne collez pas d’étiquettes, de rubans adhésifs ou d’autocollants
sur la visière ou le pare-soleil.
Conseil :
Si le casque n’est pas utilisé pendant une longue période, il peut
se former un dépôt laiteux (dû à la réaction du revêtement antibuée avec l’environnement). Ce dépôt s’élimine facilement avec un
chiffon micro-fi bres sec.
Conseil :
Si la face extérieure de la visière est très encrassée (par ex.
restes d’insectes collés), recouvrez la visière fermée d’un chiffon
humide et détrempez la saleté pendant environ 1/2 ou 1 heure.
Attention :
Ne stockez en aucun cas la visière à une température dépassant
60° C, car ceci pourrait endommager la visière.
4. COIFFE
Parties amovibles de la coiffe
Les coussinets de rembourrage de crâne et de joue peuvent être
lavés à la main, à 30° C maximum, avec une eau savonneuse non
agressive (par exemple, lessive pour textiles délicats vendue dans le
commerce, fortement diluée).
Conseil :
Pour faire sécher le bandeau de rembourrage (le cas échéant
pendant les pauses d’un voyage), on peut le pendre au
rétroviseur.
Parties en tissu non-amovibles de la coiffe
Pour nettoyer la coiffe, il est conseillé d’employer de l’eau
savonneuse non agressive et tiède (par ex. de la lessive pour textiles
délicats en vente dans le commerce, fortement diluée).
Appliquez l’eau savonneuse avec précaution sur la coiffe, en la
tamponnant ou frottant légèrement à l’aide d’une éponge ou d’un
chiffon humide. Evitez de détremper la coiffe. Ensuite, éliminez l’eau
savonneuse à l’aide d’un chiffon absorbant et sec, en pressant sur le
rembourrage. Répétez ces opérations avec de l’eau claire.
Pour le séchage de la coiffe, veillez à une bonne aération du casque.
TechSkin
Il est conseillé de nettoyer régulièrement la matière confort TechSkin
dont la surface présente la même structure que le cuir, imitant
parfaitement le cuir avec un chiffon doux et humide.
français
160 161
Page 81

H. ENTRETIEN ES SOINS
5. SYSTEMES D’AERATION
Prise d’air
Si besoin est, retirer la prise d’air du système de ventilation de la tête
et nettoyer le mécanisme de ventilation.
1. Pour cela, ôtez l’élément de
commande de la prise d’air en le
tirant simplement vers le haut.
2. Ensuite, poussez l’extrémité plate de
l’élément de commande sous le bord
situé derrière la prise d’air et sortez
la prise d’air en faisant levier vers le
haut.
3. Après l’avoir nettoyée, fi xez la prise
d’air en l’accrochant dans sa partie
avant au mécanisme de ventilation
puis enfoncez-la dans la calotte
jusqu’à audition d’un “clic” net.
4. Pour terminer, insérer l’élément de
commande dans le mécanisme, à
travers la prise d’air.
6. SYSTEME DE FERMETURE
Attache à crémaillère
Les parties métalliques du système de fermeture ne nécessitent
aucun entretien.
7. RANGEMENT
Rangez le casque dans le sac fourni, dans un endroit sec et sûr.
Déposez toujours votre casque de manière à éviter tout risque de
chute. Les éventuels endommagements qui en découleraient ne sont
pas couverts par la garantie.
Attention :
Rangez le casque hors de portée des enfants et des animaux.
français
162 163
Page 82
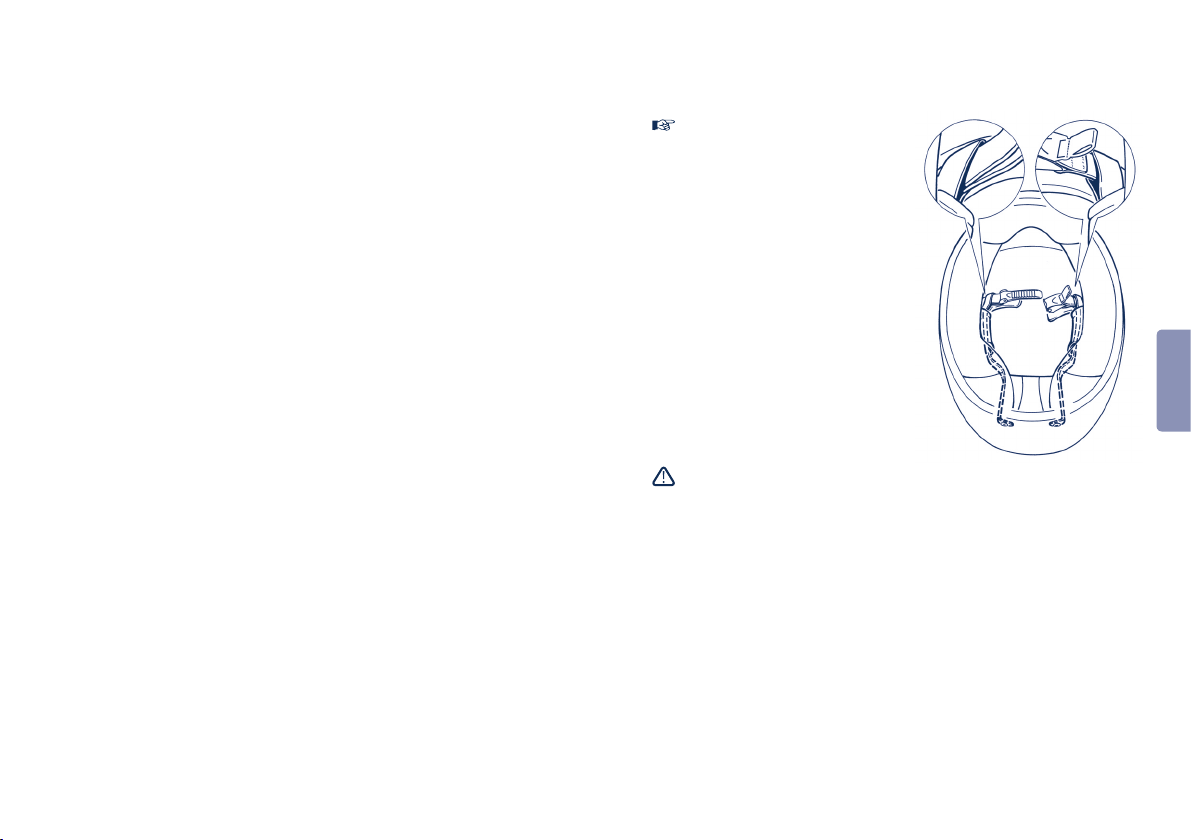
I. ACCESSOIRES ET PIECES DE
RECHANGE
1. VUE D’ENSEMBLE DES PIECES
Défl ecteur
Pour une meilleure optimisation de l’aéroacoustique.
Sac de transport du casque
Sac rembourré de haute qualité pour transporter et ranger votre casque en toute sécurité.
Avec logo SCHUBERTH en 3 dimensions.
Pare-soleil teinté gris à 80%
2 Tailles: 52/53 - 58/59, 60/61 - 64/65
Ecran de visière Pinlock
®
2 Tailles: 52/53 - 58/59, 60/61 - 64/65
Replacement l'écran intérieur Pinlock
®
2 Tailles: 52/53 - 58/59, 60/61 - 64/65
Autocollants réfl échissants
pour une utilisation du casque en France
Coiffe (bandeau de tête)
7 Tailles: 52/53, 54/55, 56/57, 58/59, 60/61, 62/63, 64/65
Jeu de coussinets de joue confort (2 pièces)
7 Tailles: 52/53, 54/55, 56/57, 58/59, 60/61, 62/63, 64/65
Attention :
Lors du remplacement des
coussinets de joues, veillez
absolument à ce que le système
anti-roll-off soit attaché à la
jugulaire. Pour cela, les attaches
des extrémités libres des sangles
de nuque – voir dessin ci-dessous
– doivent entourer les extrémités
de la jugulaire. En outre, les
sangles de nuque ne doivent ni
être tournées de travers ni former
de nœud.
français
Avertissement :
Pour des raisons de sécurité, le remplacement des autres pièces
du casque ne doit être effectué que par le service réparations de
SCHUBERTH.
164 165
Page 83

RECHANGE
J. SERVICE CLIENTELE SCHUBERTH I. ACCESSOIRES ET PIECES DE
2. SYSTEMES DE COMMUNICATION
Avertissement :
L‘installation de systèmes de communication (y compris
de simples oreillettes) dans un casque équivaut toujours à
une modifi cation du casque. C’est pourquoi les systèmes
de communication et les oreillettes doivent être testés et
homologués selon la norme européenne des casques ECE-R
22.05 pour une installation dans le modèle de casque précis.
Sinon, le casque perd son homologation et sa conformité aux
exigences imposées par les compagnies d’assurance, et ce dès
l’installation.
La preuve d‘homologation d’un casque – avec système de
communication spécial - conformément à la norme ECE-R
22.05 n’est valable que si elle est certifi ée par une autorité
d‘homologation d’un pays européen. Les informations
divergeantes délivrées par ces institutions (entre autres celles
concernant l’aptitude générale des systèmes de communication
à être intégrés dans un casque de moto) ou les renseignements
fournis par d’autres institutions n’ont aucune signifi cation et le
casque perd son homologation.
3. ACHAT DE PIECES ORIGINALES SCHUBERTH
Les pièces de rechange et accessoires originaux SCHUBERTH sont
disponibles chez votre revendeur. Sur le site Internet de SCHUBERTH,
www.schuberth.com, dans la section de produits “Motorcycle”
(Motos), la rubrique "Worldwide Importer List" vous indiquera
l’importateur compétent pour votre pays. Il pourra vous fournir les
coordonnées du revendeur situé près de chez vous.
www.schuberth.com
1. ADAPTATIONS SPECIALES
Les modifi cations individuelles de la coiffe (pour les tailles spéciales
ou la modifi cation du système de fermeture par exemple) peuvent
être effectuées en usine dans le cadre de la norme ECE en vigueur et
contre facturation.
Pour que le casque soit accepté pour une adaptation spéciale, il doit
être envoyé à la société SCHUBERTH franco à domicile.
Les adaptations spéciales ne peuvent pas être effectuées dans le
cadre du service normal des réparations car leur réalisation est plus
longue. Nous comptons sur votre compréhension.
2. SERVICE REPARATIONS
Le casque C3 est un produit de qualité SCHUBERTH, issu de
procédés de développement et de fabrication ultramodernes.
Cependant, si votre casque nécessite une réparation, veuillez vous
adresser à votre revendeur ou expédiez-nous directement votre
casque à l’adresse qui suit. N’oubliez pas d’indiquer votre adresse,
votre numéro de téléphone, votre adresse électronique et de décrire
clairement le problème.
SCHUBERTH GMBH
Kundenservice Motorradhelme
(Service clientèle casques de moto)
Stegelitzer Str. 12
39126 Magdeburg
Allemagne
Veuillez noter que les modifi cations spéciales ne peuvent être
effectuées dans le délai mentionné et que nous ne réalisons pas de
travaux de peinture. Merci de prendre en compte le temps requis
français
166 167
Page 84

J. SERVICE CLIENTELE SCHUBERTH
pour l’acheminement postal. Pour pouvoir être réparé, le casque
doit être envoyé à SCHUBERTH franco domicile (à l’exception des
cas de garantie).
Attention :
Dans la mesure où un ordre de réparation a été passé sans
description précise du problème, nous sommes en droit
d’analyser l’article et/ou de repousser l’exécution de l’ordre
jusqu’à concertation avec le client. Si le problème est décrit
avec précision et si nous constatons d’autres vices pendant
la réparation, nous sommes en droit, mais non obligés, de les
éliminer sans ordre spécial du client, dans la mesure où ceci
est essentiel au fonctionnement et d’un faible coût par rapport
au coût de la réparation demandée à l’origine. Sinon, l’accord
du client est nécessaire.
3. GARANTIE
En cas d’utilisation conforme aux prescriptions, SCHUBERTH
garantit une réparation ou un remplacement gratuit des pièces
défectueuses pendant une période de 2 ans pour le casque et d’un
an pour la visière et le pare-soleil à compter de la date d’achat.
Toutes les prestations de garantie sont assurées par notre service
réparations.
Le droit à garantie n’est valable que sur présentation du bon
d’achat. Veuillez conserver soigneusement l’original de la facture.
En cas de droit à garantie, l’original de la facture (ou une copie)
doit être joint(e) au casque. Aucun droit à garantie ne peut être
revendiqué sans bon d’achat. Une réparation ou un remplacement
irréprochable de l’article n’entraîne pas une prolongation de la
durée de garantie.
Les réclamations doivent nous être adressées immédiatement
par écrit, au plus tard dans les 8 jours suivant la date d’achat.
Les vices qui n’ont pas pu être découverts dans ce délai après un
contrôle minutieux doivent nous être communiqués par écrit, dès
leur découverte. Si vous nous retournez le casque, n’omettez pas
de décrire le défaut en détail.
Les articles ayant déjà été portés ne seront pas échangés mais
réparés. Il est à la convenance de SCHUBERTH de décider si
les pièces défectueuses doivent être réparées, remplacées ou
créditées.
Les droits à garantie ne sont pas valables, en particulier en cas
- d’utilisation non conforme aux prescriptions du produit et en
cas de sollicitation excessive
- de modifi cation du produit par le client
- de non-observation de nos recommandations de produits
- d’usure normale.
français
4. BLUE CONCEPT
Chez SCHUBERTH, „Blue Concept“ est une forme d’organisation
écologique comprenant le développement, la conception des
processus de fabrication et la réintroduction des matériaux
usagés dans le circuit de recyclage des matières premières. Dans
le cadre du système „Blue Concept“, nous reprenons tout casque
de moto SCHUBERTH usagé afi n de recycler les matériaux qui le
composent.
5. SCHUBERTH SUR INTERNET
Si vous souhaitez en savoir plus sur les derniers
perfectionnements de nos casques et sur notre gamme de
casques, venez visiter notre site Internet à l’adresse suivante :
www.schuberth.com
168 169
Page 85

K. COMMENT NOUS CONTACTER
Siège de la société
Adresse
SCHUBERTH GMBH
Stegelitzer Str. 12
39126 Magdeburg
Allemagne
Service réparations
Télécopie Adresse
+49 391 8106-228 SCHUBERTH GMBH
Kundenservice Motorradhelme
(Service clientèle casques de moto)
Stegelitzer Str. 12
39126 Magdeburg
Allemagne
Commande, pièces de rechange et accessoires
Télécopie Adresse
+49 391 8106-228 SCHUBERTH GMBH
Vertrieb Motorradhelme
(Service des ventes casques de moto)
Stegelitzer Str. 12
39126 Magdeburg
Allemagne
Internet
www.schuberth.com
français
E-Mail
casques-moto@schuberth.de
170 171
Page 86
IT
Congratulazioni…
Hai fatto un'ottima scelta optando per questo casco SCHUBERTH
C3. Il casco C3 è il risultato dei più moderni metodi di sviluppo e
di produzione e abbina le migliori caratteristiche di aerodinamica e
aeroacustica di un casco sportivo al confort e all'elevata funzionalità
di un casco apribile.
Con questo casco hai scelto un prodotto di altissima qualità, in grado
di soddisfare i requisiti più alti per sicurezza e prestazioni nel traffi co
stradale di oggi - soprattutto in caso di lunghi viaggi. Un compagno di
viaggio che ti darà moltissime soddisfazioni.
A. L’USO CORRETTO DEL MANUALE
Leggi attentamente queste istruzioni per utilizzare il casco nel modo
giusto e sfruttare correttamente la protezione che esso offre durante
la guida.
Per la tua sicurezza, leggi attentamente le seguenti istruzioni
nell’ordine cronologico in cui sono riportate.
Rispetta in modo particolare le seguenti diciture:
Attenzione: Prescrizioni di sicurezza
Avvertenza: Avvertenze
Consiglio: I nostri consigli
deutschenglish
Ti auguriamo sempre un viaggio sicuro.
F.- J . G ör ge s
Direttore vendite
SCHUBERTH GMBH
Attenzione:
Questo casco non è destinato per l’uso negli USA e nel Canada. Esso è stato
costruito, testato e omologato secondo la normativa ECE e non è quindi conforme
alle prescrizioni e ai requisiti USA e Canada. Esso è destinato all’uso solo nei Paesi in
cui è in vigore la normativa europea ECE. L’uso in altri Paesi non dà diritto a rivalse,
in caso di incidente, presso tribunali negli USA, in Canada o altri Paesi in cui non sia
in vigore la normativa ECE.
Caution:
This helmet is not intended for use in the USA and Canada. The helmet has
been inspected and approved to the European ECE Standard and therefore does not
conform to US and Canadian regulations and requirements. It is only legal to use the
helmet in countries in which the European ECE Standard is valid. If you use the helmet
in other countries, you will not in the event of injury be entitled to make a claim for
compensation before the US or Canadian courts or the courts of other countries not
bound by the ECE Standard.
Avertissement:
Ce casque n’est pas conçu pour être utilisé aux Etats-Unis ni au Canada.
Il a été fabriqué, contrôlé et homologué selon la norme européenne ECE. Par
conséquent, il n’est pas conforme aux prescriptions et exigences des Etats-Unis
d’Amérique et du Canada. Il ne peut être utilisé que dans les pays où la norme
européenne ECE est applicable. En cas d’utilisation du casque dans d‘autres pays,
aucun droit de dommages-intérêts ne peut être revendiqué devant les tribunaux des
Etats-Unis d’Amérique ou du Canada ou de pays tiers non assujettis à la norme ECE.
Avvertenza :
Con riserva di modifi che tecniche - anche senza esplicito
preavviso.
172 173
françaisitalianonederlandsespañol
Page 87

B. INDICE
A. L’uso corretto del manuale........................................... 173
B. Indice............................................................................. 174
C. La scelta del casco giusto............................................ 176
1. Determinazione della misura della testa 176
2. Determinazione della misura corrispondente del casco 177
3. Verfi cia della misura determinata 178
D. Il casco.......................................................................... 180
1. Le normative 180
2. L’omologazione ECE 180
3. L’anatomia del casco 181
4. La calotta 181
5. Il guscio interno 181
6. L’Aerodinamica 182
7. L’Aeroacustica 182
8. La mentoniera 185
9. Il sistema di ritenzione 187
®
10. Visiera Pinlock
189
11. Il parasole 196
12. L’imbottitura 200
13. Sistema di ventilazione 202
14. Dispositivi supplementari di sicurezza 205
E. Mettere e levare il casco............................................. 206
1. Mettere il casco 206
2. Levare il casco 207
F. Prima di mettersi in viaggio......................................... 208
1. Controllo del casco 208
2. Controllo del sottogola 208
3. Controllo della visiera e del parasole 209
G. Per la tua sicurezza..................................................... 210
1. Avvertenze di scurezza inerenti il casco 210
2. Avvertenze di sicurezza inerenti la visiera / il parasole 212
3. Avvertenze di sicurezza inerenti la modifi ca / gli accessori 212
H. Manutenzione e cura.................................................... 213
1. La calotta 213
2. La mentoniera 213
3. La visiera e il parasole 214
4. L’imbottitura 214
5. Ventilazione 218
6. Il sistema di chiusura 219
7. La conservazione 219
I. Accessori e pezzi di ricambio...................................... 220
1. Indice dei componenti 220
2. Sistemi si comunicazione 222
3. Acquisto di parti originali SCHUBERTH 222
J. Il servicio assitenza SCHUBERTH................................. 223
1. Richeste particolari 223
2. Servicio di riparazione 223
3. Garanzia 224
4. Blue Concept 225
5. La SCHUBERTH website 225
K. Come contattarci.......................................................... 226
deutschenglish
françaisitalianonederlandsespañol
174 175
Page 88
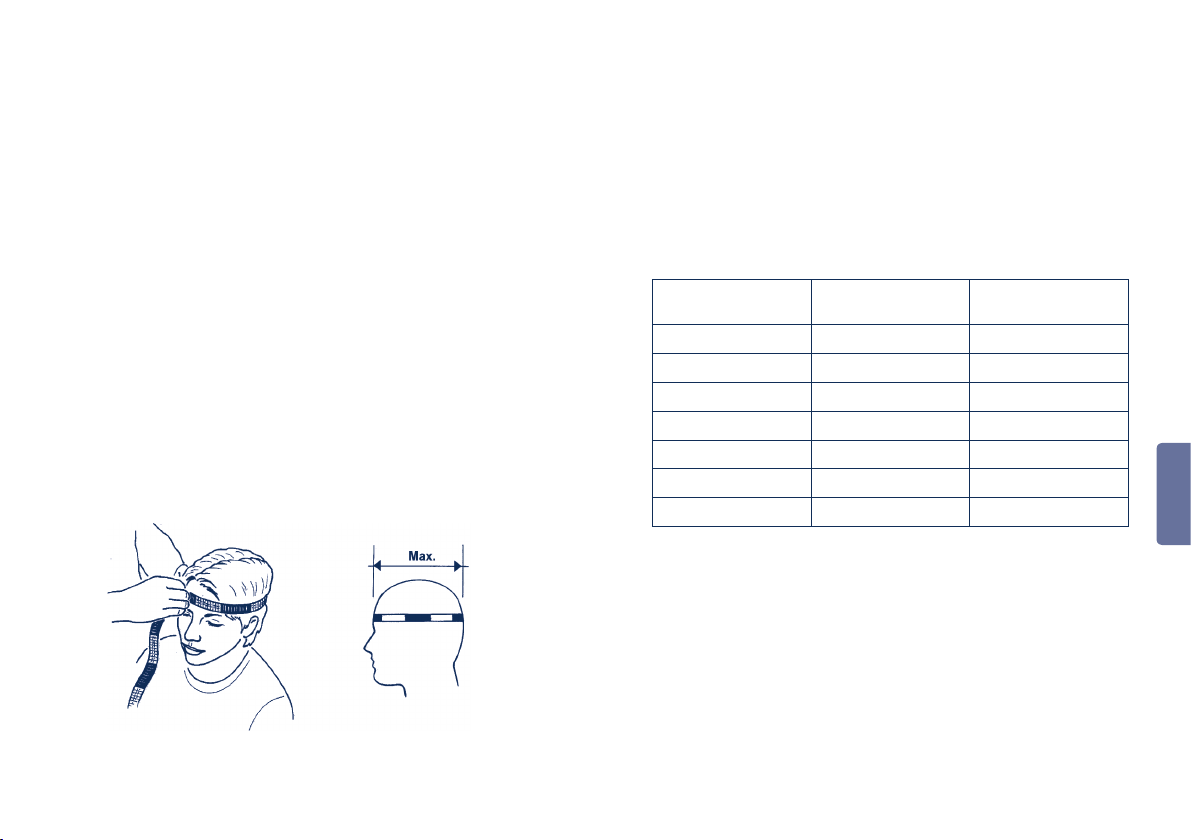
C. LA SCELTA DEL CASCO GIUSTO
La scelta del prodotto giusto è un momento importante nell’acquisto
di un casco.
Un casco che calza alla perfezione, è infatti il presupposto
indispensabile per la massima protezione in caso di caduta o di
incidente. Con i seguenti passi determina qual’è il casco giusto per
te:
1° passo: determinazione della misura della testa
2° passo: determinazione della misura corrispondente del casco
3° passo: verifi ca della misura determinata.
1. DETERMINAZIONE DELLA MISURA DELLA TESTA
Per determinare la circonferenza della testa, utilizzare un metro
a fettuccia posizionandolo ca. un dito (ca. 2 cm) al di sopra delle
sopracciglia (dove la circonferenza della testa è maggiore). Il valore
così rilevato corrisponde alla misura della testa in cm.
2. DETERMINAZIONE DELLA MISURA CORRISPONDENTE DEL
CASCO
Il casco C3 è disponibile in sette misure doppie (sulla base di due
differenti misure del guscio esterno). Per la scelta della misura
del casco corrispondente alla circonferenza della tua testa, vedi la
tabella sottostante:
Circonferenza
testa in cm
Misure di casco
SCHUBERTH
Misure di casco
alpha
52 a 53 52 / 53 XS
54 a 55 54 / 55 S
56 a 57 56 / 57 M
58 a 59 58 / 59 L
60 a 61 60 / 61 XL
62 a 63 62 / 63 XXL
64 a 65 64 / 65 XXXL
Se il valore della circonferenza della testa corrispondesse a un valore
compreso tra due misure di casco (per es. 57,5 cm), consigliamo di
provare prima la misura più piccola.
italiano
176 177
Page 89

C. LA SCELTA DEL CASCO GIUSTO
3. VERIFICA DELLA MISURA DETERMINATA
Dopo aver messo il casco e allacciato correttamente il sottogola
(importante: per la regolazione del sottogola vedi il cap. D.8.
- Sistema di ritenzione), controlla se la misura del casco è quella
giusta per te e se il casco calza perfettamente.
1° passo: controlla se il rivestimento interno appoggia
uniformemente sulla testa, ma senza premere
eccessivamente:
a) imbottitura centrale superiore
b) imbottitura delle guance
c) fascia di imbottitura (in particolare nella parte della
fronte).
Se il casco preme fastidiosamente o addirittura
dolorosamente, prova la prossima misura.
2° passo: Controlla se il casco offre una buona visuale a tutto
campo. Una certa restrizione laterale - che però non deve
essere sentita come fastidiosa o limitante - è normale per
tutti i caschi ed è dovuta alla loro struttura costruttiva.
3° passo: Prendi il casco con le mani e muovilo verso l’alto e verso
il basso, cercando anche di ruotarlo. Durante queste
operazioni, controlla il movimento della pelle della testa
e della faccia. Se il casco si muove con troppa libertà, la
misura è troppo grande! Provane una più piccola.
4° passo: Afferrando la mentoniera, cerca di levare il casco tirandolo
indietro. Se il casco si leva, signifi ca che la misura è
troppo grande oppure il sottogola è regolato male (non
stretto abbastanza). Per la tua sicurezza, prova una
misura più piccola o prova a regolare meglio il sottogola.
5° passo: Prendi il casco con le mani sulla parte posteriore e cerca
di levarlo tirandolo in avanti. Se il casco si leva, signifi ca
che la misura è troppo grande oppure il sottogola è
regolato male (non stretto abbastanza). Prova una misura
più piccola o prova a regolare meglio il sottogola.
italiano
Ripeti i passi di cui sopra fi no a trovare la misura giusta.
Il modo ideale di verifi care la scelta fatta è di fare un viaggio di prova.
Attenzione:
Non metterti mai in viaggio con un casco della misura sbagliata!
178 179
Page 90

D. IL CASCO
1. LE NORMATIVE
Il casco C3 soddisfa la normativa ECE-R 22.05. Questa normativa
di prova prevede l’osservanza di standards di sicurezza predefi niti
per quanto riguarda l’assorbimento delle forze, la resistenza alla
penetrazione, la rigidezza laterale, il sistema di ritenzione e il campo
di visuale. L’omologazione garantisce da un lato la conformità
all’omologazione nei Paesi della Comunità Europea e in tutti i
Paesi che riconoscono le normative ECE, e dall’altro la copertura
assicurativa in caso di incidente.
NB: questo casco C3 con omologazione ECE, soddisfa in particolare
la normativa ECE e quindi non è previsto per l’uso negli USA e in
Canada. Esso può essere utilizzato solo ed esclusivamente nei Paesi
in cui è in vigore la normativa ECE.
3. L’ANATOMIA DEL CASCO
La visiera
Le parti rifl ettenti
Il parasole
L’imbottitura interna
Estrazione dell’aria
La ventilazione della
visiera/della mentoniera
Il tasto di apertura
della mentoniera
Ventilazione della testa
Il guscio interno
Visiera Pinlock
Il meccanismo della visiera
La calotta esterna
Il sistema di ritenzione
(con sistema anti-roll-off)
Elemento di comando
il parasole
Mentoniera con chiusura
a molla
®
Avvertenza:
Negli USA o in Canada possono essere utilizzati solo i caschi
SCHUBERTH provvisti di apposita omologazione e regolazione
tecnica. Per ulteriori informazioni e i punti vendita di questo tipo
di caschi, consulta il sito Internet:
www.schuberth.com/usa
www.schuberth.com/canada
4. LA CALOTTA
La calotta dell'C3 riunifi ca in sé le caratteristiche di un'aerodinamica
da corsa e di una protezione coerente. Essa è costituita da
una matrice speciale sviluppata dalla SCHUBERTH in materiale
duroplastico con rinforzo in fi bra di vetro, in grado di assicurare l'alta
resistenza necessaria per la tua sicurezza.
Attenzione:
2. L’OMOLOGAZIONE ECE
Il casco è progettato per l’assorbimento di un solo urto e deve
quindi essere sostituito dopo una caduta, un incidente o qualsiasi
altro intervento di forze.
Norma di prova ECE
Numero di approvazione
059284/P-3523
35230001
Ente di omologazione
Numero di serie
5. IL GUSCIO INTERNO
Per consentire un migliore ammortizzamento, il guscio interno
del casco presenta una struttura frazionata. La strutturazione
di tipo multizonale del corpo principale in espanso, assicura un
migliore assorbimento e distribuzione delle forze e offre la massima
garanzia di sicurezza, mentre i fi anchi generosamente dimensionati
ottimizzano e offrono il massimo comfort nel vestire.
180 181
italiano
Page 91

D. IL CASCO
6. L'AERODINAMICA
Tutti i caschi SCHUBERTH per motocicletta e da corsa sono
progettati e ottimizzati con prove nella nostra galleria del vento e in
condizioni scientifi che ben defi nite. Il casco C3 è regolato in
particolare per posizioni di guida da turismo e turismo sportivo e
rimane perfettamente in posizione nel fl usso d'aria. Anche alle
velocità più elevate, il C3 praticamente non offre spinte statiche.
Ulteriori caratteristiche del C3 sono una migliore resistenza all'aria e
l'alta stabilità direzionale. Per le moto senza carenatura, viene inoltre
minimizzato sensibilmente anche il fenomeno di buffeting* alle alte
velocità.
* Vibrazione del corpo avvolto nel fl usso dell'aria
Avvertenza:
NB: per le moto con carenatura, le forti turbolenze generate sul
bordo e dovute al fenomeno del sottovento possono modifi care
sensibilmente le caratteristiche aerodinamiche del casco.
7. L' AEROACUSTICA
Per il casco C3, abbiamo dedicato un'attenzione particolare alle
caratteristiche di aeroacustica, senza per questo scendere a
compromessi per il comfort. Diversi accorgimenti sviluppati nella
galleria del vento SCHUBERTH (tra l'altro l'adattamento speciale
dello spoiler nella zona del mento e la conformazione dell'imbottitura
antirumore sul collo), nonché la scelta di materiali speciali,
assicurano l'assenza di spifferi e la massima silenziosità**. Questi
accorgimenti riducono notevolmente lo stress e aumentano la
capacità di concentrazione; un vantaggio notevole specialmente per
i viaggi lunghi.
Un casco silenzioso si contraddistingue per la percezione ridotta
del rumore del vento, che in genere è causato dalle turbolenze
dell'aria che gli turbina intorno. La struttura delle turbolenze provoca
oscillazioni di pressione locali che manifestano nel casco sottoforma
di sibilo (il cosiddetto pseudorumore).
Questo rumore è percepibile solo dal portatore del casco. A partire
da una velocità ca. 100 km/h, per la maggior parte delle motociclette
e dei caschi, il rumore del motore viene coperto da questo rumore
di vento.
** I valori di aeroacustica possono variare in base al tipo di motocicletta, di carenatura,
alla posizione di guida e all’altezza.
Attenzione:
In seguito all'ottimizzazione aeroacustica del casco e alla
conseguente riduzione dei rumori del vento, è facile che la reale
velocità venga sottovalutata. Nel valutare la velocità non ti fi dare
del tuo udito. Controlla la velocità sul tachimetro.
Avvertenza:
Per le moto con carenatura, sul bordo del sottovento si
generano forti turbolenze che possono ridurre sensibilmente le
caratteristiche aeroacustiche del casco. La carenatura deve
essere regolata in modo tale che le turbolenze non vadano a
sbattere direttamente sulla parte inferiore del casco.
italiano
182 183
Page 92

D. IL CASCO
Aeroacustica: zona acritica
Consiglio:
Per garantire la massima silenziosità di un casco, è decisiva
Aeroacustica: zona critica
Aeroacustica: zona acritica
l'aerodinamica della parte inferiore. Chiudere sempre bene il
casco sfruttando le possibilità di regolazione dell’imbottitura
del collo regolabile. Per colli piccoli si consiglia l'impiego di un
fazzoletto.
ANTI-NOISE-PAD (compreso nel volume di fornitura)
Con l’aiuto del pad insonorizzante, è possibile ridurre ulteriormente la
rumorosità nel caso.
1. Fissare il pad insonorizzante con
l’aiuto del velcro all’interno del
defl ettore.
8. LA MENTONIERA
Il casco C3 è dotato di una mentoniera apribile comodamente verso
l’alto tramite il tasto posizionato al centro. La sequenza dinamica è
stata ottimizzata ergonomicamente.
Sistema di bloccaggio
Quando è chiusa, la mentoniera è provvista – analogamente ai
sistemi di bloccaggio porte utilizzati nel settore automobilistico – di
un sistema di chiusura a fermo speciale. Nonostante l’impiego di 2
fermi, per aprire la mentoniera basta un unico pulsante. Il fermo sul
lato contrapposto viene azionato simultaneamente mediante un tirante
Bowden. Il sistema, ottimizzato dal punto di vista meccanico, riduce
la forza applicata per l’apertura dei due fermi a comodi 16 N, pur
essendo forza di chiusura complessiva rilevante per la sicurezza varie
volte superiore.
italiano
184 185
Page 93

D. IL CASCO
Comando del sistema
La mentoniera può essere aperta o chiusa in qualsiasi momento
indipendentemente dalla posizione della visiera o del parasole. Il
sistema ad innesto, duro e sicuro, fa in modo che la mentoniera, una
volta sollevata, sia trattenuta in maniera sicura nella sua posizione.
Apertura della mentoniera
1. La mentoniera si apre spingendo in
avanti col pollice, in direzione della
freccia, fi no al punto di battuta il
tasto rosso posizionato al centro
della mentoniera.
2. Il meccanismo a tirante
fl essibile sgancia le due
chiusure e la mentoniera può
essere comodamente sollevata
completamente verso l’alto.
Avvertenza:
Il meccanismo della mentoniera del casco C3 è provvisto di un
dispositivo di sicurezza in grado di impedire l’apertura involontaria
della mentoniera in caso di caduta. Per aprire correttamente la
mentoniera è quindi necessario afferrarla anche con una mano.
Chiusura della mentoniera
1. Per chiudere la mentoniera
abbassarla con una mano fi no a far
innestare le due chiusure con un
chiaro rumore di scatto.
Avvertenza:
Controllare sempre la corretta chiusura della mentoniera
spingendola dal basso verso l’alto.
Consiglio:
Utilizzando il defl ettore supplementare regolabile, durante
la chiusura aiutarsi infi lando un dito sotto l’imbottitura per
spostare la mentoniera sul mento.
Attenzione:
Non viaggiare mai con la mentoniera sollevata!
9. IL SISTEMA DI RITENZIONE
Il sistema di ritenzione dell'C3 è composto da un sottogola assicurato
mediante cinghie sulla parte posteriore del guscio del casco (sistema
anti-roll-off, vei il cap. D.14.)
Mentoniera con chiusura a molla MicroLock
Il casco C3 è provvisto di un sistema di chiusura a
molla che consente di regolare facilmente e
comodamente il cinturino del sottogola dopo
aver indossato il casco.
italiano
186 187
Page 94

D. IL CASCO
La regolazione del sottogola
La lunghezza del sottogola può essere regolata tirandolo
o allentandolo attraverso la fi bbia metallica.
La lunghezza deve essere regolata in modo
tale che la cinghia risulti tesa ma senza
dare fastidio sotto al mento. Fissa
quindi l'estremità libera col
sistema comfort.
Attenzione:
Per la regolazione fare attenzione che il casco non possa essere
tirato in avanti sulla testa con il sottogola chiuso (vedi il capitolo
C.3.).
Attenzione:
Controllare regolarmente la regolazione della lunghezza del
sottogola (vedi il cap. F.2.)
Apertura e chiusura
Il cinturino del sottogola si chiude inserendo a gradi la linguetta del
sistema di aggancio nell’apposita serratura. Se il cinturino risultasse
troppo allentato, inserire la linguetta di un altro gradino.
Per una corretta regolazione tenere presente che il cinturino del
sottogola non deve risultare opprimente, ma tuttavia ben teso sotto
al mento. Per aprire il cinturino del sottogola sollevare il nastrino
rosso del sistema di chiusura per sganciarlo e sfi lare quindi la
linguetta dalla serratura.
Attenzione:
Non partire mai con il sottogola slacciato o non regolato
correttamente. In caso di incidente, il casco può scivolare dalla
testa a causa del sottogola regolato male o non allacciato
correttamente.
Attenzione:
Un cuscino del sottogola chiuso non offre protezione. Chiudi
sempre il completamente il sottogola prima di metterti in
viaggio.
Attenzione:
Non aprire mai il sottogola durante il viaggio.
10. LA VISIERA PINLOCK
®
La visiera Pinlock® è una visiera antiappannante a doppio schermo,
dove al posto del rivestimento antiappannante, sul lato interno è
stato integrato un secondo schermo. Una guarnizione in silicone
chiara, elastica separa ed ermetizza i due schermi della visiera.
Il sistema di bloccaggio dello schermo interno mediante perni
eccentrici (pins), assicura una compressione reciproca tra i due
schermi e la perfetta tenuta della guarnizione. A questo punto, il
cuscinetto d’aria che si forma tra lo schermo principale/esterno e
quello interno della visiera, previene il fenomeno dell’appannamento.
IL RIVESTIMENTO
Lo schermo principale è trattato su entrambi i lati con la sostanza
antigraffi o HighClear®, mentre quello interno Pinlock® su entrambi i
lati con una sostanza antiappannamento.
italiano
188 189
Page 95

D. IL CASCO
Avvertenza:
Per evitare graffi sullo schermo interno più sensibile, non deporre
i guanti o altri oggetti all’interno del casco.
Avvertenza:
Lo schermo interno è dotato di un foglio di protezione per il
trasporto. Prima dell'uso, levare il foglio di protezione.
Avvertenza:
Gli schermi interni Pinlock® possono essere usati solo con le
apposite visiere speciali SCHUBERTH. Non è consentito il loro
uso su altri tipi di visiere. Ciò vale in particolare anche per le altre
visiere.
Apertura della visiera
Per aprire la visiera, appoggiare il pollice
a destra o a sinistra sotto una delle due
sporgenze sullo schermo della visiera e
sollevare, springendo, lo schermo nella
posizione desiderata.
Arresto della visiera
La visiera si blocca in sette posizioni differenti. La seconda posizione
di arresto (posizione città) è leggermente rinforzata, per cui la visiera
incontra qui una maggiore resistenza. In tal modo, l'apertura in
posizione di città risulta facilitata – in particolare durante il viaggio.
Aprendo la visiera, questa posizione di solito viene saltata, ma basta
riabbassarla leggermente per farla innestare.
Il sistema meccanico della visiera non prevede l'ingrassaggio.
La visiera può essere aperta o chiusa in qualsiasi momento
indipendentemente dalla posizione del parasole.
Chiusura della visiera
Per chiudere la visiera, abbassarla
premendo con la mano su uno degli
appositi punti a destra e sinistra fi no
a sentire chiaramente lo scatto di
aggancio.
CAMBIO DELLO SCHERMO DELLA VISIERA
Grazie alla nuova meccanica EasyChange, il cambio dello schermo
può essere effettuato velocemente e senza mezzi ausiliari.
Per cambiare la visiera consigliamo di appoggiare il casco su una
superfi cie piana oppure, stando seduti, sulle cosce.
Smontaggio dello schermo della visiera
1. Portare la visiera nella posizione di
massimo sollevamento.
2. Azionare l’elemento a molla sotto al
meccanismo della visiera in direzione
di apertura. Ripetere l’operazione
con l’elemento a molla sull’altro lato.
3. Spostare la visiera verso l’alto fi no a
sganciarla dal meccanismo.
italiano
190 191
Page 96
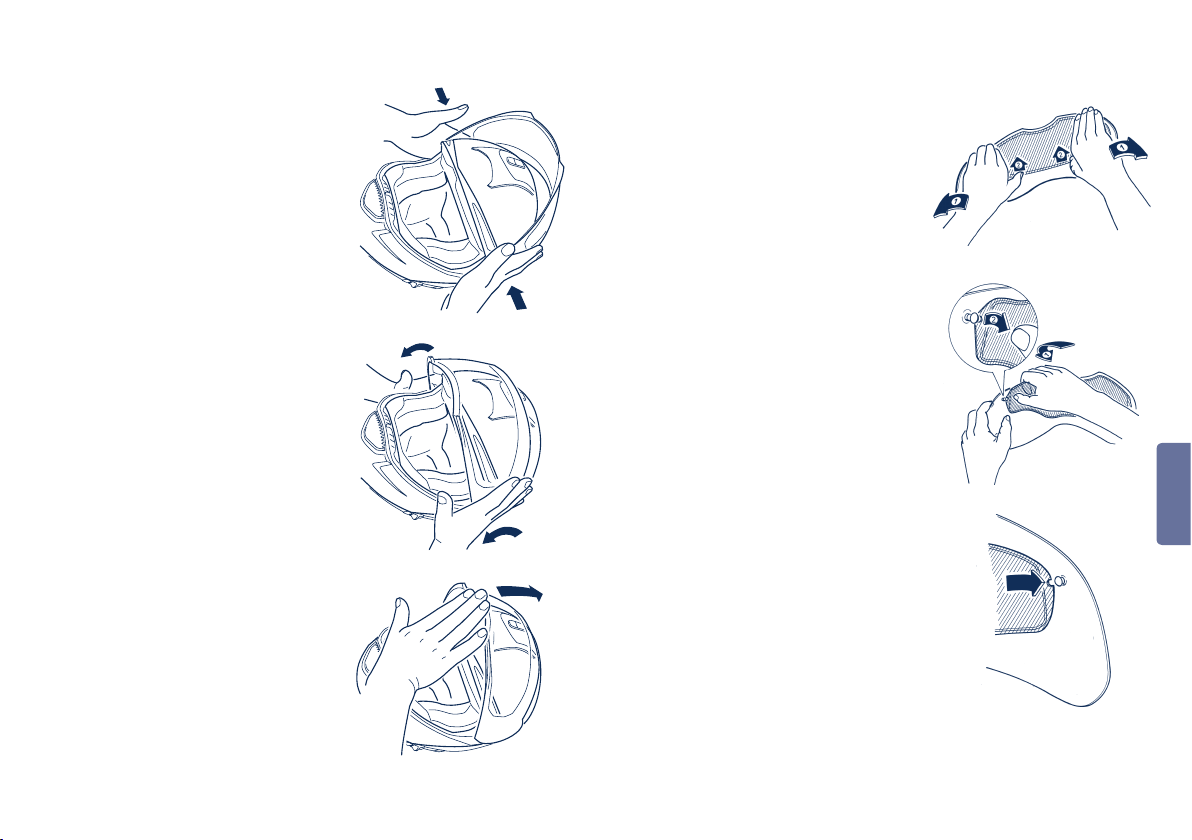
D. IL CASCO
Montaggio dello schermo della visiera
1. Inserire con tutte e due la mani i
perni della visiera nelle apposite
tacche nel meccanismo.
2. Premere leggermente abbassando
contemporaneamente la visiera fi no a
sentire un rumore di scatto.
3. Verifi care la corretta funzionalità del
meccanismo della visiera aprendola
completamente fi no al punto di
battuta.
CAMBIO DELLO SCHERMO INTERNO
Smontaggio dello schermo interno
1. Per lo smontaggio dello schermo
interno, appoggiare la visiera su un
panno morbido e pulito con il bordo
superiore rivolto verso di te.
2. Per allentare leggermente la pressione,
fl ettere con cautela la visiera con il
palmo delle mani fi no a riuscire a
spostare in avanti con i pollici di circa
2-3 mm lo schermo interno.
3. Infi lare ora l’indice e il medio dietro lo
schermo interno e staccarlo da quello
esterno. In questa posizione, con l’aiuto
del pollice, lo schermo interno può
essere sfi lato con semplicità dal perno
di fi ssaggio.
4. A questo punto è possibile estrarre lo
schermo interno dalla visiera.
Montaggio dello schermo interno
1. Appoggiare lo schermo interno su
quello principale inserendolo nel
perno con la guarnizione rivolta
verso lo schermo principale.
italiano
192 193
Page 97
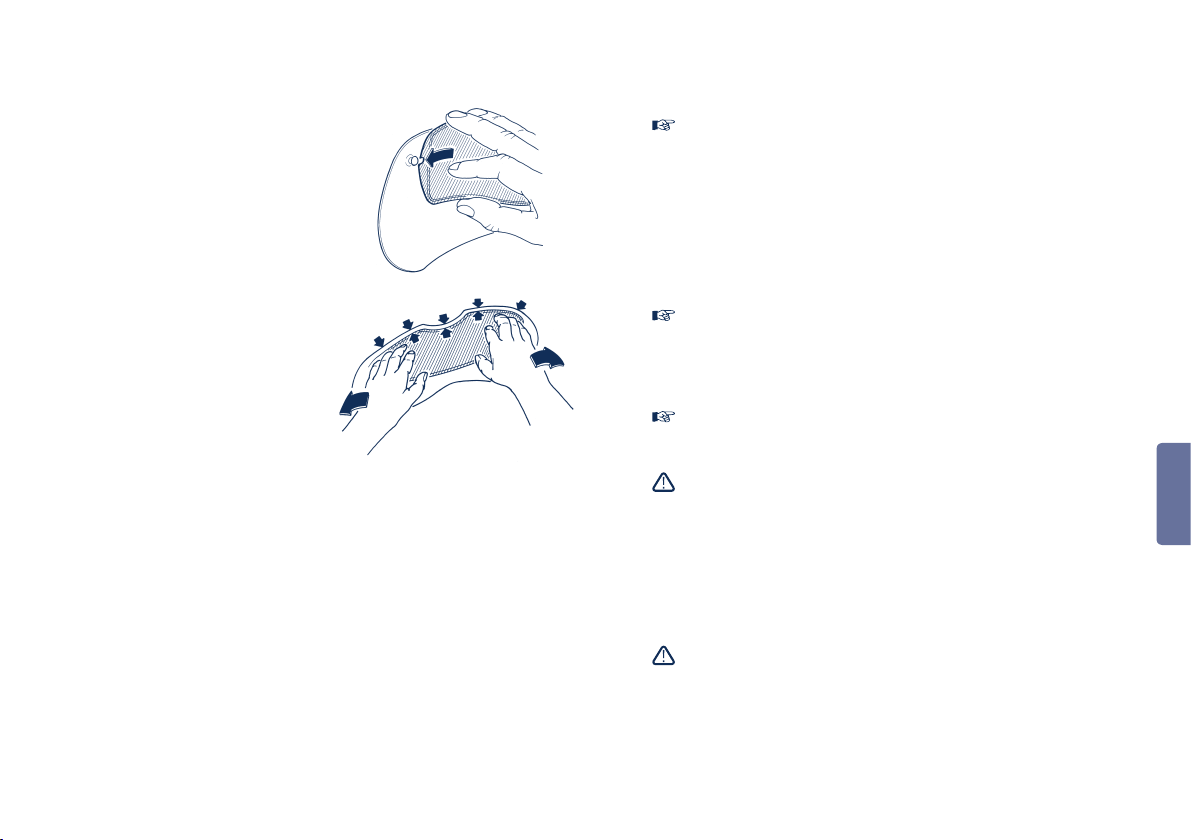
D. IL CASCO
2. Afferrare ora lo schermo sui bordi
trasversali dell’altro lato e con
l’indice spingere l’estremità con un
leggero movimento a S. A questo
punto, la tacca può essere inserita
con semplicità sul perno e lo
schermo può essere lasciato andare.
3. Lo schermo interno deve risultare
inserito su quello principale con i
due bordi a fi lo. Dovendo spostare
leggermente lo schermo interno,
fl ettere con cautela la visiera col
palmo delle mani fi no a riuscire a
muoverlo.
4. Controllare l’aderenza uniforme
della guarnizione di silicone sullo
schermo esterno. Solo una perfetta
tenuta garantisce la funzione di
disappannamento.
5. Levare eventualmente il foglio di
protezione dello schermo interno.
Una tenuta insuffi ciente e il conseguente appannamento della visiera
sono sintomi di un errore di posizionamento dello schermo interno o
di scarsa pressione sulla guarnizione. Quest’ultima può essere
regolata intervenendo sui due perni eccentrici di bloccaggio. Per
questa operazione, smontare lo schermo interno, sfi lare i perni con
cautela dallo schermo esterno con un oggetto piatto e non tagliente,
ruotarli quindi fi no a 180° e reinserirli. Rimontare lo schermo interno
e verifi carne la tenuta.
Avvertenza:
• Per evitare graffi sulla visiera, smontare e montare lo schermo
interno solo con la visiera pulita ed asciutta.
• Durante il montaggio dello schermo interno, fare attenzione a
non fare penetrare polvere e umidità tra i due schermi.
• Come piano di appoggio per lo smontaggio e il montaggio,
usare possibilmente un panno morbido e pulito.
• Controllare regolarmente l’aderenza corretta ed uniforme della
guarnizione di silicone tra lo schermo esterno e quello interno.
Avvertenza:
Per evitare il rischio di penetrazione di sporcizia e umidità dovuto
alla forte pressione che si genera sulla guarnizione di silicone
viaggiando con la visiera aperta, si consiglia di tenere quest’ultima
sempre chiusa durante il viaggio.
Avvertenza:
Non estrarre i perni di fi ssaggio con le dita; i perni si potrebbero
rompere.
Attenzione:
Utilizzando le visiere a doppio schermo, bisogna tener conto che
a causa delle loro caratteristiche costruttive, si ha il fenomeno dei
rifl essi di luce (soprattutto viaggiando di notte). In genere, grazie
all’alto grado di antiappannamento di questo tipo di visiere, questi
rifl essi non sono considerati come critici. Se tuttavia, in seguito
ad un’accentuata sensibilità personale, dovessi accorgerti di
avere problemi con i rifl essi luminosi, sarà opportuno smettere di
usare questo tipo di visiera.
Attenzione:
In caso di penetrazione di umidità nella zona ermetica tra i due
schermi della visiera, smontare immediatamente lo schermo
interno e rimontarlo solo quando entrambi gli schermi saranno
italiano
194 195
Page 98

D. IL CASCO
completamente asciutti (si consiglia di farli asciugare all’aria). Se il
fenomeno della penetrazione di umidità di dovesse ripetere,
l’impiego della visiera Pinlock® non è più consentito e la visiera
dovrà essere sostituita.
AVVERTENZE DI SICUREZZA
Controllare ogni volta prima di partire la perfetta funzionalità della
visiera e della meccanica del parasole, verifi care se la visiera
ovvero il parasole garantiscano una visibilità suffi ciente. Pulire
eventualmente ogni volta prima di partire. Controllare la visiera e il
parasole in riferimento a danni meccanici e incrinature. Una visiera
graffi ata o opaca riduce sensibilmente la visibilità e per motivi di
sicurezza dovrebbe quindi essere sostituita prima di partire.
Attenzione:
I vapori di benzina, solventi e combustibili possono causare
screpolature sulla visiera. Evitare di esporla a questo genere di
vapori o di farla venire a contatto con tali sostanze! Non
appoggiare mai il casco sul serbatoio della motocicletta.
11. Il PARASOLE
Lo schermo
Lo schermo è grigio con termodeformazione 3D. Grazie ad uno
spessore dello schermo di 1,5 mm, il parasole offre anche con la
visiera aperta una protezione minima contro i sassolini e gli insetti.
Esso offre inoltre una effi cace protezione contro i dannosi raggi
UV grazie alle caratteristiche ad assorbimento UV dello speciale
policarbonato in cui è realizzato.
Il rivestimento
Il parasole è trattato su entrambi i lati con una sostanza
antiappannamento ed è quindi resistente ai graffi .
L’u so
Per azionare il parasole bisogna intervenire
sul cursore posizionato sul lato sinistro e
raggiungibile facilmente anche con i guanti.
Spingendo il cursore in avanti il parasole
si abbassa, mentre tirandolo indietro
scompare all'interno del casco.
Il parasole può essere azionato
indipendentemente dalla posizione
della visiera.
Avvertenza:
Il parasole deve essere azionato esclusivamente attraverso il
cursore.
Attenzione:
Non viaggiare mai con il parasole abbassato durante la notte o
in caso di scarsa visibilità. Alzare sempre il parasole prima di
entrare in galleria.
Attenzione:
Viaggiare senza visiera o con la visiera aperta può causare danni
agli occhi o alla faccia dovuti a sassi, polvere, insetti o altri
elementi nell’aria. Il parasole protegge in un certo senso contro i
sassolini o gli insetti, ma non contro altri tipi di pericolo.
italiano
196 197
Page 99
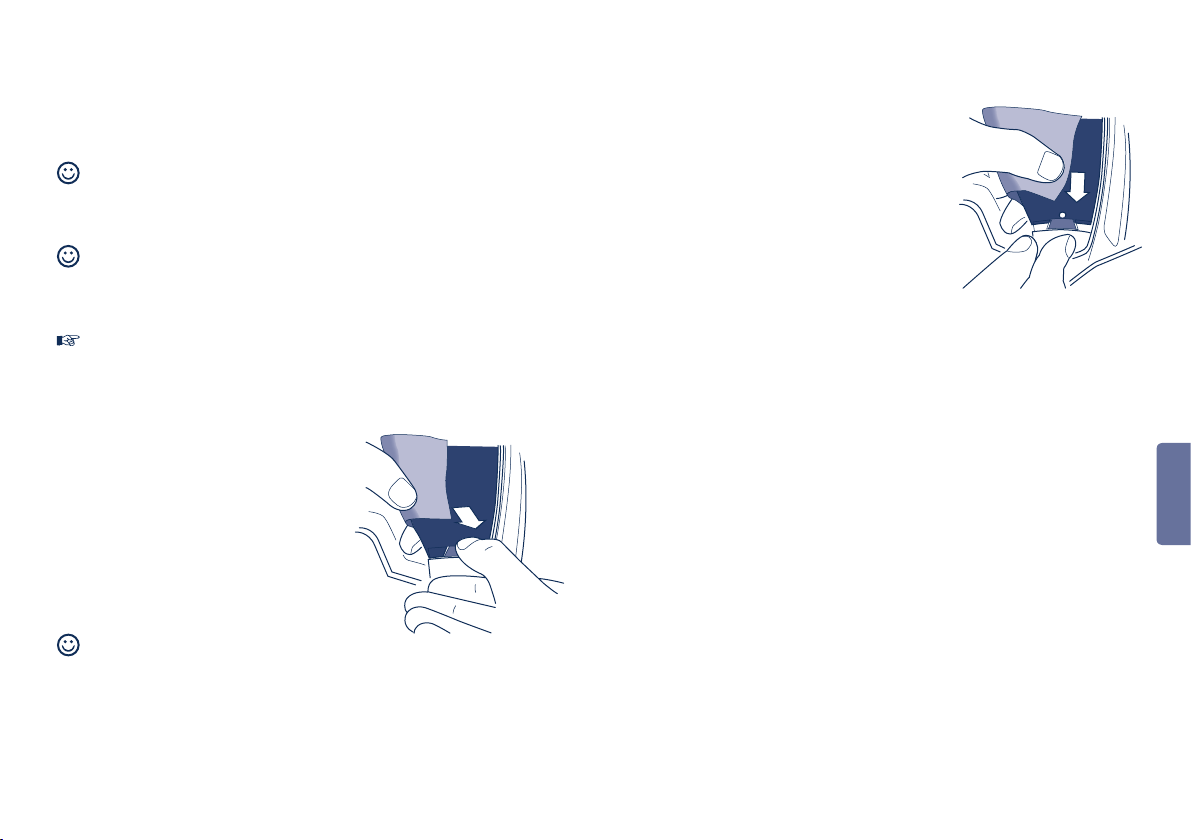
D. IL CASCO
CAMBIO DEL PARASOLE
Il cambio del parasole è possibile senza mezzi ausiliari.
Consiglio:
Durante il montaggio/lo smontaggio afferrare il parasole con
un panno pulito e morbido (consigliamo un panno in microfi bra),
per evitare di lasciare impronte e graffi .
Consiglio:
Il cambio del parasole risulta più facile con la mentoniera aperta
e bloccata. È inoltre utile appoggiare il casco su una superfi cie
piana o, stando seduti, sulle cosce.
Avvertenza:
Durante lo smontaggio/il montaggio evitare un contatto tra
parasole e calotta.
Smontaggio del parasole
1. Aprire e bloccare la mentoniera.
2. Abbassare il parasole.
3. Piegare leggermente verso l’esterno
il raccordo a scatto centrale col
perno di tenuta fi no a liberare il
parasole dal supporto.
4. Ripetere l’operazione sull’altro lato.
Consiglio:
Tenere gli alloggiamenti nella posizione più bassa fi no al
rimontaggio del parasole.
Montaggio del parasole
1. Inserire il parasole tra i raccordi a
scatto e inserirlo in successione nei
perni di tenuta.
2. Posizionare il parasole tra il guscio
interno e quello esterno del casco e
sollevarlo col cursore.
3. Eseguire una prova funzionale del
dispositivo di comando del parasole.
italiano
198 199
Page 100

D. IL CASCO
12. L’IMBOTTITURA
L’imbottitura estraibile e lavabile del C3 assicura, oltre ad una
maggiore adattabilità al profi lo della testa, anche una migliore
ventilazione del casco.
I confortevoli cuscini delle guance assicurano un morbido contatto in
quella zona, mentre il nastro imbottito della testa garantisce un buon
calzamento. Il cuscino della testa agevola inoltre un posizionamento
ottimale del casco senza coprire i canali di ventilazione (vedi il
capitolo D.13. Sistemi di ventilazione - Ventilazione della testa).
I materiali dell’imbottitura interna (soprattutto quelli che risultano a
contatto diretto con la testa) sono altamente dermocompatibili. Il
materiale più utilizzato è Coolmax
®
- una stoffa morbida, traspirante
con ottime caratteristiche di assorbimento del calore e dell’umidità.
I cuscini della testa sono invece realizzati in uno speciale materiale
antibatterico con elevato grado di assorbimento del sudore.
Smontaggio/montaggio del nastro imbottito
L’imbottitura è fi ssata sulla parte interna della calotta mediante velcro
e mollette di fermo e può essere rimossa intervenendo con cautela.
Per l’inserimento e il fi ssaggio sono di ausilio i listelli di plastica sulla
parte frontale e le pattelle nella zona della nuca.
1. Spingere per gradi il listello di
plastica sotto alle tacche del guscio
interno.
2. Inserire la pattella coi fori rotondi
sul perno integrato nella parte
terminale dell’imbottitura delle
guance e fi ssarla servendosi del
connettore.
Avvertenza:
Inserendo l’imbottitura interna, fare attenzione che gli incavi di
ventilazione del nastro risultino sopra ai canali di ventilazione
nella parte posteriore del casco e che il nastro sia posizionato
centralmente tra i due canali di ventilazione.
Attenzione:
Non metterti mai in viaggio con il casco senza imbottitura
completa.
Attenzione:
Un calore troppo elevato (per es. del tubo di scappamento)
potrebbe causare il danneggiamento dell’imbottitura!
Avvertenza:
Per evitare danneggiamenti dell’imbottitura, non appendere mai il
casco agli specchietti o alle manopole del manubrio.
Consiglio:
Se desideri una personalizzazione dell’imbottitura del casco,
rivolgiti al tuo rivenditore. Le modifi che personalizzate vengono
effettuate solo nel quadro della vigente normativa ECE-R 22 e
previa fatturazione (vedi anche il cap. J.1. Richieste particolari).
italiano
200 201
 Loading...