

Schneider Electric TR3624 120 60, TR2412 120 60, TR1524 230 50, TR2424 120 60, TR2424 230 50 User Manual
...
Xantrex™ TR Series
Inverter/Charger
Xantrex TR1512 120 60 Xantrex TR3624 120 60
Xantrex TR1524 120 60 Xantrex TR1512 230 50
Xantrex TR2412 120 60 Xantrex TR1524 230 50
Xantrex TR2424 120 60 Xantrex TR2424 230 50
Operation Manual
www.schneider-electric.com


Xantrex TR Series
Inverter/Charger
Operation Manual
www.schneider-electric.com
Copyright and Contact
Trademarks
Schneider Electric, the Schneider Electric logo, and Xantrex are trademarks or registered trademarks of the
Schneider Electric group of companies. Other trademarks, registered trademarks, and product names are the
property of their respective owners and are used herein for identification purposes only.
Notice of Copyright
Copyright © 2008, 2009, 2010 Xantrex Technology I nc. All rights reserved. No part of this document may be
reproduced in any form or disclosed to third parties without the express written consent of:
Xantrex Technology Inc.
161-G South Vasco Road
Livermore, California USA 94551
Xantrex Technology Inc. reserves the right to revise this document and to periodically make changes to the
content hereof without obligation or organization of such revisions or changes unless required to do so by prior
arrangement.
Exclusion for Documentation
U
NLESS SPECIFICALLY AGREED TO IN WRITING, XANTREX TECHNOLOGY INC. (“XANTREX”)
(
A) MAKES NO WARRANTY AS TO THE ACCURACY, SUFFICIENCY OR SUITABILITY OF ANY TECHNICAL OR OTHER INFORMATION
PROVIDED IN ITS MANUALS OR OTHER DOCUMENTATION;
(
B) ASSUMES NO RESPONSIBILITY OR LIABILITY FOR LOSSES, DAMAGES, COSTS OR EXPENSES, WHETHER SPECIAL, DIRECT,
INDIRECT, CONSEQUENTIAL OR INCIDENTAL, WHICH MIGHT ARISE OUT OF THE USE OF SUCH INFORMATION. THE USE OF ANY
SUCH INFORMATION WILL BE ENTIRELY AT THE USER’S RISK; AND
(C) REMINDS YOU THAT IF THIS MANUAL IS IN ANY LANGUAGE OTHER THAN ENGLISH, ALTHOUGH STEPS HAVE BEEN TAKEN TO
MAINTAIN THE ACCURACY OF THE TRANSLATION, THE ACCURACY CANNOT BE GUARANTEED. APPROVED XANTREX CONTENT IS
CONTAINED WITH THE ENGLISH LANGUAGE VERSION WHICH IS POSTED AT WWW.SCHNEIDER-ELECTRIC.COM.
Date and Revision
March 2010 Revision C
Part Number
975-0391-01-01
Product Number
Xantrex TR1512 120 60, Xantrex TR2412 120 60, Xantrex TR1524 120 60, Xantrex TR2424 120 60, Xantrex
TR3624 120 60, Xantrex TR1512 230 50, Xantrex TR1524 230 50, Xantrex TR2424 230 50
Contact Information
www.schneider-electric.com
☎✉
North America 1 650 351 8237
1 866 519 1470
La France +0825012999 fr-re-techsupport@fr.schneider-electric.com
Deutschland +49 (0) 180 575 6575 +49 (0) 2102 404 7101 solarservice@de.schneider-electric.com
España +34 93 498 7466 +34 93 305 5026 re.techsupport@es.schneider-electric.com
L'Italia +39 035 4151111 +39 035415 3200 IT-pronto-contatto@it.schneider-electric.com
1 925 245 1022 re.techsupport@schneider-electric.com
For other country details please contact your local Schneider Electric Sales Representative or visit our website at:
http://www .schneider-electric.com/sites/corporate/en/support/operations/local-op erations/local-operations.page

About This Manual
Purpose
The purpose of this Operation Manual is to provid e explanat ions and pr ocedur es
for operating and troubleshooting the Schn e i de r Elec tr ic Xa n t rex TR Series
Inverter/Charger.
Scope
The Manual provides safety guidelines, and procedures for operating and
troubleshooting the inverter. It does not provide details about particular brands of
batteries. You need to consult individual battery manufacturers for this
information.
Audience
The Manual is intended for anyone who needs to operate or troubleshoot the
Xantrex TR Series Inverter/Charger. Installers must be certified technicians or
electricians.
Organization
This Manual is organized into three chapters and one appendix.
Chapter 1, “Introduction” co ntains information about the featur es and functions of
the Xantrex TR Series Inverter/Charger.
Chapter 2, “Operation” contains information about how to operate the Xantr ex TR
Series Inverter/Charger.
Chapter 3, “Troubleshooting” contains information about how to troubleshoot
possible error conditions while using the Xantrex TR Series Inverter/Charger.
Appendix A, “Specifications” contains information about the electrical,
environmental and regulatory specifications of the Xantrex TR Series Inverter/
Charger.
975-0391-01-01 iii
About This Manual
Conventions Used
Model Numbering
The following conventions are used in this guide.
WARNING
Warnings identify conditions or practices that could result in personal injury or
loss of life
CAUTION
Cautions identify conditions or practices that could r esult in dama ge to the unit or
other equipment.
Important: These notes describe things which are important for you to know, but
not as serious as a caution or warning.
This Manual contains information for eight models of the Xantrex TR Series
Inverter/Charger.
Within this Manual, if information applies to all models of the Xantrex TR Series
Inverter/Charger then they will be referred to as the Xantrex TR Series. If
information only applies to select models then the model number will be
referenced as shown in the table belo w. Make sure you know which model
Xantrex TR Series Inverter/Charger you have purchased.
Input
Model Number
Xantrex TR1512 120 60 120 Vac 1500 VA 12 Volt 60 Hz
Xantrex TR2412 120 60 120 Vac 2400 VA 12 Volt 60 Hz
Xantrex TR1524 120 60 120 Vac 1500 VA 24 Volt 60 Hz
Xantrex TR2424 120 60 120 Vac 2400 VA 24 Volt 60 Hz
Xantrex TR3624 120 60 120 Vac 3600 VA 24 Volt 60 Hz
Xantrex TR1512 230 50 230 Vac 1500 VA 12 Volt 50 Hz
Xantrex TR1524 230 50 230 Vac 1500 VA 24 Volt 50 Hz
Xantrex TR2424 230 50 230 Vac 2400 VA 24 Volt 50 Hz
Voltage Power
Battery
Bank Size Frequency
iv 975-0391-01-01

Abbreviations and Acronyms
AC Alternating Current
ASC Authorized Service Center
COM Communications Port
DC Direct Current
PV Photovoltaic
RE Renewable Energy
RMA Return Material Authorization
Xantrex TR Series Xantrex TR Series Inverter/Charger
Related Information
You can find more information about Schneider Electric as well as its products
and services at www.schneider-electric.com.
About This Manual
975-0391-01-01 v

vi
IMPORTANT SAFETY INSTRUCTIONS
SAVE THESE INSTRUCTIONS
THIS MANUAL CONTAINS IMPORTANT
INSTRUCTIONS THAT SHALL BE FOLLOWED
DURING OPERATION OF ALL XANTREX TR
SERIES INVERTER/CHARGER MODELS.
WARNING: Limitations on use
The Xantrex TR Series is not intended for use in connection with life support
systems or other medical equipment or devices.
General
1. Before installing and using the Xantrex TR Series Inverter/Charger, read all
instructions and cautionary markings on the Xantrex TR Series Inverter/
Charger and all appropriate sections of this gu ide and the Xantrex TR Series
Inverter/Charger Installation Manual (Part #: 975-0367-01-01). Be sure to
read all instructions and cautionary markings for any equipment attach ed to
this unit.
2. This unit is designed for indoor use only. Do not expose the Xantrex TR
Series Inverter/Charger to rain, snow, or spray.
3. To reduce risk of fire hazard, do not cover or obstruct the ventilation
openings. Do not install the Xantrex TR Series Inverter/Charger in a zeroclearance compartment. Overheating may result.
4. Transformerless battery chargers are not to be used with this product family
due to the possible overheating and damage to the charger.
5. Use only attachments recommended or sold by the manufacturer. Doing
otherwise may result in a risk of fire, electric shock, or injury to persons.
6. To avoid a risk of fire and electric shock, make sure that existing wiring is in
good condition and that wire is not undersized. Do not operate the Xantrex
TR Series Inverter/Charger with damaged or substandard wiring.
975-0391-01-01 vii
Safety
7. Do not operate the Xantrex TR Series Inverter/Charger if it has received a
sharp blow, been dropped, or otherwise damaged in any way. If the Xantrex
TR Series Inverter/Charger is damaged, see the Warranty section.
8. Do not disassemble the Xantrex TR Series Inverter/Charger. It contains no
user-s erviceable parts. See Warranty for instructions on obtaining service.
Attempting to service the Xantrex TR Series Inverter/Charger yourself will
void your warranty and may result in a risk of electrical shock or fire. Internal
capacitors remain charged after all power is di sconnected.
9. The Xantrex TR Series contains more than one live circuit (batteries and AC
line). Power may be present at more than one source or from more than one
location. To reduce the risk of electrical shock, disconnect both AC and DC
power from the Xantrex TR Series Inverter/Charger before attempting any
maintenance or cleaning or working on any cir cuits conn ected to the Xant rex
TR Series Inverter/Charger. Turning off controls will not reduce this risk.
10. Use insulated tools to reduce the chance of short-circuits when installing or
working with the inverter, the batteries, or a PV array.
11. Several diagrams contained within this manual are basic in nature and are
included only to depict different installation options. All details may not be
shown, and as such, local electrical codes must still be referenced.
Explosive Gas Precautions
WARNING: Explosion Hazard
Working in the vicinity of lead-acid batteries is dangerous. Batteries generate
explosive gases during normal operation. Therefore, you must read this guide
and follow the instructions exactly before installing or using your Xantrex TR
Series Inverter/Charger.
1. This equipment contains components which tend to produce arcs or sparks.
To prevent fire or explosion, do not install the Xantrex TR Series Inverter/
Charger in compartments containing batteries or flammable mater ials, or in
locations that requir e ignition-protected equipment. This includes any space
containing gasoline-powered machinery, fuel tanks, as well as joints, fittings,
or other connections between components of the fuel system.
2. To reduce the risk of battery explosion, follow these instructions and those
published by the battery manufacturer and the manufacturer of the
equipment in which the battery is installed.
viii 975-0391-01-01

Precautions When Working With Batteries
WARNING: Explosion or Fire Hazard
Follow all instructions published by the battery manufacturer an d the
manufacturer of the equipment in which the battery is installed.
1. Make sure the area around the battery is well ventilated.
2. Never smoke or allow a spark or flame near the engine or batteries.
3. Use caution to reduce the risk or dr opping a metal tool on th e battery. It could
spark or short circuit the battery or other electrical pa rts and could cause a n
explosion.
4. Remove all metal items, like rings, bracelets, and watches when working with
lead-acid batteries. Lead-acid batteries produce a short circuit current high
enough to weld metal to skin, causing a severe burn.
5. Have someone within range of your voice or close enough to come to your
aid when you work near a lead-acid battery.
6. Have plenty of fresh water and soap nearby in case battery acid contacts
skin, clothing, or eyes.
7. Wear complete eye protection and clothing protection. Avoid touching your
eyes while working near batteries.
8. If battery acid contacts skin or clothing, wash immediately with soap and
water. If acid enters your eye, immediately flood it with running cold water for
at least twenty minutes and get medical attention immediately.
9. If you need to remove a battery, always remove the grounded terminal from
the battery first. Make sure all ac cessories ar e of f so you don’ t cau se a sp ark.
10. Always use identical types of batteries.
11. Never install old or untested batteries. Check each battery’s date code or
label to ensure age and type.
12. Batteries are temperature sensitive. For optimum performance, they should
be installed in a stable temperature environment.
13. Always recycle old batteries. Contact your local recycling center for proper
disposal information.
Safety
975-0391-01-01 ix

Regulatory
The Xantrex TR Series Inverter/Charger 120 Vac/60 Hz models are CSA
Certified to appropriate US and Canadian standards. The 230 Vac/50 Hz
models have been marked with the CE designation for Europ ean countries. S ee
“Safety and Electromagnetic Compatibility Specifications” on page A–5 for
more detailed information.
The Xantrex TR Series Inverter/Charger is int ended to be used for residential or
commercial applications. Do NOT use this unit for applications for which it is not
listed (for example, land vehicles or marine craft). It may not comply with the
safety code requireme nts or could possibly present other operational or safety
hazards.
FCC
Information
for the User
The Xantrex TR Series Inverter/Charger has been tested and found to comply
with the limits for a Class B digital device, pursuant to part 15 of the FCC Rules.
These limits are designed to provide reasonable protection against harmful
interference when the equipment is operated in a residential environment. This
equipment generates, uses and can radiate radio frequency energy and, if not
installed and used in accordance with this Operation Manual, may cause
harmful interference to radio communications. However, there is no guarantee
that interference will not occur in a particular installation. If this equipment does
cause harmful interference to radio or television reception, which can be
determined by turning the equipment on and off, the user is encouraged to try
to correct the interference by one or more of the following measures:
• Reorient or relocate the receiving antenna
• Increase the separation between the equipment and the receiver
• Connect the equipment into a cir cuit differ ent fr om that which th e receiver is
connected
• Consult the dealer where the eq uipment was purchased or an experienced
radio/ TV technician for help
x

Contents
IMPORTANT SAFETY INSTRUCTIONS
- - - - - - - - - - - - - - - - - - - - - - - - - - - - -vii
1 Introduction
Introduction - - - - - - - - - - - - - - - - - - - - - - - - - - - - - - - - - - - - - - - - - - - - - - - - - - - - - - - - - - - - - 1–2
Features - - - - - - - - - - - - - - - - - - - - - - - - - - - - - - - - - - - - - - - - - - - - - - - - - - - - - - - - - - - - - - - 1–3
AC Side - - - - - - - - - - - - - - - - - - - - - - - - - - - - - - - - - - - - - - - - - - - - - - - - - - - - - - - - - - - - - 1–4
DC Side - - - - - - - - - - - - - - - - - - - - - - - - - - - - - - - - - - - - - - - - - - - - - - - - - - - - - - - - - - - - - 1–5
Optional Equipment - - - - - - - - - - - - - - - - - - - - - - - - - - - - - - - - - - - - - - - - - - - - - - - - - - - - 1–5
Remote on/off Switch - - - - - - - - - - - - - - - - - - - - - - - - - - - - - - - - - - - - - - - - - - - - - - - - - 1–5
DC Conduit Box - - - - - - - - - - - - - - - - - - - - - - - - - - - - - - - - - - - - - - - - - - - - - - - - - - - - 1–5
2 Operation
Front Panel- - - - - - - - - - - - - - - - - - - - - - - - - - - - - - - - - - - - - - - - - - - - - - - - - - - - - - - - - - - - - - 2–2
User Interface - - - - - - - - - - - - - - - - - - - - - - - - - - - - - - - - - - - - - - - - - - - - - - - - - - - - - - - - - 2–2
Service Control Interface - - - - - - - - - - - - - - - - - - - - - - - - - - - - - - - - - - - - - - - - - - - - - - - - - 2–5
Over Discharge Protection (ODP) - - - - - - - - - - - - - - - - - - - - - - - - - - - - - - - - - - - - - - - - 2–8
Setting the Search Mode Threshold - - - - - - - - - - - - - - - - - - - - - - - - - - - - - - - - - - - - - - 2–9
Stacking Interface - - - - - - - - - - - - - - - - - - - - - - - - - - - - - - - - - - - - - - - - - - - - - - - - - - 2–10
Remote Control - - - - - - - - - - - - - - - - - - - - - - - - - - - - - - - - - - - - - - - - - - - - - - - - - - - - 2–10
Start-up - - - - - - - - - - - - - - - - - - - - - - - - - - - - - - - - - - - - - - - - - - - - - - - - - - - - - - - - - - - - - - - 2–11
Charge Mode- - - - - - - - - - - - - - - - - - - - - - - - - - - - - - - - - - - - - - - - - - - - - - - - - - - - - - - - - - - 2–12
3-Stage Charging Process - - - - - - - - - - - - - - - - - - - - - - - - - - - - - - - - - - - - - - - - - - - - - - - 2–12
Standby Mode - - - - - - - - - - - - - - - - - - - - - - - - - - - - - - - - - - - - - - - - - - - - - - - - - - - - - - - 2–13
OFF Mode - - - - - - - - - - - - - - - - - - - - - - - - - - - - - - - - - - - - - - - - - - - - - - - - - - - - - - - - - - 2–13
Equalize Charging - - - - - - - - - - - - - - - - - - - - - - - - - - - - - - - - - - - - - - - - - - - - - - - - - - - - 2–13
3 Troubleshooting
Troubleshooting the Xantrex TR Series - - - - - - - - - - - - - - - - - - - - - - - - - - - - - - - - - - - - - - - - - - 3–2
Problem Loads- - - - - - - - - - - - - - - - - - - - - - - - - - - - - - - - - - - - - - - - - - - - - - - - - - - - - - - - - - - 3–8
A Specifications
Safety and Electromagnetic Compatibility Specifications - - - - - - - - - - - - - - - - - - - - - - - - - - A–5
Warranty and Return Information
975-0391-01-01 xi
- - - - - - - - - - - - - - - - - - - - - - - - - - - - - - - - - - - - - - - - WA–1

xii

Figures
Figure 1-1 Front Panel Features - - - - - - - - - - - - - - - - - - - - - - - - - - - - - - - - - - - - - - - - - - - - - - - - 1–3
Figure 1-2 AC Side of the Xantrex TR Series - - - - - - - - - - - - - - - - - - - - - - - - - - - - - - - - - - - - - - - 1–4
Figure 1-3 DC Side of the Xantrex TR Series - - - - - - - - - - - - - - - - - - - - - - - - - - - - - - - - - - - - - - - 1–5
Figure 2-1 Front Panel User Interface - - - - - - - - - - - - - - - - - - - - - - - - - - - - - - - - - - - - - - - - - - - - 2–2
Figure 2-2 Removing the Service Access Cover- - - - - - - - - - - - - - - - - - - - - - - - - - - - - - - - - - - - - 2–5
Figure 2-3 Front Panel Control Interface - - - - - - - - - - - - - - - - - - - - - - - - - - - - - - - - - - - - - - - - - - 2–6
Figure 2-4 Automatically Calculated Discharge Cutoff Voltage per Cell - - - - - - - - - - - - - - - - - - - - 2–8
Figure 2-5 Search Mode Potentiometer Adjustment - - - - - - - - - - - - - - - - - - - - - - - - - - - - - - - - - 2–10
975-0391-01-01 xiii

xiv

Tables
Table 1-1 Supplemental Circuit Breaker Sizing - - - - - - - - - - - - - - - - - - - - - - - - - - - - - - - - - - - - - 1–4
Table 2-1 Battery Charge Profiles - - - - - - - - - - - - - - - - - - - - - - - - - - - - - - - - - - - - - - - - - - - - - - 2–7
Table 3-1 Error Codes- - - - - - - - - - - - - - - - - - - - - - - - - - - - - - - - - - - - - - - - - - - - - - - - - - - - - - - 3–2
Table 3-2 Troubleshooting the Xantrex TR Series - - - - - - - - - - - - - - - - - - - - - - - - - - - - - - - - - - - 3–6
Table A-1 Electrical Specifications - 120 Vac/60 Hz Models - - - - - - - - - - - - - - - - - - - - - - - - - - - - A–2
Table A-2 Electrical Specifications - 230 Vac/50 Hz Models - - - - - - - - - - - - - - - - - - - - - - - - - - - - A–4
Table A-3 Environmental Specifications - - - - - - - - - - - - - - - - - - - - - - - - - - - - - - - - - - - - - - - - - - A–5
975-0391-01-01 xv

xvi

1 Introduction
Chapter 1, “Introduction” contains information
about the features and functions of the Xantrex
TR Series Inverter/Charger.

Introduction
Introduction
Thank you for purchasing th e Xantrex TR Series Inverter/Charger from
Schneider Electric. The Xantrex TR Series is one of the finest inverter/chargers on
the market today, incorporating state-of-the-art technology and high reliability.
The inverter features an AC pass-through circuit, powering your home
appliances from utility or generator power while charging the batteries. When
utility power fails, the battery backup system keeps your appliances powered
until utility power is restored. Internal protection circuits prevent over-discharge
of the batteries by shutting down the inverter when a low battery condition
occurs. When utility or generator power is restored, the inverter transfers to the
AC source and recharges the batteries.
The front panel features indicator lights and a user interface display for reading
system status, and controls to customize the inverter settings for your battery
bank.
The Xantrex TR Series is an economical product designed to provide a reliable
supply of electricity to all the essential circuits in the home or business during a
power outage. The critical loads can be powered for hours or days, depending
on the size of the system battery bank. When utility grid power returns, the
batteries are quickly recharged to ensure they will be ready to supply backup
power during the next outage.
Accessories allow the Xantrex TR Series to also serve as a central hub of a
renewable energy system.
Modified Sine
Wave Power
Battery Charger/
AC Transfer Relay
Simplicity The Xantrex TR Series is simple to operate. All inverter and battery charger
High Efficiency The inverter/charger operates at over 90% efficiency through most of its power
Low Power
Consumption
Power Factor
Correction
The Xantrex TR Series pr ovide a modi fied sine wave outpu t which oper ates most
AC appliances and equipment.
The inverter/charger includes a 3-stage battery charger designed to recharge
batteries in the shortest possible time. Once batteries are fully charged, the
Xantrex TR Series will go into standby mode to reduce the energy draw from the
utility. The built-in, fully automatic AC transfer relay automatically transfers power
from the utility to the inverter and handles a maximum rating of 30 A of current at
120 Vac or 15 A of current at 230 Vac.
controls are located on the front panel.
range in Invert-mode.
Xantrex TR Series uses less than 2 watts of power while in standby mode and in
search mode, it consumes less than 4.7 watts of power.
The Xantrex TR Series is power factor corrected to reduce power loss and
maximize efficiency.
1–2 975-0391-01-01
Features
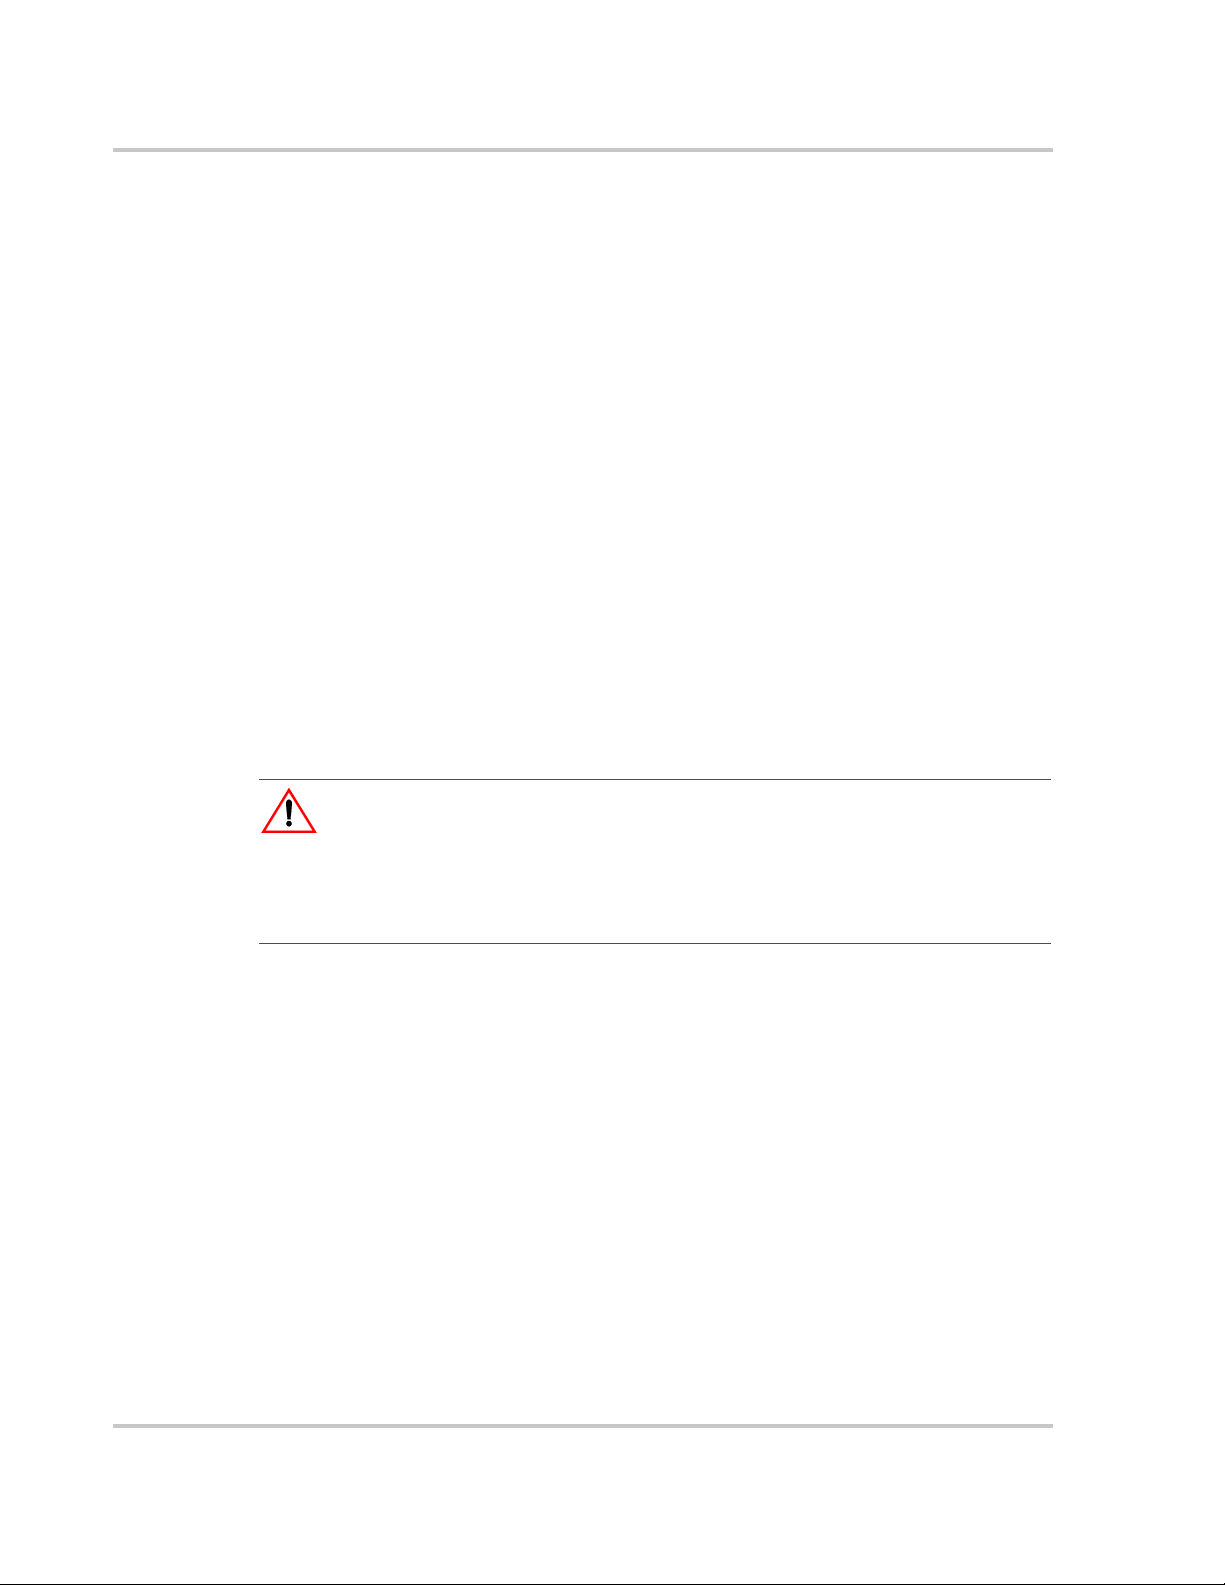
DC Side
Front Panel Indicator
Lights and User
Interface Display
(see page 2–2)
Battery Caps
AC Side
Inverter/Charger
Controls (see
page 2–5) beneath
service access panel
Features
The following sections illustrate the features of the Xantrex TR Series. Figure 1-1
shows the features of the fr ont sid e of the Xant rex TR Series and identif ies the AC
side from the DC side.
Figure 1-1 Front Panel Features
975-0391-01-01 1–3
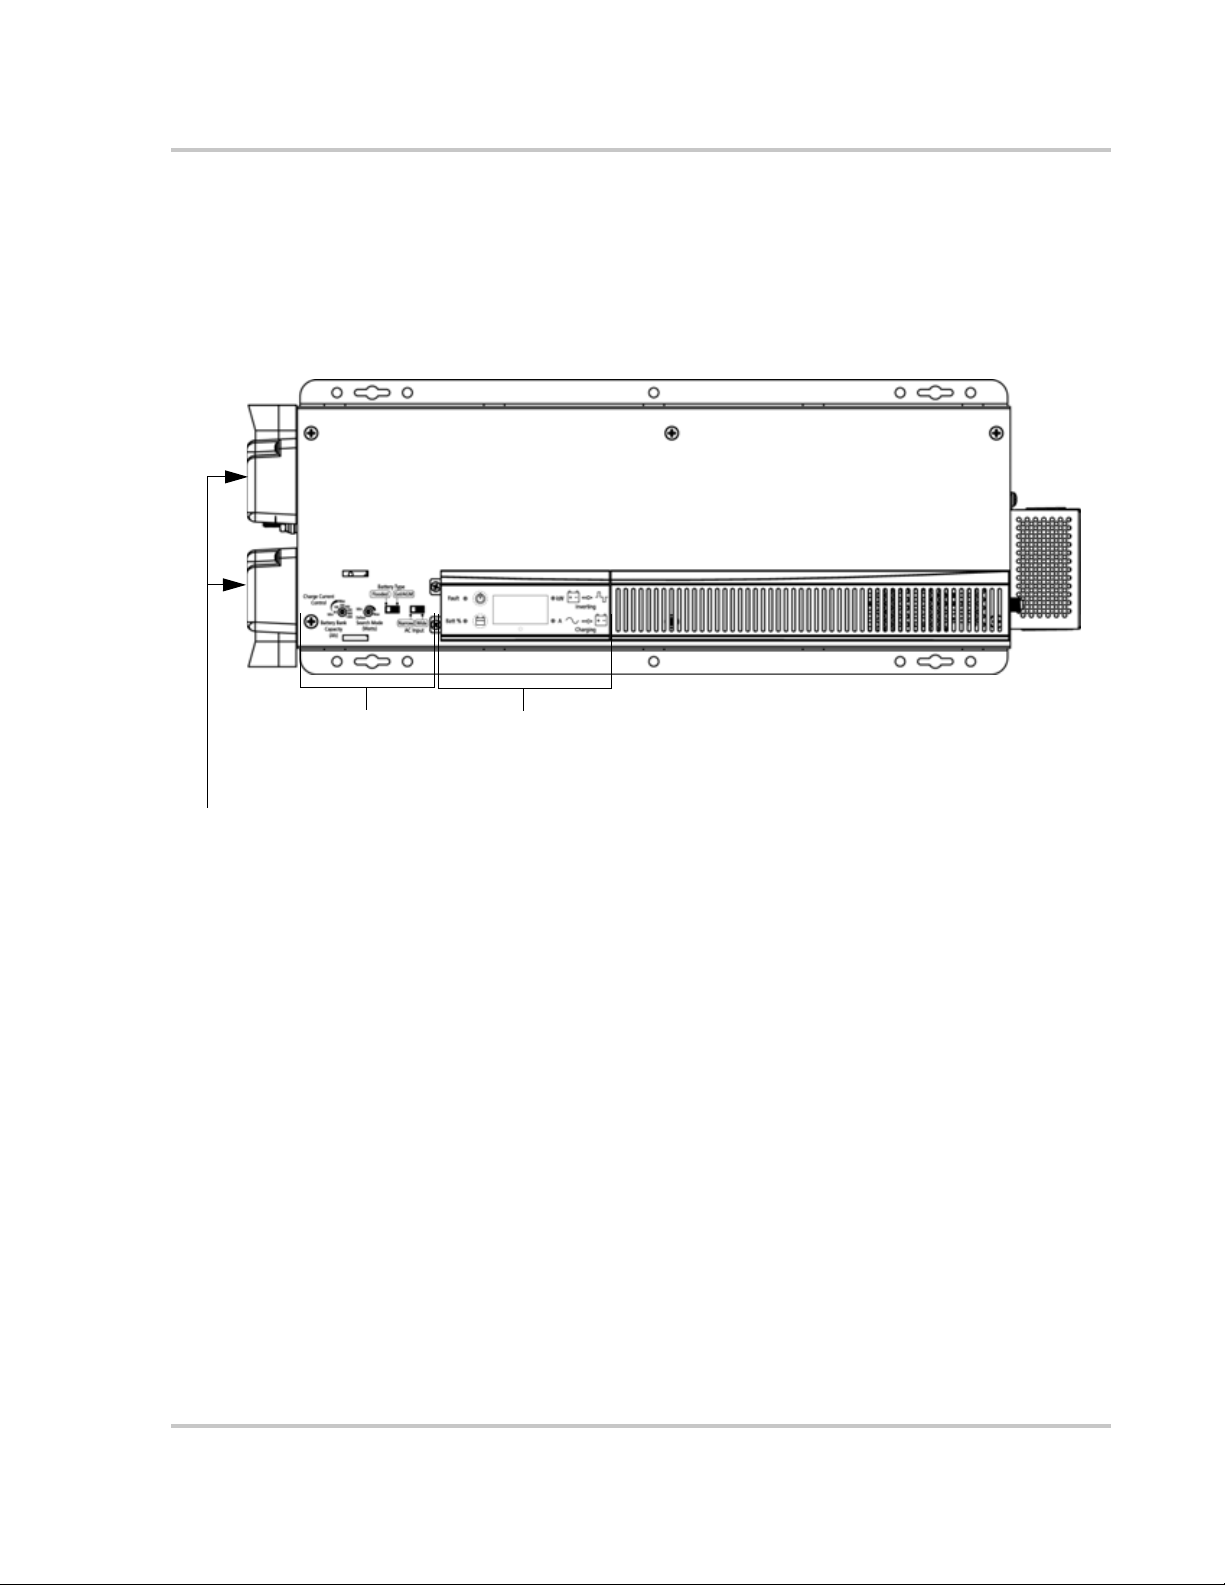
Introduction
Breaker for Passthrough AC Input
Breaker for Charger
AC Input
Ventilation Holes
AC Access
Cover Plates
AC Side
The AC side of the Xantrex TR Seri es has one breaker for pass-through AC input
(30 A max and 15 A max for 120 Vac/60 Hz and 230 Vac/50 Hz models
respectively), which protects the internal pass-through relay and wiring from the
AC output to the user-installed branch circuit breaker. There is also a second
breaker for charger AC input (30 A max and 15 A max for 120 Vac/60 Hz and
230 Vac/50 Hz models respectively), which protects the internal charge r elay and
the components on the AC filter board. The breakers are rated for the maximum
charge rate and pass-through current allowed according to the rating of the
internal relay. Appropriately sized branch-rated ci rcuit br eakers mu st be installed
directly on the AC output circuits to protect output circuits and wiring. Consult
your local electrical code for selection of these branch-rated output circuit
breakers.
Figure 1-2 AC Side of the Xantrex TR Series
1–4 975-0391-01-01
Table 1-1 Supplemental Circuit Breaker Sizing
Model
AC Pass-through Circuit
Breakers
Battery Charger
Circuit Breakers
Xantrex TR1512 120 60 30 amps 20 amps
Xantrex TR2412 120 60 30 amps 30 amps
Xantrex TR1524 120 60 30 amps 20 amps
Xantrex TR2424 120 60 30 amps 30 amps
Xantrex TR3624 120 60 30 amps 30 amps
Xantrex TR1512 230 50 15 amps 8 amps
Xantrex TR1524 230 50 15 amps 8 amps
Xantrex TR2424 230 50 15 amps 15 amps
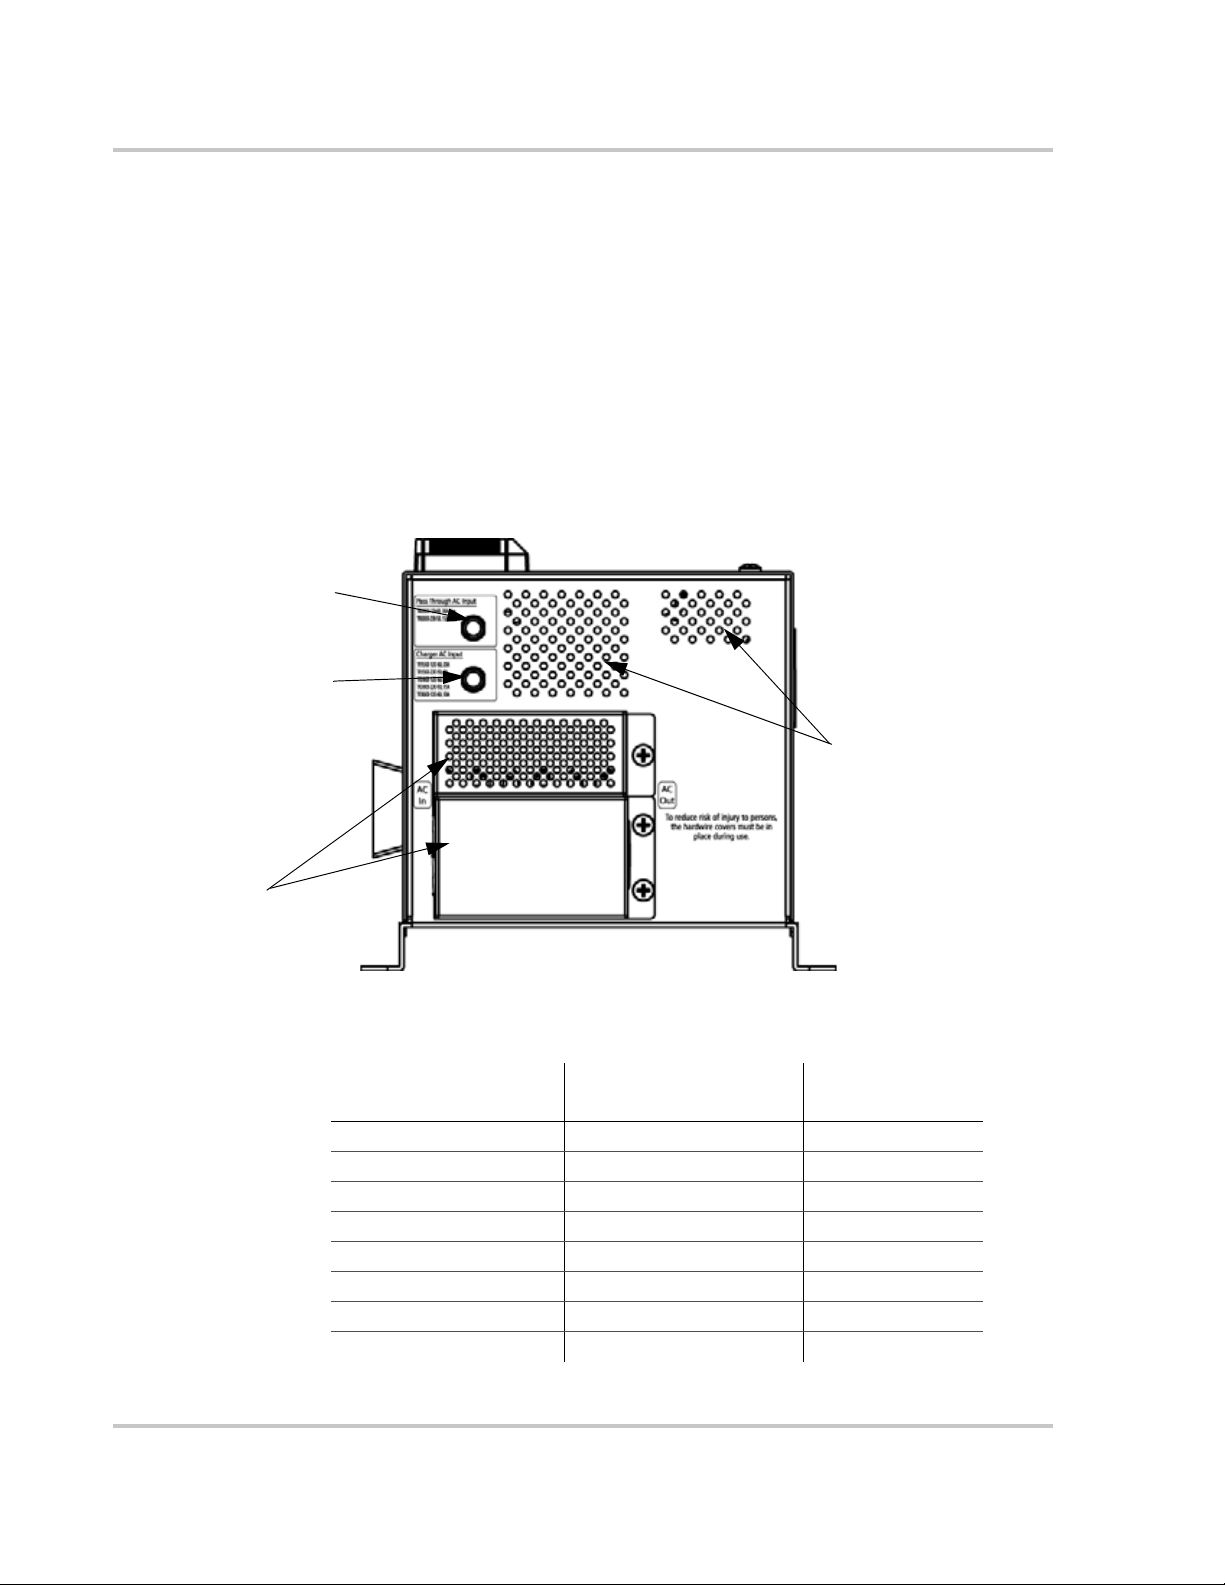
DC Side
COM Port
Battery Positive
(+) Terminal
Ventilation Holes
Ground Lug
Battery Negative
(–) Terminal
Battery Temperature
Sensor Port
Features
The DC side of the Xantrex TR Serie s has the e quipment gr o und lug, the p ositive
(+) battery terminal, and the negative (–) battery terminal plus the COM port and
battery temperature sensor port.
Figure 1-3 DC Side of the Xantrex TR Series
Optional Equipment
The following options are available for the Xantrex TR Series Inverter/Chargers.
Remote ON/OFF Switch
The XANTREX TR RS ON/OFF SWITCH (manufacturer part number: 989-1060) allows
the inverter to be switched
indicator.
DC Conduit Box
The XANTREX TR CB (manufacturer part number: 98 9-1050) connects to the DC
side of the inverter and accepts a DC conduit run.
ON or OFF remotely and includes an LED status
975-0391-01-01 1–5

1–6

2 Operation
Chapter 2, “Operation” contains information
about how to operate the Xantrex TR Series
Inverter/Charger.

Operation
ON/STANDBY Switch
Invert Mode Indicator Light
Charge Mode Indicator Light
Battery Level Switch
Fault Indicator Light
Battery Level Indicator Light
Equalize Mode Pin-Hole Switch
Display Screen
Front Panel
User Interface
The front panel of the Xantrex TR Series is equipped with a user interface,
comprised of indicator lights and a display screen to provide inverter/charger
status at a glance.
The front panel is also equipped with a contr ol interface behind an ac cess panel
intended for set-up and service use only.
Below the display screen there is a pin-hole type push button to transition the
Xantrex TR Series into battery equalize mode.
Figure 2-1 Front Panel User Interface
2–2 975-0391-01-01

Front Panel
User Interface Item Description
ON/STANDBY Switch Press to transition the Xan trex TR Series from OFF mode to ON. Xantrex TR
Series restarts in invert mode (if only DC power present) or charge mode
(AC and DC power present).
Press to transition the Xantrex TR Series from any stage of charge mode,
invert mode or standby mode to
OFF.
Press to clear faults and warnings.
Press during low battery warning to disable the ODP during ODP-enabled
low battery warning. (see “Over Discharge Protection (ODP)” on page 2–8).
Display Screen Displays the power in kW when the Xantrex TR Series is in invert mode.
Displays the current in Amps when the Xantrex TR Series is in charge
mode.
Displays the battery level in % when the battery level switch is pressed.
Alternately flashes the warning code and either power or current
(depending on mode) when there is an active warning (see Table 3-1 on
page 3–2).
Displays the fault code when there is an active fault (see Table 3-1 on
page 3–2).
Displays “---” when the Xantrex TR Series is in standby mode (charge
mode indicator light is solid green) or when the Xantrex TR Series is
OFF
(charge mode indicator light is not illuminated).
Displays “---” when the Xantrex TR Series has been manually transitioned
to
OFF Mode from charge mode (charge mode indicator light is not
illuminated).
Display is blank when the Xantrex TR Series has been manually
transitioned to
OFF Mode from invert mode (no indicator lights are
illuminated).
Invert Mode Indicator Light Indicator light is illuminated when the Xantrex TR Series is in invert mode.
Indicator light is flashing when the Xantrex TR Series is load sensing.
Indicator light is off when the Xantrex TR Series is in charge mode.
Indicator light is off when the Xantrex TR Series has been manually
transitioned to
OFF Mode.
975-0391-01-01 2–3

Operation
User Interface Item Description
Charge Mode Indicator Light Indicator light is illuminated orange when the Xantrex TR Series is in the
bulk stage of charge mode.
Indicator light is flashing orange when the Xantrex TR Series is in the
absorption stage of charge mode.
Indicator light is illuminated green when the Xantrex TR Series is in the float
stage of charge mode or when the unit is in standby mode (i n this case the
display shows
“---” instead of the current in Amps).
Indicator light is illuminated red when the Xantrex TR Series has entered an
equalize cycle but is in the bulk or absorption stage of the cycle.
Indicator light is flashing red when the Xantrex TR Series has entered an
equalize cycle and is currently equalizing the batteries.
Indicator light is off when the Xantrex TR Series is in invert mode.
Indicator light is off when the Xantrex TR Series has been manually
transitioned to
OFF Mode.
Equalize Mode Pin-Hole
Switch
Press for at least 5 seconds, using a paper clip, to transition the Xantrex
TR Series into equalize mode (see “Equalize Charging” on page 2–13).
During equalize mode press for at least 5 seconds, using a paper clip, to
cancel equalization.
Battery Level Switch Press to show the current battery level in % on the display screen.
Battery Level Indicator Light Indicator light is illuminated when the battery level switch is being pressed.
Fault Indicator Light Indicator light flashes red when the Xantrex TR Series has entered a
warning condition.
Indicator light is illuminated red when the Xantrex TR Series has entered a
fault condition.
Audible Alarm Beeps when any of the front panel switches are pressed.
Beeps when the battery temperature sensor is plug ged in.
Beeps at 1 second intervals in the event of a warning
Beeps continuously in the event of a fault (pr ess
ON/STANDBY switch to
clear the fault and stop the audible alarm).
2–4 975-0391-01-01
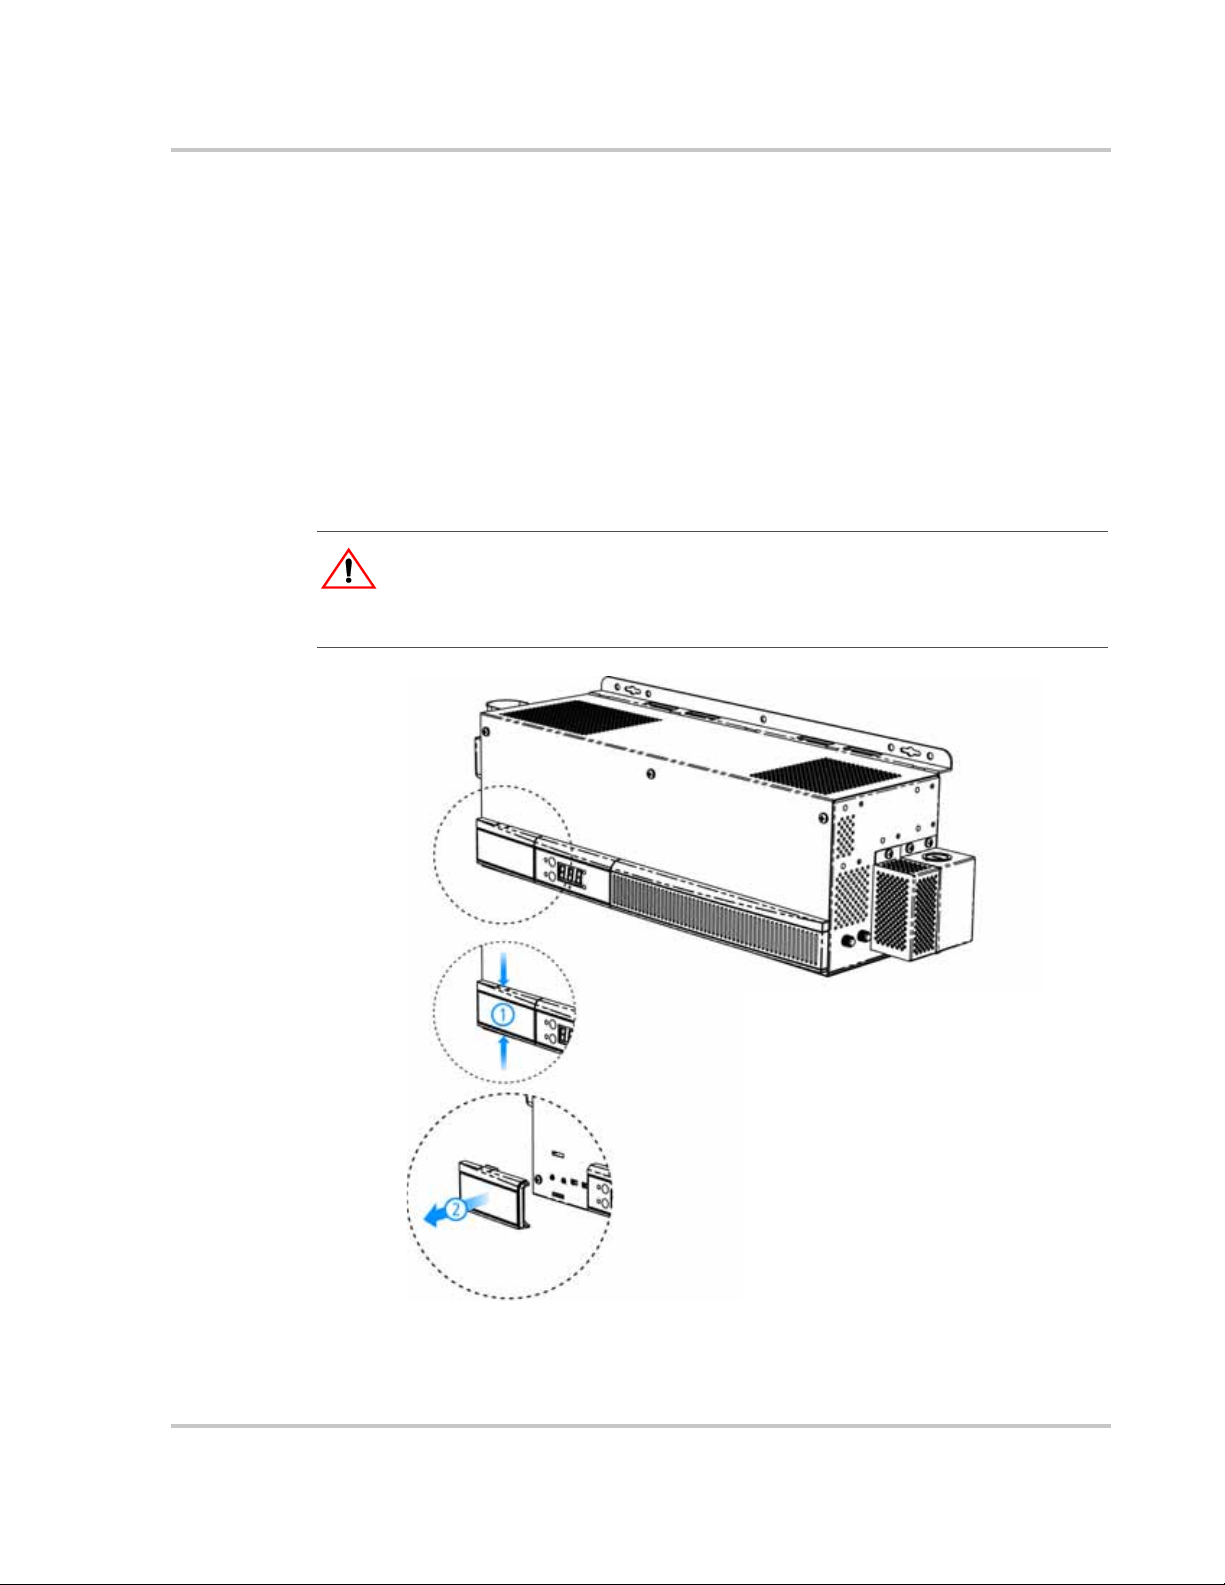
Service Control Interface
There are several service controls on the inverter’s front panel, beneath the
service access panel, that provide adjustments for the battery charger to
accommodate battery type and size, AC input stability and energy saving
preferences. These controls are intended for service users only and should be
set once during initial setup.
To remove the service access panel:
1. Squeeze the two tabs on the sides of the service access cover (➀ in Figure 2-2).
2. Pull the cover off to allow access to th e control interface (➁ in Figure 2-2).
3. Replace the cover after initial setup.
WARNING: Fire hazard
The service access panel must always remain in place d uring unit operat ion and
should always be replaced following servicing.
Front Panel
Figure 2-2 Removing the Service Access Cover
975-0391-01-01 2–5
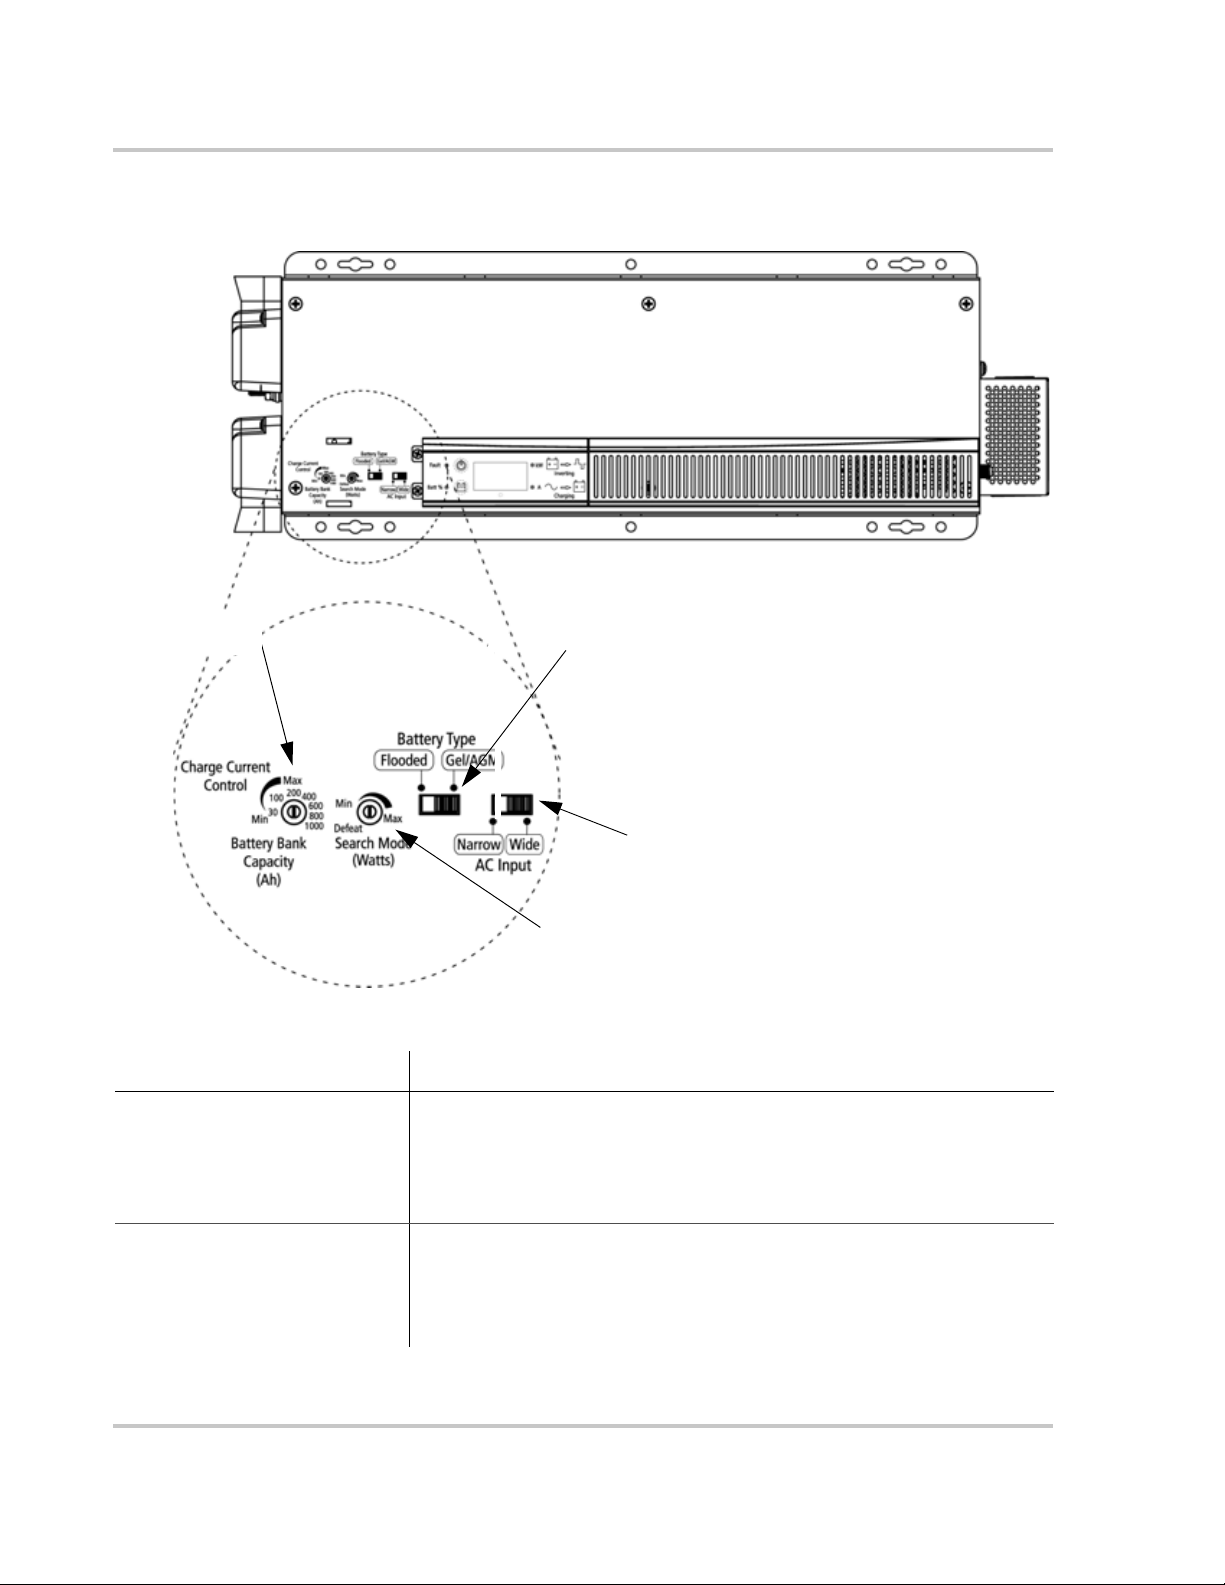
Operation
Inverter Mode Controls
(Search Watts)
Battery Type Selector
AC Input Selector
Battery Bank
Capacity Selector
Once the service access panel is removed, the service co ntrols may be mo dified
to suit the specific configuration.
Figure 2-3 Front Panel Control Interface
Service Control Interface Item Description
AC Input Selector Move the 2 position slide switch to set either narr ow or wide AC input.
Battery Type Selector Move the 2 position slide switch to set either flooded batteries or
2–6 975-0391-01-01
Choose the narrow selection for a more normal range of AC sources,
down to 95 Vac (180 Vac for 230 Vac/50 Hz units). Choose the wide
selection if you need to accept an extr emely low AC source, down to
65 Vac (120 Vac for 230 Vac/50 Hz units).
gel/AGM batteries. See caution note below.
During equalize mode, move the switch briefly to gel/AGM and back to
Flooded to cancel the equalization.
Front Panel
Service Control Interface Item Description
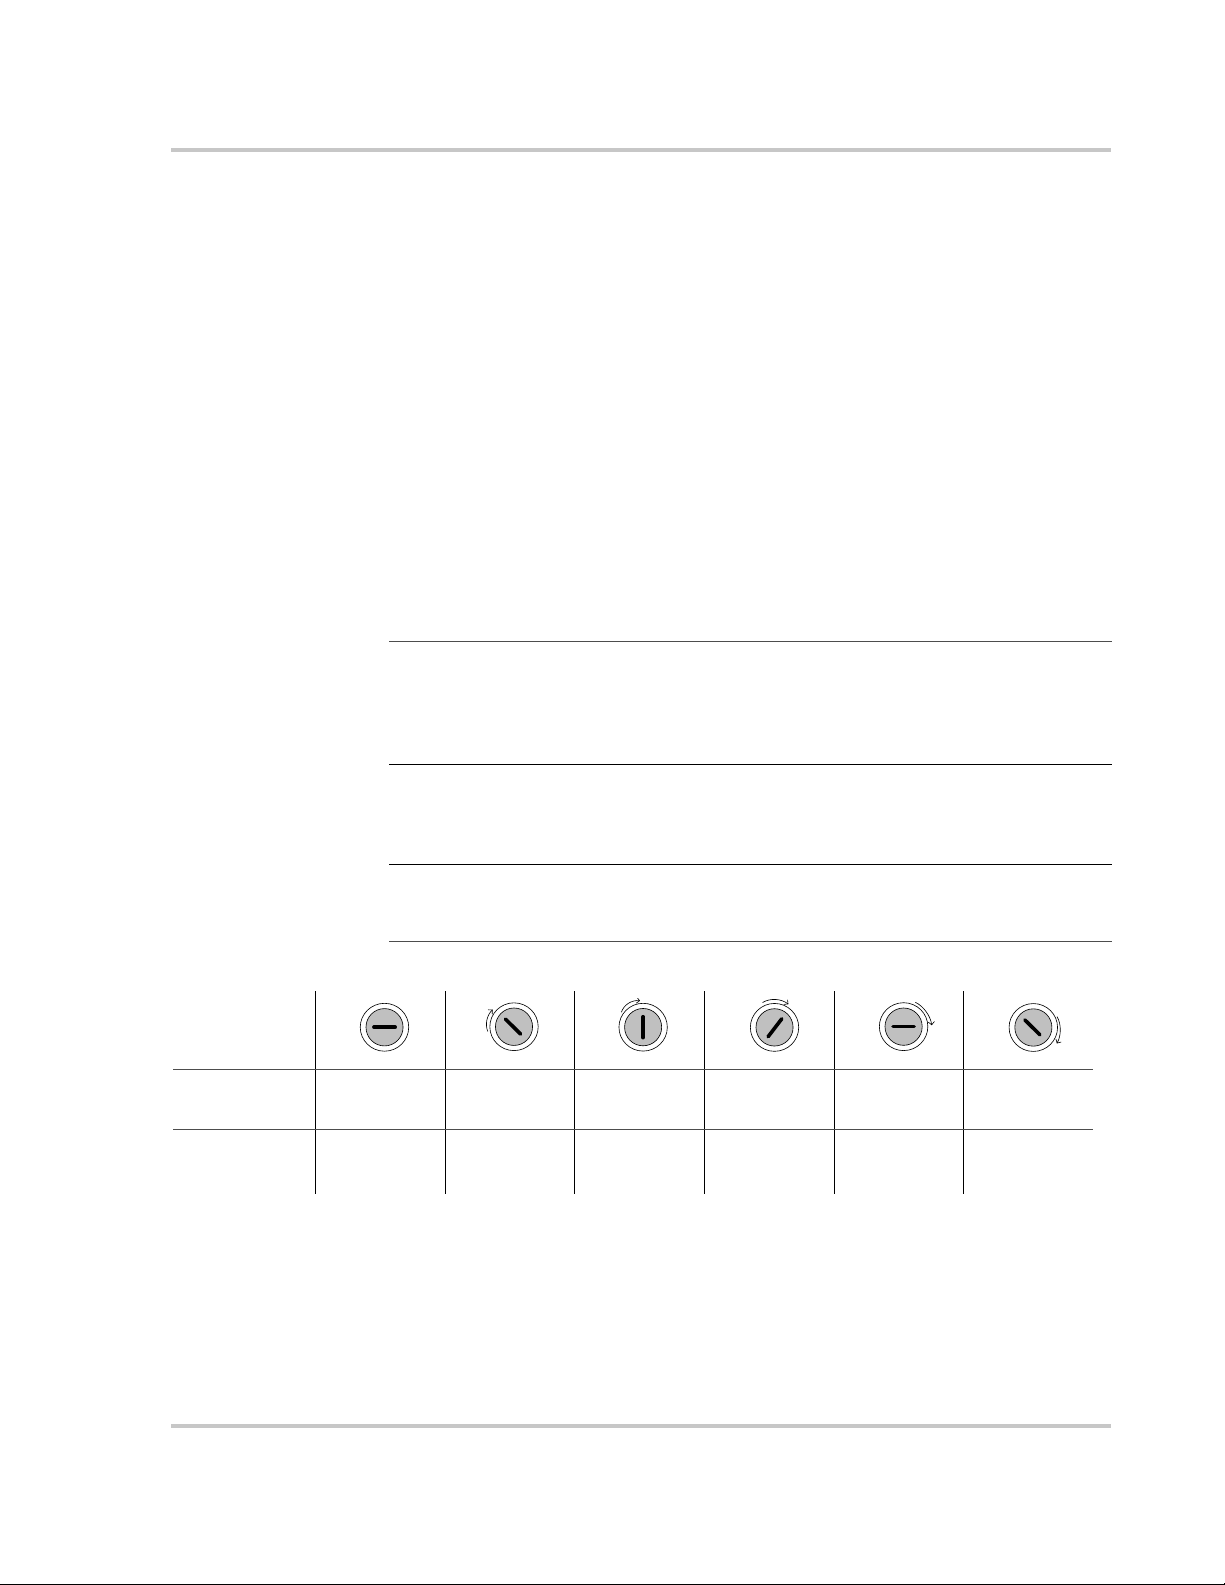
Search Mode Potentiometer Use a small jeweller's style flat-head screwdriver to adjust the current
threshold required to bring the inverter out of search mode into full
inverter operation.
With search mode enabled, the inverter minimizes energy consumption
by pulsing the AC output looking for an applied load, rather than
remaining at full inverter operation when there is no load. Disabling the
threshold by setting the potentiometer fully counter-clockwise to the
Defeat setting causes the inverter to remain on (in full power operation)
even when there is no applied load.
See “Setting the Search Mode Threshold” on page 2–9.
Battery Bank Capacity Selector/
Charge Current Control
CAUTION: Equipment damage
Batteries requiring different charging voltages than the Xantrex TR Series
provides may be damaged if used with this unit. Cr o ss- reference the information
in Table 2-1 with the information provided with your battery.
Use a small jeweller's style flat-head screwdriver to adjust t he
potentiometer to match the Ah of your batte ry bank. The setting allows
the inverter to calculate the over-discharge protection values and also
the transition criteria between Bulk, Absorption and Float stages of
charge mode.
The potentiometer should be adjusted as close as possible to the
actual capacity of the battery bank for optimum charging. If your bank
is greater than 1000 Ah, then set the potentiometer to 1000 Ah.
When set at 200 Ah or above, the charge current control is
automatically at maximum. For settings betwe en 30 Ah and 200 Ah, the
charge current is linearly determined between 14% and 100% of the
maximum charge rate.
Important: If using dual inverters configurations, set each charger for
half the value.
Table 2-1 Battery Charge Profiles
Bulk/
Absorption Equalize Float
Profile Description
Flooded Flooded lead acid 14.6 29.2 16 32 13.4 26.8
Sealed Gel/AGM lead acid 14.1 28.2 N/A N/A 13.5 27.0
975-0391-01-01 2–7
12V 24V 12V 24V 12V 24V
Operation
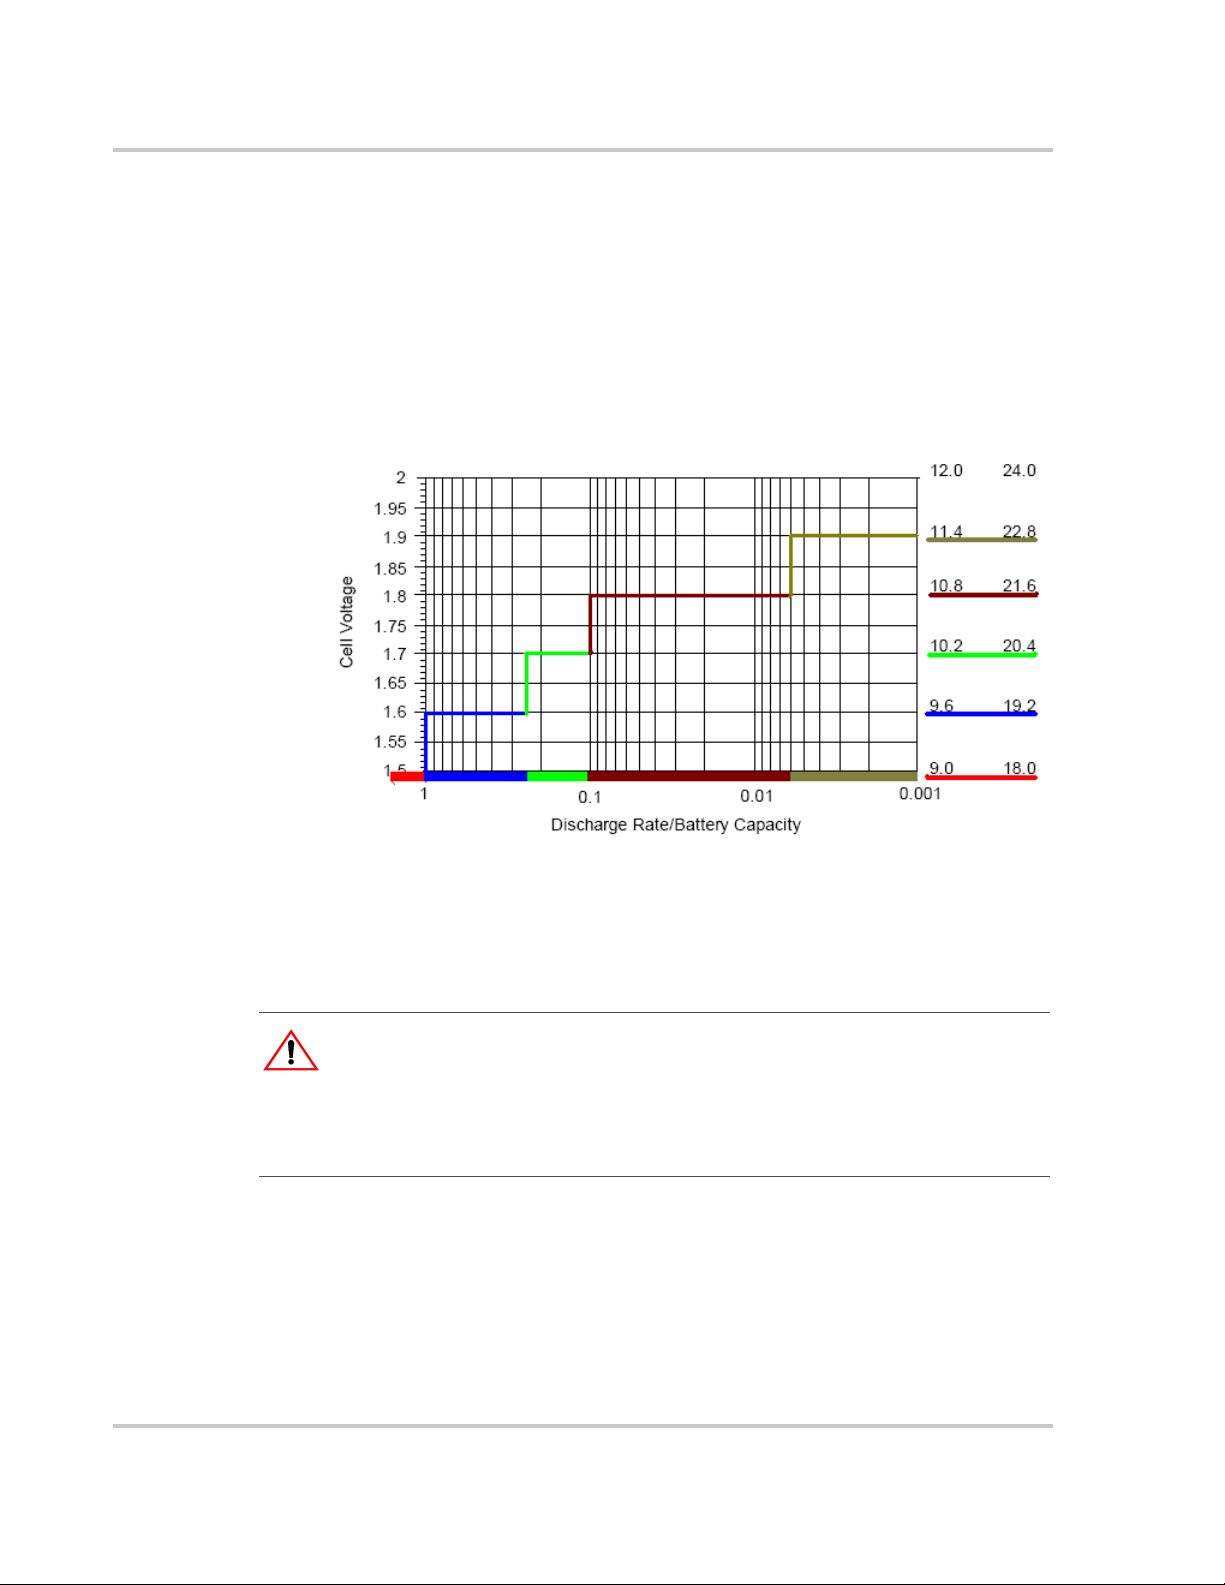
Over Discharge Protection (ODP)
Over discharge protection shuts down the inverter at a specified voltage (low
battery cutoff) to protect the batteries from over discharge damage. ODP is
automatically enabled on the Xantrex TR Series unit. The inverter circuitry
calculates the lowest (safe) DC voltage (leaving approximately 30-40% battery
capacity) based on the position of the Battery Capacity Knob and the amount of
load current on the inverter’s output. With a higher load, the inverter’s calculation
decreases the low cutoff. With higher battery capacity, it increases the cutoff.
Under no-load conditions, this level is typically between 11.8 and 12.0 Vdc (for a
12-volt battery bank).
Figure 2-4 Automatically Calculated Discharge Cutoff Voltage per Cell
In the event of a low battery warning (), the ODP may be temporarily disabled
by pressing the
until the batteries reach the default low battery threshold or until the user
manually stops inverting and charges the battery.
ON/STANDBY switch. This enables the unit to continue functioning
CAUTION: Battery damage
Allowing a battery to reach the default low battery threshold is not r ecommended
and may damage the battery. Schneider Electric recommends that if you disable
the ODP, you stop inverting and charge the battery before the default low
battery warning.
If the Xantrex TR Series turns itself of f (i f the warning has pr ogr essed to a fault) or
if the user manually stops inverting, the ODP will be automatically re-enabled as
soon as the unit is in invert mode again. With ODP enabled, the Xantrex TR
Series will restart at a battery voltage of 12.5 V (12 V units) or 25 V (24 V units).
With ODP disabled, the Xantrex TR Series will restart at a battery voltage of
11.5 V (12 V units) or 23 V (24 V units).
2–8 975-0391-01-01
Setting the Search Mode Threshold
Defeat
Min
Max
Defeat
Min
Max
Defeat
Min
Max
Defeat
Min
Max
Defeat
Min
Max
Defeat
Min
Max
To set the Search Mode Watts:
1. Remove the AC input source fro m the inverter. The inverter switches to
battery operation. Ensure all inverter supported appliances are switched
OFF.
2. Turn the potentiometer completely clockwise (to MAX).
3. Switch on the load which will trigger the inverter to full power . This could be a
lamp located in a convenient location if the power goes out. The light may
flicker as the inverter searches the line for a load. The invert mode indicator
light blinks 2-3 times a second, indicating the inverter is in Search Mode.
4. Slowly turn the potentiometer counter-clockwise (toward MIN) when the
proper setting is found, the lamp and the invert mode indicator light will
illuminate.
5. Turn the lamp OFF for a moment. The inverter should switch back to Search
Mode. Turn the lamp ON. Ensure the inverter comes out of Search Mode.
Adjust the potentiometer up or down as necessary.
Important: The Search Mode only activates when the unit is operating in invert
mode (from batteries) to prevent unnecessary battery discharge when electrical
power is not required. If the inverter is supporting loads that must constantly be
powered, turn the search mode OFF by setting the potentiometer fully counterclockwise (CCW) to the DEFEAT position.
Important: Some loads constantly draw power even though they are switched
OFF, such as TVs with instant-ON circuits, microwaves with digital displays,
VCRs. It is best to operate these devices from another circuit, install a switch to
turn these OFF completely or don’t use the Search Mode.
Important: When the Search Mode is used with series stacked inverters, only
120 Vac loads connected to the “master” inverter will bring the unit out of the
search mode.
Front Panel
Potentiometer
Setting
120 V Model
Disabled 5W 30W 60W 120W 240W
Load Setpoint
230 V Model
Disabled 10W 60W 120W 240W 480W
Load Setpoint
975-0391-01-01 2–9

Operation
With the settings here, a lower wattage
device turns inverter ON
With the settings
here, a higher
wattage device
turns inverter ON
DEFEAT Switches
Search Mode OFF
Figure 2-5 Search Mode Potentiometer Adjustment
Stacking Interface
Important: Only 120 Vac/60 Hz units can be used in a stacked configuration.
Whenever two Xantrex TR Series inverters are used in a series (stacked)
configuration, one unit (primary) controls the other unit (secondary). Which ever
unit is switched ON becomes the primary and automatically switches on the
secondary inverter and ensures the secondary’s output is 180° out of phase for
240 Vac opera tion. Both units can charge the batt eries or provide battery backup
power during a utility outage.
To operate stacked inverters:
1. Switch on the inverter designated as primary or INVERTER 1 (L1).
2. The inverter designated as secondary or INVERTER 2 (L2) will automatically
turn on.
The inverter should be providing 120 VAC/240 VAC to the sub-panel.
The stacked inverter system is now ready for use.
Once stacked, the Xantrex TR Series units will operate the same as a single unit.
In the event of an error, both units will shut down and the individual unit with the
error will show the error code on the front panel display.
Remote Control
Xantrex TR Series ar e designed to operate with a XANTREX TR RS ON/OFF SWITCH
remote control unit. The remote incorporates a membrane switch with a single
red indicator light display combinatio n to start and stop the inverter, and provides
overall system operating status. Refer to the manual shipped with t he X
RS
ON/OFF SWITCH for indicator light flash sequences and how to interpret them.
The remote control must be con nected prior to switching the inverter
otherwise, the micro-controller will not recognize (or r espond to) the remote. If the
remote is not recognized , switch the inverter to
inverter’s front panel
ON/STANDBY switch.
2–10 975-0391-01-01
STANDBY and then ON using the
ANTREX TR
ON;

Start-up
Start-up
Once the inverter is properly connected to the batteries, AC source, and loads
(using a sub-panel) the inverter is ready for operation. Recheck the controls and
ensure they are in the proper position. Recheck all wiring and ensure it is correc t.
Starting the inverter:
1. Apply DC power to the inverter by switching on the DC disconnect circuit
breaker and then pressing the
through a self-test.
• each of the indicator lights will flash in sequence
• the cooling fan will turn on momentarily
• the transfer relay will switch
• the temperature sensors will be checked for open or short circuit
2. After the self-test the unit will start inverting.
3. Apply AC power to the inverter.
4. The inverter starts charging the batteries in the Bulk mode, indicated by the
Charge Mode indicator light illuminating orange. It takes about 15 seconds
for the unit to transition fr om invert mode to charge mode after the application
of qualified AC.
5. Using a true RMS AC voltmeter, check the output voltage of the inverter. This
voltage can be checked at either the AC terminal block or in the sub-panel
(between the line and neutral). The voltage should be appr oximately 120 Vac
(120 Vac/50 Hz models) or 230 Vac (230 Vac/60 Hz models).
6. Switch the AC disconnect circuit breaker to OFF. The inverter will go into
invert mode (if a sufficient load is applied to the AC output while in the search
mode). The Invert Mode indicator light will illuminate indicating the inverter is
active. The voltage on the AC output of the inverter will remain the same as
above (± 5% maximum) except ~104 Vac under no load conditions for power
savings or ~207 Vac under no load conditions for power savings for
230 vac/60Hz models. (Non-true RMS meters probably will not measure
accurately).
ON/STANDBY switch once. The inverter will go
Important: If the inverter is in Search Mode and a sufficient load is not available
to bring the inverter up to full voltage, turn the Search Mode potentiometer fully
counter-clockwise to defeat the search function.
7. Reapply the AC power by switching the AC disconnect to ON. Allow the
batteries to fully recharge.
Important: The unit will not use renewable energy for AC output as long as AC
input (utility or generator) is available to the inverter.
975-0391-01-01 2–11

Operation
Charge Mode
3-Stage Charging Process
The charging cycle uses a 3-stage charging process to maintain the batteries.
Whenever nominal AC is present at the inverter’s input and the inverter is on, it
passes power through to the connected load and begins charging the batteries,
indicated by the Charge Mode indicator light.
Bulk Charge
Bulk charge is the first stage in the charging process and provides the batteries
with a controlled, constant current. The Charge Mode indicator light is illuminated
orange. Once the battery voltage rises to the bulk voltage thr esho ld, th e ch arger
then switches to the absorption mode.
Absorption Charge
Absorption charge is the second stage of battery charging and provides the
batteries a controlled, constant voltage. The Charge Mo d e indica to r lig ht is
flashing orange.
During this stage the current supplied to the batteries slowly decreases. When
the current equals the programmed return amps value (5% of the battery
capacity setting) set with the Battery Bank Capacit y pote nt iom ete r, the charger
switches to the third stage–float.
Important: If there are DC loads connect ed to the batte ry, the current may never
decrease to the level to initiate the float stage. The inverter/charger incorporates
a timer circuit which starts counting when AC voltage is applied. The length of
time is variable based on the amp-hours of the battery bank connected. To
ensure that the charger does not stay ind efinitely in the absorptio n charge mode,
the timer automatically switches to the float charge mode.
Float Charge
Float charge, the final stage of battery charging, maintains a charge to the
batteries for 1 hour as long as AC is present on the inverter’s input. Float
charging reduces battery gassing, minimizes watering r equirements (for flooded
batteries) and ensures the batteries are in a constant state of readiness. The
Charge Mode indicator light is illuminated green.
After 1 hour at float charge, the Xantrex TR Series will transition to Standby Mode.
2–12 975-0391-01-01

Standby Mode
OFF Mode
Charge Mode
The Xantrex TR Series will transition to the Standby (charger OFF) Mode after 1
hour in the float stage. In standby, the Charge Mode indicator light is solid green
and the display screen shows "---".
A new charge cycle will be initiated if the battery voltage drops below 12.5 Vdc
(for 12 V models) or 25 Vdc (for 24 V models) while in Standby Mode. You can
manually initiate a new charge cycle while in Standby Mode by pre ssing the
ON/STANDBY switch once, to transition the Xantrex TR Series to OFF, then pressing
the
ON/STANDBY switch again.
If qualified AC power becomes not available while the Xantrex TR Series is in
Standby Mode, it will automatically transition to Invert Mode and begin taking
power from the batteries.
You can manually transition the Xantrex TR Series to OFF while in Standby Mode,
Invert Mode or any stage of Charge Mode by pressing the
once. In
OFF Mode, no indicator lights are illuminated and the display screen
ON/STANDBY switch
shows "---" if qualified AC is present, or the display screen is blank if qualified AC
is not present.
In
qualified AC power becomes not available while the Xantrex TR Series is in
Mode, it will not automatically transition to Invert Mode. You can manually initiate
a new charge cycle or initiate inverting while in
ON/STANDBY switch once.
Equalize Charging
Equalize charging is a special mode of battery charging. During use, the
battery's cells can become unequal in the voltage and current they can deliver,
which effects the run time. Equalizing stirs up the electrolyte, distributing the
acid, and removing the sulfate from the plates. Equalizing the batteries every
month or two (depending on usage) prolongs the life of the batteries and
provides better battery performance.
The Xantrex TR Series will enter a Bulk and Absorption cycle first, before
transitioning to Equalize Mode. Once the Xantrex TR Series transitions to an
equalize cycle, and until the equalize voltage (16.0Vdc/32.0Vdc) is reached, the
charging current is determined by the battery Ah set-point as described on
page 2–7. After reaching the equalize voltage, the equalize cycle will continue for
one hour equalizing batteries at a constant voltage (16.0Vdc/32.0Vdc). The
Charge Mode indicator light is illuminated solid red during Bulk and Absorption
of an equalize cycle and is flashing red during Equalize Mode.
If the batteries are successfully equalized, the Xantrex TR Series will switch to
Float Mode and continue with normal operation.
OFF Mode the Xantrex TR Series passes-through qualified AC voltage only; if
OFF
OFF Mode by pressing the
975-0391-01-01 2–13
Operation
If the equalize voltage set-point is not reached within an hour of the equalize
cycle starting, the Xantrex TR Series will switch to Float Mode and continue with
normal operation while displaying the Failed to Equalize Warning (). This
code is only a warning that never transitions into a fault mode. It is active until it is
cleared by pressing the
equalize the batteries, try another Equalize Cycle and if it fails to equalize again
check and replace your batteries as needed.
ON/STANDBY switch once. If the Xantrex TR Series fails to
CAUTION: Explosion Hazard
Only unsealed or vented batteries should be equalize charged. On ly flooded
batteries (not gel/AGM batteries) can be equalized. Since Hydr oge n and oxygen
gases are produced when equalized, provide adequate ventilation and remove
all sources of ignition to pr event explos ion. Remove DC loads while equalizing as
they can be damaged by the higher battery voltage.
To transition the Xantrex TR Series to Equalize Mode:
1. Remove all DC loads connected to the batteries.
2. Ensure the Battery Type Selector switch is set to flooded (see Figure 2-3 on
page 2–6).
3. Remove all battery vent caps.
4. Check the battery water level, it should be just over the top of the plates (do
not overfill). Use only distilled water for filling batteries.
Important: Recheck the water level after equalize charging and refill if
necessary.
5. Press the Equalize Mode pin-hole type switch fo r at le ast 5 seco nds, using a
paper clip or something similar, to put the Xantrex TR Series into equalize
mode.
If another equalize cycle is required af ter equalization has finish ed, pres s the
Equalize Mode switch again for 5 seconds.
Important: See the Schneider Electric website for the Applic ation Note titled
“Battery Banks for Inverter Systems” for additional information on battery care
and maintenance.
To cancel Equalize Mode:
1. Press the Equalize Mode pin-hole type switch fo r at le ast 5 seco nds, using a
paper clip or something similar.
or
2. Move the Battery Type Selector Switch briefly to gel/AGM and then back to
flooded.
2–14 975-0391-01-01

3 Troubleshooting
Chapter 3, “Troubleshooting” contains
information about how to troubleshoot possible
error conditions while using the Xantrex TR
Series Inverter/Charger.

Troubleshooting
Troubleshooting the Xantrex TR Series
Table 3-1 shows the possible error codes on the display screen and the
description of the fault or warning.
Table 3-2 provides a list of possible erro r conditions that may occur, their
possible causes, and possible solutions to resolve the error condition.
When the Xantrex TR Series is in Warning status, the Fault LED is flashing red,
the audible alarm is beeping at one second intervals and the display is
alternately showing the error code an d the power or curr ent (depending on Invert
or Charge mode of the inverter).
When the Xantrex TR Series is in Fault status, the Fault LED is solid red, the
audible alarm is beeping continuously and the display is continuously showing
the error code.
If the reason for the error is corrected while the Xantrex TR Series is still in
Warning status, not Fault status, then the unit will automatically clear the warning
and restart. If the error has progressed to Fault status then the unit will shut down
and will have to be manually restarted.
To clear a fault and restart the unit:
1. Press the
2. Press the
Table 3-1 Error Codes
Error
Code
Fault Fan is locked or disconnected. This is a mechanical blockage of
Warning The Xantrex TR Series is over heating. Unit is still
Fault The warning has persisted until it has become
Fault or
Warning Description Solution
functioning, but if the over heating is not correc ted
in 40 seconds the warning will become a fault.
a fault. The Xantrex TR Series has stopped
inverting or charging and is waiting to cool down
before automatically restarting.
ON/STANDBY switch once to clear the error.
ON/STANDBY switch again to manually turn the Xantrex TR Series on.
the fan. Ensure the Xantrex TR
Series is fully
inspect for foreign objects
lodged in the fan and remove as
necessary. Manually restart unit.
If condition persists, contact
your authorized service centre.
Allow the Xantrex TR Series to
cool. Improve ventilation ar o und
the unit or install in a cooler
location.
Allow the Xantrex TR Series to
cool. Improve ventilation ar o und
the unit or install in a cooler
location.
OFF. Carefully
3–2 975-0391-01-01

Table 3-1 Error Codes
Troubleshooting the Xantrex TR Series
Error
Code
Warning The Xantrex TR Series has not detected a battery
Fault The battery temperature sensor connected to the
Fault
Fault or
Warning Description Solution
temperature sensor during startup test. After 5
seconds, this warning will automatically clear.
The battery temperature sensor connected to the
Xantrex TR Series has an error. Normal inverting
and charging is not affected by this warning. The
Xantrex TR Series will continue the charge cycle
using the last known temperature reading, then it
will continue at the default temperature of 25 °C
(77 °F).
Xantrex TR Series has detected a temperature
outside of the safe operating temperatur e of -20 °C
– 60 °C (-4 °F – 140 °F).
Xantrex TR Series AC transfer relay has failed.
Either connect a battery
temperature sensor, or be aware
or the impact of not using one.
Press the
once to clear fault.
Check the battery temperature
sensor connections and replace
the battery temperature sensor if
necessary.
Xantrex TR Series has shut
down for safety reasons.
Check the batteries and adjust
location/ventilation of the
batteries.
Manually restart unit.
Xantrex TR Series has shut
down for safety reasons.
Manually restart unit.
ON/STANDBY switch
If condition persists, contact
Schneider Electric for service.
Warning The electrical devices connected to the AC output
of the Xantrex TR Series have exceed ed the power
rating of the unit (either too many devices, or
devices with too high power consumption). Unit is
still functioning, but if the over load does not
self-corrected in 10 seconds the warning will
become a fault.
Fault The Warning has persisted until it has become
a fault. The electrical devices connected to the AC
output of the Xantrex TR Series have exceeded the
power rating of the unit (either too many devic es,
or devices with too high power consumption).
975-0391-01-01 3–3
No action required, warning is in
place to prevent shutdown in the
event of a quick, self-corrected
power surge.
Check the power rating of
connected electrical devices.
Remove electrical devices until
the combined power
consumption is less than the
power level of your Xantrex TR
Series (see the table on
page iv). Manually restart unit.

Troubleshooting
Table 3-1 Error Codes
Error
Code
Fault or
Warning Description Solution
Warning The Xantrex TR Series has been short circuited at
the AC output. Unit is still functioning, but if the
short circuit does not self-corre ct ed in 10 seconds
the warning will become a fault.
Fault The warning has persisted until it has become
a fault.
Fault The AC side of the Xantrex TR Series is attempting
to backfeed to the AC grid as the result of another
fault.
Warning At least one connected battery has dropped below
the ODP threshold set. Unit is still functioning, but if
the low battery is not corrected in 60 seconds the
warning will become a fault.
No action required, warning is in
place to prevent shutdown in the
event of a quick, self-corrected
short at the inverter outp ut.
Check connected loads for short
circuits. This condition is also
present in case of extreme
overloading (i.e. when load
requires more than 200% of the
rated output current).
Xantrex TR Series has shut
down for safety reasons.
Manually restart unit. If condition
persists, contact Schneider
Electric for service.
Charge batteries.
Reduce AC load.
or
Press the
ON/STANDBY switch
once during the 60 second
warning to temporarily disable
the ODP (see “Over Discharge
Protection (ODP)” on page 2–8.
Fault The warning has persisted until it has become
a fault. At least one connected battery has
dropped below the ODP threshold set.
Charge batteries
or
Remove all electrical devices
taking power from the unit.
Manually restart unit in Charge
Mode.
Warning Active only when ODP has been disabled.
At least one connected battery has dropped below
the default low battery threshold. Unit is still
Charge batteries.
Reduce AC load.
functioning, but if the low battery is not corrected in
30 seconds the warning will become a fault.
3–4 975-0391-01-01

Table 3-1 Error Codes
Troubleshooting the Xantrex TR Series
Error
Code
Fault Active only when ODP has been disabled.
Warning Input voltage from a connected battery (or a
Fault The warning has persisted until it has become
Fault or
Warning Description Solution
The warning has persisted until it has become
a fault. At least one connected battery has
dropped below the default low battery threshold.
combination of batteries in the bank) is too high for
the Xantrex TR Series (battery voltage goes above
15.5 V for 12 V units, or above 31 V for 24 V units).
Unit is still functioning, but if the high battery does
not self-corrected in 5 seconds the warning will
become a fault.
a fault. Input voltage from a connected battery (or
a combination of batteries in the bank) is too high
for the Xantrex TR Series (battery voltage goes
above 15.5 V for 12 V units, or above 31 V for 24 V
units).
Charge batteries
or
Remove all electrical devices
taking power from the unit.
Manually restart unit in Charge
Mode.
No action required, warning is in
place to prevent shutdown in the
event of a quick, self-corrected
power surge.
Measure the total equivalent
battery voltage and replace or
remove any that exceed the
battery bank size requirements
of your Xantrex TR Series (see
the table on page iv). Manually
restart unit.
Warning The AC output voltage has dropped below the AC
output voltage set points. Unit is still functioning,
but if the low voltage does not self-corrected in 120
seconds the warning will become a fault.
Fault The Warning has persisted until it has become
a fault.
Fault At least one connected battery is bad (battery
voltage has dropped below 8.5V during
charging).
Warning The DC output voltage has risen above the DC
output voltage set points. Unit is still functioning,
but if the high voltage does not self-correct ed in 30
seconds the warning will become a fault.
Reduce AC load and verify
battery input voltage.
If adjustment of load level does
not clear the warning, then no
further action is required,
warning is in place to prevent
shutdown in the event of a
quick, self-corrected issue.
Xantrex TR Series has shut
down for safety reasons.
Manually restart unit. If condition
persists, contact Schneider
Electric for service.
Check all batteries and replace
any faulty ones. Manually restart
unit.
No action required, warning is in
place to prevent shutdown in the
event of a quick, self-corrected
issue.
975-0391-01-01 3–5

Troubleshooting
Table 3-1 Error Codes
Error
Code
Fault The Warning has persisted until it has become
Fault or
Warning Description Solution
Xantrex TR Series has shut
a fault.
down for safety reasons.
Manually restart unit. If condition
persists, contact Schneider
Electric for service.
Warning At least one battery did not reach the target
equalize set-point voltage during the 1 hour
equalization stage. Normal inverting and charging
is not affected by this warning.
Press the
once to clear the fault.
Check batteries and replace if
necessary.
Table 3-2 Troubleshooting the Xantrex TR Series
Error Condition Possible Cause Solution
Xantrex TR Series will not turn on
during initial power up.
No AC output voltage and no
indicator lights ON.
Batteries are not connected, loo se
battery-side connections.
Xantrex TR Series has been
manually transitioned to
OFF
mode.
Check the batteries and cable
connections.
Press the
transition back to Invert Mode
(only DC power present) or
Charge Mode (AC and DC
power present).
ON/STANDBY switch
ON/STANDBY switch to
AC output voltage is low and the
inverter turns loads ON and
OFF.
AC loads are receiving low
voltage.
Inverter output reads incorrectly
on volt meter.
Low battery. Check the condition of the
batteries and recharge if
possible.
Replace the batteries.
Loose AC output connections. Check all AC output
connections.
Non-true RMS meter will probably
not measure accurately.
Check the loads; if they are
functioning correctly then meter
reading is inaccurate.
Use a true RMS meter for
accurate reading if necessar y.
3–6 975-0391-01-01

Troubleshooting the Xantrex TR Series
Table 3-2 Troubleshooting the Xantrex TR Series
Error Condition Possible Cause Solution
Charger is inoperative and unit
will not accept AC.
Charger is supplying a lower
charge rate.
Charge mode indicator light:
AC voltage has dropped
out-of-tolerance
Loose AC input connections.
AC pass-through breaker on the
side of the inverter is open.
Charger controls are improperly
set.
Low AC input voltage
(120 Vac/230 Vac RMS required
for full charger output).
Loose or corroded battery
connections.
Loose AC input connections.
Charger AC input breaker on the
side of the inverter is open.
Check the AC voltage for proper
voltage and frequency
(depending on model). See
Appendix A, “Specifications”.
Check all AC output wiring
connections.
Reset AC pass-through breaker
(see Figure 1-2 on page 1–4 for
location).
Refer to the section on adjusting
the “Charger Rate”.
Repair or replace generator.
Check and clean all DC
connections.
Check all AC output wiring
connections.
Reset charger AC input breaker
(see Figure 1-2 on page 1–4 for
location).
- indicates charging, but no
charge is going to the batteries.
- is ON, but loads are not
receiving power.
Charger turns OFF while
charging from a generator.
Sensitive loads turn off
temporarily when transferring
between grid and inverting.
975-0391-01-01 3–7
Open AC output breakers or f uses
and AC wiring connections.
High AC input voltages from the
generator.
Inverter's 95 Vac/180 Vac transfer
voltage may be too low to sustain
certain loads. See Xantrex TR
Series Inverter/Charger
Installation Manual (Part #:
975-0367-01-01) and Appendix A,
“Specifications”.
If there is good AC voltage on
inverter's AC output terminal
block, then check for open AC
output breakers or fuses and AC
wiring connections.
Load the generator down with a
heavy load.
Turn the generator output
voltage down.
Unit cannot serve as an
uninterruptible power supply.
Install a UPS if possible.

Troubleshooting
Problem Loads
The inverter can drive most loads, however, there are special conditions that can
cause a load to behave differently than expected. The following describes some
of the common problems encountered when using an inverter.
WARNING: Fire Hazard
Transformerless Battery Chargers are not to be used with any model of the
Xantrex TR Series Inverter/Charger family. Connecting a transformerless battery
charger could result in a overheating condition and possibly a fire.
Ceiling Fans Most large diameter, slow turning fans run correctly, but generate more noise
than when connected to utility power. High speed fans tend to operate normally.
Cell Phones Some cellular telephones experience interference in the form of a clicking sound.
Computers and
Sensitive
Electronics
Consumer
Electronics
Clocks The inverter’s crystal controlled oscillator keeps the frequency accurate to within
Some computers and sophisticated electronics have power supplies that do not
present a load until correct line voltage is available. When this occurs, each unit
waits for the other to begin. This can usually be solved by plugging in an
additional load (such as a lamp) to bring the inverter out of its search mode or by
changing the search mode potentiometer to a lower set point or setting it to
defeat.
High starting surge for heavy loads will cause the inverter’s output to dip during
load start-up. Avoid using sensitive electronics, such as computers, during
heavy load start-up.
AM radios tend to pick up inverter noise, especially on the lower half of their
band.
High starting surge for heavy loads will cause the inverter’s output to dip during
load start-up. Avoid using sensitive electronics, such as computers, during
heavy load start-up.
a few seconds a day; however, external loads in the system may alter the
inverter’s output waveform causing clocks to run at different speeds. There may
be periods where clocks keep time and then mysteriously do not. This is
because most clocks do not draw enough power to trigger the load sensing
circuit. In order to operate, especially with no other loads present, the inverter’s
load sensing circuit will have to be defeated. Refer to the Operation/Search
Mode Watts.
Decreasing Loads If the amount of power a load draws decreases after it has been switched on
(such as with a small motor) and its current draw beco mes less than the load
sensing threshold, it will be turned alternately ON and OFF by the inverter. This
can usually be solved by plugging in an additional load (such as a lamp).
3–8 975-0391-01-01

Problem Loads
Dimmer Switches Most dimmer switches lose their ability to dim the lights when used with an
inverter and operate only in the fully ON or OFF position. Newer, microprocessor
controlled dimmers tend to work better in inverter applications.
Fluorescent Lights Some devices cannot be detected by the inverter’s load sensor and will not
operate. Small fluorescent lights ar e the most common example. Th is can usually
be solved by plugging in an additional load. Also, try turning the lamps AC plug
over.
Heavy Loads If the battery bank cannot delive r the necessary amperage to drive a heavy load,
the inverter will shut OFF. The battery voltage will then slowly rise back above the
low voltage threshold causing the inverter to resume operation. As soon as the
heavy load draws the batteries down, the cycle will continue unless the load is
reduced or an additional source of power is added.
High starting surge for heavy loads will cause the inverter’s output to dip during
load start-up. Avoid using sensitive electronics, such as computers, during
heavy load start-up.
Microwave Ovens Microwave ovens are sensitive to peak output voltages. The higher the voltage,
the faster they cook. Since the inver ter’s peak output voltage is dependent upon
battery voltage and load size, the microwave’s cook time may need to be
increased.
Printers Most inkjet type printers work well in inverter applications. Laser printers,
however , r equire hig h current for their fusing circ uit and are not recommended for
use with an inverter.
Rechargeable
Devices
Undersized Loads If the power consumed by a device is less than the inverter’s search mode
When first using a rechargeable device, mo nitor its temperatur e for 10 minut es to
ensure it does not become abnormally hot. Excessive heat will indicate that it is
incompatible with the inverter.
circuitry threshold, it will not run. This can usually be solved by plugging in an
additional load such as a 100 watt light bulb.
CAUTION: Equipment Damage
Some products can be damaged when used with modified sine-wave power. If in
doubt, check with the product’s manufacturer.
975-0391-01-01 3–9

3–10

A Specifications
Appendix A, “Specifications” contains
information about the electrical, environmental
and regulatory specifications of the Xantrex TR
Series Inverter/Charger.
• Table A-1 provides the electrical
specifications for the Xantrex TR Series
Inverter/Charger (120 Vac/60 Hz. models).
• Table A-2 provides the electrical
specifications for the Xantrex TR Series
Inverter/Charger (230 Vac/50 Hz. models).
• Table A-3 provides physical and
environmental specifications for all models
of the Xantrex TR Series Inverter/Charger.
• Information is also provided on the safety
and electromagnetic compatibility
specifications for the Xantrex TR Series
Inverter/Charger.

Specifications
Table A-1 Electrical Specificationsa - 120 Vac/60 Hz Models
Model
Xantrex
TR1512 120
60
Xantrex
TR2412 120
60
Xantrex
TR1524 120
60
Xantrex
TR2424 120
60
Xantrex
TR3624 120
60
AC Nominal Input Voltage 120 Vac 120 Vac 120 Vac 120 Vac 120 Vac
Maximum AC Input Voltage 140 Vrms 140 Vrms 140 Vrms 140 Vrms 140 Vrms
AC Input Low Transfer Voltage
65/95 V ac 65/95 Vac 65/95 V ac 65/95 Vac 65/95 Vac
(wide/narrow)
Frequency: (± 0.04% Crystal controlled) 60 Hz 60 Hz 60 Hz 60 Hz 60 Hz
Narrow Setting (Charge & Pass - through)
Wide Setting (Charge)
Wide Setting (Pass-through)
Maximum AC Input Current
Pass-through
Charging
Nominal AC Input Curr ent
Pass-through
Charging
b
55—64 Hz 55—64 Hz 55—64 Hz 55—64 Hz 55—64 Hz
55—68 Hz 55—68 Hz 55—68 Hz 55—68 Hz 55—68 Hz
41—68 Hz 41—68 Hz 41—68 Hz 41—68 Hz 41—68 Hz
50 Aac
30 Aac
20 Aac
40 Aac
28 Aac
12 Aac
60 Aac
30 Aac
30 Aac
48 Aac
26 Aac
22 Aac
50 Aac
30 Aac
20 Aac
40 Aac
28 Aac
12 Aac
60 Aac
30 Aac
30 Aac
48 Aac
26 Aac
22 Aac
60 Aac
30 Aac
30 Aac
48 Aac
26 Aac
22 Aac
Continuous Power (@ 25°C) 1500 VA 2400 VA 1500 VA 2400 VA 3600 VA
AC Current at Max. Charge Rate
c
11.20 Aac 15.81 Aac 10.20 Aac 19.68 Aac 19.53 Aac
Rated Output Current 12.5 amps AC20 amps AC 12.5 amps AC20 amps AC 30 amps
AC
Typical Efficiency 90% 92% 92% 93% 94%
AC Output Voltage (rms) 120 Vac 120 Vac 120 Vac 120 Vac 120 Vac
Max. Output Overcurrent Protection 30 amps AC 30 amps AC 30 amps AC 30 amps AC 45 amps
AC
Surge Capability/Max. Output and Duration:
Overload 10 sec Rating
Short Circuit 10 sec Rating
3000 VA 4800 VA 3000 VA 4800 VA 7200 VA
50±5 Apk 80±8 Apk 50±5 Apk 80±8 Apk 120±12
Apk
DC Current at Rated Power 157 amps 252 amps 76 amps 120 amps 186 amps
DC Input Voltage (nominal)
d
DC Input Voltage Range 11.0—15.0
DC Charger Rate (Adjustable) ±6% 10 to 70
12.6 Vdc 12.6 Vdc 25.2 Vdc 25.2 Vdc 25.2 Vdc
Vdc
amps
11.0—15.0
Vdc
14 to 100
amps
22.0—30.0
Vdc
5 to 35
amps
22.0—30.0
Vdc
10 to 70
amps
22.0—30.0
Vdc
10 to 70
amps
Power Factor while Charging 0.88 0.89 0.88 0.92 0.93
Tare Loss 26 W 25 W 25 W 24 W 24 W
Common Specifications:
Voltage Regulation (max.)
Voltage Regulation (Typical)
Waveform
Load Power Factor (allowed)
104—127 Vac
108—125 Vac
modified sine wave
0.8 to 1.0 (leading or lagging)
A–2 975-0391-01-01

Table A-1 Electrical Specificationsa - 120 Vac/60 Hz Models
Xantrex
TR1512 120
Model
Adjustable Load Sensing Range
Force Air Cooling
Automatic Transfer Relay
a.Specifications subject to change without notice.
b.This is the minimum AC input current required, at nominal input voltage, to obtain full continuous rated pass-through and maximum battery charging while adhering to the 80% ampacity rule of North American electrical co des.
c.
In bulk mode (at nominal input AC and nominal DC voltage).
d.Product may not meet voltage regulation specifications at other than "Input Nominal" at full-rated load.
60
5 watts minimum to 240 watts maximum
Variab le speed fan
30 amps maximum (non-continu ou s)
Xantrex
TR2412 120
60
Xantrex
TR1524 120
60
Xantrex
TR2424 120
60
Xantrex
TR3624 120
60
975-0391-01-01 A–3

Specifications
Table A-2 Electrical Specificationsa - 230 Vac/50 Hz Models
Xantrex TR1512 230 50Xantrex TR1524 230 50Xantrex TR2424
Model
230 50
AC Nominal Input Voltage 230 Vac 230 Vac 230 Vac
Maximum AC Input Voltage 253 Vrms 253 Vrms 253 Vrms
AC Input Low Transfer Voltage
(wide/narrow) 120/180 Vac 120/180 Vac 120/180 Vac
Frequency: (± 0.04% Crystal
50 Hz 50 Hz 50 Hz
controlled)
Narrow Setting
(Charge & Pass - through)
Wide Setting (Charge)
Wide Setting (Pass-through)
45—55 Hz 45—55 Hz 45—55 Hz
45—68 Hz 45—68 Hz 45—68 Hz
41—68 Hz 41—68 Hz 41—68 Hz
Maximum AC Input Current 23 amps 23 amps 30 amps
Nominal AC Input Current 23 amps 23 amps 30 amps
Continuous Power (@ 25°C) 1500 VA 1500 VA 2400 VA
b
AC Current at Max. Charge Rate
5.88 Aac 6.0 0 Aac 10.44 Aac
Rated Output Current 6.4 amps AC 6.4 amps AC 10.4 amps AC
Typical Efficiency 92% 91% 94%
AC Output Voltage (rms) 230 Vac 230 Vac 230 Vac
Max. Output Overcurrent Protection 15 amps AC 15 amps AC 15 amps AC
Surge Capability/Max. Output and Duration:
Overload 10 sec Rating
Short Circuit 10 sec Rating
3000 VA 3000 VA 4800 VA
26.5±2.5 Apk 26.5±2.5 Apk 42±4 Apk
DC Current at Rated Power 158 amps 77 amps 121 amps
DC Input Voltage (nominal)
c
12.6 Vdc 25.2 Vdc 25.2 Vdc
DC Input Voltage Range 11.0—15.0 Vdc 22.0—30.0 Vdc 22.0—30.0 Vdc
DC Charger Rate (Adjustable) ±6% 0 to 70 amps 0 to 35 amps 0 to 70 amps
Power Factor while Charging 0.91 0.83 0.92
Tare Loss 23 W 21 W 22 W
Common Specifications:
Voltage Regulation (max.)
Voltage Regulation (Typical)
Waveform
Load Power Factor (allowed)
Adjustable Load Sensing Range
Force Air Cooling
Automatic Transfer Relay
a.Specifications subject to change without notice.
b.In bulk mode (at nominal input AC and nominal DC voltage).
c.Product may not meet voltage regulation specifications at other than "Input Nominal" at full-rated load.
±5% (-12%, +5% Xantrex TR1512 230 50 only)
±2. 5%
modified sine wave
0.8 to 1.0 (leading or lagging)
10 watts minimum to 480 watts maximum
Variable speed fan
30 amps maximum (non-continuous)
A–4 975-0391-01-01
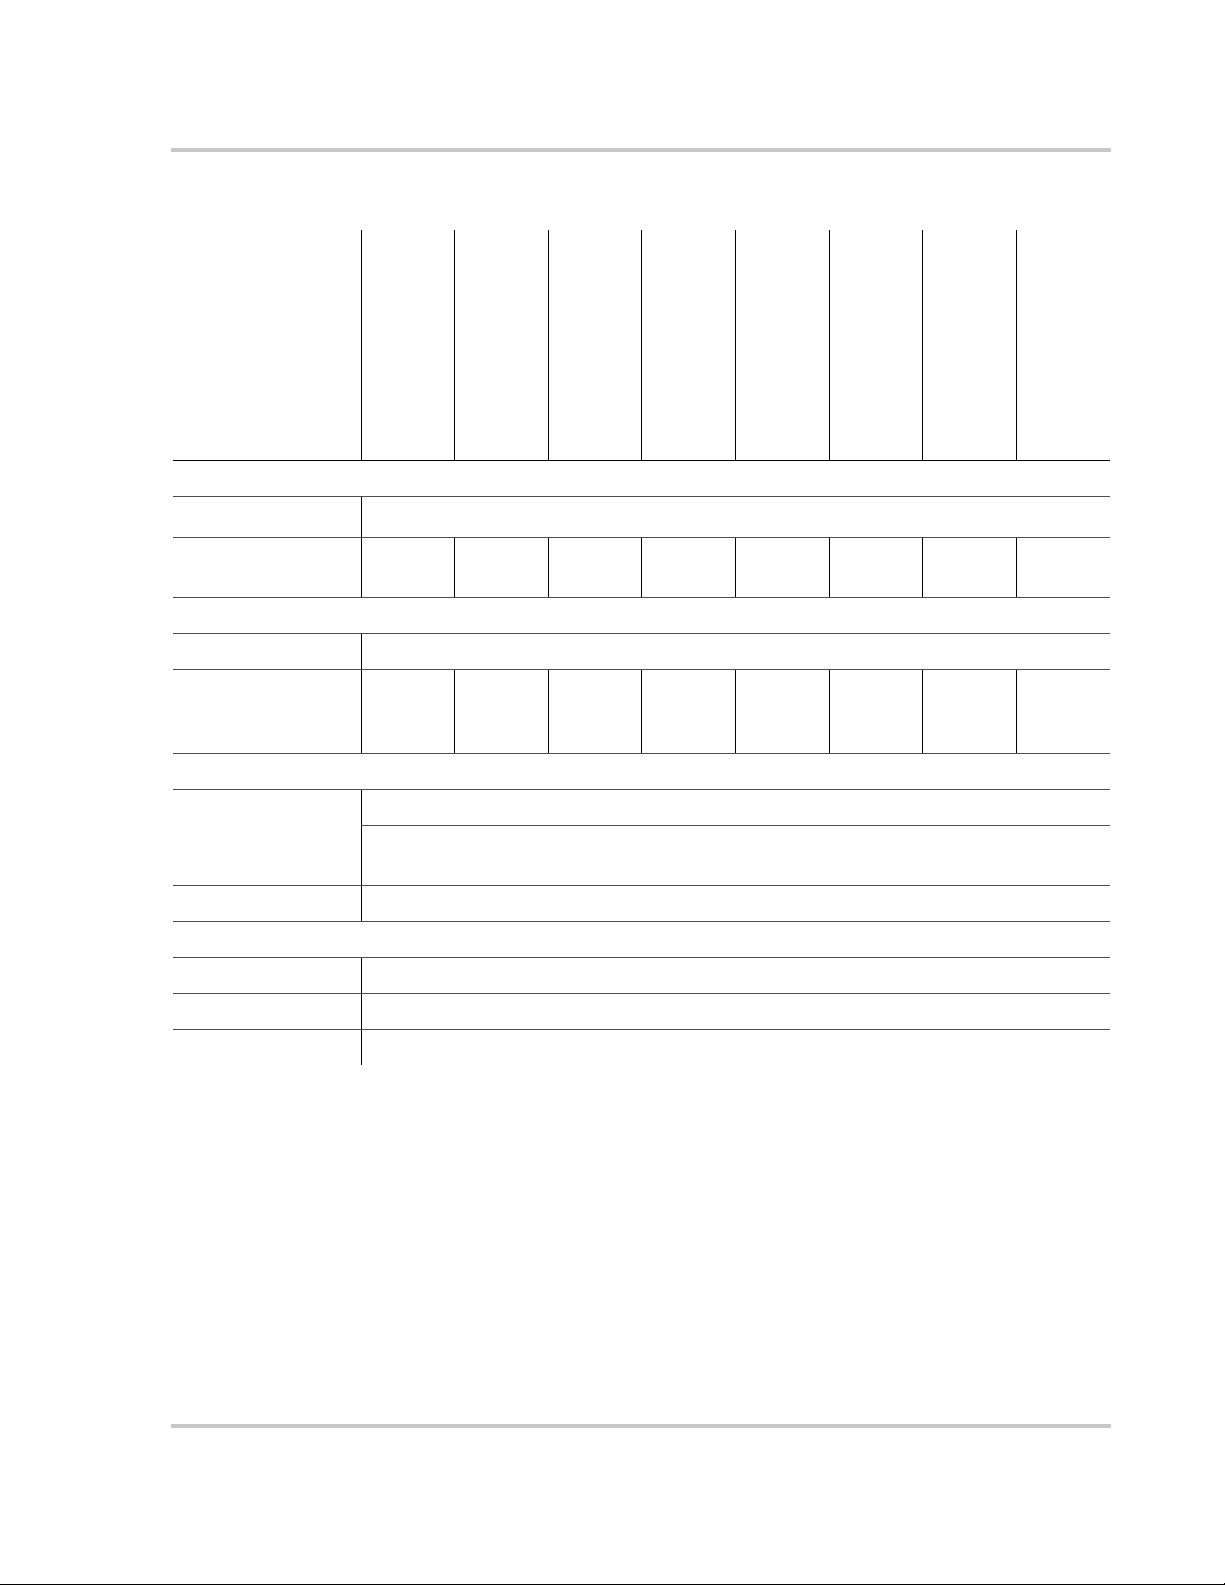
Table A-3 Environmental Specifications
a
Model
Xantrex TR1512 120 60
Xantrex TR2412 120 60
Xantrex TR1524 120 60
Xantrex TR2424 120 60
Xantrex TR3624 120 60
Xantrex TR1512 230 50
Xantrex TR Series only
Dimensions
b
Weight 40 lbs
8.5 in. W 7.25 in. H 21 in. L (216 mm W 184 mm H 546 mm L)
(18 kg)
42 lbs
(19 kg)
40 lbs
(18 kg)
45 lbs
(20 kg)
45 lbs
(20 kg)
42 lbs
(19 kg)
42 lbs
(19 kg)
Shipping/Packaging plus Xantrex TR Series
Dimensions 12.4 in. W 11.8 in. H 26.6 in. L (315 mm W 300 mm H 675 mm L)
Weight 50 lbs
(22.7
kg)
52 lbs
(23.6
kg)
50 lbs
(22.7
kg)
55 lbs
(24.9
kg)
55 lbs
(24.9
kg)
52 lbs
(23.6
kg)
52 lbs
(23.6
kg)
Ambient Temp Range
Rated T emperatur e
Range
Invert Mode: 32 °F to 122 °F (0 °C to +50 °C)
Charge Mode: 32 °F to 104 °F (0 °C to +40 °C)
105 °F to 122 °F (+40.5 °C to +50 °C) 50% derating
Storage -67 °F to 167 °F (-55 °C to +75 °C)
Altitude:
Operating 15,000 feet (4570 m)
Non-operating 50,000 feet (16800 m)
Xantrex TR1524 230 50
42 lbs
(19 kg)
52 lbs
(23.6
kg)
Xantrex TR2424 230 50
Mounting wall-mount with 16 in. (40.6 cm) mounting centers
a.Specifications subject to change without notice.
b.Allows for hardware extensions such as mounting rails, DC terminals, and front panel controls.
Safety and Electromagnetic Compatibility Specifications
120 Vac/60 Hz
Models
230 Vac/50 Hz
Models
975-0391-01-01 A–5
CSA 107.1
UL 1741
FCC Part 15B Class B
Ind. Canada ICES-0003 Class B
EN50178
New EMC Directive 2004/108/EC

A–6

Warranty and Return Information
Warranty
What does this warranty cover and how long does it last? This Limited Warranty is provided by Xantrex
Technology Inc. ("Xantrex") and covers defects in workmanship and materials in your Xantrex TR Series Inverter/
Charger. This warranty period lasts for two (2) years from the date of purchase at the point of sale to you, the original
end user customer, unless otherwise agreed in writing (the “Warranty Period”). You will be required to demonstrate
proof of purchase to make warranty claims.
This Limited Warranty is transferable to subsequent owners but only for the unexpired portion of the Warranty Period.
Subsequent owners also require original proof of purchase as described in "What proof of purchase is required?"
What will Xantrex do? During the Warranty Period Xantrex will, at its option, repair the product (if economically
feasible) or replace the defective product free of charge, provided that you notify Xantrex of the product defect within
the Warranty Period, and provided that Xantrex through inspection establishes the existence of such a defect and that
it is covered by this Limited Warranty.
Xantrex will, at its option, use new and/or reconditioned parts in performing warranty repair and building replacement
products. Xantrex reserves the right to use parts or products of original or improved design in the repair or
replacement. If Xantrex repairs or replaces a product, its warranty continues for the remaining portion of the original
Warranty Period or 90 days from the date of the return shipment to the customer, whichever is greater. All replaced
products and all parts removed from repaired products become the property of Xantrex.
Xantrex covers both parts and labor necessary to repair the product, and return shipment to the customer via a
Xantrex-selected non-expedited surface freight within the contiguous United States and Canada. Alaska, Hawaii and
outside of the United States and Canada are excluded. Contact Xantrex Customer Service for details on freight policy
for return shipments from excluded areas.
How do you get service? If your product requires troubleshooting or warranty service, contact your merchant. If you
are unable to contact your merchant, or the merchant is unable to provide service, contact Xantrex directly at:
www.schneider-electric.com
☎✉
North America 1 650 351 8237
1 866 519 1470
La France +0825012999 fr-re-techsupport@fr.schneider-electric.com
Deutschland +49 (0) 180 575 6575 +49 (0) 2102 404 7101 solarservice@de.schneider-electric.com
España +34 93 498 7466 +34 93 305 5026 re.techsuppor t@es.schneider-electric.com
L'Italia +39 035 4151111 +39 035415 3200 IT-pronto-contatto@it.schneider-electric.com
For other country details please contact your local Schneider Electric Sales Representative or visit our website at:
http://www.schneider-electric.com/sites/corporate/en/support/operations/local-operations/local-operations.page
Direct returns may be performed according to the Xantrex Return Material Authorization Policy described in your
product manual. For some products, Xantrex maintains a network of regional Authorized Service Centers. Call
Xantrex or check our website to see if your product can be repaired at one of these facilities.
What proof of purchase is required? In any warranty claim, dated proof of purchase must accompany the product
and the product must not have been disassembled or modified without prior written authorization by Xantrex.
Proof of purchase may be in any one of the following forms:
• The dated purchase receipt from the original purchase of the product at point of sale to the end user; or
• The dated dealer invoice or purchase receipt showing original equipment manufacturer (OEM) status; or
• The dated invoice or purchase receipt showing the product exchanged under warranty.
What does this warranty not cover? Claims are limited to repair and replacement, or if in Xantrex's discretion that is
not possible, reimbursement up to the purchase price paid for the product. Xantrex will be liable to you only for direct
damages suffered by you and only up to a maximum amount equal to the purchase price of the product.
1 925 245 1022 re.techsupport@schneider-electric.com
975-0391-01-01 WA–1

Warranty and Return Information
This Limited Warranty does not warrant uninterrupted or error-fr ee operation of the product or cover normal wear and
tear of the product or costs related to the r emoval, installation, or troubleshooting of the customer's electrical systems.
This warranty does not apply to and Xantrex will not be responsible for any defect in or damage to:
a) the product if it has been misused, neglected, improperly installed, physically damaged or altered, either
internally or externally, or damaged from improper use o r use in an un su it a bl e environment;
b) the product if it has been subjected to fire, water , generalized corrosion, biological infestations, or input voltage
that creates operating conditions beyond the maximum or m i nimum limits listed in the Xantrex product
specifications including, but not limited to, high input voltage from generators and lightning strikes;
c) the product if repairs have been done to it other than by Xantrex or its authorized service centers (hereafter
"ASCs");
d) the product if it is used as a component part of a product expressly warranted by another manufacturer;
e) component parts or mo nitoring systems su pplied by you or purchased by Xantrex at your direction for
incorporation into the product;
f) the product if its original identificatio n (trade-mark, serial number) markings have been defaced, altered, or
removed;
g) the product if it is located outside of the country where it was purchased; and
h) any consequential losses that are attributable to the product losing power whether by product malfunction,
installation error or misuse.
Disclaimer
Product
THIS LIMITED WARRANTY IS THE SOLE AND EXCLUSIVE WARRANTY PROVIDED BY XANTREX IN CONNECTION WITH YOUR XANTREX PRODUCT
AND IS, WHERE PERMITTED BY LAW, IN LIEU OF ALL OTHER WARRANTIES, CONDITIONS, GUARANTEES, REPRESENTATIONS, OBLIGATIONS
AND LIABILITIES, EXPRESS OR IMPLIED, STATUTORY OR OTHERWISE IN CONNECTION WITH THE PRODUCT, HOWEVER ARISING (WHETHER BY
CONTRACT, TORT, NEGLIGENCE, PRINCIPLES OF MANUFACTURER'S LIABILITY, OPERATION OF LAW, CONDUCT, STATEMENT OR OTHERWISE),
INCLUDING WITHOUT RESTRICTION ANY IMPLIED WARRANTY OR CONDITION OF QUALITY, MERCHANTABILITY OR FITNESS FOR A
PARTICULAR PURPOSE. ANY IMPLIED WARRANTY OF MERCHANTABILITY OR FITNESS FOR A PARTICULAR PURPOSE TO THE EXTENT
REQUIRED UNDER APPLICABLE LAW TO APPLY TO THE PRODUCT SHALL BE LIMITED IN DURATION TO THE PERIOD STIPULATED UNDER THIS
LIMITED WARRANTY.
IN NO EVENT WILL XANTREX BE LIABLE FOR: (A) ANY SPECIAL, INDIRECT, INCIDENTAL OR CONSEQUENTIAL DAMAGES, INCLUDING LOST
PROFITS, LOST REVENUES, FAILURE TO REALIZE EXPECTED SAVINGS, OR OTHER COMMERCIAL OR ECONOMIC LOSSES OF ANY KIND, EVEN
IF XANTREX HAS BEEN ADVISED, OR HAD REASON TO KNOW, OF THE POSSIBILITY OF SUCH DAMAGE; (B) ANY LIABILITY ARISING IN TORT,
WHETHER OR NOT ARISING OUT OF XANTREX'S NEGLIGENCE, AND ALL LOSSES OR DAMAGES TO ANY PROPERTY OR FOR ANY PERSONAL
INJURY OR ECONOMIC LOSS OR DAMAGE CAUSED BY THE CONNECTION OF A PRODUCT TO ANY OTHER DEVICE OR SYSTEM; AND (C) ANY
DAMAGE OR INJURY ARISING FROM OR AS A RESULT OF MISUSE OR ABUSE, OR THE INCORRECT INSTALLATION, INTEGRATION OR
OPERATION OF THE PRODUCT BY PERSONS NOT AUTHORIZED BY XANTREX.
CONSUMERS IN THE EUROPEAN UNION:
IF YOU ARE A CONSUMER (RA THER THAN A PURCHASER OF THE PRODUCT IN THE COURSE OF A BUSINESS) AND PURCHASED THE PRODUCT
IN A MEMBER ST ATE OF THE EUROPEAN UNION, THIS LIMITED WARRANTY SHALL BE SUBJECT TO YOUR ST ATUTORY RIGHTS AS A CONSUMER
UNDER THE EUROPEAN UNION PRODUCT WARRANTY DIRECTIVE 1999/44/EC AND AS SUCH DIRECTIVE HAS BEEN IMPLEMENTED IN THE
EUROPEAN UNION MEMBER STATE WHERE YOU PURCHASED THE PRODUCT. FURTHER, WHILE THIS LIMITED WARRANTY GIVES YOU SPECIFIC
LEGAL RIGHTS, YOU MAY HAVE OTHER RIGHTS WHICH MAY VARY FROM EU MEMBER STATE TO EU MEMBER STATE OR, IF YOU DID NOT
PURCHASE THE PRODUCT IN AN EU MEMBER STATE, IN THE COUNTRY YOU PURCHASED THE PRODUCT WHICH MAY VARY FROM COUNTRY
TO COUNTRY AND JURISDICTION TO JURISDICTION.
CONSUMERS IN THE REST OF THE WORLD:
Exclusions
If this product is a consumer product, federal law does not allow an exclusion of implied warranties. T o the extent you
are entitled to implied warranties under federal law, to the extent permitted by applicable law they are limited to the
duration of this Limited Warranty. Some states, provinces and jurisdictions do not allow limitations or exclusions on
implied warranties or on the duration of an implied warranty or on the limitation or exclusion of incidental or
consequential damages, so the above limitation(s) or exclusion(s) may not apply to you. This Limited Warranty gives
you specific legal rights. You may have other rights which may vary from state to state, province to province or
jurisdiction to jurisdiction.
Return Material Authorization Policy
For those products that are not being repaired in the field and are being returne d to Xantrex, before returning a
product directly to Xantrex you must obtain a Return Material Authorization (RMA) number and the correct factory
"Ship To" address. Products must also be shipped prepaid. Product shipments will be refused and returned at your
expense if they are unauthorized, returned without an RMA number clearly marked on the outside of the shipping
box, if they are shipped collect, or if they are shipped to the wrong location.
WA–2 975-0391-01-01

Warranty and Return Information
When you contact Xantrex to obtain service, please have your instruction manual ready for reference and be
prepared to supply:
• The serial number of your product
• Information about the installation and use of the unit
• Information about the failure and/or reason for the return
• A copy of your dated proof of purchase
Record these details in “Information About Your System”.
Return Procedure
Package the unit safely, preferably using the original box and packing materials. Please ensure that your product is
shipped fully insured in the original packaging or equivalent. This warranty will not apply where the product is
damaged due to improper packaging.
Include the following:
• The RMA number supplied by Xantrex Technology Inc. clearly marked on the outside of the box.
• A return address where the unit can be shipped. Post office boxes are not acceptable.
• A contact telephone number where you can be reached during work hours.
• A brief description of the problem.
Ship the unit prepaid to the address provided by your Xantrex customer service representative.
If you are returning a product from outside of the USA or Canada In addition to the above, you MUST include
return freight funds and are fully responsible for all documents, duties, tariffs, and deposits.
If you are returning a product to a Xantr ex Authorized Ser vice Center (ASC) A Xantrex return material authorization
(RMA) number is not required. However, you must contact the ASC prior to returning the product or presenting the
unit to verify any return procedures that may apply to that particular facility and that the ASC repairs this particular
Xantrex product.
Out of Warranty Service
If the warranty period for your product has expired, if the unit was damaged by misuse or incorrect installation, if other
conditions of the warranty have not been met, or if no dated proof of purchase is available, your unit may be se rviced
or replaced for a flat fee.
To return your product for out of warranty service, contact Xantrex Customer Service for a Return Material
Authorization (RMA) number and follow the other steps outlined in "Return Procedure".
Payment options such as credit card or money order will be explained by the Customer Service Representative. In
cases where the minimum flat fee does not apply, as with incomplete units or units with excessive damage, an
additional fee will be charged. If applicable, you will be contacted by Customer Service once your unit has been
received.
975-0391-01-01 WA–3

Warranty and Return Information
Information About Your System
As soon as you open your Xantrex TR Series Inverter/Charger package, record the following information and be sure
to keep your proof of purchase.
❐ Serial Number
❐ Product Number
❐ Purchased From
❐ Purchase Date
If you need to contact Customer Service, please record the following details before calling. This information will help
our representatives give you better service.
❐ Type of installation
❐ Length of time inverter has been installed
❐ Battery/battery bank size
❐ Battery type (e.g. flooded, sealed gel cell,
_________________________________
Xantrex TR1512 120 60, Xantrex TR2412 120 60,
Xantrex TR1524 120 60, Xantrex TR2424 120 60,
Xantrex TR3624 120 60, Xantrex TR1512 230 50,
Xantrex TR1524 230 50, Xantrex TR2424 230 50
_________________________________
_________________________________
__________________________________
__________________________________
__________________________________
__________________________________
AGM)
❐ DC wiring size and length
❐ Alarm sounding?
__________________________________
__________________________________
❐ Description of indicators on front panel
❐ Appliances operating when problem
__________________________________
__________________________________
occurred
❐ Description of problem
______________________________________________________________________________________
______________________________________________________________________________________
WA–4 975-0391-01-01
__________________________________


Schneider Electric
www.schneider-electric.com
☎✉
North America 1 650 351 8237
1 866 519 1470
La France +0825012999 fr-re-techsupport@fr.schneider-electric.com
Deutschland +49 (0) 180 575 6575 +49 (0) 2102 404 7101 solarservice@de.schneider-electric.com
España +34 93 498 7466 +34 93 305 5026 re.techsupport@es.schneider-electric.com
L'Italia +39 035 4151111 +39 035415 3200 IT-pronto-contatto@it.schne ider-electric.com
For other country details please contact your local Schneider Electric Sales Representative or visit our website at:
http://www .schneider-electric.com/sites/corporate/en/support/operations/local-operations/local-operations.page
975-0391-01-01
1 925 245 1022 re.techsupport@schneider-electric.com
Printed in China
 Loading...