


 Loading...
Satorius ME235, ME254, ME414, ME614, ME5 User Manual
...Operating Instructions
Sartorius ME and SE Series
ME and SE Models from 2005 and Later Electronic Analytical and Semi-microbalances
98648-008-84

Intended Use
ME and SE models are high-resolution balances of special accuracy for extremely precise measurement of mass. These series cover a range from
0.001 mg to 610 g.
A broad range of special performance features makes the ME and SE balances ideal for use as measuring and test equipment in ISO or GLP quality management systems.
These features include:
–The fully automatic self-calibrating and adjustment function, isoCAL (timeand temperature-dependent)
–reproTEST for quick determination of the standard deviation to check the repeatability of results
–ISO/GLP-compliant recording capability for printouts
–Password-protected menu lock
–Display of maintenance | service intervals when due
ME and SE balances meet the highest requirements placed on the accuracy and reliability of weighing results through the following features:
–Efficient filtering-out of vibration
–Fully automatic draft shield with three motorized, self-teaching draft shield elements and soft-touch technology
–Stable and repeatable results
–Excellent readability under any lighting conditions
–Rugged design and durable weighing system
ME215/235/254/414/614:
–Integrated static electricity eliminator feature to neutralize interfering electrostatic charges (ionizer)
ME and SE balances save work and speed up both simple and complex routine applications through:
–Ultrafast response times
Built-in application programs; application level 1:
–Second weight unit
–Counting
–Weighing in percent
–Animal weighing
–Recalculation
–Calculation
–Density determination
–Differential weighing
–Air buoyancy correction
–Air density determination for ME5, SE2
Application level 2:
–Checkweighing
–Time-controlled functions
Application level 3:
–Totalizing
–Formulation
–Statistics
with the following additional functions:
–Second tare memory
–Identification codes
–Product data memory
–SQmin function
–Manual data storage in application level 3
–DKD uncertainty of measurement
–Automatic initialization when you switch on the balance
–Easy input of IDs for
samples or other weighed objects
–If requested: control using an external computer
Symbols
The following symbols are used in these instructions:
●indicates steps you must perform
$indicates steps you must perform only under certain conditions
>describes what happens after you have performed a certain step
–indicates an item in a list
! indicates a hazard
Conventions Used in These
Operating Instructions:
–The pictures in these Operating Instructions are based on the ME215S model. On other models, some display readouts and printouts may differ slightly from the ones shown. This will be explained in cases where this is important for operation of the balance.
Hotline:
For advice on the use of applications, just call or fax your local Sartorius office. For the address, please visit our Internet website at: www.sartorius.com
2

Contents
2 |
Intended Use |
107 |
Extra Functions |
|
Contents |
107 |
Second Tare Memory |
3 |
109 |
Individual Identification Codes |
|
|
Warning and Safety Instructions |
113 |
Saving Values Manually in M+ |
4 |
114 |
Changing the Resolution |
|
|
General Views of the Balances |
116 |
Product Data Memory |
5 |
118 |
SQmin Function |
|
|
Operating Design |
120 |
DKD Uncertainty of Measurement |
7 |
122 |
Combining Applications |
|
|
Getting Started |
123 |
Practical Combination of Several |
11 |
|
Applications (Example) |
|
11 |
Storage and Shipping Conditions |
125 |
Data Output Functions |
11 |
Unpacking the Balance |
127 |
Interfaces |
11 |
Carrying the Balance |
130 |
Printouts |
11 |
Equipment Supplied |
134 |
Serial Communications Port |
12 |
Installation Instructions |
139 |
Pin Assignment Charts |
12 |
Remote Operation of the |
140 |
Cabling Diagram |
|
Display and Control Unit |
141 |
Error Codes and Messages |
14 |
Connecting the Balance to AC Power |
||
15 |
Warmup Time |
144 |
Care and Maintenance |
16 |
Leveling the Balance |
||
17 |
Configuring the Balance |
145 |
Recycling |
17 |
Selecting the Language |
146 |
Overview |
18 |
Navigating in the Setup Menu |
||
19 |
Entering the Time and Date |
146 |
Specifications |
20 |
Setting the Balance Functions |
152 |
Accessories (Options) |
23 |
Setting the Device Parameters |
153 |
Dimensions (Scale Drawing) |
23 |
Entering a Password |
155 |
Declarations of Conformity |
27 |
Setting the Application Parameters |
158 |
EC Type-Approval Certificate |
36 |
Selecting the Printout Function |
160 |
Plates and Markings |
38 |
Printout Configuration |
162 |
Index |
40 |
Device Information |
|
Appendix |
40 |
Factory Settings |
|
|
|
Operating the Balance |
|
Entering the General Password |
41 |
|
Brief Instructions |
41Basic Weighing Function
41General Instructions for “Analytical Weighing”
42Below-Balance Weighing
45Device Parameters
45Opening and Closing the Draft Shield
47Static Electricity Eliminator (Ionizer)
49Calibration, Adjustment, Linearization
59Repeatability Test
60Application Programs
61Toggle between Two Weight Units
63Counting
66Weighing in Percent
69Calculation
72Density Determination
77Differential Weighing
89Air Buoyancy Correction
96Diameter Determination
99Time-Controlled Functions
102 Statistics
3

Warning and Safety Instructions
This balance complies with the European Council Directives as well as international regulations and standards for electrical equipment, electromagnetic compatibility, and the stipulated safety requirements. Improper use or handling, however, can result in damage and/or injury.
Read these operating instructions thoroughly before using your balance to prevent damage to the equipment. Keep these instructions in a safe place.
Follow the instructions below to ensure safe and trouble-free operation of your balance:
!Do not operate in a hazardous area/location
!Make sure that the voltage rating printed on the AC adapter is identical to your local line voltage
!If you use electrical equipment in installations and under ambient conditions requiring higher safety standards, you must comply with the provisions as specified in the applicable regulations for installation in your country.
–The only way to switch the power off completely is to disconnect
the AC adapter
–The balance housing is protected against the penetration of solid objects with a diameter of more than 2.5 mm (such as accumulated dust) and dripping water falling vertically (IP32) – the housing is not completely dustand leak-tight, however
–Protect the AC adapter from contact with liquid
–Note on Installation:
The operator shall be responsible for any modifications to Sartorius equipment and for any connections of cables or equipment not supplied by Sartorius and must check and, if necessary, correct these modifications and connections. On request, Sartorius will provide information on the minimum operating specifications (in accordance with the Standards listed above for defined immunity to interference).
–Connect only Sartorius accessories and options, as these are optimally designed for use with your balance
When cleaning your balance, make sure that no liquid enters the balance housing; use only a slightly moistened cloth to clean the balance.
Do not open the balance housing.
If the seal is broken, this will result in forfeiture of all claims under the manufacturer‘s warranty.
In case you have any trouble with your balance:
$contact your local Sartorius office, dealer or service center
4
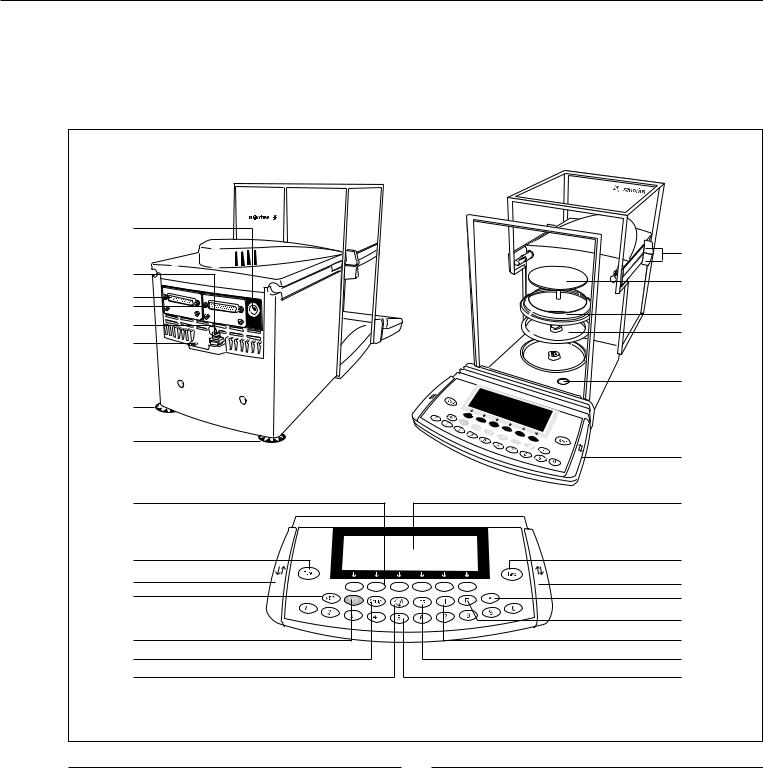
General Views of the Balance
Models ME215/235/254/414/614
26 |
|
|
|
|
|
|
1 |
25 |
|
|
2 |
24 |
|
|
|
|
|
|
|
23 |
|
|
3 |
22 |
|
|
|
|
|
4 |
|
21 |
|
|
|
|
|
|
|
|
|
|
5 |
20 |
|
|
|
20 |
|
|
|
|
|
|
6 |
19 |
|
|
7 |
8 |
|
|
8 |
9 |
|
|
9 |
18 |
|
|
10 |
|
|
|
11 |
17 |
|
|
12 |
16 |
|
|
13 |
15 |
|
|
14 |
Pos. Designation |
Spare Part Order No. |
Pos. Designation |
Spare Part Order No. |
1 |
Draft shield door grips |
|
2 |
Weighing pan |
69 ME0001 |
3 |
Shield disk (ME235S/P only) |
|
4 |
Shield plate |
69 ME0002 |
5 |
Level indicator |
|
6 |
Operating panel |
|
7 |
Display |
|
8 |
Tare key |
|
9 |
Key for opening/closing |
69ME0007 |
|
draft shield |
(set of small parts) |
10Decimal point key
11Print key
12Ionizer on/off key
13CF key (clear function)
14Numeric keys
15Toggle key for changing the application program
16Setup key for configuring the balance
17On/off key
18Toggle key for alphabetic input
19Function keys
20 Leveling foot |
69MA0091 |
21Lug for attaching antitheft locking device
22Menu access switch
23Serial printer port (PRINTER)
24Serial communications port (PERIPHERALS)
25Terminal for connecting an equipotential bonding conductor
26DC jack
Not shown: |
|
Set of dust covers |
6960ME01 |
Set of small parts (operating panel) |
69ME0007 |
Set of caps |
69ME0008 |
5

General Views of the Balance
Models ME5 and SE2
|
1 |
|
2 |
31 |
3 |
3 |
4 |
1 |
5 |
7 |
6 |
|
|
|
7 |
|
8 |
|
9 |
|
10 |
|
11 |
30 |
12 |
|
|
29 |
|
28 |
13 |
27 |
|
26 |
14 |
|
|
15 |
15 |
|
|
25 |
16 |
|
|
24 |
17 |
|
|
23 |
18 |
22 |
19 |
21 |
20 |
Pos. |
Designation |
|
Pos. |
Designation |
1 |
Weighing pan |
16 |
Key for opening the draft shield counterclockwise |
|
2 |
Filter pan, 50 mm d |
17 |
Print key |
|
3 |
Interior draft shield (only for SE2) |
18 |
Info key for displaying device information |
|
4 |
Optional filter pan, 75 mm d |
19 |
CF key (clear function) |
|
5 |
Shield ring |
20 |
Numeric keys |
|
6 |
Optional filter pan, 90 mm d |
21 |
Toggle key for changing to the next application program |
|
7 |
Shield disk |
22 |
Key for accessing Setup mode (settings) |
|
8 |
Level indicator |
23 |
On/off key |
|
9 |
Leveling foot |
24 |
Toggle key for alphanumeric input |
|
10 |
Draft shield cover |
25 |
Key for opening the draft shield clockwise |
|
11 |
Female connector for weigh cell |
26 |
Function keys |
|
12 |
DC jack for AC power |
27 |
Display |
|
13 |
Communications port (PERIPHERALS) |
28 |
Lug for attaching antitheft locking device |
|
14 |
Printer port (PRINTER) |
29 |
Female connector for evaluation unit |
|
15 |
Tare key |
30 |
Terminal for connecting an equipotential bonding conductor |
|
|
|
31 |
Draft shield |
|
6

Operating Design
The balance consists of a weighing cell, a draft shield and a display and control unit. In addition to the choice of power supply, via AC adapter or external rechargeable battery pack, your balance also has interface ports for connecting additional devices, such as a printer, computer, or universal remote control switch, etc.
The display and control unit is fastened to the weighing cell. Operation of the balance follows a uniform “philosophy,” which is described in this manual.
Where not expressly indicated otherwise, the uses described in this manual apply to verified balance versions (indicated by the suffix “-.0CE” in the model number), as well as the standard version.
Combination of Several Applications
You can combine the use of various application programs to meet your more complicated requirements.
To select application programs one after the other, press d(toggle function).
Keys
You can operate the balance either by using the keys on the display and control unit or from an on-line PC. This manual describes operation using the balance keys.
Labeled Keys
These keys always have the function indicated by their label, but are not available at all times. Availability of their functions depends on the current operating status of the balance and the menu settings.
Meaning
aAlphabetic keys
Please see section on “Text Input”
eOn | off key
Turns the balance on and off
or switches it to the standby mode
oMenu settings
Accesses and exits the Setup menu
dToggles to the next application program
cClear function Deletes keypad input
Interrupts a calibration and adjustment routine in progress Quits application programs
ME215/235/254/414/614: JTurns the ionizer on and off
ME5, SE2:
JDisplays device information
rPrint key
Outputs displayed values or data logs to the serial communications and | or printer port
.Enters a decimal point
1... 90keys
See the section on “Numeric Input”
wTares the balance
K, O, POpens | closes the draft shield
Numeric Input
To enter numbers: press
1… 90.
To store numbers entered: press the corresponding function key directly below the soft key label
To delete an entire numeric input digit by digit: press the ckey
Text Input
●To enter numbers:
see the section on “Numeric Input“
●To enter letters or characters: press the akey
>Letters are displayed in the bottom line for selection
●To select a different letter: press the corresponding soft key to change the letter shown
●To select the letter | character shown: press the corresponding function key below the soft key label
>The selected letter is shown on the display
$Enter the next letter | character, if desired, as described above
$To exit the letter input mode (e.g., if the
last character entered is a letter): press the akey
●To store a word: press the corresponding function key (soft key), such as ID
●To delete an input character by character: press the ckey
●To delete user data: enter .or a space and save
7

Operating Design
Function Keys (Soft Keys)
The current function of soft keys is indicated in the bottom line of the display (footer).
Texts (abbreviations) or symbols can be displayed.
Texts (Examples)
Cal: Start calibration | adjustment S ID: Save ID
F6 |
F5 |
F4 |
F3 |
F2 |
F1 |
The function keys are numbered from right (F1) to left (F6).
Symbols
The bottom line shows the following symbols:
ooBack to the initial state
(in the Setup menu: exit Setup)
o Go to the higher selection level
O Show sub-items under the active item
QMove upward in the input | output window
qMove downward in the input | output window
l Set the selected menu parameter
There are basically two different types of displays:
–display for weights and calculated values
–display for menu parameter settings (Setup)
Operation
Display for Weights and Calculated Values
This display is subdivided into 9 areas.
Line for metrological data
Bar graph
Measured value line
Text line
Soft key labels
Plus/minus sign |
Unit |
Stability indicator |
Tare memory |
|
Calculated value |
Application pictograms
Line for Metrological Data:
When the balance is used in legal metrology, the following metrological specifications of the balance are shown here:
Max Maximum capacity (upper range limit) of the balance
Min Minimum capacity (lower range limit) of the balance
eVerification scale interval
dReadability | scale interval
On standard balances, only Max and d are displayed.
Bar Graph:
The bar graph indicates how much of the balance’s capacity is “used up” by the current load; during checkweighing, it indicates the control limits.
The following symbols may be displayed:
0% Lower load limit
100% Upper load limit
Bar graph showing 10% intervals
-Minimum for checkweighing
=Target for checkweighing
+Maximum for checkweighing
Plus/Minus Sign, Stability Symbol:
A plus or minus sign (F or H) is shown here for a weight (or a calculated value, such as that for counting), or the S symbol indicating that a verified balance has been zeroed or tared.
Line for Measured Values:
This area shows the weighed or calculated value and the alphanumeric input.
Unit and Stability:
When the balance reaches stability, the weight unit or calculated unit is displayed here.
When the asymbol is displayed here, the value indicated in the readout cannot be used in legal metrology.
8
Tare Memory, Calculated Values:
The symbols displayed here indicate when there is a value in one of the tare memories or when the value shown is a result of calculation rather than direct measurement.
These symbols are as follows:
aCalculated value
s1 Net value | tare memory
s2 used by an application program (e.g., formulation, second tare memory)
Application Pictograms:
The pictograms displayed here indicate the application(s) selected. The pictogram is displayed inversely (white on a black background) when the corresponding application is active.
For example, the following symbols may be displayed simultaneously:
A The counting application is active
H Checkweighing is also active
S Print
T Data record
Text Line:
Additional information is displayed here (e.g., operator guidance prompts, name of the active program, etc.)
Soft Key Labels:
The current functions of the soft keys above the function keys (arrow keys) are indicated here; during calibration | adjustment, this line shows upand down-arrows (Q and q) for selecting calibration and adjustment functions.
Display for Menu Parameter Settings (Setup)
This display is divided into three sections.
Line for Operating State
Input and Output Window
Soft key labels
Status Line:
The status line of shows the function of the display screen page. In the Setup menu, the current menu “path” is shown here.
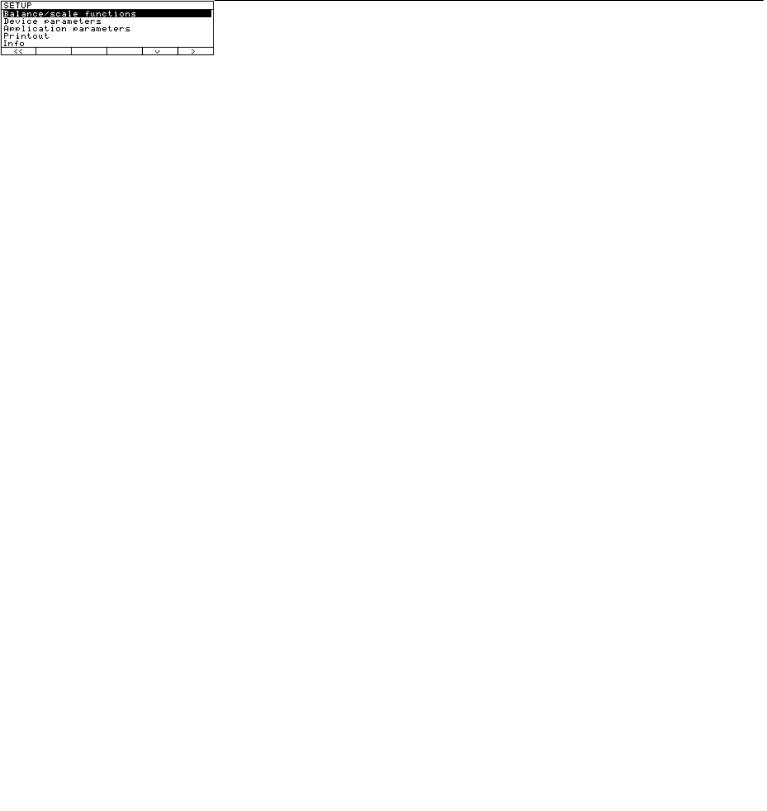
Setup Menu Example: “Balance/scale functions”:
SETUP BAL.FUNC.
Input and Output Window
This window contains either detailed information (e.g., on the active application) or a pick list. A selected item is displayed inversely (white characters on a black background). You can also enter information in an active field in this window using the alphabetic and numeric keys.
Setup Menu Example,
“Device parameters, Adapt filter”:
Minimum vibration o Normal vibration
Strong vibration Extreme vibration
The following symbol may be displayed in the input and output window:
dthis symbol marks the saved menu setting
Soft Key Labels
See the description “Function Keys (Soft Keys)” on the previous page
To set a parameter:
●Press the Q or q soft key repeatedly until the desired setting is selected (displayed inversely)
●Confirm your selection: press the l soft key
To change the numeric value of a parameter:
●Press the Q or q soft key repeatedly, if necessary, until the desired setting is selected (displayed inversely)
●Enter a new value or character:
use the 01… 9.keys or the akey and enter
the desired letters
●Confirm your selection: press the l soft key
To exit Setup: press the oo soft key
9

Input
Bar Code Scanner or Keyboard Input
You can use a bar code scanner or an external keyboard to input alphanumeric values. These inputs are processed in the same manner as keypad inputs on the display and control unit of the balance. Bar code and keyboard inputs are only displayed; they cannot activate any function.
To assign a bar code scanner or keyboard input to a function, press one of the following soft keys:
–Lot
–Samples
–Measured values
–Sample number
–Tare value
–Initial weight
–Backweighed value
–Sample ID
Foot or Hand Switch Input
You can connect a foot switch or
a hand switch to the balance to have
this device perform a keypad function (such as cor w).
PC Input
You can use a computer to control the functions of the balance and display and control unit via the communications port (see the “Data Output Function” section in the chapter entitled “Operating the Balance”).
Data Output
The balance provides two interface ports for outputting weights, calculated values and parameter settings:
–Serial communications port (PERIPHERALS – Serial I/O)
–Serial printer port (PRINTER – Serial Out)
Serial Printer Port
In addition to Sartorius printers (such as the YDO03-0CE), you also have the choice of connecting a remote display or an external checkweighing display to the printer port.
You can configure the data output functions in the Setup menu to meet your various requirements, including ISO | GLP requirements.
ISO: International Organization for Standardization
GLP: Good Laboratory Practice
You can have printouts generated automatically, or by pressing r; generation can be dependent on or independent of the stability or time parameters.
See the section on “Data Output Functions” in the chapter entitled “Operating the Balance” for a detailed description.
Serial Communications Port
You can connect a PC, a remote display, an external checkweighing display
or a standard (non-verifiable) printer to this port.
Request messages are sent via the interface to initiate functions in the weighing cell and in the display and control unit. Some of the functions generate response messages.
See the section on “Data Output Functions” in the chapter entitled “Operating the Balance” for a detailed description.
Error Codes
If you press a key that has no function, or which is blocked at a certain point in an application program, this error is indicated as follows:
–a double beep is sounded as an acoustic signal if the key has no function
–a double beep is sounded and the message “No function” is displayed in the text line if the key function is not available at that time
The response to an operator error is identical in all operating modes. See the chapter entitled “Error Codes” for a detailed description.
Storing Settings
Saving Parameter Settings
The settings configured remain stored in the balance’s non-volatile memory. In addition, you can reload the factory settings.
Saving Settings
Under “Setup > Device parameters > password” you can assign passwords in order to block access to:
–Balance | scale functions
–Device parameters
–Application parameters
–Printout
–Factory settings
10
Getting Started
Storage and Shipping Conditions
Allowable storage temperature: +5 ...+40°C | +41 ... +104°F
The packaging has been designed to ensure that the balance will not be damaged even if it is dropped from a height of 80 centimeters (about 32 inches). Do not expose the balance to extreme temperatures, jolts, impact, vibration or moisture.
Unpacking the Balance
§After unpacking the balance, check it immediately for any visible damage as a result of rough handling during shipment
$If this is the case, proceed as directed in the chapter entitled “Care and Maintenance,” under the section on “Safety Inspection”
It is a good idea to save the box and all parts of the packaging until you have successfully installed your balance. Only the original packaging provides the best protection for shipment. Before packing your balance, unplug all connected cables to prevent damage. The strip of cardboard between the display and control unit and the weighing platform is important for protecting the equipment during shipment!
Carrying the Balance
§To carry the balance, use one hand to support display unit in the front and the other hand to support the balance housing in the back
! Do not lift the balance by the shield
Equipment Supplied
The following individual components are supplied:
|
ME215/235/254/414/614 |
|
ME5-F, SE2-F |
– |
Balance |
– |
Weigh cell |
– |
AC adapter with power cord |
– |
Draft shield cover |
– |
Weighing pan with hanger for below- |
– |
Shield ring |
|
balance weighing |
– |
Electronic evaluation unit |
– |
Shield disk |
– |
Connecting cable |
– |
Dust cover for the balance housing |
– |
AC adapter with power cord |
– |
Dust cover for the display and control |
– |
Accessories kit |
|
unit |
|
The accessories kit includes: |
– |
Instruction manual |
|
|
|
ME5, SE2 |
– |
Filter pan, 50 mm d |
|
– |
Weighing pan |
|
– |
Weigh cell |
– |
Shield disk |
– |
Draft shield |
– |
Interior draft shield (only for SE2) |
– |
Electronic evaluation unit |
– |
Brush |
– |
Connecting cable |
– |
Forceps |
– |
AC adapter with power cord |
– |
Cloth |
–Accessories kit
The accessories kit includes:
–Weighing pan
–Shield disk
–Interior draft shield (only for SE2)
–Brush
–Forceps
– |
Cloth |
11 |
Installation Instructions
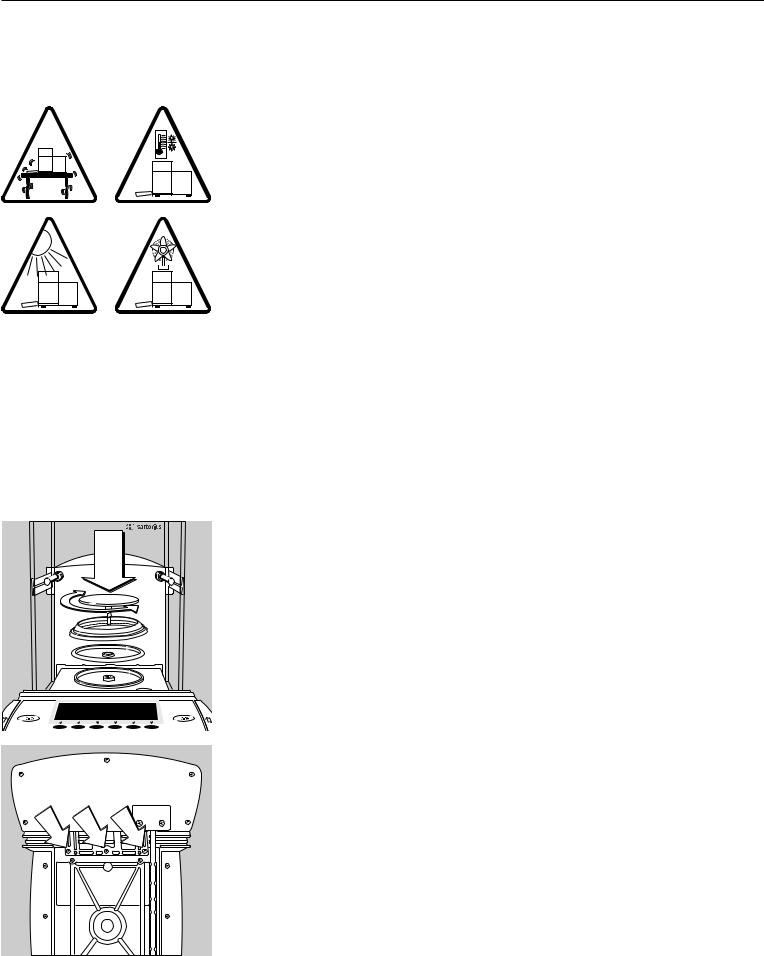
The ME/SE balances are designed to provide reliable weighing results under normal ambient conditions in the laboratory and in industry. Choose the right location to set up your balance by observing the following so that you will be able to work with added speed and accuracy:
–Set up the balance on a completely even surface on a low-vibration balance table or wall console
–Avoid placing the balance in close proximity to a heater or otherwise exposing the balance to heat or direct sunlight, as this can considerably increase the temperature inside the draft shield (greenhouse effect), resulting in incorrect readouts due
to convection currents, turbulence and buoyancy effects.
–Protect the balance from drafts that come from open windows or doors
–Avoid brief fluctuations in room temperature
–Protect the balance from aggressive chemical vapors
–Do not expose the balance to extreme moisture
Linearization after Transport
After transporting the balance, its linearity may be outside the allowable tolerances (please refer to the “Specifications” in the “Overview” chapter). After transporting the balance, be sure to perform internal linearization. Repeat this process to obtain optimal accuracy. For directions on this procedure, please refer to the section on “Linearization.”
Conditioning the Balance
Moisture in the air can condense on the surfaces of a cold balance whenever it is brought into a substantially warmer place. If you transfer the balance to a warmer area, make sure to condition it for about 2 hours at room temperature, leaving it unplugged from AC power. Afterwards, if you keep the balance connected to AC power, the continuous positive difference in temperature between the inside of the balance and the outside
will practically rule out the effects of moisture condensation.
§ |
– |
– |
– |
$ |
Setting Up the Balance ME215/235/254/414/614
Place the components listed below inside the weighing chamber in the order given: Shield plate
Position the weighing pan and turn to the left or right until it snaps into place Shield disk (ME235S/P only)
Note: the shield disk minimizes the effects of drafts within the weighing chamber
Remote Operation of the Display and Control Unit
§Unplug the cables, turn the balance on its side and lay it on a padded surface to avoid damaging the weighing system and draft shield
§Use an Allen wrench to remove the three fastening screws
§Remove the display unit and attach the connecting cable
> Length of the connecting cable: 44 cm (17 inches)
$ For information on longer cables, please see the “Accessories” section
$If you wish to use a longer cable, it must be installed by authorized Sartorius service technicians
12

ME5, SE2: |
Setting Up the ME5 or SE2 Balance |
§ |
Place the components below on the weigh cell base in the order given: |
– |
Shield disk |
– |
Weighing pan |
|
Please note: after placing the weighing pan on the base, turn the pan slightly towards |
|
the left then the right while pressing down on it to lock. |
– |
Interior draft shield (only for SE2) |
– |
Draft shield: center the hole over the pan (see arrows) |
ME5-F, SE2-F:
Setting Up the ME5-F or SE2-F Balance
§ Place the components below on the weigh cell base in the order given:
–Shield disk
– Interior draft shield ring
–50 mm dia. filter pan or weighing pan (or, optionally, the 75 or 90 mm dia. filter pan)
Please note: after placing the pan on the base, turn the pan slightly towards the left then the right while pressing down on it to lock
– Interior draft shield (only for SE2)
! If the weighing pan is removed during operation, turn the balance off and then on again after you return it to the balance.
–Draft shield cover
Setting Up the Filter Balance for Left-handed Persons:
§ Remove the draft shield cover
§Detach the pin on the right and re-attach on the left
13
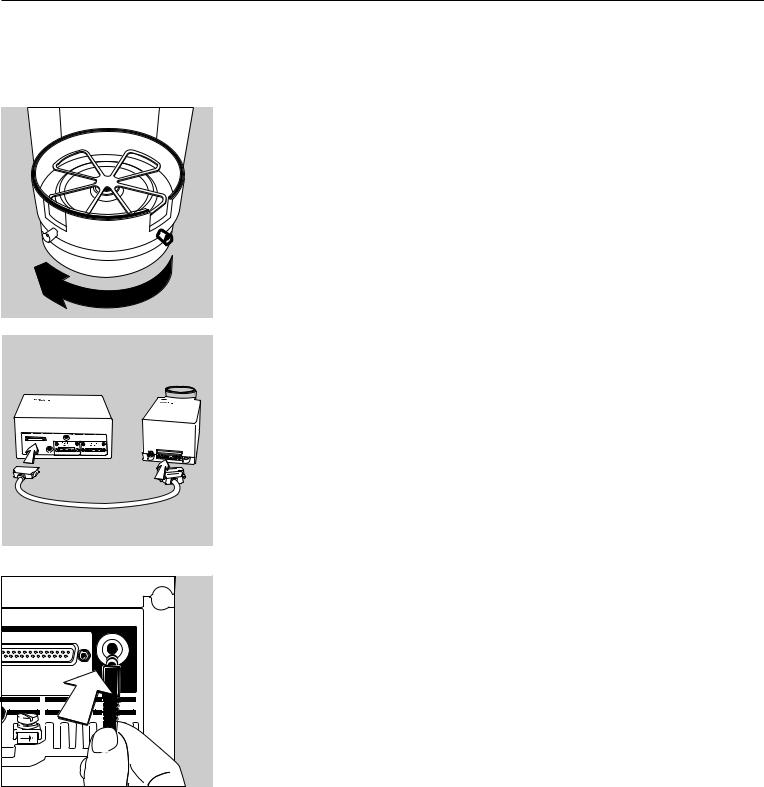
§Turn draft shield assembly by approx. 90 degrees toward the left (loosen knurled knob to turn)
§ Connect the weigh cell to the evaluation unit
– Use a screwdriver to tighten the screws to the female connector on the weigh cell
Connecting the Balance to AC Power
The wide-range AC adapter is designed for 100 V to 240 V.
§ Check the plug design of the power cord
–If it does not fit your wall outlet (mains supply), please contact your Sartorius office or dealer
Use only
–Original Sartorius AC adapters and power cords
–AC adapters with a registered approval rating from a national testing laboratory
$To use a main feeder cable from the ceiling or to mount a CEE plug, have a certified electrician install it
$To use an external rechargeable battery pack, refer to the “Accessories” in the “Overview” chapter
§ Insert the AC adapter plug with the angle facing downward into the jack on the balance
14
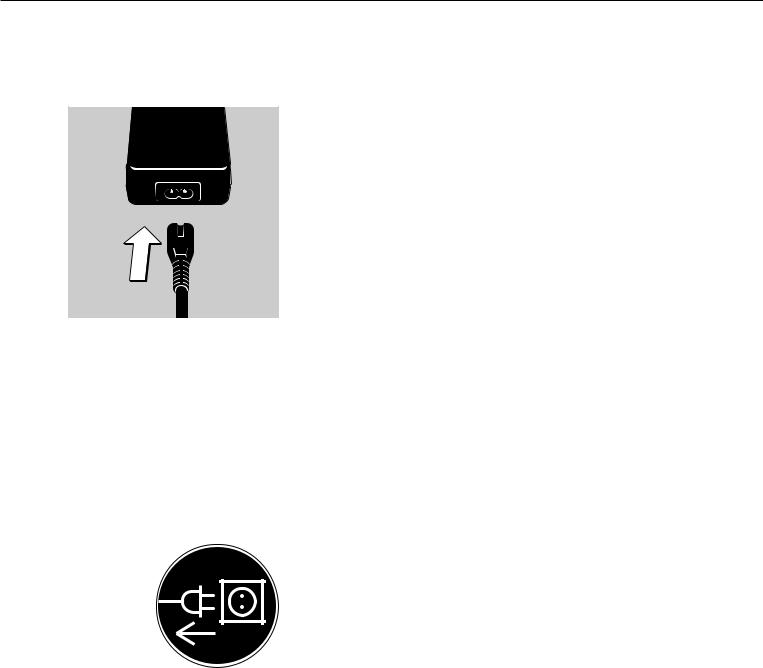
§Plug power cord into the AC adapter
§To power the balance with AC current, plug the power cord into a wall outlet (mains supply)
Charging the Rechargeable Battery for Saving Data:
All data is saved in the battery-backed memory. When initially operating the balance, leave it connected to AC power for one day to charge the battery. When the balance is disconnected from AC power, the balance-generated data will remain stored for approximately three months. In the standby mode, data is retained in the memory via the power supply. Be sure to print out data before storing your balance for a relatively long period.
Safety Precautions
The AC adapter rated to Class 2 can be plugged into any wall outlet
without requiring any additional safety precautions. The ground or earth terminal is connected to the scale housing, which can be additionally grounded, if required. The data interface is also electrically connected to the balance housing (ground).
Note:
This equipment has been tested and found to comply with the limits for a Class A digital device, pursuant to Part 15 of the FCC rules. These limits are designed to provide reasonable protection against harmful interference when the equipment is operated in a commercial environment. This equipment generates, uses and can radiate radio frequency energy and, if not installed and used in accordance with the instruction manual, may cause harmful interference to radio communications. Operation of this equipment in a residential area is likely to cause harmful interference in which case the user will be required to correct the interference at his own expense. Changes or modifications not expressly approved by Sartorius AG could void the user‘s authority
to operate the equipment.
Connecting Electronic Peripheral Devices
§Make absolutely sure to unplug the balance from AC power before you connect or disconnect a peripheral device (printer or PC) to or from an interface port
Warmup Time
Each time you move your balance to another location, you must condition it for at least 12 hours to the new location. To deliver exact results, the balance must warm up for at least 12 hours after initial connection to AC power. Only after this time will the balance have reached the required operating temperature.
Using Balances Verified as Legal Measuring Instruments in the EU*:
$The balance must warm up for at least 24 hours after initial connection to AC power
$Warmup time each time power is turned on the ME614S-0CE, ME414S-0CE: at least 30 minutes
$Always wait for the power-on adjustment routine to be completed: for requirements see page 57.
* including the Signatories of the Agreement on the European Economic Area
15
Antitheft Locking Device
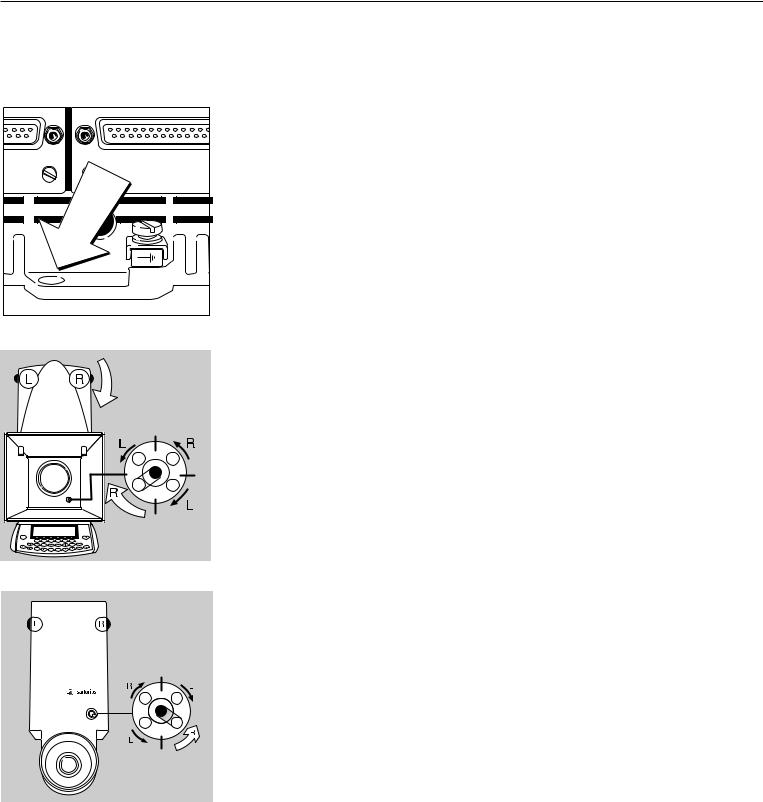
To fasten an antitheft locking device, use the lug located on the rear panel of the balance.
§Secure the balance at the place of installation, e.g., with a chain or a lock
ME215/235/254/414/614: |
MES, SE2:
Leveling the Balance
Purpose:
–To compensate for unevenness at the place of installation
–To achieve perfectly horizontal positioning of the balance for consistent repeatability of the weighing results
Always level the balance again any time it has been moved.
Only the 2 front feet are used for leveling.
§Turn the leveling feet as shown in the diagram until the air bubble is centered exactly within the circle of the level indicator
> Several leveling steps are usually required
Setting the Language
>See the section on “Setting the Language” in the chapter “Configuring the Balance”
Setting the Date and Time
>See the example on page 17, in the chapter “Configuring the Balance”
16
Configuring the Balance
|
Purpose |
|
Setting the Language |
|
You can configure your ME/SE balance |
|
You can choose from 5 languages for |
|
to meet individual requirements by |
|
the information display: |
|
entering user data and setting |
|
|
|
parameters in the Setup menu. |
– |
German |
|
|
– |
English (factory setting) |
|
The Setup menu is divided into the |
– |
English with U.S. date | time format |
|
following items: |
– |
French |
– |
Balance/scale functions |
– |
Italian |
– |
Device parameters |
– |
Spanish |
–Application parameters
–Printout
–Device information
–Language
–Factory settings
Example: Selecting the Language ”U.S. Mode”
Step |
Press key(s) (or follow instructions) |
Display | Printout |
1. Select “Setup” menu |
o |
2. |
Select “Language” |
Repeatedly |
|
and confirm |
press q soft key, |
|
|
then |
|
|
O soft key |
3. |
Select “U.S. mode” |
q soft key |
4. Save language |
l soft key |
SETUP |
LANGUAGE |
|
|
|||
Deutsch |
|
|
|
|
|
|
oEnglish |
|
|
|
|
|
|
U.S.-Mode |
|
|
|
|
|
|
Français |
|
|
|
|
|
|
Italiano |
|
|
|
|
|
|
oo |
|
|
o |
|
q |
l |
|
|
|
|
|||
SETUP |
LANGUAGE |
|
|
|||
Deutsch |
|
|
|
|
|
|
English |
|
|
|
|
|
|
oU.S.-Mode |
|
|
|
|
|
|
Français |
|
|
|
|
|
|
Italiano |
|
|
|
|
|
|
oo |
|
|
o |
|
q |
l |
5. Exit the Setup menu |
oo soft key |
17

Navigating in the Setup Menu (Examples):
Example: Adapt the balance to “Extreme vibration” by selecting this setting
Step |
Press key(s) (or follow instructions) |
Display | Printout |
1. Select Setup menu |
o |
|
2. Confirm “Balance/scale functions” |
O soft key |
3. Select menu item “Adapt filter” |
q soft key, then |
and confirm |
O soft key |
4. Select menu item “Extreme vibration” |
q soft key |
5. |
Confirm menu item |
l soft key |
|
“Extreme vibration” |
|
6. |
If required, select further menu items |
q Q soft keys |
7. |
Save setting and exit Setup menu |
oo soft key |
Exiting the Setup Menu
If you use the oo soft key:
–The software will be restarted if you have changed a setting.
–The software will not be restarted if you have kept the same settings.
In this case, the program will return to its initial state before you press the okey.
If you press the okey:
–When you exit o, the software is generally restarted.
18

Example: Entering the time and date Step
Press key(s) (or follow instructions) |
Display | Printout |
1. |
Select Setup menu; |
o, then |
|
select “Device parameters” |
q and O soft keys |
2. |
Set clock |
press q repeatedly, |
|
|
then press O |
3. |
Enter the time |
11.12 |
|
|
.30 |
4. |
Set the time according to |
l soft key |
|
your local clock |
|
5. |
Enter the date |
13.03 |
|
|
.00 |
6. |
Store the date |
l soft key |
7. |
Enter other data, if desired |
q Q soft keys |
8. |
Exit Setup menu |
oo soft key |
* = not on ME5, SE2
19

Setting the Balance Functions (BAL.FUNC.)
Purpose
This menu item enables you to configure the balance functions, i.e., to meet individual requirements by selecting predefined parameters in the Setup menu. You can block access to the menu by assigning a password.
Features
The balance functions are combined in the following groups
(1st menu level):
–Calibration | adjustment
–Adapt filter
–Application filter
–Stability range
–Taring
–Auto zero
–Weight unit 1
–Display accuracy 1
–Tare/zero with power on
–Factory settings: only wgh. param. (only the balance functions)
For legal metrology, the selection of individual parameters is limited.
Factory Settings
Parameters: The factory settings are identified by the symbol “o” in the list starting on page 21.
Preparation
Show available balance functions:
§Select Setup menu: press the okey
>SETUP is displayed
§Select “Balance functions”: press the O soft key
If you already assigned a password:
>The password prompt is displayed
$If access is blocked by a password: enter the password using the numeric | alphabetic keys
$If the last character of the password is a letter: conclude input by pressing a
§Confirm your password and have the balance functions displayed: Press the l soft key
> Balance functions are displayed:
$ To select the next group:
press the q soft key (down arrow) $ To select the previous item of
a group: press the Q soft key (up arrow)
$To select the next sub-item within a group:
press the O soft key (right arrow) $ To select the previous group:
press the o soft key (left arrow) $ To confirm: press the l soft key
Extra Functions
§ Exit the Setup menu: press the oo soft key
> Restart your application
§ Print parameter settings:
– When the balance functions are displayed, press r
>Printout (example) Texts with more than 20 characters are cut off
SETUP
BAL. FUNC.
--------------------
Calibration/adjustm CAL/isoTST key fun Selection mode Cal/adjustment seq Calibrate, then auto
adjust isoCAL function
On without resetting app.
Start automatic ad isoCAL Print GLP/GMP adju
Automatic if GLP is selected
Parameter for exte Wt. ID (W ID):
Cal./adj. wt: 200.00000 g
Adapt filter
Normal vibration Application filter
Final readout Stability range
2 digits
Auto zero
On
Weight unit 1 Grams /g
Display accuracy 1 All digits
--------------------
20
Balance Functions (Overview)
ο factory setting
√ user-defined setting(s)
|
|
|
|
|
|
|
|
|
|
Factory |
setting |
Factory |
setting |
|
||||||||||||||||
|
|
|
|
|
|
|
|
|
|
|
|
|
|
|
|
|
|
|
|
|
|
|
|
|
|
|
|
|||
Setup |
|
|
Calibration | |
|
|
|
|
|
|
|
Cal | isoTST |
|
|
|
|
|
|
|
|
|
|
External calibration | adjustment** with |
||||||||
|
|
|
|
|
|
|
|
|
|
|
|
|
|
|
|
|
|
|
||||||||||||
Balance |
|
|
Adjustment |
|
|
|
|
|
|
key function |
|
|
|
factory-defined calibration weight |
|
|||||||||||||||
functions |
|
|
|
|
|
|
|
|
|
|
|
|
|
|
|
|
|
|
|
|
|
|
External calibration | adjustment**; |
|||||||
|
|
|
|
|
|
|
|
|
|
|
|
|
|
|
|
|
|
|
|
|
|
|||||||||
|
|
|
|
|
|
|
|
|
|
|
|
|
|
|
|
|
|
|
|
|
|
|
user-defined weight |
|
||||||
|
|
|
|
|
|
|
|
|
|
|
|
|
|
|
|
|
|
|
|
|
|
|
Internal calibration | adjustment |
|
||||||
|
|
|
|
|
|
|
|
|
|
|
|
|
|
|
|
|
|
|
|
|
|
|
|
|||||||
|
|
|
|
|
|
|
|
|
|
|
|
|
|
|
|
|
|
|
|
|
|
|
Internal linearization |
|
||||||
|
|
|
|
|
|
|
|
|
|
|
|
|
|
|
|
|
|
|
|
|
|
|
|
|||||||
|
|
|
|
|
|
|
|
|
|
|
|
|
|
|
|
|
|
|
|
|
|
|
Cal key blocked |
|
||||||
|
|
|
|
|
|
|
|
|
|
|
|
|
|
|
|
|
|
|
|
|
|
|
|
|||||||
|
|
|
|
|
|
|
|
|
|
|
|
|
|
|
|
|
|
|
|
|
|
|
reproTEST |
|
||||||
|
|
|
|
|
|
|
|
|
|
|
|
|
|
|
|
|
|
|
|
|
|
|
|
|||||||
|
|
|
|
|
|
|
|
|
|
|
|
|
|
|
|
|
|
|
|
|
|
|
ο Selection mode for cal. | adjustment |
|||||||
|
|
|
|
|
|
|
|
|
|
|
|
|
|
|
|
|
|
|
|
|
|
|
||||||||
|
|
|
|
|
|
|
|
|
|
|
Calibration | |
|
|
|
|
|
|
|
|
|
ο Calibrate, then auto adjust |
|
||||||||
|
|
|
|
|
|
|
|
|
|
|
|
|
|
|
|
|
|
|
|
|
||||||||||
|
|
|
|
|
|
|
|
|
|
|
adjustment sequence |
|
|
Calibrate, then manual adjust |
|
|||||||||||||||
|
|
|
|
|
|
|
|
|
|
|
|
|
|
|||||||||||||||||
|
|
|
|
|
|
|
|
|
|
|
isoCAL function |
|
|
|
|
Off |
|
|
|
|
|
|
|
|||||||
|
|
|
|
|
|
|
|
|
|
|
|
|
|
|
|
|
|
|
|
|
|
|||||||||
|
|
|
|
|
|
|
|
|
|
|
|
|
|
|
|
|
|
|
|
|
|
|
Only adjustment prompt |
|
||||||
|
|
|
|
|
|
|
|
|
|
|
|
|
|
|
|
|
|
|
|
|
|
|
|
|||||||
|
|
|
|
|
|
|
|
|
|
|
|
|
|
|
|
|
|
|
|
|
|
|
isoCAL and linearization on |
|
||||||
|
|
|
|
|
|
|
|
|
|
|
|
|
|
|
|
|
|
|
|
|
|
|
|
|||||||
|
|
|
|
|
|
|
|
|
|
|
|
|
|
|
|
|
|
|
|
|
|
|
On and reset application |
|
||||||
|
|
|
|
|
|
|
|
|
|
|
|
|
|
|
|
|
|
|
|
|
|
|
|
|||||||
|
|
|
|
|
|
|
|
|
|
|
|
|
|
|
|
|
|
|
|
|
|
|
ο On without resetting application |
|
||||||
|
|
|
|
|
|
|
|
|
|
|
|
|
|
|
|
|
|
|
|
|
|
|
|
|||||||
|
|
|
|
|
|
|
|
|
|
|
Start automatic |
|
|
|
|
|
User-defined adjustment |
|
|
|
Enter adjustment time 1: (hh.mm) |
|||||||||
|
|
|
|
|
|
|
|
|
|
|
|
|
|
|
|
|
|
|||||||||||||
|
|
|
|
|
|
|
|
|
|
|
adjustment |
|
times |
|
Enter adjustment time 2: (hh.mm) |
|||||||||||||||
|
|
|
|
|
|
|
|
|
|
|
|
|
||||||||||||||||||
|
|
|
|
|
|
|
|
|
|
|
|
|
|
|
|
|
|
|
|
|
|
|
|
|
|
|
|
|
|
Enter adjustment time 3: (hh.mm) |
|
|
|
|
|
|
|
|
|
|
|
|
|
|
|
|
|
|
|
|
|
|
|
ο isoCAL |
|||||||
|
|
|
|
|
|
|
|
|
|
|
|
|
|
|
|
|
|
|
|
|
|
|
|
|||||||
|
|
|
|
|
|
|
|
|
|
|
|
|
|
|
|
|
|
|
|
|
|
|
|
|||||||
|
|
|
|
|
|
|
|
|
|
|
Print GLP |
|
|
|
|
ο Automatic if GLP is selected |
|
|||||||||||||
|
|
|
|
|
|
|
|
|
|
|
adjustment record |
|
|
|
On request, |
|
||||||||||||||
|
|
|
|
|
|
|
|
|
|
|
|
|
|
|
||||||||||||||||
|
|
|
|
|
|
|
|
|
|
|
|
|
|
|
|
|
|
|
|
|
|
|
from record memory |
|
||||||
|
|
|
|
|
|
|
|
|
|
|
Parameter for |
|
|
|
Weight set ID (W ID): |
|
|
Enter 14 characters max. |
||||||||||||
|
|
|
|
|
|
|
|
|
|
|
external weight |
|
|
Calibration | |
|
|||||||||||||||
|
|
|
|
|
|
|
|
|
|
|
|
|
|
|||||||||||||||||
|
|
|
Adapt filter |
|
|
|
|
ο |
Minimum vibration |
adjustment weight: |
|
|
Enter exact weight |
|||||||||||||||||
|
|
|
|
|
|
|
|
|||||||||||||||||||||||
|
|
|
|
|
|
|
|
|
|
|
|
|
|
|
||||||||||||||||
|
|
|
|
|
|
|
|
|
|
|
|
|
|
|||||||||||||||||
|
|
|
(ambient |
|
|
|
|
Normal vibration |
|
|
|
|
|
|
|
|
||||||||||||||
|
|
|
conditions) |
|
|
|
|
|
Strong vibration |
|
|
|
|
|
|
|
|
|||||||||||||
|
|
|
|
|
|
|
|
|
|
ο |
Extreme vibration |
|
|
|
|
|
|
|
|
|||||||||||
|
|
|
|
|
|
|
|
|
|
|
|
|
|
|
|
|
|
|||||||||||||
|
|
|
Application filter |
|
|
|
Final readout |
|
|
|
|
|
|
|
|
|||||||||||||||
|
|
|
|
|
|
|
|
|
|
|
|
|
||||||||||||||||||
|
|
|
|
|
|
|
|
|
|
|
Filling mode |
|
|
|
|
|
|
|
|
|||||||||||
|
|
|
|
|
|
|
|
|
|
|
|
|
|
|
|
|
|
|
||||||||||||
|
|
|
Stability range |
|
|
|
1⁄4 digit |
|
|
|
|
|
|
|
|
|||||||||||||||
|
|
|
|
|
|
|
|
|
|
|
|
|
|
|||||||||||||||||
|
|
|
|
|
|
|
|
|
|
|
1⁄2 digit |
|
|
|
|
|
|
|
|
|||||||||||
|
|
|
|
|
|
|
|
|
|
ο |
1 digit |
|
|
|
|
|
|
|
|
|||||||||||
|
|
|
|
|
|
|
|
|
|
2 digits |
|
|
|
|
|
|
|
|
||||||||||||
|
|
|
|
|
|
|
|
|
|
|
4 digits |
|
|
|
|
|
|
|
|
|||||||||||
|
|
|
|
|
|
|
|
|
|
|
8 digits* |
|
|
|
|
|
|
|
|
|||||||||||
|
|
|
|
|
|
|
|
|
|
|
|
|
|
|
|
|
|
|
||||||||||||
|
|
|
Taring* |
|
|
ο |
Without stability |
|
|
|
|
|
|
|
|
|||||||||||||||
|
|
|
|
|
|
|
|
|
|
After stability |
|
|
|
|
|
|
|
|
||||||||||||
|
|
|
|
|
|
|
|
|
|
|
|
|
|
|
|
|
|
|||||||||||||
|
|
|
Auto zero |
|
ο |
On |
|
|
|
|
|
|
|
|
|
|
|
|
|
|
|
|
|
|
|
|||||
|
|
|
|
|
|
|
|
|
|
|
Off |
|
|
|
|
|
|
|
|
|||||||||||
|
|
|
|
|
|
|
|
|
|
|
|
|
|
|
|
|
|
|
||||||||||||
* = not applicable to verified balances
** = only external calibration is possible for verified balances
21

|
|
|
|
|
|
|
|
|
Factory |
setting |
|
|
|
|
|
|
|
|
|
|
|
||
Setup – |
|
|
Weight unit 1 |
|
|
|
ο |
Grams | g |
|||
|
|
|
|
|
|||||||
Balance |
|
|
|
|
|
|
|
|
Kilograms | kg* |
||
|
|
|
|
|
|
|
|||||
functions |
|
|
|
|
|
|
|
|
Carats | ct |
||
|
|
|
|
|
|
|
|||||
|
|
|
|
|
|
|
|
|
|
Pounds | lb* |
|
|
|
|
|
|
|
|
|
|
|
||
|
|
|
|
|
|
|
|
|
|
Ounces | oz* |
|
|
|
|
|
|
|
|
|
|
|
||
|
|
|
|
|
|
|
|
|
|
Troy ounces | ozt* |
|
|
|
|
|
|
|
|
|
|
|
||
|
|
|
|
|
|
|
|
|
|
Hong Kong taels | tlh* |
|
|
|
|
|
|
|
|
|
|
|
||
|
|
|
|
|
|
|
|
|
|
Singapore taels | tls* |
|
|
|
|
|
|
|
|
|
|
|
||
|
|
|
|
|
|
|
|
|
|
Taiwanese taels | tlt* |
|
|
|
|
|
|
|
|
|
|
|
||
|
|
|
|
|
|
|
|
|
|
Grains | GN* |
|
|
|
|
|
|
|
|
|
|
|
||
|
|
|
|
|
|
|
|
|
|
Pennyweights | dwt* |
|
|
|
|
|
|
|
|
|
|
|
||
|
|
|
|
|
|
|
|
# |
Milligrams | mg |
||
|
|
|
|
|
|
|
|
||||
|
|
|
|
|
|
|
|
|
|
Parts per pound | lb* |
|
|
|
|
|
|
|
|
|
|
|
||
|
|
|
|
|
|
|
|
|
|
Chinese taels | tlc* |
|
|
|
|
|
|
|
|
|
|
|
||
|
|
|
|
|
|
|
|
|
|
Momme | mom* |
|
|
|
|
|
|
|
|
|
|
|
||
|
|
|
|
|
|
|
|
|
|
Austrian carats | K* |
|
|
|
|
|
|
|
|
|
|
|
||
|
|
|
|
|
|
|
|
|
|
Tola | tol* |
|
|
|
|
|
|
|
|
|
|
|
||
|
|
|
|
|
|
|
|
|
|
Baht | bat* |
|
|
|
|
|
|
|
|
|
|
|
||
|
|
|
|
|
|
|
|
|
ο |
Mesghal | MS* |
|
|
|
|
|
|
|
|
|
|
|||
|
|
|
Display |
|
|
|
All digits |
||||
|
|
|
|
|
|
||||||
|
|
|
accuracy 1 |
|
|
|
Fewer for weight change |
||||
|
|
|
|
|
|
||||||
|
|
|
|
|
|
|
|
|
ο |
Last digit off* |
|
|
|
|
|
|
|
|
|
|
|||
|
|
|
Tare | zero with |
|
|
|
|
On |
|
||
|
|
|
|
|
|
|
|
||||
|
|
|
power on* |
|
|
|
Off |
|
|||
|
|
|
|
|
|
|
|||||
|
|
|
Factory settings: |
|
|
|
|
No |
|
||
|
|
|
|
|
|
|
|
||||
|
|
|
only weighing |
|
|
|
Yes |
|
|||
|
|
|
|
|
|
|
|||||
|
|
|
parameters |
|
|
|
|
|
|||
|
|
|
(= balance | scale |
|
|
|
|
|
|||
|
|
|
functions) |
|
|
|
|
|
|||
* = not applicable to verified balances
# = factory setting on ME5, SE2
22

Setting the Device Parameters (Device)
Purpose
This menu item enables you to configure the balance, i.e., to meet individual requirements by selecting predefined menu parameters in the Setup menu. You can block access to the menu by assigning a password.
Features
The device parameters are combined in the following groups
(1st menu level):
–Draft shield
–Ionizer*
–Password
–User ID
–Clock
–Interfaces
–Display
–Keys
–Extra functions
–Factory settings: only device parameters
Factory Settings
Parameters: The factory settings are identified by the symbol “ο ” in the list starting on page 25.
* = not on ME5, SE2
Preparation
Display available device parameters
§Select the Setup menu: press o
> SETUP is displayed:
§Select “Device parameters”: use the q and O soft keys
If no password has been assigned, anyone can access the Setup menu device parameters
If a password has already been assigned:
> The password prompt is displayed
$If access is blocked by a password: enter the password using the numeric and | or alphabetic keys
$If the last character of the password is a letter:
conclude input by pressing the akey
§ Press l to confirm the password
> Device parameters are now displayed:
$To select the next group:
press the q soft key (down arrow)
$To select the previous menu item of a group: press the Q soft key (up arrow)
$To select the next sub-item within a group: press the O soft key (right arrow)
$To select the previous group: press the o soft key (left arrow)
$Press l to confirm the selected menu item
Entering or Changing a Password
–Let’s assume that a password with 8 characters max. has already been assigned to access the Setup device parameters
§Select the Setup menu: press o
> SETUP is displayed
§Select device parameters: Use the q and O soft keys
If you have already assigned
a password:
>The password prompt is displayed:
$ Enter the password
$Press the l soft key to confirm your password and view the device parameters
§Write down your password here for easy reference:
Password = .............................
If you assign a password and then forget what the word is:
$Enter the General Password (see Appendix)
$Press the l soft key to confirm and display the password
> The device parameters are displayed
§Select the device parameter “Password”: If necessary, repeatedly press q or Q
and O, until you see
> Password: and any existing password
23

§New password: Enter the numbers and/or letters for the new password (8 characters max.)
If “none” is displayed, this means no password has been assigned
To delete the user password: Press .or cand confirm
§To confirm:
press the l soft key
§Exit the Setup menu: press the oo soft key
> Restart the application
Extra Functions
§Exit the Setup menu: press the oo soft key
> Restart the application
§ Print the parameter settings:
–If the device parameters are displayed: press r
>Printout (example)
--------------------
SETUP
DEVICE
--------------------
Draft shield Left/right key
Same function Automatic mode
Off Weight resolution
Show all decimal pla ces
Ionizer On
Auto-off time: 10 sec
User ID User ID:
Interfaces
Serial communicati SBI
Baudrate
1200 baud Number of data b 7 data bits
Parity
Odd Number of stop b 1 stop bit
Handshake mode Hardware handshake
after 1 char Serial printer (PR YDP03
Baudrate
1200 baud
Parity
Odd Handshake mode
Hardware handshake after 1 char
Function: external Print key
Function: control Output
Display Contrast
2
etc.
24
Device Parameters (Overview)
ο factory setting
√ user-defined setting(s)
Setup –
Device parameters
Draft shield
Ionizer*
Password:
User ID:
Clock
Interfaces
Factory |
setting |
|
|
Factory |
setting |
Factory |
setting |
Factory |
setting |
|||
|
|
|
|
|
|
|
||||||
|
Keys |
|
|
ο |
Same function |
|
|
|
|
|||
|
|
|
|
|
|
|||||||
|
Left/right key |
|
|
|
Separate function |
|
|
|
|
|||
|
|
|
|
|
ο |
Off |
|
|
|
|
|
|
|
|
|
|
|
|
|
|
|
|
|
||
|
Automatic mode |
|
|
Off |
|
|
|
|
|
|
||
|
|
|
|
|
|
|
|
|
||||
|
|
|
|
|
|
Close –> |
|
|
|
|
||
|
|
|
|
|
|
|
|
|
|
|||
|
|
|
|
|
|
function –> open |
|
|
|
|
||
|
|
|
|
|
|
Close –> |
|
|
|
|
||
|
|
|
|
|
|
|
|
|
|
|||
|
|
|
|
|
|
perform function |
|
|
|
|
||
|
Weight |
|
|
ο Show all decimal places |
|
|
|
|
||||
|
|
|
|
|
|
|
||||||
|
resolution |
|
|
|
Do not show last decimal place |
|
|
|
||||
|
|
|
|
|
|
|
||||||
|
with door open |
|
|
|
|
|
|
|
|
|
|
|
ο |
Off |
|
|
|
|
|
|
|
|
|
|
|
On |
|
|
|
Auto-off time: |
|
10 s 1 .. 99 seconds |
|
|
||||
|
|
|
|
|
|
|||||||
None Enter 8 characters max.
None Enter 20 characters max.
Time: |
|
|
Enter |
|
|
|
|
|
|
||
|
|
|
|
|
|
|
|
||||
|
|
|
|
hh.mm.ss |
|
|
|
|
|
|
|
Date: |
|
|
Enter dd.mm.yy |
|
|
|
|
|
|
||
|
|
|
|
|
|
|
|
||||
|
|
|
|
or mm.dd.yy (U.S. mode only) |
|
|
|
|
|
|
|
|
|
|
(01.01.97) |
|
|
|
|
|
|
||
|
Serial |
|
|
ο SBI |
|
Baud rate |
|
|
150 baud |
||
|
communication |
|
|
|
|
|
|
|
|
300 baud |
|
|
(PERIPHERALS) |
|
|
|
|
|
|
|
ο |
600 baud |
|
|
|
|
|
|
|
|
|
|
|
1200 baud |
|
|
|
|
|
|
|
|
|
|
|
|
2400 baud |
|
|
|
|
|
|
|
|
|
|
|
4800 baud |
|
|
|
|
|
|
|
|
|
|
|
9600 baud |
|
|
|
|
|
|
|
|
|
|
ο |
19,200 baud |
|
|
|
|
|
|
|
|
|
|
||
|
|
|
|
|
|
|
Number of data bits |
|
7 bit 1) |
||
|
|
|
|
|
|
|
|
|
|
|
8 bit |
|
|
|
|
|
|
|
|
|
|
|
|
|
|
|
|
|
|
|
Parity |
|
|
Space 2) |
|
|
|
|
|
|
|
|
|
|
|||
|
|
|
|
|
|
|
|
|
|
o |
Odd |
|
|
|
|
|
|
|
|
|
|
|
Even |
|
|
|
|
|
|
|
|
|
|
|
None3) |
|
|
|
|
|
|
|
Number of stop bits |
|
ο |
1 stop bit |
|
|
|
|
|
|
|
|
|
||||
|
|
|
|
|
|
|
|
|
|
|
2 stop bits |
|
|
|
|
|
|
|
|
|
|
|
|
|
|
|
|
|
|
|
Handshake mode |
|
ο |
Software handshake |
|
|
|
|
|
|
|
|
|
||||
|
|
|
|
|
|
|
|
|
|
Hardware handshake, |
|
|
|
|
|
|
|
|
|
|
|
||
|
|
|
|
|
|
|
|
|
|
ο |
1 character after CTS |
|
|
|
|
xBPI |
|
|
Network address: |
|
|
Enter any number from 0 to 31 |
|
|
|
|
|
|
|
|
|
||||
For the display, keys and extra functions, see next pages * = not on ME5, SE2
1)not if “None” parity is selected
2)only if 7 data bits selected
3)only if 8 data bits selected
25
Setup –
Device parameters
Factory |
setting |
Factory |
setting |
|
|
Interfaces |
|
Serial |
|
YDP01IS |
|
|
|
|
|
|
|
|
|
|
|
|
|
|
|
|
|
|
|
|
|
|
|
|
|
|
|
|
|
||||
|
|
printer |
|
YDP02 |
|
see YDP03 (not with 19,200 baud) |
||||||||||||
|
|
(PRINTER) |
|
ο YDP03 |
|
Baud rate |
|
ο |
1200 baud |
|||||||||
|
|
|
|
|
|
|
|
|
|
|
|
|
|
|
|
|
|
2400 baud |
|
|
|
|
|
|
|
|
|
|
|
|
|
|
|
|
|
|
4800 baud |
|
|
|
|
|
|
|
|
|
|
|
|
|
|
|
|
|
|
9600 baud |
|
|
|
|
|
|
|
|
|
|
|
|
|
|
|
|
|
|
19,200 baud |
|
|
|
|
|
|
|
|
|
|
|
|
|
|
|
|
|
|
|
|
|
|
|
|
|
|
Parity |
|
|
|
|
|
|
|
|
|
ο |
Space |
|
|
|
|
|
|
|
|
|
|
|
|
|
|
|
|
|
Odd |
|
|
|
|
|
|
|
|
|
|
|
|
|
|
|
|
|
|
||
|
|
|
|
|
|
|
|
|
|
|
|
|
|
|
|
|
|
Even |
|
|
|
|
|
|
|
|
|
|
|
|
|
|
|
|
|
|
|
|
|
|
|
|
|
|
Handshake |
|
|
|
|
|
|
|
ο |
Software handshake |
||
|
|
|
|
|
|
|
mode |
|
|
Hardware handshake, |
||||||||
|
|
|
|
|
|
|
|
|||||||||||
|
|
|
|
|
|
|
|
|
|
|
|
|
|
|
|
|
|
1 character after CTS |
|
|
|
|
YDP01IS Label |
|
|
|
|
|
|
|
|
|
|
|
|
|
|
|
|
|
|
(label printer) |
|
|
|
|
|
|
|
|
|
|
|
|
|
|
|
|
|
|
YDP02IS |
|
|
|
|
|
|
|
|
|
|
|
|
|
|
|
|
|
|
YDP02IS Label |
|
|
|
|
|
|
|
|
|
|
|
|
|
|
|
|
|
|
(label printer) |
|
|
|
|
|
|
|
|
|
|
|
|
|
|
|
|
|
|
Universal |
|
|
Baud rate |
|
|
|
|
|
|
150 baud |
||||
|
|
|
|
|
|
|
|
|
|
|
|
|||||||
|
|
|
|
|
|
|
|
|
|
|
|
|
|
|
|
|
|
300 baud |
|
|
|
|
|
|
|
|
|
|
|
|
|
|
|
|
|
|
|
|
|
|
|
|
|
|
|
|
|
|
|
|
|
|
|
|
|
600 baud |
|
|
|
|
|
|
|
|
|
|
|
|
|
|
|
|
|
|
|
|
|
|
|
|
|
|
|
|
|
|
|
|
|
|
|
|
|
1200 baud |
|
|
|
|
|
|
|
|
|
|
|
|
|
|
|
|
|
|
|
|
|
|
|
|
|
|
|
|
|
|
|
|
|
|
|
|
|
2400 baud |
|
|
|
|
|
|
|
|
|
|
|
|
|
|
|
|
|
|
|
|
|
|
|
|
|
|
|
|
|
|
|
|
|
|
|
|
ο |
4800 baud |
|
|
|
|
|
|
|
|
|
|
|
|
|
|
|
|
|
||
|
|
|
|
|
|
|
|
|
|
|
|
|
|
|
|
|
9600 baud |
|
|
|
|
|
|
|
|
|
|
|
|
|
|
|
|
|
|
||
|
|
|
|
|
|
|
|
|
|
|
|
|
|
|
|
|
|
19,200 baud |
|
|
|
|
|
|
|
|
|
|
|
|
|
|
|
|
|
|
|
|
|
|
|
|
|
|
Number of data bits |
|
|
ο |
7 bits 1) |
|||||||
|
|
|
|
|
|
|
|
|
|
|
|
|
|
|
|
|
8 bits |
|
|
|
|
|
|
|
|
|
|
|
|
|
|
|
|
|
|
||
|
|
|
|
|
|
|
Parity |
|
|
|
|
|
Odd |
|||||
|
|
|
|
|
|
|
|
|
|
|
|
|
|
|
|
|
ο |
Even |
|
|
|
|
|
|
|
|
|
|
|
|
|
|
|
|
|
||
|
|
|
|
|
|
|
|
|
|
|
|
|
|
|
|
|
None 2) |
|
|
|
|
|
|
|
|
|
|
|
|
|
|
|
|
|
|
||
|
|
|
|
|
|
|
Number of stop bits |
|
|
ο |
1 stop bit |
|||||||
|
|
|
|
|
|
|
|
|
|
|
|
|
|
|
|
|
ο |
2 stop bits |
|
|
|
|
|
|
|
|
|
|
|
|
|
|
|
|
|
||
|
|
|
|
|
|
|
Handshake |
|
|
Software handshake mode |
||||||||
|
|
|
|
|
|
|
|
|
|
|
|
|
|
|
|
|
|
Hardware handshake, |
|
|
|
|
|
|
|
|
|
|
|
|
|
|
|
|
|
|
|
|
|
|
|
YDP04IS |
|
|
|
|
|
|
|
|
|
|
|
|
1 character after CTS |
|
|
|
|
|
|
|
|
|
|
|
|
|
|
|
|
|
|
||
|
|
|
|
YDP04IS Label |
|
|
|
|
|
|
|
|
|
|
|
|
|
|
|
|
|
|
|
|
|
|
|
|
|
|
|
|
|
|
|
||
For the display, keys and extra functions, see next page
1)not if “None” parity is selected
2)only if 8 data bits selected
26
Setup –
Device parameters
Factory |
setting |
Factory |
setting |
|
|
Interfaces |
|
|
|
|
|
Function: |
|
|
|
|
|
|
|
|
|
ο |
Print key r |
|
||||||
|
|
|
|
|
|
|
|
|
|
|
|
|
|
|||||||||||
|
|
|
|
|
|
|
|
external switch |
|
|
Tare key |
|
||||||||||||
|
|
|
|
|
|
|
|
|
|
|||||||||||||||
|
|
|
|
|
|
|
|
|
|
|
|
|
|
|
|
|
|
|
|
|
|
Calibration key |
|
|
|
|
|
|
|
|
|
|
|
|
|
|
|
|
|
|
|
|
|
|
|
|
|
||
|
|
|
|
|
|
|
|
|
|
|
|
|
|
|
|
|
|
|
|
|
|
F1 function key |
|
|
|
|
|
|
|
|
|
|
|
|
|
|
|
|
|
|
|
|
|
|
|
|
|
||
|
|
|
|
|
|
|
|
|
|
|
|
|
|
|
|
|
|
|
|
|
|
(Right soft key) |
|
|
|
|
|
|
|
|
|
|
|
|
|
|
|
|
|
|
|
|
|
|
|
|
Clear function key c |
|
|
|
|
|
|
|
|
|
|
|
|
|
|
|
|
|
|
|
|
|
|
|
|
|
||
|
|
|
|
|
|
|
|
|
|
|
|
|
|
|
|
|
|
|
|
|
|
F2 function key |
|
|
|
|
|
|
|
|
|
|
|
|
|
|
|
|
|
|
|
|
|
|
|
|
|
||
|
|
|
|
|
|
|
|
|
|
|
|
|
|
|
|
|
|
|
|
|
|
(2nd soft key from the right) |
|
|
|
|
|
|
|
|
|
|
|
|
|
|
|
|
|
|
|
|
|
|
|
|
Bar code scanner/ |
|
|
|
|
|
|
|
|
|
|
|
|
|
|
|
|
|
|
|
|
|
|
|
|
|
||
|
|
|
|
|
|
|
|
|
|
|
|
|
|
|
|
|
|
|
|
|
|
extra keyboard |
|
|
|
|
|
|
|
|
|
|
|
|
|
|
|
|
|
|
|
|
|
|
|
|
Ionizer key |
|
|
|
|
|
|
|
|
|
|
|
|
|
|
|
|
|
|
|
|
|
|
|
|
|
||
|
|
|
|
|
|
|
|
|
|
|
|
|
|
|
|
|
|
|
|
|
|
Right draft shield key |
|
|
|
|
|
|
|
|
|
|
|
|
|
|
|
|
|
|
|
|
|
|
|
|
|
||
|
|
|
|
|
|
|
|
|
|
|
|
|
|
|
|
|
|
|
|
|
|
Left draft shield key |
|
|
|
|
|
|
|
|
|
|
|
|
|
|
|
|
|
|
|
|
|
|
|
|
|
||
|
|
|
|
|
|
|
|
Function: control ports |
|
|
|
ο |
Input |
|
||||||||||
|
|
|
|
|
|
|
|
|
|
|
|
|
|
|
|
|
|
|
|
|
Output |
|
||
|
|
|
|
|
|
|
|
|
|
|
|
|
|
|
|
|
|
|
|
|
|
|||
Display |
|
|
|
Contrast |
|
|
Select contrast (0 to 4): |
|
0 |
|||||||||||||||
|
|
|
|
|
|
|||||||||||||||||||
|
|
|
|
|
|
|
|
|
|
|
|
|
|
|
|
|
|
|
|
|
|
|
|
1 |
|
|
|
|
|
|
|
|
|
|
|
|
|
|
|
|
|
|
|
|
|
|
|
o |
2 |
|
|
|
|
|
|
|
|
|
|
|
|
|
|
|
|
|
|
|
|
|
|
|
|
3 |
|
|
|
|
|
|
|
|
|
|
|
|
|
|
|
|
|
|
|
|
|
ο |
|
|
4 |
|
|
|
|
|
|
|
|
Background |
|
|
|
|
|
White |
||||||||||
|
|
|
|
|
|
|
|
|
|
|
|
|
||||||||||||
|
|
|
|
|
|
|
|
|
|
|
|
|
||||||||||||
|
|
|
|
|
|
|
|
|
|
|
|
|
|
|
|
|
|
|
|
|
ο |
Black |
|
|
|
|
|
|
|
|
|
|
|
|
|
|
|
|
|
|
|
|
|
|
|
|
|||
|
|
|
|
|
|
|
|
Digit size |
|
|
|
|
|
|
|
|
|
10mm + bar graph + text display |
||||||
|
|
|
|
|
|
|
|
|
|
|
|
|
|
|
|
|
||||||||
|
|
|
|
|
|
|
|
|
|
|
|
|
|
|
|
|
|
|
|
|
|
13mm + bar graph |
|
|
|
|
|
|
|
|
|
|
|
|
|
|
|
|
|
|
|
|
|
|
|
|
|
||
|
|
|
|
|
|
|
|
|
|
|
|
|
|
|
|
|
|
|
|
|
|
13mm + text display |
|
|
|
|
|
|
|
|
|
|
|
|
|
|
|
|
|
|
|
|
|
|
|
|
|
||
|
|
|
|
|
|
|
|
|
|
|
|
|
|
|
|
|
|
|
|
|
|
13mm |
|
|
|
|
|
|
|
|
|
|
|
|
|
|
|
|
|
|
|
|
|
|
|
|
|
||
|
|
|
|
|
|
|
|
Application |
|
|
|
|
|
|
ο |
Off |
|
|||||||
|
|
|
|
|
|
|
|
|
|
|
|
|
|
|
||||||||||
|
|
|
|
|
|
|
|
symbols |
|
|
On |
|
||||||||||||
|
|
|
|
|
|
|
|
|
|
|||||||||||||||
Keys |
|
|
|
|
CF function |
|
|
|
ο |
Clear all applications |
|
|||||||||||||
|
|
|
|
|
|
|
|
in application |
|
|
Clear only selected applications |
|||||||||||||
|
|
|
|
|
|
|
|
|
||||||||||||||||
|
|
|
|
|
|
|
|
CF function |
|
|
|
ο |
Delete entire input |
|
||||||||||
|
|
|
|
|
|
|
|
|
|
|
|
|||||||||||||
|
|
|
|
|
|
|
|
for input |
|
Delete last character |
|
|||||||||||||
|
|
|
|
|
|
|
|
|
||||||||||||||||
|
|
|
|
|
|
|
|
Block key |
|
|
|
|
ο |
All keys unblocked |
|
|||||||||
|
|
|
|
|
|
|
|
|
|
|
|
|
||||||||||||
|
|
|
|
|
|
|
|
functions |
|
|
All blocked except |
|
||||||||||||
|
|
|
|
|
|
|
|
|
|
|||||||||||||||
|
|
|
|
|
|
|
|
|
|
|
|
|
|
|
|
|
|
|
|
|
|
for o, e |
|
|
|
|
|
|
|
|
|
|
|
|
|
|
|
|
|
|
|
|
|
|
|
|
Alphanumeric |
|
|
|
|
|
|
|
|
|
|
|
|
|
|
|
|
|
|
|
|
|
|
|
|
|
||
|
|
|
|
|
|
|
|
|
|
|
|
|
|
|
|
|
|
|
|
|
|
keys blocked |
|
|
Extra functions |
|
|
|
Acoustic signal |
|
|
ο |
On |
|
|||||||||||||||
|
|
|
|
|
|
|
|
|
|
|
|
|
|
|
|
|
|
|
|
|
ο |
Off |
|
|
|
|
|
|
|
|
|
|
|
|
|
|
|
|
|
|
|
|
|
|
|
|
|||
|
|
|
|
|
|
|
|
Power-on |
|
|
Off/on/standby |
|
||||||||||||
|
|
|
|
|
|
|
|
mode |
|
|
Auto on |
|
||||||||||||
|
|
|
|
|
|
|
|
|
|
|||||||||||||||
Factory settings: |
|
|
|
No |
|
|
|
|
|
|||||||||||||||
|
|
|
|
|
|
|
||||||||||||||||||
only |
|
|
Yes |
|
|
|
|
|
||||||||||||||||
|
|
|
|
|
|
|||||||||||||||||||
device parameters |
|
|
|
|
|
|
|
|
|
|
|
|
|
|
|
|
|
|
|
|||||
27

Setting the Application Parameters (Application)
Purpose
This menu item enables you to configure the balance, i.e., adapt the balance to your individual requirements by selecting from a list of parameter options in a menu. You can block access to this menu by assigning a password.
Features
The simple weighing function is available at all times. You can select one from each of the following application groups. This means a
number of combinations are possible.
Application 1 (basic settings)
–Toggle weight units
–Counting
–Weighing in percent
–Animal weighing (averaging)
–Calculation
–Recalculation
–Density determination
–Differential weighing
–Air buoyancy correction and air density determination
–Diameter determination Application 2 (control functions)
–Checkweighing
–Time-controlled functions Application 3 (data records)
–Totalizing
–Formulation
–Statistics
In addition, you can assign 2 extra functions to each of the soft keys,
in some cases (depending on the Setup configuration):
–Second tare memory
–Identification codes
–Manual storage in app. 3 memory (M+ key)
–Changing the resolution
–Product data memory
–SQmin function*
–DKD uncertainty of measurement*
Auto-start application when the balance is switched on
Factory settings:
only application parameters
Factory Settings for the Parameters
The factory settings are identified by the symbol “ο ” in the list starting on page 29.
Preparation
Display available application parameters:
§Select the Setup menu: press the okey
> SETUP is displayed
§Select parameters: repeatedly press the q and O soft keys
If you have already assigned a password:
>The password prompt is displayed:
$If access is blocked by a password: enter the password using the numeric/alphabetic keys
$If the last character of the password is a letter: conclude input by pressing a
§Confirm your password and have the application parameters displayed: press the l soft key
> The application menu is displayed:
$To select the next group:
press the q soft key (down arrow)
$To select the previous item of a group: press the Q soft key (up arrow)
$To select the next sub-item within a group: press the O soft key (right arrow)
$To select the previous group: press the o soft key (left arrow)
$ To confirm: press the l soft key
Extra Functions
§Exit the Setup menu: press the oo soft key
> Restart your application
§ Print parameter settings:
–When the balance/scale functions are displayed, press r
>Printout (example)
Texts with more than 20 characters are truncated
SETUP
Application
--------------------
Application 1 (basi
Off Application 2 (cont Off Application 3 (data Off
Extra function (F4) Off Extra function (F5) Off
Auto-start app. whe Off
--------------------
* must be activated by service technician
28

Application Parameters (Overview) |
|
|
|
|
|
|
|
|
|
|
|
|
||||||
ο |
factory settings |
|
|
|
|
|
|
|
|
|
|
|
|
|
|
|
||
√ |
user-defined setting(s) |
|
|
|
|
|
|
|
|
|
|
|
|
|||||
|
|
|
|
|
|
|
|
Factory |
setting |
|
|
|
|
|
Factory |
setting |
||
|
|
|
|
|
|
|
|
|
|
|
|
|
|
|
||||
Setup – |
|
Application 1 |
|
|
|
ο Off (weighing only) |
|
|
|
|
|
|
|
|
||||
|
|
|
|
|
|
|
|
|
|
|
||||||||
Application |
|
(Basic settings) |
|
|
|
|
|
|
|
|
|
|
|
ο |
|
|
||
parameters |
|
|
|
|
|
|
Toggle wt. units |
|
Weight unit 1 |
|
Grams /g |
|||||||
|
|
|
|
|
|
|
|
|||||||||||
|
|
|
|
|
|
|
|
|
|
|
|
|
|
|
|
|
Kilograms /kg* |
|
|
|
|
|
|
|
|
|
|
|
|
|
|
|
|
|
|
Carats /ct |
|
|
|
|
|
|
|
|
|
|
|
|
|
|
|
|
|
|
Pounds /lb* |
|
|
|
|
|
|
|
|
|
|
|
|
|
|
|
|
|
|
Ounces /oz* |
|
|
|
|
|
|
|
|
|
|
|
|
|
|
|
|
|
|
Troy ounces /ozt* |
|
|
|
|
|
|
|
|
|
|
|
|
|
|
|
|
|
|
Hong Kong taels /tlh* |
|
|
|
|
|
|
|
|
|
|
|
|
|
|
|
|
|
|
Singapore taels /tls* |
|
|
|
|
|
|
|
|
|
|
|
|
|
|
|
|
|
|
Taiwanese taels /tlt* |
|
|
|
|
|
|
|
|
|
|
|
|
|
|
|
|
|
|
Grains /GN* |
|
|
|
|
|
|
|
|
|
|
|
|
|
|
|
|
|
|
Pennyweights /dwt* |
|
|
|
|
|
|
|
|
|
|
|
|
|
|
|
|
# |
Milligrams /mg |
||
|
|
|
|
|
|
|
|
|
|
|
|
|
|
|
|
|
Parts per pound //lb* |
|
|
|
|
|
|
|
|
|
|
|
|
|
|
|
|
|
|
Chinese taels /tlc* |
|
|
|
|
|
|
|
|
|
|
|
|
|
|
|
|
|
|
Momme /mom* |
|
|
|
|
|
|
|
|
|
|
|
|
|
|
|
|
|
|
Austrian carats /K* |
|
|
|
|
|
|
|
|
|
|
|
|
|
|
|
|
|
|
Tola /tol* |
|
|
|
|
|
|
|
|
|
|
|
|
|
|
|
|
|
|
Baht /bat* |
|
|
|
|
|
|
|
|
|
|
|
|
|
|
|
|
|
ο |
Mesghal /MS* |
|
|
|
|
|
|
|
|
|
|
|
|
|
|
|
|
|
|||
|
|
|
|
|
|
|
|
|
|
|
|
Display accuracy 1 |
|
|
All digits |
|||
|
|
|
|
|
|
|
|
|
|
|
|
|
||||||
|
|
|
|
|
|
|
|
|
|
|
|
|
|
|
|
|
Fewer for weight |
|
|
|
|
|
|
|
|
|
|
|
|
|
|
|
|
|
|
changes |
|
|
|
|
|
|
|
|
|
|
|
|
|
|
|
|
|
|
Last digit off* |
|
|
|
|
|
|
|
|
|
|
|
|
|
|
|
|
|
|
||
|
|
|
|
|
|
|
|
|
|
|
|
Weight unit 2 |
|
|
# |
Grams /g |
||
|
|
|
|
|
|
|
|
|
|
|
|
|
||||||
|
|
|
|
|
|
|
|
|
|
|
|
|
|
|
|
|
Kilograms /kg* |
|
|
|
|
|
|
|
|
|
|
|
|
|
|
|
|
|
|
||
|
|
|
|
|
|
|
|
|
|
|
|
|
|
|
|
|
Carat s/ct |
|
|
|
|
|
|
|
|
|
|
|
|
|
|
|
|
|
|
||
|
|
|
|
|
|
|
|
|
|
|
|
|
|
|
|
|
Pounds /lb* |
|
|
|
|
|
|
|
|
|
|
|
|
|
|
|
|
|
|
||
|
|
|
|
|
|
|
|
|
|
|
|
|
|
|
|
|
Ounces /oz* |
|
|
|
|
|
|
|
|
|
|
|
|
|
|
|
|
|
|
||
|
|
|
|
|
|
|
|
|
|
|
|
|
|
|
|
|
Troy ounces /ozt* |
|
|
|
|
|
|
|
|
|
|
|
|
|
|
|
|
|
|
||
|
|
|
|
|
|
|
|
|
|
|
|
|
|
|
|
|
Hong Kong taels /tlh* |
|
|
|
|
|
|
|
|
|
|
|
|
|
|
|
|
|
|
||
|
|
|
|
|
|
|
|
|
|
|
|
|
|
|
|
|
Singapore taels /tls* |
|
|
|
|
|
|
|
|
|
|
|
|
|
|
|
|
|
|
||
|
|
|
|
|
|
|
|
|
|
|
|
|
|
|
|
|
Taiwanese taels /tlt* |
|
|
|
|
|
|
|
|
|
|
|
|
|
|
|
|
|
|
||
|
|
|
|
|
|
|
|
|
|
|
|
|
|
|
|
|
Grains /GN* |
|
|
|
|
|
|
|
|
|
|
|
|
|
|
|
|
|
|
||
|
|
|
|
|
|
|
|
|
|
|
|
|
|
|
|
ο |
Pennyweights /dwt* |
|
|
|
|
|
|
|
|
|
|
|
|
|
|
|
|
|
|||
|
|
|
|
|
|
|
|
|
|
|
|
|
|
|
|
Milligrams /mg |
||
|
|
|
|
|
|
|
|
|
|
|
|
|
|
|
|
|||
|
|
|
|
|
|
|
|
|
|
|
|
|
|
|
|
|
Parts per pound //lb* |
|
|
|
|
|
|
|
|
|
|
|
|
|
|
|
|
|
|
||
|
|
|
|
|
|
|
|
|
|
|
|
|
|
|
|
|
Chinese taels /tlc* |
|
|
|
|
|
|
|
|
|
|
|
|
|
|
|
|
|
|
||
|
|
|
|
|
|
|
|
|
|
|
|
|
|
|
|
|
Momme /mom* |
|
|
|
|
|
|
|
|
|
|
|
|
|
|
|
|
|
|
||
|
|
|
|
|
|
|
|
|
|
|
|
|
|
|
|
|
Austrian carats /K* |
|
|
|
|
|
|
|
|
|
|
|
|
|
|
|
|
|
|
||
|
|
|
|
|
|
|
|
|
|
|
|
|
|
|
|
|
Tola /tol* |
|
|
|
|
|
|
|
|
|
|
|
|
|
|
|
|
|
|
||
|
|
|
|
|
|
|
|
|
|
|
|
|
|
|
|
|
Baht /bat* |
|
|
|
|
|
|
|
|
|
|
|
|
|
|
|
|
|
|
||
|
|
|
|
|
|
|
|
|
|
|
|
|
|
|
|
ο |
Mesghal /MS* |
|
|
|
|
|
|
|
|
|
|
|
|
|
|
|
|
|
|||
|
|
|
|
|
|
|
|
|
|
|
|
Display accuracy 2 |
|
All digits |
||||
|
|
|
|
|
|
|
|
|
|
|
|
|
||||||
|
|
|
|
|
|
|
|
|
|
|
|
|
|
|
|
|
Fewer digits for |
|
|
|
|
|
|
|
|
|
|
|
|
|
|
|
|
|
|
weight change |
|
|
|
|
|
|
|
|
|
|
|
|
|
|
|
|
|
|
Last digit off* |
|
|
|
|
|
|
|
|
|
|
|
|
|
|
|
|
|
|
||
|
|
|
|
|
|
|
|
|
For counting through air buoyancy correction, see the following pages |
|||||||||
|
|
|
|
|
|
|
||||||||||||
|
|
|
|
Applications 2 and 3 |
|
|
see following pages |
|
|
|
|
|
|
|
|
|||
|
|
|
|
|
|
|
|
|
|
|
|
|
||||||
* not applicable to verified balances |
|
|
|
|
|
|
|
|
|
|
|
|
||||||
# = factory setting on ME5, SE2 |
|
|
|
|
|
|
|
|
|
|
|
|
||||||
29

|
|
|
|
|
|
|
|
|
|
|
|
|
|
|
|
Factory |
setting |
|
|
|
|
|
|
|
|
|
|
|
|
|
|
|
|
|
|
||
Setup – |
|
|
Application 1 |
|
|
Counting |
|
|
|
Accuracy – Average |
|
|
ο |
Display accuracy |
||||
|
|
|
|
|
|
|
|
|||||||||||
Application |
|
(Basic settings) |
|
|
|
|
|
|
|
piece weight calculation |
|
|
|
+ 1 decimal place |
||||
parameters |
|
|
|
|
|
|
|
|
|
|
(resolution) |
|
|
|
+ 2 decimal places |
|||
|
|
|
|
|
|
|
|
|
|
|||||||||
|
|
|
|
|
|
|
|
|
|
|
|
Average piece |
|
|
|
Off |
|
|
|
|
|
|
|
|
|
|
|
|
|
|
|
|
|
|
|||
|
|
|
|
|
|
|
|
|
|
|
|
weight updating |
|
|
ο |
Manual |
||
|
|
|
|
|
|
|
|
|
|
|
|
|
|
|
|
Automatic |
||
|
|
|
|
|
|
|
|
|
|
|
|
|
|
|
||||
|
|
|
|
|
|
Percent weighing |
|
|
|
Weight storage accuracy |
|
|
|
ο |
Display accuracy |
|||
|
|
|
|
|
|
|
|
|
|
|
|
|||||||
|
|
|
|
|
|
|
|
|
|
|
|
(resolution) |
|
|
|
+ 1 decimal places |
||
|
|
|
|
|
|
|
|
|
|
|
|
|
|
|
||||
|
|
|
|
|
|
|
|
|
|
|
|
|
|
|
|
|
+ 2 decimal places |
|
|
|
|
|
|
|
|
|
|
|
|
|
|
|
|
|
|
||
|
|
|
|
|
|
|
|
|
|
|
|
Decimal places for |
|
|
|
None |
||
|
|
|
|
|
|
|
|
|
|
|
|
readout in percent |
|
|
ο |
1 decimal place |
||
|
|
|
|
|
|
|
|
|
|
|
|
|
|
|
|
2 decimal places |
||
|
|
|
|
|
|
|
|
|
|
|
|
|
|
|
|
|
3 decimal places |
|
|
|
|
|
|
|
|
|
|
|
|
|
|
|
|
|
|
4 decimal places |
|
|
|
|
|
|
|
|
|
|
|
|
|
|
|
|
|
|
5 decimal places |
|
|
|
|
|
|
|
|
|
|
|
|
|
|
|
|
|
|
6 decimal places |
|
|
|
|
|
|
|
|
|
|
|
|
|
|
|
|
|
ο |
7 decimal places |
|
|
|
|
|
|
|
|
|
|
|
|
|
|
|
|
|
|||
|
|
|
|
|
|
|
|
|
|
|
|
Display calculated value |
|
|
Residue |
|||
|
|
|
|
|
|
|
|
|
|
|
|
|
||||||
|
|
|
|
|
|
|
|
|
|
|
|
|
|
|
|
|
Loss |
|
|
|
|
|
|
|
|
|
|
|
|
|
|
|
|
|
|
Ratio 1 (DR) |
|
|
|
|
|
|
|
|
|
|
|
|
|
|
|
|
|
|
Ratio 2 (OR) |
|
|
|
|
|
|
|
|
|
|
|
|
|
|
|
|
|
|
||
|
|
|
|
|
|
Animal weighing* |
|
|
|
|
Animal activity |
|
|
|
Calm |
|||
|
|
|
|
|
|
(averaging) |
|
|
|
|
|
|
|
Normal |
||||
|
|
|
|
|
|
|
|
|
|
|
|
|
|
|
|
|
Active |
|
|
|
|
|
|
|
|
|
|
|
|
|
|
|
|
|
|
0.1% of the animal/object |
|
|
|
|
|
|
|
|
|
|
|
|
|
|
|
|
|
|
0.2% of the animal/object |
|
|
|
|
|
|
|
|
|
|
|
|
|
|
|
|
|
|
0.5% of the animal/object |
|
|
|
|
|
|
|
|
|
|
|
|
|
|
|
|
|
|
1% of the animal/object |
|
|
|
|
|
|
|
|
|
|
|
|
|
|
|
|
|
|
2% of the animal/object |
|
|
|
|
|
|
|
|
|
|
|
|
|
|
|
|
|
ο 5% of the animal/object |
||
|
|
|
|
|
|
|
|
|
|
|
|
|
|
|
|
|
10% of the animal/object |
|
|
|
|
|
|
|
|
|
|
|
|
|
|
|
|
|
|
20% of the animal/object |
|
|
|
|
|
|
|
|
|
|
|
|
|
|
|
|
|
|
50% of the animal/object |
|
|
|
|
|
|
|
|
|
|
|
|
|
|
|
|
|
|
100% of the animal/object |
|
|
|
|
|
|
|
|
|
|
|
|
|
|
|
|
|
|
||
|
|
|
|
|
|
|
|
|
|
|
|
Start |
|
|
ο |
Manual mode |
||
|
|
|
|
|
|
|
|
|
|
|
|
|
||||||
|
|
|
|
|
|
|
|
|
|
|
|
|
|
|
|
Automatic mode |
||
|
|
|
|
|
|
|
|
|
|
|
|
|
|
|
||||
|
|
|
|
|
|
|
|
|
|
|
|
Minimum load for automatic |
|
|
|
None |
||
|
|
|
|
|
|
|
|
|
|
|
|
|
|
|||||
|
|
|
|
|
|
|
|
|
|
|
|
storage |
|
|
|
10 digits |
||
|
|
|
|
|
|
|
|
|
|
|
|
|
|
|
|
|
20 digits |
|
|
|
|
|
|
|
|
|
|
|
|
|
|
|
|
|
ο |
50 digits |
|
|
|
|
|
|
|
|
|
|
|
|
|
|
|
|
|
100 digits |
||
|
|
|
|
|
|
|
|
|
|
|
|
|
|
|
|
|
200 digits |
|
|
|
|
|
|
|
|
|
|
|
|
|
|
|
|
|
|
500 digits |
|
|
|
|
|
|
|
|
|
|
|
|
|
|
|
|
|
|
1000 digits |
|
|
|
|
|
|
|
|
|
|
|
|
|
|
|
|
|
|
||
|
|
|
|
|
|
|
|
|
|
|
|
Decimal places in |
|
|
|
None |
||
|
|
|
|
|
|
|
|
|
|
|
|
|
|
|||||
|
|
|
|
|
|
|
|
|
|
|
|
result display |
|
|
ο |
1 decimal place |
||
|
|
|
|
|
|
|
|
|
|
|
|
|
|
|
|
2 decimal place |
||
|
|
|
|
|
|
|
|
|
|
|
|
|
|
|
|
|
3 decimal places |
|
|
|
|
|
|
|
|
|
|
|
|
|
|
|
|
|
|
4 decimal places |
|
|
|
|
|
|
|
|
|
|
|
|
|
|
|
|
|
|
5 decimal places |
|
|
|
|
|
|
|
|
|
|
|
|
|
|
|
|
|
|
6 decimal places |
|
|
|
|
|
|
|
|
|
|
|
|
|
|
|
|
|
|
7 decimal places |
|
|
|
|
|
|
|
|
|
|
|
|
|
|
|
|
|
|
||
|
|
|
|
|
|
|
|
|
|
|
|
Printout |
|
|
ο |
None |
||
|
|
|
|
|
|
|
|
|
|
|
|
|
||||||
|
|
|
|
|
|
|
|
|
|
|
|
|
|
|
|
Average weight only |
||
|
|
|
|
|
|
Recalculation* |
|
|
|
|
|
|
|
Average and calculated value |
||||
|
|
|
|
|
|
|
|
|
|
|
|
|
||||||
|
|
|
|
|
|
|
|
|
|
|
|
|
|
|
||||
|
|
|
|
|
|
|
|
|
|
|
|
|
|
|
||||
|
|
|
|
|
|
For calculation through air buoyancy correction, see following pages |
|
|||||||||||
|
|
|
|
|
|
|
||||||||||||
|
|
|
Applications 2 and 3 |
|
see following pages |
|
|
|
|
|
|
|
|
|
||||
|
|
|
|
|
|
|
|
|
|
|
|
|
||||||
* = How to run this application is described in detail in our Masterpro “LA….” Installation and Operating Instructions.
Request your copy directly from Sartorius or download it from the Internet (www.sartorius.com; see “download”)
30
Loading...