

Page 1

Messenger Pro
user guide
Page 2

3
00
hello
WiPOQ has been designed to keep you mobile without the need for
a huge device that weighs you down. A perfect partner to your slim
3G mobile, the WiPOQ Messenger Pro sends email, allows you to surf
the web and helps you manage your contacts and appointments.
We hope your WiPOQ will really change your on-the-move
communications for the better. Enjoy.
3
2
Page 3

4
00
00
about this guide
We’ve created this guide to help you get
the most out of your WiPOQ. Whether
you’re a cover to cover reader, or
a dip ‘n’ delve type, we’ve tried to make
this guide suit you.
Take a look a the
get going section, which
tells you how to set up your WiPOQ
from the first time you switch on.
Use the how to section for a step by step
introduction to each application, or refer
to the useful nuggets of info when you
just need a nudge in the right direction.
We’ve also scattered this guide with
some helpful tips to fill in the details
were necessary.
4
contents
01 your WiPOQ
the keypad 6
02 get going
battery 10
startup wizard 11
the home screen 13
connecting your mobile 14
setting up your email account 16
03 how to
email 20
browsing 23
sms messaging 25
downloads 27
contacts 29
calendar 31
synchronisation and backup 33
file explorer 39
gallery 41
settings 42
04 FAQs 44
05 safety 48
06 help and index 54
5
in the box
Before you start, check the contents of
your box with the list below:
◆ WiPOQ Messenger Pro
◆ User guide
◆ Battery
◆ Charger
◆ Mini USB data cable
◆ CD ROM, containing synchronisation
software and digital user guide.
Page 4

00
00
Power
Turn your WiPOQ off
and on.
4-way Navigation key
Move around the screen and scroll through
menus and lists.
Tab
Move left and right
between navigation tabs.
Back
Return to the previous screen.
Menu
Open a drop down list to reveal functions
for each application. Press and hold to access
shortcuts to all your open applications.
Alt
Access extended
characters.
Backspace
Delete characters.
Connect
Turn Bluetooth
®
connection on and off.
Quick keys
Access your browser,
IM, contacts and email.
Select
Select an option.
Shift
Access capitals.
the keypad
6
LEDs
Check the status of your Bluetooth
connection (blue and red LEDs), incoming
messages (green LED) and battery condition
(orange LED).
01
your WiPOQ
7
01
your WiPOQ
Page 5

9
02
02
get going
02
get going
8
get going
Page 6

battery
charging
Before you can start using your WiPOQ you’ll
need to charge it.
Plug the charger into the mini USB input on the
side of the WiPOQ. Charge the WiPOQ for at
least two hours before switching it on. A screen
will appear showing a charging symbol.Why not
use this time to take a look through this user
guide and familiarise yourself with some of your
WiPOQ’s features?
Your WiPOQ has a batter y life of
approximately 170 hours on standby and
120 minutes when active.
When a orange LED appears, your battery
power is running low and your WiPOQ should
be charged as soon as possible.
inserting the battery
1 Slide the battery cover clasp to pop open
the battery cover so you can remove it.
2 With the CE logo in the corner facing
upwards and to the edge of the WiPOQ,
slide the battery into place.
3 Replace the battery cover by slotting the
non-clasp edge back first. Then click the clasp
edge into place.
2 Scroll to and select Next using the Select key.
3 Choose any four-digit number and enter it
once into the field
New PIN, and again in
Confirm PIN. Scroll to and select
Next.
Step 2 - Bluetooth®
Next you will be asked to set up your WiPOQ’s
Bluetooth® settings.
1 Choose whether you want your device to
be Discoverable. This means that other
Bluetooth® users nearby will be able to see
your device when they are active.
Select Yes or No.
2 You can then enter a name for your
WiPOQ device.
3 When you have completed this step
click Next.
startup wizard
Press the red power button to turn your
WiPOQ on. The very fir st time you switch on
your WiPOQ a screen reading
Initialising...
will appear for a few seconds. To set your PIN,
Bluetooth® and the time and date easily, you can
run the Star tup Wizard. Select
OK by pressing
the Select key.
Step 1 - PIN
First you will be asked to enable your PIN.
1 Select Yes and you will be asked to enter this
PIN each time you turn on your WiPOQ.
TIP! Enabling the PIN will help protect your
information from unauthorised access.
11
02
get going
02
get going
10
Page 7

12
13
Step 4 - Time and Date
The next screen in the Startup Wizard allows
you to set the time and date on your WiPOQ.
1 Enter the time and date details, using the
Navigation key to scroll between the
different fields.
2 Set the time zone by selecting the
Choose time zone option. Scroll to the
correct zone and press the Select key to
choose your time zone.
3 Click Next followed by OK in the popup
confirmation window to exit the
Startup Wizard.
Step 3 - Pairing
A message will then appear asking you to
choose a phone to connect to as your default
Bluetooth® pairing.
1 Make sure the Bluetooth® on your mobile is
switched on. Please check your mobile user
guide if you are unsure of how to do this.
2 On your WiPOQ scroll to and select Start
Search. Your WiPOQ will begin to search for
all active Bluetooth
®
devices within range.
3 Your phone should appear in the list.
Scroll to it and select it using the Navigation
and Select keys.
4 It will take a minute or so for your WiPOQ
and mobile to pair. You will need to accept
the connection on your phone by entering
the PIN code.
5 When the connection has been successful,
choose Continue Wizard from the bottom
of the screen.
6 If the connection was not successful, continue
with the Wizard and refer to the section
Connecting to your mobile phone.
startup wizard
TIP! Set your WiPOQ as an authorised
device to avoid having to approve the
connection each time the WiPOQ and your
phone send or receive data.
my WiPOQ
My WiPOQ contains all the functions for
personalising your WiPOQ device:
Explorer
Search your WiPOQ easily for
saved attachments and images
Gallery
Easy access to all your images
Settings
Change your WiPOQ
so it suits you
To move between the two menus, use the right
and left Tab keys
The status bar that runs along the top of
the home screen displays the time, date and
remaining battery life. Amongst other icons,
it also lets you know how your Bluetooth
®
connection is doing, and alerts you to new
messages. For full details refer to the individual
sections of this guide.
the home screen
applications
This menu gives you quick access to your
WiPOQ applications:
Internet
Browse the internet and view full
web pages
Messages
Communicate using email
and messaging
I-Messaging
The instant messaging application
is currently unavailable.
Downloads
Download pictures, music files and
games for your phone
Contacts
View and manage your contacts
Calendar
Enter and check your
appointments and events
02
get going
02
get going
TIP! The WiPOQ can fetch the date and
time direct from some phones during pairing.
If this is possible the WiPOQ will ask you if
you want it to do this.
Page 8

15
get going
You will need to establish a Bluetooth® link with
your mobile so you can begin sending messages
and accessing the internet via your phone’s
network connection.
1 Use the Tab key to move to the My WiPOQ
screen and select the Settings option.
2 Within the Settings menu, use the Tab key to
move to the
Bluetooth screen.
3 Make sure the Bluetooth® is enabled on your
mobile (refer to your phone’s user guide for
details). Then press the Menu button on your
WiPOQ keypad and select
Start Search.
4 Choose your phone from the list of
discovered devices and confirm using the
Select key.
5 You will be asked to confirm that you wish
to pair with the selected device. If your
WiPOQ is already paired with another
device this will be replaced. Select
Yes
to accept.
6 Your WiPOQ will take a few moments to
initiate partner ship with your mobile.
7 An alert will appear to tell you that your
phone is requesting a pincode. Enter the
4 digit PIN that you created during the
Startup Wizard on your WiPOQ first, and
secondly on your mobile.
8 When it has been successful, you may be
asked whether you want to synchronise the
time and date on the WiPOQ with your
mobile phone. Select
Yes or No from the
Question? window using the Select key*.
Click the Back key to return to the
application screen.
*Some phones do not support this function.
connecting to your mobile phone
TIP! In order to confirm the partner ship
you may need to complete a few steps on
you mobile phone. Follow the instructions
given on your phone, or take a look at the
Bluetooth® section in your phone’s user guide
for more information.
Bluetooth
®
LEDs
The status of your Bluetooth connection is
indicated by LED.
◆ Blue pulsating light - The devices are
successfully connected.
◆ Red flashing - Bluetooth® is on but the
connection has been lost.
◆ No Blue LED - Bluetooth® is off.
Bluetooth® can be turned on and off using
the Bluetooth® key at the top right of the
keyboard.
02
get going
02
get going
14
Page 9
16
17
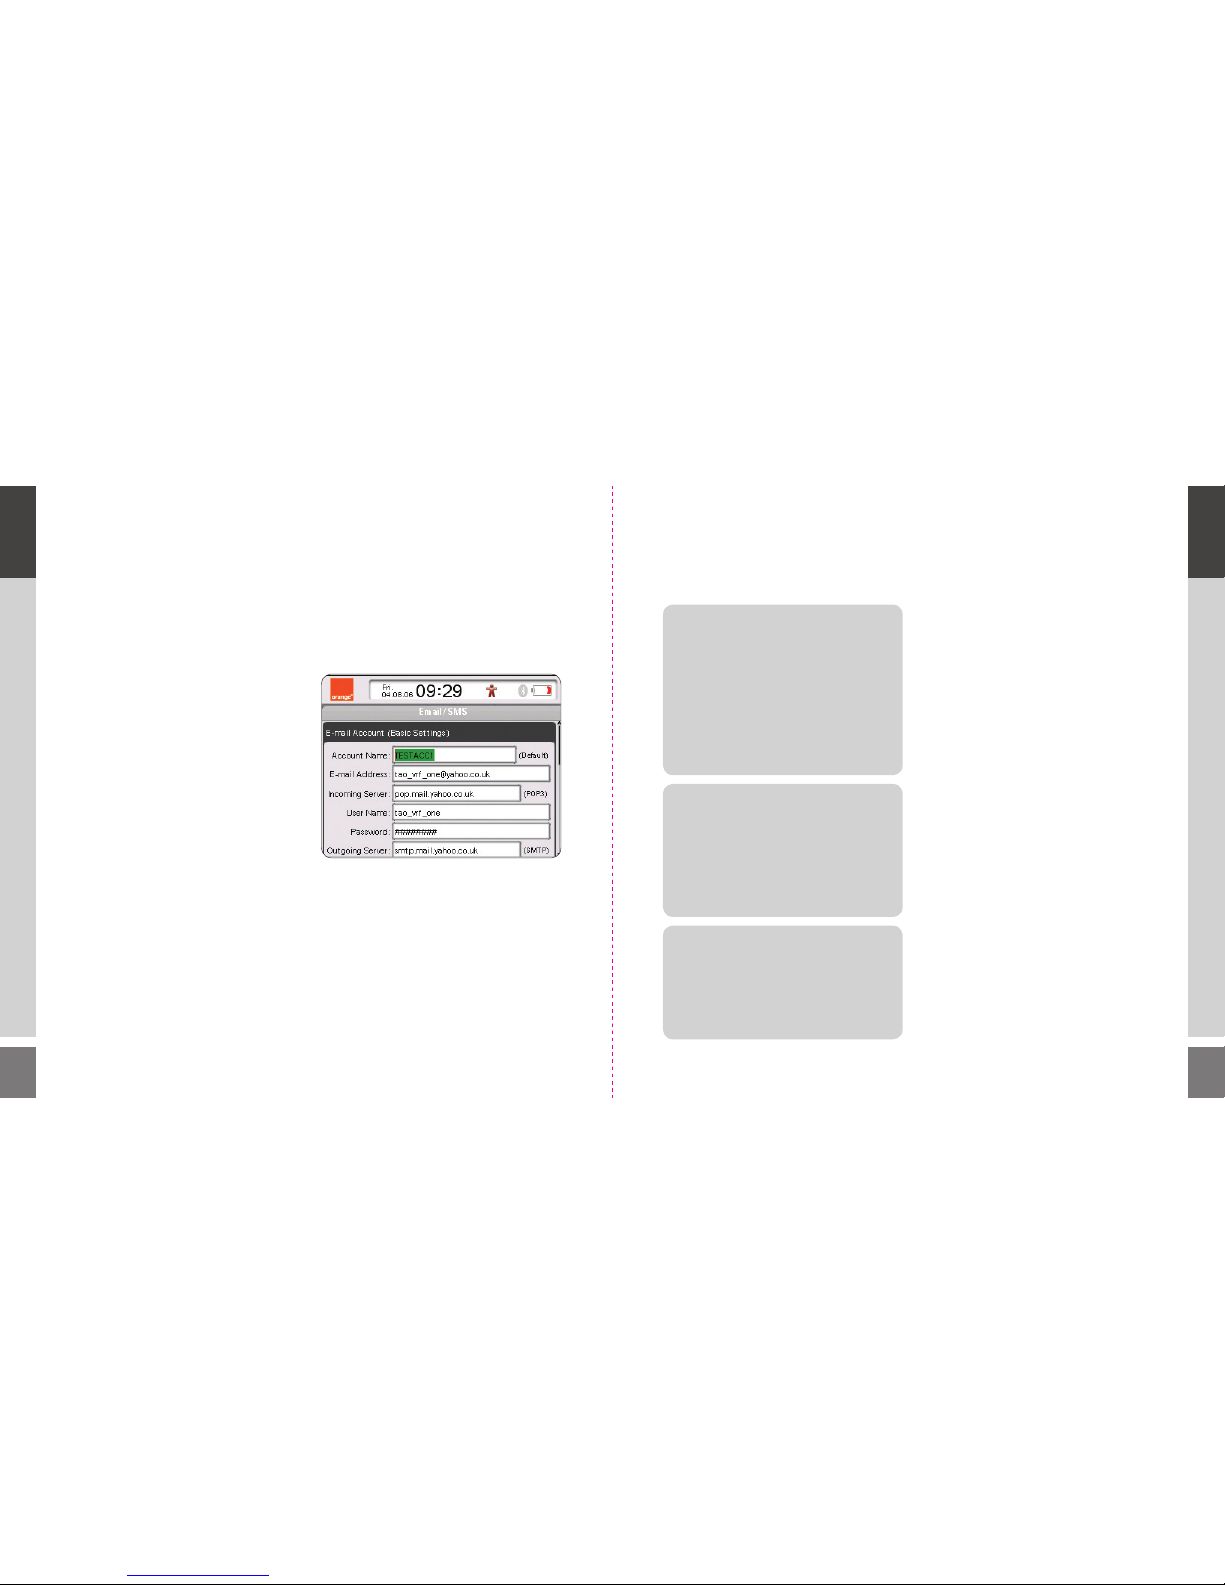
setting up your email account
Before you can start sending email, you need to
make sure that your phone’s SIM card is data
enabled. If you are unsure, contact your network
service provider.
Then you need to set up an email account for
your WiPOQ to use. This can be an office or
home-based email account. You may need to ask
your Internet service provider or IT depar tment
for the correct settings to enable you to access
your account. The information you will need
includes: user name, password, incoming server
name and outgoing (SMTP) server name.
Launch the Messages application from the
application screen of your WiPOQ.
1 Press the Menu key and scroll to Accounts
and press the Select key.
2 The E-mail Account (Basic Settings) page
will be displayed.
3 Enter your email account details according to
the information given to you by your Internet
service provider or IT depar tment.
4 When you have completed the fields
necessary, press the Menu key and select
Save from the popup menu.
5 To delete an account scroll to it in the
Accounts screen, press the Menu key and
select Delete. Confirm by choosing Yes from
the Question? popup.
02
get going
02
TIP! Additional email accounts can be added
to your WiPOQ.
1 From the Messages application press the
Menu key and select
Accounts.
2 Your current email accounts will be listed.
Press the Menu key again and choose
New account from the popup menu.
3 Fill out the details of your email account
and select Save.
setting up your email account
TIP! Your WiPOQ has an Orange email
account already set up. Please contact
Orange or visit www.orange.es in order to
activate this account and finalise the set up.
Alternatively if you already have an Orange
account, edit the username and password in
the existing settings.
TIP! You may want choose an account to
select as default. Your WiPOQ will always use
this to send email, unless you manually select
another. Highlight the account you wish to
use and press the Menu key. Select
Set as default from the popup menu.
get going
Page 10

1918
03
how to
03
how to
03
how to
Page 11

20
21
check for email
To check for new messages, press the Menu key
and select Send and Receive from the popup
menu. Your WiPOQ will retrieve any new
messages and send any emails in your outbox.
When a new email arrives in your inbox,
will appear in the status bar.
open an email
When you receive a new mail, it will appear in
your inbox with a closed envelope icon next
to it. This icon denotes that the mail is unread.
Highlight the mail using the Navigation key and
click select to open or use choose Open from
the option menu.
reply to an email
To reply to an email, open it and press the menu
button. Choose
Reply or Reply to all… from
the popup menu. You can then compose your
email as normal.
forward an email
To forward an email, open it and press the
Menu key. From the popup menu select
Forward. The email will be displayed as a new
composed message. Enter the recipient’s email
address and send as you would a normal email.
TIP! The maximum size of email messages
can be confi gured to suit your personal
preference. To do so select
Settings from the
dropdown menu. .
email
Launch the Messages application from the
Application screen and follow the steps below.
Alternatively use the messaging Quick key.
1 Unless it is set as your default account,
scroll to the account you wish to send an
email from.
2 Press the Menu key and select New email…
3 Enter the recipients’ email addresses in the
To, Cc and Bcc fi elds.
4 Type your text and fi ll in the subject fi eld.
5 When your email is ready to send, press the
Menu key and select
Send from the popup
options.
6 The progress of the outgoing message, and
any incoming emails, will be displayed in a
message box.
7 Whilst your WiPOQ is sending or receiving
messages,
will appear in the status bar.
8 When the message has been successfully
sent, it will be moved into the Sent folder.
email icons
The status of your emails is displayed using
a series of icons shown on the left hand side of
your email list within the application..
email
TIP! If the WiPOQ is unable to send or
receive an email, an error message will appear.
Check that your account settings are correct
and ensure that mobile’s SIM card is
data enabled.
New unread email
Read email
Unread email with attachment
Read email with attachment
03
how to
03
how to
Page 12

22
23
delete an email
To delete an email, highlight or open the
message, then press the Menu key. Select
Delete
from the popup menu. The message will be
deleted from your WiPOQ.
sort your mail
To change the order your mail appears in your
mailboxes, press the Menu key and select one of
these three views:
◆ Display name
This groups your messages according to the
sender, in alphabetical order.
◆ Date
This orders your messages according to the
date they were received.
◆ Subject
This separates your text messages from your
emails and groups emails with the same
subject header together in alphabetical order.
TIP! If a message is deleted from your
WiPOQ it will remain on your email server.
Your WiPOQ will continue to retrieve the
message as a new email until it has been
deleted from your server as well.
Don’t forget! If at any time you need to
access another application quickly, press and
hold the Menu key. A popup window will
display all your currently open applications.
Scroll to the one you wish to access and
press the Select key.
email
browsing
Launch the Internet application from the
Application screen. The WiPOQ homepage
will be displayed.
1 Press the Menu key and select Go To from
the popup menu.
2 Enter a URL and press the Select key. The
page may take a few moments to load.
A progress bar will be displayed in the top
right corner of the screen.
3 When your page has loaded you can move
around it using the Navigation key. Select
a link by clicking the Select key.
4 Stop and Refresh options are available in
the popup menu. To select one use the
Navigation and Select keys.
5 To view the page in full screen mode, press
the Menu key and select
Fullscreen from the
popup menu. To return to the normal view,
select Fullscreen again.
zoom in and out
To view more of a web page, select Settings from
the popup menu. Choose Size multiplier and
enter the percentage you wish to scale the page
to. Press the Menu button, and select Save to
apply your new browser settings.
03
how to
03
how to
Page 13

24
25
browsing
bookmark a page
To bookmark a page, press the Menu key and
scroll to Bookmarks in the popup menu.
Choose Add Bookmark to create one for the
page you are currently viewing (the details will
appear automatically), or you can manually enter
details for a different page. Select Add to save
the bookmark.
Choose Edit Bookmarks to amend an existing
bookmarked page.
navigate
To navigate use the
Navigate option from the
popup menu. Quickly access your homepage by
selecting Home. Skip between recently visited
web pages using
Back, Forward and
Recent Pages.
change your homepage
To change your homepage, access the
Settings screen via the popup menu. If you are
currently viewing the page you wish to use as
your homepage, simply click
Use current page.
Otherwise enter the URL of the page you wish
to use. Press the Menu key to save and exit.
Whenever you launch the WiPOQ Internet
browser, this page will automatically load.
TIP! You can also use the Back key on your
WiPOQ keyboard to quickly return to the
last page you viewed.
Launch Messages from the Application screen.
1 Press the Menu key and choose the
New SMS option.
2 Enter the number of the person you wish to
send a SMS to, or with the cursor in the
To:
field press the Menu key and select
To…
from the popup menu.
3 Enter the first few letters of the first name
or surname of the contact you wish to send
an SMS to.
4 Scroll to the contact you are searching for
from the results list and press the Select key
to confirm.
5 You will be returned to the new blank
messag e. Use the Navig ation key to
move the cur sor to the text box and
write your m essage .
6 When you have composed your message
press the Menu key and select
Send from the
popup menu.
Your message will be sent immediately via
your mobile phone, and a copy will be saved
in the Sent Items folder on your WiPOQ.
sms messaging
03
how to
03
how to
Page 14

26
27
save a message
To save a message and send it later, press the
Menu key and scroll to and select Save.
The message will be stored in the Drafts folder.
To open it again, use the Tab keys to move to
the Drafts folder and select the message using
the Select key.
open an sms message
When you receive a new message it will appear
in your inbox with
next to it. This icon
denotes that the mail is unread. A new SMS is
also indicated by green led and a person-shaped
icon in the status bar with speech bubble.
Highlight the mail using the Navigation key and
click select to open or use choose Open from
the option menu.
sms messaging
Don’t forget! If at any time you need to
access another application quickly, press and
hold the Menu key. A popup window will
display all your currently open applications.
Scroll to the one you wish to access and press
TIP! Not all phones allow the WiPOQ to
send and receive SMS using the Bluetooth
connection. Please check www.wipoq.com
to check for compatibility..
03
how to
03
how to
downloads
When you download an application, it will
automatically be saved in the Downloads
section of the application screen.
Not only is this a handy place to keep all your
installed applications together, you can also view
details and uninstall them from here.
1 Download your chosen application from
the Internet.
2 Open Downloads from the Application
screen.
3 Each download is represented by an icon.
Scroll to one and press the Menu key.
4 From the popup menu select one of the
following options:
◆ Application: Displays information on your
selected application. Choose Get info from the
extended menu to view version, vendor and
size details.
◆ Task: If your application is running, you can
control it from here. Select from the options
Run, Terminate, Pause and Resume using the
Navigation and Select key.
◆ Group: Group your applications by creating
folders to save them in. Choose Select group
from the extended menu and select an existing
group or create a new group by typing in the
name for the group.
◆ Uninstall: This option will permanently remove
an application from your WiPOQ. Scroll to it
and press the Select key.
◆ Show running: This allows you to see all the
applications from the Downloads section you
are running.
◆ Exit: Select this option to return to the
My WiPOQ screen.
Page 15

28
29
contacts
Your WiPOQ has a fully comprehensive
contacts application, allowing you to save all
important and useful details about each of your
contacts. Launch Contacts from the Application
screen, or press the Contacts Quick key.
The WiPOQ contacts applicaton is separated
in 4 categories, to enable you to keep your
contacts organised: All, Work, Friends and Family.
You can move between each screen using the
Tab keys.
1 Press the Menu key and select New… from
the popup menu.
2 Enter the details of your new contact.
The new screen is separated into four
sections: Name, Home, Work, Contact.
Fill in as little or as many details in each
section as you wish.
3 Scroll to the Category button and press the
Select key to choose the Category you wish
your new contact to be added to. Choose
Work, Friends or Family from the popup
window and press the Select key to confirm.
4 Enter phone numbers, email addresses and
homepage details in full in the last section
entitled Contact.
5 When you have added all the details you
want to include, press the Menu key and
select Done. If you select Discard from the
popup, you will be returned to the Contacts
main page and the contact will not be saved.
03
how to
03
how to
contacts
search for a contact
Along the bottom of the contact screen is a
search box containing a cursor. Enter the fir st
couple of letters of the first or surname or the
contact you are searching for.
The more letters you include, the narrower
the search.
view a contact
To view and edit the details of any contact, scroll
to it and press the Menu key. Then select
Open
from the popup menu. The contact will open in
the same format as when you first created it.
If you amend or add any details, press the Menu
key and select
Save before exiting the screen.
TIP! If you want to completely refresh your
contacts, press the Menu key and go to
Advanced in the popup menu. Select
Delete all and confirm by selecting Yes from
the Question? popup.
delete a contact
Scroll to the contact you wish to delete and
press the Menu key. Choose the
Delete option
from the popup menu. Select
Yes from the
Question? popup to confirm you want to erase
the contact.
TIP! You can search from either the All
section of the contacts main screen, or from
the category of the contact you require - this
narrows the search.
Page 16

30
31
beam a contact
Using your Bluetooth® connections you can
beam a contact’s details to your phone or any
other Bluetooth
®
device in your vicinity.
Simply select the contact you want to send and
press the Menu key and choose Beam…. Your
WiPOQ will then search for the Bluetooth
®
devices in range. Select the desired one from the
list and press the Select key. The contact will then
be sent your mobile phone or other device.
send a message
Scroll to and select the contact you wish to
send a message to and press the Menu key.
Choose Message from the popup menu, and
from the second popup choose what type of
TIP! To use this shortcut, make sure you
have entered details for the
Email, SMS and
MSN fields in the contact. Otherwise
a warning message will appear to tell you
that there is missing information in the
contact details.
contacts
message you want to send: Email, SMS or Chat.
A new message window in the application you
requested will automatically open.
sort your contacts
Within any category, press the Menu key and
select the Sort by option. Choose whether to
arrange your contacts in order alphabetically of
either their company, first name or last name .
view a homepage
If you have entered homepage details to
a contact, use the browser shortcut. Select
a contact, press the Menu key and choose
View Home Page. This will take you directly
to the WiPOQ browser and load the
contact’s homepage.
Don’t forget! If at any time you need to
access another application quickly, press and
hold the Menu key. A popup window will
display all your currently open applications.
Scroll to the one you wish to access and press
the Select key.
03
how to
03
how to
change the view
You can view your calendar entries in two
different ways. Use the Tab keys to move
between the two:
◆ Forthcoming
A list of all the upcoming days with
appointments. Click on a day using the
Select key to expand the list and see the
individual appointments.
◆ Month
The month in grid form. Days containing
appointments are identified by a small green
square next to the date.
calendar
Launch the Calendar application from the
Application screen.
1 Press the Menu key and select New event
from the popup menu.
2 Fill in the subject, date and time of your
meeting, appointment or event.
3 Choose whether you want your WiPOQ
to remind you of your entry with an alarm.
Scroll to Alarm and press the Select key.
4 Select No if you don’t require an alarm or
choose one of the time periods available
(between 1 minute and 1 day) to specify
when the the alarm should sound.
5 Add notes to the entry, such as directions,
which can be viewed at a later date.
6 When you have completed your entry press
the Menu key, and select
Save.
7 Upcoming calendar events are indicated by
the green LED and a bell -shaped icon will
appear in the status bar.
TIP! If you’re in a hurry, a quicker way of
opening a new calendar entry is to scroll to
the date you wish to add an appointment to
and press the Select key. A new entry screen
will open, with the date already entered.
Page 17

32
33
calendar
view an entry
In the Month mode, scroll to the date you wish
to view and press the Menu key. Then select
Go to date from the popup menu. A list will be
displayed showing the appointments you have
for the selected day.
To view the details of an appointment, select it
and press the Menu key. Then choose the
Open
option from the popup menu. You can amend
your entry and save the details using the Menu
key and selecting
Save.
adjusting the settings
You can adjust the default alarm settings for
your appointment, so that you don’t have to
for each appointment separately. Press the
Menu key and select the
Settings option.
You can specify when the alarm will sound,
the time between snooze alarms and the
snooze duration.
delete an entry
Move the cursor to the item you wish to delete
and press the Menu key. Select
Delete from
the popup menu and press the Select key.
Confirm the deletion by selecting
Yes from the
Question? popup.
03
how to
03
how to
synchronisation and backup
You can synchronise your contacts and calendar
on your computer with your WiPOQ. You can
also backup all your valuable information, such
as contacts, emails and calendar on your PC.
You can backup and synchronise data from
Outlook Express, Outlook 2003 and Outlook
2002. You need to have a PC operating
OS Windows XP Home or Windows XP
Profess ional SP1. Windows 2000 is
not su ppor ted.
installing the driver
1 Insert the WiPOQ Synchronisation and
Backup CD into your PC’s CD drive.
2 Within the WiPOQ Synchronisation file are
two separate files named
sync_setup and
usb_drv_win32. Save both files to the
C: drive of your PC.
3 Make sure your WiPOQ is full charged. If
battery power is low, the synchronisation
may be unsuccessful.
4 Using the mini USB cable supplied, connect
your WiPOQ to your PC.
5 A New Hardware Wizard popup will appear
on your PC, asking permission to search for
software. Select
Yes, now and everytime I
connect a device. Then click Next.
6 The wizard will then ask you to insert an
installation CD provided with your device.
As you have already transported the files you
need on to your C: Drive, choose the
Install
from a list or specific location (Advanced)
option by checking the box. Then click
Next.
Page 18

34
35
synchronisation and backup
7 You will then be offered two options for
installation, choose
Search for the best
driver in this location by checking the
tickbox and use the dropdown menu to
select your C: drive. Then click
Next again.
8 The driver will take a few moments to install,
when it is complete select Finish.
installing the installation software
1 Go to the Sync_Setup file you saved earlier
to your C: drive. Open the file and double
click on the Setup icon inside. This will launch
the setup installation wizard.
2 You will be asked to select your preferred
setup language. Click on the drop-down
menu and select your language.
3 A popup will then appear asking you to
proceed with the WiPOQ Messenger –
PC Suite Installation Wizard. Click
Next.
4 From the Setup Type screen check the
Complete option to install the full WiPOQ
synchronisation and backup features.
Then click Next.
5 Select Install from the next screen to
begin the installation. The installation will
take a few minutes and a progress screen
will be displayed.
03
how to
03
how to
synchronisation and backup
6 You will be aler ted when the installation
is complete. Click
Finish to finalise. Your
WiPOQ Synchronisation and Backup
software is now ready to use, and a shortcut
has been saved to your desktop.
synchronising your data
1 Connect your WiPOQ to your computer
using the mini USB cable.
2 Launch the WiPOQ Messenger
synchronisation software from the desktop
icon.
3 The main WiPOQ Messenger – PC Suite
page will open.
TIP! You can access the Settings screen at any
time by clicking on Sync Manager
.
Page 19

36
37
4 Click at the left hand side of the screen.
The first time you synchronise, you will be
directed to the Settings wizard.
5 Unless you want to specify your settings
manually, rather than using the wizard click
Next. We suggest you only use the Manual
option if you are an advanced user.
6 Select what type of personal information
database you are using on your computer
(for example MS Outlook 2005) and click
Next. If you select the incorrect one your
synchronisation will not be successful.
7 Next choose the items you wish to
synchronise that are available on your database
and click Next
again.
8 Finally choose whether you wish to
start your synchronisations manually, or
automatically every time you connect your
WiPOQ to your computer. Then click
Next
and a summary of your settings will appear.
9 Check the details of your settings
and click Finish when you are ready.
Sync hronisation will begin immediatel y
and can last a fe w mi nutes.
synchronisation and backup
03
how to
03
how to
synchronisation and backup
10 When the synchronisation is complete a
window will display information such as
whether it was a successful sync and how
many items where synchronised.
backup your data
1 From the main WiPOQ Messenger – PC
Suite screen click on the Backup Manager
option. The Backup page will open, click
Backup to proceed.
2 You will then be asked to give a name to the
backup file you are about to create. Type the
name into the field and click
Yes to continue.
3 Your computer will then begin to back
up all the data on your WiPOQ. It will take
a few minutes, and a progress screen will
be displayed.
4 When completed, a popup will appear
to tell you the Backup was successful. You
can choose to view a detailed report of
your Backup, or select
OK to return to the
Backup Manager screen.
Page 20

38
39
5 Your new Backup file will now appear under
Previously created backups.
restoring your data
1 Click once on the Backup file you wish to
restore to your WiPOQ and then click the
Restore option.
2 A warning will be displayed to remind you
that restoring a backup will rewrite all the
data currently existing on your WiPOQ with
the backed-up file. Click
Yes to continue.
3 It will take a few minutes to restore the
data to your WiPOQ. When complete your
WiPOQ will automatically reset.
uninstalling the synchronisation software
If you need to uninstall the software from
your PC:
1 From the start menu, select Programs
and scroll to WiPOQ Messenger – PC
Suite. Two options will be displayed in the
expanded menu, select
Uninstalling WiPOQ
Messenger – PC Suite.
2 Confirm you wish to remove the WiPOQ
synchronisation software. Your computer will
then begin to uninstall.
TIP! Restoring any backed-up files will
replace any files currently on your WiPOQ
device. If you don’t wish to lose them, be sure
to back up the existing data before restoring
a previous backup file.
synchronisation and backup
03
how to
03
how to
file explorer
File Explorer is where you can access all
your saved files, from email attachments to
photographs, from downloads to PDFs.
The File Explorer is split into two categories:
◆ docs
All files with the extension pdf, doc, xls or ppt
◆ pictures
All picture files, save with the extension png
open a file
Scroll to the file you wish to view and press the
Select key. Alternatively press the Menu key and
select Open from the popup menu.
TIP! You can view your picture files quickly
using the Gallery in My WiPOQ.
rename a file
Scroll to the file you wish to rename using the
Navigation key. Press the Menu key and select
the Rename option from the popup menu.
Enter the new file name and select
OK using
the Select key.
create a new folder
From either the main Explorer screen, or within
one of the other folders – depending on where
you would like your new folder to exist – press
the Menu key. Enter the name of your new
folder, e.g. Wor k, and select
OK to save. The
new folder will appear, and you can begin to
save items to it.
edit your folders
You can move a file from one folder to another,
reorganising your Explorer just as you would
your documents on your computer.
Page 21

40
41
file explorer
Scroll to the document you wish to move and
press the Menu key. Choose
Edit from the
popup menu and then select
Copy (to move
a duplicate file) or
Cut (to move the original
file) from the extended menu.
Then enter the folder you wish to move your
document to using the Navigation key and press
the Menu key again. This time choose
Paste
from the Edit menu. The document will be
pasted into its new folder.
send in an email
To email a file as an attachment, scroll to the file
you wish to send and press the Menu key. From
the popup menu select
Send in email, which will
automatically take you to a new email screen.
The file will appear in the mail as an attachment
ready to send.
view properties
Scroll to the file you require and press the
Menu key. Then select
Properties from the
options menu. A popup window will then
display the file name, size, type and the date
it was last modified.
delete a file
Move the cur sor to the document or image
you wish to delete and press the Menu key.
Select Delete from the popup menu and
confirm the deletion by selecting Yes from
the Question?
popup.
sort your files
To rearrange the order of your files when you
view them, press the Menu key and select
Sort by. Choose to sort your files by date, name
alphabetically or type of file (e.g. pdf). Press the
Select key to apply your new order.
03
how to
03
how to
gallery
The WiPOQ gallery is an application which
allows you to save and store images which have
been downloaded or sent to you via email.
Open the Gallery from the My WiPOQ screen.
open an image
When you enter your gallery, all your images will
be displayed as thumbnails. To open an image,
scroll to the image and press the Select key.
Alternatively press the Menu key and select
Open from the popup menu.
view on full screen
To view an image in full screen mode, press
the menu key and select
Full screen from the
popup menu. This will remove the status bar.
To return to the normal view, press the
Menu key and select
Full screen again.
scroll through images
When you have an image open, you can press
the Menu key and choose
Next or Prev to
view the images in sequence one at a time, like
a slide show.
Page 22

42
43
settings
The Settings section allows you to adjust the
preferences on your WiPOQ and includes
seven sub-screens:
◆ Time
Set the time and date of your WiPOQ – you
will have the option to synchronise the time and
date when you pair some types of phone.
◆ Bluetooth
®
Search and pair with another Bluetooth®
device. See the section connecting your
mobile for details.
◆ Volume
Adjust the volume of the alerts, or select
Mute by checking the box.
◆ Screen
Adjust the contrast of the screen using the
Navigation key.
◆ Pincode
Enable or disable your PIN. Change your PIN by
choosing enable and entering your new PIN.
◆ About
The About screen shows all the details of your
WiPOQ software version. From here, press the
Menu key to select the reset options.
Beware! A factory reset will remove all the
data on your WiPOQ permanently. We advise
you to perform a backup before resetting
your device. You can see how to do this in
the Synchronisation and Backup section
.
03
how to
03
how to
zoom in and out
When an image is open, press the Menu key
and select Zoom in or Zoom out using the
Select button.
delete an image
Select the image you wish to delete and press
the Menu key. Select
Delete from the popup
menu and confirm the deletion by selecting
Yes
from the Question? popup.
send an image
To email an image as an attachment, scroll to
the file you wish to send and press the
Menu key. From the popup menu select
Send by email, which will automatically take you
to a new email screen. The file will appear in the
mail as an attachment, ready to send.
gallery
Page 23

44
45
04
FAQs
FAQs
FAQs
04 04
Page 24

46
47
My WiPOQ won’t send
or receive a Vcard
Check that the Bluetooth® connection
between your device and WiPOQ is active.
If it is, the blue LED will flash. To re-instate the
connection press the Bluetooth button in the
top right corner of your keyboard.
Can I reset my WiPOQ?
Yes, you can reset your WiPOQ. Go to the
About tab in Settings section and press the
Menu key. A popup will give you a Factory
Reset option. Select
Factory Reset again to
proceed. You will be asked a second time to
confirm the reset and automatic restart your
device. Select
Yes to continue.
Beware! A factory reset will remove all the
data on your WiPOQ permanently. We advise
you to perform a backup before reseting
your device. You can see how to do this in
the Synchronisation and Backup section
.
What do I do if my WiPOQ
screen freezes?
If the screen freezes first try to turn the power
off and on again. If this fails, it is safe to remove
the battery for a few seconds and try to start
the WiPOQ again. You will need to complete the
installation wizard when the power is back on.
How do I input symbols?
Each letter key has an extended character or
symbol. You can access these by holding down
the Alt key and pressing the desired character.
My device will not load a web page
◆
Check that the Bluetooth® connection
between your device and WiPOQ is active.
If it is the blue LED will flash. To re-instate the
connection press the Bluetooth button in
the top right corner of your keyboard.
◆ Check that your mobile contract includes
data transfer. If you are unsure, contact your
network provider.
frequently asked questions
FAQs
FAQs
04 04
My WiPOQ doesn’t connect to my phone
◆
Check the Bluetooth® on your phone is
enabled and your mobile is visable to other
Bluetooth® users. Refer to your mobile’s
documentation for details.
◆ Make sure your mobile phone and WiPOQ
are within a 10m radius of one another.
◆ Go to the Settings section of your
My WiPOQ screen and select Bluetooth.
Check that your device is discoverable (Yes).
I can’t send/receive emails
◆
Check that the email account settings are
entered correctly. See section
setting up your
email account details.
◆ Check your Bluetooth® LED is flashing green;
this represents a good connection with
your phone. If it is red, press and hold the
Bluetooth® key until the blue light shows.
If the light still shows red, try re-partnering
your WiPOQ and your mobile.
Can I use another mobile phone
with my WiPOQ?
Many phones are already compatible with your
WiPOQ and new ones are always being added.
Please visit www.wipoq.com for up to date
information on phone compatibility.
My WiPOQ isn’t synchronising with my PC
◆
Check that the mini USB cable is correctly
connected to your computer.
◆ Check you have correctly installed
synchronisation software.
◆ Make sure you have selected the correct
Microsoft databases to synchronise with your
WiPOQ. E.g. MS Outlook 2000/2002/2003 or
Windows Address Book (Outlook Express).
My WiPOQ won’t send SMS messages
Check that the Bluetooth® connection
between your device and WiPOQ is active. If
it is the blue LED will be pulsating. To re-instate
the connection press the Bluetooth button in
the top right corner of your keyboard.
frequently asked questions
Page 25

48
49
05
safety
safety
safety
05 05
Page 26

50
51
boarding any aircraft. The use of mobile
telephones in an aircraft may be dangerous to
the operation of the aircraft, disrupt the mobile
telephone network, and is illegal. You may be
able to use your WiPOQ once in the air as
long as the Bluetooth connection is disabled.
However we recommend you check with your
airline before use.
explosive materials
• You are advised to switch off your WiPOQ
and phone when at a petrol station or other
refuelling point. You must observe restrictions
on the use of radio equipment in fuel depots
(fuel storage and distribution areas); chemical
plants or where blasting operations are
in progress.
• Areas with a potentially explosive
atmosphere are often but not always
clearly marked. They include: below deck on
boats; chemical transfer or storage facilities;
vehicles using liquefied petroleum gas (such
as propane or butane); areas where the air
contains chemicals or particles, such as grain,
dust or metal powders; and any other area
where you would normally be advised to
turn off your vehicle engine.
Note: The functioning of your WiPOQ can be
affected by localised conditions, and we cannot
guarantee coverage inside buildings.
general safety information
• Remember to always make backup copies
of all important data.
• The information or services you have
accessed using WAP or the web are often
stored in the cache of your device, which
is a memory used to store data temporar ily.
You should therefore take care in allowing
others to access your device.
• Parts of the WiPOQ are magnetic. Metallic
materials may be attracted to the device.
Do not place credit cards or other magnetic
storage media near the WiPOQ, because
information stored on them may be erased.
• Always switch your device off in any facility
where posted notices so require.
safety
05
safety
safety
operating environment
Remember to follow any special regulations
in force in any area, and always turn off your
device wherever it is forbidden to use it, or
when it may cause interference or danger.
When connecting the device to a phone, read
its user guide for detailed safety instructions.
Do not connect incompatible products.
pacemakers
Pacemaker manufacturers recommend that
a minimum separation of 16 cm (6 inches)
be maintained between a wireless device and
a pacemaker to avoid potential interference
with the pacemaker. These recommendations
are consistent with the independent research
of and recommendations of Wireless
Technology Research. Users with pacemaker s
should therefore:
• Always keep your device at least 20 cm
(8 inches) away from your pacemaker when
the device is switched on.
• Never carry your device in your breast pocket.
• Use the ear opposite to the pacemaker
to minimise the potential for interference.
• Switch off your device immediately if you
suspect that interference is being caused.
hearing aids
Certain hearing aids can be affected by wireless
products. If this occurs, please consult the
hearing aid manufacturer.
other medical equipment
Operation of any radio transmitting equipment,
including mobile phones and WiPOQs, may
interfere with the working of other inadequately
protected medical devices. Consult a physician
or the manufacturer of the medical device
if you have any questions. Always switch off
your device in health care facilities when any
regulations posted in these areas instruct you
to do so.
aircraft safety
Using your WiPOQ and phone while in the
air is prohibited. Switch off your phone before
05
safety
Page 27

52
53
a purse or pocket.
• Batteries must be recycled or disposed
of properly and according to your local
regulations, and must never be disposed
of in household waste. Never dispose of
batteries in a fire.
• When you disconnect the charger’s power
cord, grasp and pull the plug, not the cord.
• For good operation times, discharge the
NiMH battery from time to time by
leaving your WiPOQ switched on until it
turns itself off.
• Do not attempt to open the casing on your
WiPOQ or its battery. Non-expert handling
may damage it.
• Do not drop, knock or shake your device.
Rough handling can break the internal
circuit boards.
• Do not use harsh chemicals, cleaning
solvents, or strong detergents to clean your
WiPOQ. Wipe it with a soft cloth slightly
dampened in a mild soap and water solution.
• Do not store it in hot areas. High
temperatures can shorten the life of
electronic devices, damage batteries and
warp or melt certain plastics.
• Do not store your WiPOQ in cold
areas. When it warms up (to its normal
temperature) moisture can form inside
the device which may damage electronic
circuit boards.
If you are concerned about any aspect of safety,
please refer to www.wipoq.com or contact the
original retailer of the device for assistance.
declaration of conformity
We, SANYO Sales & Marketing Co declare our
sole responsibility that the product WiPOQ
WMT-100, WMT-110, WMT-120, manufactured
by Shimane Sanyo Industrial Co. Ltd. to which
this declaration relates is in conformity with
the following standard(s) or other normative
document(s): EN60950-1, EN300 328 x1.6.1
EN301 489-1 v1.4.1, EN301 489-17 v1.2.1
following the provision of 1999/5/ED(R&TTE)
Directive. Please visit www.wipoq.com if you
require a copy of the original certificate.
safety
05
safety
safety
• Temperature extremes may affect the ability
of your battery to charge: allow it to cool
down or warm up first.
• Never use any charger or battery which is
damaged or worn out.
• Always unplug the charger when not in use.
Do not leave the product connected to
the charger for longer than a week, since
overcharging may shorten its lifetime. If left
unused, a fully charged battery will discharge
itself over time.
• Do not paint your device as this can clog its
moving parts and prevent operation.
• Use your device’s battery only for its
intended purpose, and never use any charger
or battery which is damaged or worn out.
• Never allow the battery terminals to short
circuit, as this can cause damage to the
battery or to the connecting object (a shor t
circuit can occur if a metallic object such as
a coin, clip or pen causes direct connection
between the + and – terminals of the
battery). Therefore, always take adequate
precautions when carrying a spare batter y in
device and battery care
Warnin g: Use only batteries, charger and
access ories approved for use with this device.
The us e of any othe r types may i nvalida te
any wa rranty applying to the device, and
may be danger ous.
• Keep the device and all its parts and
accessories out of children’s reach.
• Your WiPOQ is not water resistant. Keep it
dry. Precipitation, humidity and all types of
liquids or moisture can contain minerals that
will corrode electronic circuits.
• Do not use the device in dusty, dirty areas. Its
moving parts can be damaged.
• Your WiPOQ is powered by a rechargeable
battery. Note that a new battery’s full
performance may only be achieved after
two or three complete charge and
discharge cycles.
• The battery can be charged and discharged
hundreds of times but it will eventually wear
out. When the operating time (use time
and standby time) is noticeably shorter than
normal, it is time to buy a new battery.
05
safety
Page 28

55
Navigation key ...................................................................................................xx
Orange ...................................................................................................................xx
Outlook .................................................................................................................xx
pairing .....................................................................................................................xx
partnering .............................................................................................................xx
PC ............................................................................................................................ xx
pictures ................................................................................................................... xx
PIN ............................................................................................................................ xx
Pincode ..................................................................................................................xx
Power ......................................................................................................................xx
Quick keys ............................................................................................................ xx
reset ......................................................................................................................... xx
safety .......................................................................................................................xx
screen ...................................................................................................................... xx
Select key .............................................................................................................. xx
setting up your account ................................................................................ xx
settings .................................................................................................................... xx
Shift key .................................................................................................................xx
SIM ............................................................................................................................ xx
sms ............................................................................................................................ xx
open an sms message ..........................................................................xx
save a sms message ...............................................................................xx
SMTP ....................................................................................................................... xx
software ................................................................................................................. xx
startup wizard ....................................................................................................xx
synchronise ............................................................................................................
synchronising your data .................................................................................. xx
Tab key ...................................................................................................................xx
Vcard .......................................................................................................................xx
view .......................................................................................................................... xx
volume .................................................................................................................... xx
Windows ..............................................................................................................xx
index
54
About ...................................................................................................................... xx
Alt key ....................................................................................................................xx
attachment ...........................................................................................................xx
Back key ................................................................................................................. xx
Backspace .............................................................................................................xx
backup ....................................................................................................................xx
battery ....................................................................................................................xx
Bluetooth ..............................................................................................................xx
bookmarks ...........................................................................................................xx
browser .................................................................................................................. xx
calendar .................................................................................................................xx
change the view ........................................................................................xx
view an entr y ..............................................................................................xx
adjusting the settings .............................................................................xx
delete an entr y ........................................................................................ xx
CD ROM ..............................................................................................................xx
charger ...................................................................................................................xx
computer ..............................................................................................................xx
Connect ................................................................................................................. xx
connecting
connecting your mobile ......................................................................xx
contact ............................................................................................................xx
adding a contact ......................................................................................xx
data ............................................................................................................................xx
data enabled ................................................................................................xx
declaration of conformity .............................................................................xx
downloading .........................................................................................................xx
driver .......................................................................................................................xx
email ........................................................................................................................xx
check for email .........................................................................................xx
delete an email .........................................................................................xx
forward an email .....................................................................................xx
open an email ...........................................................................................xx
reply to an email .....................................................................................xx
sor t your email .........................................................................................xx
email account .....................................................................................................xx
entry ........................................................................................................................xx
event ........................................................................................................................ xx
file explorer .........................................................................................................xx
file .................. ............................................................................................................ xx
delete a file ..................................................................................................xx
open a file ....................................................................................................xx
rename a file ...............................................................................................xx
sor t your files ............................................................................................. xx
folder ......................................................................................................................... xx
create a new folder ...............................................................................xx
edit your folders ......................................................................................xx
help ..........................................................................................................................xx
home screen .......................................................................................................xx
homepage ............................................................................................................. xx
images .....................................................................................................................xx
I-messaging ........................................................................................................... xx
installation ............................................................................................................. xx
installing .................................................................................................................. xx
installing the driver ..................................................................................xx
installing the installation software ...................................................xx
internet ....................................................................................................................xx
IT manager ...........................................................................................................xx
keypad ....................................................................................................................xx
LED ..........................................................................................................................xx
Menu key ..............................................................................................................xx
mini usb data cable .......................................................................................... xx
mobile phone .....................................................................................................xx
help
If you’re having problems, please contact the
Orange customer service team for free by
calling 1474 from any Orange mobile phone.
Or visit www.empresas.orange.es.
06
help and index
06
help and index
Page 29

While we have made every effort to describe the true behaviour of your WiPOQ
we are always improving our product and reserve the right to make adjustments
to the WiPOQ, which may not be reflected by this guide.
Information contained in this document is proprietary and confidential information
of SANYO Sales & Marketing Corporation and COMsciences Worldwide
Corporation. Unauthorized reproduction, use or disclosure of this material,
or any part thereof, is strictly prohibited.
© 2006 Sanyo Sales & Marketing Corp.
This symbol on the product or in the instructions means that your electrical and electronic
equipment should be disposed at the end of its life separately from your household waste.
There are separate collection systems for recycling in the EU. For more information, please
contact the local authority or your retailer where you purchased the product.
Produced by Clear® the explanation agency www.makeitclear.co.uk
Page 30

Important information to the user
This equipment has been tested and found to comply with the limits for a Class B digital
device, pursuant to part 15 of the FCC Rules. These limits are designed to provide
reasonable protection against harmful interference in a residential installation. This
equipment generates, uses and can radiate radio frequency energy and, if not installed
and used in accordance with the instructions, may cause harmful interference to radio
communications. However, there is no guarantee that interference will not occur in a
particular installation. If this equipment does cause harmful interference to radio or
television reception, which can be determined by turning the equipment off and on, the
user is encouraged to try to correct
the interference by one or more of the following measures:
• Reorient or relocate the receiving antenna
• Increase the separation between the equipment and receiver
• Connect the equipment into an outlet on a circuit different from that to which the
receiver is connected
• Consult the dealer or an experienced radio/TV technician for help
Changes or modifications not expressly approved by the manufacturer of this device could
void the user’s authority to operate the equipment.
This device and its antenna(s) must not be co-located or operating in conjunction with any
other antenna or transmitter.
Federal Communications Commission
This device complies with part 15 of the FCC Rules. Operation is subject to the following
two conditions: 1. This device may not cause harmful interference, and 2. This device must
accept any interference received, including interference that may cause undesired
operation.
Tested To Comply
With FCC Standard
FOR HOME OF OFFICE USE
 Loading...