

Page 1

Basic Manual
Contents/
Before Use
Phone Call
Videophone
Global Functions
Inputting Text
Address Book/
Pair Function
Mail
Camera
W63SA
by SANYO
EZweb
EZ Navi
TV/Radio
Remote Ctrl Lock
Other Features/
Troubleshooting
Index
Page 2

Preface
Thank you for choosing W63SA.
Before using your W63SA, be sure to read the W63SA "Basic Manual (this PDF manual)" to
ensure proper use of your W63SA. After you have finished reading, keep this PDF manual and
the printed manuals (Japanese) in a safe place for your reference whenever you need.
Contact the au shop or the au Customer Service Center for replacements if you lose either of
these manuals.
Printed Manuals for W63SA (Japanese)
The W63SA comes with Basic Manual and a Manual.
●W63SA Basic Manual ●W63SA Manual
目次/準備
通話
テレビ電話
グローバル機能
文字入力
アドレス帳/
ペア機能
メール
カメラ
EZweb
EZナビ
テレビ/ラジオ
遠隔ロック
その他機能
W63SA
by SANYO
困ったときは
English(英語)/
(中国語)
索引
/
Equivalent to this English PDF manual. English version is not available.
The following manuals are available on the au website:
• Download site for "Basic Manual" (Japanese and English) and "Manual" (Japanese only)
www.au.kddi.com/torisetsu/index.html)
(http://
• The au online manual (Japanese) for searching by keyword
www.au.kddi.com/manual/index.html)
(http://
The au online manual (Japanese) is also available from EZweb:
<How to access>
"au
"au one Top"
お客さまサポート
オンラインマニュアル
(Online Manual)".
(au Customer Support)" → "
調べる
目 次/ご利用いただく前に
auICカード
基本機能
テレビ電話
グローバル機能
W63SA
メール
カメラ
データフォルダ
microSDTMメモリカード
EZweb
EZナビ
LISMO
EZアプリ(BREW®)
PCサイトビューアー/
PCドキュメントビューアー
テレビ/ラジオ
M機能
便利な機能
auの
ネットワークサービス
付録/索引/
クイックガイド
(Information)" →
Check the au website or customer support, below, in regard to trouble with your W63SA.
•
From W63SA→"au one Top"→"au
(Information)"
お客さまサポート
(au Customer Support)"→"
→"オンラインマニュアル
(Online Manual)"→"
調べる
故障診断
Q&A
(Malfunction Diagnosis Q&A)"
•
From PC →(http://www.kddi.com/customer/service/au/trouble/kosho/index.html)
Information
• Fonts or indications may be different from those on the actual screen, or may be partly
omitted for better readability of PDF manual. Note that this PDF manual may not
reproduce actual screen color tones exactly.
• Screen color tones shown in this manual are those obtained with the default setting.
Page 3

Manners for Using Cellphones
■
A cellphone always generates weak electric waves while its power
is ON.
■ Please be considerate of others and use the cellphone safely.
●
In some places, the use of
cellphones is prohibited.
• Using cellphones while driving
is dangerous and also
the
forbidden by
• Be sure to turn your cellphone
OFF before you board airplanes.
The use of cellphones onboard
airplanes is forbidden by the law.
●
Electric waves from
law.
cellphones may adversely
influence medical devices
and equipment.
• There may be someone with a
pacemaker around you in
crowded places such as
trains. Turn your cellphone
OFF in such places.
• Follow the instructions of
hospitals and other medical
institutions where it is
forbidden to use or carry
cellphones.
●
Consider where to use your
cellphone and be careful of
the volume of your voice.
•
Do not make calls in cinemas,
theaters, museums, libraries and
other similar places. Turn your
cellphone OFF or set it to the manner
mode to prevent others around you
from being inconvenienced by ring
tones for incoming calls or mails.
• On a crowded street, use your
cellphone in places where you do
not prevent others from passing.
• On a train or in a hotel lobby,
move to an area where you will not
bother others around you.
• Take care not to talk too loudly
during conversations.
• When you shoot photos or movies
of others with your cellphone, get
permission from them.
1
Page 4

Basic of Cellphone
What You Can Do with W63SA
Mail
You can send mails to other
cellphones or personal computers.
→
Page 46
EZweb
You can download Chaku-Uta®,
Chaku-Uta-Full
etc.
→
Page 63
®
, and wallpapers,
EZ Navi
You can search for various location
information with the functions of
"EZ Navi Walk", "Passenger Seat
Navi", "Security Navi" or "Evacuate
Navi".
→
Page 70
Use Overseas
You can use the W63SA overseas
by using the global function.
→
Page 33
Videophone
You can watch the other party
while you talk with them.
→
Page 31
TV/Radio
You can watch and listen to the
Digital Terrestrial Broadcasting for
Mobile Television Service (1Seg)
or Digital Radio.
→
Page 72
For information on other features such as PC Site Viewer, see page 80.
Camera
You can shoot photos or movies
and easily send them by E-mail.
→
Page 58
2
Page 5

Manner Mode and Answer Memo
■ Manner Mode
With Manner Mode, you can
mute the ringer so as not to
bother the people around you.
Press m for more than one second
while the standby screen is displayed.
→
Page 30
■ Answer Memo
The caller can leave a
message when you cannot
answer the phone.
Press C for more than one
second while the standby screen is
displayed.
"I can't answer
the phone
right now."
(Japanese)
→
Page 26
Check the Power, Reception and Battery!
■ Keep the "power" ON for normal use.
Keep the power ON to make or answer calls.
ON
Press F for more than one second.
→
Page 14
■
You cannot talk on the phone if the "radio wave" is too weak.
It is sometimes difficult to receive the radio wave in
some places even within a service area.
→
""
indicates the reception condition.
Page 14
■ Be careful of the remaining "battery" power.
If the remaining battery power is too low, you may not
be able to use the cellphone properly.
→
"" indicates the remaining battery power.
Page 14
3
Page 6

Use of Your W63SA While Driving is Prohibited By Law
■
Do not use your cellphone while driving a motor vehicle,
motorcycle or motorbike, or when riding a bicycle, as it
can result in an accident. The use of a cellphone when
driving a motor vehicle, motorcycle or motorbike is
prohibited by law, while use of a cellphone when riding
a bicycle can also result in a fine or other penalty.
Viewing E-mails
×
and watching the
screen
Turn the Power OFF or Set Drive Mode
Turn the Power OFF or Set Drive Mode
While Driving
While Driving
■ Drive Mode
By setting Drive mode, you will enable the caller to hear a
response message such as "I'm currently driving and cannot
answer the phone right now...(in Japanese)", and to store a
message in Answer Memo.
Press m while the standby screen is displayed,
and select "Drive".
Calling with
×
a cellphone
in your hand
"I'm currently driving."
(in Japanese)
4
Page 7

Beware of Junk Mails and One-ring Calls!
■ If you receive junk mails...
Using the mail filter function, you can reject mails sent from
specific addresses or Spoof e-mails.
The following mail functions are available
to prevent junk mails.
• Reject mails with "未承諾広告※
(Unsolicited Ad)" in title.
• Reject mails from specific addresses.
• Reject Spoof e-mails.
→
Page 53
■ If you receive calls from unknown numbers...
It may be "One-ring Calls" intended to trick you into calling back
and accessing unwanted pay programs.
If One-ring Call is received, appears in
Incoming History.
Incoming Hist
5/23 15:15
01
0900001XXXX
02
5/19 11:01
030001XXXX
OutH
→
Page 25
5
Page 8

Making Key Operation Invalid
■ Making Key Operation Invalid
Prevent unintended operation while carrying W63SA closed in
the bag.
Press c for more than one second while the standby screen is displayed.
To release from the locked status
Open your W63SA and press c for more than one second while the standby
screen is displayed.
6
Page 9

Disaster Message Board Service
◆
◆
In the event of a large-scale disaster, you can register your safety
information through EZweb. The registered safety information can
be referred to from anywhere in Japan through EZweb or Internet.
Registering
Safety
Information
In the event of a large-scale disaster, you can register
your safety information such as your condition or
messages to "
災害用伝言板 (Disaster Message Board)"
established on EZweb from au cellphone.
◆ After the registration on the board, your safety
information is informed by E-mail to your family
members and friends designated previously.
Referring to
Safety
Information
災害用伝言板
伝言板トップ
〜サービス提供中〜
安否情報の登録・確認が
できます。
登録(登録可能地域は下記
のご利用地域情報を参照
くださ い )
確認
削除
安否お知らせメール設定
サービス概要
ご利用地域情報
お問合せ
災害対策への取り組み
災害関連情報
English
You can check the safety information of the person you
desire to know about, by entering his/her phone number
from EZweb or Internet
.
*
* The safety information can be accessed at
http://dengon.ezweb.ne.jp/ from cellphones of other
carriers, PHS or personal computer.
W "au one Top" "災害用伝言板
How to
(Disaster Message Board)"
Access
http://dengon.ezweb.ne.jp/
* The maximum preservation period of the registered
information is 72 hours.
* Up to 10 messages can be registered per phone
number. When the number of registration exceeds 10,
the information will be overwritten from the oldest one.
* The demonstration of this service can be referred to
anytime by pressing
サポート
版
(au Customer Support)" "災害用伝言板(デモ
) (The demonstration of Disaster Message Board)".
* Select "English" to use the English mode.
○○線
全線運休中
I'm fine.
W "au one Top" "auお客さま
7
Page 10

Contents
G
i
Contents
Preface
Manners for Using Cellphones ......................................................... 1
Basic of
Cellphone
What You Can Do with W63SA........................................................ 2
Manner Mode and Answer Memo .................................................... 3
Check the Power, Reception and Battery! ....................................... 3
Use of Your W63SA While Driving is Prohibited By Law ................. 4
Beware of Junk Mails and One-ring Calls! ....................................... 5
Making Key Operation Invalid .......................................................... 6
Disaster Message Board Service .....................................................7
Contents
Before Use
Phone Call
Videophone
lobal Functions
Confirming the Package Contents.................................................. 10
Name of Parts ................................................................................ 11
Charging the Battery Pack ............................................................. 12
Setting to Front Style or Recording Oneself Style.......................... 13
Turning the Power ON/OFF ........................................................... 14
Switching Screen Display to English.............................................. 14
Basic Usage ................................................................................... 15
Icons............................................................................................... 18
Initializing E-mail and EZweb Settings ........................................... 19
Confirming Your Phone Number and E-mail Address.................... 20
Changing Your E-mail Address...................................................... 21
Making a Call.................................................................................. 23
Making an International Call........................................................... 23
Answering a Call ............................................................................ 24
Calling Back (Outgoing History/Incoming History) ......................... 25
Countermeasure for One-ring Calls ............................................... 25
Adjusting the Other Party's Voice Volume ..................................... 26
Setting Answer Memo .................................................................... 26
Playing Back Messages on Answer Memo .................................... 27
Changing Ringer Type and Volume ............................................... 28
Setting Manner Mode..................................................................... 30
Making a Videophone Call ............................................................. 31
Answering a Videophone Call ........................................................ 32
Putting a Videophone Call on Hold ................................................ 32
Setting Area ................................................................................... 33
Calling to Japan from Overseas ..................................................... 34
8
Inputting Text
Address Book
r Function
Pa
Switching Input Mode..................................................................... 35
Entering Single-byte Alphanumeric Characters ............................. 35
Entering E-mail Address................................................................. 36
Entering Pictograph........................................................................ 38
Registering Data in Address Book ................................................. 39
Making a Call from Address Book .................................................. 41
Editing Address Book Data ............................................................ 42
Registering Data from Outgoing/Incoming History ......................... 43
Registering Data as Pair Partner.................................................... 44
Making a Call to the Pair Partner ...................................................45
8
Page 11

Mail
C
i
E-mail ............................................................................................. 46
Creating and Sending E-mail ......................................................... 47
Reading Received E-mail............................................................... 50
Replying to Received E-mail.......................................................... 52
Blocking Junk Mails........................................................................ 53
C-mail............................................................................................. 54
Creating and Sending C-mail ......................................................... 55
Reading Received C-mail............................................................... 57
Contents
amera
EZweb
EZ News Flash/
au one Gadget
EZ Nav
TV/Radio
Remote Ctrl Lock
Other Features
Troubleshooting
What You Can Do with Camera..................................................... 58
Shooting Photo............................................................................... 60
Viewing Photos .............................................................................. 61
Attaching Photo to E-mail Message ............................................... 62
EZweb ............................................................................................ 63
Displaying au one Top.................................................................... 64
Bookmarking Frequently-Accessed Site ........................................ 65
Accessing Bookmarked Site........................................................... 66
Viewing Charge.............................................................................. 66
Downloading Chaku-Uta
What You Can Do with EZ News Flash/au one Gadget................. 68
Setting EZ News Flash................................................................... 69
What You Can Do with EZ Navi ..................................................... 70
What You Can Do with TV (1Seg)/Digital Radio ............................ 72
Initializing au Media Tuner ............................................................. 74
Watching TV (1Seg)/Listening to Digital Radio.............................. 75
Ending TV (1Seg)/Digital Radio ..................................................... 77
In Case You Lose Your W63SA..................................................... 78
®
/Chaku-Uta-Full® .................................. 67
80
81
Index
82
9
Page 12

Before Use
Before Use
Confirming the Package Contents
The W63SA phone and accessories are included in the package.
W63SA Phone Battery Pack Desktop Holder
Stereo Earphones
(Sample)
KYOCERA Round-type
Earphone Jack Conversion
USB Cable
(Sample)
Adapter 04
MDRE0921
by Sony
CD-ROM (Japanese)
Basic Manual (Japanese)
目次/準備
通話
テレビ電話
グローバル機能
文字入力
アドレス帳/
ペア機能
メール
カメラ
EZweb
EZナビ
テレビ/ラジオ
遠隔ロック
その他機能
困ったときは
English(英語)/
(中国語)
索引
/
W63SA
by SANYO
Manual (Japanese)
• Warranty (Japanese)
• Precautions in Use of 2.4 GHz device (Japanese)
• Precautions in Use (Japanese)
• Global Passport CDMA Owner's Guide (Japanese)
• LISMO Installation Guide (Japanese)
• Promotional Fliers (Japanese)
Information
• An AC adapter is not included in the package. Please purchase the
common AC adapter 02 separately. (The common AC adapter 01 is also
10
available for use in Japan.)
• A microSD
package.
™
Memory Card (commercially available) is not included in the
W63SA
目 次/ご利用いただく前に
auICカード
基本機能
テレビ電話
グローバル機能
メール
カメラ
データフォルダ
microSDTMメモリカード
EZweb
EZナビ
LISMO
EZアプリ(BREW®)
PCサイトビューアー/
PCドキュメントビューアー
テレビ/ラジオ
M機能
便利な機能
auの
ネットワークサービス
付録/索引/
クイックガイド
Page 13
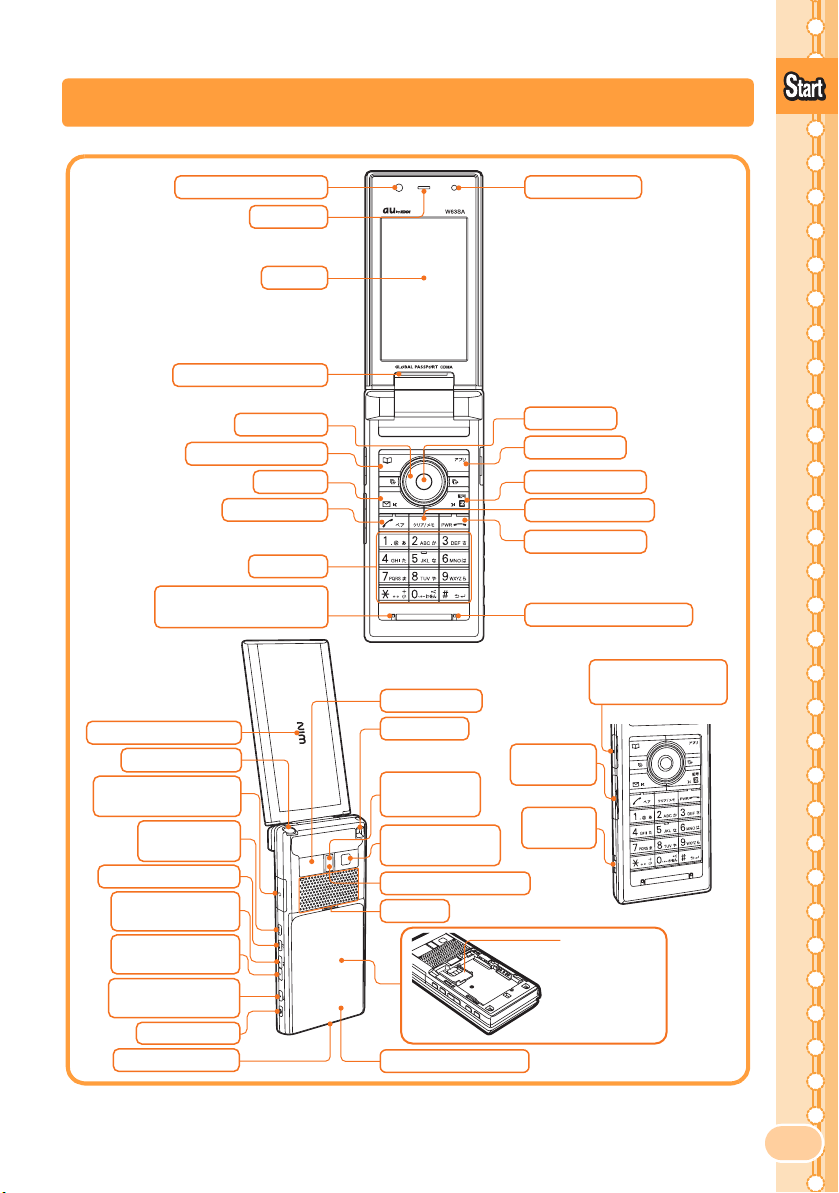
Name of Parts
Before Use
Lens (Sub Camera)
Incoming Illuminator
Address Book Key
Recording Microphone
(Mouthpiece)
Incoming Illuminator
Whip Antenna*
Flat-type
Earphone Terminal
Multi Play
Window Key
Manner/Clear Key
Side Cursor Key
(up)/TV Key
Side Cursor Key
(down)
Side Center/
Pocket Light Key
Camera Key
Built-in Antenna
Earpiece
Display
Cursor Key
Mail Key
Call/Pair Key
Dial Keys
Infrared Port
Strap Hole
Flash/
Pocket Light
Lens
(Main Camera)
Shooting Illuminator
Speaker
Battery Pack/Cover
Optical Sensor
Center Key
EZ apps Key
EZ/Symbol Key
Clear/Memo Key
Power/End Key
Recording Microphone
microSD Memory
Card Slot
External
Connector
Charge
Terminal
au IC-Card
Do not remove
the card if not
necessary as your
phone number is
recorded on it.
* Extend the whip antenna when you use TV (1Seg) or EZ・FM. It does not improve the
quality of voice calls or EZweb communication.
11
Page 14
Before Use
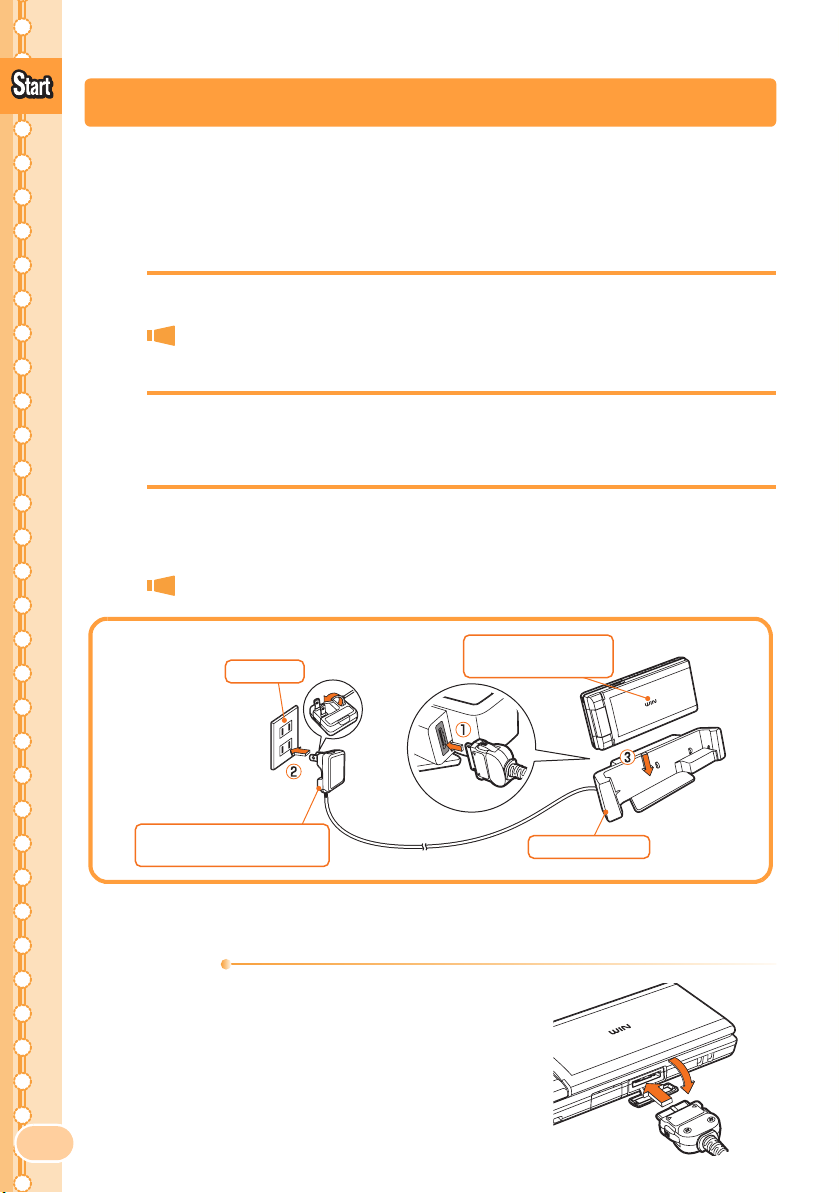
Charging the Battery Pack
The battery pack is not fully charged at the time of purchase.
Charge the battery pack before using your W63SA for the first time.
■How to Charge the Battery Pack
1
2
Connect the Common AC Adapter 02 to Desktop holder.
Check the pin configuration and orientation of the connector
and connect it horizontally.
Plug the power plug of the Common AC Adapter 02 into
an AC outlet.
3
Place the W63SA with the battery pack attached on
Desktop holder, as illustrated below.
Hold Desktop holder to detach the W63SA.
Common AC Adapter 02
(not included in the package)
AC outlet
Incoming Illuminator
(Light is red.)
Desktop Holder
• The cellphone beeps and the incoming illuminator lights red. Charging is in progress.
• The cellphone beeps and the incoming illuminator turns off.
Information
• The battery pack can also be charged by
directly inserting the Common AC Adapter
02 connector (not included in the package)
into the external connector on the W63SA.
•
Note that the actual figures may differ from the
illustrations depending on your AC adapter.
Charging is completed.
②
12
①
Page 15

Setting to Front Style or Recording Oneself Style
W63SA allows you to use in Front Style or Recording Oneself Style
other than usual open style.
Before Use
Open to the partially-
1
opened position
(about 120 degrees).
●
Front Style
Turning out the
display and hold as
closed:
You can shoot the
picture in the same
style as a digital
camera.
Rotate the display 180 degrees
2
clockwise.
●Do not make any operations
while rotating.
●Recording
Oneself Style
Turning out the
display and hold as
opened:
This style is
convenient to shoot
the picture of yourself.
Information
• Descriptions of this manual indicate the W63SA operation in the opened
style.
• Rotate the display to the direction along the arrow mark on the figure. Do
not force to rotate so that it may cause the malfunction.
13
Page 16

Before Use
天
Turning the Power ON/OFF
1
Press
F
for more than one
second.
Check the radio wave reception.
Strong Medium Weak
Check the battery level.
High Medium Low Zero
When " " appears, you cannot make or receive calls.
When " " appears, you may not be able to make or receive calls.
Very
weak
Out of
service
area
Charging
<Standby Screen>
情報料・通信料無料で
ニュース
や
Switching Screen Display to English
Menus, messages and other screen display language can be switched
between Japanese and English.
14
1
2
Press
c34
while the
standby screen is displayed.
The Set Language screen
appears.
Use j to select "English"
and press
The screen display is set to
English.
c
(Set).
Set Language
日本語
English
日本語と英語を切替えま
す
(Switch Japanese
and English display)
M34
Page 17

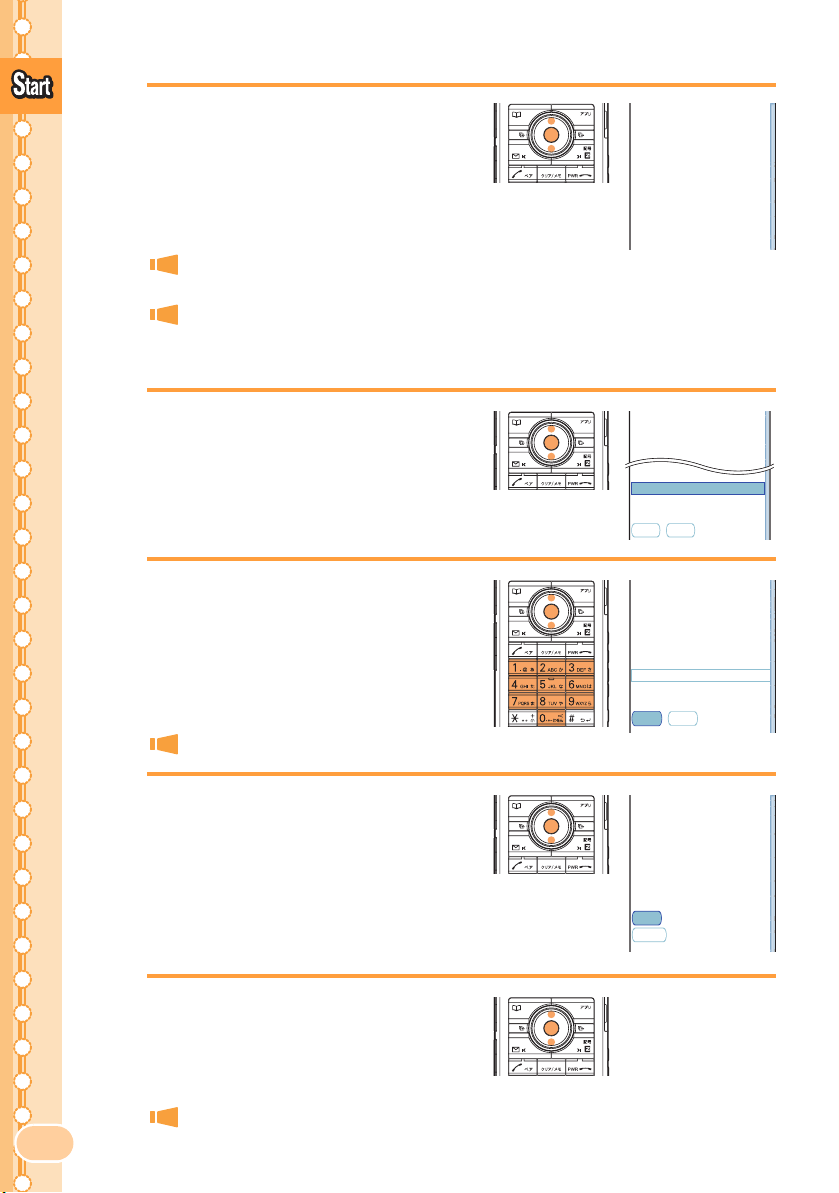
Basic Usage
■How to Use the Keys
Before Use
cCenter Key
Accessing Main Menu/
Defining the item
Pressing for more than
one second: Setting the
key operation valid/invalid
on closing
Y
Address Book Key
Accessing
Pressing for more than one
second: Registering a new
entry to the address book
XMail Key
Accessing E-Mail Menu
Pressing for more than
one second: Accessing
C-Mail Menu
NCall/Pair Key
Making/answering a call
Accessing Pair Menu
C
Canceling the operation (to
display the previous
screen), erasing characters,
and accessing Memo menu
Pressing for more than one
second: Turning Answer
Memo ON/OFF
Address Book
Clear/Memo Key
Dial Keys
Entering phone numbers
or characters
aCursor Key
Moving the cursor
u: Displaying information on standby screen or
increasing the volume
l: Accessing Incoming History
d: Displaying the notification screen, accessing
standby shortcut or decreasing the volume
r: Accessing Outgoing History
In this PDF manual, the operations of the cursor keys
are shown as follows;
Press the up or down key
Press the left or right key s
RCamera Key
Pressing for more than one
second: Activating camera
(for shooting photos)
j
ZEZ apps Key
Accessing EZ apps (BREW®)
WEZ/Symbol Key
Accessing EZ Service menu
FPower/End Key
Ending calls or operations
Pressing for more than
one second: Turning the
power ON/OFF
T
Multi Play Window Key
Executing other functions
during a call or during operation
m
Manner/Clear Key
Accessing the setting
screen for Manner Mode
Press for more than one second:
Setting/Releasing Manner Mode
hSide Cursor Key
Up/
TV Key
Scrolling through page
Pressing for more than
one second: Starting the
au Media Tuner
L
Side Cursor Key Down
Scrolling through page
PSide Center/
Pocket Light Key
Pressing for more than
one second: Turning ON
the pocket light
15
Page 18

■Items in the Underpart of the Display and the
Main M
Before Use
Operation
Use the assigned key to operate the item indicated in the underpart of
the display. The displayed items may differ depending on the screen.
For the case illustrated on the
DetailMailHis SubMenu
right, press the following keys.
MailHis Detail
SubMenu
↓ ↓ ↓
Y c Z
■
Difference in the Display Based on Phone Color
The W63SA's display design and items shown in the main menu at the
time of purchase differ depending upon the color of your phone.
Information
• This manual uses the display from the "Gritty Black" model in its
examples. The display design and ring tone, etc., can be changed all in
one procedure using "EZ keitai-arrange".
enu
16
Gritty Black Impressive Red Rigid Silver
Page 19

◆
Gritty Black, Impressive Red
Infrared
Lets you exchange
Address Book and
other information, as
well as files in the
Data folder.
TV/Radio
Lets you watch 1Seg
programs and listen
to digital radio.
Tool
Lets you use
convenient functions
like the calculator and
dictionary.
Before Use
Lets you take photos
and videos, and use
the Pashamoji
function, etc.
Lets you use the
W63SA overseas.
Lets you use your
W63SA to communicate
wirelessly with PCs
equipped with the
Bluetooth
◆ Rigid Silver
Lets you watch 1Seg
programs.
Lets you save and
view photos you have
taken as well as data
you have downloaded
from EZweb.
Camera
®
Global Function
Bluetooth
®
function.
TV (1Seg)
Data Folder
Data Folder
Lets you save and view
photos you have taken
as well as data you
have downloaded from
EZweb.
LISMO Player
Lets you play back
Chaku-Uta-Full
music and tunes
accessed via LISMO
Port.
®
microSD
Lets you playback
data saved on a
microSD™ memory
card.
Multimedia
Lets you enjoy video
and music such as TV
(1Seg) and digital
radio.
Life&News
Lets you access sites
with EZweb news as
well as travel and
gourmet information.
Function
Lets you make
settings for various
functions such as ring
tones and wallpaper.
PC Site Viewer
Lets you use your
W63SA to view
websites made for
viewing on PCs.
Calendar/Timer
Lets you create a
schedule and set
alarms, etc.
Tool
Lets you use
convenient functions
like the calculator and
dictionary.
Function
Lets you make
settings for various
functions such as ring
tones and wallpaper.
Global Function
Lets you use the
W63SA overseas.
Photo
Lets you take photos
with the camera using
the same photo mode
and size you last
used.
Calendar/Timer
Lets you create a
schedule and set
alarms, etc.
17
Page 20

■Using the Main Menu
天
Before Use
Press Center Key (c) while the standby screen is displayed, and the
main menu appears.
Use Cursor Key (
c to access the selected function.
情報料・通信料無料で
ニュース
a) to select an item from the main menu, and press
や
c
CC
Use a to
select an item,
and press
c
(Select).
<Standby Screen> <Main Menu>
Press
a wrong operation. Press
C to return to the previous screen if you got confused or made
F several times to return to the standby
screen. Depending upon the function currently in use, it may be possible
to pause that function and start another function by pressing
Icons
<Display>
bfc ed
a
i
h
No.
Running EZ apps
d
(BREW
f Unread mail exists
Description
®
)
18
No.
a
b microSD
c
g
Description
Roaming area (ex. USA)
* No indication when set to "Japan".
Phone calls are available in roaming area e Using EZweb
Packet communication is available in roaming area
™
Memory Card inserted g Key operation invalid
During a call h Manner Mode ON
During a videophone call i Answer Memo ON
Running au Media Tuner
T.
F
twice
Page 21

Initializing E-mail and EZweb Settings
Application to the EZweb service is required in advance to use the E-mail
and EZweb services. Contact au shops or the au Customer Service Center
if you did not apply to the service at the time of purchase.
Perform the EZweb initialization before using this service. Initialization
automatically provides your E-mail address.
EZweb
1
Press
X
while the standby
screen is displayed.
を利用するため
の初期設定を行います
PCサイトヒ゛ューアー
初期設定も行います。
「OK」を押して
しばらく
お待ちください。
の
Before Use
2
3
Press c (OK).
Wait for a while until the screen on the right
appears.
Press c (OK).
Welcome to EZweb.
Your e−mail address is:
△△△△△△△△△△△△△△△@ezweb.n
e.jp
−Hint−
If you want to change
your e−mail address,
push OK and enter a new
e−mail address at
e−mail menu −> e−mail
setting −> others.
Information
• Initialization can also be performed by pressing W or Z while the
standby screen is displayed.
19
Page 22

Before Use
Confirming Your Phone Number and E-mail Address
1
Press c while the standby
Profile
POC
My # Info
screen is displayed, and
0
press
The Profile screen appears, and
you can confirm your phone
number and E-mail address.
Information
• Your phone number and E-mail address can also be confirmed by
selecting
c "Function" "Profile" from the standby screen.
.
□□□□@ezweb.ne.jp
XXXXXXXXXXXXXXXXX
XX
20
Page 23

Changing Your E-mail Address
E-mailAddress
Example:△△△ @ezweb.ne.jp
CustomizablePart
Domain
Before Use
1
2
3
4
Press
X
while the standby
screen is displayed.
Use j to select
"E-mail Setup" and
c
press
(Select).
Use j to select "Other" and
c
press
Use j to select "E
レスの変更
(Select).
メールアド
(Change E-mail
Address)" and
その他の設定
1 Eメールアト゛レス
2 メールフィルター
3
有料)
4
5 Eメールヘッタ゛
6
au
されたお客様の暗証番号
を入力してください。
暗証番号の案内
送信
の変更
お預り
メール保存(
通信料
自動転送先
情報表示(通
信料有料
)
その他の設定の確認
電話のご契約時に設定
リセット
press
c
(Select).
21
Page 24
Eメールアト゛レス
5
Before Use
Enter your Security Code
c
and press
to select "
press
c
(OK). Use j
送信
(Send)" and
(Select).
を変更します。
以下のご注意を確認した
アト゛レス
の変更を行って
上で
ください。
※入力前の注意※
1.Eメールアト゛レス
ばらくの間
ないことがあります。
2.
変更直後はし
メール
わかりやすい
が受信でき
アト゛レス(
名
Security Code is a 4-digit number you have filled in the
application form at the time of purchase.
If you enter a wrong Security Code 3 times in a row within the
same day, you will not be allowed to perform setup operations
until the following day.
Eメールアト゛レス
6
After checking the cautions,
use j to select
を変更します。
ご希望の
Eメールアト゛レス
してください。
を入力
7
8
9
承諾する
"
press
(Agree)" and
c
(Select).
Use j to select the entry
c
area and press
(Input).
Enter an E-mail address and
c
press
(OK).
For details about entry of E-mail addresses, see page 36.
Use j to select "
and press
c
送信
(
Select
(Send)"
).
If the E-mail address you try to set
is not accepted:
The E-mail address you entered is already being
used. Enter another E-mail address.
After confirming the new
j
address, use
to select "OK"
@ezweb.ne.jp
送信
リセット
記号は
「.」、「−」、「_」
用可能です。
は利用できません。最初
に数字の
「0」
とはできません。
△△△△△
@ezweb.ne.jp
送信
リセット
新しい
Eメールアト゛レス
△△△△△@ezweb.ne.jp
です。
よろしいですか?
OK
キャンセル
が使
「.」
は最初に
を使用するこ
は
22
c
and then press
(Select).
After this step, perform operations as
prompted by on-screen instructions.
Page 25

Phone Call
Making a Call
1
Use the
enter the receiver's phone
number, then press
How to make a call:
Adding "184" before the phone
number
Adding "186" before the phone
number
Adding nothing The call is made in accordance with
0
to
9
keys to
N
.
To make a call to a regular
telephone, enter the phone number
starting with the area code.
Your phone number is not displayed on
the receiver's display.
Your phone number is displayed on the
receiver's display.
the Caller ID setting.
Enter a phone number and press c (Call). Use j to select
"Add Special No." and press
c (OK) to add "184" or "186".
Making an International Call
Phone Call
Outgoing
■au International Call Service
Available without any additional application.
Example: To call 212-123-XXXX in the USA
005345
International
access code
When an area code begins with "0", dial excluding "0".
*
• Calling charges for this service are added to monthly au calling charges and
billed together.
• Check the Country code at au Customer Service Center.
• For charges, refer to au MOBILE PHONE SERVICE GUIDE or contact au
Customer Service Center.
ー
Country code
(USA)
1
ー
Area code
212
ー
Phone number
*
123-XXXX
23
Page 26
■001 KOKUSAI MOBILE TALK
Application required.
For inquiries, contact KDDI Customer Service Center at
(Toll-free; open 9:00 to 20:00 every day including weekends and
Phone Call
national holidays).
0077-7160
001
KDDI
International
access code
When an area code begins with "0", dial excluding "0".
*
• Calling charges for 001 KOKUSAI MOBILE TALK are charged separately
from monthly au calling charges.
• Check the Country code at au Customer Service Center.
• For charges, refer to au MOBILE PHONE SERVICE GUIDE or contact au
Customer Service Center.
ー
010
ー
Country code
(USA)
1
ー
Area code
212
ー
Phone number
*
123-XXXX
Answering a Call
1
Press
incoming call.
Screen displays for incoming phone calls:
Caller's phone number
Example:
"0900002XXXX"
"ID Unsent"
"Payphone" The call is made from a payphone.
"Not Support" The call is made from the phone that does not
N
to answer an
Press F to hang up.
The caller has set it so as to display his/her phone
number.
The caller's name is also displayed if the caller's
information is registered in your address book.
The caller has set it so as not to display his/her phone number.
support ID notification.
24
Screen display for missed calls:
The message shows that there were incoming calls
unanswered (Missed Call).
Missed Call
X
Page 27

Calling Back (Outgoing History/Incoming History)
Example: To make a call from Incoming History
1
Press l while the standby
screen is displayed.
Press r to display Outgoing History.
The list shows the latest dialed/received call
Incoming Hist
5/23 15:15
01
0900001XXXX
02
5/19 1:01
030001XXXX
5/14 20:30
03
Hanako
04
5/11 0:14
0900001XXXX
OutH
on top.
2
Use j to select the phone
N
number, then press
.
Information
• The latest 50 phone numbers you dialed (Outgoing History) and received
(Incoming History) are saved in each history.
Countermeasure for One-ring Calls
■What are One-ring Calls?
Phone Call
One-ring Calls are made to leave the number in Incoming History, and
receivers who call back will be automatically connected to high-charged
programs such as a dating service.
■Icon as Countermeasure for One-ring Calls
On the W63SA, One-ring Calls (the ring time is 3 seconds or less) are
displayed as in Incoming History. Be careful when you call back to
an unfamiliar number.
Icons displayed on Incoming History
Missed calls of which ring time is 3 seconds or less
:
:
Missed calls of which ring time exceeds 3 seconds
Incoming Hist
5/23 15:15
01
0900001XXXX
02
5/19 1:01
030001XXXX
OutH
25
Page 28

Adjusting the Other Party's Voice Volume
天
1
Phone Call
Use j to adjust volume
during a call.
Press u to increase the volume.
d to decrease the volume.
Press
The voice volume can be adjusted to any one
of 5 levels or "LOUD".
Setting Answer Memo
1
Press
second while the standby
screen is displayed.
C
for more than one
Answer Memo is turned ON and " "
appears on the standby screen.
情報料・通信料無料で
ニュース
や
■To Turn Answer Memo OFF
Press C for more than one second while the standby screen is
displayed.
Information
• You can record each message for approximately 30 seconds maximum
in Answer Memo, and up to 6 messages can be recorded including
Phone Memo.
• Use "Answering Service (Voice Mail)" when you have turned the power off
or where the radio wave is blocked.
26
Page 29

Playing Back Messages on Answer Memo
When a message is recorded on Answer Memo:
1
2
(Answer Memo) and the number of messages
appears.
Use s to select " " and
c
press
Icons
: Unchecked Answer Memo message
: Protected Answer Memo message
(Select).
Use j to select the
recorded message to play
c
back and press
(Play).
Phone Call
Answer Memo X
Answer Memo List
5/11 15:1501
Hanako
5/10 16:2202
0900001XXXX
Answer Memo01
5/11 15:15
Hanako
Information
• Messages on Answer Memo can be deleted by the following steps.
aWhile or after playing recorded messages in step 2, press Z (SubMenu).
bUse j to select "Delete" and press c (OK).
(If you operate the function while playing the message, go to step
cUse j to select "Delete One" and press c (OK).
dUse j to select "YES" and press c (OK).
d.)
27
Page 30

Changing Ringer Type and Volume
1
Phone Call
2
3
Press c while the standby
screen is displayed.
Use a to select
"Function" and
c
press
Use
press
Use j to select
"Incoming Setup" and
press
(Select).
j
to select "Sound/Vib/Lamp" and
c
(Select).
c
(Select).
28
4
j
Use
press
Use j to select " " and
press
Use
and press
to select "Incoming Call" and
c
(Select).
c
(Select).
j
to select "Original"
c
(Select).
Pressing Y (Play) plays back the selected
ringer.
Page 31

5
Use j to select a melody
c
and press
(Set).
Phone Call
6
7
Use j to select " " and
c
press
Use j to adjust the volume
and press
Press u to increase the volume.
Press
(Select).
c
(Set).
d to decrease the volume.
The ringer volume can be adjusted in 5 levels. Set the volume
to "OFF" to mute the ringer.
Set "STEP
Set "STEP
▲" to gradually increase the volume from Level1.
▼" to gradually decrease the volume from Level5.
8
Information
• The default ringer is "Gritty".
• The Chaku-Uta
Press
page 67.
Z
(OK).
The melody (ringer) is set.
®
(ringer) can be downloaded and set as the ringer. See
29
Page 32

Setting Manner Mode
天
The vibrator of the W63SA notifies you of the incoming call.
Phone Call
1
Press m for more than one
情報料・通信料無料で
second while the standby
screen is displayed.
" " and " " appear on the standby screen.
Answer Memo is turned ON at the same time
and " " appears on the standby screen.
■To Turn Manner Mode OFF
Press m for more than one second while the standby screen is displayed.
" " and " " disappear when Manner Mode is turned OFF.
Answer Memo is turned OFF at the same time, and " " also
disappears.
ニュース
や
30
Page 33

Videophone
You can watch the other party while you talk with them and thus
communicate in real-time. "Group Videophone" calls with up to 5 people
participating simultaneously are possible as well.
プテレビ電話があります。
Making a Videophone Call
1
2
Use the
enter the receiver's phone
number, then press
c
Use
and press
Use j to select
"Videophone" and
press
0
to
9
keys to
(Call).
j
to select "Videophone"
c
(OK).
Videophone calls can also be made from the
address book, Outgoing and Incoming
History, and the pair function, etc.
c
(OK).
You can make group videophone calls by
selecting "Group Videophone" and then
selecting another member to add to the call.
Videophone
Outgoing
Hanako
■Changing the image or video you show
You can change the image or video that you show to the receiving party.
Simply press
image or video you want to show.
c (My Vid) during a videophone call and then select the
31
Page 34

Answering a Videophone Call
1
Press
N
to answer an
incoming videophone call.
Videophone
Press j to adjust the volume.
F to hang up.
Press
Hanako
Time
0:17:01
Putting a Videophone Call on Hold
When you cannot answer an incoming videophone call immediately, you
can put that caller on hold.
1
Press
incoming videophone call.
F
during an
An alarm sounds. The incoming call is put on
hold, and a message is played for the caller.
N when you are ready to start the
Press
conversation.
Hanako
Time
0:00:01
32
Press
F to hang up while the caller is still on
hold.
Page 35

Global Functions
You can use the W63SA overseas with global functions.
Setting Area
1
2
3
Press c while the standby
screen is displayed.
Use a to select
"Global Function" and
c
press
press
Use j to select
"Area Setting" and
press
(Select), and then
c
(OK).
c
(Select).
Global Functions
Global Function
Area Setting
PRL Setting
Airplane Mode
Reg. Country Code
Intl Area Info
Set phone−use area
(Japan or overseas)
4
Use j to select "Overseas"
c
and press
(Select).
33
Page 36

Calling to Japan from Overseas
1
Global Functions
2
3
From the standby screen,
enter a phone number and
c
press
Use j to select "Voice Call"
and press
Use j to select "Call to
Japan" and press
and then press
(Call).
c
(OK) .
c
c
(OK),
(Call).
Voice Call
Call to Japan
Call
Outgoing
Information
• Although the preferred roaming list (PRL) is already stored in the phone
at the time of purchase, the list may be updated several times a year.
Update it before departure.
• When you make an overseas call from Japan to cellphone compatible
with Global Passport CDMA, follow the normal procedure.
• You need to sign up for the EZweb service before departure. Initial setting
of EZweb must also be done in Japan.
34
Page 37

Inputting Text
Switching Input Mode
On the character input screen, press Y (Char. Type)
to display the input mode selection screen.
Use
a to select an input mode and press c (OK).
漢字
Entering Single-byte Alphanumeric Characters
You can use the key 1 to 0 to enter characters. The characters shown
in the following table appear each time the indicated key is pressed.
Example: Each time you press the 2 key, the characters appear in the
order of "a", "b", "c", "2", "a", "b"...
Press the key of the character to enter next, after the desired character is displayed.
Lowercase character input mode Uppercase character input mode
Key
1 2 3 4 5 6 7 8 1 2 3 4 5 6 7 8
1
2
3
4
5
6
7
8
9
0
*
#
※Various symbols will be displayed each time you press the key.
. @
a b c 2 A B C 2
d e f 3 D E F 3
g h i 4 G H I 4
j k l 5 J K L 5
m n o 6 M N O 6
p q r
t u v 8 T U V 8
w x y z 9 W X Y Z 9
0 ※ 0 ※
Switches between uppercase and lowercase characters.
Shifts to the previous character assigned to the same key, when the entered
character has not yet settled (Back Space function). Inputs a line break if
possible after the entered character has been settled.
Number of presses Number of presses
-_/ :
s
7 P Q R S 7
~
.
1
-_/ :
@
~
1
Inputting Text
Information
• Up to 30 lowercase characters including " - " (hyphen), " . " (dot) or "_"
(underbar) can be used for your E-mail address.
" . " (dot) or "0" (numeric) cannot be used at the beginning of an address.
The characters and symbols in the gray cells ( ) cannot be used
before the "@" as in "@ezweb.ne.jp".
35
Page 38

■Consecutively Entering Characters Assigned
to the Same Key
After entering the first character, press r and the next key.
Example
:Entering "ab"
Press r.Press 2 once. Press 2 twice.
■Erasing Characters
Press C to erase a character.
Inputting Text
Press
cursor (
the text.
C for more than one second to erase all characters after the
■
). All characters are erased when the cursor (■) is at the end of
Entering E-mail Address
Example: To enter "taro@sa.ne.jp" using Phrase
36
1
2
Enter "taro@sa".
t :Press 8 once.
a
:Press 2 once.
r
:Press 7 3 times.
o
:Press 6 3 times.
@
:Press 1 twice.
s
:Press 7 4 times.
a
:Press 2 once.
1 once to enter " . ".
Press
Press
Z
(SubMenu).
Page 39

3
Use j to select "Phrase"
c
and press
Z
Use
(OK).
(Category) to select
"Internet".
Press */# to switch between the phrase
lists by category.
Phrase
Internet
TEL0900001XXXX
△△△□□□@ezweb.ne.jp
@ezweb.ne.jp
http://www.
.ne.jp
.co.jp
4
Use j to select ".ne.jp" and
c
press
(Select).
Inputting Text
37
Page 40

Entering Pictograph
1
Inputting Text
2
3
Press
the character input screen.
Use a to select " " and
press
Use a to select a
pictograph to enter and
press
Y
(Char. Type) on
c
(OK).
Press Z (Category) or */# to switch
between the pictograph lists by category.
c
(Select).
38
You can consecutively enter pictographs by
pressing
Y (Repeat) instead of c (Select).
Page 41

Address Book
Registering Data in Address Book
You can register data up to 1000 in the address book.
1
2
3
Press
second while the standby
screen is displayed.
Use j to select
" " (Name) and
press
Enter a name and
press
Y
for more than one
c
(Select).
c
(OK).
The reading is automatically
entered.
Address Book
4
Use j to select
" " (Phone No.1) and
c
press
(Select).
39
Page 42

5
Enter a phone number and
c
press
Use
(OK).
j
to select a type of
phone number and
c
press
(Select).
Enter the area code when registering a
regular telephone number.
When you do not enter an E-mail address, go
to step 8.
Edit Adrs Bk
Set
Basic Other
000
Cathy Johnes
CathyJohnes
0900001XXXX
[Phone No.2]
ク゛ルーフ゜0
OFF
OFF
No GPS Info
6
Use j to select " "
(E-mail Address1) and
Address Book
7
press
Enter an E-mail address
and press
Use
c
(Select).
c
(OK).
j
to select a type of
E-mail address and
c
press
8
• Entries are automatically registered in the lowest available memory
• Groups, images or other items can also be registered.
• An address book item can be deleted using the following procedure.
40
Press
Information
number between 000 and 999.
aPress Y while the standby screen is displayed.
bUse a to select the address book item you want to delete, and
then press
cUse j to select "Delete" and press c (OK).
dUse j to select "Delete One" and press c (OK).
eUse j to select "YES" and press c (OK).
(Select).
Z
(Reg).
The available number for
entries remaining appears.
Z (SubMenu).
Edit Adrs Bk
Set
Basic Other
000
Cathy Johnes
CathyJohnes
0900001XXXX
△△△@□□□.ne.jp
[E−mail Address2]
ク゛ルーフ゜0
OFF
OFF
Page 43

Making a Call from Address Book
1
2
3
Press
screen is displayed.
Use a to select the person
to call.
Press
Y
while the standby
Press c (Detail) to display the detail screen
where you can confirm registered contents
such as phone numbers and E-mail
addresses.
N
.
Address Book
A call is made to the selected phone number.
41
Page 44

Editing Address Book Data
Example: To change a phone number
Address Book
1
2
3
4
Press
Y
while the standby
screen is displayed, and use
a
to select the data to edit.
Press c (Detail) and
Y
(Edit)
.
Use j to select " " (Phone
c
No.), and press
(Select).
Edit data and press c (OK).
j
Use
to select a type of
phone number and
c
press
(Select).
Edit Adrs Bk
Set
Basic Other
000
Cathy Johnes
CathyJohnes
0900002XXXX
△△△@□□□.ne.jp
ク゛ルーフ゜0
OFF
OFF
R.21
Edit Adrs Bk
Set
Basic Other
000
Cathy Johnes
CathyJohnes
0900003XXXX
[Phone No.2]
△△△@□□□.ne.jp
ク゛ルーフ゜0
OFF
OFF
42
5
Press
use
and press
Z
(Reg) and
j
to select "Overwrite"
c
(OK).
Select "Reg. to Empty No." to register the
address to a new memory number.
Page 45

Registering Data from Outgoing/Incoming History
1
2
3
Press r while the standby
screen is displayed.
The Outgoing History screen appears.
Press l to display the Incoming History
screen while the standby screen is displayed.
Use j to select the phone
number to register and
Z
press
(SubMenu).
Use j to select "Reg to Adrs
c
Book" and press
"Register New": Registers new data in the address book.
"Add to entry": Makes additional changes to existing
data in the address book.
(OK).
Outgoing Hist
InH
5/11 13:32
01
0900001XXXX
02
5/11 13:00
Robin Smith
5/10 20:15
03
Cathy Johnes
04
5/10 20:00
0900002XXXX
Address Book
4
Use j to select "Register
c
New" and press
j
Use
to select a type of
phone number and press
To input the name, etc., refer to procedures
after step 2 of "Registering Data in Address
Book" (Page 39).
(Select).
c
(Select).
Edit Adrs Bk
Set
Basic Other
020
[Name]
0900002XXXX
ク゛ルーフ゜0
OFF
OFF
No GPS Info
43
Page 46

y
Pair Function
You can register frequent contacts (up to 5 entries) as Pair Partners to
make phone calls or videophone calls, or to send mails.
Registering Data as Pair Partner
Pair Function
1
2
3
Press
screen is displayed.
Use
number to register.
Use j to select
"Reg./Can." and
press
Use j to select "YES" and
press
N
while the standby
s
to select a tab of the
c
(Select).
c
(OK).
4
Information
• Select an entry from the address book to register as Pair Partner. Before
44
Use a to select the person to
register and press
and then press
If more than one phone number or E-mail
address is registered in the address book, select
the one you want to register in the pair function.
registration, refer to "Registering Data in Address Book" (Page 39) and
register the data of the Pair Partner in the address book.
c
c
(Select).
(Detail),
Page 47

Making a Call to the Pair Partner
1
Press
screen is displayed.
N
while the standby
2345
Pair1
Robin Smith
0900005XXXX
△△△@ezweb.n
e.jp
Outgoing
Robin Smith
2
s
Use
to select the person
to call.
Use j to select "Call" and
c
press
(Select).
You can make a videophone call by selecting
"Videophone".
■Sending a Mail to the Pair Partner
Use j to select "E-mail" or "C-mail" in step 2 and press c (Select).
Refer to "Creating and Sending E-mail" (Page 47) to create an E-mail,
or "Creating and Sending C-mail" (Page 55) to create a C-mail.
Pair Function
45
Page 48

y
EZweb subscription required
Application to the EZweb service is required to use E-mail. Contact au
shops or the au Customer Service Center if you did not apply to the
service at the time of purchase.
Perform the EZweb initialization before using this service. If you have not
performed initialization yet, see page
19
.
E-mail is a service for sending/receiving mails to/from E-mail compatible
cellphones and personal computers via Internet E-mail addresses. Up to
5000 two-byte (10000 one-byte) characters can be sent in an E-mail
message. Still images (photos) and moving images (movies) can also be
sent via E-mail.
E-mail can be sent from your E-mail address.
Example :
Mail
@
Internet
.ne.jp
E-mail can be sent to
cellphones of au or
other carriers.
E-mail can also be sent
to personal computers.
Information
•
You can send an E-mail to up to 5 E-mail addresses (including Cc and Bcc)
at a time. You can, however, send E-mail to up to 30 addresses at a time
by turning the "Adrs. Count Limit" setting "OFF".
•
Up to 1000 E-mails (including the number of addresses) can be sent a day.
• Sending/Receiving E-mail with attached data may take time.
• Packet charges based on the size of the data included will be incurred on
46
receiving and sending E-mail.
Page 49

Creating and Sending E-mail
1
2
3
Press
screen is displayed.
Use j to select "Create
New" and press
Use j to select
" " (Address) and
press
X
while the standby
c
c
(Select).
(Select).
Mail
4
Use j to select "Quote Adrs
c
Book" and press
You can also select the address from "Quote
History", or enter the address directly from
"Address Input".
(OK).
47
Page 50

5
Use a to search the address
c
book and press
(Detail).
005Address Book
Set
Basic Other
Margaret Wat
son
0900002XXXX
△△△@□□□.ne.jp
ク゛ルーフ゜0
Mail
6
7
8
9
10
Use j to select a desired
E-mail address and
c
press
Use j to select " "
(Subject) and
press
Enter the subject and
press
Use j to select
" " (Text) and
press
Enter the text and
(Select).
c
(Select).
c
(OK).
c
(Select).
48
press
c
(OK).
Page 51

11
Press
Y
(Send).
After your E-mail is sent, the screen shown on
the right appears.
Mail
49
Page 52

Reading Received E-mail
Wh
en you receive an E-mail:
(E-mail) and the number of messages appears.
1
2
Use s to select " " and
c
press
(Select).
Use j to select the folder
E−mail
X
in which the new E-mail is
c
stored and press
Icons
Mail
3
:Unread mail
:Read mail
Use j to select the new
E-mail and press
(Select).
c
(View).
How to read received E-mail:
Indicates the time and date when the E-mail
was sent.
Indicates the sender of the E-mail.
Indicates that the mail has already been read.
Information
• You can read received E-mail following the procedure below.
aPress X while the standby screen is displayed.
bUse j to select "Inbox" and press c (Select).
cUse j to select the folder in which the new E-mail to read is stored and
c (Select).
press
dUse j to select the new E-mail to read and press c (View).
50
Page 53

■Viewing Received Photos
1
2
3
4
Perform steps 1 to 3
on page 50 to display
the received E-mail.
Use j to select " " and
c
press
Use j to select the attached
data and press
Press c (Play).
(Select).
The Attachment List is displayed.
c
(Receive).
Attached
data
Mail
Information
• Depending on the size of the attached data, it can be displayed in the text
in step 1 or played back when you press
• Mail transmission and reception may take time when data is attached or
due to the radio wave conditions in your area.
c (Play) in step 3.
51
Page 54

Replying to Received E-mail
1
2
Mail
3
Perform steps 1 to 3
on page 50 to display
the received mail.
Press
Use j to select " " (Text)
and press
Y
(Reply).
"Re:" is attached to the beginning of the
subject and the text of the original E-mail is
quoted.
c
(Select).
52
For the subsequent procedure, see steps 10
and later in "Creating and Sending E-mail"
(Pages 47 to 49).
Page 55

Blocking Junk Mails
To block junk mails, it is recommended to set
メールフィルター
(Mail Filter).
By selecting "サポート設定 (supportive settings)", you can set メールフィ
ルター
(Mail Filter) easily by answering the Inquiry on the screen.
■Setting メールフィルター (Mail Filter)
Example: To access "
aPress X while the standby screen is displayed.
b
Use j to select "E-mail Setup" and press c (Select).
cUse j to select "Mail Filter" and press c (Select).
j to select " 次へ (Next)" and press c (Select).
Use
dEnter your Security Code and press c (OK).
Select "
eSelect an item and press c (Select).
送信 (Send)" and press c (Select).
サポート設定
(supportive settings)"
■カンタン設定 (Easy Setup)
サポート設定
(supportive settings)
フィルターレベル(高)
(Filter level (Strict))
フィルターレベル(中)
(Filter level (Medium))
Sets the filter by answering the inquiry.
For the users who would like to check
each setting condition.
Rejects mails from PC.
For the users who send/receive the
mails only between cellphones.
Blocks Unsolicited Ad Mails and Spoof
e-mails, as well as all mails from
designated addresses.
For the users who are annoyed by a
stalker or a specific junk mailer.
メールフィルター
■
カンタン
設定
1 サホ゜ート
設定
2 フィルターレヘ゛ル(
3 フィルターレヘ゛ル(
4 フィルターレヘ゛ル(
※
■個別設定
5
6
7
8
■その他
9
10 PC
発行
11
サホ゜ート
サホ゜ート
答えるだけでお客様にぴ
ったりの
定できます。
※現在
ている方は現在の設定は
セット
ださい。
質問へ
高
)
中
)
低
カンタン
基本設定
指定受信
指定拒否
その他の設定
設定確認、設定解除
設定にあたって
戻る
されますのでご注意く
戻る
)
設定とは?
リスト
設定
リスト
設定
設定用
ワンタイムハ゜スワート゛
設定
設定を使えば質問に
フィルター
を自動で設
メールフィルター
を設定し
リ
Mail
フィルターレベル(低)
(Filter level (Normal))
Blocks Unsolicited Ad Mails or Spoof
e-mails.
The filter minimally required.
Information
• You can also block junk mails by changing your E-mail address. Refer to
page 21 to change the E-mail address.
53
Page 56

C-mail
C-mail is a service that uses phone number to exchange mails with other
au mobile phones that support C-mail. You can send and receive up to
50 two-byte (or 100 one-byte) characters via an C-mail.
Phone numbers are used for
sending/receiving C-mail.
Example : 090-○○○○-XXXX
Via au
Mail
All you have to do is to
enter a message and
select the receiver's
phone number.
C-mail can be sent
to au cellphones.
Information
• C-mail charges will be incurred when sending C-mail.
■C-mail Safe Block Function
C-mail safe block is a function to reject C-mails that include URL links
(http://
text.
This function is turned ON at the time of purchase.
However, the C-mail safe block function can be turned OFF in order to
receive C-mails that include URL links or phone numbers.
54
△△△ , https:// △△△ ) or phone numbers in the C-mail message
Page 57

Creating and Sending C-mail
1
2
3
4
Press
second while the standby
screen is displayed.
Use j to select "Create
New" and press
Enter the text and
press
Use j to select " "
(Address) and press
X
for more than one
c
c
(OK).
(Select).
c
(Edit).
Mail
5
Use j to select
"Quote Adrs Book" and
c
press
(OK).
You can also select the phone number from
"Quote History", or enter the phone number
directly from "Phone No. Input".
55
Page 58

6
Use a to search the address
c
book and press
(Detail).
005Address Book
Set
Basic Other
Margaret Wat
son
0900002XXXX
△△△@□□□.ne.jp
ク゛ルーフ゜0
7
8
Mail
Use j to select a desired
phone number and
c
press
Press
(Select).
Y
(Send).
After the C-mail has been sent, the screen
shown on the right appears.
56
Page 59

Reading Received C-mail
When you receive C-mail:
(C-mail) and the number of messages appears.
1
2
Use s to select " " and
c
press
(Select).
Use j to select the folder in
which the new C-mail is
stored and press
Icons
:Unread mail
:Read mail
c
(Select).
C−mail
X
Mail
3
Use j to select
the new C-mail and
c
press
Information
• You can read received C-mail following the procedure below.
a
Press X for more than one second while the standby screen is displayed.
bUse j to select "Inbox" and press c (Select).
cUse j to select the folder in which the new C-mail to read is stored and
press
c (Select).
dUse j to select the new C-mail to read and press c (View).
(View).
57
Page 60

Camera
What You Can Do with Camera
The W63SA has a built-in CMOS camera function with 1.99-megapixel
main camera and 0.32-megapixel sub-camera, that allows you to shoot
photos or movies. The camera has built-in auto focus function. The auto
focus function works when you press the shutter key. Photos and movies
which you shot can be sent by E-mail.
Use Shot Photos with W63SA
You can set the photos which you shot as the standby screen or the screen
for incoming calls or register them in the address book.
Send Photos/Movies by E-mail (Page 62)
Photos or movies of maximum size 500KB* can be sent by E-mail.
* Mail transfer may take time depending on the condition of the radio wave in the area you are in.
Camera
58
Use Pashamoji® Function
Pashamoji® Memo allows you to transform handwritten messages in a
notebook into a photo to attach to an E-mail. Pashamoji
function that you can create items such as a postcard by combining photos
and handwritten messages.
®
Card is the
Print Photos You Shot
Save the photos you shot in microSD™ Memory Card (commercially
available). You can print the photos at photo service shops in the same way
as the film developing.
Page 61

How to Hold W63SA
■ Upright
Photo : W.paper (Normal)/W.paper
(Wide)/Wallpaper (HD)/0.3M
(when using the sub-camera)
Movie: High L/QVGA (Vert)/WQVGA
(Vert)/VGA (when using the
Shutter key
sub-camera)
■ Landscape-Oriented
Photo : 0.3M (when using the main
camera)/1M/2M
Movie: QVGA (Horz)/WQVGA (Horz)/
VGA (when using the main
Shutter key
camera)
※ Hold the W63SA in the direction of .
Image-Shooting Posture
Open your feet to the breadth of your shoulders and maintain your back and
sides firm.
Camera
To Prevent Jiggling
• Hold W63SA firmly with both hands. Do not move your W63SA after
pressing the shutter key until you hear the shutter sound and the preview
screen appears.
• Using the Self-Timer allows you to shoot photos without pressing the
shutter key, which prevents jiggling.
59
Page 62

Shooting Photo
Camera
1
2
Press c while the standby
screen is displayed.
Use a to select "Camera"
c
and press
Use j to select "Photo (W.paper Mode)"
and press
The view seen through the lens appears.
The view seen through the lens also appears
by pressing
the standby screen is displayed.
Press
between the light and flash.
Aim at the object on the
display and
press
c
(Select).
c
(Select).
R for more than one second while
P for more than one second to switch
(Shoot).
60
3
The auto focus works and you will hear the
shutter sound, then a photo is shot.
C to re-shoot the photo.
Press
Press c (Save).
Page 63

■Title of Photo You Shot
Photo Size
W.paper (Normal)/W.paper
(Wide)/Wallpaper (HD)
0.3M/1M/2M SA3D + serial number
1
*
Title of a photo Where to save
year + month + day_hour
+ minute
~
serial number
"Photo Folder" of W63SA
"DSC Folder" in microSD™
Memory Card
2
*
Example: The first photo shot at 19:30 on May 24, 2008
W.paper (Normal)/W.paper (Wide)/Wallpaper (HD):
080524_1930
~
01
0.3M/1M/2M: SA3D0001
1
Press X while the live image is on the display to change the Photo Size.
*
2 Photos are saved in "Photo Folder" when a microSD™ Memory Card
*
(commercially available) is not inserted, or there is not enough space
available in the microSD™ Memory Card.
Viewing Photos
1
Press c while the standby
screen is displayed.
Use a to select
"Data Folder" and
press
c (Select).
Data Folder
All Data 1000
User Folder
Movie Folder
Photo Folder
Voice Folder
TV Rec. Data
LISMO
Unlicensed
Sound
Gadget
EZmovie
Camera
10
10
10
10
10
10
2
Use j to select
"Photo Folder" and
c
press
(Select).
61
Page 64

3
Use j to select a folder
containing your desired
image and
c
press
(Select).
Camera
4
Use j to select an image
c
and press
(Select).
Attaching Photo to E-mail Message
1
2
Perform steps 1 and 2 on
page 60 to shoot a photo.
Press
Y
(E-mail).
62
j
Use
and press
to select "E-mail"
c
(OK).
The Create Mail screen appears with the
image attached.
For the subsequent procedure, see steps 3 to
11 of "Creating and Sending E-mail" on pages
47 to 49.
Page 65

EZweb subscription required
EZweb
Application to the EZweb service is required to use the service. Contact
au shops or the au Customer Service Center if you did not apply to the
service at the time of purchase.
Perform the EZweb initialization before using this service. If you have not
performed initialization yet, see page
EZweb
EZweb is a service that provides you with information to enjoy the
Internet via cellphones.
Chaku-Uta
information sites.
®
, the latest news and other contents can be obtained from
Connecting to
the Internet
19
.
Games
Internet
Chaku-Uta®
Chaku-Uta-Full
Wallpaper
Latest News
®
EZweb
Weather Forecast
Traffic Information
Information
• When connecting to EZweb, packet charges will be incurred based on
the size of the data you send and receive and not on the length of time
you are connected.
63
Page 66

EZweb
Displaying au one Top
Press
W
1
is displayed. Use
"au one Top" and press
<au oneトップ
(au one Top)>
while the standby screen
j
to select
c
(Select).
It may take some time to display the top menu.
キーワード検索機能 (Keyword search function)
Provides a search engine for information available by the keyword entry.
メール (Mail)
Provides another e-mail address for PC usage.
マイページ (
Provides the various information, useful tools, or large storage
spaces, which are appropriate for your selection of the services.
リモコン形式での直接アクセス
①天気
④音楽
(Books/Comics)
トップニュース (Top news)
The latest top news topics are delivered by an automatic update.
最新オススメ情報 (Latest recommended information)
Introduces featured topics or contents information of various categories.
ニュース&ビジネス (News & Business information)
Provides the latest information such as news, weather, or useful
information for business.
マップ&エリアガイド (Map & Regional guide)
You can search the connection of train, map or other local information.
ショッピング&オークション
Provides information about shops where you can purchase goods with your
cellphone, and the information about the auction where you can sell or buy easily.
ライフ (Useful daily life information)
Provides useful information for daily life.
エンターテインメント (Entertainment information)
Provides the latest information about games, music, books, and
information on hobby or entertainment trends.
コミュニティ (Community information)
Provides interesting, convenient and fun information on SNS and blogs, etc.
パーソナル (Personal information)
Provides another e-mail address, information and tool suitable for
each customer, or registers ID for convenient use of au one service.
au style
Introduces au-recommended information and sites.
とくする情報 (Valuable information)
Offers gifts and free valuable information to EZweb service subscribers.
au お客さまサポート (au Customer Support)
Provides phone bills, application forms, au online manuals, and au announcement.
カンタンアクセス・オープンサイト
Introduces
災害用伝言板 (Disaster Message Board)
Registers/checks the safety information in disasters.
ENGLISH
Introduces English sites.
My Page
(Weather)
(Music)
②占い
⑤テレビ
⑧ショッピング
カンタンアクセス・オープンサイト
)
(Direct access in a remote control format)
(Fortune-telling)
(TV program)
(Shopping)
(Shopping & Auction information)
③乗換
(Transfer information)
⑥ゲーム
(Games)
⑨オークション
(Simple Access & Open Site)
(Simple Access & Open Site).
⑦本・コミック
(Auction)
Information
64
•
The layout and contents of the screens in this manual are examples and are subject to change.
Page 67

Bookmarking Frequently-Accessed Site
1
2
3
Information
• Up to 100 sites can be bookmarked.
Display the site to bookmark
Z
and press
Menu).
Use j to select
"New bookmark" and
c
press
Press
(OK).
Z
Some sites cannot be bookmarked.
(Browser
(Reg).
New
スホ゜ーツニュース
http://△△□□□.jp
Not Specified
EZweb
65
Page 68

Accessing Bookmarked Site
信
゙
1
Press
W
while the standby
screen is displayed.
2
Use j to select
"Bookmark(s)" and
c
(Select).
c
(Connect).
3
press
Use j to select a site and
press
Viewing Charge
EZweb
Approximate charges for your calls and transmission can be viewed on
EZweb.
66
1
Press c while the standby
screen is displayed and
1
press
Use
press
j
twice.
to select "YES" and
c
(OK).
確認する
通話料・通信料照会
┗今月の概算通話料/通
ご請求金額照会
┗過去の請求金額の照会
契約情報照会
┗ご契約内容の確認
有料サービス利用情報
┗有料コンテンツの利用料やモハ
au
インターネット料金お知らせ
┗auサービスの料金照会/登
KDDI
インターネット料金お知ら
┗
KDDI
まとめて請求・
゚
KDD
Page 69

Downloading Chaku-Uta®/Chaku-Uta-Full
で
®
1
2
3
Perform step 1 on page 64.
j
Use
to select "
カテゴリ検索
(Search
by category)" and press c (OK).
Use j to select "
(Chaku-Uta)" or "
ビデオクリップ
着うた
着うたフル・
(Chaku-Uta-
Full and Video Clip)" and
c
press
(Select).
カテゴリ検索
EZ
サービスで探す
au
ケータイならではの便利
┗
新サービス紹介
┗
「au one メール」
音楽・着信
着うたフル・ビデオクリップ
着うた
着信メロディ
着ムービー
待ちうた
ケータイコンテンツ
待受・画像・キャラクター
゙ー
着うた
au one
J−POP(79)
ロック・洋楽(38)
ワールドミュージック
アニメ・ゲーム
TV・映画(27)
クラブ・インディーズ
クラシック・ジャズ
アレンジ
インストゥルメンタル
演歌
ボイス・地域・バラエティ
着実況!
Select the content (information site) to use and
download data.
Image
でメールや思
・
カラオケ・ボイス
・着Flash
ミュージック
(15)
(36)
(29)
(96)
(25)
(4)
(1)
(61)
(16)
EZweb
When you access a site requiring additional information fee,
input your EZ Password or Premium EZ Password.
EZ Password: The 4-digit number that you have filled in the
application form at the time of purchase.
Premium EZ Password:
The 4-digit number that you have filled in the
application form at the time of purchase.
Follow the on-screen instructions to input either of the passwords.
Information
• The communication fee and information fee are charged for downloading
• The layout and contents of the screens in this manual are examples and
®
Chaku-Uta
or Chaku-Uta-Full® from the paid contents.
are subject to change.
67
Page 70

EZweb subscription required
天
EZ News Flash/au one Gadget
EZ News Flash/au one Gadget shows a permanent ticker of the latest
news on the standby screen. If you select that ticker, you can view more
detailed information and run a gadget that performs specific set actions.
EZ News Flash/au one Gadget can be easily set after initializing the
EZweb settings (
via EZ News Flash is free of charge.
What You Can Do with EZ News Flash/au one Gadget
P19) for immediate use. All information you receive
Select the ticker
ニュース
や
Select the window
Browsing Weather
Browsing News
EZ News Flash/au one Gadget
Select the gadget
setting icon
To au one Gadget settings
情報料・通信料無料で
<Standby Screen>
Information
• Packet charges may be incurred for EZ News Flash when performing a
manual update or when connecting to the EZweb site. In that case, a
confirmation screen appears.
• When using an au one Gadget that updates the information via
communication with the au server, packet charges may be incurred when
the information is updated.
• The Gadget for C-mail and Photo Slide Show can be used without
subscribing to EZweb.
• The information is automatically updated at regular time intervals. is
indicated while receiving the information.
• If you are using au one My Page, you can confirm the contents of update
68
of My Page by selecting "My Page" from EZ News Flash top page.
Page 71

Setting EZ News Flash
EZ News Flash can be used after performing the basic setting procedure
(free of charge). Set EZ News Flash after "Initializing E-mail and EZweb
Settings" (
P19).
1
Press u while the standby
screen is displayed. Select
c
(OK).
次回配
(Please wait for the
2
ticker and press
Use j to select
"
はい
(Yes)" and
press
c (選択
The setting is complete.
Once you return to the standby screen, "
信までしばらくお待ち下さい。
next transmission)" will appear in the ticker.
(Select)).
■Disabling EZ News Flash
To turn the EZ News Flash service OFF, perform the following procedure.
aPress u while the standby screen is displayed, select the ticker and
c.
press
b
Press Z (
and press
cSelect "YES", press c (選択 (Select)), and follow the on-screen
instructions to disable the service.
If you disable the EZ News Flash, you will not receive the news.
メニュー
c (選択
(Menu)), select "
(Select)).
サービス
設定解除
(Service Termination)",
EZ News Flash/au one Gadget
■
Changing the setting for reception notification
You can change the sound/vibrator and incoming illuminator settings of
update notification of EZ News Flash information.
aPress c216 "NewsFlash Receive" while the standby screen is
displayed.
bSet the desired volume and ringer duration, etc.
If you do not want to be notified when an update is received, select
"Silence" and "OFF".
Information
•
The au one Gadget settings are accessed via .
69
Page 72

EZweb subscription required
天
EZ Navi
What You Can Do with EZ Navi
EZ Navi offers convenient location information services (GPS).
情報料・通信料無料で
<Standby Screen>
"Passenger Seat Navi (EZ
"Passenger Seat Navi (EZ
ニュース
や
W
<EZ Service menu>
助手席ナビ
助手席ナビ
the person on the passenger seat with the most
appropriate route to your destination through
voice directions and maps.
OK!
It says
ですって
EZ Navi
"Security Navi (
安心ナビ
)" to Check Where Your Child Is
Use s to select
"EZnavi".
)" for Person on Passenger Seat
)" provides
"turn
righ
200 m
t
in
e
te
rs"
<EZnavi Screen>
70
The "Security Navi (
of 3 functions: "
(monthly charge), "
Mail)" (free of charge) and "
安心ナビ
)" application is composed
いつでも位置確認
位置確認メール
エリア通知
(Auto Position Search)"
(Position Search
(Area Message)"
(free of charge). With these functions, you can check the
location of an au cellphone that supports Position
Search and/or have a message
automatically sent to a specified
au cellphone when you enter (or
are in) or leave (or are out of) a
pre-determined area during a preregistered time period.
Page 73

"EZ Navi Walk" for When You Go Out
Displays various menus that are useful when you are out.
ナビをする
(
Navigation
地図を見る(無料)
(View Map (free))
乗換検索する(無料*)
(Search Connection
(free)
道路情報を見る
(View Traffic Info)
もっとナビウォーク
EZ Navi Walk
(
インフォメーション
(
Information
★
You can also select the service using your voice ("声de入力 (Voice input)").
* Some menus are fee-based.
)
)
★
*
Provides the navigation (voice directions) to the destination, or you
can search for shops or facilities around your present location.
★
You can view a map of your present location or any other
location.
★
You can search the connection of train, timetable and railway
information.
Check real-time traffic information on the major roads all over
Japan.
Provides explanations about each setting or search on PC.
)
You can register for memberships or make inquiries.
)
View My Position
The first positioning
result is indicated by
★
.
After that, your present
location will be shown
as in real-time by
continuous
Map Screen
positioning.
3D Navi
The display is switched to
the 3D image at the
guidance point or a point
near the destination.
Navigation engine by NAVITIME JAPAN
Map: Shobunsha Publications, Inc./
Sumitomo Electric Industries, Ltd.
3D data: ZENRIN CO., LTD./
GEO Technical Laboratory Co., Ltd.
Z06A-No. 2137
Directions Home or to a Shelter During a Disaster: "Evacuate Navi"
The area map data that is included in your W63SA
can be used to find out the directions to the nearest
shelter or to your home (Evacuate Area Map)*
You can also download a variety of content from
the "Evacuate Navi" EZweb site, such as a "Route
Home Map" that instructs the most appropriate
Evacuate
Area Map
Route Home
Map
*1 In order to indicate the direction to, for example, your home, it is
necessary to register the GPS information for your home in advance in
your au phone's address book and set it as the target location.
*2 Some contents are fee-based.
Information
•
The information offered on your phone's screen is just a guide and any instructions given
by the police, fire department or government authorities should always be obeyed.
•
Depending upon the conditions with the GPS satellite when using "Evacuate
Navi", it may take time to verify the specifics of your area.
•
The layout or contents of the screens in this manual are examples and are subject to change.
•
Packet charges are incurred when using any of the EZ Navi services.
Separate information charges may also be applied with certain services.
route between any 2 points that you select (for
example, from your office to your home)*
Map: Shobunsha Publications, Inc./
Preparation: Asia Air Survey Co., Ltd.
2
.
1
.
EZ Navi
71
Page 74

EZweb subscription required
TV/Radio
What You Can Do with TV (1Seg)/Digital Radio
Watch TV (1Seg)
You can watch 1Seg terrestrial digital broadcast for portable and mobile
devices that is available within Japan.
In addition to standard broadcasts, 1Seg data broadcasts are also
available.
Listen to Digital Radio
Digital Radio broadcasts are also available just like TV (1Seg) and data
broadcasts. Related information can also be viewed, such as the name of
the song being broadcast and the recording artist, etc.
※Digital Radio broadcasts are currently offered for practical testing purposes and
are scheduled to be terminated in July 2011.
TV/Radio
72
Check the program guide
You can download TV (1Seg) and digital radio program guides.
Record and capture TV programs
Record TV programs you are watching, or capture a single frame, and
replay that data from the Data folder or from the "TV Rec. Data" folder on a
™
microSD
Memory Card (commercially available).
View data broadcasts
You can view data that offers information on programs being broadcast, etc.
Page 75

Information
• Perform initialization before using the service. If you have not performed
initialization yet, see page 19.
• If the battery level changes to " " during use of TV (1Seg), a message
will be displayed, and TV will end automatically.
• Deteriorated image, poor image or sound quality or reception failure may
occur in mountainous areas, near buildings, in underpasses, in tunnels,
or indoors because of poor TV reception. Try the following to improve the
reception of the radio wave:
• Extend the W63SA Antenna (for TV (1Seg)/EZ・FM) to locate the
direction for the best reception.
• When listening to Digital Radio, it is recommended that you use the
included Kyocera round-type earphone jack conversion adapter 04
and Sony MDR-E0921 stereo earphones for better reception.
• The Kyocera round-type earphone jack conversion adapter 04 and
Sony MDR-E0921 stereo earphones included with your phone are
designed for optimal use as a digital radio antenna. Extend the
earphone cord to locate the best direction and position for the optimal
radio reception.
•
When you are indoors, take your W63SA as close to a window as possible.
• The layout and contents of the screens in this manual are subject to
change. Screen images are examples.
• The amount of time that the W63SA can be left in continuous operation is
as follows.
TV (1Seg) Speaker output DBEX ON: Approx. 3 hrs. 30 min.,
DBEX OFF: Approx. 3 hrs. 30 min.
Earphone
output
Digital Radio Earphone
output
* Data broadcasts will shorten the available time for continuous operation.
* Displaying the au Media Tuner screen may also shorten the available time for
continuous operation.
DBEX ON: Approx. 3 hrs. 40 min.,
DBEX OFF: Approx. 3 hrs. 40 min.
DBEX ON: Approx. 7 hrs. 10 min.,
DBEX OFF: Approx. 7 hrs. 20 min.
TV/Radio
■About TV (1Seg)
• See the websites below for more detailed information on 1Seg.
The Association for Promotion of Digital Broadcasting
http://www.dpa.or.jp/ (For PC)
http://www.dpa.or.jp/1seg/k/ (For Cellphones)
• Any fee for packet or other transmission is not charged when watching
TV (1Seg). However, you are charged for packet communication if you
access the services such as Program Information or Information
Window.
73
Page 76

Initializing au Media Tuner
When you first use TV (1Seg) and Digital Radio, perform the following
procedure to initialize the communication and channel settings.
Example: To initialize the TV (1Seg) settings:
TV/Radio
1
2
3
Press c while the standby
screen is displayed.
a
Use
and press
to select "TV/Radio"
c
(Select).
Use s to select "TV".
j
Use
and press
to select "TV (1Seg)"
c
(Select).
免責事項 (Disclaimer) screen appears.
To initialize the Digital Radio settings, use
to select "Digital Radio" and use
"Digital Radio".
Use j to confirm
免責事項
(Disclaimer).
j
Use
to select "OK" and
s
j to select
■本
アフ゜リはワンセク゛・テ゛シ゛タルラシ゛
オ
放送受信と受信された
チャンネルフ゜ラス
能な
アフ゜リ
です
■携帯電話の通話
ク゛・テ゛シ゛タルラシ゛オ
の視聴
ネルフ゜ラス
ません
(
受信した
は場所を選ばず視聴
フ゜ラス
することができます)携帯
放送局または
オススメ
情報を取得しますか?
設定項目
:
お知らせ
リンク
情報
オススメ
※初期設定後に機能
から個別に設定変更が
できます
番組の視聴が可
エリアとワンセ
放送
・EZチャン
エリア
は一致し
EZチャンネル
KDDI
からの
メニュー
EZ
74
press
c (選択
(Select)).
The initial setting screen appears. Follow the
on-screen instructions for each setting, and
the screen to set channels appears.
If you select "OK (以後表示しない(No further
indication))", the disclaimer screen does not
appear any more.
Page 77

4
Use j to select "
オート設定
放送波
(
) (Auto-setting
(Broadcast Frequency))" and
press
c (選択
A search will be made for all receivable
channels and, after they are registered under
エリア1(Area 1)", the reception area and the
"
channels will be automatically set and the
television screen appears.
Select "
the area manually.
(Select)).
©KDDI powered by
NANO Media Inc.
マニュアル設定 (Set manually)" to set
Watching TV (1Seg)/Listening to Digital Radio
Example: To watch TV (1Seg):
1
Press c while the standby
screen is displayed.
Use
a
to select "TV/Radio"
and press
c
(Select).
TV/Radio
75
Page 78

2
Use s to select "TV".
Use
j
to select
"TV (1Seg)" and
TV/Radio
press
JF
c
(Select).
Once the television operation screen appears
and a data broadcast is acquired, the data for
that broadcast will be displayed in the bottom
of the screen.
Acquisition of
data broadcast
Y (Vol/Ch)
リーグサッカー
/NANO
TV Operation
テレビ
display
To listen to Digital Radio, use
"Digital Radio" and use
Radio".
If you press
"
録画/キャプチャ(Record/Capture)" and press
c (Select) while watching TV (1Seg), you
can record and save the program, or capture
and save a single frame, by pressing
Z (キャプチャ (Capture)).
Z (機能 (Function)) and select
j to select "Digital
Data Broadcast
Operation display
s to select
Information
• After using TV (1Seg)/Digital Radio for the first time, the previously
watched/listened to channel will appear the next time you access that
service. If you are in different area or the reception is poor, perform the
channel setting again.
• One characteristic of digital broadcasting is that it may take time for
acquisition of the video, especially data during data broadcast.
76
Page 79

■Switching channels
You can switch channels by pressing s, X or W. You can also
select TV (1Seg), Digital Radio, and EZ Channel Plus/EZ Channel
programs in the same way.
TV (1Seg)
Switch channels in order
1ch 2ch 12ch 201ch 703ch
・・・
EZ Channel Plus/EZ Channel
Program 16
Program 2 Program 1
・・・
Digital Radio
Switch in direct channel order
101ch
・・・
■Viewing the program guide
You can download the program guide from the server by pressing
c (番組表 (Program Guide)) on the television or digital radio operation
screen. You can also schedule a program to watch or record by selecting
it in the guide.
■
To Switch
This setting is set to "オート (Auto)" (switch sound output automatically
to either the earphones or speaker depending upon whether earphones
are attached or not) at the time of purchase.
イヤホン
(Earphone) and
スピーカー
(Speaker)
Ending TV (1Seg)/Digital Radio
1
Press
select "
press
F
. Use j to
はい
(Yes)" and
c
(OK).
TV/Radio
77
Page 80

Remote Ctrl Lock
In Case You Lose Your W63SA
The Remote Ctrl Lock function enables you to turn on Auto Lock and
AddressBookLock through remote operation so that no one else can use
your W63SA.
■
Setting Remote Ctrl Lock Activation Conditions
Auto Lock and AddressBookLock are activated when your W63SA
receives the specified number of calls from the registered phone number
within the specified period of time.
aPress c414 while the standby screen is displayed.
bEnter your Lock No. and press c (OK).
Lock No. is set to "1234" at the time of purchase.
c
Use j to select "Valid No." and press c (Select).
j to select "Register New" and press c (Select).
Use
dUse j to select "Direct Input" and press c (OK).
Enter a phone number and press
c (OK).
You can also select "Quote Adrs Book" to enter a phone number.
Up to 3 phone numbers can be registered.
ePress Z (Comp).
fUse j to select "Duration(min)" and press c (Select).
Enter Duration and press
c (Set).
Duration(min): Sets the time limit to receive the specified number
of incoming calls. The time can be set between
Remote Ctrl Lock
gUse j to select "No. of Incm" and press c (Select).
Enter Incoming Call Count and press
1 and 10 minutes.
c (Set).
No. of Incm: Sets the number of incoming calls required for
activating Remote Ctrl Lock.
The count can be set between 3 and 10 times.
hPress Z (Save).
78
If a setting confirmation message appears, select "YES".
Rem. Ctrl Lock
Valid No.
Duration(min)
No. of Incm
Erase Data
Unlock by Phone
Set phone No. to
enable remote control
M414
Page 81

■Remotely Activating Auto Lock and
AddressBookLock on the W63SA
1
Call your W63SA in the conditions set for Remote
Ctrl Lock.
Remote Ctrl Lock is activated and an announcement to that
effect will be played once the specified number of calls are
received from the registered phone number within the
specified period of time.
■Activating the Lock through the Security Lock
Service
Even if you did not set the Remote Ctrl Lock in advance, you can turn on
Auto Lock and AddressBookLock remotely by calling the au Customer
Service Center or performing a specified procedure from PC. This
service is free of charge.
Using the Security Lock Service
●Turning Remote Ctrl Lock ON/OFF by calling the au Customer
Service Center
From au cellphones: 113 area code not required (Toll-Free)
From cellphones except au, or regular phones: 0077-7-113
(Toll-Free)
Hours: 24 hours a day
⇒Follow the voice guidance instructions.
●Turning Remote Ctrl Lock ON/OFF using au Customer Support
(http://cs.kddi.com/)
Login to au Customer Support (http://cs.kddi.com/) and perform the
procedure indicated on-screen.
* It is necessary to apply for this service before using it for the first time.
(You can apply for the service even after you have lost your phone.)
* MyKDDI has been renewed as "au Customer Support" since the
spring of 2008. The procedure remains the same.
Remote Ctrl Lock
Information
• Remote Ctrl Lock cannot be activated if your W63SA is not powered on or
in an area with bad reception, or Emission OFF is set to "ON".
• "Erase Data" is set to "Not Erase" and "Unlock by Phone" is set to "Invalid"
at the time of purchase.
79
Page 82

yyyyyyyyyyyyyyyyy
Other Features
W63SA is provided with other useful features.
Global Passport GSM
The W63SA supports Global Passport GSM function using au IC-Card.
Global Passport GSM is an international roaming service that allows you to
connect to the world by simply inserting your au IC -Card into a GSM mobile
phone for overseas use. No special application or daily/monthly charges are
needed. Charges for overseas calls are billed together with monthly domestic
calling charges.
au one My Page
This service saves the data that is on your W63SA, enabling you to backup
the contents of your address book, your E-mail, and your Data folder, etc.
Bluetooth® Wireless Technology
The W63SA can perform wireless communication with other equipment such
as PCs, printers and hands-free devices that support Bluetooth
PC Site Viewer
This feature enables you to view Internet Web Sites for PC.
®
technology.
Other Features
80
microSD™ Memory Card (Commercially Available)
You can keep various data on a microSD™ Memory Card (commercially
available).
Decoration Mail
You can send E-mails decorated with various font colors, font sizes or
templates to cellphones which supports the function.
LISMO Port
Music data downloaded from LISMO Port or purchased at mora for LISMO
can be transferred to your W63SA. You can also edit the address book or
schedule in your W63SA, or keep and manage the photo or movie data in your
PC, which were shot with your W63SA.
Page 83

Troubleshooting
Symptom Item to Check Solution Page
Cannot turn the
power ON.
Cannot make a call. Does appear
Cannot receive
calls.
The battery runs out
in a short time.
Keys do not
respond.
The power is turned off
after an alarm sounds.
Calls are answered
automatically.
Cannot hear the
other party's voice.
More detailed information is available at the following locations.
・
From W63SA: Press W for more than one second. (SANYO Keitai Planet, in Japanese only)
・ From PC: http://www.kyocera.co.jp (Kyocera website, in Japanese only)
Is the battery pack
charged?
Did you press F
for more than one
second?
on the screen?
Did you include the
area code?
Is the power turned
ON?
Did you press N?
Does appear
on the screen?
Is the power turned
ON?
Have you used
"TV (1Seg)",
"Videophone" or
"LISMO Player", etc.
for a long time?
Do you often use
W63SA in standby
where appears?
Is the power turned
ON?
The battery pack
level is low.
Is Answer Memo
ON?
Is the receiver
volume setting high
enough?
Charge the battery pack.
Press F for more than one
second.
Try to make the call again at the
place where does not appear
on the screen.
If you are making a call to a phone
other than a cellphone, include the
area code, even when calling from
the same city.
Press F for more than one
second.
Press N after entering the phone
number.
Move to a place where does
not appear on the screen.
Press F for more than one
second.
EZ apps (BREW®) such as
TV (1Seg) may consume a large
amount of battery power. Note that
"Videophone" and the "LISMO
Player", etc., also require a large
amount of battery power.
Move to a place where does
not appear on the screen.
Press F for more than one
second.
Charge the battery pack.
Turn Answer Memo OFF by
pressing
second.
Press u while talking. The volume
of the other party is increased.
C for more than one
12
14
14
23
14
23
14
14
―
14
14
12
26
26
Troubleshooting
81
Page 84

Index
A
Accessories ..............................10
Address Book
Edit
.......................................42
Make a Call
Register
Register Data from Outgoing
History/Incoming History
Adjust the Other Party's Voice
Volume
Answer Memo
Play Back/Delete
au IC-Card
au Media Tuner
au one Gadget
au one Top
B
Battery Level......................... 3, 14
Battery Pack
Bookmark(s)
C
Caller ID ....................................23
Camera
Chaku-Uta
Charge the Battery Pack
C-mail
.....................................58
Photo
.....................................60
.......................................54
C-mail Safe Block Function
Create and Send
Read
.....................................57
D
Desktop Holder ................... 10, 12
Disaster Message Board Service
Download
Index
Drive Mode
E
E-mail .......................................46
Attach a Photo
Create and Send
82
Initialization
Read
.....................................50
...........................39
.............................41
..................................39
...................................26
.......................3, 26
......................27
.................................11
................... 18, 74
...........................68
................................64
...................10, 11, 12
.............................66
®
Chaku-Uta-Full
.......................55
..................................67
................................. 4
.........................62
.......................47
.............................19
...........43
®
.......67
............12
..........54
.... 7
Reply
.....................................52
View Received Photos
E-mail Address
Change
Confirm
Enter
E-mail address
Evacuate Navi
EZ apps (BREW
EZ Navi Walk
EZ News Flash
EZweb
au one Top
EZ Password
Initialization
Premium EZ Password
..................................21
..................................20
.....................................36
...........................71
............................71
.................................18, 63
.............................64
...........................67
.............................19
.........................20
..........................19
®
..........................68
...............51
)...................... 18
...............67
F
Front Style................................ 13
G
Global Functions
Setting Area
............................33
H
How to Use the Keys................. 15
I
Icons ........................................ 18
ID Unsent
Incoming Call
Incoming History
Incoming Illuminator
Initialization
Input Text
Back Space Function
Consecutively Enter Characters of
E-mail Address
Erase
Input Mode
Pictograph
..................................24
............................28
.................25, 43
............11, 12
..............................19
.................................35
.................35
the Same Key
.......................36
........................36
....................................36
..............................35
..............................38
J
Junk Mail .............................. 5, 53
Page 85

L
Lock No. ...................................78
M
Mail
C-mail
....................................54
E-mail
....................................46
Mail Filter
Main Menu
Making an International Call
Making Key Operation
Invalid
Manner Mode
Drive Mode
Manners for Using Cellphones
microSD
Missed Calls
.............................. 5, 53
...........................16, 18
......23
................................ 6, 18
........................ 3, 30
...............................4
™
Memory Card .......18, 80
....1
.............................24
N
Name of Parts ...........................11
New Bookmark
.........................65
O
One-ring Calls....................... 5, 25
Outgoing History
.................25, 43
P
Pair Function ............................44
Make a Call
Register
Send a Mail
Passenger Seat Navi
Phone Call
Answer a Call
Call Back
Make a Call
Phone Number
Phone Number
Photo
Attach to E-mail Messages
Shoot
View
Phrase
Play Back
Answer Memo
Photo
Power
................................... 3, 14
.............................45
.................................44
.............................45
.................70
..........................24
................................25
................. 23,41,45
.........................23
..........................20
..........62
....................................60
......................................61
.................................36, 37
..........................27
....................................61
R
Radio Wave Reception...........3, 14
Recording Oneself Style
Remote Ctrl Lock Setting
Ringer
Change Type and Volume
........... 13
.......... 78
.......... 28
S
Security Code........................... 22
Security Lock Service
Security Navi
Set Language
Site
Access Bookmarked Sites
Bookmark Sites
Standby Screen
............................ 70
........................... 14
............... 79
.......... 66
....................... 65
...................14, 18
T
Troubleshooting ....................... 81
TV/Radio
End
Initialize
Watch and listen to
.................................. 72
...................................... 77
................................. 74
................... 75
V
Videophone
Answer a Videophone Call
Make a Videophone Call
Put a Videophone Call on Hold
View Charge
............................. 66
.......... 32
............ 31
.... 32
Index
83
Page 86

For inquiries, call:
au Customer Service Center (General Information)
From EZweb:
How to access
EZ au one Top
auお客さまサポート (au Customer Support)
お問い合わせ(Inquiry)
*Menu is subject to change without prior notice.
عFor general information and charges
ޓFrom regular phones:
0077-7-111
(Toll free)
From au cellphones:
157 area code not required
(Toll free)
ع
For loss, theft or damage and operation information
ޓFrom regular phones:
0077-7-113
(Toll free)
From au cellphones:
113 area code not required
(Toll free)
Pressing zero will connect you to an operator,
after calling 157 on your au cellphone.
Sales : KDDI CORPORATION •
OKINAWA CELLULAR TELEPHONE COMPANY
Manufactured by :
April 2008 Edition
Cellphone and PHS operators collect and recycle unused telephones,
batteries and battery chargers at stores bearing the logo
regardless of brand and manufacturer to protect the environment
and reuse valuable resources.
KYOCERA Corporation
Access the au online
manual from here.
 Loading...