

Page 1

SANYO Software Pack 6.9
For Digital Camera
INSTRUCTION MANUAL
Please read these instructions carefully before using. Be sure to keep this manual
for later reference.
Page 2

ATTENTION
Regarding permission to use the CD-ROM
h This CD-ROM may not be reproduced without permission.
h When installing the software in this CD-ROM, permission is granted for
its use only if the user agrees to the terms and conditions that are
displayed at the start of installation.
h Regarding products by other manufacturers that are specified on this
CD-ROM, and for service, please inquire of the respective
manufacturer.
i It is strictly forbidden to copy this manual, wholly or in part, without prior
written permission.
i The contents of this manual are subject to change without prior notice.
i Sanyo Electric shall not be held responsible for any problems resulting
from the use of this product.
i Sanyo Electric declines all responsibility for damages due to improper use
of this product, failure to adhere to the instructions given in this manual, or
repairs or changes done by those other than a technician authorized by the
manufacturer.
i Sanyo Electric shall not be held responsible for any damage caused by
optional devices or consumable items used with this product other than
those supplied with this product or those specified by Sanyo Electric.
i Sanyo Electric shall not be held responsible for any losses or loss of
revenue resulting from the loss of data caused by the malfunction, or the
repairing of a malfunction, of this product.
i English
Page 3

COPYRIGHTS
This manual and the software are copyrighted materials from Sanyo Electric
Co., Ltd.
Macintosh and QuickTime are registered trademarks of Apple Computer, Inc.
in the USA and other countries.
Microsoft and Windows is a registered trademark of Microsoft Corporation in
the USA and other countries.
Intel and Pentium are registered trademarks of Intel Corporation (USA).
All other brand or product names mentioned in this manual are trademarks or
registered trademarks of their respective companies.
1 English
Page 4

CONTENTS
INTRODUCTION ....................................................................................3
About this manual ............................................................................3
The software ....................................................................................4
Directory map ..................................................................................4
OPERATING ENVIRONMENT ...............................................................5
Windows ..........................................................................................5
Macintosh ........................................................................................6
MOUNTING AND DISMOUNTING THE CAMERA ................................7
For WINDOWS XP users ................................................................8
For WINDOWS Me and WINDOWS 2000 users ...........................10
For WINDOWS 98/WINDOWS 98SE users ..................................13
For MAC OS 9.xx users ................................................................17
For MAC OS X users .....................................................................18
INSTALLING THE APPLICATION SOFTWARE ..................................19
Windows ........................................................................................20
Macintosh ......................................................................................22
HOW TO USE PhotoExplorer ...............................................................24
Set up the environment .................................................................24
Copying data ..................................................................................27
PhotoExplorer features ..................................................................28
ABOUT MotionDirector .........................................................................29
Importing .......................................................................................29
Output format and playback ..........................................................29
English 2
Page 5

INTRODUCTION
This manual describes how to install and operate the SANYO Software Pack.
Please read this manual carefully, in order to use the images and audio
recordings captured with your digital camera in a wide range of applications.
About this manual
The explanations in this manual conform to the following conventions.
i The examples given in this manual are generally based on a Windows
environment. For Macintosh users, while the menu names and screen
indications may be different, this is not an impediment to understanding the
operation. In those places where the operations for Macintosh users and
Windows users differ, specific explanations are provided.
i In this manual, the SD Memory Card and Multi Media Card used in the
digital camera are both referred to as “card”.
i This manual is designed for users with the following computer skills:
h Knowledge of basic computer operations
h Knowledge of basic mouse operations
h Knowledge of how to open, close, move, minimize and maximize
windows
h Knowledge of how to move from one folder to another folder
Detailed information about the operations listed above can be found in the
printed or online manuals accompanying the computer or operating system
software.
Symbols used in this manual
NOTE Extra information about software or cautionary notes.
CAUTION Points requiring special caution.
[page xx] Refer to the page indicated for detailed information.
3 English
Page 6
The software
The following software applications are in the SANYO Software Pack.
k Driver software
i USB driver
The USB driver is necessary when using the USB interface in a Windows
98/Windows 98SE environment.
k Application software
Please see page 19 for a summary of each software program.
i QuickTime 6.5
In this manual, referred to as QuickTime.
i PhotoExplorer 8.0SE Basic (Windows)/PhotoExplorer for Mac 2.0
(Macintosh)
In this manual, referred to as PhotoExplorer.
i MotionDirector SE 1.1 (Windows)
In this manual, referred to as MotionDirector.
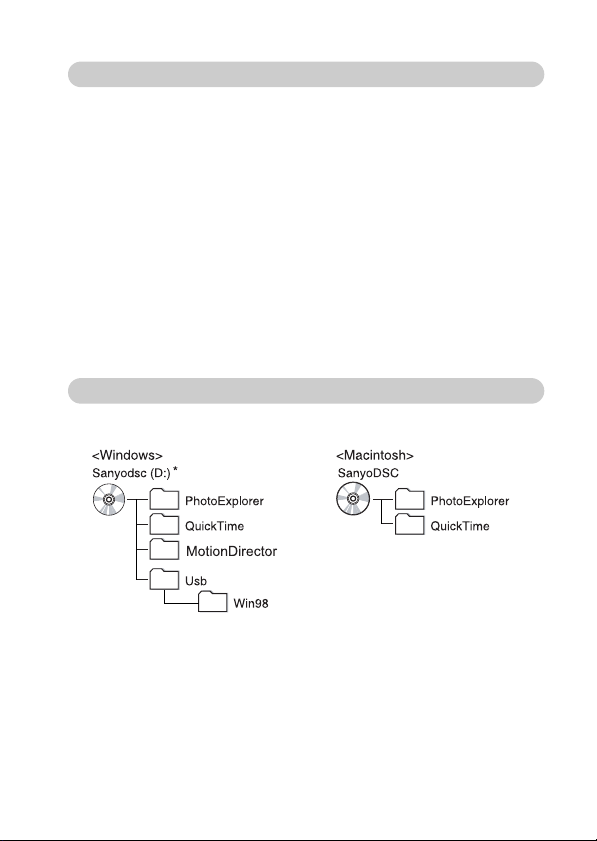
Directory map
Below is a directory map of the SANYO Software Pack contents.
* The drive name may be different on your computer.
English 4
Page 7

OPERATING ENVIRONMENT
Windows
USB storage class
A computer with a standard-equipped USB port, and preinstalled with
Windows 98 or Windows 98SE or later is required. Correct operation cannot
be guaranteed for models that have been upgraded to Windows 98 from
Windows 3.1 or Windows 95.
Application software
Software CPU Memory
QuickTime
PhotoExplorer
MotionDirector
* Including Windows 98SE
Pentium
or faster
Pentium II
350MHz
or faster
Pentium III
1GHz
or faster
128MB or more
64MB
(Windows XP:
128MB)
or more
256MB or more
(512MB
recommended)
Hard
disk
11MB
or more
18MB
or more
100MB
or more
OS
Windows 98*/
Me/2000/XP
Windows 98*/
Me/2000/XP
Windows
98SE/Me/
2000/XP
5 English
Page 8

Macintosh
USB storage class
A model with a standard-equipped USB port, and preinstalled with Mac OS
9.0, 9.1, 9.2, Mac OS X10.1 or later.
Application software
Software CPU Memory
400MHz
QuickTime*
PhotoExplorer
* Mac OS 8.6-Mac OS 9.X, QuickTime 6.0.3
CAUTION
When using in a Mac OS X Classic environment
i It is not possible to read the data directly from the camera's internal
memory or the card. The data must first be saved once to your hard disk.
Powe r PC
G3
or faster
Powe r PC
or faster
128MB
or more
64MB
or more
Hard
disk
19MB
or more
20MB
or more
OS
Mac OS X
10.2.5 - 10.3.x
Mac OS 9.0
(CarbonLib 1.4)
or later
Mac OS X 10.1
or later
English 6
Page 9

MOUNTING AND DISMOUNTING THE CAMERA
The following is an explanation of how to connect your camera to a personal
computer, enabling you to load the internal memory or card data from your
camera to the computer, and also how to remove the card from a camera
connected to your personal computer as well as disconnect the camera from
your personal computer.
k Cautions when mounting your digital camera as a removable disk
i Do not alter files or folders in your digital camera in any way. Doing so may
result in your camera not recognizing that data.
i Do not edit files in your digital camera. If you want to edit files, first copy
them to your computer’s hard drive.
i Cards formatted on your computer cannot be used by your digital camera.
Format all cards to be used by your digital camera with your digital camera.
i If there is no card installed in the camera, the camera's internal memory is
recognized as the drive.
7 English
Page 10

For WINDOWS XP users
Mounting the camera and installing the card
1 Start your computer.
2 Connect the camera to a computer, and set it to the PC mode (see
page 101 in the camera’s instruction manual).
h The message [Found New Hardware] appears in the task tray, showing
that the camera is recognized as a drive.
h At this point you can access the data in the internal memory.
3 Install a card in the camera.
h The card is recognized (mounted) as a disk, and the [Removable Disk
(E:)] window opens.
* The drive name (E:) may be different on your computer.
4 Select an action.
h Select the desired procedure from the [Removable Disk (E:)] window.
English 8
Page 11

Removing the card and dismounting the camera
CAUTION
i To remove the card or dismount your camera, be sure to follow the
procedure below. Failure to follow this procedure may cause faulty
operation of your computer or loss of card data.
k Removing the card
1 Right-click on the camera icon ([Removable Disk (E:)]) in [My
Computer].
h A menu appears.
* The drive name (E:) may be different on your computer.
2 Select [Remove] from the menu.
3 Confirm that the camera’s accessing indicator is not lit flashing, and
remove the card.
h For an explanation on how to remove the card from your camera, refer
to your camera’s instruction manual.
k Dismounting your digital camera
1 Click on [Safely Remove Hardware] in the task tray, and select
[Safely Remove USB Mass Storage Device – Drive (E:)].
h You can now disconnect the camera.
* The drive name (E:) may be different on your computer.
9 English
Page 12

For WINDOWS Me and WINDOWS 2000 users
Mounting the camera and installing the card
1 Start your computer.
2 Connect the camera to a computer, and set it to the PC mode (see
page 101 in the camera’s instruction manual).
h The camera is recognized as a drive, and [Removable Disk (E:)]
appears in the [My Computer] window.
* The drive name (E:) may be different on your computer.
h At this point you can access the data in the internal memory.
3 Install a card in the camera.
h The card is recognized (mounted) as a disk.
h Double-click on the [Removable Disk (E:)] icon in [My Computer], and
you can process the contents of the card installed in your camera
exactly like you would the data in the other computer drives.
English 10
Page 13

Removing the card and dismounting the camera
CAUTION
To remove the card or dismount your camera, be sure to follow the procedure
below. Failure to follow this procedure may cause faulty operation of your
computer or loss of card data.
k Removing the card
1 Right-click on the camera icon ([Removable disk (E:)]) in [My
Computer].
h A menu appears.
* The drive name (E:) may be different on your computer.
2 Select [Remove] from the menu.
3 Confirm that the camera’s accessing indicator is not lit flashing, and
remove the card.
h For an explanation on how to remove the card from your camera, refer
to your camera’s instruction manual.
11 English
Page 14

k Dismounting your digital camera
1 Right-click on [Unplug or Eject Hardware] in the task tray.
2 Select [Unplug or Eject Hardware].
h The [Safe to Remove Hardware] dialog box will open.
3 Double-click on [USB Mass Storage Device], select [SANYO S4 USB
Device] from the [Stop Hardware Device] dialog box, and click on the
OK button.
4 Click on the OK button.
h You can now disconnect the camera.
English 12
Page 15

For WINDOWS 98/WINDOWS 98SE users
Mounting the camera and installing the card
For Windows 98 and Windows 98SE users, please install the USB drivers
(SANYO Digital Camera Mass Storage Drive and SANYO Digital Camera
Controller). Install the SANYO Digital Camera Mass Storage Driver before
installing the SANYO Digital Camera Controller.
1 Insert the CD-ROM (SANYO Software Pack) in your computer’s CD-
ROM drive .
2 Connect the camera to a computer, and set it to the PC mode (see
page 101 in the camera’s instruction manual).
h The [Add/Remove Hardware Wizard] dialog box will open.
h If the [Add/Remove Hardware Wizard] dialog box does not appear,
double-click on the [Add Hardware] icon in [My Computer] to open it,
and proceed to step 4.
3 Click on the [Next] button.
4 Specify the USB driver search method and search location.
1 Place a check in the [Search for the best driver for your device.
(Recommended)] checkbox, and click on the [Next] button.
2 Place a check in the [Specify a Location] checkbox, and click the
[Browse] button.
h The [Browse for Folder] dialog box will open.
13 English
Page 16

5 Specify the folder with the USB driver.
h The USB driver is in the CD-ROM’s [Usb] folder, in the [Win98] folder.
1 Double-click on [Sanyodsc(D:)].
h “(D:)” denotes the CD-ROM drive name, which may be different on
your computer.
2 Double-click on [Usb].
3 Double-click on [Win98].
6 Click on the [OK] button.
h The [Browse for Folder] dialog box closes, and [D:\USB\WIN98]
appears in the [Specify a location:] field. The first character (D) may
vary depending on your computer configuration.
7 Click on the [Next] button.
8 When the dialog box appears announcing completion of the
installation, click the [Finish] button.
h Installation of the SANYO Digital Camera Mass Storage Driver is now
completed. After a while, the [Add/Remove Hardware Wizard] dialog
box appears again. Continue to the next step to install the SANYO
Digital Camera Controller.
9 Install the SANYO Digital Camera Controller.
h Use the same procedure as above to install the SANYO Digital Camera
Controller.
h When installation of the SANYO Digital Camera Controller is completed,
USB driver installation is completed.
English 14
Page 17

0 Confirm that the digital camera can be mounted.
h When the USB driver has been correctly installed, the digital camera
appears in the [My Computer] window as a [Removable Disk] drive. The
Removable Disk drive name (E:) may be different on your computer.
NOTE
If [Removable Disk] is not found...
The USB device driver has not been installed correctly. After deleting the USB
device driver once by using the procedure below, install it again.
(1) Right-click on [My Computer], and select [Properties] from the menu.
h The [System Properties] dialog box will open.
(2) Click on the [Device Manager] tab.
(3) Click on [SANYO Digital Camera], and then click on the [Delete] button.
h If there is no [SANYO Digital Camera], click on the [Cancel] button to
close the dialog box, and proceed to step (4).
(4) Insert the CD-ROM into the drive and re-install the driver.
15 English
Page 18

Removing the card and dismounting the camera
CAUTION
i To remove the card or disconnect your camera, be sure to follow the
procedure below. Failure to follow this procedure may cause faulty
operation of your computer or loss of card data.
k Removing the card
1 Right-click on the camera icon ([Removable disk (E:)]) in [My
Computer].
h A menu appears.
h The drive name (E:) may be different on your computer.
2 Select [Remove] from the menu.
3 Confirm that the camera’s accessing indicator is not lit flashing, and
remove the card.
h For an explanation on how to remove the card from your camera, refer
to your camera’s instruction manual.
English 16
Page 19

k Dismounting your digital camera
1 Confirm that the camera’s accessing indicator is not lit flashing.
2 You can now disconnect the camera.
For MAC OS 9.xx users
Mounting the camera and installing the card
1 Start your computer.
2 Connect the camera to a computer, and set it to the PC mode (see
page 101 in the camera’s instruction manual).
h The camera is recognized as a drive and appears as an icon named
[Untitled] on the Desktop.
h When you click on the [Untitled] icon, the data in the camera's internal
memory or the installed card can be processed in the same way as
media in the other drives.
17 English
Page 20

Removing the card and dismounting the card or camera
CAUTION
i To remove the card or dismount your camera, be sure to follow the
procedure below. Failure to follow this procedure may cause faulty
operation of your computer or loss of card data.
1 Drag the [Untitled] icon for your digital camera on the Desktop to the
trashcan.
h The [Untitled] icon disappears from the Desktop.
2 Confirm that the camera’s accessing indicator is not lit flashing.
3 Remove the card or camera.
h For an explanation on how to remove the card from your camera, refer
to your camera’s instruction manual.
For MAC OS X users
h The procedure to mount and dismount the camera is the same as that
for Mac OS 9.xx. However, if an application which automatically
recognizes camera images is installed, it will be activated.
English 18
Page 21

INSTALLING THE APPLICATION SOFTWARE
The SANYO Software Pack contains the application software indicated below.
Installation of each application will serve to optimize your use of the data
recorded with your digital camera.
i QuickTime*
Play back video clips. The recorded audio is played back at the same time.
Be sure to install this application if you are going to view video clips that
were photographed with your camera.
i PhotoExplorer
Organizing the data recorded with your digital camera is easy to
understand using the graphic screen.
i MotionDirector
Use MotionDirector to remove motion blur from video clips captured with
your camera and to make a single panorama still shot from a video clip
recorded white panning.
* By upgrading from QuickTime to QuickTime Pro, you will be able to edit
QuickTime movies, among other features. You can upgrade from Apple
Computer, Inc.’s web page at http://www.apple.com/.
19 English
Page 22

Windows
k QuickTime installation
1 Set the CD-ROM (SANYO Software Pack) in the CD-ROM drive.
h The installation window soon appears.
h If the installation window does not appear, double-click on the
[SanyoDSC (D:)] icon in the My Computer window, and double-click on
[Autorun.exe] in the [SanyoDSC(D):] window.
* The drive name (D:) may be different on your computer.
2 In the installation window, click on [QuickTime 6.5].
h The QuickTime setup window for beginning the installation procedure
will open.
3 Follow the instructions on the screen to install the application.
h The installer program is preset to properly install the QuickTime
software.
h If you are unfamiliar with the computer, we recommend clicking the
[Next] button at each screen.
h Do not enter anything in the [Enter Registration] dialog box, and click on
the [Next] button.
h During the installation, the QuickTime setup screen will appear. For
setup instructions, please refer to the following website:
http://www.apple.com/
4 Once the dialog box appears announcing completion of the
installation, click on the [Close] button to close the box.
h This completes the installation of QuickTime.
English 20
Page 23

k PhotoExplorer/MotionDirector installation
1 Set the CD-ROM (SANYO Software Pack) in the CD-ROM drive.
h The installation window soon appears.
h If the installation window does not appear, double-click on the
[SanyoDSC(D:)] icon in the My Computer window, and double-click on
[Autorun.exe] in the [SanyoDSC(D):] window.
* The drive name (D:) may be different on your computer.
2 In the installation window, click on [Ulead Photo Explorer 8.0SE
Basic] or [Motion Director SE 1.1].
3 Follow the instructions on the screen to install the application.
h During PhotoExplorer installation, the user registration screen will
appear. For user registration instructions, please refer to the following
website:
http://www.ulead.com/
h When a dialog box prompting you to restart your computer appears,
restart your computer.
21 English
Page 24

Macintosh
k QuickTime installation
1 Insert the CD-ROM (SANYO Software Pack) in your computer’s CD-
ROM drive.
h The CD-ROM window will open after a few seconds.
h If the window does not open, double-click on the CD-ROM icon
[SanyoDSC] on the Desktop.
2 Open the [QuickTime] folder.
<Mac OS 8.6 or 9>
3 Open the [OS 8.6/9] folder and double-click on the [QuickTime
Installer] icon in the [English] folder (or whatever other language you
prefer).
h The QuickTime setup window for beginning the installation procedure
will open.
<Mac OS X 10.2.5 - 10.3.x>
3 Open the [OS X v10.2.5 - 10.3.x] folder.
4 Open the [QuickTime65.pkg] folder.
5 Follow the instructions on the screen to install the application.
h The installer program is preset to properly install the QuickTime
software.
h Do not enter anything in the [Enter Registration] dialog box, and click on
the [Next] button.
h When a dialog box prompting you to restart your computer appears,
restart your computer.
English 22
Page 25

k PhotoExplorer installation
1 Insert the CD-ROM (SANYO Software Pack) in your computer’s CD-
ROM drive .
h The CD-ROM window will open after a few seconds.
h If the window does not open, double-click on the CD-ROM icon
[SanyoDSC] on the Desktop.
2 Install the PhotoExplorer.
h Open the [Ulead Photo Explorer] folder and copy the [English] folder (or
whatever other language you prefer) to your hard disk.
h When the folder has been copied, installation of the application is
completed.
NOTE
About the [Carbon Lib] folder
i If your computer’s CarbonLib file (extension file) is earlier than version 1.4,
please install the CarbonLib file (in the [Carbon Lib] folder) to the extension
folder.
23 English
Page 26

HOW TO USE PhotoExplorer
To copy data from your camera to your computer, when you open the drive for
your camera from [My Computer], options are shown for copying data to your
computer and for using PhotoExplorer to copy data. Explained in this section
is how to use PhotoExplorer to copy the camera’s data to your computer. For
a detailed explanation of PhotoExplorer, please see the Help menu of
PhotoExplorer.
Set up the environment
Specify the source of the data (data location in your camera) to be copied.
k Setup
1 Connect the camera to a computer, and set it to the PC mode (see
page 101 in the camera’s instruction manual).
2 Confirm the camera connection.
<Windows>
Double-click on the [My Computer] icon.
h The [Removable Disk (E:)] icon appears.
* The drive name (E:) may be different on your computer.
<Macintosh>
h An icon named [Untitled] appears on the Desktop.
k Run PhotoExplorer
1 Complete the setup.
2 Run the program.
<Windows>
Double-click on the [Ulead Photo Explorer8.0 SE Basic] icon on the Desktop.
h PhotoExplorer starts, and the PhotoExplorer window opens.
<Macintosh>
Open the folder in which PhotoExplorer was installed, and double-click on the
PhotoExplorer icon.
h PhotoExplorer starts, and the PhotoExplorer window opens.
English 24
Page 27

k Set the camera drive
Specify the drive of the camera connected to the computer. Once set, the
drive is retained until you change it.
1 Run PhotoExplorer (see page 24).
2 Click on the camera icon on the Toolbar.
h The [Digital Camera Wizard] dialog box will open.
25 English
Page 28

3 Specify the camera drive.
<Windows>
1 Click on the drive name (A:\) to the right of [Camera Drive and Card
Reader].
h The [Select Image Source] dialog box will open.
2 Turn ON the [Load Directly from Camera Memory Card or Disk] option
button, and in the [Location] list box select the camera drive → [DCIM]
→ [100SANPH] folder.
3 Click on the [OK] button.
h The [Digital Camera Wizard] dialog box will open.
h The drive name to the right of [Camera Drive and Card Reader]
<Macintosh>
changes to the specified drive name.
1 Click on the [Camera Flash Drive] column icon.
h The [Select Removable Drive] dialog box will open.
2 Click on the drive (untitled) for the camera connected to your
computer, and click on the [Select] button.
h The [Camera Flash Drive] column drive name becomes [untitled].
3 Check the [Create Subfolder] checkbox.
English 26
Page 29

k To copy image data to the computer
h Perform the procedure to “Copy data” below through step 2.
k For setup only
h If you click on the [Cancel] button, the [Camera Wizard] window will
close.
Copying data
Copy image files to the computer from the card installed in your camera.
1 Connect the camera to a computer, and set it to the PC mode (see
page 101 in the camera’s instruction manual).
h PhotoExplorer starts.
If PhotoExplorer does not start...
1 Run PhotoExplorer (see page 24).
2 The [Digital Camera Wizard] dialog box will open.
2 Click on the [Start] button.
h Copying begins.
h A folder with the name as indicated below is automatically created, to
which the data is copied.
Windows: C:\My Documents\SANYO_PEX
Macintosh: Macintosh HD:Ulead Photo Explorer
h When copying is completed, the [Done] dialog box will appear.
3 When copying is completed, click on the [OK] button.
h The copied data is shown in a thumbnail window.
27 English
Page 30

PhotoExplorer features
Import digital data, manage blocks of files, search files
With the PhotoExplorer you have visually integrated control over multiple files,
from digital camera images to DV camcorder video files to audio files (such as
MP3 and WAV files).
k Manage and edit image files
Viewing images
Images can be viewed full-size or full-screen. Use the keyboard controls or
toolbar buttons to select the menu, and you can browse the images or play
them back, for example, in a slideshow.
Organizing and editing images
You can copy and erase image files, as well as change the file names. In
addition, you can rotate and flip images, and save the edited images as
new files.
Adjusting images
You can easily enhance images by clipping and adjusting the contrast,
brightness, color balance, etc. The created images can be used for
wallpaper or screen savers.
k Abundant slideshow features
Slideshows containing combinations of still images and video clips can be
played back. The slideshow feature comes with a large variety of image-toimage transition effects.
k Convert the format of video clip data
Video clips (QuickTime format) that were shot with your digital camera can be
converted to other formats, such as AVI and MPEG.
k For questions about PhotoExplorer
Further information about PhotoExplorer can be found at
http://www.ulead.com/
<Where to find the serial number>
i From the PhotoExplorer [Help] menu, select “About PhotoExplorer.” The
program version as well as the serial number are shown.
English 28
Page 31

ABOUT MotionDirector
Use MotionDirector to remove motion blur from video clips captured with your
camera and to make a single panorama still shot from a video clip recorded
while panning.
An outline of MotionDirector is introduced below. For details, please refer to
online help for MotionDirector.
Importing
MotionDirector can read either of these file formats:
i MOV
i MP4
The compression coding for each is as follows:
Format Video coding Audio coding
MOVE Motion JPEG WAVE
MP4 ISO MPEG-4 AAC
The frame size is VGA (640 × 480 pixels) or less.
Output format and playback
MotionDirector can write files in the following formats:
Motion-blur correction: MPEG-4, MOV
Panorama composite: JPEG, BMP, TIFF, QuickTime VR
VR spatiotemporal images saved in the QuickTime VR format using Apple’s
QuickTime Player can be viewed.
29 English
Page 32

SANYO Electric Co., Ltd.
 Loading...