

Page 1
INSTRUCTION MANUAL
Digital Camera
VPC-AZ1EX
VPC-AZ1E
VPC-AZ1
Important note
This manual explains how to safely operate the VPC-AZ1EX, VPC-AZ1E, and VPC-AZ1.
Any information regarding only one of these products will be labeled as such.
Please read these instructions carefully before using the digital camera. Make sure to read and
understand the section “USING YOUR DIGITAL CAMERA SAFELY AND CORRECTLY” on pages 3
to 13. Keep this manual in a safe place for later reference.
Page 2

TO PREVENT THE RISK OF FIRE OR ELECTRIC SHOCK, DO NOT EXPOSE THIS
APPLIANCE TO RAIN OR MOISTURE
FOR AMERICAN USERS
œ This equipment has been tested and found to comply with the limits for a Class B digital device,
pursuant to Part 15 of the FCC Rules. These limits are designed to provide reasonable
protection against harmful interference in a residential installation. This equipment generates,
uses and can radiate radio frequency energy and, if not installed and used in accordance with
the instructions, may cause harmful interference to radio communications. However, there is no
guarantee that interference will not occur in a particular installation. If this equipment does
cause harmful interference to radio or television reception, which can be determined by turning
the equipment off and on, the user is encouraged to try to correct the interference by one or
more of the following measures:
œ
Reorient or relocate the receiving antenna.
œ
Increase the separation between the equipment and receiver.
œ
Connect the equipment to an outlet on a circuit different from that to which the receiver is
connected.
œ
Consult the dealer or an experienced radio/TV technician for help.
œ Changes or modifications not expressly approved by the party responsible for compliance could
void the user’s authority to operate the equipment.
Tested To Comply With FCC Standards
FOR HOME OR OFFICE USE
Declaration of Conformity
Model Number : VPC-AZ1
Trade Name : SANYO
Responsible party : SANYO FISHER COMPANY
Address : 21605 Plummer Street, Chatsworth, California 91311
Telephone No. : (818) 998-7322
This device complies with Part 15 of the FCC Rules. Operation is subject to the following two
conditions:
(1) this device may not cause harmful interference, and
(2) this device must accept any interference received, including interference that may cause
undesired operation.
i
English
Page 3

FOR CANADIAN USERS
œ This Class B digital apparatus complies with Canadian ICES-003.
English
ii
Page 4

BEFORE READING THE MANUAL
Microdrive and PowerPC are registered trademarks of International Business Machines
Corporation.
Apple, Macintosh and QuickTime are trademarks or registered trademarks of Apple Computer Inc.
Windows and Windows NT are registered trademarks of Microsoft Corporation.
CompactFlash is a trademark of SanDisk Corporation and handed over to CFA (CompactFlash
Association).
All other company and product names are registered trademarks or trademarks of their respective
owners.
Regarding the data storage media
œ This digital camera can use both CompactFlash and Microdrive cards for data storage. This
manual is written with the premise that CompactFlash cards are used. In this manual,
CompactFlash and Microdrive cards are both referred to as “card”.
Caution
œ It is forbidden to copy this manual, whole or in part, without prior written permission.
œ All images and illustrations given in this manual are for explanation purposes and may differ
slightly from that of the actual product. Also, actual specifications are subject to change without
prior notice and therefore may differ from the contents of this manual.
œ Sanyo Electric shall not be held responsible for any problems resulting from the use of this
digital camera.
œ Sanyo Electric declines all responsibility for damages due to improper use of the camera, failure
to adhere to the instructions given in this manual, or repairs or changes done by those other
than a technician authorized by the manufacturer.
œ Sanyo Electric shall not be held responsible for any damage caused by optional devices or
consumable items used with the digital camera other than those supplied with the digital
camera or those specified by Sanyo Electric.
œ Sanyo Electric shall not be held responsible for any losses or loss of revenue resulting from the
loss of data caused by the malfunction, or the repairing of a malfunction, of the digital camera.
œ The images captured with this camera will differ in quality from pictures taken with a standard
film camera.
iii
English
Page 5

Symbols used in this manual
NOTE Points giving some extended instructions or special points to pay attention to.
HINT Points that may prove useful when using the digital camera.
HELP In case of a problem, this may help in certain situations.
[page xx] Refer to the page indicated in brackets for detailed information.
English
iv
Page 6

CONTENTS
USING YOUR DIGITAL CAMERA SAFELY AND CORRECTLY . . . . . . . . . . . . . . . . . . . . . . 3
CHECKING THE INCLUDED ACCESSORIES . . . . . . . . . . . . . . . . . . . . . . . . . . . . . . . . . . . 14
PREPARATION
USING THE HAND-STRAP AND SOFT CASE. . . . . . . . . . . . . . . . . . . . . . . . . . . . . . . . . . . 15
QUICK START FOR CAPTURING IMAGES. . . . . . . . . . . . . . . . . . . . . . . . . . . . . . . . . . . . . 17
PARTS NAMES. . . . . . . . . . . . . . . . . . . . . . . . . . . . . . . . . . . . . . . . . . . . . . . . . . . . . . . . . . . 21
PREPARATION OF BATTERIES . . . . . . . . . . . . . . . . . . . . . . . . . . . . . . . . . . . . . . . . . . . . . 23
INSTALLING AND REMOVING THE CARDS. . . . . . . . . . . . . . . . . . . . . . . . . . . . . . . . . . . . 27
TURNING THE POWER ON/OFF. . . . . . . . . . . . . . . . . . . . . . . . . . . . . . . . . . . . . . . . . . . . . 29
DISPLAYING THE SETTING SCREEN AND OPTION SETTING SCREEN. . . . . . . . . . . . . 31
SHOOTING SETTING SCREENS. . . . . . . . . . . . . . . . . . . . . . . . . . . . . . . . . . . . . . . . . . . . . 33
PLAYBACK SETTING SCREEN . . . . . . . . . . . . . . . . . . . . . . . . . . . . . . . . . . . . . . . . . . . . . . 40
OPTION SETTING SCREEN . . . . . . . . . . . . . . . . . . . . . . . . . . . . . . . . . . . . . . . . . . . . . . . . 41
INFORMATION DISPLAY . . . . . . . . . . . . . . . . . . . . . . . . . . . . . . . . . . . . . . . . . . . . . . . . . . . 42
SETTING SCREEN BASIC OPERATIONS . . . . . . . . . . . . . . . . . . . . . . . . . . . . . . . . . . . . . . 45
SETTING THE DATE AND TIME . . . . . . . . . . . . . . . . . . . . . . . . . . . . . . . . . . . . . . . . . . . . . 46
REMAINING BATTERY CHARGE INDICATION. . . . . . . . . . . . . . . . . . . . . . . . . . . . . . . . . . 48
CHECKING THE REMAINING NUMBER OF IMAGES, VIDEO RECORDING TIME, AND
AUDIO RECORDING TIME . . . . . . . . . . . . . . . . . . . . . . . . . . . . . . . . . . . . . . . . . . . . . . . 50
CONCERNING IMAGE AND AUDIO DATA STORAGE . . . . . . . . . . . . . . . . . . . . . . . . . . . . 52
SHOOTING AND RECORDING
SETTING THE SHOOTING MODE . . . . . . . . . . . . . . . . . . . . . . . . . . . . . . . . . . . . . . . . . . . . 54
SETTING THE RESOLUTION. . . . . . . . . . . . . . . . . . . . . . . . . . . . . . . . . . . . . . . . . . . . . . . . 55
SETTING THE COMPRESSION RATIO . . . . . . . . . . . . . . . . . . . . . . . . . . . . . . . . . . . . . . . . 57
CAPTURING IMAGES. . . . . . . . . . . . . . . . . . . . . . . . . . . . . . . . . . . . . . . . . . . . . . . . . . . . . . 59
SEQUENTIAL SHOT . . . . . . . . . . . . . . . . . . . . . . . . . . . . . . . . . . . . . . . . . . . . . . . . . . . . . . . 63
VIDEO CLIP . . . . . . . . . . . . . . . . . . . . . . . . . . . . . . . . . . . . . . . . . . . . . . . . . . . . . . . . . . . . . 69
USING THE AUTOFOCUS . . . . . . . . . . . . . . . . . . . . . . . . . . . . . . . . . . . . . . . . . . . . . . . . . . 71
USING THE VARIOUS SHOOTING FUNCTIONS . . . . . . . . . . . . . . . . . . . . . . . . . . . . . . . . 72
MONOCHROME PHOTOGRAPHY. . . . . . . . . . . . . . . . . . . . . . . . . . . . . . . . . . . . . . . . . . . . 77
ADDING A VOICE MEMO. . . . . . . . . . . . . . . . . . . . . . . . . . . . . . . . . . . . . . . . . . . . . . . . . . . 78
PERFORMING AN AUDIO RECORDING . . . . . . . . . . . . . . . . . . . . . . . . . . . . . . . . . . . . . . . 79
EXPOSURE CORRECTION . . . . . . . . . . . . . . . . . . . . . . . . . . . . . . . . . . . . . . . . . . . . . . . . . 81
SETTING THE EXPOSURE CONTROL . . . . . . . . . . . . . . . . . . . . . . . . . . . . . . . . . . . . . . . . 82
SETTING QUICK SHOT (STILL IMAGE SHOOTING ONLY) . . . . . . . . . . . . . . . . . . . . . . . . 84
SETTING THE ISO SENSITIVITY . . . . . . . . . . . . . . . . . . . . . . . . . . . . . . . . . . . . . . . . . . . . . 85
SETTING THE WHITE BALANCE. . . . . . . . . . . . . . . . . . . . . . . . . . . . . . . . . . . . . . . . . . . . . 86
FLICKER REDUCTION SETTING (VIDEO CLIP SHOOTING ONLY) . . . . . . . . . . . . . . . . . 87
SETTING THE ZOOM . . . . . . . . . . . . . . . . . . . . . . . . . . . . . . . . . . . . . . . . . . . . . . . . . . . . . . 88
SETTING THE NOISE REDUCTION . . . . . . . . . . . . . . . . . . . . . . . . . . . . . . . . . . . . . . . . . . 90
SETTING THE LIGHT MEASURING METHOD . . . . . . . . . . . . . . . . . . . . . . . . . . . . . . . . . . 91
SETTING THE FOCUS METHOD. . . . . . . . . . . . . . . . . . . . . . . . . . . . . . . . . . . . . . . . . . . . . 92
SCENE SELECT FUNCTION . . . . . . . . . . . . . . . . . . . . . . . . . . . . . . . . . . . . . . . . . . . . . . . . 93
1
English
Page 7

PLAYBACK DATA
SETTING THE PLAYBACK MODE . . . . . . . . . . . . . . . . . . . . . . . . . . . . . . . . . . . . . . . . . . . . 96
PLAYING BACK STILL IMAGES. . . . . . . . . . . . . . . . . . . . . . . . . . . . . . . . . . . . . . . . . . . . . . 98
PLAYING BACK SEQUENTIAL SHOTS . . . . . . . . . . . . . . . . . . . . . . . . . . . . . . . . . . . . . . . 102
PLAYING BACK VIDEO CLIPS. . . . . . . . . . . . . . . . . . . . . . . . . . . . . . . . . . . . . . . . . . . . . . 103
ENLARGING (ZOOMING IN) THE IMAGE . . . . . . . . . . . . . . . . . . . . . . . . . . . . . . . . . . . . . 105
PLAYING BACK IMAGES ON A TV SET . . . . . . . . . . . . . . . . . . . . . . . . . . . . . . . . . . . . . . 106
LISTENING TO AUDIO RECORDINGS . . . . . . . . . . . . . . . . . . . . . . . . . . . . . . . . . . . . . . . 107
OTHER FUNCTIONS
ADDING A VOICE MEMO (ADD AUDIO FUNCTION) . . . . . . . . . . . . . . . . . . . . . . . . . . . . 109
ENTERING TEXT . . . . . . . . . . . . . . . . . . . . . . . . . . . . . . . . . . . . . . . . . . . . . . . . . . . . . . . . 111
RESIZING IMAGES. . . . . . . . . . . . . . . . . . . . . . . . . . . . . . . . . . . . . . . . . . . . . . . . . . . . . . . 114
IMAGE PROTECT MODE (PREVENTING ACCIDENTAL ERASURE). . . . . . . . . . . . . . . . 115
ERASING DATA . . . . . . . . . . . . . . . . . . . . . . . . . . . . . . . . . . . . . . . . . . . . . . . . . . . . . . . . . 116
COPYING IMAGES . . . . . . . . . . . . . . . . . . . . . . . . . . . . . . . . . . . . . . . . . . . . . . . . . . . . . . . 118
AUTO ROTATE PLAYBACK SETTING. . . . . . . . . . . . . . . . . . . . . . . . . . . . . . . . . . . . . . . . 119
REQUESTING PRINTING. . . . . . . . . . . . . . . . . . . . . . . . . . . . . . . . . . . . . . . . . . . . . . . . . . 120
REFORMATTING THE CARD. . . . . . . . . . . . . . . . . . . . . . . . . . . . . . . . . . . . . . . . . . . . . . . 124
SETTING THE OPERATIONAL SOUNDS (BEEPS). . . . . . . . . . . . . . . . . . . . . . . . . . . . . . 125
DISCHARGING THE BATTERIES . . . . . . . . . . . . . . . . . . . . . . . . . . . . . . . . . . . . . . . . . . . 126
CHANGING THE DISPLAY LANGUAGE . . . . . . . . . . . . . . . . . . . . . . . . . . . . . . . . . . . . . . 127
SETTING THE TV SYSTEM . . . . . . . . . . . . . . . . . . . . . . . . . . . . . . . . . . . . . . . . . . . . . . . . 128
USING THE CAMERA WITH A COMPUTER . . . . . . . . . . . . . . . . . . . . . . . . . . . . . . . . . . . 129
APPENDICES
TROUBLESHOOTING. . . . . . . . . . . . . . . . . . . . . . . . . . . . . . . . . . . . . . . . . . . . . . . . . . . . . 130
SPECIFICATIONS. . . . . . . . . . . . . . . . . . . . . . . . . . . . . . . . . . . . . . . . . . . . . . . . . . . . . . . . 134
English
2
Page 8

USING YOUR DIGITAL CAMERA SAFELY AND
CORRECTLY
CONCERNING THE DIGITAL CAMERA
WARNING
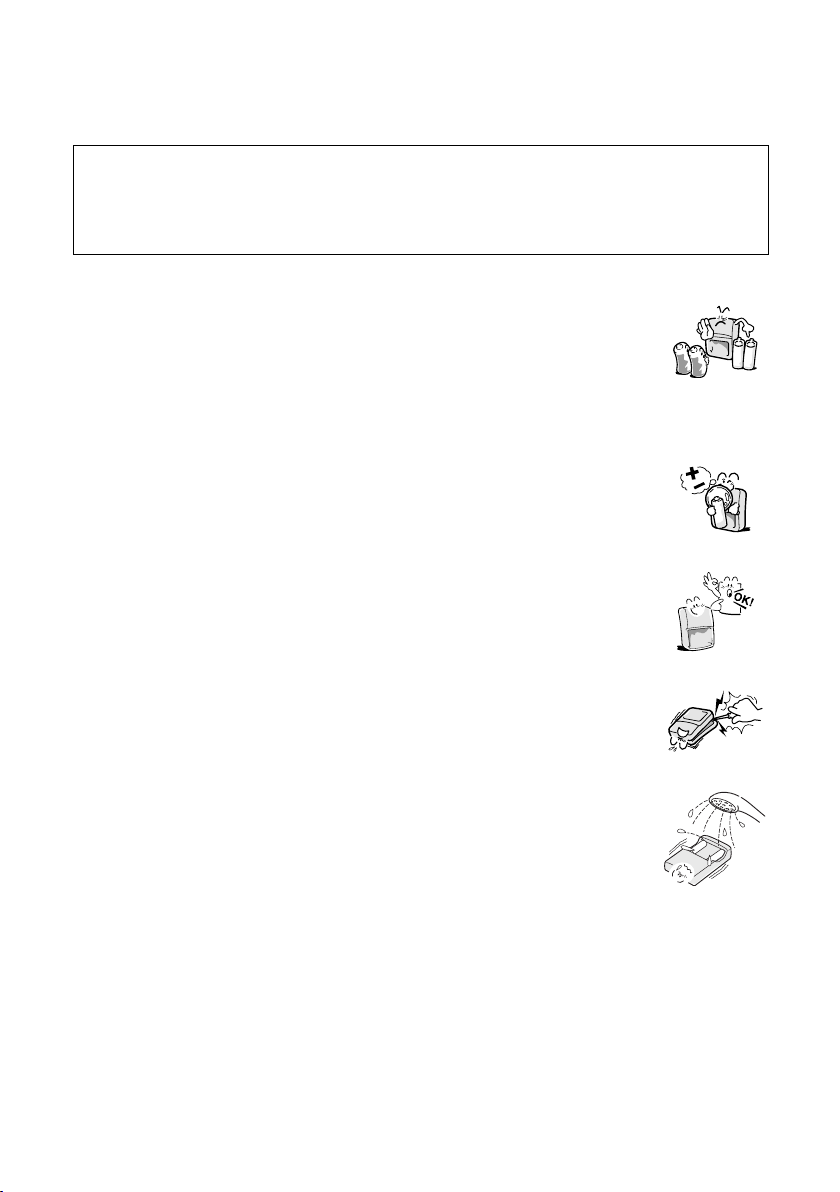
■ If the digital camera makes a strange noise, emits a strange odor, or if
smoke comes out from it, immediately turn off the power and remove
the batteries
œ If the digital camera is used under these conditions, it may cause a fire
or electric shock. Immediately turn off the digital camera, remove the
batteries, and wait to make sure no more smoke comes from the digital
camera. Then take it to the dealer for service. Do not try to repair or
open the digital camera yourself.
■ Do not modify or open the cabinet
œ High voltage circuits are inside, and there is a high risk of fire or electric
shock if they are touched. Any internal check, setting, or repair should
be performed by the dealer.
■ Do not use while driving
œ Do not capture images, play back images, or watch the LCD monitor
while driving a vehicle. Doing so may cause an accident.
œ Be careful where you put down the digital camera inside an automobile.
During sudden stops or turns it may fall behind the brake pedal and
prevent braking.
œ When using the digital camera while walking, be very careful of your
surroundings and especially the traffic to avoid accidents.
■ Be aware of your surroundings when using the digital camera
œ Pay close attention to your surroundings when using the digital camera.
Failure to do so may lead to an accident or injury.
œ Do not use the digital camera inside an airplane or elsewhere where its
use may be restricted.
■ Do not get the digital camera wet
œ This digital camera is not water-resistant. Do not allow it to get wet for it
may cause a fire or electric shock.
œ Do not use the digital camera in a bathroom.
œ If the digital camera gets wet, immediately turn it off and remove the
batteries. Then take it to the dealer for repair. Using the digital camera
after it has been become wet may cause a fire, electric shock, or other
accident.
3
English
Page 9
WARNING
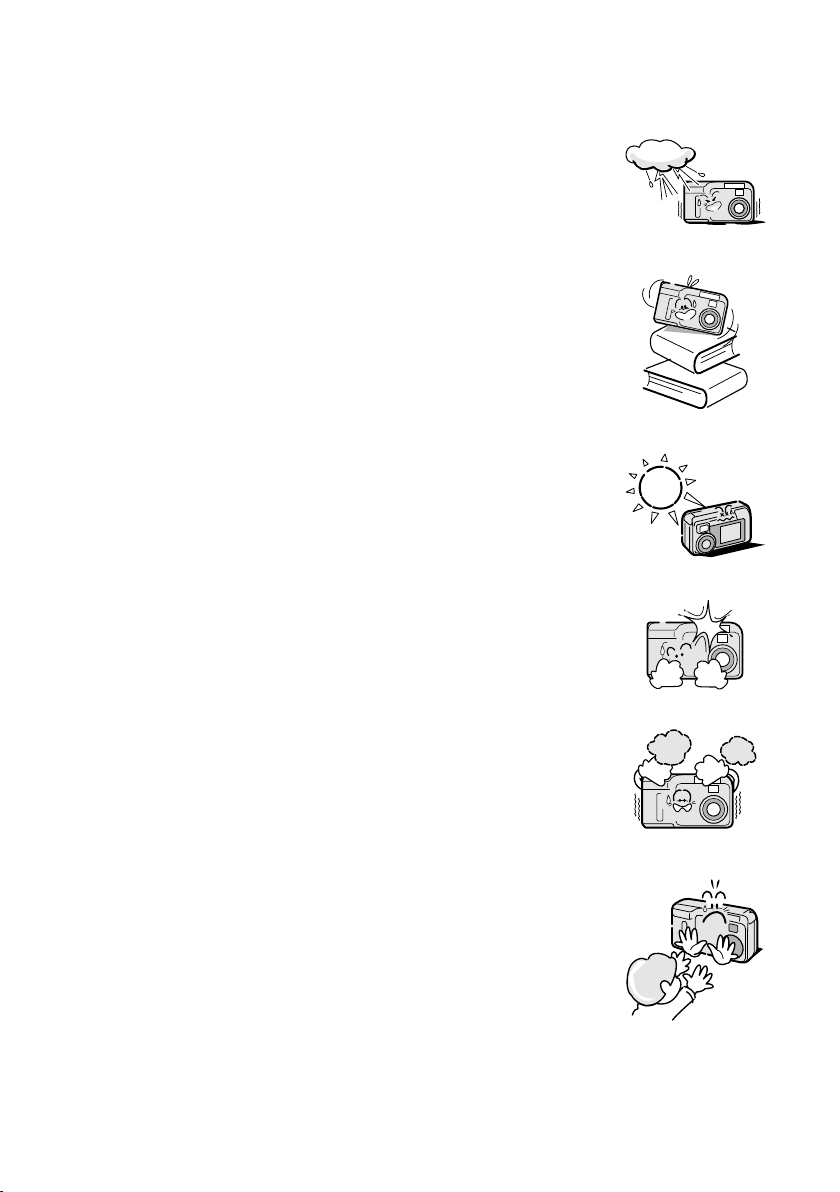
■ Do not use during a storm
œ To avoid the risk of being struck by lightning, do not use the digital
camera during a thunderstorm. In particular, if used in an open field,
you have an increased chance of being struck by lightning. Quickly
seek refuge in a place that will protect you from lightning.
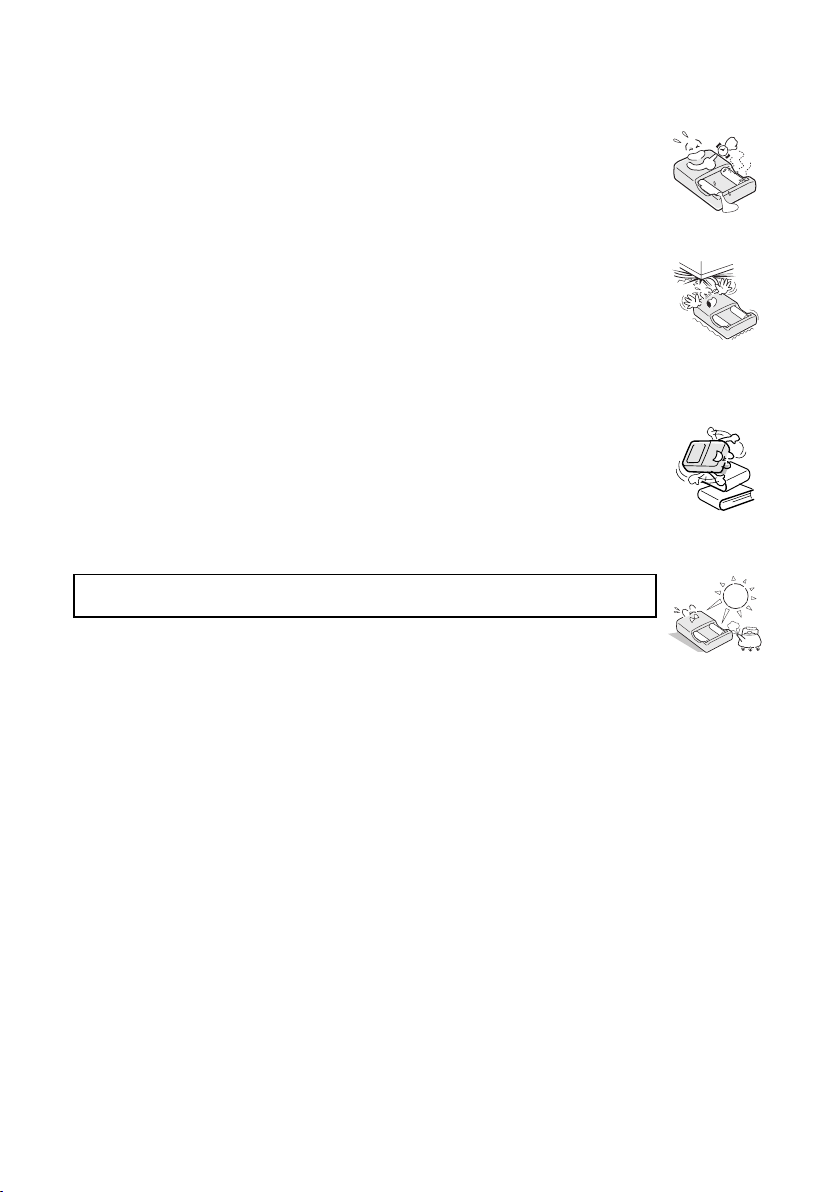
■ Do not place on an unstable surface
œ The digital camera may fall, resulting in damage to the digital camera or
injury.
œ If the digital camera has fallen and its body is damaged, turn off the
digital camera, remove the batteries, and take it to the dealer for repair.
Using the digital camera after its body has been damaged may cause a
fire or electric shock.
■ Do not look through the digital camera into the sun
œ Do not look through the digital camera at the sun or any other strong
source of light. Doing so may seriously injure your eyes.
■ Do not use the flash close to a person’s face
œ To prevent possible eye injury, do not use the flash near a person’s
face (especially young children or babies). If the flash is used close to a
person’s opened eyes, there is a risk that it may damage that person’s
eyesight.
■ Do not use where there is risk of explosion
œ Do not use the digital camera in a location where there is explosive gas,
or any other flammable material in the air. Doing so may cause a fire or
an explosion.
■ Keep the digital camera out of the reach of children
œ The following may happen if children play with the digital camera:
œ
They may wrap the strap around their neck and suffocate.
œ
They may swallow the batteries or other small parts. In such a case,
consult a physician immediately.
œ
They may damage their eyesight if the flash goes off too close to their
eyes.
œ
They may get hurt by the digital camera.
English
4
Page 10

WARNING
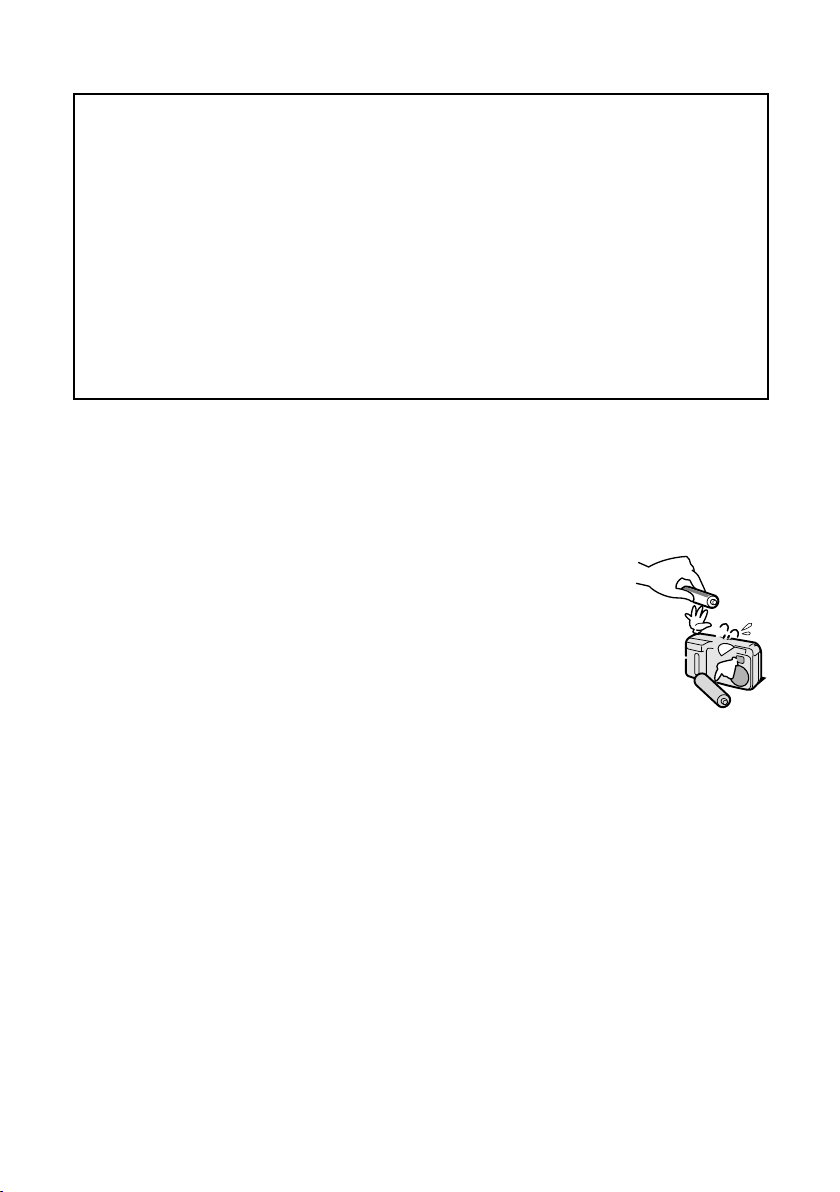
■ Concerning the Batteries
Concerning the supplied nickel metal hydride batteries
œ Follow all the warnings indicated below to prevent the batteries from leaking, overheating,
exploding, catching fire, or becoming damaged.
œ
Use only the supplied battery charger for
recharging.
œ
Do not install with the polarities ((+) and
(–)) inverted.
œ
Do not heat the batteries or throw them in a
fire.
œ
Do not allow metal objects to touch the
terminals. Do not carry loose with
necklaces, hairpins, etc.
œ
Do not transform, open, or modify.
œ
Do not put in water or any liquid, or get the
terminals wet.
œ
Always stop the recharging after the
prescribed recharge time, even if the
batteries are not fully charged.
œ Operating and storage conditions
œ Temperature 0 to 40°C (charged)
0 to 50°C (discharged)
–20 to 30°C (storage)
œ
Do not remove or puncture the external
wrapping.
œ
Do not use if there is leaking, swelling,
elevated temperature, discoloration, or any
other abnormal condition.
œ
Keep out of the reach of children.
œ
Do not drop, hit, or submit the batteries to
strong shocks.
œ
Do not use recharged batteries together
with discharged batteries.
œ
Recharge and use two batteries at a time.
œ
Always recharge the batteries before using
them for the first time, or when using them
after they have been kept in storage for a
long time.
œ Humidity 45 to 85%
5
English
Page 11
General precautions
œ Use the nickel metal hydride batteries supplied with the digital camera. Manganese batteries
cannot be used, as they have a short battery life and may overheat, causing damage to the
digital camera.
œ Do not use a recharged battery together with a discharged battery. Do not use nickel metal
hydride batteries together with Ni-Cd batteries, or batteries of different types or different
brands at the same time.
œ Make sure not to invert the polarity ((+) and (–)) when installing the batteries. Install the
batteries as described by the indicated polarity.
œ Use of different types of batteries at the same time may generate heat or cause the batteries
to leak, resulting in fire, injury or burns, or damage to the digital camera and any other
nearby object.
œ Use only specified batteries. Use of batteries without protective casings or other inferior
products may cause a fire, injury, or burns.
œ The batteries may be warm immediately after the digital camera is used. If removing the
batteries, turn off the digital camera and allow the batteries to cool down before removing them.
œ If a battery is leaking and the electrolyte gets on your skin or clothing, immediately rinse with
clean water. If the electrolyte gets into your eyes, you risk losing your eyesight. Immediately
rinse your eyes with clean, running water, and seek medical attention right away.
œ Do not drop or hit the batteries, or submit them to strong shocks.
œ If the digital camera is not going to be used for a long period of time, remove
the batteries and store them in a cool place. (When the batteries are
removed for a long period, the time and date settings will be cleared.)
œ When disposing of the batteries, make sure to follow all applicable
regulations.
œ If used in temperatures below 10°C, the service life of the batteries will be
shorter than normal.
œ Always read the instruction manuals that may come with the batteries you
purchase before use.
English
6
Page 12
Concerning the digital camera
CAUTION
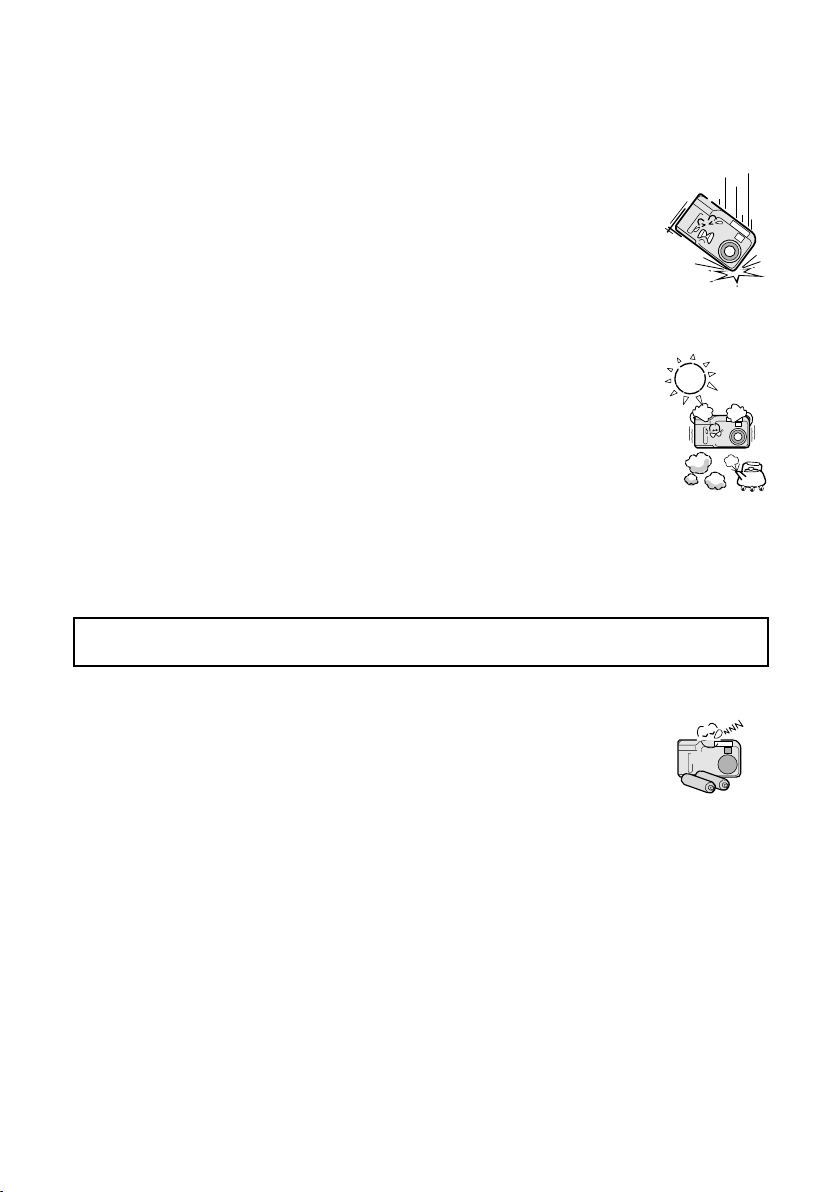
■ Cautions when carrying the digital camera
œ Do not walk around holding the digital camera by the hand-strap. It may hit
other objects and get damaged. When walking around, hold the digital camera
in your hand or place it in a pocket.
œ Be careful not to drop the digital camera or subject it to strong shocks.
œ Make sure direct sunlight does not hit the digital camera lens, as that may
damage the internal parts. When not using the digital camera, be sure to always
turn it off and keep the lens cover closed.
■ Cautions during use and storage
œ This digital camera is a precision instrument. When using or storing the digital
camera, make sure to avoid the following locations to avoid damage.
œ
Places in direct sunlight
œ
Places where humidity and temperature are high
œ
Places that may get wet
œ
Places close to an air conditioner or heater
œ
Inside a car
œ
Places where there is dust and dirt
œ
Places where there is a fire burning
œ
Places where volatile products are stored
œ
Places subject to vibrations
œ Temperature 0 to 40°C (operation) œ Humidity 30 to 90% (operation, no condensation)
–20 to 60°C (storage) 10 to 90% (storage, no condensation)
■ Cautions if the digital camera is not going to be used for a long period
œ For safety, remove the batteries. The batteries may generate heat or leak, and
that may start a fire, cause injuries or burns, and damage the digital camera
and any other objects placed nearby. (When the batteries are removed for a
long period, the time and date settings will be cleared.)
7
English
Page 13
Concerning the supplied battery charger
DANGER
Warning! Do not attempt to recharge non-rechargeable batteries.
For indoor use only.
The appliance is not intended for use by young children or infirm persons without
supervision.
Young children should be supervised to ensure that they do not play with the appliance.
■ Use with nickel metal hydride or Ni-Cd batteries
œ Do not use the supplied battery charger to recharge batteries other than the
rechargeable nickel metal hydride batteries (HR-3USV, HR-3US or HR-4US,
supplied with the digital camera or sold separately) or Ni-Cd batteries (N-3US,
N-3U or N-4U, sold separately). Recharging a dry-cell battery or other type of
rechargeable battery may cause excess heat, combustion, or leakage, and
cause a fire, injuries, burns, or damage to nearby objects.
■ Do not invert the polarity ((+) and (–)) of the batteries
œ Place the batteries in the battery charger with the (+) and (–) terminals oriented
as indicated on the charger. If the batteries are placed with the wrong
orientation, they may leak, overheat, explode, or be damaged.
■ Use a 100 to 240 V AC power supply
œ If used with a power supply other than that specified, it may cause a fire or
electric shock.
■ Do not disassemble or modify the battery charger
œ It is dangerous to touch the inside of the battery charger. Doing so may cause a
fire or electric shock.
œ Do not use the battery charger as a direct current generator.
■ Do not get the battery charger wet
œ Make sure the battery charger does not get wet, for it may cause a fire or
electric shock.
œ Do not use the battery charger in a bathroom.
œ If the battery charger gets wet, immediately unplug it from the power outlet and
remove the batteries. Then contact the place of purchase. If used while wet, it
may cause a fire, electric shock, or an accident.
English
8
Page 14

WARNING
■ Cautions when plugging in the battery charger
œ Securely plug the power cord all the way in the power outlet when using the
battery charger. If the battery charger is used with the power cord not fully
plugged in, it may generate heat and cause a fire.
œ If the power cord is damaged, or cannot be correctly plugged into the power
outlet, do not use the battery charger. Using the battery charger in this condition
may cause a fire or electric shock.
œ Do not allow dust, etc., to build up on the power cord or power outlet. A build-up
of dust may cause a short circuit or generate heat and cause a fire.
■ Do not pull on the power cord to unplug it
œ When unplugging the power cord, be sure to hold the power plug and slowly
pull it out of the power outlet. Pulling the cord portion may damage the power
cord and cause a fire or electric shock.
■ Cautions concerning the power cord
œ Do not leave the power cord plugged into the power outlet while the other end
is not plugged into the battery charger. The loose end can cause electrocution if
touched with wet hands or if handled by children.
œ Only use the power cord supplied with the battery charger. If a different power
cord is used, it may be rated for a different current load, and that may cause a
fire.
œ The supplied power cord is for exclusive use with the supplied battery charger.
Do not use it with other devices for it may cause a fire or electric shock.
■ Keep the battery charger out of the reach of children
œ Children may place the batteries or other small components in their mouth or
perform some other such unforeseeable action. If swallowed, consult a
physician immediately.
■ If smoke or a strange odor is emitted, or if strange noises are heard,
immediately unplug the power cord from the power outlet
œ If the battery charger is used under these conditions, it may cause a fire or
electric shock.
œ If strange conditions such as these occur, immediately unplug the battery
charger, remove the batteries, and wait to make sure no more smoke is
emitted. Then contact the place of purchase. Do not try to repair or open the
battery charger yourself.
■ Do not handle with wet hands
œ Handling the battery charger with wet hands may cause an electric shock.
■ Do not use during a storm
œ Do not touch the battery charger or power cord while it is plugged into a power
outlet during a thunderstorm. Doing so may cause an electric shock.
9
English
Page 15
CAUTION
■ Unplug the power cord from the power outlet when finished
œ If the battery charger is left plugged into the power outlet for a long period of
time, there is a risk of fire.
■ Do not damage the power cord
œ Do not place heavy objects on the power cord. Do not place the power cord
near a heat source. Do not excessively bend the power cord, modify it, or
secure it with staples. Doing so may damage the power cord and cause a fire or
electric shock.
œ If the power cord is damaged, or if it does not plug properly into the battery
charger or wall outlet, contact the place of purchase.
■ Do not place on an unstable surface
œ It may fall down, causing injury or damage.
œ If the battery falls down and the charger body is damaged, remove the batteries
and contact the place of purchase. If used while damaged, it may cause a fire,
electric shock, or other damages.
■ Operating and storage conditions
œ Do not use close to a heat source (close to a stove or heater) or exposed to direct sunlight.
œ Temperature 0 to 40°C (charging)
–20 to 60°C (storage)
œ Humidity 45 to 85% (charging and
storage)
English
10
Page 16

Concerning the accessories
CAUTION
■ Cautions concerning the use of the AC adapter
œ Use only the separately sold AC adapter (model VAR-G4EX for the VPC-AZ1EX, model
VAR-G4E for the VPC-AZ1E and model VAR-G4U for the VPC-AZ1) with your digital camera.
Do not use an AC adapter other than the one indicated here, designed for specific use with
your digital camera.
œ If an AC adapter other than the specified one is used, it may damage the digital camera and
cause a fire or electric shock.
œ Normally when using an AC adapter, remove the batteries. Otherwise batteries may cause
excess heat, leakage, injuries or damage to nearby objects.
œ For complete information on how to use the AC adapter, refer to the instructions accompanying
the AC adapter.
■ Cautions concerning the CompactFlash and Microdrive
œ Immediately after use, the CompactFlash and Microdrive will be very hot. Before removing the
CompactFlash or Microdrive, turn off the digital camera and wait for the temperature to cool
down.
œ Keep out of the reach of children. Young children may put the media in their mouth and choke
or cause some other unexpected injury or accident.
For correct use of your digital camera
■ Cautions before capturing important images
œ Before capturing important images, make sure that the digital camera is operating properly
and in condition to capture the image properly.
œ Sanyo Electric shall not be held responsible for any losses that result from images that could
not be recorded, are erased, destroyed, or damaged in any way due to a problem with the
digital camera, any of its accessories, or its software.
■ Cautions concerning copyrights
œ The images you capture with your digital camera are for your own private use; any other use
may violate the rights of copyrights owners.
■ Cautions when cleaning the digital camera
œ Do not use benzene or thinner products to clean the digital camera. Doing so may cause
deformation, discoloration, or paint peeling. When using a chemically treated cloth, carefully
read its instructions and warnings.
œ Do not spray insecticides or volatile sprays on the digital camera. Do not leave rubber or vinyl
objects against the digital camera for a long period. They may cause deformation, discoloration,
or paint peeling.
Cleaning procedure
1 Turn off the digital camera and remove the batteries.
2 Remove the dirt with a soft cloth.
3 If the digital camera is extremely dirty, wipe with a soft cloth moistened with a mild
detergent diluted with water and wrung dry.
11
English
Page 17

■ Cautions concerning the nickel metal hydride batteries
œ Periodically clean with a dry cloth the terminals of the nickel metal hydride batteries ((+) and (–))
and the terminals located in the battery compartment of the digital camera.
œ Do not touch the battery terminals or the terminals in the battery compartment of the digital
camera with your bare hands. Doing so will allow contaminants from your hands to adhere to
the terminals and oxidize, increasing the contact resistance. If the contact resistance increases,
the usable life of the batteries will diminish.
■ Cautions when cleaning the lens
œ If the lens gets dirty, use a commercially available air blower or a cleaning cloth for
photographic equipment to clean it.
■ When not using the digital camera for a long period
œ Remove the batteries. However, when the batteries are removed for a long time, the digital
camera functions may begin to not work properly. Periodically reinstall the batteries and check
the digital camera functions.
œ If the batteries are left in the digital camera, a small amount of power is still used even if the
digital camera is turned off. If the nickel metal hydride batteries are left in the digital camera for
a long period, they may become completely discharged and lose their ability to be recharged
again.
■ Cautions concerning condensation
œ Using the digital camera with condensation inside it may damage the digital camera.
Be careful of condensation under the following conditions
œ When moving the digital camera suddenly from a cold place to a warm place.
œ When the ambient temperature changes drastically, such as when a heater is turned on to
quickly heat the room.
œ When the digital camera is placed in the path of cool air from an air conditioner.
œ When the digital camera is placed in a location of high humidity.
If condensation seems likely to form
œ Place the digital camera in a plastic bag and seal it, and then wait until the digital camera has
reached the ambient temperature.
■ Cautions concerning undesired interference
œ The digital camera may create undesired interference if used close to a television or radio. To
avoid this type of interference, make sure the cores on the supplied AV cable and USB
interface cable are not removed.
Core Core
Dedicated AV cable Dedicated USB interface cable
English
12
Page 18

■ Cautions concerning magnetism
œ Do not place credit cards, bank cards, floppy disks, or other items that may be damaged by
magnetic fields near the speaker. Data may be lost or the magnetic strips on cards may be
damaged.
Speaker
■ Cautions concerning data storage
œ It is recommended that any important data be copied onto a separate media (such as a hard
disk, MO disk, or CD-R disk).
œ Stored data may be lost (or corrupted) in cases such as those listed below. Sanyo Electric will
not be held responsible for any damage or lost profits arising from the loss of data.
œ
If the CompactFlash or Microdrive card is used incorrectly.
œ
If the CompactFlash or Microdrive card is not inserted correctly into the digital camera.
œ
If the CompactFlash or Microdrive card is subjected to electrical or mechanical shocks or other
forces.
œ
If the CompactFlash or Microdrive card is removed from the digital camera or if the digital
camera is turned off during reading or writing operations.
œ
If the CompactFlash or Microdrive card has reached the end of its usable life.
■ Cautions when handling the CompactFlash or Microdrive
œ The CompactFlash and Microdrive cards are precision devices. Do not bend, drop, or subject
them to strong forces or shocks. Be especially careful with the Microdrive for it is easily
damaged by vibrations.
œ Avoid using or storing the CompactFlash and Microdrive cards in places with extremely high or
low temperatures, subject to direct sunlight, in a completely closed vehicle, near air conditioners
or heaters, or in humid or dusty locations.
œ Avoid using or storing the CompactFlash and Microdrive cards in locations where strong static
electrical charges or electrical noise can be easily generated.
œ Do not allow the edges of the CompactFlash and Microdrive cards to become contaminated
with foreign materials. Gently wipe away any contamination with a soft, dry cloth.
œ When not using the CompactFlash and Microdrive cards, put them back into their protective
covers to protect them from damage due to static electricity.
œ Do not carry the CompactFlash and Microdrive cards inside trouser pockets, as the cards may
become damaged when you sit down or make other movements that may apply forces.
œ Before using an unused card, be sure to format it using the digital camera (see page 124).
œ When buying separately sold or commercially available products, carefully read the instructions
and warnings that come with them.
13
English
Page 19
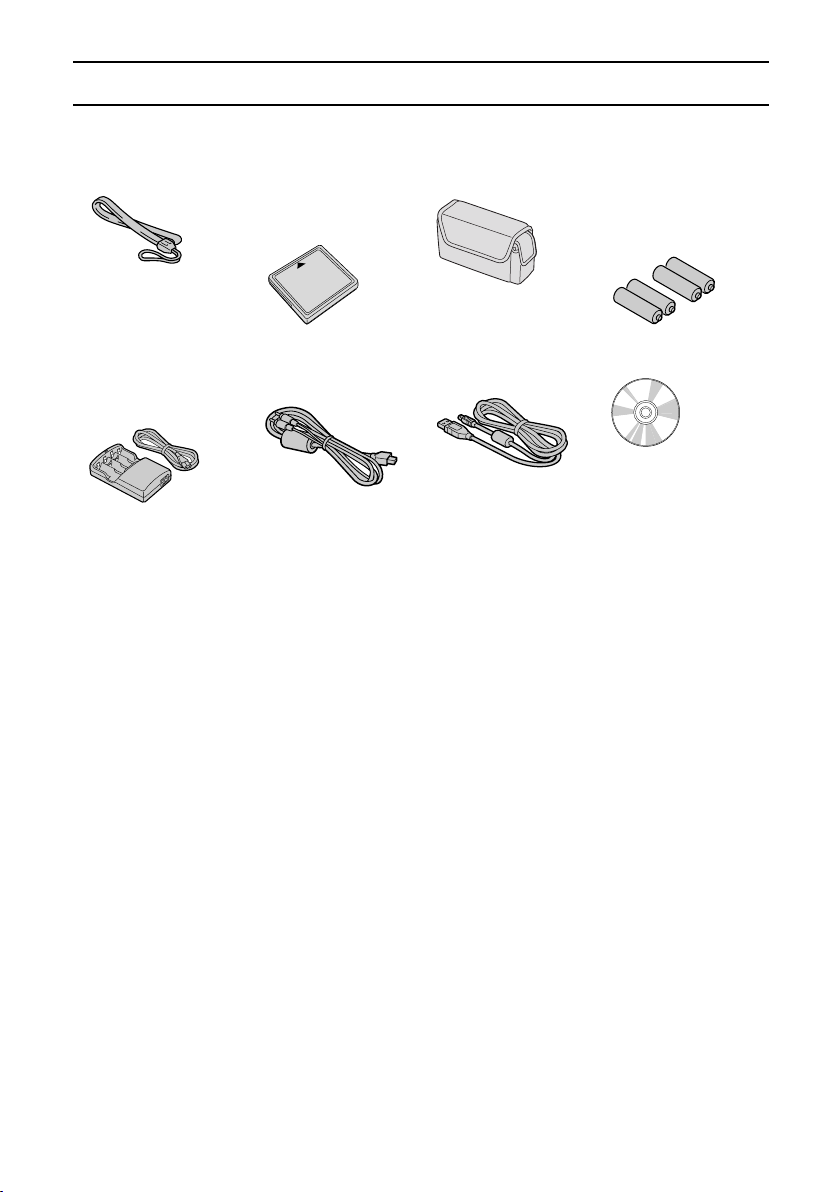
CHECKING THE INCLUDED ACCESSORIES
Open the box and check that all the accessories listed below are included. The page numbers
listed next to the part names are the page numbers where that part is explained in detail.
œ Hand-strap [page 15] œ CompactFlash
(16MB) and
protective case
œ Soft case [page 15] œ 4 AA nickel metal
hydride
rechargeable
batteries [page 23]
œ Nickel metal
hydride battery
charger and power
cord [page 23]
œ Dedicated AV cable:
1
[page 106]
œ Dedicated USB
interface cable: 1
[page 129]
œ Software: 1 CD-ROM
[page 129]
English
14
Page 20
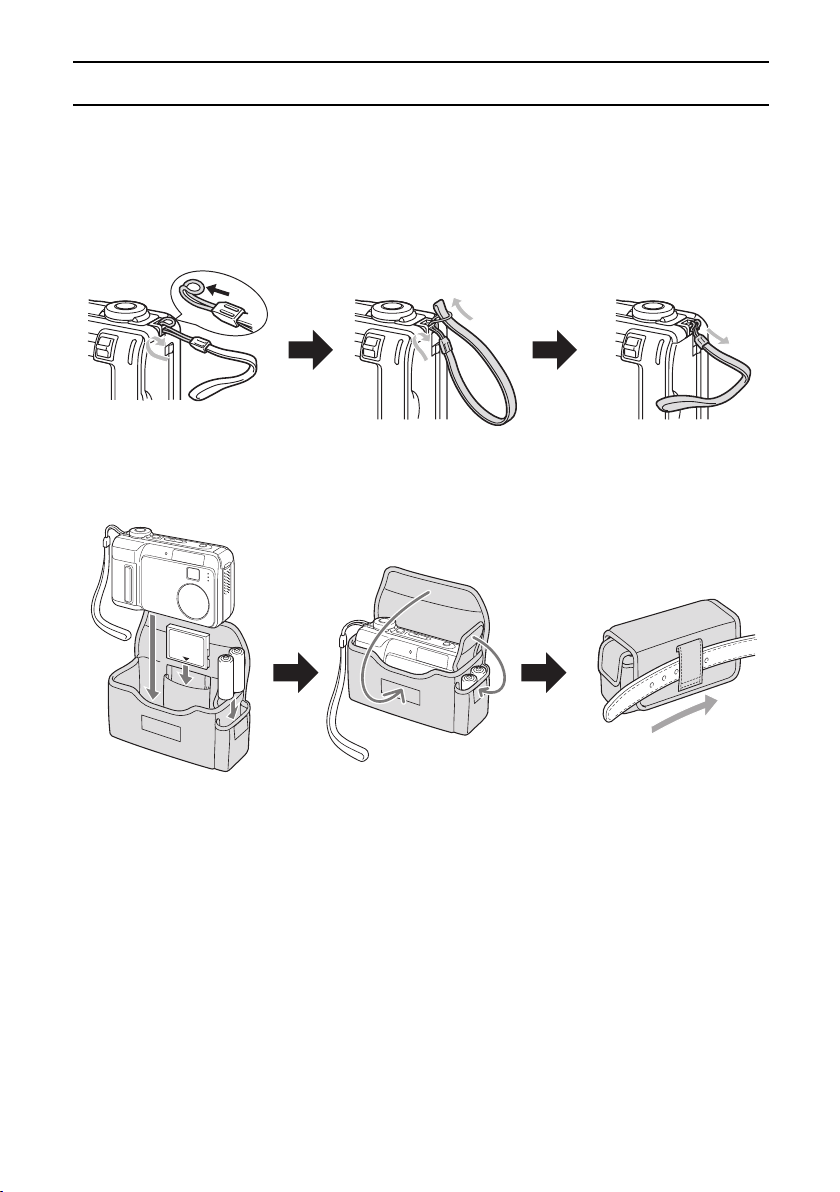
USING THE HAND-STRAP AND SOFT CASE
Attach the supplied hand-strap to the digital camera to aid in carrying. Also, when you are not
using the digital camera, put it in the soft case for protection.
Attaching the hand-strap
Bend the looped extremity of the strap and slip it through the strap holder on the digital camera.
Using the soft case
15
English
Page 21

Media cards that can be used with this digital
camera
This digital camera stores the captured images and recorded voice memos on the storage media
card inserted inside the digital camera. The number of images and amount of recording time that
can be stored on one card depends on the capacity of the card used and the recording conditions.
The types of card that can be inserted into and used with this digital camera are given below.
œ CompactFlash
œ Microdrive
There are special precautions that must be followed when using Microdrive cards. Before
using Microdrive cards, carefully read “Cautions when using the Microdrive” (see page 137).
The use of “card” in this manual
œ In this manual, CompactFlash and Microdrive cards that can be used in this digital camera are
referred to as “card”.
œ The cards in the illustrations in this manual are CompactFlash cards, but all installation,
removal, and formatting procedures are the same for both the CompactFlash and Microdrive
cards.
English
16
Page 22
QUICK START FOR CAPTURING IMAGES
Now that you have purchased a new digital camera, it is time to try and capture some images and
then view them with the LCD monitor. Although your digital camera is packed with many useful
and convenient functions, here is a simple explanation of how to capture and view images.
Afterward, carefully read the rest of this manual to get the most out of your digital camera.
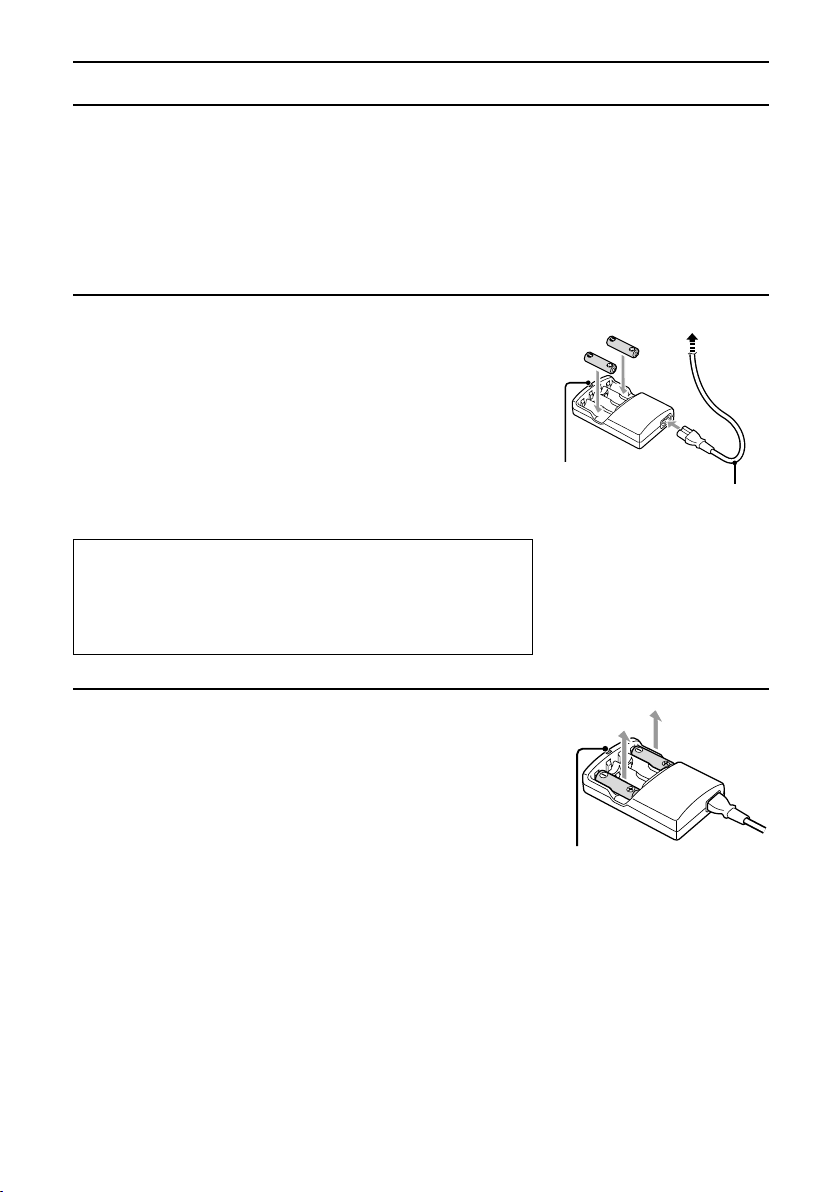
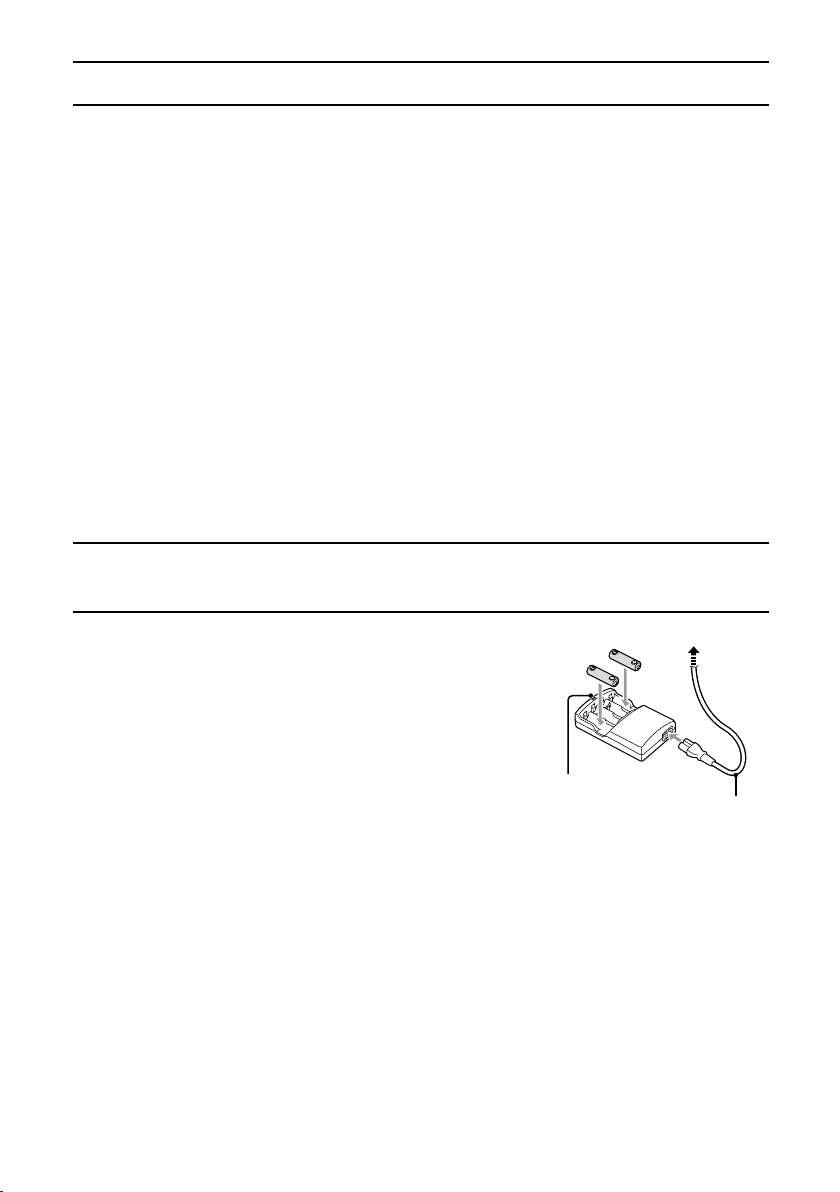
Recharging the batteries (see page 23)
Recharge the supplied batteries before use.
Insert the two supplied batteries in the outside sockets
1
and recharge them.
œ Make sure the batteries are inserted with the polarity
((+), (–)) as indicated on the battery charger.
œ During recharge, the recharge indicator on the battery
charger will light.
œ When the batteries are recharged, the indicator will go
off.
œ The recharge time for the supplied two nickel metal
hydride AA batteries (HR-3USV) is approx. 115 minutes.
Caution!
First recharge the supplied batteries. Do not recharge other
batteries with the supplied battery charger. To ensure safety,
read “Concerning the batteries” on page 5 and “Concerning
the supplied battery charger” on page 8.
Recharge
indicator
To power outlet
Supplied
power cord
17
English
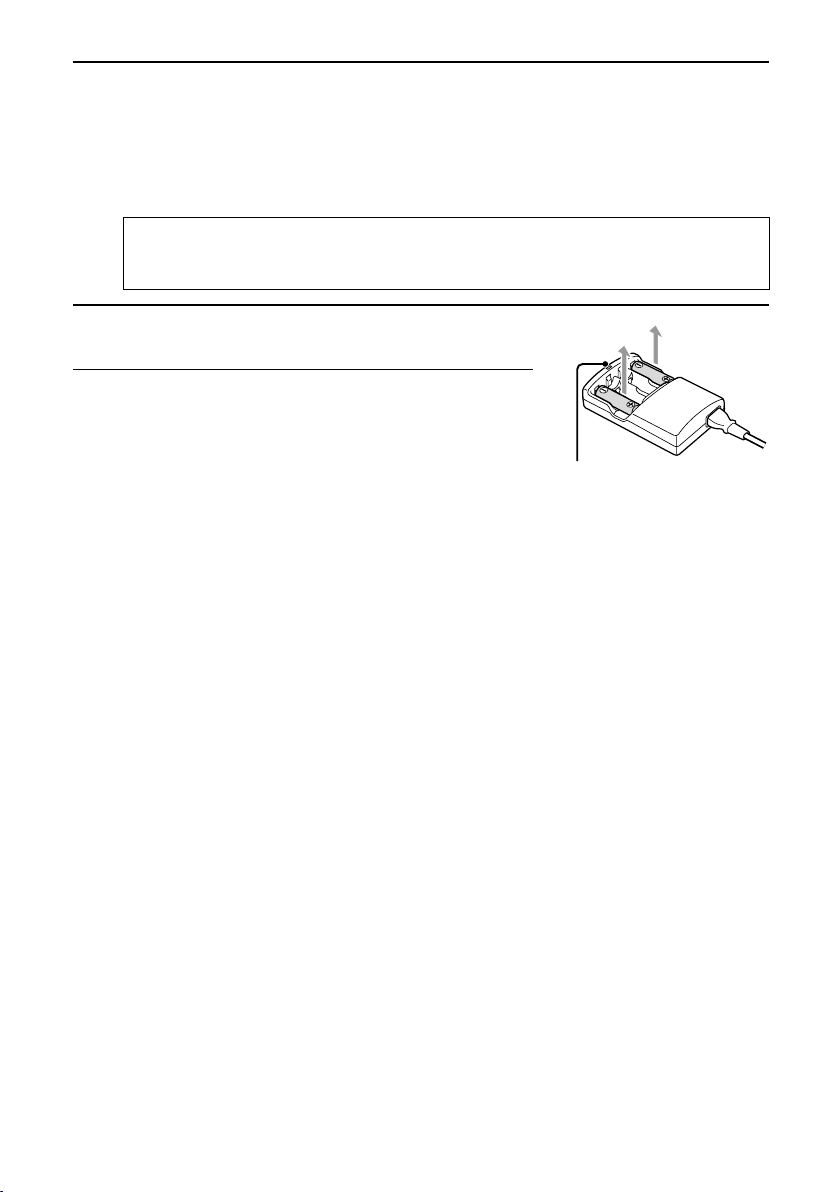
Remove the batteries from the battery charger.
2
œ When finished (the recharge indicator turns off), unplug
the power cord from the power outlet and remove the
batteries.
Recharge
indicator
Page 23
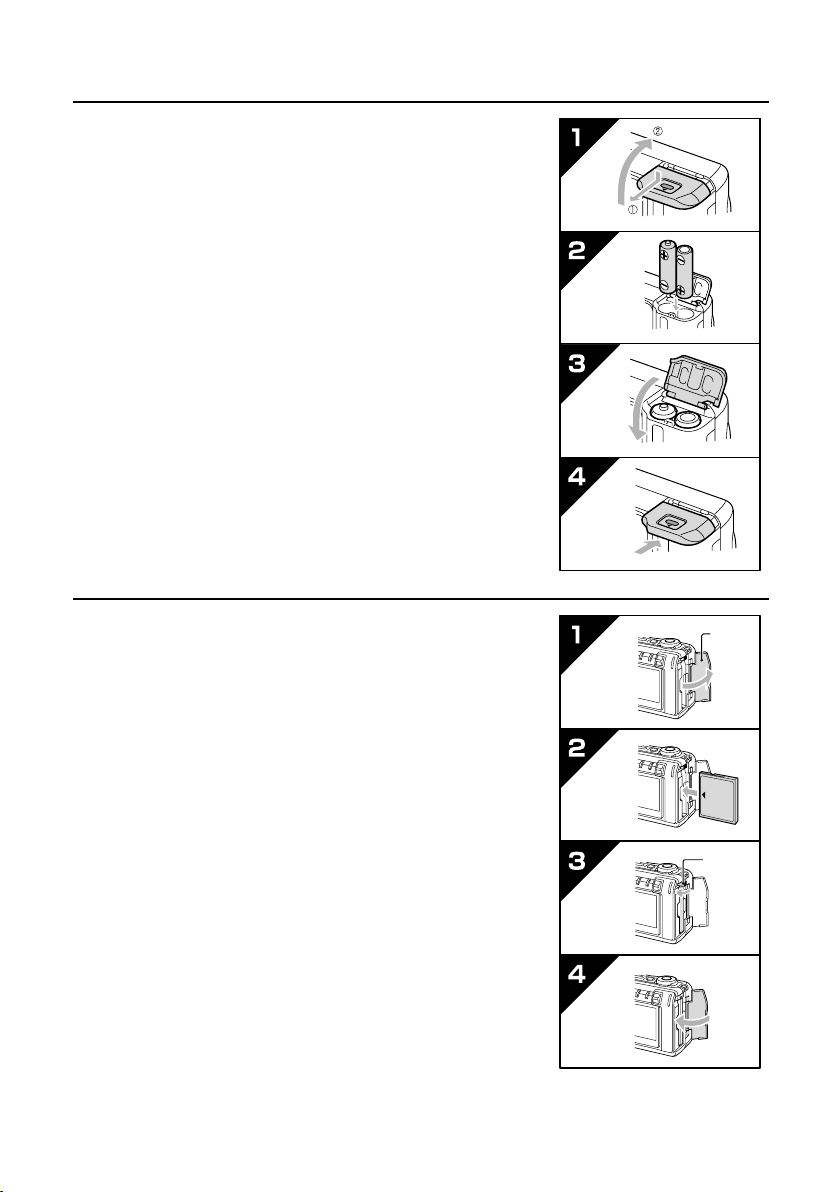
Installing the batteries and card (see pages 26, 27)
Insert the batteries.
3
œ Use the batteries recharged in step 1 above.
œ Make sure the polarity ((+) and (–)) of the batteries is as
indicated in the battery compartment.
1 Open battery compartment cover on the digital camera
bottom.
2 Insert the batteries.
3 Close the battery compartment cover.
4 Push the cover in the direction shown by the arrow until it
clicks.
Insert the card.
4
œ Make sure not to insert the card with it facing the wrong
direction.
1 Open the card slot cover.
2 Insert the card all the way.
3 Fold down the eject button.
4 Close the card slot cover.
œ After installing the card, be sure to first format it with the
digital camera (see page 124).
Card
slot
cover
Eject
button
English
18
Page 24
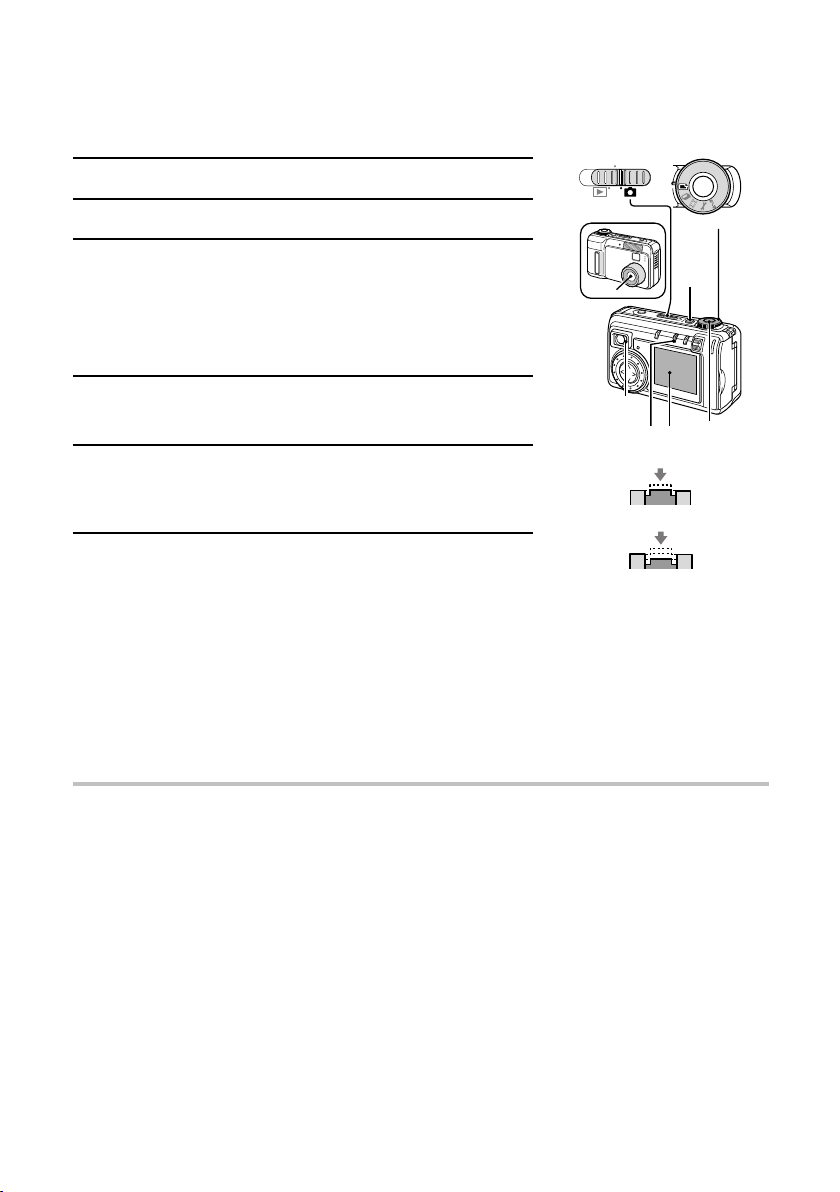
Capturing images (see page 60)
Now that preparation is completed, your digital camera is ready to capture images. Here we will
capture still images, but your digital camera can take sequential shots and even video clips.
MONITOR OFF
Set the main switch to Õ.
5
Turn the selector dial to v.
6
Press the power button.
7
œ The power turns on.
œ The lens extends.
œ When the stand-by indicator lights green, the camera is
ready to capture an image.
Main switch
Lens
Selector dial
Power
button
Point the camera lens at the subject.
8
œ Compose the desired image by looking at the LCD monitor.
Press the shutter release button halfway (focus-lock).
9
œ The autofocus locks on the subject and the image in the
LCD monitor appears clearly.
10
Continue to gently press the shutter release button all
the way.
œ The image is captured.
œ In the still image shooting mode, you can view the image captured on the LCD monitor by
holding the shutter release button down.
œ The stand-by indicator will flash red while the image is being written to the memory.
Another image can only be captured when the stand-by indicator lights green again.
œ In the still image shooting mode, the camera is ready for capturing the next image after
about 1 second.
HELP
What if the digital camera turns off by itself
œ The power save function activated (see page 30). To turn the power on, press the MODE
button once or press the shutter release button once.
Stand-by
indicator
LCD
MODE
monitor
button
Push halfway
Push completely
Shutter
release
button
19
English
Page 25

Viewing the image (see pages 96, 98)
Now let’s take a look at the images you’ve captured.
11
Set the main switch to Ô.
œ The image you captured shows up in the LCD monitor.
œ Press d or c on the arrow button to display the images
stored before and after the current image.
12
When finished, press the power button to turn it off.
œ Your digital camera turns off.
How was it? Did everything turn out fine?
Of course what you have performed here is just a fraction of the many functions your digital
camera is loaded with. But before you continue using your digital camera any further, be sure to
read this instruction manual carefully.
Arrow button
MONITOR OFF
Main switch
English
20
Page 26
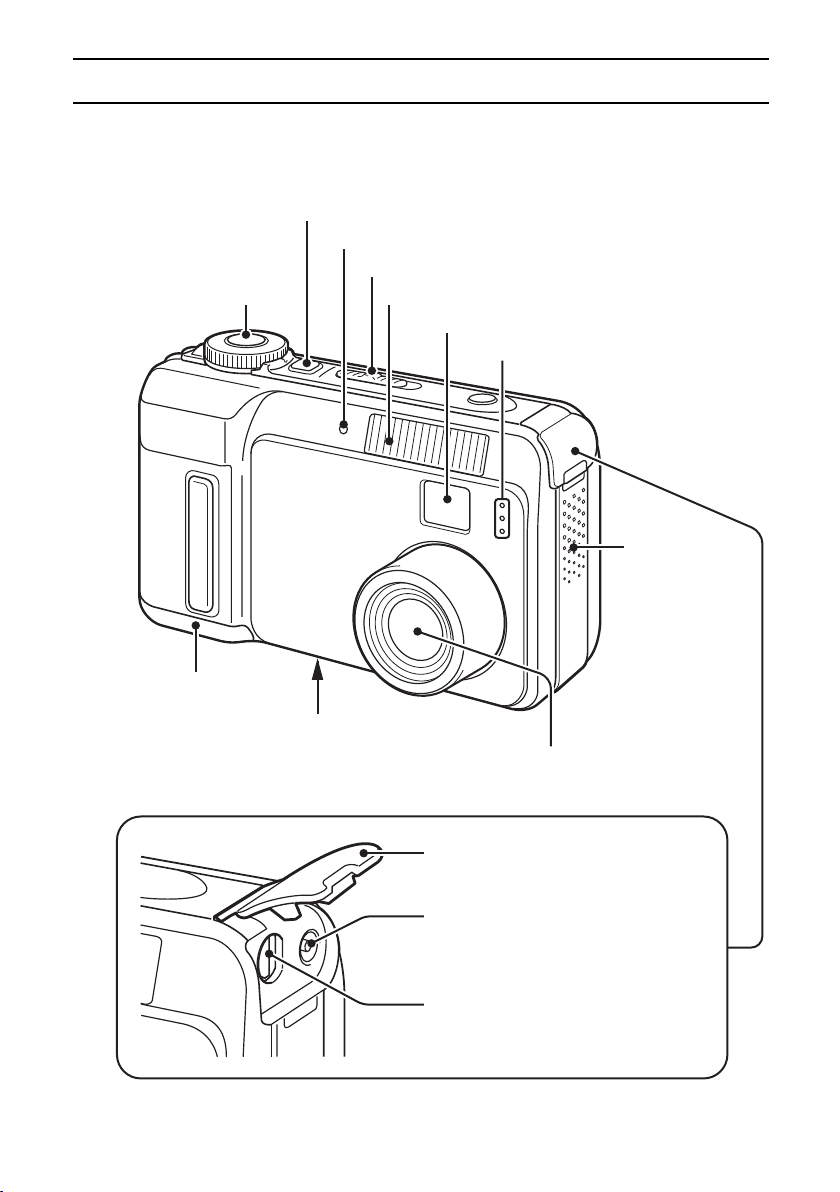
PARTS NAMES
The page numbers listed next to the part names are the page numbers where that part is
explained in detail.
Front
Shutter
release button
[pages 30, 60, 61]
Battery
compartment
cover [page 26]
Power button [pages 26 to 30]
Self-timer indicator [page 75]
Main switch
Flash [page 73]
Viewfinder [page 60]
Microphone [pages 78, 110]
Tripod stand hole
[page 75]
Speaker
œ For listening
to sound
recordings
Lens [pages 29, 30]
21
English
Terminal cover [pages 106, 129]
DC IN (external DC power input)
terminal
DIGITAL/AV terminal [pages 106, 129]
Used as both the USB connector and
AV output terminal.
Page 27
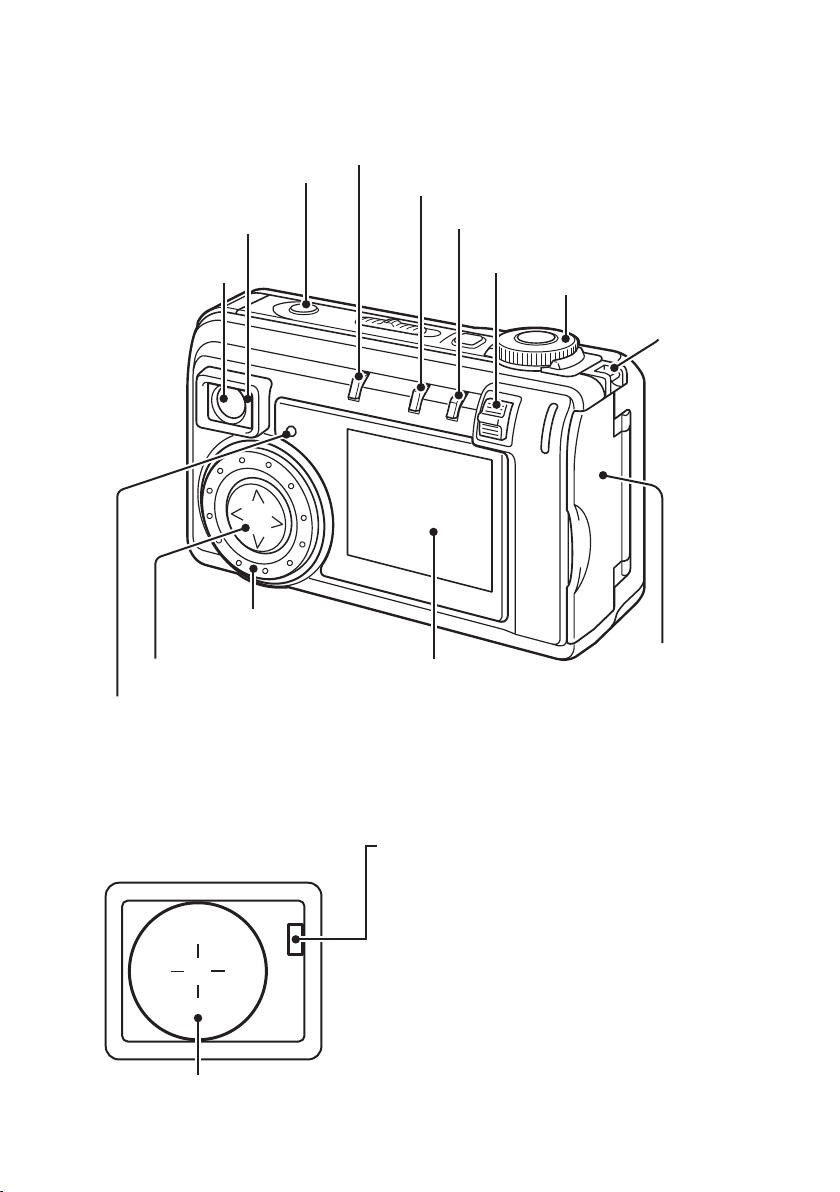
Rear
Stand-by indicator
[pages 29, 61, 74]
Viewfinder
[page 61]
Arrow button [page 45]
Accessing indicator [page 28]
Flash button
[page 73]
Jog dial
[pages 45, 98, 105]
MACRO [£/¿] button [page 72]
MODE button [page 32]
SET button
Zoom switch
[pages 72, 76, 101 to 103, 105]
Selector dial [page 31]
LCD monitor
[pages 33, 61, 98]
Hand-strap holder
[page 15]
Card slot cover
[pages 27, 28]
During use, the area around the LCD monitor may become warm. This is
*
normal and does not indicate a malfunction.
When viewing the LCD monitor, you may see some missing pixels (seen as
*
black and white dots). This is normal and does not indicate a malfunction.
Indications in the viewfinder
Autofocus mark [page 60]
Stand-by indicator (red/green) [pages 29, 60, 74]
Red flashing: When capturing an image,
Red steady: When the memory is full (image
Green flashing: When using the exposure
Green steady: Image and sound can be
recording sound, charging the
flash, storing an image or sound
recording (image or sound
cannot be recorded), or
recording using the self-timer
or sound cannot be recorded)
[page 130]
correction or digital zoom
functions (image and sound can
be recorded) [pages 76, 81]
recorded, or when connected to
a PC
English
22
Page 28
PREPARATION OF BATTERIES
Use the supplied (or sold separately) AA nickel metal hydride batteries to power the digital
camera. You can also use AA Ni-Cd batteries, but they will not last as long as the AA nickel metal
hydride rechargeable batteries. However, if you do not have access to these batteries, you may
use alkaline batteries and capture images. Also note that the duration of operation provided by the
alkaline batteries will be very short.
CAUTION
œ Manganese batteries cannot be used, as they have an extremely short battery life and may
overheat and damage the digital camera.
œ For your safety, read “Concerning the batteries” on page 5 and “Concerning the supplied
battery charger” on page 8 before handling the batteries.
Recharging nickel metal hydride batteries
Make sure to completely recharge the supplied nickel metal hydride batteries before use. Use only
the supplied battery charger to recharge the batteries. This battery charger can be used for both
nickel metal hydride batteries (AA HR-3USV [supplied with the camera] or HR-3US, AAA
HR-4US) and Ni-Cd batteries (AA N-3US or N-3U, AAA N-4U). Before using the batteries for the
first time or when the batteries remaining charge is low (see “REMAINING BATTERY CHARGE
INDICATION” on page 48), follow the steps below to recharge them.
Insert two batteries in the outside sockets of the battery charger.
1
œ Make sure the polarity ((+), (–)) of the batteries is as indicated on the charger.
23
English
Insert the power cord into the socket on the battery
2
charger.
Recharge
indicator
To power outlet
Supplied
power cord
Page 29
Plug the power cord into a power outlet (AC 100 to 240 V).
3
œ Recharge will start automatically.
œ During recharge, the recharge indicator on the battery charger will light.
œ When discharged batteries are inserted, the indicator may flash. When it changes to a
continuously lit indicator, battery recharge is proceeding normally.
œ When the batteries are fully recharged, the recharge indicator goes out.
Recharge time of the supplied nickel metal hydride batteries:
approx. 115 minutes for one or two batteries, and approx. 210 minutes for three or four
batteries.
When finished (the recharge indicator turns off),
4
unplug the power cord from the power outlet.
Remove the batteries from the battery charger.
5
Recharge
indicator
English
24
Page 30

PREPARATION OF BATTERIES
Using the nickel metal hydride batteries
properly
œ Periodically clean with a dry cloth the terminals of the nickel metal hydride batteries ((+)
and (–)) and the terminals located in the battery compartment of the digital camera.
Do not touch the battery terminals or the terminals in the battery compartment of the digital
camera with your bare hands. Doing so will allow contaminants from your hands to adhere to
the terminals and oxidize and increase the contact resistance. If the contact resistance
increases, the usable life of the batteries will diminish.
œ If you repeatedly remove the nickel metal hydride batteries before they run out and recharge
them, or place them into the digital camera before they are fully recharged, then a “memory
effect”* may occur.
œ Your digital camera is designed to handle the effects from voltage fluctuations caused by the
“memory effect” of nickel metal hydride batteries. Nevertheless, there are times when the
remaining charge indicator may show èç or êç earlier than usual.
œ If any symptoms such as these occur, first discharge the batteries completely (see page 126)
and then recharge them until they are fully charged again.
* Memory effect
Memory effect is a phenomenon where the battery performance temporarily lowers. In general,
the battery voltage during use drops below its normal voltage until it is fully discharged and
recharged again.
NOTE
œ New batteries must be recharged before they are first used.
œ Even if recharged batteries are stored and not used, they will slowly lose their charge. They
must be recharged before they are used again.
œ If the batteries are used for the first time or if they have not been used for a long time, they may
not be recharged completely even when the recharge indicator goes off. The batteries will
return to normal after they have been used and recharged two or three times.
œ The batteries may have reached the end of their service life if the recharge indicator keeps on
flashing even if the batteries have been inserted correctly, or if they overheat while being
recharged. However, if the same conditions appear with new batteries, or if the recharge
indicator does not go off after the normal time required, it may indicate a problem of the battery
charger. In such a case, stop using it immediately and take it to the dealer for service.
œ Recharge two batteries at the same time.
œ During recharging, the battery charger and batteries will be warm. This is normal and does not
indicate a malfunction.
œ During recharging, the battery charger may create interference with a radio or TV. In such a
case, make sure to plug the battery charger into a power outlet on a circuit different from the
one of the radio or TV.
œ It is recommended that the ambient temperature during battery recharging be within the range
of 10 to 40°C. At temperatures below 10°C, due to the characteristics of the batteries, they may
not become adequately charged.
œ The two inner slots of the battery charger accept both AA and AAA batteries. A maximum of
four AA batteries, or two AA and 2 AAA batteries can be recharged at the same time. (You can
also recharge two AAA batteries only.)
25
English
Page 31

Installing the batteries
Confirm that the power is turned off.
1
œ Press the power button to turn off the camera.
œ When the power is turned off, the stand-by indicator
turns off. In addition, if the lens is protruding, it
automatically retracts and closes.
Open the battery compartment cover on the bottom of
2
the digital camera.
œ Push the button on the compartment cover and slide it
outward to open it.
Insert two recharged nickel metal hydride batteries in
3
the battery compartment.
œ Make sure the polarity ((+), (–)) of the batteries is as
indicated in the battery compartment.
Close the battery compartment cover.
4
œ Slide the compartment cover in the direction of the arrow until it clicks.
Power button
NOTE
œ Battery power is still used even when the digital camera is turned off. It is recommended that
you remove the batteries from the digital camera when it is not being used. However, when the
batteries are removed for a long period, the date and time settings may be cleared. When
reinstalling recharged batteries, recheck the date and time settings (see page 46).
English
26
Page 32

INSTALLING AND REMOVING THE CARDS
The images and audio recordings recorded by your digital camera are stored on the data storage
card installed in the digital camera. You must install a card before you can capture images. For
more information on handling the cards, see “Cautions when handling the CompactFlash or
Microdrive” on page 13 and “Cautions when using the Microdrive” on page 137. Before using a
card for the first time, format it using the digital camera (see page 124).
Installing a card
Confirm that the power is turned off.
1
œ Press the power button to turn off the camera.
œ When the power is turned off, the stand-by indicator
turns off. In addition, if the lens is protruding, it
automatically retracts and closes.
Open the card slot cover.
2
Power button
Card slot cover
27
English
Insert the card.
3
œ Insert the card from the connector side, in the direction
shown by the arrow (d mark).
œ Be sure to insert the card all the way until it is fully
inserted.
Fold down the eject button and close the card slot
4
cover.
œ When a card is inserted, the eject button will protrude.
Fold down the eject button in the direction indicated by
the arrow.
Eject button
Page 33

Removing a card
Confirm that the power is turned off.
1
œ Press the power button to turn off the camera.
œ When the power is turned off, the stand-by indicator
turns off. In addition, if the lens is protruding, it
automatically retracts and closes.
Make sure the accessing indicator is not flashing, then
2
open the card slot cover.
œ If the accessing indicator is lit or flashing, then the digital
camera is writing to the card. Never remove the card at
this time.
Power button
Accessing indicator
Raise the eject button.
3
Push in the eject button and remove the card.
4
Close the card slot cover.
5
NOTE
œ Regarding the number of images that can be stored on the card, please refer to “Possible No.
of images/possible shooting time/possible recording time” (see page 136).
œ By using the card together with a commercially available PC card adapter for CompactFlash
cards, the card can be used as a PC card conforming to PC Card Standard-ATA.
Eject button
English
28
Page 34

TURNING THE POWER ON/OFF
Turning the power on
Follow the steps indicated below when capturing images or when playing back images on the
LCD monitor.
To capture images
Set the main switch to “MONITOR OFF” or Õ.
1
Press the power button.
2
œ The stand-by indicator turns on and the lens extends.
œ If the main switch was set to Õ, an image will appear
on the LCD monitor.
To play back images
Set the main switch to Ô.
1
Press the power button.
2
œ The power is turned on.
œ An image appears on the LCD monitor.
Main switch
MONITOR OFF
MONITOR OFF
Stand-by indicator
Power button
Lens
MONITOR OFF
Main switch
Power button
HELP
If “NO CARD” appears
œ If no card is installed in the digital camera, then “NO CARD” will appear on the LCD monitor. Be
sure to install a card before using the digital camera (see page 27).
29
English
Page 35

Turning the power off
Press the power button.
1
œ The power turns off.
During shooting
œ
The lens automatically retracts and closes.
œ
The stand-by indicator turns off.
œ
The LCD monitor turns off.
During playback
œ
The LCD monitor turns off.
Power button
Stand-by indicator
Lens is
automatically
stowed
Turning the power on when the power save
function is active
In order to save the battery power, the power save function will automatically turn off the power
after one minute of no use during shooting, or five minutes of no use during playback.
Press the MODE button or the shutter release button
1
once.
NOTE
œ When using the AC adapter (sold separately), the power save function will become active after
about 30 minutes of inactivity. Also, when using battery power and connecting the digital
camera to a personal computer, the power save function will become active after about five
minutes of no use.
œ When the power save function has been active for 15 minutes, the lens automatically retracts
and closes.
Shutter release button
MODE button
English
30
Page 36

DISPLAYING THE SETTING SCREEN AND
OPTION SETTING SCREEN
For both shooting and playback, there is a Setting Screen and an Option Setting Screen. These
screens allow you to perform various settings and operations.
Displaying the Setting and Option Setting
Screens
Set the main switch.
1
To display the Shooting Setting Screen or the Shooting
Option Setting Screen: Set to Õ.
To display the Playback Setting Screen or the Playback
Option Setting Screen: Set to Ô.
Press the power button.
2
Turn the selector dial to the mark for the desired
3
setting screen.
œ When set to P, the Shooting Option Setting Screen or
the Playback Option Setting Screen is displayed (see
page 41).
Main switch
MONITOR OFF
MONITOR OFF
Power button
Selector dial
Shooting Playback
W Still Image Shooting Setting Screen Still Image Playback Setting Screen
Y Sequential Shot Shooting Setting
Screen
X Video Clip Shooting Setting Screen Video Clip Playback Setting Screen
P Shooting Option Setting Screen Playback Option Setting Screen
œ Audio recording œ Sound playback
œ Date and time setting œ Auto rotate playback setting
œ Operational sound setting œ Date and time setting
œ Battery discharging œ Operational sound setting
œ Language selection œ Battery discharging
œ TV system selection œ Language selection
œ Card initializing (reformatting) œ TV system selection
PC connection mode
Ü
(the LCD monitor turns off)
NOTE
If “NO IMAGE” appears
œ This appears if there is no image for the playback mode you selected. Turn the selector dial to a
playback mode for which images exist.
31
English
Sequential Shot Playback Setting
Screen
œ Card initializing (reformatting)
PC connection mode
(the LCD monitor turns off)
Page 37

Press the MODE button (if the selector dial is set to v, x or w).
4
œ The setting screen selected in step 3 appears (see pages 33 to 40).
œ You can also access the shooting setting screen by turning the jog dial.
œ For how to operate the setting screens, see “SETTING SCREEN BASIC OPERATIONS”
on page 45.
Exiting the Setting Screen
Press the MODE button.
œ The Setting Screen disappears.
Exiting the Option Setting
Screen
Turn the selector dial to a mark other than P.
œ The Option Setting Screen is exited and either a shooting
screen or playback screen appears.
œ If the selector dial is set to Ü, the mode changes to PC
connection, and the LCD monitor turns off.
MODE button
Selector dial
English
32
Page 38

SHOOTING SETTING SCREENS
These screens are used for various settings related to capturing pictures. For the operation
procedure for the shooting setting screens, see “SETTING SCREEN BASIC OPERATIONS” on
page 45.
Still Image Shooting Setting Screen
All the icons never appear at the same time.
*
RESOLUTION
24
33
English
Page 39

Resolution menu [page 55]
1
A: 3,264 x 2,448-pixel resolution icon
B: 2,880 x 2,160-pixel resolution icon
C: 2,288 x 1,712-pixel resolution icon
Ò: 1,600 x 1,200-pixel resolution icon
4: 640 x 480-pixel resolution icon
Compression menu [page 57]
2
a: SFINE icon (super-low compression)
b: FINE icon (low compression)
c: NORM icon (moderate compression)
d: TIFF icon (no compression)
Only appears when the resolution is
set to C.
Quick Shot menu [page 84]
3
Q: Quick Shot off icon
R: Quick Shot on icon
Exposure correction icon [page 81]
4
œ When selected, the exposure correction
bar appears.
Exposure control menu [page 82]
5
Ï: Program AE icon
Î: Aperture priority AE icon
Ì: Shutter speed priority AE icon
Í: Manual exposure control icon
ISO sensitivity menu [page 85]
6
B: Auto sensitivity icon (ISO100 to 400)
+: ISO100 icon
1: ISO200 icon
%: ISO400 icon
White balance menu [page 86]
7
During monochrome shooting, the white
balance menu cannot be selected.
H: Auto white balance icon
g: Fair icon
h: Overcast icon
e: Fluorescent lighting icon
i: White (incandescent) light icon
S: Color fill icon
Light measuring method menu
8
[page 91]
X: Center point light measuring icon
V: Multi-section light measuring icon
W: Spot light measuring icon
Monochrome shooting menu [page 77]
9
f: Monochrome shooting off icon
e: Monochrome shooting on icon
Noise reduction menu [page 90]
F
h: Noise reduction off icon
g: Noise reduction on icon
Spot focus menu [page 92]
G
j: Spot focus off icon
i: Spot focus on icon
Voice memo menu [page 78]
H
b: Voice memo off icon
a: Voice memo on icon
Digital zoom menu [page 89]
I
Cannot be selected when resolution is set
to A, B or C
Z: Digital zoom off icon
Y: Digital zoom on icon
Self-timer menu [page 75]
J
V: Self-timer off icon
U: Self-timer on icon
Flash operation mode icon [page 73]
K
When using flash, indicates the flash
operation mode.
No icon: Automatic flash mode
d: Forced flash mode icon
j: Flash off mode icon
È: Red-eye reduction mode icon
Still image shooting mode icon
L
Number of images that can be
M
captured [page 50]
Remaining battery charge [page 48]
N
Not displayed when the remaining battery
charge is near full or when the AC
adapter (sold separately) is used.
English
34
Page 40

SHOOTING SETTING SCREENS
Sequential Shot Shooting Setting Screen
All the icons never appear at the same time.
*
RESOLUTION
12
35
English
Page 41

Resolution menu [page 55]
1
C: 2,288 x 1,712-pixel resolution icon
Ò: 1,600 x 1,200-pixel resolution icon
4: 640 x 480-pixel resolution icon
Compression menu [page 57]
2
a: SFINE icon (super-low compression)
b: FINE icon (low compression)
c: NORM icon (moderate compression)
Shutter operation menu [page 64]
3
Only appears when the sequential shot
method is set to Ö.
$: Images are captured only while the
shutter release button is pressed.
#: Capturing of the images starts when
the shutter release button is pressed
and stops when it is pressed again.
Exposure correction icon [page 81]
4
œ When selected, the exposure correction
bar appears.
Exposure control menu [page 82]
5
Ï: Program AE icon
Î: Aperture priority AE icon
Ì: Shutter speed priority AE icon
Í: Manual exposure control icon
ISO sensitivity menu [page 85]
6
B: Auto sensitivity icon (ISO100 to 400)
+: ISO100 icon
1: ISO200 icon
%: ISO400 icon
White balance menu [page 86]
7
H: Auto white balance icon
g: Fair icon
h: Overcast icon
e: Fluorescent lighting icon
i: White (incandescent) light icon
S: Color fill icon
Light measuring method menu
8
[page 91]
X: Center point light measuring icon
V: Multi-section light measuring icon
W: Spot light measuring icon
Monochrome shooting menu [page 77]
9
f: Monochrome shooting off icon
e: Monochrome shooting on icon
Spot focus menu [page 92]
F
j: Spot focus off icon
i: Spot focus on icon
Digital zoom icon [page 89]
G
Cannot be selected when resolution is set
to C.
Z: Digital zoom off icon
Y: Digital zoom on icon
Sequential shot method menu [page 63]
H
Displays the selected sequential shot
method even when Shooting Setting
Screen is exited.
Ä: Best select shot icon
Ö: Standard sequential shot icon
A: AE shift sequential shot icon
Sequential shot shooting mode icon
I
Number of images that can be
J
captured [page 50]
Remaining battery charge [page 48]
K
Not displayed when the remaining battery
charge is near full or when the AC
adapter (sold separately) is used.
English
36
Page 42

SHOOTING SETTING SCREENS
Video Clip Shooting Setting Screen
All the icons never appear at the same time.
*
RESOLUTION
00:46
37
English
Page 43

Resolution menu [page 55]
1
2: 320 x 240-pixel resolution icon
0: 160 x 120-pixel resolution icon
Shutter operation menu [page 69]
3
$: Images are captured only while the
shutter release button is pressed.
#: Capturing of the images starts when
the shutter release button is pressed
and stops when it is pressed again.
Exposure correction icon [page 81]
3
œ When selected, the exposure correction
bar appears.
ISO sensitivity menu [page 85]
4
When the flicker-reduction setting is on,
the ISO sensitivity menu cannot be
selected.
B: Auto sensitivity icon (ISO100 to 400)
+: ISO100 icon
1: ISO200 icon
%: ISO400 icon
White balance menu [page 86]
5
During monochrome shooting, the white
balance menu cannot be selected.
H: Auto white balance icon
g: Fair icon
h: Overcast icon
e: Fluorescent lighting icon
i: White (incandescent) light icon
S: Color fill icon
Light measuring method menu
6
[page 91]
X: Center point light measuring icon
V: Multi-section light measuring icon
W: Spot light measuring icon
Optical zoom menu [page 88]
7
ñ: Optical zoom off icon
ï: Optical zoom on icon
Flicker reduction menu [page 87]
8
l: Flicker reduction function off icon
k: Flicker reduction function on icon
Monochrome shooting menu [page 77]
9
f: Monochrome shooting off icon
e: Monochrome shooting on icon
Spot focus menu [page 92]
F
j: Spot focus off icon
i: Spot focus on icon
Digital zoom icon [page 89]
G
Z: Digital zoom off icon
Y: Digital zoom on icon
Video clip shooting mode icon
H
Remaining recording time available
I
[page 50]
Display shows the remaining minutes and
seconds.
Depending on the memory capacity of the
card, the remaining time is shown as
“hours:minutes:seconds”.
Remaining battery charge [page 48]
J
Not displayed when the remaining battery
charge is near full or when the AC
adapter (sold separately) is used.
English
38
Page 44

SHOOTING SETTING SCREENS
Shooting status display area
After you exit the Shooting Setting Screen, the status of the digital camera and card are displayed
in this shooting status display area. The icons and the positions in which they appear differ
depending on the shooting mode.
24
8.0
1/50
Flicker-reduction indicator [page 87]
1
Light measuring method indicator
2
[page 91]
White balance indicator [page 86]
3
ISO sensitivity indicator [page 85]
4
Exposure control indicator [page 82]
5
In the video clip shooting mode, the
optical zoom setting indicator appears
[page 88].
Aperture indicator [page 82]
6
Shutter speed indicator [page 82]
7
Shooting setting indicator
8
Appears when preset shooting settings
[page 93] or original shooting settings
[page 94] are selected.
Focus indicator [page 72]
9
Flash action mode indicator [page 73]
F
In the video clip shooting mode, the
shooting time display is shown [page 50].
Shooting mode indicator [page 54]
G
Number of images remaining [page 50]
H
In the video clip shooting mode, the
remaining recording time is shown.
Sequential shot method indicator
I
[page 63]
Voice memo indicator [page 78]
J
In the sequential shot shooting mode and
video clip shooting mode, the shutter
operation setting indicator appears
[pages 64 and 69].
Digital zoom indicator [page 89]
K
Self-timer indicator [page 75]
L
Exposure control indicator [page 81]
M
Remaining battery charge [page 48]
N
Noise reduction indicator [page 90]
O
Quick Shot indicator [page 84]
P
39
English
Page 45

PLAYBACK SETTING SCREEN
Still Image, Sequential Shot, and Video Clip
Playback Setting Screens
Still Image Playback Setting Screen
Sequential Shot Playback Setting Screen
Video Clip Playback Setting Screen
ROTATE
PROTECT
ERASE
EDIT PHOTO
PRINT SETTING
VOLUME
Image rotation [page 98]
1
Appears only when auto rotate playback
is not set.
Protect icon [page 115]
2
Erase icon [page 116]
3
Edit still image icon [pages 109, 111,
4
114]
Print setting icon [page 120]
5
Volume icon [pages 104, 106, 108]
6
When selected, the volume bar appears.
ROTATE
PROTECT
ERASE
COPY
PROTECT
ERASE
COPY
VOLUME
Copy icon [page 118]
7
Playback mode indicator [page 96]
8
v : Still image playback icon
x : Sequential shot playback icon
w : Video clip playback icon
Remaining battery charge [page 48]
9
Shows the remaining battery charge. Not
displayed when the remaining battery
charge is near full or when the AC
adapter (sold separately) is used.
Appears only in the Still Image Playback
Setting Screen when an image with a
voice memo appears.
English
40
Page 46

OPTION SETTING SCREEN
Shooting Option Setting Screen
AUDIO REC
CLOCK SET
BEEP
DISCHARGE
LANGUAGE
TV SYSTEM
REFORMAT
Audio recording [page 79]
1
Date and time setting [page 46]
2
Operational sound (beep) setting
3
[page 125]
Battery discharge function [page 126]
4
Language selection [page 127]
5
TV system selection [page 128]
6
Card reformatting [page 124]
7
Playback Option Setting Screen
AUDIO
AUTO ROTATE PLAY
CLOCK SET
BEEP
DISCHARGE
LANGUAGE
TV SYSTEM
REFORMAT
Playback of audio recordings
1
[pages 97, 107]
Auto rotate playback [page 119]
2
Date and time setting [page 46]
3
Operational sound (beep) setting
4
[page 125]
Battery discharge function [page 126]
5
Language selection [page 127]
6
TV system selection [page 128]
7
Card reformatting [page 124]
8
NOTE
œ You can set the LCD monitor of your digital camera to display messages in English or
Japanese. See “CHANGING THE LANGUAGE DISPLAY” on page 127.
41
English
Page 47

INFORMATION DISPLAY
The Information Screen allows you to check the current settings while shooting. Also, during
playback, you can check what the settings were during shooting.
Information Screen during shooting
Put the digital camera in the shooting/recording status.
1
œ When shooting, turn on the LCD monitor.
For still image shooting, see page 61.
For sequential shot shooting, see page 64.
For video clip shooting, see page 69.
Press the MODE button for at least 2 seconds.
2
œ The Information Screen appears.
All the icons never appear at the same time.
*
1 Currently selected settings [page 93]
2 Compression ratio setting [page 57]
œ In the video clip shooting mode, the
shutter operation setting is shown.
3 Resolution setting [page 55]
4 ISO setting [page 85]
œ In the video clip shooting mode, the
white balance setting is shown.
5 White balance setting [page 86]
œ In the video clip shooting mode, the
light measuring method setting is
shown.
6 Noise reduction setting [page 90]
œ In the sequential shot shooting mode,
the spot focus setting is shown. In the
video clip shooting mode, the
monochrome shooting setting is shown.
7 Spot focus setting [page 92]
œ In the sequential shot shooting mode,
the digital zoom setting is shown.
8 Exposure control setting [page 82]
9 Quick shot setting [page 84]
œ In the sequential shot shooting mode,
the shutter release button setting is
shown. In the video clip shooting mode,
the exposure correction setting is shown.
F Focus setting [page 72]
G Execute data save [page 95]
H Flash setting [page 73]
I Shooting mode setting [page 54]
J Remaining images [page 50]
K Exposure correction setting [page 81]
L Monochrome shooting setting [page 77]
M Light measuring method setting [page
N Digital zoom setting [page 89]
O Voice memo setting [page 78]
P Self-timer setting [page 75]
Q Aperture setting [page 82]
R Remaining battery charge indication
S Shutter speed setting [page 82]
MODE button
INFORMATION
CURRENT SET
12
3.8
1/50
For still images
œ In the video clip shooting mode, the
ISO sensitivity setting is shown.
œ In the video clip shooting mode, the
flicker-reduction setting is shown.
91]
œ In the video clip shooting mode, the
optical zoom setting is shown.
œ In the sequential shot shooting mode,
the sequential shot method setting is
shown. In the video clip shooting mode,
the digital zoom setting is shown.
[page 48]
English
42
Page 48

INFORMATION DISPLAY
To exit the Information Screen, press the MODE button again.
Displaying the shooting settings during
playback
This screen displays the shooting settings during playback.
The Information Screen appears when the MODE button is pressed for at least 2 seconds during
playback (see pages 98 to 104). To exit the Information Screen, press the MODE button again.
Information Screen in the still image, sequential image, and video clip playback
modes
For still images
Location of data (folder number) and file
1
name [page 53]
Compression rate [page 57]
2
Resolution [page 55]
3
Print setting [page 120]
4
Protect setting [page 115]
5
Voice memo indicator [page 98]
6
Execute data save [page 95]
7
File size
8
Shutter speed
9
Aperture
F
Exposure correction
G
Focus distance
H
Remaining battery charge [page 48]
I
Date and time of image [page 46]
J
100-0021
450KB
5
SHUTTER 1/30
IRIS F2.8
EXPOSE VALUE 0.0EV
FOCAL LENGTH 6.0
2002.01.23 15:36
43
English
Page 49

For sequential shots
1
Compression rate [page 57]
2
Resolution [page 55]
3
Location of data (folder number) and file
name [page 53]
4
Sequential shot method [page 63]
5
Protect setting [page 115]
6
Execute data save [page 94]
7
File size
8
Shutter speed
9
Aperture
F
Exposure correction
G
Focus distance
H
Remaining battery charge [page 48]
I
Date and time of image [page 46]
For video clips
1
Location of data (folder number) and file
name [page 53]
2
Resolution [page 55]
3
Execute data save [page 94]
4
Length of recording (min:sec)
5
File size
6
Protect setting [page 115]
7
Shutter speed
8
Aperture
9
Exposure correction
F
Focus distance
G
Remaining battery charge [page 48]
H
Date and time of image [page 46]
100-5001
450KB
SHUTTER 1/30
IRIS F2.8
EXPOSE VALUE 0.0EV
FOCAL LENGTH 6.0
2002.01.23 15:36
100-0021 00:21
949KB
SHUTTER 1/30
IRIS F2.8
EXPOSE VALUE 0.0EV
FOCAL LENGTH 6.0
2002.01.23 15:36
English
44
Page 50

SETTING SCREEN BASIC OPERATIONS
At the setting screens, use the jog dial or arrow button and the SET button to perform the desired
settings. The selected menu or icon will turn orange in color (or reverse video). To enter or exit
the setting screens, see “DISPLAYING THE SETTING SCREEN AND OPTION SETTING
SCREEN” on page 31.
SET button
Jog dial
Clockwise: The value increases
Counterclockwise: The value decreases
On the Shooting Setting Screen, you can
select a menu.
Arrow button
Lightly press d, c, l, or j
on the arrow button to
move in the direction of that
arrow.
Basic button operations
To select a menu:
œ Press [j] to select the item above.
œ Press [l] to select the item below.
œ From the Shooting Setting Screens, turn the jog dial.
To select a setting:
œ Press [c] to select the next icon (item) to the right.
œ Press [d] to select the next icon (item) to the left.
œ Press [j] to select the next icon (item) above.
œ Press [l] to select the next icon (item) below.
To finalize the selected setting:
œ Press the SET button to set the selected menu item.
œ In the Shooting Setting Screens, the selected icon moves to the far left.
œ In the Playback Setting Screens, the screen corresponding to the selected icon appears.
To cancel the operation
œ Press the MODE button. Or select the C icon or “EXIT” and press the SET button.
45
English
Page 51

SETTING THE DATE AND TIME
The digital camera will record the date and time an image or audio recording is taken so that you
can display them during playback. Therefore, before capturing images, make sure the correct
date and time are set.
Main switch
MODE button
SET button
Selector dial
LCD monitor
Arrow button
Jog dial
Example: To set the clock to August 28, 2002 at 7:30 p.m.
Display the Shooting Option Setting Screen (or
1
Playback Option Setting Screen) (see page 31).
Press [l] on the arrow button to select “CLOCK SET”,
2
and then press the SET button.
œ The CLOCK SET menu appears.
œ The current date and time settings appear.
œ Follow the procedures below to set whether to display
the date during playback, to set the date and time, and to
set the display format for the date.
œ To return to the Option Setting Screen, press the MODE
button, or select C and press the SET button.
AUDIO REC
CLOCK SET
BEEP
DISCHARGE
LANGUAGE
TV SYSTEM
REFORMAT
CLOCK SET
DISP ON D/M/Y
2001/10/01
00:00
Set the order of the date display during playback.
3
œ When the jog dial is turned, the date display order
changes as follows:
DISP ON Year/Month/Day DISP ON Month/Day/Year
DISP ON Day/Month/Year DISP OFF
Turn counterclockwise to change in the reverse order.
œ If “DISP OFF” is selected, the date the image was
captured is not shown during playback.
SETTING
CLOCK SET
DISP ON Y/M/D
2001/10/01
00:00
SETTING
English
46
Page 52

SETTING THE DATE AND TIME
Set the date.
4
1 Press [l] to select the Û icon.
2 Turn the jog dial and press the arrow button to set the date
to “2002/8/28”.
œ Year setting Ö [c] Ö Month setting Ö [c] Ö Day setting.
œ Turn clockwise to increase the number.
œ Turn counterclockwise to decrease the number.
Set the clock.
5
1 Press [l] to select the À icon.
2 Turn the jog dial and press the arrow button to set the time
to “19:30”.
œ Hour setting Ö [c] Ö Minute setting.
œ A 24-hour clock is used for the time display.
Select the C icon, and press the SET button.
6
œ The date and time setting is completed, and you return to
the Option Setting screen.
CLOCK SET
DISP OFF
2002/08/28
00:00
SELECT
SETTING
CLOCK SET
DISP OFF
2002/08/28
19:30
SELECT
SETTING
AUDIO REC
CLOCK SET
BEEP
DISCHARGE
LANGUAGE
TV SYSTEM
REFORMAT
Turn off the digital camera (see page 30).
NOTE
œ If the date and time are not set, October 1, 2001 midnight is recorded as the date and time.
Consequently, “2001/10/01 00:00” appears during playback.
œ Under normal conditions, while the batteries are replaced, an internal battery will maintain the
date and time settings. However, there is a small chance the settings may be lost. (The backup
will last for approx. 30 minutes.) It is recommended to check that the date and time settings are
still correct after replacing the batteries and before shooting or recording of any type (follow
steps 1 and 2).
To correct the date and time settings.
œ After steps 1 and 2, press [l] to select the line of the setting that you want to change and press
[c] to select that setting. Then use the jog dial to set the new setting.
47
English
Page 53

REMAINING BATTERY CHARGE INDICATION
When using nickel metal hydride batteries, the remaining battery charge can be checked on the
LCD monitor. Make sure to check this indicator before capturing an image. For an indication of the
possible length of time for battery operation, see “Battery Operation” on page 135.
Set the main switch to Õ, and press the power button.
1
œ Set the selector dial to anything other than P or Ü.
Press the MODE button for at least 2 seconds.
2
œ The Information Screen will appear and the batteries remaining charge indicator appears
in the lower right corner of the LCD monitor. (If any data is present, you can also check the
remaining battery charge at the Information Screen of the playback mode. See pages 42
to 44.)
œ êç and ëç (flashing) will appear even when the Information Screen is not
displayed.
Indicator
Information
Screen
éç No indication Approx. full.
èç No indication Battery power is low.
êç êç It will soon be impossible to capture or playback images.
ëç
Flashing
œ Due to the battery characteristics, when the ambient temperature is low, èç may appear
early for an incorrect indication of the remaining charge. Also, depending on the conditions
of use of the digital camera or the ambient conditions (temperature, etc.), the indicated
remaining charge may change. Therefore, this indication can only be used as a general
approximation of the remaining charge.
When
Information
Screen is not
displayed
ëç
Flashing
If this icon flashes when the shutter button is pressed,
images cannot be captured. If it flashes while editing a
video clip, the editing cannot be performed. Recharge the
batteries.
Remaining charge
MONITOR OFF
To cancel the display, press the MODE button.
English
48
Page 54

REMAINING BATTERY CHARGE INDICATION
NOTE
œ The remaining battery charge indicator will give an accurate indication of the remaining charge
only when the supplied AA nickel metal hydride batteries are used. The indication will not be
accurate if you are using Ni-Cd batteries.
œ For optimum performance, use only Sanyo nickel metal hydride batteries. If you are using Ni-Cd
batteries, the possible operation time will be much shorter.
œ Depending on the usage of the digital camera (such as the number of times the flash is used,
the use of the LCD monitor, etc.) or the environmental conditions (temperature, etc.) the
number of images that can be saved on a set of fully charged batteries will vary greatly.
HELP
If the LCD monitor goes off suddenly
œ When capturing images using the LCD monitor and the battery charge is about half full, the
LCD monitor may turn off momentarily. This is to allow a quick recharge of the flash. When the
flash has been recharged, the LCD monitor will come back on automatically.
49
English
Page 55

CHECKING THE REMAINING NUMBER OF IMAGES,
VIDEO RECORDING TIME, AND AUDIO RECORDING TIME
The images, video clips, and audio recordings you take are stored on the card installed in the
digital camera. If a card is not loaded into the digital camera or if the card is full, capturing or
playing back images will not be possible. Make sure to check the status of the card in the digital
camera before capturing images. For an indication of how many images can be captured and how
much recording time is available for your card, see “Possible No. of Images/Possible Shooting
Time/Possible Recording Time” on page 136.
Checking the remaining number of images
and video recording time
Set the main switch to Õ, and press the power button.
1
œ Set the selector dial to anything other than P or Ü.
œ The remaining number of images appears in the upper
right of the LCD monitor (for the still image and
sequential shot shooting modes).
œ The remaining video recording time appears in the
upper right of the LCD monitor (for the video clip
shooting mode).
œ The remaining number of images and video recording
time will differ depending on the resolution and
compression settings.
œ When the remaining number of images or the remaining
time of video clips that can be taken is “0”, you cannot
capture any more images. To capture more images,
either install a new card, or save the current images
(see page 52) and then erase them (see page 116) from
the card.
œ When the remaining number of images or the remaining
time of video clips that can be taken is “0”, it may be
possible to capture a few more images by changing the
shooting mode, setting a lower resolution setting (see
page 55), or selecting a different compression setting
(see page 57).
Remaining number of images possible
13
MONITOR OFF
Power
Main switch
button
Selector dial
13
3.1
1/50
Remaining number of images possible
(Still Image Shooting Screen)
Remaining video recording time (min:sec)
00:24
3.1
1/50
(Sequential Shot Shooting Screen)
Depending on the memory capacity
of the card, the remaining time is
shown as “hr:min:sec”.
(Video Clip Shooting Screen)
English
50
Page 56

CHECKING THE REMAINING NUMBER OF IMAGES,
VIDEO RECORDING TIME, AND AUDIO RECORDING TIME
Checking the remaining audio recording time
Display the Shooting Option Setting Screen (see page
1
31).
œ Set the selector dial to P.
œ “AUDIO REC” is highlighted.
Press the SET button.
2
œ The Audio Recording Screen appears, and the remaining
recording time appears in the upper right of the LCD
monitor.
AUDIO REC
CLOCK SET
BEEP
DISCHARGE
LANGUAGE
TV SYSTEM
REFORMAT
Remaining recording time (min:sec)
AUDIO REC
32:48
REC
Depending on the memory capacity
of the card, the remaining time is
shown as “hr:min:sec”.
51
English
Page 57

CONCERNING IMAGE AND AUDIO DATA STORAGE
Saving the images captured with your digital camera
œ Saving the images to a computer
Requires: Included CD-ROM (Sanyo Software Pack) [page 129], commercially available
Advantages: The images are saved as data on the computer hard disk. They can then be
œ Printing on paper
The images captured with your digital camera can be printed using a commercially available
printer. This unit supports PRINT Image Matching feature. When shooting, print commands
are added to the picture data, and the printer prints the pictures in accordance with these
commands. If used in combination with a printer supporting PRINT Image Matching feature, it
is possible to print with optimal colors, as purported by the digital camera when taking the
pictures. For more information regarding the PRINT Image Matching feature and printing
method etc., please read the instruction manuals that were included with your printer and
personal computer.
œ PRINT Image Matching is a term for the print command that is embedded in the header file
of the image created by digital camera. It contains color setting and image parameter
information.
œ SEIKO EPSON Corporation holds the copyright for PRINT Image Matching Version 1.0.
Requires: Commercially available printer, and commercially available personal computer
Caution: When printing a single shot from a sequential shot or from a video clip, you may
œ Print out in high quality with a digital print service
For high-quality print outs of your captured images, you can take your image data to digital
print service centers for digital cameras (see page 120). Network print services are also
available for access if necessary.
Advantages: You can receive high-quality printouts of the images you capture.
Caution: To print out a single shot from a sequential shot or a single picture from a video
personal computer.
processed or edited, sent over a network or the Internet, etc.
depending on the situation.
not be able to print the shot if it has not first been copied as still image data (see
page 118).
clip, you must first copy the data as a still image (see page 118).
If the image resolution is low, depending on the print size, the output image may
not be high quality.
Data file formats
The format of the files saved on the card and the method in which the file names are determined
are explained below.
Still image data
Data format: JPEG or TIFF format (Design rule for Camera File system compliant)
File name structure: SANYoooo.jpg or SANYoooo.tif
The “oooo” represents a sequential number assigned automatically.
Voice memo data
Data format: WAVE format
File name structure: SANYoooo.wav
The “oooo” represents the same sequential number as the image file
to which the sound memo corresponds.
English
52
Page 58

CONCERNING IMAGE AND AUDIO DATA STORAGE
Sequential shots data
Data format: JPEG format
File name structure: SEQTxxyy.jpg
The “xx” represents the folder number where the sequential shots are
stored. The “yy” represents a sequential number assigned automatically.
Video clip data
Data format: QuickTime Movie format
File name structure: VCLPoooo.mov
The “oooo” represents a sequential number assigned automatically.
Audio recording data
Data format: WAVE format
File name structure: SUNDoooo.wav
The “oooo” represents a sequential number assigned automatically.
Configuration of directories for the stored data
MISC (Location of DPOF files)
ROOT
Up to 999 still images, 99 sequential shot folders, 999 video
*
clips, and 999 audio recordings can be stored in folder
100SANDS. If more files are made, a folder named 101SANDS
will be made and they will be stored in there. New folders will
then be named in sequence, i.e., 102SANDS, 103SANDS, etc.
DCIM
SYSTEM
(Location
of card
data)
100SANDS
101SANDS
102SANDS
*
Folder number
[pages 43, 44]
SANY1001.jpg
SANY1002.jpg
SANY1999.jpg
SANY2001.jpg
SANY2002.jpg
SANY0001.jpg
SANY0002.jpg
SANY0003.jpg
SANY0003.wav
SANY0004.tif
SANY0998.jpg
SANY0999.jpg
SEQT0001
VCLP
SUND
VCLP0001.mov
VCLP0002.mov
SUND0001.wav
SUND0002.wav
File name [pages 43, 44]
File name
[pages 43, 44]
SEQT0101.jpg
SEQT0102.jpg
SEQT0103.jpg
NOTE
Do not modify the folders and file names in the card using your computer
œ If the folders, file names, or their configuration is modified using a personal computer, it will be
impossible to play back the data using the digital camera, and the digital camera may not
operate properly.
Concerning the video clip data saved by the digital camera
œ You can use QuickTime Ver. 3.0 or later from Apple to play back the video clips. QuickTime5
for Windows and Macintosh is supplied with the included CD-ROM (Sanyo Software Pack).
53
English
Page 59

SETTING THE SHOOTING MODE
Before using the digital camera, you must set the desired shooting mode (still image, sequential
shot, video clip, or audio recording). The setting is performed with the selector dial.
Turn the selector dial to the desired shooting mode.
1
Selector dial
W Still image shooting mode (see pages 60 and 61)
Y Sequential shot shooting mode (see page 63)
X Video clip shooting mode (see page 69)
P Option (for audio recording) (see page 79)
œ The shooting mode changes to that set by the selector dial.
English
54
Page 60

SETTING THE RESOLUTION
If the resolution is increased, the image quality will improve, but the remaining number of images
that can be taken will decrease. In the video clip shooting mode, if the resolution is decreased, the
length of time possible for the video clip will increase. It is therefore important to select the
resolution according to the desired image quality and purpose.
Resolution (units: pixels)
[Icon displayed on LCD monitor]
3,264 x
2,448
Still image Yes Yes Yes Yes Yes
Shooting
1
2
Sequential shot
mode
Video clip
Display the Shooting Setting Screen (see page 31).
Select the desired resolution from the resolution menu.
A: For 3,264 x 2,448 resolution*
B: For 2,880 x 2,160 resolution*
C: For 2,288 x 1,712 resolution
Ò: For 1,600 x 1,200 resolution
4: For 640 x 480 resolution
2: For 320 x 240 resolution
0: For 160 x 120 resolution
œ The selected icon turns orange in color.
œ Some resolutions cannot be selected depending on the shooting mode that is set (refer to
the table above).
available
available
A
Not
Not
2,880 x
2,160
B
Not
available
Not
available
2,288 x
1,712
C
Yes Yes Yes
available
1,600 x
1,200
D
Not
Not
available
At A and B resolutions, the camera
*
processes the image internally to
produce a 3,264 x 2,448-pixel or 2,880 x
2,160-pixel image.
640 x
480
4
Not
available
320 x
240
2
Not
available
Not
available
Yes Yes
160 x
120
0
Not
available
Not
available
RESOLUTION
12
55
English
Press the SET button.
3
œ The selected resolution is set.
To exit the Shooting Setting Screen, press the MODE button.
Page 61

NOTE
œ When the resolution menu is selected in the Video Clip Shooting Screen, the remaining video
recording time appears (see page 37).
About the resolution and compression settings (see page 57)
œ The image captured by a digital camera consists of a collection of small dots. The resolution
refers to the number of these dots, and the greater the number, the higher the image quality. As
the resolution increases, the size of the resulting data also increases, and the number of
images that can be captured decreases. To compensate for this, this digital camera is able to
compress the data. This digital camera uses JPEG compression. If JPEG compression is used,
when the image is returned to its original size, an extremely small portion of it is lost. The higher
the compression ratio, the more of the original image is lost.
Therefore, this digital camera also allows you to store image data without any compression to
ensure that none of the original image is lost. This is the L mode. Since the image data is
large when the L mode is used, the digital camera requires approximately 30 seconds to
store the data after the shutter release button is pressed, and approximately 10 seconds to
display the image in the playback mode (when using the supplied 16MB CompactFlash card).
œ When capturing images at A B resolution, it takes 5 seconds after the shutter release
button is pressed before the data is recorded.
English
56
Page 62

SETTING THE COMPRESSION RATIO
Use the procedure given below to set the compression ratio. Even if the same resolution is used,
you can change the compression setting to decrease the image data size so that you can capture
more images, or increase the image data size for no loss in image quality.
Resolution (units: pixels)
[Icon displayed on LCD monitor]
2,880 x
available
available
available
available
2,160
B
Not
Not
Not
Not
2,288 x
1,600 x
1,712
1,200
C
Yes
Yes Yes Yes
Yes Yes Yes
Yes Yes Yes
D
Not
available
640 x
480
4
Not
available
320 x
240
2
Not
available
Not
available
Not
available
Not
available
Not
available
Not
available
Not
available
160 x
120
0
Not
available
Not
available
Not
available
Not
available
Not
available
Not
available
Not
available
Shooting
mode
Still image
Sequential
shot
Compression
ratio
a Yes Yes Yes Yes Yes
b Yes Yes Yes Yes Yes
c Yes Yes Yes Yes Yes
d
a
b
c
3,264 x
2,448
A
Not
available
Not
available
Not
available
Not
available
57
English
Page 63

Display the Shooting Setting Screen (see page 31).
1
Select the desired compression ratio from the
2
compression menu.
a: Stores the data with an extremely low compression
(super high quality).
b: Stores the data with a low compression (high quality).
c: Stores the data with moderate compression (normal
quality).
d: Stores the data in TIFF format (no compression for
highest quality).
œ The selected icon turns orange in color.
œ Some compression ratios cannot be selected depending
on the shooting mode that is set (see page 57).
Press the SET button.
3
œ The selected compression ratio is set.
To exit the Shooting Setting Screen, press the MODE button.
COMPRESSION
7
English
58
Page 64

CAPTURING IMAGES
NOTE
œ When a picture is taken with the camera held vertically, the image played back on the LCD
monitor screen or on a TV set will be shown on the side. However, images captured in the still
image shooting mode or sequential shot shooting mode can be rotated when they are played
back (see pages 98 and 102). In addition, if images are played back with the auto rotate
playback function set (see page 119), even pictures taken with the camera held vertically will be
played back automatically rotated. Note that video clips cannot be rotated when they are played
back.
59
English
Page 65

Capturing images using the viewfinder
Compose the desired image by looking into the viewfinder. Compared to capturing images using
the LCD monitor, this method saves the battery power.
Set the main switch to “MONITOR OFF”. Press the
1
power button to turn on the camera.
œ Set the selector dial to anything other than P or Ü.
œ When the stand-by indicator lights in green, you are
ready to capture the image.
œ No image appears on the LCD monitor.
œ Set the focus to c when the photographic subject is
close to the camera (10 to 50 cm) (see page 72).
Viewfinder
MONITOR OFF
Main switch
Power button
Shutter release
button
Stand-by indicator
Point the camera lens at the subject.
2
Look straight into the viewfinder and center the subject
3
in the autofocus area.
Autofocus mark
Slowly press and hold the shutter release button halfway (focus-lock).
4
œ The autofocus function locks the focus on the subject.
œ If “ALL” or “SHUTTER” is selected as the operational sound setting (see
page 125), then the digital camera will beep twice when the subject is in focus.
Finish pressing the shutter release button all the way.
5
œ The image is captured.
œ If “ALL” or “SHUTTER” is selected as the operational sound setting (see
page 125), then the digital camera will beep once when the image is captured.
œ The stand-by indicator will flash red while the image is being written to the memory.
Another image can only be captured when the stand-by indicator lights green again.
NOTE
œ Although nickel metal hydride batteries are recommended, you may use alkaline batteries and
capture images using the viewfinder.
œ If an operational sound setting is set, then two quick beeps are heard when the shutter release
button is pressed fast. (No beep is heard when the shutter closes.)
Selector dial
Push halfway
Push completely
English
60
Page 66

CAPTURING IMAGES
Capturing images using the LCD monitor
This method allows you to view the exact composition of the image on the LCD monitor before
you capture it.
Viewfinder
Stand-by
indicator
MONITOR OFF
Main switch
Power button
LCD
monitor
Push completely
Set the main switch to Õ. Press the power button to
1
turn on the camera.
œ Set the selector dial to anything other than P or Ü.
œ When the stand-by indicator lights in green, you are
ready to capture the image.
œ An image appears on the LCD monitor.
œ Set the focus to c when the photographic subject is
close to the camera (10 to 50 cm) (see page 72).
Point the camera lens to the subject.
2
œ Compose the desired image by looking at the LCD
monitor.
Slowly press and hold the shutter release button halfway (focus-lock).
3
œ The autofocus function operates, and the subject in the center of the LCD
monitor screen is focussed. The focus icon ë appears in the upper left of
the LCD monitor.
œ If the focus does not lock as desired, release the shutter release button and press it again
halfway to achieve the desired results.
œ If “ALL” or “SHUTTER” is selected as the operational sound setting (see page 125), then
the digital camera will beep twice when the subject is in focus.
Finish pressing the shutter release button all the way.
4
œ The image is captured.
œ If “ALL” or “SHUTTER” is selected as the operational sound setting (see
page 125), then the digital camera will beep once when the image is captured.
œ In the still image shooting mode, you can view the image captured on the LCD monitor by
holding the shutter release button down.
œ The stand-by indicator will flash red while the image is being written to the memory.
Another image can only be captured when the stand-by indicator lights green again.
Shutter release
button
Selector dial
Push halfway
61
English
Page 67

NOTE
œ Compared to taking pictures using the viewfinder, this method consumes the battery power
more quickly.
œ After taking the picture, you can immediately view the captured image by setting the main
switch to Ô.
œ When the shutter release button is pressed halfway, the image in the LCD monitor may waver
vertically. This is the result of internal image processing and is not a malfunction. This wavering
is not recorded and will not affect your images in any way.
To lock the focus on an object that is not in the center
œ In step 3, point your digital camera at an object of the desired distance, lock the focus, and then
compose the image (see page 71).
English
62
Page 68

SEQUENTIAL SHOT
This digital camera allows three types of sequential shots: standard, AE shift sequential shot, and
best select shots.
•••• Sequential shot methods
Standard sequential shot Ö: A normal sequential shot. (For the number of images captured,
see “Maximum number of sequential shots” below.)
AE shift sequential shot A: Seven sequential images are captured while the exposure
Dark image (under exposed) (Standard exposure) Bright image (over exposed)
Best select shot Ä:
(or shutter speed) is changed automatically.
Four sequential images are captured for you to select which
one to save.
Select your
favorite one
to save.
The other three
are deleted.
•••• Maximum number of sequential shots
The maximum possible number of sequential shots depends on the resolution and compression
ratio settings, which are shown in the table below.
Resolution
C 8 images 13 images 20 images
D 18 images 27 images 40 images
E 99 images 99 images 99 images
abc
Compression ratio
63
English
Page 69

Standard sequential shot Ö
Display the Sequential Shot Shooting Setting Screen
1
(see page 31).
Select standard sequential shot Ö from the
2
sequential shot method menu, and press the SET
button.
œ This sets the standard sequential shot method.
Select the desired shutter operation from the shutter
3
operation menu and press the SET button.
$: Images are captured only while the shutter release
button is pressed.
#: Capturing of the images starts when the shutter
release button is pressed and stops when it is
pressed again.
œ This completes the shutter operation setting.
œ The sequential shot method and shutter operation
settings are retained even if the main switch is set to
“MONITOR OFF” or Ô, or the digital camera is turned
off.
œ You can set the main switch to “MONITOR OFF” and
take pictures using the viewfinder.
œ To exit the Shooting Setting Screen, press the MODE
button.
METHOD
24
SHUTTER
24
English
64
Page 70

SEQUENTIAL SHOT
Press the shutter release button to capture the
4
sequential shot.
œ If $ is selected for the shutter operation, sequential
shot images are captured while the shutter release
button is pressed. If the shutter release button is
released before the maximum number of images is
captured, the sequential shot will stop there.
œ If # is selected for the shutter operation, the sequential
shot begins when the shutter release button is pressed
and continues until the shutter release button is pressed
again or the maximum number of images is captured.
œ During shooting using the LCD monitor, K will appear
in the LCD monitor while images are being captured.
œ After taking the picture, you can view the first captured
image by setting the main switch to Ô (see page 102).
When you have finished capturing images, turn off the digital camera.
REC (recording) indicator
24
3.1
1/50
Shutter release button
AE shift sequential (auto bracket) shot A
Seven sequential images are captured while the exposure automatically changes over a range,
from underexposed to overexposed.
Set the shooting mode to the sequential shot shooting
1
mode (see page 31).
Select AE shift sequential shot A from the sequential
2
shot method menu and press the SET button.
œ This sets the AE shift sequential shot method.
NOTE
œ When the exposure control method [page 82] is set to manual Í, the AE shift sequential shot
method cannot be used. To use the AE shift sequential shot method, set the exposure control
method to a setting other than manual Í.
65
English
METHOD
16
Page 71

Select the exposure correction menu, and set the basic
3
exposure.
œ Press [d] or [c] on the arrow button to set the base
exposure setting. For how to set the exposure, see
“Exposure correction” on page 81.
œ Based on the set exposure setting, 7 images are
captured over a range of exposures, from underexposed
to overexposed. The base exposure can be set
anywhere from –0.9 EV to +0.9 EV.
œ For AE shift sequential shots, the shutter operation
setting is not necessary. (The shutter operation menu is
not available.)
œ You can set the main switch to “MONITOR OFF” and
take pictures using the viewfinder.
œ To exit the Shooting Setting Screen, press the MODE
button.
Press the shutter release button to capture the
4
sequential shot.
œ For AE shift sequential shots, the digital camera will
capture all seven images (it is not necessary to hold
down the shutter release button).
œ During shooting using the LCD monitor, K will appear
in the LCD monitor while images are being captured.
œ After taking the picture, you can view the first captured
image by setting the main switch to Ô (see page 102).
Exposure correction bar
EXPOSURE
16
Make darker Make brighter
Pointer
REC (recording) indicator
16
3.8
1/30
When you have finished capturing images, turn off the digital camera.
HINT
Shortcut for setting the exposure correction
œ If the Shooting Setting Screen or Information Screen is not displayed, you can press the arrow
button to quickly display the icon for setting the exposure correction (see page 81).
NOTE
œ In the sequential shot mode, the flash and self-timer cannot be used.
œ With AE shift sequential shots, the exposure may not change depending on the ambient lighting.
English
66
Page 72

SEQUENTIAL SHOT
Best select shot Ä
The best select shot captures four sequential images so that you can choose which one to save.
Set the shooting mode to the sequential shot shooting mode (see page 31).
1
Select best select shot Ä from the sequential shot
2
method menu, and press the SET button.
œ This sets the best select shot method.
œ For the best select shot, you do not need to set the
shutter operation. (The shutter operation menu will not
appear.)
œ If the main switch is set to “MONITOR OFF”, you can
take pictures using the viewfinder. However, if the main
switch is set to “MONITOR OFF”, the 4-image display
(step 4) will not appear and the four images will
automatically be saved as a sequential shot in the
sequential shot folder.
œ To exit the Shooting Setting Screen, press the MODE
button.
Press the shutter release button to capture the
3
sequential shot.
œ For the best select shot, it is not necessary to hold down
the shutter release button.
œ During shooting using the LCD monitor, K will appear
in the LCD monitor while images are being captured.
œ After a few moments, the 4-image display appears
showing the images captured.
METHOD
16
REC (recording) indicator
13
67
English
Page 73

Select the image that you want to save.
4
1
Press the arrow button to move the orange frame to the
image you want to save.
2
Press the SET button.
œ
The Best Shot Confirmation Screen appears with the
selected image displayed full screen. You can press
[d] or [c] to select a different image.
œ
To return to the 4-image display, select “EXIT” and
press the SET button.
To save all four images
œ At the 4-image display, press the MODE button. All four
images are saved as a sequential shot in the
sequential shot folder.
Save the selected image and erase the others.
5
1
Make your final check of the image and select “SAVE
IMAGE ERASE OTHERS”.
2
Press the SET button.
œ
A screen confirming whether or not you want to save
the selected image and erase the others appears.
œ
To return to the Best Shot Confirmation Screen, select
“NO” and press the SET button.
3 Select “YES” and press the SET button.
œ
“PROCESSING” appears for a few moments and then
you return to the sequential shot shooting mode.
œ
The selected image is saved in the still image folder
and the other three images are deleted (nothing is
saved in the sequential shot folder).
Orange frame
4-image display
Folder number and name
100-0101
SAVE IMAGE
ERASE OTHERS
EXIT
Best Shot Confirmation
Screen
100-0101
SAVE IMAGE
ERASE OTHERS
YES
NO
Confirmation Screen for
erasing the other images
When you have finished capturing images, turn off the digital camera.
HELP
If power is cut off during the sequential shot
œ If the digital camera is left alone for approximately one minute at step 4 (when using batteries),
the power save function activates (see page 30), the power is turned off, and all four images
are saved as a sequential shot in the sequential shot folder. If this occurs, copy the desired
image from the sequential shot folder (see page 118) and then erase the sequential shot.
English
68
Page 74

VIDEO CLIP
This digital camera allows you to record video clips, which are moving images with audio.
Display the Video Clip Shooting Setting Screen (see
1
page 31).
œ The remaining memory on the card is calculated, and the
remaining recording time available is displayed.
œ Depending on the memory capacity of the card, the
remaining time is shown as “hr:min:sec”.
SHUTTER
00:46
Remaining video recording time
Select the desired shutter operation from the shutter operation menu, and press the
2
SET button.
#: Recording of the video clip starts when the shutter release button is pressed and stops
when it is pressed again.
$: Recording of the video clip occurs only while the shutter release button is pressed.
œ This completes the shutter operation setting.
œ The shutter operation setting is retained even if the main switch is set to “MONITOR OFF”
or Ô, or the digital camera is turned off.
œ You can set the main switch to “MONITOR OFF” and record a video clip using the
viewfinder.
œ To exit the Shooting Setting Screen, press the MODE button.
(min:sec)
69
English
Page 75

Press the shutter release button to record the video
3
clip.
œ If $ is selected for the shutter operation, recording of
the video clip continues while the shutter release button
is pressed. If the shutter release button is released
before the maximum recording time is reached, the video
clip will stop there.
œ If # is selected for the shutter operation, the video clip
begins when the shutter release button is pressed and
continues until the shutter release button is pressed
again or the maximum recording time is reached.
œ If using the LCD monitor, the recording indicator K
appears during recording.
œ When the remaining recording time available for the
currently recording clip becomes less than about 30
seconds, the remaining recording time available appears
on the display.
œ After recording, you can view the first captured image by
setting the main switch to Ô. See “PLAYING BACK
VIDEO CLIPS” on page 103.
When you have finished capturing images, turn off the digital camera.
HINT
Short cut for setting the exposure correction
œ If the Shooting Setting Screen or Information Screen is not displayed, you can press the arrow
button to quickly display the icons for setting the exposure correction (see page 81).
NOTE
œ In the video clip mode, the flash and self-timer cannot be used.
œ The data for a video clip is very large. Therefore, be aware that if the video clip is downloaded
to a computer to be played back, the computer may not be able to play back the video fast
enough and the video may appear jerky. (The video will always be displayed properly on the
LCD monitor or a television.)
REC (recording) indicator
Recording time
(min:sec)
00:09
7
Remaining recording time (sec)
Shutter release button
English
70
Page 76

USING THE AUTOFOCUS
The autofocus will work in almost all occasions; however, there are certain conditions that may
cause the autofocus function not to work properly.
■ Conditions that may cause incorrect focus
The following examples are some of the situations where the autofocus function may not
work.
œ Subjects with low contrast or very bright subjects at the center
of the image
Use the focus-lock function (see pages 60 and 61) to lock the
focus on a subject with contrast at the same distance as the
desired subject.
œ Subjects without vertical lines
Use the focus-lock function to lock the focus on the subject
while holding the digital camera vertically.
The following examples are some of the situations where the autofocus function may work,
but not as desired.
œ When both near and far objects are present
Use the focus-lock function to lock the focus on a subject at
the same distance as the desired subject.
œ Fast-moving subjects
Use the focus-lock function to lock the focus on a subject at
the same distance as the desired subject.
HINT
About sequential shots
œ During sequential shots, the autofocus function will work when the shutter release button is
pressed and lock the focus.
71
English
Page 77

USING THE VARIOUS SHOOTING FUNCTIONS
Macro photography
Use the macro photography function when capturing images at close range (10 to 50 cm).
Press the MACRO button.
1
œ The current focus mode appears on the LCD monitor
screen.
No icon: For photography at normal focus.
c: For photography at macro focus.
å: For photography at distant focus (7 meters or more).
Select this setting when you know the distance to
your subject beforehand or when photographing a
subject that is difficult to get into focus.
Press the MACRO button to display the macro icon c.
2
œ Each time the MACRO button is pressed, the focus mode changes as follows:
No icon c (macro photography)
œ For photography using the viewfinder, press the MACRO button. The LCD monitor will turn
on briefly, and the current focus mode is shown. Press the MACRO button within 5
seconds to select the focus mode.
œ This completes the macro photography setting.
å
(distant subject)
12
3.1
1/50
Focus mode
Ex.: Still Image Shooting
Mode Screen
Compose the image.
3
œ You can set the main switch to “MONITOR OFF” and
take pictures using the viewfinder. However, it is
recommended to compose the image while viewing it on
the LCD monitor. Due to the unavoidable misalignment
between the viewfinder and camera lens, as the digital
camera gets closer and closer to the subject, the image
that is actually captured is seen lower and lower in the
viewfinder.
Press the shutter release button.
4
œ The image is captured in the macro photography mode.
When you have finished capturing images, turn off the digital camera.
HINT
œ The shortest distance for taking macro photography is 10cm if the zoom switch is pressed to
1 (Wide), and 25cm if it is pressed to 0 (Tele).
Viewfinder
MACRO button
LCD monitor
Shutter release
button
Zoom switch
English
72
Page 78

USING THE VARIOUS SHOOTING FUNCTIONS
Using the flash
The flash is used not only for taking pictures where there is insufficient light, but also when the
subject is in shade or in backlight conditions. Your camera has four modes of operation (automatic
flash mode, forced flash mode, flash off mode, and red-eye reduction mode).
The flash can be used only in the still image shooting mode. The effective flash range is:
Normal focus: 0.5 to 3.9 meters (widest lens setting) and 0.5 to 2.3 meters (telephoto lens
setting)
Macro focus: 0.15 to 0.5 meters (wide lens setting) and 0.25 to 0.5 meters (telephoto lens
Shooting using the viewfinder
Press the flash button.
1
œ The current flash mode is shown on the LCD monitor.
œ To change the flash mode, proceed to step 2 within five
seconds. To keep the same flash mode, proceed to step
3.
No icon: The digital camera will detect the subject
d: The flash will operate with every image captured
j: The flash will not operate even in dark situations. Use
È: The digital camera will detect the subject brightness
setting)
brightness and use the flash only when required.
In a backlight situation, if only the center of the
image is very dark, the flash will operate to
compensate.
regardless of the conditions. Use this setting under
backlight conditions, when the subject is in the shade,
under fluorescent lighting conditions, etc.
this setting when capturing an image in a location
where flashes are forbidden, or when shooting a night
landscape scene.
and use the flash only when required. At this time the
flash will operate in a way that reduces the red
reflection (“red-eye”) in the subject’s eyes.
Shutter release button
Flash bulb
Flash button
12
2.8
1/30
Flash mode
73
English
Press the flash button to set the flash mode.
2
œ For details, refer to step 1 on next page.
Press the shutter release button.
3
œ The image is captured in the desired flash mode.
Page 79

Shooting using the LCD monitor
Press the flash button to set the flash mode.
1
œ Each time the flash button is pressed, the flash mode changes as follows:
No icon (automatic flash) d (forced flash) j (flash off) È (red-eye reduction)
œ This completes the flash setting.
œ The flash setting is retained even if the main switch is set to “MONITOR OFF” or Ô, or
the digital camera is turned off.
Press the shutter release button.
2
œ The image is captured in the desired flash mode.
When you have finished capturing images, turn off the digital camera.
HINT
œ In the automatic flash mode using the LCD monitor, at the time of the flash, when you depress
the shutter release button halfway, the f icon appears in the upper right area of the LCD
monitor to let you know.
NOTE
œ The flash cannot be used in the sequential shot shooting (see page 63), video clip shooting
(see page 69), and audio recording (see page 79) modes.
HELP
œ While the flash is being charged, the stand-by indicator in the viewfinder will flash red. During
this time an image cannot be captured, even if the shutter release button is pressed. Wait until
the stand-by indicator lights green to capture the next image.
Stand-by indicator (red/green)
English
74
Page 80

USING THE VARIOUS SHOOTING FUNCTIONS
Using the self-timer
Use the self-timer function to have the digital camera automatically capture the image for you 10
seconds after the shutter release button is pressed. The self-timer can only be used in the still
image shooting mode.
Display the Still Image Shooting Setting Screen (see
1
page 31).
Select the self-timer on icon U from the self-timer
2
menu, and press the SET button.
U: For turning on the self-timer function.
V: For turning off the self-timer function.
œ This completes the self-timer setting.
œ The self-timer setting returns to off when the main switch
is set to “MONITOR OFF” or Ô, or the digital camera is
turned off.
Press the shutter release button.
3
œ When the shutter release button is pressed, the
self-timer indicator will light for about 7 seconds, flash for
about 3 seconds, and then the image is captured. At this
time, if the beep sound setting is “ALL” or “SHUTTER”, a
warning tone (beep-beep-beep) sounds.
œ When using the self-timer function, be sure to use a
tripod or place the digital camera on a level, stable
surface.
œ After the image has been captured, the self-timer
function is turned off.
œ If the shutter release button is pressed before the image
is captured, the self-timer mode is stopped temporarily.
Press the shutter release button one more time to restart
the self-timer.
œ To cancel the self-timer mode, select the self-timer off
icon V and press the SET button.
SELF-TIMER
5
Shutter release button
Self-timer indicator
Tripod stand hole
75
English
When you have finished capturing images, turn off the digital camera.
Page 81

Using the zoom
There are two zoom functions (optical zoom and digital zoom). When you first zoom in on the
subject, it is magnified with the optical zoom. When the limit of the optical zoom has been
reached, zooming in further will then magnify the image using the digital zoom. You can set
whether or not the digital zoom becomes active when shooting (see page 89).
The digital zoom can be used when the resolution is set to D or less.
Set the digital zoom to on (see page 89), and point the
1
camera lens at the subject.
œ When the digital zoom is set to on, the digital zoom icon
will appear on the LCD monitor.
Press 0 or 1 on the zoom switch to compose the
2
desired image.
0: Zoom in on the subject.
1: Zoom out.
œ When the optical zoom factor becomes 2.8x, zooming
stops temporarily. When the zoom switch is again
pressed to 0, it changes to the digital zoom mode, and
zooming continues (if digital zooming is available).
œ While the digital zoom is active, the stand-by indicator
flashes green and the digital zoom icon becomes yellow.
Press the shutter release button.
3
œ The image is captured with the subject zoomed up
(enlarged).
24
3.1
1/50
Digital zoom icon
Shutter release button
Zoom switch
Stand-by
indicator
When you have finished capturing images, turn off the digital camera.
NOTE
œ When the digital zoom is used, the image quality will deteriorate slightly.
œ If the optical zoom is operated during video clip photography, the noise from the zoom
movement may be picked up by the microphone. In this case, change the camera setting so
that the optical zoom does not move (see page 88).
The digital zoom cannot be used when capturing images using the viewfinder
œ If the main switch is set to “MONITOR OFF” while the digital zoom is active, the digital zoom is
canceled and only the optical zoom (2.8x) will function.
English
76
Page 82

MONOCHROME PHOTOGRAPHY
You can take pictures as black-and-white images with this camera.
Display the Shooting Settings Screen (see page 31).
1
Select the monochrome shooting on icon e from the monochrome shooting menu,
2
and press the SET button.
e: For black-and-white photography.
f: For color photography.
œ This completes the monochrome photography setting.
Press the shutter release button.
3
œ The picture is captured as a black-and-white image.
When you have finished capturing images, turn off the digital camera.
NOTE
œ During monochrome shooting, the white balance cannot be set.
MONOCHROME
12
77
English
Page 83

ADDING A VOICE MEMO
In the still image shooting mode, you can record approximately 4 seconds of sound (called a
“voice memo”) when capturing the image. You can also add a voice memo to an image previously
recorded (see “ADDING A VOICE MEMO (ADD AUDIO FUNCTION)” on page 109).
Display the Still Image Shooting Setting Screen (see
1
page 31).
Select the add voice memo icon a from the voice
2
memo menu, and press the SET button.
a: For adding a voice memo.
b: For not adding a voice memo.
œ This completes the voice memo setting.
œ The voice memo setting returns to off when the main
switch is set to “MONITOR OFF” or Ô, or the digital
camera is turned off.
œ To exit the Shooting Setting Screen, press the MODE
button. When the Shooting Setting Screen disappears,
the voice memo icon a appears in the upper right area
of the LCD monitor.
Press the shutter release button to capture the image
3
and then talk into the microphone.
œ About 4 seconds of sound are recorded.
œ During the recording, K appears in the upper right
area of the LCD monitor.
œ When the voice memo is finished, the setting returns to
the no voice memo setting.
œ The voice memo can be played back in the still image
playback mode (see page 98).
VOICE MEMO
12
Shutter release button
Microphone
When you have finished capturing images, turn off the digital camera.
NOTE
œ When the compression ratio is set to L, it takes approximately 30 seconds for the image data
to be recorded (when using the supplied 16MB CompactFlash card). The voice memo will start
after this. When the recording for the voice memo begins, K will appear in the upper right
area of the LCD monitor.
œ The voice memo function cannot be used in the sequential shot shooting mode.
œ In the video clip mode, the sound is recorded automatically.
œ Each voice memo uses one-half the memory of an image captured at a resolution of 4 and
compression rate of G.
English
78
Page 84

PERFORMING AN AUDIO RECORDING
Like a normal tape recorder, your digital camera can record sounds. Since the recording is digital,
rewinding to the beginning of the recording is quick and easy. When you add a voice memo to a
still image, only 4 seconds of recording time is allowed, but with the audio recording function, you
can record sound until the available memory of the installed card expires. (With the supplied
16MB CompactFlash card, the maximum recording time for one audio recording is 15 minutes,
and the total maximum recording time is 33 minutes and 35 seconds.)
Display the Shooting Option Setting Screen (see page
1
31).
œ The “audio recording” is selected on this screen.
Press the SET button.
2
œ The Audio Recording Screen appears.
AUDIO REC
CLOCK SET
BEEP
DISCHARGE
LANGUAGE
TV SYSTEM
REFORMAT
Shooting Option Setting
Screen
AUDIO REC
32:48
REC
Audio Recording Screen
79
English
Page 85

Press [j] or [l] on the arrow button to select æ, and
3
press the SET button.
œ Recording begins. Point the microphone toward the
sound you wish to record.
œ For more information on the maximum recording time,
see page 136.
œ “RECORDING” and K appears during recording.
œ To stop the sound recording, press the SET button again.
œ When the recording time available for sound is
approximately less than 30 seconds, the remaining
recording time is shown.
œ To return to the Shooting Option Setting Screen, press
the MODE button, or select the C icon and press the
SET button.
When you have finish making the audio recording, turn off the digital camera.
HINT
To perform audio recording even after you exit the Audio Recording Screen
œ After displaying the Audio Recording Screen (perform steps 1 and 2 on page 79) and æ is
selected, you can set the main switch to “MONITOR OFF” and put the digital camera into the
audio recording stand-by state. In this state, just press the SET button to start recording.
Remaining recording
AUDIO REC 08:12
7
RECORDING
STOP
Recording screen
Recording time
(min:sec.)
time (sec)
Microphone
English
80
Page 86

EXPOSURE CORRECTION
Use the exposure correction function when shooting to make the entire image that you capture
darker (underexposed) or lighter (overexposed) as desired.
Display the Shooting Setting Screen (see page 31).
1
Select the exposure correction icon Ê.
2
Press [d] or [c] on the arrow button to adjust the
3
exposure.
œ Press [d] or [c] to move the pointer on the exposure
correction bar to the left or right and correct the exposure
accordingly.
œ The exposure setting numerical value is shown at the left
end of the exposure bar. The exposure can be set within
the range shown below.
Still image/normal sequential shot/best shot/video clip
shooting:
–1.8EV to +1.8EV
Auto bracket shooting (AE shift sequential):
–0.9EV to +0.9EV
œ While the exposure is corrected, the stand-by indicator
will flash green.
œ Exposure correction is cancelled when the main switch is
set to “MONITOR OFF” or Ô, the camera is turned off,
or the pointer is returned to the center position.
Press the shutter release button.
4
œ The image is captured with exposure correction.
Exposure correction bar
EXPOSURE
12
Exposure correction
Make brighterMake darker
Pointer
Stand-by indicator
Jog dial
MODE button
Arrow button
Shutter release
button
When you have finished capturing images, turn off the digital camera.
NOTE
œ When the exposure control setting [page 82] is set to manual Í, exposure correction is not
possible. To use the exposure correction, set the exposure control to a setting other than
manual Í.
HINT
Shortcut for setting the exposure correction
œ When the Shooting Setting Screen or Information Screen is not displayed, you can press the
arrow button to quickly display the exposure correction bar. (The exposure correction bar will
not appear if exposure correction is not available.) Press [d] or [c] to set the exposure
correction.
81
English
Page 87

SETTING THE EXPOSURE CONTROL
By setting the shutter speed and aperture size, various exposure controls are possible. By
changing the settings in accordance with the scene to be photographed, you can create the image
that you want to express.
The exposure controls can be set in the still image shooting mode and sequential shot shooting
mode.
Display the Still Image Setting Screen or Sequential
1
Shot Setting Screen (see page 31).
Select an exposure control method from the exposure control menu, and press the
2
SET button.
Ï: The optimum shutter speed and aperture size are set according to the brightness of the
subject. (Aperture and shutter variable program AE)
Example: For simple shooting with minimum setup, using the camera’s automatic
Î: This allows you to set a specific aperture size. The camera automatically sets an
appropriate shutter speed based on this setting. (Aperture priority AE)
Example: To open the aperture for portraits with a blurred background (for a shallow
Ì: This allows you to set a specific shutter speed. The camera automatically sets an
appropriate aperture size based on this setting. (Shutter speed priority AE)
Example: To set a fast shutter speed for capturing a clear image of an fast-moving
Í: This allows you to set a specific shutter speed and aperture size. (Manual exposure
control)
Example: When shooting in a dark location without using a flash, set the shutter to stay
settings.
field depth), or to close the aperture for a clear foreground and background
(for a deep field depth).
object, or to set a slow shutter speed to shoot the flow of a background
scene.
To combine flash use with a slow shutter speed (slow shutter) so that both
the foreground subject and the nighttime background scene(s) appear clearly
in the picture (slow-synchro photography), use a tripod to eliminate camera
movement.
open for a longer time (slow shutter). When used for shooting nighttime
scenes, you can capture lights flowing across the image.
EXP CONTROL
12
2.8
1/30
English
82
Page 88

SETTING THE EXPOSURE CONTROL
Make the setting.
3
<If aperture and shutter variable program AE Ï is selected>
œ The setting changes to aperture and shutter variable program AE, and the camera returns
to the Shooting Setting Screen.
<If aperture priority AE Î is selected>
œ The display to set the aperture size appears.
œ Turn the jog dial to set the desired aperture size.
APARTURE
12
SETTING
5.0
<If shutter speed priority AE Ì is selected>
œ The display to set the shutter speed appears.
œ Turn the jog dial to set the desired shutter speed.
<If manual exposure control Í is selected>
œ The display to set the aperture size and shutter speed
appears.
œ Press [j] or [l] on the arrow button to select aperture
size or shutter speed, and turn the jog dial to change the
setting.
Press the SET button.
4
œ This completes the exposure control setting.
œ The display returns to the Shooting Setting Screen.
NOTE
œ A slow shutter speed makes shooting pictures in darker locations possible; however, image
noise may increase.
œ To reduce the noise, set the noise reduction to on.
œ When the manual exposure control mode is set, the AE shift sequential shot method cannot be
selected. Also, when the AE shift sequential shot method is set, the manual exposure control
mode cannot be selected.
œ When the manual exposure control mode is selected, the exposure correction value becomes
±0.
œ Even when shutter speed priority AE Ì or manual exposure control Í is selected and the
shutter speed is set to 1/1000 second, in some cases the shutter speed at the time an image is
captured may not be 1/1000 second. To take a picture with a shutter speed of 1/1000 second,
set the zoom to a wide lens setting and the aperture to its smallest setting.
S.SPEED
12
SETTING
1/250
MANUAL
12
SETTING
5.0
1/250
83
English
Page 89

SETTING QUICK SHOT
(STILL IMAGE SHOOTING ONLY)
With the normal settings, when the shutter release button is pressed, the digital camera performs
the exposure correction, the white balance settings, the focussing, and other settings before the
image is captured. This leads to a time lag between when the shutter release button is pressed
and the image is actually captured. By turning on the quick shot setting, these settings are set less
precisely, but the lag time from when the shutter release button is pressed to when the image is
actually captured is drastically reduced.
Display the Still Image Shooting Setting Screen (see page 31).
1
Select a quick shot setting from the quick shot menu,
2
and press the SET button.
Q: Turns off the quick shot setting.
R: Turns on the quick shot setting.
œ This completes the quick shot setting.
NOTE
How to shoot with the quick shot
œ When the quick shot setting is on, the first time the shutter release button is pressed, the digital
camera performs the normal settings. If the shutter release button is again pressed within 1
second after the camera becomes ready (the stand-by indicator lights green), the quick shot
function works to capture the image quickly. It is possible to take sequential quick shots if it is
within one second. If the shutter release button is pressed after an interval of one second or
more following the previous shot, the digital camera performs the settings as for normal
shooting.
QUICK SHOT
5
English
84
Page 90

SETTING THE ISO SENSITIVITY
With the normal settings, the ISO sensitivity is set automatically according to the brightness of the
subject. However, in the special mode, you can fix the ISO sensitivity to the equivalent of 100,
200, or 400.
Display the Shooting Setting Screen (see page 31).
1
Select an ISO sensitivity setting from the ISO
2
sensitivity menu, and press the SET button.
B: Sets the ISO sensitivity automatically (equivalent to
ISO100 to 400).
+: Sets the sensitivity equivalent to ISO100.
1: Sets the sensitivity equivalent to ISO200 (twice the
sensitivity of +).
%: Sets the sensitivity equivalent to ISO400 (four times
the sensitivity of +).
œ This completes the ISO sensitivity setting.
NOTE
œ By setting a higher ISO sensitivity, you can set higher shutter speeds and capture images in
darker locations, but noise in the captured images may increase.
œ If the flicker reduction is set to k (see page 87) in the video clip shooting mode, then the ISO
sensitivity setting is fixed to B.
ISO
12
85
English
Page 91

SETTING THE WHITE BALANCE
With the normal settings, this digital camera automatically adjusts the white balance under most
lighting conditions. However, if you want to specify the lighting conditions or change the overall
tone of the image, the white balance can be manually set.
Display the Shooting Setting Screen (see page 31).
1
Select a white balance setting from the white balance
2
setting menu, and press the SET button.
H: The digital camera will make the white balance
adjustment automatically based on the natural and
artificial light conditions. This is the setting used in the
auto mode.
g: For shooting outside on a sunny day.
h: For shooting outside on a cloudy day.
e: For shooting inside under fluorescent lighting.
i: For shooting inside under incandescent lighting.
S: For more accurate adjustment or when the light source cannot be specified.
Setting procedure
1 Select the S icon and press the SET button.
œ The S icon moves to the left.
2 Fill the entire screen with plain white card (or piece of paper, etc.)
3
Press the SET button.
œ The white balance setting programmed with the S icon is retained even if
another white balance setting (H, g, h, e, or i) is set. By selecting
the S icon and pressing the SET button, these same settings can be used
again.
œ This completes the white balance setting.
WHITE BALANCE
12
NOTE
œ To cancel the white balance setting and return to the automatic setting, perform step 1 and
select H, then press the SET button.
HINT
To capture sepia-tone images
œ In step 2 of step 2, instead of using a white card, use a blue card to set the white balance. You
can experiment by changing the card color with which the white balance is performed for
different results.
English
86
Page 92

FLICKER REDUCTION SETTING
(VIDEO CLIP SHOOTING ONLY)
The flicker reduction setting reduces the flicker that results when filming video clips underneath
fluorescent lights and the like where the background lighting pulsates at the frequency of the
power supply. The flicker reduction setting is set for a frequency of 50 Hz.
The flicker reduction setting is possible only for the video clip shooting mode.
*
Display the Video Clip Shooting Setting Screen (see
1
page 31).
Select a flicker reduction setting from the flicker
2
reduction setting menu, and press the SET button.
l: Turns off the flicker reduction setting.
k: Turns on the flicker reduction setting.
œ This completes the flicker reduction setting.
NOTE
œ Note that although the flicker reduction setting decreases the image flicker that occurs
underneath fluorescent lighting, the image quality may deteriorate slightly.
œ If the flicker reduction is set to k, then the ISO sensitivity setting (see page 85) is fixed to B.
FLICKER REDUCT
00:46
87
English
Page 93

SETTING THE ZOOM
Setting the optical zoom (video clip shooting
only)
If the optical zoom is operated during video clip photography, the noise from the zoom movement
may be picked up by the microphone. In this case, change the camera setting so that the optical
zoom does not move.
Display the Video Clip Shooting Setting Screen (see
1
page 31).
Select an optical zoom shooting setting from the optical zoom setting menu, and
2
press the SET button.
ï: Optical zoom moves during the video clip shooting.
ñ: Optical zoom does not move during the video clip shooting.
œ This completes the optical zoom setting.
OPTICAL ZOOM
00:46
English
88
Page 94

SETTING THE ZOOM
Setting the digital zoom
This setting allows you to set whether or not the digital zoom becomes active during magnified
shooting at a resolution of D or less.
Display the Shooting Setting Screen (see page 31).
1
Select a digital zoom setting from the digital zoom menu, and press the SET button.
2
Z: Digital zoom cannot be used.
Y: Digital zoom can be used.
œ This completes the digital zoom setting.
NOTE
œ The maximum digital zoom magnification ratio is 4x.
œ When the digital zoom is used, the image may not be as sharp.
œ The digital zoom does not work at resolutions of C or above.
DIGITAL ZOOM
24
89
English
Page 95

SETTING THE NOISE REDUCTION
Noise which occurs in captured images when the shutter button is pressed during still image
shooting is reduced. The initial setting for noise reduction is off.
Display the Still Image Shooting Setting Screen (see
1
page 31).
Select the noise reduction on icon g from the noise reduction menu, and press the
2
SET button.
g: Noise is reduced.
h: Noise is not reduced.
œ This completes the noise reduction setting.
NOTE
œ The noise reduction function works when the shutter speed is 1/4 second or more.
œ The time it takes to record the shooting data after the shutter release button is pressed is longer
when the noise reduction function is used than when it is not used.
NOISE REDUCT
12
English
90
Page 96

SETTING THE LIGHT MEASURING METHOD
You can select from 3 types of light measuring methods.
Center light measuring: Light is measured only in the central portion of the shooting
Multi-section light measuring: Light is measured by sampling from multiple areas of the entire
Spot measuring: Light is measured only in the central portion of the LCD monitor.
Display the Shooting Setting Screen (see page 31).
1
Select a light measuring method from the light measuring method menu, and press
2
the SET button.
X: Center light measuring
V: Multi-section light measuring
W: Spot measuring
œ This completes the light measuring method setting.
œ When the spot measuring method is selected, the spot mark K appears in the center of
the LCD monitor.
screen. This is the initial setting.
shooting screen.
EXP MEASURE
12
NOTE
When the spot measuring method is selected
œ To measure light at a specific spot, point the camera so that the spot is in the center of the LCD
monitor, and press the shutter release button halfway. The light at the center of the LCD
monitor will be measured. In this condition, compose the picture and press the shutter release
button all the way down to capture the image.
91
English
Page 97

SETTING THE FOCUS METHOD
You can choose from the following 2 types of autofocus:
Multi-section focus: Subject distance detected by sampling from multiple areas of the entire
Spot focus: The camera focuses on the subject in the center of the LCD monitor.
Display the Shooting Setting Screen (see page 31).
1
Select a focus method from the spot focus menu, and
2
press the SET button.
j: Multi-section focus is used.
i: Spot focus is used.
œ This completes the focus method setting.
œ When the spot focus setting is selected, the focus mark +
appears in the center of the LCD monitor.
NOTE
When the spot focus setting is selected
œ To focus on a specific object, point the camera so that the object matches the focus mark in the
center of the LCD monitor, and press the shutter release button halfway. The camera will focus
on the subject at the focus mark in the center of the LCD monitor. In this condition, compose
the picture and press the shutter release button all the way down to capture the image.
œ It may be difficult to focus if there is little contrast in the subject.
shooting screen. This is the initial setting.
SPOT FOCUS
12
12
3.1
1/30
Focus mark
English
92
Page 98

SCENE SELECT FUNCTION
You can select from stored settings you have completed for specific shooting conditions. Also, you
can set your custom shooting conditions and then store them.
Selecting from stored shooting settings
Select from stored shooting settings. The following settings (preset settings) are already stored in
the digital camera for specific shooting conditions.
Possible preset settings
Still image
shooting mode
Night scene —
Set to a shooting mode, and press the MODE button for at least 2 seconds to display
1
the Information Screen (see page 42).
œ The current shooting settings are shown on the information screen.
Turn the jog dial.
2
œ The stored shooting settings will appear on the LCD
monitor. Turn the jog dial to display the desired shooting
setting in the LCD monitor.
Sequential shot
shooting mode
Sports For shooting running and jumping, fast-moving subjects.
For amusement park and fireworks displays at night, produces a good
balance between the bright lights and the dark background.
Portrait Focussed subject at the center, softened background for beautiful effect.
Auto Returns various shooting settings to the initialized settings.
Setting features
SPORTS
B/W
Press the SET button.
3
œ The shooting settings shown in the LCD monitor are set.
œ An icon showing the shooting mode appears in the upper left corner of the LCD monitor.
F: Sports
G: Night scene
H: Portrait
B: No indication (I to J are for your custom settings [page 94].)
NOTE
About the preset settings
œ When selecting a stored shooting setting, the Program AE mode is effective. Consequently, the
following settings are fixed.
Exposure control : Ï Suitable program AE for each preset setting
ISO sensitivity : B
Furthermore, when sports is selected, spot focus is on; when night scene is selected, the noise
reduction on is set.
œ When capturing images using the night scene G setting, use a tripod or other method to
stabilize the camera.
To return to normal shooting
œ Display the Information Screen, turn the jog dial to select “AUTO”, and press the SET button.
93
English
Page 99

Storing shooting settings
You can store your custom settings in the digital camera (original settings). Up to 3 different
custom settings can be stored. Also, you can edit your stored original settings and save the new
settings. Your original settings are selected using the same procedure as for the preset settings.
Adjust the various settings.
1
œ Adjust the various settings that appear on the Information Screen, such as resolution,
compression ratio, white balance, light measuring method, exposure control, etc.
œ When a preset setting is selected, the settings cannot be stored.
Set to a shooting mode, and press the MODE button for at least 2 seconds to display
2
the Information Screen (see page 42).
œ The current settings are shown on the Information Screen.
Press the SET button.
3
œ The Store Settings Screen appears.
œ Turn the jog dial to select a number to store your settings.
œ Screens (I to J) are for storing the settings.
Press the SET button.
4
œ “OVERWRITE?” appears on the screen.
Confirm the settings, and press the SET button.
5
œ The screen to enter a name for the settings appears.
œ Up to 6 characters can be entered for the name.
MEMORY
SELECT
B/W
1/30
Stored setting number
INPUT SETTING TITLE
ABCDE
SCROLL
SELECT
_
<
English
94
Page 100

SCENE SELECT FUNCTION
Enter a name for the settings. Up to 6 characters can
6
be entered.
œ For entering the name, see “ENTERING TEXT” on page
111.
Press the SET button.
7
œ The screen to confirm the settings appears. After you confirm the settings, the Store
Settings Screen turns off.
INPUT SETTING TITLE
PARADE
ABCDE
SCROLL
SELECT
Play back a captured image and store the
shooting settings
The shooting settings of a captured image can be stored as your original shooting settings.
Display the desired image [pages 96 to 103].
1
Press the MODE button for at least 2 seconds to display the Information Screen.
2
Press the SET button.
3
œ The Store Settings Screen appears.
œ The rest of the procedure is the same as that beginning in step 3 on page 94.
_
<
HELP
œ If the settings cannot be stored...
The settings cannot be stored in the following cases.
Images captured with the scene select function; images captured with another digital
camera.
Resized images; images copied from a sequential shot series or video clip.
Images that have been enlarged using the digital zoom.
NOTE
To modify the settings based on a stored setting
(1) Display the Information Screen, select the original settings you wish to change, and turn off
the Information Screen once.
(2) Change the shooting settings.
(3) Display the Information Screen, and press the SET button.
œ “OVERWRITE?” appears.
(4) Press the SET button, and enter a name for the settings.
(5) Press the SET button.
œ After storing the settings, the Information Screen turns off.
95
English
 Loading...