Sanyo VA-SW2000 Instruction Manual

Sanyo VA-SW2000 Instruction Manual

INSTRUCTION MANUAL

Network Archiving Software

VA-SW2000

CONTENTS

FEATURES . . . . . . . . . . . . . . . . . . . . . . . . . . . 2 ACCESSORIES . . . . . . . . . . . . . . . . . . . . . . . . 2 SYSTEM OUTLINE . . . . . . . . . . . . . . . . . . . . . 3 SYSTEM SETUP PROCEDURE . . . . . . . . . . . 4 SYSTEM REQUIREMENTS . . . . . . . . . . . . . . . 5 INSTALLING THE SOFTWARE . . . . . . . . . . . 6

b Installing the Archiving Software. . . . . . 6 b Installing the JPEG2000 Plug-in. . . . . . 10 b Uninstalling the Software . . . . . . . . . . . 11

CAMERA SETTINGS (Camset). . . . . . . . . . . 12

b Basic Knowledge Required for

Making Camera Settings . . . . . . . . . . . . . . 12

b Camera Setting Window Display

(CAMSET MAIN) . . . . . . . . . . . . . . . . . . . . . 14

b Registering Devices . . . . . . . . . . . . . . . 15

b Changing Registration Details . . . . . . . 16

b Deleting a Registration . . . . . . . . . . . . . 17

b Detailed Camera and

Video Server Settings . . . . . . . . . . . . . . . . 18

b Setting the Camera

(CAMERA SETTING). . . . . . . . . . . . . . . . . . 19

b Setting the Video Server

(SERVER SETTING) . . . . . . . . . . . . . . . . . . 20

b Functions of Each Window Element. . . . . 21

A CAMERA SET window. . . . . . . . . . . . . . 21

B SERVER TYPE window . . . . . . . . . . . . . 22

C RECORD MODE SET window. . . . . . . . 23

D LOCAL SERVER SET window . . . . . . . 24

LIVE IMAGE RECORDING SETTINGS (LSarchive) . . . . . . . . . . . . . . . . . . . . . . . . . . 26

b Live Image Recording Window Display . . 26

b Setting the Recording Areas

(Partitions) . . . . . . . . . . . . . . . . . . . . . . . . . 28 b Recording Area Setting Procedure . . . 30

OPERATIONS FROM USER TERMINALS . . 31

b Comparison of Client Computers . . . . . . . 31

b Accessing the Image Server . . . . . . . . . . . 32

b Changing the Password . . . . . . . . . . . . 33

b Logging Off . . . . . . . . . . . . . . . . . . . . . . 34

OPERATIONS AND FUNCTIONS OF MAIN WINDOW ELEMENTS . . . . . . . . . . . . . . . . . . 35

LIVE IMAGE INFORMATION AND SAVING,

RECORDING AND PLAYING BACK LIVE

IMAGES . . . . . . . . . . . . . . . . . . . . . . . . . . . . . 42

A Image Information Display (Info) . . . . . 42

B Switching the Image Mode

(Playback/Live). . . . . . . . . . . . . . . . . . . . 42

C Recording Images (Rec/Stop) . . . . . . . 43

D Saving Images (Save (S)) . . . . . . . . . . . 43

English

1

IMAGE SEARCH (SEARCH) . . . . . . . . . . . . . 44

b Functions of Each SEARCH Window

Element . . . . . . . . . . . . . . . . . . . . . . . . . . . . 44

A Search Procedure . . . . . . . . . . . . . . . . . 46

B Saving Search Images . . . . . . . . . . . . . 48

C Playing Back Saved Images. . . . . . . . . 50

PLAYING AND SAVING ALARM IMAGES

(ALARM BUTTON). . . . . . . . . . . . . . . . . . . . . 52

b Function of Each ALARM LIST Window

Element . . . . . . . . . . . . . . . . . . . . . . . . . . . . 52

A Playing Back Alarm Images . . . . . . . . . 54

B Saving Alarm Images . . . . . . . . . . . . . . 56

C Playing Back Saved Images. . . . . . . . . 57

MENU SETTINGS . . . . . . . . . . . . . . . . . . . . . 58 b Displaying the Menu Window . . . . . . . . . . 58 b MENU Window Flowchart . . . . . . . . . . . . . 59 b Menu Settings . . . . . . . . . . . . . . . . . . . . . . 61 A Setting the Current Time . . . . . . . . . . . 61

B Displaying Recording Area

Information. . . . . . . . . . . . . . . . . . . . . . . 61 C Setting Overwrite Recording and

Deleting Recording Data. . . . . . . . . . . . 62 D Setting Recording Conditions . . . . . . . 64 a Alarm recording. . . . . . . . . . . . . . . . . . . 66 a Recording method when an alarm

occurs. . . . . . . . . . . . . . . . . . . . . . . . . . . 66 a Adjusting recording conditions. . . . . . 67 E Setting Timer Recording

Conditions . . . . . . . . . . . . . . . . . . . . . . . 68 F Setting Alarm Notification E-mail

Sending Destinations . . . . . . . . . . . . . . 69 G Setting Camera Filming

Conditions . . . . . . . . . . . . . . . . . . . . . . . 70 H Setting Time-Based

Recording Rate . . . . . . . . . . . . . . . . . . . 73 I Setting Sequence Display . . . . . . . . . . 74 J System Settings . . . . . . . . . . . . . . . . . . 77 K Setting Display Images

for Each User. . . . . . . . . . . . . . . . . . . . . 83 PPP CONNECTIONS . . . . . . . . . . . . . . . . . . . 84 MODEM CONNECTIONS. . . . . . . . . . . . . . . . 85 SPECIFICATIONS . . . . . . . . . . . . . . . . . . . . . 86

FEATURES ACCESSORIES

The VA-SW2000 Network Archiving Software is a monitoring application that lets you record JPEG2000 images from network cameras and network video servers onto the hard drive of a computer, and to play back these recorded images.

The computer that the VA-SW2000 software is installed on becomes an “image server”, so that the images that have been recorded on that computer can be monitored as live images or recorded images by other computers (user terminals) that are also connected to the network.

aJPEG2000 images from up to a maximum of 16 cameras can be recorded simultaneously. In addition, the recording condition can be set individually as desired for each camera that is connected.

aVia the network, up to a maximum of 16 users on user terminals can access the recorded images for recording and playing back. In addition, the access for users can be controlled by means of passwords.

aA standard web browser (Internet Explorer) can be used to access the image server from a user terminal.

aThe image server can simultaneously record images while processing access requests for recording and playback from user terminals.

aRecording and playback images can be viewed in a single-screen or up to a 16-screen split screen display. In addition, both live images and playback images can be displayed as required.

aNormal recording and alarm recording are both available, and you can set parameters such as the recording rate and resolution for both types of recording. You can also set recording to take place in real time or as time-lapse recording as required.

aAn alarm notification function is also available, so that if an alarm is triggered at one of the cameras on the network, an electronic alarm playback message with a single alarm image attached can be sent to up to five designated e-mail addresses.

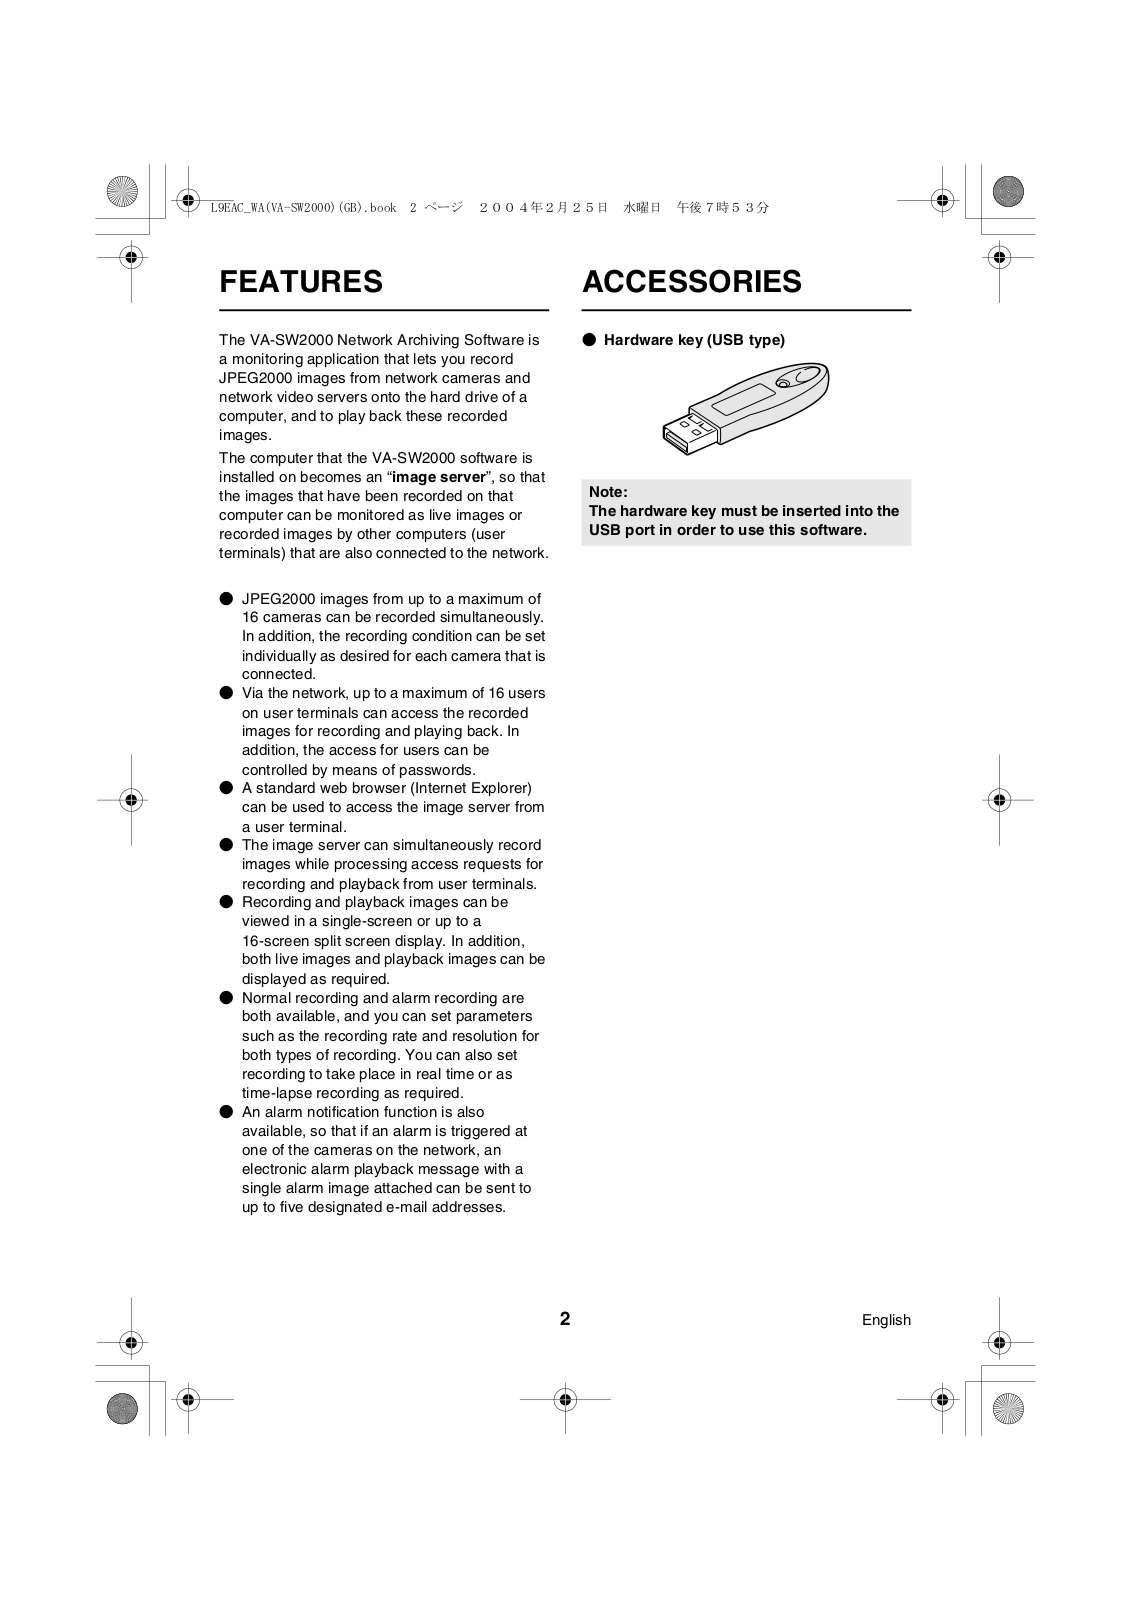
a Hardware key (USB type)

Note:

The hardware key must be inserted into the USB port in order to use this software.

2

English

SYSTEM OUTLINE

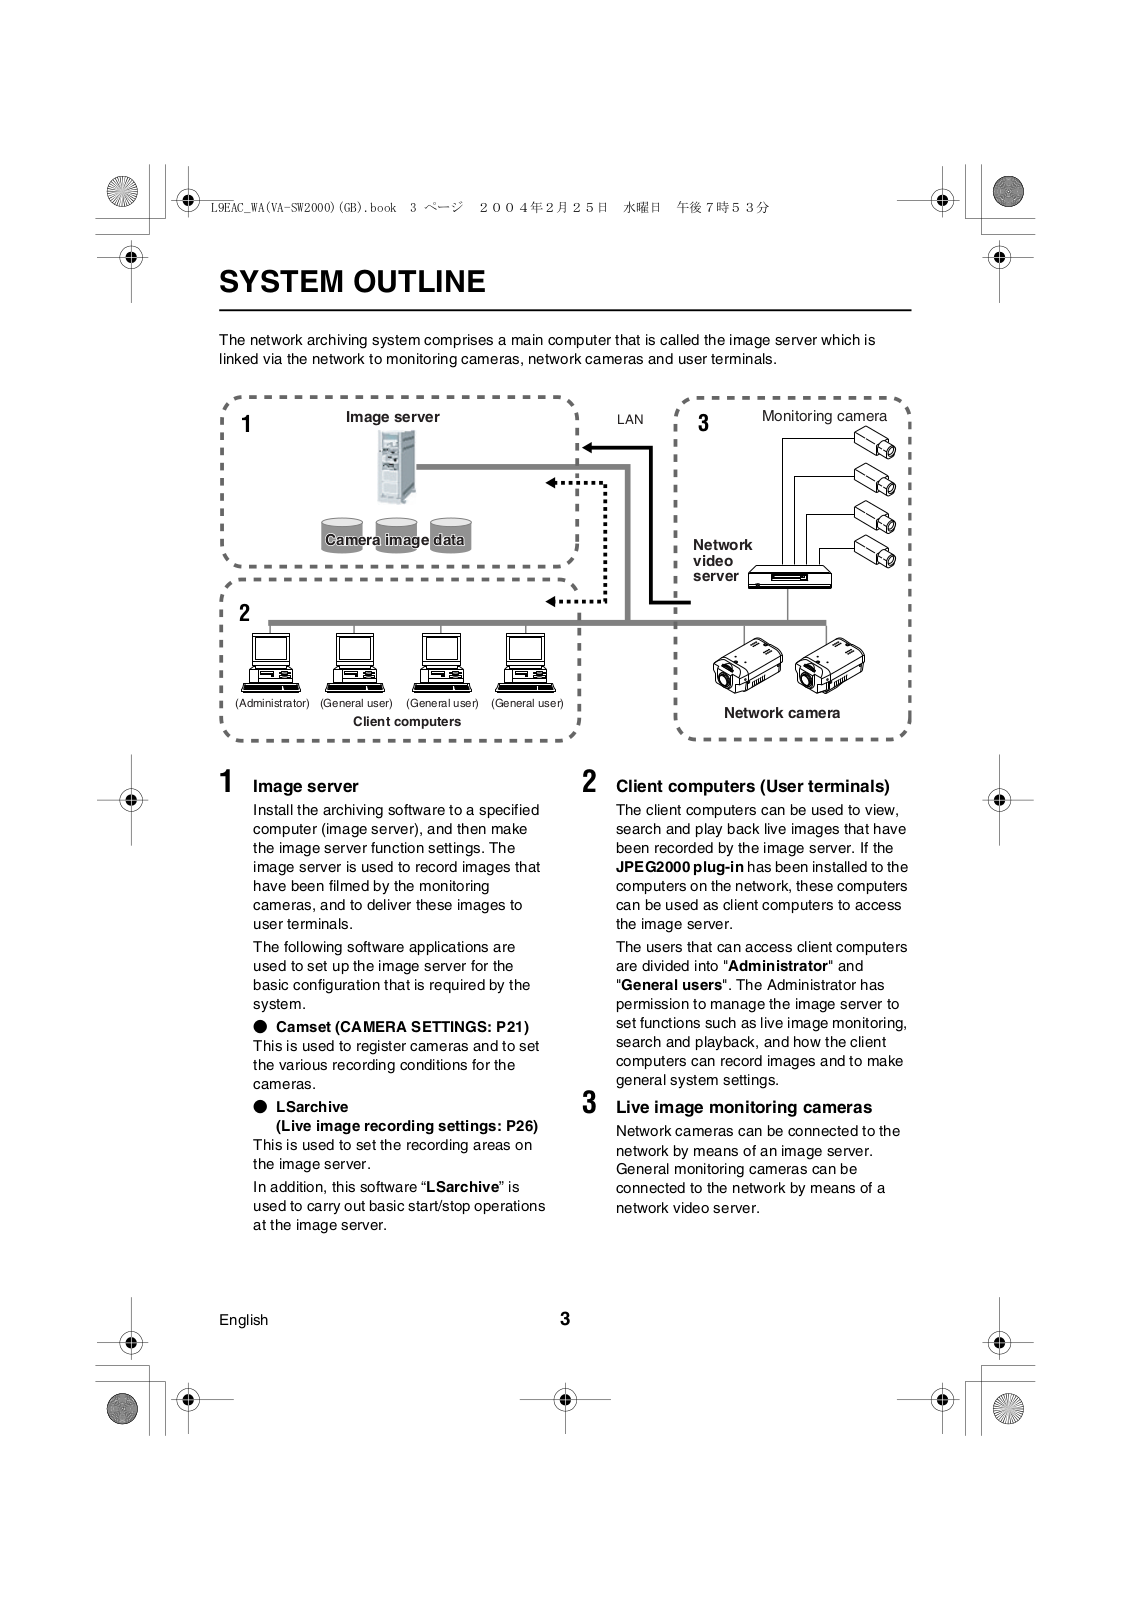
The network archiving system comprises a main computer that is called the image server which is linked via the network to monitoring cameras, network cameras and user terminals.

1

2

Image server

Camera image data

LAN

3

Monitoring camera


Network


video


server


(Administrator) (General user) (General user) (General user)

Client computers

1 Image server

2

Install the archiving software to a specified


computer (image server), and then make


the image server function settings. The


image server is used to record images that


have been filmed by the monitoring


cameras, and to deliver these images to


user terminals.


The following software applications are


used to set up the image server for the


basic configuration that is required by the


system.


a Camset (CAMERA SETTINGS: P21)


This is used to register cameras and to set


the various recording conditions for the


cameras.

3

a LSarchive

(Live image recording settings: P26)

This is used to set the recording areas on the image server.

In addition, this software “LSarchive” is used to carry out basic start/stop operations at the image server.

Network camera

Client computers (User terminals)

The client computers can be used to view, search and play back live images that have been recorded by the image server. If the JPEG2000 plug-in has been installed to the computers on the network, these computers can be used as client computers to access the image server.

The users that can access client computers are divided into "Administrator" and "General users". The Administrator has permission to manage the image server to set functions such as live image monitoring, search and playback, and how the client computers can record images and to make general system settings.

Live image monitoring cameras

Network cameras can be connected to the network by means of an image server. General monitoring cameras can be connected to the network by means of a network video server.

English

3

SYSTEM SETUP PROCEDURE

The basic flow of operations for setting up the network archiving system is as described below. The flow of operations is described in more detail in the following pages of this instruction manual.

1 Set the system requirements. (p. 5)

Connect the monitoring devices (network cameras and network video servers) and the computers to the network.

Note:

Make sure that the firmware versions for the monitoring devices match the archiving software version.

Ask the place of purchase for details on the version information.

2

3

4

Install the archiving software. (p. 6)

Install the archiving software onto the image server.

Install the JPEG2000 plug-in onto the client computers (user terminals).

Make the camera settings. (p. 12)

Run the Camset application on the image server, and use it to register cameras and to set the recording and filming conditions for each camera.

Run the Network Archiving Software. (LIVE IMAGE RECORDING SETTINGS) (p. 26)

Run the Network Archiving Software on the image server, and set up the hard disk partitions.

5 Log in to the image server. (MENU SETTING) (p. 58)

Log in to the image server from a user terminal using the Administrator user level.

Use the menu setting screens at the Administrator’s user terminal to make the settings that are required for the system to operate. In addition, register the general users who are to be able to access the image server.

This completes the basic steps for setting up the network monitoring system. After this, you can carry out additional maintenance tasks depending on the requirements of the system, such as expanding the number of devices connected, changing the setting conditions, and adding and deleting users.

4

English

SYSTEM REQUIREMENTS

The system requirements for the network archiving system are as follows.

bImage Server

aSpecifications/computer

CPU: Pentium® III 800 MHz or higher (Pentium 4, 2 GHz recommended)

Memory: 256 MB or more (512 MB recommended)

Operating System: Windows® 2000 Server / Professional, Windows® XP Professional

The operating system that can be used will vary depending on the number of client computers that are connected. Check the system configuration that you are using and also check the terms of your Microsoft windows license and select an operating system that complies with the conditions of use for your license.

Port: LAN port (2 or more recommended)

bClient Computer (User Terminal)

aSpecifications/computer

CPU: Pentium® III 800 MHz or higher (Pentium 4, 2 GHz recommended)

Memory: 128 MB or more (256 MB recommended)

Operating System: Windows® 98 SE/Me/2000/XP

aBrowser: Internet Explorer Ver. 5.5, Service Pack 2 or later

aComputer monitor display size: 1024 x 768 pixels or greater

bMonitoring Cameras

JPEG2000-compatible network camera (VCC-WB2000(P) or WB-4000(P)) or camera that is compatible with the network video server (VSP-SV2000(P)).

bConnection to Image Server

aCamera

Circuit: LAN or Internet

No. of connections: Maximum 16

aClient Computer Circuit: LAN or Internet

No. of connections: Max. 16 (Administrator: 1, General users: Maximum 15)

Note:

If your system requires protection from power outages, you should use an uninterruptible power supply (UPS). If running the system for extended periods, it is also recommended that you periodically shut the system down and restart it in order to ensure more stable system operation.

Microsoft and Windows are trademarks, or registered trademarks of Microsoft Corporation in the United States and/or other countries.

Intel and Pentium are trademarks or registered trademarks of Intel Corporation or its subsidiaries in the United States and other countries.

English

5

INSTALLING THE SOFTWARE

Install the archiving software onto the image server.

The JPEG2000 plug-in should be installed onto the computers that will be used as the client computers.

bInstalling the Archiving Software

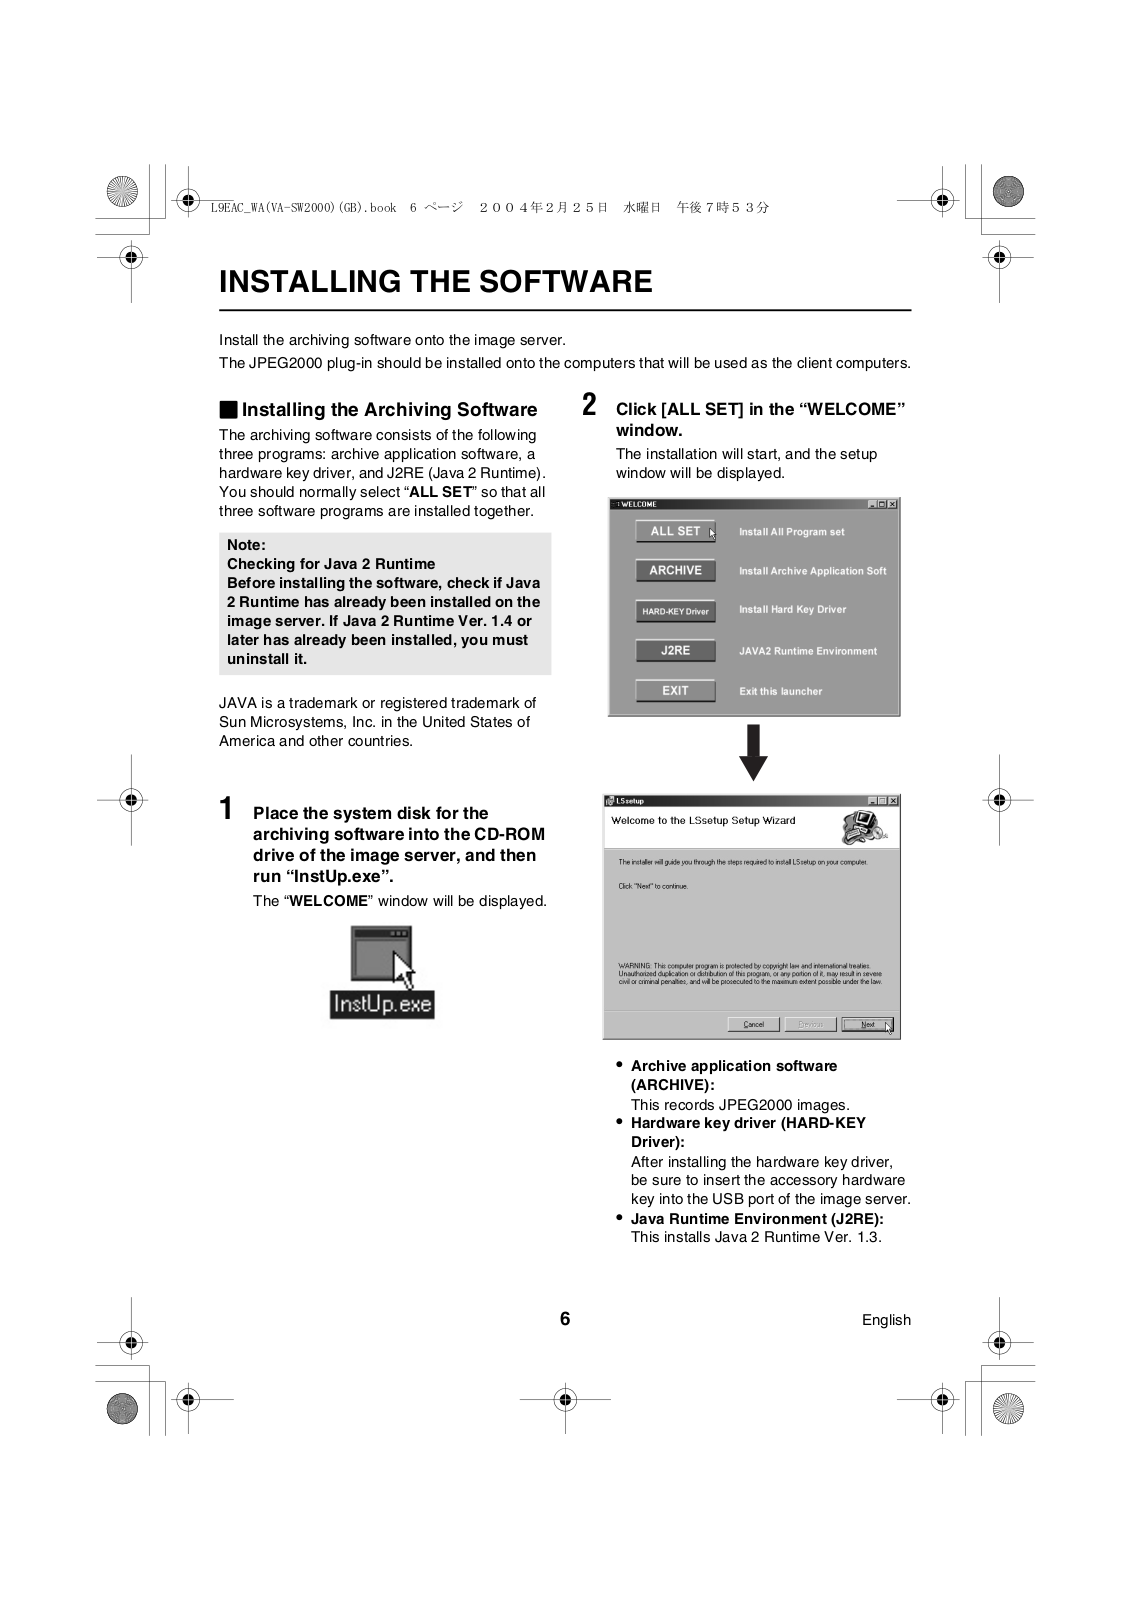
2 Click [ALL SET] in the “WELCOME”

The archiving software consists of the following

window.

three programs: archive application software, a

The installation will start, and the setup

hardware key driver, and J2RE (Java 2 Runtime).

window will be displayed.

You should normally select “ALL SET” so that all


three software programs are installed together.


Note:


Checking for Java 2 Runtime


Before installing the software, check if Java


2 Runtime has already been installed on the


image server. If Java 2 Runtime Ver. 1.4 or


later has already been installed, you must


uninstall it.


JAVA is a trademark or registered trademark of


Sun Microsystems, Inc. in the United States of


America and other countries.


1 Place the system disk for the


archiving software into the CD-ROM


drive of the image server, and then


run “InstUp.exe”.


The “WELCOME” window will be displayed.


Archive application software

(ARCHIVE):

This records JPEG2000 images.

Hardware key driver (HARD-KEY

Driver):

After installing the hardware key driver, be sure to insert the accessory hardware key into the USB port of the image server.

Java Runtime Environment (J2RE):

This installs Java 2 Runtime Ver. 1.3.

6

English

INSTALLING THE SOFTWARE

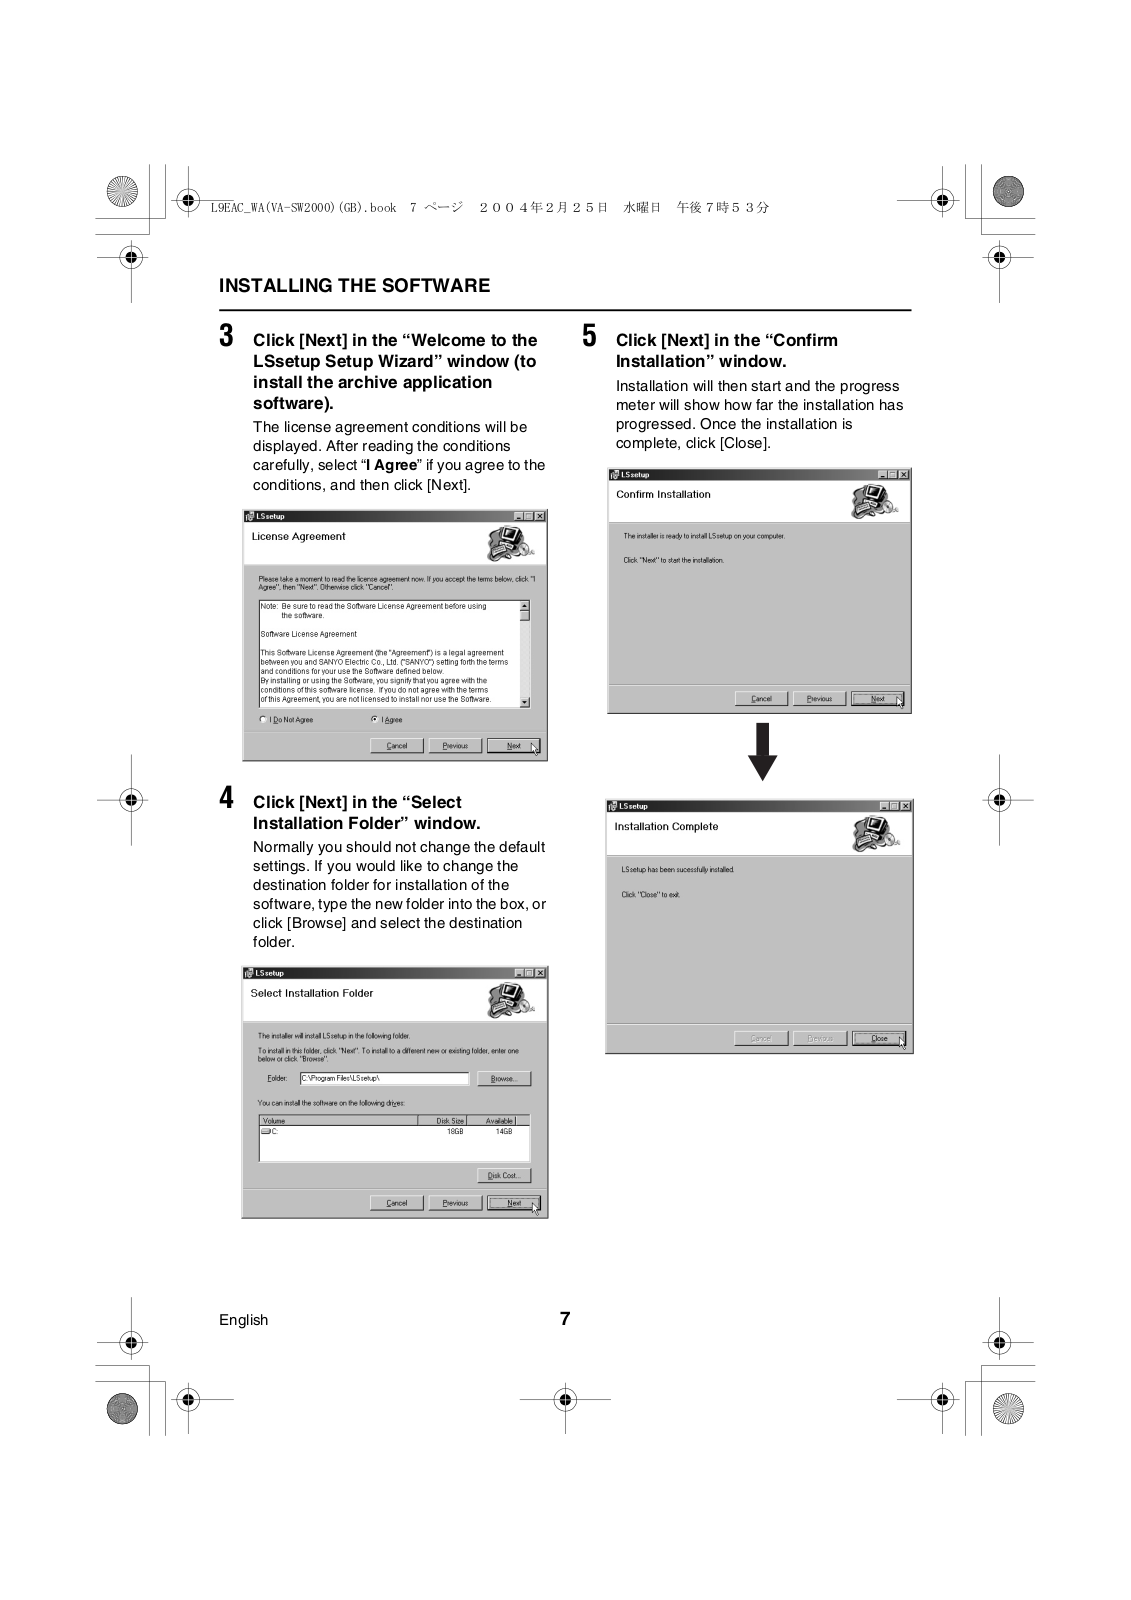
3 Click [Next] in the “Welcome to the

5 Click [Next] in the “Confirm

LSsetup Setup Wizard” window (to

Installation” window.

install the archive application

Installation will then start and the progress

software).

meter will show how far the installation has

The license agreement conditions will be

progressed. Once the installation is

displayed. After reading the conditions

complete, click [Close].

carefully, select “I Agree” if you agree to the


conditions, and then click [Next].


4 Click [Next] in the “Select

Installation Folder” window.

Normally you should not change the default settings. If you would like to change the destination folder for installation of the software, type the new folder into the box, or click [Browse] and select the destination folder.

English

7

INSTALLING THE SOFTWARE

6

7

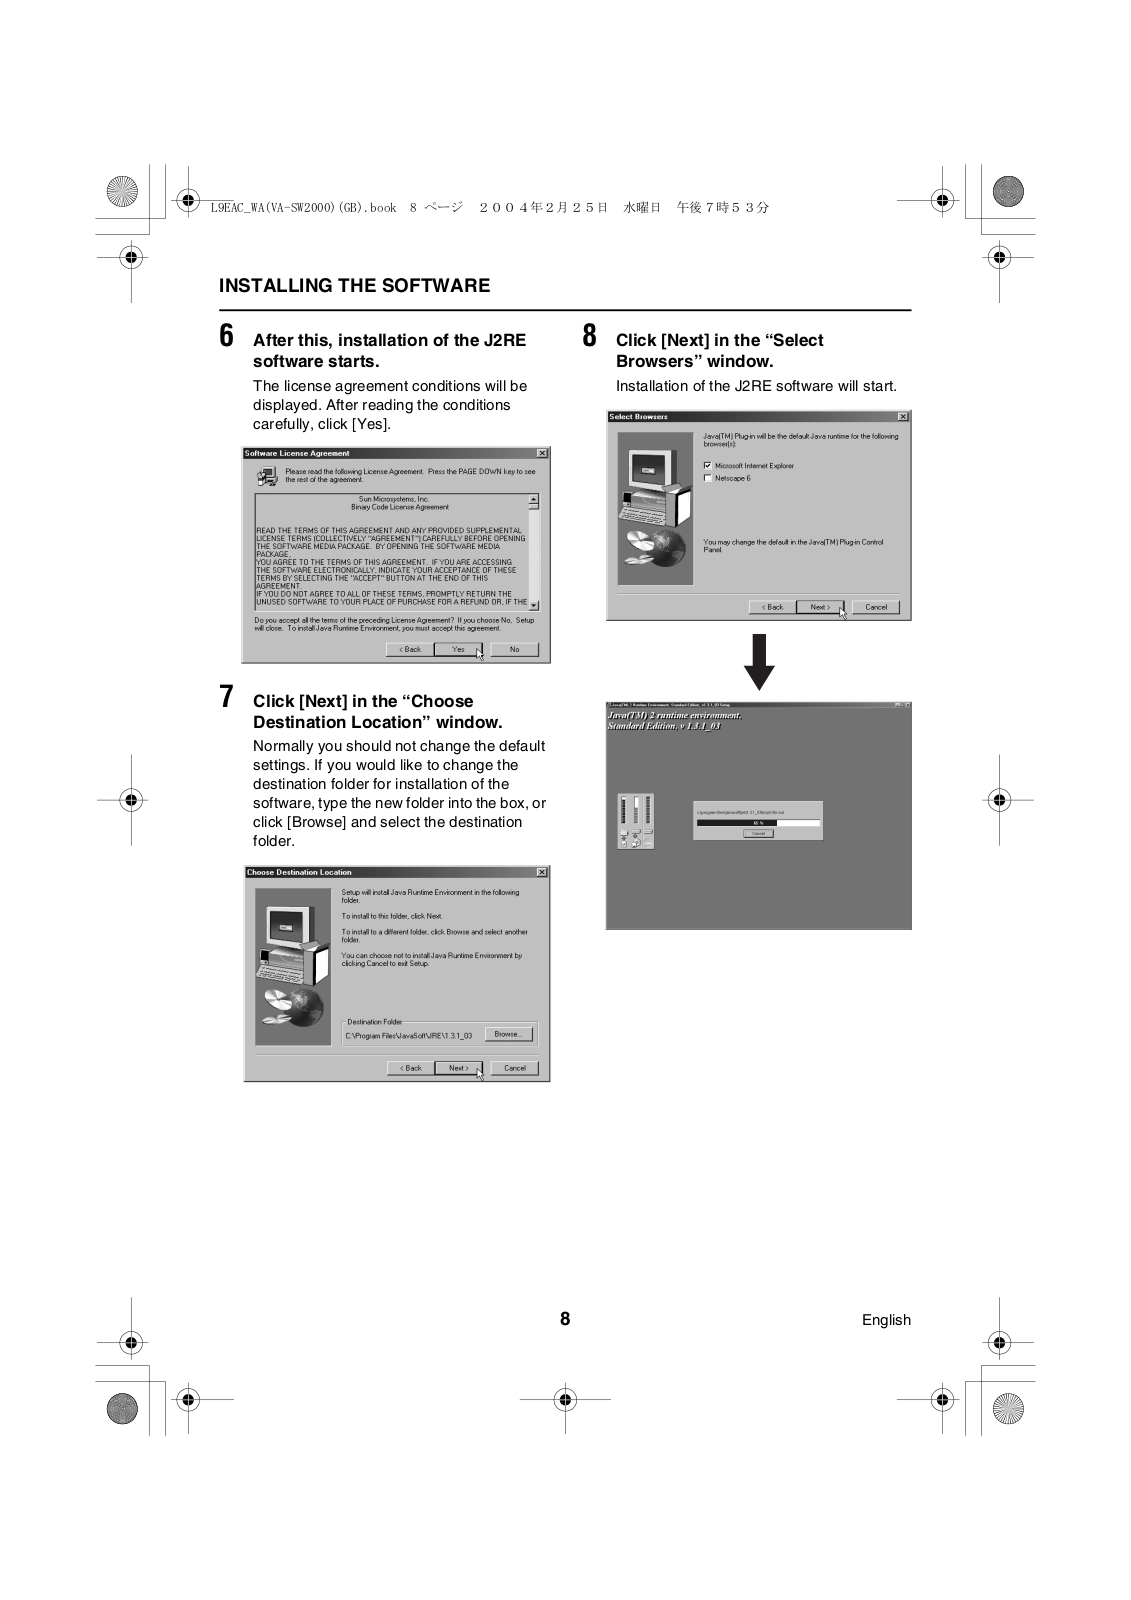
After this, installation of the J2RE

8 Click [Next] in the “Select

software starts.

Browsers” window.

The license agreement conditions will be

Installation of the J2RE software will start.

displayed. After reading the conditions


carefully, click [Yes].


Click [Next] in the “Choose

Destination Location” window.

Normally you should not change the default settings. If you would like to change the destination folder for installation of the software, type the new folder into the box, or click [Browse] and select the destination folder.

8

English

INSTALLING THE SOFTWARE

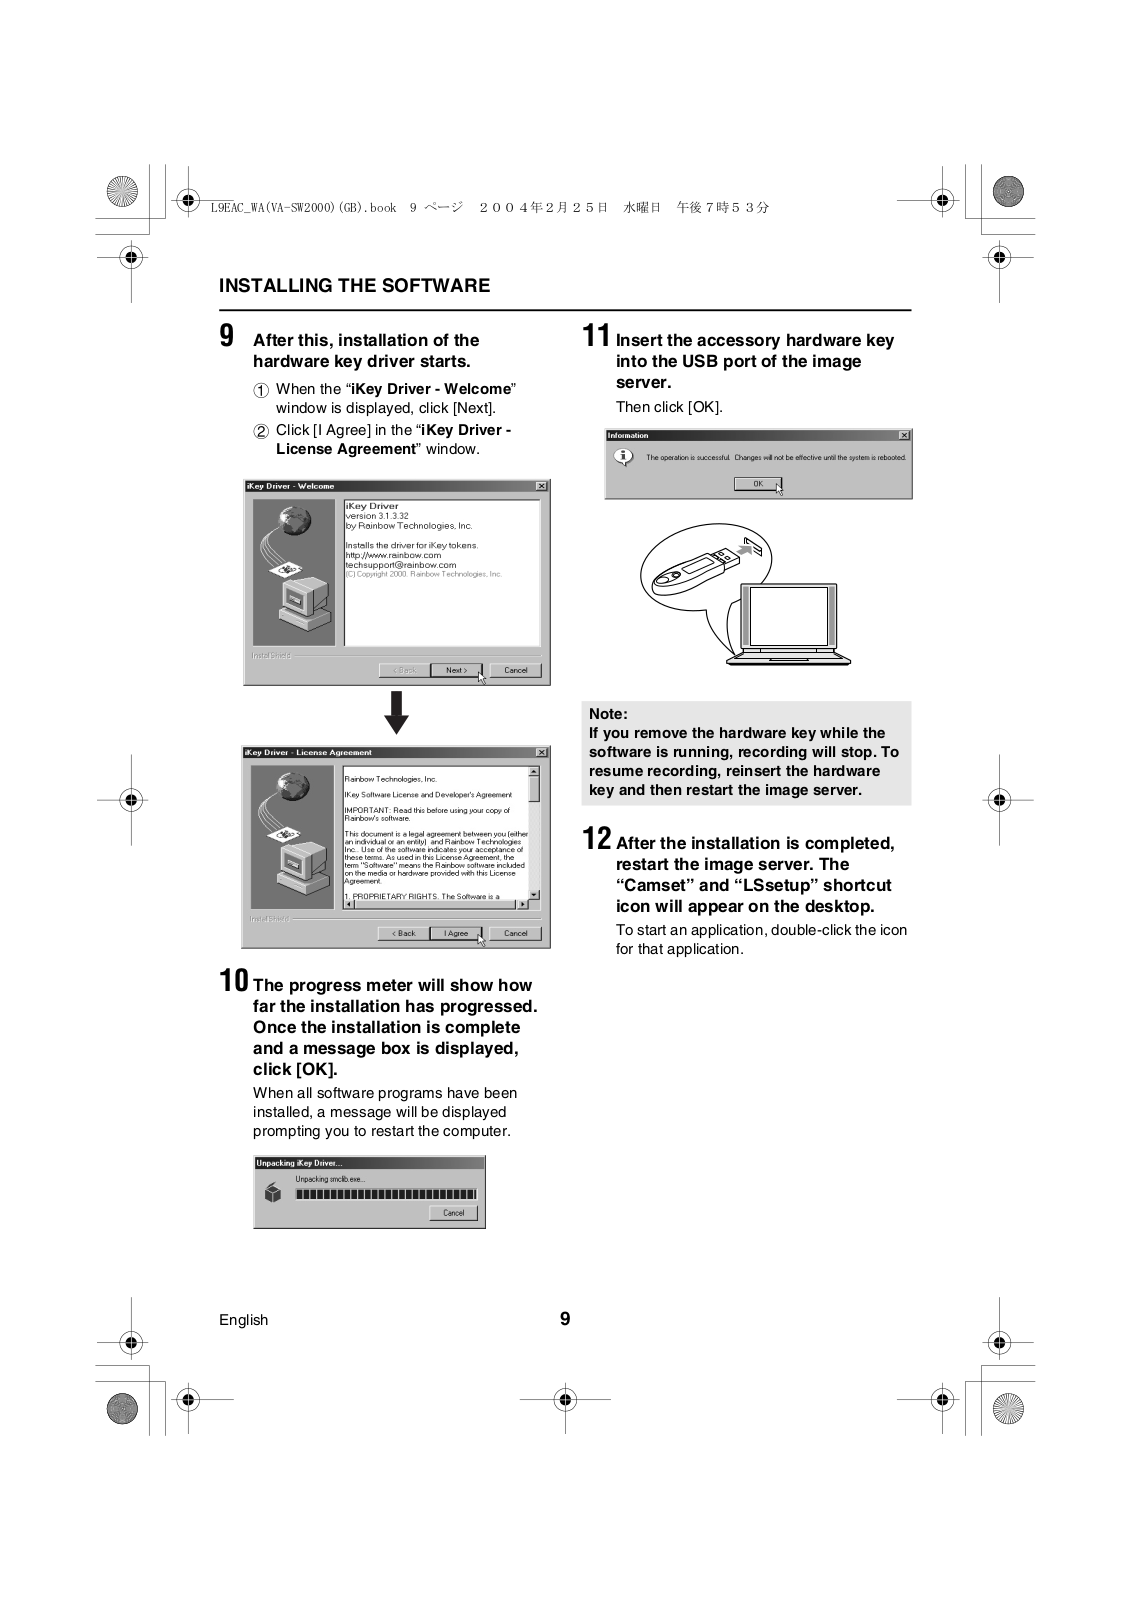
9 After this, installation of the hardware key driver starts.

1When the “iKey Driver - Welcome” window is displayed, click [Next].

2Click [I Agree] in the “iKey Driver - License Agreement” window.

10 The progress meter will show how far the installation has progressed. Once the installation is complete and a message box is displayed, click [OK].

When all software programs have been installed, a message will be displayed prompting you to restart the computer.

11 Insert the accessory hardware key into the USB port of the image server.

Then click [OK].

Note:

If you remove the hardware key while the software is running, recording will stop. To resume recording, reinsert the hardware key and then restart the image server.

12 After the installation is completed, restart the image server. The “Camset” and “LSsetup” shortcut icon will appear on the desktop.

To start an application, double-click the icon for that application.

English

9

INSTALLING THE SOFTWARE

bInstalling the JPEG2000 Plug-in 3 Enter the user information.

Note:

If the JPEG2000 plug-in has already been installed from a CD-ROM that was included with a network camera or network video server, you do not need to install it again.

Enter the required information into the “User Name” and “Organization” fields and then click [Next]. The “Ready to Install the Program” window will be displayed. Click [Install] to start the installation.

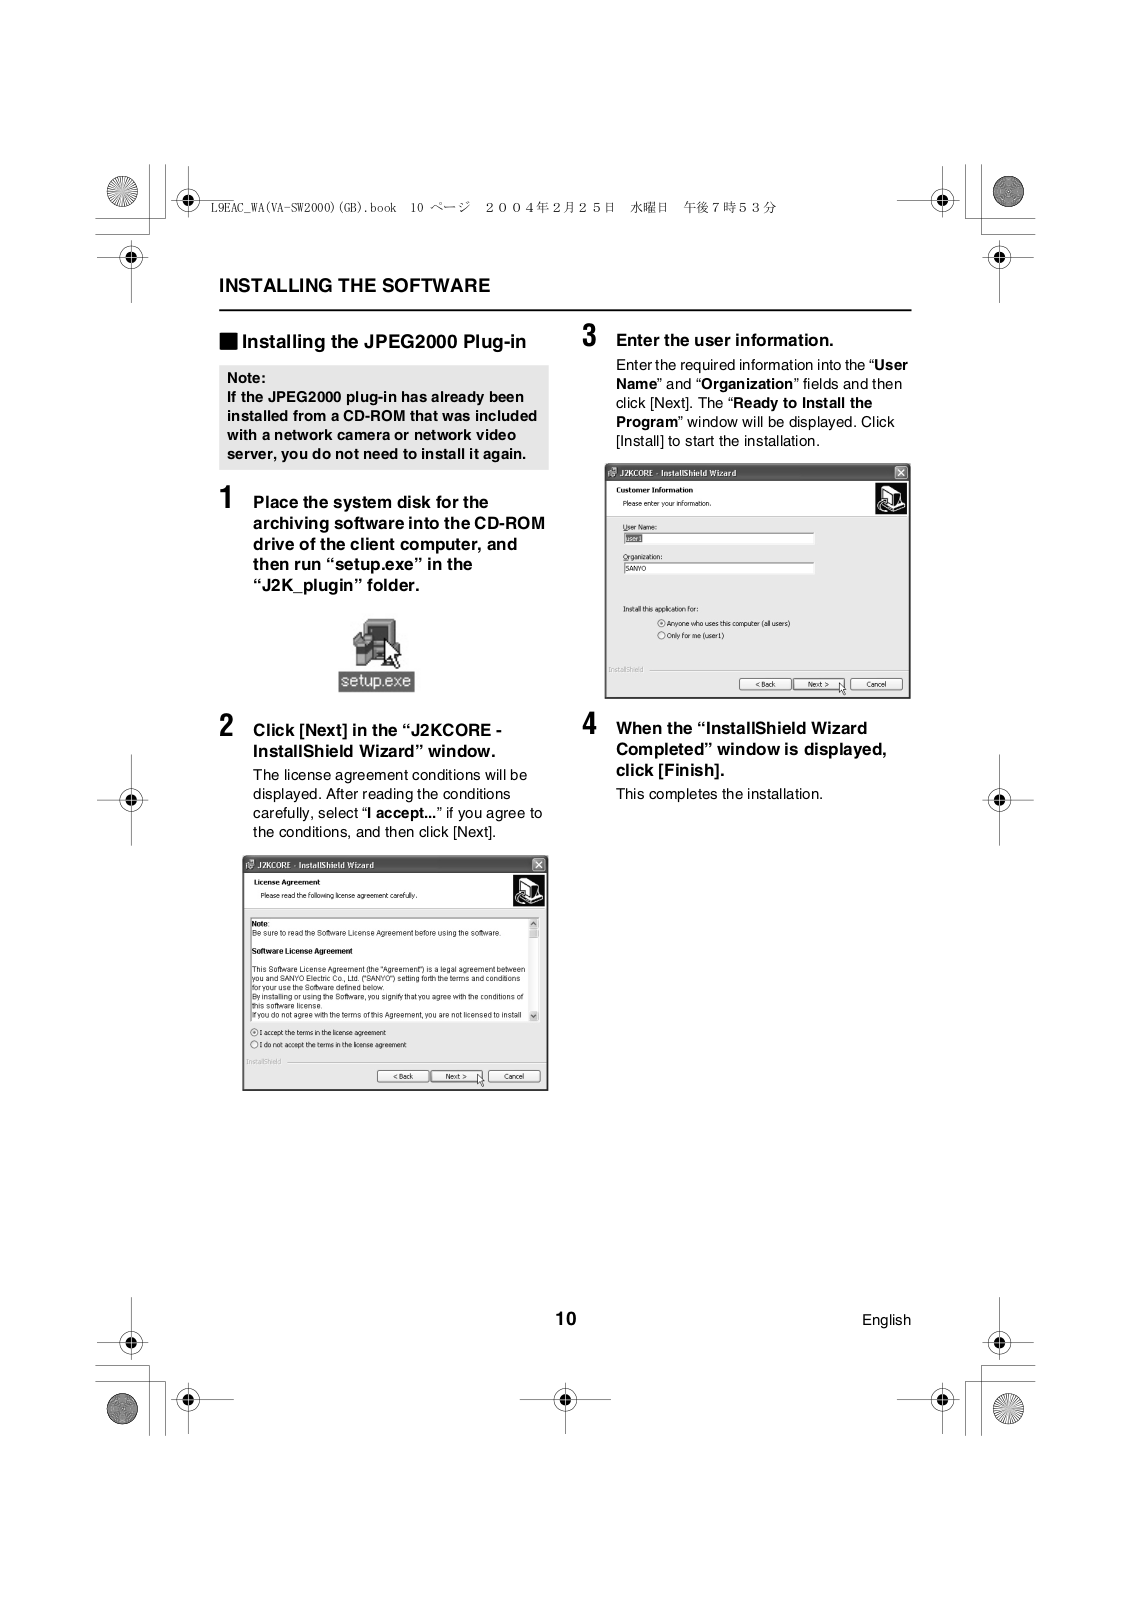
1 Place the system disk for the archiving software into the CD-ROM drive of the client computer, and then run “setup.exe” in the “J2K_plugin” folder.

2 Click [Next] in the “J2KCORE -

4 When the “InstallShield Wizard

InstallShield Wizard” window.

Completed” window is displayed,

The license agreement conditions will be

click [Finish].

displayed. After reading the conditions

This completes the installation.

carefully, select “I accept...” if you agree to


the conditions, and then click [Next].


10

English

INSTALLING THE SOFTWARE

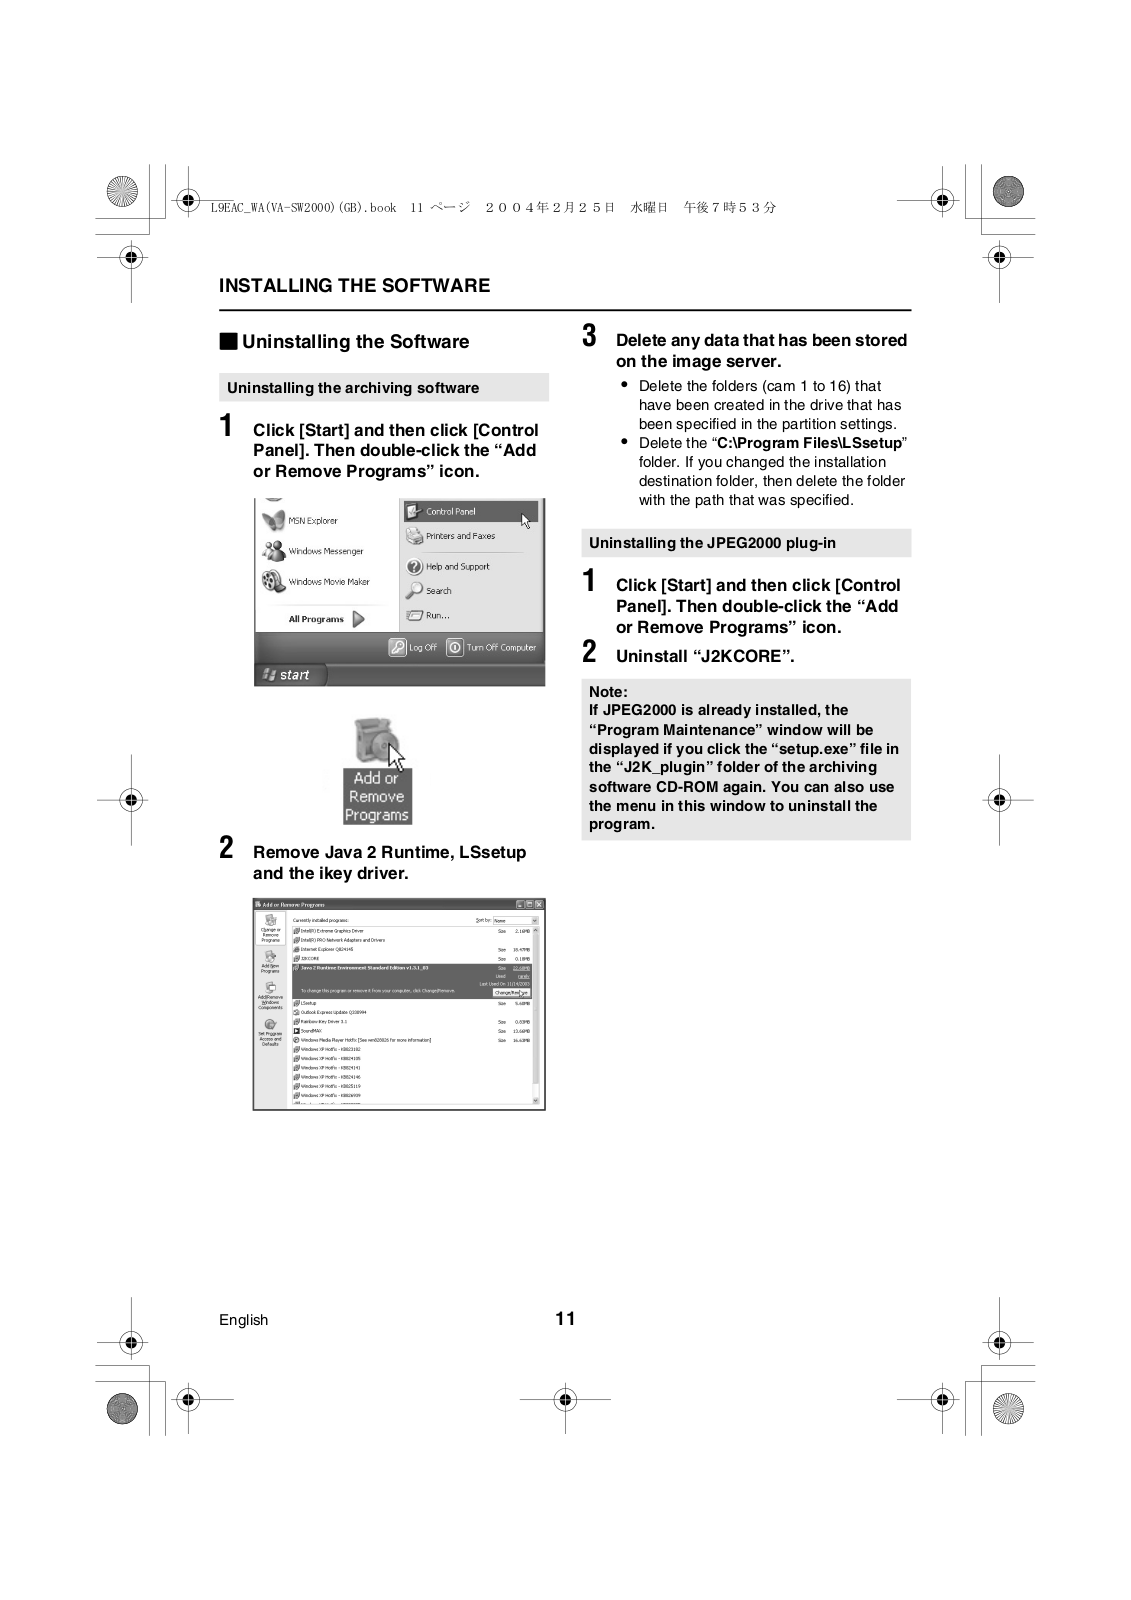
bUninstalling the Software

3 Delete any data that has been stored


on the image server.

Uninstalling the archiving software

1 Click [Start] and then click [Control Panel]. Then double-click the “Add or Remove Programs” icon.

2 Remove Java 2 Runtime, LSsetup

and the ikey driver.

Delete the folders (cam 1 to 16) that have been created in the drive that has been specified in the partition settings.

Delete the “C:\Program Files\LSsetup” folder. If you changed the installation destination folder, then delete the folder with the path that was specified.

Uninstalling the JPEG2000 plug-in

1 Click [Start] and then click [Control Panel]. Then double-click the “Add or Remove Programs” icon.

2 Uninstall “J2KCORE”.

Note:

If JPEG2000 is already installed, the “Program Maintenance” window will be displayed if you click the “setup.exe” file in the “J2K_plugin” folder of the archiving software CD-ROM again. You can also use the menu in this window to uninstall the program.

English

11

CAMERA SETTINGS (Camset)

In order to use the network archiving system, you first need to run the Camset application on the image server and use it to set up the cameras being used. The camera settings allow you to register the various connected devices (such as network cameras and network video servers) with the image server, and to set the recording conditions for each device.

(In the rest of this manual, “network cameras” may be referred to simply as “cameras”, and “network video servers” may be referred to as “video servers”.)

bBasic Knowledge Required for Making Camera Settings

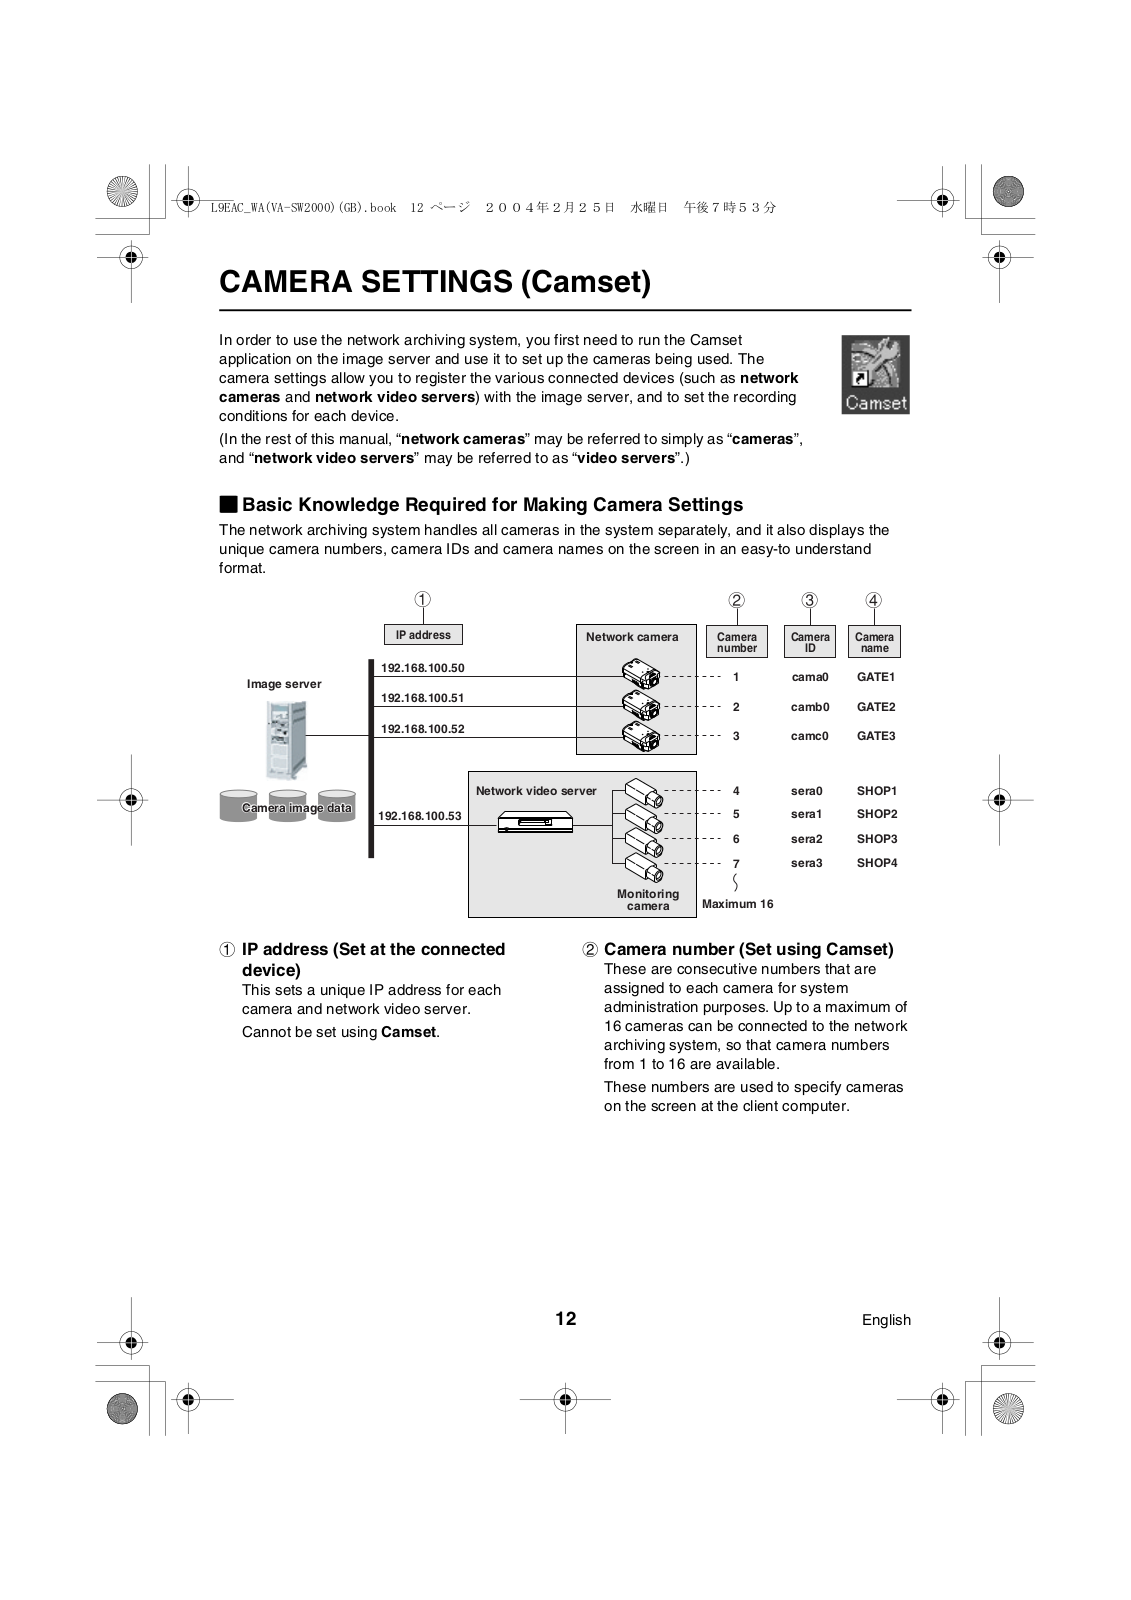
The network archiving system handles all cameras in the system separately, and it also displays the unique camera numbers, camera IDs and camera names on the screen in an easy-to understand format.

Image server

Camera image data

1


2

3

4

IP address

Network camera

Camera

Camera

Camera


number

ID

name

192.168.100.50


1

cama0

GATE1


192.168.100.51


2

camb0

GATE2


192.168.100.52


3

camc0

GATE3


Network video server

4

sera0

SHOP1

192.168.100.53


5

sera1

SHOP2


6

sera2

SHOP3


7

sera3

SHOP4


Monitoring

Maximum 16


camera


1IP address (Set at the connected device)

This sets a unique IP address for each camera and network video server. Cannot be set using Camset.

2Camera number (Set using Camset)

These are consecutive numbers that are assigned to each camera for system administration purposes. Up to a maximum of 16 cameras can be connected to the network archiving system, so that camera numbers from 1 to 16 are available.

These numbers are used to specify cameras on the screen at the client computer.

12

English

CAMERA SETTINGS (Camset)

3Camera ID (Set using Camset)

These are unique identifiers that are used by the image server to specify different cameras. The camera ID consists of 4 characters (single-byte alphanumeric characters) plus a single serial number, and it is assigned automatically by the image server when the camera is registered. You can change the camera ID if necessary using the “LOCAL SERVER SET” menu, but you cannot change it at user terminals. (p. 25)

Network camera IDs

The camera ID varies for each camera. The serial number is automatically set to

0”.

Setting Example: cama + 0 = cama0 camb + 0 = camb0 camc + 0 = camc0

Network video server IDs

A single camera ID is assigned to a single network video server, so that all monitoring cameras that are connected to the network video server share a common camera ID. The serial number portion of the camera ID is assigned automatically, starting from “0” up to the maximum “3” in accordance with the number of devices connected.

Setting Example: sera + 0 = sera0 sera + 1 = sera1 sera + 2 = sera2 sera + 3 = sera3

Note:

Camera IDs are camera identifiers for use by the system. They are not specific to any particular camera unit, so if a particular camera has a problem and needs to be replaced, you do not need to change the camera ID.

4Camera name (Set at user terminals)

These are names that are given to cameras separately from their camera numbers and camera IDs in order to make them easier to identify when specifying cameras at the client computer.

They can be set as required by the Administrator at a client computer using the “CAMERA SET” menu, and so they cannot be set using Camset.

Each camera name can consist of up to 32 single-byte alphanumeric characters, and duplication of camera names is not allowed.

Setting Example:

GATE1, GATE2, SHOP1, SHOP2

English

13

CAMERA SETTINGS (Camset)

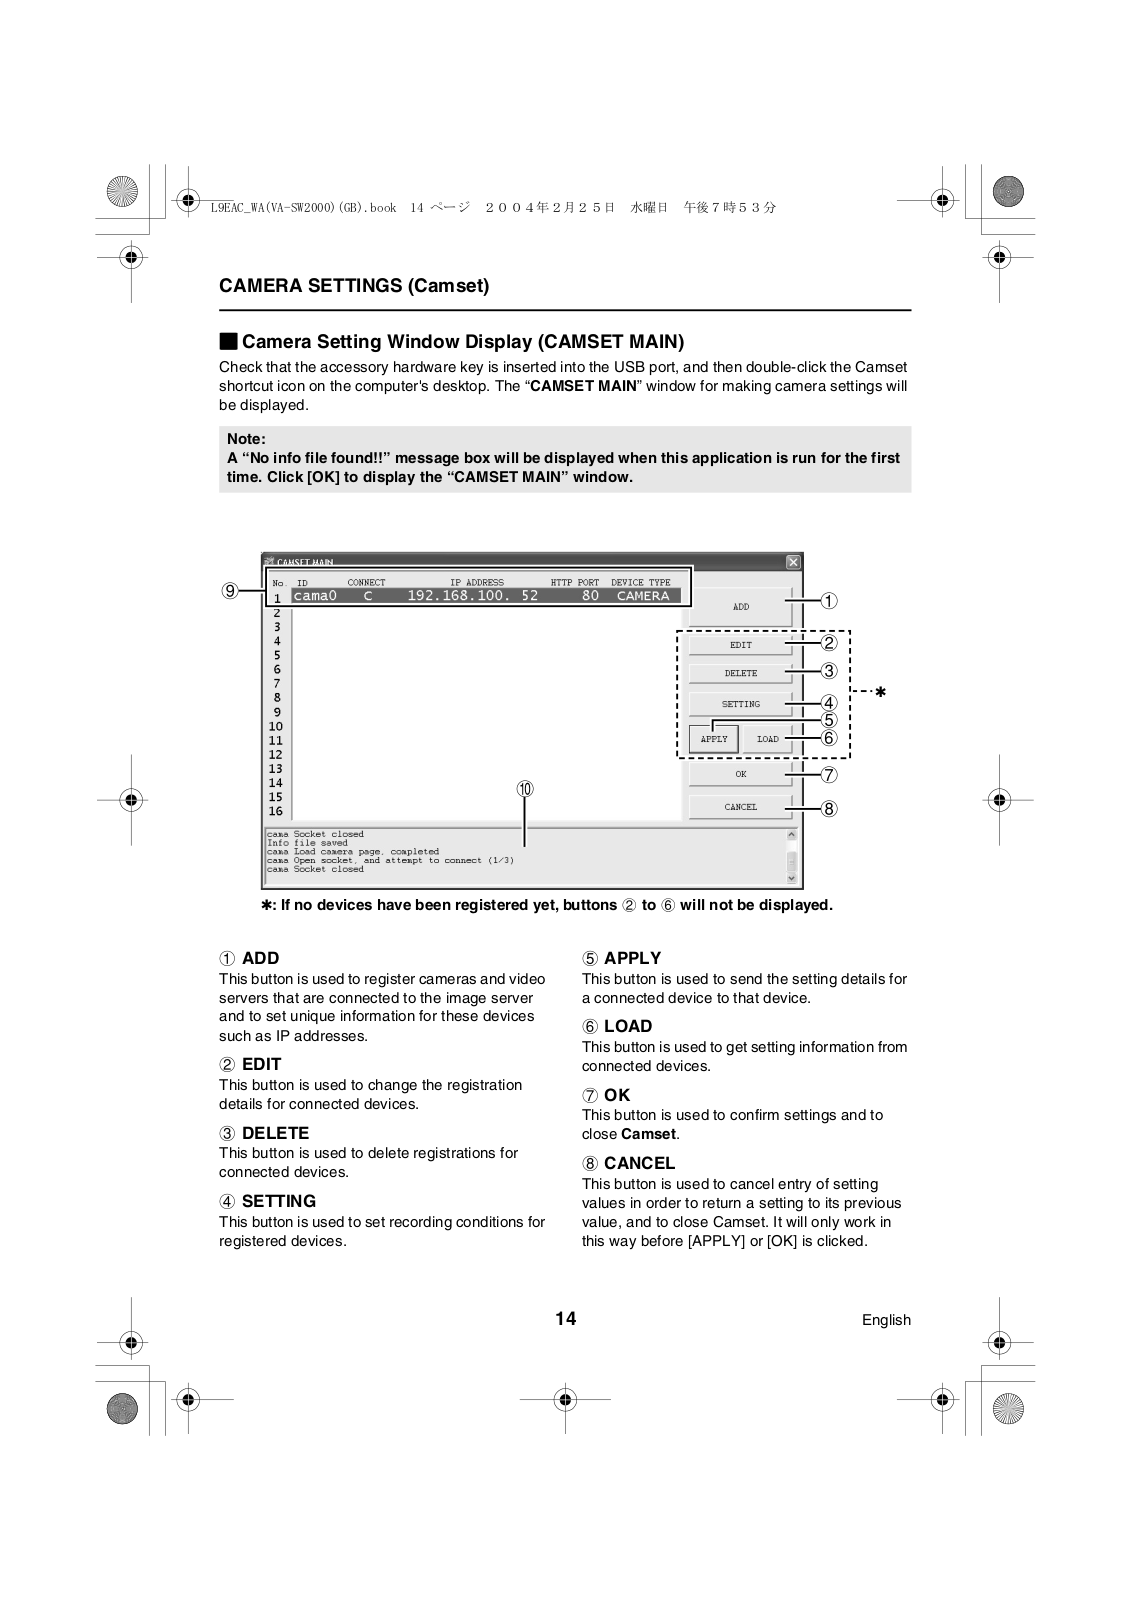
bCamera Setting Window Display (CAMSET MAIN)

Check that the accessory hardware key is inserted into the USB port, and then double-click the Camset shortcut icon on the computer's desktop. The “CAMSET MAIN” window for making camera settings will be displayed.

Note:

A “No info file found!!” message box will be displayed when this application is run for the first time. Click [OK] to display the “CAMSET MAIN” window.

9

1


2


3


4


5


6


7


F


8


: If no devices have been registered yet, buttons 2 to 6 will not be displayed.

1 ADD

This button is used to register cameras and video servers that are connected to the image server and to set unique information for these devices such as IP addresses.

2 EDIT

This button is used to change the registration details for connected devices.

3 DELETE

This button is used to delete registrations for connected devices.

4 SETTING

This button is used to set recording conditions for registered devices.

5 APPLY

This button is used to send the setting details for a connected device to that device.

6 LOAD

This button is used to get setting information from connected devices.

7 OK

This button is used to confirm settings and to close Camset.

8 CANCEL

This button is used to cancel entry of setting values in order to return a setting to its previous value, and to close Camset. It will only work in this way before [APPLY] or [OK] is clicked.

14

English

CAMERA SETTINGS (Camset)

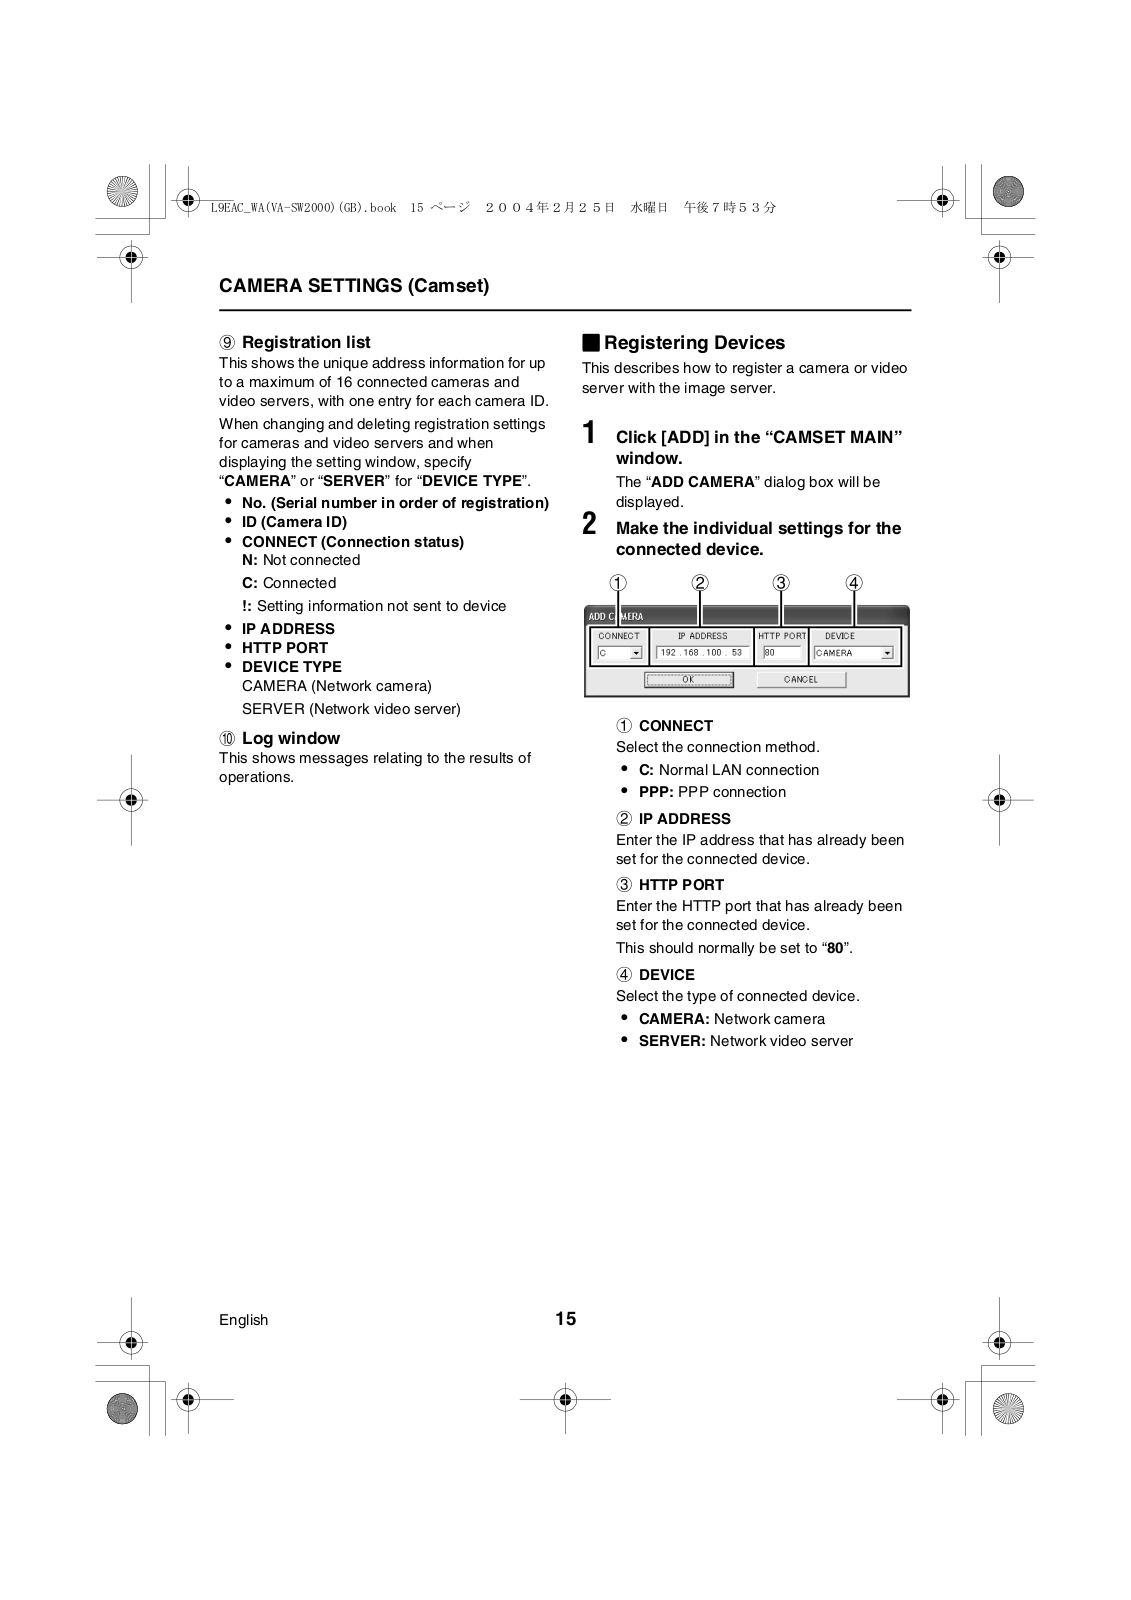
9 Registration list

This shows the unique address information for up to a maximum of 16 connected cameras and video servers, with one entry for each camera ID.

bRegistering Devices

This describes how to register a camera or video server with the image server.

When changing and deleting registration settings for cameras and video servers and when displaying the setting window, specify

CAMERA” or “SERVER” for “DEVICE TYPE”.

No. (Serial number in order of registration)

ID (Camera ID)

CONNECT (Connection status) N: Not connected

C: Connected

!: Setting information not sent to device

IP ADDRESS

HTTP PORT

DEVICE TYPE

CAMERA (Network camera) SERVER (Network video server)

F Log window

This shows messages relating to the results of operations.

1 Click [ADD] in the “CAMSET MAIN”

window.

The “ADD CAMERA” dialog box will be displayed.

2 Make the individual settings for the connected device.

1 2 3 4

1 CONNECT

Select the connection method.

C: Normal LAN connection

PPP: PPP connection

2 IP ADDRESS

Enter the IP address that has already been set for the connected device.

3 HTTP PORT

Enter the HTTP port that has already been set for the connected device.

This should normally be set to “80”.

4 DEVICE

Select the type of connected device.

CAMERA: Network camera

SERVER: Network video server

English

15

CAMERA SETTINGS (Camset)

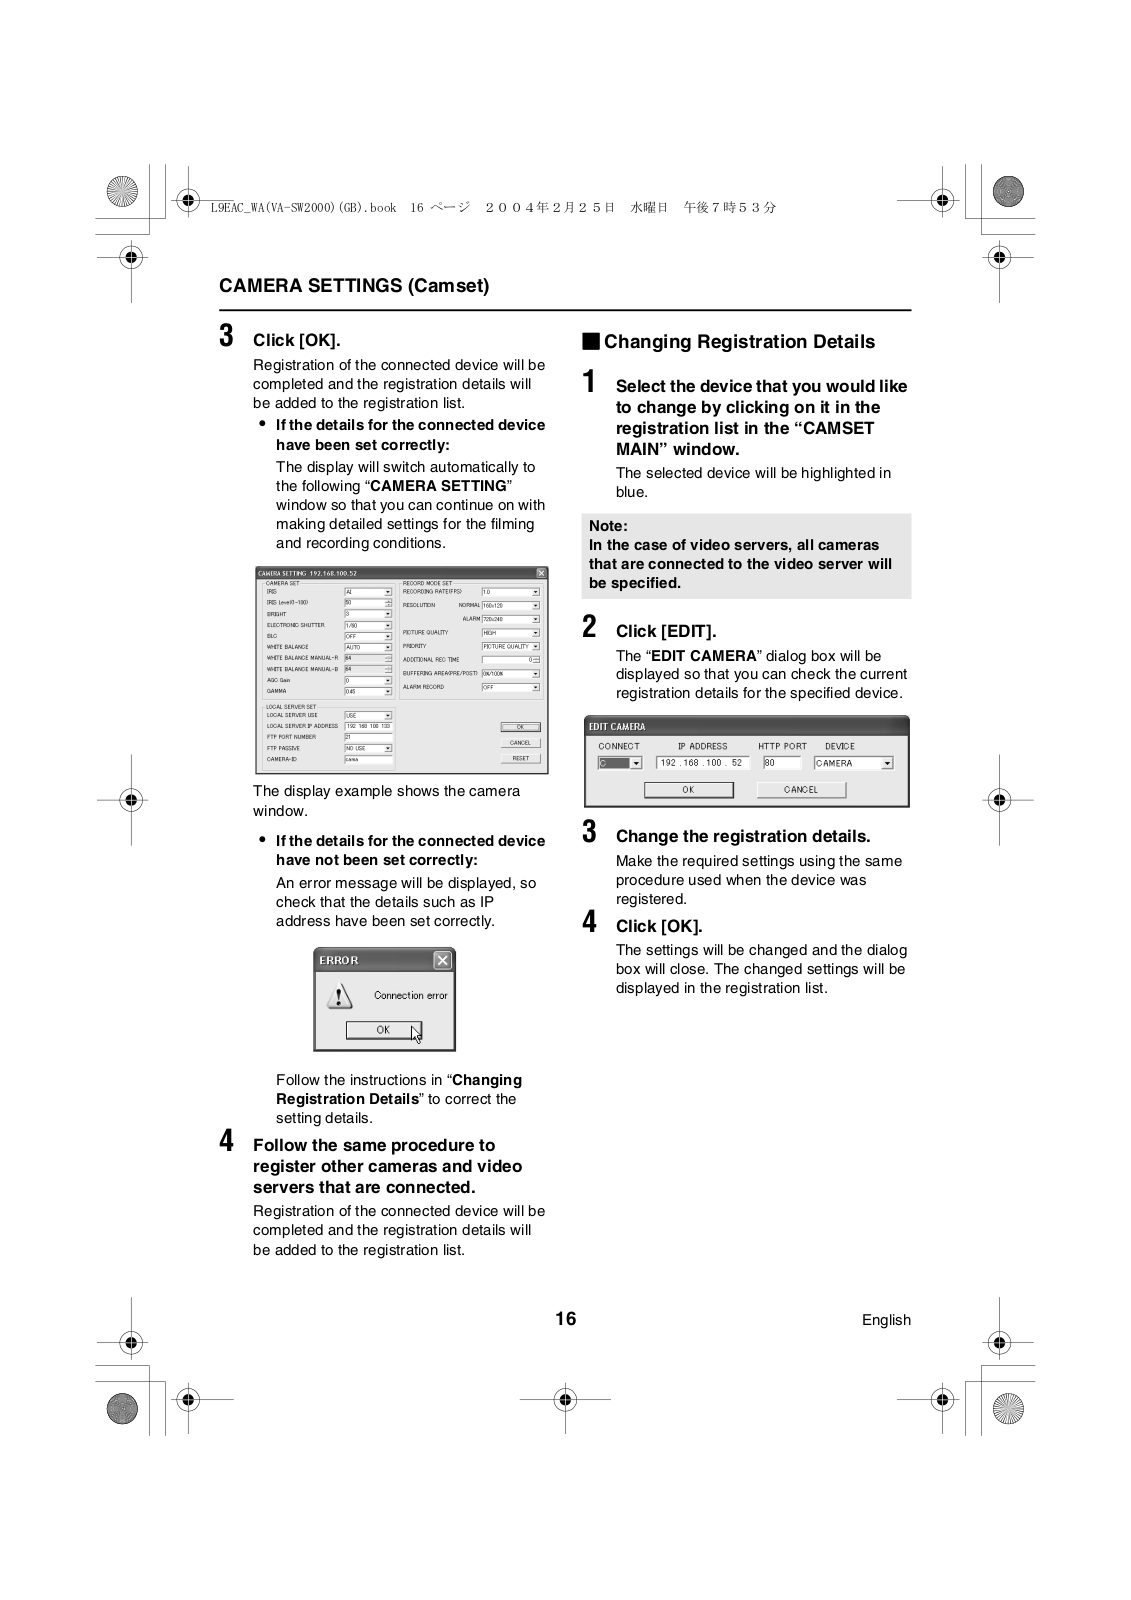
3 Click [OK].

Registration of the connected device will be completed and the registration details will be added to the registration list.

If the details for the connected device have been set correctly:

The display will switch automatically to the following “CAMERA SETTING” window so that you can continue on with making detailed settings for the filming and recording conditions.

bChanging Registration Details

1 Select the device that you would like to change by clicking on it in the registration list in the “CAMSET MAIN” window.

The selected device will be highlighted in blue.

Note:

In the case of video servers, all cameras that are connected to the video server will be specified.

2 Click [EDIT].

The “EDIT CAMERA” dialog box will be displayed so that you can check the current registration details for the specified device.

The display example shows the camera window.

If the details for the connected device have not been set correctly:

An error message will be displayed, so check that the details such as IP address have been set correctly.

Follow the instructions in “Changing Registration Details” to correct the setting details.

4 Follow the same procedure to

3

4

Change the registration details.

Make the required settings using the same procedure used when the device was registered.

Click [OK].

The settings will be changed and the dialog box will close. The changed settings will be displayed in the registration list.

register other cameras and video servers that are connected.

Registration of the connected device will be completed and the registration details will be added to the registration list.

16

English

CAMERA SETTINGS (Camset)

bDeleting a Registration

1 Select the device that you would like to delete by clicking on it in the registration list in the “CAMSET MAIN” window.

The selected device will be highlighted in blue.

Note:

In the case of video servers, all cameras that are connected to the video server will be specified, so you cannot delete the registrations for individual monitoring cameras.

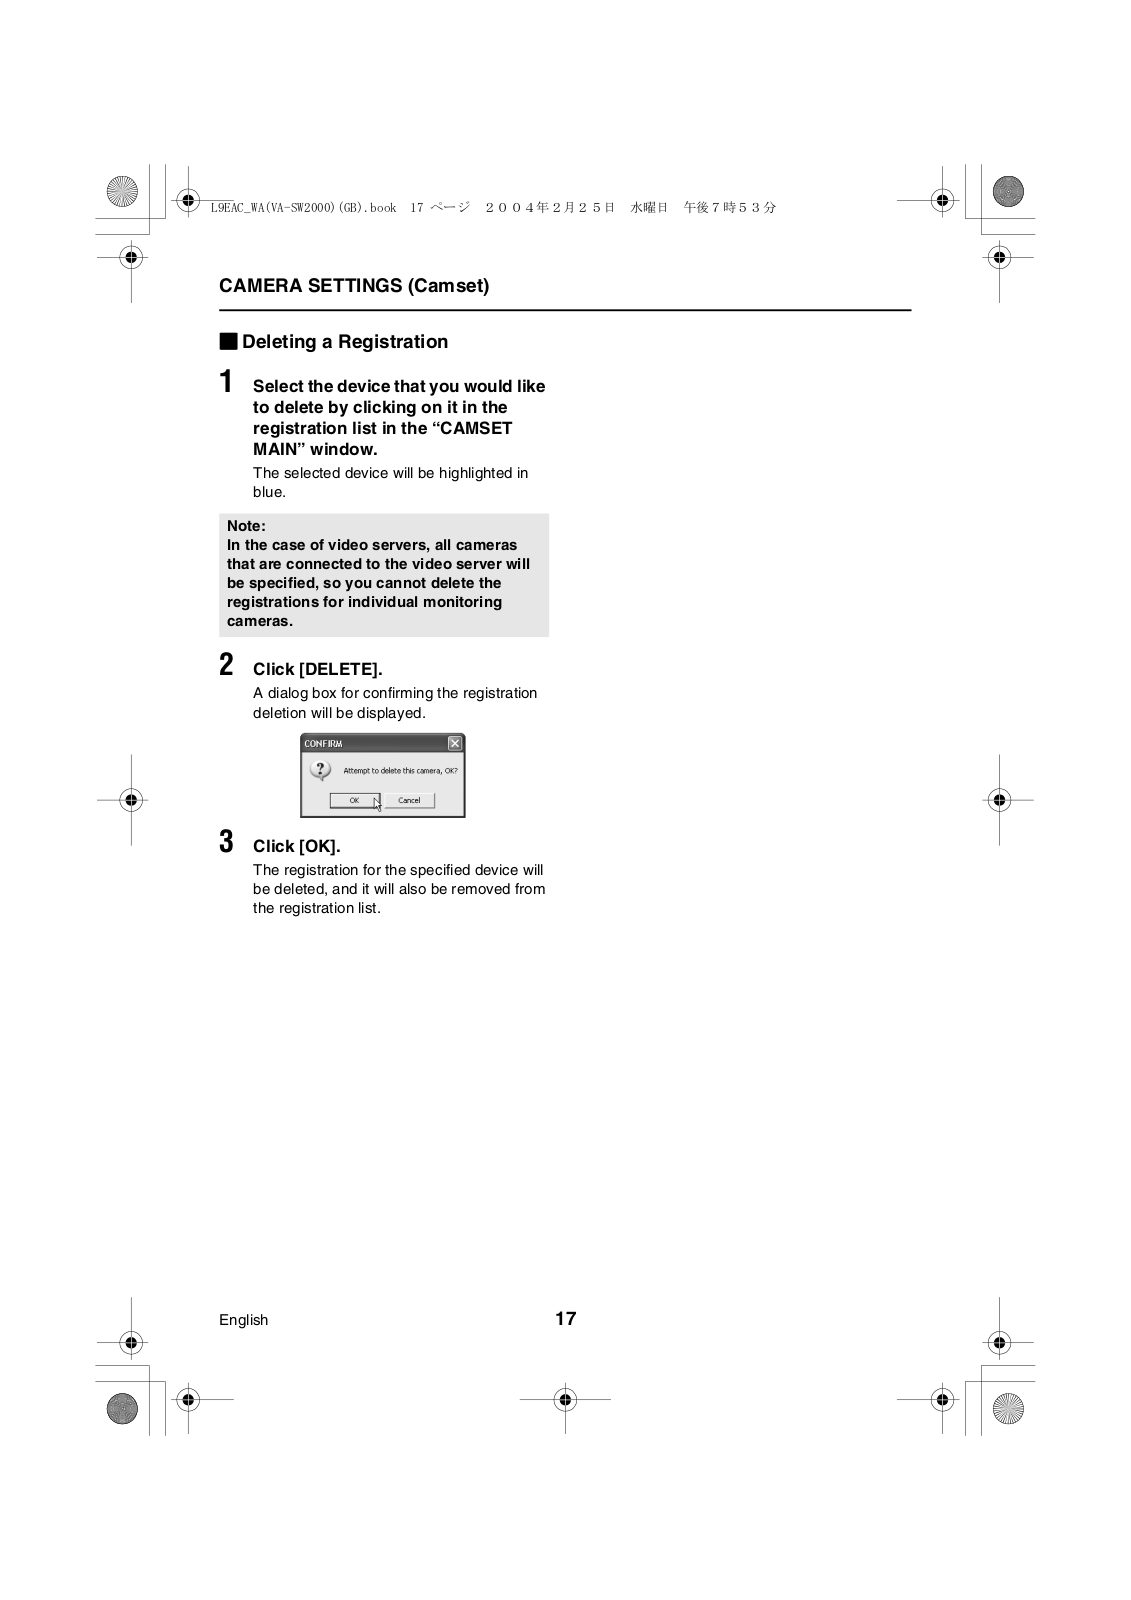
2 Click [DELETE].

A dialog box for confirming the registration deletion will be displayed.

3 Click [OK].

The registration for the specified device will be deleted, and it will also be removed from the registration list.

English

17

CAMERA SETTINGS (Camset)

bDetailed Camera and Video Server Settings

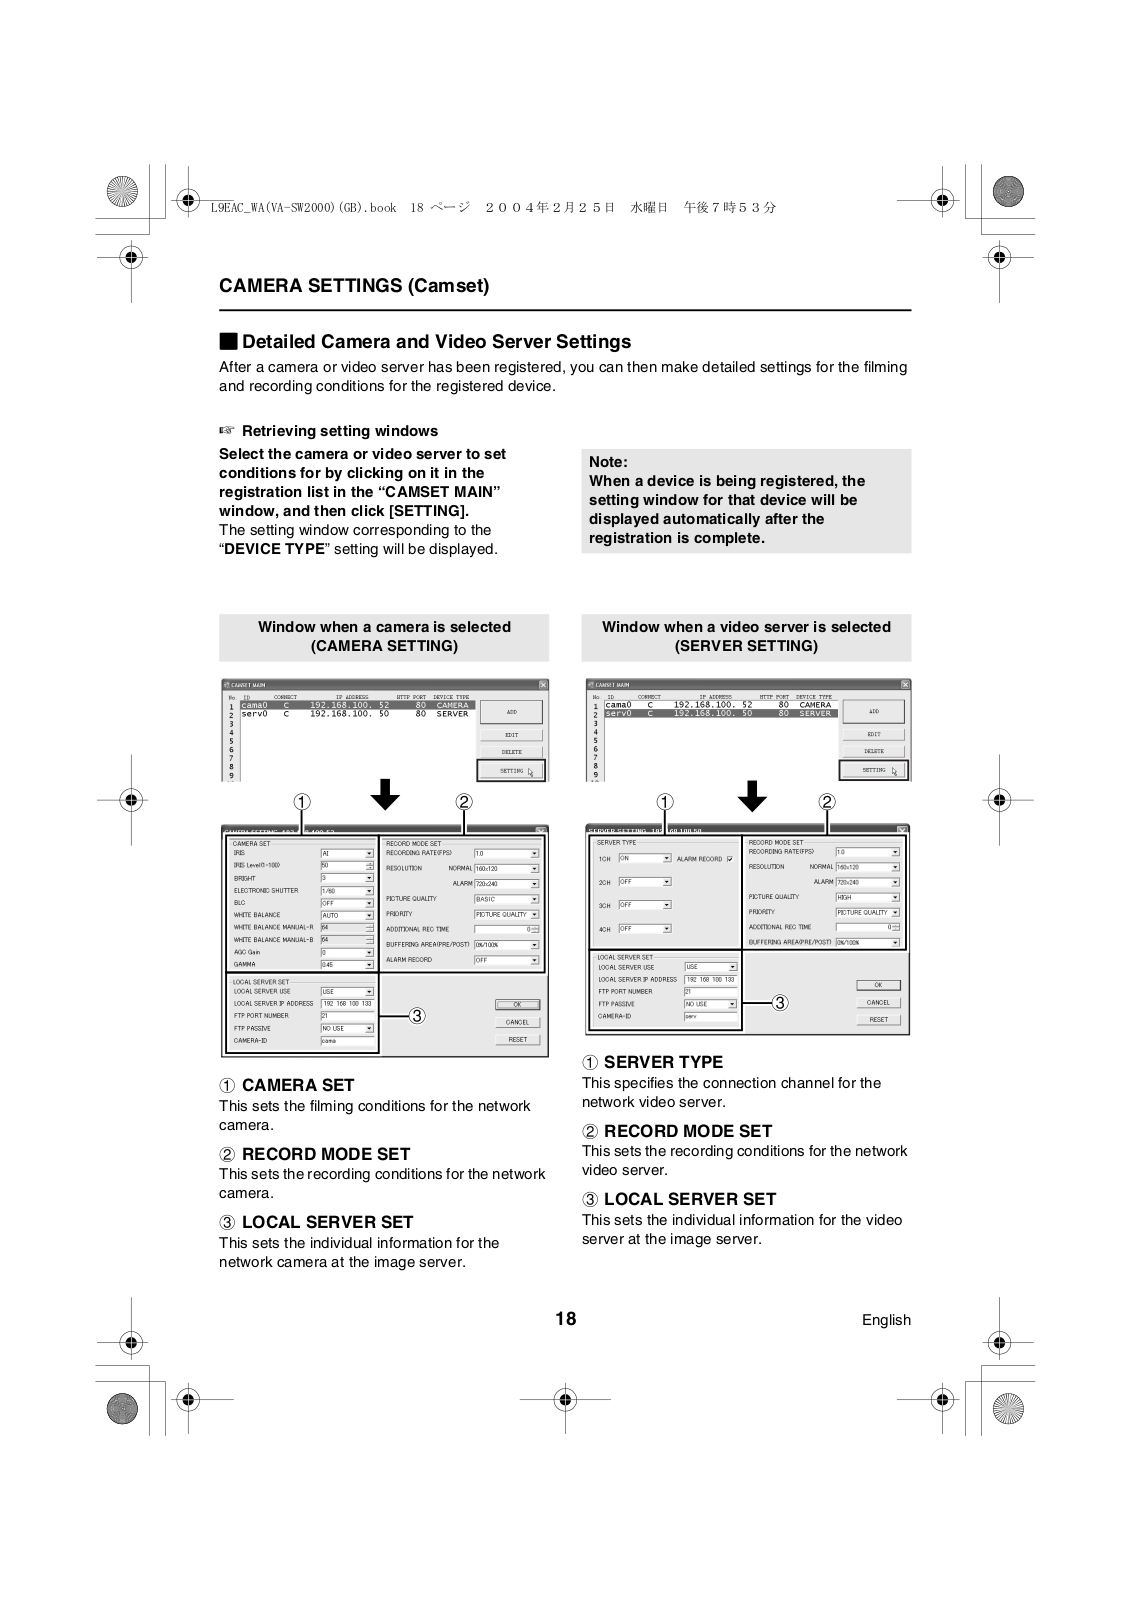
After a camera or video server has been registered, you can then make detailed settings for the filming

and recording conditions for the registered device.

Retrieving setting windows

Select the camera or video server to set conditions for by clicking on it in the registration list in the “CAMSET MAIN” window, and then click [SETTING].

The setting window corresponding to the “DEVICE TYPE” setting will be displayed.

Note:

When a device is being registered, the setting window for that device will be displayed automatically after the registration is complete.

Window when a camera is selected


Window when a video server is selected

(CAMERA SETTING)


(SERVER SETTING)


1

2


3

1 CAMERA SET


This sets the filming conditions for the network camera.

2 RECORD MODE SET

This sets the recording conditions for the network camera.

3 LOCAL SERVER SET

This sets the individual information for the network camera at the image server.

1

2


3

1 SERVER TYPE


This specifies the connection channel for the network video server.

2 RECORD MODE SET

This sets the recording conditions for the network video server.

3 LOCAL SERVER SET

This sets the individual information for the video server at the image server.

18

English

CAMERA SETTINGS (Camset)


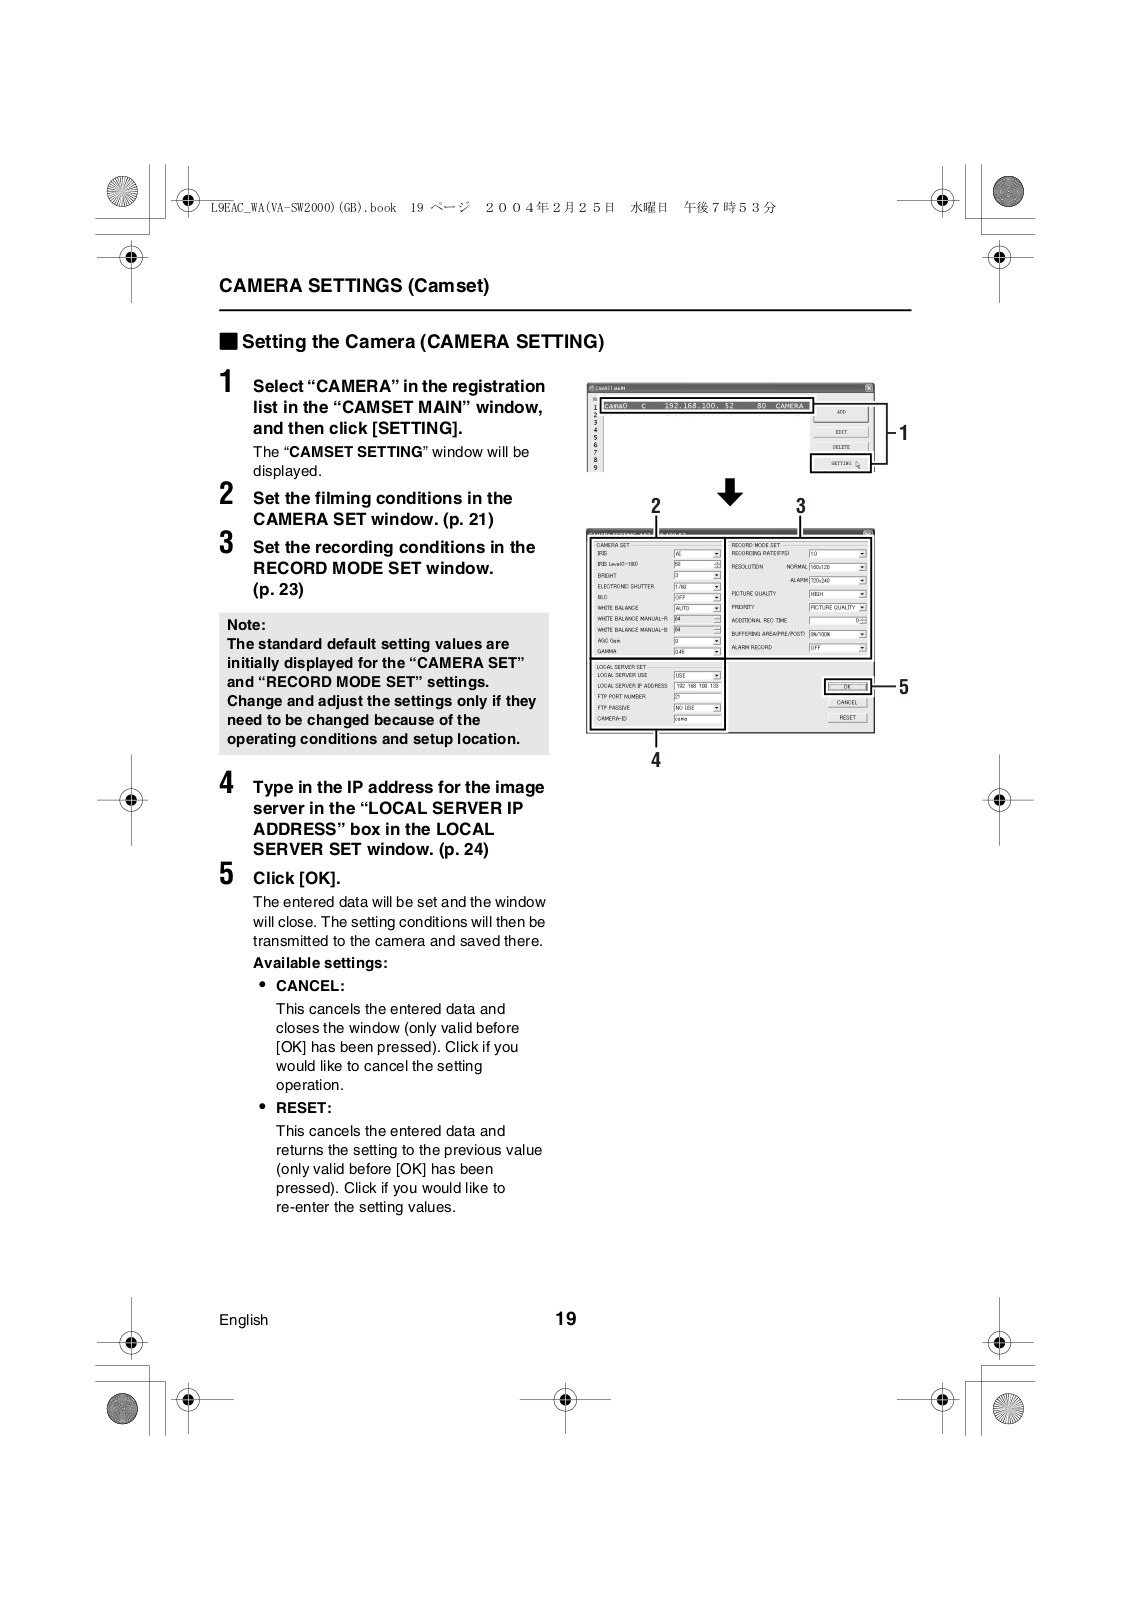
bSetting the Camera (CAMERA SETTING)


1 Select “CAMERA” in the registration


list in the “CAMSET MAIN” window,


and then click [SETTING].

1

The “CAMSET SETTING” window will be


displayed.


2 Set the filming conditions in the CAMERA SET window. (p. 21)

3 Set the recording conditions in the RECORD MODE SET window.

(p. 23)

Note:

The standard default setting values are initially displayed for the “CAMERA SET” and “RECORD MODE SET” settings. Change and adjust the settings only if they need to be changed because of the operating conditions and setup location.

4 Type in the IP address for the image server in the “LOCAL SERVER IP ADDRESS” box in the LOCAL SERVER SET window. (p. 24)

2

3


5

4


5 Click [OK].

The entered data will be set and the window will close. The setting conditions will then be transmitted to the camera and saved there.

Available settings:

CANCEL:

This cancels the entered data and closes the window (only valid before [OK] has been pressed). Click if you would like to cancel the setting operation.

RESET:

This cancels the entered data and returns the setting to the previous value (only valid before [OK] has been pressed). Click if you would like to re-enter the setting values.

English

19

CAMERA SETTINGS (Camset)


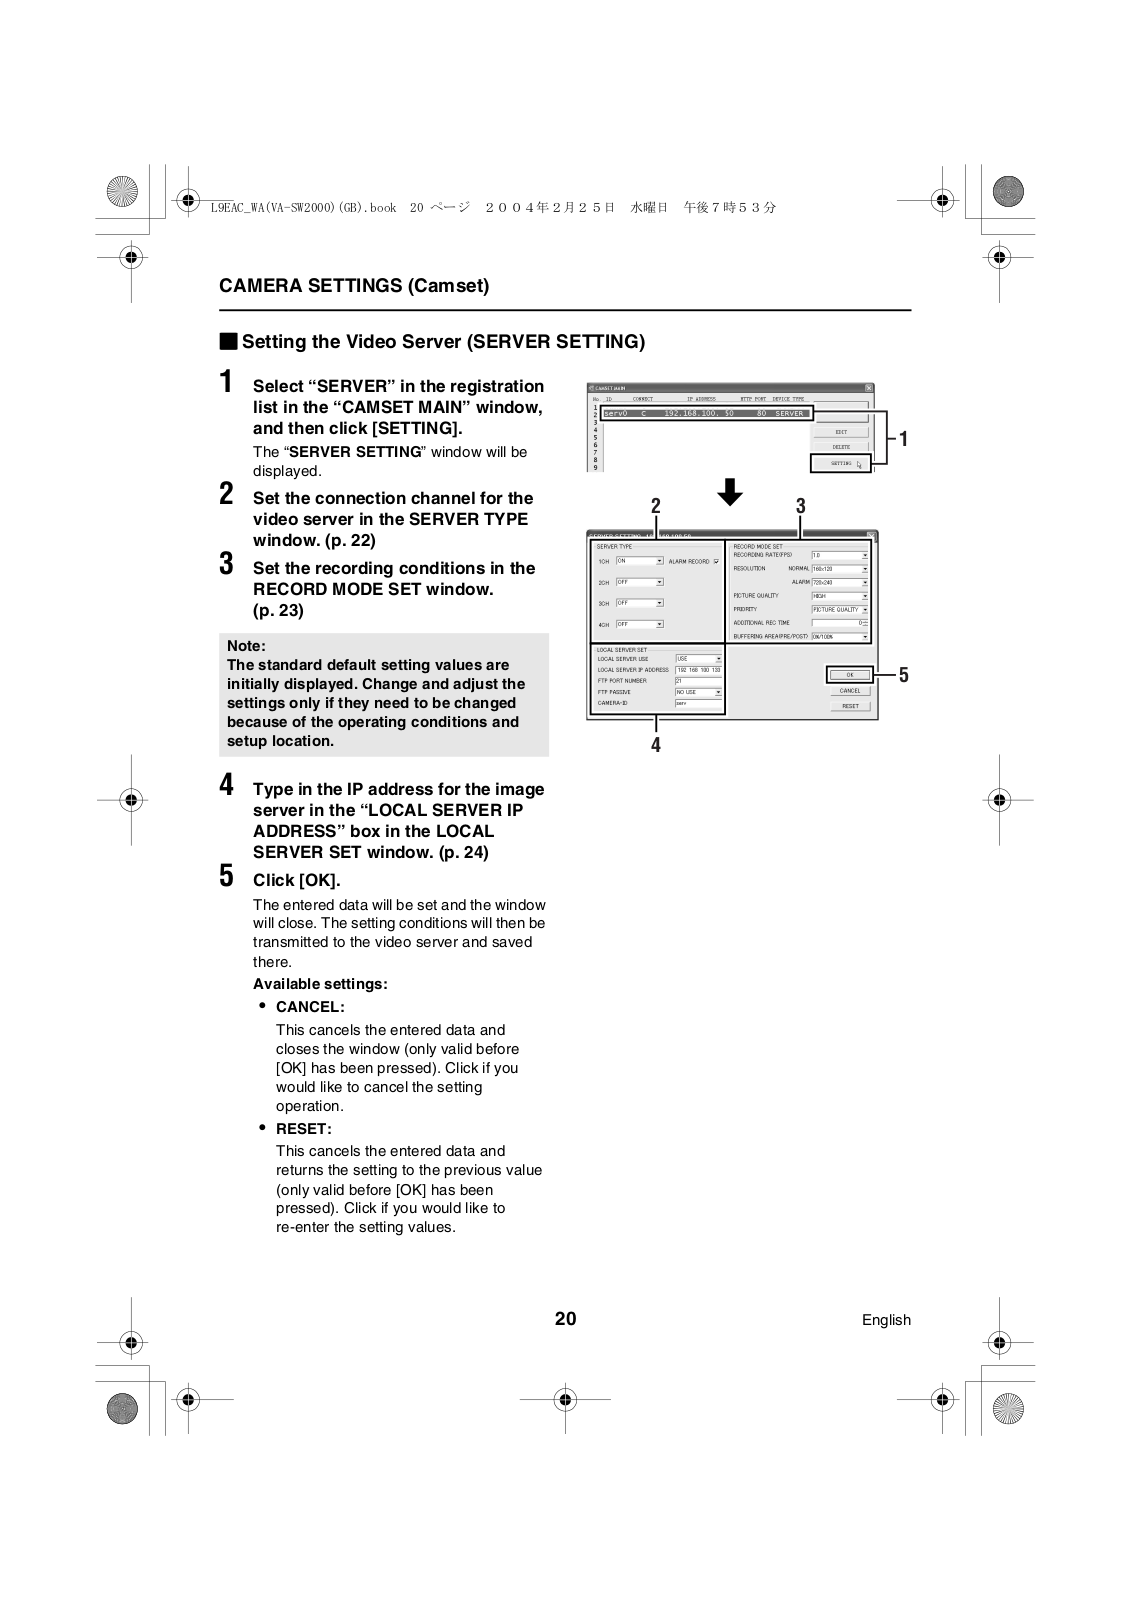
bSetting the Video Server (SERVER SETTING)


1 Select “SERVER” in the registration


list in the “CAMSET MAIN” window,


and then click [SETTING].

1

The “SERVER SETTING” window will be


displayed.


2 Set the connection channel for the video server in the SERVER TYPE window. (p. 22)

3 Set the recording conditions in the RECORD MODE SET window.

(p. 23)

Note:

The standard default setting values are initially displayed. Change and adjust the settings only if they need to be changed because of the operating conditions and setup location.

4 Type in the IP address for the image server in the “LOCAL SERVER IP ADDRESS” box in the LOCAL SERVER SET window. (p. 24)

2

3


5

4


5 Click [OK].

The entered data will be set and the window will close. The setting conditions will then be transmitted to the video server and saved there.

Available settings:

CANCEL:

This cancels the entered data and closes the window (only valid before [OK] has been pressed). Click if you would like to cancel the setting operation.

RESET:

This cancels the entered data and returns the setting to the previous value (only valid before [OK] has been pressed). Click if you would like to re-enter the setting values.

20

English

CAMERA SETTINGS (Camset)

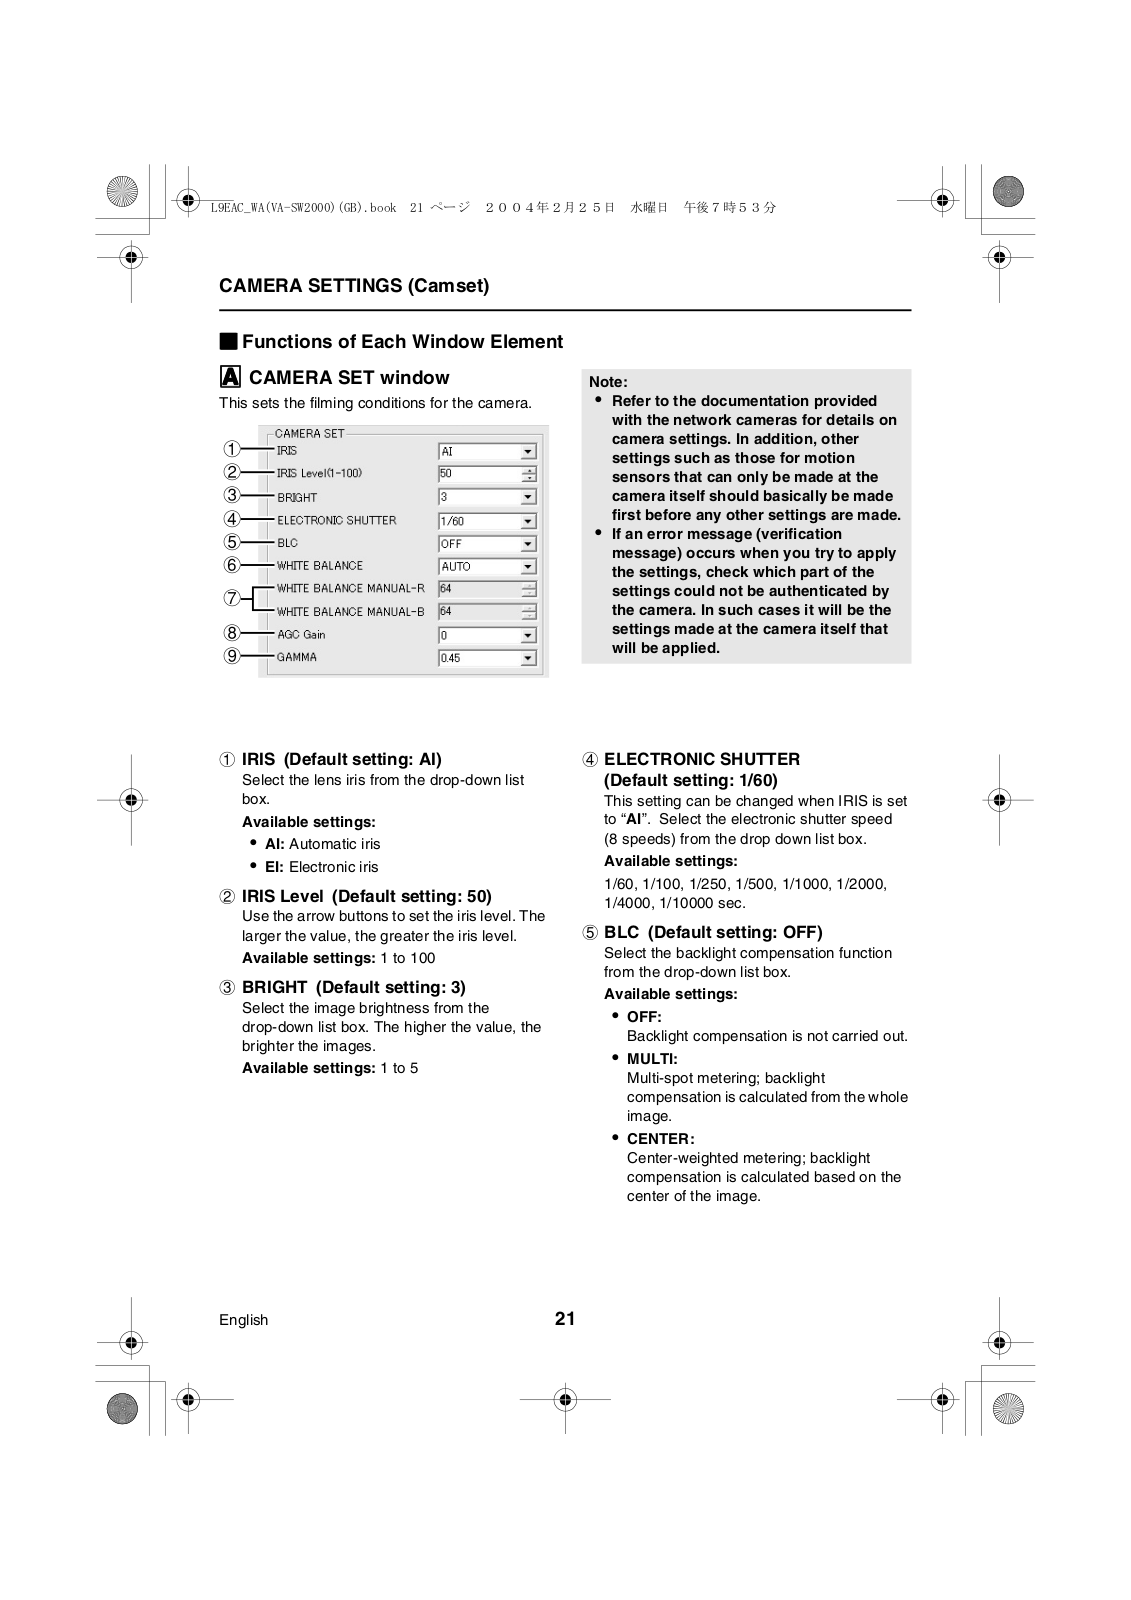
bFunctions of Each Window Element

A CAMERA SET window

This sets the filming conditions for the camera.

1

2

3

4

5

6

7

8

9

1IRIS (Default setting: AI)

Select the lens iris from the drop-down list box.

Available settings:

AI: Automatic iris

EI: Electronic iris

2IRIS Level (Default setting: 50)

Use the arrow buttons to set the iris level. The larger the value, the greater the iris level.

Available settings: 1 to 100

3BRIGHT (Default setting: 3)

Select the image brightness from the drop-down list box. The higher the value, the brighter the images.

Available settings: 1 to 5

Note:

Refer to the documentation provided with the network cameras for details on camera settings. In addition, other settings such as those for motion sensors that can only be made at the camera itself should basically be made first before any other settings are made.

If an error message (verification message) occurs when you try to apply the settings, check which part of the settings could not be authenticated by the camera. In such cases it will be the settings made at the camera itself that will be applied.

4ELECTRONIC SHUTTER (Default setting: 1/60)

This setting can be changed when IRIS is set to “AI”. Select the electronic shutter speed (8 speeds) from the drop down list box.

Available settings:

1/60, 1/100, 1/250, 1/500, 1/1000, 1/2000, 1/4000, 1/10000 sec.

5BLC (Default setting: OFF)

Select the backlight compensation function from the drop-down list box.

Available settings:

OFF:

Backlight compensation is not carried out.

MULTI:

Multi-spot metering; backlight compensation is calculated from the whole image.

CENTER:

Center-weighted metering; backlight compensation is calculated based on the center of the image.

English

21

CAMERA SETTINGS (Camset)

6WHITE BALANCE (Default setting: AUTO)

Select the white balance (automatic color temperature correction) from the drop-down list box.

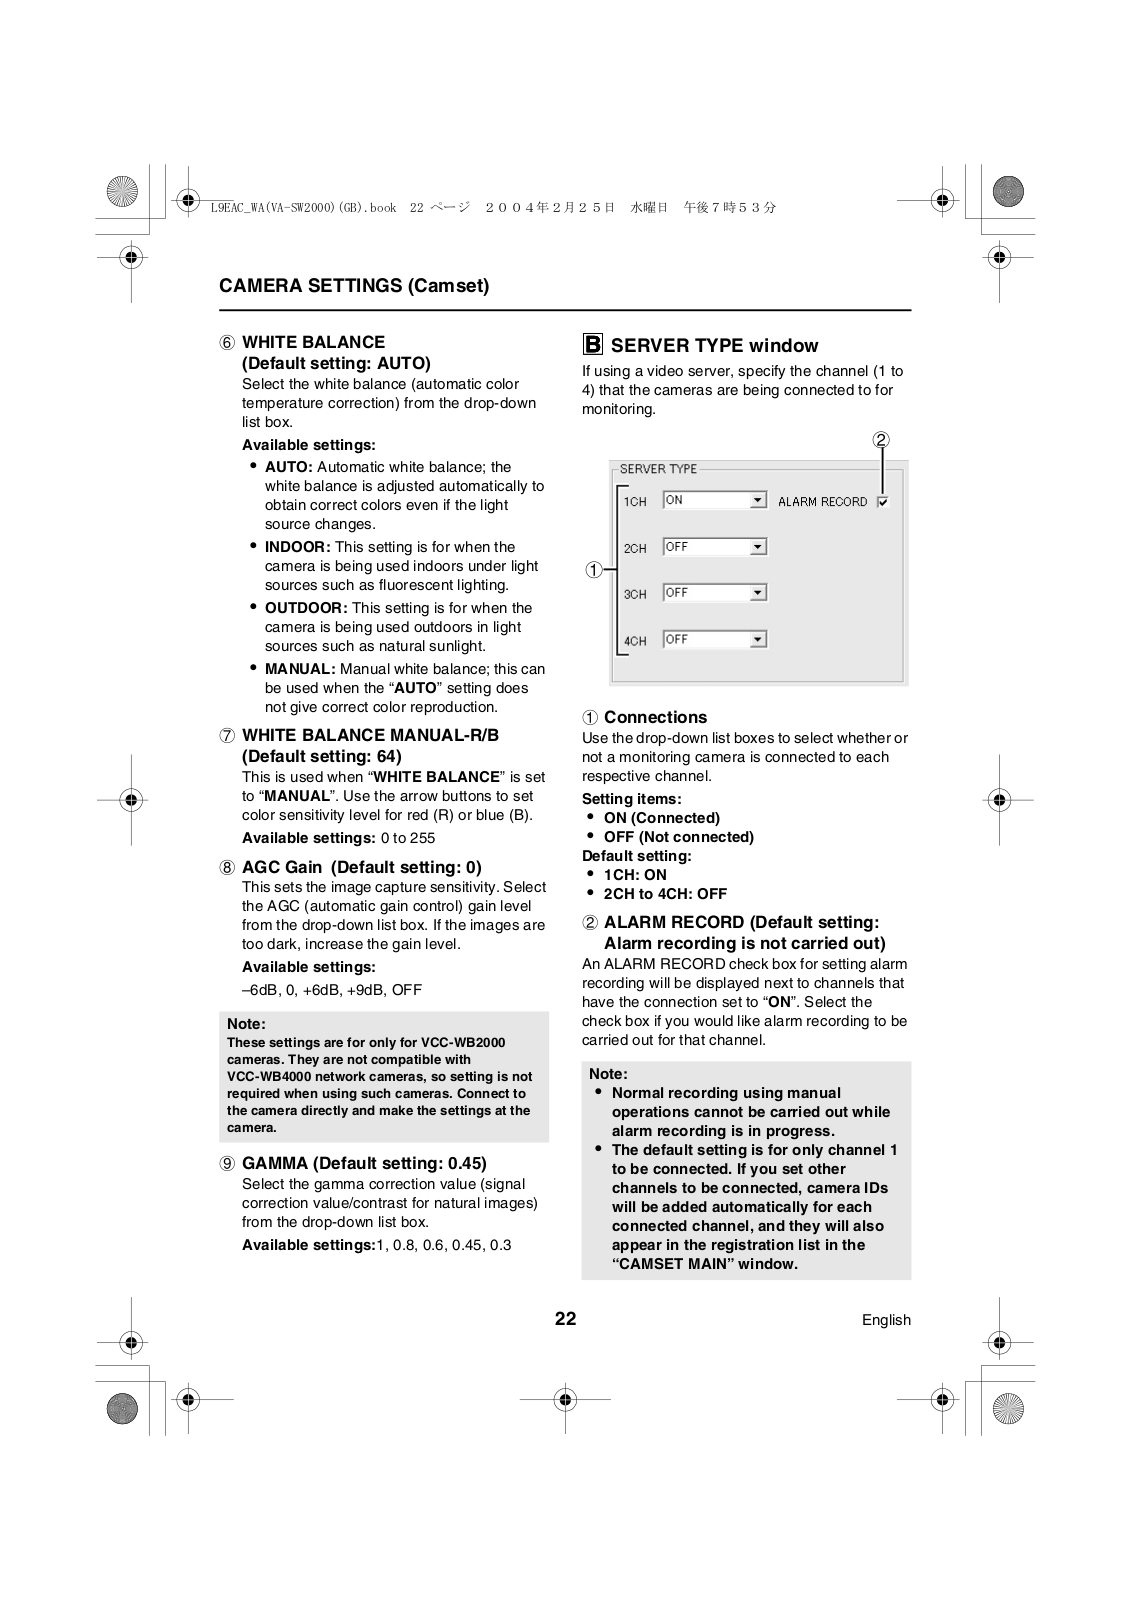
B SERVER TYPE window

If using a video server, specify the channel (1 to 4) that the cameras are being connected to for monitoring.

Available settings:

2


AUTO: Automatic white balance; the white balance is adjusted automatically to obtain correct colors even if the light source changes.

INDOOR: This setting is for when the camera is being used indoors under light sources such as fluorescent lighting.

OUTDOOR: This setting is for when the camera is being used outdoors in light sources such as natural sunlight.

MANUAL: Manual white balance; this can be used when the “AUTO” setting does not give correct color reproduction.

7WHITE BALANCE MANUAL-R/B (Default setting: 64)

This is used when “WHITE BALANCE” is set to “MANUAL”. Use the arrow buttons to set color sensitivity level for red (R) or blue (B).

Available settings: 0 to 255

8AGC Gain (Default setting: 0)

This sets the image capture sensitivity. Select the AGC (automatic gain control) gain level from the drop-down list box. If the images are too dark, increase the gain level.

Available settings:

–6dB, 0, +6dB, +9dB, OFF

Note:

These settings are for only for VCC-WB2000 cameras. They are not compatible with VCC-WB4000 network cameras, so setting is not required when using such cameras. Connect to the camera directly and make the settings at the camera.

9GAMMA (Default setting: 0.45)

Select the gamma correction value (signal correction value/contrast for natural images) from the drop-down list box.

Available settings:1, 0.8, 0.6, 0.45, 0.3

1

1 Connections

Use the drop-down list boxes to select whether or not a monitoring camera is connected to each respective channel.

Setting items:

ON (Connected)

OFF (Not connected) Default setting:

1CH: ON

2CH to 4CH: OFF

2 ALARM RECORD (Default setting:

Alarm recording is not carried out)

An ALARM RECORD check box for setting alarm recording will be displayed next to channels that have the connection set to “ON”. Select the check box if you would like alarm recording to be carried out for that channel.

Note:

Normal recording using manual operations cannot be carried out while alarm recording is in progress.

The default setting is for only channel 1 to be connected. If you set other channels to be connected, camera IDs will be added automatically for each connected channel, and they will also appear in the registration list in the “CAMSET MAIN” window.

22

English

CAMERA SETTINGS (Camset)

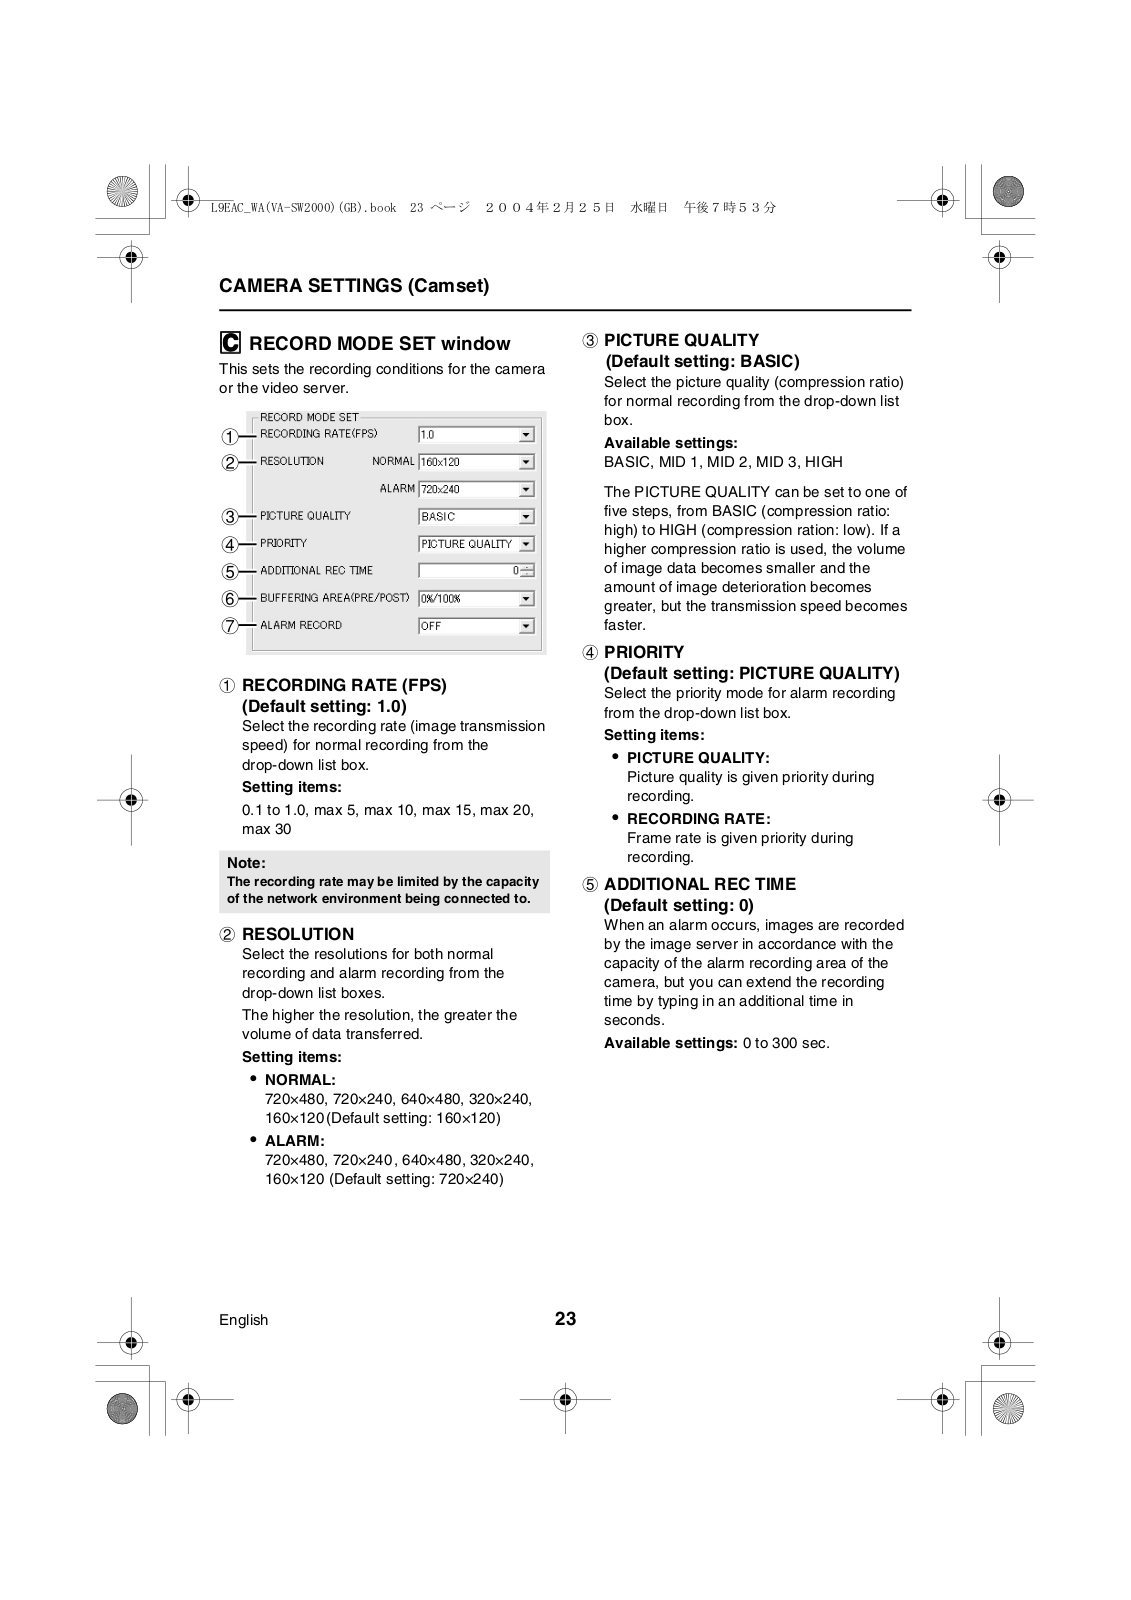
C RECORD MODE SET window

This sets the recording conditions for the camera or the video server.

1

2

3

4

5

6

7

1RECORDING RATE (FPS) (Default setting: 1.0)

Select the recording rate (image transmission speed) for normal recording from the drop-down list box.

Setting items:

0.1 to 1.0, max 5, max 10, max 15, max 20, max 30

Note:

The recording rate may be limited by the capacity of the network environment being connected to.

2RESOLUTION

Select the resolutions for both normal recording and alarm recording from the drop-down list boxes.

The higher the resolution, the greater the volume of data transferred.

Setting items:

NORMAL:

720×480, 720×240, 640×480, 320×240, 160×120(Default setting: 160×120)

ALARM:

720×480, 720×240, 640×480, 320×240, 160×120 (Default setting: 720×240)

3PICTURE QUALITY (Default setting: BASIC)

Select the picture quality (compression ratio) for normal recording from the drop-down list box.

Available settings:

BASIC, MID 1, MID 2, MID 3, HIGH

The PICTURE QUALITY can be set to one of five steps, from BASIC (compression ratio: high) to HIGH (compression ration: low). If a higher compression ratio is used, the volume of image data becomes smaller and the amount of image deterioration becomes greater, but the transmission speed becomes faster.

4PRIORITY

(Default setting: PICTURE QUALITY)

Select the priority mode for alarm recording from the drop-down list box.

Setting items:

PICTURE QUALITY:

Picture quality is given priority during recording.

RECORDING RATE:

Frame rate is given priority during recording.

5ADDITIONAL REC TIME (Default setting: 0)

When an alarm occurs, images are recorded by the image server in accordance with the capacity of the alarm recording area of the camera, but you can extend the recording time by typing in an additional time in seconds.

Available settings: 0 to 300 sec.

English

23

CAMERA SETTINGS (Camset)

6 BUFFERING AREA (PRE/POST)

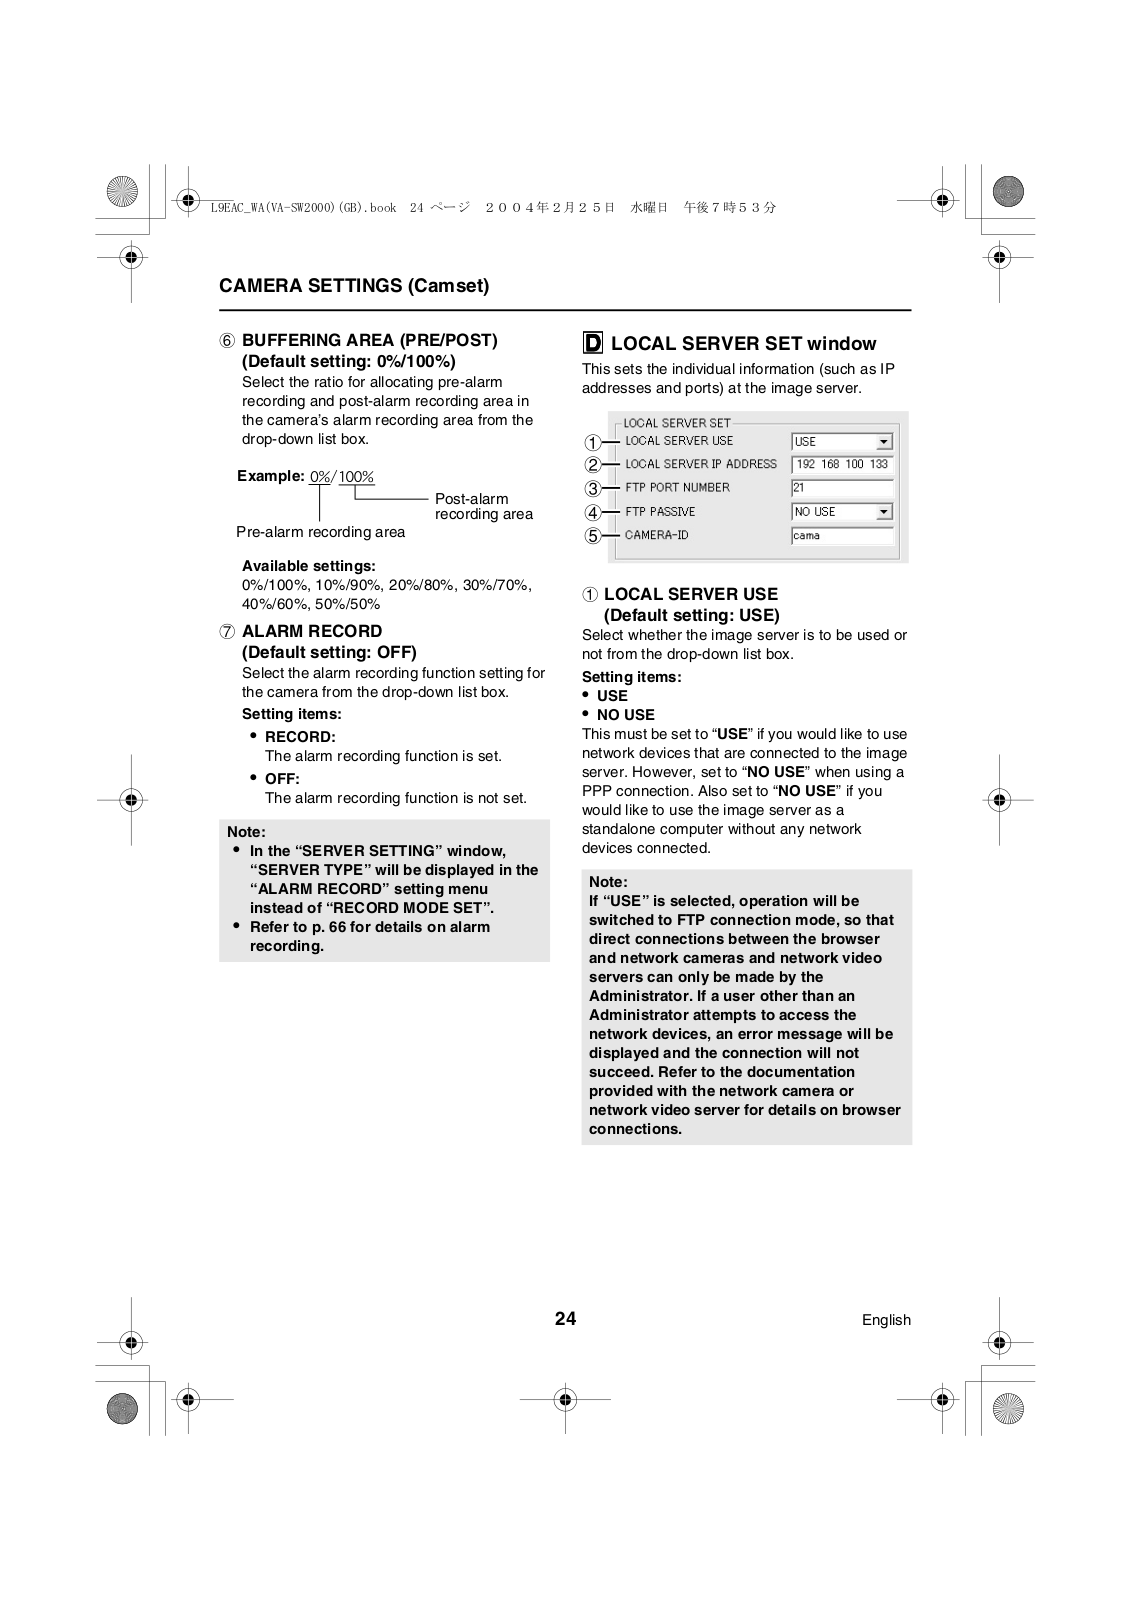
D LOCAL SERVER SET window

(Default setting: 0%/100%)

This sets the individual information (such as IP

Select the ratio for allocating pre-alarm

addresses and ports) at the image server.

recording and post-alarm recording area in


the camera’s alarm recording area from the


drop-down list box.

1


Example:

2


3


Post-alarm


4


recording area


Pre-alarm recording area

5


Available settings:

0%/100%, 10%/90%, 20%/80%, 30%/70%, 40%/60%, 50%/50%

7ALARM RECORD (Default setting: OFF)

Select the alarm recording function setting for the camera from the drop-down list box.

Setting items:

RECORD:

The alarm recording function is set.

OFF:

The alarm recording function is not set.

Note:

In the “SERVER SETTING” window, “SERVER TYPE” will be displayed in the “ALARM RECORD” setting menu instead of “RECORD MODE SET”.

Refer to p. 66 for details on alarm recording.

1 LOCAL SERVER USE

(Default setting: USE)

Select whether the image server is to be used or not from the drop-down list box.

Setting items:

USE

NO USE

This must be set to “USE” if you would like to use network devices that are connected to the image server. However, set to “NO USE” when using a PPP connection. Also set to “NO USE” if you would like to use the image server as a standalone computer without any network devices connected.

Note:

If “USE” is selected, operation will be switched to FTP connection mode, so that direct connections between the browser and network cameras and network video servers can only be made by the Administrator. If a user other than an Administrator attempts to access the network devices, an error message will be displayed and the connection will not succeed. Refer to the documentation provided with the network camera or network video server for details on browser connections.

24

English

CAMERA SETTINGS (Camset)

2 LOCAL SERVER IP ADDRESS

Type in the IP address for the image server in the text box.

3 FTP PORT NUMBER

(Default setting: 21)

Type in the FTP (File Transfer Protocol) port number for the image server in the text box. Normally you should type in “21”.

4 FTP PASSIVE

(Default setting: NO USE)

If the FTP connection is in passive mode, set to “USE”. However, this should normally be set to

NO USE”.

Setting items:

USE

NO USE

Note:

In cases such as with an intra-company LAN where the cameras are located inside a firewall and the image server is located outside the firewall, the firewall will cause access to be forbidden. In such cases, set the “FTP PASSIVE” mode to “USE”.

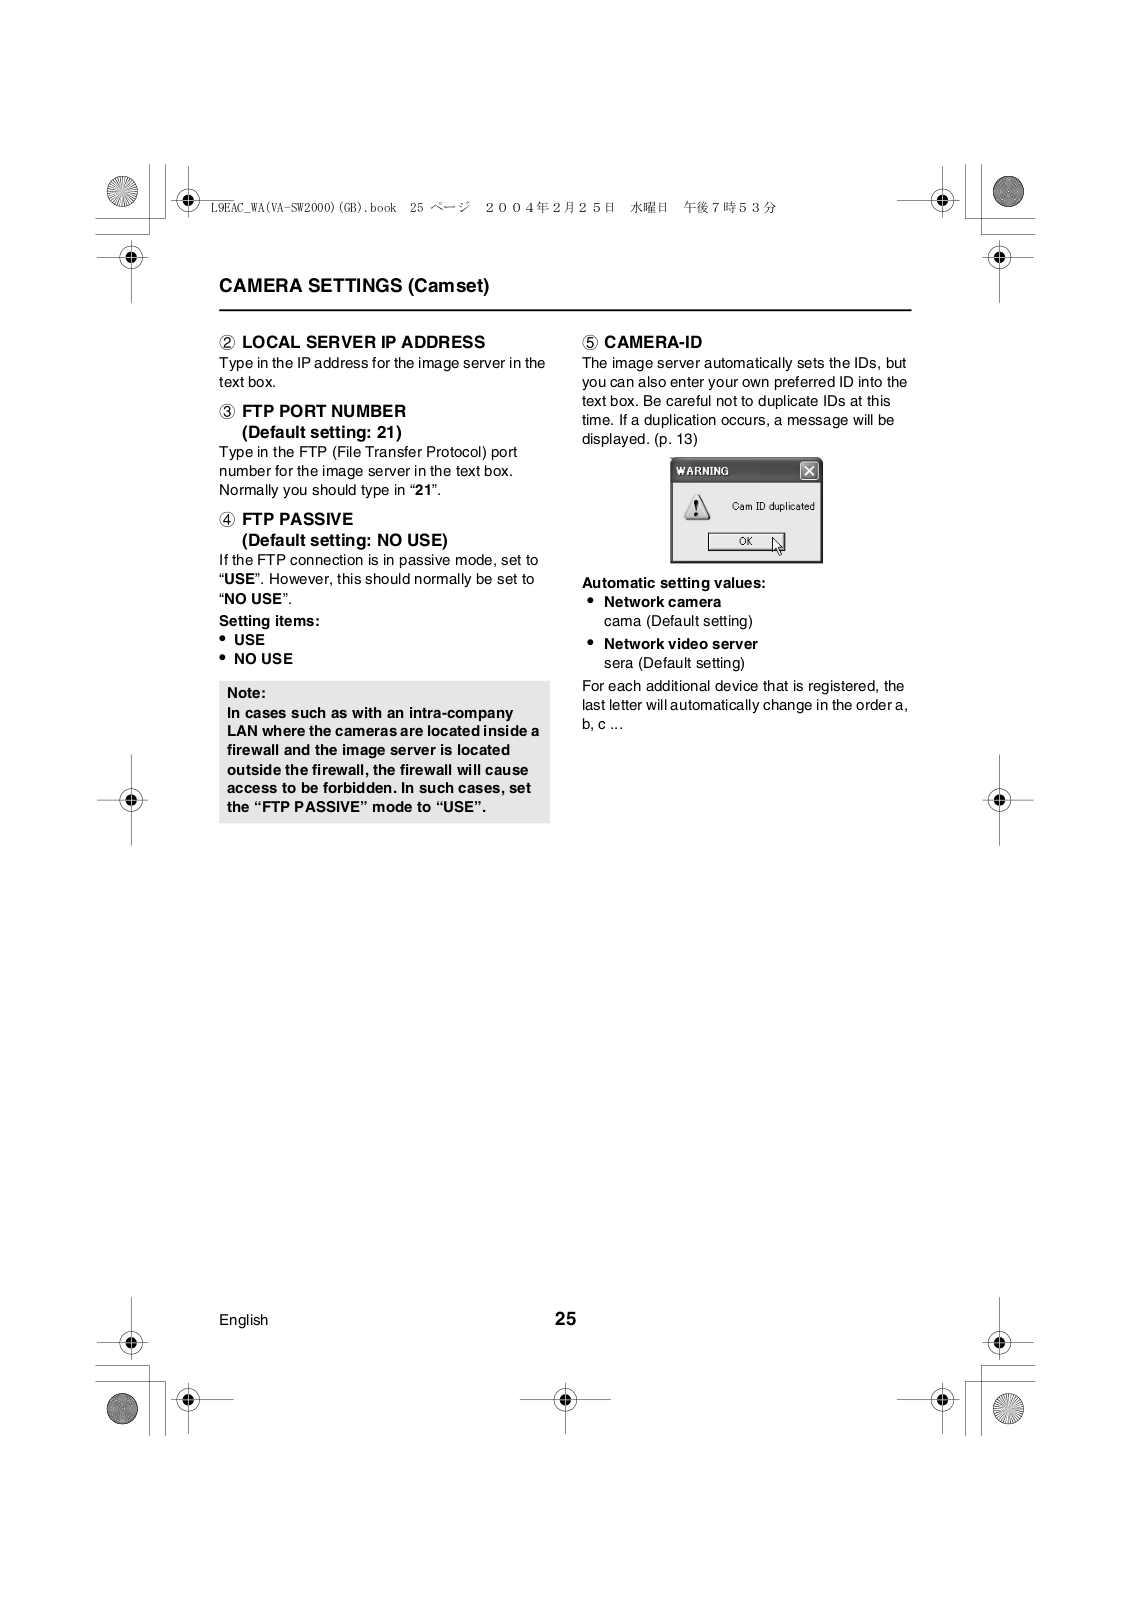
5 CAMERA-ID

The image server automatically sets the IDs, but you can also enter your own preferred ID into the text box. Be careful not to duplicate IDs at this time. If a duplication occurs, a message will be displayed. (p. 13)

Automatic setting values:

Network camera cama (Default setting)

Network video server sera (Default setting)

For each additional device that is registered, the last letter will automatically change in the order a, b, c ...

English

25

LIVE IMAGE RECORDING SETTINGS (LSarchive)

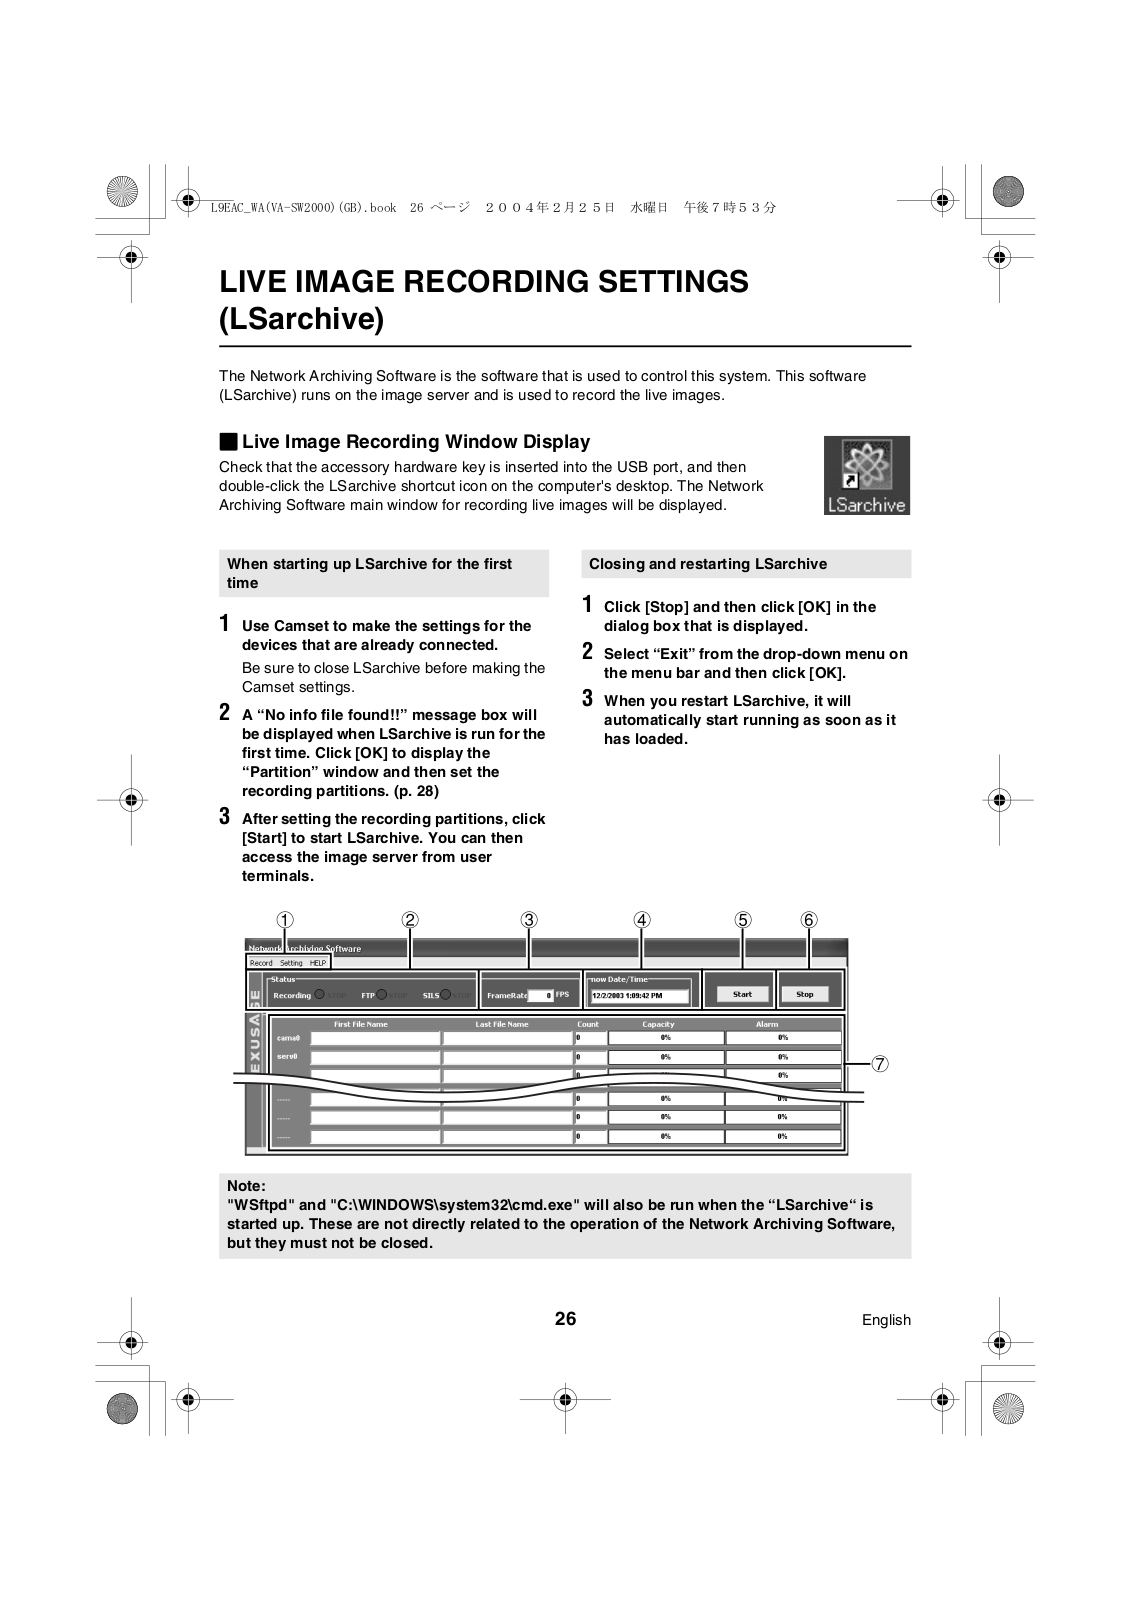
The Network Archiving Software is the software that is used to control this system. This software (LSarchive) runs on the image server and is used to record the live images.

bLive Image Recording Window Display

Check that the accessory hardware key is inserted into the USB port, and then double-click the LSarchive shortcut icon on the computer's desktop. The Network Archiving Software main window for recording live images will be displayed.

When starting up LSarchive for the first time

1 Use Camset to make the settings for the devices that are already connected.

Be sure to close LSarchive before making the Camset settings.

2 A “No info file found!!” message box will be displayed when LSarchive is run for the first time. Click [OK] to display the “Partition” window and then set the recording partitions. (p. 28)

3 After setting the recording partitions, click [Start] to start LSarchive. You can then access the image server from user terminals.

Closing and restarting LSarchive

1 Click [Stop] and then click [OK] in the dialog box that is displayed.

2 Select “Exit” from the drop-down menu on the menu bar and then click [OK].

3 When you restart LSarchive, it will automatically start running as soon as it has loaded.

1

2

3

4

5

6


7

Note:

"WSftpd" and "C:\WINDOWS\system32\cmd.exe" will also be run when the “LSarchive“ is started up. These are not directly related to the operation of the Network Archiving Software, but they must not be closed.

26

English

Loading...
+ 61 hidden pages