

Page 1
TECHNICAL & SERVICE MANUAL
STK-RCS-7TWSUA
WIRED REMOTE CONTROLLER
Model No.
STK-RCS-7TWSUA
Product Code No.
1 852 353 85
FILE NO.
Destination: North America
REFERENCE NO. SM700799
Page 2
Important!
Please Read Before Starting
This air conditioning system meets strict safety and operating
standards. As the installer or service person, it is an
important part of your job to install or service the system so it
operates safely and efficiently.
For safe installation and trouble-free operation, you must:
Carefully read this instruction booklet before beginning.
Follow each installation or repair step exactly as shown.
Observe all local, state, and national electrical codes.
Pay close attention to all warning and caution notices given
in this manual.
This symbol refers to a hazard or
WARNING
CAUTION
If Necessary, Get Help
These instructions are all you need for most installation
sites and maintenance conditions. If you require help for
a special problem, contact our sales/service outlet or
your certified dealer for additional instructions.
In Case of Improper Installation
The manufacturer shall in no way be responsible for
improper installation or maintenance service, including
failure to follow the instructions in this document.
SPECIAL PRECAUTIONS
unsafe practice which can result
in severe personal injury or death.
This symbol refers to a hazard
or unsafe practice which can
result in personal injury or
product or property damage.
When Transporting
Be careful when picking up and moving the indoor and
outdoor units. Get a partner to help, and bend your knees
when lifting to reduce strain on your back. Sharp edges or thin
aluminum fins on the air conditioner can cut your fingers.
When Installing
In a Ceiling or Wall
Make sure the ceiling/wall is strong enough to hold the unit’s
weight. It may be necessary to construct a strong wood or
metal frame to provide added support.
In a Room
Properly insulate any tubing run inside a room to prevent
"sweating" that can cause dripping and water damage to walls
and floors.
In Moist or Uneven Locations
Use a raised concrete pad or concrete blocks to provide a
solid, level foundation for the outdoor unit. This prevents
water damage and abnormal vibration.
In an Area with High Winds
Securely anchor the outdoor unit down with bolts and a metal
frame. Provide a suitable air baffle.
In a Snowy Area (for Heat Pump-type Systems)
Install the outdoor unit on a raised platform that is higher than
drifting snow. Provide snow vents.
When Connecting Refrigerant Tubing
•
Use the flare method for connecting tubing.
•
Apply refrigerant lubricant to the matching surfaces of the
flare and union tubes before connecting them, then tighten
the nut with a torque wrench for a leak-free connection.
•
Check carefully for leaks before starting the test run.
When Servicing
WARNING
•
Do not supply power to the unit until all wiring and tubing
are completed or reconnected and checked.
•
Highly dangerous electrical voltages are used in this
system. Carefully refer to the wiring diagram and these
instructions when wiring. Improper connections and
inadequate grounding can cause accidental injury or death.
•
Ground the unit following local electrical codes.
•
Connect all wiring tightly. Loose wiring may cause
overheating at connection points and a possible fire
hazard.
When Wiring
ELECTRICAL SHOCK CAN CAUSE
SEVERE PERSONAL INJURY OR DEATH.
ONLY A QUALIFIED, EXPERIENCED
ELECTRICIAN SHOULD ATTEMPT TO
WIRE THIS SYSTEM.
•
Turn the power off at the main power box (mains) before
opening the unit to check or repair electrical parts and
wiring.
•
Keep your fingers and clothing away from any moving parts.
•
Clean up the site after you finish, remembering to check
that no metal scraps or bits of wiring have been left inside
the unit being serviced.
Others
CAUTION
Ventilate any enclosed areas when installing or testing the
•
refrigeration system. Escaped refrigerant gas, on contact
with fire or heat, can produce dangerously toxic gas.
Confirm upon completing installation that no refrigerant gas
•
is leaking. If escaped gas comes in contact with a stove,
gas water heater, electric room heater or other heat source,
it can produce dangerously toxic gas.
2
Page 3

Table of Contents
Page
1. SPECIFICATIONS
2. APPLICABLE INDOOR UNITS
3. FUNCTIONS
4. SELF-DIAGNOSTICS
4-1. Self-Diagnostics Procedure
4-2. Self-Diagnostics Table (Ceiling Cassette Type)
4-3. Self-Diagnostics Table (Wall Mounted Type)
APPENDIX A INSTRUCTION MANUAL
APPENDIX B INSTALLATION INSTRUCTIONS
(STK-RCS-7TWSUA)
APPENDIX C INSTALLATION INSTRUCTIONS
(Installing the Connection Kit for Wall-Mounted Models)
.........................................................................................................................
.....................................................................................................
.................................................................................................................................
...................................................................................................................
...................................................................................................
.....................................................................
.........................................................................
.......................................................................................
...........................................................................
...........................................................................
4
5
5
6
6
7
8
A-1
A-2
A-3
3
Page 4
1. SPECIFICATIONS
Item
Description
Signal Transmission Method Dedicated Remote Controller Cable
Power Source
Display Panel Type
Temperature
Display Items
Airflow Direction
Time
Temperature Sensor
Functions
Operation Section
DC5V supplied from Indoor Unit
Liquid Crystal
Set Temperature Indication (68 ºF to 86 ºF)
Six Directions Indication
AM and PM 12-Hour Indication (Minute Indication Unit: 1 minute)
Displayed when indoor unit sensor is in use
AUTO, HEAT, DRY and FAN Operation
Push Switch
Detection using the Sensor in the Remote Controller or
Room Temperature Detection
Indoor Unit Temperature Sensor
(The detection result is transmitted to the indoor unit every 5 minutes)
NOTE
1. When the indoor unit is modified from one for wireless remote controller to that for
wired remote controller, some of the functions becomes unavailable.
Therefore, before such modification, make sure to receive an approval of the client.
Also, the self-diagnostics procedure is changed.
• Unavailable Functions : Refer to "3. FUNCTIONS".
• Self-Diagnostics Procedure : Refer to "4. SELF-DIAGNOSTICS".
2. The mode change or SINGLE/MULTI change-over operation is performed using the slide switch
located inside the rear of the remote controller.
Refer to "APPENDIX B : INSTALLATION INSTRUCTIONS" for details.
NOTE
NOTE
2
2
70.0 16.5
120.0
4
Page 5

2. APPLICABLE INDOOR UNITS
Type Indoor Unit Model No.
Ceiling Cassette Type
Wall Mounted Type
XHS1271, XHS1872, XS1271, XS1872
KHS0971, KHS1271, KHS1872, KHS2472
KS0971, KS1271, KS1872, KS2472
KMHS0772, KMHS0972, KMHS1272, KMHS1872, KMHS2472
KMS0772, KMS0972, KMS1272, KMS1872, KMS2472
3. FUNCTIONS
When the unit is modified from one for wireless remote controller to that for wired remote controller,
the following functions become unavailable.
(1) Ceiling Cassette Type
• Wireless Remote Controller
• High Power Operation
(2) Wall Mounted Type
• Wireless Remote Controller
• High Power Operation
• Quiet Operation
• ION Operation
5
Page 6
4. SELF-DIAGNOSTICS
PROCEDURE
After turning on power to the air conditioner, use the remote
controller and follow the steps below to execute selfdiagnostics.
Step 1: Press and hold the remote controller NIGHT SET
BACK (NSB) button and 1 HR TIMER button. Then,
press and hold the ACL (reset) button with a pointed
object such as the tip of a pen. After 5 seconds,
release ACL button first, then release NIGHT SET
BACK (NSB) and 1 HR TIMER buttons, "oP-1" (test
run) appears, blinking in the remote controller clock
display area.
Step 2: Next, press the 1 HR TIMER button once to change
the display from "oP-1" to "oP-3" (self-diagnostics).
(The display continues to blink.)
Step 3: Finally press the ON/OFF button to engage self-
diagnostics mode.
• The self-diagnostics function utilizes the 3 indicator lamps
on the main unit, in combinations of ON lamps, blinking
lamps, and OFF lamps, to report the existence of sensor
trouble or a protective operation. (The lamps blink or
remain ON for 5 seconds, then turn OFF for 2 seconds.)
Self-diagnostics is completed when the buzzer sounds 3
short beeps.
• A maximum of 3 self-diagnostics reports are displayed, for
5 seconds each, beginning with the most recent report.
Following this display the lamps turn OFF. In order to view
the self-diagnostics results again, press the ON/OFF button
again.
• The 3 lamps remain OFF if no trouble has occurred.
<IMPORTANT> After self-diagnostics is completed, be sure
to press the ACL (reset) button to return to
normal mode. The air conditioner will not
operate if this is not done.
ON/OFF
operation button
1 HR.TIMER
button
NIGHT SETBACK
button
ACL (Reset)
button
< Clock display >
Test run mode
Self-diagnostics mode
4-1. Self-Diagnostics Procedure
6
Page 7
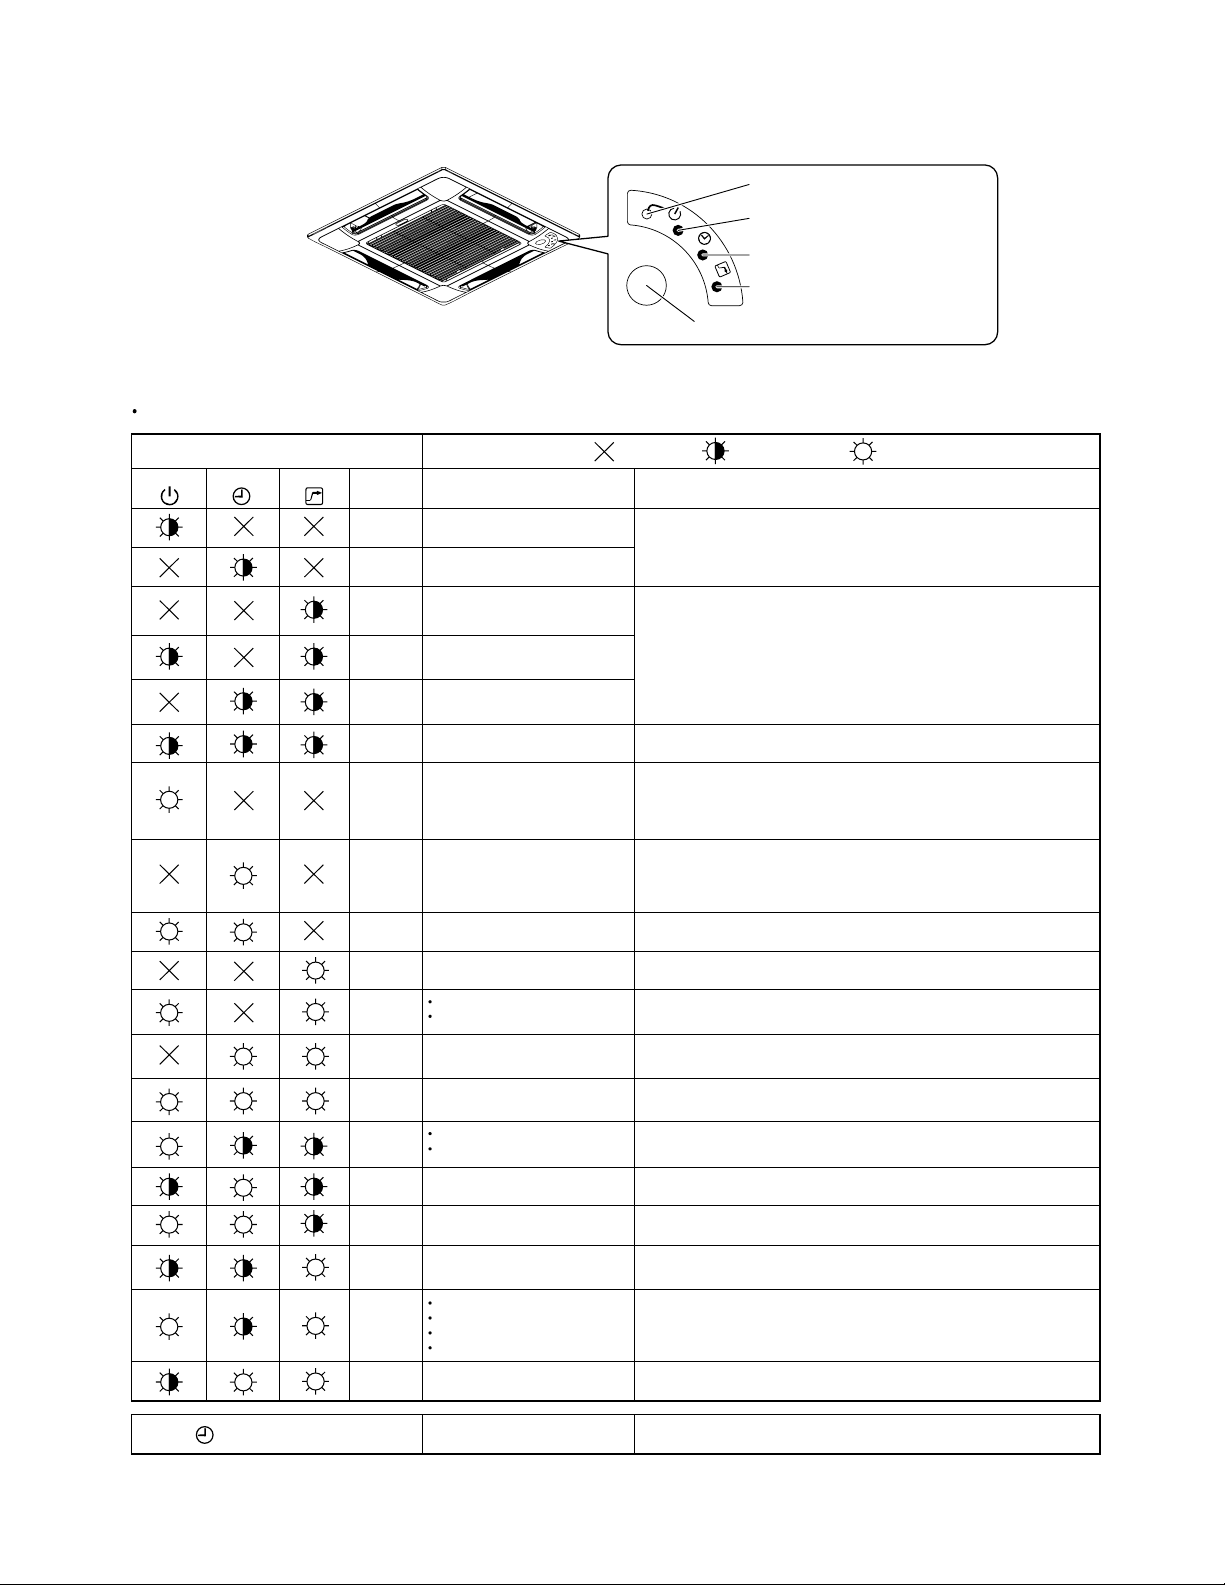
4-2. Self-Diagnostics Table (Ceiling Cassette Type)
Since the indications cover various units, the corresponding parts listed below may not be present in some models.
Indication on indoor unit
....
OFF
Timer HIGH POWER
Code Diagnostics itemsDiagnostics contents
S01
Room temperature sensor failure
Indoor heat exchanger sensor failure
Compressor temperature sensor failure
Outdoor heat exchanger sensor failure
Outdoor air temperature sensor failure
Indoor/outdoor communications failure
(serial communications)
Outdoor unit external ROM (OTP data)
failure
Peak current cut-off
• HIC circuit failure
• Power Tr (transistor) circuit failure
PAM circuit failure
Active circuit failure
Outdoor system communications failure
OLR operation
Outdoor power supply open phase
Outdoor coil freezing
Compressor discharge overheat
prevention activated.
Indoor fan operating failure
No-refrigerant protection
DC compressor drive circuit failure
Outdoor fan operating failure
Freeze-prevention operation activated.
4-way valve switching failure
Indoor zero-cross failure
Outdoor electrical current detection
failure
S02
S04
S05
S06
S07
E01
E02
E03
E04
E05
E06
E07
E08
E09
E10
E11
E12
E13
....
Blinking
....
ON (Illuminated)
OPERATION
(1) Sensor open circuit or short circuit
(2) Contact failure at connector or open circuit at terminal crimping location
(3) Indoor/outdoor PCboard failure
(1) Sensor open circuit or short circuit
(2) Contact failure at connector or open circuit at terminal crimping location
(3) Outdoor PCboard failure
Outdoor PCboard failure
(1) Mis-wiring (2) AC power failure (3) Blown fuse (4) Power Relay failure
(5) Indoor or outdoor PCboard failure (6) Outdoor Fan Motor failure (7) Reactor failure
(8) High-Pressure Switch failure (9) Overload Relay failure (10) Magnetic Coil failure
* See detailed flowchart in this section.
(1) HIC or power Tr failure (2) Outdoor fan does not turn. (3) Instantaneous power outage
(4) Service valve not opened. (5) Outdoor fan blocked. (6) Continuous overload operation
(7) Compressor failure (8) Outdoor PCboard failure
(1) External ROM data failure (2) Outdoor PCboard failure
(1) Instantaneous power outage (2) HIC or power transistor failure
(3) Outdoor PCboard failure
(1) Outdoor PCboard failure (2) Outdoor power supply voltage failure
(1) Electric expansion valve failure (2) Capillaries choked (3) Shortage of refrigerant
(4) Continuous overload operation (5) Outdoor fan does not rotate (6) Outdoor
PCboard
failure
(1) Fan motor failure (2) Contact failure at connector (3) Indoor PCboard failure
(1) 4-way valve failure (heat pump model only)
(2) Outdoor PCboard failure
(1) Service valve not opened. (2) Shortage of refrigerant
(1) Open phase (2) Outdoor PCboard failure
(1) Fan motor failure (2) Contact failure at connector (3) Outdoor PCboard failure
(1) Mis-wiring (2) Blown fuse (3) Power Relay failure (4) Outdoor PCboard failure
(5) Compressor failure
* See detailed flowchart in this section.
(1) DRAIN PUMP FAILURE (2) FS FAILURE (3) CHOKED DRAIN HOSE
(1) Indoor fan system failure (2) Shortage of refrigerant (3) Low-temperature operation
REMOTE CONTROL receiver
OPERATION lamp
TIMER lamp
OPERATION button
HIGH POWER lamp
INDOOR UNIT
TIMER
LAMP
BLINKING (3 SEC. INTERVAL)
FLOAT SWICTH (FS) IS ACTIVED.
7
Page 8

4-3. Self-Diagnostics Table (Wall Mounted Type)
Since the indications cover various units, the corresponding parts listed below may not be present in some models.
REMOTE CONTROL receiver
(1) OPERATION lamp
(2) TIMER lamp
(3) QUIET lamp
ION lamp
OPERATION button
INDOOR UNIT
Indication on indoor unit
....
OFF
Timer Operation
Code Diagnostics items Diagnostics contents
S01
Room temperature sensor failure
Indoor heat exchanger sensor failure
Humidity sensor failure
Compressor temperature sensor failure
Outdoor heat exchanger sensor failure
Outdoor air temperature sensor failure
Indoor/outdoor communications failure
(serial communications)
Outdoor unit external ROM (OTP data)
failure
Peak current cut-off
• HIC circuit failure
• Power Tr (transistor) circuit failure
PAM circuit failure
Active circuit failure
Outdoor system communications failure
OLR operation
Outdoor power supply open phase
Outdoor coil freezing
Compressor discharge overheat
prevention activated.
Indoor fan operating failure
No-refrigerant protection
DC compressor drive circuit failure
Outdoor fan operating failure
Freeze-prevention operation activated.
4-way valve switching failure
Indoor zero-cross failure
Outdoor electrical current detection
failure
S02
S03
S04
S05
S06
S07
E01
E02
E03
E04
E05
E06
E07
E08
E09
E10
E11
E12
E13
....
Blinking
....
ON (Illuminated)
Quiet
(3)(2) (1)
(1) Sensor open circuit or short circuit
(2) Contact failure at connector or open circuit at terminal crimping location
(short-circuit detection only for the humidity sensor)
(3) Indoor/outdoor PCboard failure
(1) Sensor open circuit or short circuit
(2) Contact failure at connector or open circuit at terminal crimping location
(3) Outdoor PCboard failure
Outdoor PCboard failure
(1) Mis-wiring (2) AC power failure (3) Blown fuse (4) Power Relay failure
(5) Indoor or outdoor PCboard failure (6) Outdoor Fan Motor failure (7) Reactor failure
(8) High-Pressure Switch failure (9) Overload Relay failure (10) Magnetic Coil failure
* See detailed flowchart in this section.
(1) HIC or power Tr failure (2) Outdoor fan does not turn. (3) Instantaneous power outage
(4) Service valve not opened. (5) Outdoor fan blocked. (6) Continuous overload operation
(7) Compressor failure (8) Outdoor PCboard failure
(1) External ROM data failure (2) Outdoor PCboard failure
(1) Instantaneous power outage (2) HIC or power transistor failure
(3) Outdoor PCboard failure
(1) Outdoor PCboard failure (2) Outdoor power supply voltage failure
(1) Electric expansion valve failure (2) Capillaries choked (3) Shortage of refrigerant
(4) Continuous overload operation (5) Outdoor fan does not rotate (6) Outdoor
PCboard
failure
(1) Fan motor failure (2) Contact failure at connector (3) Indoor PCboard failure
(1) 4-way valve failure (heat pump model only)
(2) Outdoor PCboard failure
(1) Service valve not opened. (2) Shortage of refrigerant
(1) Open phase (2) Outdoor PCboard failure
(1) Fan motor failure (2) Contact failure at connector (3) Outdoor PCboard failure
(1) Mis-wiring (2) Blown fuse (3) Power Relay failure (4) Outdoor PCboard failure
(5) Compressor failure
* See detailed flowchart in this section.
(1) Indoor fan system failure (2) Shortage of refrigerant (3) Low-temperature operation
8
Page 9

APPENDIX A
STK-RCS-7TWSUA
INSTRUCTION MANUAL
(OI-852-6-4181-139-00-0)
A-1
Page 10

STK-RCS-7TWSUA
This wired remote controller is designed for
both the “COOL/DRY/HEAT Model” and
“COOL/DRY Model” indoor unit.
Before using the remote controller, be sure
to confirm the “model type” specified on the
front cover of the INSTRUCTION MANUAL
INSTRUCTION MANUAL
Wired Remote Controller
MODE D’EMPLOI
Télécommande Filaire
supplied with the indoor unit.
Once the wired remote controller is
connected, the wireless remote controller
cannot be used.
Save These Instructions!
Conserver ce mode d’emploi
Pub. OI-85264181139000
© SANYO 2009
Page 11

CONTENTS
PRODUCT INFORMATION ................................................................................................................ 2
ALERT SYMBOLS..............................................................................................................................2
INSTALLATION LOCATION ................................................................................................................2
ELECTRICAL REQUIREMENTS........................................................................................................2
SAFETY INSTRUCTIONS..................................................................................................................2
FEATURES ......................................................................................................................................... 3
REMOTE CONTROL UNIT.................................................................................................................4
OPERATION WITH THE REMOTE CONTROL UNIT ........................................................................6
1. Automatic Operation (only for COOL/DRY/HEAT Model).................................................... 6
2. Manual Operation................................................................................................................6
3. Adjusting the Fan Speed .....................................................................................................7
4. Fan Only..............................................................................................................................7
5. Night Setback Mode............................................................................................................ 7
SPECIAL REMARKS..........................................................................................................................7
SETTING THE TIMER........................................................................................................................8
USING THE 1-HOUR OFF TIMER..................................................................................................... 9
ADJUSTING THE AIRFLOW DIRECTION .........................................................................................9
Page
PRODUCT INFORMATION
If you have problems or questions concerning your wired
remote controller, you will need the following information.
Model No. __________________________________
Date of purchase _____________________________
Dealer’s address _____________________________
Phone number________________
ALERT SYMBOLS
The following symbols used in this manual, alert you
to potentially dangerous conditions to users, service
personnel or the appliance:
This symbol refers to a hazard or unsafe
practice which can result in severe
personal injury or death.
CAUTION
This symbol refers to a hazard or unsafe
practice which can result in personal
injury or product or property damage.
INSTALLATION LOCATION
We recommend that this wired remote controller be
installed properly by qualified installation technicians
in accordance with the Installation Instructions
provided with the unit.
• Do not install this wired remote
controller where there are fumes or
flammable gases, or in an extremely
humid space such as a greenhouse.
• Do not install the wired remote
controller where excessively high
heat-generating objects are placed.
Avoid:
To protect the air conditioner from heavy corrosion, avoid installing
the outdoor unit where salty sea water can splash directly onto it or
in sulphurous air near a spa.
ELECTRICAL
REQUIREMENTS
1. All wiring must conform to the local electrical codes.
Consult your dealer or a qualified electrician for details.
2. Each unit must be properly grounded with a ground (or
earth) wire or through the supply wiring.
3. Wiring must be done by a qualified electrician.
SAFETY INSTRUCTIONS
• Read this Instruction Manual carefully before using
this air conditioner. If you still have any difficulties
or problems, consult your dealer for help.
• This air conditioner is designed to give you
comfortable room conditions. Use this only for its
intended purpose as described in this Instruction
Manual.
• Never use or store gasoline or other
flammable vapor or liquid near the air
conditioner — it is very dangerous.
• This air conditioner has no ventilator
for intaking fresh air from outdoors.
You must open doors or windows
frequently when you use gas or oil
heating appliances in the same room,
which consume a lot of oxygen from
the air. Otherwise there is a risk of
suffocation in an extreme case.
CAUTION
• Do not turn the air conditioner on and
off from the power mains switch. Use
the ON/OFF operation button.
• Do not stick anything into the air outlet
of the outdoor unit. This is dangerous
because the fan is rotating at high
speed.
• Do not let children play with the air
conditioner.
• Do not cool or heat the room too much
if babies or invalids are present.
2
OI-139-2-EG
Page 12

FEATURES
• Microprocessor Controlled Operation
• 24-Hour ON or OFF Timer
• 1-Hour OFF Timer
•Night Setback
• Automatic and 3-step Fan Speed
• Air Sweep Control
NOTE
• Since the wired remote controller is designed to be commonly used for various air conditioners, some of the functions of the wireless
remote controller supplied with the indoor unit cannot be used.
• “Single use” means that only one indoor unit is connected with one outdoor unit in a one-unit-to-one-unit configuration.
• “Multiple use” (i.e. Flexi-Multi system) means that two or more indoor units are connected with one outdoor unit in a multiple-unit-to-one-unit
configuration.
• Automatic Restart Function for Power Failure
• Automatic Switching between Cooling and Heating
(This function is available only for “Single use” of COOL/DRY/
HEAT Model.)
• Hot Start Heating System
(This function is available only for COOL/DRY/HEAT Model.)
REMOTE CONTROL UNIT (DISPLAY)
Displayed when indoor unit sensor
is in use
Displayed when setting timer
(1) Operation mode
AUTO .....................................
(only for COOL/DRY/HEAT
Model)
HEAT ......................................
(only for COOL/DRY/HEAT
Model)
MILD DRY..............................
Displayed when operating NIGHT
SETBACK mode
Displayed when setting
temperature
Displayed when temperature is
shown
Symbols
(3) Temperature setting
60 – 86 °F ..............................
When set to 80 °F
temperature indication...........
(4) Timer
24-hour clock with ON/OFF
program Timer .......................
COOL.....................................
FAN ........................................
(2) Fan speed
Automatic operation ...............
HIGH .....................................
MEDIUM.................................
LOW.......................................
OI-139-3-EG
ON Timer. ..............................
OFF Timer. ............................
1-hour OFF Timer..................
(5) NIGHT SETBACK..................
(6) Flap angle indication..............
Sweep indication....................
3
Page 13

REMOTE CONTROL UNIT
NOTE
The descriptions on the AUTO ( ) or HEAT ( ) operation mode are only for the “COOL/DRY/HEAT Model,” and not for the
“COOL/DRY Model.”
Display
Information on the operating conditions is displayed while the remote control
unit is switched on. If the unit is turned off, only the mode that was set
previously is still displayed.
Temperature setting buttons (TEMP.)
Press the button to increase the set temperature.
Press the button to reduce the set temperature.
The temperature setting changes by 2 °F each time one of the TEMP. buttons
is pressed.
FAN SPEED selector button
: The air conditioner automatically decides the fan speeds.
: High fan speed
: Medium fan speed
: Low fan speed
NIGHT SETBACK button
For details, see “5. Night Setback Mode”. When you press this button in the
HEAT, DRY or COOL mode, the mark appears in the display, and the
remote control unit will automatically adjust the set temperature to save
energy.
FLAP button
Press this button either to select the setting of the airflow direction to one of
the six possible positions manually or to select the sweep function which
moves the flap up and down automatically.
: The airflow direction can be set manually. (six positions)
: The flap moves up and down automatically.
NOTE
When you press the FLAP button, the air flow direction will be changed one by
one as follows.
SWEEP
Timer and Present Time setting buttons
First, press the SET button to select the mode (ON, OFF and Present Time
settings) you want.
Each time you press the ‘‘HH’’ button, the hours advance by one.
(PM0, PM1.....PM11, AM0, AM1.....AM11)
Each time you press the ‘‘MM’’ button, the minutes advance by one when
setting Present Time and by ten when setting ON and OFF Time.
SET button
For details, see ‘‘Setting the Timer’’.
Press this button to select the mode you want to program.
ACL button (ALL CLEAR)
When you press the ACL button while the
operation button is ON, all settings are cleared.
Press the ACL button if the air conditioner is not
operating correctly.
4
OI-139-4-EG
Page 14

ON/OFF operation button
This button is for turning the air conditioner on and off.
MODE selector button
Use this button to select AUTO, HEAT, DRY, COOL or FAN mode.
(AUTO) : When this setting is selected, the air conditioner calculates the difference between the
thermostat setting and the room temperature and automatically switches to the ‘‘COOL’’ or
‘‘HEAT’’ mode as appropriate. (This function is available only for “Single use” of COOL/DRY/
HEAT Model.)
(HEAT) : The air conditioner makes the room warmer.
(DRY) : The air conditioner reduces the humidity in the room.
(COOL) : The air conditioner makes the room cooler.
(FAN) : The air conditioner works only as a circulation fan except for “Multiple use” of COOL/DRY/
HEAT Model.
1 HR. TIMER button (1-HOUR OFF TIMER)
: When you press this button, regardless of whether the unit is operating or stopping, the unit operates for
one hour and then shuts down.
TIMER SELECT button
No display :The timer does not operate.
: The air conditioner starts at the set time.
: The air conditioner stops at the set time.
: The air conditioner stops and starts, or starts and stops, at the set times every day.
Sensor
A temperature sensor inside the remote control unit senses the room temperature.
SENSOR button
When you press this button (use a small-tipped object such as a ballpoint pen), the mark will disappear at the
display. And the room temperature is detected by the sensor which is built into the remote control unit and the air
conditioner is controlled accordingly.
NOTE
If the remote control unit is located near a heat source, such as a space heater or in direct sunlight, press the
SENSOR button to switch to the sensor on the indoor unit.
NOTE
The indoor fan runs continuously when the system is in normal operation. It does not turn off when the desired room temperature is
reached. If Night Set Back mode is selected, the fan will turn off intermittently during cooling operation in order to control air flow.
OI-139-5-EG
5
Page 15

OPERATION WITH THE REMOTE CONTROL UNIT
1. Automatic Operation
(only for COOL/DRY/HEAT Model)
• Single use
This unit automatically switches between cooling operation and
heating operation according to the difference between the room
temperature and the temperature setting.
• Multiple use
The air conditioner calculates the difference between the
thermostat setting and room temperature, and automatically
determines the mode to operate under cooling or heating. Then,
the air conditioner continuously operates under the mode selected
at initial operation.
STEP 2
STEP 1
NOTE
NOTE
Check that the circuit breaker on the power panel is
turned on.
Once mode is selected and the unit is preset by
following the steps below, you can have the air
conditioner automatically bring the room to the desired
temperature simply by pressing the ON/OFF operation
button.
STEP 1 Press the MODE selector button to .
STEP 2 Press the ON/OFF operation button.
To stop the air conditioner, press the ON/OFF operation
button again.
To change the temperature setting; press the
temperature setting buttons and change the setting to
the desired temperature.
2. Manual Operation
STEP 4
STEP 5
NOTE
Check that the circuit breaker on the power panel is
turned on.
If the automatic operation settings of the unit do not
meet your needs, press the setting buttons as
described below and change the settings as desired.
STEP 1 Press the MODE selector button
and select the desired mode.
For heating operation
For dehumidifying operation
For cooling operation
For fan only operation
(No Fan mode in “Multiple use” of
COOL/DRY/HEAT Model)
STEP 2 To start the air conditioner, press the ON/
OFF operation button.
STEP 3 Press the TEMP. setting buttons to change
the temperature setting to the desired
temperature.
Adjustable temperature range:
86 °F max.
60 °F min.
STEP 4 Set the FAN SPEED selector button to the
setting you want.
STEP 5 Press the FLAP button and set the airflow
direction as desired.
(Refer to “ADJUSTING THE AIRFLOW
DIRECTION” on page 9.)
To stop the air conditioner, press the ON/OFF
operation button again.
STEP 2
STEP 3
STEP 1
→
→
→
→
NOTE
6
• Choose the best position in the room for the remote
control unit, which also acts as the sensor for room
comfort and transmits the operating instructions.
Once you’ve found this best position, always keep the
remote control unit there.
• This appliance has a built-in 5-minute time delay
circuit to ensure reliable operation. When the
operation button is pressed, the compressor will start
running within three minutes. In the event of power
failure, the unit will stop.
• The display on the remote control unit shows the
setting temperature and not the room temperature.
• When multiple indoor units are used and units in other
rooms are already operating, they will be operating
with the same mode as the operating indoor units.
(only for “Multiple use” of COOL/DRY/HEAT Model)
OI-139-6-EG
Page 16

3. Adjusting the Fan Speed
A. Automatic fan speed
Simply set the FAN SPEED selector button to the
position.
This automatically sets the best fan speed for the room
temperature.
B. Manual fan speed
If you want to adjust fan speed manually during operation,
just set the FAN SPEED selector button as desired. [ ,
, or ]
4. Fan Only
A. In Cooling and DRY Mode: ( and )
When the night setback mode is selected, the air conditioner
automatically raises the temperature setting 2 °F when 30 minutes
have passed after the selection was made, and then another 2 °F
after another 30 minutes have passed, regardless of the indoor
temperature when night setback was selected. This enables you
to save energy without sacrificing comfort. This function is
convenient when gentle cooling is needed.
Setting
temperature
2°F
2°F
STEP 3
If you want to circulate air without any temperature
control, follow these steps:
NOTE
STEP 1 Press the MODE selector button to switch to
STEP 2 Press the ON/OFF operation button.
STEP 3 Press the FAN SPEED selector button to
There is no FAN only function in “Multiple use” of
COOL/DRY/HEAT Model.
the fan mode .
select the fan speed of your choice ( ,
or ).
5. Night Setback Mode
STEP 2
STEP 1
Press the NIGHT
SETBACK button
30 min.
30 min.
Time
B. In Heating Mode: ( )
(only for COOL/DRY/HEAT Model)
When the night setback mode is selected, the air conditioner
automatically lowers the temperature setting 4 °F when 30
minutes have passed after the selection was made, and then
another 4 °F after another 30 minutes have passed, regardless of
the indoor temperature when night setback was selected. This
enables you to save energy without sacrificing comfort. This
function is convenient when gentle heating is needed.
30 min.
4°F
30 min.
4°F
Time
Setting
temperature
Press the NIGHT
SETBACK button
SPECIAL REMARKS
Night Setback Mode is used for saving energy.
Press the NIGHT SETBACK button while operation.
The mark appears in the display.
To release the night setback function, press the NIGHT SETBACK
button again.
OI-139-7-EG
Power failure during operation
In the event of power failure, the unit will stop. When the power is
resumed within 8 hours, the unit will restart automatically in
approximately five minutes, or 15 minutes in “Multiple use” of COOL/
DRY/HEAT Model on AUTO mode by the remote control unit.
Remote Control Unit
The remote control unit sends the setting condition to the air
conditioner regularly at five minute intervals.
Remote Control Unit Display
If the display malfunctions, press the ACL button.
This resets the remote control unit back to the initial settings.
Make the settings again.
7
Page 17

SETTING THE TIMER
1. How to set the present time
(Example) To set to 9:10 pm.
3. How to set the ON time
(Example) To start operation at 7:10 am.
ON TIME Present time
Operation Indication
1. Press the SET button once. The timer indication alone
2. • Press the HH button until
AM 7 is displayed.
• Press the MM button until
10 is displayed.
3. Press the TIMER SELECT
button once to set ON time.
flashes and the previous settime is only displayed.
The display will change
automatically back to show the
present time after about 10 sec.
The present time and are
displayed.
Operation Indication
1. Press the SET button three
times.
2. • Press the HH button until
PM 9 is displayed.
• Press the MM button until
10 is displayed.
The time indication alone
flashes.
The display will flash for 10 sec.
and automatically stop flashing
except for the “ : ” symbol.
2. How to set the OFF time
(Example) To stop the air conditioner at 11:30 pm.
OFF TIME Present time
Operation Indication
1. Press the SET button twice. The timer indication alone
2. • Press the HH button until
PM 11 is displayed.
• Press the MM button until
30 is displayed.
3. Press the TIMER SELECT
button twice to set OFF time.
To cancel the setting, press the TIMER SELECT button twice.
flashes and the previous settime is only displayed.
The display will change
automatically back to show the
present time after about 10 sec.
The present time and are
displayed.
To cancel the setting, press the TIMER SELECT button three times.
4. How to set daily ON/OFF repeat timer
(Example) To start operation at 7:10 am. and stop the air conditioner
at 11:30 pm.
Present time OFF TIME
ON TIME
9:10 pm.
Present time
7:10 am.
ON
Operation Indication
Set the timer ON/OFF times as
shown in 2 and 3.
To cancel the setting, press the TIMER SELECT button once.
The present time PM 9:10 and
are displayed.
NOTE
You can check the timer ON/OFF times after you have set them by
pressing the SET button.
Programmed
daily ON / OFF
11:30 pm.
OFF
5. Backup function
Even if the main power supply to the unit is turned off, the remote
controller will store the previous settings in its internal memory for up
to 8 hours. If the power is not turned back on within 8 hours, the
previous settings will be lost. In this case, the mode settings must be
reset by the user.
8
OI-139-8-EG
Page 18

USING THE 1-HOUR OFF
ADJUSTING THE AIRFLOW
TIMER
1. 1-Hour OFF Timer
This function causes the unit to operate for one hour and then
stop, regardless of whether the unit is on or off when this
button is pressed.
The indicator in the display indicates that this function is
operating.
Setting procedure:
Regardless of whether the unit is operating or stopped, press the 1
HR. TIMER button.
appears in the display.
Cancellation procedure:
Press the ON/OFF operation button to turn the unit off, wait for the
unit to stop operating, and then press the ON/OFF operation button
again.
The 1-Hour Timer function is now cancelled and the unit operates
normally.
NOTE
DIRECTION
The vertical airflow can be adjusted by moving the flap with the
remote control unit. Do not move the flap with your hands. Confirm
that the remote control unit has been turned on. Use the FLAP
button to set either the sweep function or one of the six airflow
direction settings.
A. Sweep function
The flap starts moving
up and down to deliver
air over the sweep
range.
B. Setting the airflow manually
Referring to the above
illustration, use the
FLAP button to set the
airflow direction within
the range used during
the heating, cooling, or
dehumidifying
operation.
COOL
DRY
SWEEP
SWEEP
HEAT
FAN
• If, while the 1-Hour Timer function is operating, the 1HR. TIMER
button is pressed once to cancel the function and then again, the
unit continues to operate for one hour from that point in time and
then stops.
• It is not possible to use the OFF Timer and 1-Hour OFF Timer
together. Whichever function is set last takes precedence. If the 1
HR. TIMER button is pressed while the TIMER OFF function
operates, the OFF Timer is cancelled and the unit will stop
operating one hour later.
2. Operation together with the daily ON/OFF
repeat timer
The 1-Hour OFF Timer setting is given priority over the DAILY ON/
OFF REPEAT setting.
NOTE
• The flap automatically closes when the unit is off.
• During the heating operation, the fan speed will be very low and the
flap will be in the horizontal position (position ) until the air being
blown out of the unit begins to warm. Once the air warms up, the
flap position and fan speed change to the settings specified with
the remote control unit.
CAUTION
• Use the FLAP button on the remote control unit to adjust the
position of the flap. If you move the flap by hand, the flap
position according to the remote control unit and the actual
flap position may no longer match. If this should happen,
shut off the unit, wait for the flap to close, and then turn on
the unit again; the flap position will now be normal again.
• Do not have the flap pointed down during cooling operation.
Condensation may begin to form around the air vent and drip
down.
OI-139-9-EG
9
Page 19

APPENDIX B
INSTALLATION INSTRUCTIONS
(STK-RCS-7TWSUA)
STK-RCS-7TWSUA
(II-852-6-4190-481-00-1)
A-2
Page 20

IMPORTANT
Q'ty Q'ty
1
Parts
Wired
remote
controller
Machine
screws
Tapping
screws
2
2
2
Spacers
1
Parts
1
1
Instruction
manual
Figure Figure
Installation
Instructions
Wire
harness
5/32
15/16"
5/32
15/16"
(4
25mm)
(4
25mm)
26.2 ft. (8m)
INSTALLATION INSTRUCTIONS
W
IMPORTANT
• In order to install this wired remote controller onto a wall-mounted model, the connection kit
(STK-KCW1), which must be purchased separately, is required.
• Once the wired remote controller is connected, the wireless remote controller cannot be used.
I Parts supplied with the remote controller
See Table 1.
I Remote controller installation guidelines
Installation location
• Mount the remote controller 3.3 to 4.9 ft. (1 to 1.5
meters) off the floor where it can sense the average
temperature of the room.
• Do not mount the remote controller in a place
exposed to direct sunlight or where it is exposed to
outside air such as near a window.
• Do not mount the remote controller behind a curtain or
other object so that it is separated from the air circulation of the room.
• Mount the remote controller inside the room being air
conditioned.
Switching the room temperature sensor
Table 1
Room temperature sensors are separately incorporated in both the indoor unit and the remote controller. Either sensor can
be used to sense the room temperature. The indoor unit sensor is usually used.
If you wish the remote controller to sense the room temperature, press the SENSOR button with a ballpoint pen or tool with
a small tip. (Refer to Fig. 9 on page 4 to locate the SENSOR button.)
I How to install the remote controller
• The remote controller is set to “Cool/Dry/Heat model” at
the time of shipment from the factory. If the purchased air
conditioner is a COOL/DRY model, follow the instructions
on the label and change the switch on the reverse side of
the remote controller unit to “Cool/Dry model”. (Fig. 1)
• The remote controller is also set to “Single” at the time of
shipment from the factory. For multiple use, set the
switch on the reverse side of the remote controller unit to
“Multi”. (Fig. 1)
• After all work is completed, if any switches have been
changed, then be sure to press the ACL (Reset) button.
(Refer to Fig. 9 on page 4 to locate the ACL (Reset) button.)
85264190481001 © SANYO 2009
Fig. 1
SANYO Commercial Solutions In Canada
A Division of SANYO North America Corporation SANYO Canada Inc.
1300 Michael Drive, Suite A 1-300 Applewood Crescent, Concord
Wood Dale, IL 60191, U.S.A. Ontario, L4K 5C7, Canada
Page 21

A. Installing with in-wall junction box
Remote
controller
Machine
Opening
In-wall junction box
from the indoor unit
Wire harness
Spacers
Wall
screws
Back plate
Wall
Remote
controller
Wire harness
Tapping
screws
Back plate
WallWall
Cut out
Connector
Hook
PCB
Slot
Ta b
Back
plate
2-3/8"
(60mm)
In-wall junction box (locally purchased)
4-3/16"
(106mm)
3-9/32"
(83.5mm)
(1) Install the junction box (locally purchased) into the wall.
(Figs. 2-a and 3)
(2) Pass the wire harness through the junction box and
conduit. (Fig. 3)
(3) Insert a flathead screwdriver into the 5 tab locations
and disconnect the back plate of the remote controller by
lifting up slightly. (Fig. 2-b)
The tabs are thin; take care not to chip them.
(4) Pass the wire harness connector through the cord open-
ing on the back plate of the remote controller.
Use nippers or a similar tool to cut out the slots for the
remote controller back plate screws. Insert the spacers
and use the machine screws to install the remote controller back plate. (Fig. 3)
(5) Insert the connector into the PCB of the remote controller
unit, and wrap the wire harness around the hook. (Fig. 4)
(6) Store the excess wire harness inside the junction box,
then hook the remote controller unit onto the top of the
back plate and install the remote controller unit.
(7) To remove the remote controller unit after it has been
installed, insert a flathead screwdriver into the slot on the
bottom of the case and turn it. (Fig. 5)
Fig. 2-a
Fig. 2-b
B. Installing directly onto the wall
(1) Insert a flathead screwdriver into the 5 tab locations and
disconnect the back plate of the remote controller by lifting up slightly. (Fig. 2-b)
The tabs are thin; take care not to chip them.
(2) Use tapping screws to directly fasten the remote con-
troller back plate onto the wall. (Fig. 6)
(3) Insert the connector into the PCB of the remote controller
unit, and wrap the wire harness around the hook. (Fig. 4)
(4) Use nippers or a similar tool to cut out the slot on the top
of the remote controller unit. Pass the wire harness
through the slot, then hook the remote controller unit
onto the top of the back plate and install the remote controller unit.
(5) In order to conceal the exposed wiring, use a wire cover
(locally purchased) or similar means.
NOTE
• When installing the remote controller back plate, be sure
that it is flat and straight. Do not over-tighten the installation screws.
• Install the remote controller away from all sources of elec-
• Install a noise filter or take other appropriate action if elec-
trical noise.
trical noise affects the power supply circuit of the unit.
Fig. 3
Fig. 4
Fig. 5
Fig. 6
2
Page 22

I How to wire the remote controller
Ceiling
panel
5P FLAP
wiring connector
7P IND and 4P RC
wiring connector
Control
box
cover
Power box cover
Indicator
(1) Turn OFF the power and remove the ceiling panel
air-intake grille. (Refer to 3-6-1 Before Installing the
Ceiling Panel in the Installation Instructions supplied
with the indoor unit.)
(2) Remove the 3 power box cover screws and 2 control
box cover screws, then remove both covers. At this
time, take care not to drop the covers. (Fig. 7)
(3) Disconnect the 7P (IND) terminal and 4P (RC) termi-
nal of the 7P IND and 4P RC wiring connectors and
the 5P terminal of the 5P FLAP wiring connector
from the control box PCB connectors (IND, RC,
FLAP). Disconnect each wiring connector from the
clamp that fastens it. (Fig. 7)
(4) Remove the ceiling panel. (To remove the ceiling
panel, follow the steps for 3-6 How to Install the
Ceiling Panel in the reverse order. Refer to the
Installation Instructions supplied with the indoor unit.)
Indicator
Fig. 7
Fig. 8-a
7P IND and 4P RC
wiring connector
7P IND and 4P RC
wiring connector
Terminal cover
Fig. 8
Clamps
Remote
controller
5P FLAP
wiring
connector
Wire harness
4P
RCIND
FLAP
7P
Control PCB
Putty
Wire harness
Clamping strap
Fig. 8-b
Indicator
Ceiling
panel
Wire harness
5P FLAP
wiring connector
(5) Remove the terminal cover screws, then remove the cover. At this time, take care not to drop the cover. (Fig. 8)
(6) Pull in the wire harness from the remote controller as shown in Fig. 8-b.
• Remove the putty before wiring. After wiring, make sure to restore the putty.
(7) Insert the wire harness 4P terminal into the control box PCB connector (RC). (Fig. 8-a)
(8) Install the terminal cover. Then install the ceiling panel. (Refer to 3-6 How to Install the Ceiling Panel in the
Installation Instructions supplied with the indoor unit.)
(9) Insert only the 7P (IND) terminal of the 7P IND and 4P RC wiring connector into the connector (IND) on the control
box PCB. Store the 4P terminal inside the control box. (Fig. 8-a)
(10) Next, insert the 5P terminal of the 5P FLAP wiring connector into the connector (FLAP) on the control box PCB.
(Fig. 8-a)
(11) When the connections are completed, fasten the wire harness and each wiring connector with the clamps.
(12) Install the power box cover and control box cover.
(13) Install the air-intake grille. (Refer to 3-6 How to Install the Ceiling Panel in the Installation Instructions supplied
with the indoor unit.)
3
Page 23

ON/OFF
operation button
1 HR.TIMER
button
NIGHT SETBACK
button
ACL (Reset)
button
SENSOR button
OPERATION lamp
TIMER lamp
HIGH POWER lamp
REMOTE CONTROL receiver
OPERATION button
I How to Test Run the Air Conditioner
IMPORTANT
After turning on the power of the air conditioner, use the
remote controller and follow the steps below to conduct
the test run.
(1) Set the remote controller in Test Run mode. (Fig. 9)
a)Press and hold the NIGHT SETBACK button and
the 1HR. TIMER button.
b)Then press and hold the ACL (Reset) button with
a pointed object such as the tip of a pen. After 5
seconds, release the ACL button first.
c) Then release the NIGHT SETBACK and 1HR.
TIMER buttons.
d) appears and “oP-1” blinking in the remote
controller clock display area. (Fig. 10)
(2) Start Cooling mode test run by pressing the ON/OFF
operation button of the remote controller. (Fig. 9)
• This starts the fan producing uncooled forced air
with the 3 indicator lamps (OPERATION lamp,
TIMER lamp, and HIGH POWER lamp) on the
main unit blinking. (Fig. 11)
• After 3 minutes, the system shifts into cooling
operation, and cool air will start to be felt. Cooling
mode test run is unaffected by the room temperature.
(3) Press the ON/OFF operation button of the remote
controller again to stop the test run. (Fig. 9)
(4) Finally press the ACL (Reset) button of the remote
controller to release it from Test Run mode to return
to normal mode. (Fig. 9)
• “ ” and “oP-1” will disappear from the remote
controller clock display area.
Fig. 9
Fig. 10
Troubleshooting:
In the event that the green OPERATION lamp is blinking upon powering up the system, an error condition
exists. In this case, refer to the self-diagnostics procedure which can be seen by opening the air-intake grille.
After the test run is completed, be sure to press the
ACL (Reset) button to return to normal mode. The air
conditioner will not operate correctly if this is not done.
NOTE
Fig. 11
4
Page 24

STK-KCW1
(II-852-6-4190-491-00-0)
APPENDIX C INSTALLATION INSTRUCTIONS
Installing the Connection Kit
for Wall-Mounted Models
()
A-3
Page 25

INSTALLATION INSTRUCTIONS
W
P.C. board
Connector (10P)
I Parts included in the package
See Table 1.
Table 1
Parts Figure Q'ty Parts Figure Q'ty Parts Figure Q'ty
Truss-head Phillips
5/32 13/32"
(4 10mm)
1
2
Clamping
strap
7-3/32"(180mm)
Wire tube
Wire
(with a
noise filter)
Tapping
screw
1
Clamp
1
1
Installation
instructions
Label
1
1
I Installing the connection kit
A. 7000 BTU, 9000 BTU, and 12000 BTU inverter models
(1) Remove the air intake grille.
(2) Remove the terminal cover. Pull out the thermistor, then remove the grille.
• For details on steps (1) and (2), refer to the Installation Instructions
included in the outdoor unit package.
(3) Disengage the top cover from the tabs on the sides of the component
box, then pull the cover toward you to remove it. (Fig. 1)
(To disengage the tabs, pull the sides of the top cover sideways and outward from the component box.)
(4) Remove the 4 component box
installation screws. (Fig. 1)
(5) Disconnect the indicator-side connec-
tor (10P) of the wires that connect the
indicator and component box (Fig. 2a).
Then disconnect the connector on the
component box side (10P) and remove
the wires. (Lifting the P.C. board up
slightly will make this work easier.)
(Fig. 2b)
(6) After removing the wires, insert
Connector 1 of the wires (Fig. 3a) that
were included in the kit package into
the indicator (Fig. 2a), then insert
Connector 2 into the component box.
(Fig. 2b)
At this time, pass the wires through so
that they are held inside the 2 holders
on the sides of the component box.
(Fig. 3b)
Indicator
Connector 3
Noise filter
Connector 1
Fig. 2a
(4P)
(10P)
Fig. 3a
Connector (10P)
Connector 2
(10P)
Ta b
Screw
Top cover
Screw
Component box
Fig. 1
Fig. 2b
Holder
Fig. 3b
85264190491000 © SANYO 2009
SANYO Commercial Solutions In Canada
A Division of SANYO North America Corporation SANYO Canada Inc.
1300 Michael Drive, Suite A 1-300 Applewood Crescent, Concord
Wood Dale, IL 60191, U.S.A. Ontario, L4K 5C7, Canada
Page 26

(7) Feed the wire harness that was included in the wired remote controller package
Component box
>
Cut-out
Wire harness
Label
Air intake grille
Self-diagnostic label
into the right lower rear of the unit and route it to the component box. (Fig. 4a)
• When feeding the wire harness through the opening, be careful of the motor
cable and be sure to feed the wire harness and motor cable together through
the opening. (Fig. 4b)
• Be careful not to damage the wire harness when installing the conduit during
unit installation work.
Motor cable
Opening
Component box
Wire harness
(8) Cut the wire tube that was included in the kit package to a length
(9) Take the wires (Fig. 3a) and use a wire clamp to bind together the
(10) Pass the wire tube through the clamping strap, and temporarily fasten in place with the screw.
(11) Tighten the 4 screws to install the component box, taking care not to pinch any of the wires,
(12) Route the wire harness out through the small cut-out located at the bottom right side of the
Wire harness
Fig. 4b
Connector 3
(4P)
of approximately 4 inches (100 mm), then feed the wire harness
through it. Then connect Connector 3 (Fig. 3a) to the wire harness
connector (4P). (Fig. 4c)
wire for the noise filter and the wire for the thermistor (Fig. 5a). Then
Connector (4P)
position them so that the noise filter is contained within the space of
the component box. (Fig. 5b)
Noise filter
Clamp
Thermistor
Fig. 5a
Fig. 5b
Next, use a clamp and bind the wires together immediately above the clamping strap, and
fasten in place with the screw in order to prevent pulling on the wire harness. (Fig. 6a)
• Install the wire tube so that the wires cannot be damaged by the edge of the metal plate.
(Fig. 6a)
• When re-installing the grille, confirm that there is no slack in the wire harness wires.
then install the top cover. (Fig. 6b)
indoor unit frame. (Fig. 7a)
(13) Apply the label that was included in
the package at a location close to
the self-diagnostic label applied to
the air intake grille. (Fig. 7b)
(14) Refer to the Installation Instructions
that were included in the outdoor
unit package and re-install the
grille, thermistor, terminal cover,
and air intake grille.
Fig. 7a
Fig. 7b
Fig. 4c
Fig. 6a
Fig. 4a
Connector 3
Connector (4P)
Wire harness
Wire tube
Wire tube
Clamp
Clamping strap
Screw
Wire harness
<
Completion drawing
Fig. 6b
(4P)
2
Page 27

B. 18000 BTU and 24000 BTU inverter models
< Completion drawing >
(1) Remove the air intake grille.
(2) Remove the terminal cover. Pull out the thermistor, then remove the grille.
• For details on steps (1) and (2), refer to the Installation Instructions included in
the outdoor unit package.
(3) Disengage the top cover from the tabs on the sides of the component box, then
pull the cover toward you to remove it. (Fig. 1)
(To disengage the tabs, pull the sides of the top cover sideways and outward
from the component box.)
(4) Disconnect the indicator-side connector (10P) of the wires that connect the indi-
cator and component box (Fig. 2a). Then disconnect the connector on the component box side (10P) and remove the wires. (Lifting the P.C. board up slightly
will make this work easier.) (Fig. 2b)
(5) After removing the wires, insert Connector 1 of the wires (Fig. 3a) that were
included in the kit package into the indicator (Fig. 2a), then insert Connector 2
into the component box. (Fig. 2b)
At this time, pass the wires through so that they are held inside the 2 holders on
the sides of the component box. (Fig. 3b)
(6) Feed the wire harness that was included in the wired remote controller package
into the right lower rear of the unit. (Fig. 4a)
• Be careful not to damage the wire harness when installing the conduit during
unit installation work.
(7) Pass the wire harness through the wire tube that was included in the kit package.
Then connect Connector 3 (Fig. 3a) to the wire harness connector (4P). (Fig. 4c)
(8) Take the wires (Fig. 3a) and use a wire clamp to bind together the wire for the
noise filter and the wire for the thermistor (Fig. 5a). Then position them so that
the noise filter is contained within the space of the component box. (Fig. 5b)
(9) Pass the wire tube through the clamping strap, and temporarily fasten in place
with the screw. Next, use a clamp and bind the wires together immediately above
the clamping strap, and fasten in place with the screw in order to prevent pulling
on the wire harness. (Fig. 6a)
• Install the wire tube so that the wires cannot be damaged by the edge of the
metal plate. (Fig. 6a)
• When re-installing the grille, confirm that there is no slack in the wire harness
wires.
(10) Install the top cover on the component box. (Fig. 8)
(11) Route the wire harness out through the small cut-out located at the bottom right
side of the indoor unit frame. (Fig. 7a)
(12) Apply the label that was included in the package at a location close to the self-
diagnostic label applied to the air intake grille. (Fig. 7b)
(13) Refer to the Installation Instructions that were included in the outdoor unit pack-
age and re-install the grille, thermistor, terminal cover, and air intake grille.
Fig. 8
3
Page 28

ON/OFF
operation button
1 HR.TIMER
button
NIGHT SETBACK
button
ACL (Reset)
button
SENSOR button
OPERATION lamp
TIMER lamp
QUIET lamp
ION lamp
I How to Test Run the Air Conditioner
IMPORTANT
After turning on the power of the air conditioner, use the
remote controller and follow the steps below to conduct
the test run.
(1) Set the remote controller in Test Run mode. (Fig. 9)
a) Press and hold the NIGHT SETBACK button and
the 1HR. TIMER button.
b) Then press and hold the ACL (Reset) button with
a pointed object such as the tip of a pen. After 5
seconds, release the ACL button first.
c) Then release the NIGHT SETBACK and 1HR.
TIMER buttons.
d) appears with “oP-1” blinking in the remote
controller clock display area. (Fig. 10)
(2) Start Cooling mode test run by pressing the
ON/OFF operation button of the remote controller.
(Fig. 9)
• This starts the fan producing uncooled forced air
with the 4 indicator lamps (OPERATION lamp,
TIMER lamp, QUIET lamp, and ION lamp) on the
main unit blinking. (Fig. 11)
• After 3 minutes, the system shifts into cooling
operation, and cool air will start to be felt. Cooling
mode test run is unaffected by the room temperature.
(3) Press the ON/OFF operation button of the remote
controller again to stop the test run. (Fig. 9)
(4) Finally press the ACL (Reset) button of the remote
controller to release it from Test Run mode to return
to normal mode. (Fig. 9)
• “ ” and “oP-1” will disappear from the remote
controller clock display area.
Fig. 9
Fig. 10
Troubleshooting:
In the event that the green OPERATION lamp is blinking upon powering up the system, an error condition
exists. In this case, refer to the self-diagnostics procedure on the inside of the air-intake grille.
After the test run is completed, be sure to press the
ACL (Reset) button to return to normal mode. The air
conditioner will not operate correctly if this is not done.
NOTE
Fig. 11
4
Page 29

SANYO Commercial Solutions
A Division of SANYO North America Corporation
1300 Michael Drive, Suite A
Wood Dale, IL 60191, U.S.A.
Sanyo Canada Inc.
1-300 Applewood Crescent, Concord, Ontario L4K 5C7, CANADA
Apr. / 2009 (T)
 Loading...