

Page 1

Media Card Imager
(For Windows 95)
This manual describes the basic operation
of Media Card Imager and how to handle
the software. Refer to Manual on screen
for details.
OWNER’S MANUAL
Ver. 2.0
Page 2

- 2 -
Media Card Imager
Media Card Imager is used to edit the image data for projecting with
MCI function of our LCD projector.
This software can import and edit the image data in various types and
record them in a memory card.
The image data in the memory card can be projected just by inserting
the card into PC CARD SLOT of the LCD projector. It is free from
complicated connection with other peripheral equipments.
Microsoft,Windows, Visual Basic, and PowerPoint are registered
trademarks of Microsoft Corp. in the U.S.A.
Pentium is a registered trademark of Intel Corp.in the U.S.A.
LEAD and LEADTOOLS are registered trademarks of LEAD
Technologies Inc. in the U.S.A.
FXTools Pro is a trademark of ImageFX in the U.S.A.
Storage Tools is a trademark of Desaware Inc. in the U.S.A.
QuickPak Professional is a trademark of Progress Software Corp. in
the U.S.A.
Each name of corporations or products in Owner’s Manual is a
trademark or a registered trademark of its respective corporation.
Trademark
Page 3

- 3 -
Be sure to read “Software License Agreement”described below before
operating this software.
Important Notice
Software License Agreement
1. This agreement is in effect from the day you receive the software.
2. This agreement terminates when your action(s) directly contravene any
terms of this agreement.
3. We shall not be liable for any damage whatsoever to hardware / software
resulting from use of this product.
4. This software is owned by us. It is protected by copyright laws and
international treaty provision and must be treated in the same manner as
conventional copyrighted materials. You may not duplicate, divert or use the
software for other purposes. However, you may make a single copy of this
software solely for backup or archival purposes.
5. You may not rent, lease, or otherwise distribute this software. Any transfer
of this software instantly terminates this agreement and releases us from
any possible liability.
6. The Owner’s Manual accompanying the software is subject to change
without notice if it should be improved.
7. Any damaged CD-ROM disk or product documentation may be replaced
within the period of one month from the date of receipt.
8. If defects prohibit the software from being used correctly, our limited
guarantee will replace the product.
CAUTION
IT IS RECOMMENDED THAT ANY DATA SHOULD BE
COPIED ONTO SEPARATE MEDIA, SUCH AS A FLOPPY
DISK, A HARD DISK, OR A MO DISK BEFORE EDITING
WITH THIS SOFTWARE. THE DATA MAY BE DAMAGED
OR LOST BECAUSE OF THE DAMAGE OR
MALFUNCTION OF THE APPLIANCES OR ACCIDENTAL
OPERATION.
Page 4

- 4 -
Contents
Page
PC Configurations and Preparation 5
Operating System and PC Configurations 5
Connecting to LCD Projector 5
Installation 6-8
Starting/Terminating Media Card Imager 9
Basic Operation 10-16
Edit 10-11
Save the Data 12-15
Saving as Index 12-13
Saving as Project 13
Saving Formats 14
Setting of the Indexes 15
Serial Port Setting 16
Troubleshooting 17
Page 5

- 5 -
PC configurations and Preparation
Operating System and PC Configurations
This software can be used with the Operating System and PC
Configurations indicated below.
[Operating System]
Windows 95
[PC Configurations]
Pentium CPU : higher than 90 MHz is recommended.
Memory : more than 32MB is recommended.
Hard Disk : approx. more than 10MB of free disk space is
required.
Graphics : more than 640 x 480 of resolution and more than
256 colors are required.
PC Card Drive : recommended
Connecting to LCD Projector
When the computer is connected to the LCD projector with the cable
(supplied), the image data can be written in or read from a memory
card through PC CARD SLOT of the LCD projector.
If your computer does not have a PC card drive, this connection is
necessary.
This connection needs to set [Serial Port Settings]. Refer to page 16
for [Serial Port Settings].
Refer to Owner’s Manual of the LCD projector for connecting to the
LCD projector.
Computer
LCD Projector
Connecting Cable
(Supplied)
Page 6
- 6 -
Installation
Media Card Imager is recorded in the CD-ROM supplied with the LCD
projector. Install the software in the order described below.
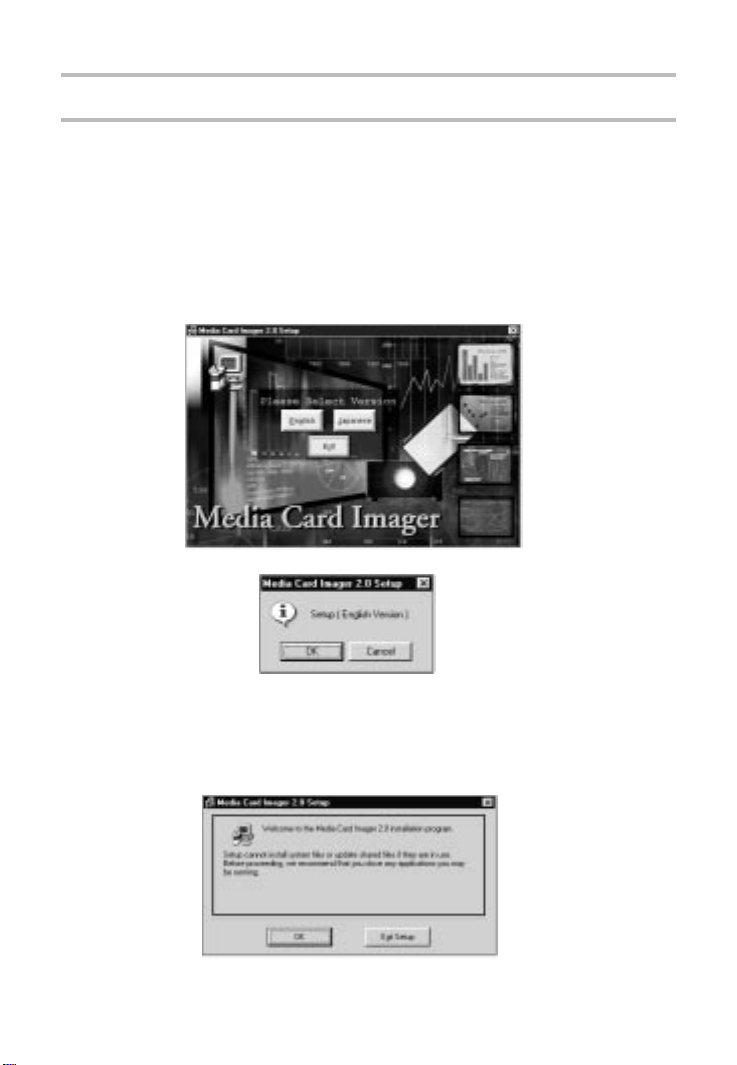
1. Load the CD-ROM into the CD-ROM drive of the computer. Setup
program starts automatically, and Setup dialog box appears. Click
“English” button, and the dialog box appears for confirmation. Click
“OK” to install the software.
2. Setup Start dialog box appears. This software can not be installed
properly if the other application is activated. Make sure that the other
application is terminated, and then click “OK” button.
Page 7

- 7 -
3. Setup Directory dialog box appears. Make sure where the software is
installed. Click “Change Directory” button to change the directory.
4. Confirm the director y, and then click Setup Start button.
● To uninstall Media Card Imager, use [Add/Remove Program] from the
Control Panel on Windows.
● Before installing the new v ersion of the Media Card Imager software , be
sure to uninstall the current one from your system.
Setup Start button
Page 8

- 8 -
When Media Card Imager is installed, the following software progr ams
and their assistant text files are registered in Start Menu of Windows.
● Media Card Imager 2.0
The main program of Media Card Imager. This program can
edit the data for presentation and record them in a memory
card.
Media Card Imager 2.0 Help
This file show the function of Media Card Imager and how to
use the software.
● Media Card Utility 2.0
This software is used to make or delete the data in a memory
card through PC CARD SLOT of the LCD projector. Connect
to the LCD projector with the cable supplied with the
projector.
Media Card Utility 2.0 Read Me
This file show the function of Media Card Utility and how to
use the software.
Page 9

- 9 -
Starting/Ter minating Media Card Imager
Select [Programs] from Start Menu, and then select Media Card Imager.
To terminate the program, select [Exit Media Card Imager] on the [File] menu.
Page 10

- 10 -
Basic Operation
Edit
When Media Card Imager starts, Editing Window appears as follow.
Edit the image data from PowerPoint or a digital camera, or image
data in other types to make the slide data for presentation. Media
Card Imager can edit the image data in various format types, such as
JPEG, BITMAP, or TIFF type.
NOTE : When importing the image data from PowerPoint file, PowerPoint
software should be installed in the computer.
Editing function
• Screen Capture
This function is used to capture and import the image data on the display
as it is.
• Effects Settings
Display Timer
Each slide data can be set when turning to the next data at [Display
Timer] on the [Tools] menu.
Pointer Settings
Pointer Settings is used to edit the pointer. Shapes, Color , and Size
of the pointer can be set.
● This function is not available in some projectors. Refer to the
Owner’s Manual of your projector.
Page 11

- 11 -
The image data is displayed in thumbnail format on the Editing
Window. Changing the order of the slide data, or copying, cutting, or
pasting the image data can be operated just by selecting menu on the
tool bar, or handling the mouse.
Other Settings
Editing conditions and file formats of the image data can be set by
operating [Tools] or [Option] on the Tool bar. Refer to Media Card
Imager 2.0 Help for details.
CAUTION
TO DELETE THE IMAGE DATA FROM EDITING WINDOW,
USE [Release Image File] ON THE [Tools] MENU. IF THE
DATA IS DELETED BY [Delete File], ORIGINAL IMAGE
FILE IS DELETED COMPLETELY.
Page 12

- 12 -
Save the Data
The data edited by Media Card Imager can be saved as Index, or
Project. Refer to “Saving Formats” (page 14) for details.
Saving as Index
The data saved as Index can be projected through PC CARD SLOT of
the LCD projector directly. Operate as follows to save the image data
as Index.
1. After edit the data, click [Make Index] on the [File] menu.
2. Make Index dialog box appears.
3. Select the drive to save the data. (Read column below
corresponding with the drive you select).
Saving to PC Card drive of the computer.
1. Click and Mark [Card Drive] on the Make Index dialog box.
2. Select the drive directory of your computer.
3. Input the file name at the column of [Index Name].
4. Click “OK” button.
Page 13

- 13 -
Saving to PC CARD SLOT of the LCD Projector.
1. Set the LCD projector to MCI mode, and select “Card access.”
(Refer to Owner’s Manual of the LCD projector for details.)
2. Select the directory for saving the data on Media Card Imager. Click
and Mark [Main Unit (Serial Connection)] on the Make Index dialog
box. (If there is message, “There is no response from the main unit
side.”, make sure if the LCD projector is connected to the computer
properly or if the LCD projector is set to “Card access” proper ly.)
3. Input the file name at the column of [Index Name].
4. Click “OK” button. The message of completion is displayed on the
monitor of PC when the data is completely saved in a memory card.
(There is no message displayed on the projected screen of the
projector during saving the data.)
Saving as Project
The data saved as Project can’t be projected with the LCD projector.
To project the Project data, it needs to be converted into Index data.
1. After edit the data, click [Save Project As] on the [File] menu. The
dialog box appears for saving file.
2. Select the directory to save the data, input the file name, and then
click “OK” button. Project data should be saved in the disk of the
computer generally, and cannot be saved in a memory card through
PC CARD SLOT of the LCD projector.
● Index or Project data should be saved with this software. The data
cannot be saved properly with other ways , such as through Windows
Explorer.
Page 14

- 14 -
● Saving Formats
The data edited by Media Card Imager can be saved as Index or Project.
Saving as Index
The data saved as Index can be projected through PC CARD SLOT of
the LCD projector. When the data is saved as Index, all image data is
copied and saved in JPEG type or BITMAP type as to form the Index
data group. Index data consists of several kind of files and is large in
quantity.
Saving as Project
The data in Project type is a log file recording the presentation data,
such as the directory of the image data, and the order of the image data.
It does not contain the image data, and it is small in quantity. The data,
however, saved as Project cannot be projected with the LCD projector.
To project the Project data, open the Project file with Media Card Imager
and click [Make Index] on the [File] menu to save the data as Index in a
memory card.
It is recommended that the data is saved as Project generally, and save it
again as Index when it is necessary to project with the LCD projector. This
way enables you to edit the data efficiently, and to save the space of the
media.
Page 15

- 15 -
● Setting of the indexes
The memory card can contain the Index data as much as its capacity.The
LCD projector, however, can project only the latest 16 inde x es in a memory
card. If the indexes are more than 16 in the memory card, assign the order
of the indexes in the card with [Edit Index Sequence] on the [File] menu.
Refer to Media Card Imager 2.0 Help for details.
CAUTION
When using a memory card and saving the data with Media
Card Imager, please observe the following.
● When using a memory card with Media Card Imager, the
card should be used as saving Index data only. If there
are Index data and other data together, the data can not
be read properly.
● Do not wr ite the data into the memor y card together with
other image data, such as data of digital camera. If there
are Index data and other data together , only Index data is
projected and other data cannot be projected.
Page 16

- 16 -
Serial Port Settings
To make a serial connection with the LCD projector, settings of the
Serial port and the Baudrate of your computer are required.
1. Star t Media Card Imager, and Editing Window appears.
2. Select [Serial Port Settings] on the [Option] menu.
3. Serial Port Setting dialog box appears.
4. Set Connecting Port No. of the computer connecting the LCD projector.
5. Set Baudrate of the computer to 115200bps generally.
6. Click “OK” button.
If an error occurs in the communication, change the serial port and the
communication speed (Baudrate).
Page 17

- 17 -
Troubleshooting
When the troubles below occur, try and check these items and refer to
Media Card Imager 2.0 Help.
Problem Try these Solutions
The image data can’t be
imported.
The image data can’t be
projected with the LCD
projector.
The image data can’t be
written in or read from the
memory card through PC
CARD SLOT.
• To import PowerPoint file, large quantity of a
memory and a hard disk is necessary. Make
sure there is enough capacity of those space
and try to import again.
• Make sure the image data is saved as Index
properly.
• Some JPEG data can’t be projected with the
LCD projector. In that case, convert the data
into BITMAP style.
• Some memory cards can’t be used with the
LCD projector. Contact a sales dealer for
suitable memory cards.
• Be sure to set the LCD projector to "Card
access" in MCI mode.
• Make sure that the LCD projector is
connected to the computer properly. And be
sure to turn the projector on first.
• Make sure [Serial Port Settings] on the
[Option] menu of Media Card Imager.
• Make sure there is enough capacity of the
memory card.
The image does not fit to
the monitor of PC when
previewing the image.
• The setting in [Setting index Creation
Standard] is larger than the resolution of your
PC monitor. The image can be projected
properly through the LCD projector.
Page 18

● The contents of this manual are subject to change
without notice.
● You may not copy the printed materials accompanying
with the software.
Manufactured by SANYO Electric Co., Ltd.
Page 19

Printed in JAPAN
Part No.610 280 3235 (1AA6P1P1921--, M6WA)
 Loading...