

Page 1
INSTRUCTION MANUAL
I
index
Pocket CameraCorder
FVD-C1
Important note
This manual explains how to safely operate the FVD-C1.
Please read these instructions carefully before using the camera. Make
sure to read and understand the section “USING YOUR CAMERA
SAFELY AND CORRECTLY” on pages 7 to 24. Keep this manual in a
safe place for later reference.
Page 2

Warning
TO PREVENT THE RISK OF FIRE OR ELECTRIC SHOCK, DO NOT EXPOSE
THIS APPLIANCE TO RAIN OR MOISTURE
FOR AMERICAN USERS
WARNING:
This product contains chemicals, including lead, known to the State of California to cause cancer, and birth defects or other reproductive harm.
after handling.
e This equipment has been tested and found to comply with the limits for a
Class B digital device, pursuant to Part 15 of the FCC Rules. These limits
are designed to provide reasonable protection against harmful interference
in a residential installation. This equipment generates, uses and can radiate
radio frequency energy and, if not installed and used in accordance with the
instructions, may cause harmful interference to radio communications.
However, there is no guarantee that interference will not occur in a
particular installation. If this equipment does cause harmful interference to
radio or television reception, which can be determined by turning the
equipment off and on, the user is encouraged to try to correct the
interference by one or more of the following measures:
d Reorient or relocate the receiving antenna.
d Increase the separation between the equipment and receiver.
d Connect the equipment into an outlet on a circuit different from that to
which the receiver is connected.
d Consult the dealer or an experienced radio/TV technician for help.
e Changes or modifications not expressly approved by the party responsible
for compliance could void the user’s authority to operate the equipment.
Wash hands
i
English
Page 3

Tested to Comply with FCC Standards
FOR HOME OR OFFICE USE
The FCC logo is included in the rating that can be found inside the battery case.
Declaration of Conformity
Model number : FVD-C1
Trade Name : Fisher
Responsible party: SANYO FISHER COMPANY
Address : 21605 Plummer Street, Chatsworth, California 91311
Telephone No. : (818) 998-7322
This device complies with Part 15 of the FCC Rules. Operation is subject
to the following two conditions:
(1) this device may not cause harmful interference, and
(2) this device must accept any interference received, including
interference that may cause undesired operation.
FOR CANADIAN USERS
e This Class B digital apparatus complies with Canadian ICES-003.
English
ii
Page 4

OUTLINE OF OPERATION
To help you get started enjoying using your camera right away, given below is
an outline of the fundamental operation, from setup to shooting to playback.
SETUP
(1) Connect the AC adapter/charger (page 128).
(2) Install the battery pack and SD Memory
1
in the camera (page 35, 36).
Card*
CAUTION
e This camera uses an SD Memory Card
instead of photographic film to record
images. Be sure to install the SD Memory
Card before operating the camera. A 512MB
SD Memory Card is supplied with this
camera.
e Be sure to format the SD Memory Card with
this camera before using it. A card that is not
formatted using the camera may limit your
full use of all the camera’s capabilities.
SHOOTING
(1) Turn on the camera (page 37).
(2) Take photos in the BASIC operation mode*
e In the BASIC mode, it's easy to take great photos
right away.
e To switch the menu mode, see page 42.
e For shooting video clips, see page 47.
e For shooting still photos, see page 48.
2
.
1
English
Page 5

PLAYBACK
(1) View your photos in the BASIC operation
mode (page 64).
Playback as well is easy in the BASIC mode.
1
*
: About the SD Memory Card
In this manual, the SD Memory Card is
referred to as “card”.
2
*
: Shooting in the BASIC mode
For recording and viewing images, your
camera has two modes to choose from. In the
BASIC mode, only the basic camera functions
are used. In the EXPERT mode, you have full
access to all the camera's functions.
Symbols used in this manual
HINT
NOTE
CAUTION
(page xx)
You may find the answers to questions or problems concerning camera
operation in the sections “COMMONLY ASKED QUESTIONS” (page 149) and
“TROUBLESHOOTING” (page 157).
Points that may prove useful when using the camera.
Points giving some extended instructions or special points to pay
attention to.
Points that require special attention.
Refer to the page indicated for detailed information.
English
2
Page 6

CONTENTS
OUTLINE OF OPERATION . . . . . . . . . . . . . . . . . . . . . . . . . . . . . .1
USING YOUR CAMERA SAFELY AND CORRECTLY . . . . . . . . .7
CHECKING THE INCLUDED ACCESSORIES . . . . . . . . . . . . . .25
GETTING THE MOST OUT OF YOUR CAMERA . . . . . . . . . . . . 27
PREPARATION
i
PARTS NAMES . . . . . . . . . . . . . . . . . . . . . . . . . . . . . . . . . . . . . .31
CHARGING THE BATTERY PACK. . . . . . . . . . . . . . . . . . . . . . .34
INSTALLING THE BATTERY PACK AND CARD . . . . . . . . . . . .35
TURNING THE POWER ON AND OFF. . . . . . . . . . . . . . . . . . . . 37
OPERATION BUTTONS . . . . . . . . . . . . . . . . . . . . . . . . . . . . . . .40
SWITCHING THE MENU MODE. . . . . . . . . . . . . . . . . . . . . . . . .42
BEFORE TAKING PICTURES. . . . . . . . . . . . . . . . . . . . . . . . . . .44
3
English
Page 7

BASIC MODE
SHOOTING
i
CAPTURING IMAGES . . . . . . . . . . . . . . . . . . . . . . . . . . . . . . . . 47
ABOUT THE BASIC MODE SHOOTING SETTING SCREEN . . 52
CHANGING THE SHOOTING SETTINGS . . . . . . . . . . . . . . . . . 55
OTHER SHOOTING FUNCTIONS . . . . . . . . . . . . . . . . . . . . . . . 58
PLAYBACK
i
VIEWING IMAGES . . . . . . . . . . . . . . . . . . . . . . . . . . . . . . . . . . . 64
ABOUT THE BASIC MODE PLAYBACK SETTING SCREEN . . 68
OTHER PLAYBACK FUNCTIONS . . . . . . . . . . . . . . . . . . . . . . . 70
English
4
Page 8

EXPERT MODE
SHOOTING
i
ABOUT THE EXPERT MODE SHOOTING SETTING SCREEN 78
VIDEO IMAGE QUALITY. . . . . . . . . . . . . . . . . . . . . . . . . . . . . . . 81
FOCUS . . . . . . . . . . . . . . . . . . . . . . . . . . . . . . . . . . . . . . . . . . . .82
FLICKER-REDUCTION FUNCTION . . . . . . . . . . . . . . . . . . . . . .83
ISO SENSITIVITY . . . . . . . . . . . . . . . . . . . . . . . . . . . . . . . . . . . . 84
WHITE BALANCE SETTING. . . . . . . . . . . . . . . . . . . . . . . . . . . . 85
EXPOSURE CORRECTION . . . . . . . . . . . . . . . . . . . . . . . . . . . . 86
PLAYBACK
i
ABOUT THE EXPERT MODE PLAYBACK SETTING SCREEN. 87
ROTATE IMAGE . . . . . . . . . . . . . . . . . . . . . . . . . . . . . . . . . . . . .89
EDITING VIDEO CLIPS. . . . . . . . . . . . . . . . . . . . . . . . . . . . . . . . 90
PRINT SETTINGS (STILL IMAGES ONLY) . . . . . . . . . . . . . . . .98
5
English
Page 9

OPTION SETTINGS
CAMERA SETTINGS
i
ABOUT THE OPTION SETTING SCREEN . . . . . . . . . . . . . . . 105
GUIDANCE FUNCTIONS . . . . . . . . . . . . . . . . . . . . . . . . . . . . . 107
OPERATIONAL SOUNDS SETTING . . . . . . . . . . . . . . . . . . . . 108
USB FUNCTION SETTING. . . . . . . . . . . . . . . . . . . . . . . . . . . . 110
FILE NO. RESET FUNCTION. . . . . . . . . . . . . . . . . . . . . . . . . . 111
DATE AND TIME SETTING . . . . . . . . . . . . . . . . . . . . . . . . . . . 114
SCREEN LANGUAGE . . . . . . . . . . . . . . . . . . . . . . . . . . . . . . . 117
TV SYSTEM SETTING. . . . . . . . . . . . . . . . . . . . . . . . . . . . . . . 118
POWER SAVE SETTING . . . . . . . . . . . . . . . . . . . . . . . . . . . . . 119
RESETTING THE CAMERA SETTINGS . . . . . . . . . . . . . . . . . 121
FORMATTING A CARD . . . . . . . . . . . . . . . . . . . . . . . . . . . . . . 122
CHECKING THE REMAINING CARD MEMORY . . . . . . . . . . . 124
CHECKING THE REMAINING BATTERY PACK CHARGE. . . 126
OTHER DEVICES AND CONNECTIONS
i
DOCKING STATION. . . . . . . . . . . . . . . . . . . . . . . . . . . . . . . . . 128
CABLE ADAPTER . . . . . . . . . . . . . . . . . . . . . . . . . . . . . . . . . . 138
CONNECTING TO A PRINTER . . . . . . . . . . . . . . . . . . . . . . . . 139
APPENDICES
i
COMMONLY ASKED QUESTIONS . . . . . . . . . . . . . . . . . . . . . 149
TROUBLESHOOTING . . . . . . . . . . . . . . . . . . . . . . . . . . . . . . . 157
SPECIFICATIONS . . . . . . . . . . . . . . . . . . . . . . . . . . . . . . . . . . 163
English
6
Page 10
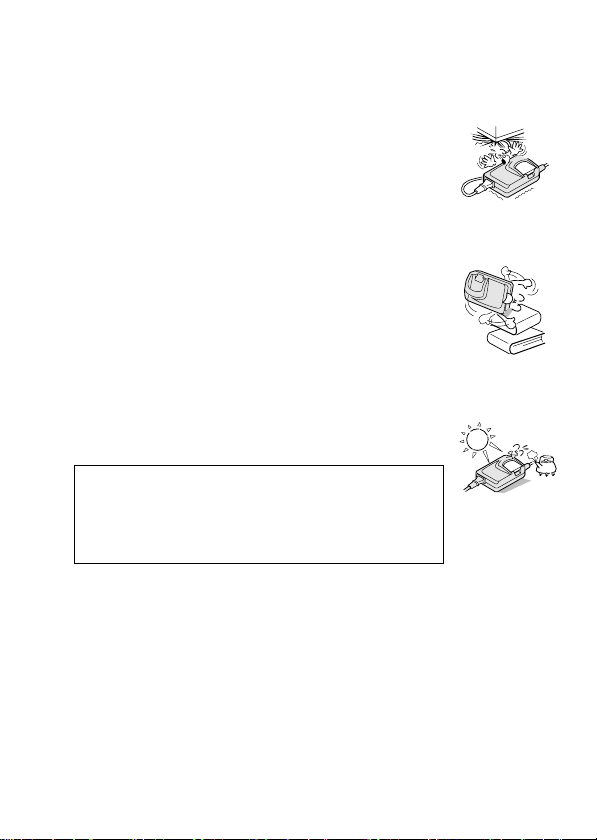
USING YOUR CAMERA SAFELY AND
CORRECTLY
CAMERA
WARNING
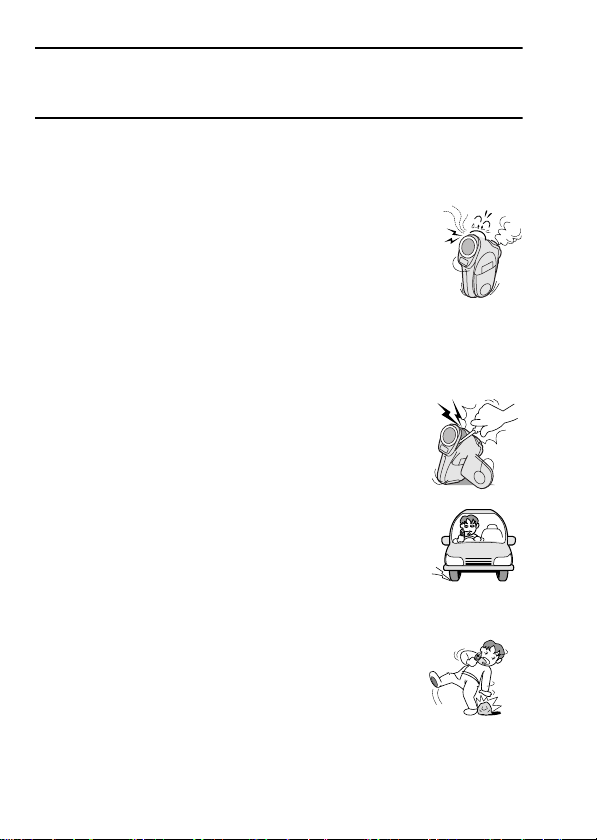
iiii If the camera makes a strange noise, emits a
strange odor, or if smoke comes out from it,
immediately turn off the power and remove the
battery pack.
e If the camera is used under these conditions, it may cause
a fire or electric shock. Immediately turn off the digital
camera, remove the battery pack, and wait to make sure
no more smoke comes from the camera. Then take it to the
dealer for service. Do not try to repair or open the camera
yourself.
iiii Do not modify or open the cabinet
e High voltage circuits are inside, and there is a high risk of
fire or electric shock if they are touched. Any internal
check, setting, or repair should be performed by the dealer.
iiii Do not use while driving
e Do not capture images, play back images, or watch the
LCD monitor while driving a vehicle. Doing so may cause
an accident.
e Be careful where you put down the camera inside an
automobile. During sudden stops or turns it may fall behind
the brake pedal and prevent braking.
iiii Be aware of your surroundings when using the
camera
e Pay close attention to your surroundings when using the
camera. Failure to do so may lead to an accident or injury.
e When using the camera while walking, be very careful of
your surroundings and especially the traffic to avoid
accidents.
e Do not use the camera inside an airplane or elsewhere
where its use may be restricted.
English
7
Page 11

WARNING
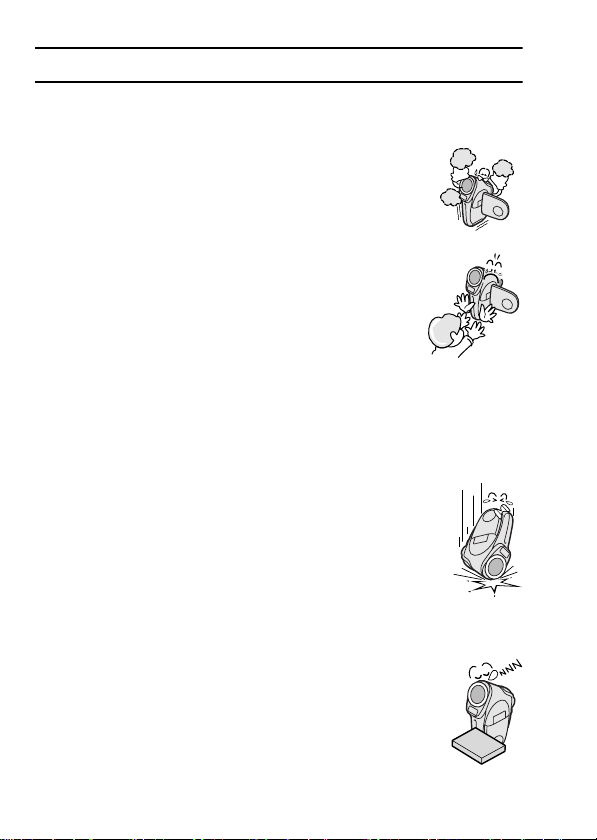
iiii Do not get the camera wet
e This camera is not water-resistant. Do not allow it to get
wet, as doing so may cause a fire or electric shock.
e Do not use the camera in a bathroom.
e If the camera gets wet, immediately turn it off and remove
the battery pack. Then take it to a dealer for repair. Using
the camera after it has been become wet may cause a fire,
electric shock, or other accident.
iiii Do not use during a storm
e To avoid the risk of being struck by lightning, do not use the
camera during a thunderstorm. In particular, if used in an
open field, you have an increased chance of being struck by
lightning. Quickly seek refuge in a place that will protect you
from lightning.
iiii Do not place on an unstable surface
e The camera may fall, resulting in damage to the camera or
injury.
e If the camera has fallen and its body is damaged, turn it off,
remove the battery pack, and take it to the dealer for repair.
Using the camera after its body has been damaged may
cause a fire or electric shock.
iiii Do not look through the camera into the sun
e Do not look through the camera at the sun or any other
strong source of light. Doing so may seriously injure your
eyes.
iiii Do not use the flash close to a person’s face
e To prevent possible eye injury, do not use the flash near a
person’s face (especially young children or babies). If the
flash is used close to a person’s opened eyes, there is a risk
that it may damage that person’s eyesight.
English
8
Page 12
USING YOUR CAMERA SAFELY AND CORRECTLY
WARNING
iiii Do not use where there is risk of explosion
e Do not use the camera in a location where there is explosive
gas, or any other flammable material in the air. Doing so may
cause a fire or an explosion.
iiii Keep the camera out of the reach of children
e The following may happen if children play with the camera:
d They may wrap the strap around their neck and suffo-
cate.
d They may swallow the battery pack or other small
parts. In such a case, consult a physician immediately.
d They may damage their eyesight if the flash goes off
too close to their eyes.
d They may get hurt by the camera.
CAUTION
iiii Cautions when carrying the camera
e Do not walk around holding the camera by the handstrap. It
may hit other objects and get damaged. When walking
around, hold the camera in your hand or place it in a pocket.
e Be careful not to drop the camera or subject it to strong
shocks.
e Make sure direct sunlight does not hit the camera lens, as
that may damage the internal parts. When not using the
camera, be sure to always turn it off and close the lens cover.
iiii If the camera is not going to be used for a long
period of time
e For safety’s sake, remove the battery pack from the camera.
This will prevent any possible excess heat or leakage of
battery fluid that may result in injuries or damage to nearby
objects. (Note that when the battery pack is removed for a
long period, the time and date settings will be cleared.)
English
9
Page 13

CAUTION
iiii Cautions during use and storage
e This camera is a precision instrument. When using or
storing the camera, make sure to avoid the following
locations to avoid damage.
d Places in direct sunlight
d Places where humidity and temperature are high
d Places that may get wet
d Places close to an air conditioner or heater
d Inside a car
d Places where there is dust and dirt
d Places where there is a fire burning
d Places where volatile products are stored
d Places subject to vibration
Operating environment:
d Temperature 0°C to 40°C (operation)
d Humidity 30 to 90% (operation, no condensation)
–20 to 60°C (storage)
10 to 90% (storage, no condensation)
English
10
Page 14
USING YOUR CAMERA SAFELY AND CORRECTLY
DOCKING STATION AND AC ADAPTER/
CHARGER
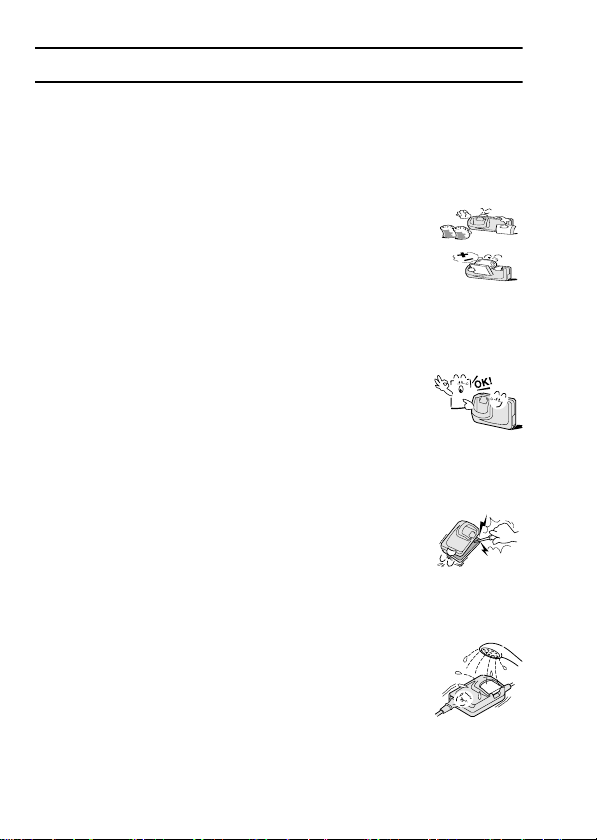
DANGER
iiii Do not recharge battery packs that are not Li-ion
battery packs (Model DB-L20)
e Do not recharge a battery pack other than the supplied Li-ion
battery pack (DB-L20). Recharging a dry-cell battery or other
type of rechargeable battery may cause excess heat,
combustion, or leakage, and cause a fire, injuries, burns, or
damage to nearby objects.
iiii Use a 100 to 240 V AC power supply
e If used with a power supply other than the one specified, it
may cause a fire or electric shock. The power cord is rated
for 125 V AC. Therefore, if you plan to use the docking
station and/or the AC adapter/charger in a region with a
different voltage, it may be necessary to replace the power
cord with one that can be used in that location. For details,
please see page 168.
iiii Do not disassemble or modify
e It is dangerous to touch the inside. Doing so may cause a fire
or electric shock.
e Do not use as a direct current generator.
iiii Do not get the docking station or AC adapter/
charger wet
e Make sure they do not get wet, as doing so may cause a fire
or electric shock.
e Do not use the camera in a bathroom.
e If the docking station or AC adapter/charger gets wet,
immediately unplug it from the power outlet and remove the
battery pack. Then contact the place of purchase. If used
while wet, it may cause a fire, electric shock, or an accident.
11
English
Page 15

DANGER
iiii Cautions when plugging in
e Securely plug the power cord all the way into the power
outlet. If the docking station or AC adapter/charger is used
with the power cord not fully plugged in, heat may be
generated and cause a fire.
e Do not use if the power cord is damaged or cannot be
correctly plugged into the power outlet. Using in this
condition may cause a fire or electric shock.
e Do not allow dust, etc., to build up on the power cord or
power outlet. A build-up of dust may cause a short circuit
or generate heat and cause a fire.
e When unplugging the power cord, be sure to hold the plug
part and slowly pull it out of the power outlet. Pulling the
cord portion may damage the power cord and cause a fire
or electric shock.
iiii Do not pull on the power cord to unplug it
e Do not leave the power cord plugged into the power outlet
while the other end is not plugged into the docking station
or AC adapter/charger. The loose end can cause
electrocution if touched with wet hands or if handled by
children.
e Use only the supplied power cord. If a different power
cord is used, it may be rated for a different current load,
and that may cause a fire.
e The supplied power cord is for exclusive use with the
devices supplied with your camera. Do not use it with
other devices, as doing so may cause a fire or electric
shock.
e Do not use a bundled power cord, as the heat generated
may cause a fire.
e When using an extension cord, make sure that the total
wattage of the connected devices does not exceed the
rated value of the extension cord. If the power load
exceeds the rated value, it may cause a fire.
English
12
Page 16

DANGER
iiii Keep out of the reach of children
e Children may place the battery pack or other small
components in their mouth or perform some other such
unforeseeable action. If swallowed, consult a physician
immediately.
iiii If smoke or a strange odor is emitted, or if
strange noises are heard, immediately unplug
the power cord from the power outlet
e If used under these conditions, it make cause a fire or
electric shock.
e If strange conditions such as these occur, immediately
unplug the device, remove the battery pack, and wait to
make sure no more smoke is emitted. Then contact the
place of purchase. Do not try to repair or open the device
yourself.
iiii Do not handle with wet hands
e Handling the docking station or AC adapter/charger with
wet hands may cause an electric shock.
iiii Do not use during a storm
e Do not touch the docking station, AC adapter/charger or
power cord while it is plugged into a power outlet during a
thunderstorm. Doing so may cause an electric shock.
13
English
Page 17
CAUTION
iiii Do not damage the power cord
e Do not place heavy objects on the power cord. Do not
place the power cord near a heat source. Do not
excessively bend the power cord, modify it, or secure it
with staples. Doing so may damage the power cord and
cause a fire or electric shock.
e If the power cord is damaged, or if it does not plug
properly into the docking station, AC adapter/charger or
wall outlet, contact the place of purchase.
iiii Do not place on an unstable surface
e The camera may fall, resulting in damage to the camera
or injury.
e If it falls and the body is damaged, remove the battery
pack and contact the place of purchase. If used while
damaged, it may cause a fire, electric shock, or other
damage.
iiii Operating and storage conditions
e Do not use close to a heat source (close to a stove or
heater) or leave it exposed to direct sunlight.
Operating environment:
d Temperature 0 to 40°C (charging)
d Humidity 20 to 80%
–20 to 60°C (storage)
(charging and storage)
English
14
Page 18

LI-ION BATTERY PACK (DB-L20)
DANGER
This camera uses a Li-ion battery pack (Model DB-L20).
iiii If there is leaking, discoloration, change of
shape, rise in temperature, damaged exterior,
strange odor or any other abnormal condition,
immediately discontinue use and remove the
battery pack from the camera, taking care to
keep it well away from fire.
e Continued use of the battery pack under any of these
conditions may result in fire, injury, explosion or other
serious damage.
e If battery fluid is leaking, placing the battery pack in close
proximity to a fire or other heat source may ignite the
battery fluid and result in fire, damage, eruption of battery
fluid, or smoke fumes.
iiii Do not transform, take apart, or modify.
e Safety mechanisms and protective devices have been in
incorporation in the battery pack for the purpose of
preventing danger. Any modification, by transforming,
disassembling, or directly soldering to it, etc., will defeat
these safety devices and possibly cause the battery pack
to catch fire, explode, or leak or spew battery fluid.
iiii Do not connect the (+) and (–) terminals with a
wire or other metal implement. Do not carry
loose or keep with necklaces, hairpins, etc.
e Doing so may result in a short circuit, high voltage flow,
fire, explosion, leaking or spewing battery fluid, or heat
generation. Metal such as a wire or necklace, etc. may
cause heat to be generated.
iiii Do not throw the battery pack in the fire or sub-
ject it to heat
e Doing so may cause the insulation to melt, damage the
gas discharge valve and safety mechanisms, or ignite
the battery fluid, resulting in fire or explosion.
English
15
Page 19

DANGER
iiii Do not drop, hit, or submit the battery pack to
strong shocks
e If the safety mechanisms and protective devices are
broken, an abnormal chemical reaction may occur inside
the battery pack, or cause the battery pack to catch fire,
explode, leak or spew battery fluid, or generate heat.
iiii Do not allow the battery pack to come into con-
tact with fresh or salt water, or allow the terminals to become wet.
e If the safety mechanisms and protective devices are
damaged by corrosion, an abnormal chemical reaction
may occur inside the battery pack, or cause the battery
pack to catch fire, explode, leak or spew battery fluid, or
generate heat.
iiii Operating and storage conditions
e Temperature when using or recharging: 0 to 40°C
e Do not use, recharge, store or leave the battery pack near fire or
inside a car exposed to the hot sun, etc. (locations in which the temperature reaches 60°C or higher).
e At high temperatures, the safety mechanisms and protective devices
inside the battery pack may be damaged by corrosion, causing an
abnormal chemical reaction to occur, or cause the battery pack to
catch fire, explode, leak or spew battery fluid, or generate heat. If the
safety mechanisms and protective devices are damaged, the battery
pack will become unusable. An environment with extremely high or
low temperatures will cause the battery capacity to deteriorate and
shorten the usable time, and may even shorten the battery life.
e Avoid storing the battery pack with it near full charge. It is recom-
mended to store the battery pack when it is near fully discharged.
e If the battery pack is completely discharged, it may become unable to
be recharged again. To avoid this, charge the battery pack for at
least five minutes every six months.
e Storage temperature:
When not using the battery pack, remove it from the camera and
store at 0°C to 30°C in a place with no condensation.
e Humidity: 10% to 90% (no condensation)
10°C to 30°C
–
English
16
Page 20

DANGER
iiii Use only the supplied docking station and AC
adapter/charger
e If another charger is used, the battery pack may be
overcharged, or recharged with an abnormal voltage,
causing an abnormal chemical reaction to occur, or cause
the battery pack to catch fire, explode, leak or spew battery
fluid, or generate heat.
iiii Use the battery pack only in the specified device
e If the battery pack is used in a device other than that
specified, it may cause an abnormal voltage flow, or cause
the battery pack to catch fire, explode, leak or spew battery
fluid, or generate heat.
iiii Do not peel or damage the outer case
e Damaging the outer case, inserting nails, hitting with a
hammer, stepping on the battery pack, etc. may cause a
short circuit inside the battery pack or cause the battery
pack to catch fire, explode, leak or spew battery fluid, or
generate heat.
iiii If the battery pack is leaking and the electrolyte
gets on your skin or clothing, immediately rinse
with clean water
e If the electrolyte gets into your eyes, you risk losing your
eyesight. Immediately rinse your eyes with clean,
running water, and seek medical attention right away.
Any electrolyte that comes into contact with your skin or
clothing may harm your skin. Immediately rinse the area
with clean, running water.
iiii Insert the battery pack correctly, as specified
e When installing the battery pack in the charger or
camera, pay attention to the indicated polarity (+ and –),
and insert it correctly.
e If the battery pack is installed with the wrong orientation,
it may cause an abnormal chemical reaction while in the
charger, an abnormal voltage flow when it is used, or
cause the battery pack to catch fire, explode, leak or
spew battery fluid, or generate heat.
17
English
Page 21

WARNING
iiii Always stop the recharging after the prescribed
recharge time, even if the battery pack is not
fully charged
e If you continue to recharge the battery pack, it may cause
the battery pack to catch fire, explode, leak or spew
battery fluid, or generate heat.
iiii Keep out of the reach of children
e They may handle the battery pack in an unforeseeable
manner that results in damage.
CAUTION
iiii Charge the battery pack before using it
e Always recharge the battery pack before using it for the
first time, or when using it after it has been kept in storage
for a long time. During recharging, the battery pack may
be warm. This is normal and does not indicate a
malfunction.
iiii Note concerning the battery pack after use
e The battery pack may be warm immediately after the
camera is used. If removing the battery pack, turn off
the camera and allow the battery pack to cool down
before removing it.
iiii Recycling the battery pack
e To conserve the environment and for efficient use of
natural resources, please discharge the used battery
pack, cover the (+) and (–) terminals with tape and recycle
the insulated battery pack.
e If disposing of the battery pack as unburnable trash,
please follow all applicable regulations of your area.
English
18
Page 22

Concerning the accessories
WARNING
iiii Cautions concerning the use of the AC adapter/charger
e Use only the supplied docking station and AC adapter/charger with your
camera. Do not use a docking station or AC adapter/charger other than the
ones indicated here, designed for specific use with your camera.
e If a docking station or AC adapter/charger other than the ones specified is
used, it may damage the camera and cause a fire or electric shock.
iiii Cautions concerning the card
e Immediately after use, the card will be very hot. Before removing the card,
turn off the camera and wait for the temperature to cool down.
e Keep out of the reach of children. Young children may put the media in their
mouth and choke or cause some other unexpected injury or accident.
19
English
Page 23

CONCERNING THE LITHIUM BATTERY
(CR2025)
WARNING
iiii Cautions concerning the CR2025 bat-
tery
e A CR2025 lithium battery is used for the
remote control. Do not use a battery other
than the CR2025 lithium battery.
–
e Install the battery with the (+) and (
terminals correctly oriented as indicated. If the
battery is placed in the wrong orientation, it
may cause a fire, overheating, or rupturing.
e Do not recharge, short circuit, disassemble, modify, heat, or place the
battery in a fire. Doing so may cause a fire, overheating, or rupturing.
e Do not hold the battery with metal tweezers or a similar tool. Doing so may
cause a short circuit leading to a fire, overheating, or rupturing.
e Do not perform soldering on the battery or use, store, or leave it near a fire,
under direct sunlight, in a hot car, or other high temperature location.
e Do not use the battery if it is leaking.
e If the electrolyte gets into your eyes, you risk losing your eyesight. Do not
rub your eyes, wash them immediately with clean water, and seek medical
attention right away. If electrolyte gets on your skin or clothing, it may cause
irritation. Immediately wash with clean water.
e Keep the battery out of the reach of children. If the battery is accidentally
swallowed, contact a physician immediately. It may cause poisoning or
suffocation.
e When disposing of batteries, make sure to follow all applicable regulations.
e When disposing of the lithium battery, place tape on its positive (+) and
negative (
with other batteries. Doing so may cause a fire or rupturing.
–
) terminals to prevent shorting. Do not mix the lithium battery
)
English
20
Page 24

FOR CORRECT USE OF YOUR CAMERA
iiii Cautions before capturing important images
e Before capturing important images, make sure that the camera is
operating properly and in condition to capture the image properly.
e Sanyo Electric shall not be held responsible for any losses that result
from images that could not be recorded, are erased, destroyed, or
damaged in any way due to a problem with the camera, any of its
accessories, or its software.
iiii Caution concerning copyrights
e The images you capture with your camera are for your own private use;
any other use may violate the rights of copyrights owners.
iiii Cautions when cleaning the camera
Cleaning procedure
1
Turn off the camera and remove the battery pack.
2
Remove the dirt with a soft cloth.
If the camera is extremely dirty,
3
Wipe with a soft cloth moistened with a mild detergent diluted with water
and wrung dry.
Caution
e Do not use benzene or thinner products to clean the camera.
Doing so may cause deformation, discoloration, or paint peeling.
When using a chemically treated cloth, carefully read its instructions and
warnings.
e Do not spray insecticides or volatile sprays on the camera. Do not let rubber
or vinyl objects contact the camera for a long period. They may cause
deformation, discoloration, or paint peeling.
21
English
Page 25

iiii Caution concerning the battery pack
e Periodically clean with a dry cloth the terminals (contacts) of the batteries.
Do not touch the battery terminals with your bare hands. Doing so will allow
contaminants from your hands to adhere to the terminals and oxidize,
increasing the contact resistance. If the contact resistance increases, the
usable life of the batteries will diminish.
iiii Caution when cleaning the lens
e If the lens gets dirty, use a commercially available air blower or a cleaning
cloth for photographic equipment to clean it.
iiii When not using the camera for a long period
e Remove the battery pack. However, when the battery pack is removed for a
long time, the camera functions may begin to not work properly. Periodically
reinstall the battery pack and check the camera functions.
e If the battery pack is left in the camera, a small amount of power is still used
even if the camera is turned off. If the battery pack is left in the camera for a
long period, it may become completely discharged and lose its ability to be
recharged again.
iiii Cautions concerning condensation
e Using the camera with condensation inside it may damage the camera.
If condensation seems likely to form
e Place the camera in a plastic bag and seal it, and then wait until the camera
has reached the ambient temperature.
Be careful of condensation under the following conditions
e When moving the camera suddenly from a cold place to a warm place.
e When the ambient temperature changes drastically, such as when a heater
is turned on to quickly heat the room.
e When the camera is placed in the path of cool air from an air conditioner.
e When the camera is placed in a location of high humidity.
English
22
Page 26

FOR CORRECT USE OF YOUR CAMER
(continued)
iiii Caution concerning undesired interference
e The camera may create undesired interference if used close to a television
or radio. To avoid this type of interference, make sure the cores on the
supplied cables are not removed.
Dedicated USB interface cable Dedicated AV interface cable
Core
Core
iiii Caution concerning magnetism
e Do not place credit cards, bank cards, floppy disks, or other items that may
be damaged by magnetic fields near the speaker. Data may be lost or the
magnetic strips on cards may be damaged.
iiii Cautions concerning data storage
e It is recommended that any important data be copied onto a separate media
(such as a hard disk, MO disk, or CD-R disk).
e Stored data may be lost (or corrupted) in cases such as those listed below.
Sanyo Electric will not be held responsible for any damage or lost profits
arising from the loss of data.
d If the card is used incorrectly.
d If the card is not inserted correctly into the camera.
d If the card is subjected to electrical or mechanical shocks or other
forces.
d If the card is removed from the camera or if the camera is turned off
during reading or writing operations.
d If the card has reached the end of its usable life.
English
23
Page 27

iiii Cautions when handling the cards
e The cards are precision devices. Do not bend, drop, or subject them to
strong forces or shocks.
e Avoid using or storing the cards in places with extremely high or low
temperatures, subject to direct sunlight, in a completely closed vehicle, near
air conditioners or heaters, or in humid or dusty locations.
e Avoid using or storing the cards in locations where strong static electrical
charges or electrical noise can be easily generated.
e Do not allow the edges of the cards to become contaminated with foreign
materials. Gently wipe away any contamination with a soft, dry cloth.
e Do not carry the cards in trouser pockets, as the cards may become
damaged when you sit down or make other movements that may apply
forces.
e Before using a new card or a card that was used in other equipment, be
sure to format it using the camera (see “FORMATTING A CARD” on page
122).
e When buying commercially available products, carefully read the
instructions and warnings that come with the card.
iiii Caution concerning high temperatures
e During shooting, when the internal temperature of the camera becomes
high, the \ icon will appear on the LCD monitor. When the \ icon
appears, it is still possible to capture and play back images for a while.
However, if the temperature rises further, it will become impossible to
record (although playback will still be possible). In this case, discontinue
shooting as soon as possible, and wait until the temperature falls before
using the camera again.
e Note that particularly when shooting video clips, soon after the \ icon
appears, the remaining shooting time indication will appear, and when that
figure becomes 0, further shooting is impossible.
English
24
Page 28

CHECKING THE INCLUDED ACCESSORIES
eeee Handstrap: 1 eeee Software: 2 CD-
eeee Docking station: 1 eeee AV cable: 1 eeee USB interface cable: 1
eeee Remote control unit: 1eeee Lens cap: 1 eeee Cable adapter: 1
A lithium battery
(CR2025) is installed
at the time of purchase.
eeee AC adapter/charger
and power cord: 1
ROM
eeee Soft case: 1
eeee Li-ion battery pack
(battery pack): 1
25
English
Page 29

eeee SD Memory Card (512MB): 1
Contact end
• Recording (images and sounds) and erasing
are inhibited (accidental erase protect
function) when the lock switch is set to the
LOCK position.
• The card is normally used with the lock
switch set to the unlocked position.
Lock switch
Unlock
iiii Handstrap
iiii Lens cap iiii Soft case
Lock
When not using the camera, keep
it in the soft case for protection.
Media cards that can be used with this camera
The type of card that can be inserted into and used with this camera is:
e SD Memory Card
English
26
Page 30

GETTING THE MOST OUT OF YOUR CAMERA
Your digital movie camera can not only record video clips, you can also take
still photos and make audio recordings. For example, you can snap a still image
while shooting a video clip, or make just an audio recording. In addition, by
using the supplied docking station, it’s easy to hook up your camera to a TV or
computer.
Shooting video clips (page 47)
You expect your camera to record great quality still photos, but you can
record 640x480-pixel video clips as well. The maximum 30-frames-persecond shooting speed guarantees beautiful, flowing movies for you to
enjoy. Another bonus is the capability to record small file sizes that are
perfect for uploading to Internet websites.
Capture still shots while recording a video clip
(page 49)
Suppose that wh ile you’re recording a video clip, there’s a scene you’d like
to keep as a still photo. Your camera makes it possible to record the still
photo without interrupting the video clip recording.
27
English
Page 31

Twin menus for easy operation (page 42)
The novice photographer will have no problem taking beautiful pictures,
thanks to the BASIC mode easy menu. All the settings necessary to capture the picture you want are easily and quickly set up. Of course, the
EXPERT mode menu is available for the experienced photographer, providing full control over detailed camera settings.
VIDEO CLIP MPEG4
640¶480 30fps HQ
<Example: BASIC Mode
Shooting Setting Screen>
VIDEO CLIP MPEG4
640¶480 30fps SHQ
<Example: EXPERT Mode
Shooting Setting Screen>
English
28
Page 32

GETTING THE MOST OUT OF YOUR CAMERA
Movable monitor for any shooting angle
The movable LCD monitor lets you shoot from any angle. Hold the camera
high to get a great view of a parade, or swivel the monitor around to snap a
photo of yourself.
29
English
Page 33

Docking station for easy connection
The docking station simplifies those complicated con nections to your TV or
computer. Just set the camera in the docking station, and you can view
your photos on your TV or computer right away. The remote control unit
makes it even more convenient.
Computer
TV
English
30
Page 34

PREPARATION
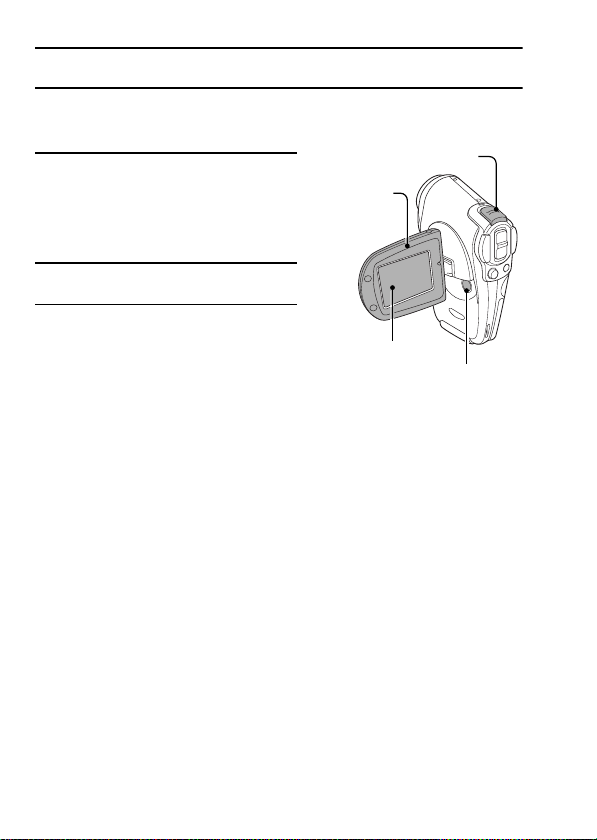
PARTS NAMES
Front
Monitor unit
Stereo microphone
<To open the monitor unit>
Lens
Flash
ON/OFF buttonSpeaker
31
English
Page 35

Rear
Multi-indicator
● Lit
Green: USB interface connection
(PC connection mode)
Red: USB interface connection
(PictBridge mode)
Charge the flush
Orange: AV cable connection
● Flashing
Green: Power save mode
Red (long interval): During self-timer
Red (short interval): Accessing the card,
Still image shooting button
photography
battery charge error
Main switch
Video clip recording button
Zoom switch
MENU button
Battery slot cover
Bottom
LCD monitor
Tripod stand hole
SET button
Strap holder
Docking station terminal
Card cover
English
32
Page 36

PARTS NAMES
Docking station
Front
Rear
Cable adapter
Docking station terminal
CAMERA/CHARGE button
Charging indicator
Remote control sensor
Camera indicator
DIGITAL/AV terminal
DC IN terminal
Docking station terminal
33
English
DIGITAL/AV terminal
DC IN terminal
Page 37

CHARGING THE BATTERY PACK
The battery pack is not charged at the time of purchase and therefore needs to
be charged before use. In addition, if the battery charge becomes low while you
are using the camera, it is recommended to recharge it as soon as possible.
1
Connect the AC adapter/charger to
a power outlet.
e Use the supplied power cord for
connecting.
2
Insert the battery pack into the AC
adapter/charger.
e Set it in the battery slot.
e Be sure the battery pack is
correctly oriented when setting it in
the charger.
e Charging begins. During charging,
the charging indicator lights red.
e When the battery pack is
completely charged, the charging
indicator turns off.
e Charging will take approximately
90 minutes.
3
When the battery pack is fully
charged, remove it from the AC
adapter/charger.
e After removing the battery pack,
unplug the power cord from the
power outlet.
English
34
Page 38

INSTALLING THE BATTERY PACK AND CARD
The card can be used after it has been formatted with the camera (page 122).
Make sure that the battery pack polarity (+ and –) and the card orientation are
correct.
Install the battery pack
1
Open the battery cover on the side.
e Open the battery cover by lightly
pressing it and sliding it towards
the rear.
2
Insert the battery pack.
e Firmly push it all the way in.
e Match the [I] mark on the battery
with the [I] mark on the camera.
<To remove the battery pack>
e Raise the battery pack and pull it
out.
35
English
Page 39

3
Close the battery cover.
e Match the [I] marks, and slide the
cover towards the front to close it.
e At the time of purchase the battery
pack is not charged. Be sure to
install a fully charged battery pack
in the camera (page 34).
Install the card
1
Open the card cover on the bottom
of the camera.
2
Insert the card.
e Firmly insert the card until it clicks
into place.
e To remove the card, press it down,
and then release. The card will
protrude slightly, and you can then
pull it out.
3
Close the card cover.
CAUTION
e Do not attempt to forcefully remove the card.
English
36
Page 40
TURNING THE POWER ON AND OFF
Turning on the camera
1
Set the main switch.
To shoot pictures:
Set to [REC].
To play back images:
Set the [PLAY].
2
Open the monitor unit.
3
Press the ON/OFF button for about
1 second.
e The camera turns on, and an
image appears on the LCD
monitor.
Monitor unit
LCD monitor
Main switch
ON/OFF button
37
English
Page 41

Turning on the camera when the power save
(sleep) function is active
In order to preserve battery pack power, the power save (sleep) function will
automatically turn off the camera after one minute of no use during shooting, or
five minutes of no use during playback (factory-preset setting).
e When the power save function is active, you can restore the power by any of
the following methods:
Move the main switch.
Press the ON/OFF button.
Press the MENU button.
Press the SET button.
e After the power save function has been active for about 1 hour, the camera
will switch to the standby mode. In this case, you can restore the power by
pressing the ON/OFF button, or by closing and then opening the monitor
unit.
e When the AC adapter/charger is connected, the power save function will
become active about 10 minutes after the camera is turned on (factorypreset setting).
e When the camera is connected to a computer or printer, it does not change
to the power save mode. In this case, the power save function becomes
active after about 12 hours.
e The user can specify the time elapsed before the power save function is
activated (page 119).
e When the camera is connected to a computer or printer, it does not change
to the power save mode. In this case, the power save function becomes
active after about 12 hours.
English
38
Page 42

TURNING THE POWER ON AND OFF
Turning off the camera
1
Press the ON/OFF button for about
1 second.
e The camera turns off.
HINT
To immediately activate the power save function
e Press the ON/OFF button briefly to active the power save function.
About the standby mode
e To turn off the camera only briefly, you can close the monitor unit to put the
camera in the standby mode. The standby mode uses almost no power.
When the monitor unit is opened again, the camera turns on immediately
and you are ready to shoot or view images without any delay.
Note
If the } icon appears...
e When a picture is taken, the date and time it was captured is recorded with it.
When the date and time cannot be recorded with the image because the
date and time have not yet been set (page 114), the } icon appears. To
have the date and time recorded with images, please make this setting
before capturing images.
39
English
Page 43

OPERATION BUTTONS
The procedures to change the camera settings, choose images, etc., are
performed by using the SET button to control the LCD monitor display. This
operation is used very frequently, so it is best to become familiar with it right
away.
1
Turn on the camera (page 37).
2
Press the MENU button.
e The Menu Screen appears.
<Select the icon above or below>
To select the icon above,
toggle the SET button up.
VIDEO CLIP MPEG4
640¶480 30fps HQ
To select the icon below,
toggle the SET button down.
SCENE SELECT
FULL AUTO
SET button
MENU button
PHOTO RESOLUTION
2048¶1536 (3.2M)
English
40
Page 44

OPERATION BUTTONS
<Select the icon to the left or right>
To select the icon to the right, toggle
the SET button to the right.
To select the icon to the left, toggle
the SET button to the left.
<Actuate the selected icon>
Press the SET button. The selected
icon moves to the left end of the
lineup.
VIDEO CLIP MPEG4
320¶240 30fps
VIDEO CLIP MPEG4
320¶240 30fps
VIDEO CLIP MPEG4
320¶240 30fps
41
English
Page 45

SWITCHING THE MENU MODE
Switch from the BASIC mode menu to the EXPERT mode menu, or vice versa,
depending on how you wish to use your camera.
1
Turn on the camera (page 37).
2
Press the MENU button.
e The Menu Screen (the Shooting
Setting Screen or the Playback
Setting Screen) appears.
VIDEO CLIP MPEG4
640¶480 30fps HQ
<Example: BASIC Mode
Shooting Setting Screen>
PLAYBACK METHOD
Set play all or 1
clip
<Example: BASIC Mode
Playback Setting Screen>
English
42
Page 46

SWITCHING THE MENU MODE
3
Toggle the SET button to the left.
e The screen to select the menu
mode appears.
4
Toggle the SET button to the left
again.
e The menu mode switches from one
mode to the other.
:
:
<Example: Shooting mode>
VIDEO CLIP MPEG4
640¶480 30fps SHQ
<Example: EXPERT Mode
Shooting Setting Screen>
PLAYBACK METHOD
Set play all or 1
clip
43
<Example: EXPERT Mode
Playback Setting Screen>
English
Page 47

BEFORE TAKING PICTURES
For best results
Hold the camera securely, keeping your elbow close to your body and
making sure the camera is stable.
Correct hold Incorrect hold
A finger is blocking
the lens or flash.
Make sure that the lens and flash are not blocked by your fingers or the
handstrap.
HINT
e Images captured in the still image shooting mode can be rotated when they
are played back (page 89). Note that video clips cannot be rotated while they
are being played back.
e When the still image shooting button is pressed halfway, the image in the
LCD monitor may waver vertically. This is the result of internal image
processing and is not a malfunction. This wavering is not recorded and will
not affect your images in any way.
e When the optical zoom is used or when the autofocus is operating, the image
may appear to waver, but this is not a malfunction.
English
44
Page 48

BEFORE TAKING PICTURES
Using the autofocus
The autofocus will work in almost all situations; however, there are certain
conditions that may cause the autofocus function to not work properly. If
the autofocus function is not working properly, set the focus range to
capture images (page 82).
i Conditions that may cause incorrect focus
The following examples are some of the situations where the autofocus
function may not work.
e Subjects with low contrast, very
bright subjects at the center of
the image or dark subjects or
locations
Use the focus-lock function to lock
the focus on an object with contrast
at the same distance as the
desired subject.
e Subjects without vertical lines
Use the focus-lock function to lock
the focus on the subject while
holding the camera vertically.
The following examples are some of the situations where the autofocus
function may work, but not as desired.
e When both near and far objects
are present
Use the focus-lock function to lock
the focus on an object at the same
distance as the desired subject,
then reposition the camera to
compose the picture.
45
English
Page 49

e Fast-moving subjects
Use the focus-lock function to lock
the focus on an object at the same
distance as the desired subject,
then reposition the camera to
compose the picture.
Hints for taking pictures
Muting the operation sounds
e The operation sounds that are generated, for example, when the still image
shooting button, MENU button or SET button is pressed, as well as the audio
guidance when you switch the mode, can be muted (page 108).
Where is the image and audio data saved?
e All the image and sound data is recorded on the card installed in the camera.
Taking pictures in backlight conditions...
e When taking pictures with the light coming from behind the subject, due to
the characteristics of the lens, light lines or ghost patterns (flare
phenomenon) may appear in the captured image. In this situation, it is
recommended that you avoid taking pictures with the subject lit from behind.
While the image data is being recorded...
e The multi-indicator will light red while the image is being written to the
memory. Another image can be captured only after the red light turns off.
However, even when the multi-indicator is lit red, depending on the camera’s
internal memory remaining capacity, in some cases the next image can be
captured about 2 seconds after shooting.
English
46
Page 50

BASIC MODE
I
index
SHOOTING
CAPTURING IMAGES
Recording video clips
1
Turn on the camera (page 37).
2
Set the main switch to REC.
3
Press the video clip recording
button [l] to start recording.
e Recording begins. During shooting,
X appears in the LCD monitor.
e It is not necessary to continue
pressing the video clip recording
button while shooting.
4
End the recording.
e Press the video clip recording
button again to stop recording.
Note
Focus lock during video clip recording
e The autofocus can be set to a fixed focus during video clip recording if you
toggle the SET button up. When the autofocus is fixed, the p icon appears
on the LCD monitor.
Main switch
Video clip recording button
00:00:15
English
47
Page 51

Capturing still images
1
Turn on the camera (page 37).
2
Set the main switch to REC.
3
Press the still image shooting
button [S] to capture the image.
1 Press the still image shooting
button halfway.
e The autofocus operates, and the
image is focused (focus lock).
2 Continue to gently press the still
image shooting button all the
way.
e The shutter releases and the image
is captured.
e You can view the captured image
on the LCD monitor by keeping the
still image shooting button
depressed when you capture the
image.
Main switch
Still image shooting button
Target mark
English
48
Page 52

CAPTURING IMAGES
Shoot a still image while recording a video clip
You can capture a still image while you are recording a video clip.
1
Turn on the camera (page 37).
2
Set the main switch to REC.
3
Press the video clip recording
button [l] to begin recording.
4
When you see a scene you'd like to
capture as a still image, press the
still image shooting button [S].
5
End the recording.
e Press the video clip recording
button to stop recording.
Main switch
Still image shooting
button
Video clip recording
button
01:25
49
English
Page 53

Note
About the target mark
e The target mark indicates the position which is currently focused. If the target
mark does not appear, or if it appears at a position that is different from the
point you wish to focus, you can refocus, for example, by changing the
shooting angle.
e The large target mark appears when the camera focuses on a wide area in
the center of the screen.
HINT
Shoot a still image while recording a video clip
e If you press the still image shooting button while recording a video clip, the
frame is also saved as a still image. Note, however, that in this case the flash
will not operate.
e If the still image resolution is set to a setting other than [, and you press
the still image shooting button while recording a video clip, the displayed
image stops briefly and then returns to video clip recording after the still
image is captured.
Note
e The data for a video clip is very large. Therefore, be aware that if the video
clip is uploaded to a computer to be played back, the computer may not be
able to play back the video fast enough, making it appear jerky. (The video
will always be displayed properly on the LCD monitor or a television.)
e Depending on the card, shooting may end even before the possible shooting
time indicated on page 167.
English
50
Page 54

CAPTURING IMAGES
AUDIO RECORDING
You can make audio recordings with your camera.
1
Select the audio recording icon <
from the recording mode menu, and
press the SET button.
e The camera changes to the audio
recording mode.
2
Press the video clip recording
button [l].
e Recording begins.
e To end the recording. press the
video clip recording button again.
00:00:16
<Screen during audio
recording>
51
English
Page 55

ABOUT THE BASIC MODE SHOOTING SETTING
SCREEN
For shooting in the BASIC mode, you can change the video clip image quality
and still image resolution settings, as well as modify the shooting settings for
various functions. These settings are performed on the BASIC Mode Shooting
Setting Screen.
Display the BASIC Mode Shooting Setting
Screen
1
Turn on the camera (page 37).
2
Set the main switch to REC.
3
Press the MENU button.
e The Menu Screen appears.
4
Set the camera to the BASIC mode
(page 42)
e The BASIC Mode Shooting Setting
Screen appears.
e To cancel the BASIC Mode
Shooting Setting Screen, press the
MENU button.
Main switch
MENU button
VIDEO CLIP MPEG4
640¶480 30fps HQ
English
52
Page 56

ABOUT THE BASIC MODE SHOOTING SETTING SCREEN
BASIC Mode Shooting Setting Screen
8
53
VIDEO CLIP MPEG4
640¶480 30fps HQ
English
9
F
.................
............................ 2
...........
............
.............................
.............................
.........................................
1
3
4
5
6
7
Page 57

1 Video clip menu (page 55)
8: Record at 640 x 480 pixels,
30 frames per second
9: 320 x 240 pixels, 30 frames
per second
<: 320 x 240 pixels, 15 frames
per second
=: 176 x 144 pixels, 15 frames
per second
<: Make an audio recording
2 Photo resolution menu (page
56)
Y: 2048 x 1536-pixel resolution
icon (3,200,000 pixels)
Z: 1600 x 1200-pixel resolution
icon (2,000,000 pixels)
[: 640 x 480-pixel resolution
icon (300,000 pixels)
3 Scene select menu (page 58)
=: Full auto icon
a:Sports icon
>: Portrait icon
+: Landscape icon
/: Night view icon
: Lamp icon
Q
4 Filter menu (page 59)
&: No filter
%: Cosmetic filter on
5: Slim filter on
W: Monochrome filter on
3: Sepia filter on
(: Ghost filter on
5 Flash menu (page 60)
k: Automatic flash mode
m: Forced flash mode
l: Flash off mode
6 Self-timer menu (page 62)
N: Self-timer off
y: Self-timer on (2 seconds)
x: Self-timer on (10 seconds)
7 Option icon (page 105)
Displays the Option Setting
Screen.
8 Menu mode display (page 42)
9 Help display (page 107)
F Remaining battery power (page
126)
e When you specify multiple functions that cannot be simultaneously
enabled, the function which was last set becomes the active setting, and
the other settings accordingly change automatically.
English
54
Page 58

CHANGING THE SHOOTING SETTINGS
In the BASIC mode, you can change the monitor brightness, the video clip
image quality and the still image resolution settings.
Video clip image quality setting
When it comes to video clips, a larger number of pixels and a higher the
frame rate means better image quality and smoother playback. On the
other hand, the file size becomes large and uses more memory. Set the
image quality to a setting that’s right for your purpose, whether for home
viewing on a TV or for showing on the Internet, for example.
1
Display the BASIC Mode Shooting
Setting Screen (page 52), and
select the video clip menu.
8: Record at 640 x 480 pixels, 30
frames per second
9: Record at 320 x 240 pixels, 30
frames per second
<: Record at 320 x 240 pixels, 15
frames per second
=: Record at 176 x 144 pixels, 15
frames per second
< : Make an audio recording
2
Select the desired icon from the
video clip menu, and press the SET
button.
e This completes the video clip
image quality setting.
VIDEO CLIP MPEG4
640¶480 30fps HQ
55
English
Page 59

Still image resolution setting
By setting the still i mage resolution (pixels) to a hig her setting, image detail
is enhanced for a smoother, finer picture. However, the file size also
becomes large and uses more memory. Select the resolution setting that
suits your purpose.
1
Display the BASIC Mode Shooting
Setting Screen (page 52), and
select the photo resolution menu.
Y: 2048 x 1536-pixel resolution
(3.2M)
Z: 1600 x 1200-pixel resolution
(2M)
[: 640 x 480-pixel resolution
(0.3M)
The numbers in parentheses ( ) refer
to the approximate number of pixels in
the image (units: megapixels).
2
Select the desired icon from the
photo resolution menu, and press
the SET button.
e This completes the still image
resolution setting.
PHOTO RESOLUTION
2048¶1536 (3.2M)
English
56
Page 60

CHANGING THE SHOOTING SETTINGS
Adjusting the brightness of the LCD monitor
(when shooting)
The brightness of the LCD monitor during shooting can be adjusted. Adjust
the brightness when it is difficult to see the LCD monitor image due to
ambient lighting. In addition, in very bright surroundings, such as outdoors
on a sunny day, you can turn the backlight OFF to preserve battery power.
1
With the Shooting Setting Screen
not shown, toggle the SET button
down for at least 1 second.
e The Monitor Brightness Screen
appears.
e You can also access the Monitor
Brightness Screen from the
Shooting Screen by pressing and
holding the SET button
downwards.
2
Toggle the SET button to the left or
right to adjust the brightness, and
press the SET button.
e This completes the LCD monitor
brightness setting, and you are
returned to the Shooting Screen.
English
57
LCD BRIGHTNESS
LCD BACKLIGHT
ON
OFF
ADJUST
0
Page 61

OTHER SHOOTING FUNCTIONS
Scene Select feature
You can select from various preset settings (aperture, shutter speed, etc.)
for specific shooting conditions.
1
Display the BASIC Mode Shooting
Setting Screen (page 52), and
select the scene select menu.
= : The camera makes settings
suitable for the surrounding
conditions.
a : Capture a split-second image of
a fast-moving subject.
> : Enhance the 3D feeling of the
subject by blurring the
background.
+: For beautiful shots of distant
scenery.
/ : Photograph the subject while
keeping the background night
scenery.
Q: Increase the sensitivity when
taking pictures.
2
Select the desired icon from the scene select menu, and press the
SET button.
e This completes the scene select function setting.
SCENE SELECT
FULL AUTO
3
Take the picture.
For video clip recording, see page 47.
For still image shooting, see page 48.
To return to normal photography, select = from the scene select menu,
and press the SET button.
English
58
Page 62

OTHER SHOOTING FUNCTIONS
Note
e When capturing images using the lamp Q or night view / setting, use a
tripod or other method to stabilize the camera.
Filter feature
The filter feature changes the aperture and shutter speed settings, as well
as the color tones, to apply unique effects to the photographed image.
1
Display the BASIC Mode Shooting
Setting Screen (page 52), and
select the filter menu.
&: No filter
%: Skin tones are enhanced in
close-up shots (cosmetic filter).
5: Change the vertical-horizontal
proportions of the subject (slim
filter).
W: Snap black-and-white photos
(monochrome filter).
3: Create a sepia-tone photo (sepia filter).
(: A radiant effect is added to the subject (ghost filter).
2
Select the desired icon from the filter menu, and press the SET
button.
e This completes the filter setting.
3
Take the picture.
For video clip recording, see page 47.
For still image shooting, see page 48.
e To return to normal photography, select & from the filter menu, and
press the SET button.
English
59
FILTER
NO
Page 63

Using the flash
The flash is used not only for taking pictures where there is insufficient
light, but also when the subject is in shade or in backlight conditions. Your
camera has three modes of operation (automatic flash mode, forced flash
mode, and flash off mode). The flash is available only when shooting still
images.
1
Display the BASIC Mode Shooting
Setting Screen (page 52), and
select the flash menu.
k : The camera will detect the
subject brightness and use the
flash only when required. In a
backlight situation, if only the
center of the image is very dark,
the flash will operate to
compensate (auto flash).
m : The flash will operate with every
image captured regardless of
the conditions. Use this setting
under backlight conditions,
when the subject is in shade,
under fluorescent lighting
conditions, etc. (forced flash).
l : The flash will not operate even in dark situations. Use this setting
when capturing an image in a location where flash photography is
prohibited, or when shooting a night landscape scene (flash off).
2
Select the desired icon from the flash menu, and press the SET
button.
e This completes the flash setting.
FLASH
AUTO
English
60
Page 64

OTHER SHOOTING FUNCTIONS
3
Take the picture.
For video clip recording, see page 47.
For still image shooting, see page 48.
e To return to normal photography, select k from the flash menu, and
press the SET button.
Using the zoom
Your camera has two zoom functions: optical zoom and digital zoom.
1
Point the camera lens at the
subject.
2
Press [T] or [W] on the zoom switch
to compose the desired image.
[T]: Zoom in on the subject.
[W]: Zoom out.
e When the zoom switch is pressed,
the zoom bar appears on the LCD
monitor.
e When the optical zoom factor is at
maximum, zooming stops
temporarily. When [T] on the zoom
switch is pressed again, the mode
changes to the digital zoom mode
and zooming continues (if digital
zooming is enabled).
When both optical
and digital zoom
are enabled
When optical zoom
only is enabled
Zoom switch
LCD monitor
Digital zoom (Yellow)
Zoom bar
Pointer
Optical zoom
3
Take the picture.
For video clip recording, see page 47.
For still image shooting, see page 48.
English
61
Page 65

Self-timer photography
1
Display the BASIC Mode Shooting
Setting Screen (page 52), and
select the self-timer menu.
N : Turns off the self-timer function.
y : Turns on the self-timer function.
The image is captured about 2
seconds after the video clip
recording button or still image
shooting button is pressed.
x : Turns on the self-timer function.
The image is captured about 10
seconds after the video clip
recording button or still image
shooting button is pressed.
2
Select the desired icon from the
self-timer menu, and press the SET
button.
This completes the self-timer setting.
3
Take the picture.
For video clip recording, see page 47.
For still image shooting, see page 48.
SELF-TIMER
OFF
English
62
Page 66

OTHER SHOOTING FUNCTIONS
HINT
To pause or cancel the self-timer function...
e If the video clip recording button or still image shooting button is pressed
again before the image is captured, the self-timer countdown temporarily
stops. Press the video clip recording button or still image shooting button one
more time to restart the self-timer.
e To cancel self-timer photography, select the N icon from the self-timer
menu, and press the SET button.
When x is selected...
e When the video clip recording button or
still image shooting button is pressed,
the illumination light and the multiindicator will blink for about 10
seconds, and then the image is
captured. Also, 4 seconds before the
shutter releases, the indication below
appears on the LCD monitor.
e If you swivel the monitor unit towards,
the self-timer indication will be visible to
the subject.
63
English
Page 67

PLAYBACK
I
index
VIEWING IMAGES
1
Turn on the camera (page 37), and
set the main switch to PLAY.
e If the main switch is set to PLAY
after a video clip was recorded, the
last recorded video clip is
displayed.
e If the main switch is set to PLAY
after a still image was captured, the
last recorded still image is
displayed.
2
Select the image you wish to view.
To display the previous image, toggle
the SET button to the left.
To display the next image, toggle the
SET button to the right.
3
Play back a video clip.
Follow these steps to play back a
video clip.
Normal playback
e Press the SET button.
e If you toggle the SET button to the
left during playback, the video clip
is played back in reverse at 15x
speed (the audio is not played
back).
Pause
e While the video clip is playing,
toggle the SET button up. To
resume playback, press the SET
button.
Main switch
SET button
JOG
<Example: After video clip
recording>
<Example: After still image
shooting>
English
64
Page 68

VIEWING IMAGES
To play back one image at a time (single-frame step)
e During forward playback
After pausing playback, toggle the SET button to the right.
For slow playback, press and hold the SET button to the right.
e During reverse playback
After pausing playback, toggle the SET button to the left.
For slow reverse playback, press and hold the SET button to the left.
To accelerate playback
e 15x fast forward playback
During normal playback, toggle the SET button to the right.
e 30x fast forward playback
During 15x playback, toggle the SET button to the right.
d During fast forward playback, the audio is not heard.
e Return to normal playback speed
Press the SET button.
JOG playback
JOG playback lets you display the previous frame or next frame, as well as
search for a particular frame during playback.
1
In the video clip playback stop or
pause mode, toggle the SET button
up.
e The JOG Playback Screen
appears.
Fast forward:
Toggle the SET button to the right.
Rewind:
Toggle the SET button to the left.
Playback:
Press the SET button.
Position of currently displayed
frame
2
Toggle the SET button down.
e You are returned to the Playback
Screen.
English
65
Page 69

Convenient 9-image display playback
1
Turn on the camera (page 37), and
set the main switch to PLAY.
e If the main switch is set to PLAY
after a video clip was recorded, the
last recorded video clip is
displayed.
e If the main switch is set to PLAY
after a still image was captured, the
last recorded still image is
displayed.
2
Press [W] (P) on the zoom
switch.
e The 9-image display appears.
3
Select the image to play back.
e Toggle the SET button up, down,
left or right to move the orange
frame to the desired image, and
press the SET button.
Instead of pressing the SET button,
you can press [T] ([
zoom switch to show the image full
screen.
]
]) on the
Main switch
Video clip
Still image
100
0001
0002 0003
0004 0005 0006
0007 0008 0009
Audio data
Folder number
Zoom switch
SET button
Orange frame
Image number
Note
e The 9-image multi-playback display can also be accessed by selecting P
on the BASIC Mode Playback Setting Screen.
English
66
Page 70

VIEWING IMAGES
Audio data playback
A { mark indicates an image for
which audio data was also recorded.
Playback
Press the SET button.
Pause
During playback, toggle the SET
button up.
Stop playback
During playback, toggle the SET
button down.
Magnifying (zooming in) the image
1
Display the image that you want to
magnify.
e For a video clip, pause playback at
the place you want to magnify.
2
Press [T] ([]]) on the zoom
switch.
e Magnification is enabled.
e The image is magnified, and the
central portion of image is
displayed.
e Toggle the SET button to view different parts of the magnified image.
To magnify:
Press [T] ([]]) on the zoom switch.
To return to normal size:
Press [W] ([P]) on the zoom switch.
Magnification indication
ZOOM
117%
ZOOM I/O
MOVE
SHUTTER FOR SAVE
HINT
The magnified portion of the image can be saved as a separate image.
e Press the still image shooting button. The magnified portion is saved as a
new still image.
English
67
Page 71

ABOUT THE BASIC MODE PLAYBACK SETTING
SCREEN
The BASIC mode playback settings are performed on the BASIC Mode
Playback Setting Screen.
Display the BASIC Mode Playback Setting
Screen
1
Turn on the camera (page 37).
2
Set the main switch to PLAY.
3
Press the MENU button.
e The Menu Screen appears.
4
Set the camera to the BASIC mode
(page 42)
e The BASIC Mode Playback Setting
Screen appears.
e To cancel the BASIC Mode
Playback Setting Screen, press the
MENU button.
Main switch
MENU button
PLAYBACK METHOD
Set play all or 1
clip
English
68
Page 72

ABOUT THE BASIC MODE PLAYBACK SETTING SCREEN
BASIC Mode Playback Setting Screen
8
1
2
3
4
5
6
7
1 Playback method setting [page 70]
e Select continuous playback or single-frame playback.
2 Multi-playback [page 66]
e Display images in the 9-frame multi-display format.
3 Volume control [page 71]
e Adjust the playback volume for video clips and audio data.
4 Monitor brightness [page 72]
e Adjust the brightness of the LCD monitor backlight.
5 Data protect setting [page 73]
e Protect data from accidental erasure.
6 Erase [page 75]
e Delete images from the card memory.
7 Option icon (page 105)
e Displays the Option Setting Screen.
8 Menu mode display (page 42)
9 Help display (page 107)
F Remaining battery power (page 126)
PLAYBACK METHOD
Set play all or 1
clip
9
F
69
English
Page 73

OTHER PLAYBACK FUNCTIONS
Playback mode
Images can be viewed continuously (slideshow playback) or you can
choose to show single images.
1
Display the BASIC Mode Playback
Setting Screen (page 68).
2
Select the playback method icon
4, and press the SET button.
e The Playback Mode Screen
appears.
1 CLIP:
Display only the selected image.
PLAY ALL:
Play back images in slideshow
fashion.
3
Select the desired playback mode,
and press the SET button.
<PLAY ALL>
e The screen to set the time that
each image is displayed appears.
1 Toggle the SET button up or down
to specify the time that each image
is shown.
2 Press the SET button.
e The display time is set, and you are
returned to the BASIC Mode
Playback Setting Screen.
<1 CLIP>
e The camera is set to display only
the image you select, and you are
returned to the BASIC Mode
Playback Setting Screen.
PLAYBACK METHOD
DURATION OF PHOTO
PLAY ALL
1 CLIP
PLAYBACK METHOD
DURATION OF PHOTO
PLAY ALL
1SEC
1SEC
English
70
Page 74

OTHER PLAYBACK FUNCTIONS
Volume control
Adjust the volume of video clip and audio data playback.
1
Display the BASIC Mode Playback
Setting Screen (page 68).
2
Select the volume icon Z, and
press the SET button.
e The volume control bar appears.
3
Toggle the SET button left or right
to set to the desired volume, and
press the SET button.
English
71
VOLUME
VOLUME SETTING
1
Page 75

Monitor brightness (playback)
Adjust the brightness of the camera’s LCD monitor display during
playback. Use this adjustment when the monitor image is difficult to view
because of ambient lighting.
In addition, in very bright surroundings, such as outdoors on a sunny day,
you can turn the backlight OFF to preserve battery power.
1
Display the BASIC Mode Playback
Setting Screen (page 68).
2
Select the LCD brightn ess icon r,
and press the SET button.
e The brightness control bar
appears.
e You can also access the Monitor
Brightness Screen from the
Shooting Screen by pressing and
holding the SET button
downwards.
3
Toggle the SET button left or right
to adjust the LCD monitor
brightness, and press the SET
button.
e The brightness is set, and you are
returned to the BASIC Mode
Playback Setting Screen.
LCD BRIGHTNESS
LCD BACKLIGHT
ON
OFF
ADJUST
0
English
72
Page 76

OTHER PLAYBACK FUNCTIONS
Image protect mode
(prevent accidental erasure)
1
Display the data that you want to
protect from accidental erasure,
and display the BASIC Mode
Playback Setting Screen (page 68).
2
Select the protect icon A, and
press the SET button.
e “LOCK?” appears.
e If the protect mode has already
been enabled for the data, then
“UNLOCK?” appears.
3
Toggle the SET button up or down
to select “YES”, and press the SET
button.
e The protect mode is set for the
data.
e The protect mark B indicates
that the data is locked.
e To return to the BASIC Mode
Playback Setting Screen, press the
MENU button.
English
73
PROTECT
LOCK?
YES
EXIT
PROTECT
UNLOCK?
YES
EXIT
Page 77

CAUTION
e Even if the protect mode is set for certain data files, they will be erased if the
card is reformatted.
HINT
To select a different image in steps 2 and 3...
e Toggle the SET button to the left or right.
To cancel the protect mode for an image...
e Display the desired data and repeat steps
disappear and the protect mode is canceled.
to 3. The protect mark B will
1
English
74
Page 78

OTHER PLAYBACK FUNCTIONS
Erasing data
You can erase data that is stored on the card if you no longer need it. You
can erase the data one at a time, or all at once.
1
Display the BASIC Mode Playback
Setting Screen (page 68).
2
Select the erase icon c, and
press the SET button.
e The Erase Mode Screen appears.
ONE ERASE:
Erases one data at a time.
ERASE ALL:
Erases all the data from the card.
EXIT:
Returns to the BASIC Mode
Playback Setting Screen.
3
Toggle the SET button up or down to select the erase mode, and
press the SET button.
e The Erase Confirmation Screen appears.
<ONE ERASE>
e Toggle the SET button to the left or right to select the data you wish to
erase.
<ERASE ALL>
e Toggle the SET button to the left or right confirm the data to erase.
English
75
ERASE
ONE ERASE
ERASE ALL
EXIT
Page 79

4
Toggle the SET button up or down to select “YES”, and press the SET
button.
<ONE ERASE>
e The currently displayed image is deleted.
e To erase other data, select the data, and press the SET button.
e To return to the BASIC Mode Playback Setting Screen, press the
MENU button.
<ERASE ALL>
e The Erase Confirmation Screen again appears. To erase the data,
select “YES”, and press the SET button. When data erase is
completed, “NO IMAGE” is shown.
CAUTION
e Data which is protected from accidental erase cannot be erased. To erase
protected data, set the protect setting for the data to off (page 73), and then
follow the data erase procedure.
English
76
Page 80

OTHER PLAYBACK FUNCTIONS
Displaying image data (Information Screen)
On the Information Screen you can check what the settings were when an
image was captured.
1
Display the desired image.
INFO
2
Press the MENU button for at about
2 seconds.
e The Playback Information Screen
appears.
e If the MENU button is pressed
again, the Playback Information
Screen is exited.
1 Video clip mode settings
2 Remaining card memory
3 Image or sound number
4 Protect setting
5 File size
6 Shooting or recording time
7 Remaining battery charge
8 Date and time of image
9 Photo resolution setting
100-0002
1
640¶480 328KB
MPEG4 00:00:06
2
9
2
UNUSED MEMORY
78%
2003.12.25 19:30
8
<Video clip playback mode>
100-0001
INFO
2048×1536 986KB
UNUSED MEMORY
78%
2003.12.25 19:30
8
<Still image playback mode>
100-0004
INFO
3
4
5
6
7
3
4
5
7
3
4
77
English
96KB
AAC 00:00:03
UNUSED MEMORY
21%
2003.12.25 19:30
8
<Audio data playback mode>
5
6
2
7
Page 81

EXPERT MODE
I
index
SHOOTING
ABOUT THE EXPERT MODE SHOOTING
SETTING SCREEN
Compared to the BASIC mode, the EXPERT mode allows you much more
control over the various shooting settings. These settings are performed on the
EXPERT Mode Shooting Setting Screen.
Display the EXPERT Mode Shooting Setting
Screen
1
Turn on the camera (page 37).
2
Set the main switch to REC.
3
Press the MENU button.
e The Menu Screen appears.
Main switch
4
Set the camera to the EXPERT
mode (page 42)
e The EXPERT Mode Shooting
Setting Screen appears.
e To cancel the EXPERT Mode
Shooting Setting Screen, press the
MENU button.
VIDEO CLIP MPEG4
640¶480 30fps SHQ
MENU button
English
78
Page 82

ABOUT THE EXPERT MODE SHOOTING SETTING SCREEN
EXPERT Mode Shooting Setting Screen
H
79
VIDEO CLIP MPEG4
640¶480 30fps SHQ
English
I
J
..............................
..............................
..............................
..............................
..............................
..............................
..............................
...................................
..............................
..............................
.........................................
1
2
3
4
5
6
7
8
9
F
G
Page 83

1 Video clip menu (page 81)
:: 640 x 480 pixels, 30 frames
per second, low compression
8: 640 x 480 pixels, 30 frames
per second
9: 320 x 240 pixels, 30 frames
per second
<: 320 x 240 pixels, 15 frames
per second
=: 176 x 144 pixels, 15 frames
per second
2 Photo resolution menu (page
56)
Y: 2048 x 1536-pixel resolution
icon (3,200,000 pixels)
Z: 1600 x 1200-pixel resolution
icon (2,000,000 pixels)
[: 640 x 480-pixel resolution
icon (300,000 pixels)
3 Scene select menu (page 58)
=: Full auto icon
a:Sports icon
>: Portrait icon
+: Landscape icon
/: Night view icon
Q: Lamp icon
4 Filter menu (page 59)
&: No filter
%: Cosmetic filter on
5: Slim filter on
W: Monochrome filter on
3: Sepia filter on
(: Ghost filter on
5 Flash menu (page 60)
k: Automatic flash mode
m: Forced flash mode
l: Flash off mode
6 Self-timer menu (page 62)
N: Self-timer off
y: Self-timer on (2 seconds)
x: Self-timer on (10 seconds)
7 Focus menu (Page 82)
-: Wide end: 10 cm to infinity
Tele end: 80 cm to infinity
*: 80 cm to infinity
+: 2 cm to 60 cm
8 Flicker-reduction menu (page
83)
p: Flicker-reduction function off
icon.
o: Flicker-reduction function on
icon.
9 ISO sensitivity menu (Page 84)
t: Auto sensitivity (ISO50 to
200)
*: ISO50 icon.
u: ISO100 icon.
v: ISO200 icon.
w: ISO400 icon.
F White balance menu (page 85)
>: Auto white balance icon.
r: Sunny icon.
o: Cloudy icon.
p: Fluorescent lighting icon.
q: White (incandescent) light
icon.
G Option icon (page 105)
e Displays the Option Setting
Screen.
H Menu mode display (page 42)
I Help display (page 107)
J Remaining battery power (page
126)
e When you specify multiple functions that cannot be simultaneously
enabled, the function which was last set becomes the active setting, and
the other settings accordingly change automatically.
English
80
Page 84

VIDEO IMAGE QUALITY
For high image quality and smooth video clip playback, a larger number of
pixels and high frame rate is selected. A lower compression rate setting
produces even more beautiful images. However, the file size becomes large
and uses more memory, set the image quality to a setting that’s right for your
purpose.
1
Display the EXPERT Mode
Shooting Setting Screen (page 78),
and select the video clip menu.
:: Record at 640 x 480 pixels, 30
frames per second, low
compression
8: Record at 640 x 480 pixels, 30
frames per second
9: Record at 320 x 240 pixels, 30
frames per second
<: Record at 320 x 240 pixels, 15
frames per second
=: Record at 176 x 144 pixels, 15
frames per second
2
Select the desired icon from the
video clip menu, and press the SET
button.
e This completes the video clip
image quality setting.
VIDEO CLIP MPEG4
640¶480 30fps SHQ
81
English
Page 85

FOCUS
1
Display the EXPERT Mode
Shooting Setting Screen (page 78),
and select the focus menu.
e When shooting a subject at a
medium to far distance, by setting
the focus range to *, you will find
it both easier and faster to focus.
-: Wide end: 10 cm to infinity
Tele end: 80 cm to infinity
(Total)
* : 80 cm to infinity (Normal)
+ : 2 cm to 60 cm (Super Macro)
2
Select the desired icon from the focus menu, and press the SET
button.
e This completes the focus range setting.
FOCUS
TOTAL RANGE
Note
About the scene select function and focus range settings
e The scene select function changes to = when the focus range is set to
* or +.
e Even if you set the focus range to * or +, it changes to - when the
scene select function is set to anything other than =.
About focus range in the BASIC mode
e In the BASIC mode, the focus range setting is automatically set to -.
When the distance between the camera and the subject is short, the focus
range automatically changes to the macro setting.
English
82
Page 86

FLICKER-REDUCTION FUNCTION
The flicker-reduction setting reduces the flicker that results when filming video
clips under fluorescent lights and the like where the background lighting
pulsates at the frequency of the power supply. The flicker-reduction setting is
set for a frequency of 50 Hz.
1
Display the EXPERT Mode
Shooting Setting Screen (page 78),
and select the flicker-reduction
menu.
p : Turns off the flicker-reduction
setting.
o : Turns on the flicker-reduction
setting.
2
Select the o icon from the flickerreduction menu, and press the SET
button.
e This completes the flicker-
reduction setting.
HINT
e If the flicker-reduction setting is used outdoors on a very bright day, a
halation effect may occur.
FLICKER REDUCT
OFF
83
English
Page 87

ISO SENSITIVITY
With the initial settings, the ISO sensitivity is automatically set according to the
brightness of the subject. However, the ISO sensitivity can be set to a fixed
setting.
1
Display the EXPERT Mode
Shooting Setting Screen (page 78),
and select the ISO sensitivity
menu.
t : Sets the ISO sensitivity
automatically (equivalent to
ISO50 to 200 (Video clip
shooting mode: ISO200 to
800)).
*: Sets the sensitivity to ISO50
equivalent (Video clip shooting
mode: ISO200).
u : Sets the sensitivity to ISO100 equivalent (Video clip shooting mode:
ISO400).
v : Sets the sensitivity to ISO200 equivalent (Video clip shooting mode:
ISO800).
w : Sets the sensitivity to ISO400 equivalent (Video clip shooting mode:
ISO1600).
2
Select the desired icon from the
ISO sensitivity menu and press the
SET button.
e This completes the ISO sensitivity
setting.
ISO
AUTO
HINT
e By setting a higher ISO sensitivity, you can set higher shutter speeds and
capture images in darker locations, but noise in the captured images may
increase.
English
84
Page 88

WHITE BALANCE SETTING
This camera automatically adjusts the white balance under most lighting
conditions. However, if you want to specify the lighting conditions or change the
overall tone of the image, the white balance can be manually set.
1
Display the EXPERT Mode
Shooting Setting Screen (page 78),
and select the white balance menu.
> : The camera will make the white
balance adjustment
automatically based on the
natural and artificial light
conditions. This is the setting
used in the auto mode.
r : For shooting outside on a sunny
day.
o : For shooting outside on a
cloudy day.
p : For shooting inside under
fluorescent lighting.
q : For shooting inside under
incandescent lighting.
2
Select the desired icon from the
white balance menu, and press the
SET button.
HINT
To cancel the white balance setting
e Perform step
, select >, and then press the SET button.
1
WHITE BALANCE
AUTO
85
English
 Loading...