

Page 1

Model: FVD48P4
1080p HDTV
( LED BACKLIGHT)
Page 2

Page 3

Page 4

Page 5

4
Table of Contents
Chapter 1: Connections and Setup
Chapter 2: Menu Operation
Chapter 3:Other Information
5
5
6
6
7
8
9
10
12
13
13
13
14
16
1
2
16
16
17
18
19
20
21
22
23
23
23
24
25
27
27
27
28
Before Initial Setup ..............................................................................................................................
Check Supplied Parts...........................................................................................................................
Attaching Your TV to the Stand Base..................................................................................................
Mounting Your TV to the Wall .............................................................................................................
Buttons on the TV ................................................................................................................................
Explanation of jacks on TV ..................................................................................................................
Choose Your Connections ....................................................................................................................
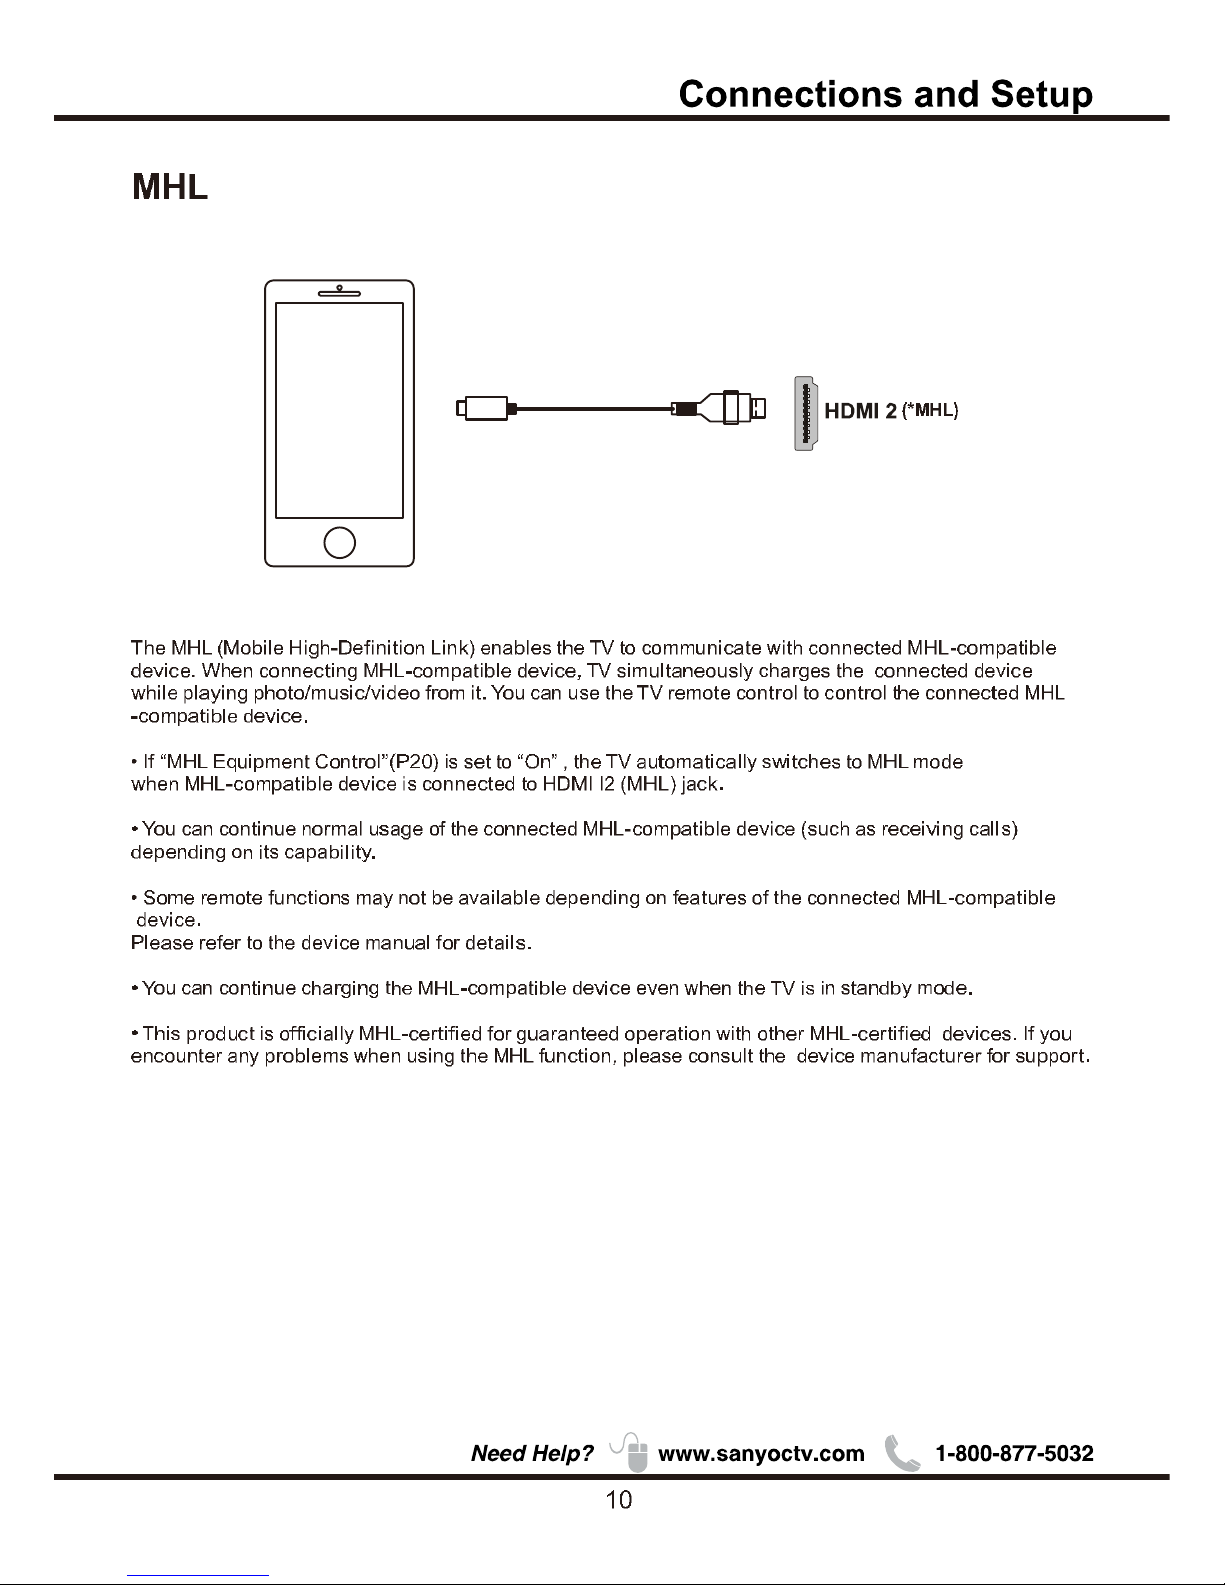
MHL ....................................................................................................................................................
Remote Control Functions ..................................................................................................................
Obtain the Signal ................................................................................................................................
Switching On .......................................................................................................................................
Switching Off .......................................................................................................................................
Setup Wizard .......................................................................................................................................
Input List ..............................................................................................................................................
Important Information ...........................................................................................................................
Important Safety Insructions ................................................................................................................
Menu .....................................................................................................................................................
Picture ..................................................................................................................................................
Sound ...................................................................................................................................................
Channel ................................................................................................................................................
Setup ....................................................................................................................................................
Lock .....................................................................................................................................................
Help ......................................................................................................................................................
PC ........................................................................................................................................................
VIDEO/HDMI ......................................................................................................................................
USB ......................................................................................................................................................
Photo ....................................................................................................................................................
Frequently Asked Questions (FAQS) ....................................................................................................
Troubleshooting ....................................................................................................................................
Care and Cleaning ...............................................................................................................................
Television Specifications .......................................................................................................................
.........................................................................................................................................
Limited Warranty ...................................................................................................................................
Specification
Page 6

Page 7

6
M4X20 (4mm) Diameter
, Length-20mm (maximum)
M4X16 (4mm) Diameter
, Length-16mm (maximum)
Base
base unassembled table
stand
Note:Stand base screws
are located in the
literature package.
Mounting screws measurements
FVD48P4
Model
FVD48P4
M624
A-1 A-3
A-2 M4 screw
M4X20
M4X16
Page 8

7
2 44 2
Recommendation to buy screws :
(Please base on the material object for the real sample.)
1
2
3
4
55
6
7
ENTER
1
2
3
4
5
6
7
Buttons on the TV
Top use M6X8. max (12mm); BTM use M6X8. max (10mm)
Page 9

8
OPTICAL OUTPUT It is possible to output audio through the digital audio terminal.
AUDIO OUTPUT the socket provides composite audio connection.
support amplified high power audio equipment. Please adjust the volume directly on
the external audio equipment. Please do not connect headphones directly to the TV.
The TV can
(For DVI input, it's audio input is shared with PC audio input)
Note: For the audio receiver control ARC, firstly you must have a device which supports
HDMI ARC, then connect it to the HDMI1 port. When the "ARC/CEC Setting" is enabled on
your TV, the TV set's speakers will mute automatically and the audio will be outputted on
your ARC sound device system.
Visual Interface (DVI), the jack on the side of your TV is also compatible with DVI
devices.
Page 10

9
ANTENNA/CABLE IN
HDMI 2/*MHL(High-Definition Multimedia Interface/Mobile High-Definition Link)
Provides an uncompressed digital connection that carries both video and
audio data by way of an integrated mini-plug cable. Since HDMI technology is
based on Mobile High-Definition Link(MHL),the jack on the side of your TV is also
compatible with MHL Device.
3
Device Digital
USB Allows you to connect a compatible mass storage device for the display of JPEG
pictures on the TV.
MHL2.1
1080p/30Hz 1080p/60Hz
Compatibility
WXGA
480i, 480p, 720p/60Hz, 1080i/60Hz
,
this socket can be used to connect and indoor or outdoor
antenna (for both analog and digital signals), or a direct Cable TV signal
(when no set-top box is required.)
Page 11
Page 12

Page 13

12
Press to
select the desired option
open the Input list, then press / to
.
RECALL press the RECALL button return to the previously
viewed channel .
the menu .
.
USB
Goes to the USB menu.
CAPTION Press this button to switch Closed Caption mode.
Page 14

Page 15

14
ENERGY STAR is a set of power-saving
guidelines issued by the U.S.
Environmental Protection Agency(E PA).
ENERGY STAR is a joint program of the U.S.
Environmental Protection Agency and the
U.S.Department of Energy helping us all
save money and protect the environment
through energy efficient products and
practices.
A menu screen asks you to set the location for TV.
Choosing“Home Mode” for the TV assigns the
optimal picture settings for most home
environments.
ENERGY STAR qualification. Use / to
select the desired location setting(“Home
Mode or “Store Mode”); then press ENTER
to continue to the next screen.
Setup Wizard
Connect an RF cable to the TV's ANTENNA/CABLE
IN terminal.
Select TV Location
1. Press / button on the remote control to select
Home Mode or Store Mode.
2. Press ENTER button to go.
1. Choose "Quick setup" or "Step by step" to setup
your new television.
2. Press ENTER button to go.
Use ARROW keys to highlight y our choice and then press ENTER k ey.
Use ARROW keys to highlight y our choice and then press ENTER key
.
Please select proper loc ation for you TV.
Please select proper loc ation for your TV.
Display wi ll be adju sted for bes t result.
Display wi ll be adju sted for bes t result.
Home mode qualifies
for ENERGY STAR.
Store mode is for the
Store mode is for the
retail display setup
retail display setup
Home
Home
Store
Store
Home mode is for saving energy
Home mode is for saving energy
and reducing power consumption.
and reducing power consumption.
Previous
Previous
Regresa
Regresa
Use ARROW keys to highlight y our choice and then press ENTER k ey
.
Previous
Choose"Qui ck setup" or"Step by step"
to set u p y our new televis ion.
Quick setup
(Advanced users)
Setp by setp
(Recommended)
Please Select Langu age
English
French
Spanish
Use ARROW keys to highlight y our choice and then press ENTER k ey
.
A menu screen asks you to select language among
English, French and Spanish.
Choosing“Store Mode”,which is not
ENERGY STAR compliant, sets the unit up
with predefined settings for retail displays.
In this setting, the power consumption may
exceed the requirements of the
Previous
Air
Search St art
Cable
Search St art
Skip
Please con nect all inputs
to the terminals.
Make sure all of you r
equipments switched on .
Use ARROW keys to highlight y our choice and then press ENTER k ey.
If you choose Please connect all
equipment to the TV's inputs and switch them on.
Air or
Cable search.
"Quick setup",
(Quick setup chosen)
Choose Initial Setup method
Home mode qualifies
for ENERGY STAR.
Page 16

15
Chapter 2
Analog channels:0 Digital channels:0
Channel search will be complete when blue progress bar reaches 100%
(PLEASE DO NOT INTERRUPT THE CHANNEL SEARCH,IT MAY TAKE A WHILE)
Use ARROW keys to highlight y our choice and then press ENTER k ey
.
Analog channels: 0 Digital channels: 0
Input search result:
Video HDMI1 HDMI2/MHL HDMI3
Finish Repeat
Channel search result:
Successfully Completed
Choose Antenna Information to get a high definition
an Air or Cable search.
Air
Search channels form an indoor or outdoor antenna.
Press the Finish button to finalize the Initial Setup and
enjoy watching TV.
NOTE: If you need to do the process again, please
choose Repeat.
Cable
Search channels from the cable provider.
Previous Cont i n ue
Use ARROW keys to highlight y our choice and then press ENTER k ey.
Connection check phase: Video
please turn on the power of apparatus and check connection.
DVD/Blu-ray
GAME
Y
(VIDEO)
Pb
Pr
L
R
Compo sit e C ompo ne nt
Video
HDMI 1
HDMI 2/M HL
HDMI 3
Please choose a connection method.
Previous Cont i n ue
Use ARROW keys to highlight y our choice and then press ENTER k ey.
Connection check phase: Video
please turn on the power of apparatus and check connection.
DVD/Blu-ray
GAME
Y
(VIDEO)
Pb
Pr
L
R
Compo sit e C ompo ne nt
Video
HDMI 1
HDMI 2/M HL
HDMI 3
Neither type of connection could be confirmed.
Previous Cont i n ue
Use ARROW keys to highlight y our choice and then press ENTER k ey.
Connection check phase: HDMI
please turn on the power of apparatus and check connection.
DVD/Blu-ray
GAME
Video
HDMI 1
HDMI 2/M HL
HDMI 3
At least one connection cannot be checked.
Previous Cont in ue
Use ARROW keys to highlight y our choice and then press ENTER k ey.
Connection check phase: HDMI
please turn on the power of apparatus and check connection.
DVD/Blu-ray
GAME
Video
HDMI 1
HDMI 2/M HL
HDMI 3
Connection was successful.
If "Step by step" is chosen, options will be more detailed.
Press Continue button to advance.
Use ARROW keys to highlight y our choice and then press ENTER k ey.
Previous
Choose"Qui ck setup" or"Step by step"
to set u p y our new televis ion.
Quick setup
(Advanced users)
Setp by setp
(Rec om me nd e d)
(Setp by setp chosen)
Looking for a hi gh definition picture?
Please t ake a moment to r eview the req uired conne ctions.
Antenna Inf ormati on
Previous
Air
Search Start
Cable
Search Start
Skip
Use ARROW keys to highlight y our choice and then press ENTER k ey.
Use ARROW keys to highlight y our choice and then press ENTER k ey
.
Analog channels: 0 Digital channels: 0
Input search result:
Video HDMI1 HDMI2/MHL HDMI3
Next
Repeat
Channel search result:
Successfully Completed
Press
Press Next button to check connection in detail.
Repeat button to do the process again.
Press Continue button to go next.
If any connection is found, then you can see "Connection
was successful." with blue color.
Successfully Completed
Page 17

Page 18

Page 19

Page 20

Page 21

Page 22

Page 23

H-Pos
Adjust the horizontal position of the picture.
Press button to adjust. /
V-Pos
Adjust the vertical position of the picture.
Press button to adjust. /
Clock
Minimize vertical stripes in the screen image.
Press button to adjust. /
Phase
Minimize horizontal distortion.
Press button to adjust. /
Auto
Adjust to the PC signal timing automatically.
Press button to enter.
*Note:
1. PICTURE menu and description are the same as that
for TV mode.
2. Audio Language in SOUND menu is invalid.
3. TIME menu and description are the same as that for
TV mode.
4.Close Caption in SETUP menu is invalid.
5.US, Canada, RRT Setting and Reset RRT in LOCK
menu is invalid.
6.PC mode has no CHANNEL menu.
PC
1.Press to select PC source.INPUT
2.Press ENU to enter the main menu, Press
button to select Setup menu.
M /
3.Press to select PC Settings.
4.Press / button to select among H-Pos / V-Pos /
Clock / Phase / Auto .
5.Press to enter.
6.Press button to adjust. /
7.Press ENU again or back to parent menu. M
22
Move
Adjust
MENU
Return
H-Pos
V-Pos
Clock
Phase
Auto
50
50
50
25
Menu Operation
Move
Select
MENU
Return
English
Off
Menu Language
Closed Caption
Over Scan
Other Settings
Input Label
Restore Defaul t
PC Settings
LockChannelPic turePic ture Sound Setup Help
LockChannelPicturePicture Sound Setup Help
Help
Get help from the following choices.
Press / button to select(Auto Recovery/
Self Test /Connection Guide / Antenna Guide /
Contact Us).
3.Press ENTER / to ent er.
4. Press MENU to exit i t
On screen help
What would you lik e to do?
Auto Recovery
Self Test
Conne ction Gu ide
Anten na Guide
Con tant Us
Use ARROW keys to highlight your choice and then press ENTER key.
Auto Recovery
Quickly find which source has signal by auto
recovery page.
Self Test
To tes t if th e TV se t is OK or not.
Connection Guide
To enter into a page for quick connection test.
Antenna Guide
To enter into antenna guide page,with the guide
page,you can conntect your antenna cable step by
step.
Contact Us
Some ways to contact us.
Page 24

Page 25

24
Other Information
Chapter 3
Page 26

25
Other Information
VIDEO INPUT
Check your connections. If you used Composite yellow, red, and white cables to connect, make
sure they're connected to the green VIDEO INPUT, and the red and white
If using DVI input please make sure to connect the audio signal to the PC INPUT's AUDIO (DVI) jack.
If using Component (Y, Pb, Pr) remember to also connect the device's left and right audio output jacks
to the TV's L and R AUDIO INPUT jacks.
Page 27

26
Other Information
Lock Enter Password
System lock,
System lock
Page 28

27
Other Information
Specification
NOTE: Dimensions are in inches
42.7 (w/stand) 26.6 (w/stand) 11.6 (w/stand)
42.7 (w/out stand) 24.9 (w/out stand) 2.6 (w/out stand)
140 watts
29.9Ibs (w/stand)
Power AC Power
Weight
Requirement Consumption
Width
Height Depth
Source:
AC 120V, 60Hz
FVD48P4
Model
60Hz
Page 29

28
Page 30

HL obil igh-Definitio in n h HL og r r dem rk
egistere r dem rk HL icensing LC.
 Loading...