

Page 1
INSTRUCTION MANUAL
Fan Assisted Microwave Oven
EM-C5796V UK2
ead these instructions carefully before use.
R
you follow these instructions, your Microwave
If
Oven will serve you long and well.
Page 2

THE OVEN CAVITY SHOULD BE CLEANED
AND WIPED DRY AFTER EACH USE. THE
OVEN SHOULD NOT BE USED IF ANY WATER
OR MOISTURE REMAINS IN THE CAVITY.
ROLLER REST AND GLASS TRAY SHOULD
NOT STAND IN WATER.
DUE TO HIGH MOISTURE CONTENT OF
CERTAIN FOODS SUCH AS POTATOES, IT IS
IMPORTANT THAT THE OVEN IS WIPED
CLEAN AFTER EACH USE.
ATTENTION!
1) Read these instructions carefully before
installing and operating the oven. Keep them
for further reference.
2) Record in the space below the SERIAL No.
found on the oven and retain this information
for future reference.
SERIAL NO.
2
Page 3

CONTENTS
SPECIFICATION----------------------------------------------------------------------------------------- 4
Safety instructions
ow To use Your Oven Safely(Microwave) ------------------------------------------------------4 H
Other Important Safety Instructions ----------------------------------------------------------------- 5
Installation
Connecting to the mains ------------------------------------------------------------------------------- 6
Oven Positioning----------------------------------------------------------------------------------------- 8
Oven Parts and Accessories-------------------------------------------------------------------------- 9
Oven Utensils------------------------------------------------------------------------------------------- 10
MAFF Rating-------------------------------------------------------------------------------------------- 10
Operating Instructions
How To Set The Oven Controls -------------------------------------------------------------------- 11
Setting The Clock ----------------------------------------------------------------------------------- 11
Child-Proof Lock ------------------------------------------------------------------------------------ 11
Microwave ---------------Grill ----------------------------------------------------------------------------------------------------- 12
Convection ------------------------------------------------------------------------------------------- 13
Microwave + Grill------------------------------------------------------------------------------------- 13
Microwave + Convection-------------------------------------------------------------------------- 14
Speed Defrost --------------------------------------------------------------------------------------- 14
Multi-Stage Cooking-------------------------------------------------------------------------------- 15
S
etting About Auto-Menu ---------------------------------------------------------------------------- 16
O
ther Convenient Features ------------------------------------------------------------------------- 18
Q
uestions And Answers -------------------------------------------------------------------------------19
Care And Cleaning ------------------------------------------------------------------------------------ 20
Before Calling For Service -------------------------------------------------------------------------- 20
Imperial To Metric Conversion Table -------------------------------------------------------------- 21
Electrical Appliance Gurantee (Warranty) ------------------------------------------------------- 22
---------------------------------------------------------------------------- 12
3
Page 4

SPECIFICATION
EM-C5796V UK2
Power Source 230V, 50Hz
Maximum Output Power 900W *
Power Grill 1400W
Convection Heater 1400W
Oven Capacity 0.9cu.ft. (25L)
Outside Dimensions (W x D x H) mm 0 x 310 508 x 43
Net Weight 21.5 Kg
MAFF Rating 900 / E
*According to IEC705 test procedures.
OW TO U LY
H SE YOUR OVEN SAFE
extr
1. When boiling water or other liquids,
sure to use a wide mouthed conta
this will allow air bubbles to escape freely
and prevent boiling over. Overheating the
liquid beyond boiling point can occur
without evidence of bubbling. This could
result in a sudden boil over of the hot
liquid.
2.
Do not attempt to operate the oven while
empty, as this will cause damage.
be
iner,
6. A
7. When disposable containers of plastic,
3. deep fry in the microwave oven as
Do not
the temperature of the oil cannot be
controlled and it may overheat.
NO
. Never completely seal containers in the
4
microwave oven. Coverings are
necessary but containers must not be
airtight.
5. Small quantities of food with low moisture
content or high fat or sugar content can
burn, dry out or catch fire if cooked or
re-heate
heating / cooking period required is
A ED
LTHOUGH YOUR OVEN IS PROVID
a.
Do not tamper with safety interlocks.
b. Do not place any object between the oven and the door or allow any food residue to
accumulate on sealing surfaces. Wipe the door sealing area frequently with a mild detergent
rinse and wipe dry. Never use abrasive powders or pads.
opened door may cause the oven to fall forward resulting in injury.
d. If any damage is apparent, do not operate the oven. Contact your nearest SANYO SERVICE
CENTRE.
d too long. Please note that the
IMPORTANT TO OBSE
subjected to strain, for example, a chc. When opened, the door must not be
RVE
e. Children may use the appliance only without supervision as long as instructions have been
given, which enable the child to operate the oven safely and makes the child aware of the
dangers of false operation
emely short: for example mince pies
or similar.
lways pierce food, which has a skin or
embrane, for example, eggs, potatoes,
m
tomatoes, apples, sausages etc. If you
don’t pierc
inside and they may explode.
paper or other combustible materials are
used to reheat food, it is advisable to
check from time to time during the cooking
cycle.
TE
It
is quite normal for steam to be emitted
a
round the door, for misting to occur on the
d ven for water droplets to appear
oor, or e
below the door during the cooking cycle.
is merely condensation from the heat
This
of the food and does not affect the safety of
your oven. The door is not intended to seal
the oven cavity completely but its special
SANYO design contributes to the complete
safety of the appliance.
e them steam will build up
WITH SAFETY FEATURES, IT IS
THE FOLLOWING:
ild hanging on an
,
4
Page 5

OTHER IMPORTANT SAFETY INSTRUCTIONS
The following safety precautions should
be
followed when using this appliance.
1. Read all instructions before first use.
2. When using the grill and / or convection
function for the first time, smoke and
odour may be given off for a few minutes.
This is normal during first operation, and
is no cause for alarm.
3. As with most cooking appliances cl
supervision is necessary to reduce the
risk of a fire in the oven cavity.
If a
fire should start;
• Keep the door closed.
• Turn the oven off
• Disconnect the power cord or shut
off the power at the mains.
ose
Other important safe
ty points to remember
are:
WHEN C
1. Do n Be sure
. It is important to keep the oven interior
2
3.
4.
5. emoving cups
OOKING BY MICROWAVE
ot use wire ties in the oven.
pect purchased items for wire ties
to ins
and remove before placing food in the
oven.
clean. Food particles left on the
walls reduce the efficiency of the
microwaves.
Do not heat foods or liquids in bottle or
th lids on. Air must be allowed to
jars wi
escape from the container.
Milk or food for babies should be heated
on “MEDIUM”. It should then be stirred
thoroughly an
at the correct temperature before giving it
to the baby.
Care must be taken when r
of hot liquid from the turntable.
d tested to ensure that it is
oven
WARNING
a) Do not adjust or repair the micro yourself. Do not operate the oven if it is
damaged, until it has been repaired by a servi
b) It is dangerous for anyone other than a pr
manufacturer to carry out adjustments or repairs.
c) If the
d) On no account remove or interfere with any parts or screws.
power supply cord/cable is damaged, it must be replaced by the manufacturer or
its service agent or a similar qualified person in order to avoid a hazard.
wave oven
THIS COULD PROVE VERY DANGEROUS.
6. Cups should be lifted not slid to the edge
of the turntable to prevent tipping.
7. Never microwave eggs in the shell since
they may explo
because of a bu
membrane. To prevent this, pierce the
membrane before cooking it.
de. The egg yolk may pop
ild-up of steam inside the
WHEN COOKING BY GRILL / CONVECTION:
1.
Take care not to spill water on the glass
viewing window during or immediately
after cooking as it may crack.
. love when
Be sure to use an oven g2
loading and unloading the ovens. Care
should be taken to avoid pressing cavity
walls inside oven.
3.
Be careful not to press the viewing
window when loading or unloading the
oven.
4.
The top of the cabinet gets very hot;
therefore do not place items on the
oven. Do not place the oven near
combustible materials e.g. curtains,
kitchen paper.
5. The grill may cycle on/off during
operation.
6.
IMPORTANT GRILLING MEAT / CHICKEN
PIECES
Roasting join
PIECES
Place on
dish. Turnover and remove any juices
halfway th
Smaller Cuts:
Place on
the turntable beneath the rack to catch
any liquid. Turn meat over and remove
any juices halfway through
ts / whole CHICKEN
an upturned saucer in a flat
rough cooking.
the grill rack; place a dish on
cooking.
ce engineer trained by the manufacturer.
operly qualified engineer trained by the
PLEASE SAVE THESE INSTRUCTIONS
5
Page 6

INSTR
CONNECTING TO
efore you use your oven, check that the
B
oltage shown on the face of the oven
v
conforms to your mains s
lead has a 13 amp plug co
se. If the fuse requires replacing at any time,
fu
the fuse cover should be remove
small screwdriver to lever it out. The old fuse
should be replaced by a 13 amp fuse and the
fuse cover must be refitted before the plug is
used again.
If the plug supplied on the mains lead is not
suitable for the socket in your home, it should
be cut off and disposed of safely, or destroyed,
to avoid possible shock hazard resulting from
the plug bein
If the fuse cover is lost or damaged, the plug
must not be used until a replacement is
obtained. Replacement fuse covers are
available from SANYO SERVICE CENTRES.
It is important that the colour of the
placement fuse cover corresponds with the
re
coloured insert or as embossed in words on
the base of the plug.
WARNING – THIS APPLIANCE MUST BE
EARTHED
IMPORTANT:
coloured in accordance with the following code:
ALLATION
THE MAINS
upply. The mains
ntaining a 13 amp
d using a
g inserted into a 13 amp socket).
The wires in this mains lead are
Green-and-yellow: Earth
Blue: Neutral
Brown: Live
As the colours of the wires in the mains lead
of this appliance may not correspond with the
coloured markings identifying the terminals in
your plug, proceed as follow
The wire, which
must be connected to the termin
which is marked with the letter E or by the
earth symbol or coloured green or
green-and-yellow. The wire, which is coloured
blue, must be connected to
which is marked with the letter N or coloured
black. The wire, which is coloured brown,
must be connected to the terminal, which is
marked with the letter L or coloured red.
It is recommended that a separate circuit
serving only the oven be provided. Using a
high voltage is dangerous and may result in a
fire or other accident causing oven damage.
is coloured green-and-yellow,
s:
al in the plug,
the terminal,
Note:
1. If you have any questions about grounding
or electrical instructions, please consult a
qualified electrician or service person.
2. Neither the manufacturer nor the dealer can
accept any liability for damage to the oven or
nal injury resulting from a failure to
perso
observe the electrical connection procedure.
6
Page 7
OVEN POSITIONING
Make sure that all packing materials are
.
1
removed from inside of the door.
. Check the oven for any damage, such as
2
a misaligned or bent door, damaged door
seals and sealing surface, broken or
loose door hinges and latches and dents
inside the cavity or on the door. If there is
any damage, do not operate the oven
and contact qualified service personnel.
. Install the oven on a flat, level surface
3
strong enough to safely bear the weight
of the oven.
. Do not locate the oven near areas where
4
heat and moisture are generated as this
may lower oven efficiency.
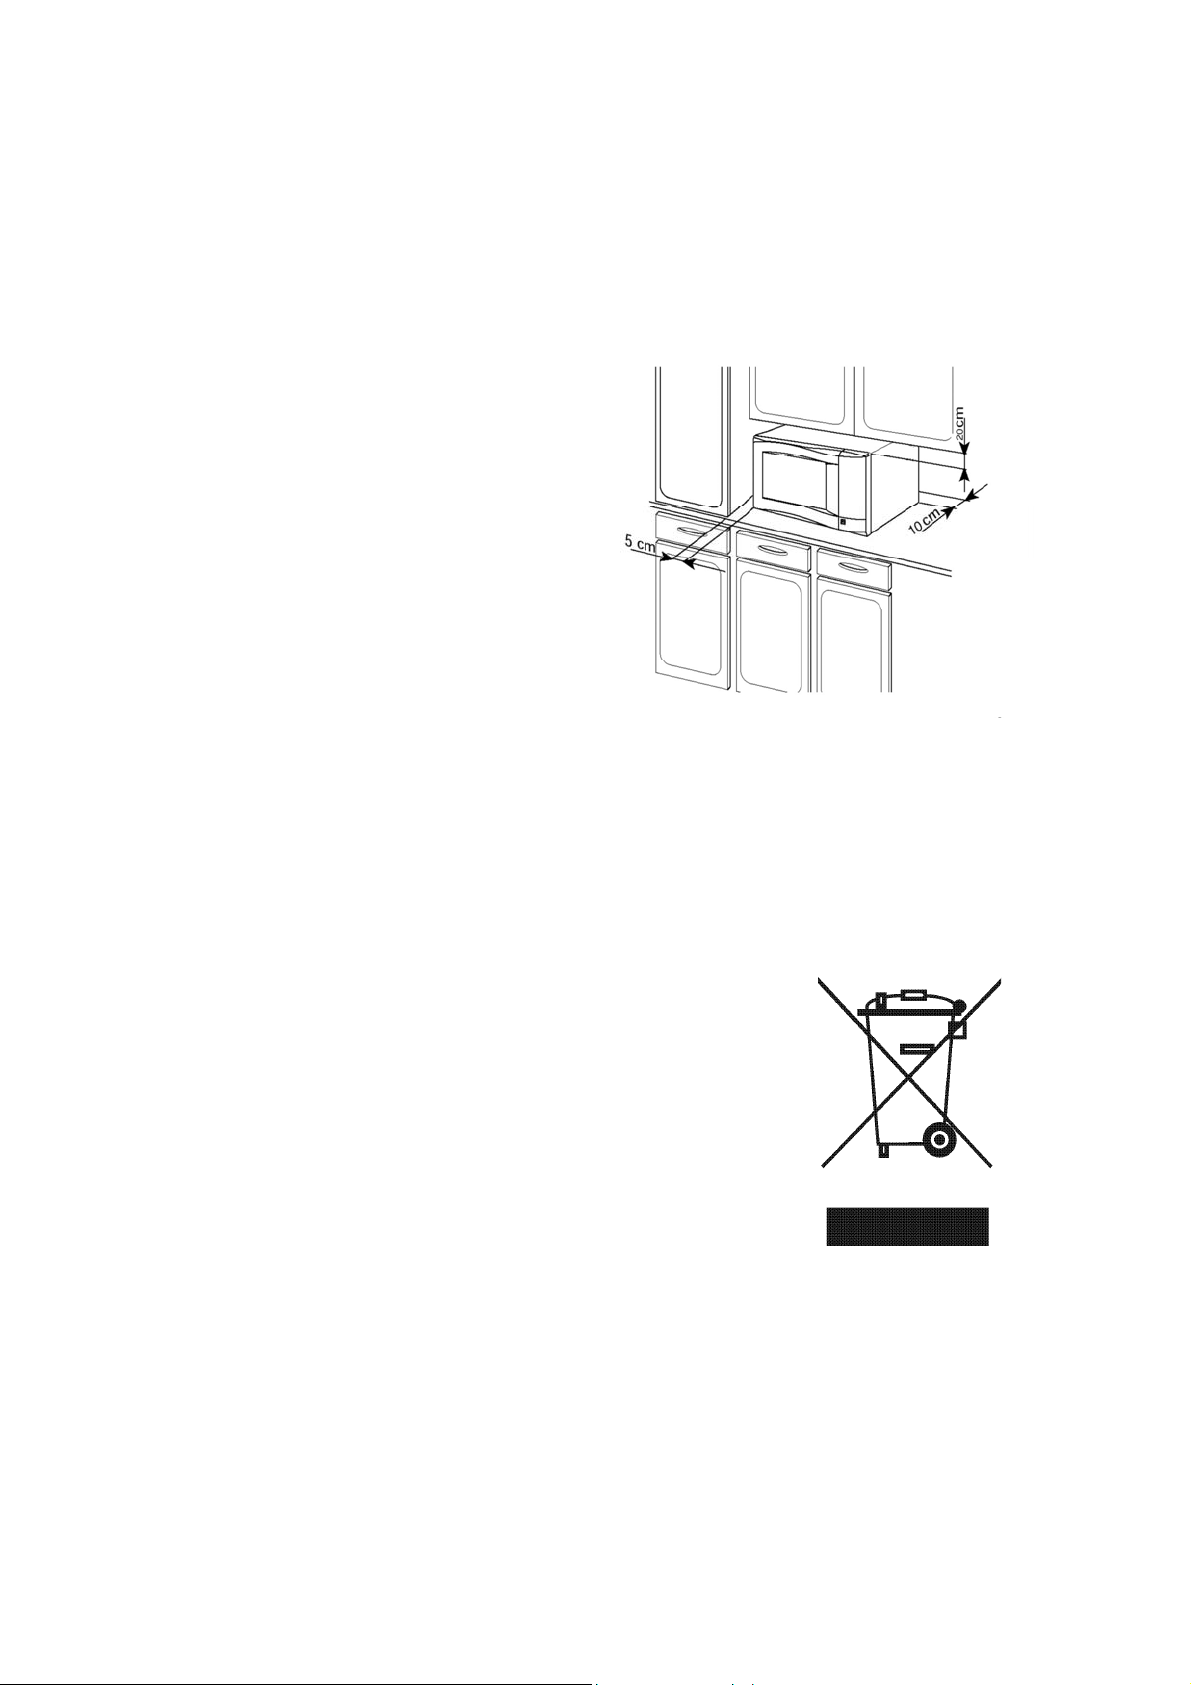
5. Covering the air vents may lead to
malfunctioning; therefore a minimum
clearance of 20cm i
oven, 10cm at the back and 5cm to each
side of the oven.
6. it is
Some interference may occur if
placed too close to a radio or TV, so keep
them as far as apart possible.
7.
The microwave oven must be installed at
a minimum height of 85cms above floor
level.
s required above the
Note:
This applied only to EU
symbol mark and recycle system are
cou pplied to countries in the other rts of the world.
ntries and not a pa
ufa red with high
ctuYour SANYO product is designed and man
qua n recycled and
lity materials and components, which ca
reus
ed.
This symbol means that electrical and electronic quip
nd-of-life, should be disposed of separately from your household
e
aste.
w
Please
collection/recycling centre.
In the European Union there are separate collection systems for
used electrical and electronic products.
Please help us to conserve the environment we live in!
dispose of this equipment at your local community waste
be
e ment, at their
7
Page 8
O
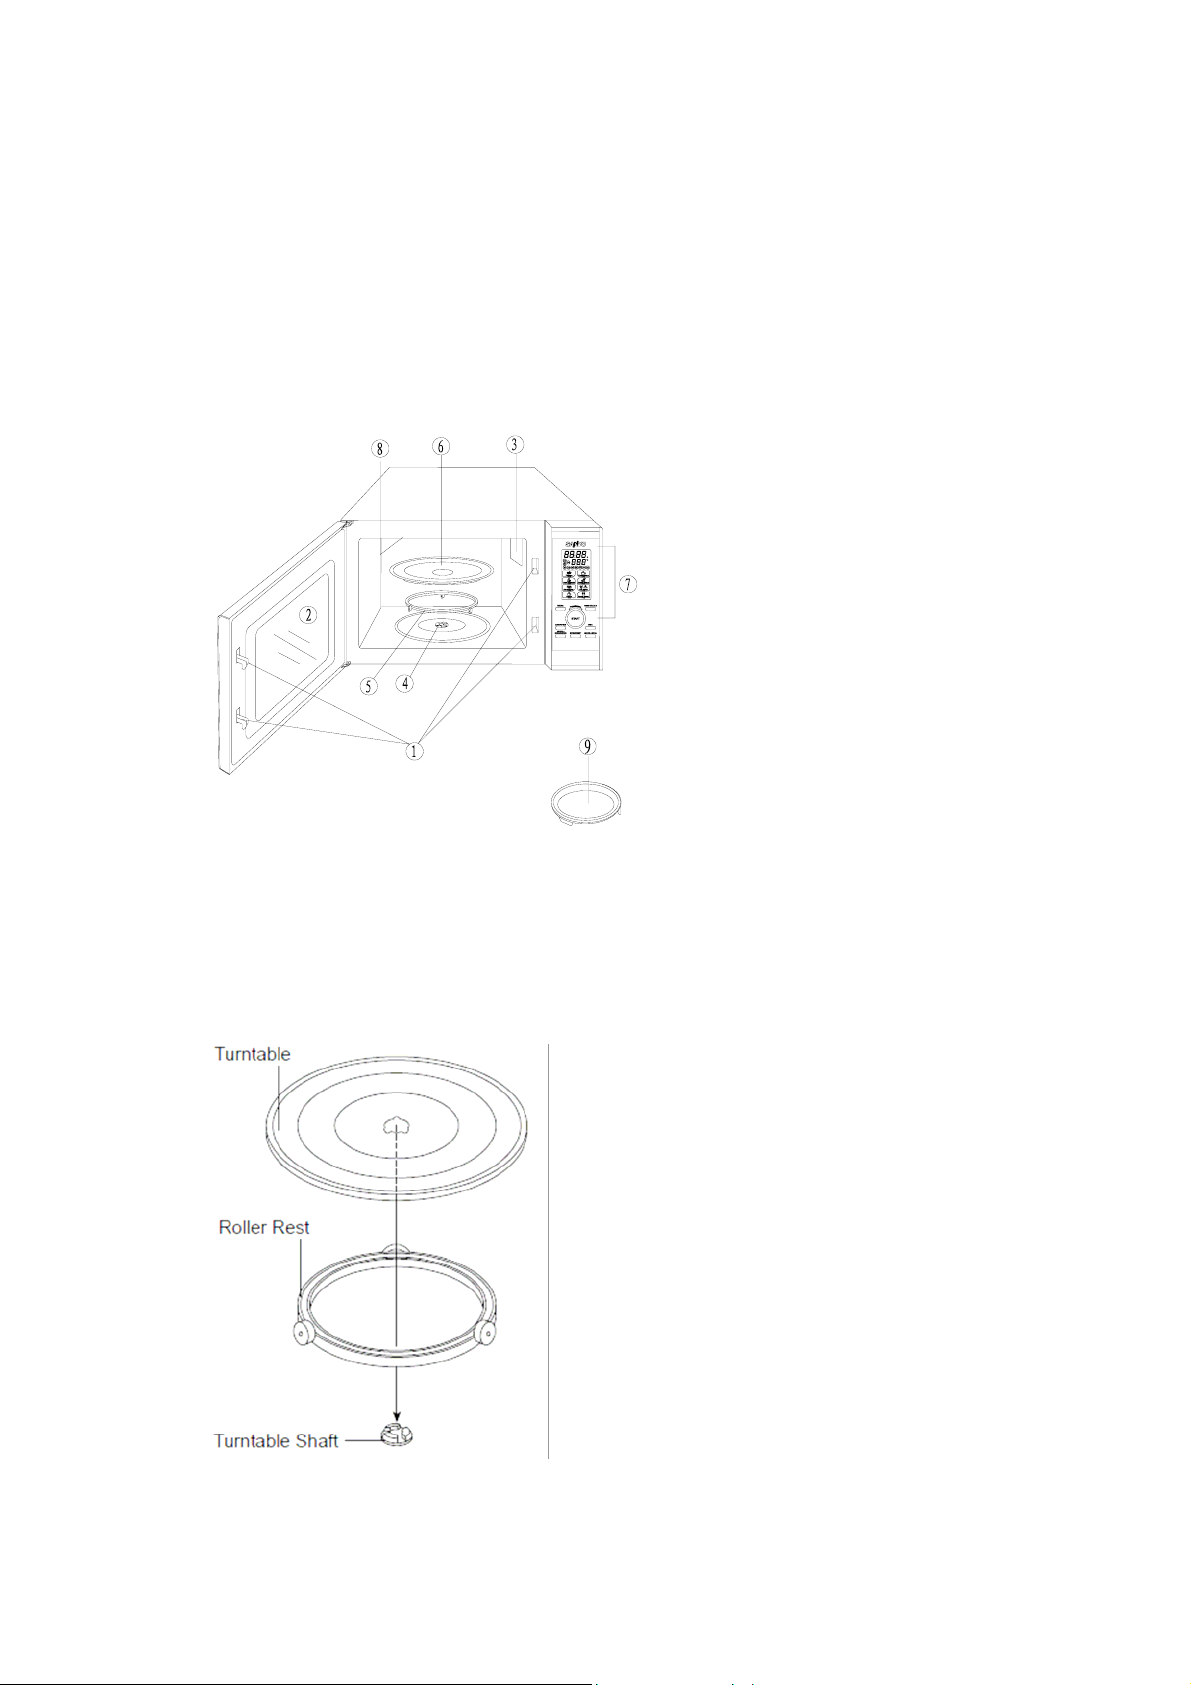
VEN PARTS AND ACCESSARIES
our oven is supplied with the following accessories:
Y
Turntable 1 Instruction manual 1
Turntable roller rest 1
Baking Plate 1
1. Safety Lock System
2. Oven Window
3. Oven Air Vents
4. Shaft
5. Roller Ring
6. Glass Tray
7. Control Panel
8. Grill Heater
9. Baking Plate
urnta
T
.
1
. Place the turntable on top of the roller rest
2
ble Installation
Place the roller rest on the cavity bottom.
as shown in the diagram. Make sure the
turntable hub is securely locked in the
turntable shaft. Never place the turntable
upside down.
• Both turntable and roller rest must
always be used during cooking.
• All food and containers of food are
always placed on this turntable for
cooking.
• This turntable rotates clockwise and
anticlockwise; this is normal
8
Page 9

OVEN CONTROL PANEL
(Please also see the following pages for more det
DISPL EN
Cooking
time are
AY SCRE
time, power, indicators and present
displayed.
MICRO.
Press to select microwave power level.
GRILL
Press to set a grill cooking program.
ONVECTION
C
Press to p
ICRO. + GRILL
M
Press to
cooking settings.
MICRO. + CONV
Press to select one of four combination
oking settings.
co
rogram convection temperature.
select one of two combination
ECTION
MENU/TIME (DIAL)
Rotate to set cook
uto-menu.
a
ing time or select
START
Press to start cook
art cooking program.
st
ing program or set quick
WEIGHT/CLOCK
Press to set th
od
fo
e clock or select the amount of
STOP/RESET
Touch to stop cooking pr
revious settings before cooking starts.
p
ai
l)
ogram or clear all
9
Page 10

OVEN UTENSILS
1. The ideal material for a microwave utensil is tran
pass through the container and heat the food.
2. Microwave cannot penetrate metal, so metal utensils or dishes with metallic trim should not be
used.
. Do not use recycled paper products when microwave cooking, as they may contain small
3
metal fragments which may cause sparks and/or fires.
4. Round /oval dishes rather tha
n square/oblong ones are recommend, as food in corners tends
to overcook.
5. Narrow strips of aluminium foil may be used to prevent overcooking of exposed areas. But be
careful not to use too much and keep a distance of 1 inch (2.54cm) between foil and cavity.
The list below is a general guide to help you select the correct utensils.
MATERIAL UTENSILS MICROWAVE GRILL CONVECTION COMBI.
ramic & Glass Heat Resistant Glassware
Ce
Glassware with Metal Decoration
Lead Glass
China Without Metal Decoration YES YES YES YES
ttery YES YES YES YES Po
Plastic Regular Oven Heat-proof Ware YES NO NO NO
Pl
astic Wrap YES NO NO NO
Metal Metal Baking Pan
Aluminium Foil
Paper , Towels
Waxed Paper YES NO NO NO
Wood NO NO NO NO
Combination: a ve + grill", and "microwave + convection" cooking.
Cups, Plates YES NO NO NO
pplicable for both "microwa
sparent to microwave, it allows energy to
YES
NO
NO
NO
YES
YES
NO
NO
YES
YES
YES
NO
NO
NO
NO
YES
NO
NO
NO
YES
MAF ING
Explanation icrow ens all p ood
500g t 2 pe s ag Ministry o
Agriculture, Fisheries and Food) in conjunction with food and microwave oven manufacturers.
F RAT
of the heating category label for m ave ov and sm acks of f (up to
/ 1lb 2oz, ypical of ready meals for 1 or ople) a reed by MAFF (the f
Oven heating category power output
B D 650W 750W
6 5 6 5
minutes minutes
Always follow instructions found on food
ackaging. The higher the power output
p
nd heating category of the oven, the less
a
eating time is required.
h
Always ensure that food is piping hot
before serving.
10
Page 11

HOW TO SET THE OVEN CONTROLS
BEEPS DURING OVEN SETTINGS
♦ ONE
♦ TWO BEEPS: Oven does not accept the entry. Please check and try again.
SETTING THE CLOCK
1. Press and hold WEIGHT/CLOCK button for 3 seconds (press it again to set clock time in 12-hour cycle).
2. Rota il the correct hour is displayed.
3. P ess
4. Rota the correct minute is displayed.
5. Press WEIGHT/CLOCK button to confirm.
CHILD-PROOF LOCK
The child-proof lock prevents unsupervised operation by little children.
To set the child proof lock: Press STOP/RESET button for 3 seconds, then a beep will sound and the indicator
light will come on. In the lock state, all buttons are disabled. To cancel the child proof lock: Press STOP/RESET
button for 3 seconds, then a beep will sound and the indicator light will go out.
It can be also reset when plugged off.
BEEP: Oven accepts the entry.
te the MENU/TIME dial unt
r WEIGHT/CLOCK button.
te the MENU/TIME dial until
11
Page 12

MICROWAVE
Microwave cooking allows you to customize cooking power and time. First, you select a power level by pressing
the ee the table below). Then you set the cooking time (maximum 95
MICRO. button a number of times (s
minu .
tes here) by rotating the MENU/TIME dial, before pushing the START button
Press MICRO. button to select cooking power
Press Power Description
Once 100% (High) P-HI
Twice 90% P-90
3 times 80% P-80
4 times 70% (Medium High) P-70
5 times 60% P-60
6 times 50% (Medium) P-50
7 times 40% P-40
8 t es 30 % (Med. Low / Defrost ) P- 3 0 im
9 times 20% P-20
10 times 10% (Low) P-10
11 times 0% P-00
Suppose you want to cook for 5 minutes at 60% power level.
1. Press MICRO. button 5 times.
2. Rotate the MENU/TIME dial until the correct cooking time (5 minutes) is displayed.
3. Press START button to start.
GRILL
Grill cooking is particularly useful for thin slices of meat, steaks, chops, kebabs, sausages and pieces of chicken.
is also suitable for hot sandwiches and au gratin dishes.
It
uppose you want to program grill cooking for 12 minutes.
S
1. Make sure the system is reset, which means no current cooking program is running, and the system is
waiting for instructions.
2. Press GRILL button.
3. Rotate the MENU/TIME dial until the correct cooking time (12 minutes) is displayed.
4. Press START button to start.
OTE:
N
rill cooking power is set at full power level by the system. Maximum cooking time for grill is 95 minutes.
G
12
Page 13

CONVECTION
During convection cooking, hot air is circulated throughout the oven cavity to brown and make crisp foods quickly
and evenly. This oven can be programmed for ten different cooking temperatures.
To Cook with Convection
ress CONVECTION button to set convection temperature.
P
P
ress Temperature(℃)
Once 110
Twice 120
3 times 130
4 times 140
5 times 150
6 times 160
7 times 170
… …
10 times 200
uppose yo cook at 160 tes.
S u want to ℃ for 40 minu
1. Press N bu
CONVECTIO tton 6 times.
2. Rotate the MENU/TIME dial until the correct cooking time (40 minutes) is displayed.
3.
Press START button to start.
N
OTE:
1. The maximum convection coo
2 You can check the convection temperature while cooking is in progress by pressing the CONVECTION
.
king time is 95 minutes.
button.
ICROWM AVE +GRILL
This feature allows you to combine grill and microwave cooking on two different settings.
The maximum cooking time here is 95 minutes. During cook
th
is button.
C
OMBINATION 1
.
30% time for microwave cooking, 70% for grill cooking. Use for fish, potatoes or au gratin
Suppose you want to set combin
. Press MICRO. + GRILL button once. Co-1 will be appeared in the display.
1
ate the MENU/TIME dial until the correct cooking time (25 minutes) is displayed.
2. Rot
3. Press START button to start.
OMBINATION 2
C
55% time for microwave cooking, 45% for grill cooking. Use for pudding, omelets, baked potatoes and
ation 1 cooking for 25 minutes.
ing, you can see the programmed setting by pressing
CHICKEN PIECES.
Suppose you want to set combination 2 cooking for 12 minutes.
1. Press MICRO. + GRILL button twice. Co-2 will be appeared in the display.
2. Rotate the MENU/TIME dial until the correct cooking time (12 minutes) is displayed.
3. Press START button to start.
13
Page 14

MICROWAVE +CONVECTION
This oven has four pre-programmed settings that make it easy to cook with both convection heat and microwave
automatically.
Press MICRO. + CONVECTION button to select convection temperature:
Press Oven temperature(℃)
CO 200 MB1 Once
COMB2 Twice 180
COMB3 3 times 150
COMB4 4 times 120
Suppose you want to bake a cake for 24 minutes on COMB3.
Press M ONV
1. ICRO. + C ECTION button 3 times.
Rotate t /TIME
2. he MENU dial to program cooking time (24 minutes).
3. Press START button to start.
OTE:
N
The maximum cooking time is 95 minutes. You can ch
progress by pressing the MICRO. + CONVECTION button.
eck the convection temperature while cooking is in
SPEED DEFROST
Suppose you want to defrost frozen food for 5 minutes.
1. Rotate the MENU/TIME dial to select Speed Defrost.
2. Press WEIGHT/CLOCK once.
3. Rotate the MENU/TIME dial to program defrosting time (5 minutes).
4. Press START button t
o start.
NOTE:
1. For either raw or previously cooked frozen food the rule of thumb is approximately 8~12minutes per pound.
2. Always
defrosted at the end of the estimated defrosting time, program the oven in 1-minute increments until totally
defrosted.
3. When using plastic containers from the freezer, defrost only long enough to remove from
place in a microwave-safe dish.
4
. The maximum defrosting time is 45 minutes.
stop the oven periodically to remove or separate the portions that are defrosted. If food is not
plastic in order to
14
Page 15

MULTI-STAGE COOKING
Your oven can be programmed for up to 3 automatic cooking sequences. SPEED DEFROST can only be
selected in the first stage of the program.
Suppose you want to set the following cooking program.
Speed defrost
①
② Microwave cooking
③ tion g
Convec cookin
1 th TIME dial to t Speed Defrost.
. Rotate e MENU/ selec
2 WE OCK once.
. Press IGHT/CL
3. Rotate the MENU/TIME dial to program defrosting time.
4. Press MICRO. button to set power level.
5. Rotate the MENU/TIME dial to program cooking t
6. Press CONVECTION button to set convection temperature.
7. Rotate the MENU/TIME dial to
8. Press START button.
NOTE:
1. If you want to temporarily stop a cooking session, press
cooking again by pressing START; or press the STOP/RESET twice to cancel the cooking program
altogether.
2. After the cooking time ends, the system will beep four times and END is displayed. Before starting another
cooking session, you need to clear the display and reset the system either by pressing the STOP/RESET
button or opening the door.
program cooking time.
ime.
the STOP/RESET once and then you can start the
15
Page 16

SETTINGS ABOUT AUTO-MENU
“AUTO MENU” allows you to cook or reheat food automatically without entering power level or time.
POPCORN
To cook popcorn (100g), take the following steps:
. Rotate the MENU/TIME dial to select “Popcorn”. 1
2. Press WEIGHT/CLOCK once
3. Press START button.
Weight Cooking time
100 2:30
N
OTE:
T otate the MENU/TIME dial to select POPCORN, press WEIGHT/CLOCK twice, use
o reset POPCORN time: R
e MENU/TIME dial to program the new popcorn time, and then press START button to verify. The new
th
opcorn time will remain whenever you use the POPCORN function until you reset it.
p
COFFEE/SOUP (200~250ml per cup)
T
o reheat coffee or soup, take the following steps:
1.
Rotate the MENU/TIME dial to select “Coffee/Soup”.
2. Press WEIGHT/CLOCK to select the appropriate amount.
3. Press START button.
Weight (7oz / per cup) Cooking time
1 2:20
2
3
4
4:00
5:40
7:20
FRESH VEGETABLE
To cook fresh vegetable, take the following steps:
1. Rotate the MENU/TIME dial to select “Fresh Vegetable”.
2. Press WEIGHT/CLOCK to select the appropriate weight.
3. Press START button.
Weight Cooking time
100 1:30
200 2:30
300 4:00
400 5:00
500 6:00
600 7:30
16
Page 17

CHICKEN PIECES
To cook chicken pieces, take the following steps:
1. Rotate the MENU/TIME dial to select “CHICKEN PIECES”.
2. Press W
3. Press START button.
Weight Cooking time
EIGHT/CLOCK to select the appropriate weight.
200 16:30
400 22:30
600 27:00
800 31:30
1000 35:30
1200 37:30
CAKE/PUDDINGS
To bake cake or puddings (450~600g), take the following steps:
1. Rotate the MENU/TIME dial to s
2. Press WEIGHT/CLOCK once
3. Press START button.
Weight Cooking time
Default 600g 40:00
NOT
E:
To reset cooking time: Rotate the MENU/TIME dial to select CAKE/PUDDINGS, press WEIGHT/CLOCK twice,
use the number pads to program the new cooking time, and then press START button to verify. The new time
will remain whenever you use this function until you reset it.
elect “Cake/Puddings”.
ATAUTO REHE
o reheat food, take the following steps:
T
1. Rotate the MENU/
2. Press WEIGHT/CLOCK to select the appropriate weight.
3. Press START button.
Weight Cooking time
TIME dial to select “Auto Reheat”.
100 1:10
200 2:10
300 3:00
400 3:50
500 4:10
600 5:30
POTATO
o cook potato, take the following steps:
T
1. Rotate the MENU/TIME dial to select “Potato”.
2. Press WEIGHT/CLOCK to select the appropriate weight.
17
Page 18

3. Press START button.
Weight Cooking time
150
300
450
600
:
NOTE
After the cooking program have finished, let food stand in the oven for 5~10 minutes.
3:40
4:40
6:00
7:00
OTHER CONVENIENT FEATURES
QUICK START
Use this feature to program the oven to microwave food at 100% power continuously.
Press START in quick succession to set the cooking time. You c
1 mi -start one second later.
nute with further pushes up to 10 minutes. The oven will auto
STOPPING THE OVEN IN OPERATION
1. P SET b
ress STOP/RE utton.
You can restart the oven by pressing START pad.
Touch
2. Open the door.
You can restart the oven by closing the door and pressing
NOTE:
O
STOP/RESET to erase all instructions.
ven stops operating when door is opened.
OVERHEATING PROTECTION
During convection cooking, when the temperature of the cavity reaches over 235 Celsius, the display will show
E-1 with buzzer sounding, press the STOP/RESET button, or after ten minutes later, the oven will be back to
norma
l.
LOW TEMPERATURE PROTECTION
5 minutes after convection cooking starts, if the temperature of cavity is lower than 40 Celsius, the system will
enter low temperature protection, the display shows E-2, buzzer will sound, press the STOP/RESET button, or
en min r, the
after t utes late oven will be back to normal.
SENSOR MALFUNCTION PROTECTION
In case of short or open circuit, the system enters into malfunction protection. The display shows E-3 or E-4 buzzer
will ill be back to normal. sound press the STOP/RESET button, or after ten minutes later, the oven w
18
an set 30 seconds with the first push and add
START pad.
Page 19

QUESTIONS AND ANSWERS
OPERATION
Q. What is wrong when the oven light does not
function?
A. Eith
er:
• e door is ly closed.
Th
o
r:
• The light bulb has failed and needs
eplacing.
r
Q. Why does steam come out of the air exhaust A. Eggs dry out if they ar
vent?
A. Steam is normally produced during cooking. Th
microwave oven has been designed to allow this
steam to escape.
Q. Can the micro
operated empty
. Yes. Never operate the oven while empty or
A
without the turntable positioned correctly on the • Eggs continue cooking du
roller rest.
Q. Why does noise sometimes come from the
turntable when the oven is turned on?
. This noise occurs when the turntable roller rest
A
and cavity bottom are dirty. Frequent clea
ese parts should eliminate or reduce the noise.
th
Q. Instructions for alumin
confusing. When should foil be used?
A. It should be used to shield portions of food f
becoming overcooked or over defrosted. Use small
flat pieces of foil
Q. Why is standing time recommended after the
cooking operation has been completed?
. Standing time is very important. With microwave
A
g, the heat is in the food, not in the oven.
cookin
Many foods build-up enough internal heat
the cooking process to continue, even after the
food is removed from the oven. Standing time for
joints of meat, large vegetables
cook completely, without overcooking the outside.
Q. Why do sparks and cracking (arcing) occur in
the oven?
A. There m
cracking within cavity (arcing) occur.
• A dish with metal parts or trim is being used.
• A metal utensil has been left in the oven.
• Too much metal foil is being used.
• A metal twist-tie is present in the oven.
Q. Why does condensation appear in the oven?
. This is normal and occurs because the food is
A
cooking faster than the moisture can be removed
from the oven. Always wipe out oven after use
ay be several reasons why sparks and
(silver or gold)
not firm
wave oven be damaged if it is
?
ning of
ium foil use are
rom
for shielding.
to allow
and cakes is to
.
FOODS
Q. Can I check the preset oven temperature when
cooking by convection?
A. Yes, you can check the set temperature by
pressing “CONVECTION” key. The temperature
will then be shown in the display.
Q. Why are scrambled eggs sometimes a little
dry after cooking?
e overcooked. You may
need to vary the cooking time or power level for
e
one of the following reasons:
• Eggs vary in size.
• The initial temperature of the egg may vary
depending on where it is stored.
• The shape of cooking utensils varies, which
makes it necessary to vary cooking times.
Q. Why do baked apples sometimes burst during
cooking?
A. The peel has not been removed from the top half
of each apple to allow for expansion of the interior
of the apple during cooking. As in regular cooking
methods, the interior of the apple expands during
the cooking process.
Q. How are liquids, soups or casseroles
prevented from boiling over?
A. Use a larger utensil than usual for cooking. If you
open the oven door and press stop, the food will
stop boiling.
Q. Why does
microwave food in it?
A. As the food becomes hot it will conduct the heat
into the dish. Use oven gloves to remove food after
cooking.
Q. Does the density of a food affect its cooking
time in the microwave?
A. Yes. A dense food such as meat will take longer to
cook or reheat than porous, light and airy food
such as bread, puddings and cakes. This i
because microwaves cannot penetrate as deeply
into denser, heavier foods.
the dish become hot when I
ring standing time.
s
19
Page 20

X
X
X
X
X
X
A
X
X
X
CARE AND CLEANING
It is important that to ensure the correct
performance
corrosio t your oven
thoroughly and dry.
INTERIOR OF THE OVEN
It is essential to keep your oven clean at all times.
The oven cavity should be cleaned and wiped dry
after each use. Please ensure that the oven is cool
be
fore cleaning. Wipe out with a mild detergent
so cular attention to the microwave
lution, paying parti
outlet cover (see illustration opposite) and the door
se ular care not to allow water to
al area. Take partic
seep through the small holes in the oven walls. Wipe
dr
y with a soft cloth. Never use abrasive cleaning
m damage the oven cavity.
aterials as these can
When grilling, using convection or dual cooking
gr s is not
ease may splash onto oven walls, if thi
removed after cooking it can accumulate and cause
th
e oven to smoke. Such stains are also more difficult
to
remove if allowed to become “bake on”.
of your oven and reduce the risk of
n. After use always wipe ou
Do not use any type of oven cleaner on your
m
icrowave oven as this can cause severe damage.
REMOV
The gla
removed
water an
tray afte
surface.
EXTERIOR OF OVEN
Wipe with a damp cloth. Do not allow water to seep
in
th
ABLE PARTS
ss turntable, roller and grill racks can be
for easy cleaning. Wash in warm soapy
d dry. It is important to clean the metal drip
r use to prevent deterioration of the non-stick
to vents. Never use abrasive cleaning materials as
ese can damage your oven
BEFORE CALLING SERVICE
Yo rself. If y
u can often correct operating problems you our microwave oven fails to work properly, locate the
ions m . If the microwave oven still
operating problem in the chart below and try the solut
do f
es not work properly, contact your either the dealer
po NTR
ssible please contact nearest SANYO SERVICE CE
arked for each problem
rom whom the oven was purchased. Should not it be
E
P
ROBLEMS
Oven will not start
rcing or sparking
U
nevenly cooked foods
Overcoo
Underco
Improper
Is
ked foods
oked foods
defrosting
POSSIBLE CAUSES
power cord plugged in?
Has the cooking time been set?
Use microwave-safe cookware only.
Is door closed?
XXX
Completely defrost food.
X
X
X
X
Turn or stir food.
20
Check to see that oven ventilation ports are not restricted.
Do not operate with oven empty.
Use correct time/cooking power level.
Page 21

IMPERIAL TO METRIC CONVERSION TABLE
Mass (Weight)
Metric Imperial
15g 1/2 oz
25g 1 oz
50g 2 oz
100g 3.5 oz
200g 7 oz
300g 10.5 oz
450g 1 lb
1 kilo 2 lb
21
Page 22

ELECTRICAL APPLIANCE GUARANTEE (WARRANTY)
Note:
othing in this express warranty affects the statutory right available to the consumer. SANYO (the Company)
N
ARRANTS to the user that if this Microwave Oven (the Product) is or becomes defective and the defect results
W
from faulty workmanship and not in any way from accident, misuse or mishandling by the user,
the C shall, at it ion, repair or replace such defective Product or part thereof free of charge on
the following basis:-
1. In the case of compon arts and of workmanship – for a period of 12 months from the date of purchase
2. Provided that the glass tray and light bulbs shall be excluded absolutely from this warranty.
The d / retailers date of sale or delivery ticket shall be evidence of the date of purchase. This warranty
is valid in the United Kingdom only and is not transferable.
The warranty shall be nu id if the Product is tampered with, misused or abused, or if the serial number is
defaced or removed.
PORTANT NOTICE
IM
his model in the SANYO range of Microwave Ovens is recommended for DOMESTIC USE ONLY. Its use in a
T
ommercial capacity will render this guarantee inoperative.
c
o obtain service under guarantee, you are advised to contact either the dealer from whom the oven was
T
urchased. Should this not be possible, please find your nearest dealer agent on internet at www.sanyo.co.uk
p
nd follow the links – Service & Support - Find your Approved Service Agent – Microwave, and entire the first 2
a
tters of your Post Code, or contact Service Administration at:
le
ANYO EUROPE LIMITED
S
8 Colonial Way,
1
atford,
W
erts, WD24 4PT
H
elephone: Watford (01923) 246363
T
ANYO IRELAND LIMITED
S
1 Western Parkway Business Centre,
4
allymount Road,
B
ublin 12, Ireland
D
ervice Tel No: Dublin 4503400/4568910
S
materials and or
ompany s sole opt
ents p
by the user: and
ealers d bill
ll and vo
22
Page 23

23 24
Page 24

 Loading...