

Page 1
DTA-1800-Efinal 9/30/02 11:54 AM Page 1
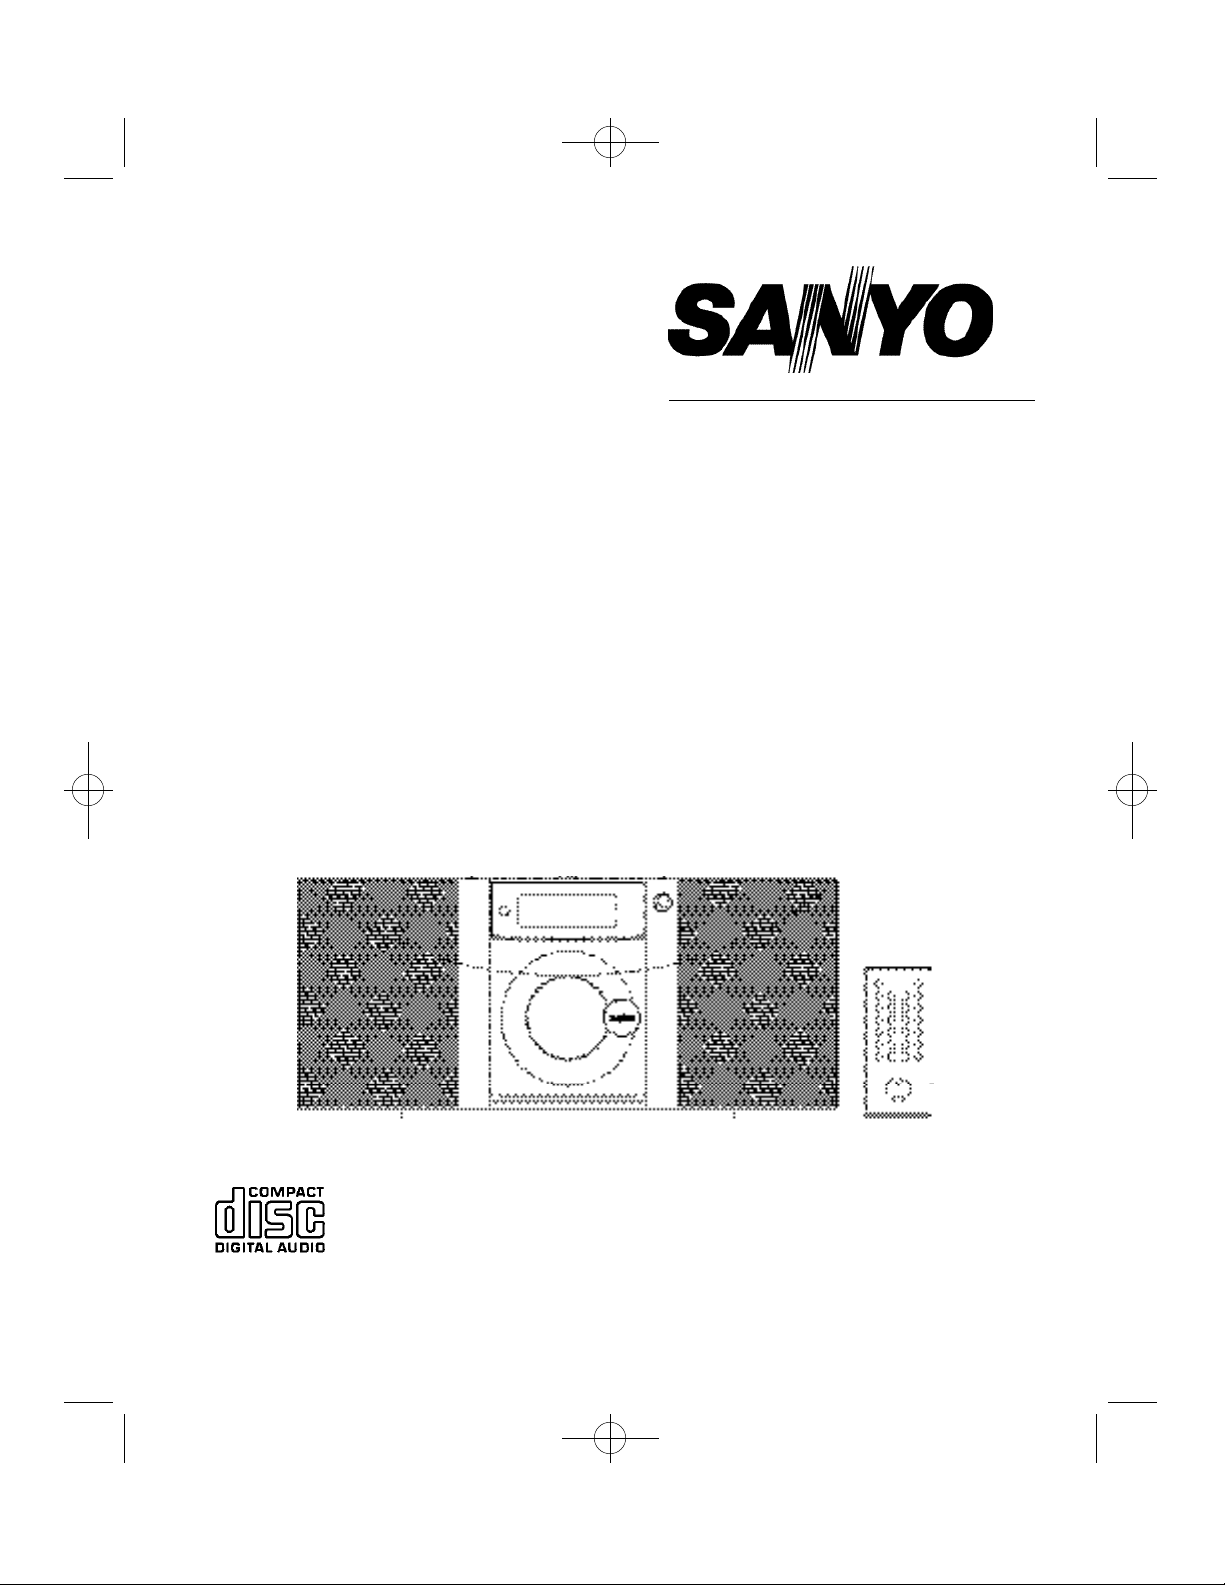
Desktop Audio System
with Under-Cupboard
and Wall Mounting Option
Instruction Manual
DTA-1800
SANYO C an ada In c.
w w w. s a n y o c a n a d a . c o m
Page 2

DTA-1800-Efinal 9/30/02 11:54 AM Page 2
TABLE OF CONTENTS
INTRODUCTION . . . . . . . . . . . . . . . . . . . . . . . . . . . . . . . . . . . . . . . . . . . . . . . . . . . . . . . . 3
SAFETY INSTRUCTIONS . . . . . . . . . . . . . . . . . . . . . . . . . . . . . . . . . . . . . . . . . . . . . . . . . . .3
INSTALLATION . . . . . . . . . . . . . . . . . . . . . . . . . . . . . . . . . . . . . . . . . . . . . . . . . . . . . . . . . .6
CONTROLS AND THEIR FUNCTIONS . . . . . . . . . . . . . . . . . . . . . . . . . . . . . . . . . . . . . . . . .8
REMOTE CONTROL . . . . . . . . . . . . . . . . . . . . . . . . . . . . . . . . . . . . . . . . . . . . . . . . . . . . . .10
Battery installation
Controls
BASIC OPERATION . . . . . . . . . . . . . . . . . . . . . . . . . . . . . . . . . . . . . . . . . . . . . . . . . . . . . .12
Power on/off
Volume control
Muting function
Switching the display
CLOCK/TIMER . . . . . . . . . . . . . . . . . . . . . . . . . . . . . . . . . . . . . . . . . . . . . . . . . . . . . . . . . .13
Setting the clock
Wake Timer on/off setting
Timer on setting
Timer off setting
SureWake function
Sleep Timer setting
Snooze function
AM/FM TUNER . . . . . . . . . . . . . . . . . . . . . . . . . . . . . . . . . . . . . . . . . . . . . . . . . . . . . . . . .16
Listening to the radio
Storing preset stations
Recalling preset station
Preset equalization
CD PLAYER . . . . . . . . . . . . . . . . . . . . . . . . . . . . . . . . . . . . . . . . . . . . . . . . . . . . . . . . . . . .17
Playing compact discs
CD skip and search function
Repeat a track or disc
Intro play function
Programmed play
Review the programs
Clear the programs
CARE AND MAINTENANCE . . . . . . . . . . . . . . . . . . . . . . . . . . . . . . . . . . . . . . . . . . . . . . .19
Compact disc care
Cleaning the unit
SPECIFICATIONS . . . . . . . . . . . . . . . . . . . . . . . . . . . . . . . . . . . . . . . . . . . . . . . . . . . . . . . .19
TROUBLESHOOTING GUIDE . . . . . . . . . . . . . . . . . . . . . . . . . . . . . . . . . . . . . . . . . . . . . . .20
Tuner
CD player
SANYO COMFORT WARRANTY . . . . . . . . . . . . . . . . . . . . . . . . . . . . . . . . . . . . . . . . . . . .21
2
Page 3
DTA-1800-Efinal 9/30/02 11:54 AM Page 3
INTRODUCTION
Thank-you for choosing Sanyo. This compact home audio system comes with a built-in CD player,
AM/FM stereo re c e i v e r, clock/alarm/kitchen timer, and a separate full-function remote control that can
be neatly stored in its own holder. This Sanyo unit is uniquely designed to operate in a vertical or
out-of-the-way horizontal position. The slim design of this system, which comes with a detachable
folding bracket for mounting, allows for great versatility in your home or office. It can be:
• Placed upright on a counter or shelf.
• Mounted on a wall.
• Mounted under a shelf or cupboard .
SAFETY INSTRUCTIONS
WA R N I N G : TO REDUCE THE RISK OF FIRE OR
SHOCK HAZARD, DO NOT EXPOSE THIS PRODUCT TO
RAIN OR MOISTURE.
C A U T I O N:
RISK OF ELECTRIC SHOCK.
DO NOT OPEN CASE.
CAUTION: TO PREVENT THE RISK OF ELECTRIC
SHOCK, DO NOT REMOVE COVER OR BACK. NO
U S E R - S E RVICEABLE PA RTS INSIDE. REFER
S E RVICING TO QUALIFIED PERSONNEL.
This symbol alerts you to the pre s e n c e
of uninsulated dangerous voltage within
the pro d u c t ’s case that might be of
s u fficient magnitude to risk electric
shock. Do not open the pro d u c t ’ s case.
This symbol indicates that import a n t
operating and maintenance instru c t i o n s
a re included in the literature
accompanying this pro d u c t .
C A U T I O N
TO PREVENT ELECTRIC SHOCK, MATCH WIDE BLADE
OF PLUG TO WIDE SLOT. FULLY INSERT.
DRIPPING WA R N I N G
The unit should not be exposed to dripping or
splashing, and no objects filled with liquids, such as
vases, should be placed on the unit.
V E N T I L ATION WA R N I N G
N o rmal ventilation for the product should not be blocked.
This CD player is made and tested to meet exacting
safety standards. It meets FCC re q u i rements and
complies with the safety perf o rmance standards of the
U.S. Department of Health and Human Serv i c e .
Wa rn i n g s :
• This CD player employs a laser light beam. Only a
qualified service person should remove the cover
or attempt to service this device, to pre v e n t
possible eye injury.
• The use of controls, adjustments, or pro c e d u re s
other than those specified herein could result in
h a z a rdous radiation exposure .
C A U T I O N :
This compact disc player is classified as a CLASS 1
LASER pro d u c t .
The CLASS 1 LASER PRODUCT label is located on the
rear panel.
C A U T I O N !
Invisible laser radiation when the door is open and the
p rotective interlock feature has automatically shut off .
Avoid exposure to beam.
3
Page 4
DTA-1800-Efinal 9/30/02 11:55 AM Page 4
SAFETY INSTRUCTIONS
IMPORTANT SAFETY INSTRUCTIONS
1. Read instru c t i o n s – All the safety and operating instructions should be read before the product is operated.
2. Retain instru c t i o n s – The safety and operating instructions should be retained for future re f e re n c e .
3 . Heed warnings – All warnings on the product and in the operating instructions should be adhered to.
4 . Follow instructions – All operating and use instructions should be followed.
5. Cleaning – Unplug this product from the wall outlet before cleaning. Do not use liquid cleaner or aero s o l
cleaners. Use a damp cloth only.
6. Attachments – Do not use attachments not recommended by the product manufacturer as they may cause
h a z a rd s .
7. Water and moisture – Do not use this product near water – for example, near a bath tub, wash bowl, kitchen
sink, or laundry tub, in a wet basement, or near swimming pool, etc.
8. Accessories – Do not place this product on an unstable cart, stand, tripod, bracket, or table. The product may
fall, causing serious injury to a child or adult, and serious damage to the product. Use only with the cart, stand,
tripod, bracket or table recommended by the manufacturer or sold with the product. Any mounting of the
p roduct should follow the manufacture r ’ s instru c t i o n s .
9. A product and cart combination should be moved with care. Quick stops, excessive force, and uneven surf a c e s
may cause the product and cart combination to overt u rn .
1 0 . Ventilation – Slots and openings in the cabinet are provided for ventilation and to ensure reliable operation of
the unit, protecting it from overheating. These openings must not be blocked or covered, for example, by
placing the unit on a bed, sofa, rug or other similar surface. Do not place the unit in a built-in installation such
as a bookcase or rack unless proper ventilation is provided according to the manufacture r ’s instru c t i o n s .
11. Power sources – This product should be operated using only the type of power source indicated on the marking
label. If you are not sure of the type of power supply to your home, consult your local power company. For
p roducts intended to operate from battery power or other sources, refer to the operating instructions.
1 2 . P o w e r- c o rd protection – Power supply cords should be routed so that they are not likely to be walked on or pinched
by items placed on or against them, paying particular attention to the cords where they connect to plugs,
convenience receptacles, and the point at which they connect to the pro d u c t .
13. Outdoor antenna grounding – If an outside antenna is connected to the re c e i v e r, be sure the
antenna system is grounded so as to provided some protection against voltage surges and built-up
static charges. Article 810 of the National Electrical Code, ANSI/NFPA 70, provides information with
re g a rd to proper grounding of the mast and supporting stru c t u r e, grounding of the lead-in wire to
an antenna-discharge unit, size of grounding conductors, location of antenna-discharge unit,
connection to grounding electrodes, and re q u i rements for the grounding electrode. See figure :
14. Lightning – For added protection for this product during a lightning storm, or when it is left unattended and unused
for long periods of time, unplug it from the wall outlet and disconnect the antenna or cable system. This will
p revent damage to the product due to lightning and power line surg e s .
1 5 . Power lines – An outside antenna system should be located in the vicinity of overhead power lines or other
electric light or power circuits, or where it can fall into such power lines or circuits. When installing an outside
antenna system, extreme care should be taken to avoid touching such power lines or circuits, as contact with
them could be fatal.
4
Page 5

DTA-1800-Efinal 9/30/02 11:55 AM Page 5
SAFETY INSTRUCTIONS
16. Overloading – Do not overload wall outlets, extension cords, or integral convenience receptacles, to avoid the
risk of fire or electric shock.
17. Object and liquid entry – Never push objects of any kind into this product through openings as they may touch
d a n g e rous voltage points or short-out parts, which could result in a fire or electric shock. Never spill liquid of
any kind on the pro d u c t .
18. S e rvicing – Do not attempt to service this product yourself, as opening or removing covers may expose you to
d a n g e rous voltage or other hazards. Refer all servicing to qualified service personnel.
19. Damage requiring service – Unplug this product from the wall outlet and refer servicing to qualified service
personnel under the following conditions:
a) When the power-supply cord or plug is damaged,
b ) If liquid has been spilled, or objects have fallen into the pro d u c t ,
c) If the product has been exposed to rain or water,
d) If the product does not operate normally by following the operating instructions. Adjust only those
c o n t rols that are covered by the operating instructions, as an adjustment of other controls may result in
damage and will often re q u i re extensive work by a qualified technician to re s t o re the product to its normal
o p e r a t i o n .
e) If the product has been dropped or damaged in any way,
f ) If the product exhibits a drastic change in perf o rm a n c e .
20. Replacement parts – When replacement parts are re q u i red, be sure the service technician has used
replacement parts that have been specified by the manufacturer or that have the same specifications as the
original parts. Unauthorized substitutions may result in fire, electric shock, or other hazard s .
21. Safety check – Upon completion of any service or repairs to this product, ask the service technician to perf o rm
safety checks to determine that the product is in proper operating condition.
22. Wall or ceiling mounting – The product should be mounted to a wall or ceiling only as recommended by the
m a n u f a c t u re r .
23. Heat – The product should be situated away from heat sources such as radiators, heat registers, stoves, or
other objects (including amplifiers) that produce heat.
2 4 . Nonuse periods – Unplug the pro d u c t ’s power cord when you will not be using it for an extended period.
5
Page 6
DTA-1800-Efinal 9/30/02 11:55 AM Page 6
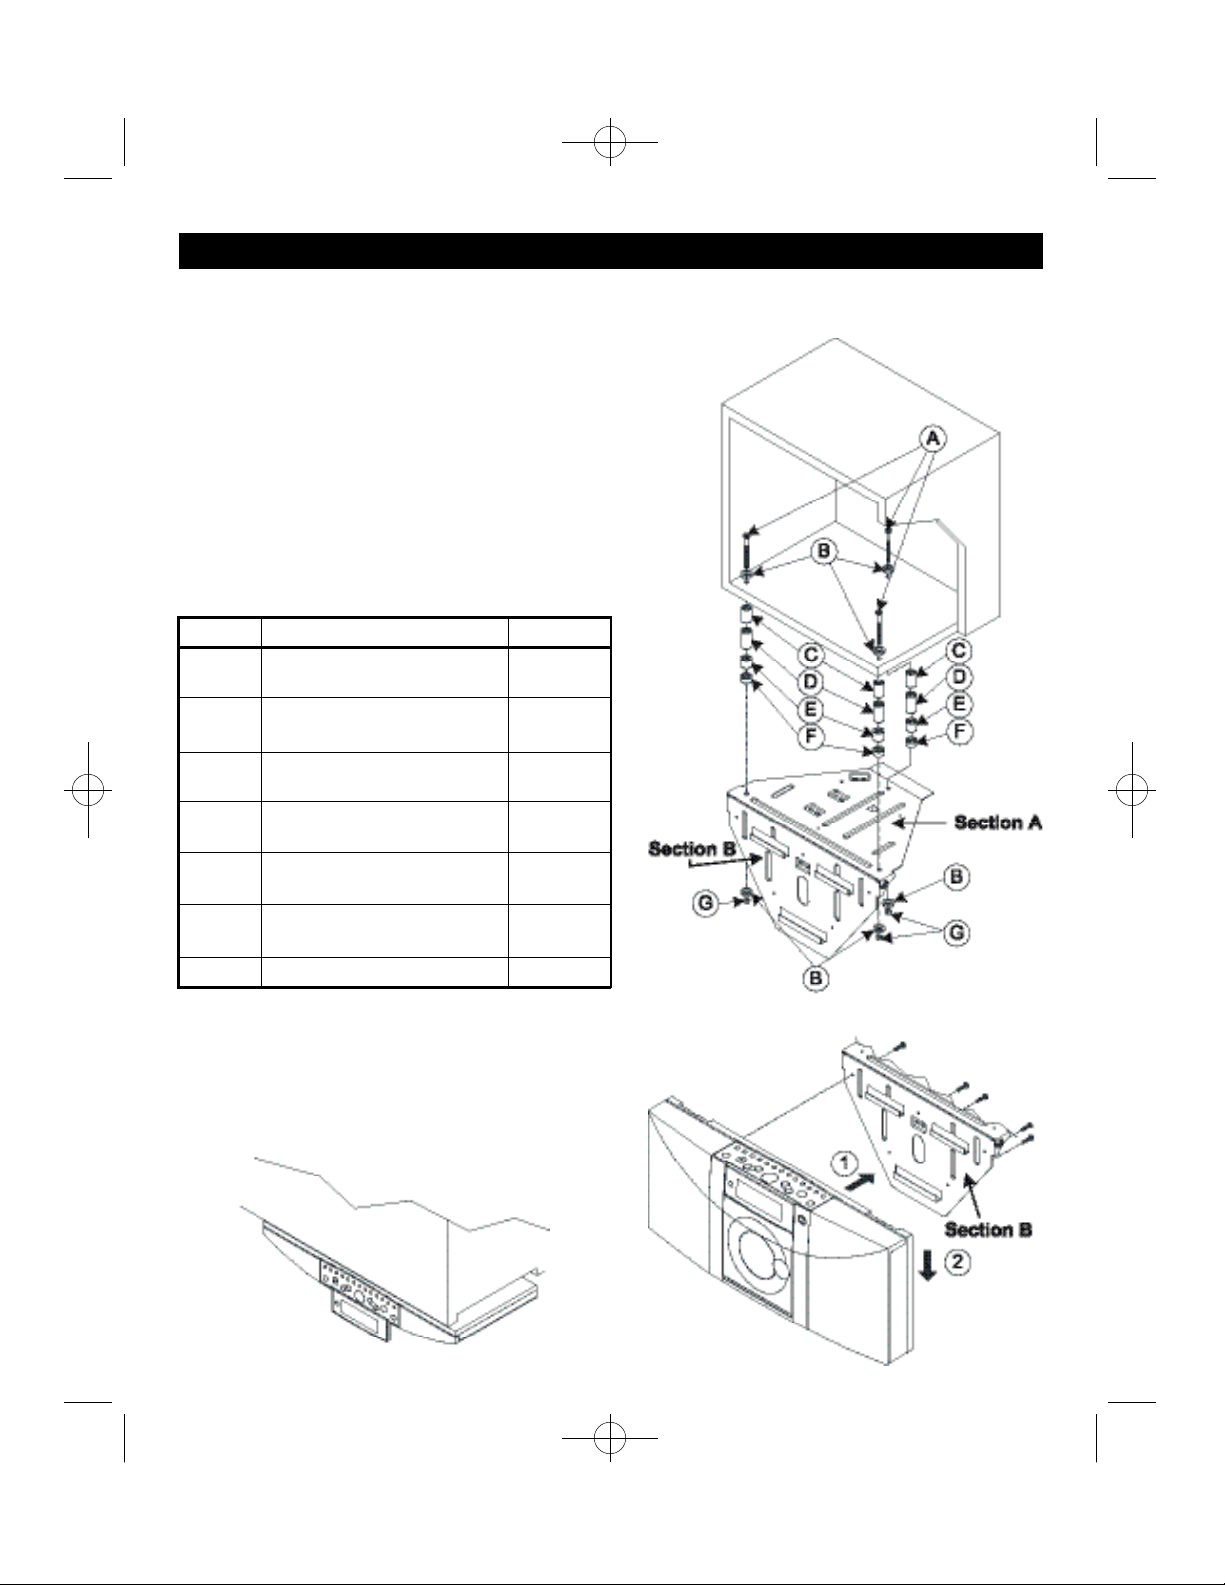
INSTALLATION
Wall/under-cupboard mounting
1. Attach Section A of the bracket onto the wall or
underside of the cupboard with 3 mounting
s c rews (A), washers (B), and nuts (supplied).
2 . If the cabinet bottom has a valance for
f l u o rescent lights, etc., you will need 1 or more
of the supplied spacers (C, D, E, F) to mount the
unit flush with the front of the lowest surf a c e .
3 . I n s e rt the system into Section B as shown with
a rrow (1), and slide it down as shown with
a rrow (2).
4 . Attach the unit onto Section B with 5 mounting
s c rews (supplied).
I t e m D e s c r i p t i o n Q ’t y
A S c re w
MF M5.0 x 70 mm 3 pcs
B Wa s h e r
15.2 x 3.0 mm 6 pcs
C S p a c e r
13.6 x 19.5 mm 6 pcs
D S p a c e r
14.5 x 27 mm 3 pcs
E S p a c e r
15 x 14.5 mm 3 pcs
F S p a c e r 3 pcs
15.2 x 8.5 mm
G S c rew Nut 3 pcs
The unit can now be raised with the hinges of the
bracket so that it fits under your cabinet with the
c o n t rols and the display clearly visible.
6
Page 7
DTA-1800-Efinal 9/30/02 11:55 AM Page 7
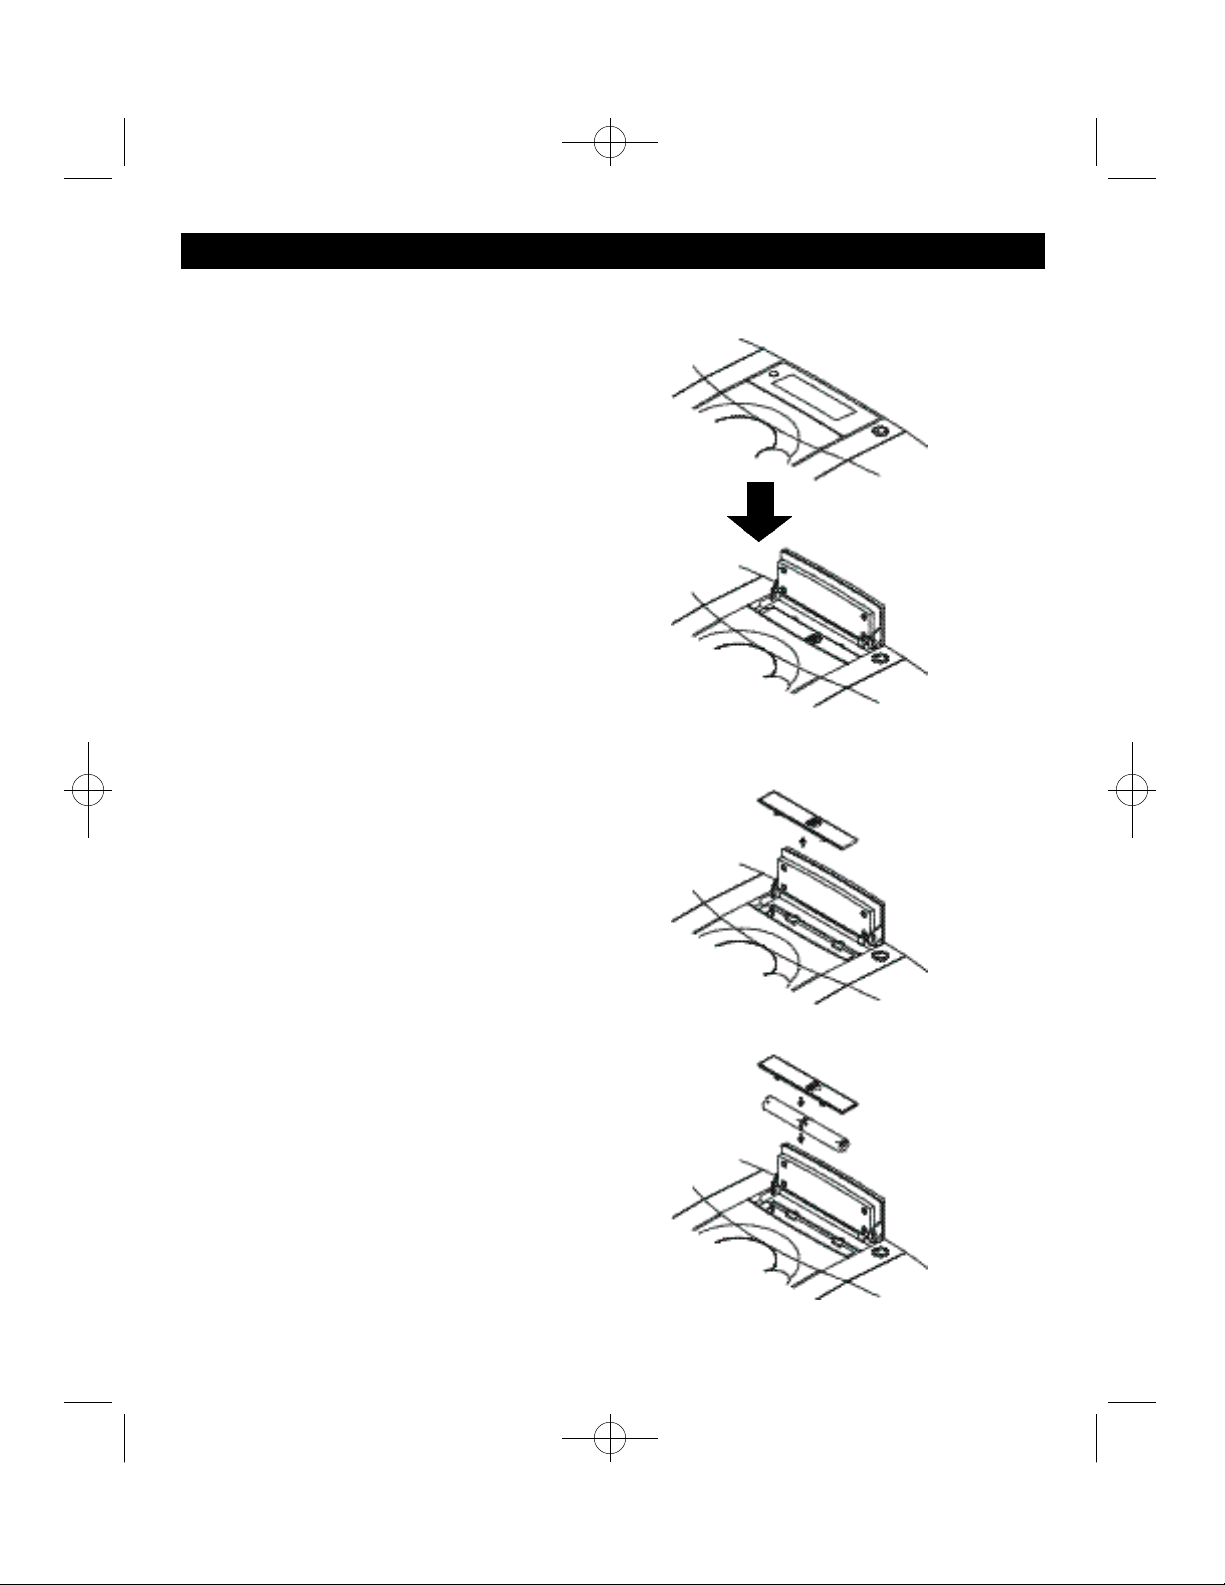
BACK-UP BATTERY INSTALLATION
I n s e rt 2 AA batteries (not supplied) to maintain
timer and tuner/CD programming in case of
power failure .
1. P ress the DISPLA Y b u t t o n
to open the display window.
2. Slide to open the battery
c o v e r.
3 . I n s e rt 2 x AA size batteries.
Close the battery cover, and
p ress down on the display
window until locked.
7
Page 8

DTA-1800-Efinal 9/30/02 11:55 AM Page 8
CONTROLS AND THEIR FUNCTIONS
1. SUREWAKE button
Tu rns on the Sure Wake function.
2. SLEEP button
Sets the Sleep Timer that automatically turns off
the unit.
3. WAKE TIMER button
Sets the Wake Ti m e r. The unit turns on and off
automatically when set.
4. TUNER/BAND button
Sets to tuner (radio) mode and selects the AM
or FM band.
5. CD button
Sets to CD play mode.
6. MEMORY button
Sets the tuner memory, and is used for CD
p rogramming and clock setting.
7. MUTE button
Tu rns off the sound only.
8. REPEAT/PRESET button
• CD mode: starts repeat play.
• Tuner mode: selects preset stations.
9. RANDOM button
Plays the tracks in random ord e r.
10. CLOCK/MODE button
Toggles display modes.
Used to set the clock and Wake Ti m e r.
11. COOK TIMER button
S t a rts the Cook Timer countdown.
12. 10 MIN button
Sets the Cook Timer for 10 minutes per step.
13. 1 MIN button
Sets the Cook Timer for 1 minute per step.
14. EQ button
Selects the desired sound effect: FLAT, ROCK,
JAZZ, POP or CLASSIC.
15. DISPLAY COLOR button
Selects the display backlit color:
A u t o / B l u e / G re e n / R e d .
16. STOP button
Stops the CD play/clears the CD pro g r a m .
8
Page 9

DTA-1800-Efinal 9/30/02 11:55 AM Page 9
CONTROLS AND THEIR FUNCTIONS
17. PLAY/PAUSE button
S t a rts or pauses the CD.
18. VOLUME UP + and DOWN –
button
Adjusts the volume.
19. TUNING CD/SKIP button
(f and e)
• CD mode: forw a rd / b a c k w a rd track skip or
s e a rch.
• Tuner mode: forw a rd / b a c k w a rd manual
tuning or station search.
20. POWER ON/STANDBY button
Switches the system on or off .
21. SNOOZE button
Tu rns off the sound temporarily.
22. Left speaker
23. Remote sensor
24. Display
Shows clock/timer status and current CD/tuner
re a d i n g .
25. Battery compartment
I n s e rt 2 x AA batteries behind display for clock
and tuner memory back-up.
26. Display button
Opens the display door to replace batteries.
27. Right speaker
28. EJECT button
Opens the CD door.
29. CD door
30. Remote control holder
31. Subwoofer jack
For connection to a subwoofer (optional) for
extended bass output.
32. DC jack (12V)
Connect the supplied AC adapter or optional
car/boat adapter here .
33. FM antenna
34. Headphone jack (3.5 mm)
35. RESET button
If the functions “freeze up,” or the display shows
no or wrong information, press the R E S E T b u t t o n
with a sharp object such as a needle or pin.
Note : Clock and tuner memory will be lost
when RESET is pre s s e d .
9
Page 10

DTA-1800-Efinal 9/30/02 11:55 AM Page 10
REMOTE CONTROL
Battery Installation
1. Remove the battery tray by pressing 1a
t o w a rds 1b; then slide 1b out at the same
t i m e .
2. Pull out the battery tray.
3. Install the button-type battery CR2032
( s u p p l i e d ) .
4. Close the battery tray.
1 0
Page 11

DTA-1800-Efinal 9/30/02 11:55 AM Page 11
REMOTE CONTROL
CONTROLS
36. MUTE button
Switches off the sound.
37. Signal transmitter
38. ON button
Switches the system on or off .
39. INTRO button
Plays 10 seconds of each CD track.
40. SKIP button
• CD mode: Forw a rd or backward CD title
s e l e c t i o n / s e a rc h .
• Tuner mode: Forw a rd or backward manual
tuning/station to station searc h .
41. MODE/CLOCK button
Toggles the display contents.
42. REPEAT/PRESET button
• CD mode: starts repeat play.
• Tuner mode: Selects the programmed
stations in increasing ord e r.
47. CD button
Activates the CD operating mode.
48. MEM button
Tuner memory/CD program/Clock setting
f u n c t i o n s .
49. RANDOM button
Plays the tracks in random ord e r .
50. MONO/STEREO button
S t e reo/mono switching for FM stations.
51. TUNER/BAND button
Selects Tuner (radio) mode and the re c e p t i o n
b a n d .
51. 0 – 9, +10 Numeric buttons
• Tuner mode: recalls preset stations
• CD mode: recalls CD tracks.
43. EQ button
Selects FLAT, ROCK, JAZZ, POP or CLASSIC
sound eff e c t s .
44. PLAY/PAUSE button
S t a rts or pauses the CD play.
45. VOLUME UP + and DOWN –
button
Adjusts the volume.
46. STOP button
Stops the CD play/clears the CD pro g r a m .
1 1
Page 12

DTA-1800-Efinal 9/30/02 11:55 AM Page 12
BASIC OPERATION
POWER ON/OFF
When the supplied AC adapter is first connected,
the clock display will flash. To set the clock, see
page 13.
1 . To turn the power on, press POWER o n
the remote or STANDBY on the unit. The
display lights up.
2 . P ress either TUNER/BAND to play the
radio or CD to play a CD.
Example: FM mode
3 . To turn the power off, press POWER on the
remote or STANDBY on the unit. The
display light goes off .
MUTING FUNCTION
1. P ress MUTE to mute the audio output.
2. P ress the button once more to set the
volume to the original level.
NOTE:
• Vol 0 is indicated for 1 second, and then it
re t u rns to the original display.
• Vol 0 will appear once every 4 seconds
SWITCHING THE DISPLAY
The display is multi-functional and shows a
variety of inform a t i o n .
P ress the MODE/CLOCK button to toggle the
display contents.
Power off mode:
➔ Clock ➔ Timer On ➔ Timer Off
S e t t i n g S e t t i n g
NOTE: Please turn off the unit before
disconnecting the main power supply.
VOLUME CONTROL
1. P ress VOL-DOWN (–) to reduce the
volume; the volume level will be shown in
the LCD display.
2. P ress VOL-UP (+) to increase the volume.
3. Hold down the button for a continuous
i n c rease or decrease in the volume.
CD mode:
➔ Playing ➔Remaining ➔Clock ➔Timer On ➔ Timer Off
Ti m e Ti m e Setting Setting
TUNER mode:
➔ Tuner ➔ Clock display ➔ Timer On ➔ Timer Off
D i s p l a y S e t t i n g S e t t i n g
Timer Status Clock
1 2
Page 13
DTA-1800-Efinal 9/30/02 11:55 AM Page 13
CLOCK/TIMER
SETTING THE CLOCK
When the unit is first connected to the supplied
AC adapter, the display shows AM 12:00. To set
the clock to the correct time, proceed as
follows. Please note: proceed to the next step
within 5 seconds or the system re v e rt s
automatically to step 1.
1. With the unit turned off, press MEMOR Y
once, and the hour digits flash.
2. P ress the CD SKIP f or e buttons to
adjust the hour. Be sure to set the hour
c o rrectly for AM or PM.
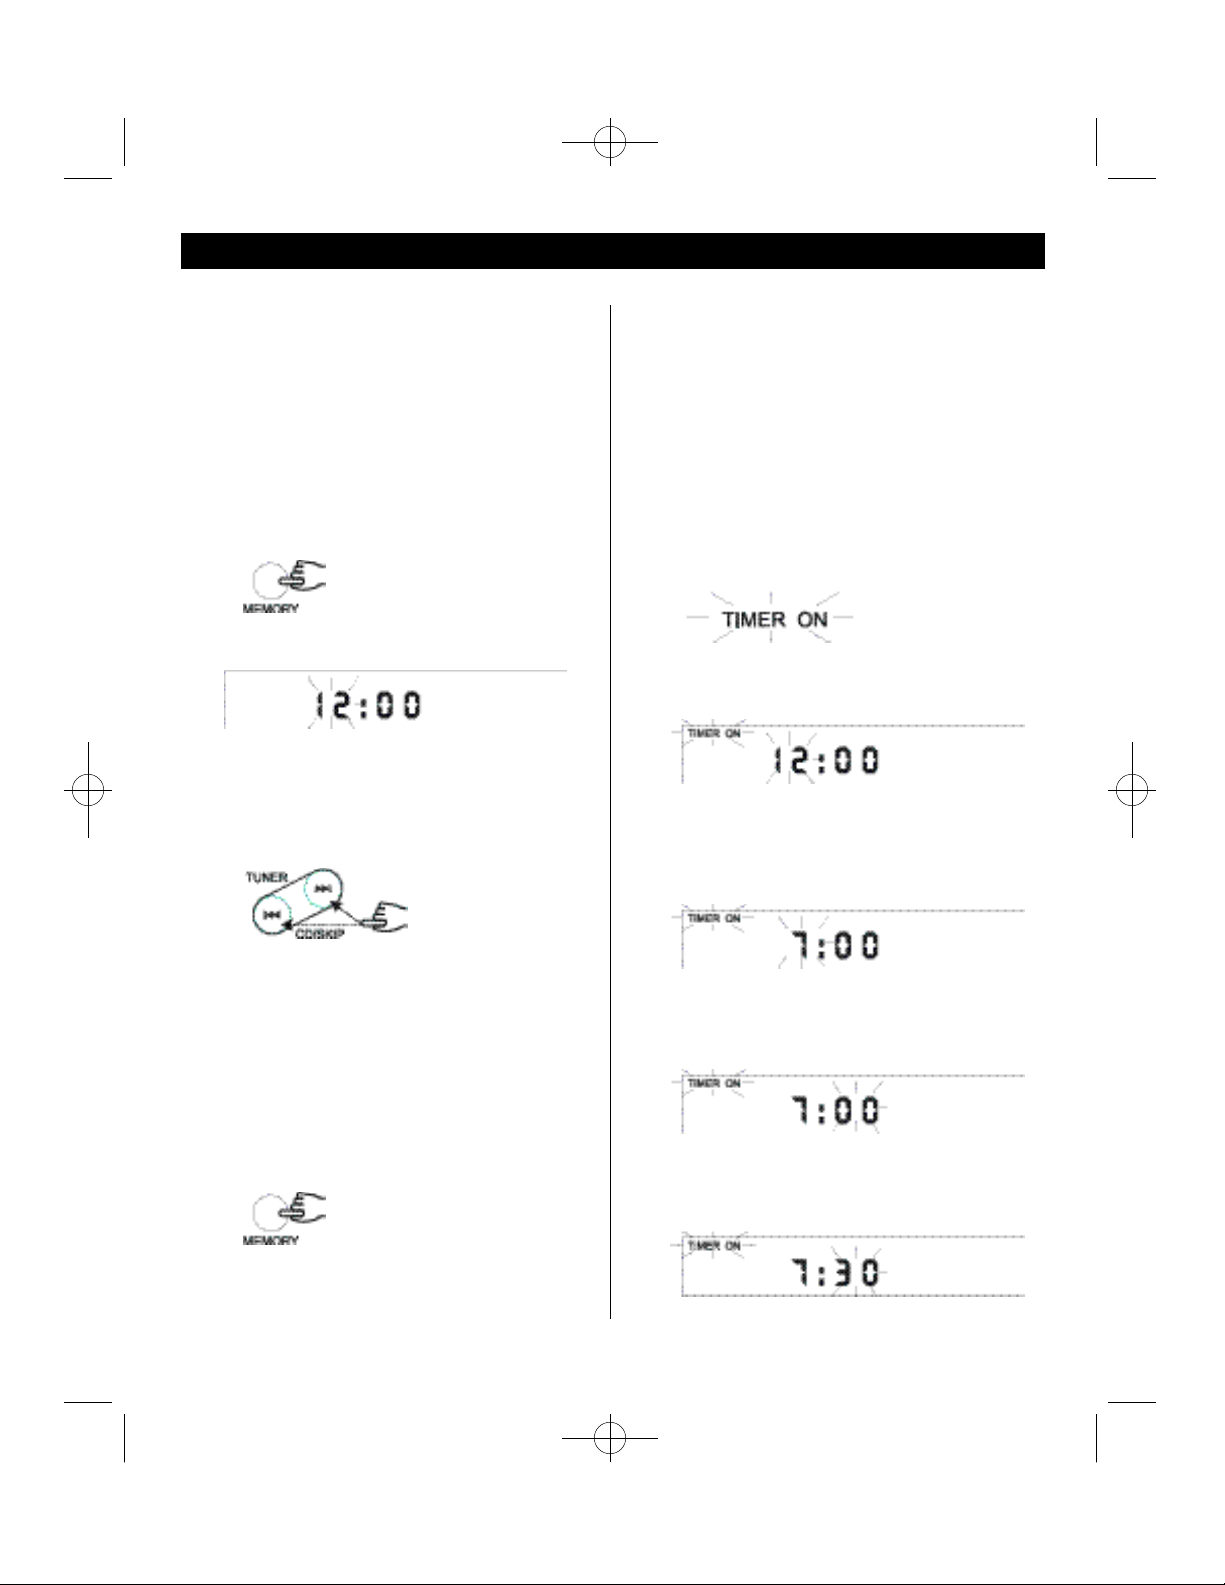
WAKE TIMER ON/OFF SETTING
NOTE: Set the clock before setting the Wa k e
Ti m e r
TIMER ON (wake-up time) Setting
Example: You wish to set the unit to come on
at 7:30:
1. P ress MODE/CLOCK until the TIMER ON
indicator in the upper left of the display
f l a s h e s .
2. P ress MEMOR Y once, and the hour digits
f l a s h .
3. P ress the CD SKIP f or e buttons to
set the hour to 7:00. Be sure to set the hour
c o rrectly for AM or PM.
3. P ress MEMOR Y again, and the minute
digits flash.
4. P ress CD SKIP f or e to adjust the
m i n u t e s .
5. P ress MEMOR Y once more; the display
stops flashing and the clock has been set.
4. P ress MEMOR Y again, and the minute
digits flash.
5. P ress the CD SKIP f or e buttons to
set the minutes to 30.
1 3
Page 14

DTA-1800-Efinal 9/30/02 11:55 AM Page 14
CLOCK/TIMER
6. P ress MEMOR Y button once more, and
the TIMER ON has been set. The O N i n d i c a t o r
stops flashing to confirm that the setting
has been made.
To cancel the Timer On setting:
P ress MODE/CLOCK several times until T I M E R
is flashing and O N is not. Then press WAKE
TIMER until TIMER ON is flashing.
TIMER OFF (shut-off time) Setting
Example: You wish to set the unit to shut off at
8:30 a.m.
1 . P ress MODE/CLOCK once, and the T I M E R
OFF indicator flashes.
2 . P ress MEMOR Y once, and the hour digits
f l a s h .
3 . P ress the CD SKIP f o rw a rd or backward
buttons to set the hour to 8:00. Be sure to
set the hour correctly for AM or PM.
5 . P ress the CD SKIP f o rw a rd or backward
buttons to set the minutes to 30.
6 . P ress MEMOR Y once more, and the T I M E R
O F F has been set. The O F F display stops
flashing to confirm that the setting has
been made.
To cancel the Timer Off setting:
P ress MODE/CLOCK several times until T I M E R
is flashing and O F F is not.
Then press WAKE TIMER until TIMER OFF i s
f l a s h i n g .
SUREWAKE FUNCTION
This feature lets you adjust the night-time
listening volume as desired without aff e c t i n g
the wake-up volume. In the morning, Sure Wa k e
s t a rts the music quietly and then increases the
volume to room level to make sure you are
a w a k e .
1. Set the timer, as in the previous section.
2. P ress SUREWAKE.
3. To cancel, press SUREWAKE a g a i n .
4 . P ress MEMOR Y again, and the minute
digits flash.
1 4
Page 15

DTA-1800-Efinal 9/30/02 11:55 AM Page 15
CLOCK/TIMER
SLEEP TIMER SETTING
1. Tu rn the unit on.
2 . P ress SLEEP once or more. The sleep time
display changes from 10 minutes up to
90 minutes, as shown below.
3 , When the desired time appears, release the
button to set the Sleep Ti m e r.
To cancel the Sleep Ti m e r:
Continue to press the button until it re t u rns to 0
(after the 90-minute display. )
NOTE: To use the Sleep Timer with the built-in
CD player, set Sleep Timer before starting CD
o p e r a t i o n .
SNOOZE FUNCTION
When the unit has switched itself on by means
of the Wake Ti m e r , press S N O O Z E to switch the
sound off for approximately 5 minutes. When
the unit switches itself on again, you can pre s s
S N O O Z E again for another 5 minutes or switch
the unit off with POWER ON/ST A N D B Y .
For example, to set 22 minutes:
1. P ress 1 MIN two times.
2. P ress 10 MIN two times.
3. P ress COOK TIMER to start .
NOTE:
• P ress 10 MIN to change the display back
to the current functional mode.
• When the time is up, the buzzer will sound for
60 seconds and re v e r t to functional display.
• To stop the alarm, press either COOK
TIMER , 10 MIN , or 1 MIN .
• To stop the countdown, press 10 MIN ,
changing the display mode to the curre n t
functional display. Then press COOK
TIMER to stop the countdown.
• You can set Cook Timer for up to 99
m i n u t e s .
COOK TIMER SETTING
1. P ress the 10 MIN or 1 MIN buttons to
reach the desired number of minutes.
2. P ress COOK TIMER to start. the Cook
Timer countdown.
1 5
Page 16

DTA-1800-Efinal 9/30/02 11:55 AM Page 16
AM/FM TUNER
LISTENING TO THE RADIO
1. P ress POWER/STANDBY to turn the
system ON.
2. P ress TUNER to select the radio function.
3. P ress BAND once or twice to select AM or
FM band.
4. P ress the TUNING f o rw a rd or backward
buttons to tune to the desired station.
Manual Tu n i n g – Press and hold the TUNING
f or e buttons until the display appro a c h e s
the desired station. Then press the buttons until
the display shows the exact fre q u e n c y.
Auto tuning – Press the TUNING f or e
buttons momentarily and release. The re a d i n g
moves up or down to the next available station.
5. To shut the system off, pre s s
POWER/STANDBY .
STORING PRESET STATIONS
The unit enables you to program 20 FM stations
and 12 AM stations.
1. Tune to the station you wish to store .
2. P ress MEMOR Y once, and – – b e g i n s
f l a s h i n g .
3. P ress REPEAT/PRESET repeatedly to
assign the desired preset number.
4. P ress MEMOR Y again. The station is
s t o re d .
5. To store other stations, repeat the above
s t e p s .
RECALLING PRESET STATIONS
P ress PRESET repeatedly to select the desire d
s t a t i o n .
SOUND EQUALIZATION
P ress EQ repeatedly to cycle through the pre s e t
sound options on the display – FLAT, ROCK,
JAZZ, POP and CLASSIC.
FM ANTENNA
S t retch the supplied antenna (33) if stro n g e r
reception is re q u i red. For non-local stations,
connect a suitable external antenna (disconnect
the supplied antenna and store for possible later
u s e . )
1 6
Page 17

DTA-1800-Efinal 9/30/02 11:55 AM Page 17
CD PLAYER
PLAYING COMPACT DISCS
1. Tu rn on the power and press CD to select
the CD mode.
Reading TOC
2. If there is no CD inside, a D I S C display will
a p p e a r.
Loading a disc
1. P ress EJECT on the CD door to open.
2. I n s e rt a disc and then push EJECT t o
close the CD door. The display shows the
total number of tracks and the timing.
E n s u re that the disc is correctly mounted on
the spindle and locked in place.
After reading TOC
Playing the disc
P ress PLAY/PAUSE to play the CD.
Playing Track 1
Pausing the disc
P ress PLAY/PAUSE while the disc is playing,
and the playing time will flash.
Stopping the disc
P ress STOP .
CD SKIP AND SEARCH FUNCTION
Skip Function
P ress the CD SKIP f or e b u t t o n s
momentarily during Play mode or Stop mode.
While the CD is playing:
P ress f once: Back to the beginning of
the current track.
P ress f twice: Back to the previous track.
P ress e once: Skip to the next track.
While the CD is stopped:
P ress f once: Skip to the previous track.
P ress e once: Skip to the next track.
S e a rch function
P ress and hold CD/SKIP during playback.
P ress f and hold: Fast backward searc h
b e g i n s .
P ress e and hold: Fast forw a rd searc h
b e g i n s .
NOTE: During the search mode, low level audio
is heard to assist in locating the exact location
on the track.
1 7
Page 18

DTA-1800-Efinal 9/30/02 11:55 AM Page 18
CD PLAYER
REPEAT A TRACK OR DISC
P ress REPEAT/PRESET once, and the curre n t
track will be repeated “one-track repeat” will be
a c t i v e . )
One track repeat (flashing)
P ress REPEAT/PRESET twice, and all tracks
will be re p e a t e d .
All track re p e a t
To cancel the repeat function, pre s s
REPEAT/PRESET once more .
RANDOM PLAY FUNCTION
P ress RANDOM during either the CD play or
the stop mode. All of the tracks on the CD will
play in a random ord e r.
PROGRAMMED PLAY
The CD player enables you to program up to 16
tracks in a sequence of your choice. With the
unit turned on,
1 . Select the CD Stop mode.
3. P ress MEMOR Y one time.
4. P ress the SKIP f o rw a rd or backward
buttons to select the desired track to be
p ro g r a m m e d .
5. P ress MEMOR Y again; then the chosen
track is store d .
6. Continue to program, repeating steps 2 and 3.
To cancel random play, press RANDOM o n c e
m o re .
Note: Once the CD program is set, pre s s i n g
RANDOM will delete the pro g r a m .
INTRO PLAY FUNCTION
In the stop mode, press INTRO on the re m o t e
to begin intro playing; the first 10 seconds of
each track will be played.
P ress I N T R O again to change to normal playing
m o d e .
Review the Pro g r a m s
P ress MEMOR Y re p e a t e d l y. The track
number programmed on each pro g r a m
number will be displayed.
7. P ress PLAY/PAUSE to play the tracks in
the programmed ord e r.
Note: If the program already exists, press
MEMOR Y and then press PLAY/PAUSE, a n d
the program play will begin.
Clear the Pro g r a m s
In Stop mode, press MEMOR Y once and then
p ress STOP . The preset programs will be
c a n c e l l e d .
1 8
Page 19

DTA-1800-Efinal 9/30/02 11:55 AM Page 19
CARE & MAINTENANCE
COMPACT DISC CARE
• Treat the disc care f u l l y. Handle the disc only by its edges. Never allow your fingers to come in contact with the
s h i n y , unprinted side of the disc.
• Treat the disc care f u l l y. Handle the disc only by its edges. Never allow your fingers to come in contact with the
s h i n y , unprinted side of the disc.• To remove a disc from its storage case, press down on the center of the case
and lift it out, holding it carefully by the edges.
• Do not attach adhesive tape, stickers etc., to the disc label.
• Clean the disc periodically with a soft, lint-free, dry cloth.
• Never use detergents or adhesive cleaners to clean the disc.
• When cleaning the disc, wipe in straight lines from the center of the disc to the edge. Never wipe in a circular motion.
• Unlike conventional re c o rds, compact discs have no grooves to collect dust and microscopic debris, so gently
wiping with a soft cloth should remove most part i c l e s .
• If necessary, use a CD cleaning kit.
• If the disc skips or is stuck on a track, it is probably dirty or damaged (scratched).
CLEANING THE UNIT
• To prevent fire or shock hazards, disconnect your unit from the AC power source when cleaning.
• If the cabinet becomes dusty, wipe it with a soft, dry dust cloth. Do not use any wax or polish sprays on the
cabinet.
• Use caution when cleaning and wiping the plastic part s .
• If the front panel becomes dirty or smudged with fingerprints it may be cleaned with a soft cloth, slightly dampened
with a mild soap and water solution. Never use abrasive cloths or polishes, as these will mar the finish of your unit.
C a u t i o n : never allow any water or other liquids to enter the unit while cleaning.
SPECIFICATIONS
Power supply DC 12 V
AC Adapter AC 120 V, 60 Hz
DC 3 V (1.5V x 2 AA batteries for tuner and clock memory )
Power output 4.5W/CH, 10% THD
Radio Section Tuning: PLL with 32 p resets (FM 20, AM 12)
F req. Range: AM 520 - 1710 kHz
FM 87.5 - 107.9 MHz
CD Section F ront vertical loading
S p e a k e r s 3.5", 3.2 ohms
Remote Contro l 2 8 - k e y, Battery: CR2032 (supplied)
D i m e n s i o n s 454 x 96 x 200 mm (main unit)
1 9
Page 20

DTA-1800-Efinal 9/30/02 11:55 AM Page 20
TROUBLESHOOTING GUIDE
Symptom Possible Cause and Solution
R a d i o
Noise or sound distorted Station not tuned properly for AM or FM.
on AM or FM bro a d c a s t s . • Tune to the AM or FM broadcast station.
No sound from either AM or FM. T U N E R button is not pre s s e d .
CD Player
Disc does not play. CD button is not pre s s e d .
CD skips while playing. Disc is dirty or scratched.
Disc is inserted but skips or Disc inserted upside down.
will not play. • Insert disc pro p e r l y .
• FM : Adjust antenna.
• A M : Rotate unit until best reception is obtained
• Press TUNER button.
• Press the CD button.
Disc is not inserted, or is inserted incorre c t l y.
• Insert disc with label side out.
• Wipe disc with cloth or use another disc.
• Disc is dirty - clean disc
• Disc is non-standard - Use correct disc.
2 0
Page 21

DTA-1800-Efinal 9/30/02 11:55 AM Page 21
SANYO COMFORT WARRANTY
WARRANTY APPLICATION
N e w, unused Sanyo Audio products purc h a s e d
t h rough a Sanyo authorized dealer in Canada are
w a rranted against manufacturing defects in materials
and workmanship for ONE YEAR from the date of
p u rchase by the original retail purc h a s e r. This
w a rranty only applies in favour of the original re t a i l
p u rchaser of the warranted product.
SANYO CANADA INC.’S RESPONSIBILITY
During the warranty period, SANYO Canada Inc. will
re p a i r, or at our option, replace an Audio pro d u c t
which shows evidence of a manufacturing defect in
materials or workmanship.
Replacement PA R TS are warranted for the re m a i n i n g
p o rtion of the warranty period.
W H A T IS NOT COVERED
a ) Audio products purchased outside Canada.
b ) Audio products purchased in a used
c o n d i t i o n .
c ) P roblems due to product set-up and installation.
d ) Adjustments that are outlined in the Operating
M a n u a l .
e ) A c c e s s o ry items including antenna, batteries and
cassette tapes.
f ) Damage in or due to transportation.
g ) Damage due to improper maintenance, impro p e r
wiring, accident, abuse, misuse or negligence.
h ) Damage caused by lightning and power surg e s .
ORIGINAL RETAIL PURCHASER’S
R E S P O N S I B I L I T Y
You, the original retail purc h a s e r , must present your
original, dated bill-of-sale together with this warr a n t y
to SANYO Canada Inc. or to an authorized Sanyo
S e rvice Depot when you make a claim
under this Wa rr a n t y.
WARRANTY BECOMES VOID
This warranty becomes void if the pro d u c t ’s serial
numbers are altered or removed or if any repair to the
p roduct is made other than by SANYO Canada Inc. or
by an authorized Sanyo Service Depot.
L I M I TAT I O N S
a ) SANYO Canada Inc. re s e rves the right to change
or improve the design of the model of the pro d u c t
w a rranted hereunder without incurring any
obligation to make any modifications to or to
install any improvement in or on the pro d u c t .
b ) In no event shall SANYO Canada Inc. or any of its
Authorized Dealers be liable for special or
consequential damage arising from the use of this
p ro d u c t
S TAT U T O RY WA R R A N T I E S
The above provisions do not preclude the operation of
any applicable provincial statute which in cert a i n
c i rcumstances may not allow some of the limitations
and exclusions described in this Wa rr a n t y. Where any
t e rms of this Wa r ranty are prohibited by such a statute,
they shall be deemed null and void but the re m a i n d e r
of this warranty shall remain in eff e c t .
HOW TO OBTAIN WARRANTY SERV I C E
Please contact the Sanyo Authorized Dealer fro m
whom the product was purchased, or contact us
d i rectly at:
SANYO Canada Inc.
1-300 Applewood Cre s .
C o n c o rd, Ont. L4K 5C7
(905) 760-9944
1 - 8 0 0 - 2 6 3 - 2 2 4 4
You, the original retail purc h a s e r, are responsible for
any costs of TRANSPORTING the product to and fro m
SANYO Canada Inc. or an authorized Sanyo Serv i c e
Depot. You also are responsible for the cost of any
MAINTENANCE necessary in respect of the pro d u c t .
2 1
 Loading...