

Page 1
INSTRUCTION MANUAL
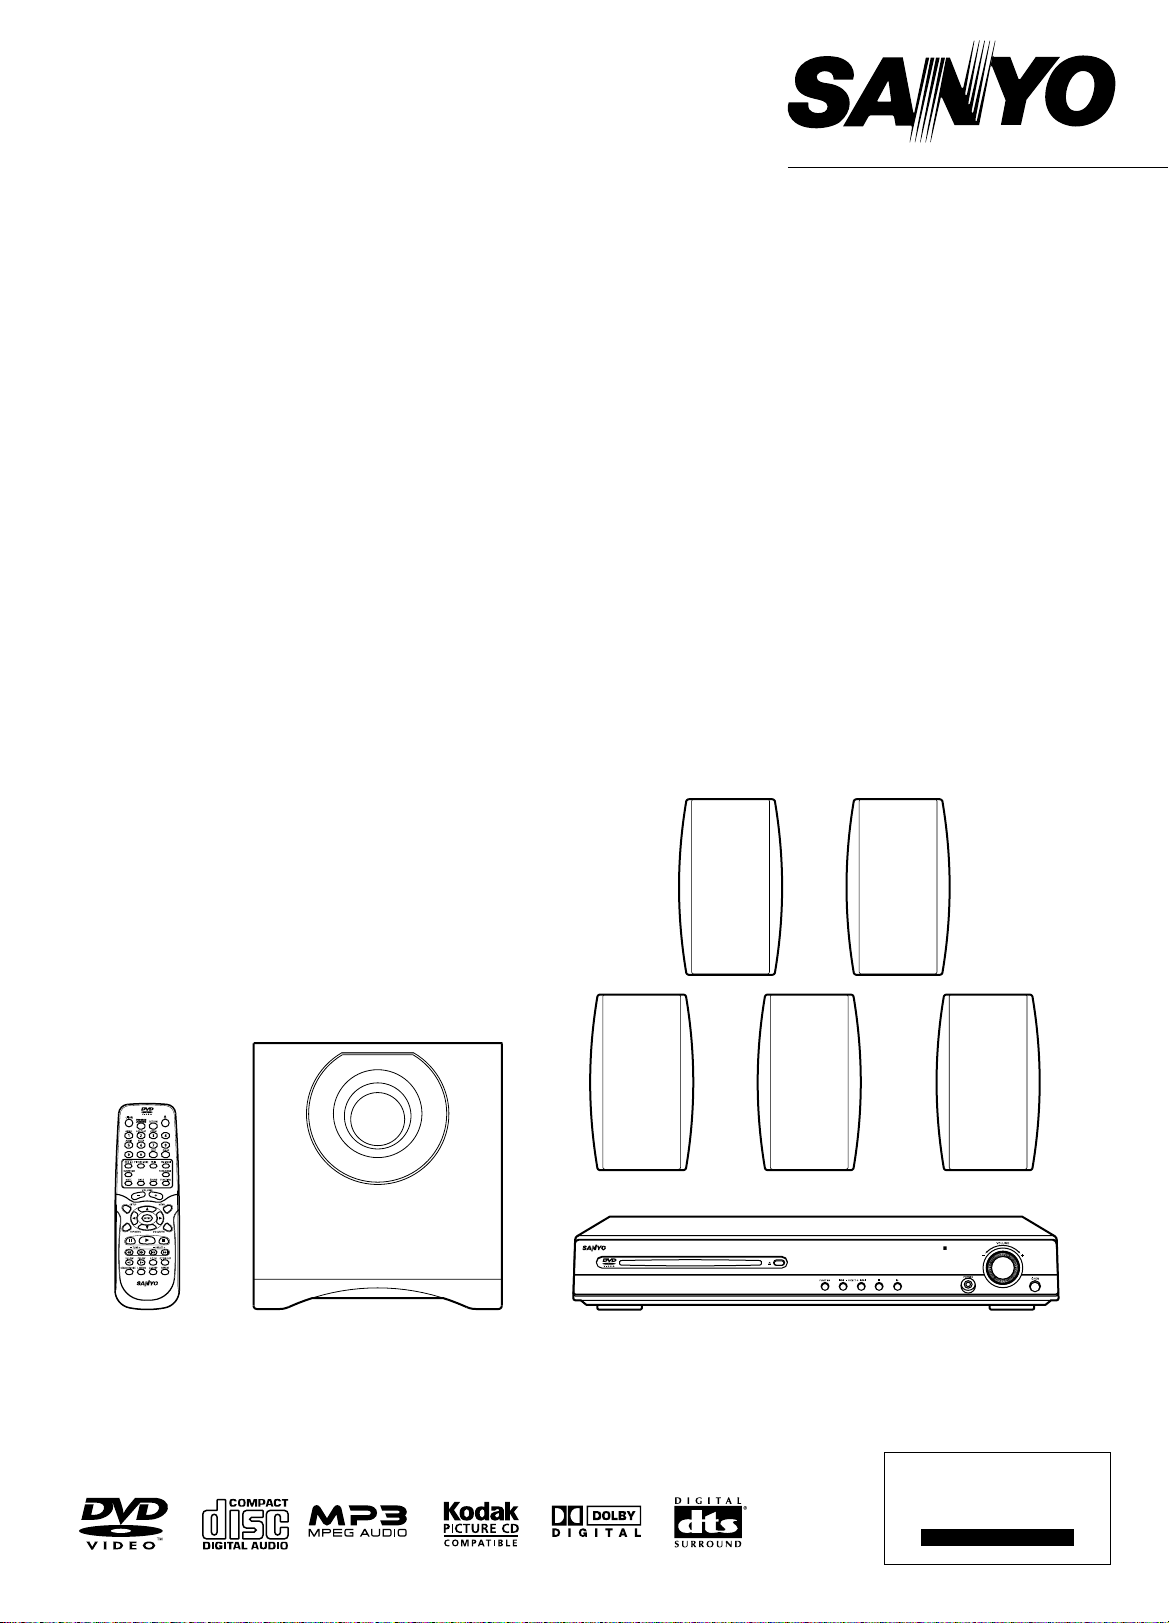
DC-TS780
DVD Home Theatre System
JCX-TS780
DVD Receiver
SX-TS780W
Subwoofer
SX-TS780S
Satellite speaker
REMOTE CONTROLLER RB-TS780
Problems with set-up?
Call freephone
0870 240 7475
Page 2
CONTENTS
PRECAUTIONS .......................................... 1
CONTROLS ................................................ 2
REMOTE CONTROL .................................. 3
BASIC CONNECTIONS .............................. 4
ADDITIONAL CONNECTIONS EXAMPLES .......
SYSTEM CONNECTIONS EXAMPLES ...... 8
BEFORE OPERATION ..............................10
VARIOUS ADJUSTINGS ........................... 1 1
PLAYABLE DISCS .................................... 12
DISC PLAY ............................................... 13
VARIOUS DISC PLAYING FUNCTIONS .... 15
7
INITIAL SETTINGS .................................... 19
LANGUAGE CODE LIST ........................... 21
MP3 CD OPERATION ................................ 22
PICTURE CD OPERATION ........................23
LISTENING TO THE RADIO .................... 24
LISTENING TO OTHER SOURCES ........ 24
SLEEP TIMER OPERATION .................... 25
MAINTENANCE ....................................... 25
TROUBLESHOOTING GUIDE ................. 25
SPECIFICATIONS .................................... 26
PRECAUTIONS
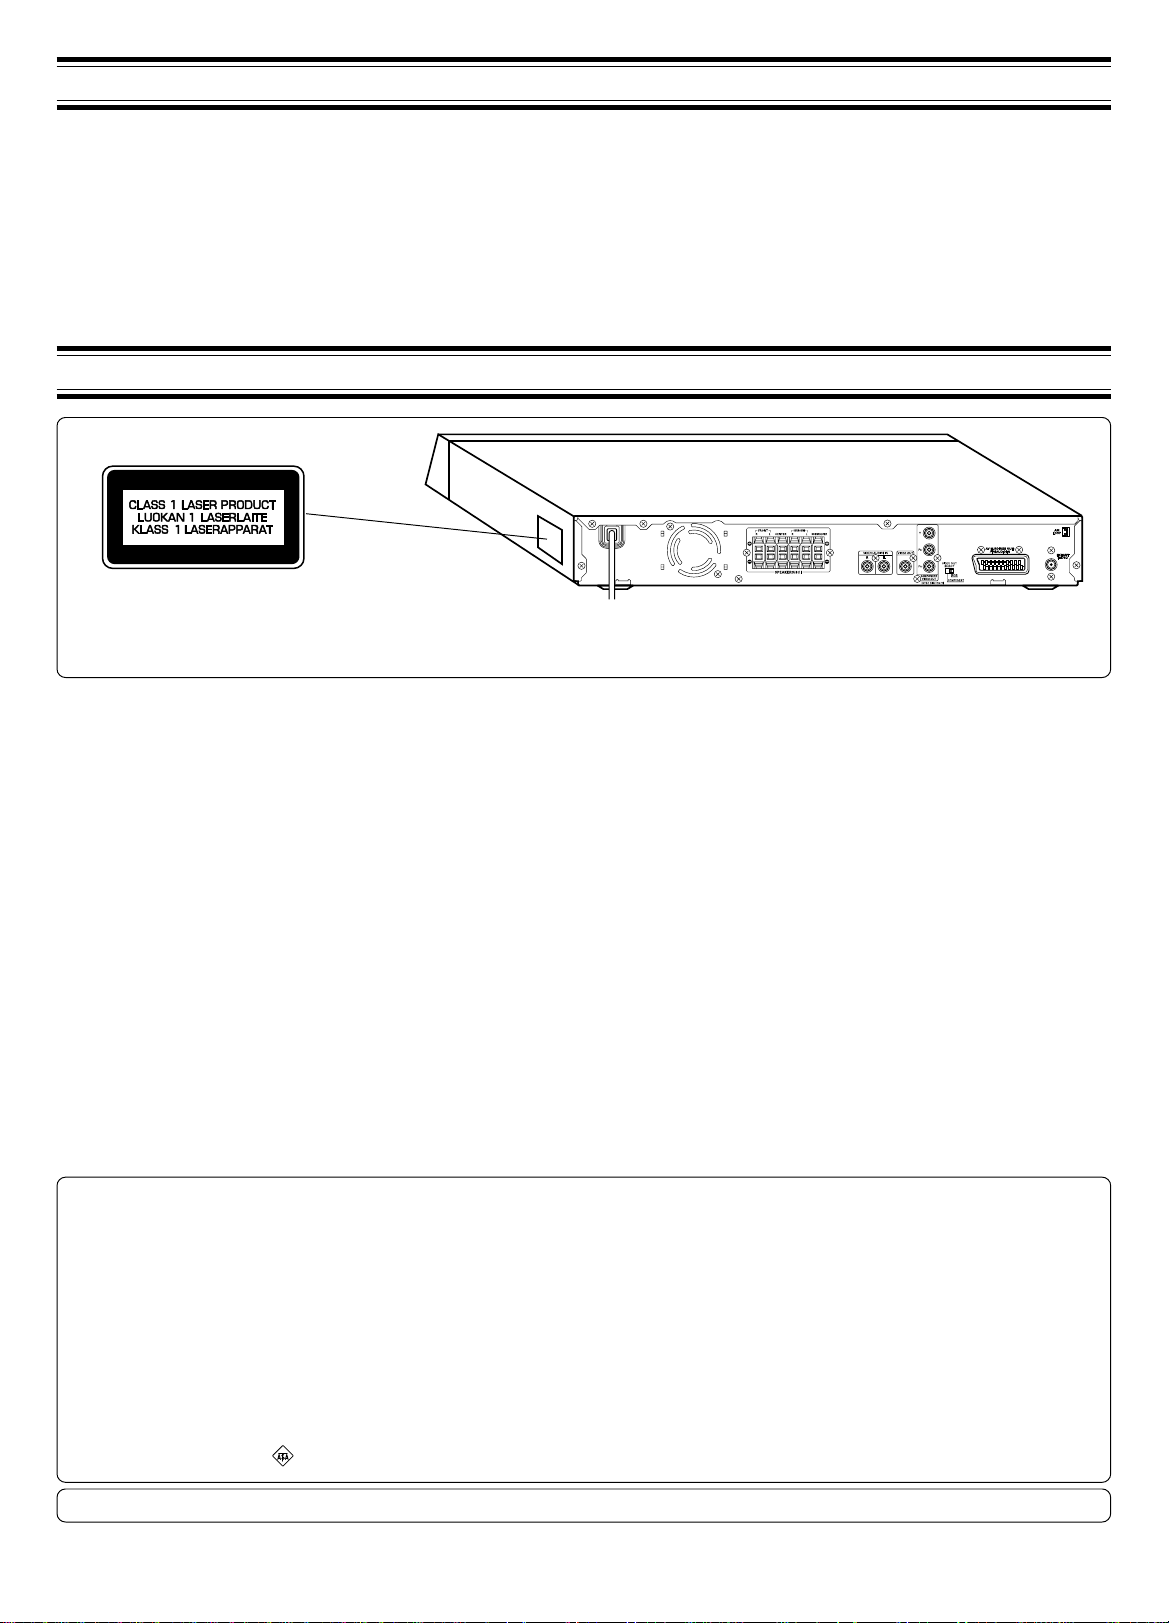
CAUTION
THIS PRODUCT CONTAINS A LOW POWER LASER DEVICE, TO ENSURE CONTINUED SAFETY DO NOT REMOVE ANY COVERS OR
ATTEMPT TO GAIN ACCESS TO THE INSIDE OF THE PRODUCT. REFER ALL SERVICING TO QUALIFIED PERSONNEL.
- The apparatus shall not be exposed to dripping or splashing.
- No objects filled with liquids, such as vases, shall be placed on the
apparatus.
- Do not use where there are extremes of temperature (below 5°C or
exceeding 35°C) or where direct sunlight may strike it.
- Because of the DVD player’s extremely low noise and wide dynamic
range, there might be a tendency to set the volume on the amplifier
unnecessarily high. Doing so may produce an excessively large
output from the amplifier which could damage your speakers.
- Sudden changes in the ambient temperature may cause condensation
to form on the optical lens inside the unit. If this happens, take out the
disc, leave the unit for about 2 hours, and then proceed to operate.
- When carrying the unit, be sure to remove a disc which may be inside
and turn the power off. Wait at least 10 seconds, then unplug the mains
lead from the AC outlet. Carrying the unit with a disc inside may
damage the disc and/or the unit.
- Do not install this equipment in a confined space, such as a book case
or built in cabinet.
- The unit is automatically set to the screen saver mode after
approximately 5 minutes have elapsed under the stop or pause mode.
- Placing the unit in a well ventilated area is strongly recommended.
Do not place any object on the top of the unit.
Do not block ventilation holes.
The cabinet of the unit warms up when it is used for a long time, but
it is not a malfunction.
Important Information:
To connect this unit to a TV, TV must have a Video input socket or an
EURO-AV/SCART socket. You cannot use an RF input socket or aerial
terminal to connect this unit.
This product incorporates copyright protection technology that is protected
by method claims of certain U.S. patents and other intellectual property
rights owned by Macrovision Corporation and other rights owners. Use of
this copyright protection technology must be authorized by Macrovision
Corporation, and is intended for home and other limited viewing uses only
unless otherwise authorized by Macrovision Corporation. Reverse
engineering or disassembly is prohibited.
IMPORTANT
If the plug supplied with this equipment is not suitable for the socket
outlets in your home it should be cut off and replaced with the correct
type.
Disposal of Plug
If the non rewireable plug is to be cut off, the removed plug should be
disposed of carefully as there is a shock hazard should the plug be
inserted into a live socket.
Replacing Fuse
The detachable fuse cover must be replaced after changing the fuse.
Only a 3A fuse should be used and should comply with BS1362 and
should carry the ASTA mark .
The unit is not disconnected from the mains unless it is unplugged from the AC outlet.
The wires in the mains lead are coloured in accordance with the following
code;
The wires in the mains lead must be connected to the terminals in the
plug as follows;
Do not connect either wire to the earth terminal.
If the mains plug contains a fuse this should be 3A, if a plug without a fuse
is used the distribution board fuse should not be greater than 5A.
1
Blue Neutral
Brown Live
Wire colour Plug terminal marking
Blue N or Black or Blue
Brown L or Red or Brown
Page 3
ACCESSORIES
RB-TS780 remote control
R6 (HP 7) battery x 2
AM loop aerial
Either the main unit or remote control can be operated. However, for convenience, this instruction manual
explains operation using the remote control.
Note:
This handling description is printed prior to product development.
When a part of the product specification must be changed to improve operability or other functions, priority is given to the product specification itself.
In such instances, the instruction manual may not entirely match all the functions of the actual product.
Therefore, the actual product and packaging, as well as the name and illustration, may differ from the manual.
FM aerial wire
Video lead
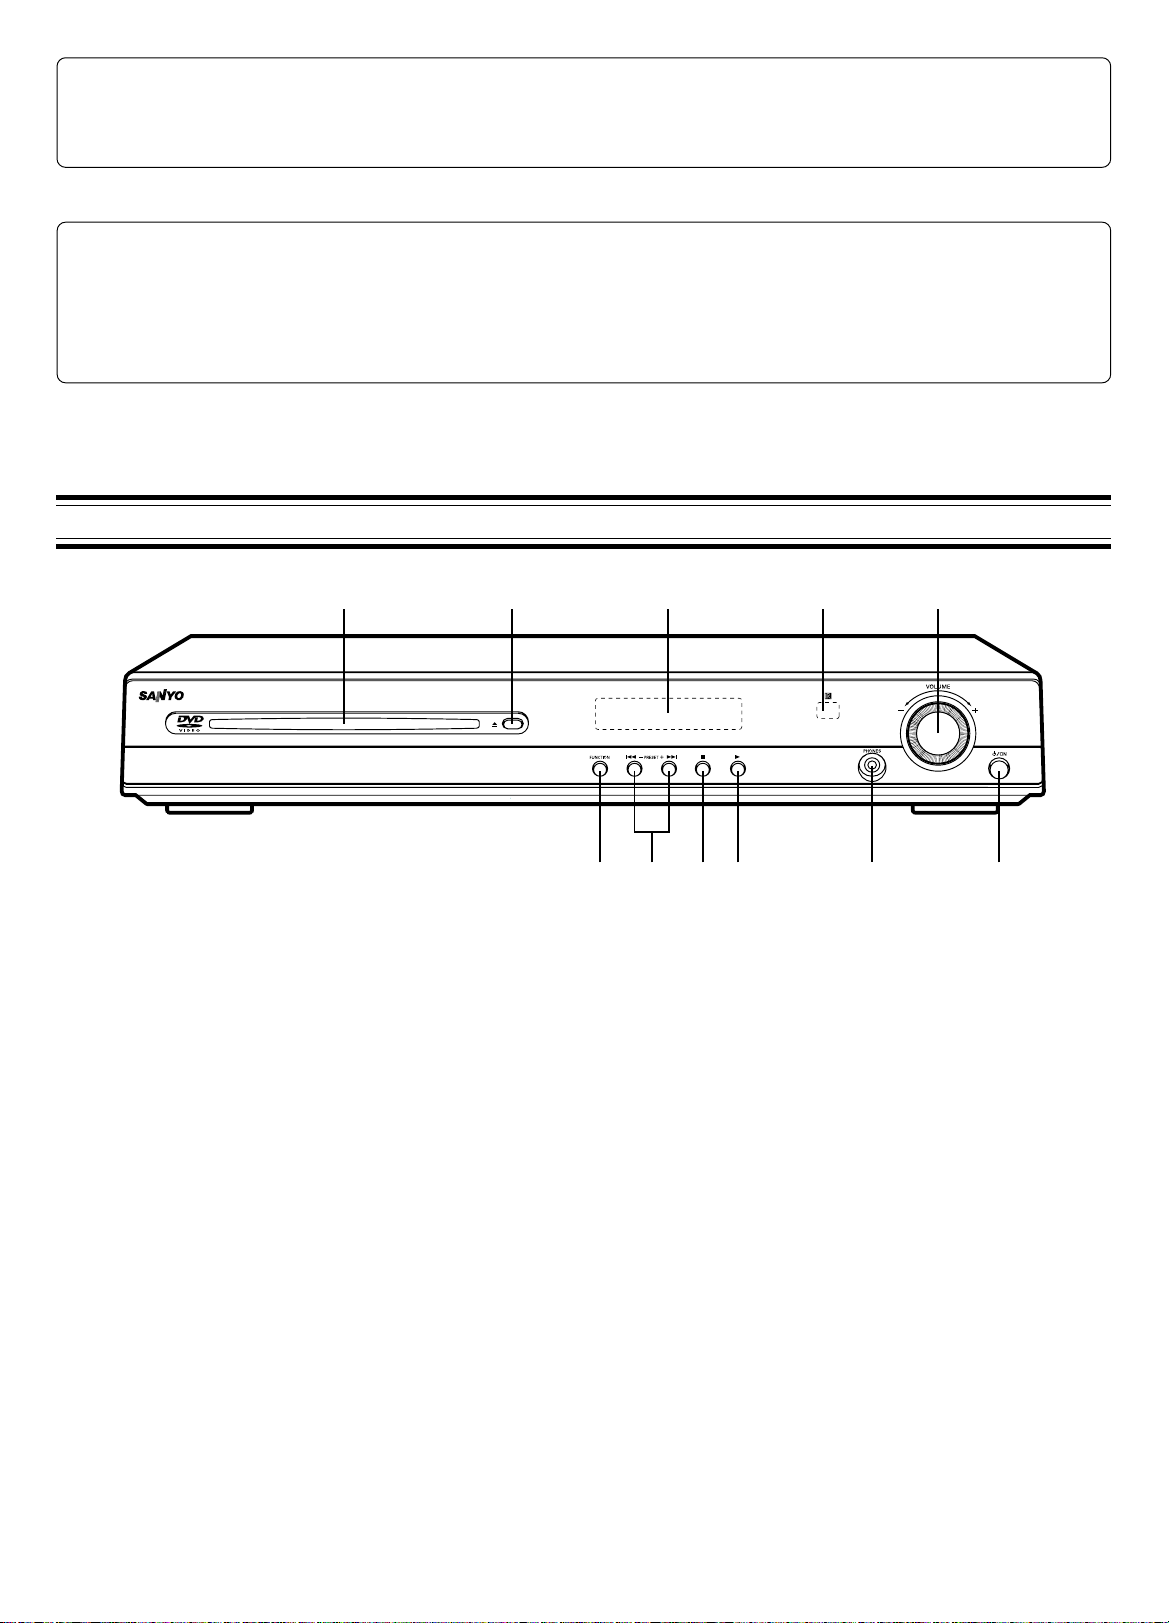
CONTROLS
2 3 451
1. Loading slot
2. Eject button (q)
3. Display
4. Remote sensor (IR)
5. Volume control (VOLUME)
6. Power button (z/ON)
7 6891011
7. Headphones socket (PHONES)
8. Play button (a)
9. Stop button (n)
10. Preset tuning, Skip/Next/Previous buttons (f – PRESET + e)
11. Function button (FUNCTION)
2
Page 4

Note:
In this instruction manual, any operation of
pressing any button while pressing the SHIFT
button is as shown below.
Example: “Press the SHIFT + 1 ANGLE
buttons.”
Controls
1. Power button (z/ON)
2. Number and other function buttons
Number buttons (1 - 9, 0)
Angle button (ANGLE)
Angle replay button (A.REPLAY)
Zoom button (ZOOM)
Audio button (AUDIO)
Sleep button (SLEEP)
3. Tuner controls
FM mode button (FM MODE)
Tuner function/Band select button (TUNE/
BAND)
Tuning buttons (TUNE)
Preset tuning buttons (PRESET)
4. Amplifier controls
Surround button (SURROUND)
Muting button (MUTE)
Bass button (BASS)
Sound preset button (SOUND)
Function button (FUNCTION)
Volume buttons (VOLUME)
5. Shift button (SHIFT)
6. Eject button (q)
7. Return button (RETURN)
8. Clear button (CLEAR)
9. Test tone button (TEST)
10. Trim button (TRIM)
11. Menu button (MENU)
12. Directional arrow buttons (4, a, 5, b)
13. On-screen display button (ON SCREEN)
14. Play button (a)
15. Stop button (n)
REMOTE CONTROL
1
2
5
4
3
REMOTE CONTROLLER RB-TS780
16. Skip/Next/Previous buttons (f, e)
17. Subtitle on/off button (S.T.ON/OFF)
18. Subtitle change button (S.T.CH)
19. Repeat button (REPEAT)
20. A-B repeat button (A-B REP)
21. Last memory button (L.MEMO)
22. Search mode button (SEARCH MODE)
23. Forward slow button (F.SLOW )
24. Reverse slow button (R.SLOW )
6
31
7
8
9
1030
29
28
27
11
12
13
14
26
25
24
23
22
21
REMOTE CONTROLLER RB-TS780
25. Fast forward/Fast reverse buttons (d, c)
26. Pause/Step button (k)
27. Top menu button (TOP MENU)
28. Enter button (ENTER)
29. Setup button (SETUP)
30. Picture mode button (PICTURE MODE)
31. Programme/Random play button
(PROGRAM/RANDOM)
16
18
20
15
17
19
Inserting batteries
Install two “R6 (HP 7)” batteries.
Note:
Remove the batteries if the remote control is not to be used for a month
or more. Batteries left in the unit may leak and cause damage.
3
Remote control range
Within approx.
6 meters
Remote sensor
30°30°
Page 5
BASIC CONNECTIONS
After all connections have been made, connect the mains lead to an AC outlet.
Note:
- Do not connect the mains lead to an AC outlet until all connections have been made.
- The system is not completely disconnected from the mains when the z/ON button is set to the z position.
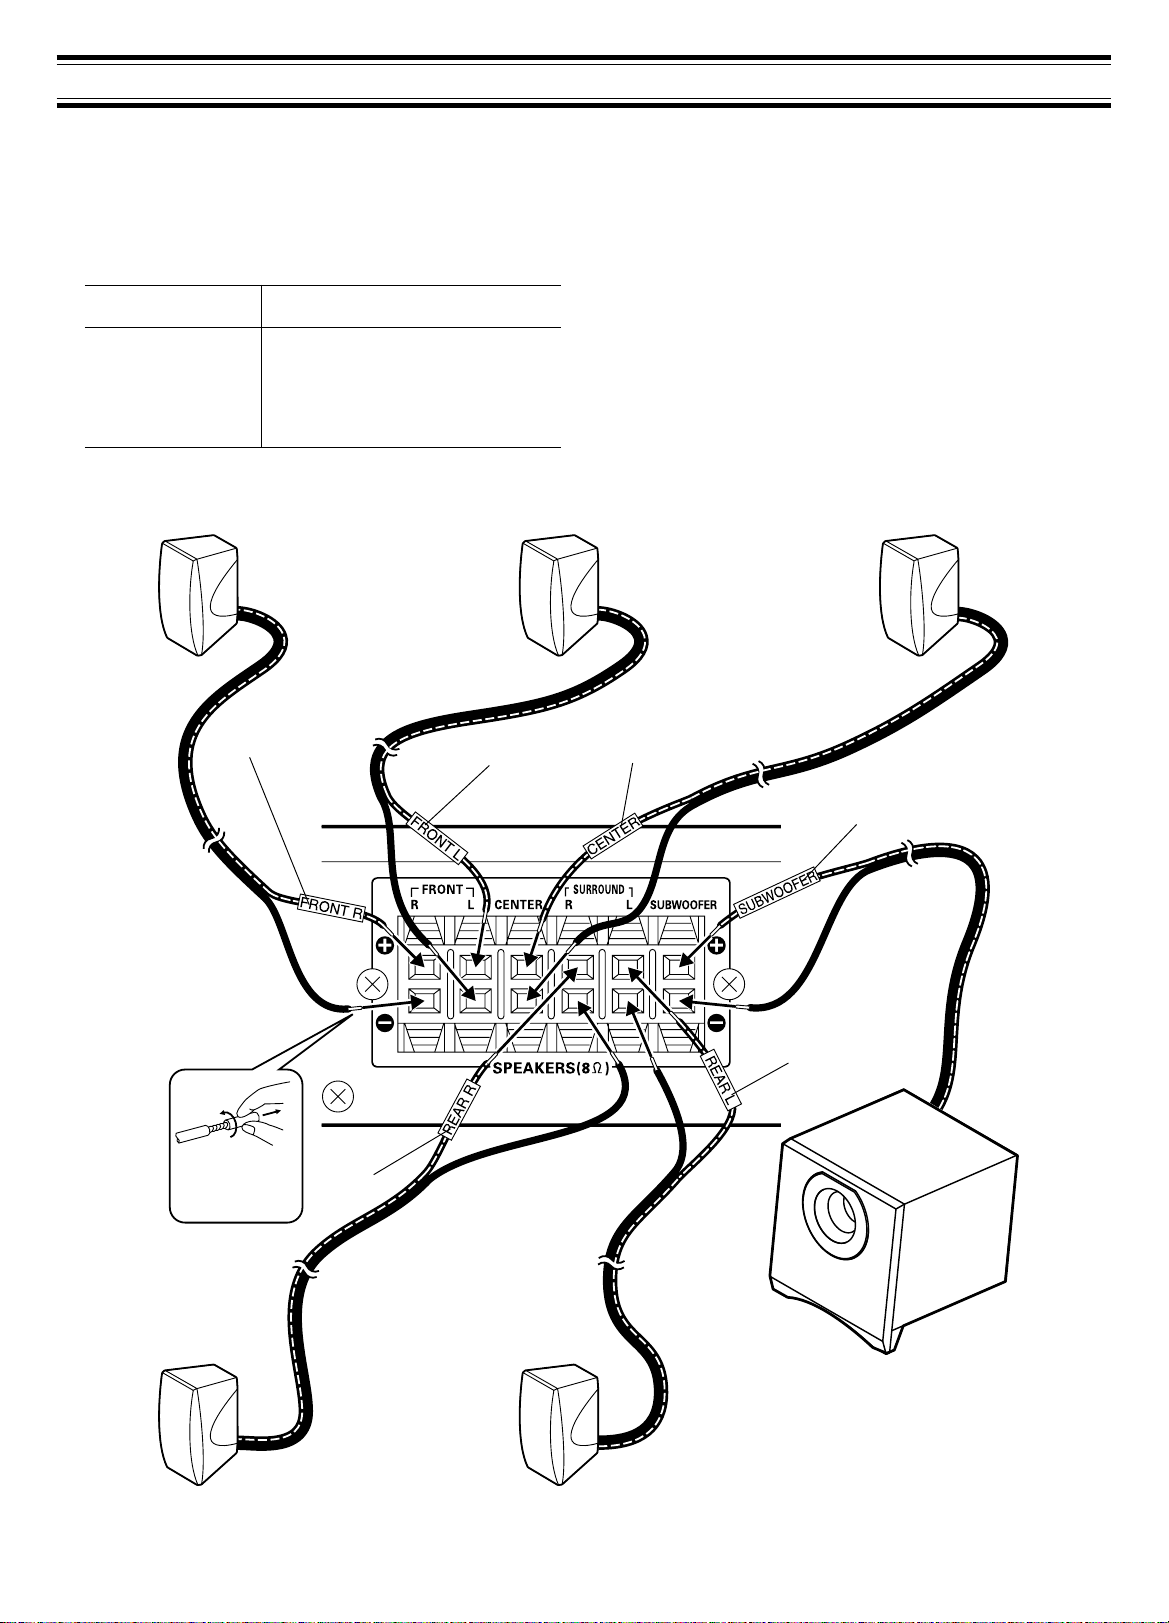
Speaker connections
To achieve proper stereo reproduction, connect the speaker wires without shorting to adjacent wires as shown in figure.
Tube of speaker wire Use
(Positive polarity)
FRONT R (Red) Front right speaker
FRONT L (White) Front left speaker
CENTER (Green) Centre speaker
REAR R (Gray) Surround right speaker
REAR L (Blue) Surround left speaker
SUBWOOFER (Violet) Subwoofer
Front right speaker Front left speaker Centre speaker
Red
White
Note:
The SPEAKERS sockets are designed for use only with the supplied
speakers. Do not use with other speakers. Connecting other speaker may
damage the speaker and/or the unit.
If using other speakers, check their impedance/input power.
8 Ω or more/70 W or more
Green
Violet
Twist and pull it
off.
Surround right speaker Surround left speaker
Gray
Blue
Subwoofer
4
Page 6
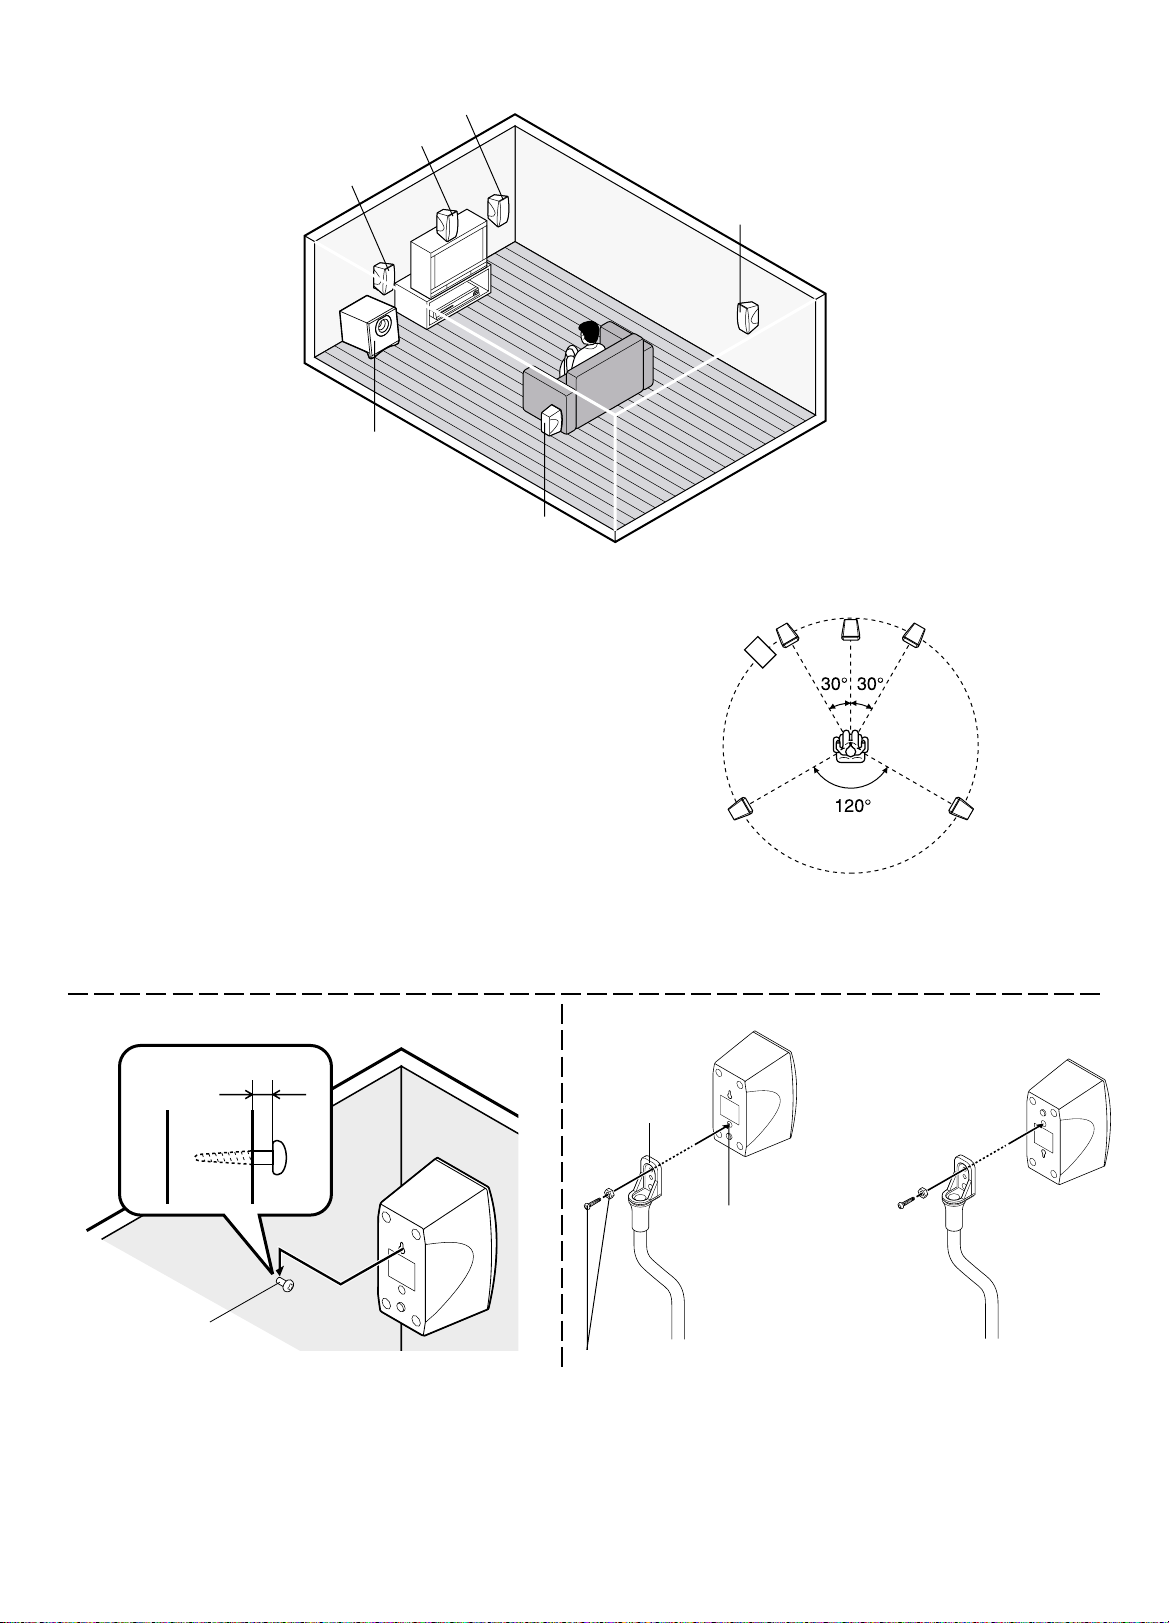
Speaker placement
Front right speaker
Centre speaker
Front left speaker
Surround right speaker
Subwoofer
Surround left speaker
The centre and front left/right speakers have built-in magnetic stray field
compensation. They may be placed close to a TV without affecting the
colour purity.
Place the front left/right speakers either side of the TV.
Place the centre speaker directly above the TV.
The front, centre, and surround speakers should be placed at approximately
the same distance from the listening position.
The surround left/right speakers and subwoofer do not have build-in
magnetic stray field compensation.
Keep enough distance between the subwoofer and the TV so as not to
garble the TV screen.
Place the surround speakers either sides of the listening position, or
slightly to the rear, approximately 60 cm ~ 1 meter higher than ear level.
Note:
The angles in the diagramme are approximate.
Example: To hang the speaker on a wall Example: To mount the speaker with a stand
Approx. 3 mm
Front left speaker Front right speaker
Subwoofer
Surround left
speaker
Stand
(not supplied)
Centre speaker
Surround right
speaker
OR
Built-in special nut,
“M5” size
Round head screw
(not supplied)
Note: Take care when installing the speakers. They may cause damage or serious injury should they fall from their mountings.
Screw/Nut (not supplied)
5
Page 7
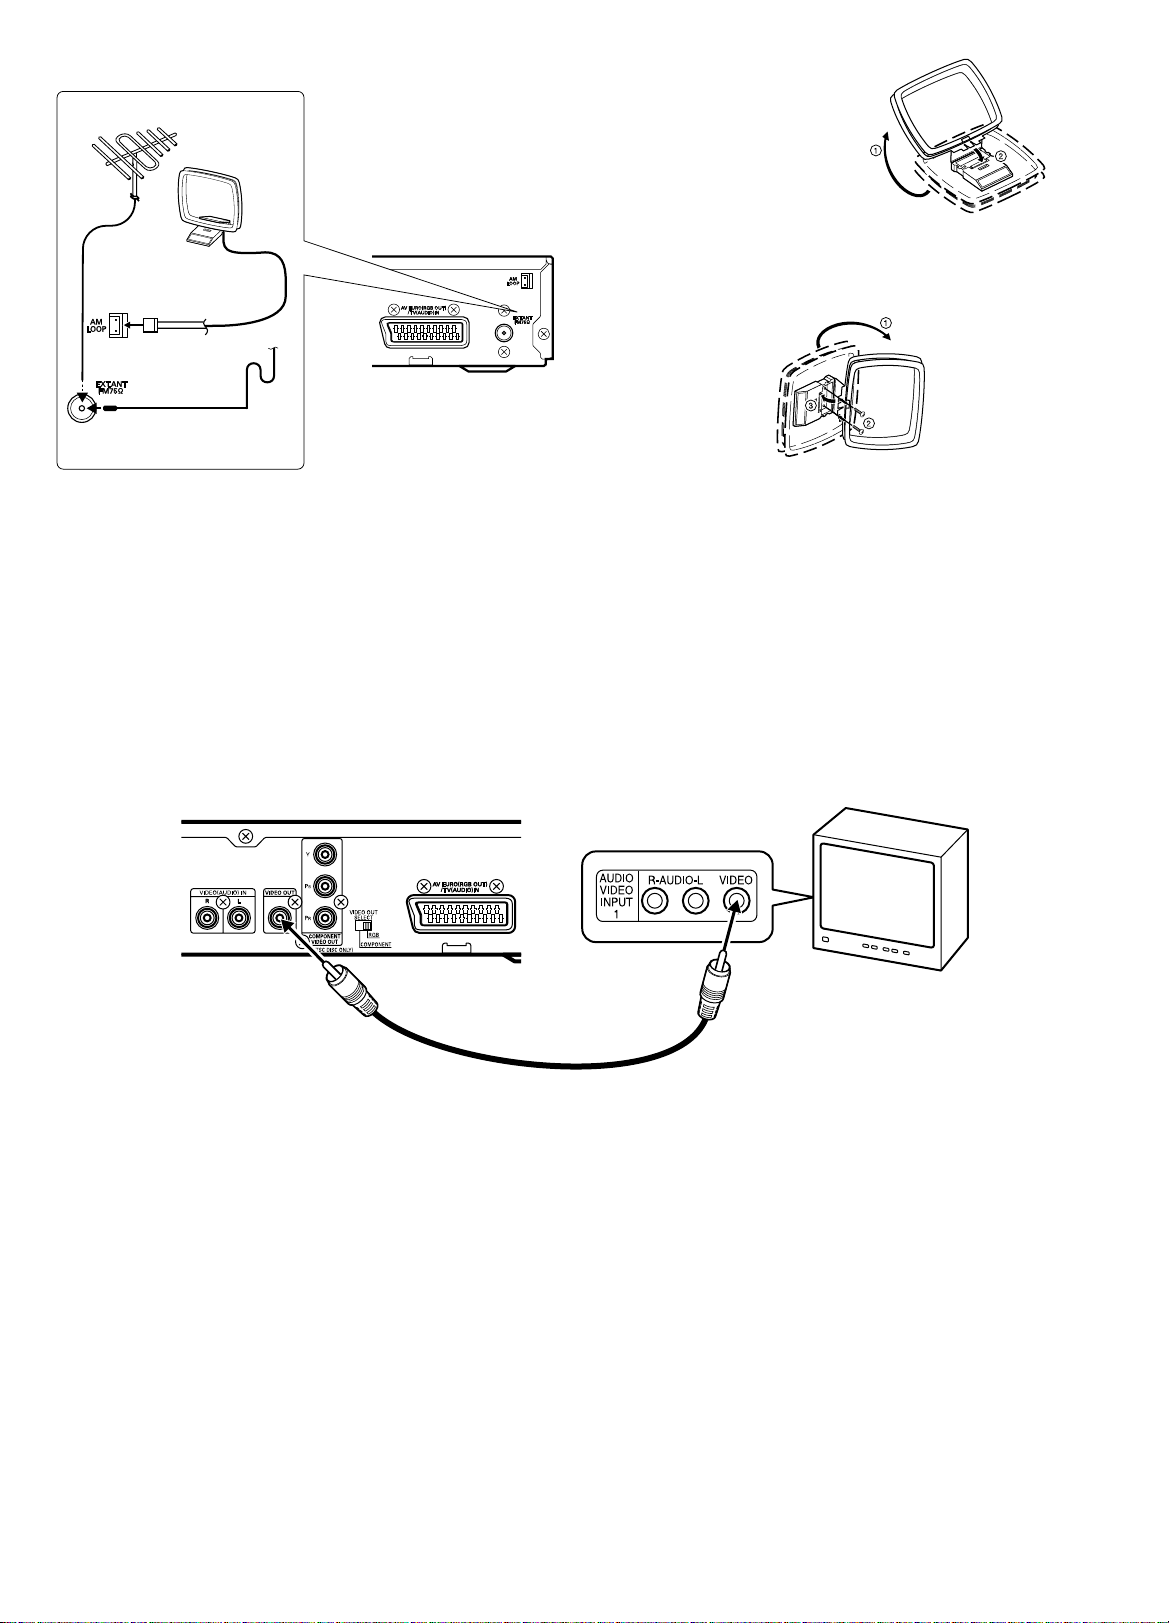
Aerial connections
FM external aerial
AM loop aerial
Aerial wire
In areas close to a transmitter the simple indoor aerial is sufficient to
receive broadcasts. Extend the aerial wire as straight as possible and,
while listening to the sound from the system, secure it in a position which
yields minimal distortion and noise.
In fringe areas or where reception is distorted or noisy, an FM external
aerial (not supplied) should be connected instead of the simple indoor
aerial. Consult your dealer.
AM loop aerial
Assemble the loop aerial.
Unwind the aerial wires, then connect the plug to the AM LOOP terminal.
If you have difficulty inserting the plug, turn it over and reinsert it. Place the
loop aerial in a position which yields the best AM reception, or attach it to
a wall or other surface.
Screws (not supplied)
Note:
To minimize noise, the speaker, mains and any other leads should not
come close to the indoor or external aerial lead and AM loop aerial. Do not
place the aerial leads close to the system.
Connecting to a TV with the video lead
Connect the video lead between the VIDEO OUT socket of the unit and the video input socket of the TV.
TV
Video lead
Notes on connections
- Please refer to the instruction manuals for the equipments that you are connecting (TV, VCR, etc.).
- When you connect the unit to your TV and other equipment, be sure to turn off the power and disconnect all of the equipments from the AC outlet until
all the connections have been made.
- Do not connect the VIDEO OUT, COMPONENT VIDEO OUT and AV EURO (RGB OUT)/TV (AUDIO) IN sockets of the unit to a VCR directly.
The playback picture will be distorted because DVD discs are copy protected.
- Please consult your local audio/video dealer for more details.
6
Page 8
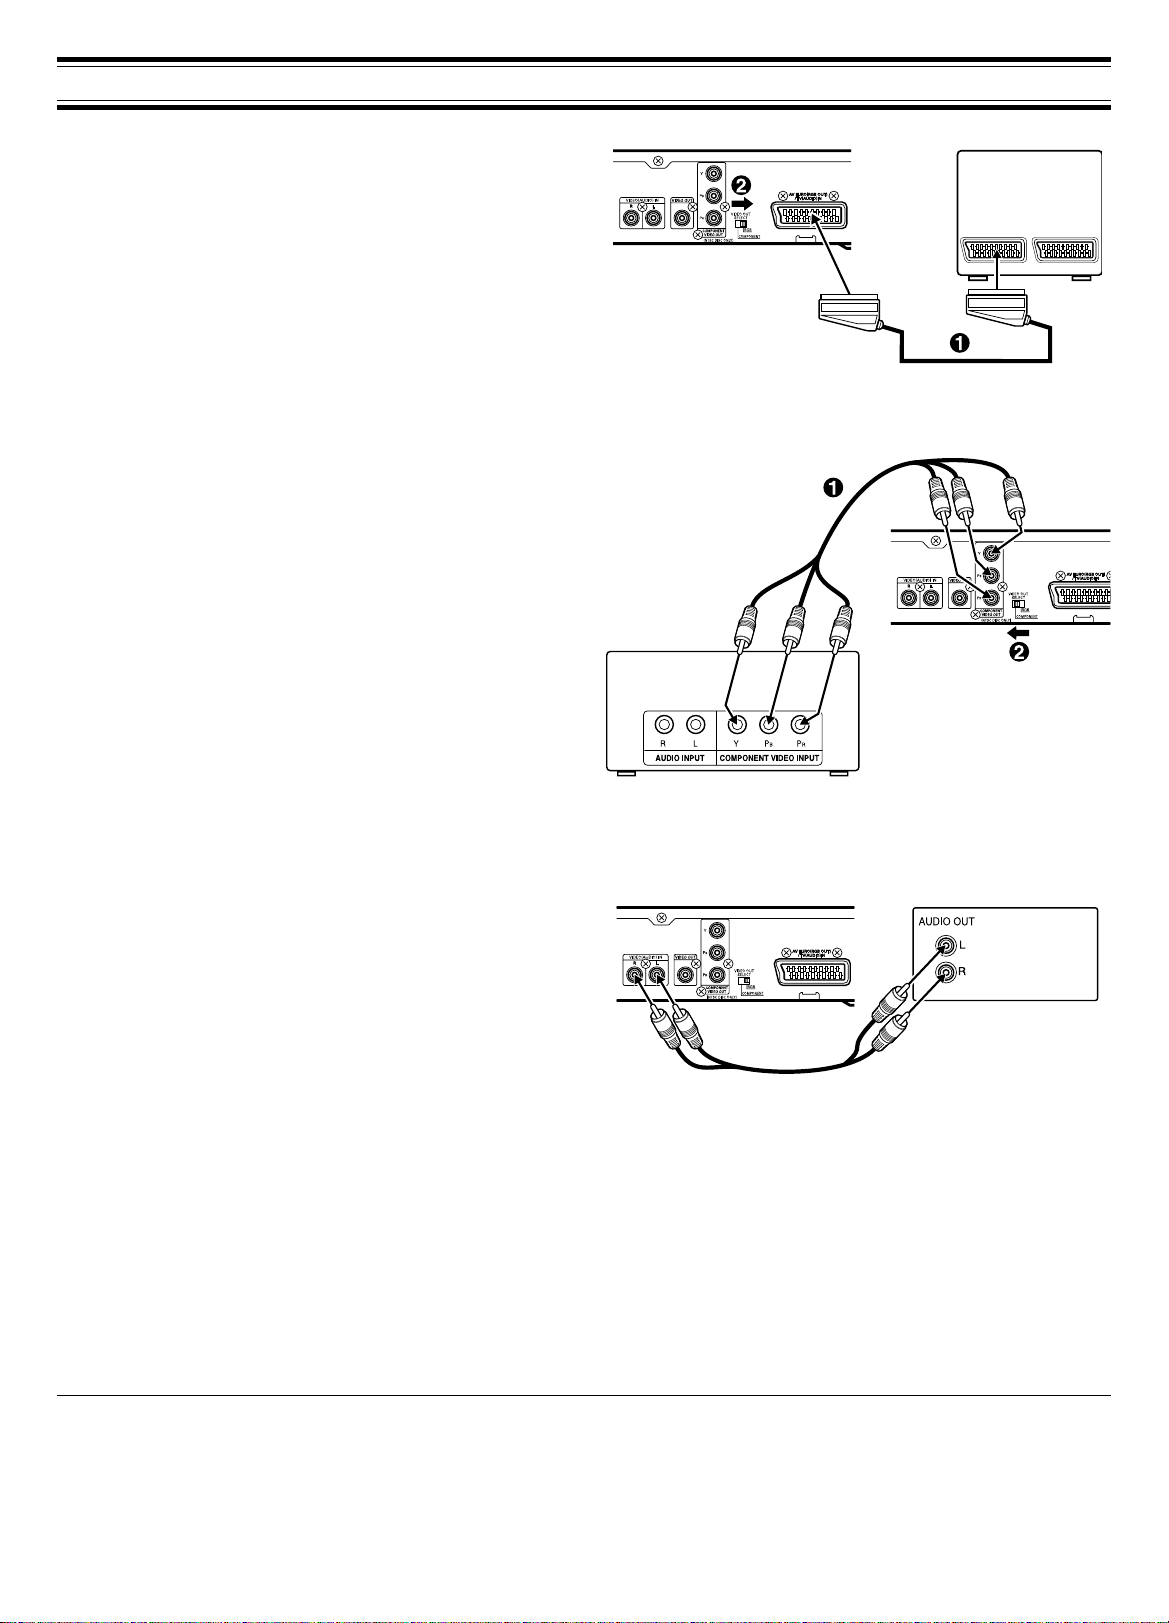
ADDITIONAL CONNECTIONS EXAMPLES
Connecting to a TV with an EURO-AV/SCART lead
Please follow the steps below before turning on the power.
1. If your TV has an EURO-AV/SCART socket, connect the unit as
shown. (Do not connect the video lead to the VIDEO OUT socket.) You
can enjoy high quality picture playback.
2. Set the VIDEO OUT SELECT switch to RGB.
Connecting to a TV with a Component video lead
(Only for TV with NTSC colour system capability)
Please follow these steps before turning on the power.
1. If your TV has component video input sockets, connect the unit as
shown. (The VIDEO OUT socket connection is not necessary.) You
can enjoy high quality picture playback.
2. Set the VIDEO OUT SELECT switch to COMPONENT.
An LCD video projector with NTSC colour system capability can also be
connected.
TV
EURO-AV/SCART
(RGB input facility)
EURO-AV/SCART lead (not supplied)
Component video lead
(not supplied)
Audio/Video equipment connection
Connect an audio lead between the VIDEO (AUDIO) IN sockets of the unit
and the audio output sockets of the audio/video equipment.
Headphones
Connect stereo headphones (not supplied) to the PHONES socket for
monitoring or for private listening. The speakers are automatically
disconnected when headphones are connected.
TV (or LCD video projector) with NTSC colour system capability
Audio/Video equipment
(such as MD deck etc.)
Audio lead (not supplied)
Manufactured under license from Dolby Laboratories.
“Dolby”, “Pro Logic” and the double-D symbol are trademarks of Dolby Laboratories.
“DTS” and “DTS Digital Surround” are registered trademarks of Digital Theater Systems, Inc.
7
Page 9
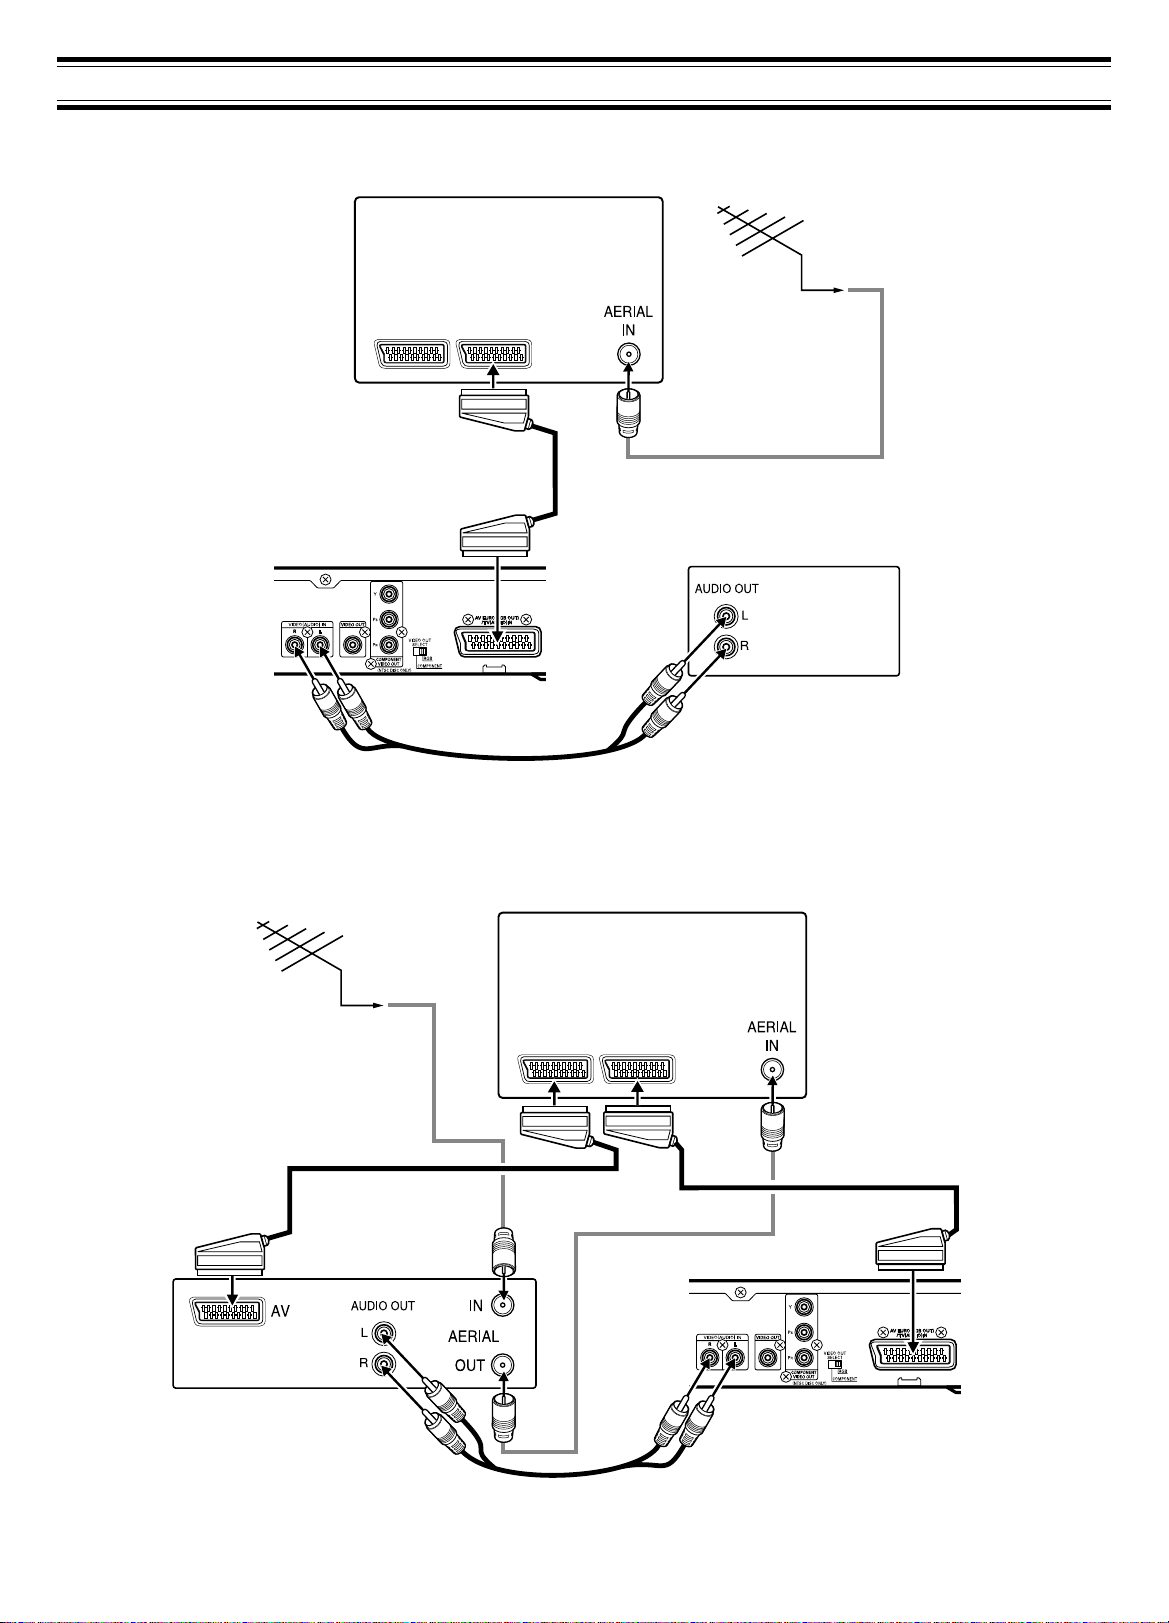
SYSTEM CONNECTIONS EXAMPLES
JCX-TS780, TV and Audio equipment
EURO-AV/SCART
(RGB input facility)
EURO-AV/SCART lead (not supplied)
JCX-TS780
TV
Aerial
Aerial lead (not supplied)
Audio equipment
(such as MD deck etc.)
Audio lead (not supplied)
JCX-TS780, TV and VCR
Aerial lead (not supplied)
EURO-AV/SCART lead
(not supplied)
Aerial
VCR
TV
EURO-AV/SCART
(Audio monitor out)
EURO-AV/SCART lead (not supplied)
Aerial lead (not supplied)
JCX-TS780
Audio lead (not supplied)
8
Page 10

JCX-TS780, TV, VCR and Audio equipment
TV
EURO-AV/SCART lead
(not supplied)
JCX-TS780
EURO-AV/SCART
(Audio monitor out)
Audio equipment
(such as MD deck etc.)
Audio lead (not supplied)
Aerial
Aerial lead (not supplied)
EURO-AV/SCART lead
(not supplied)
VCR
Aerial lead (not supplied)
JCX-TS780, TV, VCR, STB (Set Top Box) and Audio equipment
TV
EURO-AV/SCART
(Audio monitor out)
EURO-AV/SCART lead (not supplied)
JCX-TS780
Audio lead (not supplied)
Audio equipment
(such as MD deck etc.)
Aerial
Aerial lead (not supplied)
EURO-AV/SCART lead (not supplied)
Set Top Box
(not supplied)
EURO-AV/SCART
lead (not supplied)
Aerial lead
(not supplied)
VCR
Aerial lead (not supplied)
9
Page 11

BEFORE OPERATION
Either the main unit or remote control can be operated. However,
for convenience, this instruction manual explains operation using
the remote control.
Turning the power on and off
Press the z/ON button. “HELLO” appears briefly on the display. (After
connecting the mains lead, when you press the z/ON button for the first
time, the volume-reset feature automatically sets the initial volume level.)
To turn the power off, press the z/ON button again. “GOOD-BYE” appears
briefly.
- When the mains lead is connected to the AC outlet, the unit will
respond to commands from the remote control.
Direct start function
If the following buttons are pressed when the unit is in standby, the unit
turns on automatically and the selected function is activated.
Remote control a (Play), TUNE/BAND, q
Main unit a, q
Selecting the function
Press the FUNCTION button to select the desired function. Each time the
button is pressed, the display changes as follows:
DVD/CD v TV v VIDEO v FM TUNER v AM TUNER v . . .
- When the function selection is changed, disc play is automatically
stopped.
Adjusting the volume
Press the VOLUME “+” or “–” button (or turn the VOLUME control on the
main unit). The volume level appears on the display (VOLUME 0 ~
VOLUME MAX).
To reduce the volume temporarily
Press the MUTE button. “MUTE” blinks on the display. To restore the
previous volume setting, press the MUTE button again.
Selecting the sound mode
1. Press the SOUND button repeatedly to select the desired sound mode
(“BASS”, “TREBLE” or “NIGHT”).
2. Press the button as desired.
Sound mode Press Display change
BASS 5 or 4 “–5” ~ “+5”
TREBLE 5 or 4 “–5” ~ “+5”
NIGHT ENTER “ON” or “OFF”
Note for “NIGHT”:
When enjoying a DVD disc with the volume set low at night, select this
mode. It enhances spoken lines making speech clearer.
3. Repeat steps 1 - 2 for another sound mode.
4. Press the SOUND button repeatedly to close the display.
Bass boost system
Press the BASS button to select the desired bass boost effect.
BASS BOOST v BASS OFF v NORMAL . . .
Adjusting the display brightness
While pressing the n button on the main unit, press the ON SCREEN
button on the remote control.
DARK
wv
NORMAL
10
Page 12

V ARIOUS ADJUSTINGS
Selecting surround mode
Press the SURROUND button to select the surround mode. Each time the
button is pressed, the surround mode changes as follows:
AUTO SURR v 5.1ch SURR v 2.1ch ST . . .
When “DVD/CD” function is selected
AUTO SURR
The unit selects the surround mode automatically depending on the
disc.
- If a DVD disc is encoded with Dolby Digital 5.1 channel, it is played
back with Dolby Digital 5.1 channel surround sound.
Not all DVD discs are encoded with Dolby Digital 5.1 channel
surround sound.
- If a DVD disc is encoded with Dolby Digital 2 channel or mono, it
is played back with Dolby Pro Logic mode. “DOLBY PL” appears
briefly on the display.
- If a DVD disc is encoded with 2 channel Liner PCM (stereo), it is
played back with Dolby Pro Logic mode. “DOLBY PL” appears
briefly on the display.
- If a DVD or CD disc is encoded with DTS Surround, it is played
back with DTS surround sound.
- Video and Audio CDs are played back with Dolby Pro Logic mode.
- MP3 CDs are played back with Virtual 5.1 channel surround
sound.
5.1ch SURR
Disc is played back with Virtual 5.1 channel surround sound.
2.1ch ST
The surround mode is set to 2.1 channel (Front left and right speakers,
and Subwoofer).
When “TV (stereo)”, “VIDEO” or “FM TUNER (stereo)” is selected
AUTO SURR/5.1ch SURR
The surround mode is set to Virtual 5.1 channel surround sound.
2.1ch ST
The surround mode is set to 2.1 channel.
When “TV (mono)”, “FM TUNER (mono)” or “AM TUNER” is selected
AUTO SURR/5.1ch SURR
Front left and right speakers, Centre speaker and Subwoofer sound.
2.1ch ST
The surround mode is set to 2.1 channel.
Note:
- When using headphones, the surround/bass boost mode does not
change. If the SURROUND or BASS button is pressed, “-SURR-” or
“-BASS-” appears briefly on the display.
- When receiving weak FM broadcasts, set the mode to “2.1ch ST”. The
sound quality may improve.
Adjusting the speaker volume balance
This unit is set to the standard level before shipping from the factory. You
may not need adjustment.
However, depending on the size of the room and the placement of the
speakers, you may need a fine adjustment.
In this case, follow the steps below. Please use the remote control at the
listening point.
1. Press the FUNCTION button to select “DVD/CD”.
2. Press the n button to stop play completely.
3. Press the TEST button. The speaker screen appears.
“FNT-L 0” appears on the display.
The test tone will be heard from each speaker sequentially as follows:
TV screen Display Speaker
Front-L FNT-L 0 Front left speaker
Center CENT 0 Centre speaker
Front-R FNT-R 0 Front right speaker
Surround-R SUR-R 0 Surround right speaker
Surround-L SUR-L 0 Surround left speaker
4. Press the VOLUME “+” or “–” button until the test tone is at a
comfortable level.
5. If the test tone level is not the same from each speaker, press the 5
or 4 button to adjust it while the speaker is activated. The level
appears.
Front-L/Front-R: “–10” ~ “0”
Center/Surround-R/Surround-L: “–10” ~ “+10”
If necessary, repeat this step again.
6. Press the TEST button to turn the test tone off.
Note:
If no adjustments are made, the original display returns after the test
tone has cycled round 5 times.
Adjusting the subwoofer level
1. Press the TRIM button. “FNT-L 0” appears on the display.
Note: No test tone.
2. Press the ENTER button repeatedly to select “SUB.W 0”.
Each time the button is pressed, the display shows the selected
speaker and tone level.
3. Press the 5 or 4 button to adjust the level as desired.
SUB.W: “–10” ~ “+10”
Note:
If another speaker is selected, the level can also be changed as
above.
4. Press the TRIM button to turn it off.
Note:
If no adjustments are made, the original display returns after
approximately 10 seconds.
Set the delay time for your centre and surround speakers. See “Setting
audio” on Page 20.
11
Page 13

PLAYABLE DISCS
The following types of discs can be played on this unit.
Disc type and logo mark
DVD Video
Audio CD
Region number
Region number (Regional restriction code) is built-in to the unit and DVD
discs.
There is a region number on the rear of the unit.
The same region number or region number “ALL” of DVD discs can be
used on this unit.
DVD disc
There are the marks on some DVD disc packages.
Example:
Multiple languages Multi-aspect
Multi-language subtitles Region number
Multi-angle Closed caption
Note:
- Only the above types of discs can be played on this unit.
DVD-Audio, DVD-ROM, DVD-RAM, DVD-RW (VR mode), CD-ROM,
CVD, SACD, etc. cannot be played.
- This unit can play back Video CDs (VCD).
- Some DVD-R, DVD-RW (Video mode), DVD+R, DVD+RW and
SVCD discs can be played.
- This unit is to be used exclusively with the PAL (or NTSC) colour
system discs. SECAM system discs cannot be used with this unit.
- For DVD discs: The video output signal format can be selected (“PAL
60” or “NTSC”) when playing back the NTSC discs.
- For MP3 CD, please see Page 22.
- For Picture/JPEG CD, please see Page 23.
Notes on handling discs
- Do not expose the disc to direct sunlight, high humidity or high
temperatures for extended periods of time.
- Discs should be returned to their cases after use.
- Do not apply paper or write anything on the disc surface.
- Handle the disc by its edge. Do not touch the playing surface (glossy
side).
- Fingerprints and dust should be carefully wiped off the playing surface
of the disc with a soft cloth.
Wipe in a straight motion from the centre to the outside of the disc.
- Never use chemicals such as record cleaning sprays, antistatic
sprays or fluids, benzene or thinner to clean discs.
DVD discs are divided into titles, and the titles are sub-divided into
chapters.
Title 1
Chapter 1 Chapter 2
Video CD/Audio CD disc
Video CD/Audio CD discs are divided into tracks.
Track 1 Track 2 Track 3 Track 4 Track 5
Chapter 1 Chapter 2 Chapter 3
Title 2
12
Page 14

DISC PLAY
Important note:
- This instruction manual explains the basic instruction of this unit.
- Some DVD or VCD discs have different functions that may not be explained in this instruction manual. You may need extra instructions. In this
case, please follow the instructions displayed on the TV screen or jacket or case of the disc.
- The disc information takes priority in various setting.
- “ ” may appear on the TV screen during operation. This icon means that the function is not available on the disc now.
- In this instruction manual, the language in on-screen display is English. If you changed the language, please follow the selected language in onscreen display.
- The screen shown as an example in this manual may be different from the actual screen.
- For improvement, on-screen displays subject to change without notice.
Preparations
- Turn on the TV and select the video input for this unit.
Select the playback picture size according to the aspect ratio of the
TV. (See “Setting display” on Page 19.)
- Select the desired language for the on-screen menus if required. The
following languages can be selected.
English (default), Spanish, French, German, Portuguese
(See “Setting language” on Page 19.)
When the COMPONENT VIDEO OUT sockets of the unit are connected
to the component video input sockets of a TV with NTSC colour system
and progressive-scan capability, you can select the Progressive position.
Note:
Initial setting is Interlace. If you use a TV with PAL colour system only
or non-progressive-scan TV with NTSC, skip this section.
1. Turn on the power (TV and this unit).
2. Press the FUNCTION button to select “DVD/CD”.
3. In the no disc mode, press and hold down the e button on the main
unit until “ ” (Progressive) appears briefly on the TV screen.
If you want to switch the setting back again, press and hold down the
e button until “ ” (Interlace) appears briefly.
4. Select “NTSC Disc: NTSC” on “Setting display” setting (See Page 19.)
Note:
In Progressive mode, the closed caption may not appear on the
screen.
Progressive scanning
(Only for TV with NTSC colour system capability)
While interlaced scanning produces one frame of video in two fields,
progressive scanning creates one frame in one field. Conventional
interlaced scanning constitutes one second with 30 frames (60 fields), but
progressive scanning constitutes it with 60 frames from scratch. Progressive
scanning can reproduce sharper picture with high resolution for still image
or other picture containing long texts or horizontal lines.
This model has compliance with 525p (progressive) system.
Interlaced scanning
CAUTION:
- Never put anything except a disc into the loading slot. Foreign objects
can damage the unit.
- Do not apply pressure to the disc after automatic loading begins.
- Do not pull the disc out while the disc is retracting into the loading slot.
This will damage the inside of the unit and the disc.
When operation buttons are pressed, that operation is displayed
on the TV screen for several seconds.
1. Press the FUNCTION button to select “DVD/CD”. “SANYO” logo
appears on the TV screen.
2. Push the disc (label facing up) gently into the loading slot until
automatic loading begins, then release the disc.
“LOADING” then “READING” appears on the display.
Note:
Some discs may start play automatically.
Starting play
Press the a (Play) button. The DVD/CD function is selected and play
starts automatically.
Example:
Chapter number Elapsed playing time
Note:
If “NO DISC” appears on the display, load the disc.
- If the disc is loaded with the label side downward (and it is a single
sided disc), or if a badly scratched disc is loaded, “NO DISC” or “NO
PLAY” appears. If this occurs, load the disc correctly or replace the
disc.
Progressive scanning
13
Page 15

If a menu appears on the TV screen...
Press the 4, a, 5 or b button (or the number buttons)
to select the menu, then press the ENTER button.
Playback of the selected menu starts.
Note:
For more details, please refer to the jacket or case of the disc.
Stopping play
[DVD] [VCD]
- Press the n button once.
When you press the a (Play) button, play starts automatically from the
point where you stopped.
Note:
Some discs may not resume play.
- Press the n button twice. The unit stops completely.
When you press the a (Play) button, play starts from the beginning of
the disc.
[CD]
- Press the n button. The unit stops completely.
Ejecting disc
1. Stop the disc play completely.
2. Press the q button. “EJECT” appears briefly on the display and the
disc is automatically ejected.
CAUTION:
Never touch the disc while the disc being ejected. This will damage the
inside of the unit and the disc.
3. Remove the disc
Note:
After you press the q button to eject the disc, you must remove the disc
from the loading slot. If you do not remove the disc within approximately
2 minutes, the disc is automatically retracted into the loading slot.
Continuing play from where you stopped watching (Last memory
play) [DVD]
1. During play, press the L.MEMO button at the point from which you
want to resume play later. “STOP” appears on the display. Play stops
automatically.
2. Remove the disc or turn off the power.
3. Load the disc (and press the a (Play) button), or turn on the power.
“Last Memo Play?” screen appears.
(The memory is released.)
4. Press the 4 button to select “Yes”.
5. Press the ENTER button. Play resumes from the point where you
stopped.
Note:
- Point on up to 3 discs can be memorized.
- The Last Memory Play mode may not work correctly with some discs.
What is “PBC”?
“PBC” is an abbreviation for “Playback Control” that refers to control codes
prerecorded on Video CDs.
During playback of Video CD with PBC, “PBC” appears on the display.
Disc lock function
You can lock the disc to prevent misuse by young children.
1. Press and hold down the q button.
2. Load the disc while holding the q button down until “LOCKED”
appears on the display.
The q button will not function.
To release this function, press the q button until “UNLOCKED”
appears on the display.
14
Page 16

VARIOUS DISC PLAYING FUNCTIONS
“ ” may appear on the TV screen during operation. This icon means that the function is not available on the disc now.
Selecting a DVD menu [DVD]
1. Press the MENU button during play. The DVD menu screen appears.
2. Press the 4, 5, b or a button (or the number buttons) to select the
desired menu, then press the ENTER button. The selected menu play
starts.
Selecting a top menu [DVD]
1. Press the TOP MENU button. The top menu appears.
2. Press the 4, 5, b or a button (or the number buttons) to select the
desired menu, then press the ENTER button. The selected title play
starts.
Note:
Selecting a menu operation may differ depending on the disc used and
may not be possible on some discs.
Return button (RETURN) for Video CD
Normally, it returns to the previous menu when the RETURN button is
pressed during play.
Note:
The operation differs according to the content of the Video CD.
Chapter (Track) skip
Skipping forward
Press the e button during play to skip to the next chapter (or track). A
chapter (or track) is skipped each time the button is pressed.
Skipping backward
Press the f button during play to skip back to the beginning of the
chapter (or track) currently played. Press the button again immediately to
skip back to the beginning of the previous chapter (or track).
Title search [DVD]
1. Press the SEARCH MODE button once.
Example:
2. Press the number buttons to enter the title number.
Example:
To select No. 12, press 1, then 2.
- If you make a mistake, press the CLEAR button.
3. Press the ENTER or a (Play) button. Play starts from the selected title.
Chapter search [DVD]
1. Press the SEARCH MODE button twice during play.
Example:
Track search [VCD] [CD]
Press the number buttons to enter the track number, then press the
ENTER or a (Play) button. Play starts from the selected track.
Time search
1. Press the SEARCH MODE button three times (DVD) or once (VCD/
CD) during play.
Example:
2. Press the number buttons to enter the time.
Example:
20 minutes 5 seconds Press 2, 0, 0 then 5.
1 hour 4 minutes 35 seconds Press 1, 0, 4, 3 then 5.
- If you make a mistake, press the CLEAR button.
3. Press the ENTER or a (Play) button. Play starts from the searched
time (DVD) or searched time in the track (VCD/CD).
Fast play
Press the c or d button repeatedly to select the fast speed forward or
reverse play during play or still picture (pause).
[DVD] [VCD]
“c 1”, “c 2”, “c 3”, “c 4” or “d 1”, “d 2”, “d 3”, “d 4”
[CD]
“c 1”, “c 2” or “d 1”, “d 2”
Press the a (Play) button to return to normal play.
Slow-motion play
[DVD]: Forward/Reverse slow play, [VCD]: Forward slow play only
Press the F.SLOW or R.SLOW button repeatedly to select the
forward or reverse slow speed play during play or still picture.
“ 1”, “ 2”, “ 3”, “ 4” or “ 1”, “ 2”, “ 3”, “ 4”
Press the a (Play) button to return to normal play.
Note:
The sound is muted during fast play or slow-motion play in DVD/VCD.
Still picture (Pause)
[DVD] [VCD]: Still picture mode, [CD]: Pause mode
Press the k button during play.
Press the a (Play) button to return to normal play.
Note: The sound is muted.
Frame by frame advance play [DVD] [VCD]
Press the k button during still play. Each time the button is pressed, the
picture advances one frame.
Press the a (Play) button to return to normal play.
Note:
- The sound is muted.
- Frame play is operative in forward mode only.
2. Press the number buttons to enter the chapter number.
3. Press the ENTER or a (Play) button. Play starts from the selected
chapter.
15
Page 17

Picture zoom [DVD]
1. Press the SHIFT + 3 ZOOM buttons during normal, slow or still play.
- If you quit the screen, press the SHIFT + 3 ZOOM buttons.
2. Press the 4, a, 5 or b button, then the ENTER, or press the number
button to select the zoom point.
The screen is magnified. “ 1” appears briefly on the screen.
If necessary, press the 4, a, 5 or b button repeatedly to move the
screen.
3. Press the SHIFT + 3 ZOOM buttons again. The screen is magnified
more than “ 1”. “ 2” appears briefly.
4. Press the SHIFT + 3 ZOOM buttons to return to the original screen.
Note:
Picture zoom may not work on some discs.
Selecting the desired camera angle [DVD]
In the case of a DVD disc (multi angle) that contains scenes shot
simultaneously from multiple camera angles, it is possible to select the
desired camera angle.
Press the SHIFT + 1 ANGLE buttons repeatedly during play until the
desired angle appears.
Example:
Angle replay [DVD]
During Multi-angle play screen, press the SHIFT + 2 A.REPLAY buttons.
The unit skips back to last approximately 10 seconds, changes it to the
next camera angle and plays it, and continues play.
Repeat play
Press the REPEAT button during play. Each time the button is pressed,
the repeat mode changes as follows.
TV screen Operation
[DVD]
Chapter Repeat of chapter being played
Title Repeat of title being played
Off Repeat off mode
[VCD] [CD]
1 Repeat of track being played
All Repeat all tracks
Off Repeat off mode
During programmed play [VCD] [CD]
Program 1 Repeat of track being played
Program All Repeat all programmed tracks
Off Repeat off mode
Designated range repeat play (A-B Repeat)
1. Press the A-B REP button during play at the beginning of the section
you want to repeat (Point A). “ A-” appears on the screen.
2. Press the A-B REP button again at the end of the section (Point B).
“ B” appears.
The section between points A and B is played repeatedly.
3. To return to normal play, press the A-B REP button again.
Note:
Repeat play or A-B repeat play mode may not work correctly with some
discs.
Notes on using Video CD with PBC
To use the repeat play or A-B repeat play mode, select PBC off play mode
as follows.
In the stop mode, press the number buttons to select the track number
then press the a (Play) button.
Random play [CD]
1. Press the PROGRAM/RANDOM button once in the stop mode.
“Random” appears on the screen.
2. Press the a (Play) button to begin random play. The unit will
automatically select tracks at random.
Note:
The A-B REP and SEARCH MODE buttons do not work during random
play.
16
Page 18

Programmed play [VCD] [CD]
Up to 20 selections can be programmed.
Programming procedure
1. Press the PROGRAM/RANDOM button once (VCD) or twice (CD) in
the stop mode. The programme mode screen appears.
2. Press the number buttons to select the track number.
Example:
To select track No.3, press 0, then 3.
To select track No.24, press 2, then 4.
- If you make a mistake, press the CLEAR button.
3. Press the 5 button to move the highlighted box down.
Example:
Note:
- In some cases, the subtitle language is not changed to the selected
one.
- When a disc supporting closed caption is played, the subtitle and the
closed caption may overlap each other on the TV screen. In this case,
turn the subtitle off.
- When the desired language is not selected even if the button is
pressed, the language is not available on the disc.
- When the power is turned on or the disc is replaced, select the subtitle
language again.
- If the subtitle language is not necessary, press the S.T.ON/OFF
button to select “ Off”.
Selecting audio soundtrack language [DVD]
This operation works only with discs on which multiple audio soundtrack
languages are recorded.
4. Repeat step 2 - 3 as above to select other tracks.
5. Press the a (Play) button to start play.
When all programmed selections have played, the unit stops
automatically.
- The programme contents are retained in memory.
Note:
To play the programme again, press the PROGRAM/RANDOM button
once (VCD) or twice (CD) to call up the programme mode screen, then
press the a (Play) button.
To clear the programme one by one
In the programme mode, press the 4, a, 5 or b button to select the track
number. Then press the CLEAR button.
To clear all the programmes
In the programme mode, press the 4 button to select “All Clear”. Then
press the ENTER button.
To change the programme
1. In the programme mode, press the 4, a, 5 or b button to select the
track number.
2. Press the number buttons to enter the track number to be replaced.
Press the PROGRAM/RANDOM button to quit the programme mode
screen.
Selecting subtitle language [DVD]
This operation works only with discs on which multiple subtitle languages
are recorded.
1. Press the S.T.ON/OFF button during play. The subtitle language mark
appears on the screen (Example: 1/3 en). If “ Off” appears,
press the button again.
2. Press the S.T.CH button repeatedly until the desired subtitle language
appears on the screen.
Example:
Hello!
Press the SHIFT + 5 AUDIO buttons repeatedly during play until the
desired language appears on the screen.
Example:
Note:
- When the desired language is not selected even if the button is
pressed, the language is not available on the disc.
- When the power is turned on or the disc is replaced, select the
language again.
- If the language is not recorded on the disc, only the available language
on the disc will be heard.
Holà! ¡Hola!
French
DTS sound
Changing the audio channel output [VCD]
During VCD play, press the SHIFT + 5 AUDIO buttons to select an audio
channel.
Left Mono v Right Mono v Stereo v ...
French
After few seconds, “ ” disappears.
17
Page 19

Selecting on-screen information
Press the ON SCREEN button repeatedly to show the disc information
(Title, Chapter, Title elapsed playing time, Language, etc.).
Example for DVD:
1. Press the ON SCREEN button during play.
Chapter remaining playing time
Title elapsed playing time
2. Press the ON SCREEN button again.
Chapter remaining playing time
Title elapsed playing time
Chapter number
Title number
Camera angle
A kind of audio
Subtitle language
Audio language
3. Press the ON SCREEN button again to close the disc information.
Example for VCD:
1. Press the ON SCREEN button during play.
Track elapsed playing time
2. Press the ON SCREEN button again.
Track elapsed playing time
Track number
3. Press the ON SCREEN button again to close the disc information.
Note:
For Audio CD, please refer to “Example for VCD” as above.
Selecting picture mode
Press the PICTURE MODE button. Each time the button is pressed, the
picture mode changes as follows:
Standard v Mild v Black and White v ...
18
Page 20

INITIAL SETTINGS
Once the initial settings have been completed, the unit can always be
operated under the same conditions.
The settings will be retained in the memory until they are changed, even
if the power is turned off.
Setting language
1. Press the SETUP button in the stop mode. The setup screen appears
and “Language” is highlighted.
2. Press the ENTER button. “Language” screen appears.
3. Press the 5 or 4 button to select the item (highlighted).
Example: To set “OSD” (On screen display)
4. Press the ENTER button. The submenu appears.
Example:
Setting display
1. Press the SETUP button in the stop mode. The setup screen appears.
2. Press the a (Directional arrow) button to select “Display”, then press
the ENTER button. “Display” screen appears.
3. Press the 5 or 4 button to select the item (highlighted), then press the
ENTER button. The submenu appears.
Example: To set “TV Type”
4. Press the 5 or 4 button to select the submenu (highlighted).
Example: To select “TV Type: 4:3 PS”
5. Press the 5 or 4 button to select the language (highlighted).
6. Press the ENTER button. The selected language remains.
7. Repeat steps 3 - 6 for other items.
Note:
If “Others” is selected, enter the language code. (See “LANGUAGE
CODE LIST” on Page 21.)
8. Press the 4 button to skip back to the setup screen (or press the
SETUP button to quit the setup screen).
Note:
- You cannot switch audio sound track languages if there is only one
language recorded on the disc.
- When you play a DVD disc, the unit automatically displays the preselected subtitle language if it is included on the disc.
For improvement, on-screen displays subject to change without
notice.
5. Press the ENTER button. (In this example, “TV Type: 4:3 PS”
remains.)
6. Repeat steps 3 - 5 for other items.
7. Press the 4 button to skip back to the setup screen (or press the
SETUP button).
TV Type:
Select the appropriate setting for your TV screen size.
4:3 LB (Letterbox):
Select when a conventional TV set is connected.
When the wide screen disc is played, the black
bands appear at the top and bottom of screen.
4:3 PS (Panscan):
Select when a conventional TV set is connected.
When the wide screen disc is played, it displays
pictures cropped to fill your TV screen. The left
and right edges are cut off.
16:9 :
Select when a wide screen TV set is connected.
Played in “FULL” size. (Setting the wide screen
TV to “FULL” mode is also necessary.)
Note:
- The screen size may differ depending on the DVD discs.
- If you select “16:9” to get rid of the black bands on screen when wide
screen disc is played, picture may be slightly distorted.
- In some discs, even if “4:3 PS” is selected, the black bands may
remain on the screen.
Cut off
19
NTSC Disc:
Select the video output signal format to “PAL 60” or “NTSC” when playing
back the NTSC discs.
Page 21

Setting audio
The sound from speakers can reach the listening position at different times
depending on the speaker placements. You can allow for this difference
by changing the delay time of the centre and surround speakers.
You also can change the dynamic range control (DRC).
1. Press the SETUP button in the stop mode. The setup screen appears.
2. Press the a (Directional arrow) button to select “Audio”, then press the
ENTER button. “Audio” screen appears.
Example:
3. Press the ENTER button to select “Audio DRC”. The submenu
appears.
4. Press the 5 or 4 button to select “On” or “Off” as desired.
On:It will compress the dynamic range. It may have no effect with
some discs.
Off:Sound with a wide dynamic range.
5. Press the ENTER button. “Audio DRC: On” or “Audio DRC: Off”
remains.
6. Press the 5 button to select “Center Delay”, then press the ENTER
button. The submenu appears.
7. Press the 5 or 4 button to select the centre speaker delay time.
Centre speaker delay time
If D1 D2, set the delay time to “0ms”.
If D1>D2, set the delay time as follows:
Difference between D1 and D2 Delay time
Approx. 30cm 1ms
Approx. 60cm 2ms
Approx. 90cm 3ms
Approx. 120cm 4ms
Approx. 150cm 5ms
Centre speaker
Front left speaker Front right speaker
Setting parental
1. Press the SETUP button in the stop mode. The setup screen appears.
2. Press the a (Directional arrow) button to select “Parental”, then press
the ENTER button. “Parental” screen appears.
3. Press the 5 button to select “Level”.
4. Press the ENTER button repeatedly to select the parental lock level
(“Level: Off, 1 ~ 8”).
Example: To set “Level 1”
5. Press the 4 button to select “Password”.
6. Enter a number in 4 digits.
Note:
If you make a mistake, press the CLEAR button.
7. Press the ENTER button. The password is now set.
Note:
If you do not set it, Parental control does not work, and it returns to the
initial settings.
8. Press the SETUP button. The setup screen disappears.
Surround left
speaker
8. Press the ENTER button. “Center Delay” and the selected delay time
remain.
9. Press the 5 button to select “Surr. Delay”, then press the ENTER
button. The submenu appears.
10. Press the 5 or 4 button to select the surround speaker delay time.
Surround speaker delay time
If D1 D3, set the delay time to “0ms”.
If D1>D3, set the delay time as follows:
Difference between D1 and D3 Delay time
Approx. 150cm 5ms
Approx. 300cm 10ms
Approx. 450cm 15ms
11. Press the ENTER button. “Surr. Delay” and the selected delay time
remain.
12. Press the 4 button to skip back to the setup screen (or press the
SETUP button).
Surround right
speaker
Parental control
MPAA (Motion Picture Association of America) guideline is a rating
system that provides advanced cautionary information to parents about
the content of movie programmes.
The parental lock level is equivalent to the following MPAA rating system.
Level 7: NC-17 (No one 17 and under admitted)
Level 6: R (Restricted)
Level 4: PG-13 (Parents strongly cautioned)
Level 3: PG (Parental guidance suggested)
Level 1: G (General audiences)
Some DVD discs contain a restriction level which enables parents to
prevent playback of discs by children. This unit is equipped with a
password designed to prevent children changing the level.
You cannot play DVD discs rated higher than the level you selected unless
you cancel the parental lock function.
For example, when you select level “5”, the unit will not play discs with
ratings of “6”, “7” or “8”. The information will appear on the TV screen.
If you forget the password…
Enter “788444” even if 4 digits “----” appears, then press the ENTER button
to clear the current password. Enter a new password and set the parental
lock level again.
Note:
DVD discs may or may not respond to the parental lock settings. Make
sure this function works with your DVD discs.
20
Page 22

LANGUAGE CODE LIST
Enter the appropriate code number for the initial settings “Audio”, “Subtitle” and “DVD Menu”.
Code Language
6565 aa Afar
6566 ab Abkhazian
6570 af Afrikaans
6577 am Amharic
6582 ar Arabic
6583 as Assamese
6589 ay Aymara
6590 az Azerbaijani
6665 ba Bashkir
6669 be Byelorussian
6671 bg Bulgarian
6672 bh Bihari
6673 bi Bislama
6678 bn Bengali; Bangla
6679 bo Tibetan
6682 br Breton
6765 ca Catalan
6779 co Corsican
6783 cs Czech
6789 cy Welsh
6865 da Danish
6869 de German
6890 dz Bhutani
6976 el Greek
6978 en English
6979 eo Esperanto
6983 es Spanish
6984 et Estonian
6985 eu Basque
7065 fa Persian
7073 fi Finnish
7074 fj Fiji
7079 fo Faeroese
7082 fr French
7089 fy Frisian
7165 ga Irish
7168 gd Scots Gaelic
7176 gl Galician
7178 gn Guarani
7185 gu Gujarati
7265 ha Hausa
7273 hi Hindi
7282 hr Croatian
7285 hu Hungarian
7289 hy Armenian
7365 ia Interlingua
Abbreviation of
the language
Code Language
7369 ie Interlingue
7375 ik Inupiak
7378 in Indonesian
7383 is Icelandic
7384 it Italian
7387 iw Hebrew
7465 ja Japanese
7473 ji Yiddish
7487 jw Javanese
7565 ka Georgian
7575 kk Kazakh
7576 kl Greenlandic
7577 km Cambodian
7578 kn Kannada
7579 ko Korean
7583 ks Kashmiri
7585 ku Kurdish
7589 ky Kirghiz
7665 la Latin
7678 ln Lingala
7679 lo Laothian
7684 lt Lithuanian
7686 lv Latvian, Lettish
7771 mg Malagasy
7773 mi Maori
7775 mk Macedonian
7776 ml Malayalam
7778 mn Mongolian
7779 mo Moldavian
7782 mr Marathi
7783 ms Malay
7784 mt Maltese
7789 my Burmese
7865 na Nauru
7869 ne Nepali
7876 nl Dutch
7879 no Norwegian
7967 oc Occitan
7977 om (Afan) Oromo
7982 or Oriya
8065 pa Punjabi
8076 pl Polish
8083 ps Pashto, Pushto
8084 pt Portuguese
8185 qu Quechua
8277 rm Rhaeto-Romance
Abbreviation of
the language
Code Language
8278 rn Kirundi
8279 ro Romanian
8285 ru Russian
8287 rw Kinyarwanda
8365 sa Sanskrit
8368 sd Sindhi
8371 sg Sangro
8372 sh Serbo-Croatian
8373 si Singhalese
8375 sk Slovak
8376 sl Slovenian
8377 sm Samoan
8378 sn Shona
8379 so Somali
8381 sq Albanian
8382 sr Serbian
8383 ss Siswati
8384 st Sesotho
8385 su Sundanese
8386 sv Swedish
8387 sw Swahili
8465 ta Tamil
8469 te Telugu
8471 tg Tajik
8472 th Thai
8473 ti Tigrinya
8475 tk Turkmen
8476 tl Tagalog
8478 tn Setswana
8479 to Tonga
8482 tr Turkish
8483 ts Tsonga
8484 tt Tatar
8487 tw Twi
8575 uk Ukrainian
8582 ur Urdu
8590 uz Uzbek
8673 vi Vietnamese
8679 vo Volapük
8779 wo Wolof
8872 xh Xhosa
8979 yo Yoruba
9072 zh Chinese
9085 zu Zulu
Abbreviation of
the language
21
Page 23

MP3 CD OPERATION
Before starting
This unit can play back the CD that has recorded music data, MP3 files.
- Select “DVD/CD” function.
- The file system is ISO9660 level 1 and level 2.
- If the CD has both audio CD tracks and MP3 files, only audio CD tracks
are played.
- It would take 30 seconds or more for this unit to read MP3 files
depending on its structure.
- This unit can recognize up to 256 files or folders per disc. The CD with
257 files or folders and over is not available to this unit.
- MP3 CDs may not be played in the recorded order.
1. Please use the MP3 software with the function that can record
data alphabetically or numerically.
2. Please refrain from making many sub-folders by preference.
However, some CD-R/RWs and MP3 CDs cannot be played back
depending on the recording conditions.
Before playing back MP3 files, please read the following.
MP3 CD
- MP3 files must have the extension letters, “.MP3” or “.mp3”.
- Standard, sampling frequency, and the bit rate:
MPEG-1 Audio
32kHz, 44.1kHz, 48kHz
32kbps ~ 320kbps (constant bit rate or variable bit rate)
- The recommend recording setting for a high-quality sound is 44.1kHz
of sampling frequency and 128kbps of constant bit rate.
Limitations on display
- Available letters for display are the following: capital or small alphabets
of A through Z, and numbers of 0 through 9.
- Other letters than those above are replaced in “-” (hyphen).
Note:
- The CD has no music data or non-MP3 files cannot be played back.
- The WMA files cannot be played back.
MP3 CD play
1. Load the MP3 CD.
“FILE LIST” appears on the display and a table of contents in the first
directory appears on the screen.
Example:
File information
2. Press the 4, a, 5 or b button to move the highlighted box to the
desired file.
- To go on to the next or previous directory, press the 4, a, 5 or b
button.
- To go back to the previous directory, press the RETURN button.
- In some discs, if the MENU button is pressed, it goes back to the
first directory.
3. Press the ENTER or a (Play) button to start play.
The letter’s colour in the highlighted box turns green.
Example: (the second directory)
Current file elapsed playing time
Total file number
Current file number
To stop play, press the n button.
If the disc is mixed with MP3 and JPEG files…
- If you start from the MP3 file, the unit plays MP3 files. The JPEG files
are automatically skipped.
- If you start from the JPEG file, the unit plays the JPEG files. The MP3
files are automatically skipped.
22
Page 24

PICTURE CD OPERATION
You can view digital images from KODAK Picture/JPEG files.
- Select “DVD/CD” function.
- The file system is ISO9660 level 1 and level 2.
- If the CD has both audio CD tracks and JPEG files, only audio CD
tracks are played.
- It would take 30 seconds or more for this unit to read JPEG files
depending on its structure.
- This unit can recognize up to 256 files or folders per disc. The CD with
257 files or folders and over is not available to this unit.
- JPEG CDs may not be played in the recorded order.
- JPEG files must have the extension letters, “.JPG” or “.jpg”.
- JPEG resolution is up to 5760 x 3840.
KODAK Picture CD play
With KODAK Picture CD, it is easy to turn film into pictures you can email
from your PC and view on the unit.
Just bring your film in for processing, and check the box for KODAK Picture
CD. You will get back your prints and negatives as usual - plus you will get
a special CD that contains your pictures along with software that lets you
view, enhance, share, and print your pictures from your PC and view them
on the unit.
1. Load the KODAK Picture CD.
“PHOTO” appears on the display and the first thumbnail pictures
(maximum 9-picture) appear on the screen.
Example:
While the thumbnail pictures are displayed, the disc is rotating. Press the
n or MENU button to stop the disc. The file list appears.
Example:
To start the slide show from the file list:
1. Press the 4, a, 5 or b button to select the desired file.
2. Press the ENTER or a (Play) button to start the slide show.
The file list appears after the last picture has displayed.
Note:
- FUJICOLOR CD can be used.
- Some discs cannot be played back depending on the recording
conditions.
KODAK and Picture CD are registered trademarks of Eastman Kodak
Company.
2. Press the 4, a, 5 or b button to move the cursor to the desired picture.
- To go to the next or previous thumbnail pictures, press the e or
f button.
3. Press the ENTER or a (Play) button to start the slide show from the
selected picture.
Press the k button during the slide show to pause. Press the a (Play)
(or k) button to continue.
If the picture appears upside down or sideways,
1) Press the k button, if necessary.
2) Press the SHIFT + 1 ANGLE buttons repeatedly until it’s right side
up. “ ”, “ ”, “ ” or “Normal” appears briefly on the
screen.
3) Press the a (Play) (or k) button to skip to the next picture and
continue the slide show.
If you press the e or f button during the slide show, it skips to the
next picture or previous picture.
After the last picture has displayed, the last thumbnail pictures appear.
- To stop the slide show, press the n button. The thumbnail pictures
appear.
- If the TOP MENU button is pressed during the slide show, the
thumbnail pictures appear.
JPEG CD play
You can also view digital images from JPEG files on disc created by your
PC.
- Some JPEG files cannot be played back depending on the recording
conditions.
1. Load the JPEG CD.
“FILE LIST” appears on the display and the file list appears on the
screen.
Example:
2. Press the 4, a, 5 or b button to select the desired file.
3. Press the ENTER or a (Play) button to start the slide show from the
selected file. “PHOTO” appears on the display.
The file list appears after the last file has displayed.
- To stop the slide show, press the n button. The file list appears.
Picture zoom
1. Press the k button at the desired picture (KODAK Picture CD or JPEG
CD).
2. Press the SHIFT + 3 ZOOM buttons.
3. Press the 4, a, 5 or b button, then the ENTER, or press the number
button. The picture is magnified.
4. Press the a (Play) button to resume the slide show.
23
Page 25

LISTENING TO THE RADIO
To turn the unit on and listen to the last received station, press the
TUNE/BAND button.
Automatic/Manual tuning
1. Press the TUNE/BAND button to select the band (FM or AM TUNER).
2. Automatic tuning
Press the TUNE “+” or “–” button for at least 1 second to tune in a
station. The unit will scan up or down the band and receive the next
receivable station. Press the button again to continue.
Manual tuning
Press the TUNE “+” or “–” button briefly until the desired frequency is
displayed.
To preset stations
Up to 24 FM and 12 AM stations can be preset.
Automatic presetting (APT)
1. Press the TUNE/BAND button to select the band.
2. Press the PROGRAM/RANDOM button for at least 3 seconds.
“P - -” then “APT” blinks. The automatic tuning mode is set and
automatic presetting begins from the low end of the band.
When 24 FM or 12 AM stations have been preset or the high end of
the band is reached, automatic presetting stops. “APT” disappears
and the station memorized on the preset number 1 will be heard.
3. To preset stations on the other band, follow steps above.
Note:
If APT is activated, all previously programmed stations of the band will be
cleared and new stations will be programmed.
Manual presetting
1. Tune in the station to be preset.
2. Press the PROGRAM/RANDOM button.
3. While “P - -” is blinking, press the PRESET “+” or “–” button to select
the number to be preset.
- The number buttons can also be used. Example: Press 9.
4. While it is blinking, press the ENTER button.
- In this example, “FM 103.25 MHz” is preset on the preset number
9.
5. Repeat steps above to add more preset stations.
- When presetting a new station, the previous preset station is cleared.
Listening to preset stations
1. Press the TUNE/BAND button to select the band.
2. Press the PRESET “+” or “–” button briefly to select the preset number.
- The number buttons can also be used. Example: Press 9 then
ENTER.
Preset scan tuning
1. Press the TUNE/BAND button to select the band.
2. Press the PRESET “+” button for at least 1 second. The preset number
appears. Each of the preset stations is tuned in for 5 seconds.
3. When the desired station has been tuned in, press the PRESET “+”
button again to keep the reception locked at that station.
To receive FM stereo broadcasts
Make sure that “M” is not displayed. If “M” appears, press the FM MODE
button to turn the “M” indication off.
You enjoy FM stereo sound when an FM stereo broadcast is received.
- If the receiving condition is not good, press the FM MODE button to
change to monaural (M) mode. The reception may be improved but
not in stereo mode.
When beat interference is heard
A high-pitched noise called “beat” is sometimes heard during reception of
radio broadcasts. If this occurs;
While pressing the n button on the main unit, press the TEST button on the
remote control to select “bc-A” or “bc-B”. Select the setting that gives the
best results.
Changing the AM reception frequencies
It is not necessary to perform this procedure in the Europe.
1. Press the TUNE/BAND button to select “AM TUNER”.
2. While pressing the n button on the main unit, press the PROGRAM/
RANDOM button on the remote control.
522 - 1611 kHz (9 kHz steps)
wv
520 - 1610 kHz (10 kHz steps)
LISTENING TO OTHER SOURCES
Listening to the TV connected to the AV EURO (RGB OUT)/TV
(AUDIO) IN socket
1. Press the FUNCTION button to select “TV”.
2. Follow the instructions supplied with the TV.
Listening to the audio/video equipment connected to the VIDEO
(AUDIO) IN sockets
1. Press the FUNCTION button to select “VIDEO”.
2. Follow the instructions supplied with the audio/video equipment.
24
Page 26

SLEEP TIMER OPERATION
The sleep timer automatically switches off the power after a preset time
has elapsed. The volume will gradually be reduced (fade-out) during the
1-minute period before the unit turns off. There are 4 time periods
available: 30, 60, 90 and 120 minutes.
Press the SHIFT + 6 SLEEP buttons repeatedly to select the desired sleep
time. The selected time blinks on the display. After several seconds, the
original display returns and the brightness of the display reduces.
To check the remaining sleep time
Press the SHIFT + 6 SLEEP buttons once. After several seconds, the
original display returns.
To release the sleep timer while in operation
Press the SHIFT + 6 SLEEP buttons until “SLEEP OFF” appears. The
timer is also released if the power is switched off.
MAINTENANCE
Cleaning the unit
Clean the outside of the unit with a clean soft cloth moistened with lukewarm water. Do not use benzene, thinner or alcohol since they will mar the finish
of the surfaces.
TROUBLESHOOTING GUIDE
SYMPTOM
POSSIBLE CAUSE
CORRECTIVE ACTION
No picture.
The wrong function is selected.
Select the correct function.
No disc is loaded or an unplayable disc is loaded.
Load a disc or load a playable disc. (Check the disc logo, type,
colour system and regional code.)
The TV is not set to receive signal from the unit.
Select the correct input function on the TV.
No sound.
The wrong function is selected.
Select the correct function.
Volume control is set to minimum.
Turn up the volume.
The playback picture is poor.
An unplayable disc is loaded.
Load a playable disc. (Check the disc logo, type, colour system
and regional code.)
“ ” appears on the TV screen.
The selected function does not operate on the disc now.
The feature or action cannot be completed at this time because:
- The feature is not available at the moment.
- The DVD software restricts it.
- The DVD software does not support the feature (e.g., angles).
SYMPTOM
POSSIBLE CAUSE
CORRECTIVE ACTION
The unit does not start play.
No disc is loaded.
Load a disc.
An unplayable disc is loaded.
Load a playable disc. (Check the disc logo, type, colour system
and regional code.)
The disc is loaded with the label side down.
Load the disc correctly.
The disc is dirty.
Clean the disc or replace it.
“Parental” is set.
Cancel the parental lock function or change the rating level. Reset
it after play.
The operation or display is not normal.
The memory must be reset.
1. Disconnect the mains lead.
2. Reconnect the mains lead.
3. Resume operation.
The remote control does not work properly.
The batteries in the remote control are weak, or installed incorrectly.
Check the battery polarity (+ or –).
Replace the batteries.
The remote control is not aimed at the remote sensor window.
Aim the remote control at the remote sensor window.
25
Page 27

SPECIFICATIONS
Amplifier
Main amplifier
Stereo mode: 50 W/ch (at 8 Ω, 1 kHz, 10% distortion)
Dolby Digital mode: 50 W/ch (at 8 Ω, 1 kHz, 10% distortion, with the
other amplifiers off)
Centre amplifier: 50 W (at 8 Ω, 1 kHz, 10% distortion, with the other
amplifiers off)
Surround amplifier: 50 W/ch (at 8 Ω, 1 kHz, 10% distortion, with the other
amplifiers off)
Subwoofer amplifier: 50 W (at 8 Ω, 100 Hz, 10% distortion, with the other
amplifiers off)
Inputs
VIDEO (AUDIO) IN: 500 mV/50 kΩ
Input/Output
AV EURO (RGB OUT)/TV (AUDIO) IN: For Euro-AV/Scart lead
Outputs
SPEAKERS:
FRONT (L/R): 8 Ω
CENTER: 8 Ω
SURROUND (L/R): 8 Ω
SUBWOOFER: 8 Ω
VIDEO OUT: 1.0 Vp-p (75 Ω)
S-VIDEO OUT:
Y: 1.0 Vp-p (75 Ω)
C: 0.3 Vp-p (75 Ω) PAL, 0.286 Vp-p (75 Ω) NTSC
COMPONENT VIDEO OUT (NTSC DISC ONLY):
Y: 1.0 Vp-p (75 Ω)
PB, PR: 0.7 Vp-p (75 Ω)
PHONES: 8 - 32 Ω
Tuner
Reception frequency:
FM: 87.5 - 108 MHz
AM: 522 - 1611 kHz
General
Power requirements: AC 230 V, 50 Hz
Power consumption:
150 W
Less than 2 W (standby mode)
Dimensions: 430(W) x 65(H) x 324(D) mm
Weight: 5.9 kg
Satellite speaker (SX-TS780S)
Centre and front speakers … magnetic shield
Surround speakers … non-magnetic shield
Unit used: 8 cm cone type, full range
Maximum power handling capacity: 70 W (peak)
Nominal impedance: 8 Ω
Dimensions: 91(W) x 155(H) x 105(D) mm
Weight: 0.7 kg (per speaker)
Subwoofer (SX-TS780W)
Unit used: 13 cm cone type (non-magnetic shield)
Maximum power handling capacity: 70 W (peak)
Nominal impedance: 8 Ω
Dimensions: 230(W) x 248(H) x 280(D) mm
Weight: 3.2 kg
Specifications subject to change without notice.
DVD player
Playback standard: PAL or NTSC
Laser:
Semiconductor laser, wavelength: 650/790 nm
Laser output (Continuous wave max.): 0.5 mW
Signal to noise ratio: More than 105 dB
Wow and flutter: Below measurable level
26
Page 28

GUARANTEE TO CUSTOMER
Sanyo Europe Ltd. (the Company) guarantees to the initial retail
purchaser that if this equipment is or becomes defective and that,
in the opinion of the Company, the defect is due to faulty material
or workmanship the Company will, for a period of 12 calendar
months from the date of sale to the original purchaser repair or
replace, at its sole option, free of charge, any such defective
component part of the equipment, always provided that: -
1. The equipment has at all times been used in accordance with
the operating instructions issued by the Company, and has not
been connected to an electrical mains supply for which it has not
been adjusted.
2. Accidental damage, or damage caused by negligence or
misuse by the user, including leakage from exhausted batteries, is
specifically excluded.
3. Unauthorised repairs, or any modification to the equipment
which has not been expressly approved by the Company, shall
render this guarantee null and void.
4. Failure due to fair wear and tear of any item, such as batteries,
record playing styli, and tape recording, playback and erase heads
is specifically excluded.
Thank you for buying Sanyo. This equipment should give you
many years of pleasure and faithful service but in the event that a
fault occurs, the following notes for your guidance may be helpful:-
1. PLEASE RETAIN YOUR PURCHASE RECEIPT WHICH WILL
BE REQUIRED FOR SERVICE DURING GUARANTEE.
2. If your Sanyo equipment proves faulty during the period of
guarantee, take it or send it back to the dealer who originally
supplied it together with this guarantee and the proof of purchase.
We have made arrangements with our approved dealers under
which they will carry out in-guarantee service repairs on our behalf.
In this way, we hope to reduce to a minimum the amount of time
you will be without your equipment.
3. If for some reason it is impossible to return the equipment to the
original supplies, please contact our Consumer Relations Department at the address below for further advice.
4. Should the equipment require servicing after the expiry of the
guarantee period, take or send it to the original supplier or any
other Sanyo dealer. He will be pleased to give you a quotation for
the repair. If you are in any doubt about what to do, write to us at
the address below or telephone:
This guarantee is not transferable and is only applicable within the
United Kingdom (and the Republic of Ireland). Nothing in this
express guarantee affects the statutory rights available to the
purchaser of this equipment.
Note: This guarantee supersedes any other form of guarantee
that may inadvertently have been enclosed with or attached to the
product. (August 1978).
Consumer Relations Department,
Sanyo Europe Ltd.,
Sanyo House
Otterspool Way, Watford,
Hertfordshire WD2 8JX
Tel: Watford 246363
R5
(UK) 1AD6P1P2006-A
SANYO Electric Co., Ltd.
 Loading...