

Page 1
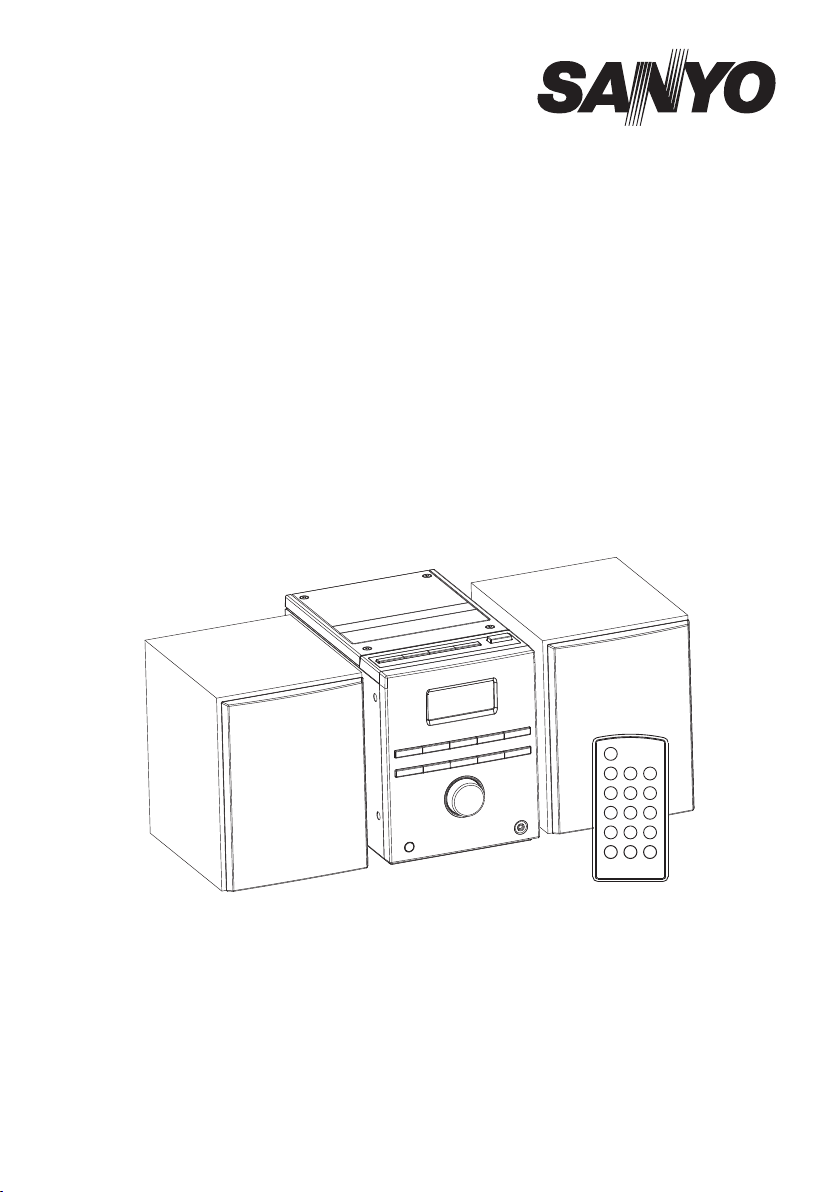
INSTRUCTION MANUAL
Micro Hi-Fi System with DAB+/FM
DC-DB10
Page 2

TABLE OF CONTENTS
SAFETY PRECAUTIONS....................................................................................... .. .. .. .. .. .. .. .. .. .. .. 2
FEATURES AND CONTROLS
REMOTE ...................................................................................................................4
PUTTING THE BATTERY INTO THE REMOTE CONTROL UNIT......................................................5
REMOTE CONTROL OPERATION...............................................................................................5
INSTALLING THE SPEAKER WIRE TO THE SPEAKER TERMINALS.
OPERATING THE UNIT
CLOCK SETTING
LISTENING TO YOUR RADIO......................................................................................................5
STORING AND RECALLING PRESET STATIONS
FACTORY RESET
LISTENING TO YOUR COMPACT DISCS
TIMER FUNCTION
SLEEP FUNCTION
MUTE FUNCTION (remote control only)
HEADPHONE JACK
MAINTENANCE
COMPACT DISC
SPECIFICATIONS
TROUBLE SHOOTING
CONTROL
.......................................................................................................................5
.......................................................................................................................8
..................................................................................................................... 9
....................................................................................................................10
..................................................................................................................10
........................................................................................................................10
....................................................................................................................... 11
.....................................................................................................................11
...................................................................................................... 4
............................................. 5
...............................................................................................................5
..........................................................................7
......................................................................................8
......................................................................................10
.............................................................................................................. 12
1
Page 3

SAFETY PRECAUTIONS
To achieve the utmost in enjoyment and performance, please read this manual carefully before attempting
to operate the unit in order to become familiar with its features, and assure you years of faithful, trouble
free performance and listening pleasure.
Important Notes
* Read instructions - All the safety and operating instructions should be read before the apparatus is operated
* Retain instructions - The safety and operating instructions should be retained for future reference.
* Cleaning Unplug this product from the wall outlet before cleaning. Do not use liquid cleaners or aerosol
cleaners. Use a damp cloth for cleaning.
* Attachment Do not use attachment not recommended by the product manufacturer as they may cause hazards.
* Power Sources -The apparatus should be connected to a power supply only of the type described in the
operating instructions of as marked on the apparatus.
* “To be completely d the power input, the mains plug of apparatus shall be disconnected
from the mains.” as the disconnect devices is the mains plug of apparatus.
* Power-Cord Protection - Power supply cords should be routed so that they are not likely to be walked on
or pinched by items placed upon or against them, paying particular attention to cords at plugs,
convenience receptacles and the point where they exit from the apparatus
* During lntended Use - The mains plug of apparatus should be easily accessed.
* Nonuse Periods - The power cord of the apparatus should be unplugged from the outlet when left
unused for a long period of time.
* This apparatus shall not be exposed to dripping or splashing water and that no object filled with liquids
such as vases shall be placed on the apparatus.
* The apparatus should be situated so that its location or position does not interfere with its proper
ventilation. The ventilation should not be impeded by covering the ventilation openings with items
such as newspaper, table-cloths, curtains etc.
* Do not install this apparatus in a confined space, such as a book case or built-in cabinet. Minimum
distance (about 100mm) around the apparatus for sufficient ventilation.
* No naked flame sources such as lighted candles should be placed on the apparatus.
* Do not use where there are extremes of temperature (below or exceeding 35 C).
* Sudden changes in the ambient temperature may cause condensation to form on the optical lens inside
the unit. lf this happens, take out the disc, leave the unit for about 1 hour, and then proceed to operate.
* Because of the CD player’s extremely low noise and wide dynamic range, there might be a tendency to
set the volume on the amplifier unnecessarily high.
* Excessive sound pressure from earphones and headphones can cause hearing loss.
* Attention should be drawn to the environmental aspects of battery disposal.
* The caution marking was located at the bottom enclosure of the apparatus.
* The nameplate marking was located at the back enclosure of the apparatus.
* The use of apparatus in moderate climates.
isconnected
5°C °
ESD Remark: In case of malfunction due to electrostatic discharge, just reset the product
(reconnect of power source may be required) to resume normal operation.
Should any trouble occur, remove the power source and refer servicing to qualified personnel.
WARNING : TO PREVENT FIRE OR SHOCK HAZARD, DO NOT EXPOSE THIS APPLIANCE TO
DRIPPING OR SPLASHING.
For safety reasons, do not remove any covers or attempt to gain access to the inside of the product.
Refer any servicing to qualified personnel.
Do not attempt to remove any screws, or open the casing of the unit; there are no user serviceable parts
inside, refer all servicing to qualified service personnel.
Note:
- This unit will become warm when used for a long period of time. This is normal and does not indicate a
Problem with the unit.
- The CD player includes micro-processors which may malfunction as a result of external electrical Interference
or noise. If the CD player is not working properly, disconnect the power source and then reconnect it.
- Excessive sound pressure from earphones and headphones can cause hearing loss.
- If an unusual conditions occurs in the display window or key button, switch the unit off, then turn on the unit
again.
2
Page 4
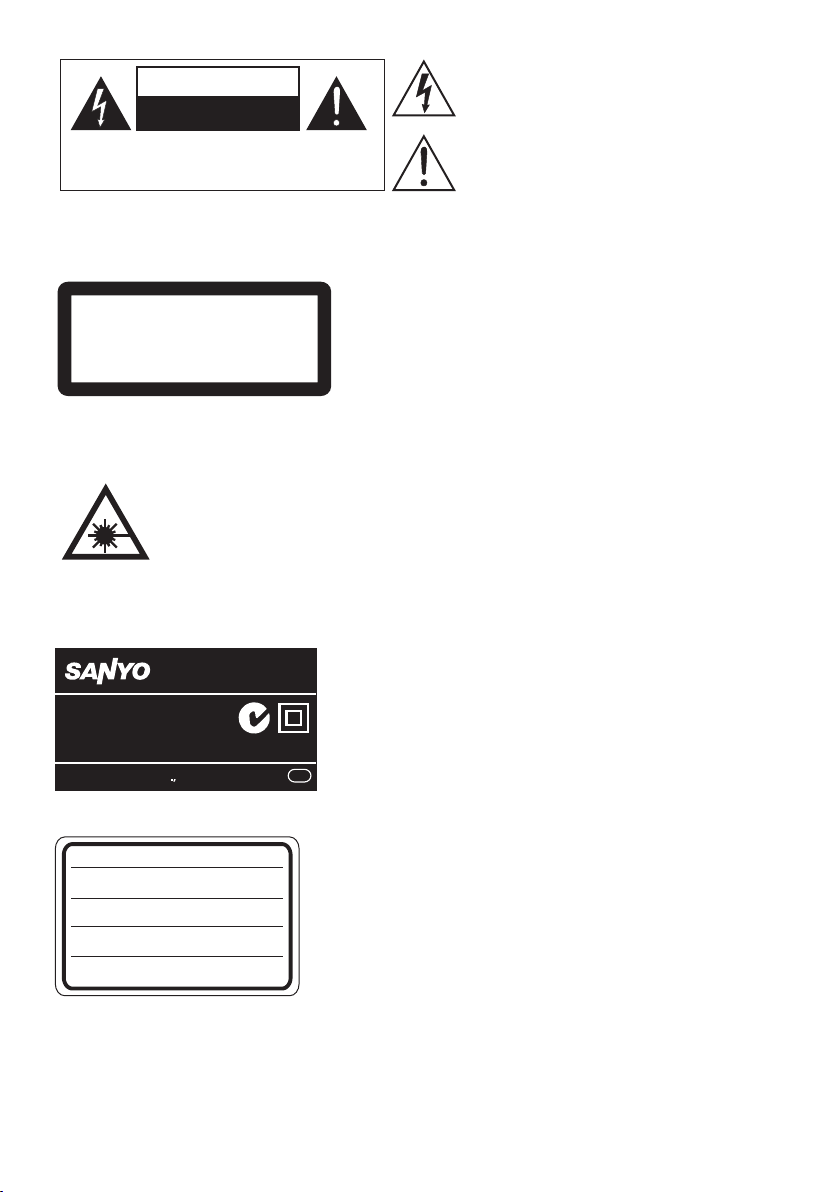
CAUTION
RISK OF ELECTRIC SHOCK
DO NOT OPEN
WARNING: SHOCK HAZARD - DO NOT OPEN
AVIS:RISQUE DE CHOC ELECTRIQUE
You can see this carved picture on the
bottom of the main unit.
NE PAS OUVRIR
This symbol indicates that dangerous
voltage constituting a risk of electric
shock is present within this unit.
This symbol indicates that there are
important operating and maintenance
instructions in the information
accompanying this unit.
CLASS 1 LASER PRODUCT
KLASS 1 LASER APPARAT
LUOKAN 1 LASER LAITE
KLASSE 1 LASER PRODUKT
You can see this carved picture on the
bottom of the main unit.
LASER SAFETY
This unit employs a laser. Only qualified service personnel should attempt to repair.
You can see this
label in the CD
compartment.
POWER CONSUMPTION: 25W
DAB /DAB/FM & CD MICRO SYSTEM
POWER CONSUMPTION: 25W
AC ~ 240V 50Hz
AC ~ 240V 50Hz
FREQUENCY RANGE:
DAB:174 - 240 MHz
FREQUENCY RANGE: DAB 174~240 MHz
DAB+ 174.928~239.200 MHz
FM:87.5 - 108 MHz
FM 87.5~108.0 MHz
AC:230V 50 Hz
SANYO Electric Co.,Ltd. MADE IN CHINA
SANYO Electric Co Ltd. MADE IN CHINA
MAX POWER CONSUMPTION: 25WATTS
CAUTION: INVISIBLE LASER RADIATION WHEN OPEN AND
INTERLOCKS DEFEATED. AVOID EXPOSURE TO BEAM.
CUIDADO: PRODUTO LASER DE CLASSE 1 RADIAÇÃO
LASER INVISÍVEL CUANDO ABERTO E SE O DE SEGURANÇA
ESTIVER DEFEITUOSO A EXPOSIÇÃO AOS RAIOS.
ADVARSEL: USYNLIG LASERSTRALING VED ÃBNING NÃR
SIKKERHEDSAFBRYDERE ER UDEAF FUNKTION UNDGA
UDSÆTTELSE FORSTRÃLING,
VARO: AVATESSA JA SUOJALUKITUS OHITETTAESSA OLET
ALTTIINA NÄKYMÄTTÖMÄLLE LASERSÄTEILYLLE
ÄLÄ KATSO SÄTEESEENI
VARNING: OSYNLIG LASERSTRÄLNING NÄR DENNA DEL
ÄR ÖPPNAD OCHSPÄRREN ÄR URKOPPLAD. BETRAKTA
EJSTRÄLENI
DAB /DAB/FM & CD MICRO SYSTEM
WARNING: RISK OF INVISIBLE LASER RADIATION WHEN CD LID IS
OPEN OR INTERLOCKS FALL.AVOID DIRECT EXPOSURE TO THE
BEAM.
Model No.:DC-DB10
MICRO HI-FI SYSTEM
Model No.:DC-DB10
DAB320
WITH DAB+/FM
CAUTION
CLASS 1 LASER PRODUCT
Operating the unit in a way other than specified herein,or
making adjustments to the unit may result in hazardous
radiation exposure
You can see this label on the
back of the main unit.
AU
AU
This label sticks inside of the unit.
3
Page 5
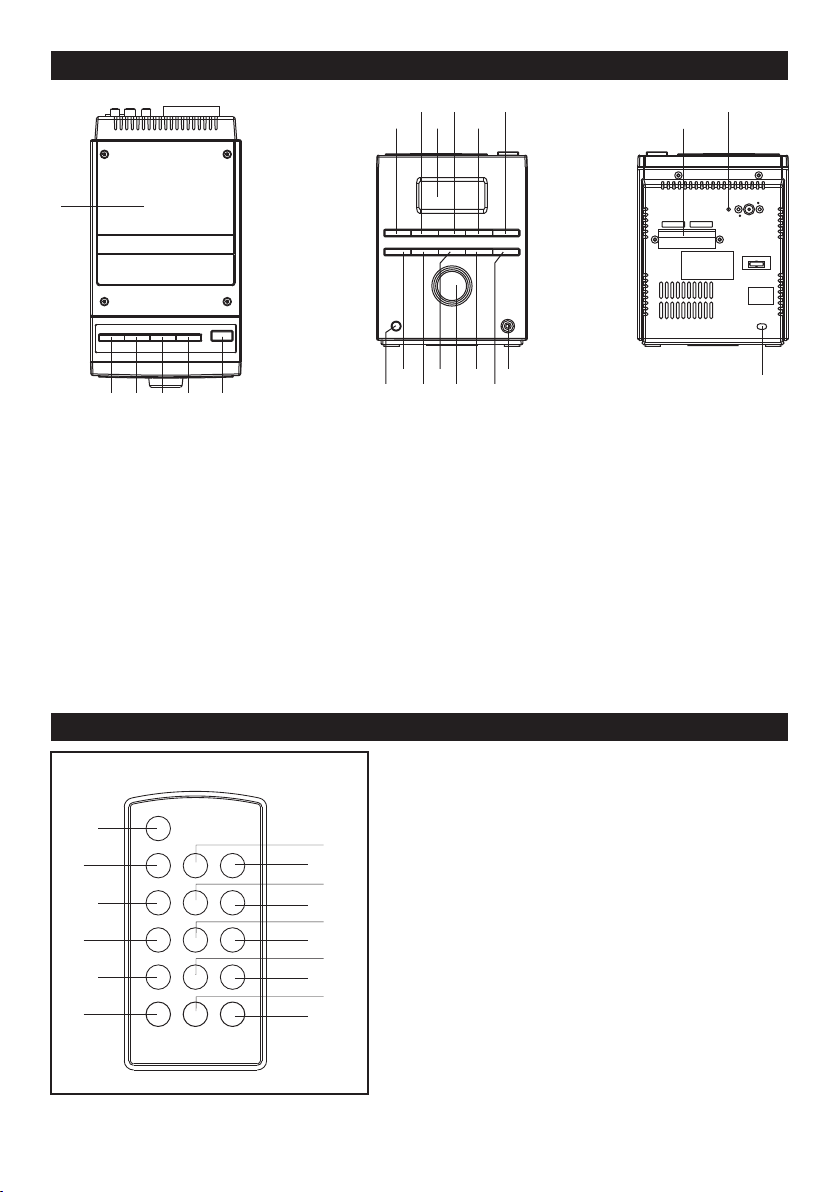
FE ATURE S AND C ONTROLS
1
5
3
4
2
1. CD DOOR
2. SCROLL ▼/ I◀◀ BUTTON
3. SCROLL ▲/ ▶▶I BUTTON
4. PLAY/PAUSE/SELECT BU TTON(
5. STOP/MENU BUTTON( )
6. CD DOOR OPEN BUTTON
7. STANDBY/ON BUTTON
8. CD BUTTON
9. LCD DISPLAY
10. DAB+/FM BUTTON
11. PRESET - BUTTON
12. PRESET + BUTTON
6
8910
7
19
17
18
20
▶/II)
■
12
11
13
15
16
14
13. HEADPHONE JACK
14. REPEAT BUTTON
15. PROGRAM BUTTON
16. VOLUME CONTROL
17. DISPLAY/INFO BUTTON
18. SLEEP BUTTON
19. TIMER BUTTON
20. IR SENSOR
21. SPEAKER TERMINALS
22. DAB+/FM WIRE ANTENN A
23. AC POWER CORD
22
21
23
REMO TE CONTRO L
1
2
3
4
5
6
8
10
12
14
16
7
9
11
13
15
1. STANDBY/ON BUTTON
2. DISPLAY/INFO BUTTON
3. REPEAT BUTTON
4. PROGRAM BUTTON
5. RANDOM BUTTON
6. MUTE BUTTON
7. DAB+/FM BUTTON
8. CD BUTTON
9. STOP/MENU BUTTON( )
10. PLAY/PAUSE/SELECT BUTTON(
11. SCROLL ▼/ I◀◀ BUTTON
12. SCROLL ▲/ ▶▶I BUTTON
13. PRESET - BUTTON
14. PRESET + BUTTON
15. VOLUME - BUTTON
16. VOLUME + BUTTON
4
■
▶/II)
Page 6

PUTT I N G T HE BATTERY INTO T H E
**
**
Battery Included
REMO TE CONTRO L U NIT
1. Press t he bat tery co mpa rtmen t gen tly acc ord ing to the
di recti on in dicat ed in t he illu str ation.
2. Slide to open the battery compartment.
3. Insert the supplied CR2032 battery in to the compartment
according to the polarity ma rk in gs ("+" and "-") inside the
compartment and on the battery. Replace the battery
compartment until it clicks.
NOTE: Remove the batteries from the remote control if not in
use for long p eriod of time. Replace wi th n ew batteries when the
batteries become weak, otherwise the remote control will not
function properly.
RE MOT E CON TRO L OPER ATIO N
Insert the batteries into the remote control. Point the remote control at the remote sensor on the front
panel. The remote control works within a distance of about 7 meters from the sensor and within an
angel of about 30 degrees from the left and right side.
IN S TALL I NG T H E SPE A KER W IRE
TO T HE S P EAK E R TER M IN A LS
1. Speakers Conne ct ion
Extend the SPEAKE R WI RES and connect them
to the SPEAKER TERMINALS.
2. Power Cord Con ne ct ion
Before using, con ne ct the AC Power Cord to
240V AC outlet.
AC CORD
OP ERATI NG TH E UNIT
Before operating the unit for the first time, make sure the AC power cord is properly connected to a
240V 50Hz AC outlet, then you can now press the STANDBY/ON button to switch the unit ON. Pull the
AC plug out of the wall socket if you want to switch off completely.
CLOCK S ETTI NG
The clock will o nly set and be up da te d if you can receive DAB+ signals in your lo ca ti on . In order for the
clock to synchronise to the current local time you must leave it one DAB+ station f or a sh or t period .
Manual clock setting is not required.
LI STEN ING TO YOUR R ADI O
Hints for better reception
This unit is fitted with a single le ad w ire DAB+/FM antenna, to obtain the best performance, you should
fully extend the wire antenna and adjust the po si ti on as well as the direction until you find the best
reception. For ideal DAB rec ep ti on , always maintain the lead wire antenna in a vertical position
(holding it upward or downward behind the unit) is highly recommended.
5
Page 7

Getting started DAB mode
When the unit is powered up for the first t im e, it will be in st an db y mode. The display will show “00:00”
and “Setting clock …”. Press the STANDBY/ON button once to switch the unit on, it will automatically
enter into the DAB mode and pe rf or m auto scan function. During the scan th e display will show
“Scanning …” together with a slide bar that indicates the progress of the scan and the amount of
stations that have been found so far. (F. 1) (F. 2) (F. 3)
F1
F2
F3
Once the scan has finished, the radio will select the first alphanumerically found station. You can now
press the S CR OL L ▲ or ▼ button to explore the found s ta ti on s and then press the SELECT button to
select your station.
Note: If there i s no stations f ou nd after auto scan, you can press the MENU button to enter into the
Tune Select Menu and you can now pres s the SCRO LL ▲ or ▼ buttons followed by pressing the
SELECT button to select manual tune or auto scan modes for stations.
DAB auto tune modes
There are two types o f auto scan modes, one is local auto scan and th e other is full auto sc an . Local
auto scan will only search for part of th e DAB Band III channels and full auto scan will search f or the
entire DAB Band II I channels. After the scan has finished, th e first alphanumerically found station will
be automatically selected.
1. To activate t he auto scan modes, first press the M EN U button to enter into t he Tune Select Menu,
then press the SCROLL ▲ or ▼ button to sele ct “Local scan” or “Full scan”, finally press the
SELECT button to confirm, the display will show “Scanning …” and a progressing slide bar. (F.4)
(F.5)
2. All the stations that ha ve be en found will be stored automatically, to explore the found stations,
press the SCROLL ▲ or ▼ buttons; and when you find a station t ha t you would like to listen to,
press the SELECT button
F4
F5
DAB manual tune
1. To select manual tune, first press the MENU button to enter into the Tune Select Menu, then
press the SCROLL ▲ or ▼ buttons to select “Manual tun e” , finally press the SELECT button to
confirm. (F. 6)
2. Press the SC ROLL ▲ or ▼ buttons to move through the D AB channels, the display will show “5A
to 13F” and their associated frequencies. (F. 7)
3. When yo ur desired fr eq ue nc y appears i n the d is pl ay, press the SELECT button to confirm. The
name of the station group (ensemble/multiplex) will be displayed.
4. To listen to the station selected, press the SELECT button again.
F6
F7
DAB secondary services
On some occasions you will see a “>” symbol directly after the name of the station, this indicates that
there are s ec on da ry services available to th at station. These secondary services contain extra
services that relate to th e primary station. E.g. a sports station may want to add extra commentaries.
The secondary services are inserted directly after the primary station.
6
Page 8

DAB display modes
Every time you press the DI SP LAY/INFO button, the display will cycl e through the following display
modes:
Tim e/Date
Frequ en cy
Audio B it R ate
DLS
Ensem bl e/Multi pl ex (Group n am e)
Progr am me Type
Signa l st rength
Time and date
The time and date w il l be automatically updated by the broadcasted information; it is no need to set
the clock ma nu al ly. In the unlikely event that no clock information is received, the display will show
“[No Time]”.
Frequency
The frequency of the present station will be displayed.
Audio bit rate
The display will show the digital audio bit rate being received.
DLS
DLS stands fo r Dynamic Label Segment which is a scrolling message tha t the broadcaster may
include in t he ir transmissions. The message usually includes information such as programme details
…etc.
Signal strength
The display will show a slide bar to indicate the signal strength, the s tr onger the signal, th e longer the
bar will be from left to right.
Programme type
This describes the style of th e programme that is being broadcast. If the information is not available,
the display will show “[No PTY]”.
Ensemble/Multiplex (Group name)
The Ensemble/Multipl ex is a collection of radio stations that are bundled and t ra ns mi tt ed together in a
single f re qu en cy. There are national and local multiplexes, local ones contain stations that are
specific to that area.
Note: Press and hold the DISPLAY/INFO button for longer than 2 seconds, the software version
number will be displayed.
FM radio
1. To select FM, press the DAB+/FM button, the FM frequency will be displayed. (F. 8)
2. To act iv at e auto se ar ch , press and hold the I◀◀ or ▶▶I buttons un ti l it st ar ts to scan down or up
the frequency band, it will stop automatically once a station has been found.
3. To activate manual search, repeatedly press the ◀I ◀ or ▶▶I button.
4. To select audio mode, press the SELECT button to toggle between t he “Auto” or “Mono”
selection.
Note: Th e radio wil l automatically switch between stereo and mono mode, but you can o ve rr id e this
and switch this function manually which is helpful for poor signal reception.
F8
STOR ING AN D RECALLI NG PRE SET S TATION S
In either DAB or FM, you c an store up to 10 stations to the favourite presets; this will enable you to get
direct access to your favourite stations.
1. To store a preset, f irst tune to your desired station , then press and hold the PROGRAM button
until the display shows the preset number and flash. (F. 9)
7
Page 9

2. Press the PRESET +/- buttons to select your desired station preset number.
3. Finally press the PROGRAM button to confirm your selection, the display will show “Preset #
stored”. (F.10)
4. To recall a preset station that you have stored, press the PRESET +/- bu tt on s, the display will
show the preset number an d the associated information. It would tune to the station in one
second after the buttons are released. (F.11)
F 9
F11F10
FACTORY RES ET
When you move th e system to another part of th e country, your pre-tuned and stored DAB stations
may no long er be available. If this is the case then you wil l need to reset your system back to its
original factory settings; to perform a factory reset, please do the following:
1. Connect the unit to mains and press the STANDBY/ON button once to turn the unit on.
2. Ensure t he unit i s in DA B mode, t he n press a nd hold the MENU button until the display shows
“Press SELECT to confirm reset”.
3. Release the ME NU bu tt on and press the SELECT but to n o nc e, the display wil l s ho w
“Restarting…” and then perform auto scan function.
4. After the scan has finished, the radio will select and display the first alphanumerically found
station.
Note: All of your stored DAB & FM presets will be lost once the reset has taken place.
LI STEN ING TO YOUR C OMPACT DISCS
NOTE: Although this CD player can read CD-R and CD-RW discs in addition to normal CDs, the
playability of CD-R and CD-RW discs may be affected by the ty pe of software that was used to create
the discs, as well as the quality and condition of the blank media you are using, 100% playability
cannot be guaranteed. This is not an indication of a problem with the player.
Playing the entire CD
1. When the unit is ON, press the CD button to select CD function. The display will first show
“Switch to CD” and then finally “NO DISC”. (F.12) (F.13)
2. Press the OPEN button to open the C D door, insert the d is c with the printed label side facing up
and then close the CD door. The display w il l first show “READING” and then the total number of
tracks and time. (F.14)
3. Press t he ▶/II button to start playback from the first track, t he display will show the current tr ac k
number and elapsed time. (F.15)
4. To interrupt playback , press ▶/II button once, “II” will be displayed an d the time in the di sp la y will
flash.
5. To resume playback, press the ▶/ II button again.
6. To stop playback, press the ■ button.
Selecting a different track during play
1. To select a different track during play, press the I◀◀ or ▶▶I buttons until the desired track
number appears on the display, then release the button, playback will begin from this track.
2. To play the next track, press the ▶▶I button once.
3. To play the previous track, press the I◀◀ button twice.
4. To play the current track from the beginni ng d ur in g pl ay, press the I◀◀ button once.
Repeat play
1. Press the REPEAT button to select the repeat play, to repeat the same track, press the REPEAT
button once, the display will show “ 1 ”. (F.16)
2. To repeat the entire disc, press the R EP EAT button again, the display will show “ ”. (F.17)
3. To canc el repeat play, repeatedly press the REPEAT button until the repeat icon disappears in
the display.
8
Page 10

Random play (remote control only)
1. During CD st op , press the RANDOM button on the remote control to start random play, the display
will show “RANDOM” and the tracks will be started playing randomly. (F.18)
2. During normal CD playback, first press the RANDOM button once, when the display shows
“RANDOM”, press the I◀◀ or ▶▶I buttons to randomly select playing another track.
3. To cancel r an do m play, press the R AN DO M button again until the “RA ND OM ” disappears in the
display.
Program play
In CD stop mode, a maximum number of 20 tracks can be programmed to play in any desired order.
1. Load your disc as usual and wait until the display shows the total number of tracks.
2. Press the PROGRAM button, the display will show “P- 01” and flash. (F.19)
3. Press the I◀◀ or ▶▶I buttons to select the first track to be programmed, then press the
PROGRAM button to confirm, the first track to play is now programmed, the display w il l show “P02” and ready for the next entry.
4. Repeat the above procedure to program other tracks for program play.
5. When you have completed programming, press the ▶/II button to begin program play, the display
will show “MEM”. P layback will begin on t he first track you programmed and will continue until the
last programmed track has played.
6. To erase the program, in CD stop mode, pr es s the ■ button once; in CD play mo de , press the ■
button twice. “MEM” will disappear in the display.
Repeat program play
You may use the program play and the repeat play features together to continuously repeat a
programmed playback. Fi rs t program the desired playback s eq ue nc e, then press the REPEAT button
to select repeating the current track or the entire programmed sequence.
F12
F15
F18
F13
F16
F14
F17
F19
TI MER FU NCT ION
You can set the timer to switch on the system at your desired time, listening mode and volume le ve l.
1. Press the TIMER button to toggle the timer function between “On” and “Off”, the display wi ll show
the timer on/off status, the timer on mode and the time.(F. 20)
2. To set the timer, press and hold the TIMER button until th e display shows “Timer Set” and the
“hour” digit of the timer clock in the display will flash.(F. 21)
3. Press the ▲ or ▼ buttons to se t th e time and press the TIMER button to confirm, first set the hour
and then the minute.
4. When the time to switch on the system is set, the display w ill s ho w t he ti me r on mode and flash,
press the ▲ or ▼ buttons to select the mode (CD/FM/DAB), then press the TIMER button to
confirm and the timer on mode is set.
5. The display will show the volume level and fl ash, press th e ▲ or ▼ buttons to select the timer on
volume level, then press the TIMER button to confirm and the timer setting is now completed.
9
Page 11

SL EEP FU NCT ION
This function allows you to program the system to switch off itself after a set period of time.
1. To activate the sleep function, repeatedly press the SLEEP button, the sleep time in the display
will change in sequence on every press:
90 80
70 60 50 40 30 20 10
off
2. When the display shows your desired sleep time, release the button, the sleep timer is now
activated. The display will show “S#” in which “S 1” is to indicate “10 minutes” sleep time and so
on. (F.22)
3. To c an ce l sleep function, press the SLEEP button once, th e display will show “Sleep-Off” and the
“S#” will be disappeared.
F21F20
F22
MU TE FUN CTI ON (remote c ontr ol onl y)
Press the M UT E button on the remote co ntrol will stop the sound from the speakers temporarily, th e
display will show “MUTE” and flash. To cancel mute and restore the sound, press the MUTE button
again or the VOLUME +/- button, the “MUTE” will disappear in the display.
HE ADPH ONE JAC K
A 3.5mm type s te re o headphone jack is located on th e front panel. Connect a set of stereo
headphones (not included) to this jack for private lis te ni ng without disturbing othe rs . The external
speakers are automatically disconnected when the headphones are in use.
IMPORTANT: Whe n using headphones always set the volume to a low level before you put the
headphones on. Then insert the hea dp ho ne s and gradually increase the volume to a comfortable
listening level.
MA INTE NAN CE
Cleaning the unit
Clean the outside of the unit with a clean soft cloth, moistened with lukewarm water. Do not use
benzene, thinners, or alcohol since they will damage the finish of the surfaces.
Cleaning the CD player Iens
The lens should never be touched. If dust is on the lens, blow it off using a camera lens blower (F. A ).
(Consult your dealer.)
F. A
10
Page 12

CO MPACT DIS C
1. Always use compact discs bearing the mark as shown.
2. Notes on handling discs
Removing the disc from its storage case.
* Do not touch the reflective recorded surface.
* Do not stick paper or write anything on the surface.
* Do not bend the disc.
3. Storage
* Store the disc in its case.
* Do not expose discs to direct sunlight or high temperatures, high humidity or dusty places.
4. Cleaning a disc
* Should the disc become soiled, wipe off dust, dirt and fingerprints with a soft cloth.
* The disc should be cleaned from the centre to the edge.
FROM THE CENTRE TO THE EDGE
CORRECT
INCORRECT
* Never use benzene, thinners, record cleaner fluid or anti static spray.
* Be sure to close the CD door so the lens is not contaminated by dust.
* Do not touch the lens.
SP ECIF ICAT IONS
POWER SUPPLY: AC~ 24 0V 50Hz
OUTPUT POWER: 3W x 2
UNIT DIMENSION: 135 (L) x 233 (W) x 170 (H) mm
SPEAKER BOX DIMENSION: 130 (L) x 135 (W) x 170 (H) mm
WEIGHT: 3.32Kg
RADIO SECTION
FREQUENCY RANGE: DAB+ 174.928-239.200 MHz
FM 87.50-108.00 MHz
COMPACT DISC SECTION
OPTICAL PICKUP : 3 - BEAM LASER
FREQUENCY RESPONSE : 100Hz - 16KHz
LASER OUTPUT: 0.6mW (Maximum continuous wave)
WAVE LENGTH:
* * SPECIFICATIONS SUBJECT TO CHANGE WITHOUT FURTHER NOTICE.
790nm
11
Page 13

TROUBLE SHOOTING
SYMPTOM
POSSIBLE CAUSE CORRECTIVE ACTION
No power
No mains lead plug connection at the AC outlet.
Insert the plug into the AC outlet.
The power is on, but the CD player does not work.
No disc is loaded.
Load a disc.
Sound is heard from one speaker.
Faulty connection of speaker wires.
Connect the speaker wires firmly to the
speaker terminals.
The CD player does not start playback. No disc is
loaded.
Loaded a disc.
An unplayable disc is loaded. Load a playable disc.
The disc is not loaded correctly.
Load the disc with the label facing up on the disc tray.
The disc is dirty.
Clean the disc or replace it.
The CD player does not start playback and
“NO FILE” appears.
An unplayable disc is loaded. Load a playable disc.
The disc is not loaded correctly.
Load the disc with the label facing up on the disc tray.
No sound.
Volume control is set to minium.
Turn up the volume.
The wrong function is selected.
Select the correct function.
Faulty speaker connections.
Connect the speaker wires firmly to the
speaker terminals.
The operation of the unit or display is not normal.
The unit must be reset.
1. Disconnect the main lead and replug again.
2. Resume operations.
FM stereo broadcast is hard to hear due to much
noise.
Weak signal.
Press the SELECT button to display “MONO”.
Reorient the FM aerial wire. Connect the speaker
wires firmly to the speaker terminals.
The remote controller does not work properly. The
batteries in the remote controller are weak, or
installed incorrectly.
Check the battery polarity (+ or -). Replace the battery.
The remote controller is not aimed at the remote
sensor window.
Aim the remote controller at the remote sensor window.
12
Page 14

CODE NO.:112975600
SANYO Electric Co., Ltd.
Printed in China
 Loading...