

Page 1
1.
2.
3.
4.
5.
6.
7.
DC-DA62M
Page 2

Page 3
Page 4
Page 5
SPECIFICATION
MAIN UNIT
POWER SUPPLY : AC 110V 60Hz
REMOTE CONTROL POWER SOURCE : DC 3V UM-4(AAA-SIZE) × 2
OUTPUT POWER : 100 WATTS (P.M.P.O.)
POWER CONSUMPTION : 25 W
SPEAKER : 5 W / 4 Ω
RADIO SECTION
FREQUENCY RANGE : AM 540 KHz~1600 KHz
FM 88 MHz~108 MHz
CASSETTE RECORDER
Recording System : DC Bias
Erase System : Magnet Erase
Auto Stop System : Playback only
Frequency Response : 125~10000 Hz
COMPACT DISC SECTION
FREQUENCY RESPONSE : 40 Hz~18000 Hz
S/N RATIO : 50 dB
MPEG (MP3) : MPEG 1/2/2.5 Layer 2/3(ISO/IEC 111723,ISO/IEC 13818-3.2)
BITRATE (MP3) : Support all MPEG bitrates including free format (8~320Kbps)
FREQUENCY (MP3) : 32/44.1/48KHz
UNIT DIMENSION : 155 (W) × 200 (D) × 223 (H)mm
SPEAKER BOX DIMENSION : 139 (W) × 184 (D) × 221 (H)mm
N. W. : 3.8 Kg
Continuous improvements are being made to our equipment both in quality and
performance, thus we reserve the right to alter specifications without notice.
ESD Remark:
In case of malfunction due to electrostatic discharge just reset the product (reconnect of
power source may be required) to resume normal operation.
12
Page 6
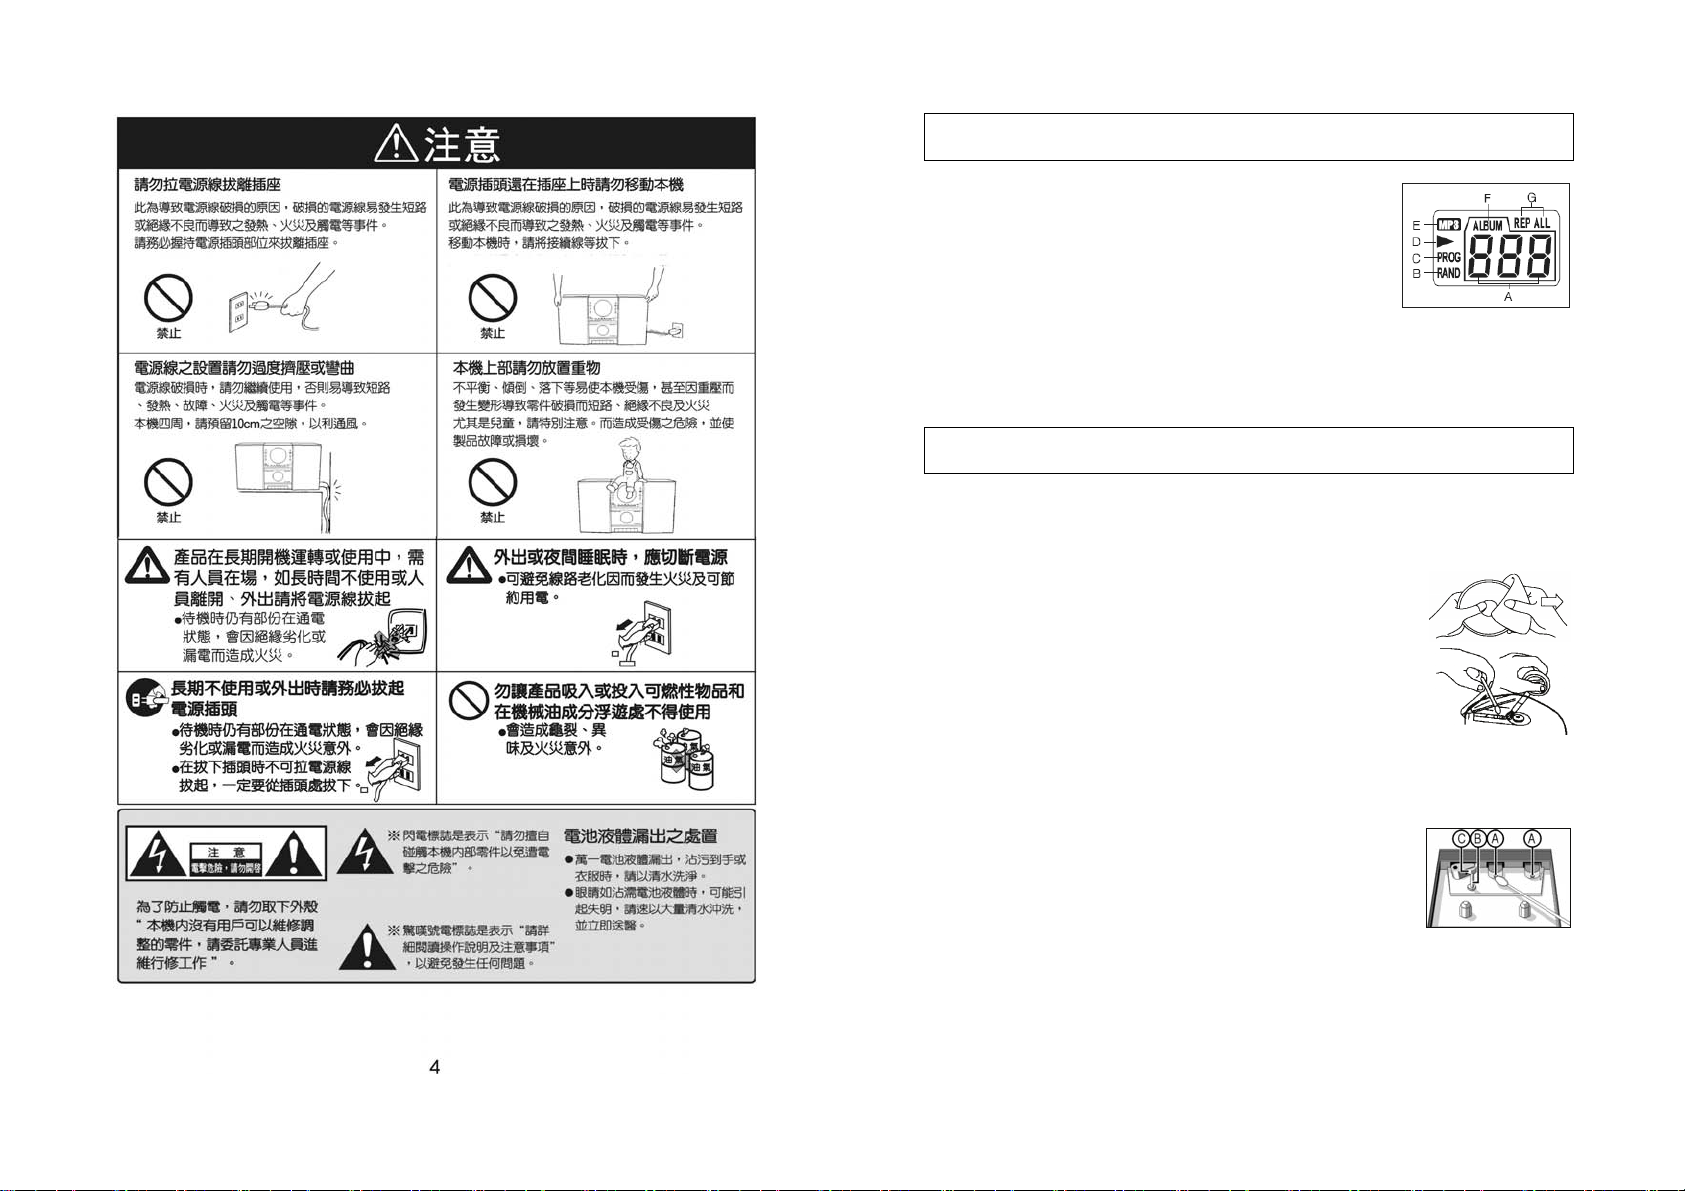
CD DISPLAY WINDOW
A. TRACK NUMBER INDICATOR
B. RAND INDICATOR
C. PROGRAM INDICATOR
D. CD PLAY INDICATOR
E. MP3 INDICATOR
F. ALBUM INDICATOR
G. REP ALL INDICATOR
MAINTENANCE
• Only compact disc with p marked can be used on this unit.
• Do not write anything using a pencil or ball-point pen on the label side or stick paper or
labels on it.
• Handle disc carefully to keep it free from fingerprints or
scratches.
• To clean the shiny-side, use a damp cloth, and wipe it dry after
cleaning. Do not use record cleaners, solvents.
• If moisture is formed because the disc was brought suddenly into
a warm room from a cold environment, wipe the moisture off
using a soft dry cloth before using.
• Avoid storing discs in locations which are:
• Exposed to direct sunlight.
• Susceptible to high levels of humidity or dust.
• Directly exposed to heat (from a heating appliance).
Tape deck maintenance
To ensure quality recording and playback of the tape deck, clean
parts A, B and C shown in the diagram below, after approx.
50 hours of operation, or on average once a month. Use a cotton
bud slightly moistened with alcohol or a special head cleaning
fluid to clean the deck.
1. Open the cassette door by pressing STOP/EJECT.
2. Press PLAY and clean the rubber pressure rollers C.
3. Press PAUSE and clean the magnetic heads A and also the Capstan B.
4. After cleaning, press STOP/EJECT.
Note: Cleaning of the heads can also be done by playing a cleaning cassette through
once.
11
Page 7

PROGRAMMING PRESETS STATION
By programming the CD/MP3 player, you can play up to MP3/10 CD/20 tracks in any
desired order. (possible only when the CD/MP3 is in stop mode.)
1. Place the disc to be programmed in the tray. Press the PROGRAM button.
2. The display will show the memory track and "PROG P01 20" (in CD mode),
And the "PROG P01" are flashing. (F.19)(F.20)
3. Press SKIP+/- button and FOLDER UP button to select the digit of the tracks
number to be programmed.
4. When the desired track appears on the display, press the PROGRAM button again.
5. The display will show the memory track and "PROG P02 And the "PROG P01" are
flashing. (F.21)(F.22)
6. Repeat this procedure to select other tracks that you wish to program from the disc
into the memory.
7. Press the PLAY/PAUSE button to playing from the first memory track.
ERASING A PROGRAM
A program is erased if you :
Press the PROGRAM button, and then STOP button in stop mode. Or switch the unit
OFF.
LISTEN TO THE MUSIC BY USING HEADPHONE
A stereo headphone jack is provided for private listening. To listen to the unit with
headphones (not included) insert the 3.5mm mini-stereo plug from the headphones into
the PHONES jack on the front panel. The external speakers are automatically
disconnected when headphones are using.
10
5
Page 8

各部名稱
喇叭
CD 匣門
CD 匣門開啟/關閉鍵(OPEN/CLOSE)
電源/待機鍵(POWER)
電源/待機指示燈(STANDBY)
遙控感應器(IR)
功能選擇開關(CD/MP3/TAPE/TUNER)
液晶顯示幕
波段選擇開關(AM/FM/FM ST.)
FM 立體指示燈(FM ST.)
電台旋鈕(TUNING)
MP3 順向章節鍵(FOLDER-UP)
MP3.CD 順向選曲鍵(SKIP+)
MP3.CD 放音/暫停鍵(PLAY/PAUSE/)
音量調整鍵(VOLUME)
MP3.CD 停止鍵(STOP)
MP3.CD 逆向選曲鍵(SKIP-)
放音模式鍵(MODE)
卡座
耳機插座( )
卡座錄音鍵( )
卡座放音鍵()
卡座倒退鍵()
卡座快速前進鍵()
卡座停止/起匣鍵(/)
卡座暫停鍵()
曲目編輯鍵(PROG.)
FM 軟質天線(FM ANT)
喇叭輸出插座(+R-/-L+)
AC 電源線(AC~)
FOLDER-UP FUNCTION(Only MP3 Mode)
1. IN STOP MODE
Skip up to next folder in increasing order and display folder number.
2. IN PLAY MODE
Skip up to next folder number in increasing order, start play head track of the folder
and display current folder and track number Press key once, current folder number is
flashing for 3s, press key again folder up is executed.
PLAY MODE FUNCTION
- CD
1. Press the MODE button once, it will repeat the same track only, and the "REP"
indicator will light up. (F.12)
2. Press the MODE button twice, it will repeat all, and the "REP ALL" indicator will
light up. (F.13)
3. Press the MODE button three times, the tracks will be played randomly, and the
"RAND" indicator will light up. (F.14)
- MP3
1. Press the MODE button once, it will repeat the same track only, and the "REP"
indicator will light up. (F.15)
2. Press the MODE button twice, it will repeat all tracks in the current folder, and the
"REP ALBUM" indicator will light up. (F.16)
3. Press the MODE button three times, it will repeat all tracks, and the "REP ALL"
indicator will light up. (F.17)
4. Press the MODE button four times, The tracks will be played randomly, and the
"RAND" indicator will light up. (F.18)
6
9
Page 9

LISTENING TO COMPACT DISC (CD)
Playing the CD
1. Push the function switch CD/MP3/TAPE/TUNER to CD/MP3 position on the unit to
select the CD mode, the total track number will appear on the display. (F.3)
2. Press the PLAY/PAUSE button on the unit once to start playing the CD from the first
track, and the “" indicator will appear on the display. (F.4)
3. Press the PLAY/PAUSE button again to pause playing the CD, and the "" indicator
will appear on the display are flashing. (F.5)
4. To resume playback, press the PLAY/PAUSE button again.
5. To stop playback, press the STOP button.
Selecting A Different Track During Play back
1. Press the SKIP+/- button on the unit , the required track number appears on the
display. (F.6)
2. Press the PLAY/PAUSE button
on the unit. The track will start
playing from the current one.
LISTENING TO MP3 DISC (MP3)
Playing The MP3
1. Push the function switch CD/MP3/TAPE/TUNER to CD/MP3 position on the unit to
select the CD-MP3 mode, the file number will appear on the display. (F.7)
2. Press the PLAY/PAUSE button on the unit once to start playing the MP3 from the
first track of the first folder, and the "" & MP3 indicator will appear on the display.
(F.8)
3. Press the PLAY/PAUSE button again to pause playing the MP3, and the ""
indicator will flashing. (F.9)
4. To resume playback, press the PLAY/PAUSE button again.
5. To stop playback, press the STOP button.
Selecting A Different Track During Play
1. Press the SKIP+/- button or press FOLDER UP button directly to select what you
wanted track number. (F.10)
2. Press the PLAY/PAUSE button, to start
playing the MP3 from the order track.
(F.11)
3. Repeat the above steps 1 to 2, to select
the other tracks that you wish to program.
Note :Using the SKIP+/- button on the
unit to select the track, when playing the MP3. the error was easy occurred. Switch the
unit off for a few seconds, and then turn on it to resume playing the Mp3.
8
遙控器各部名稱
電源開關鍵(POWER)
放音模式鍵(MODE)
MP3 順向章節鍵(FOLDER-UP)
靜音鍵(MUTE)
MP3.CD 停止鍵(STOP)
MP3.CD 放音/暫停鍵(PLAY/PAUSE/)
MP3.CD 逆向選曲鍵(SKIP)
MP3.CD 順向選曲鍵(SKIP)
音量減低鍵(VOLUME-)
音量增加鍵(VOLUME+)
紅外線發射器
電池室
電池裝置
‧打開背面電池蓋,依標示極性正確放入 4 號電池 2 只後,再裝妥電池蓋。
※注意:
1.使用遙控器時,遙控器的紅外線發射器請勿超出主機遙控感應器的接收範
圍。
2.請勿使用其他類型的電池或新舊電池混合使用,以免操作失靈或無法操作。
3.為確保遙控器正常操作及壽命,請勿同時按下兩個或以上的按鍵。
7
Page 10

系統的連接
音箱揚聲器的連接
‧將左、右喇叭線插頭分別接於左右喇叭輸出插座(+R-/-L+)上,有白色之喇叭
線接於紅色喇叭輸出插座,黑色喇叭線接於黑色喇叭輸出插座。
電源供給
‧將主機的 AC 電源線(AC~)接於 AC 電源插座上,電源指示燈(STANDBY)亮,本
機即處於待機狀態。
※使用前請先電源插座的供電電壓為 AC 110V。本機之 AC 電源線僅適用於 AC
110 V 電壓。
AM 調幅接收
‧收聽 AM 電台時,請轉動機身來調整接收狀況,以取得最佳的接收效果。
FM 調頻接收
‧調整 FM 軟質天線(FM ANT)的方向和角度,可取得較佳的接收效果。
聲音的調整
音量控制
‧按音量增加鍵(VOLUME+)可增加音量,按音量減低鍵(VOLUME-)可降低音量。
使用耳機
‧欲使用耳機聆賞時,將 3.5mm 立體耳機插頭接於耳機插座( )中即可,此時揚
聲器的聲音將被中斷。
靜音(此功能請以遙控器操作)
‧按下靜音鍵(MUTE),即關閉聲音,再按一次靜音鍵(MUTE),即恢復原先的音量。
開/關機
開機
‧按電源/待機鍵(POWER),電源/待機指示燈(STANDBY)熄滅,即開啟電源。
關機
‧再按電源/待機鍵(POWER),電源/待機指示燈(STANDBY)亮,本機即處於待機
狀態。
8
LISTENING TO COMPACT DISC (CD/MP3)
1. When CD/MP3 playback, press the CD DOOR first, the CD door will open itself
automatically. (F.1)
2. Insert the CD or MP3 disc into the CD compartment; press the CD door to close the
CD door.
3. Push the function switch CD/MP3/TAPE/TUNER to CD/MP3 position on the unit to
select the CD/MP3 mode. This unit begin selecting and into the CD or MP3 mode
itself automatically.
4. If there is no disc inserted in the CD compartment or loading failed, it will appear NO
DISC on the display. (F.2)
This unit can read CD, CD-R, CD-RW.
This unit is also available to read:
1. It can read " 8 cm " and " Multi Section " of MP3 DISC.
2. It can "Playback Transfer Rate in 8-320 kbps".
3. It can be "Max Readable 512 tracks".
4. It can "Support Version 2.0" in "ID3" mode.
note: The MP3 sampling frequency 8 - 48 KHz
SKIP / SEARCH(UP & DOWN) FUNCTION
1. Press the SKIP+/- button less than 0.5 second, it will skip to the previous/next
track.
2. Press and hold the SKIP+ / - button more than 0.5 second, it will be fast
downward/forward.
STOP PLAYING
1. In play/pause mode, press STOP button to stop state.
In memory edit/play mode, press this button to stop or remain memory station.
While the unit is playing randomly, press this button to stop and cancel the playing
disc.
2. Open the CD door on the unit to remove the CD/MP3.
7
Page 11

CASSETTE OPERATION
Playing Of Cassette
When playing of cassette, open the cover of the CASSETTE BUTTON DOOR first.
Be sure to tighten any slack tape in the cassette before use. Using either a pencil or a
ball-point pen, simply insert the pen or pencil into the center of the spool and rotate to
remove slackness.
Depress the CASS. STOP / EJECT button to open the cassette door.
Insert the cassette into the compartment with the open end facing downwards and full
reel on the left hand side, push the cassette well down and close the door. Be sure not to
touch the tape surface. Select "TAPE" on the CD/MP3/TAPE/TUNER switch and press
the PLAY button. To stop playback, press the CASS. STOP/EJECT button once. To
release the cassette, press the CASS. STOP/ EJECT button again.
Recording From Radio
Set the CD/MP3/TAPE/TUNER to TUNER select AM or FM on AM/FM/FM ST.
switch and press to the desired broadcast (refer to radio operation section). Insert a
cassette into the deck and press the RECORD button.
Press the CASS. STOP/EJECT button to stop recording. The CASS. PAUSE button can
be used to stop recording for short intervals. Press the CASSETTE F.FWD to fast
forword the tape, press the CASSETTE REWIND button to fast rewind the tape.
Recording From CD
Set the CD/MP3/TAPE/TUNER to CD/MP3. Select the required tracks to be recorded.
Insert a cassette into the cassette deck and press the CASS. RECORD button. Press the
CASS. STOP/EJECT button to stop recording.
Auto Stop
When the tape reaches the end in PLAY or RECORD, the built-in AUTO STOP system
functions to release the depressed PLAY, RECORD keys. The AUTO STOP system
operates while recording from the built-in RADIO or CD player. Only the cassette
function is brought automatically to a stop, the RADIO or CD PLAYER will continue to
play.
Type Of Cassettes
Use only good quality cassettes (IEC TYPE1) for making recordings. May be used to
replay other types of cassette but is unable to make proper recordings on these more
specialized tapes. The use of C120 cassettes is not recommended in this machine.
6
收音機操作
1.按電源/待機鍵(POWER),電源/待機指示燈(STANDBY)熄滅。
2.將功能選擇開關(CD/MP3/TAPE/TUNER)切於”TUNER”位置。
3.將波段選擇開關(AM/FM/FM ST.)切於想聽的波段位置。
※選擇 FM ST.波段,當接收到 FM 立體聲訊號時,FM 立體指示燈(FM ST.)即亮。
4.旋轉電台旋鈕(TUNING)調整至喜歡的節目。
5.調整音量調整鍵(VOLUME)至適當的聆賞程度。
6.按電源/待機鍵(POWER),電源/待機指示燈(STANDBY)亮,即關閉收音機。
※調整接收效果
FM:調整 FM 伸縮天線(FM ANT)的角度和方向,可取得較佳的接收效果。
AM:調整機器的方向,可取得較佳的收聽效果。
CD 碟盤操作
˙將功能選擇開關(CD/MP3/TAPE/TUNER)切至”CD/MP3”位置。
˙液晶顯示幕顯示”- - -”,數秒後再顯示”no”字樣。按 CD 匣門開啟
/關閉鍵(OPEN/CLOSE),開啟 CD 匣門,將 CD 光碟片印刷
面朝上放入 CD 匣座中,並向下輕壓固定好,再蓋妥 CD 匣門,
本機即自動偵測光碟片為一般 CD 光碟片或 MP3 光碟片。
※本機可播放 CD、CD-R、CD-RW 及 MP3 光碟片。
一、CD 光碟片
A.放音
1.一般 CD 光碟片放入 CD 匣座後,液晶顯示幕會顯示 CD 的總曲目數。
2.按 CD 放音/暫停鍵(PLAY/PAUSE/),即自第一首曲目開始
放音,液晶顯示幕會顯示””符號與被播放的曲目數字。
3.調整音量調整鍵(VOLUME)至適當的聆賞程度。
4.放音中按 CD 放音/暫停鍵(PLAY/PAUSE/)可暫停放音,此
時液晶顯示幕的””符號閃爍,再按一次 CD 放音/暫停鍵
(PLAY/PAUSE/)則可恢復放音,同時液晶顯示幕的””符號
停止閃動。
5.按 CD 停止鍵(STOP)可停止放音,液晶顯示幕會顯示 CD 光
碟片的總曲目數。
9
Page 12

B.跳播選曲:可迅速選擇一般 CD 光碟片中您想要欣賞的曲目。
1.在放音停止狀態下,按 CD 順向選曲鍵(SKIP+)或 CD 逆向選曲鍵(SKIP-),
可順向或逆向選擇曲目,再按 CD 放音/暫停鍵(PLAY/PAUSE/)即可放音。
2.放音中,輕按 CD 順向選曲鍵(SKIP+),可選下一首曲目。
3.放音中,輕按 CD 逆向選曲鍵(SKIP-),可將正在放音的曲目從頭放音。
4.放音中,連續按 CD 逆向選曲鍵(SKIP-)二次,可選上一首曲目。
5.暫停放音中,輕按 CD 順向選曲鍵(SKIP+),可選下一首曲目,再按 CD 放音/
暫停(PLAY/PAUSE/)即可放音。
6.暫停放音中,連續按 CD 逆向選曲鍵(SKIP-)二次,可選上一首曲目,再按 CD
放音/暫停鍵(PLAY/PAUSE/)即可放音。
C.快速尋曲:可快速於所在曲目中尋找您想要的曲段。
‧放音中,按住 CD 逆向選曲鍵(SKIP-)或 CD 順向選曲鍵(SKIP+),可逆向
或順向尋找曲段。
D.編輯曲序:可依您個人喜好重新編輯 CD 播放順序,最多可記憶 20 首曲目;請
在停止放音狀態下進行設定。
1.按 CD 匣門開啟/關閉鍵(OPEN/CLOSE),開啟 CD 匣門,在 CD 碟片匣中放入
欲編輯曲序的一般 CD 光碟片,再蓋妥 CD 匣門。
2.按曲目編輯鍵(PROG.),液晶顯示幕出現”PROG P01”閃動字樣。
3.按 CD 順向選曲鍵(SKIP+)或 CD 逆向選曲鍵(SKIP-)選擇
曲目。
4.再按一次曲目編輯鍵(PROG.),液晶顯示幕顯示”PROG P02”閃動字樣,即設定
完成。
5.重覆上述步驟,直到所有曲目被記憶儲存,最多可記憶 20 首。
※當編輯至第 20 首曲目結束,液晶顯示幕會顯示”PROG- - -“閃動字樣,再按一
次曲目編輯鍵(PROG.),液晶顯示幕會自動依序顯示已編輯的曲目。
6.連續按曲目編輯鍵(PROG.),可檢視已編輯的曲目。
7.按 CD 放音/暫停鍵(PLAY/PAUSE/),液晶顯示幕顯示”PROG”字樣,即開始
編輯曲序的放音。
8.按 CD 停止鍵(STOP
9.再按 CD 放音/暫停鍵(PLAY/PAUSE/),可恢復編輯曲序的放音。
※編輯途中按 CD 匣門開啟/關閉鍵(OPEN/CLOSE)打開 CD 匣門、切換其他功
能或關閉電源時,編輯的曲序即取消。
※在編輯曲序停止放音狀態時,按 CD 停止鍵(STOP),編輯的曲序即取消。
)可停止放音。
E.放音模式:每按一次放音模式鍵(MODE),可依序循環切換不同的放音模式:單
曲重覆→全部重覆→隨機選曲→一般放音,液晶顯示幕會顯示目前
的模式狀態。
1.單曲重覆──此模式會重覆播放目前所在的曲目,亦適用於編輯曲序的放音
按放音模式鍵(MODE)1 次,液晶顯示幕出現”REP”字樣。
10
SYSTEM CONNECTIONS
CONNECTIONS
A. Terminals for 2 loudspeakers (minimum speaker impedance 4 ohm.)
Attach loudspeaker cables to the unit.
Left speaker: connect the wire to terminal 'L'.
Right speaker: connect the wire to terminal 'R'.
B. Terminal for FM antenna.
The antenna wire supplied with the unit can be connected to terminal. Adjust the
position of FM antenna for optimum reception.
For good FM stereo reception, use an FM outdoor antenna or connect the supplied
antenna wire to your house distribution system.
Using AC Power
1. Check if the power voltage, as shown on the type plate located on the bottom of the
set, corresponds to your local AC power supply. If it does not, consult your dealer or
service centre.
2. Connect the power cord to the AC MAINS inlet and the wall outlet. The power supply
is now connected and ready for use.
3. To switch off completely, unplug the power cord from the wall outlet.
˙Unplug the power cord from the wall outlet to protect your set during heavy
thunderstorms.
˙If the electric cable is damaged, it must be replaced by the manufacturer, or by the
qualification persons, in order to avoid a danger.
RADIO OPERATION
Set the CD/MP3/TAPE/TUNER switch to TUNER.
AM
Select AM mode on AM/FM/FM ST. switch. Turn the TUNING control to select the
required station. For operation on AM the set control a built-in ferrite aerial which is
directional. Therefore, the set should be positioned for the best signal strength.
FM
Select FM mode on AM/FM/FM ST. switch. Turn the TUNING control to select the
required station. The FM stereo indicator light will show a stereo broadcast is being
received. Fully extend the FM antenna and adjust its direction for best FM reception.
FM STEREO RECEPTION
For reception of a FM stereo broadcast station, set the AM/FM/FM ST. Switch to FM ST.
position. The FM stereo indicator will light when a FM STEREO broadcast is being
received.
5
Page 13

REMOTE CONTROLS
1. POWER BUTTON
2. MODE BUTTON
3. FOLDER-UP BUTTON
4. MUTE BUTTON
5. CD STOP BUTTON
6. CD PLAY/PAUSE BUTTON
7. CD SKIP- BUTTON
8. CD SKIP+ BUTTON
9. VOLUME- BUTTON
10. VOLUME+ BUTTON
11. LIGHT TRANSMISSION
12. BATTERY COMPARTMENT DOOR
PUTTING THE BATTERIE INTO THE REMOTE CONTROL UNIT
Press down of the compartment cover, and slide the cover off
to open the compartment. Place the two (UM4), (AAA), (R03)
batteries in the remote control according to the polarity
markings ("+" and "-") inside the compartment and on the
batteries.
Place the cover over the compartment, press down lightly, and
push it upward until it snaps on.
NOTE : Remove the batteries from the remote control if not
in use for long period of the time. Do not mix normal batteries
with rechargeable batteries, when the batteries become weak, remote control will not
function and replace with new batteries.
4
按 CD 逆向選曲鍵(SKIP-)或 CD 順向選曲鍵(SKIP+),
選擇欲單曲重覆的曲目,再按 CD 放音/暫停鍵(PLAY/PAUSE
/)即可放音。
回到一般放音模式,按放音模式鍵(MODE)3 次。
2.全部重覆──此模式會重覆播放 CD 光碟片上的所有曲目,亦適用於編輯曲序的
放音
按放音模式鍵(MODE)2 次,液晶顯示幕出現”REP ALL”字樣。
按放音/暫停鍵(PLAY/PAUSE/)開始放音。
回到一般放音模式,按放音模式鍵(MODE)2 次。
3.隨機選曲──此模式將不依原 CD 光碟片的順序,而以自動選曲方式播放
在停止放音狀態下,按放音模式鍵(MODE)3 次,液晶顯示幕
出現”RAND”字樣。
按放音/暫停鍵(PLAY/PAUSE/),即開始隨機放音。
回到一般放音模式,按放音模式鍵(MODE)1 次。
二、MP3 光碟片
※本機支援國際標準:ISO/IEC 111723(MPEG1 Audio) & ISO/IEC 13818-3.2
(MPEG 2 Audio)第三層音頻解碼壓縮格式,其他 MP3 格式因為解碼及壓縮格式
不同,可能不支援而無法播放。
※本機支援採用 VBR(可變速率)格式壓縮的 MP3(壓縮速率為 8~320Kbps)。支援
採樣頻率為 32KHz、44.1KHz 或 48KHz 的 MP3 文件。
A.放音
1.將 MP3 光碟片放入 CD 匣座後,液晶顯示幕會顯示 MP3 的總曲
目數。
2.按 MP3 放音/暫停鍵(PLAY/PAUSE/),液晶顯示幕會顯
示”MP3”字樣與””符號,同時自第一個章節的第一首曲目開始
放音,液晶顯示幕會顯示被播放的曲目數字。
3.放音中按 MP3 放音/暫停鍵(PLAY/PAUSE/)可暫停放音,液
晶顯示幕”” 符號閃爍,再按一次 MP3 放音/ 暫停鍵
(PLAY/PAUSE/)則可恢復放音,同時””符號停止閃爍。
4.按 MP3 停止鍵(STOP)可停止放音,液晶顯示幕會顯示 MP3 光碟片的總曲目
數。
B.跳播選曲:可迅速選擇 MP3 光碟片中您想要欣賞的曲目。
˙在放音停止狀態下,按 MP3 逆向選曲鍵(SKIP-)或 MP3 順向選曲鍵(SKIP+
),可逆向或順向選擇曲目,再按 MP3 放音/暫停鍵(PLAY/PAUSE/)即開始
放音。
˙放音中,輕按 MP3 順向選曲鍵(SKIP+),可選下一首曲目。
˙放音中,輕按 MP3 逆向選曲鍵(SKIP-),可將正在放音的曲目從頭放音。
˙放音中,連續按 MP3 逆向選曲鍵(SKIP-)兩次,可選上一首曲目。
11
Page 14

˙暫停放音中,輕按 MP3 順向選曲鍵(SKIP+),可選下一首曲目,再按 MP3 放
音/暫停鍵(PLAY/PAUSE/)即可放音。
˙暫停放音中,連續按 MP3 逆向選曲鍵(SKIP-)兩次,可選上一首曲目,再按
MP3 放音/暫停鍵(PLAY/PAUSE/)即可放音。
C.跳尋章節:可尋找 MP3 光碟片您想要欣賞的章節。
˙按 MP3 順向章節鍵(FOLDER-UP),可選擇章節,再按放音/暫停鍵(PLAY/PAUSE
/)即自該章節的第一首曲目開始放音。
D.編輯曲序:可依您個人喜好重新編輯 MP3 光碟片的播放順序,最多可記憶 10
首曲目,請在停止放音狀態下進行設定。
1.按 CD 匣門開啟/關閉鍵(OPEN/CLOSE),開啟 CD 匣門,在 CD 碟片匣中放入
欲編輯曲序的 MP3 光碟片,再蓋妥 CD 匣門。
2.按曲目編輯鍵(PROG.),液晶顯示幕顯示”PROG P01”閃動字樣。
3.按 MP3 順向章節鍵(FOLDER-UP)選擇章節,再按 MP3 逆向選
(SKIP-)或 MP3 順向選曲鍵(SKIP+)選擇曲目。
曲鍵
4.再按一次曲目編輯鍵(PROG.),液晶顯示幕顯示”PROG P02”閃
動字樣,即設定完成。
5.重覆上述步驟,直到所有曲目被記憶儲存,最多可記憶 10 首。
※當編輯至第 10 首曲目結束,液晶顯示幕會顯示”PROG- - -“閃動字樣,再按一
次曲目編輯鍵(PROG.),液晶顯示幕會自動依序顯示已編輯的曲目。
6.按 MP3 放音/暫停鍵(PLAY/PAUSE/),液晶顯示幕顯示”PROG“字樣,即開
始編輯曲序的放音。
7.按 MP3 停止鍵(STOP)可停止放音。
8.按 MP3 放音/暫停鍵(PLAY/PAUSE/),可恢復編輯曲序的放音。
※編輯途中打開 CD 匣門、連續按 MP3 停止鍵(STOP)兩次、切換其他功能或
關閉電源時,編輯的曲序即取消。
E.放音模式
放音狀態下,每按一次放音模式鍵(MODE),可依序循環切換不同的放音模式:單
曲重覆→章節重覆→全部重覆→隨機選曲→一般放音,液晶顯示幕會顯示目前的模
式狀態。
1.單曲重覆──此模式會重覆播放目前所在的曲目,亦適用於編輯曲序的放音
放音狀態下,按放音模式鍵(MODE)1 次,液晶顯示幕出
現”REP”字樣。
按 MP3 順向章節鍵(FOLDER-UP)選擇章節,再按 MP3 逆向
選曲鍵(SKIP-)或 MP3 順向選曲鍵(SKIP+),選擇欲單
曲重覆的曲目。
回到一般放音模式,按放音模式鍵(MODE)4 次。
12
FEATURES AND CONTROLS
1. SPEAKER
2. CD DOOR
3. CD DOOR OPEN/CLOSE
4. POWER BUTTON
5. STANDBY INDICATOR
6. IR SENSOR
7. CD/MP3/TAPE/TUNER SWITCH
8. LCD DISPLAY
9. AM/FM/FM ST. SWITCH
10. FM STEREO INDICATOR
11. TUNING KNOB
12. FOLDER-UP BUTTON
13. CD SKIP+ BUTTON
14. PLAY/PAUSE BUTTON
15. VOLUME CONTROL BUTTON
16. STOP BUTTON
17. CD SKIP- BUTTON
18. MODE BUTTON
19. CASSETTE DOOR
20. PHONES JACK
21. CASSETTE RECORD
22. CASSETTE PLAY
23. CASSETTE REWIND
24. CASSETTE F.FWD
25. CASSETTE STOP/EJECT
26. CASSETTE PAUSE
27. PROGRAM BUTTON
28. FM ANTENNA
29. SPEAKER TERMINAL
30. AC CORD
3
Page 15

2.章節重覆──此模式會重覆播放 MP3 光碟片上目前章節的所有曲目
MAIN UNIT CONTROLS
2
放音狀態下,按放音模式鍵(MODE)2 次,液晶顯示幕出
現”REP ALBUM”字樣。
按 MP3 順向章節鍵(FOLDER-UP)選擇欲重覆放音的章節。
回到一般放音模式,按放音模式鍵(MODE)3 次。
3.全部重覆──此模式會重覆播放 MP3 光碟片上的所有曲目,亦適用於編輯曲序
的放音
放音狀態下,按放音模式鍵(MODE)3 次,液晶顯示幕出
現”REP ALL”字樣。
回到一般放音模式,按放音模式鍵(MODE)2 次。
4.隨機選曲──此模式將不依原 MP3 光碟片的順序,而以自動選曲方式播放
放音狀態下,按放音模式鍵(MODE)4 次,液晶顯示幕出
現”RAND”字樣。
按 MP3 逆向選曲鍵(SKIP-)或 MP3 順向選曲鍵(SKIP+
),即開始隨機放音。
回到一般放音模式,按放音模式鍵(MODE)1 次。
錄/放音座操作
A.放音
1.將功能選擇開關(CD/MP3/TAPE/TUNER)切至”TAPE”位置。
2.按卡座停止/起匣鍵(/)打開卡座,放入錄音帶,並蓋妥卡匣門(取出時亦同)。
3.按下卡座放音鍵()即可放音,調整音量調整鍵(VOLUME)至適當音量聆聽。
4.按卡座快速前進鍵()或卡座倒帶鍵(),可快速運轉,當卡帶到達想要的位置
時,按卡座停止/起匣鍵(/)。
※當快速前進或倒帶到錄音帶兩端盡頭時,需按卡座停止/起匣鍵(/),卡座快
速前進鍵()或卡座倒帶鍵()才會跳起。
5.中途欲暫停放音時,按下卡座暫停鍵()即可,再按一次則恢復正常放音。
6.按卡座停止/起匣鍵(/),即停止放音。
B.錄音
(a)收音機的錄音
1. 依照想要錄音波段的節目,將功能選擇開關(CD/MP3/TAPE/TUNER) 切
至”TUNER 位置。
2.按卡座停止/起匣鍵(/)打開卡座,放入空白錄音帶,並蓋妥卡匣門。
3.按下卡座錄音鍵( ),卡座放音鍵()亦會同時被按下,即開始錄音。
13
Page 16

4.欲暫停錄音時,按卡座暫停鍵()即可。
5.按卡座停止/起匣鍵(/)則可停止錄音。
(b)MP3/CD 光碟片錄音
1.將功能選擇開關(CD/MP3/TAPE/TUNER)切至”CD/MP3”位置。
2.按 CD 匣門開啟/關閉鍵(OPEN/CLOSE),開 啟 CD 匣門,放入 MP3/CD 光碟
片,再確實蓋妥 CD 匣門。
3.按下卡座停止/起匣鍵(/)打開卡座,放入空白錄音帶,蓋妥卡匣門。
4.按卡座暫停鍵()後,再按下卡座錄音鍵( ),卡座放音鍵()亦會同時被按下。
5.按 MP3.CD 放音/暫停鍵(PLAY/PAUSE/)二次,使 MP3/CD 在暫停狀態下
準備放音。
6. 當一切準備就緒,同時按下卡座暫停鍵()及 MP3.CD 放音/ 暫停鍵
(PLAY/PAUSE/
),即開始錄音。
7.欲暫停錄音時,按卡座暫停鍵()即可,但 MP3/CD 仍持續放音不會停止。
8.按卡座停止/起匣鍵(/)則可停止錄音。
C.錄音自動電平控制(ALC)
本機具有自動電平控制功能,因此錄音時不需調整音量。
D.自動停止
卡帶放音或錄音時,當磁帶轉到盡頭,卡座放音鍵()或卡座錄音鍵( )會自動
跳起並停止運轉。
14
To achieve the utmost in enjoyment and performance, please read this manual carefully before
attempting to operate the unit in order to became familiar with its features, and assure you
years of faithful, trouble free performance and listening pleasure.
Important Notes
˙Keep safety and operating instructions in a safe place for future reference.
˙Avoid installing the unit in locations described below:
Places exposed to direct sunlight or close to heat radiating appliances such as electric
heaters.
On top of other stereo equipment that radiate too much heat.
Places lacking ventilation or dusty places.
Places subject to constant vibration.
Humid or moist places.
˙Make sure not to obstruct the ventilation opening.
Operate turning controls and switches as instructed in the manual.
˙Before turning on the power for the first time, make certain the power cord is properly
installed.
˙Store your CD in a cool area to avoid damage from heat.
For safety reasons, do not remove any covers or attempt to gain access to the inside of the
product. Refer any servicing to qualified personnel.
Do not attempt to remove any screws, or open the casing of the unit; there are no user
serviceable parts inside, refer all servicing to qualified service personnel.
CAUTION
CAUTION : TO REDUCE THE RISK OF ELECTRIC SHOCK DO NOT REMOVE
COVER(OR BACK), NO USER SERVICEABLE PARTS INSIDE,
REFER SERVICING TO QUALIFIED SERVICE PERSONNEL.
DANGEROUS VOLTAGE
Contains dangerous voltage, that may be of sufficient magnitude to constitute a
risk of electric shock to persons is present within this product’s enclosure.
ATTENTION
The owner’s manual contains important operating and maintenance
instructions, for your safety, it is necessary to refer to the manual.
WARNING : TO PREVENT FIRE OR SHOCK HAZARD, DO NOT EXPOSE THIS
APPLIANCE TO LIQUID OR SPLASHING.
Note:
This unit will become warm when used for a long period of time. This is normal and does not
indicate a problem with the unit.
This CD player includes micro-processors which may malfunction as a result of external
electrical interference or noise. If the CD player is not working properly, disconnect the power
source and then reconnect it.
1
Page 17

DC-DA62M
MICRO HI-FI SYSTEM
with MP3 Playback Function
INSTRUCTION MANUAL
※警告:清潔前請關掉電源並把電源線自電源插座中拔下,定期小心的保養可保持
機器的良好效果及延長使用壽命。
電源
長時間不使用本機時,請將電源線自電源插座中拔下,並將遙控器電池取出,以避
免產生腐蝕;如電池盒內有腐蝕現象或不潔時,請徹底地清潔電池室並更換新電池。
注意:送修前請先更換新電池試試,或許可解決問題。
機器外殼的清潔
本機外殼有灰塵及雜質時,以沾濕的抹布擦拭即可,不可使用刺激性的清潔劑、溶
劑或粗糙的清潔用品擦拭,以免對外殼的表面造成損傷或刮痕。
錄音磁頭的清潔
磁頭上的氧化物會導致卡帶的聲音劣化、音量減小及卡帶音源的消失,建議應定期
用棉花棒或軟布沾酒精輕輕擦拭錄放音頭、壓帶輪及驅動軸,同時應避免讓磁性或
金屬物體接近磁頭,以免磁頭被磁化,而使噪音增加、音調失真。
卡帶的選擇
請使用優良品質的卡帶,以避免造成錄放音磁頭的磨損及其他零件的不良。
C120 的卡帶因磁帶太薄,可能會發生絞帶現象,並不適用本機。
MP3/CD 光碟片
1.MP3/CD 光碟片使用完畢後應立即放回 CD 儲存盒中,可避
免遭嚴重刮傷。
2.擦拭 MP3/CD 光碟片時,請用柔軟的布由內向外擦或使用
CD 光碟片自動清潔器。
3.請勿將 MP3/CD 光碟片長時間曝露在陽光、重濕氣或高溫下,以免變形。
4.請勿在 MP3/CD 光碟片的表面黏貼紙或膠帶。
5.不可使用溶劑來清潔 MP3/CD 光碟片,如:輕油劑、酒精或防靜電的噴劑。
6.當鐳射讀取頭有灰塵或指印時,可能會造成跳音現象,此時
請以吹氣刷或棉花棒輕輕拂拭即可,或使用鐳射鏡頭清潔片
來清除。
維護須知
15
Page 18

故障排除
使用中如有任何不正常的情況出現,請先檢查以下幾點:
1.無聲
a)檢查音量是否調至最小?
b)檢查揚聲器是否連接了?
c)檢查電源線是否接妥?
d)檢查是否按了靜音鍵?
2.CD 碟盤無法動作
a)檢查 CD 匣座內是否有 MP3/CD 光碟片,且印刷面朝上?
b)檢查 CD 匣門是否蓋妥?
c)檢查 MP3/CD 光碟片是否清潔,或有刮傷?
d)檢查 MP3/CD 光碟片是否為音樂片?
3. MP3/CD 放音有跳音現象
檢查 MP3/CD 光碟片是否清潔,或有刮傷?
4.液晶顯示幕出現”no”字樣
a)檢查 CD 匣座內是否有 MP3/CD 光碟片?
b)檢查 CD 匣座內的 MP3/CD 光碟片是否印刷面朝上?
c)檢查 MP3/CD 光碟片是否清潔,或有刮傷?
d)檢查 MP3/CD 光碟片是否為音樂片?
5.卡式帶匣無法關妥
a)檢查卡帶是否裝置正確?
b)檢查是否已按下放音鍵?
6.無法錄音
a)檢查卡帶下方的誤消音保護片是否被挖掉了?
b)檢查放音或消音磁頭是否髒了?
7.卡帶放音時有雜音出現
a)檢查使用的磁帶是否過於老舊或變質?
b)檢查磁頭、驅動輪是否清潔?
8.遙控器無法操作
a)檢查遙控器內的電池是否電力不足?極性是否裝置正確?
b)遙控器的遙控位置是否在有效距離、角度內?
16
規格
‧使用電源:AC 110V 60Hz
‧遙控器使用電源:DC 3V UM-4(AAA-SIZE)×2
‧輸出功率:瞬間最大 100W(P.M.P.O.)
‧消耗功率:25W
‧喇叭:5W/4Ω
‧調諧器
頻率範圍:AM 540KHz~1600KHz,FM 88MHz~108MHz
‧卡式錄放音座
頻率響應:125Hz~10000Hz
錄音系統:直流偏壓
磁帶速度:4.75cm/sec
‧鐳射碟盤
頻率響應:40Hz~18000Hz
信號/雜音比:50dB
取樣頻率:44.1KHz
‧主機尺寸:155(寬)×200(深)×223(高)mm
‧音箱尺寸:139(寬)×184(深)×221(高)mm
‧重量:3.8Kg
‧附件:遙控器×1
※產品、規格如有變更時,恕不另行通知。
製造年份:2006 年製
進 口 商:十全企業股份有限公司
地 址:台北市士林區大南路 361 號 5 樓
電 話:(02)2883-2435
製 造 商:NELSON ELECTONICS LTD.
產 地:中國
17
 Loading...