

Page 1
CLT-9902
CLT-9901
INSTRUCTION MANUAL
900-MHz
Cordless Telephone
IMPORTANT
Charge the handset battery pack for a full 15 hours before using your
cordless handset for the first time.
NOISE REDUCTION
Français au verso
CLT9902 #4 (SANYO) 8/11/00 4:14 PM Page 1
Page 2
Your Sanyo 900-MHz COMPANDER PLUS cordless
telephone is a fine-quality home communications
product. It is carefully designed and produced by a
world leader of consumer and industrial electronics
equipment. With proper maintenance and care, it will
provide you with years of enjoyment and
convenience.
900-MHz Technology
Superior Range - The use of 900-MHz frequency
band for signal transmission between base and
handset means greater communication range
compared to conventional 43—49 MHz cordless
telephones. In normal situations, approximately
4 times greater distance can be achieved.
Ultra-Low Noise - The high frequency communication
has also significantly reduced noise level.
40-Channel Auto Scan - Your new telephone uses
one of 40 channels in the 900-MHz frequency band. It
automatically selects a clear channel every time you
receive or place a call on the handset. Should you
wish to switch channels during a call, the handset
provides a SCAN button.
COMPANDER PLUS Noise Reduction
This fourth generation of the Sanyo’s original noise
reduction technology now filters out more
background noise.
Other Features
● Moonglow Keypad (CLT-9902 only)
● Digital Security Codes
● 10-Number Memory dialing
● Page/Handset Locator
● AutoTalk and AutoStandby
● Handset Volume Control
● 14-Day Standby/7-Hour Talk Time
● Last-Number Redial
● Mute
● Tone/Pulse Dialing
● Hearing Aid Compatible
● Wall-Mountable
● Belt Clip and Headset Jack (CLT-9902 only)
To get the most from your phone, please read these
instructions thoroughly.
Also included:
• This owner’s manual
• Index card
E1
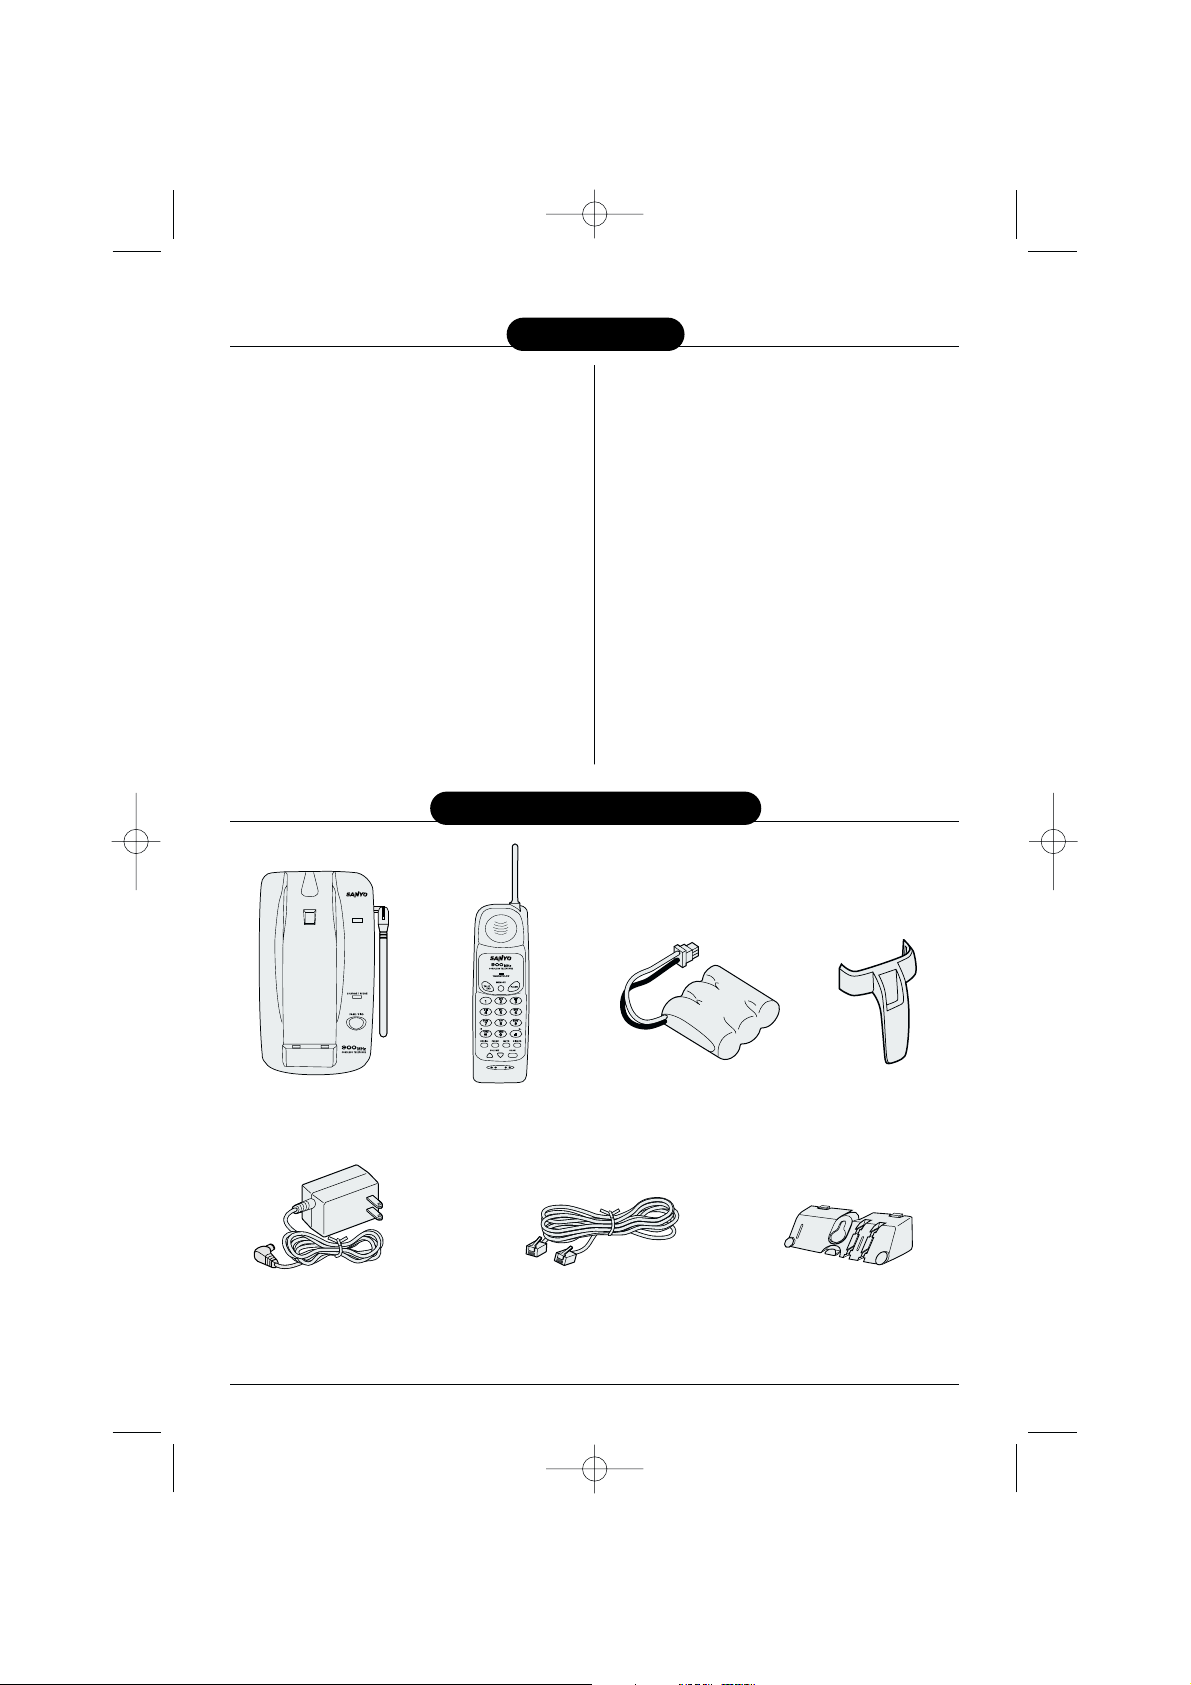
Base
Handset
AC adapter (AD-210)
Rechargeable battery
(Sanyo 3KR-600AAL)
Telephone line cord (1), long
COMPANDER
NOISE REDUCTION
PLUS
Bottom bracket
for desktop use and
wall-mounting
Belt clip
(CLT-9902 only)
Introduction
Included with Your Phone
• Battery order sheet
CLT9902 #4 (SANYO) 8/11/00 4:14 PM Page 2
Page 3
E2
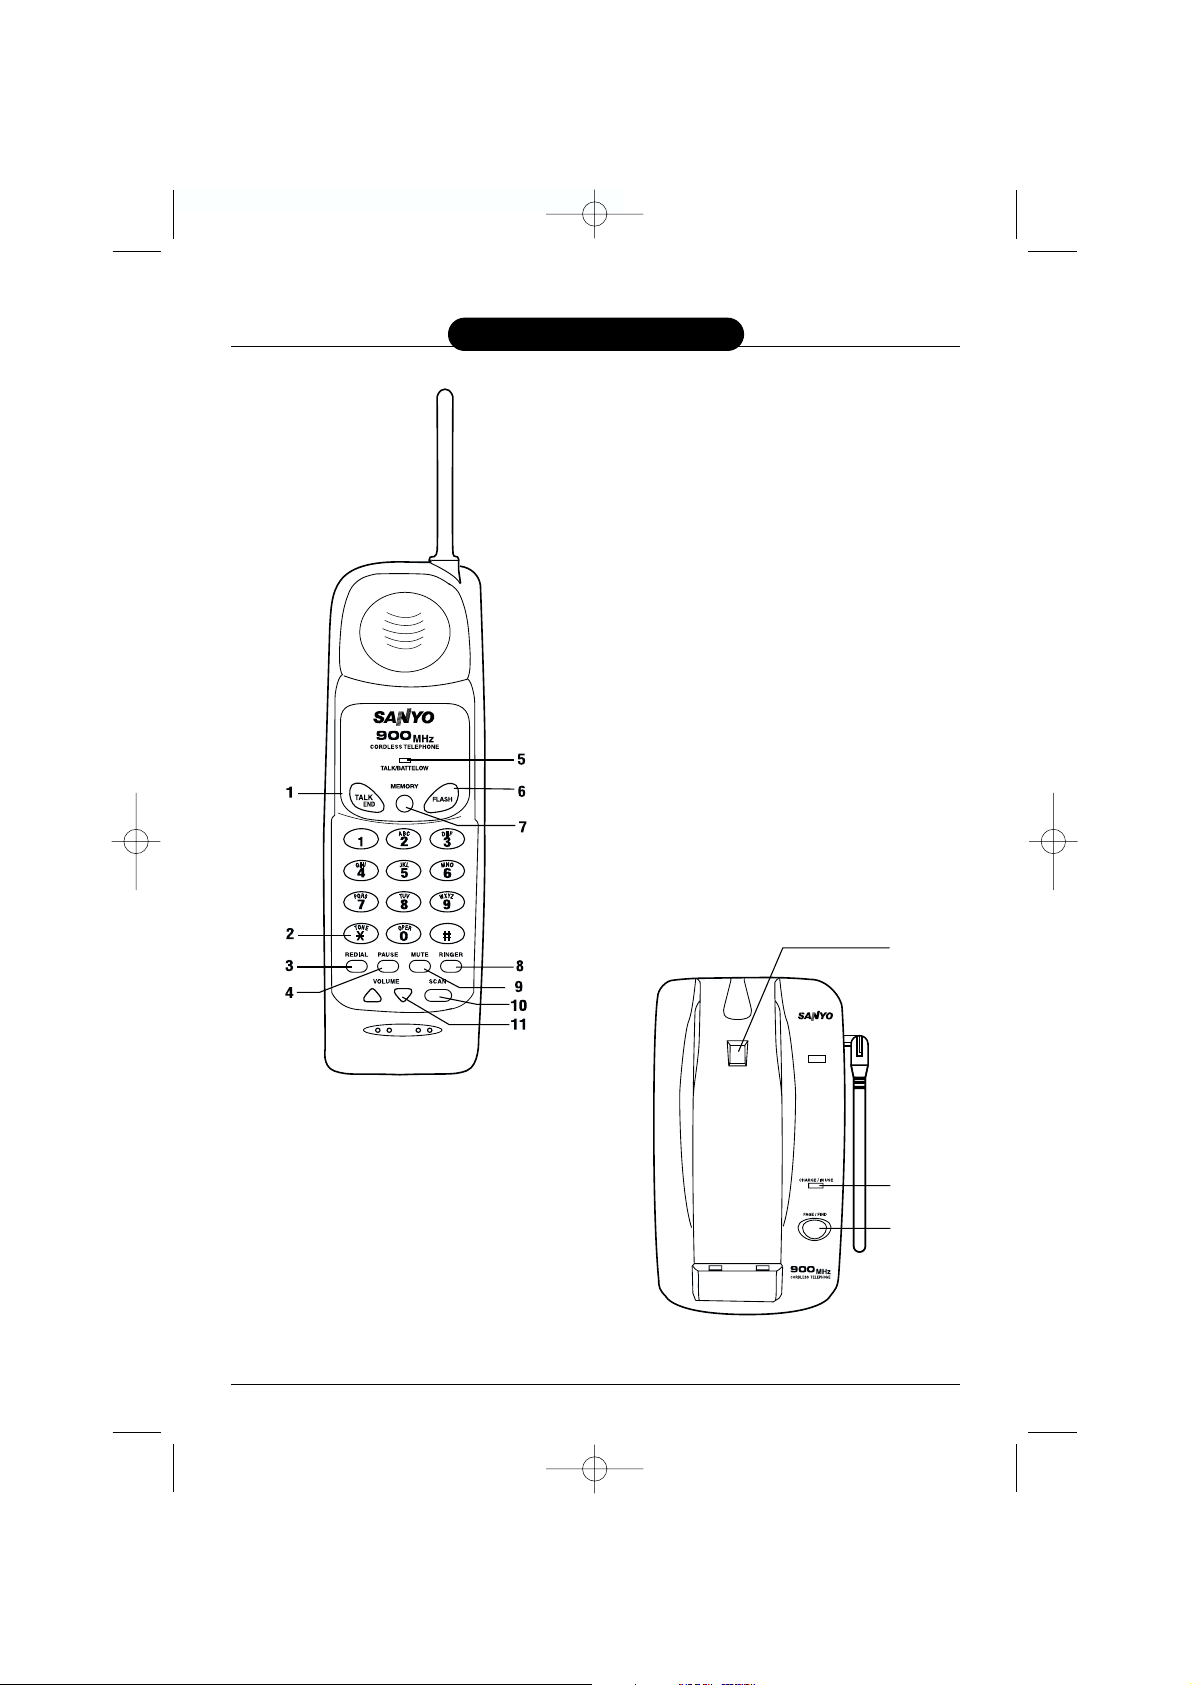
1. TALK/END - Answers or places calls. Also used to
hang up a call.
2.
✱ /TONE - Switches to tone dialing in pulse dialing
mode.
3.
REDIAL - Redials the last number.
4.
PAUSE - Adds a timed pause in a memory dialing
sequence.
5.
TALK/BATT LOW indicator - Lights when phone is in
use and flashes when the battery is low.
6.
FLASH - Accesses special services such as call waiting
(A subscription required from local telephone
company.)
7.
MEMORY - Enters or retrieves numbers in memory.
8.
RINGER - Sets the ringer volume.
9.
MUTE - Turns off the handset microphone while you
are using the phone.
10.
SCAN - Selects another channel for clearer reception.
11.
VOLUME - Sets the earpiece volume.
12.
Handset retainer - Holds handset in place when it is
charged on the wall-mounted base.
13.
CHARGE IN/USE indicator - Lights when the phone is
in use or the handset is charging.
14.
PAGE/FIND - Pages or locates the handset.
COMPANDER
NOISE REDUCTION
PLUS
12
13
14
Controls and Functions
CLT9902 #4 (SANYO) 8/11/00 4:14 PM Page 3
Page 4

Selecting a Location
Before choosing a location for your new phone, there
are some important guidelines you should consider:
• The location should be close to both a phone jack
and continuous power outlet.
A continuous power outlet is an AC
outlet which does not have a switch
to interrupt its power.
• Keep the base unit and handset
away from sources of electrical
noise such as motors or
fluorescent lighting.
• Be sure there is sufficient space
to rotate the base unit antenna
to a fully vertical position.
Important: Do not place the power
cord in an area where it may create a
trip hazard or become chafed and
create a fire or electrical hazard.
Setting the Dialing Mode Switch
Place the switch in the
TONE position for tone
dialing, or the
PULSE
position for pulse dialing.
E3
Charging the Battery Pack
The rechargeable Nickel-Cadmium battery pack must
be fully charged before using your phone for the first
time.
Before plugging the phone line into your new
phone, you must charge the battery for at least
15 hours without interruption
.
1
Remove the handset battery cover.
2
Plug the battery’s
cable into the
handset and place
the battery pack
inside the battery
compartment.
3
Replace the battery cover.
The connectors will fit together only one
way. Make sure the battery’s connector is
property aligned.
▼ Charging the Handset
Place the handset on the base
to charge. (The handset can
charge in either the face-up or
face-down position.)
▼ Low Battery Indicator
When the battery pack in the
handset is low and needs to be
charged, the
TALK/BATT LOW
indicator flashes every 3 seconds.
If this occurs while you are on the
phone, you will hear an alert tone.
Complete your call as quickly as
possible, and return the handset
to the base for charging.
▼ Cleaning the Battery Contacts
To maintain a good
charge, it is important to
clean all battery contacts
on the handset and base
about once a month.
Use a dry cloth or other
contact cleaner.
Do not use any liquids
or solvents.
Rechargeable batteries have a memory
effect that reduces standby and talk time.
To avoid this memory effect, on a
monthly basis use the phone until the
low battery indicator appears. Then
charge the battery for 15 hours.
Repeated short chargings may cause
memory effect in the handset battery. It
is recommended not to replace the
handset to the base after each call.
PULSE
TONE
BLACK
RED
COMPANDER
N
O
I
S
E
R
E
D
U
C
T
IO
N
PLUS
Installation
RECYCLING NICKEL-CADMIUM BATTERIES
NICKEL-CADMIUM
BATTERIES MUST BE
DISPOSED OF
PROPERLY.
Ni-Cd
Nickel-cadmium cells are used in the battery
pack. Please take your used nickel-cadmium
battery packs to a store that recycles nickelcadmium batteries.
Replacement Battery Packs: Sanyo 3KR-600AAL or
Sanyo-GE GES-PCF01. Use only specified battery packs.
CLT9902 #4 (SANYO) 8/11/00 4:14 PM Page 4
Page 5

E4
To telephone outlet
To TEL LINE
To DC IN 9V
AC adapter
(supplied)
Telephone line cord
(supplied)
2
3
To AC outlet
When connecting the power cord, make sure it does not create
a trip or fire/electrical hazard. Avoid places where it could
become chafed.
1
Snap the bottom bracket into the notches on the base.
2
Connect the AC adapter to the
DC IN 9V
jack and to a standard 120-V
AC wall outlet. Then raise the base antenna to a vertical position.
3
Connect the telephone line cord to the
TEL LINE
jack and to a telephone
outlet.
1
Snap the bottom bracket into the notches on
the base.
2
Plug the telephone line cord to the
TEL LINE
jack and the AC adapter to the DC IN 9V jack.
3
Plug the telephone line cord into the telephone
outlet.
4
Fit the AC adapter cord into the molded channel.
Then wrap the cord around the strain relief
notch.
5
Plug the AC adapter into a standard 120-V AC
wall outlet.
6
Raise the antenna to a vertical position.
7
Align the mounting holes on the base with the
mounting posts on the wall plate. Push in and
down until the phone is firmly seated.
1
2 - 7
Use only the AC adaptor that is supplied
with your phone.
Mounting the base unit on a wall
▼ Standard wall plate mounting
This phone can be mounted on any standard
telephone wall plate.
1
Connections
▼ Connect the base unit
CLT9902 #4 (SANYO) 8/11/00 4:14 PM Page 5
Page 6

Raising the Antenna
Before using your phone, be sure to raise the base
antenna fully to the vertical position.
Adjusting Ringer/Volume Controls
▼ Ringer Tone and Volume
1
While the phone is not in use, press
RINGER
.
2
The phone has two ringer tones, each with two
volume levels. Press
RINGER
again until you hear
the ringer tone and volume level you want.
E5
▼ Setting the Handset Earpiece Volume
1
While you are on a call, press
VOLUME
or .
2
The phone has three receiver volume levels,
Normal, High, and Loud. Press
VOLUME
or
repeatedly until you hear the volume level
you want.
When you hang up, the phone keeps the last
volume setting selected.
▼ Direct wall plate mounting
If you do not have a standard wall plate, you can
mount your phone directly to the wall. Before doing
this, consider the following:
• Avoid electrical cables, pipes or other items behind
the mounting location, that could cause a hazard
when inserting screws into the wall.
• Try to mount your phone within 10 –15 feet of a
working phone jack to avoid excessive cord
lengths.
• Make sure the wall material is capable of
supporting the weight of the base and handset.
• Use #10 screws with anchoring devices suitable
for the wall material where the base unit will be
placed.
1
Insert two mounting
screws with a minimum
length of 1-3/8 inches
(35.5 mm) into the wall,
3-15/16 inches (100 mm)
apart. Allow about 3/16 of
an inch (4.8 mm) between
the wall and screwheads
for mounting the phone.
2
Refer to steps 1 through 9
on page 4 and 5 to mount
the telephone.
TOP
3/16 in.
3-15/16 in.
8
On the base unit, pull the handset retainer out of
the slot. Rotate it clockwise 180 degrees.
9
Flip it over. Slide it back into the slot so that the lip
of the retainer is up and the points down. The
retainer holds the handset in place.
COMPANDER
N
OISE
R
E
DU
CT
ION
PLUS
Handset retainer
When the beltclip is attached onto the
handset, you can hang the handset on
the wall-mounted base with the
keypad facing inside only.
Setting Up Your Phone
(4.8 mm)
(100 mm)
CLT9902 #4 (SANYO) 8/11/00 4:14 PM Page 6
Page 7

To answer a call Press any key.
To make a call Press TALK/END.
The
TALK/BATT LOW indicator lights.
Listen for the dial tone.
Dial the number.
To hang up a call Press TALK/END.
To redial last number Press TALK/END.
Listen for the dial tone.
Press
REDIAL to dial the number.
E6
Making and Receiving Calls (when the handset is not in the base)
Using Your Phone
AutoTalk and Auto Standby
When the handset is in the base, the AutoTalk
feature allows you to answer a call by just picking it
up from the base. There is no need to press any
buttons.
The
Auto Standby feature allows you to hang up the
phone by simply returning the handset to the base.
Temporary Tone Dialing
Even if your phone line is pulse dialing, you can still
access to special telephone ser vices that are
available to tone dialing lines only.
After the line is connected, press
✱ /TONE. The
subsequent numbers dialed will be sent as tone
dialing.
Storing a Number in Memory
Your CLT-9901/9902 phone has 10 memory
locations for storing important telephone numbers.
Memory storing can be done only when
the handset is out of the base and not
in use.
1
Press
MEMORY
. The
TALK/BATT LOW
indicator
flashes.
2
Enter the phone number you want to store
(up to 16 digits) within 20 seconds.
If no key is pressed for 20 seconds after step 1,
operation is cancelled and a beep sounds.
3
Press
MEMORY
and enter a number (0–9) for the
memory location you want to use.
You hear a long beep and the
TALK/BATT LOW
indicator goes out. The number has been stored
successfully.
If you select any keys other than 0–9, the handset
will beep rapidly and no number will be stored.
Entering a Pause in Memory
Dialing
When storing a telephone number with an access
code (an overseas number or an access number to a
voice mail service, for example), you may need to
store a pause in the phone number sequence.
To use this function, follow steps 1 and 2 in
Storing
a Number in Memory, then press the PAUSE
button to insert a pause in the phone number
sequence.
The maximum length of a stored phone
number is up to 16 digits including the
pause. (A pause counts as one digit.)
Storing Mixed Tone/Pulse Numbers
If you have a pulse dialing line and use temporar y
tone dialing feature to a special service, you can store
a pulse/tone mixed number (up to 16 digits) in the
memory.
1
Press
MEMORY
.
The
TALK/BATT LOW
indicator flashes.
2
Enter the number to be dialed in pulse mode.
3
Press the
✱ /TONE
button. The
✱ /TONE
button
counts as one digit.
4
Enter the number to be dialed in tone mode.
5
Press
MEMORY
and a number (0–9) for the
memory location you wish to use. You hear a long
beep and the
TALK/BATT LOW
indicator goes out.
The number has been stored successfully.
CLT9902 #4 (SANYO) 8/11/00 4:14 PM Page 7
Page 8

E7
Dialing a Stored Number
To dial a phone number stored in memory, press
TALK/END, then press MEMORY and the memory
location (0–9) number. Your phone will dial the stored
number.
If you select a memory location that
does not have a stored number, the
handset will beep rapidly and the phone
will not dial.
Mute
You can turn off the handset microphone while you
are on the phone, so that your calling party cannot
hear you.
1
Press
MUTE
during a telephone call.
The microphone is turned off.
2
To cancel mute, press
MUTE
or
TALK/END
.
Chain Dialing
You can store a special access code, a number to
access banking transaction, for example, and then
use chain-dialing to facilitate your operation.
1
Store the access code into one of the memory
location (0–9).
2
Dial the main number.
3
Press
MEMORY
and the memory location of the
access code at the appropriate time.
Erasing a Stored Number
1
Remove the handset from the base.
2
Press
MEMORY
twice.
3
Press the memory location number (0–9) you
want to clear. You hear a long beep confirming
that you have erased the number.
Replacing a Stored Number
Your phone has 10 memory locations, represented by
the numbers 0–9 on the keypad. If you store a phone
number in one of these locations and attempt to
store a different number in the same location later,
the new number will replace the previous one.
Selecting a Different Channel
If you encounter interference while using your phone,
you can manually change the channel for clearer
communication. Interference can come from
appliances or other phones in your home.
The
SCAN button on the handset allows you to
choose from 40 factory-set channels. During the
course of a conversation, if you hear static or noise
which makes it difficult to hear, press
SCAN. The
TALK/BATT LOW indicator flashes while the phone is
changing to another channel.
This function works only when the phone is in use.
Using the Flash Button
Use FLASH for accessing special services* offered by
your telephone company such as Call Waiting. If you
receive a call during your conversation, you hear a
beep. Press the
FLASH button on the handset to
answer the new call. Press
FLASH again to return to
the previous call.
*Subscription required.
Using the Page/Find Feature
The Page/Find feature sends a signal from the base
to the handset causing it to beep. This is useful for
locating the handset when it is away from the base.
To use this feature, press
PAGE/FIND on the base.
The handset beeps for 60 seconds. (Press and hold
the
PAGE/FIND button to get a continuous beep.)
The paging feature does not work when
the phone is in use.
On the handset, press any key except TALK/END to
end the page. If you want to end the page and make
a call, press
TALK/END.
Press
TALK/END again if you do not wish to make a
call.
Travelling Out of Range
When you begin to move too far from the base, you
will first hear a clicking sound. As you travel further
out of range, the voice transmission will begin to
break up.
If you pass the range limits of the base, your call will
terminate.
CLT9902 #4 (SANYO) 8/11/00 4:14 PM Page 8
Page 9

Suggestion
• Make sure the AC adapter is plugged into the base and wall outlet.
• Make sure the handset is properly seated in the base.
• Make sure the rechargeable battery pack is properly connected in the
handset.
• Make sure that the charging contacts on the handset and on the base
are clean.
• Make sure that the base antenna is in the vertical position.
• Interference by other electronics equipments such as T Vs, computers,
microwaves, fluorescent lighting, etc.
• You may have gone too far from the base.
• Press
SCAN to search clearer reception.
• Check both ends of the telephone line cord.
• Make sure the AC adapter is plugged into the base and a wall outlet.
• Disconnect the AC adapter for a few minutes, then reconnect it.
• Reset security code by placing the handset back on the base for a few
seconds. The
CHARGE/IN USE indicator will blink when the phone has
been reset.
• The Nickel-Cadmium batter y pack may be weak. Charge the battery for
a full 15 hours.
• The handset may be too far away from the base.
• Place the base away from appliances or metal objects.
• Reset security code by placing the handset back on the charging cradle
for a few seconds. The
CHARGE/IN USE indicator will blink when the
phone has been reset.
E8
headset
jack
Installing the belt
clip (CLT-9902
only)
▼ To attach the belt clip
Insert the belt clip into the
holes on each side of the
handset. Press down until it
clicks.
Headset installation
(CLT-9902 only)
Your phone may be used with an optional headset for
handsfree operation. To use this feature, simply plug
any standard shielded headset with a 2.5-mm plug
into the headset jack.
▼ To remove the belt clip
Pull both sides of the belt clip
to release the tabs from the
holes.
If you have wall-mounted the base, you
must remove the belt clip to charge the
handset with the keypad facing forward.
Belt Clip and Headset Jack
(Available on CLT-9902 only)
Problem
CHARGE/IN USE won’t come on
when handset is placed in base.
Weak and/or scratchy sound
Can’t make or receive calls.
Handset doesn’t ring or receive
a page.
If your cordless telephone is not performing to your expectations, please try these simple steps. If you
are still unable to resolve the problems, contact your place of purchase or call SANYO SOS Helpline.
Caution: Do not attempt to service this unit yourself. Servicing must be performed by
qualified personnel.
Troubleshooting
CLT9902 #4 (SANYO) 8/11/00 4:14 PM Page 9
Page 10

E9
Ren Number: 0.4
The Ringer Equivalence Number (REN) assigned to
each terminal device provides an indication of the
maximum number of terminals allowed to be
connected to a telephone interface. The termination
on an interface may consist of any combination of
devices subject only to the requirement that the sum
of the Ringer Equivalence Numbers of all the devices
does not exceed 5.
CAUTION
This Product is intended for use in CANADA only.
Sale or use in other countries may violate local laws.
Cordless telephones use radio frequencies to allow
mobility. This affects the performance of your unit.
1. NOISE
Electrical pulse noise is present in most homes at one
time or another. This is most intense during electrical
storms. Certain kinds of electrical equipment, such as
light dimmers, fluorescent bulbs, motors, fans, etc.,
also generate pulse noise.
Because radio frequencies are susceptible to this, you
may on occasion hear pulse noise through the
handset. This is usually only a minor annoyance and
should not be interpreted as a defect of the unit.
2. RANGE
Because radio frequencies are used, the location of
the base station can affect the operating range of the
unit. Try several locations and choose the one that
gives the clearest signal to the handset. (Turning in a
circle while holding the handset may also increase
the operating range.)
3. INTERFERENCE
Electronic circuits activate a relay to connect the unit
to your telephone line. These electronic circuits
operate in the radio frequency spectrum. While
several protection circuits are used to prevent
unwanted signals, there may be periods when these
unwanted signals enter the base station. You may
hear click or hear the relay activate when you are not
using the cordless handset. If this occurs frequently,
you can minimize or eliminate the problem by
lowering the height of the base station or relocating
the base station. It may also be helpful to change the
operating channel and/or the security code setting.
Operation is subject to the following two conditions:
(1) this device may not cause interference, and (2)
this device must accept any interference, including
interference that may cause undesired operation of
the device.
NOTICE:
Privacy of communications may not be ensured
when using this telephone. Other devices, including
other cordless telephone telephones, may interfere
with the operation of this cordless telephone or cause
noise during operation. Units without coded access
may be accessed by other radio communication
systems. Cordless telephones must not cause
interference to any licensed radio service.
The Industry Canada Label identifies certified
equipment. This certification means that the
equipment meets certain telecommunications
network protective, operational and safety
requirements. The ministry does not guarantee that
the equipment will operate to the user’s satisfaction.
Before installing this equipment, users should ensure
that it is permissible to be connected to the facilities
of the local telecommunications company. The
equipment must also be installed using an acceptable
method of construction.
In some cases, the company’s inside wiring
associated with single-line individual ser vice may be
extended by means of a certified connector assembly
(telephone extension cord). The customer should be
aware that compliance with the above conditions
may not prevent degradation of service in some
situations.
Repairs to certified equipment should be made by an
authorized Canadian maintenance facility designated
buy the supplier. Any repairs or alterations made by
the user to this equipment, or equipment
malfunctions, may give the telecommunications
company cause to request that the user disconnect
the equipment.
The user should ensure for his own protection that
the electrical ground connections of the power utility,
telephone lines and internal metallic water pipe
system, if present, are connected together. This
precaution may be particularly important in rural
areas.
CAUTION
Users should not attempt to make such connections
themselves, but should contact the appropriate
electrical inspection authority, or electrician, as
appropriate.
The exclamation point within an
equilateral triangle is intended to alert
the user to the presence of important
operating and maintenance (servicing)
instructions in the literature
accompanying the product.
This symbol on the product is used to identify the
following important information. Use only with
specified SANYO power adaptor.
Technical Information
CLT9902 #4 (SANYO) 8/11/00 4:14 PM Page 10
Page 11

E10
At Sanyo, fulfilling the needs of our customers is a priority. That’s why we created our Sanyo On Site (SOS)
customer service program that guarantees satisfaction. We’re so confident about the quality of our products that
we’re expanding our warranty to include the following exceptional, new level of service.
SOS guarantees you:
Nationwide Customer Support
SOS is there to help you. Our friendly and knowledgeable product specialists will quickly answer your questions
about setup and use of Sanyo telephone products. Simply call toll free from anywhere in Canada to connect to
our no-charge,
SOS support and service network.
1-800-263-2244 between 10:00 AM – 7:00 PM EST
Stay-At-Home Convenience
It’s a nuisance making another trip to the store when you’re stuck. Now with SOS,
all that’s necessary is a quick call from your home for product assistance
or exchange.
SOS – it’s the ultimate in convenience.
Hassle-Free Exchange
Should your Sanyo telephone/telephone with answering system require servicing during the warranty period,
SOS will have a free replacement unit at your door within 48 hours.* For security reasons, you will be asked to
give us your credit card number (
VISA or MasterCard).
Guaranteed Quality
All SOS replacement sets are checked and serviced by factory-authorized technicians before being sent out. SOS
means you never have to worry.
With SOS,
we’ve got you
covered!
* Two business days required
CLT9902 #4 (SANYO) 8/11/00 4:14 PM Page 11
Page 12

Covered under one or more of the following U.S. patents:
4,511,761 4,523,058 4,595,795 4,597,104 4,797,916 5,426,690
All rights reserved * UCZZ01276DZ
Printed in China
The SANYO Comfort Warranty
WARRANTY APPLICATION
Sanyo Communications products purchased new, unused
in Canada through a Sanyo Authorized Dealer are
warranted against manufacturing defects in materials and
workmanship for
ONE YEAR covering parts and labour,
from the date of purchase by the original retail purchaser.
This warranty only applies in favour of the original retail
purchaser of the warranted product.
SANYO CANADA INC.’S RESPONSIBILITY
During the warranty period, SANYO Canada Inc. will repair,
or at our option, replace a Communications product which
shows evidence of a manufacturing defect in materials or
workmanship. Replacement PARTS are warranted for the
remaining portion of the warranty period.
WHAT IS NOT COVERED
(a) Communications products purchased outside Canada.
(b) Communications products purchased in a used
condition.
(c) Communications products purchased from non Sanyo-
authorized dealer.
(d) Communications products not intended for Canadian
usage or products without appropriate Canadian
regulatory approvals.
(e) Problems due to product set-up and installation.
(f) Adjustments that are outlined in the Operating Manual.
(g) Accessory items including antenna, and batteries,
(h) Damage in or due to transportation.
(i) Damage due to improper maintenance, accident,
abuse, misuse or negligence.
(j) Damage caused by lightning and power surges.
ORIGINAL RETAIL PURCHASER’S RESPONSIBILITY
You, the original retail purchaser, must present your original,
dated bill-of-sale together with this warranty to SANYO
Canada Inc. or to an authorized Sanyo Service Depot when
you make a claim under this warranty.
You, the original retail purchaser, are responsible for any
costs of TRANSPORTING the product to and from SANYO
Canada Inc. or an authorized Sanyo Service Depot. You also
are responsible for the cost of any MAINTENANCE
necessary in respect of the product.
WARRANTY BECOMES VOID
This warranty becomes void if the product’s serial numbers
are altered or removed or if any repair to the product is
made other than by SANYO Canada Inc. or by an authorized
Sanyo Service Depot.
LIMITATIONS
(a). SANYO Canada Inc. reserves the right to change or
improve the design of the model of the product
warranted hereunder without incurring any obligation
to make any modifications to or to install any
improvement in or on the product.
(b). In no event shall SANYO Canada Inc. or any of its
Authorized Dealers be liable for special or
consequential damage arising from the use of this
product.
STATUTORY WARRANTIES
The above provisions do not preclude the operation of any
applicable provincial statute which in certain circumstances
may not allow some of the limitations and exclusions
described in this Warranty. Where any terms of this
Warranty are prohibited by such a statute, they shall be
deemed null and void but the remainder of this warranty
shall remain in effect.
HOW TO OBTAIN WARRANTY SERVICE
Please contact the Sanyo Authorized Dealer from whom the
product was purchased, or contact us directly at:
SANYO Canada Inc.
300 Applewood Cres.
Concord, Ont. L4K 5C7
(905) 760-9944
1-800-263-2244
CLT9902 #4 (SANYO) 8/11/00 4:14 PM Page 12
 Loading...