

Page 1

Congratulations
Your Sanyo 900-MHz COMPANDER PLUS cordless telephone is a fine-quality
home communications product. It is carefully designed and produced by a world
leader of consumer and industrial electronics equipment. With proper maintenance
and care, it will provide you with years of enjoyment and convenience.
Main features:
900-MHz Technology
Superior Range - The use of 900-MHz frequency band for signal transmission
between base and handset means greater communication range compared to
conventional 43—49 MHz cordless telephones. In normal situations,
approximately 4 times greater distance can be achieved.
Ultra-Low Noise - The high frequency communication has also significantly
reduced noise level.
40-Channel Auto Scan - Your new telephone uses one of 40 channels in the
900-MHz frequency band. It automatically selects a clear channel every time
you receive or place a call on the handset. Should you wish to switch channels
during a call, the handset provides a SCAN button.
COMPANDER PLUS Noise Reduction
This fourth generation of the Sanyo’s original noise reduction technology now
filters out more background noise.
LCD Display and Call Manager Features* on Handset
The backlit LCD display on the handset is compatible with many special
services offered by your telephone company, including Caller ID, Visual Call
Waiting and Call Waiting Option services*. When you subscribe to these
services, you can see the caller’s name/number on the display before you
answer a call, or even when you’re already on the phone. The callers list
memory of this telephone keeps a log of as many as 30 recent callers, which
you can review on the display. The display also shows the number you dial,
date/time and operation prompts. Display language is English or French
selectible.
*Require a subscription. Please ask your telephone company for more details.
30-Name/Number Directory
You can program 30 telephone numbers, together with each party’s name, into
the directory memory. You can transfer numbers saved in the Caller ID log to
the directory, view the directory name/number list on the handset display, and
dial out the number on display at the touch of a button.
Handsfree Speakerphones and Dual Keypad
Handsfree speakerphone is included on both cordless handset and base station.
With a dialing keypad on both units, the CLT 9389 is like two telephones, and
serves you as an intercom or 2-way pager.
Power Failure Backup System
This unique feature allows you to place or receive a call on the cordless
telephone during a power interruption of up to 20 hours. Four AA batteries are
required (not supplied with the telephone).
E1
Page 2
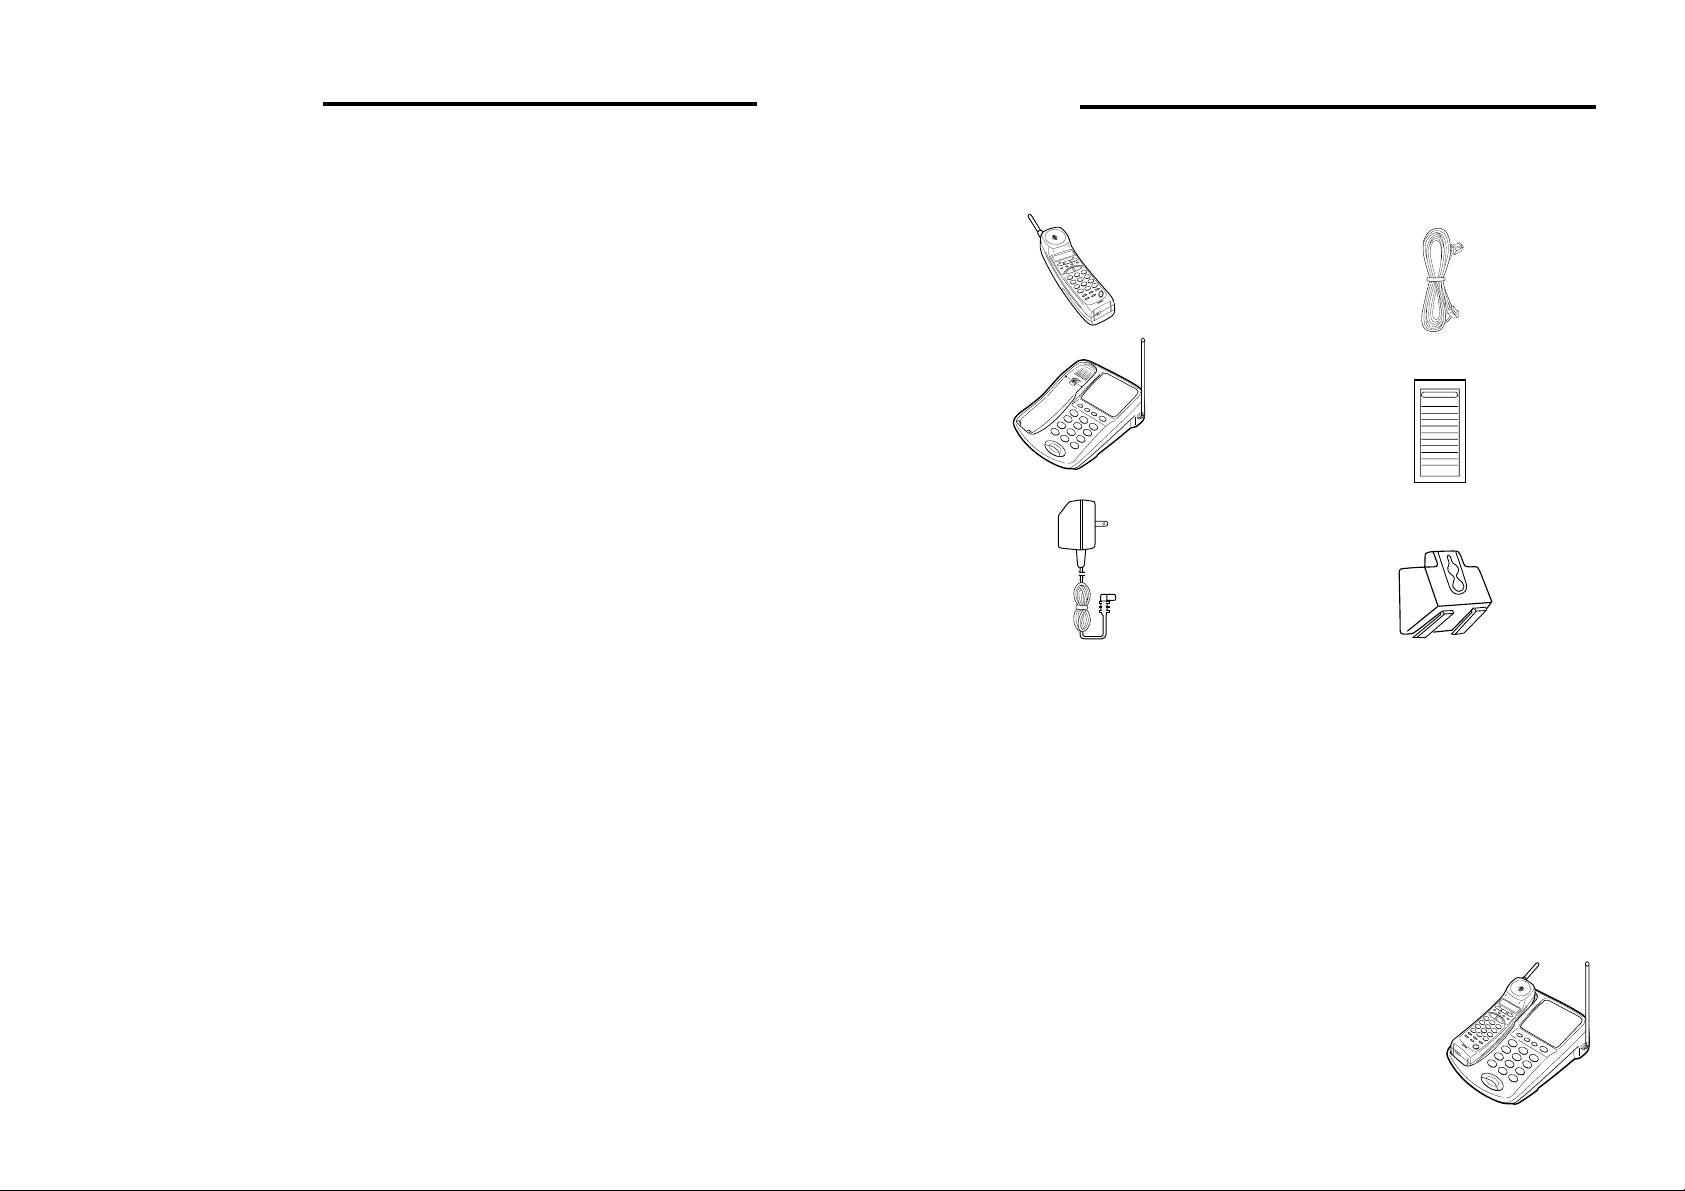
Table of contents
Unpacking
SETTING UP
Unpacking ....................................................................................................... 3
Names of controls ........................................................................................... 4
Installation ....................................................................................................... 8
Location
Connections
Dialing system
Backup batteries
Charging the handset battery .......................................................................... 11
Optional feature menu..................................................................................... 12
Handset ringer level selection
Programming your area code
Clearing message indications
Programming voice mail access number
Programming your greeting display
Call Waiting OFF/ON/OPTIONS selection
Selecting the display language
BASIC USE
Placing a call ................................................................................................... 20
Answering a call .............................................................................................. 21
Using the speakerphone ................................................................................. 22
CALL MANAGEMENT SERVICES ...................................................................... 23
Caller ID
Visual Call Waiting
Call Waiting Options
Directory
ADVANCED USE
Speed dial ....................................................................................................... 35
Hold ............................................................................................................. 36
Redial ............................................................................................................. 36
Predial ............................................................................................................. 37
Intercom .......................................................................................................... 38
Transferring a call............................................................................................ 39
Flash button..................................................................................................... 40
Temporary Touch-Tone dialing ....................................................................... 40
GENERAL
Replacing handset battery............................................................................... 41
In the event of power failure ............................................................................ 42
Display information.......................................................................................... 42
Wall mounting.................................................................................................. 43
Security code................................................................................................... 44
Troubleshooting............................................................................................... 45
Technical information ...................................................................................... 46
Warranty.......................................................................................................... 48
Read this information carefully before installing and operating your cordless telephone.
Check to make sure you have all the items that come with the telephone.
Handset with rechargeable battery
Base station
AC adaptor
DESCRIPTION
Cordless telephones operate on the same principle as a two-way radio. The location
of the base station determines the range of operation. In most homes, maximum
range is obtained by locating the base station at the highest point in the house.
The base station operates from a 120 V AC electrical outlet. Connect the base station
to a telephone line by simply plugging it into a standard telephone jack. The handset
is powered by a heavy-duty rechargeable battery. This SANYO cordless telephone is
hearing-aid compatible.
CAUTION
Charge the handset battery pack before using the
cordless phone for the first time. Do not attempt to use
the phone before charging the battery pack for a full 10
hours.
Telephone cord
Speed dial sheet (for base station)
Wall mount bracket
E2
E3
Page 3
Names of controls
Names of controls
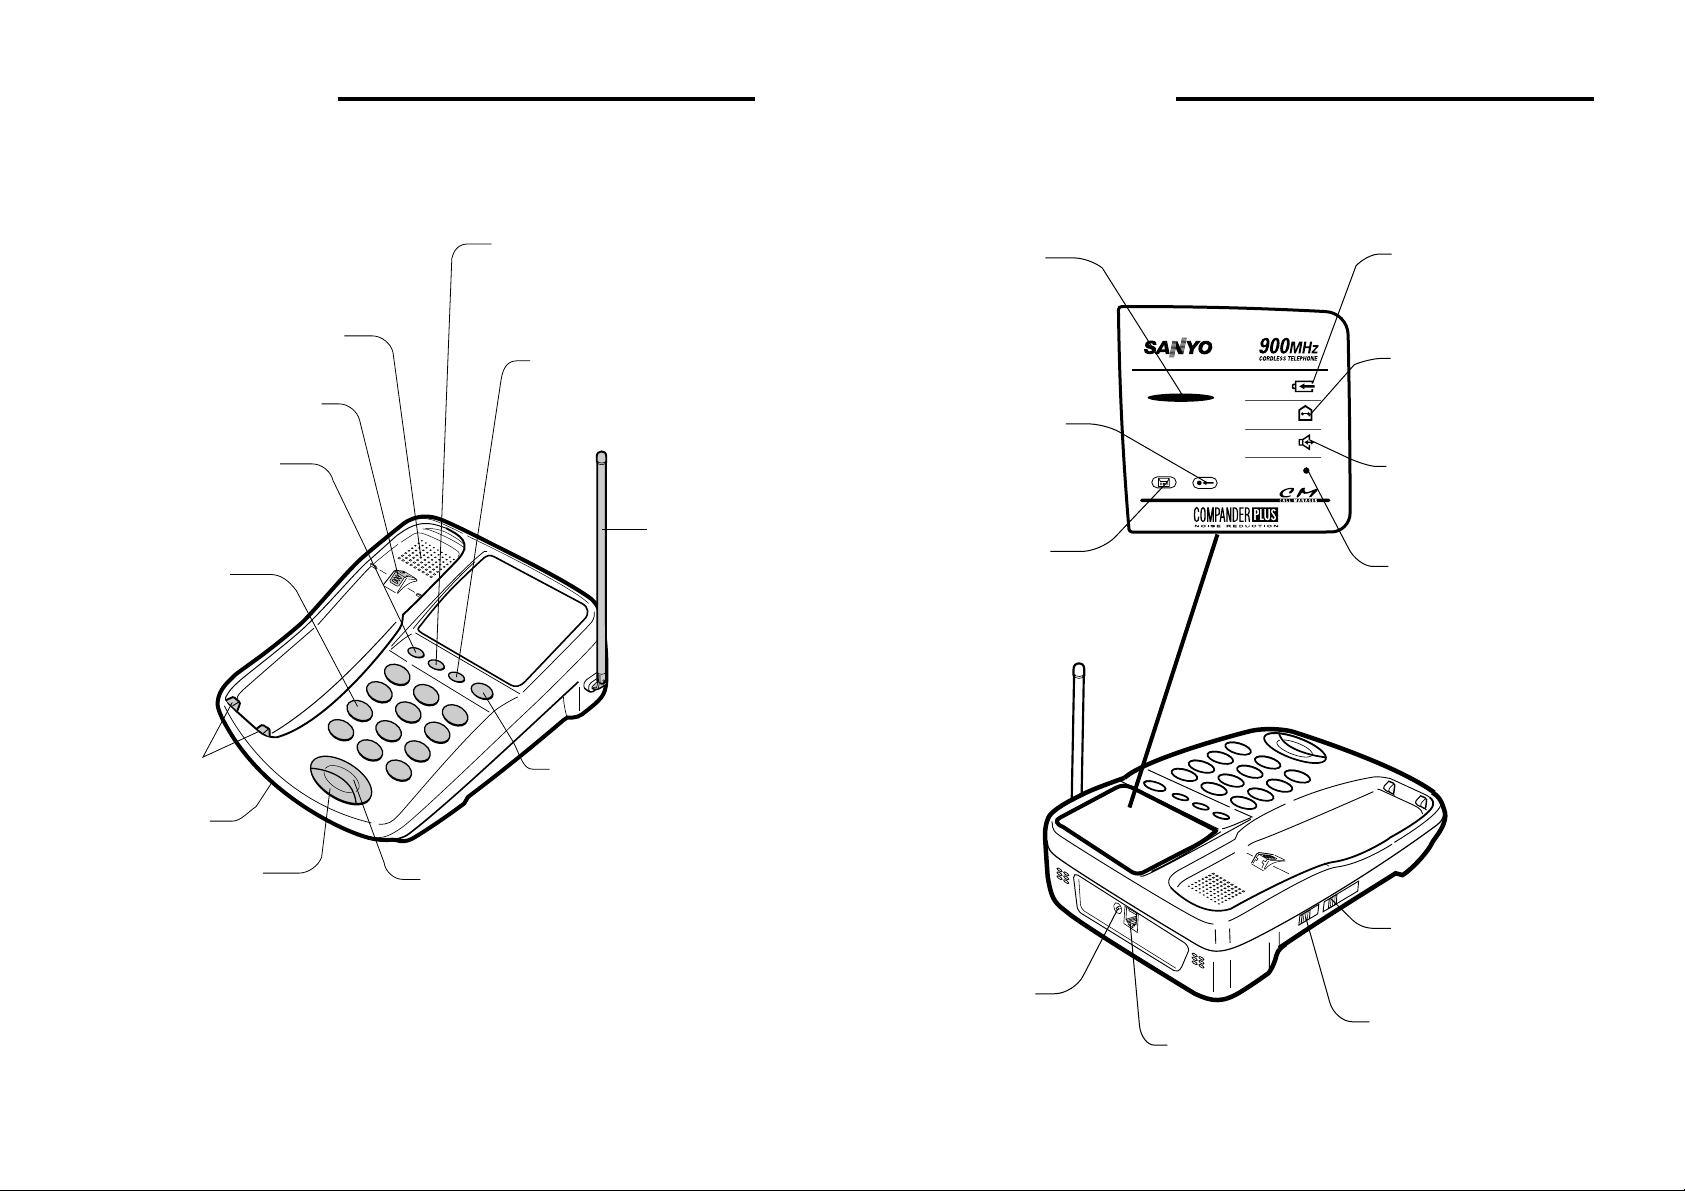
BASE STATION
Handset hanger
HOLD button
Lets you place a call
on hold.
Dialing
buttons
Speaker
FLASH button
Used to get a new dial tone
during a call or to access
special services subscribed to
from your telephone company.
MEMORY button
Used to program Speed
Dialing memory (of the
base station) and to place
a call from the memory.
Antenna
BASE STATION
IN USE indicator
Flashes when a call is
coming in, the handset is
paging or a call is on hold.
Lights when the base
station is in use.
CALLERS indicator
Flashes when you
have new callers in the
caller list.
V. MAIL indicator
Flashes when you have
messages in the voice mail
service you subscribed to
from your telephone campany.
V.MAIL
CALLERS
CHARGE
INTERCOM
SPEAKER
P.BACK UP
CHARGE indicator
Lights when the handset
is being charged.
INTERCOM indicator
Lights when the intercom
feature is being used.
SPEAKER indicator
Lights when the base station
speakerphone is in use.
P.BACK UP indicator
Flashes when the unit is
powered by the backup
batteries.
Recharge
contact points
Microphone
PAGE/INT button
Used to page/intercom the handset.
REDIAL/P button
Lets you automatically
call the last number
you dialed from the
base station.
SPEAKER button
Used to place or receive a call using
the base station speakerphone.
E4
AC adaptor
jack
VOLUME control (LOW-HIGH)
Lets you change the speaker
volume of the speakerphone.
TONE-PULSE select switch
TEL LINE jack
E5
Page 4
Names of controls
Names of controls
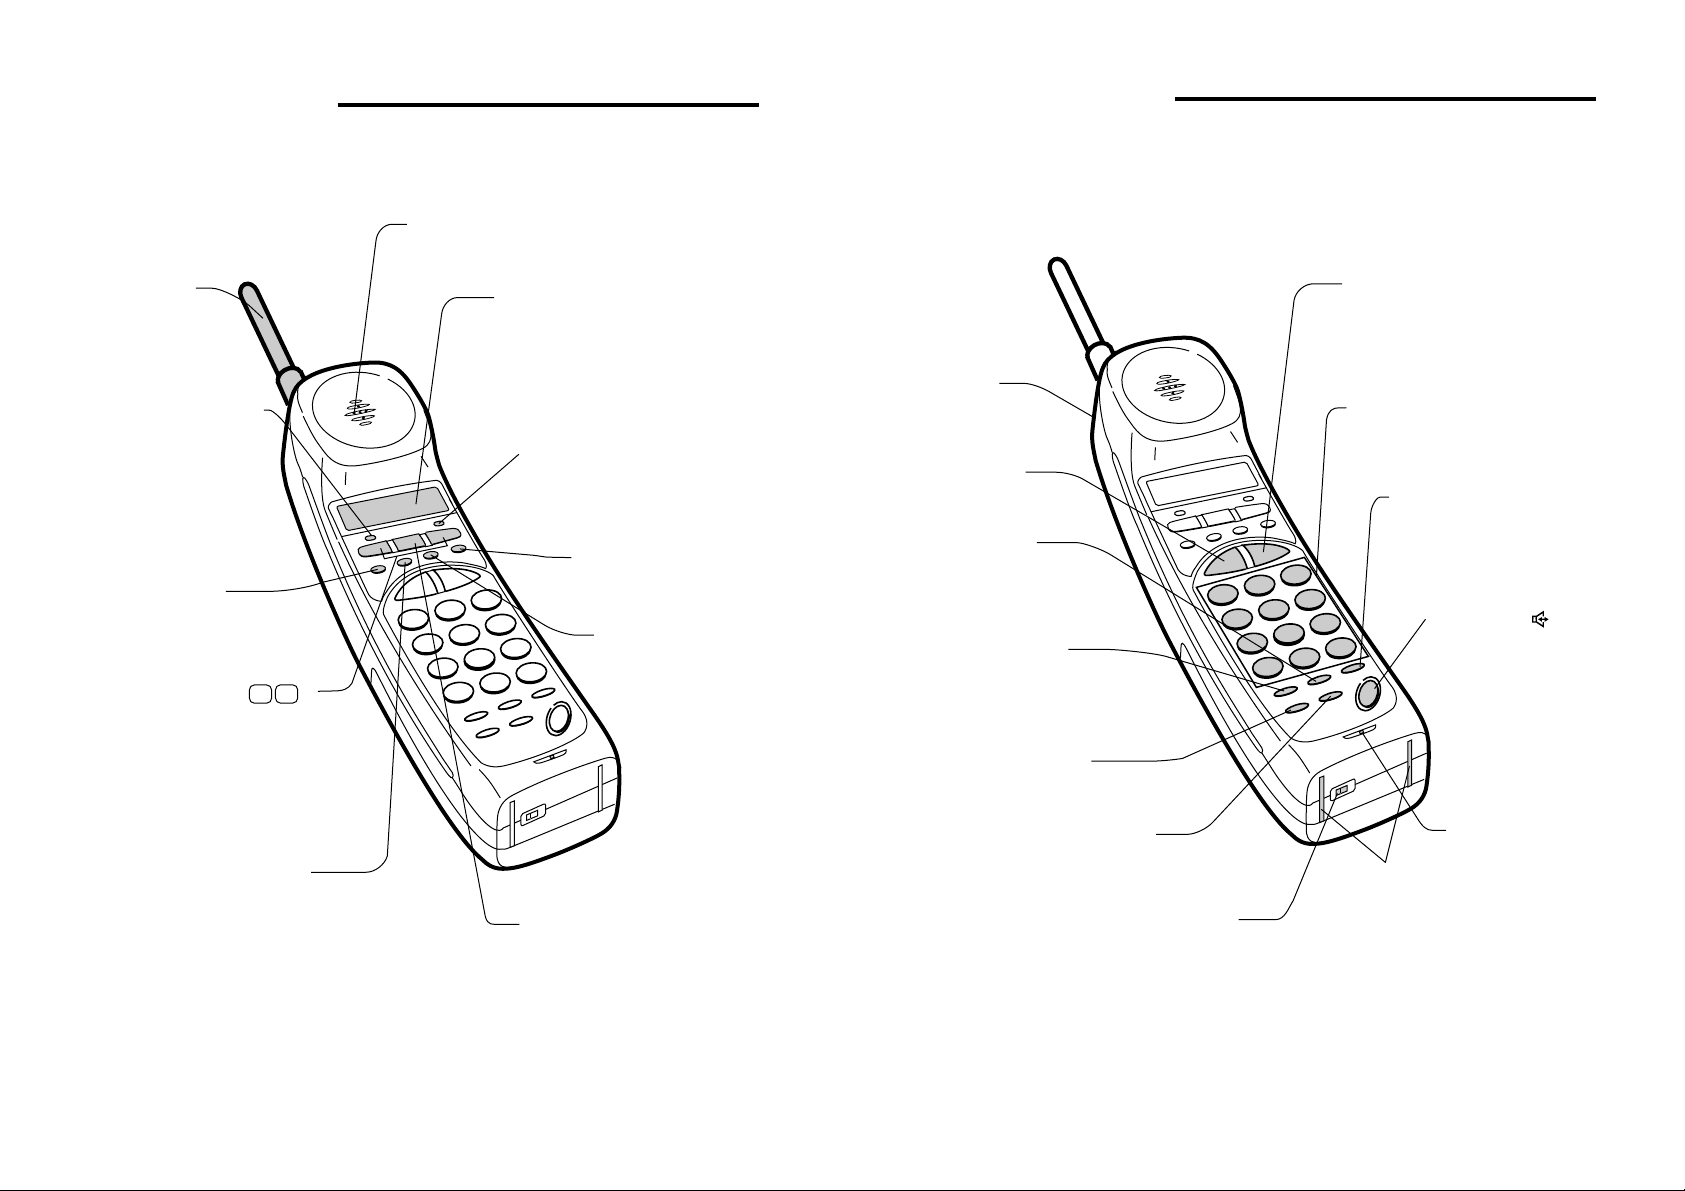
HANDSET
Antenna
Multifunction indicator
Flashes when you have
new callers in the callers
list or new messages in
the voice mail service
(slow flash), or when the
handset battery needs
recharging (fast flash).
MENU button
Used to select various
optional features.
VOLUME
CALL REVIEW ( )
▼
▲
buttons
VOLUME control
(HIGH-MIDDLE-LOW)
Lets you change the receiver volume
of the earpiece.
Used to review caller log list on
the display.
ERASE button
Used to delete a caller from
the callers list or to erase
characters on the display.
Earpiece
Backlit LCD display
Shows you the caller information*,
telephone status and menu prompts.
English or French selectible.
* Subscription to a caller ID service
from your telephone company is
required.
In-use indicator
Lights in green when the handset
is in use.
DIRECTORY button
Used to dial out a number
from the directory.
MEMO button
Used to program the
directory (handset).
C. WTG button
Used to talk to second caller
while already on the phone.
Requires a subscription to
Call Waiting service.
HANDSET
Speaker
(on the back)
END button
Used to end a call.
V.MAIL button
Used to access the voice
mail service you subscribe
from your telephone company.
FLASH button
Used to get a new dial tone
during a call or to access special
services subscribed to from your
telephone company.
SCAN button
Used to change to a different
channel during a call.
INT button
Used to page the
base station.
POWER switch
Turn the handset power
on and off.
TEL button
Used to receive or place a
call. Also used to switch from
speakerphone to earpiece
receiver during conversation.
Dialing buttons
Flash when an incoming call is
ringing. Light up for 10 seconds
when TEL is pressed.
REDIAL/P button
Lets you automatically
call the last number you
dialed from the handset.
Also used to insert a pause
in a dial number.
SPEAKER ( )
button
Used to activate the
handset speakerphone.
Lights when the speakerphone is in use.
Microphone
Recharge contact
points
E6
E7
Page 5
Installation
Installation
BASE UNIT LOCATION
Avoid places near electrical equipment such as refrigerators, computers, TVs or
fluorescent lamps. These may cause interference or reduce the operating range of
the cordless telephone.
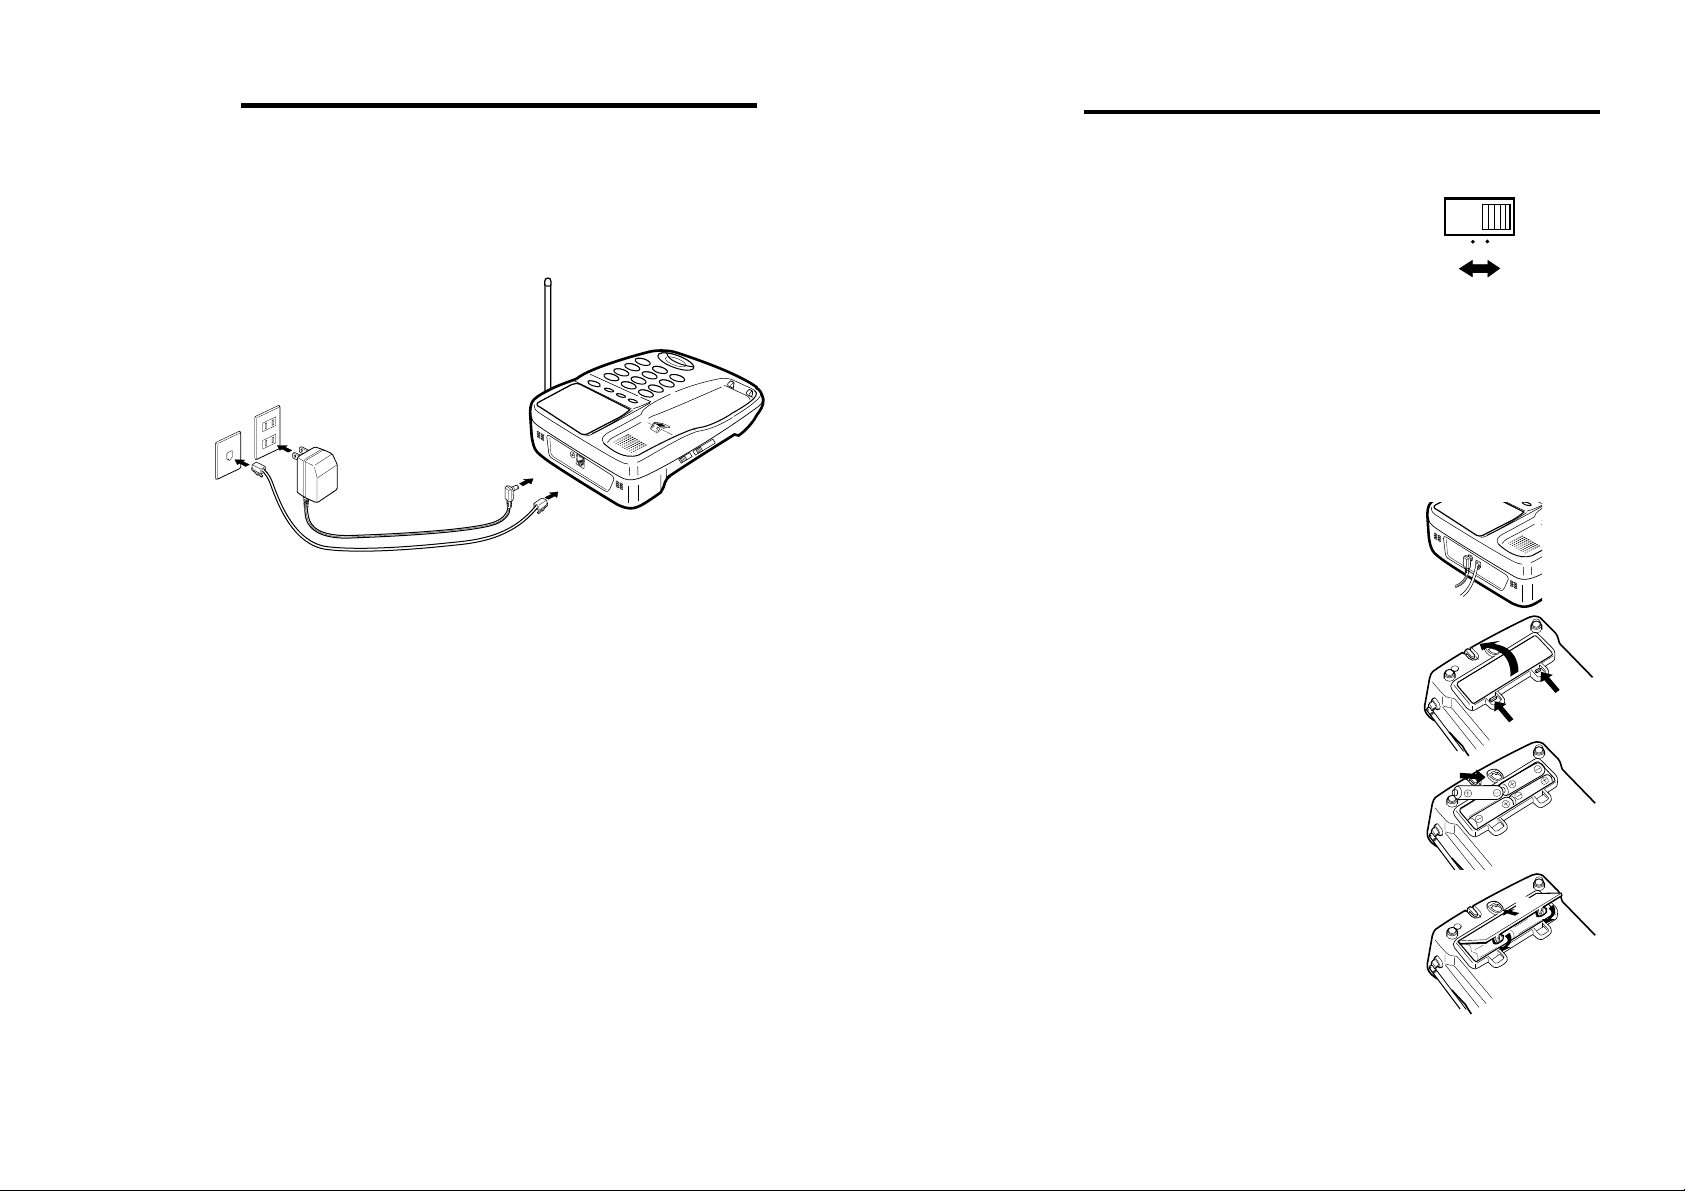
CONNECTIONS
AC wall outlet
2
3
Wall telephone jack
Telephone cord
1
Insert the small plug of the AC adaptor into the DC 12V jack provided on the back
of the base station.
2
Plug the AC adaptor into an AC 120V wall outlet.
3
Insert one plug of the telephone cord into a wall telephone jack (modular type) and
the other into the TEL LINE jack on the base station.
4
Wind any excess length of the telephone cord around the cord holder on the back
of the base station.
1
DC 12V
TEL LINE
3
DIALING SYSTEM
Set the TONE-PULSE select switch on the base station
to the dialing system used in your home (touch-tone or
pulse). If you do not know which system is in use, ask
your telephone company.
BACKUP BATTERY INSTALLATION
This cordless telephone has a power-failure battery backup system. With four AA
alkaline batteries properly installed, the backup system allows you to use both handset
and base station during a power interruption for up to 20 hours in standby mode or up
to 8 hours in talk mode. See page E42 for more details.
1
Make sure that the base station is connected to AC
power.
2
Open the battery cover on the bottom of the base station.
3
Insert four AA batteries (not supplied).
Match the polarities (+ and – signs) of the batteries
to the polarities shown inside the battery compartment.
TONE PULSE
➁
➀
Note
If you move the CLT-9839 to another location, connect it in the correct order as above.
4-Pronged Jack
If you have a 4-pronged jack, use a modular 4-pronged adaptor (not supplied).
Direct Wire Connection
If your current phone is wired directly into the wall, have the phone company install a
modular wall phone jack.
Party Line or Pay Phone
If you have a party line or a pay phone, telephone companies do not allow the installation
of cordless telephones, because they will not work correctly with these systems.
E8
4
Close the battery cover.
Make sure the P.BACK UP indicator lights.
During a power interruption, the P.BACK UP indicator
flashes to indicate the battery power is being used.
E9
➀
➁
Page 6

Installation
Charging the handset battery
P. BACKUP indicator
CHARGE
INTERCOM
P. BACKUP indicator
V.MAIL
CALLERS
SPEAKER
P.BACK UP
Flashes while the telephone is powered by the backup batteries.
Turns off when the backup batteries need to be replaced.
CAUTION
When installing batteries:
To prevent corrosive leakage from batteries, which can cause personal injury
and damage to the unit, observe the following precautions:
• Always use new dry batteries for the backup function. If you use used batteries
or if the batteries are drained, the backup function may not work and you may
not be able to place a call, even though the P.BACKUP indicator is on.
• Match the polarities (+ and – signs) on batteries to the polarities shown inside
the battery case.
• Do not mix new batteries with old or used ones.
• Only use batteries of the same type and brand.
• If the unit is not to be used for an extended period of time, remove the batteries
from the unit.
• Carefully follow the battery manufacturer's instructions for proper use and
disposal.
• DO NOT ALLOW YOUNG CHILDREN TO HANDLE BATTERIES.
IMPORTANT
Charge the handset before using the cordless phone for the first time.
Do not attempt to use the handset before charging it for a full 10 hours.
1
Place the handset on the base station and charge it
for 10 hours with the POWER switch set in the OFF
position.
Bidirectional handset
The handset can be placed with the keypad facing
up or down.
2
Remove the handset from the base station.
3
Set the POWER switch to ON.
The language menu appears on the display.
To change the display language to French:
press ▼ and then
MENU
If you do not change the language,
MANAGER
appears.
within 7 seconds.
SANYO CALL
The handset is ready for use.
The display will show
Battery LOW
when the handset needs recharging. Simply place
→
English
→
Français
POWER
ON OFF
SANYO
CALL MANAGER
the handset in the base station cradle and charge it for 10 hours. It is not necessary to
turn the POWER switch off before each charging, except for the first time.
Note
• The handset battery can be recharged and reused many times.
• Repeated recharging for a shorter period may reduce the battery time.
• If the handset battery fails (the
Battery LOW
appears on the display) even after
being charged for 10 hours, replace it with a new Sanyo cordless telephone battery,
type 3N-600AACL or Sanyo / GE GES-PCF01 (See page E41).
Note
When the batteries are discharged, they must be disposed of in a safe manner
that complies with all applicable laws.
E10
Battery saver mode
The handset saves battery power by going into battery saver mode 45 seconds after
you stop using the handset. In this mode, the display "sleeps" (goes blank), but the
handset still receives calls. When you use the handset again, the display automatically
"wakes up". If it does not, make sure the handset power is on.
E11
Page 7

Optional Feature Menu
Using the Option List display, you can change the settings of many optional features
of your telephone:
1) Handset ringer level selection
2) Programming your own area code
*3) Clearing message indications
*4) Programming voice mail number
5) Programming a greeting display
*6) Call waiting OFF/ON/OPTIONS selection
7) Selecting the display language
*You may be required to subscribe to specific telephone company services.
Contact your local telephone company for more information.
Optional Feature Menu
3
Press*. Each time you press the key, you
hear the ringer at the selected volume level.
The display also shows the selection.
4
Press
END
If the ringer is set to OFF (the display shows the “Ringer is OFF”), the handset
will not ring when a call comes in.
2) Programming your area code
or
MENU
to finish ringer level setting.
1.Ringer is Low
✱
=Change
▼
=Next
To review the current settings:
1
2
3
1) Handset ringer level selection
Three ringer levels are provided:
To change the ringer Level:
1
2
*Continued on next page.
MENU
Press
Press ▲ or ▼ to scroll through the feature list. You can also enter the number
of the feature you want to review (1 to 7).
END
Press
High, Low and OFF. (Factory setting is High).
Press
MENU
Press ▼ or 1.
.
The handset ringer is set to HIGH.
1.Ringer is High
✱
=Change▼=Next
Press ✱ to change this setting, or ▼ to review the next setting.
MENU
or
.
to finish reviewing.
Option list
1.Ringer is High
✱
=Change
▼
=Next
▼
=Next
When you program your area code in the telephone memory, the caller ID display
does not attach an area code to incoming local numbers having the same area
code as yours. This allows you to dial a local number directly from the callers list
without having to remove the area code first.
To program your area code
1
2
3
4
5
6
If you press
Cannot Save
MENU
Press
Press ▼ until the display shows
or press 2.
Press *.
Enter your area code (3 digits).
To make correction, press
re-enter.
MEMO
Press
You hear a beep, and the display shows the area
code you entered.
END
Press
MEMO
and automatically returns to
.
2.Area code>
ERASE
.
MENU
or
without entering a 3-digit number, the display shows
and then
to return to the standby mode.
2.Area code>
Option list
▼
2.Area code>
✱
=Add
2.Area code>
2.Area code> 123
2.Area code> 123
- confirmed -
display.
▼
MEMO=OK
=Next
=Next
E12
E13
Page 8
Optional Feature Menu
Optional Feature Menu
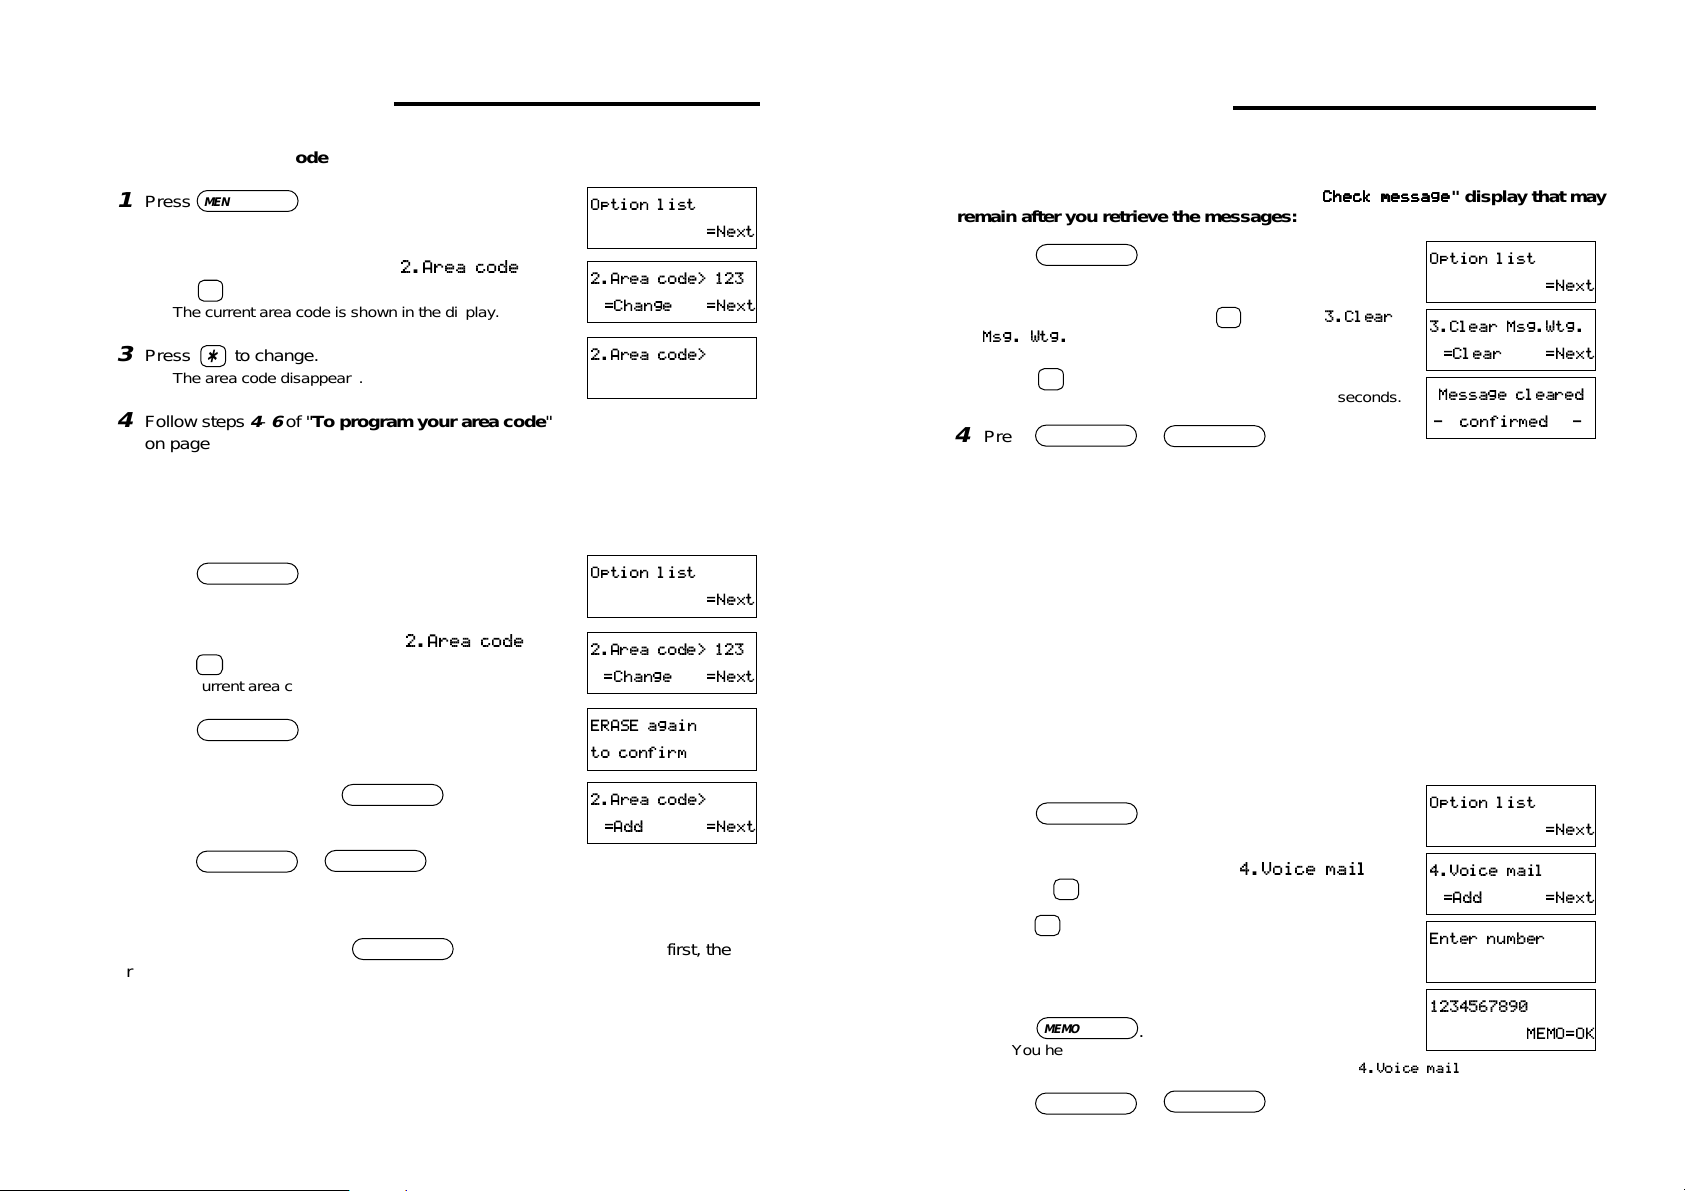
To change the area code
1
2
3
4
To erase the area code
1
2
3
4
5
If you don't press the second
area code will not be erased.
MENU
Press
Press ▼ until the display shows
press
Press * to change.
Follow steps 4- 6 of "To program your area code"
on page E13.
Press
Press ▼ until the display shows
press
The current area code is shown in the display.
Press
Within 5 seconds, press
You hear a long beep and the area code is erased.
Press
standby mode.
.
2
The current area code is shown in the display.
The area code disappears.
MENU
.
2
ERASE
END
.
.
.
or
ERASE
MENU
2.Area code,
2.Area code,
to return to the
ERASE
again.
within 5 seconds after the first, the
Option list
or
2.Area code> 123
✱
=Change
2.Area code>
Option list
or
2.Area code> 123
✱
=Change
ERASE again
to confirm
2.Area code>
✱
=Add
▼
=Next
▼
=Next
▼
=Next
▼
=Next
▼
=Next
3) Clearing MESSAGE indications
To turn off the V. MAIL indicator and clear "
remain after you retrieve the messages:
1
2
3
Press *.
4
4) Programming voice mail access number
A voice mail* service is an electronic on-line answering system offered by your
telephone company. Once you subscribe to voice mail, your callers can leave
voice messages if your line is busy or the call is not answered. The V. MAIL button
on the handset allows you quick access to the system to retrieve your messages.
*Voice mail service must be subscribed to from your telephone company.
Setting up
When you subscribe to a voice mail service, the telephone company will provide a
service access number. You must store this number in the memory of your telephone.
To store the service access number
1
2
3
4
5
6
MENU
Press
Press ▼ repeatedly or press3to display
Msg. Wtg.
The display shows “Message cleared” for a few seconds.
Press
standby mode.
Press
Press ▼ until the display shows
or press4.
Press*to select "Add" .
Dial your access number on the handset.
Press
You hear a beep and the display shows the number you
entered. After five seconds the display returns to
Press
.
END
MENU
MEMO
END
.
MENU
or
.
4.Voice mail
.
MENU
or
Check messageCheck message
Check message
Check messageCheck message
3.Clear
to return to the
,
4.Voice mail
to return to the standby mode.
" display that may
Option list
3.Clear Msg.Wtg.
✱
=Clear
Message cleared
- confirmed -
Option list
4.Voice mail
✱
=Add
Enter number
1234567890
.
▼
=Next
▼
=Next
▼
=Next
▼
=Next
MEMO=OK
E14
E15
Page 9

Optional Feature Menu
Optional Feature Menu
To retrieve messages from your voice mail service
The display shows
service. The V. MAIL indicator (on the base station) and the multifunction indicator
(on the handset) both flash.
1
2
To erase the Voice Mail access number
1
2
3
4
5
For detailed instruction on how to use the voice mail service, refer to the manual
provided by your telephone company.
TEL
Press
V. MAIL
Press
Then proceed as instructed by your telephone company.
MENU
Press
Press ▼ until the display shows
or press4.
Press
Within 5 seconds, Press
You hear a long beep and the service access number
is erased.
END
Press
standby mode.
If you don't press
Within 5 seconds after the first, the service access number
will not be erased.
Check messages
ERASE
when you have messages in the voice mail
or on the handset.
to access the voice mail.
.
4.Voice mail
.
or
ERASE
ERASE
MENU
again.
to return to the
for the second time.
,
Option list
▼
=Next
4.Voice mail
✱
=Change▼=Next
ERASE again
to confirm
4.Voice mail
✱
=Add
▼
=Next
5) Programming your greeting display
Once programmed, your own greeting display appears when the telephone is in
standby mode. The default display is
have up to 16 characters.
To program your greeting:
1
2
3
4
5
6
7
MENU
Press
Press ▼ until the display shows
or press5.
Press*to select "Change" .
Press#.
Enter the first character using the dialing buttons.
(Example) Tom
[ T ].....Press
[ o ].....Press6 three times, ▼, and then#.
[ m ]....Press
Rules for entering letters
• The character entry is only registered when you press another dialing button.
• To enter 2 letters from a same group (number button) in sequence, press
before entering the second letter.
#
• To write a lower case letter, press ▼ after entering the character.
• To erase a character, press
• To insert a space, press
• Refer to the character chart on the next page to find out how to enter other
special characters.
MEMO
Press
You hear a beep and the display confirms your entry.
After five seconds the display returns to
END
Press
standby mode.
.
8
and ▼ .
6
.
or
MENU
SANYO CALL MANAGERSANYO CALL MANAGER
SANYO CALL MANAGER
SANYO CALL MANAGERSANYO CALL MANAGER
5.Greeting
ERASE
.
*
5.Greeting
to return to the
. Your greetingcan
Option list
,
.
5.Greeting
✱
=Change
5.Greeting
✱
=SANYO #=Custom
To
Tom
- confirmed -
.
▼
=Next
▼
=Next
MEMO=OK
E16
When the ringer volume for the handset is set to OFF, the standby mode display is
Ringer is OFF
regardless of your greeting selection (SANYO or Custom).
E17
Page 10

Optional Feature Menu
Optional Feature Menu
Character chart
Dialing
button
1
B
C
A
2
F
E
D
3
H
I
G
4
K
L
J
5
N
O
M
6
Q
R
P
7
U
V
T
8
X
Y
W
9
0
one
,
A
D
G
J
M
S
P
T
Z
W
0
Number of key presses
three
two
.
B
E
H
K
N
Q
U
X
&( ) /1
C2
F
I
L5
O6
RS7
V8
YZ9
four five six seven
3
4
6) Call Waiting OFF/ON/OPTIONS selection
(Factory setting is ON. See page E 30 "Call Waiting")
1
2
MENU
Press
.
Press ▼ until the display shows
6.C.WTG.ON
or press 6.
3
Press * to select "Change".
OFF .............
ON...............
OPTIONS ....
Select this if you do not subscribe to Call Waiting.
Select this if you subscribe to Call Waiting.
Select this if you subscribe to Call Waiting Options.
7) Selecting the display language
The display language can be in English or French.
(Factory setting is English)
To change language to French
1
2
3
MENU
Press
.
Press ▼ until the display shows
press
.
7
Press * to select French.
7.Language,
or
Option list
7.Language
✱
=Franç
Français
▼
=Next
▼
=Next
- confirmé -
4
Press
END
or
MENU
to return to the
standby mode.
Option list
▼
=Next
,
6.C.WTG ON
✱
=Change
▼
=Next
6.C.WTG OPTIONS
✱
=Change ▼=Next
4
Press
END
MENU
or
to return to the standby mode.
E18
E19
Page 11

Placing a call
Answering a call
USING THE HANDSET
Make sure the handset POWER switch is ON.
1
Press
2
Dial the number.
3
Press
(or return the handset to the base station.)
Press
using the handset speakerphone.
Press
the earpiece receiver.
To adjust the volume
The handset has 3 volume levels HIGH/MIDDLE/LOW.
Press ▲ or ▼ during a call, to increase or decrease the level.
Note
The volume adjustment provides a minimum of 12 dB difference between the lowest
and the the highest levels.
TEL
END
during a call to switch to handsfree conversation
TEL
and listen for a dial tone.
to hang up.
to return to normal conversation using
END button
TEL button
Dialing button
ANSWERING WITH THE HANDSET
Make sure the handset POWER switch is ON.
1
When a call comes in, the handset rings.
The IN-USE indicator and the dialing keypad flash.
END button
2
3
Dial light (Handset only)
The dialing keypad of the handset flashes when the phone rings, and lights up for 10
seconds when
to light it up again for 10 seconds during a call.
TEL
Press
to answer the call.
If you press the END button, the ringing stops and incoming
call is automatically placed on hold until you press any key.
(except the END button).
END
Press
in the base station cradle.
or any key (except END button)
to hang up, or place the handset
TEL
or dialing button is pressed. Press dialing button any time
TEL button
40-CHANNEL ACCESS/AUTO SCAN
Every time you answer or place a call using the handset, this cordless telephone
automatically selects a clear channel from 40 frequencies available to transmit signals
between the base station and handset. If you notice interference during a call, simply
press the SCAN button on the handset to access a clear channel. To stop scanning
manually, press the SCAN button.
CALL TIMER
The call timer display appears 10 seconds after you begin a call using the handset.
Timer count begins when the line connects between the handset and the base. Elapsed
time appears in minutes and seconds.
E20
CAUTIONS:
• Do not use this handset near water - for example, in a wet basement or near a
bathtub, kitchen sink or swimming pool. Condensation will result in corrosion
and cause malfunction.
• Never spill liquid of any kind on the handset. Liquid corrosion may cause
malfunction.
• Operating the handset with hands soiled with cooking oil, machine oil, etc. or
leaving the handset exposed to direct sunlight for extended periods can cause
discoloration and fading of the handset keypad. Discoloration or fading will have
no effect on the telephone performance.
E21
Page 12

Using the speakerphones
Call Management services
The CLT 9839 has two speakerphones--one on the handset and the other on the base
station--which allow you to answer and place a call on either unit. Both speakerphones
let you have handsfree phone conversation with no need to hold the handset.
BASE STATION
To place a call from the base station:
1
2
3
To answer a call at the base station:
1
2
SPEAKER
Press
The SPEAKER indicator lights.
Dial the number.
SPEAKER
Press
SPEAKER
Press
The SPEAKER indicator lights.
SPEAKER
Press
to get a dial tone.
to hang up.
to answer a call.
again to hang up.
HANDSET
To place a call using the handset
speakerphone:
1
Press and listen for a dial tone.
The indicator lights.
The display shows
2
Dial the number.
3
To answer a call using the handset
speakerphone:
1
2
END
Press
Press .
The indicator lights.
END
Press
handsfree
to hang up.
to hang up.
.
The CLT-9839 enables you to take advantage of many call management services
which are available through your telephone company. All services require a
subscription from your telephone company. Availability and names of these services
may vary by region.
Caller ID
Once you subscribe to this service, the display shows the name and telephone
number of the calling person before you pick up the phone. This way, you can
screen calls when you are at home.
Alison McNab
416-421-8344
The information that appears on the display is kept in the callers list memory of your
telephone whether you answer or not. The callers list holds information of up to 30
callers. You can view the list on the display by scrolling through it, and call back the
caller shown on the list at the touch of a button. You can also transfer any number
to the 30-number directory memory.
If neither caller’s name or number is available, it will indicate the reason. This
varies, depending on the type of call and where it originated. Some display
examples are shown on the next page.
The caller information display remains until you hang up or press a dialing button.
Caller information will not appear in the event of a power failure.
If the handset is on the base station,
pressing
turns on the handset speakerphone.
To adjust the speaker volume:
Slide the VOLUME control foward you
(LOW) or away from you (HIGH). This
will also change the ringer volume level.
CAUTION
When using the handsfree handset speakerphone, keep the speaker ( located
on the back of the handset) away from your ear to prevent any damage to
your ear.
To adjust the speaker volume:
The handset speaker has 3 volume levels:
HIGH/MIDDLE/LOW. Press ▲ or ▼during
a call to increase or decrease the level.
TEL
or any key also
E22
Visual Call Waiting
With Visual Call Waiting service and your CLT-9839, you will not have to interrupt
your conversation for every new incoming call. The phone’s LCD display shows you
who’s calling, even when you are on the phone.
Call Waiting Options
This new call management service will provide you with more choices on how to
handle the second call when you are already on the phone. You can switch
between 2 callers, have a 3-way conference call with both callers, send the second
caller to your voice mail, or answer second caller with a prerecorded message
asking them to hold the line.
E23
Page 13

Caller ID service
Caller ID service
CALL DISPLAY EXAMPLES
When a call comes in, the display may show one of the following:
Alison McNab
416-421-8344
Alison McNab
L 416-421-8344
Alison McNab
Long distance
Long distance
Unknown caller
Caller name and number.
Caller number is not available.
Long distance caller. Caller name is not available.
Long distance caller.
Long distance caller that cannot be identified.
Call is from an area unable to provide the Caller ID service
to your area.
CALLERS LIST
The callers list memory stores information on your 30 most
recent callers. When you begin reviewing the list, a callers
list header appears indicating how many new callers have
called since your last review and how many callers are
saved on the list. If a call is received after 30 callers have
already been stored, the oldest item is bumped (dropped
from memory).
CALLERS LIST HEADERS
Press a CALL REVIEW (▲ or ▼) button once to display the header.
No calls
Saved calls= 5
New calls= 2
Saved calls= 3
No callers stored in the list.
The callers list has five callers that have already been viewed.
The callers list has 2 new callers and 3 previously viewed
callers (5 callers in total).
CALL REVIEW
button
Alison McNab
L Private number
Private name
Private number
No information
available
DISPLAY LANGUAGE
The display language is English or French selectable. To change to another language,
see page E19.
Indicates that the number is suppressed at caller's request.
L means long distance caller.
Indicates that the name and the number are suppressed at
caller's request.
Indicates that your telephone could not read the number.
E24
New calls=1
Bumped calls=1
One new caller was received after the caller list memory
saved 30 calls. The oldest item has been bumped from the
list.
E25
Page 14

Caller ID service
Caller ID service
REVIEWING THE CALLERS LIST
1
Press a CALL REVIEW (▲ or ▼) button once to
display a header.
2
From a callers list header display, you can...
Press ▼ repeatedly to scroll the list
starting from the oldest new call.
New calls= 2
Saved calls= 3
New call 1
New call 2
End of New calls
Saved calls=5
Saved call 1
Saved call 2
Saved call 3
Header
No. 4
Oldest new call
No. 5
Most recent call
Oldest call on the list
No. 1
No. 2
No. 3
CALL REVIEW
button
Press ▲ repeatedly to scroll the list
starting from the most recent caller.
New calls= 2
Saved calls= 3
END
New call 2
New call 1
End of New calls
Saved call 3
Saved call 2
Saved call 1
Header
No. 5
Most recent call
No. 4
Oldest new call
No. 3
Newest call on the list
No. 2
No. 1
The callers list displays caller information in 3 pages in sequence:
Name page Number page Date page
Caller name
Alison McNab
NO. 5 MENU=
Memory number
(No. 1 is the oldest)
s
Caller phone number
416-421-8344
*=Edit MENU=
Date and time of the call. If you are called repeatedly
from the same number, the caller list keeps only the
latest date and time, but indicates how many calls were
made from the same number.
s
Jun15 2:35pm 2X
MENU=
s
To move from page to page
Whenever press MENU (s), move to name / number / date.
End of New calls
END
This appears when you have seen all the new calls received
since your last review.
This indicates that you have now reviewed all items in the
callers list memory. (If you press ▲ , the display shows the
last received item again.)
Once reviewed, callers are no longer listed as [New calls] but remain on the list.
Information remains on display for about 45 seconds.
You can press ▲ to scroll up or ▼ to scroll down any time while viewing the
list. To exit the callers list, press
END
any time.
E26
E27
Page 15

Caller ID service
Caller ID service
ERASING CALLER INFORMATION FROM THE CALLERS LIST
To erase one entry at a time:
1
Review the callers list by pressing a CALL REVIEW
(▲ or ▼) button.
2
3
To erase all items in the callers list at once:
1
2
3
ERASE
Press
want to erase is on the display.
Within 5 seconds, press
The display changes to the next caller (or callers list
heading).
Press a CALL REVIEW button once to display the
callers list header.
ERASE
Press
Within 5 seconds, press
Callers list memory is now cleared.
when the caller information you
ERASE
.
ERASE
again.
again.
Alison McNab
No.5 MENU=
ERASE again
to confirm
Tom Jacobs
No.6 MENU=
New calls=02
Saved calls=03
ERASE again
to confirm
No calls
s
s
EDITING NUMBERS IN THE CALLERS LIST
To dial out a number in the callers list, you may have to edit it (add a [1] before a
long distance number, for example).
1
Find the caller in the list by pressing a CALL REVIEW
(▲ or ▼) button.
2
3
4
5
The original number in the callers list remains unedited.
You can store an edited number in the Directory.
(See page E32)
MENU
Press
Press *.
The first digit flashes.
Add a digit.
TEL
Press
The number is dialed out automatically.
to display the number page.
.
Alison McNab
No. 5 MENU=
416-421-8344
✱
=Edit MENU=
4164218344
14164218344
1-416-421-8344
CH17
s
s
DIALING FROM THE CALLERS LIST
1
Find the caller in the list by pressing a CALL REVIEW
(▲ or ▼) button.
2
Press
MENU
3
TEL
Press
The number is dialed out automatically.
to display the number.
.
E28
Alison McNab
No. 5 MENU=
416-421-8344
✱
=Edit MENU=
416-421-8344
CH11
s
s
E29
Page 16

Visual Call Waiting
Visual Call Waiting service allows your handset to display the
name of the second caller while you are on the phone.
A subscription from your telephone company or P.B.X. system
is required to access Visual Call Waiting service.
C. WTG
button
Call Waiting options
DISPLAY MEANING
Caller to V. Mail
Send waiting caller to your Voice Mail.
To use Visual Call Waiting service:
• Subscribe to the service from your telephone company.
• Set the Optional Feature Menu, No.6 Call Waiting, to ON.
(see page E18.)
1
You hear a soft beep when a call comes in while you are
already on the phone.
The display shows the caller name and telephone number
and Call Waiting alternately.
2
Press
C. WTG
The first caller is put on hold, and you can answer the
waiting call.
3
Press
C. WTG
.
again to talk to the first caller.
◆
Bill Brown
123-456-7890
Call Waiting
◆
Bill Brown
0:01
Call Waiting options
Call Waiting Options service provides you with several choices on handling the
second call. The list of actions you can choose is shown below:
DISPLAY MEANING
Switch Caller
Switch between waiting caller and first caller.
Repeat as often as you like.
Link Callers
Drop & Switch
To use Call Waiting Options service:
• Subscribe to the service from your telephone company.
• Set the Optional Feature Menu, No.6 Call Waiting, to OPTIONS.(see page E18.)
1
. You hear a soft beep when a call comes in while
you are already on the phone.
The display shows the caller name and telephone number
and Call Waiting alternately.
2
. Press
3
. Use a Call Review (▲ and ▼) button to scroll through
4
. Press
C. WTG
An option displays for 20 seconds.
(See the table on previous page.)
the options list.
C. WTG
Allows you to speak with your first caller and the waiting caller
to have a 3-way conference call.
During a conference call, you can:
Drop Caller 1: Hang up on the first caller and continue with the 2nd.
Drop Caller 2: Hang up on the 2nd caller and continue with the 1st.
Disconnects the active call (caller on the display), and
connects automatically to the remaining caller.
◆
Bill Brown
123-456-7890
.
to select the option displayed.
Switch caller
C.WTG=OK ▼=Next
Hold message
C.WTG=OK ▼=Next
Hold Message
Busy Message
Waiting caller hears prerecorded message stating that you will
be with him (her) shortly, and is put on hold. When you are
ready to answer, select the Switch Caller option.
A prerecorded message indicates you are too busy to take a
call, and the waiting call is disconnected. (Example: We are
too busy to answer calls now. Please call later, thank you.)
E30
Note
After having selected the Switch Caller or Hold Message options, you can use the
following options:
Press
C. WTG
Choose the Drop & Switch option to disconnect the current call and talk to the
waiting caller.
Choose the Link Callers option to have a conference call with both of them.
to select the Switch Caller option again.
E31
Page 17

Directory
(Handset only)
Directory
(Handset only)
STORING A NUMBER IN THE DIRECTORY
The directory of this telephone stores up to 30 telephone numbers of a maximum of
16 digits (including pauses) into its memory. You can attach a name (up to 16
characters) to stored phone numbers.
To store a number:
1
2
3
4
5
Note
• If you press
• To insert a 2-second pause between the two digits in a stored number (after 9 to
MEMO
Press
The IN-USE indicator lights.
Dial the phone number you want to store.
Press
MEMO
Enter the name using the dialing buttons.
(see pages E17 - E18 for the details of entering a name.)
Press
MEMO
The display shows the “Saved directory”. You hear a beep,
and the number is stored.
the display shows “Directory full”
get an outside line in PBX system, for example), press
first digit.
MEMO
.
.
.
at step 1 when 30 numbers have already been stored,
Enter telephone
number
123-456-7890
MEMO=Save
Enter name
SA
MEMO=Save
Saved directory
REDIAL / P
after the
STORING A NUMBER OF THE CALLERS LIST IN THE DIRECTORY
When the callers list is on the display:
1
Press a CALL REVIEW (▲ and ▼) button a few times to display the name you
want to store.
2
Press
When the number does not have a name:
1
Press a CALL REVIEW (▲ and ▼) button a few times to display the name you
want to store.
2
Press
3
Enter the name using the dialing buttons. (see pages E17 - E18)
4
Press
STORING THE LAST NUMBER DIALED IN THE DIRECTORY
MEMO
You hear a beep, and the display shows “Saved directory”. After five seconds, the
display returns to callers list.
MEMO
The display shows “Enter name”.
MEMO
You hear a beep, and the display shows “Saved directory”. After five seconds, the
display returns to callers list.
.
.
.
CALLING A NUMBER STORED IN THE DIRECTORY
To call a number stored in the directory
1
2
3
DIRECTORY
Press
Press a CALL REVIEW (▲ and ▼) button to scroll through the directory.
To find a name quickly using its first letter, press the number key that corresponds
with the letter.
Example 1: To find a name starting with D, press
listing of the names starting with D.
Example 2: To find a name starting with E, press 3 twice.
Press
TEL
The number on the display is automatically dialed out.
.
3
once. The display shows the first
E32
1
2
3
4
REDIAL / P
Press
The display shows the last number you dialed.
Press
Enter the name using the dialing buttons. (see pages E17 - E18)
Press
MEMO
The display shows “Enter name”.
MEMO
You hear a beep, and the display shouws “Saved directory”. After five seconds,
the display returns to the number.
.
.
.
E33
Page 18

Directory
(Handset only)
Speed dial
(Base station only)
CONFIRMATION OF A DIRECTORY ENTRY
1
2
3
DELETING AN ENTRY FROM THE DIRECTORY
1
2
3
4
DIRECTORY
Press
Press CALL REVIEW (▲ and ▼) button.
The display shows the names in alphabetical order.
Press the number key that corresponds with the first letter
of the name you want to confirm.
MENU
Press
number displays.
DIRECTORY
Press
DIRECTORY
Press
Press the dialing buttons or a CALL REVIEW (▲ and ▼) button to display the
name you want to erase.
Press
Press
ERASE
ERASE
You hear a beep, and the entry is now erased from the directory.
.
(s) to switch between the name and
or
.
.
again.
END
to return to standby display.
ERASE again
to confirm
STORING A NUMBER IN THE SPEED DIAL MEMORY
The speed dial memory can store up to 10 numbers in the base station. Stored phone
numbers can have a maximum of 16 digits including pauses.
To store a number:
1
2
3
4
Note
To insert a 2-second pause between two digits in a stored number (after 9 to get an
outside line in a PBX system, for example), press
CALLING A NUMBER STORED IN THE SPEED DIAL MEMORY
To call a number stored in the memory
1
2
MEMORY
Press
The IN-USE indicator flashes.
Dial the phone number you want to store.
Press
MEMORY
Press a number button to assign a location number ( 0 - 9 ).
You hear a beep, and the number is now stored.
SPEAKER
Press
The SPEAKER indicator lights.
MEMORY
Press
.
.
REDIAL / P
.
.
after the first digit.
E34
3
Enter the location number ( 0 - 9 ).
The number is dialed out automatically.
DELETING A NUMBER FROM SPEED DIAL MEMORY
To delete a number from the base station speed dial memory:
1
2
3
MEMORY
Press
The IN-USE indicator flashes.
MEMORY
Press
Enter the location number ( 0 - 9 ).
You hear a beep, and the number is now erased.
.
again.
E35
Page 19

Hold
(Base station only)
Predial
(For handset only)
When a call is on hold, you and your caller cannot
hear each other.
1
2
If a call is on hold for more than 5 minutes, the telephone automatically disconnects
from the line.
HOLD
Press
SPEAKER indicator flashes.
HOLD
Press
return to the call.
to place a call on hold.
again or
SPEAKER
to
Redial
You can automatically redial the last number called ( after getting a busy signal, for
example. ) This CLT 9839 can redial a number of up to 16 digits.
BASE STATION
1
2
ERASING A REDIAL NUMBER
SPEAKER
Press
tone.
REDIAL / P
Press
The last number called from the base
station is automatically dialed out.
to get a new dial
.
HANDSET
1
2
TEL
Press
tone.
REDIAL / P
Press
The last number called from the handset
is automatically dialed out.
to get a new dial
.
Predial feature allows you to key in a telephone number, verify it on the display and
then dial it out. You can predial a number of up to 16 digits.
1
Dial the number when the handset is in the standby
mode.
The number appears on the display.
2
You can also predial the number in the Redial memory and then dial it out.
1
2
A predialed number can be stored in the directory before you dial it out.
1
TEL
Press
The number is automatically dialed out.
REDIAL / P
Press
mode.
The display shows the last number you dialed.
TEL
Press
The number is automatically dialed out.
Dial the phone number you want to store.
after you verify the number.
while the handset is in the standby
after you verify the number.
1234567
TEL or MEMO
123-4567
CH17
123-4567
TEL or MEMO
123-4567
CH17
1234567
TEL or MEMO
BASE STATION
1
2
3
MEMORY
Press
MEMORY
Press
REDIAL / P
Press
You hear a beep, and the number is now
erased.
.
again.
.
E36
HANDSET
1
2
3
REDIAL / P
Press
ERASE
Press
Within 5 seconds, press
again.
The display shows the “Redial empty”.
You hear a beep, and the number is now
erased.
.
.
ERASE
2
Press
3
Enter the name you want to store using the dialing
buttons. (Maximam of 16 characters)
4
Press
MEMO
MEMO
The display shows the “Saved directory”. You hear a beep,
and the name and number is now transferred to the directory.
.
.
E37
Enter name
BILL
MEMO=Saved
Saved directory
Page 20

Intercom
Transferring a call
FROM BASE STATION TO HANDSET
1
Base station:
PAGE / INT
Press
The IN-USE and INTERCOM indicators flash.
2
Handset:
INT
Press
The IN-USE indicator lights.
3
Handset:
END
Press
If the handset does not answer within 20 seconds, the base station automatically
returns to the standby mode.
FROM HANDSET TO BASE STATION
1
Handset:
INT
Press
The IN-USE indicator flashes.
2
Base station:
A beep sounds, and the IN-USE and INTERCOM
indicators light.
The base station user can begin talking.
to page handset.
TEL
or
to turn off intercom.
to page the base station.
and begin talking.
Paging you
Intercom
CH 5
Paging base
Intercom
CH 5
A call can be transferred between the handset and the base station.
FROM BASE STATION TO HANDSET
1
Base station:
PAGE / INT
Press
The call is put on hold.
The IN-USE, INTERCOM and SPEAKER indicators flash.
2
Handset:
INT
Press
the base station.
The IN-USE indicator lights.
3
Handset:
TEL
Press
Base station automatically switches to standby mode.
If the handset does not answer, press
FROM HANDSET TO BASE STATION
1
Handset:
INT
Press
The call is put on hold.
to alert the handset user.
TEL
or
to talk to the caller.
to page the base station.
to answer
SPEAKER
Paging you
Intercom
0:10
I
0:11
to talk to the caller again.
Paging base
3
Handset:
END
Press
Handset user cannot use speakerphone for intercom conversation.
to turn off intercom.
E38
2
Base station:
A beep sounds, and the IN-USE indicator flashes and
INTERCOM indicator lights.
The base station user can answer the handset.
3
Base station:
SPEAKER
Press
Handset automatically turns off intercom mode, but the caller display remains until
the handset user hangs up.
If the base station does not answer, press
Handset cannot transfer a call if the handset speakerphone is in use.
to talk to the caller.
TEL
Intercom
0:10
to talk to the caller again.
E39
Page 21

Flash button
Replacing the handset battery
If you subscribe to Call Waiting or Three-way Calling,
read the information from your telephone company for
the exact procedures.
Whenever it instructs you to press the TEL button,
press
FLASH
instead.
Temporary Touch-Tone dialing
Even if your home is equipped with pulse dialing and
your phone is set to pulse mode, you may still change
to Touch-Tone dialing temporarily. This allows you to
access special services available to Touch-Tone lines
(electronic banking systems and remote-control
answering machines, for example ).
FLASH
button
N
E
O
T
button
1
Set the POWER switch of the handset to OFF.
2
Slide the lid off the battery compartment.
3
Unplug the battery cord, and remove the old battery.
4
Plug in the cord of the new battery and place it in the
compartment.
5
Replace the lid by sliding it up over the battery pack
until it is firmly in place.
POWER
ON OFF
red
black
1
Dial the number you want to call.
2
When your call is connected, press the
TONE
button.
*
The telephone stays in tone mode until the call ends.
Then it returns automatically to pulse mode.
E40
6
Set the POWER switch back to ON.
Replacement battery part number: SANYO 3N-600AACL
SANYO GE GES-PCF01
CAUTION
Use of wrong battery may cause serious damage or malfunctions, and
could invalidate warranty.
E41
POWER
ON OFF
Page 22

In the event of a power failure
Wall mounting
Using four AA batteries (not supplied), the power-failure backup system allows you to
continue using this cordless telephone (both handset and base) in the event of a
power failure.
The backup time can last up to 20 hours in standby mode or 6 hours of talk time.
Note
: The backup duration may be shorter when the backup batteries are not
fresh or handset battery is not fully charged.
While the telephone is powered by the backup batteries, the following operations
are not functional:
•
Caller information will not appear.
• Callers List and Option List cannot be reviewed.
• Directory cannot be reviewed.
Display information
Base in use
Battery LOW
The base station is in use.
Handset needs recharging.
To mount the base station on a wall:
1
Remove the handset hanger from the base station,
turn it upside down and then reattach it.
2
Tuck the telephone cord inside the wall mount bracket.
3
Insert the upper hooks of the wall mount bracket into the
holes in the bottom of the base stations.
Then push the bracket down firmly.
CHXX Scanning
Check messages
Out of range
Try again
Channel scanning taking place.
You have new messages in the voice mail service.
Handset is too far away from the base.
Handset may be too far from base.
May be no AC power to base station. Check all connections.
E42
4
Connect the telephone cord to a wall phone plate
(not supplied). Mount the base station on the wall phone
plate, and seat it securely.
5
Hang the handset on the base station with keypad
facing front.
E43
Page 23

Security code
Troubleshooting
The security code system prevents other 900-MHz phone users from interfering with
the operation of your unit. Since the security code of this telephone was selected from
1,000,000 different codes, it is virtually impossible to find any other cordless telephone
having the same code as yours. However, if you wish to set your own security code,
follow the steps below.
1
Disconnect the AC adaptor and remove backup battery.
2
Set the POWER switch of the handset to the OFF
position.
3
Press and hold
reconnect the AC adaptor. Release
4
While pressing
POWER switch to ON. Release
5
Press * on the handset.
6
Enter the desired 6-digit number (000,000 - 999,999)
using the dialing buttons on the handset.
PAGE / INT
END
on the base station and
PAGE / INT
on the handset, set the
END
.
.
Security code:
999999
POWER
ON OFF
✱
=Change
MEMO=OK
The phone does not work:
• AC adaptor may not be plugged into wall outlet.
• Handset battery may need recharging (
• Handset may be too far from base station.
The communication range becomes shorter:
• Handset may need recharging.
Incoming calls do not ring on the handset:
• Handset is on the base station.
• Handset may be too far from base station.
• Handset ringer may be OFF. (See page E12).
• Handset POWER switch may be set to OFF.
Callers list and directory do not appear:
• Base station may be in use.
• Handset may be too far from the base.
• May be no AC power to base station.
• You may have a power failure.
• You have not subscribed to Caller ID service.
If the phone still does not work, try resetting the base station and handset:
To reset base station
• Remove the backup batteries. Disconnect and reconnect the AC adaptor.
Then insert the backup batteries.
To reset handset
• Set the POWER switch to OFF and then back to ON.
• Disconnect and then reconnect the handset battery.
Battery LOW
appears in talk mode).
7
8
MEMO
Press
You hear long beeps from both handset and base station.
Your personal security code is now set.
Insert the backup battery.
4
- 8 must be performed within 90 seconds.
Steps
If not, five beeps sound to indicate that you should start again from step
on the handset.
999999
- confirmed -
E44
1
.
E45
Page 24

Technical Information
Technical Information
Ren Number: 0.2
The Ringer Equivalence Number (REN) assigned to each terminal device provides an
indication of the maximum number of terminals allowed to be connected to a telephone
interface. The termination on an interface may consist of any combination of devices
subject only to the requirement that the sum of the Ringer Equivalence Numbers of all
the devices does not exceed 5.
Miniature Connector Type Code: CA11A
CAUTION
This product is intended for use in CANADA only. Sale or use in other
countries may violate local laws.
Cordless telephones use radio frequencies to allow mobility. This affects the
performance of your unit.
1. NOISE
Electrical pulse noise is present in most homes at one time or another. This is most
intense during electrical storms. Certain kinds of electrical equipment, such as light
dimmers, fluorescent bulbs, motors, fans, etc., also generate pulse noise.
Because radio frequencies are susceptible to this, you may on occasion hear pulse
noise through the handset. This is usually only a minor annoyance and should not be
interpreted as a defect of the unit.
2. RANGE
Because radio frequencies are used, the location of the base station can affect the
operating range of the unit. Try several locations and choose the one that gives the
clearest signal to the handset. (Turning in a circle while holding the handset may also
increase the operating range.)
3. INTERFERENCE
Electronic circuits activate a relay to connect the unit to your telephone line. These
electronic circuits operate in the radio frequency spectrum. While several protection
circuits are used to prevent unwanted signals, there may be periods when these
unwanted signals enter the base station. You may hear click or hear the relay activate
when you are not using the cordless handset. If this occurs frequently, you can minimize
or eliminate the problem by lowering the height of the base station or relocating the
base station. It may also be helpful to change the operating channel and/or the security
code setting.
NOTICE:
Privacy of communications may not be ensured when using this telephone. Other
devices, including other cordless telephones, may interfere with the operation of this
cordless telephone or cause noise during operation. Units without coded access may
be accessed by other radio communication systems. Cordless telephones must not
cause interference to any licensed radio service.
The Industry Canada Label identifies certified equipment. This certification means
that the equipment meets certain telecommunications network protective, operational
and safety requirements. The ministry does not guarantee that the equipment will
operate to the user's satisfaction.
Before installing this equipment, users should ensure that it is permissible to be
connected to the facilities of the local telecommunications company. The equipment
must also be installed using an acceptable method of construction.
In some cases, the company's inside wiring associated with single-line individual service
may be extended by means of a certified connector assembly (telephone extension
cord). The customer should be aware that compliance with the above conditions may
not prevent degradation of service in some situations.
Repairs to certified equipment should be made by an authorized Canadian maintenance
facility designated by the supplier. Any repairs or alterations made by the user to this
equipment, or equipment malfunctions, may give the telecommunications company
cause to request that the user disconnect the equipment.
The user should ensure for his own protection that the electrical ground connections
of the power utility, telephone lines and internal metallic water pipe system, if present,
are connected together. This precaution may be particularly important in rural areas.
CAUTION
Users should not attempt to make such connections themselves, but should
contact the appropriate electrical inspection authority, or electrician, as
appropriate.
Operation is subject to the following two conditions: (1) this device may not cause
interference, and (2) this device must accept any interference, including interference
that may cause undesired operation of the device.
E46
E47
Page 25

THE SANYO COMFORT WARRANTY
WARRANTY APPLICATION
New, unused Sanyo Communications.
products purchased in Canada through a
Sanyo Authorized Dealer are warranted
against manufacturing defects in materials and
workmanship for ONE YEAR covering parts
and labour, from the date of purchase by the
original retail purchaser.
This warranty only applies in favour of the
original retail purchaser of the warranted
product.
SANYO CANADA INC.'S RESPONSIBILITY
During the warranty period, SANYO
Canada Inc. will repair, or at our option,
replace a Communication product which
shows evidence of a manufacturing defect in
materials or workmanship.
Replacement PARTS are warranted for the
remaining portion of the warranty period.
WHAT IS NOT COVERED
(a) Communications products purchased
outside Canada.
(b) Communications products purchased in
a used condition.
(c) Problems due to product set-up and
installation.
(d) Adjustments that are outlined in the
Operating Manual.
(e) Accessory items including antenna, and
batteries.
(f) Damaged in or due to transportation.
(g) Damage due to improper maintenance,
accident, abuse, misuse or negligence.
(h) Damage caused by lightning and power
surges.
ORIGINAL RETAIL PURCHASER'S
RESPONSIBILITY
You, the original retail purchaser, must
present your original, dated bill-of-sale together
with this warranty to SANYO Canada Inc. or to
an authorized Sanyo Service Depot when you
make a claim under this warranty.
You, the original retail purchaser, are
responsible for any costs of TRANSPORTING
the product to and from SANYO Canada Inc.
or an authorized Sanyo Service Depot.
You also are responsible for the cost of
any MAINTENANCE necessary in respect of
the product.
WARRANTY BECOMES VOID
This warranty becomes void if the
product's serial numbers are altered or
removed or if any repair to the products is
made other than by SANYO Canada Inc. or
by an authorized Sanyo Service Depot.
LIMITATIONS
(a) SANYO Canada Inc. reserves the right
to change or improve the design of the
model of the product warranted
hereunder without incurring any
obligation to make any modifications to
or to install any improvement in or on the
product.
(b) In no event shall SANYO Canada Inc. or
any of its Authorized Dealers be liable for
special or consequential damage arising
from the use of this product.
STATUTORY WARRANTIES
The above provisions do not preclude
the operation of any applicable provincial
statute which in certain circumstances may
not allow some of the limitations and
exclusions described in this Warranty.
Where any terms of this Warranty are
prohibited by such a statute, they shall be
deemed null and void but the remainder of
this warranty shall remain in effect.
HOW TO OBTAIN WARRANTY SERVICE
Please contact the Sanyo Authorized
Dealer from whom the product was
purchased or contact us directly at:
SANYO Canada Inc.
50 Beth Nealson Drive,
Toronto, Ontario. M4H 1M6
(416) 421-8422
Branches:
Montreal, Quebec (514) 342-0290
Vancouver, B. C. (604) 278-4466
1RA6P10B16500
E48
 Loading...