

Page 1
Please read this Instruction book before using your television.
We wish you many hours of pleasure from your new television.
Colour T elevision
Instruction Manual
CE28WN3-B
CE
32WN3-B
Page 2
2
SAFETY PRECA
SAFETY PRECA
UTIONS
UTIONS
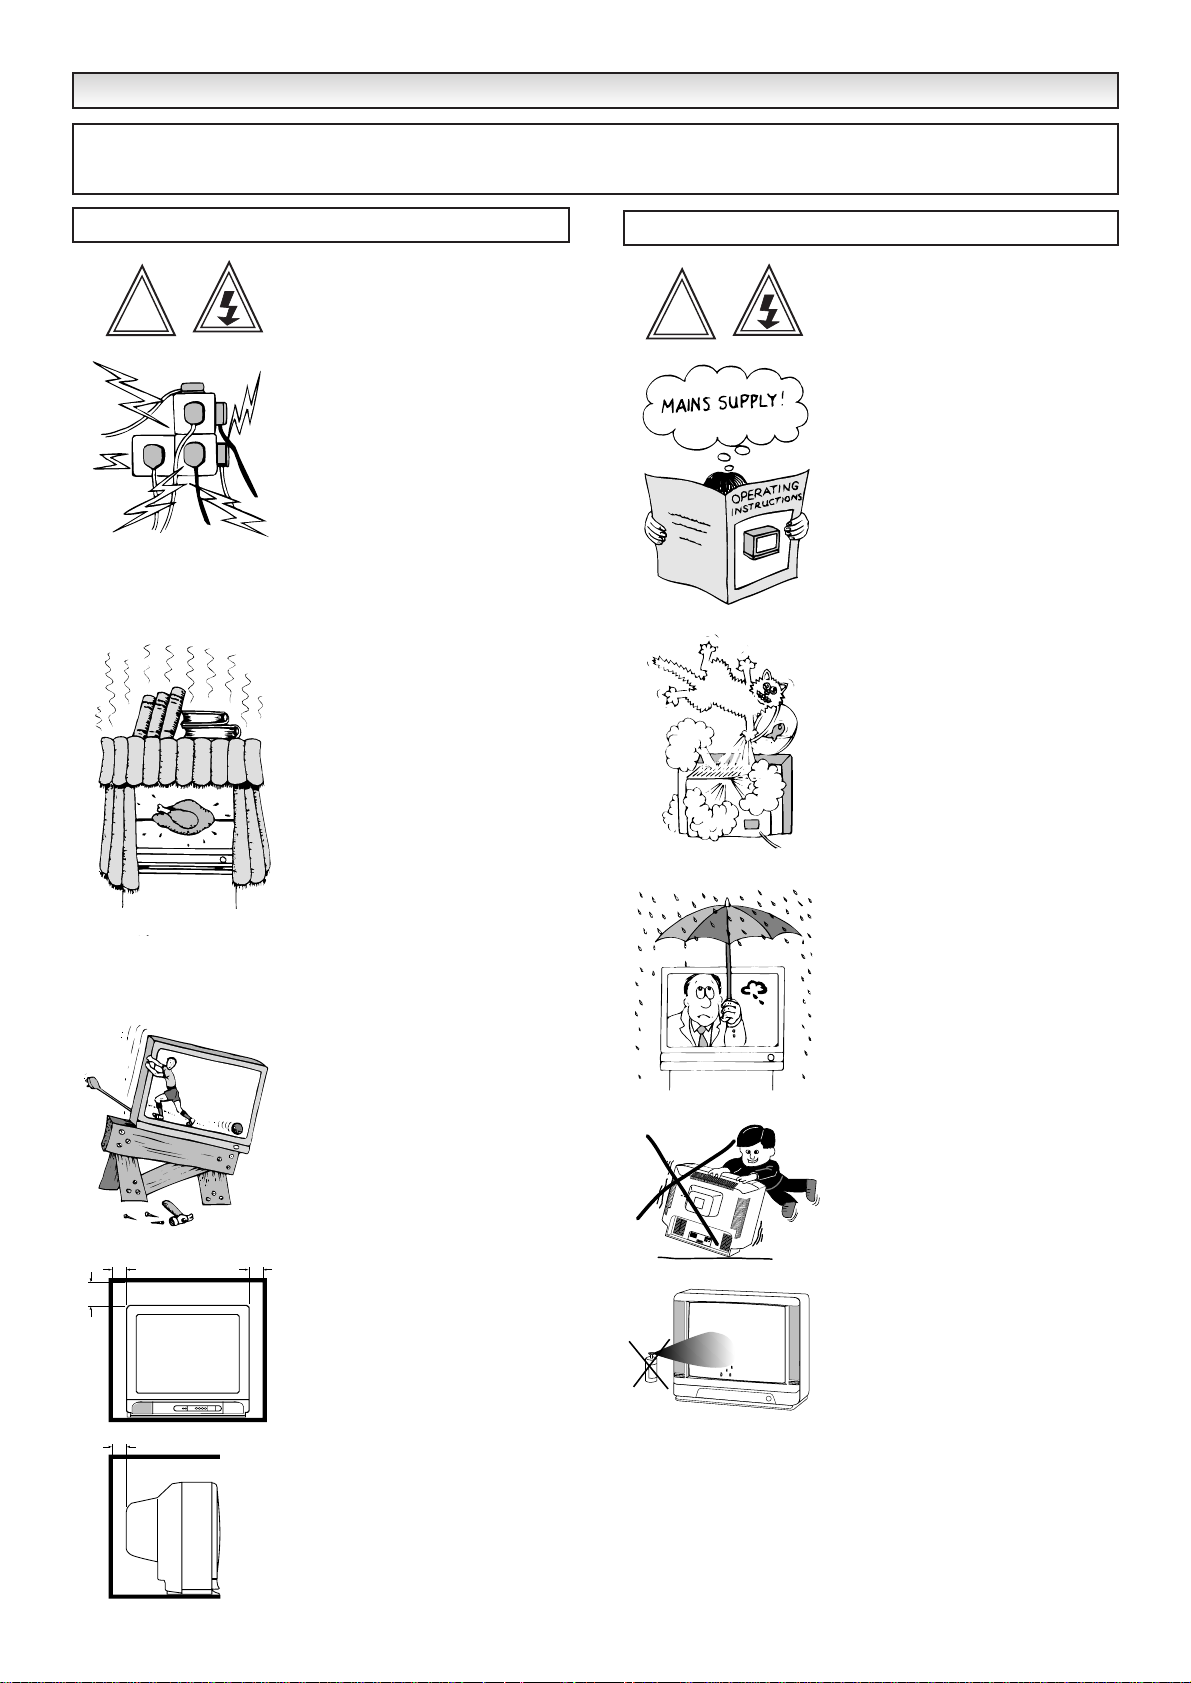
Do not allow anything to rest on the
power cord.
Do not locate this television receiver where the cord will be
damaged by people walking on it.
Do not overload wall outlets and
extension cords as this can result in
fire or electric shock.
Slots and openings in the cabinet
and in the back or bottom are
provided for ventilation to ensure
reliable
operation and to protect it
from overheating.These openings
must not be blocked or covered.
The opening
should never be
covered with a cloth or other
material, and the bottom openings
should not be blocked by placing
the television receiver on a bed,
sofa, rug, or other similar surface.
This television receiver
should
never
be placed near or over a
radiator or heater.
Do not place your television receiver
on an unstable stand, shelf or table.
Serious injury to an individual, and
damage to the television may result
if it should fall.Your sales person
can recommend approved stands or
shelf and wall mounting instructions.
This television receiver should not
be placed in a built-in installation
such as a bookcase unless proper
ventilation is provided.
If the television is built into a unit, or
enclosed, the minimum distances
for ventilation must be maintained.
Heat build up can reduce the life
of your television, and can be
dangerous.
This television receiver should be
operated only from the type of
power source indicated on the
television or as indicated in the
Operating Instructions. If you are
not sure of the type of power supply
in
your home, consult your sales
person or your local power company.
Never add accessories that have
not been specifically designed for
this television.
Do not drop or push objects into
the television cabinet slots or
openings. Some inter nal parts carry
hazardous voltages and contact
may result in an electric shock
hazard.
Never spill liquids of any
kind on the television receiver.
Do not expose the television
receiver to rain or use near water.
For example, near a bathtub,
kitchen sink, in a wet basement,
etc. Before cleaning, unplug the
television receiver from the wall
socket.
Never stand on, lean on or push
suddenly the television or its stand.
You should pay special attention to
children. Serious injury may result
if it should fall.
Do not apply liquid cleaners or
aerosol cleaners directly onto the
television receiver. Use a damp
cloth for cleaning.
Installation
Use
CAUTION: Please read and retain for your safety. This unit has been engineered and manufactured to assure your personal safety.
But improper use can result in potential electric shock or fire hazards. In order not to defeat the safeguards incorporated in this receiver
observe the following basic rules for its installation, use and servicing.
20cm
10cm
5cm
!
MINIMUM DISTANCES
10cm
!
Page 3
INST
INST
ALLA
ALLA
TION
TION
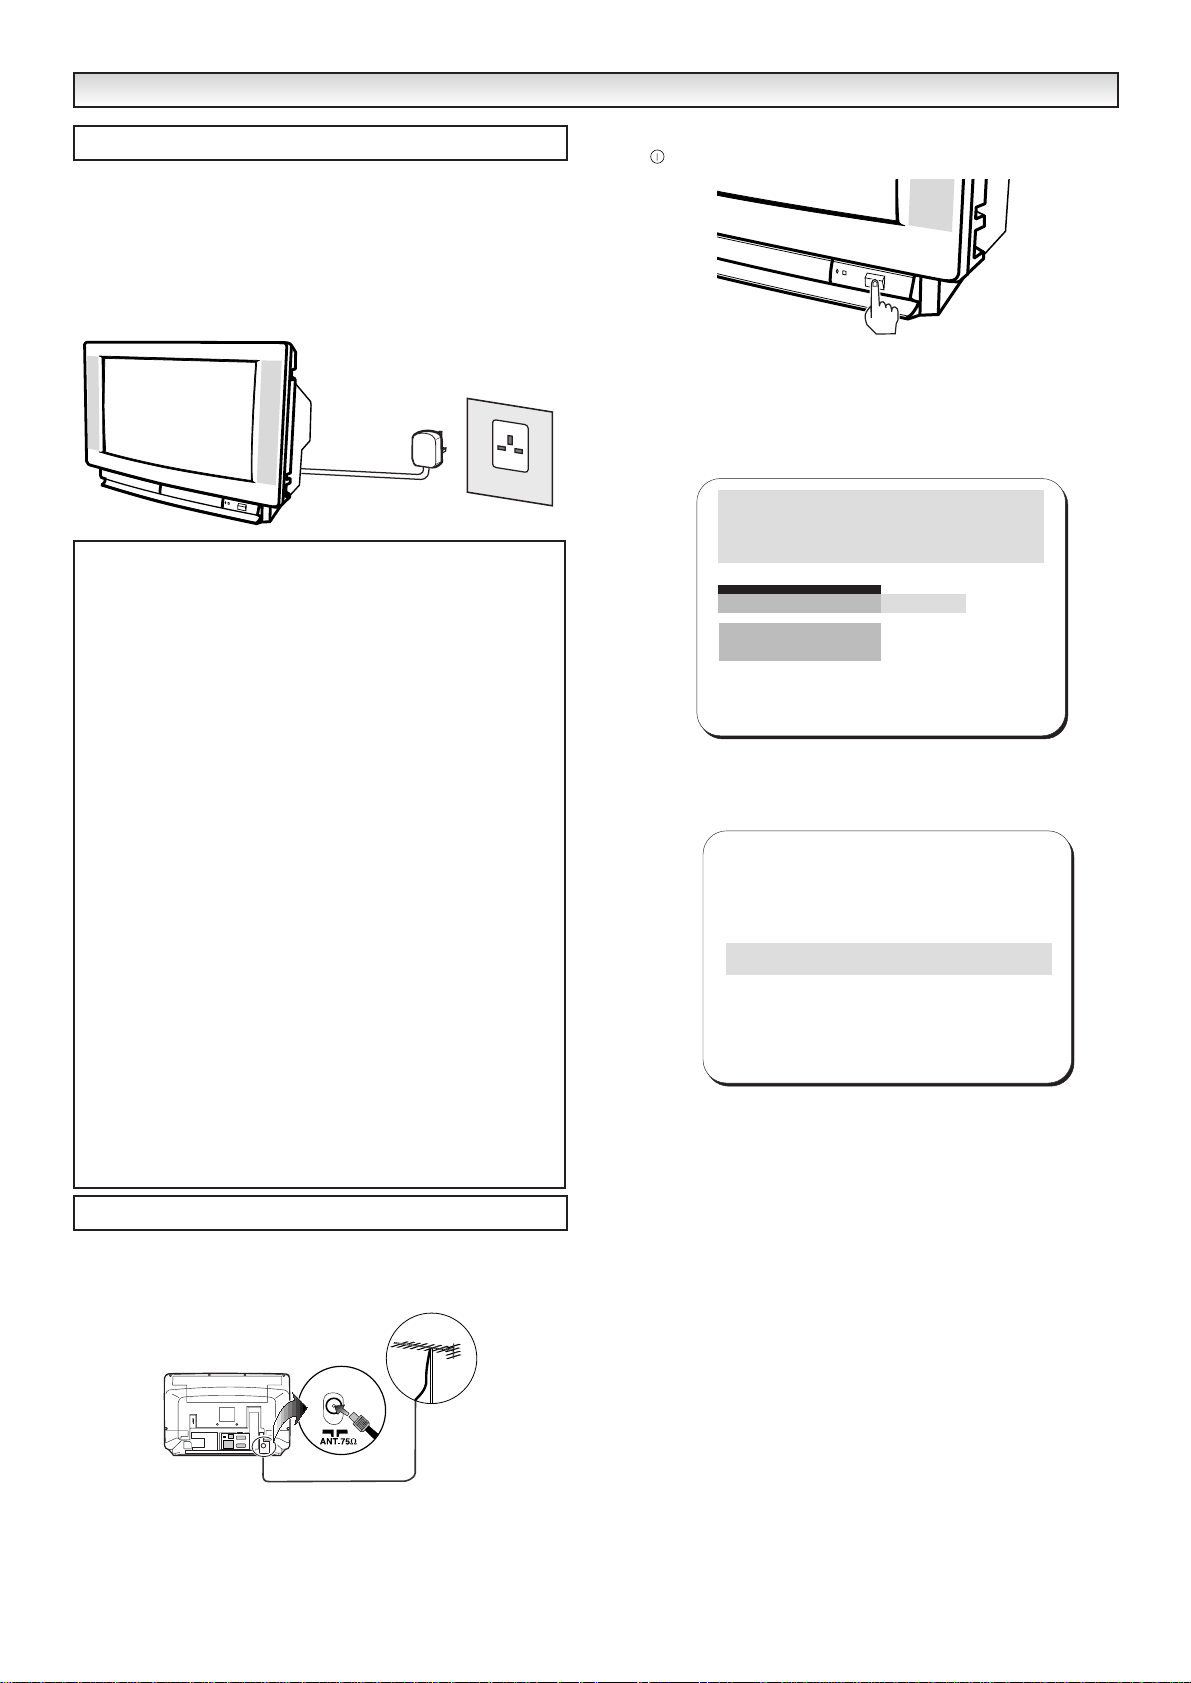
The TV set is prepared for a mains voltage AC220~240V, 50Hz.
Connect the power cord of the TV set to a wall outlet.When the
TV set is not to be used for an extended period of time, it is
advisable to disconnect the power cord from the power outlet.
WARNING!
High voltages are used in the operation of this set.Refer service
to qualified service personnel.
1. Connect your aerial cable socket to the rear of the TV. Don’t worry
about other AVequipment you should add this later referring to the
section “Connecting AV equipment” on page 13.
2. Plug the Mains cable plug into a wall socket.
✐
This TV set is prepared for a mains voltage of AC220~ 240V 50Hz.
✐ Please make sure that the aerial cable is connected to the aerial
socket of the TV set before switching on.
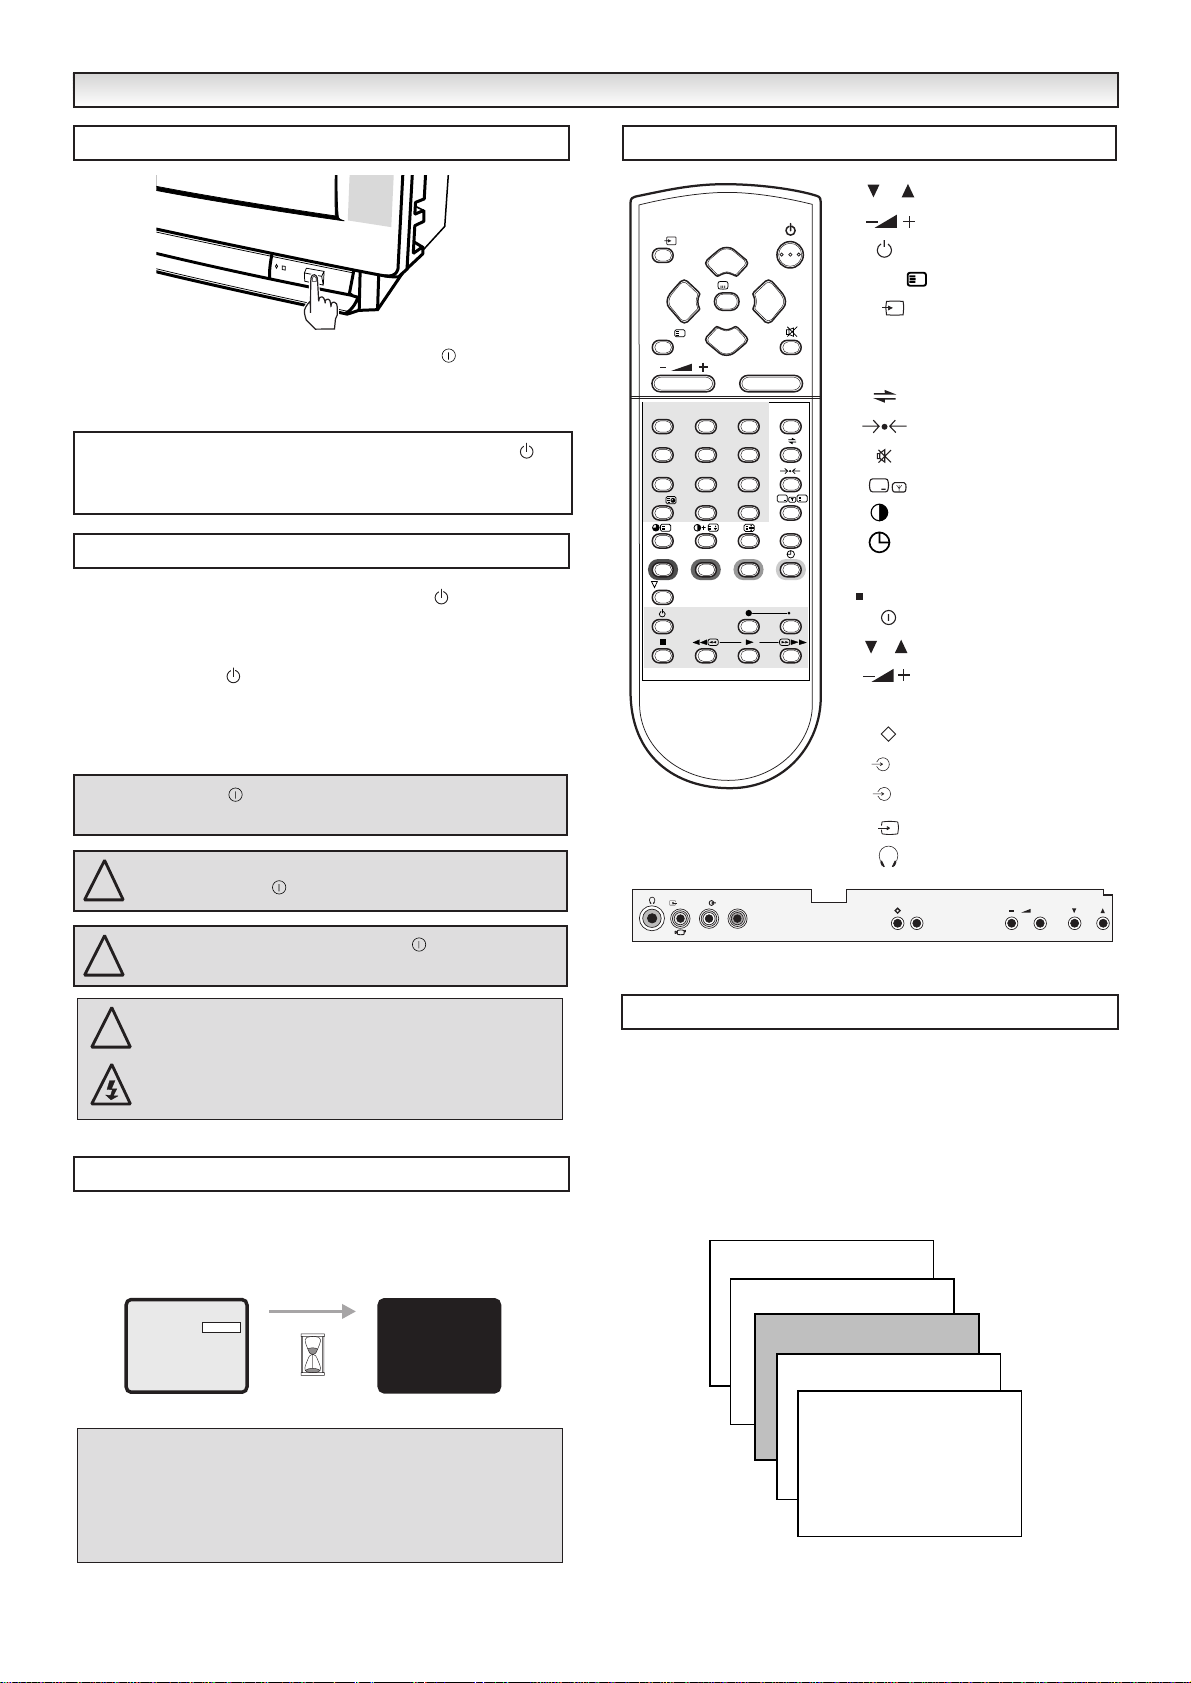
3. You are now ready to switch on.Simply press the Mains ON/OFF
switch on the front of the TV set.
✐
A red power indicator will appear.
The following message appears on the screen the first time the
television set is switched on.
After completing this procedure, the ending message appears on the
screen.
Now the installation is completed !
3
Mains Supply
Introduction Screen
Important:
This equipment is fitted with an approved non rewireable UK mains
plug.To change a fuse in this type of plug proceed as follows:
1. Remove the fuse cover and fuse.
2. Fit a new fuse which should be a BS1362 5 Amp A.S.T.A. or
BSI approved type.
3. Refit the fuse cover.
If the fitted plug is not suitable for your socket outlets, it should be
cut off and an appropriate plug fitted in its place. If the mains plug
contains a fuse, this should have a rating of 5 Amp. If a plug
without a fuse is used, the fuse at the distribution board should
not be greater than 5 Amp.
Note: The severed plug must be destroyed to avoid a possible shock
hazard should it be inserted into a 13 Amp socket elsewhere.
The wires in this mains lead are coloured in accordance with the
following code:
Blue -------> Neutral Brown ----> Live
1. The Blue wire must be connected to the terminal which is
marked with the letter “N” or coloured BLACK.
2. The Brown wire must be connected to the terminal with the
letter “L” or coloured RED.
3. Do not connect either wire to the earth terminal in the plug
which is marked with the letter “E” or by the ear th symbol or
coloured GREEN or GREEN and YELLOW.
Before replacing the plug cover, make certain that the cord gr ip is
clamped over the sheath of the lead - not simply over the wires.
AC Mains Outlet
Thank you for purchasing your SANYO TV.
Now I am searching and storing all the
programmes. Please W
Tuning
Mode
System
Search
Program
Store
Swap
Name
AUTO
PAL
451.25 U >>
>
01
ait.
Auto set-up completed. Happy viewing.
Tuning
>
Page 4
4
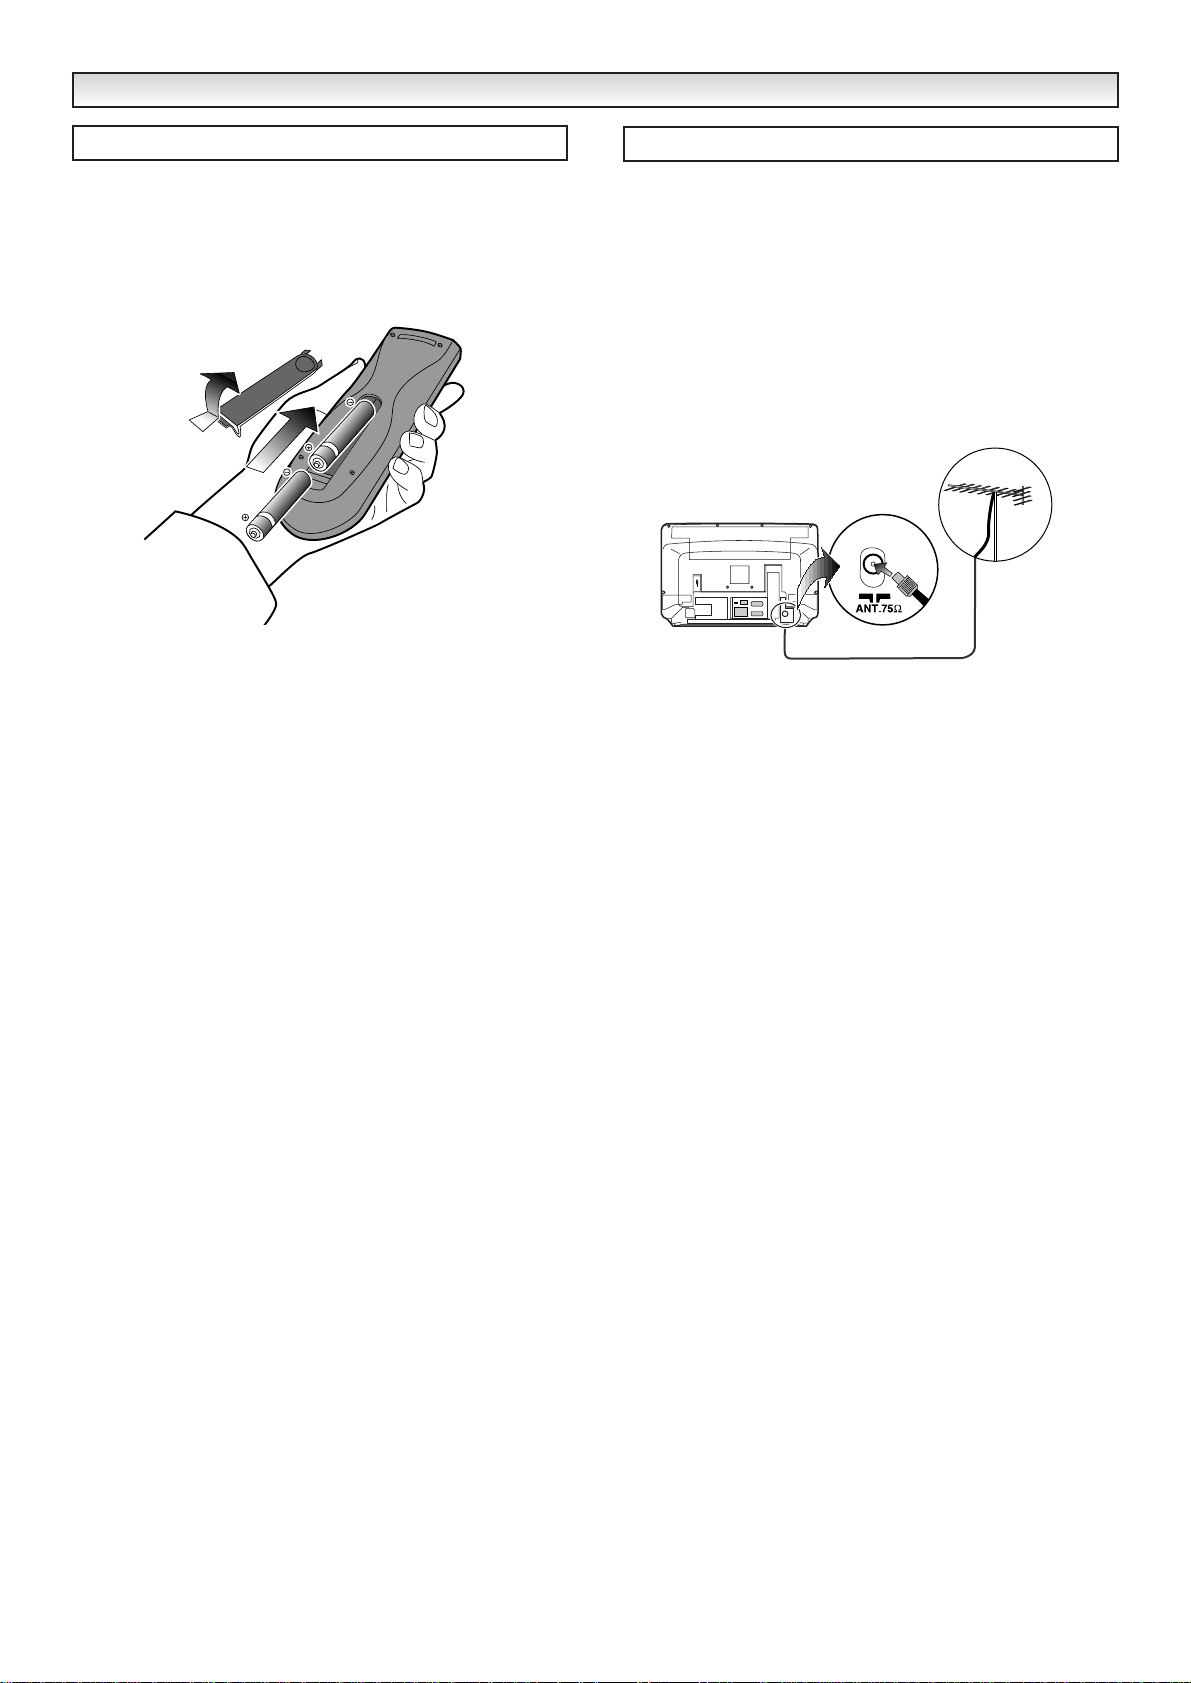
1. Remove the battery cover by sliding it in direction of the arrow.
2. Install two "AA" 1.5 volt batteries so that the "+" and "-" marks on
the batteries match the "+" and "-" marks inside the unit.
3. Close the battery cover.
Replace the batteries when the TV set is showing the following
symptoms: Operation is unsteady or erratic, sometimes the TV does
not work with the transmitter.Discharged batteries may leak and
damage the unit.The normal life of batteries should be from nine to
ten months.
■ The aerial socket is located on the back of the TV set.
■ A colour picture of good quality requires a higher aerial signal than
a black/white picture. If you tune your set to a station with a weak
colour signal, the television set automatically changes to a
black/white picture.
■ For all aerial problems please consult your local dealer.
■ For the best signal quality, the use of a well shielded antenna
cable is recommended.
INST
INST
ALLA
ALLA
TION
TION
Battery Installation
Aerial Connections
Page 5
5
GENERAL OPERA
GENERAL OPERA
TION
TION
■ To turn the TV set ON, press the Mains ON/OFF switch.The
power indicator illuminates red to show the power is on.
■ To turn the TV set OFF, press it again.
■ To turn the TV set into standby mode, press the button. The
power indicator illuminates more brightly.
■ To turn the TV set ON from standby mode, press any of the
following buttons: button, P▲ / P▼, 0 to 9 Numeric buttons.
In the Standby mode the TV set is still partially powered, this is
denoted by the red Standby/Power indicator illuminating more
brightly than in Power mode.
This TV set will automatically switch into the standby mode, 10
minutes after a signal is no longer received.The time until the set
will switch off is displayed on the screen.
■
Direct Programme Selection
For selection of programme position 0 to 9, press the corresponding
numeric button. If the required programme is equal or more than
10, for example 23, first press the -/- - button and enter 2 then 3.
■ Up/Down Programme Selection
Press the P▲ button to increase the programme position.
Press the P▼ button to decrease the programme position.
■ If the aerial is removed the TV set will automatically switch into
the standby mode after 10 minutes.
■ When the TV set is switched on by using the On-timer function
with no signal being received, the auto-shut off function will be
ignored.
If you found a power indicator flashing, please turn the
TV set off completely with the Mains ON/OFF switch
and contact our Service desk. This warning is a sign to
let you know that the power protection function of this
TV set is now operating.
Controls
Mains ON/OFF
Standby
Auto Shut Off
If no picture appears but the power indicator is on, press the
button, P▲ P▼ or 0-9 button on the Remote Control Handset as
the TV set is in the Standby mode.
The Mains ON/OFF switch must be in the ON position before
the using remote control transmitter.
Be sure to set the Mains ON/OFF switch to the off
position, if a power failure occurs while viewing.
NOTE: It is not possible to turn on with the Mains
ON/OFF switch from the standby mode.
Programme Selection
11:06:33
03 ITV1
AUTO
NICAM STEREO
11:06:33
02 BBC2
AUTO
NICAM STEREO
11:06:33
01 BBC1
AUTO
NICAM STEREO
00
99
!
!
TV/
MENU/
123
456
78
-/--
SURROUND
A.B
▲
/OK
F
▲
i
▼
0
CS
X
BASS
AUDIO
VIDEO
LR
P
MENU/
▲
TV/
0~9
▲
▼
P
WIDE
P P
9
?
TXT/TV
-/--
PP
BASS
TV local keyboard
P
F
Programme Up / Down
Level Up / Down
Stand-by
i
Menu
TV/AVSelection
0 to 9 Numeric buttons
2 Digit button
Alternate
Normalisation/Memory
Sound mute
Recall
Black Stretch
+
Time Display
Bass
Mains ON/OFF
Programme Up / Down
LevelUp/ Down
Menu
Memory/Normalisation
Right audio
R
Leftaudio
L
Video
Headphones
F + P
!
OFF:10
Page 6
6
SOUND FUNCTIONS
SOUND FUNCTIONS
To adjust the sound volume, press the / buttons.
Note : If the volume is restricted check Hotel Specification settings
on page 17.
To enter and exit the main menu press the F button on the TV or
the Menu button on the remote control unit.
Use the ▲ or ▼ buttons to scroll up and down between menu
options. Use the ©button to open the sub menus and the
§
and ©buttons to switch between the options. Press the Menu
button to return to a higher level menu screen.
Press the Menu button and select the Sound option from the Main
Menu by pressing the ▲ or ▼ buttons.A sub menu will drop down
when the © button is pressed, providing the following options.
■ Volume : Increase the sound level
output
.
■ Balance : Balances the sound level
between the left and right speakers.
■ Bass : Adjusts bass (low) frequencies.
■ Treble :Adjusts treble (high) frequencies.
■ Mode : Provides two or three options
depending on the sound standard detected
in the selected channel: DUAL A, DUAL B,
MONO, STEREO, NICAM MONO.
Note: Balance, Bass, Treble and Volume can also be accessed by
pressing the
/OK button.
■ Effects : Select the effects option by
pressing the ▲ or ▼ buttons followed by
the ©button.This sub menu provides
options enabling the adjustment of certain
sound properties (see “Sound Effects”).
Select sound required by pressing the
§
or ©button. To select other sub menus
press the ▲ or ▼ buttons. To return to
the Sound Menu press the Menu button
once.
■ Headphones :Press the ▲or ▼ buttons.
This sub menu is available only when the
presence of headphone is detected. A sub
menu drops down when the
©
button is
pressed, with the following options:
V olume,
Balance, Bass, Treble and mode (*), with
the same functions as the Sound menu
described previously on this page.
To retur n to the main menu press the Menu button.
The menu display only appears on the screen for 10 seconds.
* Mode only appears if there is a dual language broadcast signal.
■
Stereo Mode
Several of the following options are displayed depending on the type
of broadcast, when pressing the Surround button or the button.
PSEUDO STEREO ON/OFF :When ON, it provides a pseudo-stereo
effect to mono broadcasts.
NORMAL STEREO : Switches to stereo sound if broadcast is in stereo.
SPATIAL STEREO : Enhances stereo sound when enabled.
3D SURROUND MONO :This mode is especially prepared to produce
3D Surround effects in mono broadcasts.
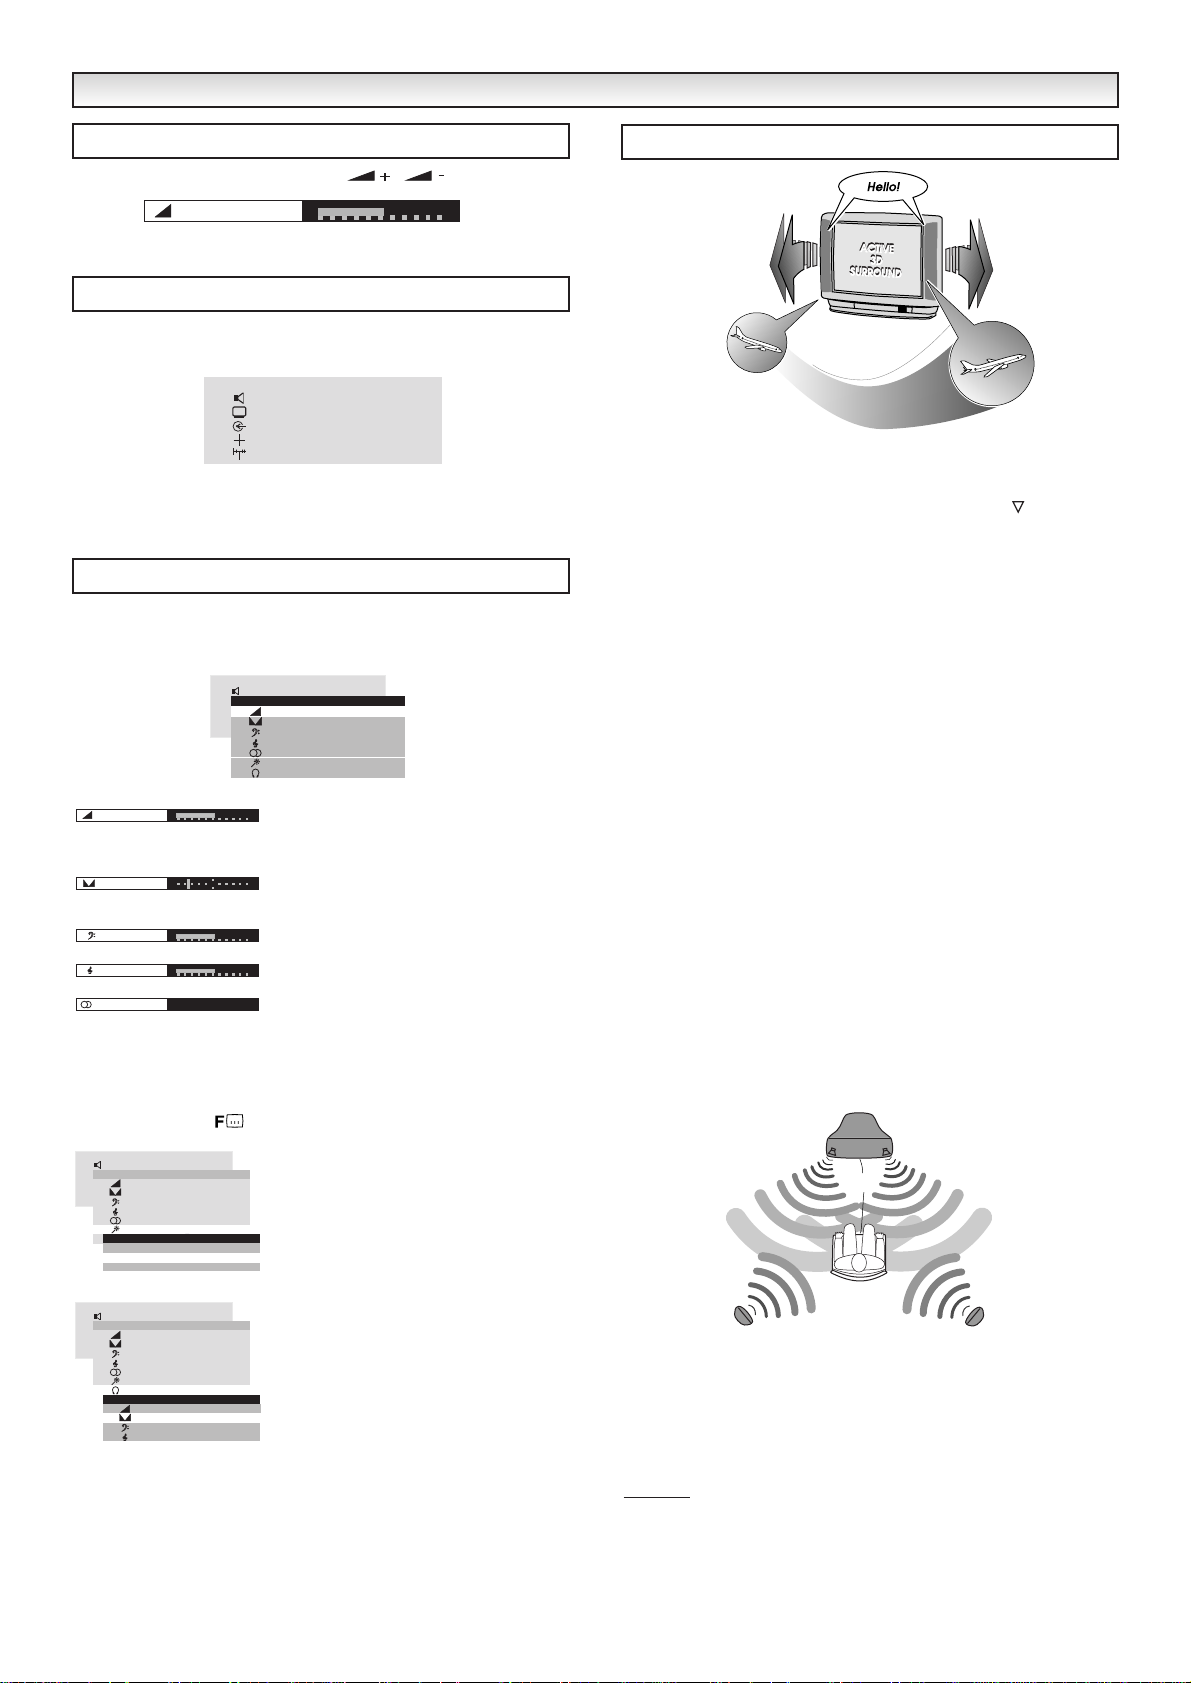
ACTIVE 3D SURROUND : Provides optimum 3D Surround effects.
SUPER 3D SURROUND :Select this mode if you wish to enhance the
3D Surround effect, e.g.when viewing
movies.
NOTE : Balance will have no effect on the audible sound
in any 3D surround mode, although the on screen
display will still adjust.
What is Active 3D Surround?
In traditional stereo sound, left and right channels combine to create
a
stereo image. Better speakers can create a larger perceived sound
stage, so sound seems to emanate from a few feet behind the
monitor.Sound can have a much wider presence with Active 3D
surround technologies. Music and sound effects appear to come
from points in the room far from the speakers.Objects (such as
jets) seem to move towards and then past the listener, whilst the
important channel sound still appears to come from the centre of
the screen.
Optimum positioning
Sit at a distance of approximately 2 to 4 meters from the TV set.
Listen facing the centre of the TV set.
Remove any obstructions between you and the TV set.
Effects
■ Bass boost : Enhances bass frequencies when enabled.This can
be accessed by pressing the BASS button.
■ Auto V olume :Keeps steady volume when enabled.
A•B
Volume Adjustment
Sound Effects
Sound Adjustment
Main Menu
Volume
Menu
Sound
Picture
Externals
More
Tuning
>
>
>
>
>
Menu
Sound
Volume
Balance
Bass
Treble
Mode
Effects
Phones
Volume
Balance
Treble
Mode
Bass
STEREO
Menu
Sound
Sound
Volume
Balance
Bass
Treble
Mode
Effects
Auricular
Effects
Stereo mode
Bass boost
Auto volume
>
>
>
Sound
Menu
Volume
Balance
Bass
Treble
Mode
Effects
Phones
Volume
Balance
Bass
Treble
Sound
Headphones
>
>
>
Sound
>
>
>
2 ~ 4
meters
Page 7

7
GENERAL OPERA
GENERAL OPERA
TION
TION
To adjust the picture, open the Main
Menu by pressing the Menu button and
select Picture by pressing the ▲ or ▼
buttons followed by the © button for
sub menus. Along with the basic
Brightness, Contrast, Colour and
Sharpness saturation options, you will
find a sub menu with other less common
functions and a picture format control
function.
You can have direct access to the following picture controls,
Brightness, Contrast, Colour and Sharpness by pressing the /
OK button repeatedly.
■ Noise Coring : Can be enabled or
disabled (ON/OFF).When enabled, it
eliminates “fuzz” on the picture.
■ Colour Tone : Three colour tones can be
selected, corresponding to “normal”,
“warm” or “cold” colour ranges.
■ Blue Stretch : Can be enabled or
disabled (ON/OFF).When enabled, it
increases the proportion of blue on white
picture tones.
■ Black Stretch : Can be enabled or
disabled (ON/OFF).When enabled, it
darkens the grey areas of the screen,
this can be changed in normal TV mode
by pressing the button.
■ Skin Tone : Can be enabled or disabled
(ON/OFF).When enabled, it corrects skin
tones providing more natural colours.
This television can make the most of the range of picture formats now
being transmitted. Many programmes are now being transmitted in Wide
formats 14:9 or 16:9 and films in wider formats known as Letterbox whilst
many programmes are the traditional 4:3 picture ratio.
It is possible to identify that the transmission is 4:3, Letterbox or
Wide screen format (14:9 or 16:9), but it is difficult to tell the difference
between 16:9 and 14:9.
You may choose to leave your Picture Format as Auto, your television will
automatically fill the screen, but this may not always give you what you
want. If so you can select from a range of picture formats. You can select
the Picture Format option either through the Menu screen or by pressing
the Wide button.
Picture Format by Menu
Press the Menu button,
use the ▲ or ▼ buttons to highlight Picture,
press the §and©buttons to select, press the ▲ or ▼ buttons to
highlight Format, press the §and©buttons to select the format
required.
Picture Format by pressing the Wide button
Press the Wide button repeatedly to select the different for mats.
The format changes as follows:
Wide Screen Signalling (WSS)
Your television will automatically select the correct picture format if the
transmission source is transmitting the WSS signal e.g.a DVD player or
digital TV decoder.
The WSS signal can be overridden by manually selecting the Picture
Format.
Note : When you switch on your TV set the picture format will be AUTO.
Note : When in AUTO your picture may change especially when adverts
appear. Many adverts are in a different transmission format to
the programme.
Picture Adjustment
Picture Effects
Picture Format
Menu
Sound
Picture
Conexiones
Otros
Brightness
Contrast
Sintonía
Colour
Sharpness
Effects
Format
Brightness
Contrast
Colour
Sharpness
Picture
>
>
>
>
>
Menu
Sound
Picture
Conexiones
Brightness
Otros
Contrast
Sintonía
Colour
Sharpness
Effects
Noise coring
Colour tone
Blue stretch
Black stretch
Skin tone
Picture
Effects
>
>
>
>
>
Menu
Sound
Picture
Conexiones
Otros
Brightness
Contrast
Sintonía
Colour
Sharpness
Effects
Format
Picture
>
>
>
>
>
NATURAL
Blackstretch
OFF
Blackstretch
ON
AUTO
NORMAL
FULL
16:9
NATURAL WIDE
ZOOM
14:9
Page 8

8
GENERAL OPERA
GENERAL OPERA
TION
TION
4:3 T ransmission Reception
14:9/16:9 T ransmission Reception
NORMAL
You will see a black bar, left and
right. The viewing ratio is
correct, this is how the
transmission was intended for
viewing.
This automatically stretches the
picture so that it fills the width of
the screen. This gives a
distorted picture where objects
appear squashed.
This automatically zooms into
picture (all the arrows relating to
the coloured buttons are black).
The picture is stretched and
enlarged so that the edges of
the picture are missing.
Whilst
the yellow button, more of the
top and bottom become visible,
and eventually the picture is as
the Normal format. Note the
arrows turn blue and at this
point the Red and Green
buttons become inoperative.
Whilst
the Blue button, the picture
zooms in even more. Note the
arrows turn blue.
Whilst
the Red button, the centre of
the picture moves down. Note
the arrows turn blue.
Whilst
the Green button, the centre of
the picture moves up. Note the
arrows turn blue.
This automatically stretches the
picture so that it fills the width of
the screen and looses some of
the top and bottom in a 14:9
ratio. This gives a distorted
picture where objects appear
squashed. Subtitles may
disappear use the coloured
buttons to move or scale the
picture to see them.
As 14:9 but the image is even
more squashed because of the
width being stretched even
more.
AUTO
ZOOM
14:9
16:9
NORMAL
NA TURAL WIDE FULL
AUTO
ZOOM
ZOOM
ZOOM
ZOOM
ZOOM
14:9
16:9
Zoom
is displayed press
Zoom
is displayed press
Zoom
is displayed press
Zoom
is displayed press
NORMAL
You will see a black bar, left,
right, top and bottom. The
NORMAL
AUTO
AUTO
NA TURAL WIDE
NATURAL WIDE
ZOOM
ZOOM
ZOOM
ZOOM
ZOOM
ZOOM
14:9
14:9
16:9
16:9
FULL
viewing ratio is correct.
These formats fill the width with
the whole picture and stretch
the height to fit.
You will see a black bar top and
bottom. The width of the picture
is correct but the picture is
squashed vertically.
This automatically zooms into
picture (all the arrows relating to
the coloured buttons are black).
The picture is stretched and
enlarged so that the edges of
the picture are missing.
Zoom
Whilst
is displayed press
the yellow button, more of the
top and bottom become visible,
and eventually the picture is as
the Normal format. Note the
arrows turn blue and at this
point the Red and Green
buttons become inoperative.
Whilst
Zoom
is displayed press
the Blue button, the picture
zooms in even more. Note the
arrows turn blue.
Whilst
Zoom
is displayed press
the Red button, the centre of
the picture moves down. Note
the arrows turn blue.
Zoom
Whilst
is displayed press
the Green button, the centre of
the picture moves up. Note the
arrows turn blue.
Correct viewing ratio for 14:9
transmission filling the screen.
A 16:9 transmission will have
correct width but some of the
top and bottom of the picture
may be missing.
Correct viewing ratio for 16:9
transmission filling the screen.
A 14:9 transmission will have
correct width but a black bar top
and bottom of the picture may
be present.
Page 9

9
GENERAL OPERA
GENERAL OPERA
TION
TION
Letterbox T ransmission Reception
NORMAL
You will see a black bar, left,
right, top and bottom. The
NORMAL
viewing ratio is correct, this is
how the transmission was
intended for viewing.
AUTO
ZOOM
NA TURAL WIDE FULL
AUTO
ZOOM
ZOOM
ZOOM
You will see a black top and
bottom. The viewing ratio is
correct, this is how the
transmission was intended for
viewing.
This automatically zooms into
picture (all the arrows relating to
the coloured buttons are black).
The picture is stretched and
enlarged so that the edges of
the picture are missing.
Zoom
Whilst
the yellow button, more of the
top and bottom become visible,
and eventually the picture is as
the Normal format. Note the
arrows turn blue and at this
point the Red and Green
buttons become inoperative.
Whilst
the Blue button, the picture
zooms in even more. Note the
arrows turn blue.
is displayed press
Zoom
is displayed press
14:9
16:9
ZOOM
ZOOM
14:9
16:9
Zoom
Whilst
the Red button, the center of
the picture moves down. Note
the arrows turn blue.
Whilst
the Green button, the center
of the picture moves up. Note
the arrows turn blue.
This automatically stretches the
picture so that it fills the width of
the screen in a 14:9 ratio. This
gives a distorted picture where
objects appear squashed.
As 14:9 but the image is even
more squashed because of the
width being stretched even
more.
is displayed press
Zoom
is displayed press
Page 10

10
This menu includes options referring to SCART connections.
■ Audio 1 OUT/Audio 2 OUT :If your TV set receives a Dual broadcast
signal, this menu allows you to select the desired audio output for the
relevant connector situated at the rear of the set.
For instance, if a hi-fi system is connected to the TV set, the selection
results would be as follows:
A & A :You hear the language broadcast on channel A on both
speakers.
B & B :You hear the language broadcast on channel B on both
speakers.
A & B :You hear each language broadcast A on speaker A and
language broadcast B on speaker B.
S-VHS Video : If you have an S-VHS video cassette recorder, you will
obtain optimum picture quality by connecting it to the
AV2 connector with an appropriate cable and enabling
this option.
Access the Main
Menu and select More, the following options appear:
■ Clock : This sub menu allows you to set the
clock, alarm and timers.
Only the remote control unit numeric keys are
valid for these functions.
You must always enter four digits when setting
the time in hours and minutes (hh:mm).
Any of the four options in this sub menu can
be reset by pressing the § button.
■ Time Set : Lets you check or set the
current time, which is kept current if the TV
set is not turned off using the mains
ON/OFF switch.
The time is automatically set if there is a
teletext signal. If there is not a text signal or
that time is incorrect you can enter the time
manually using the numeric buttons e.g.for
8.30 am enter 0830, for 8.30 pm enter 2030.
A manually set time is only cancelled when
the TV is switched off with the Mains On/Off
button, and overrides the teletext signal.
■ Alarm Set : Using the remote control unit
numeric keys, you can set the TV alar m
function. When the alarm is enabled a
sequence of beeps is heard, gradually
increasing in volume.
To stop the alar m, press any button on the
remote control unit.
■ Timer On : This sub menu lets you set the
time you want the TV set to turn on when in
Standby mode, using the remote control
unit numeric keys to set the time.
■ Timer Off : This sub menu lets you set the
time you want the TV set to switch into
Standby mode, using the remote control
unit numeric keys to set the time.
The red pilot light turns soft green if the Alarm
or Timer Off options are enabled and the TV
set is ON.
The red pilot light turns bright green if the
Alarm or Timer On options are enabled and
the TV set is in Standby mode.
■ Child Lock : Can be enabled or
disabled (ON/OFF). When enabled, it
locks out all local keypad operations.
OOTHER FUNCTIONS
THER FUNCTIONS
More Menu
Child Lock
Externals Menu
To Enable or Disable S-VHS on Scart 2
Access Menu->Externals->AV2->S-VHS
A&A
AA
Menu
Sound
Picture
Externals
More
Sintonía
More
Clock
Bloq.infantil
Sintonía
Clock
Time set
Idioma
Alarm set
Timer ON
Timer OFF
Time set
123
456
7809
Alarm set
>
>
>
>
>
--:--
12:00
>
>
13:48:54
21
21
NICAM
NICAM
DU ALA
DUALA
A&B
B&B
BB
AB
STAND-BY
Timer ON
Sound
Picture
Externals
More
Child lock
Menu
More
Clock
Child lock
12:00
ON
>
>
>
>
>
>
>
VIDEO
AUDIO
LR
F + P
Page 11

11
Up to 100 broadcast stations in your reception area can be stored in the
electronic memory.There are three ways to preset these channels:
■ AUTO : Searches automatically stor ing found channels in
consecutive programme positions.
■ SEMI : Searches for channels one at a time automatically locking
into strong signals.
■ MANUAL :Searches for channels one at a time manually selecting
any signal found even if weak.
The TV set automatically searches and stores all locally accessible
channels.
Press the Menu button and using the ▲ or ▼ buttons highlight the
Tuning menu, press the ©button to access the tuning menu. Use the
▲ or ▼ buttons to highlight Mode, press the ©button until AUTO
appears. Press the ▼ button to highlight Search and press the
©
button to start searching.
The TV starts searching and storing all available channels, use the
“rearranging channels setting” to reposition the stored location of
each channel to your preferred programme positions e.g. BBC1 to
position 1.
The TV set searches for channels one at a time automatically locking
into strong signals.
Press the Menu button and using the ▲ or ▼ buttons highlight the
Tuning menu, press the ©button to access the tuning menu. Use
the ▲ or ▼ buttons to highlight Mode, press the ©button until SEMI
appears. Press the ▼ button to highlight Search and press the
©
button to start searching. When a signal is found searching stops
and the screen display reads AFT. You can now choose to store this
channel or to search again.
To Store the channel
Press the ▼ button to highlight Program, enter
the programme position where you wish to
store the channel using the numeric buttons
e.g. to store at position 2 press 0 then 2.
Press the ▲ or ▼ button until Name is
highlighted you can enter some channel
information e.g. ITV. To enter press the
©
button the first digit is highlighted, press the
▲ or ▼ buttons to select the character you
require (A~Z, !, “, £, $, %, &, ‘, (, ), *, +, ,,-, /,
0~9), press the ©button to select the
second digit, continue to enter for up to 5
digits. Press the ©button so that no digit is
highlighted, press the ▼ button until Store is
selected, the word Confirm appears, press
the ©button and the word changes to
Stored.
To Search for another channel
With Search still highlighted press the ©button again until another
channel is found. When you have searched for and stored all the
channels press the Menu button twice to leave the Main Menu.
The TV manually searches for any signal even if weak.
Press the Menu button and using the ▲ or ▼ buttons highlight the
Tuning menu, press the ©button to access the tuning menu. Use the
▲ or ▼ buttons to highlight Mode, press the ©button until MANUAL
appears. Press the ▼ button to highlight Search then press and hold
the §or©button to start searching. (<< or >> indicates it is
searching but no strong signal is nearby, < or > indicates a signal is
being detected, >< indicates the signal is strong, release the button
when the best picture appears.
You can now choose to store this channel or search again. Please
refer to Storing and searching channels in the Semi Mode.
Having accessed the Tuning sub menu
press the ▲ or ▼ buttons to highlight
Swap. Enter the channel number you
wish to store the station at using the
numeric buttons e.g. to store at program
position 12 enter 1 then 2.
The word confirm appears, press the
©
button and the programme positions
are swapped.
■ System: This menu informs you of the broadcast standard that has
been detected.
Note : If the tuning menu is not present check the Hotel Specification
setting on page 17 as it may be disabled.
PRESETTING
PRESETTING
Searching for Channels in Auto Mode
Searching Channels in Semi Mode
Searching Channels in Manual Mode
Rearranging Channel Settings
Other Tuning Menu Options
Menu
Sound
Picture
Externals
More
Tuning
Mode
System
Search
Program
Store
Swap
Name
Tuning
>
>
>
>
>
AUTO
PALBG
U
Swap
12
12
--
0
2
▲
Program
123
456
2
7809
1
Program
Name
Name
Name
Store
T
▲
T ---
Confirm
▲
-----
--
02
▲
----
Swap
Sound
Picture
Externals
More
Tuning
Menu
Mode
System
Search
Program
Store
Swap
Name
Tuning
02
Confirm
>
>
>
>
>
AUTO
PALBG
U
01
03
System
PAL
Store
Stored
Page 12

12
Press the button and the TV set will alternately select the current
programme position and the previous programme position viewed.
This function has two sound mute stages.Press the button once,
the sound from the speakers will be reduced, press it again and it will
be muted completely.
Press the button again to switch the sound back on.
When the / button is pressed, the sound mute is
cancelled.
Press the button once, the programme information such as
current programme number, stereo status, picture format, remaining
timer if set.
The following function levels can be altered and then stored as user
level default settings, Brightness, Contrast, Colour and Sharpness.
You can store 3 different user levels which can be recalled at a later
date.
Using the Menu button or the /
OK
button select a Picture setting
eg. Contrast. Adjust the level using the
©
button and whilst the display is still
on the screen press the
button.
You must now select which User level
setting to store these settings, by
pressing the numeric button 1, 2 or 3.
Restoring the saved settings
Press the button repeatedly to restore either Normal level
(Factory settings), User level 1, User level 2 or User level 3.
Note : Settings cannot be restored while a picture setting is displayed
on-screen.
In the TV mode, if the receiving programme has a teletext service
when the button is pressed, the present time will be displayed on
the screen for 5 seconds.
OOTHER FUNCTIONS
THER FUNCTIONS
Alternative Program
6
23
Recall
Mute
Store/Restore Default Settings
Time Display
P P
Contrast
Contrast
LEVEL? (1-2-3)
1
STORED USER LEVEL 1
NORMAL LEVEL
13:48:54
04 CH4
AUTO
NICAM STEREO
/OK
F
▲
Contrast
Page 13

13
The rear of the set includes the antenna input line and two SCART
or Euro connector connections, with some common features and
other features that are unique to each connector.
■ Common Features:
- Video signal (CVBS) and stereo audio signal input.
- Automatic switching when VCR is in “PLAY”mode, as well as
auto selection of 4/3 or 16/9 format if the VCR provides this
feature.
- Audio output channel selection in Dual broadcasts(A&A,B&B
or A&B).
■ Right Euroconnector:
- Input: RGB signal type.
- Output: Always matches antenna input signal.
■ Left Euroconnector:
- Input: SVCR for mat signal.
- Output: Always matches signal shown on screen, which can
come from the antenna or any other input.
There are two possibilities:
■ Via the antenna jack:In this case you must tune the VCR chan-
nel.
Select the test pattern screen (check your VCR User’s Manual to
see how to do this) and tune the channel. Use of the Semi tuning
mode is advisable (see “Presetting” on page 11).
Drawbacks:
- Lower picture and sound quality during playback.
- Cannot play back in stereo.
■ Via Euroconnector: Advantages:
- Better picture and sound quality.
- Stereo sound can be played back.
■ If you have an S-VHS video cassette recorder, connect it to the
left Euro connector.For viewing, make sure you have the
Connections menu option enabled (see “Externals Menu” on page
10).
This TV set has a number of connectors providing optimum
connection of the TV set to a wide range of peripherals.Keep in
mind that the use of the appropriate connecting cable is essential for
good results.
■ Stereo Headphone Jack The Sound menu provides a specific
set of sound control options (Volume, Balance, Bass, Treble) that
are available only when the TV set detects that headphones are
actually plugged into the set.
When the set receives a Dual language broadcast another option
(mode) will appear. This allows you to select which language you
want to hear by changing between Dual A and Dual B. (see page
10).
■ AV3 Front RCA Sockets
Behind the flap on the front of the TV are located 3 RCA input
sockets. These are as follows :
Yellow : Video Input
White : Audio (L) Input
Red : Audio (R) Input
AV3 mode is not available until a plug is inserted into the yellow
(Video) socket. If you wish to only use these sockets for an audio
input you must still fit a dummy plug into the Video Socket. If only
one sound channel (mono) is available, plug this into the white
(Audio L) socket.
When the button is pressed the mode changes as follows.
Press the button to select the mode you require.
Note : Most equipment connected via AV1 or AV2 will automatically
switch the TV to AV mode when the play button is pressed.
Note : AV3 mode cannot be selected if no plug is inserted into the
AV3 white (Video) socket.
TV/
CONNECTION OF A
CONNECTION OF A
V EQ
V EQ
UIPMENT
UIPMENT
Connectors Located on the Rear of the TV Set
Connecting a VCR
Connectors Located on the Front of the TV Set
Your Video Camera
can also be connected
by using the Front AV.
AUTO
TV
AV3
AUTO
When AV3
is not
connected
AV2
AUTO
AV1
AUTO
Page 14

14
This remote control transmitter has been designed to be used in
conjunction with selected SANYO VCR’ s.Some SANYO VCR’s may
have their own functions, so please refer to the individual instr uction
booklet when using this remote control to ensure compatibility.
POWER On/Off :
Use to turn VCR power on and off.
PLAY :
Use to playback the tape.
STOP :
Use to stop the movement of the tape.
FAST/CUE :
Use to advance the tape at fast speed, or in order to playback the
tape at fast speed.
REWIND/REVIEW :
Use to rewind the tape or in order to playback the tape in reverse at
fast speed.
RECORD :
Keep the two buttons pressed down to begin video recording.
The main TV functions can be operated by using the local keypad
situated on the bottom front of the set.
The keys on the keypad are directly related to the corresponding
buttons on the remote control unit.
1. Key equivalences for navigating screen menus.
2. Switching channels.
3. Adjusting the volume.
4. Stor ing/restoring defaults. The local keypad key ( ) performs the
same functions as the same remote control button ( ).
VCR USE / OPERA
VCR USE / OPERA
TING
TING
THE
THE
TV
TV
WITHOUT
WITHOUT
THE REMO
THE REMO
TE CONTR
TE CONTR
OL
OL
Operating the TV Without the Remote Control
1.
2.
3.
4.
Functions for Video cassette
VCR KEYS
▲
TV/
/OK
F
▲
▲
i
MENU/
▲▼▼
P
123
WIDE
P P
456
78
9
?
-/-0
CS
X
TXT/TV
SURROUND
BASS
A.B
i
P
MENU/
▲▼
▲
▼
▲
▼
TV/
▲
MENU/
▲
/OK
F
i
▼
123
456
78
-/--
SURROUND
A.B
0
CS
X
BASS
▲
▲
▼
P
WIDE
P P
9
?
TXT/TV
NORMAL LEVEL
Page 15

15
TELETEXT
TELETEXT
This TV accepts TXT signals until 1.5 level in Flof and Top modes.
The internal memory can store 8 pages, that allows an agile access
to the information.
Press theTXT/TV button, and the screen changes as illustrated.
■ Direct page access
A page can be selected with the 0-9 Numeric buttons. eg. To
display page 301, press buttons 3, 0 and then 1.The selected page
number will appear on the screen.
■ Up/down page access
When a page is displayed on the screen and you want to read the
following page number, press the up (▲) button instead of selecting
the new page number.To read the previous page, press the (▼)
button.
P▲ : P301 ➙ P302 ➙ P303 .... P399 ➙ P400 ....
P▼ : P301 ➙ P300 ➙ P299➙ P298 ....P201 ....
When a television station provides the FLOF service, you can access
the pages more easily. At the bottom of the screen four headings
are displayed on red, green, yellow, cyan. Access these headings by
pressing the button with the corresponding colour button on the
remote control transmitter.
Teletext Controls
Page Selection
Coloured Page Access
Switching to the Teletext mode
P303
P302
P301
P300
P299
.
H
H
O
O
C
C
K
K
E
E
Y
Y
.
1
2
5
0
5
P
P
3
3
2
2
5
5
0
CC
CC
CC
CC
.
TT
TT
E
E
N
N
N
N
I
I
SS
SS
F
F
OO
OO
OO
OO
TT
TT
B
B
AA
AA
L
L
L
L
.
P
P
33
33
00
00
1
1
33
33
00
00
22
P
P
33
33
00
00
55
55
P
P
33
33
1
1
00
00
55
55
Symbol Function
TXT/TV
Teletext/Mix/TV mode
switch
0-9 0-9 numeric buttons
P▼ P▲ Page down/up
Previous viewed page
selection
Index page selection
Hold
Size
Cancel
Sub code entry mode
Reveal
■■■ Red
■■■ Green
■■■ Yellow
■■■ Blue
▲
TV/
/OK
F
▲
i
MENU/
123
456
78
-/--
0
X
SURROUND
A.B
CS
BASS
▲
▲▼▼
P
WIDE
P P
9
?
TXT/TV
P P
i
X
?
TELETEXT P100 1/1
P100
INDEX
TOPICS ..............................P201
NEWS ................................P251
SPORT .............................. P301
WEATHER ........................ P351
TRAFIC ............................. P401
TOPICS NEWS
6
TELETEXT P100 1/1
P100
INDEX
SPORT
WEATHER
TOPICS .............................P201
NEWS ............................... P251
SPORT ..............................P301
WEATHER ........................ P351
TRAFIC ............................. P401
TOPICS NEWS
SPORT
WEATHER
PP
33
00
11
SPORT
PPP33
00
CC
RRRIIICC
KKKEEETTTT...............................................
TT
EE
NN
NN
II
SS
...................
FF
OO
OO
TT
BB
AA
LL
LL
PPP33311100
FOOTBALL
CONTENTS
DV2
DV1
............
PRE SCOT
RRRUUUGGGGBBBYYYY...................
HHHOOOOCCCCKKKEEEYYYY..................................................
CRICKET TENNIS F.BALL RUGBY
Red Green Yellow Blue
PP
33
00
PP
33
11
PPP333311155
PPP3333222255
22
55
00
PPP33300011
SPORT
CCCRRRIIICCCKKKEEETTT................
TTTEEENNNNNNIIISSS...................
FFFOOOOOOTTTBBBAAALLLLLL............
RRRUUUGGGBBBYYY........................................................
HH
OO
CC
KK
CRICKET TENNIS F.BALL RUGBY
EE
YY
..................................................
PPP33300022
PPP33300055
PPP33311100
PPP33311155
PP
33
22
55
Page 16

16
TELETEXT
TELETEXT
Press the button to select one of the teletext index pages.
Press the button to stop sub pages changing.The word "STOP"
will appear instead of the page number.
Some teletext pages are made up of several sub pages.These sub
pages are automatically changed. Sub page is shown as P4/8 (sub
page 4 of 8 pages) the location on the text page depends on the text
service.
Either the top half or the bottom half of the page can be expanded to
fill the whole screen by pressing the button. Each time the button
is pressed, the display changes as illustrated.
Press the
button to reveal hidden items on the text page.
Some pages such as quiz pages have the answers hidden.The
button may have to be held to keep the answer on the screen, or
pressed again to remove the answers.
When the teletext information is longer than one page, it may take
some time to reach the required page which is automatically
changed. By using the sub-coded page access, you can continue
watching the TV picture until the sub-page is reached.
Select a teletext page with sub pages.
1. Press the button. The characters "
****
" will be displayed
on the top left corner of the screen.
2. Enter the sub page number by using the (0-9) buttons.
For example, to enter the sub page 4, press buttons 0, 0, 0 and 4.
3. Press the button to return the normal TV picture.
Immediately the requested sub-coded page is found, the page
number will appear over the TV picture.
4. Press the button to view the sub-coded page.
X
X
?
i
Index Page Selection
Sub Page Access
Stop
Double Letter Height
INDEX
P
P
P
2
2
2
0
0
0
1
1
1
P
P
P
2
2
2
5
5
5
1
1
1
P
P
3
3
0
0
1
1
P
P
3
3
5
5
1
1
P
P
4
4
0
0
1
1
P
P
1
1
0
0
0
0
TOPICS NEWS
WEATHERSPORT
T
T
T
O
O
O
P
P
P
I
I
I
C
C
C
S
S
S
.
.
.
.
.
.
.
.
.
.
.
.
.
.
.
.
.
.
.
.
.
.
.
.
.
.
.
.
.
.
.
.
.
.
.
.
N
N
N
E
E
E
W
W
W
S
S
S
.
.
.
.
.
.
.
.
.
.
.
.
.
.
.
.
.
.
.
.
.
.
.
.
.
.
.
.
.
.
.
.
.
.
.
.
.
.
.
.
.
.
S
S
P
P
O
O
R
R
T
T
...................
W
W
E
E
A
A
T
T
H
H
E
E
R
R
.............
T
T
R
R
A
A
F
F
F
F
I
I
C
C
................
Displaying Concealed Information
33
33
1
1
1
++
++
22
22
1
1
1
22
22
==
P
1
0
0
P
2
0
T
O
P
I
C
S
.
.
.
.
.
.
N
E
W
S
.
.
.
.
.
.
.
.
.
S
P
O
R
T
W
E
A
T
H
E
R
T
R
A
F
F
I
C
1
.
.
.
.
.
.
.
.
.
.
.
.
P
2
5
1
.
.
.
.
.
.
.
.
.
.
.
.
P
3
0
1
P
3
5
1
P
4
0
1
P401
AIRLINES
0825
0830
0855
0900
0915
0955
LONDON
FRANKFULT
PARIS
GENEVE
CAIRO
TOKYO
DEPARTURE
BA012
LH335
AF223
SR553
SQ707
JL005
1/8
✶✶✶✶
AIRLINES
DEPARTURE
0825
LONDON
FRANKFULT
PARIS
GENEVE
CAIRO
TOKYO
BA012
LH335
AF223
SR553
SQ707
JL005
0830
0855
0900
0915
0955
1/8
P401
0855
0900
0915
0955
PARIS
GENEVE
CAIRO
TOKYO
P401
0825
0830
0855
0900
0915
0955
AF223
SR553
SQ707
JL005
AIRLINES
LONDON
FRANKFULT
PARIS
GENEVE
CAIRO
TOKYO
DEPARTURE
BA012
LH335
AF223
SR553
SQ707
JL005
1/8
P401
AIRLINES
DEP ARTURE
0825
LONDON
0830
FRANKFULT
1/8
BA012
LH335
PPP55555511
QUIZ
P401
0004
P401
0825
0830
0855
0900
0915
0955
1325
1330
1355
1400
1415
1425
AIRLINES
DEPARTURE
LONDON
FRANKFULT
PARIS
GENEVE
CAIRO
TOKYO
AIRLINES
DEPARTURE
ROME
HONGKONG
DUBLIN
VIENNA
SINGAPORE
BONN
BA012
LH335
AF223
SR553
SQ707
JL005
IR012
CX501
BA051
SR443
SQ307
LH995
1/8
4/8
11
++++22
==
PPP55555511
QUIZ
22
=
33
11
++
Page 17

17
TELETEXT / HO
TELETEXT / HO
TEL SPECIFICA
TEL SPECIFICA
TIONS / SPECIFICA
TIONS / SPECIFICA
TIONS
TIONS
Sometimes the page access can take some time.While waiting you
can view the television picture by pressing the button.
1. Enter the new page number. Press the button.
2. When the page is found, the page number will appear over the
television picture.
3. Press the button again, to view the teletext page.
A special two digit code controls special conditions for Hotel and
Rental use.
The first digit controls presetting, Childlock and Maximum volume.
The second digit controls the start up programme position.
The first digit has 3 options 0, 1,2
0 = Normal operation, presetting enabled
1 = Hotel presetting is disabled
2 = Hotel/Rental, presetting is disabled, Child Lock is
always on, the current volume at time of setting
becomes the maximum volume level.
The second digit has 10 options 0~9
SET➞ 0 Last programme position start
SET
➞ 1 Programme position "1" start
SET
➞ 2 Programme position "2" start
SET
➞ 3 Programme position "3" start
SET
➞ 4 Programme position "4" start
SET
➞ 5 Programme position "5" start
SET
➞ 6 Programme position "6" start
SET
➞ 7 Programme position "7" start
SET
➞ 8 Programme position "8" start
SET
➞ 9 "AV1" position start
How to enter your code
For example, you wish to prohibit presetting and start up in AV1 mode,
you must enter the code 19. Whilst pressing the button on the
TV set, press the button on the remote control handset. The
Hotel display appears on the screen.
Enter the code you require e.g.19 using the numeric buttons 1 and 9.
When you next switch on the TV set there conditions will apply.
Changing from Hotel Codes 20~29
You must first reduce the colour to minimum before entering a new
Hotel code. Switch off the TV with the Mains On/Off button and then
switch on, the code is activated.Press the
button to restore the
picture settings.
Power source AC 220~240V, 50Hz
Television system System I
Colour system
PAL
Receiving channel UHF: 21~69
Aerial input impedance 75 ohm
AV terminal
21-Pin Terminal AV1 :CENELEC Standard (with RGB/
S-inputs)
AV2 :CENELEC Standard
Sound output Main L/R 10 watts x 2
Dimensions 780 x 526 x 513 (CE28WN3-B)
(W x H x D mm) 880 x 583.5 x 567.5 (CE32WN3-B)
Weight 32 Kg (CE28WN3-B)
46 Kg (CE32WN3-B)
Specification subject to change without notice.
The specification of the 21 pin connector is as follows.
AV1 T erminal
Pin
1 Audio output 0.5V/ 1 K ohm
2 Audio Input 0.5V/10 K ohm
3 Audio output 0.5V/ 1 K ohm
4 Audio ear th
5 Earth (blue)
6 Audio Input 0.5V/10 K ohm
*7 Blue (B) input 0.7Vpp/75 ohm
8 Remote switch input L:0-2V, 16/9:4.5 to 7V,
4/3:9.5 to 12V H:10-12V
9 Earth (green)
*10
*11 Green (G) input 0.7Vpp/75 ohm
*12
13 Earth (red)
14 Earth
15 Red (R) *1 or chrominance input 0.7Vpp/75 ohm
*16 Fast blanking L:0-0.4V H:1-3V
17 Earth(video)
18 Earth
19 Video output 1 Vpp/75 ohm
20 Video/sync. or luminance input 1 Vpp/75 ohm
21 Connector shield
*Not connected on AV2 terminal
?
XXX
Viewing TV while searching for a page
TV Specifications
Hotel Specification
Scart Specifications
HOTEL:
0 0
HOTEL:
1 9
X
X
20
18
17
1921
121114
16
13
15
1098
6
214
5
3
7
Page 18

18
SER
SER
VICING & HELPFUL HINTS
VICING & HELPFUL HINTS
■ If the power cord or plug is damaged.
■ If liquid has been spilt into the television receiver.
■ If television receiver has been exposed to rain or water.
■ If the television receiver has been dropped or the cabinet has
been damaged.
■ If the television receiver exhibits a distinct change in performance.
■ If the television receiver does not operate normally by following the
operating instructions.
Adjust only those controls that are covered in the operating
instructions as improper adjustment of other controls may result in
damage.This will often require extensive work by a qualified
technician to restore the television receiver to normal operation.
When replacement parts are required, have the service technician
verify that the replacements he uses have the same safety
characteristics as the original parts. Use of manufacturers specified
replacements can prevent fire, shock or other hazards.
■ NO PICTURE, NO SOUND
● Check if TV is plugged in.
● Try a different channel, if OK, probably
station trouble.
■ POOR PICTURE, SOUND OK
● Adjust BRIGHTNESS control.
● Adjust FINE TUNING control.
● Check aerial connections.
■ NO COLOUR, PICTURE OK
● Adjust COLOUR control.
● Adjust FINE TUNING control.
● Is the programme in colour ?
■ WEAK PICTURE
● Check aerial connections on back of
set.
● Check aerial for broken wires.
● Re-orient aerial.
The following faults are not caused by the receiver:
"GHOSTS"
Reflections of signals from mountains or
high buildings will cause multiple images,
called "Ghosts".These abnormal
conditions can be reduced to minimum by
repositioning aerial or by installing new
one suited for your area.
"INTERFERENCE"
Interference may be caused by electrical
appliances, car ignition systems, etc.
This should normally be a temporary
condition, but should this interference
persist, contact your dealer.
Stand-by mode: In order to save energy and to maintain an optimum
picture quality, it is advisable to switch off the TV using the ON/OFF
button located at the front of TV set.
Used batteries:The batteries in the remote control of your TV set do
not contain mercury.However, SANYO recommends that you do not
dispose of used batteries in domestic refuse. Please, contact your
dealer or your local authorities for information regarding the disposal
of used batteries or your nearest collection point.
Recommendation about the end-of-life:Your SANYO TV set has
been designed and manufactured using high quality materials which
can be recycled and reused. In the future, when the life cycle of this
set comes to an end, specialised companies can disassemble it and
reuse certain materials. This reduces the impact of waste in our
environment. Please, contact your local authorities for information
regarding the disposal of your set when the time arrives.Help us to
conserve the environment we live in!
Your television is fully transistorised and does not contain
any user serviceable components.
Removal of the cabinet cover may expose you to dangerous
voltages. Refer all servicing to qualified service personnel.
Unplug the television receiver from the wall outlet and refer
servicing to qualified service personnel under the following
conditions:
Servicing
Helpful Hints
Recommendations to protect our environment
?
?
Page 19

19
W ARRANTY TO CUST OMER
Sanyo U.K. Sales Ltd. (the company) warrants to the initial
retail purchaser that if this equipment is or becomes
defective and that, in the opinion of the Company, the defect
is due to faulty material or workmanship the Company will, for
a period of 12 calendar months from the date of sale to the
original purchaser repair or replace, at its sole option, free of
charge, any such defectiv e component part of the equipment,
always provided that:-
1:The equipment has at all times been used in accordance
with the operating instructions issued by the Company, and
has not been connected to an electrical mains supply for
which it has not been adjusted.
2: Accidental damage or damage caused by negligence of
misuse by the user, is specifically excluded.
3: Unauthorised repairs, or any modification to the equipment
which has not been expressly approved by the Company,
shall render this warranty null and void.
4:Failure due to fair wear and tear of any item is specifically
excluded.
This warranty is not transferable and is only applicable
within the United Kingdom (and the Republic of Ireland).
Nothing in this express warranty affects the statutory
rights available to the purchaser of this equipment.
Note: This warranty supersedes any other f orm of guarantee
that may inadvertently have been enclosed with or attached
to the product.
Dear Customer.
Thank you for buying
SANYO
. This equipment should give
you many years of pleasure and faithful service but in the
event that a f ault occurs , the following notes for you guidance
may be helpful:-
1:PLEASE RETAIN YOUR PURCHASE RECEIPT WHICH
WILL BE REQUIRED FOR SERVICE DURING WARRANTY .
2:If your Sanyo equipment proves faulty during the period of
guarantee, take it or send it back to the dealer who
originally supplied it together with this guarantee and the
proof of purchase. We have made arrangements with our
approved dealers under which they will carry out inguarantee
service repairs on our behalf. In this way, we hope to
reduce to a minimum the amount of time you will be
without your equipment.
3:If for some reason it is impossible to return the equipment
to the original supplier, please contact our Service
Department at the address below for further advice.
4:Should the equipment require servicing after the expiry of
the guarantee period, take or send it to the original supplier
or any other Sanyo dealer. He will be pleased to give you
a quotation for the repair.
Service Departments,
Sanyo U.K. Sales Ltd.,
Sanyo House,
Otterspool Way,
Watford, Hertfordshire WD2 8JX
Tel: 01923 246363
Page 20

Part No. SKP10179-B F7HS/YS
SANYO Industries (U.K.) Ltd
Printed in U.K.
 Loading...