

Page 1
CE32LDY1-B
Please read this Instruction book before using your television.
We wish you many hours of pleasure from your new television.
Colour Television
INSTRUCTION MANUAL
Page 2
2
END-USER LICENCE & SERVICING
END-USER LICENCE & SERVICING
The product (meaning the equipment or appliance to which this
documentation relates) incorporates Software (the software applications, utilities and modules embedded within the Product) which is
owned by Sanyo or its licensors. Before using the product, please
read the End-User Licence Conditions detailed below. If you do not
agree to the terms and conditions of the End-User Licence, Please
do not proceed to use the Product- repack the Product unused and
return it to your supplier together with proof of purchase for a full
refund. By using the product, you agree to be bound by the terms
and conditions of the End-User Licence.
Licence Grant, Conditions and restrictions
1. Sanyo grants you a non-exclusive, world-wide (subject to export
controls), non-transferable (except as permitted by 2 below),
royalty-free licence to use the Software upon and with the Product.
2. You may not transfer any of your licence rights in the Software
without the prior written consent of SANYO and if consent is
provided then the Software shall only be transferred in conjunction
with the transfer of the Product AND provided that the transferee
has read and agreed to accept the terms and conditions of this
licence.
3. You must ensure that the copyright, trademark and other protective
notices contained in the Software are maintained and not altered
or removed.
4. The Software provided hereunder is copyrighted and licenced (not
sold). SANYO especially does not transfer title or and ownership
rights in the Software to you. The Software provided hereunder
may contain or be derived from portions of materials provided to
SANYO under licence by a third party supplier.
5. Except as expressly permitted by statute you may not;
● use the Software in conjunction with any other computer
hardware other than the product;
● copy all or part of the Software;
● incorporate all (or any of) the Software into other programs
developed by (or on behalf of) you and/or used by you;
● reverse-engineer, decompile or disassemble the Software;
● make the Software (or any part of it) available, or permit its
redistribution, for use with any computer hardware other than
the Product; or rent, lease, gift, loan, sell, distribute or transfer
possession of the whole or any part of the Software.
Termination
This licence is effective until terminated. This licence will terminate
automatically without notice if you fail to comply with any of its
provisions.
Disclaimer
1. The Software is(to the extent permitted by law) supplied ‘as is’ and
SANYO and its suppliers expressly exclude all warranties, express
or implied, including (but not limited to) warranties of satisfactory
quality, fitness for purpose and non-infringement (save to the
extent that the same are not capable of exclusion at law).
2. In no circumstances will SANYO be liable for any direct, indirect,
consequential, or incidental damage (including loss of profits,
business interruption, loss of data or the cost of procurement of
substitute goods, technology or services) arising out of the use or
the inability to use the Software (save to the extent that such
liability is not capable of exclusion at law).
General
1. This End-User Licence will be governed by laws of England and
the User may only bring claims in the English Courts and SANYO
shall be entitled to bring a claim in the courts of any jurisdiction.
2. The above terms and conditions supersede any prior agreement,
oral or written, between you and SANYO relating to the Software.
End-User Licence
Your television is fully transistorised and does not contain any user serviceable components.
You must not remove the rear cover of the TV by yourself. The apparatus is working with high voltages and could damage objects or
even endanger people. Leave all required repair and service jobs to an authorised service technician. He will exclusively use such
spare parts that are complying with the same safety standards as applicable to the original parts. The use of original spare parts can
prevent fire, shock and other hazards.
Unplug the television receiver from the wall outlet and refer servicing to qualified service personnel under the following conditions:
■ If the power cord or plug is damaged.
■ If liquid has been spilt into the television receiver.
■ If television receiver has been exposed to rain or water.
■ If the television receiver has been dropped or the cabinet has been damaged.
■ If the television receiver exhibits a distinct change in performance.
■ If the television receiver does not operate normally by following the operating instructions.
Adjust only those controls that are covered in the operating instructions as improper adjustment of other controls may result in damage. This will
often require extensive work by a qualified technician to restore the television receiver to normal operation.
Servicing
Page 3

3
Do not allow anything to rest on the power
cord.
Do not locate this television receiver
where the cord will be damaged by people
walking on it.
Do not overload wall outlets and extension
cords as this can result in fire or electric
shock.
Slots and openings in the cabinet and in the back or bottom are
provided for ventilation to ensure reliable operation and to protect
it from overheating. These openings
must not be blocked or
covered. The opening
should never be covered with a cloth or
other material, and the bottom openings
should not be blocked
by placing the television receiver on a bed, sofa, rug, or other
similar surface.
Do not place this television near any heat sources such as
radiators, heaters, stoves and other heat-generating products
(including amplifiers).
Do not place the television in direct sunlight.
Do not place your television receiver on an unstable stand, shelf
or table. Serious injury to an individual, and damage to the
television may result if it should fall. Your sales person can
recommend approved stands or shelf and wall mounting
instructions. A special wall mounting kit is available for this model.
Warning To prevent injury, this television receiver must be
securely attached to the wall in accordance with the
manufacturers installation instructions.
If the television is built into a unit, or enclosed, the minimum
distances for ventilation must be maintained. Heat build up can
reduce the life of your television, and can be dangerous.
This television receiver should be operated only from the type of
power source indicated on the television or as indicated in the
Operating Instructions. If you are not sure of the type of power
supply in your home, consult your sales person or your local
power company.
Never add accessories that have not been specifically designed
for this television.
Do not drop or push objects into the television cabinet slots or
openings. Some internal parts carry hazardous voltages and contact may result in an electric shock hazard.
Never spill liquids of
any kind on the television receiver.
Do not place items such as
vases containing liquid on top of the TV set.
Do not expose the television receiver to rain or use near water.
For example, near a bathtub, kitchen sink, in a wet basement, etc.
Do not use immediately after moving
the television from a low temperature to
a high temperature environment, as this
causes condensation, which may result
in fire, electric shock, or other hazards.
Before cleaning, unplug the television
receiver from the wall socket.
Never stand on, lean on or push the
television or its stand.
Never allow
children to play with the television or
its stand. Serious injury may result if it
should fall.
Do not apply liquid cleaners or
aerosol cleaners directly onto the television receiver. Use a damp cloth for
cleaning.
Do not place candles or hot objects upon the TV, next to it or
behind it. Open flames must never be used near the TV set.
SAFETY
SAFETY
PRECAUTIONS
PRECAUTIONS
Installation
CAUTION: Please read and retain for your safety. This unit has been engineered and manufactured to assure your personal safety, but
improper use can result in potential electric shock or fire hazards. In order not to defeat the safeguards incorporated in this receiver observe
the following basic rules for its installation, use and servicing.
Use
MINIMUM DISTANCES
5cm
L
/
S
R
/
D
10cm
10cm
10cm
Page 4
4
● Cleaning your LCD screen.
Your LCD screen is coated in a non reflective film. Damage to
this film will result in possible discolouration. Any scratches will
not be repairable.
Clean your screen with a soft cloth, only rub lightly, do not use
detergents.
Do not stick anything to the screen, use solvent or alcohol
based cleaners, hit the screen with a hard object or rub the
surface hard.
● Placement of your LCD TV.
Table top stand
This LCD TV is supplied with a table top stand fitted.
Wall mounting bracket
An optional wall bracket is available for your LCD TV. Before you
consider wall mounting this TV, check that you have an appropriate wall made from solid materials such as concrete or bricks.
You will have to remove the table top stand to use this.
SAFETY
SAFETY
PRECAUTIONS
PRECAUTIONS
Important:
This equipment is fitted with an approved non rewireable UK mains plug. To change a fuse in this type of plug proceed as follows:
1. Remove the fuse cover and fuse.
2. Fit a new fuse which should be a BS1362 5Amp A.S.T.A. or BSI approved type.
3. Ensure that the fuse cover is correctly refitted.
If the fuse cover is lost or damaged the plug must NOT be used but replaced with a serviceable plug.
If the fitted plug is not suitable for your socket outlets, it should be cut off and an appropriate plug fitted in its place. If the mains plug contains
a fuse, this should have a rating of 5 Amp, ensure the fuse cover is correctly fitted. If a plug without a fuse is used, the fuse at the distribution
board should not be greater than 5 Amp.
Note: The severed plug must be destroyed to avoid a possible shock hazard should it be inserted into a 13Amp socket elsewhere.
The wires in this mains lead are coloured in accordance with the following code:
Blue -------> Neutral
Brown ----> Live
1. The Blue wire must be connected to the terminal which is marked with the letter “N” or coloured BLACK.
2. The Brown wire must be connected to the terminal with the letter “L” or coloured RED.
3. Do not connect either wire to the earth terminal in the symbol or coloured GREEN or GREEN and YELLOW.
Before replacing the plug cover, make certain that the cord grip is clamped over the sheath of the lead - not simply over the wires.
THIS UNIT IS NOT DISCONNECTED FROM THE MAINS UNLESS THE MAINS LEAD IS UNPLUGGED.
Care of your product
Important recycling information.
Your SANYO product is designed and
manufactured with high quality materials
and components which can be recycled
and reused.
This symbol means that electrical and
electronic equipment, at their end-of-life,
should be disposed of separately from
your household waste.
Please dispose of this equipment at your
local community waste collection/recycling centre.
In the European Union there are separate collection systems for
used electrical and electronic products.
Please help us to conserve the environment we
live in!
Note: This symbol mark and recycle system are applied only to
EU countries and are not applied to other countries of the
world.
Page 5
5
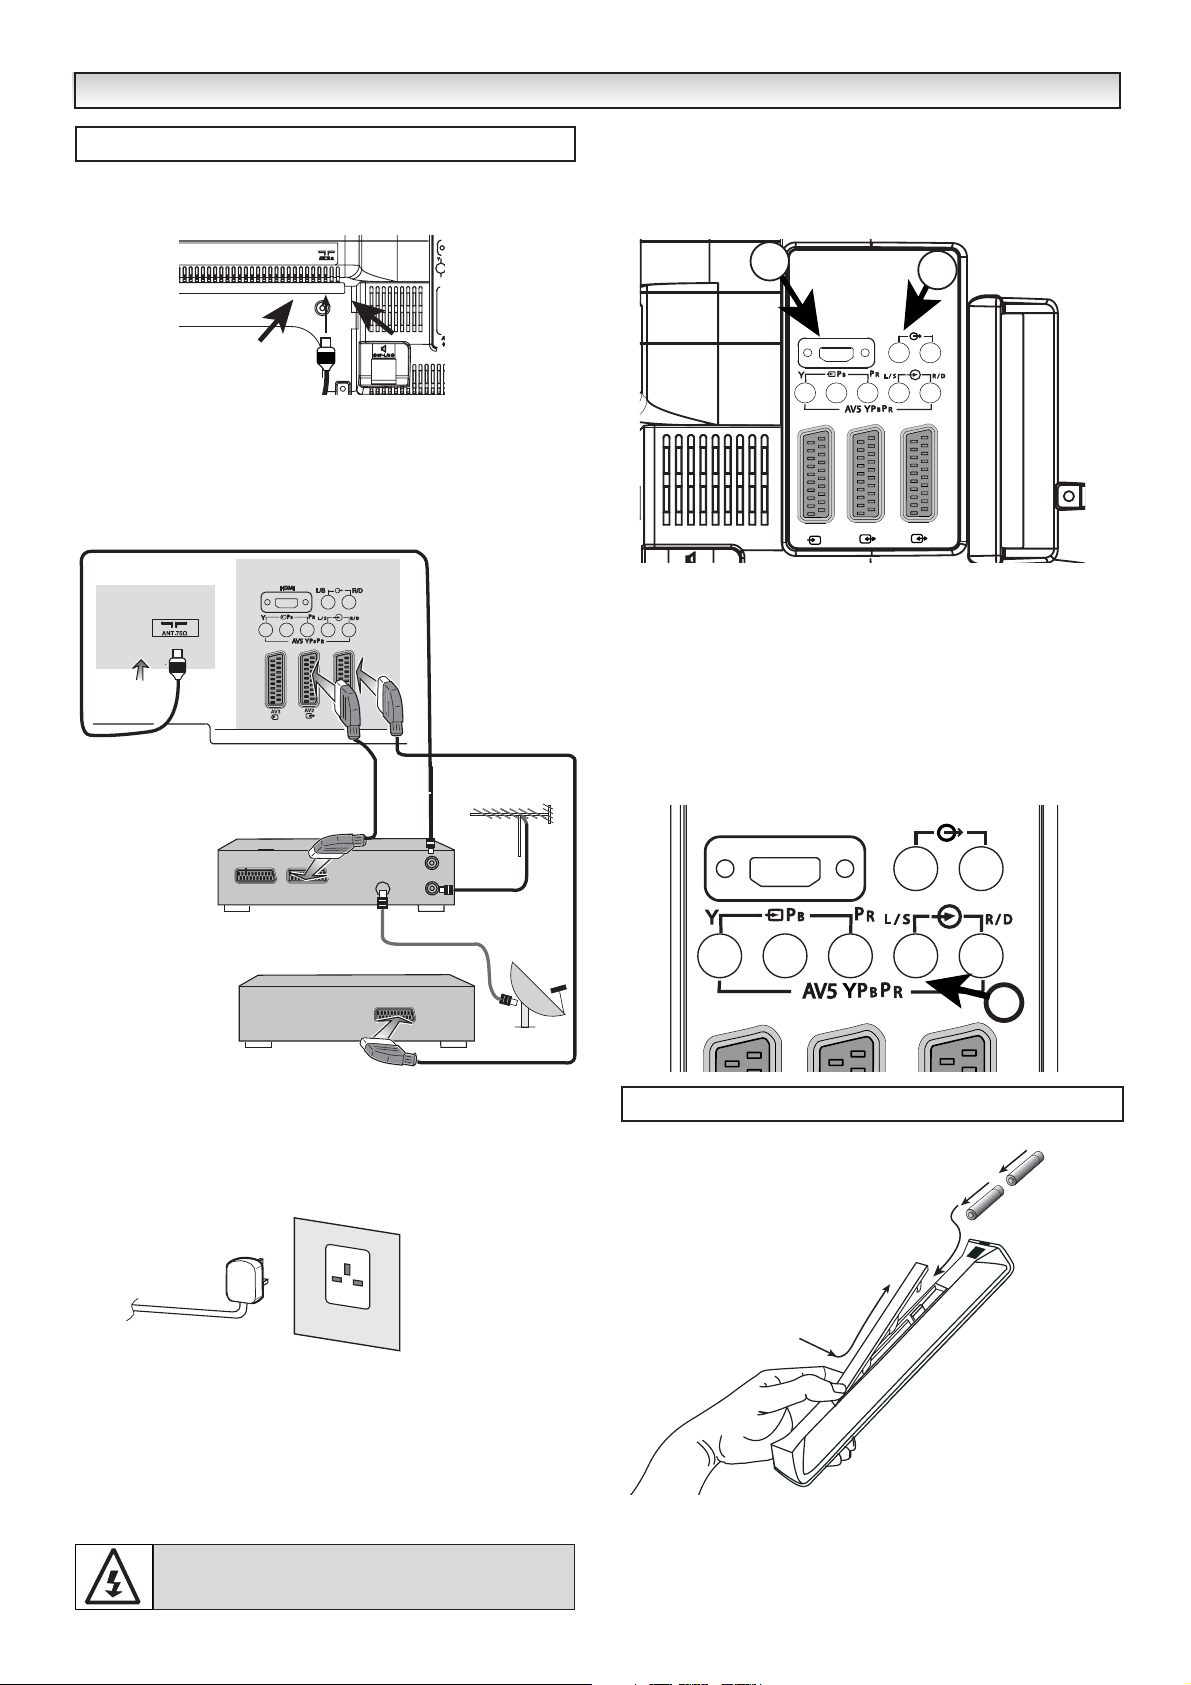
1. Connect your aerial cable socket to the back of the TV set. Fit the
aerial cable as shown or as shown below when AV equipment is
connected.
● Connecting DVD / VCR player/ Satellite receiver or
Set top box.
We recommend that you connect all other equipment before Plug and
Play. The following examples are our recommended standard connection. For further information please consult your local dealer.
2. Connect the power cord of the LCD TV to a wall outlet.
✐ As this product does not have a mains On/Off switch, please
ensure your mains plug is easily accessible.
✐ The TV set is prepared for a mains voltage AC220~240V, 50Hz. To
disconnect completely from the mains or, when the TV set is not to
be used for an extended period of time, it is advisable to disconnect the power cord from the power outlet.
✐ For all aerial problems please consult your local dealer.
1. HDMI (High Definition Multimedia Interface)
This TV set has an HDMI connector. When connected to the HDMI
source and HDMI is selected using the remote control,There is a short
time period before the picture appears at a much higher resolution.
This connection is located at the back of the TV set as shown below.
2.If you want to connect a DVD player with a DVI adaptor connection
cable,please ensure the sound is connected to L/S andR/D connections. Refer to diagram above.
DVI-I Format will only work carrying a Digital signal.
3. Y,Pb,Pr connection
This TV set has Y, Pb, Pr. You can connect your DVD player to these
terminals instead of using a scart lead as indicated below. This can
support high definition in analogue component form.
Install two "AAA" 1.5 volt batteries so that the "+" and "-" marks on
the batteries match the "+" and "-" marks inside the unit into the
remote control handset.
INST
INST
ALLA
ALLA
TION
TION
Step : 1 Connections ( Essential)
AV1
WARNING! High voltages are used in the operation of
this set. Refer service to qualified service personnel.
HDMI
L/S
R/D
HDMI
L/S
R/D
Step : 2 Remote control battery installation
As indicated
above
AV1
1
HDMI
AV2
AV3
2
L/S
R/D
AV1
Set top box
or
Satellite
VCR
TV
DISH
IN
OUT
IN
For satellite
only
DVD
AC Mains Outlet
HDMI
L/S
R/D
3
-
+
-
+
Page 6
6
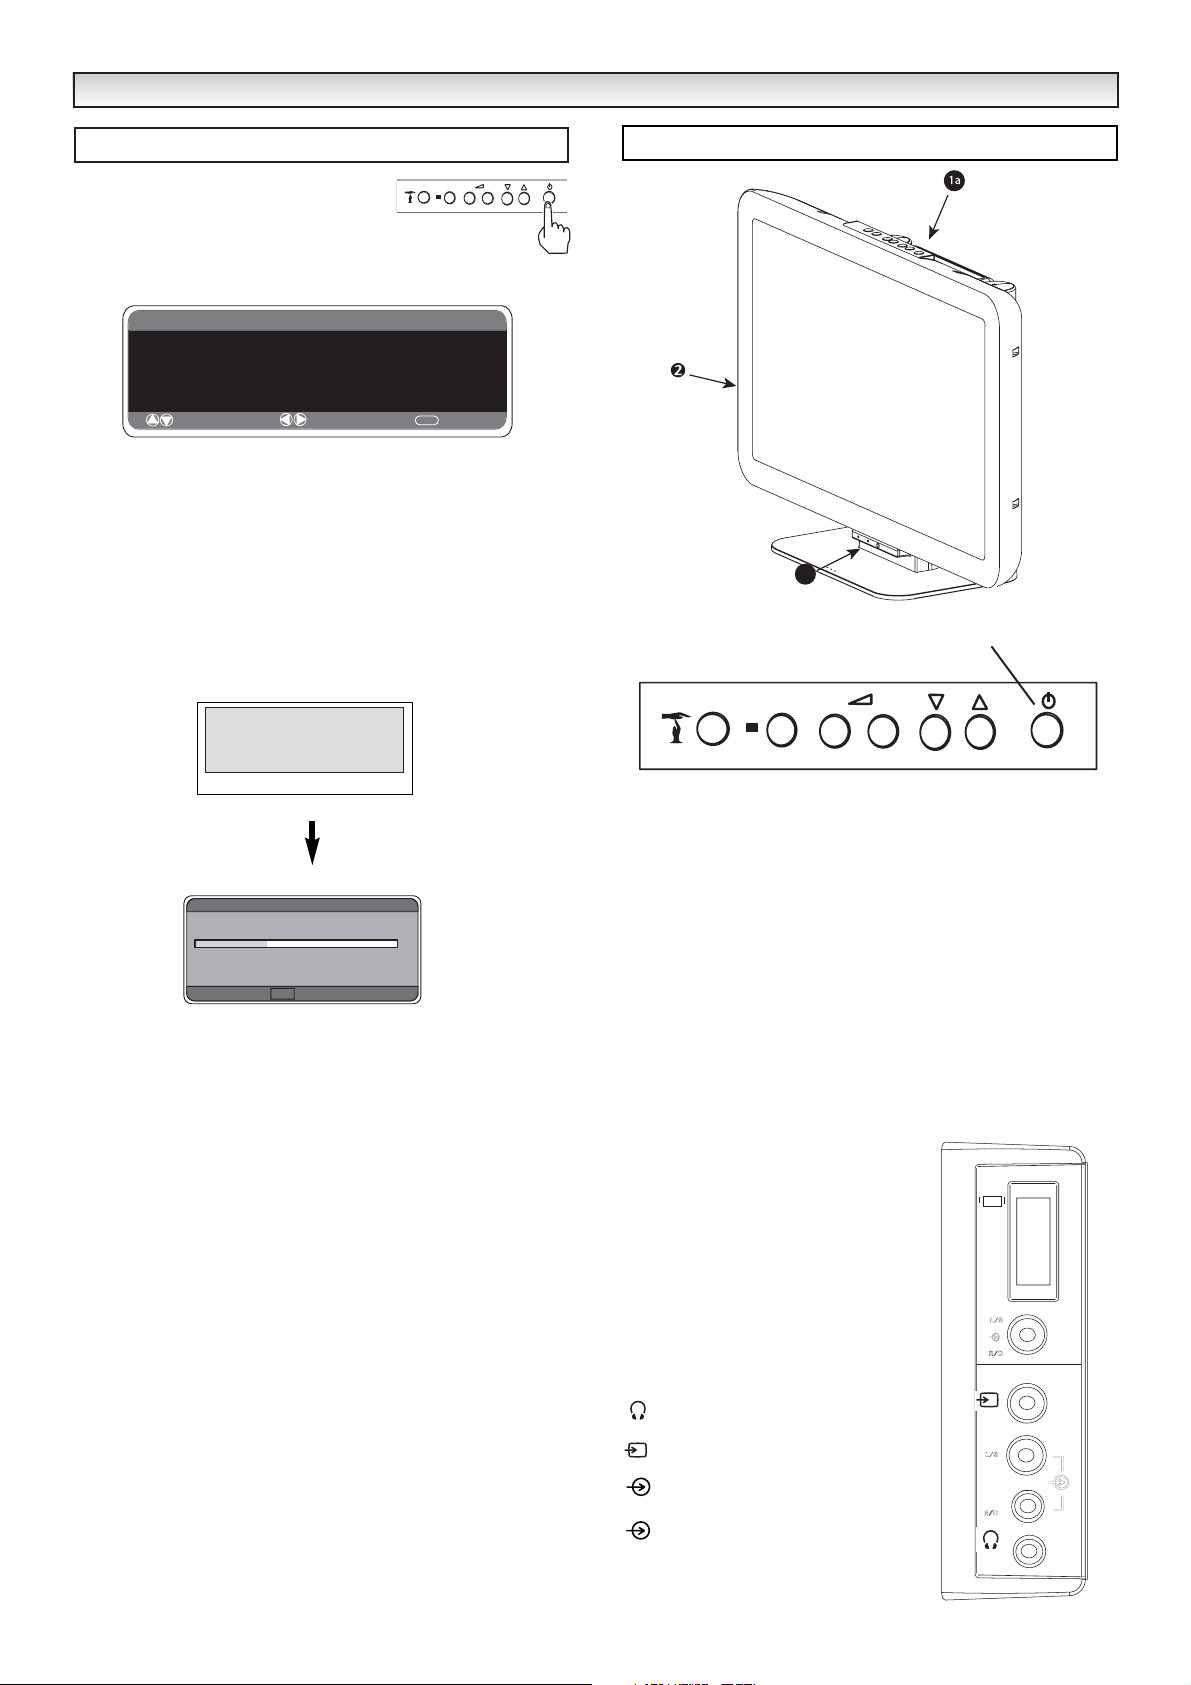
The LCD TV will have a red Standby light to
show there is power.
The following screen will appear before Plug and Play will start.
Using your remote control, press the eor dbutton to highlight the
Country option. Select UK using the 7or 8button. Press the eor
d
button to highlight the Start option and press the 8button to
begin the self-automatic tuning system called Plug and Play.
The TV scans the analogue channels first and then switches to digital channel mode and scans digital channels. This could take up to
15 minutes. During automatic tuning, the TV displays the tuning status of analogue and digital channel tuning on the screen.
Now the installation is complete!
After Plug & Play, Digital channels are stored in the programme
positions shown in the All channel table.
Analogue channels will be automatically sorted as follows:
Programme position 1 : BBC1
Programme position 2 : BBC2
Programme position 3 : ITV
Programme position 4 : CH4 or S4C
Programme position 5 : CH5
Programme position 6 : ITV2
Programme position 7 : channels in order found.
✐
If any other channels are available in your reception area, the
remaining channels will be stored from programme position 7 in
sequence as found.
✐
If you move to another city or cable is installed, please follow the
description “Channel List - scan for channels”. (on page 13) or
“Preset Menu” (on page 17/18) for Analogue channels.
✐
This procedure only appears the first time you switch on.
1a. Control Buttons on TV
Press the 5 or 6 button to increase or decrease the programme
position.
Press the 1 or 2 button to increase or decrease the sound
volume.
Press the Time out button to freeze the picture and start recording
current live program
Press the stop button to cancel the time out function or stop playing
a disc.
1b. The Power light and HDD light are shown here. The Power light
displays Red and the HDD light displays Orange when Time out or
Replay are active,. The HDD light displays Red when Recording and
Green when Replaying.
2. Left side terminals
✐
To select the AV4 mode press the v button repeatedly.
✐
When the headphones are inserted the sound from the TV
speakers is muted.
PC Connection
This TV set has a PC connector.You
can connect a PC to the LCD TV and
use it as a monitor if required.
This connection is located on the side
terminal above the AV4 Video and Audio
sockets
3.5 mm Mini Headphone din
AV4 Video in
AV4 Left Audio in
AV4 Right Audio in
Step : 3 Switching on / Plug & Play
Terminals
INST
INST
ALLA
ALLA
TION
TION
Time outTime out
StopStop
-
+
P
Time out
Stop
Standby switch
Autostore
Country UK
Start
: Select
: Adjust
Thank you for purchasing your SANYO TV.
Now I am searching and storing all
programmes.
Please wait.
Scan for channels
Channels found
The scan will take approximately 3 minutes
In progress
RET
Stop
MENU
: Exit
35
1b
Time out
Stop
-
+
P
PC input
PC
I
IN
AV4
L/S
R/D
Page 7
7
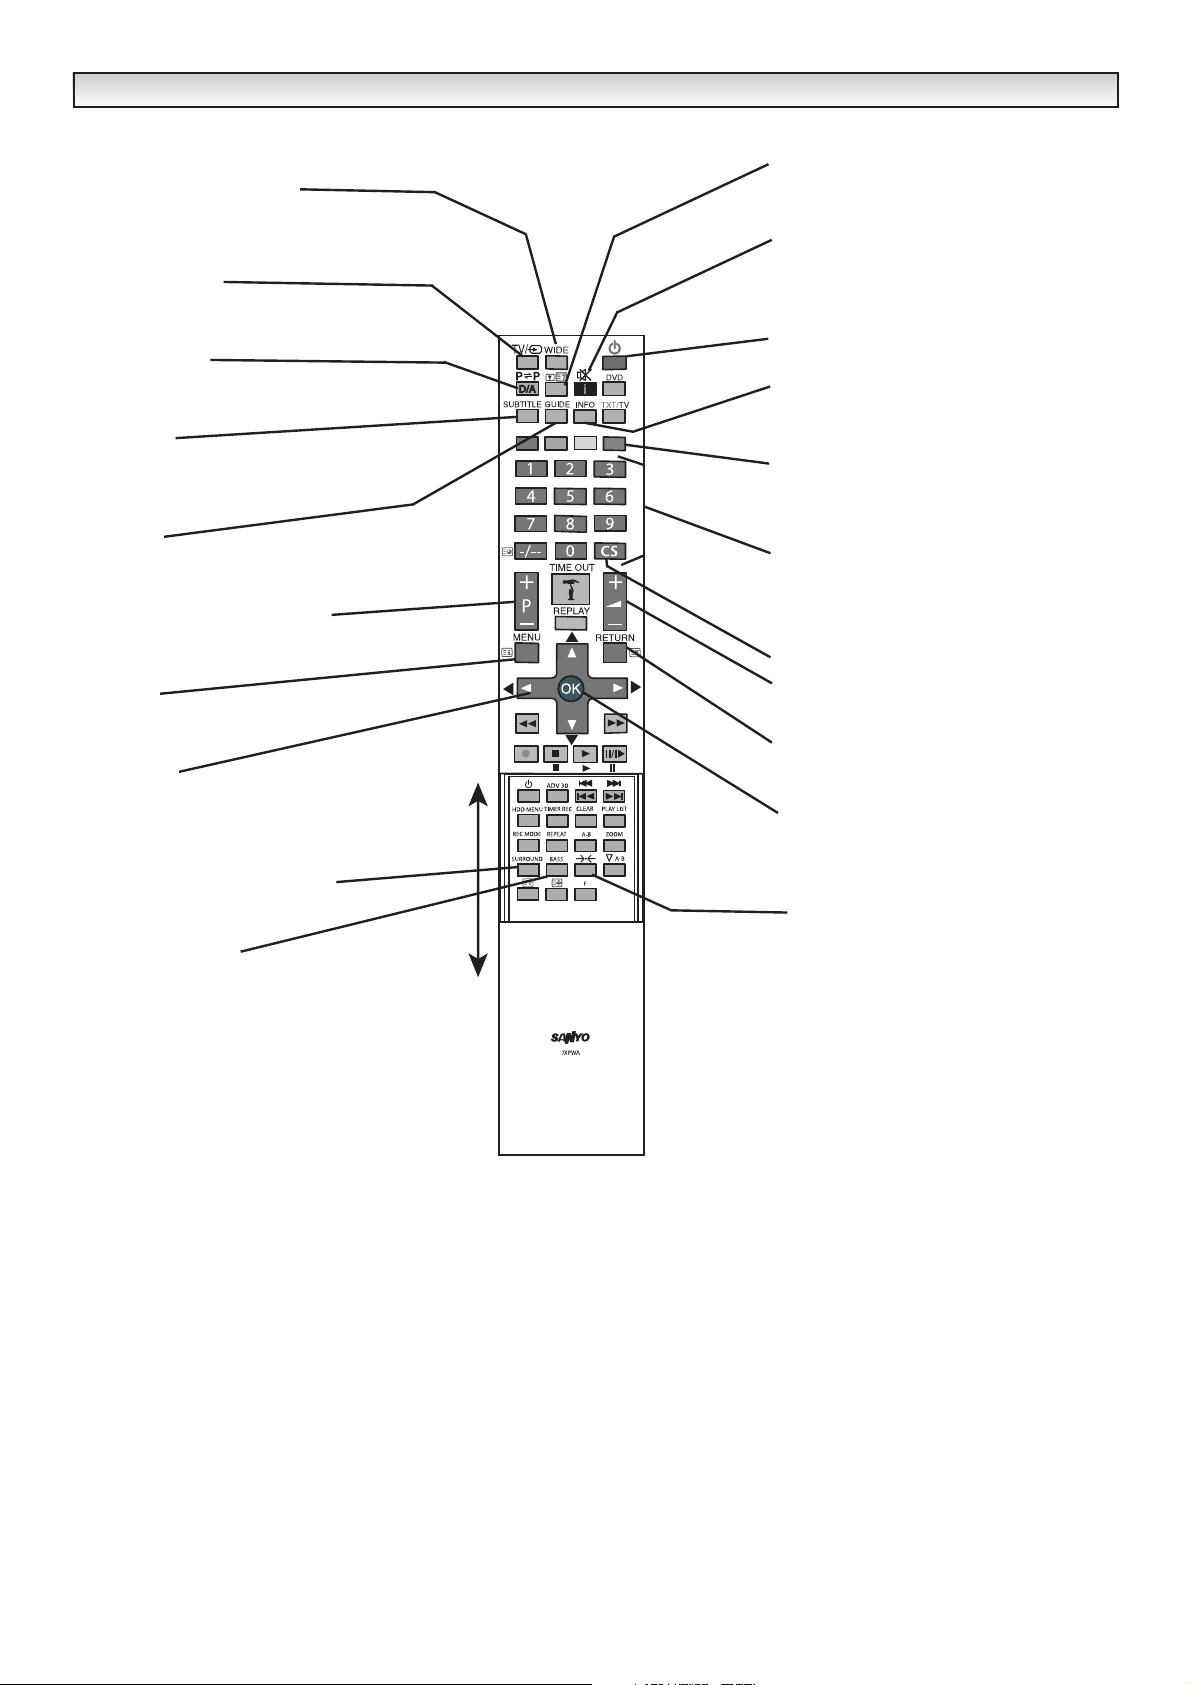
REMOTE CONTROL
REMOTE CONTROL
- Digital Use
- Digital Use
Screen mode selector
To select the screen mode, Auto, Natural,
Zoom14:9, Title In 14:9, Zoom 16:9,
Title In 16:9, Full or Normal.
TV/AV switch
To switch from Digital TV, AV1, AV2, AV3, AV4
AV5 YPrPb, PC, HDMI or TV mode press repeatedly.
D/A selector
To switch between analogue (TV)
and digital channels (DTV).
Subtitle
Displays sub titles On and Off.
You may need to switch to title in by pressing
WIDE button. See page 25.
Guide
To call up the Digital TV schedule guide display on
the screen. (refer to page 14).
Programme up and down
To select the next programme number or
previous programme number.
MENU
To switch on the screen display menu on/off.
See page 8.
Cursors
To select the sub menu items in the
menu display, Up, Down, Left, Right.
Surround mode selector
To select the surround mode, Off, Mid, Max.
Bass selection
To get an emphasised bass sound, On or Off.
System selector
To select the colour system in the AV mode,
Auto, PAL, NTSC or SECAM.
Sound mute
To switch the sound from the speakers.
The sound changes as follows;
Normal volume -> Mute
Standby/Power on/off
To switch the TV on and off. Also see page 19.
INFO
Shows the current and next programme on
the selected channel. (refer to page 14).
Coloured buttons
Some channels have interactive services.
Use the red button to enter and other colours
as directed. Also used in menu functions
Direct programme selector
For direct access to programmes
using (0-9) numeric buttons for example
for channel 23, press 2 and 3 numeric
buttons.
N/A
Volume up/down
To adjust the sound level.
Return
Returns back to previous screen
in menu. Exits interactive mode.
OK
To save the setting in the menu,
or to call up the All channel table.
Picture mode selector
To access a series of picture modes:
Personal, Dynamic, and Standard or ECO.
Page 8
8
DIGIT
DIGIT
AL
AL
OPERA
OPERA
TION
TION
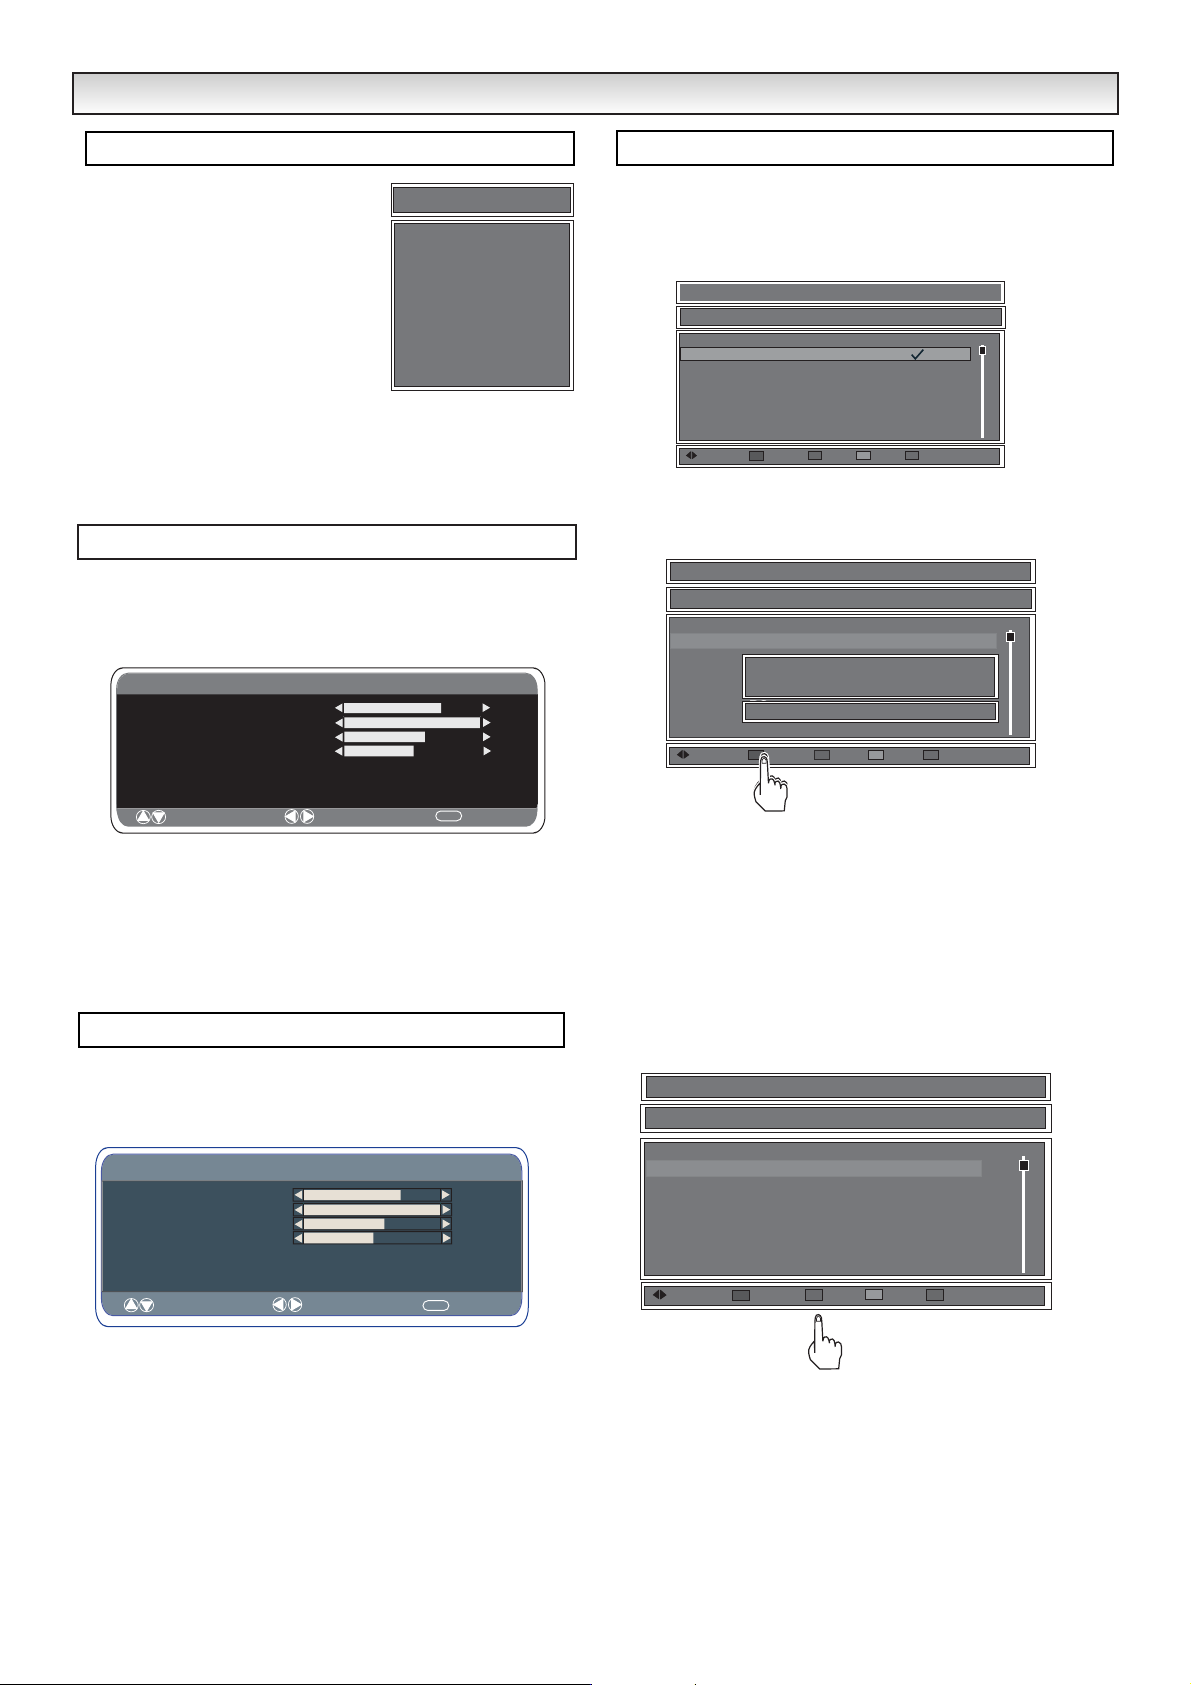
The main menu screen takes you to many
functions in the TV. The buttons below are
the main buttons and their uses.
MENU button - Enters and exits menus.
Cursorseand dmoves up and down in
each selected menu.
Cursor
7 8
Re-locates cursor bar to top
or bottom of main menu.
OK button save settings or enters next
menu.
RETURN button - Returns to the previous screen.
Refer to the bar at the bottom of the screen for added help in which
buttons to use.
1. Press the MENU button and select Picture using theeor
d
buttons.
2. Press the OK button to select.
3. Select Brightness, Contrast, Colour etc. using thee, dbuttons and
adjust using the 7, 8buttons to obtain the best picture settings for
your environment.
Press the
MENU button to return to Main Menu. These settings
automatically store when you exit the menu.
Press the MENU button and select Sound using theeor
d
buttons, press the OK button to enter.
Select and adjust to obtain the best sound settings for your environment using the
e, d
and 7, 8buttons.
Press the MENU to return to Main Menu. These settings automatically
store when you exit the menu.
Press the MENU button to exit menu.
You can re-organize the channel list to allow quick access to your
favourite channels.
Press the
MENU button and select Channel organizer using the
e
ordbuttons.
■ Remove a channel.
1. Highlight a channel to be removed.
2. Press the Red button an inset window will appear.
✐ Red button refers to coloured buttons Red, Green, Yellow and
Blue. Do not get confused with larger Red Standby button.
3. Press the OK to confirm deletion of the the chosen channel.
4. Press the Return button to exit.
■ Move selection.
To change the order of channels in your list.
1. Select the channel you wish to move using the eor dbuttons.
2. Highlight the channel by Pressing the Green button to select.
3. Use the eor dbutton to move to a different position
4. Press the Green button to save the new order.
Repeat steps 1-4 until all channels are in the order you need.
5. Press the Return button to exit.
Picture menu
Sound menu
Channel Organizer
Main Menu
Main Menu
Installation
Main menu
_
Main Menu
Picture
Sound
Channel organizer
Parental lock
Configuration
Installation
Technical information
Off Timer
TV settings
Picture
Brightness
Contrast
olour
C
Sharpness
Preset Personal / Dynamic / Standard / ECO
Reduction Mid / M in / Auto /
Noise
Dyn
Text Brightness Min/ Mid / Max
tone ON / OFF
. skin
: Select
: Adjust
OFF
/Max
MENU
: Back
CHANNEL ORGANIZER
Lock
Swap
RETURN
Favourite
Favourite
Cancel
Swap
Lock OK Save
Lock
Lock OK Save
CH. No. Channel name
1 BBC ONE
2 BBC TWO
7 BBC THREE
30 CBBC
40 BBC NEWS 24
Favourite
CHANNEL ORGANIZER
CH. No. Channel name
1 BBC ONE
2 BBC TWO
7 BBC THREE
30 CBBC
40 BBC NEWS 24
Favourite
Remove Move
? Do you want to delete.
Confirm
OK
Remove Move
Sound
Volume
Balance
Bass
Treble
Preset Personal / Talk / Music / Normal
Surround OFF / Mid / Max
: Select
: Adjust
MENU
: Back
CHANNEL ORGANIZER
CH. No. Channel name
1 BBC ONE
2 BBC TWO
7 BBC THREE
30 CBBC
40 BBC NEWS 24
Favourite
Remove Move
Swap
Lock OK Save
Page 9
9
DIGIT
DIGIT
AL
AL
OPERA
OPERA
TION
TION
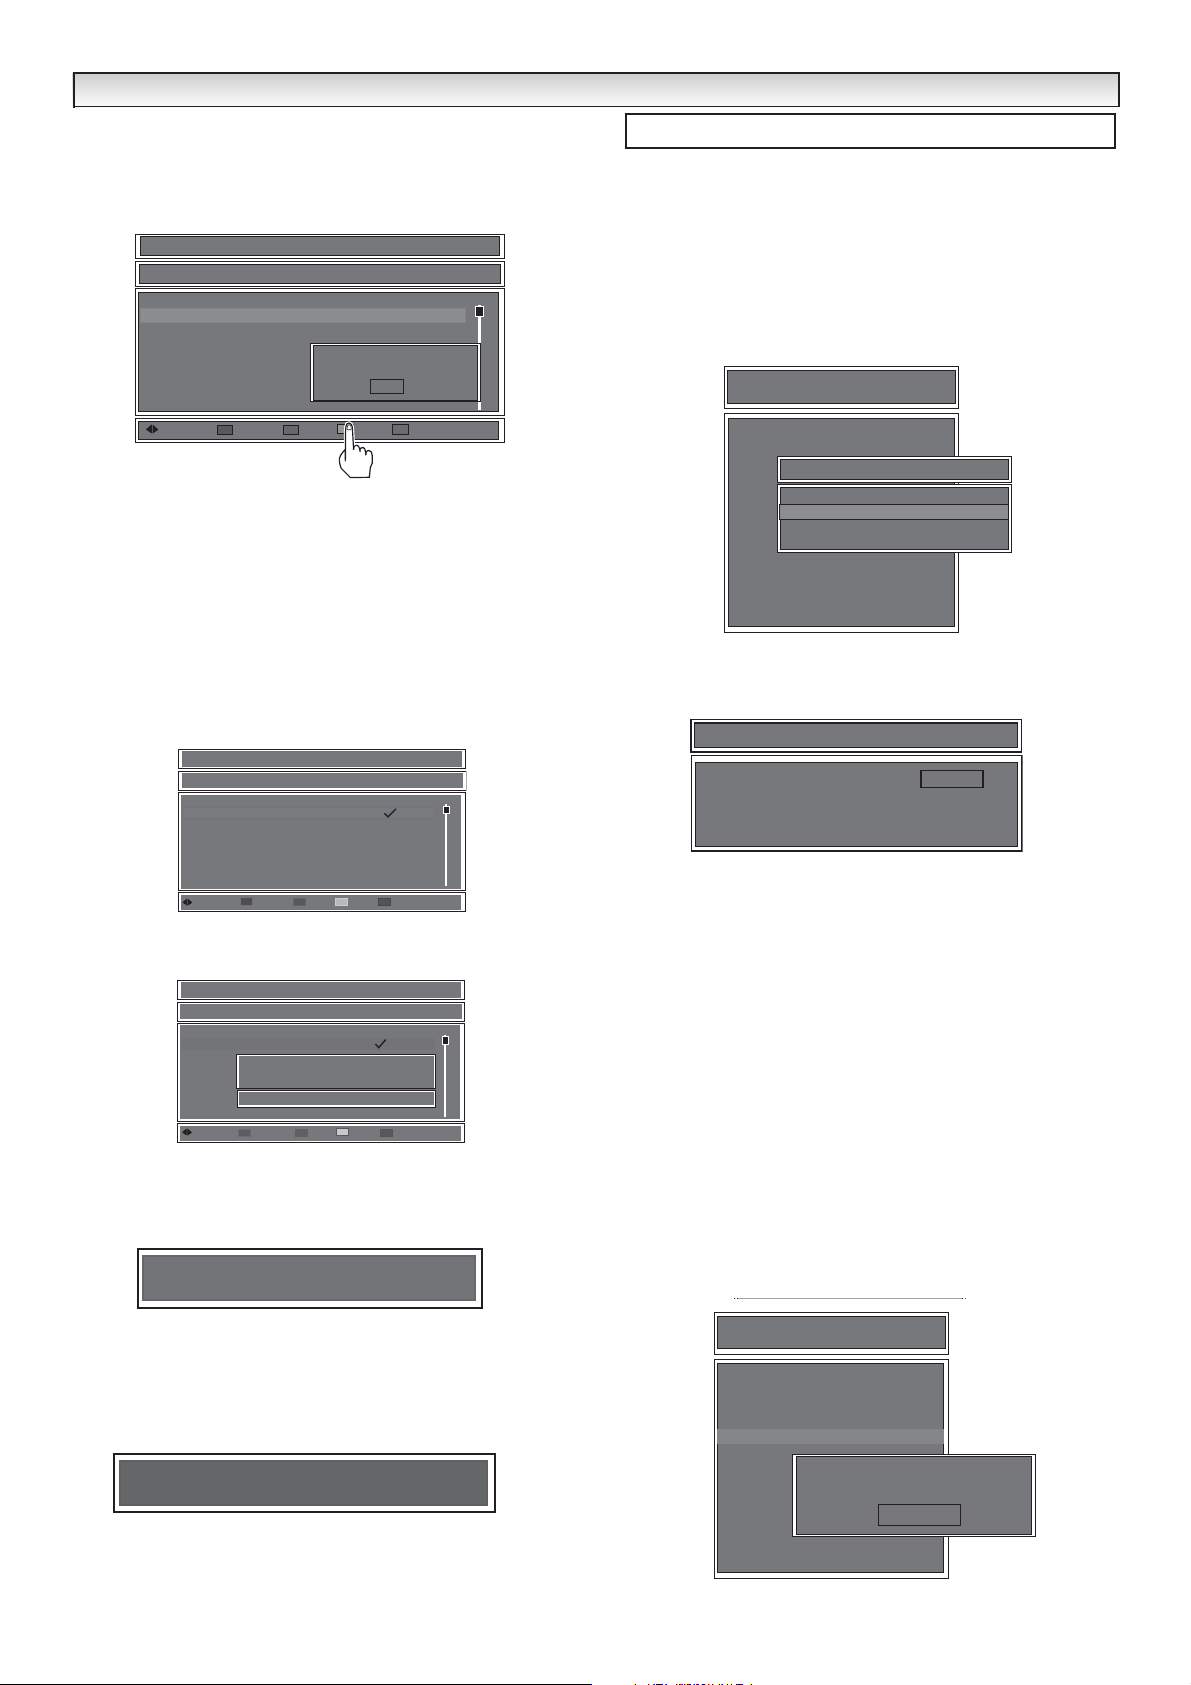
■ Swap channels.
1. Choose a channel that you wish to swap with another by pressing
the eor dbuttons . Press the Yellow button to enter the Swap
screen.
2. Use 7, 8and numeric buttons to enter channel number and
press the OK button to swap.( When in swap screen you can
press the RETURN button repeatedly to take you back a screen).
3. Press Return to exit.
4. Press the MENU button again to return to normal picture.
■ Favourites Mode
1. In Channel Organiser you can select channels to put in a
favourites mode. Using the
8
button you can select the channels
you want, a tick will appear near the selected channels.
2. Press OK to save your settings.
3. To activate the favourites mode exit out of menu. Press 7or
8
button on the remote control, a window will appear to show that
favourite mode has activated.
4. To check the channels selected on favourite mode press OK on
the remote control and the channels will be displayed. To deactivate
the favourites mode and return to Normal mode press the 7or
8
button and thiis will actvivate Normal mode.
The first time you use this function the code numbers are 0 0 0 0.If
you forget the code,reset the digital Configuration and enter the
default code (0 0 0 0 ).
● How to change the code to your own preference.
1. Press the MENU button to select Main Menu.
2. Using the eor dbuttons select Configuration and press the OK
button to enter.
3. Press the dbutton to select Change parental code. Press the
OK button to enter.
4. Enter the Old code in the box that is highlighted, using the 0-9
numeric button
5. Enter the New code in the next box that is highlighted, using the
0-9 numeric buttons.
6. To Confirm the new code, Enter the New code again in the last
highlighted box.
7. A prompt Save new code will appear. If you are happy with the
new code press the OK button to return to the Main Menu
✐ Press the RETURN button repeatedly to return to Main Menu at
any time
Press the MENU button to return to normal picture.
■ To activate parental lock.
1. Press the MENU button to select Main menu.
2. Using the
e
or dbuttons select Parental lock. Press the OK
button to select.
Main Menu
* * *
Main Menu
Parental lock
CHANNEL ORGANIZER
Lock
CH. No. Channel name
1 BBC ONE
2 BBC TWO
7 BBC THREE
30 CBBC
40 BBC NEWS 24
Favourite
Remove Move
Favourite
Swap
?
_
Swap
Lock OK Save
CHANNEL ORGANIZER
CH. No. Channel name
1 BBC ONE
2 BBC TWO
7 BBC THREE
30 CBBC
40 BBC NEWS 24
Favourite
Lock
Favourite
Swap
Remove
Move
LockOKSave
Main Menu
Configuration
Preferred language
Change parental code
Common interface
CHANGE PARENTAL CODE
Old code
New code
Confirm new code
* * * *
- - - -
- - - -
CHANNEL ORGANIZER
Lock
CH. No. Channel name
1 BBC ONE
2 BBC TWO
7 BBC THREE
30 CBBC
40 BBC NEWS 24
Favourite
? Do you want to save.
OK
Confirm
Remove Move
Favourite
RETURN Cancel
Swap
Lock
OK Save
i Favourite mode activated
i Normal mode Activated
Main Menu
1 BBC ONE All Channels
Picture
Sound
Channel organiser
Parental lock
Configuration
Installation
Technical information
Off Timer
TV settings
Enter code to activate
?
parental lock
* * *
_
Page 10

10
DIGIT
DIGIT
AL
AL
OPERA
OPERA
TION
TION
3. Enter your code and press the OK button to save. Only the cor-
rect code will activate this feature! repeat 1-3 again if wrong code
is entered.
✐ Parental lock is now activated you will now have to enter the code
every time you wish to enter the Main menu unless parental lock
is deactivated.(See below)
● Blocking access to selected channels.
1. Press the MENU button to select Main menu.
2. Using the eor dbuttons select Channel organizer. Press the
OK button to enter.
3.Using theeor dbuttons select a Channel you wish to lock.
4.Press the Blue button, a locked symbol will appear to show it is
selected. To de-select press the Blue button again. Repeat until
all channels you wish to lock are selected.
5.To set the Channel lock, press the OK button to Save. Press the
Return button to return to the main menu.
✐ The channel lock will only be activated when parental lock is in
use.
● How to watch a locked channel.
1. Select a locked channel, This parental lock display appears.
2. Enter the Numeric Parental code.
3.The display will disappear and the normal channel picture will
appear,
4. The channel is now temporarily unlocked and may be watched
until the channel is changed.
✐ If Parental lock is activated and you wish to record this locked
channel, deactivate first before setting timer recording.
● How to deactivate parental lock
1. Press the MENU button to select Main menu.
2. Using the eor dbuttons select Parental code. Press the OK
button to enter menu function.
3. Using the numeric buttons enter the parental code.
4. The inset display will disappear.
5. Main menu screen will now show Parental Unlock.
6. Press the MENU button or Return to exit to normal picture
✐ Once you have de-activated Parental Lock,all channels will be
available.
Main Menu
Main Menu
* * *
* * *
_
Main Menu
_
* * *
Main Menu
_
Channel Lock
Main Menu
Main Menu
* * *
_
* * *
_
Main Menu
Main Menu
_
Parental Lock
Main Menu
Main Menu
* * *
_
* * *
_
Main Menu
Main Menu
Main Menu
_
Main Menu
Picture
Sound
Channel organiser
Parental lock
Configuration
Installation
Technical information
Off Timer
TV settings
Enter code to watch a
locked channel.
.
* * *
Main Menu
Picture
Sound
Channel organiser
Parental lock
Configuration
Installation
Technical information
Deactivate parental lock
!
Off Timer
OK
TV settings
Select
Favourite
Remove Move
Configuration
Prefered language
Change parental code
Common Interface
CHANNEL ORGANIZER
CH. No. Channel name
1 BBC ONE
2 BBC TWO
7 BBC THREE
30 CBBC
40 BBC NEWS 24
RET
Cancel
Favourite
Swap
Lock
Lock OK Save
Main Menu
Picture
Sound
Channel organiser
Parental lock
Configuration
Installation
Technical information
Off Timer
TV settings
Enter code to deactivate
?
parental lock
C I
* * *
_
CI CARD
Main Menu
Picture
Sound
Channel organiser
Parental lock
Configuration
Installation
Technical information
Off Timer
TV settings
Common Interface
Reader 1: Interface card
OK
Select
RET
Cancel
Page 11

11
DIGIT
DIGIT
AL
AL
OPERA
OPERA
TION
TION
Signal information
Technical information
Software upgrade
Product data
Reset
● Preferred language.
1. Press the MENU button to select Main Menu.
2. Select Configuration by using the eordbuttons. Press the OK
button to enter.
3. Press the dbutton to highlight Preferred language and press
the OK button to enter.
Audio - Select your preferences as required.
Example. If you speak Welsh or Gaelic and prefer to receive
Welsh or Gaelic audio when it is transmitted then select Welsh or
Gaelic for your first Language and English as your second.
4. Press the
7
or 8button to select Language, press the eor
d
buttons, select second language and change your preference
using the
7
or 8buttons.
Subtitling - Select your preferences as required.
If you wish for Welsh or Gaelic Subtitles instead of English to be
shown (when available) then select your preference for the first
language.
Example: as shown will give you English first language, if not
available Welsh may be shown.
5. To change press the eor dbuttons to highlight the box and
press the 7or 8buttons to select your preferred First language
and repeat for Second language.
6. Press the dbutton to select Subtitle display. This can be set ON
or OFF by pressing the 7or 8buttons.
7. Press the OK button to Save.
The above display bar will appear on the screen as it is returned to
the normal TV picture.
● Common Interface
This TV set provides a common Interface slot on the top rear of the
TV set behind the control buttons. .
1. Press the MENU button to select Main Menu.
2. Select Configuration by using the eor dbuttons. Press the OK
button to enter.
3. Press the dbutton to highlight Common Interface and press the
OK button to enter.
The following screen appears to show that a card is inserted.
When you select OK, follow the on screen directions. This will vary
depending on the type of card inserted.
Important!
The TV should be turned off by the Mains Power switch when inserting or removing the Common Interface Card, otherwise it may cause
damage to the card or the TV set.
● Preferred Setup
1. Press the MENU button to select Main Menu.
2. Select Configuration by using the eordbuttons. Press the OK
button to enter.
3. Press the dbutton to highlight Preferred Setup and press the
OK button to enter.
4. Press OK on the remote to Select MHEG5 for Digital Teletext or
Select Subtitles for on screen subtitles by using the eordbut
tons.
5. Select OK to save your preferred setting and exit the menu. On
exiting the menu screen a message appears showing that the set
tings chosen have been activated.
6. The message on screen for Subtitles will read Priority set to DVB
setup
Configuration
LANGUAGE CHOICE
Channel list
Lock channels
Scan for channels
Configuration
Lock channels All channels
Preferred language
BBC ONE
Change parental code
Common interface
Y
Parental lock
1
2
3
4
5
6
7
8
9
10
11
12
13
14
15
BBC ONE
BBC TWO
ITV 1
Channel 4
five
ITV 2
BBC THREE
Teletext
BBC FOUR
Sky Travel
UK History
Ch 14
CH 15
QVC
TV Travel Shop
OK
Save
CI
TIME OUT STOP
Card
LANGUAGE CHOICE
BBC THREE (BBC)
Free
DVB Identifiers (9018,4103,4351)
Channel 63
Signal strength (%) 34
Bit error rate
Uncorrected errors/sec
Cam. Module :- Top Up TV
Signal information
OK
Select
RET
Cancel
P
LANGUAGE CHOICE
Audio
First language
Second language
Subtitling
First language
Second language
Subtitle display
Navigate
OK Save RETURN Cancel
English
Welsh
English
Welsh
0ff
Scan for channels
Channels found
0
The scan will take approximately 3 minutes
In progress
RET
Stop
Information
OK
Software upgrade
RETURN
Cancel
Looking for new version.......
RET
Cancel
Product
Software
Resourse
Boot
RET
Product data
LDITPGFTG_01_00
1.9.76 build jun 25 2003 16:10:15
1.26.3
2.4.0
Cancel
i Your modifications are saved
i Priority Set to MHEG
Reset receiver configuration?
!
RET
Cancel
R
Confirm
i Priority Set to DVB Subtitle
Page 12

12
DIGIT
DIGIT
AL
AL
OPERA
OPERA
TION
TION
■ Off-timer setting
The Off timer will switch the TV set into the standby mode when the
selected time period has elapsed.
Press the MENU button to select main menu.
Press the eor dbuttons to select Off timer. Press the OK button
to enter menu (Setting / Off timer).
Select your desired time by pressing the
7
or 8button.
The time changes in 5 minute steps. The maximum time is 2:00hrs.
When Off timer has been set the time will show briefly on the screen
with the remaining time.
Press MENU button or RETURN button repeatedly to return to
normal TV picture.
✐ If the TV set is switched off by the Mains Switch 4 and by using
the Power button on the remote control, or during Autosort, the
timer settings will be cancelled.
■ Alarm timer
1. Press the MENU button. Select Off timer using the e or d button
press the 8 button to enter and select timer.
2. Select Alarm-Timer using the e or d button.
3. Press the 7 or 8 button to change time.
The time changes in 1 minute steps.The maximum time is 180 mins.
To cancel the alarm, press any button and the display will disappear.
✐ If the TV set is switched off by the standby button 4on the
remote control or by the standby switch 4on the top of the TV
set the timer settings will be cancelled.
● Scan for channels
1. Press the Menu button to select Main Menu.
2. Select Installation by using the eor dbuttons. Press the OK
button to enter.
1. Select Manual or Auto scan by using the eor dbuttons. Press
OK button to enter.
2. Using the eor dbuttons, this screen will allow you quickly to
tune into any Channel multiplex emitted by the Transmitters in
your area.
3. Press the OK button to scan.
✐ Only those channels showing appreciable signal strength are suitable for viewing.
1. If Auto Scan is chosen, when completed, all channels are saved
automatically.
✐ Parental lock is still saved after the scan for channels has been
initialised.
Off Timer menu
Installation
Main Menu
Installation
Band width (MHz) 8
Channel number CH-21
Frequency (kHz) 474000
Signal strength
Manual Scan
Auto Scan
Timer
Off Timer 5~ 120
Alarm Timer OFF
: Select
Channel Date & time End
1 (not set) --/--/-- --:-- --:-- (not set)
2 (not set) --/--/-- --:-- --:-- (not set)
3 (not set) --/--/-- --:-- --:-- (not set)
4 (not set) --/--/-- --:-- --:-- (not set)
5 (not set) --/--/-- --:-- --:-- (not set)
6 (not set) --/--/-- --:-- --:-- (not set)
7 (not set) --/--/-- --:-- --:-- (not set)
8 (not set) --/--/-- --:-- --:-- (not set)
9 (not set) --/--/-- --:-- --:-- (not set)
10 (not set) --/--/-- --:-- --:-- (not set)
11 (not set) --/--/-- --:-- --:-- (not set)
12 (not set) --/--/-- --:-- --:-- (not set)
OK
Edit/Add event
: Adjust
Current events
R
Delete
RET
Cancel
MENU
: EXIT
Main Menu
i
Installation
Manual Scan
Auto Scan
Channel
Wake-up day
wake-up time
Timer
Finish time
Off Timer OFF
Repeat
Alarm Timer 1 ~180
: Select
OK
Save
Set event
RET
Cancel
: Adjust
BBC ONE
17/07/03
10:52
11:28
No repeat
MENU
: EXIT
MANUAL SCAN
Band width (MHz) 8
Channel number CH-21
Frequency (kHz) 474000
Signal strength
Navigate OK Scan RETURN Cancel
SCAN FOR CHANNELS
Channel(s) found: 0
This scan will take approximately 3 minutes.
Event #1 is due to start in 4
?
minutes. Press YELLOW to switch
now. GREEN to switch on time.
RED to delete the event .BLUE to cancel.
R
Delete
G
Due
Y
Now
B
Cancel
In progress... RETURN Stop
Page 13

13
DIGIT
DIGIT
AL
AL
OPERA
OPERA
TION
TION
In this section a lot of the information will only be useful to a
technician. Some parts are however useful to you. If there is
an upgrade in software you will need this section to upgrade
your TV from time to time.
1. Press the Menu button to select Main Menu.
2. Select Technical Information menu by using the eor
d
buttons. Press the OK button to enter.
3. Select Signal information by using the eor dbuttons
and press the OK button to enter.
This screen cannot be altered but if you have a problem you
may need to refer to this screen for some data.
4. Press the Return to go back to Technical information
screen.
■ Software upgrade
1. Press the dbutton to select Software Upgrade screen.
Press the OK button to enter.
This looks for any new software upgrades that maybe transmitted at any time.
2. Press the Return button to go back to Technical informa-
tion screen.
3. Select Product Data by using the eor dbuttons and
press the OK button to enter.
This is useful to service engineers.
4. Press the Return button to go back to Technical informa-
tion screen.
5. Press the dbutton to select Reset screen. Press the
8
button to enter.
If you press Red button to confirm it will return all settings to
factory (default) mode for digital channels. To start a scan for
all available channels switch the TV set Off and On again or
run auto scan
■ Child lock
You can prevent small children from operating the TV
with the front buttons of the TV set.
Press the
MENU button to select main menu.
Press the
e
or dbuttons to select TV settings. Press
the OK button to enter menu (Setting).
Press the
e
or dbuttons to select Child lock. Child
lock can be set to
ON or OFF. Press the 7or 8but-
tons to select.
Press the
MENU button repeatedly to exit menu.
The child lock mode will be reset to “OFF” when the
TV set is switched off with the
Mains ON/OFF 3
switch.
■ Timer menu
Select timer menu by using the 8button from the TV
setting menu. On the timer menu OFF timer and Alarm
timer can be used (see page 12 and 17)
■ Setting of AV2 input mode
If you use a VCR which has S-VHS, you should connect it to AV2 and change the AV2 menu to S-VIDEO.
Press the
MENU button to select main menu.
Press the
e
or dbuttons to select TV settings. Press
the
8
to enter menu (Setting, as shown above).
Press the
d
button to select AV2 and select VIDEO or
S-VIDEO by pressing the
7
or 8buttons.
Press the MENU button or the RETURN button twice
to return to normal TV picture.
Technical Information
TV Setting menu
Technical information
Signal information
Software upgrade
product data
Reset
Signal information
7: BBC THREE (FTA)
Network : Crystal Palace
Provider : <not available>
Frequency (kHz) 506000 - Band width (MHz) 8
Video none - Audio none - PCR none - SUB none
Channel number 25
Signal strength (%) 34
Bit error rate 6.23e+08 bps
Uncorrected errors/sec 0 packet(s)
Software upgrade
Looking for new version.......
OK or
Return
Product data
Hardware version :1.0
Software version : ADID0324
Build on : Jan 07 2006 at 09:01:43
Cancel
Setting
CHILD LOCK OFF / ON
Timer
AV2 Video / S-Video
: Select
: Adjust
MENU
: Back
Reset digital configuration
?
Return
Cancel
Confirm
Page 14

14
The guide shows the digital TV channel schedule for the next 7
days.
1. Press the guide button on your remote control.
2. A schedule will appear on the screen.
3. Use the eor dbuttons to move up and down the program list.
Use the 7or 8buttons to show the daily program schedule lists.
4. Press the OK button to get more information on the programme
you have selected. The program selected will be highlighted
yellow.
5. To set recording see Timer recording below
- This feature is used when you wish to record a digital channel on
your Hard disk recorder.
- In order to record digital channels you cannot watch another digital
channel when recording.
- Timer recording will switch your TV set to the digital channel at the
preset time until the finish time is reached.
- Whilst timer recording is running you can switch to Analogue TV.
- You can also switch your TV into Standby mode.
✐ If channel has been locked (Parental lock) and you have set timer
record for locked channel it will not record. You have to deactivate parental lock first.
1. Press the Guide button to set recording.
2. Press the RED button to select set recording
3. A Set events screen will appear.
4. Select channel by pressing the
7
or 8buttons and rotate
through all available channels.
5. Press the dbutton to select Wake-up day box. Enter your day,
month and year by using numeric buttons (0-9). and using the
7
or 8buttons to move left and right.
6. Press the dbutton to select Wake-up time box. Enter your time
by using numeric buttons (0-9). and using the
7
or 8buttons to
move left and right.
7. Press the dbutton to select Finish time box. Enter your time by
using numeric buttons (0-9). and using the
7
or 8buttons to
move left and right the time you wish to finish.
8. Press the dbutton to select Repeat box. Press the 7or 8but-
tons to enter No repeat, daily, or weekly. This would be a useful
feature if you have a favourite programme that you dont want to
miss and it is shown on a daily or weekly schedule.
9. Press the OK button to save settings, you can repeat again or
press the RETURN button to go back. Once the OK button is
pressed, the HDD Timer Record menu appears with the preset
data added from the Set Events saved settings.
10. The entered settings can be changed such as the Date/Time/
Duration/ Program. Once the settings have been entered using the
8
button move to Save/ Cancel. Once the seetings have been Saved/
Canceled using the OK button, the Playlist menu appears on
screen to exit press the
Timer REC button.
When you press the info button in digital mode you will be displayed
a window showing all the channels available.
The channel you want info on will be highlighted yellow and will be
viewed on the right side of the displayed window.
Press the
e
or dbuttons to select current channel information.
Press the Green button to show information on the following program.
Press the Blue button to bring up the weekly program guide.
Press
Return on the remote to exit the info window.
From time to time upgrades will become available. When this happens the following screen appears.
To upgrade press the
OK button and the following screen will
appear.
Press the
OK button to start, this automatically downloads for you.
The following screen appears.
The following screen appears to show that the upgrade is nearly finished. Once this screen disappears the upgrade is complete.
DIGIT
DIGIT
AL
AL
OPERA
OPERA
TION
TION
Guide
EPG
[NOW]
09:30, 26 JAN 2006
‘ Info’ button
Programme Download
Once you have started the upgrade process you must not interrupt it (disconnect or separate it from the mains supply) under any
circumstances. Do not press any key on the remote control or the
top of the cabinet. If you interrupt the upgrade process the IDTV
may be defective afterwards.
Timer Recording
SET EVENTS 00:06, 01 Jan 2006
Channel name BBC THREE
Wake-up day 01/01/2006
Wake-up time 00:05
Finish time 00:36
Mode Once
Navigate OK Save RETURN Cancel
EPG
[NOW]
09:30, 26 JAN 2006
1 BBC ONE
2 BBC TWO
3 ITV1
4 CHANNEL 4
5 FIVE
6 ITV2
[11:30 - 12:00, Five News] National and International News. [S]
Navigate Set Recording Next Weekly
Do you want to download
?
the latest software.
CancelReturnOK Confirm
Software update from AIR
Loader Version
Hardware Version
Version
Total Size
Size Collected
Please wait.....
Software update from AIR
Loader Version
Hardware Version
Version
Total Size
Size Collected
Downloading Application Software...
2.02
1.00
1.01
883332
4068
ID Date Start Duration Mode Program
2
05/04/ 06 19:00:00 : 45 HQ D
Move Change 0-9 to set data
SAVE CANCEL
Software update from AIR
Fusing into FlashROM
PLEASE DONT SWITCH OFF THE TELEVISION
If it takes longer than 20 minutes,
Contact your television supplier
In progress....
Page 15

15
■ DVD controls
With selected Sanyo DVD players you can use this remote. The following table shows all available function buttons for the DVD. When
you use a compatible Sanyo DVD player, first press and hold the
DVD button and then press your desired function button.
REMOTE CONTROL
REMOTE CONTROL- -
Analogue
Analogue
Screen mode selector
To select the screen mode, Auto, Natural,
Zoom14:9, Title In 14:9, Zoom 16:9,
Title In 16:9, Full or Normal.
TV/AV switch
To switch from Digital TV, AV1, AV2, AV3, AV4
AV5 YPrPb, PC, HDMI or TV mode press
repeatedlyPress and hold, few seconds AV selection
bar appears. Select mode by using .
keys
D/A selector
To switch between analogue (TV)
and digital channels (DTV).
Programme up and down
To select the next programme number or
previous programme number.
MENU
To switch on the screen display menu on/off.
See page 8.
Cursors
To select the sub menu items in the
menu display, Up, Down, Left, Right.
System selector
To select the colour system in the AV mode,
Auto, PAL, NTSC
Sound mute
To switch the sound from the speakers.
The sound changes as follows;
Normal volume -> Mute
Standby/Power on/off
To switch the TV on and off. Also see page 19.
Teletext / TV selector
To switch TV, MIX and Teletext mode.
Direct programme selector
For direct access to programmes
using (0-9) numeric buttons in analogue
and digital. For selection of analogue
programme position 10 - 99, for example 23,
first press -/-- button and press
2 and 3 numeric buttons.
CS button
Press the button once to scan through all
current channels already tuned in. Press
again to cancel.
Volume up/down
To adjust the sound level.
Surround mode selector
To select the surround mode, Off, Mid, Max.
Bass selection
To get an emphasised bass sound, On or Off.
DVD (
blue symbols
Power
Play
Pause
Stop
Next chapter selection
Previous chapter selection
n/a
)
OK
To save the setting in the menu,
or to call up the All channel table.
Nicam / Bilingual selector
To switch the sound mode as follows; NICAM or MONO
in the stereo programmes. A or B in the bilingual
programmes. If the nicam or stereo sound reception is
poor in quality, you can switch to MONO sound reception
by pressing A•B button. This operates only analogue
channel mode.
Picture mode selector
To access a series of picture modes:
Personal, Dynamic, and Standard or Eco.
DVD command mode selection
DVD
Enter
Cursor selection
OK
Page 16

16
Many of your TV’s functions are controlled through the menu function.
During menu operation the bottom of the screen show which controls
can be used.
Press the u button to enter and exit the 4 sub menus Sound,
Picture, Setting and Preset.
When a sub menu is selected its background shows white.
When you have set a Sub menu you can press the MENU button to
exit. Using the e or d button you can select any of the sub menu’s.
Press the MENU button and select Sound menu by pressing the
e or d button.
Press the 8 button to enter.
Select and adjust to obtain the best sound settings for your environment
using the e or d button and the 7 or 8 button.
Sound Preset : You can select between Music, Talk, Normal or
Personal.
2. Surround : Use 7 or 8 to select level of surround sound required
OFF / Mid or Max.
To exit press
MENU button.
1. Press the MENU button. Select Picture using the e or d button.
Press the 8 button to enter.
Set the picture settings for your “personal” preference.
Use the e or d button to select eg. Brightness and the 7 or 8
button to adjust levels.
Tint : is only available if NTSC equipment is connected.
Preset : You can select either your “Personal” settings,Dynamic,
Standard or ECO
To exit press the MENU button.
■ Noise Reduction
1. Press the MENU button. Select Setting using the e or d button.
Press the 8 button to enter.
2. Select Noise Reduction using the e or d button.
3. Set to MId, Max, Auto or Min by pressing the 7 or 8 button.
4. Press the MENU button to exit.
■ Dynamic Skin tone
1. Select ON or OFF using the7or8buttons.
2. Select ON and the tone of the picture will change to a pink
colour.
3. Select OFF and the colour tone will return to normal settings.
■ Text Brightness
This may be adjusted by using the7or8buttons to select between
Min/ Mid/ Max.
To Exit press the Menu button
✐ Your personal settings are automatically saved when you exit the
menu.
■ Child lock
You can prevent small children from operating the TV with the buttons
on the top of the TV set.
1. Press the MENU button. Select Setting using the e or d button.
Press the 8 button to enter.
2. Select Child lock using the e or d button.
3. Set the Child lock to Off or On by pressing the 7 or 8 button.
✐ The child lock mode will be reset to “Off” when the TV set is
completely disconnected from the Mains supply.
4. Press the MENU button to exit.
MENU OPERA
MENU OPERA
TION -
TION -
Analogue channels
Analogue channels
Sound menu
Picture menu
Setting menu
Volume
Balance
Bass
Treble
Preset Personal / Talk / Music / Normal
Surround Mid / Max / OFF
Brightness
Contrast
Colour
Sharpness
Preset Personal / Dynamic / Standard / Eco
Noise Reduction Mid / High / Auto / Low / OFF
Dyn. Skin Tone ON / OFF
Text Brightness Min / Mid / Max
CHILD LOCK OFF
T
imer
AV 2 Video / S-Video
Program Sort (Program sort) - MOVE / DELETE
Program pos.
Program name
Country
Autosort
Frequency
Skip
Memory OK? / OK
ON/OFF
Picture
Brightness
Contrast
olour
C
Sharpness
Preset Personal / Dynamic / Standard / ECO
Reduction M id / Min / Auto /
Noise
Dyn
Text Brightness Min/ Mid / Max
tone ON / OFF
. skin
: Select
: Adjust
Max
MENU
: Back
Main Menu
Sound
Picture
Setting
Preset
: Select
: Adjust
MENU
: Exit
Sound
Volume
Balance
Bass
Treble
Preset Personal / Talk / Music / Normal
Surround OFF / Mid / Max
: Select
: Adjust
MENU
: Back
Setting
CHILD LOCK OFF / ON
Timer
AV2 Video / S-Video
: Select
: Adjust
MENU
: Back
Page 17

17
■ AV2 setting
In setting menu, to select AV2 press the 8 button and set to Video
or S-Video depending on your external equipment. If you use a VCR
which has S-VHS, you should connect it to AV2 and change the AV2
menu to S-VIDEO.
1. Press the MENU button. Select Setting using the e or d button
press the 8 button to enter.
2. Select AV2 using the e or d button.
3. Press the 7 or 8 button to select which Video or S-Video.
4. Press the MENU button to exit, this automatically stores your
changes.
■ Off-timer setting
The Off timer will switch the TV set into the standby mode when the
selected time has elapsed.
1. Press the MENU button. Select Setting using the e or d button
press the 8 button to enter.
2. Select Timer using the e or d button and then select OFF Timer
using the e or d buttons.
3. Press the 7 or 8 button to change time.
The time changes in 5 minute steps.The maximum time is 2:00hrs.
If you have set the off timer, a display appears in the corner of the
screen.
✐ If the TV set is switched off by the standby button 4on the
remote control or by the standby switch 4on the top of the TV
set the timer settings will be cancelled.
4. Press the MENU button to exit.
■ Alarm Timer setting
The Alarm-timer will sound the alarm for 15 secs, when the selected
time has elapsed.
1. Press the MENU button. Select Setting using the e or d button
press the 8 button to enter and select timer.
2. Select Alarm-Timer using the e or d button.
3. Press the 7 or 8 button to change time.
The time changes in 1 minute steps.The maximum time is 180 mins.
To cancel the alarm, press any button and the display will disappear.
✐ If the TV set is switched off by the standby button 4on the
remote control or by the standby switch 4on the top of the TV
set the timer settings will be cancelled.
4. Press the MENU button to exit.
The preset menu can be used to tune new channels, to reorder
channels and their programme positions, and to make fine adjustments to the tuning.
1.Press the Menu button
2. Select Preset using the
e or d. Press the 8 button to enter
● Program sort
This is used to preset a received channel in any desired programme
position.
Use the ed or 78 buttons on your remote control to move to
selected program numbers. The number you have selected will be
highlihted yellow.
To move a program number press the Green button on your remote
and use the ed or 78 buttons to place it where you want it
moved to.
To delete a program select the number and press the Red button on
your remote to Delete it
■ Program Name.
With this feature individual channels may be numbered or renamed
by using the 7 or 8 buttons. Using the 5 or 6 buttons. Press
the 8 button, the first character space will be highlighted. Press the
5 or 6 buttons until the number or first letter you require
appears (0-9, A-Z, a-z, ?, !, -, +). Press the 8 button to select the
second character.
You can assign 7 characters of information. When finished press the
8 button repeatedly until no character is highlighted.
MENU OPERA
MENU OPERA
TION
TION
Setting menu
Preset menu
Setting
CHILD LOCK OFF / ON
Timer
AV2 Video / S-Video
: Select
: Adjust
Timer
Off Timer 5~ 120
Alarm Timer OFF
: Select
: Adjust
MENU
MENU
: Back
: EXIT
Preset
Program Sort
Program pos.
6
Program name
UK
Country
to sort
Au
Fr
equency 495.25 MHz
Skip
Memory OK? / OK
: Select
Program sort
1 6 11
2 7 12
3 8 13
4 9 14
5 10 15
ON / OFF
: Adjust
MENU
: Back
Move Delete
Timer
Off Timer OFF
Alarm Timer 1 ~180
: Select
: Adjust
MENU
: EXIT
Preset
Program Sort
Program pos.
6
Program name
UK
Country
to sort
Au
Fr
equency 495.25 MHz
Skip
Memory OK? / OK
: Select
ON / OFF
: Adjust
MENU
: Back
Page 18

18
● AutoSort
1. Press the MENU button. Select Preset using the e or d button.
Press the 8 button to enter.
2. Select Auto sort by using the e or d button. Press the OK but-
ton to enter.
3. As soon as the OK button has been selected Scanning will
automati
cally begin.
4. The channel frequency will change and the channels will be stored
in numeric order once found.
All available channels will be automatically stored, starting from position 01.
● Frequency
The frequency shown will be the frequency being dis
played except when Scanning, then the frequency
shown will change as the scan progresses.
1. To manually Select Frequency by using the 5 or 6 button.
(Refer to the channel table.)
You can either...
a) Enter the frequency using the 0-9 buttons referring to the
channel table.
b) Press and hold the 7 or 8 buttons until the frequency starts
scanning (about 5 seconds), scanning will stop when a channel is found.
Repeat above until the correct channel is found.
2. Press the 5 or 6 button to select Memory. Press the OK
button to store the new frequency and allother settings.
● Skip
Skip is situated directly beneath Frequency on the screen.
When ‘ON’ it removes access to a channel using the e or d button.
The only way that selected channel can be accessed will be by using
the direct channel access keys.
■ Memory.
Memory is situated directly beneath Skip on the screen.
When all the preceding headings under preset have been adjusted to
your satisfaction, using the OK button, change ‘OK?’ to ‘OK’ all the
preset settings will be stored automatically.
MENU OPERA
MENU OPERA
TION
TION
Preset menu
■
Channel Table
The table below shows the receivable channels and channel
allocation for this LCD TV set.
Preset
Program Sort
Program pos. 6
Program name
Country
Autosort Busy
Frequency 495.25 MHz
Skip ON/OFF
Memory OK?/ OK
: Select
A
: Adjust
MENU
: Back
Italian
channels
CCIR
channels
OIRT
Channels
OIRT
Channels
CCIR
channels
Italian
channels
Displayed
channel no.
C 1 43.25
C 2 A E2 R1 48.25
C 3 A E3 55.25
C 4 B E4 R2 62.25
C 5 D E5 R6 175.25
C 6 E E6 R7 182.25
C 7 F E7 R8 189.25
C 8 E8 R9 196.25
C 9 G E9 205.25
C10 H E10 R10 210.25
C11 H1 E11 R11 217.25
C12 H2 E12 R12 224.25
C21 21 E21 E21 471.25
C22 22 E22 E22 479.25
C23 23 E23 E23 487.25
C24 24 E24 E24 495.25
C25 25 E25 E25 503.25
C26 26 E26 E25 511.25
C27 27 E27 E27 519.25
C28 28 E28 E28 527.25
C29 29 E29 E29 535.25
C30 30 E30 E30 543.25
C31 31 E31 E31 551.25
C32 32 E32 E32 559.25
C33 33 E33 E33 567.25
C34 34 E34 E34 575.25
C25 35 E35 E35 583.25
C36 36 E36 E36 591.25
C37 37 E37 E37 599.25
C38 38 E38 E38 607.25
C39 39 E39 E39 615.25
C40 40 E40 E40 623.25
C41 41 E41 E41 631.25
C42 42 E42 E42 639.25
UHF band
C43 43 E43 E43 647.25
C44 44 E44 E44 655.25
C45 45 E45 E45 663.25
C46 46 E46 E46 671.25
C47 47 E47 E47 679.25
C48 48 E48 E48 687.25
C49 49 E49 E49 695.25
C50 50 E50 E50 703.25
C51 51 E51 E51 711.25
C52 52 E52 E52 719.25
C53 53 E53 E53 727.25
C54 54 E54 E54 735.25
C55 55 E55 E55 743.25
C56 56 E56 E56 751.25
C57 57 E57 E57 759.25
C58 58 E58 E58 767.25
C59 59 E59 E59 775.25
C60 60 E60 E60 783.25
C61 61 E61 E61 791.25
C62 62 E62 E62 799.25
C63 63 E63 E63 807.25
C64 64 E64 E64 815.25
C65 65 E65 E65 823.25
C66 66 E66 E66 831.25
C67 67 E67 E67 839.25
C68 68 E68 E68 847.25
C69 69 E69 E69 855.25
Displayed
channel no.
Vision
Frequency
[MHz]
C75 X X 69.25
C76 Y Y R3 76.25
C77 C/Z Z R4 83.25
C78 Z+1 Z+1 R5 90.25
C79 Z+2 Z+2 97.25
C80 S1 S1 105.25
C81 S2 S2 112.25
C82 S3 S3 119.25
C83 S4 S4 126.25
C84 S5 S5 133.25
C85 S6 S6 140.25
C86 S7 S7 147.25
C87 S8 S8 154.25
C88 S9 S9 161.25
C89 S1S S10 168.25
C90 S11 S11 231.25
C91 S12 S12 238.25
C92 S13 S13 245.25
C93 S14 S14 252.25
C94 S15 S15 259.25
C95 S16 S16 266.25
C96 S17 S17 273.25
C97 S18 S18 280.25
C98 S19 S19 287.25
C99 S20 S20 294.25
H21 S21 S21 303.25
H22 S22 S22 311.25
H23 S23 S23 319.25
H24 S24 S24 327.25
H25 S25 S25 335.25
H26 S26 S26 343.25
H27 S27 S27 351.25
H28 S28 S28 359.25
H29 S29 S29 367.25
H30 S30 S30 375.25
H31 S31 S31 383.25
H32 S32 S32 391.25
H33 S33 S33 399.25
H34 S34 S34 407.25
H35 S35 S35 415.25
H36 S36 S36 423.25
H37 S37 S37 431.25
H38 S38 S38 439.25
H39 S39 S39 447.25
H40 S40 S40 455.25
H41 S41 S41 463.25
Vision
Frequency
[MHz]
Page 19

19
Teletext - This is a free service to give you lots of varied informa-
tion such as news, sports results, weather and travel features.
Teletext reception
If your aerial signal is poor, the teletext reception operation may be
erratic.
Teletext brightness level
You can change the teletext brightness level. Please return to TV
mode.(See Picture menu -Text Bright on page 16).
Sound volume control
In teletext mode sound volume and muting can be controlled.
However they are not displayed on the screen.
■ Switching into / from standby mode
The Standby mode is used for switching the TV set off for short
periods of time. In standby mode the TV is switched off but is
still receiving mains power.
● To turn the TV set into standby mode, press the 4button.
The red power indicator illuminates more brightly.
● To turn the TV set ON from standby mode, press any of the
following buttons:4,
5, 6
or
0-9 buttons.
■ Auto shut off
This TV set will automatically switch into the standby mode, 10
minutes after a signal is no longer received. The time until the
set will switch off is displayed on the screen.
■ Use of Audio Output Jacks
This TV provides the audio monitor output jacks on the left side
of the cabinet. You can connect your audio equipment to these
jacks to give you sound with your audio equipment.
TELETEXT & OTHER OPERA
TELETEXT & OTHER OPERA
TION -
TION -
Analogue channels
Analogue channels
Teletext
If you find the power indicator flashing, please turn the TV
set off with the Standby switch and disconnect the power
cord from the power outlet and contact our Service desk.
This warning is a sign to let you know that the power
protection function of this TV set is now operating.
HDMI
L/S
R/D
To audio equipment
Analogue and Digital Operation
Direct access to a page
All the numeric buttons can be used
to select a page number directly.
If you need page 301, press 3 then
0 then 1.
Sub page access
Some text pages are made up of several
sub pages which rotate automatically if
you wish to view P4 of 8 press the sub page
button. “----” will appear. Enter 0004.
Page up and down
To select the next page number or
previous programme number.
Index page selector
To call up the Index pages.
eg. P100.
Up / down page access
Press the button to select the next page
or previous page number.
Reveal switch
This reveals hidden items on the teletext
page eg: a hidden answer to a quiz question.
Standby/Power on/off
To switch the TV on and off.
Teletext/TV selector
To switch TV, MIX and Teletext mode.
Direct access to subject headings
Coloured boxes are displayed at the bottom
of the screen. The 4 coloured buttons give
access to the corresponding subjects or pages.
Return
To view the TV picture in the teletext mode
while waiting for the text page to change or update
(not available for sub pages).
Note. the page number will appear if the
text page is available.
Size switch
This will make either the top half or
the bottom half of the page expand
to fill the whole screen.
Stop
This stops the sub pages from changing.
The word “STOP” will appear instead of
the page number.
HDMI
L/S
R/D
Page 20

20
REM0TE CONTROL - HARD DISK USE
Display
Press to display current operation status.
For example while playing the hard disk use the
display button to view the current chapter, title etc
Time Out
To activate the Time out Function
This feature can pause live media
coverage.
Cursors
To select the sub menu items in the
menu display, Up, Down, Left, Right.
Reverse
Press to fast reverse the
HDD/DVD content at different rewind rates.
To view REPLAY contents press the reverse
button then the PLAY button
Stop
Press to stop playing or
recording current content. This button
can be used to cancel Time out or Replay function
Record
Press to start recording from selected media content.
To activate sleep mode press the Record button twice
this will display the remaining record time on screen
ADV 30
To skip the HDD content 30
seconds forward
HDD MENU (setup)
To show or hide the “Setupʼ menu
Record Mode
Press to select the recording mode.
This affects the video quality and
possibly recording length
Timer REC
To access directly to the
Timer REC menu
Repeat mode
Press to select a repeat mode:
Title: Repeat a tilte
ALL: Repeat all titles
OFF :no repeat (press repeatly untill displayed)
Direct programme selector
For direct access to programmes
using (0-9) numeric buttons for example
for channel 23, press 2 and 3 numeric
buttons.
Replay
To activate or deactivate the Replay Function
when the Always Replay function is OFF.
The Replay button does not work when
the Always Replay function is active
OK
Press OK button to confirm a selected item
in the HDD Setup menu
Forward
To fast forward the HDD/ DVD content at
different forward rates
Pause/ Step
To pause the current playing content.
Press the button twice to display the video
image frame by fame
Play
Press to start playing the HDD/DVD content
Also to start playing a still picture from the
Time out or from the Replay function
Previous/ Next
To jump to next/ previous title
or chapter while playing a DVD/HDD
Play list/ menu
Press to show/ hide the play
list or menu screen
Zoom
Press to zoom in on the video image
Can elarge and pan a paused image.
(200%/ 400%/ 800% zoom rate)
Clear
Press to clear the settings in Timer Record
A-B repeat
Press to acces the A-B repeat function
To repeat certain sequences
Page 21

21
HDD OPERATION
When watching TV you can activate the Time out function, so
you can take a short break from the TV and return without
missing any part of the live program as the HDD will record the
signal in the buffer area.
Select Timeout button and the picture will become still. The HDD will
begin to record the signal of the live program. When returning to the
TV Press the PLAY button the program will start from the position
timeout was activated.
During TIme out it is possible to Reverse or Forward the program.
To stop the time out function and return to live coverage press STOP
button
✐The maximun time allowed for Time out Function replay is 2
hours.
This set has the ability to record and replay live TV coverage. When
the replay function is activated the HDD starts to record the TV
signal in a buffer area. To watch any missed coverage press the
Reverse button to search the picture and watch again, Press STOP
to end Replay. This function can be set to be continously active from
when the set is powered on
To select Always Replay press the HDD setup button to access the
HDD menu. Use the e or d buttons to select Always Replay, use
the 8 button to access ON/ OFF. Press OK to confirm your selection
(see page 23)
When Always replay is active the REPLAY button does not function.
✐ The maximun time allowed for Replay playback is 2 hours.
You can record a TV program from Analogue / Digital,and a selected
Signal source such as AV1-4 (It does not record in AV5/ HDMI or
PC)
Press the RECORD button on the remote control to start
recording the selected channel. The RECORD icon will appear
on screen whilst the program is recording.
To activate Sleep mode (choose the length of recording) press the
RECORD button twice. The total time remaining will be displayed on
screen for example +30 +60 sec / min etc
Press the PLAYLIST button to view the HDD recording list on
screen. Use the e or d buttons to highlight a record you wish to
play. The corresponding preview picture will appear in the back
ground. Press the PLAY button to start the program or STOP to end
the program.
● Playing multiple recordings
Press the PLAY LIST button to view the recording list on screen.
Using the e or d buttons highlight the record you wish to view. A
corresponding picture will appear in the background. Once the
record has been selected using the OK button, a ✓ will appear next
to it. Multiple records can be selected by repeating the above steps,
each record selected will have a ✓ displayed.
Press PLAY to start playing the recordings selected in a row. Press
Stop to end the record selection from playing
Select the
Playlist button on the remote. Playlist menu will appear.
Use the e or d buttons to highlight the record wanted to delete, a
coresponding preview picture will appear on screen.
Press the 8button, a submenu appears press OK button to delete
A confirmation window will appear before deletion takes place.
The play list can be edited in the same way as when deleting a
record, instead of selectIng delete select EDIT NAME then press
OK button.
This shows a virtual keybord which can be used to edit the record.
To select a character use the ed or 7 or 8 buttons then press
the OK button
✐ Only 14 characters can be enter at any one time
TIME OUT Function
Replay Function
Recording
Replay Function
Delete Record
Edit Record
ID Date Start Duration Mode Program
1 05/04/ 06 19:00:00 02:00:00 HQ A 04 CH
2 08/04/ 06 12:30:00 00:30: 00 LP D 04 CH
3 10/04/ 06 22:00:00 02:00:00 SP AV 3
Total - 003
ID Date Start Duration Mode Program
1 05/04/ 06 19:00:00 02:00:00 HQ A 04 CH
2 08/04/ 06 12:30:00 00:30: 00 LP D 04 CH
3 10/04/ 06 22:00:00 02:00:00 SP AV 3
Total - 003
Delete current clip
Are you sure to continue
Yes No
Delete current clip
Tools
Delete
Edit name
Tools
Delete
Edit name
01:00:47
14 Chars)
Tools
Delete
Edit name
ID Date Start Duration Mode Program
1 05/04/ 06 19:00:00 02:00:00 HQ A 04 CH
2 08/04/ 06 12:30:00 00:30: 00 LP D 04 CH
3 10/04/ 06 22:00:00 02:00:00 SP AV 3
Total - 003
Delete current clip name(
EDIT
Delete Clear Backup Done Cancel
0 1 2 3 4 5 6 7 8 9 A B C E
F G H I J K L M N O P Q R S T
U V W X Y Z
É
ÊËÌ
ID Date Start Duration Mode Program
ÙÛ
Ú
,
;
1 05/04/ 06 19:00:00 02:00:00 HQ A 04 CH
#
2 08/04/ 06 12:30:00 00:30: 00 LP D 04 CH
Move caract Switch Lowercase/ Uppercase
/
3 10/04/ 06 22:00:00 02:00:00 SP AV 3
Total - 003
ÍÎÏ
ƒ
Ü
P
<
!
@
Delete current clip name (
ÀÁ
ß
>
Œ
µ
?
Å
Ã
ÑÒ
_
>><<
D
ç
È
Æ
Ä
Â
Õ
Ó
Ô
.
º
Ö
^)(
Space
ʻ
14 Chars)
Tools
ø
Delete
&:
Edit name
Page 22

22
HDD OPERATION
You can define the initial setup of the HDD operation from the HDD
Setup menu or change the settings of other items to suit your preferences.
To launch the
HDD Setup menu press the HDD Menu button on the
remote control.
The HDD menu window will appear press the
e or d on the remote
control to move the highlighted bar to the desired item. Press the
8
button on the remote to activate the currently selected menu item. To
confirm the selection press the
OK button.
Enter the HDD Setup Menu and select set time by using the e or d
buttons. Set Time has two options Automatic and Manual time
adjust. Select the options by using the e or d buttons and then the
OK button.
● Automatic time will adjust the time automatically via the
antenna . This will show the progress of gathering the Date, once
found the date and Time will be displayed. If the time data is not
available a message will appear on the screen and time will have to
be entered in manually.
● Manual time
To select manual press e or d buttons until it
becomes highlighted press the OK button. A message
will appear
Summer time can be turned on or off by using the
7or 8 buttons and the OK button.
To adjust the time use the numeric (0-9) buttons on the remote or by
using the e or d buttons. To move to the next position use the 7
or 8 buttons. To save or cancel the options select the SAVE/ Cancel
on the menu by using the 7or 8 buttons.
Formating the Hard disk all the information stored will be deleted.
Select the HDD Menu buttonto open Hdd Setup. Press the e or d
buttons to select Format and the 8 button to highlight START. Press
OK button.
To confirm Format select yes or no using the 7 or 8 buttons and
then the OK button, the following display will appear.
When formating is in progess do not power off the set.
The scandisk function will scan the disc and check for any errors
Select Scan disk by using the e or d buttons. Select Start and a
confirmation message will appear. Select Yes or no using the 7 or 8
buttons on the remote and then the OK button.
Once scaning starts the following screen appears, do not Power off
the set
Main menu
Format HDD
Scandisk HDD
Set Time
HDD Setup
Set Time
Format HDD
Scandisk HDD
Timer Record
Record Quality
Always Replay
HDD MENU
Move
Exit
Automatic
Manual
Set Time
Antenna is not available
OK
Automatic
Manual
HDD Setup
Format HDD
Move
[OK] Enter [HDD Menu]
Start
Exit
HDD Setup
Format HDD
Move
All Erase HDD?
Yes No
Enter
OK
Start
HDD MENU
Exit
HDD Setup
Format HDD
Move
[OK] Enter [HDD Menu]
Start
Donʼt power off
While resetting
Cancel
Exit
Set Time
Summer Time?
On
Automatic
Manual
Off
HDD Setup
Set Time
Move
OK
Enter
Automatic
Manual
D / M / Y h : m
01 / 11 / 06 / 16 : 30
HDD MENU
Save
Cancel
Exit
HDD Setup
Scan Disk HDD
Move
Scandisk HDD?
Yes No
Enter
OK
Start
HDD MENU
Exit
HDD Setup
Scan Disk HDD
Move
[OK] Enter [HDD Menu]
Start
Scandisk HDD
Donʼt power off
Cancel
Exit
Page 23

23
HDD OPERATION
Enter HDD Setup menu using the HDD menu button.Using the e or
dbuttons to select Timer record. The timer record function will start
and stop recording the program at the selected time and data set.
To select time and date for the program required recording press the
8 button to open the recording menu
Using the e or d buttons select the ID number 1-2-3 for the
program postion to be indicated. Once this has been choosen press
the OK button to access INPUT mode.
In Input mode use the e or d buttons or the numeric (0-9) buttons
on the remote to change the Date/ Time/ Program.....
To move from one input position to another use the 7 or 8 buttons.
The record mode can be changed from HQ (high quality), to short/
long play etc. To choose the desired mode use the e or d buttons.
The HDD record function can record programs from Analogue/ digital
and AV1-4 mode.
When entering in the program number for recording the modes are
selected by letters. Analogue is indicated by A, Digital is indicated by
D and AV mode is indicated by AV, these can be selected by using
the e or d buttons.
Use the e or d buttons or numberic (0-9) buttons to select the
program number.
Once all the settings have been entered use the
8 button to move
to Save/ Cancel. Press OK button to Save or cancel the settings
entered. To exit the timer list press the HDD menu button on the
remote.
If there has been a duplicate record entered or an error has occured
a message will appear on can either be ignored or can be entered
again.
To directly access the Timer recording menu press the Timer REC
button. To Delete the timer record settings press Clear.
Record Quality allows you to select a default recording mode, this
will determine the record quality and the total HDD playing time.
Press thee or d buttons to select record quality from HQ/ SP/ LP/
EP/ SLP. Press the OK button the save the settings
This function selects a default Replay mode. Once the Always
Replay function is preset to ON it is aways active and the HDD
records the signal in a buffer area once the set is powered on.Use
the e or d buttons to select Always Replay, use the 8 button to
access ON/ OFF. Press OK button to confirm your selection
When Always replay is active the REPLAY button does not function.
✐ The maximun time allowed for Replay playback is 2 hours.
Timer record
Record Quality
Always Replay
HDD Setup
Set Time
Format HDD
Scandisk HDD
Timer Record
Record Quality
Always Replay
HDD MENU
Move
ID Date Start Duration Mode Program
1 05/04/ 06 19:00:00 02:00:00 HQ A 04 CH
2 08/04/ 06 12:30:00 00:30: 00 LP D 04 CH
3 10/04/ 06 22:00:00 02:00:00 SP AV 3
4
5
6
7
8
Move Edit Clear Exit
OK
ID Date Start Duration Mode Program
1 05/04/ 06 19:00:00 02:00:00 HQ A 04 CH
2 08/04/ 06 12:30:00 00:30: 00 LP D 04 CH
3 10/04/ 06 22:00:00 02:00:00 SP AV 3
4
5
6
7
8
Exit
CLEAR TIMER REC
ID Date Start Duration Mode Program
1 05/04/ 06 19:00:00 02:00:00 HQ A 04 CH
Overlapped entry. Try again
SAVE
On
Move Edit Clear Exit
OK CLEAR TIMER REC
Cancel
Off
HDD Setup
Set Time
Format HDD
Scandisk HDD
Timer Record
Record Quality
Always Replay
[OK] Enter [HDD MENU]
Move
HQ
SP
LP
EP
SLP
Exit
HDD Setup
Exit
On
Off
Set Time
Format HDD
Scandisk HDD
Timer Record
Record Quality
Always Replay
Move
HDD MENU
Move Edit Clear Exit
OK CLEAR TIMER REC
ID Date Start Duration Mode Program
1 05/04/ 06 19:00:00 02:00:00 HQ A 04 CH
SAVE
Move Enter
OK
Cancel
Page 24

24
PC OPERATION
Connect your PC to the connector on the left side terminal of the
set. Once connected select PC mode via the v button on your
remote control. The set will become a monitor for the PC.
By pressing the MENU button on the remote control a menu window
will appear on screen, this allows the settings to be adjusted.
Press the 8 button to enter Sound menu. This will adjust Volume/
Balance/ Bass/ Treble/ Preset and Surround sound. The display is
the same as TV mode (page 8/16)
To adjust the Picture settings select picture using the e or d buttons
on the remote then the 8 button to enter the following picture
settings menu.
Press the 7 or 8 buttons to adjust the Picture bightness and the
same to adjust the contrast of the picture.
Picture position changes the picture horizontally or vertically, this is
done by using the 7 or 8 buttons on the remote control.
Video adjust changes the Phase and the clock of the screen. If the
picture is blurred or grainy this function will adjust it to a clearer
picture.
Auto Adjust will automatically adjust the picture by using the 8
button. This will change all the above settings automatically .Auto
adjust can also be acheived by pressing the
button on the remote control
Resolution displays the current resolution of the picture. This is just
for information and cannot be adjusted.
Using the 7 or 8 buttons it is possible to adjust the tone of the
screen using the White tone Red(R) / Green (G)/ Blue(B). This will
adjust the picture to show more of the choosen colour for example if
red is selected you can adjust the red in the picture to increase or
decrease using the 7 or 8 buttons
To select the Settings menu press the menu button on your remote
and using the e or d buttons to select Settings. The 8 button will
enter the settings menu.
Child lock/ Timer and AV2 settings are the same as in the TV mode
(pg 16/17)
Power save if turned ON will turn the TV to stand by after 1 minute if
no signal is detected, the LED light will turn RED to indicate stand
by. The TV will automatically turn on when a signal has been
detected. Use 7 or 8 buttons to selected ON or OFF.
PC menu settings
Main Menu
Sound
Picture
Setting
: Select
: Adjust
MENU
: Exit
Picture
Brightness
Contrast
Position
Video Adjust
Auto Adjust
Resolution
White Tone R
White Tone G
White Tone B
: Select
1024 X 768 @60Hz
: Adjust
MENU
: Back
Setting
CHILD LOCK OFF / ON
Timer
AV2 Video / S-Video
Power save OFF/ON
: Select
: Adjust
MENU
: Back
Page 25

25
■ Screen options
Today there are various transmission formats with different size
ratios, eg. 4:3 , 14:9, 16:9 and video formats such as letterbox.
■ Auto
It automatically switches to the optimum screen mode according to
the WSS signal provided in the receiving signal source. If the signal
does not have it, the TV keeps current screen mode.
✐ This setting may cause the picture to change when a different
format is received eg. when an advert is received.
✐ WSS (Wide screen signalling)
Some broadcasters transmit this signal and some VCR tapes have it
included . The signal identifies the picture format ratio (16:9, 14:9, 4:3
etc.).
If WSS is not being received and you are not happy with your picture
this TV provides you the option to change it with the following options.
Press the WIDE button repeatedly to select your desired setting.
OPERA
OPERA
TION
TION
Selecting of picture size
■ Natural
■ Zoom 14:9
TITLES ON SCREEN
TITLES ON SCREEN
■ Title In 14:9
■ Zoom 16:9
TITLES ON SCREEN
TITLES ON SCREEN
■ Title In 16:9
■ Normal
■ Full
4:3 14:9 16:9
Letterbox Video
4:3 14:9 16:9
The correct picture
width is maintained
but the top and
bottom are
cropped.
Zooms in slightly
cropping the top
and bottom.
4:3 14:9 16:9
As Zoom (16:9),
but bottom is
compressed even
more to allow
subtitles to be
seen.
As Zoom (16:9),
but bottom is
compressed even
more to allow
subtitles to be
seen.
Zooms in slightly
cropping the top
and bottom.
TITLES ON SCREEN
As Zoom (16:9),
but bottom is
compressed even
more to allow
subtitles to be
seen.
Letterbox Video
The black bars top
and bottom are
smaller and the
picture height is
compressed slightly.
Letterbox Video
TITLES ON SCREEN
As Zoom (16:9),
but bottom is
compressed even
more to allow
subtitles to be
seen.
Stretches the
picture horizontally
to fill the screen.
The picture is more
stretched at the
edges.
The height is
expanded to fill the
whole screen.
4:3 14:9 16:9
The correct picture
width is maintained
but the top and
bottom are
cropped.
Zooms in slightly
cropping the top
and bottom.
4:3 14:9 16:9
As zoom (14:9), but
bottom is
compressed even
more to allow
subtitles to be
seen.
As zoom (14:9), but
bottom is
compressed even
more to allow
subtitles to be
seen.
The picture fills the
screen and is
proportionally
correct.
Zooms in slightly
cropping the top
and bottom.
TITLES ON SCREEN
As zoom (14:9), but
bottom is
compressed even
more to allow
subtitles to be
seen.
The black bars top
and bottom remain
and the height is
compressed to fit
the picture area.
Letterbox Video
The black bars top
and bottom are
smaller and the
picture height is
compressed slightly.
Letterbox Video
TITLES ON SCREEN
As zoom (14:9), but
bottom is
compressed even
more to allow
subtitles to be
seen.
4:3 14:9 16:9
The whole screen
is filled stretching
the width.
The whole screen
is filled stretching
the height slightly
at the edges.
4:3 14:9 16:9
The correct ratio is
maintained with
black bars on the
left and right.
Black bars left and
right, picture height
is stretched.
The whole screen
is filled with the
corrrect picture
ratio.
Black bars left and
right, picture height
is stretched.
Letterbox Video
The black bars top
and bottom are
present and the
height is
compressed.
Letterbox Video
Black bars left,
right, top and
bottom.
Page 26

26
Common specification
Power source AC 220~240V 50Hz
Television system System I
Colour system PAL
(PAL/NTSC in AV mode)
Channel coverage VHF, UHF: 21-69,CATV
Aerial input impedance 75 ohm
AV terminal
AV1: CENELEC Standard
Input: Composite video, RGB and audio-L/R
Output:TV-output with composite video and
audio-L/R
AV2: CENELEC Standard
Input: Composite video, RGB, S-VHS and
audio-L/R
Output:Monitor-output with composite video
and audio-L/R
AV3: CENELEC Standard
Input: Composite video, and audio-L/R
Side AV terminal
AV4: RCA jacks
Input: Composite video and audio-L/R
AV terminal AV5
Input : Component (Y,Pb,Pr.)and audio-L/R
PC Input : VGA,and audio, D-sub 15pin
HDMI Input : HDMI group Standard
Headphone socket Mini Jack
Audio M.Out CINCH : L/R
CI
Video recording mode HDD 160GB
HQ ~ 37H
SP ~ 60H
LP ~ 100H
EP ~ 130H
SLP ~ 180H
CE32LDY1-B
Speaker system Time Domain
Sound output
(Continuous) 2 x 5W
Contrast Ratio 1000:1
Screen(inches) 32in, 81mm
(viewing measured diagonally)
Display Resolution 1366 x 768 (WXGA)
Viewing angles H:176°, V:176°
Dimensions 819 x 568 x 280
(WxHxD mm)
(including stand)
Weight (kg) 21.5
(including stand)
1) This television has installed speakers that have
applied the time domain theory proposed by Mr.
Yoshii Hiroyuki.
2) TIME DOMAIN SPEAKER IS A TRADEMARK OF TIMEDOMAIN
Corporation.
3) The Time Domain speakers are manufactured based on the Audio
design technology of Authentic Limited, licenced by TIME DOMAIN
CORPORATION.
■ NO PICTURE, NO SOUND
● Check if TV is plugged in.
● Try a different channel, if OK, probably station trouble.
■ POOR PICTURE, SOUND OK
● Adjust BRIGHTNESS control.
● Adjust FINE TUNING control.
● Check aerial connections.
■ NO COLOUR, PICTURE OK
● Adjust COLOUR control.
● Adjust FINE TUNING control.
● Is the programme in colour ?
■ WEAK PICTURE
● Check aerial connections on back of set.
● Check aerial for broken wires.
● Re-orient aerial.
The following faults are not caused by the receiver:
"GHOSTS"
Reflections of signals from mountains or high buildings will cause
multiple images, called "Ghosts". These abnormal conditions can be
reduced to minimum by repositioning aerial or by installing new one
suited for your area.
"INTERFERENCE"
Interference may be caused by electrical appliances, car ignition
systems, etc. This should normally be a temporary condition, but
should this interference persist, contact your dealer.
SPECIFICA
SPECIFICA
TION / HELPFUL
TION / HELPFUL
HINTS
HINTS
Helpful hints
Specification
Page 27

27
HDMI / PC / COMPONENT SIGNAL
HDMI / PC / COMPONENT SIGNAL
SUPPOR
SUPPOR
T TIMING LIST
T TIMING LIST
* When this LCD television is operated with component input, use of
progressive scan (p) is advised for enhanced performance
HD MI si gna l supp ort tim in g
HD MI si gna l supp ort tim in g
Vertical
Aspect
Format Timing
Description
Description
60Hz Formats
60Hz Formats
VGA 640x480p 4:3
VGA 640x480p 4:3
480p 720x480p 4:3
480p 720x480p 4:3
480p 720x480p 16:9
480p 720x480p 16:9
720p 1280x720p 16:9
720p 1280x720p 16:9
1080i 1920x1080i 16:9
1080i 1920x1080i 16:9
480i 720(1440)x480i 4:3
480i 720(1440)x480i 4:3
480i 720(1440)x480i 16:9
480i 720(1440)x480i 16:9
50Hz Formats
50Hz Formats
576p 720x576p 4:3
576p 720x576p 4:3
576p 720x576p 16:9
576p 720x576p 16:9
720p 1280x720p 16:9 50 861A HDTV
720p 1280x720p 16:9 50 861A HDTV
1080i 1920x1080i 16:9
1080i 1920x1080i 16:9
576i 720(1440)x576i 4:3
576i
576i 720(1440)x576i 16:9
576i
PC signal support timing
PC signal support timing
Resolution Horizontal
Resolution Horizontal
720_400 31.47 70.08 28.322 DOS
720_400 31.47 70.08 28.322 DOS
640_480 31.50 60.00 25.18 DOS
640_480 31.50 60.00 25.18 DOS
640_480 35.00 67.00 30.24 Mac.
640_480 35.00 67.00 30.24 Mac.
640_480 37.50 75.00 31.50 VESA
640_480 37.50 75.00 31.50 VESA
640_480 37.86
640_480 37.86
800_600 35.16
800_600 35.16
800_600 37.90 60.32 40.00 VESA
800_600 37.90 60.32 40.00 VESA
800_600 46.90 75.00 49.50 VESA
800_600 46.90 75.00 49.50 VESA
832_624 49.00 74.00 57.27 Mac. (H+V)
832_624 49.00 74.00 57.27 Mac. (H+V)
1024_768 48.40
1024_768
1024_768 56.50 70.00 75.00 VESA
1024_768 60.00
Format Timing
720(1440)x576i 4:3 50
720(1440)x576i 16:9 50
Frequency(Khz)
Frequency(Khz)
56.50 70.00 75.00 VESA
60.00 75.00 78.75 VESA
Aspect
ratio
ratio
Vertical
Freq (Hz)
Freq (Hz)
59.94 /60 861 Default format
59.94 /60 861 Default format
59.94 /60 861 EDTV
59.94 /60 861 EDTV
59.94 /60 861 EDTV
59.94 /60 861 EDTV
59.94 /60 861 HDTV
59.94 /60 861 HDTV
59.94 /60 861 HDTV
59.94 /60 861 HDTV
59.94 /60
59.94 /60
59.94 /60
59.94 /60
50 861A EDTV
50 861A EDTV
50 861A EDTV
50 861A EDTV
50 861A HDTV
50 861A HDTV
50
50
Vertical
Vertical
Frequency(Hz)
Frequency(Hz)
72.81 31.50 VESA
72.81 31.50 VESA
56.25 36.00 VESA
56.25 36.00 VESA
60.00 65.00 VESA
60.00 65.00 VESA
75.00 78.75 VESA
Where
Where
defined
defined
861
861
optional
optional
861
861
optional
optional
861A
861A
optional
optional
861A
861A
optional
optional
Dot Clock
Dot Clock
Frequency(Mhz)
Frequency(Mhz)
Remark
Remark
Double clock for
Double clock for
Double clock for
Double clock for
Double clock for
Double clock for
Double clock for
Double clock for
720x480i
720x480i
720x480i
720x480i
720x576i
720x576i
720x576i
720x576i
Remark
Remark
Component signal suppo rt timing
Resolution Horizontal
fre quenc y (K H z)
720x480 15.735 60i 12.27 SDTV 480i
720x576 15.625 50i 13.50 SDTV 576i
720x480 31.25 60p 27 SDTV 480p
720x576 31.25 50p 27 DTV 576p
1280x720 45.00 60p 74.25 HDTV 7 20p
1280x720 37.50 50p 74.25 HDTV 7 20p
1920x1080 33.75 60i 74.25 HDTV 1080i
1920x1080 28.13 50i 74.25 HDTV 1080i
1920x1080 31.25 50i 74.25 HDTV 1152i
Vertical frequency
(Hz)
Dot Clock
Frequency(Mhz)
Remark
S
Page 28

28
SANYO Europe Ltd. (the company) warrants to the initial retail
purchaser that if this equipment is or becomes defective and that,
in the opinion of the Company, the defect is due to faulty material
or workmanship the Company will, for a period of 12 calendar
months from the date of sale to the original purchaser repair or
replace, at its sole option, free of charge, any such defective
component part of the equipment, always provided that:-
1: The equipment has at all times been used in accordance with
the operating instructions issued by the Company, and has not
been connected to an electrical mains supply for which it has
not been adjusted.
2: Accidental damage or damage caused by negligence of mis-
use by the user, is specifically excluded.
3: Unauthorised repairs, or any modification to the equipment
which has not been expressly approved by the Company, shall
render this warranty null and void.
4: Failure due to fair wear and tear of any item is specifically
excluded.
This warranty is not transferable and is only applicable within the
United Kingdom (and the Republic of Ireland).
Nothing in this express warranty affects the statutory rights
available to the purchaser of this equipment.
Note: This warranty supersedes any other form of guarantee that
may inadvertently have been enclosed with or attached to the
product.
Dear Customer.
Thank you for buying SANYO. This equipment should give you
many years of pleasure and faithful service but in the event that a
fault occurs, the following notes for you guidance may be helpful:-
1: PLEASE RETAIN YOUR PURCHASE RECEIPT WHICH WILL
BE REQUIRED FOR SERVICE DURING WARRANTY.
2: If your SANYO equipment proves faulty during the period of
guarantee, take it or send it back to the dealer who originally
supplied it together with this guarantee and the proof of
purchase. We have made arrangements with our approved
dealers under which they will carry out in guarantee service
repairs on our behalf. In this way, we hope to reduce to a
minimum the amount of time you will be without your equipment.
3: If for some reason it is impossible to return the equipment to
the original supplier, please contact our Customer Relations
Department at the address below for further advice.
4: Should the equipment require servicing after the expiry of the
guarantee period, take or send it to the original supplier or any
other Sanyo dealer. He will be pleased to give you a quotation
for the repair.
Customer Relations Department,
SANYO Europe Ltd.
SANYO House,
18, COLONIAL WAY,
Watford, Hertfordshire, WD24 4PT.
Tel: 01923 246363
Part No. 1KA6P1P0266-A N3LK
Printed in U.K.
WWARRANTY
ARRANTYTT
O CUST
O CUST
OMER
OMER
 Loading...