

Page 1
WR-12BT
中文
GB
Revision 1
Page 2

IMPORTANT SAFETY INSTRUCTIONS
Read these instructions.
1.
Keep these instructions.
2.
Heed all warnings.
3.
Follow all instructions.
4.
Do not use this apparatus near water.
5.
Clean only with dry cloth.
6.
Do not block any ventilation openings. Install in accordance
7.
with the manufacturer’s instructions.
Do not install near any heat sources such as radiators, heat
8.
registers, stoves, or other apparatus (including ampliers) that
produce heat.
GB
Do not defeat the safety purpose of the polarized or grounding-
9.
type plug. A polarized plug has two blades with one wider than
the other. A grounding type plug has two blades and a third
grounding prong. The wide blade or the third prong is provided
for your safety. If the provided plug does not t into your outlet,
consult an electrician for replacement of the obsolete outlet.
10.
Protect the power cord from being walked on or pinched
particularly at plugs, convenience receptacles, and the point
where they exit from the apparatus.
1
Page 3

11.
Only use attachments/accessories specied by the manufacturer.
Use only with the cart, stand, tripod, bracket, or table specied
12.
by the manufacturer, or sold with the apparatus. When a cart is
used, use caution when moving the cart/apparatus combination
to avoid injury from tip-over.
13.
Unplug this apparatus during lightning storms or when unused
for long periods of time.
14.
Refer all servicing to qualified service personnel. Servicing is
required when the apparatus has been damaged in any way,
such as power-supply cord or plug is damaged. liquid has been
spilled or objects have fallen into the apparatus, the apparatus
has been exposed to rain or moisture, does not operate normally,
or has been dropped.
15.
To Reduce the Risk of Fire or Electric Shock, Do not Expose
This Appliance To Rain or Moisture.
16.
The Shock Hazard Marking and Associated Graphical Symbol is
provided on the bottom panel of unit.
2
Page 4

Apparatus shall not be exposed to dripping or splashing and no
17.
objects lled with liquids, shall not be placed on the apparatus.
Excessive sound pressure on ear- and headphones could
18.
impair the hearing ability. Higher setting that idle on the
equalizer leads to higher signal voltages on the output for ear
and headphones.
The power plug should be close to the radio, and easy to be
19.
approached that during the emergency, to disconnect the power
from the radio, just unplug the power plug from the AC power
slot.
Where the MAINS plug or an appliance coupler is used as the
20.
disconnect device, the disconnected device shall remain readily
operable.
GB
3
Page 5
4
Page 6

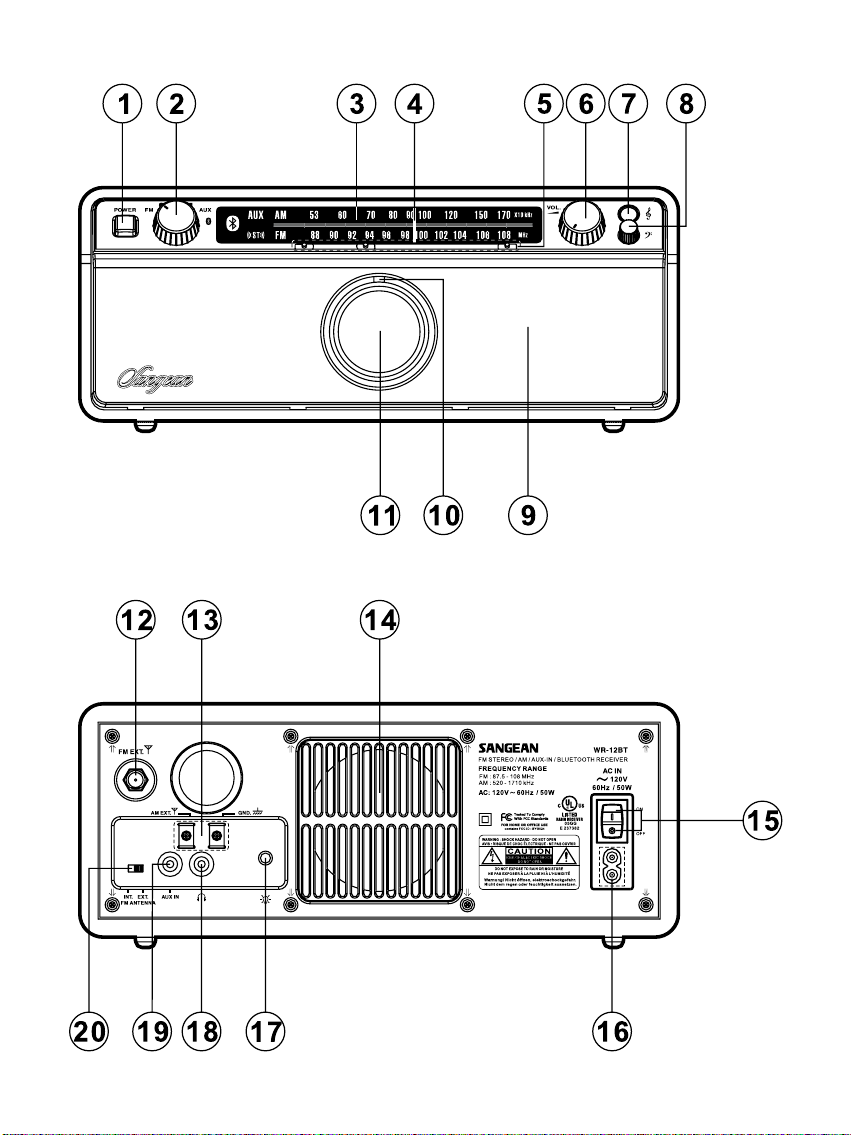
Controls
1
Power button
2
Band selecting rotary
3
Dial scale
4
Dial indicator
5
Dial marker
6
Volume control
7
Treble control
8
Bass control
9
Speaker
10
Tuning LED indicator
11
Tuning control
12
F-type external antenna terminal
13
AM external antenna terminal
14
Subwoofer speaker
15
AC main power switch
16
AC power cord socket
17
Dimmer control
18
Headphone socket
19
AUX IN socket
20
External / internal antenna switch
GB
5
Page 7

Power your radio
AC operation
Before you plug the AC cord into the radio, make sure the AC
voltage is correct. Insert the plug on the end of the supplied power
cord into the AC power socket on the back of the radio.
Power-on
Turn on the main power switch and the power button simultaneously.
Power-off
Turn off the main power switch and the power button simultaneously.
Antenna setup for FM reception
The radio comes with built-in AM/FM antenna and external
antenna.
To use FM internal antenna, make sure to switch FM external/
internal antenna switch in the back of your radio to internal antenna
position (i.e. INT. FM ANTENNA). As for external antenna, you can
use to improve FM reception. Two types of antenna can be used.
You can use the supplied FM wire antenna into the F-type antenna
terminal and adjust the wire for best reception.
You can also connect a 75 ohm coaxial cable of outdoor antenna
to the terminal. Make sure to switch external/internal antenna
switch to external position while using the supplied wire antenna
or connecting the outdoor antenna. In some of the European
countries, you may have to connect the supplied antenna terminal
adaptor to connect with the outdoor antenna.
6
Page 8

Operating your radio FM
1. Make sure you have set up the FM antenna in advance and turn
on the main power switch in the rear of the unit.
2. Rotate the band selecting rotary to the FM (MONO) or ST(FM
stereo).
Note: If the FM radio station being listened to has a weak signal,
some hiss may be audible. It is possible to reduce this hiss by
forcing the radio to play the station in mono rather than stereo.
3. Rotate the Tuning Control to select the desired station. In FM
mode, the tuning scale is marked in MHz (Megahertz). The tuning
LED indicator will appear brightest when best tuning has been
achieved. In ST mode, the ST tuning LED indicator will illuminate
when a stereo station is tuned.
4. Adjust the Volume Control for comfortable listening.
GB
5. Press the power button and the main power switch to turn off the
radio.
Antenna setup for AM reception
The radio comes with built-in AM antenna which should be enough
for normal listening. To improve the AM reception, you may connect
the outdoor AM antenna with AM external antenna terminal.
7
Page 9

Operating your radio AM
1. Rotate the Tuning Control to select the desired station. In AM
mode, the tuning scale is marked in kHz (Kilohertz). The tuning
LED will appear brightest when best tuning has been achieved.
2. Rotate your radio for best reception.
3. Adjust the Volume Control for comfortable listening.
4. Press the power button and the main power switch to turn offt he
radio.
Dial marker
This device allows you to mark 3 of your favorite station frequency,
so that you can find the particular station immediately next time
when tuning the stations.
Headphone use
Headphone use with this radio should be tted with a 3.5 mm jack
plug. Insert the headphones plug into the socket marked on the
rear side of the radio. When the headphones are plugged in, the
loudspeaker is automatically disconnected.
Important: Excessive sound pressure from earphones and
headphones can cause hearing loss.
8
Page 10

AUX IN socket
Connect a stereo or mono audio source (like CD walkman, iPod or
digital media music player) to this input to listen the audio program
via the speaker.
Dimmer control
The brightness of the dial scale may be adjusted. If you use the
unit in the bedroom, you may prefer a higher brightness level than
the standard setting.
Treble / Bass control
The sound on your radio can be adjusted to suit your personal taste
for the material that you are listening to. You can set the treble and
bass levels to your own preferences.
Note: To adjust the volume without interference, you can press
down the treble and bass button. It will not change your treble/
bass setting.
GB
9
Page 11

Listening to Bluetooth music
You need to pair your Bluetooth device with your radio before you
can auto-link to play/stream Bluetooth music through your WR12BT. Paring creates a permanent `bond' so two devices can
always recognize each other.
Pairing your Bluetooth device
1. Rotate the Band selecting rotary to select Bluetooth function.
The Bluetooth icon on the panel will ash within 3 second.
2. Activate Bluetooth on your device according to the device's user
manual to link to your WR-12BT. With some mobile, you may
need to input the pass code “0000”.
3. Once connected, the Bluetooth icon will remain illuminated. You
can now play the music in your Bluetooth-enabled device via
WR-12BT.
Note: If there are 2 Bluetooth devices searching for WR-12BT, it
will show its availability on both devices. However, if one device
links with the WR-12BT rst, then the other Bluetooth device won't
nd the WR-12BT on its list.
10
Page 12

Note: If your Bluetooth-enabled device is temporarily disconnected
to your WR-12BT. As long as the disconnection last within 7
minutes, your device can re-connect with your radio again
automatically. If the disconnection last more than 7 minutes, then
you need to manually reconnect your device again to the radio. Be
aware that during the period of disconnection, no other Bluetooth
device can pair or link with your radio.
Disconnecting your Bluetooth device
Rotate the Band selecting rotary to any bands other than Bluetooth
band or disconnect the Bluetooth-enabled device. The LED light
for Bluetooth icon will then start to ash indicating deactivation of
Bluetooth.
GB
11
Page 13

Specications
AC Power:
AC 120 V/60 Hz/50W (max) (US version)
AC 230 V/50 Hz/50W (max) (European version)
Frequency Coverage:
FM 87.50 - 108 MHz
AM 520 - 1710 kHz
AUX-IN:
3.5mm diameter, stereo
Internal Antenna System:
AM Built-in ferrite aerial
FM Built-in wiring aerial
External antenna terminal:
AM antenna terminal
FM F-type antenna terminal
Output Power:
3W+3W stereo amplier (1 kHz)
10W subwoofer amplier (100Hz)
12
Page 14

Speaker:
Stereo: 2.25inches 8 ohm x 2
Subwoofer: 3.5inches 8 ohm x 1
Headphones socket:
3.5 mm dia. Stereo jack Stereo output
Output power: 3mW + 3mW (impedance 32ohm)
The company reserves the right to amend the specication without notice.
GB
If at any time in the future you should need to dispose of this
product please note that: Waste electrical products should not be
disposed of with household waste. Please recycle where facilities
exist. Check with your Local Authority or retailer for recycling advice.
(Waste Electrical and Electronic Equipment Directive)
13
 Loading...