

Page 1
WFT-1D+
GB
Version 1
Page 2

Table of Contents
Important Safety In structions
............................................. 2-4
Getting Started ......................................................................... 5
Controls .............................................................................. 7-10
Getting connected to Internet (for Internet Ra dio) ............. 14
Listening to Internet Radio ................................................... 18
Digital Radio (DAB plus) ...................................................... 31
Clock Operation .................................................................... 37
Upgrade f irmware .................................................................. 40
T rouble Shooting ................................................................... 42
Specification .......................................................................... 43
1
Page 3

Important Safety In structions
1. Read and understand all safety and operating instructions before the
radio is operated.
2. Retain instruction: The safety and operating in struction s should be
retained for future reference.
3. Heed warnings. All warnings on the appliance and operating
instructions should be followed.
4. Follow all operations and use instructions.
5. Only use attachments/accessories specified by the manufacturer .
6. Use only a dry cloth for clea ning the exterior of the radio.
7. Ventilation: This radio should be situated so that its location or
position does not interfere with its proper ventilation. For example,
the radio should not be used on a bed, sofa, rug or other soft
surfaces that may block the ventilation openings. It should not be
placed in a built-in situation like a cabinet that may reduce airflow
through the ventilation openings. Also keep 10cm space on the back
of the radio.
8. Water a nd moisture: The appliance should not be used near water.
Do not use near a bathtub, washbowl, laundry tub, kitchen sink,
wet basement, swimming pool, etc.
WARNING! Do not expose this product to rain or moisture.
9. Do not expose this product to splashing or dripping.
Objects containing liquid, such as vases or drinking glasses,
should not be placed on top of this product.
10. Do not install near any heat sources such as radiators,
heat registers, stoves, or other apparatus (including amplifiers)
that produce heat.
11. Do not place the radio on an unstable cart, stand, bracket or ta ble.
The radio may fall, causing serious personal injury and damage to
the radio.
12. Do not atte mpt to service the receiver yoursel f. Removing the cover
may expose you to dangerous voltage, a nd will void the warranty.
Refer all servicing to authorized service personnel.
13. Unplug the ra dio from the AC power outlet before clea ning. Use only
a dry cloth for cleaning the exterior of the radio.
14. Do not plug the AC lead into the AC outlet if the outlet is still wet.
Make sure that the outlet is dry before and after use.
15. Power sources: The radio should be operated only from the type of
power source indicated on the marking label. If you are not sure of
the type of power supply to your home, consult your radio dealer or
power company.
GB
2
Page 4

16. Power cords: The power cord should be positioned so it is not
walked on, pinched, or items placed on top of it. Pay particular
attention to cords at plugs, convenience receptacle s, and the
point where they exit from the unit. Unplug the power cord by
gripping the power plug, not the cord. Operate the radio using
only the current type of power source indicated. If you are not
sure of the type of power supply to your home, consult your
dealer or local power company.
17. Do not defeat the safety purpose of the polarized or
grounding-type plug. A polarized plug has two bla de s with one wider
than the other . A grounding type plug has two blade s and a third
grounding prong. The wide blade or the third prongs are provided
for your safety. If the provided plug does not fit into your outlet,
consult an electrici an for replacement of the obsolete outlet.
21. Unplug this product from the wall outlet and refer servicing to
qualified service personnel under the following conditions:
a.
When the power supply cord or plug is damaged.
b.
If liquid has been spilled or objects have fallen into the product.
c.
If the product has been exposed to water or rain.
d.
If the product does not operate normally by following the
operating instructions.
e.
If the product has been dropped or damaged in any way.
f.
When the product exhibits a distinctive change in performance.
22. If the LCD becomes cracked and damaged, do not touch the liquid.
23. The changes or modif ications not expre ssly approved by the party
responsible for compliance could void the user’s authority to
operate the equipment.
18. Do not overload wall outlets or exten sion cords. This can result in a
risk of fire or electrical shock. Never insert objects of any kind into
the radio through opening.
19. The power plug should be close to the radio, and easy to be
approached that in case of emergency, to disconnect the power
from the radio, just unplug the power plug from the AC power slot.
20. Object and Liquid Entry – Never push objects of any kind into this
radio through openings as they may touch dangerous voltage points
or short – out parts that could result in a fire or electric shock.
Never spill liquid of a ny kind on the product.
3
24. To comply with the FCC RF exposure compliance requirements,
no change to the antenna or the device is permitted. Any change
to the antenna or the device could result in the device exceeding
the RF exposure requirements and void user’s authority to operate
the device.
Page 5

25. FCC INFORMATION
The Federal Communication Commission Radio Frequency Interference
Statement includes the following paragraph:
The equipment has been tested and found to comply with the li mits
for a Cla ss B Digital Device, pursuant to part 15 of the FCC Rules.
These limits are designed to provide reasonable protection against
harmful interference in a residential installation. This equipment
generates, uses and can radiate radio frequency energy and, if not
installed and used in accordance with the instruction, may cause
harmful interference to radio communication. However, there is no
grantee that interference will not occur in a particular installation.
If this equipment dose cause harmful interference to radio or television
reception, which can be determined by turning the equipment of f and on,
the user is encouraged to try to correct the interference by one or more
of the following mea sure s:
- Reorient or relocate the receiving antenna .
- Increa se the separation between the equipment a nd re ceiver.
- Connect the equipment into an outlet on a circuit different from that to
which the receiver is connected.
- Consult the dealer or an experienced radio/TV te chnici an for help.
The user should not modify or change this equipment without written
approval f orm SANGEAN ELECTRONICS INC. Modification could void
authority to use this equipment.
26. Excessive sound pressure on ear - and he a dphones could i mpair
the hearing ability.
Higher setting that idle on the equalizer leads to higher signal
voltages on the output for ear - a nd he adphones.
GB
4
Page 6
Getting Started
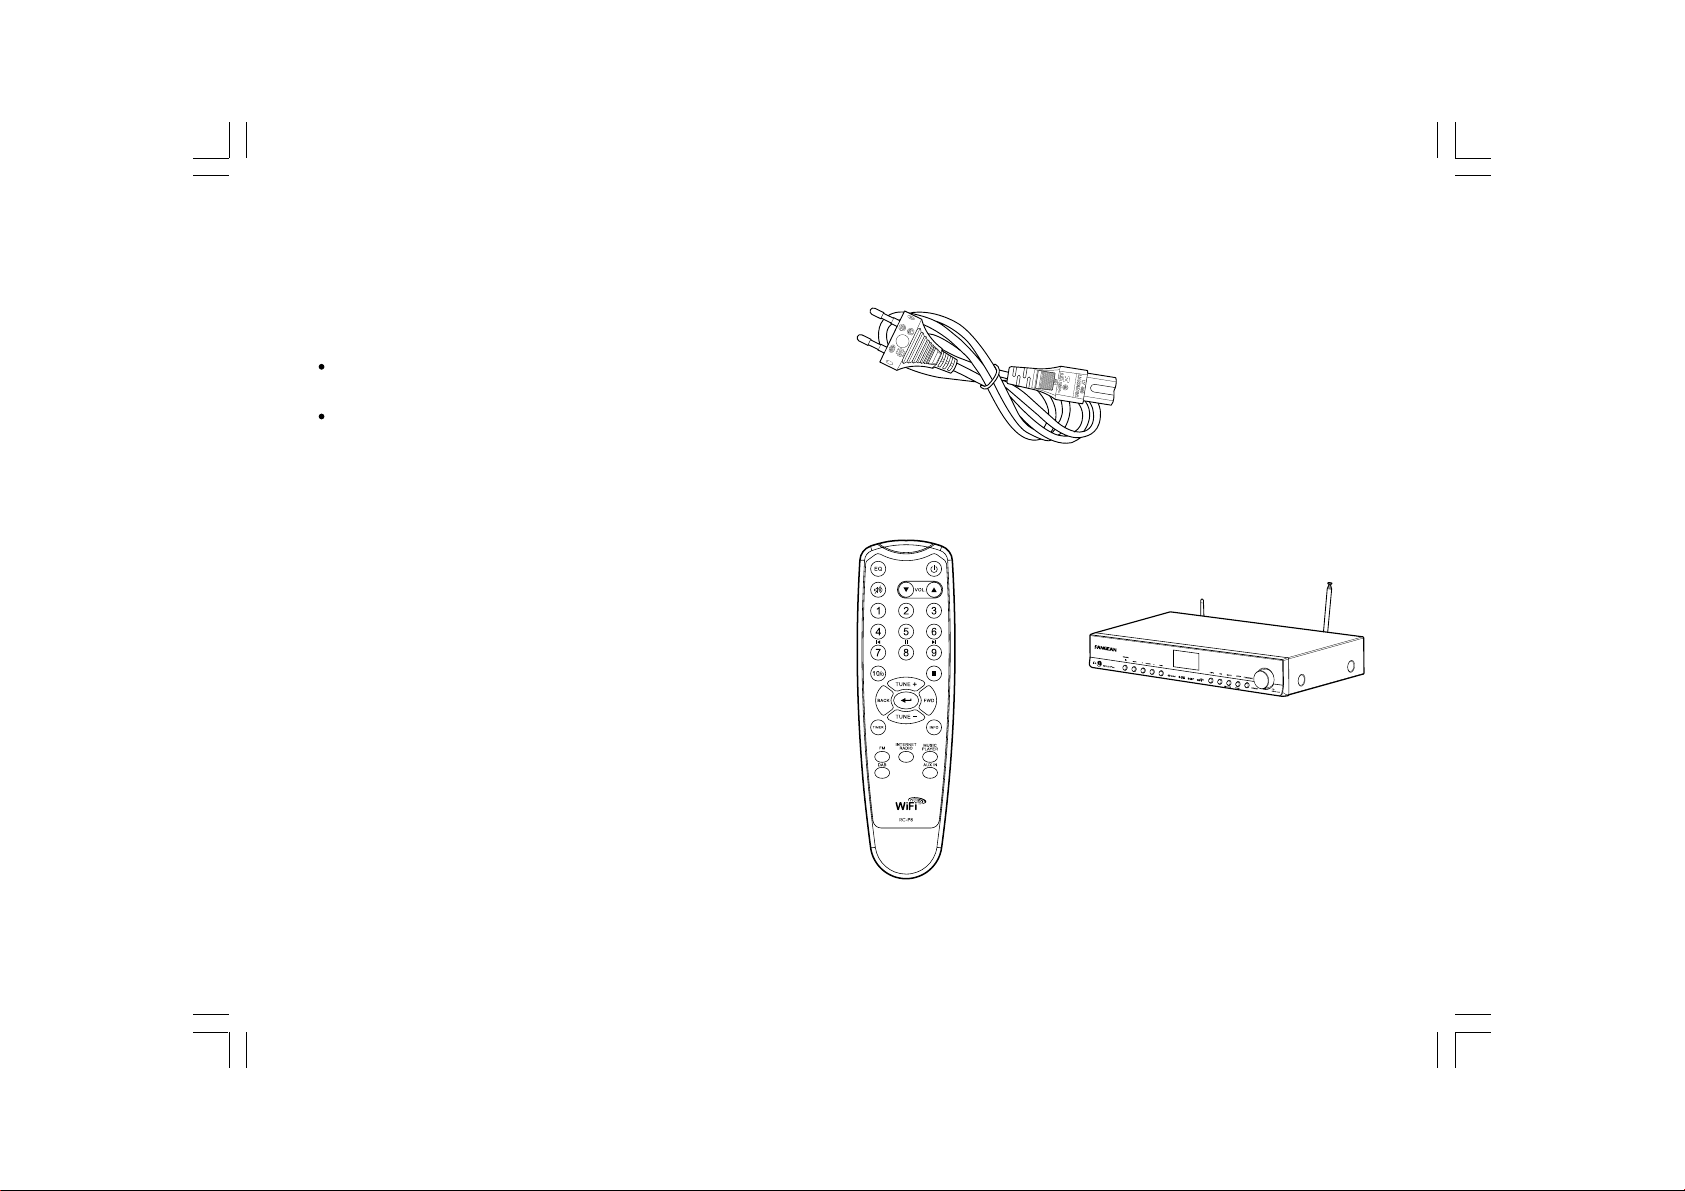
Congratulations on your purchase of the Sa nge an WFT -1D+.
Check the package and ensure all the items are present:
Product and Accessories:
Power Cable: used to power the radio.
Remote Control: used for remote operation of the radio.
Power Cable
Remote Control
5
WFT-1D+ Wi-Fi Tuner
Page 7
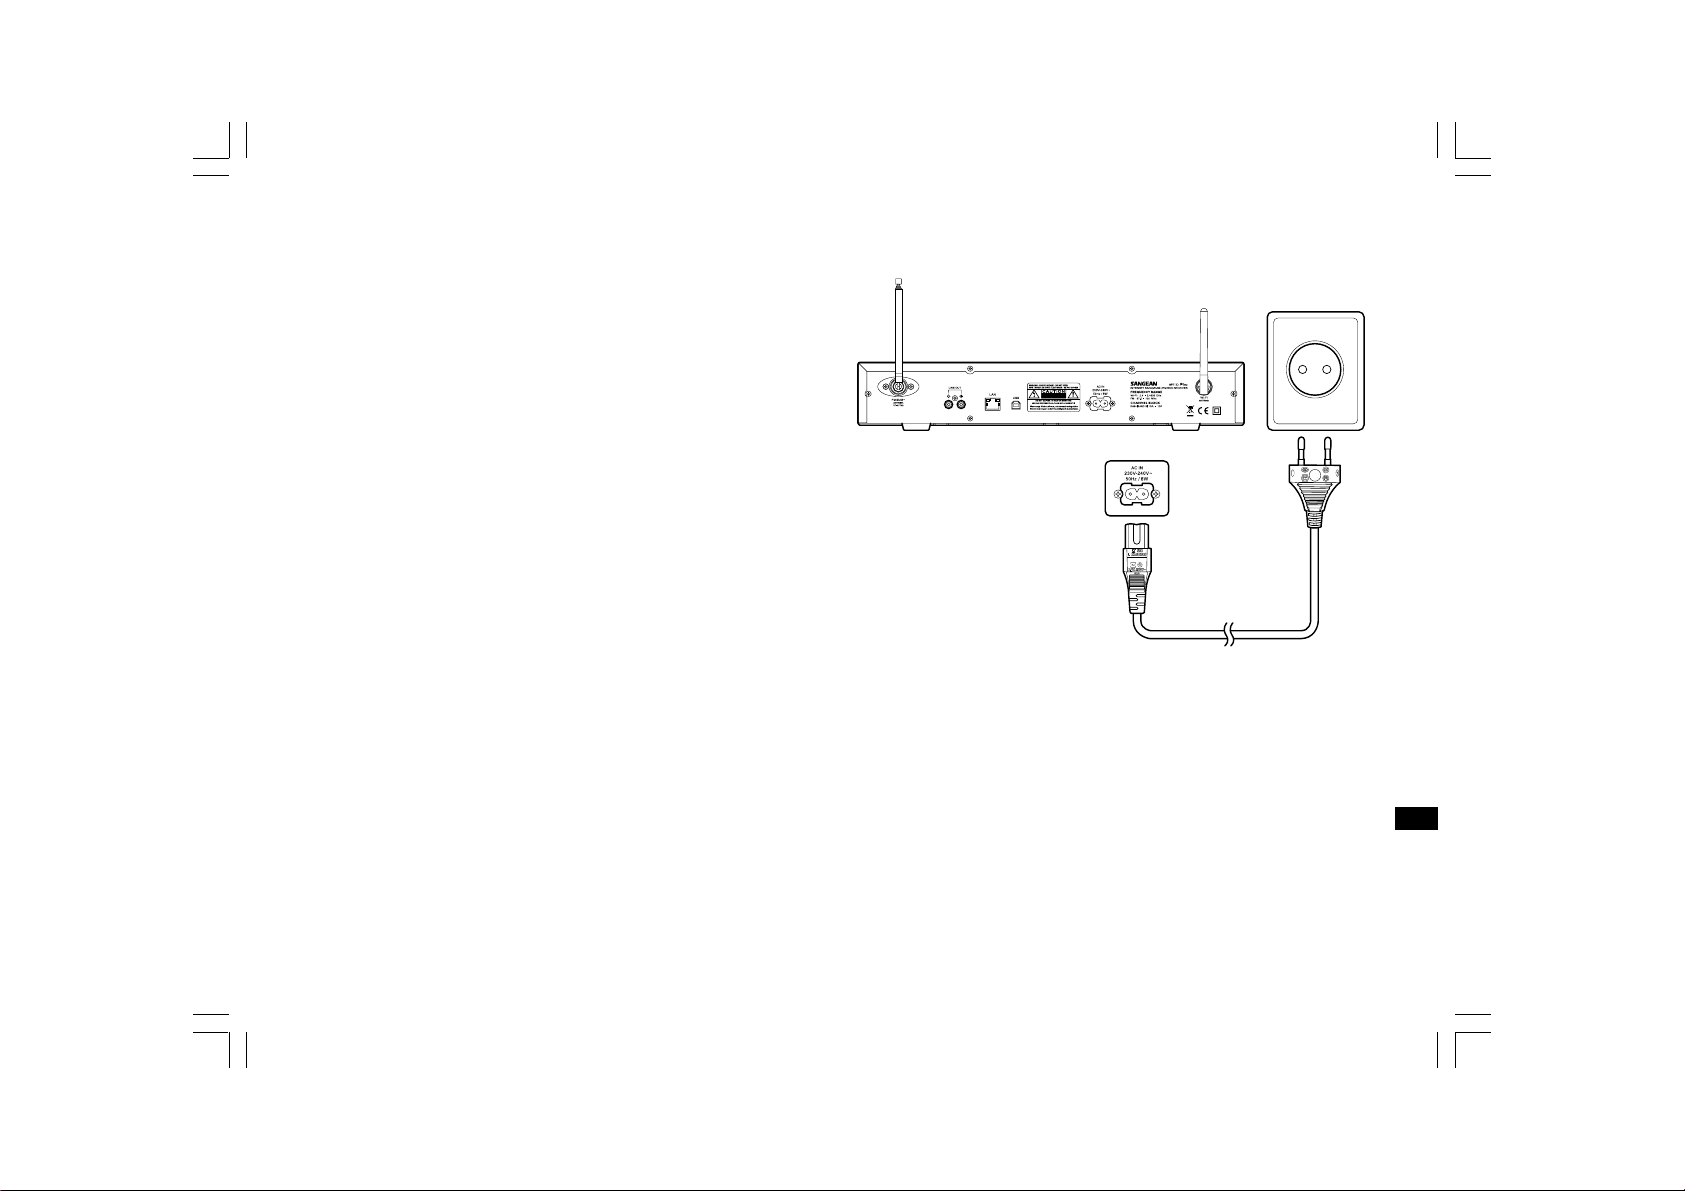
Power on the radio
1. Connect the power cable with the radio and plug it in to a live outlet
as shown.
2. Press the ST ANDBY button to turn on the radio.
Note:
Use only the ada pter supplied with the radio. Connecting an
incompatible power supply will cause permanent damage to the radio.
GB
6
Page 8
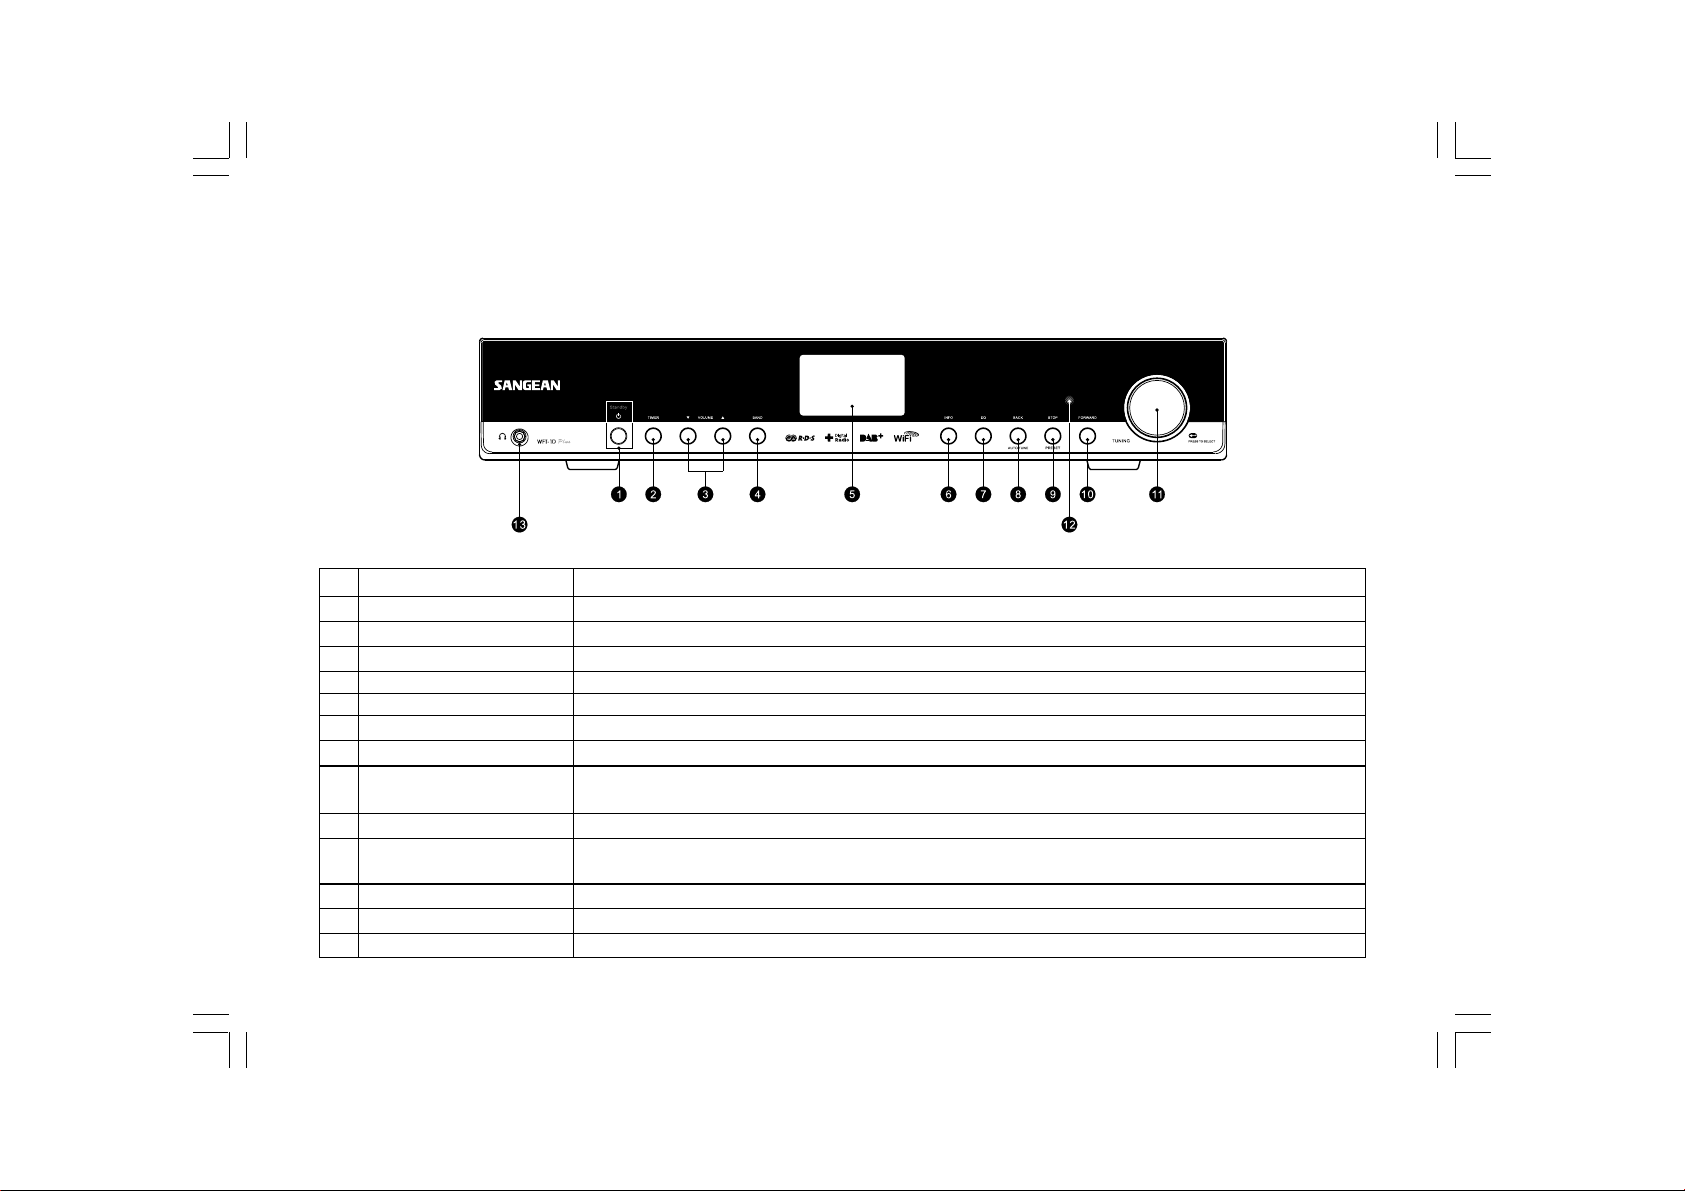
Controls
(Front)
Item
1
STANDBY button
2
TIMER button
3
VOLUME UP/DOWN button
4
BAND button
5
LCD display
6
INFO button
7
EQ button
8
BACK button
9
STOP/PRESET button
10
FORWARD button
11
Tuning Knob
12
Infra-red sensor
13
Headphone jack
7
Description
Turn on/off the radio.
Press to set sleep time and alarms.
Press to turn the volume UP/down.
Press to switch between modes (Internet Radio, Digital Radio(DAB +) Music Player, FM).
Screen that display texts.
Press to display information on the LCD.
Press to enter Equalizer setup.
Press to backward one page in menu selections. In Music player mode, press to skip to the previous track.
In setup screens, press to go to the previous field.
Press to enter the Preset menu. In Music player mode press to stop the track.
Press to move to the right when entering user na me or password.
In Music player mode, press to skip to the next.
Rotate to enter menu selections/navigate through selections.
To communicate with the remote control.
Connect to a headphone.
Press the knob to confirm selections.
Page 9
Controls
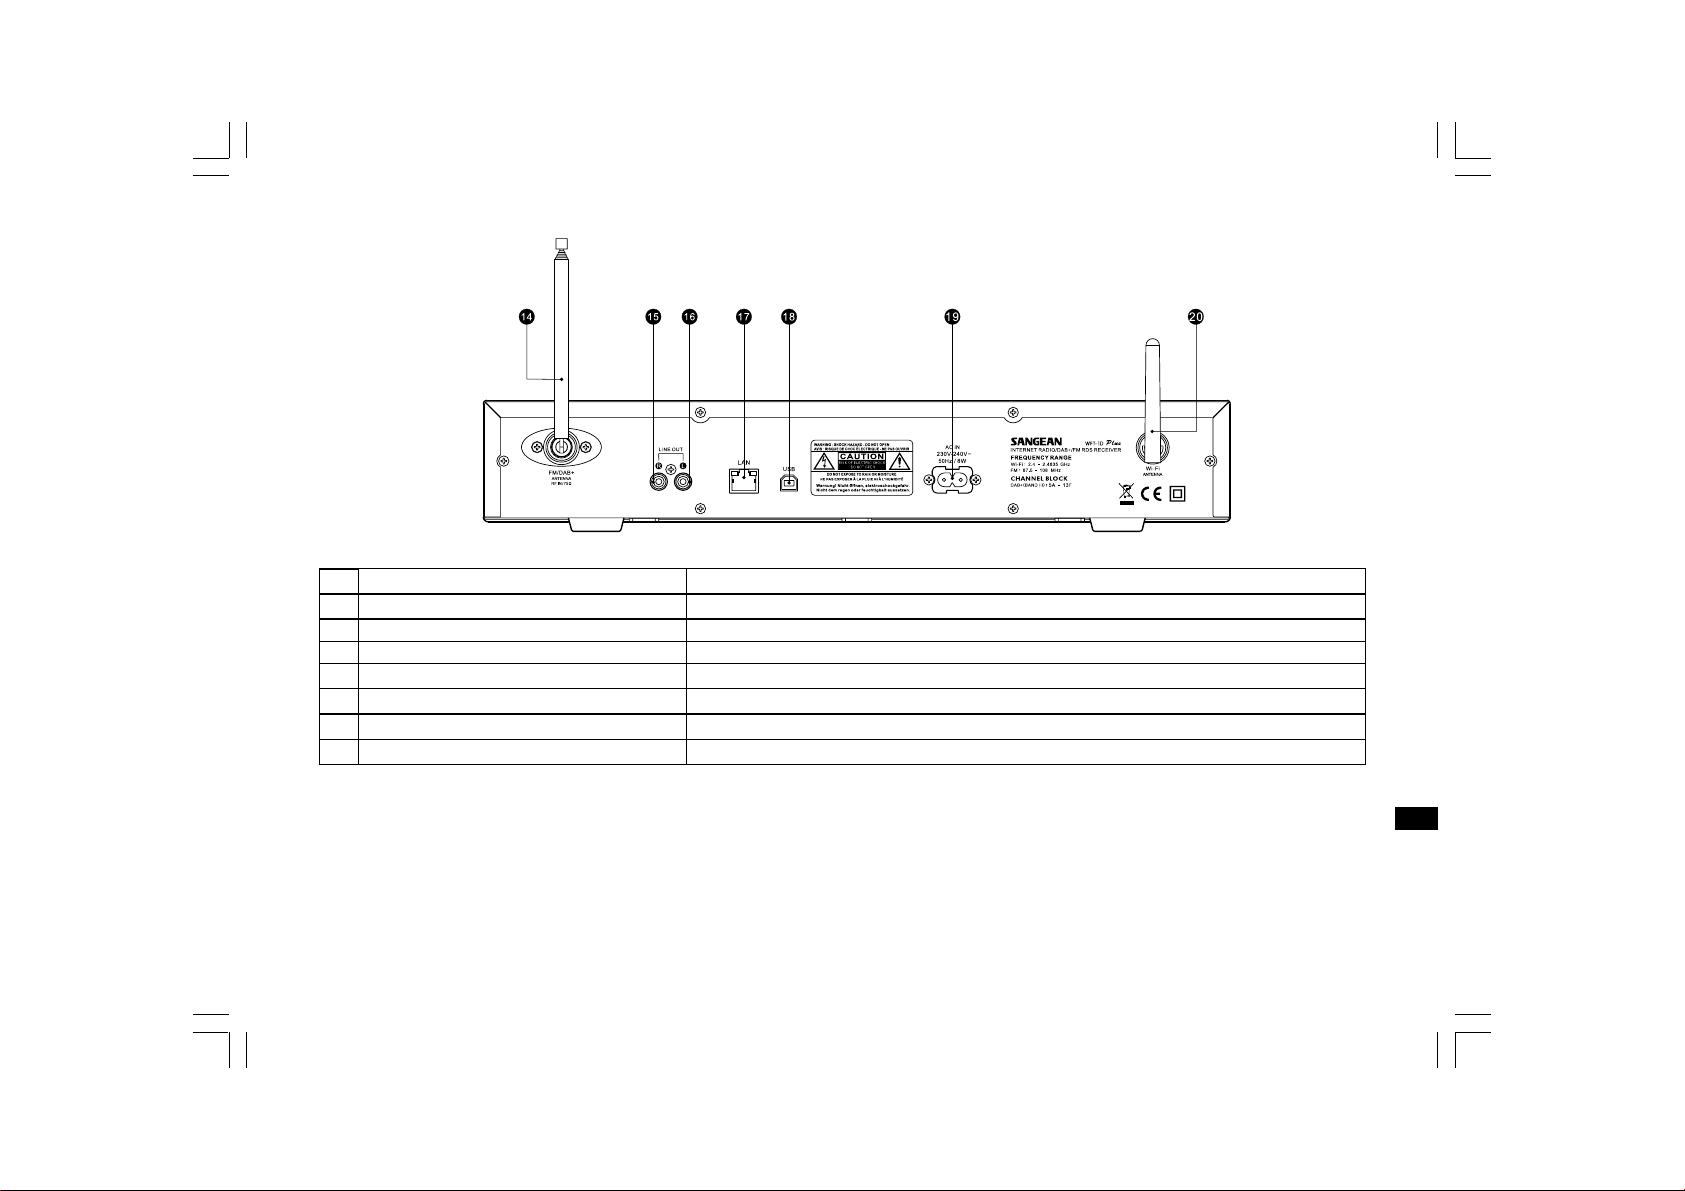
(Rear)
Item
14
Antenna for FM a nd Digital Radio (DAB plus)
15
LINE OUT jack-right
16
LINE OUT jack-left
17
LAN socket
18
USB socket
19
Power cord socket
20
WiFi antenna
Description
Connect for FM and Digital Radio (DAB plus).
Connect to an external speaker - right side.
Connect to an external spea ker - left side.
Connect to Ethernet for wired Internet Radio.
Connect to a USB device for software upgrade.
Connect to the power cable.
Connect for wireless Internet Radio.
GB
8
Page 10
Controls
(Remote Control)
A.
Power button
B.
Volume buttons
C.
Radio Preset buttons
D.
Preset 7,8,9,0,+10 / previous track, pause, next track, add 10
E.
Stop button
F.
TUNE + button
G.
TUNE - button
H.
FORWARD button
I.
Back button
J.
Enter button
K.
INFO button
L.
TIMER button
M.
Music Player button
N.
FM button
O.
Internet Radio button
P.
AUX IN button
Q.
DAB button
R.
EQ button
S.
Mute button
9
Page 11
Item
A
Power button
B
Volume buttons
C
Radio Preset buttons
D
Preset 7,8,9,0,+10 /
previous track, pause,
next track, add 10
E
Stop button
F
TUNE + button
G
TUNE - button
H
FORWARD button
I
Back button
J
Enter button
K
INFO button
L
TIMER button
M
Music Player button
N
FM button
O
Internet Radio button
P
AUX IN button
Q
DAB button
R
EQ button
S
Mute button
Description
Turn on/off the radio.
Press to turn the volume up/down.
Press to listen to preset stations.
Press to listen to preset stations 7, 8, 9, 0, 10 Also for previous track, pause, next track, 10.
Press to stop current action. In Music Player mode press to stop the track.
Navigation button used to go up.
Navigation button used to go down.
Press to move to the right when entering user na me or password.
In Music player mode, press to skip to the next.
Press to backward one page in menu selections. In Music player mode, press to skip to the previous track.
In setup screens, press to go to the previous field.
Press to confirm selection.
Press to display information.
Press to set sleep time and alarms.
Press to enter Music player mode.
Press to enter FM radio mode.
Press to enter Internet radio mode.
Press to enter auxiliary input mode.
Press to enter Digital Radio (DAB plus) mode.
Press to enter Equalizer setup.
Press to mute the radio.
GB
10
Page 12
Navigate Menu Selections
There are two ways to navigate through the menu selections.
1. Navigate through the selection s by rotating the Turning knob on the
radio clockwise or counter clockwise to move the > symbol and
press the Turning knob to confirm the selection.
Use FORWARD/BACK to enter/go to previous menu.
2. Use the navigation buttons (TUNE +, TUNE-, BACK, FW D) on the
remote control to move the > symbol and press enter to confirm
the selection. Use FORWARD/BACK to enter/go to previous menu.
* If necessary, press the BACK button until you can find “Main menu”.
Then highlight and press is with the Turning knob. And you can start
to operate the radio.
Menu navigation:
11
Page 13
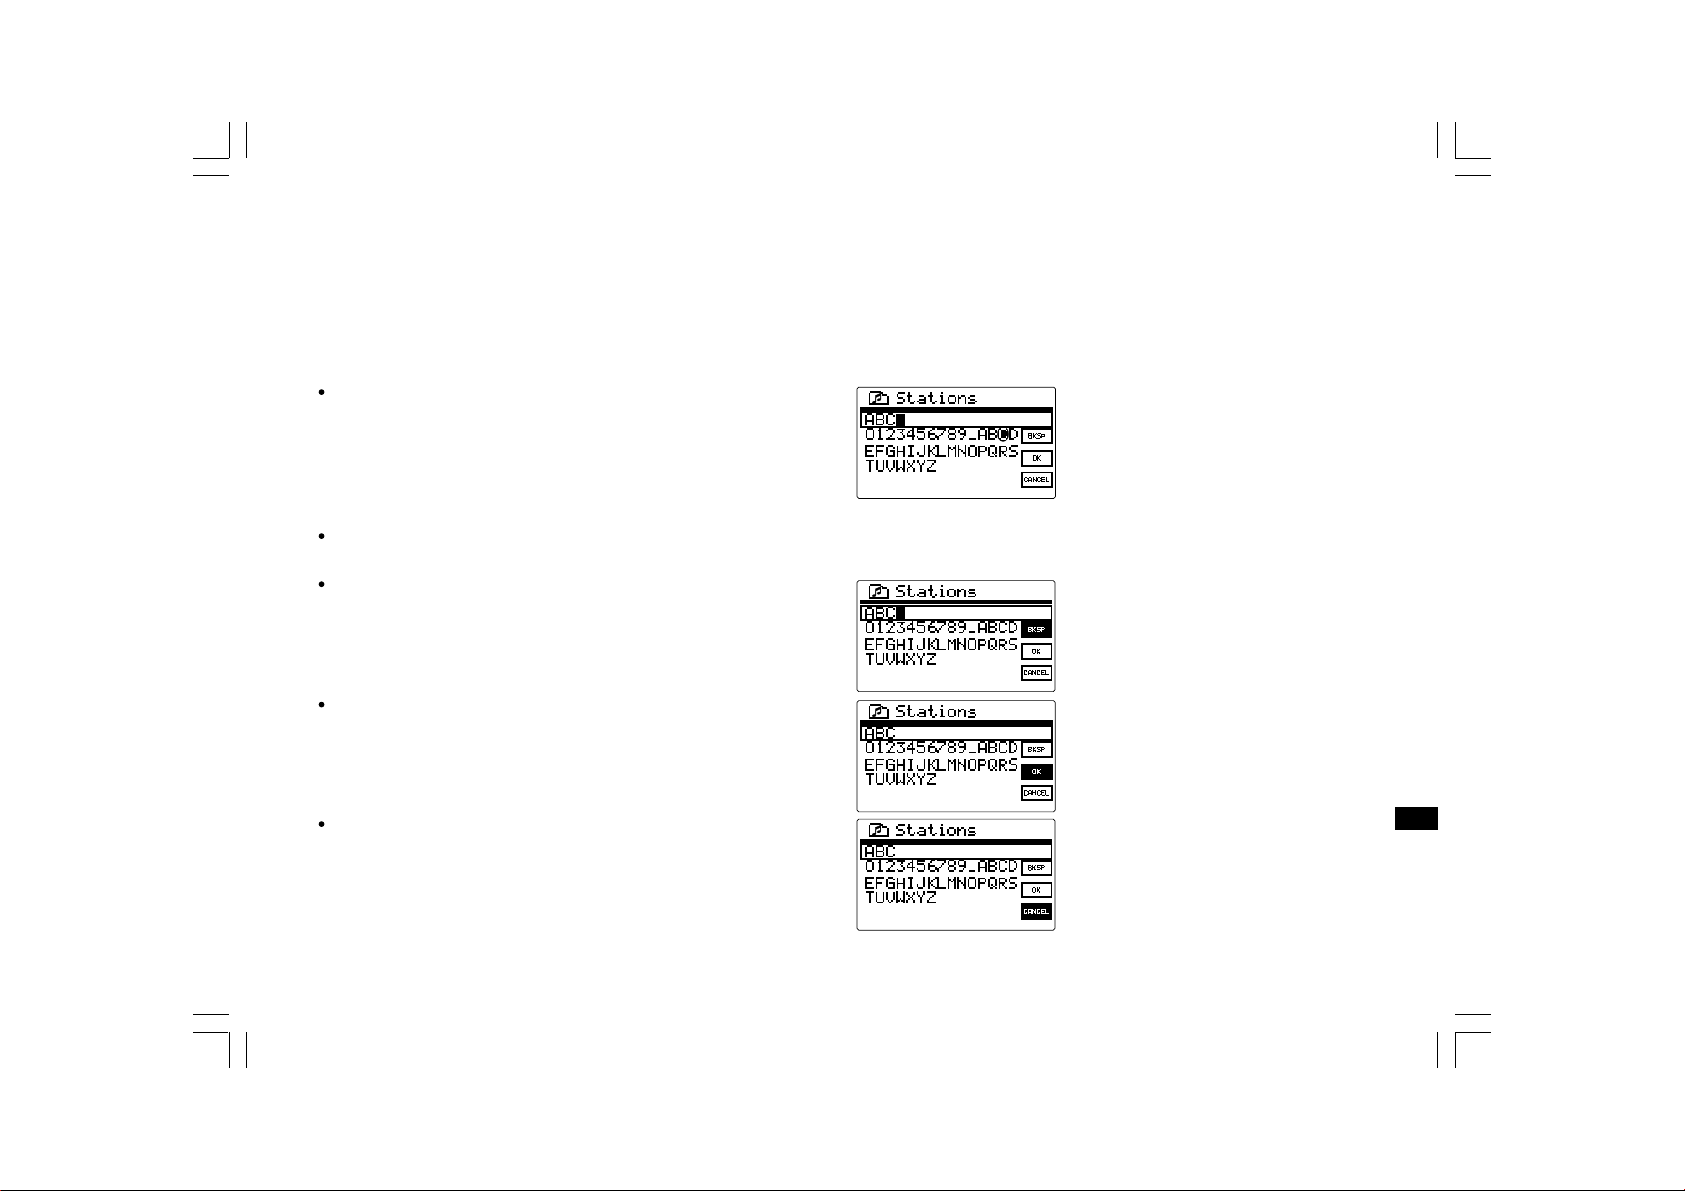
Entering Texts
To start using the radio, text entering may be required. For example,
entering user name, password, search station, etc.
To enter texts:
Rotate the Turning knob to highlight the text/number/symbol.
Press the Turning knob to confirm.
Use BKSP to delete.
Use OK to enter when you are done.
Use CANCEL to cancel and exit.
GB
12
Page 14
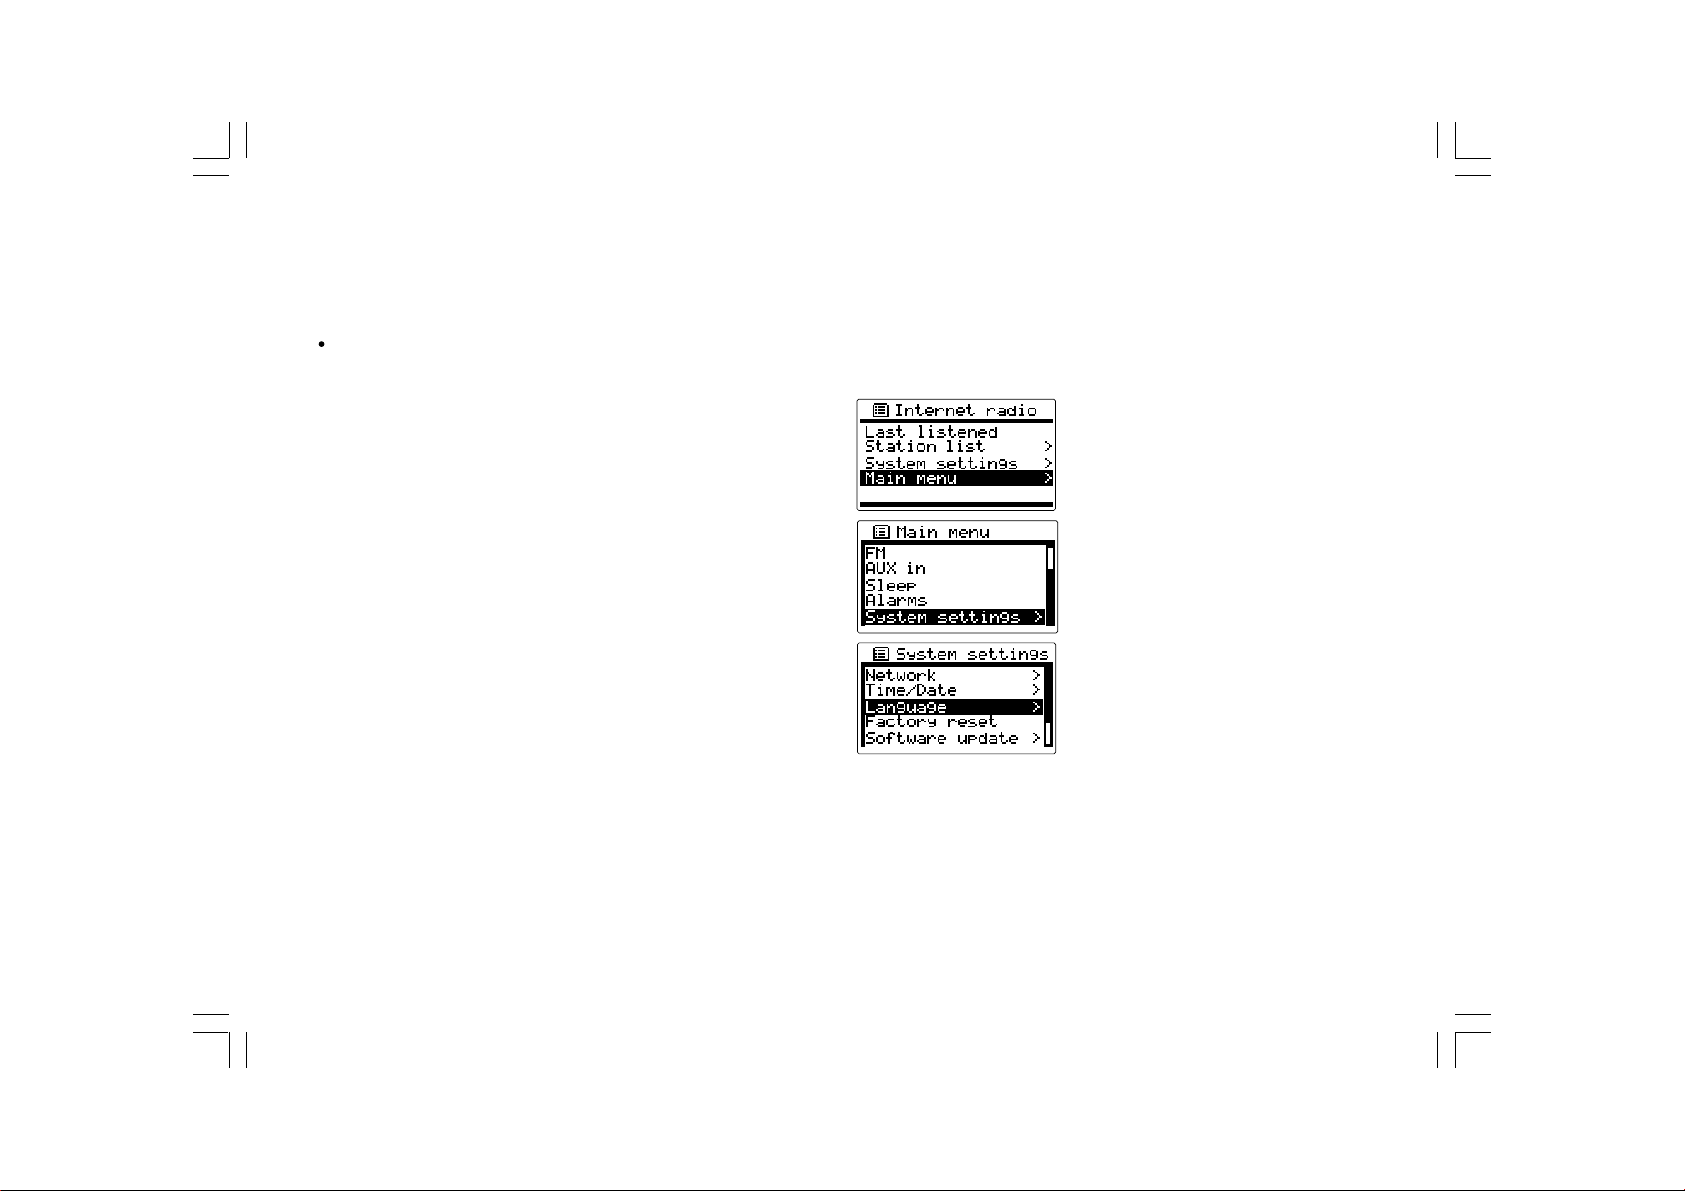
Language Setup
Choose the language to display on the screen.
Go to > System settings > Language and select the language.
* If necessary, press the BACK button to find the “Main menu”
13
Page 15

Getting connected to Internet (for Internet Radio)
Before you can use your Internet ra dio, you must have the f ollowing:
A broadband Internet connection or
A wireless access point (Wi-Fi) or a wired Ethernet connection
(10 or 100 M bits/sec with RJ45 connection) connected to your
broadband Internet, preferably via a router. In ma ny cases the
broadband modem, router and wireless access point will be a single
combined unit supplied by your Internet Service Provider or bought
from a computer store.
If your wireless network is configured to use Wired Equivalent
Privacy (WEP) or Wi-Fi Protected Access (WPA) data encryption
then you need to know the WEP or WPA key so you can get the
Internet radio to communicate with the network.
IMPORT ANT:
Before you continue, make sure that your wireless access point or
router is powered up and working with your broadba nd Internet service
(use your computer to verify this). To get this part of the system working
you must read the instructions supplied with the wireless access point
or router.
* There are 2 ways of connecting your radio to the network,
wired and wireless:
GB
14
Page 16

Connecting to wireless network
1. Make sure you are within ra nge of a wireless network.
2. Go to > System settings > Network > Network wizard >
[name of the wireless network].
3. If your wireless Internet access (router) haven’t been set
the password, the radio will be connected to the Internet. Or,
4. If your wireless Internet access (router) has been set the password,
the display will show either ‘Enter WEP key’ or ‘Enter WPA key’.
You therefore need to enter the correct WEP or WPA key into the
radio to allow it to communicate with your network.
15
Page 17

If you do not have the WEP or WPA key, then you should obtain it from
the person who set your network. Some Wi-Fi routers may come with a
key already set up by the supplier, in which case you should refer to the
user documentation provided with it.
Y ou will be prompted to enter password:
Rotate the Turning knob to highlight the text/number/symbol.
Press the Turning knob to confirm.
Use BKSP to delete.
Use OK to enter when you are done.
Use CANCEL to cancel and exit.
GB
5. Then the screen will show “Connected” when connection had
been made.
16
Page 18

Connecting to wired network
Connect the Ethernet cable into the RJ-45 socket at the ba ck of
the radio. If a wired connection is present then the radio will use
this in preference to a wireless connection.
There are two indicator lights incorporated into the RJ-45 connector.
If you have problems with your wired connection, they may help you to
identify the possible cause of the problem.
Green ON = Link e sta blished, Flashing = Data transfer.
Yellow ON = 100M bps link, OFF = 10M bps link.
17
Page 19

Listening to Internet Radio
There are 3 ways to enter Internet Radio mode:
1. From the menu selections go to > Main menu > Internet radio or
2. Press the BAND button until you see “Internet radio”, or
3. Press the INTERNET RADIO button on the remote control.
GB
18
Page 20

The radio will play the last played radio station.
If you would like to select other stations (or it is the 1st time use,
no last played radio station), f ollow the instruction below.
To search for Internet radio stations:
In The Station list you will find 5 different ways to search for stations.
Go to > Main menu > Internet radio > Stations a nd you will find
5 options. When you enter Internet radio, you may find the radio is
playing the last played station. In this case, rotate the Tuning Knob to
continue the operation.
When you enter Stations, there are 5 options to search for stations:
19
Page 21

Location:
enables you to choose a radio station from the list first by geographic
region and then by country.
1. Rotate the Tuning Knob until the display shows <Location>, and then
press the Tuning Knob to enter the Location search.
2. Rotate the Tuning Knob until it shows the continental you would like
to go to. And press the Tuning Knob to enter.
3. Rotate the Tuning Knob until it shows the country you would like to
go to. And press the Tuning Knob to enter.
GB
20
Page 22

4. It will show the catalog of Internet radio stations from the country
you select. Use the same way to select the catalog, and then the
radio station.
5. When you find the radio station you would like to listen to, press the
Tuning Knob. In few seconds the radio will connect to the selected
radio station.
* Should you be unable to connect to a particular station, please note
that some radio stations do not broadcast 24 hours per day , and some
stations are not always on-line.
21
Page 23

Genre:
enables you to choose radio stations according to their content,
for example Classic, Rock, Sport, News, etc.
1. Rotate the Tuning Knob until the display shows <Genre>, and then
press the Tuning Knob to enter the Genre search.
2. Rotate the Tuning Knob until it shows the type of music you would
like to go to. And press the Tuning Knob to enter.
3. Rotate the Tuning Knob until it shows the country you would like to
go to. And press the Tuning Knob to enter.
4. It will show all the Internet radio stations from the genre and country
you are looking for.
5. When you find the radio station you would like to listen to, press the
Tuning Knob. In few seconds the radio will connect to the selected
radio station.
Should you be unable to connect to a particular station, please note
that some radio stations do not broadca st 24 hours per day, and some
stations are not always on-line.
GB
22
Page 24

Search stations:
enables you to search for a station by entering the name or a keyword.
1. Rotate the Tuning Knob until the display shows <Search stations>,
and then press the Tuning Knob to enter the Search stations search.
2. Enter the key word of the radio station na me you would like to se arch
for by rotating and pressing the Tuning Knob.
3. When the key word is input, press on “OK”. In a moment, the radio
will show all the radio stations related to your search.
To enter texts:
Rotate the Turning knob to highlight the text/number/symbol.
Press the Turning knob to confirm.
Use BKSP to delete.
Use OK to enter when you are done.
23
Page 25

Use CANCEL to cancel and exit.
4. Use the Tuning Knob to find the radio station you would like
to choose, then press the Tuning Knob, and the radio will connect to
the radio station you choose.
Popular station:
enables you to view a list of popular stations and choose from them.
New station:
enables you to view a list of the newest stations and choose from them.
GB
24
Page 26

To listen to the Podcasts:
Some radio stations allow you listen to progra ms that have alrea dy
been broadcast.
Go to > Main menu > Internet radio > Podcasts and you will find
3 options:
1. Location:
enables you to choose a radio station from the list first by geographic
region and then by country.
2. Genre:
enables you to choose podcasts according to their content,
for example Classic, Rock, Sport, News, etc.
3. Search station:
enables you to search for a podcast by entering the name or
a keyword.
T o listen to My Favorite s / My Added Station:
My Favorites and My added station s allow you to a dd Internet
radio stations using Frontier’s website and listen to those station s
on your radio.
It supports http:// form, but not mms:// form.
Go to > Main menu > Internet radio >My Favorites / >
My Added Stations
Register online:
Before first use, please follow the instructions to register on
the website:
1. Go to > Station list > Help > Get access code. The display will show
the Access code.
2. Visit the website using your computer http://www.wifiradio-frontier.
com then click on “register here” and fill out the form with the
access code shown on the display. You can leave blank on
“WiFi radio model”.
25
Page 27

Frontier Website
3. After the registration, the web page shows “My favorite” a n d
“My added station” for operating these 2 functions. After this one
time registration, every time you would like to use these functions,
just go to the website: and enter the email address and password.
To edit My Favorites:
1. Use Browse or Search for stations on the web site to find a station,
2. Click the “Add” icon and the station is added to My Favorite f older.
To edit My Added Stations:
My Added Stations allows you to add the Internet radio stations if you
know the web address of the Internet radios.
1. Click the arrow under My added stations and you will be asked to
enter the web address. Enter the URL exactly as described on the
web page.
2. Click the “Add” icon to add the station.
GB
26
Page 28

Music Player
The Music Player allows you to play audio files which are stored on a
computer on your network. Y ou have to set up on the computer bef ore
you play the music on your radio. It doesn’t support iTunes yet.
Shared Folder
The Windows Media Player 11 allows you to play audio files that are
stored on a computer or a computer on your network.
Y our ra dio supports two file access methods. It ca n conne ct to
Shared Folders on the network. It can also connect with file server
applications using the Universal Plug and Play (UPnP) protocol known
as Shared Media .
All of the supported file types are playable in Windows Shares mode.
When using a UPnP server, the playa ble file type s are de pendant
on the server software used. For example, Microsoft Windows Media
Player11 can serve MP3 and WMA files. To be a ble to play the other
supported file types via UPnP you may need to install additional
third-party software.
When using Windows Shares, music selection is by Artist, by Album
and optionally by tra ck within an Album. When using a Shared Media
UPnP server, the search and selection criteria are determined by the
server, but typically include additional option s such as Genre.
Many server applications also allow you to access files according to the
folders within which they are stored.
27
Page 29

T o share medi a using Windows Media Player 11:
1. Open Media Player and click the arrow below Library tab then
choose Options.
2. Click the Configure Sharing button.
3. Check the Share my media to: check box. WiFi Radio is shown as
an U nknown Device.
4. Click the Settings button.
GB
28
Page 30

5. Name your Share media and choose the settings.
6. Finally, check the box to choose to Allow new devices and
computers automatically or not.
7. Click Ok when you are done.
Shared Folder PC Setup
Set up the PC to allow your radio to access your audio files via Window
Shares (make the music file shared).
1. Ensure that your PC is available on the same network as your
Internet radio.
2. Use Windows Explorer to locate the folder where your audio files
are stored.
3. Right click on the folder.
4. Select ‘Properties’.
5. Click on ‘Sharing’.
6. Select ‘Share this folder on the network’ and ‘Allow network users to
change my files’.
Setup your radio to connect to the computer if user na me and password
are required to log in.
29
Page 31

Shared Media (UPnP)
Shared Media uses Windows Media Player (WMP) 11 and above as
media server. This mode does not require any setting in the radio,
but the PC needs to be configured to allow the radio access to
the media. You will only have to do it once.
T o play music in the Music Player’s shared medi a:
1. Go to > Main menu > Music Player > Shared media >
[na me of computer] > [medi a categories]. The UPnP server makes
Media categories available. For example, ‘Music’ or ‘Playlists’.
User na me and password may be required.
T o setup your PC f or shared medi a:
1. If your PC is running Microsoft Windows XP or Windows Vista then
you can use Microsoft’s Windows Media Player 11 (WMP 11) to act
as your UPnP (Universal Plug and Play) media server. If not already
installed on your PC, Windows Media Player 11 may be downloaded
from Microsoft’s website.
2. Once installed, WMP 11 can create a library from all the media files
available to it on your PC. To add new media files to the library ,
select ‘File > Add to Library… > Advanced Options’, click ‘Add’ and
choose the files you wish to add and click ‘OK’.
T o play music in the Music Player’s shared folders:
1. Go to > Main menu > Music Player > Shared folders >
[name of computer] > [name of folders]. User name and password
may be required.
2. Find and select the audio file you want to listen to in the folder and
press the Turning knob to play.
3. Use Forward/Back to go to next/previous track.
2. Find and select the audio file you want to listen to in the folder and
press the Turning knob to play.
3. Use Forward/Back to go to next/previous tra ck.
GB
30
Page 32

Digital Radio (DAB plus)
To listen to the Digital Ra dio (DAB plus) ra dio, there are 3 ways to enter
Digital Radio (DAB plus) mode, after turning on the radio:
1. From the menu selections go to > Main menu > DAB or
2. Press the BAND button until you see “DAB radio”, or
3. Press the DAB button on the remote control.
* If this is the first time the radio is used in Digital radio (DAB plus)
mode, the display will show “Scanning”. If the radio has been
used before, the la st played station will be selected. If there is no
station been detected in your area, the display will show
“Service not available”. You may relocate your radio to a position
giving better reception.
Selecting a Digital Radio (DAB plus) station
1. Rotate the Turning knob to scroll through the list of available stations.
2. Press the Turning knob to select the station. The display may show
“Connecting…”. And then enter the station you choose.
31
Page 33

Secondary service - a Digital Radio (DAB plus)
Some radio stations have one or more secondary services associated
with them. T ypically they are not broadcasting continually. If a station
has a secondary services, the se condary service s will appear in the list
of radio station nam e s bene ath the main (or pri mary) station.
Rotate the Turning knob to scroll through the list and press on it to
select the station.
Display modes - Digital Radio (DAB plus)
Your radio ha s 5 display option s when in Digital Radio (DAB plus) mode.
Press the INFO button to cycle through the different display options.
a. Frequency:
Displays the frequency of Digital Radio (DAB plus) of the station
listened to.
b. Signal strength and Signal error:
Displays a graphic showing the signal strength and the signal error
for the station been received.
c. Bit rate, Codec and Channels:
Displays the digital bit rate, decode method and channels of the
station been listened to.
d. Date:
Displays the current date.
e. Scrolling text:
Displays the text provided by the station been listened to. If the
station doesn’t provide the text, the display will show “Playing”.
GB
32
Page 34

Finding new stations - Digital Radio (DAB plus)
If you would like to use your radio for Digital Ra dio (DAB plus) re ception
in a new location, or if no station were detected during the initial scan,
you can follow the procedure below to find out which stations
are available:
1. Ensure the radio is on and in DAB plus (Digital Radio) mode.
2. Press the BACK button (if necessary) to go to the DAB plus
(Digital Radio) menu.
3. Rotate the Turning knob until “Local sca n” is highlighted on
the display, and press the Turning knob. And your radio will
perform a scan of your local frequencies.
4. The display will show “Scanning”. As new stations are found,
the counter will increase and stations will be added to the list.
5. To scan a full range frequency of your radio, rotate the T urning knob
until “Full scan” is highlighted, and press the Turning knob.
The display will show “Scanning”. As new stations are found,
the counter will increase and stations will be added to the list.
33
Page 35

Manual Tuning - Digital Radio (DAB plus)
This is for you to turn to the specific channel directly.
1. Ensure the radio is on and in DAB plus (Digital Radio) mode.
2. Rotate the Turning knob until “Ma nual tune” is highlighted on
the display, and press the Turning knob.
3. Rotate and press the T urning knob to select the required channel.
The clear unfilled rectangular on the display shows the minimum
signal level required for satisfactory reception. The signal strength
bar will go up and down showing the changing signal strength as
you adjust the antenna on your radio.
4. When a DAB plus (Digital Ra dio) signal is found, the display will
show the na me of the DAB plus (Digital Radio) multiplex and a bar
graph to indicate the signal strength.
5. Any new stations found will be added to the list in the radio.
6. Press the Turning knob to access the DAB plus (Digital Radio) menu,
and select “Station list” to go back to the normal tuning.
GB
34
Page 36

DRC (Dynamic Range Control) - Digital Radio (DAB plus)
DRC can ma ke quieter sounds e asier to hear when your radio is listened
in noisy environment. Not all the stations support DRC function.
FM Radio
To listen to the FM radio, there are 3 ways to enter Internet
Radio mode, after turning on the radio:
1. Ensure the radio is on and in DAB plus (Digital Radio) mode.
2. Press the BACK button to go to the DAB plus (Digital Radio) menu.
3. Rotate the Turning knob until “DRC” is highlighted on the display,
and press the Turning knob.
4. The display will show:
DRC high: DRC level is set as sent by broadcaster.
DRC low: DRC level is set to 1/2 that sent by broadcaster.
DRC off: DRC is off.
Rotate and press the Turning knob to make the selection.
Station order setup - Digital Radio (DAB plus)
There are 3 station order settings which are alphanumeric,
ensemble and valid. The default of your radio is alphanumeric.
1. Ensure the radio is on and in DAB plus (Digital Radio) mode.
2. Press the BACK button to go to the DAB plus (Digital Radio) menu.
3. Rotate the Turning knob until “Station order” is highlighted on
the display, and press the Turning knob.
4. Rotate and press the Turning knob to make the selection of:
Alphanumeric: Arranges your stations by alpha-number like
A…Z 0…9.
Ensemble: Arranges each station due to multiples.
Valid.: Shows the stations for which a signal can be found.
1. From the menu selections go to > Main menu > FM or
2. Press the BAND button until you see “FM”, or
3. Press the FM button on the remote control.
The radio will play the last played radio station. If you would like to
select other stations, follow the instruction below.
T o change FM stations:
1. Rotate the Turning knob on the radio clockwise or counter clockwise
or press the TUNE+/TUNE- buttons on the remote to
increase/de cre ase the radio frequencies. Or,
2. Press the Turning knob on the radio or on the remote control to
scan and go to the next available FM station.
35
Page 37

FM RDS – Radio Data System
The Radio Data System (RDS) is a system in which inaudible digital
information in addition to the normal FM radio program is transmitted.
Under FM ba nd, it provides functions such as Clock Time, Music Type
Search and Information Mode:
* The information display is only available when the station provides
R.D.S service.
Press the INFO button when the radio is under FM mode, to cycle
through the various modes.
EQ- Equalizer
Your radio ha s bass and treble characteristics of the sound ca n be
adjusted to your personal taste.
1. Press the EQ button either on the radio or on the remote control.
2. Select the suitable EQ setting for the music you are listening to.
Or Select User EQ to adjust bass and treble. When Flat is selected,
treble and base will be set to zero.
GB
36
Page 38

Preset
Preset allows you to store the most frequent listened stations that
you can select those stations easily and quickly. You can preset up to
10 stations for ea ch Internet Radio, FM and Digital Radio (DAB plus).
To store a preset:
1. Turn to the required ba nd (Internet Ra dio, FM or Digital Radio
(DAB plus)) and station.
2. Press and hold the required preset button (1 to 10) on the re mote
control until the display shows “Preset stored”. The station will be
stored in the chosen preset. Repeat this for the remaining presets
if needed.
There is another option for FM mode:
1. Press the Preset button and the LCD will show “Save to preset” list.
2. Rotate the Tuning knob to select which preset number you would like
to save, and press the Tuning knob to save the preset.
T o recall a preset:
1. Enter the required band (Internet Radio, FM or Digital Radio
DAB plus)).
2. Press the required preset button (1 to 10) and your remote control
will then to the station stored in the preset memory. Or press the
STOP/PRESET button and use TUNING KNOB to select and recall
the preset.
Clock Operation
The radio must have the clock / date set to use the alarm functionality.
Clock/Date Setup
1. To setup the time go to > System settings > Time/Date >
Set Time/Date.
2. Use TUNE+/TUNE- or Turning knob to a djust the values and use
FORWARD/BACK to move back and forth between fields. Press the
Turning knob or the button to move back and forth between f ields
or confirm.
Time Zone Setup
To setup the time go to > System settings > Time/Date >
Set timezone. Then select the time zone.
DST (Daylight Savings Time setup)
To setup the daylight saving time (1 hour ahead) go to >
System settings > Time/Date > Daylight savings. And then select
ON or OFF for the daylight savings.
Time/Date Auto Update
Auto update menu allows the user to select whether or not the
time/Date is to be synchronized with the Internet.
To setup the auto update go to > System settings > Time/Date >
Auto update and choose the source of the update.
37
Page 39

Set 12/24 Hour
12/24 hour setup allows you to change the clock display format.
To setup the auto update go to > System settings > Time/Date >
Set format, and choose 12 hour or 24 hour display.
Set Sleep Time
Sleep time allows you to set the time to turn the radio off automatically.
Press the Ti mer button on the radio. And the radio will enter the
Set Sleep time mode. While the display still showing as the picture,
rotate the Tuning Knob to adjust between off, 15 minutes, 30 minutes,
45 minutes, and 60 minutes.
GB
38
Page 40

Set Alarms
There are 2 alarms.
1. Press the Timer button twice on the radio.
2. Choose Alarm1 or Alarm2 to enter Alarm setup, by rotating a nd
pressing the Turning knob.
3. After entering the Alarm setup, there are some options to set up:
Time: Alarm time setup.
Mode:
Choose the source of what to play when time is up: Buzzer,
Internet radio, DAB (Digital Radio) or FM.
Preset:
Choose the radio station which will play when time is up. You can
choose from the last played station, or from the Presets.
Enable:
On/Off: Use this option to turn the alarm on/off, by pressing the
Turning knob.
Frequency:
To set whether the alarm is for once, everyday, weekly, weekdays or
at weekends.
Daily - will sound everyday.
Once - will sound at one time only.
Weekends - will sound on weekends only.
Weekdays - will sound on weekdays only.
39
Volume: To adjust the alarm volume.
Save: To save the change you have made.
When the Alarm sounds
To turn off the alarm, press the STANDBY button. Or,
To interrupt the alarm sounding, press any button of the radio, the alarm
will stop for 5 minutes and the display will show the count down.
The snooze function can be repeat during the period of the alarm
is active.
Press the STANDBY button to cancel the snooze and alarm function.
Page 41

Upgrade firmware
From time to time, new software features for your radio may
be developed. For example, a new audio decoder may be a dded to
allow an alternative audio f ormat to be supported. You radio has
therefore been designed to allow its internal software to be upgraded
using your Internet connection.
Upgrading the software will remove all network settings, radio station
presets and alarm settings from your radio. Do not attempt this
procedure unless you have a good Internet connection and a relia ble
mains power supply. If you connect to your router using a Wi-Fi
connection, make sure that this is also reli able before proceeding.
The Upgrade Firmware option allows your radio to download new
internal software from the Frontier portal on the Internet. If there
is new software available, then the radio will ask whether you want to
download it or not. Selecting No or using the Back button will cancel
the operation.
IMPORT ANT:
Do not switch off the power to the radio until the upgrade operation is
complete and the radio has restarted, otherwise the radio may become
permanently da maged.
There are two mechanisms to upgra de the radio.
Upgrade via Internet:
Go to > System settings > Software upgrade
There are 2 options, you can either choose Auto-check setting to check
periodically for new software version, or check it now.
Follow the instruction on the display, it tells you if the software of your
radio is up to date or not. If not, you can upgrade to the latest software.
Upgrade via USB
1. Connect the radio with the PC using an USB cable.
2. Start the upgrade.exe utility on the PC.
3. Utility will ask you to run the Software upgrade wizard on the
Wi-Fi radio.
4. If the radio is not yet in upgrade mode (showing the text
“Waiting for PC wizard…”), enter the Software upgrade mode by
removing the power, then holding down the keys <s kip backward>
and <ski p forward> while turning the radio on again.
5. The upgrade will automatically start a nd takes approximately
2 minutes.
6. Upon completion, the radio will automatically reboot and load the
new software.
GB
40
Page 42

Factory Reset
If you wish to completely reset your radio to its initial state this may be
performed by following this procedure.
1. Go to > System settings > Factory reset.
2. Rotate and press the Turning knob to confirm rest.
3. The display will show “Restarting” for several seconds, and then the
Factory reset is done.
41
Page 43

Trouble Shooting
Problem
Unable to connect to Wi-Fi network
or Una ble to get Internet listing.
Unable to hear sound in
AUX IN mode.
Una ble to find PC or music folder
using scan.
Unable to connect to certain stations.
Connections are Un stable.
Possible Cause
1. Router might be down.
2. Wrog network password entered.
Aux device or radio volume not
adjusted correctly.
Sharing not enabled.
1. Selected Internet radio station
might be down.
2. The station does not support
the format used by the Internet
radio station.
3. Radio is not broadcasting at this
time of day or reached maximum
allowed listeners.
1. Interference caused by other
electronic products.
2. Internet may be out of bandwidth.
Possible Solution
1. Check if PC is able to connect to the network.
2. Check if the network key is correct.
Increa se the volume on the radio and the aux device.
Enable sharing. See Music Player for more details.
1. Check if PC is able to access the Internet radio portal
(http://www.wifiradio-frontier.com) when connected to the
same Wi-Fi network.
2. Try connecting to the radio station again later.
1. Try moving the Ra dio to a nother Location.
2. Try connecting to a wired network and if the problem persists,
turn off programs that are using the Internet on your PC to
preserve bandwidth.
GB
42
Page 44

Specification
TUNE
FEA TURE
I/O Socket
FM
Digital Radio
(DAB plus)
WiFi
Ethernet
If at any time in the future you should need to dispose of this product please note that: Waste electrical products should not
be disposed of with household waste. Please recycle where facilities exist. Check with your Local Authority or retailer for
recycling advice. (Waste Electrical and Electronic Equipment Directive)
Frequency (MHz)
Band III
IEEE 802.11 b / g (GHz)
IEEE 802.3
Internet Radio
Media Player
Program upgrade
EQ
AC / DC - in
Line - out
Earphones
87.5 - 108
(5A – 13F)
2.4 - 2.4835
*
vTuner
*
Via USB-B
T one control
AC
*
*
43
 Loading...