

SANGEAN WFR-39 Instructions

WFR-39
GB
Version 1

Table of Contents
1. IMPORTANT SAFETY INSTRUCTIONS ..............03
2. Introduction ....................................................03-04
Overview of the main unit ............................ 03-04
3. Getting started .............................................. 04-06
Finding a suitable location for the radio .......... 04
Powering the radio .........................................04-05
Operation on USB power ...................................... 04
Operation on battery power....................................04
Charging the unit..............................................04-05
Performing the radio's initial setup....................05
Setting the menu language .................................. 05
The mobile app's privacy policy..............................05
Configuring the network connection ......................05
Turning the radio on / off ...................................05
Navigating the radio menus .............................. 05
Controlling the radio using the AirMusic Control
app ........................................................................06
4. The configuration menu ...............................06-08
5. Listening to Internet Radio ............................08-09
Tuning into internet radio stations ...................08
Local radio menu .................................................. 08
Internet Radio menu ..............................................08
Storing preset / favorite internet stations.....08-09
Recalling preset / favorite internet stations ..... 09
6. Listening to podcasts ........................................09
Storing preset / favorite podcasts ....................09
Recalling preset / favorite podcasts .................. 09
7. Spotify Connect ...................................................09
8. Listening to FM radio .....................................09-10
Tuning into FM stations .................................09-10
Performing an automatic scan .............................09
Manually tuning into FM stations ......................09-10
Storing preset FM stations ................................. 10
Recalling preset FM stations .............................10
9. Listening to music using the radio's media
center features ...............................................10-11
Podcasts ............................................................. 10
Audio playback via cloud music services ....... 10
Audio playback via UPnP server ...................10-11
Setting up a UPnP server and playing audio using
Windows Media Player .....................................10-11
Using UPnP server on Mac or Linux .....................11
Supported formats .................................................11
10. Listening to music using the headphones jack....
...............................................................................11
11. Troubleshooting ..................................................12
01
12. Specifications ......................................................13
1
2
GB
3
4
5
10 8 7 69111213
14
15
16
02
1. IMPORTANT SAFETY INSTRUCTIONS
1. Do not install near any heat sources such as radiators,
heat registers, stoves or other apparatus (including
amplifiers) that produce heat.
2. Only use attachments / accessories specified by the
manufacturer.
3. To reduce the risk of fire or electric shock, do not
expose this appliance to rain or moisture.
4. Apparatus shall not be exposed to dripping or
splashing liquids and no objects filled with liquids,
shall not be placed on the apparatus.
5. The batteries shall not be exposed to excessive heat
such as sunshine, fire or the like.
6. Any changes or modifications not expressly approved
by the party responsible for compliance could void the
user’s authority to operate the equipment and warranty.
GB
7. CAUTION: Risk of explosion if the battery is replaced
by an incorrect type.
8. Do not allow your radio to be exposed to water, steam
or sand.
9. Do not leave your radio where
excessive heat could cause damage.
10. The following safety relevant information should be
considered as applicable:
● minimum distances around the apparatus for
sufficient ventilation;
● the ventilation should not be impeded by covering
the ventilation openings with items, such as
newspaper, table-cloths, curtains, etc.;
● no naked flame sources, such as lighted candles,
should be placed on the apparatus;
● attention should be drawn to the environmental
aspects of battery disposal;
● the use of apparatus in tropical and / or moderate
climates.
11. CAUTION: Danger of explosion if battery is incorrectly
replaced. Replace only with the same or equivalent type.
12. If an apparatus is provided with a replaceable lithium
battery, the following applies:
● if the battery is intended to be replaced by the user,
there shall be a warning close to the battery or in
both the instruction for use and service instructions.
For United States:
Cautions to the user
This device complies with part 15 of the FCC Rules.
Operation is subject to the following two conditions:
(1) This device may not cause harmful interference, and (2)
this device must accept any interference received, including
interference that may cause undesired operation.
Any Changes or modifications not expressly approved by
the party responsible for compliance could void the user’s
authority to operate the equipment.
Note: This equipment has been tested and found to comply
with the limits for a Class B digital device, pursuant to part
15 of the FCC Rules. These limits are designed to provide
03
reasonable protection against harmful interference in a
residential installation. This equipment generates uses and
can radiate radio frequency energy and, if not installed
and used in accordance with the instructions, may cause
harmful interference to radio communications.
However, there is no guarantee that interference will not
occur in a particular installation. If this equipment does
cause harmful interference to radio or television reception,
which can be determined by turning the equipment
off and on, the user is encouraged to try to correct the
interference by one or more of the following measures:
● Reorient or relocate the receiving antenna.
● Increase the separation between the equipment and
receiver.
● Connect the equipment into an outlet on a circuit
different from that to which the receiver is connected.
● Consult the dealer or an experienced radio / TV
technician for help.
This equipment complies with FCC radiation exposure
limits set forth for an uncontrolled environment. This
equipment should be installed and operated with minimum
distance 20cm (8 inches) between the radiator & your
body.
2. Introduction
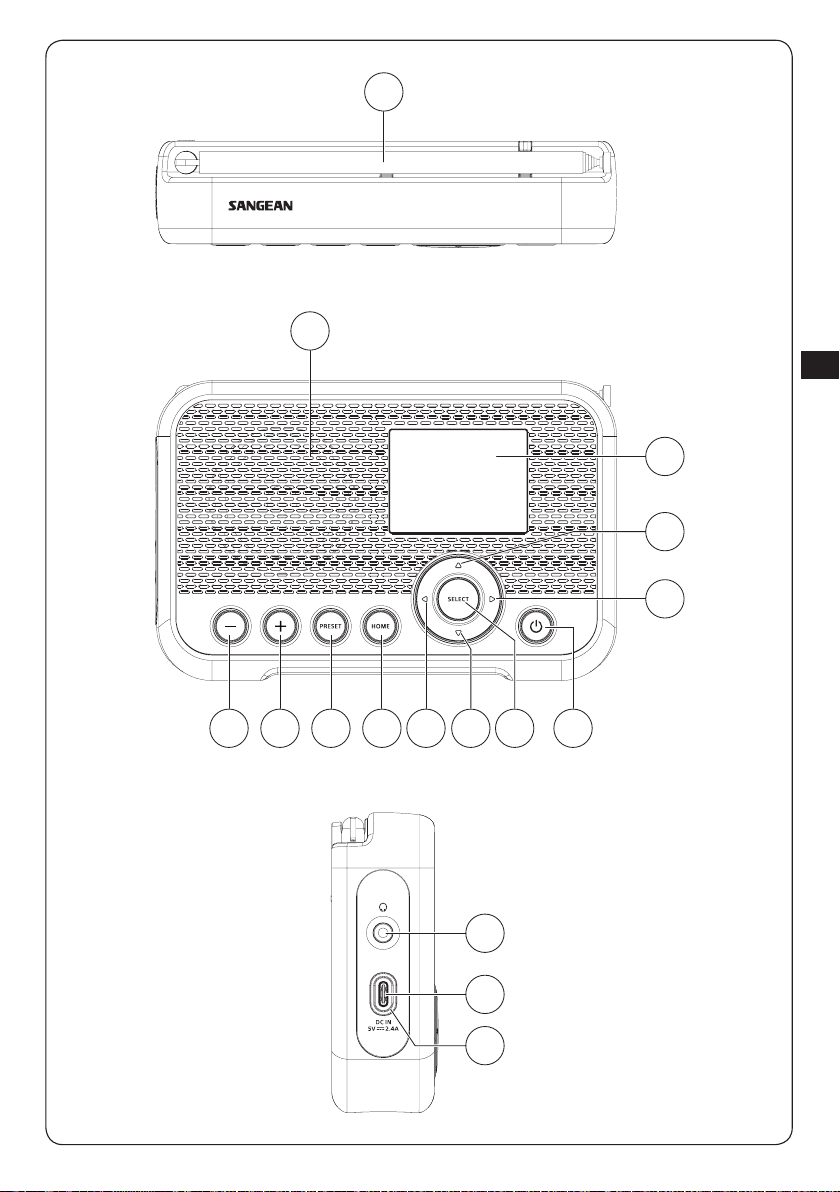
Overview of the main unit
1
FM antenna
● Position and extend the antenna correctly to
improve the radio's FM reception.
2
Speaker
3
LCD display
4
Up button
● Press to navigate in the radio's menus or change
the current character while inputting text.
● While in FM mode, press to increase the frequency.
● While playing from a UPnP server, press to go to
the previous track.
5
Right button
● Press to navigate in the radio's menus or select
the next character while inputting text.
● While in FM mode, press to increase the frequency.
● While in FM mode, press and hold to automatically
scan from the current frequency for a station with a
higher frequency.
● While playing from a UPnP server, press to watch
track cover.
● While playing from a UPnP server, press and hold
to go to the next track.
6
Power button
● When connected to a USB power source, press
this button to turn on the radio or switch to the
Standby mode.
● When not connected to a USB power source,
press this button to turn the radio on or off.

7
Select button
● Press the button to go forward one step in menus
or to confirm the selected item.
● While in FM mode, press this button to perform an
automatic scan.
8
Down button
● Press to navigate in the radio's menus or change
the current character while inputting text.
● While in FM mode, press to decrease the frequency.
● While playing from a UPnP server, press to go to
the next track.
9
Left button
● Press to navigate in the radio's menus or select
the previous character while inputting text.
● While in FM mode, press to decrease the frequency.
● While in FM mode, press and hold to automatically
scan from the current frequency for a station with a
lower frequency.
● While playing from a UPnP server, press and hold
to go to the previous track.
10
Home button
● Press this button to go back to the radio's main
menu.
11
Preset button
● In the Internet radio, Podcast, FM modes, quickly
press and release this button to go to the preset
list for the selected mode.
● In the Internet radio, Podcast, FM modes, press
and hold this button to save the station you are
tuned into to a preset number.
12
+ button
● Press this button to increase the radio's volume
setting.
13
- button
● Press this button to decrease the radio's volume
setting.
14
Headphone socket
● 3.5mm socket for connecting a pair of headphones.
15
DC IN socket (USB Type-C)
● Connect a USB Type-C cable to this port to power
the radio and charge the battery.
16
Battery charging indicator
● The Battery charging indicator will light up green
when the battery is being charged and will light
up red to indicate the battery is low when using
battery power.
3. Getting started
Follow the instructions in this chapter to get your WFR-39
up and running in no time.
Finding a suitable location for the radio
After unpacking the radio from the box, take the following
guidelines into account when finding a suitable location
for the radio:
● Place the radio on a flat, even surface such as a table.
● Do not place the radio near heat sources.
● Make sure there is sufficient space available around the
radio for proper ventilation.
● If you are planning to connect the radio to your Wi-
Fi network, make sure to place the radio in a location
where Wi-Fi reception is good.
● Avoid placing the radio near appliances that can
interfere with Wi-Fi reception, such as microwaves.
Powering the radio
The WFR-39 can be powered using the radio's internal
Lithium-ion battery or by connecting a USB power source
to the radio's DC IN socket.
Operation on USB power
To use the radio on USB power, connect the supplied
USB cable to the radio's DC IN socket and a USB power
source supplying 5V / 2.4A while the radio is turned off.
After connecting the cable, the radio will automatically turn
on and the Battery charging indicator will light up green
to indicate that the radio's battery is being charged. Press
the Power button to switch the radio to the Standby mode.
The radio will power off by disconnecting the radio from
the USB power source when radio is in standby mode.
Operation on battery power
To use the radio on battery power, disconnect the USB
cable, make sure the battery is charged and then press
and hold the Power button. To turn off the radio, press the
Power button. The radio's Battery charging indicator will
light up red when the radio is low on battery. At this point
the USB cable needs to be connected to recharge the
internal Lithium-ion battery.
Note: Reduced power, distortion and a "stuttering sound"
or a red battery charging indicator are all signs that the
batteries need to be replaced or recharged. Instructions
on recharging the batteries can be found below.
Charging the unit
The WFR-39 features a built-in Lithium-ion battery that
can be recharged by either using a USB charging port or
a USB power adapter (not included) with a rated output of
DC 5V / 2.4A.
The first time you use your WFR-39, connect it to a USB
charging port or USB power adapter and fully charge the
battery. While the battery is being charged, the Battery
charging indicator will be solid green. After the battery is
fully charged, the green Battery charging indicator will turn
off.
Note: You can start using your WFR-39 while charging. In
this case, please make sure that the USB power source
provides 5V / 2.4A of electrical current. Otherwise, it may
damage the USB power source.
1. Connect the supplied USB cable to the radio's DC IN
socket and a USB power source supplying 5V / 2.4A.
2. When the battery is charging, the Battery charging
indicator will be solid green.
When the indicator turns off, the battery is fully charged,
and charging is stopped.
GB
04
 Loading...