

Page 1
381RE0D-A
WiFi - Internet Radio/DAB+/FM RDS STEREO RECEIVER
WiFi – Radio Internet RECEPTEUR STEREO/
DAB+/FM RDS
WiFi-Internetradio/
DAB+/UKW-RDS-STEREOEMPFÄNGER
Operating instruction
Mode d’emploi
Bedienungsanleitung
GB
F
D
Page 2

T able of Contents
Important Safety In structions
.............................................. 2-4
Getting Started ......................................................................... 5
Controls .............................................................................. 7-10
Getting connected to Internet (for Internet Ra dio) ............. 14
Listening to Internet Radio ................................................... 18
Digital Radio (DAB plus) ...................................................... 31
Clock Operation .................................................................... 38
Upgrade firmware ................................................................. 41
T rouble Shooting ................................................................. 43
Specification .......................................................................... 44
1
Page 3

Important Safety In structions
1. Read and understand all safety and operating instructions bef ore the
radio is operated.
2. Retain instruction: The safety and operating in struction s should be
retained for future reference.
3. Heed warnings. All warnings on the appliance a nd operating
instructions should be followed.
4. Follow all operations and use instructions.
5. Only use attachments/accessories specified by the ma nufacturer.
6. Use only a dry cloth for clea ning the exterior of the radio.
7. Ventilation: This radio should be situated so that its location or
position does not interfere with its proper ventilation. For example,
the radio should not be used on a bed, sofa, rug or other soft
surfaces that may block the ventilation openings. It should not be
placed in a built-in situation like a cabinet that may reduce airflow
through the ventilation openings. Also keep 10cm space on the back
of the radio.
8. Water a nd moisture: The appliance should not be used near water.
Do not use near a bathtub, washbowl, laundry tub, kitchen sink,
wet basement, swimming pool, etc.
WARNING! Do not expose this product to rain or moisture.
9. Do not expose this product to splashing or dripping.
Objects containing liquid, such as vases or drinking glasses,
should not be placed on top of this product.
10. Do not install near any heat sources such as radiators,
heat registers, stoves, or other apparatus (including amplifiers)
that produce heat.
11. Do not place the radio on an unstable cart, stand, bracket or table.
The radio may fall, causing serious personal injury and damage to
the radio.
12. Do not atte mpt to service the receiver yoursel f. Removing the cover
may expose you to dangerous voltage, a nd will void the warranty.
Refer all servicing to authorized service personnel.
13. Unplug the ra dio from the AC power outlet before cleaning. Use only
a dry cloth for cleaning the exterior of the radio.
14. Do not plug the AC lead into the AC outlet if the outlet is still wet.
Make sure that the outlet is dry before and after use.
15. Power sources: The radio should be operated only from the type of
power source indicated on the marking label. If you are not sure of
the type of power supply to your home, consult your radio dealer or
power company.
GB
2
Page 4

16. Power cords: The power cord should be positioned so it is not
walked on, pinched, or items placed on top of it. Pay particular
attention to cords at plugs, convenience receptacles, and the point
where they exit from the unit. Unplug the power cord by gripping
the power plug, not the cord. Operate the radio using only the
current type of power source indicated. If you are not sure of the
type of power supply to your home, consult your dealer or local
power company.
17. Do not defeat the safety purpose of the polarized or grounding-type
plug. A polarized plug has two blade s with one wider than the other.
A grounding type plug has two bla des and a third grounding prong.
The wide blade or the third prongs are provided for your safety. If the
provided plug does not fit into your outlet, consult an ele ctrician for
replacement of the obsolete outlet.
21. Unplug this product from the wall outlet and refer servicing to
qualified service personnel under the following conditions:
When the power supply cord or plug is damaged.
a.
If liquid has been spilled or objects have fallen into the product.
b.
If the product has been exposed to water or rain.
c.
If the product does not operate normally by following the
d.
operating instructions.
If the product has been dropped or damaged in any way.
e.
When the product exhibits a distinctive change in performance.
f.
22. If the LCD becomes cracked and damaged, do not touch the liquid.
23. The changes or modif ications not expre ssly approved by the party
responsible for compliance could void the user’s authority to
operate the equipment.
18. Do not overload wall outlets or exten sion cords. This can result in a
risk of fire or electrical shock. Never insert objects of any kind into
the radio through opening.
19. The power plug should be close to the radio, and easy to be
approached that in case of emergency, to disconnect the power
from the radio, just unplug the power plug from the AC power slot.
20. Object and Liquid Entry – Never push objects of any kind into this
radio through openings as they may touch dangerous voltage points
or short – out parts that could result in a fire or electric shock.
Never spill liquid of a ny kind on the product.
3
24. To comply with the FCC RF exposure complia nce require ments,
no change to the antenna or the device is permitted. Any cha nge to
the antenna or the device could result in the device exceeding the
RF exposure requirements and void user’s authority to operate
the device.
Page 5

25. FCC INFORMATION
The Federal Communication Commission Radio Frequency Interference
Statement includes the following paragraph:
The equipment has been tested and found to comply with the li mits
for a Cla ss B Digital Device, pursua nt to part 15 of the FCC Rule s.
These limits are designed to provide reasonable protection against
harmful interference in a residential installation. This equipment
generates, uses and can radiate radio frequency energy and, if not
installed and used in accordance with the instruction, may cause
harmful interference to radio communication. However, there is no
grantee that interference will not occur in a particular installation.
If this equipment dose cause harmful interference to radio or television
reception, which can be determined by turning the equipment of f and on,
the user is encouraged to try to correct the interference by one or more
of the following mea sure s:
- Reorient or relocate the receiving antenna .
- Increa se the separation between the equipment a nd re ceiver.
- Connect the equipment into an outlet on a circuit different from that to
which the receiver is connected.
- Consult the dealer or an experienced radio/TV te chnici an for help.
The user should not modify or change this equipment without written
approval f orm SANGEAN ELECTRONICS INC. Modification could void
authority to use this equipment.
26. Excessive sound pressure on ear - and he a dphones could i mpair
the hearing ability.
Higher setting that idle on the equalizer leads to higher signal
voltages on the output for ear - a nd he adphones.
GB
4
Page 6
Getting Started
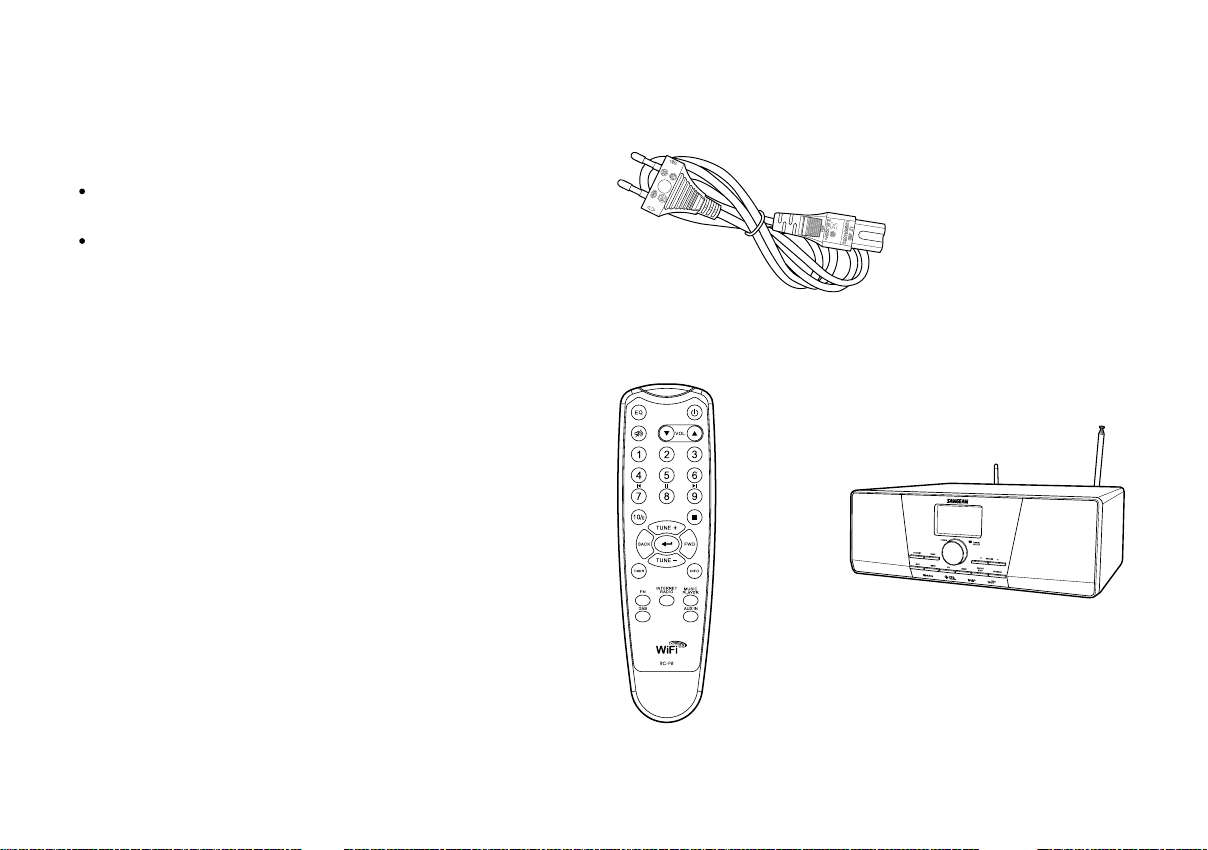
Congratulations on your purchase of the Sa ngean WFR-1D+.
Check the package and ensure all the items are present:
Product and Accessories:
Power Cable: used to power the radio.
Remote Control: used for remote operation of the radio.
Power Cable
Remote Control
5
WFR-1D+ Wi-Fi Radio
Page 7
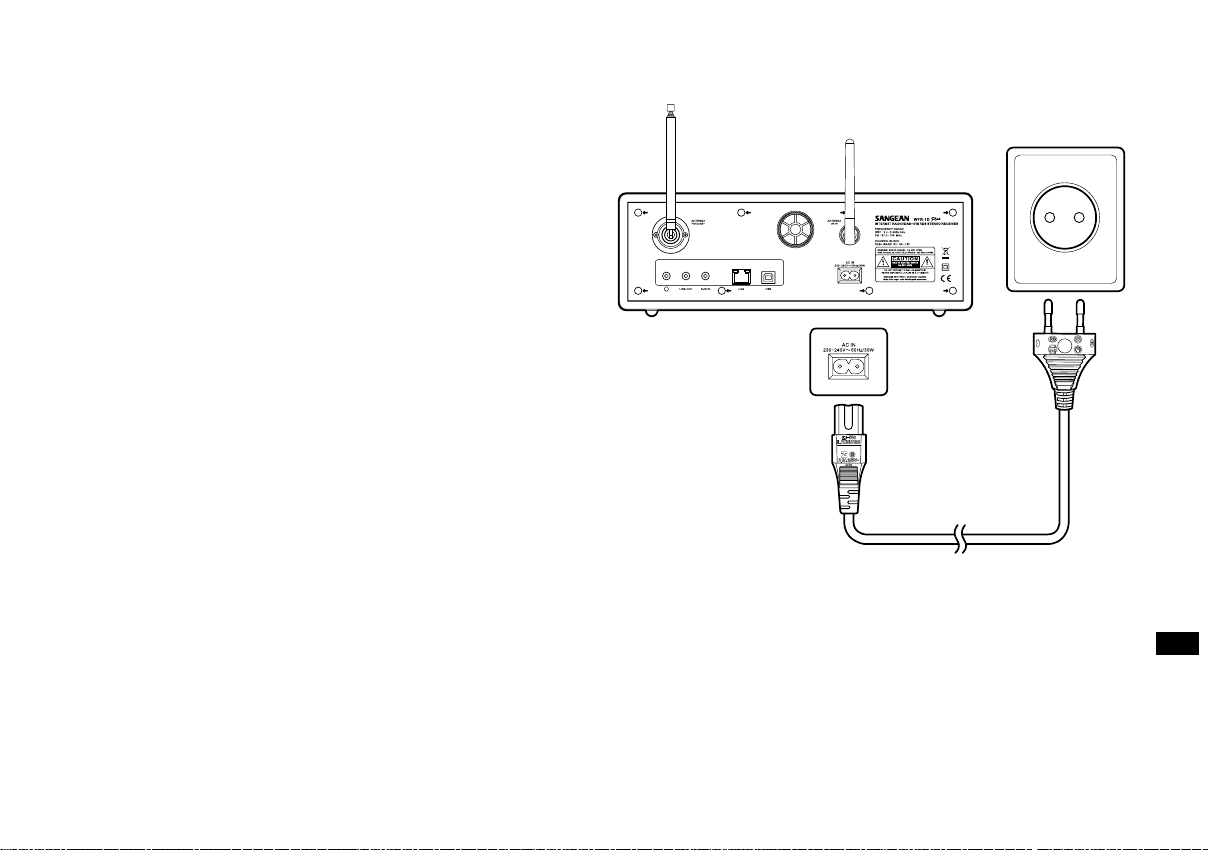
Power on the radio
1. Connect the power cable with the radio and plug it in to a live outlet
as shown.
2. Press the ST ANDBY button to turn on the radio.
Note:
Use only the ada pter supplied with the radio. Connecting an
incompatible power supply will cause permanent damage to the radio.
GB
6
Page 8
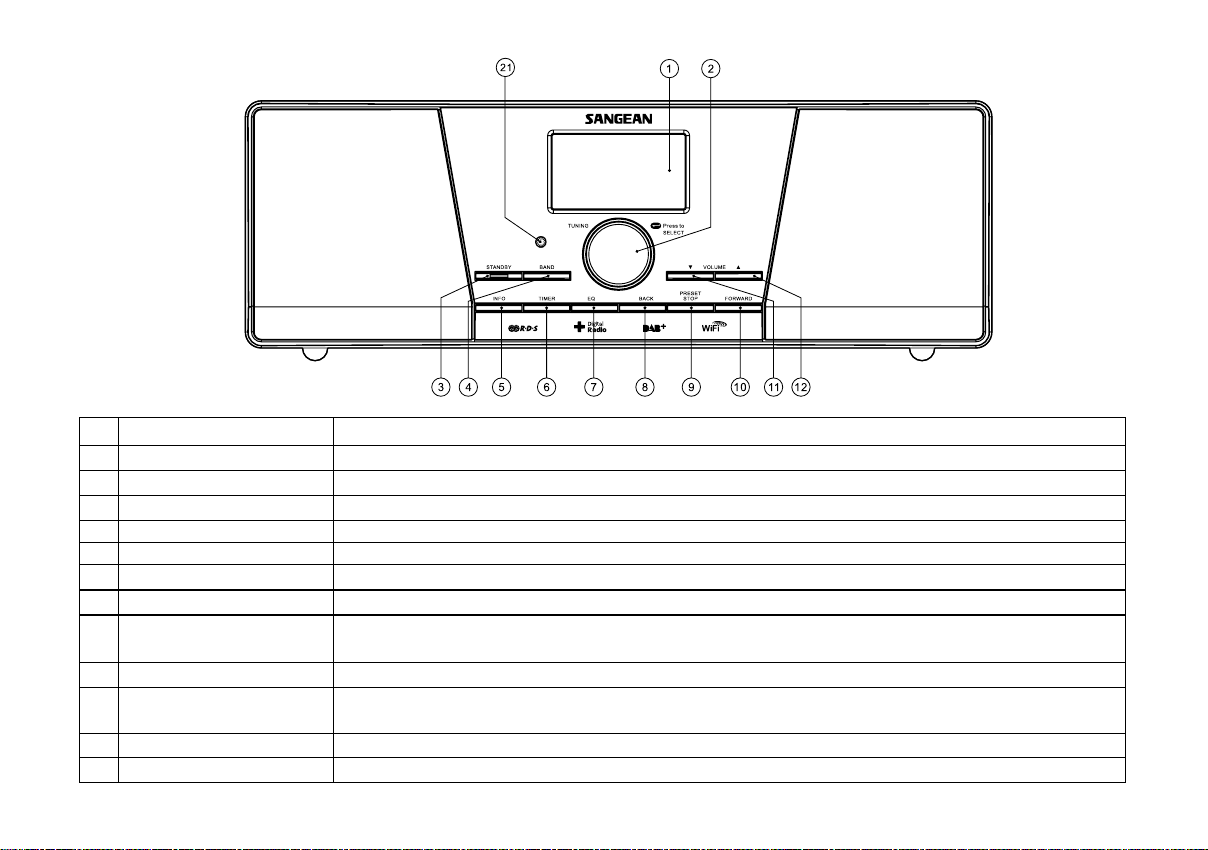
Controls
(Front)
Item
1
LCD display
2
Tuning Knob
3
STANDBY button
4
BAND button
5
INFO button
6
TIMER button
7
EQ button
8
BACK button
9
PRESET STOP button
10
FORWARD button
11
VOLUME DOW N button
12
VOLUME UP button
7
Description
Screen that display texts.
Rotate to enter menu selections/navigate through selections.
Turn on/off the radio.
Press to switch between modes.
Press to display information on the LCD.
Press to set sleep time and alarms.
Press to enter Equalizer setup.
Press to backward one page in menu selections. In Music player mode, press to skip to the previous track.
In setup screens, press to go to the previous field.
Press to enter the Preset menu. In Music player mode press to stop the track.
Press to move to the right when entering user na me or password.
In Music player mode, press to skip to the next.
Press to turn the volume down.
Press to turn the volume up.
Press the knob to confirm selections.
Page 9
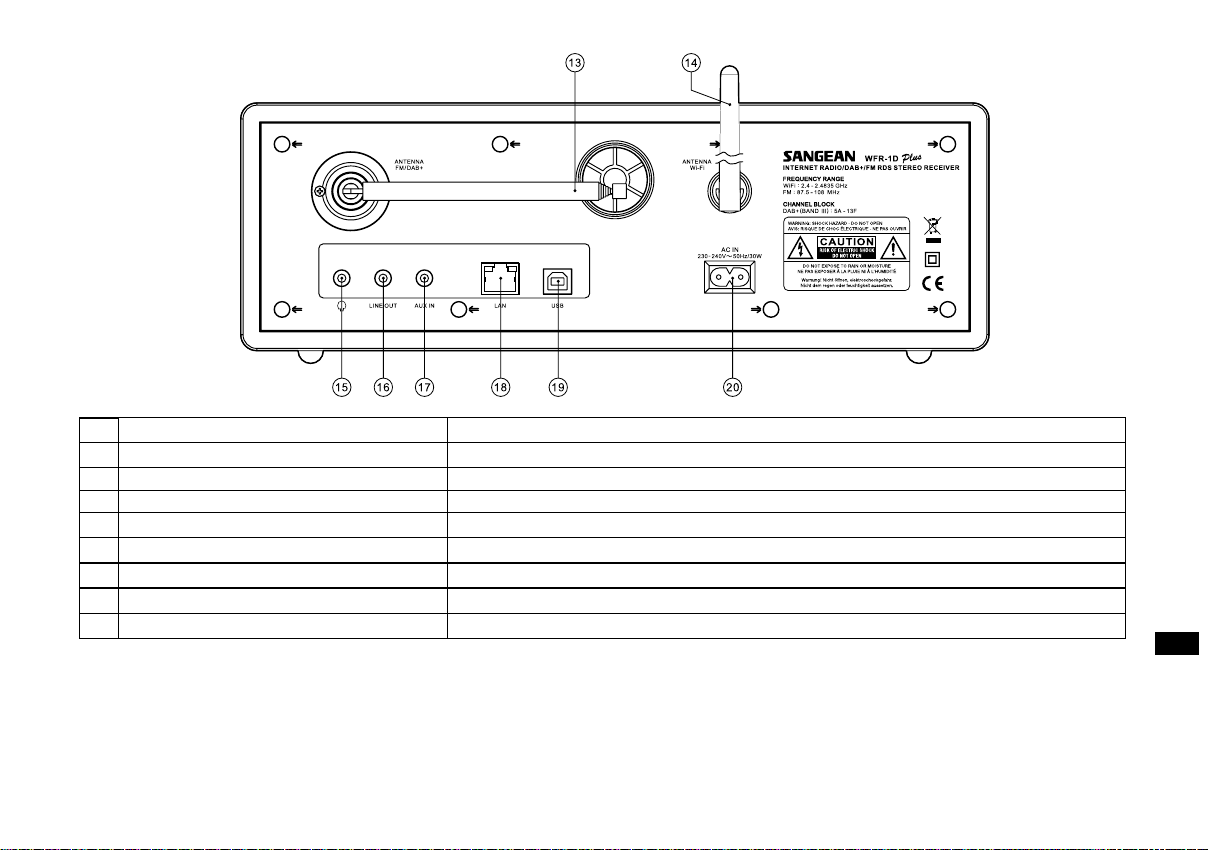
Controls
(Rear)
Item
Antenna for FM a nd Digital Radio (DAB plus)
13
WiFi antenna
14
Headphone jack
15
LINE OUT jack
16
AUX IN
17
LAN socket
18
USB socket
19
Power cord socket
20
Description
Connect for FM and Digital Radio (DAB plus).
Connect for wireless Internet Radio.
Connect to a headphone.
Connect to an external speaker.
Connect to external Aux devices.
Connect to Ethernet for wired Internet Radio.
Connect to a USB device for software upgrade.
Connect to the power cable.
GB
8
Page 10
Controls
(Remote Control)
A.
Power button
B.
Volume buttons
C.
Radio Preset buttons
D.
Preset 7,8,9,0,+10 / previous track, pause, next track, add 10
E.
Stop button
F.
TUNE + button
G.
TUNE - button
H.
FORWARD button
I.
Back button
J.
Enter button
K.
INFO button
L.
TIMER button
M.
Music Player button
N.
FM button
O.
Internet Radio button
P.
AUX IN button
Q.
DAB button
R.
EQ button
S.
Mute button
9
Page 11

Item
A
Power button
B
Volume buttons
C
Radio Preset buttons
D
Preset 7,8,9,0,+10 /
previous track, pause,
next track, add 10
E
Stop button
F
TUNE + button
G
TUNE - button
H
FORWARD button
I
Back button
J
Enter button
K
INFO button
L
TIMER button
M
Music Player button
N
FM button
O
Internet Radio button
P
AUX IN button
Q
DAB button
R
EQ button
S
Mute button
Description
Turn on/off the radio.
Press to turn the volume up/down.
Press to listen to preset stations.
Press to listen to preset stations 7, 8, 9, 0, 10 Also for previous track, pause, next track, 10.
Press to stop current action. In Music Player mode press to stop the track.
Navigation button used to go up.
Navigation button used to go down.
Press to move to the right when entering user na me or password.
In Music player mode, press to skip to the next.
Press to backward one page in menu selections. In Music player mode, press to skip to the previous track.
In setup screens, press to go to the previous field.
Press to confirm selection.
Press to display information.
Press to set sleep time and alarms.
Press to enter Music player mode.
Press to enter FM radio mode.
Press to enter Internet radio mode.
Press to enter auxiliary input mode.
Press to enter Digital Radio (DAB plus) mode.
Press to enter Equalizer setup.
Press to mute the radio.
GB
10
Page 12
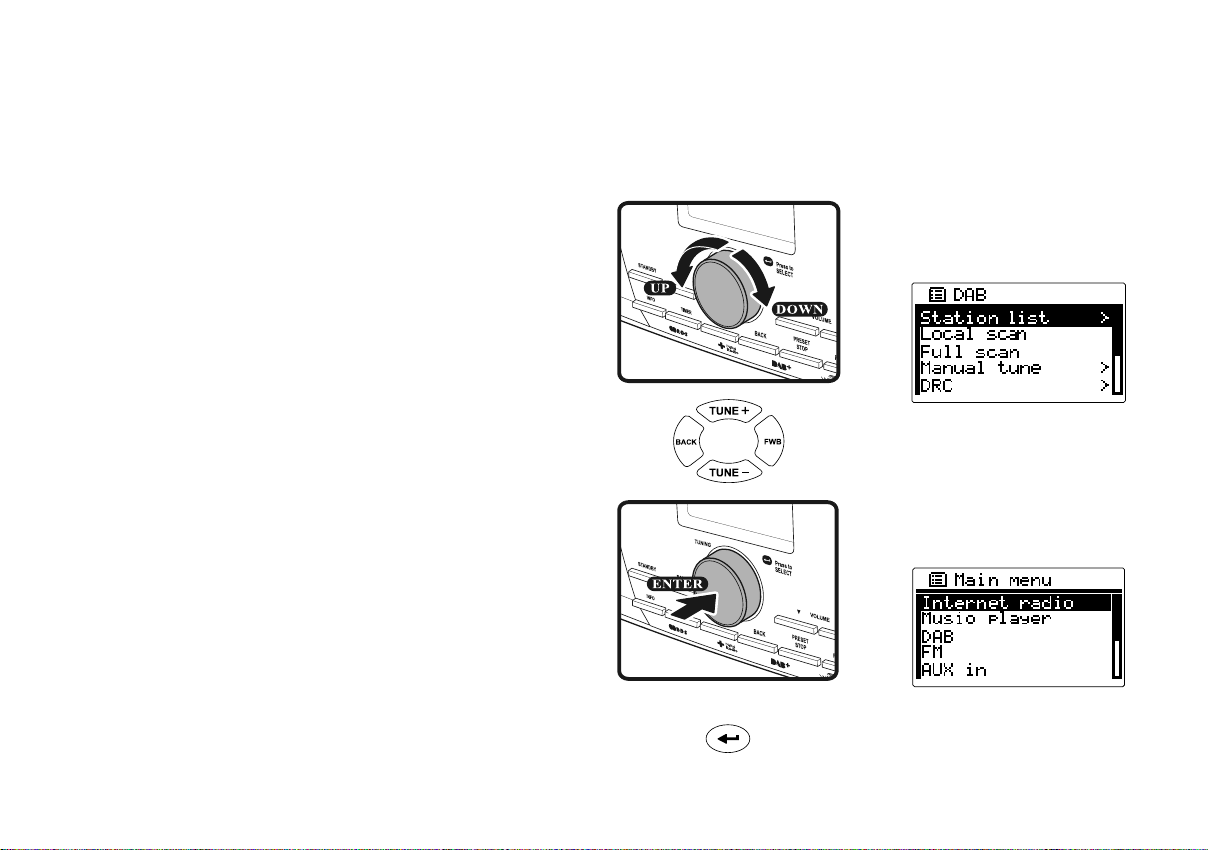
Navigate Menu Selections
There are two ways to navigate through the menu selections.
1. Navigate through the selection s by rotating the Turning knob on the
radio clockwise or counter clockwise to move the > symbol and
press the Turning knob to confirm the selection.
Use FORWARD/BACK to enter/go to previous menu.
2. Use the navigation buttons (TUNE +, TUNE-, BACK, FW D) on the
remote control to move the > symbol and press enter to confirm
the selection. Use FORWARD/BACK to enter/go to previous menu.
* If necessary, press the BACK button until you can find “Main menu”.
Then highlight and press is with the Turning knob. And you can start
to operate the radio.
Menu navigation:
11
Page 13
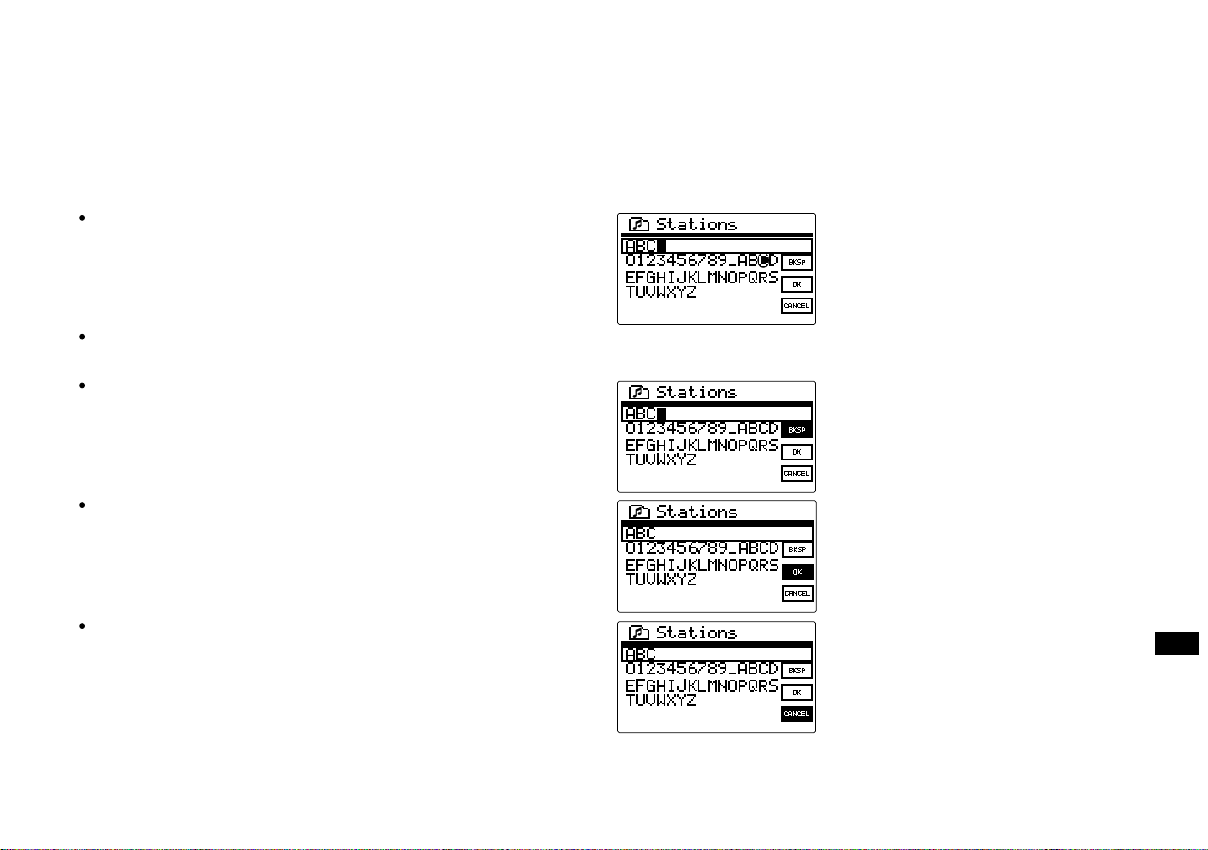
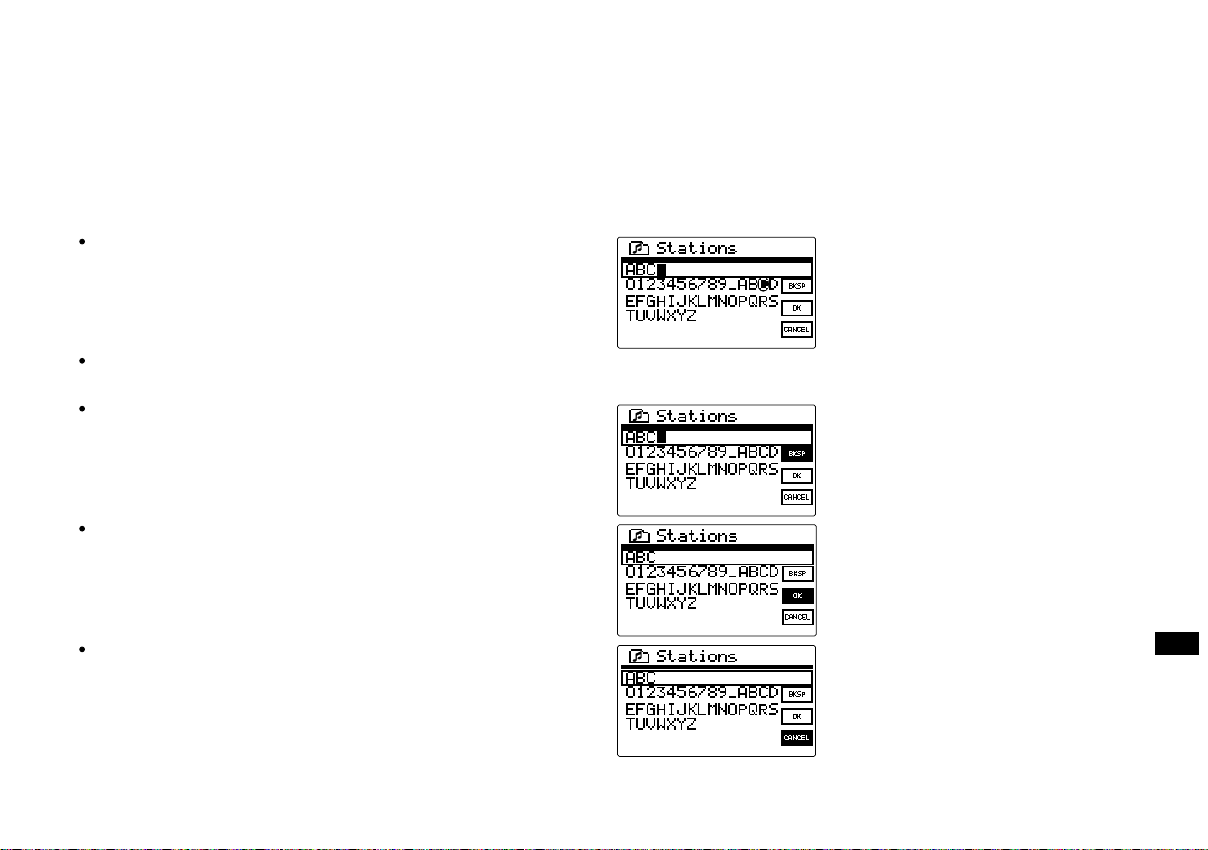
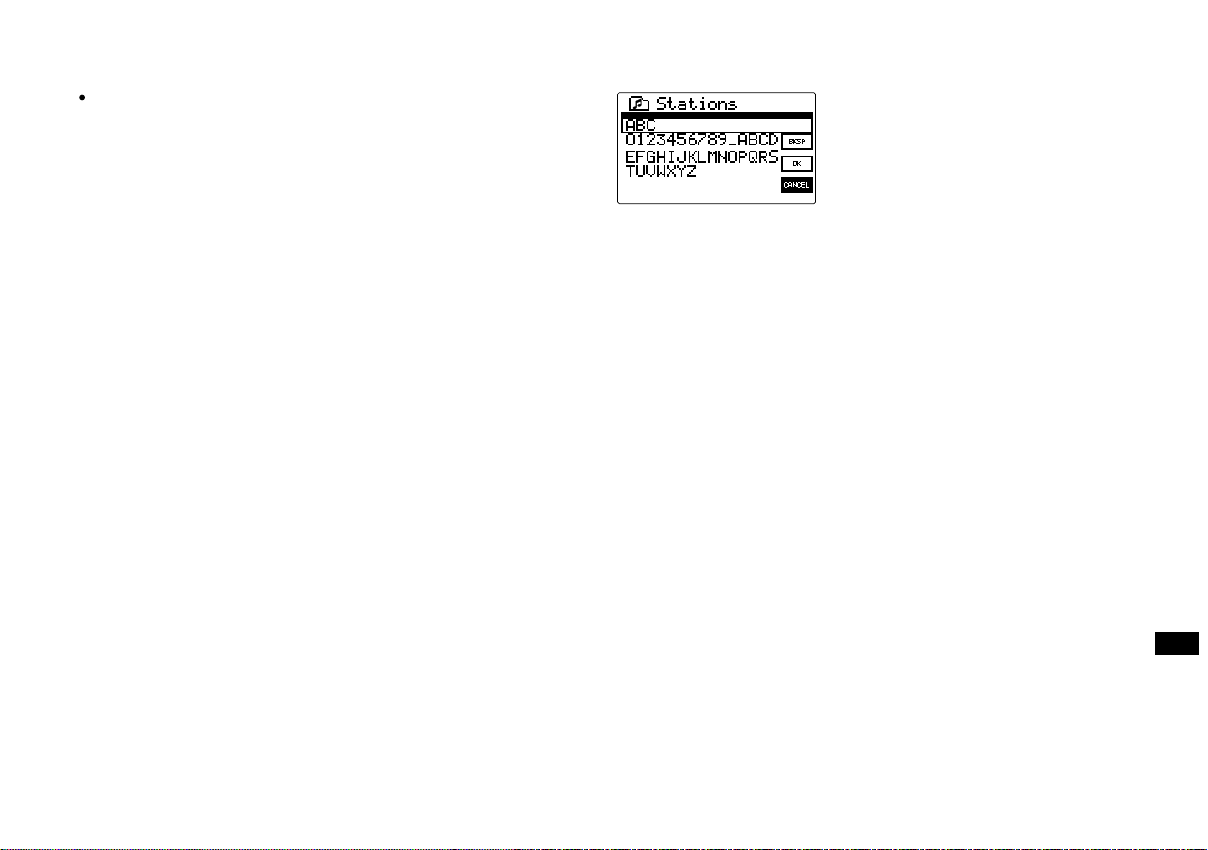
Entering Texts
To start using the radio, text entering may be required. For example,
entering user name, password, search station, etc.
To enter texts:
Rotate the Turning knob to highlight the text/number/symbol.
Press the Turning knob to confirm.
Use BKSP to delete.
Use OK to enter when you are done.
Use CANCEL to cancel and exit.
GB
12
Page 14
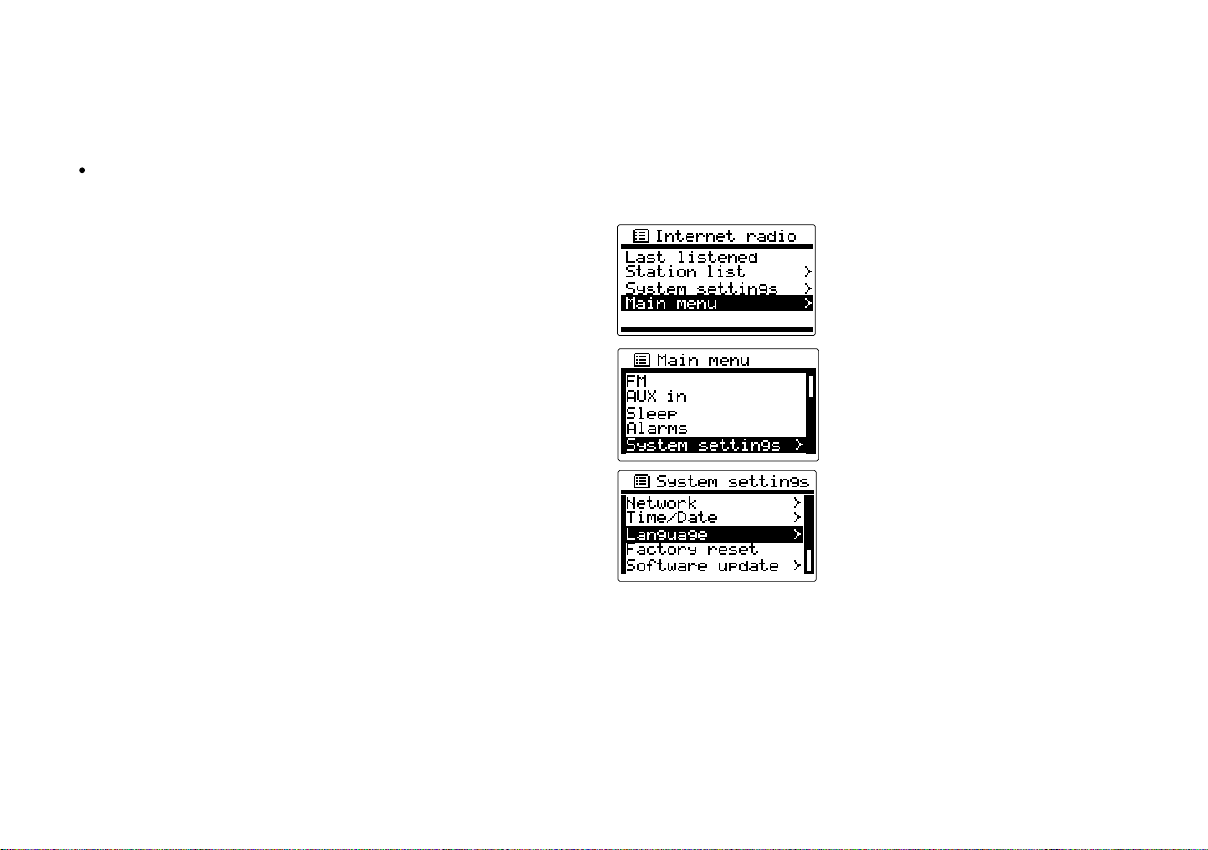
Language Setup
Choose the language to display on the screen.
Go to > System settings > Language and select the language.
* If necessary, press the BACK button to find the “Main menu”
13
Page 15

Getting connected to Internet (for Internet Radio)
Before you can use your Internet ra dio, you must have the f ollowing:
A broadband Internet conne ction or
A wireless access point (Wi-Fi) or a wired Ethernet connection
(10 or 100 M bits/sec with RJ45 connection) connected to your
broadband Internet, preferably via a router. In ma ny cases the
broadband modem, router and wireless access point will be a single
combined unit supplied by your Internet Service Provider or bought
from a computer store.
If your wireless network is configured to use Wired Equivalent
Privacy (WEP) or Wi-Fi Protected Access (WPA) data encryption
then you need to know the WEP or WPA key so you can get the
Internet radio to communicate with the network.
IMPORT ANT:
Before you continue, make sure that your wireless access point or
router is powered up and working with your broadba nd Internet service
(use your computer to verify this). To get this part of the system working
you must read the instructions supplied with the wireless access point
or router.
* There are 2 ways of connecting your radio to the network,
wired and wireless:
GB
14
Page 16
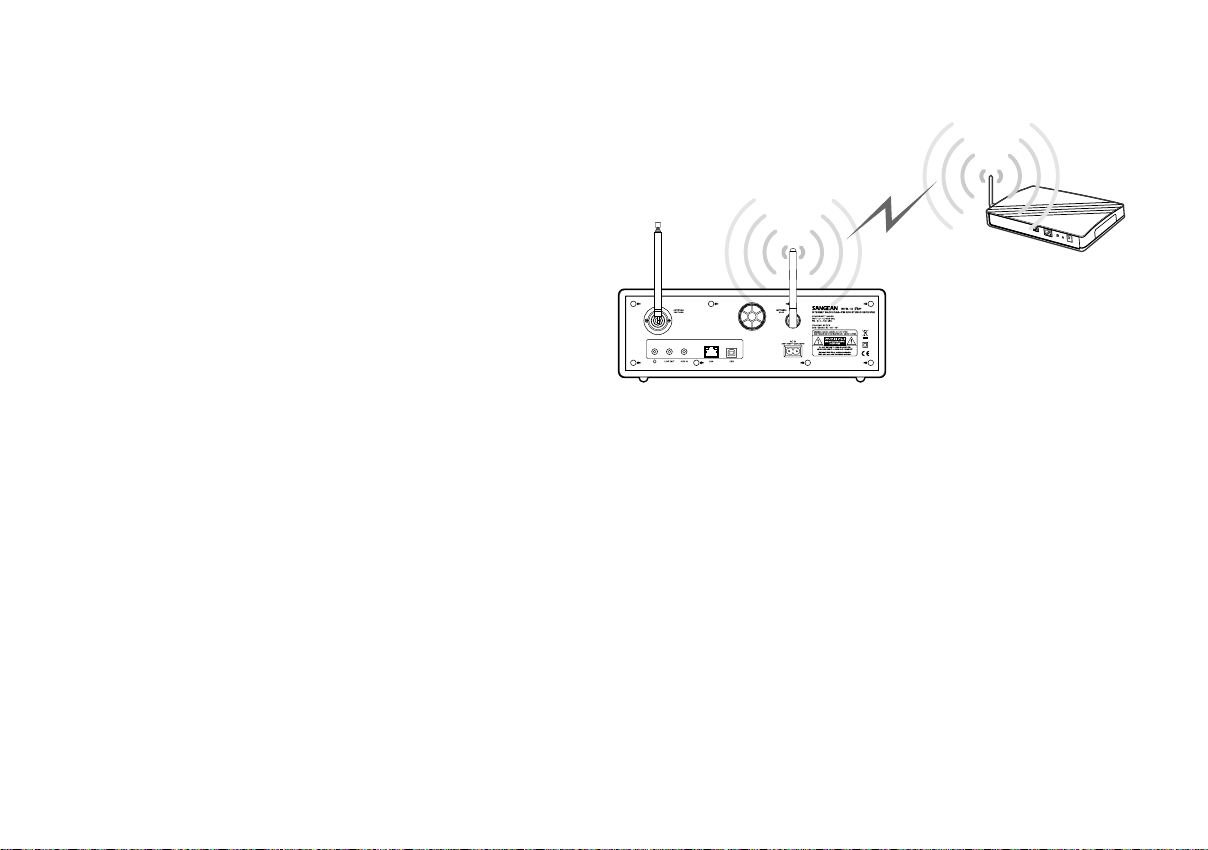
Connecting to wireless network
1. Make sure you are within ra nge of a wireless network.
2. Go to > System settings > Network > Network wizard >
[name of the wireless network].
3. If your wireless Internet access (router) haven’t been set
the password, the radio will be connected to the Internet. Or,
4. If your wireless Internet access (router) has been set the pa ssword,
the display will show either ‘Enter WEP key’ or ‘Enter WPA key’.
You therefore need to enter the correct WEP or WPA key into the
radio to allow it to communicate with your network.
15
Page 17
If you do not have the WEP or WPA key, then you should obtain it from
the person who set your network. Some Wi-Fi routers may come with a
key already set up by the supplier, in which case you should refer to the
user documentation provided with it.
Y ou will be prompted to enter password:
Rotate the Turning knob to highlight the text/number/symbol.
Press the Turning knob to confirm.
Use BKSP to delete.
Use OK to enter when you are done.
Use CANCEL to cancel and exit.
5. Then the screen will show “Connected” when connection had
been made.
GB
16
Page 18
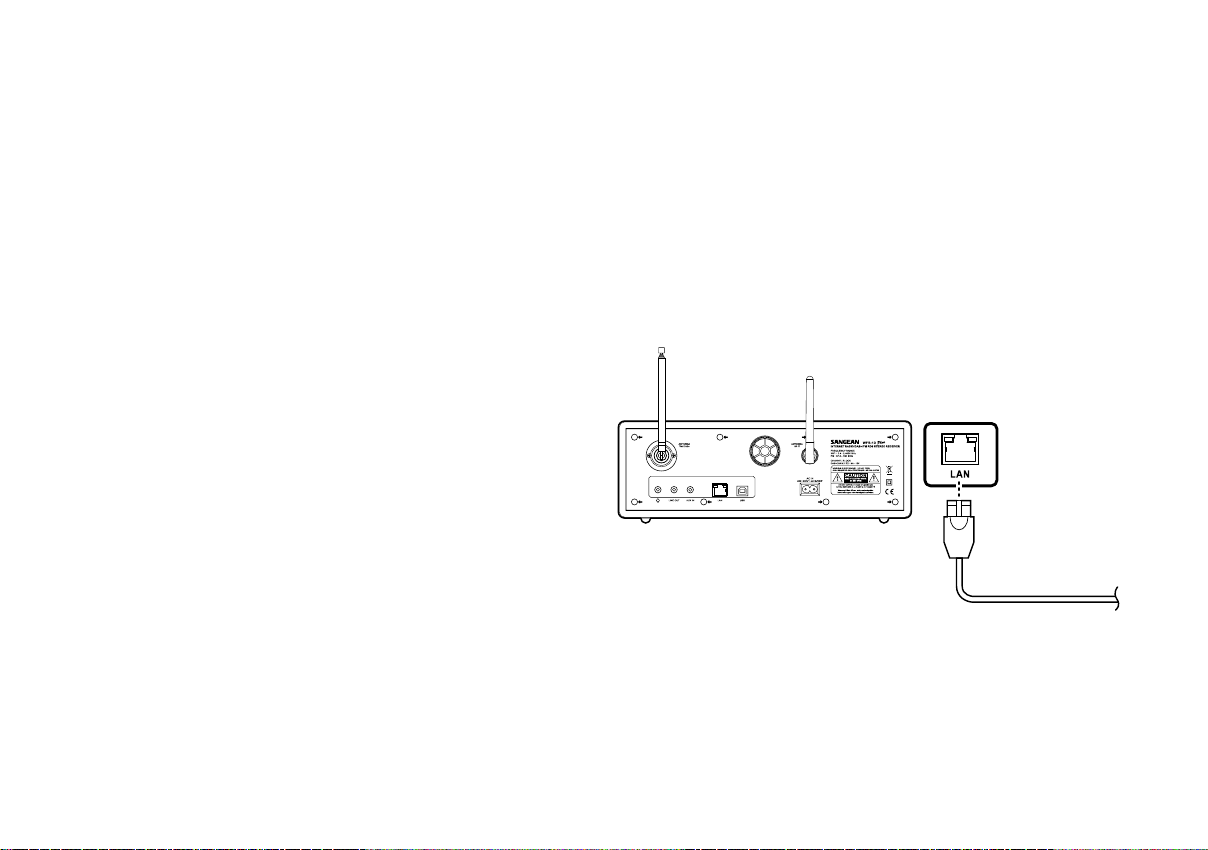
Connecting to wired network
Connect the Ethernet cable into the RJ-45 socket at the ba ck of
the radio. If a wired connection is present then the radio will use
this in preference to a wireless connection.
There are two indicator lights incorporated into the RJ-45 connector.
If you have problems with your wired connection, they may help you to
identify the possible cause of the problem.
Green ON = Link established, Flashing = Data transfer
Yellow ON = 100M bps link, OFF = 10M bps link.
17
Page 19
Listening to Internet Radio
There are 3 ways to enter Internet Radio mode:
1. From the menu selections go to > Main menu > Internet radio or
2. Press the BAND button until you see “Internet radio”, or
3. Press the INTERNET RADIO button on the remote control.
GB
18
Page 20

The radio will play the last played radio station.
If you would like to select other stations (or it is the 1st time use,
no last played radio station), f ollow the instruction below.
To search for Internet radio stations:
In The Station list you will find 5 different ways to search for stations.
Go to > Main menu > Internet radio > Stations a nd you will find
5 options. When you enter Internet radio, you may find the radio
is playing the last played station. In this case, rotate the Tuning Knob to
continue the operation.
When you enter Stations, there are 5 options to search for stations:
19
Page 21
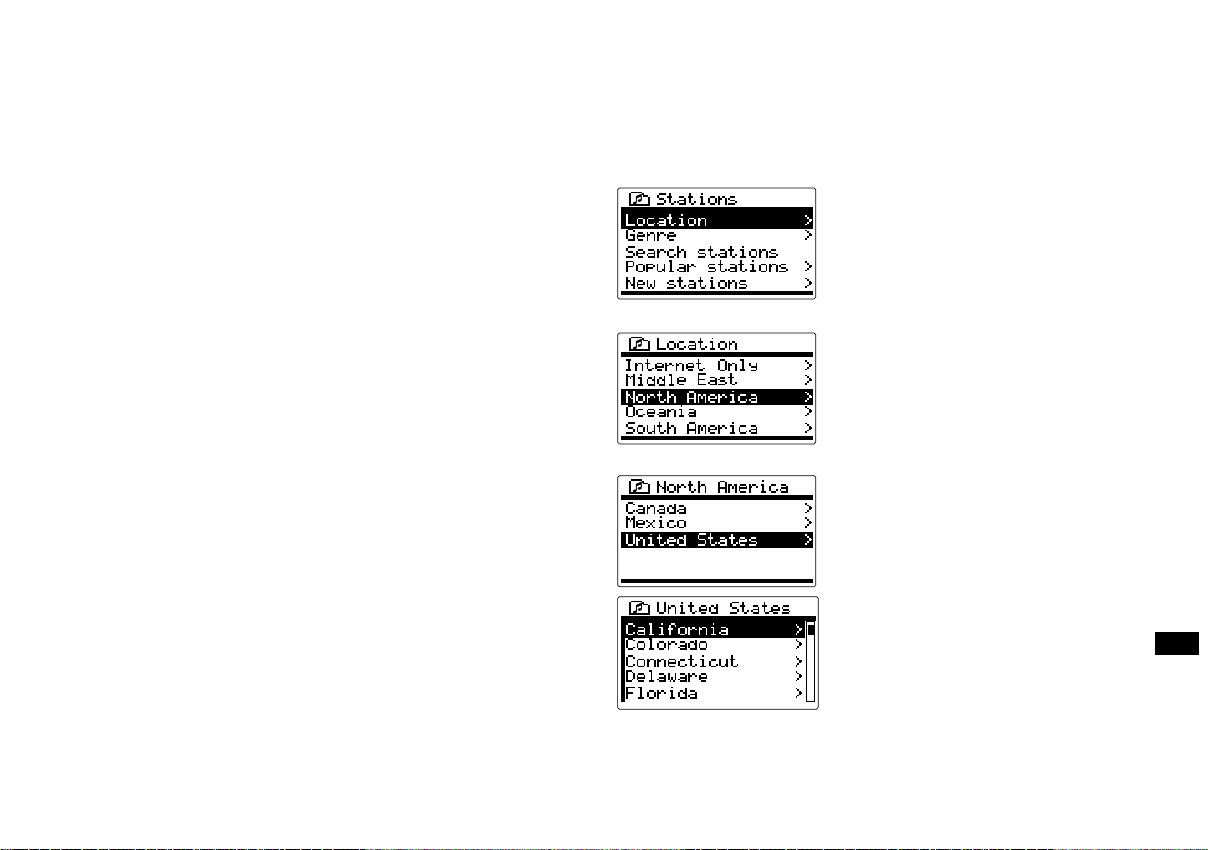
Location:
enables you to choose a radio station from the list first by geographic
region and then by country.
1. Rotate the Tuning Knob until the display shows <Location>, and then
press the Tuning Knob to enter the Location search.
2. Rotate the Tuning Knob until it shows the continental you would like
to go to. And press the Tuning Knob to enter.
3. Rotate the Tuning Knob until it shows the country you would like to
go to. And press the Tuning Knob to enter.
GB
20
Page 22
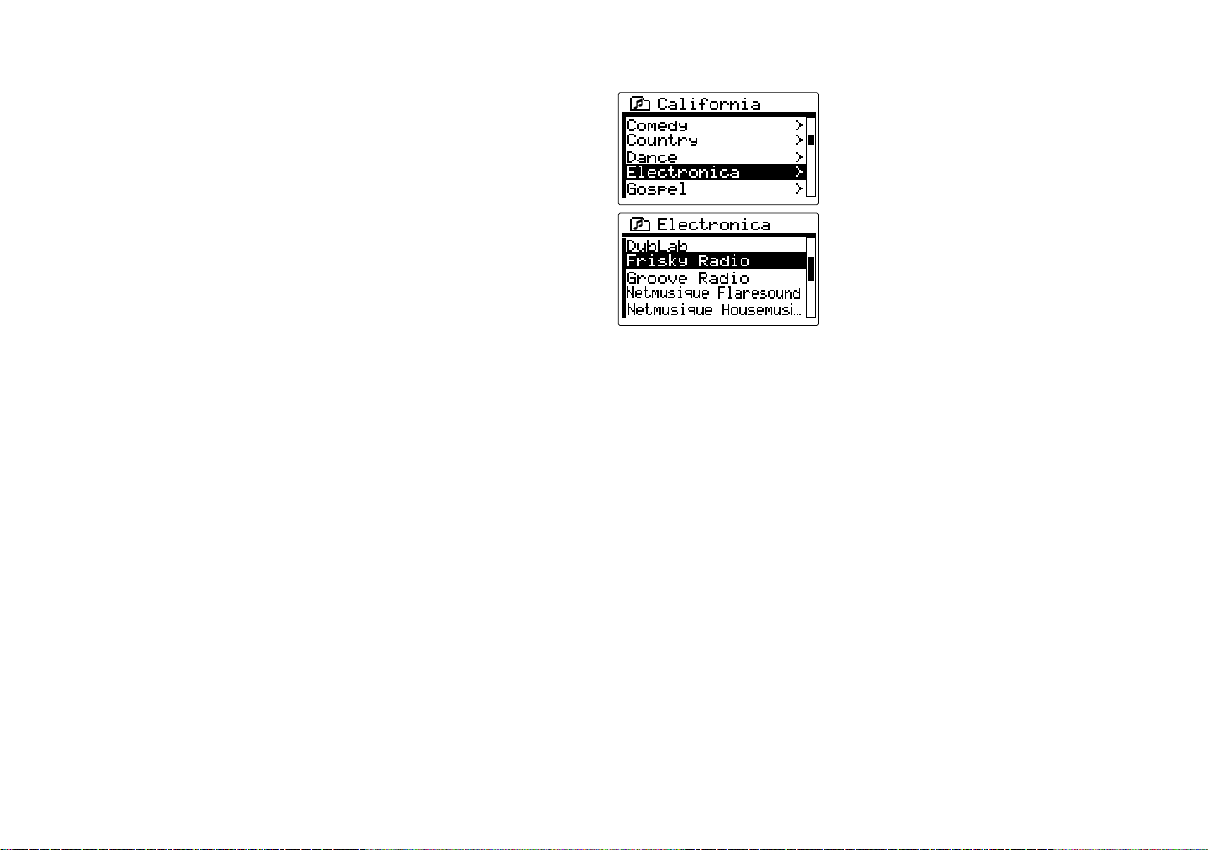
4. It will show the catalog of Internet radio stations from the country
you select. Use the same way to select the catalog, and then the
radio station.
5. When you find the radio station you would like to listen to, press the
Tuning Knob. In few seconds the radio will connect to the selected
radio station.
* Should you be unable to connect to a particular station, please note
that some radio stations do not broadcast 24 hours per day, and some
stations are not always on-line.
21
Page 23

Genre:
enables you to choose radio stations according to their content,
for example Classic, Rock, Sport, News, etc.
1. Rotate the Tuning Knob until the display shows <Genre>, and then
press the Tuning Knob to enter the Genre search.
2. Rotate the Tuning Knob until it shows the type of music you would
like to go to. And press the Tuning Knob to enter.
3. Rotate the Tuning Knob until it shows the country you would like to
go to. And press the Tuning Knob to enter.
4. It will show all the Internet radio stations from the genre and country
you are looking for.
5. When you find the radio station you would like to listen to, press the
Tuning Knob. In few seconds the radio will connect to the selected
radio station.
Should you be unable to connect to a particular station, please note
that some radio stations do not broadca st 24 hours per day, and some
stations are not always on-line.
GB
22
Page 24
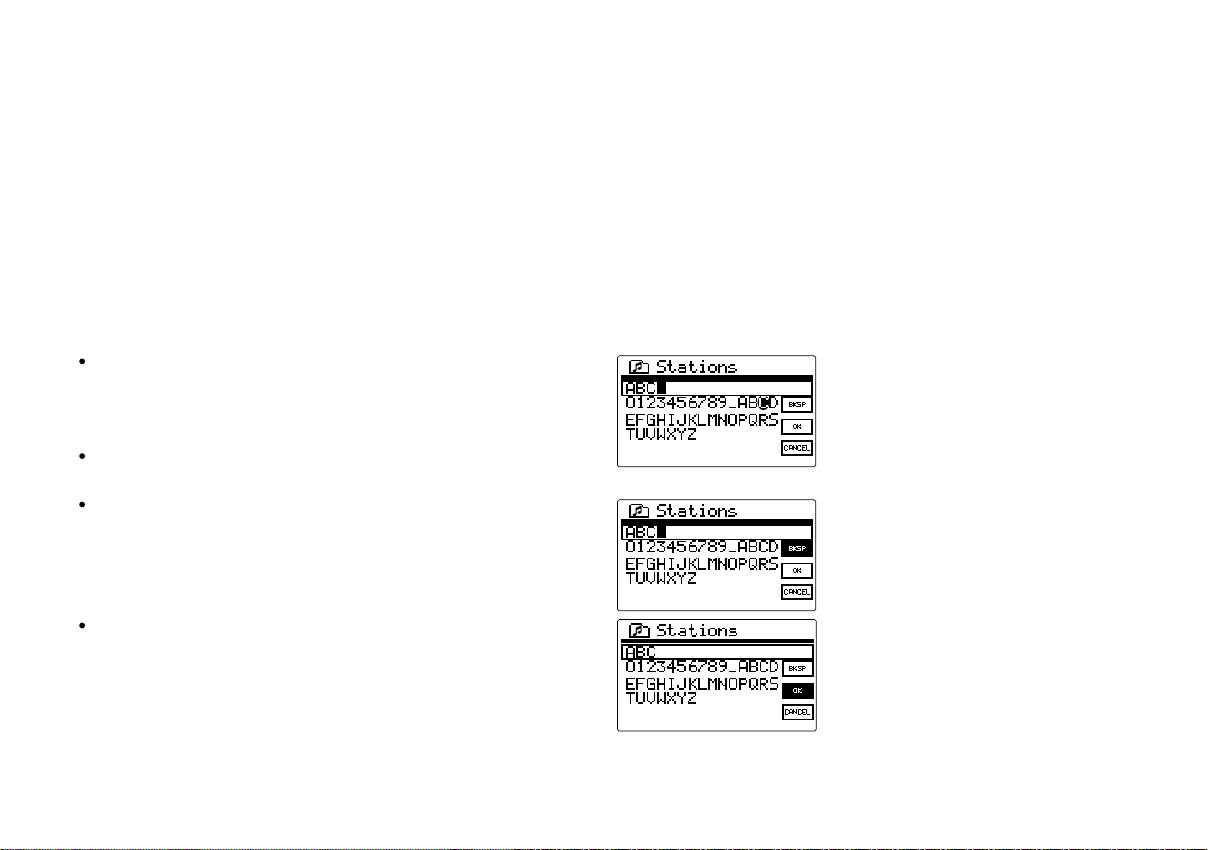
Search stations:
enables you to search for a station by entering the name or a keyword.
1. Rotate the Tuning Knob until the display shows <Search stations>,
and then press the Tuning Knob to enter the Search stations search.
2. Enter the key word of the radio station na me you would like to se arch
for by rotating and pressing the Tuning Knob.
3. When the key word is input, press on “OK”. In a moment, the radio
will show all the radio stations related to your search.
To enter texts:
Rotate the Turning knob to highlight the text/number/symbol.
Press the Turning knob to confirm.
Use BKSP to delete.
Use OK to enter when you are done.
23
Page 25
Use CANCEL to cancel and exit.
4. Use the Tuning Knob to find the radio station you would like
to choose, then press the Tuning Knob, and the radio will connect to
the radio station you choose.
Popular station:
enables you to view a list of popular stations and choose from them.
New station:
enables you to view a list of the newest stations and choose from them.
GB
24
Page 26

To listen to the Podcasts:
Some radio stations allow you listen to progra ms that have alrea dy
been broadcast.
Go to > Main menu > Internet radio > Podcasts and you will find
3 options:
1. Location:
enables you to choose a radio station from the list first by geographic
region and then by country.
2. Genre:
enables you to choose podcasts according to their content,
for example Classic, Rock, Sport, News, etc.
3. Search station:
enables you to search for a podcast by entering the na me or
a keyword.
T o listen to My Favorite s / My Added Station:
My Favorites and My added station s allow you to a dd Internet
radio stations using Frontier’s website and listen to those station s on
your radio.
It supports http:// form, but not mms:// form.
Go to > Main menu > Internet radio > My Favorites/ >
My Added Stations
Register online:
Before first use, please follow the instructions to register on
the website:
1. Go to > Station list > Help > Get access code. The display will show
the Access code.
2. Visit the website using your computer http://www.wifiradio-frontier.
com then click on “register here” and fill out the form with the
access code shown on the display. You can leave blank on
“WiFi radio model”.
25
Page 27
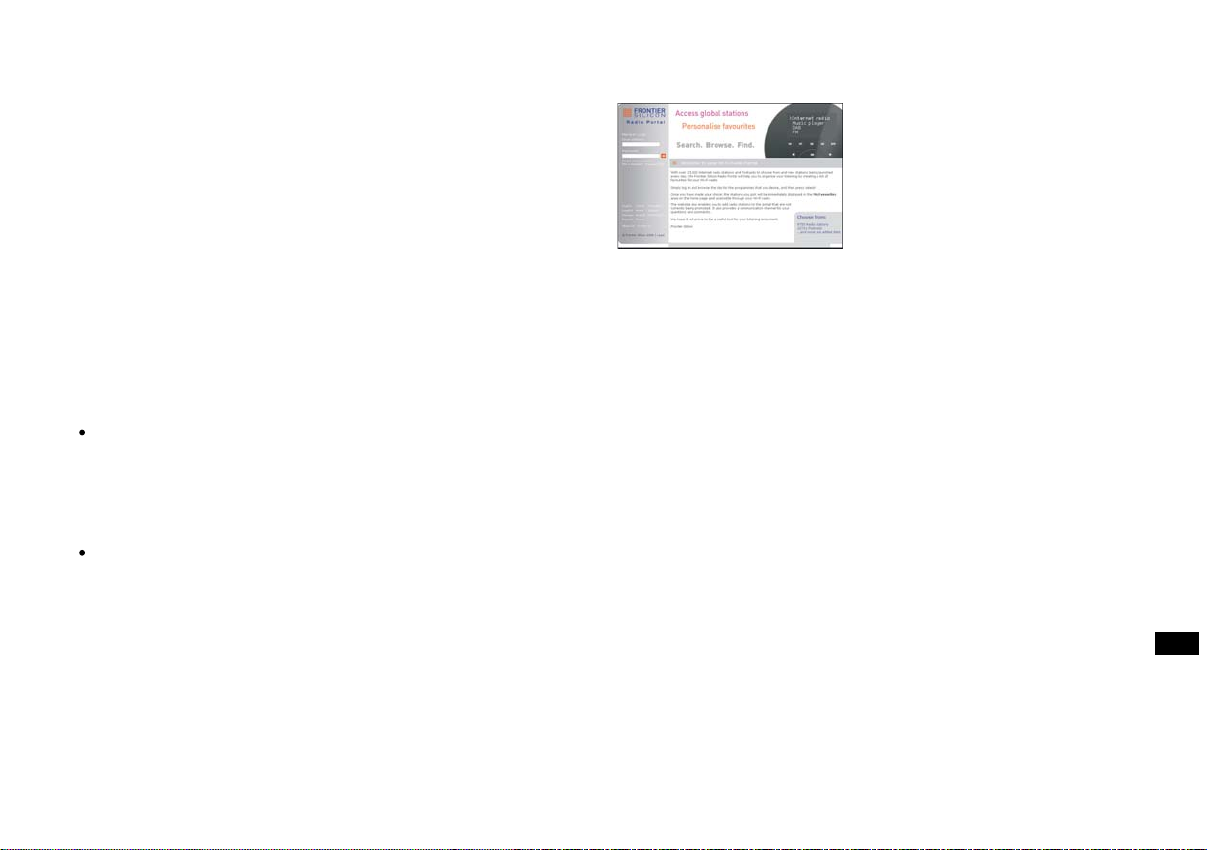
Frontier Website
3. After the registration, the web page shows “My favourite” a nd
“My added station” for operating these 2 functions.
After this one time registration, every time you would like to use
these functions, just go to the website: and enter the email address
and password.
To edit My Favorites:
1. Use Browse or Search for stations on the web site to find a station,
2. Click the “Add” icon and the station is added to My Favorite f older.
To edit My Added Stations:
My Added Stations allows you to add the Internet radio stations if you
know the web address of the Internet radios.
1. Click the arrow under My added stations and you will be asked
to enter the web address. Enter the URL exactly as described
on the web page.
2. Click the “Add” icon to add the station.
GB
26
Page 28

Music Player
The Music Player allows you to play audio files which are stored on a
computer on your network. Y ou have to set up on the computer bef ore
you play the music on your radio. It doesn’t support iTunes yet.
Shared Folder
The Windows Media Player 11 allows you to play audio files that are
stored on a computer or a computer on your network.
Y our ra dio supports two file access methods. It can conne ct to
Shared Folders on the network. It can also connect with file server
applications using the Universal Plug and Play (UPnP) protocol known
as Shared Media .
All of the supported file types are playable in Windows Shares mode.
When using a UPnP server, the playa ble file type s are de pendant
on the server software used. For example, Microsoft Windows Media
Player11 can serve MP3 and WMA files. To be able to play the other
supported file types via UPnP you may need to install additional
third-party software.
When using Windows Shares, music selection is by Artist, by Album
and optionally by tra ck within an Album. When using a Shared Medi a
UPnP server, the se arch and selection criteria are determined by
the server, but typically include additional options such as Genre.
Many server applications also allow you to access files according to the
folders within which they are stored.
27
Page 29
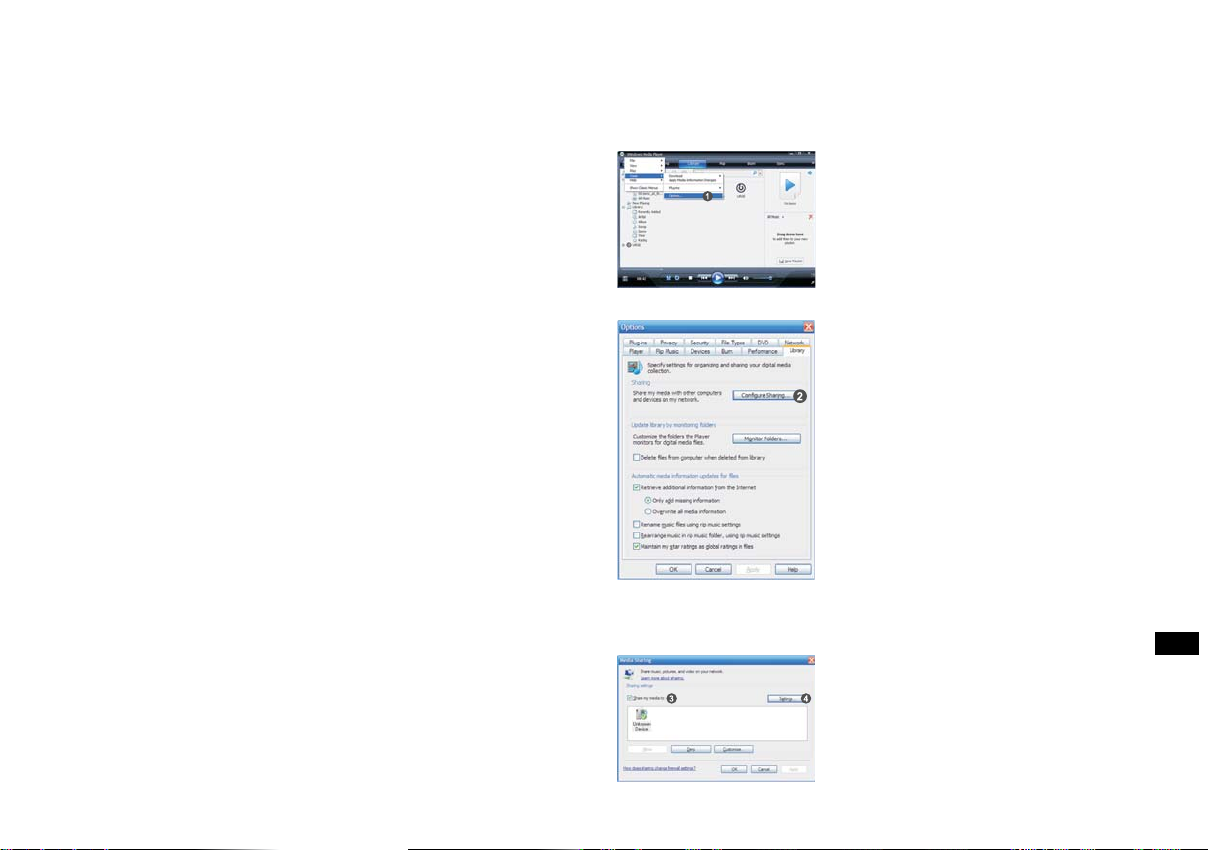
T o share medi a using Windows Media Player 11:
1. Open Media Player and click the arrow below Library tab then
choose Options.
2. Click the Configure Sharing button.
3. Check the Share my media to: check box. WiFi Radio is shown as
an U nknown Device.
4. Click the Settings button.
GB
28
Page 30
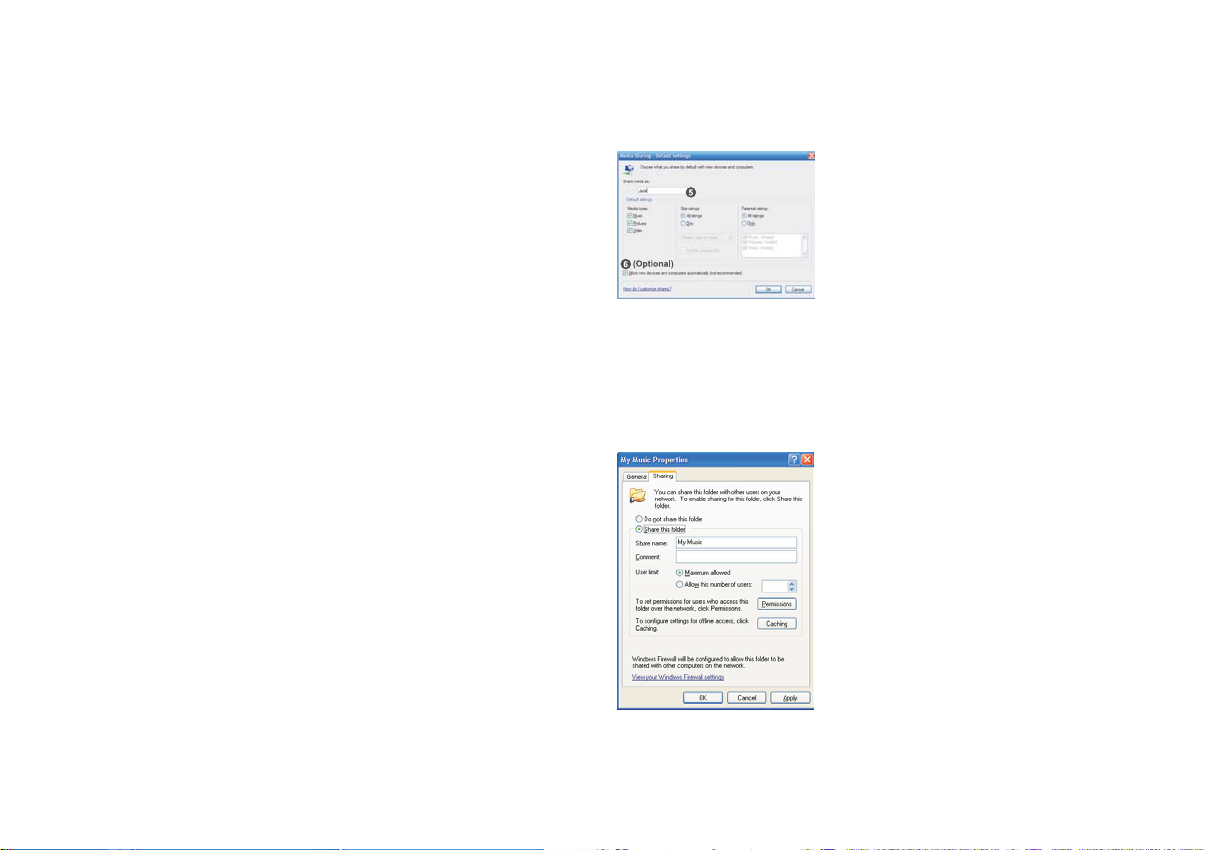
5. Name your Share media and choose the settings.
6. Finally, check the box to choose to Allow new devices a nd
computers automatically or not.
7. Click Ok when you are done.
Shared Folder PC Setup
Set up the PC to allow your radio to access your audio files via Window
Shares (make the music file shared).
1. Ensure that your PC is available on the same network as your
Internet radio.
2. Use Windows Explorer to locate the folder where your audio files
are stored.
3. Right click on the folder.
4. Select ‘Properties’.
5. Click on ‘Sharing’.
6. Select ‘Share this folder on the network’ and ‘Allow network users to
change my files’.
Setup your radio to connect to the computer if user na me and password
are required to log in.
29
Page 31

Shared Media (UPnP)
Shared Media uses Windows Media Player (WMP) 11 and above
as medi a server. This mode does not require a ny setting in the ra dio,
but the PC needs to be configured to allow the radio access to
the media. You will only have to do it once.
T o play music in the Music Player’s shared medi a:
1. Go to > Main menu > Music Player > Shared media >
[na me of computer] > [medi a categories]. The UpnP server make s
Media categories available. For example, ‘Music’ or ‘Playlists’.
User na me and password may be required.
T o setup your PC f or shared medi a:
1. If your PC is running Microsoft Windows XP or Windows Vista then
you can use Microsoft’s Windows Media Player 11 (WMP 11) to act
as your UPnP (Universal Plug and Play) media server.
If not already installed on your PC, Windows Media Player 11
may be downloaded from Microsoft’s website.
2. Once installed, WMP 11 can create a library from all the media files
available to it on your PC. To add new media files to the library,
select ‘File > Add to Library… > Advanced Options’, click ‘Add’ and
choose the files you wish to add and click ‘OK’.
T o play music in the Music Player’s shared folders:
1. Go to > Main menu > Music Player > Shared folders >
[name of computer] > [name of folders]. User n ame and password
may be required.
2. Find and select the audio file you want to listen to in the folder and
press the Turning knob to play.
3. Use Forward/Back to go to next/previous track.
2. Find and select the audio file you want to listen to in the folder and
press the Turning knob to play.
3. Use Forward/Back to go to next/previous tra ck.
GB
30
Page 32

Digital Radio (DAB plus)
To listen to the Digital Radio (DAB plus) ra dio, there are 3 ways to enter
Digital Radio (DAB plus) mode, after turning on the radio:
1. From the menu selections go to > Main menu > DAB or
2. Press the BAND button until you see “DAB radio”, or
3. Press the DAB button on the remote control.
* If this is the first time the radio is used in Digital radio (DAB plus)
mode, the display will show “Scanning”. If the radio has been
used before, the last played station will be selected. If there is
no station been detected in your area, the display will show
“Service not available”. You may relocate your radio to a position
giving better reception.
Selecting a Digital Radio (DAB plus) station
1. Rotate the Turning knob to scroll through the list of available stations.
2. Press the Turning knob to select the station. The display may show
“Connecting…”. And then enter the station you choose.
31
Page 33

Secondary service - a Digital Radio (DAB plus)
Some radio stations have one or more secondary services associated
with them. T ypically they are not broadcasting continually. If a station
has a secondary services, the se condary service s will appear in the list
of radio station nam e s bene ath the main (or pri mary) station.
Rotate the Turning knob to scroll through the list and press on it to
select the station.
Display modes - Digital Radio (DAB plus)
Your radio ha s 5 display option s when in Digital Radio (DAB plus) mode.
Press the INFO button to cycle through the different display options.
a. Frequency:
Displays the frequency of Digital Radio (DAB plus) of the station
listened to.
b. Signal strength and Signal error:
Displays a graphic showing the signal strength and the signal error
for the station been received.
c. Bit rate:
Displays the digital bit rate, decode method and channels of the
station been listened to.
d. Date:
Displays the current date.
e. Scrolling text:
Displays the text provided by the station been listened to. If the
station doesn’t provide the text, the display will show “Playing”.
GB
32
Page 34

Finding new stations - Digital Radio (DAB plus)
If you would like to use your radio for Digital Ra dio (DAB plus)re ception
in a new location, or if no station were detected during the initial scan,
you can follow the procedure below to find out which stations
are available:
1. Ensure the radio is on and in DAB plus (Digital Radio) mode.
2. Press the BACK button to go to the DAB plus (Digital Radio) menu.
3. Rotate the Turning knob until “Local sca n” is highlighted on
the display, and press the Turning knob. And your radio will perform
a scan of your local frequencies.
4. The display will show “Scanning”. As new stations are found,
the counter will increase and stations will be added to the list.
5. To scan a full ra nge frequency of your ra dio, rotate the Turning knob
until “Full scan” is highlighted, and press the Turning knob.
The display will show “Scanning”. As new stations are found,
the counter will increase and stations will be added to the list.
33
Page 35

Manual Tuning - Digital Radio (DAB plus)
This is for you to turn to the specific channel directly.
1. Ensure the radio is on and in DAB plus (Digital Radio) mode.
2. Rotate the Turning knob until “Ma nual tune” is highlighted on
the display, and press the Turning knob.
3. Rotate and press the T urning knob to select the required channel.
The clear unfilled rectangular on the display shows the minimum
signal level required for satisfactory reception. The signal strength
bar will go up and down showing the changing signal strength as
you adjust the antenna on your radio.
4. When a DAB plus (Digital Ra dio) signal is found, the display will
show the na me of the DAB plus (Digital Radio) multiplex and a bar
graph to indicate the signal strength.
5. Any new stations found will be added to the list in the radio.
6. Press the Turning knob to access the DAB plus (Digital Ra dio) menu,
and select “Station list” to go back to the normal tuning.
GB
34
Page 36

DRC (Dynamic Range Control) - Digital Radio (DAB plus)
DRC can ma ke quieter sounds e asier to hear when your radio is listened
in noisy environment. Not all the stations support DRC function.
FM Radio
To listen to the FM radio, there are 3 ways to enter Internet
Radio mode, after turning on the radio:
1. Ensure the radio is on and in DAB plus (Digital Radio) mode.
2. Press the BACK button to go to the DAB plus (Digital Radio) menu.
3. Rotate the Turning knob until “DRC” is highlighted on the display,
and press the Turning knob.
4. The display will show:
DRC high: DRC level is set a s sent by broadcaster.
DRC low: DRC level is set to 1/2 that sent by broadcaster.
DRC off: DRC is off.
Rotate and press the Turning knob to make the selection.
Station order setup - Digital Radio (DAB plus)
There are 3 station order settings which are alphanumeric,
ensemble and valid. The default of your radio is alphanumeric.
1. Ensure the radio is on and in DAB plus (Digital Radio) mode.
2. Press the BACK button to go to the DAB plus (Digital Radio) menu.
3. Rotate the Turning knob until “Station order” is highlighted on
the display, and press the Turning knob.
4. Rotate and press the Turning knob to make the selection of:
Alphanumeric: Arranges your stations by alpha-number like
A…Z 0…9.
Ensemble: Arranges each station due to multiples.
Valid: Shows the stations for which a signal can be found.
1. From the menu selections go to > Main menu > FM or
2. Press the BAND button until you see “FM”, or
3. Press the FM button on the remote control.
The radio will play the last played radio station. If you would like to
select other stations, follow the instruction below.
T o change FM stations:
1. Rotate the Turning knob on the radio clockwise or counter
clockwise or press the TUNE+/TUNE- buttons on the remote
to increase/decrease the radio frequencies. Or
2. Press the Turning knob on the radio or on the remote control to
scan and go to the next available FM station.
35
Page 37

FM RDS – Radio Data System
The Radio Data System (RDS) is a system in which inaudible digital
information in addition to the normal FM radio program is transmitted.
Under FM ba nd, it provides functions such as Clock Time, Music Type
Search and Information Mode:
* The information display is only available when the station provides
R.D.S service.
Press the INFO button when the radio is under FM mode, to cycle
through the various modes.
EQ- Equalizer
Your radio ha s bass and treble characteristics of the sound can be
adjusted to your personal taste.
1. Press the EQ button either on the radio or on the remote control.
2. Select the suitable EQ setting for the music you are listening to.
Or Select User EQ to adjust bass and treble. When Flat is selected,
treble and base will be set to zero.
GB
36
Page 38

Auxiliary Input (AUX IN)
Auxiliary Input allows you to play music from an audio source such as
an iPod or a DVD player.
To play music using AUX IN:
1. Connect the device to the radio using an AUX cable a s shown.
2. Go to > Main menu > Auxiliary input or press AUX in on the remote or
press the BAND button to switch to Aux in.
3. Start playing sound from the auxiliary device; adjust the device and
radio volume when necessary.
37
Page 39

Preset
Preset allows you to store the most frequent listened stations that
you can select those stations easily and quickly. You can preset up to
10 stations for ea ch Internet Ra dio, FM and Digital Radio (DAB plus).
To store a preset:
1. Turn to the required band (Internet Radio, FM or Digital Ra dio
(DAB plus)) and station.
2. Press and hold the required preset button (1 to 10) on the re mote
control until the display shows “Preset stored”. The station will be
stored in the chosen preset. Repeat this for the remaining presets
if needed.
T o recall a preset:
1. Enter the required band (Internet Radio, FM or Digital Radio
(DAB plus)).
2. Press the required preset button (1 to 10) and your remote control
will then to the station stored in the preset memory. Or Press the
PRESET/STOP button and use the TUNING KNOB to select 1 of
the 10 presets.
Clock Operation
The radio must have the clock/date set to use the alarm functionality.
Clock/Date Setup
1. To setup the time go to > System settings > Time/Date >
Set Time/Date.
2. Use TUNE+/TUNE- or Turning knob to a djust the values and use
FORWARD/BACK to move back and forth between f ields.
Press the Turning knob or the button to move back and forth
between fields or confirm.
Time Zone Setup
To setup the time go to > System settings > Time/Date >
Set timezone. Then select the time zone.
Daylight savings Setup
To setup the daylight saving time go to > System settings >
Time/Date > Daylight savings. And then select yes/no for the
daylight savings.
Time/Date Auto Update
Auto update menu allows the user to select whether or not the
time/Date is to be synchronized with the Internet.
GB
To setup the auto update go to > System settings > Time/Date >
Auto update and choose the source of the update.
38
Page 40

Set 12/24 Hour
12/24 hour setup allows you to change the clock display format.
To setup the auto update go to > System settings > Time/Date >
Set format, and choose 12 hour or 24 hour display.
Set Sleep Time
Sleep time allows you to set the time to turn the radio off automatically.
Press the Timer button on the ra dio. And the radio will enter the
Set Sleep time mode. While the display still showing as the picture,
rotate the Tuning Knob to adjust between off, 15 minutes, 30 minutes,
45 minutes, and 60 minutes.
39
Page 41

Set Alarms
There are 2 alarms.
1. Press the Timer button twice on the radio.
2. Choose Alarm1 or Alarm2 to enter Alarm setup, by rotating and
pressing the Turning knob.
3. After entering the Alarm setup, there are some options to set up:
Time: Alarm time setup.
Mode:
Choose the source of what to play when time is up: Buzzer,
Internet radio, DAB (Digital Radio) or FM.
Preset:
Choose the radio station which will play when time is up. You can
choose from the last played station, or from the Presets.
Enable:
On/Off: Use this option to turn the alarm on/off, by pressing the
Turning knob.
Frequency:
To set whether the alarm is for once, everyday, weekly,
weekdays or at weekends.
Daily - will sound everyday.
Once - will sound at one time only.
Weekends - will sound on weekends only.
Weekdays - will sound on weekdays only.
Volume: T o a djust the alarm volume.
Save: To save the change you have ma de.
When the Alarm sounds
To turn off the alarm, press the ST ANDBY button. Or
To interrupt the alarm sounding, press any button of the radio, the alarm
will stop for 5 minutes and the display will show the count down.
The snooze function can be repeat during the period of the alarm
is active.
Press the STANDBY button to cancel the snooze and alarm function.
GB
40
Page 42

Upgrade firmware
From time to time, new software features for your radio may
be developed. For example, a new audio decoder may be added to allow
an alternative audio format to be supported. You radio has therefore
been designed to allow its internal software to be upgraded using your
Internet connection.
Upgrading the software will remove all network settings, radio station
presets and alarm settings from your radio. Do not attempt this
procedure unless you have a good Internet connection and a relia ble
mains power supply. If you connect to your router using a Wi-Fi
connection, make sure that this is also reli a ble before proceeding.
The Upgrade Firmware option allows your radio to download new
internal software from the Frontier portal on the Internet. If there is
new software available, then the radio will ask whether you want to
download it or not. Selecting No or using the Back button will cancel
the operation.
IMPORTANT:
Do not switch off the power to the radio until the upgrade operation is
complete and the radio has restarted, otherwise the radio may become
permanently da maged.
There are two mechanisms to upgrade the ra dio.
Upgrade via Internet:
Go to > System settings > Software upgrade
There are 2 options, you can either choose Auto-check setting to
check periodically for new software version, or check it now.
Follow the instruction on the display, it tells you if the software of your
radio is up to date or not. If not, you can upgrade to the latest software.
Upgrade via USB
1. Connect the radio with the PC using an USB cable.
2. Start the upgrade.exe utility on the PC.
3. Utility will ask you to run the Software upgra de wizard on the
Wi-Fi radio.
4. If the radio is not yet in upgrade mode (showing the text
“Waiting for PC wizard…”), enter the Software upgrade mode by
removing the power, then holding down the keys <s kip backward>
and <skip forward> while turning the radio on again.
5. The upgrade will automatically start a nd takes approximately
2 minutes.
6. Upon completion, the radio will automatically reboot and load the
new software.
41
Page 43

Factory Reset
If you wish to completely reset your radio to its initial state this may be
performed by following this procedure.
1. Go to > System settings > Factory reset.
2. Rotate and press the Turning knob to confirm rest.
3. The display will show “Restarting” for several seconds, a nd then the
Factory reset is done.
GB
42
Page 44

Trouble Shooting
Problem
Unable to connect to Wi-Fi network
or Una ble to get Internet listing.
Unable to hear sound in
AUX IN mode.
Unable to f ind PC or music folder
using scan.
Unable to connect to certain stations.
Connections are Unsta ble.
Possible Cause
1. Router might be down.
2.Wrog network password entered.
Aux device or radio volume not
adjusted correctly.
Sharing not enabled.
1. Selected Internet radio station
might be down.
2. The station does not support
the format used by the Internet
radio station.
3. Radio is not broadcasting at
this time of day or reached
maximum allowed listeners.
1. Interference caused by other
electronic products.
2. Internet may be out
of bandwidth.
Possible Solution
1. Check if PC is able to connect to the network.
2. Check if the network key is correct.
Increa se the volume on the radio a nd the aux device.
Enable sharing. See Music Player for more details.
1. Check if PC is able to access the Internet radio portal
(http://www.wifiradio-frontier.com) when connected to
the same Wi-Fi network.
2. Try connecting to the radio station again later.
1. Try moving the Ra dio to a nother Location.
2. Try connecting to a wired network and if the problem persists,
turn off programs that are using the Internet on your PC to
preserve bandwidth.
43
Page 45

Specification
TUNE
FEATURE
AMPLIFIER
SPEAKER
I/O Socket
DIMENSIONS
FM
Digital Radio
(DAB plus)
WiFi
Ethernet
Frequency (MHz)
Band III
IEEE 802.11 b / g (GHz)
IEEE 802.3
Internet Radio
Media Player
Record - SD / Flash
Program upgra de
Others
EQ
Speaker output (TYP)
Earphones output
Size
Impedance
Magnetically shield
AC / DC - in
Aux - in
Line - out
Earphones
USB
Antenna
RJ - 45
Width ( mm )
Height ( mm )
Depth ( mm )
We ight ( g )
US: 87.8-108
EU: 87.5-108
(5A – 13F)
2.4 - 2.4835
*
vTuner
*
Via USB-B
T one control
5W + 5W
5 + 5 mW
3 inches x 2
8 ohms
*
AC
*
*
*
USB-B
WiFi, FM, Digital Radio (DAB plus)
*
326
108
210
2946
GB
44
Page 46

If at any time in the future you should need to dispose of this product please note that: Waste electrical products should not
be disposed of with household waste. Please recycle where facilities exist. Check with your Local Authority or retailer for
recycling advice. (Waste Electrical and Electronic Equipment Directive)
454647
Page 47

Page 48

Sommaire
Consignes de sécurité importantes .............................. 48-50
Démarrage ............................................................................. 51
Commandes .................................................................... 53-56
Connexion à Internet (pour la radio Internet) ..................... 60
Ecouter la radio Internet ....................................................... 64
Radio numérique (DAB plus) .............................................. 77
Fonctionnement de l’horloge ............................................... 84
Mise à niveau du firmware ................................................... 87
Dépannage ............................................................................ 89
Spécifications ........................................................................ 90
Page 49

Consigne s de sécurité importa ntes
1. Lire et comprendre toutes les consignes de sécurité et d’utilisation
avant d’allumer l’appareil.
2. Les consignes de sécurités doivent êtres conservées pour une
éventuelle consultation ultérieure.
3. Toutes les consignes d’utilisation et avertissements concernant
l’appareil devraient être s suivies.
4. Suivre toutes les consignes et instructions d’utilisation.
5. utilisez seulement les pièces/a ccessoires spécifiées par le fabricant.
6. utilisez seulement un chiffon doux et sec pour nettoyer le boîtier
externe de la radio.
9. N’exposez pas ce produit à des éclaboussures et égouttements.
Les objets contenant des liquides, tels que les vase s ou verres,
ne doivent pas être posés sur l’unité.
10. N’in stallez pas cet appareil près de sources de chaleur telles
qu’un radiateur , conduit d’air chaud, poêle ou autres appareils
(en incluant les amplificateurs) qui produisent de la chaleur.
11. Ne pas placer la ra dio sur un support instable, table, chariot etc.
La radio risquerait de tomber ce qui pourrait gravement
l’endommager.
12. Ne pas essayer d’entretenir l’appareil vous-même. Retirer le ca pot
vous exposerait à des tensions électriques dangereuses et annulera
la garantie. Adressez-vous à un réparateur qualifié.
7. Ventilation: Cette ra dio devrait être située de sorte que son
emplacement n’interfère pas avec sa propre ventilation.
Exemple, la radio ne doit pas être utilisée sur un lit, sofa,
couverture ou autres surfaces qui ris queraient de bloquer le s
orifices de ventilation. Ne pas placer l’appareil da ns de s endroits
clos comme un coffre ce qui réduirait le débit d’air nécessaire à
sa propre ventilation. Maintenez 10 cm d’espace à l’arrière de ra dio.
8. Eau et humidité: L’appare il ne doit pas être utilisé près de l’eau.
Ne pas utiliser près d’une baignoire, cuvette, évier, sous-sol humide,
piscine, etc.
AVERTISSEMENT ! n’exposez pas cette unité à la pluie
ou l’humidité.
13. Débrancher la radio du secteur avant nettoyage.
Employer seulement un tissu humide pour le nettoyage
extérieur de la radio.
14. Ne raccordez pas le cordon d’alimentation Ca à une prise de courant
CA mouillée. Assurez-vous que la prise de courant est sèche avant
et après utilisation.
15. Source d’énergie: La radio devrait être utilisée seulement avec la
source d’énergie indiquée sur l’étiquette de l’appareil. Si vous n’êtes
pas sûr du type d’alimentation dans votre habitation, consultez votre
revendeur ou la compagnie d’électricité.
48
F
Page 50

16. Cordon électrique: Le cordon électrique devrait être placé de
manière à ne pas marcher dessus, pincer ou placer des objets
sur celui-ci. Prêter une attention particulière au cordon électrique
et à la prise, surtout à la sortie de l’appare il. Débrancher l’appareil
en saisissant la prise et non pas le cordon lui-même. Utiliser la
radio seulement avec le type d’alimentation indiqué sur l’appareil.
Si vous n’êtes pas sûr de la source d’énergie présente à votre
domicile, consultez votre revendeur ou la compagnie d’électricité.
17. Ne désassemblez pas le dispositif de sécurité de la fiche de mise
à la terre ou de polarisation. Une prise polarisée possède
deux broches, une étant plus large que les deux autres. Une fiche
de mise à la terre dispose d’une troisième broche. Cette troisième
broche permet votre sécurité. Cette fiche s’adapte seule ment à une
prise de courant mise à la terre. Si la fiche fournie ne s’adapte pas
à votre prise de courant, consultez un électricien pour le
remplacement de la prise de courant obsolète.
18. Ne pas surcharger les prises murales ou les rallonges électriques.
Ceci peut avoir comme conséquence un risque d’incendies ou
d’électrocution. Ne jamais insérer d’objet d’aucune sorte dans la
radio ni dans les ouvertures.
19. la prise de courant doit se trouver près de la radio, et simple
d’accès durant un cas d’urgence, pour mettre la radio hors tension,
déconnectez la fiche du cordon de la prise de courant CA.
20. Insertion d’objets et de liquides-Ne jamais insérer d’objet d’aucune
sorte dans la radio ni dans les ouvertures. L’objet pourrait entrer en
contact avec des parties électrifiées et créer des surtensions,
chocs électriques ou des incendies. Ne renversez jamais de
liquides sur l’unité.
21. Débra nchez ce produit de la prise de courant puis contactez un
personnel qualifié dans les conditions suivantes:
a.
Le cordon d’alimentation ou la prise est endommagé.
b.
un liquide a été renversé ou si un objet est tombé dan s l’appareil.
c.
La radio a été exposée à de la pluie ou à de l’eau.
d.
si l’appareil ne f onctionne pas normalement même en suivant les
instructions d’utilisation.
e.
L’appareil a subi une chute ou e st endommagé.
f.
La radio semble fonctionner de ma nière a normale ou vous
remarquez un changement da ns son f onctionne ment.
22. En cas de f issures présentes sur l’écran LCD, ne le laissez pas
entrer en contact avec des liquides.
23. Les modifications non expressément a pprouvée s par la partie
responsable de la conformité peuvent annuler le droit de l’utilisateur
d’utiliser l’unité.
24. Pour se conformer aux exigences de conformité aux expositions
RF de la FCC, aucune modification de l’antenne ou de l’équipe ment
n’est permise. Toute modification apportée à l’antenne ou à
l’équipement peut se résulter par une exposition aux RF et annuler
le droit de l’utilisateur d’utiliser l’unité.
49
Page 51

25. INFORMATIONS FCC
La déclaration sur les interférences de fréquences radio de la
Federal Communication Commission inclut les points suivants:
Cet équipement a été testé et déclaré conforme aux limites des
appareils numériques de Classe B; en accord avec les règles de
la FCC, chapitre 15.
Ces limites ont pour objectif de fournir une protection raisonnable
contre les interférences nuisibles dan s une installation résidentielle.
Cet équipement génère, utilise et rayonne de l’énergie de fréquence
radio et peut nuire aux communications radio s’il n’e st pas installé et
utilisé en accord avec le mode d’e mploi. Cependant, il n’est pas garanti
que des interférences surviendront dans une in stallation particulière.
Si l’équipement cause des interférences nuisibles à la réception radio
ou télévision, qui peuvent être localisées en allumant ou en éteigna n t
l’équipement, l’utilisateur est encouragé à corriger les interférences en
employant une ou plusieurs des mesures suivantes:
- Réorienter ou déplacer l’a ntenne de réception.
- Séparer davantage l’équipement et le récepteur.
- Connecter l’équipement à une prise de coura nt située sur un circuit
différent de celui du récepteur.
- Dema ndez assistance à un revendeur ou un technicien expérimenté
dans le domaine ra dio/TV.
L’utilisateur ne doit pas modifier cet équipe ment sans accord écrit
préalable de SANGEAN ELECTRONICS INC. Toute modification peut
annuler le droit de l’utilisateur d’utiliser cet équipement.
26. Une pression sonore excessive proven a nt des écouteurs peut
affecter votre ouïe.
Un paramètre plus élevé que l’égaliseur à une tension de signal de
la sortie vers les oreilles – et les écouteurs.
F
50
Page 52

Démarrage
Nous vous félicitons d’avoir fait l’acquisition de la radio Sa nge a n
WFR-1D+.
Vérifiez que les éléments suivants sont présents dan s l’e mballage:
Produit et accessoires:
Cordon d’alimentation: permet d’alimenter la radio.
Télécommande: permet de contrôler la ra dio à distance.
Cordon d’alimentation
Radio WFR-1D+ Wi-FiTélécommande
51
Page 53

Mise sous tension de la radio
1. Raccordez une extrémité du cordon d’alimentation à la radio
et raccordez l’autre extrémité à une fiche de courant murale
tel qu’indiqué.
2. Appuyez sur la touche STANDBY pour mettre en marche la radio.
Remarque:
Utilisez seulement l’ada ptateur de coura nt fourni ave c la radio.
Raccorder un autre type d’ada ptateur de courant peut endommager la
radio de manière perma nente.
F
52
Page 54

Commande s
(Panneau ava nt)
Elément
1
Ecran LCD
2
Commande Tuning
3
T ouche ST ANDBY
4
T ouche BAND
5
T ouche INFO
6
T ouche TIMER
7
T ouche EQ
8
T ouche BACK
9
T ouche PRESET ST OP
10
T ouche AV ANT
11
T ouche VOLUME BAS
12
T ouche VOLUME HAUT
53
Description
Permet d’afficher le texte.
Tournez cette commande pour effectuer des sélections/naviguer parmi les options. Appuyez sur la touche
pour confirmer vos sélections.
Pour mettre en marche/éteindre la radio.
Appuyez sur cette touche pour basculer entre les modes.
Appuyez sur cette touche pour afficher les informations sur l’écran LCD.
Appuyez sur cette touche pour accéder à l’option Egaliseur.
Appuyez sur cette touche pour accéder au réglage de l’égaliseur.
Appuyez sur cette touche pour revenir à la page précédente dans un menu. En mode Lecteur audio,
appuyez sur cette touche pour sélectionner la piste précédente.
Dans les interfaces de configuration, appuyez sur cette touche pour accéder au champ précédent.
Appuyez sur cette touche pour accéder au menu des présélections. En mode Lecteur audio, appuyez sur
cette touche pour arrêter la lecture.
Appuyez sur la touche pour déplacer le curseur vers la gauche lorsque vous entrez le nom d’utilisateur ou le
mot de passe.
En mode Lecteur audio, a ppuyez sur cette touche pour sélectionner la piste suivante.
Appuyez sur la touche pour diminuer le volume.
Appuyez sur la touche pour augmenter le volume.
Page 55

Commande s
(Panne au arrière)
Elément
13
Antenne de la radio FM et numérique (DAB plus)
14
Antenne Wi-Fi
15
Connecteur Headphone
16
Connecteur LINE OUT
17
Connecteur AUX IN
18
Connecteur LAN
19
Connecteur USB
20
Connecteur d’alimentation
Description
Permet de recevoir des signaux FM et numériques (DAB plus).
Permet de recevoir des stations radio Internet.
Permet de raccorder une paire d’écouteurs.
Permet de raccorder des haut-parleurs externes.
Permet de raccorder un équipement auxiliaire.
Permet de raccorder un câble Ethernet pour une connexion Internet filaire.
Permet de raccorder un équipement USB et mettre à nive au le firmware.
Permet de raccorder le cordon d’alimentation.
F
54
Page 56

Commande s
(Télécommande)
T ouche Power
A.
T ouches V olume
B.
Touches de présélection radio
C.
Touches de présélection 7,8,9,0,+10 / piste précédente, pause,
D.
piste suivante, a jouter 10
T ouche Stop
E.
T ouche TUNE +
F.
T ouche TUNE –
G.
T ouche AV ANT
H.
T ouche Ba ck
I.
T ouche Enter
J.
T ouche INFO
K.
T ouche TIMER
L.
T ouche Lecteur audio
M.
T ouche FM
N.
T ouche Radio Internet
O.
T ouche AUX IN
P.
T ouche DAB
Q.
T ouche EQ
R.
T ouche Mute
S.
55
Page 57

Elément
A
T ouche Power
B
T ouches V olume
C
T ouches de
présélection radio
D
Présélections 7,8,9,0,+10 /
piste précédente, pause,
piste suivante, a jouter 10
E
T ouche Stop
F
T ouche TUNE +
G
T ouche TUNE -
H
T ouche FOR W ARD
I
T ouche Ba ck
J
T ouche Enter
K
T ouche INFO
L
T ouche TIMER
M
T ouche Lecteur audio
N
T ouche FM
O
T ouche Radio Internet
P
T ouche AUX IN
Q
T ouche DAB
R
T ouche EQ
S
T ouche Mute
Description
Pour mettre en marche/éteindre la radio.
Appuyez sur la touche pour augmenter le volume/diminuer le volume.
Appuyez sur la touche pour rappeler une station radio.
Appuyez sur la touche pour rappeler une station présélectionnée 7, 8, 9, 0, 10 Permet également de
sélectionner la piste précédente, pause, sélectionner la piste suivante, 10.
Appuyez sur la touche pour arrêter l’opération en cours. En mode Lecteur audio, appuyez sur cette touche
pour arrêter la lecture.
T ouche de n avigation, permet de séle ctionner l’option du de ssus.
T ouche de n avigation, permet de sélectionner l’option en de ssous.
Appuyez sur la touche pour déplacer le curseur vers la droite lorsque vous entrez nom d’utilisateur ou mot
de passe.
En mode Lecteur audio, appuyez sur cette touche pour sélectionner la piste suivante.
Dans un menu, a ppuyez sur cette touche pour revenir d’une page. En mode Lecteur audio,
appuyez sur cette touche pour sélectionner la piste suiva nte.
Dans les interfaces de configuration, appuyez sur cette touche pour accéder au champ précédent.
Appuyez sur la touche pour confirmer votre sélection.
Appuyez sur cette touche pour afficher les informations sur l’écran LCD.
Appuyez sur cette touche pour régler la minuterie Sommeil et les alarmes.
Appuyez sur cette touche pour accéder au mode Lecteur audio.
Appuyez sur cette touche pour accéder au mode radio FM.
Appuyez sur cette touche pour accéder au mode Radio Internet.
Appuyez sur cette touche pour accéder au mode Entrée auxiliaire.
Appuyez sur cette touche pour accéder au mode (DAB plus).
Appuyez sur cette touche pour accéder à l’interface de sélection des égaliseurs.
Appuyez sur la touche pour couper le son de la radio.
F
56
Page 58

Naviguer dans les menus
Il existe deux manières de naviguer dan s le s menus.
1. Naviguez parmi les sélections en tourn ant la commande de réglage
Tuning de la radio dans le sens des aiguilles d’une montre ou dans
le sens contraire des aiguilles d’une montre pour déplacer le symbole
> et appuyez sur la commande de réglage Tuning pour confirmer
votre sélection.
Utilisez la touche AVANT/RETOUR pour sélectionner/accéder à
l’option précédente du menu.
2. Utilisez les touches de navigation (TUNE +, TUNE-, RETOUR,
AVANT) de la télécommande pour dépla cer le symbole > et appuyez
sur la touche Enter pour confirmer votre sélection. Utilisez AVANT/
RETOUR pour sélectionner/accéder à l’option précédente du menu.
Navigation dans le menu
:
* Si nécessaire, appuyez sur la touche BACK jusqu’à ce que
“Menu principal” s’affiche.
Sélectionnez cette option puis appuyez dessus en utilisant la
commande de réglage T uning. Vous pouvez utiliser la radio.
57
Page 59

Saisie de texte
Pour commencer à utiliser la radio, il est nécessaire d’entrer du texte.
Par exemple, entrer un nom d’utilisateur, mot de passe, rechercher une
station, etc.
Pour entrer du texte:
Faites tourner la commande de réglage T uning pour mettre en
surbrillance le texte/numéro/symbole.
Appuyez sur la touche la comma nde de réglage Tuning
pour confirmer.
Utilisez BKSP pour supprimer.
Utilisez OK pour confirmer lorsque vous avez terminé.
Utilisez CANCEL pour annuler et quitter.
F
58
Page 60

Configuration de la langue
Permet de sélectionner la langue d’aff ichage.
Accédez à > Configuration système > Langue et sélectionnez
la langue.
* Si nécessaire, appuyez sur la touche BACK pour revenir au
“Menu principal”
59
Page 61

Connexion à Internet (pour la radio Internet)
Avant d’utiliser cette radio Internet, vous devez être équi pé de
manière suiva nte:
Une connexion Internet haut débit ou
Un point d’accès sans fil (Wi-Fi) ou connexion filaire Ethernet
(10 ou 100 Mbits/sec avec connexion RJ45) relié à votre connexion
Internet haut débit, de préférence via un routeur . Dans la plupart des
cas un mode m haut débit, routeur ou point d’accès sans fil sera un
boîtier unique fourni par votre fournisseur d’a ccès Internet ou acheté
dans une boutique d’inf ormatique.
Si votre réseau sans fil est configuré pour utiliser le cryptage
“Wired Equivalent Privacy” (WEP) ou “Wi-Fi Protected Access”
(WPA) il vous sera nécessaire de connaître la clé de cryptage
de manière à ce que la radio Internet puisse communiquer avec
le réseau.
IMPORT ANT:
Avant de continuer , assurez-vous que votre point d’accès sans fil ou
routeur est sous tension et qu’il marche parfaitement avec votre réseau
informatique existant (utilisez votre ordin ateur pour vous en a ssurer).
Pour que cette partie de votre système fonctionne, vous devez lire
les instructions fournies avec votre point d’accès sans fil ou de
votre routeur.
F
* Il existe 2 manières de connecter votre radio au réseau, avec f il ou
sans fil:
60
Page 62

Connexion à un réseau san s f il
1. Assurez-vous qu’un réseau sans fil soit à portée.
2. Accédez à > Configuration système > Réseau > Assistant réseau >
[nom du réseau sans fil].
3. Si votre accès Internet san s f il (routeur) ne requiert pas de mot
de passe, la radio se connecte à Internet. Ou,
4. Si votre accès Internet sa ns f il (routeur) de mande un mot de passe,
l’écran affichera ‘Enter WEP key’ ou ‘Enter WPA key’.
Vous devez saisir la correcte clé WEP or WPA dans la radio afin que
celle-ci puisse communiquer avec votre réseau.
61
Page 63

Si vous n’avez pas la clé de cryptage WEP ou WPA, l’administrateur
de votre réseau pourra vous la communiquer. Certains routeurs Wi-Fi
sont fournis avec une clé par défaut, da ns ce cas reportez-vous à la
documentation fournie avec votre routeur.
Entrez le mot de passe lors que celui-ci vous est dem andé:
Faites tourner la commande de réglage T uning pour mettre en
surbrillance le texte/numéro/symbole.
Appuyez sur la commande de réglage Tuning pour confirmer .
Utilisez BKSP pour supprimer.
Utilisez OK pour confirmer lorsque vous avez terminé.
Utilisez CANCEL pour annuler et quitter.
F
5. L’écran affiche “Conne cted” lors que la connexion est éta blie.
62
Page 64

Connexion à un réseau filaire
Connectez la radio au réseau filaire en utilisa nt un câble Ethernet
comme indiqué. Lorsque le câble RJ-45 est ra ccordé à l’unité,
la connexion réseau filaire sera prioritaire à la connexion sans f il.
Sur le connecteur RJ-45 se trouvent deux voyants lumineux.
Si vous rencontrez des difficultés avec votre connexion filaire,
ceux-ci peuvent vous aider à identifier le problème.
Vert allumé = Connexion établie,
le voyant clignote = T ra n sfert de données
Jaune allumé = Connexion à 100Mbps,
Voya nt éteint = Connexion à 10Mbps
63
Page 65

Ecouter la radio Internet
Il existe 3 manières d’a ccéder au mode Radio Internet:
1. Dans le menu, accédez à > Menu principal > Radio Internet ou
2. Appuyez sur la touche BAND jusqu’à ce que s’affiche
“Radio Internet”, ou
3. Appuyez sur la touche RADIO INTERNET de la télécommande.
F
64
Page 66

La radio lira la dernière station radio écoutée.
Lorsque vous souhaitez sélectionner d’autres stations, suivez les
instructions ci-dessous (ou li s’agit de la première utilisation,
vous n’avez jamais écouté de stations ra dio).
Pour rechercher des stations radio Internet:
Dans la Liste des stations, 5 méthodes de recherche de stations
sont disponibles.
Accédez à > Menu principal > Radio Internet > Stations, 5 options
sont disponibles. Lorsque vous a ccédez au mode Ra dio Internet,
la radio lit la dernière station écoutée. Dans ce cas, tournez la
commande de réglage T uning pour continuer .
Lorsque vous accédez au mode Stations, 5 options de recherche de
stations sont disponibles:
65
Page 67

Emplacement:
Cette option vous permet de choisir une station radio à partir de la liste
continent et pays.
1. Tournez la commande de réglage Tuning jusqu’à ce que <Location>
s’affiche, appuyez ensuite sur la commande Tuning pour accéder au
mode recherche par emplacement.
2. Tournez la commande de réglage Tuning jusqu’à ce que l’écra n
affiche la sélection de continent. Appuyez sur la commande
Tuning pour accéder.
3. Tournez la commande de réglage Tuning jusqu’à ce que l’écra n
affiche la sélection du pays. And appuyez sur la commande
Tuning pour accéder.
F
66
Page 68

4. La liste des stations radio Internet s’affiche pour le pays sélectionné.
Procédez de même pour sélectionner un autre catalogue et
station radio.
5. Une fois la station radio désirée trouvée, appuyez sur la
commande Tuning. Au bout de quelques secondes, la radio se
connectera à la station radio sélectionnée.
* Il est possible que vous ne puissiez pas vous connecter à
certaines radios, ceci est tout à fait normal, car certaines stations
n’émettent pas 24/24h ou ne sont pas toujours en ligne.
67
Page 69

Genre:
Cette option vous permet de choisir une station radio selon le contenu,
par exemple Classique, Rock, Sport, Actualités, etc.
1. Tournez la commande de réglage Tuning jusqu’à ce que <Genre>
s’affiche, a ppuyez en suite sur la commande Tuning pour accéder
au mode recherche par Genre.
2. Tournez la commande de réglage Tuning jusqu’à ce que l’écra n
affiche le type de musique désiré. Appuyez sur la commande
Tuning pour accéder.
3. Tournez la commande de réglage Tuning jusqu’à ce que l’écra n
affiche le pays désiré. Appuyez ensuite sur la commande
Tuning pour accéder.
4. Les stations radio Internet s’affichent par genre et par
pays sélectionné.
5. Lorsque vous trouvez la station radio que vous souhaitez écouter,
appuyez sur la commande Tuning. Au bout de quelques secondes,
la radio se connecte à la station radio sélectionnée.
Il est possible que vous ne puissiez pas vous connecter à certaines
radios, ceci est tout à fait normal, car certaines stations n’émettent pas
24/24h ou ne sont pas toujours en ligne.
F
68
Page 70

Recherche de stations:
Vous permet de rechercher une station en entra nt le nom ou un
mot clé.
1. Tournez la commande de réglage Tuning jusqu’à ce que
<Search stations>, a ppuyez ensuite sur la commande Tuning pour
accéder au mode Recherche de stations.
2. Saisissez un mot clé de la station radio que vous recherchez en
tournant et en appuyant sur la commande Tuning.
3. Une fois le mot clé entré, appuyez sur “OK”. Au bout de
quelques secondes, la radio affichera toutes les stations radio liées
à votre recherche.
Pour saisir du texte:
Faites tourner la commande de réglage T uning pour mettre en
surbrillance le texte/numéro/symbole.
Appuyez sur la comma nde de réglage Tuning pour confirmer.
Utilisez BKSP pour supprimer.
Utilisez OK pour confirmer lorsque vous avez terminé.
69
Page 71

Utilisez CANCEL pour annuler et quitter.
4. Utilisez la commande de réglage T uning pour trouver la station radio
de votre choix, appuyez en suite sur la commande Tuning, la radio se
connecte à la station radio sélectionnée.
Station populaire:
Vous permet de visualiser une liste des stations ra dio populaire s et
effectuer une sélection.
Nouvelle station:
Vous permet de visualiser une liste des stations radio les plus récentes
et d’effectuer une sélection.
F
70
Page 72

Pour écouter des Podcasts:
Certaines stations radio vous permettent d’écouter des programmes
déjà diffusés.
Accédez à > Menu principal > Radio Internet > Podcasts,
3 options sont disponibles:
1. Emplacement:
Cette option vous permet de choisir une station radio à partir de la
liste continent et pays.
2. Genre:
Cette option vous permet de choisir une station radio selon
le contenu, par exemple Classique, Rock, Sport, Actualités, etc.
3. Recherche de station:
Vous permet de re chercher une station en entrant le nom ou un
mot clé.
Pour écouter la Mes favoris / Mes stations ajoutées:
Les fonctions Mes favoris et Mes stations radios vous permettent
d’ajouter de s station s radio internet sur le site internet frontière et
d’écouter les stations de votre radio.
It supports http:// form, but not mms:// form.
Accédez à > Menu principal > Radio Internet > Mes favoris >
Mes stations ajoutées
S’enregistrer en ligne:
Avant la première utilisation de ces deux fonctions, veuillez suivre
les instructions pour vous inscrire au site internet:
1. Accédez à > Liste des stations > Aide > Obtenir un code d’accès.
Le code s’affiche à l’écran.
2. Visitez le site internet en utilisant votre ordin ateur
http://www.wifiradio-frontier.
com puis cliquez sur “Inscrivez-vous ici” et remplissez le formulaire
avec le code d’accès affiché à l’écran. Vous pouvez laisser le champ
“Mode radio WiFi” libre.
71
Page 73

Site Internet frontière
3. Une fois l’inscription terminée, la page internet affiche “Mes favoris”
et “Mes stations ajoutées” pour utiliser ces deux fonctions. Une fois
l’enregistrement terminé, lorsque vous souhaiterez utiliser ces
fonctionnalités, il vous suffit seulement d’accéder au site internet:
entrez ensuite l’adresse email et le mot de passe.
Pour modifier Mes favoris:
1. Utilisez Naviguer ou Rechercher des station s sur le site internet pour
trouver une station,
2. Cliquez sur l’icône “Ajouter”, la station est ajoutée au dossier
Mes favoris.
Pour modifier Mes stations ajoutées:
Cette option vous permet d’ajouter des stations ra dio internet lorsque
vous connaissez l’adresse Internet des stations radio.
1. Cliquez sur la flèche située sous Mes stations ajoutées, il vous sera
demandé d’entrer l’adresse Internet. Entrez l’adresse exacte comme
indiquée sur la page.
2. Cliquez sur l’icône “Ajouter” pour ajouter la station.
F
72
Page 74

Lecteur audio
Le lecteur audio vous permet de lire des fichiers audio stockés sur
un ordinateur de votre réseau. V ous devez configurer l’ordinateur
avant de lire les musiques sur votre ra dio. iTunes n’est actuellement
pas supporté.
Dossiers partagés
Le lecteur Windows média 1 1 vous permet de lire le s f ichiers audio
stockés sur votre ordinateur ou un autre ordinateur du réseau.
Votre radio of fre deux méthodes d’accès aux fichiers. Il est possible
de se connecter aux Dossiers partagés sur le réseau. Il est égale ment
possible de se connecter avec l’application de gestion de fichiers en
utilisant le protocole Universal Plug and Play (UpnP) connu sous le
nom de Médias partagés.
Tous les types de fichiers supportés sont lisibles en mode
Partages Windows.
Lorsque vous utilisez un serveur UpnP, les types de fichiers
compatibles dépendent du logiciel serveur utilisé. Par exemple,
le lecteur Windows média 11 de Microsoft prend en charge les
fichiers MP3, WMA et WAV. Pour pouvoir lire les autres types de
fichiers supportés via UpnP, vous devrez peut-être installer d’autres
logiciels tiers.
Lorsque vous utilisez Partages Windows, la sélection de musiques se
fait par Artiste, par Album et optionnellement par piste dans un Album.
Lorsque vous utilisez un serveur de partage de médias UpnP,
la recherche et les critères de sélection sont déterminés par le serveur,
mais incluent en général des options supplémentaires comme la
recherche par Genre. Plusieurs applications serveur vous permettent
également d’accéder aux fichiers selon le s répertoires dans lesquels ils
sont stockés.
73
Page 75

Pour partager des médias en utilisant le lecteur Windows média 11:
1. Ouvrez le Lecteur média et cliquez sur la flèche située sous l’onglet
Librairie puis sélectionnez Options.
2. Cliquez sur le bouton Configuration du partage.
3. Cochez Partager le média vers: La radio WiFi est affichée comme
un périphérique inconnu.
4. Cliquez sur le bouton Paramètres.
F
74
Page 76

5. Nommez votre Média partagé et séle ctionnez le s paramètres.
6. Enfin, cochez la case pour sélectionner Autoriser les nouveaux
périphériques et ordinateurs automatiquement.
7. Cliquez sur Ok lorsque vous avez terminé.
Configuration des dossiers partagés
Configurez votre ordinateur Windows afin d’autoriser la radio à a ccéder
à vos fichiers audio par l’intermédiaire de Partages Windows
(partager des musiques).
1. Vérifiez que votre ordinateur est sur le même réseau que la
radio Internet.
2. En utilisant l’Explorateur Windows, sélectionnez le répertoire
contenant vos fichiers audio.
3. Effectuez un clic droit sur le répertoire.
4. Sélectionnez “Propriétés”.
5. Cliquez sur “Partage”.
6. Sélectionnez “Partager ce répertoire sur le réseau” et
“Autoriser les utilisateurs du réseau à modifier mes fichiers”.
Configurez votre radio pour que celle-ci se connecte à votre ordinateur
lorsqu’un nom d’utilisateur et un mot de pa sse sont requis.
75
Page 77

Médias partagés (UPnP)
Les Médias partagés utilisent le lecteur Windows Média (WMP) 11 et
supérieurs pour agir en tant que serveur média. Ce mode ne requiert
aucun réglage sur la radio, l’ordinateur doit cependa nt être configuré afin
d’autoriser la radio à accéder aux médias. Il vous suffit de configurer
l’ordinateur une fois.
Configuration de l’ordinateur pour le partage de média s:
1. Si vous êtes sous Microsoft Windows XP ou Windows Vista,
vous pouvez alors utiliser le lecteur Windows média 11 de Microsoft
(WMP11) pour agir en tant que serveur de médias UpnP
(Universal plug a nd Play). S’il n’e st pas déjà installé sur votre PC,
le lecteur Windows média 11 peut-être téléchargé et installé à partir
du site Internet de Microsoft.
2. Une fois installé, WMP11 crée une librairie de tous le s f ichiers média
disponible sur votre PC. Pour ajouter de nouveaux fichiers média à
la librairie, sélectionnez “Fichier > Ajouter à la librairie.. >
Options avancées”, cliquez sur “Ajouter” et sélectionnez les fichiers
que vous souhaitez ajouter, cliquez sur ‘OK’.
Pour lire des musiques des répertoires partagés du lecteur audio:
1. Accédez à > Menu princi pal > Lecteur audio > Répertoire s partagés
> [nom de l’ordinateur] > [noms des répertoires]. Le nom
d’utilisateur et le mot de passe peuvent être requis.
3. Utilisez les touches A vant/retour pour accéder à la piste
suivante/précédente.
Pour lire une musique des média s partagés du lecteur audio:
1. Accédez à > Menu princi pal > Lecteur audio > Médias partagés >
[nom de l’ordinateur] > [catégories de média]. Le serveur UpnP
rend les catégories de media disponibles. Par exemple, ‘Music’ ou
‘Playlists’.
Le nom d’utilisateur et le mot de passe peuvent être requis.
2. Trouvez et sélectionnez le f ichier audio que vous souhaitez lire da n s
le répertoire et appuyez sur la touche Tuning pour lancer la lecture.
3. Utilisez les touches A vant/retour pour accéder à la piste
suivante/précédente.
F
2. Trouvez et sélectionnez le fichier audio que vous souhaitez lire dans
le répertoire et appuyez sur la touche Tuning pour lancer la lecture.
76
Page 78

Radio numérique (DAB plus)
Pour écouter la Radio numérique (DAB plus), employez une des
3 manières d’a ccès au mode Ra dio numérique (DAB plus), après avoir
réglé la radio:
1. Dans le menu, accédez à > Menu principal > DAB ou
2. Appuyez sur la touche BAND jusqu’à ce que s’affiche “DAB radio”, ou
3. Appuyez sur la touche DAB de la télécommande.
* S’il s’agit de la première fois que vous activez le mode Radio
numérique (DAB plus), l’écran affichera “Scanning”. S’il ne s’agit pas
de la première utilisation de la radio, la dernière station écoutée est
automatiquement sélectionnée. Lorsqu’aucun signal n’a été détecté,
l’écran affichera “Service not availa ble”. V ous pouvez dépla cer votre
radio afin d’obtenir une meilleure réception.
Sélection de stations radio numériques (DAB plus)
1. Tournez la commande de réglage Tuning pour naviguer sur la liste
des stations disponibles.
2. Appuyez sur la touche T uning pour sélectionner une station.
L’écran peut afficher “Connecting…”. Saisissez ensuite la station de
votre choix.
77
Page 79

Services secondaires - Radio numérique (DAB plus)
Certaines stations radio offrent des services secondaires. Ces stations
ne sont généralement pas dif fusées de ma nière continue. Lors qu’une
station offre de tels services, les services secondaires s’af fichent dans
la liste des noms de station radio sous la station principale
(ou primaire).
Tournez la commande de réglage Tuning pour faire défiler la liste et
appuyez dessus pour sélectionner une station.
Modes d’affichage - Radio numérique (DAB plus)
Votre ra dio dispose de 5 modes d’aff ichage DAB (DAB plus).
Appuyez sur la touche INFO pour sélectionner un mode.
a. Fréquence:
Permet d’afficher la fréquence Radio numérique (DAB plus) de la
station en cours d’écoute.
b. Force du signal et erreur de signal:
Aff iche une barre indiquant la puissance du signal de la station
en cours d’écoute.
c. Débit:
Affiche le débit numérique, la méthode de décodage et canal de la
station en cours d’écoute.
d. Date:
Permet d’afficher l’heure et la date.
e. Défilement de texte:
Permet de faire défiler des messages texte fournis par la station en
cours d’écoute. Si la station n’offre pas de services texte,
l’écran affichera “Playing”.
F
78
Page 80

Recherche de nouvelles stations - Radio numérique (DAB plus)
Pour utiliser la Radio numérique (DAB plus) à un autre emplacement,
ou si aucune station n’est détectée durant la recherche initiale,
vous pouvez suivre la procédure ci-dessous pour rechercher les
stations disponibles:
1. Assurez-vous que la radio e st en marche et en mode DAB plus
(Radio numérique).
2. Appuyez sur la touche BACK pour accédez au menu DAB plus
(Radio numérique).
3. Tournez la commande de réglage Tuning jusqu’à ce que “Local sca n ”
soit mise en surbrillance à l’écran, and appuyez sur la touche Tuning.
Votre radio ef f ectue une recherche des fréquences locales.
4. L’écran affiche “Sca nning”. Lors que de nouvelles stations ont
été trouvées, le nombre de nouvelles stations ajoutées à la
liste s’affiche.
5. Pour effectuer une recherche complète de la bande de
fréquences radio, tournez la commande de réglage Tuning
jusqu’à ce que “Full scan” est mis en surbrillance, appuyez sur la
touche Tuning.
L’écran affiche “Scanning”. Lorsque de nouvelles stations ont été
trouvées, le nombre de nouvelles stations a joutées à la liste s’affiche.
79
Page 81

Réglage manuel - Radio numérique (DAB plus)
Le réglage manuel vous permet de régler manuellement une
station radio.
1. Assurez-vous que la radio est en marche et en mode DAB plus
(Radio numérique).
2. Tournez la commande de réglage Tuning jusqu’à ce que
“Manual tune” est mis en surbrillance à l’écran et appuyez sur
la touche Tuning.
3. Tournez et appuyez sur la touche Tuning pour sélectionner la
fréquence désirée.
Une barre située au milieu de l’écran indique la puissance de signal
minimum nécessaire à l’obtention d’une bonne réception. Les barres
d’indication de la puissance du signal augmentent et diminuent et
indiquent la force actuelle du signal lorsque vous ajustez l’antenne
télescopique de votre radio.
4. Lorsque la radio détecte un signal DAB plus (Radio numérique)
l’écran affiche le nom multiplex de la station DAB plus
(Radio numérique) et une barre indique la puissance de signal.
5. Les nouvelles stations trouvées sont ajoutées à la liste de la radio.
6. Appuyez sur la touche Tuning pour accéder au menu DAB plus
(Radio numérique), sélectionnez ensuite “Station list” pour revenir
en recherche manuelle.
F
80
Page 82

DRC (Contrôle de la gamme dynamique ) - Radio numérique
(DAB plus)
Le DRC peut vous aider à mieux entendre les son s faible s lorsque vous
utilisez la radio dans un environnement bruyant. Certaines stations
DAB ne sont pas compatibles avec la f onction DRC.
1. Assurez-vous que la radio e st en marche et en mode DAB plus
(Radio numérique).
2. Appuyez sur la touche BACK pour accéder au menu DAB plus
(Radio numérique).
3. Tournez la commande de réglage Tuning jusqu’à ce que “DRC” soit
mis en surbrillance à l’écra n, et appuyez sur la touche Tuning.
4. L’écran affiche:
DRC élevé: signifie que le niveau de DRC est identique à celui des
informations diffusées.
DRC faible: signif ie que le niveau de DRC est défini sur la moitié des
informations diffusées.
D RC désactivé: signifie que le DRC est désactivé.
Tournez et appuyez sur la touche Tuning pour effe ctuer
votre sélection.
Tri des stations - Radio numérique (DAB plus)
Votre radio dispose de 4 méthodes de tri de s stations: alphanumérique,
ensemble et valides. Le tri sélectionné par défaut est alpha numérique.
1. Assurez-vous que la radio e st en marche et en mode DAB plus
(Radio numérique).
2. Appuyez sur la touche BACK pour accéder au menu DAB plus
(Radio numérique).
3. Tournez la commande de réglage Tuning jusqu’à ce que
“Station order” soit mis en surbrillance à l’écran, appuyez sur la
touche Tuning.
4. Tournez et appuyez sur la touche Tuning pour sélectionner une des
options suivantes:
Alpha numérique: votre radio triera le s stations dans l’ordre
alphanumérique, de A à Z et de 0 à 9.
Ensemble: range chaque station s’il y en a de multiples.
Valides: l’écran affiche seulement les stations émettant un signal
Radio FM
Pour écouter la Radio FM, il existe 3 manières d’a ccéder au mode
radio Internet, après avoir réglé la ra dio:
1. Dans le menu, accédez à > Menu principal > FM ou
2. Appuyez sur la touche BAND jusqu’à ce que s’affiche “FM”, ou
3. Appuyez sur la touche FM de la télécomma nde.
La radio lira la dernière station radio écoutée. Lorsque vous souhaitez
sélectionner d’autres stations, suivez les instructions ci-dessous.
Changer de station FM:
1. Faites tourner la commande de réglage Tuning de la ra dio da n s le
sens des aiguilles d’une montre ou dans le sens contraire des
aiguilles d’une montre ou appuyez sur la touche TUNE+/TUNE de la télécommande pour augmenter/diminuer la fréquence radio. Ou
2. Appuyez sur la touche la comma nde de réglage T uning de la ra dio
ou de la télécommande pour rechercher et a ccéder à la
prochaine station radio FM disponible.
81
Page 83

FM RDS – Radio Data System
Le Radio Data System (RDS) est un système dans lequel des signaux
inaudibles numériques sont tran smis en plus du programme radio
normal FM.
Sous la bande FM, il offre de s fonctions telles que l’horloge, le type de
recherche de musique et le mode Informations:
* Les informations affichées sont seulement disponibles lorsque la
station offre des services R.D.S.
Appuyez sur la touche INFO lorsque la radio est en mode FM,
pour sélectionner un mode.
EQ- Egaliseur
Votre radio possède une fonction de réglage des basses et des aigus
afin de régler le volume selon vos gouts.
1. Appuyez sur la touche EQ de la radio ou de la télécommande.
2. Sélectionnez l’égaliseur de votre choix pour la musique que
vous écoutez.
Ou sélectionnez un égaliseur que vous avez défini pour régler les
basses et les aigus. Lorsque vous sélectionnez Plat, les aigus et les
basses sont définis sur zéro.
F
82
Page 84

Entrée auxiliaire (AUX IN)
Entrée auxiliaire vous permet d’écouter de la musique à partir d’une
source audio comme un iPod ou un lecteur DVD.
Pour écouter une musique en utilisant AUX IN:
1. Raccordez le périphérique à la ra dio en utilisant un câble AUX
tel qu’indiqué.
2. Accédez à >Menu princi pal>Entrée auxiliaire ou appuyez sur la
touche AUX IN de la télécommande or appuyez sur la touche
BAND pour activer le mode Aux in.
3. Lancez la lecture à partir de l’équipement externe; ajustez l’unité et
le volume de la radio lorsque nécessaire.
83
Page 85

Présélection
Présélection vous permet de mémoriser les stations radio les plus
fréquemment écoutées et de pouvoir les ra ppeler aisément. Vous
pouvez mémoriser jusqu’à 10 stations pour la Radio Internet,
FM et Radio numérique (DAB plus).
Pour mémoriser une présélection:
1. Sélectionnez la bande requise (Radio Internet, FM ou Ra dio
numérique (DAB plus)) et la station.
2. Appuyez et maintenez enfoncée une des touches numériques (1-10)
pendant environ 5 secondes. «Présélection mémorisée» s’aff iche
à l’écran. La station est mémorisée sur la présélection sélectionnée.
Répétez cette étape pour les autres stations à mémoriser.
Rappeler une station ra dio dernièrement écoutée:
1. Sélectionnez la bande requise (Radio Internet, FM or Ra dio
numérique (DAB plus)).
2. Appuyez sur la touche de présélection de votre choix (1 à 10) de la
télécommande pour ra ppeler la station mémorisée. Ou appuyez sur
la touche PRESET/STOP et utilisez la comma nde de réglage Tuning
pour sélectionner 1 des 10 présélections.
Fonctionnement de l’horloge
Il est nécessaire de préalablement régler l’horloge/la date de la radio
avant de pouvoir utiliser la fonction Alarme.
Réglage de l’horloge/de la date
1. Pour configurer l’option Date, accédez à l’option >
Configuration système > Réglage de l’horloge >
Réglage de l’heure/date.
2. Utilisez les touches TUNE+/TUNE- ou la comma nde de réglage
Tuning pour régler les valeurs et AVANT/RET OUR pour revenir/vous
déplacer sur un autre champ. Appuyez sur la commande de réglage
Tuning ou la touche pour confirmer.
Sélection du fuseau horaire
Pour configurer l’option Fuseau horaire > Configuration système >
Réglage de l’horloge > Fuseau horaire. Sélectionnez ensuite un
fuseau horaire.
Réglage de l’heure d’été
Pour configurer l’option Heure d’été, accédez à l’option >
Configuration système > Réglage de l’horloge > Heure d’été.
Sélectionnez ensuite parmi yes/no pour a ctiver/désactiver l’heure d’été.
Mise à jour auto de l’heure/Date
Le menu Mise à jour automatique vous permet de synchroniser l’horloge
avec internet.
F
Pour configurer l’option Mise à jour auto, accédez à l’option >
Configuration système > Réglage de l’horloge > Mise à jour auto et
sélectionnez la source de la mise à jour.
84
Page 86

Réglage du format 12/24 heures
Format 12/24 heures vous permet de changer le format d’af fichage
de l’horloge.
Pour configurer l’option Mise à jour auto, accédez à l’option >
Configuration système>Réglage de l’horloge > Format 12/24 heures.
Réglage de la minuterie sommeil
La minuterie Sommeil vous permet de définir la durée après laquelle la
radio s’éteint automatiquement.
Appuyez sur la touche Timer de la radio. La radio active le mode de
réglage de la minuterie sommeil. Lorsque l’écran af fiche la durée,
tournez la commande de réglage T uning pour sélectionner une option:
désactivée, 15 minutes, 30 minutes, 45 minutes et 60 minute s.
85
Page 87

Réglage des alarmes
2 alarmes sont disponibles.
1. Appuyez deux f ois sur la touche Timer de la radio.
2. Sélectionnez Alarme 1 ou Alarme 2 pour accéder à l’interface de
configuration Alarme, en tournant et en appuyant la commande de
réglage Tuning.
3. Une fois que vous avez accédé à l’interface de réglage de l’alarme,
plusieurs options de configuration sont disponibles:
Activer:
On/Off: Utilisez cette option pour mettre en marche/éteindre
la radio, en appuyant la commande de réglage Tuning.
Fréquence:
Pour définir l’alarme sur un jour, tous les jours, une fois
par semaine, les jours de la semaine ou les weekends.
Daily - Tous les jours.
Once - une fois seulement.
Weekends - Seulement le s weekends.
Weekdays - Seulement en semaine.
Heure: réglage de l’alarme.
Mode:
Permet de sélectionner la source à activer lorsque l’heure définie
est atteinte: Buzzer, Radio Internet, DAB (Radio numérique) ou FM.
Présélection:
Permet de sélectionner la source d’entrée à activer lors que l’heure
définie est atteinte. Vous pouvez sélectionner parmi la dernière
station écoutée et les présélections.
Volume: permet de régler le volume de l’alarme.
Sauvegarder: permet de sauvegarder les modifications a pportées.
Lorsque l’alarme retentit
Pour désactiver l’alarme, appuyez sur la touche STANDBY. Ou
Pour interrompre l’alarme lorsque celle-ci retentit, a ppuyez sur une
touche de la radio, l’alarme s’arrête pendant 5 minutes et l’écran
affichera le minuteur.
La fonction Snooze peut être répétée durant la période d’activation
de l’alarme.
Appuyez sur la touche ST ANDBY pour a nnuler la f onction Snooze
et l’alarme
F
86
Page 88

Mise à niveau du f irmware
De temps en temps de nouvelles fonctionnalités pour votre radio vont
être développées. Par exemple, un nouveau décodeur peut-être a jouté
pour permettre à un nouveau format audio d’être pris en charge par
la radio. V otre radio a été conçue pour que son logiciel intégré puisse
être mis à jour via votre connexion internet.
La mise à jour du logiciel effacera tous les paramètres réseau,
les stations mémorisées, et les alarmes que vous aurez programmée s.
Ne pas procéder à la mise à jour si votre connexion internet est
perturbée ou que l’installation électrique est mauvaise. Si vous utilisez
une connexion Wi-Fi via un routeur , assurez-vous que le signal soit
excellent avant d’effectuer l’opération.
La mise à jour du logiciel sera téléchargée sur le site de Reciva.
Lorsqu’une nouvelle version du logiciel est disponible, votre radio vous
demandera si vous souhaitez la télécharger ou non. Choisissez ‘No’ ou
utilisez le bouton ‘BACK’ pour ne pas ef fectuer la mise à jour.
IMPORTANT:
Ne pas éteindre la radio ou débrancher la prise secteur tant que la mise
à jour n’est pas terminée et que la radio ait redémarré, sinon la radio
sera inutilisable.
Il existe deux manières de mettre à niveau la radio.
Mise à niveau via Internet:
Accédez à > Configuration système > Software upgrade
2 options sont disponibles, vous pouvez sélectionner l’option de
vérification automatique afin de régulièrement vérifier la disponibilité
de nouvelles versions ou vérifier dès maintena nt.
Suivez les instructions à l’écran, celui-ci indique si le logiciel de votre
radio est à jour. Si celui-ci n’est pas à jour, vous pouvez installer la
dernière version.
Mise à niveau via USB
1. Raccordez la radio et l’ordinateur en utilisant le cordon USB.
2. Lancez l’utilitaire upgrade.exe sur le PC.
3. L’utilitaire vous demande de la ncer l’assistant de mise à niveau du
logiciel de la radio Wi-Fi.
4. Si vous n’avez pas encore sélectionné le mode Mise à nive au
(le texte “En attente de l’assista nt de l’ordin ateur…” s’affiche),
accédez au mode de mise à niveau logicielle en déconnectant le
cordon d’alimentation, maintenez enfoncées ensuite les touches
<saut arrière> et <saut avant> tout en remettant la radio à nouveau
en marche.
5. La mise à niveau se lance automatiquement et dure environ
2 minutes.
6. A la fin de la mise à nive au, la radio redémarrera automatique ment
et chargera le nouveau logiciel.
87
Page 89

Réinitialisation d’usine
Lorsque vous souhaitez rétablir la configuration d’origine de la radio,
suivez les instructions suiva ntes.
1. Accédez à > Configuration système > Réinitialisation d’usine.
2. Tournez et appuyez sur la touche Tuning pour confirmer
la réinitialisation.
3. L’écran affichera “Restarting” penda nt quelque s seconde s,
la restauration de la configuration d’usine est terminée.
F
88
Page 90

Dépannage
Problème
Impossible de se connecter à un
réseau Wi-Fi ou impossible d’obtenir
un listing Internet.
Aucun son en mode AUX IN.
Impossible de trouver un dossier
Ordinateur ou musique.
Impossible de se connecter à
certaines stations.
La connexion est instable.
Cause possible
1. Le routeur WiFi rencontre
des problèmes.
2. Vous avez entré une mauvaise
clé réseau.
Le volume du périphérique Aux ou
de la radio est mal réglé.
Le partage n’est pas a ctivé.
1. La station radio internet
sélectionnée est inactive.
2. La station ne prend pas en
charge le format utilisé par la
station radio Internet.
3. La radio n’émet pas à cette
heure de la journée ou a atteint
le nombre maximal d’auditeurs.
1. Des interférences sont causées
par d’autres produits
électroniques environnants.
2. La bande passante Internet peut
être insuffisante.
Solution
1. Vérifiez que le PC peut se connecter au réseau.
2. Vérifiez que la clé réseau est correcte.
Augmentez le volume de la radio et celui de
l’équipement auxiliaire.
Activez le partage. Voir la section Le cteur audio pour plus
de détails.
1. Vérifiez que le PC peut a ccéder au portail ra dio internet
(http://www.wifiradio-frontier.com) lorsque connecté au même
réseau Wi-Fi.
2. Essayez de vous connecter à la station radio ultérieurement.
1. Tentez de déplacer la radio à un autre endroit.
2. Tentez de raccorder al radio à un réseau filaire. Si le
problème persiste, arrêtez les progra mmes utilisant
Internet sur votre PC afin d’allouer davantage de ba nde
passante à a radio.
89
Page 91

Spécifications
SON
FONCTIONNALITES
AMPLIFICTEUR
HAUT-PARLEUR
Connecteurs I/O
DIMENSIONS
FM
Radio numérique
(DAB plus)
Wi-Fi
Ethernet
Fréquence (MHz)
Bande III
IEEE 802.11b/g (GHz)
IEE802.3
Tuner Radio Internet
Lecteur de média s
Enregistrement sur SD/Flash
Mise à niveau
Autres
Egaliseur
Sortie haut-parleur(TYP)
Sortie Ecouteurs
Taille
Impédance
Bouclier magnétique
CA/CC-in
Aux-in
Line-out
Ecouteurs
USB
Antenne
RJ-45
Largeur (mm)
Hauteur (mm)
Profondeur (mm)
Poids (g)
US: 87.8-108
EU: 87.5-108
(5A – 13F)
2.4 - 2.4835
*
vTuner
*
Via USB-B
Réglage du son
5W+5W
5+5mW
3 pouces X 2
8 ohms
*
CA
*
*
*
USB-B
WiFi, FM, Radio numérique (DAB plus)
*
326
108
210
2946
F
90
Page 92

Si à l’avenir vous devez vous débarrasser de ce produit merci de noter ceci: Vous ne devez pas vous débarrasser des déchets
d’équipements électriques et électroniques par les ordures ménagères ou autres déchets municipaux non triés. Le consommateur
devra apporter ses équipe ments usagés, soit en déchetterie, soit chez un distributeur lors de l’achat d’un produit neuf, soit le
donner à une association d’économie solidaire
919293
Page 93

Page 94

Inhalt
Wichtige Sicherheitshinweise ........................................ 94-96
Inbetriebnahme ..................................................................... 97
Bedienelemente ............................................................ 99-102
Internetzugang für Internetra dio ......................................... 106
Internetradio hören .............................................................. 1 10
Digitalradio (DAB plus) ...................................................... 123
Uhrzeit .................................................................................. 130
Firmware-Upgrade .............................................................. 133
Fehlerbehebung ................................................................. 135
T echnische Daten ............................................................... 136
Page 95

Wichtige Sicherheitshinwe ise
1. Lesen und verstehen Sie vor der Inbetriebnahme alle Sicherheits- und
Bedienungshinweise.
2. Bewahren Sie die Anle itung auf: Die Sicherheitshinweise
und die Bedienungsanleitung sollten Sie für den späteren
Gebrauch aufbewa hren.
8. Wasser und Feuchtigkeit: Das Gerät sollte nicht in der Nähe von
Wasser benutzt werden. Benutzen Sie das Gerät nicht in der Nähe
von Badewannen, Waschbecken, Spülen, feuchten Kellerräumen,
Swimmingpools etc.
WARNUNG! Setzen Sie dieses Gerät niemals Regen oder
Feuchtigkeit aus.
3. Beachten Sie die W arnhinwe ise. Alle Warn- und Bedienungshinweise
auf dem Gerät sollten unbedingt befolgt werden.
4. Befolgen und benutzen Sie alle Anwe isungen.
5. Verwenden Sie lediglich vom Hersteller a ngegebenes Zubehör.
6. Benutzen Sie zur Reinigung der Außenseite des Radios lediglich ein
trockenes Tuch.
7. Ventilation: Das Gerät sollte so aufgestellt werden, dass die
Luftzirkulation nicht beeinträchtigt wird. Das Gerät sollte z. B.
nicht auf ein Bett, Sofa, Bettvorleger oder eine andere weiche
Unterlage gestellt werden, bei der die Ventilationsöffnungen blockiert
werden könnten. Das Gerät sollte nicht an Orten aufgestellt werden,
an denen die Luftzufuhr zu den Ventilationsöffnungen beeinträchtigt
werden könnte. Halten Sie and der Rückseite des Radios
mindestens 10 cm Abstand zur Wand.
9. Setzen Sie dieses Gerät niemals Wassertropfen oder -spritzern aus.
Gegenstände, die mit Flüssigkeiten gefüllt sind, wie z. B. Vasen oder
Trinkgläser, sollten niemals auf das Gerät gestellt werden.
10. Installieren Sie da s Gerät nicht in der Nähe von Hitzequellen,
wie z. B. Heizungen, Herden oder anderen Geräten die Hitze
produzieren (z. B. Verstärker) auf.
11. Benutzen Sie zur Aufstellung des Geräts keine insta bilen Wagen,
Gestelle, Haltevorrichtungen oder Tische. Das Gerät kann
herunterfallen und damit zu Verletzungen oder Beschädigungen
am Gerät führen.
12. Versuchen Sie nicht das Gerät selbst zu reparieren. Bei Öffnen des
Gehäuses setzen Sie sich gefährlicher Hochspannung aus und
machen die Garantie nichtig. Wenden Sie sich nur an ausgebildetes
Wartungspersonal.
13. Ziehen Sie vor der Reinigung des Geräts i mmer den Stecker aus
der Steckdose. Benutzen Sie zur Reinigung der Außenseite des
Radios lediglich ein trockenes Tuch.
D
94
Page 96

14. Schließen Sie das Netzkabel nicht an eine Steckdose an,
wenn diese Nass ist. Vergewissern Sie sich, dass die eine
Steckdose vor der Bentzung vollständig trocken ist.
18. Überlasten Sie die Wandsteckdosen und Verlängerungska bel nicht.
Ansonsten k ann erhöhte Feuer- und Stromschlaggefahr bestehen.
Stecken Sie niemals Gegenstände in die Öf fnungen des Geräts.
15. Stromversorgung: Da s Gerät sollte nur an Stromnetze
angeschlossen werden, die den Spezifikationen auf dem
Typenschild entsprechen. Falls Sie sich nicht sicher über die
Spezifikationen Ihres Stromnetzes sind, wenden Sie sich bitte an
Ihren Händler oder Ihren Stromnetzbetreiber.
16. Netzka bel: Das Netzkabel sollte so verlegt werden, dass niema nd
darauf treten kann oder Objekte darauf gestellt werden. Achten Sie
insbesondere auf den Stecker, bei Steckdosen oder am
Ausgangspunkts des Kabels am Gerät. Ziehen Sie den Stecker aus
der Steckdose, indem Sie am Stecker ziehen und nicht am Kabel.
Benutzen Sie das Gerät nur mit dem auf dem Gerät angegebenen
Netzstrom. Falls Sie sich nicht sicher über die Spezifikationen
Ihres Stromnetzes sind, wenden Sie sich bitte an Ihren Händler
oder Ihren Stromnetzbetreiber.
17. W enn Ihr Gerät über einen polarisierten oder geerdeten
Stecker verfügt, machen Sie auf keinen Fall diese
Sicherheitsfunktion unbrauchbar. Ein polarisierter Stecker hat
zwei Flügel, bei denen einer breiter als der andere ist. Verfügt der
Stecker über eine Erdung, so ist ein dritter Erdungsflügel
vorhanden. Der breite und der Erdungs flügel sind eingebaute
Sicherheitsvorrichtungen. Wenn der Stecker Ihres Geräts nicht in
Ihre Steckdose passt, wenden Sie sich bitte an einen
ausgebildeten Elektriker.
19. Der Netzstecker sollte sich immer in der Nähe des Radios befinden
und im Notfall le icht zugänglich sein. Um das Radio vom Strom
zu trennen, ziehen Sie einfach den Netzstecker aus der
Steckdose heraus.
20. Fremdgegenstände – V ersuchen Sie niemals Gegenstände
irgendwelcher Art in das Gerät zu stecken. Hochspannungsteile
könnten berührt werden und zu Feuer oder Stromschlag führen.
Lassen Sie niemals Flüssigkeiten irgendwelcher Art auf das
Gerät kommen.
21. Ziehen Sie den Stecker aus der Steckdose und wenden Sie
sich an ausgebildetes Wartungspersonal, wenn folgende
Umstände eintreten:
a.
Wenn Netzk abel oder Netzstecker beschädigt sind.
b.
Wenn Flüssigke iten auf das Gerät geschüttet wurden oder
Fremdgegenstände in da s Geräteinnere gela ngt sind.
c.
Wenn das Gerät Regen oder Wa sser ausgesetzt wurde.
d.
Wenn das Gerät trotz Befolgung der Bedienungsan weisungen
nicht richtig funktioniert.
e.
Wenn das Gerät heruntergefallen oder auf irgendwelche W eise
beschädigt wurde.
f.
Wenn das Gerät einen deutlichen Leistungsabfall zeigt.
95
Page 97

22. W enn Sie Risse oder Beschädigungen am LCD-Display bemerken,
berühren Sie die Flüssigkeit bitte nicht.
23. Veränderungen oder Modifik ationen a n die sem Gerät, die nicht
ausdrücklich vom Verantwortlichen für Konformität genehmigt
wurden, machen die Rechte des Benutzers auf den Betrieb des
Geräts nichtig.
24. Um der FCC-RF-Vorschrift zu entsprechen, darf das Gerät und
dessen Antenne nicht modifiziert werden. Veränderungen am Gerät
oder der Antenne, können dazu führen, dass die RF-Grenzwerte
überschritten werden, und der Benutzer das Recht auf Benutzung
des Geräts verwirkt.
25. FCC-INFORMATIONEN:
Die FCC-Interferenzerklärung zu Radiofrequenzen beinhaltet den
folgenden Absatz:
Dieses Gerät wurde entsprechend Teil 15 der FCC-Richtlinien
getestet und hält die für Klasse B geltenden Be schränkungen für
digitale Geräte ein.
Diese Beschränkungen sind dafür entwickelt worden,
einen ausreichenden Schutz gegen schädliche Interferenz in
Wohngebieten zu sichern. Dieses Gerät verursacht, benutzt und strahlt
Radiowellen aus, und kann, wenn es nicht der Bedienungsa nle itung
entsprechend installiert wird, für Radiokommunikation schädliche
Interferenz verursachen. Es wird allerdings nicht gara ntiert, dass bei
bestimmten Konfigurationen keine Interferenz entstehen ka nn.
W enn das Gerät als Ursache für Interferenz festgestellt werden ka nn,
indem es an- und ausge schaltet wird, wird dem Benutzer e mpfohlen die
Interferenz durch eine der folgenden Maßna hmen zu korrigieren:
- Richten Sie die Empfangsantenne neu aus bzw. stellen Sie sie an
einem anderen Ort auf.
- Erhöhen Sie die Entfernung zwischen Gerät und Empfänger.
- Verbinden Sie das Gerät mit einer Steckdose, die nicht mit dem
Empfangsgerät verbunden ist.
- W enden Sie sich a n Ihren Händler oder a n e inen erfa hrenen
Radio-Fernsehtechniker.
Dem Benutzer sind V eränderungen und Modifikationen a n diese m Gerät
ohne schriftliche Zusage der Firma SANGEAN ELECTRONICS INC.
untersagt. Modifikationen können dazu führen, dass der Benutzer das
Recht auf die Benutzung des Geräts verwirkt.
26. Übermäßiger Schalldruck von Kopfhörern ka nn
Hörschäden verursachen.
Höhere Einstellungen am Equalizer verursachen höhere
Signalspannungen am Kopfhörerausgang.
D
96
Page 98

Inbetriebnahme
Herzlichen Glückwunsch zum Kauf des Sangean WFR-1D+.
Überprüfen Sie den Verpa ckungsinhalt und vergewissern Sie sich,
dass die f olgenden Gegenstände vorhanden sind:
Produkt und Zubehör:
Netzkabel: zur Stromversorgung des Radios.
Fernbedienung: zur Fernbedienung des Radios.
Netzkabel
WFR-1D+ Wi-Fi RadioFernbedienung
97
Page 99

Einschalten des Radios
1. Schließen Sie das Netzkabel am Radio an und stecken Sie es wie
in der Abbildung gezeigt in eine Steckdose.
2. Betätigen Sie die Bereitschaftstaste zum Einschalten des Radios.
Hinweis:
Benutzen Sie nur das mit diesem Radio mitgelieferte Netzteil.
Der Anschluss von nicht kompatiblen Netzteilen kann zu
permanenten Schäden am Radio führen.
D
98
Page 100

Bedienelemente
(Gerätevorderseite)
Bezeichnung
1
LCD-Display
2
Frequenzdrehknopf
3
Bereitschaftstaste
(STANDBY)
4
BAND-Taste
5
INFO-Taste
6
TIMER-Taste
7
EQ-Taste
8
Schnellrücklauf (BACK)
9
SENDERSPEICHER/
STOPP-Taste
10
Schnellvorlauf (FORWARD)
11
Lautstärke verringern
12
Lautstärke erhöhen
99
Beschreibung
Bildschirm zur Textanzeige.
Benutzen Sie diesen Drehknop f zur Menüauswahl und — navigation. Betätigen Sie den Drehknopf zur
Bestätigung Ihrer Auswahl.
Ein-/Ausschalten des Radios.
Benutzen Sie diese Taste, um zwischen verschiedenen Betriebsarten zu wechseln.
Benutzen Sie diese Taste zur Anzeige von Inf ormationen auf dem LCD-Bildschirm.
Benutzen Sie diese Taste zum Einstellen der Uhrzeit und der Weckalarme.
Benutzen Sie diese Taste zum Einstellen der Equalizer-Funktion.
Betätigen Sie diese Taste, um in Menüs eine Seite zurück zu gehen. Benutzen Sie diese Taste im
Musikwiedergabemodus, um einen Musiktitel vor zu springen.
In Einstellungsmenüs dient die Taste zum Zurückkehren zum vorigen Eingabefeld.
Betätigen Sie diese Taste zum Aufrufen des Einstellungsmenüs. Betätigen Sie die Taste im
Musikwiedergabemodus, um die Wiedergabe zu stoppen.
Betätigen Sie die Taste während der Eingabe von Benutzername und Passwort,
um ein Feld nach rechts zu gehen.
Betätigen Sie die Taste im Musikwiedergabemodus, um einen Musiktitel nach vorne zu springen.
Benutzen Sie diese Taste zum Verringern der Lautstärke.
Benutzen Sie diese Taste zum Verringern der Lautstärke.
 Loading...