

Page 1
381RE01-A
WiFi - Internet Radio
Operating instruction
Mode d’emploi
Instruccions de manejo
Gebruiksaanwijzing
Bedienungsanleitung
GB
F
E
NL
D
Page 2

1
Ta ble of Contents
Important Safety Instructions ................................................. 2-3
Chapter 1 Getting Started .......................................................... 4
Product and Acce ssories: ......................................................... 4
Power on the radio ..................................................................... 5
Controls ..................................................................................... 6
Using the Wi-Fi Radio ................................................................ 7
Remote Control ...................................................................... 8-9
Navigate Menu Selections ...................................................... 10
Menu navigation: ..................................................................... 10
Entering Texts .......................................................................... 11
To enter texts: .......................................................................... 11
Language Setup ....................................................................... 1 1
Connecting Devices to the Ra dio ............................................ 12
Chapter 2 Getting Connected .................................................. 13
Connecting to wireless network ............................................... 14
Connecting to wired network .................................................... 15
Chapter 3 Listening to the Ra dio .............................................. 16
Internet Radio .......................................................................... 16
To listen to the internet ra dio: ................................................... 16
To se arch for stations on the internet: ................................ 16-17
To listen to the Podcasts: ........................................................ 17
To listen to My Favourite s / My Added Station: ....................... 18
Music Player ........................................................................... 20
To play music in the Music Player’s shared folders: ............... 20
To play music in the Music Player’s shared medi a: ................ 20
Shared Folder .......................................................................... 21
To share medi a using Windows Medi a Player 11: ................... 22
Shared Folder Setup .......................................................... 23-24
Shared Media (UPnP) ............................................................. 24
To setup your PC f or shared medi a: ....................................... 24
FM Radio ................................................................................. 25
To listen to the FM radio: ......................................................... 25
To change FM stations: ........................................................... 25
Auxiliary Input (AUX IN) .......................................................... 26
To play music using AUX IN: .................................................. 26
Radio Station Preset ................................................................ 27
On the remote control you will find numeric keys 1-10
that are used to store preset stations. See Remote Control
on page 5 for more details. When no station is a ssigned
to a number, “Preset empty” is displayed on the screen.
Presets are available in the f ollowing modes: .......................... 27
To recall a pre set: .................................................................... 27
To assign the current radio station to a preset key: ................. 27
Last Listened ........................................................................... 27
To recall last listened: .............................................................. 27
Chapter 4 Clock Operation ...................................................... 28
Clock Setup ............................................................................. 28
Date Setup ............................................................................... 28
Time Zone Setup ..................................................................... 29
DST Setup ............................................................................... 29
Auto Update ............................................................................. 30
Set 12/24 Hour ........................................................................ 30
Set Sleep Time ........................................................................ 30
Set Alarms................................................................................ 31
Alarm setup ........................................................................ 31-32
Chapter 5 Upgra de a nd Reset ................................................. 33
Software Upgrade .................................................................... 33
Upgrade via internet: ............................................................... 33
Upgrade via USB ................................................................ 33-34
Factory Reset .......................................................................... 34
Chapter 6 T rouble Shooting ..................................................... 35
Chapter 7 Product Specification ......................................... 36-28
Page 3

2
GB
Important Safety Instruction s
1. Read and understand all safety and operating instructions before
the radio is operated.
2. Retain instruction: The safety and operating instructions should be
retained for future reference.
3. Heed warnings. All warnings on the a ppliance and operating
instructions should be followed.
4. Follow all operations and use instructions.
5. Water and moisture: The appliance should not be used near water .
Do not use near a bathtub, washbowl, laundry tub, kitchen sink,
wet basement, swimming pool, etc.
6. Unplug the radio from the AC power outlet bef ore cleaning. Use only a
damp cloth for cleaning the exterior of the radio. Clean the radio only
with dry cloth.
7. Do not pla ce the radio on an unstable cart, stand, bra cket or table.
The radio may fall, causing serious personal injury and damage
to the radio.
8. Ventilation: This radio should be situated so that its location or
position does not interfere with its proper ventilation. For example,
the radio should not be used on a bed, sofa, rug or other soft
surfaces that may block the ventilation openings. It should not be
placed in a built-in situation like a cabinet that may reduce air flow
through the ventilation openings.
9. Don’t install near any heat sources such as radiators, heat registers,
stoves, or other apparatus (including amplifiers) that produce heat.
10. If the provided plug doesn’t fit into your outlet, consult an electrici an
for replacement of the obsolete outlet.
11. Power sources: The radio should be operated only from the type of
power source indicated on the marking label.
If you are not sure of the type of power supply to your home,
consult your radio dealer or power company.
12. Power cords: The power cord should be positioned so it is not
walked on, pinched, or items placed on top of it. Pay particular
attention to cords at plugs, convenience receptacles, a nd the point
where they exit from the unit. Unplug the power cord by gripping the
power plug, not the cord. Operate the radio using only the current
type of power source indicated. If you are not sure of the type
of power supply to your home, consult your dealer or local
power company.
13. Do not overload wall outlets or extension cords. This can result in a
risk of fire or electrical shock. Never insert objects of any kind into
the radio through opening. The objects may touch dangerous
voltage points or short out parts. This could cause a fire or
electrical shock.
14. Only use attachment/acce ssorie s specified by the manufacturer.
Page 4

3
15. If the radio is left attended and unused for long periods of time,
unplug it form the unattended wall outlet. This will prevent damage
caused by lightning or power line surges.
16. If the radio is left unattended and unused for a long period of time,
remove the batteries. The batteries may leak and damage furniture
of your radio.
17. Do not attempt to service the receiver yourself. Re moving the cover
may expose you to dangerous voltage, and will void the warranty.
Refer all servicing to authorized service personnel.
18. Object and Liquid Entry-Never push objects of any kind into this
radio through opening as they may touch dangerous voltage points
or short-out parts that could result in a fire or electric shock.
Never spill liquid of any kind of product.
19. The applia nce should be serviced by qualif ied service
personnel when:
The power supply cord or the plug has been damaged.
Objects have fallen or liquid had been spilled into the radio.
The radio has been exposed to rain or water.
The radio does not appear to operate normally or exhibits a
marked change in performance.
The radio has been dropped, or the enclosure damaged.
Notice:
The changes or modifications not expressly approved by the party
responsible for compliance could void the user’s authority to operate
the equipment.
IMPORTANT NOTE:
To comply with the FCC RF exposure compliance requirements,
no change to the antenna or the device is permitted. Any change to the
antenna or the device could result in the device exceeding the RF
exposure requirements and void user’s authority to operate the device.
FCC INFORMATION
The Federal Communication Commission Radio Frequency Interference
Statement includes the following paragra ph:
The equipment has been te sted and found to comply with the limits
for a Class B Digital Device, pursuant to part 15 of the FCC Rules.
These limits are designed to provide rea sona ble protection against
harmful interference in a residential installation. This equipment
generates, uses and ca n radi ate ra dio frequency energy and, if not
installed and used in accordance with the instruction, may cause
harmful interference to radio communication. However, there is no
grantee that interference will not occur in a particular installation.
If this equipment dose cause harmful interference to radio or television
reception, which can be determined by turning the equipment off a nd on,
the user is encouraged to try to correct the interference by one or more
of the following measure s:
- Reorient or relocate the receiving antenna.
- Increase the separation between the equipment a nd re ceiver.
- Connect the equipment into an outlet on a circuit different from that to
which the receiver is connected.
- Consult the dealer or an experienced radio/TV technici an for help.
The user should not modify or change this equipment without written
approval form SANGEAN ELECTRONICS INC. Modification could void
authority to use this equipment.
Page 5
4
GB
Chapter 1 Getting Started
Congratulations on your purchase of the Sa ngea n WFR-1 Wi-Fi Ra dio.
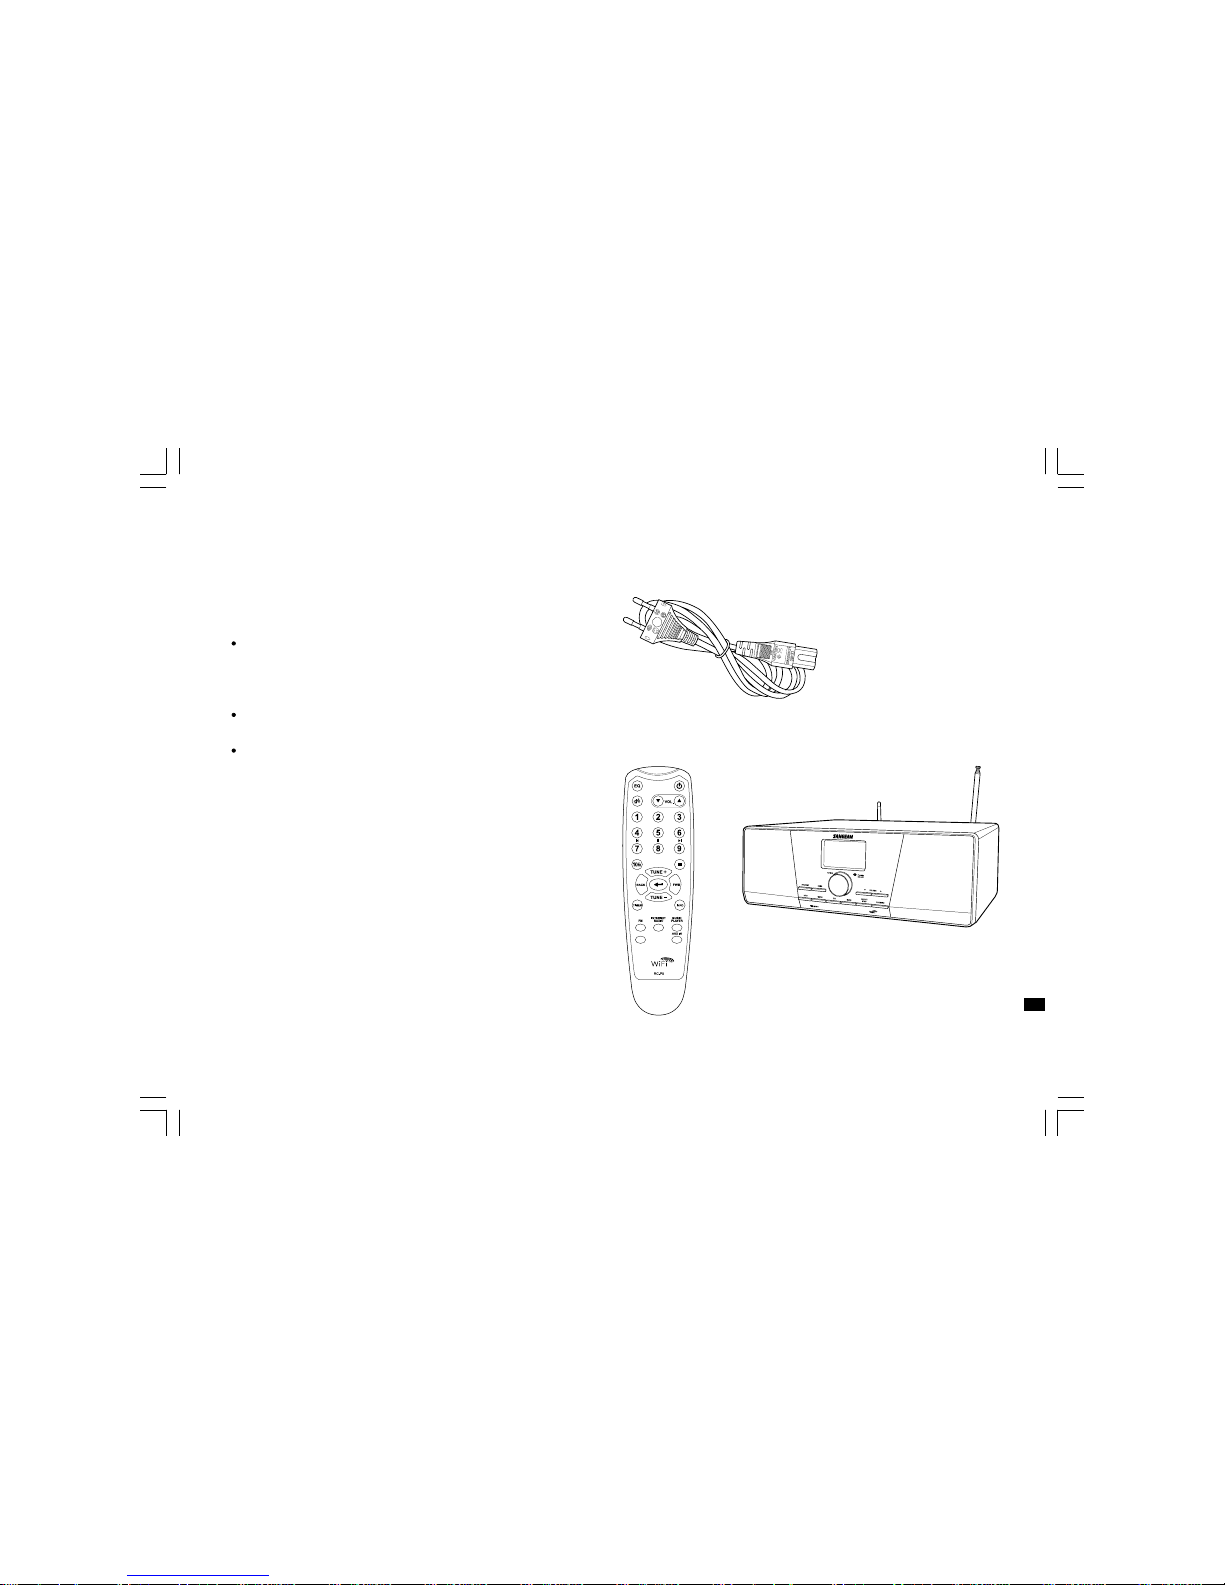
Check the package a nd ensure all the ite ms are present:
Product and Accessories:
Power Cable: used to power the radio.
(
When this radio is purchased in the US,
the US related accessories will be provided)
Remote Control: used for remote operation of the radio.
WFR-1 Wi-Fi Radio: your Wi-Fi radio
Power Cable
WFR-1 Wi-Fi Radio
Remote Control
Page 6
5
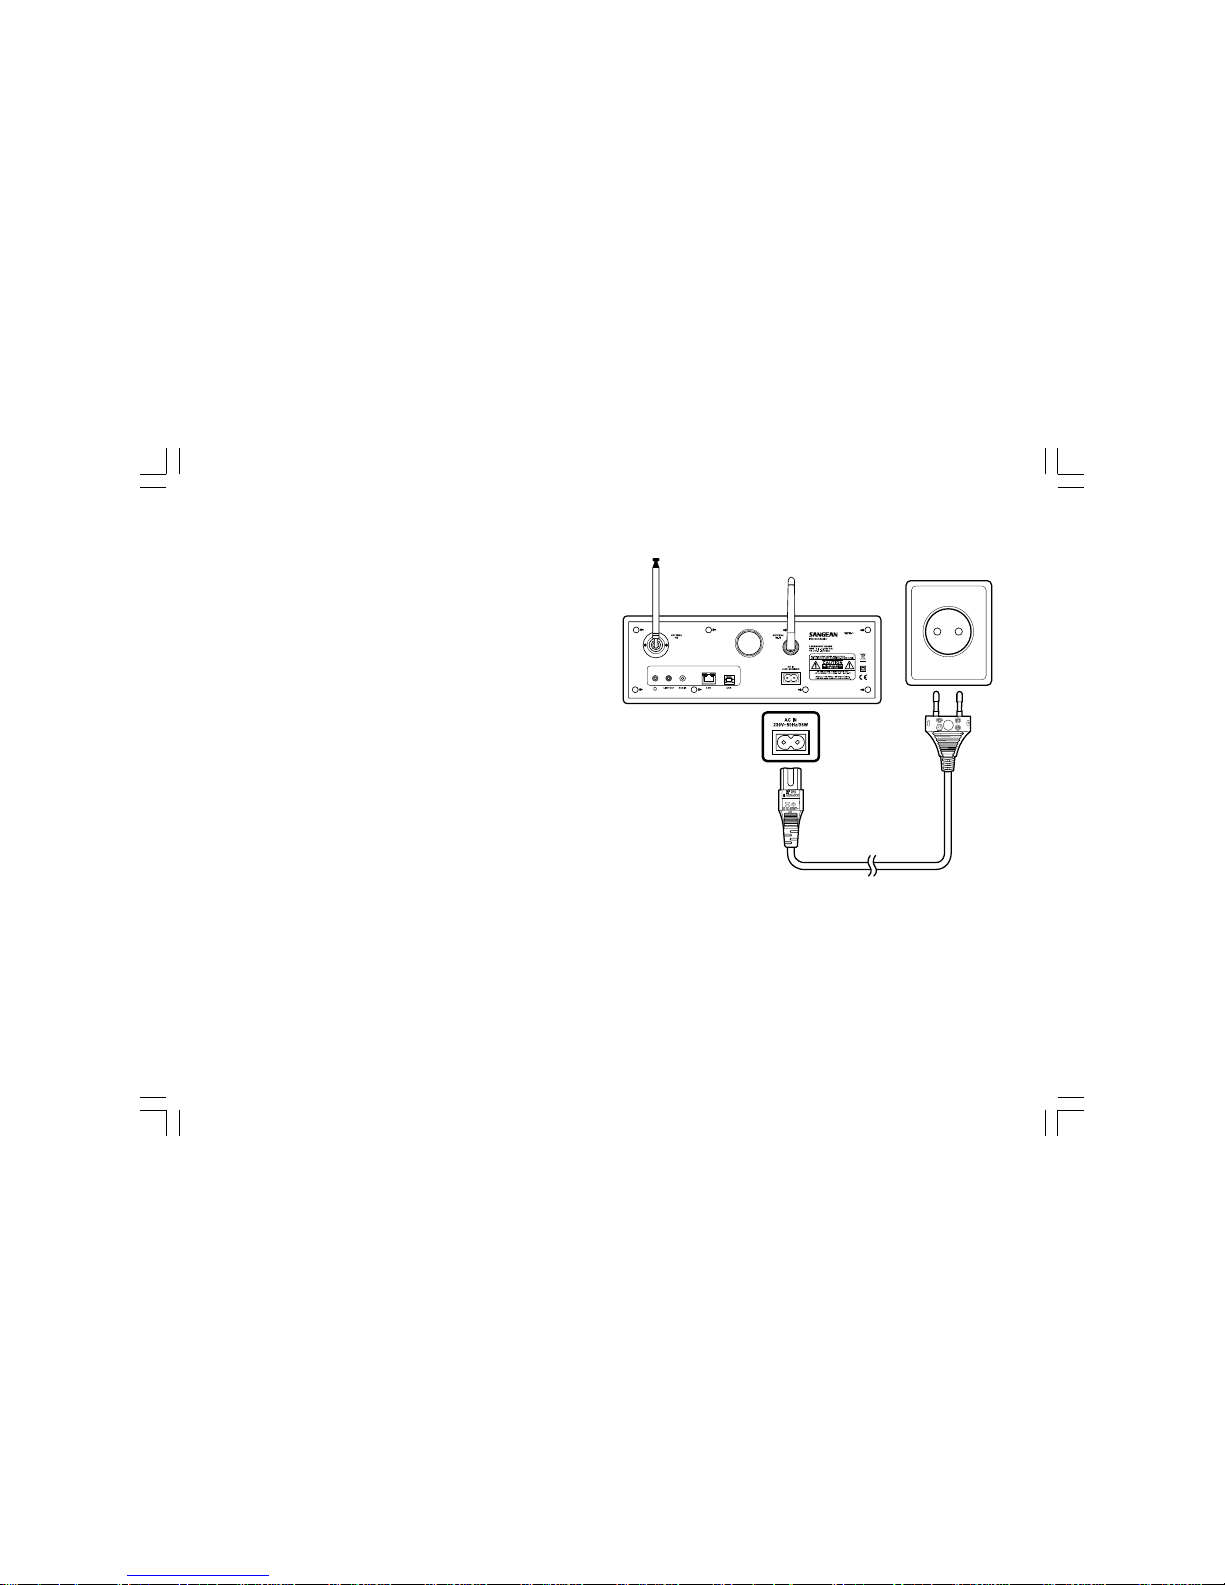
Power on the radio
1. Connect the power cable with the radio and plug it in to a live
outlet as shown.
(
When this radio is purchased in the US,
the US related accessories will be provided)
2. Press the STANDBY button to turn on the radio.
Note:
Use only the adapter supplied with the radio. Connecting an
incompatible power supply will cause permanent damage to the ra dio.
Page 7
6
GB
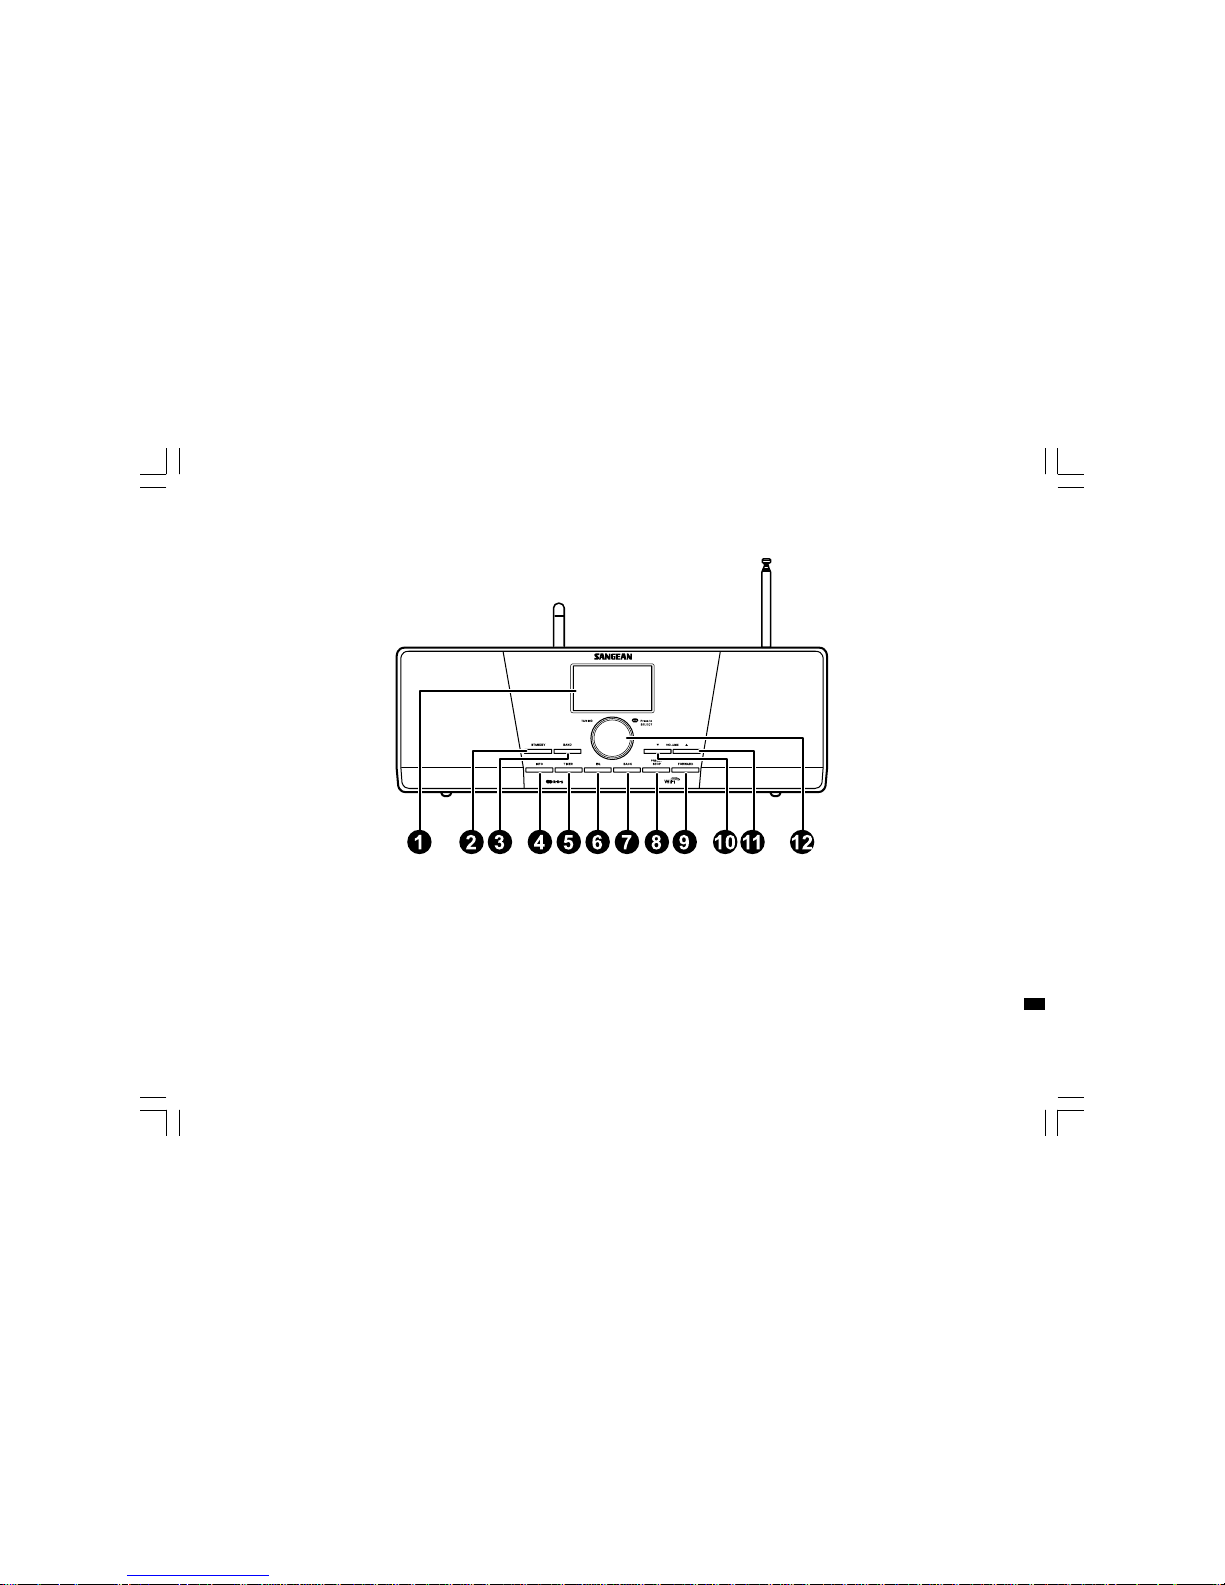
Controls
(Front)
1.
2.
3.
4.
5.
6.
LCD display
STANDBY button
BAND button
INFO button
TIMER button
EQ button
7.
8.
9.
10.
11.
12.
BACK button
PRESET STOP button
FORWARD button
VOLUME DOWN button
VOLUME UP button
Turning knob
Page 8
7
Using the Wi-Fi Radio
Refer to the following illustrations to famili arize yoursel f with the button s and controls of the radio.
1
2
3
4
5
6
7
8
9
10
11
12
Description
Screen that display texts
Turn on/off the radio
Press to switch between modes
Press to display information on the LCD
Press to set sleep time and alarms
Press to enter Equalizer setu
Navigation button. Press to activate the menu/go ba ckward one page in menu sele ctions. In Music
player mode, press to skip to the previous track. In setup screens, press to go to the previous field
Press to enter the Preset menu. In Music player mode press to stop the track
Navigation button. Press to confirm a selection in menus. Press to move to the left when entering user na me
or password
In Music player mode, press to skip to the next track. In setup screens, press to go to the next field
Press to turn the volume down
Press to turn the volume up
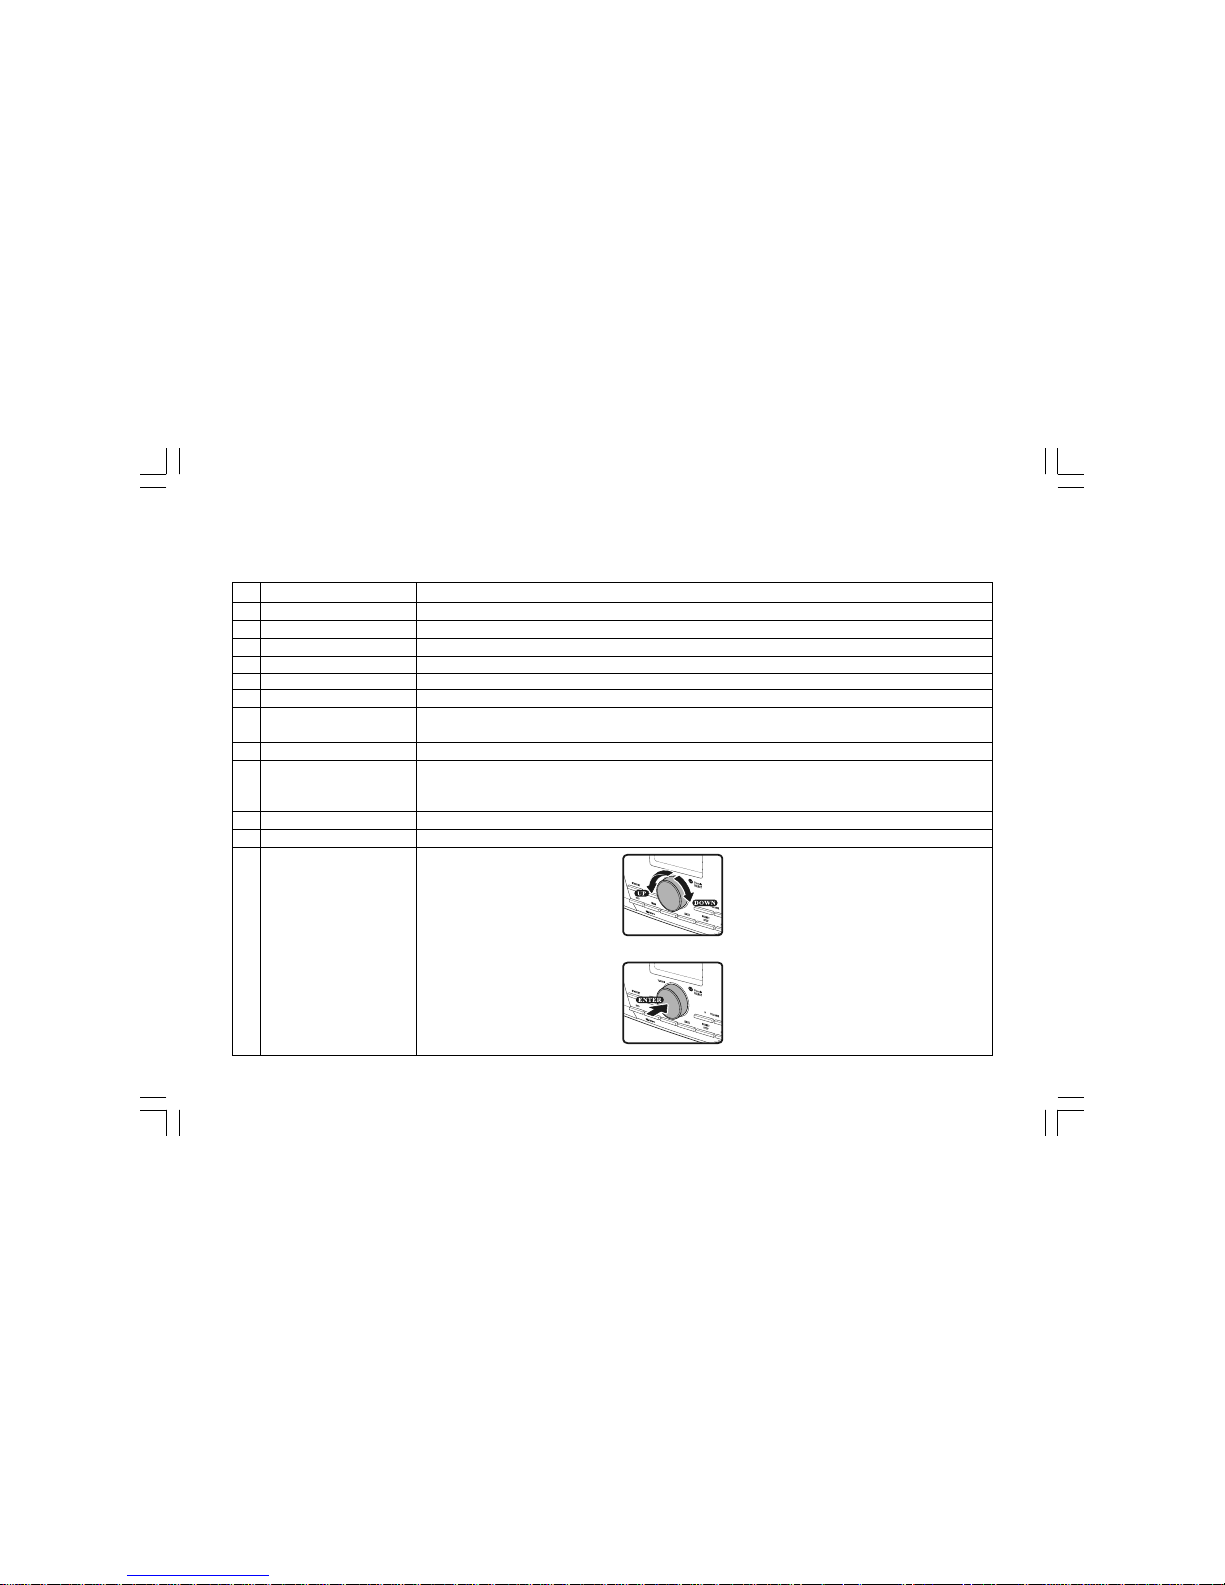
Rotate to enter menu selections/
navigate through selections
Press the knob to
confirm selections
Item
LCD display
STANDBY button
BAND button
INFO button
TIMER button
EQ button
BACK button
PRESET STOP button
FORWARD button
VOLUME DOWN button
VOLUME UP button
Turning knob
Page 9
8
GB
1.
2.
3.
4.
5.
6.
7.
8.
9.
10.
11.
12.
13.
14.
15.
16.
17.
18.
Remote control
EQ button
Mute button
TUNE + button
Back button
TIMER button
TUNE - button
FM button
iRadio button
AUX IN button
Mplayer button
INFO button
Enter button
FORWARD button
Stop button
Preset 7,8,9 /rewind, pause, fast forward
Radio Preset buttons
Volume buttons
Power button
Page 10

9
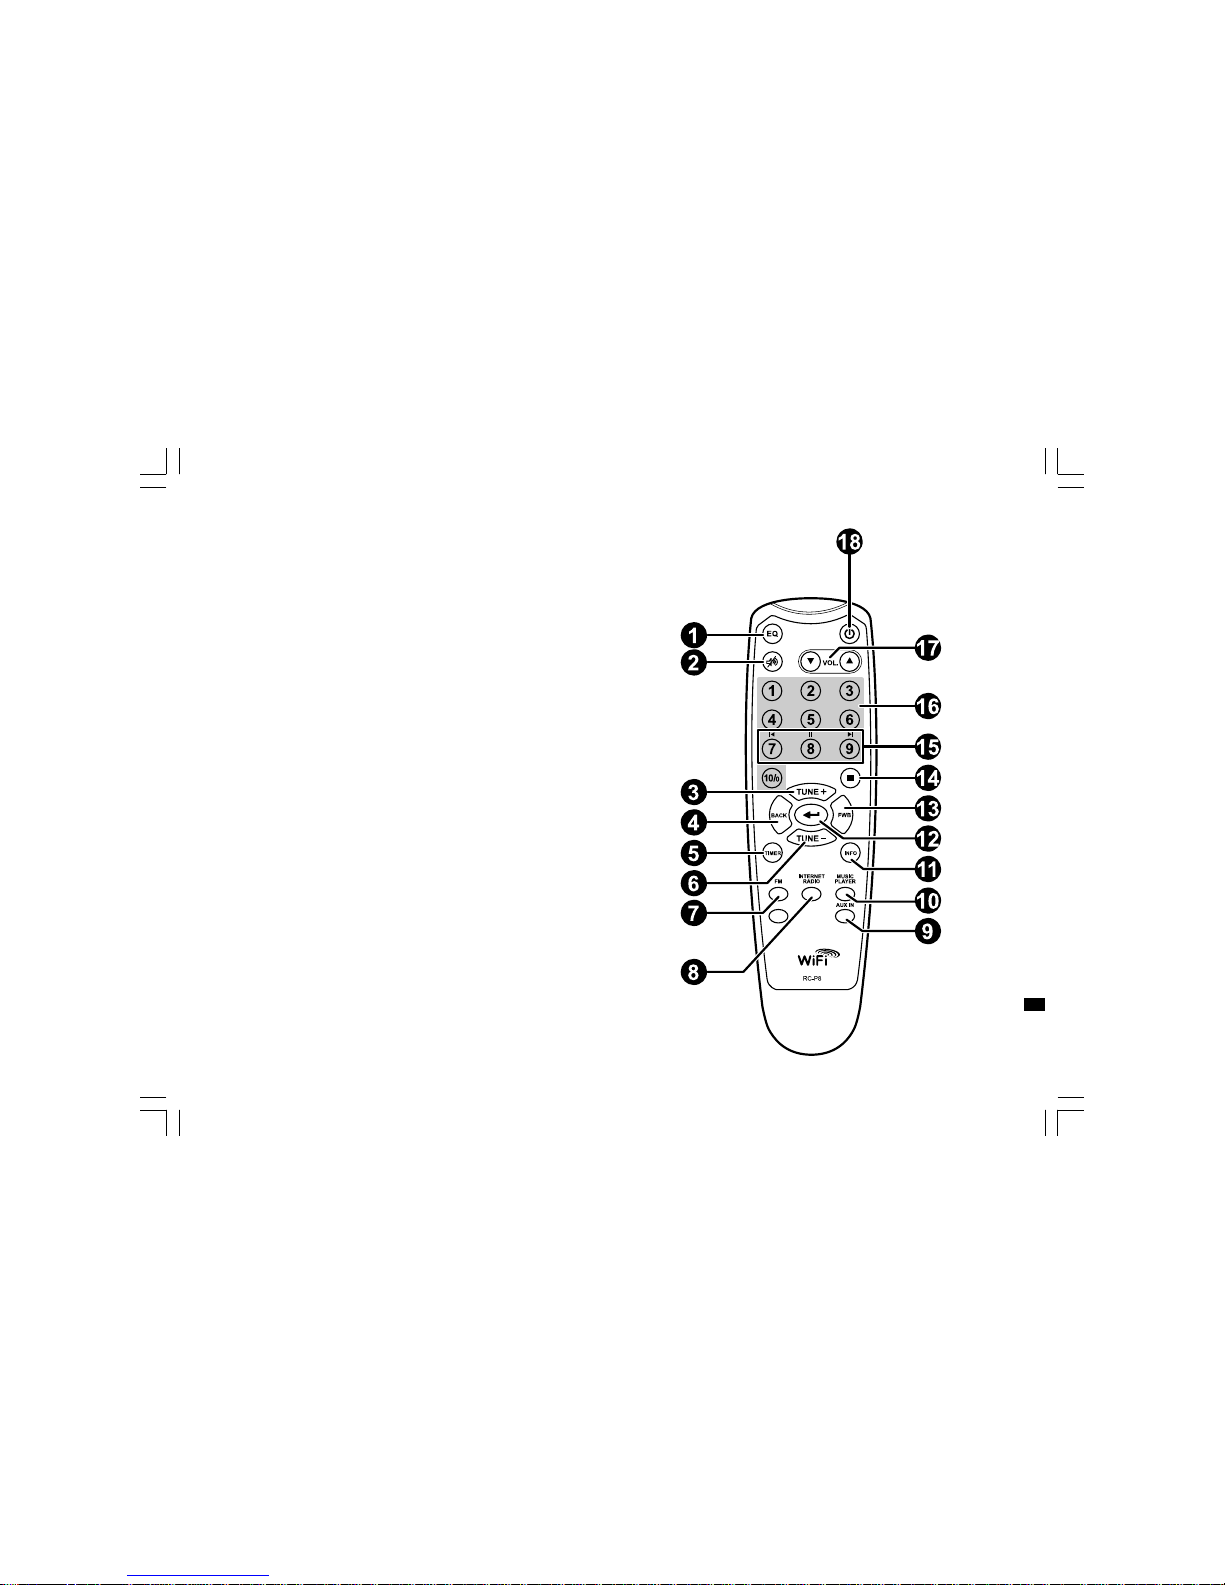
Remote Control
You can control the radio with the remote control. See the following illustration for descriptions of each button.
1
2
3
4
5
6
7
8
9
10
11
12
13
14
15
16
17
18
Description
Press to enter Equalizer setup
Press to mute the radio
Navigation button used to go up
Navigation button. Press to activate the menu/go ba ckward one page in menu sele ctions. In Music
player mode, press to go to the previous track. In setup screens, press to go to the previous field
Press to set sleep time and alarms
Navigation button used to go down
Press to enter FM radio mode
Press to enter internet radio mode.
Press to enter auxiliary input mode
Press to enter Music player mode
Press to display information on the LCD
Press to confirm selection
Navigation button. Press to confirm a selection in menus. Press to move to the left when entering user
name or password. In Music player mode, press to skip to the next track. In setup screens, press to go to
the next field
Press to stop current action. In Music player mode press to stop the track
Press to listen to preset stations 7, 8, 9/
Also for rewind, pause, fast f orward
Press to listen to preset stations
Press to turn the volume up/down
Turn on/off the radio
Item
EQ button
Mute button
TUNE + button
Back button
TIMER button
TUNE - button
FM button
iRadio button
AUX IN button
Mplayer button
INFO button
Enter button
FORWARD button
Stop button
Preset 7,8,9 /rewind,
pause, fast forward
Radio Preset buttons
Volume buttons
Power button
Page 11
10
GB
Navigate Menu Selections
There are two ways to navigate through the menu selections.
Press BACK to activate the menu then:
1. Navigate through the selections by rotating the Turning knob on the
radio clockwise or counter clockwise to move the > symbol and
press the Turning knob to confirm the selection.
Use FORWARD/BACK to enter/go to previous menu.
2. Use the navigation buttons (TUNE +, TUNE-, BACK, FWD) on the
remote control to move the > symbol and press enter to confirm
the selection. Use FORWARD/BACK to enter/go to previous menu.
See Using the Wi-Fi Radio for descriptions of the Turning knob and
Navigation buttons.
Menu navigation:
1 2
Page 12
11
Entering Texts
To start using the radio, text entering may be required. For example,
entering user name, password, search station, etc.
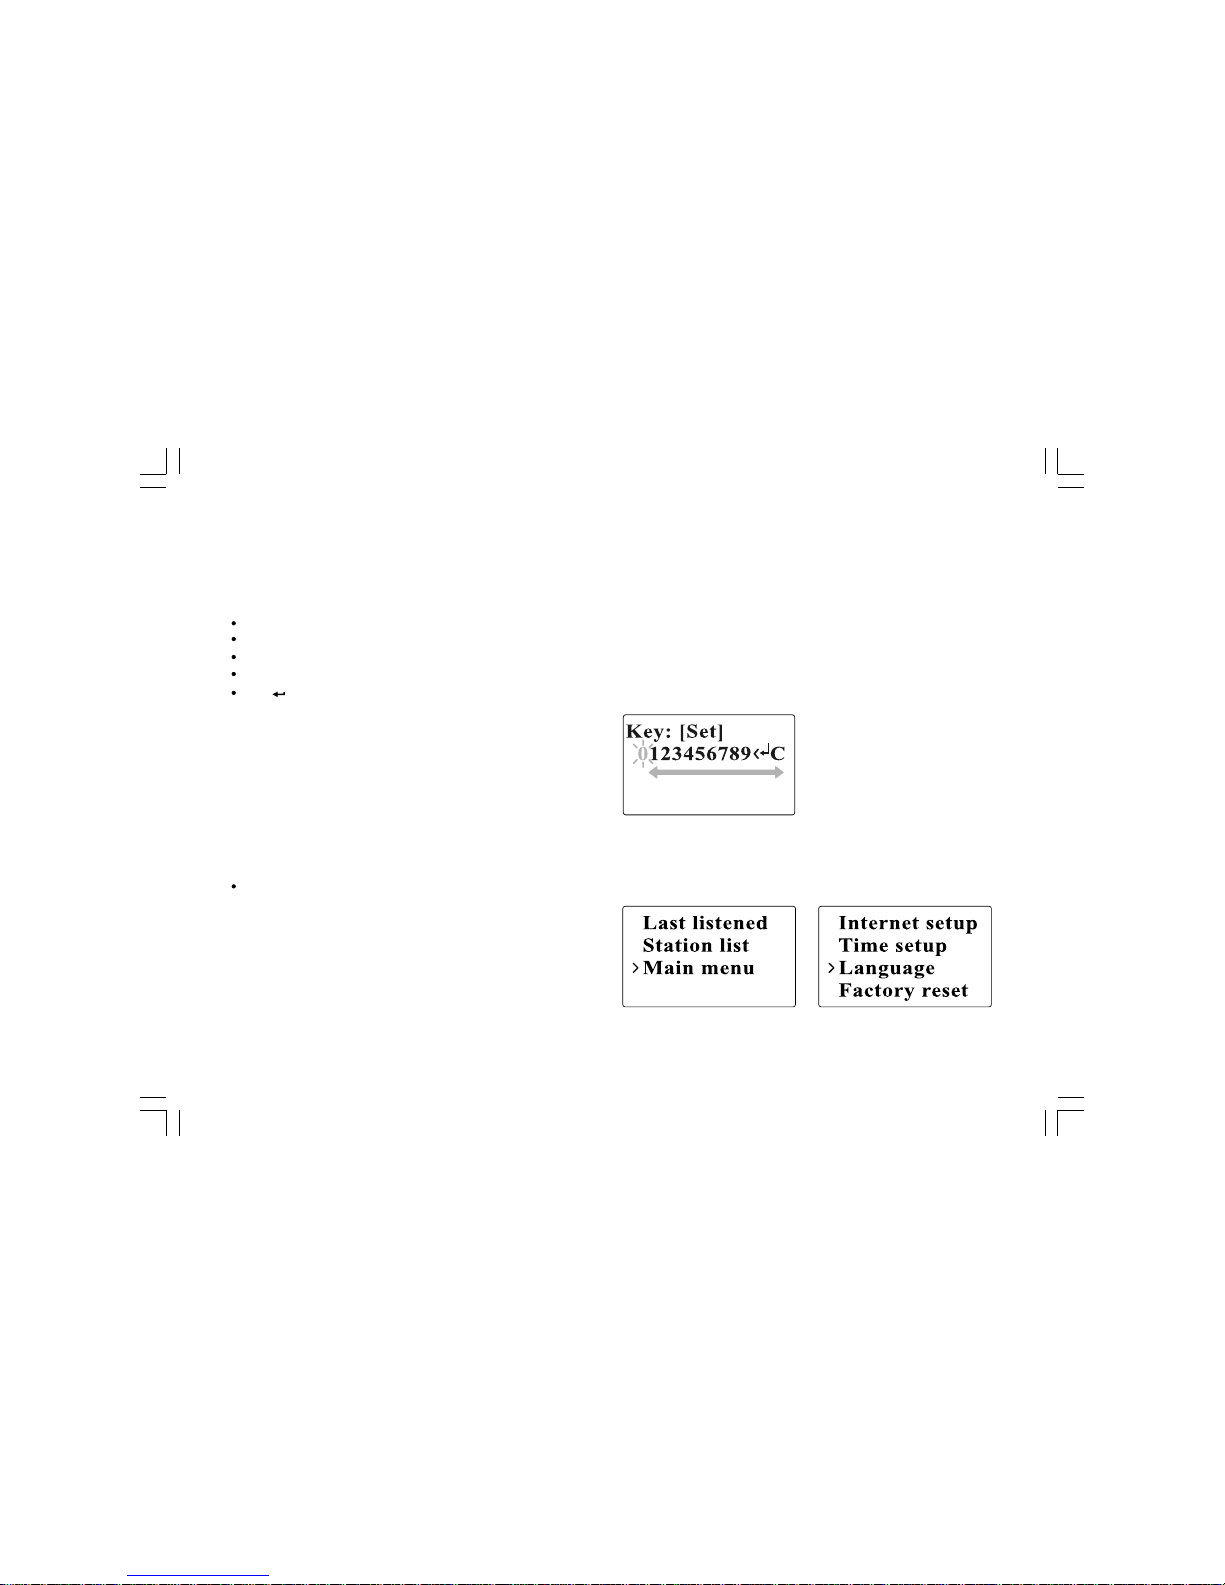
To enter texts:
Rotate the Turning knob to highlight the text/number/symbol.
Press the Turning knob to confirm.
Use < to delete.
Use C to cancel and exit
Use to enter when you are done.
Language Setup
Choose the language to display on the screen.
Go to >Main menu>Language and select the language.
Page 13
12
GB
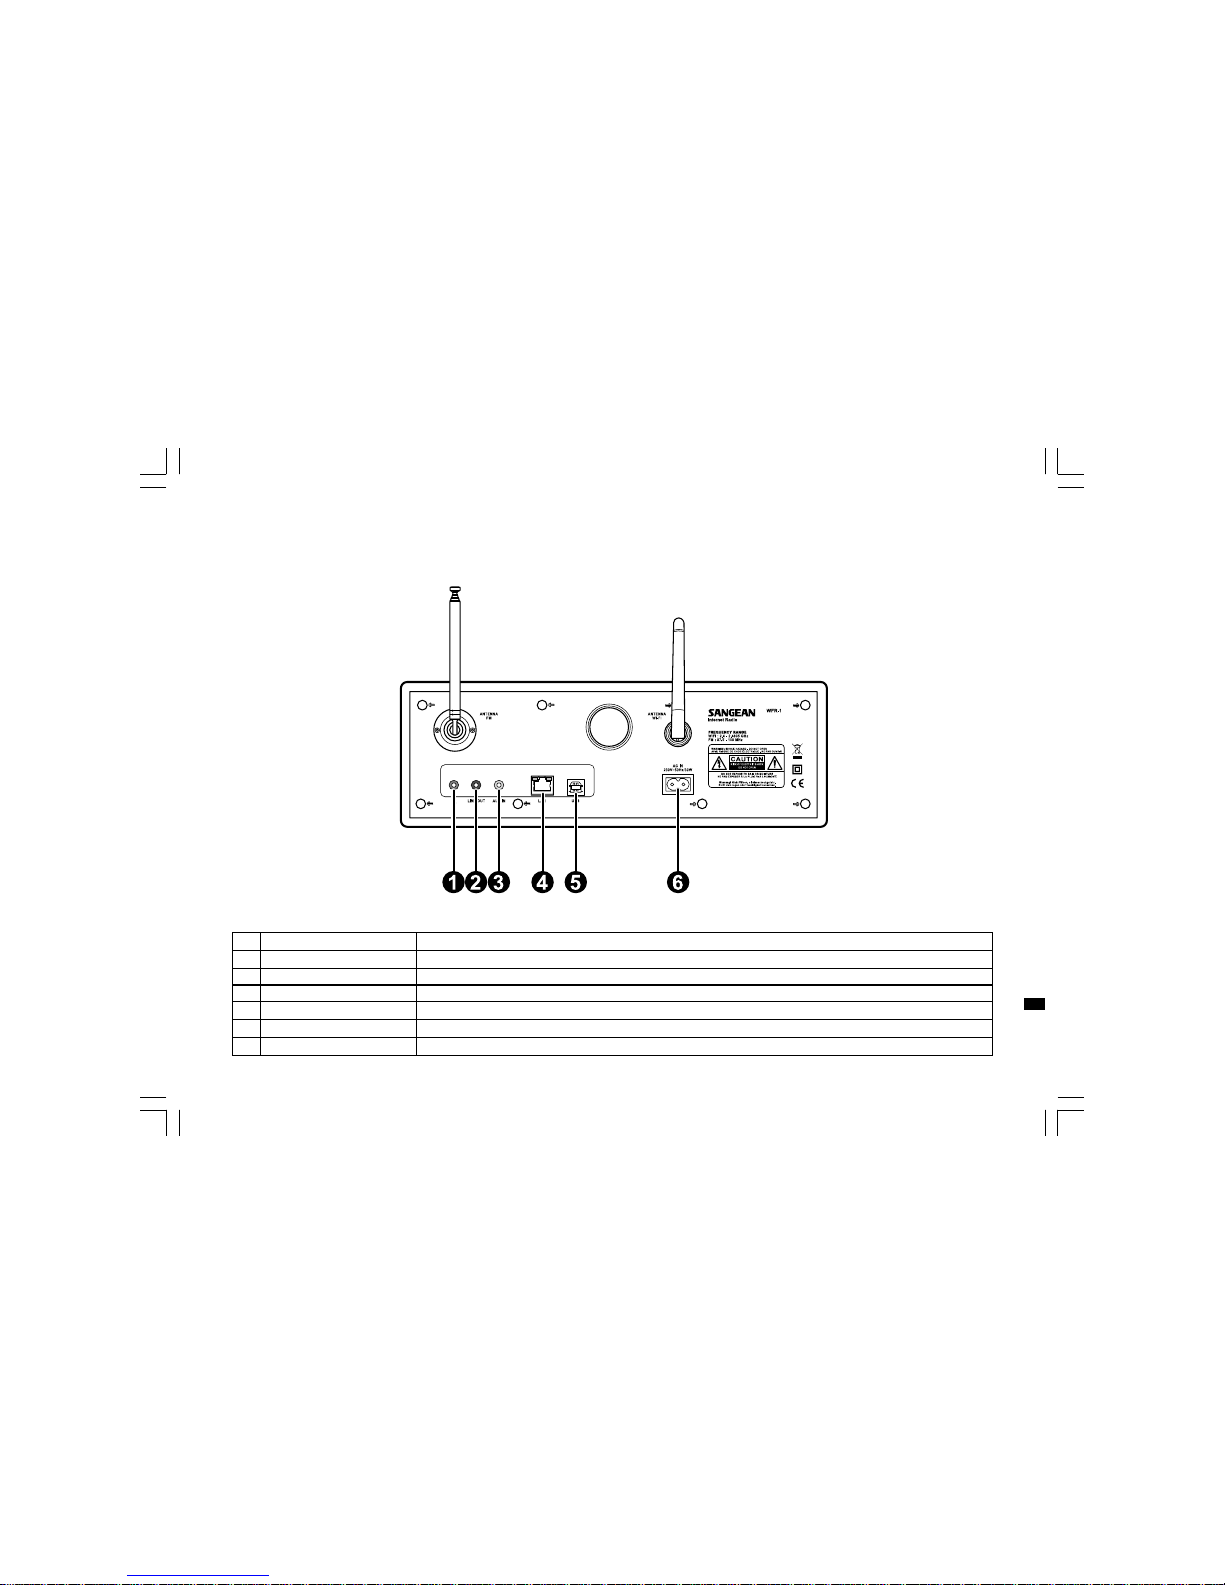
Connecting Devices to the Radio
See the following illustration for descriptions of the outlets on the back panel.
1
2
3
4
5
6
Description
Connect to a headphone
Connect to an external spea ker
Connect to external Aux devices
Connect to Ethernet
Connect to a USB device
Connect to the power cable
Item
Headphone jack
LINE OUT jack
AUX IN
LAN socket
USB socket
Power cord socket
Page 14

13
Chapter 2 Getting Connected
Before you can use your internet radio, you must have the following:
A broa dband internet connection or
A wireless access point (Wi-Fi) or a wired Ethernet connection
(10 or 100 M bits/sec with RJ45 connection) connected to your
broadband internet, preferably via a router. In many cases the
broadband modem, router a nd wireless access point will be a single
combined unit supplied by your Internet Service Provider or bought
from a computer store.
If your wireless network is configured to use Wired Equivalent Privacy
(WEP) or Wi-Fi Protected Access (WPA) data encryption then you
need to know the WEP or WPA key so you can get the internet radio
to communicate with the network.
IMPORTANT:
Before you continue, make sure that your wireless access point or
router is powered up and working with your broadband internet service
(use your computer to verify this). To get this part of the system working
you must read the instructions supplied with the wireless access point
or router.
Page 15
14
GB
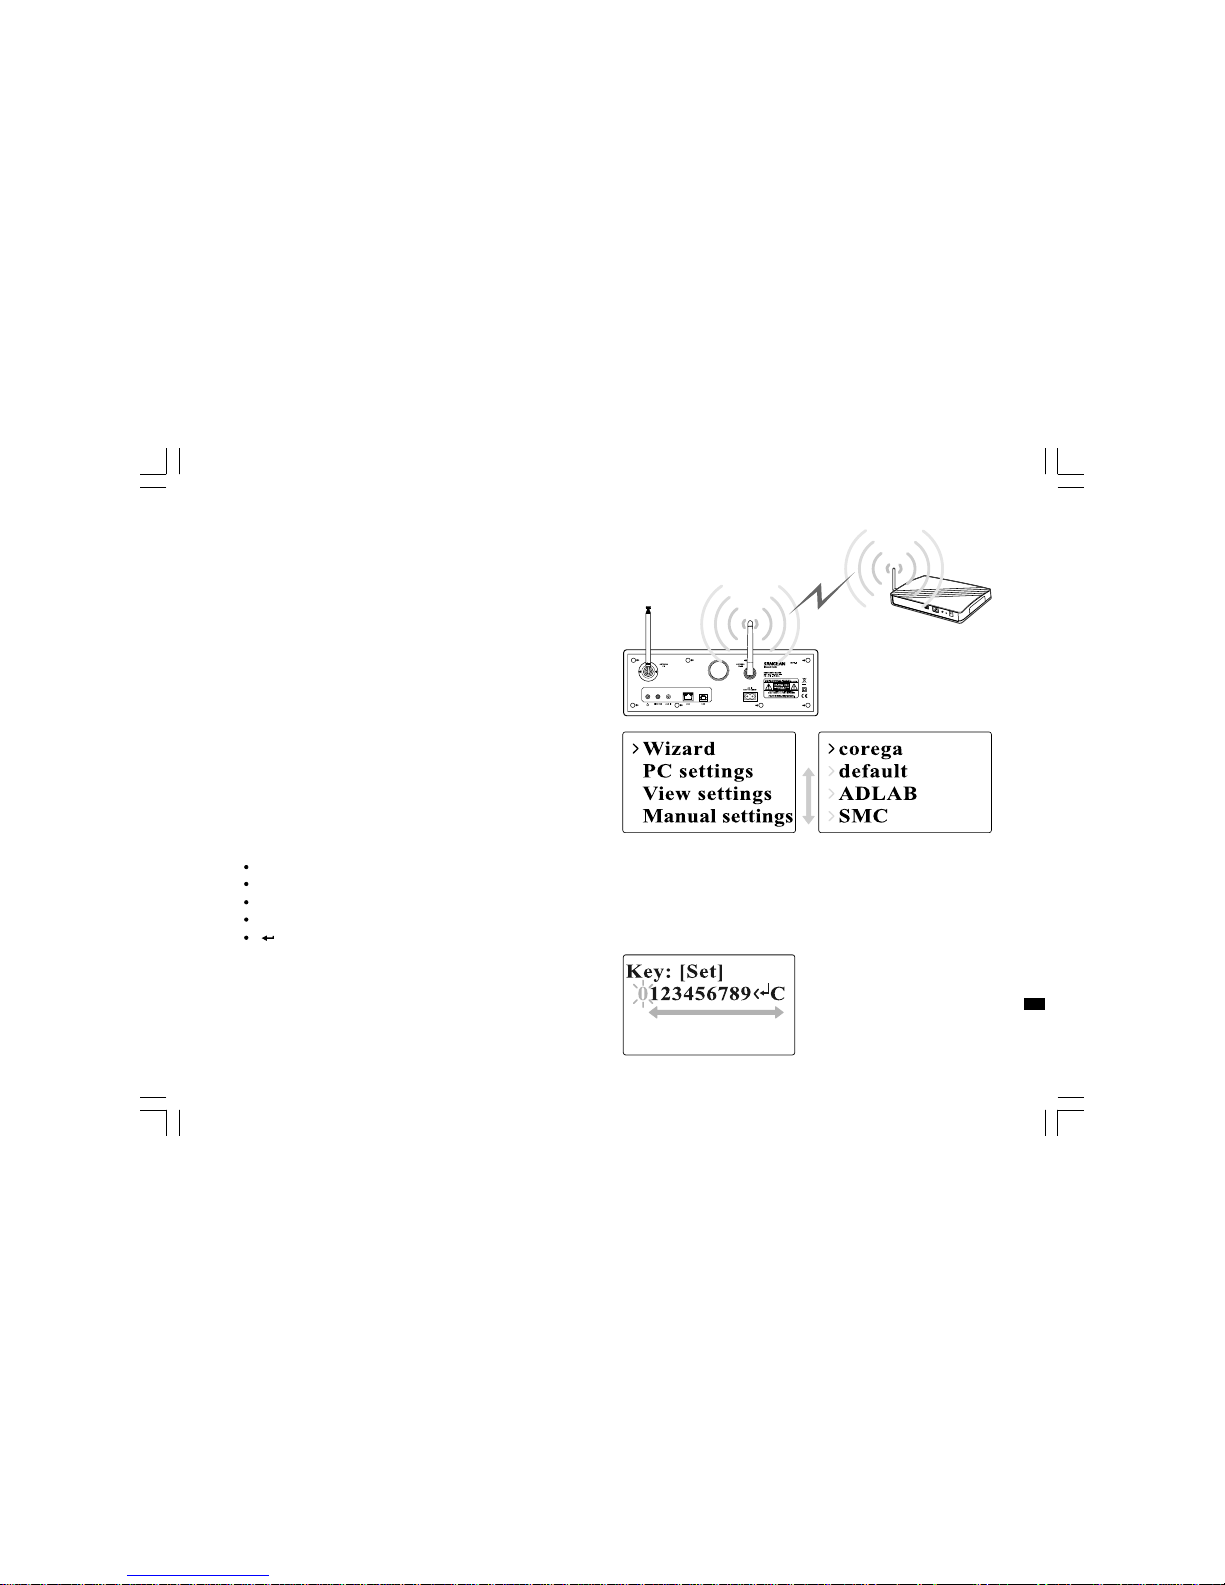
Connecting to wireless network
To setup the wirele ss network:
1. Make sure you are within range of a wireless network.
2. Go to >Main menu>System setup > Internet setup > Wizard >
[name of the wireless network].
3. You will be prompted to enter password:
Rotate the Turning knob to highlight the text/number/symbol
Press the Turning knob to confirm.
< to delete
C to cancel and exit
to enter when you are done
4. The screen will show “Connected” when connection had been made.
Page 16
15
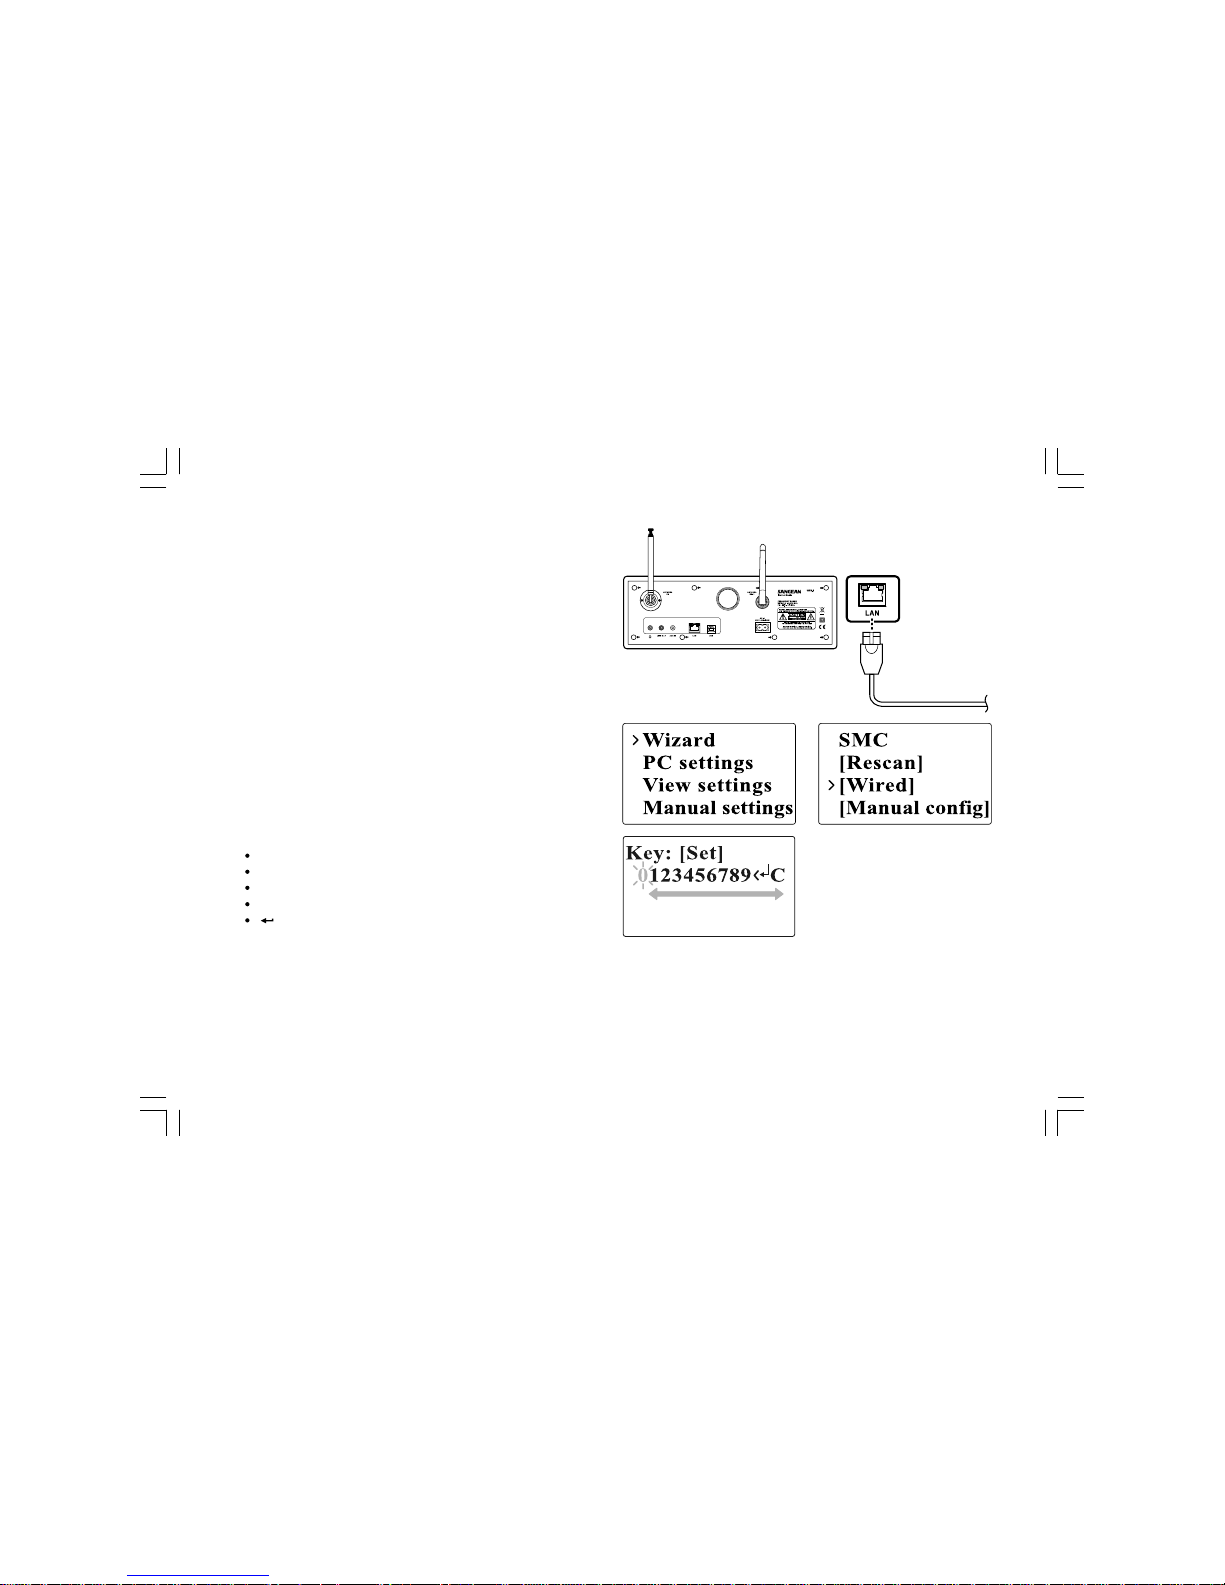
Connecting to wired network
To setup the wired network:
1. Connect the radio to the wired network using an Ethernet cable
as shown.
2. Go to >Main menu> System setup > Internet setup > Wizard >
[Wired] from the menu selections.
3. Enter the password when prompted.
Rotate the Turning knob to highlight the text/number/symbol
Press the Turning knob to confirm.
< to delete
C to cancel and exit
to enter when you are done
4. The screen will show “Connected” when connection had been made.
If you have problems with your wired connection, the lights by the
LAN (RJ-45) connector may help you to identify the possible cause
of the problem:
Green ON = Link established, Flashing = Data transfer
Yellow ON = 100M bps link, OFF = 10M bps link
Page 17
16
GB
Chapter 3 Listening to the Radio
Internet Radio
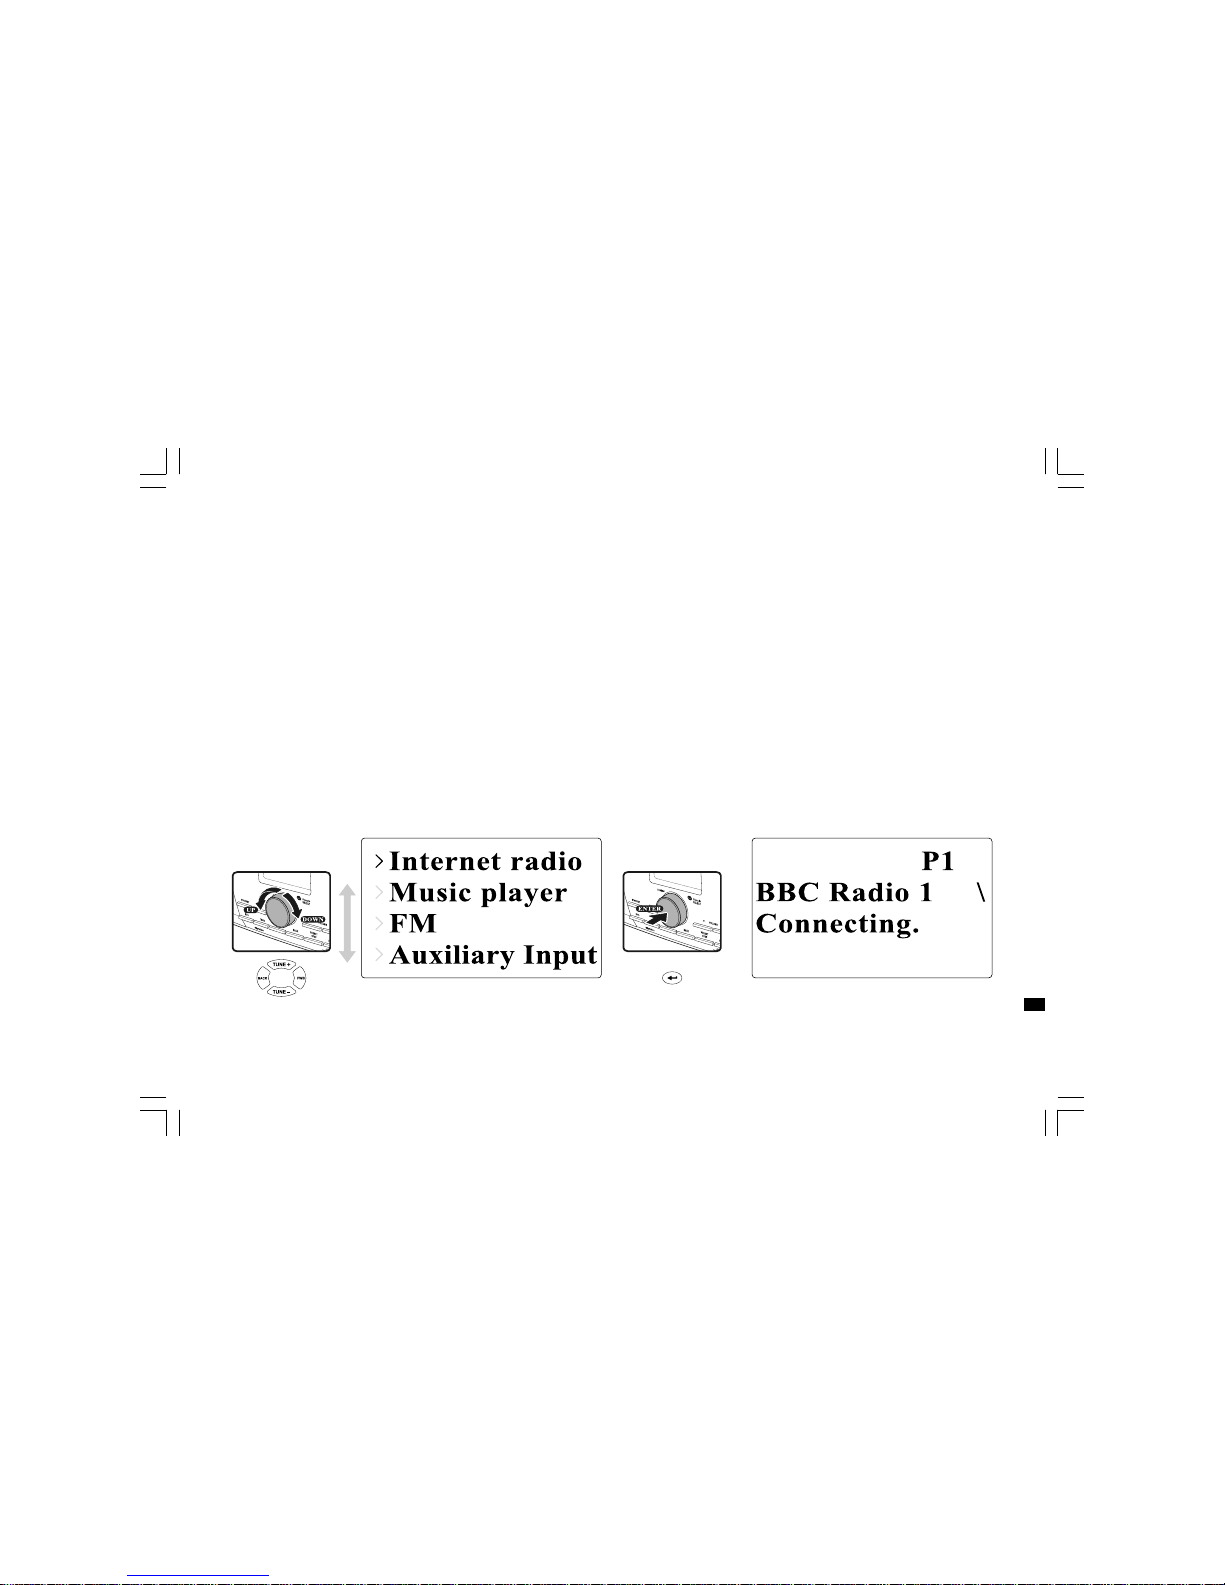
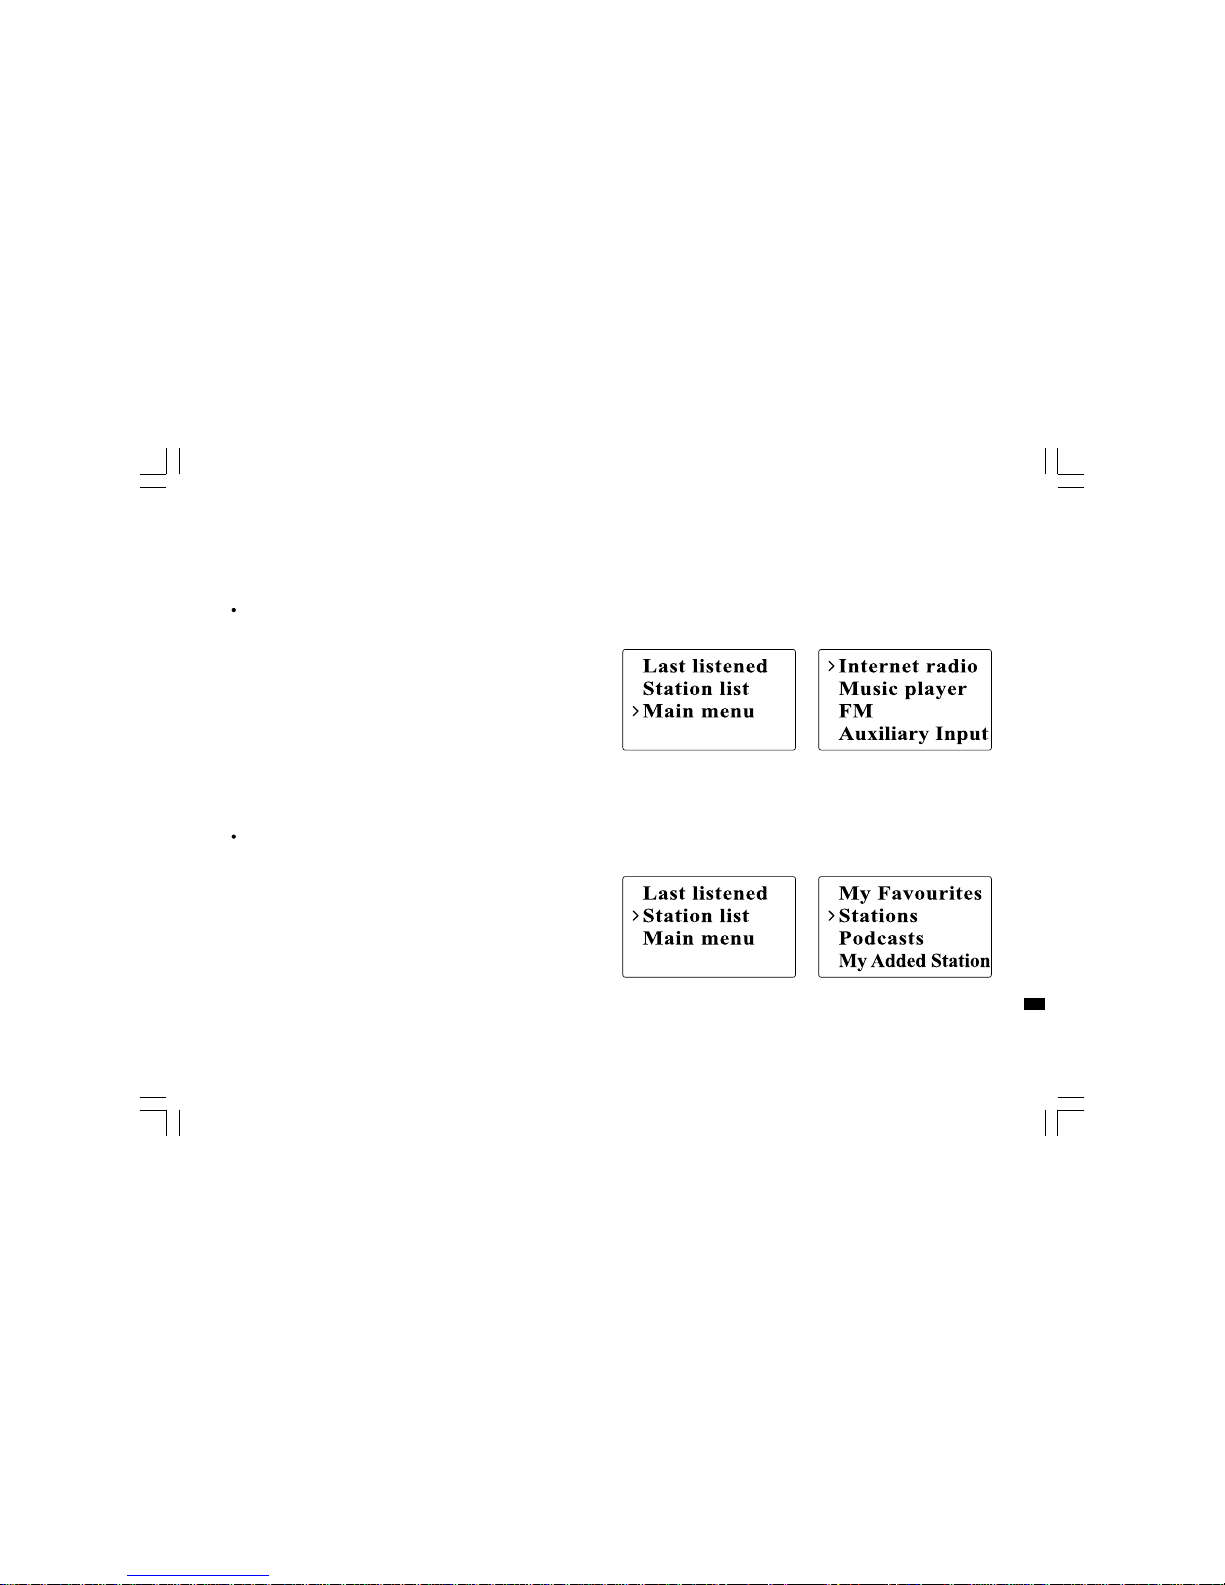
To listen to the internet radio:
From the menu selections go to >Main menu > Internet radio or
press the iRadio button on the remote. The radio will play the last
played radio station.
If you would like to select other stations, follow the instruction below.
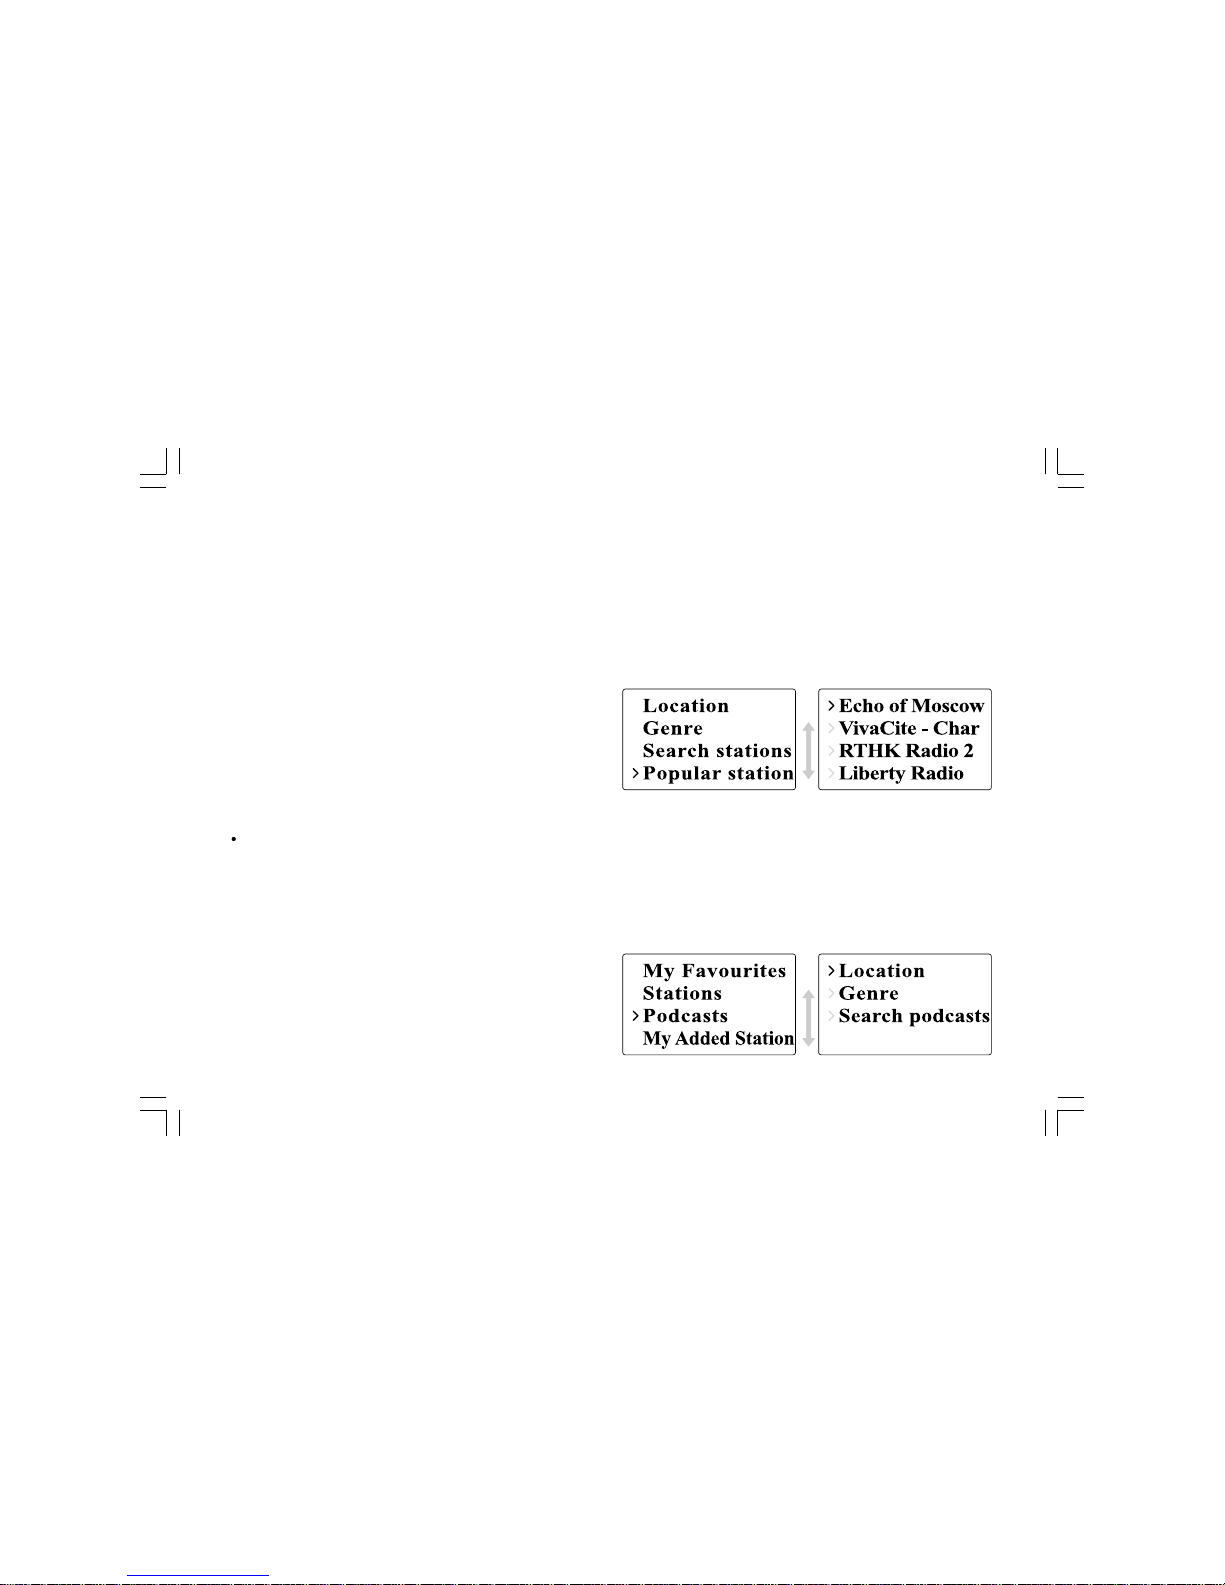
To search for stations on the internet:
Press BACK to activate the menu and go to Station list.
In The Station list you will find 5 different ways to search for stations.
Go to >Station list>Stations from the menu selection you will find:
1. Location:
enables you to choose a radio station from the list first by geographic
region and then by country.
Page 18
17
2. Genre:
enables you to choose radio stations according to their content,
for example Classic, Rock, Sport, News, etc.
3. Search station:
enables you to search for a station by entering the name or
a keyword.
4. Popular station:
enables you to view a list of popular stations and choose from them.
5. New station:
enables you to view a list of the newest stations and choose
from them.
To listen to the Podcasts:
Go to >Station list>Podcasts and you will find 3 options:
1. Location:
enables you to choose a radio station from the list first by
geographic region and then by country.
2. Genre:
enables you to choose podcasts according to their content,
for example Classic, Rock, Sport, News, etc.
3. Search station:
enables you to search for a podcast by entering the name or
a keyword.
Page 19
18
GB
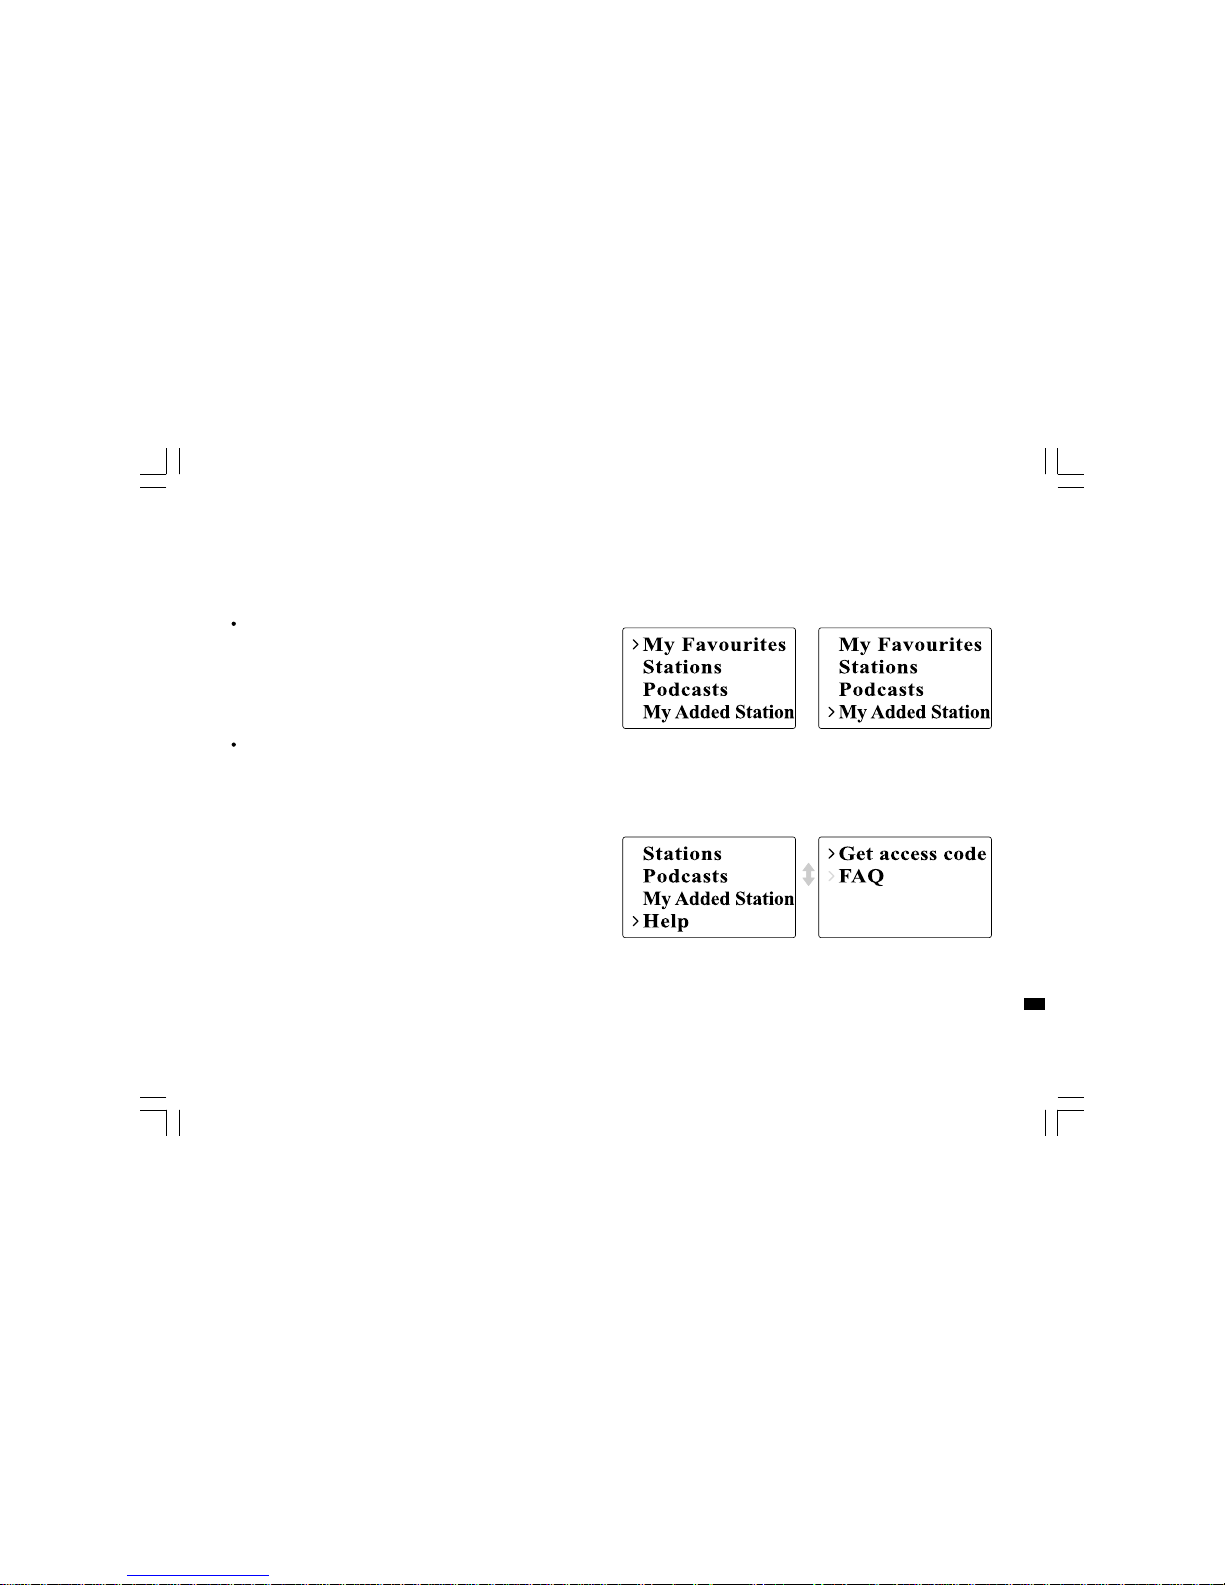
To listen to My Favourites / My Added Station:
My Favourites and My added stations allow you to add internet
radio stations using Frontier’s website and listen to those stations on
your radio.
Go to>Station list>My Favourites / >Station list>My Added Station.
Register online:
Before first use, please follow the instructions to register on
the website:
1. Go to >Station list>Help>Get access code. The display will show
the Access code.
2. Visit the website using your computer
http://www.wifiradio-frontier.com then click on “register here” and
fill out the form with the access code shown on the display.
You can leave blank on “WiFi radio model”.
Page 20

19
Frontier Website
3. After the registration, the web page shows “My favourite” and
“My added station” for operating these 2 functions. After this one
time registration, every time you would like to use these functions,
just go to the website: and enter the email address and password.
To edit My Favourites:
1. Use Browse or Search for stations on the web site to find
a station,
2. Click the “Add” icon and the station is added to
My Favourite folder.
To edit My Added Stations:
My Added Stations allows you to add the internet radio stations if
you know the web address of the internet radios.
1. Click the arrow under My added stations and you will be asked to
enter the web address. Enter the URL exactly as described on
the web page.
2. Click the “Add” icon to add the station.
Page 21
20
GB
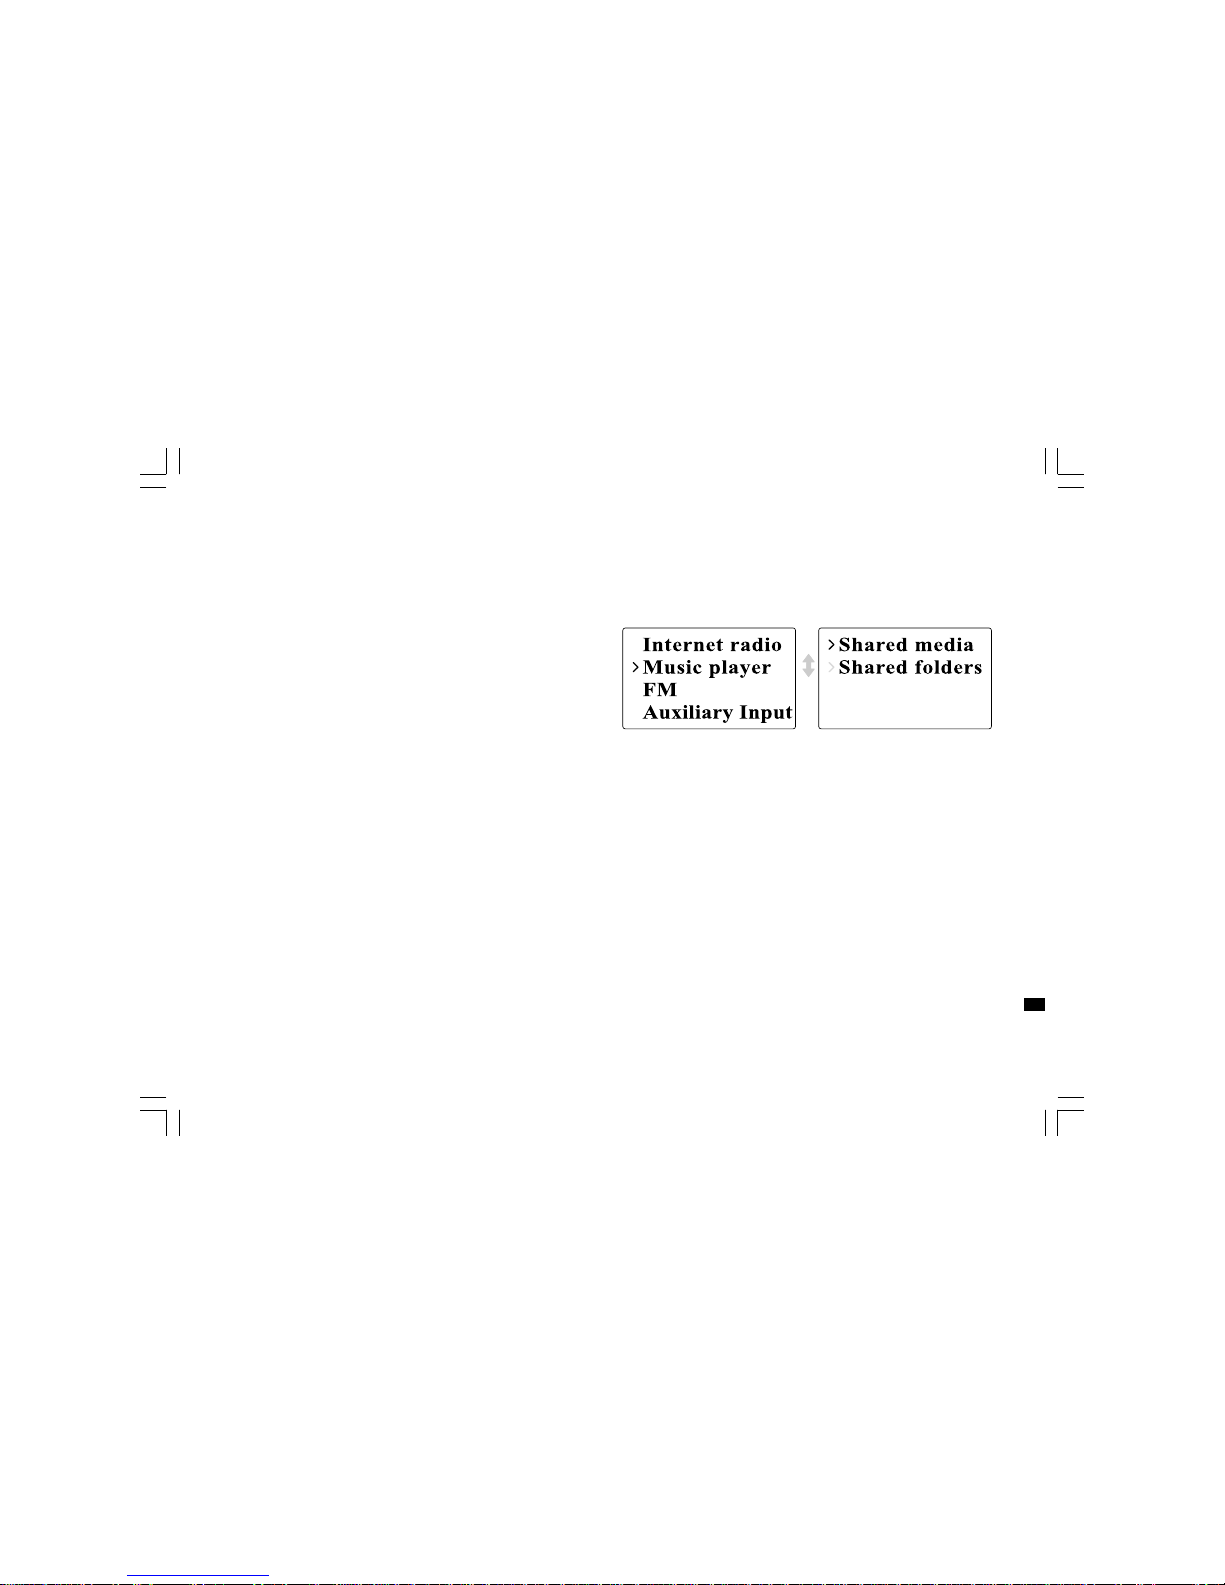
Music Player
To play music in the Music Player’s shared folders:
1. Go to >Main menu>Music Player> Shared folders>
[name of computer]>[name of folders]. User name and password
may be required.
2. Find and select the audio file you want to listen to in the folder and
press the Turning knob to play.
3. Use Forward/Back to go to next/previous track.
To play music in the Music Player’s shared media:
1. Go to >Main menu>Music Player> Shared media>
[name of computer]>[media categories]. The Up nP server makes
Media categories available. For example, ‘Music’ or ‘Playlists’.
User name a nd password may be required.
2. Find and select the audio file you want to listen to in the folder and
press the Turning knob to play.
3. Use Forward/Back to go to next/previous track.
Page 22

21
Shared Folder
The Windows Media Player 1 1 allows you to play audio files that are
stored on a computer or a computer on your network.
Your radio supports two file access methods. It can connect to Shared
Folders on the network. It can also connect with file server applications
using the Universal Plug and Play (UPnP) protocol known as
Shared Media.
All of the supported file types are playable in Windows Shares mode.
When using a UPnP server, the playable file type s are dependant on the
server software used. For example, Microsoft Windows Medi a Player11
can serve MP3, WMA and WA V files. To be able to play the other
supported file types via UPnP you may need to install additional
third-party software.
When using Windows Shares, music selection is by Artist,
by Album and optionally by track within an Album. When using a Shared
Media UPnP server, the search and selection criteria are determined by
the server, but typically include additional options such as Genre.
Many server applications also allow you to access files according to the
folders within which they are stored.
Page 23
22
GB
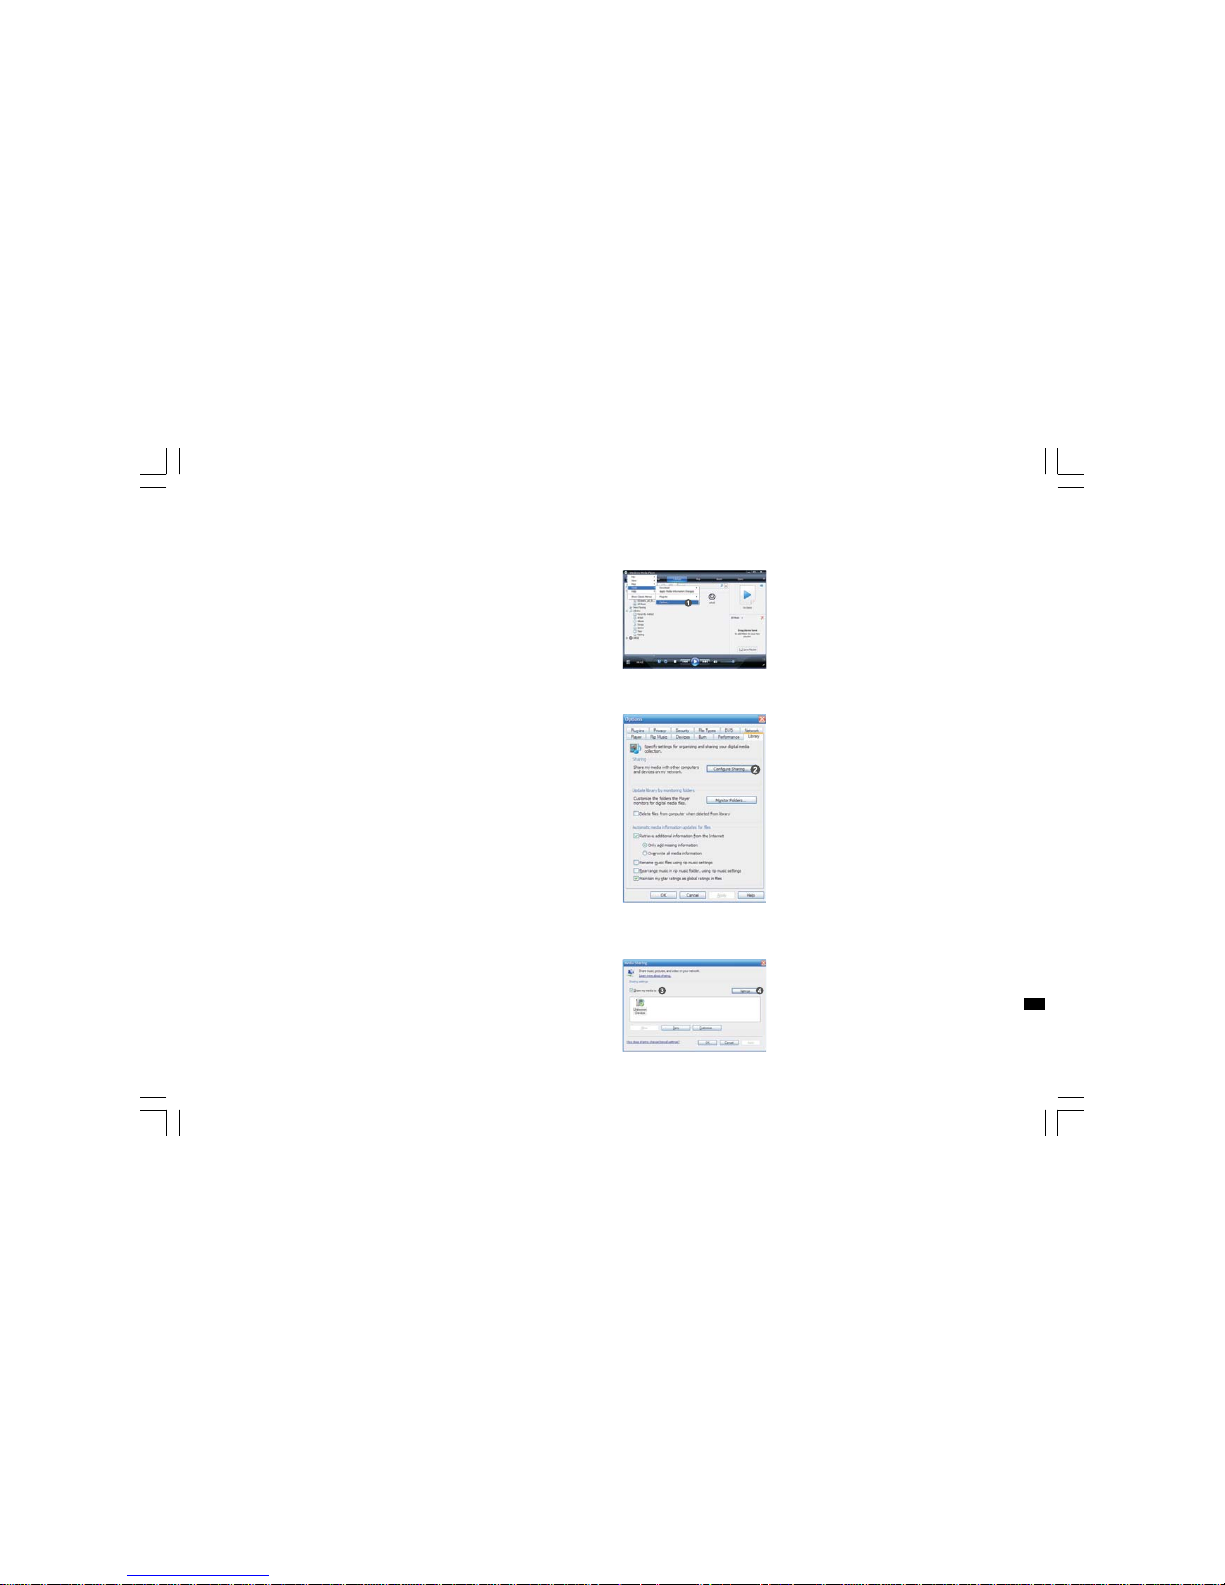
To share medi a using W indows Media Player 11:
1. Open Media Player and click the arrow below Library tab then
choose Options.
2. Click the Configure Sharing button.
3. Check the Share my media to: check box. WiFi Radio is shown as
an Unknown Device.
4. Click the Settings button.
Page 24

23
5. Na me your Share media and choose the settings.
6. Finally, check the box to choose to Allow new devices and
computers automatically or not.
7. Click Ok when you are done.
Shared Folder Setup
Computer:
Setup your PC to allow the radio to access your audio files via
Windows Shares.
1. Ensure that your PC is available on the same network as your
internet radio.
2. Use Windows Explorer to locate the folder where your audio files
are stored.
3. Right click on the folder.
4. Select ‘Properties’.
5. Click on ‘Sharing’.
6. Select ‘Share this folder on the network’ and ‘Allow network users
to change my files’.
Page 25

24
GB
Wi-Fi Radio:
Setup your radio to connect to the computer if user name and
password are required to log in.
1. Go to >Main menu>System setup>Internet setup>PC settings.
2. Enter the user name a nd password.
Shared Media (UPnP)
Shared Media uses Windows Media Player (WMP) 11 and above as
media server. This mode doe s not require any setting in the radio,
but the PC needs to be configured to allow the radio access to
the media. Y ou will only have to do it once.
To setup your PC for shared medi a:
1. If your PC is running Microsoft Windows XP or Windows Vista then
you can use Microsoft’s Windows Media Player 11 (WMP 11) to act
as your UPnP (Universal Plug and Play) media server. If not alread y
installed on your PC, Windows Media Player 11 may be downloa ded
from Microsoft’s website.
2. Once installed, WMP 1 1 can create a library from all the media files
available to it on your PC. To add new media files to the library,
select ‘File > Add to Library… > Advanced Options’, click ‘Add’ and
choose the files you wish to add and click ‘OK’.
Page 26
25
FM Radio
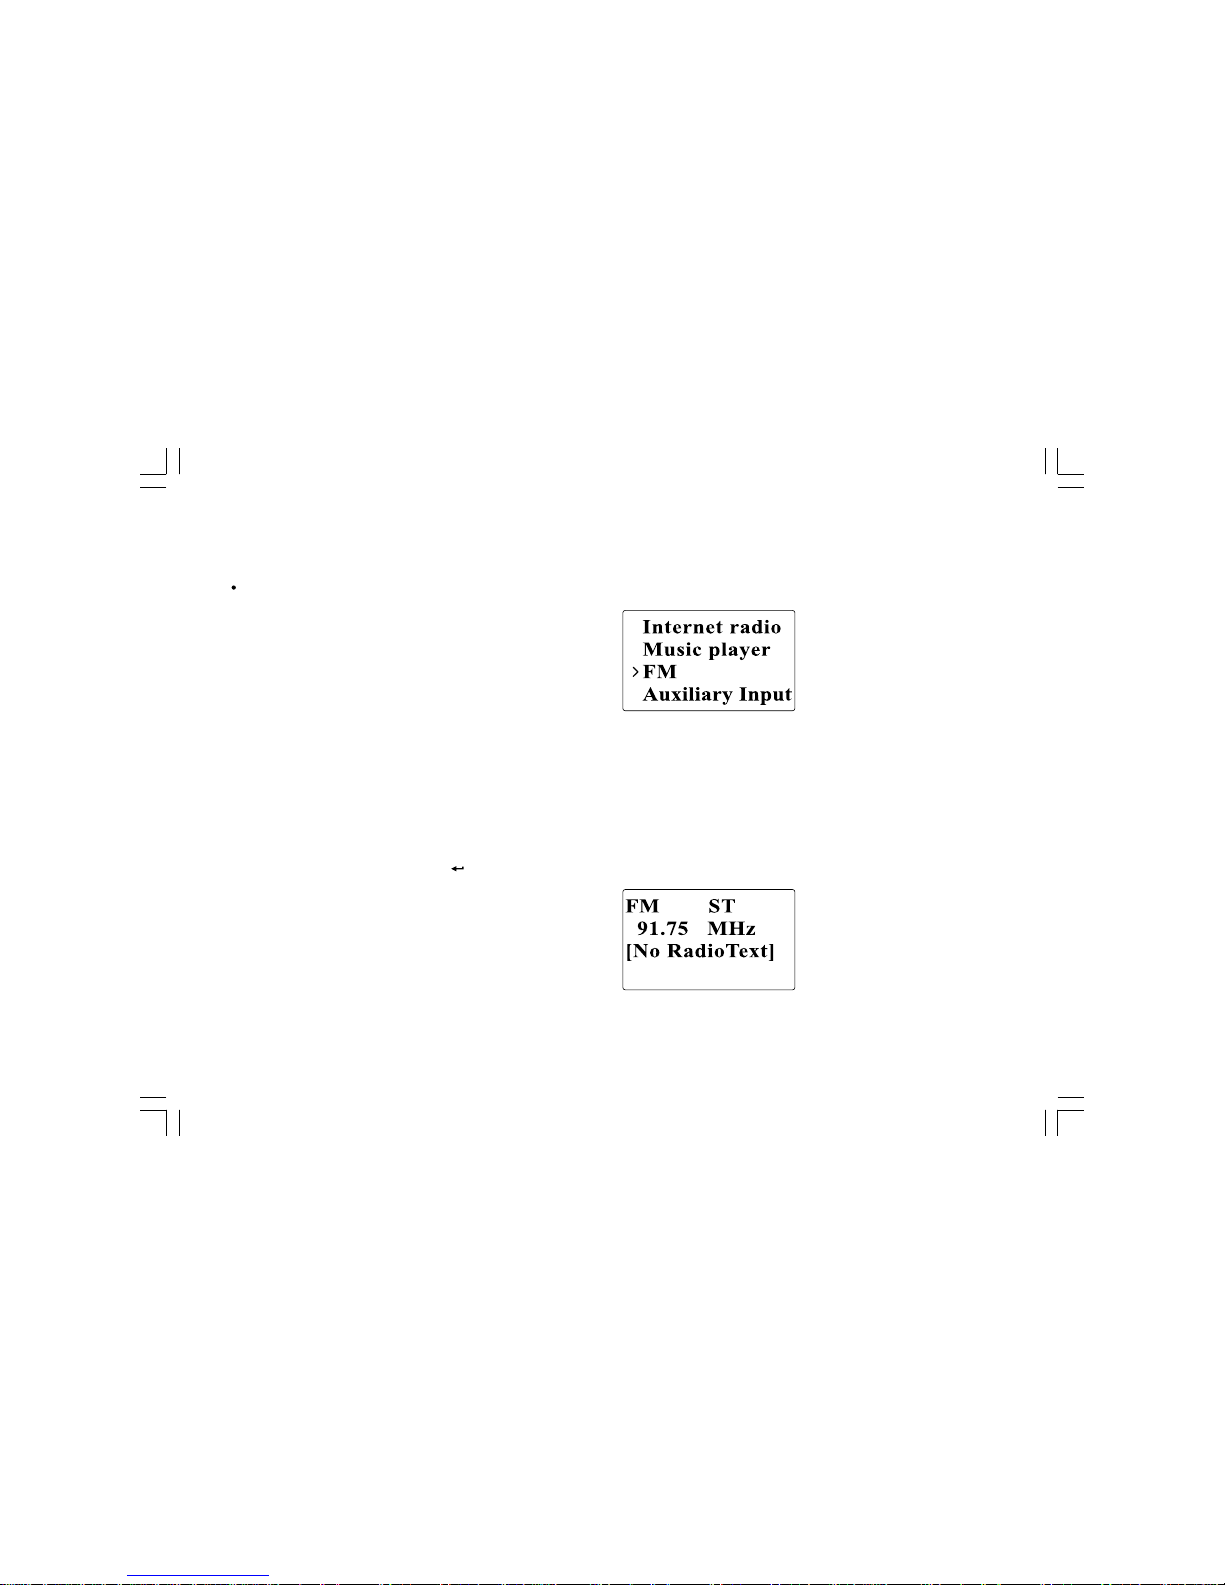
To listen to the FM radio:
From the menu selections go to >Main menu > FM or press the
FM button on the remote.
The radio will play the last played radio station. If you would like to
select other stations, follow the instruction below.
To change FM stations:
1. Rotate the Turning knob on the radio clockwise or counter clockwise
or press the TUNE+ / TUNE- buttons on the remote to
increase/decrease the radio frequencies. Or
2. Press the Turning knob on the radio or on the remote control to
scan and go to the next available FM station.
Page 27

26
GB
Auxiliary Input (AUX IN)
Auxiliary Input allows you to play music from an audio source such as
an iPod or a DVD player.
To play music using AUX IN:
1. Connect the device to the radio using an AUX ca ble as shown
2. Go to >Main menu>Auxiliary input or press AUX IN on the remote.
3. Start playing sound from the auxiliary device; adjust the device and
radio volume when necessary.
Page 28

27
Radio Station Preset
On the remote control you will find numeric keys 1-10 that are used to
store preset stations. See Remote Control on page 5 for more details.
When no station is assigned to a number, “Preset empty” is displayed
on the screen. Presets are available in the following modes:
Internet Radio
FM
To recall a preset:
Short press a numeric key on the remote (1-10).
To assign the current radio station to a preset key:
Press and hold the numeric key (1-10) for about 5 seconds.
Preset stored will be displayed on the screen.
Last Listened
The last 10 listened stations are stored on the radio.
To recall last listened:
Choose Last listened from the menu a nd select the station.
Page 29
28
GB
Chapter 4 Clock Operation
The radio must have the clock / date set to use the alarm functionality.
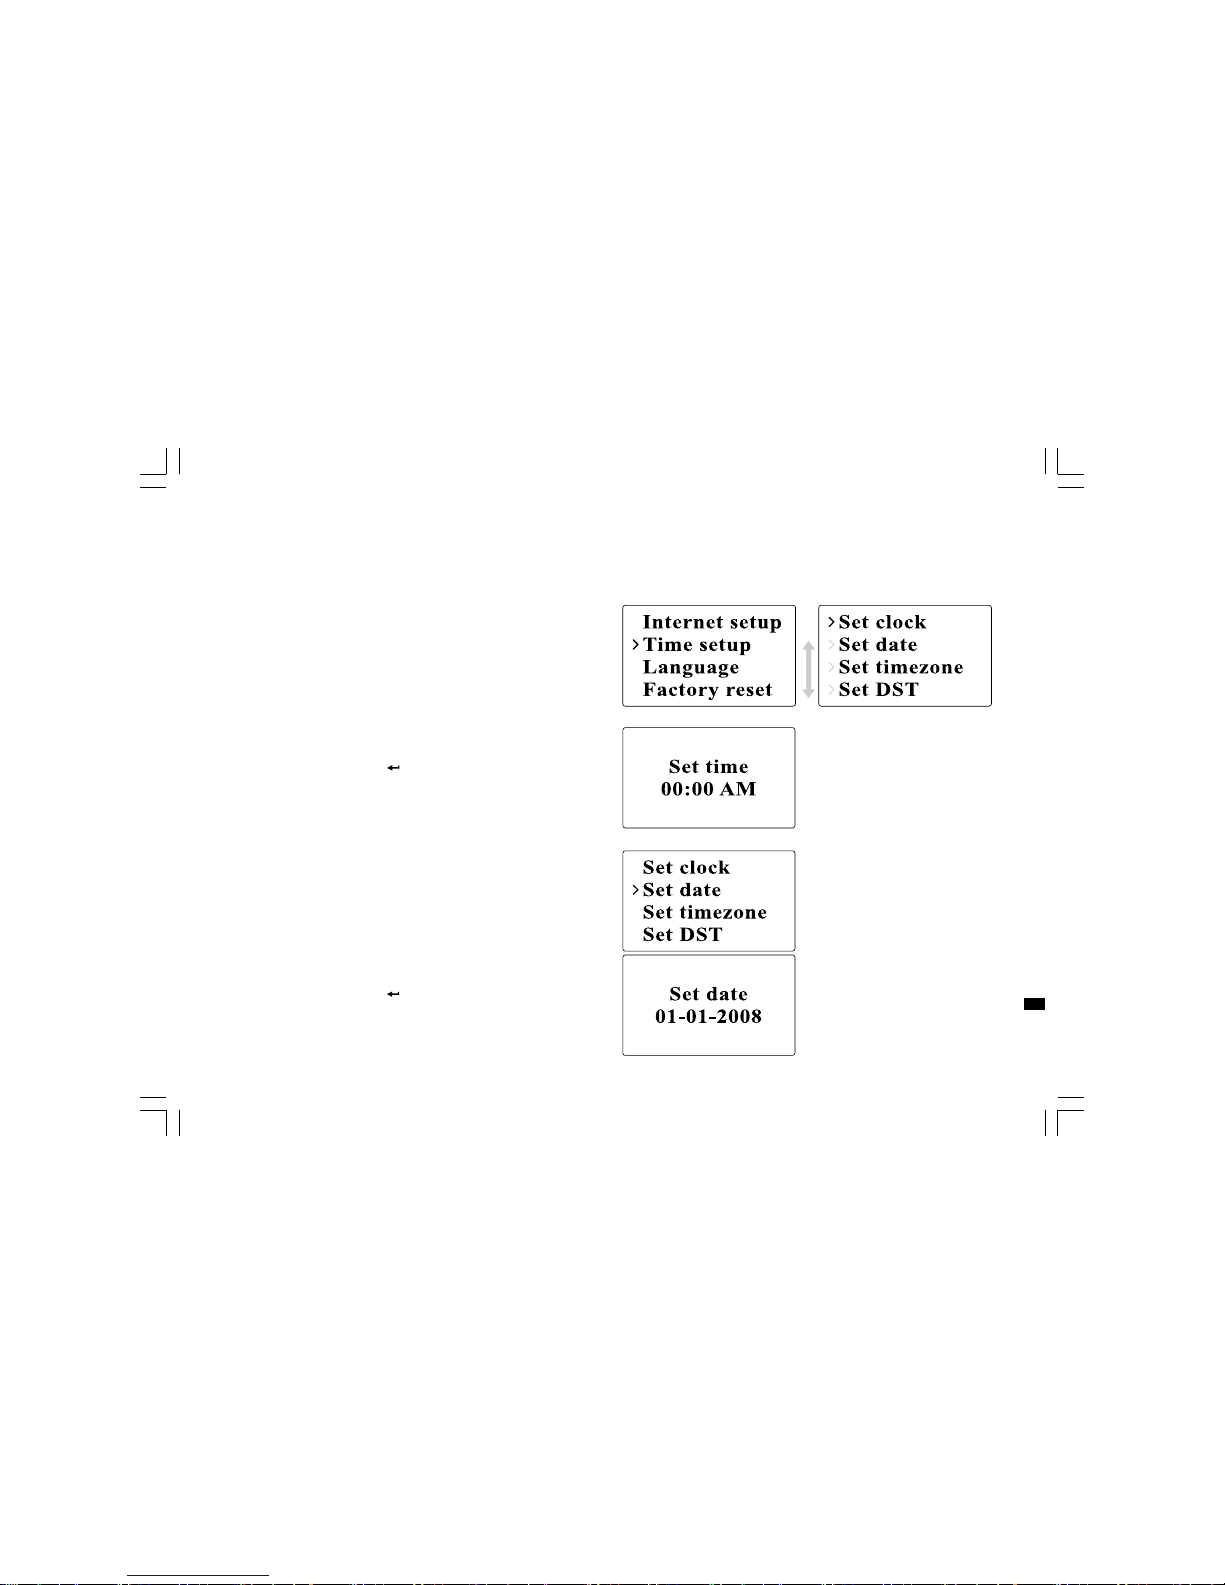
Clock Setup
1. To setup the time go to >Main menu>System setup>Time setup>
Set clock.
2. Use TUNE+/TUNE- or Turning knob to adjust the values and use
FORWARD/BACK to move ba ck and forth between fields.
Press the Turning knob or to confirm.
Date Setup
1. To setup the time go to >Main menu>System setup>Time setup>
Set date.
2. Use TUNE+/TUNE- or Turning knob to adjust the values a nd
FORWARD/BACK to move ba ck and forth between fields.
Press the Turning knob or to confirm.
Page 30
29
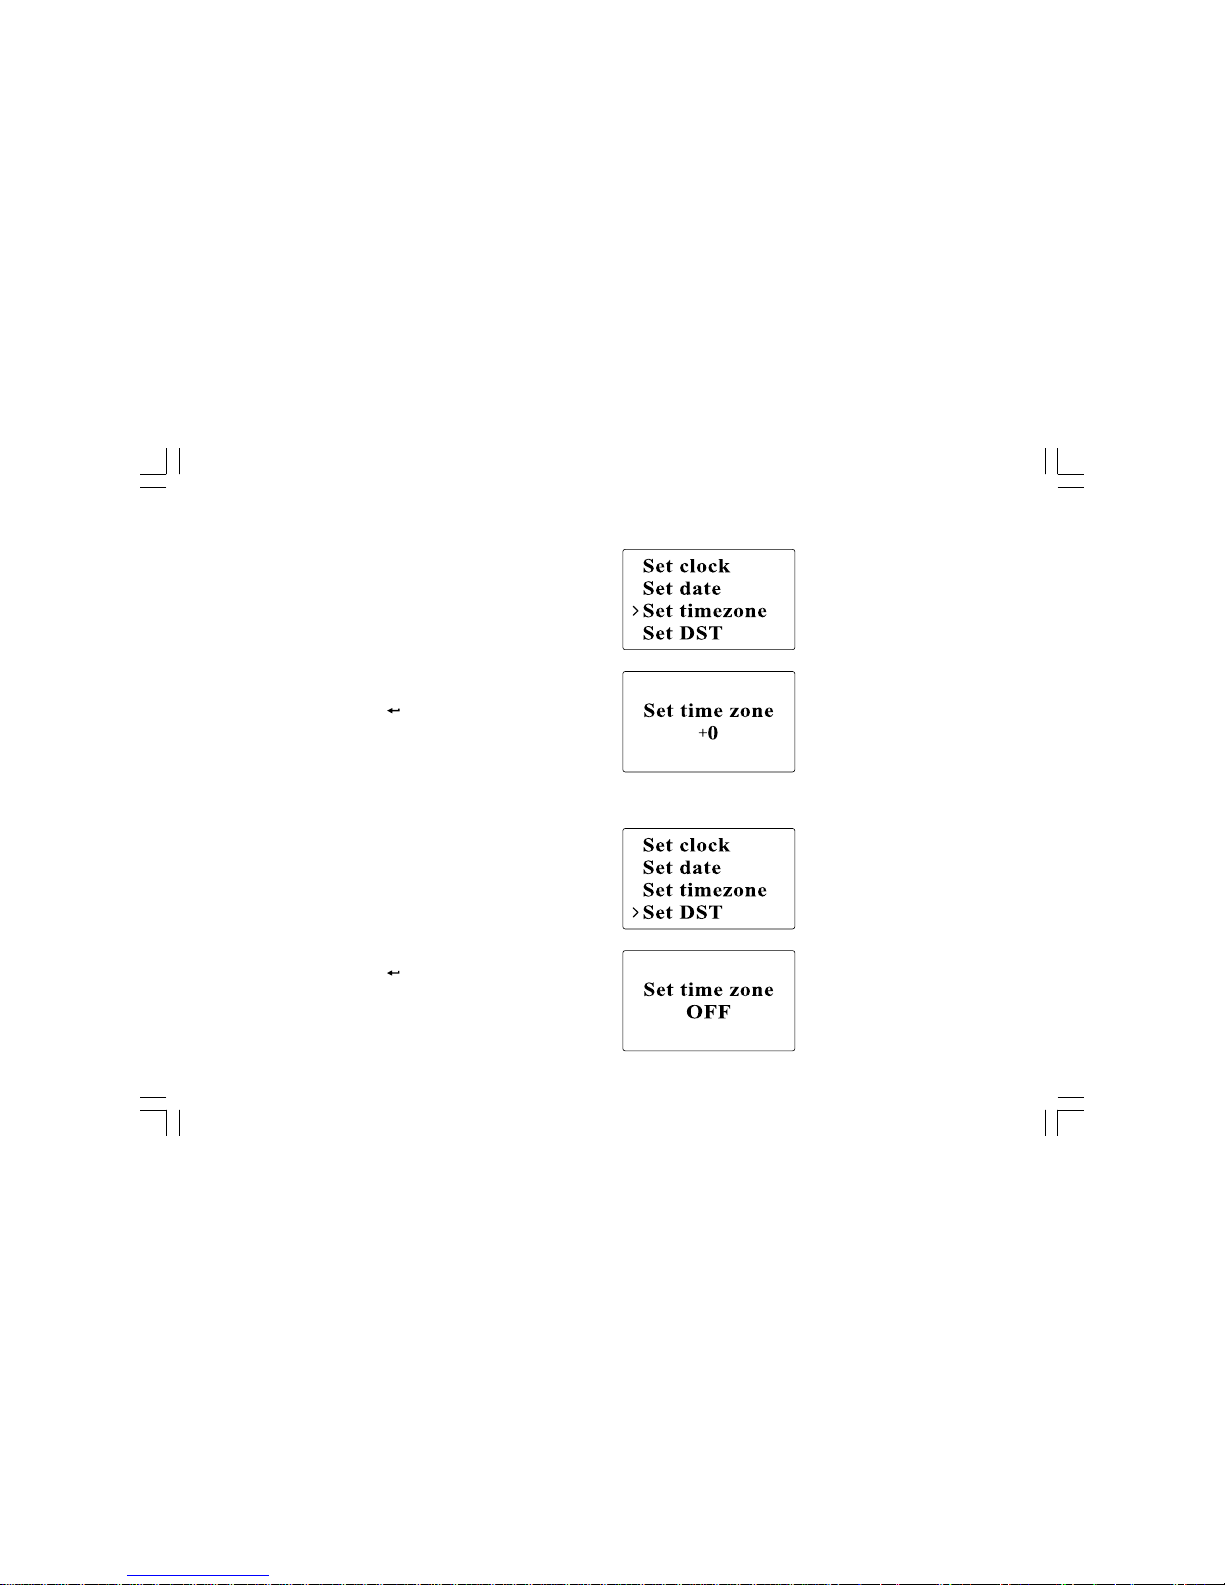
Time Zone Setup
1. To setup the time go to >Main menu>System setup>Time setup>
Set time zone.
2. Use TUNE+/TUNE- or Turning knob to adjust the values a nd
FORWARD/BACK to move ba ck and forth between fields.
Press the Turning knob or to confirm.
DST Setup
1. To setup the daylight saving time go to >Main menu>System setup>
Time setup> Set DST.
2. Use TUNE+/TUNE- or Turning knob to switch On
or Off.
Press the Turning knob or to confirm.
Page 31

30
GB
Auto Update
Auto update menu allows the user to select whether or not the time is
to be synchronized with the internet.
To setup the auto update go to >Main menu>System setup>
Time setup> Auto update and Choose the source of the update.
Set 12/24 Hour
12/24 hour setup allows you to change the clock display format.
To setup the auto update go to >Main menu>System setup>
Time setup>Set 12/24 hour.
Set Sleep Time
Sleep time allows you to set the time to turn the radio off automatically.
1. To setup the auto update go to >Main menu>System setup>
Time setup>Set sleep time. Or press the Timer button on the radio.
2. Use TUNE+/TUNE- or Turning knob to toggle between off,
15 minutes, 30 minutes, 45 minutes, and 60 minutes.
Page 32

31
Set Alarms
1. To setup the alarm go to >Main menu>System setup>Time setup>
Alarms. Or Press the Timer button twice on the radio.
2. Choose Alarm1 or Alarm2 to enter Alarm setup.
Alarm setup
Time: Enter the time to set the alarm off.
On/Off: Use this option to turn the alarm on/off.
Page 33

32
GB
Mode: Choose the source of what to play when time is up:
Buzzer, Internet radio, or FM.
Last listened:
a. Buzzer: choose a preset buzzer.
b. iRadio, FM: choose one of the last listened stations.
Volume: Use TUNE + or TUNE – or the Turning knob to adjust
the volume.
Save: The settings will not be saved and activated until this option
has been selected.
Page 34

33
Chapter 5 Upgrade and Reset
Software Upgrade
There are two mechanisms to upgrade the radio.
Upgrade via internet:
Go to >Main menu>System setup>Software upgrade
If there is a newer version of software available, the user will be
asked to confirm the upgrade. If the radio lost power during the upgra de,
it may restart automatically in USB upgrade mode.
Upgrade via USB
A user may choose to use this method instead of Internet Software
Upgrade if a network connection is not available or the power was
removed from the radio during Internet software upgrade.
1. Connect the radio with the PC using an USB cable.
2. Start the upgrade.exe utility on the PC.
3. Utility will ask you to run the Software upgrade wizard on the
Wi-Fi radio.
Page 35

34
GB
4. If the radio is not yet in upgrade mode (showing the text
“Waiting for PC wizard…”), enter the Software upgrade mode by
removing the power, then holding down the keys <skip backward>
and <skip forward> while turning the ra dio on again.
5. The upgrade will automatically start and ta ke s approximately
2 minutes.
6. Upon completion, the radio will automatically reboot and load the
new software.
Note:
Do not disconnect power during the update process. Update will fail if
power is disconnected.
Factory Reset
If you wish to completely reset your radio to its initial state this may be
performed by following this procedure.
1. Go to >Main menu>System setup>Factory reset
2. Press the Select (Turning knob or ?) to confirm rest.
3. The display will show “Restarting” for several seconds.
4. When the display shows “Welcome to Internet radio”,
the Factory reset is done.
Page 36

35
Possible Solution
1. Check if PC is able to connect to the network
2. Check if the network key is correct
Increase the volume on the radio a nd the aux device
Enable sharing. See Music Player on page 20 for more details
1. Check if PC is able to access the internet radio portal
(http://www.wifiradio-frontier.com) when connected to the
same Wi-Fi network
2. Try connecting to the radio station again later
1. Try moving the radio to a nother location
2. Try connecting to a wired network and if the proble m persists,
turn off programs that are using the internet on your PC to
preserve bandwidth
Chapter 6 Trouble Shooting
Problem
Unable to connect to Wi-Fi network
or Unable to get internet listing
Unable to hear sound in AUX IN mode
Unable to find PC or music folder
using scan
Unable to connect to certain stations
Connections are unstable
Possible Cause
1. Router might be down
2. Wrong network
password entered
Aux device or radio volume
not adjusted correctly
Sharing not enabled
1. Selected internet radio station
might be down
2. The station does not support the
format used by the internet
radio station
3. Radio is not broadcasting at this
time of day or reached
maximum allowed listeners
1. Interference caused by other
electronic products
2. Internet may be out of bandwidth
Page 37

36
GB
Chapter 7 Product Specification
TUNER
MEDIA
CLOCK
DISPLAY
FM
MW
WiFi
Ethernet
Preset
CD
SD
USB
Aux-in
Others
Real time
Alarm
Sleep
Nap
Others
Frequency (MHz)
Stereo
RDS/RBDS
Frequency (kHz)
IEEE 802.11 b / g (GHz)
IEEE 802.3
Internet Radio (iRadio)
Media Player (mPlayer)
CD / CDR / CDRW
Radio control - iRadio
Tuner / Media / Buzzer
LCD / VFD
View area (mm)
Graphic / Character type
Back light
Others
US: 87.8-108
EU: 87.5-108
Earphones / Speaker
PS/PTY/RT
522 - 1710
2.4 - 2.4835
*
vTuner
*
30
*
iRadio
Tuner/Media
*
Snooze
LCD
59 x 33.5
Graphic 128 x 64
*
Page 38

37
FEATURE
AUDIO
AMPLIFIER
SPEAKER
I/O Socket
EQ
Record - SD / Flash
Rewind - SDRAM
Record - SD / Flash
Program upgrade
Others
Tone control
Treble / Bass control
DBB
EQ (Sound effect selection)
Others
Speaker output (TYP)
Earphones output
Others
Size
Impedance
Magnetically shield
Others
AC / DC - in
Aux - in
Line - out
Digital - out
Earphones
SD
USB
Ext. Antenna
RJ - 45
Others
Via USB-B
*
6
5W + 5W
5 + 5 mW
3 inches x 2
8 ohms
*
AC
*
*
*
USB-B
WiFi, FM, AM-loop
*
Page 39

38
GB
If at any time in the future you should need to dispose of this product please note that: Waste electrical products should not
be disposed of with household waste. Please recycle where facilities exist. Check with your Local Authority or retailer for
recycling advice. (Waste Electrical and Electronic Equipment Directive)
DIMENSIONS Width ( mm )
Height ( mm )
Depth ( mm )
Weight ( g )
326
108
210
2946
Page 40

39
Sommaire
Consignes de sécurité importante s .................................... 40-41
Chapitre 1 démarrage .............................................................. 42
Produit et accessoires: ............................................................ 42
Mise sous tension de la radio .................................................. 43
Commandes ............................................................................ 44
Fonctionnement de la Radio Wi-fi ............................................ 45
Télécommande ................................................................... 46-47
Naviguer dans les menus ........................................................ 48
Navigation dans les menus: .................................................... 48
Entrées de texte ...................................................................... 49
Entrer du texte: ........................................................................ 49
Langue ..................................................................................... 49
Raccorder un équipement à la ra dio ........................................ 50
Chapitre 2 Connexion .............................................................. 51
Connexion à un réseau sans f il ............................................... 52
Raccordement à un réseau filaire ........................................... 53
Chapitre 3 Ecouter la ra dio ...................................................... 54
Radio Internet .......................................................................... 54
Ecouter la radio Internet: .......................................................... 54
Recherche de stations radio sur internet: ................................ 54
Ecouter des Podcast: .............................................................. 55
Ecouter Mes favoris / Mes stations ajoutées: ......................... 56
Lecteur audio ........................................................................... 58
Ecouter de la musique avec les dossiers partagés du
lecteur audio: .......................................................................... 58
Ecouter de la musique avec les médias partagés du
lecteur audio: .......................................................................... 58
Dossiers partagés ................................................................... 59
Partage de médias avec Windows Lecteur média 11: ........... 60
Configuration Dossiers partagés ............................................. 61
Médias partagés (UPnP) ......................................................... 62
Configuration de l’ordinateur pour les Média s partagés: .......... 62
Radio FM ................................................................................. 63
Ecouter la radio FM: ................................................................ 63
Changer des stations FM: ....................................................... 63
Entrée auxiliaire (AUX IN) ....................................................... 64
Ecouter de la musique avec le mode AUX IN: ........................ 64
Présélection de stations radio ................................................. 65
Rappeler une présélection: ...................................................... 65
Assigner la station radio sélectionnée à une touche
de présélection: ....................................................................... 65
Dernières écoutées ................................................................. 65
Rappeler une station dernièrement écoutée: ........................... 65
Chapitre 4 Fonctionnement de l’horloge .................................. 66
Réglage de l’horloge ................................................................ 66
Réglage de la date ................................................................... 66
Fuseau horaire ........................................................................ 67
Heure d’été .............................................................................. 67
Mise à jour automatique .......................................................... 68
Format 12/24 heures .............................................................. 68
Réglage de la minuterie Sommeil ........................................... 68
Réglage des alarmes .............................................................. 69
Réglage de l’alarme ................................................................. 69
Chapitre 5 Mise à niveau et Réiniti alisation ............................. 71
Mise à niveau logicielle ............................................................ 71
Mise à niveau via internet: ....................................................... 71
Mise à niveau via USB ............................................................ 71
Réinitialisation d’usine ............................................................. 72
Chapitre 6 Dépa nnage ............................................................. 73
Chapitre 7 Spécifications du produit ................................... 74-76
Page 41

40
F
Consignes de sécurité importa ntes
1. Lire et comprendre toutes les consignes de sécurité et d’utilisation
avant d’allumer l’appare il.
2. Conservez ces instructions: Les consignes de sécurités doivent êtres
conservées pour une éventuelle consultation ultérieure.
3. Observez les avertissements. Toutes les consignes d’utilisation et
avertissements concernant l’appareil devraient êtres suivies.
4. Suivre toutes les consignes et instructions d’utilisation.
5. Eau et humidité: L’appareil ne doit pas être utilisé près de l’eau.
Ne pa s utiliser près d’une baignoire, cuvette, évier, sous-sol humide,
piscine, etc.
6. Débrancher la radio du se cteur ava nt nettoyage. Employer seule ment
un tissu humide pour le nettoyage extérieur de la radio.
7. Ne pas placer la radio sur un support instable, table, chariot etc.
La radio risquerait de tomber ce qui pourrait
gravement l’endommager.
8. Ventilation: Cette radio devrait être située de sorte que son
emplacement n’interfère pas avec sa propre ventilation. Exemple,
la radio ne doit pas être utilisée sur un lit, sofa, couverture ou autres
surfaces qui risqueraient de bloquer les orifice s de ventilation.
Ne pas placer l’appareil da ns des endroits clos comme un coffre ce
qui réduirait le débit d’air nécessaire à sa propre ventilation.
9. N’installez pas cet appareil près de sources de chaleur telles qu’un
radiateur, conduit d’air chaud, poêle ou autres appareils (en incluant
les amplificateurs) qui produisent de la chaleur.
10. Si la fiche ne s’adapte pas à votre prise murale, contactez un
électricien afin que celui-ci procède au remplacement de la prise de
courant obsolète.
11. Source d’énergie: La radio devrait être utilisée seule ment avec la
source d’énergie indiquée sur l’étiquette de l’appareil. Si vous n’êtes
pas sûr du type d’ali mentation dans votre habitation, consultez votre
revendeur ou la compagnie d’électricité.
12. Cordon électrique: Le cordon électrique devrait être placé de
manière à ne pa s marcher dessus, pincer ou placer des objets sur
celui-ci. Prêter une attention particulière au cordon électrique et à
la prise, surtout à la sortie de l’appareil. Débrancher l’appareil en
saisissant la prise et non pas le cordon lui-même. Utiliser la radio
seulement avec le type d’alimentation indiqué sur l’appareil. Si vous
n’êtes pas sûr de la source d’énergie présente à votre domicile,
consultez votre revendeur ou la compagnie d’électricité.
13. Ne pas surcharger les prises murales ou les rallonges électriques.
Ceci peut avoir comme conséquence un risque d’incendies ou
d’électrocution. Ne jamais insérer d’objet d’aucune sorte dans la
radio ni dans les ouvertures. L’objet pourrait entrer en contact avec
des parties électrifiées et créer des surtensions, chocs électriques
ou des incendies.
14. Utilisez seulement les pièces/acce ssoires fournies par le fabricant.
15. Si vous n’utilisez pas la radio pendant une longue période de temps,
débranchez le cordon d’alimentation de la prise murale,
ceci afin d’éviter tout dommage occasionné par la foudre ou par
une surtension.
16. Si vous n’utilisez pas la radio pendant une longue période de temps,
retirez les batteries. Les batteries peuvent fuir et endommager
la radio.
Page 42

41
17. Ne pa s essayer d’entretenir l’appareil vous-même. Retirer le capot
vous exposerai à des tensions électriques dangereuses et annulera
la garantie. Adressez-vous à un réparateur qualifié et agréé.
18. Insertion d’objets et de liquides -Ne jamais insérer d’objet ou de
liquide d’aucune sorte par les ouvertures de l’appareil, ceux-ci
pourrait entrer en contact avec des parties de l’appareil sous
tension et pourrait provoquer des incendies ou des chocs
électriques. Ne jamais renverser de liquide d’aucune sorte
sur l’appareil.
19. L’appareil doit être entretenu par du personnel qualifié qua nd:
Le cordon d’alimentation ou la fiche est endommagé.
Des objets sont tombés ou du liquide a été renversé sur la radio.
La radio a été exposée à de la pluie ou à de l’eau.
La radio semble fonctionner de manière a normale ou vous
remarquez un changement dans son f onctionnement.
La radio est tombée ou son aspect extérieur est endommagé.
Remarque:
Toute modification ou changement non approuvé explicitement par
l’entité responsable des conformités est susceptible d’annuler le droit
de l’utilisateur à faire fonctionner cet équipement.
REMARQUE IMPORTANTE:
afin de se conformer aux exigences des directives de la FCC liées à
l’exposition aux FR, aucune modification de l’antenne ou de l’unité n’est
autorisée. T oute modif ication de l’antenne ou de l’unité peut excéder les
exigences de conformité à l’exposition de FR et annuler le droit de
l’utilisateur à faire fonctionner cet équipement.
INFORMATIONS RELA TIVES A LA FCC
La déclaration sur les interférences de fréquences radio de la Federal
Communication Commission inclut le paragraphe suivant:
Cet équipement a été testé et déclaré conforme aux normes des
appareils numériques de classe B, conformément à l’article 15 du
Règlement de la FCC (Federal Communications Commission).
Ces normes sont conçues pour fournir une protection raisonnable
contre les interférences préjudiciables dans une installation
résidentielle. Cet équipement génère, utilise et peut émettre une
énergie de fréquence radio et peut causer des interférences nocives aux
radiocommunications s’il n’est pa s in stallé et utilisé conformément aux
instructions. Toutefois, il n’existe aucune garantie que des interférences
ne se produiront pas dan s une installation particulière. Si cet
équipement venait à causer des interférences nocives à la réception
radio ou télévision, qui peuvent être déterminées en l’allumant et en
l’éteignant, l’utilisateur est invité à tenter de corriger ces interférences
par une ou plusieurs des mesures suivantes:
- Réorienter ou repositionner l’antenne réceptrice.
- Augmenter la dista nce qui sépare l’équi pement et le réce pteur.
- Brancher l’équipement sur une sortie d’un circuit différent de celui
auquel le récepteur est raccordé.
- Consulter le revendeur ou un technicien radio/télévision spécialisé pour
obtenir de l’aide.
L’utilisateur ne doit pas modifier cet équipement sans l’accord écrit de
SANGEAN ELECTRONICS INC. Toute modification peut annuler le droit
de faire fonctionner cet équipement.
Page 43

42
Cordon d’alimentation
Radio Wi-fi WFR-1 Télécommande
F
Chapitre 1 Démarrage
Nous vous félicitons d’avoir fait l’a cquisition de la ra dio Sa ngean
WFR-1 Wi-fi. Vérifiez que les éléments suivants sont présents
dans l’emballage:
Produit et accessoires:
Cordon d’alimentation: permet d’alimenter la radio.
Télécommande: permet de contrôler la radio à dista nce.
Radio Wi-fi WFR-1: votre radio Wi-Fi
Page 44

43
Mise sous tension de la radio
1. Raccordez une extrémité du cordon d’alimentation à la radio et
raccordez l’autre extrémité à une fiche de courant murale.
2. Appuyez sur la touche ST ANDBY pour mettre en marche la radio.
Remarque:
Utilisez seulement l’adaptateur de coura nt f ourni ave c la radio.
Raccorder un autre type d’ada ptateur de coura nt peut endommager la
radio de manière permanente.
Page 45

44
Commandes
(Panneau avant)
1.
2.
3.
4.
5.
6.
Ecran LCD
Touche ST ANDBY
Touche BAND
Touche INFO
Touche TIMER
Touche EQ
7.
8.
9.
10.
11.
12.
Touche RET OUR
Touche PRESET STOP
Touche A VANT
T ouche VOLUME BAS
Touche VOLUME HAUT
Commande de réglage T uning
F
Page 46

45
Fonctionnement de la Radio Wi-fi
Référez-vous aux images ci-dessous pour vous fa mili ariser avec le s comma ndes de la ra dio.
1
2
3
4
5
6
7
8
9
10
11
12
Item
Ecran LCD
Touche ST ANDBY
Touche BAND
T ouche INFO
T ouche TIMER
Touche EQ
T ouche RETOUR
Touche PRESET STOP
T ouche AV ANT
T ouche VOLUME BAS
Touche VOLUME HAUT
Commande de
réglage Tuning
Description
Permet d’afficher le texte
Pour mettre en marche/éteindre la radio
Appuyez sur cette touche pour basculer entre les modes
Appuyez sur cette touche pour afficher les informations sur l’écran LCD
Appuyez sur cette touche pour définir la minuterie Sommeil et les alarmes
Appuyez sur cette touche pour accéder à l’option Egaliseur
T ouche de navigation. Appuyez sur cette touche pour activer le menu/revenir à la page précédente dans
un menu. En mode Lecteur audio, appuyez sur cette touche pour sélectionner la piste précédente.
Dans les interfaces de conf iguration, appuyez sur cette touche pour accéder à l’option précédente
Appuyez sur cette touche pour accéder au menu Présélections. En mode Lecteur audio, appuyez sur cette
touche pour arrêter la lecture de la piste
T ouche de navigation. Appuyez sur la touche pour confirmer votre sélection dans un menu. Appuyez sur la
touche pour déplacer le curseur vers la gauche lorsque vous entrez le nom d’utilisateur ou le mot de passe.
En mode Lecteur audio, appuyez sur cette touche pour sélectionner la piste suiva nte. Dans les interfaces
de configuration, appuyez sur cette touche pour accéder à l’option suivante
Appuyez sur la touche pour diminuer le volume
Appuyez sur la touche pour augmenter le volume
Tournez cette comma nde pour
effectuer des sélections/
naviguer parmi les options
Appuyez sur la touche pour
confirmer vos sélections
Page 47

46
1.
2.
3.
4.
5.
6.
7.
8.
9.
10.
11.
12.
13.
14.
15.
16.
17.
18.
Télécommande
F
Touche Mute
Touche Mute
Touche TUNE +
Touche Retour
Touche TIMER
Touche TUNE Touche FM
Touche iRa dio
Touche AUX IN
Touche Mplayer
Touche INFO
Touche Enter
Touche A VANT
Touche Stop
T ouche Présélection 7,8,9 /rembobin age, pause, ava nce rapid
T ouches de présélection ra dio
T ouches Volume
Touche Power
Page 48

47
Télécommande
Vous pouvez contrôler la radio avec la télécomma nde. Voir l’image ci-dessous pour une présentation détaillée de chaque touche.
1
2
3
4
5
6
7
8
9
10
11
12
13
14
15
16
17
18
Commande
Touche Mute
Touche Mute
Touche TUNE +
Touche Retour
T ouche TIMER
Touche TUNE Touche FM
Touche iRa dio
T ouche AUX IN
Touche Mplayer
T ouche INFO
Touche Enter
T ouche AV ANT
Touche Stop
Touche Préséle ction
7,8,9 /rembobinage,
pause, avance ra pid
Touche s de
présélection radio
T ouches V olume
Touche Power
Description
Appuyez sur cette touche pour accéder à l’interface de sélection d’un Egaliseur
Appuyez sur la touche pour couper le son de la radio
T ouche de navigation, permet de séle ctionner l’option du de ssus.
Appuyez sur cette touche pour activer le menu/revenir d’une page dans un menu. En mode Lecteur audio,
appuyez sur cette touche pour accéder à la piste précédente. Dans les interfaces de configuration, appuyez
sur cette touche pour accéder à l’option précédente
Appuyez sur cette touche pour régler la minuterie Sommeil et les alarmes
T ouche de navigation, permet de séle ctionner l’option en dessous
Appuyez sur cette touche pour accéder au mode radio FM
Appuyez sur cette touche pour accéder au mode Radio Internet.
Appuyez sur cette touche pour accéder au mode Entrée auxiliaire
Appuyez sur cette touche pour accéder au mode Lecteur audio
Appuyez sur cette touche pour afficher les informations sur l’écran LCD
Appuyez sur la touche pour confirmer votre sélection
T ouche de navigation, permet de conf irmer votre sélection dans un menu. Appuyez sur cette touche pour vous
déplacer vers la gauche lorsque vous entrez le nom d’utilisateur ou le mot de passe. En mode Lecteur audio,
appuyez sur cette touche pour a ccéder à la piste suivante. Dans les interfaces de configuration, appuyez sur
cette touche pour accéder à l’option suivante.
Appuyez sur cette touche pour annuler l’opération en cours.
Appuyez sur ces touches pour rappeler la présélection 7, 8, 9/ef fectuer un re mbobinage/pause/ava nce rapide.
Appuyez sur ces touches pour rappeler des présélections.
Appuyez sur ces touches pour régler le volume
Appuyez sur la touche pour mettre en marche/éteindre la radio
Page 49

48
2
Navigation parmi les options des menus
Il existe deux manières de naviguer dans les menus.
Appuyez sur la touche RETOUR pour activer le menu puis:
1. Naviguez parmi les sélections en tournant la commande de réglage
Tuning de la radio da ns le sens des aiguilles d’une montre ou dans le
sens contraire des aiguilles d’une montre pour déplacer le symbole >
et appuyez sur la commande de réglage Tuning pour confirmer
votre sélection. Utilisez la touche AVANT/RETOUR pour
sélectionner/accéder à l’option précédente du menu.
2. Utilisez les touches de navigation (TUNE +, TUNE-, RETOUR,
AVANT) de la télécommande pour déplacer le symbole > et appuyez
sur la touche Enter pour confirmer votre sélection. Utilisez AVANT/
RETOUR pour sélectionner/accéder à l’option précédente du menu.
Voir la section Fonctionnement de la radio Wi-fi pour une
présentation détaillée de la commande de réglage Tuning et des
touches de navigations.
Navigation dans le menu:
1
F
Page 50

49
Entrer du texte
Pour commencer à utiliser la radio, il est nécessaire d’entrer du texte.
Par exemple, entrer un nom d’utilisateur, mot de passe, rechercher une
station, etc.
Pour entrer du texte:
Faites tourner la commande de réglage Tuning pour mettre en
surbrillance le texte/numéro/symbole.
Appuyez sur la touche la commande de réglage Tuning
pour confirmer.
Utilisez < pour supprimer.
Utilisez C pour annuler et quitter
Utilisez pour confirmer lorsque vous avez terminé.
Langue
Permet de sélectionner la langue d’affichage.
Accédez à >Menu principal>La ngue et séle ctionnez la langue.
Page 51

50
F
Raccorder un équipement à la radio
Voir l’image ci-dessous pour une présentation détaillée des connecteurs situés sur le panneau arrière de la radio.
1
2
3
4
5
6
Description
Permet de raccorder des écouteurs
Permet de raccorder des haut-parleurs externes
Permet de connecter un périphérique audio externe
Permet de raccorder un câble Ethernet
Permet de raccorder un périphérique USB
Permet de raccorder le cordon d’alimentation
Elément
Connecteur Ecouteurs
Connecteur LINE OUT
Connecteur AUX IN
Connecteur LAN
Connecteur USB
Connecteur Alimentation
Page 52

51
Chapitre 2 Connexion
Avant d’utiliser cette radio internet, vous devez être équipé de la
manière suivante:
Une connexion internet haut débit ou
Un point d’accès sans fil (Wi-Fi) ou connexion filaire Ethernet
(10 ou 100 Mbits/sec avec connexion RJ45) relié à votre connexion
internet haut débit, de préférence via un routeur. Dans la plupart des
cas un modem haut débit, le routeur ou point d’accès sans fil sera un
boitier unique fourni par votre fournisseur d’accès internet ou a cheté
dans une boutique d’informatique.
Si votre réseau sans fil est configuré pour utiliser le cryptage
“Filaire Equivalent Privacy” (WEP) ou “Wi-Fi Protected Access”
(WPA) il vous sera nécessaire de connaitre la clé de cryptage
de manière à ce que la radio internet puisse communiquer avec
le réseau.
IMPORTANT:
Avant de continuer, assurez-vous que votre point d’accès sans fil ou
routeur est sous tension et qu’il marche parfaitement avec votre réseau
informatique existant (utilisez votre ordinateur pour vous en a ssurer).
Pour que cette partie de votre système fonctionne, vous devez lire
les instructions fournies avec votre point d’accès sans fil ou de
votre routeur.
Page 53

52
F
Connexion à un réseau sans fil
Pour configurer l’option Réseau sans fil:
1. Assurez-vous qu’un réseau san s f il soit à portée.
2. Accédez à >Menu principal>Configuration système >
Configuration Internet > Assistant >[nom du réseau sans fil].
3. Il vous sera demandé d’ entrer un mot de pa sse:
Faites tourner la commande de réglage T uning pour mettre en
surbrillance le texte/numéro/symbole
Appuyez sur la touche la comma nde de réglage Tuning
pour confirmer.
< pour supprimer
C pour annuler et quitter
pour confirmer lorsque vous avez terminé
4. L’écran affiche “Connecté” lors que la connexion e st établie.
Page 54

53
Raccordement à un réseau filaire
Pour configurer l’option Réseau filaire:
1. Connectez la radio au réseau filaire en utilisant un câble Ethernet
comme indiqué.
2. Accédez à >Menu principal> Configuration système >
Configuration Internet > Assistant > [Filaire] à partir des option s
du menu.
3. Entrez le mot de passe lorsque demandé.
Faites tourner la commande de réglage Tuning pour mettre en
surbrillance le texte/numéro/symbole
Appuyez sur la commande de réglage Tuning pour confirmer.
< pour supprimer
C pour annuler et quitter
pour confirmer lorsque vous avez terminé
4. L’écran affiche “Connecté” lorsque la connexion e st éta blie.
Si vous rencontrez des problèmes lors de la connexion au réseau filaire,
les témoins lumineux du connecteur LAN (RJ-45) vous aideront à
identifier la cause du problème :
Vert allumé = liaison établie, clignote=transfert de données
Jaune allumé = liaison à 100M bps, éteint = liaison à 10M bps
Page 55

54
F
Chapitre 3 Ecouter la radio
Radio Internet
Pour écouter la radio Internet:
A partir du menu, accédez à l’option >Menu principal > Radio Internet
ou appuyez sur la touche iRadio de la télécommande. La radio lira la
dernière station radio écoutée.
Lorsque vous souhaitez sélectionner d’autres stations, suivez les
instructions ci-dessous.
Pour rechercher des stations radio sur internet:
Appuyez sur la touche RETOUR pour activer le menu et accéder à
l’option Liste des stations.
Dans la Liste des stations, 5 méthodes de recherche des stations sont
disponibles. Accédez à >Liste des stations>Stations à partir du menu:
1. Emplacement:
Cette option vous permet de choisir une station radio à partir de la
liste continent et pays.
Page 56

55
2. Genre:
Cette option vous permet de choisir une station radio selon
le contenu, par exemple Classique, Rock, Sport, Actualités, etc.
3. Rechercher une station:
vous permet de rechercher une station en entrant le nom ou un
mot clé.
4. Stations radio populaires:
vous permet d’afficher la liste des stations radio populaires et de
sélectionner des stations.
5. Nouvelle station:
vous permet d’afficher la liste des stations les plus récentes et de
sélectionner des stations.
Pour écouter des Podcasts:
Accédez à >Liste des stations>Podcasts, 3 options
sont disponibles:
1. Emplacement:
cette option vous permet de choisir une station radio à partir de la
liste continent et pays.
2. Genre:
Cette option vous permet de choisir une station radio selon
le contenu, par exemple Classique, Rock, Sport, Actualités, etc.
3. Recherche de station:
vous permet de rechercher une station en entrant le nom ou un
mot clé.
Page 57

56
F
Pour écouter la Mes favoris / Mes stations ajoutées:
Les fonctions Mes favoris et Mes stations radios vous permettent
d’ajouter des stations ra dio internet sur le site internet frontière et
d’écouter les stations de votre radio.
Accédez à>Liste des stations>Mes favoris / >Liste des stations>
Mes stations ajoutées.
S’enregistrer en ligne:
Avant la pre mière utilisation de ces deux fonctions, veuillez suivre les
instructions pour vous inscrire au site internet:
1. Accédez à >Liste des stations>Aide>Obtenir un code d’accès.
Le code s’affiche à l’écran.
2. Visitez le site internet en utilisant votre ordinateur
http://wifiradio-frontier.com/then cliquez sur “Inscrivez-vous ici” et
remplissez le formulaire avec le code d’accès affiché à l’écran.
Vous pouvez laisser le champ “Mode radio WiFi” libre.
Page 58

57
Site internet frontière
3. Une fois l’inscription terminée, la page internet affiche et
“Mes stations ajoutées” pour utiliser ces deux fonctions. Une fois
l’enregistrement terminé, lorsque vous souhaiterez utiliser ces
fonctionnalités, il vous suffit seulement d’accéder au site internet:
entrez ensuite l’adresse email et le mot de passe.
Pour modifier Mes favoris:
1. Utilisez Naviguer ou Rechercher des stations sur le site internet
pour trouver une station,
2. Cliquez sur l’icône “Ajouter”, la station est ajoutée au dossier
Mes favoris.
Pour modifier Mes stations ajoutées:
Cette option vous permet d’ajouter des stations radio internet lorsque
vous connaissez l’adresse internet des stations radio.
1. Cliquez sur la flèche située sous Mes stations ajoutées, il vous
sera demandé d’entrer l’adresse internet. Entrez l’adresse exacte
comme indiquée sur la page.
2. Cliquez sur l’icône “Ajouter” pour ajouter la station.
Page 59

58
F
Lecteur audio
Pour écouter de la musique avec les dossiers partagés du
lecteur audio:
1. Accédez à >Menu principal>Lecteur audio> Dossiers partagés>
[nom de l’ordinateur]>[noms des dossiers].
Un nom d’utilisateur et mot de passe peuvent être requis.
2. Trouvez et sélectionnez le fichier audio que vous souhaitez écouter
dans le dossier et a ppuyez sur la commande de réglage Tuning pour
lancer la lecture.
3. Utilisez la touche Forward/Back pour accéder à la piste
suivante/précédente.
Pour écouter de la musique avec les médias partagés du
Lecteur audio :
1. Accédez à >Menu principal>Lecteur audio> Médi as partagés>
[nom de l’ordinateur]>[catégories de média].
Le serveur UpnP rend les Catégories de média disponibles.
Par exemple, ‘Musique’ ou ‘Listes de lecture’. Un nom d’utilisateur
et un mot de passe peuvent être requis.
2. Trouvez et sélectionnez le fichier audio que vous souhaitez écouter
dans le dossier et a ppuyez sur la commande de réglage Tuning pour
lancer la lecture.
3. Utilisez les touches Forward/Back pour accéder à la piste
suivante/précédente.
Page 60

59
Dossier partagés
Le lecteur Windows média 11 vous permet de lire les f ichiers audio
stockés sur votre ordinateur ou un autre ordinateur du réseau.
Votre radio offre deux méthodes d’a ccès aux fichiers. Il est possible de
se connecter aux Dossiers partagés sur le réseau. Il est également
possible de se connecter avec l’application de gestion de fichiers en
utilisant le protocole Universal Plug and Play (UpnP) connu sous le nom
de Médias partagés.
Tous les types de fichiers supportés sont lisibles en mode
Partages Windows.
Lorsque vous utilisez un serveur UpnP, les types de fichiers
compatibles dépendent du logiciel serveur utilisé. Par exemple,
le lecteur Windows média 11 de M icrosoft prend en charge le s
fichiers MP3, WMA et WAV. Pour pouvoir lire les autres types de
fichiers supportés via UpnP, vous devrez peut-être installer d’autres
logiciels tiers.
Lorsque vous utilisez Partages Windows, la sélection de musiques se
fait par Artiste, par Album et optionnelle ment par piste dans un Album.
Lorsque vous utilisez un serveur de partage de médias Up nP,
la recherche et les critères de sélection sont déterminés par le serveur,
mais incluent en général des options supplémentaires comme la
recherche par Genre. Plusieurs a pplications serveur vous permettent
également d’accéder aux fichiers selon les répertoires da n s les quels ils
sont stockés.
Page 61

60
F
Pour partager des médias en utilisa nt le lecteur W indows média 11:
1. Ouvrez le Lecteur média et cliquez sur la flèche située sous l’onglet
Librairie puis sélectionnez Options .
2. Cliquez sur le bouton Configurer le partage.
3. Vérifiez Partager le média vers: vérifiez la boîte. Radio WiFi est
affiché comme un périphérique inconnu.
4. Cliquez sur le bouton Paramètres.
Page 62

61
5. Nommez votre Média partagé et sélectionnez le s paramètres.
6. Enfin, sélectionnez Autoriser les nouveaux péri phérique s et
ordinateurs automatiquement.
7. Cliquez sur Ok lorsque vous avez terminé
Configuration des dossiers partagés
Ordinateur:
Configurez votre ordinateur Windows afin d’autoriser la radio
à accéder à vos fichiers audio par l’intermédiaire de
Partages Windows.
1. Vérifiez que votre ordinateur soit sur le même réseau que la
radio internet.
2. En utilisant l’Explorateur Windows, repérez le répertoire contena nt
vos fichiers audio.
3. Effectuez un clic droit sur le répertoire.
4. Sélectionnez “Propriétés”.
5. Cliquez sur “Partage”.
6. Sélectionnez “Partager ce répertoire sur le réseau” et
“Autoriser les utilisateurs du réseau à modifier mes fichiers.”.
Page 63

62
F
Radio Wi-fi:
Configurez votre radio pour que celle-ci se connecte à votre
ordinateur lorsqu’un nom d’utilisateur et un mot de passe sont requis.
1. Accédez à >Menu principal>Configuration système>
Configuration Internet>Paramètres de l’ordinateur.
2. Entrez le nom d’utilisateur et le mot de passe.
Médias partagés (UPnP)
Les Médias partagés utilisent le lecteur Windows Média (WMP) 11 et
supérieurs pour agir en tant que serveur média. Ce mode ne requiert
aucun réglage sur la radio, mais l’ordinateur doit être configuré afin
d’autoriser la radio à accéder aux médias. Il vous suffit de configurer
l’ordinateur une fois.
Configuration de l’ordinateur pour les média partagés:
1. Si vous êtes sous Microsoft Windows XP ou Windows Vista,
vous pouvez alors utiliser le lecteur Windows média 1 1 de Microsoft
(WMP11) pour agir en ta nt que serveur de médi as UpnP
(Universal plug and Play). S’il n’est pas déjà installé sur votre PC,
le lecteur Windows média 11 peut-être téléchargé et installé à partir
du site Internet de Microsoft.
2. Une fois installé, WMP11 crée une librairie de tous les fichiers média
disponible sur votre PC. Pour ajouter de nouveaux fichiers médi a à la
librairie, sélectionnez “Fichier>Ajouter à la librairie..>
Options avancées”, cliquez sur “Ajouter” et sélectionnez les fichiers
que vous souhaitez ajouter , cliquez sur ‘OK’.
Page 64

63
Radio FM
Ecouter la radio FM:
A partir du menu, accédez à l’option >Menu principal >
FM ou appuyez sur la touche FM de la télécomma nde.
La radio lira la dernière station radio écoutée. Lorsque vous
souhaitez sélectionner d’autres stations, suivez les
instructions ci-dessous.
Changer de station FM :
1. Faites tourner la commande de réglage Tuning de la radio da ns le
sens des aiguilles d’une montre ou dans le sens contraire des
aiguilles d’une montre ou appuyez sur la touche TUNE+ / TUNE- de
la télécommande pour augmenter/diminuer la fréquence radio. Ou
2. Appuyez sur la touche la commande de réglage Tuning de la radio ou
de la télécommande pour rechercher et accéder à la prochaine
station radio FM disponible.
Page 65

64
F
Entrée auxiliaire (AUX IN)
Entrée auxiliaire vous permet d’écouter de la musique à partir d’une
source audio comme un iPod ou un lecteur D VD.
Pour écouter une musique en utilisant AUX IN:
1. Raccordez le périphérique à la radio en utilisant un câble AUX
comme indiqué
2. Accédez à >Menu principal>Entrée auxili aire ou appuyez sur la
touche AUX IN de la télécommande.
3. Lancez la lecture à partir de l’équipement externe; ajustez l’unité et
le volume de la radio lorsque nécessaire.
Page 66

65
Présélection de stations radio
Sur la télécommande, les touches numériques 1-10 permettent de
mémoriser des stations. Voir la section Télécommande en page 5 pour
plus de détails. Lorsqu’aucune station n’est assignée à un numéro,
“Présélection vide” s’affiche.
Les présélections sont disponibles sous les modes suivants:
Radio Internet
FM
Rappeler une station présélectionnée:
Appuyez brièvement sur une touche numérique de la
télécommande (1-10).
Assigner la station radio sélectionnée à une touche de présélection:
Appuyez et maintenez enfoncée la touche numérique (1-10) penda n t
environ 5 secondes. Présélection mémorisée s’affiche à l’écran
Dernières stations écoutées
Il s’agit des 10 dernières stations radio écoutées mémorisées.
Rappeler une station radio dernièrement écoutée:
Sélectionnez Dernière écoutée à partir du menu et sélectionnez
la station.
Page 67

66
F
Chapitre 4 Fonctionne ment de l’horloge
Il est nécessaire de préalablement régler l’horloge / la date de la radio
avant de pouvoir utiliser la fonction Alarme.
Horloge
1. Pour configurer l’option Heure, accédez à l’option >Menu principal>
Configuration système>Réglage de l’heure> Réglage de l’horloge.
2. Utilisez les touches TUNE+/TUNE- ou la commande de réglage
Tuning pour régler les valeurs et utilisez les touches
A VANT/RETOUR pour revenir/vous déplacer sur un autre cha mp.
Appuyez sur la touche la commande de réglage Tuning ou
pour confirmer.
Date
1. Pour configurer l’option Date, accédez à l’option >Menu principal>
Configuration système>Réglage de l’horloge> Date.
2. Utilisez les touches TUNE+/TUNE- ou la commande de réglage
Tuning pour régler les valeurs et AVANT/RETOUR pour revenir/vous
déplacer sur un autre cha mp. Appuyez sur la commande de réglage
Tuning ou pour confirmer.
Page 68

67
Sélection du fuseau horaire
1. Pour configurer l’option Fuseau horaire, accédez à l’option >
Menu principal>Configuration système>Réglage de l’horloge>
Fuseau horaire.
2. Utilisez les touches TUNE+/TUNE- ou la commande de réglage
Tuning pour régler les valeurs et AVANT/RETOUR pour revenir/vous
déplacer sur un autre champ. Appuyez sur la commande de réglage
Tuning ou pour confirmer.
Heure d’été
1. Pour configurer l’option heure d’été, accédez à l’option>
Menu principal>Configuration système>Réglage de l’horloge>
Heure d’été.
2. Utilisez les touches TUNE+/TUNE- ou la commande de réglage
Tuning pour activer/désactiver. Appuyez sur la comma nde de réglage
Tuning ou pour confirmer.
Page 69

68
F
Mise à jour auto
Le menu Mise à jour automatique vous permet de synchroniser l’horloge
avec internet.
Pour configurer l’option Mise à jour auto, accédez à l’option>
Menu principal>Configuration système>Réglage de l’horloge>
Mise à jour auto et permet de sélectionner la source de la mise
à jour.
Format 12/24 heures
Format 12/24 heures vous permet de changer le format d’affichage
de l’horloge.
Pour configurer l’option Mise à jour auto, accédez à l’option>
Menu principal>Configuration système>Réglage de l’horloge>
Format 12/24 heures.
Définir la minuterie Sommeil
La minuterie Sommeil vous permet de définir la durée après la quelle la
radio s’éteint automatiquement.
1. Pour configurer l’option Mise à jour auto, accédez à l’option>
Menu principal>Configuration système>Réglage de l’horloge>
Définir la minuterie Sommeil. Ou appuyez sur la touche Timer de
la radio.
2. Utilisez les touches TUNE+/TUNE- ou la commande de réglage
Tuning pour sélectionner parmi Désactivée, 15 minutes, 30 minutes,
45 minutes et 60 minutes.
Page 70

69
Définir les alarmes
1. Pour configurer l’option Alarme, accédez à l’option >Menu principal>
Configuration système>Réglage de l’horloge>Alarmes. Ou appuyez
deux fois sur la touche Timer de la radio.
2. Sélectionnez Alarme 1 ou Alarme 2 pour accéder à l’interface de
configuration Alarme.
Alarme
Heure: Entrez d’arrêt de l’alarme.
On/Off: Utilisez cette option pour mettre en marche/éteindre la radio.
Page 71

70
F
Mode: Permet de sélectionner la source d’entrée à activer lorsque
l’heure définie est atteinte: Buzzer, Radio Internet ou radio FM.
Dernière écoutée:
a. Buzzer: pour sélectionner un buzzer prédéfini.
b. iRadio, FM: permet de sélectionner une des dernières stations
radio écoutées.
Volume: Utilisez TUNE + ou TUNE – ou la commande de réglage
Tuning pour régler le volume.
Sauvegarder: Les paramètres ne seront pas sauvegardés et activés
jusqu’à ce que cette fonction ait été sélectionnée.
Page 72

71
Chapitre 5 Mise à niveau et Réinitialisation
Mise à niveau logicielle
Il existe deux manières de mettre à niveau la radio.
Mise à niveau via Internet:
Accédez à >Menu principal>Configuration système>
Mise à niveau logicielle
Lorsqu’une nouvelle version logicielle est disponible, il est demandé à
l’utilisateur de confirmer la mise à niveau. Si vous déconnectez la radio
durant le processus de mise à niveau, la mise à niveau pourrait
redémarrer en mode de mise à niveau via USB.
Mise à niveau via USB
L’utilisateur peut choisir d’employer cette méthode au lieu de la mise à
niveau logicielle depuis Internet lorsque la connexion au réseau n’est
pas disponible ou lorsque le cordon d’alimentation a été déconnecté
durant la dernière mise à niveau depuis Internet.
1. Raccordez la radio et l’ordinateur en utilisa nt le cordon USB.
2. Lancez l’utilitaire upgrade.exe sur le PC.
3. L’utilitaire vous demande de lancer l’assistant de mise à niveau du
logiciel de la radio Wi-Fi.
Page 73

72
F
4. Si vous n’avez pas encore sélectionné le mode Mise à niveau
(le texte “En attente de l’assistant de l’ordinateur…” s’affiche),
accédez au mode de mise à niveau logicielle en déconnectant le
cordon d’alimentation, maintenez enfoncées ensuite les touches
<skip backwd> et <skip fwd> tout en remettant la radio à
nouveau en marche.
5. La mise à niveau se lance automatiquement et dure environ
2 minutes.
6. A la f in de la mise à niveau, la ra dio redémarrera automatiquement
et chargera le nouveau logiciel.
Remarque:
Ne déconnectez pas le cordon d’alimentation durant la mise à niveau.
La mise à niveau échoue lorsque vous débranchez le
cordon d’alimentation.
Réinitialisation d’usine
Lorsque vous souhaitez rétablir la configuration d’origine de la radio,
suivez les instructions suivantes.
1. Accédez à >Menu principal>Configuration système>
Réinitialisation d’usine
2. Appuyez sur la touche Select (la commande de réglage
Tuning ou ) pour confirmer la réinitialisation.
3. L’écran affiche “Redémarrage” penda nt quelques seconde s.
4. Lorsque l’écran affiche” Bienvenue sur la radio Internet” la
restauration de la configuration d’usine est terminée.
Page 74

73
Chapitre 6 Dépannage
Problème
Impossible de se connecter à un
réseau Wi-Fi ou impossible
d’obtenir un listing Internet
Aucun son en mode AUX IN
Impossible de détecter un dossier
Ordinateur ou Musique
Impossible de se connecter à
certaines stations
La connexion est instable
Cause possible
1. Le routeur WiFi rencontre des problèmes
2. Vous avez entré une mauvaise clé réseau
Le volume du périphérique Aux ou de la radio
est mal réglé
Le partage n’est pas a ctivé
1. la station radio internet sélectionnée
est inactive
2. la station ne prend pas en charge le
format utilisé par la station radio Internet
3. La radio n’émet pas à cette heure de
la journée ou a atteint le nombre
maximal d’auditeurs
1. D’autres produits électroniques
environnants émettent des interférences.
2. La connexion Internet a été réinitialisée.
Solution possible
1. Vérifiez que le PC peut se connecter au réseau
2. Vérifiez que la clé réseau (si vous en avez défini une)
est correcte
Augmentez le volume de la radio et celui de
l’équipement auxiliaire
Activez le partage. Voir la section Lecteur audio on
page58 pour plus de détails
1. Vérifiez que le PC peut accéder au portail radio
internet (http://www.wifiradio-frontier.com) lorsque
connecté au même réseau wifi.
2. Essayez de vous connecter à la station
radio ultérieurement
1. Essayez d’utiliser la radio à un autre endroit.
2. Essayez de raccorder l’unité à un réseau filaire,
si la problème persiste, fermez tous les programmes
utilisant Internet afin de maximiser la ba nde
passante disponible.
Page 75

74
F
Chapitre 7 Spécification s du produit
TUNER
MEDIA
HORLOGE
AFFICHAGE
FM
MW
WiFi
Ethernet
Présélections
CD
SD
USB
Aux-in
Autres
Heure réelle
Alarme
Sommeil
Nap
Autres
Fréquence (MHz)
Stéréo
RDS/RBDS
Fréquence (kHz)
IEEE802.11b/g(GHz)
IEEE 802.3
Radio Internet (iRadio)
Lecteur média (Lecteur M)
CD/CDR/CDRW
Contrôlée par la radio-iRadio
Tuner/Media/Buzzer
LCD/VFD
Ecran (mm)
Graphique/Cara ctères
Rétro éclairage
Autres
US: 87.8-108
EU: 87.5-108
Ecouteurs/Haut-parleurs
PS/PTY/RT
522-1710
2.4-2.4835
*
vTuner
*
30
*
Snooze
LCD
59X33.5
Graphique 128X64
*
Page 76

75
FONCTIONNALITES
AUDIO
AMPLIFICATEUR
HAUT-P ARLEUR
Connecteurs I/O
EG
Enregistrement-SD/Flash
Rembobinage-SDRAM
Enregistrement-SD/Flash
Mise à jour du programme
Autres
Réglage de la tonalité
Réglage des aigus/basses
DBB
EG (sélection d’un effet sonore)
Autres
Puissance de sortie des haut-parleurs(TYP)
Sortie Ecouteurs
Autres
Taille
Impédance
Bouclier magnétique
Autres
AC/DC-in
Aux-in
Line-out
Sortie numérique
Ecouteurs
SD
USB
Antenne externe
RJ-45
Autres
Via USB-B
*
6
5+5mW
5+5mW
3 pouces X 2
8 ohms
*
AC
*
*
*
USB-B
WiFi, FM, AM-loop
*
Page 77

76
Largeur (mm)
Hauteur (mm)
Profondeur (mm)
Poids (g)
DIMENSIONS 326
108
210
2946
Si à l’avenir vous devez vous débarrasser de ce produit merci de noter ceci: Vous ne devez pa s vous débarrasser des déchets
d’équipements électriques et électroniques par les ordures ménagères ou autres déchets municipaux non triés. Le consommateur
devra apporter ses équipements usagés, soit en déchetterie, soit chez un distributeur lors de l’a chat d’un produit neuf, soit le
donner à une association d’économie solidaire.
F
Page 78

77
Ta bla de contenidos
Importantes instrucciones de seguridad ............................ 78-79
Capítulo 1 Iniciación ................................................................. 80
Producto y accesorios: ........................................................... 80
Aimentación de la radio ........................................................... 81
Controles ................................................................................. 82
Uso de la radio Wi-Fi ............................................................... 83
Mando a dista ncia ............................................................... 84-85
Navegación por las selecciones del menú .............................. 86
Navegación por el menú: ........................................................ 86
Introducción de textos ............................................................. 87
Para introducir textos: ............................................................. 87
Configuración de idioma .......................................................... 87
Conexión de otros dispositivos a la radio ................................ 88
Capítulo 2 Conexión ................................................................. 89
Conexión a una red inalámbrica .............................................. 90
Conexión a una red por cable .................................................. 91
Capítulo 3 Para escuchar la ra dio ............................................ 92
Radio internet ........................................................................... 92
Para escuchar la radio internet: ............................................... 92
Búsqueda de emisoras en internet: ......................................... 92
Para escuchar los Podcasts: .................................................. 93
Para escuchar Mis favoritas / Mis emisoras agregadas: ........ 94
Reproductor de música ........................................................... 96
Para reproducir música en las carpetas compartidas del
reproductor de música: ........................................................... 96
Para reproducir música en medios de reproducción
compartidos del reproductor de música: ................................. 96
Carpeta compartida ................................................................. 97
Para compartir medios de reproducción con el Windows
Media Player 11: ...................................................................... 98
Configuración de la carpeta compartida .................................. 99
Medio de reproducción compartido (UPnP) .......................... 100
Configuración de su PC para medios de
reproducción compartidos: .................................................... 100
Radio FM ............................................................................... 101
Para escuchar la radio FM: ................................................... 101
Para cambiar emisoras de FM: ............................................. 101
Entrada auxiliar (AUX IN) ...................................................... 102
Para reproducir música por medio de la AUX IN: ................. 102
Presintonías de emisora s de ra dio ......................................... 103
Para recuperar una presintonía: ............................................ 103
Para asignar la emisora de radio actual a uno de los
botones de presintonías: ........................................................ 103
Última emisora escucha da .................................................... 103
Para recuperas la última emisora escuchada: ...................... 103
Capítulo 4 Funciona miento del reloj ....................................... 104
Ajuste de la hora .................................................................... 104
Ajuste de la fecha .................................................................. 104
Ajuste de la zona horaria ....................................................... 105
Ajuste del DST (Horario de vera no) ....................................... 105
Autoajuste .............................................................................. 106
Reloj de 12/24 horas .............................................................. 106
Programación del temporizador de apagado automático ....... 106
Programación de las alarmas ................................................ 107
Programación de la alarma ................................................... 107
Capítulo 5 Actualización y “Reset” ......................................... 109
Actualización del software ..................................................... 109
Actualización vía internet: ...................................................... 109
Actualización vía USB ........................................................... 109
Restablecimiento de los valores predetermin ados ................ 110
Capítulo 6 Localización y resolución de proble ma s ............... 111
Capítulo 7 Especifica ciones del producto ....................... 112-114
Page 79

78
E
Importantes instrucciones de seguridad
1. Lea y entienda todas las instrucciones de seguridad y funcionamiento
antes de hacer uso de la radio.
2. Conserve estas instruccione s. En previsión de futuras consultas,
conviene mantener las instrucciones operacionales y de seguridad.
3. Preste atención a todas las advertencias. Todas las advertencias del
producto y de las instrucciones opera cionales deben ser atendidas.
4. Siga todas las instrucciones. Debe seguir todas las instrucciones
operacionales y de uso.
5. Agua y humedad - No use este producto cerca del agua, por ejemplo,
junto a una bañera, barreño, fregadero o tambor de lava dora; en un
sótano húmedo o cerca de una piscina, o cualquier lugar o situación
similar a las mencionadas.
6. Desenchufe la radio de la toma de pared a ntes de proceder a
su limpieza. Use un trapo humedecido para la limpieza de s
uparte externa. Limpie la radio únicamente con un trapo seco.
7. No coloque la radio en una carretilla inestable, trípode, re pisa o
mesa. El producto podría caerse, causando de este modo serios
daños personales, asi como tambien al producto.
8. Ventila ción: Esta radio deberá colocarse de modo que su posición o
ubicación no interfiera con su adecuada ventilación. Por ejemplo,
no debe usar la radio sobre una cama, un sofá, un a alfombra u otras
superficies blandas que pudieran bloquear las salidas de ventilación.
No deberá colocarse en una instala ción empotra da como una
estantería, ya que la circulación del aire por las salidas de ventilación
podría verse reducida.
9. No instale el producto cerca de fuentes de calor, como radiadores,
generadores de calor, hornos, fuegos de cocina u otros aparatos
(incluidos los amplificadores) que produzcan calor.
10. Si el enchufe de la unidad no entrara en la toma de corriente,
consulte con un electricista para que este reemplace la
toma obsoleta.
11. Fuentes de suministro - Realice la conexión sólo al tipo de
suministro eléctrico del hogar que se indica en las instrucciones
operacionales y en la etiqueta de clasificación. Si no está seguro
del tipo de suministro eléctrico de su hogar, consulte con su
distribuidor o con la compañía eléctrica local.
12. Protección del cable de alimentación - El ca ble de alimentación
deberá ser guiado de modo que se evite el ser pisado o pellizcado
por elementos colocados sobre o contra este, especialmente en
enchufes, distribuidores, y el lugar en el que este sale del aparato.
Desenchufe el cable de alimentación asiéndolo por el enchufe,
no por el cable.
13. No sobrecargue las tomas de pared, distribuidores o alargadores,
ya que esto podría suponer un riesgo de incendio o de descarga
eléctrica. No meta nunca objetos ni derrame ningún tipo de líquido
en el interior de este producto a través de las aberturas, ya que
esto podría suponer un riesgo de incendio o de descarga eléctrica.
14. Utilice únicamente los a ccesorios/acoples especificados por
el fabricante.
15. Si dejara la radio sin supervisión y falta de uso por un periodo de
tiempo prolongado, desenchúfela de la toma de pared. Esto podría
evitar los daños provocados por rayos o subidas de ten sión.
16. Si dejara la radio sin supervisión y falta de uso por un periodo de
tiempo prolongado, retire la s pilas. Las pilas podrían presentar
pérdidas que afectaran a su mobiliario o a la propia radio.
Page 80

79
Aviso:
Los cambios o modificacione s no aprobados expresamente por la parte
responsable de la conformidad puede a nular la autorida d del usuario
para utilizar el equipo.
NOTA IMPOR TANTE:
Para cumplir con los requisitos de conformidad de exposición RF de la
FCC (Comisión Federal de Comunicaciones, por sus siglas en inglés),
no se permite ninguna alteración a la antena o al dispositivo.
Cualquier alteración de la anten a o el dispositivo puede resultar en que
el dispositivo rebase los requisitos de exposición RF y en la anulación
de la autoridad del usuario para utilizar el aparato.
17. No intente revisar o reparar el receptor por su cuenta, ya que abrir o
quitar las cubiertas le expondría a voltaje peligroso u otros riesgos,
al tiempo que anularía la garantía. Para su revisión, diríjase sólo a
personal cualificado.
18. Introducción de objetos o entrada de líquidos - No meta nunca
objetos ni derrame ningún tipo de líquido en el interior de este
producto a través de las aberturas, ya que esto podría suponer un
riesgo de incendio o de descarga eléctrica.
19. El aparato deberá ser reparado por personal cualif icado cua ndo:
Cuando el cable de alimenta ción o el enchufe estén daña dos.
Si se ha derramado líquido, o algún objeto ha caído sobre
la radio.
La radio ha sido expuesta a la lluvia o la humedad.
Si la radio no funcionara con normalidad o mostrara un marcado
cambio en sus prestaciones.
Si la radio se hubiera caído o su cubierta externa hubiera
resultado dañada.
INFORMACIÓN FCC
El Radio Frequency Interference Statement (Comunicado sobre
Interferencias de Radiofre cuencias) de la Federal Communications
Commision (la Comisión Federal de Comunicaciones del Gobierno
de los EE. UU.) incluye el siguiente párrafo:
El equipo ha sido probado y cumple con las restricciones
correspondientes a un equipo digital de Clase B, según la Parte 15 del
Reglamento FCC. Estas restricciones están diseñadas para
proporcionar protección razonable contra interferencia s perjudiciales en
una instalación residenci al. Este equi po genera, utiliza y puede irradiar
energía de ondas de radio y, si no se instala y usa de acuerdo a la s
instrucciones, podría causar interferencia s perjudiciales en las
comunicaciones de radio. Sin embargo, no hay gara ntía de que las
interferencias no ocurrirán en una in stalación determinada. Si el equipo
causa interferencias que perjudiquen la re cepción de ra dio o televisión,
que puede determinarse encendiendo y apaga ndo el equipo,
se recomienda al usuario que intente solucionar las interferenci as
tomando una o más de las siguientes medidas:
- Cambie la orienta ción o posición de la antena receptora.
- Aumente la distancia entre el equipo y el receptor.
- Conecte el equipo a una toma de un circuito diferente del que está
conectado con el receptor.
- Consulte al proveedor o a un técnico de radio/TV con experiencia para
recibir ayuda.
El usuario no debe modificar o alterar este equipo sin a probación escrita
de parte de SANGEAN ELECTRONICS INC. La modificación puede
anular la autoridad para usar este equipo .
Page 81

80
Cable de alimentación
Radio Wi-Fi WFR-1Mando a dista nci a
E
Capítulo 1 Inicia ción
Le damos la enhorabuena por la compra de la ra dio Wi-Fi Sangean
WFR-1. Asegúrese de que no falta ninguno de los siguientes artículos
contenidos en el paquete:
Producto y accesorios:
Cable de conexión: se emplea para alimentar la radio.
Mando a distancia: se emplea para el control a distancia de la radio.
Radio Wi-Fi WFR-1: su radio Wi-Fi
Page 82

81
Alimentación de la radio
1. Conecte el cable de alimentación a la radio por uno de sus extremos,
y a una toma de pared por el otro.
2. Pulse el botón STANDBY para encender la radio.
Nota:
Utilice únicamente el adaptador que acompaña a la radio. La conexión
de un suministrador de corriente incompatible podría causar daños
permanentes en la radio.
Page 83

82
1.
2.
3.
4.
5.
6.
LCD display
STANDBY button
BAND button
INFO button
TIMER button
EQ button
7.
8.
9.
10.
11.
12.
BACK button
PRESET STOP button
FORWARD button
VOLUME DOWN button
VOLUME UP button
Turning knob
E
Controles
(Vista frontal)
Page 84

83
Uso de la radio Wi-Fi
Observe las siguientes ilustra ciones para familiarizarse con los botones y controles de la radio.
1
2
3
4
5
6
7
8
9
10
11
12
Elemento
Pantalla LCD
Botón STANDBY
Botón BAND
Botón INFO
Botón TIMER
Botón EQ
Botón BACK
Botón PRESET STOP
Botón FORWARD
Botón VOLUME DOW N
Botón VOLUME UP
Dial giratorio
Descripción
Pantalla en la que se pueden visualizar textos
Encendido/apagado de la radio
Púlselo para cambiar los diferentes modos
Púlselo para mostrar información en la pa ntalla LCD
Púlselo para programar la hora de a paga do automático y las alarmas
Púlselo para entrar en la configuración del ecualizador
Botón de navegación. Púlselo para activar el menú/retroceder un a página en las selecciones del menú.
En el modo de reproductor de música, púlselo para saltar a la pista anterior. En las pantallas de conf iguración,
púlselo para ir al campo a nterior.
Púlselo para entrar en el menú de presintonías. En el modo de reproductor de música, púlselo para
detener la pista.
Botón de navegación. Púlselo para confirmar una selección de los menús. Púlselo para desplazarse a la
izquierda al introducir el nombre de usuario o la contraseña. En el modo de reproductor de música,
púlselo para saltar a la siguiente pista. En las pantallas de configuración, púlselo para ir al campo siguiente.
Púlselo para bajar el volumen
Púlselo para subir el volumen
Gírelo para entrar en las selecciones
del menú/navegar por las selecciones
Pulse el dial para confirmar sus selecciones
Page 85

84
1.
2.
3.
4.
5.
6.
7.
8.
9.
10.
11.
12.
13.
14.
15.
16.
17.
18.
Mando a dista ncia
Botón EQ
Botón de supresión del sonido
Botón TUNE +
Botón BACK
Botón TIMER
Botón TUNE Botón FM
Botón iRadio
Botón AUX IN
Botón Mplayer
Botón INFO
Botón Aceptar/confirmar
Botón FORWARD
Botón Stop
Presintonías 7,8,9 /retroceso rápido, pausa, ava nce rápido
Botones de las presintonías de radio
Botones de control del volumen
Botón de encendido/apagado
E
Page 86

85
Mando a distancia
Podrá controlar la radio con el mando a distancia. Vea la siguiente ilustración para las descripciones de cada botón.
1
2
3
4
5
6
7
8
9
10
11
12
13
14
15
16
17
18
Elemento
Botón EQ
Botón de supresión del sonido
Botón TUNE +
Botón BACK
Botón TIMER
Botón TUNE Botón FM
Botón iRadio
Botón AUX IN
Botón Mplayer
Botón INFO
Botón Aceptar/confirmar
Botón FORWARD
Botón Stop
Presintonías 7,8,9 /retroceso rápido,
pausa, avance rápido
Botones de las presintonías de radio
Botones de control del volumen
Botón de encendido/apagado
Descripción
Púlselo para entrar en la configuración del ecualizador
Púlselo para silenciar la radio
Botón de navegación empleado para aumentar o subir
Botón de navegación. Púlselo para activar el menú/retroceder un a página en las selecciones
del menú. En el modo de reproductor de música, púlselo para ir a la pista anterior.
En las pa ntallas de configuración, púlselo para ir al ca mpo anterior
Púlselo para programar la hora de a paga do automático y las alarmas
Botón de navegación emplea do para ba jar o disminuir
Púlselo para entrar en el modo de radio FM
Púlselo para entrar en el modo de radio internet
Púlselo para entrar en el modo de entrada auxiliar
Púlselo para entrar en el modo de reproductor de música
Púlselo para mostrar información en la pa ntalla LCD
Púlselo para confirmar la selección
Botón de navegación. Púlselo para confirmar una selección de los menús. Púlselo para
desplazarse hacia la izquierda al introducir el nombre de usuario o la contraseña. En el modo
de reproductor de música, púlselo para saltar a la siguiente pista. En las pantallas de
configuración, púlselo para ir al ca mpo siguiente
Púlselo para detener la acción en curso. En el modo de reproductor de música, púlselo para
detener la pista
Púlselo para escuchar las emisoras presintonizadas 7, 8, 9/ , también para el retroceso rápido,
pausa y avance rápido
Púlselo para escuchar las emisoras presintonizadas
Púlselo para subir/bajar el volumen
Encendido/apagado de la radio
Page 87

86
1
2
E
Navegación por las selecciones del menú
Hay dos modos de navegar por las selecciones del menú.
Pulse BACK para activar el menú, y después:
1. Navegue por la s sele cciones gira ndo el dial de la radio tanto en el
sentido de las agujas del reloj como en el sentido contrario para
desplazar el símbolo > , y pulse el dial para confirmar la selección.
Use FORWARD/BACK para entrar/ir al menú previo.
2. Emplee los botones de navegación (TUNE +, TUNE-, BACK, FW D)
del mando a distancia para desplazar el símbolo > y pulse
Confirmar/Aceptar para confirmar su selección. Use FORWARD/
BACK para entrar/ir al menú previo.
Vea “Uso de la radio Wi-Fi” para la descripción del dial giratorio y los
botones de navegación.
Navegación del menú:
Page 88

87
Introducción de textos
Para empezar a usar la radio, se precisará la introducción de texto.
Por ejemplo, introducción del nombre de usuario, contraseña,
búsqueda de emisora, etc.
Para digitar textos:
Gire el dial para destacar el texto/número/símbolo.
Pulse el dial para confirmar.
Emplee < para corregir.
Emplee C para cancelar y salir
Emplee para confirmar cuando haya terminado.
Configuración de idioma
Elija el idioma que mostrar en la pantalla.
Vaya a >M ain menu>Language y seleccione el idioma.
Page 89

88
E
Conexión de aparatos a la radio
Vea la siguiente ilustración para de scripciones de las salidas del panel posterior.
1
2
3
4
5
6
Elemento
Toma para auriculares
Toma LINE OUT
AUX IN
Toma LAN
Toma USB
Toma del ca ble de ali mentación
Descripción
Conexión a unos auriculares
Conexión a un altavoz externo
Conexión a aparatos externos auxiliares
Conexión a Ethernet
Conexión a un dispositivo USB
Conexión al cable de alimentación
Page 90

89
Capítulo 2 Conexión
Antes de poder usar su radio internet, deberá contar con lo siguiente:
Una conexión a internet de banda ancha o
Un punto de acceso in alámbrico (Wi-Fi) o un a conexión Ethernet por
cable (10 o 100 M bits/sec con conexión RJ45) conectada a su
internet de banda ancha, preferiblemente por medio de un enruta dor.
En muchos casos, el módem de banda ancha, el enrutador y el
punto de acceso inalámbrico consistirán en un a única unidad
combinada proporcionada por su proveedor de servicios de internet o
comprada en una tienda de ordenadores.
Sis u red inalámbrica está configurada para usar la codificación de
datos Wired Equivalent Privacy (WEP) o Wi-Fi Protected Access
(WPA), en ese caso necesitará conocer la clave WEP o WPA para
conseguir que la radio internet comunique con la red.
IMPORTANTE:
Antes de continuar, asegúrese de que su punto de acceso inalámbrico
o enrutador están encendidos y funcionando con su servicio de internet
de banda ancha (utilice su ordena dor para verificarlo).
Para conseguir que esta parte del sistema funcione, deberá leer
las instrucciones que acompañan al punto de acceso inalámbrico o
al enrutador.
Page 91

90
E
Conexión a una red inalámbrica
Para configurar la red inalámbrica:
1. Asegúrese de que se encuentra en los límites de una
red inalámbrica.
2. Vaya a >Main menu>System setup > Internet setup > Wizard >
[nombre de la red inalámbrica].
3. Se le pedirá que introduzca una contraseña:
Gire el dial para destacar el texto/número/símbolo
Pulse el dial para confirmar.
< para corregir
C para cancelar y salir
para confirmar cuando haya terminado
4. La pantalla mostrará “Connected” cuando se haya realizado
la conexión.
Page 92

91
Conexión a una red por cable
Para configurar la red por cable:
1. Conecte la radio a la red por cable usando un cable Ethernet tal y
como se muestra.
2. Vaya a >Main menu> System setup > Internet setup > Wizard >
[Wired] de las selecciones del menú.
3. Introduzca la contraseña cuando se le solicite.
Gire el dial para destacar el texto/número/símbolo
Pulse el dial para confirmar.
< para corregir
C para cancelar y salir
para confirmar cuando haya terminado
4. La pantalla mostrará conectado “Connected” cuando se haya
efectuado la conexión.
Si tuviera problemas con su conexión por cable, las luces del
conector LAN (RJ-45) podría n ayudarle a identificar la posible
causa del problema:
Luz verde encendida = enlace establecido,
parpadeando = tran sferenci a de datos
Luz amarilla encendida = enla ce a 100M bps,
apagada = enla ce a 10M bps
Page 93

92
E
Capítulo 3 Para e scuchar la radio
Radio internet
Para escuchar la radio internet:
Desde las selecciones del menú vaya a >Main menu > Internet radio
o pulse el botón iRadio en el mando a dista nci a. La ra dio re producirá
la última emisora de radio sintonizada.
Si quisiera seleccionar otras emisoras, siga las instrucciones de debajo.
Para buscar emisoras en internet:
Pulse BACK para activar el menú y vaya a la lista de emisoras
(Station list).
En la lista de emisoras hallará 5 modos distintos de buscar emisoras.
Vaya a >Station list>Stations en la selección del menú encontrará:
1. Localización (Location):
le permite elegir una emisora de radio de la lista, primero por
región geográfica, y después por país.
Page 94

93
2. Género (Genre):
le permite elegir emisoras de radio según su contenido, por e jemplo,
Clásica, Rock, Deportes, Noticias, etc.
3. Búsqueda de emisora (Search station):
le permite buscar una emisora introduciendo el nombre o una
palabra clave.
4. Emisoras populares (Popular station):
le permite ver una lista de emisoras populares y elegir las que más
le interesen.
5. Nueva emisora (New station):
le permite ver una lista con las emisoras más recientes y elegir las
que más le interesen.
Para escuchar los Podcasts:
Vaya a >Station list>Podcasts y encontrará 3 opciones:
1. Localización (Location):
le permite elegir un podcast de la lista, primero por región geográfica,
y después por país.
2. Género (Genre):
le permite elegir podcasts según su contenido, por ejemplo, Clásica,
Rock, Deportes, Noticias, etc.
3. Búsqueda de emisora (Search station):
le permite buscar un podcast introduciendo el nombre o una
palabra clave.
Page 95

94
E
Para escuchar Mis favoritas/ Mis emisora s agregadas:
Mis favoritas y Mis emisoras agregadas le permitirá agregar emisoras de
radio internet por medio de la página web de Frontier, y escucharlas
después en su radio.
Vaya a >Station list>My Favourites / >Station list>
My Added Station.
Registro online:
Antes del primer uso, por favor, siga las instrucciones para
registrarse en la página web:
1. Vaya a >Station list>Help>Get access code. La pantalla mostrará
el código de acceso.
2. Visite la página web usando su ordenador, diríjase a
http://www.wifiradio-frontier.com, después haga clic sobre
“register here” (registrarse aquí) y rellene el formulario con el
código de acceso mostrado en la pantalla. Podrá dejar en blanco
el espacio “WiFi radio model”.
Page 96

95
Página web de Frontier
3. Una vez registrado, la página web mostrará las opciones
“My favourite” y “My added station”. Siempre que se haya registrado,
podrá acceder a estas opciones con sólo entrar en la página web:
bastará con introducir la dirección de correo electrónico y
la contraseña.
Para editar Mis favoritas:
1. Utilice “Browse” o “Search” para encontrar una emisora en la
página web,
2. Haga clic sobre el icono “Add” y la emisora se agregará a la
carpeta “My Favourite”.
Para editar Mis emisoras agregadas:
“My Added Stations” le permitirá agregar las emisoras de la
radio internet, siempre que conozca la página web de las emisoras
de radio.
1. Haga clic sobre la flecha que hay debajo de My added stations y
se le pedirá que introduzca la dirección de la página web.
Introduzca la URL exactamente como se describe en la
página web.
2. Haga clic sobre el icono “Add” para agregar la emisora.
Page 97

96
E
Reproductor de música
Para reproducir música en las carpetas compartidas del reproductor
de música:
1. Vaya a >Main menu>Music Player> Shared folders>
[nombre del ordenador]> [nombre de las carpetas].
Se le pedirá el nombre de usuario y la contraseña.
2. Encuentre y seleccione el archivo de audio de la carpeta que desee
escuchar y pulse el dial para reproducir.
3. Use Forward/Back para ir a la pista siguiente/anterior .
Para reproducir música en el medio de reproducción compartido del
reproductor de música:
1. Vaya a >Main menu>Music Player> Shared medi a >
[nombre del ordenador]>[categorías de medios de reproducción].
El servidor UpnP pondrá a su disposición las categorías de medios
de reproducción.
Por ejemplo, ‘Music’ o ‘Playlists’ (Listas de reproducción).
Se requerirá el nombre de usuario y la contraseña.
2. Encuentre y seleccione el archivo de audio de la carpeta que desee
escuchar y pulse el dial para reproducir.
3. Use Forward/Back para ir a la pista siguiente/anterior .
Page 98

97
Carpeta compartida
El Windows Media Player 11 le permitirá re producir archivos de audio
almacenados en un ordenador o en un orden ador de su red.
Su radio acepta dos métodos de acceso a archivos. Podrá conectarse a
los archivos compartidos de la red. T ambién podrá conectarse con las
aplica ciones del servidor de archivo medi a nte el protocolo U niversal Plug
and Play (UPnP) conocido como medios de reproducción compartidos.
Todos los ti pos de archivo aceptados son reproducibles en el modo
Windows Shares.
Al utilizar un servidor UPnP, los tipos de archivo reproducibles
dependerán del software del servidor que se utilice. Por ejemplo,
Microsoft Windows Media Player 1 1 puede servir archivos MP3,
WMA y WAV. Para poder reproducir el resto de tipos de archivo
aceptados media nte el servidor UPnP será nece sario instalar softwares
de terceros adicionales.
Al usar Windows Shares,la selección de música se hará por Artista,
Álbum y, de forma opcional, por pista contenida en un álbum. Al utilizar
el servidor UPnP de medios de reproducción compartidos, el criterio
de búsqueda y selección vendrá determinado por el servidor,
aunque normalmente se incluyen opciones adicionales como el Género.
Muchas a plicaciones del servidor también le permiten acceder
a archivos, de acuerdo con las carpetas en las que estos se
encuentran almacena dos.
Page 99

98
E
Para compartir medios de reproducción usando el Windows Media
Player 11:
1. Abra el Media Player y haga clic sobre la flecha que hay debajo de la
pestaña Library (Biblioteca), después seleccione Options.
2. Haga clic sobre el botón Configure Sharing
(Configuración de compartidos).
3. Marque la casilla Share my medi a. La ra dio WiFi será mostrada
como dispositivo desconocido (Unknown Device).
4. Haga clic sobre el botón Settings (Ajustes).
Page 100

99
5. Dé un nombre al medio de reproducción compartida y seleccione
los ajustes.
6. Finalmente, marque la casilla para permitir automáticamente o no
el acceso a nuevos dispositivos u ordenadores.
7. Haga clic sobre Ok cuando haya terminado
Configuración de carpeta compartida
Ordenador:
Configure su PC para permitir a la radio acceder a sus archivos de
audio por medio del Windows Shares.
1. Compruebe que su PC está disponible en la misma red que su
radio internet.
2. Use el Windows Explorer para ubicar la carpeta en la que se
encuentran almacena dos los archivos de audio.
3. Haga clic derecho en la carpeta.
4. Seleccione ‘Properties’ (Propiedades).
5. Haga clic en ‘Sharing’ (Compartir).
6. Seleccione ‘Share this folder on the network’ (Compartir esta
carpeta en la red) y “Allow network users to change my files’
(Permitir cambiar mis archivos a los usuarios de la red).
 Loading...