

Page 1
381Q101-A
H201
Operating instruction
Mode d’emploi
Instruccions de ma nejo
Gebruiksaanwijzing
Bedienungsanleitung
GB
F
E
NL
D
AM/FM Digital Tuning Shower Radio
Radio numérique AM/FM
pour douche
Radio de Baño con Sintonización
Digital AM/FM
AM/FM Digitaal Afstembare
Doucheradio
MW/UKW Digitales Duschradio
Page 2

1
Features
1. Built-in AM/FM a ntenna for be st reception
2. 10 presets ( 5 ea ch wave ba nd )
3. Water re sista nt up to JIS7 standard
4. Auto seek station s
5. Large and easy to rea d LCD display
6. Ea sy to fix bra cket a nd ha nger
7. Battery power indicator
8. Clock
9. Adjustable sleep timer
10. Adjusta ble short ti mer
1 1. Emergency LED illumination ( Torch )
12. Emergency Buzzer
13. Water-re sista nt 3 inches spe a ker
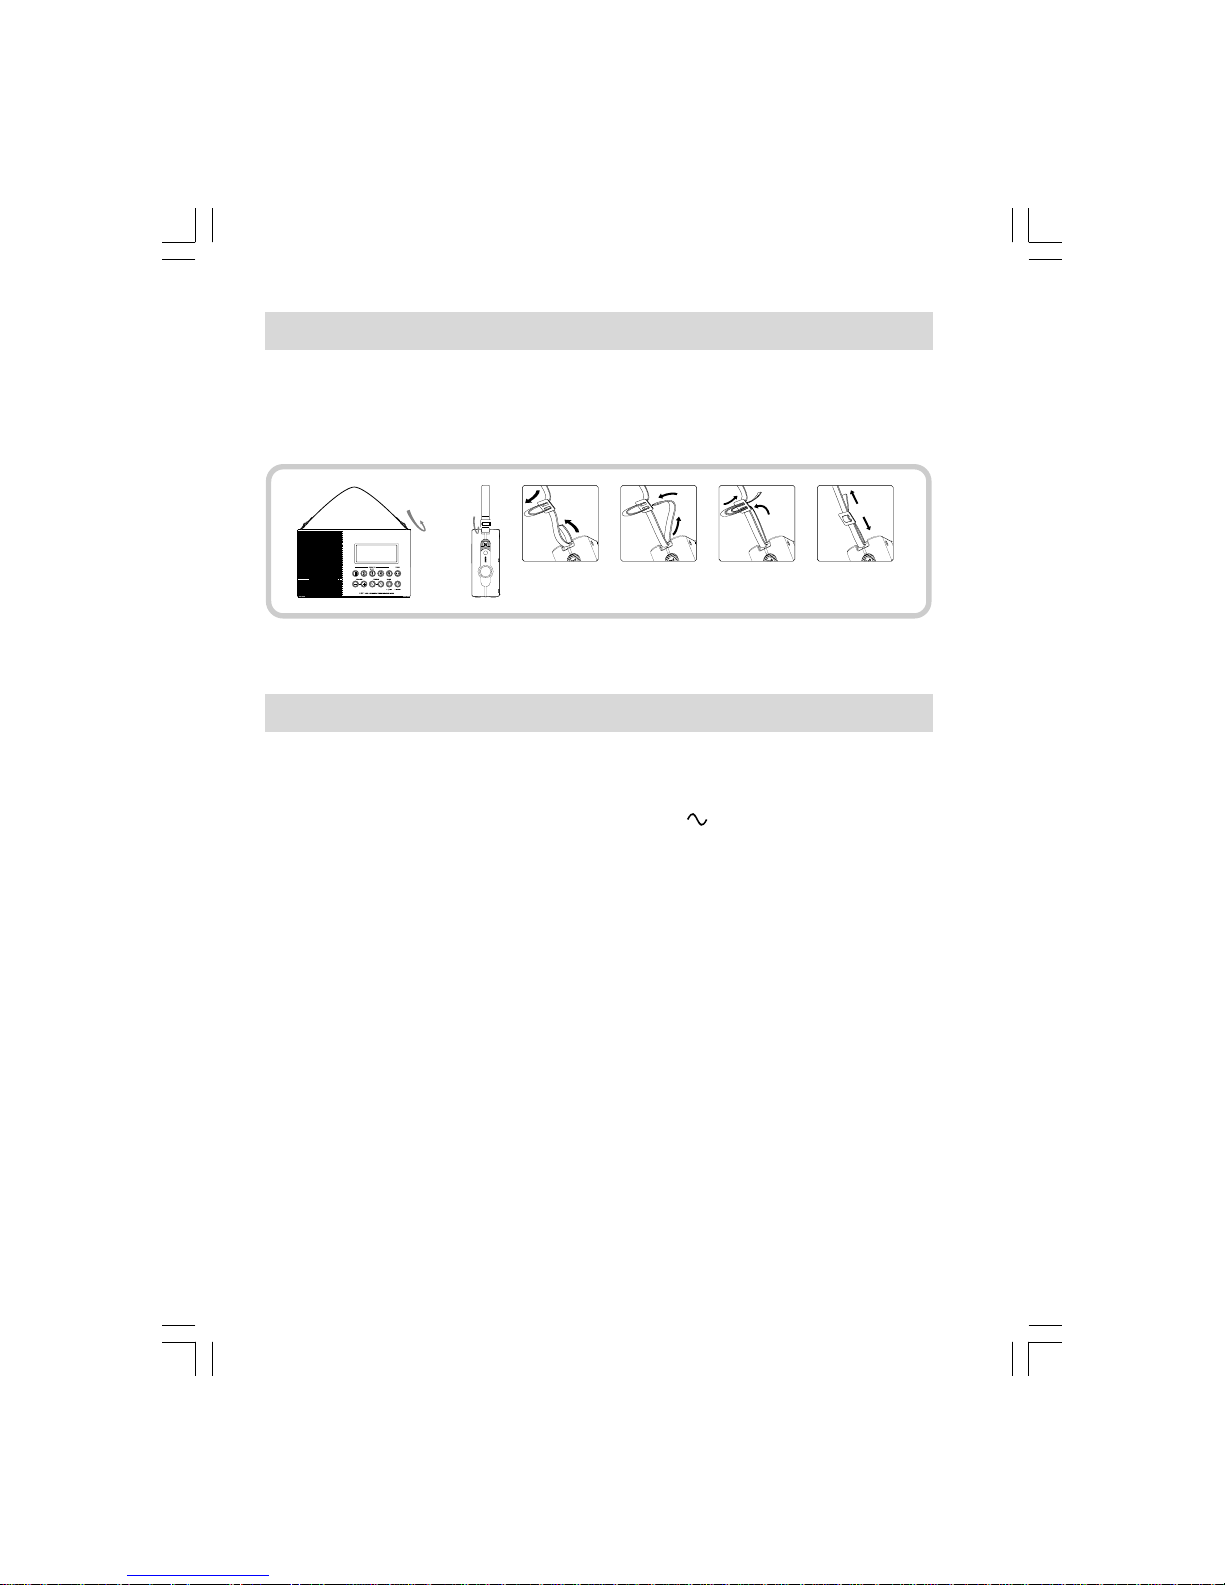
Controls
LCD Display
Preset stations ( preset 3 also f or tuning step cha nge )
Nap timer ( Short timer )
Power button
Tuning Control
Speaker
Hanger Ring
T orch button
Multi Purpose Handle
Battery Cover
Band a nd T ime Set button
Volume Control
DC IN socket
Emergency Buzzer
Torch
Bracket Holder
FM wire antenna compartment
1
2
3
4
5
6
7
8
9
10
11
12
13
14
15
16
17
Page 3

2
GB
Page 4
3
LCD Display
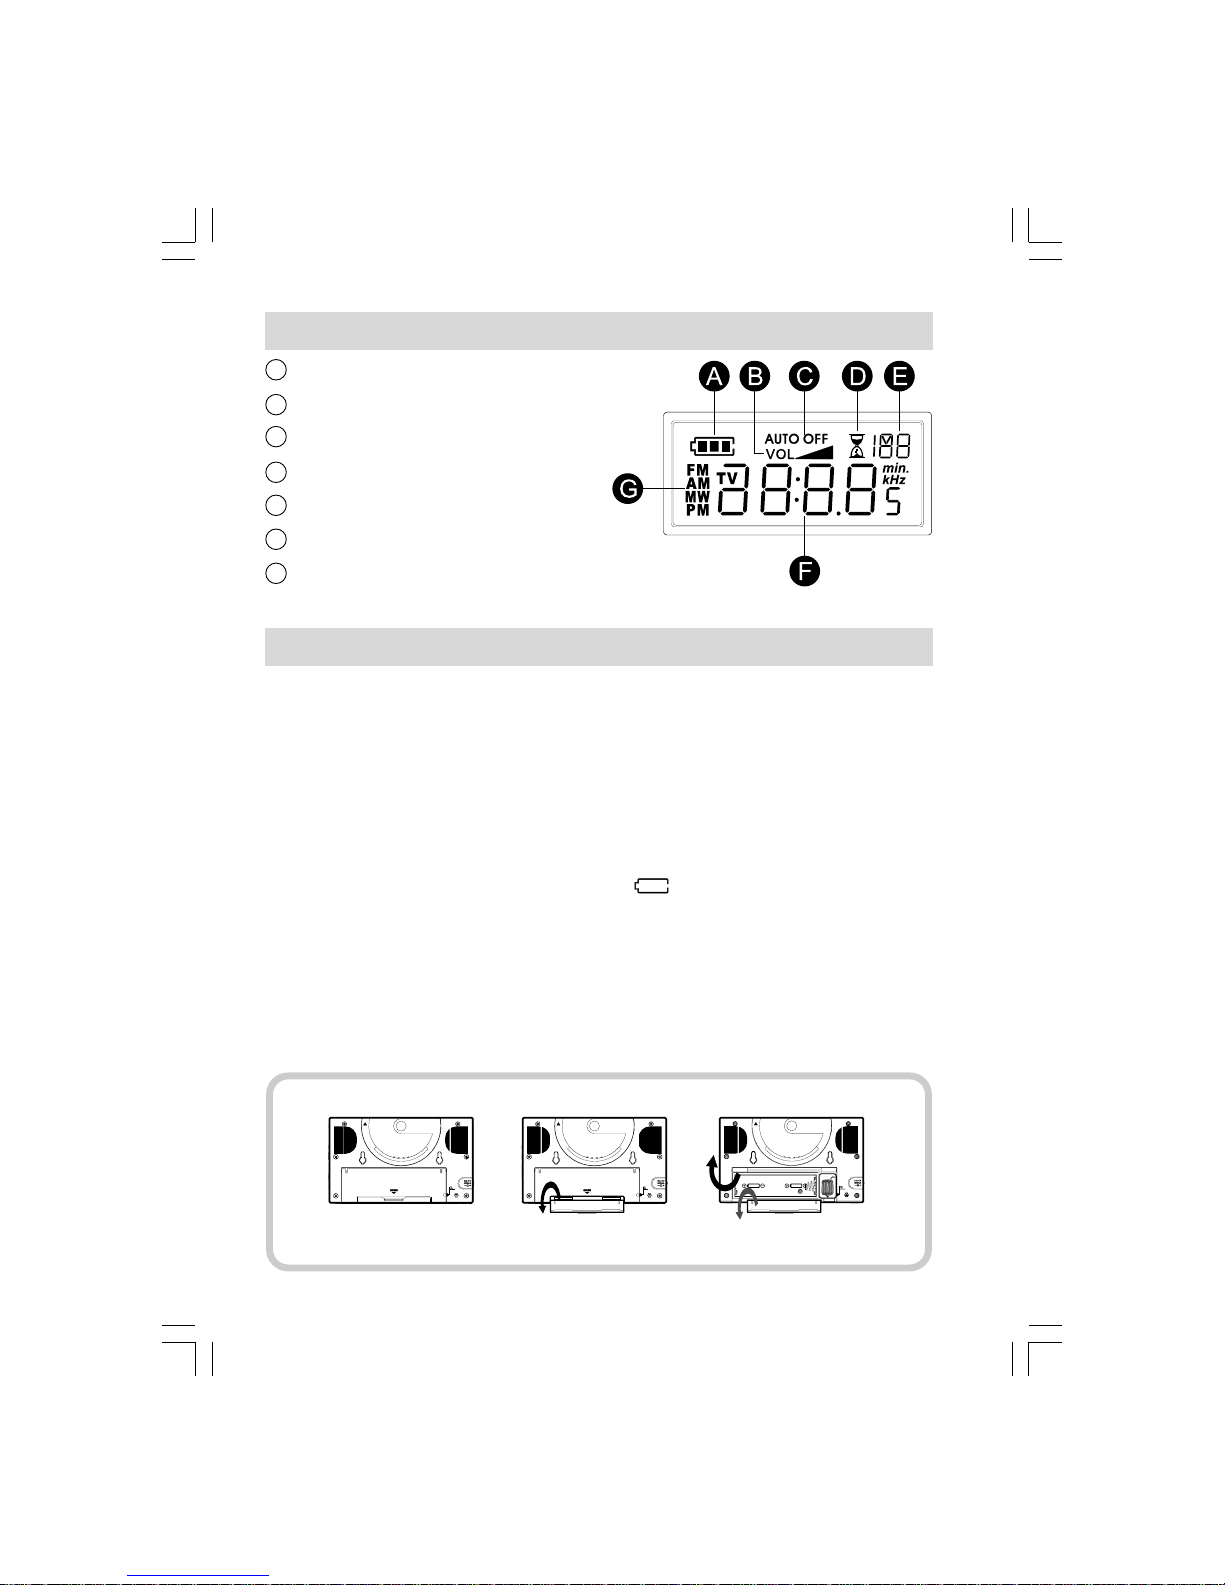
Battery Power Status
Volume level
Auto Off status
Short T imer set
Memory number and se conds
Ti me a nd Frequency
Band indicator
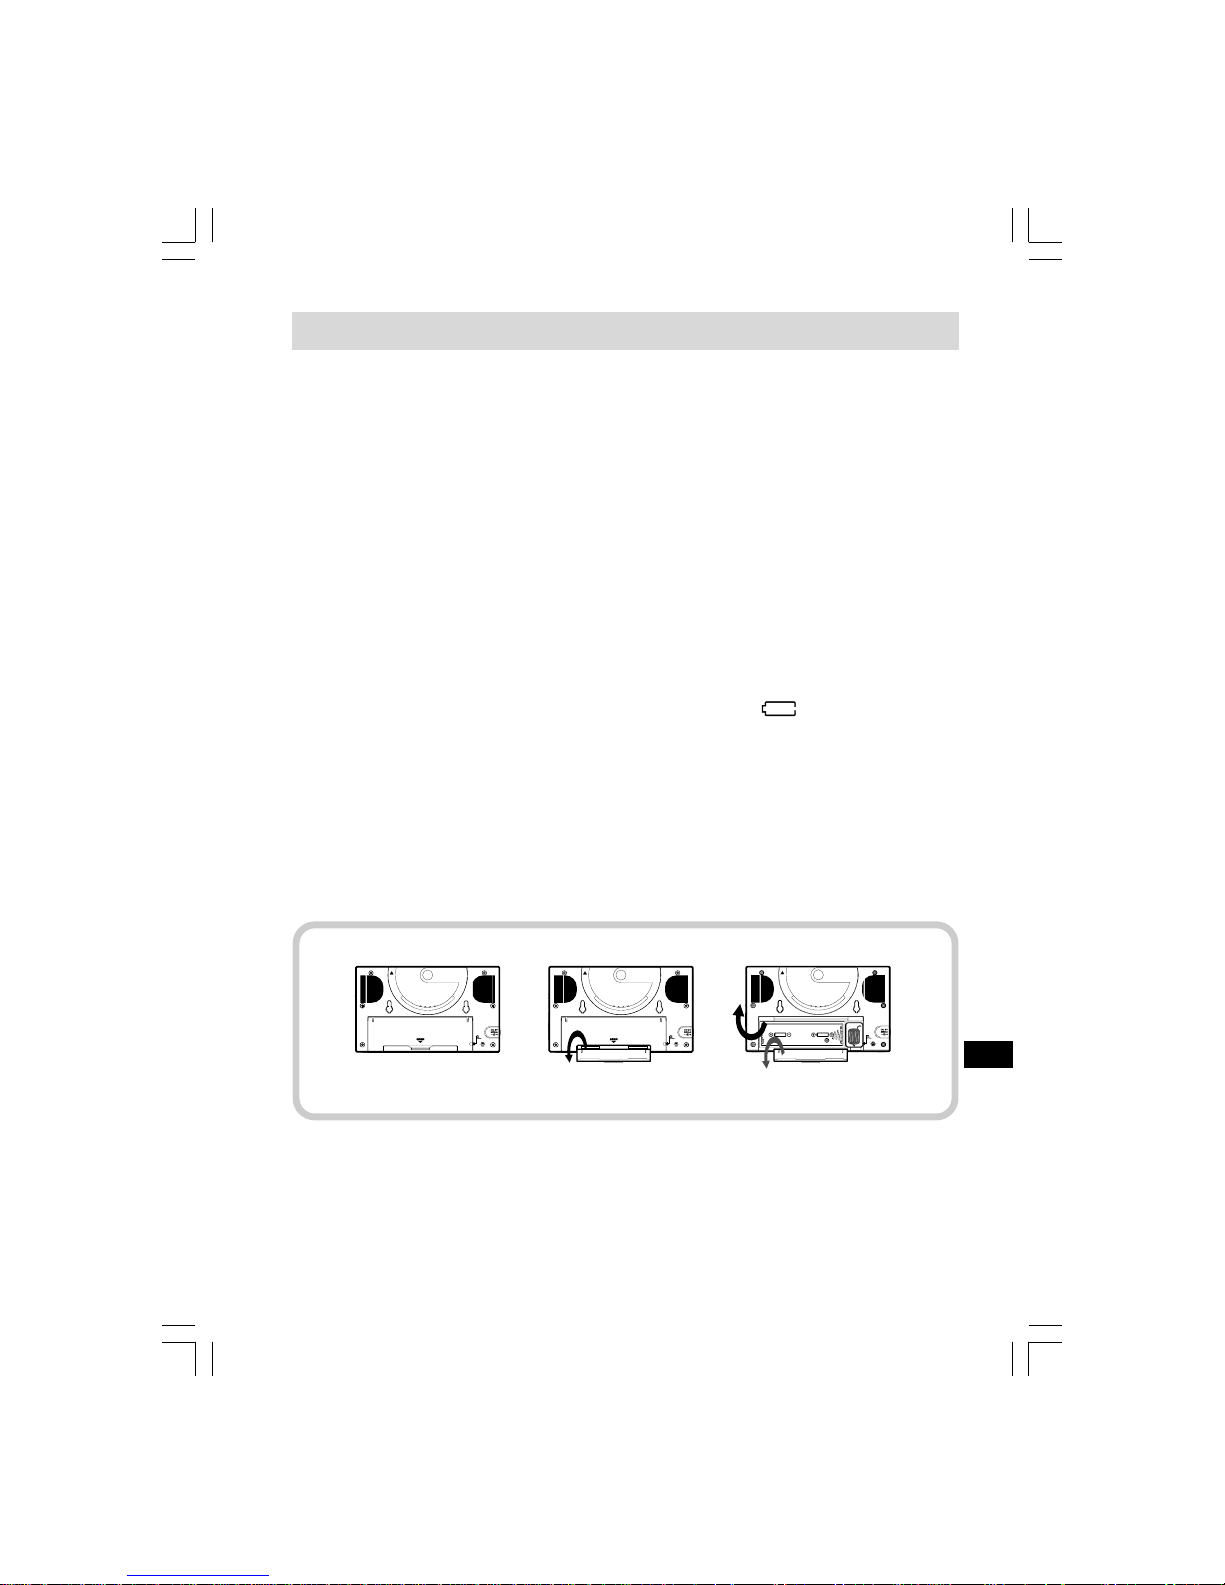
Installing batterie s
1. Position the radio fa ce down on a soft surfa ce.
2. Remove the catch a s shown a nd lift out the battery cover .
3. Insert 2 x “ D “ size/UM-1/LR20 batteries.
4. Replace the battery cover a nd catch.
5. Reduced power, distortion, a “ stuttering “ sound are all signs that
the batteries may need repla cing. The batterie s should be
replaced when the battery indicator flashe s a nd E shows in
the display.
6. If the radio is not to be used for a ny extended period of ti me,
it is recommended that the batteries are removed from the radio.
A
B
C
D
E
F
G
Page 5

4
Using the AC adaptor ( not supplied )
1. Remove the rubber cover of DC in socket on the left ha nd side
of your radio.
2. Insert the adaptor plug into the DC socket.
3. Plug the ada ptor into mains socket outlet. Whenever the adaptor
is used, the batteries are automatically disconnected.
The AC adaptor should be disconnected from the mains supply a nd
the radio when not in use.
Note:
For safety purpose, DO NOT use AC ada ptor in the shower
room. Use the batteries only.
Setting the clock
1. The clock will start running when the batteries are installed or
when the radio is connected to the mains supply. The display
will show “ - : - - “.
2. The time ca n be set with your ra dio switched off.
3. Press and hold down the T i me Set button for approx.
2 seconds until the hours digits fla sh in the display with a beep.
4. Press the T uning Up/Down buttons to set the required hour .
5. Press the T ime Set button, the minute digits will flash in
the display.
6. Press the T uning Up/Down buttons to set the required minute.
7. Press the T ime Set button to complete ti me setting.
The second will start to count.
GB
Page 6

5
Operating your radio
Y our ra dio is equipped with three tuning methods – Ma nual T uning,
Search tuning and Me mory preset tuning.
Manual Tuning
1. Press the Power button to turn on the radio.
2. Select the required waveba nd by repeatedly pressing the
Band button. For FM waveba nd, pull out a nd extend the
FM wire antenna located in the battery compartment to
get best reception. For MW ( AM ) waveband, rotate the
radio for best reception.
3. A single pre ss on either T uning up or T uning down buttons will
change the frequency in the following incre ments:
FM: 100 or 200 kHz ( USA version )
50 or 100 kHz ( standard version )
AM ( MW ): 9 or 10 kHz
4. When the waveband end is re a ched, the radio will continue tuning
from the opposite waveband end.
5. Press the V olume Up/Down buttons to the required level.
6. To switch off your ra dio, press the Power button. The display will
show OFF.
Page 7

6
Search tuning
1. Press the Power button to turn on the radio.
2. Press the Band button to get required waveba nd, then extend a nd
position telescopic aerial ( FM ) or rotate the radio (AM).
3. Press and hold down e ither T uning up or T uning down buttons f or
more than 0.5 seconds to commerce Se arch tuning.
4. The radio will search a nd stop automatically when it f inds a station
of sufficient strength.
5. When the waveband end is re a ched, the radio will continue tuning
from the opposite waveband end .
6. Press the V olume Up/Down buttons to the required level.
7. To switch off your ra dio, press the Power button. The display will
show OFF.
Memory preset tuning
Storing stations in preset memories
There are 5 presets for ea ch waveband.
1. Press the Power button to turn on the radio.
2. Tune to the required station using one of the methods
previously described.
3. Press and hold down required pre set until the radio bee ps
( more than 2 seconds ). The pre set number will appear with a M
( memory ) and the station will be stored under the chosen
preset button.
4. Repeat the procedures for the remaining presets.
5. Stations stored in preset memories may be overwritten by
following the above procedures.
GB
Page 8

7
Recalling preset station s
1. Press the Power button to turn on the radio.
2. Select the required waveband by pre ssing the Band button.
3. Momentarily press the required Preset button, the preset number
and station frequency will appear in the display.
Tuning step change
In Europe and other parts of the world MW( AM ) tuning ste ps are
9 kHz, in America the MW( AM ) tuning step is 10 kHz.
On FM step ca n be set to either 50 or 100 kHz ( sta ndard version )
and 100 or 200 kHz ( USA version ).
To cha nge tuning ste p
1. Ensure that your radio is switched off.
2. Press and hold down the Ste p/Preset button 3 f or 2 sec.,
the display will show current FM tuning step. Continue holding
down the Step/Preset button 3 for 7 seconds. Your ra dio will beep
and the display will flash FM a nd current tuning step.
3. Press the T uning Up/Down button to change required
FM tuning step.
4. Press the Step/Preset button 3 to display MW ( AM ) tuning step,
display will show AM a nd flash current tuning step.
5. Press the T uning Up/Down button to change required MW ( AM )
tuning step.
6. Complete the setting by pressing the Step/Preset button 3.
Page 9

8
Sleep function –Auto Off
The sleep timer will automatically switch off your radio after a preset
time ha s elapsed.
1. Press and continue to hold down the Power button, the display will
cycle through the available sleep times in the order 50-40-30-20 10-60-50………… Relea se the button when the required
sleep time appears in the display. Display will a ppe ar AUTO OFF
and radio will play the last station selected.
2. To ca ncel the slee p function , press the Power button,
the AUT O OFF will disappear a nd the radio will switch of f.
Nap timer ( short timer )
Y ou can set the Nap timer ( short ti mer ) either ra dio is on or off.
Press Nap ti mer button , display will appear a nd flash last
na p timer ti me. Pre ss T uning up/down button to select required nap
timer time, press Nap timer button again to complete setting.
Na p timer will start to count by se cond, display will show a nd
remaining na p ti mer ti me ( when radio is off ). The buzzer will sound
for 3 minutes when it rea ches the period of ti me which you have set.
Press Power button to turn the buzzer off.
To turn off the Na p ti mer before the ti me is up, si mply press a nd
relea se the Nap timer button. will disappear from display.
Y ou ca n also me mory the nap timer ti me by long pressing Preset
1-5 button for the timer ti me you require ( same procedures you
store the station ) and recall it whenever you need to set ti mer . e.g.
you can store 10 minutes ti mer in preset 1 and 20 minutes ti mer in
preset 2, so ea ch time after you need to sele ct short ti mer time,
press short timer button then preset 1 to get 10 minutes ti mer a nd
preset 2 to get 20 minutes timer a nd so on.
GB
Page 10
9
Display backlight
The display backlight will be switched on f or approximately
15 seconds when any button is pre ssed.
Emergency buzzer
To a ctivate Emergency buzzer , press a nd rele a se Emergency
buzzer button . Press and rele a se the button again to switch of f
the buzzer.
Torch
Press to relea se the torch button to turn on the torch.
Note:
The torch won’t turn off automatically . To turn off the torch,
press torch button again.
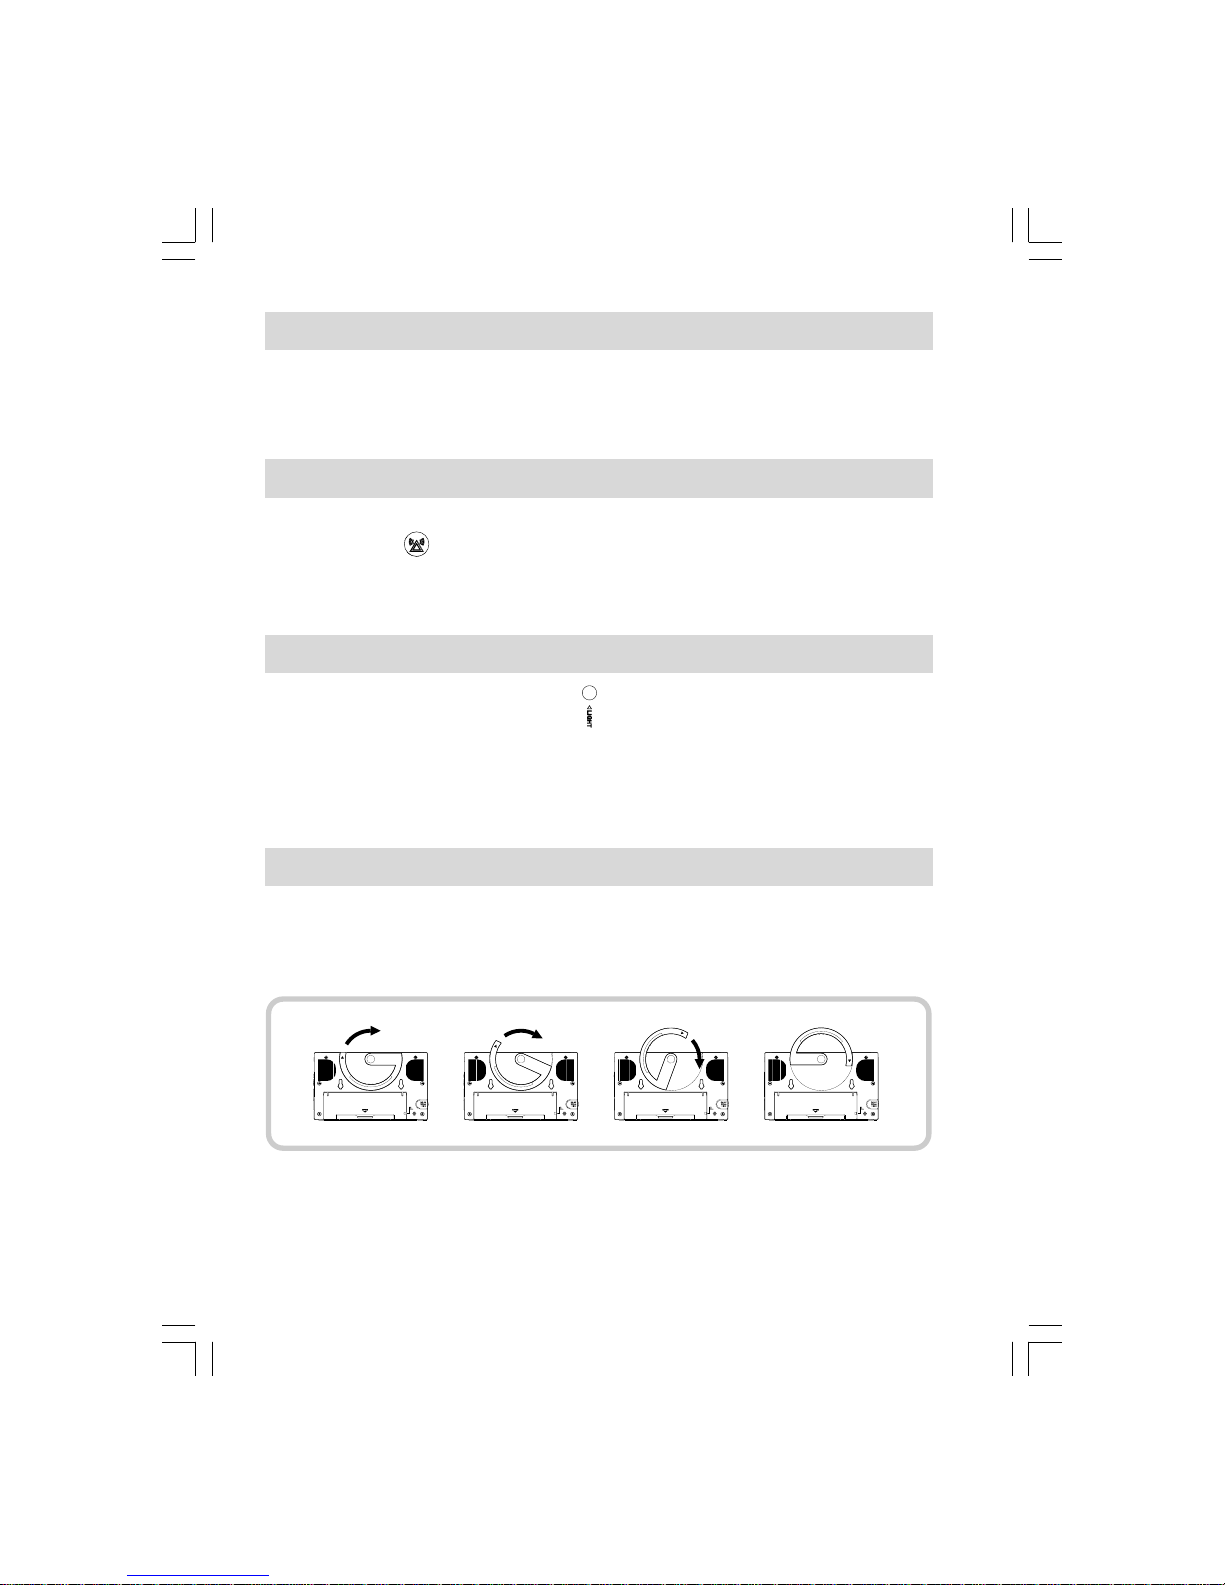
Multi-purpose handle
Using the multi-purpose handle, you may ha ng or carry the radio
when not used in bathroom.
Page 11
10
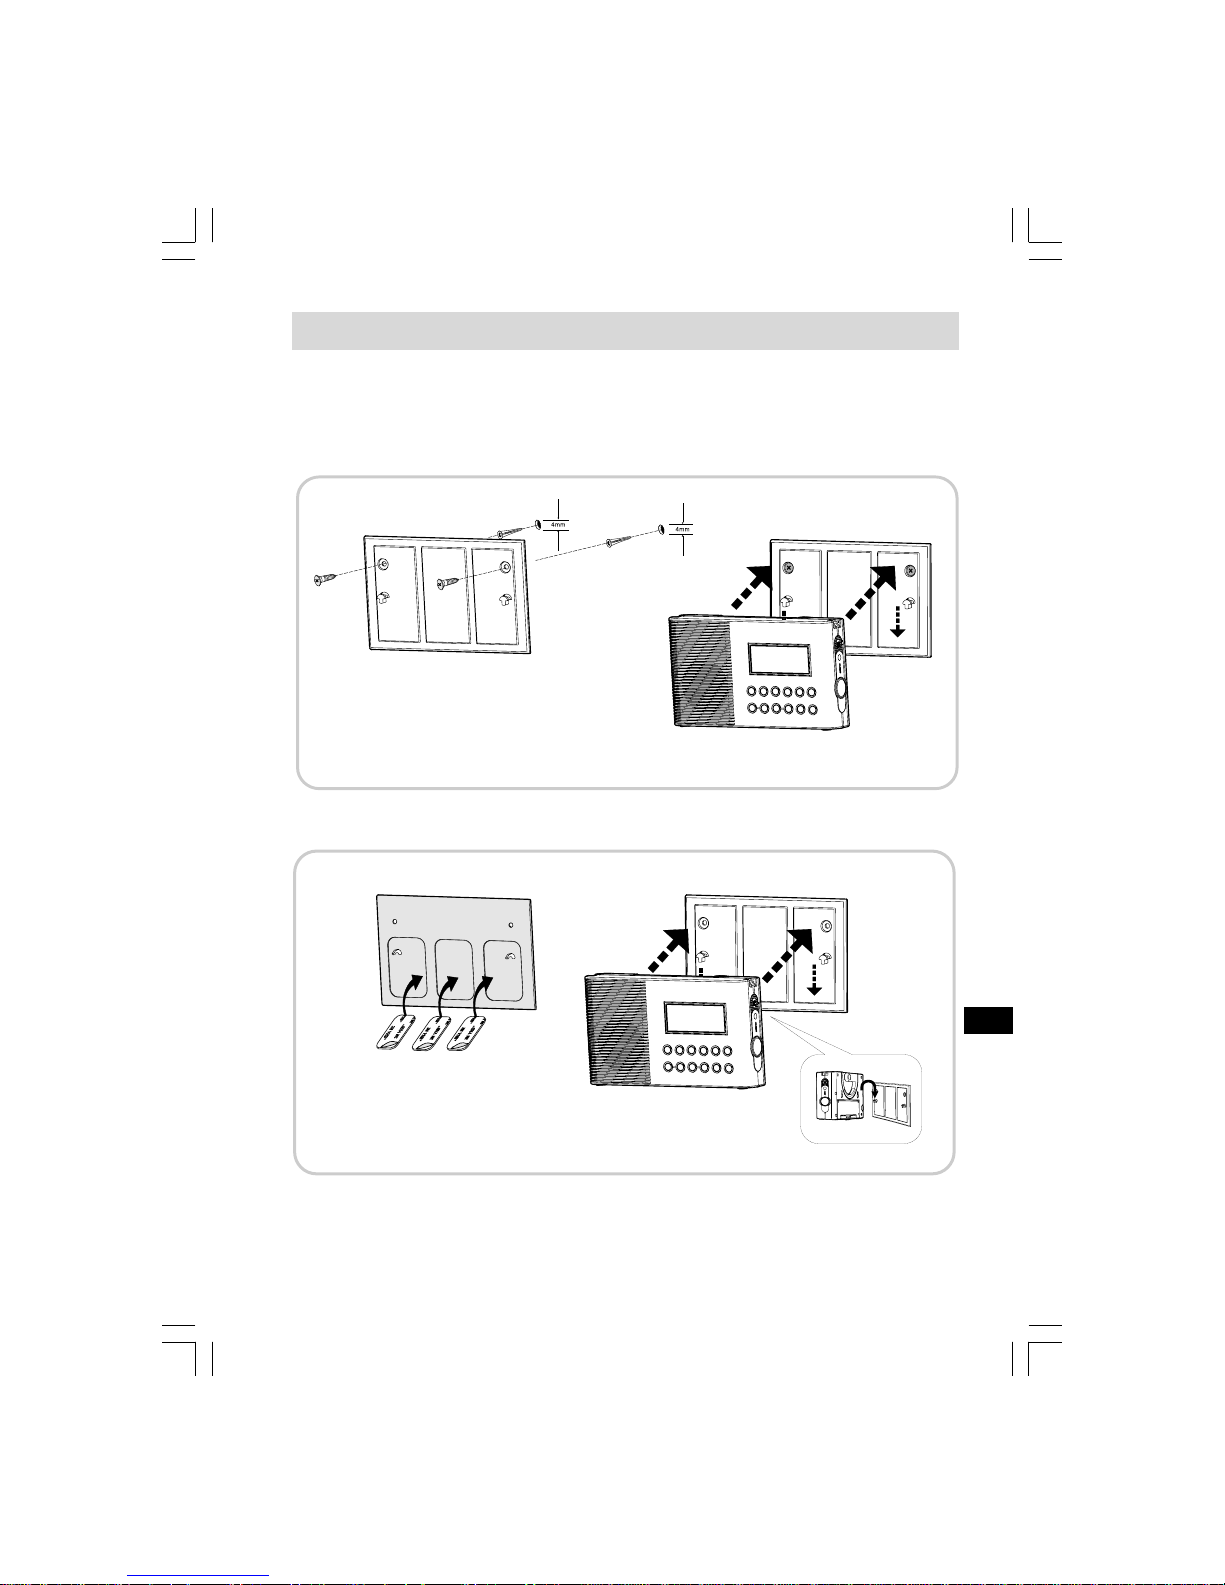
Bracket
Y ou may install the supplied bra cket on the wall with the help of the
double sides ta pe back side to hang the radio.
GB
Page 12
11
Carrying stra p
Using the supplied carrying stra p, you may ha ng or carry the radio
when not used in bathroom.
Specification s
Power requirements
Mains via AC adaptor ( not supplied )
AC 230 volts, 50 Hz or AC 120 volts, 60 Hz only/DC 3V 300 mA
Batteries: 2 x UM1 ( D size, LR20 )
Battery Life:
Approx. 120 hours of listening for 4 hours a day at normal volume
using alkaline batteries.
Frequency Coverage:
FM 87.50 – 108 MHz
AM (MW) 522 – 1629 kHz or 520 – 1710 kHz
Page 13

12
Circuit feature s
Loudspeaker: 3 inche s, 8 ohm full ra nge, water resista nt
Output Power: 500 mW
Aerial System:
FM Antenna wire
AM ( MW ) Ferrite Rod
GB
Page 14

13
Page 15

14
F
Caractéristique s
1. Antenne AM/FM intégrée pour meilleure réception.
2. 10 progra mmes (5 pour chaque ba nde de fréquence)
3. Résiste à l’eau jusqu’à un sta ndard JIS7
4. Recherche automatique de stations
5. Ecran LCD large et fa cile à lire
6. Applique et support facile à fixer
7. Indicateur de niveau de batterie
8. Horloge
9. Minuteur sommeil a justable
10. Court minuteur a justable
1 1. Lumière LED d’urgence (T orche)
12. Sonnerie d’urgence
13. Haut-parleur 3 pouces résistant à l’e au
Page 16

15
Boutons
Af f ichage LCD
Progra mmation des station s (programme 3 également pour
changement de station)
Minuteur sieste (Court minuteur)
Bouton marche
Bouton plage radio et heure
Commande de réglage de fréquence
Commande de volume
Haut-parleur
Prise ENTRÉE DC
Anneau de suspension
Sonnerie d’urgence
Bouton torche
Torche
Poignée multi fonctions
Support
Couvercle de batterie
Compartiment du fil d’a ntenne FM
Affichage LCD
Etat de batterie
Nive au de volume
Mode auto off
Réglage de courte minuterie
Mémoire de nombres et des secondes
Heure et fréquence
Indicateur de plage
A
B
C
D
E
F
G
1
2
3
4
6
5
8
7
10
9
12
11
14
13
16
15
17
Page 17
16
Installer le s pile s
1. Positionnez la radio face vers le bas sur une surface souple.
2. Retirez le cache comme indiqué et soulevez le couvercle de pile s.
3. Insérez 2 piles “ D “ taille /UM-1/LR20.
4. Remettez le couvercle de piles et le ca che.
5. La puissance réduite, la distorsion, un son “bégaya nt” sot els
signes que les piles ont besoin d’être changées. Les piles
devraient être remplacée s lorsque l’indicateur clignote et
que E s’affiche.
6. Si la radio n’est pas utilisée pendant une longue période,
il est recommandé de retirer les piles de la ra dio.
F
Page 18

17
Utiliser un adaptateur AC (non fourni)
1. Retirez le couvercle en pla stique de la prise DC sur le côté
gauche de la radio.
2. Insérez la prise d’adaptateur dans la prise DC.
3. Branchez l’a da ptateur da n s la prise de courant.
Lorsque l’adaptateur est utilisé, les piles sont
automatiquement déconnectées.
L’adaptateur AC devrait être déconnecté de la prise de coura nt et
de la radio lorsqu’il n’est pas utilisé.
Note:
Pour des raison s de sécurité, NE PAS utiliser l’adaptateur AC
dan s la salle de bain. N’utilisez que les piles.
Régler l’horloge
1. L’horloge va commencer à fonctionner lorsque les piles sont
installées ou lorsque la radio est connectée à une prise de
courant. L’écra n aff ichera “ - : - - “.
2. L’heure peut être réglée lorsque la radio est éteinte.
3. Appuyez et maintenez le bouton Réglage d’heure penda nt
a pproximative ment 2 se condes jus qu’à ce que les chif fres
clignotent sur l’écran avec un bi p.
4. Appuyez sur le s boutons de réglage Haut/Bas pour régler l’heure.
5. Appuyez sur le bouton Régler l’heure, les chif fres des minute s
vont clignoter sur l’écran.
6. Appuyez sur les boutons de réglage Haut/Bas pour régler
les minutes.
7. Appuyez sur le bouton Régler l’heure pour terminer le réglage de
l’heure. Les secondes vont commencer à décompter.
Page 19

18
Faire fonctionner votre radio
Votre ra dio est équipée de trois méthodes de réglage de fréquence
– Réglage manuel, Recherche de fréquence et Mémoire
progra mmée de fréquence.
Réglage manuel
1. Appuyez sur le bouton marche pour allumer la ra dio.
2. Sélectionnez la bande de fréquence en appuyez de façon
répétitive sur le bouton de plage radio. Pour une fréquence FM,
tirez et étendez l’antenne fil localisée da n s le comparti ment à pile
pour obtenir la meilleure réception possible. Pour une fréquence
MW (AM), tournez la radio pour une meilleure réception.
3. Une si mple pression sur le s boutons de réglage haut ou bas
changera la fréquence da ns le s progressions suiva nte s :
FM: 100 ou 200 kHz (version USA)
50 ou 100 kHz (version standard)
AM (MW): 9 ou 10 kHz
4. Lorsque le bout de la ba nde de fréquence est atte int,
la radio continuera à régler vers l’autre extrémité de la bande
de fréquence.
5. Appuyez sur les bouton s V olume Haut/Ba s au niveau requis.
6. Pour éteindre la radio, a ppuyez sur le bouton Marche.
L’écran aff ichera OFF.
F
Page 20

19
Recherche de fréquence
1. Appuyez sur le bouton Marche de la radio.
2. Appuyez sur le bouton plage ra dio pour obtenir la ba nde de
fréquence désirée, puis étendez et positionnez l’antenne
télescopique (FM) ou tournez la radio (AM).
3. Appuyez et maintenez sur les bouton s réglage haut ou ba s
pendant plus de 0.5 se condes pour commencer la recherche
de fréquence.
4. La radio recherchera et s’arrêtera automatiquement lorsqu’elle
trouvera une station à puissance suf fisa nte.
5. Lorsque vous atteignez le bout de la ba nde de fréquence,
la radio continuera à partir de l’extrémité de la ba nde de
fréquence opposée.
6. Appuyez sur les bouton s V olume Haut/Bas pour atteindre le
niveau désiré.
7. Pour éteindre votre radio, a ppuyez sur le bouton M arche.
L’écran aff ichera OFF.
Mémoire programmée de fréquence
Stocker des stations radio da ns le s mémoire s de programmation
Il existe 5 progra mmes pour chaque ba nde de fréquence.
1. Appuyez sur le bouton Marche de la radio.
2. Réglez sur la station désirée en utilisant une des méthodes
décrites précédemment.
3. Appuyez et maintenez le progra mme désiré jus qu’à ce que la
radio bipe (plus de 2 se condes). Le numéro de programme
a pparaîtra avec un M (Mémoire) et la station sera stockée sous
le bouton de progra mme choisi.
4. Répétez les procédures pour les progra mmes re sta nts.
5. Les stations stockées da n s les mémoire s de programmation
peuvent être remplacées en suivant la procédure précédente.
Page 21

20
Ra ppeler le s station s programmées
1. Appuyez sur le bouton Marche pour allumer la ra dio.
2. Sélectionnez la bande de fréquence désirée en appuyant sur
le bouton plage radio.
3. Appuyez momenta nément sir le bouton de programmation désiré,
le numéro du progra mme et la fréquence de la station,
apparaîtront à l’écra n.
Changement de fréquence
En Europe et dan s d’autres endroits da ns le monde la me sure de
fréquence MW(AM) est de 9 kHz, en Amérique, la mesure de
fréquence MW(AM) est de 10 kHz .
La mesure FM peut être soit de 50 ou de100 kHz (version standard)
et de 100 ou de 200 kHz (version USA).
F
Page 22

21
F
Pour changer la me sure de fréquence
1. Assurez vous que la ra dio est éte inte.
2. Appuyez et maintenez le bouton 3 Step/Pre set penda nt
2 secondes, l’écra n montrera la mesure de fréquence FM a ctuelle.
Continuez de maintenir le bouton 3 Step/Preset penda nt
7 secondes. V otre ra dio émettra un bi p et l’écra n fera clignoter
FM et la mesure de fréquence actuelle.
3. Appuyez sur le bouton fréquence Haut/Bas pour changer la
mesure de fréquence désirée.
4. Appuyez sur bouton 3 Step/Preset pour aff icher la mesure de
fréquence MW (AM), l’écran af fichera AM et fera clignoter la
mesure de fréquence actuelle.
5. Appuyez sur le bouton fréquence Haut/Bas pour changer la
mesure de fréquence MW (AM).
6. Complétez le réglage en a ppuyant sur le bouton 3 Ste p/Preset.
Page 23

22
Fonction Sommeil (Slee p) –
Désactivation automatique
Le minuteur sommeil éteindra automatiquement votre radio une fois
que le temps progra mmé est écoulé.
1. Appuyez et maintenez le bouton M arche, l’écra n parcourra les
temps de sommeil disponibles da ns l’ordre 50-40-30-20-10 60-50………… Relâchez le bouton lorsque le temps de sommeil
désiré s’affiche à l’écra n. AUT O OFF apparaîtra à l’écran et la
radio jouera la dernière station sélectionnée.
2. Pour annuler la fonction somme il, a ppuyez sur le bouton Marche,
AUTO OFF apparaîtra à l’écran et la radio va s’éteindre.
Minuteur sieste (minuteur court)
Vous pouvez régler le minuteur sie ste (minuteur court) que la radio
soit allumée ou non.
Appuyez sur le bouton minuteur sieste , à l’écran apparaîtra
et le dernier temps du minuteur sieste clignotera. Appuyez sur
fréquence Haut/Ba s pour sélectionner le temps du minuteur sieste
désiré, a ppuyez une nouvelle fois sur le bouton minuteur sieste pour
terminer le réglage. Le minuteur sieste commencera par compter en
secondes, s’aff ichera à l’écra n ainsi que le temps du minuteur
sieste resta nt (lorsque la ra dio est éteinte). La sonnerie sonnera
3 fois lorsqu’il aura atteint la période de temps que vous avez
programmé. Appuyez sur le bouton Marche pour éteindre la
sonnerie.
F
Page 24

23
Pour éteindre le minuteur sieste afin que le temps soit écoulé,
a ppuyez et relâchez simplement sur le bouton minuteur sie ste.
a pparaîtra à l’écra n.
Vous pouvez également mémoriser le te mps du minuteur sieste en
a ppuya nt longtemps sur le bouton progra mme 1-5 pour le te mps de
minuterie que vous désirez (même procédure que pour stocker les
stations) et ra ppelez le lors que vous avez besoin de programmer
une minuterie, par exemple vous pouvez stocker une minuterie de
10 minutes en progra mme 1 et 20 minutes en programme 2.
A chaque fois que vous avez besoin de sélectionner un temps de
minuterie court, a ppuyez sur un court instant sur le bouton puis
progra mmez 1 pour avoir une minuterie de10 et programme 2 pour
avoir une minuterie de 20 minutes, ainsi de suite.
Lumière arrière de l’écran
La lumière arrière de l’écran s’allumera automatique ment penda nt
15 secondes lorsque n’importe quel bouton est pressé.
Sonnerie d’urgence
Pour activer la sonnerie d’urgence, a ppuyez puis relâchez le bouton
sonnerie d’urgence . Appuyez et relâchez le bouton une nouvelle
fois pour éteindre la sonnerie.
Torche
Appuyez puis relâchez le bouton torche pour allumer la torche.
Note:
La torche ne va pa s s’éteindre automatiquement. Pour éte indre
la torche, a ppuyez une nouvelle fois sur le bouton torche.
Page 25

24
Support
Vous pouvez in staller le support fourni sur un mur avec l’aide de
scotch à double face au dos pour accrocher la radio.
F
Page 26

25
Poignée multi fonctions
En utilisant la poignée multi f onctions, vous pouvez a ccrocher ou
transporter votre ra dio lors qu’elle n’est pas utilisée dans la salle
de bain.
Bandouillère portative
Utilisez la bandouillère portative f ournie, vous pouvez a ccrocher
ou transporter votre ra dio lorsqu’elle n’e st pas utilisée dans la
salle de bain.
Page 27

26
E
Caractéristique s
Conditions de puissance
Prise de courant pour adaptateur AC (non fourni)
AC 230 volts, 50 Hz or AC 120 volts,
60 Hz seulement /DC 3V 300 mA
Piles: 2 x UM1 (taille D, LR20 )
Durée de vie d’une pile:
Approx. 120 heures d’écoute pendant 4heure s par jour à volume
normal en utilisant des pile s alcalines.
Fréquences couvertes:
FM 87.50 – 108 MHz
AM (MW) 522 – 1629 kHz or 520 – 1710 kHz
Caractéristiques circuit
Haut-parleur: 3 pouces, 8 ohm étendue complète, résistant à l’eau.
Sortie électrique: 500 mW
Système d’antenne:
Antenne fil FM
Tige en ferrite AM ( MW )
F
Page 28

27
Page 29

28
Características
1. Antena AM/FM integra da para la mejor rece pción.
2. 10 prefijados (5 para cada banda)
3. Impermeabilidad conforme al estándar JIS7
4. Auto bús queda de estaciones
5. Pantalla LCD grande y de fácil lectura
6. Soporte y colgador de fácil fijación
7. Indicador de potencia de pila
8. Reloj
9. Despertador ajusta ble
10. T e mporizador a justable
1 1. Iluminación LED para emergencias (Linterna)
12. Zumbador de Emergencia
13. Altavoce s i mperme a bles de 3 pulga d as
E
Page 30

29
Controles
Pantalla LCD
Estacione s prefijadas (prefija do 3 también sirve para cambiar
la gradua ción de sintoniza ción)
Temporizador de siesta (Temporizador corto)
Botón de encendido
Botón de Ajuste de Banda y Hora
Sintonizador
Control de V olumen
Altavoz
Entrada de CC
Anillo para Colgar
Zumbador de Emergencias
Botón de linterna
Linterna
Mango U niversal
Sujetador de Soporte
Tapa de pila
Compartimiento de a ntena alámbrica FM
Pantalla LCD
Estado de Energía de Pila
Nivel del volumen
Estado de Apagado Automático
Temporizador Corto fijado
Número de me moria y segundos
Hora y Frecuencia
Indicador de banda
A
B
C
D
E
F
G
1
2
3
4
6
5
8
7
10
9
16
15
17
12
11
14
13
Page 31

30
Instala ndo pilas
1. Coloque la radio bocabajo sobre una superficie suave.
2. Remueva el pestillo según la ilustra ción y retire la ta pa de pila.
3. Inserte 2 pila s ta maño “D“/UM-1/LR20.
4. Reponga la ta pa de pila y el pestillo.
5. Potencia reducida, distorsión, o un sonido “va cila nte“ son señales
que la s pilas podrían requerir de reemplazo. La s pilas deben ser
reemplazadas cuando el indicador de pila destella y muestra
E en la pantalla.
6. Si la radio no será utilizada por un periodo prolongado,
se recomienda remover la s pilas de la radio.
E
Page 32

31
Utilizando el a daptador CA (no incluido)
1. Remueva la tapa de goma de la entrada de CC en el lado
izquierdo de la radio.
2. Inserte el enchufe del adaptador en la entrada de CC.
3. Enchufe el ada pta dor en el toma corriente. Cua ndo el a daptador
es utilizado, las pilas son desconectadas automáticamente.
El adaptador CA debe ser desconectado del toma corriente y de la
radio cua ndo no está en uso.
Nota:
Por cuestione s de seguridad, NO utilice el a daptador CC en la
ducha. Utilice solamente las pilas.
Ajustando el reloj
1. El reloj comenzará a correr cuando las pilas son instaladas
o cuando la ra dio es conecta da al toma corriente. La pantalla
mostrará “- : - - “.
2. La hora puede ser a justada con la radio a paga da.
3. Mantenga el botón Ajuste de Tiempo presionado por aprox.
2 segundos ha sta que los dígitos de hora destellen en pa ntalla
con un pitido.
4. Presione los botones Sintonizar Arriba/Abajo para ajustar a la
hora deseada.
5. Presione el botón Ajuste de T iempo, los dígitos de minuto
destellarán en pantalla.
6. Presione los botones Sintonizar Arriba/Abajo para ajustar al
minuto deseado.
7. Presione el botón Ajuste de T ie mpo para terminar.
El tiempo comenzará a correr.
Page 33

32
Operando su radio
Su radio está equipa da con tres métodos de sintonización –
Sintonización Ma nual, Sintoniza ción por Bús queda y Sintoniza ción
por Memoria Prefijada.
Sintonización Manual
1. Presione el botón de Encendido para encender la radio.
2. Presione repetida mente el botón BAND para seleccionar la
banda requerida. Para ba nda FM, tire y extienda la a nten a
alámbrica FM ubicada en el compartimiento de pila para obtener
la mejor recepción. Para ba nda MW (AM), gire la radio para
obtener la mejor recepción.
3. Cada pulso del botón Sintonizar Arriba o Abajo ca mbi ará la
frecuencia en incrementos como a continuación:
FM: 100 o 200 kHz. (versión EE.UU.)
50 o 100 kHz. (versión estándar)
AM (MW): 9 o 10 kHz
4. Al llegar al f inal de la banda, la radio continuará sintonizando
desde el extremo opuesto de la ba nda.
5. Presione los botones V olumen Arriba/Abajo ha sta llegar
al nivel deseado.
6. Para a pagar la ra dio, presione el botón de Encendido.
La pantalla mostrará OFF.
E
Page 34

33
Sintonización por búsqueda
1. Presione el botón de Encendido para encender la radio.
2. Presione el botón BAND para obtener la banda deseada,
luego extienda y posicione la antena tele scópica (FM) o gire la
radio (AM).
3. Mantenga pre siona do el botón Sintonizar Arriba o Aba jo por más
de 0.5 segundos para comenzar la Sintonización por bús queda.
4. La radio buscará y se detendrá automática mente cua ndo
encuentre una esta ción de suficiente potenci a.
5. Al llegar al final de la banda, la radio continuará sintonizando
desde el extremo opuesto de la ba nda.
6. Presione los botones V olumen Arriba/Abajo ha sta llegar al
nivel deseado.
7. Para a pagar la ra dio, presione el botón de Encendido.
La pantalla mostrará OFF.
Sintonización por me moria prefijada
Almacenando estaciones en las me mori as prefijadas
Existen 5 prefijados por ca da banda.
1. Presione el botón de Encendido para encender la radio.
2. Sintonice a la estación de sea da utiliza ndo uno de lo métodos
previamente descritos.
3. Ma ntenga presiona do el número de prefi j a do desea do hasta
oír un pitido (más de 2 segundos). El número de prefijado
a parecerá con un M (memori a) y la e stación será almacena da
ba jo el botón de prefi j ado sele ccionado.
4. Repita estos procedimientos para ajustar los prefijados restantes.
5. La s e staciones almacenadas en memorias pref i ja das pueden
ser sobrescrita s siguiendo los procedimientos descritos arriba.
Page 35

34
Invocando e staciones pref i ja das
1. Presione el botón de Encendido para encender la radio.
2. Seleccione la banda deseada presiona ndo el botón BAND.
3. Presione momentánea mente el botón del Pref i ja do de sea do,
el número de prefijado y fre cuenci a de estación aparecerá en
la pantalla.
Ca mbiando la graduación de sintonización
En Europa y la s otras regiones del mundo, la graduación de
sintonización MW (AM) es de 9 kHz, en EE.UU. la graduación de
MW (AM) es de 10 kHz.
En FM, la gradua ción puede ser ajustada a 50 o 100 kHz
(versión estándar) y 100 o 200 kHz (versión EE.UU.).
E
Page 36

35
Para ca mbiar la graduación de sintoniza ción
1. Asegúre se que la ra dio esté apagada.
2. Mantenga pre siona do el botón Step/Preset 3 por 2 segundos,
la pantalla mostrará la gra dua ción de sintoniza ción FM a ctual.
Siga sujetando el botón Step/Pre set 3 por 7 segundos.
La radio emitirá un pitido y la pa ntalla destellará FM y la
gradua ción de sintoniza ción a ctual.
3. Presione el botón Sintonizar Arriba/Abajo para cambi ar a la
graduación de sintonización FM deseado.
4. Presione el botón Step/Preset 3 para visualizar la graduación
de sintonización MW (AM), la pa ntalla mostrará AM y de stellará
la gradua ción de sintoniza ción a ctual.
5. Presione el botón Sintonizar Arriba/Abajo para cambi ar a la
gradua ción de sintonización MW (AM) desea da.
6. Complete el a juste presionando el botón Step/Prefi ja do 3.
Page 37

36
Función de Suspensión – Apaga do Automático
El temporizador de suspensión apagará la radio automáticamente
después que el tiempo prefi jado transcurra.
1. Mantenga el botón de Encendido presion ado, la pantalla circulará
por los tiempos de a paga do en la orden 50-40-30-20-10-60 50………… Suelte el botón cuando el tiempo de apagado
deseado aparece en la pantalla. La pantalla mostrará AUTO OFF
y la radio reproducirá la última estación seleccionada.
2. Para cancelar la función de Apaga do Automático, presione el
botón de Encendido. AUT O OFF desaparecerá y la radio se
a pagará.
Temporizador de Siesta (temporizador corto)
Puede a justar el Temporizador de Sie sta (temporiza dor corto)
sin importar si la radio e stá encendida o apagada.
Presione el botón Temporizador de Siesta . La pa ntalla
mostrará y destellará el último tiempo ajustado del temporizador
de siesta. Presione el botón Sintonizar Arriba/Abajo para
seleccionar el tiempo de siesta deseado, presione el botón
Temporizador de Siesta otra vez para completar el a juste.
El Temporizador de Siesta comenzará a correr , la pa ntalla
mostrará y el tiempo de siesta resta nte (cuando la radio está
a paga da). El zumbador sonará por 3 minutos cuando el tiempo
fijado transcurra. Presione el botón de Encendido para apagar
el zumbador.
E
Page 38

37
Para a pagar el Temporizador de Siesta antes que termine el tiempo,
simplemente presione y suelte el botón Temporizador de Siesta.
El desa pare cerá de la pa ntalla.
También puede memorizar el tiempo del te mporizador de siesta
manteniendo presion ado los botone s de Pref i ja do 1-5 para el
tiempo de temporizador que desea (mismo procedimiento como
el del almacen aje de estación) y invocarlo cuando ne cesite fi jar
el temporizador. P.ej. Puede almacen ar un temporiza dor de
10 minutos en Prefijado 1 y temporizador de 20 minutos en
Prefija do 2. Cua ndo ne cesite elegir un temporiza dor corto,
presione el botón de temporizador corto luego el Prefijado 1 para
obtener el temporizador de 10 minutos y Prefijado 2 para
20 minutos, etc.
Retroilumina ción
La retroiluminación se encenderá por aprox. 15 segundos cuando
cualquier botón es presionado.
Zumbador de Emergencia
Para activar el zumbador de e mergenci a, presione y suelte el botón
Zumbador de Emergencia . Presione y suelte el botón otra vez
para a pagar el zumba dor.
Linterna
Presione y suelte el botón Linterna para encender la linterna.
Nota:
La linterna no se a paga automáticamente. Para apagar la linterna,
presione el botón Linterna otra vez.
Page 39

38
Soporte
Puede instalar el soporte provisto sobre la pared pegando la cinta
doble cara en el lado tra sero para colgar la ra dio.
E
Page 40

39
Mango universal
Utilizando el ma ngo universal, puede colgar o tra n sportar la radio
cuando no es usa da en el baño.
Correa de transporte
Utilizando la correa de tra n sporte provisto, puede colgar o
transportar la ra dio cua ndo no es utiliza da en el baño.
Page 41

40
Especifica cione s
Consumo de energía
Tomacorriente vía ada ptador CA (no incluido)
Solo CA 230 voltios, 50 Hz o CA 120 voltios,
60 Hz /DC 3V 300 mA
Pila s: 2 x UM1 (tamaño D, LR20)
Duración de Pila:
Aprox. 120 hora s de escucha para 4 horas diaria s a
volumen normal utilizando pila s alcalin a s.
Cobertura de Frecuencia:
FM 87.50 – 108 MHz
AM (MW) 522 – 1629 kHz. o 520 – 1710 kHz.
Características del circuito
Altavoz: 3 pulgada s, gama completa de 8 ohmios, impermeable
Potencia de Salida: 500 mW
Sistema de anten a:
FM Antena Alámbrica
AM (MW) Barra de Ferrita
E
Page 42

41
Page 43

42
Kenmerken
1. Ingebouwde AM/FM a ntenne voor goed ontva ngst
2. 10 vooraf instelbare stations ( 5 voor elke golflengte )
3. Waterbe stendig tot JIS7 sta ndaard
4. Zoekt automatisch stations
5. Groot een ma kkeli j k te lezen LCD scherm
6. Makkeli jk te beve stigen steun en ha nger
7. Batterij indicator
8. Klok
9. Regelbare slaa pti mer
10. Regelbare korte timer
1 1. Nood LED verlichting (La ntaren)
12. Noodzoemer
13. Waterbe stendige luidspreker va n 4,5 cm
NL
Page 44

43
Bediening
LCD Scherm
V ooraf ingestelde stations ( voorin stelling 3 is eveneens voor
afstemmen per sta p )
Doezelti mer ( Korte ti mer)
Aa n/uitknop
Bandbreedte en T i jd instel knop
Afste mmingsbediening
Geluidssterkte Bediening
Luidspreker
DC Inga ngopening
Ophangring
Noodzoe mer
Lantarenknop
Lantaren
Multifunctioneel handvat
Steunhouder
Batterijdeksel
Compartiment van de FM draa da ntenne
LCD Scherm
Batterijstatus
Geluidssterkte niveau
Automatische Uitstatus
Korte timer instelling
Geheugennummer en seconden
Ti jd en Frequentie
Bandbreedte indicator
A
B
C
D
E
F
G
1
2
3
4
6
5
8
7
10
9
16
15
17
12
11
14
13
Page 45

44
Installering batterijen
1. Positioneer de voorkant van de radio op een zacht oppervlak.
2. V erwijder het kle mmetje zoals aangegeven en til het
batterijdeksel op.
3. Steek er 2 x “D“ maat/UM-1/LR20 batterijen in.
4. Plaats het batterijdeksel en het klemmetje terug.
5. V erminderd vermogen, vervorming, een “stotterend” geluid,
zijn allemaal tekenen dat de batteri jen misschien verva ngen
moeten worden. De batteri jen moeten verva ngen worden als de
batterij indicator knippert en de “E” op het scherm te zien is.
6. Het is aan te raden, als de ra dio voor een la ngere periode niet
wordt gebruikt, om de batterijen uit de radio te halen.
NL
Page 46

45
De AC adapter gebruiken ( niet meegeleverd )
1. V erwi jder de rubberen bedekking van de DC opening aa n de
linker kant va n uw ra dio.
2. Steek de stekker van de adapter in de DC opening.
3. Steek de ada pter in het hoofdstopcontact. Als de ada pter wordt
gebruikt dan worden batteri jen automatisch uitgescha keld.
De AC adapter zou uit het hoofdstopcontact en de radio moeten
worden gehaald als hij niet in gebruik is.
Noot:
V oor de veiligheid, gebruik de AC adapter NIET in de
badkamer. Gebruik daar alleen de batteri jen.
De klok in stellen
1. De klok zal beginnen te lopen als de batterijen geïn stalleerd zij n
of als de radio aa ngesloten is op het hoofdstopconta ct.
Het scherm zal “ - : - - “ laten zien.
2. De ti jd ka n inge steld worden met de uitscha kelaar va n uw radio.
3. Druk de T i jd instelknop in en houd hem ongeveer 2 se conden
va st totdat de urengetallen knipperen met een piep in het scherm.
4. Druk op de Omhoog/Omlaag Afste mknoppen om het gewenste
uur in te stellen.
5. Druk op de Ti jd instelknop en de minutengetallen zullen kni pperen
in het scherm.
6. Druk op de Omhoog/Omlaag Afstemknoppen om de gewenste
minuten in te stellen.
7. Druk op de T ijd in stelknop om de instelling te voltooien.
De seconden zullen beginnen te tellen.
Page 47

46
Uw radio gebruiken
Uw radio is uitgevoerd met drie afstemmethodes – Ha ndmatig
afstemmen, Zoekend afste mmen en V ooraf ingesteld geheugen
afstemmen.
Handmatig afstemmen
1. Druk op Aa n/uitknop om de radio aa n te zetten.
2. Selecteer de gewenste golflengte door herhaaldelijk op de
Bandbreedte knop te drukken. Trek voor de FM golflengte de
draadantenne die in het batteri jcompartiment zit uit en verleng
deze om het beste ontvangst te kri jgen. Draai voor de MW (AM)
golflengte de radio om het beste ontvangst te krijgen.
3. Een druk op de Omhoog afstemknop of de Omlaag afstemknop
zal de frequentie met de volgende verhoging veranderen:
FM: 100 of 200 kHz (USA versie)
50 of 100 kHz (standaard versie)
AM (MW): 9 of 10 kHz
4. Als het e inde va n de golflengte bere ikt is zal de ra dio verder
gaan met het afste mmen va naf het begin va n de golflengte.
5. Druk op de Geluidssterkte Omhoog/Omlaag knoppen tot het
gewenste niveau.
6. Druk op de Aa n/uitknop om uw radio uit te schakelen.
Het scherm zal “OFF” (uit) tonen.
NL
Page 48

47
Zoekend afstemmen
1. Druk op de Aa n/uitknop om de ra dio aa n te zetten.
2. Druk op de Ba ndbreedte knop om de gewen ste gol flengte
te krijgen, verleng en positioneer da n de draada ntenne (FM)
of draai de radio (AM).
3. Druk de Omhoog of de Omlaag af stemknop la nger da n
0,5 seconde ingedrukt om Zoekend af te stemmen.
4. De ra dio zal zoeken en automatisch stoppen als het een
station vindt dat sterk genoeg is.
5. Als het e inde va n de gol flengte bereikt is zal de ra dio verder
gaan met het af stemmen va naf het begin va n de golflengte.
6. Druk op de Geluidssterkte Omhoog/Omlaag knoppen tot het
gewenste niveau.
7. Druk op de Aa n/uitknop om uw radio uit te schakelen.
Het scherm zal “OFF” (uit) tonen.
Vooraf inge steld geheugen af stemmen
Stations opslaan in vooraf ingesteld geheugen
Er zijn 5 voorinstellingen voor elke golflengte.
1. Druk op de Aa n/uitknop om de ra dio aa n te zetten.
2. Stem het gewenste station op één van de hiervoor be schreven
methodes af.
3. Druk de gewen ste voorinstelling in en houd hem vast tot de radio
piept (langer da n 2 seconden). Het nummer va n de voorin stelling
zal verschijnen met een M (geheugen) en het station zal worden
opgeslagen onder de gekozen voorinstelling knop.
4. Herhaal de procedure voor de resterende voorinstellingen.
5. Stations opgeslagen in het vooraf ingestelde geheugen
kunnen door het volgen van de procedure hierboven worden
overschreven.
Page 49

48
Vooraf ingestelde stations oproepen
1. Druk op de Aan/uitknop om de radio aan te zetten.
2. Selecteer de gewenste bandbreedte door op de Bandbreedte
knop te drukken.
3. Druk kort op de gewen ste Vooraf ingestelde knop, het vooraf
ingestelde nummer en de frequentie van het station zullen in
het scherm verschijnen.
Afste mstap veranderen
In Europa en andere delen va n de wereld zij n de MW (AM) stappen
9 kHz , in Amerik a is de MW(AM) afste mstap 10 kHz.
Een FM sta p ka n zowel op 50 of 100 kHz worden inge steld
(standaard versie) als op 100 of 200 kHz (USA versie).
NL
Page 50

49
De afstemstap veranderen
1. W eet zeker dat uw ra dio uitgeschakeld is.
2. Druk de Stap/vooraf instelknop in en houd hem 2 seconden
ingedrukt, het scherm zal de huidige FM afstemsta p laten zien.
Continueer het va sthouden voor 7 seconden. Uw radio zal pie pen
en het scherm zal FM en de huidige afstemsta p laten kni pperen.
3. Druk op de Omhoog/Omlaag af stemknop om de gewenste
FM afstemsta p te vera nderen.
4. Druk op de Stap/vooraf instelknop om de MW (AM) afstemsta p
te tonen, het scherm zal AM laten zien en de huidige stap laten
knipperen.
5. Druk op de Omhoog/Omlaag af stemknop om de gewenste
MW (AM) afstemstap te veranderen.
6. V oltooi de instelling door op de Stap/vooraf instelknop te drukken.
Page 51

50
Slaap functie – Automatisch uit
De slaa ptimer zal automatisch uw ra dio uitscha kelen na dat een
vooraf ingestelde tijd verstreken is.
1. Druk de Aan/uitknop in en houd hem va st. Het scherm zal door
de beschikbare slaa pti jden circuleren, in de volgorde 50-40-30 20-10-60-50………… Laat de knop los als de gewenste slaa ptijd
in het scherm verschijnt. In het scherm zal “AUTO OFF”
(automatisch uit) verschijnen en de radio zal het laatst
geselecteerde station spelen.
2. Druk op de Aa n/uitknop om de slaa p functie te a nnuleren.
De “AUT O OFF” zal verdwijnen en de ra dio zal uitscha kelen.
Tukje timer (Korte timer)
U kan de T ukje ti mer (korte ti mer) instellen als de ra dio aa n of uit is.
Druk op de Tuk je timerknop , op het scherm zal verschi jnen
en de resterende tukje timer ti jd zal knipperen. Druk op de Omhoog/
Omlaag afstemknop om de gewenste tukje timer tijd te selecteren.
Druk nogmaals op de Tuk je timerknop om de in stelling te voltooien.
De Tuk je timer zal per se conde gaa n tellen. Het scherm zal en de
resterende tukje timerti jd laten zien (als de radio uit is). De zoemer
zal 3 minuten een geluid laten horen als de tijdsperiode die u heeft
ingesteld bereikt is. Druk op de Aan/uitknop om de zoemer uit te
zetten.
NL
Page 52

51
Druk, om de Tuk je ti mer uit te zetten voordat de tijd om is, eenvoudig
op de Tuk je timerknop en laat he m weer los. zal va n het scherm
verdwijnen.
U kan de tuk je ti merti jd ook opslaa n in het geheugen door la ng
op de V ooraf instelknop 1-5 te drukken voor de ti merti jd die u wenst
(dezelfde procedure dan dat u een station opslaat) en het op te
roepen op het moment dat u het nodig heeft. U ka n bijvoorbeeld in
voorinstelling 1 een 10 minuten timer opslaa n en in voorstelling 2 een
20 minuten timer. Elke volgende keer dat u een korte timertijd nodig
heeft drukt u kort op de timerknop en da n op voorinstelling 1 om een
10 minuten timer te krijgen, op voorinstelling 2 om een 20 minuten
timer te krijgen en zo verder.
Scherm achtergrondverlichting
De scherm achtergrondverlichting zal voor ongeveer 15 seconden
worden aangeschakeld als er op een knop is gedrukt.
Noodzoe mer
Druk, om de Noodzoe mer te a ctiveren, op de Noodzoe mer
knop en laat hem los. Druk nogmaals op de knop en laat he m
weer los om de zoemer uit te schakelen.
Lantaren
Druk op de Lantarenknop en laat hem weer los om de lantaren
aan te zetten.
Noot:
De lantaren zal niet automatisch uitgaa n. Druk nogmaals op de
Lantarenknop om de la ntaren uit te zetten.
Page 53

52
Steun
U zou de meegeleverde steun aan de muur kunnen bevestigen
m.b.v . het dubbelzijdig plakband aan de a chterka nt om de ra dio
op te hangen.
NL
Page 54

53
Multifunctioneel handvat
U zou m.b.v . het multifunctionele ha ndvat de radio op kunnen ha ngen
of kunnen dragen als hij niet in de badkamer wordt gebruikt.
Draagriem
U zou m.b.v . de draagriem de radio op kunnen ha ngen of kunnen
dragen als hij niet in de badkamer wordt gebruikt.
Page 55

54
Specificatie s
Vermogenvereisten
Hoofd via AC a d apter (niet meegeleverd)
AC 230 V, 50 Hz of AC 120 V, 60 Hz alleen /DC 3 V 300 mA
Batterijen: 2 x UM1 (D maat, LR20)
Levensduur batterij:
Ongeveer 120 luister uren bij 4 uur per dag op een normale
geluidssterkte met gebruik van alkaline batteri jen.
Frequentie:
FM 87.50 – 108 MHz
AM (MW) 522 – 1629 kHz of 520 – 1710 kHz
Circuit kenmerken
Luidspreker: 4,5 cm, 8 ohm volledig bereik, waterbestendig
Vermogen uitvoer: 500 mW
Antennesysteem:
FM Draadantenne
AM ( MW ) Staafa ntenne va n Ferriet kern
NL
Page 56

55
Page 57

56
Funktionen
1. Eingebaute MW/UKW-Antenne für idealen Emp fa ng
2. 10 Senderspeicher (jeweils 5 pro Frequenzband)
3. Wa sserresistent na ch JIS7 Norm
4. Automatische Suchfunktion
5. Große s, einfa ch zu lesende s LCD-Display
6. Einfach benutzbare Kla mmer und Aufhängung
7. Batteriestandsa nze ige
8. Uhr
9. Einstellbare Schlaffunktion
10. Einstellbare Schlummerfunktion
1 1. LED-Notleuchte (Taschenla mpe)
12. Notsummer
13. Wa sserre sistente 3-Zoll-Lautsprecher
D
Page 58

57
Bedienelemente
LCD-Display
Senderspeicher (Speicherplatz 3 auch für Einzelschrittsuche)
Schlummertaste
AN-/Ausschalter
Frequenzband und Zeite instellungsta ste
Sendersuche
Lautstärkeregler
Lautsprecher
Gleichstromeingang
Aufhängring
Notsummer
Taschenla mpentaste
Taschenlampe
Mehrzweckgriff
Klammerhalter
Batteriefach
UKW-Antennenfa ch
LCD-Display
Batteriestand
Lautstärke
Automatische Abschaltung
Schlummereinstellung
Speicherplatznummer und Sekunden
Zeit und Frequenz
Bandanzeige
1
2
A
B
C
D
E
F
G
3
4
6
5
8
7
10
9
16
15
17
12
11
14
13
Page 59

58
Batterien einlegen
1. Legen Sie da s Ra dio mit der Vorderseite nach unten auf eine
weiche Unterlage.
2. Haken Sie wie in der Abbildung gezeigt die Klammer aus und
heben Sie die Batteriefachabde ckung heraus.
3. Legen Sie 2 Batterien des T yps D/UM-1/LR20 ein.
4. Setzen Sie die Batteriefacha bdeckung wieder zurück.
5. Schwache Batterien können dadurch erk a nnt werden, da ss der
Ton “stottert” Die Batterien sollten gewechselt werden, wenn die
Batteriestandanzeige blinkt und ein E im Display a ngeze igt
wird.
6. W enn da s Ra dio für längere Zeit nicht benutzt wird,
wird empfohlen die Batterien aus dem Radio zu nehmen.
D
Page 60

59
Benutzung des Netzadapters
(nicht im Lieferumfang)
1. Entfernen Sie Schutzabdeckung vom Gleichstromeinga ng a n
der linken Seite des Radios.
2. Stecken Sie den Adapterstecker in den Gleichstromeinga ng.
3. Stecken Sie da s Netzteil in eine Steckdose. W enn das Netzteil
benutzt wird, werden die Batterien automatisch deaktiviert.
Da s Netzteil sollte aus der Ste ckdose herausgezogen werden,
wenn da s Radio nicht benutzt wird.
Hinweis:
Aus Sicherheitsgründen darf das Radio im Ba dezi mmer nicht
mit Netzteil betrieben werden. Benutzen Sie nur Batterien.
Einstellen der Uhrze it
1. Die Uhr wird aktiviert, wenn die Batterien eingelegt werden oder
da s Radio über e in Netzteil an eine Steckdose a ngeschlossen ist.
Im Display wird “ - : - - “ a ngezeigt.
2. Die Zeit ka nn einge stellt werden, wenn da s Ra dio ausgeschaltet
ist.
3. Halten Sie die Zeiteinstellungstaste für ca. 2 Sekunden
gedrückt bis die Stundenziffern im Display mit einem
T on signal aufblinken.
4. Betätigen Sie die Sendersuchta sten zum Einstellen der
Stundenuhrzeit.
5. Betätigen Sie die Zeiteinstellungstaste und die Minutenziffern
blinken im Display auf.
6. Betätigen Sie die Sendersuchta sten zum Einstellen der
Minutenuhrzeit.
7. Betätigen Sie die Zeiteinstellungstaste, um die Zeiteinstellung
abzuschließen. Die Sekundena nzeige fängt a n zu laufen.
Page 61

60
D
Benutzung des Ra dios
Ihr Radio ist mit drei verschiedenen Wegen zur Sendersuche
versehen: Manuelle Suche, automatische Suche und
Senderspeicher.
Manuelle Suche
1. Betätigen Sie den An-/Ausschalter zum Ein schalten des Radios.
2. Wählen da s gewünschte Frequenzba nd durch wiederholte
Betätigung der Frequenzbandtaste. Für besseren Empfang des
UKW-Ba nds, ziehen Sie bitte die UK W-Drahtantenne im
Batteriefach heraus. Für einen be sseren MW-Empfa ng,
richten Sie bitte da s Radio entspre chend aus.
3. Betätigen Sie die die Sendersuchta sten zum Verändern der
Frequenz in folgenden Schritten:
UKW: 100 oder 200 kHz (US-V ersion)
50 oder 100 kHz (Standardversion)
MW: 9 oder 10 kHz
4. W enn das Ende des jeweiligen Frequenzbandes erre icht wird,
fährt da s Radio mit der gegenüberliegenden Se ite de s
Frequenzbands fort.
5. Betätigen Sie die Lautstärkereglerta sten zum Einstellen der
gewünschten Lautstärke.
6. Benutzen Sie den An-/Ausschalter zum Ausschalten de s Radios.
Im Display wird OFF a ngeze igt.
Page 62

61
Automatische Sendersuche
1. Betätigen Sie den An-/Ausschalter zum Einschalten des Radios.
2. Betätigen Sie die Frequenzbandtaste zur Auswa hl des
gewünschten Frequenzbands. Richten Sie da nn die
Teleskopantenne (UK W) aus oder drehen Sie das Radio in
eine geeignete Position (MW).
3. Halten Sie eine der Sendersuchta ste für mehr als eine halbe
Sekunde gedrückt, um mit der automatischen Suche zu beginnen.
4. Das Radio wird mit der Suche beginnen und automatisch stoppen,
wenn der Sender mit ausreichender Sendestärke gefunden wird.
5. W enn das Ende des jeweiligen Frequenzbande s erreicht wird,
fährt da s Radio mit der gegenüberliegenden Se ite de s
Frequenzbands f ort.
6. Betätigen Sie die Lautstärkereglerta sten zum Einstellen der
gewünschten Lautstärke.
7. Benutzen Sie den An-/Ausschalter zum Ausschalten de s Radios.
Im Display wird OFF angezeigt.
Speicherplatzsuche
Speichern von Sendern
Für jedes Frequenzband stehen 5 Spe icherplätze zur V erfügung.
1. Betätigen Sie den An-/Ausschalter zum Einschalten des Radios.
2. Suchen Sie den gewünschten Sender mithilfe der beiden weiter
oben beschriebenen Methoden.
3. Halten Sie die gewünschte Senderta ste gedrückt bis e in Signalton
hörbar wird (mehr als 2 Sekunden). Die Speicherplatznummer
erscheint zusa mmen mit einem M (für „Memory“) und der Sender
wird unter der gewählten Senderta ste gespeichert.
4. Wiederholen Sie den V orga ng für die verble ibenen Sendertasten.
5. Bereits gespeicherte Sendereinstellungen können mit den oben
beschriebenen Methoden überschrieben werden.
Page 63

62
Abrufen voreinge stellter Sender
1. Betätigen Sie den An-/Ausschalter zum Ein schalten des Radios.
2. Wählen da s gewünschte Frequenzba nd durch wiederholte
Betätigung der Frequenzbandtaste.
3. Betätigen Sie die gewünschte Senderta ste und
Speicherplatznummer und Senderfrequenz erscheinen im Display.
V erändern der Suchschrittweite
In Europa und anderen Teilen der Erde liegen die Einstellschritte
für da s MW-Ba nd be i 9kHz und in den USA be i 10 kHz.
Die UKW-Suchschrittweite k a nn entweder auf 50 oder 100 kHz
(Standardversion) bzw. 100 oder 200 kHz (US-Version) betragen.
D
Page 64

63
Verändern der Suchschrittwe ite
1. V ergewissern Sie sich, dass das Radio a bge schaltet ist.
2. Halten Sie die Step/Preset-Ta ste 3 für 2 Sekunden gedrückt.
Im Display wird die a ktuelle UKW -Suchschrittweite a ngezeigt.
Halten Sie die Step/Preset-Taste 3 für we itere 7 Sekunden
gedrückt. Ein Signalton ertönt und da s Display fängt a n zu blinken.
3. Betätigen Sie die Sendersuchta sten zum Einstellen der
Suchschrittweite.
4. Betätigen Sie die Step/Preset-Taste 3 zur Anzeige von der
MW-Suchschrittweise. Das Display fängt an zu blinken und
AM wird zusammen mit der aktuellen Suchschrittweite angeze igt.
5. Betätigen Sie die Sendersuchta sten zum Einstellen der
MW-Suchschrittweite.
6. Beenden Sie die Einstellung durch Betätigung der
Step/Preset-Taste 3.
Page 65

64
Schlaffunktion – Automatische
Selbstabschaltung
Die Schlaffunktion schaltet da s Ra dio automatisch na ch Ablauf der
eingestellen Warteze it ab.
1. Halten Sie den An-/Ausschalter gedrückt. Im Display werden die
verfügbaren Abschaltzeiten na chein a nder a ngezeigt (50-40-30 20-10-60-50). La ssen Sie die Ta ste los, wenn die gewün schte
Zeiteinstellung im Display erscheint. Im Display wird AUT O OFF
angezeigt und das Radio beginnt mit der Wiedergabe des zuletzt
benutzten Senders.
2. Zum Abschalten der Schlaf funktion, betätigen Sie bitte den
An-/Ausschalter . AUTO OFF wird angezeigt und da s Ra dio
geht aus.
Schlummerfunktion
Sie können die Zeit der Schlummerfunktion entweder wenn da s
Radio a n oder aus ist einstellen.
Betätigen Sie die Schlummerta ste . Im Display ersche int und
die zuletzt eingestellt Schlummerzeit wird a ngezeigt. Betätigen
Sie die Sendersuchta ste zur Auswahl der neuen Schlummerze it.
Betätigen Sie die Schlummerta ste zum Übernehmen der neuen
Einstellung. Die Schlummerfunktion fängt an mit e inem Countdown.
Im Display wird zusammen mit der verbleibenen Schlummerzeit
angezeigt (wenn das Radio ausgeschaltet ist). Der Summer ertönt
für 3 Minuten sobald da s Ende der Schlummerzeit erre icht wird.
Betätigen Sie den An-/Ausschalter zum Ausschalten de s Summers.
D
Page 66

65
Zum Ausschalten der Schlummerfunktion vor Ablauf der
Schlummerzeit, betätigen Sie einfa ch die Schlummerta ste.
wird vom Display gelöscht.
Sie können die Schlummerzeit ebenfalls durch langes
Gedrückthalten der Senderta sten 1-5 speichern (entspricht dem
Speichern von Sendern) und dann jederzeit be i Bedarf abrufen.
Sie können z.B. 10 Minuten im Speicher 1 einstellen und 20 Minuten
in Speicher 2. Jedesmal wenn Sie dann die Spe ichertaste
1 betätigen, wird die Schlummerzeit auf 10 Minuten gestellt,
und wenn Sie die Speicherta ste 2 betätigen wird die Schlummerze it
auf 20 Minuten gestellt usw.
Hintergrundbeleuchtung
Die Hintergrundbeleuchtung wird bei beliebiger Ta stenbetätigung
für ca. 15 Sekunden angeschaltet.
Notsummer
Zum Aktivieren de s Notsummers, betätigen Sie die
Notsummerta ste . Betätigen Sie die Ta ste erneut, um den
Summer wieder auszuschalten.
Taschenlampe
Betätigen Sie die Taschenlampentaste , um die Ta schenlampe
anzuschalten.
Hinweis:
Die Taschenlampe geht nicht automatisch aus. Zum Abschalten der
Taschenla mpe, betätigen Sie die Taschenlampentaste bitte erneut.
Page 67

66
Halterung
Sie können Sie die mitgelieferte Halterung mithilfe des
doppelseitigen Klebebands zur Aufhängung des Radios an einer
Wa nd montieren.
D
Page 68

67
Mehrzweckgriff
Durch Benutzung des Mehrzweckgriffs können Sie das Radio
aufhängen oder außerhalb des Badezimmer tragen.
Trageriemen
Durch Benutzung des T rageriemens können Sie das Radio
aufhängen oder außerhalb des Badezimmer tragen.
Page 69

68
Technische Daten
Stromnetzanforderungen
Netzada pters (nicht im Lieferumfa ng)
nur AC 230V, 50 Hz oder AC 120V, 60 Hz / DC 3V 300 mA
Batterien: 2 x UM1 (D, LR20)
Batteriebenutzungsdauer:
ca. 120 Stunden Hörzeit bei 4 Stunden pro Tag bei normaler
Lautstärke mit alkalischen Batterien.
Frequenzbereich:
UKW 87,50 – 108 MHz
MW 522 – 1629 kHz oder 520 – 1710 kHz
Schaltkreismerkmale
Lautsprecher: 3 Zoll, 8 V ollbereich, wasserresistent
Ausgangsleistung: 500 mW
Antennensystem:
FM Antennendra ht
MW Ferritstab
D
 Loading...