

Page 1

HDR-1
User Manual
Page 2

HD Radio™ Technology Manufactured Under License From iBiquity Digital Corporation.
iBiquity Digital and the HD Radio and HD logos are registered trademarks of iBiquity Digital
Corporation. HD Radio
TM
is a trademark of iBiquity Digital Corporation. U.S. and Fore ign Patents.
20070524_HDR-1_381QB0SB-A_GB.p65 2007/5/24, ¤U¤È 03:194
Page 3

2
Important Safety Instructions
1. Read these instructions.
2. Keep these instructions.
3. Heed all warnings
4. Follow all instructions.
5. Do not use this apparatus near water.
6. Clean only with dry cloth.
7. Do not block any ventilation openings. Install in accordance with the
manufacturer’s instructions.
8. Do not install near any heat sources such as radi ators, heat
registers, stoves, or other apparatus (including amplifiers) that
produce heat.
9. Protect the power cord from being walked on or pinched particularly
at plugs, convenience receptacles, and the point where they exit
from the apparatus.
10. Only use attachments/acce ssories specified by the manufacturer.
11. Use only with the cart, stand, tripod, bracket or table specified by
the manufacturer or sold with the apparatus. When a cart is used,
use caution when moving the cart/apparatus combination to avoid
injury from tip-over.
12. Unplug this a pparatus during lightning storms or when unused f or
long periods of time.
13. Refer all servicing to qualified service personnel. Servicing is
required when the apparatus has been damaged in a ny way,
such as power-supply cord or plug is damaged, liquid has been
spilled or objects have fallen into the apparatus, the apparatus has
been exposed to rain or moisture, does not operate normally,
or has been dropped.
14. To reduce the Risk of Fire or Electric Shock. Do not expose this
appliance to rain or moisture.
15. The Shock Hazard marking and Associated Graphical Symbol is
provided on the rear panel of unit.
16. Apparatus shall not be exposed to dripping or splashing and no
objects filled with liquids, shall not be placed on the apparatus.
20070524_HDR-1_381QB0SB-A_GB.p65 2007/5/24, ¤U¤È 03:195
Page 4

3
Unit Controls
(Front)
1.2.LCD display
Standby LED indicator
Remote Control Sensor
Power and Control knob
3.
4.
20070524_HDR-1_381QB0SB-A_GB.p65 2007/5/24, ¤U¤È 03:196
Page 5
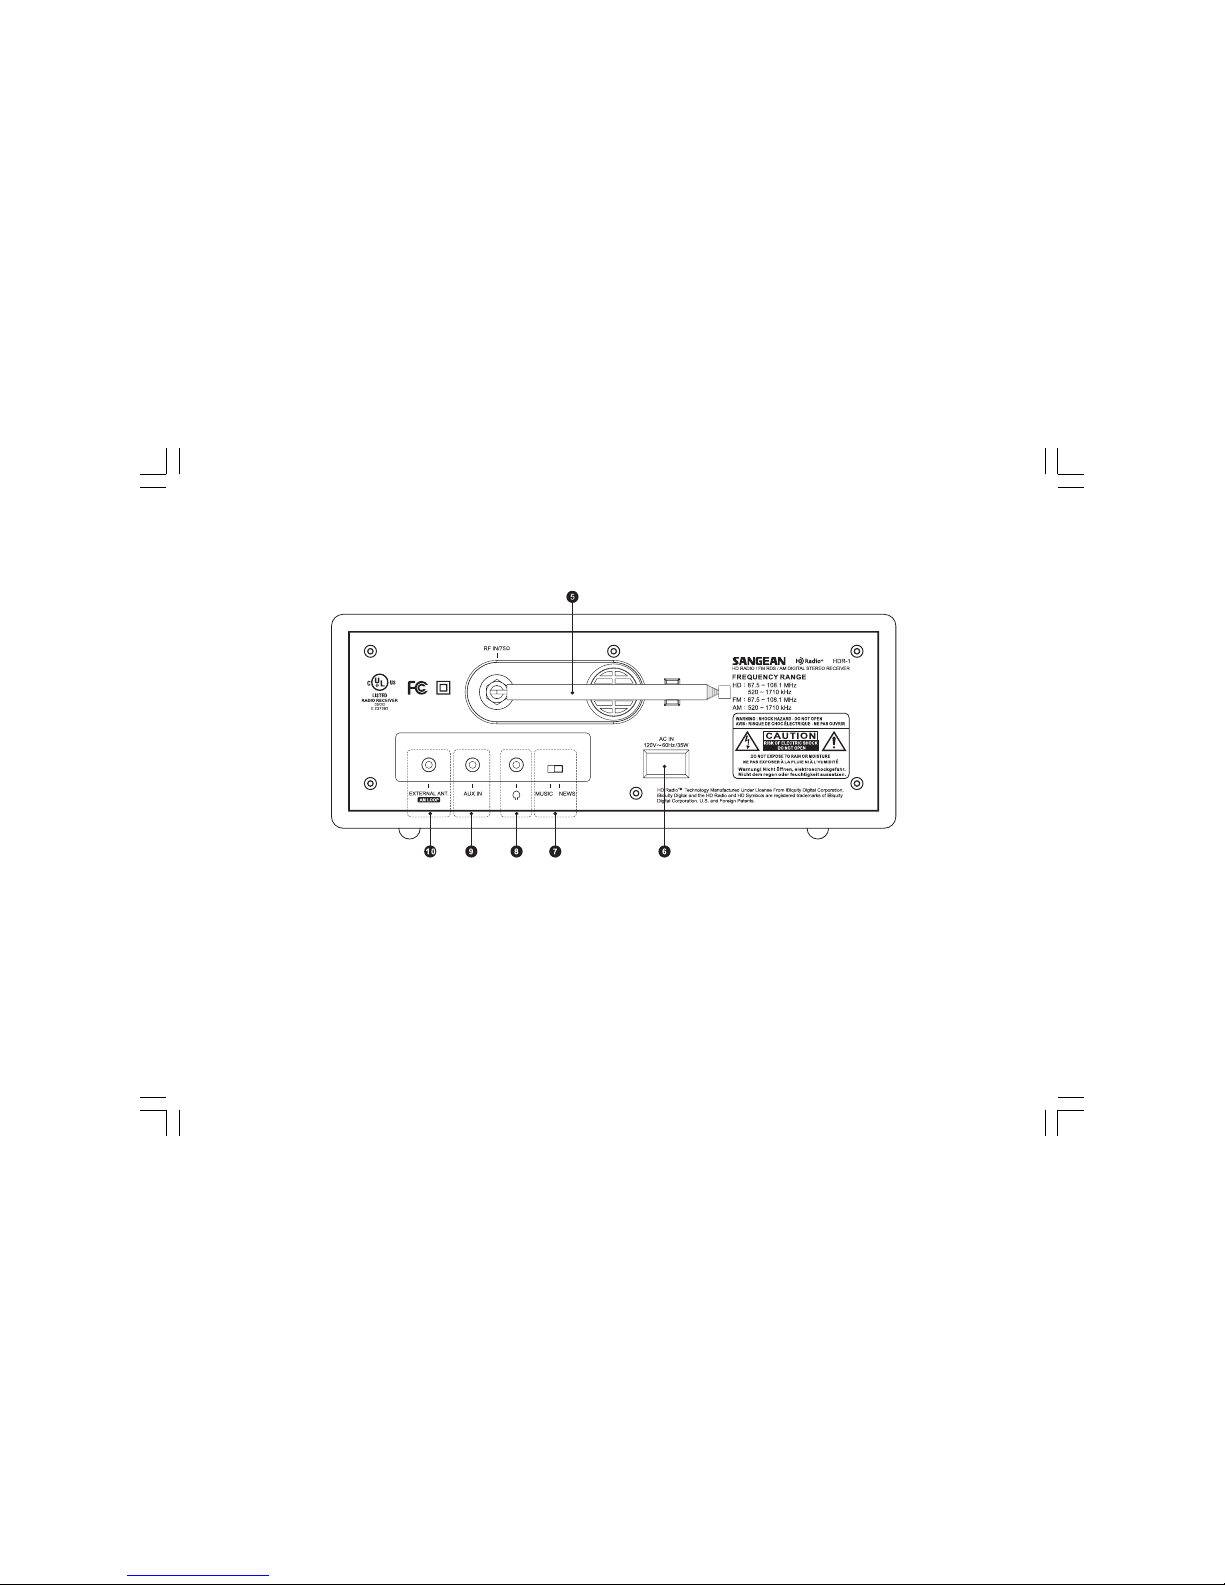
4
Unit Controls
(Rear)
5.
6.
7.
FM T elescopic Antenna
AC power cord socket
Music and News selection switch
Headphone socket
Aux In socket
External AM Loop antenna socket
8.
9.
10.
20070524_HDR-1_381QB0SB-A_GB.p65 2007/5/24, ¤U¤È 03:207
Page 6
5
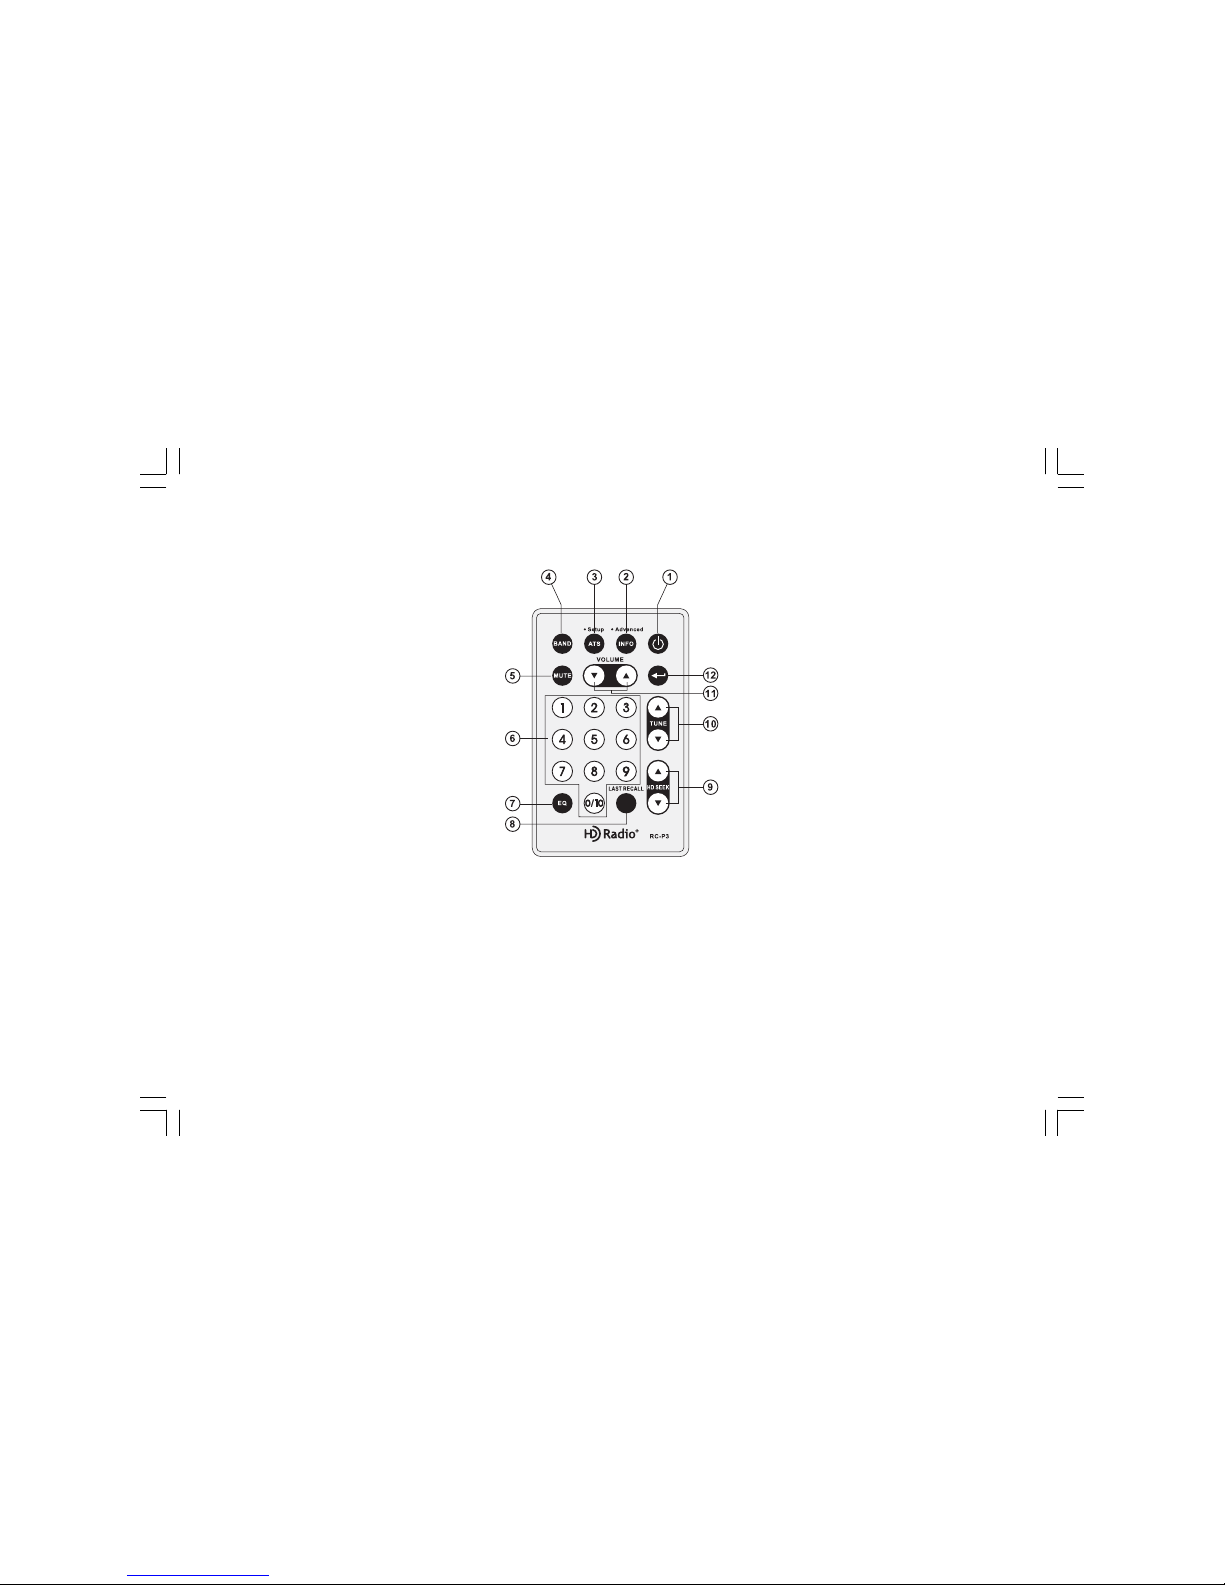
Remote Control
Power
Information button
ATS and Setup button
Band selection
Mute button
Number buttons
Audio Equalizer selection
Last station recall
HD Radio Seek button
Tuning Control
Volume Control
Execution button
1.
2.
3.
4.
5.
6.
7.
8.
9.
10.
11.
12.
20070524_HDR-1_381QB0SB-A_GB.p65 2007/5/24, ¤U¤È 03:208
Page 7
6
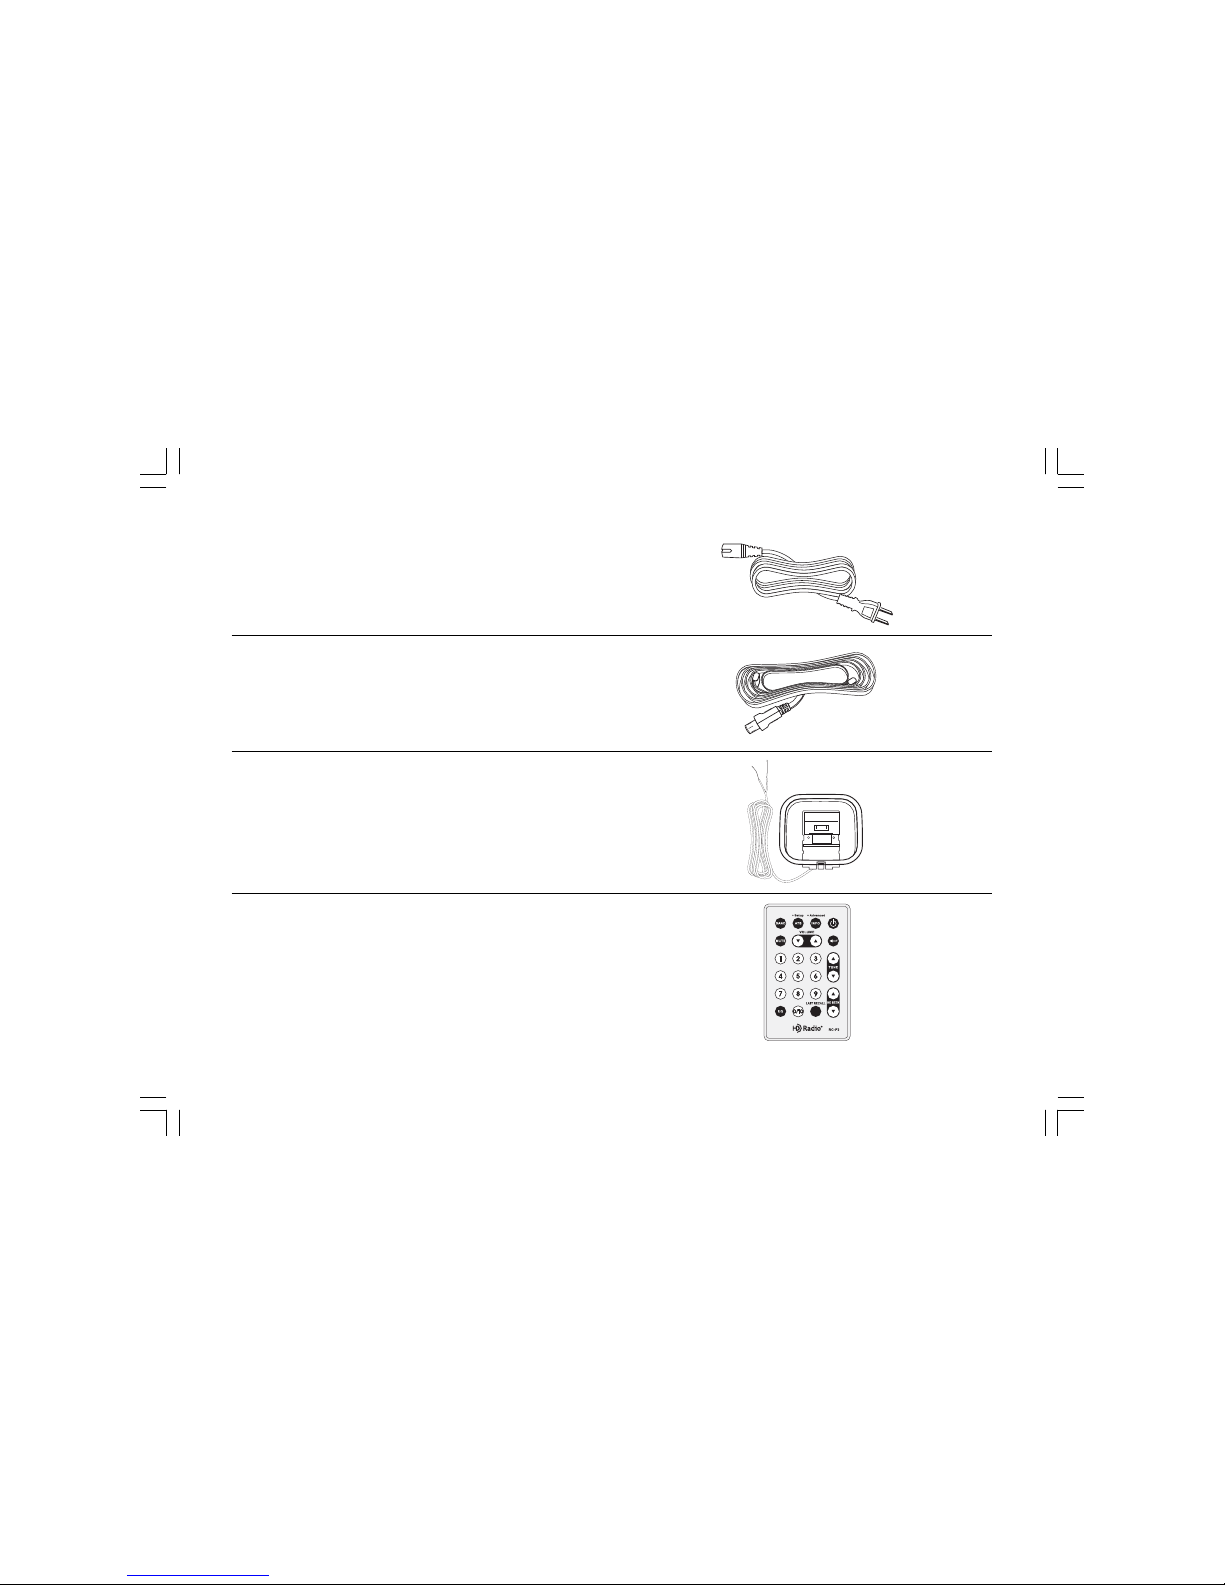
Accessories
Detachable power Cord x 1
FM Dipole Antenna x 1
AM Loop antenna x 1
Remote control unit x 1
Instruction manual x 1
Warranty card x 1
20070524_HDR-1_381QB0SB-A_GB.p65 2007/5/24, ¤U¤È 03:209
Page 8
7
Getting started
First find a location for your new HD radio,
1. The FM telescopic antenna is already installed. Dipole Antenna and
installing tool are in cluded for better reseption.
2. Connect the AM loop a ntenna into extern al AM loop antenna terminal
on the back of the unit.
3. Plug the AC power cord into the socket located on the back of the
unit. Please ensure that the plug is pushed fully into the socket.
4. Plug the other hand of the AC power cord into a wall socket and
switch on the wall socket if needed. (NOTE: You may hear a loud
“POP” when power is connected. Do not be alarmed.)
Important:
1. The AM loop antenna should be located at least 50 cm away
from the receiver to avoid possible interference.
2. Do not touch Power/Control knob on the radio while plug in
AC power.
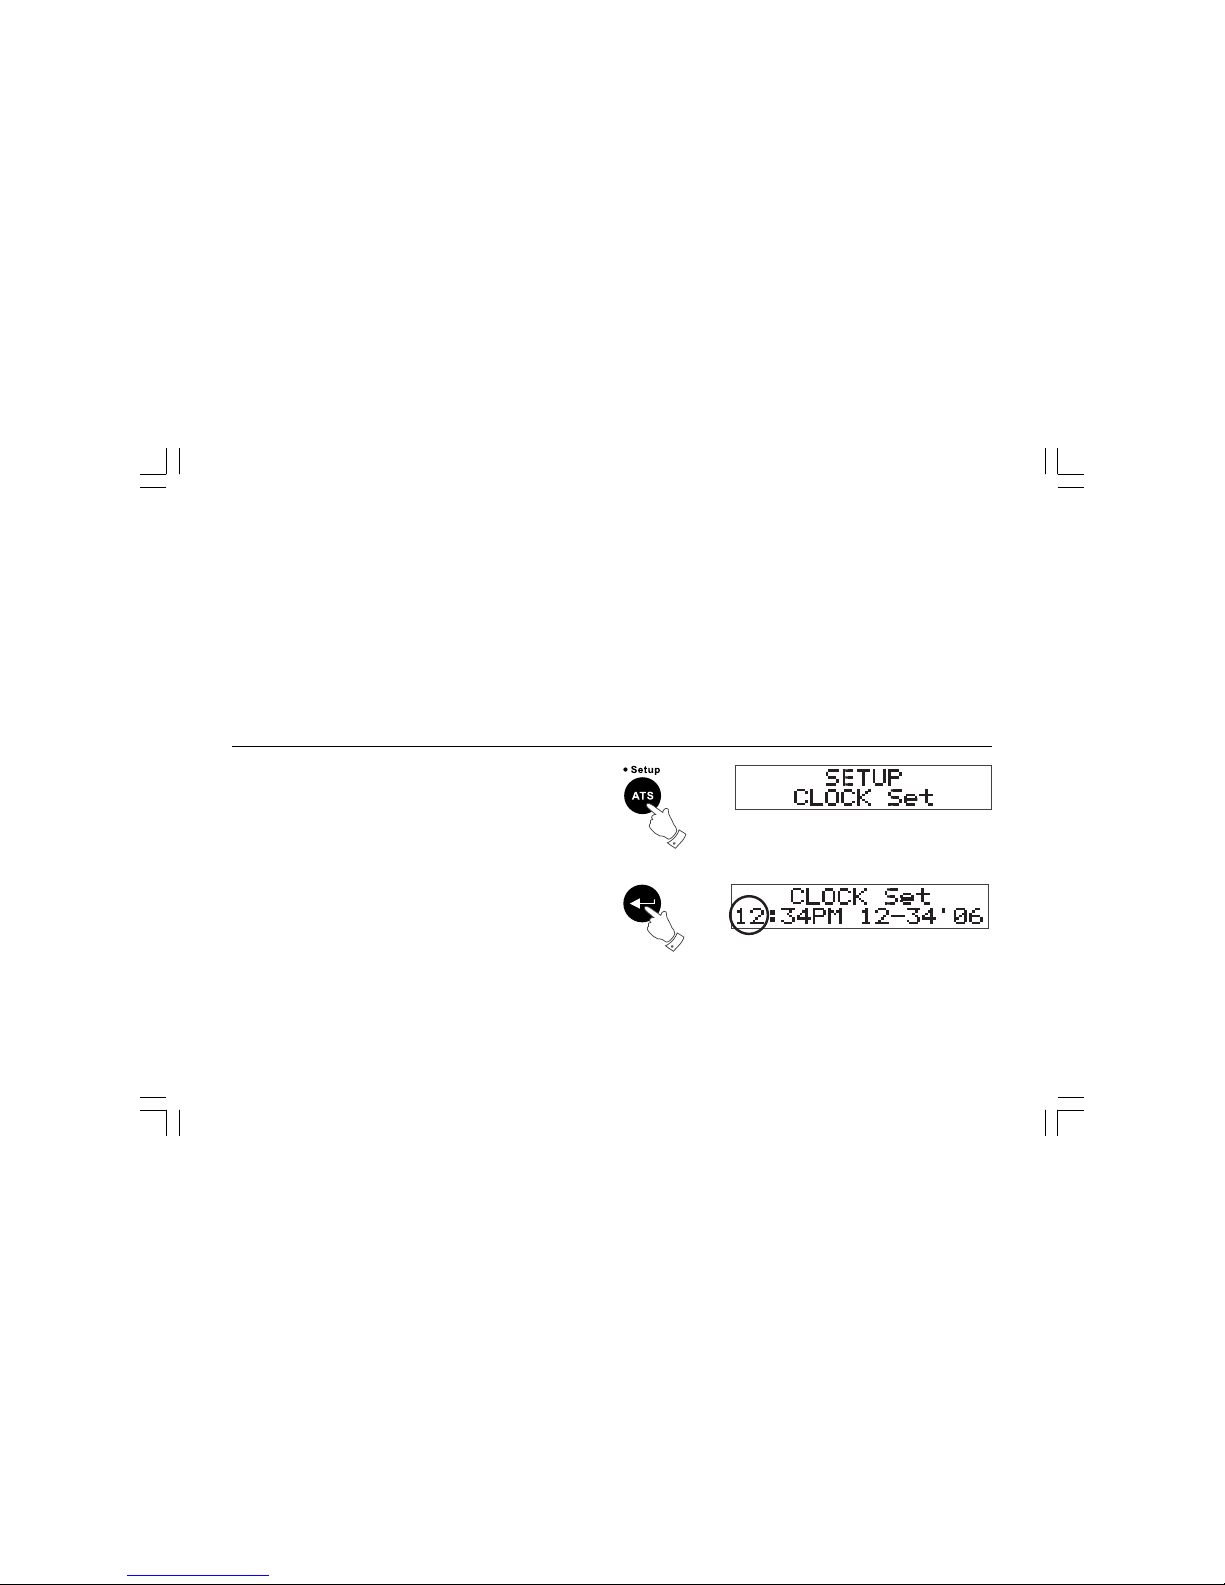
Setting the clock
Clock setting can be done when the receiver is on or in Standby Mode
(power off).
1. Press “Enter” or “Power /Control knob” button. The display should
not read “Setup Clock Set”.
2. Press “Enter” or “Power /Control knob” button again. Display should
read “Clock Set” and the hour should begin blinking.
3. Press “Tuning” Up/Down or rotate “Power /Control knob” to select
Hour then press “Enter” or “Power /Control knob” button again to
complete hour setting.
4. Use same procedures to complete minute, AM or PM, date,
month and year. Press “Enter” or “Power /Control knob” button
to complete Clock Set.
20070524_HDR-1_381QB0SB-A_GB.p65 2007/5/24, ¤U¤È 03:2010
Page 9

8
Radio Controls
1. To turn the radio on press the “Power” button on the remote control
or hold “Power /Control knob” on the unit for 2 seconds.
2. To turn the radio off press the “Power” button on the remote control
or hold “Power /Control knob” on the unit for 2 seconds. (NOTE: In
standby mode, the tuner will display the time, dim the backlight
(in 12 seconds) and standby LED will be on.
3. To access or select the menu option press and release the
Power/ Control knob on the unit or “Enter” button on the remote.
4. To navigate through the menu options rotate the “Power/Control knob”
or press “Tuning” Up/Down button.
5. During normal operation (not in the menu tree) the “Power/Control
knob” will control volume.
Selecting the radio band/Auxiliary Input
Using the remote, press the “BAND” button. (Note: When you
switch from one band to another, the radio will return to the last
tuned station used in the band.)
Using the Unit:
1. Press “Power/Control knob” and cycle through the menu options
by rotating the “Power/Control knob” until you are at “Band”
menu option.
2. Press “Power/Control knob to select. Repeat until desired band
is reached.
Note:
When AUX IN socket behind the unit is connected, Display will cycle
through AM FM AUX IN AM …………
Manual Tuning
Using Remote:
1. Press the Tuning rocker switch UP or DOWN on the remote control
to select a radio station. Tuning step per press for AM is 10 kHz
and 100 kHz for FM band.
Using the Unit:
1. Press “Power/Control knob” and cycle through the menu options by
rotating the “Power/Control knob” until you are at “Tune” menu option.
2. Press “Power/Control knob to select.
3. Rotate “Power/Control knob” until you reach desired station
frequency.
20070524_HDR-1_381QB0SB-A_GB.p65 2007/5/24, ¤U¤È 03:2011
Page 10

9
Volume Control
Using the Remote:
1. Press “Volume” Up/Down button until you reach desired volume.
Using the Unit:
1. Rotate the “Power/Control knob” unit desired volume is reached.
Mute
Using the Remote:
1. Press MUTE button on the remote control to mute the radio.
Press the MUTE button again to turn on the volume.
Using the Unit:
1. Rotate “Power/Control knob” until volume is muted.
Audio Equalizer (EQ)
Using the Remote:
1. Press the “EQ” button until desired EQ setting is reached.
Using the Unit:
1. Press “Power/Control knob” and cycle through the menu options by
rotating the “Power/Control knob” until you are at “EQ” menu option.
2. Press “Power/Control knob” to select.
3. Rotate “Power/Control knob” until you reach desired preset
EQ option.
Custom “BASS” and “TREBLE” Settings
Using the Remote:
1. Press “EQ” button until “Bass” or “Treble” options are chosen.
2. Press “Enter” button to select.
3. Press “Tuning” Up/Down button until desired level is reached.
4. Press “Enter” button to save setting.
5. Repeat as necessary.
Using the Unit:
1. Press “Power/Control knob” and cycle through the menu options by
rotating the “Power/Control knob” until you are at “EQ” menu option.
2. Press “Power/Control knob” to select.
3. Rotate “Power/Control knob” until you reach “Bass” or “Treble”
EQ option.
4. Press “Power/Control knob” to select.
5. Rotate “Power/Control knob” until desired levels are reached.
6. Press “Power/Control knob” to select settings.
7. Repeat as necessary.
Music/News selection switch
Music/News selection switch is located on the back of the unit. Switch
Music/News selection to Music position when you wish to use “EQ”
settings. Switch it to News position when you listen to news programs.
Note:
The EQ setting can’t be used when the Music/News selection is in
News position.
HD SEEK function
Using the Remote:
1. Press the “HD SEEK” Up/Down button to seek the next frequency
broadcasting in a usable HD Radio signal.
Using the Unit:
1. Press “Power/Control knob” and cycle through the menu options
by rotating the “Power/Control knob” until you are at “HD SEEK”
menu option.
2. Press “Power/Control knob” to select.
3. Rotate “Power/Control knob” to select “Up” or “Down” direction.
4. Press “Power/Control knob” to select.
20070524_HDR-1_381QB0SB-A_GB.p65 2007/5/24, ¤U¤È 03:2012
Page 11

10
Listening to HD Radio
When HD Radio station is found, display will show,
1. Station call sign.
2. The number of the multicasting program (1= main program).
3. The total number of HD Radio program services and HD Radio mark.
4. The preset number of this program.
5. The radio band.
Receiving & Tuning Multicast Stations
When the radio is tuned to an HD compatible station and it determines
that one or more Multicast station are available the station call letter
will be followed by a number designator indicating the number of
available Multicast stations.
Using the Remote:
1. Press “Tuning” Up/Down button to navigate through the multicast
stations.
Using the Unit:
1. Press “Power/Control knob” and cycle through the menu options by
rotating the “Power/Control knob” until you are at “Tune” menu option.
2. Press “Power/Control knob” to select.
3. Rotate “Power/Control knob” to navigate to the next multicast signal.
NOTE:
When navigating to a different frequency, wait for the HD signal to lock
before navigating through the additional multicast signals. The lock will
be achieved when the HD signal is no longer blinking and the station
call letters will have a number following it, i.e. KROQ-1 2 HD FM.
20070524_HDR-1_381QB0SB-A_GB.p65 2007/5/24, ¤U¤È 03:2013
Page 12

11
Display Modes (INFO)
There are several display modes. Please refer to the HDR-1 Menu
Structure Table for a complete listing and description of these
display modes.
Using the Remote:
1. Press “Info” button.
2. Continually press “Info” button or press “Tune” Up/Down button to
navigate through available display modes.
Using the Unit:
1. Press “Power/Control knob” and cycle through the menu options by
rotating the “Power/Control knob” until you are at “Info” menu option.
2. Press “Power/Control knob” to select.
3. Rotate “Power/Control knob” to navigate through the available
display modes.
4. Press “Power/Control knob” to select display mode.
20070524_HDR-1_381QB0SB-A_GB.p65 2007/5/24, ¤U¤È 03:2014
Page 13

12
Advanced Information
There are several Advanced Display modes. Please refer to the HDR-1
Menu Structure Table for a complete listing and description of these
display modes.
Using the Remote:
1. Press and hold “Info” button.
2. Continually press “Info” button to navigate through available
display modes.
Using the Unit:
1. Press “Power/Control knob” and cycle through the menu options
by rotating the “Power/Control knob” until you are at “Ad. Info”
menu option.
2. Press “Power/Control knob” to select.
3. Rotate “Power/Control knob” to navigate through the available
display modes.
4. Press “Power/Control knob” to select display mode.
20070524_HDR-1_381QB0SB-A_GB.p65 2007/5/24, ¤U¤È 03:2015
Page 14

13
Hybrid Seek
Using the Remote:
1. Press the “SEEK” Up/Down button to seek the next frequency
broadcasting in a usable radio signal.
Using the Unit:
1. Press “Power/Control knob” and cycle through the menu options
by rotating the “Power/Control knob” until you are at “SEEK”
menu option.
2. Press “Power/Control knob” to select.
3. Rotate “Power/Control knob” to select “Up” or “Down” direction.
4. Press “Power/Control knob” to select.
20070524_HDR-1_381QB0SB-A_GB.p65 2007/5/24, ¤U¤È 03:2016
Page 15

14
ATS – Auto Tuning System
The ATS function will scan through the selected band frequency
for all usable signals. It will create an easily navigated table for all
detected signals.
Using the Remote:
1. Press and hold “ATS” button to activate menu.
2. Press “Enter” button to activate frequency scanning.
3. Allow radio to finish scanning. Once completed you can navigate
through the available stations using the “Tune” Up/Down buttons.
To navigate to the multicast stations using ATS function press the
“Enter” button.
4. To recall ATS table navigation press “ATS” button.
Using the Unit:
1. Press “Power/Control knob” and cycle through the menu options
by rotating the “Power/Control knob” until you are at “SETUP”
menu option.
2. Press “Power/Control knob” to select.
3. Rotate “Power/Control knob” to cycle through the menu options until
you reach the “ATS SCAN” menu option.
4. Press “Power/Control knob” to select.
5. Allow radio to finish scanning. Once completed you can navigate
through the available stations by rotating the “Power/Control knob”.
To navigate to the multicast stations using ATS function press the
“Enter” button.
6. To recall the ATS Table press “Power/Control knob” and cycle
through the menu options until you reach the “ATS Table’
menu option.
7. Press “Power/Control knob” to select.
8. You can begin navigating as described above.
NOTE:
While using the ATS Table, the “Power/Control knob” will no longer
control volume. You must wait until the unit returns to normal control
function, indicated by displaying the previously selected display mode.
20070524_HDR-1_381QB0SB-A_GB.p65 2007/5/24, ¤U¤È 03:2017
Page 16

15
Setting and Recalling Memory Presets
Preset stations
There are 10 preset stations each for AM and FM.
Setting Memory Presets
Using the Remote:
1. Press “Band” button to select desired band.
2. Hold corresponding numbered button for 2 seconds to store. i.e.
to store 93.1 into memory position 2 press and hold the “#2” button
on the remote.
Using the Unit:
1. Press “Power/Control knob” and cycle through the menu options
by rotating the “Power/Control knob” until you are at “SET PRESET”
menu option.
2. Press “Power/Control knob” to select.
3. Rotate “Power/Control knob” to cycle through the preset options until
you reach the desired location.
4. Press “Power/Control knob” to select.
Recalling Memory Presets
Using the Remote:
1. Press corresponding numbered button to the memory location. i.e.
to recall 93.1 stored in preset number 2 press and release the
“#2” button.
Using the Unit
1. Press “Power/Control knob” and cycle through the menu options by
rotating the “Power/Control knob” until you are at “GO-TO PRESET”
menu option.
2. Press “Power/Control knob” to select.
3. Rotate “Power/Control knob” to cycle through the preset options until
you reach the desired location.
4. Press “Power/Control knob” to select.
Note:
If preset stations are full, display will appear Preset Full. Press another
2 seconds will replace previous memory station. Display will show
“P-X stored”. To give up the preset, simply release the number button
when Preset Full appears, display will return to frequency status.
20070524_HDR-1_381QB0SB-A_GB.p65 2007/5/24, ¤U¤È 03:2018
Page 17

16
Last Recall Station
Using Remote:
1. Press LAST RECALL button on the remote control to recall last
listening station.
Using the Unit:
1. Press “Power/Control knob” and cycle through the menu options
by rotating the “Power/Control knob” until you are at “RECALL”
menu option.
2. Press “Power/Control knob” to select.
Setting Sleep timer
This unit comes with an adjustable sleep timer. This function can only
be activated when the unit is on.
Using the Remote:
1. Press and hold “ATS/Setup” button to activate menu.
2. Continue to press “ATS” button or “Tune” Up/Down button to reach
“SLEEP” menu option.
3. Press “Enter” to select.
4. Press “Tune” Up/Down button to set the desired sleep time.
Using the Unit:
1. Press “Power/Control knob” and cycle through the menu options
by rotating the “Power/Control knob” until you are at “SETUP”
menu option.
2. Press “Power/Control knob” to select.
3. Rotate the “Power/Control knob” until you are at “SLEEP”
menu option.
4. Press “Power/Control knob” to select.
5. Rotate the “Power/Control knob” to set desired sleep time.
6. Press “Power/Control knob” to save setting.
20070524_HDR-1_381QB0SB-A_GB.p65 2007/5/24, ¤U¤È 03:2019
Page 18

17
Auto clock function
If the FM station you are listening to providing RDS service and has
Auto clock time setting feature ( CT ). You can set the clock to be Auto
clock, the clock will be automatically adjusted by the station RDS – CT
service.
Note:
Before you set the Auto clock function, please make sure the
FM station you tune to providing auto clock time setting service.
The Auto clock function can be set only when radio Power is on.
1. Press ATS/SET UP button for more than 2 seconds until display
appears SET UP and flashing ATS.
2. Press and release ATS/SET UP button to get AUTO CLOCK.
3. Press and release Execution button to confirm
AUTO CLOCK setting.
4. The clock time will be auto setting by the FM RDS station
which supports Auto Clock setting ( CT ).
20070524_HDR-1_381QB0SB-A_GB.p65 2007/5/24, ¤U¤È 03:2020
Page 19

18
Turning Alarms On/Off & Setting
This unit features a dual alarm system that can sound either to a
beeping tone or AM/FM or Auxiliary Audio. The easiest way to set
the alarms is when the unit is off, and these instructions are designed
using this option.
Using the Remote:
1. Press and hold “ATS/Setup” button to activate menu.
2. Continue to press “ATS” button or “Tune” Up/Down button to reach
desired alarm (Alarm-1 or Alarm-2).
3. Press “Enter” to select.
4. Press “Tune” Up/Down button to set the desired alarm setting
(Beep, AM, FM, Auxiliary, OFF).
5. If turning the alarm off, then press “Enter” button to save. Any other
setting, continue to next step.
6. Set appropriate time. Hour first, then Minutes, AM/PM then to
frequency options (Daily, Weekdays, Once, Weekends.)
7. Press “Enter” to save selections and proceed to next step.
8. If using Beep Function proceed to step 13.
9. If using AM set the appropriate frequency and continue to step 12.
10. If using FM, set the appropriate frequency and multicast channel
and continue to step 12.
11. If using Auxiliary continue to next step.
12. Set desired volume level.
13. Press “Enter” to save settings.
20070524_HDR-1_381QB0SB-A_GB.p65 2007/5/24, ¤U¤È 03:2021
Page 20

19
Using the Unit:
1. Press “Power/Control knob” and cycle through the menu options
by rotating the “Power/Control knob” until you are at desired alarm
(Alarm-1 or Alarm 2).
2. Press “Power/Control knob” to select.
3. Rotate “Power/Control knob” to select the desired alarm setting
(Beep, AM, FM, Auxiliary, OFF).
4. If turning off, press “Power/Control knob” to save. For all others press
“Power/Control knob” and proceed to next step.
5. Set appropriate time. Hour first, then Minutes, AM/PM then to
frequency options (Daily, Weekdays, Once, Weekends.)
6. Press “Power/Control knob” to save selections and proceed to
next step.
7. If using Beep Function proceed to step 12.
8. If using AM set the appropriate frequency and continue to step 12.
9. If using FM, set the appropriate frequency and multicast channel
and continue to step 12.
10. If using Auxiliary continue to next step.
11. Set desired volume level.
12. Press “Power/Control knob” to save settings.
Note:
Daily – wake up at set alarm time everyday.
Weekdays – wake up only on Monday to Friday at set alarm time.
Weekends – wake up only on Saturday and Sunday at set alarm time.
Once – wake up only once at set alarm time.
Note:
Make sure to set correct clock time and date before setting alarm timer.
The radio can judge which dates are weekends and weekdays only
when the clock and dates are set correctly before alarm setting.
Note:
If you select alarm timer via “Beep” a repeating beep tone will sound.
The alarm beep will increase in volume for 1 minute followed by
1 minute of silence before repeating the cycle (HWS-Humane
Wake System). The HWS alarm will sound for 30 minutes unless
turned off by pressing Power/Standby button.
20070524_HDR-1_381QB0SB-A_GB.p65 2007/5/24, ¤U¤È 03:2022
Page 21

20
Snooze function
The alarm will sound at the selected alarm time. Press any button
except Power (Standby) button can be silence for 5 minutes interval
until alarm is on again (Snooze). This sequence can be repeated
during the alarm period.
Display will appear Snooze and remaining time to next alarm on.
Press Power button to cancel the Snooze.
Canceling alarms
The alarm will activate for 60 minutes (30 minutes for Beep alarm) until
you press Power button to cancel it.
Display backlight brightness control
1. Long press ATS/SET UP button until display appears SET UP and
flashing ATS.
2. Repeatedly press and release ATS/SET UP button to get Backlight.
3. Press Execution button to enter backlight control mode.
4. Press Tuning Up or Down button to adjust display brightness.
5. Press Execution button again to complete setting.
20070524_HDR-1_381QB0SB-A_GB.p65 2007/5/24, ¤U¤È 03:2023
Page 22

21
Change Hour format
You can change 12 hours time format into 24 hours format and
vice versa.
1. Long press ATS/SET UP button until display appears SET UP and
flashing ATS.
2. Repeatedly press and release ATS/SET UP button to get Hour Mode.
3. Press Execution button to enter Hour mode adjustment.
4. Press Tuning Up or Down button to get change required hour format.
5. Press Execution button again to complete setting.
System RESET
System RESET feature will allow you to back to initial factory setting
status of the radio.
1. Long press ATS/SET UP button until display appears SET UP and
flashing ATS.
2. Repeatedly press and release ATS/SET UP button to get
System Reset.
3. Press Execution button to execute system reset.
4. After the reset, the radio will clean all the memory/time/alarm etc.
presets and back to initial factory setting status.
20070524_HDR-1_381QB0SB-A_GB.p65 2007/5/24, ¤U¤È 03:2024
Page 23

22
RESET the radio
If the radio fails to operate correctly i.e. display can’t change according
to the operation. Unplug the AC power cord and wait for 5 seconds
then re-plug. This is to reset the radio for troubleshooting the possible
CPU power down. After RESET the radio, radio will be back to
Standby mode (Power off)
Headphone socket
A 3.5 mm Headphone Socket located on the rear of the radio is
provided for use with either headphones or an earpiece. Inserting a
plug automatically mutes the internal speaker.
Aux in socket
1. Connect a stereo or mono audio source (i.e. iPod, MP3 or CD player)
to the Aux IN socket on the rear of the radio.
2. Switch the band to AUX IN.
3. Select required volume level by pressing Volume Control on the
remote control or rotary the Power/Control knob on the radio.
4. Select required audio equalizer by pressing EQ button.
Specifications
Power Requirement:
Mains AC 120 volts 60 Hz only
Battery (remote control) 3.0V CR 2025 button type
Frequency Coverage:
FM
AM
HD FM
HD AM
Circuit Features:
Loudspeaker
Output Power
Headphone socket
Aux In socket
Aerial System:
FM Telescopic aerial
AM Loop antenna
Dimensions (WxHxD): 290x110x182 mm
Weight: approx. 3 kgs.
63 mm x 2
5 Watts x 2
3.5 mm dia.
3.5 mm dia.
87.50 – 108 MHz
520 – 1710 kHz
87.50 – 108 MHz
520 – 1710 kHz
20070524_HDR-1_381QB0SB-A_GB.p65 2007/5/24, ¤U¤È 03:2025
Page 24

23
Brief User Interface:
NO
0
1
2
3
4
5
6
Button
any keys
Standby
Power OFF
Rotary Knob
Rotary Knob
Band
ATS
Info
action
click
click
click
click
click
long 2s
left
right
click
click
long 2s
click
click
long 2s
status
Alarm ON
Standby /
Power ON
Alarm ON /
Snooze ON
Standby
Power ON
Power ON
Power ON
Power ON
Power ON
Power OFF
Power ON
Power ON
Power ON
Power ON
HDR1 function
Snooze ON
Power ON / Standby toggle
Snooze OFF, Alarm OFF & Power OFF
Power ON
T o go into frequency T une mode to change frequency.
Power OFF
VOLUME
VOLUME
FM AM AUX IN
Clock Set Alarm1 Alarm2 Backlight Hour Mode
System Reset
ATS Sleep Auto clock Set Clock Set Alarm1
Alarm2 Backlight Hour Mode System Reset
Recall ATS table ON / OFF
RT PTY Frequency SSI Audio Mode Graphic EQ
EQ Mode Time/Date Alarm1 Alarm2 Sleep
BER Service mode Station ID UI Version SW Version
HW Version
Note
except StandBy
recall the last station
on last ba nd
recall the last station
on last ba nd
turn left / right
use ENTER to execute
use ENTER to execute
Tune to
change station.
20070524_HDR-1_381QB0SB-A_GB.p65 2007/5/24, ¤U¤È 03:2026
Page 25

24
7
8
9
10
11
12
13
14
15
Preset 0~9
Volume
Mute
Tune
HD seek
Execution
EQ
Last recall
News SW
click
long 2s
click
long hold
click
click
long 0.5 s
click
Click
Click
Click
Click
Power ON
Power ON
Power ON
Power ON
Power ON
Power ON
Power ON
Power ON
Power ON
Power ON
Power ON
Power ON
Power ON
Go to Preset 0~9
Store Preset 0~9
VOLUME
VOLUME fast
T oggle Mute ON / OFF
Tune next frequency step.
Auto seek and go to the next station.
(include analog and HD station s)
Auto seek and go to the next HD station.
cycle through the multicasting progra ms
Enter input
Flat Classical Rock Jazz Pop My Bass My Treble
To go back to the last station (program).
swap Audio EQ to FLAT
On My Bass /
Treble use ENTER &
Tune to adjust
Note:
1. Long 2s(.5s) = press key and hold up to 2 (0.5) seconds.
2. Long hold = just press key and hold.
3. BER = Error Bit Rate.
4. SSI = Signal Strength Indicator.
5. RT = Radio Text.
6. PTY = Program Type.
7. ATS = Auto Tuning System.
20070524_HDR-1_381QB0SB-A_GB.p65 2007/5/24, ¤U¤È 03:2027
 Loading...