


H203D
中文
GB
Version 1

Contents
Installing batteries .................................................................. 4
Using the AC adapter (not supplied) ..................................... 5
Setting the clock .................................................................. 6-7
Updating your radio - DAB ..................................................... 8
Selecting a station - DAB ....................................................... 9
Secondary services - DAB ..................................................... 9
Display modes - DAB .......................................................... 10
Finding new stations - DAB ................................................. 11
Manual tuning - DAB ........................................................... 12
Dynamic range control - DAB .............................................. 13
Manual tuning - FM .............................................................. 14
Auto tuning - FM .................................................................. 15
Scan sensitivity setting ........................................................ 16
Display modes - FM ............................................................. 17
Presetting stations - DAB & FM ........................................... 17
Recalling a preset - DAB & FM ............................................ 18
Sleep function- Auto off ....................................................... 18
Egg timer ............................................................................. 19
Software version .................................................................. 19
System reset ........................................................................ 20
Software upgrade ................................................................ 21
Emergency buzzer ............................................................... 22
Torch .................................................................................... 22
Installing multi - purpose handle / bracket / carrying strap .......
........................................................................................ 22-24
Specications ...................................................................... 25
GB
1
1
2
3
4
5
6
7
89
13
14
16
10
11
12
17
18
15
2
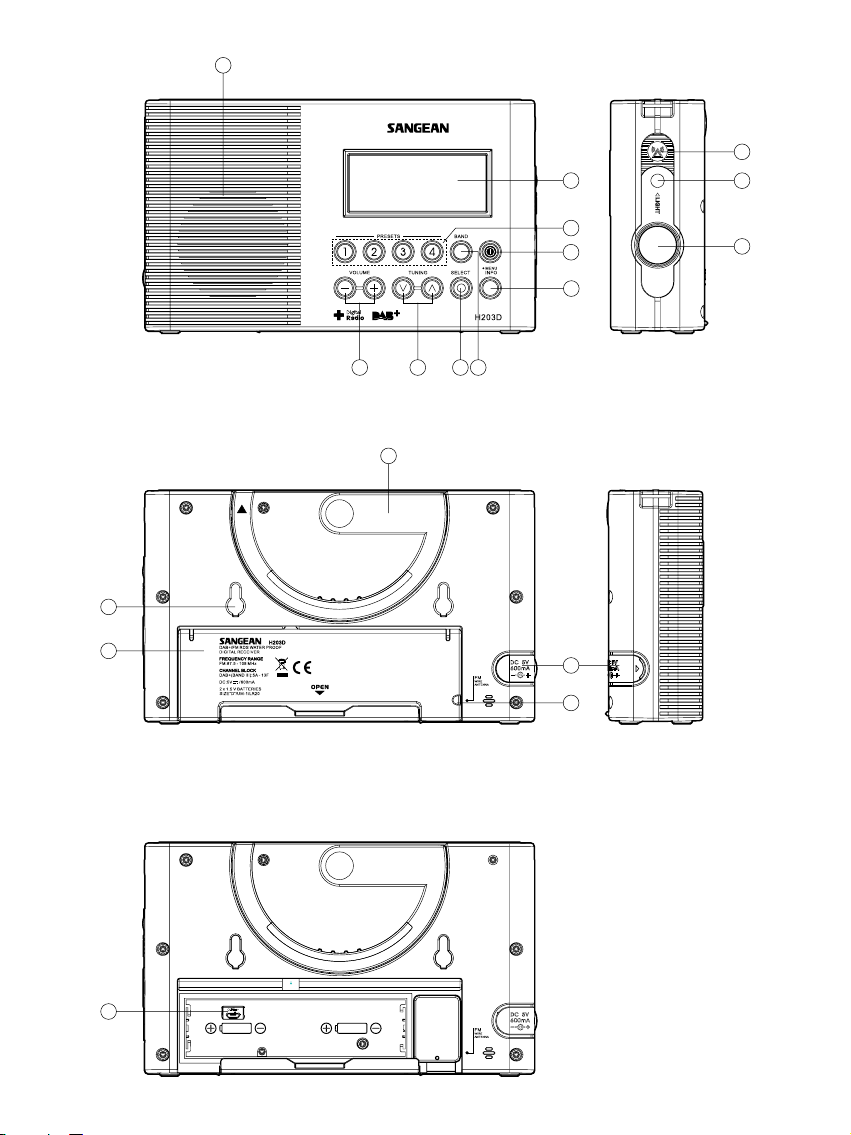
Controls
F
H
M
L
E
A
B
C D G I
J
K
N
O
1
Speaker
2
LCD display
3
Station preset
4
Power button
5
Info / Menu button
6
Band button
7
Select button
8
Tuning up / down button
9
Volume up / down button
10
Emergency buzzer
11
Torch button
12
Torch
13
Multi purpose handle
14
DC IN socket
15
FM wire antenna compartment
16
Battery compartment
17
Bracket holder
18
USB socket for software upgrade
GB
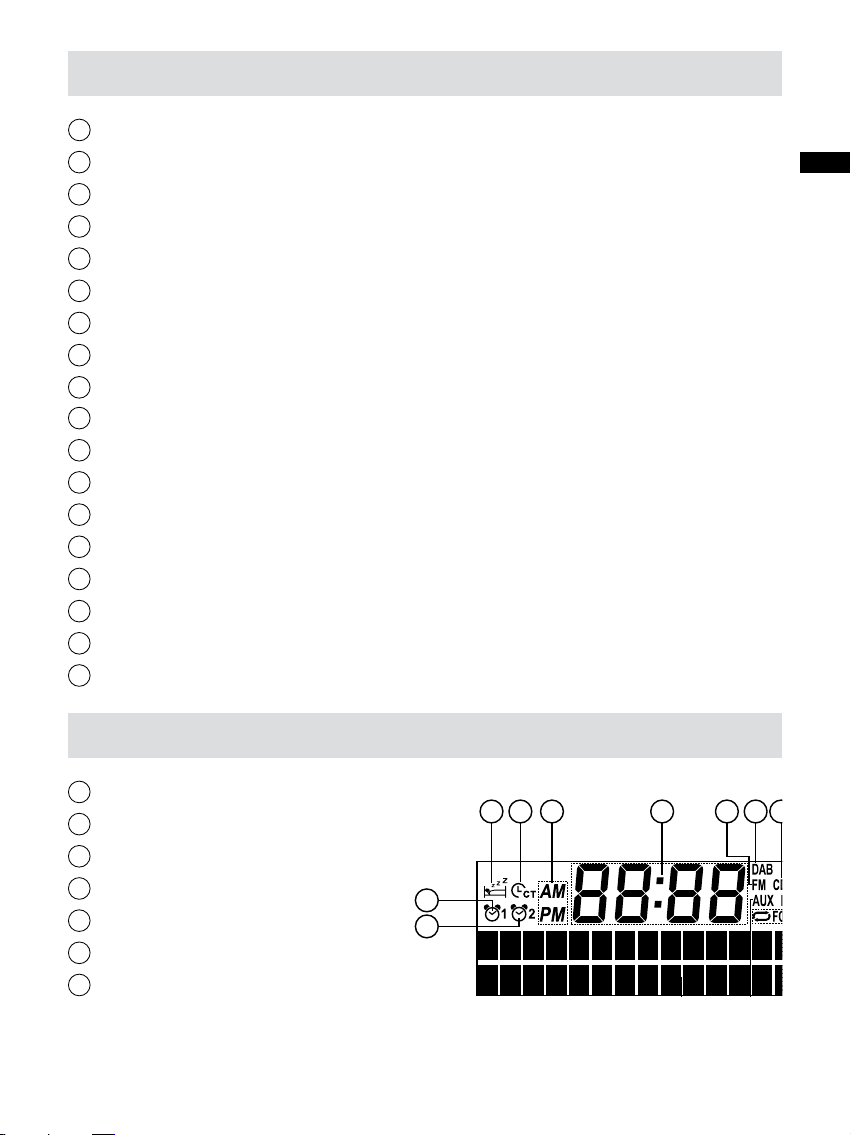
LCD Display
A
Sleep indicator
B
Egg timer indicator
C
AM / FM indicator
D
Clock digits
E
DAB indicator
G
F
FM indicator
Two line text display
3
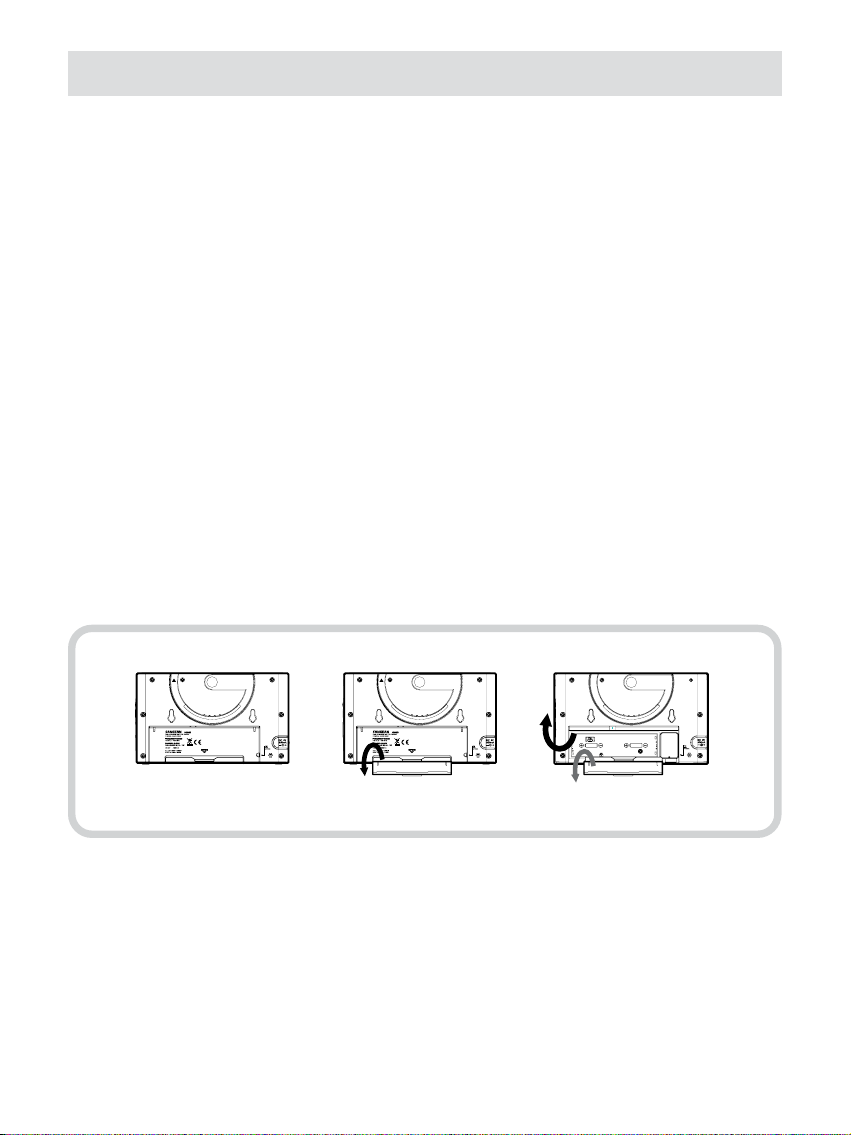
Installing batteries
1. Position the radio face down on a soft surface.
2. Remove the catch as shown and lift out the battery cover.
3. Insert 2 x “ D “ size/UM-1/LR20 batteries.
4. Replace the battery cover and catch.
5. Reduced power, distortion, a “ stuttering “ sound are all signs
that the batteries may need replacing. The batteries should be
replaced when “Low Battery” shown on the display.
6. If the radio is not to be used for any extended period of time,
it is recommended that the batteries are removed from the radio.
4

Using the AC adaptor (not supplied)
1. Remove the rubber cover of DC in socket on the left hand side
of your radio.
2. Insert the adaptor plug into the DC socket.
3. Plug the adaptor into mains socket outlet. Whenever the adaptor
is used, the batteries are automatically disconnected.
The AC adaptor should be disconnected from the mains supply and
the radio when not in use.
Note:
For safety purpose, DO NOT use AC adaptor in the shower
room. Use the batteries only.
GB
5

Setting the clock
Automatically updating the clock
1. Press and hold the Info/Menu button.
2. Press the Tuning up/down button until ‘System’ shown on the
display, then press the Select button to enter the setting.
3. Press the Tuning up/down button until ‘Time’ shown on the
display., then press the Select button to enter the setting.
4. Press the Tuning up/down until ‘Auto Update’ shown on the
display, press the Select button to enter the setting.
5. Press the Tuning up/down to choose an update option from
‘Update from any’, ‘Update from DAB’, ‘Update from FM’ or ‘No
update’ as required. Press the Select button to conrm your choice.
The radio will exit to previous menu display.
Setting the clock format
1. Press and hold the Info/Menu button.
2. Press the Tuning up/down button until ‘System’ shown on the
display, then press the Select button to enter the setting.
3. Press the Tuning up/down button until ‘Time’ shown on the
display, then press the Select button to enter the setting.
4. Press the Tuning up/down until ‘Set 12/24 hour’ shown on the
display, Press the Select button to enter the setting.
5. Press the Tuning up/down to choose a clock format from ‘Set 12
hour’ or ‘Set 24 hour’ as required. Press the Select button to
conrm your choice
6

Manually setting the clock
1. Press and hold the Info/Menu button.
2. Press the Tuning up/down button until ‘System’ shown on the
display, then press the Select button to enter the setting.
3. Press the Tuning up/down button until ‘Time’ shown on the
display, then press the Select button to enter the setting.
4. Press the Tuning up/down button until ‘Set Time/Date’ shown
on the display. Press the Select button to enter the setting. The
digit will ash.
5. Press the Tuning up/down until the correct hour is shown on the
display. Press the Select button to enter the selection. The minute
digit will start ashing.
6. Press the Tuning up/down until the correct minute is shown on
the display. Press the Select button to enter the selection. The
day digit will then ash.
GB
7. Then you will be asked to adjust month and year using the steps
previously described. ‘Time Saved’ will show on the display when
the clock setting is completed.
7

Operating your radio - DAB
1. Press the Power button to switch on your radio. The display will
show “Welcome to Digital Radio” for a few seconds.
2. If this is the rst time the radio is used, scan of the Band III DAB
channels will be carried out. The display will show “Welcome to
DAB”. If the radio has been used before the last used station will
be selected.
3. During the scanning process, as new stations are detected the
station counter on the right hand side of the display will increase
and stations will be added to the list. The lower line of the display
shows a bar-graph indicating progress of autotune.
4. When the scanning is completed the rst station (in numeric-alpha
order 0...9...A....Z) will be selected.
5. If the station list is still empty after the scan, your radio will show
“No DAB Station“ for a moment.
6. If no signals are found it may be necessary to relocate your radio
to a position giving better reception.
8

Selecting a station - DAB
1. The top line of the display shows the name of the station currently
selected.
2. Press the Tuning Up/Down buttons to scroll through the list of
available stations.
3. Press and release the Select button to select the station. The display
may show “Now tuning...” while your radio nds the new station.
4. Adjust the Volume up or Down buttons to set the sound level as
needed.
Note:
If after selecting a station the display shows “Service not available
“. It may be necessary to relocate your radio to a position giving
better reception.
GB
Secondary services - DAB
1. Certain radio stations have one or more secondary services
associated with them. If a station has a secondary service associated
with it the display will show “>>” next to the station name on the
station list. The secondary service will then appear immediately
after the primary service as you press the Tuning Up button.
2. Press the Select button to select the station.
9

Display modes - DAB
Your radio has seven display modes:-
1. Press the Info button to cycle through the various modes.
a. Scrolling text Displays scrolling text messages such
as artist/track name, phone in number
etc.
b. Program Type Displays the type of station being
listened to e.g. Pop, Classic, News
etc.
c. Multiplex Name Displays the name of DAB multiplex to
which the current station belongs.
d. Time and date Displays the current the time and date.
e. Frequency Displays the frequency of the DAB
multiplex for the station listened to.
f . Bit rate & audio type Displays the digital bit rate & audio
type for the station being listened to.
g. Signal Strength Displays a graph showing the signal
strength for the station being received.
10

Finding new stations - DAB
As time passes new stations may become available. To allow the
radio to nd the available stations, it is recommended to carry out a
full scan of the entire DAB Band III frequencies.
1. With the radio switched on and in DAB mode, press and hold the
Info/Menu button to enter the setting.
2. Press the Tuning up/down button until ‘Full Scan’ shown on the
display. Press Select button to carry out a full scan. The display
will show "Scanning..." and your clock radio will perform a scan
of the Band III DAB channels. As new radio stations are found
the station counter on the left hand side of the display will increase
and the radio stations will be added to the list stored in the radio.
GB
11

Manual Tuning - DAB
Manual tuning allows you to tune directly to the various DAB Band
III channels. Note that DAB stations are located in the range of
5A-13F.
1. Press and hold the Info/Menu to enter the setting.
2. Press Tuning up/down button until “Manual tune” shown on the
display. Press the Select button to enter the setting.
3. Press either Tuning Up/Down buttons to select the required DAB
channel.
4. Press the Select button to select the required DAB channel. The
clear unlled rectangle indicates the minimum signal level required
for satisfactory reception. The signal strength bar will go up and
down showing the changing signal strength as you adjust the
telescopic aerial on your radio.
5. When a DAB signal is found, the display will show the name of
the DAB multiplex. Any new radio stations found will be added to
the list stored in the radio.
6. Press and release the Select button to return to the normal DAB
tuning mode.
12

Dynamic Range Control settings - DAB
Dynamic Range Control (also known as DRC) can make quieter
sounds easier to hear w hen your r adio is used in a noisy
environment.
1. Press the Power button to switch on your radio.
2. Press and hold the Info/Menu button.
3. Press the Tuning Up/Down buttons until the display shows “DRC
value”.
4. Press the Select button to enter the setting.
5. Press the Tuning Up/Down buttons to select the required DRC
setting (the default is 0).
DRC 0 - DRC is switched off, Broadcast DRC will be ignored.
DRC 1 - DRC is set as sent by broadcaster.
DRC 1/2 - DRC level is set to 1/2 that sent by broadcaster.
GB
6. Press the Select button to confirm the setting. The display will
return to normal tuning mode.
Note:
Not all DAB broadcasts are able to use the DRC function. If the
broadcast does not support DRC, then the DRC setting in the radio
will have no effect.
13

Manual Tuning- FM
1. Press the Power button to switch on your radio.
2. Press the Band button to select the FM band. Fully extend the
wire antenna.
3. Press the Select button repeatedly until the display shows “Manual
tune < >”.
4. Press either the Tuning Up or Down buttons to tune to a station.
The frequency will change in steps of 50kHz. Pressing and holding
one of the buttons will advance the frequency selection several
times each second.
5. When the end of the waveband is reached the radio will recommence
tuning from the opposite end of the waveband.
6. Adjust the Volume control to the required setting.
7. To cancel the Manual Tune option, press and release the Select
button again so that the display shows “Auto tune < >”.
14

Auto tuning - FM
1. Press the Power button to turn on the radio.
2. Press the Band button to get required waveband, then extend
the FM wire antenna located in the battery compartment to get
best reception.
3. Press the Select button repeatedly until ‘Auto tune <>’ shown on
the display.
4. Press the Tuning Up button. Your radio will scan from the currently
frequency direction upwards and will stop scanning when it nds
a station of sufcient strength.
5. The display will show the frequency of the signal which has been
found. If RDS information is available, after a few seconds the
display will show the radio station name. The display will also
show “St” and “RDS” on the upper line if the station is received
with stereo and RDS information.
GB
6. Press the Tuning Down button to scan the FM band in a downwards
direction (high frequency to low frequency).
7.
When the end of the waveband is reached your radio will recommence
tuning from the opposite end of the waveband.
8. Adjust the Volume control to the required setting.
15

Scan sensitivity setting
Your radio will normally scan for FM broadcasts which are strong
enough to give good reception. However, you may wish the Auto-
scan function to also be able to nd weaker signals, possibly from
more distant radio transmitters. Your radio includes a local / distant
option for the Auto-scan function.
1. Press and hold Info/Menu button to enter the setting.
2. Press the Tuning up or down button until ‘FM Scan Zone’ shown
on the display. Press Select to enter the setting.
3. Press the Tuning Up or down to select to scan either local or
distant radio stations. The Distant option will allow the radio to
nd weaker signals when scanning.
4. Press the Select button to conrm your setting. The Local or Distant
setting is stored in the radio and remains in force until changed
or until a system Reset.
Note:
The initial setting (out of the box, or after a System Reset) causes
the radio to ignore weaker (or more distant) signals.
16

Display modes - FM
In FM mode the bottom line of the display can be set any of four
display options.
1. Press the Info button to cycle through the various options.
a. Radio text Displays scrolling text messages such
as artist/track name, phone in number
etc.
b. Program Type Displays the programme information
for the station being listened to e.g.
Pop, Classic, News, etc.
c. Time and date Displays the current time and date.
d. Frequency Displays the frequency of the station
being listened to.
Note:
These FM mode information displays are only available when the
radio is able to receive RDS information from the broadcaster.
GB
Presetting stations - DAB and FM
There are 4 memory presets for each of the two wavebands.
1. Press the Power button to switch on your radio.
2. Tune to the required station as previously described.
3. Press and hold the required Preset button until the display shows,
for example, “Preset 1 stored”. The station will be stored under
the chosen preset button. Repeat this procedure for the remaining
presets.
4. Stations stored in the presets may be overwritten by following
the above procedure.
17

Recalling a preset - DAB and FM
1. Press the Power button to switch on your radio.
2. Select the required waveband.
3. Momentarily press the required Preset button. Your radio will
then tune to the station stored in preset memory.
Sleep function – Auto Off
The sleep timer will automatically switch off your radio after a
preset time has elapsed.
1. Press and hold the Info/Menu button.
2. Press the Tuning up/down button until ‘System’ shown on the
display. Press the Select button to enter the setting.
3. Press the Tuning up/down button until ‘Sleep’ shown on the
display. Press the Select button to enter the setting. The display
will cycle through the available sleep times in the order of Sleep
off-15-30-45-60-90. Release the button when the required sleep
time appears in the display. Press the Select button to conrm
the setting. The symbol will appear in the display and the radio
will play the last station selected.
4. To terminate the sleep function before reaching the preset time,
follow the procedure above and select ‘Sleep Off”. Then the
function can be turned off.
18

Egg timer (timer function)
1. Press and hold the Info/Menu button.
2. Press the Tuning up/down button until ‘System’ shown on the
display. Press the Select button to enter the setting.
3. Press the Tuning up/down button until ‘Egg timer’ shown on the
display. Press the Select button to enter the setting and the display
will appear on the display.
4. Press the Tuning up/down button to select required time. Press
the Select button to conrm the setting.
The buzzer will sound for 3 minutes when it reaches the period of
time which you have set. Press Power button to turn the buzzer off.
To turn off the Egg timer before the time is up, follow the previous
timer setting procedure and set the timer to zero. Then the timer
setting can be turned off before the time is up.
GB
Software version
The software display cannot be altered and is just for your
reference.
1. To view the software version on the display press and hold the
Info button.
2. Repeatedly press the Tuning Up/Down button until ’System’ shown
on the display. Press the Select button to enter the setting
3. Repeatedly press the Tuning up/down until ‘SW version’ shown
on the display. Press the Select button to conrm the option. The
version number is then shown on the display. Press the Info button
to the normal tuning mode.
19

System reset
If your radio fails to operate correctly, or some digits on the display
are missing or incomplete carry out the following procedure.
1. Press and hold down Info button.
2. Repeatedly press the Tuning Up/Down buttons until ‘System’
shown on the display press the Select button to enter the setting.
3. Press the Tuning up/down button until ‘Factory Reset’ shown on
the display, then press the Select button to enter the setting. If you
wish to perform the reset operation, press the Select button once
again. A full reset of your radio will be performed. All presets and
station lists will be erased.
4. After a system reset a scan of the DAB band will be performed.
In case of malfunction due to electrostatic discharge, reset the
product (reconnection of power source may be required) to resume
normal operation.
20

Software upgrade
Software updates for your radio may be available in the future.
As software updates become available software and information on
how to update your radio can be found at:
http://sg.sangean.com.tw/rst/rst.asp
http://www.sangean.eu/rst/rst.asp
www.sangean.com.au.
For more information, please contact our Head Ofce by sending
email to info@sangean.com
1. Press and hold the Info/Menu button to enter the setting in any
wave band.
2. Press the Tuning control until ‘System’ shown on the display.
Press the Select button to enter the setting.
3. Press the Tuning up/down button until ‘Software Upgrade’ shown
on the display. Press the Select button to enter the setting.
The default setting is ‘NO’. Otherwise, press the Tuning control
to choose ‘YES’ and press the Tuning control to select the option.
The display will show ‘Waiting for PC wizard’.
GB
4. Using the micro USB cable (not supplied) to connect the USB
socket in the battery compartment and your PC. Follow the
procedure stated on your PC screen and the unit will upgrade
automatically.
Note:
Please use adapter (not supplied) as main power when upgrading
software.
21

Emergency buzzer
To activate Emergency buzzer, press Emergency buzzer button.
Press the button again to switch off the buzzer.
Torch
Press the torch button to turn on the torch.
Note:
The torch won’t turn off automatically. To turn off the torch, press
torch button again.
Multi-purpose handle
Using the multi-purpose handle, you may hang or carry the radio
when not used in bathroom.
22

Bracket
You may install the supplied bracket on the wall with the help of the
double sides tape back side to hang the radio.
GB
23

Carrying strap
Using the supplied carrying strap, you may hang or carry the radio
when not used in bathroom.
24

Power requirements
Mains via AC adaptor (not supplied)
INPUT: 100-240V~ 50/60HZ OUTPUT: DC 5V/600mA
Batteries: 2 x UM1 ( D size, LR20 )
Battery Life:
Approx. 120 hours of listening for 4 hours a day at normal volume
using alkaline batteries.
Frequency Coverage:
FM 87.50 – 108 MHz
DAB+ (BAND III): 5A-13F
GB
If at any time in the future you should need to dispose of this product please note
that: Waste electrical products should not be disposed of with household waste.
Please recycle where facilities exist. Check with your Local Authority or retailer for
recycling advice. (Waste Electrical and Electronic Equipment Directive)
25
 Loading...