

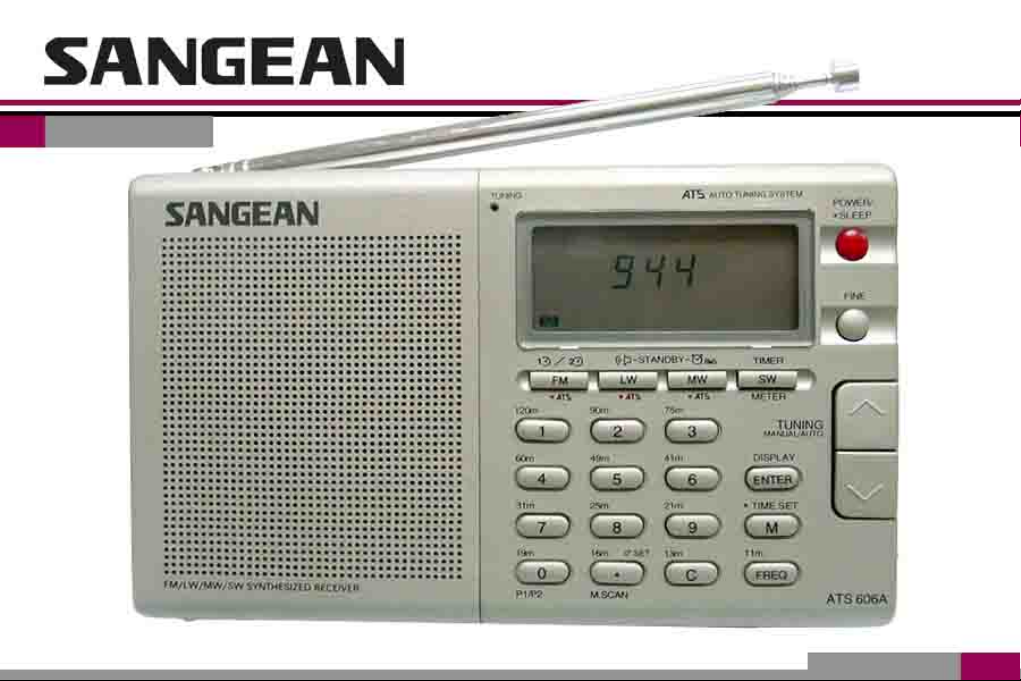
Page 1
Page 2

CONTENTS
Features 2
Control Locations 3
Display Information 7
Choosing a Power Supply 8
Preliminary Settings 13
Zero Second Set 19
Tuning Mode 23
Scan Tuning 32
Memory Tuning 35
ATS(Auto Tuning System) 43
Clock Radio Operation 47
Miscellaneous Controls 58
Care and Maintenance 62
Specifications 65
1
Page 3

FEATURES
Continuous tuning-permits reception of more
stations than ever before without any break
between LW, MW or SW bands.
Large easy to read LCD display indicates station
frequency, dual time, memory locations and all
the functional status.
Direct access keypad permits instant tuning of
any desired frequency.
Fifty-four memory presets offer instant access to
your favorite stations on LW MW FM and SW.
Supplemental tuning control allows for
maximum clarity of the selected frequency.
Dual time setting allows you to preset your local
time or UTC time ,or any two time zones with
instant recall.
Scanning circuit permits you to check various
frequencies on a certain band-width and lock
on to it at random.
2
Cancel button allows you to instantly change
incorrect information keyed into the
microprocessor.
SW meter band select buttons offer instant
selection of any desired frequency bandwidth
on SW.
Dual Alarm Feature allows presetting two wake
up times for clock alarm.
ATS(Auto Tuning System) which will
automatically scan and select presets based on
station signal strength on FM,MW and LW band.
Adjustable sleep timer allows you to fall asleep
to music.
Standby mode turns on the radio automatically at 2
preset times either by radio program or HWS buzzer.
1 kHz/step fine tuning on AM (MW/LW/SW)band.
Page 4

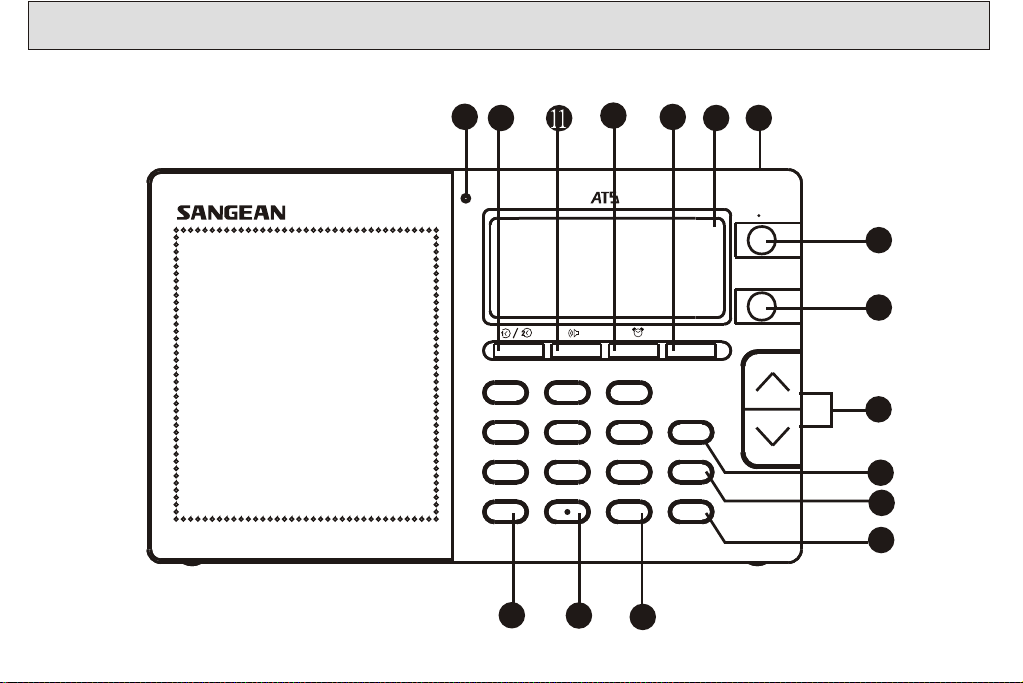
CONTROL LOCATIONS
1.Power on/off and sleep button.
2.Fine tuning button.
3.Manual tuning/auto scan button.
4.Enter command button/Display button to
display frequency or time.
5.Memory entry and time set button.
6.Frequency select button.
7.Cancel button.
8.Dot,memory scan and zero second set button.
9.Digit button for frequency,time,SW meter band
and memory page 1 or 2.
10.Multi functions for FM band knob,FM ATS
and exchange dual and real time in time
mode.
11.Multi functions for LW band knob,LW ATS
and Standby by radio.
12.Multi functions for MW band knob,MW ATS
and Standby by HWS buzzer.
13.Multi functions for SW band knob, SW
meter band and counting down timer.
14.LCD display.
15.Light button to light LCD display 12
seconds for every push.
16.Tuning LED indicator.
3
Page 5
16
10
12
13
14
15
TUNING
AUTO TUNING SYSTEM
POWER/
SLEEP
1
FINE
2
-STANDBY-
120m
60m
31m
90m
1
4
2
49m
5
25m
7 8
P1/P2
0
9
16m
M.SCAN
8
19m
FM/LW/MW/SW SYNTHESIZED RECEIVER
4
HWS
TIMER
MWLWFM
SW
75m
41m
21m
13m
METER
TUNING
MANUAL/AUTO
3
DISPLAY
ENTER
6
TIME SET
9
C
M
11m
FREQ
ATS606A
3
4
5
6
7
Page 6
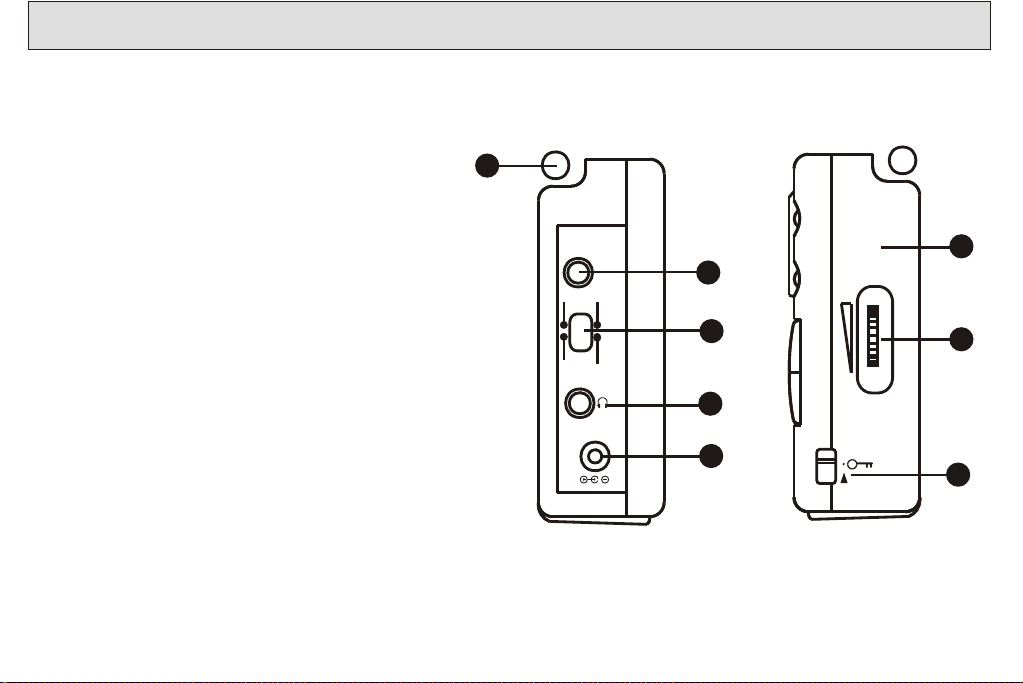
17.Earphones jack.
18.AC adaptor jack.
21
19.AM external antenna jack.
20.FM stereo.mono/AM sens-DX. local mode
selector.
21.Telescopic Antenna.
22.Volume control.
23.Lock switch to avoid misoperation.
24.Folding stand.
MONO
AM EXT
ANT
FM
STEREO
DC I N 4.5V
AM
SENS
DX
LOVAL
19
20
17
18
24
VOLUME
22
23
5
Page 7
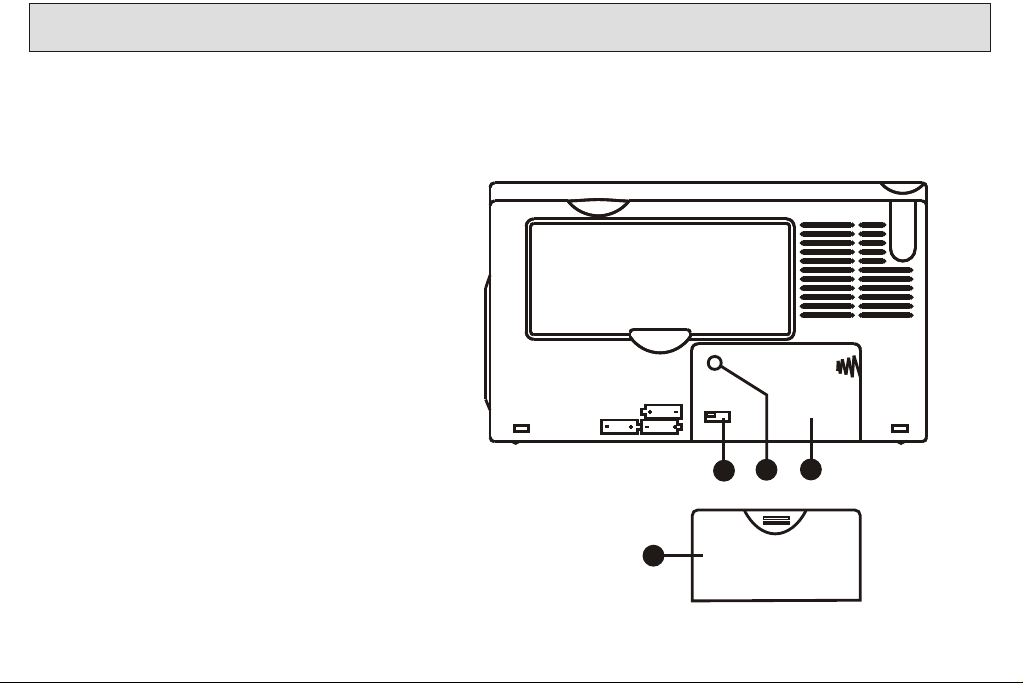
25.Reset button to clear all the presets in the
microprocessor except the SW preset
stations.
26.9K/10K MW step switch.
27.Battery compartment.
28.Battery cover.
6
3
1
2
27
25
26
28
Page 8
DISPLAY INFORMATION
1.Band indication.
2.Time set status.
3.Time adjustment and zero second set indication.
4.Memory presets.
5.Memory Page 1 and Page 2 for SW/FM bands.
6.Sleep status.
7.Lock on.
8.FM stereo indication.
9.SW meter band.
10.Auto Tuning System status.
11.Low battery.
1
4
FMFM
LMLM
MWMW
SW SW
MM
12.kHz for MW and LW, MHz for FM and SW.
13.Frequency and time display.
5
14.Time area 1 or 2.
15.Standby by radio.
16.Standby by HWS buzzer.
17.Counting down timer status.
18.Memory preset, battery strengthy and scanning status during ATS.
19.Fine tuning status.
2 3 10 7 6 8
13
SET-00
P1 P2
1 2 3 4 5 6 7 8 9
-STANDBY-
14
15 16
MHS
ST
KHZ
MHZ
9
FINEFINE
TIMETIME
17
12
19
11
18
7
Page 9
CHOOSING A POWER SUPPLY
You can operate the receiver using
* 3 Alkaline AA(UM-3)batteries.
* Household AC adaptor.(optional)
USING BATTERIES
1.Press latch marked "OPEN" on battery compart-
ment covers in the direction of the arrow and
lift off cover.
8
OPEN
Page 10
2.Insert 3 "AA" battery in battery compartment as
indicated in diagram. Be sure to position them
on the back of the radio and on top of lift out
ribbons for easy removal.
3.Replace battery cover and press down until you
hear it snap closed.
OPEN
PRESS
9
Page 11
BATTERY REPLACEMENT
AM EXT
ANT
FM
STEREO
MONO
AM
SENS
DX
LOVAL
DC I N 4.5V
Whenever the radio is turned off, the battery
indicator will show for about 7 seconds to show
battery condition. If the indicator falls below 2
the batteries should be replaced.Be sure to replace
the battery Within 3 minutes to secure time and all
memory functions.
USING HOUSE CURRENT AC ADAPTOR
The receiver may be powered by using AC adaptor. Insert the plug into the jack on the side of the
radio marked DC IN 4.5V. Plug the other end of
the adaptor into a standard household outlet.
Whenever AC adaptor is used, the batteries are
automatically disconnected.
10
1 2
AC Adapter
DC IN 4.5V Jack
Page 12
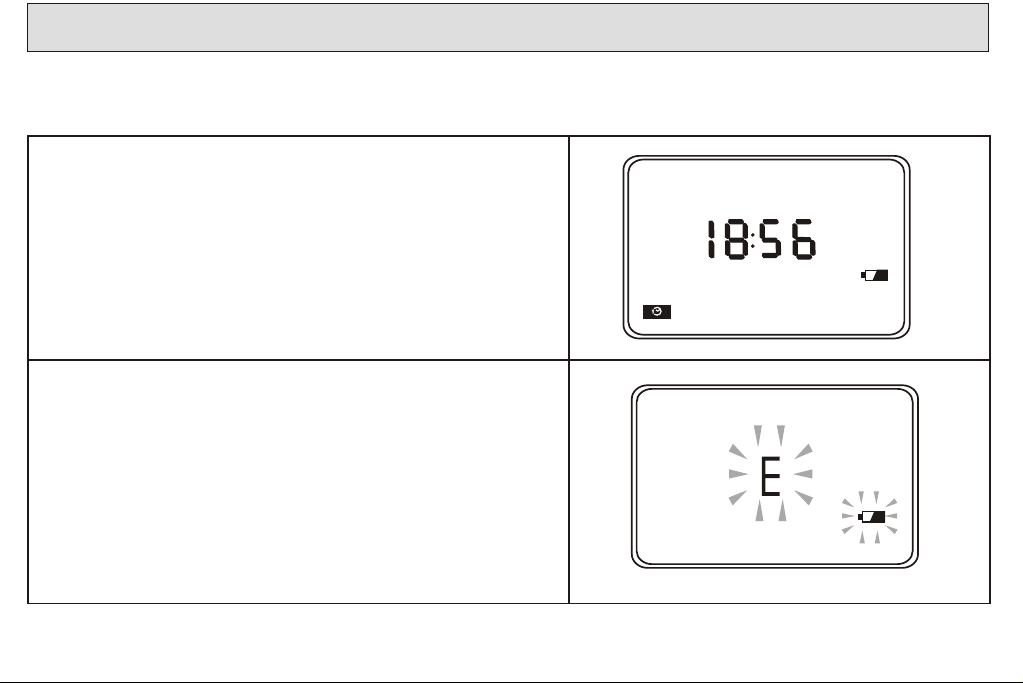
TIME TO REPLACE BATTERIES
1.Turn off the power and battery indicator falls
below 2 .
2.IF "E" flashes on LCD and low battery indicator
is displayed when radio is turned on batteries
should be replaced.
1 2
11
Page 13

3.Whenever the low battery indicator appears on
LCD display,batteries should be replaced.
12
Page 14
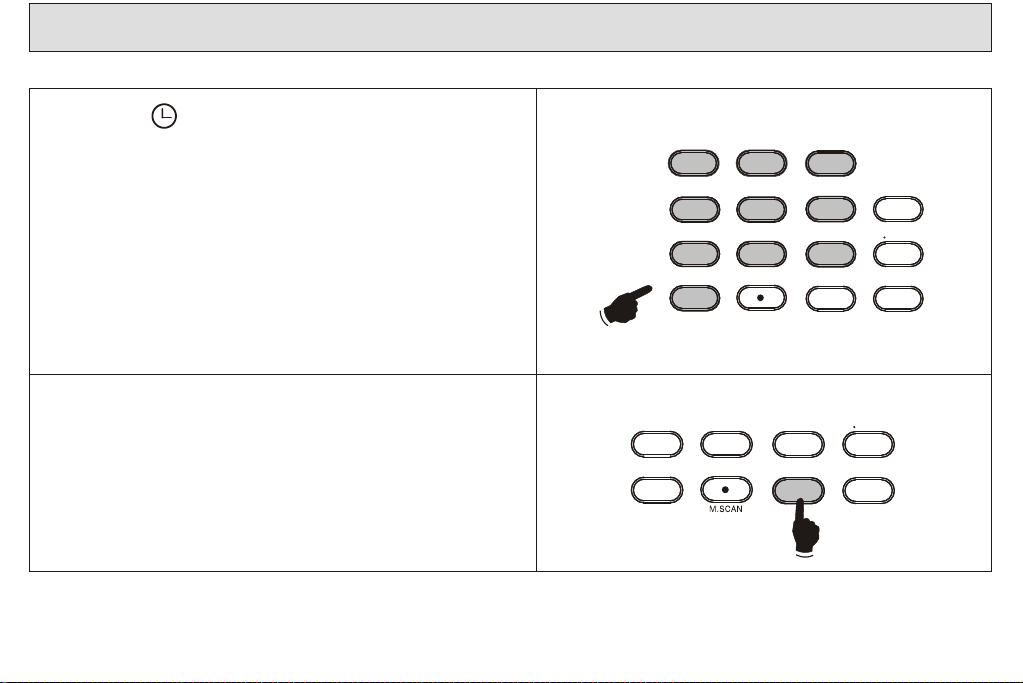
PRELIMINARY SETTINGS
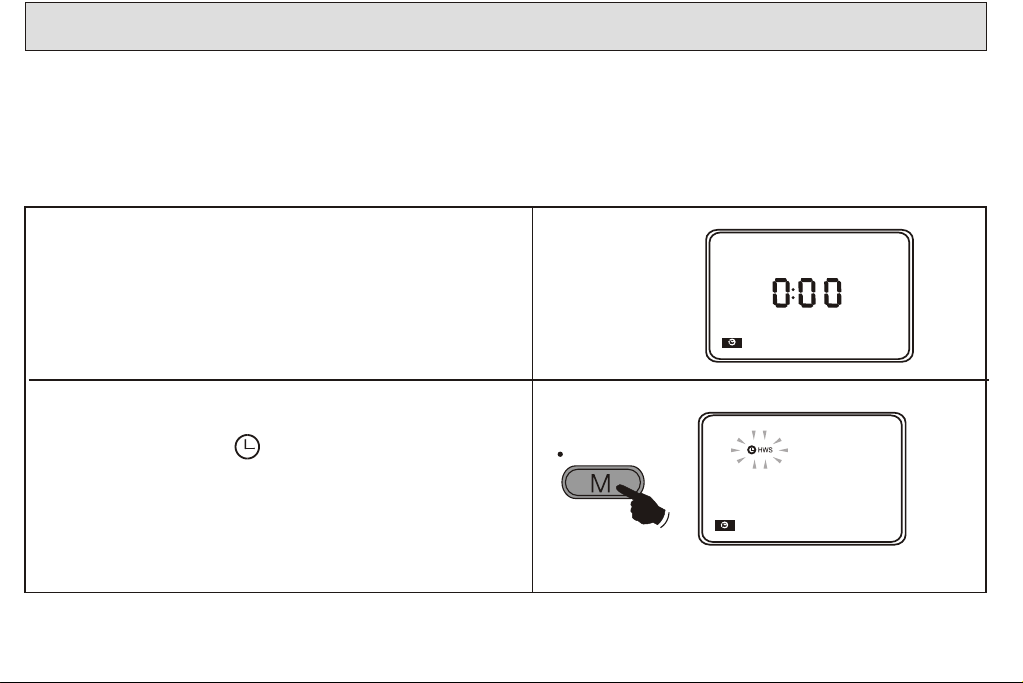
SETTING THE CLOCK
The time is displayed in the 24 hours mode since most shortwave broadcasting stations operate according
to Greenwich Mean Time .This is the standard that is used through the world.
1.The clock will start when 3 "AA" batteries are
installed. The display shows 0:00
2.Press "TIME SET" key for more than 2 seconds,
display will show " SET" and flash.
TIME SET
13
Page 15

3.While " SET" is flashing ,set the correct time
by pressing the numbered buttons .As you press
the corresponding button the number shows up
on the LCD display
120m
60m
31m
19m
P1/P2
2
5
8
M.SCAN
75m
3
41m
6
21m
9
13m
C
90m
1
49m
4
25m
7
16m
0
4.If you press the wrong number, press the "C "
(cancel ) button which deletes one number at a
time .
Note :Time can be adjusted only when " SET"
is in flashing mode.
14
120m
60m
31m
19m
P1/P2
M.SCAN
75m
2
5
8
3
41m
6
21m
9
13m
C
90m
1
49m
4
25m
7
16m
0
Page 16
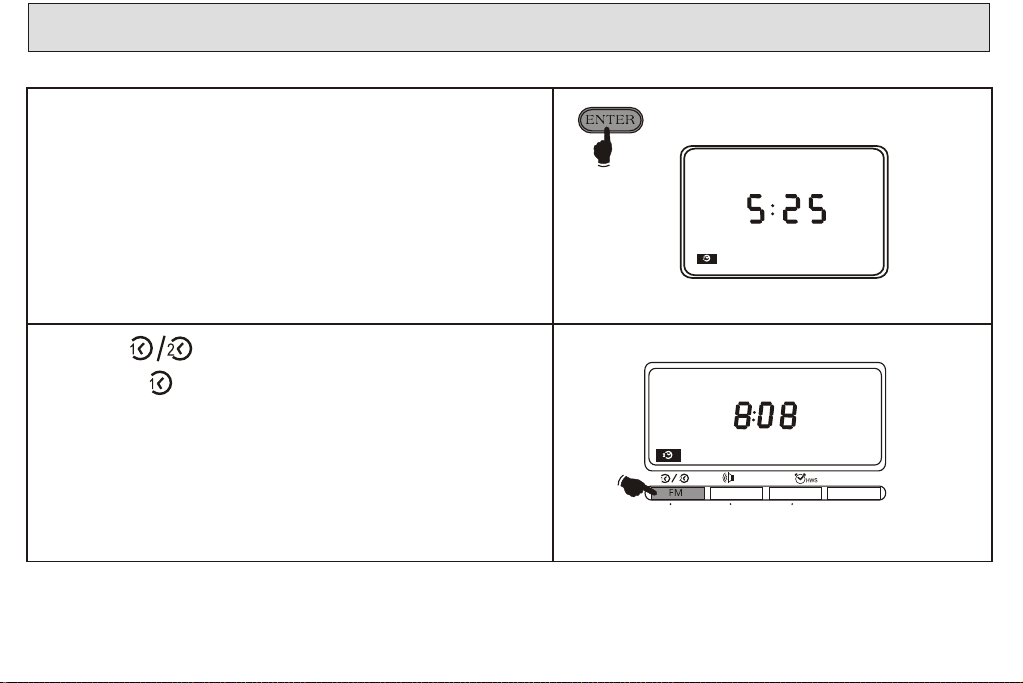
5.Now press button "ENTER" ,display will show
hours and minutes.
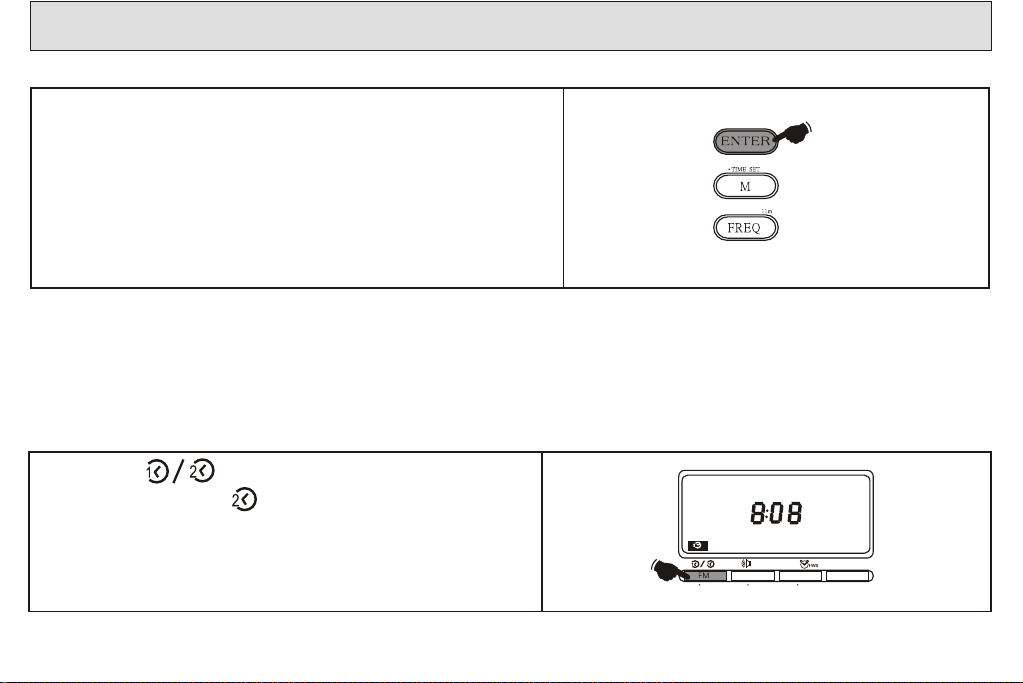
SETTING DUAL TIME
A second time zone can be programmed into this unit such as your home time if you are travelling, or
Greenwich Mean Time for instant access to shortwave broadcasting or local time wherever you are .
1.Press button and display will
show and flash .
ATS
-STANDBY-
MW
LW
ATS ATS METER
TOMER
SW
15
Page 17
2.Press "ENTER" button within 3 seconds, display
will stop flashing.
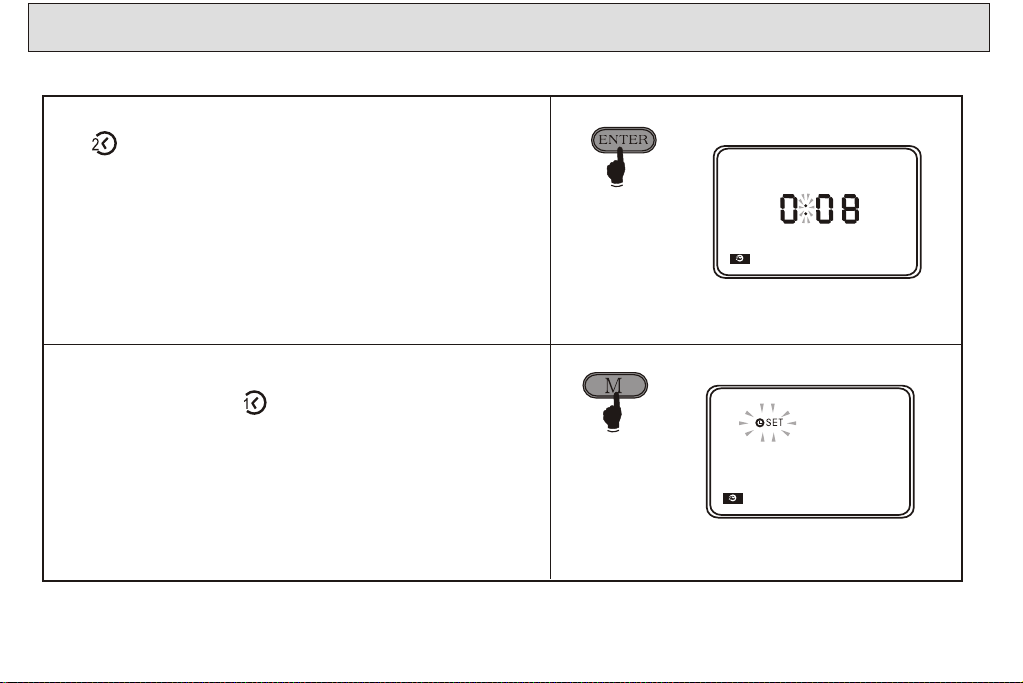
3.Press "TIME SET" button for more than 2
seconds, display SET will flash.
16
Page 18
4.While " SET" is flashing, set the correct time
by pressing the corresponding buttons. The
numbers will show up on the LCD display.
5.If you press the wrong number, press the "C"
button which deletes one number at a time.
P1/P2
120m
1
60m
4
31m
7
19m
90m
2
49m
5
25m
8
16m
0
31m
7
19m
25m
8
16m
0
75m
3
41m
21m
13m
ENTER
TIME SET
M
11m
FREQ
TIME SET
M
11m
FREQ
6
9
C
21m
9
13m
C
17
Page 19
6.Now press button "ENTER" ,display shows
hours and minutes.
7.Push button and "ENTER" again to
back to time.
18
-STANDBY-
LW
ATS
ATS ATS METER
TOMER
MW
SW
Page 20
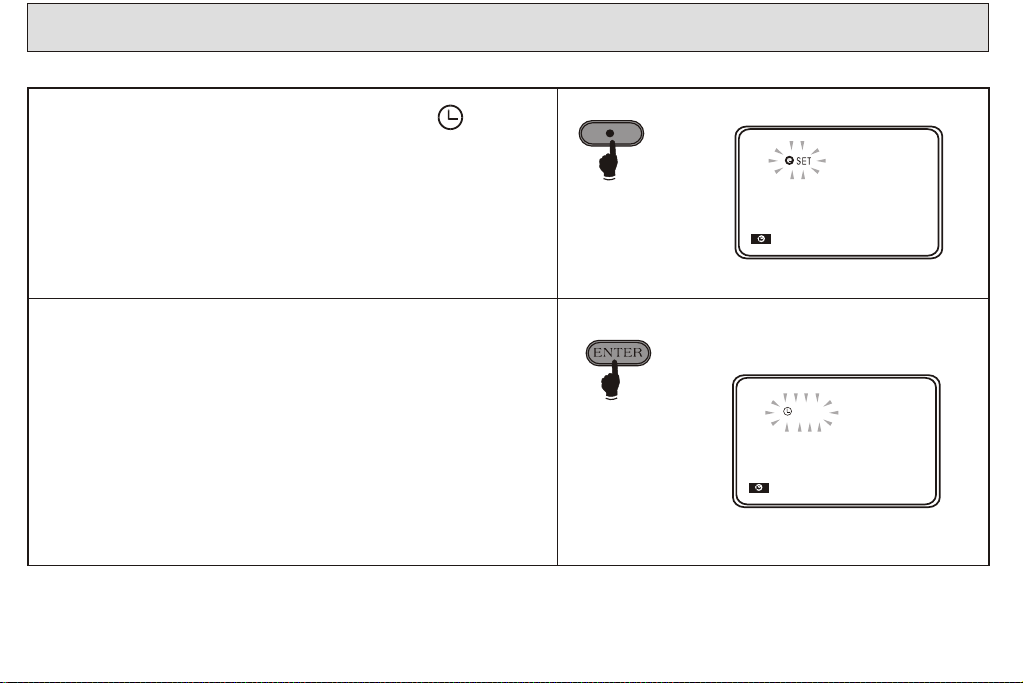
ZERO SECOND SET
During time set period, display shows " SET" ,
press 0'set button, display will show "SET-00"
and flash. Now press "ENTER" button, the clock
will start from its zero second.
0'' SET 16m
SET.00''
19
Page 21
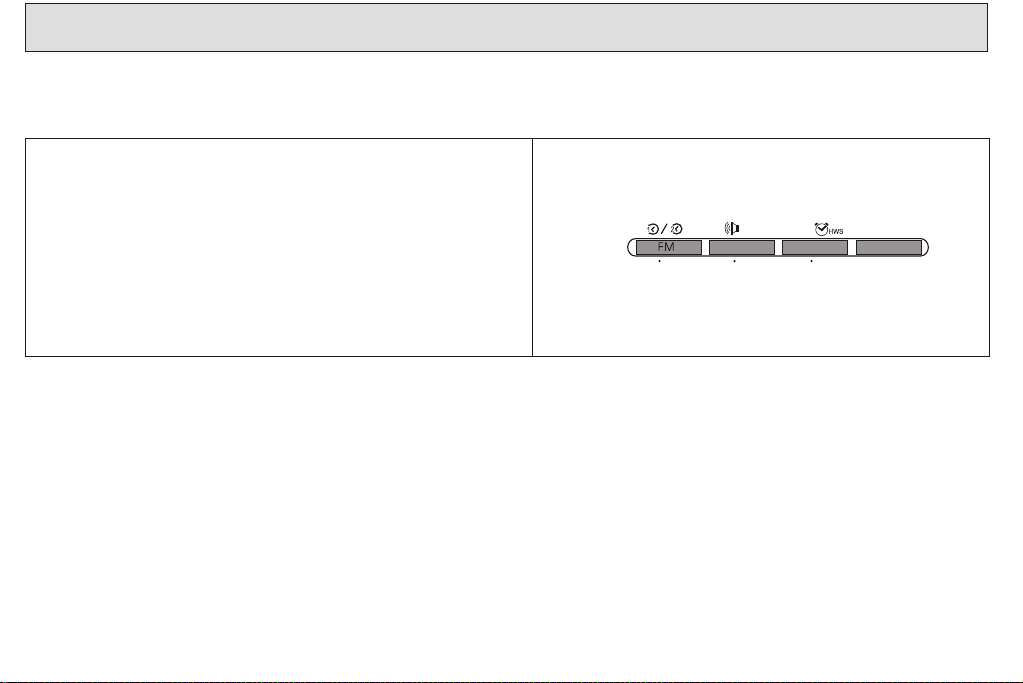
BAND SELECTION
There are four band selector buttons located just
beneath the LCD display.
ATS
BAND FREQUENCY PROGRAM TYPE
FM 87.5-108 MHz Standard FM
LW 153-513 kHz Longwave
MW 520-1710 kHz Standard AM
SW 1.711-29.999 MHz SW/13 sub-bands
20
-STANDBY-
LW
ATS ATS METER
MW
TIMER
SW
Page 22

1.Turn radio on by pressing "POWER/SLEEP"
button. Display will show last band and fre-
quency selected.
2.By pressing any one of the four band selector
buttons, last frequency used within that band
will appear.
Auto tuning system
FW
POWER/
SLEEP
M
SW
M
-STANDBY-
LW
TOMER
MW
SW
21
Page 23

Note:
If you select SW, pressing "SW/METER" button again
TIMER
SW
METER
M
will display a flashing "m" indicating any meter
band may now be selected. For example press but-
ton 6/41m, display will show lowest frequency of
41 meter.i.e 7.100 Mhz.
22
SW
M
120m
1
60m
4
31m
7
75m
90m
3
2
49m
41m
6
5
25m
8
SW
21m
M
9
Page 24

TUNING MODE
ADJUSTING THE ANTENNA
Locate the band you want to listen to in the following chart and adjust the antenna as indicated.
BAND
FREQUENCY RANGE
ANTENNA TYPES
INTERANAL
Rotate radio
MW 520-1710 kHz for best reception
INTERNAL
Rotate radio
LW 153-513 kHz for best reception
ILLUSTRATION
TUNING
AUTO TUNING SYSTEM
-STANDBY-
HWS
TIMER
MWLWFM
SW
METER
120m
75m
90m
TUNING
2
MANUAL/AUTO
3
1
DISPLAY
49m
60m
41m
ENTER
5
6
4
31m
25m
21m
TIME SET
M
7 8
9
16m
19m
13m
11m
FREQ
C
0
P1/P2
FM/LW/MW/SW SYNTHESIZED RECEIVER
FM/LW/MW/SW SYNTHESIZED RECEIVER
M.SCAN
ATS606A
TUNING
AUTO TUNING SYSTEM
-STANDBY-
HWS
TIMER
MWLWFM
SW
METER
120m
75m
90m
TUNING
2
MANUAL/AUTO
3
1
DISPLAY
49m
60m
41m
ENTER
5
6
4
31m
25m
21m
TIME SET
M
7 8
9
16m
19m
13m
11m
FREQ
C
0
P1/P2
M.SCAN
ATS606A
23
POWER/
SLEEP
FINE
POWER/
SLEEP
FINE
Page 25

Extend antenna all the
FM 87.50-108 MHz way and rotate it for best
reception.
TELESCOPIC
FM/LW/MW/SW SYNTHESIZED RECEIVER
TUNING
AUTO TUNING SYSTEM
POWER/
SLEEP
FINE
-STANDBY-
HWS
TIMER
MWLWFM
SW
METER
120m
75m
90m
TUNING
2
MANUAL/AUTO
3
1
DISPLAY
49m
60m
41m
ENTER
5
6
4
31m
25m
21m
TIME SET
M
7 8
9
16m
19m
13m
11m
FREQ
C
0
P1/P2
M.SCAN
ATS606A
TELESCOPIC
Extend antenna all the
SW 1.711-29.999 MHz
You may select five different tuning methods to choose the frequency and station broadcasting you prefer.
.Direct Tuning . Manual Tuning . Scan Tuning
.Memory Recall Tuning .ATS Tuning on FM,LW and MW bands.
24
way for best reception
but do not rotate.
3
1
2
Page 26

DIRECT TUNING
Example:To tune 100.70 MHz on the FM band, follow this procedure
1.Press the "POWER/SLEEP" button to turn on
the radio.
2.Press the button marked FREQ (Frequency).
Auto tuning system
FW
POWER/
SLEEP
M
ATS
-STANDBY-
LW
ATS AT S METER
FREQ
TIMER
MW
SW
25
Page 27

3.Press the corresponding buttons marked [1],
[0],[0],[.],[7],[0], That exact frequency
will now show up in the display.
4.Press the button marked "ENTER" , the frequen-
cy and band will now show up in the display.
Note: Be sure to press the decimal point[.] in
100.70 MHz otherwise the display will show
SW [10.070 Mhz].
26
FREQ
120m
1
60m
4
31m
7
19m
90m
2
49m
5
25m
8
16m
0
75m
3
41m
DISPLAY
ENTER
6
21m
TIME SET
M
9
13m
C
11m
FREQ
Page 28

5.Extend the antenna all the way and rotate for
best FM reception.
FM/LW/MW/SW SYNTHESIZED RECEIVER
TUNING
AUTO TUNING SYSTEM
POWER/
SLEEP
FINE
-STANDBY-
HWS
TIMER
MWLWFM
SW
METER
120m
75m
90m
TUNING
2
MANUAL/AUTO
3
1
DISPLAY
49m
60m
41m
ENTER
5
6
4
31m
25m
21m
TIME SET
M
7 8
9
16m
19m
13m
11m
FREQ
C
0
P1/P2
M.SCAN
ATS606A
6.Adjust the Volume control for comfortable
listening.
VOLUME
27
Page 29

7.When selecting a FM stereo station, and using
stereo earphones, make sure the FM mode swith
is in the STEREO position.
MANUAL TUNING
To select a station when you do not know the
frequency, use the Manual Tuning [ ][V] button.
28
DC I N 4.5V
MW
ATS METER
75m
3
MANUAL/AUTO
41m
ENTER
6
21m
9
13m
TIMER
SW
TUNING
TIME SET
M
11m
Page 30

1.Press the "POWER/SLEEP" button to turn on
radio.
2.Select a band.
Auto tuning system
POWER/
SLEEP
LW
MW
SW
29
Page 31

3.Press repeatedly the[ ]or[V]buttons to reach
a desired frequency. Press and hold the[ ]or
[V]button for more than half a second to
change frequency rapidly.
Note:
When you repeatedly press the [ ]or[V]
button,the frequency change in increments of
FM:100 kHz
LW: 9 kHz
MW: 9 kHz or 10 kHz
SW: 5 kHz
30
MW
ATS METER
75m
3
MANUAL/AUTO
41m
ENTER
6
21m
9
13m
SW
TUNING
TIME SET
M
11m
Page 32

MEMORY SCAN
If you would like to scan the preset stations all in
your mimory. Press M. Scan button the radio will
start memory scan from the last station you were
and stops for 4 seconds for every preset station
then moving forward to next preset station until
you press any functional buttons (except POWER
and LIGHT) to stop the memory scan.
FW
123456789
M
16m
M.SCAN
31
Page 33

SCAN TUNING
Use scan tuning to rapidly locate a station or to monitor several station within a specific band.
1.Turn on radio by pressing "POWER/SLEEP"
button.
2.Select a band.
Auto tuning system
LW
MW
POWER/
SLEEP
SW
32
Page 34

3.Adjust antenna or radio position depending on
the selected band.
TUNING
AUTO TUNING SYSTEM
POWER/
SLEEP
FINE
-STANDBY-
HWS
TIMER
MWLWFM
SW
METER
120m
75m
90m
TUNING
2
MANUAL/AUTO
3
1
DISPLAY
49m
60m
41m
ENTER
5
6
4
31m
25m
21m
TIME SET
M
7 8
9
16m
19m
13m
11m
FREQ
C
0
P1/P2
M.SCAN
3
1
2
FM/LW/MW/SW SYNTHESIZED RECEIVER
ATS606A
4.Press and hold the [ ]or[V] buttons for more
than half a second, the radio will scan all the
frequencies in the Selected band and will stop
automatically each time it lands on an active
station.
TUNING
FM/LW/MW/SW SYNTHESIZED RECEIVER
MW
ATS METER
75m
3
41m
6
21m
9
13m
-STANDBY-
120m
75m
90m
2
1
49m
60m
41m
5
4
31m
25m
21m
7 8
16m
19m
13m
0
P1/P2
M.SCAN
MANUAL/AUTO
ENTER
TIME SET
AUTO TUNING SYSTEM
POWER/
SLEEP
FINE
HWS
TIMER
MWLWFM
SW
METER
TUNING
MANUAL/AUTO
3
DISPLAY
ENTER
6
TIME SET
M
9
11m
FREQ
C
ATS606A
SW
TUNING
M
TUNING
AUTO TUNING SYSTEM
POWER/
SLEEP
FINE
-STANDBY-
HWS
TIMER
MWLWFM
SW
METER
120m
75m
90m
TUNING
2
MANUAL/AUTO
3
1
DISPLAY
49m
60m
41m
ENTER
5
6
4
31m
25m
21m
TIME SET
M
7 8
9
16m
19m
13m
11m
FREQ
C
0
P1/P2
M.SCAN
FM/LW/MW/SW SYNTHESIZED RECEIVER
ATS606A
11m
33
Page 35

5.Press and hold the [ ]or[V] button again to
resume scanning.When you reach the upper or
lower limits of the band, the scanning starts over
again as long as the button is depressed.
6.Adjust Volume control for comfortable listening.
34
Mw
ATS METER
75m
3
MANUAL/AUTO
41m
ENTER
6
21m
9
13m
Sw
TUNING
TIME SET
M
11m
VOLUME
Page 36

MEMORY TUNING
You may store up to 18 presets on FM/SW, and 9 presets on each of the , LW and MW bands for instant
selection of your favorite stations.
STORING A FREQUENCY
1.Press "POWER/SLEEP" button to turn on radio.
2.Tune to any frequency using any of the previous ly mentioned tuning methods.
Auto tuning system
SW
12
M
POWER/
SLEEP
35
Page 37

3.Press the button marked " M" (memory), display
"M" and suggested preset number will flash for
12 seconds. If preset 1 and 2 have been stored,
it will suggest preset 3 at this stage, on display
preset 3 will flash.
4.Press "ENTER" button and your station will be
stored in that memory position.
TIME SET
M
SW
M
1 2
3
36
SW
M
3
1
2
Page 38

5.Preset positions may be exchanged easily and at
any time. Select preset that is to be changed,
push memory button,( "M" and existing position
will flash ) while flashing select new preset posi-
tion. Presets will be exchanged automatically.
M
SW
M
1
1 2
3
6.FM/SW bands have 18 presets. Presets 1-9 are
set in normal manner. When P1 presets 1-9 are
full selecting another station to be preset will
display the "P2" display and an additional 1-9
presets can be set for a total of 18 presets.
0
SW
3 4 5 6 7 8
1 2
M
9
SW
3
1 2
M
37
Page 39

Note
1.If all presets have been used pushing "M" but-
ton will display "FULL" on LCD. If you still desire
to store new station push any button 1-9 where
new station is to be positioned and hold for more
than 2 seconds. New station will be put into
memory in position selected and original station
in this position will be canceled.
2.All preset stations are indicated by [ ] on the
display. If a station has already been preselected
it will always show preset position on display.
38
3 4 5 6 7 8
Z
9
3
M
Z
9
M
M
SW
3 4 5 6 7 8
1 2
M
Z
9
SW
M
3 4 5 6 7 8
1 2
SW
1 2
M
M
Page 40

RECALLING A PRESET
1.Press "POWER/SLEEP" button to turn on radio.
Auto tuning system
POWER/
SLEEP
2.Select a band in which a station is stored that
you want to recall.
ATS
120m
1
60m
4
LW
ATS ATS METER
90m
2
49m
5
MW
SW
75m
3
41m
6
ENTER
39
Page 41

1.Press any of the NUMBERED buttons for a
desired station and the radio will instantly tune
to it. Display will show frequency and Memory
position .If you want to change to another preset
station just press any other numbered button for
access .For SW/FM preset 01-09,push "P1/P2"
button first then any of 1-9.
CANCELLING PRESET
120m
1
2
60m
4
5
31m
7
8
19m
0
75m
90m
3
49m
41m
6
25m
21m
9
16m
13m
FW
3 4 5 6 7 8
1 2
M
9
1.Recall a preset station, push "M" button. On
display "M" and preset digit will flash, push "C"
button to cancel the preset.
40
M
MW
3 4 5 6 7 8
1 2
M
9
C
MW
3 4 5 6 7 8
1 2
M
9
Page 42

EXCHANGE THE PRESET
If you want to exchange preset 2 to preset 7 for editing the memory.
1.Recall preset 2.
2
FW
2.Push "M" and display "M" and preset 2 will
flash.
3 4 5 6 7 8
1 2
M
M
FW
3 4 5 6 7 8
1 2
M
9
9
41
Page 43

3.Push 7 then preset 2 and preset 7 have been exchanged.
7
FW
42
M
3 4 5 6 7 8
1 2
9
Page 44

ATS (AUTO TUNING SYSTEM )
This radio provides an excellent and easy to use feature called ATS (Auto Tuning System) which is available
on FM, LW and MW bands.
1.Push any of FM/LW/MW band buttons for more
than 2 seconds. The radio will start with a beep
tone and display ATS will flash indicating the
radio is in ATS mode.
2.The radio will then scan from the lowest fre quency of the Selected band and automatically
preset the stations based on station signal
strength in order from Memory 1-9.
ATS
Press more than 2 second
FW
1
M
FW
M
43
Page 45

3.After the whole scanning is completed, a beep
tone will be heard. Display will show M [1] and
the frequency which is the strongest signal in
your area will be heard.
FW
4.If no stations are found, display will show '----'
for 2 seconds and return to last tuning
frequency.
44
M
FW
3 4 5 6 7 8
1 2
9
9
Page 46

Note:
1.Maximum presets on MW and LW are 9 and 18
on FM, and if the auto preset stations are more
than 9 for MW/LW bands,18 for FM band,the
microporcessor will pick up only 9 stations for
MW/LW bands and 18 stations for FM band into
2 memory pages (P1/P2) based on signal
strength.
2.If the auto presets are less than 9, display will
show actual auto presets stations found. For
example, if only 5 stations are preset , display will
show [1] 2 3 4 5, when the scanning is
completed.
3.SW band has no ATS function.
4.When ATS starts to function, it will clear all the
original presets.
5.When ATS starts to function, if can be terminated
by pushing "POWER/SLEEP" button. During
ATS function, all the other functional buttons will
not work except light, "POWER/SLEEP" and
lock button.
M
LW
1
3 4 5
2
45
Page 47

FINE TUNING
To have best reception, while is necesary, press fine
tuning button FINE, LCD will appear FINE indicating
now is under Fine tuning status. The tuning step
now will become 1 kHz/step on AM(MW/LW/SW)
band and 50 kHz/step on FM band while pressing
tuning [ ]or[V] button.
46
M
SW
1 2
FINE
3 4 5 6
Page 48

CLOCK RADIO OPERATION
With this radio you can fall asleep to your favorite station by pressing the "POWER/SLEEP" for more
than 2 seconds or wake you up to the morning news or an alarm buzzer. This radio provides two alarm
times that you can set for two different wake up times at the same time.
SETTING THE ALARM (STANDBY)
The alarm can be set
1.While radio power is off.
Auto tuning system
-STANDBY-
ATS
LW
ATS ATS METER
MW
TIMER
SW
POWER/
SLEEP
47
Page 49

2.If power is on, push "DISPLAY" button to time
mode.
SETTING ALARM (STANDBY) BY RADIO
1.When the display is in the time mode, press
" -SEANDBY" button, display " -STANDBY"
will flash and show last alarm time (0:00 for the
first time).
48
-STANDBY-
-STANDBY-
MW
75m
SW
3
41m
TIMER
ENTER
SW
6
MW
ATS
120m
1
60m
4
LW
ATS ATS METER
90m
2
49m
5
LW
ATS
ATS ATS METER
Page 50

1.Press the numbered buttons to activate alarm-
on time. Using 24 hour time, an example will be,
if you set the alarm on time at 1:30PM, press the
button [1] [3] [3] [0] and "ENTER" button.
Display will show 13:30 and "STANDBY" will
stop flashing indicating alarmed by radio has
been set at 1:30 PM.
If the wrong number was keyed-in, to delete by
pressing "C" button. each number for every push
on the "C" button.
If the time you key in does not exist like 25:30,
display will show "E" for about 2 seconds and back
to original time.
-STANDBY-
120m
1
60m
4
31m
7
19m
90m
2
49m
5
25m
8
16m
0
C
-STANDBY-
75m
3
41m
ENTER
6
21m
TIME SET
9
M
13m
11m
FREQ
49
Page 51

3.When the alarm time is set, the clock will return
to the current time automatically. Meanwhile the
colon will start to flash.
4.To verify, press "STANDBY" button then
"ENTER" button again.
50
ATS
-STANDBY-
-STANDBY-
-STANDBY-
LW
ATS ATS METER
TIMER
MW
SW
Page 52

5.To cancel the alarm time, press "STANDBY" but-
ton and display "STANDBY" will flash, press
13m
C
"C" button to cancel.
Note
1.When alarm is on press "POWER/SLEEP' button to turn off the alarm.
2.The radio alarm will last for one hour if not turned off by pushing POWER/SLEEP button.
3.Tune the radio before setting radio alarm. When alarm is on, the radio will play according to last
frequency or station selected.
SETTING ALARM BY HWS BUZZER
HWS-Humane Waking system.
A repeating beep tone sounds when using the set buzzer. The alarm buzzer volume increases every
15 seconds for 1 minute then silences for 1 minute before beginning the cycle. Again HWS will continue
this pattern for 30 minutes.
51
Page 53

Setting Alarm by HWS buzzer has same procedures
as setting alarm by radio except pushing
"STANDBY- HWS' button instead.
Turn off the HWS buzzer by pushing "POWER/
SLEEP" button.
.
COUNTING DOWN TIMER
1.Press "TIMER" key, "TIMER" display will flash
Auto tuning system
POWER/
SLEEP
52
ATS
-STANDBY-
LW
ATS ATS METER
TIMER
MW
SW
Page 54

2.Use 0-9 button to key in required time (Max 23
hours and 59 minutes).
120m
1
2
60m
4
5
31m
7
8
19m
0
75m
90m
3
49m
41m
6
25m
21m
9
16m
13m
C
3.Press "ENTER" button, " TIMER" display will
stop flashing indicating Count Down timer has
been set. Display will be back to real time within
7 seconds after time is set.
DISPLAY
ENTER
TIME SET
M
53
Page 55

4.Push "TIMER" button again to see remaining
time.
a.Push "TIMER" button again to continue timer
function.
b.Push "ENTER" button to re-start timer
function.
TIMER
SW
METER
5.When timer is on, buzzer will last for one
minute, to turn off the buzzer, push "POWER/
SLEEP" button.
54
Auto tuning system
POWER/
SLEEP
Page 56

6.To cancel timer setting:
a: Press "TIMER" button. Display shows remain-
ing time.
b: Press "C" button "TIMER" on the display will
disappear, and display will show real time
immediately.
Note
1.When alarm is on, press "POWER/SLEEP"
button to turn off the alarm.
2.The alarm will last for one minute if not turned
off by pushing "POWER/SLEEP" button.
3. For initial operation on timer, display will show
Meanwhile press "ENTER" button, display
shows "E" to indicate error operation.
TIMER
SW
METER
C
55
Page 57

SETTING THE SLEEP TIMER
You can set the sleep timer with the radio on or off.
1.Push POWER/SLEEP button for more than 2
seconds, LCD will show indicating the
radio is in sleep (auto shut off) function. A buzzer
will be heard this time, if the radio is on.
2.Continue pushing "PLWER/SLEEP" but-
ton. Sleep time can be adjusted by 60-45-30-
15-60.
56
Auto tuning system
Auto tuning system
Auto tuning system
POWER/
SLEEP
POWER/
SLEEP
POWER/
SLEEP
Page 58

3.Release "POWER/SLEEP" button whenever the
sleep time shown on the display is acceptable
to you.
FM
M
4.To cancel sleep function, simply push "POWER/
SLEEP" key. Display " " will disappear and
return to the real time.
FM
M
POWER/
SLEEP
1 2 3 4 5 6
57
Page 59

MISCELLANEOUS CONTROLS
In addition to the standard tuning methods described previously, use following controls for special operations.
MONO LOCAL/STEREO DX SWITCH
1.When listening to FM stereo broadcasting and
using earphones, set the switch to STEREO
position to enjoy stereo programs.
2.When listening to AM (MW/LW/SW) broad casting, this switch adjusts the receiver's sensitivi ty. When you listen to a strong station and the
signal is slightly distored, set the switch to the
LOCAL position for best reception. For normal
or weak stations, set the switch to the DX
position for maximum sensitivity.
58
Page 60

HEADPHONE USE
While not a control, you may consider using Headphones to obtain the best audio clarity when listening to SW. Since many SW stations broadcast only
marginal signals, using Headphones will enable you
to distinguish between the signal and the noise usually
encountered at night. Be sure that, the Headphones
terminate in a 1/8 inch plug, which is inserted into the
Headphones jack located on the side of the radio,
marked with the symbol " " . When the Head phones are plugged in, the speaker is muted.
MONO
AM EXT
ANT
STEREO
AM
FM
SENS
DX
LOVAL
Because the radio is capable of receiving FM stereo,
the Headphones should be stereo so that your
listening will be enhanced, When listening to stereo
FM, be sure that the FM STEREO/MONO switch is set
to the stereo position. This switch is located on the side
of the radio.
DC I N 4.5V
59
Page 61

LOCK SWITCH
Using the LOCK switch prevents unauthorized operation of the radio and will also prevent the station you
are listening to from being changed. When the
LOCK switch is moved to its up " " position, the
POWER/SLEEP button and all tun ing control buttons.
are completely disabled. If the radio is on, you will not
be able to turn it off. This will also prevent it from
being turned on by accidient when packed in a
suitcase or carrying pouch. If the LOCK stitch is on,
display will show " ' . To release the LOCK
switch, simply move the switch down.
EXTERNAL ANTENNA USE
To obtain optimum performance from this radio,
especially when listening to SW, an external antenna
should be used, if at all possible. The antenna is
connected to the External Antenna Adaptor and then
plugged into the AM EXT ANT Jack located on the
side of the radio.
60
AM EXT
ANT
Page 62

MW STEP SELECTOR SWITCH
Located in the battery compartment of the radio, MW
step 9K/10k switch provides means to select the
incremental frequency steps for MW band, depending
upon your geographic location. In the USA or
CANADA, 10K steps are used so the switch should be
set to 10K position. In the other parts of the world
where they use 9K steps, move the switch to the 9K
Position.
PORTABLE SHORTWAVE ANTENNA (OPTIONAL)
Depending on the selling areas, some of these radios
may include a PORTABLE SHORTWAVE ANTENNA
as a standard accessory to this radio. Move out the
connector and connect to the AM EXTERNAL
ANTENNA JACK of the radio. This PORTABLE
SHORTWAVE ANTENNA provides a 7 Meters wire
antenna, serving as extention to the Telescopic Antenna, so that you won't have to listen to SW broadcasting
near the window.
3
1
2
61
Page 63

CAR E AND MAI NTE NANCE
T his receiver is an example of superior design and craftsmanship. T he f oll owing suggestions will help you
care f or the receiver so that you can enjoy it for years.
K eep the product dry. If it does get wet, wipe it dry
immediately. L iquids might contain minerals that
can corrode the electronic circuits.
Use and store the product only in normal
temperature environments. High temperatures can
shorten the life of electronic devices, damage
batteries, and distort or melt plastic parts.
62
Page 64

Handle the prodoct gently and carefully. Dropping it can damage circuit boards and cases and can
cause the product to work improperly.
Keep the product away from dust and dirt, which
can cause permature wear of parts.
63
Page 65

Wipe the product with a dampened cloth occasionally to keep it looking new. Do not use harsh
chemicals, cleaning solvents or strong detergents
to clean the product.
Use only fresh batteries of the recommended
size and type. Always remove old or weak
batteries. They can leak chemicals that destroy
electronic circuits.
Modifying or tampering with the product's
internal components can cause a malfunction and
might invalidate the product's warranty.
64
Page 66

SPECIFICATIONS
Frequency range:
FM 87.50-108 MHz
LW 153-513 kHz
MW 520-1710 kHz/522-1710 kHz
SW 1.711-29.999 MHz
Includes short wave 13 meter bands
120m 2.300- 2.495 MHz
90m 3.200- 3.400 MHz
75m 3.900- 4.000 MHz
60m 4.750- 5.060 MHz
49m 5.900- 6.200 MHz
41m 7.100- 7.350 MHz
31m 9.400- 9.900 MHz
25m 11.600-12.100 MHz
21m 13.570-13.870 MHz
19m 15.100-15.800 MHz
16m 17.480-17.900 MHz
13m 21.450-21.750 MHz
11m 25.600-26.100 MHz
Page 67

Semi conductors: 1 LSI, 10 IC, 8 FET, 24 Transistors, 25 Diode, 2 LED.
Circuit: FM : Heterodyne
AM(LW,MW,SW) : Double-conversion Heterodyne
Antennas: LW/MW : Built-in Ferrite Bar Antenna
SW : Telescopic Antenna or External Antenna(not included)
FM : Telescopic Antenna
Speaker output power: Nominal 180 mW at 10% T.H.D.
Jack: 1.DC Jack for external power 4.5V
2.Headphones Jack-3.5 for mini stereo headphones
3.AM EXT ANT Jack
Power source: 1.3 AA(UM-3) batteries.
2.AC adaptor 4.5V/250 mA center negative
Dimension: 148(L) 89(H) 30(T) m/m
Weight: 300g (without battery)
Accessies: Carrying pouch, stereo earphones, AC adaptor and PORTABLE
SHORTWAVE ANTENNA. However accessories may be different depending on area.
 Loading...